

Page 1

7415
SERVICE HANDBOOK
FIELD SERVICE
KONICA CORPORATION
TECHNOLOGY SUPPORT CENTER
TOKYO JAPAN
Page 2

INDEX (FIELD SERVICE)
DIS/REASSEMBLY,
ADJUSTMENT
SWITCHES ON PWBs,
TECH. REP. SETTINGS
TROUBLESHOOTING
Page 3

SAFETY AND IMPORTANT WARNING ITEMS
SAFETY AND IMPORTANT WARNING ITEMS
Read carefully the Safety and Important Warning Items described below to understand them
before doing service work.
IMPORTANT NOTICE
Because of possible hazards to an inexperienced person servicing this copier, as well as the risk
of damage to the copier, Konica Corporation, strongly recommends that all servicing be performed only by Konica-trained service technicians.
Changes may have been made to t his copier to improv e i ts perf ormance after this Service Handbook was printed. Accordingly, Konica Corporation, makes no representations or warranties,
either expressed or implied, that the information contained in this Service Handbook is complete
or accurate. It is understood that the user of this Service Handbook must assume all risks or
personal injury and/or damage to the copier while servicing the copier for which this Service
Handbook is intended.
Therefore, this Service Handbook must be read carefully before doing service work both in the
course of the technical training and even after that, for keeping the correct maintenance and
control of the copier. Keep the Service Handbook also for the future service. When it is
impossible to read the description about safety and warning (due to contamination or tear), the
relevant page should be replaced.
DESCRIPTION ITEMS FOR DANGER, WARNING AND CAUTION
In this Service Handbook, each of three expressions, “ DANGER”, “ WARNING” and
“ CAUTION” is defined as follows together with a symbol mark to be used in a limited mean-
ing. When servicing, the relevant works (disassembling, assembling, adjustment, repair and
maintenance) need to be conducted with utmost care.
DANGER:
WARNING:
CAUTION:
Actions having a high possibility of suffering death or serious wound
Actions having a possibility of suffering death or serious wound
Actions having a possibility of s uffering a slight wound, medium trouble
and material damage
C-1
Page 4

SAFETY AND IMPORTANT WARNING ITEMS
SAFETY WARNINGS
[1] MODIFICATIONS NOT AUTHO-
RIZED BY Konica
Konica copiers are renowned for their high
reliability. This reliability is achieved through
high-quality design and a solid service network.
Photocopier design is a highly complicated
and delicate process where numerous
mechanical, physical, and electrical aspects
have to be taken into consideration, with the
aim of arriving at proper tolerances and safety
factors. For this reason, unauthorized modifications involve a high risk of degrading performance and safety. Such modifications are
therefore strictly prohibited. The points listed
below are not exhaustive, but they illustrate
the reasoning behind this policy.
PROHIBITED ACTIONS:
(1) Using extension cables or a different
power cord than specified by Konica.
(2) Using other fuses than specified by
Konica. Safety will not be assured,
leading to a risk of fire and injury.
(3) Disabling fuses or bridging fuse termi-
nals with wire, metal clips, s older or
similar. (This applies also to thermal
fuses.)
(4) Removing air filters (except for
replacement).
(5) Dis a bling relay fun ctions (such as
wedging paper between relay contacts,
etc.).
(6) Disabling safety functions (interlocks,
safety circuits, etc.). Safety will not be
assured, leading to a risk of fire and
injury.
(7) Performi ng actions to copier not
described in the instruction manual or
the service handbook.
(8) Usi ng pa rts othe r than specified by
Konica.
[2] CHECKPOINTS WHEN PER-
FORMING ON -S I T E SE RVICE
Konica copiers are extensively tested before
shipping, to ensure that all applicable safety
standards are met, in order to protect the customer and customer engineer from the risk of
injury . However, in daily use, any electrical
equipment may be subject to parts wear and
eventual failure. In order to maintain safety
and reliability, the customer engineer must
perform regular safety checks.
1. Advance Preparation for
Safety Checks
CAUTION:
(1) Wear clothing that facilitates work and
is designed for safety.
(2) Carry out all procedures carefully to
prevent injury.
(3) Be sure to disconnect the power cord
of the copier and all optional equipment from the AC outlet.
Simply turning off the power switch is
not sufficient, because paper feed
units or other electrical equipment may
be powered also when the power
switch is turned of f.
(4) Proceed with special care when per-
forming operation checks or adjustment while the unit is powered. When
carrying out operation checks or
adjustment while external covers are
removed, the risk of electrical shock
exists when touc hing parts which c arry
high voltage or electrical charge. The
risk of injury exists when touching
moving parts such as gears or chains.
C-2
Page 5

SAFETY AND IMPORTANT WARNING ITEMS
2. Safety Checkpoints
The following list is not exhaustive, but it
includes actions which must be carried out at
every on-site service.
CAUTION:
(1) Check external covers and the frame
for sharp edges, burrs, or nicks.
(2) Check external covers and hinges for
loosening or damage.
(3) Check wiring for squeezing or damage.
(4) Check power cord for insulatio n prob-
lems (conductor m us t not be exposed).
(5) Check power cord and cable ties etc.
for loosening from frame.
WARNING:
(1) Verify that the copier is properly
grounded. If a problem is detected,
establish a proper ground connection.
(2) Connecting the ground lead to an
improper point such as listed below
results in a risk of explosion and elec-
tric shock.
Unsuitable ground points:
a. Gas pipe
b. Lightning rod
c. Telephone line ground
d. Plastic water pipe or water pipe or
faucet that has not been approved
by authorities for grounding use
3. Precautions for on-site service
CAUTION:
(1) Before performing safety check work,
read all relevant documentation (ser-
vice handbook, technical notices, etc.)
and proceed according to the pre-
scribed procedure, using only the pre-
scribed tools. Do not carry out any
adjustments not described in the docu-
mentation.
(2) If the power cord is damaged, replace it
only with the specified power cord. If
the power cord insulation has been
damaged and there are exposed sec-
tions, short-circuits and overheating
may occur, leading to a serious fire
risk.
(3) Do not route the power cord so that it
can be stepped on or pinc he d. Otherwise overheating may occur , leading to
a serious fire risk.
(4) When disconnecting any cables,
always grasp the connector and not
the cable (especially in the case of AC
and high-voltage leads).
(5) Carefully remove all toner remnants
from electrical parts, electrodes, etc.
(6) Make sure that wiring cannot come
into contact with sharp edges, burrs, or
other pointed parts.
(7) Double-check to make sure that all
screws, components, wiring, connectors, etc. that were removed for safety
check maintenance have been reinstalled in the original loc a tion. (Pa y
special attention to forgotten connectors, pinched cables, forgotten scre ws,
etc.)
(8) When installation and preventive main-
tenance, verify that the power cord has
been securely plugged into the AC outlet. Contact problems may lead to
increased resistance, overheating,
and the risk of fire.
WARNING:
(1) Bef ore disassembling or adjusting the
optical unit or any parts that use a
laser, make sure that the power cord
has been disconnected.
(2) Do not remove the main cover of the
write unit. Direct exposure of the eye to
laser beams may lead to blindness.
(3) Do not turn the copier on while the
write unit is not install e d in its normal
position.
(4) Da nger of explosion if bat ter y is inc or -
rectly replaced, replace only with the
same or equivalent recommended by
the manufacturer. Discard used batteries according to the manufacture’s
instructions.
C-3
Page 6

SAFETY AND IMPORTANT WARNING ITEMS
VORSICHT:
Expiosionsgefahr dei unsachegemäßem
Austausch der Battetie. Ersatz nur durch
denselben oder einen vom. Hersteller empfohlenen gleichwertigen Typ. Entsorgung
gebrauchter Batterie n na c h Angaben des
Herstellers.
[3] HANDLING OF MATERIALS
FOR SERVICING
CAUTION:
Drum cleaner (alcohol-based) and roller
cleaner (acetone-based) are highly flammable and must be handled with care.
When using these materials for cleaning of
copier parts, observe the following precautions.
(1) Disconnect the power cord from the A C
outlet.
(2) Use only a small amount of cleaner at a
time and take care not to spill any liquid. If this happens, immediately wipe
it off.
(3) Perform cleaning only in an enviro n-
ment where sufficient ventilation is
assured. Breathing large quantities of
organic solvents can lead to discomfort.
(4) Do not replace the cover or turn the
unit on before any solvent remnants on
the cleaned parts have fully evaporated.
CAUTION:
Toner and deve lo per are not harmful substances, but care must be taken not to
breathe excessive amounts or let the substances come into contact with eyes etc. If
the substances get in the eye, rinse it with
plenty of water immediately. When symptoms are noticeable, consult a physician.
[4] MEASURES TO TAKE IN CASE
OF AN ACCIDENT
(1) It an accident has occurred, the distributor
who has been notified first must immediately take emergency measures to provide relief to affected persons and to
prevent further damage.
(2) It a report of a serious accident has been
received from a customer, an on-site evaluation must be carried out quickly and
Konica Corporation must be notified.
(3) To determine the cause of the accident,
conditions and materials must be
recorded through direct on-site checks, in
accordance with instructions issued by
Konica Corporation.
(4) For reports and measures concerning
accidents, consult your superior, and follow the regulations set in “Standards for
the Control Program for Measures Against
Electrical Equipment Accidents”.
[5] CONCLUSION
(1) Safet y of users and customer engineers
depends highly on accurate maintenance
and administration. Therefore, safety can
be maintained by the appropriate by the
proper daily service work conducted by
the customer engineer.
(2) When performing service, each copier on
the site must be tested for safety. The customer engineer must verify the safety of
parts and ensure appropriate management of the equipment.
C-4
Page 7
Safety Precautions for Inspection and Service
When performing inspection and service procedures, observe the following precautions to
prevent accidents and ensure utmost safety.
✽
Depending on the model, some of the precautions given in the following do not apply.
Different markings are used to denote specific meanings as detailed below.
Indicates a potentially hazardous situation which, if not avoided,
WARNING
CAUTION
The following graphic symbols are used to give instructions that need to be observed.
Used to call the service technician’s attention to what is graphically represented
inside the marking (including a warning).
Used to prohibit the service technician’s from doing what is graphically represented inside the marking.
Used to instruct the service technician’s to do what is graphically represented
inside the marking.
1. Always observe precautions.
•
Parts requiring special attention in this product will include a label containing the
mark shown on the left plus precautionary notes. Be sure to observe the precautions.
•
Be sure to observe the “Safety Information” given in the Operator’s Manual.
could result in death or serious injury.
Indicates a potentially hazardous situation which, if not avoided,
may result in minor or moderate injury. It may also be used to
alert against unsafe practices.
WARNING
2. Before starting the procedures, be sure to unplug the power cord.
•
This product contains a high-voltage unit and a circuit with a large current
capacity that may cause an electric shock or burn.
•
The product also contains parts that can jerk suddenly and cause injury .
•
If this product uses a laser, laser beam leakage may cause eye damage or
blindness.
3. Use the specified parts.
•
For replacement parts, always use the genuine parts specified in the manufacturer’s parts manual. Installing a wrong or unauthorized part could cause
dielectric breakdown, overload, or undermine safety devices resulting in possible electric shock or fire.
•
Replace a blown electrical fuse or thermal fuse with its corresponding genuine
part specified in the manufacturer’s parts manual. Installing a fuse of a different
make or rating could lead to a possible fire. If a thermal fuse blows frequently,
the temperature control system may have a problem and action must be taken
to eliminate the cause of the problem.
P-1
Page 8
4. Handle the power cord with care and never use a multiple outlet.
•
Do not break, crush or otherwise damage the power cord. Placing a heavy
object on the power cord, or pulling or bending it may damage it, resulting in a
possible fire or electric shock.
•
Do not use a multiple outlet to which any other appliance or machine is connected.
•
Be sure the power outlet meets or exceeds the specified capacity.
5. Be careful with the high-voltage parts.
•
A part marked with the symbol shown on the left carries a high voltage. Touc hing it could result in an electric shock or burn. Be sure to unplug the power cord
before servicing this part or the parts near it.
6. Do not work with wet hands.
•
Do not unplug or plug in the power cord, or perform any kind of service or
inspection with wet hands. Doing so could result in an electric shock.
7. Do not touch a high-temperature part.
•
A part marked with the symbol shown on the left and other parts such as the
exposure lamp and fusing roller can be very hot while the machine is energized.
Touching them may result in a burn.
•
Wait until these parts have cooled down before replacing them or any surrounding parts.
8. Maintain a grounded connection at all times. (This item may not apply in the USA.)
•
Be sure to connect the ground wire to the ground terminal even when performing an inspection or repair. Without proper grounding, electrical leakage could
result in an electric shock or fire.
•
Never connect the ground wire to a gas pipe, water pipe, telephone ground wire,
or a lightning conductor.
9. Do not remodel the product.
•
Modifying this product in a manner not authorized by the manufacturer may
result in a fire or electric shock. If this product uses a laser, laser beam leakage
may cause eye damage or blindness.
10. Restore all parts and harnesses to their original positions.
•
To promote safety and prevent product damage, make sure the har nesses are
returned to their original positions and properly secured in their clamps and saddles in order to avoid hot parts, high-voltage parts, sharp edges, or being
crushed.
•
To promote safety, make sure that all tubing and other insulating materials are
returned to their original positions. Make sure that floating components mounted
on the circuit boards are at their correct distance and position off the boards.
P-2
Page 9
CAUTION
1. Precautions for Service Jobs
•
A toothed washer and spring washer, if used originally, must be reinstalled.
Omitting them may result in contact failure which could cause an electric shock
or fire.
•
When reassembling parts, make sure that the correct screws (size, type) are
used in the correct places. Using the wrong screw could lead to stripped
threads, poorly secured parts, poor insulating or grounding, and result in a malfunction, electric shock or injury.
•
Take great care to avoid personal injury from possible burrs and sharp edges on
the parts, frames and chassis of the product.
•
When moving the product or removing an option, use care not to injure your
back or allow your hands to be caught in mechanisms.
2. Precautions for Servicing with Covers and Parts Removed
•
Wherever feasible, keep all parts and covers mounted when energizing the
product.
•
If energizing the product with a cover removed is absolutely unavoidable , do not
touch any exposed live parts and use care not to allow your clothing to be
caught in the moving parts. Never leave a product in this condition unattended.
•
Never place disassembled parts or a container of liquid on the product. Parts
falling into, or the liquid spilling inside, the mechanism could result in an electric
shock or fire.
•
Never use a flammable spray near the product. This could result in a fire.
•
Make sure the power cord is unplugged before removing or installing circuit
boards or plugging in or unplugging connectors.
•
Always use the interlock switch actuating jig to actuate an interlock s wit ch when
a cover is opened or removed. The use of folded paper or some other object
may damage the interlock switch mechanism, possibly resulting in an electric
shock, injury or blindness.
3. Precautions for the Working Environment
•
The product must be placed on a flat, level surface that is stable and secure.
•
Never place this product or its parts on an unsteady or tilting workbench when
servicing.
•
Provide good ventilation at regular intervals if a service job must be done in a
confined space for a long period of time.
•
Avoid dusty locations and places exposed to oil or steam.
•
Avoid working positions that may block the ventilation ports of the product.
4. Precautions for Handling Batteries
•
Replace a rundown battery with the same type as specified in the manufacturer’s parts manual.
•
Before installing a new battery, make sure of the correct polarity of the installation or the battery could burst.
•
Dispose of used batteries according to the local regulations. Never dispose of
them at the user’s premises or attempt to try to discharge one.
P-3
Page 10
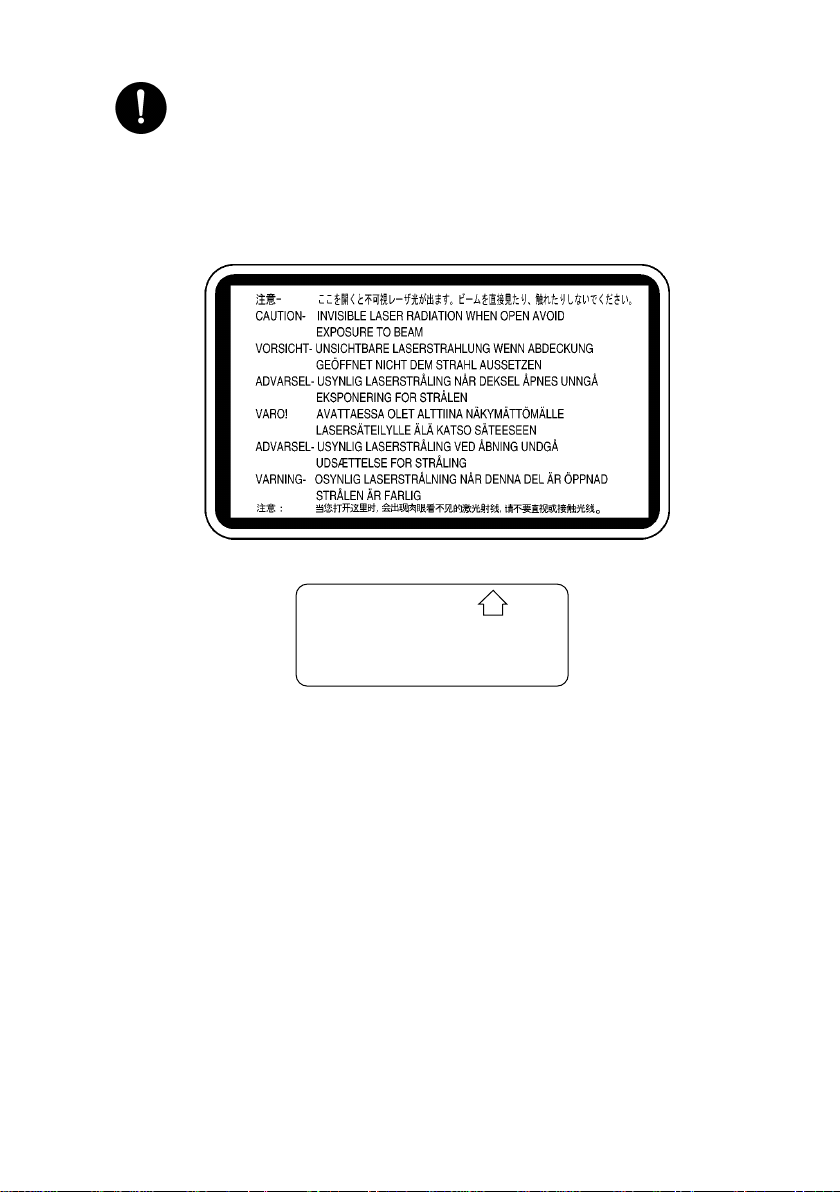
5. Precautions for the Laser Beam (Only for Products Employing a Laser)
•
Removing the cover marked with the following caution label could lead to possible exposure to the laser beam, resulting in eye damage or blindness. Be sure
to unplug the power cord before removing this cover.
•
If removing this cover while the power is ON is unavoidab le , be sure to wear protective laser goggles that meet specifications.
•
Make sure that no one enters the room when the machine is in this condition.
•
When handling the laser unit, observe the “Precautions for Handling Laser
Equipment.”
1167P001AA
DANGER
Invisible laser radiation when open.
AVOID DIRECT EXPOSURE
TO BEAM
0947-7127-01
1144D270AA
P-4
Page 11

Other Precautions
•
To reassemble the product, reverse the order of disassembly unless otherwise specified.
•
While the product is energized, do not unplug or plug connectors into the circuit boards
or harnesses.
•
The magnet roller generates a strong magnetic field. Do not bring it near a watch, floppy
disk, magnetic card, or CRT tube.
•
An air gun and vacuum cleaner generates a strong electrostatic charge that can destroy
the ATDC sensor and other sensors. Before cleaning a component with one of these
devices, be sure to remove all the sensors. Otherwise, use a blower brush and cloth
when cleaning parts.
•
When handling circuit boards with MOS ICs, observe the “INSTRUCTIONS FOR HANDLING THE PWBs WITH MOS IC s” (applicable only to the products using MOS ICs).
•
The PC Drum is a very delicate component. Observe the precautions given in “HANDLING OF THE PC DRUM” because mishandling may result in serious image problems.
•
Note that replacement of a circuit board may call for readjustments or resetting of particular items, or software installation.
•
After completing a service job, perform a safety check. Make sure that all parts, wiring
and screws are returned to their original positions.
•
Check the area surrounding the service site for any signs of damage, wear or need of
repair.
•
Do not pull out the toner hopper while the toner bottle is turning. This could result in a
damaged hopper motor or locking mechanism.
•
If the product is to be run with the front door open, make sure that the toner hopper is in
the locked position.
P-5
Page 12

Used Batteries Precautions
ALL Areas
Danger of explosion if battery is incorrectly replaced.
Replace only with the same or equivalent type recommended by the manufacturer.
Dispose of used batteries according to the manufacturer’s instructions.
CAUTION
P-6
Page 13

PRECAUTIONS FOR SERVICE
When performing inspection and service procedures, observe the following precautions to
prevent mishandling of the machine and its parts.
✽
Depending on the model, some of the precautions given in the following do not apply.
Precautions Before Service
•
When the user is using a word processor or personal computer from a wall outlet of the
same line, take necessary steps to prevent the circuit breaker from opening due to overloads.
•
Never disturb the LAN by breaking or making a network connection, altering termination,
installing or removing networking hardware or software, or shutting down networked
devices without the knowledge and ex press permission of the network administrator or
the shop supervisor.
How to Use this Book
1. DIS/REASSEMB LY, ADJUST MENT
•
To reassemble the product, reverse the order of disassembly unless otherwise specified.
2. TROUBLESHOOTING
•
If a component on a PWB or any other functional unit including a motor is defec tive, the
text only instructs you to replace the whole PWB or functional unit and does not give troubleshooting procedures applicable within the defect ive unit.
•
All troubleshooting procedures contained herein assume that there are no breaks in the
harnesses and cords and all connectors are plugged into the right positions.
•
The procedures preclude possible malfunctions due to noise and other external causes.
Precautions for Service
•
Check the area surrounding the service site for any signs of damage, wear or need of
repair.
•
Keep all disassembled parts in good order and keep tools under control so that none will
be lost or damaged.
•
After completing a service job, perform a safety check. Make sure that all parts, wiring
and screws are returned to their original positions.
•
Do not pull out the toner hopper while the toner bottle is turning. This could result in a
damaged motor or locking mechanism.
•
If the product is to be run with the front door open, make sure that the toner hopper is in
the locked position.
•
Do not use an air gun or vacuum cleaner for cleaning the ATDC Sensor and other sensors, as they can cause electrostatic destruction. Use a blower brush and cloth. If a unit
containing these sensors is to be cleaned, first remove the sensors from the unit.
PS-1
Page 14

Precautions for Dis/Reassembly
•
Be sure to unplug the copier from the outlet before attempting to service the copier.
•
The basic rule is not to operate the copier anytime during disassembly. If it is absolutely
necessary to run the copier with its covers removed, use care not to allow y our clothing to
be caught in revolving parts such as the timing belt and gears.
•
Before attempting to replace parts and unplug connectors, make sure that the power
cord of the copier has been unplugged from the wall outlet.
•
Be sure to use the Interlock Switch Actuating Jig whenever it is necessary to actuate the
Interlock Switch with the covers left open or removed.
•
Do not plug in or unplug print jacks on the PWB or connect or disconnect the PWB connectors while power is being supplied to the copier.
•
Never use flammable sprays near the copier .
•
A battery (lithium, nickel-cadmium, etc.) is used in this machine. Do not charge or short
circuit it and make sure of the correct polarity at replacement.
•
A used battery should be disposed of according to the local regulations and never be discarded casually or left unattended at the user's premises.
•
When reassembling parts, make sure that the correct screws (size, type) and toothed
washer are used in the correct places.
•
If it becomes necessary to replace the thermal fuse or any other fuse mounted on a
board, be sure to use one of the rating marked on the blown fuse. Always note the rating
marked on the fuse, as the rating and mounting site or number used are subject to
change without notice.
Precautions for Circuit Inspection
•
Never create a closed circuit across connector pins except those specified in the text and
on the printed circuit.
•
When creating a closed circuit and measuring a voltage across connector pins specified
in the text, be sure to use the GND wire.
PS-2
Page 15

Handling of PWBs
1. During Transpor tation/St orage:
•
During transportation or when in storage, new P.W. Boards must not be indiscriminately
removed from their protective conductive bags.
•
Do not store or place P.W. Boards in a location exposed to direct sunlight and high temperature.
•
When it becomes absolutely necessary to remove a Board from its conductive bag or
case, always place it on its conductive mat in an area as free as possible from static electricity.
•
Do not touch the pins of the ICs with your bare hands.
•
Protect the PWBs from any external force so that they are not bent or damaged.
2. During Inspection/Replacement:
•
Avoid checking the IC directly with a multimeter; use connectors on the Board.
•
Never create a closed circuit across IC pins with a metal tool.
•
Before unplugging connectors from the P.W. Boards, make sure that the power cord has
been unplugged from the outlet.
•
When removing a Board from its conductive bag or conductive case, do not touch the
pins of the ICs or the printed pattern. Place it in position by holding only the edges of the
Board.
•
When touching the PWB, wear a wrist strap and connect its cord to a securely grounded
place whenever possible. If you cannot wear a wrist strap, touch a metal part to discharge static electricity before touching the PWB.
•
Note that replacement of a PWB may call for readjustments or resetting of particular
items.
Handling of Other Parts
•
The magnet roller generates a strong magnetic field. Do not bring it near a watch, floppy
disk, magnetic card, or CRT tube.
PS-3
Page 16

Handling of the PC Drum
✽
Only for Products Not Employing an 7415 Supply Unit.
1. During Transpor tation/St orage:
•
Use the specified carton whenever moving or storing the PC Drum.
•
The storage temperature is in the range between –20°C and +40°C.
•
In summer, avoid leaving the PC Drum in a car for a long time.
2. Handling:
•
Ensure that the correct PC Drum is used.
•
Whenever the PC Drum has been removed from the copier , store it in i ts carton or protect
it with a Drum Cloth.
•
The PC Drum exhibits greatest light fatigue after being exposed to strong light over an
extended period of time. Never, therefore, expose it to direct sunlight.
•
Use care not to contaminate the surface of the PC Drum with oil-base solvent, fingerprints, and other foreign matter.
•
Do not scratch the surface of the PC Drum.
•
Do not apply chemicals to the surface of the PC Drum.
•
Do not attempt to wipe clean the surface of the PC Drum.
If, however, the surface is contaminated with fingerprints, clean it using the following procedure.
1. Place the PC Drum into one half of its carton.
1076D001
1076D002
2. Gently wipe the residual toner off the surface of the
PC Drum with a dry, Dust-Free Cotton Pad.
A. Turn the PC Drum so that the area of its surface on
which the line of toner left by the Cleaning Blade is
present is facing straight up. Wipe the surface in
one continuous movement from the rear edge of
the PC Drum to the front edge and off the surface
of the PC Drum.
B. Turn the PC Drum slightly and wipe the newly
exposed surface area with a CLEAN face of the
Dust-Free Cotton Pad. Repeat this procedure until
the entire surface of the PC Drum has been thoroughly cleaned.
✽
At this time, always use a CLEAN face of the dry
Dust-Free Cotton Pad until no toner is e vident on the
face of the Pad after wiping.
PS-4
Page 17
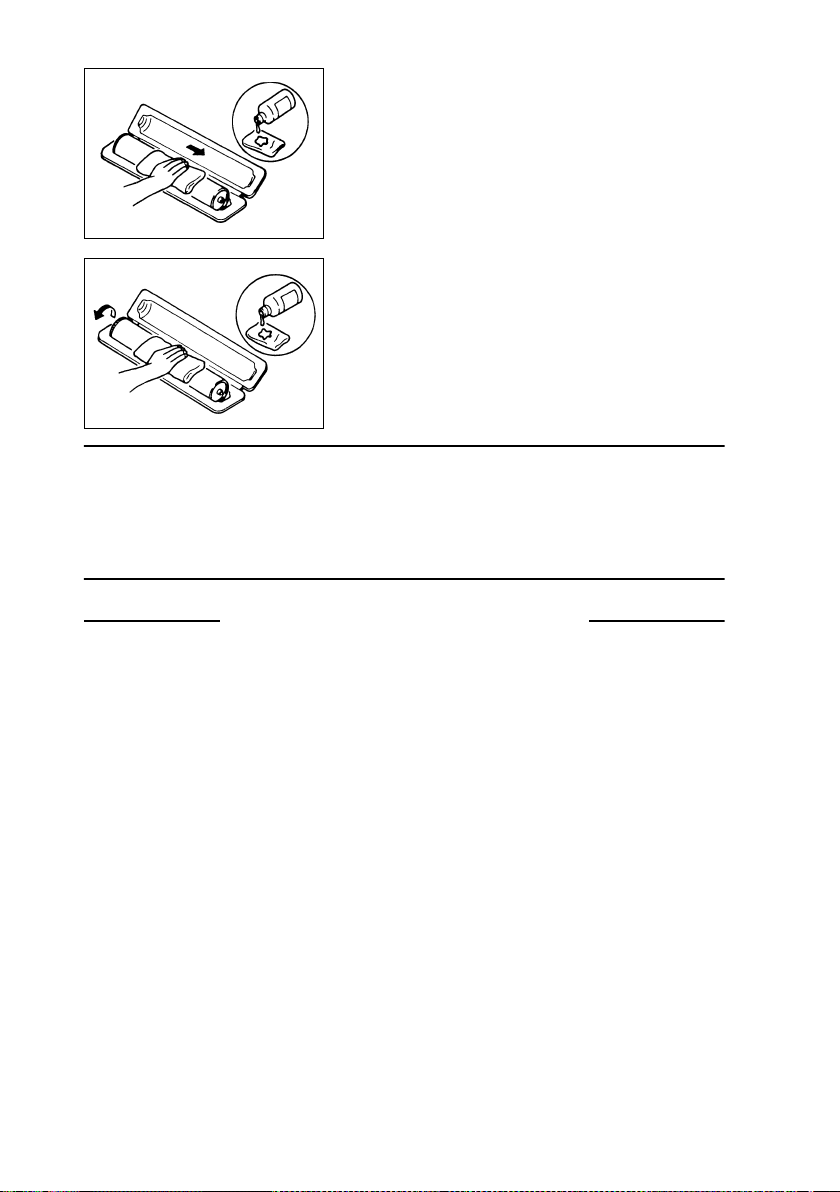
3. Soak a small amount of either ethyl alcohol or isopropyl alcohol into a clean, unused Dust-Free Cotton Pad which has been folded over into quarters.
Now, wipe the surface of the PC Drum in one continuous movement from its rear edge to its front
edge and off its surface one to two times.
✽
Never move the Pad back and forth.
1076D003
4. Using the SAME face of the Pad, repeat the procedure explained in the latter half of step 3 until the
entire surface of the PC Drum has been wiped.
Always OV ERLA P the areas when wiping. Two
complete turns of the PC Drum would be appropriate for cleaning.
1076D004
NOTES
• Even when the PC Drum is only locally dirtied, wipe the entire surface.
• Do not expose the PC Drum to direct sunlight. Clean it as quickly as possible even under
interior illumination.
• If dirt remains after cleaning, repeat the entire procedure from the beginning one more
time.
Handling of the 7415 Supply Unit
✽
Only for Products Employing an 7415 Supply Unit.
1. During Transpor tation/St orage:
•
The storage temperature is in the range between –20°C and +40°C.
•
In summer, avoid lea v ing the 7415 Supply Unit in a car for a long time.
2. Handling:
•
Store the 7415 Supply Unit in a place that is not exposed to direct sunlight.
3. Precautionary Information on the PC Drum Inside the 7415 Supply Unit:
•
Use care not to contaminate the surface of the PC Drum with oil-base solvent, fingerprints, and other foreign matter.
•
Do not scratch the surface of the PC Drum.
•
Do not attempt to wipe clean the surface of the PC Drum.
PS-5
Page 18

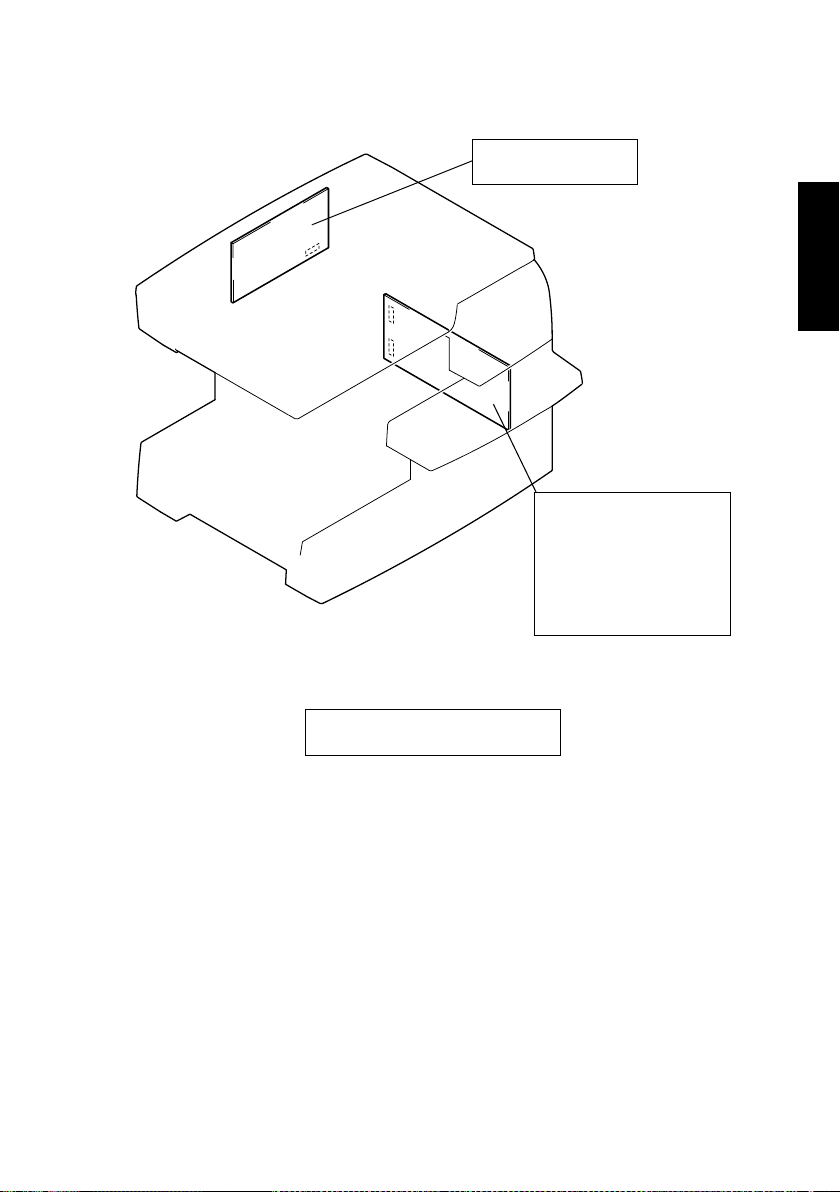
DIS/REASSEMBLY,
ADJUSTMENT
18605
Page 19

CONTENTS
1. SERVICE INSTRUCTIONS .............................................................................D-1
1-1. IDENTIFICATION OF FUSES ......................................... ........................D-1
1-2. PRECAUTIONS FOR HANDLING THE LASER EQUIPMENT ...............D-1
1-3. PARTS WHICH MUST NOT BE TOUCHED ....................... ....................D-2
(1) Red Screws .... ............. ......................... ......................... ..................D-2
(2) Variable Resistors on Board ............................................................D-2
(3) Other Screws ...................................................................................D-2
1-4. READING THE TEXT ..............................................................................D-3
2. DISASSEMBLY/REASSEMBLY ......................................................................D-4
2-1. COVERS AND EXTERIOR PARTS: IDENTIFICATION AND REMOVAL
PROCEDURES ....................................................................................... D-4
2-2. REMOVAL OF PWBs ..............................................................................D-6
2-3. MAINTENANCE SCHEDULE .................................................................. D-7
2-4. REMOVAL OF UNITS .............................................................................D-8
(1) Removal of the Upper Half of the Copier .........................................D-8
(2) Removal of the IR Unit .................................................................... D-11
(3) Removal of the PH Unit ...................................................................D-12
(4) Removal of the Fusing Unit .............................................................D-15
2-5. IMAGE TRANSFER SECTION ................................................................D-17
(1) Replacement of the Image Transfer Roller ......................................D-17
2-6. FUSING SECTION ..................................................................................D-18
(1) Removal of the Fusing Backup Roller .............................................D-18
(2) Removal of the Fusing Heater Lamp ............................................... D-20
(3) Removal of the Fusing Roller ..........................................................D-21
2-7. MISCELLANEOUS ..................................................................................D-22
(1) Removal of the Scanner and Timing Belt ........................................D-22
(2) Removal of the Scanner Motor ........................................................D-24
(3) Removal of the Paper Take-Up Roll ................................................D-25
(4) Removal of the Paper Take-Up Solenoid ........................................D-26
(5) Removal of the Main Motor and PH Section Cooling Fan Motor .....D-28
3. ADJUSTMENT .................................................................................................D-30
3-1. ADJUSTMENT REQUIREMENTS LIST .................................................. D-30
3-2. ADJUSTMENT OF UPPER UNIT INTERLOCK SWITCH S2 ..................D-31
3-3. ELECTRICAL/IMAGE ADJUSTMENT .....................................................D-32
(1) Entering the Tech. Rep. Mode .........................................................D-32
(2) Entering the Adjust Mode ................... .............................................D-32
(3) Producing a Test Pattern .................................................................D-32
(4) CD Registration Adjustment (Paper Tray) .......................................D-33
(5) FD Registration Adjustment (Paper Tray) .......................................D-34
(6) CD Zoom Ratio Adjustment (Scanner) ............................................D-35
(7) FD Zoom Ratio Adjustment (Scanner) ............................................D-36
(8) CD Registration Adjustment (Scanner) ...........................................D-37
(9) FD Registration Adjustment (Scanner) ............................................D-38
4. MISCELLANEOUS ..........................................................................................D-39
4-1. TORSION BAR POSITION ADJUSTMENT .............................................D-39
4-2. REMOUNTING EEPROM (U21) .................................. ............................D-40
i
Page 20
1. SERVICE INSTRUCTIONS
1-1. IDENTIFICATION OF FUSES
Control Board PWB-I
250V 3A (F1)
Power Supply Board PU1
100V Area
250V 6.3A (F1)
250V 15A (F2)
200V Area
4007D040AA
250V 4A(F1)
250V 6.3A(F2)
1-2. PRECAUTIONS FOR HANDLING THE LASER EQUIPMENT
• The laser used in this copier is a semiconductor laser with the following specifications:
Max. power: 5 mW
Output wavelength: 770 to 795 nm
• When laser protective goggles are to be used, select ones with a lens conforming to the
above specifications.
• When a disassembly job needs to be performed in the laser beam path, such as when
working around the PH and PC Drum, be sure to turn the copier OFF first.
• If the job requires that the copier be left ON, take off your watch and ring and wear laser
protective goggles.
• A highly reflective tool can be dangerous if it is brought into the laser beam path. Use
utmost care when handling such tools near the laser.
• The PH is not maintainable in the field. It is to be replaced as a unit including the control
board. Never, therefore, attempt to remove the laser diode or adjust trimmers on the control board.
D-1
Page 21
1-3. PARTS WHICH MUST NOT BE TOUCHED
(1) Red Screws
Purpose of Application of Red Paint
Red painted screws show that the assembly or unit secured can only be adjusted or set at
the factory and should not be readjusted, set, or removed in the field.
Note that when two or more screws are used on the part in question, only one representative screw may be marked with red paint.
(2) Variable Resistors on Board
Do not turn the variable resistors on boards for which no adjusting instructions are given in
“ADJUSTMENT.”
(3) Other Screws
Scanner
PH Unit
4007D043AA
Pulley Fixing Screw
4007D045AA
4007D075AA
D-2
Page 22
1-4. READING THE TEXT
Disassembly procedures are given under separate titles; illustrations identify each part
only.
Parts that require special attention and service jobs are given at the corresponding part
name in the illustration.
The disassembly procedures omit removal of exterior parts.
☞
D-4
Remove the roller after the Supply Unit has been taken out of the copier.
1. Image Transfer Roller cover
2. Image Transfer Roller
Disassembly
Procedures
Image Transfer Roller
Replace.
Image Transfer Roller Cover
Part requiring
service jobs.
Pusher Spring
Image Transfer Roller Holder
4007D017AA
D-3
Page 23
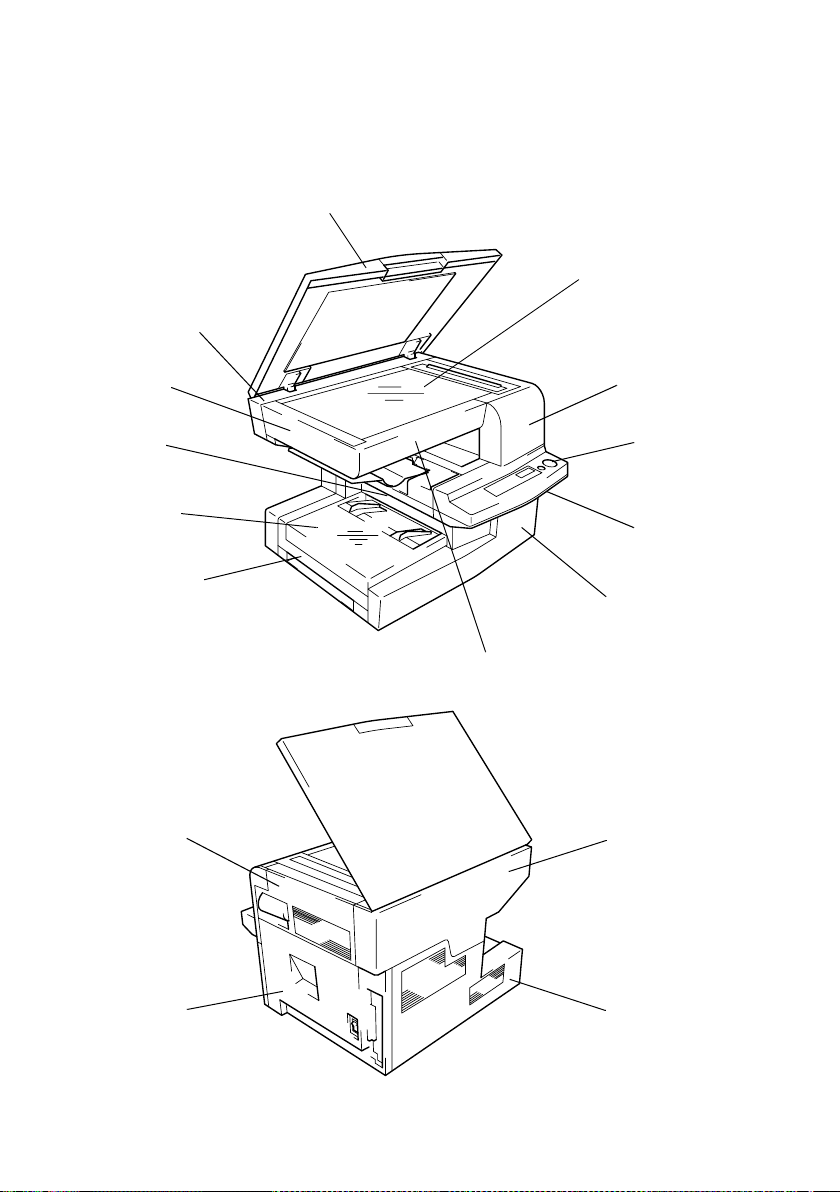
2. DISASSEMBLY/REASSEMBLY
2-1. COVERS AND EXTERIOR PARTS: IDENTIFICATION AND
REMOVAL PROCEDURES
1
2
12
10
11
16
3
4
9
8
4007D001AB
7
5
6
13
15
14
4007D002AB
D-4
Page 24

No. Name Removal Procedure
1 Platen Cover Remove screws that secure the Platen Cover.
2 Original Glass Remove 1. → Remove 13. → Remove 12. → Remove 3. →
Remove 7. → Remove the Original Glass holding brackets (two
at the front).
3 Front Upper Cover Remove screws that secure the Front Upper Cover.
4 Control Panel Remove 3. → Remove screws that secure the control panel.
5 Front Middle
Cover
6 Front Lower Cover Release and swing up the upper half of the copier. → Remove
7 Front IR Cover Remove 3. → Remove screws that secure the Front IR Cover.
8 Paper Tray Remove 9. → Release and swing up the upper half of the copier.
9 Manual Bypass
Tray
10 Paper Exit Tray
Lower Cover
11 Left IR Cover Remove 1. → Remove 3. → Remove 7. → Remove 13. →
12 Rear IR Upper
Cover
13 Rear Upper Cover Remove 14. → Remove screws that secure the Rear Upper
14 Rear Lower Cover Remove screws that secure the Rear Lower Cover.
15 Right Cover Release and swing up the upper half of the copier. → Remove
16 Right IR Cover Remove 3. → Remove 1. → Remove 13. → Remove 12. →
Remove 3. → Remove 4. → Remove screws that secure the
Front Middle Cover.
screws that secure the Front Lower Cover.
→
Remove 6. → Remove 14. → Remove the screw that secures
the Paper Tray.
Remove 9. → Remove 6. → Remove 14. → Remove 8. →
Remove screws that secure the Paper Exit Tray Lower Cover.
Remove 12. → Remove screws that secure the Left IR Cover.
Remove 1. → Remove 13. → Remove screws that secure the
Rear IR Upper Cover.
Cover.
the 14. → Remove screws that secure the Right Cover.
Remove screws that secure the Right IR Cover.
D-5
Page 25

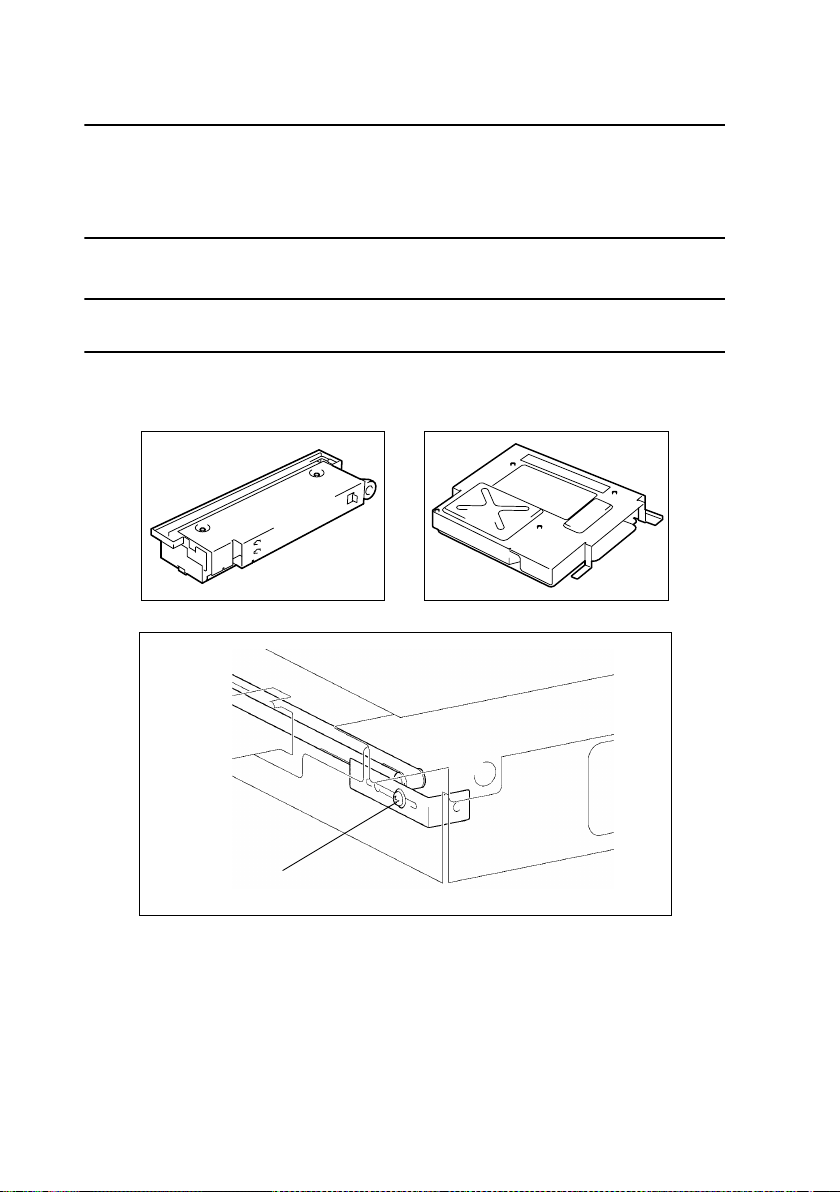
2-2. REMOVAL OF PWBs
• The removal procedures given below omit the steps of unplugging connectors and
removing the PWB from the PWB support.
• Where it is absolutely necessary to touch the ICs and other electrical components on the
board, be sure to ground your body.
PWB-I
PWB-M
PWB-A
Symbol Name Removal Procedure
PWB-A Master Board
PWB-B Control Panel
PWB-G
PWB-I Control Board
PWB-M Memory Board
PWB-S
PU1
HV1 High Voltage Unit
Toner Empty
Board
Scanner Interface
Board
Power Supply
Board
Remove the Rear Upper Cover and Rear Lower Cover. →
Remove the protective cover. → PWB-A
Remove the Front Upper Cover. → Remove the Control
Panel. → PWB-B
Remove all exterior covers . → Remove the upper half of the
copier. → Remove the rear side plate. → Remove the Paper
Take-Up Roll Cover Assy. → PWB-G
Remove the Rear Lower Cover and Rear Upper Cover. →
Remove the protective cover. → PWB-I
Remove the Rear Lower Cover and Rear Upper Cover. →
Remove the protective cover. → PWB-M
Remove the Front Upper Cover, Front IR Cover, Rear IR
Upper Cover , Rear Upper Cov er, and Rear Lower Cover. →
Remove the Original Glass bracket . → Remove the Original
Glass. → Remove the protective cover. → PWB-S
Release and swing up the upper half of the copier. →
Remove the Right Cover. → Remove the Power Switch. →
Remove the Fusing Section Cooling Fan Motor . → Remove
the Fusing Section Cooling Fan Motor mounting brack et. →
Remove the Inlet mounting bracket. → PU1
Remove the Paper Exit Tray Lower Cover. → Remove the
Paper Exit Tray. → Release and swing up the upper half of
the copier. → Remove the Cover. → Remove the Supply
Unit. → Remove the PH Unit. → HV1
PWB-S
4007D003AB
PU1
PWB-B
PWB-G
HV1
D-6
Page 26

2-3. MAINTENANCE SCHEDULE
• To ensure that the copier produces good copies and to extend its service life, it is recommended that the maintenance jobs described in this schedule be carried out as
instructed.
Maintenance Schedule
PM Parts
Fusing Section
Fusing Unit — 50
Image Transfer Section
Image Transfer Roller — 50 4110-4103-01 1
Cleaning Replacement
(K)
Part No. Qty
100V Area
4007-0431-02
200V Area
4007-0432-02
1
Reference
Page
☞
D-15
☞
D-17
D-7
Page 27

2-4. REMOVAL OF UNITS
(1) Removal of the Upper Half of the Copier
Remove the upper half of the copier after the Front Upper Cover, control panel, Front Middle Cover, Rear Upper Cover, and Paper Exit Tray Lower Cover have been removed.
1. Protective cover
2. Control Board
NOTE
Unplug all print jacks from the PWB.
Protective Cover
Control Board
4007D010AB
3. IR Lower Cover
4. Paper Exit Tray
Paper Exit Tray
IR Lower Cover
4007D062AA
4007D005AC
D-8
Page 28

5. Torsion Bars A and B
Torsion Bar B
Torsion Bar Mounting Position
Torsion Bar B
Torsion Bar A
4007D006AB
Front Side
Torsion Bar A
4007D063AA
Rear Side
Torsion Bar B
Torsion Bar A
4007D064AA
NOTE
Before removing or reinstalling the torsion bars, be sure to release and swing up the upper
half of the copier to release pressure.
When reinstalling them, install torsion bar A first, then torsion bar B.
D-9
Page 29
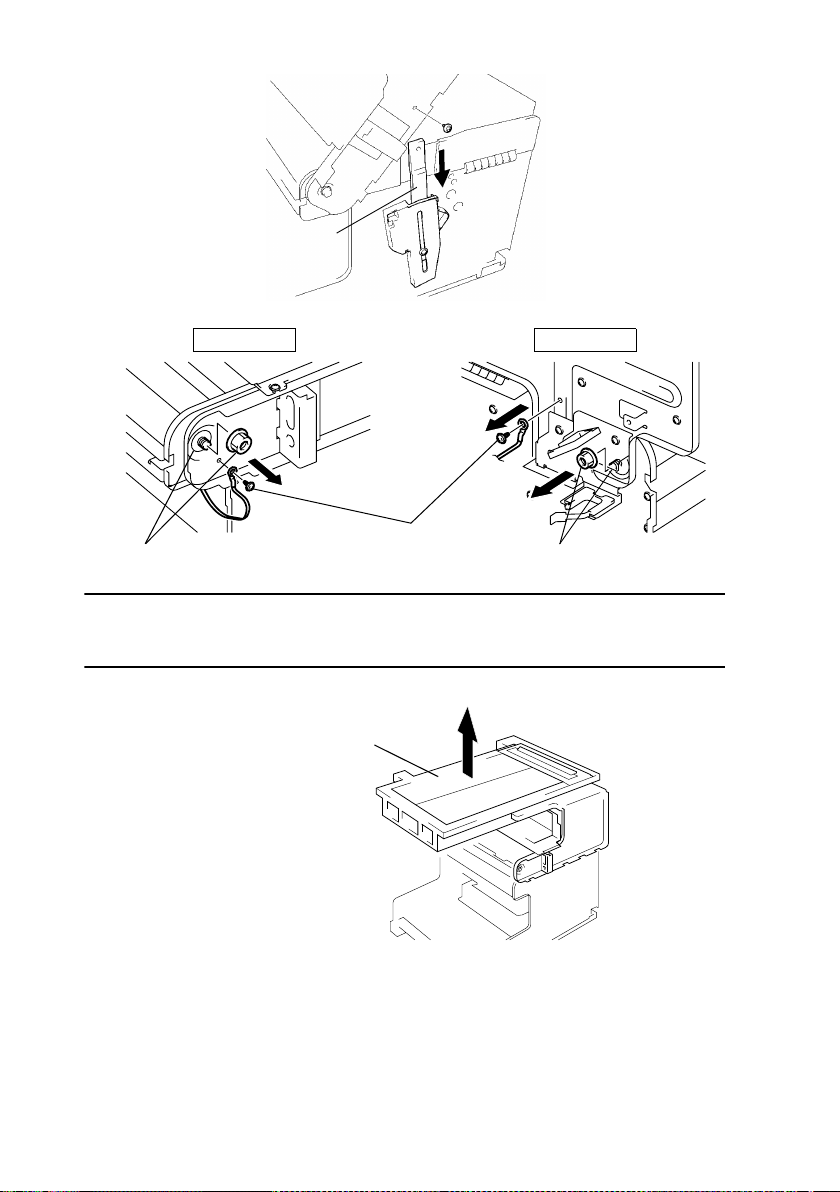
6. Lock Plate
Lock Plate
7. Shoulder screws and other screws
Front Side Rear Side
4007D073AA
Screws
Shoulder Screw
Shoulder Screw
4007D007AA 4007D008AA
NOTE
When mounting the shoulder screws, make sure that the round hole and the slot in the
frames are properly aligned with each other.
8. Upper half of the copier
Upper Half of the Copier
4007D009AA
D-10
Page 30

(2) Removal of the IR Unit
Remove the IR Unit after the Front Upper Cover, Front IR Cover, Rear IR Upper Cover,
Rear Upper Cover, Rear Lower Cover, and Right IR Cover have all been removed.
1. Protective Cover
2. Control Board
NOTE
Unplug all print jacks from the PWB.
Protective Cover
Control Board
4007D010AB
3. ADF Set Switch hookup connector
4. IR Unit
IR Unit
ADF Set Switch
Hookup Connector
4007D011AB
D-11
Page 31

(3) Removal of the PH Unit
Remove the PH Unit after the Front Lower Cov er, Rear Lower Cover, P aper Exit Tray Lower
Cover, and Supply Unit have been removed.
1. Protective cover
2. Control Board
NOTE
Unplug all print jacks from the PWB.
Protective Cover
Control Board
4007D010AB
3. IR Lower Cover
IR Lower Cover
4. Paper Exit Tray
Paper Exit Tray
4007D062AA
4007D005AC
D-12
Page 32

5. Protective Cover
Protective Cover
6. Print Jack
Master Board
7. PH Unit fixing screws
4007D012AA
4007D013AB
PH Unit
4007D015AC
D-13
Page 33

8. Cover
9. PH Unit
Cover
PH Unit
4007D014AA
NOTE
Take care with the torsion bars: They will come off when the upper half of the copier is
swung up.
D-14
Page 34

(4) Removal of the Fusing Unit
Remove the Fusing Unit after the Right Cover, Rear Lower Cover, Front Lower Cover, and
Supply Unit have been removed.
1. Fusing cover
Fusing Cover
4007D067AA
2. Cover
Cover
3. Fusing Section Cooling Fan Motor
4. Right Side Plate
Right Side Plate
Fusing Section
Cooling Fan Motor
4007D074AA
4007D068AA
D-15
Page 35

5. Fusing Unit
Fusing Unit
Replace.
4007D069AA
D-16
Page 36

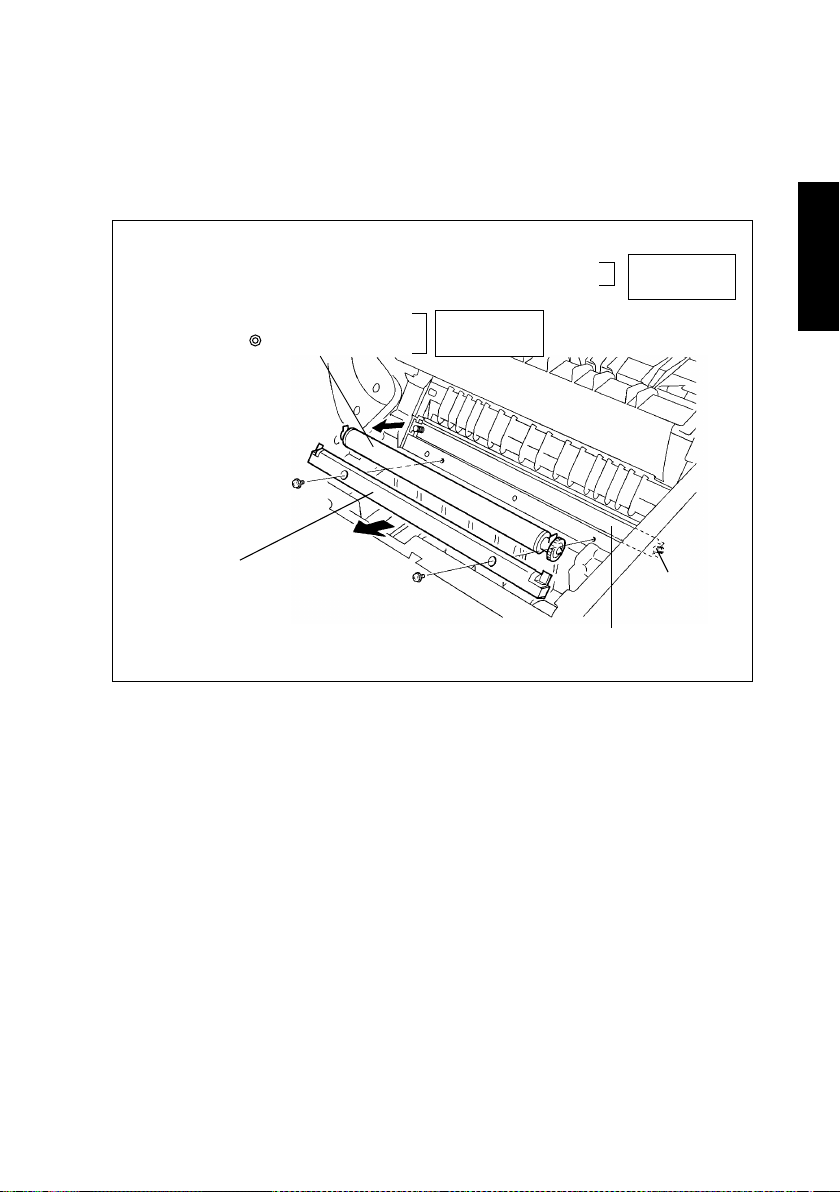
2-5. IMAGE TRANSFER SECTION
(1) Replacement of the Image Transfer Roller
Remove the Image Transfer Roller after the Supply Unit have been removed.
1. Image Transfer Roller cover
2. Image Transfer Roller
Image Transfer Roller
Replace.
Pusher Spring
Image Transfer Roller Cover
NOTE
Be sure not to lose the pusher springs hooked to the Image Transfer Roller holder.
3. Gear
4. Bushing
5. Roll
6. Image Transfer Roller
Roll
Bushing
Image Transfer Roller
Bushing
Pusher Spring
Image Transfer Roller Holder
4007D017AA
Roll
Bushing
4007D018AB
Gear
D-17
Page 37

2-6. FUSING SECTION
(1) Removal of the Fusing Backup Roller
1. Thermistor hookup harness
4007D070AA
2. Lower Fusing Unit
3. Fusing Entrance Guide Plate
Thermistor hookup harness
Lock in the Rear
Lower Fusing Unit
Lock at the Front
Fusing Entrance Guide Plate
4007D019AC
D-18
Page 38

4. Pressure spring
5. Fusing Backup Roller
Fusing Backup Roller
4007D020AB
Pressure Springs
NOTE
During reinstallation, make sure that the pressure springs fit over the protrusions on the
Lower Fusing Unit.
Front Side
Rear Side
Protrusions
4007D047AA 4007D060AB
D-19
Page 39

(2) Removal of the Fusing Heater Lamp
1. Terminal
2. Fusing Heater Lamp
Gear
Fusing Heater Lamp
Terminal
4007D021AB
NOTE
When inserting the Fusing Heater Lamp, make sure that the end marked with the specifications is on the gear end.
D-20
Page 40

(3) Removal of the Fusing Roller
1. Gear
2. Fusing Roller
3
Fusing Roller
2
1
Gear
Fusing Entrance Guide Plate
4007D022AA
NOTES
• When mounting the Fusing Roller, take care not to allow the Paper Separator Fingers to
damage the surface of the roller.
• When installing the gear, make sure that the protrusion on the inner side of the gear fits
into the slit on the end of the Fusing Roller.
• When installing the Fusing Entrance Guide Plate, fit the ground plate of the Fusing
Entrance Guide Plate inside the ground plate on the Fusing Unit side.
Where the Ground Plate is Mounted
Ground Plate of the Fusing
Entrance Guide Plate
Ground Plate of
the Fusing Unit
4007D071AA
D-21
Page 41

2-7. MISCELLANEOUS
(1) Removal of the Scanner and Timing Belt
Remove these parts after the Front Upper Cover, Front IR Cover, Left IR Cover, Rear IR
Upper Cover, Rear Upper Cov er, Rear Lower Cover, and Right IR Cover have all been
removed.
1. Original Glass holding bracket
2. Original Glass
Original Glass
Original Glass
Holding Brackets
4007D023AB
3. Timing belt pulley
4. Timing belt
Timing belt pulley
Timing belt
4007D072AA
D-22
Page 42

5. Scanner Rail fixing screw (on timing belt side)
6. Scanner Rail (on timing belt side)
Scanner Rail
7. Scanner plate
8. Flexible harness
9. Scanner
3
Scanner
Scanner Rail Fixing Screw
4007D024AB
1
Protective Cover
Flexible Harness
2
4007D025AC
NOTE
When installing the Scanner, always connec t the flexible harness first.
D-23
Scanner Plate
Page 43

(2) Removal of the Scanner Motor
1. IR Unit
2. Fixing bracket
3. Scanner Motor
IR Unit
Fixing Bracket
Scanner Motor
4007D026AA
D-24
Page 44

(3) Removal of the Paper Take-Up Roll
Remove the Paper Take-Up Roll after the Supply Unit has been taken out of the copier.
1. Paper Take-Up Roll
2
Paper Take-Up Roll
1
Paper Take-Up Roll
Cover
4007D027AA
NOTE
When securing the Paper Take-Up Roll, make sure that the positioning pin on the back side
of the roll fits into the hole in the shaft.
D-25
Page 45

(4) Removal of the Paper Take-Up Solenoid
Remove the solenoid after the Front Lower Cov er, Paper Tray, Manual Bypass Tray, Manual
Bypass Tray Lower Cover, Rear Lower Cover, and Right Cover have all been removed.
1. Protective cover
Protective Cover
4007D012AA
2. Print jack
Master Board
3. Paper Take-Up Solenoid hookup connector
D-26
4007D048AA
4007D049AB
Page 46

4. Base plate fixing screws
Front
5. Base plate
6. Paper Take-Up Solenoid
Rear
4007D031AA 4007D032AA
Base Plate
4007D030AA
D-27
Paper Take-Up Solenoid
4007D033AB
Page 47

(5) Removal of the Main Mot or a nd PH Se c tion Cooling Fan Motor
Remove these parts after the upper half of the copier, and Supply Unit has been removed.
1. Protective cover
2. Master Board
Master Board
Protective Cover
4007D046AA
3. Base plate
☞
D-27
4. Rear side plate fixing screws (marked with black dots)
5. Gear Assy fixing screws (marked with black squares)
6. Rear side plate, gear assy
NOTE
Install the rear side plate first, then the base plate.
D-28
4007D035AB
Gear Assy
Rear Side Plate
4007D037AA
Page 48

7. Main Motor, PH Section Cooling Fan Motor
PH Section Cooling Fan Motor
Main Motor
4007D038AA
D-29
Page 49

3. ADJUSTMENT
3-1. ADJUSTMENT REQUIREMENTS LIST
Adjustment Item Requirements Adjustment Point Ref. Page
Registration (Paper Tray) Control panel
CD
FD 20 ± 2.0 mm
Zoom Ratios (Scanner)
CD 100 ± 1.0 mm
FD 200 ± 2.0 mm
Registration (Scanner)
CD
FD 20 ± 2.0 mm
→
→
→
→
→
→
→
→
☞
☞
☞
☞
☞
☞
D-33
D-34
D-35
D-36
D-37
D-38
D-30
Page 50

3-2. ADJUSTMENT OF UPPER UNIT INTERLOCK SWITCH S2
1. Release and swing up the upper half of the copier and remove the Right Cover.
2. Remove the Fusing Cover.
3. Loosen the screw on the Upper Unit Interlock Switch adjusting bracket and slide it
downward until it is stops.
4. Swing down the upper half of the copier into its locked position.
5. Moving the Upper Unit Interlock Switch adjusting bracket upward, find the position at
which a click of the switch is heard. Then tighten the screw to secure the adjusting
bracket in that position.
[Check Method]
When the Power Switch is turned ON, the Exposure Lamp should turn ON.
Upper Unit Interlock Switch Adjusting Bracket
D-31
4007D039AA
Page 51

3-3. ELECTRICAL/IMAGE ADJUSTMENT
(1) Entering the Tech. Rep. Mode
Procedure:
Press the following keys in this order:
Clear/Stop → Exposure Control Lighter (<) → Clear/Stop → Exposure Control Darker (>)
(2) Entering the Adjust Mode
Procedure:
1. Enter the Tech. Rep. mode.
2. Press the following keys in this order:
1Key → 1Key → 1Key → Start key → Press the 1Key until the specific function is displayed.
(3) Producing a Test Pattern
NOTE
A test pattern is used when making the following adjustments:
• CD registration adjustment (Paper Tray)
• FD registration adjustment (Paper Tray)
• Registration adjustment (Scanner)
• Zoom ratio adjustment (Scanner)
Procedure
1. Enter the Tech. Rep. mode.
2. Press the following keys in this order to enter the function of “F5 Test Pattern 1”:
1Key → 1Key → Start key → 1Key → 1Key → 1Key → 1Key
3. Press the Start key.
NOTE
To exit the test pattern function, press the Clear/Stop key to go back to the Basic screen.
D-32
Page 52

(4) CD Registration Adjustment (Paper Tray)
Requirement
B Side
A Side
Requirement Adjust Mode Function Setting Range
NOTE
This adjustment must be made whenever the PH Unit is replaced.
Procedure
1. Produce a test pattern (F5: Test Pattern 1).
2. Fold the test pattern in half and make sure that the centerline on the test pattern is
aligned with the crease. If it is not aligned with the crease, perform the following adjustment procedure.
3. Enter Adjust function A9.
4. Change the setting value using the 1Key or 10Key as necessary (1 step equivalent to
0.5 mm).
If the centerline deviates on the B side, increase the setting value.
If the centerline deviates on the A side, decrease the setting value.
✽
If one adjustment sequence does not bring the centerline into the required range, perform the sequence again.
5. Press the Start key to validate the setting value.
NOTE
If the Clear/Stop key is pressed to go back to the Basic screen without pressing the Start
key, the setting will be restored to the original value.
4007D050AA
CD registration
adjustment
43 to 57
(-3.5 to +3.5 mm)
D-33
Page 53

(5) FD Registration Adjustment (Paper Tray)
Requirement
c
4007D051AA
Requirement Adjust Mode Function Setting Range
A4C 20 ±2.0 mm
NOTE
This adjustment must be made whenever the PH Unit is replaced. Should be made after
the CD registration adjustment (Paper Tray) has been completed.
Procedure
1. Produce a test pattern (F5: Test Pattern 1).
2. Make sure that dimension C on the test pattern falls within the specified range. If it falls
outside the specified range, perform the following adjustment procedure.
3. Enter Adjust function AA.
4. Change the setting value using the 1Key or 10Key as necessary (1 step equivalent to
0.5 mm).
If dimension C on the test pattern is longer than the specified range, decrease the setting
value.
If dimension C on the test pattern is shorter than the specified range, increase the setting
value.
✽
If one adjustment sequence does not bring the dimension into the required range, perform the sequence again.
Dimension C on the test pattern produced should fall
within the range specified below.
FD registration
adjustment
43 to 57
(-3.5 to +3.5 mm)
5. Press the Start key to validate the setting value.
NOTE
If the Clear/Stop key is pressed to go back to the Basic screen without pressing the Start
key, the setting will be restored to the original value.
D-34
Page 54

(6) CD Zoom Ratio Adjustment (Scanner)
Requirement
D
4007D052AA
Zoom Ratio Requirement Adjust Mode Function Setting Range
Full size (100%) 100 ±1.0 mm
NOTE
This adjustment must be made whenever the Scanner is replaced. Should be made after
the CD and FD registration adjustments (Paper Tray) have been completed.
Procedure
1. Produce a test pattern (F5: Test Pattern 1).
2. Place the test pattern produced on the Original Glass and make a copy.
3. Make sure that dimension D on the copy of the test pattern falls within the specified
range.
Calculation formula: (1 – Dimension D on test pattern ÷ Dimension D on copy) × 100
If dimension D falls outside the specified range, perform the follo wing adjustment procedure.
4. Enter Adjust function A1.
5. Change the setting value using the 1Key or 10Key as necessary (1 step equivalent to
0.4%).
Produce a test pattern after the CD and FD registration
adjustments (Paper Tray) have been made. Place this
test pattern on the Original Glass and make a copy.
Dimension D on the copy of the test pattern should fall
within the range specified below.
CD zoom ratio
adjustment
45 to 55
(Reduced ↔ Enlarged)
If dimension D on the copy of the test pattern is longer than the specified range, decrease
the setting value.
If dimension D on the copy of the test pattern is shorter than the specified range, increase
the setting value.
✽
If one adjustment sequence does not bring the dimension into the required range, perform the sequence again.
6. Press the Start key to validate the setting value.
NOTE
If the Clear/Stop key is pressed to go back to the Basic screen without pressing the Start
key, the setting will be restored to the original value.
D-35
Page 55

(7) FD Zoom Ratio Adjustment (Scanner)
Requirement
Produce a test pattern after the CD and FD registration
adjustments (Paper Tray) have been made. Place this
test pattern on the Original Glass and make a copy.
Dimension E on the copy of the test pattern should fall
within the range specified below.
E
4007D053AA
Zoom Ratio Requirement Adjust Mode Function Setting Range
Full size (100%) 200 ±2.0 mm
NOTE
This adjustment must be made whenever the Scanner is replaced. Should be made after
the CD and FD registration adjustments (Paper Tray) have been completed.
Procedure
1. Produce a test pattern (F5: Test Pattern 1).
2. Place the test pattern produced on the Original Glass and make a copy.
3. Make sure that dimension E on the copy of the test pattern falls within the specified
range.
Calculation formula: (1 – Dimension E on test pattern ÷ Dimension E on copy) × 100
If dimension E falls outside the specified range, perform the following adjustment procedure.
4. Enter Adjust function A2.
5. Change the setting value using the 1Key or 10Key as necessary (1 step equivalent to
0.4%).
FD zoom ratio
adjustment
45 to 55
(Reduced ↔ Enlarged)
If dimension E on the copy of the test pattern is longer than the specified range, decrease
the setting value.
If dimension E on the copy of the test pattern is shorter than the specified range, increase
the setting value.
✽
If one adjustment sequence does not bring the dimension into the required range, perform the sequence again.
6. Press the Start key to validate the setting value.
NOTE
If the Clear/Stop key is pressed to go back to the Basic screen without pressing the Start
key, the setting will be restored to the original value.
D-36
Page 56

(8) CD Registration Adjustment (Scanner)
Requirement
B Side
A Side
Requirement Adjust Mode Function Setting Range
NOTE
This adjustment must be made whenever the Scanner is replaced. Should be made after
the CD and FD registration adjustments (Paper Tray), and CD zoom ratio adjustment
(Scanner) have been completed.
Procedure
1. Produce a test pattern (F5: Test Pattern 1).
2. Place the test pattern produced on the Original Glass and make a copy.
3. Fold the test pattern in half and check that the centerline on the test pattern is aligned
with the crease. If it is not aligned with the crease, perform the following adjustment procedure.
4. Enter Adjust function A3.
5. Change the setting value using the 1Key or 10Key as necessary (1 step equivalent to
0.5 mm).
If the centerline deviates on the B side, increase the setting value.
If the centerline deviates on the A side, decrease the setting value.
✽
If one adjustment sequence does not bring the centerline into the required range, perform the sequence again.
6. Press the Start key to validate the setting value.
4007D050AA
CD registration
adjustment
40 to 60
(-5.0 to +5.0 mm)
NOTE
If the Clear/Stop key is pressed to go back to the Basic screen without pressing the Start
key, the setting will be restored to the original value.
D-37
Page 57

(9) FD Registration Adjustment (Scanner)
Requirement
c
4007D051AA
Requirement Adjust Mode Function Setting Range
20 ±2.0 mm
NOTE
This adjustment must be made whenever the Scanner is replaced. Should be made after
the CD and FD registration adjustments (Paper Tray), and FD zoom ratio adjustment (Scanner) have been completed.
Procedure
1. Produce a test pattern (F5: Test Pattern 1).
2. Place the test pattern produced on the Original Glass and make a copy.
3. Make sure that dimension C on the copy of the test pattern falls within the specified
range. If it falls outside the specified range, perf orm the following adjustment procedure.
4. Enter Adjust function A4.
5. Change the setting value using the 1Key or 10Key as necessary (1 step equivalent to
0.5 mm).
Produce a test pattern after the CD and FD registration
adjustments (Paper Tray) have been made. Place this
test pattern on the Original Glass and make a copy.
Dimension C on the copy of the test pattern should fall
within the range specified below.
FD registration
adjustment
40 to 60
(-5.0 to +5.0 mm)
If dimension C on the copy of the test pattern is longer than the specified range, decrease
the setting value.
If dimension C on the copy of the test pattern is shorter than the specified range, increase
the setting value.
✽
If one adjustment sequence does not bring the dimension into the required range, perform the sequence again.
6. Press the Start key to validate the setting value.
NOTE
If the Clear/Stop key is pressed to go back to the Basic screen without pressing the Start
key, the setting will be restored to the original value.
D-38
Page 58

4. MISCELLANEOUS
4-1. TORSION BAR POSITION ADJUSTMENT
NOTE
When an Automatic Document Feeder or FK-116 (Fax Unit) is mounted on the copier, the
position of the torsion bar must be adjusted as detailed below.
1. Remove the Front Upper Cover and control panel.
2. Release and swing up the upper half of the copier.
3. Remove the torsion bar attachment plate.
4007D054AA
Torsion Bar Attachment Plate
4. Change the position of the torsion bar in the attachment plate as necessary.
Torsion Bar
Hole Copier Configuration
Factory setting or when the Platen Cover is mounted
A
When the FK-116 (Fax Unit) is mounted
B When the Automatic Document Feeder is mounted
When both the Automatic Document Feeder and FK-116 (Fax Unit) are
C
mounted
5. Secure the torsion bar attachment plate into position.
D-39
4007D055AA
Page 59

4-2. REMOUNTING EEPROM (U21)
NOTES
• If the Control Board has been replaced, be sure to remount EEPROM (U21) from the old
to new Control Board.
• If the Control Board has been replaced and EEPROM (U21) has not been remounted, be
sure to make settings and readjustments as necessary because New EEPROM (U21)
contains no data in this case.
1. Remove the Control Board.
2. Remove EEPROM (U21) from the new Control Board.
3. Remove EEPROM (U21) from the old Control Board and remount it onto the new Control Board.
New EEPROM
New Control Board Old Control Board
A
A
4007D057AA
NOTE
Note the alignment notch (A) on EEPROM (U21) when
mounting the IC.
Old EEPROM
4007D056AA
D-40
Page 60

SWITCHES ON PWBs,
TECH. REP. SETTINGS
17196
Page 61

CONTENTS
1. CONTROL PANEL KEYS AND INDICATORS ................................................S-1
1-1. Control Panel Keys ..................................................................................S-1
2. USER’S CHOICE MODE ........... ......................................................................S-5
2-1. Functions Available from the User’s Choice Mode ..................................S-5
2-2. User’s Choice Function Setting Procedure ..............................................S-5
2-3. Settings in the User’s Choice Mode .........................................................S-6
3. TECH. REP. MODE .........................................................................................S-10
3-1. Tech. Rep. Mode Function Tree ..............................................................S-10
3-2. Tech. Rep. Mode Setting Procedure .......................................................S-11
(1) Display .............................................................................................S-11
(2) Function ...........................................................................................S-13
(3) Tech. Rep. Choice ...........................................................................S-15
(4) Adjust .............................................................................................S-17
i
Page 62

1. CONTROL PANEL KEYS AND INDICATORS
1-1. Control Panel Keys
1. Start Key
• Press to start a copy cycle.
2. Clear/Stop Key
• Press to cancel a copy operation.
• Press to reset the Copies setting to “1”.
• Press to retur n the zoom ratio setting to 100%.
• Press for three seconds to enable the total check function.
3. 1 Key
• Use to change the values for each setting.
4. 10 Key
• Use to change the values for each setting.
5. Copies/Function Key
• Use to change the Copies setting and the Function Mode settings.
6. Zoom Key
• Press to change the zoom ratio.
• Use to select the standard zoom ratio.
7. Exposure Control Key (Darker)
• Use to manually adjust the density of the document.Image will become darker by pressing this key.
8. Auto Exposure Mode Key
• Press to select either the Auto Exposure Mode, the Manual Exposure Mode or the Photo
Mode.
9. Exposure Control Key (Lighter)
• Use to manually adjust the density of the document.Image will become lighter by pressing this key.
• Press for three seconds enter the User's Choice mode.
10. Paper Select Key
• Press to select the drawer that contains the desired paper size.
S-1
Page 63

Inch Areas
1
10
C/
2
3
4
5
6
7
8
Auto/Photo
9
OHP
Card
Non-Sort
S-2
Sort
2in1-Sort
2in1-Non-Sort
4007S001EA
Page 64

F1-F4
F1-F4
Metric Areas
1
10
C/
2
3
4
5
6
7
A /
8
9
OHP
Card
S-3
2in1-Non-Sort
Non-Sort
Sort
2in1-Sort
4007S002DA
Page 65

Others
1
10
C/
2
3
4
5
6
7
8
Auto/Photo
9
OHP
Card
Non-Sort
S-4
2in1-Sort
2in1-Non-Sort
Sort
4007S003CA
Page 66

2. USER’S CHOIC E MOD E
• User’s Choice Mode is used to make various settings according to the user’s needs.
2-1. Functions Available from the User’s Choice Mode
Code Function Code Function
U1 Auto Panel Reset U8 Manual Feed Input Size
U2 Sleep
U3 Disable Sleep
Exposure Mode Priority/Photo
U4
Mode
U5 Auto Exposure Level Priority
U6 Manual Exposure Level Priority
U7 Paper Size Select
✽
Functions of U9 to UC are available on the display only when the copier is equipped with
the corresponding options as detailed below.
U9: Automatic Document Feeder (DF216)
U0: Memory for Copier (MU-7415C1 (16M)/MU-7415C2 (32M))
UA: Paper Feed Unit (PF-120)
Ub: Printer Controller (IP-412)
UC: Paper Feed Unit (PF-120) and Printer Controller (IP-412)
✽
✽
✽
✽
✽
2-2. User’s Choice Function Setting Procedure
<Setting Procedure>
1. On the copying mode screen, hold down the Exposure Control Lighter < key for about 3
sec. or more.
2. Using the 10Key and 1Key, select the appropriate choice code.
3. Press the Start key to show the current setting.
4. Using the 10Key and 1Key, select the appropriate choice data.
5. Press the Start key to validate the choice data entered.
Density (Automatic Document
U9
Feeder)
U0 Function
UA Tray Priority (for Copier mode)
Ub Image Density (for Printer mode)
UC Tray Priority (for Printer mode)
<Exiting the Mode>
• Press the Clear/Stop key.
S-5
Page 67

2-3. Settings in the User’s Choice Mode
Highlighted
1
Choice Code.
U1
U2
U3
U4
Setting (The default is ).
<Auto panel Reset>
Select the time it takes the Auto Panel Reset function, which resets
the panel settings when the set period of time elapses after a copy
cycle has been completed or the last key operated, to be activated.
Data Description Data Description
OF Disabled 2 2min.
05 30sec. 3 3min.
1
Set the time it takes the copier to enter the P ower Sa v e mode after the
copy cycle has been completed or the last key operated.
NOTE
• The choice data “OF” may be selected when “Enabled” is selected
in “U3, Disable Sleep.”
Data OF
Description Disabled The data value is the time in min.
Select whether to enable the “OF” setting of Sleep.
Data 2
Description Disabled Enabled
Select the priority exposure mode, either Text Auto Exposure, Text
Manual Exposure, or Photo Manual Exposure.
Data Description
1
2 Photo Manual exposure ON U6 default setting ON
3 Text Manual exposure OFF U6 default setting ON
1min. 4 4min.
<Sleep>
1.......................... ......................120
<Disable Sleep>
<Exposure Mode Priority/Photo Mode>
Photo
LED
Text Auto exposure OFF All ON
15
Exposure Level LED
U5
Select the priority exposure level in the Auto Exposure mode.
Data 0 2
Description Darker Standard Lighter
<Auto Exposure Priority>
1
S-6
Page 68

Choice Code
Highlighted
U6
Setting (The default is ).
Select the priority exposure level in the Manual Exposure mode.
Data Description Exposure Level LEDs
4
3
2
1
0
-1
-2
-3
-4
<Manual Exposure Level Priority>
Darker
Standard
Lighter
U7
U8
Select the paper size of the Paper Tray.
- Metric Areas - - Inch Areas -
Data Description Data Description
1 1
2 A5L 2 Legal L
Set the size of the paper of a nonstandard size to be used for Manual
Bypass feeding.
After the CD size has been set, press the Start key, which allows the
user to set the FD size.
- CD Size Data Description
128 - 134mm (5” - 5-1/4”)
13
14 135 - 144mm (5-1/4” - 5-3/4”)
15 145 - 154mm (5-3/4” - 6”)
16 155 - 164mm (6” - 6-1/2”)
17 165 - 174mm (6-1/2” - 6-3/4”)
18 175 - 184mm (7” - 7-1/4”)
19 185 - 194mm (7-1/4” - 7-3/4”)
20 195 - 204mm (7-3/4” - 8”)
21 205 - 216mm (8” - 8-1/4”)
<Paper Size Select>
A4L Letter L
3 Half Letter L
<Manual Feed Input Size>
S-7
Page 69

Choice Code
Highlighted
U8
Setting (The default is ).
- FD Size Data Description
182 - 184mm (7-1/4”)
18
19 185 - 194mm (7-1/4” - 7-3/4”)
20 195 - 204mm (7-3/4” - 8”)
21 205 - 214mm (8” - 8-1/2”)
22 215 - 224mm (8-1/2” - 8-3/4”)
23 225 - 234mm (8-3/4” - 9-1/4”)
24 235 - 244mm (9-1/4” - 9-1/2”)
25 245 - 254mm (9-3/4” - 10”)
26 255 - 264mm (10” - 10-1/2”)
27 265 - 274mm (10-1/2” - 10-3/4”)
28 275 - 284mm (10-3/4” - 11-1/4”)
29 285 - 294mm (11-1/4” - 11-1/2”)
30 295 - 304mm (11-1/2” - 12”)
31 305 - 314mm (12” - 12-1/4”)
32 315 - 324mm (12-1/2” - 12-3/4”)
33 325 - 334mm (12-3/4” - 13-1/4”)
34 335 - 344mm (13-1/4” - 13-1/2”)
35 345 - 356mm (13-1/2” - 13-3/4”)
<Manual Feed Input Size>
U9
Select the copy image density level when the copier is equipped with
an Automatic Document Feeder.
Data Description
<Density (Automatic Document Feeder)>
When the standard original (text original) is used.
1
2 For sharper reproduction of a faint original.
S-8
Page 70

Choice Code
Highlighted
U0
UA
Ub
Setting (The default is ).
Select the priority Function mode.
NOTES:
• If the copier is not equipped with an Automatic Document Feeder,
choice data of F1 and F2 only are available.
• If the copier is equipped with an Automatic Document Feeder, all of
the following choice data are available.
Data Description Data Description
F1 Non-Sort Sort
F2 2in1 Non-Sort F4 2in1 Sort
✽
The default setting is “F1” if the copier is not equipped with an Automatic Document Feeder.
Select the priority paper source selected when the copier is turned
ON.
Data Description
1
2 Paper Feed Unit (PF-120)
3 Paper Tray + Auto Tray Switching
4 Paper Feed Unit (PF-120) + Auto Tray Switching
Select the image density level of printer outputs.
Data
Description
<Tray Priority (for Copier mode)>
Paper Tray
<Image Density (for Printer mode)>
32 1 -1-2-3
Darker Standard Lighter
<Function>
F1
0
UC
Select the priority paper source for printer outputs.
Data Description
1
2 Paper Tray
3 Paper Feed Unit (PF-120)
<Tray Priority (for Printer mode)>
Auto selection
S-9
Page 71

3. TECH. REP. MODE
• This mode is used by the Tech. Rep. to set, adjust, and/or program various service functions.
3-1. Tech. Rep. Mode Function Tree
d1: Supply Unit Counter
d3: LED Test
d4: MIsfeed Counter
d5: Copy Counter
d6: PC Print Counter
d7: ROM V ersion
d8: Total Memory Size for Copier
d9: Total Memory Size for Printer Controller
F1: Paper Passa ge Test
F2: Scanner Test
F3: Original Passage Test
F4: Scanner & Paper Passage Test
F5: Test Pattern 1
F6: Test Pattern 2
FA: EEPROM Test
Fb: Sleep Mode Test
FE: Original Sc ann i ng Position
Contamination Test (DF-216)
FF: Scanner Home Position
C1: Market ing Area
C2: Toner Empty Stop
C3: Predrive
C6: Data Clear
C8: Exposure Lamp OFF Time Setting
TECH. REP. MODE
Display
Function
Tech. Rep. Choice
Adjust
A1: Zoom Adjustment in CD Direction (Copy)
A2: Zoom Adjustment in FD Direction (Copy)
A3: Registration Adjustment in CD
Direction (Copy)
A4: Registration Adjustment in FD
Direction (Copy)
A5: Zoom Adjustment in CD Direction
(DF-216)
A6: Zoom Adjustment in FD Direction
(DF-216)
A7: Registration Adjustment in CD
Direction (DF-216)
A8: Registration Adjustment in FD
Direction (DF-216)
A9: Registration Adjustment in CD
Direction (Paper Tray)
AA: Registration Adjustment in FD
Direction (Paper Tray)
Ab: Registration Adjustment in CD
Direction (PF-120)
AC:Registration Adjustment in FD
Direction (PF-120)
S-10
Page 72

3-2. Tech. Rep. Mode Setting Procedure
<Setting Procedure>
1. Press the following keys in this order:
Clear/Stop → Exposure Control Lighter (<) → Clear/Stop → Exposure Control Darker (>)
2. Press the 1Key until the desired Tech. Rep. sub-mode is reached. Sub-modes cycle as
follows:
Display “d” Tech. Rep. Choice “C” Function “F” Adjust “A”
3. When the code that represents the desired sub-mode is displayed, press the Start key.
<Exiting the Mode>
• Press the Clear/Stop key.
(1) D isplay
• Displays the count of each of different counters and makes some checks.
• The maximum value that can be displayed for the counter is 999,999.
<Procedure>
• Press the 1Key as necessary until “d” appears on the display.
• Press the Start key to let the copier start the sequence.
<Exiting the Mode>
• Press the Clear/Stop key.
Code Description
<Supply Unit Counter>
d1
Displays the count of the Supply Unit counter.
Two digits each are displayed on the display, cycling through all digits
of the count as detailed below.
E.g.: 1234
d1 00 12 34
d3
d4
<LED Test>
Turns ON and flashes OFF and ON all LEDs on the control panel to
check for correct operation.
<Misfeed Counter>
Displays the count of the misfeed counter.
Two digits each are displayed on the display, cycling through all digits
of the count as detailed below.
E.g.: 12
d4 00 00 12
S-11
Page 73

Code Description
<Copy Counter>
d5
Displays the count of the copy counter.
Two digits each are displayed on the display, cycling through all digits
of the count as detailed below.
E.g.: 12345
d5 01 23 45
d6
d7
d8
d9
Displays the count of the PC print counter.
<PC Print Counter>
Two digits each are displayed on the display, cycling through all digits
of the count as detailed below.
E.g.: 12345
d6 01 23 45
<ROM Version>
Displays the ROM version.
Two digits each are displayed on the display, cycling through all digits
of the ROM version number as detailed below.
E.g.: 1.00
d7 00 01 00
<Total Memory Size for Copier>
Displays the capacity of the copier memory.
Display 08 24 40
Capacity (MB) 0 16 32
<Total Memory Size for Printer Controller>
Displays the capacity of the printer controller memory.
Display 08 16 32
Capacity (MB) 0 16 32
S-12
Page 74

(2) Function
• Allows the Tech. Rep. to run paper passage and other tests.
<Procedure>
1. Press the 1Key as necessary until “F” appears on the display.
2. Press the Start key to let the copier start the sequence.
<Exiting the Mode>
• Press the Clear/Stop key.
Code Description
<Paper Passage Test>
<Scanner Test>
<Original Passage Test>
<Scanner & Paper Passage Test>
<Test Pattern 1>
<Test Pattern 2>
F1
F2
F3
F4
F5
F6
Checks for correct paper passage.
<Procedure>
1. Select the paper source before entering the Tech. Rep. mode
(when the copier is equipped with a Paper Feed Unit).
2. Press the Start key to let the copier start the paper passage
sequence.
3. Press the Clear/Stop key to stop the sequence.
Checks to see if the Exposure Lamp turns ON properly and the Scanner operates correctly.
<Procedure>
1. Press the Start key. This turns ON the Exposure Lamp and lets
the Scanner make a scan motion.
2. Press the Clear/Stop key to stop the operation.
Checks the Automatic Document Feeder for corr ect docum ent passage.
<Procedure>
1. Place paper on the Document Feed Tray.
2. Press the Start key to let the Automatic Document Feeder start
the document take-up and feeding sequence.
Checks to see if the Scanner operates properly and paper is fed
through the copier correctly.
<Procedure>
1. Place the original on the Original Glass.
2. Press the Start key. This turns ON the Exposure Lamp and lets
the Scanner make a scan motion.
3. A copy is produced.
4. Press the Clear/Stop key to stop the operation.
Produces a test pattern for adjusting the Paper Tray for correct alignment and registration in the main scanning and sub-scanning directions.
Produces a halftone pattern.
S-13
Page 75

Code Description
<EEPROM T est>
FA
Checks EEPROM to determine if it is fully operational or not.
Display 00 FF
Description O K NG
Fb
FE
FF
Carries out a test for Sleep function.
<Sleep Mode>
<Original Scanning Position Contamination Test (DF-216)>
Checks the Automatic Document Feeder original scanning position
(Original Glass) for contamination.
<Procedure>
1. Place A4 blank paper on the original scanning part.
2. Press the Start key to let the copier produce a copy.
3. Check the copy for possible contamination.
<Scanner Home Position>
Moves the Scanner to its home position.
Used to lock the Scanner in position when the copier is to be moved.
S-14
Page 76

(3) Tech. Rep. Cho ice
Highlighted
• Allows the Tech. Rep. to make the settings for the various service functions.
<Procedure>
1. Press the 1Key as necessary to select the desired Tech. Rep. Choice code.
2. Press the Start key to validate the choice code.
3. Using the 10Key and 1Key, select the choice data.
4. Press the Start key to validate the choice data setting (C1 to C3).
<Exiting the Mode>
• Press the Clear/Stop key.
Choice Code
C1
C2
C3
Setting (The default is ).
Select the display options for paper sizes and fixed zoom ratios
according to the applicable marketing areas.
Data 0 1
Description Metric areas Inch areas
Default: 0 (Metric areas)/1 (Inch areas)
Select whether or not to inhibit the initiation of a new copy cycle after
a toner-empty condition has been detected.
Data 1
Description Cop ying permitted Copying inhibited
Select whether or not to stop predrive of the Fusing Rollers when the
Start key is pressed.
Data 1
Description Predrive disabled Predrive enabled
<Marketing Area>
<Toner Empty Stop>
0
<Predrive>
0
S-15
Page 77

Choice Code
Highlighted
C6
C8
Setting (The default is ).
Use to clear the counters and initialize the various types of setting
data.
<Procedure>
1. Using the 10Key and 1Key, select the desired function.
2. Press the Start key to validate the selected function (counter or
setting data).
3. Turn OFF and ON the Power Switch. (This completes the clearing
of the data.)
NOTES
•“9” or “A” can be selected when the Auto Exposure Mode key is
pressed.
•“A” is selected when clearing all counters at once (C6-1 to -7).
Data Description Data Description
0 None 7 PM counter
1 Supply Unit counter 8 Use’s/Tech. Rep. Choice
4 M isfeed counter 9 Adjust
5 Copy counter A All counters
6 PC print counter
✽
Be sure to clear the Supply Unit counters “C6-1” when Supply Unit
is replaced.
Select the time it takes the Exposure Lamp to turn OFF after a copy
cycle has been completed.
Description 30 sec. 20 sec. 3 min.
<Exposure Lamp OFF Time Setting>
Data 1 2
<Data Clear>
0
S-16
Page 78

(4) A djust
Highlighted
• Used for adjustments to be made before shipment at the factory.
<Procedure>
1. Press the 1Key as necessary to select the desired Adjust code.
2. Press the Start key to validate the Adjust code. At the same time, currently set data is
displayed.
3. Using the 10Key and 1Key, change the data.
4. Press the Start key to validate the data setting.
<Exiting the Mode>
• Press the Clear/Stop key.
Adjust Code
A1
A2
A3
A4
A5
Setting (The default is ).
Adjust the zoom ratio in the CD direction on the IR side (for copies).
Description
Adjust the zoom ratio in the FD direction on the IR side (for copies).
Description
Adjust registration in the CD direction on the IR side (for copies).
Description
Adjust registration in the FD direction on the IR side (for copies).
Description
Adjust the zoom ratio in the CD direction on the IR side (when the
Automatic Document Feeder is used).
Description
<Zoom Adjustment in CD Direction (Copy)>
Data
Data
Data
Data
Data
45................................. ................................55
Smaller Greater
<Zoom Adjustment in FD Direction (Copy)>
45................................. ................................55
Smaller Greater
<Registration Adjustment in CD Direction (Copy)>
40................................. ................................60
-5.0mm ±0 +5.0mm
<Registration Adjustment in FD Direction (Copy)>
46................................. ................................60
-3.0mm ±0 +5.0mm
<Zoom Adjustment in CD Direction (DF-216)>
45................................. ................................55
Smaller Greater
50
50
50
50
50
S-17
Page 79

Adjust Code
Highlighted
A6
A7
Setting (The default is ).
Adjust the zoom ratio in the FD direction on the IR side (when the
Automatic Document Feeder is used).
Description
Adjust registration in the CD direction on the IR side (when the Automatic Document Feeder is used).
Description
<Zoom Adjustment in FD Direction (DF-216)>
Data
Data
45................................. ................................55
Smaller Greater
<Registration Adjustment in CD Direction (DF-216)>
40................................. ................................60
-5.0mm ±0 +5.0mm
50
50
A8
A9
AA
Ab
AC
Adjust registration in the FD direction on the IR side (when the Automatic Document Feeder is used).
Adjust registration in the CD direction on the engine side (when the
Paper Tray is used).
Adjust registration in the FD direction on the engine side (when the
Paper Tray is used).
Adjust registration in the CD direction on the engine side (when the
Paper Feed Unit is used).
Adjust registration in the FD direction on the engine side (when the
Paper Feed Unit is used).
<Registration Adjustment in FD Direction (DF-216)>
Data
Description
Data
Description
Data
Description
Data
Description
Data
Description
40................................. ................................60
-5.0mm ±0 +5.0mm
<Registration Adjustment in CD Direction (Paper Tray)>
43................................. ................................57
-3.5mm ±0 +3.5mm
<Registration Adjustment in FD Direction (Paper Tray)>
43................................. ................................57
-3.5mm ±0 +3.5mm
<Registration Adjustment in CD Direction (PF-120)>
43................................. ................................57
-3.5mm ±0 +3.5mm
<Registration Adjustment in FD Direction (PF-120)>
43................................. ................................57
-3.5mm ±0 +3.5mm
50
50
50
50
50
S-18
Page 80

TROUBLESHOOTING
10794
Page 81

CONTENTS
1. INTRODUCTION .............................................................................................T-1
1-1. Reading the Text .....................................................................................T-1
2. PAPER TRANSPORT FAILURE .....................................................................T-2
2-1. Paper Misfeed ..........................................................................................T-2
2-2. Size Error .................................................................................................T-2
2-3. Misfeed Detection Sensor Layout ............................................................T-3
2-4. Types of Misfeed Detection and Detection Timings ................................T-3
2-5. Misfeed Clearing Procedures ..................................................................T-4
(1) Copier/Manual Bypass Paper Take-Up Misfeed .............................T-4
(2) Transport Misfeed ............................................................................T-5
(3) Exit Misfeed .....................................................................................T-6
(4) PF-120 Paper Take-Up Misfeed ......................................................T-7
3. MALFUNCTIONS ............................................................................................T-8
3-1. Detection Timing Classified by Malfunctio n Code ........................ ...........T-8
3-2. Troubleshooting Procedures ....................................................................T-10
(1) C0000: Main Motor’s Failure to Turn ...............................................T-10
(2) C0045: Fusing Section Cooling Fan Motor’s Failure to Turn
C0049: PH Section Cooling Fan Motor’s Failure to Turn ................T-11
(3) C0200: HV Output Failure ...............................................................T-12
(4) C0500: Warm-up Failure
C0510: Abnormally Low Fusing Temperature
C0520: Abnormally High Fusing Temperature ................................ T-13
(5) C0650: Scanner Motor’s Failure to Turn, Scanner Home Position
Sensor Malfunction ................. ..................................... ....................T-14
(6) C14A3: Exposure Lamp Malfun ction ................... ............................T-15
(7) C1200: System Memory Failure
C1300: Polygon Motor Malfunction
C133B: Option Communications Error
C13F0: SOS Detection Failure
C1468: Hardware (EEPROM) Malfunction ......................................T-16
(8) Power Failure ..................................................................................T-17
4. IMAGE FAILURE .............................................................................................T-18
4-1. Image Failure Troubleshooting ................. .. .. .... ....... .. .. .... .. .... ..... .... .. .... .. .T-18
4-2. Initial Checks ...........................................................................................T-18
4-3. Troubleshooting Procedures Classified by Image Failure .......................T-19
(1) Blank copy .......................................................................................T-20
(2) Black copy .......................................................................................T-20
(3) Low image density ...........................................................................T-21
(4) Foggy background ...........................................................................T-21
(5) Black streaks or bands ....................................................................T-22
(6) Black spots ......................................................................................T-22
(7) Blank streaks or bands .................................................................... T-2 3
(8) Void areas ...................................................................................... .T-23
(9) Smear on back ............ ....................................................................T-24
(10) Uneven image density .....................................................................T-24
(11) Gradation reproduction failure .........................................................T-25
i
Page 82

(12) Rough image .............................. .... .. .. .... .. ....... .. .... .. .... .. ....... .. .... .. .. .T-25
(13) Periodically uneven image ............................................................... T-2 6
ii
Page 83

1. INTRODUCTION
1-1. Reading the Text
1. The paper transport failure troubleshooting procedures are given according to the
symptom. First, identify the location of the paper is present and start the procedure for
that particular location. For malfunction troubleshooting, start with step 1 and onward.
2. Make checks in the numerical order of steps and, if an item is checked okay, go to the
next step.
Pattern 1
Step Check Result Ac tion
1~ YES ~
2
Go to step 2 if you answered No.
Pattern 2
Step Check Result Action
1~ YES ~
NO ~
2
Go to step 2 if it checks okay.
T-1
Page 84

2. PAPER TRANSPORT FAILURE
2-1. Paper Misfeed
When a paper misfeed occurs, the display shows both the misfeed location and paper location.
Lit Misfeed/Paper Location Action Ref. Item OP
Copier paper take-up 2-5. (1)
PC
J2 Transport 2-5. (2)
J3 Exit 2-5. (3)
J8 DF-216
<Resetting misfeed display>
Misfeed in the copier
Misfeed in the option
2-2. Size Erro r
When a size error occurs, the display gives a warning code.
Warning Code Size Error
Manual bypass paper take-up 2-5. (1)
PF-120 paper take-up 2-5. (4)
✽
Open the relevant door, remove the misfeed and
paper left inside, and close the door.
H2
The paper size setting on the paper source does not match the size
of the paper actually loaded.
See the relevant option
service manual.
When the option is mounted.
✽
✽
<Resetting error display>
Press the Clear/Stop key.
<Causes of a size error>
• Wrong paper size setting is made on the paper source.
• User loads paper of a wrong size in the paper source.
• Double feeding of paper occurs.
T-2
Page 85

2-3. Misfeed Detection Sensor Layout
Paper Exit Sensor PS3
Paper Take-Up Sensor PS1
4007T001AA
2-4. Types of Misfeed Detection and Detection Timings
• The following lists the types of misfeed detection and detection timings for different mis-
feed locations within the copier.
• The symbols “L” (for the leading edge) and “T” (for the trailing edge) given in ( ) indicate
the particular edge of the paper detected by the sensor.
NOTE
For the types of misfeed detection and detection timings of options, see the relevant option
service manual.
<Copier/Manual Bypass Paper Take-Up Misfeed>
Type Detection Star t Detection
Paper take-up fail ure detection Paper Take-Up Solenoid
energized
Paper Take-Up Sensor (L)
<Transport Misfeed>
Type Detection Star t Detection
Trailing edge detection by Paper
Take-Up Sensor
Leading edge detection by Paper
Exit Sensor
<Exit Misfeed>
Type Detection Star t Detection
Trailing edge detection by Paper
Exit Sensor
<Size Error>
Type Detection Star t Detection
Size error detection Paper Take-Up Sensor (L) Paper length calculated
Paper Take-Up Sensor (L) Paper Take-Up Sensor (T)
Paper Take-Up Sensor (L) Paper Exit Sensor (L)
Paper Take-Up Sensor (T) Paper Exit Sensor (T)
based on the time it takes
Paper Take-Up Sensor to
detect (T).
T-3
Page 86

2-5. Misfeed Clearing Procedures
(1) Copier/Manual Bypass Paper Take-Up Misfeed
Relevant Electrical P arts
Paper Take-Up Sensor PS1
Master Board PWB-A
Paper Take-Up Solenoid SL1
CN2
2
SL1
1
2
1
PJ3A-1(DC24V)
PJ3A-2(FEED1)
PJ8A-1(ANODE PS1)
PJ8A-2(GND)
PJ8A-3(PS1 ON)
CN3
3
2
1
PJ4
3
1
2
2
1
3
PS1
PWB-A
4007C02TAB
Copier/Manual Bypass Paper Take-Up Misfeed Clearing Procedure
• Paper is not taken up at all.
Step Check Result Action
1 Paper meets product specifications. NO Change paper.
2 Paper is curled, wavy, or damp. YES Change paper.
3 Paper Take-Up Roll is deformed, worn, or has
paper dust.
4 Paper Take-Up Solenoid operation: the voltage
across PJ3A-2 on the Master Board and GND
is DC24 V (solenoid deenergized) and DC0 V
(instantaneously) (solenoid energized) when
the Start key is pressed.
5 Paper Take-Up Sensor operation: the voltage
across PJ8A-3 on the Master Board and GND
is DC5 V (sensor unblocked) and DC0 V (sensor blocked).
Advise user on correct
paper storage.
YES Clean or change.
YES Change solenoid.
NO Change Master Board.
YES Change Master Board.
NO Correct actuator.
Change sensor.
T-4
Page 87

(2) Transport Misfeed
Paper Take-Up Sensor PS1
Paper Exit Sensor PS3
Relevant Electrical P arts
PJ8A-1(ANODE PS1)
PJ8A-2(GND)
PJ8A-3(PS1 ON)
Master Board PWB-A
PJ4
CN3
1
3
2
1
3
2
2
1
3
PS1
PJ8A-4(ANODE PS3)
PJ8A-5(GND)
PJ8A-6(PS3 ON)
3
2
1
PS3
PWB-A
4007C03TAB
Transport Misfeed Clearing Procedure
• Paper has stopped near the PC Drum.
Step Check Result Action
1 Transport Roller is dirty, deformed, or worn. YES Clean or change.
PJ5
2 Pre-Image Transfer Guide Plate is dirty or
deformed.
3 Image Transfer Roller is dirty, deformed, or
worn.
4 PC Drum Paper Separator Fingers are dirty or
deformed.
• Paper has stopped at the Fusing Unit.
Step Check Result Action
1 Fusing Guide Plate is dirty or deformed. YES Clean or change.
2 Fusing Roller is dirty, defor m ed, or worn. YES Clean or change.
3 Fusing Roller Paper Separator Fingers are
dirty, deformed, or worn.
4 Paper Exit Sensor operation: the voltage
across PJ8A-6 on the Master Board and GND
is DC0 V (sensor unblocked) and DC5 V (sensor blocked).
YES Clean or change.
YES Clean or change.
YES Clean. Or, change Supply
Unit.
YES Clean, correct, or change.
YES Change Master Board.
NO Correct actuator.
Change sensor.
T-5
Page 88

(3) Exit Misfeed
Relevant Electrical P arts
Paper Exit Sensor PS3 Master Board PWB-A
PJ5
PJ8A-4(ANODE PS3)
PJ8A-5(GND)
PJ8A-6(PS3 ON)
3
2
1
PS3
PWB-A
4007C04TAB
Exit Misfeed Clearing Procedure
• Paper has stopped at the exit section.
Step Check Result Action
1 Paper Exit Roller rotation NO Correct drive coupling.
2 Paper Exit Roller is dirty, def ormed, or worn. YES Clean or change.
3 Paper Exit Sensor operation: the voltage
across PJ8A-6 on the Master Board and GND
is DC0 V (sensor unblocked) and DC5 V (sensor blocked).
YES Change Master Board.
NO Correct actuator.
Change sensor.
T-6
Page 89

(4) PF-120 Paper Take-Up Misfeed
Relevant Electrical P arts
Paper Take-Up Sensor PS1
Master Board PWB-A
Paper Take-Up Solenoid SL5
CN3
PJ4
3
1
2
1
3
2
2
3
1
SL5
CN2
1
2
AB
2
7
1
6
1
CN15
7
6
1
PJ8A-1(ANODE PS1)
PJ8A-2(GND)
PJ8A-3(PS1 ON)
PJ11A-7(DC24V)
7
14
13
6
PJ11A-8(FEED2)
1
1
PWB-A
4007C05TAB
PF-120 Paper Take-Up Misfeed Clearing Procedure
• Paper is not taken up at all.
Step Check Result Action
1 Paper meets product specifications. NO Change paper.
2 Paper is curled, wavy, or damp. YES Change paper.
Advise user on correct
paper storage.
3 Paper Take-Up Roll is deformed, worn, or has
paper dust.
4 Paper Transport Roller is deformed, worn, or
has paper dust.
5 Paper Take-Up Solenoid operation: the voltage
across PJ11A-8 on the Master Board and GND
is DC24 V (solenoid deenergized) and DC0 V
(instantaneously) (solenoid energized) when
the Start key is pressed.
6 Paper Take-Up Sensor operation: the voltage
across PJ8A-3 on the Master Board and GND
is DC5 V (sensor unblocked) and DC0 V (sensor blocked).
YES Clean or change.
YES Clean or change.
YES Change solenoid.
NO Change Master Board.
YES Change Master Board.
NO Correct actuator.
Change sensor.
PS1
T-7
Page 90

3. MALFUNCTIONS
The copier’s CPU is equipped with a self-diagnostic function that, on detecting a malfunction, gives the corresponding malfunction code on the display.
Resetting a Malfunction
• Turn OFF and then ON the power switch.
3-1. Detection Timing Classified by Malfunction Code
Code Description Detection Timing
C0000 Main Motor’s failure to
turn
C0045 Fusing Section Cooling
Fan Motor’s failure to turn
C0049 PH Section Cooling Fan
Motor’s failure to turn
C0200 HV output failure • The drum charge monitor voltage is lower than 4.5 V
C0500 Warm-up failure • During the period from 12 s to 30 s after the start of
C0510 Abnormally low fusing
temperature
C0520 Abnormally high fusing
temperature
C0650 Scanner Mot or’s failure
to turn, Scanner Home
Position Sensor malfunction
• The Lock signal does not go LOW within 1 s after
the motor has been energized.
• The Lock signal remains HIGH for continuous 0.1 s
or more while the motor remains energized.
A voltage of 0.3 V or less is detected for a continuous
1 s period while the motor remains energized.
A voltage of 0.35 V or less is detected for a continuous
0.5 s period while the motor remains energized.
when the power switch is turned ON.
• The drum char ge monitor voltage remains 4.5 V or
more when the drum charge output is turned ON.
• The image transfer monitor voltage is 0.5 V or more
immediately before the image transfer output is
turned ON.
• The image transfer monitor voltage does not
increase 0.5 V or more within 40 ms after the image
transfer output is turned ON.
the warm-up cycle, a condition of small temperature
difference from the temperature at the start of the
warm-up cycle is detected for a 50 ms period.
• The temperature detected by the Thermistor does
not reach the set level within 120 s after the start of
the warm-up cycle.
• The temperature detected by the Thermistor
remains lower than 94 °C for a continuous 50 ms
period while the copier is in the standby state.
• The temperature detected by the Thermistor
remains lower than 110 °C for a continuous 50 ms
period during a copy cycle.
The temperature detected by the Thermistor remains
higher than 240 °C for a continuous 50 ms period
while fusing temperature control is in progress.
The Scanner Home Position Sensor is not activated
within a given period of time after the Scanner Motor
has been energized.
T-8
Page 91

Code Description Detection Timing
C1200 Syst em mem ory failure A memory test error is detected during the power-on
C1300 Polygon Motor malfunc-
tion
C13F0 SOS detection failure
C133B Option communications
error
C1468 Hardware (EEPROM)
malfunction
C14A3 Exposure Lamp malfunc-
tion
initialization procedure.
• During the period 6 s after the Polygon Motor has
been energized, a cluster of 56 or more SOS signals output for a 20 ms period is detected five consecutive times.
• After the lapse of 6 s after the Polygon Motor has
been energized, a cluster of below 43 or above 56
SOS signals output for a 20 ms period is detected
five consecutive times.
• No SOS signal is detected during the period from
the start of laser emission to the deenergization of
the Polygon Motor .
The Controller Board is not detected within 5 s after
the start of a print cycle.
An EEPROM read/write error occurs during the poweron initialization procedure.
The intensity level of the Exposure Lamp does not stabilize within a given period of time.
T-9
Page 92

3-2. Troubleshooting Procedures
(1) C0000: Main Motor’s Failure to Turn
Relevant Electrical P arts
Main Motor M1 Master Board PWB-A
M1
PJ3
1
2
3
4
PJ6A-1(GND)
PJ6A-2(DC24V)
PJ6A-3(M1 ON)
PJ6A-4(M1 LOCK)
PWB-A
4007C06TAB
C0000
Step Check Result Action
1 Main Motor turns after the malfunction has
NO Correct drive.
been reset.
2 Main Motor operation: the voltage across
NO Change Master Board.
PJ6A-3 on the Master Board and GND is DC5
V (motor deenergized) and DC0 V (motor energized) after the malfunction has been reset.
3 The voltage across PJ6A-4 on the Master
Board and GND is DC5 V (motor deenergized)
and DC0 V (motor energized) after the mal-
YES Change Master Board.
NO Change motor.
function has been reset.
T-10
Page 93

(2) C0045: Fusing Section Cooling Fan Motor’s Failure to Turn
C0049: PH Section Cooling Fan Motor’s Failure to Turn
Relevant Electrical P arts
Fusing Section Cooling Fan Motor M3
PH Section Cooling Fan Motor M5
Power Supply Board PU1
Master Board PWB-A
M5
PJ13A-1(M5 REM)
PJ13A-2(DC24V)
PWB-A
PJ14A-1(FAN)
PU1
M3
C0045
Step Check Result Action
1 Fusing Section Cooling Fan Motor operation:
the voltage across CN7-2 on the Power Supply
Board and GND is DC24 V after the malfunction has been reset.
2 Fusing Section Cooling Fan Motor operation:
the voltage across CN7-1 on the Power Supply
Board and GND is DC1.2 V (during high-speed
rotation) and DC12 V (during low-speed rotation) after the malfunction has been reset.
CN7-1
CN7-2
PJ31-11
4007C07TAB
NO Change Power Supply
Board.
YES Change motor.
NO Change Power Supply
Board.
Change Master Board.
C0049
Step Check Result Action
1 PH Section Cooling Fan Motor operation: the
voltage across PJ13A-2 on the Master Board
and GND is DC24 V after the malfunction has
been reset.
2 PH Section Cooling Fan Motor operation: the
voltage across PJ13A-1 on the Master Board
and GND is DC1 V (motor energized) and
DC24 V (motor deenergized) after the malfunction has been reset.
NO Change Master Board.
YES Change motor.
NO Change Master Board.
T-11
Page 94

(3) C0200: HV Output Failure
Relevant Electrical P arts
High Voltage Unit HV1 Master Board PWB-A
PJ10HV-11
PJ10HV-10
PJ10HV-9
PJ10HV-8
PJ10HV-7
PJ10HV-6
PJ10HV-5
PJ10HV-4
PJ10HV-3
PJ10HV-2
PJ10HV-1
HV1
Image Tr ansfer
Drum
Charg
Developing
Bias
Seal
Bias
Toner Blade
Bias
PJ4A-1(DC5V)
PJ4A-2(SS_H/L_CTL)
PJ4A-3(T_VR)
PJ4A-4(HV_REM)
PJ4A-5(T_MON)
PJ4A-6(B_MON)
PJ4A-7(B_REM)
PJ4A-8(C_REM)
PJ4A-9(C_MON)
PJ4A-10(GND)
PJ4A-11(DC24V)
PWB-A
4007C09TAB
C0200
Step Check Result Action
1 High Voltage Unit operat ion: the vol tage across
YES Change High Voltage Unit.
PJ4A-4 on the Master Board and GND is DC24
V after the malfunction has been reset.
2 Proper connection between the High Voltage
Unit and Master Board.
YES Change Master Board.
NO Correct connection.
T-12
Page 95

(4) C0500: Warm-up Failure
C0510: Abnormally Low Fusing Temperature
C0520: Abnormally High Fusing Temperature
Relevant Electrical P arts
Fusing Heater Lamp H1
Thermoswitch TS1
Thermistor TH1
Power Supply Board PU1
Master Board PWB-A
PJ7A-1(DC24V IN)
PJ14A-3(H1 REM)
PWB-A
H1
TS1
CN14
1
2
PJ31-1
PJ31-10
1
2
ST3
ST4
PU1
TH1
C0500, C0510
Step Check Result Action
1 Fusing Heater Lamp turns ON after the mal-
function has been reset.
2 Thermistor operation: resistance across CN1-1
and 2 on the Fusing Unit side is infinite, as
measured with CN1 disconnected.
3 Thermoswitch and Fusing Heater Lamp opera-
tion: there is continuity across CN14-1 and 2
on the Fusing Unit side, as measured with
CN14 disconnected.
4 The voltage across PJ14A-3 on the Master
Board and GND is DC0 V (Fusing Heater
Lamp ON) and DC24 V (Fusing Heater Lamp
OFF) after the malfunction has been reset.
CN1
1
2
1
2
4007C08TAB
YES Correct Thermistor for
mounting position and/or
clean.
YES Change Thermistor.
NO Change Thermoswitch.
Change Fusing Heater
Lamp.
YES Change Power Supply
Board.
Change Fuse 2 of Power
Supply Board.
NO Change Master Board.
PJ2A-2(DC5V)
PJ2A-1(TH1 ON)
C0520
Step Check Result Action
1 Thermistor installed at the correct position. NO Correct.
2 Thermistor contaminated. YES Clean.
3 The circuit across CN1-1 and 2 on the Fusing
Unit side is shorted as checked with CN1 disconnected.
YES Change Thermistor.
NO Change Master Board.
Change Power Supply
Board.
T-13
Page 96

(5) C0650: Scanner Motor’s Failure to Tu rn, Scanner Home Position Sensor Mal-
function
Relevant Electrical P arts
Scanner Motor M6
Control Board PWB-I
Scanner Home Position Sensor PS5
PJ31-1(DC24V)
PJ31-3(DC15V)
PJ31-5(DC-9V)
PJ31-7(GND)
PJ32-2(DC5V)
PJ32-3(DC5V)
PJ32-4(GND)
PJ32-6(DC5V REM/SLP)
PJ32-7(DC24V REM/SLP)
PS5
M6
JP9-1(A)
JP9-2(A/)
JP9-3(B)
JP9-4(B/)
JP14-1(PS5 ON)
JP14-2(GND)
JP14-3(GND)
JP14-4(Power)
1
2
3
4
5
6
7
8
9
JP7
PU1
JP5
12
11
10
9
8
7
6
5
PWB-I
4
3
2
1
2
1
JP6
C0650
Step Check Result Action
1 Scanner movement after the malfunction has
been reset
2 Scanner motion as it is moved manually NO Correct drive coupling.
3 Proper JP9 connector connection of Control
Board
4 Scanner Home Position Sensor operation: the
voltage across JP14-1 on the Control Board
and GND is DC0 V (sensor unblocked) and
DC3 V (sensor blocked) after the malfunction
has been reset.
PJ1A-1
PJ1A-2
PJ1A-3
PJ1A-4
PJ1A-5
PJ1A-6
PJ1A-7
PJ1A-8
PJ1A-9
PJ1A-10
PJ1A-11
PJ1A-12
PJ18A-1(GND)
PJ18A-2(VIDEO)
PWB-A
4007C10TAC
YES To step 4
Install belt.
YES Change Scanner Motor.
Change Control Board.
NO Correct connections.
YES Change Control Board.
NO Change sensor.
T-14
Page 97

(6) C14A3: Exposure Lamp Malfunction
Relevant Electrical P arts
Scanner
Scanner Interface Board PWB-S
Control Board PWB-I
Connector
12
11
10
9
8
7
6
5
4
3
2
1
JP5
PJ1A-1
PJ1A-2
PJ1A-3
PJ1A-4
PJ1A-5
PJ1A-6
PJ1A-7
PJ1A-8
PJ1A-9
PJ1A-10
PJ1A-11
PJ1A-12
PWB-A
4007C11TAC
CN1
1
PJ31-1(DC24V)
PJ31-3(DC15V)
PJ31-5(DC-9V)
PJ31-7(GND)
PJ32-2(DC5V)
PJ32-3(DC5V)
PJ32-4(GND)
PJ32-6(DC5V REM/SLP)
PJ32-7(DC24V REM/SLP)
PU1
LA1
CN2
2
CN2
4
3
1
1
2
2
Scanner
CN1
JP7
Flat Cable
1
2
3
4
5
6
7
8
9
CN1
PWB-I
JP8-1(LA1 REM)
JP2
PWB-S
C14A3
Step Check Result Action
1 Proper connections between the Scanner,
Scanner Interface Board, and Control Board
YES Change Scanner Interface
Board.
Change Control Board.
Change Scanner.
NO Correct connections.
T-15
Page 98

(7) C1200: System Memory Failure
C1300: Polygon Motor Malfunction
C133B: Option Communications Error
C13F0: SOS Detection Failure
C1468: Hardware (EEPROM) Malfunction
• These malfunctions are detected mainly when there is a fault occurring in software, hardware, or communications.
Code Action
C1200 1. Reset the malfunction.
C1300,
C13F0
C133B 1. Reset the malfunction.
C1468 1. Run “FA” of Function.
2. If the malfunction is detected again, check the Control Board and Memory
Board for proper connections.
3. If connections are okay, change the Control Board and/or Memory Board.
1. Reset the malfunction.
2. If the malfunction is detected again, check the harness between, and PJ connections on, the PH Unit and Master Board.
3. If connections are okay, change the PH Unit and Master Board.
2. If the malfunction is detected again, check the Control Board and the controller board.
3. If connections are okay, change the Control Board and the controller board.
2. If it has not been checked okay (“FF” appears on the display ), change the
EEPROM on the Control Board. If it has been checked okay (“00” appears on
the display), change the Control Board itself.
T-16
Page 99

(8) Power Failur e
Power Supply Board PU1
Power Switch S1
Upper Unit Interlock Switch S2
Relevant Electrical P arts
Control Board PWB-I
Master Board PWB-A
PJ30-2(DC24V OUT)
S2
PU1
ST2
ST1
Plug
L
N
in
G
GND
1
2
S1
L
N
PJ31-1 (DC24V)
PJ31-3 (DC15V)
PJ31-4 (DC15V)
PJ31-5 (DC-9V)
PJ31-6 (DC-9V)
PJ31-7 (GND)
PJ31-8 (GND)
PJ32-1 (DC5V)
PJ32-2 (DC5V)
PJ32-3 (DC5V)
PJ32-4 (GND)
PJ32-5 (GND)
PJ32-6 (DC5V REM/SLP)
PJ32-7 (DC24V REM/SLP)
• Power failure
Step Check Result Action
1 No power is supplied when the Power Switch is
turned ON.
Blown Fuse 1 of the Power Supply Board.
YES Change Fuse 1 of Power
Supply Board.
NO Change Power Switch.
Change Power Supply
Board.
2 Only the display and Fusing Section Cooling
Fan Motor operate.
The voltage across PJ30-2 on the Power Supply Board and GND is DC24 V when the P o wer
Switch is turned ON.
YES Change Upper Unit Inter-
lock Switch.
Change Control Board.
Change Master Board.
NO Change Power Supply
Board.
3 Only the Fusing Section Cooling Fan Motor
operates.
The voltage across JP7-2/3 on the Control
Board and GND is DC5 V when the Po wer
YES Change Control Board.
NO Change Power Supply
Board.
Switch is turned ON.
4 Only the display and Scanner operate.
The voltage across PJ7A-4 on the Master
Board and GND is DC5 V when the Po wer
Switch is turned ON.
YES Change Master Board.
NO Change Power Supply
Board.
PWB-A
PJ7A-1 (DC24V IN)
PJ7A-2 (GND)
PJ7A-3 (GND)
PJ7A-4 (DC5V)
PJ17A-2 (DC15V IN)
PJ17A-1 (DC-9V IN)
PWB-I
JP7-1 (DC24V IN)
JP7-2 (DC5V)
JP7-3 (DC5V)
JP7-4 (DC15V)
JP7-5 (DC-9V)
JP7-6 (GND)
JP7-7 (GND)
JP7-8 (DC5V REM/SLP)
JP7-9 (DC24V REM/SLP)
4007C12TAC
T-17
Page 100

4. IMAGE FA ILURE
4-1. Image Failure Troubleshooting
• In this chapter, troubleshooting is divided into “initial checks” and “troubleshooting procedures classified by image failures.”
• If any image failure has occurred, first make the initial checks; then proceed to the corresponding image failure troubleshooting procedure.
4-2. Initial Checks
• Determine if the failure is attributable to a basic cause or causes.
Section Step Check Result Action
Installation
site
Paper 2 Recommended paper used. NO Instruct user.
Original 4 Original not flat YES Correct original.
PM parts 8 The PM parts, as they relate
1 See “PRECAUTI ON S FOR
INSTALLATION” in GENERAL.
3 Paper is damp. YES Change paper.
5 The original is written in light
pencil.
6 The original is transparent
(OHP transparencies, etc.).
7 Original Glass is dirty and
scratched.
to image formation, have
reached the end of cleaning/
replacement cycles.
NO Change the installation site.
Instruct user in paper storage.
YES Instruct user.
YES Instruct user.
YES Clean or change.
YES Clean or change. (See the PM
list.)
• Deter mine if the failure is attributable to an input system (IR) or output system (engine)
fault.
Check Result Cause
Copy made at a reduced
ratio.
Original
1177T03YA
Full-size copy Reduced copy
Input
system
4007T002AA
Full-size copy Reduced copy
Output
system
4007T003AA
T-18
 Loading...