

Page 1

1312 Copier
Powered by
Aleck Kholopov
Slash, Ltd
( 095 201 48 20
* slash@slash.ru
" http://www.slash.ru
User's Manual
Page 2

Recycled paper is used for the inside pages of this book.
1312 Copier
Welcome to the Konica 1312 Copier.
To learn how to operate your copier
safely and correctly, read all Safety
information in Chapter 1 before
attempting to operate your machine.
To benefit fully from the features and
functions of the 1312 Copier, read
through this manual. Should you
require product information not
covered in this manual, contact your
Konica service representative.
User’s Manual
Page 3

© 1998 by Konica Business Technologies, Inc.
Powered by
Aleck Kholopov
Slash, Ltd
( 095 201 48 20
* slash@slash.ru
" http://www.slash.ru
MAINTENANCE AGREEMENT
The KONICA 1312 Copier will give you many years of trouble-free service. To
ensure high quality copying performance and to prevent premature wear and
failure of precision parts and components, periodic cleaning and routine
adjustments should be scheduled.
We recommend that you contact your service representative to discuss the
benefits and advantages of Konica's Customer Service Maintenance
Agreement and to be shown how a maintenance plan can be tailored to your
individual copying needs.
NOTICE:
Konica Business Technologies, Inc. has made every effort to ensure that the
information in this manual is complete and accurate. However, constant
efforts are also being made to improve and update the product. Therefore,
Konica Business Technologies, Inc. shall not be liable for errors in this manual
or for any consequential damages resulting from the use of this manual. The
information contained herein is subject to change without notice.
FEDERAL OR STATE STATUTES MAY PROHIBIT THE COPYING OF
CERTAIN DOCUMENTS OR INFORMATION, RESULTING IN FINES OR
IMPRISONMENT FOR VIOLATORS.
MANUAL PART NUMBER: OP-01-1312
WEB SITE ADDRESS: http://www.konicabt.com
ii
CORRESPONDENCE:
Correspondence regarding this manual may be mailed to the address
shown below.
Konica Business Technologies, Inc.
Digital Systems Solutions Group
& New Product Development
500 Day Hill Road
Windsor, CT 06095
Tel. (860) 683-2222
Page 4

About the International ENERGY STAR® Program
Powered by
Aleck Kholopov
Slash, Ltd
( 095 201 48 20
* slash@slash.ru
" http://www.slash.ru
The purpose of the International ENERGY STAR Program is to
protect the quality of the global environment through the efficient use
of electric power that is generated chiefly by fossil fuels.
The Konica 1312 copier conforms to the International ENERGY
STAR Program when used with the following Power Save function.
Power Save function
The Power Save function saves energy by reducing power
consumption of the fixing unit below 5W. To accomplish this,
Power Save puts the copier in the
function automatically activates the sleep state if the copier is
inactive for 30 minutes initially, or you can choose another sleep
state, as desired, from 2, 5, 30, 60, 120, or 240 minutes. If you
wish to make changes to the Power Save function, contact your
Konica service representative.
sleep
state. The Power Save
Ozone Statement
During operation of the Konica 1312 copier, ozone is generated in
amounts too small to be harmful to human health. Operating the
1312 in a poorly ventilated room for an extended period of time or
making a large number of copies will cause an unpleasant ozone
odor. We recommend that you locate the Konica 1312 Copier in a
well-ventilated room to maintain a comfortable working environment.
Ozone generated by this machine is as follows:
Maximum 0.3 ppm or less / Average 0.1ppm or less.
iii
Page 5

NOTICE TO USERS IN THE USA
Powered by
Aleck Kholopov
Slash, Ltd
( 095 201 48 20
* slash@slash.ru
" http://www.slash.ru
FCC Regulations
NOTICE: The Konica 1312 copier generates, uses, and can
radiate radio frequency energy. If it is not installed and used in
accordance with the instruction manual, interference with radio
communications may result. This equipment has been tested and
found to comply with the limits for a class B computing device,
pursuant to Subpart J, Part 15, of FCC rules, which are designed
to provide reasonable protection against interference from such
equipment when it is operating in a commercial environment.
Users operating this equipment in a residential area are likely to
cause interference, in which case they may be required to correct
the interference at their own expense.
NOTICE TO USERS IN CANADA
Canadian Department of Communications Regulations
This Class B digital apparatus complies with Canadian ICES-003.
Cet appareil numérique de la classe B est conforme à la norme
NMB-003 du Canada.
v
Page 6

CONTENTS
Chapter 1
Installation, transportation, handling
Machine Labels ......................................................................1-2
Label Locations ..................................................................1-2
High-Temperature Caution Label .......................................1-3
High-Voltage Caution Label................................................1-3
Safety Information ..................................................................1-4
Warnings ............................................................................1-5
Cautions .............................................................................1-5
Locating the Equipment......................................................1-7
Handling the Copier & Supplies .........................................1-8
Transporting the Copier......................................................1-9
Recommended Site Requirements ......................................1-10
Chapter 2
Preparations before using the copier
Removing Protective Packing Materials................................. 2-2
Preparing Drum Unit & Developing Unit................................ 2-4
Adding Toner ..........................................................................2-7
Enforced Replenishment of Toner ...................................... 2-7
Add T oner Indication...........................................................2-7
Paper & Tray Information ..................................................... 2-10
Tray Specifications ...........................................................2-10
Installing the Paper Exit Tray............................................2-10
Storing Paper ................................................................... 2-11
Paper Curl ........................................................................ 2-11
Paper Orientation ............................................................. 2-11
Adding Paper .......................................................................2-12
Add Paper Indication ........................................................ 2-12
Standard & Option Trays ..................................................2-13
Paper in the Manual Feed Bypass Tray ........................... 2-15
Turning the Power On ..........................................................2-16
Initializing the Developer Unit............................................... 2-17
Initializing the Paper Size .....................................................2-19
Chapter 3
Hardware parts & functions
Main Body ..............................................................................3-2
Exterior View ......................................................................3-2
Interior View........................................................................3-3
Page 7

Chapter 4
Making copies
How to Make a Basic Copy ....................................................4-2
Using The Manual Feed Bypass Tray ....................................4-4
Preset Mode .......................................................................... 4-5
Zoom Mode ............................................................................4-6
Features .................................................................................4-7
Auto Clear Function............................................................4-7
Power Save Mode ..............................................................4-7
Copy Counter .....................................................................4-7
Function Settings ...................................................................4-8
Setting Paper Size..............................................................4-8
Setting Auto Clear Function................................................4-8
Initialize Drum/Developer Unit ............................................4-8
Setting Automatic Check of Paper Length..........................4-8
Setting Procedure...............................................................4-8
Function Codes ....................................................................4-10
How To Read The Copy Counter ......................................... 4-11
Chapter 5
Maintenance
Supplies .................................................................................5-2
Toner Cartridge...................................................................5-2
Drum Unit ...........................................................................5-2
Developing Unit .................................................................. 5-2
Spare Parts Availability.......................................................5-2
Package Contents ..............................................................5-2
Daily Maintenance.................................................................. 5-3
Cleaning the Platen Glass and Paten Cover ......................5-3
Cleaning the Paper Carrier.................................................5-3
Adding Toner & Replacing the Cleaning Pad ......................... 5-4
Adding Toner ......................................................................5-4
Replacing the Cleaning Pad................................................... 5-4
Replacing the Drum Unit ........................................................5-6
Replacing the Developing Unit .............................................5-10
Cleaning the Corona Wire ....................................................5-13
Chapter 6
Troubleshooting
Copy Quality........................................................................... 6-2
Error Codes & Remedies .......................................................6-4
J Code ...............................................................................6-4
P Code ...............................................................................6-6
F Code ............................................................................... 6-8
Chapter 7
Specifications
Specifications .........................................................................7-2
Index
Page 8

Chapter 1
Powered by
Aleck Kholopov
Slash, Ltd
( 095 201 48 20
* slash@slash.ru
" http://www.slash.ru
Installation, transportation, handling
Read this chapter before attempting
to use this equipment. If you have
any concerns about safety matters
not addressed in this manual, be
sure to contact your Konica service
representative for advice.
Machine Labels ............................................... 1-2
Label Locations ........................................ 1-2
High-Temperature Caution Label ............. 1-3
High-Voltage Caution Label ..................... 1-3
Safety Information ........................................... 1-4
Warnings .................................................. 1-5
Cautions ................................................... 1-5
Locating the Equipment ........................... 1-7
Handling the Copier & Supplies ............... 1-8
Transporting the Copier............................ 1-9
Recommended Site Requirements ............... 1-10
Page 9
Chapter 1 Installation, transportation, handling
Machine Labels
Read this chapter before attempting to use this equipment. If you have
any concerns about safety matters not addressed in this manual, be
sure to contact your Konica service representative for advice.
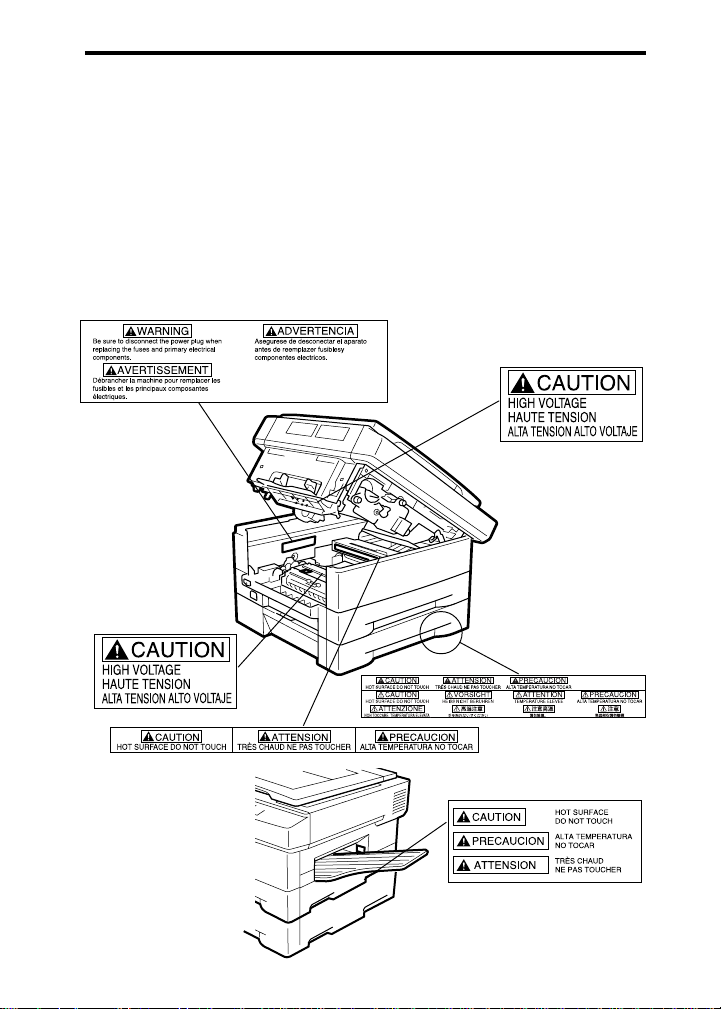
■ Label Locations
This copier bears safety caution labels in the locations shown below.
When using this product, use every precaution to avoid burns to your
body, electrical shocks, or other personal injuries.
1-2
Page 10
Chapter 1 Installation, transportation, handling
Machine Labels (continued)
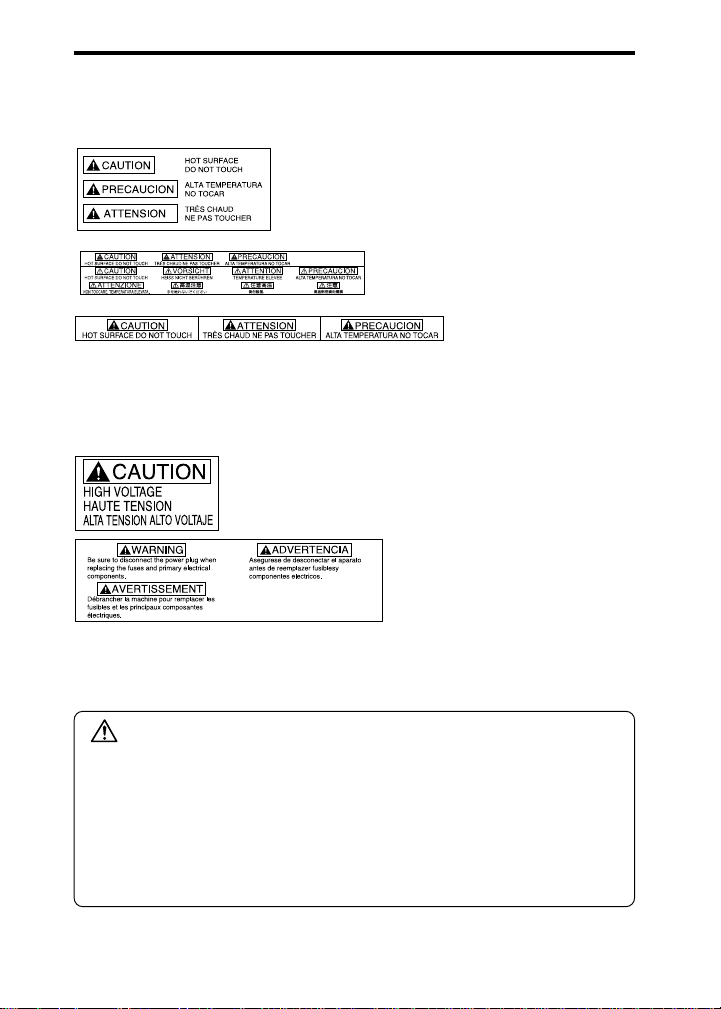
■ High-Temperature Caution Label
To avoid getting burned, DO NOT touch any portion of the copier that
bears this label. These areas become very hot during copier use.
■ High-Voltage Caution Label
To avoid an electrical shock to your body, DO NOT touch any portion
of the copier that bears this label. High voltage is applied to such
areas during copier use.
CAUTION:
Never remove any caution labels. These labels are affixed to the
equipment for your own protection, warning you against touching
hot or electrically charged areas of the machine. The absence of a
caution label might cause you or someone else to touch one of
these parts by mistake and result in an accident from a burn or a
shock. If any caution label is missing or becomes illegible from
soilage, contact your Konica service representative.
1-3
Page 11
Chapter 1 Installation, transportation, handling
Safety Information
Be sure to read the safety information contained in this manual and
heed the safety labels attached to the copier.
Labels are categorized as WARNING or CAUTION to help you avoid
hazardous conditions to your person and prevent property damage.
Labels found on this equipment are defined below.
WARNING
WARNING indicates a potentially hazardous situation
that could result in death or serious injury.
See the next page for a list of Warnings that should be
heeded at all times.
CAUTION
CAUTION indicates a potentially hazardous situation
that may result in minor or moderate injury or cause
accidents resulting in property damage.
See page 1-6 for a list of Cautions that should be
heeded at all times.
1-4
Page 12

Chapter 1 Installation, transportation, handling
Safety Information (continued)
■ Warning - To Prevent Fire and Electrical Shock
❏Do not expose the high-voltage area inside the copier by removing
the rear cover or any other cover from the copier.
■ Cautions - To Prevent Fire and Electrical Shock
❏Do not operate the copier on a voltage other than the voltage
stated. Be sure the copier does not share the same wall outlet with
other electrical equipment.
❏Do not place any liquid-filled vessel or metal on the copier. Should
any foreign matter (metal chips or water or other liquid) enter the
copier, immediately disconnect the power plug and contact your
Konica service representative.
❏Do not scratch, damage, or modify the power cord. Never place any
heavy item on the power cord or tug it or forcibly bend it.
❏Do not modify the copier in any way or attempt to repair it yourself.
Always contact your Konica service representative for help.
❏If the copier emits smoke, abnormal odor, or is unduly heated,
immediately stop using it, disconnect the power plug from the wall
outlet and contact your Konica service representative.
❏If the copier is damaged in any way, disconnect the power plug and
contact your Konica service representative.
❏Do not connect, disconnect or touch the power plug while your
hands are wet; and do not allow an infant’s mouth to come in
contact with the power cord.
❏Do not disconnect the power cord from the copier while the plug is
connected to the wall outlet.
❏Do not throw the toner cartridge developing unit, or drum unit into a
fire, as the contents may blaze and cause burns.
1-5
Page 13

Chapter 1 Installation, transportation, handling
Safety Information (continued)
■ Cautions - T
❏When closing the left side of the upper unit, press down evenly on
both corners of the left side and close the unit slowly to avoid injury
to your fingers or damage to the copier.
❏Avoid exposing the copier to humidity or dust.
❏When using the copier in a small room for extended periods of time,
use care to provide adequate ventilation.
❏Never tug the power cord as a means to disconnect the plug, and
always disconnect the power cord from the wall outlet before
moving the copier; otherwise, the cord may become damaged.
Never use the copier when the cord is damaged.
❏Do not cover the copier vent openings; otherwise, heat will become
trapped inside the copier.
❏Avoid placing any heavy object on the copier that may interfere with
normal copier use or be likely to topple or fall.
❏When power is turned ON, the fixing unit becomes extremely hot.
When replacing the drum unit or performing other maintenance
tasks, do not touch any high temperature area.
❏When transporting the copier, grasp and lift the copier only in the
areas designated for lifting; otherwise, the main unit may fall or
break and cause an accident.
o prevent Fire and Electrical Shock (continued)
❏When opening or closing any copier component, hold only the
specified areas; otherwise, your fingers may be injured.
1-6
Page 14

Chapter 1 Installation, transportation, handling
Safety Information (continued)
■ Locating the Equipment
❏Place equipment horizontally on a stable surface that does not
shake or vibrate in any way.
❏Keep this equipment away from direct sunlight; otherwise plastic
parts may become deformed or discolored.
❏To avoid risk of fire or electric shock, keep this equipment away from
water. If water inadvertently enters the equipment, immediately
unplug the AC power cord and contact your Konica service representative for assistance.
❏Maintain a temperature range of 10~30°C (50~86°F) and a humidity
range of 30~80% RH in the room where the equipment is placed.
High temperature or high humidity can adversely affect paper and
cause deterioration in print quality.
❏Choose a location with a minimum amount of dust; otherwise, dust
entering the equipment may degrade image quality or cause severe
equipment malfunctions and physical damage.
❏Keep other electrical appliances (television, radio, etc.) away from
the equipment, as electromagnetic noise can cause a deterioration
in performance.
❏Do not remove any screws (unless otherwise instructed) or open the
equipment case itself.
❏Be sure the socket outlet is installed near the equipment and is
easily accessible. To prevent electrical shock or fire, be sure the
power cable remains free from any crimping.
1-7
Page 15

Chapter 1 Installation, transportation, handling
Safety Information (continued)
■ Handling the Copier & Supplies
❏When a heater is used in a cool room to generate heat quickly,
condensation may form inside the copier housing and cause paper
jams or other operation problems. In this case, turn on the equipment and wait before using the copier until the temperature inside
the housing increases sufficiently to evaporate the moisture.
❏Keep the equipment case and control panel clean by wiping away
soil marks with a soft cloth dampened with a mild synthetic detergent. Never use any volatile chemical cleaners, which can cause
discoloration or deformation of plastic parts.
❏Exposing the photosensitive drum in the drum unit to direct sunlight
will cause deterioration in print quality. Do not place the photosensitive drum outside the main unit for a period longer than 5 minutes
and never touch the drum surface.
Photosensitive
drum
❏Do not touch the developing roller in the developing unit; otherwise
your hands may become soiled. Soil on your hands may be transferred to the paper and cause deterioration in print quality.
Developing roller
❏Do not place the drum or developing unit in an upright position or
turn it upside down; otherwise the photosensitive drum surface may
be scratched or the toner may spill.
1-8
Page 16
Chapter 1 Installation, transportation, handling
Safety Information (continued)
■ Transporting the Copier
❏When transporting the copier for relocation, first remove compo-
nents from the copier listed below, then pack the main body and all
components using the packing materials and boxes supplied at the
time of purchase; or use similar containers, if original packing
materials are not available.
Wrap up the developing and drum unit in aluminium packing
materials before placing them in packing boxes.
- Developing unit
- Drum unit
- Power cord
- Paper exit tray
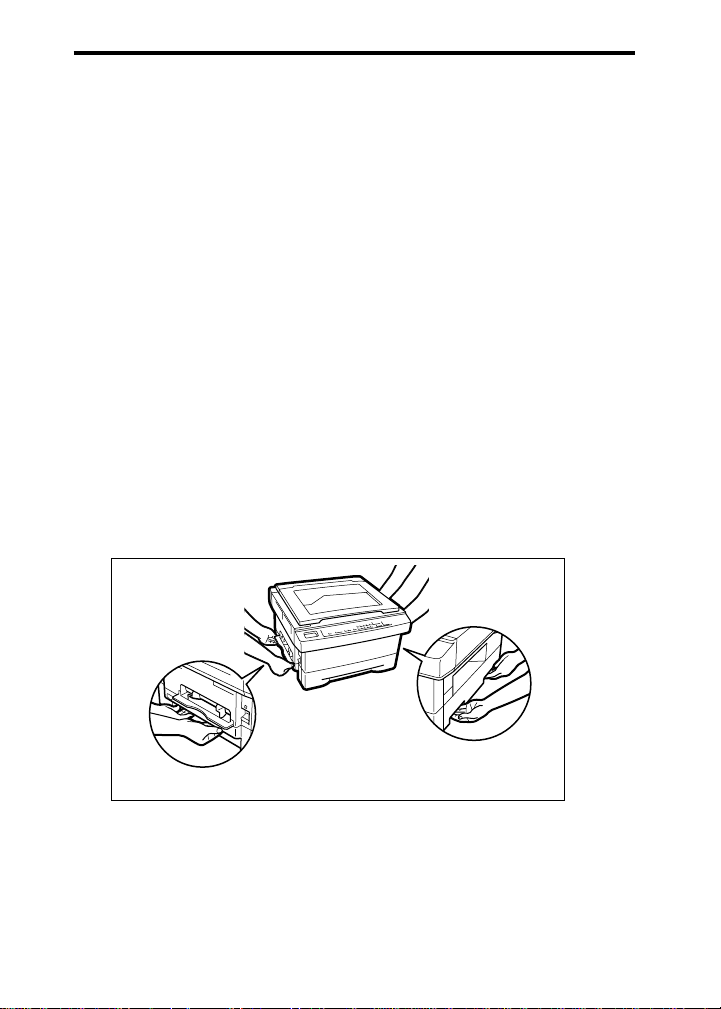
❏The main body should be lifted and carried by two persons. One
person should support the bottom front area and the other person
should support both sides of the rear area.
❏Do not dispose of the copier yourself. Contact your Konica service
representative.
1-9
Page 17
Chapter 1 Installation, transportation, handling
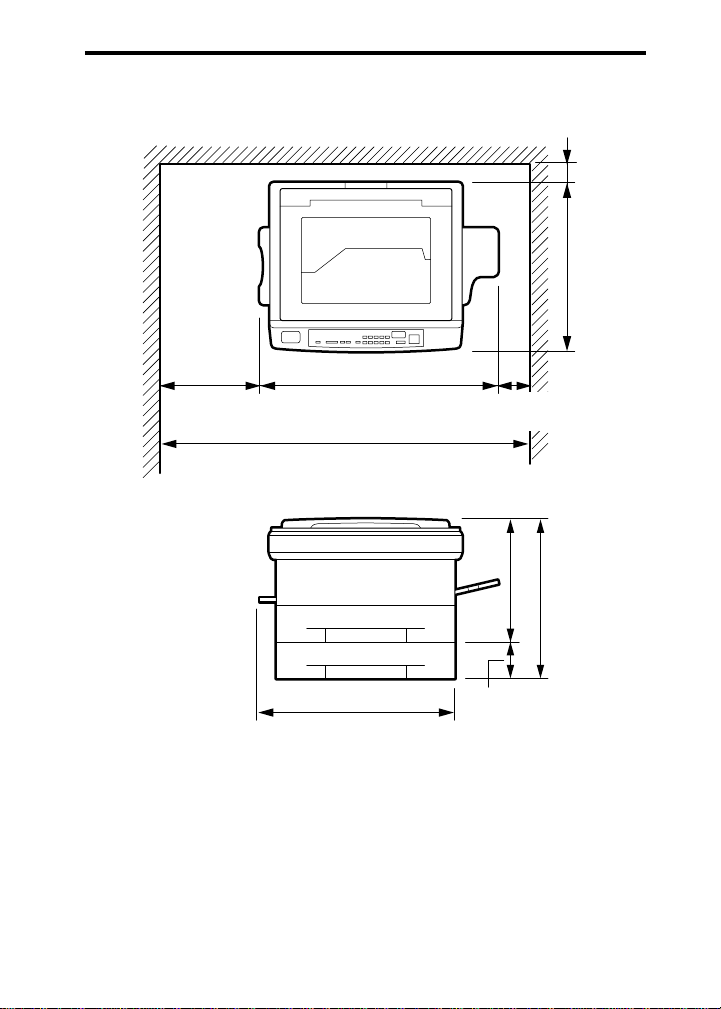
Recommended Site Requirements
Unit: inches (mm)
2.0
(50)
21.1
(536)
11.8
(300)
28.5
(723)
3.9
(100)
44.2
(1123)
13.5
(343)
3.8
23.0
(96)
(583)
NOTE:
Dimensions placed within parentheses indicate where the option
tray feeder is installed.
1-10
17.3
(439)
Page 18

Chapter 2
Powered by
Aleck Kholopov
Slash, Ltd
( 095 201 48 20
* slash@slash.ru
" http://www.slash.ru
Preparations before using the copier
The copier comes packed with protective
materials to protect it from damage during
transportation. Be sure to remove all of the
protective packing material before installing
the copier, and store the material in a convenient location for future use.
Removing Protective Packing Materials............ 2-2
Preparing Drum Unit & Developing Unit............ 2-4
Adding Toner ..................................................... 2-7
Enforded Replenishment of Toner .............. 2-7
Add Toner Indication................................... 2-7
Paper & Tray Information ................................ 2-10
Tray Specifications ................................... 2-10
Installing the Paper Exit Tray.................... 2-10
Storing Paper.............................................2-11
Paper Curl .................................................2-11
Paper Orientation ......................................2-11
Adding Paper................................................... 2-12
Add Paper Indication ................................ 2-12
Standard & Option Trays .......................... 2-13
Paper in the Manual Feed Bypass Tray .......
2-15
Turning the Power On ..................................... 2-16
Initializing the Developing Unit ........................ 2-17
Initializing the Paper Size ................................ 2-19
Page 19
Chapter 2 Preparations before using the copier
Removing Protective Packing Materials
The copier comes packed with protective materials to protect it from
damage during transportation. Be sure to remove all of the protective
packing material before installing the copier, and store the material in
a convenient location for future use.
1. Remove the four protective materials
from the four corners of the platen
cover.
Three (3) screws secure the optical unit.
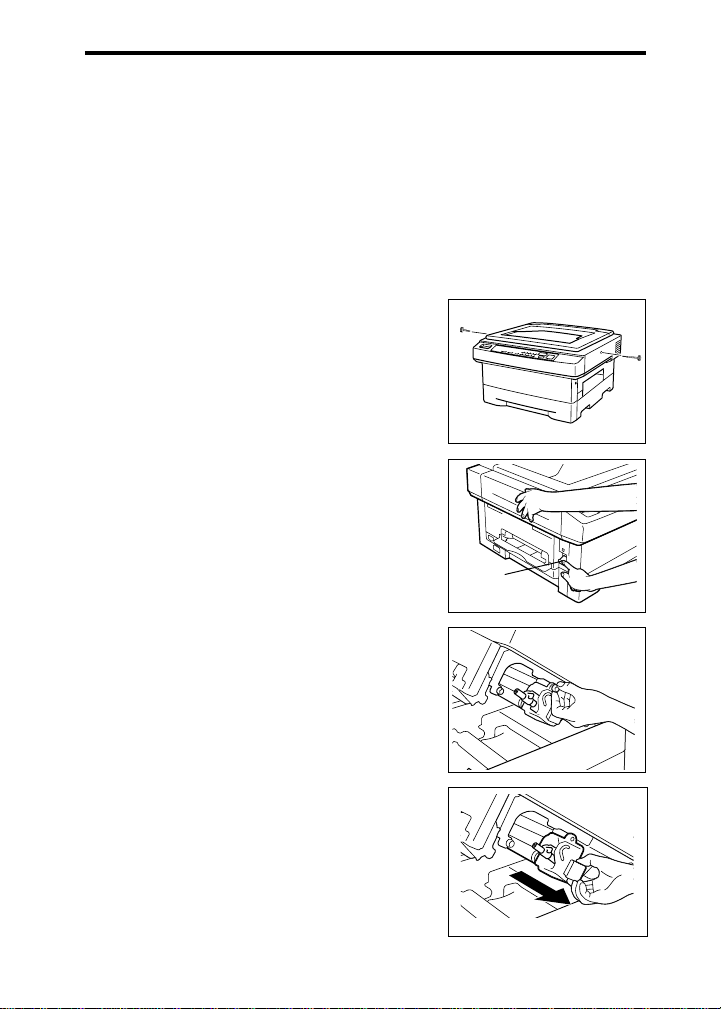
2. Remove two of the screws from the
left and right sides of the upper
cover.
3. While holding the upper unit with one
hand, press the upper unit release
button to open the unit.
Remove the mat from the manual
feed bypass tray.
NOTES:
• Use care to prevent the upper
unit from popping up.
• Open the upper unit until it clicks.
4. Remove the screw from the drum
unit fixing area.
Upper unit
release
button
5. Pull out the drum unit.
NOTES:
• Do not touch the drum surface.
Touching the drum may mark or
scratch it.
• Do not expose the drum unit to
light for longer than 5 minutes.
2-2
Page 20
Chapter 2 Preparations before using the copier
Powered by
Aleck Kholopov
Slash, Ltd
( 095 201 48 20
* slash@slash.ru
" http://www.slash.ru
Removing Protective Packing Materials (continued)
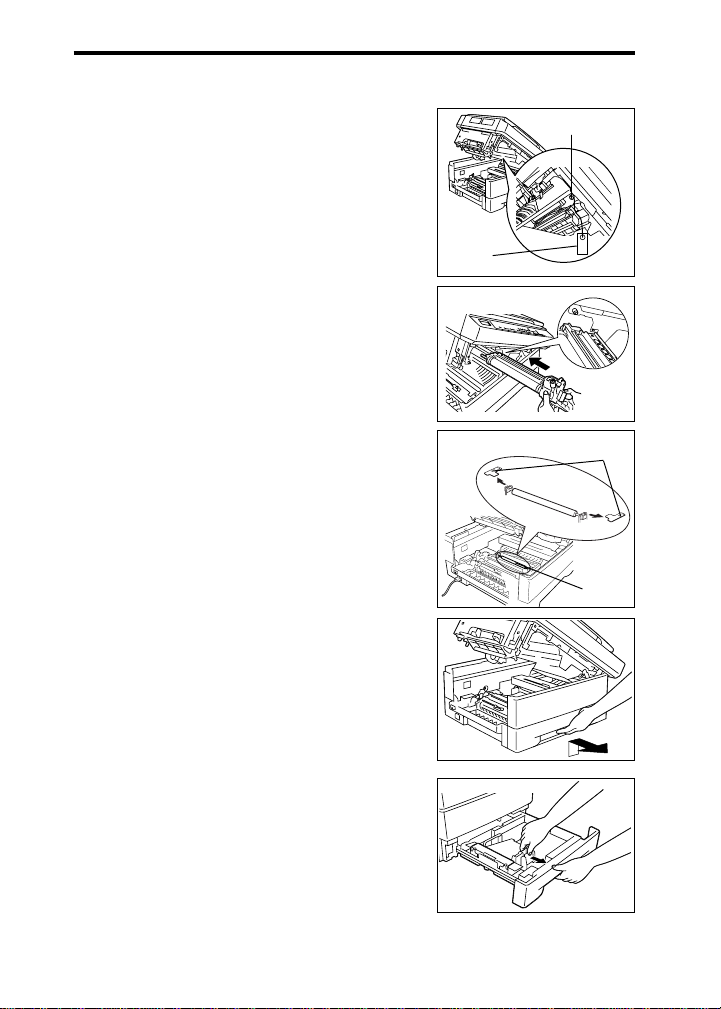
6. Remove one screw with the red tag
from the bottom side of the upper
unit.
7. Reinstall the drum unit in the main body.
NOTE:
Align the blue mark on the drum
unit with that on the main body,
when reinstalling the drum unit.
8. Secure the drum unit with the drum
unit fixing screw.
9. Remove the two protective materials
from both ends of the transfer roller
inside the main body.
10. Remove the protective material from
the paper tray, then lift the tray
slightly and pull it out toward you.
Red tag
Screw
Protective
materials
Transfer
roller
Packing material in the main body tray.
11. Remove the protective material from
12. Push the tray into the copier until it clicks
inside the tray, while moving Paper
Guide [1] outward.
into place inside the main body.
After removing the protective materials,
prepare the drum unit and developing unit.
Proceed to p. 2-4 to p. 2-6.
2-3
Page 21
Chapter 2 Preparations before using the copier
Powered by
Aleck Kholopov
Slash, Ltd
( 095 201 48 20
* slash@slash.ru
" http://www.slash.ru
Preparing Drum Unit & Developing Unit
When installing the copier, prepare the drum unit and developing unit
as described below.
NOTE:
DO NOT insert the drum unit into the main body when not
installing the developing unit; otherwise the drum may be
damaged.
1. If the upper unit of the main body is
not open, open it according to step 2
of p. 2-2.
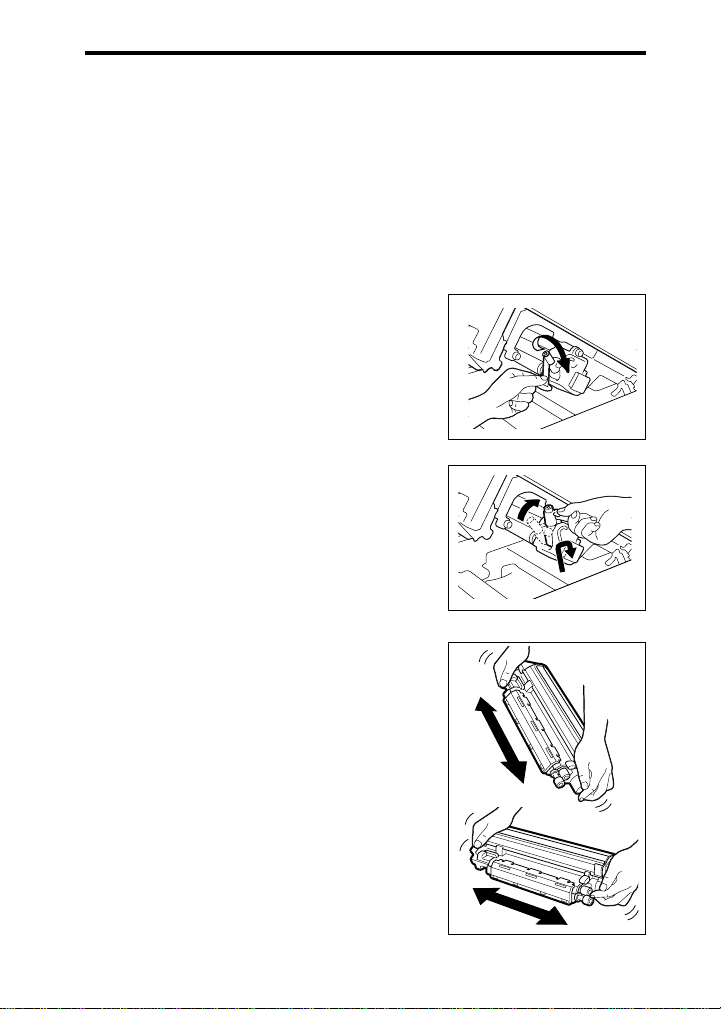
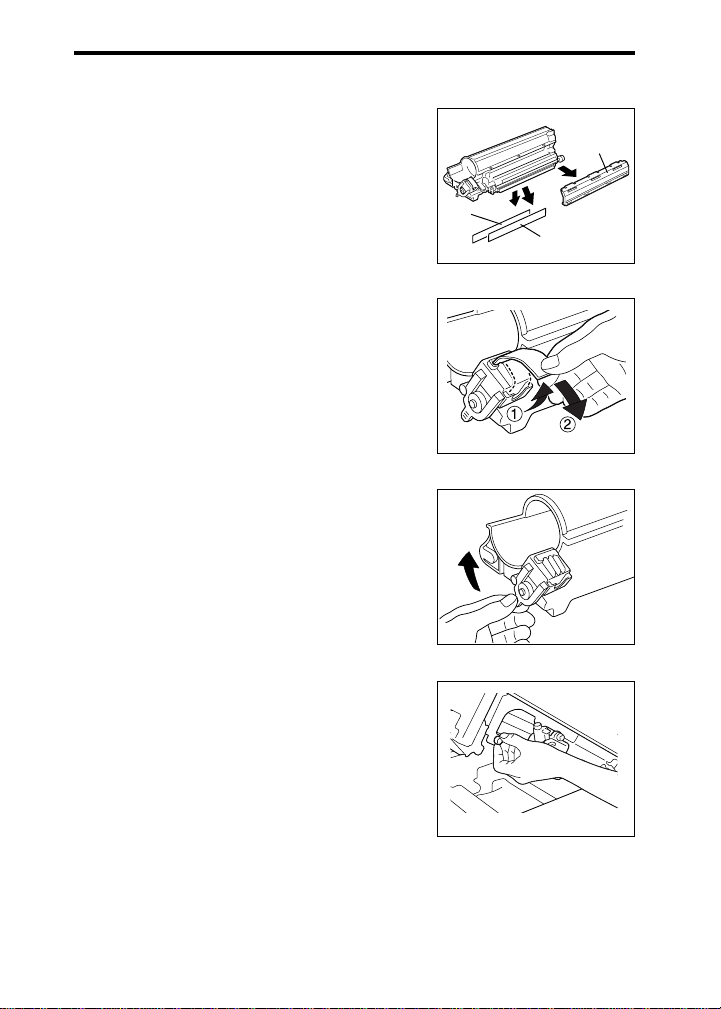
2. Remove the shield tape from the
recycle pipe of the drum unit.
3. Set the recycle pipe to the RELEASE
position.
4. Unpack the developing unit.
5. Tip the developing unit with the gear
side downwards, and shake it up and
down about four or five times.
6. Then hold the developing unit in a
level position and shake it from side
to side four or five times.
2-4
Page 22
Chapter 2 Preparations before using the copier
Preparing Drum Unit & Developing Unit (continued)
7. Remove the protective cover, then
pull off the protective sheet and the
mat in a downward direction.
NOTE:
It is not necessary to keep the
protective cover, the protective
sheet and the mat.
8. Peel the tape fixing the magnet tape,
then carefully remove the magnetic
tape by slipping it down slowly.
9. Remove the pipe cover.
NOTE:
To prevent developer from being
scattered, remove it slowly.
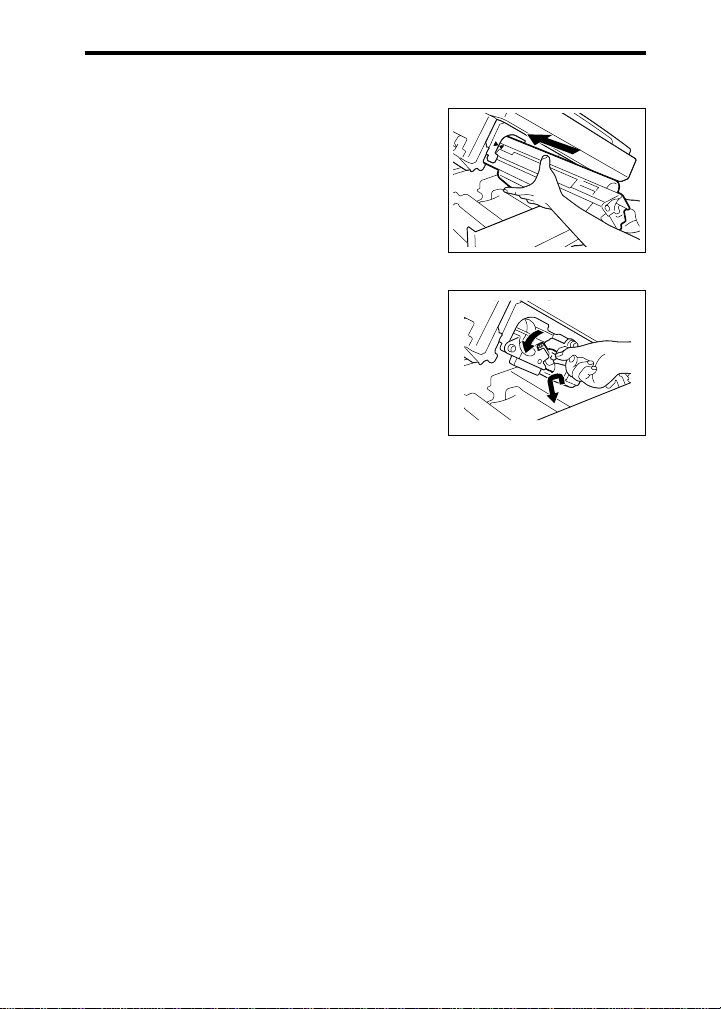
10. Remove the developing unit fixing
screw.
Mat
Protective
cover
Protective sheet
2-5
Page 23
Chapter 2 Preparations before using the copier
Preparing Drum Unit & Developing Unit (continued)
11. Insert the developing unit into the
copier main body.
NOTE:
When reinstalling the developing
unit, align the blue mark on the unit
with the blue mark on the main
body.
12. Secure the developing unit with the
developing unit fixing screw.
13. Return the recycle pipe to the SET
position.
After setting the developing unit
correctly, replenish it with toner.
See p. 2-7 to p. 2-9.
2-6
Page 24

Chapter 2 Preparations before using the copier
a
Adding Toner
This section describes the procedure for replenishing the drum unit
with toner.
CAUTION:
Keep toner cartridge away from children. Although the toner is
non-toxic, do not inhale it or allow it to enter your eyes. In case
the toner comes in contact with eyes, please consult your
physician.
■ Enforced Replenishment of Toner
When the toner supply of the developing unit temporarily becomes
low while copying dark originals, the copier may stop just long
enough to replenish the developing unit with toner. In this case,
code [P25] displays and the Add Toner lamp blinks until replenishing
is completed.
The toner supply is restored, and then copying starts automatically.
■ Add Toner Indication
When toner runs out, code [P25] flashes on the control panel in the
Print quantity/Magnification ratio window and the Add Toner lamp
blinks. Follow the steps below to replenish the developing unit with
toner.
Add Toner lamp
Print quaitity/Magnification ratio window
Lighter Normal D
SELECT PAPER
ALL STOP/CLEAR START PRINT
NOTE:
Use the toner cartridge specified for the machine. Using a toner
cartridge of different type will cause copy quality problems.
2-7
Page 25
Chapter 2 Preparations before using the copier
Adding Toner (continued)
1. While holding the upper unit with one
hand, press the upper unit release
button to open the unit.
NOTES:
• Use care to prevent the upper
unit from popping up.
• Open the upper unit until it clicks.
2. Turn the toner cartridge a little to
both sides two or three times to
empty any remaining toner into the
developing unit.
3. Turn the toner cartridge 180°
counterclockwise and pull it out.
NOTE:
Steps 2 and 3 are not required
when you are initially setting the
copier.
4. Before inserting the new cartridge,
shake it from side to side four or five
times.
Upper unit
release
button
5. While removing the shield tape,
insert the new toner cartridge into the
developing unit.
NOTE:
Please insert the toner cartridge
with shield tape side up.
2-8
Page 26

Chapter 2 Preparations before using the copier
Adding Toner (continued)
6. Turn the toner cartridge 180°
clockwise.
7. Close the upper unit by picking up
the stopper lever while pushing up
the upper unit slightly.
8. Close the upper unit securely, while
holding it at each side.
2-9
Page 27

Chapter 2 Preparations before using the copier
Paper & Tray Information
■ Tray Specifications
Main body tray: User-adjustable tray
Capacity :250 sheets 20 lb
Paper size :LG/LT/R/8”x13”/8.5”x13”/8.25”x13”
Copy paper weight :16 lb~24 lb
Manual feed bypass tray
Capacity :1
Paper size : 5.5”x8.5”~LG
Copy paper weight :16 lb~32 lb
Option tray: User-adjustable tray
Capacity :250 sheets 20 lb
Paper size :LT/R/LG/8”x13”/8.5”x13”/8.25”x13”
Copy paper weight :16 lb~24 lb
■ Installing the Paper Exit Tray
Insert the receiving tray into the
stopper of the main body and
push it until it is fixed in place.
Tray capacity: 99 sheets
NOTE:
LG (Legal size 8.5”x14”)
LT (vertical Letter size 8.5”x11”)
R (horizontal Letter size 11”x8.5”)
2-10
Page 28

Chapter 2 Preparations before using the copier
Paper & Tray Information (continued)
■ Storing Paper
If all the sheets from the newly
opened package of copy paper
cannot fit into the tray, wrap the
remaining paper properly and
store it in a darkened area that is cool,
and dry. Using paper that was once
exposed to dampness or wetness may
cause deterioration of copy quality and
paper feed efficiency.
■ Paper Curl
Check to see the direction in which
the stack of paper curls.
• In the Tray
Place paper in the user-adjustable tray
with the curl upward.
• In the Bypass
Place paper in the manual feed bypass
tray with the curl down.
Paper curl
■ Paper Orientation
Paper orientation is sometimes
described as portrait (vertical) or
landscape (horizontal). This refers
to the way paper is loaded in the
feeder tray and output trays.
The Portrait and Landscape
illustrations shown at the right
refer to paper orientation as you
face the copier.
Portrait
(vertical)
Landscape
(horizontal)
2-11
Page 29

Chapter 2 Preparations before using the copier
a
Adding Paper
This section describes how to load paper in the main body tray or
option tray and shows how to insert paper in the manual feed bypass
tray.
■ Add Paper Indication
When copy paper is depleted, the remaining copy quantity displays
in the Print quantity/Magnification ratio window for 90 seconds, and
the Main Body Tray Selection lamp or Option Tray Selection lamp
blinks.
After 90 seconds, the copier returns to the normal condition.
Print quaitity/Magnification ratio window
Main body tray selection lamp
Lighter Normal D
SELECT PAPER
Option tray selection lamp
ALL STOP/CLEAR START PRINT
To replenish the tray with copy paper, use the procedure starting on
the following page.
NOTE:
Never pull out a tray to replenish it with paper while copying is in
process. Otherwise the copier will malfunction.
2-12
Page 30

Chapter 2 Preparations before using the copier
Adding Paper (continued)
■ Standard & Option Trays
Both the main body tray and the option tray are user-adjustable trays
that can hold letter or legal paper sizes. To replenish the main body
tray or option tray with paper, use the procedure below.
NOTE:
When turning on the power of the copier for the first time with paper
loaded into the trays, the READY indicator may light in green, while the
[SELECT PAPER] lamp is still off.
In this case, paper has already been fed into the internal area of the
copier. Open the upper unit to remove it before making any copies,
otherwise paper misfeed may occur.
1. Fan the copy paper to keep sheets
from sticking together during
copying.
2. Lift the tray slightly and pull it out
toward you.
3. Push down the base plate.
NOTE:
Push down on the base plate until it
is locked securely.
2-13
Page 31

Chapter 2 Preparations before using the copier
Adding Paper (continued)
■ Standard & Option Trays (continued)
4. Place copy paper in the tray.
NOTES:
• Place copy paper into the tray
with curl side up.
• Be sure paper is stacked slightly
below the hook level of the tray.
• The tray holds up to 250 sheets
of 20 lb paper. Do not load paper
above the upper paper guides.
5. Adjust Paper Guide [1] to the paper
size.
NOTE:
Use the guide knob to adjust the
paper guide.
6. Adjust Paper Guide [2] to the paper
size.
NOTE:
Use the guide knob to adjust the
paper guide.
hooks
Paper
guide 1
Upper paper
guide
Paper
guide 2
7. Remove the size label, then refold it
so that the correct paper size will
show when it is put back into the
indicator window.
8. Push the tray into the copier until it
clicks into place inside the main
body.
2-14
Page 32

Chapter 2 Preparations before using the copier
Adding Paper (continued)
■ Paper in the Manual Feed Bypass Tray
The manual feed bypass tray is used to feed non-standard size copy
paper one sheet at a time. Use this convenient tray to copy labels,
OHP transparencies, or irregular-sized sheets of paper.
Bypass paper size range: 8.5”x14”~5.5”x8.5”
Be sure paper is inserted with curl side down.
1. Insert one sheet of copy paper while
adjusting the paper guide to the
paper size.
2. Insert the paper until it touches the
back end of the tray.
• For two-sided copying:
After copying the first side,
insert the sheet again with the
blank side facing up. Insert the
sheet so that the page heading
end of the sheet feeds last.
NOTE:
To prevent paper misfeeds, DO
NOT insert wrinkled, curled or
stapled paper into the manual feed
bypass tray.
2-15
Page 33

Chapter 2 Preparations before using the copier
Turning the Power On
NOTE:
Before turning on the power to your Konica 1312 Copier for the
first time check to be sure that the three screws used to fasten
the optical unit and upper unit during transportation have been
removed. (See p. 2-2).
If power is turned on with these screws installed, the copier will
malfunction.
1. The power cord is packed with your
copier. Connect one end of the
power cord to the power supply
connector located on the side of the
copier next to the power switch.
2. Then, insert the other end of the
power cord plug into the wall outlet.
Power plug illustration varies
according to the shipping
destination of the copier.
3. Turn the power switch ON.
When the copier is initially turned
on, the code [P26] displays.
After preparing the drum unit and
developing unit, and installing the
toner cartridge, initialize the
developing unit and paper size
before using the copier for the first
time.
(See initializing procedures
starting on the next page.)
2-16
Page 34

Chapter 2 Preparations before using the copier
T
:
Initializing the Developing Unit
Before using the copier for the first time after installation, you need to
initialize the developing unit and set the paper size.
1. Press [SELECT PAPER] for five
seconds.
All settings you made will clear and
default settings will resume.
2. Use the keypad to enter [5] and [1].
3. Press [START PRINT]. The value
you enter will be displayed.
NOTE:
It takes about 6 minutes to initialize
the developing unit.
Lighter Normal Darker
SELECT PAPER
5
0
RECALL STOP/CLEAR STAR
OM
eset
1 2 3 4 5
1
6 7 8 9 0
ODE
STOP/CLEAR START PRINT
RECALL
2-17
Page 35

Chapter 2 Preparations before using the copier
Initializing the Developing Unit (continued)
4. When initialization of the developing
unit is completed, the code [C - -]
displays on the control panel.
5. Press [STOP/CLEAR].
After pressing [STOP/CLEAR], [01]
will be displayed.
STOP/CLEAR START PRINT
STOP/CLEAR START PRINT
2-18
Page 36

Chapter 2 Preparations before using the copier
T
:
Initializing the Paper Size
Before using the copier for the first time after installation, you need to
initialize the paper size.
1. Press [SELECT PAPER] for five
seconds.
All settings you made will clear and
default settings will be resumed.
2. Use the keypad to enter the paper
size code. Select the code from the
table below.
LT (Letter) C00
LG (Legal) C01
A4 C02
B5 C03
A5 C04
F4-1:8x13in. C05
(203x30mm)
F4-2:8.5x13in. C06
(216x330mm)
F4-3:8.25x13in. C07
(210x330mm)
F4-4:206x337mm C08
Lighter Normal Darker
SELECT PAPER
5
0
RECALL STOP/CLEAR STAR
OM
eset
1 2 3 4 5
1
6 7 8 9 0
ODE
STOP/CLEAR START PRINT
RECALL
3. Press [START PRINT]. The entered
value is established, and “C - -” will
be displayed.
STOP/CLEAR START PRINT
2-19
Page 37

Chapter 2 Preparations before using the copier
Initializing the Paper Size (continued)
4. Press [STOP/CLEAR].
At that time, [01] will be displayed
indicating that initialization is
successful and the machine is ready
for copying.
STOP/CLEAR START PRINT
STOP/CLEAR START PRINT
2-20
Page 38

Chapter 3
Powered by
Aleck Kholopov
Slash, Ltd
( 095 201 48 20
* slash@slash.ru
" http://www.slash.ru
Hardware Parts & Functions
This chapter identifies the
external and internal parts
and components of the copier
and points out their locations.
Main Body ....................................................... 3-2
Exterior View ............................................ 3-2
Interior View ............................................. 3-3
Control Panel .................................................. 3-4
Page 39

Chapter 3 Hardware parts & functions
Main Body
■ Exterior View
2 Platen cover
1 Power
switch
9 Manual feed
bypass tray
8 Left side cover
7 Upper unit release button
6 Option tray
1. Power switch turns copier power on or off.
2. Platen cover covers documents to be copied and holds them in
place.
3. Control panel controls copier settings & functions.
4. Main body tray is user-adjustable 250-sheet tray for various sizes
(Letter/Legal).
3 Control panel
4 Main body tray
5 Paper exit tray
5. Paper exit tray receives up to 99 output sheets.
6. Option tray is a third paper source functioning as a user-adjustable
250-sheet main body tray.
7. Upper unit release button opens the upper unit.
8. Left side cover opens to remove mishandled paper.
9. Manual feed bypass tray is a manual tray for feeding various
sizes and stock, one sheet at a time (labels, OHP transparency film,
etc.).
3-2
Page 40

Chapter 3 Hardware parts & functions
Main Body (continued)
■ Interior View
2 Toner cartridge
1 Developing
unit
8 Copy counter
7 Fixing unit
1. Developing unit prints images to the drum, and needs to be
replaced periodically.
2. Toner cartridge is charged with toner, and needs to be replaced
periodically.
3. Drum unit is electrically charged to form the copy image, and
needs to be replaced periodically.
4. Recycle pipe returns toner in drum unit to the developing unit for
reuse.
5. Stopper lever is moved to close and lock the upper unit.
6. Cleaning pad cleans the fixing roller, and needs to be replaced
periodically.
7. Fixing unit is provided with a fixing roller to fix images (toner) to
copy paper by heating up and applying pressure.
CAUTION:
To avoid getting burned, NEVER touch the fixing unit; its tempera-
ture rises very high when the copier is on.
8. Copy counter shows total number of copies made.
3 Drum unit
4 Recycle pipe
5 Stopper lever
6 Cleaning pad
3-3
Page 41

Chapter 3 Hardware parts & functions
Control Panel
12
3
18
4
Lighter Normal Darker
17
587
6
1
1
1
ZOOM
5
8
811
2
2
2
1
1
8
81114
Preset
2
2
1 : 1
LENS MODEMAGNIFICATIONSELECT PAPER
141516
1 2 3 4 5
6 7 8 9 0
9
10
RECALL STOP/CLEAR START PRINT
1213
11
1. Add Toner lamp (blinking light) blinks when toner is running out.
When toner is low, the copier stops copying and automatically
replenishes the drum unit with toner.
In this case, wait a minute until the replenishment of toner fin-
ishes.
2. Paper monitoring lamp (blinking light) blinks when copying
paper is mishandled or no paper remains in the tray.
In this case, remove the mishandled paper or replenish the tray
with paper.
3. Main body tray selection lamp (steady/blinking light) lights up
when the main body tray is selected, and blinks when no copy
paper is left.
4. Option tray selection lamp (steady/blinking light) lights up when
the option tray is selected, and blinks when no copy paper is left.
5. Preset magnification indicators (steady light) lights up the
preset reduction or enlargement magnification mode selected.
3-4
Page 42

Chapter 3 Hardware parts & functions
Control Panel (continued)
6. Zoom mode lamp (steady light) lights up when the zoom magnifi-
cation mode is selected.
When lit, you can set a zoom magnification with the ▲(enlarge) or
▼(reduce) button.
7. Preset magnification mode lamp (steady light) lights up when
the Preset Magnification mode is selected.
When lit, magnification is set with the ▲(enlarge) or ▼(reduce)
button.
8. One-to-one (1:1) mode lamp (steady light) lights up when the 1:1
mode is selected. When lit, originals are copied in 1:1 without any
magnification applied.
9. Print quantity/Magnification ratio window displays the number
of copies and the copy magnification you set.
10. READY indicator lights up green when the copier is ready for
copying. During warm-up or when the copier is not ready for
copying, the orange lamp lights up.
When the copier is in the Power Save mode, the orange lamps
blinks.
11. [START PRINT] button can be pressed to begin copying while
the READY indicator light is green. If you press this button during
warm up, the copier returns to the copying-ready state, and then
automatically starts to copy.
12. [STOP/CLEAR] button can be pressed during continuous
copying to cancel the number of copies being made.
3-5
Page 43

Chapter 3 Hardware parts & functions
Control Panel (continued)
13. Numeric keypad selects the number of copies
14. [LENS MODE] button selects the desired lens mode, i.e., 1 : 1,
Preset, or Zoom.
Each time the button is pressed, the lens mode cycles from
1 : 1 -> Preset -> Zoom -> 1: 1...
1 : 1: 1 to 1 mode effects no enlargement or reduction.
Zoom: Press the [MAGNIFICATION] buttons to select a Zoom
ratio from 70%~141%.
Preset: Select a Preset ratio of 129% or 77%.
15. [MAGNIFICATION ▲ (enlarge)] button selects a Preset enlarge-
ment ratio or sets any Zoom mode ratio between 70 to 141%.
16. [MAGNIFICATION ▼ (reduce)] button selects a Preset reduction
ratio or sets any Zoom mode ratio between 70 to 141%.
17. [Copy density] control knob controls copy density.
Slide the knob to the right to adjust exposure when originals are
too light or slide the knob to the left to adjust for dark originals.
18. [SELECT PAPER] button selects a paper tray. (This button is
used only when the option tray is installed in the copier.)
3-6
Page 44

Chapter 4
Powered by
Aleck Kholopov
Slash, Ltd
( 095 201 48 20
* slash@slash.ru
" http://www.slash.ru
Making Copies
Turn the page to see how to make
a basic copy, or refer to remaining
pages to select various copying
functions required for special
jobs. Read on to learn how easy it
is to customize the Konica 1312
Copier to suit your particular work
environment.
How to Make a Basic Copy ....................................4-2
Using the Manual Feed Bypass Tray .....................4-4
Preset Mode .......................................................... 4-5
Zoom Mode ............................................................4-6
Features .................................................................4-7
Auto Clear Function .........................................4-7
Power Save Mode ...........................................4-7
Copy Counter ..................................................4-7
Function Settings.................................................... 4-8
Setting Paper Size ...........................................4-8
Setting Auto Clear Function.............................4-8
Initialize Drum/Developer Unit .........................4-8
Setting Automatic Check of Paper Length....... 4-8
Setting Procedure ............................................4-8
Function Codes ....................................................4-10
Reading the Copy Counter ................................... 4-11
Page 45

Chapter 4 Making copies
How to Make a Basic Copy
The following information describes how to make a basic copy
without selecting any special features.
1. Turn on the power switch.
2. Open the platen cover.
3. Place an original document face
down on the platen glass and align
the edge of the paper with the scale
plate on the right.
B4
A4
B5
B6
ハガキ
ハガキ
B6
B5
A4
B4
4. Select a paper tray by pressing
[SELECT PAPER].
NOTE:
• If a sheet of paper is set in the
manual feed bypass tray, priority
is given to the manual feed
bypass tray.
• If the option tray is not installed,
skip this step and proceed as
follows.
4-2
Lighter Normal Darker
SELECT PAPER
Page 46

Chapter 4 Making copies
OL
:
How to Make a Basic Copy (continued)
5. Select the following copying
conditions.
Select Copy density.
Set the control knob at the
midpoint for normal density.
Slide the knob to the right for
darker copy image.
Slide the knob to the left for lighter
copy image.
Select [1:1, PRESET, or ZOOM
MODE].
Press [LENS MODE] to highlight
[1:1].
Each time you press [LENS
MODE], the mode cycles in the
following order: 1 : 1 -> Preset ->
Zoom -> 1 : 1 ....
To select a Preset or Zoom mode
magnification ratio, see p. 4-5 or
p. 4-6.
ECT PAPER
arker
Lighter Normal Darker
1
1
1
5
8
811
2
2
2
1
1
8
81114
2
2
LENS MODEMAGNIFICATION
ZOOM
Preset
1 : 1
5
8
MAGNIFICATI
1
6
1
1
8
2
2
1
14
2
Select Print Quantity.
Use the keypad to select the
desired number of copies.
To change the number of copies,
press [STOP/CLEAR] and reset
the print quantity.
OM
eset
1 2 3 4 5
1
6 7 8 9 0
ODE
RECALL
6. Press [START PRINT].
Coping will begin.
To stop copying, press [STOP/
CLEAR].
STOP/CLEAR START PRINT
4-3
Page 47

Chapter 4 Making copies
Using the Manual Feed Bypass Tray
Use the manual feed bypass tray to feed special copy paper that
cannot be fed through the regular tray. After positioning the original
document, manually feed one sheet at a time into the bypass.
The manual feed bypass tray can be used to manually feed an OHP
transparency, a label sheet, Legal (8.5”x14”), Letter/R (8.5”x11”/R) and
Invoice (5.5”x8.5”), from 16lb~32 lb.
NOTE:
To avoid a paper misfeed, DO NOT feed wrinkled or warped
paper into the manual feed bypass tray.
1. Adjust the paper guides of the
manual bypass tray to the width of
the copy paper and insert the paper
until it reaches the end.
• When paper is inserted, the
bypass mode is selected
automatically and the paper feeds
into the copier by a roller.
2. Select the conditions for copying.
See p. 4-3.
3. Press [START PRINT].
Coping will begin.
4-4
Page 48

Chapter 4 Making copies
Preset Mode
Select the Preset mode to enlarge or reduce the photocopy image
using a Preset magnification ratio.
The following procedure describes how to select a Preset magnification ratio after you have made all other copying selections and
positioned the original document.
1. Press [LENS MODE] to select the
Preset mode.
2. Press [MAGNIFICATION (▲) (▼)] to
select the desired Preset ratio.
For Invoice to Letter, select 129%
5.5”x8.5” to 8.5”x11”
For Legal to Letter, select 77%
8.5”x14” to 8.5”x1 1”
arker
arker
1
1
1
2
1
2
811
2
1
81114
2
1
811
2
1
81114
2
ZOOM
Preset
1 : 1
LENS MODEMAGNIFICATION
ZOOM
Preset
1 : 1
LENS MODEMAGNIFICATION
5
8
2
1
8
2
1
5
8
2
1
8
2
1
6
1
6
4-5
Page 49

Chapter 4 Making copies
Zoom Mode
Select the Zoom mode to enlarge or reduce the photocopy image
using a magnification ratio from 70%~141%. A Zoom ratio can be
selected in increments of 1%.
The following procedure describes how to select a Zoom magnification
ratio after you make all other copying selections, including positioning
the original document.
1. Press [LENS MODE] to select the
Zoom mode.
2. Either use the keypad to enter a
Zoom ratio or press
[MAGNIFICATION (▲) (▼)] to select
the desired Zoom ratio.
Each time you press [▲ (enlarge)] or
[▼ (reduce)], the magnification ratio
changes in increments or
decrements of 1%.
arker
arker
1
1
1
2
1
2
811
2
1
81114
2
1
811
2
1
81114
2
ZOOM
Preset
1
1 : 1
6
LENS MODEMAGNIFICATION
ZOOM
Preset
1
1 : 1
6
LENS MODEMAGNIFICATION
5
8
2
1
8
2
1
5
8
2
1
8
2
If you press [▲ (enlarge)] or [▼
(reduce)], the magnification ratio
increases or decreases continuously.
4-6
Page 50

Chapter 4 Making copies
Features
The following information describes the special features of the Konica
1312 Copier.
■ Auto Clear Function
If no settings are entered on the control panel for a specified period
of time, all previous settings will be cleared and default values
shown below will be resumed automatically.
Default Settings
Print quantity : 1
Copy magnification : 1 : 1
Paper tray : Main body tray
NOTE:
You can change the elapse time of the Auto Clear function to 30,
60, 90, or 120 seconds. See p. 4-8 to p. 4-10.
■ Power Save Mode
If no command is entered on the control panel for a specific period
of time, the temperature of the fixing unit will be lowered automatically to reduce power consumption. The Power Save feature will
help you conserve energy.
In the Power Save mode, only the READY indicator is on and all
other lamps are off. To return the copier to the READY mode, press
any button on the control panel.
You can change the elapse time of the Power Save function to 2, 5,
30, 60, 120 or 240 minutes. Contact your Konica service representative if you wish to change Power Save settings. The default
setting is 30 minutes.
■ Copy Counter
This feature allows you to view the total number of the copies made
on the machine by displaying the amount in the Print quantity/
Magnification ratio window (see procedure on p. 4-8 to p. 4-10).
4-7
Page 51

Chapter 4 Making copies
P
Function Settings
Setting changes can be made for the four functions shown below. See
function setting options and codes on p. 4-10.
■ Setting Paper Size
Change the paper size setting whenever you need to load a different size copy paper in a tray.
■ Setting Auto Clear Function
Set the time period for activating the auto clear function.
■ Initializing Drum/Developer
Initialize the drum every time you replace the drum unit.
Initialize the developing unit, when you install the copier initially and
every time you replace the developing unit.
■ Setting Automatic Check of Paper Length
Set the automatic detection setting.
■ Setting Procedure
Before starting, be sure the copier is in the READY state.
1. Press [SELECT PAPER] for five
seconds.
All settings previously made will be
cleared and the copier default
settings will be resumed.
2. Referring to the table on p. 4-10,
enter the desired code using the
keypad.
Ex.: [2] [0]
4-8
Lighter Normal Darker
SELECT PAPER
5
0
RECALL STOP/CLEAR START
Page 52

Chapter 4 Making copies
Function Settings (continued)
3. Press [START PRINT].
The value you entered will be
defined.
4. Press [STOP/CLEAR].
The copier will return to the READY
state.
STOP/CLEAR START PRINT
STOP/CLEAR START PRINT
4-9
Page 53

Chapter 4 Making copies
Function Codes
Paper Size Settings
Size of paper in Main body tray
C-00 LT (letter)
C-01 LG (legal)
C-02 A4
C-03 B5
C-04 A5
C-05 F4-1: 8”x13” (203x330mm)
C-06 F4-2: 8.5”x13” (216x330mm)
C-07 F4-3: 8.25”x13” (210x330mm)
C-08 F4-4: 206x337mm
Size of paper in Option tray
C-10 LT (letter)
C-11 LG (legal)
C-12 A4
C-13 B5
C-14 A5
C-15 F4-1: 8”x13” (203x330mm)
C-16 F4-2: 8.5”x13” (216x330mm)
C-17 F4-3: 8.25”x13” (210x330mm)
C-18 F4-4: 206x337mm
Auto Clear Elapse Settings (Default is underlined)
C-20 30 sec.
C-21 60 sec.
C-22 90 sec.
C-23 120 sec.
Copy Counter Reading
C40 Read the main body copy count
C41 Read the drum unit copy count
C42 Read the developing unit copy count
Initialization: Initialize Drum Unit/Developing Unit
C-50 Initialize the drum unit.
C-51 Initialize the developing unit.
Paper Length: Automatic Paper Length Detection (Default is
underlined)
C-60 OFF
C-61 ON
C-62 ON (LT width erase)
4-10
Page 54

Chapter 4 Making copies
P
Reading the Copy Counter
Display the number of copies made on the copier.
To read the total number, keep in mind that the first three digits of the
number display first, then the last three digits display.
Before starting, be sure the copier is in the READY state.
1. Press [SELECT PAPER] for five
seconds.
All settings previously made will be
cleared and the default settings will
be resumed.
(See default settings on p. 4-7.)
2. Use the keypad to enter [4] and [0],
then the required value.
3. Press [START PRINT].
The first three digits of the number
will be displayed for about three
seconds.
Then, after a 1-second delay, the last
three digits will be displayed.
Ex. 1,900 copies
Lighter Normal Darker
SELECT PAPER
5
0
RECALL STOP/CLEAR START
STOP/CLEAR START PRINT
3 sec. 1 sec. 3 sec.
4-11
Page 55

Chapter 4 Making copies
Reading the Copy Counter (continued)
4. Press [STOP/CLEAR].
The copier will return to the READY
state.
STOP/CLEAR START PRINT
4-12
Page 56

Powered by
Aleck Kholopov
Slash, Ltd
( 095 201 48 20
* slash@slash.ru
" http://www.slash.ru
Chapter 5
Maintenance
To enjoy optimal performance from
your Konica 1312 Copier, be sure to
use only Konica brand supplies.
Perform maintenance on a
daily basis and periodically replace
consumables as recommended.
See Chapter 2 for instructions on
Adding Paper.
Supplies .......................................................... 5-2
Toner Cartridge ........................................ 5-2
Drum Unit ................................................. 5-2
Developing Unit ........................................ 5-2
Spare Parts Availability............................. 5-2
Package Contents .................................... 5-2
Daily Maintenance .......................................... 5-3
Cleaning the Platen Glass and Platen Cover ..
Cleaning the Paper Carrier ...................... 5-3
Adding Toner & Replacing the Cleaning Pad ..........
Adding Toner ............................................ 5-4
Replacing the Cleaning Pad..................... 5-4
Replacing the Drum Unit ................................. 5-6
Replacing the Developing Unit...................... 5-10
Cleaning the Corona Wire............................. 5-13
5-3
5-4
Page 57

Chapter 5 Maintenance
Supplies
■ Toner Cartridge
Toner cartridge ................ 1pc
Cleaning pad .................. 1pc
■ Drum Unit
Drum unit ........................ 1pc
■ Developing Unit
Developing unit ............... 1pc
■ Spare Parts Availability
Spare parts for this copier are available for at least 7 years after the
discontinuance of the production of the model.
■ Package Contents
Drum unit (already installed in the main body) ....... 1pc
Developing unit ....................................................... 1pc
Toner cartridge ........................................................ 1pc
Paper exit tray ........................................................ 1pc
Cleaning pad (already installed in the main body).. 1pc
User’s Manual......................................................... 1pc
User’s Service Guide .............................................. 1pc
Warranty Registration ............................................. 1pc
Limited Warranty Statement ................................... 1pc
5-2
Page 58

Chapter 5 Maintenance
Daily Maintenance
Soil marks on the platen glass or platen cover are likely to show up as
black marks on your copies.
To obtain optimal copying performance and image quality, be sure to
perform the following maintenance on a routine basis.
CAUTION:
Do not use any solvents, such as benzine and thinner.
■ Cleaning the Platen Glass and Platen Cover
Wipe the glass and the cover with a
clean soft cloth.
If soil marks are difficult to remove,
slightly moisten the cloth with water
or alcohol.
■ Cleaning the Paper Carrier
If the paper carrier becomes soiled,
copy quality will be diminished.
To ensure optimal copy quality, clean
the paper carrier on a routine basis
using a clean soft cloth.
5-3
Page 59

Chapter 5 Maintenance
Adding Toner & Replacing the Cleaning Pad
When toner runs out, code [P25] displays in the Print quantity/
Magnification ratio window and the Add Toner lamp blinks.
In this case, replenish the developing unit with toner and also
replace the cleaning pad.
■ Adding Toner
See p. 2-7 to p. 2-9.
■ Replacing the Cleaning Pad
1. While holding the upper unit with one
hand, press the upper unit release
button to open the unit.
NOTES:
• Use care to prevent the upper
unit from popping up.
• Open the upper unit until it clicks.
2. Slide the cleaning pad to the rear,
then remove it while pulling up on the
front side.
5-4
Page 60

Chapter 5 Maintenance
Adding Toner & Replacing the Cleaning Pad (continued)
3. Insert a new cleaning pad at the rear,
then slide it to the front to install
firmly.
NOTE:
After installing a new cleaning pad,
pull it upward to check that it is
firmly installed.
If not firmly installed, soiling of copy
images and mishandled paper may
occur.
4. Close the upper unit by picking up
the stopper lever while pushing up
the upper unit slightly.
5. Close the upper unit securely, while
holding it at each side.
5-5
Page 61

Chapter 5 Maintenance
Replacing the Drum Unit
The drum unit has a life-span of approx. 25,000 copies.
When the life of the drum unit is near the end, code [P20] displays in
the Print quantity/Magnification ratio window to let you know that
approximately 500 additional copies can be made.
When the life of the drum unit actually reaches the end, code [P24]
displays and further copying will not be possible. When code [P24]
displays, replace the drum unit as shown below.
If necessary, contact your Konica service representative for supplies.
NOTES:
• Install the new drum unit, and then reinstall the developing
unit; otherwise the drum may be damaged.
• Initialize the drum unit after installing it.
See p. 4-8 to p. 4-10.
1. While holding the upper unit with one
hand, press the upper unit release
button to open the unit.
NOTES:
• Use care to prevent the upper
unit from popping up.
• Open the upper unit until it clicks.
2. Remove the developing unit.
(1) Set the recycle pipe to the
RELEASE position.
(2) Remove the developing unit fixing
screw.
5-6
Page 62

Chapter 5 Maintenance
Replacing the Drum Unit (continued)
(3) Slide the developing unit to the
left, then pull it out.
3. Remove the drum unit.
(1) Remove the drum unit fixing
screw.
(2) Pull out the drum unit.
4. Install a new drum unit.
(1) Unpack a new drum unit.
(2) Insert a new drum unit into the
main body.
NOTE:
Align the blue mark on the drum
unit with that on the main body,
when installing the drum unit.
(3) Secure the drum unit with the
drum unit fixing screw.
5-7
Page 63

Chapter 5 Maintenance
Replacing the Drum Unit (continued)
(4) Remove the shield tape from the
recycle pipe of the drum unit.
(5) Move the recycle pipe to the
RELEASE position.
5. Reinstall the developing unit.
(1) Insert the developing unit into the
copier main body.
NOTE:
When reinstalling the drum unit,
align the blue mark on the unit with
the blue mark on the main body.
(2) Secure the developing unit with
the developing unit fixing screw.
(3) Return the recycle pipe to the SET
position.
5-8
Page 64

Chapter 5 Maintenance
Replacing the Drum Unit (continued)
6. Close the upper unit by picking up
the stopper lever while pushing up
the upper unit slightly.
7. Close the upper unit securely, while
holding it at each side.
8. Initialize the drum unit according to
the appropriate procedure. See p. 48 to p. 4-10.
5-9
Page 65

Chapter 5 Maintenance
Replacing the Developing Unit
The developing unit has a life-span of approx. 25,000 copies.
When the life of the developing unit is near the end, code [P29]
displays in the Print quantity/Magnification ratio window to let you
know that approximately 500 additional copies can be made before
the copier shuts down.
When the life of the developing unit is actually over, code [P29]
displays and further coping will not be possible. When code [P29]
appears, replace the developing unit as shown below.
If necessary, contact your Konica service representative for supplies.
NOTE:
After installing the developing unit, add toner, replace the felt
cleaning pad and initialize the developing unit, in that order.
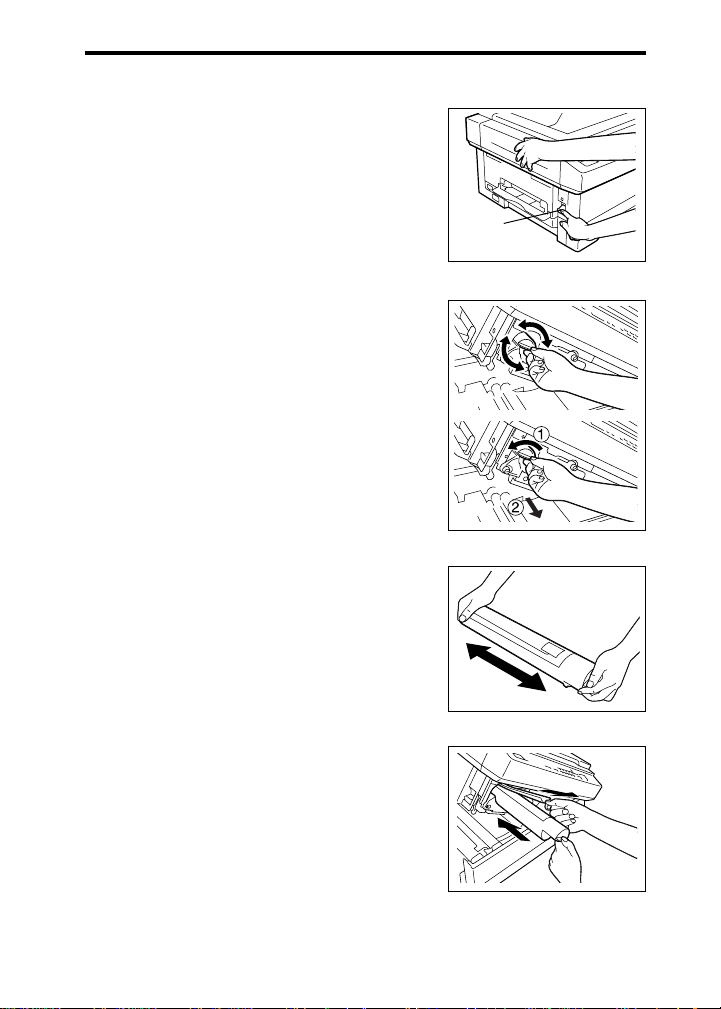
1. While holding the upper unit with one
hand, press the upper unit release
button to open the unit.
NOTES:
• Use care to prevent the upper
unit from popping up.
• Open the upper unit until it clicks.
2. Remove the developing unit.
(1) Move the recycle pipe to the
RELEASE position.
(2) Remove the developing unit fixing
screw.
5-10
Page 66

Chapter 5 Maintenance
Replacing the Developing Unit (continued)
(3) Slide the developing unit to the
left, then pull it out.
3. Install a new developing unit.
(1) Unpack a new developing unit.
(2) Tip the developing unit with the
gear side downward, and shake it
up and down about four or five
times.
(3) Then hold the developing unit in a
level position and shake it from
side to side four or five times.
(4) Remove the protective cover, then
pull off the protective sheet and
the mat in a downward direction.
NOTE:
It is not necessary to keep the
protective cover, the protective
sheet and the mat.
(5) Peel the tape fixing the magnet
tape, then carefully remove the
magnetic tape by slipping it down
slowly.
Mat
Protective
cover
Protective sheet
5-11
Page 67

Chapter 5 Maintenance
Replacing the Developing Unit (continued)
(6) Remove the pipe cover.
NOTE:
To prevent developer from being
scattered, remove it slowly.
(7) Insert the developing unit into the
copier main body.
(8) Secure the developing unit with
the developing unit fixing screw.
(9) Return the recycle pipe to the SET
position.
4. Replenish the developing unit with
the toner. (See p. 2-7 to p. 2-9.)
5. Replace the felt cleaning pad. (See
p. 5-4.)
6. Initialize the developing unit. (See p.
2-17 to p. 2-18.)
5-12
Page 68

Chapter 5 Maintenance
Cleaning the Corona Wire
If copies appear to be soiled, clean the corona wire. Use the wire
cleaner provided in the main body tray to clean the wire. The corona
wire is inside the drum unit slot.
NOTES:
• To be able to clean the corona wire, it is necessary to remove
the drum unit and the developing unit from the main body.
After cleaning the corona wire, reinstall the drum unit and the
developing unit in that order; otherwise the drum may be
damaged. See p. 5-6 to p. 5-12.
• Do not touch the drum surface. Touching the drum may mark
or scratch it.
• Do not expose the drum unit to light for longer than 5 minutes.
1. Remove the drum unit from the main
body.
2. Withdraw the main body tray and
take out the wire cleaner.
3. Insert the wire cleaner into the slot of
the drum unit.
4. To clean the corona wire, slide the
wire cleaner to the left and right four
or five times.
5. Reinstall the drum unit and the
developing unit in that order.
Wire cleaner
Slot
5-13
Page 69

Chapter 6
Powered by
Aleck Kholopov
Slash, Ltd
( 095 201 48 20
* slash@slash.ru
" http://www.slash.ru
Troubleshooting
In most cases you will be able to
correct problems by following the
troubleshooting advice in this
chapter.
To prevent problems from
occurring, read the information
in this chapter to learn the various
ways to care for your equipment.
Should you encounter a problem
that cannot be resolved easily,
contact your Konica service
representative.
Copy Quality.................................................... 6-2
Error Codes & Remedies ................................ 6-4
J Code ...................................................... 6-4
P Code ..................................................... 6-6
F Code ..................................................... 6-8
Page 70

Chapter 6 Troubleshooting
Copy Quality
Problem Cause Remedy
■Copy image is
too light.
■Copy image is
too dark
■No image
copied. Blank
sheet is
output.
■Back of copy
is soiled.
Copy density setting
is not correct.
Toner supply is low.
A large number of
high-contrast copies
are made continuously.
Copy paper is damp
or wet.
Copy contrast setting
is not correct.
The developing unit
is not set correctly.
The transfer roller is
soiled.
Adjust the copy
density properly.
Check to see if the
Add Toner lamp is lit.
If it is lit, replace the
toner cartridge.
Replace the copy
paper.
Adjust the copy
density properly.
Set the developing
unit correctly.
Clean the roller with
a dry cloth.
Transfer roller
■Copies shows
dark stripes in
vertical
direction.
6-2
The cleaning pad life
is over.
Replace the cleaning
pad.
Page 71

Chapter 6 Troubleshooting
Copy Quality (continued)
Problem Cause Remedy
■Dark parts are
copied
unevenly.
■Certain
portions of the
copy appear
blank.
■Similar soil
marks appear
on every copy.
■Toner removes easily if
the copy is
rubbed.
Copy paper being
used is outside
specifications.
Copy paper is damp
or wet.
The edge of the copy
paper is blank.
The copy paper is
damp or wet.
Copy paper used is
not within specifications.
The drum surface is
scratched.
Copy paper used is
too thick or the
surface is too slick.
Use one of the
designated copy
papers.
Set copy paper
correctly.
Replace the copy
paper.
Use copy paper that
is within specifications.
If the distance
between soil marks
on the copy is 94
mm, replace the
drum unit.
Use copy paper that
is within specifications.
NOTE:
If no improvement is detected on the copy quality after
using the remedies shown above, contact your Konica
service representative.
6-3
Page 72

Chapter 6 Troubleshooting
Error Codes & Remedies
This copier indicates error codes beginning with J, P, or F. When an
error occurs, take appropriate measures according to the code
indicated on the Print quantity/Magnification ratio window and the
mishandled paper label on the platen cover.
J Code
NOTES:
• Remove mishandled paper so that no torn paper remains
inside the machine.
• Do not touch or damage the drum surface.
• When removing mishandled paper, be sure to follow the
caution labels attached inside the machine to keep from
getting burned or experiencing an electrical shock.
Error code Meaning / Cause Remedy
J11/16
6-4
Copy paper is
mishandled in the
paper feed area of
the main body tray.
Withdraw the main
body tray and remove
the mishandled
paper.
Page 73

Chapter 6 Troubleshooting
Error Codes & Remedies (continued)
J Code (continued)
Error code Meaning / Cause Remedy
J12
J31
J32
Copy paper is
mishandled in the
paper feed area of the
option tray.
Copy paper is
mishandled in the
paper carrier.
Copy paper is
mishandled in the
fixing unit.
Open the left side
cover and remove
the mishandled
paper.
Open the upper unit
and remove the
mishandled paper in
the direction shown.
Open the upper unit
and remove the
mishandled paper.
6-5
Page 74

Chapter 6 Troubleshooting
Error Codes & Remedies (continued)
P Code
Error code Meaning / Cause Remedy
P11(*2)
(see NOTES
next page)
P12
P20
P24(*1)
(see NOTES
next page)
P24 (blinking)
P25
Irregular size paper
is loaded in the main
body tray.
Irregular size paper
is loaded in the
option tray.
The drum unit or
developing unit is not
loaded in the main
body.
The drum life is
nearly over and will
need to be replaced
after about 500 more
copies are made.
The drum life is over.
Copying will stop
immediately after
copy paper discharges.
Copying stops while
toner is being
replenished.
Load regular size
copy paper in the
tray.
Load regular size
copy paper in the
tray.
Open the upper unit
and load the drum
unit or developing
unit in the main body.
Prepare to replace
the new drum unit,
as copying will stop
when the drum life is
over.
Replace the drum
unit and initialize the
drum unit newly
loaded.
Wait until toner
replenishment is
completed.
6-6
P25
(blinking)
Toner is empty.
Copying stops
immediately after
copy paper discharges.
See p. 2-7 ~ p. 2-9.
Replenish the drum
unit with toner.
Page 75

Chapter 6 Troubleshooting
Error Codes and Remedies (continued)
P Code (continued)
Error code Meaning / Cause Remedy
P26
P27(*1)
P29(*1)
(blinking)
P29
P51
NOTES:
(1*) appears when Auto Clear function operates or when power
is turned on. To clear the signs, press any key on the
keypad or press [STOP/CLEAR] or [START PRINT].
(2*) appears when copying finishes or the Auto Clear function
operates or the power is turned on.
The developing unit is
not yet initialized.
Errors P24& P29
occur at the same
time.
Developer unit life is
nearly over.
If toner runs out, code
[P29] starts blinking
and copying stops.
The upper unit is
open.
Initialize developing
unit immediately.
Replace the developing/drum unit
soon.
Replace the developing unit soon.
Replace the developing unit, then
initialize the new
developing unit.
Close the upper unit
securely.
6-7
Page 76

Chapter 6 Troubleshooting
Error Codes and Remedies (continued)
F Code
Service Codes (F Codes) indicate machine conditions that require the
attention of your Konica service representative.
If an abnormal machine condition exists, an F Code will flash in the
Print quantity/Magnification ratio window, and the copier will remain in
the WAIT condition until power is turned off. Service Codes are listed
below:
Error code Meaning / Cause Remedy
F41, F42,
F43, F45,
F50, F52,
F54
F34, F35,
F36
F26
Copying cannot be
performed.
Trouble occurs in the
fixing unit.
The developing unit is
not initialized correctly.
Turn power switch
off, then turn it on. If
the code remains ,
contact your Konica
service representative.
Turn power switch
off, unplug copier
and contact your
Konica service
representative.
Initialize the developing unit again.
6-8
Page 77

Chapter 7
Powered by
Aleck Kholopov
Slash, Ltd
( 095 201 48 20
* slash@slash.ru
" http://www.slash.ru
Specifications
Specifications .................................................. 7-2
Page 78

Chapter 7 Specifications
Specifications
Type: Desk-top with stationary platen
Copying system: Dry Electrostatic Transfer
Originals: Books, Sheets, 3-Dimensional objects
Max. original size: Legal 8.5”x14”/257x364 mm
Max. copy size: Legal (8.5”x14”)
Bypass size: 8.5”x14”~5.5”x8.5”
Max. copy speed: 12 cpm (Letter)
First copy out speed: 7.9 seconds (Letter)
Copy paper weight: 16 lbs~24 lbs
Bypass 16 lb~32 lb
Magnification ratio: 1:1 same size (100%)
preset (129%,77%)
Zoom (70%~141%) 1% increments
Paper capacity: User-adjustable tray 250 sheets (20 lb)
Manual feed bypass - 1sheet
Multiple copying: Up to 99 copies
Copy exit tray: Capacity: 250 sheets
Warm-up time: Approximately 20 sec.
Power consumption: 10A (120V)
Stand-By: 10W (Heater On); 16W (Heater
Off)
Power source: AC Local Voltage and Frequency
Dimensions:
Weight: 61.7 lb/28 kg
Accessories: Paper Exit Tray/ User’s Manual/
23.0” (583) (W) x 21.1” (536) (D) x 13.5” (343) (H)
User’s Service Guide/
Installation Report/ Power Cord/
Toner Cartridge/ Cleaning Pad/ Developing
Unit/ Drum Unit
7-2
Specification are subject to change without notice.
Page 79

Index
Powered by
Aleck Kholopov
Slash, Ltd
( 095 201 48 20
* slash@slash.ru
" http://www.slash.ru
A
Add toner lamp ............................................................ 3-4
Auto clear function....................................................... 4-7
B
Basic copying .............................................................. 4-2
C
Caution labels....................................................... 1-2, 1-3
Cleaning pad ........................................................ 3-3, 5-4
Control panel ............................................................... 3-4
Copy counter function......................................... 4-7, 4-10
D
Developing unit............................................2-4, 3-3, 5-10
Drum unit .............................................................. 2-4, 5-6
E
Error codes .................................................................. 6-4
(enlarge) button ........................................................... 3-6
F
Fixing unit .................................................................... 3-3
Function codes .......................................................... 4-10
L
LENS MODE button .................................................... 3-6
M
MAGNIFICATION button ............................................. 3-6
Main body tray ............................................................. 3-2
Main body tray selection lamp ..................................... 3-4
Manual feed bypass tray .................................... 2-15, 3-2
N
Numeric keypad........................................................... 3-6
O
One-to-one (1:1) mode lamp ....................................... 3-5
Option tray ................................................................... 3-2
Option tray selection lamp ........................................... 3-4
Index-1
Page 80

Index
P
Paper exit tray .................................................... 2-10, 3-2
Paper monitoring lamp ................................................ 3-4
Paper trays ......................................................... 2-10, 3-2
Copy density control knob ........................................... 3-6
Platen cover................................................................. 3-2
Power .......................................................................... 3-2
Power save mode........................................................ 4-7
Power switch ............................................................... 3-2
Preset magnification indicators.................................... 3-4
Preset magnification mode lamp ................................. 3-5
Preset mode ................................................................ 4-5
Print quantity/Magnification ratio window .................... 3-5
Protective packing materials........................................ 2-2
R
READY indicator.......................................................... 3-5
RE (reduce) button ...................................................... 3-6
S
SELECT PAPER button............................................... 3-6
START PRINT button .................................................. 3-5
STOP/CLEAR button................................................... 3-5
T
Toner, adding ............................................................... 2-7
Toner cartridge............................................................. 3-3
U
Upper unit release button ............................................ 3-2
W
Warning ................................................................ 1-4, 1-5
Z
Zoom mode ................................................................. 4-6
Zoom mode lamp......................................................... 3-5
Index-2
Page 81

Konica Business T echnologies, Inc.
500 Day Hill Road W indsor, CT 06095
T elephone (860) 683-2222
OP-01-1312
Printed in Japan June 1998
 Loading...