

Page 1

Chapter 3 Operating Instructions
3-1. Machine configuration and function ................................. 3-1
3-1-1. Main Body......................................................................... 3-1
3-1-2. Control Panel ................................................................... 3-3
3-2. Copying operations ............................................................ 3-5
3-2-1. How to Make a Basic Copy ............................................. 3-5
3-2-2. Copy Using the Manual Feed BypassTray .................... 3-7
3-2-3. RE(Preset Ratio)Mode ..................................................... 3-7
3-2-4. Zoom Mode....................................................................... 3-8
3-2-5. Useful Functions.............................................................. 3-9
3-2-6. Setting Procedure .......................................................... 3-10
3-3. Troubleshooting.................................................................3-13
3-3-1. Copy Quality-Related Troubles .................................... 3-13
3-3-2. Error Codes and Remedies........................................... 3-14
3-4. Copier management ......................................................... 3-18
3-4-1. Periodic Maintenance .................................................... 3-18
3-4-2. Daily Maintenance ......................................................... 3-27
3-4-3. Copy Materials ............................................................... 3-29
Page 2
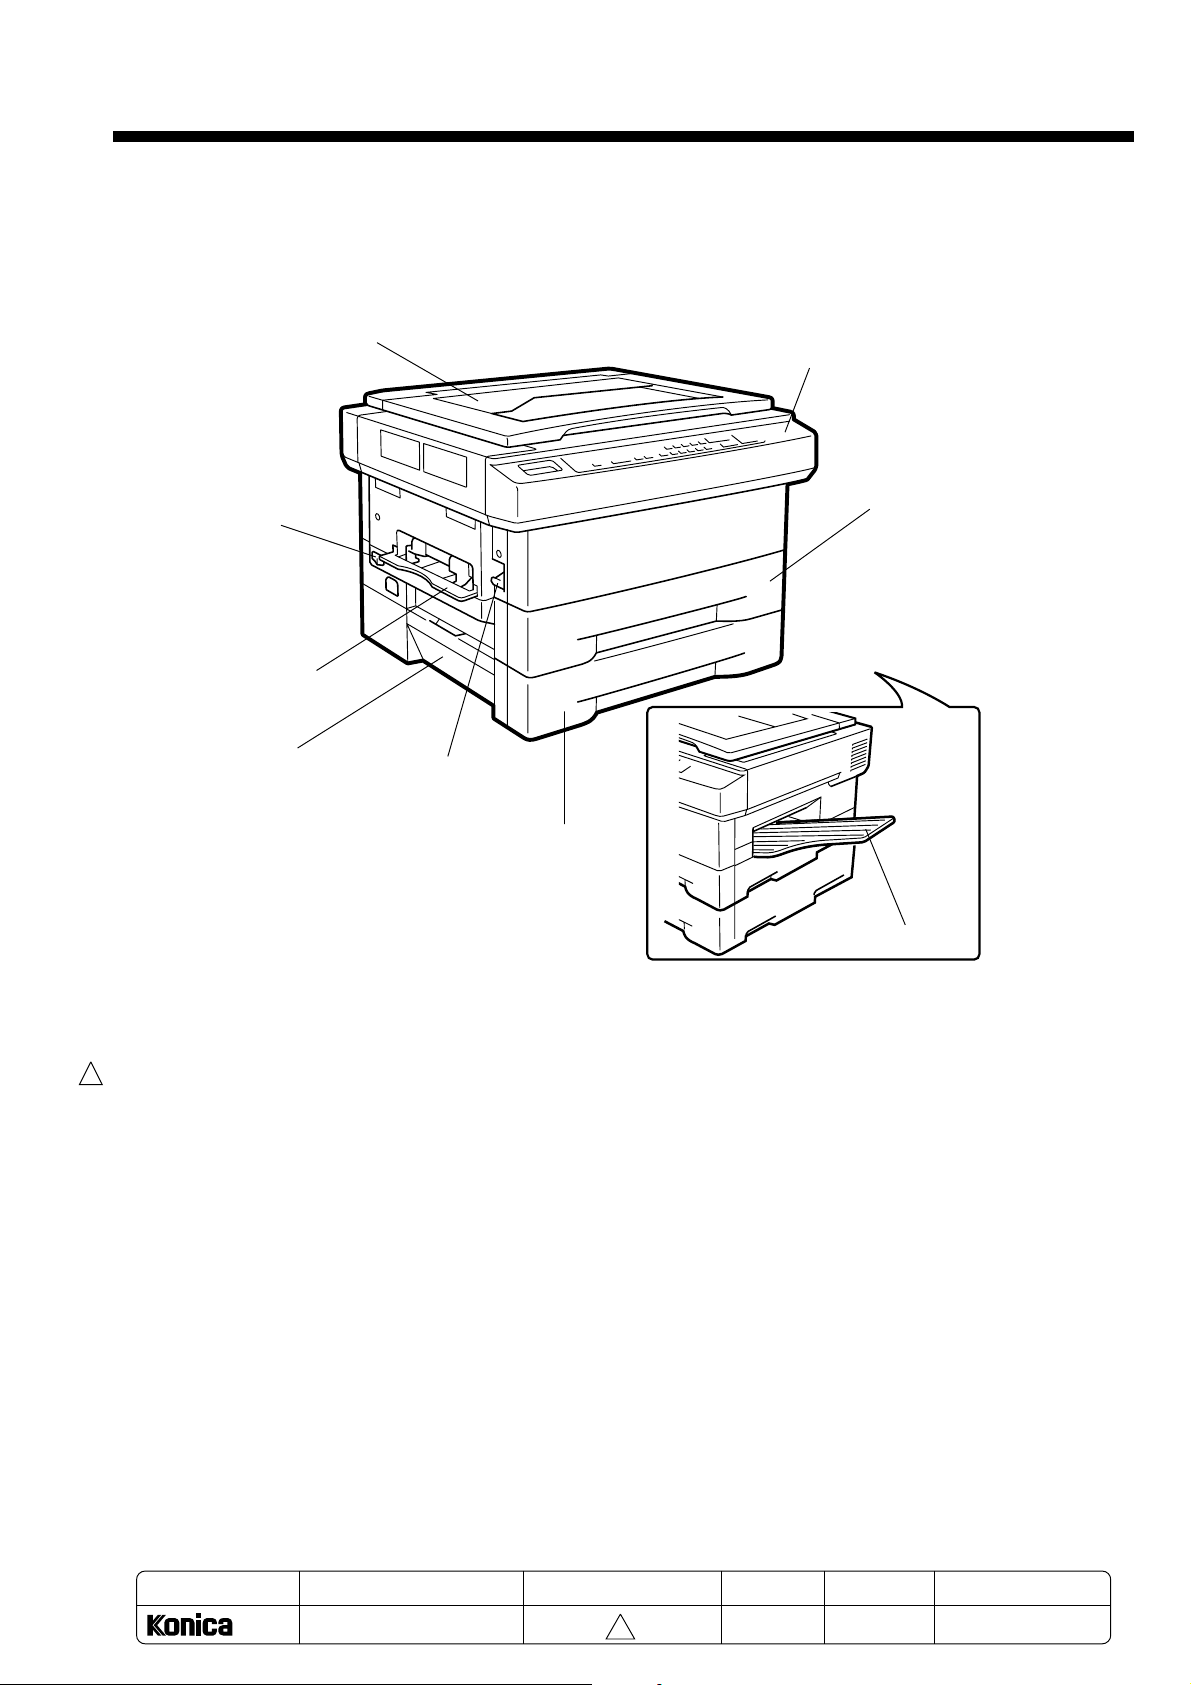
3-1. Machine configuration and function
3-1-1. Main Body
External Main Body
Chapter 3 Operating Instructions
Platen cover
Power switch
Manual feed
(Bypass)tray
Left side cover
Control panel
Main body tray
Upper unit
release button
Optional tray
Paper exit tray
Upper unit release button .... opens the upper unit.
Power switch ....................... turns copier power on or off.
Paper exit tray ..................... receives discharged copies.
1
Capacity: 50 sheets max.
Platen cover ........................ holds documents to be copied.
Control panel ....................... specifies copying conditions.
Main body tray..................... is an universal (user-adjustable) tray which holds up to 250 sheets of
various sizes.
Manual feed bypass tray ..... holds copy paper of various sizes ranging from A5 size to A4 size, and
of various types including OHP sheets.
Optional tray ........................ has the same function as the main body tray and enables paper
feeding in three different ways if used in combination with the other
two trays.
Left side cover ..................... opens to remove mishandled paper.
MODEL
1312
MANUAL
SERVICE HANDBOOK
REVISED EDITION
3-1
1
DATA
May.1999
PAGE
3-1
METHOD
REPLACEMENT
Page 3
Chapter 3 Operating Instructions
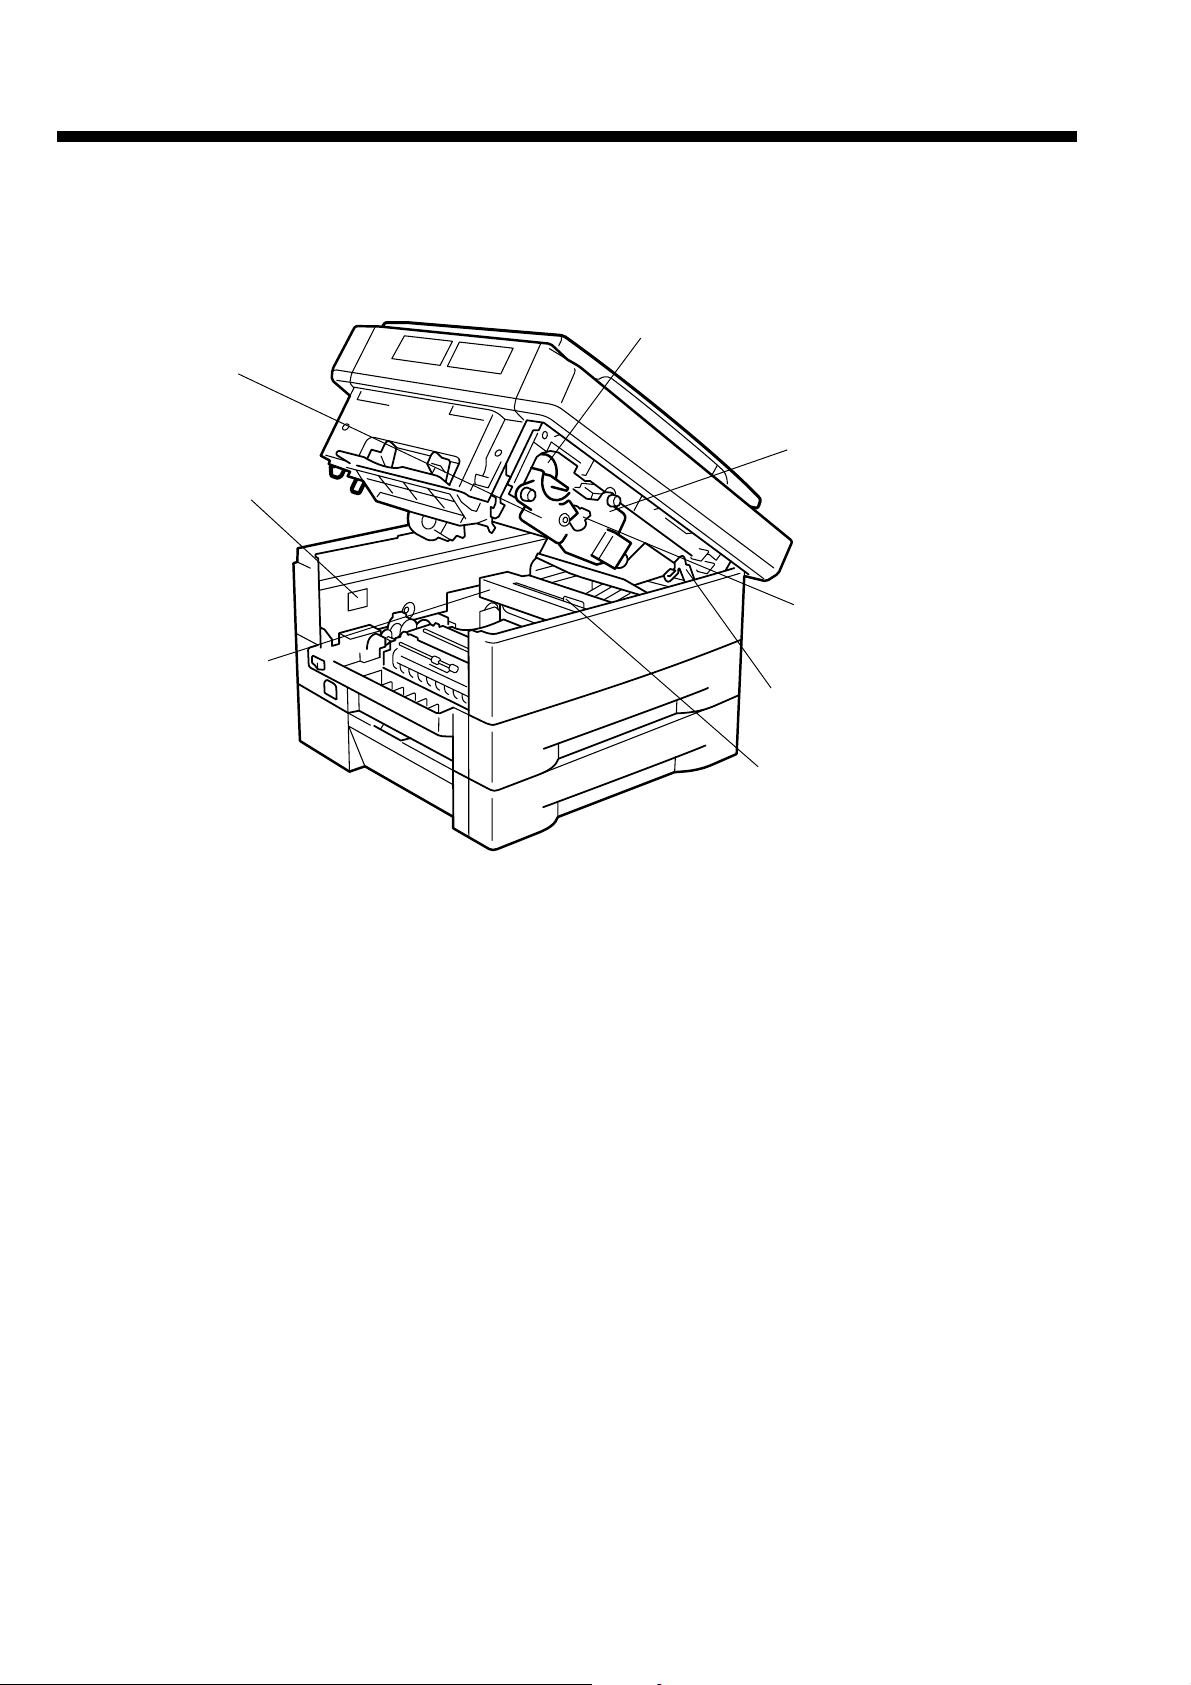
Internal Main Body
Developing
unit
Copy counter
Fixing unit
Toner cartridge
Drum unit
Toner
Recycle pipe
Stopper lever
Cleaning pad
Cleaning pad .................. cleans the fixing roller and needs periodical replacement.
Drum unit........................ is electrically charged to form the copy image. This unit needs periodical
replacement.
Developing unit .............. prints images to the drum. This unit needs periodical replacement.
Toner cartridge ............... is charged with toner and needs to be replaced when it runs out of toner.
Fixing unit ....................... is provided with a fixing roller to fix images (toner) to copy paper by
heating up and applying pressure.
Copy counter .................. indicates the total number of copies.
Toner recycle pipe .......... returns toner remaining in the drum unit to the developing unit to reuse
it.
Stopper lever .................. is moved to close and lock the upper unit.
3-2
Page 4
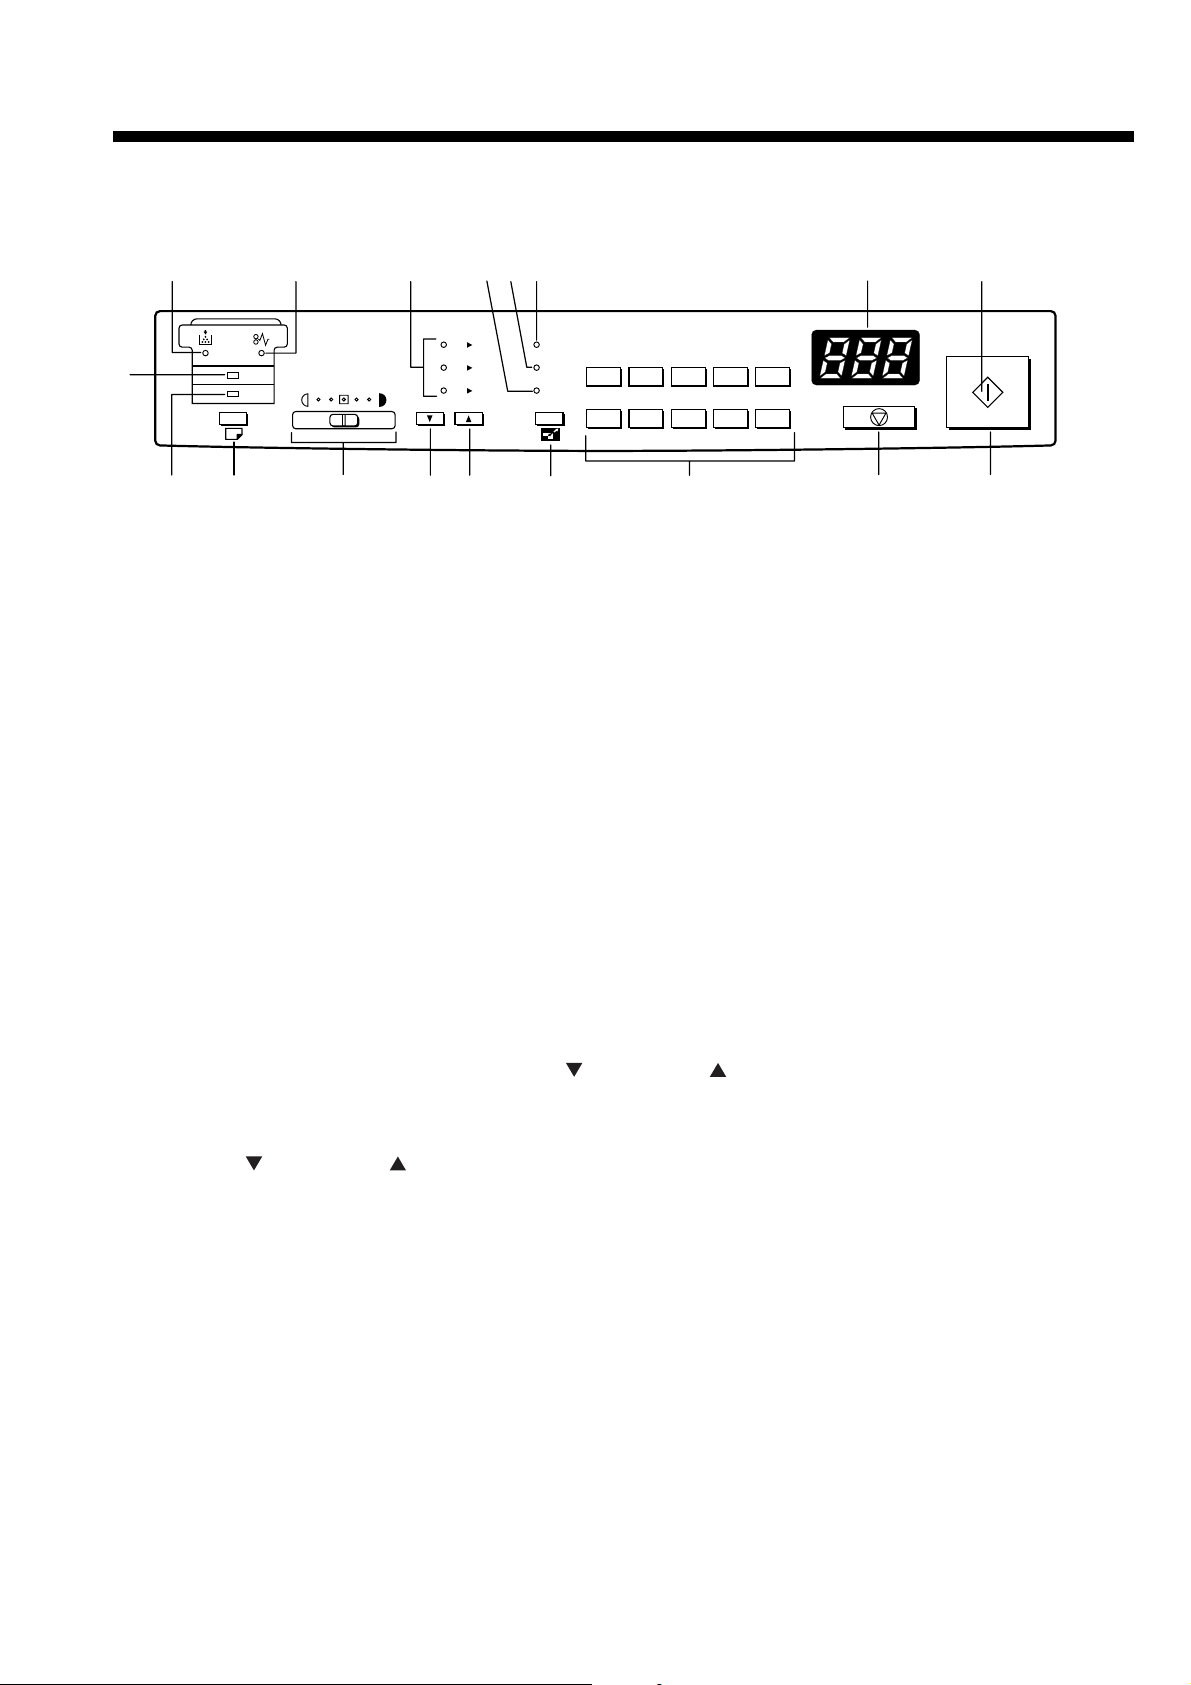
3-1-2. Control panel
Chapter 3 Operating Instructions
12
3
18
4
17
A5 A4
B4 A4
A4
1516
87
6
ZOOM
RE
1 2 3 4 5
1 : 1A5
6 7 8 9 0
RECALL
14
5
9
1. Add toner lamp (Blinking)
This lamp blinks when toner is running short, then the copier stops copying automatically to
replenish the drum unit with toner. Wait until the toner supply is completed.
2. Paper misfeed lamp (Blinking)
This lamp blinks when a paper misfeed occurs.
Remove misfed paper.
3. Main body tray selection lamp (Lighting/Blinking)
This lamp lights when the main body tray is selected, and blinks when no copy paper is left.
10
1213
11
4. Optional tray selection lamp (Lighting/Blinking)
This lamp lights when the optional tray is selected, and blinks when no copy paper is left.
5. RE mode indicators (Lighting)
When making reduced or enlarged copies in the RE (preset ratio) mode, the lamp corresponding to the selected preset ratio lights.
6. ZOOM mode lamp (Lighting)
This lamp lights when the ZOOM mode is selected.
Set the desired magnification ratio using the [ (reduce)] or [ (enlarge)] button.
7. RE mode lamp (Lighting)
This lamp lights when the RE (preset ratio) mode is selected.
Use the [ (reduce)] or [ (enlarge)] button to select a RE ratio.
8. 1 : 1 mode lamp (Lighting) ;
This lamp lights up when 1:1 (full-size) mode is selected.
Select this mode to make copies of the same size as the original.
9. Copy quantity/Magnification ratio display
Displays the number of copies or the magnification ratio you set.
10. READY indicator
This indicator lights in green when the copier is ready for copying. During warm-up or when
the copier is not ready for copying, the indicator lights in orange.
When the copier is in the power save mode, the orange lamp blinks.
3-3
Page 5

Chapter 3 Operating Instructions
11. [COPY] button
Press this button to start copying, while the READY indicator lights in green.
If you press this button during warm-up, the copier automatically starts copying as soon as the
system gets ready for copying.
12. [STOP/CLEAR] button
Press this button to cancel the entered copy quantity or to stop copying in progress.
13. Ten-key pad
Press to enter numeric values.
14. [MAGNIFICATION MODE] button
Press to select a magnification mode.
Pressing this button will switch the magnification mode in the following order:
“1 : 1" -> “RE” -> “Zoom” -> “1 : 1”...
“1 : 1”: Full-size mode (Full-size (1 : 1) copy)
“RE”: Preset ratio mode (Use the [ (reduce)] or [ (enlarge)] button to select one of the
three preset ratio types.)
“Zoom”: Zoom mode (Use the [ (reduce)] or [ (enlarge)] button to set the desired magnifi-
cation ratio.)
15. [ (enlarge)] button
Used to select a preset ratio or to set the desired ratio (from 70 to 141%).
16. [ (reduce)] button
Used to select a preset ratio or to set the desired ratio (from 70 to 141%)
17. Copy density control knob
Slide the knob to the right to adjust exposure when originals are too light or slide the knob to
the left to adjust for dark originals.
18. [CASSETTE] button
Used to select a paper tray (only when the optional tray is mounted in the copier).
3-4
Page 6
Chapter 3 Operating Instructions
3-2. Copying operations
This Section describes the basic copying procedure and how to use various functions.
3-2-1. How to Make a Basic Copy
1. Turn on the power switch.
2. Open the platen cover.
3. Place an original document FACE DOWN on the
platen glass.
✎ Align the original to the scale on the right side.
B4
A4
B5
B6
Postcard
Postcard
B6
B5
A4
B4
4. Select a paper tray by pressing the [CASSETTE]
button.
✎ The Manual feed bypass tray is always used
irrespective of the selection when paper is set in it.
✎ If the optional tray is not mounted on the copier,
skip here and proceed to step 5.
3-5
Page 7
Chapter 3 Operating Instructions
A
A
A
2
7
5. Set copying conditions.
(1) Set the copy contrast by sliding the Copy density control
knob.
✎ Set the control knob at the midpoint for normal density.
Slide the knob to the right for darker copy image.
Slide the knob to the left for lighter copy image.
(2) Set the desired magnification.
✎ To make full-size copies, press the [MAGNIFICATION
MODE] button to select “1 : 1”.
Each time you press the [MAGNIFICATION] button, the
magnification mode changes in the following order: “1 :
1” -> “RE” -> “Zoom” -> “1:1” ....
✎ To make reduced/enlarged copies, refer to p. 3-7 or p. 3-
8.
A5 A4
B4 A4
A4
ZOOM
RE
1 : 1A5
A5
B4
A4
1
6
(3) Enter the desired copy quantity using the ten-key pad.
✎ To change the copy quantity, press the [STOP/CLEAR]
button and re-enter it.
6. Press the [COPY] button.
The copier will start copying.
✎ To stop copying, press the [STOP/CLEAR] button.
OM
E
1 2 3 4 5
: 1
6 7 8 9 0
RECALL
3-6
Page 8
Chapter 3 Operating Instructions
2
7
2
7
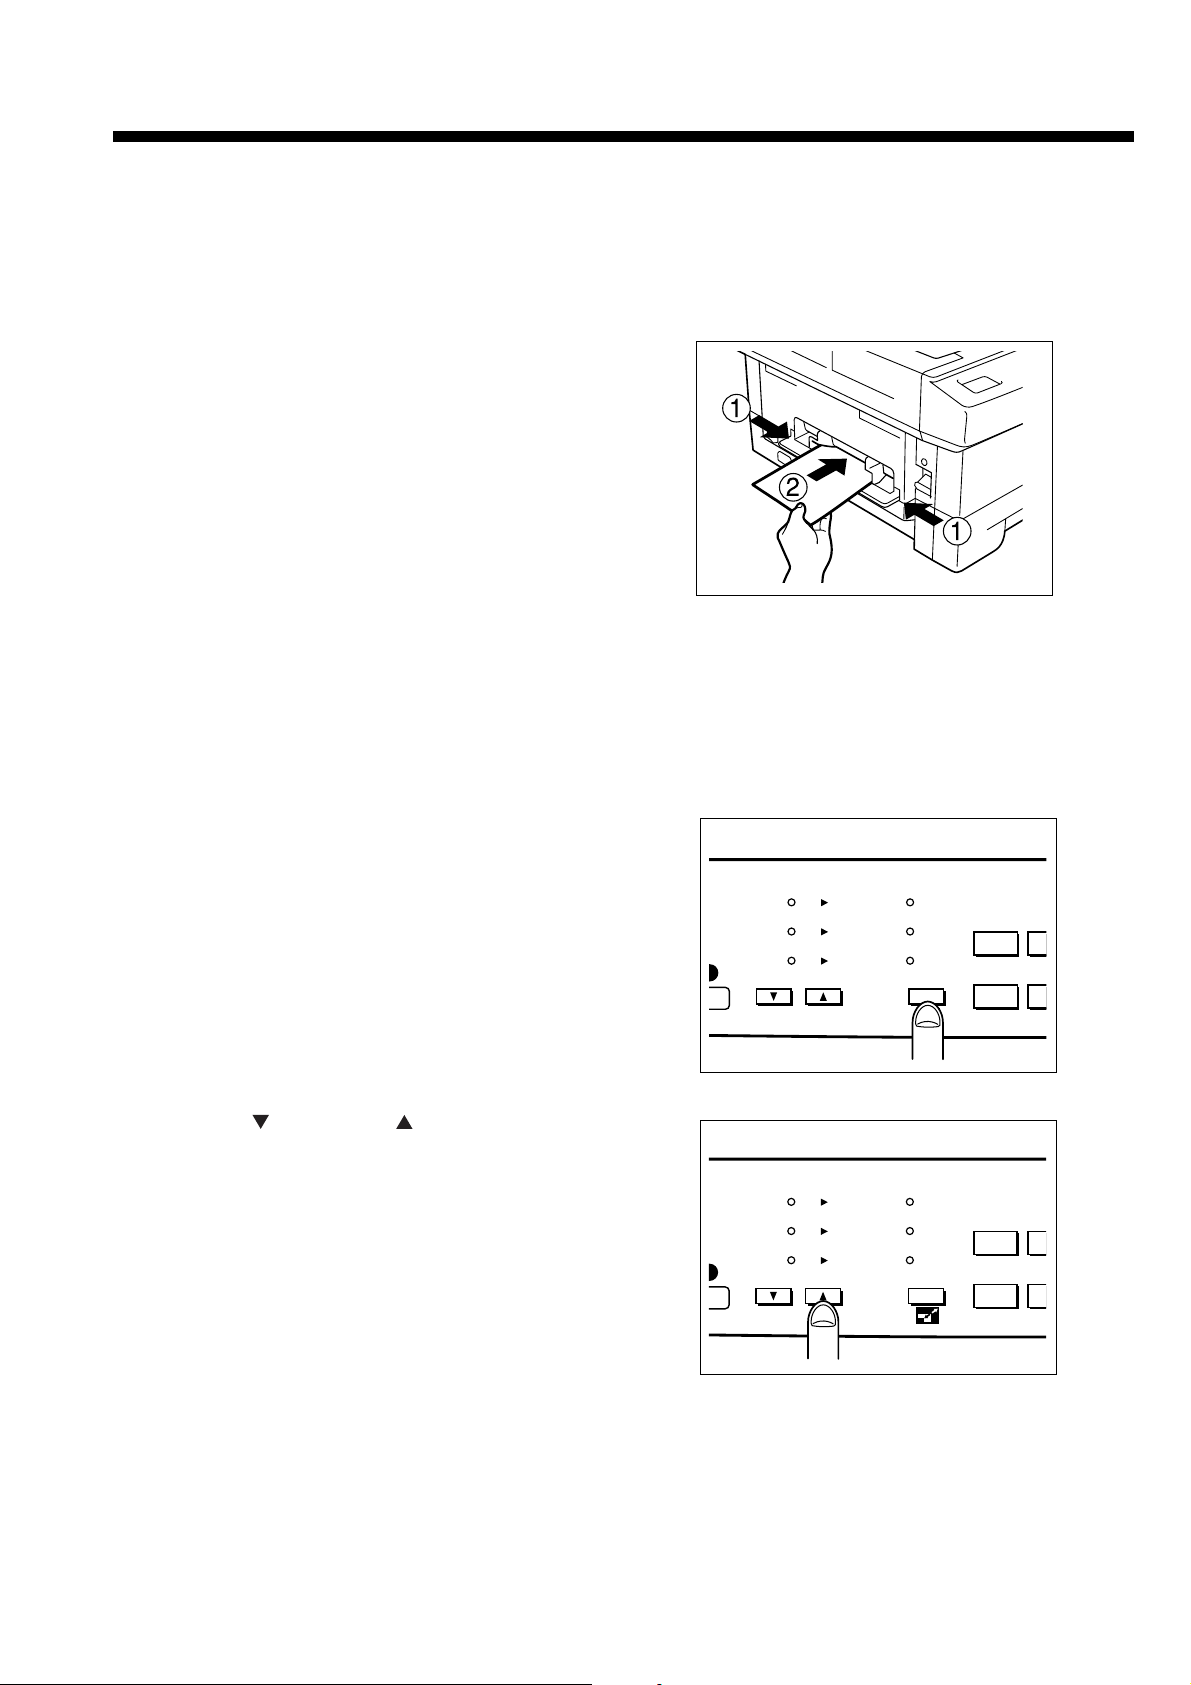
3-2-2. Copy Using the Manual Feed Bypass Tray
Use the Manual feed bypass tray to copy onto paper other than the sizes loaded in main body and
optional trays, paper of the irregular size, or onto OHP films in the single-sheet mode.
Note:
Do not use wrinkled or warped paper; otherwise a paper misfeed may occur.
1. Adjust the paper guides of the Manual feed bypass tray to
the paper and insert it all the way.
✎ Paper is automatically fed into the copier by the roller
as it is inserted.
✎ Placing copy paper in the manual-feed tray causes the
copier to select it automatically.
2. Set copying conditions. Refer to p. 3-6.
3. Press the [COPY] button.
The copier will start copying.
3-2-3. RE (Preset Ratio) Mode
Use RE (preset ratio) mode to make enlarged or reduced copies by selecting one of the preset
magnification types. This section exclusively describes how to select a preset ratio, supposing that
any other preparations for copying have been made.
1. Press the [MAGNIFICATION MODE] button to select “RE”
(preset ratio) mode.
2. Press the [ (reduce)] or [ (enlarge)] button to select
the desired magnification ratio.
A5 -> A4: 141%
B4 -> A4: 82%
A4 -> A5: 71%
A5 A4
B4 A4
A4
A5 A4
B4 A4
A4
ZOOM
RE
1 : 1A5
ZOOM
RE
1 : 1A5
1
6
1
6
3-7
Page 9
Chapter 3 Operating Instructions
2
7
2
7
3-2-4. Zoom Mode
Use this mode to get copy image enlarged or reduced to the desired size.
This section exclusively describes how to set the desired magnification ratio, supposing that any
other preparations have been made. See the following table for your reference.
Original
Copy paper size
document
size
B4
A4
B5
A5
1. Press the [MAGNIFICATION MODE] button to select
“ZOOM”.
The 3-digit magnification ratio will appear for 3 seconds,
then change to the copy quantity display.
✎ If 82% is selected, “082” will be displayed.
If 115% is selected, “115” will be displayed.
A4
82
100
115
141
B5
71
86
100
122
A5
71
82
100
A5 A4
B4 A4
A4
ZOOM
RE
1 : 1A5
1
6
2. Using the [ (reduce)] or [ (enlarge)] button, set the
desired magnification ratio.
✎ While pressing the [ (reduce)] or [ (enlarge)]
button, go on the magnification ratio.
✎ Each time you press the [ (reduce)] or [ (reduce)]
button, the zoom ratio increases or decreases in 1%
steps. Hold it down to scroll to the desired ratio.
A5 A4
B4 A4
A4
ZOOM
RE
1 : 1A5
1
6
3-8
Page 10

Chapter 3 Operating Instructions
3-2-5. Useful Functions
This section describes various useful functions provided for the copier. For the operational procedure, see p. 3-10.
■ Auto Clear
If no command is entered from the control panel for a specified period of time, all the settings you
made will be cleared automatically and the copier will restore the default settings.
Default
Copy quantity: 1
Magnification: 1:1
Paper tray: Main body tray
You can change the time elapsed before the Auto Clear function operates. (30, 60, 90, or 120
seconds) See p. 3-10, 3-11.
■ Power Save mode
This mode enables you to conserve energy by lowering the fixing temperature automatically after
a certain period of copier inactivity.
In the Power Save mode, all the lamps and indicators are off, except for the blinking READY
indicator. To return the copier to the standby state, press any button on the control panel.
Initially, the Power save mode is set to function after 30 minutes of copier inactivity.
You can change the time elapsed before the Power Save function operates. (2, 5, 30, 60, 120 or
240 minutes)
Contact your service centre to use this function.
■ Copy Counter Read
This function enables you to check the total number of copies you have made so far.
The total number of copies will be indicated on the Copy Quantity/Magnification ratio display in
six digits divided into two; first three figures, and then last three figures.
3-9
Page 11

Chapter 3 Operating Instructions
3-2-6. Setting Procedure
How to Set Conditions of Copier Functions
This section describes the procedure of the following settings:
1. Setting Tray paper size
2. Setting Auto Clear function
3. Initializing the drum unit and developing unit
4. Setting the automatic paper-length check function
In this procedure we suppose that the copier is already on and ready for copying (on standby).
✎ Be sure to perform the paper size setting when loading paper of a different size into the tray.
✎ Initialize the drum unit when replacing it.
✎ Initialize the developing unit when installing the copier or replacing the developing unit.
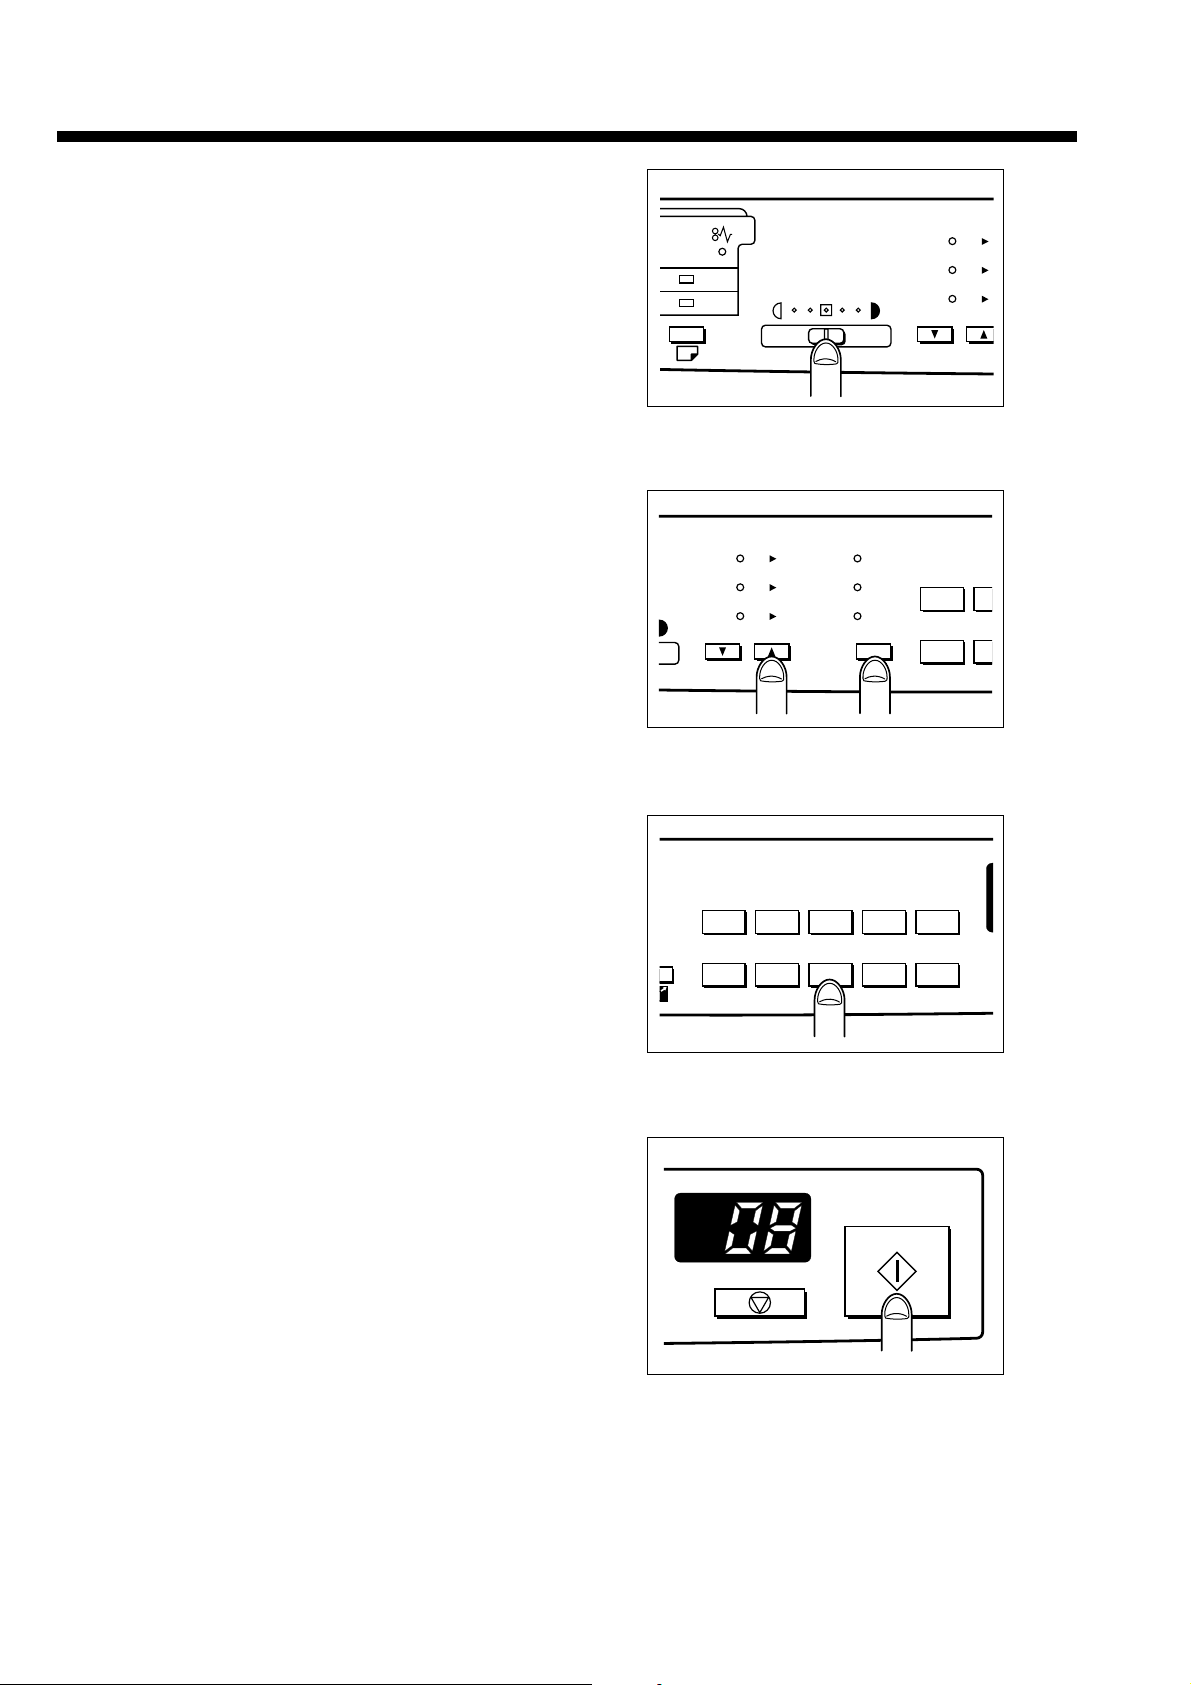
1. Press the [CASSETTE] button for five seconds.
The copier will turn to the condition for designating the initial
settings.
2. Referring to the table on the next page, enter the desired
code using the ten-key pad.
Ex.: 3 0
(Designates 30 seconds of the time elapsed before the Auto
Clear operates.)
3. Press the [COPY] button.
The entered value will be established.
4. Press the [STOP/CLEAR] button.
The copier will return to the standby state.
5
0
RECALL
3-10
Page 12

■ Function Code Table
Tray paper size
Main body tray
C00 LT (letter)
C01 LG (regal)
C02 A4
C03 B5
C04 A5
C05 F4-1: 8”x13” (203x330mm)
C06 F4-2: 8.5”x13” (216x330mm)
C07 F4-3: 8.25”x13” (210x330mm)
C08 F4-4: 206x337mm
Optional tray
C10 LT (letter)
C11 LG (regal)
C12 A4
C13 B5
C14 A5
C15 F4-1: 8”x13”(203x330mm)
C16 F4-2: 8.5”x13”(216x330mm)
C17 F4-3: 8.25”x13”(210x330mm)
C18 F4-4: 206X337mm
Time elapsed before the Auto Clear operates
C30 30sec
C31 60sec (Default is underlined.)
C32 90sec
C33 120sec
Copy counter read
C40 Read the main body copy count
C41 Read the drum body copy count
C42 Read the developing unit copy count
Initializing the drum unit and developing unit
C50 Initialize the drum unit.
C51 Initialize the developing unit.
Setting the automatic paper-length check function
C60 OFF
C61 ON (Default is underlined.)
C62 ON (LT width erase)
Chapter 3 Operating Instructions
3-11
Page 13

Chapter 3 Operating Instructions
How to Read the Copy Counter
This section describes the procedure for reading the copy counter.
In this section we suppose that the copier is already on and ready for copying (on standby).
1. Press the [CASSETTE] button for five seconds.
The copier will turn to the condition for designating the initial
settings.
2. Using the ten-key pad, enter “4” then “0”.
3. Press the [COPY] button.
The first three figures of the total number of copies will be
displayed for about three seconds,
then the last three figures following an interval of one
second.
(Example:1900 copies)
Displayed for
3 seconds
Interval
1 second
Displayed for
3 seconds
4. Press the [STOP/CLEAR] button.
The copier will return to the standby state.
5
0
RECALL
3-12
Page 14

3-3. Troubleshooting
3-3-1. Copy Quality-Related Troubles
Problems Causes Remedies
Copy image is too light.
Copy image is too dark.
No image is copied.
(Blank sheet)
The back page of the
copy is dirty.
The copy contrast is not
set properly.
Toner is scarce.
A large number of highcontrast copies are made
continuously.
Copy paper is damp.
The copy contrast is not
set properly.
The developing unit is
not set correctly.
The transfer roller is dirty.
Adjust the copy contrast
properly.
Check to see if the add
toner lamp is lit.
Replace the toner cartridge if required.
Replace the copy paper.
Adjust the copy contrast
properly.
Set the developing unit
correctly.
Clean the roller with a dry
cloth.
Chapter 3 Operating Instructions
Transfer roller
Copies show dark stripes
in vertical direction.
Dark parts are not
copied evenly.
No image is copied at
specific parts.
The same stains are
repeatedly found on one
copy.
Copy image can be
rubbed off.
If the remedies listed above cannot improve the copy quality, as listed above,
consult with your Service Centre.
The cleaning pad life is
over.
Copy paper other than
the designated ones is
used.
Copy paper is damp.
The edge of the copy
paper is skew.
Copy paper is damp.
Copy paper other than
the designated ones is
used.
The drum has been
damaged.
Copy paper is too slick or
too thick.
Replace the cleaning
pad.
Use the designated copy
paper.
Set copy paper correctly.
Replace copy paper.
Use the designated copy
paper.
If the distance between
stains is 94 mm, replace
the drum unit.
Use the designated copy
paper.
3-13
Page 15

Chapter 3 Operating Instructions
3-3-2. Error Codes and Remedies
This copier indicates error codes beginning with J, P or F. When an error occurs, take appropriate
measures according to the code indicated on the Copy quantity / Magnification ratio display and the
misfed paper label on the platen glass.
■ J Code
3
5
4
1
2
Note:
• Remove misfed paper so that no torn paper remains inside the machine.
• Do not touch or damage the drum surface.
• When removing misfed paper, be sure to follow the caution labels attached inside the machine
to avoid getting burned or electrical shock.
Error code Meaning / Causes Remedies
J11/ 16
Copy paper is misfed in
the paper feeder of the
Open the upper unit and
remove the misfed paper.
main body tray.
J12
Copy paper is misfed in
the paper feeder of the
optional tray.
Open the left side cover
and remove the misfed
paper.
3-14
Page 16

Error signs Meaning / Causes Remedies
J31
Copy paper is misfed in
the paper carrier.
Open the upper unit and
remove the misfed paper.
Be sure to pull the copy
paper as illustrated
below. Drawing paper in
the opposite direction
might soil the copy
image.
Chapter 3 Operating Instructions
J32
Copying paper is misfed
in the fixing unit.
Open the upper unit and
remove the misfed paper.
3-15
Page 17

Chapter 3 Operating Instructions
■ P Code
Error codes Meaning / Causes Remedies
*2
P11
P12
P20
Paper of a different size is
loaded in the main body tray.
Paper of a different size is
loaded in the optional tray.
The drum unit or developing
unit is not mounted on the
copier main unit.
Load paper of the correct size
into the tray.
Load paper of the correct size
into the tray.
Open the upper unit, and
install the drum unit or developing unit in the copier main
unit.
*1
P24
The copy count of the drum unit
Get a new drum unit.
has reached 24,500. The drum
unit needs to be replaced
before long.
P24(Blinking)
The copy count of the drum unit
has reached 25,000.
Replace the drum unit with a
new one, then initialize it.
After discharging copy paper,
the copier will stop copying
automatically.
P25
Copying stops temporarily
because toner is being replen-
Wait until the toner supply is
completed.
ished.
P25(Blinking)
Toner has run out. After discharging copy paper, the copier
Replace the toner cartridge
with a new one.
will stop copying automatically.
P26
The developing unit is not yet
Initialize the developing unit.
initialized.
*1
P27
The errors [P24] and [P29]
occur at the same time.
The developing unit and the
drum unit need to be replaced
before long. Get new ones.
*1
P29
The copy count of the develop-
Get a new developing unit.
ing unit has reached 25,000.
The developing unit needs to
be replaced before long.
P29(Blinking)
The previously displayed [P29]
blinks when the developing unit
is out of toner. The copier will
Replace the developing unit
with a new one, then initialize
it.
automatically stop copying after
discharging copy paper.
P51
The upper unit is open.
Close the upper unit securely.
*1: Appears when the Auto Clear function operates or copier power is turned on. To clear
the code, press any key of the ten-key pad, the [STOP/CLEAR] button, or the [COPY]
button.
*2: Appears when copying job finishes, the Auto Clear function operates, or copier power
is turned on.
3-16
Page 18

■ F Code
CAUTION
If the F code number is displayed in the Copy quantity/Magnification ratio
display, immediately switch off the copier and disconnect from the power
socket. Contact your Service Centre and inform the Report Code.
Error codes Meaning / Causes Remedies
Chapter 3 Operating Instructions
F41,F42,F43,F45,
F50,F52,F54,
F34,F35,F36
F26
Trouble has occurred
inside the copier.
Trouble has occurred in
the fixing unit.
The developing unit is
not initialized correctly.
Turn off the power
switch, then turn it on
again. If the error code
remains displayed in
spite of this action,
contact your Service
Centre.
Turn off the copier, and
unplug it from the
outlet.Contact your
Service Centre.
Initialize the developing
unit over again.
3-17
Page 19

Chapter 3 Operating Instructions
3-4. Copier management
3-4-1. Periodic Maintenance
Adding Toner and Replacing the Cleaning Pad
When toner runs out, the code [P25] appears on the Copy quantity / Magnification ratio display
and the Add Toner lamp blinks. (See p. 2-14.)
Replace the toner cartridge and the cleaning pad following the procedure below.
Adding Toner
Replace the toner cartridge following the procedure described on p. 2-14 to p. 2-15.
Replacing the Cleaning Pad
1. While holding the upper unit with one hand, press the upper
unit release button to open the upper unit.
Note:
• Use care to prevent the upper unit from popping up.
• Open the upper unit till it clicks.
Do not expose the drum to light for longer than 5 minutes;
otherwise the copier may cause copy image problems.
2. Push the cleaning pad to the rear, then remove the cleaning
pad by drawing it up on the front side.
3. Insert a new cleaning pad to the rear, then slide it to the
front to install firmly.
Note:
After reinstalling a new cleaning pad, pull it upwards to
check that it is firmly installed.
If not firmly installed, it may lead to dirt appearing on copy
images and misfed paper.
upper unit
release button
3-18
Page 20

4. Close the upper unit by picking up the stopper lever while
pushing up the upper unit slightly.
5. Close the upper unit securely, hold down the central part
1
of the upper unit.
Chapter 3 Operating Instructions
MODEL
1312
MANUAL
SERVICE HANDBOOK
REVISED EDITION
3-19
1
DATA
May.1999
PAGE
3-19
METHOD
REPLACEMENT
Page 21

Chapter 3 Operating Instructions
Replacing the Drum Unit
The drum unit has a lifespan of approx. 25,000 copies.
When the copy count reaches 24,500, the code [P24] appears on the Copy quantity / Magnification ratio display to indicate that the life of the drum unit is reaching its end, and when 25,000
copies are made, [P24] blinks and copying jobs will no longer be available.
When the code [P24] appears, contact your Service Centre.
Note:
• Install the new drum unit, then reinstall the developing unit in order; otherwise the drum may
be damaged.
• Initialize the drum unit after installing it.
☞ See p. 2-13.
1. While holding the upper unit with one hand, press the upper
unit release button to open the upper unit.
Note:
• Use care to prevent the upper unit from popping up.
• Open the upper unit till it clicks.
2. Remove the developing unit.
(1) Move the toner recycle pipe to the RELEASE position.
(2) Remove the developing unit fixing screw.
upper unit
release button
3-20
Page 22

(3) Slide the developing unit to the left, then pull it out.
3. Remove the drum unit.
(1) Remove the drum unit fixing screw.
Chapter 3 Operating Instructions
(2) Pull out the drum unit.
4. Install a new drum unit.
(1) Unpack a new drum unit.
1
(2) Insert the drum unit into the main body.
Note:
Align the blue mark on the drum unit with that on the
main body, when installing the drum unit.
(3) Secure the drum unit with the drum unit fixing screw.
MODEL
1312
MANUAL
SERVICE HANDBOOK
REVISED EDITION
3-21
1
DATA
May.1999
PAGE
3-21
METHOD
REPLACEMENT
Page 23

Chapter 3 Operating Instructions
(4) Remove the shield tape from the toner recycle pipe.
(5) Move the toner recycle pipe to the RELEASE position.
5. Reinstall the developing unit.
1
(1) Insert the developing unit into the copier main body.
Note:
Align the blue mark on the develping unit with that on the
main body, when reinstalling the drum unit.
(2) Secure the developing unit with the developing unit
fixing screw.
(3) Return the toner recycle pipe to the SET position.
MODEL
1312
MANUAL
SERVICE HANDBOOK
REVISED EDITION
3-22
1
DATA
May.1999
PAGE
3-22
METHOD
REPLACEMENT
Page 24

6. Close the upper unit by picking up the stopper lever while
pushing up the upper unit slightly.
7. Close the upper unit securely, hold down the central part
1
of the upper unit.
Chapter 3 Operating Instructions
8. Initialize the drum unit according to the appropiate procedure.
☞ See p. 2-13
Cleaning the fixing roller
1
1. After replacing a drum unit, make10 copies of the
“Black line pattern”.
2. Set one copy of the “Black line pattern” onto the
sheet bypass tray with its face down and the
arrow indication facing the manual feed inlet.
3. Press [START PRINT] button.
4. Repeat steps 2 and 3 for the rest of the 10 copies
made in step 1.
MODEL
1312
SERVICE HANDBOOK
MANUAL
REVISED EDITION
3-23
1
DATA
May.1999
PAGE
3-23
METHOD
REPLACEMENT
Page 25

Chapter 3 Operating Instructions
Replacing the Developing unit
The developing unit has a lifespan of approx. 25,000 copies.
When the copy count reaches 25,000, the code [P29] appears on the Copy quantity / Magnification ratio display to indicate that the life of the developing unit is reaching its end, and when the
developing unit is out of toner, [P29] blinks and copying job will no longer be available.
When the code [P29] appears, contact your Service Centre.
Note:
After installing a new developing unit, add toner, replace the cleaning pad, and initialize the
developing unit in order.
1. While holding the upper unit with one hand, press the upper
unit release button to open the upper unit.
Note:
• Use care to prevent the upper unit from popping up.
• Open the upper unit till it clicks.
2. Remove the developing unit.
(1) Move the toner recycle pipe to the RELEASE position.
(2) Remove the drum unit fixing screw.
upper unit
release button
3-24
Page 26

(3) Pull out the developing unit.
3. Install a new developing unit.
(1) Unpack the developing unit.
(2) Slant the developing unit with the gear side down-
wards, and shake it up and down about four or five
times.
(3) Then hold the developing unit level, and shake it from
side to side about four or five times.
Chapter 3 Operating Instructions
1
(4) Remove the protective cover, then pull off the
protective sheet and the mat in a downward direction.
Note:
It is not necessary to keep the protective cover,
protective sheet and the mat.
(5) Peel the tape fixing the magnet tape, then carefully
remove the magnet tape by slipping it down slowly.
Mat
Protective cover
Protective sheet
MODEL
1312
MANUAL
SERVICE HANDBOOK
REVISED EDITION
3-25
1
DATA
May.1999
PAGE
3-25
METHOD
REPLACEMENT
Page 27

Chapter 3 Operating Instructions
(6) Remove the pipe cover.
Note:
Remove the pipe cover slowly to prevent the developer
from being scattered.
(7) Insert the developing unit in the main unit.
Pipe cover
(8) Secure the developing unit with the developing unit fixing
screw.
(9) Return the toner recycle pipe to the SET position.
4. Supply toner.
☞ See p. 2-14.
5. Replace the cleaning pad.
☞ See p. 2-15.
6. Initialize the developing unit according to the appropriate procedure.
☞ See p. 2-10.
3-26
Page 28

3-4-2. Daily Maintenance
To maintain the optimum copy quality, perform the following maintenance periodically.
CAUTION
Never use paint solvents, such as benzine and thinners
Cleaning the Platen Glass and the Platen Cover
Chapter 3 Operating Instructions
Wipe them with a clean, soft cloth.
If dirt is hard to remove, wipe it off with a cloth moistened
with alcohol.
✎ Always keep the platen glass and cover clean; other-
wise dirty marks may be copied.
Cleaning the Paper Carrier
Open the upper unit, wipe the paper carrier with a clean soft
cloth.
Note:
• Use care to prevent the upper unit from popping up.
• Open the upper unit till it clicks.
✎ Always keep the paper carrier clean; otherwise dirty
marks may be copied.
Platen cover
Platen glass
3-27
Page 29

Chapter 3 Operating Instructions
Cleaning the Corona Wire
Clean the corona wire if any dirty marks appear on copies. Use the wire cleaner provided in the
main body tray to clean the wire. The corona wire is inside the drum unit slot.
Note:
• It is necessary to remove the drum unit and the developing unit from the main body, when
cleaning the corona wire. Reinstall the drum unit and the developing unit in order; otherwise
the drum may be damaged. See p. 3-20 to p. 3-21.
• Do not touch the drum surface. Touching the drum may mark or scratch it.
• Do not expose the drum unit to light for longer than 5 minutes.
1. Remove the drum unit from the main body.
2. Withdraw the main body tray and take out the wire cleaner.
3. Insert the wire cleaner into the slot of the drum unit.
4. Slide the wire cleaner to the left and right four or five times
to clean the corona wire.
5. Reinstall the drum unit and the developing unit in order.
3-28
Page 30

Chapter 3 Operating Instructions
3-4-3. Copy Materials
Toner Cartridge
Toner cartridge is capable of making approx. 5,000 prints.
Toner cartridge ............ 1pc
Cleaning pad ............... 1pc
Drum Unit
Drum unit is capable of making approx. 25,000 prints.
Drum unit .................... 1pc
Developing Unit
Developing unit is cpapble of making approx. 25,000 prints.
Developing unit ........... 1pc
Spare Parts Holding Period
All the spare parts necessary for maintaining your copier are available for at least 7 years after
the production of the same model has been discontinued.
Package Contents
Drum unit (already installed in the main body) ......... 1
Developing unit ......................................................... 1
Toner cartridge.......................................................... 1
Paper exit tray .......................................................... 1
Cleaning pad (already installed in the main body).... 1
Instruction manual .................................................... 1
3-29
 Loading...