

ii
PRO EVOLUTION SOCCER 2011
WARNING Before playing this game, read the Xbox 360® console and
accessory manuals for important safety and health information. Keep all manuals
for future reference. For replacement console and accessory manuals, go to
www.xbox.com/support.
Important Health Warning About Playing Video Games
Photosensitive seizures
A very small percentage of people may experience a seizure when exposed to
certain visual images, including ashing lights or patterns that may appear in
video games. Even people who have no history of seizures or epilepsy may have
an undiagnosed condition that can cause these “photosensitive epileptic seizures”
while watching video games.
These seizures may have a variety of symptoms, including lightheadedness, altered
vision, eye or face twitching, jerking or shaking of arms or legs, disorientation,
confusion, or momentary loss of awareness. Seizures may also cause loss of
consciousness or convulsions that can lead to injury from falling down or striking
nearby objects.
Immediately stop playing and consult a doctor if you experience any of these
symptoms. Parents should watch for or ask their children about the above
symptoms—children and teenagers are more likely than adults to experience these
seizures. The risk of photosensitive epileptic seizures may be reduced by taking the
following precautions: Sit farther from the screen; use a smaller screen; play in a
well-lit room; do not play when you are drowsy or fatigued.
If you or any of your relatives have a history of seizures or epilepsy, consult a
doctor before playing.
ESRB Game Ratings
The Entertainment Software Rating Board (ESRB) ratings are designed to provide
consumers, especially parents, with concise, impartial guidance about the ageappropriateness and content of computer and video games. This information can
help consumers make informed purchase decisions about which games they deem
suitable for their children and families.
ESRB ratings have two equal parts:
• Rating Symbols suggest age appropriateness for the game. These symbols
appear on the front of virtually every game box available for retail sale or
rental in the United States and Canada.
• Content Descriptors indicate elements in a game that may have triggered a
particular rating and/or may be of interest or concern. The descriptors appear
on the back of the box next to the rating symbol.
PRO EVOLUTION SOCCER 2011
CONTENTS
Getting Started 02
Controls 02
Basic Controls 03
Dribbling & Trapping 03
Passing 03
Crossing 04
Shooting 04
Tricks & Skills 04
Defense, General Controls 06
Set-Pieces & Dead-Ball Situations 06
Match Screens 07
Game Plan 08
Game Modes 09
Edit Mode 10
Gallery 11
System Settings 11
UEFA Champions League 11
Master League 11
Become a Legend 12
Connect to Xbox LIVE (Online) 13
Legal 14
Warranty/Product Support 15
Thank you for purchasing PES® 2011 from Konami. Please read this manual thoroughly before playing the game.
Also, please keep this manual in a safe place so you can refer to it easily later.
Note: Konami does not re-issue manuals.
Konami is continuously striving to improve its products. As a result this product may dier slightly from another
depending on the purchase date.
01
ON FRONT
For more information, visit www.ESRB.org.
VIDEO
VIDEO
GAME
GAME
E
ON BACK
02 03
GETTING STARTED / CONTROLS CONTROLS
PRO EVOLUTION SOCCER 2011PRO EVOLUTION SOCCER 2011
Getting Started
If this is your rst time playing, press any button on the Title Screen to move to the Default Settings Screen. If you
have previously saved game data, you will advance to the Top Menu.
Default Settings
Before playing a game for the rst time, you can select between ve dierent levels of diculty. You can also
change the diculty after you begin your game. System data, where all game information is saved, will then be
created automatically. After conrming this step has been completed, proceed to the Top Menu.
Saving Data and Memory Required
In order to store and update your “System data” and “Edit data” and save your progress in competitions, you will
need a Xbox 360 Hard Drive or a Xbox 360 Memory Unit in memory unit port A. The “System data” and “Edit data”
can only be saved to or loaded from a Xbox 360 Hard Drive or a Xbox 360 Memory Unit inserted into memory unit
port A. Each le saved to the Xbox 360 Hard Drive or a Xbox 360 Memory Unit requires a certain amount of free
space, as the following table explains.
Top Menu Screen
The Top Menu select screen provides access to PES 2011 competitions, options, and features. Use the left stick or
D-pad to highlight the required option, and then press the A button to make your selection.
Using the Help Function
PES 2011 is a massive, feature-p acked game, but every effort has been made t o make it as accessible as possible.
When the Help icon appears at the bottom of the scree n, you can press the corresponding button to call up the
Help Menu to view helpful advice. Pl ease select your preferred language from the language select ion screen
displayed when booting up the game.
Note: This game is presented in Dolby Digital 5.1 surround sound. Connect your Microsoft Xbox 360 to a sound
system with Dolby Digital technology using a digital optical cable. Connect the digital optical cable to the base
of an Xbox 360 Component HD AV Cable, Xbox 360 VGA HD AVCable, or Xbox 360 S-Video AV Cable. From the
“system” blade of the Xbox 360 dashboard, choose “console settings,” then select “audio options,” then “digital
output,” and nally select “Dolby Digital 5.1” to experience the excitement of surround sound.
Family Settings
These easy and exible tools enable parents and caregivers to decide which games young game players can
access based on the content rating. For more information, go to www.xbox.com/familysettings
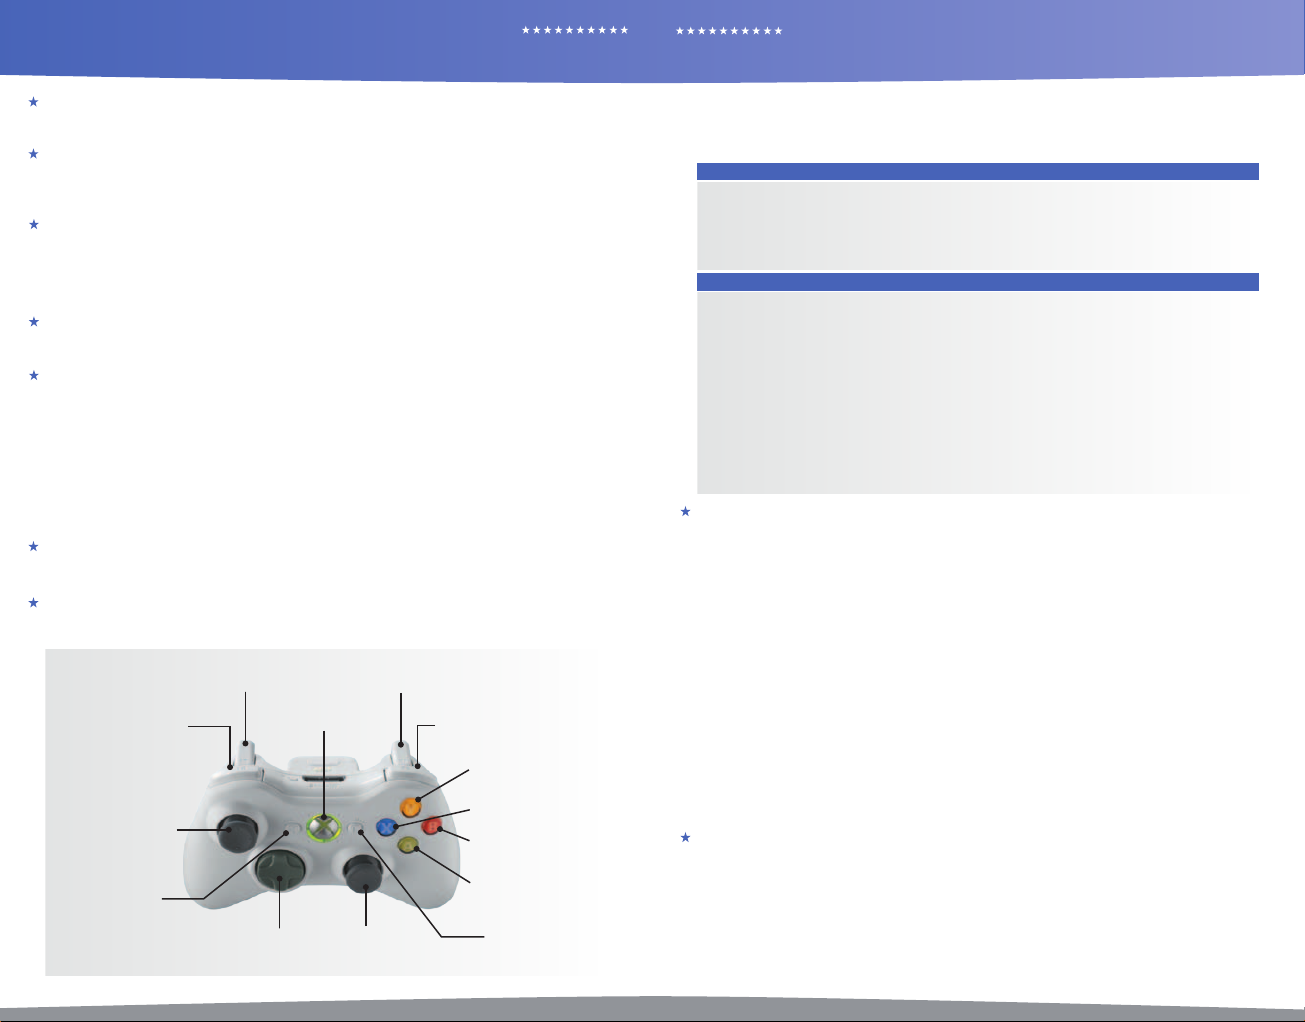
Default Controls
Use your controller to navigate menu screens. Use left stick or D-pad to move through menus, the A button to
conrm a selection, and the B button to cancel or move back through screens.
]
x
Right TriggerLeft Trigger
à
Left Bumper
_
Xbox Guide Button
`
Right Bumper
Y
X
Left Stick
<
L
l
C
Right StickD-pad
B
A
>
For the basic controls used during a match, refer to the table below. Read pages 3-7 for more advanced controls.
You can change the assignments for each button by going to “Controller Settings” in “System Settings.” (See System
Settings, page 11). For this game, the left stick and D-pad control the same actions. When this manual refers to “left
stick,” you may also use the D-pad in the same manner.
BASIC ATTACKING CONTROLS
y button: Switch between players
z button: Dash
Left Stick: Player movement, dribbling
D-pad: Player movement, dribbling
Y button: Through ball
BASIC DEFENSE CONTROLS
y button: Switch between players
z button: Dash
Left Stick: Player movement
D-pad: Player movement
Y button (hold down): Goalkeeper
B button: Sliding tackle
A button (hold down): Tackle/apply pressure with player you are controlling
X button (hold down): Clearance/apply pressure with player you are not controlling
(hold down button)
Players only go and pressure opposition players if you press the
Otherwise, players try to hold up the opposition by positioning themselves right in front of them and
tracking their moves.
Dribbling & Trapping
Dribbling: Push the left stick to move when the ball is at your player’s feet.
Sideways Dribble: Hold the
of players can perform this dribble.
Dash Dribble: Press the
Extend Time between Ball Touches: While holding the
rapidly push the left stick two or three times between touches to knock the ball further ahead. You can also
achieve the same effect by repeatedly tapping the
Greater Distance between Ball Touches: While running with the ball with the
button and push the left stick 45° to either side of the current direction of movement.
Slow Dribble: Keep the
your player’s feet as you per form this technique, and it can be followed by a quick change of direction or one of
many feints.
Stop the Ball 1: Release the left stick and press the
Stop the Ball 2: Release the left stick and press the
opponent’s goal.
Jump: When an opponent executes a sliding tackle, press the
Control Ball: When receiving a pass, push the left stick to control the ball.
Turn without Touching the ball: To instruct a player to turn and run onto an incoming pass without making an
initial touch, hold the
Passing
Note: Push the left stick to specify the direction a pass should be played in.
Short Pass/Head Ball: Press the
button for longer to pass to a more distant player.
Backheel: Quickly push the left stick away from the player’s current direction of movement and then press
the
A button.
First-Time Pass: Press the
Long Pass: Press the
First-Time Long Pass: Press the
x and push the left stick at 90° to the direction of movement. Just a small number
z button while dribbling to sprint.
z button.
x button depressed while dribbling to perform a “slow dribble.” The ball will hardly leave
z button to stop the ball’s movement while dribbling.
x button to instruct your player to stop and face your
z button and push the left stick in the direction that the ball is moving.
A button to make a short pass along the ground or head the ball. Hold the A
A button before your player traps the ball.
B button. The distance of the pass depends on the length of time that the B button is held.
B button before your player traps the ball.
B button: Cross/long pass
A button: Short pass
X button: Shoot
Right Stick: Manual pass
A button + the left stick.
z button to sprint with the ball at your player’s feet,
z button depressed, hold the x
x button to attempt to jump over it.
PRO EVOLUTION SOCCER 2011PRO EVOLUTION SOCCER 2011
PRO EVOLUTION SOCCER 2011
CONTROLS CONTROLS
0504
Through Ball: Press the Y button. Holding the Y button down for longer will direc t the pass to a more
distant player.
First-Time Through Ball: Press the
Chipped Through Ball: Hold the
One-Two Pass: Hold down the
before your teammate receives the ball to execute a return pass.
One-Two Pass with Chipped Return Ball: Hold down the
short pass, then press the
pass.
Pass and Move: Press the
Manual Pass: While holding the
button to execute the pass.
Manual Long Pass: While holding the
Crossing
Note: Push the left stick to specify the direction of a cross.
High Cross: From deep in your opponent’s half, press the
Low Cross: From deep inside your opponent’s half, press the
Cross along the Ground: From deep inside your opponent’s half, press the
low cross along the ground.
Lofted Ball: Press the
Early Cross: Hold the
Shooting
Notes on shooting: Press the
gauge reaches the desired level, and your player will send a shot towards the goal. The length of the power
gauge determines the power and height of your shot. Push the left stick to specify the required direction as the
shot is made.
Shoot: Press the
First-Time Shot/Head Ball: Press the
or header on goal.
Controlled Shot: Press the
power for precision.
Chip Shot: Hold the
Chip Shot Type 2: For a lob with a lower trajectory, press the
power gauge appears.
Tricks & Skills
Note: All moves are assuming that the player is facing forward.
Shoulder Feint Skills
Upper body Feint: From a stationary position, push the right stick to the side.
Matthews Feint: From a stationary position, push and hold the right stick to the left, then push the left stick
diagonally right. (Or hold the right stick to the right, then push the left stick diagonally left).
Matthews Feint into Side-Slip: From a stationary position, push and hold the right stick to the left, then push the
left stick to the right. (Or hold the right stick to the right, then push the left stick to the left).
Scissors Feint Skills:
Step over Dummy: Rotate the right stick from forward to 90° left or right. If executed from a stationary position,
the player will step over the ball on the spot.
Reverse Step over Dummy: Rotate the right stick from 90° left or right back to forward. If executed from a
stationary position, the player will step over the ball on the spot.
Step Over Fake: Rotate the right stick from 90° left or right back to forward. Then while holding the right stick,
push the left stick to back left or back right. (Depending on the direction you initially pressed the right stick).
x button while delivering a cross to loft the ball high into the air.
y and B buttons to cross the ball from any position in your opponent’s half.
X button.
y button and press the X button.
Y button before your player traps the ball.
y button and press the Y button.
y button and press the A button to make a short pass, then press the Y button
y button and press the A or Y button to make a
y + Y buttons before your teammate receives the ball to execute a chipped return
x button immediately after passing the ball to instruct the player to make a forward run.
w button, push the right stick in the desired direction and press the A or Y
w button + push the right stick in the desired direction to execute the pass.
B button.
B button twice.
B button three times to send in a
X button to build up the power gauge. Release the X button when the power
X button just before the ball reaches your player to make a rst-time shot
x button when the power gauge reaches the desired level to make a shot that trades
X button and then press the z button when the
Step On Skills
Step On & Drag: From a stationary position, press the
Step On & Slide: From a stationary position, press the w button and left or right on the right stick depending on
which direction you want to take the ball.
L Feint (If Right Footed): From a stationary position, press the w button and back on the right stick. Then,
while holding the right stick, push the left stick to the right. (For a left footed player, you must push the left stick
to the left.)
Backheel Feint: From a stationary position, push and hold the w button, then rotate the right stick from back to
90° left. Then while holding the right stick, push the left stick to the right or left.
Drag Back into Right Take / Left Take: From a stationary position, press and hold the
right stick to the back. Then, while holding the right stick, push the left stick diagonally left or right. (If the player
is left footed, you must reverse the directions.)
Inside Bounce: From a stationary position, press the w button and back on the right stick. Then, while holding
the right stick, push the left stick forward.
Running Inside Bounce into Diagonal Take: While Dribbling, press the w button and back on the right stick.
Then, while holding the right stick, push the left stick diagonally left or right.
Flip Flap Skills
Flip Flap: While Dribbling, press the w button and the right stick diagonally right. Then, while holding the right
stick, push the left stick diagonally left. (If the player is left footed, you must reverse the directions.)
Reverse Flip Flap: While Dribbling, press the w button and the right stick diagonally left. Then, while holding
the right stick, push the left stick diagonally right. (If the player is left footed, you must reverse the directions.)
Roulette Skills
Roulette: Press the
depends on which way you rotate the right stick. Certain players may have dierent Roulette motions.
Turn Skills
Cross Over Turn: While Dribbling, press the w button and the right stick to the side, followed by the left stick.
(Towards the same side you pushed the right stick).
Flicking Skills
Front Flick: Press and hold the w button and click the right stick. Then, push the left stick diagonally left or right.
(Can also be executed while dribbling).
Rainbow Flick: Press and hold the w button , then click the right stick button twice. (Can also be executed
while dribbling.)
Sideway Dribble Skills
Sideway Dribble: While dribbling, press and hold the w button. Then, push the right stick forward or to
either side.
Sideway Scissors: During Sideway Dribble (to the left), press and hold the w button, then rotate the right stick
180° from the left all the way to the right. Finally, push the left stick to the left. (You must reverse the directions if
you were initially moving towards the right.)
Sideward Stepover: During Sideway Dribble (to the left), press and hold the
90° from left back to forward. Finally, push the left stick to the left while holding the right stick. (You must reverse
the directions if you were initially moving towards the right.)
Link Feints
A feature new to PES 2011, Link Feints allow you to pull a trick combination consisting of up to 4 moves by simply
pressing y and C / Z / V / X on the right stick. These Link Feints can be customized and congured in Game Plan,
so why not create your very own set of tricks and give yourself the edge over your rivals by showcasing your trickery?
The Default Link Feints are as follows:
Command 1st Move 2nd Move 3rd Move 4th Move
y / z C
y / z V
y / z Z
y / z X
w button, then rotate the right stick a full 360°. The direction in which the player spins
Running Upper
Body Feint (R)
Upper Body
Feint (L)
Running Upper
Body Feint (R)
Running Stepover
Dummy (L)
[
[
[
[
w button and back on the right stick.
[
Matthews Feint (R)
Step On & Slide (R)
Reverse Stepover
Dummy (R)
Stepover Fake (R)
[
[
w button, then push the
w button, then rotate the right stick
Step On & Slide (L)
Roulette (L)
[
V Feint (R)

PRO EVOLUTION SOCCER 2011PRO EVOLUTION SOCCER 2011
CONTROLS CONTROLS / MATCH SCREENS
0706
Defense
Tackle/Apply Pressure: Press the A button and hold the left stick towards the opposition player with the ball.
Delay 1 (Hold up the opposition): Press the A button. The player holds up an opposition attacker by taking up
a position to block his path to goal. The defending player will remain stationary.
Delay 2 (Hold up the opposition): Press the A button and the left stick (pull towards the defending player’s
goal). This makes the player backtrack towards his goal while still facing his opponent and holding him up.
Close Down: Hold the
(not counting the player you are controlling) close down the player on the ball.
Sliding Tackle: Press the
Clearance: When the ball is deep inside your half, press the
Rush Keeper from Goal: Press the
Goal Kick: Press the
Throw Ball: When your goalkeeper is holding the ball, press the
Drop Ball: When your goalkeeper is holding the ball (with no left stick pushed), press the
him to drop the ball at his feet.
Goalkeeper: Click the right stick +
General Controls
Change Player: Press the
Control Player When Ball is Airborne: When the ball is in the air, hold the
position the player to meet it.
Super Cancel: When a player is automatically running after the ball, press the
to bring the player to a halt, or to regain full control.
Activate/Cancel Strategies (Manual Mode): Hold down the
button, the Y button, or the X button to activate or cancel strategies assigned to those buttons.
Attack/Defense Level: Press the
instructing your players to push forward. Press the
Dive: Click the left and right sticks together.
Kick/Pass Feint: Press the
Set-Pieces & Dead-Ball Situations
Note: For free kicks and corners, hold the relevant button down to increase the power gauge to the required level.
Corners
Regular: Press the
High Cross: Hold down the
Low Cross: Push the left stick up + the
Along the Ground: Left stick down +
Apply Curl: Push left stick left or right while the power gauge is onscreen.
Short Corner: Press the
Free Kicks: Passing.
Short Pass: Choose a direction with the left stick and then press the
Regular Long Pass: Press the
High Ball: Hold down the
Low Ball: Up on the left stick +
Along the Ground: Down on the left stick +
Curl: Left or right on the left stick while the power gauge is displayed.
Through Ball: Press the
to aim the pass.
Free Kicks: Shooting
Regular Shot: Press the
Hard Shot: Up on the left stick + the
Weak Shot: Down on the left stick + the
Moderately Hard Shot: Press the
Moderately Weak Shot: Press the
Apply Curl: Hold the left stick left or right when the power gauge is displayed.
X button when the opposing team is in possession to have the player closest to the ball
B button.
X button to clear the ball.
Y button while defending to make the goalkeeper sprint towards the ball.
B button or X button to kick the ball upeld. Use the left stick to aim.
A button to throw the ball to a teammate.
z button to instruct
y buttons to switch control between an outeld player and the keeper.
y button to switch control to the player closest to the ball.
x button and use the left stick to
z and x buttons simultaneously
< button and then press the B button, the A
<and z buttons together to increase the Attack/Defense gauge level, thus
w and x buttons together to reduce it.
A, X, or B button and then press the A button after the power gauge appears.
B button.
x button + B button.
B button.
B button.
A button to send a short pass to your nearest teammate.
A button.
B button.
x button + B button.
B.
B button.
Y button when taking a free kick to send a ball through the defense. Push the left stick
X button.
X button.
X button.
X button, and just as the player makes contact, press the Y button.
X button and then, just as the player makes contact, press the A button.
Free Kicks: General Controls
Quick Restart: This only works with the correct timing when a player is positioning the ball for a quick free kick
using his hands. When this happens, specify a direction by holding the left stick and press the
quickly restart the game with a simple pass.
Changing the Number of Kickers: Press the
free kick congurations: one kicker (default), two kickers (second kicker: right side), two kickers (second kicker:
left side).
Using the Second Kicker: Execute the free kick while holding the
the shot or cross pass.
Second Kicker Rolls Ball Forward: Hold down the
kicker roll the ball forward. You can then make a shot or pass from open play with the second kicker.
Free Kicks: Wall Control
When the opposing team has a free kick, press and hold the following buttons to control the players in the
defensive wall:
Increase/decrease number of players in the wall: Hold down the
up to two more players to the wall. To remove these players hold down the
left stick. Only players that have been added can be later removed.
All Players Jump: Press the
Players Hold Position: Press the
Players Charge Forward + Jump: Press the
Players Charge Forward: Press the
Random: No buttons pressed.
Throw-ins
Short/ Long Throw-in: Press the
Penalty Kicks
Kicker: The height and the direction of the shot depends on how long the player presses the left stick towards
goal and to either side respectively when running up to take the penalty. (Player automatically runs up to
take the shot).
Goalkeeper: Hold the left stick and the
want to jump in order to save the shot. You must match the timing of the kicker. If you don’t input a direction, your
keeper stay still and cover the goal center.
Unique controls for when the cursor is set to Fixed
Calling for the Ball: When a teammate has the ball, press the
frequently you press the button, the more strident your appeal for the ball will be.
Match Screens
This section explains the various features and functions of screens you will encounter during a match.
Match Display
Active Player (Cursor)
(indicating player under control)
•Yellow name/number above
cursor: Player got booked
•Yellow/red checkered ag:
Your controlled player is in an
Attack/Defence Mindedness
Attack/Defense Mindedness: This gauge indicates your team’s current mentality. The redder the bar is, the more
attacking the team will be; conversely, a blue bar indicates that a team is pulling back to defend.
Strategy Mark: Button symbols representing Manual Strategies appear in this area when active.
Stamina Gauge: Displays a player’s current stamina. The gauge will turn red when stamina is dangerously low,
indicating a drop in that player’s performance.
X button.
A button.
A button to throw the ball. Distance depends on length of gauge.
Score
oside position
Strategy Mark
y and z buttons simultaneously to cycle through the following
y button to make the second kicker make
y button and then press the A button to make the second
w button and press up on the left stick to add
x or w button and press down on the
B button.
B and A buttons together.
X button for a length of time that’s proportional to how high or wide you
x button t wice to call for a pass. The more
Radar
A or Y button to
Elapsed Time
Name
Active Player
(Cursor)/
Stamina Gauge
Power Gauge
PRO EVOLUTION SOCCER 2011PRO EVOLUTION SOCCER 2011
MATCH SCREENS / GAME PLAN GAME PLAN / GAME MODES
0908
Active Player:
The active player under control will be highlighted by a bar (or “Cursor”) above his head. Each user will be
displayed be a dierent color, which you’ll see when selecting sides (see also page 11).
Power Gauge:
The Power Gauge is shown underneath the player once you initiate a pass or shot. The longer you keep
the respective button pressed, the more the gauge will be lled and the more powerful a pass or shot
will be.
Event Icons: The following symbols will appear in the top left-hand corner of the screen during matches.
Blue - Returning to the Match (No Injury):
A player is returning to the pitch with a clean bill of health.
Yellow - Returning to the Match (Slight Injury):
A player is returning to the pitch, but is carrying an injury that will have an impact on his performance.
Red - Not Returning to the Match (Due to Injury):
An injured player cannot return to the pitch, and must be substituted (if possible).
Gray - Indirect Free Kick:
An indirect free kick has been awarded.
Gray - Stoppage Time:
Game Plan
Before starting a match, you can set your team’s formation, line-up, captain and set piece takers, and other settings
on the Game Plan Screen. Make sure you are well prepared for the match.
Information Windows
When you rst select Game plan, you will be presented with 3 options as ways to set up your team. These are
“Leave to Manager”, “Simple Settings” and “Choose Manually”. If you want to have your formation and lineup
chosen for you automatically, choose “Leave to Manager”.
Simple Settings
Allows you to choose the formation and the team’s attack pattern. The rest of the game plan will be
formed automatically.
Management Edit
Choose a strategy t for certain time periods or situations during the match. Strategies will then be automatically
implemented if the conditions are met.
Choose Auto Trigger Setting to choose whether you want certain strategies such as Oside traps to be
triggered automatically.
Choose Manually
Choose all Game Plan settings manually
Press the
indicate Form and the green gauge indicates stamina), Position/Overall Rating and Player Icon.
Green
Cross
Injuries
1 Returning to Full Fitness 2 Severe Injury 3 Slight Injury 4 Injury Status Unclear
Unavailable
5 On International Duty 6 Suspended due to Cumulative Yellow Cards 7 Suspended due to a Red Card
Assisted Settings
Move the sliders to adjust Lineup, Formation, Tactics, and Set Piece Settings.
Once you’ve chosen the settings to change, use left and right on the left stick to move the sliders. The settings will
automatically change to match the slider’s position.
Lineup
The circular icons shown on the pitch diagram represent players and their positions. Make use of “Edit Position”
and “Substitutions” to form your game plan.
This indicates the game minutes of stoppage time that will be played.
y or z button while the pitch diagram is shown to switch between Player form/Stamina (Arrows
7654321
Red
Cross
Yellow
Cross
Purple
Dash
Globe Yellow
Cards
Red
Cards
Player Abilities
To look at the player’s abilities, move the cursor on to a player of your choice and press the
stats are on screen, press the
Note: If you need details on player abilities, please refer to the Edit Mode of PES 2011, where you can nd detailed
descriptions for them.
Set Formation
Move the cursor onto a player on the pitch, then press the
moved around the pitch until you release him at the desired position by pressing
drag the player onto the icon representing the player you want to replace him with. Also, you can press the
button when an on-pitch Player icon is highlighted to choose:
1) The player’s Role
2) Whether to appoint the player as Captain
3) Mark Settings
Card System
Through the Card System, you can take advantage of a player’s unique abilities. This oers you endless possibilities
and strategic options as never seen before.
The Card System oers two dierent categories:
1) P = Playstyle Cards represent individual playstyles like “Pinpoint Pass.”
2) S = Skill Cards identify skills (for example, “Penalty Saver”) that players own, and can’t be changed
or deactivated.
Note: The available Playstyle Cards may dier depending on the player’s role and attack level.
If you are using a Playstyle Card that goes against your current tactics, the tactics will be given priority.
Other Settings
Make use of various options by choosing the icons shown at the bottom of the screen to fine tune your Game
Plan such as:
Link Feints
Congure up to 4 custom-made chain of tricks and skills which can be executed by pressing the
stick (C, V, Z and X). First, choose a controller you want to assign the Link Feints to. Then, select “Create New”
to design a new set then proceed to the edit screen. Or alternatively, you can choose “PRESET” to edit existing
Link Feints. Link Feints can be saved and loaded in “Data Management” and can be congured to each unique
controller. However, if you share your Game Plan Data with friends (for example in a multi-player game), then
choose to load Link Feints in “Data Management”, your data will be overwritten by that of “The Leader”.
Note: “The Leader” refers to the player who has control of the Game Plan in a multi-player game. (Usually, the one
with the smallest number on each side).
UEFA Champions League (page 11)
Pit your club against the elite of European soccer in the exclusive UEFA Champions League mode.
Copa Santander Libertadores
Take on the very best of Latin American Football in the also Exclusive Copa Santander Libertadores mode.
Exhibition
First, if you want to quickly start a match, choose whether you will compete against a friend (VS. PLAYER) or the
computer (VS. COM). This is the quickest way to get the ball rolling, while a custom match (CUSTOM) gives you
more options from the start. Besides very obvious selections for the team, uniform, or stadium, you will nd the
following pre-match options depending on the selected mode:
Game Options
For each controller you have connected, decide whether the corresponding players will compete against
one another or play on the same team. Also, choose whether you or the computer will control the players
during the match. By pressing the
Home/Away: Push left or right on the left stick to switch between the home and away sides.
Coach Mode: Issue tactical commands while the computer controls the players on the pitch. Switch to Coach
Mode by pushing left on the left stick when the controller icon is on the home side, or by pushing right on the left
stick when the controller icon is on the away side.
y or z button to see what Skill Cards or Playing Style Cards the player has.
A button to grab him. The player can then be freely
X button, you can adjust “Cursor Settings.” (See “Cursor Settings,” page 11.)
Y button. Once the
A again. To substitute players,
X
7
w button + right

10 11
PRO EVOLUTION SOCCER 2011
GAME MODES / EDIT MODE GALLERY / SYSTEM SETTINGS/ UEFA CHAMPIONS LEAGUE / MASTER LEAGUE
PRO EVOLUTION SOCCER 2011
Watch Match: Watch two computer controlled teams play each other.
General Settings
Choose settings for Diculty Level, Match Duration, Injuries, Team Conditions, and more. Then, select “Conrm.”
Please note that some options such as “Rule Settings” and “Player Development” are unique to par ticular
game modes.
Master League (page 11)
Compete in league play, developing your players and looking to strengthen your team in the transfer market.
Become a Legend (page 12)
This challenging mode recreates the career of one specic player of your choice.
If you put in good performances, your reputation will grow, which will result in transfer oers to join dierent
clubs. Can you write your name in the history books?
League & Cup
Enjoy various league and cup competitions. A good table standing in the league will enable you to enter the UEFA
Europa League or even the UEFA Champions League the following season.
Community
“Community” is a mode which supports the matches you have with your closest friends. By registering your mates
in a community, you can compete together using various competition formats. An eight player option is available
in Online Community, which you can access directly.
Xbox LIVE (Network Mode) (page 13)
Connect to Xbox LIVE® and enjoy matches against players from many dierent countries playing the same version
of PES 2011. Up to eight players can join in an Online Match.
Training
Move your players freely as you practice the game’s controls. By adjusting the settings, you can focus on specic
areas such as free kicks and corners. Please note that you cannot choose “Spectator Mode” in Player Settings.
Edit
This option enables you to customize many things, such as teams and players as well as stadium and cup names
featured in PES 2011. You can create your own original club. Activate the Help menu (look for the prompt at the
bottom of the screen) to view more detailed instructions on how to use this mode’s various options and features.
Note: Edited team and strip (uniform) data will be reected in all modes including online.
Stadium Edit
You can freely edit designs of the pitch and the stands to create your very own Home Stadium.
Adding Your Own Images
You can add images for player faces, uniform logos, and emblems by using existing image data, an Xbox LIVE
Vision Camera, or similar equipment. Wherever the camera symbol appears, just follow the on-screen instructions.
Note: Data for up to 600 faces, 600 logos, 46 team emblems and 20 league emblems can be stored, depending on
the capacity of your Xbox 360 Hard Drive or Xbox 360 Memory Unit.
Registering a Created Player with a Team
To register a player you made in “Create Player” with a team, go to “Team” from the Edit Menu, and select “Register
Player.” Then, choose the team you would like the player to join. Next, after a list of that team’s players appears,
either select “Add Player” or choose an existing player to switch with the created player. Finally, select “Other” and
choose the player you just made.
Using the Edit Data of a Prequel Title
Choose the “Load” option to load and then implement the Edit Data from a Prequel PES title.
Note: Please note that data from the various game modes cannot be used. If you choose to use Prequel Edit data
when you have already created Edit data for this title, it will be overwritten.
Extra Content
Use GP you can earn by playing matches to buy extra items such as Balls and Stadium Parts as well as Expansion
kits for the various modes.
Note: To obtain the latest uploads via the internet, choose “Data Pack”.
Gallery
The gallery combines a lot of fun and informative features.
Track Record: View a history of what you have played in the game.
Replay Playback: Watch replays that you have saved.
Credits: View sta credits.
System Settings
Adjust settings for controls and saving data.
Playlist Editor: Listen to the game’s background music.
Controller Settings: Change how the controls are used. You can also adjust other settings, deciding, for example,
how the player cursor is displayed and how it is switched. (See Cursor Name below.)
On-Screen Display: Decide the on-screen information and position shown during matches.
Sound Settings: Adjust various items related to sound, such as Commentary Volume and Sound Eect Volume.
Screen Adjustments: Change screen position and color settings.
Language: Change the language that is used in the game.
Cursor Settings
Go to “Cursor Settings” in “Controller Settings” to change how the player cursor is displayed and how it is switched.
Among the items available, Change Cursor in particular has a great eect on the game’s controls. Be sure to choose
a “Change Cursor” option that makes it easy for you to control the action.
Change Cursor
Assisted: Cursor switches automatically. You can also switch manually between players when pressing
the
y button.
Semi-assisted: When on attack, the cursor will switch automatically to the player receiving the ball. On defense, the
cursor is switched manually through pressing the
Unassisted: The cursor only switches when you press the
Fixed Player: With this being switched on, you can set the cursor permanently on one player (except the goalkeeper).
Note: You can access the settings for “Change Cursor” also through “Player Settings” before and during a match.
Cursor Name
User Number: Cursor displays that user’s number (1-7).
Player Name: Displays the name of the player.
No: Does not show any numbers or names.
UEFA Champions League
Pit your club against the elite of European soccer in the exclusive UEFA Champions League mode. Is your team
strong enough to negotiate the group stages? Will you rise to the challenge of knock-out games? Can you become
one of the few to lift the cup every player, manager, and fan dreams of?
Master League
In this mode, you must choose a team and then lead it to success in league and cup competitions over an unlimited
number of seasons. As well as generating revenue through success on the eld and keeping your squad at peak
tness, you’ll need to make astute forays into the transfer market and carefully nurture up-and-coming talent to
transform your club into a dominant force in world soccer.
Note: The Master League in PES 2011 oers a whole bunch of new features and improvements, some of which are
featured below. And of course you can now qualify and participate for the world’s most prestigious events in club
soccer: the UEFA Europa League and UEFA Champions League.
Advancing through Master League
Master League seasons begin during the August transfer period and last until the middle of the last week in July
of the following year. As matches are held and the schedule progresses, time will advance on a half-week basis.
Team Management
As in the real world, it’s all about money. You need it to pay costs like sta/player salaries and fan club management.
Money can be earned from tournament prizes, fan club fees, sponsors, and other sources. You can acquire new
players, invest in a youth team, and improve the team’s performance with your money.
Note: Sta lineup can be changed during August by selecting the “Hire Sta” option in “Personnel”.
y button.
y button.

PRO EVOLUTION SOCCER 2011
PRO EVOLUTION SOCCER 2011
BECOME A LEGEND / XBOX LIVE (ONLINE) MASTER LEAGUE / BECOME A LEGEND
1312
Losing Money & Going Bankrupt
Expenses are calculated in the rst week of September. If your funds are in the red at that point, your team will
go bankrupt. Even if the team goes bankrupt, it will still be able to play matches as usual, but the number of
times it goes bankrupt will be recorded in your save data. While your funds are in the red, you will be incapable
of conducting negotiations. So you should quickly try to reduce costs, for example through selling players, well in
advance of September. Otherwise, the game will do this automatically.
Transfer Negotiations
Transfer Negotiations are held over the course of the season. There are four major patterns to these negotiations:
Instigating Negotiations, Receiving Negotiation Oers, Releasing Players, and Renewing Contracts. When
negotiating with players, a scout will handle the proceedings. (You can also appoint your scout to perform
everything, from player selection to negotiations and signing. This is turned o by default.)
Check the Youth Team
The Youth Team option in the Club House lets you pick from up to ten talented young players as possible additions
to your team. Because these players don’t need to be negotiated with or require transfer fees to be paid, you can
sign them up anytime during the season. Finally, players signed from the youth team will have great aection for
your team and will be less likely to transfer to other teams in the future.
Become a Legend
Create a player and aim to become the World Player of the Year. Enjoy your career from your professional debut
to your retirement from the game.
Advancing through Become a Legend
Opportunities to play matches will be scarce from your debut. You start o as a youth team graduate of the club
you’ve chosen and must work hard and impress in Reserve M atches to win a place on the bench. Good match
performances will lead to oers from other clubs. After transferring, lead your new team to victory but also aim
to win personal accolades such as the league MVP or top goal scorer. Titles such as these can often result in oers
from major clubs and even national team call-ups. A player’s career begins at the age of 17 and increases by one
year at the start of the new season. At the age of 27 you can choose to retire or play until age 35 or a few years
later, if you still have an ongoing contract when you reach 35. At that time retirement is forced and “Become a
Legend” is concluded.
Note: In PES 2011 you may use your developed Become a Legend player online in the Legends Mode as well as in
Master League. To do so, go to “Options” in the Become a Legend menu. Furthermore, you can now qualify for the
UEFA Europa League and UEFA Champions League within Become a Legend.
Auto-Move: Turn the auto-move function ON/OFF. If ON, your player will move automatically if you keep the
button pressed (the cursor above the player will change from solid blue to transparent).
Matches
Starting players, team formation, substitutions etc. will be decided automatically by the CPU. You control only your
created player. When you are not playing, you can view the match as a spec tator (accelerate the match speed on
the “Fast-Forward Menu” if you wish).
Player Development
Playing in matches allows players to acquire experience points, which also increase based on good match
performances. Once a certain amount is acquired, the player’s ability will increase in accordance with the
development curve.
Note: If a certain age is reached, the player’s ability may decrease.
Focus Point Settings
On starting the game, you will be asked to choose the type of player you want to be. At this point, you will also
allocate Focus points (14 in total across the key abilities). The more points are allocated to one skill, the quicker
it develops.
Interacting with your Team Mates
To call for the ball, press the
get a teammate to close down opposition players, you need to press the X button. Both of the above are aected
by how much trust and understanding you have wit your teammates.
x button twice. If you’re in a good position your teammate will pass you the ball. To
y
Vertical Wide Camera:
w when using the Vertical Wide Camera (your player must be o the ball), you can get the camera to
By pressing
retreat giving you a much wider view of the pitch.
Xbox LIVE
Play anyone and everyone, anytime, anywhere on Xbox LIVE. Build your prole (your gamer card). Chat with your
friends. Download content (TV shows, trailers, HD movies, game demos, exclusive game content, and Arcade
games) at Xbox LIVE Marketplace. Send and receive voice and video messages. Use LIVE with both Xbox 360® and
Windows®. Play, chat, and download on both your PC and your Xbox 360. LIVE gives you ultimate access to the
things you want and the people you know, on both your PC and your TV. Get connected and join the revolution!
Connecting
Before you can use Xbox LIVE, connect your Xbox console to a high-speed Internet connection and sign up to
become an Xbox LIVE member. For more information about connec ting, and to determine whether Xbox LIVE is
available in your region, go to www.xbox.com/live/countries.
Note: Connection quality can be adversely aected near devices that emit disruptive waves.
Family Settings
These easy and exible tools enable parents and caregivers to decide which games young game players can
access based on the content rating. Parents can restrict access to mature-rated content. Approve who and how
your family interacts with others online with the Xbox LIVE service. And set time limits on how long they can play.
For more information, go to www.xbox.com/familysettings.
Network Preparations
After selecting “Online” from the Top Menu, follow the steps below to set up your game.
1 Create User Data/Check Details
You will be taken to the “Create User Data” screen if there is no user data available. Please beware that user data
created cannot be deleted until a certain time period has passed.
2 Divisions
Players will be placed in 1 of 5 divisions (Divisions 1 to 5).
Competitions
By rule, Competitions have a Qualifying Round and a Knockout Stage. Users must rank high in the Qualifying
Round to advance to the Knockout Round.
Note: Competitions all have a set start time. Please note you will be unable to enter any Competitions outside
the specied times.
Xbox LIVE Game Modes
The Master League Online is similar in structure to its oine original, apart from one important fact. You are
competing against fellow Online users! Your objectives are to build and strengthen your team by signing the right
players and raising capital through strong showings in various competitions. Please note that there is an Entrance
Fee when playing matches and this fee becomes greater the more big names you have in your squad.
Signing Players in Master League Online
To sign players in Master League Online, select [Market] from the menu. From there, all you need to do is to search
the player you want and place your bid. The general rule is that the more popular the player, the higher the fee
you must pay.
Become a Manager!
Choosing Coach Mode in Quick Match allows you to take a dierent look at the game where what counts most is
your tactical guile rather than on-pitch skills.
Legends
Play as your alter-ego from Become a Legend or as a Real Life footballer forging a team with up to 3 Online users.
There is also an option for a 4 on 4 VS. Match!

PRO EVOLUTION SOCCER 2011
WARRANTY
Official Licensed
Product
XBOX LIVE (ONLINE) WARRANTY / PRODUCT SUPPORT
3 Icons in Network Mode
Player Status Icons
Playing Logged In Logged O
(Red) (Blue) (Gray)
Player Icons
You Friend
(Green) (Blue) (Red)
Transmission Status Icons
These icons inform you about the network connection quality:
Good Poor Very Poor Disconnected
(Green) (Yellow) (Orange) (Red)
Manner Icons
If you want to know the manner of an opponent, these icons will tell (declining from left to right). The manner
reects, for example, if a player is quitting matches early.
Note: Users with poor manners will not be eligible for online rankings.
IMPORTANT MESSAGE
Konami reserve the right to penalize or ban any player using the chat function to abuse others. The penalty will be
decided by Konami and may result in a temporary or permanent ban from the chat function or online play with
or without further warning.
We thank you for your understanding and continued good sportsmanship.
Ocial Licensed Product of UEFA CHAMPIONS LEAGUE™. All names, logos and trophies of UEFA are the property, registered trademarks
and/or logos of UEFA and are used herein with the permission of UEFA. No reproduction is allowed without the prior written approval of
UEFA. adidas, the 3-Bars logo, the 3-Stripe trade mark and Predator are registered trademarks of the adidas Group, used with permission.
adiPURE, adiZERO and F50 are trademarks of the adidas Group, used with permission. the use of real player names and likenesses is
authorised by FIFPro and its member associations. Ocially licensed by Czech National Football Association Ocially licensed by CFF
© 2010, DFB Licence granted by m4e AG, Grünwald © The Football Association Ltd 2010. The FA Crest and FA England Crest are ocial
trademarks of The Football Association Limited and are the subject of extensive trade mark registrations worldwide. copyright FFF
Ocially licensed by FIGC and AIC © 2001 Korea Football Association Licensed by OLIVEDESPORTOS (Ocial Agent of the FPF) Producto
ocial licenciado RFEF © 2002 Ligue de Football Professionnel ® Ocially Licensed by Eredivisie Media & Marketing C.V. Ocial Licensed
Product of A.C. Milan Manchester United crest and imagery © MU Ltd © Real Madrid (10) Ocial product manufactured and distributed by
Konami Digital Entertainment under licence granted by Soccer s.a.s. di Brand Management S.r.l. Under licence from Tottenham Hotspur Plc
Wembley, Wembley Stadium and the Arch device are ocial trademarks of Wembley National Stadium Limited and are subject to extensive
trade mark registrations. All other copyrights or trademarks are the property of their respective owners and are used under license.
This software is based in part on the work of the Independent JPEG Group.
Dolby and the double-D symbol are trademarks of Dolby Laboratories.
©2010 Konami Digital Entertainment. KONAMI is a registered trademark of KONAMI CORPORATION.
Player from your Blacklist
Official Licensed
Product
Searching Not
(Blue) (Grey)
Connected
PRO EVOLUTION SOCCER 2011
1514
WARRANTY
Konami Digital Entertainment, Inc. warrants to the original purchaser of this Konami
software product that the medium on which this computer program is recorded is free from
defects in materials and workmanship for a period of ninety (90) days from the date of
purchase. This Konami product is sold "as is," without express or implied warranty of any
kind, and Konami is not liable for any losses or damages of any kind resulting from use of this
program. Konami agrees for a period of ninety (90) days to either repair or replace, at its
option, free of charge, any Konami product, postage paid, with proof of date of purchase, at
its Factory Service Center. This warranty is not applicable to normal wear and tear. This
warranty shall not be applicable and shall be void if the defect in the Konami software
product has arisen through abuse, unreasonable use, mistreatment, or neglect.
THIS WARRANTY IS IN LIEU OF ALL OTHER WARRANTIES AND NO OTHER
REPRESENTATIONS OR CLAIMS OF ANY NATURE SHALL BE BINDING ON OR OBLIGATE
KONAMI. ANY IMPLIED WARRANTIES APPLICABLE TO THIS SOFTWARE PRODUCT,
INCLUDING WARRANTIES OF MERCHANTABILITY AND FITNESS FOR A PARTICULAR
PURPOSE, ARE LIMITED TO THE NINETY (90) DAY PERIOD DESCRIBED ABOVE. IN NO EVENT
WILL KONAMI BE LIABLE FOR ANY SPECIAL INCIDENTAL OR CONSEQUENTIAL DAMAGES
RESULTING FROM POSSESSION, USE OR MALFUNCTION OF THIS KONAMI PRODUCT.
Some states do not allow limitations as to how long an implied warranty lasts and/or
exclusions or limitations of incidental or consequential damages so the above limitations
and/or exclusions of liability may not apply to you. This warranty gives you specific rights,
and you may also have other rights which vary from state to state.
If you experience technical problems with your game, please head to
www.konami.com/support for assistance, here you will have access to many support
materials, as well as our Knowledge Base which is available 24 hours a day, 7 days a week.
All products must be deemed defective by a Konami Customer Service representative and an
RMA number assigned prior to returning the product. All products received not matching
this criteria will be returned if a Konami Customer Service Representative cannot reach you
within three days upon receipt of the unauthorized return.
Konami Digital Entertainment, Inc.
Attention: Customer Service-RMA # XXXX
2381 Rosecrans Ave, Suite 200
El Segundo, CA 90245
USA
Register now at www.konami.com
to receive exclusive product news, special offers and more!
www.konami-pes2011.com

14
PRO EVOLUTION SOCCER 2011
PRO EVOLUTION SOCCER 2011
CONTENUS
Demarrer 18
Commande 18
Commandes Élémentaires 19
Dribbles et Contrôle du Ballon 19
Passes 20
Centres 20
Tirs 20
Mouvements & Feintes 21
Commandes Générales, Défense 22
Coups de Pieds Arrêtés & Remises en Jeu 22
Ecrans du Match 24
Plan du Match 24
Modes de Jeu 26
Mode Modier 27
Galerie 27
Réglages Système 27
Ligue des Champions UEFA 28
Ligue des Masters 28
Devenez une Légende 29
Se connecter à Xbox LIVE (En ligne) 29
Mentions Legales 31
Garantie/
Support Produit 33
17
RECTO
JEU
VIDÉO
E
VERSO
Merci d’avoir acheté PES® 2011 de Konami. Avant de commencer à jouer, nous vous recommandons de lire
attentivement ce manuel. Nous vous conseillons également de le conserver précieusement pour pouvoir le
consulter ultérieurement.
REMARQUE: Konami ne réédite pas ses manuels.
Konami vise constamment à améliorer ses produits. C’est pourquoi les produits peuvent présenter de légères
diérences selon la date à laquelle ils ont été achetés.

PRO EVOLUTION SOCCER 2011
PRO EVOLUTION SOCCER 2011
DEMARRER / COMMANDES COMMANDES
Introduction
Si vous jouez pour la première fois, appuyez n’importe quel bouton sur l’écran principal an d’aller à l’écran des
Réglages par défaut. Si vous avez sauvegardé des données de jeu récemment, avancez au Menu Principal.
Réglages Standard
Avant de jouer un jeu pour la première fois, vous pouvez choisir entre cinq niveaux de diculté. Vous pouvez aussi
modier le niveau de diculté une fois que votre jeu est lancé. Les données relatives au système contenant toutes
les informations sauvegardées du jeu seront ensuite créées automatiquement. Après avoir conrmé cette étape,
allez au Menu Principal.
Sauvegarde des Données et Mémoire Nécessaire
An de stocker et de mettre à jour votre «Système de données» et «Modier les données», puis enregistrer votre
progression dans les compétitions, vous aurez besoin d’un disque dur Xbox 360 ou une carte mémoire Xbox 360
insérée dans le port mémoire A. Chaque chier sauvegardé dans le disque dur Xbox 360 ou dans la carte mémoire
Xbox 360 nécessite une certaine quantité d’espace libre, comme indiqué dans le tableau suivant.
Ecran Menu Principal
L’écran de sélection du Menu Principal vous permet d’accéder aux compétitions, aux options et aux réglages de
PES 2011. Utilisez le stick analogique gauche ou bouton multidirectionnel pour surligner l’option demandée, et
ensuite appuyez sur le bouton A pour faire votre sélection.
Utiliser la Fonction D’Aide
PES 2011 est un jeu palpitant qui comprend un nombre de fonctions incroyable, mais tous les eorts nécessaires
ont été fournis an de le rendre aussi accessible que possible. Quand l’icône Aide apparaît en bas de l’écran, vous
pouvez appuyer sur le bouton correspondante an d’accéder au menu de l’aide pour découvrir des conseils utiles
à tout moment. S’il vous plaît choisir votre langue préférée à partir de l’écran de sélection de langue s’ache lors
du démarrage du jeu.
Remarque: Ce jeu est présenté en Dolby Digital 5.1 en son multicanal. Connectez votre Microsoft Xbox 360 à un
système sonore avec une technologie de codage Dolby en utilisant un câble optique numérique. Connectez le
câble optique numérique à la base d’un câble audio/vidéo haute dénition Xbox 360, un câble audio/vidéo haute
dénition VGA Xbox 360, ou un câble audio/vidéo S-Vidéo Xbox 360. A partir de l’interface Xbox 360, sélectionnez
«Réglages de console», ensuite sélectionnez «options audio», ensuite «sortie numérique» et enn «Dolby Digital
5.1» an de proter de la qualité exceptionnelle du son ambiophonique.
Xbox LIVE
Ecouter toute personne et tout le monde, n’importe quand, n’importe où sur le Xbox LIVE. Créez votre prol (votre
carte de joueur). Chattez avec vos amis. Télécharger des contenus (séries TV, des remorques, des lms HD, des
démos de jeux, du contenu de jeu exclusif, et les jeux d’arcade) au Marché Xbox LIVE. Envoyez et recevez des voix
et des messages vidéo.
Connexion
Avant de pouvoir utiliser Xbox LIVE, vous devez raccorder votre console Xbox 360 à une connexion à large bande
ou haut débit et vous inscrire pour devenir membre du service Xbox LIVE. Pour savoir si Xbox LIVE est disponible
dans votre région et pour de plus amples renseignements sur la connexion au service Xbox LIVE, rendez-vous sur
le site www.xbox.com/live/countries.
Remarque: Qualité de la connexion peut être aectée à proximité d’appareils qui émettent des ondes perturbatrices
Contrôle Parental
Ces outils exibles et faciles d’utilisation permettent aux parents et aux tuteurs de décider à quels jeux les jeunes
joueurs peuvent accéder en fonction de la classication du contenu du jeu. Les parents peuvent restreindre l’accès
aux contenus classés pour adulte. Approuvez qui et comment votre famille interagit avec les autres personnes en
ligne sur le service Xbox LIVE et xez une limite de temps de jeu autorisé. Pour plus d’informations, rendez-vous sur
le site www.xbox.com/familysettings.
Commandes par Défaut
Utilisez votre manette pour naviguer sur les écrans de menu. Utilisez le stick analogique gauche ou le bouton
multidirectionnel pour vous déplacer dans les menus, le bouton A pour conrmer la sélection et le bouton B
pour annuler votre choix ou revenir aux menus précédents.
Pour les commandes de base utilisées pendant un match, référez-vous au tableau ci-dessous. Lisez les pages 19-23
pour les commandes avancées. Vous pouvez changer les fonctions de chaque touche en allant dans « Réglages
de manette » dans les «Réglages de Système». ( Voir réglages du système, page 27). Le stick analogique gauche
et Bouton Multidirectionnel contrôlent les mêmes actions pour ce jeu. Quand le manuel se réfère au «Bouton
Multidirectionnel», vous pouvez aussi utiliser le stick analogique gauche de la même manière.
COMMANDES D’ATTAQUE DE BASE
Bouton
Bouton z: Course
Stick analogique gauche: Mouvement du joueur, dribble
Bouton Multidirectionnel: Mouvement du joueur, dribble
Bouton Y: Passe en profondeur
Bouton B: Passe longue/ centre
Bouton A: Passe courte
Bouton X: Tir
Stick Analogique Droit: Passe manuelle
COMMANDES DE DEFENSE ELEMENTAIRE
Bouton y: Changement de joueur
Bouton z: Course
Stick analogique gauche: Mouvement joueur
Bouton Multidirectionnel: Mouvement joueur
Bouton Y (maintenir enfoncé): Gardien de but
Bouton B: Tacle glissé
Bouton A (maintenir enfoncé): Tacle/ mettre sous pression avec le joueur que vous contrôlez
Bouton X (maintenir enfoncé): Tacle/ mettre sous pression un joueur que vous ne contrôlez pas
(maintenir enfoncé le bouton)
Les joueurs ne vont joueurs et la pression de l’opposition, si vous appuyez sur le bouton
gauche. Sinon, les joueurs essayent de tenir jusqu’à l’opposition en se positionnant juste en face d’eux
et suivre leurs mouvements.
Dribbles et Contrôle du Ballon
Dribbles: Utilisez le stick analogique gauche pour déplacer votre joueur quand le ballon est à ses pieds.
Dribble Oblique: Maintenez le bouton
déplacement. Seul un petit nombre de joueurs est capable de réaliser ce dribble.
Dribble Rapide: Appuyez sur le bouton z pendant le dribble pour sprinter.
Gâchette
Haute Gauche
stick
analogique
gauche
Gâchette Gauche
_
L
]
Bouton Xbox Guide
<
l
y: Changement de joueur
x et appuyez sur le stick analogique gauche à 90°dans le sens de
à
C
Stick Analogique DroitBouton Multidirectionnel
x
Gâchette Droite
`
Gâchette Haute
Droite
Y
X
B
A
>
A + le stick
1918

PRO EVOLUTION SOCCER 2011
PRO EVOLUTION SOCCER 2011
COMMANDES COMMANDES
2120
Plus de Temps entre les Contacts Avec le Ballon: Maintenez le bouton z enfoncé pour sprinter balle au pied et
appuyez rapidement sur le stick analogique gauche deux ou trois fois entre les contacts avec le ballon pour le pousser
encore plus loin. Vous pouvez également obtenir le même eet à plusieurs reprises par appuyant sur le bouton z.
Longue Distance entre les Contacts Avec le Ballon: Lorsque vous sprintez balle au pied avec le bouton z
enfoncée, maintenez le bouton x et appuyez sur le stick analogique gauche à 45° à droite ou à gauche dans le
sens de la course.
Dribble Lent: Gardez le bouton x enfoncé pendant que vous dribblez an de réaliser un “Dribble lent”. Grâce à
cette technique, le ballon colle aux pieds de votre joueur et il peut alors exécuter de brusques changements de
direction ou une des nombreuses feintes possibles.
Bloquer le Ballon 1: Relâchez le stick analogique gauche et appuyez sur le bouton z pour immobiliser le ballon
pendant le dribble.
Bloquer le Ballon 2: Relâchez le stick analogique gauche et appuyez sur le bouton x pour donner l’ordre à votre
de joueur de s’arrêter et de faire face au but de vos adversaires.
Sauter: Lorsqu’un adversaire exécute un tacle glissé, appuyez sur le bouton x pour tenter de sauter par-dessus.
Contrôle du Ballon: Quand vous recevez une passe, appuyez sur le stick analogique gauche pour contrôler le ballon.
Tourner sans toucher le ballon: Pour demander à votre joueur de suivre le ballon quand une passe lui est destine sans
qu’il le touche, maintenez le bouton z enfoncée et appuyez sur le stick analogique gauche dans la direction de la course
du ballon.
Passes
Remarque: Utilisez le stick analogique gauche an de spécier la direction des passes.
Passe Courte/Tête: Appuyez sur le bouton
le bouton A enfoncé plus longtemps pour eectuer une passe vers un joueur plus éloigné.
Talonnade: Appuyez rapidement sur le stick analogique gauche dans la direction opposée au déplacement du
joueur puis appuyez sur le bouton A.
Passe Sans Contrôle: Appuyez sur le bouton A avant que votre joueur ne réceptionne le ballon.
Passe Longue: Appuyez sur le bouton B. La longueur de la passe dépend de la durée pendant laquelle le bouton
B est maintenue enfoncé.
Passe Longue Sans Contrôle: Appuyez sur le bouton B avant que votre joueur ne réceptionne le ballon.
Passe en Profondeur: Appuyez sur le bouton Y. En maintenant le bouton Y enfoncée le plus longtemps, vous
adressez votre passe à un joueur plus éloigné.
Passe en Profondeur Sans Contrôle: Appuyez sur le bouton Y avant que votre joueur ne réceptionne le ballon.
Passe en Profondeur Piquée: Maintenez le bouton y enfoncé et appuyez sur le bouton Y.
Une-Deux: Maintenez le bouton y et appuyez sur le bouton A pour eectuer une passe courte, ensuite appuyez
sur le bouton Y avant que votre coéquipier ne reçoive le ballon an qu’il vous renvoie le ballon.
One-Two Pass Avec Retour ébréchée Ball: Maintenez le bouton y et appuyez sur le bouton A pour eectuer
une passe courte, ensuite appuyez sur les boutons y + Y avant que votre coéquipier ne reçoive le ballon an
qu’il vous renvoie une balle piquée.
Passe et Accélération: Appuyez sur le bouton x immédiatement après avoir passé le ballon pour donner l’ordre
au joueur de courir en avant.
Passe Manuelle: Tout en maintenant enfoncé le bouton w, appuyez sur le stick analogique droit dans la direction
souhaitée et appuyez sur le bouton A pour réaliser la passe.
Passe Longue Manuelle: Tout en maintenant le bouton w, poussez le stick droit dans la directionto souhaité
exécuter le pas.
Les centres
Remarque: Utilisez le stick analogique gauche pour spécier la direction des centres.
Centre Haut: Quand vous êtes loin dans la moitié de terrain adverse, appuyez sur le bouton
Centre Bas: Quand vous êtes loin dans la moitié de terrain adverse, appuyez deux fois sur le bouton B.
Centre Bas Au Ras Du Sol: Quand vous êtes loin dans la moitié de terrain adverse, appuyez trois fois sur le bouton
B pour adresse un centre à ras de terre.
Centre Flottant: Appuyez sur le bouton x pendant que vous exécutez le centre pour envoyer le ballon en l’air.
Centre Rapide: Maintenez le boutons y et B enfoncés pour exécuter un centre à partir de n’importe quelle
position dans la moitié de terrain adverse.
Tirs
Notes sur les tirs: Appuyez sur le bouton
tir atteint le niveau désiré et votre joueur tirera en direction du but. Le niveau atteint par la jauge de tir détermine
la force et la hauteur de votre tir. Utilisez le stick analogique gauche pour dénir la direction voulue pendant le tir.
A pour eectuer une passe courte près du sol ou une tête. Maintenez
B.
X pour remplir la jauge de tir. Relâchez le bouton X quand la jauge de
Tir: Appuyez sur le bouton
Tir Sans Contrôle /Tête: Appuyez sur le bouton X juste avant que le ballon n’atteigne votre joueur pour eectuer
un tir sans contrôle ou une tête vers le but.
Tir Contrôlé: Appuyez sur le bouton x lorsque la jauge de puissance atteint le niveau souhaite pour exécuter un
tir plus axé sur la précision que sur la force.
Tir Lobé: Maintenez le bouton y enfoncé et appuyez sur le bouton X.
Tir Lobé Type 2: Pour eectuer un lob moins piqué, appuyez sur le bouton X, puis appuyez sur le bouton z
quand la jauge de tir apparaît.
Mouvements & Feintes
Remarque: Tous les mouvements supposent que la direction est dans laquelle regarde le joueur.
Compétences Feint épaule.
Partie supérieure du corps Feint: D’une position stationnaire, poussez le stick droit vers le côté.
Feinte de Matthews: D’une position stationnaire, poussez et maintenez le stick droit vers la gauche, puis poussez
le stick gauche en diagonale à droite. (Ou maintenez le stick droit vers la droite, puis poussez le stick gauche en
diagonale gauche).
Feinte de Matthews en glissade: D’une position stationnaire, poussez et maintenez le stick droit vers la g auche,
puis poussez le stick gauche vers la droite. (Ou maintenez le stick droit vers la droite, puis poussez le stick gauche
vers la gauche).
Compétences Feint Ciseaux
Étape Plus de Fake: Tourner le stick droit de 90° vers la gauche ou arrière droit de transmettre. Puis tout en
maintenant le stick droit, poussez le stick gauche à l’arrière gauche ou arrière droit. (Selon la direction, vous d’abord
appuyé sur le stick droit).
Étape sur les compétences
Étape On & Drag: D’une position stationnaire, appuyez sur la touche
Étape Sur & Slide: D’une position stationnaire, appuyez sur la touche w et à gauche ou à droite sur le stick droit
selon la direction dans laquelle vous voulez prendre la balle.
L Feint (Si pied droit): À partir d’une position stationnaire, appuyez sur la touche w et de retour sur le stick droit.
Puis, tout en maintenant le stick droit, poussez le stick gauche vers la droite. (Pour un lecteur du pied gauche, vous
devez pousser le stick gauche vers la gauche..
Talonnade Feint: D’une position stationnaire, appuyez et maintenez le bouton w, puis tourner le stick droit de l’arrière
à 90° vers la gauche. Puis tout en maintenant le stick droit, poussez le stick gauche vers la droite ou vers la gauche.
Faites glisser Retour en droite prendre / gauche prendre: Une position stationnaire, appuyez et maintenez la
touche w, puis poussez le stick droit vers l’arrière. Puis, tout en maintenant le stick droit, poussez le stick gauche en
diagonale vers la gauche ou la droite. (Si le joueur est du p ied gauche, vous devez inverser le sens.)
A l’intérieur Bounce: D’une position stationnaire, appuyez sur la touche w et de retour sur le stick droit. Puis, tout
en maintenant le stick droit, poussez le stick gauche avant.
Fonctionne à l’intérieur de rebond en diagonale Prendre: En dribblant, appuyez sur la touche w et de retour sur
le stick droit. Puis, tout en maintenant le stick droit, poussez le stick gauche en diagonale vers la gauche ou la droite.
Compétences Flip Flap
Flip Flap: En dribblant, appuyez sur la touche w et le stick droit en diagonale droite. Puis, tout en maintenant le stick
droit, poussez le stick gauche en diagonale gauche. (Si le joueur est du pied gauche, vous devez inverser le sens.)
Flip Flap Inversée: En dribblant, appuyez sur la touche w et le stick droit en diagonale gauche. Puis, tout en
maintenant le stick droit, poussez le stick gauche en diagonale à droite. (Si le joueur est du pied gauche, vous devez
inverser le sens.)
Roulette Compétences
Roulette: Appuyez sur la touche w, puis tourner le stick droit à 360 °. La direction dans laquelle le joueur tourne
dépend de la façon dont vous tournez le stick droit. Certains joueurs peuvent avoir diérentes motions Roulette.
Tourner des compétences
Cross Over Tourner: en dribblant, appuyez sur la touche W et le stick droit vers le côté, suivi par le stick gauche. (Du
même côté vous avez poussé le stick droit.)
Épousseter Compétences
Flick avant: Appuyez sur la touche w et cliquez sur le stick droit. Ensuite, poussez le stick gauche en diagonale
vers la gauche ou la droite. (Peut aussi être exécuté en dribblant.)
Flick Rainbow: Appuyez sur la touche w, puis cliquez sur le bouton de commande de droite deux fois. (Peut aussi
être exécuté en dribblant.).
Compétences Dribble Oblique
Dribble Oblique: Bien que le dribble, appuyez et maintenez la touche w. Ensuite, poussez le stick droit vers l’avant
ou à l’autre.
X.
w et de retour sur le stick droit.

PRO EVOLUTION SOCCER 2011
PRO EVOLUTION SOCCER 2011
COMMANDES COMMANDES
2322
Ciseaux Oblique: Au cours de Dribble Oblique (à gauche), appuyez et maintenez la touche
stick droit à 180° de la gauche tout le chemin à droite. Enn, poussez le stick gauche vers la gauche. (Vous devez
inverser les directions si vous étiez d’abord le déplacement vers la droite.)
Latéralement prise de passe: Pendant Dribble Oblique (à gauche), appuyez sur la touche w, puis tourner le stick
droit de 90° de gauche Retour à l ’avant. Enn, poussez le stick gauche vers la gauche tout en maintenant le stick
droit. (Vous devez inverser les directions si vous étiez d’abord le déplacement vers la droite.)
Feintes Link
Une nouvelle fonctionnalité à PES 2011, Feintes Link vous permettent de tirer une combinaison astuce consistant à
4 coups en appuyant simplement sur y et C / Z / V / X on the right stick. sur le stick droit. Ces feintes Link peut
être personnalisé et conguré dans le Plan des Jeux, alors pourquoi ne pas créer votre propre série de trucs et de vous
donner l’avantage sur vos concurrents en mettant en valeur votre ruse?
Les feintes de lien par défaut sont les suivants:
w, puis tourner le
Commandement 1er mouvement 2ème mouvement 3e mouvement 4e mouvement
y / z C
y / z V
y / z Z
y / z X
Défense
Tacle/Mettre sous pression: Appuyez sur le bouton
adverse avec le ballon.
Retard 1(Contrer l’adversaire): Appuyez sur le bouton A. Le joueur contre un attaquant adverse en adoptant une
position pour lui barrer sa progression jusqu’au but. Le défenseur restera immobile.
Retard 2 (contrer l’adversaire): Appuyez sur le bouton X et le Stick analogique gauche (ramène le défenseur vers son
but). Cela rend le joueur revenir vers son but tout en face de son adversaire et en le tenant en place.
Tacle Glissé: Appuyez sur le bouton B.
Dégagement: Quand le ballon se trouve dans votre moitié de terrain, appuyez sur le bouton X pour le dégager.
Faire Sortir le Gardien: Appuyez sur le bouton Y en situation de défense pour que le gardien se rue vers le ballon.
Dégagement du Gardien: Appuyez sur le bouton B ou sur le bouton X pour dégager le ballon avec le pied.
Relance à la Main: Quand votre gardien a le ballon en main, appuyez sur le bouton A pour lancer le ballon à un
coéquipier. Utilisez le stick analogique gauche pour viser.
Relâcher le Ballon: Quand votre gardien a le ballon en main (avec aucun bouton directionnel appuyé), appuyez sur
le bouton z pour lui ordonner de relâcher le ballon à ses pieds.
Gardien: Appuyez sur le stick analogique droit + le bouton y pour passer entre un joueur du champ extérieur
et le gardien.
Commandes Générales
Changer de Joueur: Appuyez sur le bouton
Contrôle du Joueur Quand le Ballon est en l’air: Lorsque le ballon est dans les airs, maintenez le bouton x
enfoncé et utilisez le stick analogique gauche pour positionner le joueur an de le réceptionner.
Super Cancel: Quand un joueur court automatiquement après le ballon, appuyez sur les boutons z et x
simultanément pour stopper le joueur ou pour en reprendre le contrôle.
Activer/ Annuler une Stratégie (en Mode Manuel): Maintenez le bouton w enfoncé et appuyez sur les boutons
B, A, Y ou X pour activer ou annuler les stratégies attribuées à ces boutons.
Niveau d’Attaque/ de Défense: Appuyez sur les boutons w et z ensemble pour augmenter le niveau de votre
jauge d’attaque / de défense ce pour faire avancer vos joueurs. Appuyez simultanément sur les boutons w et x
pour réduire le niveau de la jauge.
Plonger: Appuyez simultanément le le gauche et à droite.
Feintes de tir et de passe: Appuyez sur le bouton A, X, ou B puis appuyez sur le bouton A après que la jauge
de puissance apparaisse.
Coups de Pieds Arrêtés et Remises en Jeu
Remarque: Pour les coups francs et les corners, maintenez le bouton approprié enfoncée pour augmenter la jauge
de tir au niveau désiré.
Running Feint haut
du corps (R)
Feint haut du
corps (L)
Running Feint haut
du corps (R)
Running Dummy
prise de passe (L)
Feinte de
[
Matthews (R)
Étape Sur & Slide
[
(R)
Inversée prise de
[
passe Dummy (R)
Fake prise de
[
passe (R)
[
[
Étape Sur &
Slide (L)
Roulette (L)
[
V Feint (R)
A et maintenez le stick analogique gauche vers le joueur
y pour transférer le contrôle au joueur le plus proche du ballon.
Corners
Classique: Appuyez sur le bouton B.
Centre Haut: Maintenez le boutons x + B enfoncés.
Centre Bas: Maintenez le stick analogique gauche vers le haut et appuyez sur le bouton B.
Passe à ras de Terre: Maintenez le stick analogique gauche vers le bas et appuyez sur le bouton B.
Eet: Appuyez sur le stick analogique gauche gauche ou droit pendant que la jauge de tir est achée.
Corner Court: Appuyez sur le bouton A pour envoyer une passe courte vers votre coéquipier le plus proche.
Coups Francs: Les passes.
Passe Courte: Choisissez une direction avec le stick analogique gauche puis appuyez sur le bouton A.
Passe Longue Classique: Appuyez sur le bouton B.
Passe Haute: Maintenez les boutons x et B enfoncés.
Passe Basse: stick analogique gauche vers le haut + bouton B.
Passe à ras de Terre: stick analogique gauche vers le bas + bouton B.
Eet: stick analogique gauche droit ou gauche pendant que la jauge de tir est achée.
Passe en Profondeur: Appuyez sur le bouton Y au cours d’un coup franc pour envoyer le ballon à travers la
défense. Utilisez le stick analogique gauche pour orienter la passe.
Coups Francs: Tirs
Tir: Appuyez sur le bouton X.
Tir Appuyé: stick analogique gauche vers le haut + bouton X.
Tir Modéré: stick analogique gauche vers le bas + bouton X.
Tir Légèrement Appuyé: Appuyez sur le bouton X et au moment où le joueur entre en contact avec le ballon,
appuyez sur le bouton Y.
Tir Légèrement Faible: Appuyez sur le bouton X et au moment où le joueur entre en contact avec le ballon,
appuyez sur le bouton A.
Eet: Maintenez le stick analogique gauche droit ou gauche enfoncé pendant que la jauge de tir est achée.
Coups Francs: Commandes Générales
Remise en Jeu Rapide: Cela fonctionne seulement avec le bon timing quand un joueur positionne le ballon pour
eectuer un coup franc rapide en utilisant ses mains. Dans ce cas, déterminez une direction en utilisant le stick
analogique gauche et appuyez sur le bouton A ou Y pour redémarrer rapidement le jeu avec une simple passe.
Modier le Nombre de Tireurs: Appuyez simultanément sur les boutons y et z pour choisir entre les diérentes
congurations de coup franc: un tireur (réglage d’origine), deux tireurs (deuxième tireur : côté droit), deux tireurs
(deuxième tireur : côté gauche).
Utiliser le Second Tireur: Lorsque vous tirez le coup franc, maintenez le bouton y enfoncé an que le deuxième
tireur soit l’auteur d’un tir ou d’une passe longue.
Le Second Tireur Pousse le Ballon: Maintenez le bouton y enfoncé et puis appuyez sur le bouton A an que
le second tireur pousse le ballon devant lui. Vous pourrez alors exécuter un tir ou une passe avec le second joueur.
Coups Francs: Contrôle du Mur
Quand l’équipe adverse obtient un coup franc, maintenez les boutons suivants enfoncés pour contrôler les joueurs
qui forment le mur:
Augmenter/ Réduire le nombre de joueurs formant le mur: Maintenez enfoncé le bouton w et appuyez sur
le stick analogique gauche en haut pour ajouter plus de joueur au mur. Pour supprimer ces joueurs maintenez
enfoncé le bouton x ou w vers le bas. Seuls les joueurs qui ont été ajoutés peuvent être supprimés ultérieurement.
Faire Sauter Tous les Joueurs: Appuyez sur le bouton X.
Les Joueurs Restent Immobiles: Appuyez sur le bouton A.
Les Joueurs Sautent et Se Ruent Vers l’avant: Appuyez sur le bouton B.
Les Joueurs Se Ruent Vers l’avant: Appuyez simultanément le boutons B et A.
Comportement Aléatoire: Aucun bouton.
Remises en jeu
Touche courte et longue: Appuyez sur le bouton A. La distance dépend de la longueur achée sur la jauge.
Penalties
Tireur: La hauteur et la direction du tire dépend du temps pendant lequel le joueur appuie sur le stick analogique
gauche vers le but et de son côté (FLECHE DROITE), ou également lorsqu’il courre pour réceptionner un tir au but.
(Le joueur courre automatiquement pour réceptionner le tir).
Gardien: Maintenez le stick analogique gauche et le bouton X pour une durée de temps proportionnelle à la
hauteur ou la grandeur du saut souhaité an d’éviter le tir. Vous devez être dans le même rythme que le tireur. Si
vous n’entrez pas une direction, votre gardien reste immobile et couvre le centre du but.
Commandes exceptionnelles lorsque le curseur est réglé sur Figé
Demander le Ballon: Lorsqu’un coéquipier possède le ballon, appuyez sur le bouton x deux fois pour demander
une passe. Plus vous appuyez sur le bouton, plus vous augmentez la probabilité qu’il vous passe le ballon.

24
PRO EVOLUTION SOCCER 2011
PRO EVOLUTION SOCCER 2011
ECRANS DU MATCH / PLAN DU MATCH PLAN DU MATCH
25
Ecrans du Match
Cette section fournit des explications sur les diérentes fonctionnalités et options des écrans que vous rencontrerez
au cours d’un match.
Achage du Match
Joueur actif (le curseur)
(Lecteur indiquant sous contrôle)
•nom de Yellow / numéro ci-dessus
•Jaune / drapeau à damier rouge:
Votre lecteur est contrôlé dans un
Attitude Oensive/ Défensive
Attitude Oensive/ Défensive: Cette jauge indique l’état d’esprit actuel de votre équipe. Plus la barre est rouge, plus
l’équipe se montrera oensive ; au contraire, une barre bleue indique que l’équipe se met en position de défense.
Marquage de Stratégie: Les symboles de touche représentant les Stratégies Manuelles apparaissent dans cette
zone quand elle est active.
Jauge d’endurance: Ache le niveau d’endurance actuel d’un joueur. La jauge devient rouge quand le niveau
d’endurance est très faible, ce qui indique une baisse de la performance du joueur.
Joueur actif :
Le joueur actif sous contrôle est indiqué par une barre (ou « curseur ») placée au- dessus de sa tête.
Chaque uti lisateur s’ache avec une couleur diérente que vous pouvez voir en sélectionnant les
équipes (voir également page 27).
Jauge de puissance :
La jauge de puissance est placée sous le joueur lorsque vous initiez une passe ou un tir. Plus vous gardez
le bouton appuyé, plus la jauge se remplit et plus la passe ou le tir en question est puissant.
Icônes d’information: Les symboles qui suivent apparaitront dans le coin supérieur gauche de l’écran durant
les Matchs.
Bleu - Retourner au Match (Pas de Blessure) :
Un joueur revient sur le terrain en pleine forme.
Jaune - Retourner au Match (Blessure Légère):
Un joueur revient sur le terrain mais il est légèrement blessé, ce qui aura un eet sur sa performance.
Rouge - Ne Revient pas sur le Terrain (Pour Cause de Blessure):
Un joueur blessé ne peut pas revenir sur le terrain et doit être remplacé (si possible).
Gris - Coup franc Indirect :
Un coup franc indirect a été accordé.
Gris - Temps Supplémentaire :
Cela indique le nombre de minutes de jeu supplémentaires qui vont être jouées.
Plan du Match
Avant de commencer un match, vous pouvez congurer la formation de votre équipe, le capitaine et les tireurs de
coups de pieds arrêtés et eectuer d’autres Réglages sur l’écran pour le plan du match. Assurez-vous d’être bien
préparé pour disputer le match.
Fenêtres D’information
Lorsque vous sélectionnez pour la première fois le plan du match, il vous sera présenté sous la forme de 3 options
en tant que moyen pour former votre équipe. Il existe «Laisser au Manager», «Réglages simpliés» et «Choisir
manuellement». Si vous souhaitez que votre formation et composition soient choisies pour vous automatiquement,
choisir «Laisser au Manager».
Score
cursor
Lecteur m’a réservé
position de hors-jeu
Marquage de Stratégie
Radar
Temps Écoulé
Nom
Active Player
(Cursor)/
Jauge
D’endurance
Power Gauge
Réglages Simpliés
vous permet de choisir la formation et le mode d’attaque de l’équipe. Le reste du plan de match se formera
automatiquement.
Modier la gestion
Choisissez une stratégie adéquate pour certaines périodes de temps ou situations au cours du match. Les stratégies
seront ainsi automatiquement mises en œuvre si les conditions sont remplies. Choisissez Réglages déclenchement
automatique pour choisir si vous souhaitez certaines stratégies telles que des hors-jeux qui se déclenchent
automatiquement.
Choisir manuellement
Choisir tous les réglages des plans de match.
Press the
y or z button while the pitch diagram is shown to switch between Player form/Stamina (Arrows
indicate Form and the green gauge indicates stamina), Position/Overall Rating and Player Icon.
1
Vert Centre2Rouge Centre3Jaune Centre4Violet Courir 5Monde entier6Cartons Jaunes
Blessures
1 Retour après Blessure 2 Blessure Grave 3 Blessure Légère 4 Gravité de la Blessure Indéterminée
Indisponible
5 Engagement International 6 Suspendu pour cause de Cartons Jaunes 7 Suspendu pour cause de Carton Rouge
Réglages Assistées
Déplacez les cases de délement pour ajuster les réglages de la composition de l’équipe, de la formation, des
tactiques et des coups de pieds arrêtés. Une fois que vous avez choisi les réglages à modier, utilisez le stick
analogique gauche à gauche et à droite pour déplacer les cases de délement. Les réglages seront automatiquement
modiés an de correspondre à la position des cases de délement.
Composition de l’équipe
Les icônes circulaires indiquées sur le schéma désignent les joueurs et leurs positions. Protez de «Modier
Position» et «Remplacements» pour créer votre plan de match.
Capacités Joueurs
Pour consulter les capacités du joueur, déplacez le curseur sur celui de votre choix et appuyez sur le bouton
Une fois que les statistiques sont à l’écran, appuyez sur y ou z pour voir les cartes de compétence ou cartes
du style de jeu.
Remarque: Si vous avez besoin de plus de détails sur les capacités des joueurs, consultez le Mode Modier de PES
2010 où vous pouvez trouver des descriptions détaillées des capacités.
Dénir la Formation
Déplacez le curseur sur un joueur sur le terrain, puis appuyez sur le bouton
se déplacé librement autour du terrain jusqu’à ce que vous le relâchiez à la position souhaitée en appuyant de
nouveau sur le bouton A. Remplacer des joueurs, attraper le joueur sur l’icône désignant celui que vous souhaitez
faire remplacer. Vous pouvez également appuyer sur le bouton Carré lorsque l’icône d’un joueur sur le terrain est
mise en évidence pour choisir:
1) Le rôle du joueur
2) Pour désigner le joueur comme capitaine
3) Réglages des notes
Système de Carte
Grâce au nouveau système de car vous pouvez régler le niveau d’attaque de chaque joueur et choisir de tirer parti
ou non des capacités uniques d’un joueur.
Ceci vous ore des possibilités innies et des options stratégiques encore jamais vu auparavant.
Le Système de Carte ore deux diérentes catégories :
1) P = Les cartes du style de jeu représentent les styles de jeu individuels tels que des «Passes localisées».
Vous pouvez désactiver toutes les cartes si vous ne voulez pas d’un joueur qui exécute certains styles, si,
par exemple les styles ne cadrent pas avec votre stratégie globale.
2) S = Les cartes de compétence identient les compétences (par exemple, «économiseur de tir au but») que
les joueurs possèdent, et ne peuvent pas être modiées ou désactivées.
Remarque: Les cartes de style de jeu disponibles peuvent diérer selon le rôle des joueurs et le niveau d’attaque.
Si vous utilisez la carte du style de jeu qui va à l’encontre de vos tactiques en cours, elles seront traitées en priorité.
A pour l’attraper. Le joueur peut alors
7
Cartons Rouge
Y.

PRO EVOLUTION SOCCER 2011
PRO EVOLUTION SOCCER 2011
PLAN DU MATCH / MODES DE JEU MODES DE JEU / MODE MODIFIER / GALLERIE / REGLAGES SYSTEME
2726
Autres réglages
Protez des diverses options en choisissant les icônes gurant en bas de l’écran pour régler avec précision votre de
plan de match notamment avec:
Les feintes à la chaîne
Congurer jusqu’à 4 enchainements personnalisés de mouvements et de feintes est possible en appuyant sur
le bouton
w et le stick droit (C, V, Z et X). FTout d’abord, choisir une manette à laquelle vous souhaitez
attribuer des feintes à la chaîne. Ensuite, sélectionnez «Créer nouveau» pour concevoir un nouveau programme,
puis passez à l’écran modier. Ou bien, vous pouvez choisir «PROGRAMMER» pour modier les feintes à la chaîne
existante. Les feintes à la chaîne peuvent être sauvegardées et chargées dans le «Gestionnaire de données» et
peuvent être congurées individuellement pour chaque manette. Cependant, si vous partagez vos données de
plan de match avec des amis (par exemple dans un match multi-joueurs), choisir charger les feintes en chaîne dans
le «gestionnaire de données», vos données seront écrasées par celles du «Meneur de jeu».
Remarque: «Le meneur de jeu» désigne le joueur qui possède le contrôle du plan de match dans un match multijoueurs. (Habituellement, celui avec le plus petit nombre de chaque côté).
Ligue des Champions UEFA (page 28)
Opposez votre club à l’élite du football européen avec le tout nouveau mode exclusif de la Ligue des
Champions UEFA.
Copa Santander Libertadores
Proter du meilleur du football latino-américain également dans le mode exclusif Copa Santander Libertadores.
Exhibition
Tout d’abord, si vous voulez démarrer rapidement un match, choisissez de vous mesurer contre un ami (CONTRE
AMI) ou l’ordinateur (CONTRE ORDI.) C’est le moyen le plus rapide pour pousser ballon, alors qu’un match
personnalisé (PERSONNALISER) vous ore plus d’options dès le départ. Outre des nombreux choix évidents pour
les équipes, les uniformes ou le stade, vous trouverez les options suivantes pour le match préalable en fonction du
mode sélectionné:
Options du Jeu
Pour chaque manette que vous avez connectée, décidez si les joueurs correspondants vont être en compétition
ou jouer dans la même équipe. Choisissez aussi si vous souhaitez que les joueurs soient contrôlés par vous ou par
l’ordinateur durant le match. En appuyant sur le bouton
«Réglages curseur», page 28).
Match à Domicile/ Extérieur: Appuyez sur le stick analogique gauche droit ou gauche pour changer entre les
équipes à domicile et à l’extérieur.
Mode Entraineur: Prenez des décisions tactiques pendant que l’ordinateur contrôle les joueurs sur le terrain. Passez au
Mode entraineur en appuyant à gauche du stick analogique gauche quand l’icône de la manette est du côté domicile
ou en appuyant à gauche du stick analogique gauche quand l’icône de la manette est du côté extérieur.
Regarder un match: Regarder deux équipes commandées par l’ordinateur jouer ensemble.
Réglages généraux
Choisissez les Réglages pour le Niveau de Diculté, la Durée du Match, les Blessures, les Conditions d’Equipe etc.
Ensuite, sélectionnez «Conrmer». Notez que certains réglages tels que «Réglages de Règles» et «Développement
des Joueurs» sont propres à des modes de matchs particuliers.
Ligue des Masters (page 28)
Jouez en compétition dans la ligue, faites évoluer vos joueurs et cherchez à renforcer votre équipe sur le marché
des transferts.
Devenez une Légende (page 29)
Ce mode passionnant recrée la carrière d’un joueur spécique de votre choix.
Si vous montrez de bonnes performances, votre réputation sera meilleure ce qui provoquera des ores de transfert
pour rejoindre des clubs diérents. Pouvez-vous écrire votre nom dans les livres d’histoire?
Ligue et Coupe
Protez des diérents types de compétitions et de coupe. Un bon classement dans le tableau du tournoi vous permettra
d’entrer dans la Ligue Europa UEFA ou éventuellement dans la ligue des champions UEFA la prochaine saison.
Communauté
«Communauté» est un mode qui supporte les correspondances que vous avez avec vos amis les plus proches.
En enregistrant vos compagnons dans une communauté, vous pouvez ainsi la concurrence en utilisant diérents
formats de compétition.Une option huit joueurs est disponible en ligne communautaire, auquel vous pouvez
accéder directement.
X, vous pouvez ajuster les «Réglages de Curseur». (Voir
Xbox LIVE (Mode réseau) (page 29)
Connectez-vous à Xbox LIVE® et protez des matchs contre des joueurs venant de diérents pays qui jouent à la
même version de PES 2011.
Entraînement
Déplacez vos joueurs librement pendant que vous pratiquez les commandes du match. En ajustant les Réglages,
vous pouvez vous concentrer sur des domaines spéciques tels que coups francs et corners. Notez que vous ne
pouvez pas choisir le « Mode Spectateur » dans les Réglages Joueur.
Modier
Cette option vous permet de personnaliser la multitude d’équipe et de joueurs proposés dans PES 2011. Vous pouvez
même créer votre propre équipe. Activez le Menu d’Aide (son icône apparaît en bas de l’écran) pour consulter des
instructions plus détaillées sur la manière d’utiliser les nombreuse options et fonctionnalités de ce mode.
Modier le stade
Vous pouvez modier librement l’apparence du terrain et des tribunes pour créer votre propre stade personnalisé.
Ajouter vos Propres Images
Vous pouvez ajouter des images de têtes de joueurs, de logos d’uniformes et d’emblèmes en utilisant des données
d’image existantes, une caméra Xbox LIVE Vision ou un équipement similaire. Peu importe l’endroit où le symbole
de la caméra apparaît, suivez les instructions sur l’écran.
Remarque: Des données pour plus de 400 visages, 200 logos d’uniformes et 40 emblèmes peuvent être stockées,
selon la capacité de votre Disque dur Xbox 360 ou de la carte de mémoire Xbox 360.
Inscrire un Joueur créé Avec une Equipe
An d’inscrire un joueur que vous avez créé dans « Créer Joueur » avec une équipe, allez dans « Equipe » à partir
du Menu Modier et sélectionnez « Inscrire Joueur ». Ensuite, choisissez l’équipe à laquelle vous souhaitez que le
joueur adhère. Ensuite, après qu’une liste des joueurs de cette équipe ai été achée, sélectionnez « Ajouter joueur
» ou choisissez un joueur existant à échanger contre le joueur créé. Enn, sélectionnez « Autres » et choisissez le
joueur que vous venez juste de créer.
Galerie
La galerie combine beaucoup de divertissements et des fonctions instructives.
Gestion de la Musique: Ecoutez la musique de fond du match. Vous pouvez aussi changer la musique de fond qui
est jouée pendant le match.
Historique Musical: Visualisez un historique de ce que vous avez joué pendant le match.
Visionner les Ralentis: Regarder les matchs que vous avez sauvegardés.
Générique: Voir le générique de l’équipe.
Réglages Système
Ajustez les Réglages pour les commandes et la sauvegarde des données.
Playlist Editor: Écouter de la musique du jeu.
Réglages Manette: Changez la manière d’utiliser les commandes. Vous pouvez aussi ajuster d’autres Réglages et décider
par exemple comment le curseur de joueur est aché et comment il est changé. (Voir «Réglages joueurs», en dessous.)
Achage Ecran: Déterminez les informations achées à l’écran et la position indiquée pendant les matchs.
Réglages Son: Ajustez diérents éléments relatifs au son, comme par exemple le volume des commentaires et
des eets sonores.
Ajustements Ecran: Changez la position de l’écran et les réglages de couleurs.
Données Système: Activez ou désactivez la sauvegarde automatique. Sauvegardez ou chargez les données système.
Langue: Changez la langue utilisée pendant le match.
Réglages Curseur
Allez dans « Réglages Curseur » dans « Réglages Manette » pour changer le type d’achage et de déplacement du
curseur. Parmi les articles disponibles, «Modier le curseur» a en particulier un grand impacte sur les commandes du
jeu. Veillez choisir l’option «Modier Curseur» qui vous facilite les commandes pour l’action.
Changer Curseur
Automatique: Le curseur se déplace automatiquement. Vous pouvez aussi changer manuellement entre les
joueurs en appuyant sur le bouton
Semi-automatique: Lors d’une attaque le curseur se déplace automatiquement vers le joueur qui reçoit la balle.
Lors d’une situation de défense, le curseur passe en mode manuel en appuyant sur le bouton y.
y.

PRO EVOLUTION SOCCER 2011
PRO EVOLUTION SOCCER 2011
REGLAGES SYSTEME / LIGUE DES CHAMPIONS UEFA / LIGUE DES MASTER DEVENEZ UNE LEGENDE / XBOX LIVE (EN LIGNE)
2928
Manuel: Le curseur se déplace seulement lorsque vous appuyez sur le bouton y.
Joueur de base: Ette option vous permet de mettre le curseur constamment sur un joueur (sauf le gardien de but).
Remarque: Vous pouvez aussi accéder aux Réglages pour « Changer Curseur » en passant par « Réglages Joueur »
avant et pendant un match.
Ligue des Champions UEFA
Opposez votre club à l’élite du football européen avec le tout nouveau mode exclusif de la Ligue des Champions
UEFA. Votre équipe est-elle assez forte pour négocier les niveaux de groupe? Allez-vous faire face au challenge des
matchs éliminatoires? Etes-vous capable de devenir un des rares à remporter la coupe, ce dont tous les joueurs,
managers et supporters rêvent?
Ligue des Master
Dans ce, vous devez choisir une équipe puis la menez au succès au cours des compétitions de Ligue et de Coupe pour un
nombre de saisons illimité. Tout en générant des revenus avec chaque victoire sur le terrain et en gardant votre équipe
au meilleur de sa forme, vous devrez vous illustrer sur le marché des transferts et faire progresser consciencieusement
vos jeunes talents an de transformer votre club en une valeur sûre du football mondial.
Remarque: La ligue des Masters dans PES 2010 ore une myriade de nouvelles fonctionnalités et des améliorations,
dont certaines sont présentées ci-dessous. Et bien sûr, vous pouvez désormais vous qualier et participer aux
événements les plus prestigieux des clubs de football: La ligue Europa UEFA et la Ligue des Champions UEFA.
Progresser à travers la Ligue des Masters
Les saisons de la Ligue Master débutent au cours de la période de transfert du mois d’août et durent jusqu’au
milieu de la dernière semaine du mois de juillet de l’année suivante. A mesure que les matchs sont tenus et que le
calendrier progresse, le temps s’écoulera par tranche de demi-semaine.
Gestion de L’équipe
Comme dans le monde réel, tout est question d’argent. Vous êtes tenu de payer les frais tels que les salaires du
personnel, des joueurs et pour la gestion du fan club. Il est possible de gagner de l’argent avec des prix obtenus lors
de tournoi, les frais liés au fan club, et d’autres sources. Vous pouvez acquérir des nouveaux joueurs, investir dans
une jeune équipe, et améliorer les performances de l’équipe avec votre argent.
Remarque: La composition du personnel peut être changée en août en sélectionnant l’option «Embaucher du
personnel» dans «Personnel».
Perdre de L’argent et Faillite
Les dépenses sont calculées dans la première semaine de septembre. Si vos fonds sont dans le rouge à ce moment,
votre équipe fera faillite. Même si l’équipe fait faillite, il sera toujours possible de jouer des matchs normalement,
mais la fréquence des dépôts de bilan sera enregistrée dans vos données de sauvegarde.
Lorsque vos fonds sont dans le rouge, vous ne serez pas en mesure de mener des négociations. Donc, vous
serez forcé de tenter de réduire les frais rapidement, par exemple en vendant des joueurs, bien avant le mois de
septembre. Sinon, le jeu s’en occupera automatiquement.
Négociations de Transfert
Les négociations de transfert se tiennent au cours de la saison. Il existe quatre modèles principaux pour ces
négociations; Instigation de négociation, réceptions des ores de négociation, mis en vente de joueurs et
renouvellement des contrats. Lors de la négociation avec les joueurs, un observateur se chargera de la procédure.
(Vous pouvez également designer votre observateur an qu’il s’occupe de tout, de la sélection des joueurs aux
négociations et pour la signature. Cette option est désactivée par défaut).
Vérier les Jeunes Équipes
L’option jeune équipe dans le pavillon-club vous permet de choisir parmi plus de 10 jeunes joueurs talentueux en
tant que nouvelles recrues pour votre équipe. Aucune négociation n’est nécessaire avec ces joueurs ou encore frais
de transfert à payer, donc vous pouvez signer avec eux à tout moment durant la saison. Enn, les joueurs qui ont
signé provenant d’une jeune équipe seront très attachés à votre équipe et seront moins susceptibles de se faire
transférer pour une autre équipe dans le futur.
Devenez une Légende
Créez un joueur et visez le titre de Joueur Mondial de l’Année. Vivez votre carrière depuis votre début professionnel
jusqu’à la retraite.
Progresser à travers le mode Devenez une Légende
Les possibilités de jouer des matchs seront peu nombreuses au début. Vous débutez en tant que jeune équipe
diplômée du club que vous avez choisi, qui doit travailler dur et impressionnée dans la Réserve des matches pour se
faire une place sur le banc. Les possibilités de jouer des matchs seront peu nombreuses au début. Vous allez devoir
travailler dur et impressionner les gens pendant les matchs d’équipe pour mériter votre place sur le banc. Montrez
vos bonnes performances en dehors du banc pour gagner votre place xe dans l’équipe. De bonnes performances
de jeu ouvriront le chemin à des ores venant d’autres clubs. Après le transfert, faites gagner votre équipe, mais
visez aussi à gagner des récompenses personnelles comme la MVP de la ligue ou le titre de meilleur marqueur. De
tels titres peuvent souvent provoquer des ores faites par des clubs plus importants et même un appel en équipe
nationale. La carrière d’un joueur commence à 17 ans et augmente d’un an au début d’une nouvelle saison. A l’âge
de 27 ans, vous pouvez également opter de prendre votre retraite. Vous pouvez aussi choisir de continuer de jouer
jusqu’à vos 35 ans ou plus ou que votre contrat expire. . A ce moment la retraite est forcée et le mode “Devenez une
légende” est terminé.
Remarque: Dans PES 2011 vous pouvez utiliser votre joueur développé du mode Devenez une légende en ligne
ainsi qu’en ligue des Masters. Pour ce faire, allez dans «Options» dans le menu Devenez une légende.
En outre, vous pouvez désormais vous qualier pour la ligue Europa UEFA et la ligue des Champions UEFA au sein
du mode Devenez une légende.
Mouvement Automatique: Activez ou désactivez la fonction de mouvement automatique. Si elle est ACTIVEE,
votre joueur bouge automatiquement si vous maintenez le bouton
change d’un bleu opaque à transparent).
Matchs
Les joueurs qui vont jouer, la formation de l’équipe, les remplacements, etc. sont décidés automatiquement par
l’ordinateur. Vous contrôlez seulement votre joueur créé. Quand vous ne jouez pas, vous pouvez regarder le match
en tant que spectateur (accélérez la vitesse du match dans le « Menu Avance Rapide » si vous le souhaitez).
Développement Joueur
Jouer des matchs permet aux joueurs d’acquérir des points d’expérience qui augmentent également avec de
bonnes performances de jeu. Une fois que vous avez acquis un certain nombre de points, les capacités du joueur
vont augmenter en accord avec la courbe de développement.
Remarque: Une fois un certain âge atteint, les capacités du joueur peuvent décliner. L’expérience peut également
apporter des compétences spéciales (jusqu’à huit).
Paramètres de Mise au Point
Au démarrage du jeu, il vous sera demandé de choisir le type de joueur que vous souhaitez être. A ce stade, vous
aurez également attribué des Mises au points (14 points au total parmi les compétences clés). Plus de points sont
attribués à une compétence, plus sont développement est rapide.
Interagir avec vos coéquipiers
Pour demander le ballon, appuyez sur le bouton
coéquipier, vous passerez la balle. Pour obtenir un coéquipier de fermer l’opposition joueurs, vous devez appuyer
sur le bouton X. Votre lecteur doit être de la balle.
Préparations de Réseau
Après avoir sélectionné «En ligne» dans le Menu Principal, suivez les étapes ci-dessous pour congurer votre partie.
1 Création de Données Utilisateur/ Vérication de Détails
Vous serez dirigé vers l’écran « Création de données utilisateur » s’il n’y a pas de données utilisateurs disponibles.
Soyez conscient que les données utilisateur créées ne peuvent pas être supprimées pendant un certain temps.
2 Divisions
Les joueurs seront placés dans 1 des 5 divisions (divisions 1 à 5).
3 Compétitions
En règle générale, les compétitions possèdent des séries de qualications et des étapes éliminatoires. Les utilisateurs
doivent être bien classés dans la série de qualications.
*Toutes les compétitions ont un temps de départ dénie. Veuillez prendre en compte que vous serez dans
l’impossibilité d’accéder aux compétitions en dehors des heures déterminées
x à deux reprises. Si vous êtes dans une bonne position de votre
y enfoncé (le curseur au-dessus du joueur

PRO EVOLUTION SOCCER 2011
Official Licensed
Product
PRO EVOLUTION SOCCER 2011
XBOX LIVE (EN LIGNE) XBOX LIVE (EN LIGNE) / MENTIONS LEGALES
4 Modes de Jeu Xbox LIVE
La ligue des Masters en ligne possède une structure similaire à la version originale hors ligne, sauf pour une chose
importante. Vous être en compétition contre les autres utilisateurs en ligne! Vos objectifs sont de constituer et de
renforcer votre équipe en signant pour les bons joueurs et d’augmenter le capital avec de belles démonstrations
au sein diérentes compétitions. Veuillez prendre en compte qu’un droit d’entrée est nécessaire lorsque vous jouez
des matches et ce prix augmente plus votre équipe compte de grands noms.
5 Signer des joueurs dans la ligue des Masters en ligne
Pour signer des joueurs dans la Ligue des Master en ligne, sélectionnez [Marché] dans le menu. A partir de là, tout
ce que vous avez à faire est de rechercher le joueur que vous souhaitez et placer votre ore. La règle générale est
plus le joueur est populaire plus le prix à payer sera élevé.
6 Devenez un Manager
Choisir le mode Entraineur dans Match rapide vous permet d’avoir une approche diérente du jeu, là où ce qui
compte par-dessus tout est votre génie tactique plutôt que vos compétences sur le terrain.
7 Légendes
Incarner votre alter-ego du mode Devenez une légende ou comme un véritable footballeur, constituez-vous une
équipe avec jusqu’à 3 utilisateurs en ligne. Il existe également une option 4 sur 4 VS. Match!
8 Icônes en Mode Réseau
Icônes État des Joueurs
Partie en cours Connecté Non Connecté
(Rouge) (Bleu) (Gris)
Icônes Joueurs
Vous Ami
Joueur de votre
Liste Noire
(Vert) (Bleu) (Rouge)
Icône Etat de Transmission
Ces icônes vous informent de la qualité de la connexion réseau:
Bon Moyen Mauvais Pas de Communication Recherche
(Vert) (Jaune) (Orange)
Recherche
en cour
Icônes de Comportement
Si vous voulez connaître l’évaluation de l’attitude d’un adversaire, ces icônes vous le diront (par ordre décroissant
de gauche à droite). L’attitude reète, par exemple, si un joueur abandonne un match prématurément.
en cour
Remarque: Les utilisateurs avec une mauvaise attitude n’auront pas accès aux classements en ligne.
Ocial Licensed Product of UEFA CHAMPIONS LEAGUE™. All names, logos and trophies of UEFA are the property, registered trademarks
and/or logos of UEFA and are used herein with the permission of UEFA. No reproduction is allowed without the prior written approval of
UEFA. adidas, the 3-Bars logo, the 3-Stripe trade mark and Predator are registered trademarks of the adidas Group, used with permission.
adiPURE, adiZERO and F50 are trademarks of the adidas Group, used with permission. the use of real player names and likenesses is
authorised by FIFPro and its member associations. O cially licensed by Czech National Football Association Ocially licensed by
CFF © 2010, DFB Licence granted by m4e AG, Grünwald © The Football Association Ltd 2010. The FA Crest and FA England Crest are
ocial trademarks of The Football Association Limited and are the subject of extensive trade mark registrations worldwide. copyright
FFF Ocially licensed by FIGC and AIC © 2001 Korea Football Association Licensed by OLIVEDESPORTOS (Ocial Agent of the FPF)
Producto ocial licenciado RFEF © 2002 Ligue de Football Professionnel ® Ocially Licensed by Eredivisie Media & Marketing C.V. Ocial
Licensed Product of A.C. Milan Manchester United crest and imager y © MU Ltd © Real Madr id (10) Ocial product manufactured
and distributed by Konami Digital Entertainment under licence granted by Soccer s.a.s. di Brand Management S.r.l. Under licence from
Tottenham Hotspur Plc Wembley, Wembley Stadium and the Arch device are ocial trademarks of Wembley National Stadium Limited
and are subject to extensive trade mark registrations. All other copyrights or trademarks are the property of their respective owners and
are used under license.
This software is based in part on the work of the Independent JPEG Group.
Dolby and the double-D symbol are trademarks of Dolby Laboratories.
©2010 Konami Digital Entertainment. KONAMI is a registered trademark of KONAMI CORPORATION.
Official Licensed
Product
3130
MESSAGE IMPORTANT
Konami se réserve le droit de pénaliser ou condamner chaque joueur utilisant de la fonction de chat pour
abuser de tiers. La pénalité sera décidée par Konami et peut provoquer un bannissement temporaire ou
permanent de la fonction de chat ou du jeu en ligne avec ou sans préavis.
Nous vous remercions pour votre compréhension et votre fair-play.

PRO EVOLUTION SOCCER 2011
WARRANTY
NOTES GARANTIE / SUPPORT PRODUIT
PRO EVOLUTION SOCCER 2011
3332
GARANTIE
Konami Digital Entertainment, Inc. garantit à l’acheteur original de ce jeu Konami que le média sur
lequel ce logiciel est enregistré est franc de tout vice de matériel ou de main-d’œuvre pour une
période de quatre-vingt-dix (90) jours à compter de sa date d’achat. Ce produit Konami est vendu «
tel quel » et sans aucune garantie expresse ou tacite et Konami ne peut être tenu responsable de
quelque dommage ou perte découlant de l’usage de ce logiciel. Konami accepte, pour une période
de quatre-vingt-dix (90) jours, de remplacer ou de réparer sans frais, à sa discrétion, tout produit
Konami, dont les frais d’envoi postal ont été payés, avec une preuve d’achat, acheminé à son
Centre de service. La présente garantie ne peut être invoquée lorsque le vice résulte de l’usure
normale ou d’égratignures. La présente garantie sera également nulle et sans effet si le vice du jeu
Konami résulte d’un usage abusif ou déraisonnable, d’un acte délibéré ou d’une négligence.
L’OBLIGATION DÉCOULANT DE LA PRÉSENTE GARANTIE TIENT LIEU DE TOUTE AUTRE GARANTIE
ET NULLE AUTRE ASSERTION OU REPRÉSENTATION DE QUELQUE NATURE QUE CE SOIT
N’ENGAGE KONAMI. TOUTE GARANTIE TACITE S’APPLIQUANT AU PRÉSENT LOGICIEL, Y
COMPRIS TOUTE GARANTIE QUANT À SA VALEUR MARCHANDE OU À SA PERTINENCE EN
REGARD D’UN USAGE PARTICULIER, SE LIMITE À LA PÉRIODE DE QUATRE-VINGT-DIX (90) JOURS
DÉCRITE CI-DESSUS. KONAMI NE SAURAIT EN AUCUN CAS ÊTRE TENU RESPONSABLE DES
DOMMAGES SPÉCIAUX, ACCESSOIRES OU CIRCONSTANTIELS RÉSULTANT DE LA POSSESSION,
DE L’UTILISATION OU DE LA DÉFAILLANCE DE CE PRODUIT KONAMI.
Certains états ou provinces ne permettent ni les limites sur la période de garantie tacite, et/ou les
exclusions ou limites vis-à-vis des dommages accessoires ou circonstanciels. Le cas échéant, les
limites et/ou exclusions de responsabilité qui précèdent peuvent ne pas s’appliquer à vous. Cette
garantie vous octroie des droits spécifiques et vous pourriez bénéficier d’autres droits qui varient
d’un état ou d’une province à l’autre.
Si vous avez des problèmes techniques avec votre jeu, rendez-vous sur www.konami.com/support
pour obtenir de l'aide. Depuis cette page, vous pourrez accédez à de nombreuses rubriques
d'assistance ainsi qu'à notre base de connaissances, disponible 24 h/24 et 7 jours/7. Tout produit
doit être jugé défectueux par un représentant au service à la clientèle de Konami et un numéro
d’autorisation de retour de produit (#RMA) doit vous être attribué avant l’envoi du produit; tout
produit reçu sans ces critères vous sera retourné si un représentant du service à la clientèle de
Konami ne peut pas vous rejoindre dans les trois (3) jours suivant la réception du produit retourné
non autorisé.
Konami Digital Entertainment, Inc.
Attention: Customer Service-RMA # XXXX
2381 Rosecrans Ave, Suite 200
El Segundo, CA 90245
USA
Inscrivez-vous dès aujourd’hui au www.konami.com afin de recevoir des informations
exclusives sur les nouveaux produits, des offers spéciales et bien plus encore!
www.konami-pes2011.com

KINECT, Xbox, Xbox 360, Xbox LIVE, and the Xbox logos are trademarks of the Microsoft group of
KINECT, Xbox, Xbox 360, Xbox LIVE et les logos Xbox sont des marques commerciales du groupe de
Ofcial Licensed Product of UEFA CHAMPIONS LEAGUE™. Ofcial Licensed Product of UEFA EUROPA LEAGUE™.
All names, logos and trophies of UEFA are the property, registered trademarks and/or logos of UEFA and are
used herein with the permission of UEFA. No reproduction is allowed without the prior written approval of UEFA.
adidas, the 3-Bars logo, the 3-Stripe trade mark and Predator are registered trade marks of the adidas Group, used
with permission. adiPURE, adiZERO and F50 are trade marks of the adidas Group, used with permission. All other
copyrights or trademarks are the property of their respective owners and are used under license. ©2010 Konami
companies and are used under license from Microsoft.
sociétés Microsoft et sont utilisées sous licence de Microsoft.
Digital Entertainment KONAMI is a registered trademark of KONAMI CORPORATION.
30105
 Loading...