

Page 1

Operations Manual
Page 2

Updating the PSP® system software
This UMD® includes the latest update data for the PSP® system. If a screen prompting you to
update the system software is displayed when you start the UMD
®
, you must perform an update
to start the software title contained on the UMD
®
.
Performing the update
When you insert the UMD®, an icon (as shown on
the right) is displayed under [Game] in the home
menu. Select the icon, and then follow the on-screen
instructions to perform the update.
Before starting the update:
• Fully charge the PSP
®
system battery.
• Connect the AC adaptor to the system and plug it
into an electrical outlet.
During an update:
• Do not remove the AC adaptor, turn off the system or remove the UMD
®
.
If an update is canceled before completion, the system software may become damaged, and the
system may require servicing to repair or exchange.
Checking that the update was successful
After th e update has bee n completed, s elect [Syste m Settings] un der [Setting s] from the home
menu, a nd then sel ect [Syst em Informa tion]. If t he System So ftware fi eld displa ys the vers ion
number of the update, the update was successful.
PSP® Update ver X.XX
Updating the PSP® (PlayStation®Portable) system
LIMITED WARRANTY
Publisher warranty required here.
Net BSD
The communications function of this product includes software developed by the
NetBSD Foundation, Inc. and its contributors. For a complete list of contributors please
see http://www.scei.co.jp/psp-license/pspnet.txt
“PlayStation”, “PS” Family logo, “PSP”, and “UMD” are registered trademarks of Sony Computer Entertainment Inc.
Memory Stick Duo and Memory Stick PRO Duo are trademarks of Sony Corporation.
For safe use of this product , carefully read the following section of this m anual and the Precautions section
of the instruction manual supplied with the P SP
software manual and the instruction manual for future reference.
®
(PlayStation®Portable) system before use. Retain both th is
WARNING: PHOTOSENSITIVITY/EPILEPSY/SEIZURES
A very small percentage of individuals may experience epileptic seizures or blackouts when exposed to
certain light patterns or flashing lights. Exposure to certain patterns or backgrounds on a screen or when
playing video games may trigger epileptic seizures or blackouts in these individuals. These conditions may
trigger previously undetected epileptic symptoms or seizures in persons who have no history of prior
seizures or epilepsy. If you, or anyone in your family, has an epileptic condition or has had seizures of any
kind, consult your physician before playing. IMMEDIATELY DISCONTINUE use and consult your physician
before resumi ng gameplay if you or your chil d experience any of the follo wing health problems or
symptoms:
• dizzines s • disorientation
• altered vision • seizures
• eye or muscle twitches • any involuntary movement or convulsion
• loss of awareness
RESUME GAMEPLAY ONLY ON APPROVAL OF YOUR PHYSICIAN.
_______________________________________________________________________________
Use and handling of video games to reduce the likelihood of a seizure
• Use in a well-lit area and keep a safe distance from the screen.
• Avoid prolonged use of the PSP
• Avoid playing when you are tired or need sleep.
_______________________________________________________________________________
Stop using the system immediately if you experience any of the following symptoms: lightheadedness,
nausea, or a sensation similar to motion sickness; discomfort or pain in the eyes, ears, hands, arms, or any
other part of the body. If the condition persists, consult a doctor.
_______________________________________________________________________________
Do not use while driving or walking. Do not use in airplanes or medical facilities where use is prohibited or
restricted. Set the PSP
other crowded locations. If used near persons with pacemakers, the signal from the PSP
network feature could interfere with the proper operation of the pacemaker.
Use and handling of UMD
• This disc is PSP® (PlayStation®Portable) format software and is intended for use with the PSP® system only. If
the disc is used with other devices, damage to the disc or to the dev ice may result. • This disc is compatible for
use with the PS P
software, a Memory Stick Duo™ or Memory Stick PRO Duo™ (both sold separately) may be required. Refer to the
software manual for full details. • If paused images are displayed on t he screen for an extended period of time,
a faint i mage may be l eft perma nently on th e screen. • D o not leave th e disc in dir ect sunli ght, near a he at
source, in a car or other places subject t o high heat and humidity. • Do not touch the opening on the rear of the
disc (recording surface of the disc; s ee drawing). Also, do not allow dust, sand, foreign objects or other t ypes of
dirt to ge t on the disc. • Do n ot block the op ening with pa per or tape. Als o, do not write o n the disc. • If th e
opening area does get dirty, wipe gently with a soft cloth. • To clean the disc, wipe
the exterior surface gently with a soft cloth. • Do not use solvents such as benzin e,
com merc iall y-av aila ble cl eane rs not i nten ded fo r CDs , or a nti- sta tic spra y
inte nded for vinyl L Ps as the se may da mage th e disc. • Do not us e crack ed or
defo rmed d iscs or d iscs t hat hav e been r epaire d with a dhesives as th ese may
cause c onsole dama ge or malfunc tion. • SCE wil l not be held lia ble for damag e
resulting from the misuse of discs.
®
system mark ed with FOR SALE AND USE I N U.S. AND CANADA ONLY. • Depen ding on the
®
system. Take a 15-minute break during each hour of play.
®
system’s wireless network feature to off when using the PSP® system on trains or in
®
Ejecting the d isc
Pre ss the rig ht side o f the disc u ntil it i s in the pos ition s hown in t he
drawing and the n remove it. If excess force i s applied this may result in
damage to the disc.
Storing the disc
Insert the bo ttom side of the disc an d then press on the top sid e until it
cli cks int o place . If the di sc is not s tored p roperl y, this ma y resul t in
damage to the d isc. Store the disc in it s case when not in use and kee p
in a pl ace out o f the rea ch of chi ldre n. If the d isc is le ft out th is may
result in warping or other damage to the disc.
®
system’s wireless
Recording surface
Contents
Getting Started.....................
Title Menu............................
Game Screen........................
Controls: So Easy!
Controls (Shooter Type)........
Stealth: Feel the Thrill!
Sneaking..............................
Spotted by an Enemy............
LIFE Gauge and Items............
Weapon Attacks...................
CO-OPS: You’re Not Alone!
Starting CO-OPS...................
CO-OP Ring.........................
02
Recruiting: Build An Army!
04
Fulton Recovery....................
05
Mother Base: Make it Grow!
Mother Base........................
06
Other Languages: Parle Vous?
French.................................
Español...............................
08
09
10
11
12
13
14
15
19
37
Page 3

METAL GEAR SOLID: PEACEWALKER
|
03
METAL GEAR SOLID: PEACEWALKER
|
06
Getting Started
Set up your PSP® (PlayStation®Portable) system according to the instructions in the manual supplied with the
system. Turn the system on. The power indicator lights up in green and the home menu is displayed. Press the
OPEN latch to open the disc cover. INSERT METAL GEAR SOLID: PEACEWALKER disc with the label facing away
from the system, slide until fully inserted and close the disc cover. From the PSP® system’s home menu, select
the Game icon and then the UMD icon. A thumbnail for the software is displayed. Select the thumbnail and press
the S button of the PSP® system to start the software. Follow the on-screen instructions and refer to this manual
for information on using the software.
NOTICE: Do not eject a UMD® while it is playing.
Memory Stick Duo™
Warning! Keep Memory Stick Duo media out of reach of small children, as the media could be swallowed by accident.
To save game settings and progress, insert a Memory Stick Duo into the memory stick slot of your PSP® system.
You can load saved game data from the same memory stick or any Memory Stick Duo containing previously saved
games.
November 10, 1974
Caribbean Coast,
Costa Rica
THIS IS A SNEAKING
MISSION.
02
READY TO GET THIS
SHOW STARTED,
SNAKE?
YEAH.
Camo Index
10%
Ca mo In dex
80%
Wall Press:
Press the Action Button near a wall
AVOID COMBAT AND DON'T LET
THOSE MERCS SEE YOU.
03
Page 4

METAL GEAR SOLID: PEACEWALKER
|
05
METAL GEAR SOLID: PEACEWALKER
|
02
Title Menu
02
03
Title Menu
Game Screen
Press the START button at the title menu to get started!
Title Menu
(scroll up/down)
NEW GAME
LOAD GAME
DELETE
EXTRAS
Start the main game.
Continue a previous game from saved data.
Delete data.
Go to the Extras menu.
You must connect to the PlayStation®Network to access some of the
content in this game. An external peripheral and/or wireless Internet
connection is required to access the network. For details, please refer
to the instruction manual for your PSP® or network peripheral.
*
DATA INSTALL Install data on a Memory Stick PRO Duo™.
In stallat ion is req uired to p lay in-game rad io dial ogue voices . *
For PSP 1000/2000/3000 models, a Memory Stick PRO Duo™ with at
least 330MB of free space is required.
Title Menu
Press the START button at the title menu to get started!
Title Menu
(scroll up/down)
Game Screen
NEW GAME
LOAD GAME
DELETE
EXTRAS
*
You must connect to the PlayStation®Network to access some of the
content in this game. An external peripheral and/or wireless Internet
connection is required to access the network. For details, please refer
to the instruction manual for your PSP® or network peripheral.
DATA INSTALL Install data on a Memory Stick PRO Duo™.
In stallat ion is req uired to p lay in-game rad io dial ogue voices . *
For PSP® 1000/2000/3000 models, a Memory Stick PRO Duo™ with at
least 330MB of free space is required.
Start the main game.
Continue a previous game from saved data.
Delete data.
Go to the Extras menu.
AUTO AIM On
Enemy
Status
(see p.9)
PSYCHE
Gauge
(right)
Camo Index
(see p.08)
Item in Use
(see p.10)
04
LIFE Gauge
(left)
(see p.10)
Player Name
Action Icon
Shows actions available at that moment.*
Weapon in
Use
(see p.11)
05
Page 5

METAL GEAR SOLID: PEACEWALKER
|
07
METAL GEAR SOLID: PEACEWALKER
|
Controls (Shooter Type)
Action Type and Hunter Type controls also available!
:
04
05
Controls (Shooter Type)
Action Type and Hunter Type controls also available!
Controls (Shooter Type - Aiming)
Directional buttons
Up: Action Button
Performs actions suited to
the situation (Action Icon)
Right: Weapon Select Button
Hold down and press the
f or a button to change
weapons
Left: Item Select Button
Hold down and press the
f or a button to change
items
Down: Crouch Button
Press and hold to lie down
Cannot move while lying
down
*
n button: Aim Button
b button: Attack Button
Analog Stick: Move
Run / walk quietly
dasf buttons:
Camera
Shift camera
perspective
:
START button: Menu Button
SELECT button: Varies
(based on control scheme)
Press and hold to aim weapon
Attack with bare hands
Controls (Shooter Type)
Action Type and Hunter Type controls also available!
Directional buttons
Up: Action Button
Right: Weapon Select Button
Left: Item Select Button
Down: Crouch Button
Performs actions suited to
the situation (Action Icon)
Hold down and press the
f or a button to change
weapons
Hold down and press the
f or a button to change
items
Press and hold to lie down
Cannot move while lying
*
down
Controls (Shooter Type - Aiming)
Directional buttons
Up: Reload Button
Right: Camera Switch Button
Left: Camera Switch Button
Down: Crouch Button
Reload weapon
Move camera to right
Increase scope zoom*
Move camera to left
Decrease scope zoom*
n button: Aim Button
Press and hold to aim weapon
SELECT button: Varies
(based on control scheme)
START button: Menu Button
Analog Stick: Move
Run / walk quietly
n button: Aim Button
Press and hold to aim weapon
b button: Attack Button
Attack with bare hands
dasf buttons
Camera
Shift camera
perspective
b button: Attack Button
Attack with weapon
06
SELECT button: Varies
(based on control scheme)
START button: Menu Button
Analog Stick: Move
Run / walk quietly
dasf buttons
Camera
Shift camera
perspective
07
Page 6

METAL GEAR SOLID: PEACEWALKER
|
09
METAL GEAR SOLID: PEACEWALKER
|
08
09
Spotted by the Enemy
The enemy's after you! Now what?!
When the enemy spots Snake, they'll call for backup and attack in
numbers. You'll need to either defeat them or get out of their sight.
WHO'S THERE?!
SNAKE, GET OUT
OF SIGHT, NOW!
REQUESTING
BACKUP!
THEY FOUND ME!
Stealth:
Feel the
Thrill!
Stealth:
Feel the
Thrill!
08
Spotted by the Enemy
WHO'S THERE?!
SNAKE, GET OUT
OF SIGHT, NOW!
REQUESTING
BACKUP!
06
07
Sneaking
Move cautiously to avoid detection!
The Camo Index in the upper right corner tells you how easy you are to spot.
Move the analog stick just a little to walk slowly.
Stealth:
Feel the
Thrill!
Stealth:
Feel the
Thrill!
Ca mo In dex
80%
Camo Index
10%
Wall Press:
Press the Action Button near a wall
November 10, 1974
Caribbean Coast,
Costa Rica
THIS IS A SNEAKING
MISSION.
READY TO GET THIS
SHOW STARTED,
SNAKE?
YEAH.
AVOID COMBAT AND DON'T LET
THOSE MERCS SEE YOU.
06
Sneaking
Ca mo In dex
80%
Camo Index
10%
Wall Press:
Press the Action Button near a wall
THIS IS A SNEAKING
MISSION.
AVOID COMBAT AND DON'T LET
THOSE MERCS SEE YOU.
Sneaking
Move cautiously to avoid detection!
The Camo Index in the upper right corner tells you how easy you are to spot.
Move the analog stick just a little to walk slowly.
Lying still Crouching walk Crouching runStanding walk Run
Stealth : Feel the thrill!
Hard to spot Easy to spotHigh Low
Camo Index
08
Spotted by the Enemy
The enemy's after you! Now what?!
When the enemy spots Snake, they'll call for backup and attack in
numbers. You'll need to either defeat them or get out of their sight.
Upper left corner of screen
■
Spotted
(red)
Out of sight
(yellow)
Stealth : Feel the thrill!
Preventing reinforcements
You can stop reinforcements from
coming by taking out the enemy
before they can call for backup.
09
Page 7

METAL GEAR SOLID: PEACEWALKER
|
11
METAL GEAR SOLID: PEACEWALKER
|
12
13
Weapon Attacks
Shoot the enemy without being noticed!
Aim with the n button and shoot with the b button.
DAMN.
THERE'S ANOTHER
ONE.
YOU CAN ALWAYS
JUST TAKE 'EM
OUT, YOU KNOW.
GOT IT.
USE THE MK.22 TO PUT
'EM TO SLEEP WHILE
STAYING HIDDEN.
Stealth:
Feel the
Thrill!
Stealth:
Feel the
Thrill!
10
11
LIFE Gauge and Items
Keep a close eye on your gauges!
If the LIFE Gauge drops to zero, it's game over!
YOU GOT ANY RATIONS?
AGH!
I'VE BEEN
SHOT!
NOT ON ME.
SNAKE, WHAT
HAPPENED?!
FIND A PLACE TO
HIDE UNTIL YOU
RECOVER.
Stealth:
Feel the
Thrill!
Stealth:
Feel the
Thrill!
LIFE Gauge and Items
10
LIFE Gauge and Items
Keep a close eye on your gauges!
YOU GOT ANY RATIONS?
NOT ON ME.
SNAKE, WHAT
HAPPENED?!
FIND A PLACE TO
HIDE UNTIL YOU
RECOVER.
12
Weapon Attacks
DAMN.
THERE'S ANOTHER
ONE.
GOT IT.
USE THE MK.22 TO PUT
'EM TO SLEEP WHILE
STAYING HIDDEN.
If the LIFE Gauge drops to zero, it's game over!
Stealth : Feel the thrill!
Weapon Attacks
Shoot the enemy without being noticed!
Aim with the n button and shoot with the b button.
CQC-compatible weapon
Tranquilizer weapon
LIFE Gauge
Restore LIFE by using
a recovery item or by
resting in a crouching
or lying position.
PSYCHE Gauge
Affects LIFE recovery
speed, shot accuracy,
and other physical
capabilities.
Selecting Items
Left button + f or a button
Rations
When you have a ration equipped,
your LIFE will automatically recover
when it drops to zero.
Selecting Weapons
Right button + f or a button
Stealth : Feel the thrill!
10
Quick Change
Adjust i ng th e we a po n o r i te m
SE LEC T SET TI N GS fro m the
OPTIONS tab in the menu window
will let you to quickly equip/unequip
or cycle between 2 or 3 weapons/
items with a simple tap of the
weapon or item select buttons.
11
Page 8
METAL GEAR SOLID: PEACEWALKER
|
13
METAL GEAR SOLID: PEACEWALKER
|
22
23
CO-OP Ring
Become one with your teammates with CO-OP In!
Touch the ring around a character to go CO-OP In with that character,
allowing you to share the same LIFE Gauge, items, and weapons.
IN CO-OPS
WHEN TWO RINGS TOUCH, IT'S
CALLED GOING CO-OP IN.
YOU'LL SHARE THE SAME LIFE GAUGE
AND AMMO AND WILL BE ABLE TO
BORROW ITEMS FROM EACH OTHER.
YOU'LL SEE A RING
AROUND EACH PLAYER.
CO-OP IN!
CO-OPS:
You're Not
Alone!
CO-OPS:
You're Not
Alone!
20
21
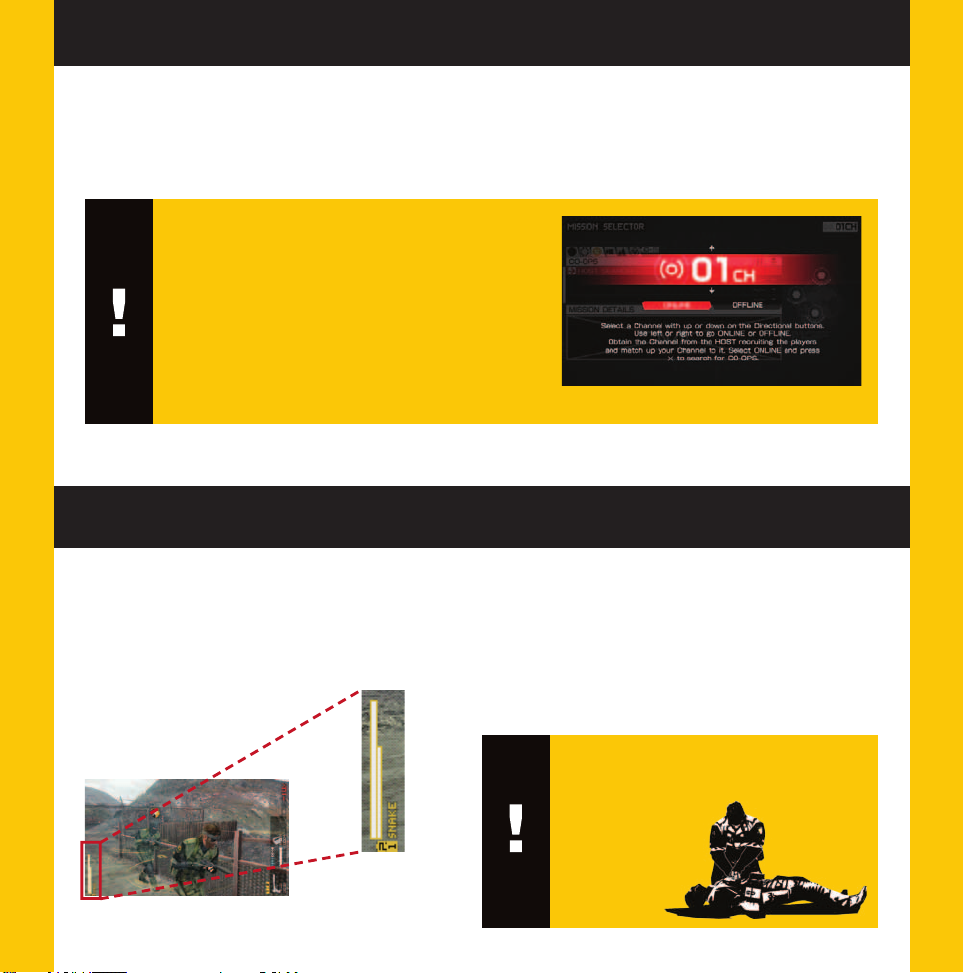
Starting CO-OPS
Host a game and bring your friends on board!
Choose HOST on the Mission Select screen and you can invite other
players to join your game.
YOU KNOW HOW TO START
A CO-OPS MISSION,
SNAKE?
CO-OPS LETS 2 TO 4 PEOPLE
PLAY COOPERATIVELY OVER AN
AD-HOC CONNECTION.
ONE PERSON ACTS
AS THE HOST AND
INVITES FRIENDS TO
JOIN IN.
NO...
HOST
CO-OPS:
You're Not
Alone!
CO-OPS:
You're Not
Alone!
Starting CO-OPS
22
CO-OP Ring
IN CO-OPS
WHEN TWO RINGS TOUCH, IT'S
CALLED GOING CO-OP IN.
YOU'LL SHARE THE SAME LIFE GAUGE
AND AMMO AND WILL BE ABLE TO
BORROW ITEMS FROM EACH OTHER.
YOU'LL SEE A RING
AROUND EACH PLAYER.
CO-OP IN!
20
Starting CO-OPS
Host a game and bring your friends on board!
YOU KNOW HOW TO START
A CO-OPS MISSION,
SNAKE?
CO-OPS LETS 2 TO 4 PEOPLE
PLAY COOPERATIVELY OVER AN
AD-HOC CONNECTION.
ONE PERSON ACTS
AS THE HOST AND
INVITES FRIENDS TO
JOIN IN.
NO...
HOST
Choose HOST on the Mission Select screen and you can invite other
players to join your game.
HOST SEARCH
Choose HOST SEARCH from the CO-OPS tab
to join a mission that's accepting players.
Must be receiving ad-hoc connection signal*
Match the channel with that of the HOST
CO-OPS : You’re Not Alone!
12
CO-OP Ring
Become one with your teammates with CO-OP In!
Touch the ring around a character to go CO-OP In with that character,
allowing you to share the same LIFE Gauge, items, and weapons.
LIFE Gauge
during CO-OP In
CO-OPS : You’re Not Alone!
CPR
Tap the Action Button repeatedly
In CO-OPS, when y ou r L IF E
Gauge drops to zero, your
teammate can revive you
by performi n g CPR.
13
Page 9

METAL GEAR SOLID: PEACEWALKER
|
15
METAL GEAR SOLID: PEACEWALKER
|
30
31
Mother Base
Use recovered soldiers to develop weapons and items!
The more soldiers you have, the more weapons,
items, and ammo you can produce.
AT OUR OFFSHORE MOTHER BASE, YOU CAN:
DEVELOP NEW WEAPONS, ITEMS,
AND AMMO
●
RECRUIT VOLUNTEERS
●
HOLD MULTIPLAYER MATCHES
●
EXCHANGE RECRUITS
●
TRADE WEAPONS AND ITEMS
●
PUT MOTHER
BASE TO WORK
SUPPORTING YOU
IN MISSIONS.
WE'RE GONNA BE
STRONGER THAN EVER!
It Grow!
It Grow!
28
29
Fulton Recovery
Yesterday's enemy is today's ally!
Use Fulton recovery to pick up new recruits!
Recover enemies and prisoners and you can put them to work at
Mother Base (see p.30).
SLEEPING OR KNOCKED-
OUT ENEMIES CAN BE
RECRUITED TO OUR SIDE.
USE THE FULTON RECOVERY
SYSTEM TO SEND 'EM BACK
TO MOTHER BASE.
THE CHOPPER
WILL TAKE CARE
OF THE REST.
Fulton Recovery:
Equip and press the
Action Button
Recruiting:
Build An
Army!
Recruiting:
Build An
Army!
Fulton Recovery
28
Fulton Recovery
USE THE FULTON RECOVERY
SYSTEM TO SEND 'EM BACK
TO MOTHER BASE.
THE CHOPPER
WILL TAKE CARE
OF THE REST.
30
Mother Base
PUT MOTHER
BASE TO WORK
SUPPORTING YOU
IN MISSIONS.
WE'RE GONNA BE
STRONGER THAN EVER!
Yesterday's enemy is today's ally!
Use Fulton recovery to pick up new recruits!
Recover enemies and prisoners and you can put them to work at
Mother Base (see p.15).
Neutralized
Neutralize enemies without
killing them before using
Fulton recovery.
Mother Base
Use recovered soldiers to develop weapons and items!
The more soldiers you have, the more weapons,
items, and ammo you can produce.
Recruiting : Build an army!
Near death Unconscious Asleep
Mother Base : Make it grow!
14
MISSIONS MOTHER BASE
Fulton recover new personnel
Develop weapons/items
15
Page 10

LIMITED WARRANTY
Konami Digital Entertainment, Inc. warrants to the original purchaser of this Konami software product
that the medium on which this computer program is recorded is free from defects in materials and
workmanship for a period of ninety (90) days from the date of purchase. This Konami product is sold
"as is," without express or implied warranty of any kind, and Konami is not liable for any losses or
damages of any kind resulting from use of this program. Konami agrees for a period of ninety (90) days
to either repair or replace, at its option, free of charge, any Konami product, postage paid, with proof
of date of purchase, at its Factory Service Center. This warranty is not applicable to normal wear and
tear. This warranty shall not be applicable and shall be void if the defect in the Konami software
product has arisen through abuse, unreasonable use, mistreatment, or neglect.
THIS WARRANTY IS IN LIEU OF ALL OTHER WARRANTIES AND NO OTHER REPRESENTATIONS OR
CLAIMS OF ANY NATURE SHALL BE BINDING ON OR OBLIGATE KONAMI. ANY IMPLIED
WARRANTIES APPLICABLE TO THIS SOFTWARE PRODUCT, INCLUDING WARRANTIES OF
MERCHANTABILITY AND FITNESS FOR A PARTICULAR PURPOSE, ARE LIMITED TO THE NINETY (90)
DAY PERIOD DESCRIBED ABOVE. IN NO EVENT WILL KONAMI BE LIABLE FOR ANY SPECIAL
INCIDENTAL OR CONSEQUENTIAL DAMAGES RESULTING FROM POSSESSION, USE OR
MALFUNCTION OF THIS KONAMI PRODUCT.
Some states do not allow limitations as to how long an implied warranty lasts and/or exclusions or
limitations of incidental or consequential damages so the above limitations and/or exclusions of
liability may not apply to you. This warranty gives you specific rights, and you may also have other
rights which vary from state to state.
If you experience technical problems with your game, please head to www.konami.com/support for
assistance, here you will have access to many support materials, as well as our Knowledge Base
which is available 24 hours a day, 7 days a week. All products must be deemed defective by a Konami
Customer Service representative and an RMA number assigned prior to returning the product. All
products received not matching this criteria will be returned if a Konami Customer Service
Representative cannot reach you within three days upon receipt of the unauthorized return.
Konami Digital Entertainment, Inc.
Attention: Customer Service-RMA # XXXX
2381 Rosecrans Ave, Suite 200
El Segundo, CA 90245
USA
Register now at www.konami.com to receive exclusive product news, special offers and more!
http://www.konami.jp/mgs_pw/
Net BSD
The communications function of this product includes software developed by the
NetBSD Foundation, Inc. and its contributors. For a complete list of contributors please
see http://www.scei.co.jp/psp-license/pspnet.txt
“PlayStation”, “PS” Family logo, “PSP”, and “UMD” are registered trademarks of Sony Computer Entertainment Inc.
Memory Stick Duo and Memory Stick PRO Duo are trademarks of Sony Corporation.
Updating the PSP® (PlayStation®Portable) system
Updating the PSP® system software
This UMD® includes the latest update data for the PSP® system. If a screen prompting you to
update the system software is displayed when you start the UMD
to start the software title contained on the UMD
Performing the update
When you insert the UMD®, an icon (as shown on
the right) is displayed under [Game] in the home
menu. Select the icon, and then follow the on-screen
instructions to perform the update.
Before starting the update:
• Fully charge the PSP
• Connect the AC adaptor to the system and plug it
into an electrical outlet.
During an update:
• Do not remove the AC adaptor, turn off the system or remove the UMD
If an update is canceled before completion, the system software may become damaged, and the
system may require servicing to repair or exchange.
Checking that the update was successful
After th e update has bee n completed, s elect [Syste m Settings] un der [Setting s] from the home
menu, a nd then sel ect [Syst em Informa tion]. If t he System So ftware fi eld displa ys the vers ion
number of the update, the update was successful.
®
system battery.
®
.
®
, you must perform an update
PSP® Update ver X.XX
®
.
Page 11

Pour une ut ilisation du pro duit en toute séc urité, lisez att entivement le ch apitre suivan t de ce manuel et le
Mise à jour de la console PSP®
Cet UMD® contient la dernière mise à jour pour la console PSP® system. Si une fenêtre vous
invitant à mettre à jour le logiciel système s’affiche lorsque vous démarrez l’UMD
®
, vous devrez
effectuer une mise à jour avant de démarrer le logiciel se trouvant sur l’UMD
®
.
Mise à jour
Lorsque vous insérez l’UMD®, une icône (voir ci-contre)
s’affiche dans l’option [Jeu] du menu principal. Sélection
nez l’icône et suivez les instructions à l’écran pour
effectuer la mise à jour.
Avant d’effectuer la mise à jour:
• Chargez complètement la batterie de la console PSP
®
.
• Branchez l’adaptateur secteur à la console et insérez-
le dans une prise.
Pendant la mise à jour:
• Ne retirez pas l’adaptateur secteur. N’éteignez pas la console et ne retirez pas l’UMD
®
.
Si la m ise à jo ur est i nter rompu e avan t d’ar rive r à son te rme, c ela ris que d’ endo mmag er la
console. Une réparation ou un échange pourrait dès lors s’avérer nécessaire.
Vérification de la réussite de la mise à jour
Une fois la mis e à jour effectuée, séle ctionnez [Paramètr es système] sous l’opt ion [Paramètres]
du menu pr incipal. Sé lectionne z ensuite [In formation s système]. S i le champ Logi ciel systèm e
af fich e le nu méro d e ver sion c orr espo nda nt à la m ise à jo ur, c’ est qu e la mi se à jou r a été
PSP® Update ver X.XX
Mise à jour de la console PSP® (PlayStation® Portable)
GARANTIE LIMITÉE
BSD Net
La fonction de communication de ce produit exploite un logiciel développé par la
NetBSD Foundation, Inc. et ses parties prenantes. Pour obtenir la liste complète des
parties prenantes, veuillez consulter le site http://www.scei.co.jp/psp-license/pspnet.txt
« PlayStation », le logo « PS », « PSP » et « UMD » sont des marques déposées de Sony Computer Entertainment,
Inc. Memory Stick Duo et Memory Stick PRO Duo sont des marques de Sony Corporation.
Konami Digital Entertainment, Inc. garantit à l’acheteur original de ce jeu Konami que le média sur lequel ce
logiciel est enregistré est franc de tout vice de matériel ou de main-d’œuvre pour une période de
quatre-vingt-dix (90) jours à compter de sa date d’achat. Ce produit Konami est vendu « tel quel » et sans aucune
garantie expresse ou tacite et Konami ne peut être tenu responsable de quelque dommage ou perte découlant
de l’usage de ce logiciel. Konami accepte, pour une période de quatre-vingt-dix (90) jours, de remplacer ou de
réparer sans frais, à sa discrétion, tout produit Konami, dont les frais d’envoi postal ont été payés, avec une
preuve d’achat, acheminé à son Centre de service. La présente garantie ne peut être invoquée lorsque le vice
résulte de l’usure normale ou d’égratignures. La présente garantie sera également nulle et sans effet si le vice
du jeu Konami résulte d’un usage abusif ou déraisonnable, d’un acte délibéré ou d’une négligence.
L’OBLIGATION DÉCOULANT DE LA PRÉSENTE GARANTIE TIENT LIEU DE TOUTE AUTRE GARANTIE ET NULLE
AUTRE ASSERTION OU REPRÉSENTATION DE QUELQUE NATURE QUE CE SOIT N’ENGAGE KONAMI. TOUTE
GARANTIE TACITE S’APPLIQUANT AU PRÉSENT LOGICIEL, Y COMPRIS TOUTE GARANTIE QUANT À SA VALEUR
MARCHANDE OU À SA PERTINENCE EN REGARD D’UN USAGE PARTICULIER, SE LIMITE À LA PÉRIODE DE
QUATRE-VINGT-DIX (90) JOURS DÉCRITE CI-DESSUS. KONAMI NE SAURAIT EN AUCUN CAS ÊTRE TENU
RESPONSABLE DES DOMMAGES SPÉCIAUX, ACCESSOIRES OU CIRCONSTANTIELS RÉSULTANT DE LA
POSSESSION, DE L’UTILISATION OU DE LA DÉFAILLANCE DE CE PRODUIT KONAMI.
Certains états ou provinces ne permettent ni les limites sur la période de garantie tacite, et/ou les exclusions ou
limites vis-à-vis des dommages accessoires ou circonstanciels. Le cas échéant, les limites et/ou exclusions de
responsabilité qui précèdent peuvent ne pas s’appliquer à vous. Cette garantie vous octroie des droits
spécifiques et vous pourriez bénéficier d’autres droits qui varient d’un état ou d’une province à l’autre.
Si vous avez des problèmes techniques avec votre jeu, veuillez appeler notre Centre de Garantie et de Support
Technique au (310) 220-8330 ou au (310) 220-8331 du lundi au vendredi de 9 heures à 17 heures, heure normale du
Pacifique, ou envoyez un courriel à support@konami.com. Tout produit doit être jugé défectueux par un
représentant au service à la clientèle de Konami et un numéro d’autorisation de retour de produit (#RMA) doit
vous être attribué avant l’envoi du produit; tout produit reçu sans ces critères vous sera retourné si un
représentant du service à la clientèle de Konami ne peut pas vous rejoindre dans les trois (3) jours suivant la
réception du produit retourné non autorisé.
Konami Digital Entertainment, Inc.
Attention: Customer Service-RMA # XXXX
2381 Rosecrans Ave, Suite 200
El Segundo, CA 90245
USA
SERVICE À LA CLIENTÈLE
Si vous êtes pris ou que vous avez simplement besoin d’aide, ne vous en faites pas! Vous pouvez écrire à nos
experts en jeux à support@konami.com ou consulter notre section de soutien au www.konami.com.
Inscrivez-vous dès aujourd’hui au www.konami.com afin de recevoir des informations exclusives sur les
nouveaux produits, des offers spéciales et bien plus encore!
chapitr e Avertissemen ts du manuel four ni avec la PSP
conserver le présent manuel et le manuel de la console pour toute consultation ultérieure.
®
(PlaySt ation® Portabl e) avant de l’uti liser. Veillez à
AVERTISSEMENT : PHOTOSENSIBILITÉ, ÉPILEPSIE, CRISES
Certaines personnes, qui sont sensibles aux lumières clignotantes ou vacillantes ou encore aux motifs
géométriques, peuvent présenter des symptômes épileptiques ou faire une crise lorsqu’elles regardent la
télévision ou jouent à des jeux vidéo. Ces symptômes peuvent apparaître chez les personnes ne présentant
aucun antécédent épileptique. Si vous ou quelqu’un de votre famille êtes sujet à l’épilepsie ou à des crises
quelconques, consultez votre médecin avant de commencer à jouer. CESSEZ IMMÉDIATEMENT de jouer et
consultez votre médecin si vous ou votre enfant présentez les symptômes suivants :
• vertige • désorientation
• troubles de la vision • crises
• clignements d’yeux ou contractions musculaires • mouvements involontaires ou convulsions
• perte de connaissance
NE RECOMMENCEZ À JOUER QUE SUR APPROBATION DE VOTRE MÉDECIN
________________________________________________________________________________
Utilisation des jeux vidéo afin d’éviter le risque de crise
• Jouez toujours dans un endroit bien éclairé et à distance suffisante de l'écran.
• Évitez toute utilisation prolongée du système PSP
• Évitez de jouer si vous êtes fatigué ou manquez de sommeil.
________________________________________________________________________________
Évitez immédiatement de jouer si vous présentez l’un des symptômes suivants : étourdissement, nausée ou
toute sensation analogue au mal des transports, gêne ou douleur au niveau des yeux, des oreilles, des
mains, des bras ou toute autre partie du corps. Si cet état persiste, consultez un médecin.
________________________________________________________________________________
N’utilisez pas l’appareil lorsque vous conduisez ou marchez. N’utilisez pas la fonction de réseau sans fil dans
les endroits où son utilisation est interdite comme dans les avions ou dans les hôpitaux. Désactivez la liaison
sans fil du système PSP
affluence. Si vous utilisez l’appareil à proximité de personnes portant un stimulateur cardiaque, le signal du
système de liaison au réseau sans fil de votre PSP
fonctionnement.
®
lorsque vous utilisez le système PSP® dans un train ou dans les lieux de forte
Utilisation et manipulation de l’UMD
• Ce disque es t un logiciel au forma t PSP® (PlaySta tion® Portable ) conçu pour une utili sation avec le syst ème
PSP® uni quement. Si le di sque est utili sé avec d’autre s appareils, vo us risquez d’e ndommager l’a ppareil en
que stion e t le disq ue. • Ce di sque es t réser vé à une ut ilisa tion av ec le sys tème PS P
RÉSER VÉ À LA VENTE E T POUR UNE UTI LISATION AUX É TATS-UN IS UNIQUEM ENT. • Selon le lo giciel, un e
carte Memory Stick Duo
le manuel p our de plus amples i nformations . • Si le système rest e en pause pendant u ne période prol ongée,
l’image af fichée risque de res ter définitiveme nt en filigrane à l’éc ran. • N’exposez pas l e disque à la lumière
directe du sole il, ne le rangez pas à proximi té d’une source de chaleur, dans une v oiture où à d’autres endroi ts
soumis à une forte chaleur ou présentant une haute teneur en humidité . • Ne touchez pas l’ouverture à l’arrière
du di sque (s urface d ’enre gistr ement d u disqu e, voir s chéma) . Ne lais sez pas d e pouss ières , sable , corps
étrangers ou autre s types de saletés sur le disque. • Ne bloq uez pas l’ouverture à l’aide de papi er ou de ruban
adhésif. N’é crivez pas sur le disque. • S i l’ouverture est sale, n ettoyez-la à l’aide
d’un c hiffon d oux. • Pour n ettoye r le disqu e, frotte z les surf aces ext érieure s à
l’ai de d’un chi ffon doux . • N’utili sez pas de so lvants te ls que de l’e ssence, l es
déte rgents di sponib les dans le c ommerc e et non adap tés aux CD o u les spray s
anti statique s prévus po ur les disq ues vinyl es car ils ri squent d’ endomma ger le
di sq ue. • N ’ut il ise z pa s de di sq ues f is sur és ou d éf orm és o u les d is que s
susceptible s d’endommager la consol e ou de provoquer un dysfonct ionnement. •
SCE décline toute responsabilité en cas d'utilisation inadéquate des disques.
®
ou Memory Stick PRO Duo® (vendues séparément) peut s’avérer nécessaire. Consultez
®
. Faites une pause de 15 minutes toutes les heures.
®
risque d’interférer avec l’appareil et d’empêcher son
®
®
por tant la m entio n
Surface
d’enregistrement
Éjection du di sque
App uyez s ur la pa rtie dr oite d u disq ue jus qu’à ce q u’il s oit da ns la
positi on indiquée s ur le schéma ci -contre et re tirez-le. N’ exercez pas
une pression excessive car vous risqueriez d’endommager le disque.
Stockage du disque
Insérez la partie inférieure du disque et appuyez sur la partie supérieure
jusq u’au déc lic. Si l e disque n ’est pas c orrect ement co nservé , vous
risquez de l’endommager. Conservez le disque dans son b oîtier lorsqu’il
n’es t pas util isé et ten ez-le ho rs de porté e des enfa nts. Si le d isque
n’ est p as co nven abl eme nt ra ngé , il ri squ e de se v oile r ou d’ êtr e
endommagé.
Démarrage..........................
Menu Titre............................
Écran de jeu........................
Contrôles : Trop facile !
Contrôles (type tireur)..........
Infiltration : Des sensations pures !
Infiltration............................
Si l’ennemi te repère............
Jauge de vie et d’objets........
Attaques avec arme.............
CO-OPS : Tu n’es pas seul !
Commencer CO-OPS............
Cercle CO-OP.......................
20
22
23
24
26
27
28
29
30
31
Sommaire
Recrutement : Lève une armée !
Récupération Fulton.............
Mother Base : À toi de la développer !
Mother Base........................
32
33
Page 12

METAL GEAR SOLID: PEACEWALKER
|
21
METAL GEAR SOLID: PEACEWALKER
|
Démarrage
Configurez votre console PSP® (PlayStation®Portable) selon les consignes du manuel fourni avec la console.
Mettez la console sous tension. Le témoin d’alimentation s’allume (vert) et le menu d’accueil s’affiche. Appuyez
sur la touche OPEN pour ouvrir le couvercle du compartiment à disque. INSÉREZ le disque GTI CLUB SUPERMINI
FESTA! l’étiquette tournée vers l’extérieur. Faites glisser le disque jusqu’à ce qu’il soit correctement inséré et fermez
le capot. À partir du menu Accueil de votre console PSP®, sélectionnez l’icône Jeu et ensuite l’icône UMD. Une
miniature du jeu s’affiche. Sélectionnez la miniature et appuyez sur le bouton S de la console PSP® pour démarrer
le jeu. Consultez les instructions à l’écran et ce manuel pour de plus amples informations sur l’utilisation du logiciel.
AVIS: N’éjectez pas UMD® pendant la lecture.
Memory Stick Duo™
Avertissement! Conservez les cartes Memory Stick Duo hors de portée des jeunes enfants car ils pourraient les avaler.
Pour conserver les paramètres et votre progression, insérez une carte Memory Stick Duo dans la fente prévue à
cet effet sur votre console PSP®. Vous pouvez charger les données de jeu enregistrées à partir d’une même carte
Memory Stick Duo contenant des données de jeu enregistrées.
10 novembre 1974
Côte caribéenne du
Costa Rica
C'EST UNE MISSION
D'INFILTRATION.
20
PRÊT À
COMMENCER,
SNAKE ?
OUAIS.
Index camo
10 %
Index camo
80 %
Se coller au mur :
Appuyer sur la touche Action près d'un mur
ÉVITE LE COMBAT ET NE TE
FAIS PAS REPÉRER PAR CES
MERCENAIRES.
21
Page 13

METAL GEAR SOLID: PEACEWALKER
|
23
METAL GEAR SOLID: PEACEWALKER
|
02
Menu Titre
02
03
Menu Titre
Écran de jeu
Appuie sur la touche START dans le menu Titre pour commencer !
Menu Titre
(déler haut/bas)
NOUVELLE PARTIE
CHARGER PARTIE
SUPPRIMER
BONUS
Commencer la partie principale.
Continuer u ne partie à parti r des
données sauvegardées.
Supprimer les données.
Aller au menu Bonus.
Tu dois être connecté à PlayStation®Network pour accéder au contenu
de ce jeu. Un périphérique extérieur et/ou une connexion Internet sans
l est nécessaire pour accéder au réseau. Pour plus d'informations,
merci de se référer au manuel de la PSP® ou du réseau.
*
INSTALLATION
DE DONNÉES
Installer des données sur un Memory
Stick PRO Duo™.
Installation requise pour écouter les dialogues radio vocaux du jeu. *
Pour les PSP modèles 1000/2000/3000, un Memory Stick PRO Duo™
avec au moins 330 MB d'espace libre est requis.
Menu Titre
Appuie sur la touche START dans le menu Titre pour commencer !
Commencer la partie principale.
Continuer u ne partie à parti r des
données sauvegardées.
Supprimer les données.
Aller au menu Bonus.
Installer des données sur un Memory
Stick PRO Duo™.
Menu Titre
(déler haut/bas)
Écran de jeu
NOUVELLE PARTIE
CHARGER PARTIE
SUPPRIMER
BONUS
*
Tu dois être connecté à PlayStation®Network pour accéder au contenu
de ce jeu. Un périphérique extérieur et/ou une connexion Internet sans
l est nécessaire pour accéder au réseau. Pour plus d'informations,
merci de se référer au manuel de la PSP® ou du réseau.
INSTALLATION
DE DONNÉES
Installation requise pour écouter les dialogues radio vocaux du jeu. *
Pour les PSP® modèles 1000/2000/3000, un Memory Stick PRO Duo™
avec au moins 330 MB d'espace libre est requis.
VISÉE AUTO activée
Index camo
État des
ennemis
(voir p. 27)
Jauge de
psyché
(droite)
(voir p. 26)
Objet utilisé
(voir p. 28)
22
Jauge de vie
(gauche)
(voir p. 28)
Nom du
joueur
Icône Action
Montre les actions disponibles à ce moment.*
Arme utilisée
(voir p. 29)
23
Page 14

METAL GEAR SOLID: PEACEWALKER
|
25
METAL GEAR SOLID: PEACEWALKER
|
04
Contrôles (Type Tireur)
Les contrôles de type Action et de type Chasseur sont aussi disponibles !
04
05
Contrôles (Type Tireur)
Les contrôles de type Action et de type Chasseur sont aussi disponibles !
Contrôles (Type tireur - Viser)
Touches directionnelles
Haut : touche Action
Accomplis les act ion s en
fonction de la situation (Icône
Action)
Droit :
touche de sélection d'armes
Pour changer d'arme,
maintiens la touche f et a
enfoncée
Gauche :
touche de sélection d'objets
Pour changer d'objet,
maintiens la touche f et a
enfoncée
Bas : s'accroupir
Pour t'accroupir, maintiens
la touche Bas enfoncée.
Le s dé p l ac em e nt s s o n t
impossibles en étant allongé
*
Touche n : touche visée
Touche b : touche attaque
Pad Analogique : déplacements
Courir / marcher doucement
Touche START : touche Menu
Touche SELECT : variable
Pour viser avec ton arme,
maintiens la touche enfoncée
Attaque à mains nues
(suivant la conguration de contrôle)
Touches
dasf :
caméra
Changer la perspective
de la caméra
Contrôles (Type Tireur)
Les contrôles de type Action et de type Chasseur sont aussi disponibles !
Touches directionnelles
Haut : touche Action
Droit :
Gauche :
Bas : s'accroupir
Accomplis les act ion s en
fonction de la situation (Icône
Action)
touche de sélection d'armes
Pour changer d'arme,
maintiens la touche f et a
enfoncée
touche de sélection d'objets
Pour changer d'objet,
maintiens la touche f et a
enfoncée
Pour t'accroupir, maintiens
la touche Bas enfoncée.
Le s dé p l ac em e nt s s o n t
*
impossibles en étant allongé
Contrôles (Type tireur - Viser)
Touches directionnelles
Haut : touche recharger
Droit :
Gauche :
Bas : touche s'accroupir
Recharger l'arme
touche changement de caméra
Déplacer la caméra vers la
droite
Augmente le zoom de la
*
lunette
touche changement de caméra
Déplacer la caméra vers la
gauche
Dim i n ue le z o o m de la
*
lunette
Touche n : touche visée
Pour viser avec ton arme,
maintiens la touche enfoncée
Touche SELECT : variable
(suivant la conguration de contrôle)
Touche START : touche Menu
Pad Analogique : déplacements
Courir / marcher doucement
Touche n : touche visée
Pour viser avec ton arme,
maintiens la touche enfoncée
Touche SELECT : variable
(suivant la conguration de contrôle)
Touche START : touche Menu
Pad Analogique : déplacements
Courir / marcher doucement
Touche b : touche attaque
Attaque à mains nues
Touches
caméra
Changer la perspective
de la caméra
dasf :
Touche b : touche attaque
Attaque avec une arme
Touches
dasf :
caméra
Changer la perspective
de la caméra
24
25
Page 15

METAL GEAR SOLID: PEACEWALKER
|
27
METAL GEAR SOLID: PEACEWALKER
|
08
09
Si l'ennemi te repère…
L'ennemi te cherche ! Tu fais quoi ?
Quand les ennemis ont repéré Snake, ils appellent des renforts et
attaquent en nombre. Tu devras soit les battre soit te mettre hors de
leur vue.
QUI EST LÀ ?
SNAKE, METS-TOI
HORS DE VUE, VITE !
DEMANDE DE
RENFORT !
ILS M'ONT TROUVÉ !
Infiltration :
Des sensations
pures !
Infiltration :
Des sensations
pures !
06
07
Infi ltration
Déplace-toi prudemment pour éviter d'être repéré !
L'index camo, en haut à droite de l'écran, te dit si tu es facilement
repérable.
Bouge légèrement le pad analogique pour marcher doucement.
Index camo
80 %
Index camo
10 %
Se coller au mur :
Appuyer sur la touche Action près d'un mur
10 novembre 1974
Côte caribéenne du
Costa Rica
C'EST UNE MISSION
D'INFILTRATION.
PRÊT À
COMMENCER,
SNAKE ?
OUAIS.
ÉVITE LE COMBAT ET NE TE
FAIS PAS REPÉRER PAR CES
MERCENAIRES.
Infi ltration :
Des sensations
pures !
Infi ltration :
Des sensations
pures !
08
Si l'ennemi te repère…
QUI EST LÀ ?
SNAKE, METS-TOI
HORS DE VUE, VITE !
DEMANDE DE
RENFORT !
06
Infi ltration
Index camo
80 %
Index camo
10 %
Se coller au mur :
Appuyer sur la touche Action près d'un mur
C'EST UNE MISSION
D'INFILTRATION.
ÉVITE LE COMBAT ET NE TE
FAIS PAS REPÉRER PAR CES
MERCENAIRES.
Infiltration
Déplace-toi prudemment pour éviter d'être repéré !
L'index camo, en haut à droite de l'écran, te dit si tu es facilement
repérable.
Bouge légèrement le pad analogique pour marcher doucement.
Position allongée Marcher accroupi Courir accroupiMarcher debout Courir
Diffi cile à repérer Facile à repérerHaut Bas
Index camo
Inltration : Des sensations pures !
26
Si l’ennemi te repère…
L'ennemi te cherche ! Tu fais quoi ?
Quand les ennemis ont repéré Snake, ils appellent des renforts et
attaquent en nombre. Tu devras soit les battre soit te mettre hors de
leur vue.
En haut à gauche de l'écran
■
Repéré
(rouge)
Hors de vue
(jaune)
Inltration : Des sensations pures !
Empêcher les renforts
Tu peux empêcher les renforts
d'arriver en éliminant les ennemis
avant qu'ils ne puissent demander
des renforts.
27
Page 16

METAL GEAR SOLID: PEACEWALKER
|
29
METAL GEAR SOLID: PEACEWALKER
|
12
13
COMPRIS.
UTILISE LE MK.22 POUR
LES ENDORMIR TOUT EN
RESTANT À COUVERT.
10
11
Jauge de vie et objets
Garde un œil sur tes jauges !
Si la jauge de vie tombe à zéro, la partie est terminée !
TU AS DES RATIONS ?
ARGH !
JE SUIS
TOUCHÉ !
PAS SUR MOI.
SNAKE, QU'EST-CE
QUI S'EST PASSÉ ?
TROUVE UN ENDROIT OÙ
TE CACHER JUSQU'À CE
QUE TU RÉCUPÈRES.
Infiltration :
Des sensations
pures !
Infiltration :
Des sensations
pures !
Jauge de vie et objets
10
Jauge de vie et objets
Garde un œil sur tes jauges !
TU AS DES RATIONS ?
PAS SUR MOI.
SNAKE, QU'EST-CE
QUI S'EST PASSÉ ?
TROUVE UN ENDROIT OÙ
TE CACHER JUSQU'À CE
QUE TU RÉCUPÈRES.
12
Attaques avec armes
BON SANG, IL Y
EN A UN AUTRE.
COMPRIS.
UTILISE LE MK.22 POUR
LES ENDORMIR TOUT EN
RESTANT À COUVERT.
12
13
Attaques avec armes
Tire sur l'ennemi sans être remarqué !
Vise avec la touche n et tire avec la touche b.
Changement rapide
L'ajustement de SÉLECTION DES
RÉGLAGES des armes ou des objets
dans l'onglet OPTIONS de la fenêtre
du menu te permet de t'équiper ou
d'enlever rapidement une arme ou
un objet ou bien de choisir entre
2 ou 3 armes/objets en appuyant
si mplement sur les touch es de
sélection de l'arme ou de l'objet.
Sélection d'armes
Touche droite + touche f ou a
BON SANG, IL Y
EN A UN AUTRE.
TU PEUX TOUJOURS
T'EN DÉBARRASSER,
TU SAIS.
COMPRIS.
UTILISE LE MK.22 POUR
LES ENDORMIR TOUT EN
RESTANT À COUVERT.
Infiltration :
Des sensations
pures !
Infiltration :
Des sensations
pures !
Inltration : Des sensations pures !
Si la jauge de vie tombe à zéro, la partie est terminée !
Attaques avec armes
Tire sur l'ennemi sans être remarqué !
Vise avec la touche n et tire avec la touche b.
Arme compatible avec le CQC
Jauge de vie
Restaure ta vie en
utilisant des objets
de récupération ou
en restant accroupi
ou allongé.
Jauge de psyché
Affecte la vitesse de
récupération de vie,
la précision du tir et
d'autres capacités
physiques.
Sélection d'objets
Touche gauche + touche f ou a
Rations
Quand tu as une ration équipée, ta
vie se restaure automatiquement
lorsqu'elle tombe à zéro.
Inltration : Des sensations pures !
Sélection d'armes
Touche droite + touche f ou a
28
Arme tranquillisante
Changement rapide
L'ajustement de SÉLECTION DES
RÉGLAGES des armes ou des objets
dans l'onglet OPTIONS de la fenêtre
du menu te permet de t'équiper ou
d'enlever rapidement une arme ou
un objet ou bien de choisir entre
2 ou 3 armes/objets en appuyant
si mplement sur les touch es de
sélection de l'arme ou de l'objet.
29
Page 17

METAL GEAR SOLID: PEACEWALKER
|
31
METAL GEAR SOLID: PEACEWALKER
|
22
23
Cercle CO-OP
Lorsque tu entres en mode CO-OP, ne fais plus
qu'un avec ton coéquipier !
Toucher le cercle entourant un personnage pour entrer en CO-OP
avec ce personnage te permet de partager les objets et les armes et
la même jauge de vie.
EN CO-OPS
QUAND DEUX CERCLES SE
TOUCHENT, ON APPELLE CELA
ENTRER EN MODE CO-OP.
VOUS PARTAGEREZ LA MÊME JAUGE
DE VIE ET LES MÊMES MUNITIONS ET
VOUS POURREZ VOUS EMPRUNTER
DES OBJETS MUTUELLEMENT.
TU VERRAS UN CERCLE
AUTOUR DE CHAQUE
JOUEUR.
ENTRER EN MODE CO-OP !
CO-OPS :
Tu n'es
pas seul !
CO-OPS :
Tu n'es
pas seul !
20
21
Commencer CO-OPS
Héberge une partie et entraîne tes amis dans
une mission !
À l'écran Sélectionner une mission, choisis HÔTE et invite les autres
joueurs à se joindre à ta partie.
TU SAIS COMMENT
COMMENCER UNE MISSION
EN CO-OPS, SNAKE ?
LA CO-OPS PERMET À 2 À
4 JOUEURS DE JOUER EN
COOPÉRATION GRÂCE À UNE
CONNEXION AD-HOC.
UNE PERSONNE JOUE
LE RÔLE D'HÔTE ET
INVITE DES AMIS À LE
REJOINDRE.
NON…
HÔTE
CO-OPS :
Tu n'es
pas seul !
CO-OPS :
Tu n'es
pas seul !
Commencer CO-OPS
22
Cercle CO-OP
EN CO-OPS
QUAND DEUX CERCLES SE
TOUCHENT, ON APPELLE CELA
ENTRER EN MODE CO-OP.
VOUS PARTAGEREZ LA MÊME JAUGE
DE VIE ET LES MÊMES MUNITIONS ET
VOUS POURREZ VOUS EMPRUNTER
DES OBJETS MUTUELLEMENT.
TU VERRAS UN CERCLE
AUTOUR DE CHAQUE
JOUEUR.
ENTRER EN MODE CO-OP !
20
Commencer CO-OPS
TU SAIS COMMENT
COMMENCER UNE MISSION
EN CO-OPS, SNAKE ?
LA CO-OPS PERMET À 2 À
4 JOUEURS DE JOUER EN
COOPÉRATION GRÂCE À UNE
CONNEXION AD-HOC.
UNE PERSONNE JOUE
LE RÔLE D'HÔTE ET
INVITE DES AMIS À LE
REJOINDRE.
NON…
HÔTE
Héberge une partie et entraîne tes amis dans
une mission !
À l'écran Sélectionner une mission, choisis HÔTE et invite les autres
joueurs à se joindre à ta partie.
RECHERCHE D'HÔTE
Choisis RECHERCHE D'HÔTE à partir de
l'onglet CO-OPS pour rejoindre une mission
acceptant des joueurs.
Un signal de connexion ad-hoc doit être reçu.*
CO-OPS : Tu n’es pas seul !
Règle le canal sur celui de l'hôte.
30
Cercle CO-OP
Lorsque tu entres en mode CO-OP, ne fais plus
qu'un avec ton coéquipier !
Toucher le cercle entourant un personnage pour entrer en CO-OP
avec ce personnage te permet de partager les objets et les armes et
la même jauge de vie.
Jauge de vie en
mode CO-OP
CO-OPS : Tu n’es pas seul !
Réanimation
Appuie plusieurs fois sur la
touche Action.
En mode CO-OPS, q u a n d t a
jauge de vie tombe à zéro, ton
coéquipier peut te ranimer
en fa isa nt un e réanimation.
31
Page 18

METAL GEAR SOLID: PEACEWALKER
|
33
METAL GEAR SOLID: PEACEWALKER
|
30
31
Mother Base
Utilise des soldats récupérés pour développer
des armes et des objets !
Plus tu as de soldats, plus tu peux produire d'armes, d'objets et de munitions.
À LA MOTHER BASE, TU PEUX :
DÉVELOPPER DE NOUVELLES ARMES ET
MUNITIONS ET DE NOUVEAUX OBJETS
●
RECRUTER DES VOLONTAIRES
●
HÉBERGER DES MATCHS MULTIJOUEURS
●
ÉCHANGER DES RECRUES
●
FAIRE DU COMMERCE D'ARMES ET
D'OBJETS
●
FAIS TRAVAILLER
LA MOTHER BASE
POUR T'ÉPAULER
DURANT LES
MISSIONS.
NOUS SERONS PLUS
FORTS QUE JAMAIS !
28
29
Récupération Fulton
Les ennemis d'hier sont les alliés d'aujourd'hui !
Utilise le système de récupération Fulton pour
engager de nouvelles recrues !
Récupère des ennemis et des prisonniers et fais-les travailler à la
Mother Base (voir p. 30)
TU PEUX RECRUTER LES
ENNEMIS ENDORMIS OU
ASSOMMÉS.
UTILISE LE SYSTÈME DE
RÉCUPÉRATION FULTON
POUR LES RENVOYER À LA
MOTHER BASE.
L'HÉLICO
S'OCCUPERA DU
RESTE.
Récupération Fulton :
Sélectionne ce système
et appuie sur la touche
Action
Recrutement :
Lève une
armée !
Recrutement :
Lève une
armée !
Récupération Fulton
28
Récupération Fulton
UTILISE LE SYSTÈME DE
RÉCUPÉRATION FULTON
POUR LES RENVOYER À LA
MOTHER BASE.
L'HÉLICO
S'OCCUPERA DU
RESTE.
30
Mother Base
FAIS TRAVAILLER
LA MOTHER BASE
POUR T'ÉPAULER
DURANT LES
MISSIONS.
NOUS SERONS PLUS
FORTS QUE JAMAIS !
Les ennemis d'hier sont les alliés d'aujourd'hui !
Utilise le système de récupération Fulton pour
engager de nouvelles recrues !
Récupère des ennemis et des prisonniers et fais-les travailler à la
Mother Base (voir p. 33)
Neutralisation
Neutralise les ennemis
sans les tuer avant
d'utiliser le système de
récupération Fulton.
Mother Base
Utilise des soldats récupérés pour développer
des armes et des objets !
Plus tu as de soldats, plus tu peux produire d'armes, d'objets et de munitions.
Recrutement : Lève une armée !
Coma Inconscient Endormi
Mother Base : À toi de la développer !
32
MISSIONS MOTHER BASE
Nouveau personnel récupéré par Fulton
Développer armes / objets
33
Page 19

GARANTIE LIMITÉE
Konami Digital Entertainment, Inc. garantit à l’acheteur original de ce jeu Konami que le média sur lequel ce
logiciel est enregistré est franc de tout vice de matériel ou de main-d’œuvre pour une période de
quatre-vingt-dix (90) jours à compter de sa date d’achat. Ce produit Konami est vendu « tel quel » et sans aucune
garantie expresse ou tacite et Konami ne peut être tenu responsable de quelque dommage ou perte découlant
de l’usage de ce logiciel. Konami accepte, pour une période de quatre-vingt-dix (90) jours, de remplacer ou de
réparer sans frais, à sa discrétion, tout produit Konami, dont les frais d’envoi postal ont été payés, avec une
preuve d’achat, acheminé à son Centre de service. La présente garantie ne peut être invoquée lorsque le vice
résulte de l’usure normale ou d’égratignures. La présente garantie sera également nulle et sans effet si le vice
du jeu Konami résulte d’un usage abusif ou déraisonnable, d’un acte délibéré ou d’une négligence.
L’OBLIGATION DÉCOULANT DE LA PRÉSENTE GARANTIE TIENT LIEU DE TOUTE AUTRE GARANTIE ET NULLE
AUTRE ASSERTION OU REPRÉSENTATION DE QUELQUE NATURE QUE CE SOIT N’ENGAGE KONAMI. TOUTE
GARANTIE TACITE S’APPLIQUANT AU PRÉSENT LOGICIEL, Y COMPRIS TOUTE GARANTIE QUANT À SA VALEUR
MARCHANDE OU À SA PERTINENCE EN REGARD D’UN USAGE PARTICULIER, SE LIMITE À LA PÉRIODE DE
QUATRE-VINGT-DIX (90) JOURS DÉCRITE CI-DESSUS. KONAMI NE SAURAIT EN AUCUN CAS ÊTRE TENU
RESPONSABLE DES DOMMAGES SPÉCIAUX, ACCESSOIRES OU CIRCONSTANTIELS RÉSULTANT DE LA
POSSESSION, DE L’UTILISATION OU DE LA DÉFAILLANCE DE CE PRODUIT KONAMI.
Certains états ou provinces ne permettent ni les limites sur la période de garantie tacite, et/ou les exclusions ou
limites vis-à-vis des dommages accessoires ou circonstanciels. Le cas échéant, les limites et/ou exclusions de
responsabilité qui précèdent peuvent ne pas s’appliquer à vous. Cette garantie vous octroie des droits
spécifiques et vous pourriez bénéficier d’autres droits qui varient d’un état ou d’une province à l’autre.
Si vous avez des problèmes techniques avec votre jeu, Rendez-vous sur www.konami.com/support pour obtenir
de l'aide. Depuis cette page, vous pourrez accédez à de nombreuses rubriques d'assistance ainsi qu'à notre
base de connaissances, disponible 24 h/24 et 7 jours/7. Tout produit doit être jugé défectueux par un
représentant au service à la clientèle de Konami et un numéro d’autorisation de retour de produit (#RMA) doit
vous être attribué avant l’envoi du produit; tout produit reçu sans ces critères vous sera retourné si un
représentant du service à la clientèle de Konami ne peut pas vous rejoindre dans les trois (3) jours suivant la
réception du produit retourné non autorisé.
Konami Digital Entertainment, Inc.
Attention: Customer Service-RMA # XXXX
2381 Rosecrans Ave, Suite 200
El Segundo, CA 90245
USA
Inscrivez-vous dès aujourd’hui au www.konami.com afin de recevoir des informations exclusives sur les
nouveaux produits, des offers spéciales et bien plus encore!
http://www.konami.jp/mgs_pw/
BSD Net
La fonction de communication de ce produit exploite un logiciel développé par la
NetBSD Foundation, Inc. et ses parties prenantes. Pour obtenir la liste complète des
parties prenantes, veuillez consulter le site http://www.scei.co.jp/psp-license/pspnet.txt
« PlayStation », le logo « PS », « PSP » et « UMD » sont des marques déposées de Sony Computer Entertainment,
Inc. Memory Stick Duo et Memory Stick PRO Duo sont des marques de Sony Corporation.
Mise à jour de la console PSP® (PlayStation® Portable)
Mise à jour de la console PSP®
Cet UMD® contient la dernière mise à jour pour la console PSP® system. Si une fenêtre vous
invitant à mettre à jour le logiciel système s’affiche lorsque vous démarrez l’UMD
effectuer une mise à jour avant de démarrer le logiciel se trouvant sur l’UMD
Mise à jour
Lorsque vous insérez l’UMD®, une icône (voir ci-contre)
s’affiche dans l’option [Jeu] du menu principal. Sélection
nez l’icône et suivez les instructions à l’écran pour
effectuer la mise à jour.
Avant d’effectuer la mise à jour:
• Chargez complètement la batterie de la console PSP
• Branchez l’adaptateur secteur à la console et insérez-
le dans une prise.
Pendant la mise à jour:
• Ne retirez pas l’adaptateur secteur. N’éteignez pas la console et ne retirez pas l’UMD
Si la m ise à jo ur est i nter rompu e avan t d’ar rive r à son te rme, c ela ris que d’ endo mmag er la
console. Une réparation ou un échange pourrait dès lors s’avérer nécessaire.
Vérification de la réussite de la mise à jour
Une fois la mis e à jour effectuée, séle ctionnez [Paramètr es système] sous l’opt ion [Paramètres]
du menu pr incipal. Sé lectionne z ensuite [In formation s système]. S i le champ Logi ciel systèm e
af fich e le nu méro d e ver sion c orr espo nda nt à la mi se à jo ur, c’ est qu e la mi se à jou r a été
correctement effectuée.
®
.
®
, vous devrez
®
.
PSP® Update ver X.XX
®
.
Page 20

Actualización del software de la consola PSP
®
Este UMD® includes the latest update data for the PSP® system. If a screen prompting you to
update the system software is displayed when you start the UMD
®
, you must perform an update to
start the software title contained on the UMD
®
.
Realización de la actualización
Al colocar el UMD®, aparece un icono (como se
muestra a la derecha) en [Juego] en el menú principal.
Seleccione el icono y luego siga las instrucciones que
aparecen en la pantalla para realizar la actualización.
Antes de comenzar la actualización:
• Cargue completamente la batería de la consola PSP
®
.
• Conecte el adaptador de CA a la consola y enchúfelo
en un tomacorriente.
Durante la actualización:
• No retire el adaptador de CA, no apague la consola ni retire el UMD
®
.
Si se cancel a la actualizació n antes de que finali ce, se puede dañar el s oftware de la conso la y
ésta podría necesitar un mantenimiento para realizar reparaciones o cambios.
Cómo comprobar si la actualización se realizó correctamente
Des pué s de hab er fin aliz ado la a ctua liza ción , sel ecci one [C onfi gura ción d el sis tem a] en
[Configuración] d el menú principal y luego seleccione [ Información del sistema]. Si en el camp o
Sof tware d e la cons ola ap arece e l númer o de la ve rsión d e la actu aliza ción , ésta se r ealiz ó
PSP® Update ver X.XX
Actualización de la consola PSP® (PlayStation® Portable)
GARANTÍA LIMITADA
Net BSD
La función de comunicaciones de este producto incluye software desarrollado por
NetBSD Foundation, Inc. y sus colaboradores. Para consultar la lista completa de
colaboradores, visite http://www.scei.co.jp/psp-license/pspnet.txt
“P layS tat ion” , el log oti po de fa mil ia “PS ”, “PS P” y “UM D” so n marc as reg ist rada s de Son y Com pute r
Entertainment Inc. Memory Stick Duo y Memory Stick PRO Duo son marcas registradas de Sony Corporation.
A fin de u tilizar e ste produ cto de man era segur a, lea aten tamente l a siguie nte secci ón de este ma nual y la
Konami Digital Entertainment, Inc. garantiza al comprador original de este producto Konami que los medios en
los cuales está grabado este programa de computadora están libres de defectos en materiales y mano de obra
por un periodo de noventa (90) días a partir de la fecha de compra. Este producto Konami es vendido "tal como
es", sin garantía expresa o implícita de cualquier tipo y Konami no es responsable de perdidas o daños de
cualquier tipo resultantes del uso de este programa. Konami acepta reparar o reemplazar, sin ningún cargo,
cualquier producto Konami por un periodo de noventa (90) días, con franqueo pagado y con prueba de la fecha
de compra, en el Centro de Servicio de su Fábrica. Esta garantía no es aplicable al uso normal del producto.
Esta garantía no será aplicable y será inválida si el defecto en el producto Konami es originado por maltrato,
uso indebido, abuso o descuido.
ESTA GARANTÍA SUSTITUYE A TODAS LAS DEMÁS GARANTÍAS Y NINGUNA OTRA PROTESTA O RECLAMO DE
NINGUNA NATURALEZA VINCULARÁ U OBLIGARÁ A KONAMI A NINGUNA GARANTÍA APLICABLE A ESTE
PRODUCTO, LAS GARANTÍAS MERCANTILES Y APTITUDES INCLUIDAS PARA UN FIN PARTICULAR, ESTÁN
LIMITADAS AL PERIODO DE NOVENTA (90) DÍAS DESCRITO ANTERIORMENTE. POR NINGUNA
CIRCUNSTANCIA KONAMI SERÁ RESPONSABLE DE DAÑOS INCIDENTALES O CONSECUENTES RESULTANTES
DE LA POSESIÓN, USO O MAL FUNCIONAMIENTO DE ESTE PRODUCTO KONAMI.
Algunos estados no permiten limitaciones en lo que respecta a la vigencia de la garantía implícita y/o
exclusiones o limitaciones de daños incidentales o consecuentes, así que las limitaciones y/o exclusiones
anteriores de responsabilidad podrían no aplicar a usted. Esta garantía le da derechos específicos y usted
podría tener otros derechos que varían entre un estado y otro.
Si usted experimenta problemas técnicos con su juego, por favor marque nuestros números de Garantía o
Servicio Técnico que son 310.220.8330 ó 310.220.8331 de las 9:00 a.m. PST a 5:00 p.m. PST, de lunes a viernes o
envíe un correo electrónico a support@konami.com. Todos los productos deben ser considerados defectuosos
por un representante de Servicio al Cliente de Konami y con un número RMA asignado antes de regresar el
producto, todos lo productos que se reciban sin estas características serán devueltos si un Representante de
Servicio al Cliente de Konami no puede localizarlo tres días después de recibida la devolución no autorizada.
Konami Digital Entertainment, Inc.
Attention: Customer Service-RMA # XXXX
2381 Rosecrans Ave, Suite 200
El Segundo, CA 90245
USA
SERVICIO AL CLIENTE
Si siente que no avanza en el juego o necesita ayuda, ¡no se preocupe! Puede escribir a nuestros expertos en
juegos a support@konami.com o visitar nuestra sección de Ayuda en www.konami.com.
Regístrate ahora en www.konami.com y ¡recibe información exclusive sobre productos, ofertas especiales y
más!
sección Precauciones del manual d e instrucciones provisto con la consola PSP
utilizarlo. Conserve este manual del software y el manual de instrucciones para consultarlos en el futuro.
®
(PlayStation® Portable) antes de
ADVERTENCIA: FOTOSENSIBILIDAD/EPILEPSIA/CONVULSIONES
Un peque ño porcentaj e de personas puede sufrir ataque s de epilepsi a o desmayos s i se exponen a
determinados patrones o destellos de luz. La exposición a determinados patrones o fondos en la pantalla o
cuando se juega videojuegos puede provocar ataques de epi lepsia o desmayo en dichas personas. Estas
condiciones puede n provocar síntomas de epile psia o de convulsiones no detectados ante riormente en
personas que no p oseen antecedentes de convulsion es o epile psia. Si u sted o alg ún miembro de su fami lia
padecen epilepsia o han tenido convulsi ones de cualquier t ipo, consulte con su médico antes de jugar. Si
usted o su hijo exper imentan alguno de l os siguientes probl emas de salud o sínt omas, INTERRUMPA
INMEDIATAMENTE el uso y consulte co n su médico antes de volver a ju gar:
• mareos • desorienta ción
• alteración de la visión • convulsiones
• temblores en los ojos o los músculos • cualquier m ovimiento involuntario convulsi ón
• pérdida del c onocimiento
SÓLO VUELVA A JUGAR BAJO LA AU TORIZACIÓN DE SU MÉDICO.
__________________ ________________________________ _____________________________
Uso y manejo de vi deojuegos para disminuir la posi bilidad de sufrir convulsiones
• Úselo en un á rea con buena iluminación y man tenga una distancia segura de la pantalla.
• Evite el uso prolongado de la consola PSP
• Evite jugar s i está cansado o tiene sueño.
__________________ ________________________________ _____________________________
Si experim enta alguno de los siguientes síntomas, deje de usar la consola de inmediato: mareos , náuseas o
una sensación s imilar a los mareos por mo vimiento; molestias o dolor en los ojos, oídos, manos , brazos u otra
parte del cuerpo. Si la afección persiste, consult e con un médico.
__________________ ________________________________ _____________________________
No lo use mient ras condu ce o camina. No lo use en aviones o instalaciones médicas donde el uso está
prohibido o rest ringido. Desactive la función de red inalámbrica de la co nsola PSP
o en otros lu gares muy concurridos. Si se utiliza cerca de pe rsonas con marcapasos, la señal de la función de
red inalámbrica de la consola PSP
Uso y manejo de UMD
• Este disco contien e software con formato PSP® (PlayStation® Portable) y debe ser u tilizado solamente con la
consola PSP®. Si se utiliza el disco con otros dispositivos, se pueden provocar daños al disco o al dispositivo. •
Este disco es c ompatible con la con sola PSP
LOS E STADOS U NIDOS Y C ANADÁ • S egún el s oftw are, pu ede ser n ecesa rio usa r Memo ry Stic k
®
PRO Duo (se comercializan por s eparado). Para obtener más información, consul te el manual del
Memory Stick
software. • S i aparecen imágene s pausadas en la pantal la durante mucho tiem po, puede quedar una im agen
tenue de m anera permane nte en la pantal la. • No exponga el d isco a la luz solar d irecta, no lo de je cerca de
una fuente de c alor, en un automóvil o en otro s lugares húmedos o con t emperaturas eleva das. • No toque la
abert ura de la part e posterio r del disco (su perficie d e grabació n del disco; o bserve la il ustració n). Tampoco
perm ita que ing rese polv o, arena , objetos e xtraños u o tros tipo s de sucie dad en el dis co. • No obst ruya la
abertu ra con papel o cint a. No escriba so bre el disco. • Si el á rea de la abertur a
se ensucia , límpiela cuidad osamente con un pañ o suave. • Para limpi ar el disco,
pase c uidado samente u n paño sua ve sobre l a superfi cie exte rior. • No uti lice
solventes como bencina, productos de limpieza comerciales que no están previstos
para uso en CD, ni ae rosoles antiestático s para discos de vinilo de lar ga duración
ya que p ueden dañ ar el disco . • No utilic e discos ro tos o defor mados ni di scos
re p ar ad os c on a dh es iv os y a qu e p ue de n da ña r la c on so la o c a us ar u n
func ionam iento de fectu oso de ést a. • SCE no s erá resp onsab le por los d años
ocasionados por el uso incorrecto de los discos.
®
. Tome un descanso de 15 minutos cada una hora de juego.
®
cuando la utili ce en trenes
®
podría interferir con el correcto funcionamiento del marcapasos.
®
®
señalada co n PARA COMERCIALIZACI ÓN Y USO EXCLUSIVO EN
Superficie de
grabación
Expulsión del disco
Presione el l ado derecho del disc o hasta que se encuentr e en la posición
indicada en la ilust ración y luego retírelo. Si se ejerce f uerza excesiva, se
puede dañar el disco.
Almacenamiento d el disco
Coloque e l lado posterior de l disco y presione e l lado superior ha sta que
se tra be en su lug ar. Si el disc o no se guar da corre ctamen te, se pue de
dañar. Col oque el disc o en su caja cua ndo no lo util ice y guárde lo en un
lugar que esté fuer a del alcance de los niños. Si no se guar da el disco, se
pueden provocar deformaciones u otros daños en éste.
®
Duo o
Inicio....................................
Menú de título.....................
Pantalla del juego..................
Controles: ¡qué fácil!
Controles (Disparos)............
Sigilo: ¡siente la emoción!
Infiltración...........................
Si el enemigo te descubre.....
Indicador de vida y objetos....
Ataques con armas..............
CO-OPS: ¡no estás solo!
Iniciar CO-OPS....................
Anillo de CO-OP....................
38
40
41
42
44
45
46
47
48
49
Índice
Reclutamiento: ¡crea tu ejército!
Rescate Fulton....................
Mother Base: ¡haz que crezca!
Mother Base........................
50
51
Page 21

METAL GEAR SOLID: PEACEWALKER
|
39
METAL GEAR SOLID: PEACEWALKER
|
Inicio
Sigue las instrucciones del manual provisto con tu consola PSP® (PlayStation®Portable) para configurarlo. Enciende
la consola. El indicador de alimentación se ilumina en verde y aparece el menú principal. Pulsa el botón OPEN (abrir)
para abrir la cubierta del disco. A continuación, inserta el disco de GTI CLUB SUPERMINI FESTA! con la etiqueta
hacia la parte opuesta a la consola, deslízalo hasta que quede bien colocado y cierra la cubierta del disco. Desde el
menú principal de la consola PSP®, selecciona el icono Juego y a continuación selecciona el icono UMD. Aparece
una vista en miniatura del software. Selecciona la vista en miniatura y presiona el botón S de la consola PSP®
para comenzar a usar el software. Sigue las instrucciones que se muestran en pantalla y consulta este manual si
deseas información acerca de cómo usar el programa.
AVISO: No expulses un UMD® durante su reproducción.
Memory Stick Duo™
Advertencia! Conserva la Memory Stick Duo lejos del alcance de niños pequeños, ya que podrían tragársela
accidentalmente.
Para guardar la configuración y tus avances en el juego, introduce una Memory Stick Duo en la ranura para tarjetas
de la consola PSP®. Puedes cargar una partida guardada desde la misma tarjeta o de cualquier Memory Stick Duo
que tenga partidas previamente guardadas.
10 de noviembre de 1974
Litoral caribeño de
Costa Rica
ESTA ES UNA
MISIÓN DE
INFILTRACIÓN.
38
¿ESTÁS LISTO
PARA EMPEZAR,
SNAKE?
SÍ.
Índice de camufl aje
10%
Índice de camufl aje
80%
Pegarse a la pared:
Pulsa el botón de acción cuando estés cerca de un muro
EVITA EL COMBATE Y NO DEJES
QUE ESOS MERCENARIOS TE VEAN.
39
Page 22

METAL GEAR SOLID: PEACEWALKER
|
41
METAL GEAR SOLID: PEACEWALKER
|
02
Menú de título
02
03
Menú de título
Pantalla del juego
En la pantalla de título, pulsa el botón START (inicio) para empezar.
Menú de título
(desplazar arriba/abajo)
PARTIDA NUEVA
CARGAR PARTIDA
BORRAR
EXTRAS
Inicia el juego principal.
Continúa una partida anterior desde
un archivo de guardado.
Borrar datos.
Ir al menú EXTRAS.
Debes conectarte a PlayStation®Network para acceder a algunos
contenidos de este juego. Para acceder a la red necesitarás un periférico
externo o una conexión inalámbrica a internet. Para más información,
consulta el manual de instrucciones de tu PSP® o periférico de red.
*
INSTALAR DATOS Instalar datos en un Memory Stick
PRO Duo™.
La instalación es necesaria para reproducir los diálogos por radio en el juego. *
En los modelos PSP 1000/2000/3000 se necesita un Memory Stick PRO
Duo™ que tenga al menos 330 MB libres.
Menú de título
En la pantalla de título, pulsa el botón START (inicio) para empezar.
Menú de título
(desplazar arriba/abajo)
Pantalla del juego
PARTIDA NUEVA
CARGAR PARTIDA
BORRAR
EXTRAS
*
Debes conectarte a PlayStation®Network para acceder a algunos
contenidos de este juego. Para acceder a la red necesitarás un periférico
externo o una conexión inalámbrica a internet. Para más información,
consulta el manual de instrucciones de tu PSP® o periférico de red.
INSTALAR DATOS Instalar datos en un Memory Stick
La instalación es necesaria para reproducir los diálogos por radio en el juego. *
En los modelos PSP® 1000/2000/3000 se necesita un Memory Stick PRO
Duo™ que tenga al menos 330 MB libres.
Inicia el juego principal.
Continúa una partida anterior desde
un archivo de guardado.
Borrar datos.
Ir al menú EXTRAS.
PRO Duo™.
Activar AUTOAPUNTAR
Estado del
enemigo
(consulta la
página 45)
Indicador
de psique
(derecha)
Indicador
de vida
(izquierda)
(consulta la
página 46)
Nombre del
jugador
Icono de acción
Muestra las acciones disponibles en cada momento.*
Índice de
camuflaje
(consulta la
página 44)
Objeto
utilizado
(consulta la
página 46)
Arma
utilizada
(consulta la
página 47)
40
41
Page 23

METAL GEAR SOLID: PEACEWALKER
|
43
METAL GEAR SOLID: PEACEWALKER
|
Controles (tipo Disparos)
También hay controles de tipo Acción y de tipo Cazador.
04
05
Controles (tipo Disparos)
También hay controles de tipo Acción y de tipo Cazador.
Controles (tipo Disparos: apuntar)
Botones de dirección
Arriba: botón de acción
Realiza acciones adecuadas a
la situación (icono de acción)
Derecha:
botón de selección de arma
Mantén pulsado este botón
de dirección y pulsa el
botón f o el botón a para
cambiar de arma
Izquierda:
botón de selección de objeto
Mantén pulsado este botón
de dirección y pulsa el
botón f o el botón a para
cambiar de objeto
Abajo: botón de agacharse
Mantenlo pulsado para tumbarte
No puedes moverte si estás
tumbado
*
Botón n: botón de puntería
Botón b: botón de ataque
Pad analógico: mover
Correr / caminar en silencio
Botones dasf:
cámara
Cambiar la
perspectiva de la
cámara
Botón START (inicio): botón del menú
Botón SELECT (selección): variar
(en función del sistema de control)
Mantenlo pulsado para apuntar
Para atacar con las manos vacías
Controles (tipo Disparos)
También hay controles de tipo Acción y de tipo Cazador.
Botones de dirección
Arriba: botón de acción
Derecha:
Izquierda:
Abajo: botón de agacharse
Realiza acciones adecuadas a
la situación (icono de acción)
botón de selección de arma
Mantén pulsado este botón
de dirección y pulsa el
botón f o el botón a para
cambiar de arma
botón de selección de objeto
Mantén pulsado este botón
de dirección y pulsa el
botón f o el botón a para
cambiar de objeto
Mantenlo pulsado para tumbarte
No puedes moverte si estás
*
tumbado
Controles (tipo Disparos: apuntar)
Botones de dirección
Arriba: botón de recarga
Derecha:
Izquierda:
Abajo: botón de agacharse
Recargar arma
botón de movimiento de
cámara
Mover la cámara a la
derecha
Ampliar el zoom en la mira*
botón de movimiento de
cámara
Mover la cámara a la
izquierda
Reducir el zoom en la mira*
Botón n: botón de puntería
Mantenlo pulsado para apuntar
Botón SELECT (selección): variar
(en función del sistema de control)
Botón START (inicio): botón del menú
Pad analógico: mover
Correr / caminar en silencio
Botón n: botón de puntería
Mantenlo pulsado para apuntar
Botón SELECT (selección): variar
(en función del sistema de control)
Botón START (inicio): botón del menú
Pad analógico: mover
Correr / caminar en silencio
Botón b: botón de ataque
Para atacar con las manos vacías
Botones dasf:
cámara
Cambiar la
perspectiva de la
cámara
Botón b: botón de ataque
Para atacar con un arma
Botones dasf:
cámara
Cambiar la
perspectiva de la
cámara
42
43
Page 24

METAL GEAR SOLID: PEACEWALKER
|
45
METAL GEAR SOLID: PEACEWALKER
|
08
09
Descubierto por el enemigo
¡El enemigo te persigue! ¿Ahora qué?
Si el enemigo descubre a Snake, pedirá refuerzos y atacará con gran
cantidad de efectivos. Tendrás que derrotarlos o evitar que te vean.
¿QUIÉN ESTÁ
AHÍ?
¡SNAKE, QUE NO
TE VEAN!
¡SOLICITO
REFUERZOS!
¡ME HAN ENCONTRADO!
Sigilo:
¡siente la
emoción!
Sigilo:
¡siente la
emoción!
06
07
Infi ltración
Muévete con cuidado para evitar que te descubran.
El índice de camuaje que aparece en la esquina superior derecha
indica lo fácil que eres de descubrir.
Mueve un poco el pad analógico para andar despacio.
Índice de camufl aje
80%
Índice de camufl aje
10%
Pegarse a la pared:
Pulsa el botón de acción cuando estés cerca de un muro
10 de noviembre de 1974
Litoral caribeño de
Costa Rica
ESTA ES UNA
MISIÓN DE
INFILTRACIÓN.
¿ESTÁS LISTO
PARA EMPEZAR,
SNAKE?
SÍ.
EVITA EL COMBATE Y NO DEJES
QUE ESOS MERCENARIOS TE VEAN.
Sigilo:
¡siente la
emoción!
Sigilo:
¡siente la
emoción!
08
Descubierto por el enemigo
¿QUIÉN ESTÁ
AHÍ?
¡SNAKE, QUE NO
TE VEAN!
¡SOLICITO
REFUERZOS!
06
Infi ltración
Índice de camufl aje
80%
Pegarse a la pared:
Pulsa el botón de acción cuando estés cerca de un muro
ESTA ES UNA
MISIÓN DE
INFILTRACIÓN.
EVITA EL COMBATE Y NO DEJES
QUE ESOS MERCENARIOS TE VEAN.
Infiltración
Muévete con cuidado para evitar que te descubran.
El índice de camuaje que aparece en la esquina superior derecha
indica lo fácil que eres de descubrir.
Mueve un poco el pad analógico para andar despacio.
Tumbado Caminar agachado Correr agachadoCaminar erguido Correr
Sigilo : ¡siente la emoción!
Difícil de descubrir Fácil de descubrirAlto Bajo
Índice de camuaje
44
Descubierto por el enemigo
¡El enemigo te persigue! ¿Ahora qué?
Si el enemigo descubre a Snake, pedirá refuerzos y atacará con gran
cantidad de efectivos. Tendrás que derrotarlos o evitar que te vean.
Ángulo superior izquierdo de la pantalla
■
Descubierto
(rojo)
Oculto
(amarillo)
Sigilo : ¡siente la emoción!
Cómo evitar los refuerzos
Para evitar que lleguen refuerzos,
deshazte del enemigo antes de que
pueda pedirlos.
45
Page 25

METAL GEAR SOLID: PEACEWALKER
|
47
METAL GEAR SOLID: PEACEWALKER
|
12
13
ENTENDIDO.
OCÚLTATE Y USA
LA MK.22 PARA
DORMIRLOS.
10
11
Indicador de vida y objetos
No pierdas de vista los indicadores.
Si tu indicador de vida llega a cero, la partida se ha acabado.
¿TIENES RACIONES?
¡AH!
¡ME HAN
DISPARADO!
NO.
SNAKE, ¿QUÉ
HA PASADO?
BUSCA UN LUGAR PARA
ESCONDERTE HASTA
QUE TE RECUPERES.
Sigilo:
¡siente la
emoción!
Sigilo:
¡siente la
emoción!
Indicador de vida y objetos
10
Indicador de vida y objetos
No pierdas de vista los indicadores.
¿TIENES RACIONES?
NO.
SNAKE, ¿QUÉ
HA PASADO?
BUSCA UN LUGAR PARA
ESCONDERTE HASTA
QUE TE RECUPERES.
12
Ataques con armas
¡MALDITA SEA!
AHÍ HAY OTRO.
ENTENDIDO.
OCÚLTATE Y USA
LA MK.22 PARA
DORMIRLOS.
12
13
Ataques con armas
¡Dispara sin que te descubran!
Apunta con el botón n y dispara con el botón b.
Cambio rápido
Si conguras la SELECCIÓN DE
AJUSTES de armas y objetos en la
pestaña OPCIONES de la ventana
del menú podrás cambiar entre dos
o tres armas u objetos o equiparte
y dejarlas rápidamente tocando una
vez el botón de selección de arma
u objeto.
Seleccionar armas
Botón derecho + botón f o a
¡MALDITA SEA!
AHÍ HAY OTRO.
SIEMPRE PUEDES
QUITARLOS DE EN
MEDIO.
ENTENDIDO.
OCÚLTATE Y USA
LA MK.22 PARA
DORMIRLOS.
Sigilo:
¡siente la
emoción!
Sigilo:
¡siente la
emoción!
Si tu indicador de vida llega a cero, la partida se ha acabado.
Indicador de vida
Usa un ob j e to de
r e c u p e r a c i ó n o
descansa agachado
o t um ba do pa ra
recuperar vida.
Indicador de psique
Afecta a la velocidad
de recuperación de
vida, la precis i ó n
de disparo u otras
capacidades físicas.
Sigilo : ¡siente la emoción!
Seleccionar objetos
Botón izquierdo + botón f o a
Raciones
Si te equipas con un a ra ció n ,
tu nivel de vida se recuperará
automáticamente cuando llega a
cero.
46
Ataques con armas
¡Dispara sin que te descubran!
Apunta con el botón n y dispara con el botón b.
Arma compatible con
combate cuerpo a cuerpo
Arma tranquilizadora
Seleccionar armas
Botón derecho + botón f o a
Cambio rápido
Si conguras la SELECCIÓN DE
AJUSTES de armas y objetos en la
pestaña OPCIONES de la ventana
del menú podrás cambiar entre dos
o tres armas u objetos o equiparte
y dejarlas rápidamente tocando una
vez el botón de selección de arma
u objeto.
Sigilo : ¡siente la emoción!
47
Page 26

METAL GEAR SOLID: PEACEWALKER
|
49
METAL GEAR SOLID: PEACEWALKER
|
22
23
Anillo de CO-OP
Únete a tus compañeros en CO-OP In.
Toca el anillo que rodea a un personaje para entrar en CO-OP In y
compartir el indicador de vida, los objetos y las armas.
EN CO-OPS
SI DOS ANILLOS SE TOCAN,
SE ENTRA EN CO-OP IN.
LOS JUGADORES COMPARTIRÁN EL
INDICADOR DE VIDA Y LA MUNICIÓN Y
PODRÁN PRESTARSE COSAS EL UNO
AL OTRO.
VERÁS UN ANILLO
EN TORNO A CADA
JUGADOR.
¡CO-OP In!
CO-OPS:
¡no estás
solo!
CO-OPS:
¡no estás
solo!
20
21
Iniciar CO-OPS
Organiza una partida e invita a tus amigos.
Selecciona Antrión en la pantalla de selección de misión para invitar
a otros jugadores a unirse a tu partida.
¿SABES CÓMO INICIAR
UNA MISIÓN CO-OPS,
SNAKE?
EN CO-OPS, ENTRE DOS Y
CUATRO JUGADORES PUEDEN
COOPERAR USANDO EL MODO AD
HOC.
UNA PERSONA HACE
DE ANFITRIÓN E
INVITA A SUS AMIGOS
A UNIRSE.
NO...
ANFITRIÓN
CO-OPS:
¡no estás
solo!
CO-OPS:
¡no estás
solo!
Iniciar CO-OPS
22
Anillo de CO-OP
EN CO-OPS
SI DOS ANILLOS SE TOCAN,
SE ENTRA EN CO-OP IN.
LOS JUGADORES COMPARTIRÁN EL
INDICADOR DE VIDA Y LA MUNICIÓN Y
PODRÁN PRESTARSE COSAS EL UNO
AL OTRO.
VERÁS UN ANILLO
EN TORNO A CADA
JUGADOR.
¡CO-OP In!
20
Iniciar CO-OPS
Organiza una partida e invita a tus amigos.
¿SABES CÓMO INICIAR
UNA MISIÓN CO-OPS,
SNAKE?
EN CO-OPS, ENTRE DOS Y
CUATRO JUGADORES PUEDEN
COOPERAR USANDO EL MODO AD
HOC.
UNA PERSONA HACE
DE ANFITRIÓN E
INVITA A SUS AMIGOS
A UNIRSE.
NO...
ANFITRIÓN
Selecciona Antrión en la pantalla de selección de misión para invitar
a otros jugadores a unirse a tu partida.
BUSCAR ANFITRIÓN
Selecciona Buscar antrión en la pestaña
CO-OPS para unirte a una misión que esté
buscando jugadores.
Es necesario recibir una señal de conexión Ad hoc.*
CO-OPS : ¡no estás solo!
Ajusta tu canal al del antrión.
48
Anillo de CO-OP
Únete a tus compañeros en CO-OP In.
Toca el anillo que rodea a un personaje para entrar en CO-OP In y
compartir el indicador de vida, los objetos y las armas.
Indicador de vida
en CO-OP In.
CO-OPS : ¡no estás solo!
Reanimación cardiopulmonar
Pulsa repetidamente el botón de
acción
En CO-O P S , si tu indicador de
vida llega a cero, tu compañero
puede reanimarte usando
reanimación
cardiopulmonar.
49
Page 27

METAL GEAR SOLID: PEACEWALKER
|
51
METAL GEAR SOLID: PEACEWALKER
|
30
31
Mother Base
Usa a los soldados rescatados para desarrollar armas y objetos.
Cuantos más soldados tengas, más armas, objetos y munición podrás producir.
EN LA PLATAFORMA MOTHER BASE PUEDES:
DESARROLLAR ARMAS, OBJETOS Y
MUNICIÓN
●
RECLUTAR VOLUNTARIOS
●
ORGANIZAR PARTIDAS
●
INTERCAMBIAR RECLUTAS
●
INTERCAMBIAR ARMAS Y OBJETOS
●
HAZ QUE MOTHER
BASE TRABAJE
PARA AYUDARTE EN
TUS MISIONES.
¡DEBEMOS SER MÁS
FUERTES QUE NUNCA!
28
29
Rescate Fulton
El enemigo de ayer es el amigo de hoy.
Usa el sistema Fulton para conseguir reclutas
nuevos.
Rescata a enemigos y prisioneros y ponlos a trabajar en Mother Base
(consulta la página 30).
PUEDES RECLUTAR
A LOS ENEMIGOS
DORMIDOS O
INCONSCIENTES.
USA EL SISTEMA DE
RESCATE FULTON PARA
ENVIARLOS A MOTHER
BASE.
EL HELICÓPTERO
SE ENCARGARÁ
DEL RESTO.
Rescate Fulton:
Equípate y pulsa el
botón de acción.
Reclutamiento:
¡crea tu
ejército!
Reclutamiento:
¡crea tu
ejército!
Rescate Fulton
28
Rescate Fulton
USA EL SISTEMA DE
RESCATE FULTON PARA
ENVIARLOS A MOTHER
BASE.
EL HELICÓPTERO
SE ENCARGARÁ
DEL RESTO.
30
Mother Base
HAZ QUE MOTHER
BASE TRABAJE
PARA AYUDARTE EN
TUS MISIONES.
¡DEBEMOS SER MÁS
FUERTES QUE NUNCA!
El enemigo de ayer es el amigo de hoy.
Usa el sistema Fulton para conseguir reclutas
nuevos.
Rescata a enemigos y prisioneros y ponlos a trabajar en Mother Base
(consulta la página 51).
Neutralizado
Neutraliza a tus enemigos
sin mata r l os an t es de
usar el sistema de rescate
Fulton.
Mother Base
Usa a los soldados rescatados para desarrollar armas y objetos.
Cuantos más soldados tengas, más armas, objetos y munición podrás producir.
Reclutamiento: ¡crea tu ejército!
Moribundo Inconsciente Dormido
Mother Base : ¡haz que crezca!
50
MISIONES MOTHER BASE
Rescata más personal con el sistema Fulton
Desarrolla armas/objetos
51
Page 28

GARANTÍA LIMITADA
Konami Digital Entertainment, Inc. garantiza al comprador original de este producto Konami que los medios en
los cuales está grabado este programa de computadora están libres de defectos en materiales y mano de obra
por un periodo de noventa (90) días a partir de la fecha de compra. Este producto Konami es vendido "tal como
es", sin garantía expresa o implícita de cualquier tipo y Konami no es responsable de perdidas o daños de
cualquier tipo resultantes del uso de este programa. Konami acepta reparar o reemplazar, sin ningún cargo,
cualquier producto Konami por un periodo de noventa (90) días, con franqueo pagado y con prueba de la fecha
de compra, en el Centro de Servicio de su Fábrica. Esta garantía no es aplicable al uso normal del producto.
Esta garantía no será aplicable y será inválida si el defecto en el producto Konami es originado por maltrato,
uso indebido, abuso o descuido.
ESTA GARANTÍA SUSTITUYE A TODAS LAS DEMÁS GARANTÍAS Y NINGUNA OTRA PROTESTA O RECLAMO DE
NINGUNA NATURALEZA VINCULARÁ U OBLIGARÁ A KONAMI A NINGUNA GARANTÍA APLICABLE A ESTE
PRODUCTO, LAS GARANTÍAS MERCANTILES Y APTITUDES INCLUIDAS PARA UN FIN PARTICULAR, ESTÁN
LIMITADAS AL PERIODO DE NOVENTA (90) DÍAS DESCRITO ANTERIORMENTE. POR NINGUNA
CIRCUNSTANCIA KONAMI SERÁ RESPONSABLE DE DAÑOS INCIDENTALES O CONSECUENTES RESULTANTES
DE LA POSESIÓN, USO O MAL FUNCIONAMIENTO DE ESTE PRODUCTO KONAMI.
Algunos estados no permiten limitaciones en lo que respecta a la vigencia de la garantía implícita y/o
exclusiones o limitaciones de daños incidentales o consecuentes, así que las limitaciones y/o exclusiones
anteriores de responsabilidad podrían no aplicar a usted. Esta garantía le da derechos específicos y usted
podría tener otros derechos que varían entre un estado y otro.
Si usted experimenta problemas técnicos con su juego, por favor dirígete a www.konami.com/support si
requieres asistencia, aquí tendrás acceso a muchos materiales de apoyo, al igual que a nuestra Base de
Conocimientos que está disponible 24 horas al día, 7 días a la semana. Todos los productos deben ser
considerados defectuosos por un representante de Servicio al Cliente de Konami y con un número RMA
asignado antes de regresar el producto, todos lo productos que se reciban sin estas características serán
devueltos si un Representante de Servicio al Cliente de Konami no puede localizarlo tres días después de
recibida la devolución no autorizada.
Konami Digital Entertainment, Inc.
Attention: Customer Service-RMA # XXXX
2381 Rosecrans Ave, Suite 200
El Segundo, CA 90245
USA
Regístrate ahora en www.konami.com y ¡recibe información exclusive sobre productos, ofertas especiales y
más!
http://www.konami.jp/mgs_pw/
Net BSD
La función de comunicaciones de este producto incluye software desarrollado por
NetBSD Foundation, Inc. y sus colaboradores. Para consultar la lista completa de
colaboradores, visite http://www.scei.co.jp/psp-license/pspnet.txt
“P layS tat ion” , el log oti po de fa mil ia “PS ”, “PS P” y “UM D” so n marc as reg ist rada s de Son y Com pute r
Entertainment Inc. Memory Stick Duo y Memory Stick PRO Duo son marcas registradas de Sony Corporation.
Actualización de la consola PSP® (PlayStation® Portable)
Actualización del software de la consola PSP
Este UMD® includes the latest update data for the PSP® system. If a screen prompting you to
update the system software is displayed when you start the UMD
start the software title contained on the UMD
Realización de la actualización
Al colocar el UMD®, aparece un icono (como se
muestra a la derecha) en [Juego] en el menú principal.
Seleccione el icono y luego siga las instrucciones que
aparecen en la pantalla para realizar la actualización.
Antes de comenzar la actualización:
• Cargue completamente la batería de la consola PSP
• Conecte el adaptador de CA a la consola y enchúfelo
en un tomacorriente.
Durante la actualización:
• No retire el adaptador de CA, no apague la consola ni retire el UMD
Si se cancel a la actualizació n antes de que finali ce, se puede dañar el s oftware de la conso la y
ésta podría necesitar un mantenimiento para realizar reparaciones o cambios.
Cómo comprobar si la actualización se realizó correctamente
Des pué s de hab er fin aliz ado la a ctua liza ción , sel ecci one [C onfi gura ción d el sis tem a] en
[Configuración] d el menú principal y luego seleccione [ Información del sistema]. Si en el camp o
Sof tware d e la cons ola ap arece e l númer o de la ve rsión d e la actu aliza ción , ésta se r ealiz ó
correctamente.
®
®
®
.
, you must perform an update to
®
.
®
.
PSP® Update ver X.XX
Page 29

 Loading...