

Page 1
KH 1149
3
SSTTEEAAMM IIRROONN
Operating Instructions
HHÖÖYYRRYYSSIILLIITTYYSSRRAAUUTTAA
Käyttöohje
ÅÅNNGGSSTTRRYYKKJJÄÄRRNN
Bruksanvisning
DDAAMMPPSSTTRRYYGGEEJJEERRNN
Betjeningsvejledning
DDAAMMPPSSTTRRYYKKEEJJEERRNN
Bruksanvisning
ÁÁôôììïïóóßßääååññïï
Ïäçãßá ÷ñÞóçò
DDAAMMPPFFBBÜÜGGEELLEEIISSEENN
Bedienungsanleitung
KOMPERNASS GMBH · BURGSTRASSE 21 · D-44867 BOCHUM
www.kompernass.com
ID-Nr.: KH1282-09/06-V5
KH 1282
CV_KH1282_E554_LB3.qxd 11.09.2007 10:01 Uhr Seite 1
Page 2
KH 1282
CV_KH1282_E554_LB3.qxd 10.09.2007 16:49 Uhr Seite 4
Page 3

- 3 -
Content Page
Basic Safety Instructions 4
Intended use 5
Unpacking 5
Before the first use 5
Operating Elements 6
Preparation 6
Plugging in and ironing 6
Steam ironing 7
Ironing with steam blast 8
Ironing with the spray function 8
Temporarily setting the steam iron aside 8
Taking the steam iron out of service 8
Cleaning and Care 9
Troubleshooting 9
Technical data 10
Disposal 10
Warranty and Service 10
Importer 11
Read the operating instructions carefully before using the appliance for the first time and preserve this booklet
for later reference. Pass this booklet on to whoever might acquire the appliance at a future date.
IB_KH1282_E5554_UK_3 10.09.2007 16:20 Uhr Seite 3
Page 4
- 4 -
Steam Iron KH 1282
Basic Safety Instructions
Danger of Burns!
• Do not allow individuals (including children) to
use the appliance whose physical, sensorial or
mental abilities or lack of experience and knowledge hinder their safe usage of it if they have
not previously been supervised or instructed in its
correct usage.
• Tell children about the appliance and its potential dangers so that they do not play with it.
• Never touch the sole-plate of the iron when it is
hot. Take hold of the steam iron with the handle
only.
• Never hold your hand over the steam spray or
on hot metal parts.
• Never direct the steam blast at people or other
living creatures.
• You should not open the filler opening of the
water reservoir while the iron is in use. First
remove the plug from the power socket and allow the steam iron to cool down before refilling
it.
Fire hazard!
• Never leave the steam iron unattended when it is
hot or switched on. You and others can be easily
injured through a still hot iron.
• Never place the steam iron in the close vicinity of
inflammable materials, such as curtains and drapes. They could catch fire.
• Use only the ironing temperatures given in the
care instructions for the material and those suitable for it. Otherwise, you could damage the textiles. Should care instructions for the item be neither known nor available, begin ironing with the
lowest temperature setting.
• Put the steam iron into storage only when it has
cooled down completely.
• Never place the steam iron on edges, for example table edges. It could tip and fall down.
• Stand the steam iron only on its back end, or lay
it in the support tray provided on the ironing board. Never lean the hot iron against walls or
other objects. There could be a risk of fire
breaking out.
Danger of electrical shock!
• Connect the steam iron only to correctly installed
wall power sockets.
• To avoid possible dangers, arrange for a defective appliance to be checked and possibly repaired by qualified techni-cians, or contact our
Customer Service Department.
• Arrange for defective power cables to be replaced immediately by qualified technicians, or
contact our Customer Service Department.
• To disconnect from the power source, pull only
on the plug itself, not on the cable.
• Never direct the steam jets or the water-spray jets
at electrical appliances or at objects sensitive to
heat or moisture.
• Never bend (kink) or crush the power cable.
Arrange it in such a way that it can not come into
contact with hot surfaces and such that no-one
can step on it or trip over it.
• After every use, before cleaning and when refilling with water, remove the plug from the power
socket.
• Always unroll the power cable fully before
switching on and do not use an extension cord.
• Never touch the power cable or the power plug
with wet hands.
IB_KH1282_E5554_UK_3 10.09.2007 16:20 Uhr Seite 4
Page 5

- 5 -
• Under no circumstances should you submerge
the steam iron in any liquid or permit liquids to
penetrate into the housing of the steam iron. You
should never expose the appliance to moisture or
use the device outdoors. Should liquids penetrate
into the appliance housing , immediately remove
the plug from the power source and arrange for
the appliance to be repaired by a qualified specialist workshop or by the Customer Service
Department.
• Never use the steam iron adjacent to water
contained in a bath, shower, wash basin or other
vessels. The proximity of moisture presents a
danger, even when the appliance is switched off.
• You may not open the housing of the steam iron.
Arrange for a defective steam iron to be repaired
only by a qualified specialist workshop or by the
Customer Service Department.
• Arrange for defective power plugs and/or
cables to be replaced as soon as possible by a
qualified technician or by our Customer Service
Department to avoid the risk of injury.
Important!
• Should the clothing care instructions forbid ironing, (Symbol ), the clothing item may not be
ironed. If you ignore this warning, the item could
be damaged.
• Do not fill the water tank with a liquid other than
water. You will otherwise damage the steam iron.
• You may not clean the steam iron with solvents,
alcohol or abrasive cleaning agents. You could
otherwise cause damages.
Intended use
The steam iron is intended exclusively for the ironing
of textiles. The iron may only be used indoors and in
a private household. All other use is deemed improper use.
Unpacking
Plastic bags can present a danger. To avoid
fatalities through suffocation, keep plastic bags
out of the reach of children.
• Remove the steam iron from the packaging.
• Remove all protective coverings and protective
foils from the steam iron and from sole of the iron
i
.
Before the first use
• Fill the steam iron with water (see Chapter
„Filling with water“).
• Insert the power plug into a wall socket with
220-240 V~/50 Hz.
• Set the temperature controller
u
to "Max".
• Heat the steam iron for several minutes at the
highest setting.
• Then iron a handtowel or other piece of old
material (suitable for heat level •••) to remove
any impurities from the sole of the iron
i
.
• Activate the steam blast button
d
a few times to
remove any possible impurities in the steam jets.
Note: On the first use, a light odour develop-
ment - caused by manufacturing residues - may
occur. This odour is not damaging to health.
Provide for sufficient ventilation, for example,
open a window.
IB_KH1282_E5554_UK_3 10.09.2007 16:20 Uhr Seite 5
Page 6
- 6 -
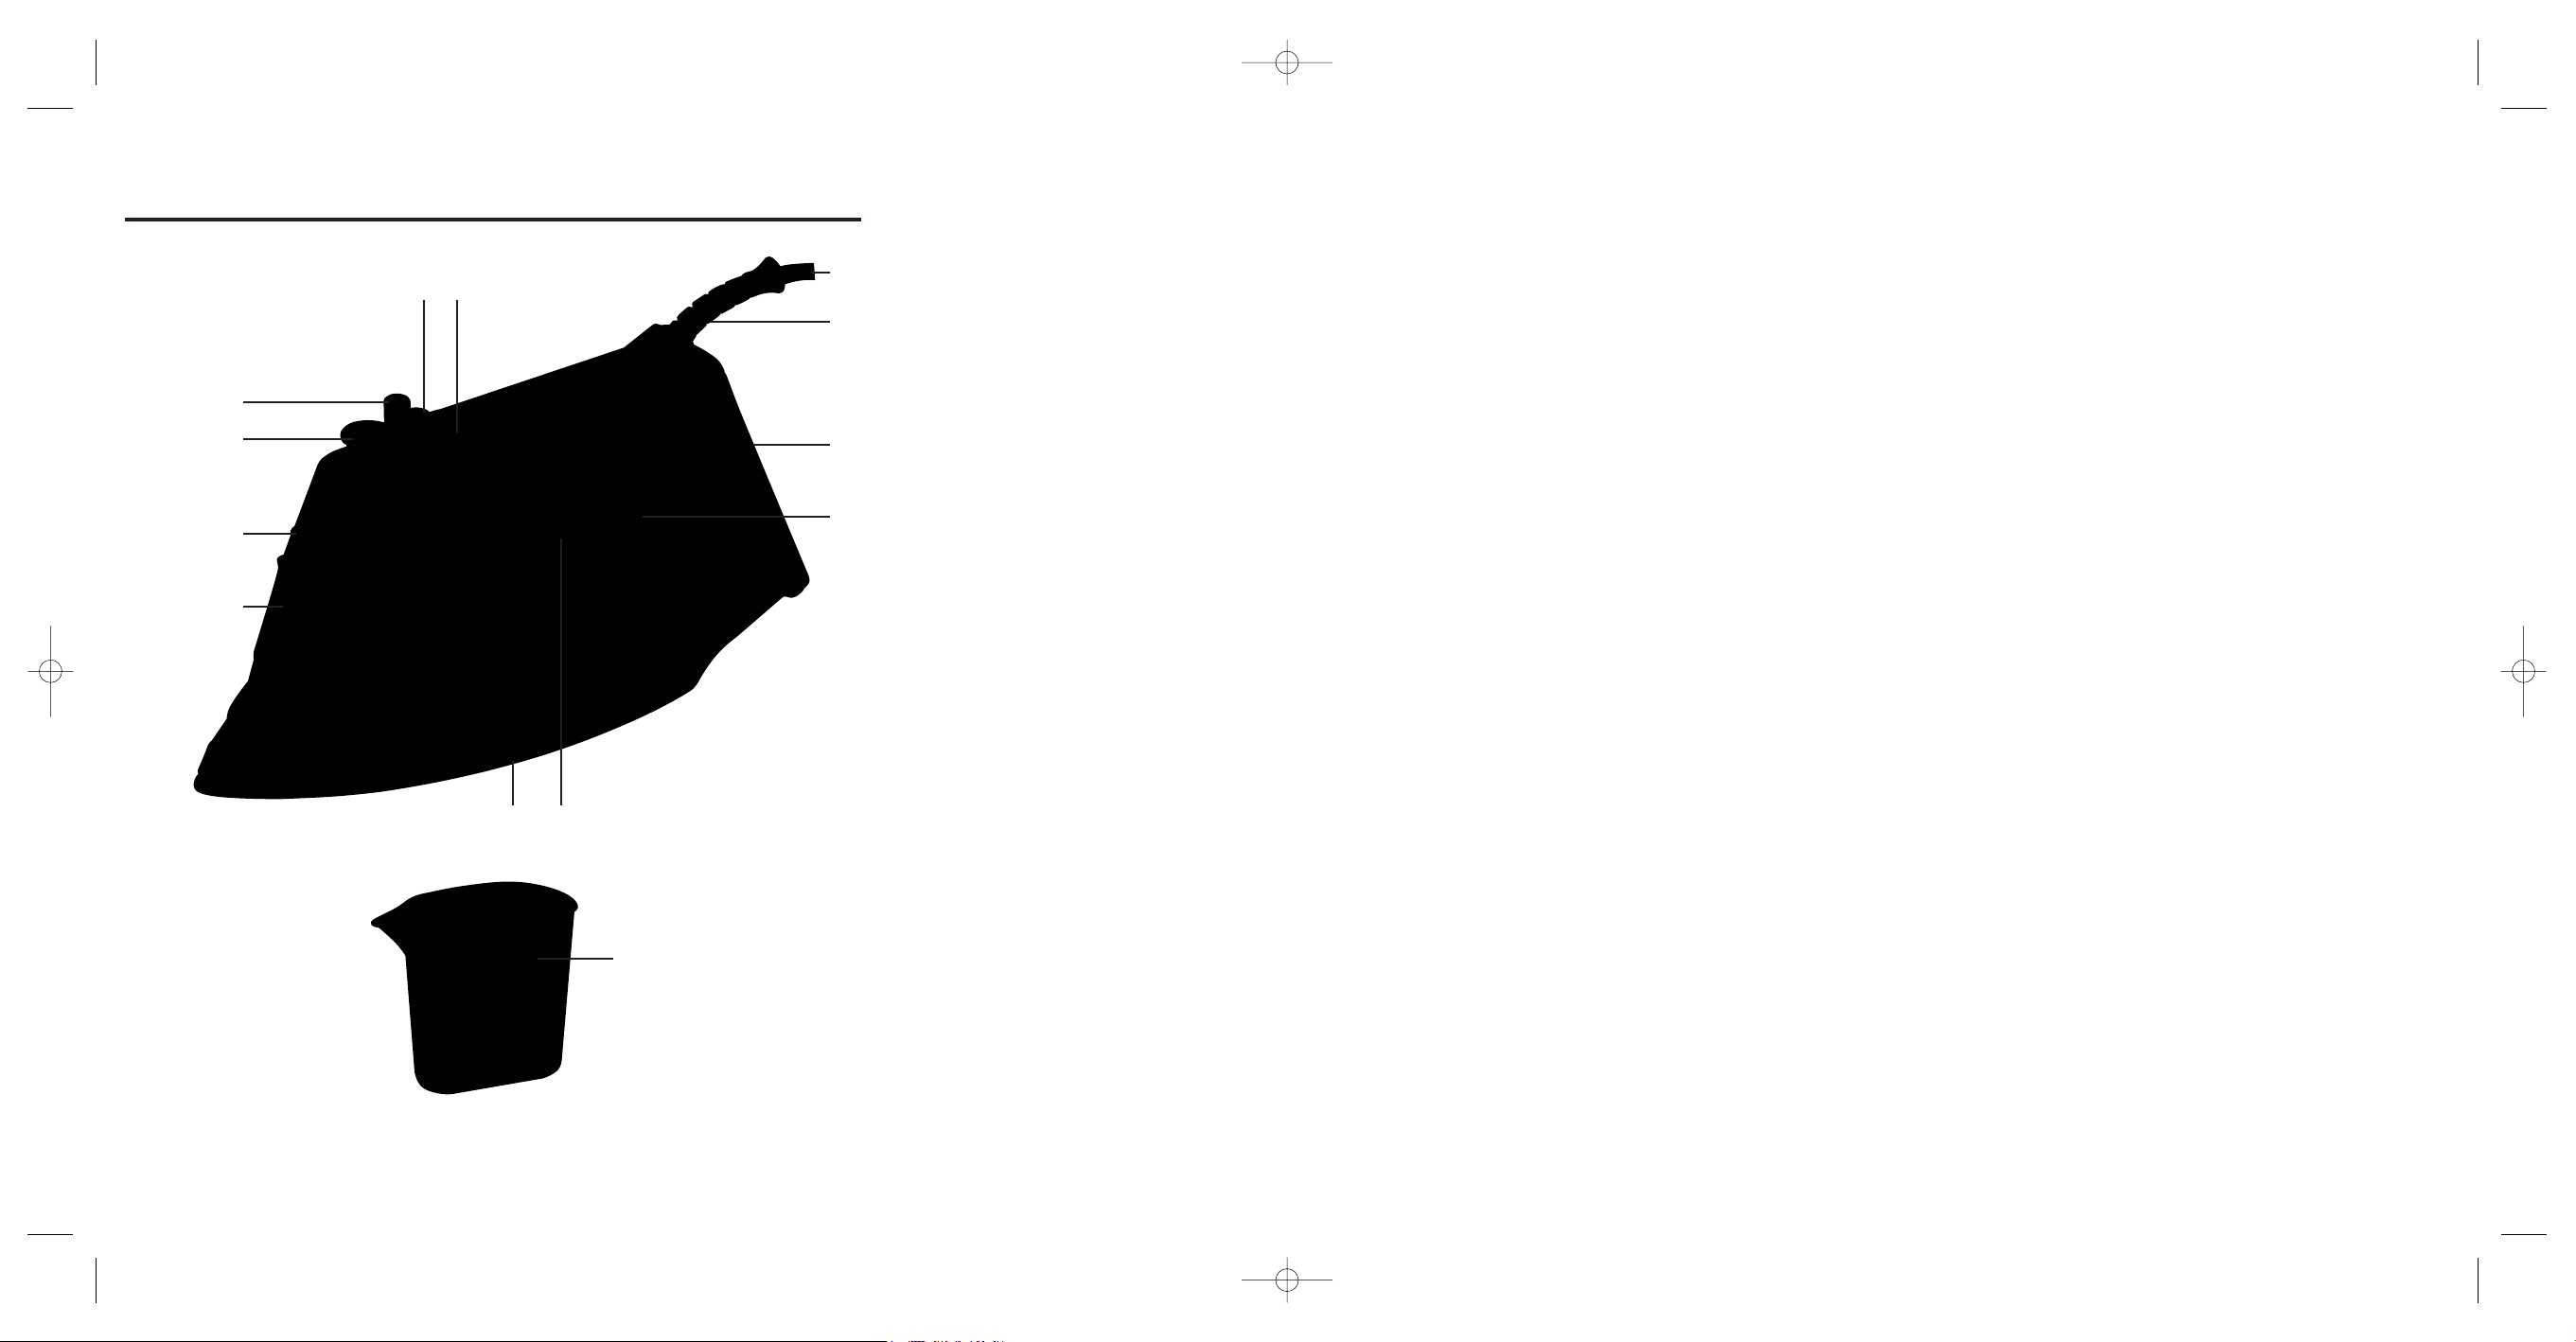
Operating Elements
q
Spray button
w
Heating control lamp
e
Power cable with plug
r
Flexible cable restrainer
t
Back end
y
Water tank
u
Temperature controller
i
Sole of the iron
o
Water fill opening
a
Water jet
s
Steam controller/Self Clean
d
Steam blast button
f
Measuring beaker
Preparation
Filling with water
You require water to be able to use the steam and
spray functions. Water is not needed for dry ironing.
• Place the cooled down iron in an upright position
on its back end
t
.
• Open the water fill opening
o
for the water tank
y
.
• Using the measuring beaker
f
, pour in water to
no further than the "Max" marking in the water
tank
y
.
• Close the water fill opening
o
for the water tank
y
.
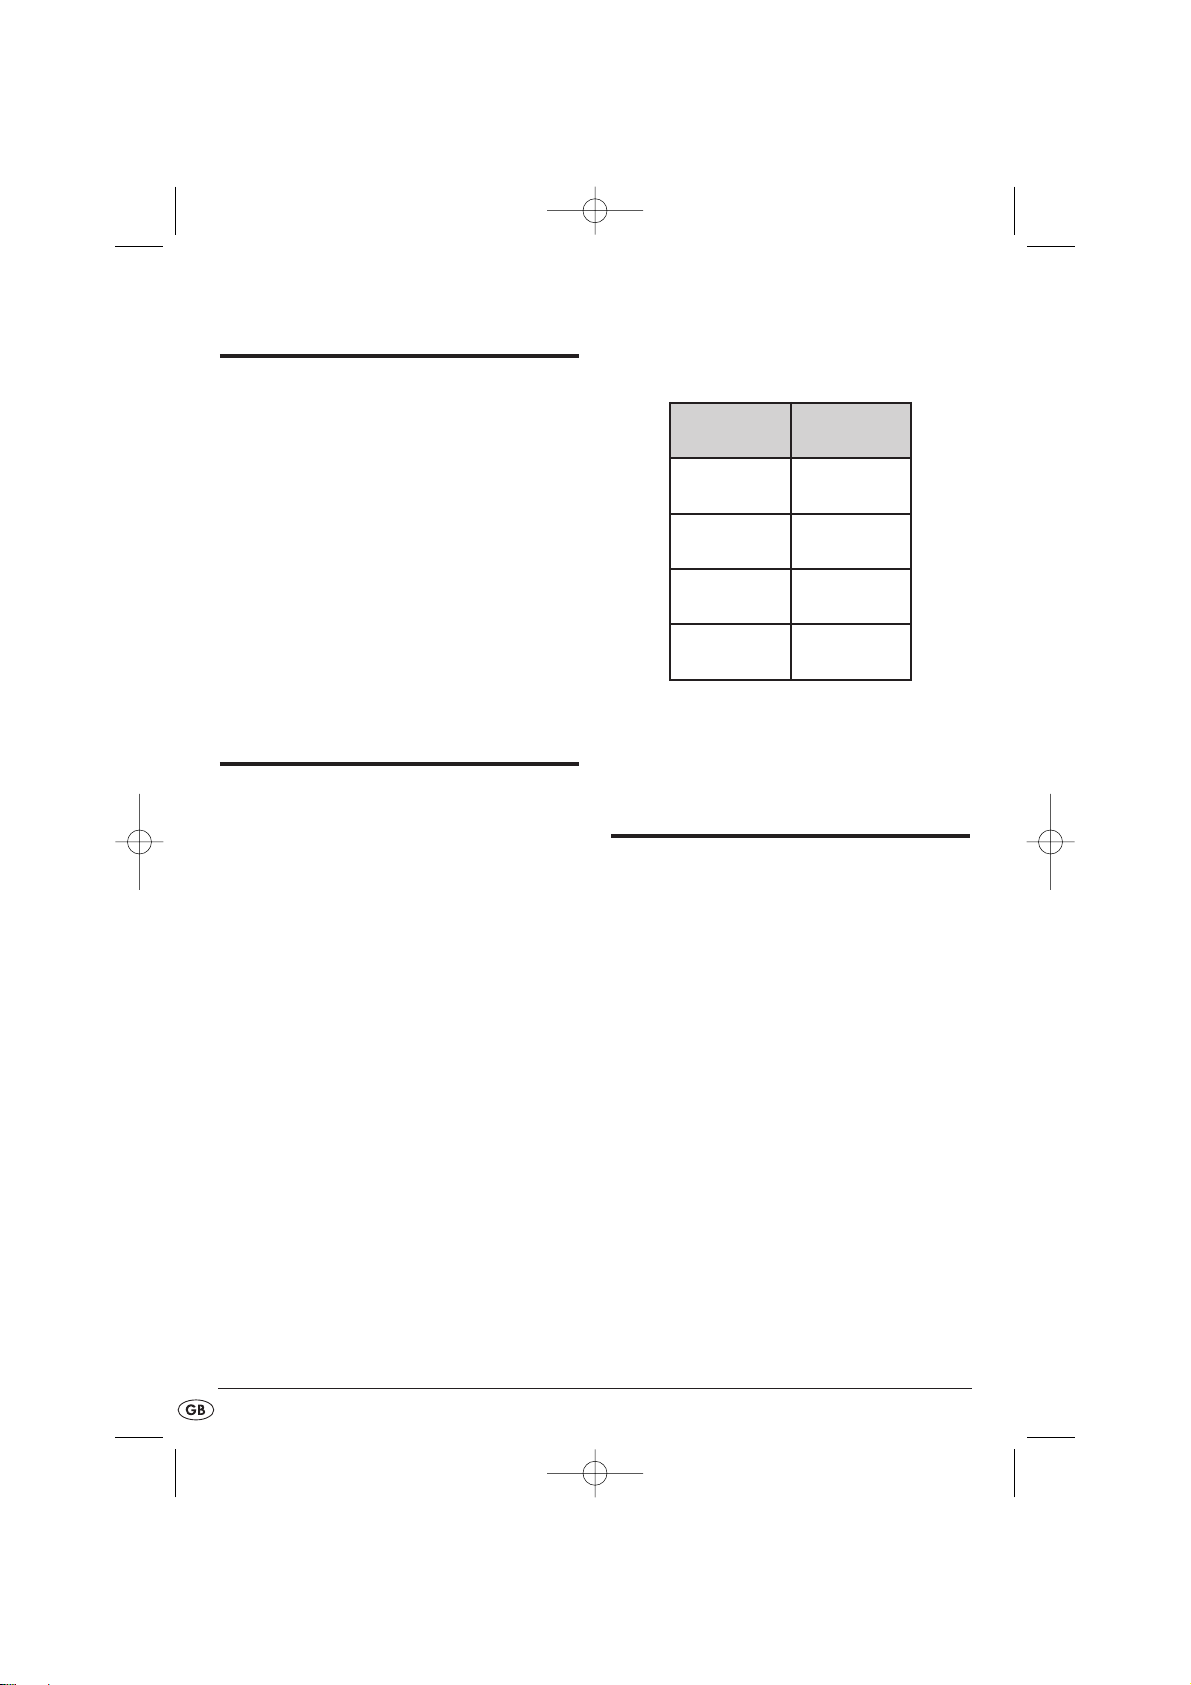
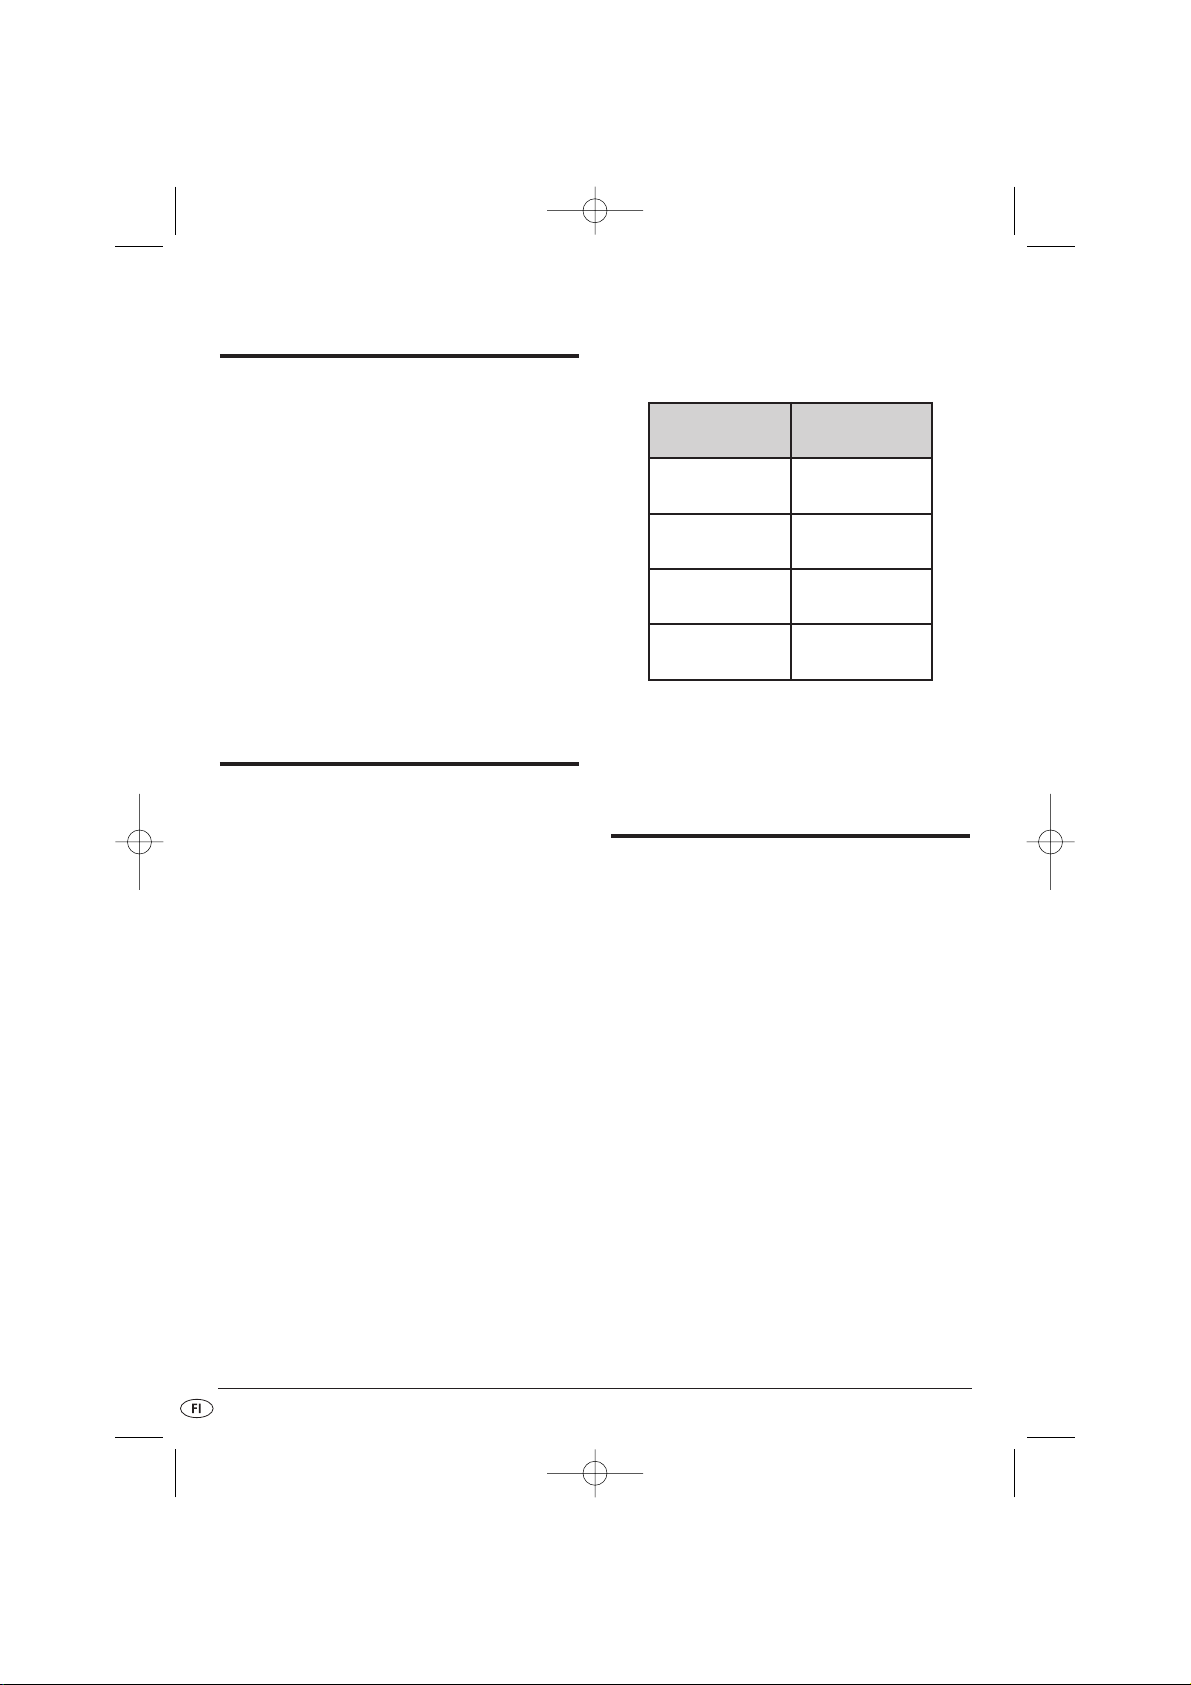
Should the mains water at your locality be rated as
hard, it is recommended that you mix mains water
with some distilled water. Otherwise, the jets for the
steam blast function could calcify (become blocked)
prematurely.
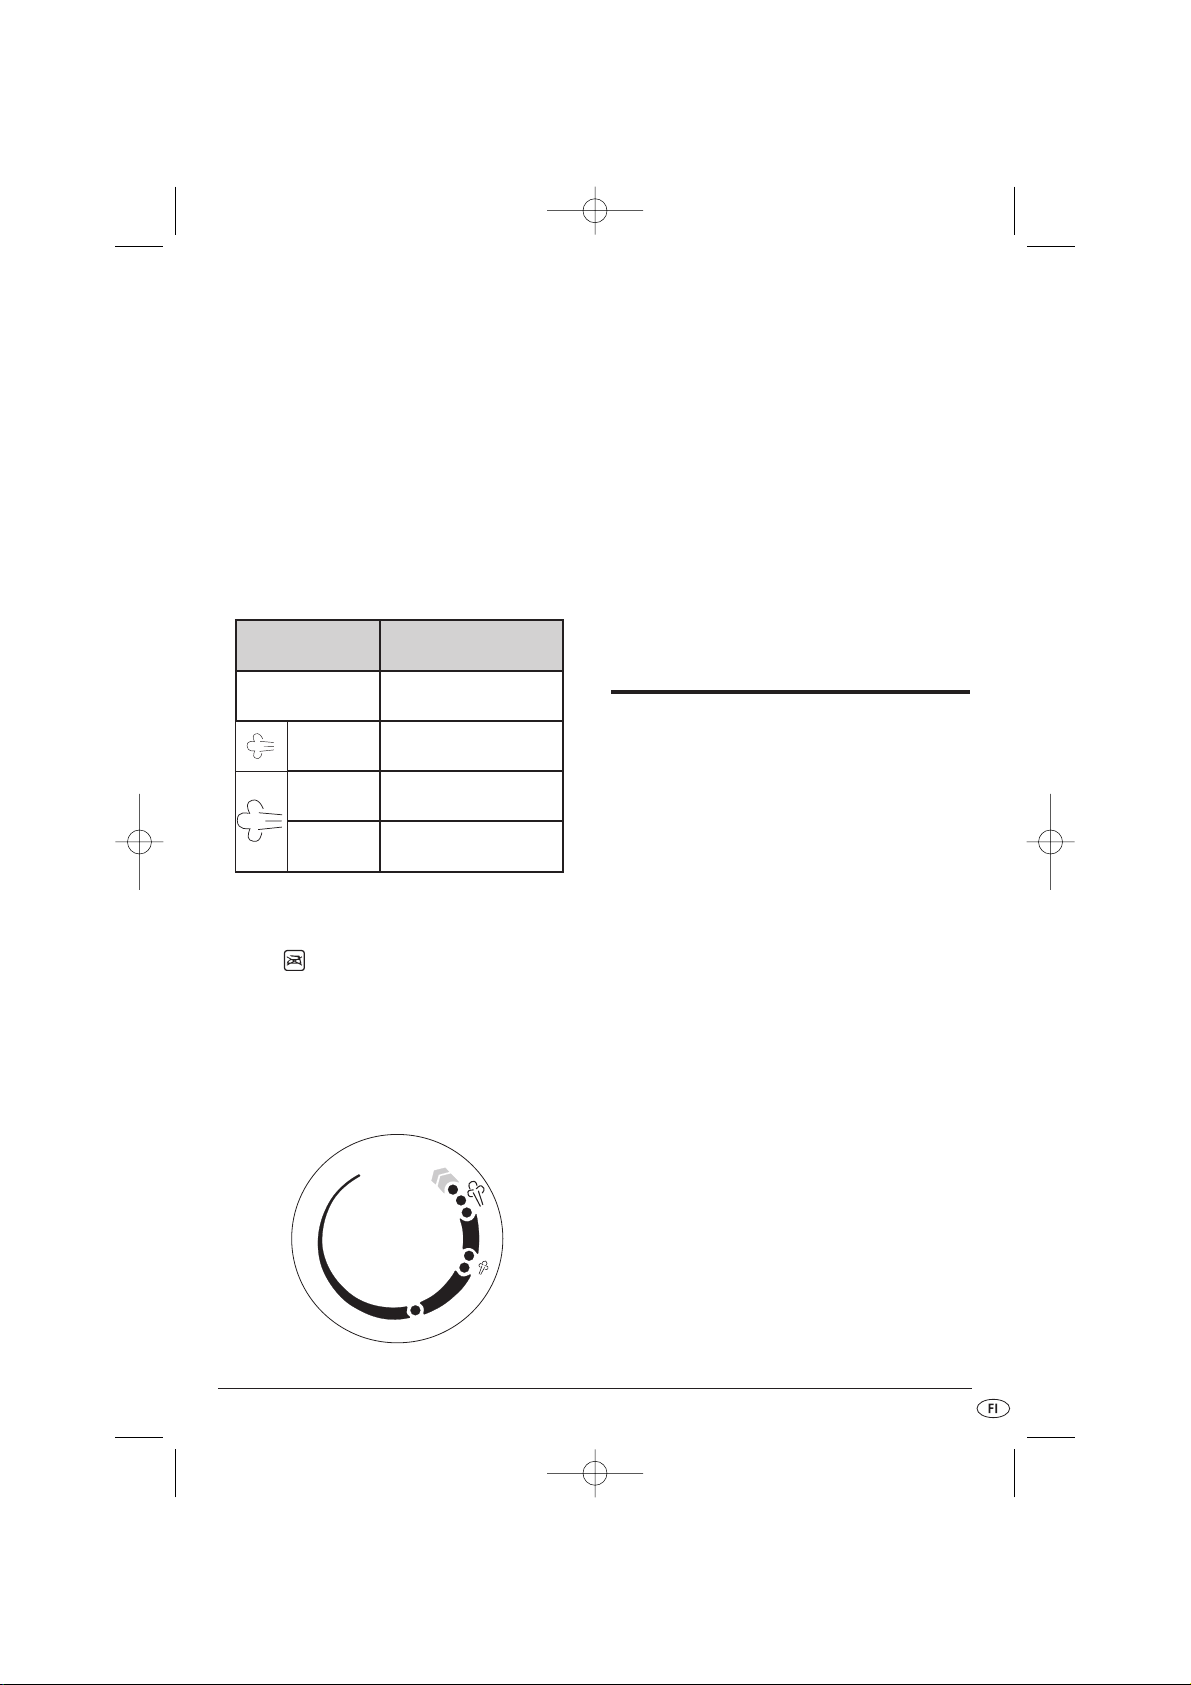
To extend the optimal steam blast function, mix
mains water with distilled water according to the
table.
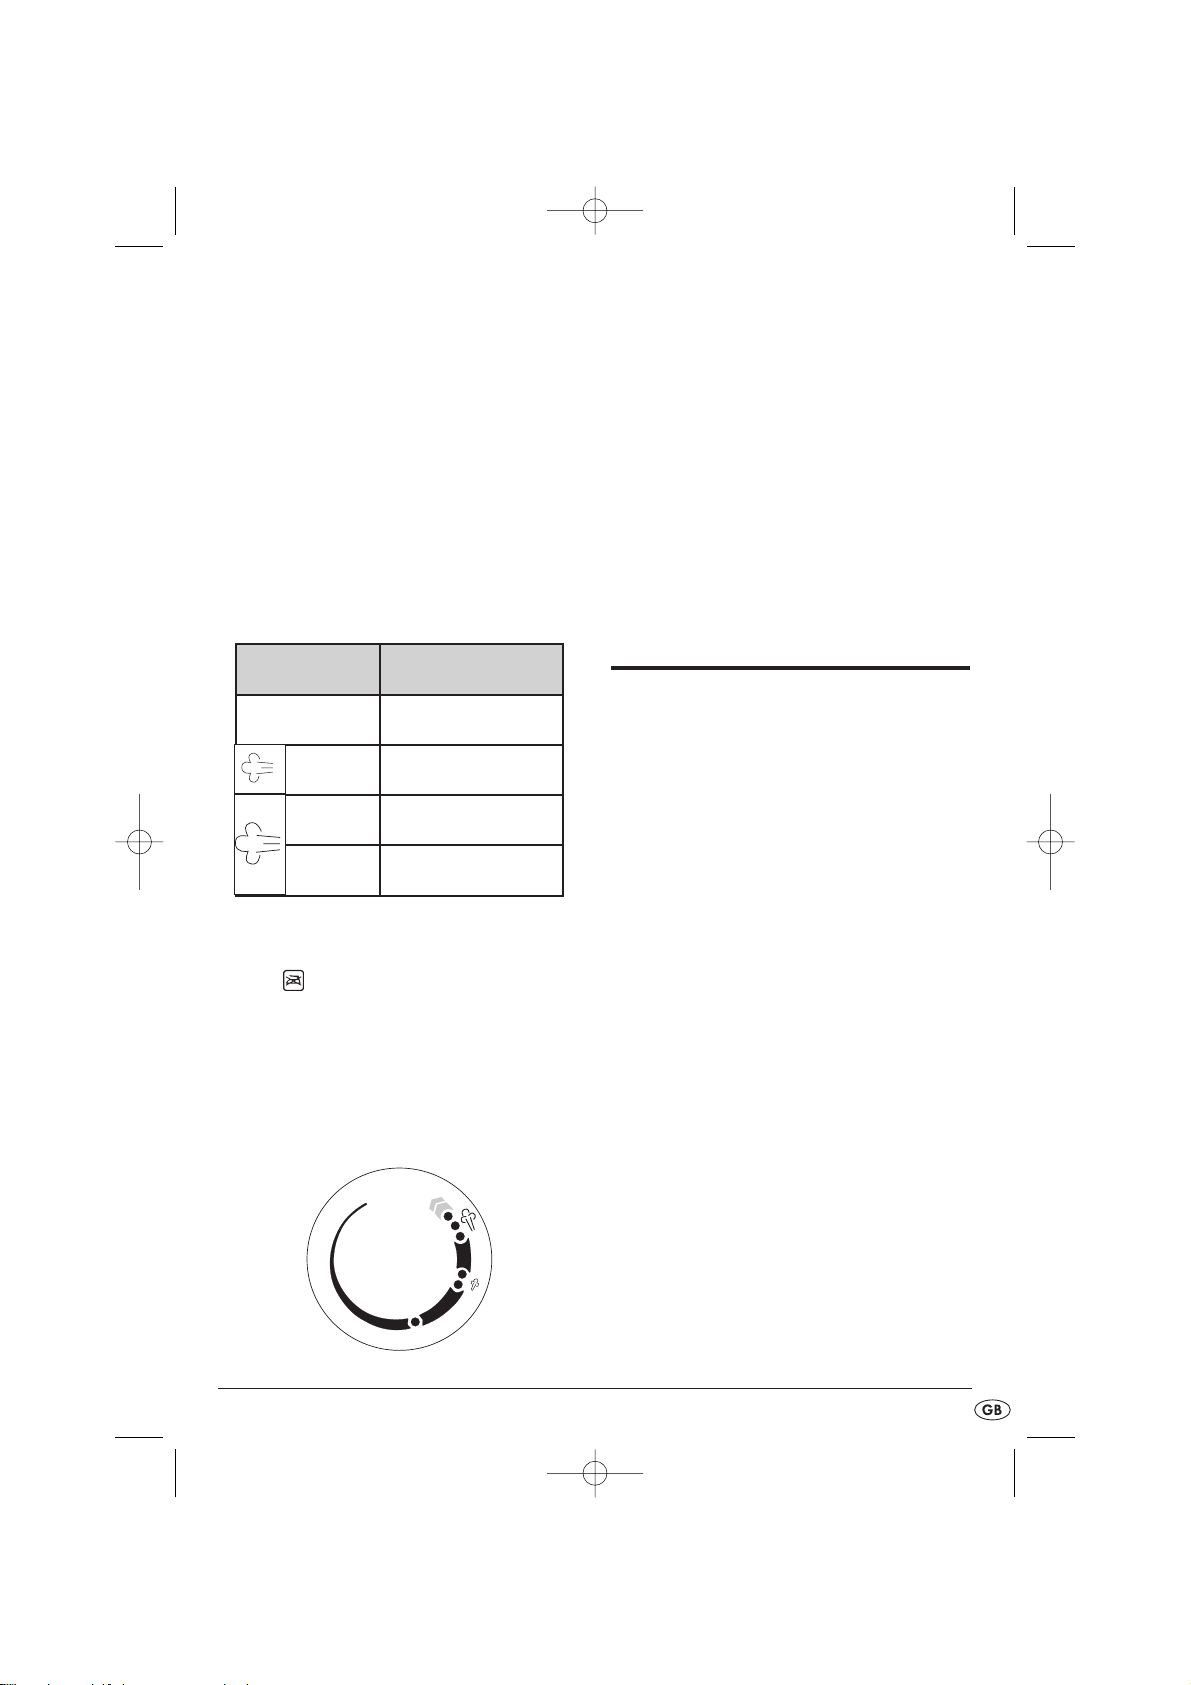
The water hardness level can be queried at your local water works.
Plugging in and ironing
Ironing tips
Sort the laundry in accord with the type of material.
Always observe the ironing and care instructions
given for the material. Start with the materials that
require the lowest heat settings.
If you are not sure what material has been used in
the garment, first of all carefully iron a small area
(hem-piece or an inner edge). In cases of serious
doubt, start with a low iron temperature. If creases
remain, slowly increase the heat level in steps.
When you have found the temperature which gives
the best ironing results, do not increase the
temperature further. Never raise the temperature so
high that the material of the garment could be
damaged.
local water
hardness
Ratios - distilled
water to mains water
very soft / soft 0
medium 1: 1
hard 2: 1
very hard 3: 1
IB_KH1282_E5554_UK_3 10.09.2007 16:20 Uhr Seite 6
Page 7
- 7 -
Connection
• Insert the power plug into a power socket.
Ironing
During use, lay the steam iron aside only on its
back end
t
or in the support tray provided on
the ironing board. Never lean the hot iron
against walls or other objects. There could be a
risk of fire breaking out.
Dry ironing is possible at all temperatures, steam ironing is first possible from the level ••.
Important!
If the clothing care instructions forbid ironing
(Symbol ), the clothing item may not be ironed.
Should you do so, you could damage the item.
• Check the care instructions on the labels in the
garment to see if it is suitable for being ironed,
and at which temperature setting.
• Select the best suitable temperature setting with
the temperature controller
u
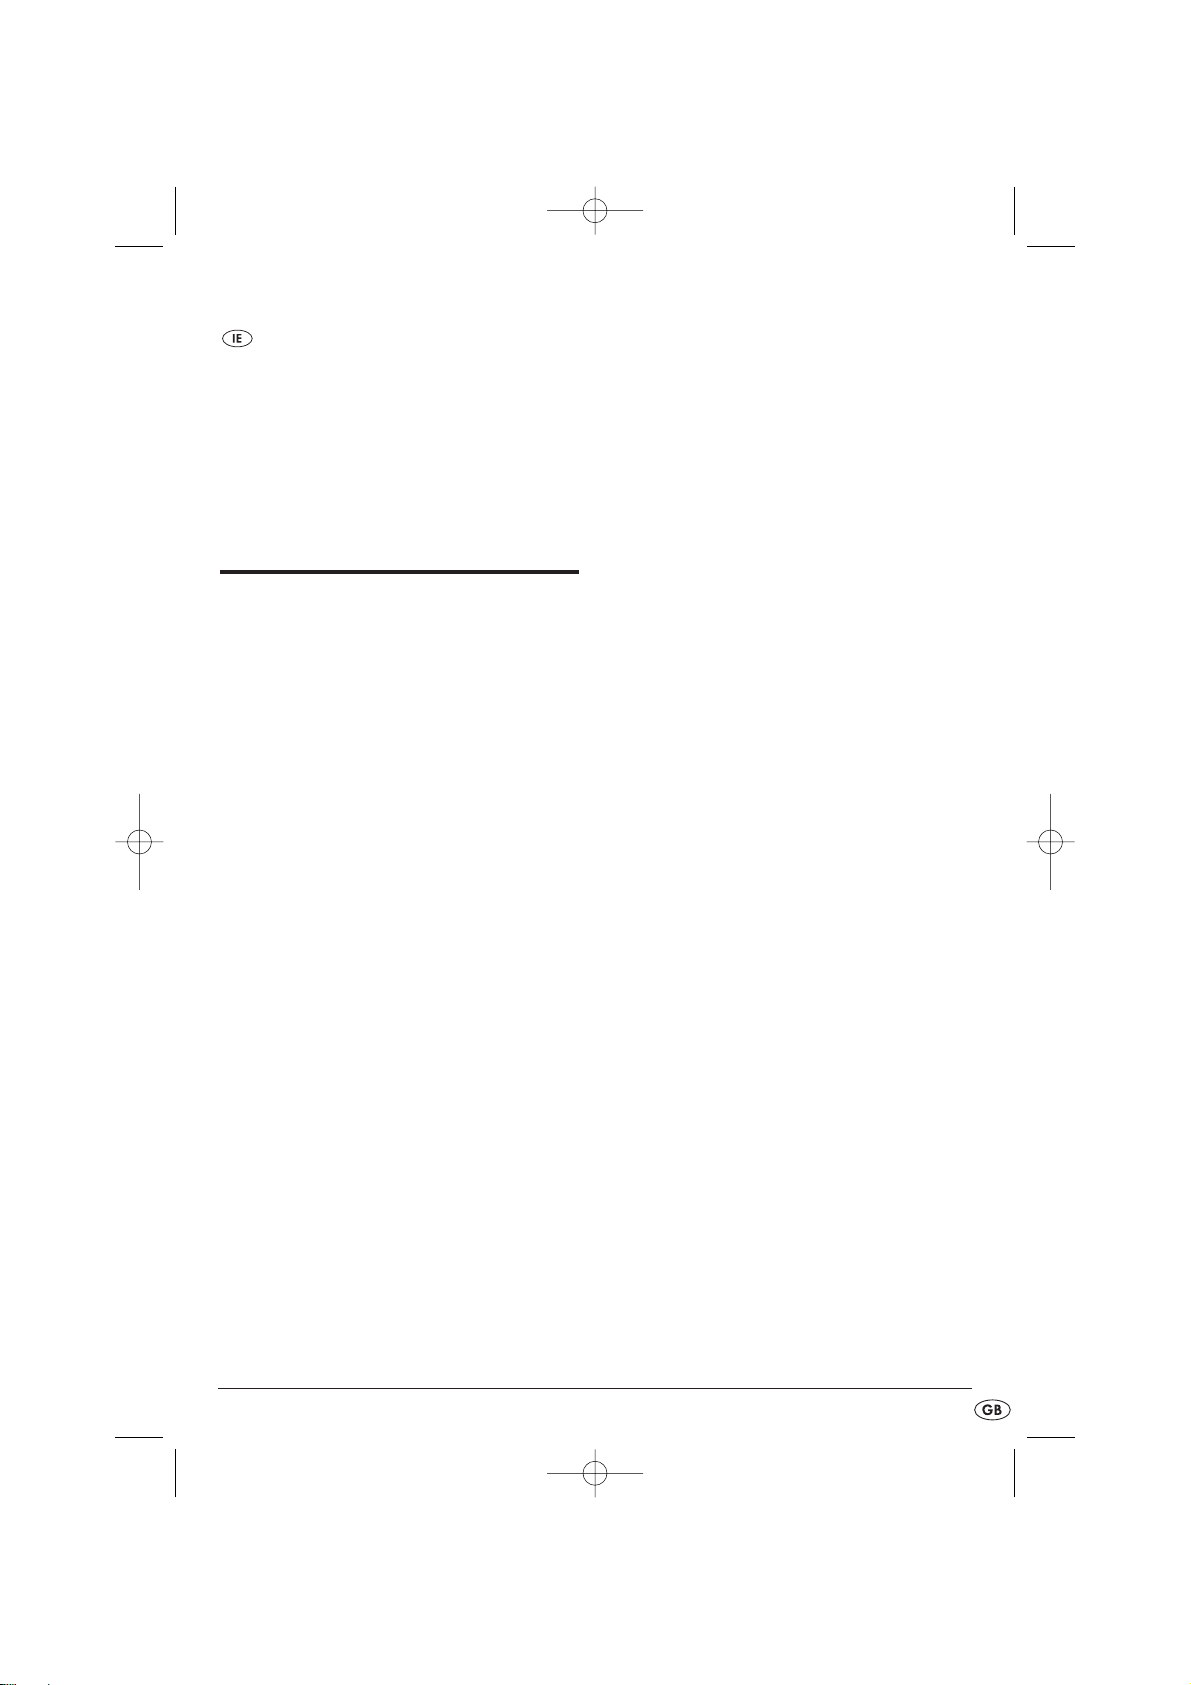
MIN
MAX
Setting of the
Steam Iron
Type of Material
• Silk, Nylon
•• Wool
••• Cotton
Max Linen
The heating control lamp wglows. When the
heating control lamp
w
extinguishes, the selected
temperature has been reached.
• Wait until the heating control lamp wextinguishes at the set temperature.
• Allow the steam iron to slide over the material
under light pressure.
Avoid ironing over zippers and studs, as these
can scratch the sole of the iron
i
. Pass around
them when ironing.
Steam ironing
• Programme the steam controller sto the desired
steam setting:
If you have adjusted the temperature controller uto
the setting ••, always move the steam controller
s
to the small steam symbol.
If you have adjusted the temperature controller
u
to
the setting •••, always move the steam controller
s
to the large steam symbol.
Note: Steam ironing is first possible from
setting ••.
Notice: Should steam no longer be required,
or the setting be adjusted to a temperature lower than ••, always turn the steam controller
s
to position “0”! Otherwise, water could
leak from the ironing sole
i
.
IB_KH1282_E5554_UK_3 10.09.2007 16:20 Uhr Seite 7
Page 8
- 8 -
Drip-Stop Function
This iron is fitted with a Drip-Stop function. It prevents
the dripping of water from the ironing sole
i
when
the iron is switched off and when steam ironing.
When steam ironing, the iron must be set to at least
level ••. Consequently, first set the steam controller
s
to "Steam" when the temperature control knob
u
is set to at least level •• and the temperature has
been reached. Otherwise, water could leak from the
ironing sole
i
.
Ironing with steam blast
The steam blast is especially suitable for smoothing
difficult to reach parts of a garment.
Note: Steam-blast is first possible from level
•••.
• Slightly raise the steam iron.
• For one steam blast, press the steam blast button
d
once.
Ironing with the spray
function
• To moisten the laundry, press the spray button
q
.
This function is suitable for very dry and very crumpled garments.
Temporarily setting the
steam iron aside
Fire hazard!
Never leave the steam iron unattended when it is
hot or switched on.
• Adjust the temperature controller
u
to "Min".
• Stand the steam iron on its back end t.
or
• Lay the steam iron in the support provided on the
ironing board.
Important: NEVER place the steam iron on
unsuitable surfaces. Risk of fire!
Taking the steam iron out
of service
• Remove the power plug from the wall socket.
• Allow the steam iron to cool down.
• Drain the water tank
y
in that you open up the
water fill opening
o
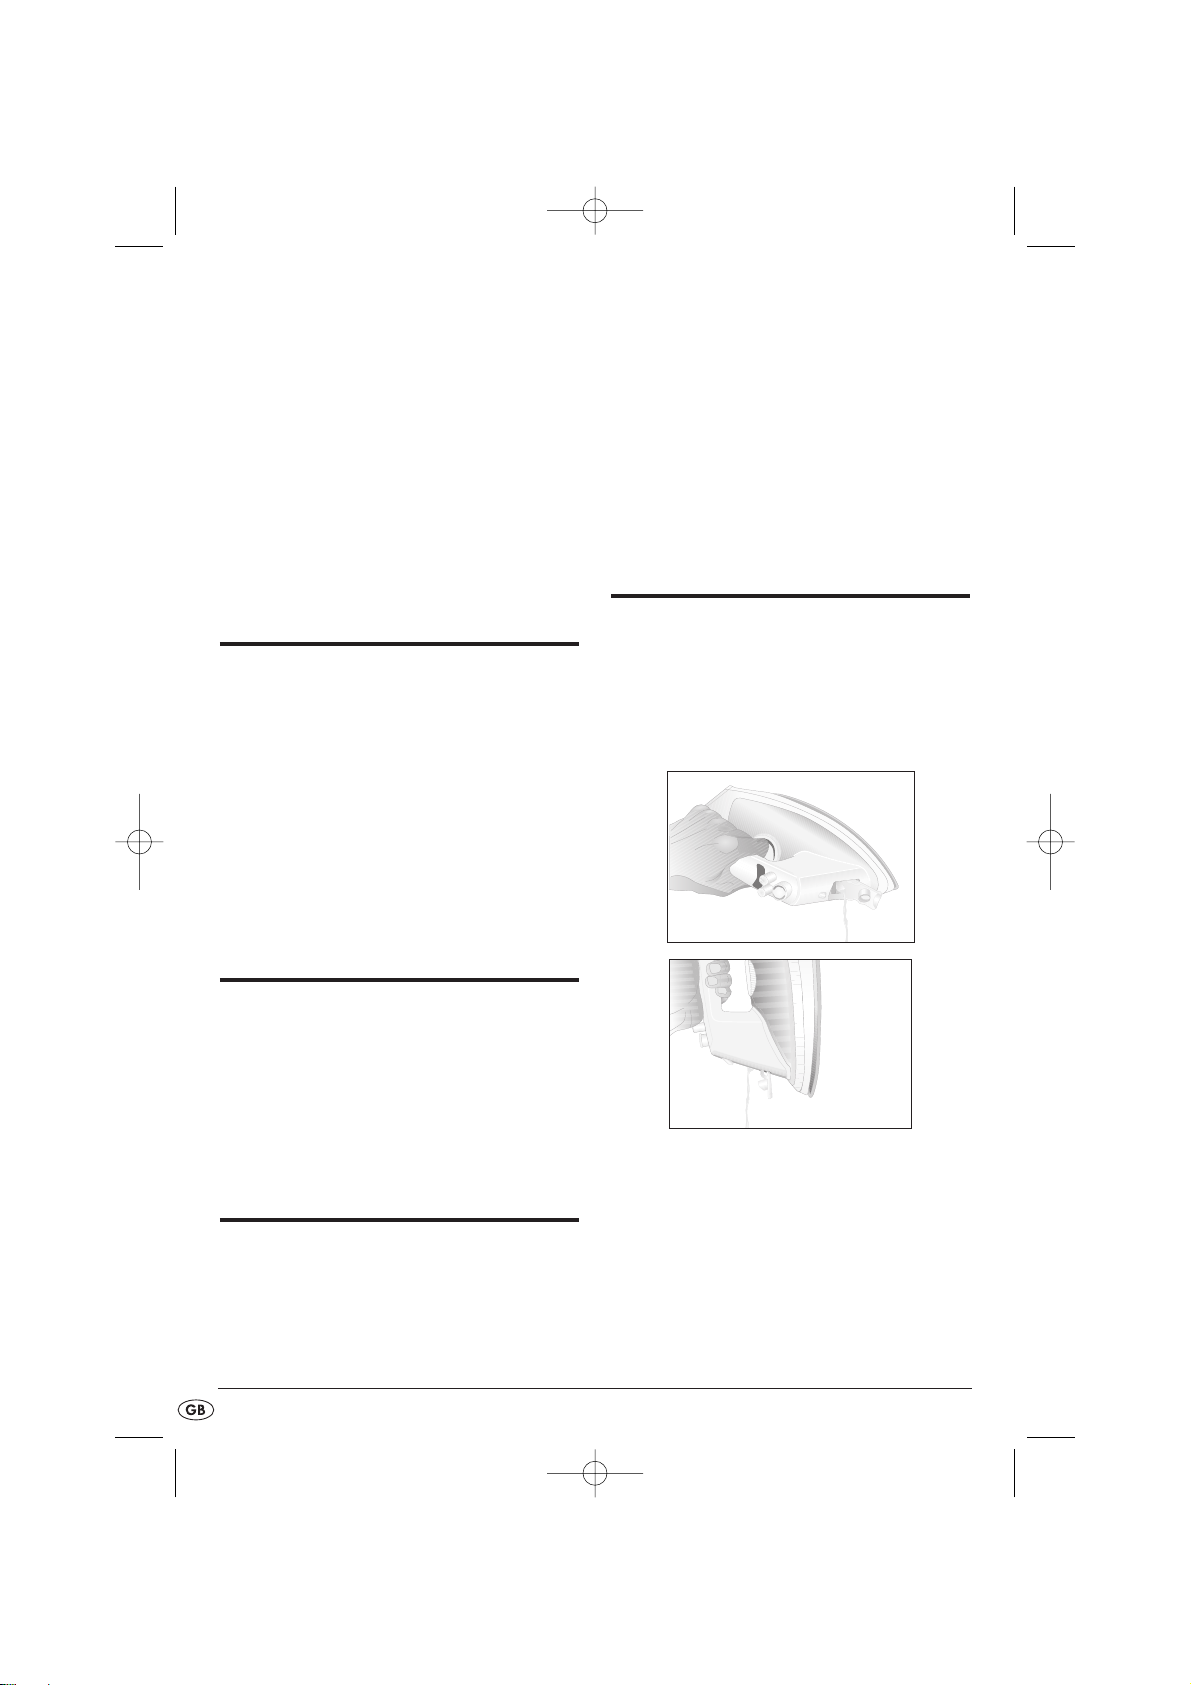
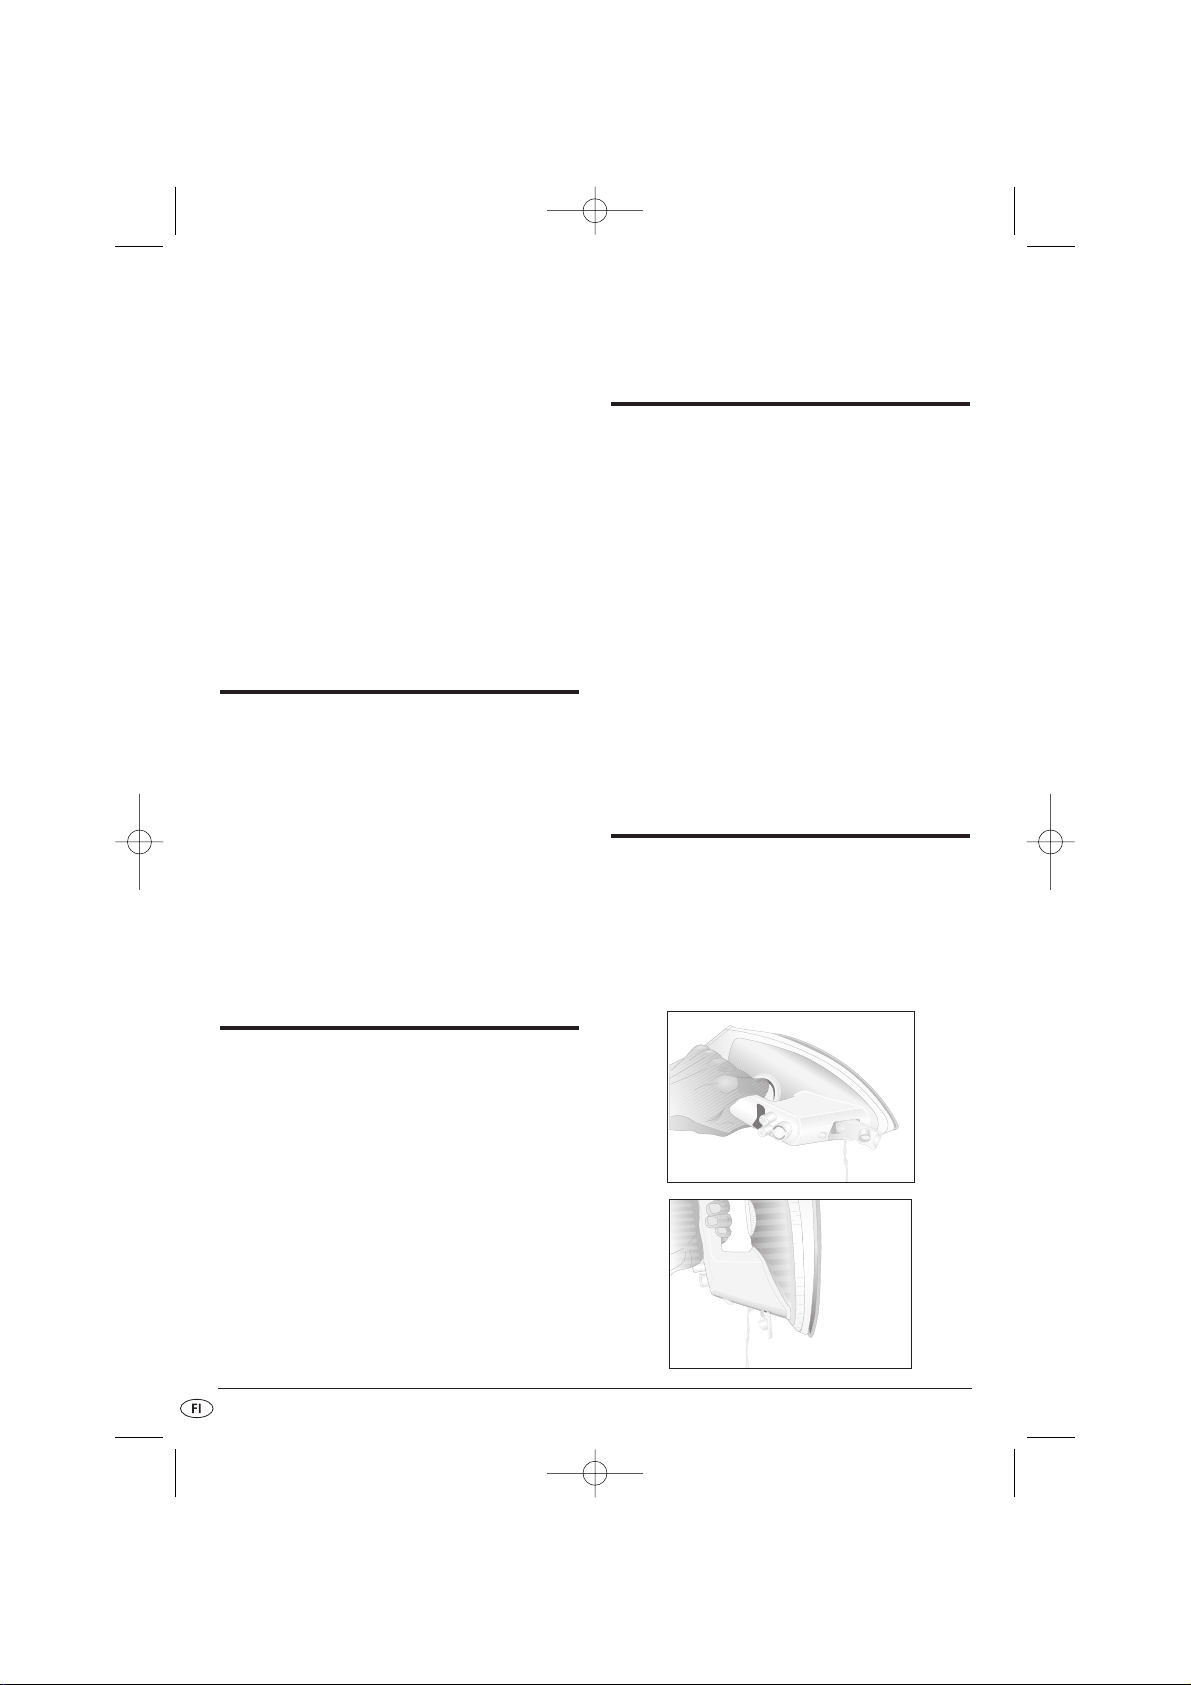
and either tip the contents
out to the side (see Fig.1) or empty it by tipping it
up to the front (see Fig.2).
• Clean the sole of the iron
i
(see chapter
"Cleaning and care").
• Coil the power cable
e
around the power cable
retainer at the back end of the iron
t
.
• Place the cooled down steam iron horizontally
onto a soft and clean surface.
Fig.1
Fig.2
✓
✓
IB_KH1282_E5554_UK_3 10.09.2007 16:20 Uhr Seite 8
Page 9
- 9 -
Cleaning and Care
• Avoid ironing over zippers and studs, as these
can scratch the sole of the iron
i
. Pass around
them when ironing. Take steps to ensure the sole
of the iron
i
remains smooth.
• The composition of water and its minerals varies
very much from place to place. If the water in
your locality is very hard, we recommend the use
of commercially available distilled water in order
to ensure the optimal functional capability of
your steam iron (see chapter "Filling with water").
Do not use acids (for example, vinegar) or
decalcification products to clean your steam
iron.
• Clean the housing with a soft, dry cloth only.
• Do not use aggressive cleaning materials.
Warning: NEVER submerse the steam iron
in water or other fluids.
• Clean the metal parts with a soft cloth lightly moistened with water. Dry all parts thoroughly.
• Do not use abrasive cleaning materials.
• Allow the appliance to dry completely before
taking it back into use.
Self-cleaning function (Self-Clean)
• Fill the water tank
y
to the marking MAX.
• Insert the plug
e
into a power socket.
• Set the temperature controller
u
to the level
Max.
• Allow the steam iron to heat up until the heat
control lamp
w
extinguishes and once again
glows.
• Hold the steam iron horizontally over a
catchment receptacle.
• Adjust the steam controller sto the position Self
Clean . In this position the steam controller
knob lifts itself slightly. Thereby, steam exits the
holes in the sole of the iron
i
. Impurities that
may be present are washed out.
Attention
There is a danger of being scalded!
• Release the steam controller sas soon as all of
the water in the water tank
y
has drained away.
• Do ensure that no water remains in the steam
chamber, dry the sole of the iron
i
thoroughly.
To do this, slide the sole of the iron
i
back and
forth several times over a hand towel or an old
piece of material (suitable for temperature setting
•••).
• Allow the steam iron to cool down before
placing it in storage.
Troubleshooting
The steam iron blows out no or very little steam:
The reserves of water in the steam iron are depleted.
Fill the water tank
y
with water.
The steam iron sprays no or very little
water with the spray function:
The reserves of water in the steam iron are depleted.
Fill the water tank
y
with water.
The steam iron does not get hot:
The steam iron is not plugged in or is not switched
on. Insert the plug
e
in a power socket and adjust
the temperature controller
u
to the desired tempera-
ture.
Water drips from the ironing sole i:
The temperature setting is too low for steam ironing.
Adjust the temperature control knob
u
to at least
level ••.
IB_KH1282_E5554_UK_3 10.09.2007 16:20 Uhr Seite 9
Page 10

- 10 -
Should the measures described above not solve the
problem, then the steam iron is defective. Arrange
for it to be repaired by a qualified specialist workshop or the Customer Service Department.
Technical data
Power Supply Voltage: 220-240 V~/50 Hz
Output: 1800 W
Disposal
Do not dispose of the appliance in your normal domestic waste.
Dispose of the appliance through an approved disposal centre or at your community waste facility.
Observe the currently applicable regulations. In
case of doubt, please contact your waste disposal
centre.
Dispose of packaging materials in an environmentally responsible manner.
Warranty and Service
This appliance is guaranteed for 3 years from the
date of purchase. It has been carefully produced
and meticulously checked before delivery. Please
keep your receipt as proof of purchase. Contact
your service centre by telephone in case of questions pertaining to the warranty.
Your goods can be transmitted free of cost only in
this manner.
The warranty covers only material or manufacturing
faults, not normal wear or damage to fragile parts
such as switches or rechargeable batteries.
The appliance is intended solely for private, not
commercial, use. If this product has been subjected
to improper or inappropriate handling, abuse, or
interventions not carried out by one of our authorised sales and service outlets, the warranty will be
considered void. This warranty does not affect your
statutory rights.
DES Ltd
Units 14-15
Bilston Industrial Estate
Oxford Street
Bilston
WV14 7EG
Tel.: 0870/787-6177
Fax: 0870/787-6168
e-mail: support.uk@kompernass.com
IB_KH1282_E5554_UK_3 10.09.2007 16:20 Uhr Seite 10
Page 11
- 11 -
Kompernass Service Ireland
c/o Irish Connection
41 Harbour view
Howth Co. Dublin
Tel: 087-99 62 077
Fax: 18398056
e-mail: support.ie@kompernass.com
Importer
KOMPERNASS GMBH
BURGSTRASSE 21
D-44867 BOCHUM
www.kompernass.com
IB_KH1282_E5554_UK_3 10.09.2007 16:20 Uhr Seite 11
Page 12

- 12 -
IB_KH1282_E5554_UK_3 10.09.2007 16:20 Uhr Seite 12
Page 13
- 13 -
Sisällysluettelo Sivu
Tärkeitä turvallisuusohjeita 14
Määräystenmukainen käyttö 15
Purkaminen pakkauksesta 15
Ennen ensimmäistä käyttöä 15
Osat 16
Esivalmistelut 16
Kytkentä ja silitys 16
Höyrysilitys 17
Silittäminen höyrypaineella 18
Silittäminen suihketoiminnolla 18
Höyrysilitysraudan väliaikainen pois asettaminen 18
Höyrysilitysraudan käytöstä otto 18
Puhdistus ja hoito 19
Toimintahäiriöiden korjaaminen 19
Tekniset tiedot 20
Hävittäminen 20
Takuu ja huolto 20
Maahantuoja 20
Lue käyttöohje ennen ensimmäistä käyttökertaa huolellisesti läpi ja pidä sitä lähettyvillä myös myöhemmissä käytöissä.
Jos myyt laitteen, anna ohje myös seuraavalle omistajalle.
IB_KH1282_E5554_FIN_3 10.09.2007 16:22 Uhr Seite 13
Page 14
- 14 -
Höyrysilitysrauta KH
1282
Tärkeitä turvallisuusohjeita
Palovaara!
• Älä anna laitetta sellaisten henkilöiden (mukaan
lukien lapset) käyttöön, joiden fyysiset, aistilliset
tai henkiset kyvyt tai kokemuksen ja tiedon puute
estävät heitä käyttämästä laitetta turvallisesti, jollei heitä ole aikaisemmin valvottu tai opastettu
laitteen käytössä.
• Selvitä lapsille laite ja sen vaarat, jotta he eivät
leikkisi laitteella.
• Älä koskaan kosketa raudan pohjaa laitteen ollessa kuuma. Tartu höyrysilitysrautaan ainoastaan
sen kahvasta.
• Älä milloinkaan pidä käsiäsi höyryssä tai kuumissa metalliosissa.
• Älä koskaan suuntaa höyryä henkilöitä tai muita
eläviä kohden.
• Älä milloinkaan avaa vesisäiliötä käytön aikana
täyttötarkoituksessa. Anna höyrysilitysraudan ensin jäähtyä ja irrota verkkopistoke pistorasiasta
laitteen täyttöä varten.
Tulipalon vaara!
• Älä milloinkaan jätä kuumaa tai päällekytkettyä
höyrysilitysrautaa ilman valvontaa. Voit loukata
itseäsi tai kanssaihmisiäsi vielä kuumalla silitysraudalla.
• Älä koskaan aseta höyrysilitysrautaa palavien
materiaalien, kuten verhojen lähettyville. Nämä
saattavat syttyä palamaan.
• Silitä ainoastaan hoito-ohjeissa annetuilla ja materiaalille soveltuvilla lämpötiloilla. Muutoin tekstiilit saattavat vahingoittua. Mikäli et tunne hoitoohjeita, aloita alimmalla lämpötila-asetuksella.
• Aseta höyrysilitysrauta pois vain kylmänä.
• Älä koskaan aseta höyrysilitysrautaa reunoille,
kuten esimerkiksi pöydän reunalle. Se voi kaatua
ja pudota.
• Aseta höyrysilitysrauta ainoastaan tukijalalle tai
silityslaudan tätä varten tarkoitetulle alustalle.
Älä nojaa kuu-malla silitysraudalla seiniin tai muihin
esineisiin. Muutoin on olemassa tulipalon vaara.
Sähköiskun vaara!
• Liitä höyrysilitysrauta ainoastaan määräysten mukaisesti asennettuun verkkopistorasiaan.
• Jotta vaaroilta vältyttäisiin, anna vaurioitunut laite
välittömästi pätevän ammattikorjaamon korjattavaksi tai käänny huoltopalvelumme puoleen.
• Vaidata viallinen virtajohto välittömästi uuteen tai
käänny huoltopalvelumme puoleen, jotta vaaroilta
vältyttäisiin.
• Vedä aina pelkästä pistokkeesta, älä koskaan
johdosta.
• Älä suuntaa höyry- tai suihkesuuttimia koskaan sähkölaitteita tai kosteudelle herkkiä esineitä kohti.
• Älä taita tai purista virtajohtoa, ja asenna se niin,
ettei se joudu kosketukseen kuumien pintojen
kanssa tai ettei kukaan voi astua sen päälle tai
kompastua siihen.
• Irrota verkkopistoke ennen puhdistusta, ennen veden
täyttämistä ja jokaisen käytön jälkeen.
• Kierrä aina virtajohto kokonaan auki ennen
kytkemistä äläkä käytä jatkojohtoja.
• Älä milloinkaan koske johtoon tai
virtapistokeeseen kosteilla käsillä.
• Älä upota höyrysilitysrautaa missään tapauksessa nesteeseen äläkä päästä mitään nesteitä höyrysilitysraudan koteloon. Laitetta ei altistaa kosteudelle, eikä sitä saa käyttää ulkona.
Jos laitteen koteloon sattuu kuitenkin pääsemään
nestettä, irrota välittömästi laitteen verkkopistoke
pistorasiasta ja anna pätevän ammattikorjaamon
tai huoltopalvelun korjata laite.
IB_KH1282_E5554_FIN_3 10.09.2007 16:22 Uhr Seite 14
Page 15
- 15 -
• Älä käytä höyrysilitysrautaa missään tapauksessa lähellä vettä, jota voi olla kylpyammeessa, suihkussa, pesual-taassa tai muissa astioissa. Veden
läheisyys aiheuttaa aina vaaran, mikäli laite on kiinni sähköverkossa.
• Höyrysilitysraudan koteloa ei saa avata. Anna viallinen höyrysilitysrauta aino-astaan pätevän ammattikorjaamon tai huoltopalvelumme korjattavaksi.
• Anna valtuutetun ammattihenkilöstön vaihtaa
vaurioitunut verkkojohto tai verkkopistoke välittömästi uuteen vaarojen välttämiseksi.
Huomaa!
• Mikäli vaatetuksen hoito-ohje kieltää silittämisen
(symboli ), ei vaatekappaletta saa silittää.
Muutoin vaatekappale saattaa vahingoittua.
• Älä täytä vesisäiliötä millään muulla nesteellä
kuin vedellä. Muuten voit vahingoittaa höyrysilitysrautaa.
• Höyrysilitysrautaa ei saa puhdistaa
liuotinaineella, alkoholilla tai hankaavalla puhdistusaineella. Muussa tapauksessa se voi vahingoittua.
Määräystenmukainen
käyttö
Höyrysilitysrauta on tarkoitettu ainoastaan tekstiilien silittämiseen. Sitä saa käyttää ainoastaan suljetuissa tiloissa ja yksityis-talouksissa. Kaikkia muita käyttöjä
pidetään määräystenvastaisena.
Purkaminen pakkauksesta
Muovipussit saattavat olla vaarallisia. Tukehtumis-
vaaran välttämiseksi tulee muovipussit säilyttää poissa vauvojen ja pikkulasten ulottuvilta.
• Poista höyrysilitysrauta pakkauksesta.
• Poista kaikki tarrat ja kalvot höyrysilitysraudasta
ja raudan pohjasta .
Ennen ensimmäistä käyttöä
• Täytä höyrysilitysrautaan vettä (katso luku
"Veden täyttäminen").
• Liitä verkkopistoke 220-240 V~/50 Hz:n
pistorasiaan.
• Säädä lämpötilan kierresäädin asentoon
"Max".
• Anna höyrysilitysraudan lämmetä muutamia
minuutteja korkeimmalla asetuksella.
• Silitä sitten pyyhkeen tai vanhan kangaspalan
(lämpöasetukselle ••• soveltuva) yli poistaaksesi mahdolliset epäpuhtaudet raudan pohjasta .
• Käytä sitten muutamia kertoja höyrysuihku-painiketta
poistaaksesi mahdolliset epäpuhtaudet höyrysuuttimista.
Ohje: Enimmäisellä käyttökerralla saattaa val-
mistuksesta johtuvien jäänteiden vuoksi esiintyä lievää
hajua. Tämä haju ei ole terveydelle haitallista. Huolehdi riittävästä ilmanvaihdosta, avaa esimerkiksi ikkuna.
IB_KH1282_E5554_FIN_3 10.09.2007 16:22 Uhr Seite 15
Page 16
- 16 -
Osat
Suihkepainike
Lämmityksen merkkivalo
Virtajohto ja pistoke
Liikkuva johdonohjain
Tukijalka
Vesisäiliö
Lämpötilan kierresäädin
Raudan pohja
Täyttöaukko
Vesisuutin
Höyrysäädin/Self Clean
Höyrypainike
Mitta-astia
Esivalmistelut
Veden täyttäminen
Tarvitset vettä käyttääksesi höyry- tai suihketoimintoa. Kuivasilitykseen ei tarvita vettä.
• Aseta höyrysilitysrauta jäähtyneenä pystyyn tukijalan varaan.
• Avaa vesisäiliön täyttöaukko .
• Täytä mitta-astialla vettä korkeintaan vesisäiliön
"Max"-merkintään saakka.
• Sulje vesisäiliön täyttöaukko .
Jos asuinpaikkakuntasi vesijohtovesi on liian kovaa,
suosittelemme tislatun veden sekoittamista vesijohtoveteen. Muutoin höyrytoiminnon suuttimet saattavat
kalkkeutua ennen aikojaan.
Ihanteellisen höyrytoiminnon pidentämiseksi tulee vesijohtoveteen sekoittaa tislattua vettä taulukon
mukaisesti.
Veden kovuuden saat selville paikallisesta vesilaitoksesta.
Kytkentä ja silitys
Silitysvinkkejä
Lajittele tekstiilit kangaslaaduittain. Noudata aina
tekstiileissä olevia silitys- ja hoito-ohjeita. Aloita niillä
kankailla, jotka vaativat alhaisimman lämpöasteen.
Jos et ole varma tekstiileissä käytettyjen kankaiden
koostumuksesta, silitä ensin varovasti pientä kohtaa
(sauma tai sisäreuna). Aloita epävarmassa tapauksessa alhaisella silityslämpötilalla. Jos kankaaseen jää
ryppyjä, nosta lämpötilaa asteittain. Kun olet löytänyt lämpötilan, jossa sili-tystulos on paras, älä nosta
lämpötilaa enempää. Älä koskaan nosta lämpötilaa
niin korkeaksi, että silitettävän tuotteen kudos vaurioituu.
Liittäminen virtalähteeseen
• Työnnä verkkopistoke pistorasiaan.
Veden kovuus
Tislatun veden suhde vesijohtoveteen
erittäin pehmeä/
pehmeä
0
keskinkertainen 1: 1
kova 2: 1
erittäin kova 3: 1
IB_KH1282_E5554_FIN_3 10.09.2007 16:22 Uhr Seite 16
Page 17
- 17 -
Silittäminen
Aseta silitysrauta käytön aikana ainoastaan
tukijalan varaan tai silityslaudan tätä varten
varatulle alustalle. Älä nojaa kuumalla silitysraudalla seiniin tai muihin esineisiin. Muutoin on
olemassa tulipalonvaara.
Kuivasilitys ilman höyryä on mahdollista kaikissa
lämpötiloissa, höyrysilittäminen on mahdollista vasta
tasosta •• alkaen.
Huomaa!
Mikäli tekstiilien hoito-ohjeet kieltävät silittämisen
(symboli ), ei tekstiileitä saa silittää. Muutoin saatat vaurioittaa tekstiilejä.
• Tarkasta tekstiilien hoito-ohjeista, soveltuuko
tekstiili silitettäväksi ja millä lämpötila-asetuksella.
• Säädä soveltuva lämpötila lämpötilan kierresäätimellä .
MIN
MAX
Silitysraudan asetus Kangaslaatu
• Silkki, nailon
•• Villa
••• Puuvilla
Max Pellava
Lämmityksen merkkivalo palaa. Kun lämmityksen
merkkivalo sammuu, säädetty lämpötila on saavutettu.
• Odota, kunnes lämpötilan lämmityksen merkkivalo
sammuu.
• Anna höyrysilitysraudan liukua tekstiileillä kevyesti painaen.
Vältä vetoketjujen ja niittien yli silittämistä,
koska nämä naarmuttavat raudan pohjaa .
Kierrä ne silittäessäsi.
Höyrysilitys
• Säädä höyrysäätimellä höyryn haluttu
voimakkuus:
Kun lämpötilan kierresäädin on asetettu lämpöasetukselle ••, säädä höyrypainike aina pienen
höyrysymbolin kohdalle.
Kun lämpötilan kierresäädin on asetettu lämpöasetukselle •••, säädä höyrypainike aina suu-
ren höyrysymbolin kohdalle.
Ohje: Höyrysilitys on mahdollista vasta tasolta
•• alkaen.
Ohje: Käännä höyrynsäädin aina 0-asen-
toon, kun höyryä ei enää tarvita tai kun lämpötila on säädetty matalammaksi kuin tasolle ••.
Muussa tapauksessa silitysraudan pohjasta
saattaa valua vettä.
IB_KH1282_E5554_FIN_3 10.09.2007 16:22 Uhr Seite 17
Page 18
- 18 -
Pisaranestotoiminto
Tässä silitysraudassa on tippalukkotoiminto. Se
estää vesipisaroiden vuotamisen silitysraudan pohjasta höyrysilityksen aikana ja silloin kun silitysraudan virta on katkaistu. Höyrysilityksen ajaksi lämmönsäädin on kytkettävä vähintään tasolle ••.
Säädä siksi höyrynsäädin asentoon ”höyry” vasta sitten, kun lämmönsäädin on kytketty vähintään tasolle •• ja lämpötila on saavutettu. Muussa
tapauksessa silitysraudan pohjasta saattaa vuotaa vettä.
Silittäminen höyrypaineella
Höyrypaine soveltuu erityisesti vaatteiden vaikeapääsyisten alueiden silittämiseen.
Ohje: Höyryä suihkuaa vasta lämpötilasta
••• lähtien.
• Nosta höyrysilitysrautaa hieman.
• Paina höyrypainetta varten höyry-painiketta
kerran.
Silittäminen suihketoiminnolla
• Paina pyykin kostuttamiseksi suihkepainiketta .
Tämä toiminto soveltuu erittäin kuiville, erittäin ryppyisille tekstiileille.
Höyrysilitysraudan väliaikainen pois asettaminen
Tulipalon vaara!
Älä koskaan jätä kuumaa tai päällekytkettyä höyrysilitysrautaa ilman valvontaa.
• Säädä lämpötilan kierresäädin asentoon
"Min".
• Aseta höyrysilitysrauta tukijalalle .
tai
• Aseta höyrysilitysrauta silityslaudan tätä varten
varatulle alustalle.
Huomaa: Älä koskaan aseta silitysrautaa so-
pimattomille alustoille. Palovaara!
Höyrysilitysraudan
käytöstä otto
• Vedä verkkopistoke irti pistorasiasta.
• Anna höyrysilitysraudan jäähtyä.
• Tyhjennä vesisäiliö avaamalla täyttöaukko
ja kääntämällä höyrysilitysrautaa joko sivulle
(katso kuva 1) tai eteenpäin kallistaen (katso
kuva 2).
✓
kuva 1
kuva 2
✓
IB_KH1282_E5554_FIN_3 10.09.2007 16:22 Uhr Seite 18
Page 19
- 19 -
• Puhdista raudan pohja (katso luku "Puhdistus
ja hoito").
• Kierrä virtajohto tukijalustan johtopidikkeeseen.
• Aseta jäähtynyt höyrysilitysrauta vaakasuoraan
pehmeälle, puhtaalle alustalle.
Puhdistus ja hoito
• Vältä vetoketjujen ja niittien yli silittämistä, koska
nämä naarmuttavat raudan pohjaa . Kierrä ne
silittäessäsi.
Varmista, että raudan pohja pysyy tasaisena.
• Veden ja sen sisältämien mineraalien koostumus
poikkeaa huomattavasti paikkakunnittain. Jos
alueesi vesi on erittäin kovaa, suosittelemme
lisäksi tislatun veden käyttöä, jotta silitysraudan
ihanteellinen toimintakyky varmis-tettaisiin (katso
luku "Veden täyttäminen").
Älä käytä höyrysilitysraudan puhdis-tamiseen
happoja (esimerkiksi etikkaa) tai kalkinpoistoainetta.
• Puhdista kotelo ainoastaan pehmeällä, kuivalla liinalla.
• Älä käytä voimakkaita puhdistusaineita.
Varoitus: Älä koskaan upota höyry-silitysrau-
taa veteen tai muihin nestei-siin.
• Puhdista metalliosat kevyesti vedellä kostutetulla
liinalla. Kuivaa kaikki osat perusteellisesti.
• Älä käytä hankaavia puhdistusaineita.
• Anna laitteen kuivua kokonaan, ennen kuin otat sen
uudelleen käyttöön.
Itsepuhdistustoiminto (Self-Clean)
• Täytä vesisäiliö MAX-merkintään saakka.
• Työnnä verkkopistoke pistorasiaan.
• Säädä lämpötilan kierresäädin tasolle Max.
• Anna silitysraudan kuumentua, kunnes lämmityksen
merkkivalo sammuu ja syttyy uudelleen.
• Pidä silitysrautaa vaakasuorassa keräilyastian
yläpuolella.
• Aseta höyrysäädin asentoon Self Clean
. Höyrysäädin kääntyy Self Clean -asentoon hieman ulospäin. Tällöin raudan pohjassa
olevista aukoista tulee höyryä ja kiehuvaa
vettä. Mahdolliset epäpuhtaudet huuhdellaan tällöin ulos.
Huomaa!
On olemassa palovammavaara!
• Kierrä höyrysäädin jälleen sisään heti, kun ve-
sisäiliössä oleva vesi on käytetty.
• Varmistaaksesi, ettei höyrykammioon jää vettä,
kuivaa raudan pohja perusteellisesti. Kuljeta
tätä varten raudan pohjaa muutamia kertoja
pyyhkeen tai vanhan kangaspalan (lämpöasteelle ••• soveltuva) yli edes-takaisin.
• Anna silitysraudan jäähtyä, ennen kuin asetat
sen sivuun.
Toimintahäiriöiden korjaaminen
Höyrysilitysraudasta ei tule lainkaan höyryä tai ainoastaan erittäin vähän:
Höyrysilitysraudan vesisäiliö on tyhjä. Täytä vesisäiliö vedellä.
Höyrysilitysrauta ei ruiskuta suihketoiminnossa lainkaan vettä tai ainoastaan
erittäin vähän:
Höyrysilitysraudan vesisäiliö on tyhjä. Täytä vesisäiliö vedellä.
IB_KH1282_E5554_FIN_3 10.09.2007 16:22 Uhr Seite 19
Page 20
- 20 -
Höyrysilitysrauta ei kuumene:
Silitysrautaa ei ole liitetty virtaan tai sitä ei ole kytketty päälle. Työnnä verkkopis-toke verkkopistora-
siaan ja säädä lämpötilan kierresäätimellä
haluttu lämpötila.
Silitysraudan pohjasta vuotaa vesipisa-
roita:
Lämpötila on liian matala höyrysilitykseen. Säädä
lämmönsäädin vähintään tasolle ••.
Jos kuvatut toimenpiteet eivät auta, höyrysilitysrauta
on rikki. Anna se pätevän ammattikorjaamon tai huoltopalvelumme korjattavaksi.
Tekniset tiedot
Syöttöjännite: 220-240 V~/50 Hz
Teho: 1800 W
Hävittäminen
Älä hävitä laitetta tavallisen talousjätteen
mukana.
Hävitä laite hyväksytyn jätehuoltoyrityksen tai kunnallisen jätelaitoksen avulla. Noudata ajankohtaisia
voimassa olevia määräyksiä. Ota epävarmoissa
tilanteissa yhteyttä jätelaitokseen.
Hävitä kaikki pakkausmateriaalit ympäristöystävällisellä tavalla.
Takuu ja huolto
Laitteen takuu on 3 vuotta ostopäivästä lukien. Laite
on valmistettu huolella ja tarkastettu perusteellisesti
ennen toimitusta. Säilytä ostokuitti tositteeksi ostosta.
Ota takuutapauksessa puhelimitse yhteyttä lähimpään
huoltopisteeseen. Vain näin voidaan taata tuotteesi
maksuton lähettäminen huoltoon.
Takuu koskee ainoastaan materiaali- ja tuotantovirheitä,
ei kuitenkaan kuluvia osia tai helposti rikkoutuvien
osien, esim. kytkinten tai akkujen vaurioita. Tuote on
tarkoitettu ainoastaan yksityiseen, ei kaupalliseen
käyttöön. Väärä tai asiaton käyttö, väkivallan käyttö
ja muut kuin valtuutetun huoltopisteen suorittamat
korjaukset aiheuttavat takuun raukeamisen. Tämä
takuu ei rajoita kuluttajan lakisääteisiä oikeuksia.
Kompernass Service Suomi
Petäjäksentie 19
FIN - 26100 Rauma
Tel: 02 822 28 87
Fax: 010 293 02 63
e-mail: support.fi@kompernass.com
Maahantuoja
KOMPERNASS GMBH
BURGSTRASSE 21
D-44867 BOCHUM, GERMANY
www.kompernass.com
IB_KH1282_E5554_FIN_3 10.09.2007 16:22 Uhr Seite 20
Page 21

- 21 -
Innehållsförteckning Sidan
Grundläggande säkerhetsanvisningar 22
Föreskriven användning 23
Uppackning 23
Innan du börjar använda strykjärnet 23
Kontrollelement 23
Förberedelser 24
Ansluta och stryka 24
Ångstryka 25
Stryka med ångpuff 25
Stryka med sprayfunktion 25
Stänga av ångstrykjärnet tillfälligt 26
Ställa undan ångstrykjärnet 26
Rengöring och skötsel 26
Åtgärda fel 27
Tekniska specifikationer 27
Kassering 27
Garanti och service 27
Importör 28
Läs igenom bruksanvisningen noga innan du börjar använda strykjärnet och spara den för senare bruk. Lämna
över den tillsammans med strykjärnet till en ev. ny användare.
IB_KH1282_E5554_SV_3 10.09.2007 16:24 Uhr Seite 21
Page 22

- 22 -
Ångstrykjärn KH
1282
Grundläggande säkerhetsanvisningar
Risk för brännskador!
• Låt aldrig personer (inklusive barn) som av psykiska, sensoriska eller mentala skäl eller på grund
av bristande erfarenhet och kunskap inte kan använda apparater på ett säkert sätt använda den
här apparaten utan att de först övervakats eller
instruerats av någon ansvarig person.
• Förklara för barnen hur apparaten fungerar och
vilka risker som är förbundna med den så att de
inte leker med apparaten.
• Rör aldrig vid sulan när den är varm. Ta bara i
strykjärnets handtag.
• Håll aldrig händerna i ångpuffen eller på heta
metalldelar.
• Rikta aldrig ångutsläppet mot människor eller
djur.
• Du får inte öppna vattentankens påfyllningsöppning när du stryker. Låt strykjärnet kallna först
och dra ut kontakten när du ska fylla på vatten.
Brandrisk!
• Lämna aldrig det heta eller påkopplade ångstrykjärnet utan uppsikt. Då kan både du själv och andra skada sig på det.
• Ställ aldrig strykjärnet i närheten av brännbara
material, t ex gardiner och förhängen. Då kan
det börja brinna.
• Stryk bara med de temperaturer som anges i
skötselanvisningarna och som lämpar sig för materialet. Annars kan det bli brännmärken eller -hål
på tyget. Om det inte finns några skötselanvisningar ska du börja stryka på den lägsta temperaturen.
• Ställ inte undan ångstrykjärnet förrän det kallnat.
• Ställ aldrig ångstrykjärnet på kanter, t ex bordskanter. Det kan välta och falla i golvet.
• Sätt bara strykjärnet på högkant eller på stället
som är avsett för detta på strykbrädan när du
sätter ifrån dig det. Luta aldrig det heta strykjärnet mot väggar eller andra föremål. Då kan det
börja brinna.
Risk för elektrisk stöt!
• Anslut bara strykjärnet till ett godkänt eluttag.
• Lämna genast in trasiga strykjärn till en kvalificerad verkstad för reparation eller kontakta vår
kundtjänst för att inte utsätta dig för onödiga risker.
• Låt genast byta ut trasiga elsladdar eller kontakta
vår kundtjänst för att inte utsätta dig för onödiga risker.
• Håll alltid i kontakten när du drar ut den, dra aldrig i sladden.
• Rikta inte ång- eller spraymunstycket mot elektriska apparater eller föremål som inte tål värme eller fukt.
• Vik eller kläm inte sladden och lägg den så att
den inte kommer i kontakt med heta ytor och så
att ingen kan trampa på eller snubbla över den.
• Dra alltid ut kontakten innan du rengör eller fyller
på vatten och när du strukit färdigt.
• Rulla alltid ut sladden fullständigt innan du kopplar
på strykjärnet och använd inte någon förlängningssladd.
• Ta aldrig i sladden eller kontakten med fuktiga
händer.
• Du får absolut inte doppa ner ångstrykjärnet i
vätska och inte låta någon vätska komma in innanför ångstrykjärnets hölje. Du får inte utsätta ångstrykjärnet för fuktighet och inte använda det
utomhus. Om det ändå råkar komma in vätska innanför höljet ska du genast dra ut kontakten och
lämna in strykjärnet till en kvalificerad verkstad
eller till kundtjänst för reparation.
IB_KH1282_E5554_SV_3 10.09.2007 16:24 Uhr Seite 22
Page 23

- 23 -
• Använd aldrig ångstrykjärnet i närheten av vatten, t
ex vid badkar, duschar, tvättfat eller andra kärl.
Närhet till vatten utgör en fara även när strykjärnet
är avstängt.
• Du får inte försöka öppna strykjärnets hölje. Om
strykjärnet är trasigt måste du lämna in det till en
kvalificerad yrkesman eller till kundtjänst för reparation.
• Låt genast en auktoriserad yrkesman eller kundtjänst byta ut skadade elkablar eller kontakter för
att inte utsätta dig för onödiga risker.
Varning!
• Om skötselanvisningarna i ett klädes-plagg visar att
det inte får strykas (symbolen ) ska du inte heller stryka det. Då kan tyget förstöras.
• Fyll aldrig vattentanken med något annat än vatten. Om du gör det skadas ångstrykjärnet.
• Du får inte rengöra ångstrykjärnet med lösningsmedel, alkohol eller slipande rengöringsmedel.
Då kan det skadas.
Föreskriven användning
Det här ångstrykjärnet är endast avsett att användas
för att stryka textil. Du får endast använda det inomhus i privata hushåll. All annan form av användning
räknas som ej föreskriven.
Uppackning
Plastpåsar kan vara farliga. För att eliminera ri-
sken för kvävningsolyckor ska plastpåsar förvaras
utom räck-håll för småbarn.
• Ta upp ångstrykjärnet ur förpackningen.
• Ta bort alla klistermärken och allt folie från strykjärnets hölje och stryksula .
Innan du börjar använda
strykjärnet
• Fyll strykjärnet med vatten (se kapitel "Fylla på
vatten").
• Sätt kontakten i ett eluttag med
220-240 V~/50 Hz.
• Vrid temperaturreglaget till läge "Max".
• Låt strykjärnet värmas upp på den högsta temperaturen i några minuter.
• Stryk sedan över en handduk eller en gammal
tygbit (som lämpar sig för temperaturinställning
•••) för att få bort ev. smuts från stryksulan .
• Tryck på ångknappen några gånger för att få
bort ev. smuts ur ångmunstyckena.
OBS: Första gången du använder strykjär-
net kan det lukta lite på grund av den beläggning som finns kvar från tillverkningsprocessen. Det är inte farligt. Sörj för god ventilation, t
ex genom att öppna fönstret.
Kontrollelement
Sprayknapp
Kontrollampa
Elsladd med kontakt
Ledat sladdfäste
Fot
Vattentank
Temperaturreglage
Stryksula
Påfyllningsöppning
Vattenmunstycke
Ångreglage/Self Clean
Ångknapp
Måttbägare
IB_KH1282_E5554_SV_3 10.09.2007 16:24 Uhr Seite 23
Page 24

- 24 -
Förberedelser
Fylla på vatten
För att kunna använda ång- eller sprayfunktionen
krävs vatten. Om du ska torrstryka behövs inget vatten.
• Ställ det kalla strykjärnet lodrätt på foten .
• Öppna påfyllningsöppningen till vattentanken
.
• Använd måttbägaren för att fylla tanken
med vatten upp till maxmarkeringen.
• Stäng öppningen till vattentanken .
Om vattnet där du bor är mycket hårt är det bra om
du blandar det med destillerat vatten. Annars kan ångmunstyckena kalkas igen i förtid.
För att öka ångpuffsfunktionens livslängd ska du
blanda kranvatten och destillerat vatten enligt tabellen.
Fråga din lokala vattenleverantör om vattnets hårdhet.
Vattnets hårdhet
Andel destillerat vatten
i förhållande till kranvatten
mycket
mjukt/mjukt
0
medel: 1: 1
hårt 2: 1
mycket hårt 3: 1
Ansluta och stryka
Stryktips
Sortera de textiler som ska strykas efter typ av
material. Följ alltid skötsel- och strykanvisningarna
för det aktuella materialet. Börja stryka sådant som
ska strykas på låg värme.
Om du är osäker på hur ett visst material ska strykas provar du först försiktigt på en liten yta (t ex en
söm eller fåll). Börja alltid stryka på låg temperatur i
tveksamma fall. Om tyget fortfarande är skrynkligt
ökar du temperaturen lite i taget. När du hittat den
rätta temperaturen och är nöjd med resultatet ska
du inte öka den mera. Stryk aldrig på så hög värme
att tyget skadas.
Anslutning
• Sätt kontakten i ett eluttag.
Stryka
Ställ bara ifrån dig strykjärnet på foten eller på
stället som är avsett för detta på strykbrädan
när du stryker. Luta aldrig det heta strykjärnet
mot väggar eller andra föremål. Då kan det
börja brinna.
Du kan torrstryka utan ånga på alla temperaturer.
Det går bara att ångstryka från läge ••.
Inställning av ång-
strykjärnet
Typ av material
• Siden, nylon
•• Ylle
••• Bomull
Max Linne
IB_KH1282_E5554_SV_3 10.09.2007 16:24 Uhr Seite 24
Page 25

- 25 -
Varning!
Om skötselanvisningarna på ett plagg visar att det inte
får strykas (symbolen ) ska du inte heller stryka
det. Om du gör det kan materialet skadas.
• Kontrollera uppgifterna på lapparna med skötselanvisningar om materialet kan strykas och i så fall
på vilken värme.
• Ställ in rätt temperatur med temperaturreglaget
.
Kontrollampan börjar lysa. När kontrollampan
slocknar har strykjärnet kommit upp i rätt temperatur.
• Vänta tills kontrollampan slocknat.
• Tryck ner strykjärnet lätt och låt det glida över tyget.
Undvik att stryka över blixtlås och nitar, då kan
stryksulan repas. Stryk runt omkring.
Ångstryka
• Ställ in ångstyrkan med ångreglaget :
När du ställt temperaturreglaget på steg •• ska
du alltid sätta ångreglaget på den lilla ångsym-
bolen.
När du ställt temperaturreglaget på steg •••
ska du alltid sätta ångreglaget på den stora ångsymbolen.
MIN
MAX
OBS: Det går bara att ångstryka från och med
läge ••.
OBS: Om det inte behövs mer ånga eller om
en lägre temperatur än steg •• ställs in ska du
alltid sätta ångreglaget på läge 0! Annars
kan det tränga ut vatten ur stryksulan .
Droppstoppfunktion
Det här ångstrykjärnet är utrustat med en droppstoppfunktion som hindrar att vatten tränger ut ur
stryksulan när strykjärnet är avstängt eller när
man ångstryker. För att det ska gå att ångstryka måste strykjärnet vara inställt på minst steg ••. Sätt
därför inte ångreglaget på läge ”Ånga” förrän
du först ställt in temperaturreglaget på minst läge
•• och strykjärnet kommit upp i den inställda temperaturen. Annars kan det sippra ut vatten ur stryksulan .
Stryka med ångpuff
Ångpuffen är mycket bra när man vill stryka på svåråtkomliga ställen.
OBS: Ångpuffen fungerar bara från steg •••
• Lyft strykjärnet en aning.
• Tryck en gång på ångknappen för att
framkalla en ångpuff.
Stryka med sprayfunktion
• Tryck på sprayknappen för att fukta det som ska
strykas.
Den här funktionen ska användas på mycket torr och
skrynklig textil.
IB_KH1282_E5554_SV_3 10.09.2007 16:24 Uhr Seite 25
Page 26

- 26 -
Stänga av ångstrykjärnet tillfälligt
Brandrisk!
Lämna aldrig strykjärnet utan uppsikt när det är varmt
eller påkopplat.
• Vrid temperaturreglaget till läge "Min".
• Ställ strykjärnet lodrätt på foten
eller
• Sätt strykjärnet vågrätt på stället som är avsett
för detta på strykbrädan.
Observera: Ställ aldrig ifrån dig strykjärnet
på ytor som inte tål värme. Brandrisk!
Ställa undan ångstrykjärnet
• Dra ut kontakten ur uttaget.
• Låt ångstrykjärnet kallna.
• Töm vattentanken genom att fälla upp locket
över påfyllningsöppningen och antingen luta
strykjärnet åt sidan (se Bild 1) eller framåt (se
Bild 2).
• Rengöra stryksulan (se kapitel Rengöring och
skötsel).
• Linda upp elsladden runt sladdvindan på
foten .
• Ställ det kalla strykjärnet vågrätt på ett mjukt,
rent underlag.
Rengöring och skötsel
• Undvik att stryka över blixtlås och nitar, då
kan stryksulan repas. Stryk runt omkring.
Se till att hålla stryksulan slät.
• Vattnets kvalitet och mineralinnehåll skiljer sig
mycket från plats till plats. Om vattnet är mycket
hårt där du bor rekommenderar vi att du blandar det med destillerat vatten för att strykjärnet
ska kunna fungera så bra som möjligt (se kapitel
"Fylla på vatten").
Använd inte syror (t ex ättika) eller avkalknings-
medel för att rengöra strykjärnet.
• Torka bara av höljet med en mjuk, torr trasa.
• Använd inte starka rengöringsmedel.
Varning: Doppa aldrig ner ångstrykjär-net i vat-
ten eller andra vätskor.
• Rengör strykjärnets metalldelar med en lätt fuktad
trasa. Torka av alla delar noga.
• Använd inte slipande rengöringsmedel.
• Låt strykjärnet bli helt torrt innan du använder det
igen.
Självrengöringsfunktion (Self Clean)
• Fyll vattentanken upp till MAX-markeringen.
• Sätt kontakten i ett eluttag.
• Vrid temperaturreglaget till läge Max.
• Låt strykjärnet stå och värmas upp tills kontrollampan slocknar och sedan tänds igen.
• Håll strykjärnet vågrätt över ett uppsamlingskärl.
✓
Bild 1
Bild 2
✓
IB_KH1282_E5554_SV_3 10.09.2007 16:24 Uhr Seite 26
Page 27

- 27 -
• Sätt ångreglaget på läge Self Clean .
Ångreglaget skruvas ut en aning när det står på
läge Self Clean. Då tränger det ut ånga och kokande vatten ur hålen i stryksulan . Eventuell
smuts spolas samtidigt ut.
Varning!
Risk för personskador!
• Skruva in ångreglaget igen så snart vattnet
är slut i tanken .
• Torka av stryksulan noga för att kontrollera att
det inte finns något vatten kvar i ångkammaren.
För då stryksulan några gånger fram och till-
baka över en handduk eller gammal tygbit (som tål
att strykas på läge •••).
• Låt strykjärnet kallna innan du ställer undan det.
Åtgärda fel
Det kommer bara ut lite eller ingen ånga alls
ur strykjärnet:
Allt vatten har tagit slut i tanken. Fyll vattentanken
med vatten.
Det sprutar inte ut något eller bara lite
vatten när jag använder sprayfunktionen:
Allt vatten har tagit slut i tanken. Fyll vattentanken
med vatten.
Ångstrykjärnet blir inte varmt:
Ångstrykjärnet är inte anslutet eller inte påkopplat.
Sätt kontakten i ett eluttag och ställ in en temperatur med temperaturreglaget .
Det droppar vatten från stryksulan :
Temperaturen är för låg för ångstrykning. Sätt temperaturreglaget på minst steg ••.
Om felet inte kan avhjälpas med de åtgärder som beskrivs här är ångstrykjärnet defekt. Lämna in det till en
behörig yrkesman eller till kundtjänst för reparation.
Tekniska specifikationer
Försörjningsspänning: 220-240 V~/50 Hz
Effekt: 1800 W
Kassering
Apparaten får absolut inte kastas bland
de vanliga hushållssoporna.
Lämna in den till ett företag som har tillstånd att ta
hand om den här typen av kasserade apparater
eller till din kommunala avfallsanläggning. Följ gällande föreskrifter. Kontakta din avfallsanläggning
om du har några frågor.
Lämna in allt förpackningsmaterial till
miljövänlig återvinning.
Garanti och service
Du erhåller 3 års garanti på apparaten, räknat från
köpdatum. Apparaten är omsorgsfullt tillverkad och
har noggrannt kontrollerats före leveransen. Var god
bevara kassakvittot som köpbevis. Vid garantifall ber
vi dig ringa till din serviceavdelning. Annars kan vi
inte garantera en kostnadsfri frakt av varan.
Garantin gäller endast för material- eller fabrikationsfel, men inte för förbr ukningsdelar eller för skador på ömtåliga delar, t.ex. kontakter eller uppladdningsbara batterier.
Produkten är endast avsedd för privat bruk, inte för
yrkesmässigt bruk. Vid missbruk och ofackmässig behandling, användande av våld och vid ingrepp, som
inte genomförs av vår auktoriserade service-filial,
upphör garantin att gälla. Dina lagliga rättigheter inskränks inte av denna garanti. Denna garanti gäller
bara för den ursprunglige köparen och kan inte
överlåtas.
IB_KH1282_E5554_SV_3 10.09.2007 16:24 Uhr Seite 27
Page 28

- 28 -
Kompernass Service Sverige
EA Rosengrensgata 22
42131 Västra Frölunda
Tel: 031 491080
Fax: 031 497490
e-mail: support.sv@kompernass.com
Kompernass Service Suomi
Petäjäksentie 19
FIN - 26100 Rauma
Tel: 02 822 28 87
Fax: 010 293 02 63
e-mail: support.fi@kompernass.com
Importör
KOMPERNASS GMBH
BURGSTRASSE 21
D-44867 BOCHUM
www.kompernass.com
IB_KH1282_E5554_SV_3 10.09.2007 17:51 Uhr Seite 28
Page 29

- 29 -
Indholdsfortegnelse Side
Grundlæggende sikkerhedsanvisninger 30
Bestemmelsesmæssig anvendelse 31
Udpakning 31
Før anvendelse første gang 31
Betjeningskomponenter 31
Forberedelse 32
Tilslutning og strygning 32
Dampstrygning 33
Strygning med dampstød 33
Strygning med sprayfunktion 34
Midlertidig frastilling af dampstrygejernet 34
Sådan slukkes dampstrygejernet 34
Rengøring og vedligeholdelse 34
Afhjælpning af funktionsfejl 35
Tekniske data 35
Bortskaffelse 35
Garanti og service 36
Importør 36
Læs betjeningsvejledningen omhyggeligt igennem, før du bruger dampstrygejernet første gang, og gem den
til senere brug. Hvis du giver dampstrygejernet videre til andre, skal vejledningen også følge med.
IB_KH1282_E5554_DK_3 10.09.2007 16:26 Uhr Seite 29
Page 30

- 30 -
Dampstrygejern KH
1282
Grundlæggende sikkerhedsanvisninger
Fare for forbrænding!
• Enheden må ikke bruges af personer (inklusive
børn), hvis fysiske, sensoriske eller mentale evner
eller mangel på erfaring og viden forhindrer en
sikker brug af enhederne, hvis de ikke i forvejen
er blevet overvåget eller undervist.
• Forklar børnene enheden og dens farer, så at de
ikke leger med enheden.
• Rør aldrig ved strygejernets bund, når apparatet
er varmt. Hold kun på dampstrygejernet med
håndtaget.
• Hold aldrig hænderne ind i dampstødet eller på
de varme metaldele.
• Ret aldrig dampstødet mod personer eller andre
levende væsener.
• Påfyldningsåbningen til vandbeholderen må ikke
åbnes under brug. Lad først dampstrygejernet
køle af, og træk stikket ud, når beholderen skal
fyldes op.
Brandfare!
• Lad aldrig det varme eller tilsluttede dampstrygejern være uden opsyn. Du og andre personer
kan komme til skade på strygejernet, hvis det stadig er varmt.
• Stil aldrig dampstrygejernet i nærheden af brændbare materialer som gardiner eller forhæng. Der kan
gå ild i dem.
• Stryg kun med temperaturindstillingerne, som er
egnede til materialet ifølge anvisningerne på vaskemærket. Ellers kan tøjet ødelægges. Hvis du
ikke kender temperaturerne, skal du starte med
den laveste temperaturindstilling.
• Stil først dampstrygejernet på plads, når det er
afkølet.
• Stil aldrig dampstrygejernet på kanter som f.eks.
bordkanter. Det kan vælte og falde ned.
• Sil kun strygejernet på foden eller på frastillingspladen på strygebrættet, som er beregnet til
det. Lad ikke det varme strygejern hælde op ad
vægge eller andre genstande. Ellers er der
fare for brand.
Fare for elektrisk stød!
• Slut kun dampstrygejernet til en stikkontakt, som er
installeret efter for-skrifterne.
• Hvis dampstrygejernet er defekt, skal du omgående lade det reparere af et kvalificeret specialværksted eller henvende dig til kundeservice, så farlige
situationer kan undgås.
• Lad straks ledningen udskifte, hvis den er defekt,
eller henvend dig til kundeservice, så farlige situationer kan undgås.
• Træk altid i stikket og aldrig i ledningen.
• Ret aldrig dampdyserne eller spray-dysen mod
elektriske apparater eller genstande, som er følsomme over for varme eller fugt.
• Knæk eller mas aldrig strømledningen, og læg den,
så den ikke kan komme i kontakt med varme
overflader, og så man ikke kan snuble i den.
• Træk stikket ud efter brug, før rengøring og før
påfyldning af vand.
• Rul ledningen helt ud, før du tænder for dampstrygejernet, og brug ikke forlængerledning.
• Hold aldrig på ledningen eller stikket med våde
hænder.
• Dampstrygejernet må aldrig dyppes ned i væske,
og der må ikke komme væske ind i dampstrygejernets hus. Dampstrygejernet må aldrig udsættes
for fugt og ikke bruges udendørs. Hvis der skulle
komme væske ind i dampstrygejernets hus, skal
du straks trække stikket ud af stikkontakten og lade
strygejernet reparere af et kvalificeret specialværksted eller af kundeservice.
IB_KH1282_E5554_DK_3 10.09.2007 16:27 Uhr Seite 30
Page 31

- 31 -
• Brug aldrig dampstrygejernet i nærheden af
vand som f.eks. ved badekar, brusebad, vaskekummer eller andre beholdere. Det kan også
være farligt at stille strygejernet i nærheden af
vand, selv om strygejernet er slukket.
• Dampstrygejernets hus må ikke åbnes. Hvis
dampstrygejernet er defekt, må det udelukkende
repareres af et kvalificeret specialværksted eller
kunde-service.
• Få omgående beskadigede el-stik eller el-ledninger
udskiftet af autoriserede fagfolk eller af kundenservicen, så du undgår farer.
Obs!
• Hvis vaskemærket i tøjet forbyder strygning (symbol ), må tøjet ikke stryges. Ellers kan tøjet
tage skade.
• Fyld ikke andre væsker end vand i vandtanken.
Ellers ødelægges dampstrygejernet.
• Dampstrygejernet må ikke rengøres med opløsningsmidler, alkohol eller skurende rengøringsmidler. Ellers kan det ødelægges.
Bestemmelsesmæssig
anvendelse
Dampstrygejernet er udelukkende beregnet til strygning af tekstiler. Det må kun anvendes i lukkede rum
og i private hjem. Al anden anvendelse betragtes
som ikke-bestemmelsesmæssig.
Udpakning
Plasticposer kan være farlige. Opbevar plastic-
poser uden for småbørns rækkevidde, så risikoen for kvælning undgås.
• Tag dampstrygejernet ud af emballagen.
• Fjern alle mærkater og foliedele fra dampstrygejernet og strygesålen .
Før anvendelse første
gang
• Fyld vand i dampstrygejernet (se kapitlet "Påfyldning af vand").
• Sæt stikket i en stikkontakt med
220-240 V~/50 Hz.
• Stil temperatur-regulatoren på "Maks".
• Varm dampstrygejernet op til det højeste trin i
nogle minutter.
• Stryg hen over et håndklæde eller gammelt stykke stof (egnet til varmetrin •••), så eventuelle
urenheder fra strygesålen fjernes.
• Tryk nogle gange på dampstøds-knappen , så
eventuelle urenheder fjernes fra dampdyserne.
Bemærk: Når du bruger dampstrygejernet
første gang, kan det forekomme, at der udvikles
en smule lugt på grund af rester fra produktionen. Denne lugt er ikke sundhedsskadelig. Sørg
for tilstrækkelig udluftning, og åbn for eksempel
et vindue.
Betjeningskomponenter
Spray-knap
Opvarmnings-kontrollampe
Ledning med stik
Bevægelig ledningsføring
Fod
Vandtank
Temperatur-regulator
Strygesål
Påfyldningsåbning
Vanddyse
Dampregulator/Self Clean
Dampstøds-knap
Målebæger
IB_KH1282_E5554_DK_3 10.09.2007 16:27 Uhr Seite 31
Page 32

- 32 -
Forberedelse
Påfyldning af vand
Du skal bruge vand for at anvende damp- eller
spray-funktionen.
Til tørstrygning skal du ikke bruge vand.
• Stil dampstrygejernet i afkølet tilstand lodret på
foden .
• Åbn påfyldningsåbningen til vandtanken .
• Fyld vand i vandtanken med målebægeret M
til "Maks"-markeringen.
• Luk påfyldningsåbningen til vandtanken .
Hvis ledningsvandet, hvor du bor, er for hårdt, anbefales det at blande vandet med destilleret vand. Ellers kan dyserne til dampstøds-funktionen kalke hurtigt til.
For at forlænge den optimale damp-støds-funktion
blandes ledningsvandet med destilleret vand som
angivet i tabellen.
Spørg det lokale vandværk, hvilken hårdhed vandet
har.
Vandets hårdhed
Andel af destilleret
vand til ledningsvand
meget
blødt/blødt
0
middel 1: 1
hårdt 2: 1
meget hårdt 3: 1
Tilslutning og strygning
Tips til strygningen
Sorter tekstilerne efter stoftyper. Følg altid stryge- og
vaskeanvisningerne i tøjet. Begynd med de stoffer,
der skal have det laveste varmetrin.
Hvis du ikke er sikker på tekstiltypen, skal du først
stryge et lille område forsigtigt (sømmen eller inderkanten). Begynd med en lav strygetemperatur, hvis
du er i tvivl. Hvis der stadig er folder, skal du øge temperaturen trinvist. Når du har fundet varmetrinet,
som giver det bedste strygeresultat, skal du ikke øge
temperaturen mere. Sæt aldrig temperaturen så højt
op, at strygetøjets stof ødelægges.
Tilslutning
• Sæt stikket i stikkontakten.
Strygning
Stil kun strygejernet på foden , når du bruger
det, eller på frastillingspladen på strygebrættet,
som er beregnet hertil. Lad ikke det varme strygejern hælde op ad vægge eller andre genstande. Ellers er der fare for brand.
Du kan tørstryge uden damp ved alle temperaturer,
dampstrygning er først muligt fra trin ••.
Indstilling strygejern Stoftype
• Silke, nylon
•• Uld
••• Bomuld
Max Linned
IB_KH1282_E5554_DK_3 10.09.2007 16:27 Uhr Seite 32
Page 33

- 33 -
Obs!
• Hvis vaskemærket i tøjet forbyder strygning (symbol ), må tøjet ikke stryges. Ellers kan tøjet
ødelægges.
• Kontrollér vaskeanvisningerne på skiltet i tøjet, så du
ved, hvilken temperatur-indstilling du skal bruge
til strygning af tøjet.
• Indstil den egnede temperatur med temperatur-regulatoren .
Opvarmnings-kontrollampen lyser. Når opvarmnings-kontrollampen slukkes, er den indstillede
temperatur nået.
• Vent, til opvarmnings-kontrollampen til temperaturen er slukket.
• Lad dampstrygejernet glide hen over tøjet med et
let tryk.
Undgå at stryge hen over lynlåse og nitter, da
det laver ridser i strygesålen . Stryg i stedet
udenom.
Dampstrygning
• Indstil den ønskede dampstyrke med dampregulatoren :
Hvis du har stillet temperatur-reguleringen på trin
••, skal du altid stille dampregulatoren på det
lille damp-symbol.
MIN
MAX
Hvis du har stillet temperatur-reguleringen på trin
•••, skal du altid stille dampregulatoren på det
store damp-symbol.
Bemærk: Dampstrygning er først muligt fra
trin ••.
Bemærk: Hvis du ikke behøver damp, eller
temperaturen er indstillet lavere end trin ••,
skal du altid stille dampregulator på ”0”! El-
lers kan der løbe vand ud af strygesålen .
Dryp-stop-funktion
Dette strygejern har en dråbe-stop-funktion. Når strygejernet er slukket og under dampstrygning, forhindrer denne funktion, at der løber vanddråber ud af
strygesålen ved dampstrygning. Ved dampstrygning skal strygejernet mindst indstilles på trin ••. Stil
derfor først dampregulatoren på "damp", når
temperatur-drejeregulatoren er stillet på mindst
trin ••, og temperaturen er nået. Ellers kan der
komme vand ud af strygesålen .
Strygning med dampstød
Dampstødet er især velegnet til strygning af vanskeligt tilgængelige steder på tøjet.
Bemærk: Dampskud er først muligt fra trin
•••.
• Løft dampstrygejernet en smule.
• Tryk på dampstøds-tasten én gang for et
dampstød.
IB_KH1282_E5554_DK_3 10.09.2007 16:27 Uhr Seite 33
Page 34

- 34 -
Strygning med sprayfunktion
• Tryk på spray-knappen for at fugte tøjet.
Denne funktion er egnet til tørt, meget krøllet tøj.
Midlertidig frastilling af
dampstrygejernet
Brandfare!
• Lad aldrig det varme eller tændte dampstrygejern
være uden opsyn.
• Stil temperatur-regulatoren på "Min".
• Stil dampstrygejernet på foden .
eller
• Læg dampstrygejernet på frastillingspladsen på
strygebrættet.
Obs: Stil aldrig strygejernet på underlag, som
ikke kan tåle varme. Brandfare!
Sådan slukkes dampstrygejernet
• Træk stikket ud af stikkontakten.
• Lad dampstrygejernet køle af.
• Tøm vandtanken ved at klappe påfyldning-
såbningen op og enten vippe dampstrygejernet til siden (se fig.1) eller tømme det ved at holde det fremad (se fig. 2).
• Rengør strygesålen (se kapitlet "Rengøring og
vedligeholdelse“).
• Rul ledningen om ledningsholderen på foden
.
• Stil det afkølede dampstrygejern vandret på et
blødt, rent underlag.
Rengøring og vedligeholdelse
Undgå at stryge hen over lynlåse og nitter, da det
laver ridser i strygesålen .
Undgå dem ved strygning. Sørg for, at strygesålen
bliver ved med at være glat.
• Vandets beskaffenhed og dets mineraler er forskelligt afhængigt af område. Hvis vandet i dit
område er meget hårdt, anbefaler vi brug af
destilleret vand, så det sikres, at strygejernet fungerer optimalt (se kapitlet "Påfyldning af vand").
Brug ikke syre (for eksempel eddike) eller afkal-
kningsmiddel til at rengøre dampstrygejernet
med.
• Rengør huset med en blød, tør klud.
• Brug ikke aggressive rengøringsmidler.
Advarsel: Læg aldrig dampstrygejernet ned i
vand eller andre væsker.
• Rengør metaldelene med en klud, der er fugtet
let med vand. Tør alle dele grundigt af.
• Brug ikke skurende rengøringsmidler.
✓
fig. 1
fig. 2
✓
IB_KH1282_E5554_DK_3 10.09.2007 16:27 Uhr Seite 34
Page 35

- 35 -
• Lad apparatet tørre fuldstændigt, før det bruges
igen
Selvrensningsfunktion (Self-Clean)
• Fyld vandtanken indtil markeringen MAKS.
• Sæt stikket i stikkontakten .
• Stil temperatur-reguleringen på
trinet "Maks".
• Lad strygejernet varme op, indtil opvarmningskontrollampen slukkes og lyser igen.
• Hold strygejernet vandret over en skål.
• Stil dampregulatoren på position Self Clean
. Dampregulatoren drejer sig lidt ud på
positionen Self Clean. Derved slipper der damp
og kogende vand ud af dampudslipshullerne i
strygesålen . Herved skylles eventuelle urenheder med ud.
Obs!
Fare for skoldning!
• Drej dampregulatoren ind igen, så snart van-
det er brugt op i vandtanken .
• For at sikre, at der ikke er mere vand i dampkammeret, skal strygesålen tørres grundigt. Træk
strygesålen nogle gange frem og tilbage over
et håndklæde eller et gammelt stykke stof (egnet
til varmetrin •••).
• Lad strygejernet køle helt af, før du stiller det
væk.
Afhjælpning af funktionsfejl
Dampstrygejernet støder ingen damp ud
eller meget lidt:
Vandforrådet i dampstrygejernet er brugt op. Fyld
vandtanken med vand.
Dampstrygejernet sprøjter intet eller meget lidt vand ud ved spray-funktionen:
Vandforrådet i dampstrygejernet er brugt op. Fyld
vandtanken med vand.
Dampstrygejernet varmer ikke rigtigt:
Strygejernet er ikke sluttet til eller tændt. Sæt stikket
i stikkontakten, og indstil den ønskede temperatur
med temperatur-regulatoren .
Der løber dråber ud af strygesålen :
Temperaturen er for lav til dampstrygning. Stil temperatur-drejeregulatoren på mindst trin ••.
Hvis de beskrevne aktiviteter ikke hjælper, er dampstrygejernet defekt. Lad det reparere af et kvalificeret specialværksted eller af kundeservice.
Tekniske data
Forsyningsspænding: 220-240 V~/50 Hz
Effekt: 1800 W
Bortskaffelse
Kom under ingen omstændigheder radioen
i det normale husholdningsaffald.
Bortskaf hårudglatteren hos et godkendt affaldsfirma
eller på dit kommunale affaldsanlæg. Følg de aktuelt
gældende regler. Kontakt affaldsordningen, hvis du
er i tvivl.
Aflever alle emballagematerialer på et
affaldsdepot, så miljøet skånes.
IB_KH1282_E5554_DK_3 10.09.2007 16:27 Uhr Seite 35
Page 36

- 36 -
Garanti og service
På dette apparat får du 3 års garanti fra købsdato.
Apparatet er produceret med stor omhu og er
kontrolleret omhyggeligt før levering.
Opbevar kassebonen som bevis for købet. Ring til
det pågældende servicested i tilfælde af, at garantien skal tages i brug. Kun på denne måde kan vi
sikre dig en gratis indsendelse af din vare.
Garantiydelsen gælder kun for materiale- og fabrikationsfejl, men ikke for sliddele eller for beskadigelser
på skrøbelige dele, f.eks. kontakter eller batterier.
Produktet er kun beregnet til brug i private husholdninger og ikke til erhvervsmæssig anvendelse.
Ved misbrug og ukorrekt behandling, vold og ved
indgreb, som ikke er udført af vores autoriserede serviceafdeling, bortfalder garantien.
De rettigheder, som du er sikret ved lov, begrænses
ikke af denne garanti. Denne garanti gælder kun i
forhold til den første køber og kan ikke videregives.
Kompernass Service Danmark
H.C. Ørsteds Vej 6
DK-3000 Helsingør
Tel.: 0045 491 300 72
Fax: 0045 481 448 46
e-mail: support.dk@kompernass.com
Importør
KOMPERNASS GMBH
BURGSTRASSE 21
D-44867 BOCHUM
www.kompernass.com
IB_KH1282_E5554_DK_3 10.09.2007 16:27 Uhr Seite 36
Page 37

- 37 -
Innholdsfortegnelse Side
Grunnleggende sikkerhetsanvisninger 38
Hensiktsmessig bruk 39
Utpakking 39
Før første gangs bruk 39
Kontrollelementer 39
Forberedelser 39
Tilkobling og stryking 40
Dampstryking 41
Stryking med dampstøt 41
Stryking med sprayfunksjon 42
Midlertidig frakobling 42
Koble fra dampstrykejernet 42
Rengjøring og vedlikehold 42
Reparering av funksjonsfeil 43
Tekniske spesifikasjoner 43
Avhending 43
Garanti og service 44
Importør 44
Les bruksanvisningen nøye før første gangen apparatet tas i bruk og oppbevar den for senere bruk. Hvis du
gir dampstrykejernet videre til andre, skal bruksanvisningen følge med.
IB_KH1282_E5554_NO_3 10.09.2007 17:38 Uhr Seite 37
Page 38

- 38 -
Dampstrykejern KH
1282
Grunnleggende sikkerhetsanvisninger
Fare for forbrenning!
• Apparatet må ikke brukes av personer som på
grunn av reduserte fysiske, sensoriske eller mentale egenskaper eller manglende erfaring og
kunnskap ikke vil kunne bruke apparatet på en
forskriftsmessig måte. Slike personer bør i så fall
ha tilsyn og tilstrekkelig opplæring.
• Forklar barn hvilke farer som er forbundet med
apparatet slik at de ikke leker med apparatet.
• Berør aldri strykesålen når apparatet er varmt.
Dampstrykejernet må kun gripes med håndtaket.
• Hold aldri hendene inn i dampstøtet eller mot
varme metalldeler.
• Rett aldri dampstrålen mot personer eller andre
levende vesen.
• Påfyll-åpningen for vanntanken må ikke åpnes
under bruk. La dampstrykejernet avkjøle seg og
trekk støpselet ut av kontakten før du fyller den.
Brannfare!
• La aldri dampstrykejernet være uten tilsyn når det
er tilkoblet eller varmt. Du og andre personer kan
komme til skade hvis strykejernet fortsatt er varmt.
• Still aldri dampstrykejernet i nærheten av brennbare materialer som f. eks. gardiner.
• Du må kun stryke med de temperaturinnstillingene som er angitt på pleiehenvisningene og som
er egnet for materialet. Ellers kan stoffene skades. Hvis ingen pleiehenvisninger er kjent begynner du med den laveste temperaturinnstillingen.
• Dampstrykjernet kan ikke settes tilbake på plass før
det er avkjølt.
• Plassere aldri dampstrykejernet på kanter, for eksempel bordkanter. Det kan lett falle ned på gulvet.
• Sett strykejernet på foten eller flaten som er beregnet for dette på strykebrettet. Ikke len det varme strykejernet mot vegger eller andre gjenstander. Det kan være brannfarlig.
Fare for elektrisk støt!
• Dampstrykejernet må kun tilkobles en veggkontakt
som er forskriftsmessig installert.
• Hvis apparatet er defekt, må det straks repareres
av et autorisert verksted eller det må tas kontakt
med kundeservice for å unngå brannfare.
• Hvis ledningen er defekt, må den straks skiftes, ut
eller du kan henvende deg til kundeservice for å
unngå farer.
• Trekk alltid i støpselet og aldri i ledningen.
• Dampdysen eller spraydysen må aldri rettes mot
elektriske apparater eller mot gjenstander som er
følsomme for varme og fuktighet.
• Aldri knekk ledningen eller la den komme i beklem. Legg ledningen slik at den ikke kommer i
kontakt med varme overflater og slik at ingen kan
snuble i den.
• Før rengjøring, før apparatet fylles med vann og etter hver bruk må støpselet frakobles.
• Før apparatet slås på må ledningen rettes helt ut,
skjøteledning skal ikke brukes.
• Aldri ta på ledningen eller støpselet med fuktige
hender.
• Dampstrykjernet må aldri dyppes ned i en væske
og det må ikke komme inn væske på innsiden av
dampstrykejernets hus. Apparatet må ikke utsettes for fuktighet og ikke benyttes utendørs. Hvis
det likevel skulle skje at væske kommer inni apparathuset må støpselet dras ut av veggkontakten med
en gang, og apparatet må da repareres av et
kvalifisert verksted eller kundeservice.
• Aldri bruk dampstrykejernet i nærheten av vann
som befinner seg i badekar, dusjkar, oppvaskkummer eller andre beholdere. Vann i nærheten
er en stor fare selv om apparatet er slått av.
IB_KH1282_E5554_NO_3 10.09.2007 17:38 Uhr Seite 38
Page 39

- 39 -
• Apparathuset til dampstrykejernet må ikke åpnes.
Det defekte dampstrykejernet må kun repareres av
et kvalifisert verksted eller kundeservice.
• Skadet strømledning eller støpsel skal straks skiftes av autorisert elektriker eller av kundeservice
for å unngå skader.
Obs!
• Hvis pleiehenvisningene på tøyet forbyr stryking,
må ikke tøyet strykes. Ellers kan tøyet ta skade.
• Fyll ingen andre væsker utenom vann inn i vannbeholderen. Ellers blir dampstrykejernet skadet.
• Dampstrykejernet må ikke renses med løsningsmidler, alkohol eller skurende rengjøringsmidler.
Dette kan skade strykejernet.
Hensiktsmessig bruk
Dampstrykejernet skal kun brukes til stryking av tekstiler. Det må kun brukes innendørs innendørs og i
private husholdninger. All annen bruk betraktes som
ikkehensiktsmessig.
Utpakking
For å unngå fare for kvelning må plastposen
oppbevares utilgjengelig for spedbarn og små
barn.
• Ta dampstrykejernet ut av forpakningen.
• Fjern alle etiketter og foliedeler fra dampstrykejernet og strykesålen.
Før første gangs bruk
• Fyll vann i dampstrykejernet (se kapittelet "fylle
på vann") .
• Stikk kontakten inn i en stikkontakt med
220-240 V~/50 Hz.
• Still temperaturregulatoren til „Max“.
• Varm opp dampstrykejernet noen minutter på det
høyeste trinnet.
• Stryk da over et tørkle eller et gammelt stykke stoff
(egnet for varmetrinn •••) for å fjerne eventuelle urenheter fra strykesålen .
• Trykk dampstøttasten noen ganger for å fjer-
ne eventuelle urenheter fra dampdysene.
HENVISNING: Ved første bruk kan rester
som har oppstått under produksjonen danne en
lukt. Denne lukten er ikke helseskadelig. Sørg
for tilstrekkelig ventilasjon; du kan f. eks. åpne
et vindu.
Kontrollelementer
Spraytasten
Oppvarmingskontrollys
Ledning med støpsel
Bevegelig kabelføring
Fot
Vanntank
Temperaturdreieregulator
Strykesåle
Påfyllåpning
Vanndyse
Dampregulator/selvrensing
Dampstøttaste
Målekopp
Forberedelser
Fyll på vann
Du trenger vann for å benytte damp- eller sprayfunksjonen. For tørrstryking trenger du ikke vann.
• Still dampstrykejernet som i avkjølt tilstand loddrett på foten .
• Åpne påfyllåpningen for vanntanken .
IB_KH1282_E5554_NO_3 10.09.2007 17:38 Uhr Seite 39
Page 40

- 40 -
• Bruk målekoppen til å fylle vann maksimalt til
„MAX“-markeringen i vanntanken .
• Åpne påfyllåpningen for vanntanken .
Hvis vannet fra kranen er for hardt der du bor anbefaler vi å blande vannet fra kranen med destillert
vann. Ellers kan dysene for dampstøtfunksjonen forkalke for tidlig.
For forlengelse av den optimale dampstøtfunksjonen
må du blande vannet fra kranen med destillert vann
slik det er angitt i tabellen.
Du kan få opplysninger om vannhardheten fra ditt
lokale vannverk.
Vannhardhet
Andel destillert vann
til vann fra kranen
veldig bløtt/bløtt 0
middels 1 : 1
hardt 2: 1
veldig hardt 3: 1
Tilkobling og stryking
STRYKETIPS
Sorter tøyet etter tekstiltyper. Følg alltid stryke-og
pleiehenvisningene på klesplagget eller på stoffet.
Begynn med de stoffene som trenger det laveste
oppvarmingstrinnet.
Hvis ikke du er sikker på tekstiltypen, kan du først
stryke et lite området forsiktig (sømmen eller indre
kant). Hvis du er i tvil starter du først med lav stryketemperatur. Hvis folder forblir må du trinnvis forhøye
temperaturen. Når du har funnet varmetrinnet som
oppnår de beste strykeresultatene kan du ikke forhøye temperaturen videre. Still aldri temperaturen
så høyt at stoffet skades.
Tilkobling
• Stikk støpselet inn i kontakten.
Stryking
Sett kun strykjernet på foten når du bruker det
eller på frastillingsplassen på strykebrettet. Ikke
len det varme strykejernet inntil vegger eller andre gjenstander. Det kan være brannfarlig.
Tørrstryking uten damp kan du gjennomføre med
alle temperaturer, dampstryking er ikke mulig under
trinn ••.
Innstilling av
strykejernet
Stofftype
• Silke, nylon
•• Ull
••• Bomull
Max Lin
IB_KH1282_E5554_NO_3 10.09.2007 17:38 Uhr Seite 40
Page 41

- 41 -
Obs!
• Hvis pleiehenvisningene på klærne forbyr stryking (Symbol ) må kles-plagget ikke strykes.
Ellers kan plaggene skades.
• Kontroller pleiehenvisningen på klesplagget for å
kontrollere om plagget kan strykes og hvilken
temperatur du skal bruke.
• Still inn til egnet temperatur ved å bruke temperatur-regulatoren .
Oppvarmingskontrollyset lyser. Når oppvarmingskontrollyset slukner er den innstilte temperaturen
oppnådd.
• Vent til oppvarmingskontrollyset for temperaturen går av.
• La dampstrykejernet gli over stoffet med lett
trykk.
Unngå å stryke over glidelåser og nagler der-
som disse kan forårsake revner i strykesålen
. Unngå disse under strykingen.
Dampstryking
• Bruk dampregulatoren for å stille inn ønsket
dampstyrke.
Hvis temperaturdreieregulatoren er stilt til trinn
•• må dampregulatoren alltid stilles til det lille
dampsymbolet.
MIN
MAX
Hvis temperaturdreieregulatoren er stilt til trinn
••• må dampregulatoren alltid stilles til det store dampsymbolet.
HENVISNING: Dampstryking er ikke mulig
under trinn ••.
HENVISNING: Dersom det ikke er behov for
mer damp, eller det er stilt inn en lavere temperatur enn trinn •• , ,dreier dampregulatoren
seg automatisk til ”0”! Ellers kan det komme
vann ut av jernets såle .
Dryppstoppfunksjon
Dette strykejernet har en dryppstoppfunksjon. Denne
forhindret at det kommer ut dråper fra jernets såle
når jernet er slått av og ved dampstryking. Ved dampstryking må strykejernet minst stå på trinn ••. Still
derfor inn dampregulatoren til „Damp“ først når
trinn •• er stilt inn og temperaturen er nådd. Ellers
kan det komme vann ut av jernets såle .
Stryking med dampstøt
Dampstøtet er spesielt egnet for å stryke områder på
plaggene som er vanskelige å komme til.
HENVISNING: Dampstøt er først mulig fra
trinn •••.
• Løft dampstrykejernet litt.
• Trykk på dampstøttasten én gang for et dampstøt
.
IB_KH1282_E5554_NO_3 10.09.2007 17:38 Uhr Seite 41
Page 42

- 42 -
Stryking med sprayfunksjon
• For å få klesplaggene fuktige må du trykke
spraytasten .
Denne funksjonen er spesielt egnet for veldig tørre
og krøllede plagg.
Midlertidig frakobling
Brannfare!
La aldri det varme eller tilkoblede dampstrykejernet
være uten tilsyn.
• Still temperaturregulatoren til „Min“.
• Still dampstrykejernet på foten .
eller
• legg dampstrykejernet på den tilsvarende flaten
på strykebrettet.
Obs: Sett aldri strykejernet på en flate som
ikke tåler varme. Brannfare!
Koble fra dampstrykejernet
• Dra støpselet ut av kontakten.
• La dampstrykejernet få avkjøle.
• Tøm vanntanken ved å åpne påfyllåpningen
og tømmer dampstrykejernet sidelengs
(se ill. 1) eller forover (se ill. 2).
• Rens strykesålen (se kapittelet „rengjøring og
pleie“).
• Surr ledningen rundt ledningsholderen på
foten.
• Sett det avkjølte dampstrykejernet vannrett på et
mykt og rent underlag.
Rengjøring og vedlikehold
• Unngå å stryke over glidelåser og nagler dersom disse kan forårsake revner i strykesålen .
Unngå disse under strykingen.
Sørg for at strykesålen holder seg glatt.
• Vannets egenskaper og dets mineraler er svært
forskjellig fra sted til sted. Hvis vannet der du bor
er veldig hardt, anbefaler vi at du i tillegg bruker
destillert vann for at strykejernet skal gi deg et
optimalt resultat (se kapittel ”fylle på vann”.)
Bruk ingen syrer (for eksempel eddik) eller
avkalkingsmidler for å rengjøre dampstrykejernet.
• Rens huset kun med et bløtt, tørt tørkle.
• Bruk ingen aggressive rengjøringsmidler.
Advarsel: Legg aldri dampstrykejernet ned i
vann eller i andre væsker.
• Rens metalldelene med et litt fuktig tørkle. Tørk
alle delene grundig.
• Bruk ingen skurende rengjøringsmidler.
• La apparatet tørke helt før du bruker det igjen.
✓
ill. 1
ill. 2
✓
IB_KH1282_E5554_NO_3 10.09.2007 17:38 Uhr Seite 42
Page 43

- 43 -
Funksjonen selvrensing (self-clean)
• Fyll vanntanken til markeringen MAX.
• Stikk støpselet inn i kontakten.
• Still temperaturregulatoren til trinnet „Max.
• La strykejernet varme opp til oppvarmingskontrollyset går av og begynner å lyse på nytt.
• Hold strykejernet vannrett over en samlebolle.
• Still dampregulatoren til posisjonen Self Clean
. Dampregulatoren dreier litt ut i posisjonen
Self Clean. Derved vil damp og kokende vann
komme ut av dampåpningene i strykesålen .
Eventuelt eksisterende for-urensinger vil skylles ut
ved dette.
Obs!
Det består fare for forbrenninger!
• Drei dampregulatoren inn igjen så snart som
vannet i vanntanken er brukt opp.
• For å sikre at ikke det fins vann igjen inne i dampkammeret må du tørke strykesålen grundig. For
dette må du kjøre strykesålen frem og tilbake
noen ganger over et tørkle eller et gammelt stykke stoff (egnet for varmetrinn •••).
• La strykejernet få avkjøle før du setter det til side.
Reparering av funksjonsfeil
Dampstrykejernet vil ikke støte ut noen
damp eller kun litt damp.
Vannmengden i dampstrykejernet er brukt opp. Fyll
vanntanken med vann.
Dampstrykejernet sprayer ingen eller veldig lite vann ved bruk av sprayfunksjonen:
Vannet i dampstrykejernet er brukt opp. Fyll vanntanken med vann.
Dampstrykejernet vil ikke oppvarmes:
Strykejernet er ikke tilkoblet eller slått på. Stikk støpselet inn i kontakten og still inn ønsket temperatur
med temperaturdreieregulatoren .
Det kommer ut dråper fra jernets såle :
Temperaturen er for lav for dampstryking. Still temperaturregulatoren til trinn ••.
Hvis de beskrevne tiltakene ikke løser problemet er
dampstrykejernet defekt. Da må det repareres av et
kvalifisert verksted eller kundeservice.
Tekniske spesifikasjoner
Elektrisk spenning: 220-240 V~/50 Hz
Wattforbruk: 1800 W
Avhending
Apparatet må ikke kastes i husholdningsavfallet.
Apparatet avhendes via godkjent renovasjonsbedrift eller leveres til godkjent avfallsbehandlingsanlegg. Følg gjeldende forskrifter for denne typen
avfall. Ta kontakt med renovasjonsetaten i din
kommune hvis du er i tvil.
Kildesorter all embalasje før du kaster den.
IB_KH1282_E5554_NO_3 10.09.2007 17:38 Uhr Seite 43
Page 44

- 44 -
Garanti og service
Du får garanti på dette apparatet som gjelder i 3 år
etter kjøpdato. Apparatet har blitt produsert med
omsorg og har blitt kontrollert samvittighetsfull.
Oppbevar kassakvitteringen som bevis for kjøpet.
Hvis det blir nødvendig for deg å kreve Garantiytelser må du ringe ditt servicekontor. Bare da kan varen din bli sendet inn gratis.
Garanti gjelder kun for material- og fabrikasjonsfeil,
men ikke for deler som er utsatt for slitasje eller for
skader på skjøre deler som f. eks. brytere eller batterier. Produktet er utelukkende ment for privat og ikke
for yrkesmessig bruk. Ved uriktig og ufagmessig behandling, bruk av vold og ved inngrep som ikke har
blitt gjennomført av vår autorisert servicefilial forfaller garantien.
Dine lovbestemte retter innskrenkes ikke av denne
garantien. Denne garantien gjelder bare for første
kjøper og kan ikke overføres.
Kompernaß Service Norway
Phone: 0047 3558 3550
Importør
KOMPERNASS GMBH
BURGSTRASSE 21
D-44867 BOCHUM
www.kompernass.com
IB_KH1282_E5554_NO_3 10.09.2007 17:38 Uhr Seite 44
Page 45

- 45 -
ΠΠεερριιεεχχόόµµεενναα ΣΣεελλίίδδαα
Βασικές υποδείξεις ασφαλείας 46
Χρήση σύµφωνη µε τους κανονισµούς 47
Αποσυσκευασία 47
Πριν την πρώτη χρήση 47
Στοιχεία χειρισµού 48
Προετοιµασίες 48
Σύνδεση και σιδέρωµα 48
Σιδέρωµα µε ατµό 49
Σιδέρωµα µε ώθηση ατµού 50
Σιδέρωµα µε λειτουργία ψεκασµού 50
Προσωρινή απενεργοποίηση σίδερου µε ατµό 50
Απενεργοποίηση σίδερου µε ατµό 50
Καθαρισµός και συντήρηση 51
∆ιόρθωση βλαβών 52
Τεχνικές πληροφορίες 52
Αποµάκρυνση 52
Εγγύηση και σέρβις 52
Εισαγωγέας 53
∆ιαβάστε το εγχειρίδιο χειρισµού πριν από την πρώτη χρήση προσεκτικά και φυλάξτε το για µια µελλοντική
χρήση. Παραδώστε το εγχειρίδιο σε όποιον παραδοθεί στη συνέχεια η συσκευή.
IB_KH1282_E5554_GR_3 10.09.2007 17:07 Uhr Seite 45
Page 46

- 46 -
ΑΑττµµοοσσίίδδεερροο KKHH 11228822
Βασικές υποδείξεις
ασφαλείας
Κίνδυνος εγκαύµατος!
• Αυτή η συσκευή δεν προορίζεται για χρήση από
παιδιά ή άλλα άτοµα χωρίς υποστήριξη ή
επιτήρηση, εάν οι φυσικές, αισθητηριακές ή
πνευµατικές δυνατότητες τους, τους εµποδίζουν
από το να την χρησιµοποιούν µε ασφάλεια.
• Τα παιδιά πρέπει να επιτηρούνται ώστε να
εξασφαλίζεται ότι δεν θα παίζουν µε τη συσκευή.
• Ποτέ µην αγγίζετε τη βάση σίδερου όταν η
συσκευή είναι καυτή. Πιάνετε το ατµοσίδερο µόνο
από τη λαβή του.
• Ποτέ µην έχετε τα χέρια σας στο σηµείο εξόδου
ατµού ή σε καυτά µεταλλικά τµήµατα.
• Ποτέ µην κατευθύνετε την ώθηση ατµού σε άτοµα
ή άλλα ζώντα όντα.
• ∆εν επιτρέπεται κατά τη λειτουργία να ανοίγετε το
άνοιγµα πλήρωσης για το δοχείο νερού. Αφήστε
πρώτα το ατµοσίδερο να κρυώσει και τραβήξτε
το βύσµα από την πρίζα ώστε να το γεµίσετε.
Κίνδυνος πυρκαγιάς!
• Ποτέ µην αφήνετε το καυτό ή ενεργοποιηµένο
ατµοσίδερο χωρίς επιτήρηση. Εσείς και οι
συνάνθρωποι σας µπορείτε να τραυµατιστείτε
από το καυτό σίδερο.
• Ποτέ µην τοποθετείτε το ατµοσίδερο κοντά σε
εύφλεκτα υλικά όπως κουρτίνες ή παρόµοια.
Αυτά µπορεί να πιάσουν φωτιά.
• Σιδερώνετε µόνο µε τις ρυθµίσεις που
αναφέρονται στις υποδείξεις φροντίδας και µε
τις κατάλληλες ρυθµίσεις θερµοκρασίας. Αλλιώς
µπορεί να καταστρέψετε τα υφάσµατα. Στην
περίπτωση που δεν σας είναι γνωστές υποδείξεις
φροντίδας, ξεκινήστε µε την χαµηλότερη ρύθµιση
θερµοκρασίας.
• Αποθηκεύετε το ατµοσίδερο πάντα όταν έχει κρυώσει.
• Ποτέ µην τοποθετείτε το ατµοσίδερο σε άκρες, όπως
για παράδειγµα σε άκρες τραπεζιών. Μπορεί να γείρει
και να πέσει κάτω.
• Τοποθετήστε το ατµοσίδερο µόνο στη βάση του ή
στην προβλεπόµενη επιφάνεια τοποθέτησης στη
σανίδα σιδερώµατος. Μην γέρνετε το καυτό σίδερο σε
τοίχους ή άλλα αντικείµενα. Σε άλλη περίπτωση
υπάρχει κίνδυνος πυρκαγιάς.
Κίνδυνος από ηλεκτροπληξία!
• Συνδέετε το ατµοσίδερο µόνο σε µια σύµφωνα µε τις
προδιαγραφές εγκατεστηµένη πρίζα.
• Μια ελαττωµατική συσκευή πρέπει να επιδιορθώνεται
αµέσως από εξειδικευµένο συνεργείο ή πρέπει να
απευθύνεστε στο τµήµα εξυπηρέτησης πελατών ώστε
να αποφεύγετε κινδύνους.
• Ένα ελαττωµατικό καλώδιο δικτύου πρέπει να
αντικαθίσταται αµέσως ή πρέπει να απευθύνεστε στο
τµήµα εξυπηρέτησης πελατών ώστε να αποφεύγετε
κινδύνους.
• Τραβάτε πάντα µόνο από το βύσµα, ποτέ από το
καλώδιο.
• Ποτέ µην κατευθύνετε τα ακροφύσια ατµού ή το
ακροφύσιο ψεκασµού σε ηλεκτρικές συσκευές ή σε
αντικείµενα που έχουν ευαισθησία στις υψηλές
θερµοκρασίες καθώς και στην υγρασία.
• Μην κάµπτετε ή συµπιέζετε το καλώδιο δικτύου και
τοποθετείτε το έτσι ώστε να µην έρχεται σε επαφή µε
καυτές επιφάνειες και να µην µπορεί κανείς να πατάει
εκεί ή να σκοντάφτει.
• Πριν από τον καθαρισµό, την πλήρωση µε νερό και
µετά από κάθε χρήση τραβάτε το βύσµα.
IB_KH1282_E5554_GR_3 10.09.2007 17:07 Uhr Seite 46
Page 47

- 47 -
• Πριν από την ενεργοποίηση τυλίγετε πάντα εντελώς
το καλώδιο δικτύου και µην χρησιµοποιείτε καλώδια
επεκτάσεις.
• Ποτέ µην πιάνετε το καλώδιο ή το βύσµα µε
βρεγµένα χέρια.
• Σε καµία περίπτωση δεν επιτρέπεται να βυθίζετε το
ατµοσίδερο σε υγρά και δεν επιτρέπεται να αφήνετε
να φτάνουν υγρά στο περίβληµα συσκευής. ∆εν
επιτρέπεται να εκθέτετε τη συσκευή σε υγρασία και
δεν πρέπει να την χρησιµοποιείτε σε εξωτερικό χώρο.
Στην περίπτωση που ωστόσο φτάσει υγρό στο
περίβληµα συσκευής, τραβήξτε αµέσως το βύσµα
της συσκευής από την πρίζα και παραδώστε το για
επιδιόρθωση από ένα εξειδικευµένο συνεργείο ή από
το τµήµα εξυπηρέτησης πελατών.
• Σε καµία περίπτωση µην χρησιµοποιείτε το
ατµοσίδερο κοντά σε νερό το οποίο υπάρχει σε
µπανιέρες, ντους, νιπτήρες ή σε άλλα δοχεία.
Υπάρχει κίνδυνος από την ύπαρξη νερού ακόµα και
όταν η συσκευή είναι εκτός ρεύµατος.
• ∆εν επιτρέπεται να ανοίξετε το περίβληµα της
συσκευής. Ένα ελαττωµατικό ατµοσίδερο επιτρέπεται
να επιδιορθώνεται µόνο από ένα εξειδικευµένο
συνεργείο ή από το τµήµα εξυπηρέτησης πελατών.
• Τα χαλασµένα βύσµατα ή καλώδια δικτύου πρέπει
να αντικαθίστανται αµέσως από εξουσιοδοτηµένο
ειδικό προσωπικό ή από το τµήµα εξυπηρέτησης
πελατών ώστε να αποφεύγονται κίνδυνοι.
Προσοχή!
• Στην περίπτωση που οι υποδείξεις φροντίδας στο
ρούχο απαγορεύουν το σιδέρωµα (σύµβολο ),
δεν επιτρέπεται να σιδερώσετε το είδος ένδυσης.
Αλλιώς ίσως το καταστρέψετε.
• Μην γεµίζετε µε άλλα υγρά το δοχείο νερού εκτός
από νερό. Σε αντίθετη περίπτωση καταστρέφετε το
ατµοσίδερο.
• ∆εν επιτρέπεται να καθαρίζετε το ατµοσίδερο µε
διαλυτικά µέσα, οινόπνευµα ή τριβικά καθαριστικά
µέσα. Σε άλλη περίπτωση µπορεί να το
καταστρέψετε.
Χρήση σύµφωνη µε τους
κανονισµούς
Το ατµοσίδερο προορίζεται αποκλειστικά για το
σιδέρωµα υφασµάτων. Επιτρέπεται να το χρησιµοποιείτε
µόνο εντός κλειστών χώρων και σε οικιακά νοικοκυριά.
Όλες οι άλλες χρήσεις ισχύουν ως µη σύµφωνες µε
τους κανονισµούς.
Αποσυσκευασία
Οι πλαστικές σακούλες µπορεί να αποτελούν
κίνδυνο. Για να αποφύγετε κίνδυνο πνιγµού,
φυλάτε τις πλαστικές σακούλες εκτός εµβέλειας
νηπίων και µικρών παιδιών.
• Αποµακρύνετε το ατµοσίδερο από τη συσκευασία.
• Αποµακρύνετε όλα τα αυτοκόλλητα και τα τµήµατα
µεµβρανών από το ατµοσίδερο και από την βάση
σίδερου .
Πριν την πρώτη χρήση
• Γεµίστε µε νερό το ατµοσίδερο (Βλέπε Κεφάλαιο
ψΠλήρωση µε νερό“).
• Εισάγετε το βύσµα στην πρίζα µε
220-240 V~/50 Hz.
• Θέστε τον περιστροφικό ρυθµιστή θερµοκρασίας
στο “Max“.
• Θερµαίνετε το ατµοσίδερο µερικά λεπτά στην
υψηλότερη βαθµίδα.
• Στη συνέχεια σιδερώστε πάνω από µια πετσέτα ή
ένα παλιό κοµµάτι ύφασµα (ενδείκνυται για την
υψηλότερη βαθµίδα•••), ώστε να
αποµακρύνετε ενδεχόµενες ακαθαρσίες από τη
βάση σίδερου .
• Πατήστε µερικές φορές το πλήκτρο ώθησης
ατµού , ώστε να αποµακρύνετε ενδεχόµενες
ακαθαρσίες από τα ακροφύσια ατµού.
IB_KH1282_E5554_GR_3 10.09.2007 17:07 Uhr Seite 47
Page 48

- 48 -
ΥΠΟ∆ΕΙΞΗ: Κατά την πρώτη χρήση ίσως
υπάρξει δηµιουργία ελαφριάς οσµής που οφείλεται
στην διαδικασία κατασκευής. Αυτή η οσµή δεν είναι
επιβλαβής για την υγεία. Φροντίζετε για επαρκή
αερισµό, για παράδειγµα ανοίξτε ένα παράθυρο.
Στοιχεία χειρισµού
Πλήκτρο ψεκασµού
Λυχνία ελέγχου θέρµανσης
Καλώδιο δικτύου µε βύσµα
Κινούµενη οδήγηση καλωδίου
Βάση
∆οχείο νερού
Περιστροφικός ρυθµιστής θερµοκρασίας
Βάση σίδερου
Άνοιγµα πλήρωσης
Ακροφύσιο νερού
Ρυθµιστής ατµού/Αυτόµατο καθάρισµα Self Clean
Πλήκτρο ώθησης ατµού
∆οχείο µέτρησης
Προετοιµασίες
Προσθήκη νερού
Χρειάζεστε νερό για να χρησιµοποιήσετε τη
λειτουργία ατµού ή ψεκασµού. Για στεγνό σιδέρωµα
δεν χρειάζεστε νερό.
• Εισάγετε το ατµοσίδερο σε κρύα κατάσταση
κάθετα επάνω στη βάση .
• Ανοίξτε το άνοιγµα πλήρωσης για το δοχείο
νερού .
• Γεµίστε µε το δοχείο µέτρησης νερό το πολύ
έως το σύµβολο ψMAX“ στο δοχείο νερού .
• Κλείστε το άνοιγµα πλήρωσης για το δοχείο
νερού .
Εάν το νερό βρύσης της περιοχής σας είναι πολύ
σκληρό, προτείνεται να αναµείξετε το νερό βρύσης µε
αποσταγµένο νερό. Αλλιώς τα ακροφύσια για τη
λειτουργία ώθησης ατµού µπορεί να γεµίσουν άλατα
πρόωρα. Για την παράταση της τέλειας λειτουργίας
ώθησης ατµού αναµείξτε το νερό βρύσης µε
αποσταγµένο νερό σύµφωνα µε τον πίνακα.
Μπορείτε να µάθετε για τη σκληρότητα νερού στην
τοπική εγκατάσταση ύδρευσης.
Σύνδεση και σιδέρωµα
Υποδείξεις σιδερώµατος
∆ιαχωρίστε τα υφάσµατα σύµφωνα µε το είδος
υφάσµατος. Ακολουθείτε πάντα τις υποδείξεις
σιδερώµατος και φροντίδας στο ύφασµα. Ξεκινήστε µε
τα υφάσµατα τα οποία απαιτούν τη µικρότερη βαθµίδα
θέρµανσης.
Όταν δεν είστε σίγουροι για τη δοµή υφάσµατος,
σιδερώστε πρώτα προσεκτικά σε µια µικρή επιφάνεια
(σηµείο στριφώµατος ή σε εσωτερική άκρη). Σε
περίπτωση αµφιβολίας ξεκινήστε µε µια ελάχιστη
θερµοκρασία σιδερώµατος. Όταν παραµένουν ζάρες,
αυξήστε βηµατικά την θερµοκρασία. Όταν έχετε βρει τη
βαθµίδα θερµοκρασίας µε την οποία επιτυγχάνετε τα
καλύτερα αποτελέσµατα σιδερώµατος, µην αυξάνετε τη
θερµοκρασία. Ποτέ µην αυξάνετε πολύ τη θερµοκρασία
διότι ίσως καταστραφεί το ύφασµα που σιδερώνεται.
Σκληρότητα
νερού
Αναλογία
αποσταγµένου νερού
σε νερό βρύσης
πολύ µαλακό/
µαλακό
0
µεσαίο 1: 1
σκληρό 2: 1
πολύ σκληρό 3: 1
IB_KH1282_E5554_GR_3 10.09.2007 17:07 Uhr Seite 48
Page 49

- 49 -
Σύνδεση
• Εισάγετε το βύσµα σε µια πρίζα δικτύου.
Σιδέρωµα
Τοποθετείτε το ατµοσίδερο κατά τη διάρκεια
της λειτουργίας στη βάση , ή στην
προβλεπόµενη επιφάνεια τοποθέτησης στη
σιδερώστρα. Μην γέρνετε το καυτό σίδερο σε
τοίχους ή άλλα αντικείµενα. Σε άλλη περίπτωση
υπάρχει κίνδυνος πυρκαγιάς.
Μπορείτε να σιδερώνετε στεγνά σε όλες τις
θερµοκρασίες, σιδέρωµα στον ατµό είναι δυνατό
από τη βαθµίδα ••.
Προσοχή!
Στην περίπτωση που οι υποδείξεις φροντίδας στο
ύφασµα απαγορεύουν το σιδέρωµα (σύµβολο ),
δεν επιτρέπεται να σιδερώσετε το ύφασµα. Αλλιώς
ίσως καταστρέψετε το ύφασµα.
• Ελέγχετε τις υποδείξεις φροντίδας στις ετικέτες στο
ύφασµα, για το εάν και σε ποια ρύθµιση
θερµοκρασίας ενδείκνυται να σιδερώνεται το ύφασµα.
Ρύθµιση σίδερου
ατµού
Είδος υφάσµατος
• Μετάξι, νάιλον
•• Μαλλί
••• Βαµβάκι
Μέγ. Λινό
• Ρυθµίστε την κατάλληλη ρύθµιση θερµοκρασίας µε
τον περιστροφικό ρυθµιστή θερµοκρασίας .
Η λυχνία ελέγχου θέρµανσης ανάβει. Όταν η λυχνία
ελέγχου θέρµανσης σβήνει, έχει επιτευχθεί η
ρυθµισµένη θερµοκρασία.
• Περιµένετε έως ότου η λυχνία ελέγχου θέρµανσης
για τη θερµοκρασία σβήσει.
• Αφήστε το ατµοσίδερο µε ελαφριά πίεση να
γλιστρήσει επάνω στο ύφασµα.
Αποφεύγετε να σιδερώνετε επάνω σε φερµουάρ και
περτσίνια διότι αυτά γρατσουνάνε τη βάση σίδερου
. Αυτά να τα αποφεύγετε κατά το σιδέρωµα.
Σιδέρωµα µε ατµό
• Ρυθµίστε µε τον ρυθµιστή ατµού την επιθυµητή ισχύ
ατµού:
Όταν έχετε θέσει τον περιστρεφόµενο ρυθµιστή
θερµοκρασίας στη βαθµίδα ••, θέτετε τον ρυθµιστή
ατµού πάντα στο µικρό σύµβολο ατµού.
Όταν έχετε θέσει τον περιστρεφόµενο ρυθµιστή
θερµοκρασίας στη βαθµίδα •••, θέτετε τον ρυθµιστή
ατµού πάντα στο µεγάλο σύµβολο ατµού.
ΥΠΟ∆ΕΙΞΗ: Το σιδέρωµα µε ατµό είναι µόνο
δυνατό από τη βαθµίδα ••.
MIN
MAX
IB_KH1282_E5554_GR_3 10.09.2007 17:07 Uhr Seite 49
Page 50

- 50 -
ΥΠΟ∆ΕΙΞΗ: Εάν δεν χρειάζεται ατµός άλλο, ή
εάν έχει ρυθµιστεί µια χαµηλότερη
θερµοκρασία από τη βαθµίδα •• γυρίζετε τον
ρυθµιστή ατµού πάντα στο “0“! Αλλιώς
ίσως βγει νερό από την βάση σίδερου .
Λειτουργία σταµατήµατος σταξίµατος
Αυτό το ατµοσίδερο παρουσιάζει ένα νέο χαρακτηριστικό
εξοπλισµού, τη λειτουργία απενεργοποίησης ατµού
ΣΤΑΜΑΤΗΜΑΤΟΣ ΣΤΑΞΙΜΑΤΟΣ. Το ατµοσίδερο
απενεργοποιεί αυτόµατα την ώθηση ατµού σε
χαµηλές θερµοκρασίες. Μόνο από τη βαθµίδα ••
ενεργοποιείται η λειτουργία σταµατήµατος
σταξίµατος. Για το λόγο αυτό θέστε τον ρυθµιστή
ατµού πρώτα στο ψDampf“ (ατµός), όταν ο
περιστρεφόµενος ρυθµιστής ατµού έχει τεθεί
τουλάχιστο στη βαθµίδα •• . Αλλιώς µπορεί να
βγει νερό από τη βάση σίδερου .
Σιδέρωµα µε ώθηση ατµού
Η ώθηση ατµού ενδείκνυται ιδιαίτερα για τη λείανση
δύσκολα προσβάσιµων πεδίων των υφασµάτων.
ΥΠΟ∆ΕΙΞΗ: Η ώθηση ατµού είναι µόνο δυνατή
από τη βαθµίδα •••.
• Σηκώστε λίγο το σίδερο στµού.
• Για µια ώθηση ατµού πατήστε µια φορά το πλήκτρο
ώθησης ατµού .
Σιδέρωµα µε λειτουργία
ψεκασµού
• Για την ύγρανση των ρούχων πατήστε στο πλήκτρο
ψεκασµού .
Αυτή η λειτουργία ενδείκνυται για πολύ στεγνά, εξαιρετικά
τσαλακωµένα υφάσµατα.
Προσωρινή
απενεργοποίηση σίδερου µε
ατµό
Κίνδυνος πυρκαγιάς!
Ποτέ µην αφήνετε το καυτό ή ενεργοποιηµένο ατµοσίδερο
χωρίς επιτήρηση.
• Θέστε τον ρυθµιστή θερµοκρασίας στο ψMin“.
• Τοποθετείστε το ατµοσίδερο επάνω στη βάση .
ή
• Τοποθετείστε το ατµοσίδερο στο για αυτό
προβλεπόµενο σηµείο απόθεσης στη
σιδερώστρα.
Προσοχή: Ποτέ µην τοποθετείτε το σίδερο σε
ακατάλληλες βάσεις. Κίνδυνος πυρκαγιάς!
Απενεργοποίηση σίδερου
µε ατµό
• Τραβήξτε το βύσµα από την υποδοχή.
• Αφήστε το ατµοσίδερο να κρυώσει.
• Αδειάζετε το δοχείο νερού , σηκώνοντας
επάνω το άνοιγµα πλήρωσης και είτε γέρνετε
το σίδερο ατµού πάνω από τα πλάγια (βλέπε
Απεικ.1) είτε αδειάζετε επάνω και προς τα
εµπρός (βλέπε Απεικ.2).
✓
Απεικ.1
IB_KH1282_E5554_GR_3 10.09.2007 17:07 Uhr Seite 50
Page 51

- 51 -
• Καθαρίζετε τη βάση σίδερου
(βλέπε Κεφάλαιο ψΚαθαρισµός και φροντίδα“).
• Τυλίξτε το καλώδιο δικτύου γύρω από τη
συγκράτηση καλωδίου δικτύου στη βάση .
• Τοποθετείστε το κρύο ατµοσίδερο οριζόντια σε
µια µαλακή, καθαρή βάση.
Καθαρισµός και
συντήρηση
• Αποφεύγετε να σιδερώνετε επάνω σε φερµουάρ
και περτσίνια διότι αυτά γρατσουνάνε τη βάση
σίδερου . Αυτά να τα αποφεύγετε κατά το
σιδέρωµα.
Προσέχετε ώστε η βάση σίδερου να
παραµείνει λεία.
• Η ποιότητα νερού και των ανόργανων ουσιών του
είναι διαφορετική ανάλογα µε την τοποθεσία. Όταν
το νερό στην περιοχή σας είναι πολύ σκληρό,
προτείνουµε συµπληρωµατικά τη χρήση
αποσταγµένου νερού ώστε να εξασφαλίσετε την
τέλεια δυνατότητα λειτουργίας του σίδερου ατµού
(βλέπε Κεφάλαιο ψΠλήρωση νερού“).
Μην χρησιµοποιείτε οξέα (για παράδειγµα ξίδι) ή
µέσα αφαίρεσης αλάτων για να καθαρίσετε το
ατµοσίδερο.
• Καθαρίζετε το περίβληµα µόνο µε ένα µαλακό,
στεγνό πανί.
• Μην χρησιµοποιείτε επιθετικά καθαριστικά µέσα.
Προειδοποίηση: Ποτέ µην βυθίζετε το
ατµοσίδερο σε νερό ή άλλα υγρά.
• Καθαρίζετε τα µεταλλικά τµήµατα µε ένα ελαφρά
νωπό πανί µε νερό. Στεγνώνετε λεπτοµερώς όλα τα
τµήµατα.
• Μην χρησιµοποιείτε τριβικά καθαριστικά µέσα.
• Αφήνετε τη συσκευή να στεγνώνει εντελώς πριν την
θέσετε εκ νέου σε λειτουργία
Λειτουργία αυτόµατου καθαρισµού (SelfClean)
• Γεµίστε το δοχείο νερού έως το σύµβολο MAX.
• Εισάγετε το βύσµα µέσα στην πρίζα δικτύου.
• Θέστε τον περιστροφικό ρυθµιστή θερµοκρασίας
στη βαθµίδα Max.
• Αφήστε το ατµοσίδερο να ζεσταθεί έως ότου η
λυχνία ελέγχου θέρµανσης σβήσει και ανάψει
εκ νέου.
• Κρατήστε το ατµοσίδερο οριζόντια πάνω από
ένα µπολ συλλογής.
• Θέστε τον ρυθµιστή ατµού στη θέση Self Cle-
an . Ο ρυθµιστής ατµού περιστρέφεται
στη θέση Self Clean λίγο προς τα έξω. Τότε
βγαίνει ατµός και βραστό νερό από τις οπές
εξόδου ατµού στη βάση του σίδερου .
Ενδεχόµενα υπάρχουσες ακαθαρσίες
αποπλένονται και βγαίνουν τότε προς τα έξω.
Προσοχή!
Υπάρχει κίνδυνος εγκαύµατος!
• Βιδώστε πάλι τον ρυθµιστή ατµού , µόλις
υπάρχει πάλι νερό στο δοχείο νερού .
• Για να εξασφαλίσετε ότι δεν θα µείνει πίσω νερό
µέσα στο θάλαµο ατµού, στεγνώστε τη βάση
σίδερου λεπτοµερώς. Για αυτό οδηγήστε
πέρα - δώθε τη βάση σίδερου µερικές φορές
πάνω από µια πετσέτα ή από ένα παλιό κοµµάτι
υφάσµατος (ενδείκνυται για τη βαθµίδα
θέρµανσης ••• ).
• Αφήστε το ατµοσίδερο να κρυώσει πριν το
αποθηκεύσετε.
✓
Απεικ.2
IB_KH1282_E5554_GR_3 10.09.2007 17:07 Uhr Seite 51
Page 52

- 52 -
∆ιόρθωση βλαβών
Το ατµοσίδερο δεν βγάζει ή βγάζει πολύ
ελάχιστο ατµό προς τα έξω:
Ο χώρος αποθήκευσης νερού στο ατµοσίδερο έχει
αδειάσει. Γεµίστε το δοχείο νερού µε νερό.
Το ατµοσίδερο δεν ψεκάζει ή ψεκάζει πολύ
λίγο νερό κατά τη λειτουργία ψεκασµού:
Ο χώρος αποθήκευσης νερού στο ατµοσίδερο έχει
φθαρεί. Γεµίστε το δοχείο νερού µε νερό.
Το ατµοσίδερο δεν ζεσταίνεται:
Το ατµοσίδερο δεν είναι συνδεδεµένο ή
ενεργοποιηµένο. Εισάγετε το βύσµα δικτύου στην
υποδοχή και ρυθµίστε µε τον περιστροφικό
ρυθµιστή θερµοκρασίας την επιθυµητή
θερµοκρασία.
Βγαίνουν από τη βάση σίδερου
σταγόνες:
Η θερµοκρασία είναι πολύ χαµηλή για το σιδέρωµα
µε ατµό. Θέστε τον περιστρεφόµενο ρυθµιστή
θερµοκρασίας 7 τουλάχιστο στη βαθµίδα ••.
Εάν τα περιγραφόµενα µέτρα δεν παρέχουν καµία
βοήθεια, το ατµοσίδερο είναι ελαττωµατικό.
Παραδώστε το για επισκευή σε ένα εξειδικευµένο
συνεργείο ή στο τµήµα εξυπηρέτησης πελατών.
Τεχνικές πληροφορίες
Τάση παροχής : 220-240 V~/50 Hz
Απόδοση: 1800 W
Αποµάκρυνση
Σε καµία περίπτωση µην πετάξετε τη συσκευή
στα φυσιολογικά οικιακά απορρίµµατα.
Αποµακρύνετε τη συσκευή µέσω µιας εγκεκριµένης
επιχείρησης απόρριψης ή µέσω της κοινοτικής
επιχείρησης απόρριψης. Προσέχετε τις τρέχουσες
ισχύουσες προδιαγραφές. Σε περίπτωση
αµφιβολιών ελάτε σε επαφή µε την επιχείρηση
απόρριψης.
Αποµακρύνετε όλα τα υλικά συσκευασιών
φιλικά προς το περιβάλλον.
Εγγύηση και σέρβις
Για τη συσκευή αυτή έχετε 3 χρόνια εγγύηση από την
ηµεροµηνία αγοράς. Η συσκευή κατασκευάστηκε µε
προσοχή και πριν την παράδοσή της έχει ελεγχθεί
ευσυνείδητα. Παρακαλούµε να διαφυλάξετε την
απόδειξη σαν τεκµήριο αγοράς. Σε περίπτωση
εγγύησης παρακαλούµε να επικοινωνήσετε
τηλεφωνικώς µε το σέρβις πελατών.
Μόνο έτσι µπορεί να επακολουθήσει δωρεάν
αποστολή του προϊόντος.
Η εγγύηση ισχύει µόνο για λάθη στο υλικό ή για
κατασκευαστικά λάθη, όχι όµως για εξαρτήµατα που
φθείρονται φυσιολογικά ή για βλάβες σε εύθραυστα
τµήµατα της συσκευής, όπως π.χ. διακόπτες ή
επαναφορτιζόµενες µπαταρίες. Το προϊόν
προορίζεται αποκλειστικά για την ιδιωτική και όχι
για την επαγγελµατική χρήση. Η εγγύηση χάνεται σε
περίπτωση λανθασµένης χρήσης ή περέκκλισης
από το σκοπό χρήσης, εάν έχει ασκηθεί βία στη
συσκευή ή εάν έχουν γίνει επεµβάσεις από άλλους
εκτός τα εξουσιοδοτηµένα µας καταστήµατα σέρβις.
Τα θεµιτά σας δικαιώµατα δεν περιορίζονται από
την εγγύηση. Αυτή η εγγύηση ισχύει µόνο για τον
πρώτο αγοραστή και δεν µεταβιβάζεται.
IB_KH1282_E5554_GR_3 10.09.2007 17:07 Uhr Seite 52
Page 53

- 53 -
KKoommppeerrnnaassss SSeerrvviiccee EEλλλλάάδδαα
Kalothanassi G. Amalia α 10-12 Thiatiron Str.
14231 N.Ionia Athens
Tel.: 210 279 0865
Fax: 210 279 6982
e-mail: support.gr@kompernass.com
Εισαγωγέας
KOMPERNASS GMBH
BURGSTRASSE 21
D-44867 BOCHUM
www.kompernass.com
IB_KH1282_E5554_GR_3 10.09.2007 17:07 Uhr Seite 53
Page 54

- 54 -
IB_KH1282_E5554_GR_3 10.09.2007 17:07 Uhr Seite 54
Page 55

- 55 -
Inhaltsverzeichnis Seite
Grundlegende Sicherheitshinweise 56
Bestimmungsgemäßer Gebrauch 57
Auspacken 57
Vor dem ersten Gebrauch 57
Bedienelemente 58
Vorbereitungen 58
Anschließen und Bügeln 58
Dampfbügeln 59
Bügeln mit Dampfstoß 60
Bügeln mit Spray-Funktion 60
Dampfbügeleisen vorübergehend abstellen 60
Dampfbügeleisen außer Betrieb nehmen 61
Reinigung und Pflege 61
Fehlfunktionen beseitigen 62
Technische Daten 62
Entsorgung 62
Garantie und Service 63
Importeur 63
Lesen Sie die Bedienungsanleitung vor der ersten Verwendung aufmerksam durch und heben Sie diese für den späteren Gebrauch auf. Händigen Sie bei Weitergabe des Gerätes an Dritte auch die Anleitung aus.
IB_KH1282_E5554_DE_3 10.09.2007 16:41 Uhr Seite 55
Page 56

- 56 -
Dampfbügeleisen KH
1282
Grundlegende
Sicherheitshinweise
Verbrennungsgefahr!
• Dieses Gerät ist nicht dafür bestimmt, durch
Personen (einschließlich Kinder) mit eingeschränkten, physischen, sensorischen oder
geistigen Fähigkeiten oder mangels Erfahrung
und/oder mangels Wissen benutzt zu werden,
es sei denn, sie werden durch eine für ihre Sicherheit zuständige Person beaufsichtigt oder erhielten von ihr Anweisungen, wie das Gerät zu
benutzen ist.
• Kinder sollten beaufsichtigt werden, um sicherzustellen, dass sie nicht mit dem Gerät spielen.
• Berühren Sie niemals die Bügelsohle, wenn das
Gerät heiß ist. Fassen Sie das Dampfbügeleisen
nur am Griff an.
• Halten Sie niemals Ihre Hände in den Dampfstoß
oder an heiße Metallteile.
• Richten Sie niemals den Dampfstoß auf Personen
oder andere Lebewesen.
• Sie dürfen die Einfüllöffnung für den Wassertank
während des Gebrauchs nicht öffnen. Lassen Sie
das Dampfbügeleisen zunächst erkalten und ziehen Sie den Netzstecker aus der Netzsteckdose,
um es zu befüllen.
Brandgefahr!
• Lassen Sie das heiße oder eingeschaltete Dampfbügeleisen niemals unbeaufsichtigt. Sie und Ihre
Mitmenschen können sich bei noch heißem
Bügeleisen verletzen.
• Stellen Sie das Dampfbügeleisen nie in die Nähe
brennbarer Materialien, wie Gardinen oder Vorhängen. Diese können Feuer fangen.
• Bügeln Sie nur mit der auf den Pflegehinweisen
angegebenen und für das Material geeigneten
Temperatureinstellungen. Sie können die Textilien
andernfalls beschädigen. Falls Ihnen keine
Pflegehinweise bekannt sind, beginnen Sie mit
der niedrigsten Temperatureinstellung.
• Verstauen Sie das Dampfbügeleisen nur im abgekühlten Zustand.
• Stellen Sie das Dampfbügeleisen nie auf Kanten,
wie zum Beispiel Tischkanten. Es kann kippen
und herunterfallen.
• Stellen Sie das Bügeleisen nur auf den Standfuß,
oder die am Bügelbrett vorgesehene Abstellfläche. Lehnen Sie das heiße Bügeleisen nicht an
Wände oder andere Gegenstände. Anderenfalls
besteht Brandgefahr.
Gefahr durch elektrischen Schlag!
• Schließen Sie das Dampfbügeleisen nur an eine
vorschriftsmäßig installierte Netzsteckdose an.
• Lassen Sie ein defektes Gerät umgehend von
einer qualifizierten Fachwerkstatt instandsetzen,
oder wenden Sie sich an den Kundenservice, um
Gefährdungen zu vermeiden.
• Lassen Sie ein defektes Netzkabel sofort
ersetzen, oder wenden Sie sich an den Kundenservice, um Gefährdungen zu vermeiden.
• Ziehen Sie immer nur am Netzstecker, niemals
am Kabel.
• Richten Sie die Dampfdüsen oder die Spray-Düse
nie auf elektrische Geräte oder hitze- sowie
feuchteempfindliche Gegenstände.
• Knicken oder quetschen Sie das Netzkabel nicht
und verlegen Sie es so, dass es nicht in Kontakt
mit heißen Oberflächen kommt und niemand
darauf treten oder darüber stolpern kann.
• Ziehen Sie vor dem Reinigen, vor dem Auffüllen
mit Wasser und nach jedem Gebrauch den Netzstecker.
• Rollen Sie das Netzkabel vor dem Einschalten
immer vollständig ab und verwenden Sie keine
Verlängerungskabel.
IB_KH1282_E5554_DE_3 10.09.2007 16:41 Uhr Seite 56
Page 57

- 57 -
• Fassen Sie das Kabel oder den Netzstecker
niemals mit feuchten Händen an.
• Sie dürfen das Dampfbügeleisen keinesfalls in
eine Flüssigkeit tauchen und keine Flüssigkeiten in
das Gerätegehäuse des Dampfbügeleisens gelangen lassen. Sie dürfen das Gerät keiner
Feuchtigkeit aussetzen und nicht im Freien
benutzen. Falls doch einmal Flüssigkeit in das
Gerätegehäuse gelangt, ziehen Sie sofort den
Netzstecker des Geräts aus der Netzsteckdose
und lassen Sie es von einer qualifizierten Fachwerkstatt oder dem Kundenservice reparieren.
• Benutzen Sie das Dampfbügeleisen keinesfalls in
der Nähe von Wasser, das in Badewannen,
Duschen, Waschbecken oder anderen Gefäßen
enthalten ist. Die Nähe von Wasser stellt eine
Gefahr dar, auch wenn das Gerät ausgeschaltet
ist.
• Sie dürfen das Gerätegehäuse des Dampfbügeleisens nicht öffnen. Lassen Sie das defekte
Dampfbügeleisen nur von einer qualifizierten
Fachwerkstatt oder dem Kundenservice reparieren.
• Lassen Sie beschädigte Netzstecker oder Netzkabel sofort von autorisiertem Fachpersonal oder
dem Kundenservice austauschen, um Gefährdungen zu vermeiden.
Achtung!
• Falls die Pflegehinweise in der Kleidung das Bügeln untersagen (Symbol ), dürfen Sie das
Kleidungsstück nicht bügeln. Sie könnten das
Kleidungsstück andernfalls beschädigen.
• Füllen Sie keine anderen Flüssigkeiten außer
Wasser in den Wassertank. Andernfalls beschädigen Sie das Dampfbügeleisen.
• Sie dürfen das Dampfbügeleisen nicht mit
Lösungsmitteln, Alkohol oder scheuernden
Reinigungsmitteln säubern. Andernfalls könnten
Sie es beschädigen.
Bestimmungsgemäßer
Gebrauch
Das Dampfbügeleisen ist ausschließlich zum Bügeln
von Textilien bestimmt. Sie dürfen es nur innerhalb
geschlossener Räume und in privaten Haushalten
verwenden. Alle anderen Verwendungen gelten als
nicht bestimmungsgemäß.
Auspacken
Plastiktüten können eine Gefahr darstellen. Um
Erstickungsgefahr zu vermeiden, bewahren Sie
die Plastiktüten außerhalb der Reichweite von
Babys und Kleinkindern auf.
• Entnehmen Sie das Dampfbügeleisen aus der
Verpackung.
• Entfernen Sie alle Aufkleber und Folienteile vom
Dampfbügeleisen und der Bügelsohle
i
.
Vor dem ersten Gebrauch
• Füllen Sie Wasser in das Dampfbügeleisen (siehe
Kapitel „Wasser einfüllen“).
• Stecken Sie den Netzstecker in eine Netzsteckdose mit 220-240 V~/50 Hz.
• Stellen Sie den Temperatur-Drehregler
u
auf
„Max“.
• Heizen Sie das Dampfbügeleisen einige Minuten
auf der höchsten Stufe auf.
• Bügeln Sie dann über ein Handtuch oder altes
Stück Stoff (für Heizstufe ••• geeignet), um
eventuelle Unreinheiten von der Bügelsohle
i
zu beseitigen.
• Betätigen Sie einige Male die Dampfstoß-Taste
d
, um eventuelle Unreinheiten aus den Dampf-
düsen zu entfernen.
IB_KH1282_E5554_DE_3 10.09.2007 16:41 Uhr Seite 57
Page 58

- 58 -
Hinweis: Beim ersten Gebrauch kann es
durch fertigungsbedingter Rückstände zu
leichter Geruchsentwicklung kommen. Dieser
Geruch ist nicht gesundheitsschädlich. Sorgen
Sie für ausreichende Belüftung, öffnen Sie zum
Beispiel ein Fenster.
Bedienelemente
q
Spray-Taste
w
Aufheiz-Kontrollleuchte
e
Netzkabel mit Stecker
r
Bewegliche Kabelführung
t
Standfuß
y
Wassertank
u
Temperatur-Drehregler
i
Bügelsohle
o
Einfüllöffnung
a
Wasserdüse
s
Dampfregler/Self Clean
d
Dampfstoß-Taste
f
Messbecher
Vorbereitungen
Wasser einfüllen
Sie benötigen Wasser um die Dampf- oder SprayFunktion zu verwenden. Zum Trockenbügeln
brauchen Sie kein Wasser.
• Stellen das Dampfbügeleisen im abgekühlten
Zustand senkrecht auf den Standfuß
t
.
• Öffnen Sie die Einfüllöffnung
o
für den
Wassertank
y
.
• Füllen Sie mit dem Messbecher
f
langsam
Wasser bis höchstens zur „Max“-Markierung in
den Wassertank
y
.
• Verschließen Sie die Einfüllöffnung
o
für den
Wassertank
y
.
Sollte das Leitungswasser Ihres Wohnortes zu hart
sein, empfiehlt es sich, das Leitungswasser mit destilliertem Wasser zu mischen. Ansonsten können die
Düsen für die Dampfstoß-Funktion vorzeitig
verkalken.
Zur Verlängerung der optimalen Dampfstoß-Funktion
mischen Sie das Leitungswasser mit destilliertem
Wasser entsprechend der Tabelle.
Die Wasserhärte können Sie beim örtlichem Wasserwerk erfragen.
Anschließen und Bügeln
Bügeltipps
Sortieren Sie die Textilien nach Stoffarten. Befolgen
Sie stets die Bügel- und Pflegehinweise in der Textilie. Beginnen Sie mit den Stoffen, die die geringste
Heizstufe erfordern.
Wenn Sie sich nicht über die stoffliche Struktur der
Textilie sicher sind, bügeln Sie zunächst vorsichtig
eine kleine Fläche (Saumstück oder Innenkante).
Beginnen Sie im Zweifelsfall mit einer geringen
Bügeltemperatur. Wenn Falten bleiben, erhöhen Sie
schrittweise die Temperatur. Wenn Sie die Heizstufe
gefunden haben, die die besten Bügelergebnisse
erzielt, erhöhen Sie die Temperatur nicht weiter.
Erhöhen Sie die Temperatur nie so hoch, dass das
Gewebe des Bügelgutes beschädigt wird.
Wasserhärte
Anteil destilliertes
Wasser zu
Leitungswasser
sehr
weich/weich
0
mittel 1 : 1
hart 2 : 1
sehr hart 3 : 1
IB_KH1282_E5554_DE_3 10.09.2007 16:41 Uhr Seite 58
Page 59

- 59 -
Anschließen
• Stecken Sie den Netzstecker in eine Netzsteckdose.
Bügeln
Stellen Sie das Bügeleisen während des
Betriebs nur auf den Standfuß
t
, oder die am
Bügelbrett vorgesehene Abstellfläche. Lehnen
Sie das heiße Bügeleisen nicht an Wände oder
andere Gegenstände. Anderenfalls besteht
Brandgefahr.
Trockenbügeln ohne Dampf können Sie bei allen
Temperaturen, Dampfbügeln ist erst ab Stufe ••
möglich.
Achtung!
Falls die Pflegehinweise in der Textilie das Bügeln
untersagen (Symbol ), dürfen Sie die Textilie
nicht bügeln. Sie könnten die Textilie andernfalls
beschädigen.
• Prüfen Sie die Pflegehinweise auf den Schildern
in der Textilie, ob und bei welcher Temperatureinstellung die Textilie zum Bügeln geeignet ist.
• Stellen Sie die geeignete Temperatureinstellung
mit dem Temperatur-Drehregler
u
ein.
Einstellung Bügeleisen Stoffart
• Seide, Nylon
•• Wolle
••• Baumwolle
Max Leinen
Die Aufheiz-Kontrollleuchte wleuchtet. Wenn die
Aufheiz-Kontrollleuchte
w
erlischt, ist die eingestellte
Temperatur erreicht.
• Warten Sie, bis die Aufheiz-Kontrollleuchte
w
für
die Temperatur erlischt.
• Lassen Sie das Dampfbügeleisen mit leichtem
Drück über die Textilie gleiten.
Vermeiden Sie es, über Reißverschlüsse und
Nieten zu bügeln, da diese die Bügelsohle
i
zerkratzen. Umgehen Sie diese beim Bügeln.
Dampfbügeln
• Stellen Sie mit dem Dampfregler sdie gewünschte Dampfstärke ein:
Wenn Sie den Temperatur-Drehregler
u
auf
Stufe •• gestellt haben, stellen Sie den Dampfregler
s
immer auf das kleine Dampf-Symbol.
Wenn Sie den Temperatur-Drehregler
u
auf
Stufe ••• gestellt haben, stellen Sie den Dampfregler
s
immer auf das große Dampf-Symbol.
Hinweis: Das Dampfbügeln ist erst ab
Stufe •• möglich.
Hinweis: Wird kein Dampf mehr benötigt,
oder eine niedrigere Temperatur als Stufe ••
eingestellt, drehen Sie den Dampfregler
s
immer auf „0“! Ansonsten kann Wasser aus der
Bügelsohle
i
austreten.
MIN
MAX
IB_KH1282_E5554_DE_3 10.09.2007 16:41 Uhr Seite 59
Page 60

- 60 -
Tropf-Stop-Funktion
Dieses Bügeleisen verfügt über eine Tropf-Stop-Funktion. Diese verhindert beim ausgeschalteten Bügeleisen und beim Dampfbügeln das Austreten von
Wassertropfen aus der Bügelsohle
i
. Beim Dampf-
bügeln muss das Bügeleisen mindestens auf Stufe
•• eingestellt sein. Stellen Sie daher den
Dampfregler
s
erst dann auf „Dampf“, wenn der
Temperatur-Drehregler
u
mindestens auf Stufe ••
gestellt ist und die Temperatur erreicht ist. Ansonsten
kann Wasser aus der Bügelsohle
i
austreten.
Bügeln mit Dampfstoß
Der Dampfstoß eignet sich besonders, um schwer
zugängliche Bereiche der Textilien zu glätten.
Hinweis: Der Dampfstoß ist erst ab Stufe
••• möglich.
• Heben Sie das Dampfbügeleisen leicht an.
• Drücken Sie für einen Dampfstoß einmal die
Dampfstoß-Taste
d
.
Bügeln mit SprayFunktion
• Zum Befeuchten der Wäsche drücken Sie auf die
Spray-Taste
q
.
Diese Funktion ist für sehr trockene, stark knittrige
Textilien geeignet.
Dampfbügeleisen vorübergehend abstellen
Brandgefahr!
Lassen Sie das heiße oder eingeschaltete Dampfbügeleisen niemals unbeaufsichtigt.
• Stellen Sie den Temperatur-Drehregler
u
auf
„Min“.
• Stellen Sie das Dampfbügeleisen auf dem Standfuß
t
ab.
oder
• Legen Sie das Dampfbügeleisen in die dafür
vorgesehene Ablage am Bügelbrett.
Achtung: Stellen Sie das Bügeleisen niemals
auf ungeeignete Unterlagen. Brandgefahr!
IB_KH1282_E5554_DE_3 10.09.2007 16:41 Uhr Seite 60
Page 61

- 61 -
Dampfbügeleisen außer
Betrieb nehmen
• Ziehen Sie den Netzstecker aus der Netzsteckdose.
• Lassen Sie das Dampfbügeleisen abkühlen.
• Leeren Sie den Wassertank
y
, indem Sie die
Einfüllöffnung
o
aufklappen und entweder das
Dampfbügeleisen über die Seite auskippen
(siehe Abb.1) oder nach vorne herüber ausleeren (siehe Abb.2).
• Reinigen Sie die Bügelsohle
i
(siehe Kapitel
„Reinigung und Pflege“).
• Wickeln Sie das Netzkabel
e
um die Netz-
kabelhalterung am Standfuß
t
.
• Stellen Sie das abgekühlte Dampfbügeleisen
waagerecht auf einer weichen, sauberen
Unterlage ab.
Reinigung und Pflege
• Vermeiden Sie es, über Reißverschlüsse und
Nieten zu bügeln, da diese die Bügelsohle
i
zerkratzen. Umgehen Sie diese beim Bügeln.
Achten Sie darauf, dass die Bügelsohle
i
glatt
bleibt.
• Die Beschaffenheit des Wassers und seiner
Mineralien ist je nach Ort sehr unterschiedlich.
Wenn das Wasser in Ihrer Gegend sehr hart ist,
empfehlen wir zusätzlich die Verwendung von
destilliertem Wasser, um die optimale Funktionsfähigkeit des Bügeleisens sicherzustellen (siehe
Kapitel „Wasser einfüllen“).
Verwenden Sie keine Säuren (zum Beispiel
Essig) oder Entkalkungsmittel, um das Dampfbügeleisen zu reinigen.
• Reinigen Sie das Gehäuse nur mit einem
weichen, trockenem Tuch.
• Benutzen Sie keine aggressiven Reinigungsmittel.
Warnung: Tauchen Sie das Dampfbügeleisen nie in Wasser oder andere Flüssigkeiten.
• Reinigen Sie die Metallteile mit einem leicht mit
Wasser befeuchtetem Tuch. Trocknen Sie alle
Teile gründlich ab.
• Benutzen Sie keine scheuernden Reinigungsmittel.
• Lassen Sie das Gerät vollständig trocknen, bevor
Sie es erneut in Betrieb nehmen.
Selbstreinigungs-Funktion (Self-Clean)
• Füllen Sie den Wassertank ybis zur Markierung MAX.
• Stecken Sie den Netzstecker
e
in die Netz-
steckdose.
• Stellen Sie den Temperatur-Drehregler
u
auf die
Stufe Max.
✓
Abb.1
Abb.2
✓
IB_KH1282_E5554_DE_3 10.09.2007 16:41 Uhr Seite 61
Page 62

- 62 -
• Lassen Sie das Bügeleisen aufheizen, bis die Aufheiz-Kontrollleuchte
w
erlischt und erneut auf-
leuchtet.
• Halten Sie das Bügeleisen waagerecht über eine
Auffangschüssel.
• Stellen Sie den Dampfregler
s
auf Position Self
Clean . Der Dampfregler dreht sich auf
der Position Self Clean etwas heraus. Dabei tritt
Dampf und kochendes Wasser aus den Dampfaustrittslöchern in der Bügelsohle
i
aus.
Eventuell vorhandene Verunreinigungen werden
dabei herausgespült.
Achtung!
Es besteht Verbrühungsgefahr!
• Drehen Sie den Dampfregler swieder ein,
sobald das Wasser im Wassertank
y
aufgebraucht ist.
• Um sicherzustellen, dass kein Wasser in der
Dampfkammer zurückbleibt, trocknen Sie die
Bügelsohle
i
gründlich. Führen Sie dazu die
Bügelsohle
i
einige Male über ein Handtuch
oder altes Stück Stoff (für Heizstufe ••• geeignet)
hin und her.
• Lassen Sie das Bügeleisen abkühlen, bevor Sie
es zur Seite stellen.
Fehlfunktionen beseitigen
Das Dampfbügeleisen stößt keinen oder
sehr wenig Dampf aus:
Der Vorrat an Wasser im Dampfbügeleisen ist
erschöpft. Füllen Sie den Wassertank
y
mit Wasser.
Das Dampfbügeleisen sprüht kein oder
sehr wenig Wasser bei der Spray-Funktion aus:
Der Vorrat an Wasser im Dampfbügeleisen ist erschöpft. Füllen Sie den Wassertank
y
mit Wasser.
Das Dampfbügeleisen erhitzt sich nicht:
Das Bügeleisen ist nicht angeschlossen oder nicht
eingeschaltet. Stecken Sie den Netzstecker
e
in die
Netzsteckdose und stellen mit dem TemperaturDrehregler
u
die gewünschte Temperatur ein.
Tropfen treten aus der Bügelsohle
i
aus:
Die Temperatur ist zum Dampfbügeln zu niedrig.
Stellen Sie den Temperatur-Drehregler
u
minde-
stens auf Stufe ••.
Sollten die beschriebenen Maßnahmen keine Abhilfe schaffen, ist das Dampfbügeleisen defekt. Lassen
Sie es von einer qualifizierten Fachwerkstatt oder
dem Kundenservice reparieren.
Technische Daten
Versorgungsspannung: 220-240 V~/50 Hz
Leistung: 1800 W
Entsorgung
Werfen Sie das Gerät keinesfalls in den
normalen Hausmüll.
Entsorgen Sie das Gerät über einen zugelassenen
Entsorgungsbetrieb oder über Ihre kommunale
Entsorgungseinrichtung.
Beachten Sie die aktuell geltenden Vorschriften.
Setzen Sie sich im Zweifelsfall mit Ihrer Entsorgungseinrichtung in Verbindung.
Führen Sie alle Verpackungsmaterialien
einer umweltgerechten Entsorgung zu.
IB_KH1282_E5554_DE_3 10.09.2007 16:41 Uhr Seite 62
Page 63

- 63 -
Garantie und Service
Sie erhalten auf dieses Gerät 3 Jahre Garantie ab
Kaufdatum. Das Gerät wurde sorgfältig produziert
und vor Anlieferung gewissenhaft geprüft. Bitte bewahren Sie den Kassenbon als Nachweis für den
Kauf auf. Bitte setzen Sie sich im Garantiefall mit
Ihrer Servicestelle telefonisch in Verbindung. Nur so
kann eine kostenlose Einsendung Ihrer Ware gewährleistet werden.
Die Garantieleistung gilt nur für Material- oder Fabrikationsfehler, nicht aber für Verschleißteile oder für
Beschädigungen an zerbrechlichen Teilen, z. B.
Schalter oder Akkus. Das Produkt ist lediglich für
den privaten und nicht für den gewerblichen Gebrauch bestimmt.
Bei missbräuchlicher und unsachgemäßer Behandlung, Gewaltanwendung und bei Eingriffen, die
nicht von unserer autorisierten Service-Niederlassung vorgenommen wurden, erlischt die Garantie.
Ihre gesetzlichen Rechte werden durch diese
Garantie nicht eingeschränkt.
Schraven Service- und
Dienstleistungs GmbH
Gewerbering 14
D-47623 Kevelaer
Tel.: +49 (0) 180 5 008107
(14 Ct/Min. aus dem dt. Festnetz)
Fax: +49 (0) 2832 3532
e-mail: support.de@kompernass.com
Kompernaß Service Österreich
Rittenschober KG
Gmundner Strasse 10
A-4816 Gschwandt
Tel.: +43 (0) 7612 6260516
Fax: +43 (0) 7612 626056
e-mail: support.at@kompernass.com
Importeur
KOMPERNASS GMBH
BURGSTRASSE 21
D-44867 BOCHUM
www.kompernass.com
IB_KH1282_E5554_DE_3 10.09.2007 16:41 Uhr Seite 63
Page 64

- 64 -
IB_KH1282_E5554_DE_3 10.09.2007 16:41 Uhr Seite 64
 Loading...