

Page 1

6
TIMER COFFEE MACHINE
KOMPERNASS GMBH · BURGSTRASSE 21 · D-44867 BOCHUM
www.kompernass.com
ID-Nr.: KH1114-08/09-V3
KH 1114
Timer Coffee Machine
Operating instructions
KH 1114
Page 2
KH 1114
q
w
1x4
e
y
t
j
h
g
f
1@
r
u
i
o
a
1!
Page 3
CONTENT PAGE
Safety instructions 2
Technical data 3
Items supplied 3
Intended use 3
Description of parts 3
Before the First Use 3
Setting the time 4
Memory Function..............................................................................................................................4
Making coffee 4
Using the Timer .................................................................................................................................4
Cleaning and care 5
Cleaning of the lid............................................................................................................................5
Removing scale 5
Rectifying malfunctions 6
The Coffee Maker does not start working.....................................................................................6
The brewing process does not start at the determined time (Timer Function):...........................6
The coffee is too strong/too weak: ................................................................................................6
The brewing process lasts very long. .............................................................................................6
The appliance switches off during brewing...................................................................................6
The unit gets very loud during brewing. ........................................................................................6
Immoderate steam develops during brewing................................................................................6
Disposal 6
Warranty & Service 7
Importer 7
Read these operating instructions carefully before using the appliance for the first time and preserve this
maual for later reference. Pass this manual on to whoever might acquire the appliance at a future date.
- 1 -
Page 4

Timer Coffee Machine
KH 1114
Safety instructions
Danger of electric shock!
• Connect the appliance only to correctly installed
and earthed mains sockets.
• Remove the plug from the wall socket when you
move the appliance, fill it with water, if it malfunctions, before cleaning it and when it is not in
use.
• NEVER submerse the appliance in liquids.
Should liquids nonetheless permeate into the
appliance housing, immediately remove the plug
from the wall socket. Arrange for it to be
repaired by qualified specialists.
• Never take hold of the appliance, power cable
or plug with wet hands.
• To disconnect, always pull the plug itself from the
power socket, do not pull on the power cable.
• Do not fold or squeeze the power cable.
• Should the power cable or plug be damaged, to
avoid possibly life-threatening risks immediately
arrange for it to be replaced by qualified
specialists.
Fire hazard!
• Do not leave the appliance unattended when in
use.
• Never operate the appliance without water.
• Never place the appliance near sources of heat.
• Do not use extension cables. In the event of
danger, the plug must be quickly accessible.
• Do not operate the appliance via an external
time-switch or a separate remote control system.
Risk of personal injuries
• NEVER use the thermos jug rin a microwave
oven.
• This appliance is not intended for use by persons
(including children) with reduced physical, sensorial or mental cabilities, or lack of experience
and knowledge, unless they have been given
supervision or instruction concerning use of the
appliance by a person responsible for their
safety.
• Children should be supervised to ensure that
they do not play with the appliance.
• Lay the power cable in such a way that no one
can tread on or trip over it.
• Do not insert sharp or stiff objects into the thermos jug r. Do not grab into the thermos jug
This may damage the appliance and lead to
injuries.
r
.
Risk of scalding!
• Never open the filter holder qduring the
brewing process.
• Do not handle the hot filter bag. Remove the filter bag first when the coffee has drained away
and it has cooled down. Use the filter insert
to remove the filter bag.
• Do not hold your hands in the rising steam.
• Never move/transport the appliance during the
brewing process.
• Remove the thermos jug
wing process is complete and the filter has fully
drained itself.
• Always close the filter container before switching
on, there exists a risk of scalds from steam and
hot water.
first when the bre-
r
y
- 2 -
Page 5

Caution: To avoid damage to the
appliance!
• Fill the water tank wof the appliance
exclusively with clean water.
• Do not expose the glass of the thermos jug
extreme variation in temperature. The glass can
be damaged.
• There is no liability for damages caused by
breakage of glass!
Technical data
r
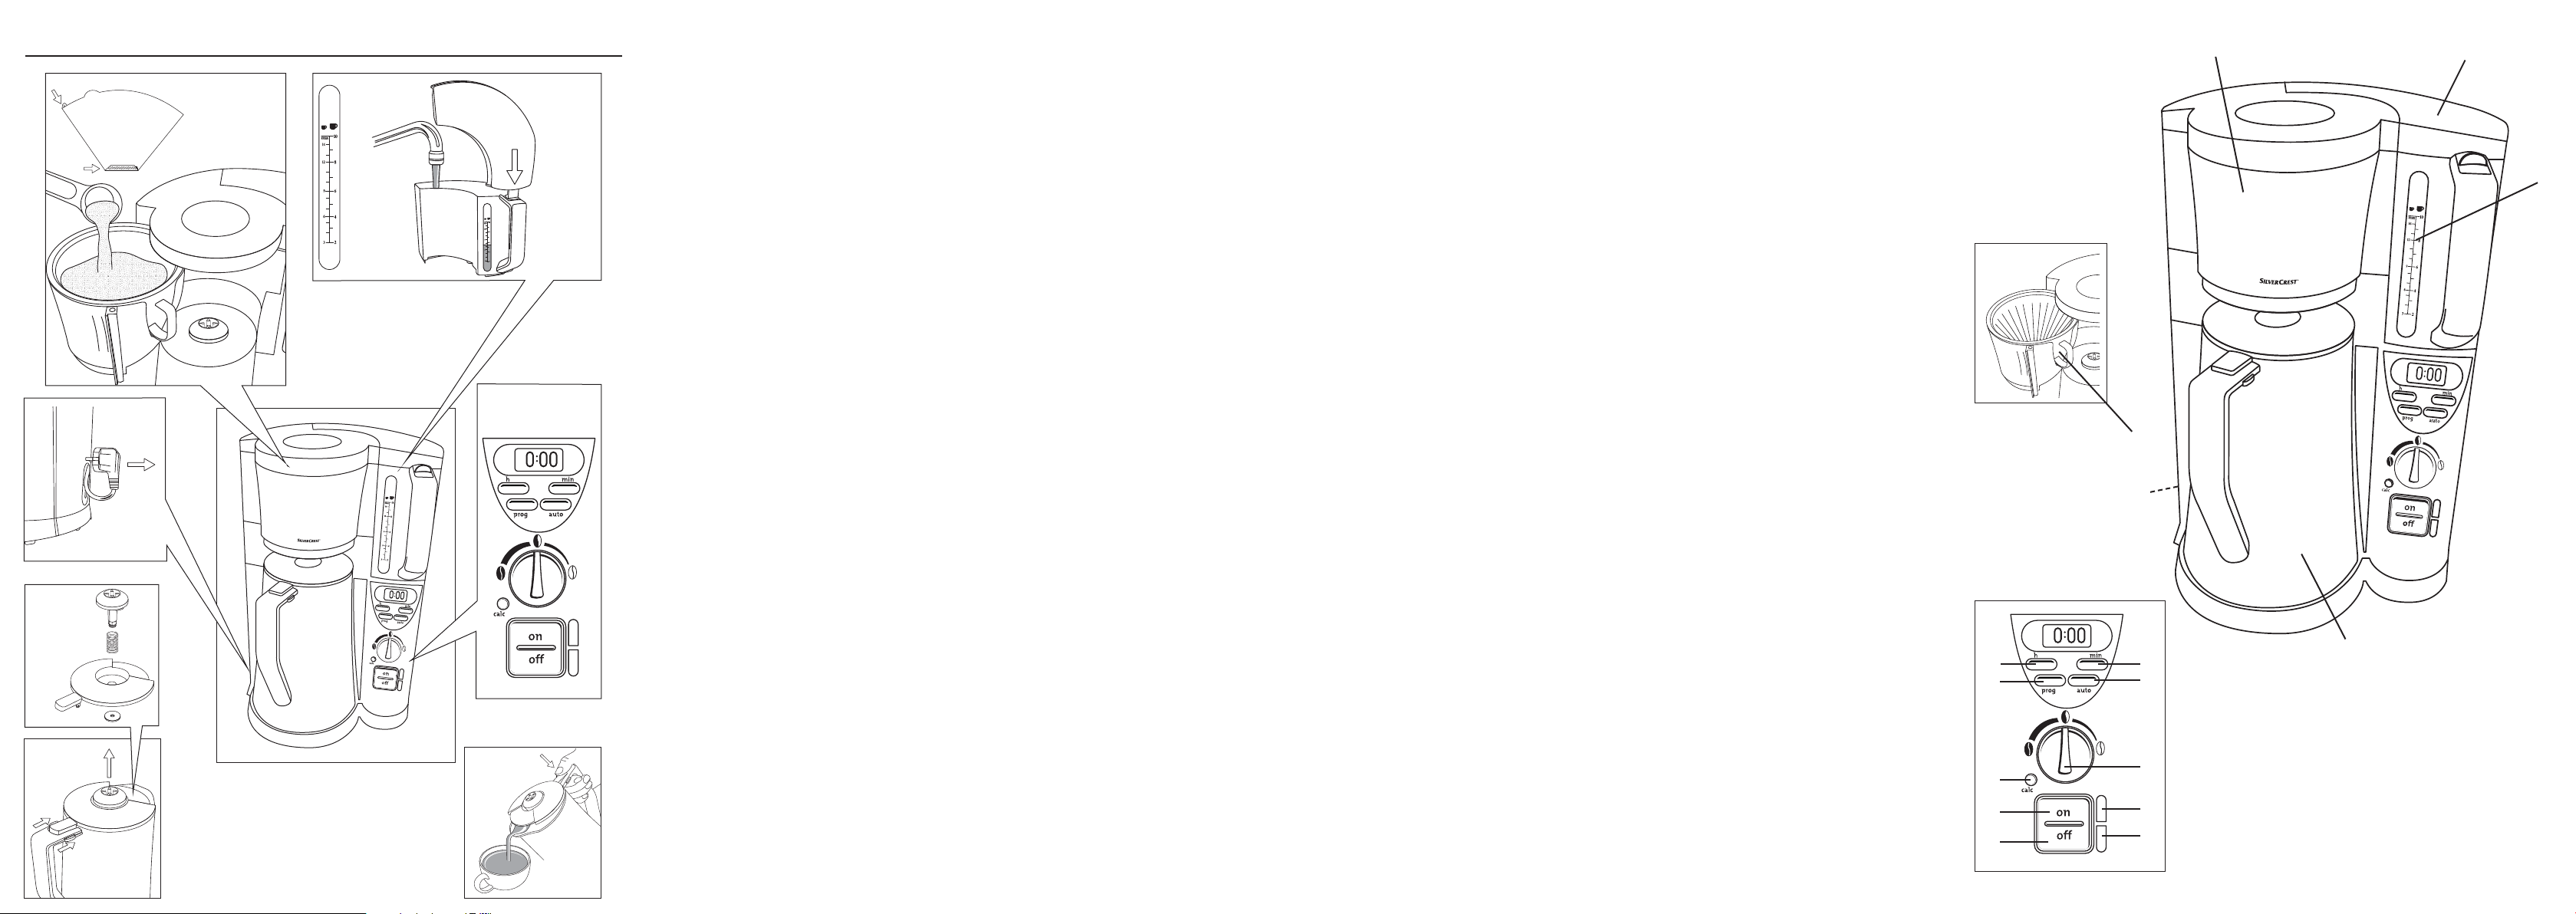
Description of parts
The description of parts is located at the right fold
out page.
to
Coffee Maker:
Filter holder
q
Water tank
w
Scale
e
Thermos jug
r
Cable storage compartment
t
Filter insert
y
Mains voltage: 220 - 240 V ~50 Hz
Power consumption: 1000 W
Coffee filter bags: Size 1x4
Items supplied
• Coffee Maker KH 1114 with Timer Function
• Thermos jug with lid
• Measuring spoon
• Operating instructions
Before taking the appliance into use, check that all
items are present and free of visible damage.
Intended use
The Coffee Maker is intended exclusively for brewing coffee. This Coffee Maker is intended exclusively for use in private domestic households. Do not
use it commercially. The appliance is for indoor use
only.
Control panel:
Button "min"
u
Button "auto"
i
Aroma knob
o
Red indicator
a
Green indicator
s
Switch "off"
d
Switch "on"
f
Red indicator "calc"
g
Button "prog"
h
Button "h"
j
Before the First Use
Note:
Never fill the appliance with water beyond the
max-marking (10 cups). The appliance can
overflow.
• Before the first use, set the aroma knob
setting and allow two times 8 cups of water to
flow through the appliance. Do not use coffee
powder for this.
• Clean the appliance (see chapter "Cleaning and
care").
o
to the
- 3 -
Page 6

Setting the time
• Press the buttons "h" jfor hours resp. "min"
for minutes repeatedly until the correct time is
shown in the display.
Memory Function
In the event of a power failure lasting up to about 5
minutes, the setting of time and timer is saved once
power has been restored.
Making coffee
Avoid brewing less than 2 large or 3 small cups of
coffee. Otherwise, the coffee will not have the
desired temperature and strength.
• Turn the filter holder
a filter bag (Size 1x4) with its sides folded over
into the filter insert
red amount of coffee powder (medium to fine
ground) (Fig. ). One small teaspoon is
equivalent to about 6 g of coffee powder.
to the outside and insert
q
. Fill the bag with the requi-
y
u
• Turn the filter holder qback into the Coffee
Maker.
• Fill the required amount of water in the water
tank
(Fig. ) by using the scale on the outsi-
w
de
(Fig. ) of the water tank. Never fill the
e
appliance with water beyond the max-marking
(10 cups)
• Enter in the desired coffee strength by turning the
aroma knob
The setting results in stronger coffee and the
setting results in mild coffee.
• Place the thermos jug
and make sure the thermos jug
before every use.
Note:
The coffee remains warm for a longer period if the
thermos jug is rinsed out with hot water before use.
• Start the brewing process by pressing switch
"on"
f
• Pour the coffee from the thermos jug
red indicator light
Take note of Fig. for serving the coffee.
on the Panel (Fig. ).
o
in the Coffee maker
r
is empty
r
. The red indicator aturns on.
turns off.
a
r
after the
g
3 2 3 x 6g 18
1
4
/
2
6 4 5 x 6g 30
1
7
/
2
9 6 7 x 6g 42
1
10
/
2
12 8
1
13
/
2
15 10 10 x 6g 60
3 4 x 6g 24
5 6 x 6g 36
1
7
/
7
9 9 x 6g 54
x 6g
2
1
/
8
x 6g
2
45
51
Note:
Let the coffee maker cool down for about 5 minutes,
before you start the next brewing process or add
water.
Using the Timer
With the button „prog“ hyou can programme the
Coffee Maker so that it starts the brewing process
at a predetermined time. Always first insert coffee
powder into the filter bag in the filter holder
water into the water tank
Place the thermos jug
Make sure the thermos jug
water tank
(10 cups) before every use.
- 4 -
.
w
in the Coffee Maker.
r
is empty and the
r
is not filled beyond the max-marking
w
y
and
Page 7

• Press and hold down the button "prog" h.
• Enter in the desired start time with the buttons "h"
and "min" u(see chapter "Setting the
j
timer").
• When the desired time has been entered,
release the button "prog"
• Enter in the desired coffee strength by turning the
aroma knob
• Press the button "auto"
indicator
• If you wish to deactivate the automatic brewing
start, press the button "off"
s
.
o
lights up.
. The Timer is set.
h
until the green
i
.
d
Cleaning and care
• Always remove the plug from the power socket
before cleaning the appliance.
Danger of electrical shock
Before you clean the Coffee Maker, you must
remove the power plug from the power socket.
Caution
When cleaning the Coffee Maker, under no
circumstances may you submerse it in water or
hold it under running water.
• Remove the filter and rinse the filter holder q,
the filter insert
running water.
and the thermos jug runder
y
Cleaning of the lid
• To clean the lid of the thermos jug r first
disassemble the lid (See Fig. ):
• Carefully pull off the silicone disc from the valve
at the underside of the lid. When doing this, hold
the valve, because it is pressed up by a spring
from the other side.
• You now can take off the valve and the spring.
• Clean all parts with a mild soapy solution and
wipe them off well.
• To assemble the lid again, proceed in reversed
order.
Note:
Do not let the thermos jug with lid lie in soapy water
and do not wash the parts in the dishwasher, as
they could become leaky!
If you do not use the Coffee Maker for an extended
period, store the power cable in the cable storage
compartment
(Fig. ).
t
Removing scale
Risk of burns!
Always wait until the Coffee Maker has cooled
down before cleaning it.
Take off the lid of the thermos jug r, when
cleaning (see Fig )
• Do not use household detergents or sharp/
pointed objects to remove soiling. These could
damage the Coffee Maker.
• Wipe the housing of the Coffee Maker and the
thermos jug
with a soapy solution.
• After every brewing process remove the filter
bag from the filter insert
with a soft cloth lightly moistened
r
.
y
Remove scale from the Coffee Maker regularly.
If your water has a high degree of hardness, the
coffee maker must be descaled after every 30 applications, low degrees of hardness need only be
descaled after every 60 applications.
Use only descaling agents that are suitable for coffee machines and read up the instructions.
• Insert the descaling agent into the water tank
• Fill it with enough water for max. 8 large cups.
• Turn the aroma knob
descaling function.
• Press the button "on"
turns on and the indicator “calc” gis blinking.
• Wait until the solution has completely run
through the Coffee Maker.
- 5 -
to "calc" to activate the
o
. The red indicator
f
a
w
.
Page 8

• When the procedure is complete, rinse the
Coffee Maker through with 8 large cups of
clean water twice.
• After descaling, the Coffee Maker switches itself
off.
Rectifying malfunctions
The Coffee Maker does not start
working.
• The appliance is not turned on.
Press the switch “on”
Maker.
• The power plug is not plugged into the power
socket. Connect the Coffee Maker to the mains
by plugging the power plug into the power
socket.
• The appliance has not been cooled down after
the last brewing process. Wait for the appliance
to cool down for about 5 minutes until you start
the next brewing process.
The brewing process does not start at
the determined time (Timer Function):
• The timer is not activated. Press the button “auto”
to activate the timer.
i
• The time is not set correctly. Check the present
time and set the time if necessary.
to turn on the Coffee
f
The brewing process lasts very long.
The appliance switches off during
brewing.
The unit gets very loud during
brewing.
Immoderate steam develops during
brewing.
• The brewing system is scaled. remove the scale
as described under “Removing scale”.
Disposal
Do not dispose of the appliance in your
normal domestic waste. This product is
subject to the European guideline
2002/96/EC.
Dispose of the appliance through an approved disposal centre or at your community waste facility.
Observe the currently applicable regulations.
In case of doubt, please contact your waste disposal
centre.
Dispose of all packaging materials in an
environmentally responsible manner.
The coffee is too strong/too weak:
• There is too little/too much water in the water
tank. Fill in the correct amount of water.
• There is too much/too little coffee powder in the
filter bag. Fill in less/more coffee power.
• The coffee powder is grinded too fine/too
rough. Choose a different type of ground coffee.
• The aroma control knob
sted. Reset the coffee strength on the aroma control knob
o
.
is incorrectly adju-
o
- 6 -
Page 9

Warranty & Service
Importer
The warranty for this appliance is for 3 years from
the date of purchase. This appliance has been
manufactured with care and meticulously examined
before delivery. Please retain your receipt as proof
of purchase date. Should a claim need to be made
under the warranty, please make contact by telephone with our service department. Only in this
way can a post-free despatch for your goods be
assured.
The warranty covers ONLY claims for material and
maufacturing defects, not for wearing or consumable or for damage to fragile components. This product is for private use only and is not intended for
commercial applications.
The warranty will become void in the event of abusive and improper handling, use of force and internal
tampering not carried or approved by our authorized service branch. Your statutory rights are not
restricted in any way by this warranty.
DES Ltd
Tel.: 0870/787-6177
Fax: 0870/787-6168
e-mail: support.uk@kompernass.com
KOMPERNASS GMBH
BURGSTRASSE 21
44867 BOCHUM, GERMANY
www.kompernass.com
Kompernass Service Ireland
Tel: 1850 930 412
Standard call rates apply. Mobile operators may vary.
e-mail: support.ie@kompernass.com
(0,082 EUR/Min.)
- 7 -
 Loading...