

Page 1
- 1 -
List of contents Page
Safety instructions 2
Technical data 3
Items supplied 3
Intended use 3
Description of parts 3
Before the First Use 3
Setting the time 3
Memory Function 3
Making coffee 4
Using the Timer 4
Cleaning and care 5
Danger of electrical shock 5
Risk of burns! 5
Removing scale 5
Rectifying malfunctions 6
Disposal 6
Warranty & Service 7
Importer 7
Read the operating instructions carefully before using the appliance for the first time and preserve this booklet
for later reference. Pass this booklet on to whoever might acquire the appliance at a later date.
IB_KH1114_UK4 10.10.2007 16:18 Uhr Seite 1
Page 2
- 2 -
Coffee Maker
KH 1114
Safety instructions
Danger of electric shock!
• Connect the appliance only to correctly installed
and earthed mains sockets.
• Remove the plug from the wall socket when you
move the appliance, fill it with water, if it malfunctions, before cleaning it and when it is not in use.
• NEVER submerse the appliance in liquids.
Should liquids nonetheless permeate into the
appliance housing, immediately remove the plug
from the wall socket. Arrange for it to be repaired by qualified specialists.
• Never take hold of the appliance, power cable
or plug with wet hands.
• To disconnect, always pull the plug itself from the
power socket, do not pull on the power cable.
• Do not fold or squeeze the power cable.
• Should the power cable or plug be damaged, to
avoid possibly life-threatening risks immediately
arrange for it to be replaced by qualified specialists.
Fire hazard!
• Do not leave the appliance unattended when in
use.
• Never operate the appliance without water.
• Never place the appliance near sources of heat.
• Do not use extension cables. In the event of danger, the plug must be quickly accessible.
Risk of personal injuries
• NEVER use the thermos jug r in a microwave
oven.
• DO NOT allow children to use the appliance
without adult supervision. Explain to children the
potential dangers of the appliance.
• Lay the power cable in such a way that no one
can tread on or trip over it.
• Do not insert sharp or stiff objects into the thermos jug r. Do not grab into the thermos jug r.
This may damage the appliance and lead to injuries.
Risk of scalding!
• Never open the filter holder q during the brewing process.
• Do not handle the hot filter bag. Remove the filter
bag first when the coffee has drained away and
it has cooled down. Use the filter insert y to remove the filter bag.
• Do not hold your hands in the rising steam.
• Never move/transport the appliance during the
brewing process.
• Remove the thermos jug r first when the brewing
process is complete and the filter has fully drained itself.
• Always close the filter container before switching
on, there exists a risk of scalds from steam and
hot water.
Caution: To avoid damage to the
appliance!
• Fill the water tank w of the appliance exclusively
with clean water.
• Do not expose the glass of the thermos jug r to
extreme variation in temperature. The glass can
be damaged.
• There is no liability for damages caused by breakage of glass!
IB_KH1114_UK4 10.10.2007 16:18 Uhr Seite 2
Page 3
- 3 -
Technical data
Mains voltage: 220 - 240 V ~50 Hz
Power consumption: 1000 W
Coffee filter bags: Size 1x4
Items supplied
• Coffee Maker KH 1114 with Timer Function
• Thermos jug with lid
• Measuring spoon
• Operating instructions
• Warranty card
Before taking the appliance into use, check that all
items are present and free of visible damage.
Intended use
The Coffee Maker is intended exclusively for brewing coffee. This Coffee Maker is intended exclusively for use in private domestic households. Do not
use it commercially. The appliance is for indoor use
only.
Description of parts
The description of parts is located at the right fold
out page.
Coffee Maker:
q Filter holder
w Water tank
e Scale
r Thermos jug
t Cable storage compartment
y Filter insert
Control panel:
u Button "min"
i Button "auto"
o Aroma knob
a Red indicator
s Green indicator
d Switch "off"
f Switch "on"
g Red indicator "calc"
h Button "prog"
j Button "h"
Before the First Use
Note:
Never fill the appliance with water beyond the
max-marking (10 cups). The appliance can
overflow.
• Before the first use, set the aroma knob o to the
setting and allow two times 8 cups of water to
flow through the appliance. Do not use coffee
powder for this.
• Clean the appliance
(see chapter "Cleaning and care").
Setting the time
• Press the buttons "h" j for hours resp. "min" u
for minutes repeatedly until the correct time is
shown in the display.
Memory Function
In the event of a power failure lasting up to about 3
minutes, the setting of time and timer is saved once
power has been restored.
IB_KH1114_UK4 10.10.2007 16:18 Uhr Seite 3
Page 4
- 4 -
Making coffee
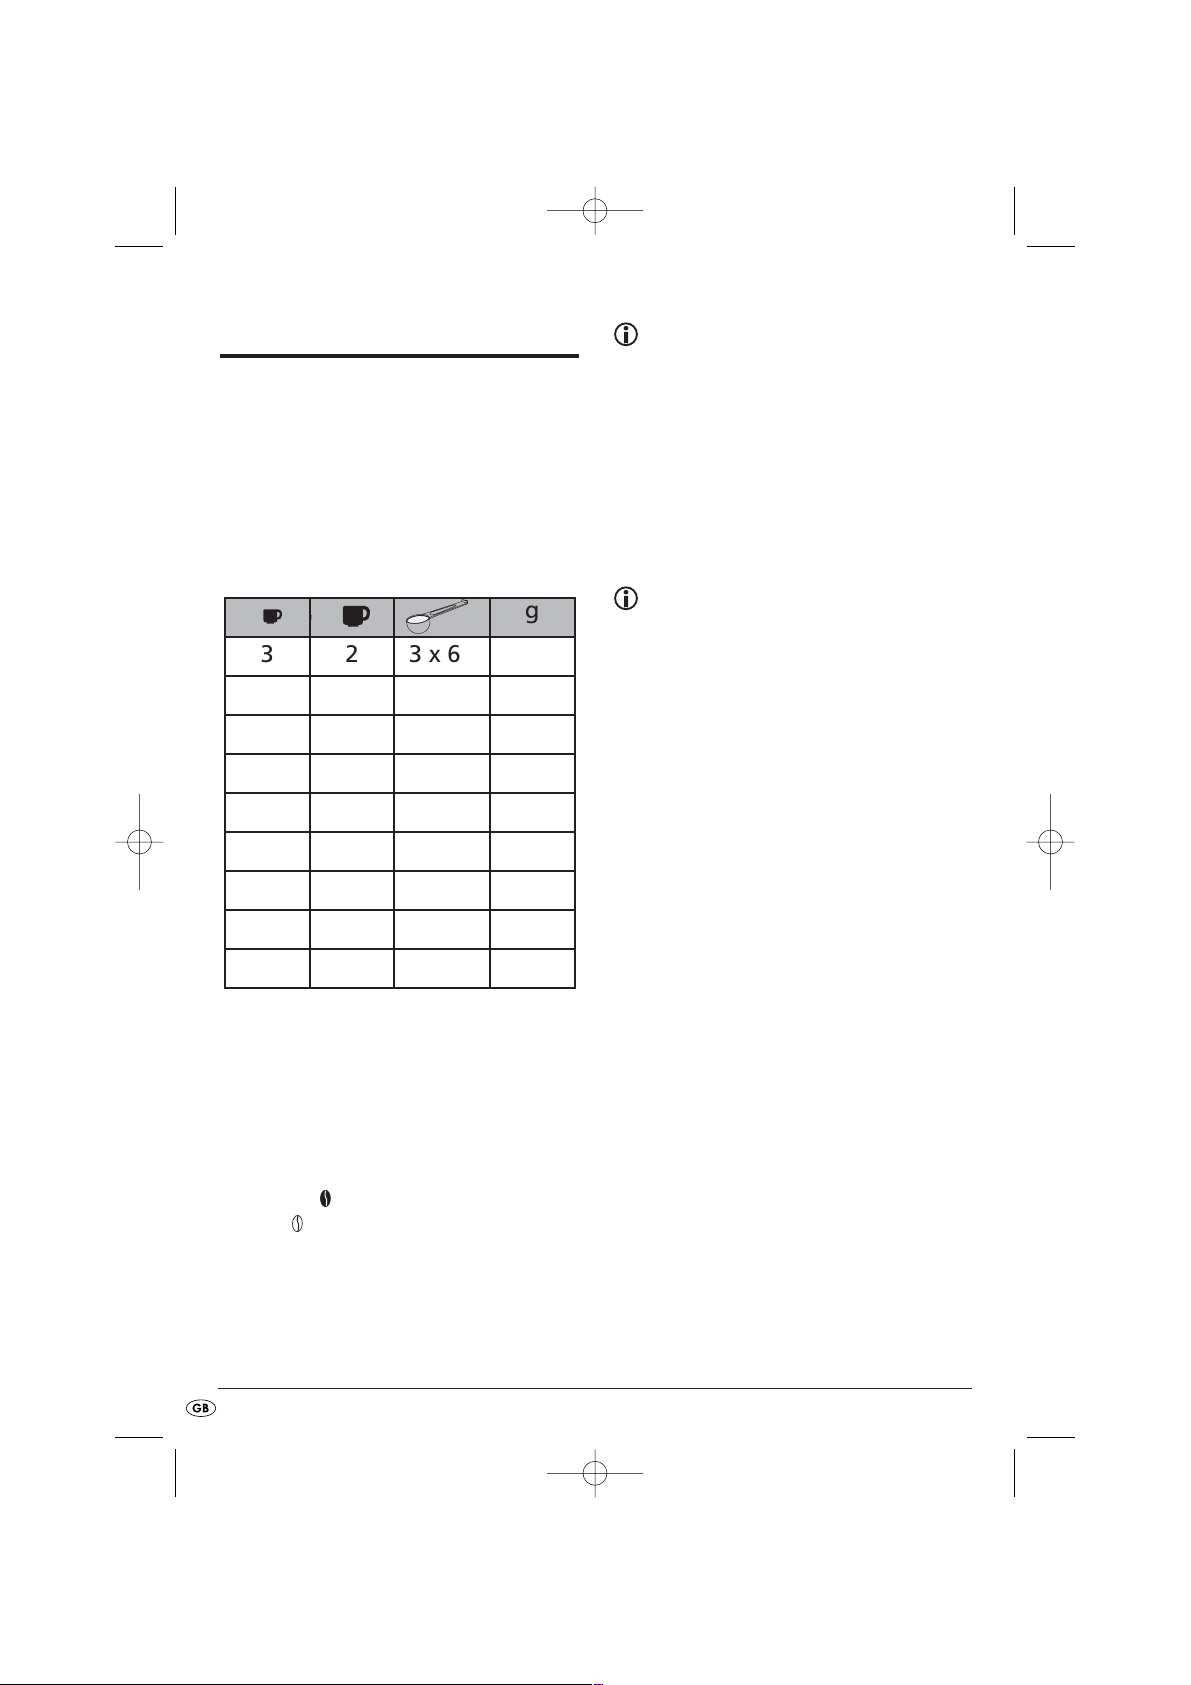
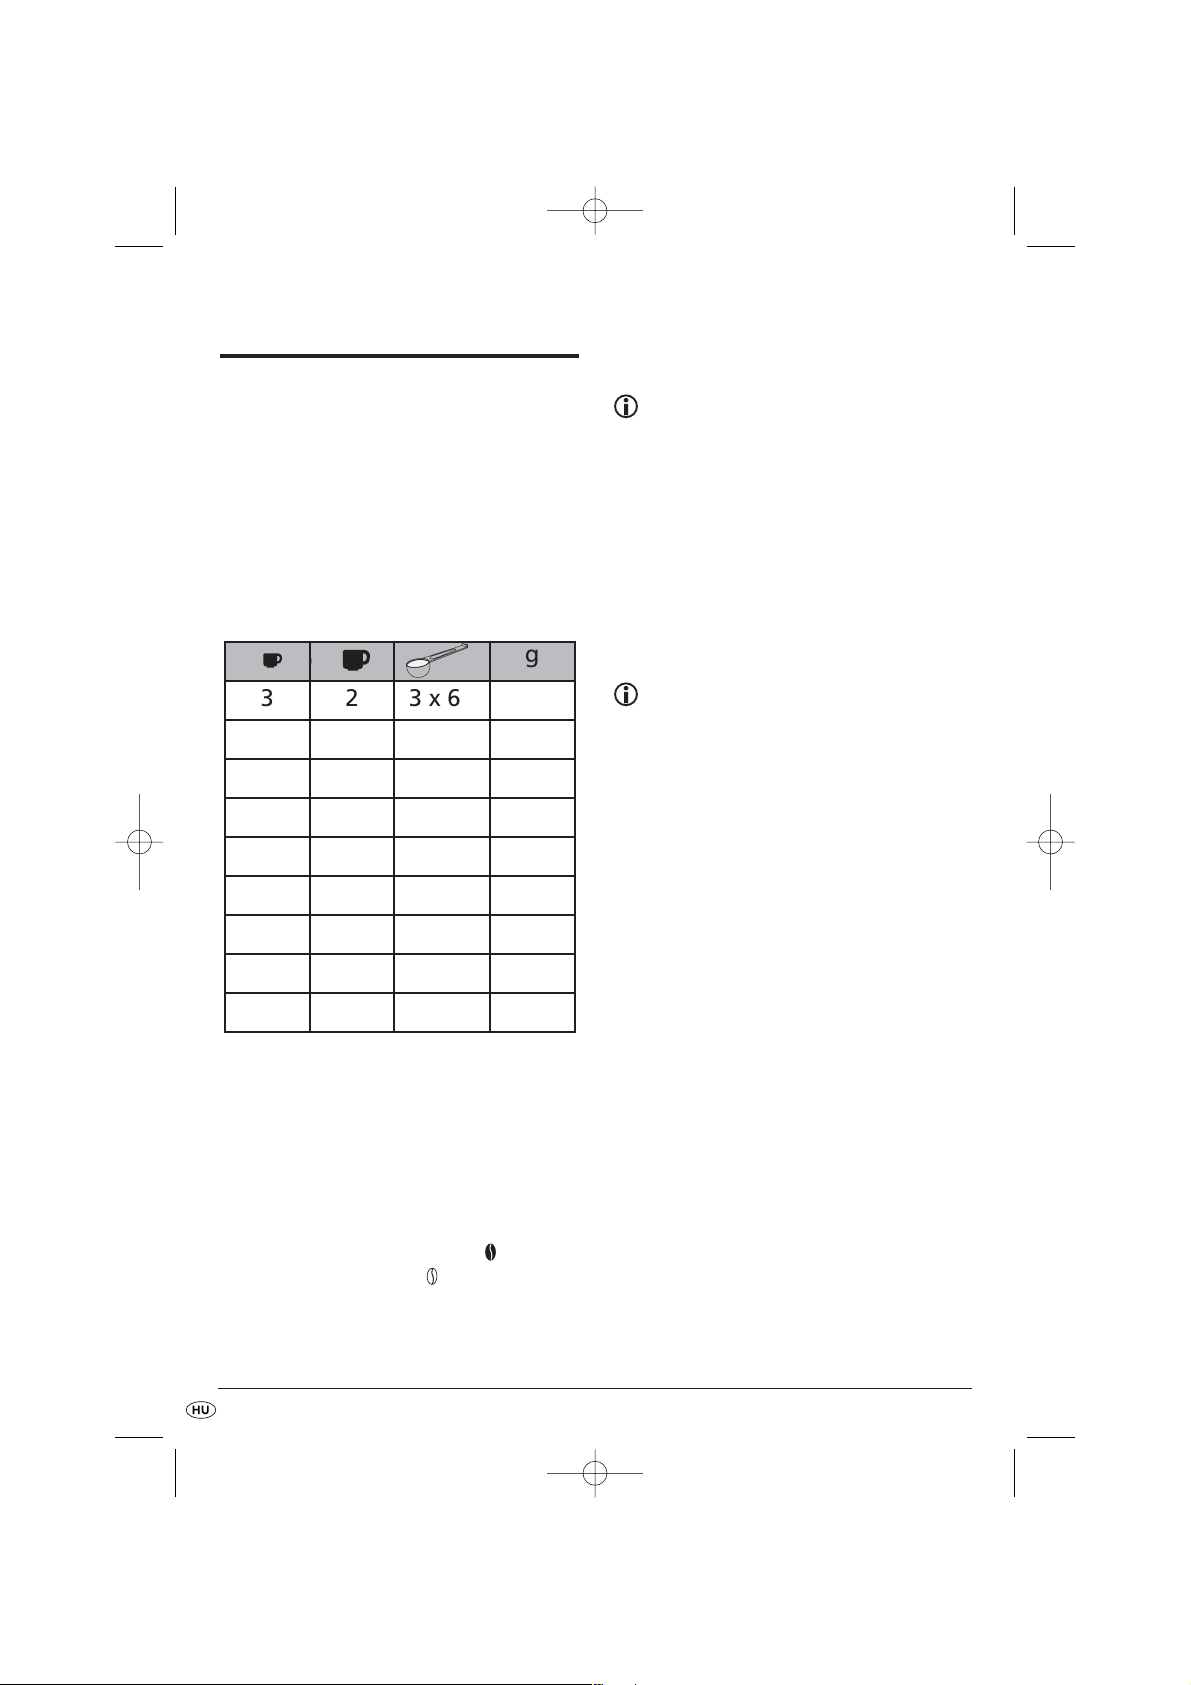
Avoid brewing less than 2 large or 3 small cups of
coffee. Otherwise, the coffee will not have the desired temperature and strength.
• Turn the filter holder q to the outside and insert a filter bag (Size 1x4) with its sides folded over into the
filter insert y. Fill the bag with the required amount
of coffee powder (medium to fine ground) (Fig. ).
One small teaspoon is equivalent to about 6 g of
coffee powder.
• Turn the filter holder q back into the Coffee Ma-
ker.
• Fill the required amount of water in the water
tank w by using the scale on the outside e
(Fig. ) of the water tank. Never fill the appliance with water beyond the max-marking (10 cups)
• Enter in the desired coffee strength by turning the
aroma knob o on the Panel (Fig. ).
The setting results in stronger coffee and the
setting results in mild coffee.
• Place the thermos jug r in the Coffee maker and
make sure the thermos jug r is empty before
every use.
Note:
The coffee remains warm for a longer period
if the thermos jug is rinsed out with hot water
before use.
• Start the brewing process by pressing switch
"on"f. The red indicator a turns on.
• Pour the coffee from the thermos jug after the red
indicator light a turns off.
Take note of Fig. for serving the coffee.
Note:
Let the coffee maker cool down for about 5
minutes, before you start the next brewing process or add water.
Using the Timer
With the button „prog“ h you can programme the
Coffee Maker so that it starts the brewing process at
a predetermined time. Always first insert coffee powder into the filter bag in the filter holder q and wa-
ter into the water tank w.
Place the thermos jug r in the Coffee Maker. Make
sure the thermos jug r is empty and the water tank
is not filled beyond the max-marking (10 cups)before every use.
• Press and hold down the button "prog" h.
• Enter in the desired start time with the buttons "h"
j and "min" u (see chapter "Setting the timer").
• When the desired time has been entered, release
the button "prog" h. The Timer is set.
• Enter in the desired coffee strength by turning the
aroma knob o.
• Press the button "auto" i until the green indica-
tor s lights up.
• If you wish to deactivate the automatic brewing
start, press the button "off" d.
g
3 2 3 x 6g 18
4
1
/
2
3 4 x 6g 24
6 4 5 x 6g 30
7
1
/
2
5 6 x 6g 36
9 6 7 x 6g 42
10
1
/
2
7
7
1
/
2
x 6g
45
12 8
8
1
/
2
x 6g
51
13
1
/
2
9 9 x 6g 54
15 10 10 x 6g 60
IB_KH1114_UK4 10.10.2007 16:18 Uhr Seite 4
Page 5
- 5 -
Cleaning and care
• Always remove the plug from the power socket
before cleaning the appliance.
Danger of electrical shock
Before you clean the Coffee Maker, you must
remove the power plug from the power socket.
Caution
When cleaning the Coffee Maker, under no
circumstances may you submerse it in water or
hold it under running water.
Risk of burns!
Always wait until the Coffee Maker has cooled down before cleaning it.
Take off the lid of the thermos jug r, when cleaning
(see Fig )
• Do not use household detergents or sharp/pointed objects to remove soiling. These could damage the Coffee Maker.
• Wipe the housing of the Coffee Maker and the
thermos jug r with a soft cloth lightly moistened
with a soapy solution.
• After every brewing process remove the filter
bag from the filter insert y.
• Remove the filter and rinse the filter holder q, the
filter insert y and the thermos jug r under running water.
Cleaning of the lid
• To clean the lid of the thermos jug r first disassemble the lid (See Fig. ):
• Carefully pull off the silicone disc from the valve
at the underside of the lid. When doing this, hold
the valve, because it is pressed up by a spring
from the other side.
• You now can take off the valve and the spring.
• Clean all parts with a mild soapy solution and
wipe them off well.
• To assemble the lid again, proceed in reversed
order.
Note:
Do not let the thermos jug with lid lie in soapy
water and do not wash the parts in the dishwasher, as they could become leaky!
If you do not use the Coffee Maker for an extended
period, store the power cable in the cable storage
compartment t (Fig. ).
Removing scale
Remove scale from the Coffee Maker regularly.
If your water has a high degree of hardness, the coffee maker must be descaled after every 30 applications, low degrees of hardness need only be descaled after every 60 applications.
Use only descaling agents that are suitable for coffee machines and read up the instructions.
• Insert the descaling agent into the water tank w.
• Fill it with enough water for max. 8 large cups.
• Turn the aroma knob o to "calc" to activate the
descaling function.
• Press the button "on" f. The red indicator a
turns on and the indicator “calc” g is blinking.
• Wait until the solution has completely run
through the Coffee Maker.
• When the procedure is complete, rinse the Coffee Maker through with 8 large cups of clean
water twice.
• After descaling, the Coffee Maker switches itself off.
IB_KH1114_UK4 10.10.2007 16:18 Uhr Seite 5
Page 6
- 6 -
Rectifying malfunctions
The Coffee Maker does not start working.
• The appliance is not turned on.
Press the switch “on” f to turn on the Coffee
Maker.
• The power plug is not plugged into the power
socket. Connect the Coffee Maker to the mains
by plugging the power plug into the power sokket.
• The appliance has not been cooled down after
the last brewing process. Wait for the appliance
to cool down for about 5 minutes until you start
the next brewing process.
The brewing process does not start at the determined time (Timer Function):
• The timer is not activated. Press the button “auto”
i to activate the timer.
• The time is not set correctly. Check the present
time and set the time if necessary.
The coffee is too strong/too weak:
• There is too little/too much water in the water
tank. Fill in the correct amount of water.
• There is too much/too little coffee powder in the
filter bag. Fill in less/more coffee power.
• The coffee powder is grinded too fine/too rough.
Choose a different type of ground coffee.
The brewing process lasts very long.
The appliance switches off during brewing.
The unit gets very loud during brewing.
Immoderate steam develops during brewing.
• The brewing system is scaled. remove the scale
as described under “Removing scale”.
Disposal
Do not dispose of the appliance in your normal domestic waste.
Dispose of the appliance through an approved disposal centre or at your community waste facility.
Observe the currently applicable regulations. In
case of doubt, please contact your waste disposal
centre.
Dispose of packaging materials in an environmentally responsible manner.
IB_KH1114_UK4 10.10.2007 16:18 Uhr Seite 6
Page 7
- 7 -
Warranty & Service
This appliance is guaranteed for 3 years from the
date of purchase. It has been carefully produced
and meticulously checked before delivery. Please
keep your receipt as proof of purchase. Contact
your service centre by telephone in case of questions pertaining to the warranty.
Your goods can be transmitted free of cost only in
this manner.
The warranty covers only material or manufacturing
faults, not normal wear or damage to fragile parts
such as switches or rechargeable batteries.
The appliance is intended solely for private, not
commercial, use. If this product has been subjected
to improper or inappropriate handling, abuse, or
interventions not carried out by one of our authorised sales and service outlets, the warranty will be
considered void. This warranty does not affect your
statutory rights. This warranty applies only to the initial purchaser and is non-transferable.
DES Ltd
Units 14-15
Bilston Industrial Estate
Oxford Street
Bilston
WV14 7EG
Tel.: 0870 787 6177
Fax: 0870 787 6168
e-mail: support.uk@kompernass.com
Importer
KOMPERNASS GMBH
BURGSTRASSE 21
D-44867 BOCHUM
www.kompernass.com
IB_KH1114_UK4 10.10.2007 16:18 Uhr Seite 7
Page 8

- 8 -
IB_KH1114_UK4 10.10.2007 16:18 Uhr Seite 8
Page 9
- 9 -
Pojemność Strona
Wskazówki bezpieczeństwa 10
Dane techniczne 11
Zakres dostawy 11
Użytkowanie zgodne z przeznaczeniem 11
Opis urządzania 11
Przed pierwszym użyciem 11
Ustawianie czasu 11
Funkcja pamięci 11
Przyrządzanie kawy 12
Wyznaczanie czasu rozpoczęcia parzenia 12
Czyszczenie i konserwacja 13
Usuwanie kamienia 13
Usuwanie usterek 14
Utylizacja 14
Gwarancja i serwis 15
Importer 15
Przed pierwszym użyciem urządzenia należy dokładnie przeczytać niniejszą instrukcję obsługi i zachować ją na
przyszłość. Przekazując urządzenie innej osobie należy jej również udostępnić niniejszą instrukcję obsługi.
IB_KH1114_PL4.qxd 10.10.2007 16:17 Uhr Seite 9
Page 10
- 10 -
AAuuttoommaatt ddoo kkaawwyy
KKHH 11111144
Wskazówki
bezpieczeństwa
NNiieebbeezzppiieecczzeeńńssttwwoo ppoorraażżeenniiaa
pprrąąddeemm!!
• Urządzenie należy podłączać wyłącznie do prawidłowo zainstalowanego gniazdka ze stykiem
uziemiającym.
• Przed poruszaniem lub napełnianiem, w przypadku
wystąpienia zakłóceń, przed czyszczeniem lub w
przypadku zaprzestania użytkowania urzą-dzenia
należy wyciągnąć wtyczkę z gniazdka sieciowego.
• Nigdy nie zanurzać urządzenia w cieczach. Jeżeli
mimo wszystko do obudowy urządzenia dostanie
się ciecz, należy natychmiast wyciągnąć wtyczkę
urządzenia z gniazdka. Zlecić naprawę wykwalifikowanemu personelowi specjalistycznemu.
• Nigdy nie chwytać ani nie dotykać urządzenia,
kabla sieciowego lub wtyczki wilgotnymi rękami.
• Wyciągając kabel sieciowy z gniazda, pociągaj
zawsze za wtyczkę, a nie za kabel.
• Nie wyginaj i nie przygniataj kabla sieciowego.
• Przed każdym użyciem sprawdź kabel sieciowy i
wtyczkę. W wypadku uszkodzenia przewodu zasilania należy zwrócić się do producenta, autoryzowanego serwisu lub wykwalifikowanego punktu naprawczego w celu naprawienia usterki.
NNiieebbeezzppiieecczzeeńńssttwwoo ppoożżaarruu!!
• W trakcie używania nigdy nie zostawiać urządzenia bez nadzoru.
• Nigdy nie używać urządzenia bez wody.
• Nie ustawiać urządzenia w pobliżu źródeł ciepła.
• Nie stosować przedłużaczy.W razie zagrożenia
wtyczka musi znajdować się w dostępnej odległości.
ZZaaggrroożżeenniiee ooddnniieessiieenniieemm
oobbrraażżeeńń!!
• Nigdy nie używać termosu r urządzenia
w kuchence mikrofalowej.
• Nie wolno dopuścić, by dzieci używały urządzenie bez nadzoru osoby dorosłej. Należy
poinformować dzieci o zagrożeniach, powodowanych przez urządzenie.
• Kabel sieciowy musi być ułożony tak, aby nikt
nie mógł po nim deptać ani potknąć się o kabel.
• Nie wkładać ostrych lub twardych przedmiotów
do termosu r. Nie wkładać palców do termo-
su. Może to spowodować uszkodzenia urządzenia i obrażenia.
OOssttrrzzeeżżeenniiee pprrzzeedd ppooppaarrzzeenniiaammii!!
• Podczas parzenia nigdy nie otwierać uchwytu
filtra q.
• Nie dotykać gorącego wkładu filtracyjnego. Filtr papierowy należy wyjmować dopiero wtedy, gdy
ciecz całkowicie spłynie i filtr ostygnie. Do usuwania
filtra papierowego należy używać wkładu filtra yn.
• Nie trzymać rąk nad obszarem unoszenia się
pary wodnej.
• Nigdy nie przemieszczać urządzenia podczas
parzenia.
• Termos r należy wyjmować dopiero wtedy, gdy
parzenie zostanie zakończone i filtr jest pusty.
• Przed włączeniem urządzenia zawsze zamykać
koszyczek na filtr, w przeciwnym wypadku istnieje zagrożenia poparzenia z powodu ulatniającej się gorącej pary wodnej.
UUwwaaggaa::
PPoozzwwoollii ttoo uunniikknnąąćć uusszzkkooddzzeenniiaa uurrzząą--
ddzzeenniiaa!!
• Do zbiornika wody w urządzenia należy nalewać wyłącznie czystej wody wodociągowej.
• Szkła termosu r nie należy nigdy narażać na
duże wahania temperatury. Może to spowodować uszkodzenie szkła.
• Nie przejmuje się żadnej odpowiedzialności za
uszkodzenia, spowodowane pęknięciem szkła!
IB_KH1114_PL4.qxd 10.10.2007 16:17 Uhr Seite 10
Page 11
- 11 -
Dane techniczne
Napięcie sieciowe : 220 - 240 V ~50 Hz
Moc znamionowa: 1000 W
Filtr do kawy: Wielkość 1x4
Zakres dostawy
• Ekspres do kawy KH 1114 z funkcją zegara sterującego
• Termos z pokrywką
• Miarka
• Instrukcja obsługi
Przed uruchomieniem urządzenia sprawdź, czy
w zestawie znajdują się wszystkie elementy oraz
czy nie występują żadne uszkodzenia.
Użytkowanie zgodne z
przeznaczeniem
Ekspres do kawy służy wyłącznie do przyrządzania
kawy. Ten ekspres kawowy przeznaczony jest
wyłącznie do zastosowania w gospodarstwach
domowych. Nie należy go używać do zastosowań
przemysłowych.
Opis urządzania
Ilustracja znajduje się na tylnej wkładce.
EEkksspprreess ddoo kkaawwyy::
q Uchwyt filtra
w Zbiornik wody
e Skala
r Termos
t Kieszeń na kabel
y Wkład filtra
PPaanneell sstteerroowwaanniiaa::
u Przycisk „min”
i Przycisk „auto”
o Pokrętło regulacji aromatu
a Czerwona kontrolka
s Zielona kontrolka
d Przełącznik „off”
f Przełącznik „on”
g Czerwona kontrolka „calc”
h Przycisk „prog”
j Przycisk „h”
Przed pierwszym
użyciem
UUWWAAGGAA::
Nie napełniać wody powyżej znacznika
„Max” (10 filiżanek). Urządzenie może
zostać przepełnione.
• Przed pierwszym użyciem ustawić pokrętło regulatora aromatu o w pozycji i dwukrotnie
przegotować urządzenie z 8. dużymi filiżankami
wody. Nie wkładać filtra papierowego i nie
nasypywać kwy.
• Oczyścić urządzenie (patrz rozdział Czyszczenie
i konserwacja).
Ustawianie czasu
• Tyle razy naciskać przycisk „h” j (ustawianie
godzin) lub przycisk „min” u (ustawianie minut),
aż ustawiony zostanie wymagany czas.
FFuunnkkccjjaa ppaammiięęccii
W razie awarii zasilania ustawienie czasu zegarowego i czasu startu pozostaje zachowane przez
około 3 minuty.
IB_KH1114_PL4.qxd 10.10.2007 16:17 Uhr Seite 11
Page 12

- 12 -
Przyrządzanie kawy
Należy unikać parzenia mniej niż 2 dużych lub
3 małych filiżanek. Inaczej kawa nie będzie miała
wymaganej temperatury i mocy.
• Odchylić uchwyt filtra q nach na zwewnątrz
i włożyć filtr papierowy (wielkość 1x4)
z załamanym szwem do wkładu filtra y.
Za pomocą miarki napełnić kawy (średnio
lub drobno zmielonej) do filtra (rys. ).
Plaska miarka odpowiada przy tym ok. 6 g
zmielonej kawy.
• Obrócić uchwyt filtra q z pworotem do
wnętrza ekspresu do kawy.
• Nalać wymaganą ilość wody do zbiornika
wody w (rys. ). Skorzystać przy tym z
zewnętrznej skali e (rys. ). Nie napełniać
wody powyżej znacznika „Max” (10 filiżanek).
• Ustawić moc kawy za pomocą pokrętła regulacji aromatu o (rys. ). Ustawienie daje
mocną kawę, a ustawienie słabszą kawę.
• Wstawić termos r do ekspresu do kawy. Przed
każdym użyciem upewnić się, że termos r jest
pusty.
WWsskkaazzóówwkkaa::
Kawa pozostanie dłużej ciepła, jeżeli termos
zostanie przepłukany gorącą wodą.
• Nacisnąć przełącznik „on” f u góry, aby rozpocząć parzenie. Świeci czerwona kontrolka a.
• Można wyjąć termos r i podać kawę, gdy
czerwona kontrolka a zgaśnie.
Przy nalewaniu kawy należy kierować się ilustracją .
WWsskkaazzóówwkkaa::
Przed ponownym parzeniem kawy lub napełnianiem wody pozostawić ekspres do kawy na
około 5 minut do wystygnięcia.
WWyyzznnaacczzaanniiee cczzaassuu rroozzppoocczzęęcciiaa
ppaarrzzeenniiaa
Przyciskiem „prog” h można tak ustawić ekspres
do kawy, aby rozpoczął parzenie kawy o określonej godzinie. Najpierw nasypać zmielonej kawy
do filtra papierowego we wkładzie filtra y, a
następnie napełnić wody do zbiornika wody w.
Wstawić termos r do ekspresu do kawy. Upewnić
się, że termos r jest pusty i zbiornik wody nie zo-
stał napełniony powyżej maksimum (10 filiżanek).
• Nacisnąć i przytrzymać przycisk „prog” h.
Ustawić wymaganą godzinę rozpoczęcia parzenia za pomocą przycisku „h” j i przycisku
„min” u (patrz rozdział „Ustawianie czasu”).
• Po wprowadzeniu wymaganej godziny startu
zwolnić przycisk „prog” h. Czas rozpoczęcia
parzenia został zaprogramowany.
• Ustawić wymaganą moc kawy za pomocą
pokrętła regulacji aromatu o.
• Nacisnąć przycisk „auto” i, aż zaświeci zielona
kontrolka s.
• Jeżeli automatyczny początek parzenia ma
zostać ponownie dezaktywowany, nacisnąć
przełącznik „off” d.
g
3 2 3 x 6g 18
4
1
/
2
3 4 x 6g 24
6 4 5 x 6g 30
7
1
/
2
5 6 x 6g 36
9 6 7 x 6g 42
10
1
/
2
7
7
1
/
2
x 6g
45
12 8
8
1
/
2
x 6g
51
13
1
/
2
9 9 x 6g 54
15 10 10 x 6g 60
IB_KH1114_PL4.qxd 10.10.2007 16:17 Uhr Seite 12
Page 13
- 13 -
Czyszczenie i konserwacja
• Przed każdym czyszczeniem urządzenia wyjąć
wtyczkę z gniazdka sieciowego.
NNiieebbeezzppiieecczzeeńńssttwwoo ppoorraażżeenniiaa eelleekkttrryycczznneeggoo!!
Przed rozpoczęciem czyszczenia ekspresu do
kawy należy zawsze wyciągnąć wtyczkę
z gniazdka sieciowego.
UUwwaaggaa!!
Nigdy nie zanurzać ekspresu do kawy w wodzie.
NNiieebbeezzppiieecczzeeńńssttwwoo ppooppaarrzzeenniiaa!!
Przed rozpoczęciem czyszczenia odczekać
do całkowitego ostudzenia ekspresu do kawy.
Do czyszczenia zdjąć pokrywkę z termosu r
(patrz rys. ).
• Do usuwania brudu nigdy nie używać
artykułów do czyszczenia ani żadnych innych
ostrych przedmiotów. W przeciwnym wypadku
można uszkodzić ekspres do kawy.
• Obudowę ekspresu do kawy i termos f czyścić
miękką ściereczką, lekko zwilżoną delikatnym
płynem do mycia naczyń.
• Po każdym użyciu wyjmować filtr papierowy
z wkładu filtra y.
• Wyjąć filtr i wypłukać uchwyt filtra q, wkład
filtra y i termos r pod bieżącą wodą.
CCzzyysszzcczzeenniiee ppookkrryywwkkii
• W celu oczyszczenia pokrywki termosu należy
ją najpierw rozłożyć na części zgodnie z
poniższym opisem (rys. ):
• Ostrożnie zdjąć podkładkę silikonową z czopa
od dołu pokrywki. Przytrzymać przy tym czop,
gdyż od przeciwnej strony jest on dociskany
sprężyną.
• Wyjąć czop ze sprężyną z pokrywki.
• Oczyścić części w delikatnym płynie do mycia
naczyń, a potem dobrze wysuszać.
• Aby ponownie zmontować pokrywkę należy
postępować w odwrotnej kolejności.
UUwwaaggaa!!
Nie pozostawiać termosu i pokrywki w wodzie z płynem do mycia naczyń ani nie myć ich
w zmywarce do naczyń, gdyż inaczej części
mogą stracić szczelność.
Jeżelli ekspres do kawy nie będzie używany przez
dłuższy czas, należy schować kabel w kieszeni na
kabel t (rys. ).
Usuwanie kamienia
Przy wysokiej twardości wody odkamienianie jest
konieczne po każdych 30 przygotowaniach kawy,
natomiast przy niskiej twardości wody po każdych
60 przygotowaniach.
Stosować wyłącznie środki do odkamieniania domowego użytku, przeznaczone dla ekspresów do
kawy, i przestrzegać instrukcji użycia danego środka.
Sposób usuwania kamienia:
• Dodać środek odkamieniający do zbiornika na
wodę w.
• Napełnić na maks. 8 dużych filliżanek.
• Ustawić pokrętło regulatora aromatu o na
„calc”, aby rozpopcząć funkcję odkamnieniania.
• Nacisnąć przełącznik f „on”. Świeci czerwona
kontrolka a i miga kontrolka „calc” g.
• Odczekać, aż ekspres przegotuje całą wodę.
• Po usuwaniu kamieniać przegotować w ekspresie
dwa razy po 8 filiżanek wody.
• Po odkamienieniu ekspres do kawy wyłącza się.
IB_KH1114_PL4.qxd 10.10.2007 16:17 Uhr Seite 13
Page 14

- 14 -
Usuwanie usterek
EEkksspprreess ddoo kkaawwyy nniiee ddzziiaałłaa::
• Urządzenie nie jest włączone. Nacisnąć
przełącznik „on” f, aby włączyć urządzenie.
• Wtyczka nie jest podłączona do gniazdka sieciowego. Połączyć urządzenie z siecią zasilającą. Podłącz wtyczkę do gniazdka sieciowego.
• Ekspres do kawy nie wystygnął jeszcze wystarczająco po ostatnim parzeniu. Przed ponownym
parzeniem kawy pozostawić ekspres do kawy
na około 5 minut do wystygnięcia.
PPrroocceess ppaarrzzeenniiaa nniiee rroozzppoocczzyynnaa ssiięę oo
wwyymmaaggaannyymm cczzaassiiee ((zzeeggaarr sstteerruujjąąccyy))::
• Zegar sterujący nie został aktywowany. Nacisnąć przycisk „auto” i, aby aktywować zegar
sterujący.
• Czas nie jest poprawnie ustawiony. Sprawdzić
czas i ustawić go w miarę potrzeby.
KKaawwaa jjeesstt zzaa mmooccnnaa aallbboo zzaa ssłłaabbaa::
• W zbiorniku wody jest za mało lub za dużo
wody. Napełnić odpowiednią ilość wody.
• Nasypano za dużo lub za mało zmielonej kawy.
Nasypać mniej lub więcej zmielonej kawy.
• Kawa jest zmielona za drobno lub za grubo.
Wybrać inny stopień zmielenia kawy.
PPrroocceess ppaarrzzeenniiaa ttrrwwaa nniieettyyppoowwoo
ddłłuuggoo..
UUrrzząąddzzeenniiee wwyyłłąącczzaa ssiięę ppooddcczzaass
ppaarrzzeenniiaa..
PPooddcczzaass ppaarrzzeenniiaa uurrz
ząąddzzeenniiee pprraaccuujjee
ggłłoośśnniieejj..
WWyyddoossttaajjee ssiięę bbaarrddzzoo dduużżoo ppaarryy..
• System parzenia urządzenia jest pokryty osadem
kamienia kotłowego. Odkamienić urządzenie zgodnie z opisem w rozdziale „Usuwanie kamienia”.
Utylizacja
Urządzenia nie należy wyrzucać wraz z
normalnymi odpadami domowymi.
Urządzenie należy poddać utylizacji w akredytowanym zakładzie utylizacji lub komunalnym
zakładzie utylizacji odpadów.
Należy przestrzegać aktualnych przepisów. W razie
pytań należy skontaktować się z komunalnym
zakładem utylizacji odpadów.
Wszystkie materiały wchodzące w skład
opakowania należy przekazać do odpowiednich punktów zbiórki odpadów.
IB_KH1114_PL4.qxd 10.10.2007 16:17 Uhr Seite 14
Page 15
- 15 -
Gwarancja i serwis
Urządzenie objęte jest trzyletnią gwarancją, licząc
od daty zakupu. Urządzenie zostało starannie
wyprodukowane i poddane skrupulatnej kontroli
przed wysyłką. Paragon należy zachować jako dowód dokonania zakupu. W przypadku roszczeń
gwarancyjnych należy skontaktować się telefonicznie z serwisem. Tylko w ten sposób można zagwarantować bezpłatną wysyłkę zakupionego produktu.
Gwarancja obejmuje wyłącznie wady materiałowe
i fabryczne, natomiast nie obejmuje części ulegających zużyciu ani uszkodzeń części łatwo łamliwych, np. wyłącznika lub akumulatorów. Urządzenie jest przeznaczone wyłącznie do użytkowania
w gospodarstwie domowym, a nie do celów przemysłowych.
Gwarancja traci ważność w przypadku niewłaściwego używania urządzenia, używania niezgodnego z przeznaczeniem, użycia siły lub ingerencji w
urządzenie dokonywanej poza naszymi autoryzowanymi punktami serwisowymi. Niniejsza gwarancja nie ogranicza ustawowych praw nabywcy
urządzenia. Niniejsza gwarancja obowiązuje
wyłącznie w odniesieniu do pierwotnego nabywcy
produktu i nie podlega cesji.
KKoommppeerrnnaassss SSeerrvviiccee PPoollsskkaa
ul, Strycharska 4
26-600 Radom
Tel. 048 360 91 40
Fax.048 384 65 38
e-mail: support.pl@kompernass.com
Importer
KOMPERNASS GMBH
BURGSTRASSE 21
D-44867 BOCHUM
www.kompernass.com
IB_KH1114_PL4.qxd 10.10.2007 16:17 Uhr Seite 15
Page 16
- 16 -
IB_KH1114_PL4.qxd 10.10.2007 16:17 Uhr Seite 16
Page 17

- 17 -
Tartalmjegyzék Oldalszám
Biztonsági utasítások 18
Műszaki adatok 19
Tartozékok 19
Rendeltetésszerű használat 19
A készülék leírása 19
Az első használat előtt 19
Az óra beállítása 19
Memória funkció 19
Kávéfőzés 20
A főzés elindításának meghatározása 20
Tisztítás és karbantartás 21
Vízkőoldás 21
Hibaelhárítás 22
Ártalmatlanítás 22
Garancia és szerviz 23
Gyártja 23
Az első használat előtt figyelmesen olvassa el az útmutatót, és későbbi használatra tegye el.
A készülék harmadik fél részére történő továbbadásakor adja át a leírást is.
IB_KH1114_HU4.qxd 10.10.2007 16:23 Uhr Seite 17
Page 18
- 18 -
KKáávvééffőőzzőő ggéépp
KKHH 11111144
Biztonsági utasítások
ÁÁrraammüüttééss vveesszzééllyyee!!
• A készüléket csak előírásszerűen beszerelt és
földelt konnektorba csatlakoztassa.
• Húzza ki a hálózati dugót a hálózati aljzatból,
ha a készüléket mozgatja, tölti, ha hiba lép fel,
a készülék tisztításának megkezdése előtt vagy
ha nincs szüksége a készülékre.
• Soha ne merítse a készüléket folyadékba. Ha
mégis folyadék kerülne a készülék burkolatába,
azonnal húzza ki a készülék csatlakozóját az
aljzatból.Képzett szakemberrel javíttassa meg.
• Ne fogja meg nedves kézzel az eszközt, a
hálózati kábelt és a hálózati dugót.
• Soha ne húzza ki a csatlakozót a kábelnél fogva,
a csatlakozóvéget fogja meg.
• Ne törje meg és ne szorítsa be a hálózati kábelt.
• Használat előtt mindig ellenőrizze a hálózati
kábelt és a csatlakozót. Ha megsérül a készülék
hálózati vezetéke, cseréltesse ki a gyártóval, annak
ügyfélszolgálatával vagy hasonló szakemberrel,
hogy ne veszélyeztesse magát.
TTűűzzvveesszzééllyy!!
• Üzemeltetés közben soha se hagyja a készüléket
felügyelet nélkül.
• Csapvíz nélkül soha ne működtesse a készüléket.
• A készüléket soha se állítsa hőforrás közelébe.
• Ne használjon hosszabbítókábelt.Veszély esetén
a csatlakozónak gyorsan elérhetőnek kell lennie.
SSéérrüüllééssvveesszzééllyy!!
• Soha ne használja a készülék hőszigetelő kannáját r a mikrohullámú sütőben.
• Soha ne engedje, hogy a gyermekek felnőtt
felügyelete nélkül használják a készüléket.
Magyarázza el a gyermekeknek a készülék
veszélyeit.
• Úgy helyezze el a hálózati kábelt, hogy arra
senki ne léphessen rá és senki ne botolhasson
meg benne.
• Ne dugjon a tegyen a kannába r hegyes vagy
kemény tárgyat. Ne nyúljon bele a kannába.
Ez kárt tehet a készülékben és sérülést okozhat.
FFiiggyyeellmmeezztteettééss,, lleeffoorrrráázzhhaattjjaa mmaaggáátt!!
• A főzési eljárás során soha ne nyissa ki a szűrőtartót q.
• Ne érjen hozzá a forró filterhez. Csak azután vegye
ki a szűrőpapírt, miután a folyadék eltávozott és
a szűrőpapír lehűlt. Használja a filterbetétet y a
papírfilter eltávolítására.
• Ne tartsa kezét a felszálló vízgőzbe.
• A főzési eljárás során soha ne mozgassa az
eszközt.
• Csak azután vegye ki a kannát r, ha a főzés
befejeződött és a szűrő kiürült.
• Bekapcsolás előtt zárja le a szűrőtartót, mivel
a felszálló gőz és a forró víz leforrázhatja.
VViiggyyáázzaatt::
ÍÍggyy kkeerrüüllhheettii eell,, hhooggyy kkáárr kkeelleettkkeezzzzeenn
aa kkéésszzüülléékkbbeenn!!
• Kizárólag tiszta csapvizet töltsön a készülék
víztartályába w.
• Ne tegye ki a termoszkannában r lévő üveget
nagy hőingadozásnak. Az üveg megsérülhet.
• Az üveg eltöréséből eredő kárért nem vállalunk
felelősséget!
IB_KH1114_HU4.qxd 10.10.2007 16:23 Uhr Seite 18
Page 19
- 19 -
Műszaki adatok
Hálózati feszültség: 220 - 240 V ~50 Hz
Névleges teljesítmény: 1000 W
Kávéfilter: 1x4-es méret
Tartozékok
• időzítő funkcióval rendelkező kávéfőző automata
KH 1114
• fedeles hőszigetelő kanna
• mérőkanál
• használati útmutató
Üzembe helyezés előtt kérjük ellenőrizze, hogy a csomag hiánytalan-e és nincsen-e esetleg megsérülve.
Rendeltetésszerű
használat
A kávéfőző kizárólag csak kávé készítésre alkalmazható. Ez a kávéfőző rendeltetésszerűen csak
magánháztartásokban használható. Ne használja
kereskedelmi célokra.
A készülék leírása
Az ábra a hátsó kihajtható oldalon található.
KKáávvééffőőzzőő::
q filtertartó
w víztartály
e skála
r hőszigetelő kanna
t vezetéktartó
y filterbetét
KKeezzeellőőppaanneell::
u „min“ gomb
i „auto“ gomb
o forgatható aromaszabályozó
a piros kijelzőlámpa
s zöld kijelzőlámpa
d „off“ kapcsoló
f „on“ kapcsoló
g piros „calc“ kijelzőlámpa
h „prog“ gomb
j „h“ gomb
Az első használat előtt
TTuuddnniivvaallóó::
Soha ne töltsön bele több vizet, mint ahogy az
a Max jelzéssel meg van adva (10 csésze).
A készülékből kifolyhat a viz.
• Mielőtt először használná a készüléket, állítsa a
forgatható aromaszabályozót o beállításra
és eresszen át a gépen kétszer 8 nagy csésze
vizet. Ne helyezzen be papírfiltert és ne használjon hozzá kávét.
• Tisztítsa meg a készüléket (lásd a Tisztítás és karbantartás részt).
Az óra beállítása
• Nyomja meg annyiszor a „h“ gombot j az
órák, és a „min“ gombot u a percek beállításához,
amíg be nem állította a kívánt időpontot.
MMeemmóórriiaa ffuunnkkcciióó
Az óra és a kezdési idő beállítása áramkimaradás
után akár 3 percig megmarad.
IB_KH1114_HU4.qxd 10.10.2007 16:23 Uhr Seite 19
Page 20
- 20 -
Kávéfőzés
Ha lehet, ne főzzön 2 nagy vagy 3 kis csészénél
kevesebb kávét. Különben a kávé nem lesz elég
meleg és elég erős.
• Hajtsa ki a filterszűrőt q és helyezzen be egy
behajtott oldalú papírfiltert (1x4-es méret) a filterbetétbe y.
Töltsön a mérőkanállal őrölt kávét (közepesen
durvára vagy finomra őröltet) a papírfilterbe
( ábra).
Egy csapott mérőkanál kb. 6 g őrölt kávénak
felel meg.
• Hajtsa vissza a filtertartót q a kávéfőző auto-
matába.
• Töltse bele a víztartályba w a kívánt vízmennyiséget ( ábra). Használja hozzá a külső skálát
e (ábra). Soha ne töltsön bele több vizet,
mint ahogy az a Max jelzéssel meg van adva
(10 csésze).
• A kávé erősségét állítsa be a forgatható aromaszabályozóval o ( ábra). A beállítás
erős kávét eredményez, a beállítás pedig
gyengét.
• Helyezze be a hőszigetelő kannát r a kávéfő-
ző automatába. Használat előtt győződjön meg
róla, hogy a termoszkanna r üres.
TTuuddnniivvaallóó::
A kávé tovább marad meleg, ha a kannát
előtte forró vízzel kiöblíti.
• Nyomja meg az „on“ f kapcsolót a felső végén,
ha el szeretné indítani a főzést. A piros kijelzőlámpa a világít.
• Ha a piros kijelzőlámpa a kialszik, kiveheti a
termoszkannát r és felszolgálhatja a kávét.
A kávé kitöltésére vonatkozólag vegye figyelembe
a ábrát.
TTuuddnniivvaallóó::
Hagyja kb. 5 percig hűlni a kávéfőző automatát,
mielőtt másik kávét kezdene főzni vagy vizet
töltene bele.
AA ffőőzzééss eelliinnddííttáássáánnaakk mmeegghhaattáárroozzáássaa
A"prog" gombbal húgy állíthatja be a kávéfőző
automatát, hogy az meghatározott időpontban
kezdje meg a kávéfőzést. Először mindig töltse
bele a kávét a filterbetétben y lévő papírfilterbe
és a vizet a víztartályba w. Helyezze a kannát r a
kávéfőző automatába. Győződjön meg róla, hogy
a kannát r üres és a víztartály nincs
a Max jelzés fölött megtöltve (10 csésze).
• Nyomja meg a „prog“ h gombot és tartsa lenyomva. Állítsa be a kívánt kezdési időt a „h“ j és
„min“ u gombokkal (lásd az „Idő beállítása“
részt).
• Ha beállította a kívánt időt, engedje el a „prog“
h gombot. Ezzel be van programozva a kezdési
idő.
• A kávé erősségét a forgatható aromaszabályozóval o állíthatja be.
• Nyomja meg az „auto“ igombot, amíg világítani
nem kezd a zöld kijelzőlámpa s .
• Ha ki szeretné kapcsolni az automatikus főzésindítást, nyomja meg az „off“ d kapcsolót.
g
3 2 3 x 6g 18
4
1
/
2
3 4 x 6g 24
6 4 5 x 6g 30
7
1
/
2
5 6 x 6g 36
9 6 7 x 6g 42
10
1
/
2
7
7
1
/
2
x 6g
45
12 8
8
1
/
2
x 6g
51
13
1
/
2
9 9 x 6g 54
15 10 10 x 6g 60
IB_KH1114_HU4.qxd 10.10.2007 16:23 Uhr Seite 20
Page 21

- 21 -
Tisztítás és karbantartás
• Tisztítás előtt húzza ki a konnektorból a csatlakozót.
ÁÁrraammüüttééss vveesszzééllyyee!!
A kávéfőző-automata tisztítása előtt mindig
húzza ki a hálózati dugót a csatlakozóaljzatból.
FFiiggyyeelleemm!!
Soha ne merítse víz alá a kávéfőző automatát.
MMeeggééggeetthheettii mmaaggáátt!!
Mindig várja meg, amíg lehűl a kávéfőző
automata, mielőtt kitisztítja.
Tisztításhoz vegye le a hőszigetelő kanna r fede-
lét (lásd az ábrát).
• A szennyeződések tisztításához ne használjon
háztartási tisztítószert vagy éles ill. hegyes tárgyakat. Ezek károsíthatják a kávéfőző automatát.
• A kávéfőző házát és a kannát r kissé beszappanozott, nedves ruhával törölje le.
• A filtert minden használat után vegye ki a filterbetétből y.
• Vegye ki a filtert és mossa el folyó csapvíz alatt
a filtertartót q, a filterbetétet y és a kannát r.
AA ffeeddééll ttiisszzttííttáássaa
• A termoszkanna fedelének tisztításához először
az alább leírt módon szedje szét ( ábra ):
• Óvatosan vegye le a szilikongyűrűt a fedél alján lévő csapról. Közben fogja szorosan a csapot, mivel az ellenkező oldalról rugó tartja.
• Vegye le a fedélről a csapot és a rugót.
• Valamennyi alkatrészt enyhén szappanos vízben mosson meg, majd jól szárítsa meg őket.
• A fedél összerakásakor fordított módon járjon el.
FFiiggyyeelleemm!!
Ne hagyja a termoszkannát és a fedelet a
szappanos vízben és az alkatrészeket ne a
mosogatógépben tisztítsa, mert különben előfordulhat, hogy elromlik a tömítésük.
Ha hosszabb ideig nem használja a kávéfőző automatát, helyezze a kábelt a kábeltartóba t ( ábra).
Vízkőoldás
Magas keménységi fok esetén már kb. 30 használatot követően, alacsony keménységi fok esetén kb.
60 használatot követően szükséges a vízkőoldás.
Használjon kizárólag kávéfőző automatákhoz való
vízkőoldó szert és tartsa be a használati útmutatót.
Így oldhatja le a vízkövet:
• Tegye a vízkőoldót a víztartályba w.
• Töltsön bele max. 8 nagy csésze vizet.
• Fordítsa el a forgatható aromaszabályozót o
„calc“-ra a vízkőoldó funkció bekapcsolásához.
• Nyomja meg az f „on“ kapcsolót. A piros kijelzőlámpa a világít és a „calc“ g kijelzőlámpa
villog.
• Várja meg, amíg a víz teljesen átfolyt.
• Vízkőoldás után eresszen át a készüléken kétszer
8 csésze vizet.
• A kávéfőző automata a vízkőoldás kikapcsol.
IB_KH1114_HU4.qxd 10.10.2007 16:23 Uhr Seite 21
Page 22

- 22 -
Hibaelhárítás
AA kkáávvééffőőzzőő aauuttoommaattaa nneemm mműűkkööddiikk::
• A készülék nincs bekapcsolva. Nyomja meg az
„on“ f kapcsolót a készülék bekapcsolásához.
• A hálózati csatlakozó nincs benne a dugaljban.
Csatlakoztassa a készüléket a hálózatra. Dugja
a hálózati csatlakozót egy konnektorba.
• A kávéfőző automata még nem hűlt le teljesen
az utolsó főzés után. Hagyja kb. 5 percig hűlni
a kávéfőző automatát, mielőtt másik kávét kezdene főzni.
AA kkáávvééffőőzzééss nneemm kkeezzddőőddiikk eell
aa kkíívváánntt iiddőőbbeenn ((iiddőőzzííttőő))::
• Nincsen bekapcsolva az időzítő. Nyomja meg
az “auto” i gombot, ha be szeretné kapcsolni
az időzítőt.
• Nincs helyesen beállítva az idő. Ellenőrizze az
időt és ha szükséges, állítsa be megint.
AA kkáávvéé ttúúll eerrőőss//ttúúll ggyyeennggee::
• Túl kevés/sok víz van a tartályban. Töltsön bele
megfelelő mennyiségű vizet.
• Túl sok/kevés kávé van beletöltve. Töltsön bele
kevesebb/több kávét.
• Az őrölt kávé túl finom/durva. Válasszon másik
őrlési fokozatot a kávédarálón.
AA kkáávvééffőőzzééss sszzookkaattllaannuull hhoosssszzúú iiddeeiigg
ttaarrtt..
AA kkéésszzüülléékk kkáávvééffőőzzééss kköözzbbeenn kkiikkaappccssooll..
AA kkéésszzüülléékk ffőőzzééss k
köözzbbeenn hhaannggoossaabbbb
lleesszz..
TTúúll ssookk ggőőzz kkééppzzőőddiikk..
• A készülék forralórendszere el van vízkövesedve.
Oldja le a vízkövet a “Vízkőoldás” részben leírtak
alapján.
Ártalmatlanítás
Semmi esetre se dobja a készüléket a háztartási hulladékba.
A készüléket engedélyeztetett hulladékgyűjtő helyen
vagy a helyi hulladékeltávolító üzemnél tudja
kidobni.
Tartsa be az érvényes előírásokat. Kétség esetén
vegye fel a kapcsolatot a hulladékfeldolgozó
vállalattal.
Valamennyi csomagolóanyagot juttasson el
a környezetbarát hulladékhasznosítóhoz.
IB_KH1114_HU4.qxd 10.10.2007 16:24 Uhr Seite 22
Page 23

- 23 -
Garancia és szerviz
A készülékre 3 év garanciát adunk a vásárlás dátumától számítva. A készüléket gondosan gyártottuk, és
szállítás előtt lelkiismeretesen ellenőriztük. Kérjük,
a vásárlás igazolására őrizze meg a pénztári blokkot.
Kérjük, garanciaigény esetén vegye fel a kapcsolatot
telefonon az Ön közelében lévő szervizzel. Csak
ebben az esetben garantálhatjuk, hogy ingyen tudja
beküldeni az árut.
A garancia csak anyag- és gyártási hibára vonatkozik, nem pedig kopásra vagy törékeny részek
(pl. kapcsoló vagy elem) sérülésére. A termék kizárólag magánhasználatra, nem kereskedelmi használatra készült.
A garancia érvényét veszti visszaélésszerű vagy
szakavatatlan kezelés, erőszak alkalmazása vagy
olyan beavatkozások esetén, amelyeket nem engedélyeztetett szervizelő üzleteink hajtottak végre. Az
ön törvényes jogait ez a garancia nem korlátozza.
A garancia csak az első vásárlóra vonatkozik és
nem lehet átruházni másra.
HHoorrnnooss kkfftt..
H - 2600 Vác
Zrínyi utca 39.
Telefon +36 27 314 212
Telefax +36 27 317 212
e-mail: support.hu@kompernass.com
Gyártja
KOMPERNASS GMBH
BURGSTRASSE 21
D-44867 BOCHUM
www.Kompernass.com
IB_KH1114_HU4.qxd 10.10.2007 16:24 Uhr Seite 23
Page 24

- 24 -
IB_KH1114_HU4.qxd 10.10.2007 16:24 Uhr Seite 24
Page 25

- 25 -
Vsebina Stran
Varnostni napotki 26
Tehnični podatki 27
Obseg dobave 27
Predvidena uporaba 27
Opis naprave 27
Pred prvo uporabo 27
Nastavitev časa 27
Pomnilniška funkcija 27
Priprava kave 28
Določitev začetka kuhanja kave 28
Čiščenje in vzdrževanje 29
Odstranjevanje vodnega kamna 29
Odprava napak 30
Odstranitev 30
Garancija in servis 31
Uvoznik 31
Pred prvo uporabo ta navodila skrbno preberite in jih shranite za poznejšo uporabo. Ob predaji naprave
tretji osebi zraven priložite tudi navodila za uporabo.
IB_KH1114_SL4.qxd 10.10.2007 16:16 Uhr Seite 25
Page 26

- 26 -
KKaavvnnii aappaarraatt
KKHH 11111144
Varnostni napotki
NNeevvaarrnnoosstt eelleekkttrriiččnneeggaa uuddaarraa!!
• Napravo priključite samo na omrežno vtičnico,
instalirano in ozemljeno po predpisih.
• Preden aparat premaknete, polnite, čistite, če
se pokvari ali ko ga ne uporabljate, potegnite
električni vtič iz vtičnice.
• Aparata nikoli ne polagajte v tekočine. Če tekočina kljub temu steče v ohišje aparata, takoj izvlecite električni vtič aparata iz električne vtičnice.
Aparat odnesite v popravilo k usposobljenim
strokovnjakom.
• Naprave, omrežnega kabla ter vtiča nikoli ne
prijemajte z mokrimi rokami.
• Omrežni kabel zmeraj povlecite iz vtičnice za
vtič, ne vlecite kabla samega.
• Omrežnega kabla ne prepogibajte in ga ne
stiskajte.
• Pred vsako uporabo preverite omrežni kabel
in vtič. Če je omrežni kabel tega aparata poškodovan, ga mora zamenjati proizvajalec, njegova
servisna služba ali podobno kvalificirana oseba,
da ne pride do nevarnosti.
NNeevvaarrnnoosstt ppoožžaarraa!!
• Naprave med delovanjem ne pustite nenadzorovane.
• Aparat naj nikoli ne deluje brez vode iz vodovoda.
• Aparata nikoli ne postavljajte v bližini virov
toplote.
• Ne uporabljajte nobenih kabelskih podaljškov.
V primeru nevarnosti mora biti električni vtič hitro
dosegljiv.
NNeevvaarrnnoosstt ppoošškkooddbbee!!
• Termoposode r aparata nikoli ne uporabljajte
v mikrovalovni pečici.
Otroke obvestite o nevarnostih, ki lahko izhajajo
iz naprave.
• Omežni kabel speljite tako, da nihče ne more
stopiti nanj ali se spotakniti čezenj.
• V termoposodo r ne potiskajte nobenih ostrih
ali trdih predmetov. Ne segajte v termoposodo.
To lahko povzroči okvare na aparatu in poškoduje
ljudi.
OOppoozzoorriilloo zzaarraaddii ooppaarriinn!!
• Med kuhanjem kave nikoli ne odpirajte držala
filtra q.
• Ne dotikajte se vroče filtrne vrečke. Filtrno vrečko
odstranite šele, ko tekočina odteče in se vrečka
ohladi. Za odstranjevanje filtrne vrečke uporabite
filtrni vložek y.
• Ne držite rok nad dvigajočo se vodno paro.
• Med kuhanjem kave aparata nikoli ne premikajte.
• Termoposodo r odstranite šele, ko je kuhanje
končano in se filter izprazni.
• Pred vklopom držalo filtra zmeraj zaprite, ker
drugače obstaja nevarnost oparin zaradi izstopajoče pare in vroče vode.
PPrreevviiddnnoo::
TTaakkoo pprreepprreeččiittee ookkvvaarree aappaarraattaa!!
• V rezervoar za vodo w v aparatu nalivajte
izključno čisto vodo iz vodovoda.
• Notranjega steklenega dela termoposode r
nikoli ne izpostavljajte velikim temperaturnim
nihanjem. V nasprotnem primeru lahko steklo
poči.
• Za škodo zaradi loma stekla ne prevzemamo
nobenega jamstva!
IB_KH1114_SL4.qxd 10.10.2007 16:16 Uhr Seite 26
Page 27

- 27 -
Tehnični podatki
Omrežna napetost: 220 - 240 V ~50 Hz
Nazivna moč: 1000 W
Kavni filter: velikost 1x4
Obseg dobave
• kavni avtomat KH 1114 s funkcijo časovnika
• termoposoda s pokrovom
• merilna žlička
• navodila za uporabo
Pred zagonom prosimo,da preverite obseg dobave
glede popolnosti in morebitnih poškodb.
Predvidena uporaba
Ta kavni avtomat je namenjen izključno za uporabo
v zasebnih gospodinjstvih. Ne uporabljajte ga
v poslovne namene.
Opis naprave
Slika je na zadnji razklopni strani.
AAppaarraatt zzaa kkaavvoo::
q držalo filtra
w rezervoar za vodo
e merilna skala
r termoposoda
t prostor za kabel
y filtrni vložek
UUpprraavvlljjaallnnaa ppllooššččaa::
u tipka "min" (najmanj)
i tipka "auto" (samodejno)
o regulator arome
a rdeča lučka
s zelena lučka
d stikalo "off" (izklop)
f stikalo "on" (vklop)
g rdeča lučka "calc" (odstranjevanje vodnega
kamna)
h tipka "prog" (programiranje)
j tipka "h" (čas oz. ura)
Pred prvo uporabo
NNaappootteekk::
V rezervoar aparata nikoli ne nalijte vode
višje od oznake Max/največ (10 skodelic).
V nasprotnem primeru lahko voda steče
preko roba.
• Pred prvo uporabo regulator arome o nastavite
na in skozi aparat spustite dvakrat po 8 velikih
skodelic vode. Pri tem v aparat ne vlagajte filtrnih
vrečk in ne uporabite mlete kave.
• Aparat očistite (glejte poglavje Čiščenje in
vzdrževanje).
Nastavitev časa
• Ure nastavite s tipko „h“ j, minute pa s tipko
„min“ u, ki ju pritisnite tolikokrat, da nastavite
želen čas.
PPoommnniillnniišškkaa ffuunnkkcciijjaa
Nastavljen čas in začetni čas se po izpadu električne
energije ohranita približno 3 minute.
IB_KH1114_SL4.qxd 10.10.2007 16:16 Uhr Seite 27
Page 28

- 28 -
Priprava kave
Ne pripravljajte manj od 2 velikih ali 3 majhnih
skodelic kave. V nasprotnem primeru kava ne bo
imela želene temperature in moči.
• Držalo filtra q obrnite navzven in v filtrni vložek
y s prepognjenimi stranicami vložite filtrno vrečko
(velikosti 1x4).
Z merilno žličko v filtrno vrečko dajte (srednje
do fino) mleto kavo (slika ).
V do roba polni merilni žlički je pribl. 6 g mlete
kave.
• Držalo filtra q potisnite nazaj v avtomat za
kavo.
• V rezervoar za vodo w nalijte želeno količino
vode (slika ). Pri tem si pomagajte z zunanjo
merilno skalo e (slika ). V rezervoar nikoli
ne nalijte vode višje od oznake Max/največ
(10 skodelic).
• Z regulatorjem arome o nastavite moč kave
(slika ). Z nastavitvijo nastavite močno
kavo, z nastavitvijo pa blago.
• Termoposodo r postavite v avtomat za kavo.
Pred vsako uporabo se prepričajte, ali je termoposoda r prazna.
NNaappootteekk::
Kava bo ostala vroča dlje časa, če boste pred
tem termoposodo splaknili z vročo vodo
.
• Kuhanje kave vklopite s pritiskom na zgornji del
stikala za vklop (on) f. Pri tem zasveti rdeča
lučka a.
• Ko rdeča lučka a ugasne, lahko termoposodo
r vzamete iz aparata in kavo postrežete.
Glede nalivanja kave upoštevajte sliko .
NNaappootteekk::
Pred ponovnim kuhanjem kave ali dolivanjem
vode počakajte približno 5 minut, da se aparat
ohladi.
DDoollooččiitteevv zzaaččeettkkaa kkuuhhaannjjaa kkaavvee
S tipko za programiranje „prog“ h lahko avtomat
za kavo nastavite tako, da bo kavo začel kuhati ob
določenem času. Vedno najprej dajte mleto kavo
v filtrno vrečko v filtrnem vložku y in v rezervoar w
nalijte vodo. Nato v avtomat za kavo vstavite termoposodo r. Pred tem se prepričajte, ali je termoposoda r prazna in da rezervoar za vodo ni napolnjen čez oznako Max/največ (10 skodelic).
• Pritisnite tipko za programiranje „prog“ h.
S tipkama „h“ j in „min“ u nastavite želen
začetni čas v urah in minutah (glejte poglavje
Nastavitev časa).
• Ko je želen začetni čas nastavljen, tipko za programiranje „prog“ h izpustite. Sedaj je začetni
čas programiran.
• Z regulatorjem arome o nastavite želeno moč
kave.
• Pritisnite tipko za samodejno pripravo „auto“ i,
da zasveti zelena lučka s.
• Ko želite samodejno pripravo znova izklopiti,
pritisnite stikalo za izklop (off) d.
G
3 2 3 x 6 g 18
4
1
/
2
3 4 x 6 g 24
6 4 5 x 6 g 30
7
1
/
2
5 6 x 6 g 36
9 6 7 x 6 g 42
10
1
/
2
7
7
1
/
2
x 6 g
45
12 8
8
1
/
2
x 6 g
51
13
1
/
2
9 9 x 6 g 54
15 10 10 x 6 g 60
IB_KH1114_SL4.qxd 10.10.2007 16:16 Uhr Seite 28
Page 29

- 29 -
Čiščenje in vzdrževanje
• Pred vsakim čiščenjem omrežni vtič potegnite iz
omrežne vtičnice.
NNeevvaarrnnoosstt eelleekkttrriiččnneeggaa uuddaarraa!!
Pred čiščenjem kavnega avtomata morate
vedno potegniti električni vtič iz vtičnice.
PPoozzoorr!!
Kavnega avtomata nikoli ne polagajte
v vodo.
NNeevvaarrnnoosstt ooppeekklliinn!!
Pred čiščenjem vedno počakajte, da se kavni
avtomat ohladi.
Pred čiščenjem s termoposode r snemite pokrov
(glejte sliko ).
• Ne uporabljajte gospodinjskih čistil ali ostrih oz.
koničastih predmetov za odstranjevanje umazanije.
Z njimi namreč lahko poškodujete kavni avtomat.
• Ohišje kavnega avtomata in termoposodo r
obrišite z mehko krpo, navlaženo z blago milnico.
• Po vsaki uporabi filtrno vrečko vzemite iz filtrnega
vložka y.
• Odstranite filter in pod tekočo vodo iz vodovoda
splaknite držalo filtra q, filtrni vložek y in
termoposodo r.
ČČiiššččeennjjee ppookkrroovvaa
• Pokrov termoposode očistite tako, da ga najprej
razstavite, kot je opisano v nadaljevanju (slika ):
• Silikonsko ploščo previdno snemite z nastavka
na spodnji strani pokrova. Pri tem nastavek
držite, ker nanj na nasprotni strani pritiska
vzmet.
• Nastavek in vzmet snemite s pokrova.
• Vse dele operite v blagi milnici in jih nato dobro
posušite.
• Pokrov ponovno sestavite v obratnem vrstnem
redu.
PPoozzoorr!!
Termoposode in pokrova ne puščajte v milnici,
delov tudi ne perite v pomivalnem stroju, sicer
se lahko zgodi, da ne bodo več tesnili.
Če kavnega avtomata ne boste uporabljali dlje
časa, kabel pospravite v prostor za kabel t
(slika ).
Odstranjevanje vodnega
kamna
Pri trdi vodi je potrebno kamen odstraniti že po
pribl. 30 uporabah aparata, če pa je trdota vode
nizka, pa po pribl. 60 uporabah.
Uporabite le tista sredstva za odstranjevanje vodnega kamna, ki so primerna za aparate za kavo
ter pri tem upoštevajte navodilo za uporabo.
Postopek odstranjevanja vodnega kamna:
• Sredstvo za odstranjevanje vodnega kamna
dajte v rezervoar za vodo w.
• Dolijte največ 8 velikih skodelic vode
(do oznake Max/največ).
• Regulator arome o preklopite na "calc", da
vklopite odstranjevanje vodnega kamna.
• Vklopite stikalo za vklop f (on). Zasvetila
bo rdeča lučka a in lučka za odstranjevanje
vodnega kamna (calc) g bo utripala.
• Počakajte, da skozi aparat steče vsa voda.
• Ko je vodni kamen odstranjen, skozi aparat
spustite dvakrat po 8 skodelic vode.
• Po končanem odstranjevanju vodnega kamna
se kavni avtomat izklopi.
IB_KH1114_SL4.qxd 10.10.2007 16:16 Uhr Seite 29
Page 30

- 30 -
Odprava napak
ČČee kkaavvnnii aavvttoommaatt nnee ddeelluujjee::
• Aparat ni vklopljen. Pritisnite stikalo za vklop
(on) f, da ga vklopite.
• Električni vtič ni priklopljen v električno vtičnico.
Aparat priklopite v električno omrežje.
Električni vtič priklopite v električno vtičnico.
• Kavni avtomat se po zadnjem kuhanju še ni
popolnoma ohladil. Pred ponovnim kuhanjem
počakajte približno 5 minut, da se aparat ohladi.
KKaavvaa ssee nnee zzaaččnnee kkuuhhaattii oobb ččaassuu,, ddoolloo--
ččeenneemm ss ččaassoovvnniikkoomm::
• Časovnik ni vklopljen. Pritisnite tipko za samodejni začetek (auto) i, da vklopite časovnik.
• Nepravilno nastavljen čas. Preverite nastavitev
časa in ga po potrebi nastavite.
KKaavvaa jjee pprreemmooččnnaa aallii pprreessllaabbaa::
• V rezervoarju za vodo je premalo ali preveč
vode. V rezervoar nalijte zadostno količino
vode.
• V aparatu je preveč ali premalo mlete kave.
Dodajte manj ali več (oz. zadostno količino)
mlete kave.
• Mleta kava je zmeta predrobno ali pregrobo.
Kavo zmeljite na ustrezno velikost zrnc.
KKaavvaa ssee kkuuhhaa nneennaavvaaddnnoo ddoollggoo..
AAppaarraatt ssee mmeedd ddeelloovvaannjjeemm iizzkkllooppii..
AAppaarraatt mmeedd ddeelloovvaannjjeemm ppoossttaannee ggllaasseen
n..
MMeedd kkuuhhaannjjeemm nnaassttaajjaa pprreekkoommeerrnnaa
ppaarraa..
• Na sistemu za kuhanje kave je preveč vodnega
kamna. Iz aparata odstranite vodni kamen, kot
je opisano v poglavju Odstranjevanje vodnega
kamna.
Odstranitev
Naprave nikakor ne odvrzite v normalne
hišne smeti.
Aparat oddajte pri podjetju, registriranem za predelavo
odpadkov, ali pri svojem komunalnem podjetju za
predelavo odpadkov.
Upoštevajte trenutno veljavne predpise. V primeru
dvoma se obrnite na svoje podjetje za predelavo
odpadkov.
Vse embalažne materiale oddajte v reciklažo.
IB_KH1114_SL4.qxd 10.10.2007 16:16 Uhr Seite 30
Page 31

- 31 -
Garancija in servis
Za to napravo prejmete 3 leta garancije od datuma
nakupa. Naprava je bila skrbno izdelana in natančno
preverjena pred dobavo. Prosimo, da shranite
blagajniški račun kot dokazilo o nakupu.
V primeru uveljavljanja garancije se obrnite na
svojo servisno službo. Samo tako je zagotovljeno
brezplačno pošiljanje vašega izdelka.
Garancijska storitev velja samo za napake pri
materialu ali proizvodnji, ne pa za obrabne dele
ali za poškodbe na lomljivih delih, npr. stikalih ali
akumulatorjih. Proizvod je namenjen izključno za
privatno in ne za obrtno uporabo.
V primeru zlorabe ali nepravilnega ravnanja, pri
uporabi sile ter pri posegih, ki jih ni izvedla naša
pooblaščena servisna poslovalnica, garancija
preneha veljati. Vaših zakonskih pravic ta garancija ne omejuje. Ta garancija velja samo za prvega
kupca in ni prenosljiva.
BBIIRROOTTEEHHNNIIKKAA
Lendavska 23
9000 Murska Sobota
Phone: +386 (0) 2 522 1 666
Fax: +386 (0) 2 531 1 740
e-mail: renata.hodoscek@siol.net
Uvoznik
KOMPERNASS GMBH
BURGSTRASSE 21
D-44867 BOCHUM
www.kompernass.com
IB_KH1114_SL4.qxd 10.10.2007 16:16 Uhr Seite 31
Page 32

- 32 -
IB_KH1114_SL4.qxd 10.10.2007 16:16 Uhr Seite 32
Page 33

- 33 -
Obsah Strana
Bezpečnost 34
Technické údaje 35
Rozsah dodávky 35
Účel použití 35
Popis přístroje 35
Před prvním použitím 35
Nastavení hodin 35
Funkce paměti 35
Příprava kávy 36
Stanovení začátku spařování 36
Čištění a údržba 37
Odvápňování 37
Odstranění závad 38
Likvidace 38
Záruka & servis 39
Dovozce 39
Před prvním použitím si pozorně přečtěte návod k obsluze a uschovejte jej pro pozdější potřebu.
Při předávání zařízení třetím osobám předejte i tento návod.
IB_KH1114_CZ4.qxd 10.10.2007 16:20 Uhr Seite 33
Page 34

- 34 -
KKáávvoovvaarr KKHH 11111144
Bezpečnost
NNeebbeezzppeeččíí zzáássaahhuu eelleekkttrriicckkýýmm
pprroouuddeemm!!
• Přístroj připojte pouze do řádně instalované
a uzemněné zásuvky.
• Pokud spotřebič přemísťujete či plníte nebo
v případě poruchy, před čištěním a tehdy, když
přístroj není v provozu, vytahujte vždy zástrčku
ze zásuvky!
• Přístroj nikdy neponořujte do kapalin. Pokud by
však přesto kapalina do přístroje pronikla, okamžitě
vytáhněte zástrčku ze sítě. Přístroj nechte opravit
kvalifikovanými servisními pracovníky.
• Přístroje, síťového kabelu ani zástrčky se nikdy
nedotýkejte vlhkýma rukama.
• Přívodní kabel vždy vytahujte ze zásuvky za
zástrčku, nikdy netahejte za kabel samotný.
• Nepřehýbejte ani nemačkejte síťový kabel.
• Před každým použitím přístroje zkontrolujte síťový
kabel a zástrčku. Bude-li síťový kabel tohoto
přístroje poškozen, musí být vyměněn výrobcem,
jeho zákaznickým servisem nebo osobou s podobnou kvalifikaci, aby se zabránilo nebezpečí
zranění.
NNeebbeezzppeeččíí ppooppáálleenníí!!
• Během provozu nenechávejte přístroj nikdy bez
dozoru.
• Přístroj nikdy nezapínejte prázdný, bez vody
z vodovodu.
• Spotřebič nikdy neumisťujte do blízkosti zdroje
tepla.
• Nepoužívejte prodlužovací kabel. V případě
nebezpečí musí být síťová zástrčka snadno
přístupná.
NNeebbeezzppeeččíí ppoorraanněěnníí!!
• Termokonvici r přístroje nikdy nepoužívejte
v mikrovlnné troubě.
• Zařízení nenechávejte nikdy používat děti bez
dozoru dospělých osob. Vysvětlete dětem nebezpečí, která v blízkosti přístroje hrozí.
• Pokládejte síťový kabel tak, aby na něj nemohl
nikdo stoupnout nebo o něj zakopnout.
• Do termokonvice r nezasouvejte žádné ostré
nebo tvrdé předměty. Nezasahujte do termokonvice. Můžete tím způsobit poškození přístroje
nebo poranění osob.
NNeebbeezzppeeččíí ppooppáálleenniinn!!
• Během spařování nikdy neotevírejte držák filtru q.
• Nedotýkejte se horkého filtračního sáčku. Filtrační
sáček vyjměte až poté, co odteče tekutina a sáček
vychladne. K odstranění filtračního sáčku používejte
filtrační vložku y.
• Nevkládejte ruce do páry, která stoupá nad
přístroj.
• Během spařování nikdy nepohybujte přístrojem.
• Termokonvici r vyjměte až po ukončení
spařování a vyprázdnění filtru.
• Před zapnutím přístroje vždy nejprve uzavřete
držák filtru, aby nedošlo k opaření osob vystupující párou nebo vařící vodou.
PPoozzoorr::
ZZaabbrraaňňttee ppoošškkoozzeenníí ppřřííssttrroojjee!!
• Do zásobníku na vodu w nalévejte výhradně
čistou vodu z vodovodu.
• Sklo termokonvice r nevystavujte velkému kolísání
teplot. Mohlo by se poškodit.
• Za škody způsobené prasknutím skla neneseme
odpovědnost!
IB_KH1114_CZ4.qxd 10.10.2007 16:20 Uhr Seite 34
Page 35

- 35 -
Technické údaje
Síťové napětí: 220 - 240 V ~50 Hz
Jmenovitý výkon: 1000 W
Kávový filtr: Velikost 1x4
Rozsah dodávky
• Kávovar KH 1114 s funkcí časovače
• Termokonvice s víkem
• Odměrná lžička
• Návod k obsluze
Před spuštěním přístroje zkontrolujte úplnost dodaného
zboží a absenci případných poškození.
Účel použití
Tento kávovar je určen výlučně pro soukromé použití
v domácnostech. Není určen k profesionálnímu
použití.
Popis přístroje
Vyobrazení se nachází na zadní výklopné straně.
KKáávvoovvaarr::
q Držák filtru
w Zásobník na vodu
e Stupnice
r Termokonvice
t Kabelová šachta
y Filtrační vložka
OObbsslluužžnnýý ppaanneell::
u Tlačítko „min“
i Tlačítko „auto“
o Otočný regulátor aromatu
a Červená kontrolka
s Zelená kontrolka
d Spínač „off“
f Spínač „on“
g Červená kontrolka „calc“
h Tlačítko „prog“
j Tlačítko „h“
Před prvním použitím
PPoozznnáámmkkaa::
Nikdy nenalévejte vodu nad označení Max
(10 šálků). Přístroj by mohl přetéci.
• Před prvním použitím nastavte otočný regulátor
aromatu o do polohy a dvakrát nechte protéci
vodu na 8 velkých šálků. Nevkládejte filtrační
sáček a nepoužívejte při tom žádný kávový
prášek.
• Přístroj čistěte (viz kapitolu Čištění a údržba).
Nastavení hodin
• Stiskněte tlačítko „h“ j pro nastavování hodin,
resp. tlačítko „min“ u pro nastavování minut tolikrát,
abyste nastavili požadovaný čas.
FFuunnkkccee ppaamměěttii
Nastavení času a doby spuštění zůstává zachováno
přibližně 3 minuty i po výpadku proudu.
IB_KH1114_CZ4.qxd 10.10.2007 16:20 Uhr Seite 35
Page 36

- 36 -
Příprava kávy
Nikdy nepřipravujte menší množství kávy než do 2
velkých nebo 3 malých šálků. V opačném případě
nebude mít káva požadovanou teplotu a sílu.
• Držák filtru q vychylte směrem ven a vložte filtrační sáček (velikost 1x4) zalomenými rohy do
filtrační vložky y.
Odměrnou lžičkou naplňte filtrační sáček (obr.
) kávovým práškem (umletým středně nahrubo
nebo jemně).
Zarovnaná odměrná lžička přitom odpovídá ca
6 g kávového prášku.
• Držák filtru q zaklopte znovu do kávovaru.
• Do zásobníku na vodu w nalijte požadované
množství vody (obr. ). Využijte při tom vnější
stupnici e (obr. ). Nikdy nenalévejte vodu
nad označení Max (10 šálků).
• Otočným regulátorem aromatu o nastavte sílu
kávy (obr. ). Nastavením získáte silnou
kávu, nastavením lehkou kávu.
• Termokonvici r vložte do kávovaru. Před
každým použitím se ujistěte, že je termokonvice
r prázdná.
PPoozznnáámmkkaa::
Káva si déle udrží teplotu, vypláchnete-li
termokonvici předem horkou vodou.
• Stiskněte spínač „on“ f na horním okraji pro
spuštění spařování. Červená kontrolka a svítí.
• Termokonvici r můžete vyjmout a s podáváním
kávy můžete začít, jakmile červená kontrolka a
zhasne.
Nalévání kávy je naznačeno na obrázku .
PPoozznnáámmkkaa::
Kávovar nechte přibližně 5 minut vychladnout,
než začnete znovu vařit kávu nebo doplňovat
vodu.
SSttaannoovveenníí zzaaččááttkkuu ssppaařřoovváánníí
Tlačítkem „prog“ h můžete kávovar nastavit tak,
že spařování začne ve stanovenou dobu. Nejprve
vždy nasypte kávový prášek do filtračního sáčku ve
filtrační vložce y a doplňte vodu do zásobníku w.
Termokonvici r umístěte do kávovaru. Ujistěte se,
že termokonvice r je prázdná a zásobník na vodu
není naplněn výše než po označení Max (10 šálků).
• Držte stisknuté tlačítko „prog“ h. Nastavte
požadovanou dobu spuštění tlačítkem „h“ j
a tlačítkem „min“ u (viz kapitolu „Nastavení času“).
• Po nastavení požadované doby spuštění uvolněte tlačítko „prog“ h. Doba spuštění je nyní
naprogramována.
• Otočným regulátorem aromatu o nastavte
požadovanou sílu kávy.
• Stiskněte tlačítko „auto“ i, aby se rozsvítila
zelená kontrolka s.
• Chcete-li opět deaktivovat automatické spuštění
spařování, stiskněte spínač „off“ d.
g
3 2 3 x 6g 18
4
1
/
2
3 4 x 6g 24
6 4 5 x 6g 30
7
1
/
2
5 6 x 6g 36
9 6 7 x 6g 42
10
1
/
2
7
7
1
/
2
x 6g
45
12 8
8
1
/
2
x 6g
51
13
1
/
2
9 9 x 6g 54
15 10 10 x 6g 60
IB_KH1114_CZ4.qxd 10.10.2007 16:20 Uhr Seite 36
Page 37

- 37 -
Čištění a údržba
• Před každým čištěním vytáhněte síťovou zástrčku
ze síťové zásuvky.
NNeebbeezzppeeččíí úúrraazzuu eelleekkttrriicckkýýmm pprroouuddeemm!!
Před čištěním kávovaru musíte vždy nejprve
vytáhnout zástrčku ze sítě.
PPoozzoorr!!
Kávovar nikdy neponořujte do vody.
NNeebbeezzppeeččíí ppooppáálleenníí!!
Vždy vyčkejte, až kávovar vychladne.
Teprve poté jej čistěte.
Před čištěním sejměte víko termokonvice r (viz obr. ).
• Nepoužívejte čisticí přípravky pro domácnost
ani ostré či špičaté předměty, chcete-li odstranit
nečistoty z přístroje. Jimi byste mohli kávovar
poškodit.
• Kryt kávovaru a termokonvice r otírejte
měkkým hadříkem, lehce navlhčeným v mýdlové
vodě.
• Filtrační sáček vyjměte po každém použití
z filtrační vložky y.
• Odstraňte filtr a vypláchněte držák filtru q,
filtrační vložku y i termokonvici r pod tekoucí
vodou z vodovodu.
ČČiiššttěěnníí kkrryyttuu
• Chcete-li čistit kryt termokonvice, rozložte jej
nejprve podle následujícího postupu (obr. ):
• Opatrně sejměte silikonový kotouč ze zátky na
spodní straně krytu. Zátku při tom pevně držte,
neboť je z druhé strany tlačena pružinou.
• Zátku a pružinu sejměte z krytu.
• Vyčistěte všechny díly v jemné mýdlové vodě a
následně je dobře osušte.
• Chcete-li kryt znovu sestavit, postupujte v opačném pořadí než při jeho rozkládání.
PPoozzoorr!!
Termokonvici ani kryt nenechávejte v mýdlové
vodě ležet a jednotlivé díly nemyjte v myčce,
neboť by mohly přestat těsnit.
Pokud kávovar delší dobu nepoužíváte, uschovejte
kabel do kabelové šachty t (obr. ).
Odvápňování
V případě vyšší tvrdosti vody je nutné odvápňování
již po ca 30 použitích, v případě nízké tvrdosti
vody pak po ca 60 použitích.
Používejte výhradně odvápňovací prostředky, které
jsou vhodné pro kávovary, a dodržujte návod
k použití.
Takto postupujte při odvápňování:
• Do zásobníku na vodu w dejte odvápňovací
prostředek.
• Nalijte množství vody, které vystačí max. na
8 velkých šálků.
• Otočný regulátor aromatu o nastavte na
„calc“. Tím aktivujete funkci odvápňování.
• Stiskněte spínač f „on“. Červená kontrolka
a svítí a a kontrolka „calc“ g bliká.
• Vyčkejte, až veškerá voda proteče.
• Po odvápnění nechte dvakrát protéci vodu na
8 šálků.
• Kávovar se po odvápnění vypne.
IB_KH1114_CZ4.qxd 10.10.2007 16:20 Uhr Seite 37
Page 38

- 38 -
Odstranění závad
KKáávvoovvaarr nneeffuunngguujjee::
• Přístroj není zapnutý. Stiskněte spínač „on“ f.
Jím přístroj zapnete.
• Zástrčka není správně zastrčena do zásuvky.
Propojte přístroj se sítí. Zapojte zástrčku do zásuvky.
• Kávovar po posledním spařování ještě důkladně
nevychladnul. Kávovar nechte přibližně 5 minut
vychladnout, než začnete znovu vařit kávu.
SSppaařřoovváánníí ssee nneessppuussttíí vv ppoožžaaddoovvaannoouu
ddoobbuu ((ččaassoovvaačč))::
• Časovač není aktivován. Stiskněte tlačítko
“auto” i. Jím časovač aktivujete.
• Nejsou správně nastaveny hodiny. Zkontrolujte
hodiny a dle potřeby je nastavte.
KKáávvaa jjee ppřříílliišš ssiillnnáá//ssllaabbáá::
• V zásobníku na vodu je příliš málo/příliš mnoho
vody. Doplňte správné množství vody.
• V kávovaru je příliš mnoho/příliš málo kávového
prášku. Odeberte/přidejte kávový prášek.
• Kávový prášek je namlet příliš najemno/nahrubo.
Zvolte jiný stupeň umletí kávového prášku.
SSppaařřoovváánníí ttrrvváá nneezzvvyykkllee ddlloouuhhoo..
PPřřííssttrroojj ssee bběěhheemm ssppaařřoovváánníí vvyyppnnuull..
PPřřííssttrroojj jjee bběěhheemm ssppaařřoovváánníí hhllaas
siittěějjššíí..
VVzznniikkáá ppřříílliišš vveellkkéé mmnnoožžssttvvíí ppáárryy..
• Spařovací systém přístroje je zanesen vápnem.
Odvápněte přístroj tak, jak je uvedeno v kapitole
„Odvápňování“.
Likvidace
Přístroj nikdy nevyhazujte do běžného
domovního odpadu.
Přístroj předejte k likvidaci odborné firmě či jej
odevzdejte ve Vašem místním recyklačním zařízení.
Dodržujte aktuálně platné předpisy. V případě pochyb
se poraďte s recyklační firmou.
Také všechny obalové materiály zlikvidujte
v souladu s ekologickými předpisy.
IB_KH1114_CZ4.qxd 10.10.2007 16:20 Uhr Seite 38
Page 39

- 39 -
Záruka & servis
Na tento přístroj platí tříletá záruka od data zakoupení.
Přístroj byl vyroben s nejvyšší pečlivostí a před
odesláním prošel výstupní kontrolou. Uschovejte si,
prosím, pokladní lístek jako doklad o nákupu. Budete-li
uplatňovat záruku, spojte se prosím telefonicky se
servisní provozovnou. Pouze tak Vám můžeme zajistit
bezplatné zaslání vašeho zboží.
Záruční plnění se vztahuje pouze na vady materiálu nebo výrobní závady, nikoliv však na opotřebované díly nebo poškození rozbitných součástí,
např. spínačů nebo akumulátorů. Výrobek je určen
výhradně pro soukromé použití, nikoliv pro podnikatelské účely.
Při nesprávném a neodborném využívání, při použití
násilí a při zásazích, které nebyly provedeny
našimi autorizovanými servisními provozovnami,
záruční nároky zanikají. Vaše práva vyplývající ze
zákona touto zárukou nejsou omezena. Tato záruka
platí pouze pro prvního kupujícího a není přenosná
na další osoby.
IInngg.. MMaarrttiinn ŠŠiimmáákk zzpprroossttřřeeddkkoovvaatteell sseerrvviissuu
vvýýrroobbkkůů KKoommppeerrnnaassss
Malešické nám.1
108 00 Praha 10
Hotline: 800 400 235
Fax.: 274 773 499
e-mail: support.cz@kompernass.com
Dovozce
KOMPERNASS GMBH
BURGSTRASSE 21
D-44867 BOCHUM
www.kompernass.com
IB_KH1114_CZ4.qxd 10.10.2007 16:20 Uhr Seite 39
Page 40

- 40 -
IB_KH1114_CZ4.qxd 10.10.2007 16:20 Uhr Seite 40
Page 41

- 41 -
Obsah Strana
Bezpečnostné pokyny 42
Technické údaje 43
Obsah dodávky 43
Používanie primerané účelu 43
Opis prístroja 43
Pred prvým použitím 43
Nastavenie času 43
Funkcia pamäte 43
Príprava kávy 44
Zistenie začiatku varu 44
Čistenie a údržba 45
Odvápnenie 45
Odstraňovanie porúch 46
Likvidácia 46
Záruka a servis 47
Dovozca 47
Pred prvým použitím si pozorne prečítajte návod na používanie a uschovajte ho pre prípadné ďalšie použitie.
Pri odovzdaní prístroja tretej osobe ho odovzdajte spolu s návodom.
IB_KH1114_SK4.qxd 10.10.2007 16:23 Uhr Seite 41
Page 42

- 42 -
KKáávvoovvaarr KKHH 11111144
Bezpečnostné pokyny
NNeebbeezzppeeččeennssttvvoo úúrraazzuu eelleekk--
ttrriicckkýýmm pprrúúddoomm!!
• Prístroj pripojte iba do takej zásuvky, ktorá je
nainštalovaná a uzemnená podľa predpisov.
• Ak kávovar budete premiestňovať, plniť, čistiť,
alebo ak sa vyskytnú na ňom závady, prípadne
ak ho nebudete potrebovať, vytiahnite zástrčku
zo sieťovej zásuvky.
• Nikdy neponárajte prístroj do tekutín. Ak by do
telesa prístroja predsa len vnikla tekutina, vytiahnite
okamžite sieťovú zástrčku zo sieťovej zásuvky.
Potom je potrebné dať ho opraviť kvalifikovanému
odbornému personálu.
• Nikdy nechytajte prístroj, napájací kábel
a zástrčku kábla mokrými rukami.
• Sieťový kábel vyťahujte zo zásuvky vždy pri
zástrčke, nikdy neťahajte za samotný kábel.
• Sieťový kábel nelámte ani neohýbajte.
• Pred každým použitím skontrolujte sieťovú šnúru
a zástrčku. Keď sa sieťová šnúra tohto prístroja
poškodí, musí ju vymeniť výrobca, jeho servis
alebo iná podobne kvalifikovaná osoba, aby
sa zabránilo ohrozeniu.
NNeebbeezzppeeččeennssttvvoo ppoožžiiaarruu!!
• Počas činnosti nenechávajte prístroj nikdy
bez dozoru.
• Nikdy nepoužívajte prístroj bez vodovodnej
vody.
• Neumiestňujte kávovar nikdy v blízkosti zdrojov
tepla.
• Nepoužívajte žiadne predlžovacie káble.
Pri nebezpečenstve musí byť zástrčka ľahko
dostupná.
RRiizziikkoo ppoorraanneenniiaa!!
• Nikdy nepoužívajte termosku r prístroja
v mikrovlnnej rúre.
• Nenechávajte kávovar nikdy používať deťmi
bez dozoru dospelej osoby. Vysvetlite deťom
možné nebezpečenstvo, ktoré môže pochádzať
z prístroja.
• Sieťový kábel umiestnite tak, aby naň nikto
nemohol stúpiť ani oň zakopnúť.
• Nedávajte do termosky žiadne špicaté ani tvrdé
predmety r. Nesiahajte do termosky. Mohlo by
to viesť k poškodeniu prístroja a poraneniam.
VVaarroovvaanniiee pprreedd ppooppáálleenníímm!!
• Nikdy počas varenia neotvárajte držiak filtra.q.
• Nedotýkajte sa horúceho filtračného vrecka.
Vyberte filter, až keď kvapalina pretiekla a filter
sa ochladil. Na odstránenie filtračného vrecka
používajte filtračnú vložku y.
Nedržte ruky v mieste stúpajúcich vodných pár.
• Počas varu nikdy kávovar nepremiestňujte.
• Termosku r vyberte až vtedy, keď je proces
varenia ukončený a filter je už bez kvapaliny.
• Pred zapnutím je potrebné vždy zatvoriť držiak
filtra, v opačnom prípade vzniká nebezpečenstvo
obarenia vystupujúcou parou a horúcou vodou.
PPoozzoorr::
TTaakkttoo ssaa vvyyhhnneettee ppoošškkooddeenniiaamm
pprrííssttrroojjaa!!
• Do nádoby na vodu w dávajte výlučne čistú
vodu z vodovodu.
• Sklo v termoske r nikdy nevystavujte silným
výkyvom teploty. Mohlo by sa poškodiť.
• Za škody spôsobené prasknutím skla nepreberáme
žiadnu záruku!
IB_KH1114_SK4.qxd 10.10.2007 16:23 Uhr Seite 42
Page 43

- 43 -
Technické údaje
Sieťové napätie : 220 - 240 V, 50 Hz
Menovitý výkon: 1000 W
Filter na kávu: Veľkosť 1x4
Obsah dodávky
• Kávovar KH 1114 s funkciou časovača
• Termoska s krytom
• Odmerná lyžica
• Návod na používanie
Pred uvedením do prevádzky prosím skontrolujte,
či je dodávka kompletná a či nie je poškodená.
Používanie primerané
účelu
Kávovar slúži výlučne na prípravu kávy. Tento kávovar
je určený výhradne na použitie v domácnosti.
Nepoužívajte ho komerčne.
Opis prístroja
Vyobrazenie je na zadnej roztváracej strane.
KKáávvoovvaarr::
q Držiak filtra
w Nádoba na vodu
e Stupnica
r Termoska
t Priestor pre kábel
y Filtračná vložka
OOvvllááddaaccíí ppaanneell::
u Tlačidlo „min“
i Tlačidlo „auto“
o Otočný regulátor arómy
a Červená kontrolka
s Zelená kontrolka
d Spínač „off“ (Vyp)
f Spínač „on“ (Zap)
g Červená kontrolka „calc“
h Tlačidlo „prog“
j Tlačidlo „h“
Pred prvým použitím
UUppoozzoorrnneenniiee::
Nikdy nenapĺňajte viac vody, než po značku
max (10 šálok). Prístroj by mohol pretiecť.
• Pred prvým použitím nastavte otočný regulátor
arómy o na nastavenie a nechajte dvakrát
pretiecť 8 veľkých šálok vody. Nevložte žiadne
filtračné vrecko a nepoužite pritom ani žiadnu
zomletú kávu.
• Vyčistite prístroj (pozri kapitola Čistenie a údržba).
Nastavenie času
• Stláčajte tlačidlo „h“ j pre nastavenie hodín,
príp. tlačidlo „min“ u pre nastavenie minút dovtedy, kým nie je nastavený požadovaný čas.
FFuunnkkcciiaa ppaammäättee
Nastavenie času a spustenia zostáva zachované aj
pri výpadku elektrického prúdu až asi do 3 minút.
IB_KH1114_SK4.qxd 10.10.2007 16:23 Uhr Seite 43
Page 44

- 44 -
Príprava kávy
Nikdy nerobte menej než 2 veľké alebo 3 malé
šálky kávy. Ak by ste to spravili, káva by nemala
požadovanú teplotu a silu.
• Otočte držiak filtra q von a vložte filtračné
vrecko (veľkosť 1x4) so zalomenými stranami
do filtračnej vložky y.
Odmernou lyžicou naplňte stredne až jemne
pomletú kávu do filtračného vrecka (obr. ).
Pritom zodpovedá jedna zarovnaná odmerná
lyžica asi 6 g rozomletej kávy.
• Znova otočte držiak filtra q späť do kávovaru.
• Naplňte požadované množstvo vody do nádoby
na vodu w (obr. ). Použite pritom vonkajšiu
stupnicu e (obr. ). Nikdy nenapĺňajte viac
vody, než po značku max (10 šálok).
• Otočným regulátorom arómy o nastavte silu
kávy (obr. ). Nastavenie dáva silnú kávu,
nastavenie dáva jemnú kávu.
• Postavte termosku r do kávovaru. Pred každým
použitím si overte, či je termoska r prázdna.
UUppoozzoorrnneenniiee::
Káva vydrží dlhšie teplá, keď termosku najprv
vypláchnete horúcou vodou.
• Stlačte spínač „on“ f na hornej strane, čím
spustíte proces varenia. Rozsvieti sa červená
kontrolka a.
• Termosku r môžete vybrať a servírovať kávu,
keď červená kontrolka a zhasne.
Pri nalievaní kávy sa riaďte obrázkom .
UUppoozzoorrnneenniiee::
Pred ďalším varením kávy alebo dopĺňaním
vody nechajte kávovar asi 5 minút chladnúť.
ZZiisstteenniiee zzaaččiiaattkkuu vvaarruu
Tlačidlom „prog“ h môžete kávovar nastaviť tak,
aby sa proces varenia začal v určitom stanovenom
čase. Vždy naplňte najprv pomletú kávu do filtračnej
vložky y a vodu do nádoby na vodu w. Dajte
termosku r do kávovaru. Overte si, či je termoska
r prázdna a či nádoba na vodu nie je naplnená
viac než po značku max (10 šálok).
• Stlačte tlačidlo „prog“ h a držte ho stlačené.
Nastavte požadovaný čas spustenia tlačidlom
„h“ j a tlačidla „min“ u (pozri kapitola
„Nastavenie času“).
• Keď je nastavený požadovaný čas spustenia,
pusťte tlačidlo „prog“ h. Čas spustenia je teraz
naprogramovaný.
• Otočným regulátorom arómy o nastavte
požadovanú silu kávy.
• Stlačte tlačidlo „auto“ i, až sa rozsvieti zelená
kontrolka s.
• Ak chcete nastavený automatický začiatok
varenia znova zrušiť, stlačte spínač „off“ d.
g
3 2 3 x 6 g 18
4
1
/
2
3 4 x 6 g 24
6 4 5 x 6 g 30
7
1
/
2
5 6 x 6 g 36
9 6 7 x 6 g 42
10
1
/
2
7 71/2 x 6 g 45
12 8
8
1
/
2
x 6 g
51
13
1
/
2
9 9 x 6 g 54
15 10 10 x 6 g 60
IB_KH1114_SK4.qxd 10.10.2007 16:23 Uhr Seite 44
Page 45

- 45 -
Čistenie a údržba
• Pred každým čistením vytiahnite zástrčku zo
zásuvky.
NNeebbeezzppeeččeennssttvvoo úúrraazzuu eelleekkttrriicckkýýmm pprrúúddoomm!!
Pred čistením kávovaru, musíte vždy vytiahnuť
zástrčku zo sieťovej zásuvky.
PPoozzoorr!!
Nikdy neponárajte kávovar do vody.
NNeebbeezzppeeččeennssttvvoo ppooppáálleenniiaa!!
Vždy počkajte, až kávovar vychladne, než ho
vyčistíte.
Pri čistení dajte kryt termosky r dolu (pozri obr.
).
• Na odstránenie nečistôt nepoužívajte prostriedky
na čistenie do domácnosti ani ostré predmety.
Tým by ste mohli kávovar poškodiť.
• Utrite teleso kávovaru a termosky r mäkkou
utierkou, mierne navlhčenou jemným mydlovým
roztokom.
• Po každom použití vyberte filtračné vrecko
z filtračnej vložky y.
• Odstráňte filter a pod tečúcou vodou z vodovodu
umyte držiak filtra q, filtračnú vložku y
a termosku r.
ČČiisstteenniiee kkrryyttuu
• Aby ste mohli vyčistiť kryt termosky, musíte ju
najprv rozobrať spôsobom, ktorý je uvedený
ďalej (obr. ):
• Opatrne snímte silikónový kotúč z kolíka na
spodnej strane krytu. Držte pritom kolík pevne,
pretože je z druhej strany tlačený pružinou.
• Snímte z krytu kolík s pružinou.
• Vyčistite všetky diely jemným mydlovým roztokom a potom ich poriadne vysušte.
• Ak chcete kryt znova poskladať, postupujte
v opačnom poradí než pri rozoberaní.
PPoozzoorr!!
Nenechajte termosku a kryt ležať v mydlovej
vode a nečistite jednotlivé diely v umývačke riadu, pretože by to mohlo spôsobiť netesnosti
Keď nebudete kávovar dlhšiu dobu používať,
zastrčte kábel do priestoru pre sieťovú šnúru t
(obr. ).
Odvápnenie
Pri vysokom stupni tvrdosti vody je odstránenie vodného kameňa potrebné už po asi 30 používaniach,
pri nízkom stupni tvrdosti vody po asi 60
používaniach.
Používajte výlučne pre kávovary vhodné odvápňovacie prostriedky a dodržujte návod na používanie.
Pri odvápňovaní postupujte takto:
• Vložte prostriedok na odvápnenie do nádoby
na vodu w.
• Naplňte vodu na max. 8 veľkých šálok.
• Otočte otočný regulátor arómy o do polohy
„calc“, aby ste aktivovali funkciu odvápňovania.
• Stlačte spínač f „on“. Rozsvieti sa červená
kontrolka a a kontrolka „calc“ g bliká.
• Vyčkajte, kým všetka voda celkom nepretečie.
• Po odvápňovaní nechajte pretiecť dvakrát
8 šálok vody.
• Kávovar sa po odvápnení vypne.
IB_KH1114_SK4.qxd 10.10.2007 16:23 Uhr Seite 45
Page 46

- 46 -
Odstraňovanie porúch
KKáávvoovvaarr nneeffuunngguujjee::
• Prístroj nie je zapnutý. Stlačte spínač „on“ f,
čím prístroj zapnete.
• Zástrčka nie je zasunutá v zásuvke. Pripojte
prístroj k elektrickej sieti. Zasuňte zástrčku do
zásuvky.
• Kávovar po poslednom varení kávy ešte celkom
nevychladol. Pred ďalším varením kávy nechajte
kávovar asi 5 minút chladnúť.
VVaarreenniiee kkáávvyy nneezzaaččíínnaa vv ppoožžaaddoovvaannoomm
ččaassee ((ččaassoovvaačč))::
• Časovač nie je aktivovaný. Ak chcete časovač
aktivovať, stlačte tlačidlo “auto” i.
• Nie je správne nastavený čas. Skontrolujte čas
a v prípade potreby upravte jeho nastavenie.
KKáávvaa jjee pprríílliišš ssiillnnáá aalleebboo pprríílliišš ssllaabbáá::
• V nádobe na vodu je príliš veľa alebo príliš
málo vody. Naplňte správne množstvo vody.
• Je nadávkovanej príliš veľa alebo príliš málo
rozomletej kávy. Dajte menej alebo viac
pomletej kávy.
• Káva je pomletá na príliš jemno alebo príliš
hrubo. Zvoľte si iný stupeň pomletia kávy.
VVaarreenniiee kkáávvyy ttrrvváá nneezzvvyyččaajjnnee ddllhhoo..
PPrrííssttrroojj ssaa vv pprriieebbeehhuu vvaarreenniiaa kkáávvyy
vvyyppnnee..
PPrrííssttrroojj vvyyddáávvaa pprrii vva
arreenníí hhllaassnnýý
zzvvuukk..
VVzznniikkáá nnaaddmmeerrnnéé mmnnoožžssttvvoo ppaarryy..
• Ohrievací systém prístroja je zavápnený. Odvápnite
prístroj podľa postupu uvedeného v časti „Odvápňovanie“.
Likvidácia
Prístroj v žiadnom prípade nevyhadzujte
do bežného domového odpadu.
Zlikvidujte prístroj v príslušnom zariadení (firme)
na likvidáciu odpadu.
Dbajte na aktuálne platné predpisy. V prípade
pochybností sa obráťte na zariadenie na likvidáciu
odpadu.
Všetok baliaci materiál zlikvidujte ekologickým
spôsobom.
IB_KH1114_SK4.qxd 10.10.2007 16:23 Uhr Seite 46
Page 47

- 47 -
Záruka a servis
Na tento prístroj máte trojročnú záruku od dátumu
nákupu. Prístroj bol starostlivo vyrobený a pred
expedíciou dôkladne vyskúšaný. Uschovajte si,
prosím, účtenku ako dôkaz o nákupe. V prípade
uplatnenia záruky sa spojte s opravovňou telefonicky.
Len tak sa dá zabezpečiť bezplatné zaslanie tovaru.
Záruka platí len na chyby materiálu a výroby, nie
na opotrebenie ani na poškodenia krehkých častí,
ako sú spínače alebo akumulátory. Výrobok je
určený len na súkromné používanie a nie na
podnikateľské účely.
Záruka prestáva platiť pri zaobchádzaní nezodpovedajúcom účelu a pri neprimeranom zaobchádzaní,
pri používaní násilia a zásahoch, ktoré neurobil náš
autorizovaný servis. Práva vyplývajúce zo zákona
nie sú touto zárukou obmedzené. Táto záruka platí
len pre prvého kupujúceho a nie je prenosná.
EELLBBYYTT
Masarykova 16/B
080 01 Prešov
Slovakia
Tel. +421 (0) 51 7721414
Fax. +421 (0) 51 7721414
e-mail: support.sk@kompernass.com
Dovozca
KOMPERNASS GMBH
BURGSTRASSE 21
D-44867 BOCHUM
www.kompernass.com
IB_KH1114_SK4.qxd 10.10.2007 16:23 Uhr Seite 47
Page 48

- 48 -
IB_KH1114_SK4.qxd 10.10.2007 16:23 Uhr Seite 48
Page 49

- 49 -
Obsah Strana
Sigurnosne upute 50
Tehnički podaci 51
Obim isporuke 51
Upotreba u skladu sa namjenom 51
Opis uređaja 51
Prije prve uporabe 51
Podešavanje vremena 51
Funkcija Memory 51
Pripravljanje kave 52
Utvrditi početak kuhanja 52
Čišćenje i održavanje 53
Uklanjanje vapnenca 53
Otklanjanje grešaka 54
Zbrinjavanje 54
Jamstvo & servis 55
Uvoznik 55
Upute za posluživanje prije prve upotrebe pažljivo pročitajte i sačuvajte ih za kasnije korištenje.
Ukoliko uređaj dajete trećim osobama, priložite i ove upute.
IB_KH1114_HR4.qxd 10.10.2007 16:16 Uhr Seite 49
Page 50

- 50 -
AAppaarraatt zzaa kkaavvuu
KKHH 11111144
Sigurnosne upute
OOppaassnnoosstt oodd ssttrruujjnnoogg uuddaarraa!!
• Uređaj priključite isključivo na propisno instaliranu
i uzemljenu mrežnu utičnicu.
• Kada pokrećete ili punite uređaj, kod smetnji,
prije čišćenja uređaja ili ako isti ne korstite,
iskopčajte mrežni utikač iz utičnice.
• Uređaj nikada ne uronite u tekućine. Ako u
kućište uređaja ipak dospije tekućina, odmah
iskopčajte mrežni utikač uređaja iz utičnice.
Uređaj dajte popraviti od kvalificiranog stručnog
osoblja.
• Uređaj, te kabel i utikač za napajanje nikada
ne dirajte mokrim rukama.
• Mrežni kabel uvijek izvucite povlačenjem za
utikač, a nikada povlačenjem samoga kabela.
• Ne savijajte i ne gnječite mrežni kabel.
• Prije svake upotrebe uređaja prekontrolirajte
napojni kabel i utikač. Ukoliko dođe do oštećenja
napojnog kabela uređaja, on mora biti zamijenjen
od strane proizvođača, servisne ispostave ili
druge kvalificirane osobe, kako bi bila isključena
mogućnost nastanka opasnosti.
OOppaassnnoosstt oodd ppoožžaarraa!!
• Uređaj nikada ne ostavite nenadziranog, dok
je u pogonu.
• Uređaj nikada nemojte koristiti bez vode iz
vodovoda.
• Uređaj nikada nemojte postavljati u blizinu
izvora topline.
• Nemojte koristiti produžni kabel. U slučaju
opasnosti utičnica mora brzo biti na dohvatu.
OOppaassnnoosstt oodd oozzlljjeeđđiivvaannjjaa!!
• Termos posudu uređaja nikada nemojte koristiti
u mikrovalnoj pećnici.
• Djeci objasnite, koje opasnosti ovaj uređaj može
prouzrokovati.
• Mrežni kabel postavite tako, da nitko ne može
stati na njega ili se preko njega protepsti.
• U termos posudu nikada nemojte unositi oštre ili
tvrde predmeter . Nemojte zahvaćati u termos
posudu. To može dovesti do oštećenja uređaja
i do ozljeda.
UUppoozzoorreennjjee oodd ooppeekkoottiinnaa!!
• Držač filtra nikada nemojte otvarati za vrijeme
trajanja postupka kuhanja.
• Ne dotaknite vruću filtarsku vrećicu. Vrećicu filtra
izvadite tek onda, kada je istekla sva tekućina i
kada se ista ohladila. Korisite umetak za filter,
kako biste uklonili vrećicu za filter.
• Ruke ne držite u paru koja uzlazi.
• Uređaj nikada nemojte pomicati za vrijeme
postupka kuhanja.
• Termos posudu izvadite tek onda, kada se okonča
postupak kuhanja i kada se isprazni filtar.
• Prije uključivanja uvijek zatvorite držač filtra, u
protivnom postoji opasnost od ozljede uslijed
izlazeće pare i vruće vode.
OOpprreezz::
OOvvaakkoo ććee ttee iizzbbjjeeććii oošštteeććeennjjaa nnaa
uurraađđaajjuu!!
• U spremnik uređaja za vodu isključivo punite
čistu vodu iz vodovoda.
• Staklo u termos posudi nikada nemojte izlagati
jakim kolebanjima temperature. Staklo se može
oštetiti.
• Za štete nastale uslijed pucanja stakla se ne
preuzima jamstvo!
IB_KH1114_HR4.qxd 10.10.2007 16:16 Uhr Seite 50
Page 51

- 51 -
Tehnički podaci
Mrežni napon: 220 - 240 V ~50 Hz
Nominalna snaga 1000 W
Filter za kavu: Veličina 1x4
Obim isporuke
• Aparat za kavu KH 1114 sa funkcijom
podešavanja vremena
• Termos posuda sa poklopcem
• Mjerna žlica
• Upute za uporabu
Molimo da prije puštanja u pogon prekontrolirate
obim isporuke na cjelovitost i eventualna oštećenja.
Upotreba u skladu sa
namjenom
Ovaj aparat za kavu je isključivo namijenjen za
uporabu u privatnim domaćinstvima.Nemojte ga
koristiti u obrtničke svrhe.
Opis uređaja
Slika se nalazi na stražnjoj preklopnoj stranici.
AAppaarraatt zzaa kkaavvuu::
q Držač filtera
w Spremnik za vodu
e Skala
r Termos posuda
t Okno za kabel
y Umetak filtera
PPoosslluužžnnii ppaanneell::
u Tipka „min“
i Tipka „auto“
o Okretni regulator arome
a Crvena prikazna lampica
s Zelena prikazna lampica
d Sklopka „off“
f Sklopka „on“
g Crvena prikazna lampica „calc“
h Tipka „prog“
j Tipka „h“
Prije prve uporabe
NNaappoommeennaa::
Nikada nemojte napuniti vode preko oznake
max (10 šalica). Iz uređaja se može preliti
tekućina.
• Prije prve uporabe okretni regulator arome o
postavite na podešavanje i pustite dva puta
da kroz uređaj prođe 8 velikih šalica vode.
Nemojte stavljati vrećice za filter i nemojte
koristiti mljevenu kavu.
• Očistite uređaj (vidi poglavlje čišćenje i
održavanje).
Podešavanje vremena
• Pritisnite tipku „h“ j za sate tj. tipku „min“ u za
minute tako često, dok ne podesite željeno vrijeme.
FFuunnkkcciijjaa MMeemmoorryy
Podešavanje vremena i vremena pokretanja nakon
ispada struje ostaje održano za oko 3 minute.
IB_KH1114_HR4.qxd 10.10.2007 16:16 Uhr Seite 51
Page 52

- 52 -
Pripravljanje kave
Izbjegavajte kuhati manju količinu od 2 do 3 male
šalice kave. Kava inače nema željenu temperaturu
i jačinu.
• Isklopite držač za filterq prema vani i umetnite
vrećicu za filter (veličina 1x4) sa preklopljenim
stranama u umetku za filter y.
Napunite uz pomoć mjerne žlice mljevenu kavu
(srednje do fino mljevenu) u vrećicu za filter
(slika ).
Jedna puna mjerna žlica odgovara otprilike 6 g
mljevene kave.
• Zatvorite držač filtera za kavu q opet u aparat
za kavu.
• Napunite željenu količinu vode u spremnik za
vodu w (slika ). Za to koristite skalu izvana e
(slika ). Nikada nemojte napuniti vode preko
oznake max (10 šalica).
• Na okretnom regulatoru arome o podesite jačinu
kave (slika ). Podešavanje daje jaku kavu,
podešavanje daje blagu kavu.
• Postavite termos posudu r u aparat za kavu.
Prije svake uporabe se osigurajte, da je termos
posuda r prazna.
NNaappoommeennaa::
Kava ostaje duže topla, ako termos posudu
prije toga isperete sa vrelom vodom.
• Pritisnite sklopku „on“ f na gornjem kraju, kako
biste pokrenuli postupak kuhanja.Pali se crvena
lampica za prikaza .
Možete izvaditi termos posudur i servirati kavu,
kada se ugasi crvena lampica za prikaz a.
Za serviranje kave obratite pozor na sliku .
NNaappoommeennaa::
Aparat za kavu pustite oko 5 minuta da se
ohladi, prije nego počnete novi postupak
kuhanja ili napunite vode
.
UUttvvrrddiittii ppooččeettaakk kkuuhhaannjjaa
Sa tipkom „prog“ h aparat za kavu možete tako
podesiti, da isti u zadanom vremenu počinje postupak
kuhanja. Uvijek najprije umetnite mljevenu kavu u
vrećicu filtera u umetku za filtery i vodu u spremnik
za vodu. Stavite termos posudu r u aparat za
kavu. Osigurajte se, da je termos posuda r prazna i
da u spremniku za vodu nema vode više od oznake
max (10 šalica).
• Pritisnite tipku „prog“ h i držite ju pritisnutu.
Podesite željeno vrijeme pokretanja sa tipkom
„h“ j i tipkom „min“ u (vidi poglavlje
"Podešavanje vremena“).
• Kada je podešeno željeno vrijeme pokretanja,
pustite tipku „prog“ h. Vrijeme pokretanja je
sada programirano.
• Na okretnom regulatoru arome o podesite
jačinu kave.
• Pritisnite na tipku „auto“ i, skroz dok se ne
upali zelena prikazna lampica s.
• Ako opet želite deaktivirati automatski početak
kuhanja, pritisnite na sklopku „off“ d.
g
3 2 3 x 6g 18
4
1
/
2
3 4 x 6g 24
6 4 5 x 6g 30
7
1
/
2
5 6 x 6g 36
9 6 7 x 6g 42
10
1
/
2
7
7
1
/
2
x 6g
45
12 8
8
1
/
2
x 6g
51
13
1
/
2
9 9 x 6g 54
15 10 10 x 6g 60
IB_KH1114_HR4.qxd 10.10.2007 16:16 Uhr Seite 52
Page 53

- 53 -
Čišćenje i održavanje
• Prije svakoga čišćenja izvucite mrežni utikač iz
mrežne utičnice.
OOppaassnnoosstt oodd eelleekkttrriiččnnoogg uuddaarraa!!
Prije nego očistite aparat za kavu, morate
iskopčati mrežni utikač iz utičnice.
PPaažžnnjjaa!!
Aparat za kavu nikada nemojte zaranjati u
vodu..
OOppaassnnoosstt oodd ooppeekklliinnaa!!
Uvijek čekajte dok se aparat za kavu ne ohladi, prije nego ga čistite.
Za čišćenje termos posude skinite poklopacr (vidi
sliku ).
• Ne koristite sredstva za čišćenje u domaćinstvu
ili oštre, odnosno šiljate predmete, da biste
otklonili nečistoće. Na taj način možete oštetiti
aparat za kavu.
• Obrišite kućište aparata za kavu i termos posudu
f sa mekanom krpom ovlaženom sa blagom
lužinom sapuna.
• Nakon svake upotrebe vrećicu za filter izvadite
iz držača filtra.
• Uklonite filtar i držač filtra q, umetak y i termos
posudu r isperite pod tekućom vodom iz vodovoda.
ČČiiššśśeennjjee ppookkllooppccaa
• Za čišśenje poklopca termos kane, isti najprije
rastavite kao što je niže opisano (slika ):
• Oprezno skinite silikonsku ploču sa rukavca na
donjoj strani poklopca. Pri tome držite rukavac,
pošto se sa suprotne strane pritišśe oprugom.
• Skinite rukavac i oprugu sa poklopca.
• Očistite sve dijelove sa blagom sapunicom i nakon toga ih dobro osušite.
• Kako biste ponovno sastavili poklopac, postupajte u obrnutom redoslijedu.
PPoozzoorr!!
Termos kanu i poklopac nemojte pustiti da stoje u sapunici i dijelove nemojte prati u perilici
za posu_e, pošto isti nače mogu postati propusni.
Ako aparat za kavu niste duže vremena koristili,
onda kabel spremite u okno za kabel t (slika ).
Uklanjanje vapnenca
Kod visokog stupnja tvrdoće potrebno je vapnenac
odstraniti već nakon ca. 30 upotreba, kod niskog
stupnja nakon ca. 60 upotreba.
Isključivo koristite sredstvo za uklanjanje vapnenca,
koje je primjereno za aparate za kavu i obratite
pozor na uputu za uporabu.
Vapnenac se uklanja na sljedeći način:
• U spremnik za vodu stavite sredstvo za
uklanjanje vapnencaw.
• Napunite vodu do max. 8 velikih šalica.
• Okrenite okretni regulator o na „calc“ za
aktiviranje funkcije za uklanjanje vapnenca.
• Pritisnite sklopku f „on“. Pali se crvena prikazna
lampica a i treperi prikazna lampica „calc“ g.
• Čekajte dok sva voda prođe.
• Nakon uklanjanja vapnenca dva puta pustite
po 8 šalica vode da prođe kroz aparat.
• Aparat za kavu se nakon uklanjanja vanpenca
isključuje.
IB_KH1114_HR4.qxd 10.10.2007 16:16 Uhr Seite 53
Page 54

- 54 -
Otklanjanje grešaka
AAppaarraatt zzaa kkaavvuu nnee ffuunnkkcciioonniirraa::
• Uređaj nije uključen. Pritisnite sklopku „on“ f
za uključivanje uređaja.
• Mrežni utikač nije utaknut u utičnicu. Uređaj
spojite sa strujnom mrežnom.Mrežni utikač
utaknite u utičnicu.
• Aoarat za kavu se nakon zadnjeg postupka
kuhanja nije potpuno ohladio. Aparat za kavu
pustite oko 5 minuta da se ohladi, prije nego
počnete novi postupak kuhanja.
PPoossttuuppaakk kkuuhhaannjjaa ssee nnee aakkttiivviirraa uu
žžeelljjeennoo vvrriijjeemmee ((TTiimmeerr))::
• Timer nije aktivan. Pritisnite tipku “auto” i, kako
biste aktivirali timer.
• Vrijeme nije ispravno podešeno. Kontrolirajte
vrijeme i po potrebi ga podesite.
KKaavvaa jjee pprreejjaakkaa // pprreessllaabbaa::
• U spremniku za vodu je premalo / previše
vode. Napunite ispravnu količinu vode.
• Napunjeno je previše / premalo mljevene kave.
Nunite manje / više mljevene kave.
• Kava je prefino / pregrubo mljevena. Odaberite neki drugi stupanj mljevenja za vašu kavu.
PPoossttuuppaakk kkuuhhaannjjaa ttrraajjee nneeuuoobbiiččaajjeennoo
dduuggoo..
UUrreeđđaajj ssee zzaa vvrriijjeemmee kkuuhhaannjjaa iisskklljjuuččuujjee..
UUrreeđđaajj pprrii kkuuhhaannj
juu ppoossttaajjee ggllaassnniijjii..
NNaassttaajjee pprreekkoommjjeerrnnoo ppaarree..
• U sustavu kuhanja uređaja ima previše vapnenca.
Uklonite iz uređaja vapnenca kao što je opisano
pod "Uklanjanje vapnenca".
Zbrinjavanje
Uređaj nikako ne bacajte u obično kućno
smeće.
Uređaj otklonite preko ovlaštenog poduzeća za
otklanjanje otpada ili preko vašeg komunalnog
poduzeća za otklanjanje otpada.
Obratite pažnju na aktualno važeće propise.
U slučaju dvojbe se povežite sa svojim poduzećem
za uklanjanje otpada.
Sve materijale ambalaže zbrinite na način
neškodljiv za okoliš.
IB_KH1114_HR4.qxd 10.10.2007 16:16 Uhr Seite 54
Page 55

- 55 -
Jamstvo & servis
Na ovaj uređaj vrijedi jamstvo u trajanju od 3 godine
od datuma kupovine. Uređaj je pažljivo proizveden i
prije isporuke brižljivo kontroliran. Molimo sačuvajte
blagajnički račun kao dokaz o kupnji. Molimo vas,
da se u slučaju garancije telefonski povežete sa
svojom servisnom ispostavom. Samo na taj način
vaša roba može biti besplatno uručena.
Garancija vrijedi samo za greške u materijalu i
izradi, a ne za potrošne dijelove ili za oštećenja
lomljivih dijelova, na primjer prekidača ili baterija.
Proizvod je namjenjen isključivo za privatnu, a ne
za komercijalnu uporabu.
U slučaju nestručnog rukovanja, rukovanja protivnog
namjeni uređaja, primjene sile i zahvata, koji nisu
izvršeni od strane našeg ovlaštenog servisnog
predstavništva, važenje jamstva prestaje. Vaša zakonska prava ovim jamstvom ostaju netaknuta. Ovo
jamstvo vrijedi samo za prvog kupca i nije prenosivo.
OOvvllaašštteennii sseerrvviiss::
MMiiccrrootteecc ssiisstteemmii dd..oo..oo..
Koprivnička 27 a
10000 Zagreb
Tel.: 01/3692-008
email: support.hr@kompernass.com
Proizvođač: Kompernaß GmbH
Burgstraße 21
D-44867 Bochum
Njemačka
Uvoznik
Lidl Hrvatska d.o.o. k.d.,
p.p. 61
10020 Novi Zgareb.
IB_KH1114_HR4.qxd 10.10.2007 16:16 Uhr Seite 55
Page 56

- 56 -
IB_KH1114_HR4.qxd 10.10.2007 16:16 Uhr Seite 56
Page 57

- 57 -
Inhaltsverzeichnis Seite
Sicherheitshinweise 58
Technische Daten 59
Lieferumfang 59
Bestimmungsgemäßer Gebrauch 59
Gerätebeschreibung 59
Vor dem ersten Gebrauch 59
Einstellung der Uhrzeit 59
Memory Funktion 59
Kaffeezubereitung 60
Beginn des Brühens festlegen 60
Reinigung und Wartung 61
Entkalkung 61
Fehlerbehebung 62
Entsorgung 62
Garantie & Service 63
Importeur 63
Lesen Sie die Bedienungsanleitung vor der ersten Verwendung aufmerksam durch und heben Sie diese für
den späteren Gebrauch auf. Händigen Sie bei Weitergabe des Gerätes an Dritte auch die Anleitung aus.
IB_KH1114_DE4 10.10.2007 16:19 Uhr Seite 57
Page 58

- 58 -
Kaffeemaschine
KH 1114
Sicherheitshinweise
Gefahr durch Stromschlag!
• Schließen Sie das Gerät nur an eine vorschriftsmäßig installierte und geerdete Netzsteckdose an.
• Ziehen Sie, wenn Sie das Gerät bewegen, befüllen, bei Störungen, bevor Sie das Gerät reinigen
oder wenn Sie es nicht gebrauchen, den Netzstecker aus der Netzsteckdose.
• Tauchen Sie das Gerät nie in Flüssigkeiten. Falls
doch einmal Flüssigkeit in das Gerätegehäuse
gelangt, ziehen Sie sofort den Netzstecker des
Geräts aus der Netzsteckdose. Lassen Sie es von
qualifiziertem Fachpersonal reparieren.
• Fassen Sie das Gerät, Netzkabel und -stecker
nie mit nassen Händen an.
• Ziehen Sie das Netzkabel stets am Stecker aus
der Steckdose, ziehen Sie nicht am Kabel selbst.
• Knicken oder quetschen Sie das Netzkabel nicht.
• Überprüfen Sie vor jedem Gebrauch Netzkabel
und -stecker. Wenn das Netzkabel dieses Gerätes beschädigt wird, muss es durch den Hersteller, seinen Kundendienst oder eine ähnlich
qualifizierte Person ersetzt werden, um Gefährdungen zu vermeiden.
Brandgefahr!
• Lassen Sie das Gerät während des Betriebs niemals unbeaufsichtigt.
• Betreiben Sie das Gerät niemals ohne Leitungswasser.
• Stellen Sie das Gerät niemals in der Nähe von
Wärmequellen auf.
• Benutzen Sie kein Verlängerungskabel. Bei Gefahr muss der Netzstecker schnell erreichbar sein.
Verletzungsgefahr!
• Benutzen Sie die Isolierkanne r des Geräts niemals in der Mikrowelle.
• Lassen Sie das Gerät niemals von Kindern ohne
Aufsicht eines Erwachsenen benutzen. Klären Sie
Kinder über die Gefahren auf, die vom Gerät
ausgehen können.
• Verlegen Sie das Netzkabel so, dass niemand
darauf treten oder darüber stolpern kann.
• Führen Sie keine spitzen oder harten Gegenstände in die Isolierkanne r ein. Greifen Sie nicht in
die Isolierkanne. Das kann zu Beschädigungen
am Gerät und zu Verletzungen führen.
Warnung vor Verbrühungen!
• Öffnen Sie niemals während des Brühvorgangs
den Filterhalter q.
• Berühren Sie nicht die heiße Filtertüte. Entnehmen
Sie die Filtertüte erst, wenn die Flüssigkeit abgelaufen und die Filtertüte abgekühlt ist. Benutzen Sie
den Filtereinsatz y, um die Filtertüte zu entfernen.
• Halten Sie Ihre Hände nicht in den aufsteigenden
Wasserdampf.
• Bewegen Sie niemals das Gerät während des
Brühvorgangs.
• Entnehmen Sie die Isolierkanne r erst, wenn der
Brühvorgang abgeschlossen ist und der Filter leer
gelaufen ist.
• Schließen Sie vor dem Einschalten immer den Filterhalter, es besteht sonst Verbrühungsgefahr
durch austretenden Dampf und heißes Wasser.
Vorsicht:
So vermeiden Sie Geräteschäden!
• Füllen Sie ausschließlich sauberes Leitungswasser
in den Wassertank w des Geräts.
• Setzen Sie das Glas in der Isolierkanne r nie
starken Temperaturschwankungen aus. Das Glas
kann beschädigt werden.
• Für Schäden durch Glasbruch wird
keine Haftung übernommen!
IB_KH1114_DE4 10.10.2007 16:19 Uhr Seite 58
Page 59

- 59 -
Technische Daten
Netzspannung: 220 - 240 V ~50 Hz
Nennleistung: 1000 W
Kaffeefilter: Größe 1x4
Lieferumfang
• Kaffeeautomat KH 1114 mit Timerfunktion
• Isolierkanne mit Deckel
• Messlöffel
• Bedienungsanleitung
• Garantiekarte
Bitte überprüfen Sie vor der Inbetriebnahme den Lieferumfang auf Vollständigkeit und eventuelle Beschädigungen.
Bestimmungsgemäßer
Gebrauch
Der Kaffeeautomat dient ausschließlich dem Zubereiten von Kaffee. Dieser Kaffeeautomat ist ausschließlich für die Benutzung in privaten Haushalten
bestimmt. Benutzen Sie ihn nicht gewerblich.
Das Gerät ist nur für den Innengebrauch bestimmt.
Gerätebeschreibung
Die Abbildung befindet sich auf der hinteren Ausklappseite.
Kaffeemaschine:
q Filterhalter
w Wassertank
e Skala
r Isolierkanne
t Kabelschacht
y Filtereinsatz
Bedienpanel:
u Taste „min“
i Taste „auto“
o Aromadrehregler
a Rote Anzeigelampe
s Grüne Anzeigelampe
d Schalter „off“
f Schalter „on“
g Rote Anzeigelampe „calc“
h Taste „prog“
j Taste „h“
Vor dem ersten Gebrauch
Hinweis:
Füllen Sie nie mehr Wasser, als bis zur MaxMarkierung (10 Tassen) ein. Das Gerät kann
überlaufen.
• Stellen Sie vor dem ersten Gebrauch den Aromadrehregler o auf die Einstellung und lassen
Sie zwei mal 8 große Tassen Wasser durchlaufen. Legen Sie keine Filtertüte ein und benutzen
Sie dabei kein Kaffeepulver.
• Reinigen Sie das Gerät (siehe Kapitel Reinigung
und Wartung).
Einstellung der Uhrzeit
• Drücken Sie die Taste „h“ j für die Stunden
bzw. die Taste „min“ u für die Minuten so oft,
bis die gewünschte Uhrzeit eingestellt ist.
Memory Funktion
Die Einstellung von Uhrzeit und Startzeit bleibt nach
einem Stromausfall von bis zu etwa 3 Minuten erhalten.
IB_KH1114_DE4 10.10.2007 16:19 Uhr Seite 59
Page 60

- 60 -
Kaffeezubereitung
Vermeiden Sie es, weniger als 2 große oder 3 kleine Tassen Kaffee zu brühen. Ansonsten hat der Kaffee nicht die gewünschte Temperatur und Stärke.
• Schwenken Sie den Filterhalter q nach außen
und legen Sie eine Filtertüte (Größe 1x4) mit umgeknickten Seiten in den Filtereinsatz y. Füllen
Sie mit dem Messlöffel Kaffeepulver (mittel bis
fein gemahlen) in die Filtertüte ein (Abb. ). Dabei entspricht ein gestrichener Messlöffel ca. 6 g
Kaffepulver.
• Schwenken Sie den Filterhalter q wieder in den
Kaffeeautomaten.
• Füllen Sie die gewünschte Wassermenge in den
Wassertank w ein (Abb. ). Nutzen Sie dafür
die äußere Skala e (Abb. ). Füllen Sie nie
mehr Wasser, als bis zur Max-Markierung (10
Tassen) ein.
• Stellen Sie die Kaffeestärke am Aromadrehregler
o ein (Abb. ). Die Einstellung ergibt starken
Kaffee, die Einstellung ergibt milden Kaffee.
• Stellen Sie die Isolierkanne r in den Kaffeeautomaten. Stellen Sie vor jedem Gebrauch sicher,
dass die Isolierkanne r leer ist.
Hinweis:
Der Kaffee bleibt länger warm, wenn Sie die
Isolierkanne vorher mit heißem Wasser ausspülen.
• Drücken Sie den Schalter „on“ f am oberen
Ende, um den Brühvorgang zu starten. Die rote
Anzeigelampe a leuchtet.
• Sie können die Isolierkanne r entnehmen und
den Kaffee servieren, wenn die rote Anzeigelampe a erloschen ist.
Beachten Sie zum Einschenken des Kaffees die Abbildung .
Hinweis:
Lassen Sie den Kaffeeautomaten etwa 5 Minuten lang auskühlen, bevor Sie einen weiteren
Brühvorgang beginnen oder Wasser nachfüllen.
Beginn des Brühens festlegen
Mit der Taste „prog“ h können Sie den Kaffeeautomaten so einstellen, dass er zu einem festgelegten
Zeitpunkt mit dem Brühvorgang beginnt. Füllen Sie
immer zuerst Kaffeepulver in die Filtertüte im Filtereinsatz y und Wasser in den Wassertank w. Stellen
Sie die Isolierkanne r in den Kaffeeautomaten. Stel-
len Sie sicher, dass die Isolierkanne r leer ist und
der Wassertank nicht über die Max-Markierung hinaus (10 Tassen) gefüllt ist.
• Drücken Sie die Taste „prog“ h und halten Sie
diese gedrückt. Stellen Sie die gewünschte Startzeit mit der Taste „h“ j und der Taste „min“ u
ein (siehe Kapitel „Einstellung der Uhrzeit“).
• Wenn die gewünschte Startzeit eingestellt ist, lassen Sie die Taste „prog“ h los. Die Startzeit ist
nun programmiert.
• Stellen Sie die gewünschte Kaffeestärke am Aromadrehregler o ein.
• Drücken Sie auf die Taste „auto“ i, bis die grüne Anzeigelampe s aufleuchtet.
• Wenn Sie den automatischen Brühbeginn wieder
deaktivieren möchten, drücken Sie den Schalter
„off“ d.
g
3 2 3 x 6g 18
4
1
/
2
3 4 x 6g 24
6 4 5 x 6g 30
7
1
/
2
5 6 x 6g 36
9 6 7 x 6g 42
10
1
/
2
7
7
1
/
2
x 6g
45
12 8
8
1
/
2
x 6g
51
13
1
/
2
9 9 x 6g 54
15 10 10 x 6g 60
IB_KH1114_DE4 10.10.2007 16:19 Uhr Seite 60
Page 61

- 61 -
Reinigung und Wartung
•Ziehen Sie vor jeder Reinigung den Netzstecker
aus der Netzsteckdose.
Gefahr eines elektrischen Schlags!
Bevor Sie den Kaffeeautomaten reinigen, müssen Sie immer den Netzstecker aus der Netzsteckdose ziehen.
Achtung!
Tauchen Sie den Kaffeeautomaten nie unter
Wasser.
Verbrennungsgefahr!
Warten Sie immer, bis der Kaffeeautomat abgekühlt ist, bevor Sie ihn reinigen.
Nehmen Sie zum Reinigen den Deckel von der Isolierkanne r ab (siehe Abb. ).
• Benutzen Sie keine Haushaltsreiniger oder schar-
fe bzw. spitze Gegenstände, um Verschmutzungen zu entfernen. Dadurch könnten Sie den
Kaffeeautomaten beschädigen.
• Wischen Sie das Gehäuse des Kaffeeautomaten
und die Isolierkanne r mit einem, leicht mit mil-
der Seifenlauge befeuchteten, weichen Tuch ab.
• Nehmen Sie nach jeder Benutzung die Filtertüte
aus dem Filtereinsatz y.
• Entfernen Sie den Filter und spülen Sie Filterhalter
q, Filtereinsatz y und die Isolierkanne r unter
fließendem Leitungswasser aus.
Reinigung des Deckels
• Um den Deckel der Isolierkanne zu reinigen, neh-
men Sie ihn zuerst auseinander wie im Folgenden beschrieben (Abb. ):
• Nehmen Sie vorsichtig die Silikonscheibe vom
Zapfen an der Unterseite des Deckels ab. Halten
Sie den Zapfen dabei fest, da er von der Gegenseite mit einer Feder angedrückt wird.
• Nehmen Sie den Zapfen und die Feder vom
Deckel.
• Reinigen Sie alle Teile in einer milden Seifenlauge und trocknen Sie sie anschließend gut ab.
• Um den Deckel wieder zusammen zu setzen, verfahren Sie in umgekehrter Reihenfolge.
Achtung!
Lassen Sie die Isolierkanne und den Deckel
nicht im Seifenwasser liegen und reinigen Sie
die Teile nicht in der Spülmaschine, da sie
sonst undicht werden können.
Wenn Sie den Kaffeeautomaten für längere Zeit
nicht benutzen, verstauen Sie das Kabel im Kabelschacht t (Abb. ).
Entkalkung
Bei hohem Härtegrad ist eine Entkalkung bereits
nach ca. 30 Benutzungen notwendig, bei niedrigem
Härtegrad nach ca. 60 Benutzungen.
Verwenden Sie ausschließlich für Kaffeemaschinen
geeignetes Entkalkungsmittel und beachten Sie die
Gebrauchsanleitung.
So gehen Sie zum Entkalken vor:
• Geben Sie das Entkalkungsmittel in den Wassertank w.
• Füllen Sie Wasser für Max. 8 große Tassen ein.
• Drehen Sie den Aromadrehregler o auf „calc“,
um die Entkalkungsfunktion zu aktivieren.
• Drücken Sie den Schalter f „on“. Die rote An-
zeigelampe a leuchtet und die Anzeigelampe
„calc“ g blinkt.
• Warten Sie, bis das Wasser vollständig durchgelaufen ist.
• Lassen Sie nach dem Entkalken zwei mal 8 Tassen Wasser durchlaufen.
• Der Kaffeeautomat schaltet sich nach der Entkalkung aus.
IB_KH1114_DE4 10.10.2007 16:19 Uhr Seite 61
Page 62

- 62 -
Fehlerbehebung
Der Kaffeeautomat funktioniert nicht:
• Das Gerät ist nicht eingeschaltet. Drücken Sie den
Schalter „on“ f um das Gerät einzuschalten.
• Der Netzstecker steckt nicht in einer Netzsteckdose.
Verbinden Sie das Gerät mit dem Stromnetz.
Stecken Sie den Netzstecker in eine Netzsteckdose.
• Der Kaffeeautomat hat sich nach dem letzten
Brühvorgang noch nicht vollständig abgekühlt.
Lassen Sie den Kaffeeautomaten etwa 5 Minuten
lang auskühlen, bevor Sie einen weiteren Brühvorgang beginnen.
Der Brühvorgang startet nicht zur gewünschten Zeit (Timer):
• Der Timer ist nicht aktiviert. Drücken Sie die Taste
“auto” i, um den Timer zu aktivieren.
• Die Uhrzeit ist nicht richtig eingestellt. Kontrollieren Sie die Uhrzeit und stellen Sie sie gegebenenfalls ein.
Der Kaffee ist zu stark/zu schwach:
• Es ist zu wenig/zu viel Wasser im Wassertank .
Füllen Sie die korrekte Wassermenge ein.
• Es ist zu viel/zu wenig Kaffeepulver eingefüllt.
Füllen Sie weniger/mehr Kaffeepulver ein.
• Das Kaffeepulver ist zu fein/zu grob gemahlen.
Wählen Sie einen anderen Mahlgrad für Ihr Kaffeepulver.
Der Brühvorgang dauert ungewöhnlich lange.
Das Gerät schaltet sich während des
Brühens aus.
Das Gerät wird beim Brühen lauter.
Es entsteht übermäßiger Dampf.
• Das Brühsystem des Gerätes ist verkalkt. Entkalken
Sie das Gerät wie unter “Entkalkung” beschrieben.
Entsorgung
Werfen Sie das Gerät keinesfalls in den normalen Hausmüll.
Entsorgen Sie das Gerät über einen zugelassenen
Entsorgungsbetrieb oder über Ihre kommunale Entsorgungseinrichtung.
Beachten Sie die aktuell geltenden Vorschriften. Setzen Sie sich im Zweifelsfall mit Ihrer Entsorgungseinrichtung in Verbindung.
Führen Sie alle Verpackungsmaterialien einer umweltgerechten Entsorgung zu.
IB_KH1114_DE4 10.10.2007 16:19 Uhr Seite 62
Page 63

- 63 -
Garantie & Service
Sie erhalten auf dieses Gerät 3 Jahre Garantie ab
Kaufdatum. Das Gerät wurde sorgfältig produziert
und vor Anlieferung gewissenhaft geprüft. Bitte bewahren Sie den Kassenbon als Nachweis für den
Kauf auf. Bitte setzen Sie sich im Garantiefall mit Ihrer Servicestelle telefonisch in Verbindung. Nur so
kann eine kostenlose Einsendung Ihrer Ware gewährleistet werden.
Die Garantieleistung gilt nur für Material- oder Fabrikationsfehler, nicht aber für Verschleißteile oder für
Beschädigungen an zerbrechlichen Teilen, z. B.
Schalter oder Akkus. Das Produkt ist lediglich für
den privaten und nicht für den gewerblichen Gebrauch bestimmt.
Bei missbräuchlicher und unsachgemäßer Behandlung, Gewaltanwendung und bei Eingriffen, die
nicht von unserer autorisierten Service-Niederlassung vorgenommen wurden, erlischt die Garantie.
Ihre gesetzlichen Rechte werden durch diese Garantie nicht eingeschränkt. Diese Garantie gilt nur
gegenüber dem Erstkäufer und ist nicht übertragbar.
Schraven
Service- und Dienstleistungs GmbH
Gewerbering 14
D-47623 Kevelaer
Tel.: +49 (0) 180 5 008107
(14 Ct/Min. aus dem dt. Festnetz)
Fax: +49 (0) 2832 3532
e-mail: support.de@kompernass.com
Importeur
KOMPERNASS GMBH
BURGSTRASSE 21
D-44867 BOCHUM
www.kompernass.com
IB_KH1114_DE4 10.10.2007 16:19 Uhr Seite 63
Page 64

- 64 -
IB_KH1114_DE4 10.10.2007 16:19 Uhr Seite 64
 Loading...