

Page 1
TOOBI
INSTALLATION INSTRUCTIONS
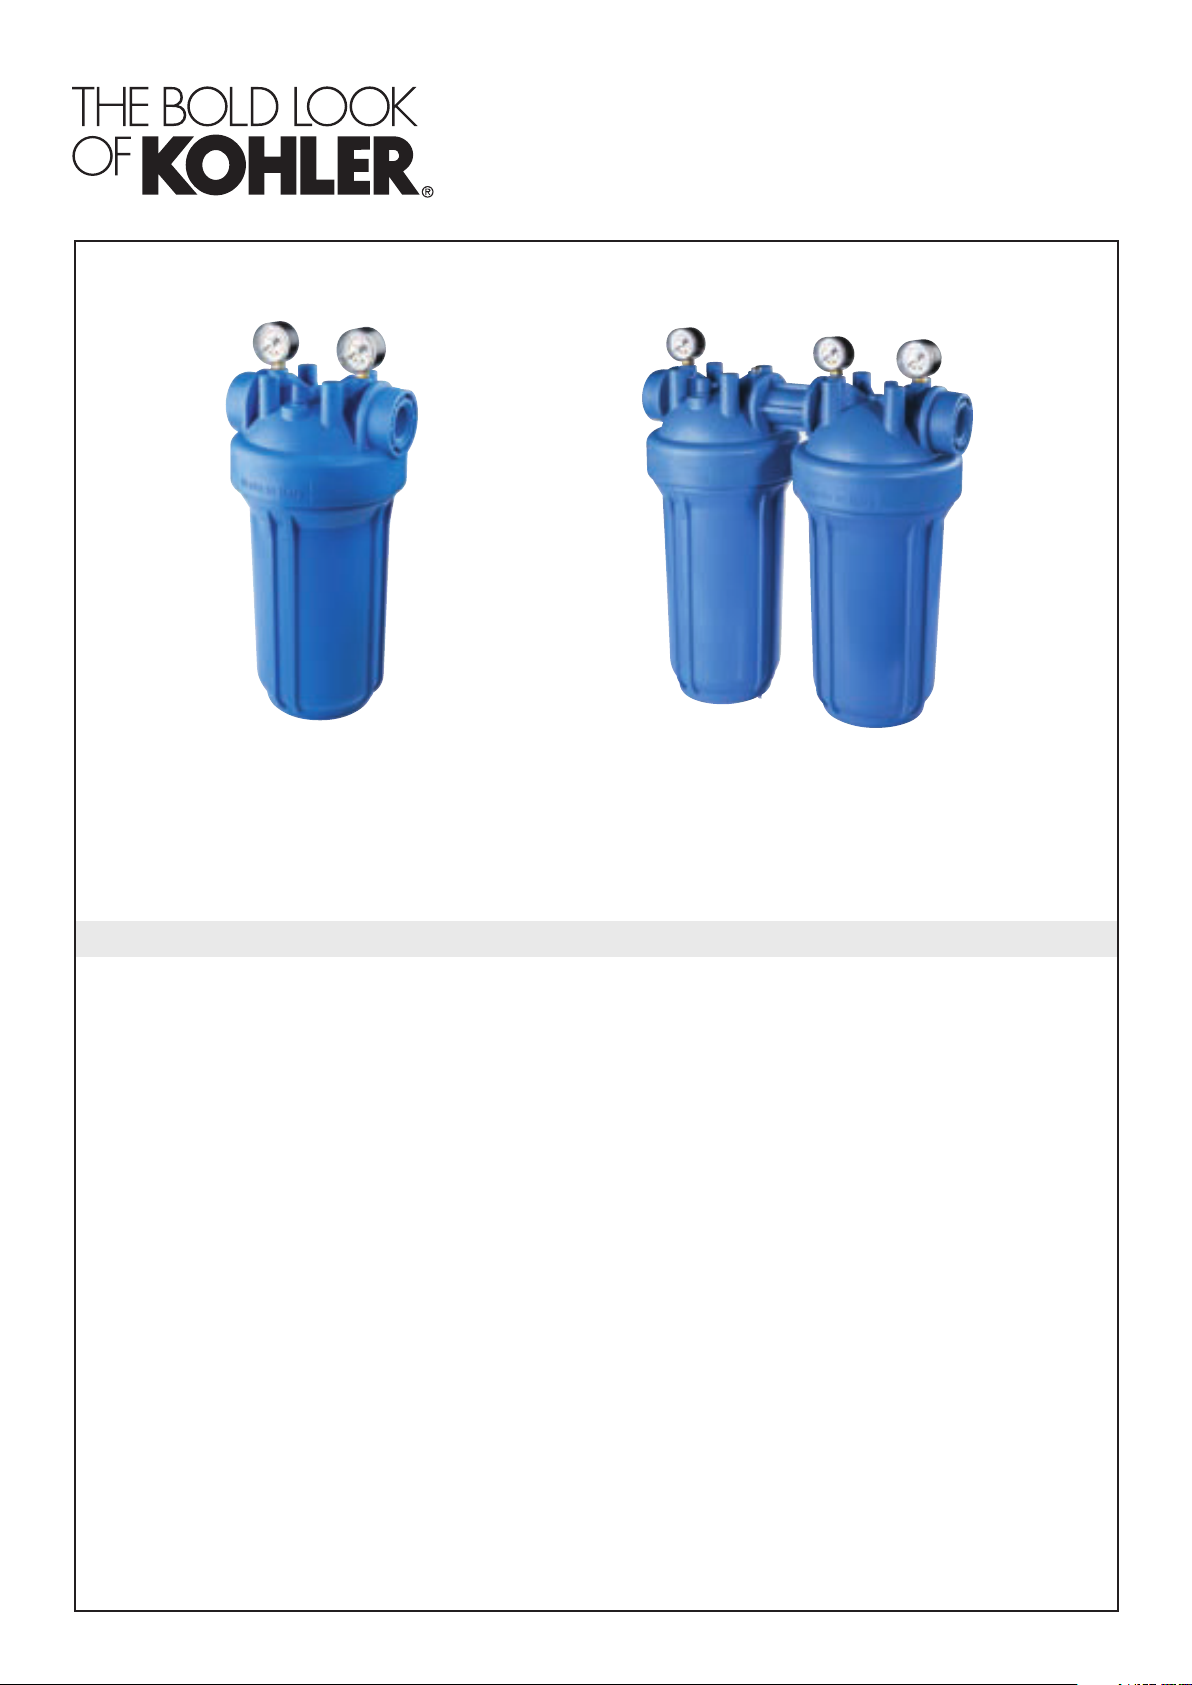
TOOBI 5020 FILTER POE, TOOBI 20 FILTER POE
23849IN-NA/23843IN-NA
23849IN-NA23843IN-NA
TOOBI 20 FILTER
POE
TOOBI 5020 FILTER
POE
GENERAL DIRECTIONS FOR USAGE
• Use only for filtration of water with pH from 6.5 to 8.5.
• In case of filtration of drinking water, do not use with unsafe water or with water of unknown quality without adequate
disinfection before or after the filter.
• Keep protected from sun light.
• Keep protected from back-flows with a non-return valve.
• Keep protected from water hammer.
• Do not install near to electric appliances.
1. Important Warning
The necessary safeguards and handling methods as prescribed should be used for such liquids.
The safety kits like gloves, respirators, protective eyeware etc. should be used.
Do not open the vessel under pressure. No operation in filter housing should be performed without releasing pressure. Filter
Operations should be performed by trained manpower only. Review all precautions specific to the handling of the fluid being
filtered before changing the filter cartridges. A filter cartridges that has been used with a hazardous/or toxic liquid may
contain residual amounts of hazardous material. necessary safeguards and handling methods as prescribed should be used
for such liquids. The safety kits like gloves, respirators, protective eyewear etc. should be used for hazardous and toxic
materials.
Filter cartridges should be disposed off in accordance with statutory guidelines and rules. Failure to follow precautions may
cause serious injury, property damage and may be fatal in extreme cases.
2. Safety Precaution
• This Filter is designed and manufactured to provide many years of safe and reliable service when installed, operated and
maintained according to the information in this manual.
• Regular pressure check of housing with a reliable & calibrated pressure device such as: pressure gauge should be done.
• Before operating filters, the O-ring & gaskets should be checked properly for any damage or deterioration. The damaged or
worn-out gaskets should be replaced immediately.
• Before start of filter or draining out, remove air from vent. There should not be any “external load” on filter housing, pipes,
valves or connection etc.
1 1377486-IN2-A
Page 2
INSTALLATION INSTRUCTIONS
1. I nstallation
Before installation check all parameters of specification and instructions.
• Pressure and Temperature should not exceed more than instructed on vessel.
• Allow sufficient space above filter to remove lid for cleaning and servicing.
• Make all plumbing connections prior to placing the vessels. The filter is to be positioned for safe water drainage.
• Check all O-rings, Gaskets of vessels for any wear & tear, damage etc.
• Install a reliable pressure gauge on top lid of vessel before use.
• The inlet and outlet of filter housings should be fitted with pressure gauges and valves for safety reasons.
• The Inlet Connection Flanges of filter housing and Pipeline Flanges should be properly bolted using good sealing
gaskets to avoid any leakage. The vessel’s outlet and discharge pipeline are to be connected likewise.
During servicing or repairs of vessels, the manufacturer’s recommended spare parts should be used for replacement.
2. Ideal Installation
Install the products in sheltered rooms and protected from freeze and excessive heat. Before the installation, check if
the hydraulic system has been set-up according to the rules-of-the art in force.
TECHNICAL SPECIFICATIONS
Operating conditions
Temperature Rating 4 ° C to 60° C (140° F)
Max. Forward Pressure 8 kg/cm
The Filter housing should be operated according to these specifications.
2
Materials of Construction
Housing Shell Polypropylene or PET
Housing Top Polypropylene
Locking Mechanism Threads
O-ring Silicon (Standard)/EPDM
Conguration
Size(Length) 20”
No. Of cartridge 1(Mono), 2 (Duo)
Suitable Cartridges Dia. 4.5”
Connection Type BSP Threads (Plastic / Brass)
Connection Size 1.5”
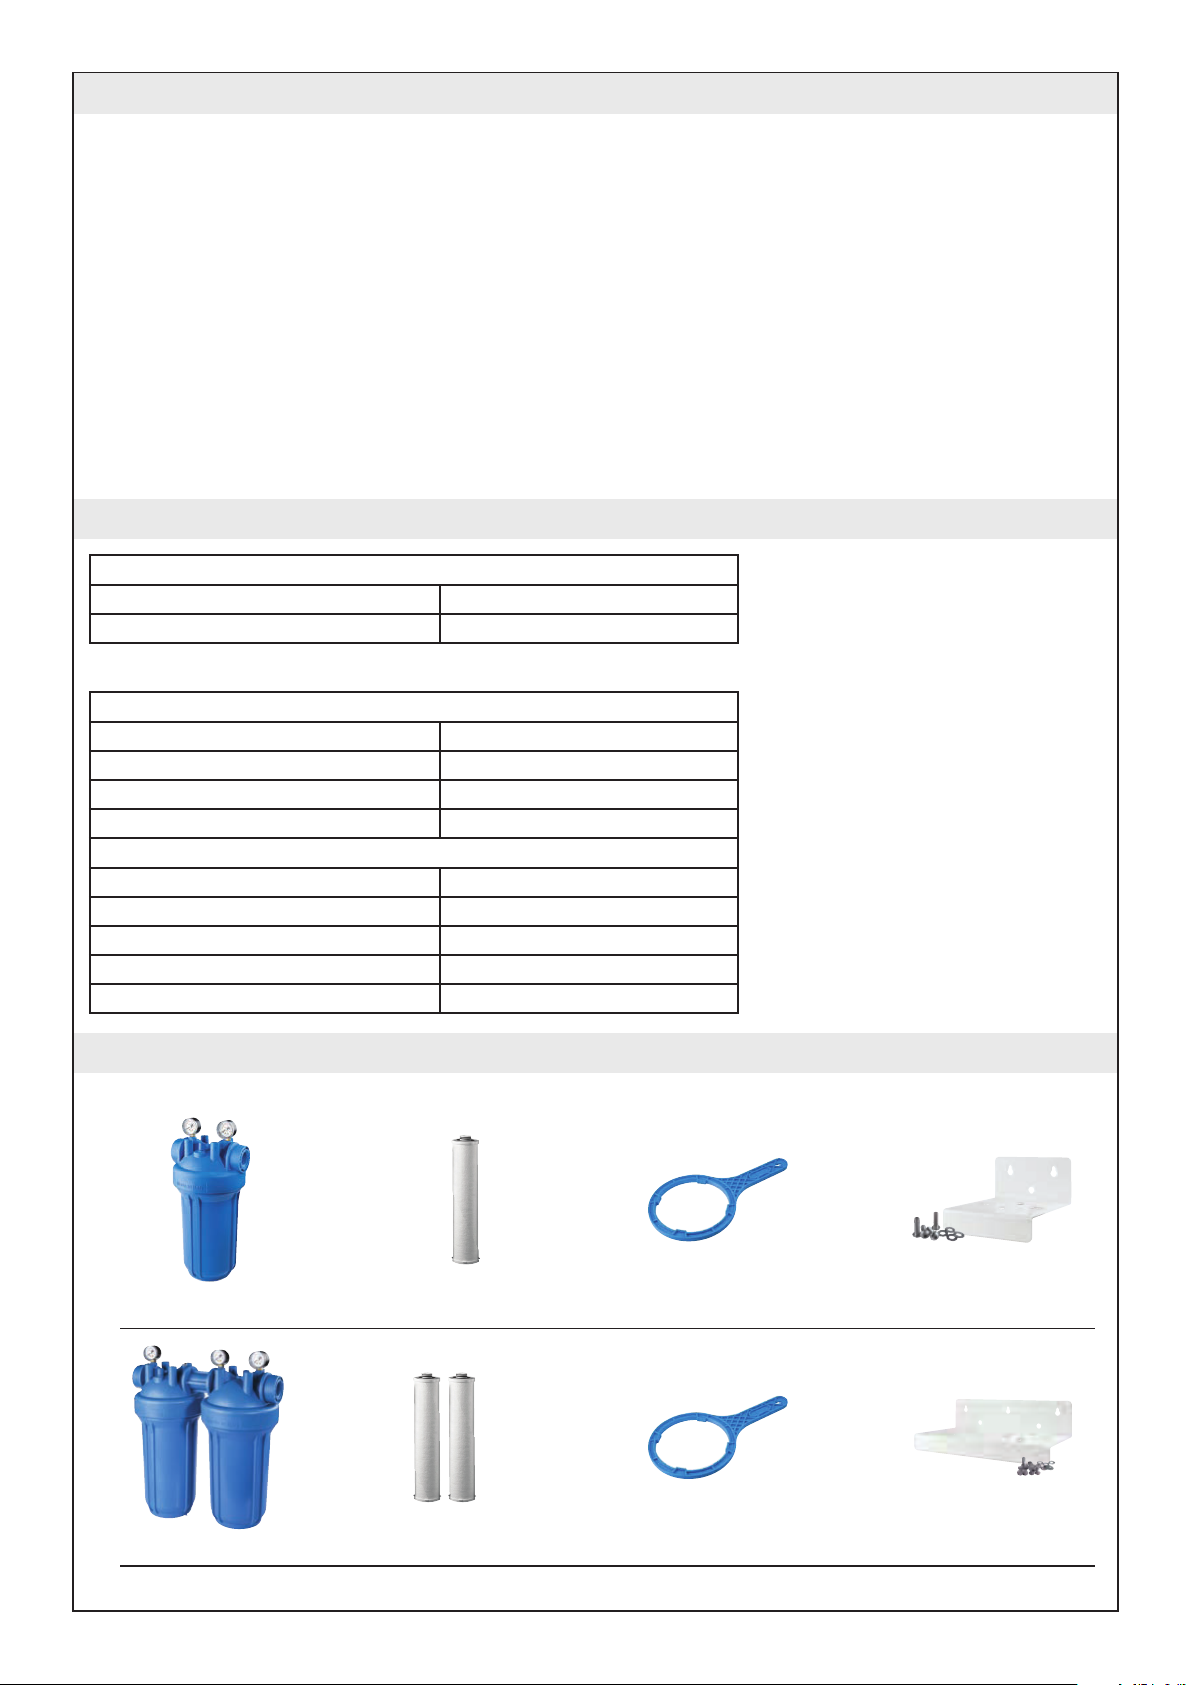
LIST OF COMPONENTS
Housing
Cartridge* Spanner Wall Bracket
+ + +
+ 2 Pressure gauge Bigline Mono
+ + +
* Cartridge may be different as per your specication.
1377486-IN2-A 2
Bigline Duo+ 3 Pressure gauge
Page 3

START UP
• Clean the filter either with compressed air or flush the housing with pure water to avoid debris or dirt to float in the system.
• Position the filter in such a way that the fluid enters the inlet connection.
• Close the outlet valve and open the vent on top of the filter housing.
• Partially open the inlet valve at pipe before the filter housing and allow fluid to fill completely into housing along with venting
of air from top of the housing.
• After complete venting of air, close the vent valve. Fully open the inlet valve and open the outlet valve simultaneously.
OPERATION & FILTER CHANGEOUT
1. Changing the Filter Cartridge
• Follow regulations in force for the disposal of used cartridges.
• Before opening the filter housing turn-off, the water main.
• Release the pressure from the product by un-screwing the vent-valve of the head. Then screw and tighten the vent-valve.
• Open the housing unscrewing the housing using a proper wrench.
• Remove the used cartridge.
• Wipe clean the filter housing with cold water and a soft sponge.
• Open the new cartridge wrap and discard wrap.
• Insert the new cartridge and place it into the housing.
• Tighten the housing bowl to housing’s head using a proper wrench. Do not over-tighten.
• Turn-on the water main.
• Slowly turn-on a water supply (tap) downstream the filter.
• Wait for air purge from the vent-valve, then screw and tighten the vent-valve.
Remark: Let the water flow for at least 5 minutes before the use.
TROUBLESHOOTING
1. Troubleshooting for Leaks
• Check the O-ring for any damage and wear & tear, dirt or swelling etc. If required, replace 0-ring with new one.
• Properly close the housing. Hand tightening is good enough to seal.
• Carefully check all threaded connections. If connections not proper, unscrew and connect again as and when needed.
• Check to see if filter cartridge is dirty and choked up. If this is the case, replace the cartridges as per instructions.
2. Poor Filtration Results
• Check to make sure the filter cartridges is properly seated in the support basket.
• Check all O-rings and sealing surfaces are cleaned before installing.
• Frequent Cartridges Clogging - Selection of proper filter cartridge with proper micron rating.
• Lower filtration flow or High Differential Pressure- Change the Cartridgeas per recommended Differential Pressure.
If Differential Pressure is not achieved -Open the system and check the cartridge condition for damages (if any).
INSTALLATION LAYOUT
General information.
a.
FITTINGS
BSP
NPT
IN-OUT directions presentation in different lter housings models.
b.
IN
OUT
OUTIN IN OUT
3 1377486-IN2-A
IN
Page 4

Installation lay-out:
c.
2 4
1 3
B.V
B.V
B.V
Ø
66
7
1. Water main line | 2. Non-return valve | 3. Pressure reducer | 4. Bypass | B.V Ball Valve | 6. Filter unit |
7. Other utilities.
WARNING: To reduce the risk associated with choking, do not allow children under 3 years of age to have access to
small parts during the installation of this product. The disposable filter cartridge should be replaced every 6 months at
the rated capacity, or sooner if a noticeable reduction in flow rate occurs.
For the maximum benefit of your filtration system, Kohler recommends the use of Kohler-brand filters only. Using
KOHLER brand filters provides optimal performance and reliability. Kohler filters meet rigorous industry standards for
safety and quality that are important for products that are filtering your water. Kohler has not qualified non- Kohlerbranded filters for use in Kohler housings and there is no assurance that non-Kohler-branded filters meet Kohler’s
standards for quality, performance and reliability.
Respect the working conditions, as shown in the sticker affixed to the product. If the sticker is tampered, damaged, not
legible or missing, applicable working conditions are: max pressure 8 bar, max temperature 45°C, with the exception of
products marked as hot water filter applicable for max working temperature at 80°C. If pressure exceeds the working
conditions, protect the product with a pressure reducer.
The content of this manual has been reviewed for correctness however it is the user’s responsibility to confirm all
instructions and to operate the equipment in a safe and correct manner.
Design changes may be made without notice.
QUESTIONS?
Contact our Support Department for any queries:
indiacustomercare@kohler.com
If you have questions, visit our website at www.kohler.co.in
1377486-IN2-A 4
© Kohler Co.2018
 Loading...