

Page 1

Installation Guide
Bath/Deck Mount Faucet and Trim
K-T398, K-R399 K-T413
M product numbers are for Mexico (i.e. K-12345M)
Los números de productos seguidos de
M corresponden a México (Ej.
K-12345M)
Français, page“ Français-1”
Español, página“ Español-1”
1012740-2-E
Page 2

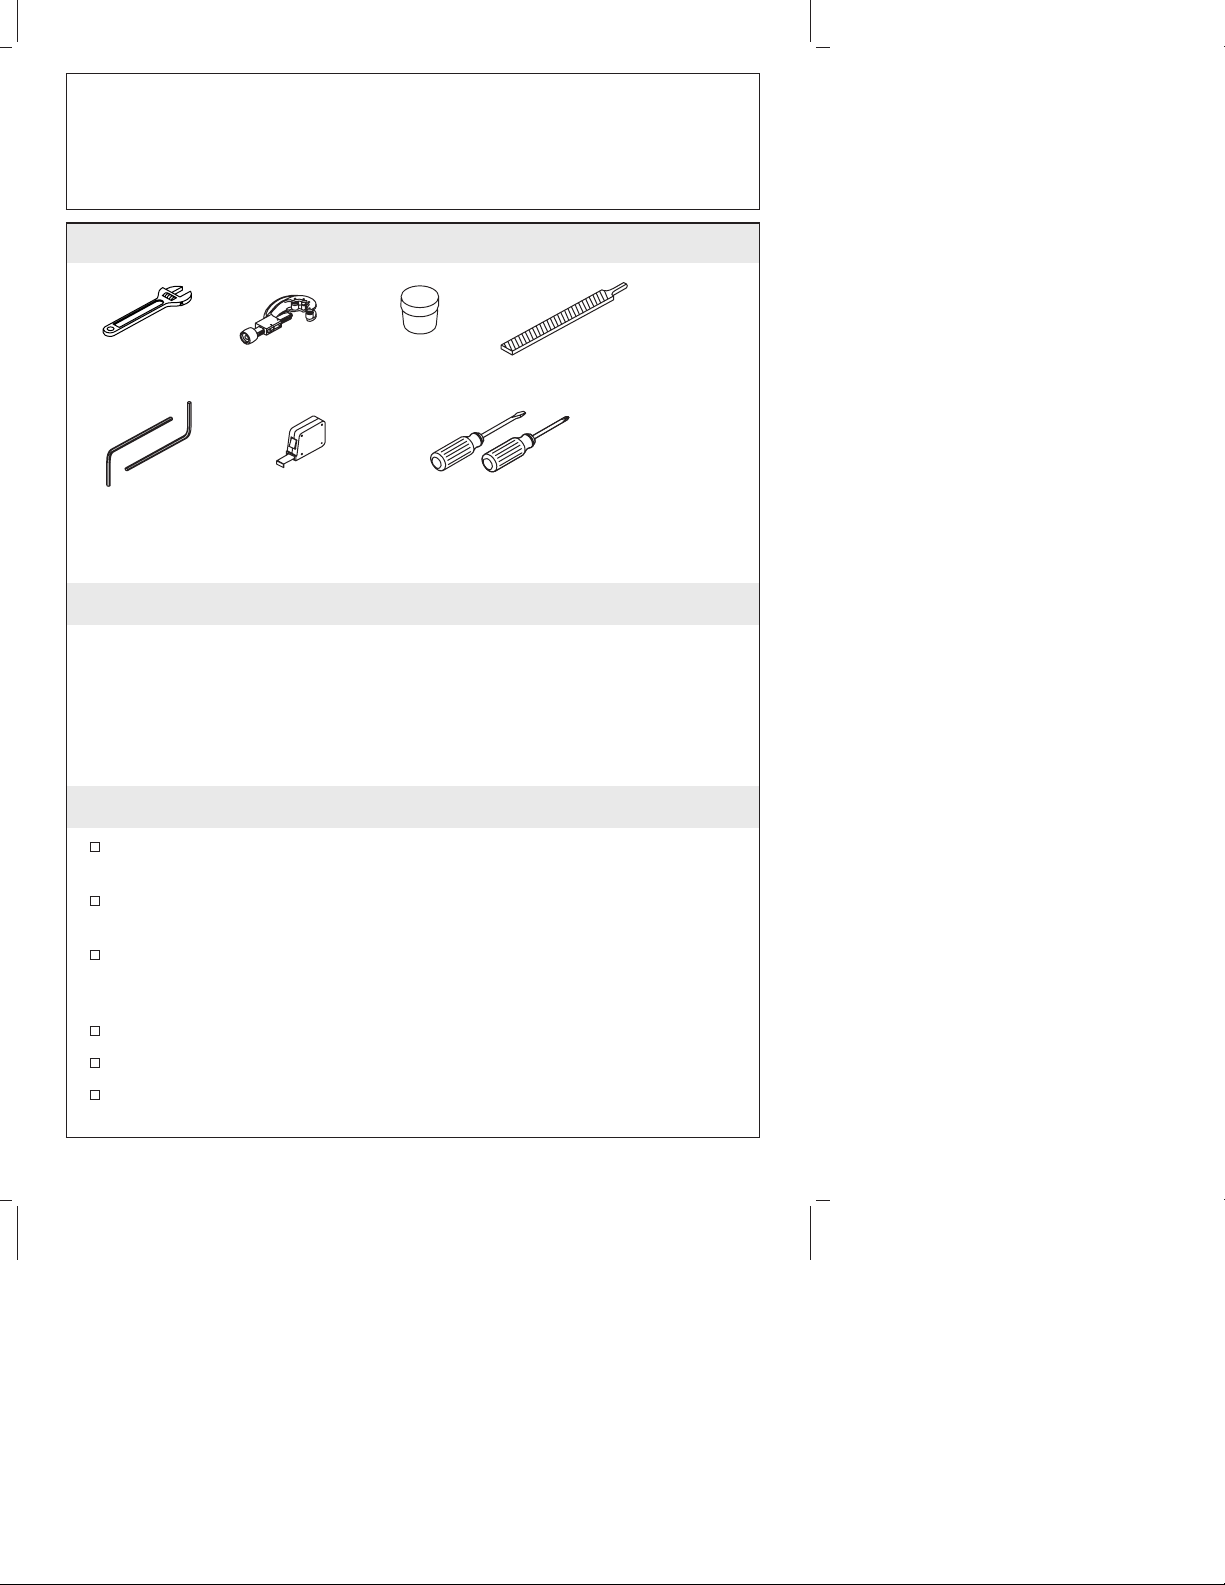
Tools and Materials
Adjustable
Wrench
Tube Cutter
Plumbers
Putty
Plus:
• Rag
File
Hex
Wrench
Tape
Measure
Assorted
Screwdrivers
Thank You For Choosing Kohler Company
We appreciate your commitment to Kohler quality. Please take a few
minutes to review this manual before you start installation. If you
encounter any installation or performance problems, please don’t
hesitate to contact us. Our phone numbers and website are listed on
the back cover. Thanks again for choosing Kohler Company.
Before You Begin
The valve is sold separately. Please read the instructions packed
with the valve for installation procedures.
Deep rough-in kit #73444 allows an additional 1/2″ (1.3 cm) of
tile thickness.
Order rough-in kit #773132 for finished deck installations over
1-1/4″ (3.2 cm) thick [max. 1-3/4″ (4.4 cm)].
Please read all instructions before you begin.
Shut off the main water supply.
Observe all local plumbing and building codes.
Complete the finished deck material before installing.
Before installation, unpack the new faucet trim and inspect it for
damage. Return it to the carton until installation.
Kohler Co. reserves the right to make revisions in the design of
faucets without notice, as specified in the Price Book.
1012740-2-E 2 Kohler Co.
Page 3
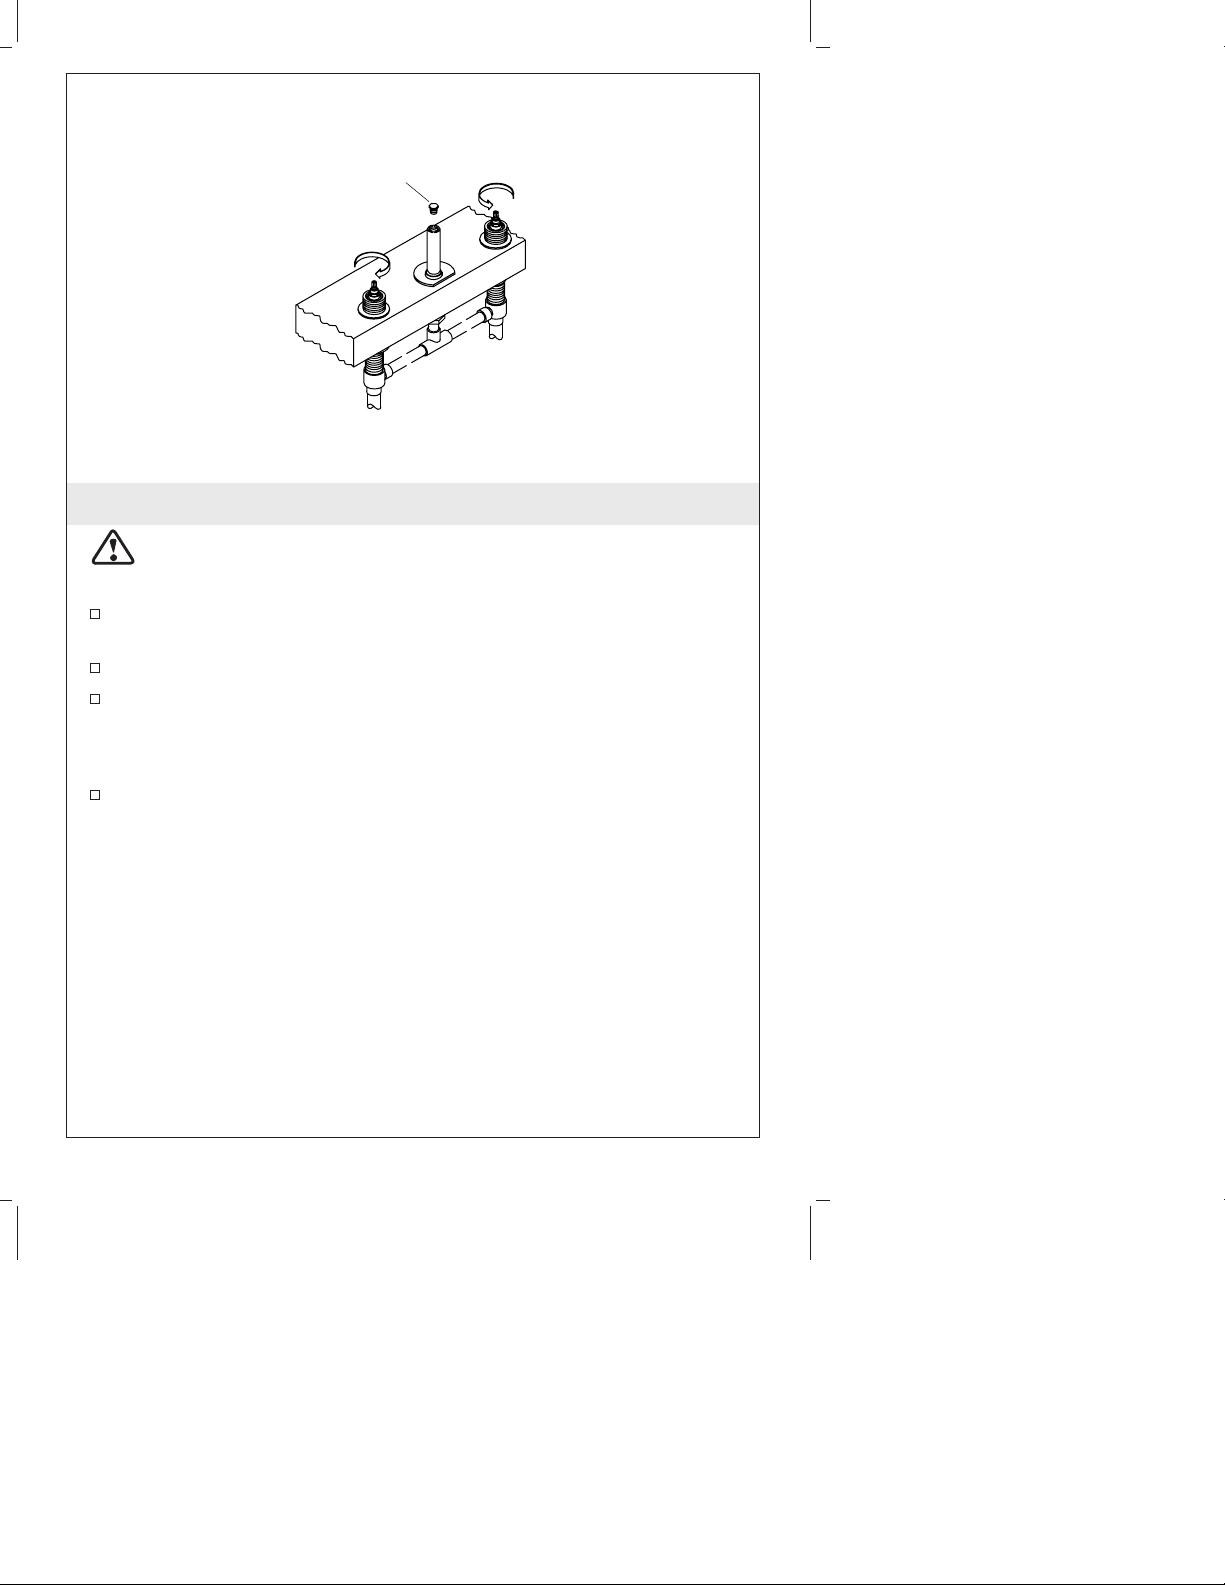
Close
Pipe Plug
Close
Hot
Cold
1. Remove the Pipe Plug
WARNING: Risk of personal injury. Lines may be pressurized.
Do not lean over the pipe plug when turning or removing the
plug.
Make sure the valves are closed (cold = fully counterclockwise;
hot = fully clockwise).
Turn off the main water supply.
Wrap a rag around the pipe plug to prevent water spray.
IMPORTANT! Water may purge from the supply tube when you
remove the plug.
Carefully remove the pipe plug.
Kohler Co. 3 1012740-2-E
Page 4
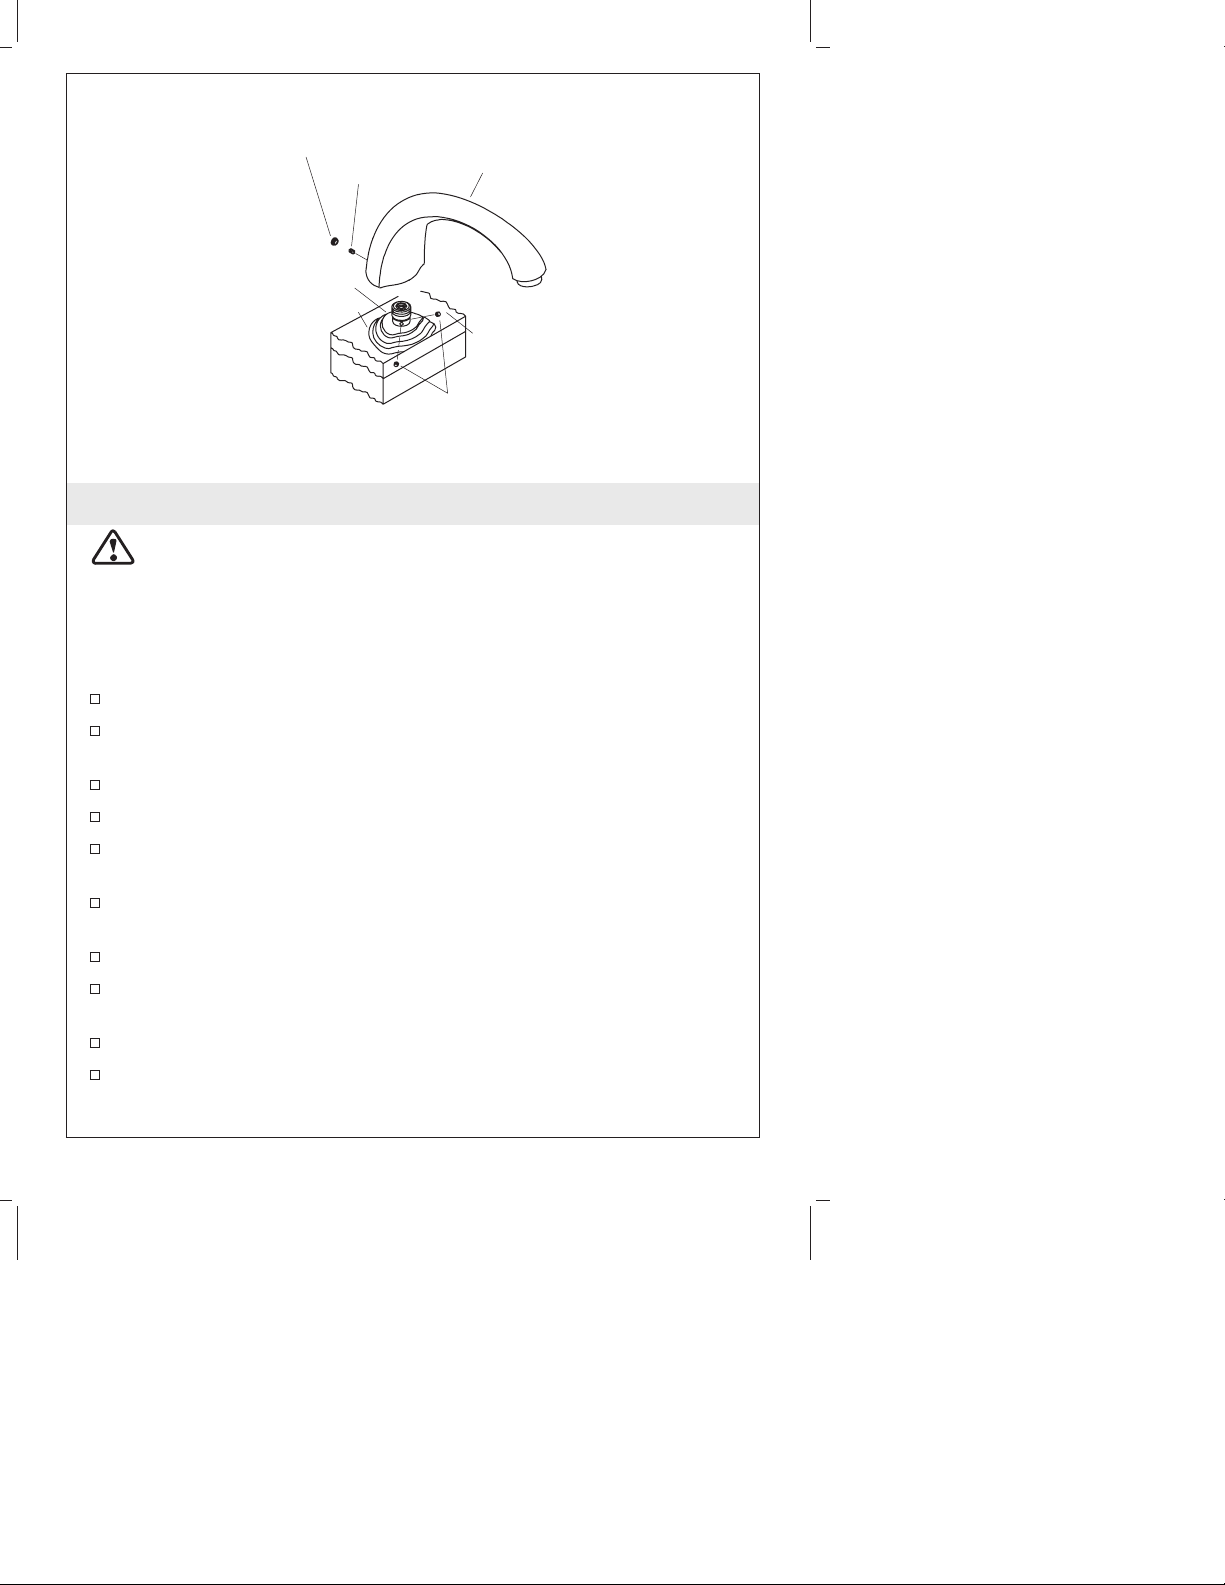
Plug Button
Setscrew
Sleeve
Escutcheon
Spout
Assembly
Finished
Deck
Setscrews
2. Install the Spout
CAUTION: Risk of product damage. Use care when installing
the spout assembly to prevent damage to the O-ring seal.
NOTE: If your installation is on a tile-covered rough deck, slide a
brass washer, flat side facing forward, onto the supply tube. The
brass washer is supplied with the spout. This washer is not needed
for rim/finished deck installations.
Remove the plaster guard from the spout supply tube.
Cut off the spout supply tube 1-1/2″ (3.8 cm) above the
escutcheon.
Remove all burrs from the supply tube.
Loosen the setscrews in the sleeve.
Using a twisting motion, install the sleeve on the spout supply
tube until it contacts the deck or washer.
Align the sleeve with the setscrews offset from the center (not
facing directly forward or backward) of the supply tube.
Tighten the setscrews.
Position the spout on the sleeve, and carefully press down until
the spout contacts the finished deck.
Align the spout as desired, and tighten the setscrew.
Insert the plug button (if included) over the setscrew, flush with
the spout surface.
1012740-2-E 4 Kohler Co.
Page 5
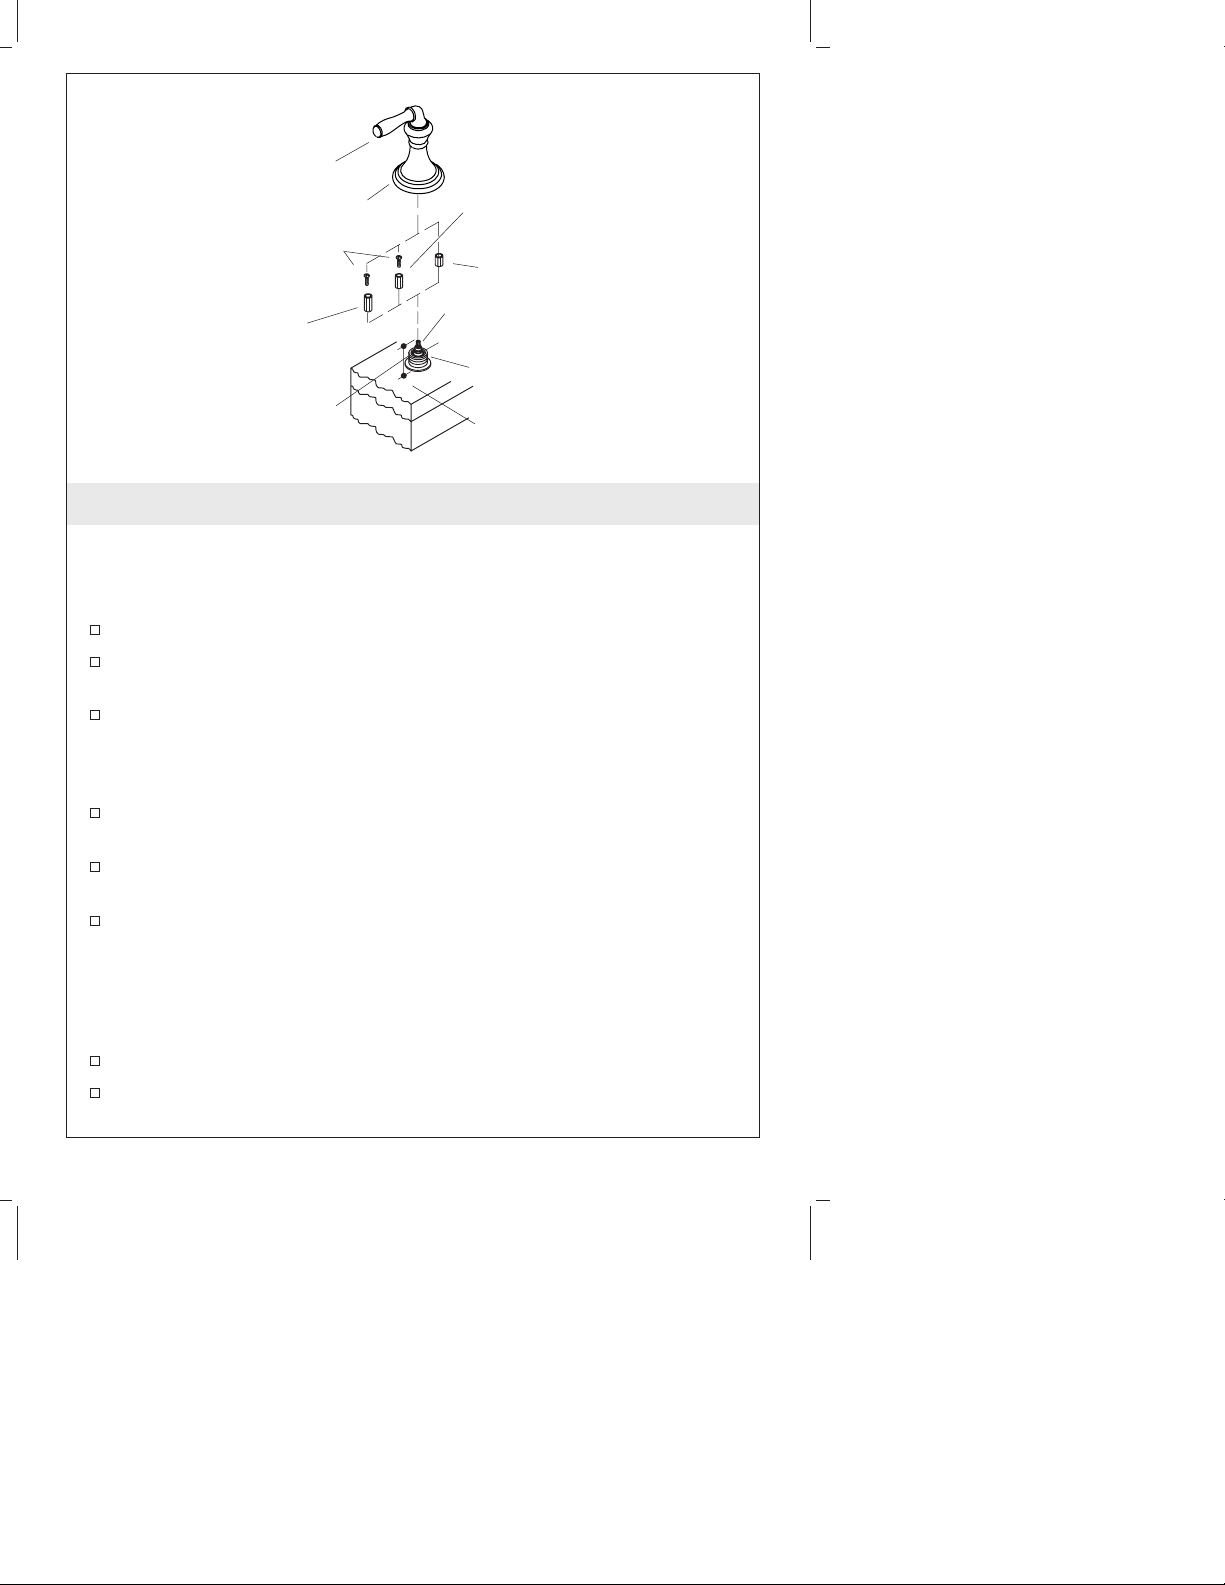
Handle
Apply plumbers
Short Brass Spline Adapter
putty.
Screw
Plastic Spline Adapter
Long Brass
Spline Adapter
Valve Stem Height
Measurement
Valve Stem
Valve Body
Threaded Sleeve
Finished Surface
3. Install Handles
NOTE: There are different handle styles available for this product.
Only one style of handle is shown. Installation of all handle styles is
identical.
Remove the plaster guards.
Measure the distance from the top of the valve stem to the
finished surface.
For a valve stem height between 1-13/16″ (4.6 cm) and 2-1/8″ (5.4
cm) use a brass spline adapter and screw. For a valve stem height
between 2-1/8″ (5.4 cm) and 2-5/16″ (5.9 cm) use a plastic spline
adapter.
If the brass spline adapter is required, attach using the screw
supplied. The plastic spline adapter slides on with no attachment.
Position the handle assemblies facing in opposite directions away
from the spout.
Thread the handle onto the valve body. Make sure the splines in
the handle and stem extension are engaged.
NOTE: The spline adapter allows fine adjustment of the handle
alignment. To adjust, remove the handle and reposition the spline
adapter.
Align the handle.
Reinstall the handle and check alignment.
Kohler Co. 5 1012740-2-E
Page 6
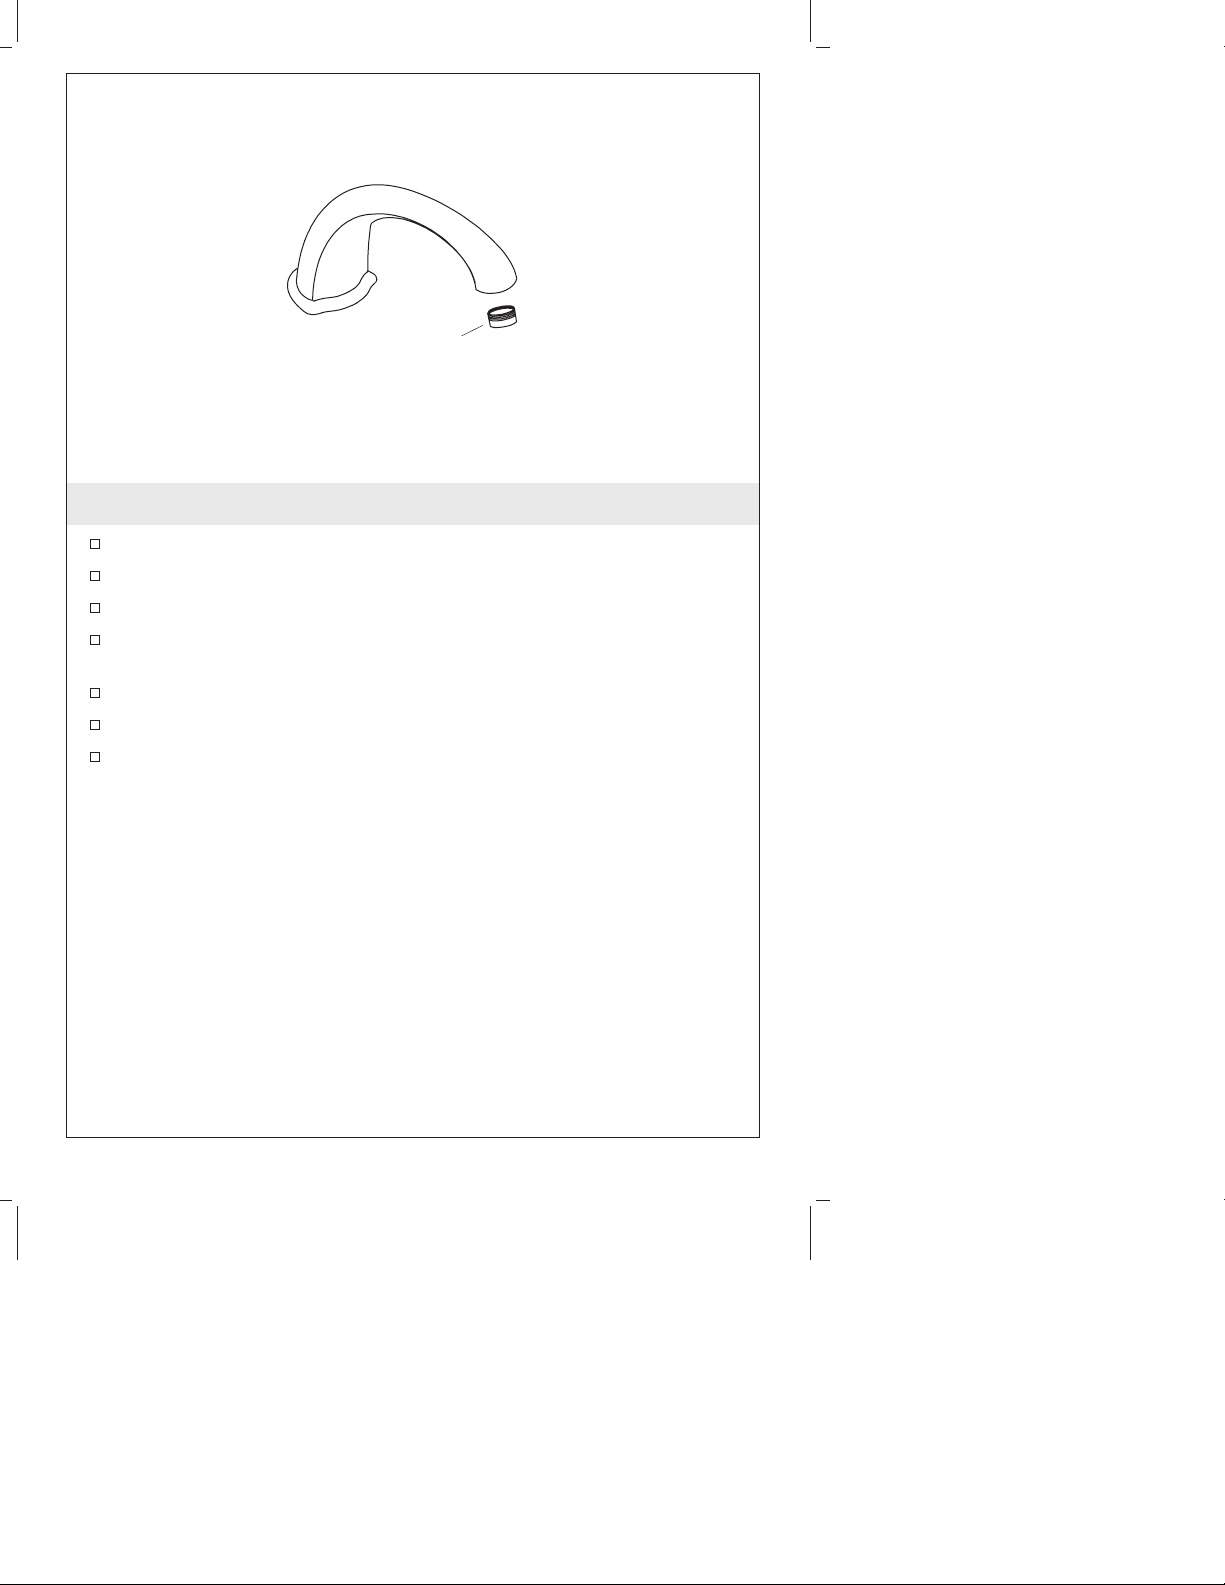
Aerator
4. Complete the Installation
Turn off the water (hot = clockwise, cold = counterclockwise).
Remove the aerator assembly.
Turn on the main water supply and check for leaks.
Turn on the hot and cold valves and run water through the spout
to remove debris. Check for leaks.
Turn off the hot and cold valves.
Remove any debris from the aerator.
Reinstall the aerator assembly.
1012740-2-E 6 Kohler Co.
Page 7
Guide d’installation
Robinet montage sur baignoire/comptoir et
garniture
Outils et matériels
Plus:
Clé à
molette
Coupe-tubes
Mastic de
plombier
Lime
• Chiffon
Clé
hexagonale
Mètre
ruban
Tournevis
assortis
Merci d’avoir choisi la compagnie Kohler
Nous apprécions votre engagement envers la qualité Kohler. Veuillez
prendre s’il vous plaît quelques minutes pour lire ce manuel avant de
commencer l’installation. Ne pas hésiter à nous contacter en cas de
problème d’installation ou de fonctionnement. Nos numéros de
téléphone et notre adresse du site internet sont au verso. Merci encore
d’avoir choisi la compagnie Kohler.
Avant de commencer
La valve est vendue séparément. Veuillez s’il vous plaît lire les
instructions d’installation emballées avec la valve.
Le kit d’installation No.73444 permet une épaisseur additionnelle
de 1/2″ (1,3 cm) de carreau.
Commander le kit de raccordement No.773132 pour des
installations de comptoir fini de plus de 1-1/4″ (3,2 cm)
d’épaisseur [(max. 1-3/4″ (4,4 cm)].
Veuillez lire toutes les instructions avant de commencer.
Couper l’alimentation d’eau principale.
Respecter tous les codes de plomberie et de bâtiment locaux.
Kohler Co. Français-1 1012740-2-E
Page 8

Avant de commencer (cont.)
Compléter le matériau du comptoir fini avant d’installer.
Avant l’installation, déballer la garniture du nouveau robinet et
l’examiner pour en déceler tout dommage. Remettre le robinet
dans l’emballage jusqu’à l’installation.
Kohler Co. se réserve le droit d’apporter toutes modifications au
design des robinets et ceci sans préavis, comme spécifié dans le
catalogue des prix.
1012740-2-E Français-2 Kohler Co.
Page 9

Bouchon
du tuyau
Fermer l'eau
chaude
Fermer
l'eau froide
1. Retirer le bouchon du tube
AVERTISSEMENT : Risque de blessure corporelle. Les
canalisations peuvent être pressurisées. Ne pas se pencher sur le
bouchon du tube au moment de le tourner et de le retirer.
S’assurer que les robinets soient fermés (côté froid complètement
vers la gauche, côté chaud complètement vers la droite).
Fermer l’alimentation d’eau principale.
Enrouler une serviette autour du bouchon du tube pour
empêcher l’eau de gicler.
IMPORTANT ! L’eau pourrait s’écouler du tube d’alimentation
d’eau lorsque le bouchon est retiré.
Retirer le bouchon de tuyau avec précaution.
Kohler Co. Français-3 1012740-2-E
Page 10

Bouchon
Manchon
Applique
Vis de
retenue
Ensemble
du bec
Comptoir
fini
Vis de
retenue
2. Installer le bec
ATTENTION : Risque d’endommagement du produit. Travailler
avec soin lors de l’installation de l’ensemble du bec afin d’éviter
d’endommager le joint torique.
REMARQUE : Dans les cas d’installations sur comptoir brut carrelé,
glisser une rondelle en laiton, le côté plat dirigé vers l’avant, sur le
tube d’alimentation. La rondelle en laiton est fournie avec le bec.
Cette rondelle n’est pas nécessaire pour des installations sur
rebord/comptoir fini.
Retirer le renfort de plâtre du tube d’alimentation du bec.
Découper le tuyau d’alimentation du bec à 1-1/2″ (3,8 cm) au
dessus de l’applique.
Retirer toutes ébarbures du tube d’alimentation.
Dévisser les vis de retenue sur le manchon.
Par un mouvement de torsion, installer le manchon sur le tuyau
d’alimentation du bec jusqu’au contact avec le comptoir ou la
rondelle.
Aligner le manchon avec les vis de retenues contre balancées du
centre (ne faisant pas directement face vers l’avant ou l’arrière)
du tube d’alimentation.
Serrer les vis de retenue.
Positionner le bec sur le manchon, et presser délicatement vers le
bas jusqu’à ce que le bec touche le comptoir fini.
1012740-2-E Français-4 Kohler Co.
Page 11

Installer le bec (cont.)
Aligner le bec selon le désir et serrer la vis de retenue.
Insérer le bouchon (si inclus) sur la vis de retenue, à égalité avec
la surface du bec.
Kohler Co. Français-5 1012740-2-E
Page 12

Poignée
Appliquer du mastic
de plomberie.
Vis
Adaptateur court à
cannelures en laiton
Adaptateur à
cannelures en
plastique
Adaptateur à
cannelures en laiton
Measure de hauteur
Tige V alve
Tige de la valve
Corps de valve
Manchon fileté
Surface finie
3. Installer les poignées
REMARQUE : Il y a des styles de poignée différents disponibles
pour ce produit. Un seul style de poignée est montré uniquement.
L’installation de tous les styles de poignée est identique.
Retirer les renforts en plâtre.
Mesurer la distance depuis le dessus de la tige de la valve à la
surface finie.
Utiliser l’adaptateur à cannelures en laiton et la vis pour une
hauteur de tige de valve comprise entre 1-13/16″ (4,6 cm) et
2-1/8″ (5,4 cm). Utiliser l’adaptateur à cannelures en plastique
pour une hauteur de tige de valve comprise entre 2-1/8″ (5,4
cm)]et 2-5/16″ (5,9 cm).
Si l’adaptateur à cannelures en laiton est requis, raccorder avec la
vis fournie. L’adaptateur à cannelures en plastique s’adapte sans
attache.
Positionner les ensembles de poignées de façon à ce qu’elles
soient en directions opposées, loin du bec.
Visser la poignée sur le corps de la valve. S’assurer que les
cannelures de la poignée et que l’extension de la tige soient
engagées.
REMARQUE : L’adaptateur à cannelures permet un alignement
minutieux de la poignée. Pour ajuster, retirer la poignée et
repositionner l’adaptateur à cannelures.
1012740-2-E Français-6 Kohler Co.
Page 13

Installer les poignées (cont.)
Aligner la poignée.
Réinstaller la poignée et vérifier l’alignement.
Kohler Co. Français-7 1012740-2-E
Page 14

Aérateur
4. Compléter l’installation
Couper l’alimentation d’eau (chaud = vers la droite, froid = vers
la gauche).
Retirer l’ensemble de l’aérateur.
Ouvrir l’alimentation d’eau principale et vérifier s’ilyades
fuites.
Ouvrir les valves d’eau chaude et froide et faire couler l’eau à
travers le bec pour chasser tous les débris. Vérifier s’ilyades
fuites.
Fermer les valves d’eau chaude et froide.
Nettoyer l’aérateur de tous débris.
Réinstaller l’ensemble aérateur.
1012740-2-E Français-8 Kohler Co.
Page 15

Guía de instalación
Grifería de montaje en cubierta o bañera y
guarnición
Herramientas y materiales
Más:
Llave
ajustable
Cortatubos
Masilla de
plomería
Lima
• Trapo
Llave
hexagonal
Cinta
métrica
Surtido de
destornilladores
Gracias por elegir los productos de Kohler
Apreciamos su elección por la calidad de Kohler. Dedique unos
minutos para leer este manual antes de comenzar la instalación. En
caso de problemas de instalación o de funcionamiento, no dude en
contactarnos. Nuestros números de teléfono y nuestra página web se
encuentran en la última página. Gracias nuevamente por escoger a
Kohler.
Antes de comenzar
La válvula se vende por separado. Lea las instrucciones incluidas
con la válvula para ver los procedimientos de instalación.
El juego de instalación profunda n° 73444 le permite utilizar
azulejos con un espesor adicional de 1/2″ (1,3 cm).
Pida el juego de instalación n° 773132 para las instalaciones sobre
cubierta acabada con un espesor superior a 1-1/4″ (3,2 cm)
[1-3/4″ (4,4 cm) como máximo].
Lea estas instrucciones atentamente antes de comenzar.
Cierre el suministro principal de agua.
Cumpla con todos los códigos locales de plomería y de
construcción.
Kohler Co. Español-1 1012740-2-E
Page 16

Antes de comenzar (cont.)
Termine el revestimiento de la cubierta antes de comenzar la
instalación.
Antes de la instalación, desembale la guarnición de la grifería
nueva y revísela para ver si está dañada. Vuelva a colocarla en la
caja hasta que la instale.
La empresa Kohler se reserva el derecho de modificar el diseño
de la grifería sin previo aviso, tal como se especifica en la lista de
precios.
1012740-2-E Español-2 Kohler Co.
Page 17

Tapón
de tubo
Cierre el
agua caliente
Cierre el
agua fría
1. Retire el tapón de tubo
ADVERTENCIA: Riesgo de lesiones personales. Las tuberías
pueden estar presurizadas. No se incline sobre el tapón de tubo
cuando gire o retire el tapón.
Verifique que las válvulas estén cerradas (agua fría =
completamente a la izquierda; agua caliente = completamente a la
derecha).
Cierre el suministro de agua.
Envuelva el tapón de tubo en un trapo para impedir que el agua
salga a presión.
¡IMPORTANTE! Puede que salga agua del tubo de suministro
cuando se quite el tapón.
Quite el tapón de tubo con cuidado.
Kohler Co. Español-3 1012740-2-E
Page 18

Montaje
Tapón
Manga
Chapetón
Tornillo de
fijación
del
surtidor
Cubierta
acabada
Tornillos de
fijación
2. Instale el surtidor
PRECAUCIÓN: Riesgo de daños al producto. Tenga cuidado al
instalar el montaje del surtidor para no causar daños al sello del
empaque de anillo (O-ring).
NOTA: Si la instalación se realiza sobre una cubierta no acabada
revestida de azulejos, deslice una arandela de latón por el tubo de
suministro, con el lado plano orientado hacia el frente. La arandela
de latón viene incluida con el surtidor. La arandela no es necesaria
en instalaciones sobre la cubierta acabada o el borde de la bañera.
Retire el protector de yeso del tubo de suministro del surtidor.
Corte 1-1/2″ (3,8 cm) del tubo de suministro del surtidor por
encima del chapetón.
Elimine todas las rebabas del tubo de suministro.
Afloje los tornillos de fijación en la manga.
Instale la manga en el tubo de suministro del surtidor girándola
hasta que haga contacto con la arandela o cubierta.
Alinee la manga con los tornillos de fijación descentrados (sin
estar orientados hacia el frente o hacia atrás) del tubo del
surtidor.
Apriete los tornillos de fijación.
Coloque el surtidor en la manga y presione hacia abajo con
cuidado hasta que el surtidor esté en contacto con la cubierta
acabada.
1012740-2-E Español-4 Kohler Co.
Page 19

Instale el surtidor (cont.)
Alinee el surtidor a la posición deseada y apriete el tornillo de
fijación.
Inserte el tapón (si está incluido) sobre el tornillo de fijación, a ras
de la superficie del surtidor.
Kohler Co. Español-5 1012740-2-E
Page 20

Manija
Aplique masilla
Adaptador de ranura
corto de latón
de plomería.
Tornillo
Adaptador de ranura
largo de latón
Medida de la altura de
la espiga de válvula
Adaptador de
ranura de plástico
Espiga de la válvula
Cuerpo de válvula
Manga roscada
Superficie acabada
3. Instale las manijas
NOTA: Hay diversos estilos de manijas disponibles para este
producto. Sólo se ha ilustrado un estilo de manija. La instalación de
todos los estilos de manijas es idéntica.
Retire los protectores de yeso.
Mida la distancia entre la parte superior de la espiga de válvula
hasta la superficie acabada.
Utilice un adaptador de ranura de latón y un tornillo, en caso de
que la altura de la espiga de la válvula sea entre 1-13/16″ (4,6
cm) y 2-1/8″ (5,4 cm). Utilice el adaptador de ranura de plástico
cuando la altura de la espiga de la válvula sea entre 2-1/8″ (5,4
cm) y 2-5/16″ (5,9 cm).
Si es necesario utilizar el adaptador de ranura de latón, móntelo
con el tornillo incluido. El adaptador de ranura de plástico se
ajusta sin necesidad de tornillos.
Coloque los montajes de la manija orientados en dirección
contraria respecto al montaje del surtidor.
Enrosque la manija en el cuerpo de válvula. Verifique que las
ranuras en la manija y en la extensión de la espiga estén
engranadas.
NOTA: El adaptador de ranura permite realizar ajustes en la manija
para alinearla. Para ajustarla, retire la manija y vuelva a colocar el
adaptador de ranura.
1012740-2-E Español-6 Kohler Co.
Page 21

Instale las manijas (cont.)
Alinee la manija.
Vuelva a instalar la manija y verifique la alineación.
Kohler Co. Español-7 1012740-2-E
Page 22

Aireador
4. Termine la instalación
Cierre el agua (caliente = derecha, fría = izquierda).
Retire el montaje del aireador.
Abra el suministro principal de agua y verifique que no haya
fugas.
Abra las válvulas del agua fría y caliente y deje correr el agua por
el surtidor para eliminar los residuos. Verifique que no haya
fugas.
Cierre las válvulas del agua fría y caliente.
Elimine los desechos del aireador.
Vuelva a instalar el montaje del aireador.
1012740-2-E Español-8 Kohler Co.
Page 23

1012740-2-E
Page 24

USA: 1-800-4-KOHLER
Canada: 1-800-964-5590
México: 001-877-680-1310
kohler.com
©2004 Kohler Co.
1012740-2-E
 Loading...