

Page 1

Installation Guide
Single-Control Bath and Shower Trim
K-T16113, K-T16114, K-T16115,
K-T16116, K-T16117, K-T16139,
K-16213, K-16214, K-16217
M product numbers are for Mexico (i.e. K-12345M)
Los números de productos seguidos de
M corresponden a México (Ej.
K-12345M)
Français, page “Français-1”
Español, página “Español-1”
1025255-2-C
Page 2

IMPORTANT INSTRUCTIONS
READ AND SAVE FOR THE
CONSUMER
WARNING: Risk of scalding or other severe injury.
•
Before completing installation, the installer must set the
maximum water temperature setting of this valve to minimize the
risks associated with scalding hazards according to ASTM F 444.
•
Do not install a shut-off device on either outlet of this valve. The
installation of any such device may create a cross-flow condition
at the valve and affect the water temperature.
•
Factors that change the temperature of the water supplied to the
valve, such as seasonal water temperature changes, and water
heater replacement or servicing, will change the maximum water
temperature supplied by the valve and may create a scalding
hazard.
•
The pressure-balanced valve will not compensate for changes in
the water supply temperature; adjust the maximum water
temperature setting of this pressure-balanced valve when such
changes occur.
•
Pressure-balanced valves may not provide protection against
scalding if there is a failure of other temperature-limiting devices
elsewhere in the plumbing system.
The installer is responsible for installing the valve and adjusting the
maximum water temperature of this valve according to instructions.
This valve meets or exceeds ANSI A112.18.1 and ASSE 1016.
If you do not understand any of the installation or temperature
adjustment instructions in this document, in the United States please
contact our Customer Service Department at 1-800-4-KOHLER.
Outside the U.S., please contact your distributor.
IMPORTANT NOTICE TO INSTALLERS! Please fill in the blanks in
the information box in the Homeowners Guide and on the valve label.
Retain the Homeowners Guide for future reference.
1025255-2-C 2 Kohler Co.
Page 3
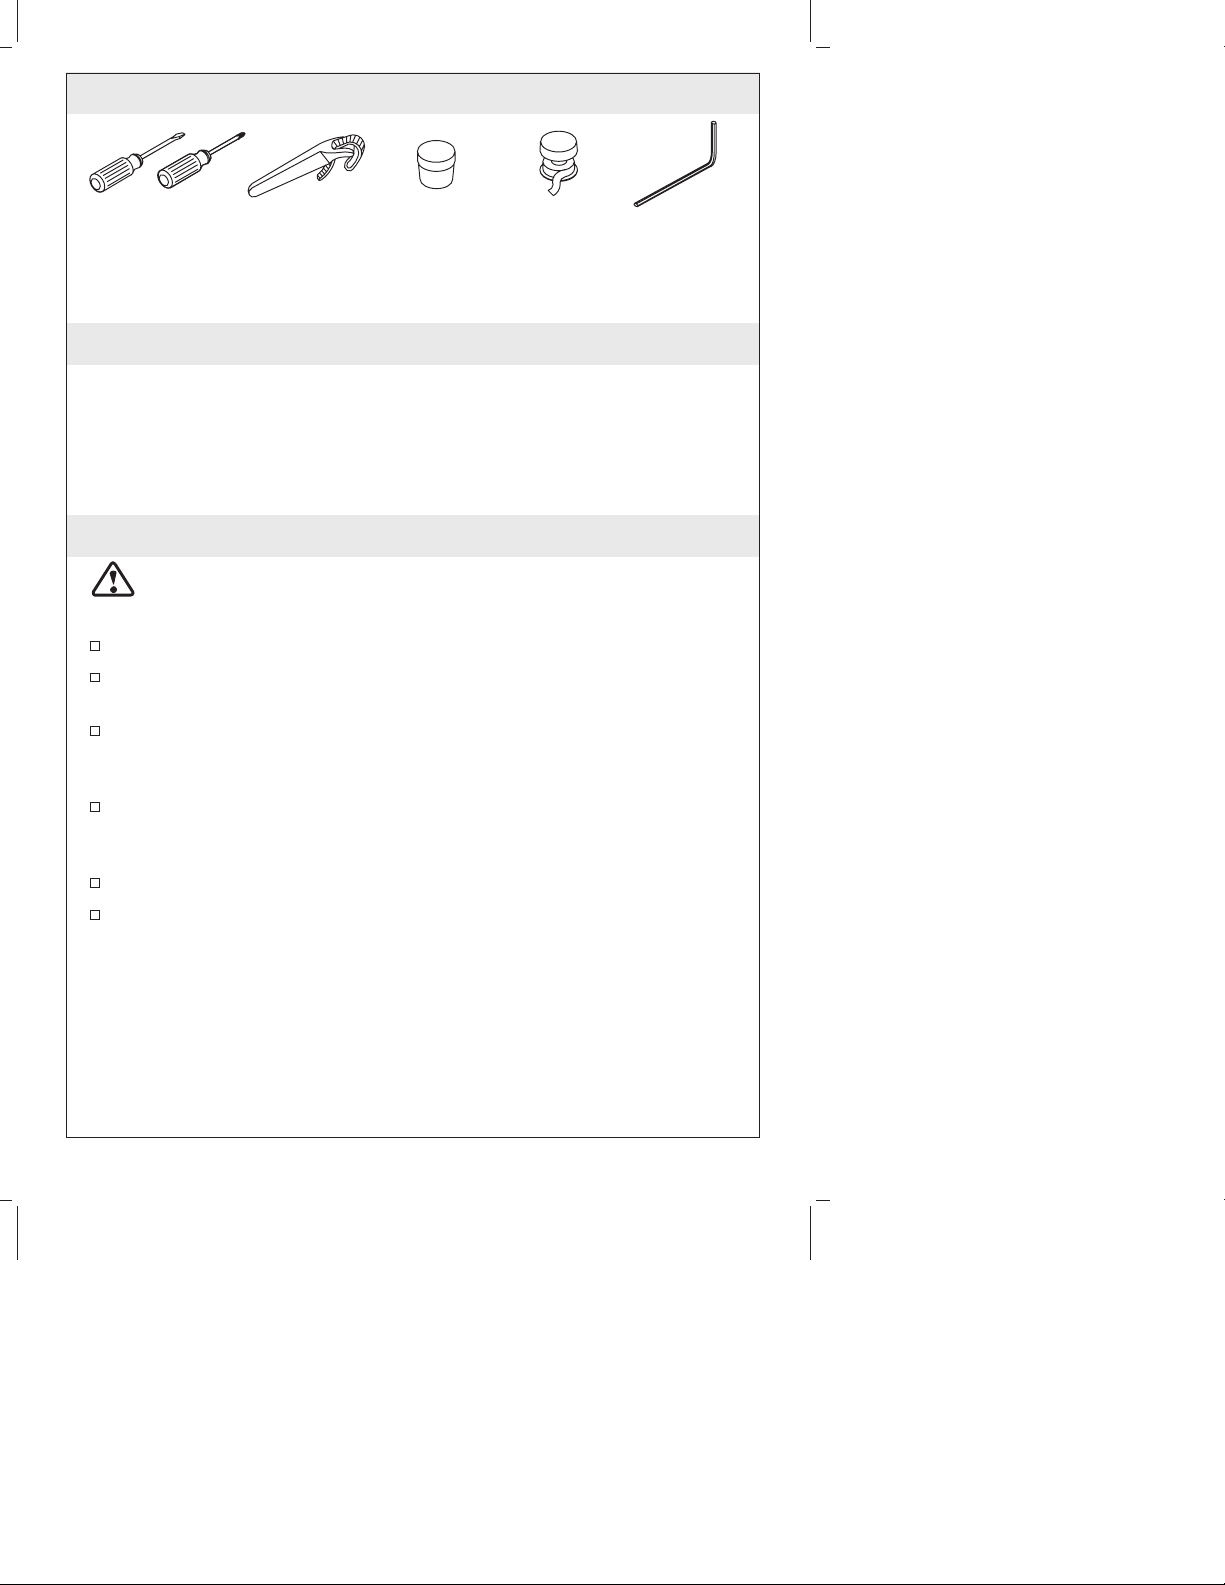
Tools and Materials
Assorted
Screwdrivers
Strap
Wrench
Plumbers
Putty
Thread
Sealant
Hex Wrench
Thank You For Choosing Kohler Company
We appreciate your commitment to Kohler quality. Please take a few
minutes to review this manual before you start installation. If you
encounter any installation or performance problems, please don’t
hesitate to contact us. Our phone numbers and website are listed on
the back cover. Thanks again for choosing Kohler Company.
Before You Begin
CAUTION: Risk of product damage to the K-306-KS valve
assembly. When using this valve in a fiberglass or acrylic
installation, use the Thin Wall Installation Kit (88526).
Observe all local plumbing and building codes.
The finished wall or bath/shower unit must be installed prior to
installing this trim.
Before installing the trim, determine if the maximum water
temperature is acceptable to the user. If temperature adjustment is
needed, refer to the ″Water Temperature Adjustment″ section.
The valve shuts off by water pressure. Do not force the handle in
any direction. To turn the valve off, gently turn it to the ″Off″
position.
Shut off the main water supply.
Kohler Co. reserves the right to make revisions in the design of
products without notice, as specified in the Price Book.
Kohler Co. 3 1025255-2-C
Page 4
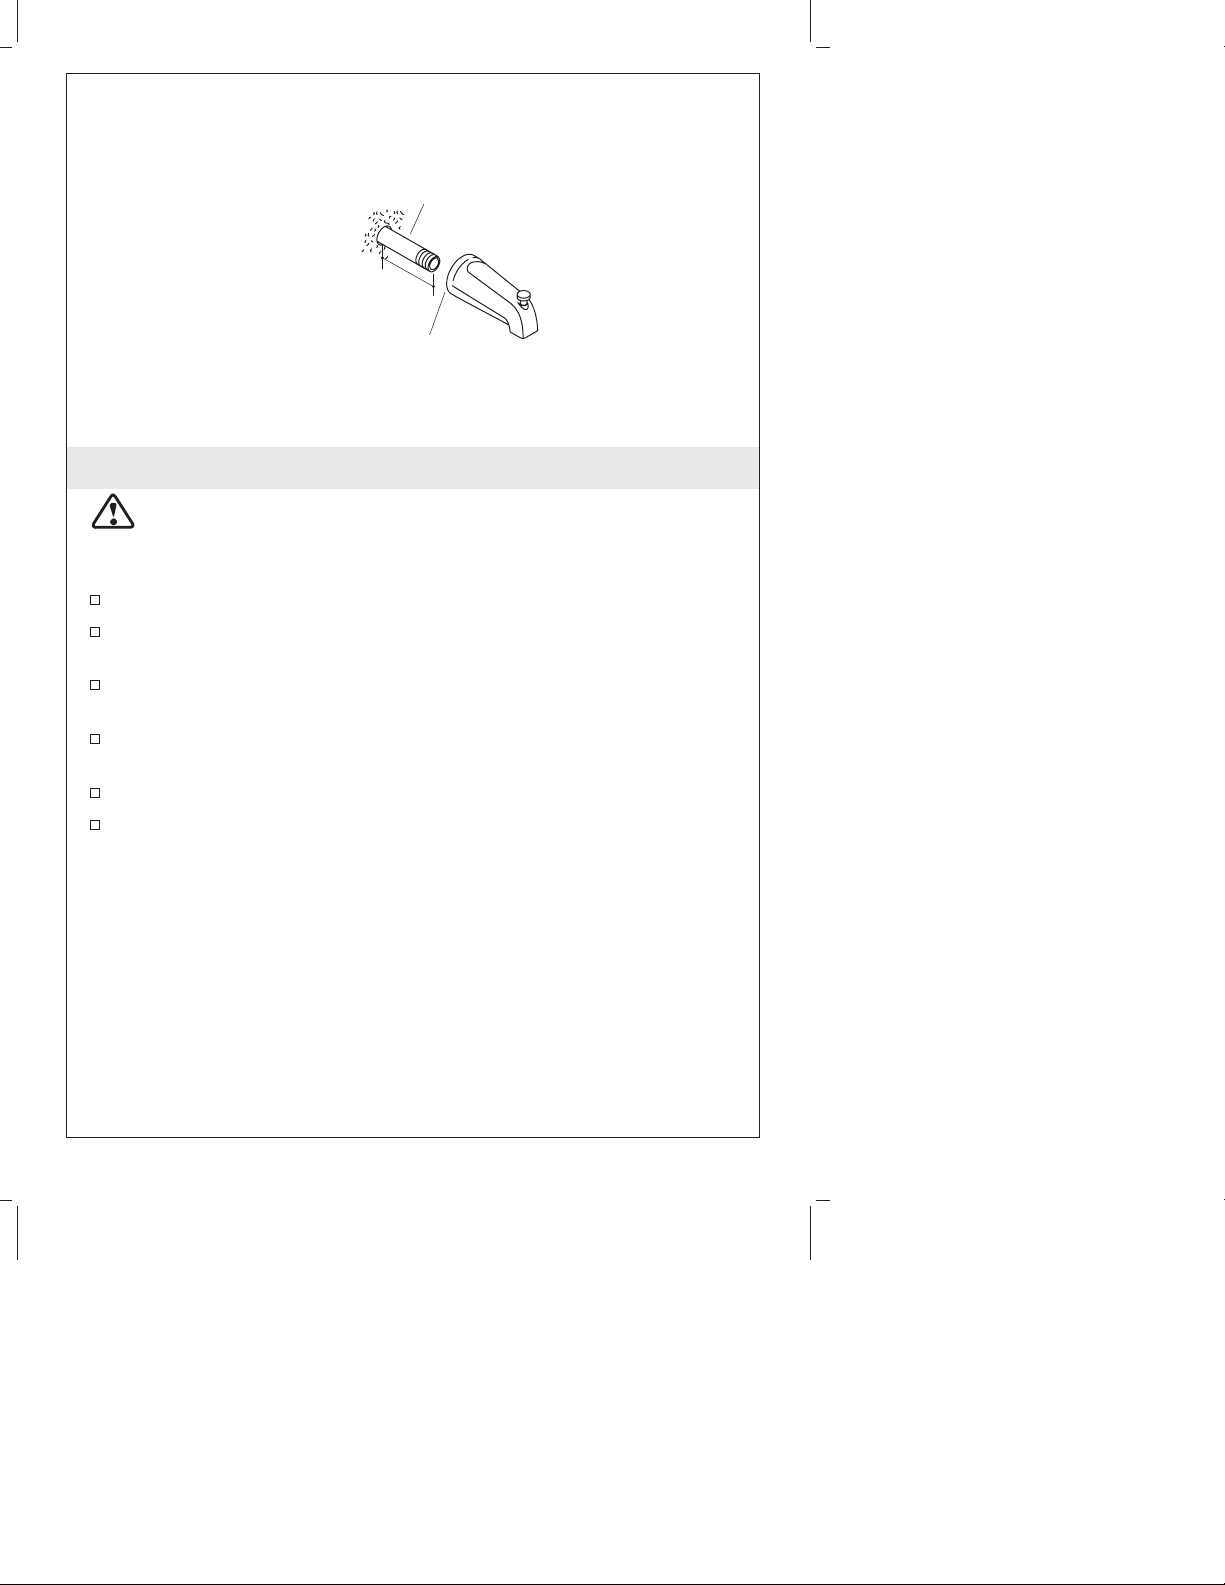
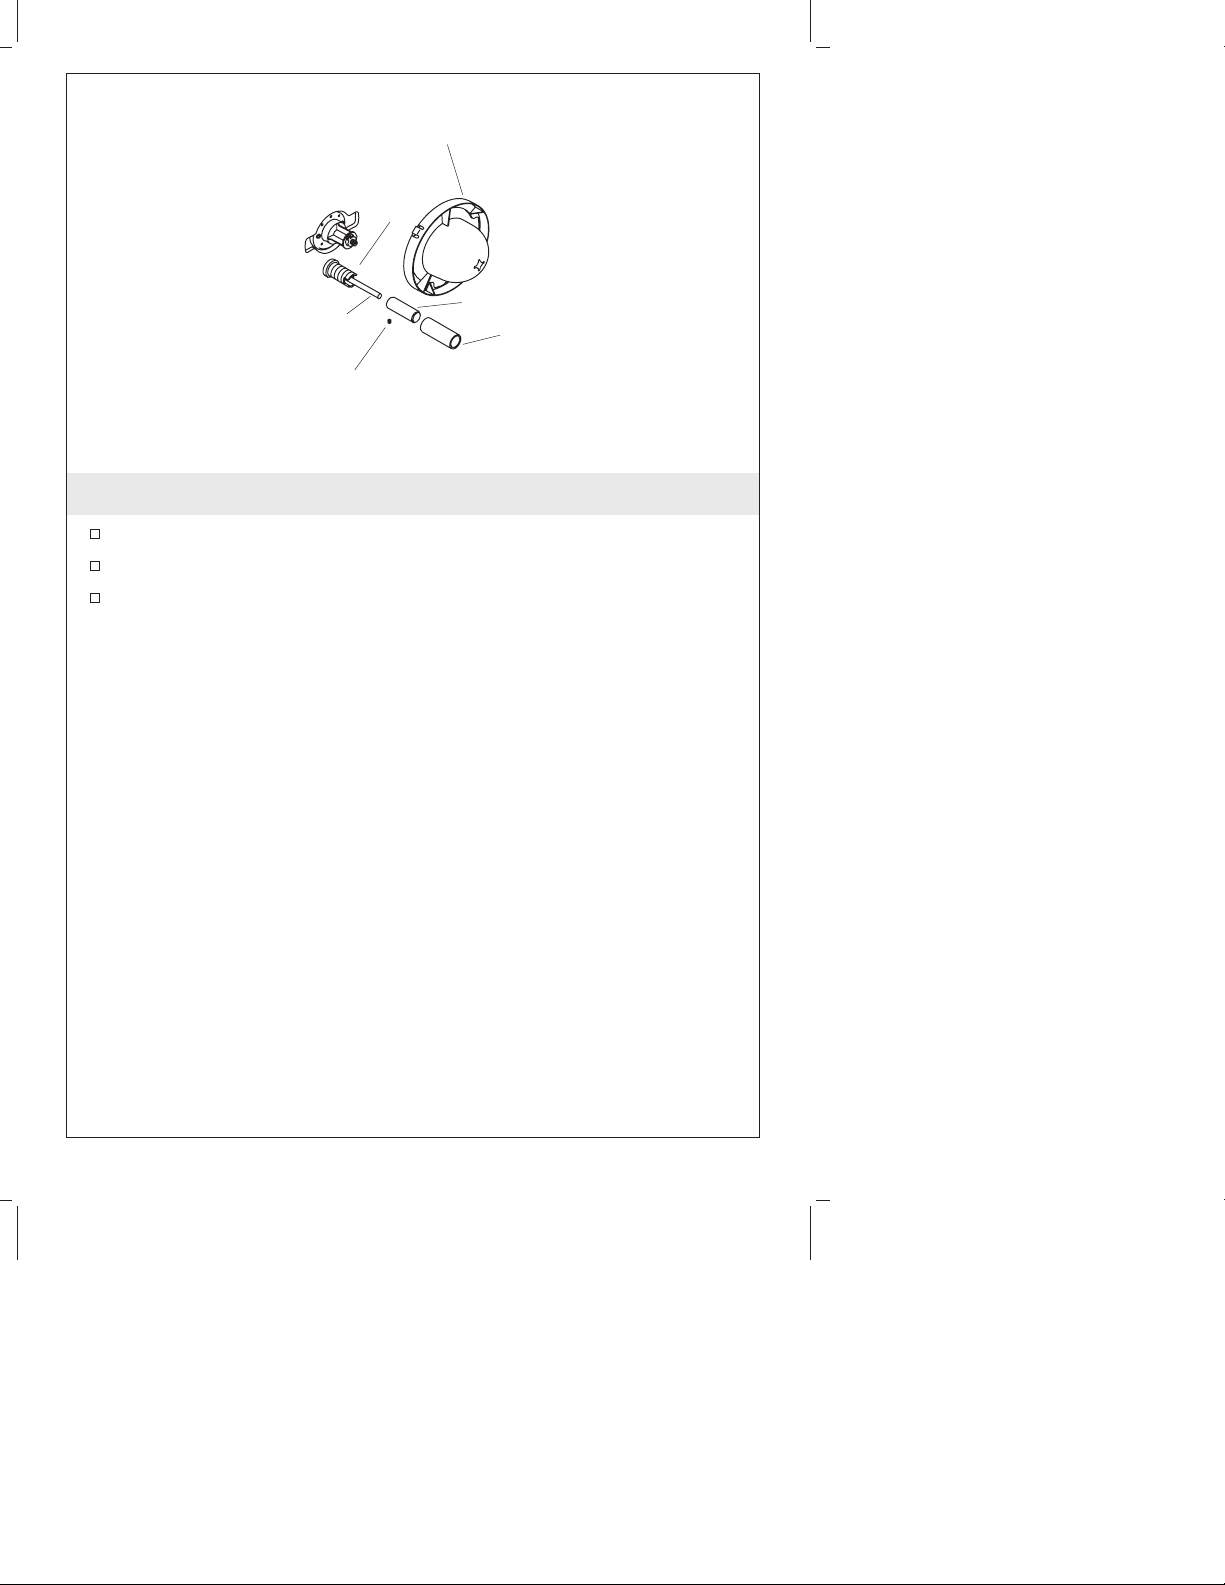
Threaded Spouts
Nipple
3-7/8"
(9.8 cm)
Apply plumbers
putty.
1. Install the Spout
CAUTION: Risk of internal seal damage. Do not use
petroleum-based lubricants when installing slip-fit spouts. If the
spout will not slide over the tubing, use soapy water or a
silicone-based lubricant.
Remove the temporary nipple.
Apply thread sealant and install a 1/2″ nipple so it extends 7/16″
(1.1 cm) beyond the finished wall.
Apply a bead of plumbers putty or other sealant around the inlet
end of the spout according to the manufacturer’s instructions.
Apply thread sealant to the nipple and thread the spout onto the
nipple.
Carefully tighten with a clean strap wrench.
Remove all excess putty.
1025255-2-C 4 Kohler Co.
Page 5
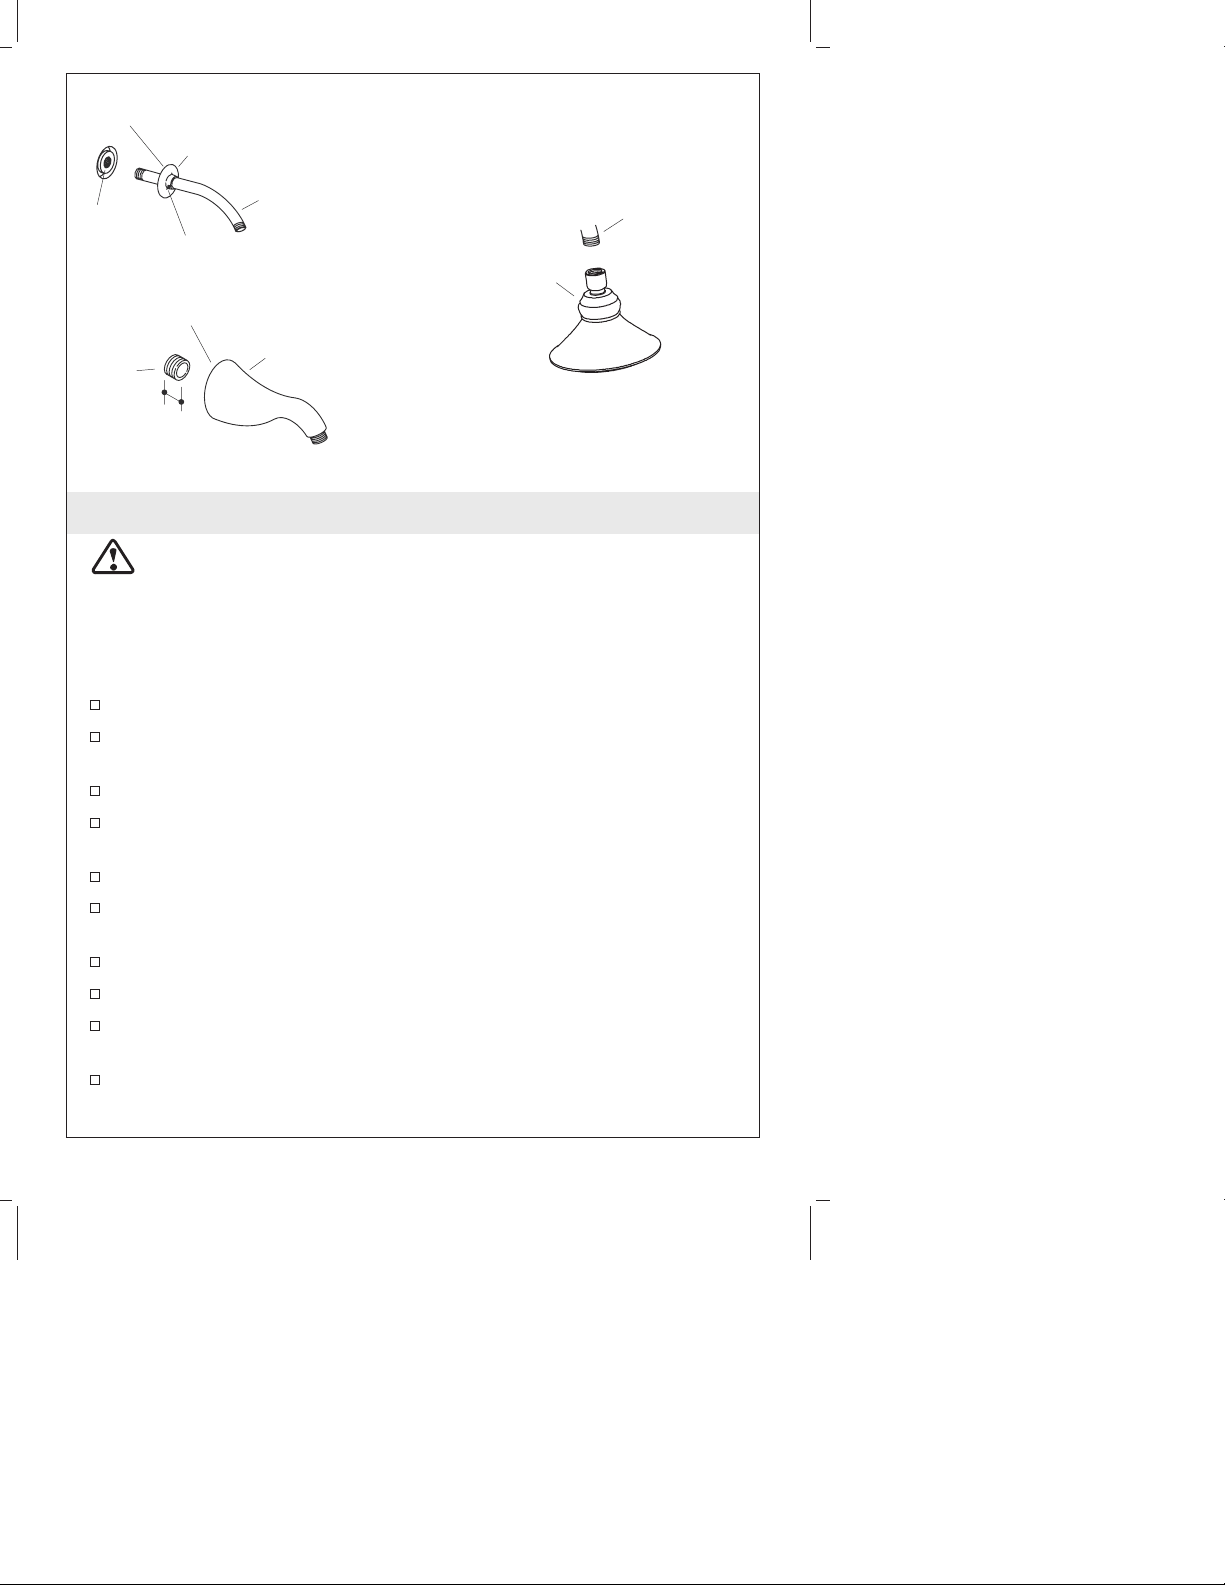
Apply plumbers putty.
Escutcheon
Standard
Shower Arm
Shower
Elbow
1/2"
Nipple
Setscrew
Apply plumbers
putty.
1/2"
Nonstandard
Shower Arm
Showerhead
2. Install the Showerhead
CAUTION: Risk of product damage. To avoid clogging the
showerhead spray outlets, use thread sealant tape on the shower
arm threads. Do not use thread sealant compound (pipe dope).
NOTE: A standard showerhead is shown.
Installing the Standard Showerhead
Remove the temporary nipple from the shower elbow.
Apply a bead of plumbers putty or other sealant to the back of
the escutcheon according to the manufacturer’s instructions.
Slide the escutcheon over the shower arm.
Apply thread sealant tape and install the shower arm to the
shower elbow.
Carefully tighten with a clean strap wrench.
Press the escutcheon against the finished wall and secure with the
setscrew.
Remove all excess putty.
Turn the main water supply on.
Run hot and cold water through the shower arm to flush out dirt
and debris.
Apply thread sealant tape to the shower arm and thread the
showerhead to the shower arm.
Shower Arm
Kohler Co. 5 1025255-2-C
Page 6

Install the Showerhead (cont.)
Installing the Nonstandard Showerhead
Remove the temporary nipple from the shower elbow.
Apply thread sealant tape and install a 1/2″ NPT nipple to
extend 1/2″ (1.3 cm) beyond the finished wall.
Apply a bead of plumbers putty or other sealant to the back of
the shower arm according to the manufacturer’s instructions.
Apply thread sealant tape to the nipple and thread the shower
arm onto the nipple.
Carefully tighten with a clean strap wrench.
Remove all excess putty.
With the showerhead off, flush out the system.
Apply thread sealant tape to the shower arm, and thread the
showerhead to the shower arm.
1025255-2-C 6 Kohler Co.
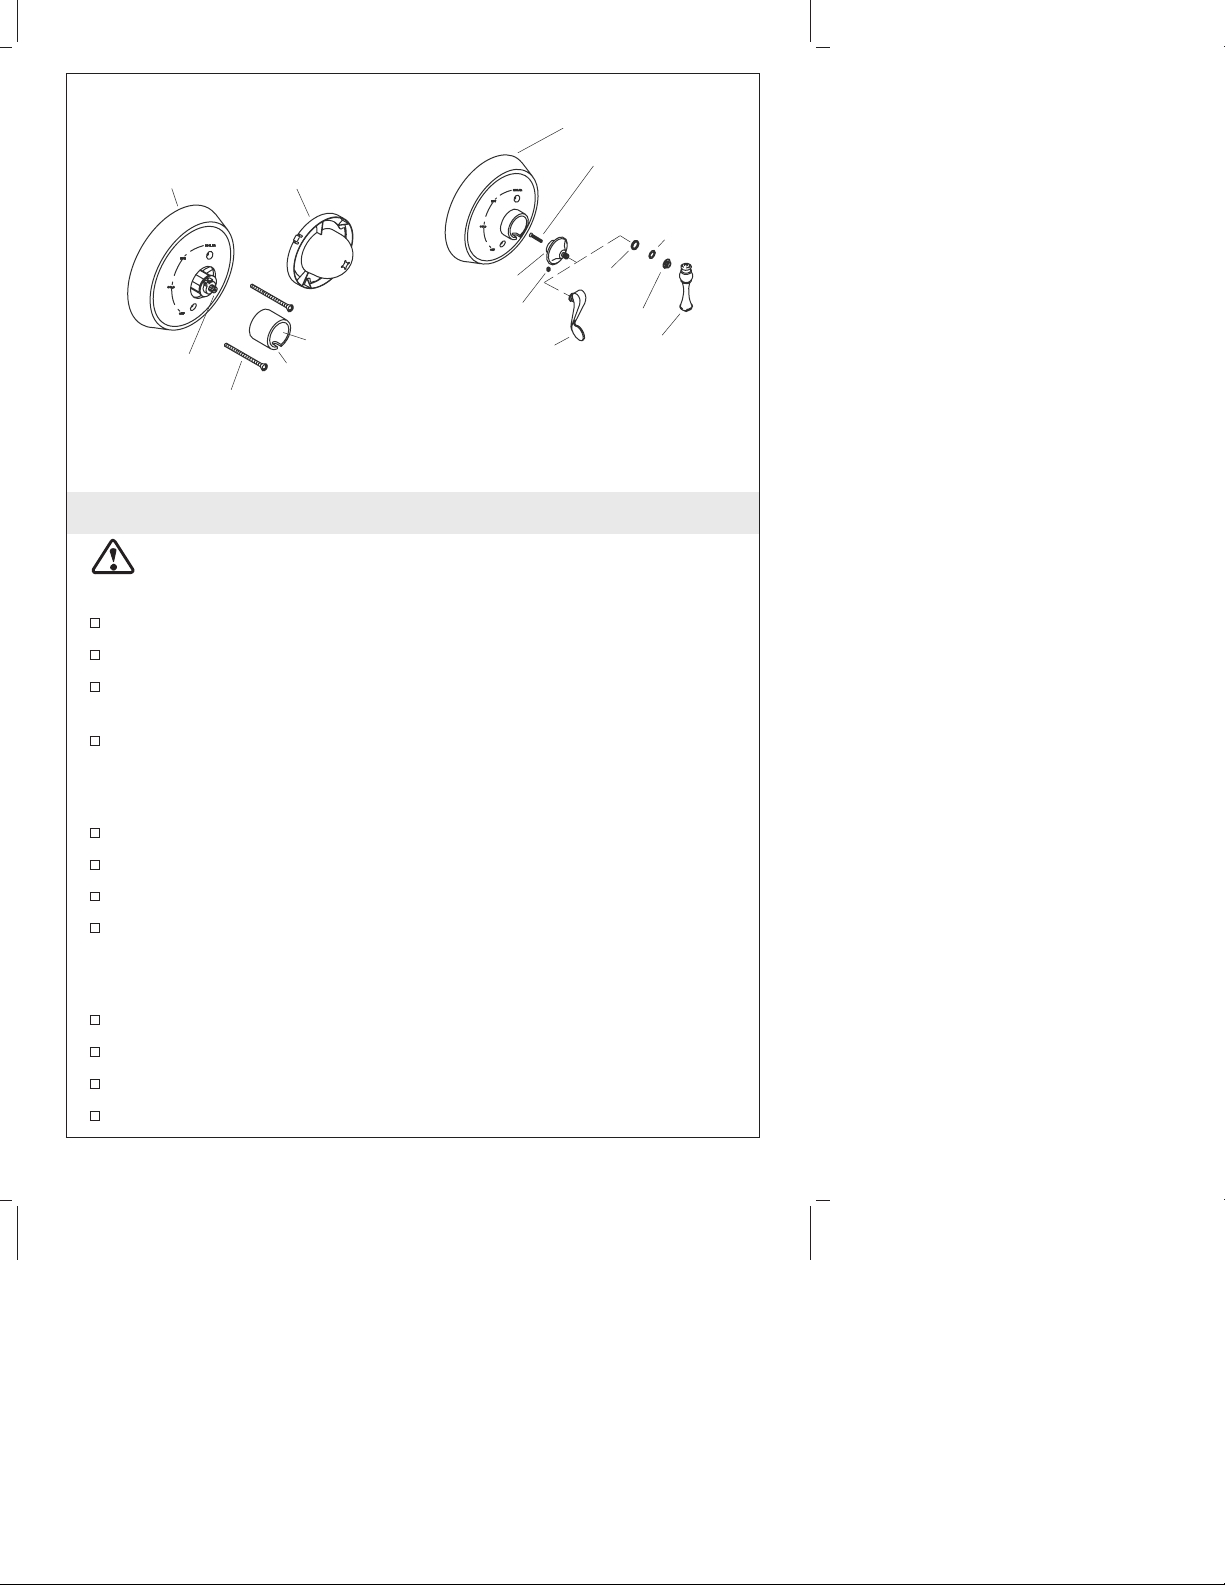
Page 7
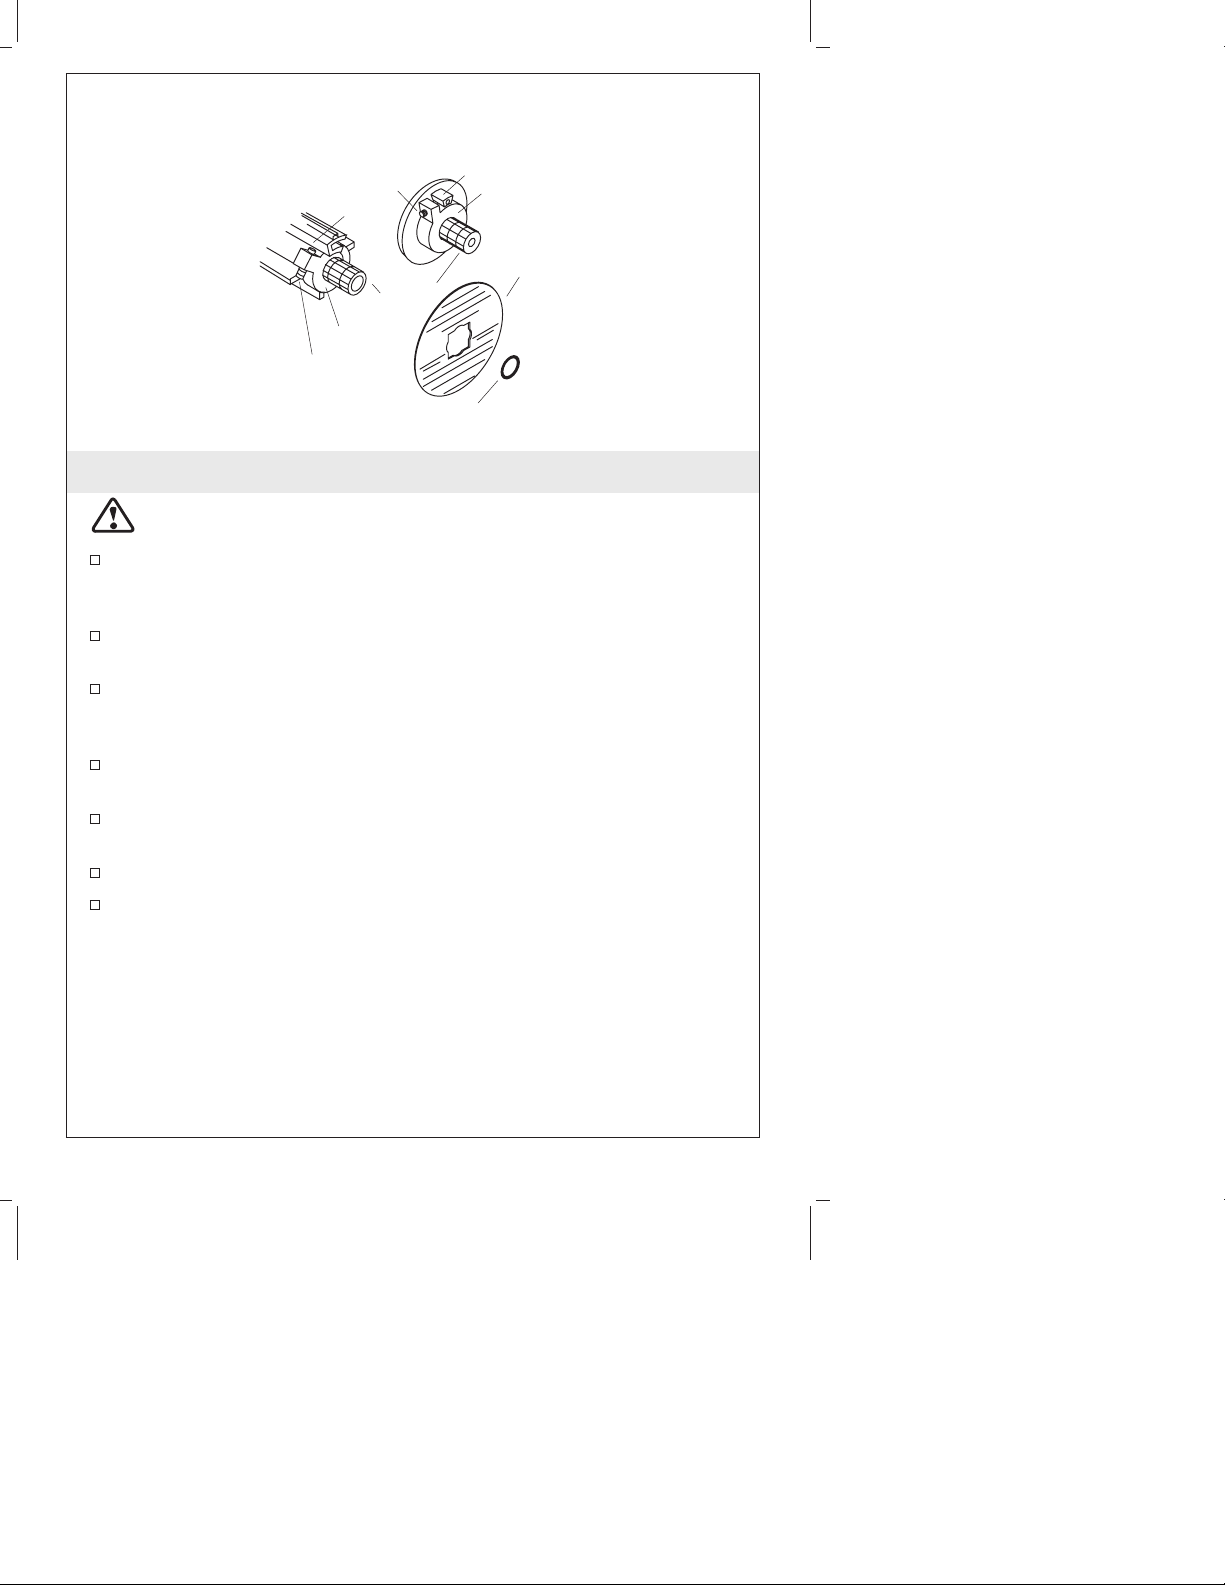
Standard
High Flow
Valve
Setscrew
Tab
Collar
Setscrew
Valve
Stem
O-Ring
Valve
Tab
Collar
Valve
Label
3. Water Temperature Adjustment
CAUTION: Risk of personal injury. The water temperature
should never be set above 120° F (49° C).
Turn the valve clockwise to the full open position and let the hot
water run for several minutes. Position a thermometer in the
water stream and check the temperature.
For minor water temperature changes, adjust the setscrew, and
recheck the water temperature.
For major water temperature changes, remove the O-ring and
collar from the valve stem. Slowly rotate the valve stem until the
desired maximum water temperature is reached.
Reinstall the collar on the valve stem with the setscrew against
the side of the tab.
Reinstall the O-ring, rotate the valve stem counterclockwise to
shut the water off.
Recheck the water temperature.
Complete the information on the valve label (if supplied).
Kohler Co. 7 1025255-2-C
Page 8
Discard plaster
guard with dome.
Valve
Stem
Actuator
Diverter
Stem
Setscrew
Diverter Assembly
Guide
4. Diverter Assembly
Remove and discard the plaster guard and/or dome, if installed.
Position the actuator over the diverter stem. Tighten the setscrew.
Slide the guide over the actuator and thread it onto the diverter
stem.
1025255-2-C 8 Kohler Co.
Page 9
Faceplate
Faceplate
Valve Stem
Discard plaster
guard with dome.
Screw
Slot
Sleeve
Base
Setscrew
Scroll
Handle
Screw
Washer
Bonnet
Traditional
Handle
5. Install the Faceplate and Handle
CAUTION: Risk of product damage to the K-306-KS valve
assembly. When using this valve in a fiberglass or acrylic
installation, use the Thin Wall Installation Kit (88526).
Remove and discard the plaster guard and/or dome, if installed.
Rotate the valve stem fully counterclockwise to the ″Off″ position.
Install the faceplate onto the valve. Secure with two screws. Do
not overtighten.
Slide the sleeve over the valve stem with the slot down and
facing outward.
O-Ring
Scroll Handle
Install the handle to the base.
Secure with a screw.
Align the handle assembly and press it onto the valve stem.
Secure the handle in place with the setscrew. Tighten the setscrew
to one quarter-turn past hand-tight.
Traditional Handle
Assemble the handle and bonnet.
Install the washer and O-ring onto the base.
Fit the handle assembly to the base.
Secure with a screw.
Kohler Co. 9 1025255-2-C
Page 10

Install the Faceplate and Handle (cont.)
Align the handle and the base assembly. Press the handle onto the
valve stem.
Secure the handle in place with the setscrew. Tighten the setscrew
to one quarter-turn past hand-tight.
6. Complete the Installation
Turn the valve fully counterclockwise to the off position.
Remove the aerator assembly from the spout by turning it
counterclockwise.
Turn on the main water supply.
Turn the valve to the center and run water for approximately one
minute to flush the system.
Check all connections for leaks.
Reinstall the aerator.
1025255-2-C 10 Kohler Co.
Page 11

Guide d’installation
Baignoire mono-contrôle et garniture de
douche
INSTRUCTIONS IMPORTANTES
À LIRE ET À LAISSER AU CLIENT
AVERTISSEMENT : Risque de brûlures ou autres blessures
graves.
•
Avant de commencer l’installation, l’installateur doit régler la
température maximale de l’eau de cette valve pour réduire au
minimum les risques de brûlures, ceci conformément à la norme
ASTM F 444.
•
Ne pas installer un dispositif d’arrêt sur les sorties de cette valve.
L’installation d’un tel dispositif peut créer une condition de débit
croisé au régulateur et modifier la température de l’eau.
•
Les facteurs qui changent la température de l’eau fournie à cette
valve, tels que les changements de température d’eau saisonniers,
et le remplacement ou l’entretien du chauffeau, changeront la
température maximale de l’eau fournie par le régulateur et
pourront présenter un danger de brûlures.
•
La valve à pression équilibréene compensera pas les changements
de température d’alimentation d’eau; ajuster la température
maximale de cette valve à pression équilibrée si de tels
changements se produisent.
•
Les valves à pression équilibrée peuvent ne pas assurer une
protection contre les brûlures en cas de défaillance d’autres
dispositifs de limitation de température installés ailleurs sur le
réseau de plomberie.
L’installateur est responsable de l’installation de la valve et du
réglage de la température maximale de cette valve selon les
instructions.
Cette valve satisfait ou excède les exigences des normes ANSI
A112.18.1M et ASSE 1016.
S’il ne vous est pas possible de comprendre les instructions
d’installation ou de réglage de la température données par ce
document, veuillez contacter notre département du service clientèle
aux États-Unis.1-800-4-KOHLER. Hors des États-Unis, veuillez
contacter votre distributeur.
Kohler Co. Français-1 1025255-2-C
Page 12

INSTRUCTIONS IMPORTANTES (cont.)
AVIS IMPORTANT AUX INSTALLATEURS! Veuillez remplir le
coupon dans le guide du propriétaire ainsi que sur l’étiquette de la
valve. Conserver le guide du propriétaire pour future référence.
Outils et matériels
Tournevis
variés
Clé à
sangle
Mastic
d'étanchéité
Ruban
d'étanchéité
pour filetage
Clé
hexagonale
Merci d’avoir choisi la compagnie Kohler
Nous apprécions votre engagement envers la qualité Kohler. Veuillez
prendre s’il vous plaît quelques minutes pour lire ce manuel avant de
commencer l’installation. Ne pas hésiter à nous contacter en cas de
problème d’installation ou de fonctionnement. Nos numéros de
téléphone et notre adresse du site internet sont au verso. Merci encore
d’avoir choisi la compagnie Kohler.
Avant de commencer
ATTENTION : Risque d’endommagement de l’ensemble de
valve K-306KS. Lorsque cette valve est utilisée en installation
fibres de verre ou acrylique, utiliser le kit d’installation de mur
fin (88526).
Respecter tous les codes de plomberie et de bâtiment locaux.
Le mur fini ou la baignoire/douche doit être installé avant
d’installer cette garniture.
Avant d’installer la garniture, déterminer si la température
maximum de l’eau est acceptable. S’il un réglage de température
est nécessaire, se réferer à la section ″Réglage de la température
d’eau″.
La valve s’arrête par pression d’eau. Ne pas forcer la poignée
dans aucune direction. Pour fermer la poignée, la tourner
doucement sur la position ″Off″.
Couper l’alimentation d’eau principale.
1025255-2-C Français-2 Kohler Co.
Page 13

Avant de commencer (cont.)
Kohler Co. se réserve le droit d’apporter toutes modifications sur
le design des produits et ceci sans préavis, tel que spécifié dans le
catalogue des prix.
Kohler Co. Français-3 1025255-2-C
Page 14

Becs à visser
Mamelon
3-7/8"
(9,8 cm)
Appliquer du
mastic de
plomberie.
1. Installer le bec
ATTENTION : Risque d’endommagement interne du joint. Ne
pas utiliser de lubrifiants à base de pétrole lors de l’installation
de becs ajustables. Si le bec ne peut pas glisser sur le tube,
utiliser de l’eau savonneuse ou un lubrifiant à base de silicone.
Retirer le mamelon temporaire.
Appliquer un ruban d’étanchéité pour filetage et installer un
mamelon de 1/2″ de manière à ce qu’il s’étende de 7/16″ (1,1 cm)
au-delà du mur fini.
Appliquer du mastic d’étanchéité ou un produit semblable sur le
périmètre de l’extrémité arrière du bec, selon les instructions du
fabricant du mastic.
Appliquer un ruban d’étanchéité sur le filetage du mamelon et
visser le bec sur ce dernier.
Serrer doucement à l’aide d’une clé à sangle propre.
Retirer tout excédent de mastic.
1025255-2-C Français-4 Kohler Co.
Page 15

Appliquer du mastic de plomberie.
Applique
Bras de
douche
Coude de
douche
Appliquer du
mastic de
plomberie.
Mamelon
de 1/2"
Vis de retenue
1/2"
Bras de
douche non
standard
Pomme de
douche
2. Installer la pomme de douche
ATTENTION : Risque d’endommagement du produit. Pour
éviter de boucher les orifices de la pomme de douche, utiliser du
ruban d’étanchéité sur la tige filetée du bras de douche. Ne pas
utiliser d’enduit pour filetage.
REMARQUE : Une pomme de douche standard est illustrée.
Bras de
douche
Installer une pomme de douche standard
Retirer le mamelon temporaire du coude de la douche.
Appliquer du mastic d’étanchéité ou un produit semblable au dos
de l’applique selon les instructions du fabricant du mastic.
Glisser l’applique sur le bras de douche.
Appliquer du ruban d’étanchéité et installer le bras de douche au
coude de douche.
Serrer doucement à l’aide d’une clé à sangle propre.
Presser l’applique contre le mur fini et sécuriser avec la vis de
retenue.
Retirer tout excédent de mastic.
Ouvrir l’alimentation d’eau principale.
Faire couler l’eau chaude et l’eau froide dans le bras de douche
pour évacuer tout débris.
Kohler Co. Français-5 1025255-2-C
Page 16

Installer la pomme de douche (cont.)
Appliquer un ruban d’étanchéité sur le bras de douche et visser
la pomme de douche sur ce dernier.
Installer la pomme de douche non-standard
Retirer le mamelon temporaire du coude de la douche.
Appliquer du ruban d’étanchéité pour filetage à un mamelon de
1/2″ NPT et installer un mamelon de 1/2″ NPT de manière à ce
qu’il s’étende de 1/2″ (1,3 cm) au-delà du mur fini.
Appliquer un lit de mastic pour plomberie ou un produit
d’étanchéité semblable à l’arrière du bras de douche selon les
instructions du fabricant du mastic.
Appliquer un ruban d’étanchéité sur le mamelon et visser le bras
de douche sur ce dernier.
Serrer doucement à l’aide d’une clé à sangle propre.
Retirer tout excédent de mastic.
Avec la pomme de douche fermée, purger le système.
Appliquer du ruban d’étanchéité sur le bras de douche et visser
la pomme de douche sur le bras.
1025255-2-C Français-6 Kohler Co.
Page 17

Valve haut
débit
Vis de retenue
Languette
Collier
Vis de retenue
Joint torique
Valve
standard
Tige de
valve
Languette
Collier
Etiquette
de valve
3. Réglage de la température d’eau
ATTENTION : Risque de blessure corporelle. La température
de l’eau ne devrait jamais être supérieure à 120° F (49° C).
Tourner la valve vers la droite à la position ouverte et laisser
couler l’eau chaude pendant quelques minutes. Placer un
thermomètre dans le courant d’eau et vérifier la température.
Pour de petits changements de température, ajuster la vis de
serrage, et re-vérifier la température d’eau.
Pour de grands changements de température, retirer le joint
torique et le collier de la tige de la valve. Tourner lentement la
tige de la valve jusqu’à atteindre la température maximale
désirée.
Réinstaller le collier sur la tige de la valve de manière à placer la
vis de retenue contre la languette.
Réinstaller le joint torique, tourner la tige de la valve vers la
gauche pour arrêter l’eau.
Vérifier de nouveau la température de l’eau.
Compléter l’information sur l’étiquette de la valve (si fournie).
Kohler Co. Français-7 1025255-2-C
Page 18

Jeter le renfort en
plâtre avec dôme.
Tige de la
valve
Tige
d'inverseur
Vis de retenue
Ensemble inverseur
Interrupteur
Guide
4. Ensemble inverseur
Retirer et jeter le renfort en plâtre et/ou dôme, s’il est installé.
Positionner l’actionneur sur la tige d’inverseur. Serrer la vis de
retenue.
Glisser le guide sur l’actionneur et le visser sur la tige de
l’inverseur.
1025255-2-C Français-8 Kohler Co.
Page 19

Couvercle
Couvercle
Tige de la valve
Jeter le renfort en
plâtre avec dôme.
Manchon
Rainure
Vis
Base
Vis de
retenue
Poignée à
roulement
Vis
Rondelle
Chapeau
Poignée
traditionnelle
5. Installer le couvercle et la poignée
ATTENTION : Risque d’endommagement de l’ensemble de
valve K-306KS. Lorsque cette valve est utilisée en installation
fibres de verre ou acrylique, utiliser le kit d’installation de mur
fin (88526).
Retirer et jeter le renfort en plâtre et/ou dôme, s’il est installé.
Pivoter la tige de la valve complètement vers la gauche à la
position fermée ″Off″.
Installer le couvercle sur la valve. Sécuriser avec deux vis. Ne pas
trop serrer.
Glisser le manchon sur la tige de la valve avec la rainure orientée
vers le bas et vers l’extérieur.
Joint torique
Poignée à roulement
Installer la poignée à la base.
Sécuriser avec une vis.
Aligner l’ensemble de poignée et presser fermement sur la tige de
la valve.
Sécuriser la poignée en place avec la vis de retenue.
Poignée traditionnelle
Assembler la poignée et le chapeau.
Installer la rondelle et le joint torique sur la base.
Kohler Co. Français-9 1025255-2-C
Page 20

Installer le couvercle et la poignée (cont.)
Installer l’ensemble de la poignée à la base.
Sécuriser avec une vis.
Aligner l’ensemble de la poignée et de la base. Presser la poignée
sur la tige de la valve.
Sécuriser la poignée en place avec la vis de retenue. Serrer la vis
de retenue d’un quart de tour de plus que le serrage possible la
main.
6. Compléter l’installation
Tourner la valve complètement vers la gauche à la position
fermée.
Tourner l’ensemble de l’aérateur du bec vers la gauche pour le
retirer.
Ouvrir l’alimentation d’eau principale.
Tourner la valve vers le centre et faire couler l’eau pendant une
minute environ pour purger le système.
Vérifier s’il y a des fuites dans les connexions.
Réinstaller l’aérateur.
1025255-2-C Français-10 Kohler Co.
Page 21

Guía de instalación
Guarnición de grifería monomando para
bañera y ducha
INSTRUCCIONES IMPORTANTES
LÉALAS Y GUÁRDELAS PARA EL
CLIENTE
ADVERTENCIA: Riesgo de quemaduras u otras lesiones
graves.
•
Antes de terminar la instalación, el instalador debe ajustar la
temperatura máxima del agua en la válvula para reducir el riesgo
de quemaduras, según la norma ASTM F 444.
•
No instale llaves de paso en ninguna de las salidas de esta
válvula. La instalación de tales dispositivos puede producir
contracorriente en la válvula y afectar la temperatura del agua.
•
Los factores que cambian la temperatura del agua suministrada a
la válvula, tales como los cambios de temperatura debido a las
estaciones del año y el mantenimiento o reemplazo del calentador
de agua, afectarán la temperatura máxima del agua suministrada
por la válvula y pueden causar quemaduras.
•
La válvula reguladora de presión no compensará los cambios de
temperatura del agua; ajuste la temperatura máxima del agua de
esta válvula reguladora de presión cuando se produzcan tales
cambios.
•
Es posible que las válvulas reguladoras de presión no protejan
contra las quemaduras si otros aparatos de limitación de la
temperatura en el sistema de plomería no funcionan
correctamente.
El instalador tiene la responsabilidad de instalar la válvula y ajustar
la temperatura máxima del agua según las instrucciones.
Esta válvula cumple o excede las normas ANSI A112.18.1 y ASSE
1016.
Si usted no entiende las instrucciones de instalación o de ajuste de
temperatura contenidas en este documento, desde los Estados Unidos
llame a nuestro Departamento de Atención al Cliente, al1-800-4-
KOHLER. Fuera de los Estados Unidos, comuníquese con su
distribuidor.
Kohler Co. Español-1 1025255-2-C
Page 22

INSTRUCCIONES IMPORTANTES (cont.)
¡AVISO IMPORTANTE A LOS INSTALADORES! Por favor, llene los
espacios en blanco del cuadro de información de la Guía del usuario y
en la etiqueta de la válvula. Guarde la Guía del usuario para referencia
futura.
Herramientas y materiales
Destornilladores
surtidos
Llave de
correa
Masilla de
plomería
Cinta
selladora
de roscas
Llave
hexagonal
Gracias por elegir los productos de Kohler
Le agradecemos que haya elegido la calidad de Kohler. Dedique unos
minutos para leer este manual antes de comenzar la instalación. En
caso de problemas de instalación o de funcionamiento, no dude en
contactarnos. Nuestros números de teléfono y nuestro sitio web se
encuentran en la cubierta posterior de esta guía. Gracias nuevamente
por escoger a Kohler.
Antes de comenzar
PRECAUCIÓN: Riesgo de daños al montaje de válvula
K-306-KS. En caso de utilizar esta válvula en una instalación de
fibra de vidrio o acrílica, utilice el juego de instalación para
paredes delgadas (88526).
Cumpla con todos los códigos locales de plomería y de
construcción.
La pared acabada o la unidad de la bañera/ducha debe instalarse
antes que la guarnición.
Antes de instalar la guarnición, determine si la temperatura
máxima del agua es aceptable para el usuario. Si es necesario
ajustar la temperatura, consulte la sección ″Ajuste de la
temperatura del agua″.
1025255-2-C Español-2 Kohler Co.
Page 23

Antes de comenzar (cont.)
La presión del agua cierra la válvula. No fuerce la manija en
ninguna dirección. Para cerrar la válvula, gire suavemente a la
posición cerrada.
Cierre el suministro principal de agua.
La empresa Kohler se reserva el derecho de modificar el diseño
de los productos sin previo aviso, tal como se especifica en la lista
de precios.
Kohler Co. Español-3 1025255-2-C
Page 24

Surtidores de montaje roscado
Niple
3-7/8"
(9,8 cm)
Aplique masilla
de plomería.
1. Instale el surtidor
PRECAUCIÓN: Riesgo de daños al sello interno. No utilice
lubricantes derivados del petróleo cuando instale surtidores de
montaje deslizante. Si no logra deslizar el surtidor por el tubo,
utilice agua jabonosa o un lubricante a base de silicona.
Retire el niple provisional.
Aplique sellador de roscas e instale un niple de 1/2″ de modo
que sobresalga 7/16″ (1,1 cm) de la pared acabada.
Aplique masilla de plomería u otro sellador alrededor del
extremo de entrada del surtidor, según las instrucciones del
fabricante.
Aplique sellador de roscas en el niple y enrosque el surtidor en el
niple.
Apriete cuidadosamente con una llave de correa limpia.
Limpie el exceso de masilla de plomería.
1025255-2-C Español-4 Kohler Co.
Page 25

Aplique masilla de plomería.
Chapetón
Brazo de
ducha
Codo de
ducha
Tornillo de fijación
estándar
Cabeza
de ducha
Aplique masilla de
plomería.
Niple de
1/2"
1/2"
Brazo de
ducha no
estándar
2. Instale la cabeza de ducha
PRECAUCIÓN: Riesgo de daños al producto. Para no obstruir
las salidas del rociador de la cabeza de ducha, utilice cinta
selladora de roscas en las roscas del brazo de la ducha. No
utilice sellador líquido de rosca (pasta lubrificante).
NOTA: Se muestra una cabeza de ducha estándar.
Brazo de
ducha
Instalación de una cabeza de ducha estándar
Retire el niple provisional del codo de la ducha.
Aplique una tira de masilla de plomería u otro sellador en la
parte posterior del chapetón según las instrucciones del
fabricante.
Deslice el chapetón en el brazo de ducha.
Aplique cinta selladora de roscas e instale el brazo de ducha en el
codo de la ducha.
Apriete cuidadosamente con una llave de correa limpia.
Presione el chapetón contra la pared acabada y fije con el tornillo
de fijación.
Limpie el exceso de masilla de plomería.
Abra el suministro principal de agua.
Abra el agua caliente y fría para limpiar partículas y residuos del
brazo de ducha.
Kohler Co. Español-5 1025255-2-C
Page 26

Instale la cabeza de ducha (cont.)
Aplique cinta selladora de roscas en el brazo de ducha, y
enrosque la cabeza de ducha en el brazo de ducha.
Instalación de una cabeza de ducha no estándar
Retire el niple provisional del codo de la ducha.
Aplique cinta selladora de roscas, e instale un niple de 1/2″ con
rosca NPT de modo que sobresalga 1/2″ (1,3 cm) de la pared
acabada.
Aplique una tira de masilla de plomería u otro sellador en la
parte posterior del brazo de la ducha, según las instrucciones del
fabricante.
Aplique cinta selladora de roscas al niple y enrosque el brazo de
la ducha en el niple.
Apriete cuidadosamente con una llave de correa limpia.
Limpie el exceso de masilla de plomería.
Con la cabeza de ducha desmontada, haga circular agua por el
sistema.
Aplique cinta selladora de roscas en el brazo de ducha, y
enrosque la cabeza en el brazo de ducha.
1025255-2-C Español-6 Kohler Co.
Page 27

Válvula de
alto flujo
Tornillo de
fijación
Lengüeta
Espiga de
válvula
Collarín
Tornillo de
fijación
Empaque de anillo (O-Ring)
Válvula
estándar
Lengüeta
Collarín
Etiqueta
de la
válvula
3. Ajuste de la temperatura del agua
PRECAUCIÓN: Riesgo de lesiones personales. La temperatura
del agua nunca debe ajustarse a más de 120° F (49° C).
Gire la válvula a la derecha, a la posición completamente abierta,
y deje correr el agua caliente durante varios minutos. Coloque un
termómetro en el chorro de agua y verifique la temperatura.
Para cambios menores de la temperatura del agua, ajuste el
tornillo de fijación y vuelva a verificar la temperatura del agua.
Para cambios mayores de la temperatura del agua, quite el
empaque de anillo (O-ring) y el collarín de la espiga de válvula.
Gire lentamente la espiga de válvula hasta obtener la temperatura
máxima deseada del agua.
Vuelva a instalar el collarín en la espiga de válvula colocando el
tornillo de fijación contra el lado de la lengüeta.
Vuelva a instalar el empaque de anillo (O-ring) y gire la espiga a
la izquierda para cerrar el suministro de agua.
Vuelva a verificar la temperatura del agua.
Llene la información en la etiqueta de la válvula (si se ha
suministrado).
Kohler Co. Español-7 1025255-2-C
Page 28

Deseche el protector
de yeso con cúpula.
Espiga de
válvula
Accionador
Espiga de
desviador
Tornillo de fijación
Montaje del desviador
Guía
4. Montaje del desviador
Retire y deseche el protector de yeso y/o la cúpula, si están
instalados.
Coloque el accionador sobre la espiga del desviador. Apriete el
tornillo de fijación.
Deslice la guía sobre el accionador y enrósquelo en la espiga del
desviador.
1025255-2-C Español-8 Kohler Co.
Page 29

Placa
frontal
Deseche el
protector de yeso
con cúpula.
Placa frontal
Tornillo
Empaque
de anillo
(O-Ring)
Arandela
Bonete
Manija de
espiral
Espiga de válvula
Tornillo
Manga
Ranura
Base
Tornillo de
fijación
5. Instale la placa frontal y la manija
PRECAUCIÓN: Riesgo de daños al montaje de válvula
K-306-KS. En caso de utilizar esta válvula en una instalación de
fibra de vidrio o acrílica, utilice el kit de instalación para paredes
delgadas (88526).
Retire y deseche el protector de yeso y/o la cúpula, si están
instalados.
Gire la espiga de la válvula completamente a la izquierda, a la
posición de apagado ″Off″.
Instale la placa frontal sobre la válvula. Fije con dos tornillos. No
apriete demasiado.
Deslice la manga sobre la espiga de válvula de modo que la
ranura esté hacia abajo y orientada hacia fuera.
Manija
tradicional
Manija de espiral
Instale la manija en la base.
Fije con un tornillo.
Alinee el montaje de la manija y presiónelo sobre la espiga de la
válvula.
Fije la manija en su lugar con el tornillo de fijación.
Manija tradicional
Monte la manija y el bonete.
Kohler Co. Español-9 1025255-2-C
Page 30

Instale la placa frontal y la manija (cont.)
Instale la arandela y el empaque de anillo (O-ring) sobre la base.
Encaje el montaje de la manija en la base.
Fije con un tornillo.
Alinee la manija con el montaje de la base. Presione la manija
sobre la espiga de la válvula.
Fije la manija en su lugar con el tornillo de fijación. Después de
apretar a mano, apriete el tornillo de fijación un cuarto de vuelta
adicional.
6. Termine la instalación
Gire la válvula totalmente a la izquierda, a la posición cerrada.
Gire el montaje del aireador hacia la izquierda para sacarlo del
surtidor.
Abra el suministro principal de agua.
Gire la válvula al centro y deje correr el agua durante
aproximadamente un minuto para limpiar el sistema.
Revise que no haya fugas en las conexiones.
Reinstale el aireador.
1025255-2-C Español-10 Kohler Co.
Page 31

1025255-2-C
Page 32

USA: 1-800-4-KOHLER
Canada: 1-800-964-5590
México: 001-877-680-1310
kohler.com
©2005 Kohler Co.
1025255-2-C
 Loading...