

Page 1
Installation Guide
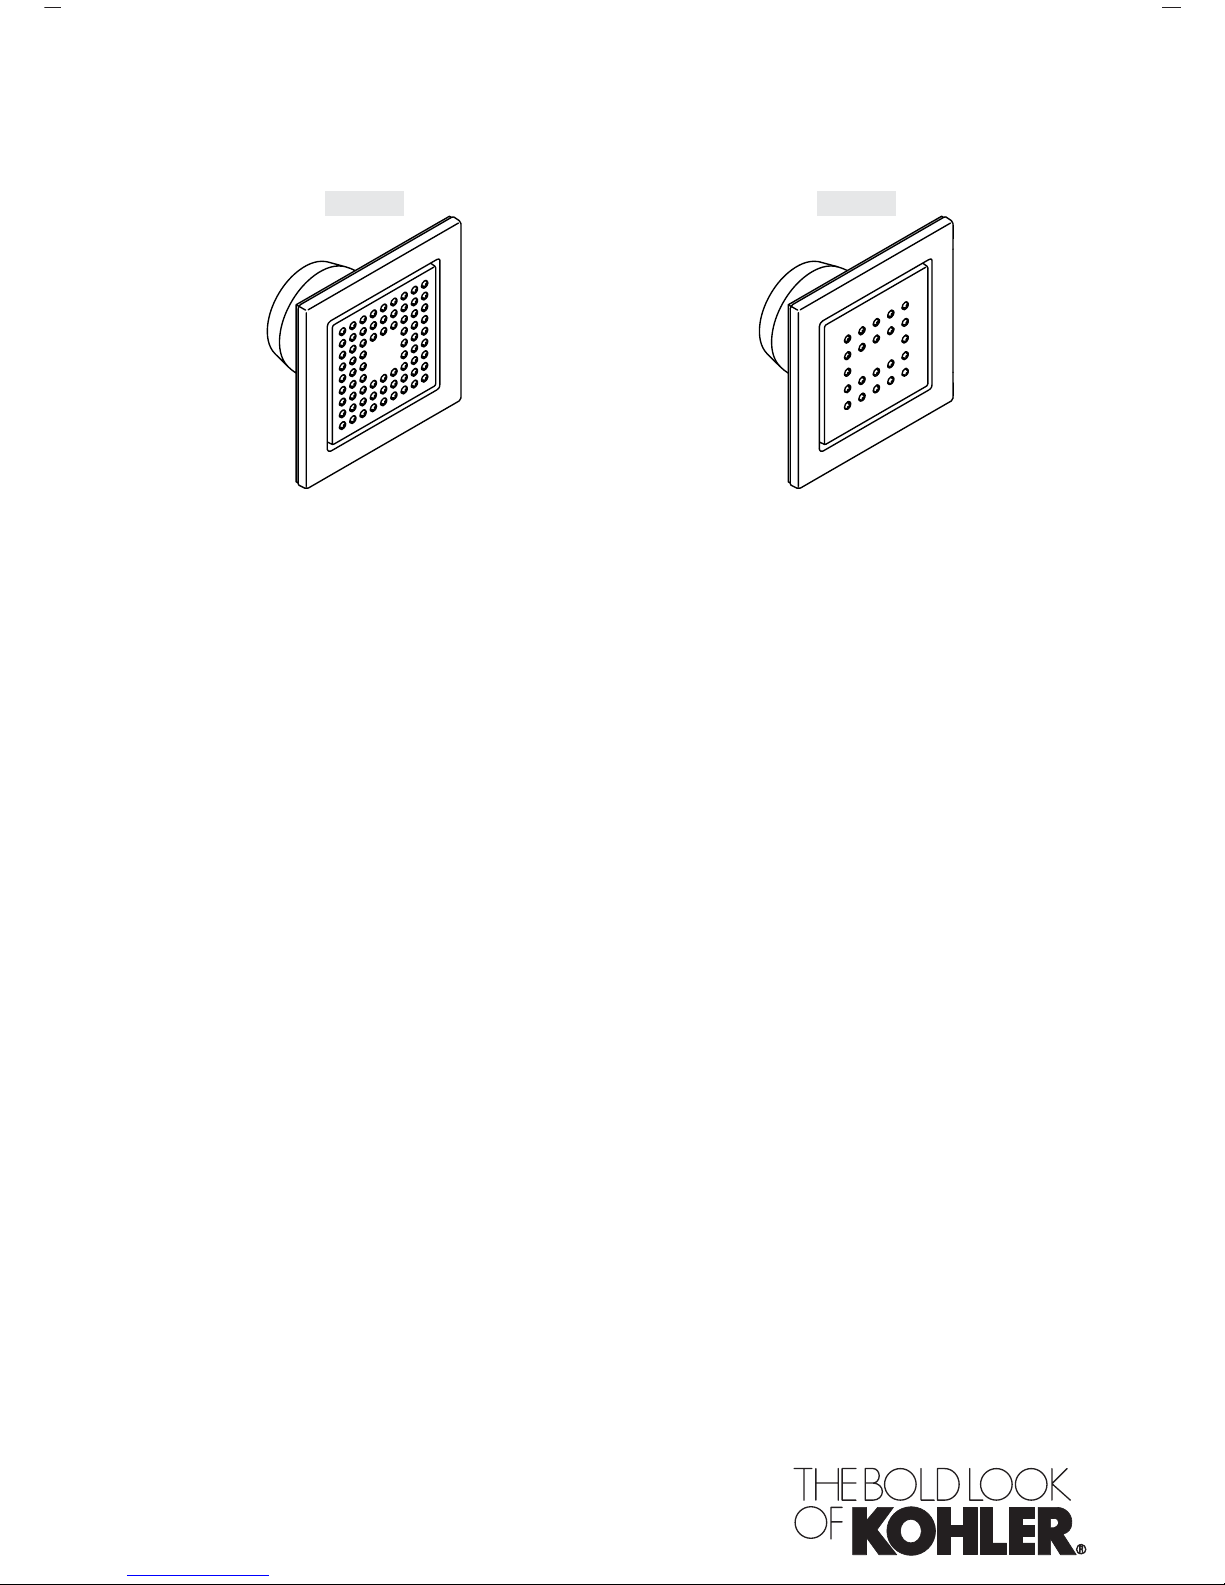
Bodyspray Tile
M product numbers are for Mexico (i.e. K-12345M)
Los números de productos seguidos de
M corresponden a México (Ej.
K-12345M)
Français, page “Français-1”
Español, página “Español-1”
K-8002 K-8003
1043851-2-D
Page 2
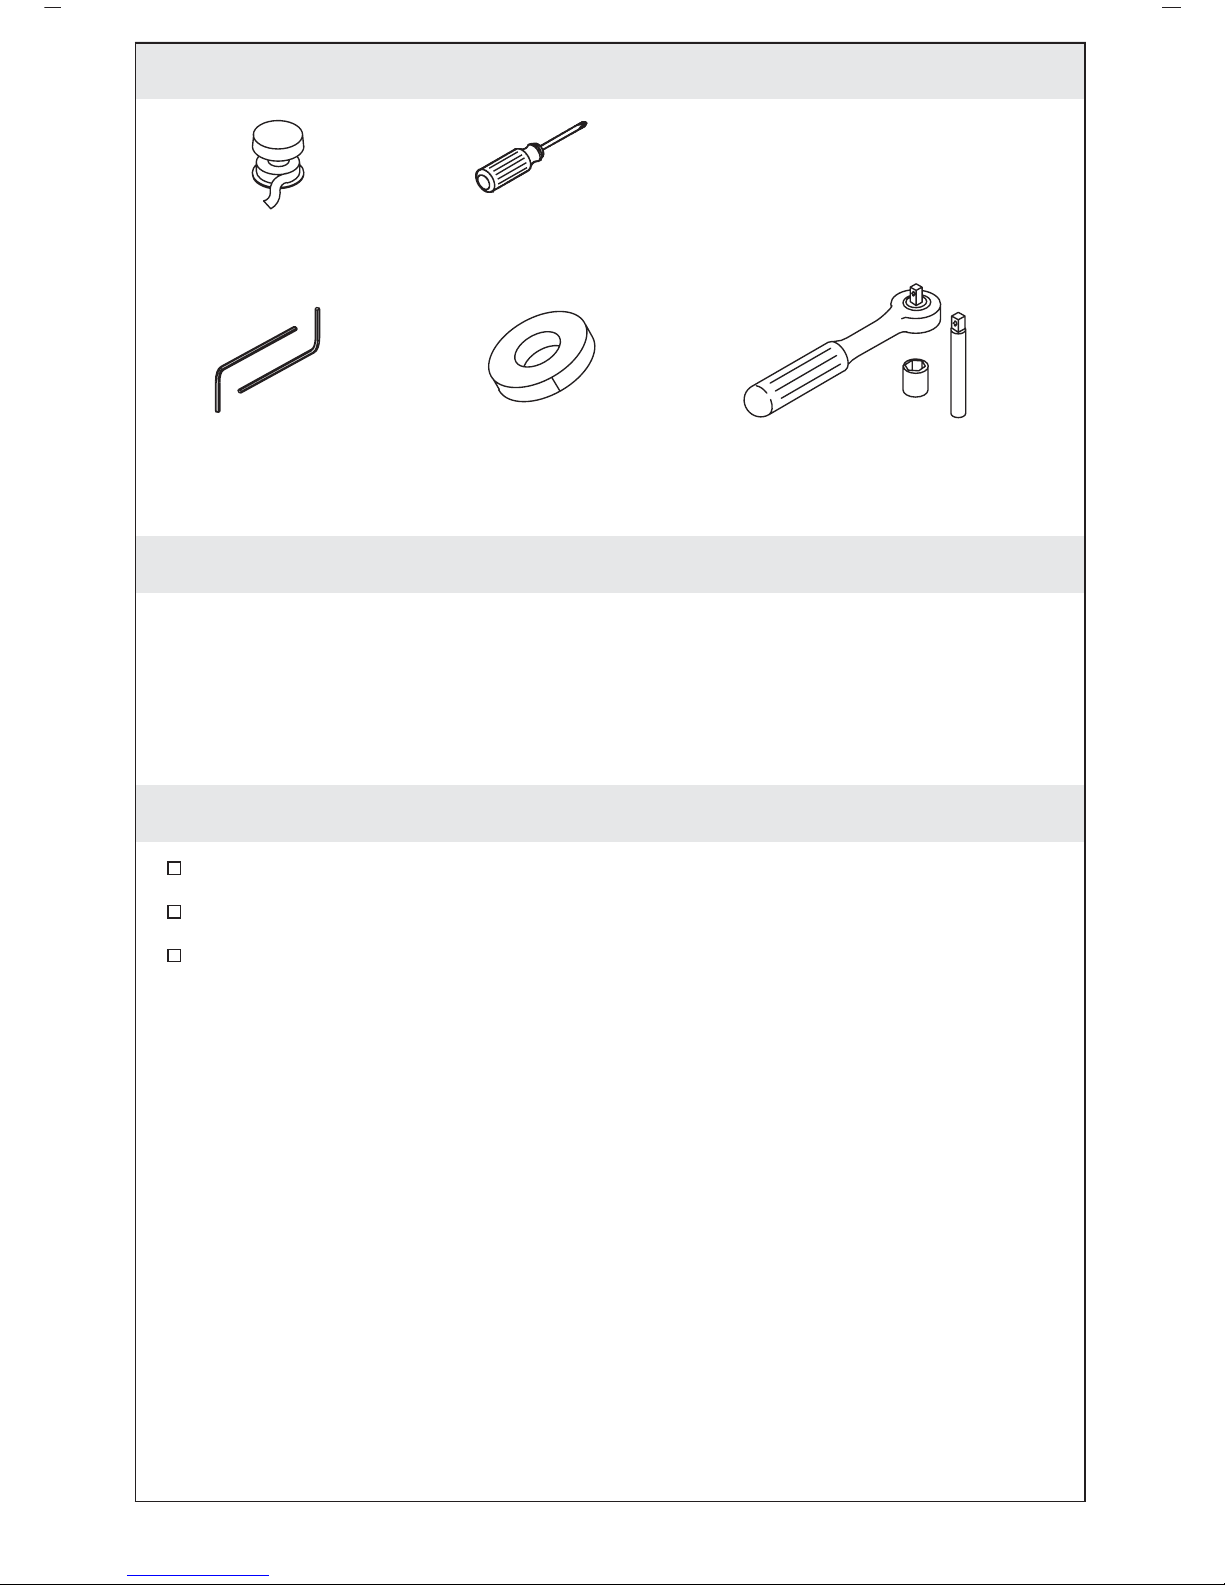
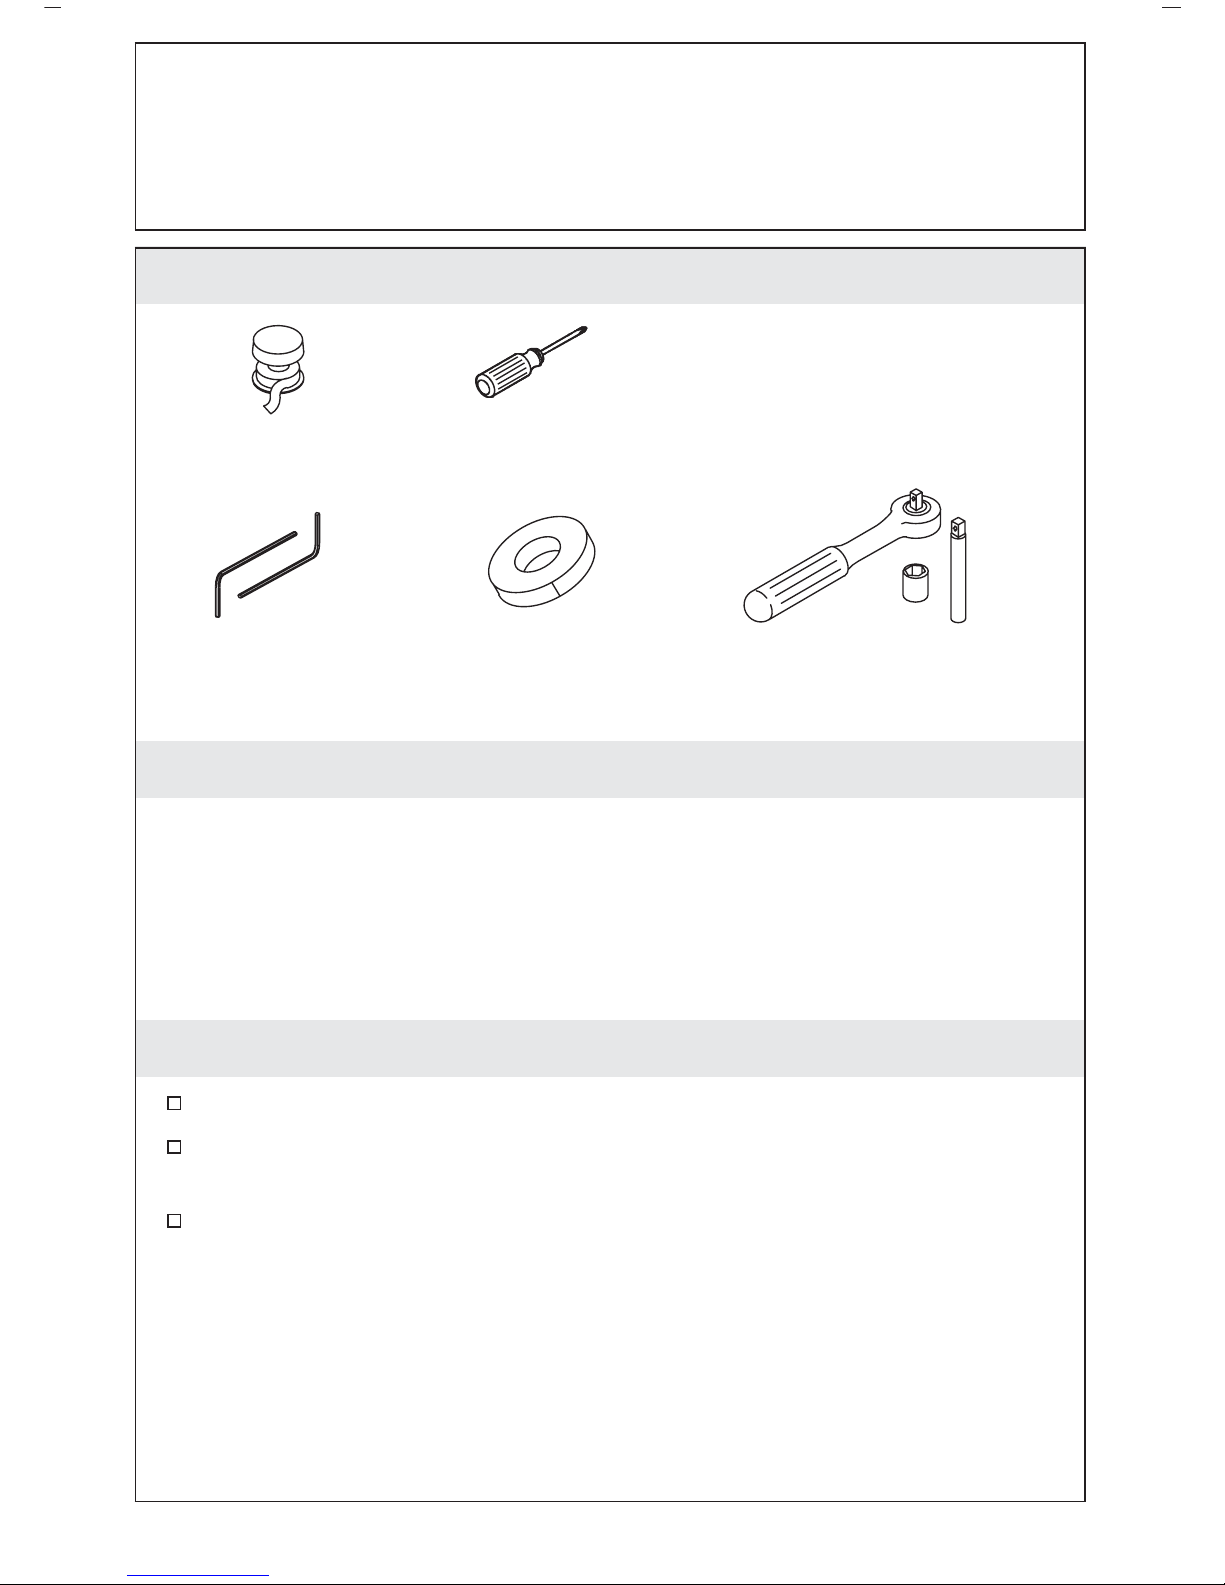
Tools and Materials
Thank You For Choosing Kohler Company
We appreciate your commitment to Kohler quality. Please take a few
minutes to review this manual before you start installation. If you
encounter any installation or performance problems, please don’t
hesitate to contact us. Our phone numbers and website are listed on
the back cover. Thanks again for choosing Kohler Company.
Before You Begin
Observe all local plumbing and building codes.
Inspect the supply piping for damage. Replace as necessary.
Kohler Co. reserves the right to make revisions in the design of
faucets without notice, as specified in the Price Book.
5/64" & 3/16"
Hex Wrenches
Socket Wrench with 11 mm or
7/16" Socket and Extension
Sealant
Tape
Plus:
• Close nipple or
• 1-1/2" NPT pipe nipple
• 1/2" NPT female fittings
• 1/2" copper pipe
Phillips
Screwdriver
Masking
Tape
1043851-2-D 2 Kohler Co.
Page 3
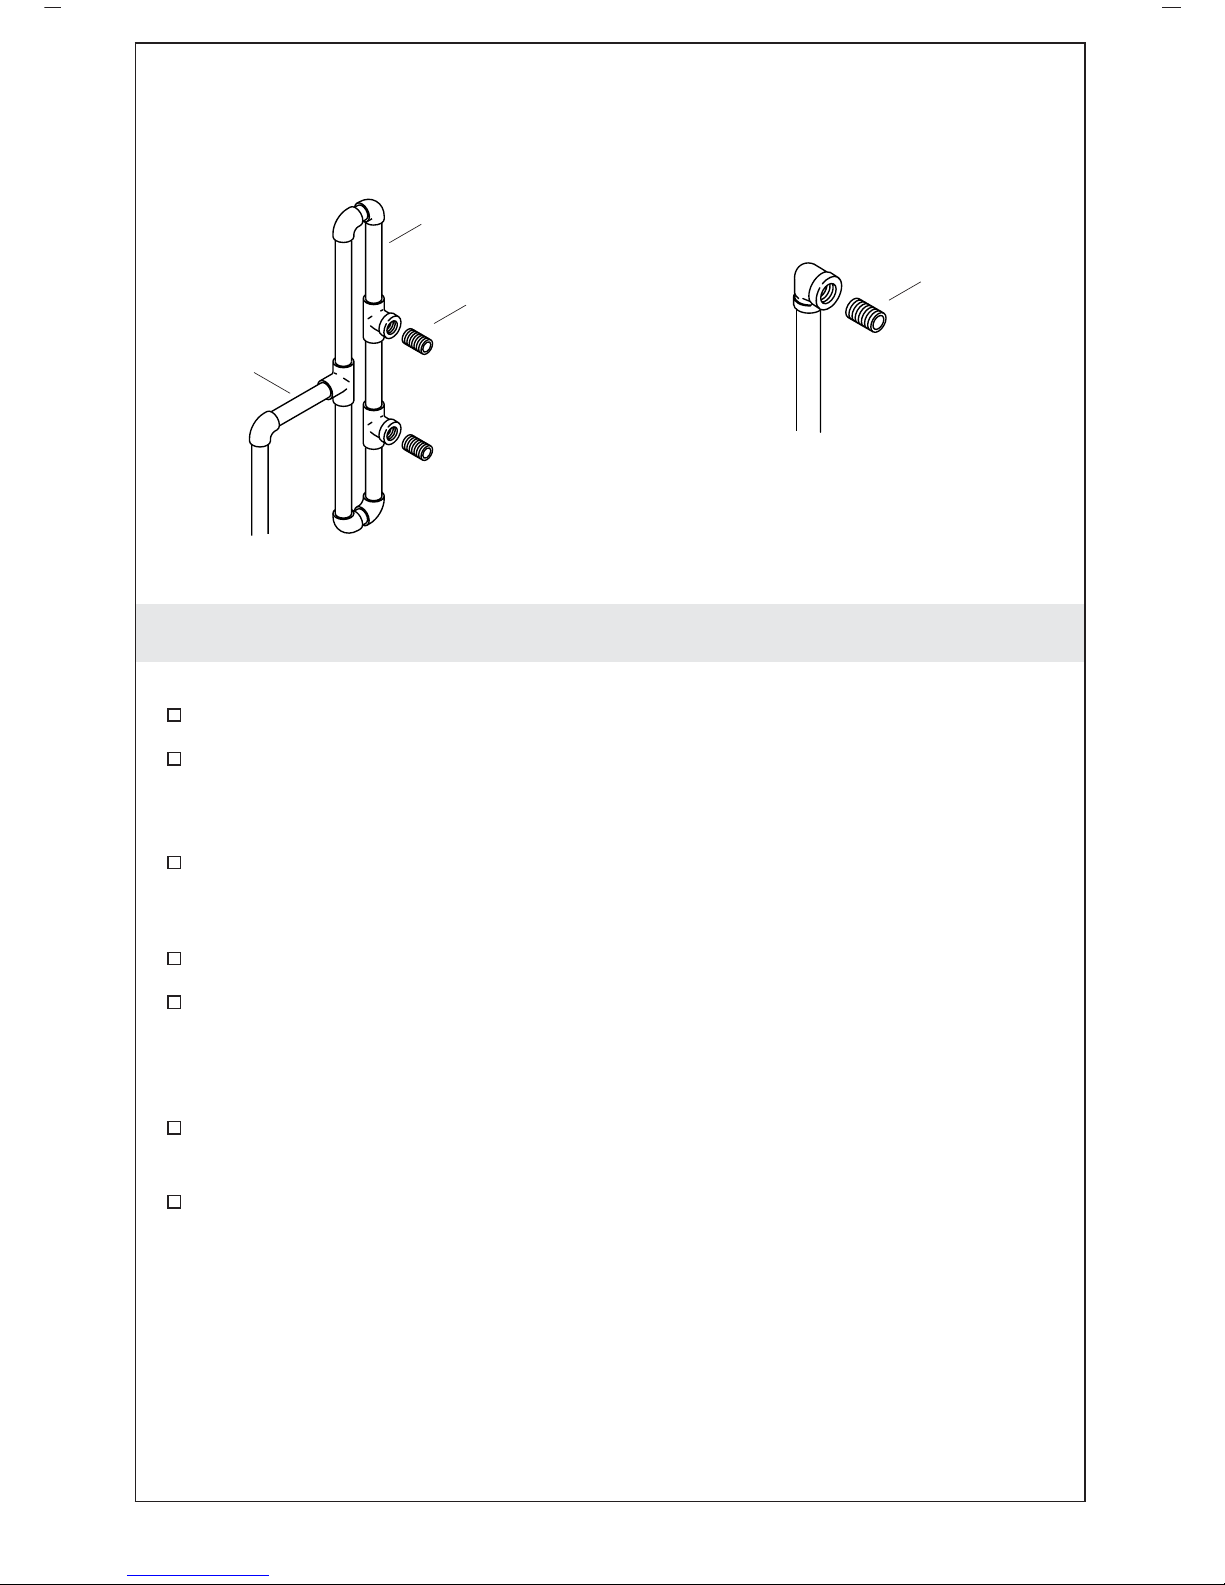
1. Install the Supply Piping
Multiple Bodyspray Installations
Route the water supply lines.
If installing more than one bodyspray off the same supply line,
construct a pressure balancing loop. Locate a tee along the loop at
each bodyspray installation location.
Do not strap the pipes at this time.
Single Bodyspray Installations
Route the water supply line.
Install an elbow to the end of the supply pipe at the bodyspray
installation location.
All Installations
Temporarily install a nipple to each tee/elbow. Do not use any
sealant.
Do not strap the pipes at this time.
Pressure
Balancing Loop
Water
Supply
Single Bodyspray InstallationMultiple Bodyspray Installation
Nipple
Nipple
Kohler Co. 3 1043851-2-D
Page 4
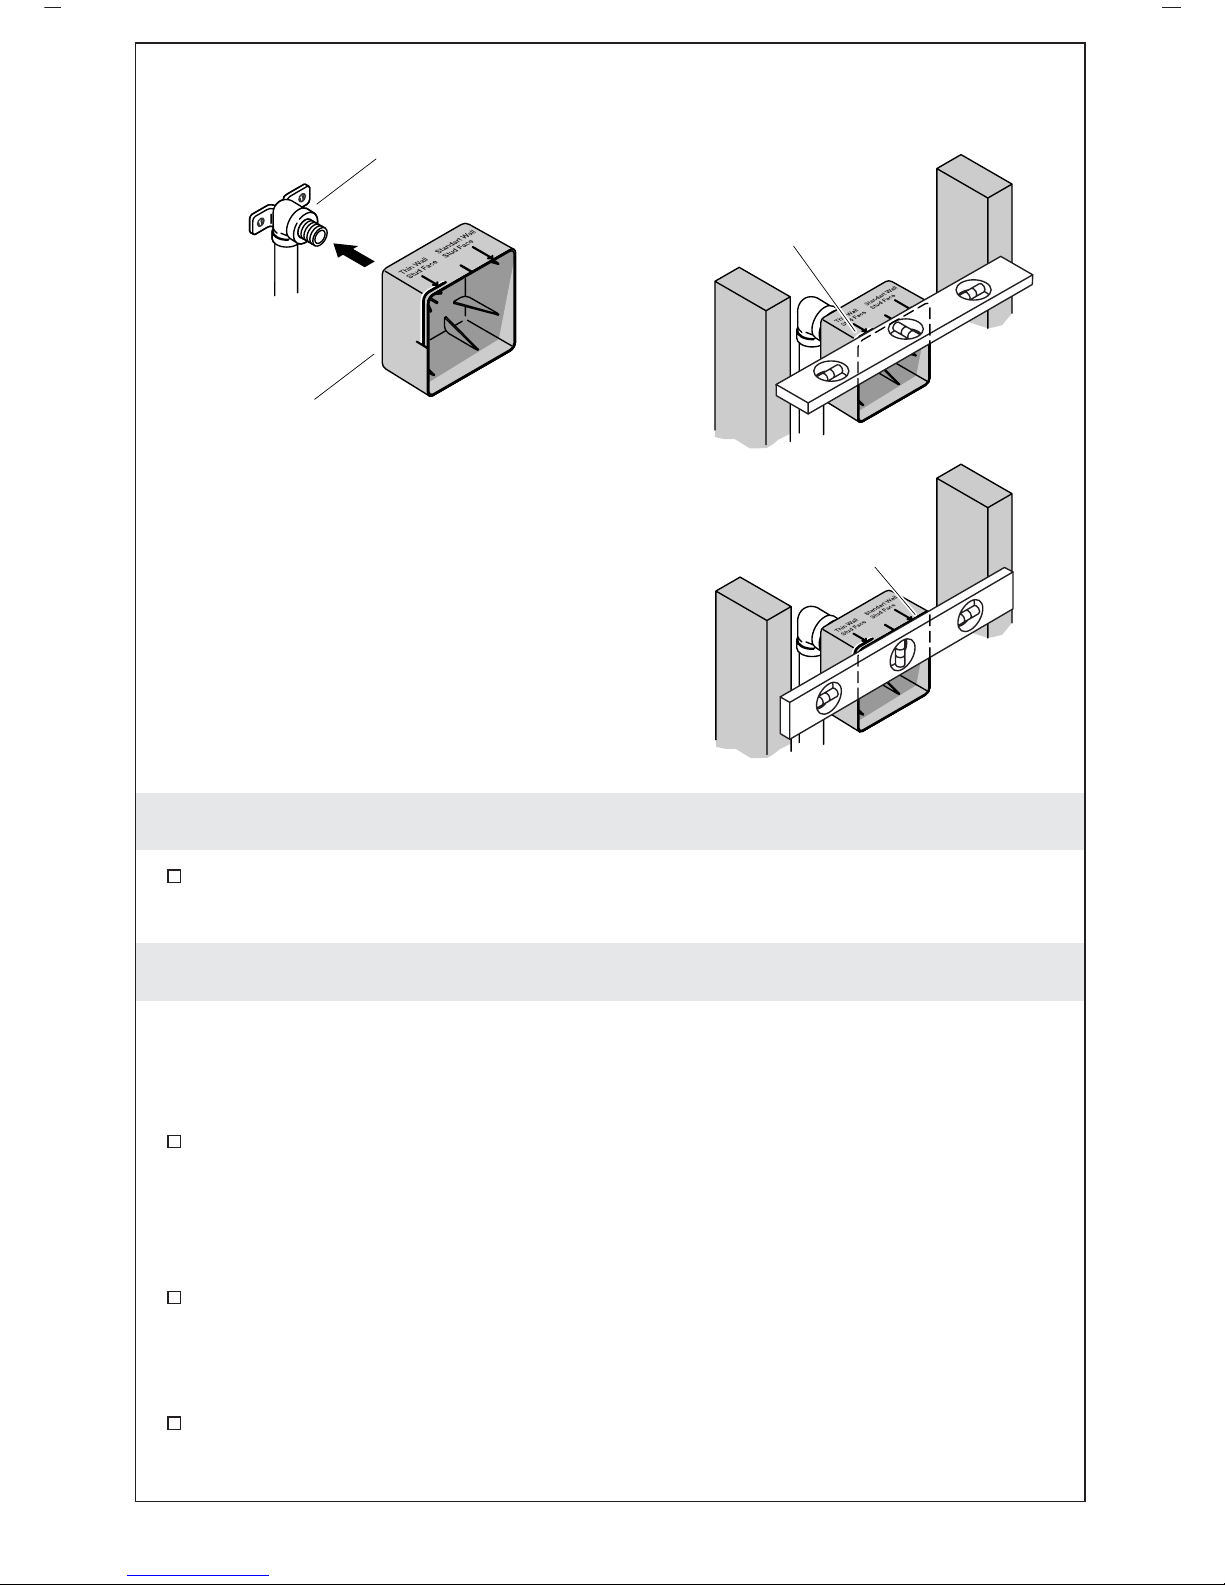
2. Install the Plaster Guard
Install the plaster guard. Push until the plaster guard is snug
against the face of the elbow (or tee).
3. Set the Pipe Depth
Thin Wall Installations
NOTE: Thin wall installations have a finished wall thickness of less
than 1/2″ (1.3 cm).
To adjust the pipe depth, use a level or other straight edge to line
up the ″Thin Wall Installation″ mark with the front face of the
studs.
Standard Wall Installations
To adjust the pipe depth, use a level or other straight edge to line
up the edge of the plaster guard with the front face of the studs.
All Installations
Install appropriate backing and strap the pipes at the adjusted
depth.
Elbow (or Tee)
Thin Wall
Standard Wall
Set Piping DepthInstall the Plaster Guard
Install the
plaster guard.
Align mark with the
front of the stud face.
Align mark with the
front of the stud face.
1043851-2-D 4 Kohler Co.
Page 5
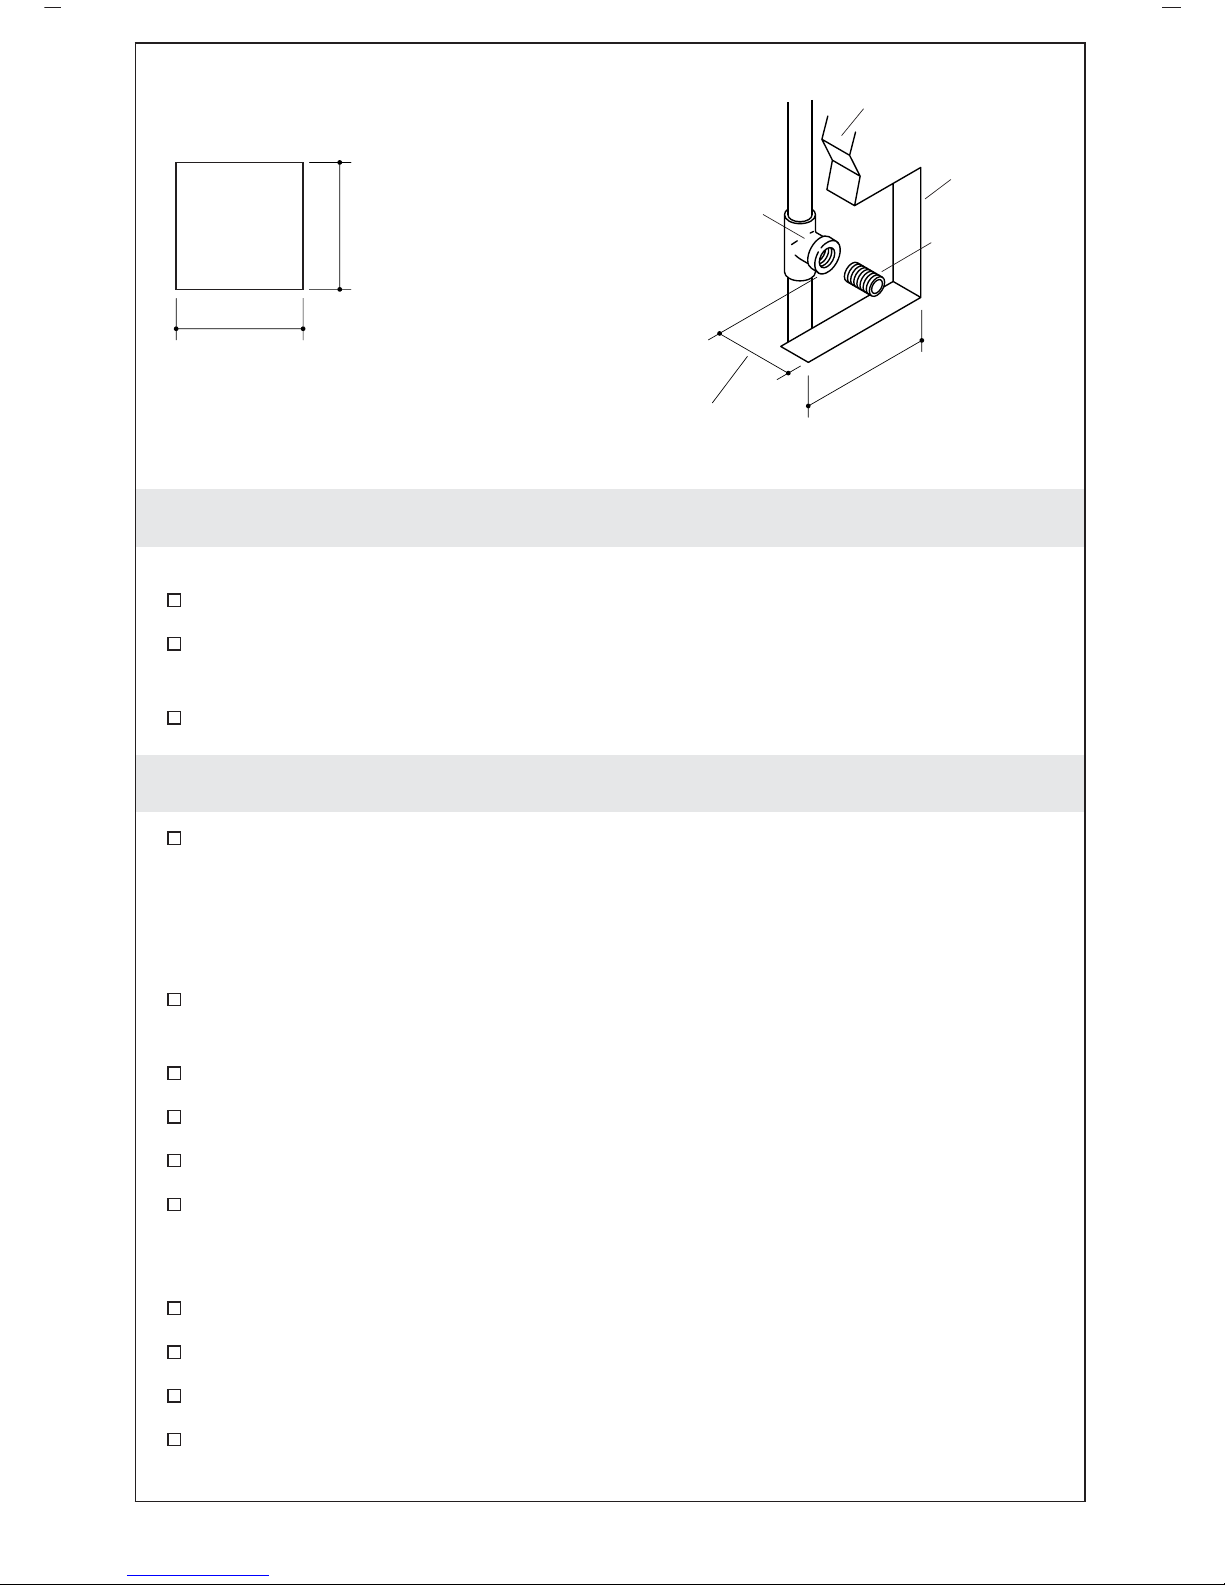
4. Install the Finished Wall
Install the Wall Material
Install the water-resistant wall board.
Cut out a 4″ (10.2 cm) to 4-1/4″ (10.8 cm) square at each tile
installation location.
Install the finished wall material.
5. Verify Depth and Install the Nipple
Remove the nipple.
NOTE: The minimum distance between the face of the tee/elbow
and the surface of the finished wall should be 2-1/4″ (5.7 cm). The
measurement for typical installations is 2-3/4″ (7 cm).
Measure the distance from the face of the tee/elbow to the
surface of the finished wall. Make any adjustments as needed.
If your measurement is 2-1/4″ (5.7 cm): Use a close pipe nipple.
If your measurement is 2-3/4″ (7 cm): Use a 1-1/2″ pipe nipple.
Thread the nipple into the tee/elbow and hand tighten.
Measure the distance from the end of the nipple to the surface of
the finished wall. Verify that the distance is at least 1-1/2″ (3.8
cm) and no more than 1-3/4″ (4.4 cm).
Remove the nipple.
Apply thread sealant to the threads of the nipple.
Reinstall the nipple to the tee/elbow.
Run water through the system to flush out any dirt or debris.
4" (10.2 cm) –
4-1/4" (10.8 cm)
4" (10.2 cm) –
4-1/4" (10.8 cm)
4" (10.2 cm) –
4-1/4" (10.8 cm)
Cutout
Nipple
Tee (or Elbow)
Finished Wall
Cutout
2-1/4" (5.7 cm) Min
Kohler Co. 5 1043851-2-D
Page 6
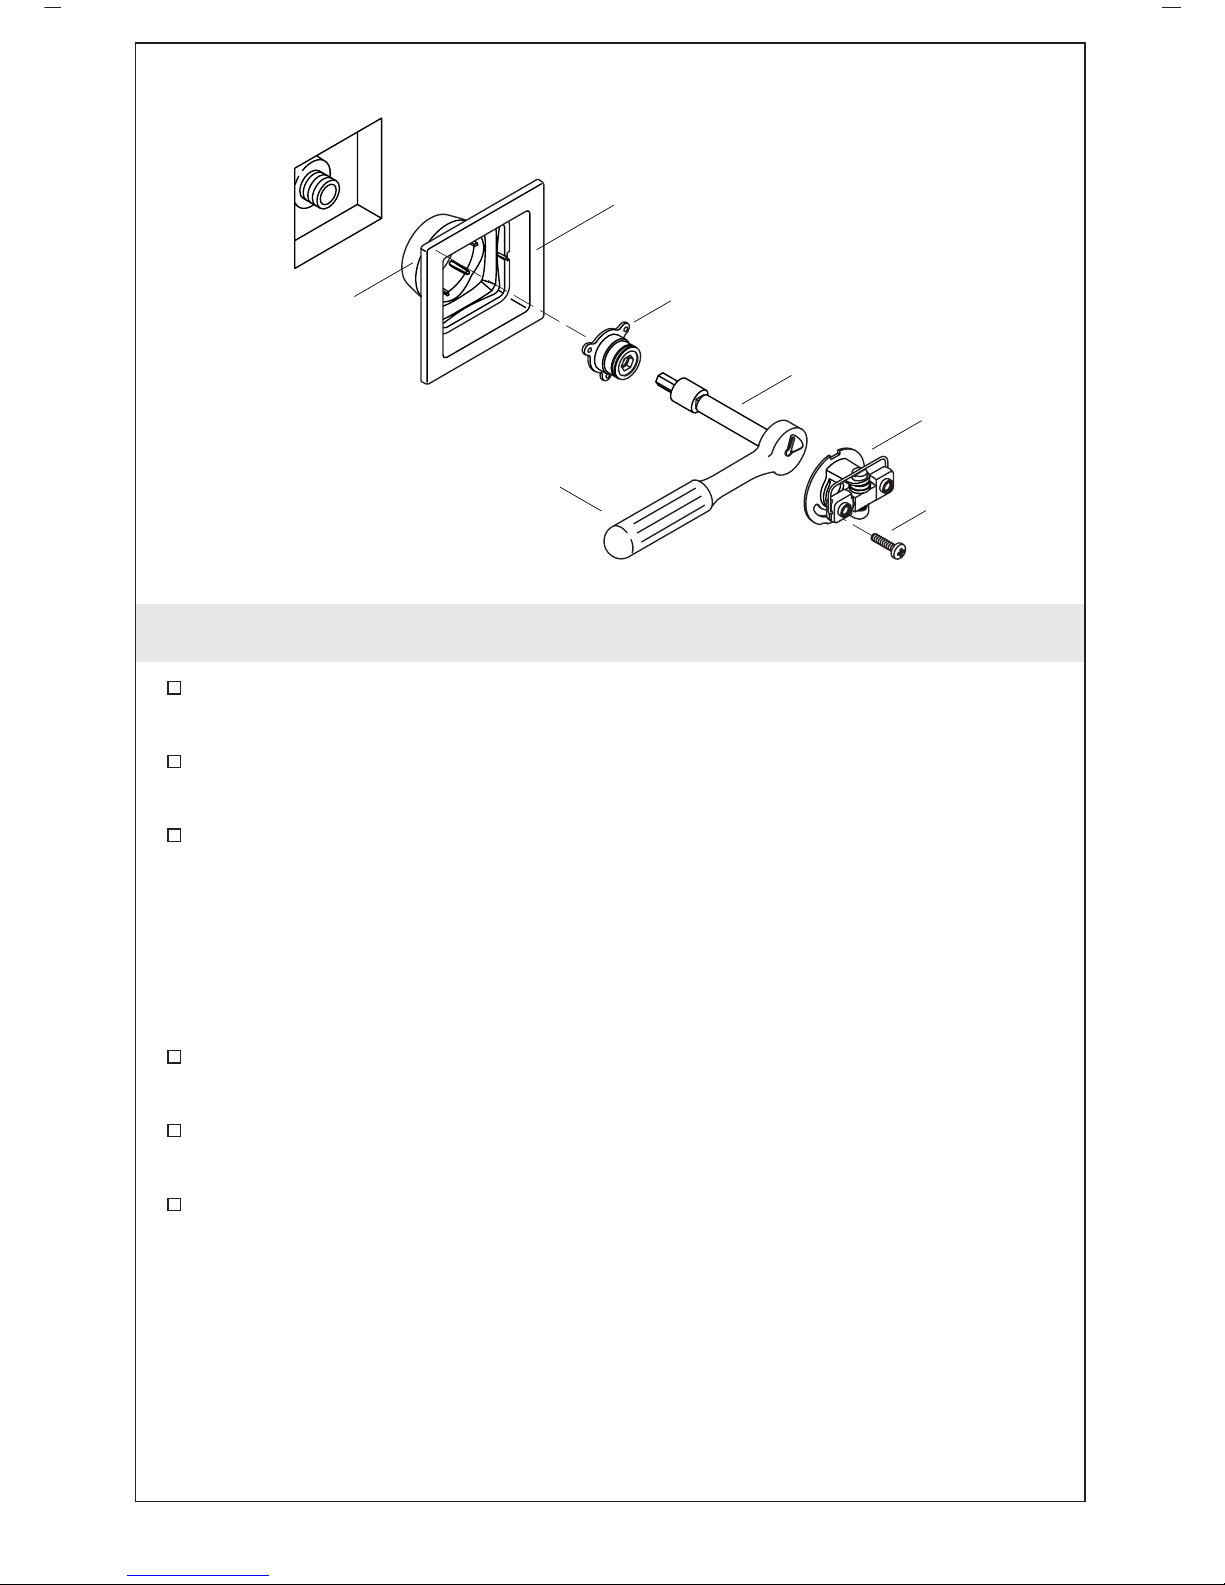
6. Install the Waterway
Insert the escutcheon into the rough opening. The double ribs of
the leak shield should be facing up.
If the leak shield makes contact with the elbow: Enlarge the
hole in the back of the leak shield to 1-1/4″ (3.2 cm).
Thread the adapter onto the nipple using the provided 11 mm bit,
11 mm or 7/16″ socket, extension and socket wrench. Use
masking tape to hold the bit in place, as the bit could fall off and
cause damage.
IMPORTANT! The escutcheon should sit loosely at this point. If it is
tight against the wall, use a longer pipe nipple.
Align the groove in the waterway with the double ribs on the
leak shield.
Press the waterway into place over the adapter. Secure the
waterway to the adapter with the screw provided.
Verify that the escutcheon does not turn or shift.
IMPORTANT! If the escutcheon is still loose after this step, use a
shorter pipe nipple.
Waterway
Screw
Leak Shield
Escutcheon
Adapter
Socket Wrench
With Bit
Extension
1043851-2-D 6 Kohler Co.
Page 7
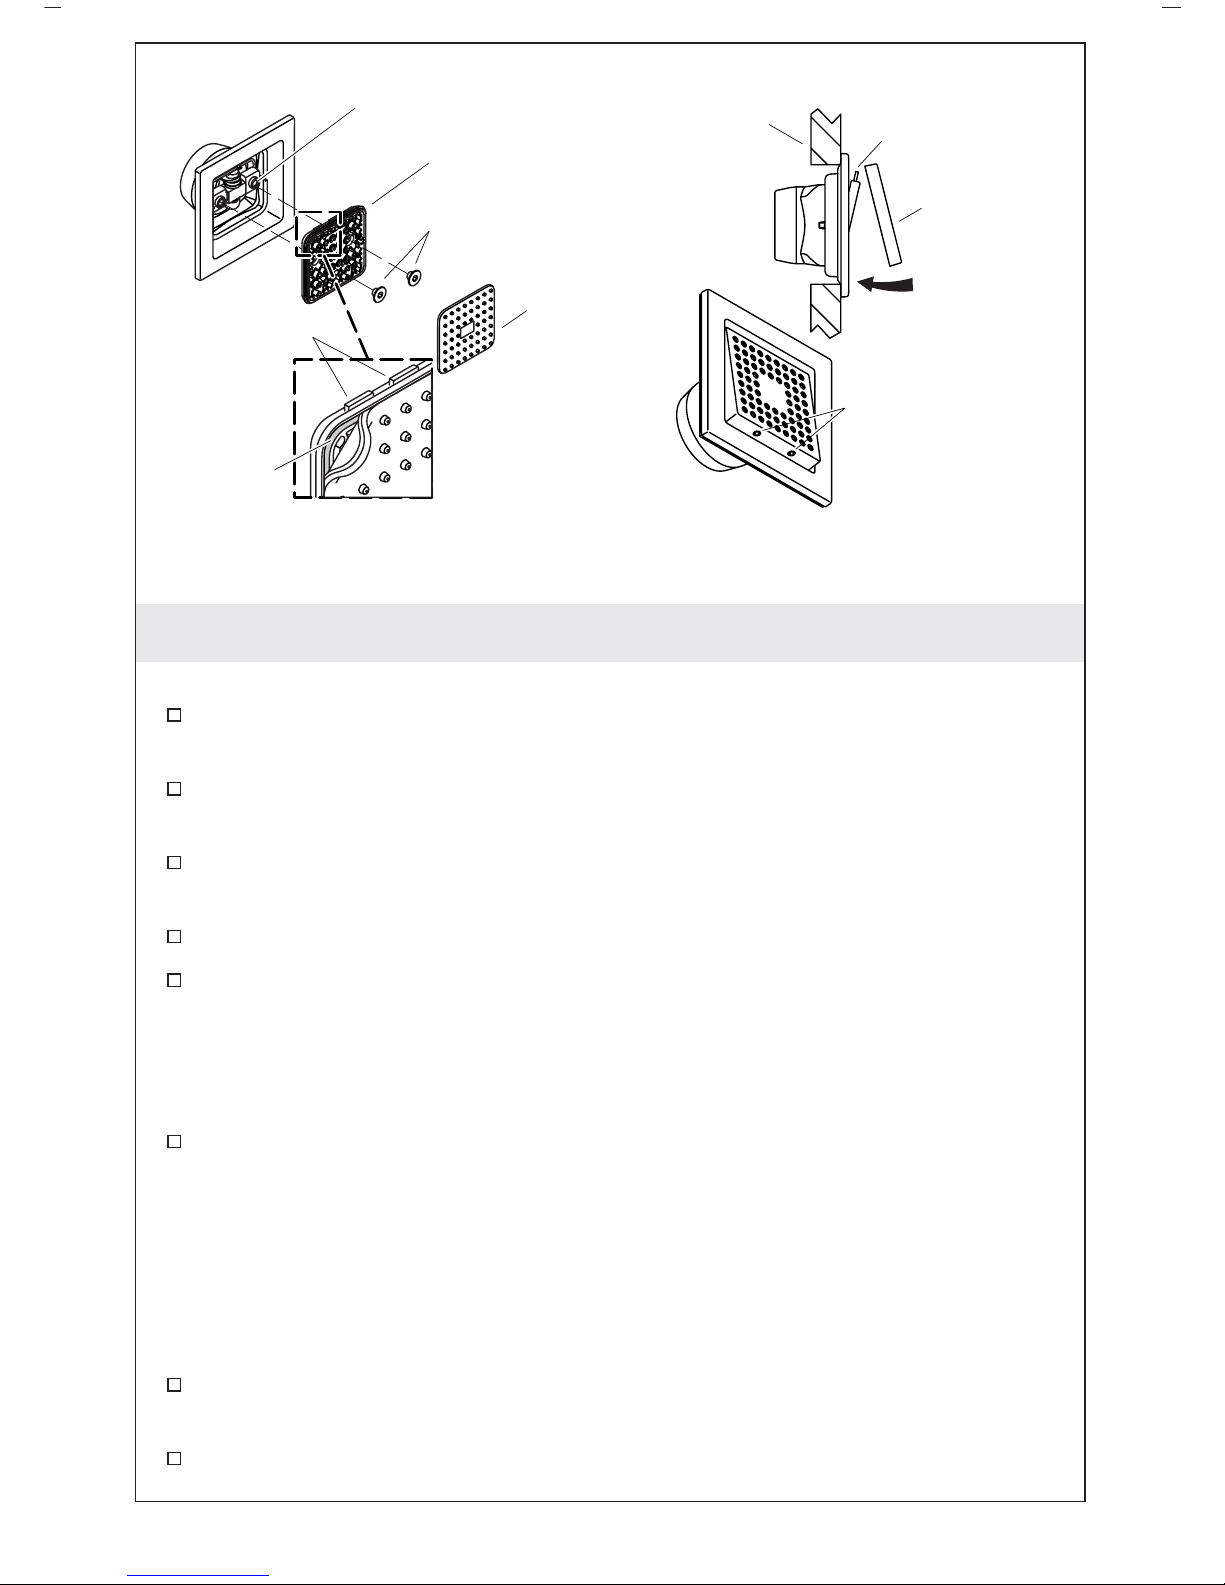
7. Complete the Installation
Attach the Sprayhead
With the ribs of the sprayhead facing up, attach the sprayhead to
the waterway.
Using a 3/16″ hex wrench, secure the sprayhead to the waterway
with the two hex screws provided. Do not overtighten.
Check the sprayhead for upward and downward movement and
that it sits squarely within the escutcheon.
Place the nozzle membrane over the sprayhead.
Align the long edge of the membrane with the hinge ribs
(horizontal).
NOTE: For optimum performance, ensure that the membrane is
applied evenly.
Applying pressure evenly, press the membrane seal into the
sprayhead groove.
Attach the Sprayface
NOTE: For product with brushed finishes, align the brush pattern of
the sprayfaces with the direction of the brushed pattern of the
escutcheon.
Tilt the sprayhead downward so the ribs on the top of the
sprayhead are exposed.
Insert the grooves of the sprayface over the ribs of the sprayhead.
Sprayface
Ribs
Ribs
Groove
Finished Wall
Setscrews
Sprayhead
Waterway
Hex Screws
Attach the Sprayhead Attach the Sprayface
Nozzle
Membrane
Kohler Co. 7 1043851-2-D
Page 8

Complete the Installation (cont.)
Press the sprayface down to cover the sprayhead, as illustrated.
Tilt the sprayhead upward to expose the setscrew holes on the
bottom of the sprayhead.
IMPORTANT! The setscrews must be flush with the edge of the
sprayface frame. If the setscrews protrude outside of the sprayface
frame, product damage will occur.
Using a 5/64″ hex wrench, turn the setscrews counterclockwise
until they are flush with the edge of the sprayface frame.
1043851-2-D 8 Kohler Co.
Page 9
Guide d’installation
Carrelage jet corporel
Outils et matériels
Merci d’avoir choisi la compagnie Kohler
Nous apprécions votre engagement envers la qualité Kohler. Veuillez
prendre s’il vous plaît quelques minutes pour lire ce manuel avant de
commencer l’installation. Ne pas hésiter à nous contacter en cas de
problème d’installation ou de performance. Nos numéros de téléphone
et notre adresse du site internet sont au verso. Merci encore d’avoir
choisi la compagnie Kohler.
Avant de commencer
Respecter tous les codes de plomberie et de bâtiment locaux.
Inspecter la tuyauterie d’alimentation de tout endommagement.
Remplacer si nécessaire.
Kohler Co. se réserve le droit d’apporter toutes modifications au
design des robinets et ceci sans préavis, comme spécifié dans le
catalogue des prix.
Clés
hexagonales
Clé à douille avec douille et
rallonge de 11 mm ou de 7/16"
Ruban
d'étanchéité
Plus:
• Mamelon étroit ou
• mamelon de tuyau de 1-1/2" NPT
• raccords femelles 1/2" NPT
• tuyau en cuivre de 1/2"
Tournevis
cruciforme
Ruban-cache
Kohler Co. Français-1 1043851-2-D
Page 10

1. Installer la tuyauterie d’alimentation
Installations de jets corporels multiples
Acheminer les lignes d’alimentation d’eau.
Si plus d’un jet corporel d’une même ligne d’alimentation est
installé, construire une boucle de régulation de pression. Localiser
un T le long de la boucle à chaque emplacement d’installation de
jet corporel.
Ne pas attacher les tuyaux à ce moment.
Installations d’un seul jet corporel
Acheminer la ligne d’alimentation d’eau.
Installer un coude à l’extrémité du tuyau d’alimentation à
l’emplacement d’installation du jet corporel.
Toutes les installations
Installer temporairement un mamelon à chaque T/coude. Ne pas
utiliser de mastic.
Ne pas attacher les tuyaux à ce moment.
Boucle de
régulateur
de pression
Alimentation
d'eau
Installations d'un
seul jet corporel
Installations de jets
corporels multiples
Mamelon
Mamelon
1043851-2-D Français-2 Kohler Co.
Page 11

2. Installer le renfort de plâtre
Installer le renfort de plâtre. Presser jusqu’à ce que le renfort de
plâtre soit contre la face du coude (ou T).
3. Établir la profondeur du tuyau
Installations de murs fins
REMARQUE : Les installations de mur fin ont une épaisseur de mur
finie de moins de 1/2″ (1,3 cm).
Pour ajuster la profondeur du tuyau, utiliser un niveau ou autre
rebord droit pour aligner la marque ″Installation de mur fin″ avec
la face avant des montants.
Installations de murs standards
Pour ajuster la profondeur du tuyau, utiliser un niveau ou autre
rebord droit pour aligner le rebord du renfort de plâtre avec la
face avant des montants.
Toutes les installations
Coude (ou T)
Mur fin
Mur standard
Établir la profondeur de la tuyauterieInstaller le renfort de plâtre.
Installer le renfort
de plâtre
Aligner la marque avec
l'avant de la face du montant.
Aligner la marque avec
l'avant de la face du montant.
Kohler Co. Français-3 1043851-2-D
Page 12

Établir la profondeur du tuyau (cont.)
Installer un renfort approprié et attacher les tuyaux à la
profondeur ajustée.
1043851-2-D Français-4 Kohler Co.
Page 13

4. Installer le mur fini
Installer le matériau du mur
Installer le matériau du mur résistant à l’eau.
Découper un carré de 4″ (10,2 cm) à 4-1/4″ (10,8 cm) à chaque
emplacement d’installation de carreau.
Installer le matériau du mur fini.
5. Vérifier la profondeur et installer le mamelon
Retirer le mamelon.
REMARQUE : La distance minimum entre l’avant du T/coude et la
surface du mur fini devrait être de 2-1/4″ (5,7 cm). La mesure des
installations typiques est de 2-3/4″ (7 cm).
Mesurer la distance de l’avant du T/coude à la surface du mur
fini. Faire les ajustements si nécessaire.
Si la mesure est de 2-1/4″ (5,7 cm): Utiliser un mamelon de tuyau
fermé.
Si la mesure est de 2-3/4″ (7 cm): Utiliser un mamelon de tuyau
de 1-1/2″.
Visser le mamelon du tuyau dans le T/coude et serrer à la main.
Mesurer la distance de l’extrémité du mamelon à la surface du
mur fini. Vérifier que la distance soit au moins de 1-1/2″ (3,8 cm)
et pas plus de 1-3/4″ (4,4 cm).
Retirer le mamelon.
Appliquer un ruban d’étanchéité aux filetages du mamelon.
Installer à nouveau le mamelon au T/coude.
4" (10,2 cm) –
4-1/4" (10,8 cm)
4" (10,2 cm) –
4-1/4" (10,8 cm)
4" (10,2 cm) –
4-1/4" (10,8 cm)
Découpe
Mamelon
T (ou coude)
Mur fini
Découpe
2-1/4" (5,7 cm) Min.
Kohler Co. Français-5 1043851-2-D
Page 14

Vérifier la profondeur et installer le mamelon (cont.)
Faire couler l’eau dans le système pour éliminer toute saleté ou
tous débris.
1043851-2-D Français-6 Kohler Co.
Page 15

6. Installer le passage d’eau
Placer l’applique à l’intérieur de l’ouverture de raccordement. Les
doubles arrêtes de l’anti fuites devrait faire face vers le haut.
Si l’anti-fuites fait contact avec le coude: Élargir l’orifice à
l’arrière de l’anti-fuites de 1-1/4″ (3,2 cm).
Visser l’adaptateur sur le mamelon en utilisant la mèche fournie
de 11 mm, la douille de 11 mm ou de 7/16″, clé à rallonge et à
douille. Utiliser du ruban cache pour maintenir la mèche en place
car celle-ci pourrait tomber et causer des dommages.
IMPORTANT ! L’applique devrait reposer légèrement à ce point. Si
c’est serré contre le mur, utiliser un plus long mamelon.
Aligner la rainure dans le passage d’eau avec les doubles arrêtes
de l’anti-fuites.
Presser le passage d’eau en place sur l’adaptateur. Sécuriser le
passage d’eau à l’adaptateur avec la vis fournie.
Vérifier que l’applique ne tourne pas ni se déplace.
IMPORTANT ! Si l’applique est encore desserré après cette étape,
utiliser un mamelon plus court.
Passage eau
Vis
Protection
contre fuites
Applique
Adaptateur
Clé à douille
avec mèche
Extension
Kohler Co. Français-7 1043851-2-D
Page 16

7. Compléter l’installation
Attacher la tête du vaporisateur
Avec les arrêtes du vaporisateur orientées vers le haut, attacher le
vaporisateur au passage d’eau.
En utilisant une clé hexagonale de 3/16″, sécuriser le vaporisateur
au passage d’eau avec les deux vis hexagonales fournies. Ne pas
trop serrer.
Vérifier le mouvement vers le haut et le bas de la tête du
vaporisateur et que celle-ci repose de manière nivelée dans
l’applique.
Placer la membrane du jet sur le vaporisateur.
Aligner le long rebord de la membrane dans les arrêtes de
charnière (horizontal).
REMARQUE : Pour une performance optimum, s’assurer que la
membrane soit appliquée de manière égale.
Tout en appliquant de la pression de manière égale, presser le
joint de membrane dans la rainure de la tête du vaporisateur.
Attacher la face du vaporisateur
REMARQUE : Pour un produit en finition brossée, aligner le motif
brossé avec les faces de vaporisateur avec l’orientation du motif
brossé de l’applique.
Incliner le vaporisateur vers le bas de manière à ce que le dessus
en soit exposé.
Face
du
vaporisateur
Arrêtes
Arrêtes
Rainure
Mur fini
Vis de retenue
Tête du vaporisateur
Passage eau
Vis hexagonales
Attacher la tête du vaporisateur Attacher la face du vaporisateur
Membrane
de la buse
1043851-2-D Français-8 Kohler Co.
Page 17

Compléter l’installation (cont.)
Insérer les rainures de la face du vaporisateur sur les arrêtes de
ce dernier.
Presser la face du vaporisateur vers le bas pour la couvrir tel
qu’illustré.
Incliner le vaporisateur vers le haut pour exposer les orifices des
vis de serrage à la base du vaporisateur.
IMPORTANT ! Les vis de serrage doivent être à égalité avec le
rebord du cadre de la face du vaporisateur. Si les vis de serrage
dépassent du cadre de la face du vaporisateur, un endommagement
du produit aura lieu.
En utilisant une clé hexagonale de 5/64″, tourner les vis de
serrage vers la gauche jusqu’à ce qu’elles soient à égalité avec le
rebord du cadre du vaporisateur.
Kohler Co. Français-9 1043851-2-D
Page 18

Guía de instalación
Rociador corporal en forma de azulejo
Herramientas y materiales
Gracias por elegir los productos de Kohler
Le agradecemos que haya elegido la calidad de Kohler. Dedique unos
minutos para leer este manual antes de comenzar la instalación. En
caso de problemas de instalación o de funcionamiento, no dude en
contactarnos. Nuestros números de teléfono y nuestro sitio web se
encuentran en la cubierta posterior de esta guía. Gracias nuevamente
por escoger a Kohler.
Antes de comenzar
Cumpla con todos los códigos locales de plomería y de
construcción.
Revise que las tuberías de suministro no estén dañadas.
Reemplácelas de ser necesario.
Kohler Co. se reserva el derecho de modificar el diseño de la
grifería sin previo aviso, tal como se especifica en la lista de
precios.
Llaves hexagonales
de 5/64" y 3/16"
Llave de dados con extensión
y dado de 11 mm o 7/16"
Cinta
selladora
Más:
• Niple corto o
• Niple de 1-1/2" NPT
• Conexiones hembra de 1/2" NPT
• Tubería de cobre de 1/2"
Destornillador
de punta de
cruz o Phillips
Cinta de
enmascarar
Kohler Co. Español-1 1043851-2-D
Page 19

1. Instale las tuberías de suministro
Instalaciones de múltiples rociadores corporales
Haga el tendido de las líneas de suministro.
Si va a instalar más de un rociador corporal en la misma línea de
suministro, construya un bucle de regulación de presión. Instale
unaTalolargodelbucle en el lugar de instalación de cada
rociador corporal.
No instale abrazaderas para tubos en este momento.
Instalaciones de un solo rociador corporal
Haga el tendido de la línea de suministro.
Instale un codo en el extremo del tubo de suministro en el lugar
de instalación del rociador corporal.
Todas las instalaciones
Instale temporalmente un niple en cada T/codo. No utilice
ningún sellador.
No instale abrazaderas para tubos en este momento.
Bucle de
regulación
de presión
Suministro
de agua
Instalación de un solo
rociador corporal
Instalación de múltiples
rociadores corporales
Niple
Niple
Kohler Co. Español-2 1043851-2-D
Page 20

2. Instale el protector de yeso
Instale el protector de yeso. Empuje hasta que el protector de
yeso esté ajustado contra la cara del codo(oT).
3. Establezca la profundidad de la tubería
Instalaciones en pared delgada
NOTA: Las instalaciones en pared delgada tienen un espesor de
pared acabada inferior a 1/2″ (1,3 cm).
Para ajustar la profundidad de la tubería, utilice un nivel u otro
filo recto para alinear la marca identificada ″Thin Wall
Installation″ con la cara frontal de los postes de madera.
Instalaciones en pared estándar
Para ajustar la profundidad de la tubería, utilice un nivel u otro
filo recto para alinear el borde del protector de yeso con la cara
frontal de los postes de madera.
Todas las instalaciones
Codo (o T)
Pared delgada
Pared estándar
Establezca la profundidad de la tuberíaInstale el protector de yeso
Instale el
protector
de yeso.
Alinee el punto marcado con el
frente de la cara del poste de
madera.
Alinee el punto marcado con el frente
de la cara del poste de madera.
1043851-2-D Español-3 Kohler Co.
Page 21

Establezca la profundidad de la tubería (cont.)
Instale un refuerzo adecuado e instale abrazaderas para tubos a la
profundidad ajustada.
Kohler Co. Español-4 1043851-2-D
Page 22

4. Instale la pared acabada
Instale el material de la pared
Instale el panel de yeso para pared resistente al agua.
Corte un cuadro de 4″ (10,2 cm) a 4-1/4″ (10,8 cm) en el lugar de
instalación de cada azulejo.
Instale el material de acabado de la pared.
5. Verifique la profundidad e instale el niple
Retire el niple.
NOTA: La distancia mínima entre el frente de la T/codo y la
superficie de la pared acabada debe ser de 2-1/4″ (5,7 cm). La
distancia para las instalaciones típicas es 2-3/4″ (7 cm).
Mida la distancia desde la cara de la T/codo hasta la superficie
de la pared acabada. Haga los ajustes necesarios.
Si la distancia es 2-1/4″ (5,7 cm): Utilice un niple corto.
Si la distancia es 2-3/4″ (7 cm): Utilice un niple de 1-1/2″.
Enrosque el niple en la T/codo y apriete a mano.
Mida la distancia desde el extremo del niple hasta la superficie de
la pared acabada. Verifique que la distancia sea por lo menos
1-1/2″ (3,8 cm) pero que no sea mayor de 1-3/4″ (4,4 cm).
Retire el niple.
Aplique cinta selladora de roscas a las roscas del niple.
Vuelva a instalar el niple a la T/codo.
Deje correr el agua a través del sistema para eliminar las
partículas y residuos.
4" (10,2 cm) –
4-1/4" (10,8 cm)
4" (10,2 cm) –
4-1/4" (10,8 cm)
4" (10,2 cm) –
4-1/4" (10,8 cm)
Abertura
Niple
T (o codo)
Pared acabada
Abertura
2-1/4" (5,7 cm) Mín
1043851-2-D Español-5 Kohler Co.
Page 23

6. Instale la vía de agua
Introduzca el chapetón en la abertura no acabada. La saliente
doble del protector contra fugas debe quedar orientado hacia
arriba.
Si el protector contra fugas entra en contacto con el codo:
Agrande a 1-1/4″ (3,2 cm) el orificio de la cara posterior del
protector contra fugas.
Enrosque el adaptador al niple utilizando la llave de dados y
extensión, dado de 11 mm o 7/16″, o la broca de 11 mm provista.
Utilice cinta de enmascarar para retener la broca en su lugar,
puesto que puede caerse y causar daños.
¡IMPORTANTE! El chapetón debe estar suelto en este momento. Si
está apretado contra la pared, utilice un niple más largo.
Alinee la ranura en la vía de agua con la saliente doble del
protector contra fugas.
Presione la vía de agua en su lugar sobre el adaptador. Asegure la
vía de agua al adaptador con los tornillos provistos.
Verifique que el chapetón no gire ni se mueva.
¡IMPORTANTE! Si después de este paso, el chapetón aún está
suelto, utilice un niple más corto.
Vía de agua
Tornillo
Protector
contra fugas
Chapetón
Adaptador
Llave de dados
con broca
Extensión
Kohler Co. Español-6 1043851-2-D
Page 24

7. Termine la instalación
Instale la cabeza del rociador
Con las salientes de la cabeza del rociador hacia arriba, instale la
cabeza del rociador a la vía de agua.
Con la llave hexagonal de 3/16″, apriete los dos tornillos
hexagonales incluidos para fijar la cabeza del rociador a la vía de
agua. No apriete demasiado.
Verifique que la cabeza del rociador se mueva hacia arriba y hacia
abajo y que esté encuadrada con el chapetón.
Coloque la membrana de boquillas sobre la cabeza del rociador.
Alinee el borde largo de la membrana con las salientes de la
bisagra (horizontal).
NOTA: Para un funcionamiento óptimo, asegúrese de que la
membrana esté pareja.
Presione el sello de la membrana, aplicando presión
uniformemente e introduciéndolo en la ranura de la cabeza del
rociador.
Instale la placa exterior del rociador
NOTA: Para el producto con acabados cepillados, alinee el dibujo
del cepillado de la placa exterior de los rociadores con la dirección
del dibujo del cepillado del chapetón.
Placa
exterior
del rociador
Salientes
Salientes
Ranura
Pared acabada
Tornillos
de fijación
Cabeza del rociador
Vía de agua
Tornillos hexagonales
Instale la cabeza del rociador Instale la placa exterior del rociador
Membrana
de boquillas
1043851-2-D Español-7 Kohler Co.
Page 25

Termine la instalación (cont.)
Incline hacia abajo la cabeza del rociador de manera que se
expongan las salientes de la parte superior de la cabeza del
rociador.
Inserte las ranuras de la placa exterior del rociador sobre las
salientes de la cabeza del rociador.
Presione la placa exterior del rociador para cubrir la cabeza del
rociador, tal como se ilustra.
Incline hacia arriba la cabeza del rociador para exponer los
orificios de los tornillos de fijación que se encuentran en la parte
inferior de la cabeza del rociador.
¡IMPORTANTE! Los tornillos de fijación deben quedar al ras con el
borde del marco de la placa exterior del rociador. Si los tornillos de
fijación sobresalen del marco de la placa exterior del rociador,
ocurrirán daños al producto.
Con una llave hexagonal de 5/64″, gire hacia la izquierda los
tornillos de fijación hasta que queden al ras con el borde del
marco de la placa exterior del rociador.
Kohler Co. Español-8 1043851-2-D
Page 26

1043851-2-D
Page 27

1043851-2-D
Page 28

USA: 1-800-4-KOHLER
Canada: 1-800-964-5590
México: 001-877-680-1310
kohler.com
©2006 Kohler Co.
1043851-2-D
 Loading...