

Page 1
Homeowners Guide
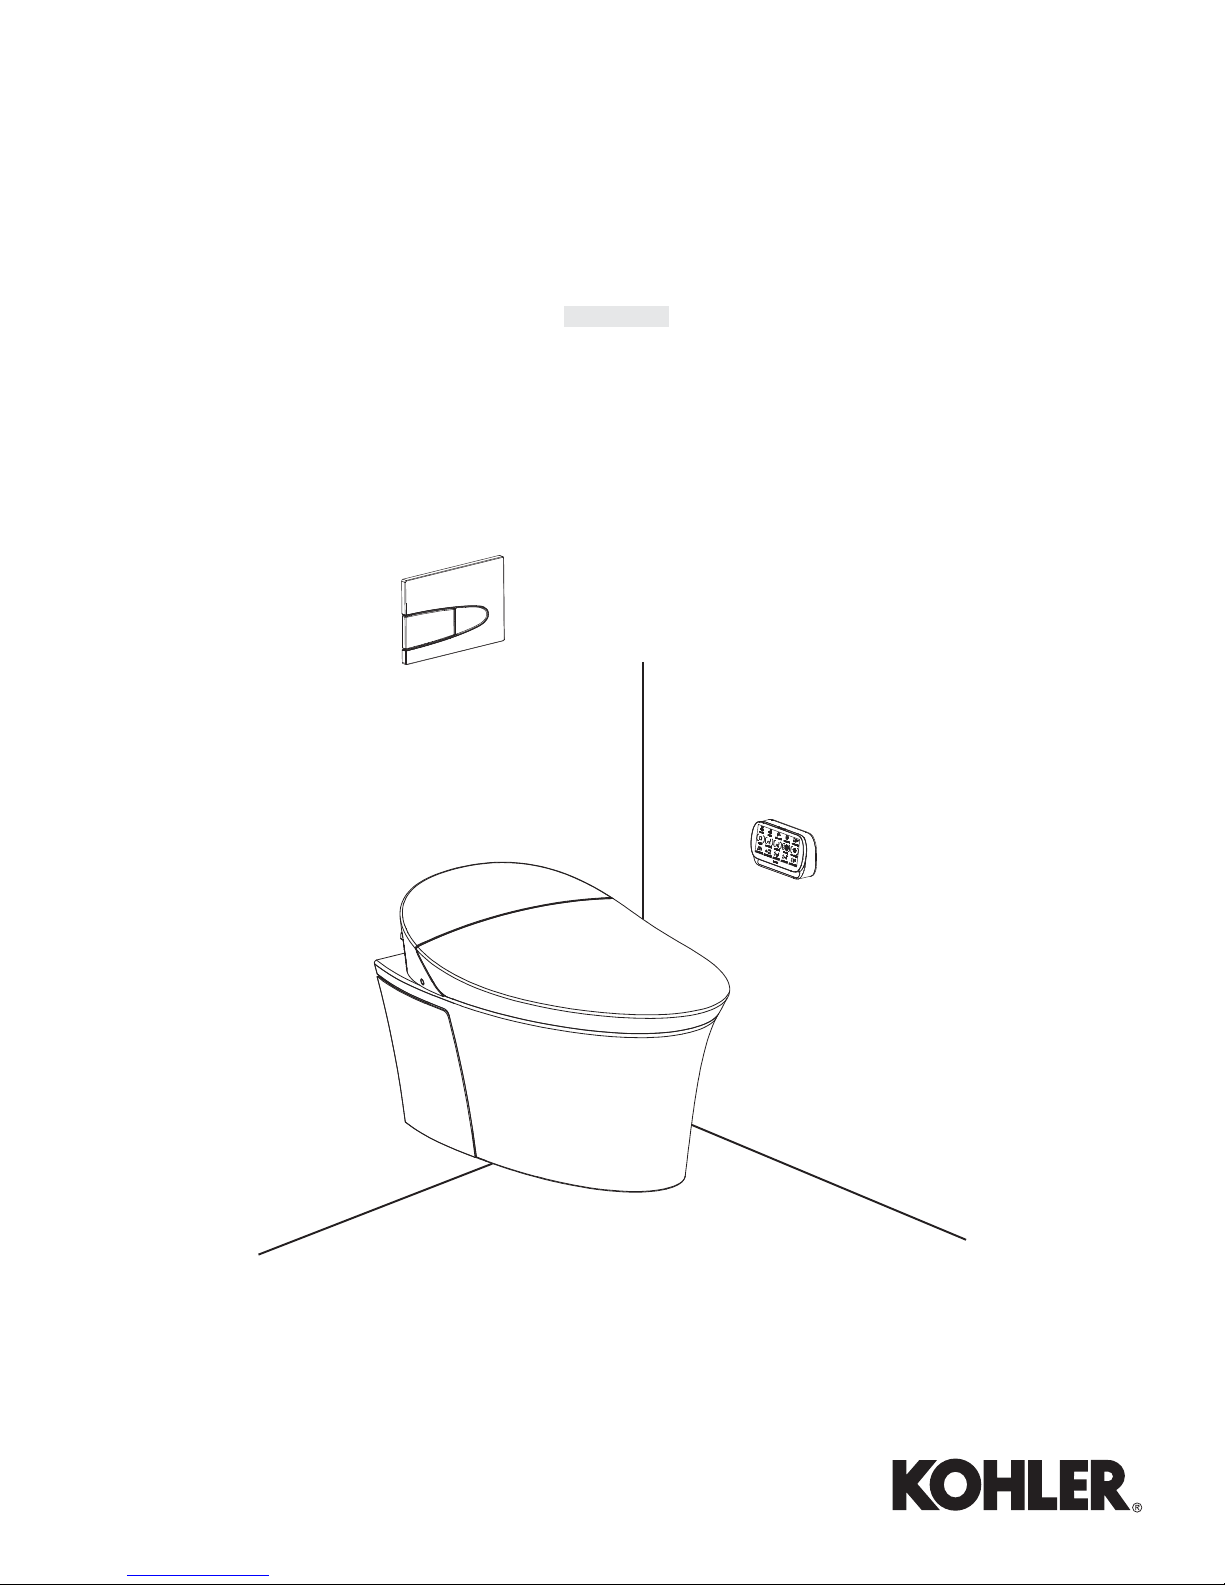
Veil Wall Hung
Intelligent Toilet
K-5402A-0
1274372-A05-B June 2016
Page 2
CAUTIONS AND WARNINGS
SAVE THESE INSTRUCTIONS
WARNING: Risk of electric shock, fire, or personal injury. This product must be grounded. Connect only to a dedicated
220V-240V~, 50/60Hz,10A or higher circuit protected by a minimum 10A Ground-Fault Circuit Interrupter (GFCI) or
Earth-Leakage Circuit-Breaker (ELCB). Require 1mm - 2.5mm hard cord as power input, flexible cord is not allowed.
WARNING: Risk of electric shock or product damage. Do not immerse product within water.
IMPORTANT! Risk of product damage. Do not install seat in a location where water might be splashed on the product.
IMPORTANT! Risk of product damage. Do not install this seat in a location exposed to excessive moisture
where condensation might form on the product surface. Provide adequate ventilation to avoid damage to
the electronic components due to high humidity levels.
IMPORTANT! Risk of product or property damage. Pushing or pulling on the water connection may cause water leakage.
2 2
IMPORTANT! Risk of product damage. Do not apply excessive force to the spray wands. Product may break.
IMPORTANT! Risk of product damage. In areas where water may freeze in the pipes, make arrangements to keep
the pipes warm. Any water remaining in the seat may freeze during the winter, allow the unit to warm to room
temperature before reinstalling or using.
IMPORTANT! Risk of product damage. Do not supply electrical power to the unit until the plumbing installation
work has been completed; it could cause product to malfunction.
NOTE: The thermal protectors may trip during storage or transportation in warm weather causing the unit not to operate.
Allow the unit to cool to room temperature before installation or operation.
When using electrical products, especially when children are present, basic safety precautions should always be
followed, including the following:
DANGER – To reduce the risk of electric shock
Do not place or store this appliance where it can fall or be pulled into a bath or sink.
Do not place in or drop into water or other liquid.
Do not reach for a product that has fallen into water. Turn off the power.
WARNING – To reduce the risk of low-grade burns electric shock, fire or injury to persons:
Close supervision is necessary when this appliance is used by or near the very young, the elderly, or invalids.
Children should not be permitted to use to touch this appliance. Do not leave children unattended in any room
where this product is installed.
Adjust the temperature, spray temperature and air temperature of the toilet seat to proper dials for the elderly, those
who are incapacitated, or persons with sensitive skin.
Use this appliance only for its intended purpose as described in the manual. Do not use
attachments not recommended by Kohler Co.
To prevent product from damage, do not lean on cover when using this appliance.
Never operate this appliance if it is not working properly or if it has been dropped into water.
Install this product properly by following the installation procedure.
Kohler Co.21274372-A05-B June 2016
Page 3
CAUTIONS AND WARNINGS (cont.)
Only authorized persons may install or repair the unit. Do not attempt to repair this appliance yourself; doing
so could void the warranty.
Keep the cord away from heated surfaces.
Never drop or insert any objects into hose.
Do not use outdoors or where aerosol spray product is being used or where oxygen is administrated.
Always follow the grounding instructions in this manual before plugging in the unit.
Keep the cord away from splash water.
Avoid low-grade burn from exposed skin contact heating seat for a long time.
Only authorized persons from manufacture, maintenance or similar departments may repair or replace UV
sterilization device.
In case the power line is damaged; to avoid danger, product should be replaced by the manufacturer or
professionals from its maintenance department or similar departments, to avoid the occurrence of danger.
Please use the water supply hose assemblies and tee valve components accompanying the new product.
The old hose assemblies and tee valve components shall not be used again.
Never let children play with this appliance.
Kohler Co.31274372-A05-B June 2016
Page 4
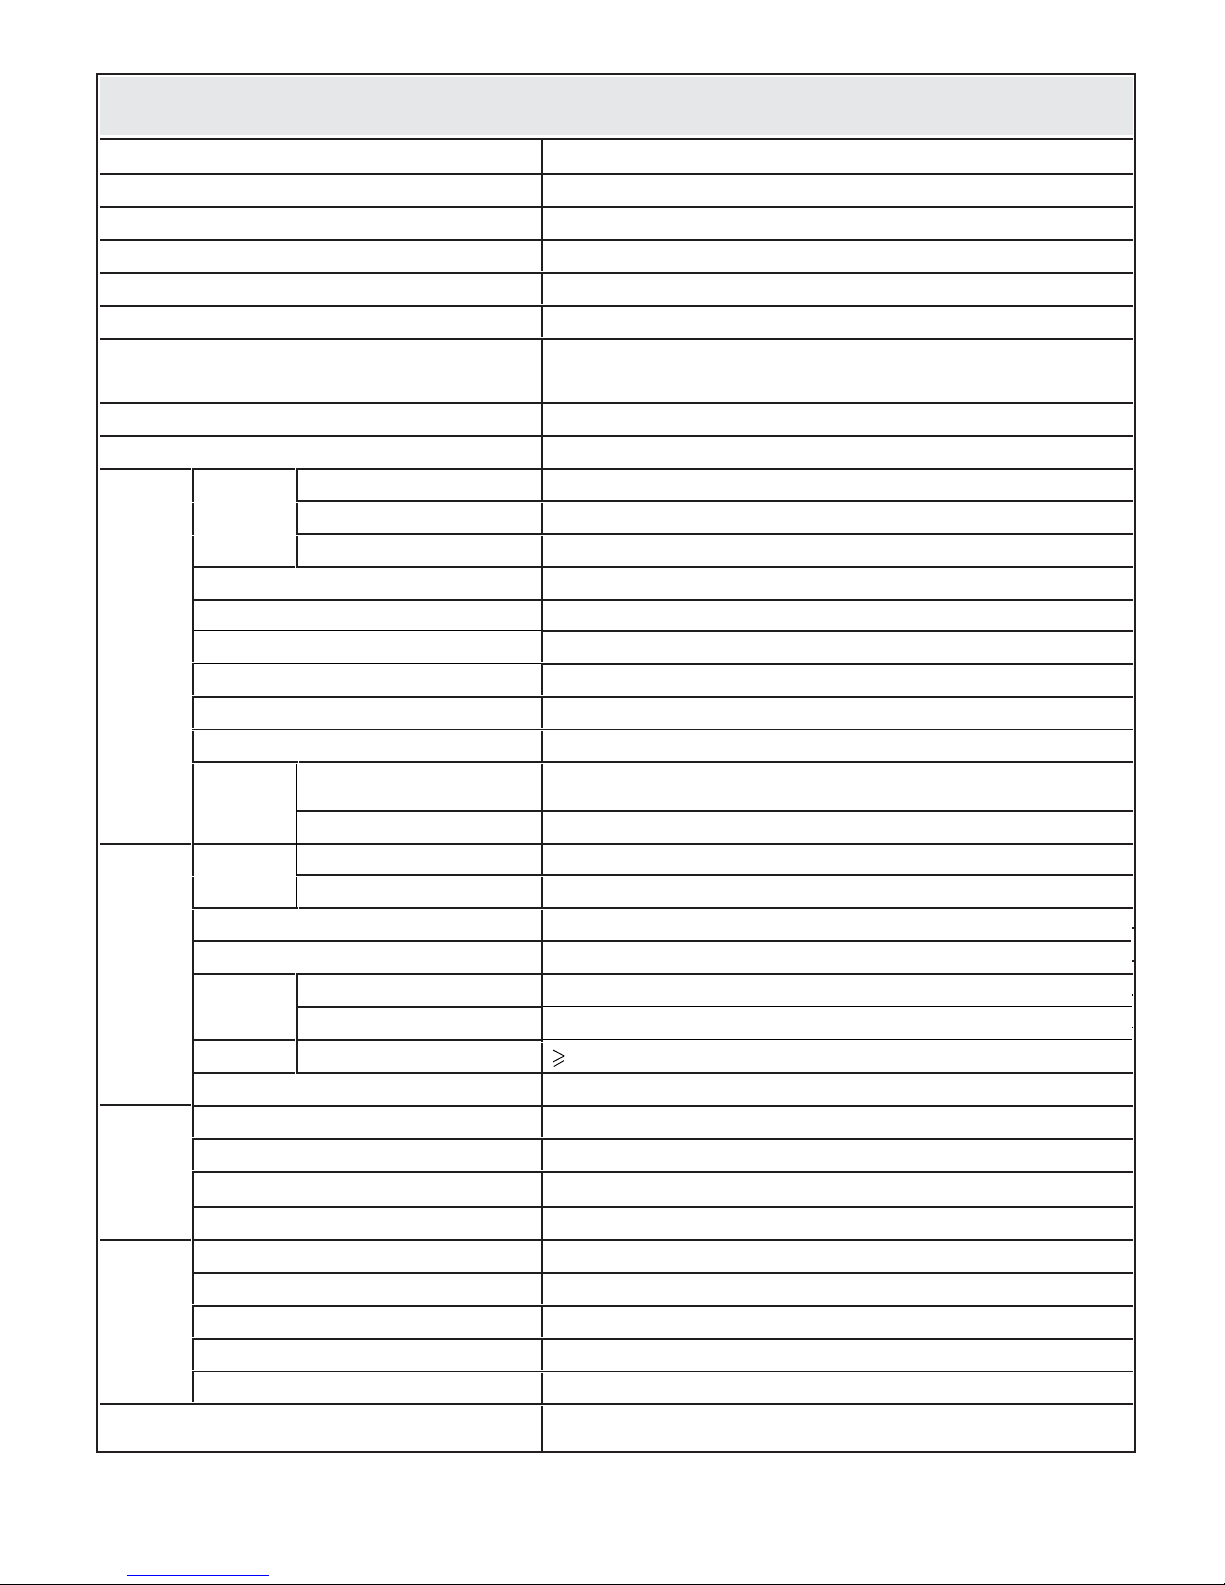
SPECIFICATION
Water consumption
Min water supply condition (recommended)
Max water supply condition
Rated voltage
Rated power
Max instant power
Product size
Product weight (excluding concealed water tank)
Ambient environment
Cleaning
Water flow
(under
0.2Mpa
pressure)
Spray water temp adjustment
Spray duration (Max.)
Wand quantity
Wand position adjustment
Pulsate cleaning
Rear wash
Spiral wash
Front wash
Oscillation cleaning ON/OFF
4.5L/3L
70kPa (dynamic)
500kPa (static)
220-240V~, 50/60Hz
1100W
1600W
675mmX438mmX533mm (height: from floor to the top of
the product.).
About
44kg
1-40℃
35
About 0.
About 0.
About 0.
OFF, 1-5 dials (ambient temp 31-39℃ )
300s
1
5 dials
ON/OFF
-0.68L/min
26
-0.68L/min
35
-0.68L/min
Comfort
Sanitary
Other
functions
Safety
device
Thermal
Cover Auto OPEN/CLOSE, slow falling, remote OPEN/CLOSE
Seat
Dryer
Deodorize Air flow rate
Remote controller
Wand auto clean Yes
Anti-microbial material
E-water sterilization Yes
UV light sterilization Yes
Side panel
Seated inspection
Night light
Auto Lid OPEN/CLOSE
Manual flush
Thermal protection
Back-flow prevention Check valve
Temp adjustment
Safety device
Temp adjustment
Safety devices
Temp fuse, overheat breaker
OFF, 1-5 dials (ambient temp 31-39℃ )
Temp fuse, overheat breaker
Slow falling, remote OPEN/CLOSE
OFF, 1-5 dials (ambient temp 38-52℃ )
Temp fuse, overheat breaker
0.
11
m3/min
Function setting refer to page 6~7
Cover and Seat
6 function keys
Capacitor detection
2 blue LED
Microwave detection
Able to operate when power is off
light
In-wall tank dimension (L*W*D)
1190mmX478mmX88mm
Kohler Co.41274372-A05-B June 2016
Page 5
SPECIFICATION (cont.)
Flush control board dimension (L*W)
Concealed water tank driving method
Flush control board color Soft frost
Flush control board LED light color Blue
Concealed water tank water inlet connector spec G 1/2''
Bearing capability Max. 400kg
Adjustable wall thickness 11-60mm
215mmX150mm
Manual + Auto
Thank You For Choosing Kohler Company
Thank you for choosing Kohler. Kohler craftsmanship offers you a rare combination of proven performance and graceful
sophistication that will satisfy you for years to come. The dependability and beauty of your Kohler product will surpass your
highest expectations. We’re very proud of our products here at Kohler and we know you will be too.
Please take a few minutes to study this Homeowners Guide. Pay special attention to the care and cleaning instructions.
All information in this manual is based upon the latest product information available at the time of publication. At Kohler,
we constantly strive to improve the quality of our products. We reserve the right to make changes in product
characteristics, packaging, or availability at any time without notice.
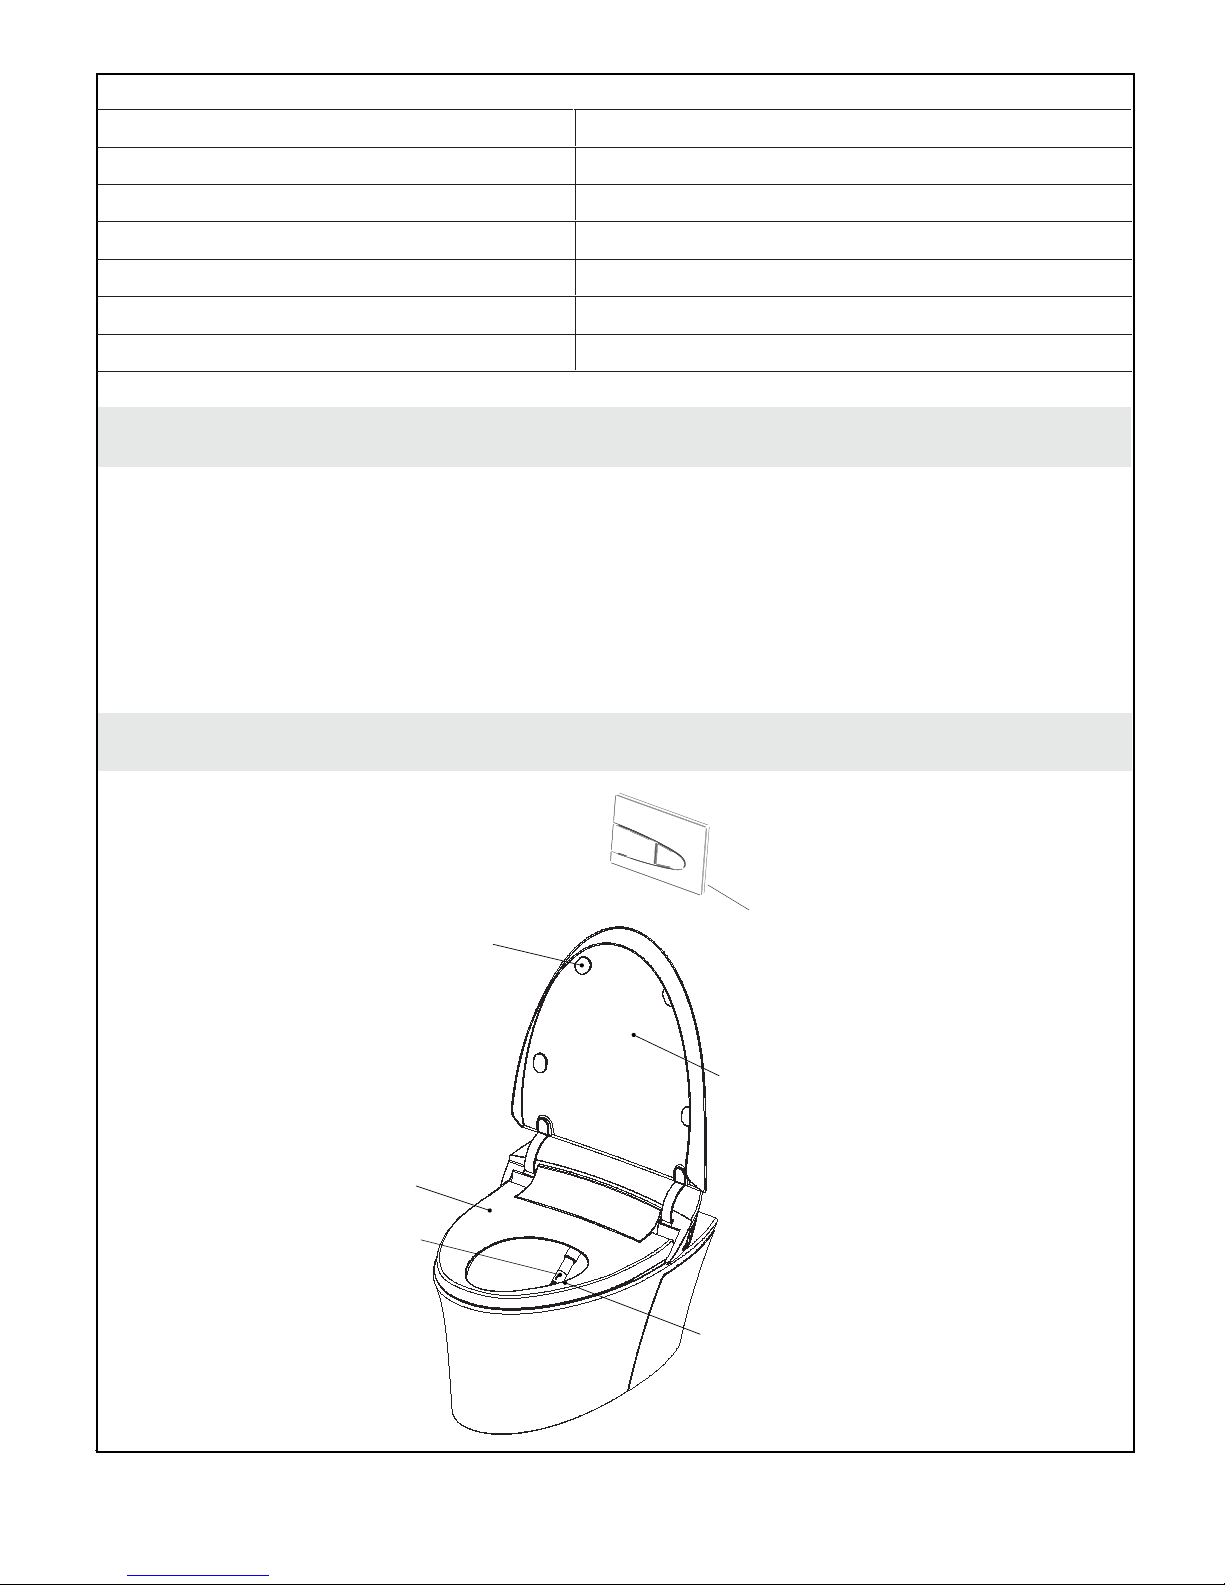
Toilet Schematic
Seat (antibacterial)
Flush control board
Buffer pad x 4
Cover (antibacterial)
Nozzle
Seated detection zone
Kohler Co.51274372-A05-B June 2016
Page 6
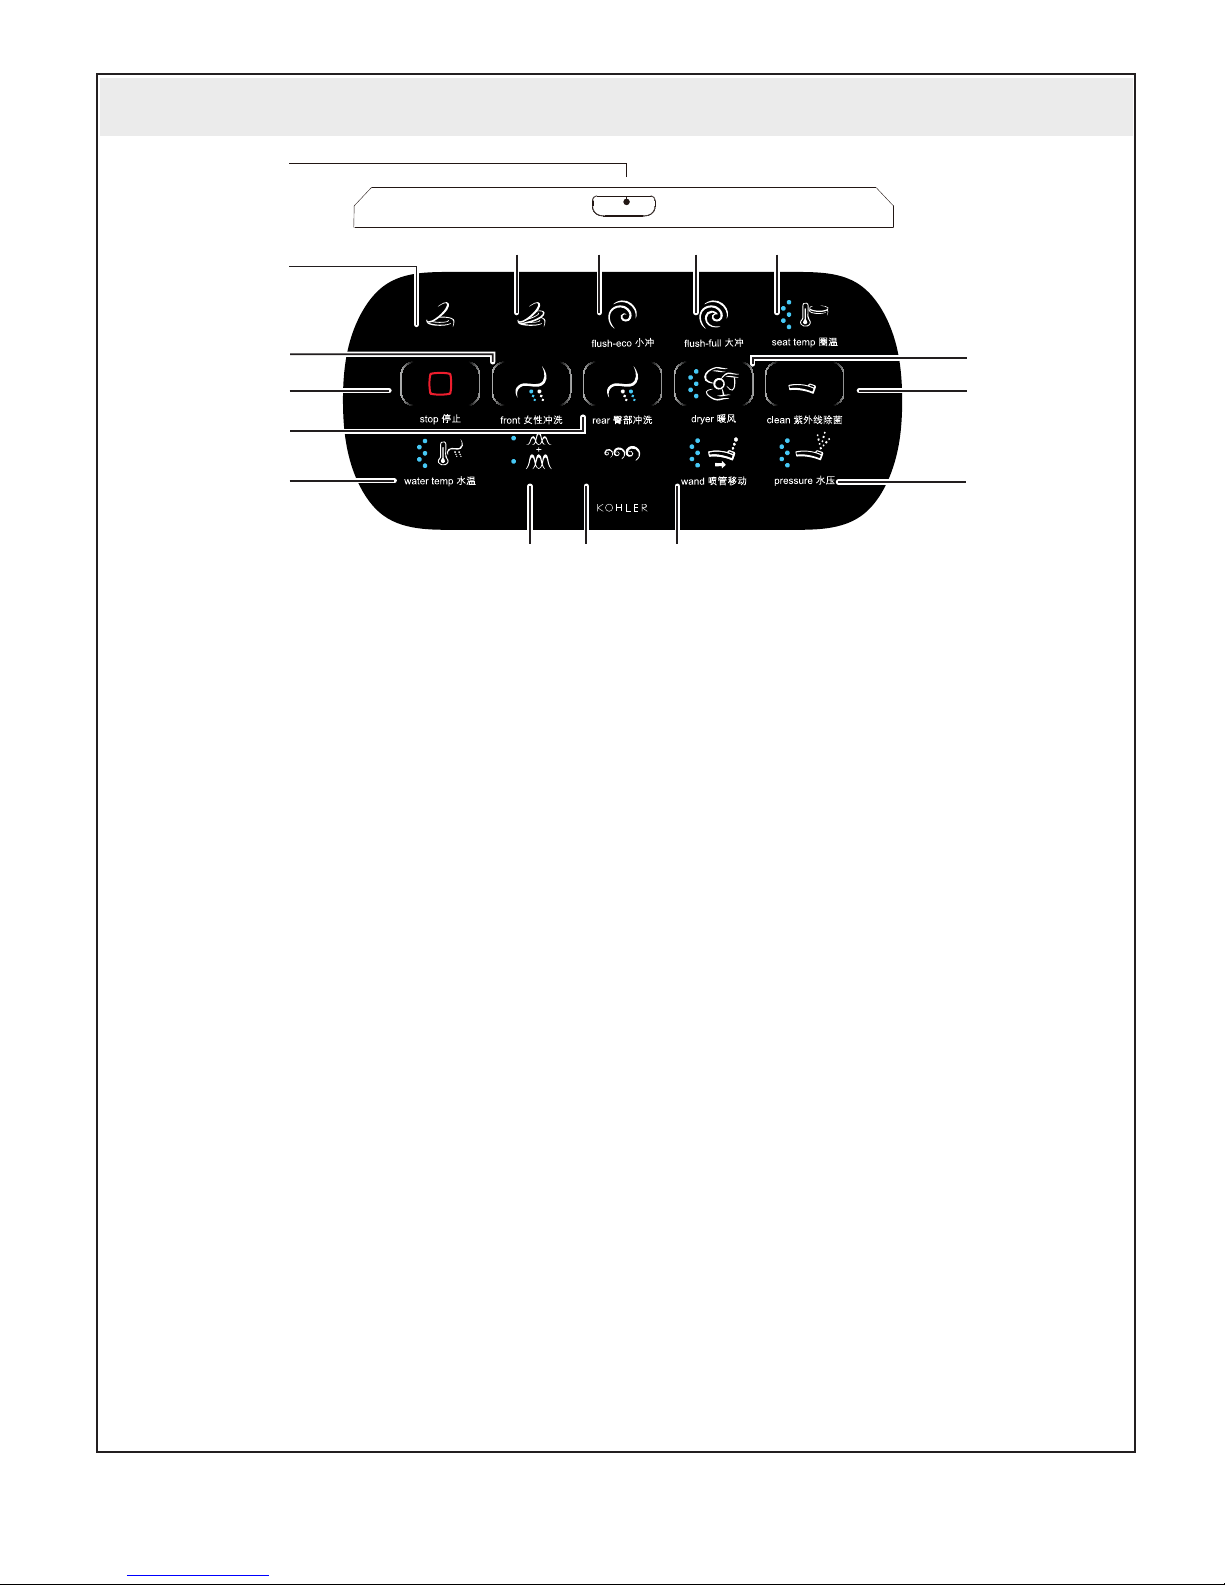
REMOTE GUIDE
A
DC
B
G
H
I
J
cover 便盖
seat 座圈
massage 脉冲/移动
K
spiral 旋转冲洗
L
E
M
F
N
UV
O
P
Warning: To prevent it from falling, please remove remote from docking station before pressing the ON button.
A – Activate toilet
Press this button to activate toilet by remote. Perform ON/OFF screen switch from this button after activation.
If it is not connected to toilet after activation, the 3
Enter activation mode.
B – Lid OPEN/CLOSE
Press this button to perform cover ON/OFF action under unseated status.
C - Ring OPEN/CLOSE
Press this button to perform seat ON/OFF action under unseated status.
D – Flush ECO
Press this button to perform ECO (half) flush operation.
E – Flush Full
Press this button to perform full flush operation.
F – Seat Temp
Press this button to adjust seat temperature, when 5 blue dots aren’t displayed this indicates seat heating function is OFF.
G – Front Wash
Press this button to enter front wash when seated. This function will automatically stop after about 5 minutes or will turn
off immediately upon pressing the OFF button.
H – Stop
Press this button to stop front wash, rear wash, dryer and deodorizer, manual wand clean and UV etc. functions.
•
Pressing and holding this button will turn off remote.
•
I – Rear Wash
Press this button to enter rear wash when seated. This function will automatically stop after about 5 minutes or will turn
off immediately upon pressing the OFF button.
rd
row icons will flash; icons stop flashing after successful connection.
J – Water temp
Press this button to adjust water temp dial when front wash or rear wash is activated.
K – Massage
Press this button
press this button a 3
to enter oscillate when front wash or rear wash is activated; press this button again to enter pulsate;
rd
time to perform oscillate/pulsate simultaneously; press this button a 4
(left side icon LED on for corresponding functions).
L – Spiral Wash
Press this button to enter spiral wash during rear wash - spiral icon will blink. Press this button again to exit spiral wash (or
press “STOP” button to turn off) - spiral icon will stop blinking.
th
time to exit this mode
Kohler Co.61274372-A05-B June 2016
Page 7

M – Wand Move
Press this button to adjust wand position.
N – Dryer
Press this button once to activate dryer function after seating; press this button again to adjust dryer dials. Function will
stop automatically after about 4 minutes or can be turned off immediately by pressing the OFF button.
O – UV Sterilization
Press this button to enter UV sterilization function under unseated status. Icon will blink.
P – Water Pressure
Press this button to adjust water pressure dials when front wash or rear wash is activated.
Low-Voltage Warning
Note: Please charge immediately after voltage warning.
When button blinks, this indicates remote internal battery will be exhausted, the remote requires charging.
•
Pairing
Note: Pairing process shall only be performed when unseated.
Press remote top ON button to activate toilet when under normal powered on status.
•
Hold remote dryer button, after bottom row of icons quick blinking, toilet operation starts.
•
•
Hold toilet button and button on toilet side panel, release button when heard one short beep.
•
When the bottom row of icons on remote stop blinking, this indicates successful pairing.
Remote to Toilet Communication
When remote moves outside of detection area, bottom row of icons on remote will auto flash (indicating searching toilet
•
signal). When moved back into toilet detection area, if toilet is powered on and under normal operation, signal will be
automatically reconnected, and icon will stop blinking after successful connection.
Stop Function
Whenever pressing and holding button, remote shall enter stop mode.
•
Remote Setting Guide
B
G
H
I
J
cover 便盖
seat 座圈
massage 脉冲/移动
DC
spiral 旋转冲洗
E
F
N
UV
O
P
K
L
M
Kohler Co.71274372-A05-B June 2016
Page 8

On the side of toilet, press and hold the button until you hear one short beep. Night light shall blink 3 times
simultaneously. Release button, then change settings according to below B/C/E/F/O.
–
•
Press and hold this button to set auto cover detection distance
1. Night light quick blink once is close distance (short beep)
2. Night light quick blink twice is middle distance (short beep)
3. Night light quick blink three times is far distance (short beep)
4. Night light slow blink once to turn off auto cover open function (long beep).
–
Press and hold this button to set deodorizer function ON/OFF status
•
Night light quick blink once indicate deodorizer functions is ON (short beep)
1.
Night light slow blink once indicate deodorizer functions is OFF (long beep)
2.
–
Press and hold this button to set auto flush function ON/OFF status.
•
Night light quick blink once to activate auto flush function (short beep)
1.
Ni t light slow blink once to deactivate auto flush function (longh g beep)
2.
–
Press and hold this button to set energy saving function ON/OFF status.
•
1. Night light quick blink once to activate energy saving function (short beep)
2. Night light slow blink once to deactivate energy saving function (long beep).
–
Press and hold this button to set auto sterilization function ON/OFF status.
•
1. Night light quick blink once to activate auto sterilization function (short beep)
2. Night light slow blink once to deactivate auto sterilization function (long beep)
–
Press and hold manual clean wand function under unseated status to extend wand to perform manual clean on nozzle.
•
Press and hold this button again or press STOP button to deactivate this function.
Remote Battery Usage and Exchange
Remote docking station uses 4x AA alkaline batteries.
•
When battery is low, red LED blinking on docking station indicates
•
user is required to change battery.
To remove docking station from wall bracket:
•
1) Lift dock upwards 2) Shift dock sideways 3) Remove dock
Red light blink
1. Batteries +/- poles must be oriented
as shown in diagram on the remote.
2.
Do not mix new and old batteries.
3. Please use alkaline batteries.
Others
Do not place remote in water or in a location where water may be splashed on the remote.
•
•
Do not place remote near a heater, dryer or any appliance that may cause interference to the normal operation of remote.
•
Place remote back on docking station after each use.
•
Avoid dropping or rough handling of the remote.
Guarding function: the remote can be locked with docking station. Refer to the instruction manual for this specific method.
•
Kohler Co.81274372-A05-B June 2016
Page 9

Preparation Before Initial Use
Connect to power supply
Connect to water inlet valve
Power switch ON
(indicating LED ON)
Confirm power switch is ON and inlet valve is OPEN by opening side panel.
Angle valve ON
Confirm "remote" battery is installed correctly.
Confirm no obstruction in front of the product.
When power is ON, wait until toilet completes self checking. It is normal to hear motor rotation and water flow sounds
as well as seeing the night light blinking during this process. When night light stops blinking, self-checking procedure
is complete.
Default status settings for initial use:
Front wash:
Water temp: mid
Water flow: mid
Wash position: 3rd dial
Rear wash:
Water temp: mid
Water flow: mid
Washing position: 3rd dial
Spiral:
Water temp: mid
Water flow: mid
Washing position: 3rd dial
Seat temp: mid
Wind temp: mid
Night light: ON
Energy saving: OFF
Auto cover swing function: ON; distance: mid Auto
flush function: ON
Auto UV function: ON
E-water function: ON
Deodorizing: ON
Kohler Co.91274372-A05-B June 2016
Page 10

Cover/Seat OPEN/CLOSE Function
A) Cover OPEN/CLOSE
Auto cover OPEN/CLOSE
Cover automatically opens when user enters detection zone when cover is CLOSED.
Cover automatically closes after about 2 minutes when customer moves out from detection zone when cover is OPEN.
OPEN/CLOSE cover by remote
Press cover OPEN/CLOSE button on remote when unseated, and cover will perform corresponding OPEN/CLOSE function.
(For details refer to remote button sketch). Invalid operation when pressing button on remote under seated status.
Manual Cover OPEN/CLOSE
Cover can be OPEN/CLOSED manually. When user opens/closes cover
normally, cover shall automatically open/close based on the movement
trend. Do not continue to apply force to cover. Cover shall automatically
stop when meeting with an obstruction during movement.
Note:
1. When user enters detection zone slowly, cover OPEN/CLOSE
distance might be shorter. Please use remote or manual cover
OPEN/CLOSE if still no response.
Auto cover OPEN/CLOSE function shall only be valid when
2.
remote cover OPEN/CLOSE setting” is “ON”.
Do not set any obstruction 40cm in front of toilet front end; cover
3.
might auto OPEN if there are obstructions.
B) Seat OPEN/CLOSE
OPEN/CLOSE seat by remote
Press seat OPEN/CLOSE button on remote when unseated, and seat will perform corresponding OPEN/CLOSE function.
(For details refer to remote button sketch). Invalid operation when pressing button on remote under seated status.
Kohler Co.101274372-A05-B June 2016
Page 11

Manual Swing Seat
Seat can be OPEN/CLOSED manually. When user open/close seat normally,
the seat shall automatically open/close based on the movement trend. Do not
continue to apply force to seat. Seat shall automatically stop when meeting
with an obstruction during movement.
Note:
During cover and seat OPEN/CLOSE process, do not apply excessive force to
cover or seat. Any man-made interference on cover or seat during automatic
OPEN/CLOSE process is not allowed and may damage the product.
Toilet Flush
A) Auto flush function usage
Seated usage
1)
When the cover is open and the user is seated, the toilet will automatically flush when the user leaves the toilet or is
unseated for a period of time. The cover will close after about 2 minutes of disuse.
12
11
1
10
2
3
9
4
8
5
7
6
2min
Kohler Co.111274372-A05-B June 2016
Page 12

2)
Standing usage
When the cover is open the user can open the seat manually or by remote. The toilet will automatically flush when the
user leaves the toilet for a period of time. The cover and seat will close after about 2 minutes of disuse.
12
11
1
10
2
3
9
4
8
5
7
6
2min
Note:
1. User shall be able to use remote to control flush water or manual flush water, or use in-wall tank
faceplate buttons to flush the toilet if auto flush function is OFF.
2. Auto flush function shall be effect when remote “flush setting” is “ON” (Refer to Page 8 for setting).
B. Flush controlled by remote
Customer shall be able to perform toilet flush function by pressing flush FULL or ECO button on remote.
Note: Remote flush function shall not execute twice before complete flushing process .
C. Flush by waving detection on flush control board
Customer shall be able to control flush full or flush ECO by waving hand
over the in-wall tank faceplate.
Flush Full detection zone
Flush ECO detection zone
D. Flush by manual pressing
When power is OFF, auto flush is deactivated.
Press manual flush button on flush control board:
Left button: flush full
Right button: flush ECO (half flush)
Flush Full button
Flush ECO button
Kohler Co.121274372-A05-B June 2016
Page 13

Side Panel Function
Press to activate dryer function
Note:
Press to enter rear wash
Light induction zone
Press to enter front wash
1. Each function begins on factory defaults. User can change settings by remote (see remote setting guide, pg7~8).
2. Press STOP during front or rear wash to cease function. This will automatically switch off after 5 minutes.
3. Press STOP during dryer operation to cease function. This will automatically switch off after 4 minutes.
rear
front ush lighting
dryer
Press to flush the toilet
stop
STOP function
Press night light function down (long beep indication)
Press again to activate night light function (short beep
indication).
UV Sterilization Function
UV sterilization function is used to sterilize wand by UV light.
Note:
Auto UV sterilization
Auto activates UV sterilization function to sterilize wand if not used for a long time. The process takes about 45
minutes. This function will not be reactivated within the next 24 hrs.
During UV sterilization process, sterilization will be deactivated if customer opens cover and sits on toilet, or
presses STOP button on side panel.
For auto UV sterilization function setting, refer to Page 8.
Manual UV sterilization
Click remote UV button to perform UV sterilization function when toilet cover is CLOSED. This process takes about
34 minutes.
or presses STOP button on side panel.
During UV sterilization process, sterilization will be deactivated if customer opens cover and sits on toilet,
E-water Function
E-water function is used to sterilize nozzle by E-water.
Toilet shall activate E-water sterilization function after user completes front wash, rear wash or spiral wash etc.
E-water sterilization function with automatically activate every 8 hrs when toilet is not in use.
Kohler Co.131274372-A05-B June 2016
Page 14

Auto Energy Saving Function
The toilet shall auto-detect idleness if energy saving function is ON, and decrease seat temperature for energy saving.
•
Refer to page 8 for setting the energy saving feature.
•
Service and Cleaning
A) Regular clean
For best results, keep the following in mind when caring for your KOHLER product:
IMPORTANT! Do not rinse cover directly (including remote).
Inspection
•
Do not allow cleaners to soak on surface – do not allow cleaners to soak the product.
•
Do not use abrasive material – use a soft, damp sponge or cotton cloths. Never use an abrasive material
•
such as a brush or scouring pad to clean surfaces.
Wipe surface – wipe surfaces clean and rinse completely with water immediately after applying cleanser. Rinse
•
and dry any overspray that lands on nearby surfaces.
– always test your cleaning solution on an inconspicuous area before applying to the entire surface.
Cleaning seat
Do not use abrasive detergent and sterilizing aerosol spray products.
•
Caring indication: use detergent and water
mixture or any other detergent listed for seat
cleaning products to clean seat; use a soft,
dampened sponge or cloth. Wipe away and dry
with soft towel, leave to dry naturally in the air.
No corrosive chemical products or cosmetics (such as nail polish or aftershave solution) allowed
•
to come into contact with the seat as it may cause surface damage.
NOTE: Not following these cleaning instructions could void the Kohler warranty.
NOTE:
NOTE:
Cleaning success shall be determined by water hardness and temperature, accurate quantities and cleaning
specification modification.
Do not use excessive force when cleaning cover and seat to prevent product damage.
Kohler Co.141274372-A05-B June 2016
Page 15

B) Nozzle Clean
User shall use a soft-bristled brush to clean rear wash/front wash spray wand.
Press and hold WAND MOVE button for 2 seconds when not sitting on toilet to extend the wand.
Alternatively, press and hold FRONT WASH or REAR WASH button on side panel when not sitting
on toilet to extend the wand for cleaning or inspection.
Press STOP button on side panel or remote to retract the wand. Alternatively, the wand will automatically
retract after 2 minutes.
Remove nozzle from wand and manually clean.
Kohler Co.151274372-A05-B June 2016
Page 16

C) Clean and Replace Filter Screen
Clean or replace the filter screen if there is little or no water spray.
1) Toilet filter screen clean
Turn off power supply, close water supply valve and remove filter screen plug.
Power switch OFF
(LED OFF)
Remove filter screen and clean
CLOSE valve
Clean filter screen
Reinstall filter screen, connect to hose connector, open valve. Turn on power supply and check for leaks.
Reinstall side panel.
2) Concealed water tank filter screen clean
Filter
Please follow the steps specified in installation manual.
Remove control board.
Remove supporting board.
Remove water repelling board.
Screw valve switch to turn off water supply. Unscrew
filter locknut as shown and clean with water.
Reinstall filter screen after clean.
Screen
Tighten
Locknut
Kohler Co.161274372-A05-B June 2016
Page 17

D) Exchange Deodorizer Block
Please replace deodorizer block when poor deodorizing performance or strange smell occurrs.
Deodorizer block exchange steps:
Remove deodorizer screen and deodorizer block.
Screen
After exchanging deodorizer block, re-install back to the toilet.
Deodorizer block
Deodorizer block bracket
Note:
When taking deodorizer block off, please do not insert finger or other objects into deodorizer block cavity.
This may damage the fan or other components.
Kohler Co.171274372-A05-B June 2016
Page 18

E. Service after long idle times
Turn off power supply and close water valve. Press discharge button within small hole on heating pipeline with a fine
rod to discharge the residual water.
CLOSE valve
Power switch OFF
(LED OFF)
Note:
1. Residual water may freeze in winter and cause damage if toilet is not discharged completely
over long idle times.
2. Any water remaining in the seat may freeze during winter, allow the unit to warm to room temperature
before reinstalling or using.
3. Please flush several times after long idle times to ensure the cleanness of internal pipelines.
4. Please remove battery from docking station when expecting to not to use system for a long time.
Kohler Co.181274372-A05-B June 2016
Page 19

TROUBLE SHOOTING
This troubleshooting guide is for general aid only. A Kohler Authorized Service Representative should correct any electrical
problems. For warranty service, contact your dealer or wholesale distributor.
Symptoms Probable Causes Recommended Action
1. Toilet does not work
2. Toilet does not flush
automatically
3.Toilet does not flush
completely
4.Clean function does
not operate properly
5.Flush function stops
during operation
6.Spray function starts
even when unseated
A.
A power failure occurred
B. Product is under protected
status.
C. Toilet is OFF.
A. No water supply.
B. The water supply valve is closed.
C. A power failure occurred.
D. Product is under protected status.
E. Auto flush function is OFF.
A. Filter screen is clogged.
B. Insufficient manual button travel.
A. No water supply.
B. Water supply valve closed or is not fully open.
C. Toilet is in OFF mode.
D. User is unseated or current sitting position is
undetectable by sensor.
E. Filter screen is clogged.
F. Insufficient water supply pressure.
A. Auto stops flush function after 5 min continuous.
B. The seat does not detect any customer.
A. The seat is covered by an object or the seat is
wet.
.
A. Wait until the power is restored.
B. Turn power off on switchbox and then turn
back on (refer to page 9 diagram).
C. Turn on switch on terminal box (refer to pg9).
A. Wait for restoration of water supply.
B. Open the water supply stop.
C. Wait until the power is restored or check
“Manual Flush” section.
D. Turn on terminal box switch (refer to pg9).
E. Refer to “Remote Setting Guide” section.
A. Refer to “ Clean Filter Screen” section.
B. Dismantle water outlet control panel, adjust
manual flush adjustment rod.
A. Wait for restoration of water supply.
B. Fully open water supply valve.
C. Turn on switch on terminal box (refer to pg9).
D. Please sit on again or adjust sitting position.
E. Refer to “Clean and Replace Filter Screen”
section.
F. Inspect water inlet hose for any sharp
bending; if it is too sharp, please adjust hose.
A. If needed, please press flush button again.
B. Adjust sitting gesture and sit again.
A. Remove object and wipe the seat.
7.Dryer stops working
during operation
8.Deodorizer fan stops
working
9.Unable to open/close
cover
elbanU..0011
open/close cover
automatically
11.Night light OFF
12.UV sterilization
process stops
13.No display on
remote
A. Dryer auto stops after continuous 4 min blowing.
B. The seat does not detect any customer.
A. The seat sensor is not detecting the user.
B. Accidently press STOP button during operation.
C. Auto deodorizing function is disabled.
A. The seat sensor is not detecting the user.
B. Customer interference during previous cover
swing process.
A. Customer does not enter or leave detecting zone.
B. Remote “auto swing” function is OFF.
C. Toilet is flushing.
A. Night light function is OFF. A. Refer to night light in “Auxiliary Side Panel
B. Ambient light is too bright.
A. Customer sits on seat.
B. The seat is covered by an object or seat is wet.
A. Battery has run out.
B. Wrong battery installation.
C. Remote has not been awakened yet.
A. If needed, please press dryer button again.
B. Adjust sitting gesture and sit on again.
A. Remove object or wipe seat.
B. If needed, sit on again after 2 seconds.
C. Refer to “Remote setting guide” section.
A. Remove object or wipe seat.
B. Use remote to open/close cover or manual
open/close cover to normal position.
Do not block switch during swing process.
A. Please enter or leave detecting zone.
B. Refer to “Remote setting guide” section.
C. Wait until toilet flush process complete.
Function” section to turn on night light function.
B. Reduce ambient light and close curtains.
A. Please close cover and reactivate UV
sterilization and close toilet cover.
B. Remove objects or wipe seat.
A. Change new battery.
B. Re-install battery correctly.
C. Touch remote screen or awake button.
Approach to toilet or sit on seat.
Kohler Co.191274372-A05-B June 2016
Page 20

TROUBLE SHOOTING continued
Symptoms Probable Causes Recommended Action
Remote unable to
14.
control toilet
A. Battery runs out.
B. Remote and toilet distance is too far.
C. Toilet power is not ON.
D. Toilet is under OFF mode.
E. Toilet and remote is not connected.
A. Refer to “Remote Battery Usage And
Exchange” section to replace battery.
B. Refer to “Remote to Toilet Communication”
section and move remote closer to toilet.
C. Please connect toilet power supply.
D. Turn on switch to terminal box (refer to pg9)
E. Refer to “Remote to Toilet Communication”
section, connect toilet to remote.
15.Seat temp is low
when seated
pplyus retaw oN..6611
from inlet valve
17.No water when
press FLUSH FULL or
FLUSH ECO button
s wrongi level retaW..8811
19.Toilet leak
A. Seat temp is OFF.
B. Energy saving mode ON.
A. Water inlet valve is not OPEN.
B. Water inlet float is covered by other parts.
C. Water inlet valve float is dirty.
A. Wrong adjusting board and screw rod installation.
B. Discharge valve lever and barb is not connected.
A. Water inlet valve float is not adjusted properly. A. Adjust water level again.
A. Foreign objects block water inlet valve float
when water enters water tank; unable to stop water;
water leak from water discharge valve overflow pipe.
B. Foreign objects on water sealing piece.
CONTACT AND WARRANTY INFORMATION
For warranty information, please visit our website:
A. Refer to “Remote Guide” section for setting.
B. Refer to “Remote Guide” section to exit
energy saving mode.
A. Open water inlet valve.
B. Adjust other parts to avoid contact with float.
C. Clean float with water.
A. Re-install screw rod.
B. Re-install barb on discharge valve lever
and snap in.
A. Adjust other parts to avoid any contact with
float during process.
B. Remove foreign objects on water seal piece.
Australia
www.au.kohler.com
New Zealand
www.kohler.co.nz
CALL US FOR HELP
NEW ZEALAND AUSTRALIA
KOHLER NZ LTD KOHLER CO.
Free Ph: 0800 564 537 (0800 KOHLER) Free Ph: 1 800 KOHLER
Free Fax: 0800 664 488 (1 800 564 537)
www.kohler.co.nz www.au.kohler.com
Kohler Co.201274372-A05-B June 2016
 Loading...