

Page 1

Installation Guide
Bath Filler Spout Shank
K–411
M product numbers are for Mexico (i.e. K-12345M)
Los números de productos seguidos de
M corresponden a México (Ej.
K-12345M)
Français, page“ Français-1”
Español, página“ Español-1”
1010568-2-B
Page 2

Tools and Materials
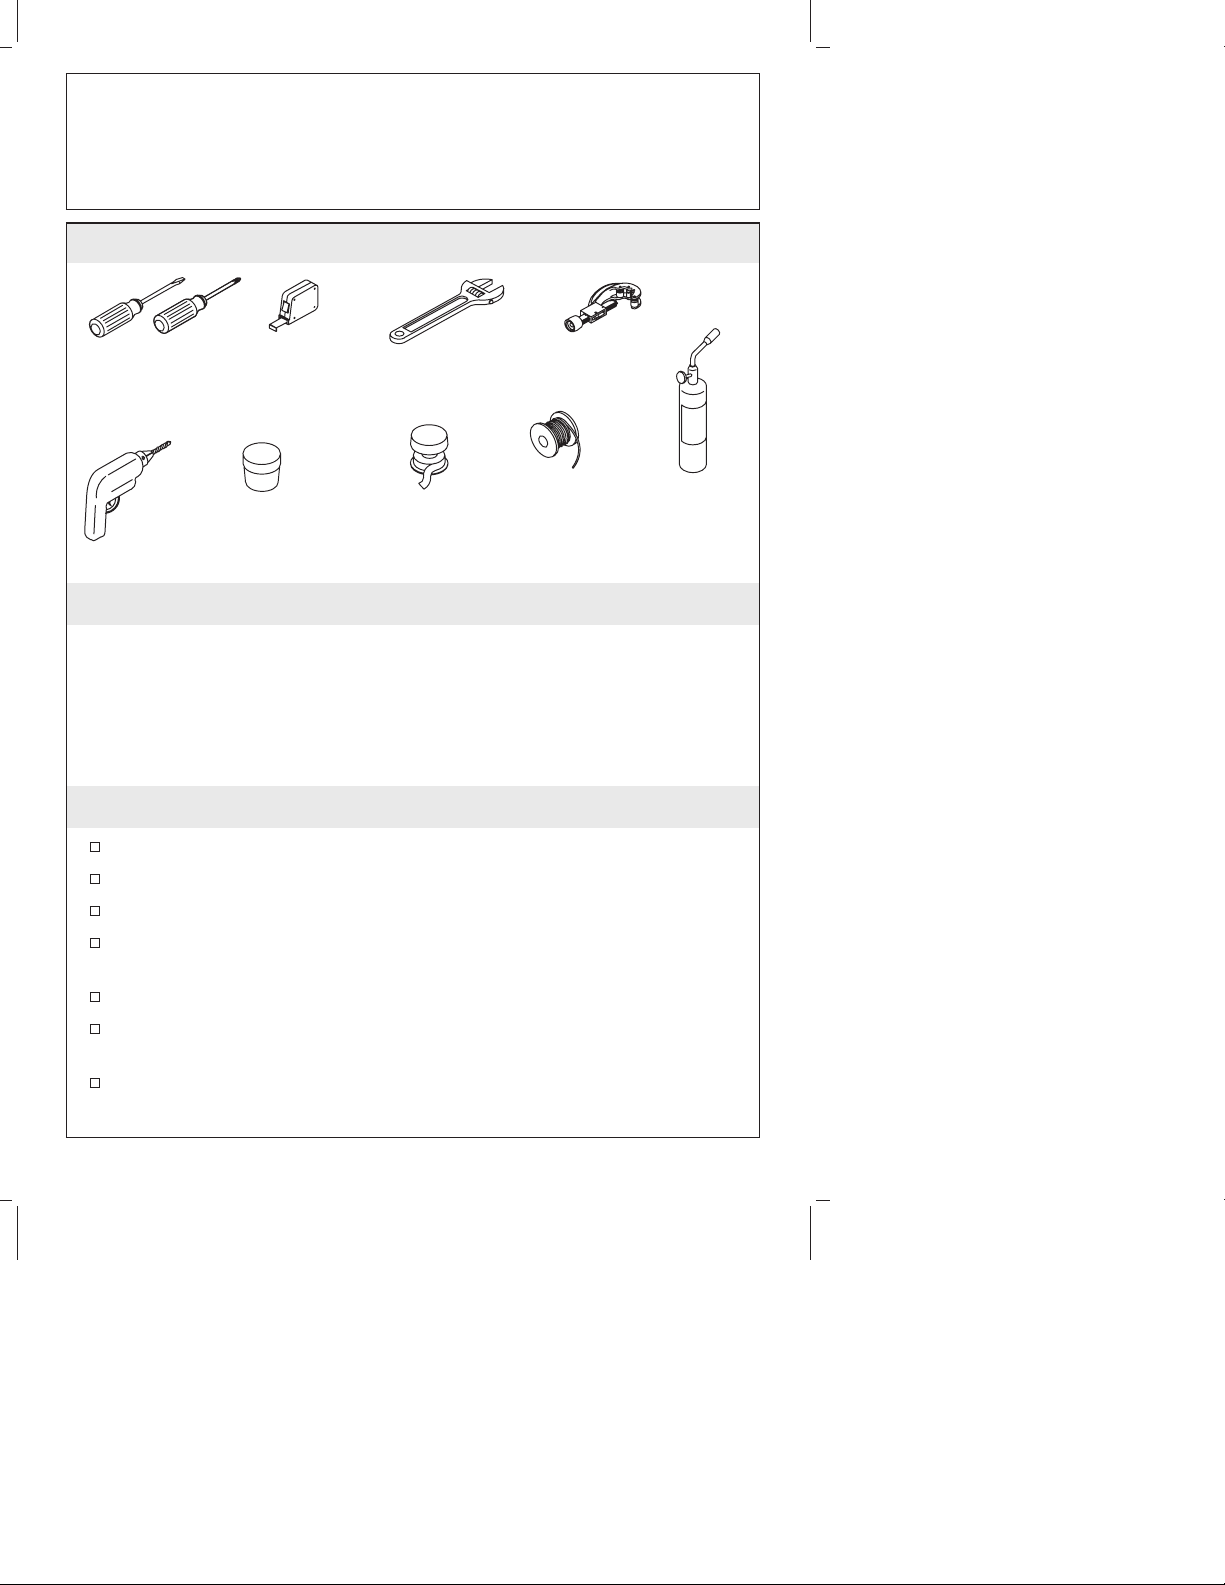
Assorted
Screwdrivers
Drill
Tape
Measure
Plumbers
Putty
Adjustable
Wrench
Thread
Sealant
Solder
Tubing
Cutter
Propane
Torch
Thank You For Choosing Kohler Company
We appreciate your commitment to Kohler quality. Please take a few
minutes to review this manual before you start installation. If you
encounter any installation or performance problems, please don’t
hesitate to contact us. Our phone numbers and website are listed on
the back cover. Thanks again for choosing Kohler Company.
Before You Begin
Please read all instructions before you begin.
Shut off the main water supply.
Observe all local plumbing and building codes.
Products purchased separately may change valve placement and
alignment.
Provide an access panel to the valves for servicing.
Installer-supplied copper tubing is to be: 5/8″ O.D. (1/2″ Nom.).
The finished deck material must fit closely to the diameters of the
plastic guards.
The spout plaster guard diameter is 7/8″ (2.2 cm) for the spout.
Leave the protective sleeve on the spout supply tube until spout
installation. This is an O-ring sealing surface which may be
damaged when unprotected.
Kohler Co. reserves the right to make revisions in the design of
faucets without notice, as specified in the Price Book.
1010568-2-B 2 Kohler Co.
Page 3
7/8" D
X
X
5/8" OD Tubing
(1/2" Nominal)
1/2" (1.3 cm) Min.±
2-1/8" (5.4 cm) Max.
Deck Thickness
1/8" (3 mm) Min.±
2-1/8" (5.4 cm) Max.
Rim Thickness
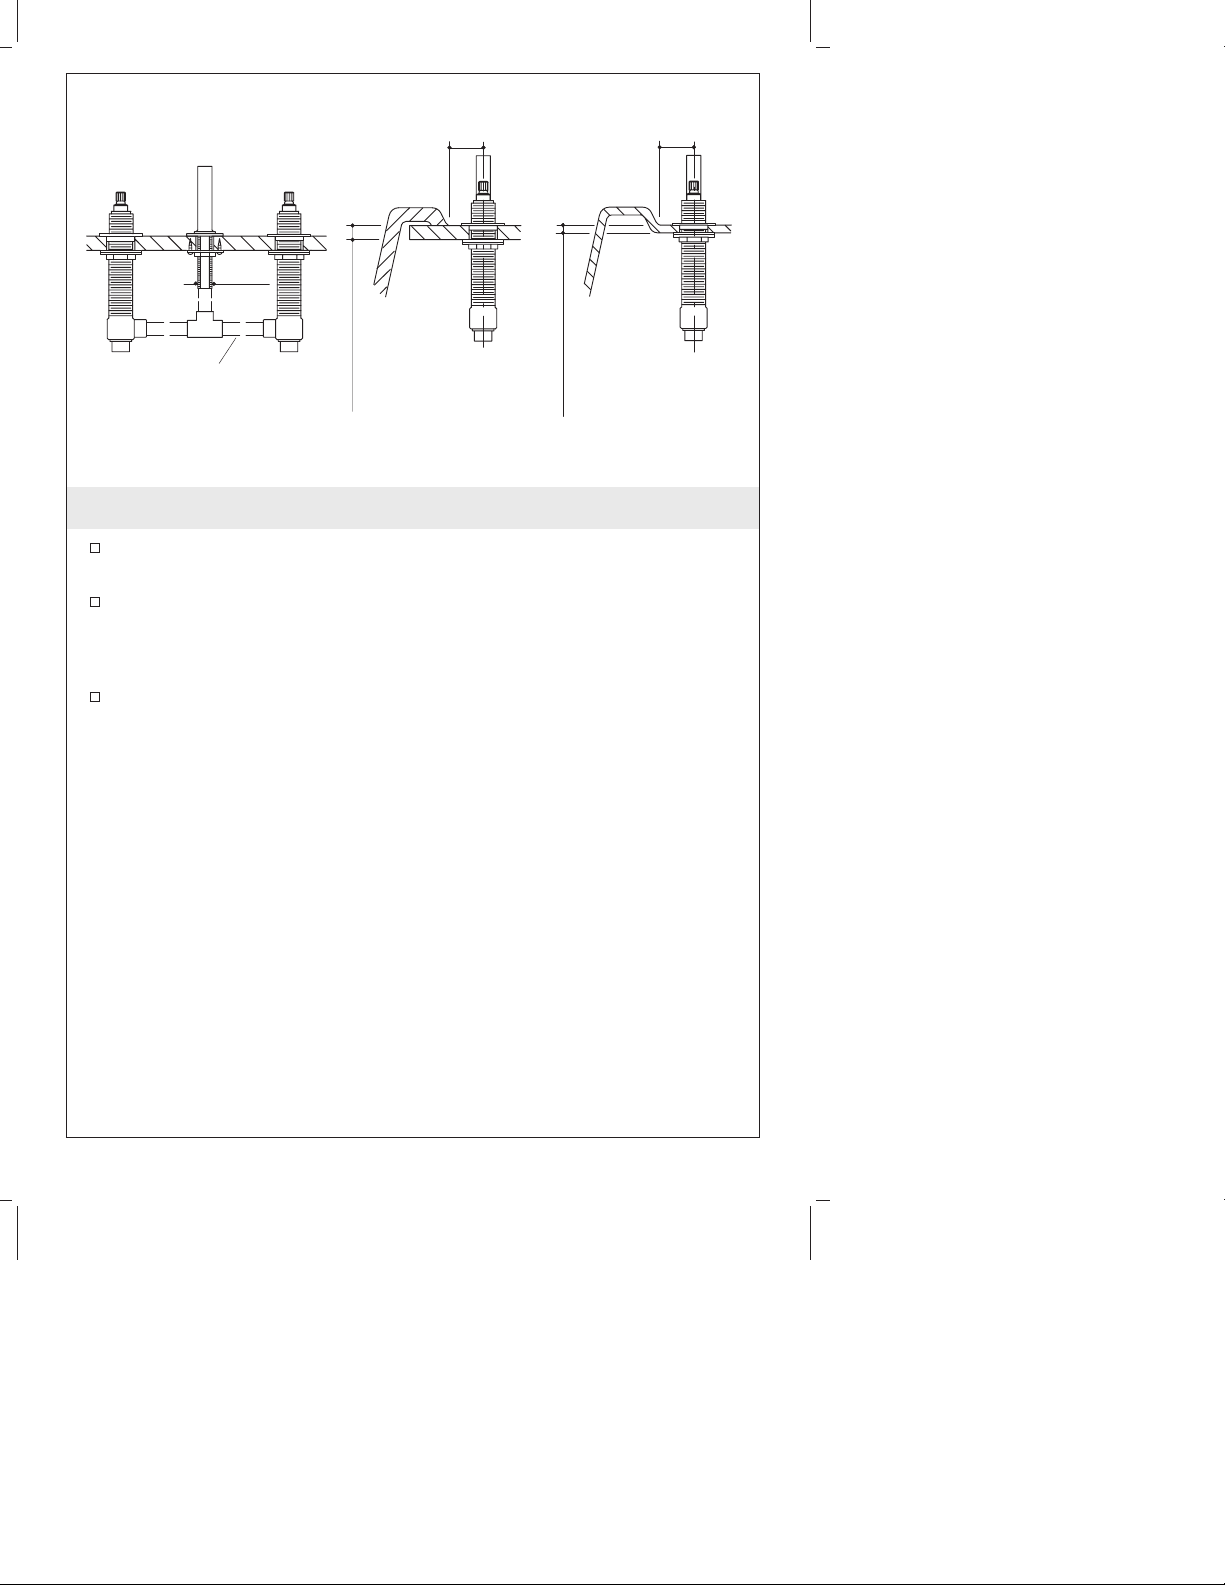
1. Roughing-In Dimensions
X=the distance from the centerline of the spout inlet base to the
front of the spout base plus 1/2″ (2.5 cm).
Install or relocate the water supplies as needed.
NOTE: Reinforcing material may be required if the deck or rim is
thin. Install 1/2″ exterior grade plywood before proceeding.
The diameter of the spout hole should be 1-1/8″ (2.9 cm)
maximum.
NOTE: For installations to be covered with tile, the tile thickness
must not exceed 1-1/4″ (3.2 cm).
Kohler Co. 3 1010568-2-B
Page 4
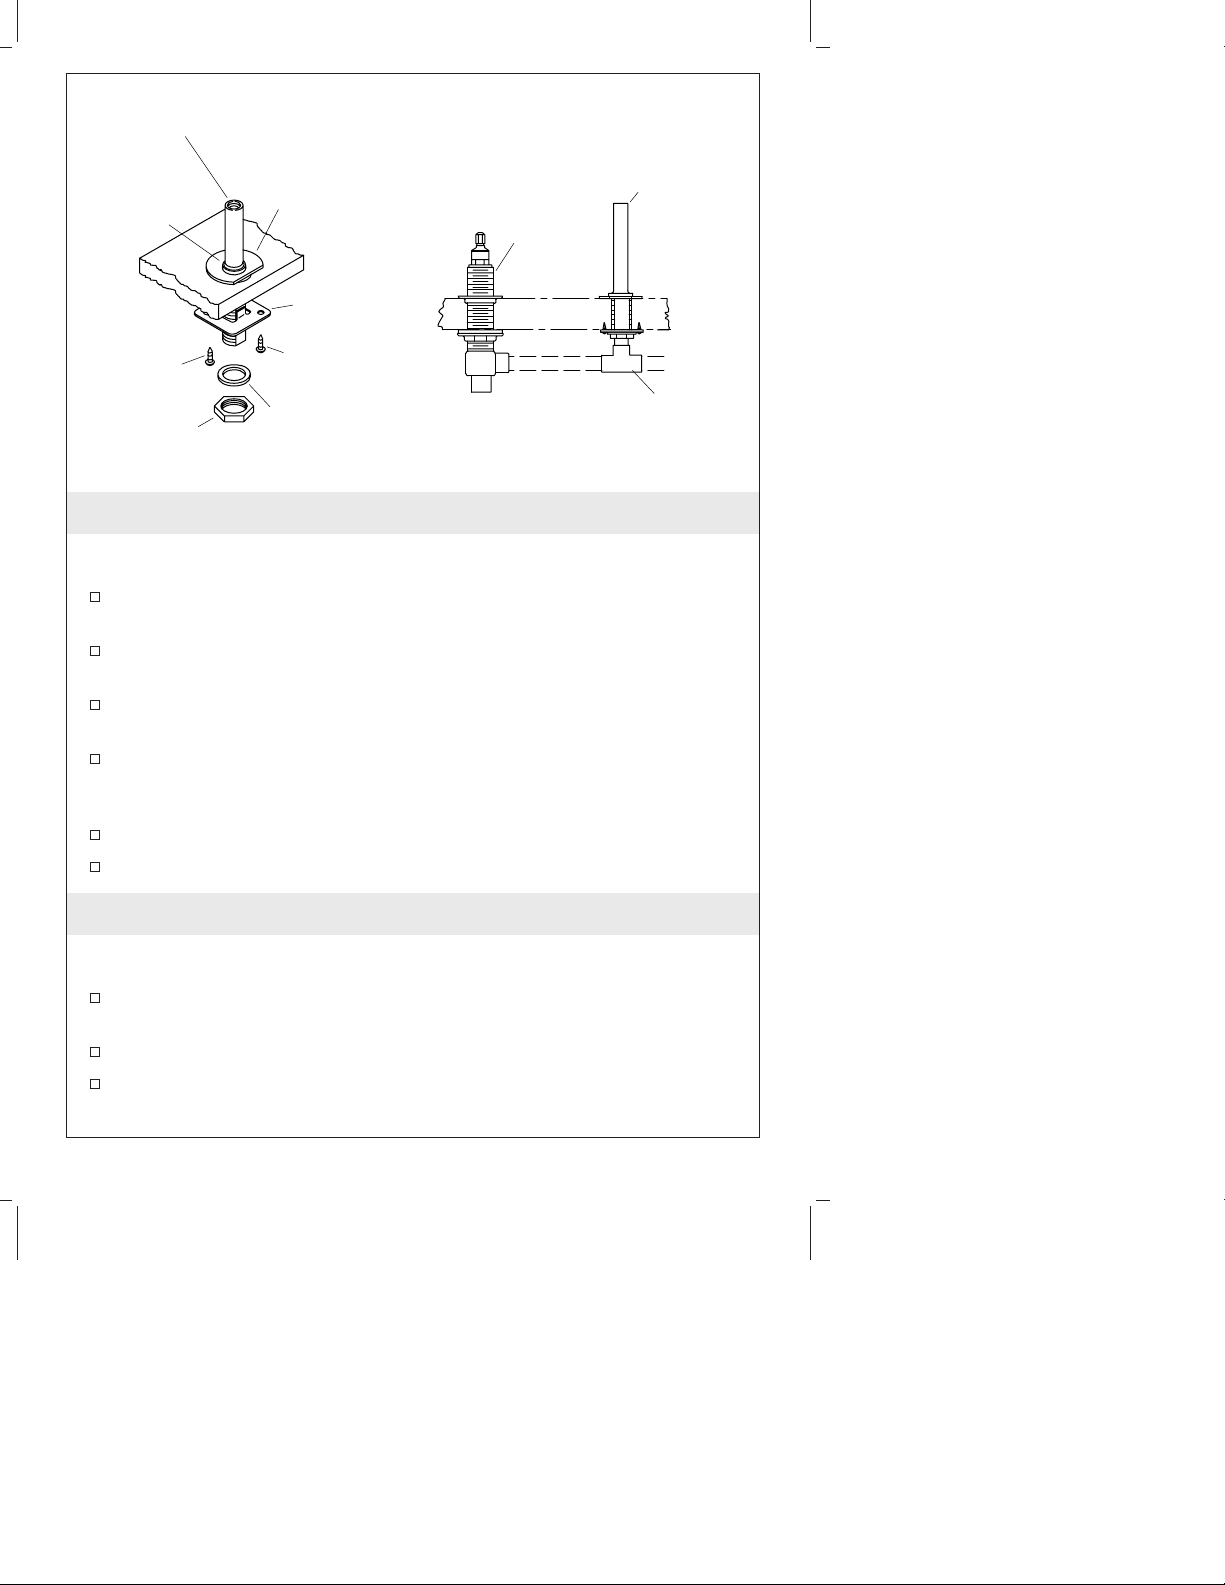
Spout Supply Tube
Spout
Supply
Shoulder
Brass
Washer
Plate
Spout
Supply
Tube
Threaded
Collar
Wood
Screw
Nut
Wood
Screw
Washer
Tee
2. Install the Spout Supply Tube
NOTE: Leave the protective sleeve on the spout supply tube until
the spout installation.
Slide the brass washer from the bottom of the spout supply tube
over the threads until it reaches the spout supply shoulder.
Insert the spout supply tube through the mounting hole from the
top of the deck/bath rim.
The flat portion of the brass washer should face forward. The
spout supply tube will be suspended by the brass washer.
Slide the plate (oriented with the tabs toward the deck) and
washer onto the spout supply tube from the bottom and thread
on the nut.
Tighten the nut.
Secure the plate to the rough deck with two wood screws.
3. Attach the Tubing
NOTE: The tee supplied with the supply tube may not be needed,
depending on the valve.
Measure, cut, and insert the copper tubing between the supply
tube and the valves as needed.
Dry fit the components to confirm proper fit.
Solder the copper tubes to the valve bodies, tee, and spout supply
tube.
1010568-2-B 4 Kohler Co.
Page 5

3/8" Pipe Plug
CLOSE
HOT
CLOSE
COLD
4. Check Operation of Valves
WARNING: Risk of personal injury. Wrap a towel around the
pipe plug to prevent water spray. Water will purge from the
supply tube when you remove the plug.
Thread a 3/8″ pipe plug into the top of the spout supply tube.
Ensure that the valves are closed (cold = fully counterclockwise;
hot = fully clockwise).
Turn on the main water supply and check the complete
installation for leaks with the valves closed and open.
Repair leaks as needed.
Close both valves and turn off the main water supply.
Carefully loosen the pipe plug to remove pressure.
Thread the pipe plug back into the spout supply tube.
Install the cardboard plaster guards over both valves and the
spout supply tube.
Kohler Co. 5 1010568-2-B
Page 6
Guide d’installation
Manche de bec remplisseur de baignoire
Outils et matériels
Tournevis
assortis
Perceuse
Mètre
ruban
Mastic de
plombier
Clé ajustable
Joint
d'étanchéité
pour filetage
Coupetuyauterie
Soudure
Chalumeau
à propane
Merci d’avoir choisi la compagnie Kohler
Nous apprécions votre engagement envers la qualité Kohler. Veuillez
prendre s’il vous plaît quelques minutes pour lire ce manuel avant de
commencer l’installation. Ne pas hésiter à nous contacter en cas de
problème d’installation ou de fonctionnement. Nos numéros de
téléphone et notre adresse du site internet sont au verso. Merci encore
d’avoir choisi la compagnie Kohler.
Avant de commencer
Veuillez lire toutes les instructions avant de commencer.
Couper l’alimentation d’eau principale.
Respecter tous les codes de plomberie et de bâtiment locaux.
Des produits achetés séparément peuvent influencer
l’emplacement et l’alignement de la valve.
Fournir un panneau d’accès au service des valves.
Le tuyau en cuivre fourni par l’installateur doit être de: Ø 5/8″
Ext. (1/2″ Nom.).
Le matériau du comptoir fini doit bien s’ajuster aux diamètres des
protections en plastique.
Kohler Co. Français-1 1010568-2-B
Page 7

Avant de commencer (cont.)
Le diamètre du renfort en plâtre doit être à 7/8″ (2,2 cm) pour le
bec.
Laisser en place les manchons de protection du tube
d’alimentation du bec jusqu’à l’installation du bec. C’est une
surface d’étanchéité par joint torique qui devrait être protégée
pour ne pas l’endommager.
Kohler Co. se réserve le droit d’apporter toutes modifications au
design des robinets et ceci sans préavis, comme spécifié dans le
catalogue des prix.
Kohler Co. Français-2 1010568-2-B
Page 8

Ø 7/8"
X
X
Tuyauterie Ø 5/8"
Ext.(1/2" Nominal.)
± 1/2" (1,3 cm) Min.
2-1/8" (5,4 cm) Maxi.
Épaisseur comptoir
± 1/8" (3 mm) Min.
2-1/8" (5,4 cm) Maxi.
Épaisseur rebord
1. Dimensions de raccordement
X=la distance de l’axe central de la base d’entrée du bec à
l’avant de la base du bec plus 1/2″ (2,5 cm).
Installer ou déplacer les alimentations d’eau au besoin.
REMARQUE : Un matériau de renfort peut être requis si le rebord
de baignoire ou du comptoir est mince. Installer un contre-plaqué
extérieur de 1/2″ avant de continuer.
Le diamètre de l’orifice du bec devrait être de 1-1/8″ (2,9 cm)
maximum.
REMARQUE : Pour des installations carrelées, l’épaisseur des
carreaux ne doit pas dépasser 1-1/4″ (3,2 cm).
1010568-2-B Français-3 Kohler Co.
Page 9

Tuyau d'alimentation
du bec
Épaule
alimentation
bec
Rondelle
en laiton
Plaque
Tuyau
d'alimentation
du bec
Collier
fileté
Vis à
bois
Écrou
Vis à
bois
Rondelle
T
2. Installer le tube d’alimentation du bec
REMARQUE : Laisser en place le manchon de protection du tube
d’alimentation du bec jusqu’à l’installation de ce dernier.
Glisser une rondelle en laiton sur le bas du tube d’alimentation
du bec et le filetage jusqu’à atteindre le coude d’alimentation du
bec.
Insérer le tuyau d’alimentation du bec à travers l’orifice de
fixation à partir du dessus du rebord de comptoir/baignoire.
La partie plate de la rondelle en laiton devrait faire face vers
l’avant. Le tube d’alimentation du bec sera suspendu à l’aide
d’une rondelle en laiton.
Glisser la plaque (avec les pattes orientées vers le comptoir) et la
rondelle sur le tuyau d’alimentation du bec à partir de la partie
inférieure puis visser l’écrou.
Serrer l’écrou.
Sécuriser la plaque au comptoir brut au moyen de deux vis à
bois.
3. Attacher la tuyauterie
REMARQUE : Le T fourni avec le tube d’alimentation peut ne pas
être indispensable, selon la valve.
Mesurer, couper et insérer la tuyauterie en cuivre entre le tube
d’alimentation et les valves selon le besoin.
Kohler Co. Français-4 1010568-2-B
Page 10

Attacher la tuyauterie (cont.)
Fixer à sec les composants pour confirmer le bon ajustage.
Souder les tubes en cuivre aux corps de robinet, au raccord en T
et au tube d’arrivée d’eau de bec.
1010568-2-B Français-5 Kohler Co.
Page 11

Bouchon du tuyau de 3/8"
Fermer l'eau
chaude
Fermer
l'eau froide
4. Vérifier le fonctionnement des valves
AVERTISSEMENT : Risque de blessure corporelle. Enrouler
une serviette autour du bouchon du tuyau pour empêcher l’eau
de gicler. L’eau purgera du tube d’alimentation lorsque le
bouchon sera retiré.
Visser un bouchon de 3/8″ (1 cm) sur le tuyau d’alimentation du
bec.
S’assurer que les robinets soient fermés (côté froid complètement
vers la gauche, côté chaud complètement vers la droite).
Ouvrir l’alimentation principale d’eau et vérifier que l’installation
n’ait pas de fuites, avec les valves fermées et ouvertes.
Réparer les fuites au besoin.
Fermer les deux valves et l’alimentation principale d’eau.
Dévisser doucement le bouchon du tuyau de manière à libérer la
pression.
Revisser le bouchon du tuyau sur le tube d’alimentation du bec.
Installer les renforts de plâtre sur les deux valves et tubes
d’alimentation d’eau du bec.
Kohler Co. Français-6 1010568-2-B
Page 12

Guía de instalación
Vástago del surtidor de bañera
Herramientas y materiales
Surtido de
destornilladores
Taladro
Cinta
métrica
Masilla de
plomería
Llave
ajustable
Cinta selladora
de roscas
Cortatubos
Soldadura
Soplete
de
propano
Gracias por elegir los productos de Kohler
Apreciamos su elección por la calidad de Kohler. Dedique unos
minutos para leer este manual antes de comenzar la instalación. En
caso de problemas de instalación o de funcionamiento, no dude en
contactarnos. Nuestros números de teléfono y nuestra página web se
encuentran en la última página. Gracias nuevamente por escoger a
Kohler.
Antes de comenzar
Lea estas instrucciones atentamente antes de comenzar.
Cierre el suministro principal de agua.
Cumpla con todos los códigos locales de plomería y de
construcción.
Los productos adquiridos por separado pueden afectar el
emplazamiento de la válvula, así como la alineación.
Proporcione un panel de acceso a las válvulas para su
mantenimiento.
El tubo de cobre suministrado por el instalador debe tener:
Diámetro exterior de 5/8″ (1/2″ Nom.)
Kohler Co. Español-1 1010568-2-B
Page 13

Antes de comenzar (cont.)
El material de la cubierta acabada debe quedar muy ajustado a
los diámetros de los protectores de yeso.
El diámetro del protector de yeso del surtidor es de 7/8″ (2,2 cm).
Deje la manga protectora en el tubo de suministro hasta instalar
el surtidor. La superficie de sellado del empaque de anillo
(O-ring) puede sufrir daños si no está protegida.
La empresa Kohler se reserva el derecho de modificar el diseño
de la grifería sin previo aviso, tal como se especifica en la lista de
precios.
Kohler Co. Español-2 1010568-2-B
Page 14

7/8" D.
X
X
Tubo de 5/8" D.E.
(1/2" nominal)
1/2" (1,3 cm) Mín.±
2-1/8" (5,4 cm) Máx.
Espesor de la
cubierta
1/8" (3 mm) Mín.±
2-1/8" (5,4 cm) Máx.
Espesor del borde
1. Dimensiones de instalación
X=la distancia desde la línea central de la base de entrada del
surtidor a la parte frontal de la base del surtidor más 1/2″ (2,5
cm).
Instale o cambie los suministros de lugar según sea necesario.
NOTA: Es posible que necesite un material de refuerzo si la cubierta
o el borde tienen poco espesor. Instale madera contrachapada para
exteriores de 1/2″ antes de continuar.
El diámetro del orificio del surtidor debe ser 1-1/8″ (2,9 cm) como
máximo.
NOTA: En las instalaciones que se vayan a revestir de azulejos, el
grosor del azulejo no debe exceder de 1-1/4″ (3,2 cm).
1010568-2-B Español-3 Kohler Co.
Page 15

Tubo de suministro del surtidor
Reborde del
suministro
del surtidor
Arandela
de latón
Placa
Tubo de
suministro del
surtidor
Collarín
roscado
Tornillo
para madera
Tuerca
Tornillo para
madera
Arandela
2. Instale el tubo de suministro del surtidor
NOTA: Deje la manga protectora en el tubo de suministro del
surtidor hasta instalar el surtidor.
Deslice la arandela de latón desde la parte inferior del tubo de
suministro del surtidor y por las roscas hasta que alcance el
reborde del suministro del surtidor.
Inserte el tubo de suministro del surtidor por el orificio de
fijación, desde la parte superior de la cubierta/borde de la bañera.
La parte plana de la arandela de latón debe estar orientada hacia
el frente. El tubo de suministro del surtidor estará suspendido por
la arandela de latón.
Deslice la placa (con las lengüetas hacia la cubierta) y la arandela
por el tubo de suministro del surtidor desde la parte inferior y
enrósquela en la tuerca.
Apriete la tuerca.
Fije la placa a la cubierta no acabada con dos tornillos para
madera.
T
3. Conecte el tubo
NOTA: Es posible que no sea necesaria la T incluida con el tubo de
suministro, dependiendo de la válvula.
Mida, corte e inserte tubería de cobre entre el tubo de suministro
y las válvulas de ser necesario.
Kohler Co. Español-4 1010568-2-B
Page 16

Conecte el tubo (cont.)
Monte los componentes para verificar que encajen.
Suelde los tubos de cobre a los cuerpos de la válvula, a laTyal
tubo de suministro del surtidor.
1010568-2-B Español-5 Kohler Co.
Page 17

Tapón de tubo de 3/8"
Cierre el
agua caliente
Cierre el
agua fría
4. Verifique el funcionamiento de las válvulas
ADVERTENCIA: Riesgo de lesiones personales. Envuelva el
tapón de tubo en una toalla para impedir que el agua salpique.
Al quitar el tapón saldrá agua del tubo de suministro.
Enrosque un tapón de tubo de 3/8″ en la parte superior del tubo
de suministro del surtidor.
Verifique que las válvulas estén cerradas (agua fría =
completamente a la izquierda; agua caliente = completamente a la
derecha).
Abra el suministro del agua y verifique que no haya fugas en la
instalación cuando las válvulas estén abiertas y cerradas.
Repare las fugas de ser necesario.
Cierre ambas válvulas y el suministro principal de agua.
Levante levemente el tapón de tubo con cuidado para aliviar la
presión.
Vuelva a enroscar el tapón de tubo en el tubo de suministro.
Instale los protectores de yeso sobre ambas válvulas y el tubo de
suministro del surtidor.
Kohler Co. Español-6 1010568-2-B
Page 18

1010568-2-B
Page 19

1010568-2-B
Page 20

USA: 1-800-4-KOHLER
Canada: 1-800-964-5590
México: 001-877-680-1310
kohler.com
©2005 Kohler Co.
1010568-2-B
 Loading...