

Page 1

Publication No. 632732
27APR98
Supersedes 632732
OCT82
OPERATOR’S MANUAL
for the
Kodak RP X-Omat PROCESSOR, MODEL M7B
Kodak RP X-Omat PROCESSOR, MODEL M7B-E
HEALTH IMAGING
© Eastman Kodak Company
H054_0054DA
Page 2

PLEASE NOTE The information contained herein is based on the experience and knowledge relating to the
subject matter gained by Eastman Kodak Company prior to publication.
No patent license is granted by this information.
Eastman Kodak Company reserves the right to change this information without notice, and
makes no warranty, express or implied, with respect to this information. Kodak shall not be
liable for any loss or damage, including consequential or special damages, resulting from any
use of this information, even if loss or damage is caused by Kodak’s negligence or other fault.
Warning
To avoid hazardous conditions, keep floors and floor coverings around your Kodak X-Omat PROCESSOR and
associated drains clean and dryat all times. Any accumulation of fluids from mixing tanks, drain lines, etc., should
be cleaned up immediately. In the event of an accumulation of liquid due to backup, overflow, or other malfunctions
of the drain associated with your Kodak X-Omat PROCESSOR, call a plumber or other contractor to correct any
problem with the drain. Kodak accepts no responsibility or liability whatsoever for the serviceability of any drain
connected to or associated with a Kodak X-Omat PROCESSOR. Such drains are the sole responsibility of the
customer.
Table of Contents
Description Page
Processing Film . . . . . . . . . . . . . . . . . . . . . . . . . . . . . . . . . . . . . . . . . . . . . . . . . . . . . . . . .3
Overview . . . . . . . . . . . . . . . . . . . . . . . . . . . . . . . . . . . . . . . . . . . . . . . . . . . . . . 3
Start-Up . . . . . . . . . . . . . . . . . . . . . . . . . . . . . . . . . . . . . . . . . . . . . . . . . . . . . . . 3
Operating Notes . . . . . . . . . . . . . . . . . . . . . . . . . . . . . . . . . . . . . . . . . . . . . . . . . 3
Film-Feeding Procedure . . . . . . . . . . . . . . . . . . . . . . . . . . . . . . . . . . . . . . . . . . . 3
Shutdown . . . . . . . . . . . . . . . . . . . . . . . . . . . . . . . . . . . . . . . . . . . . . . . . . . . . . . 4
Cleanup and Preventative Maintenance . . . . . . . . . . . . . . . . . . . . . . . . . . . . . . . . . . . . . . . 5
Daily . . . . . . . . . . . . . . . . . . . . . . . . . . . . . . . . . . . . . . . . . . . . . . . . . . . . . . . . . . 5
Weekly (or whenever solutions are changed) . . . . . . . . . . . . . . . . . . . . . . . . . . 6
Periodically (in addition to the Daily and Weekly procedures) . . . . . . . . . . . . . 7
Replenishment . . . . . . . . . . . . . . . . . . . . . . . . . . . . . . . . . . . . . . . . . . . . . . . . . . . . . . . . . .8
Correcting Difficulties . . . . . . . . . . . . . . . . . . . . . . . . . . . . . . . . . . . . . . . . . . . . . . . . . . . . 11
New Equipment Warranty . . . . . . . . . . . . . . . . . . . . . . . . . . . . . . . . . . . . . . . . . . . . . . . . . 13
2 27APR98 – 632732
Page 3
Processing Film
Section 1: Processing Film
Overview
The Kodak RP X-Omat PROCESSOR, MODELS M7B and M7B-E will process all films designed for processing
with Kodak RP X-Omat DEVELOPER REPLENISHER and Kodak RP X-Omat FIXER and REPLENISHER, or
equivalents.
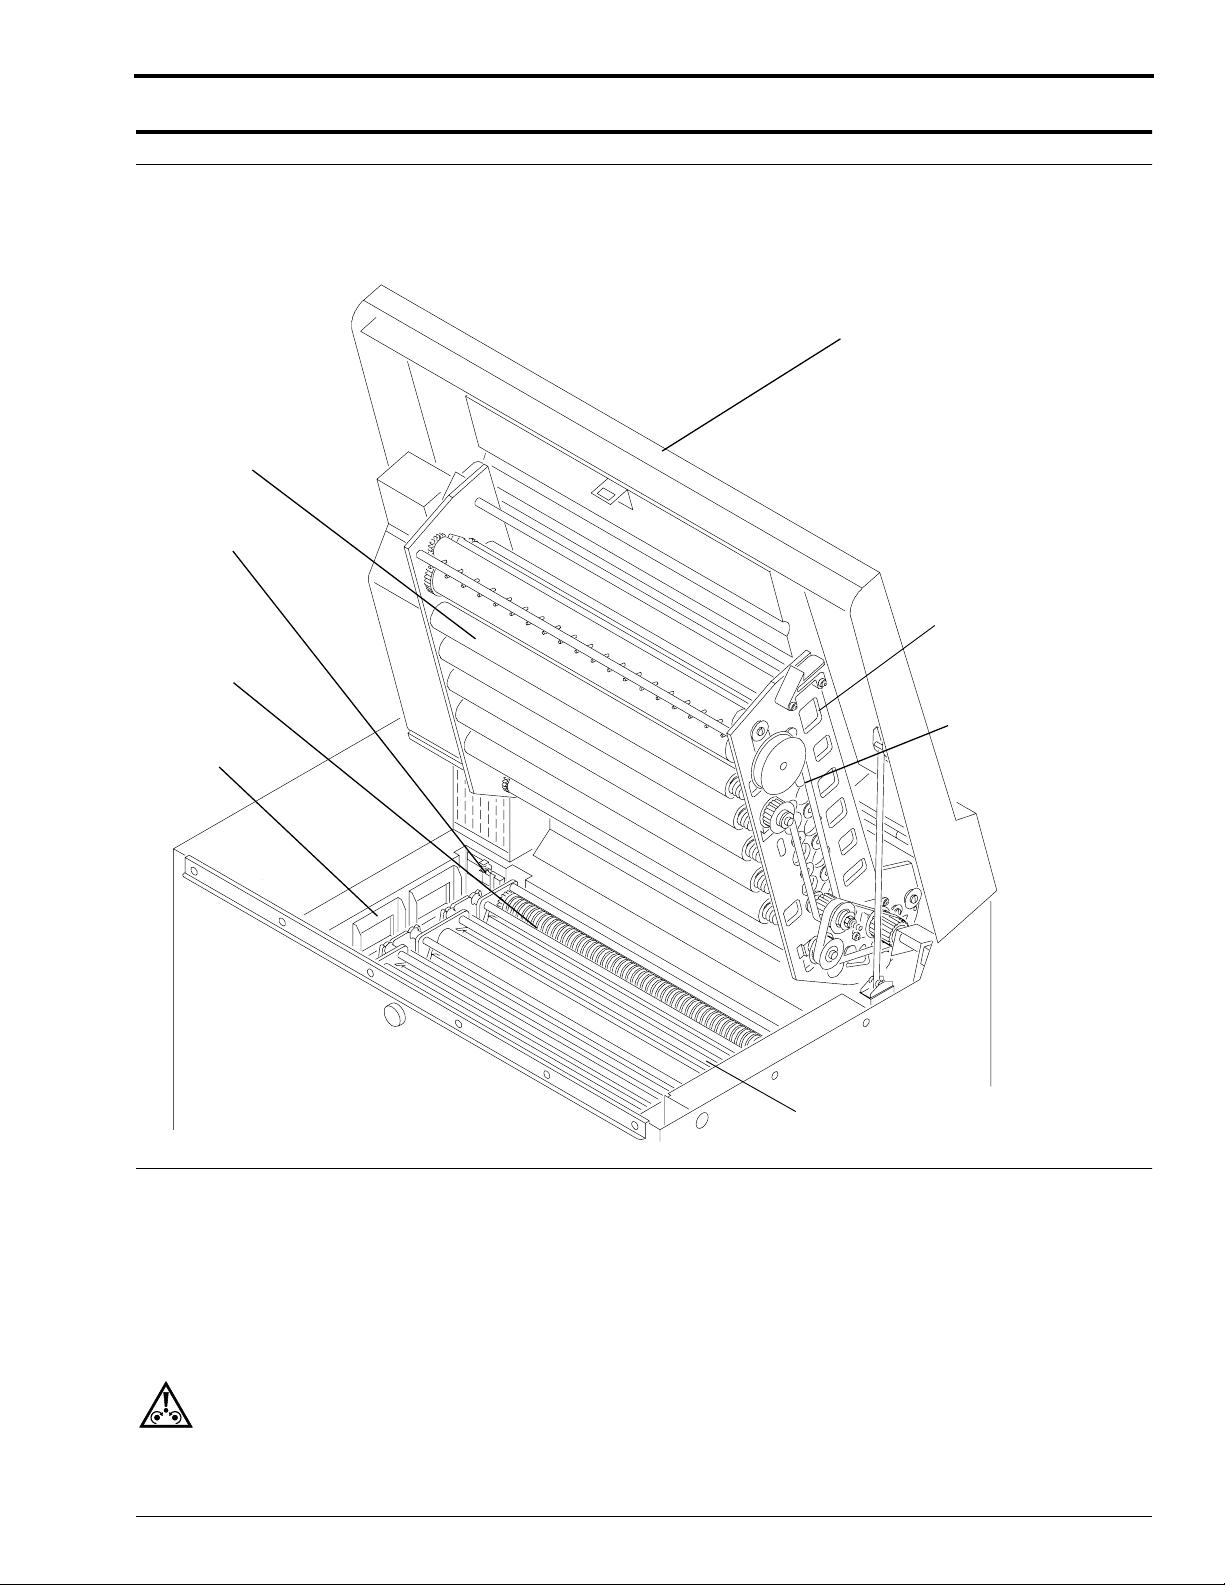
COVER
AIR TUBES
DETECTOR
SWITCH
DRYER
DETECTOR
CROSSOVER
ASSEMBLY
3 OVERFLOW
WEIRS
ASSEMBLY
DRYER
DRIVE
BELT
RACKS AND
CROSSOVERS
H054_0057DCA
H054_0057DA
Start-Up
[1] Check that the RACKS and CROSSOVERS are seated correctly.
[2] Push down and seat the WASH TANK OVERFLOW WEIR, so the WASH TANK can fill.
[3] Check:
• that the DEVELOPER and FIXER are at the overflow level of the WEIRS
• that the EVAPORATION COVERS are in position
Caution
Use care when positioning the SEPARATION COVER between the wet and dry sections.
632732 – 27APR98 3
Page 4
OPERATORS MANUAL
[4] Check that the SEPARATION COVER is in position.
[5] Carefully lower the DRYER ASSEMBLY.
[6] Close the COVER.
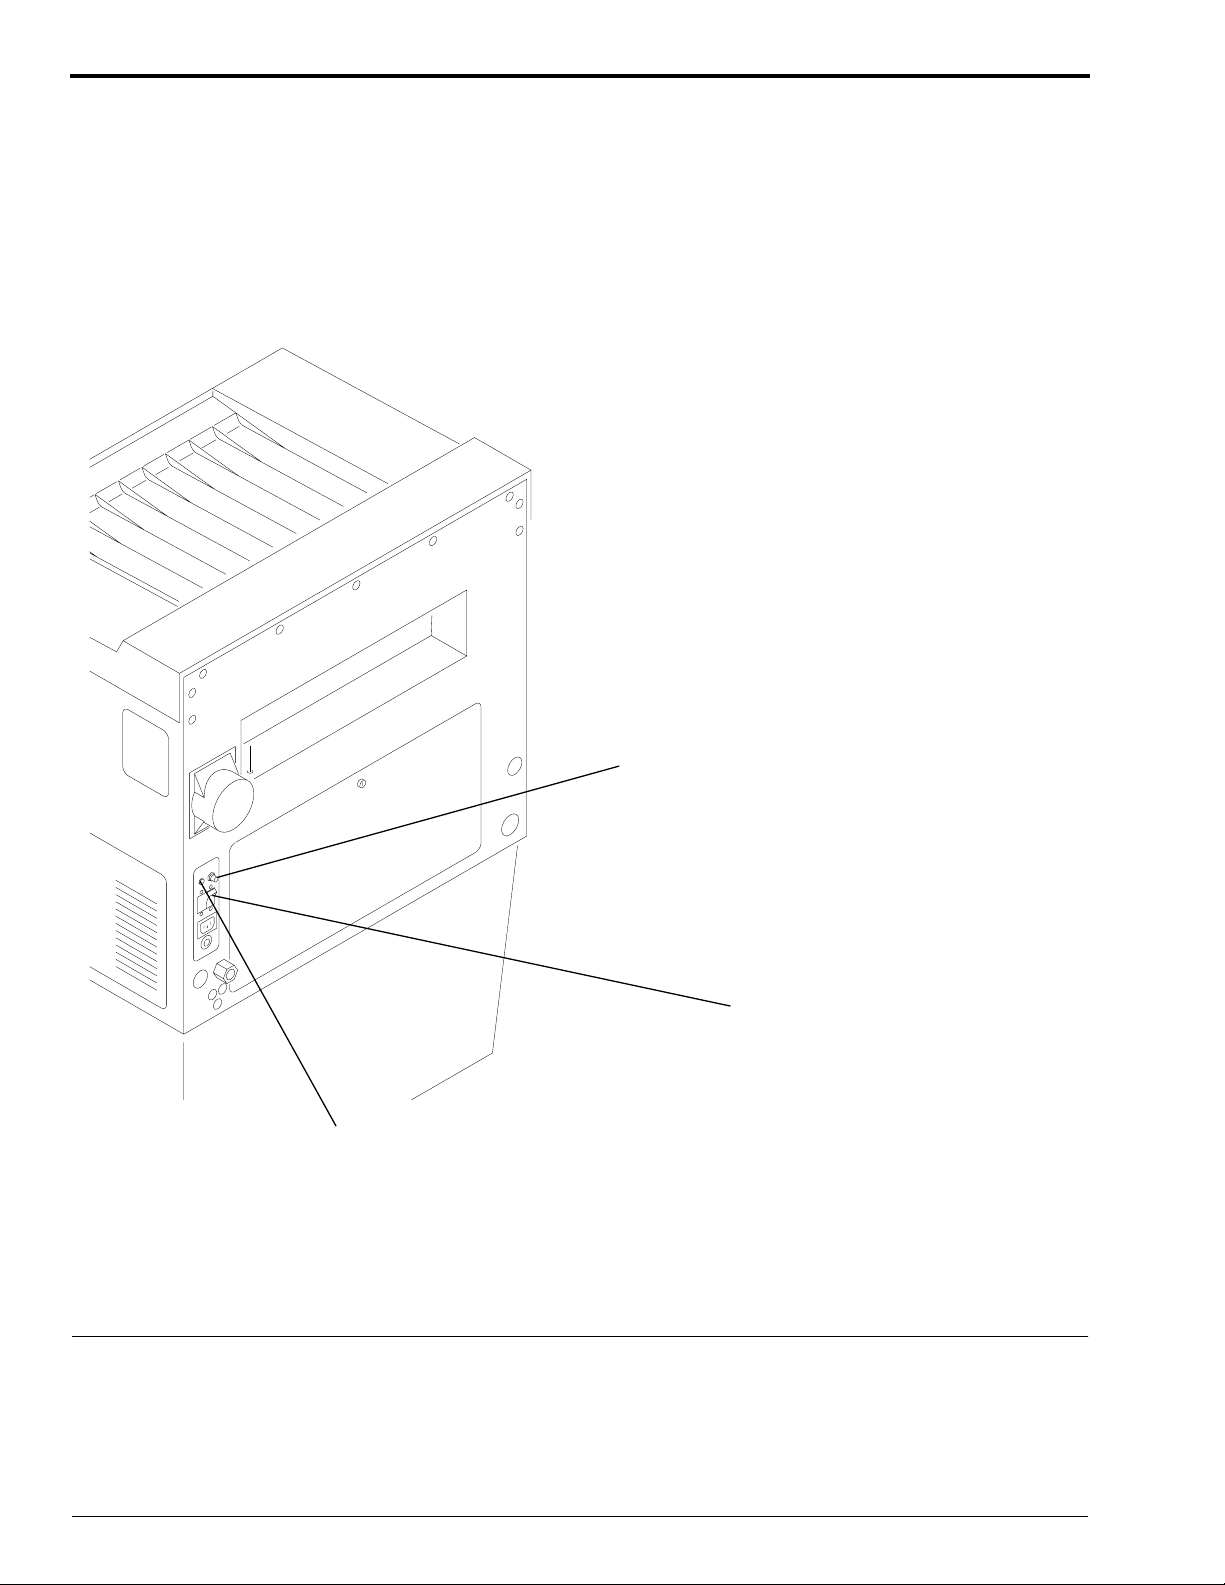
[7] Turn on:
• cold-water supply temperature: 4.5 – 26.5˚C (40 – 80˚F)
• Main Power Source
• CIRCUIT BREAKER
STANDBY
BUTTON
CIRCUIT
BREAKER
READY
H054_0111DCA
H054_0111DA
LIGHT
[8] Check the “READY” light blinks when the PROCESSOR is ready to accept film.
[9] Press the “STANDBY” button.
[10] Feed a cleanup film when the “READY” light begins to blink.
[11] Check for transport reliability and/or film artifacts.
Operating Notes
[1] Check the “READY” light frequently during operation:
• Steady Light - DEVELOPER is coming up to temperature.
• Blinking Light - DEVELOPER is at the correct operating temperature.
• No Light - DEVELOPER is above the set operating temperature.
4 27APR98 – 632732
Page 5

Processing Film
[2] The PROCESSOR will automatically go into the “Standby Mode” approximately 3 minutes after the last film
has been fed into it. To return the PROCESSOR to normal operation, press the “STANDBY” button before
feeding film.
Film-Feeding Procedure
[1] Feed Sheet Film:
• in the direction of the arrow shown
• into the PROCESSOR square with the edge of the Film Guide
[2] Roll Film use:
• a leader of sheet film at least as wide as the roll film, and at least 17.8 cm (7 in.) long.
• 1 in. wide tape, such as 3M Scotch™ Polyester Film Tape No. 850, to butt-splice the film to the leader.
– Make sure that the adhesive side of the tape is not exposed.
– Most other tapes are not suitable due to the solubility of their bases in the processing solutions.
1 each
24 x 30 cm
or
10 x 12 in.
1 each
35 x 43 cm
or
14 x 17 in.
1 each
24 x 24 cm
or
9 1/2 x 9 1/2 in
1 each
35 x 35 cm
or
14 x 14 in.
1 each
18 x 43 cm
or
7 x 17 in.
1 each
30 x 40 cm
or
11 x 14 in.
2 each
18 x 43 cm
or
7 x 17 in.
2 each
18 x 24 cm
8 x 10 in.
H112_9007DC
1 each
18 x 24 cm
or
or
8 x 10 in.
1 each
6 1/2 x 8 1/2 in.
2 each
18 x 24 cm
or
6 1/2 x 8 1/2 in.
3 each
5 x 7 in.
3 each
10 x 10 cm
or
4 x 4 in.
632732 – 27APR98 5
Page 6

OPERATORS MANUAL
Shutdown
[1] Turn off:
• CIRCUIT BREAKER
• Main Power Source
• Water Supply
[2] Raise:
• COVER and DRYER ASSEMBLY to the highest position (Keep them open overnight to vent.)
• WASH TANK OVERFLOW WEIR to drain the WASH TANK
[3] Remove:
• 2 EVAPORATION COVERS
• SEPARATION COVER
[4] Do the “Daily” procedures listed in the “Cleanup and Preventative Maintenance” Section on Page 7.
6 27APR98 – 632732
Page 7

Cleanup and Preventative Maintenance
Section 2: Cleanup and Prev entative Maintenance
Daily
Caution
Wear rubber gloves, suiteable eye protection, and protective clothing when performing the maintenance procedures.
The best time to do daily cleanup is at shutdown.
[1] Turn off:
• Main Power Source
• CIRCUIT BREAKER
[2] Open the COVER.
Caution
• Handle the CROSSOVERS carefully to avoid:
– twisting them out of square
– disturbing the GUIDE SHOE settings
• Use a damp cloth or synthetic sponge and warm water.
• Do not use any abrasive material on the RACKS, CROSSOVERS, or SQUEEGEE ROLLERS.
[3] Remove the CROSSOVERS.
[4] Rinse the CROSSOVERS with warm water and turn the ROLLERS.
[5] Clean the ROLLERS with a damp cloth or synthetic sponge, and wipe dry.
[6] Wipe off all chemical deposits above the solution level in the processing section.
632732 – 27APR98 7
Page 8

OPERATORS MANUAL
Weekly (or whenever solutions are changed)
Caution
Wear rubber gloves, suiteable eye protection, and protective clothing when performing the maintenance procedures.
[1] Turn off:
• Main Power Source
• CIRCUIT BREAKER
[2] Perform the Daily Maintenance Procedures.
Caution
FIXER will contaminate the DEVELOPER. Always use the SPLASH GUARD and the RACK DRIP TRAY when
removing or installing the RACKS.
[3] Remove the RACKS.
[4] Rinse the RACK withrunningwater and wipe them with a clean cloth. Use a soft brush to clean off all chemical
deposits.
[5] Check:
• that the RACK CHAIN moves freely and is adjusted correctly
• that all ROLLER GEARS, SPROCKETS, and IDLERS engage correctly
• that the space between the RACK SIDE PLATES and the Turnaround SIDE PLATES is equal, and that the
PLATES are parallel on both sides
[6] Remove any foreign matter from the solutions.
Caution
Lower the RACKS and CROSSOVERS slowly to prevent overflow of solutions into the surrounding TANKS.
[7] Replace the RACKS and CROSSOVERS.
[8] The GEARS engage when they are seated correctly.
[9] Clean the REPLENISHER STRAINERS.
[10] Check that the DRYER AIR TUBES are clean.
8 27APR98 – 632732
Page 9

Cleanup and Preventative Maintenance
Periodically (in addition to the Daily and Weekly procedures)
Caution
Wear rubber gloves, suiteable eye protection, and protective clothing when performing the maintenance procedures.
Important
It is strongly recommended that service personnel use the “Preventative Maintenance Checklist” in the Service
Manual in a Periodic Maintenance Program.
[1] Turn off:
• Main Power Source
• CIRCUIT BREAKER
[2] Check the incoming water temperature: 4.5 – 26.5˚C (40 – 80˚F)
Caution
DEVELOPER temperature adjustments are to be made by qualified personnel only.
[3] Check the DEVELOPER temperature:
• 33.5˚C (92˚F) + 0.2˚C (+ 0.3˚F) - 2.5 min cycle
• 34.5˚C (94˚F) + 0.2˚C (+ 0.3˚F) - 2.0 min cycle: PROCESSORS equipped with Modification No. 2
[4] Check the replenishment rates.
Important
Never immerse the RACKS in the System Cleaner or water when cleaning.
[5] Use a sponge and Kodak FIXER/WASH System Cleaner, or equivalent, to clean the WASH and FIXER
RACKS.
• To access the inner ROLLERS, remove all outer ROLLERS, except the bottom one, from the
DRIVE SIDE.
• Flush the RACKS thoroughly with warm water.
[6] Use a sponge and Kodak DEVELOPER System Cleaner, or equivalent, to clean the ROLLERS in the
DEVELOPER RACK.
• Use the instructions packed with the cleaner.
• Flush the RACKS thoroughly with warm water.
[7] Clean the REPLENISHER and PROCESSOR TANKS with their respective cleaners.
[8] Use warm water to clean off debris and buildup from the DRYER area.
[9] Use warm water and a soft brush to clean the DETECTOR ROLLERS.
632732 – 27APR98 9
Page 10

OPERATORS MANUAL
Section 3: Replenishment
Checking the Replenishment Flow Rates
[1] Remove:
• CROSSOVERS
• DEVELOPER RACK
• FIXER RACK
Note
Do not drain the TANKS.
[2] Replace the DETECTOR CROSSOVER ASSEMBLY.
[3] Insert the CHECK TUBE into the DEVELOPER REPLENISHER inlet in the bottom of the TANK.
[4] Turn on the Main Power Switch.
[5] Manually actuate one of the DETECTOR SWITCHES, and allow the DEVELOPER to flow through the TUBE
and release any existing air in the TUBE.
[6] To check the replenishment rate, hold a GRADUATED CYLINDER under the CHECK TUBE.
[7] Feed a sheet of 35 x 43 cm (14 x 17 in.) film into the PROCESSOR.
Note
The Replenishment Solution flows for 4 seconds after the training edge of the film leaves the DETECTOR
ROLLERS.
[8] When the REPLENISHMENT PUMP stops, check that the amount of solution in the GRADUATED
CYLINDER is correct according to the manufacturer’s film and chemical specifications.
[9] Remove the CHECK TUBE and clean it thoroughly.
[10] Check the FIXER replenishment flow rate by doing Steps 3 - 9 for the FIXER TANK.
[11] Install the CROSSOVERS, DEVELOPER RACK, and FIXER RACK.
Note
• Drain, clean, and fill the DEVELOPER PROCESSING TANK after one month’s use, or after processing fewer
than 150 sheets of film in 24 hours of operation of the PROCESSOR (example three 8-hour days, two 12-hour
days, etc.).
• When you process greater quantities of film, drain, clean, and fill the DEVELOPER PROCESSING TANK after
3 month’s use, or as experience indicates.
• Do not mix DEVELOPER and REPLENISHER solutions in quantities larger than a 2-week supply.
10 27APR98 – 632732
Page 11

Correcting Difficulties
Section 4: Correcting Difficulties
Important
• Many film transport and sensitometric difficulties can be caused or aggravated by inadequate hardening of the
emulsion due to under-replenishment of the DEVELOPER and/or FIXER solutions.
• Another cause of inadequate hardening of the emulsion may be deterioration of the DEVELOPER
REPLENISHER because of age or storage at too high a temperature. Do not mix more than a 2-week supply of
DEVELOPER REPLENISHER.
1. Transport Failure
2. Surface Artifacts
3. Abnormal Film Densities
4. Wet Films
5. Low Solution Levels
6. Overlapping of Films
123456
• • Film Feeding Error
Feed only single thicknesses of film. Feed the next film only after the film feed
signal sounds. If there is no film feed signal, refer the difficulty to qualified
service personnel.
•• Feed only compatible films.
• • Check that all RACKS and CROSSOVERS are seated correctly.
• Adjust the tension of the DRYER DRIVE BELT, if necessary.
• Check that the surfaces of all the ROLLERS are clean and smooth, especially in the
• • Check that the DRYER AIR TUBES are in the correct positions.
• Remove any dirt from the slits in the DRYER AIR TUBES. Use a bottle brush and rinse with
• • Adjust the DRYER temperature control setting to the lowest possible temperature that still
•• • Check that the TOP COVER is closed.
• Clean the FEED TRAY and DETECTOR ROLLERS.
•• • Clean any biological growth in the WASH TANK with a mild solution of chlorine bleach. Use
DEVELOPER TURNAROUND ASSEMBLY.
water.
allows good drying.
60 mL (2 fl oz) of bleach per 3.8 L (1 gallon) of water.
Always raise the WASH TANK overflow WEIR to drain the WASH TANK when
the PROCESSOR is shut down.
632732 – 27APR98 11
Page 12

OPERATORS MANUAL
1. Transport Failure
2. Surface Artifacts
3. Abnormal Film Densities
4. Wet Films
5. Low Solution Levels
6. Overlapping of Films
123456
•••• • Change any chemicals that were not mixed correctly, are exhausted, or are contaminated.
Mix the DEVELOPER replenishment in quantities not to exceed a
2-week supply.
Always use a SPLASH GUARD and RACK DRIP TRAY when lifting the FIXER
RACK to prevent contaminating the DEVELOPER.
Mix chemicals as directed.
•• Adjust the GUIDE SHOES correctly.
Usually in theDEVELOPERTurnaround. Adjust the tips of the GUIDE SHOES
in the Exit Turnaround as close as possible to the RACK ROLLER above them.
•• Check that all ROLLERS are in place and rotating correctly.
•• Check that all ROLLER GEARS, SPROCKETS, and IDLERS are engaged.
•• Replace any ROLLER that has broken or worn GUDGEONS.
•• Replace any BEARINGS that do not allow the Turnaround ROLLERS to rotate correctly.
•• Check the tension on the RACK CHAIN. Check that the ROLLERS do not hesitate and that the
• With the PROCESSOR on, check for movement on the surface of the solutions. Movement
• Check for solution in the REPLENISHMENT TANKS. Fill if necessary.
•• If the incoming wash water is dirty, clean the RACK and TANK thoroughly. Change the
• Check for dirt behind the CHECK VALVE POPPET SEATS, and for distorted POPPETS.
• Check that the DRYER air exhaust is free from any obstruction.
• Check that the Turnaround ASSEMBLY is adjusted correctly. Make sure that the Turnaround
• Check the temperature of the DEVELOPER. Contact qualified service personnel to make
• Check that the correct BULB and Safelight FILTER are in the Safelight and at the correct
• Check that the TOP COVER and PANELS are tight on the PROCESSOR.
CHAIN moves smoothly.
Lower the Turnaround ASSEMBLY squarely.
indicates recirculation. If the solutions are not moving, contact qualified service personnel.
Mix the DEVELOPER replenishment in quantities not to exceed a
2-week supply.
incoming water FILTER. Make sure to use the correct water FILTER.
Contact qualified service personnel to clean or install new POPPETS.
ASSEMBLIES are square with the RACKS.
adjustments, if necessary.
The “READY” light must be blinking before feeding film.
The incoming DEVELOPER REPLENISHER should not exceed 26.5˚C (80˚F).
distance from the FEED SHELF and work surface.
Check that there are no leaks in the lighttight GASKET.
12 27APR98 – 632732
Page 13

Section 5: New Equipment W arranty
Kodak warrants this Kodak RP X-Omat PROCESSOR to function properly for 1 year from the date of
initial installation, when installed within 1 year from the date of shipment.
Warranty Repair Coverage
If this equipment does not function properly during the warranty period, the dealer who sold the
equipment will provide or arrange for repair of the equipment during the dealer’s normal working
hours. Such repair service will include any necessary adjustments and/or replacement of parts
necessary to maintain your equipment in good working order.
How to Obtain Service
Should equipment require service, refer to the sales contract for details on whom to call for service, or
contact the dealer who sold the equipment.
Limitations
Warranty service is limited to the contiguous United States, the island of Oahu in Hawaii, and
certain areas of Alaska.
This warranty does not cover: circumstances beyond Kodak’s control; misuse; abuse; any
attachments, accessories, or alterations not marketed by Kodak (including service or parts to
correct problems resulting from the use of such attachments, accessories or alterations); failure to
follow Kodak’s operating instructions; or supply items.
Kodak makes no other warranties, express, implied, or of merchantability for this equipment.
Repair without charge is Kodak’s and the dealer’s only obligation under this warranty.
Kodak will not be responsible for any consequential or incidental damages resulting from the
•
sale, use, or improper functioning of this equipment even if loss or damage is caused by the
negligence or other fault of Kodak.
• Such damages for which Kodak will not be responsible, include, but are not limited to, loss of
revenue or profit, downtime costs, loss of use of the equipment, cost of any substitute
equipment, facilities or services or claims of your customers for such damages.
This limitation of liability will not apply to claims for injury to persons or damage to property
caused by the sole negligence or fault of Kodak or by persons under its direction or control.
New Equipment Warranty
Print
Date Pub No.
OCT 1982 632732 All n/a Original Printing
27APR98 632732 All om3407_1_27apr98.fm Revised the manual to conform with European MDD.
632732 – 27APR98 13
Affected
Pages File Name Notes
Page 14

Kodak, Min-R, and X-Omat are trademarks
om3407_1_27apr98.fm
Printed In USA
EASTMAN KODAK COMPANY
HEALTH IMAGING
● ROCHESTER, N.Y. 14650
 Loading...