

Page 1
Operator’s
Manual
Publication
Supersedes
No.
1C7072
July
968361
1994
1/92
ES
HEALTH
SCIENCES
DIVISION
Page 2
&
Vis
The
Eastman
No
Eastman
or
special
other
人
information
Kodak
patent
license
Kodak
implied,
with
damages,
fault.
This
equipment
caution
contained
Company
is
Company
respect
resulting
to
prevent
herein
prior
granted
reserves
to
this
includes
damage
is
based
to
publication.
by
this
the
information.
from
the
parts
on
the
information.
right
to
change
Kodak
use
of
this
information,
and
assemblies
during
all
PLEASE
experience
this
shall
not
be
service
procedures.
NOTE
and
knowledge
information
liable
even
for
if
loss
sensitive
relating
without
any
loss
or
damage
to
damage
to
notice,
or
damage,
is
caused
the
and
from
subject
makes
including
by
matter
gained
no
warranty,
consequential
Kodak’s
electrostatic
negligence
by
express
or
or
discharge.
Use
Description
Operator
Normal
Preventive
Troubleshooting
New
Publication
Orientation
Product
Environmental
Cassettes
Power
Operation
Applying
Setting
Adjusting
RecordingaPatientsDatâ...............................................
EEES
Maintenance
Lamp
Replacement
Cleaning
Battery
Equipment
Warranty
HowtoObtainSerice..................................................
Limitations
Change
.ee
Description
Requirements
Requirements
Power
the
the
Replacement
Procedures
Warranty
Clock
Lamp
ACA
Cover
Repair
Table
to
the
ii
Intensity
eccesesscseneeseesceeseescescsescessnedueesnsessessessueessesesessuessesasansensaucnecscesesensesartenuseeseses
.......oononccononconononccononncnononccconononorocancononcnnnnnonannonann
Coverage
Table
.ee
ce
eeeeeeseceeceesesnseesscessncesnensseecsenseceustasssensaeenseecseuseneessesenceaeseasssansaeensneceaneeneeseseuaneusecsees
Camera
and
Adjustment
GaSS
.ee
eee
ии
of
Contents
ии
инете
eee
cnn
nono
racer
enteran
rra
rca
naaa
нение
Page
3
5
5
canes
8
9
10
10
11
nora
rnnnnnnn
one
nn
cra
rrnnnn
cnn
raanrnnranns
rece
e
eee
amana
aneen
esen
ese
ceeenine
2
1C7072
Page 3
Operator
Orientation
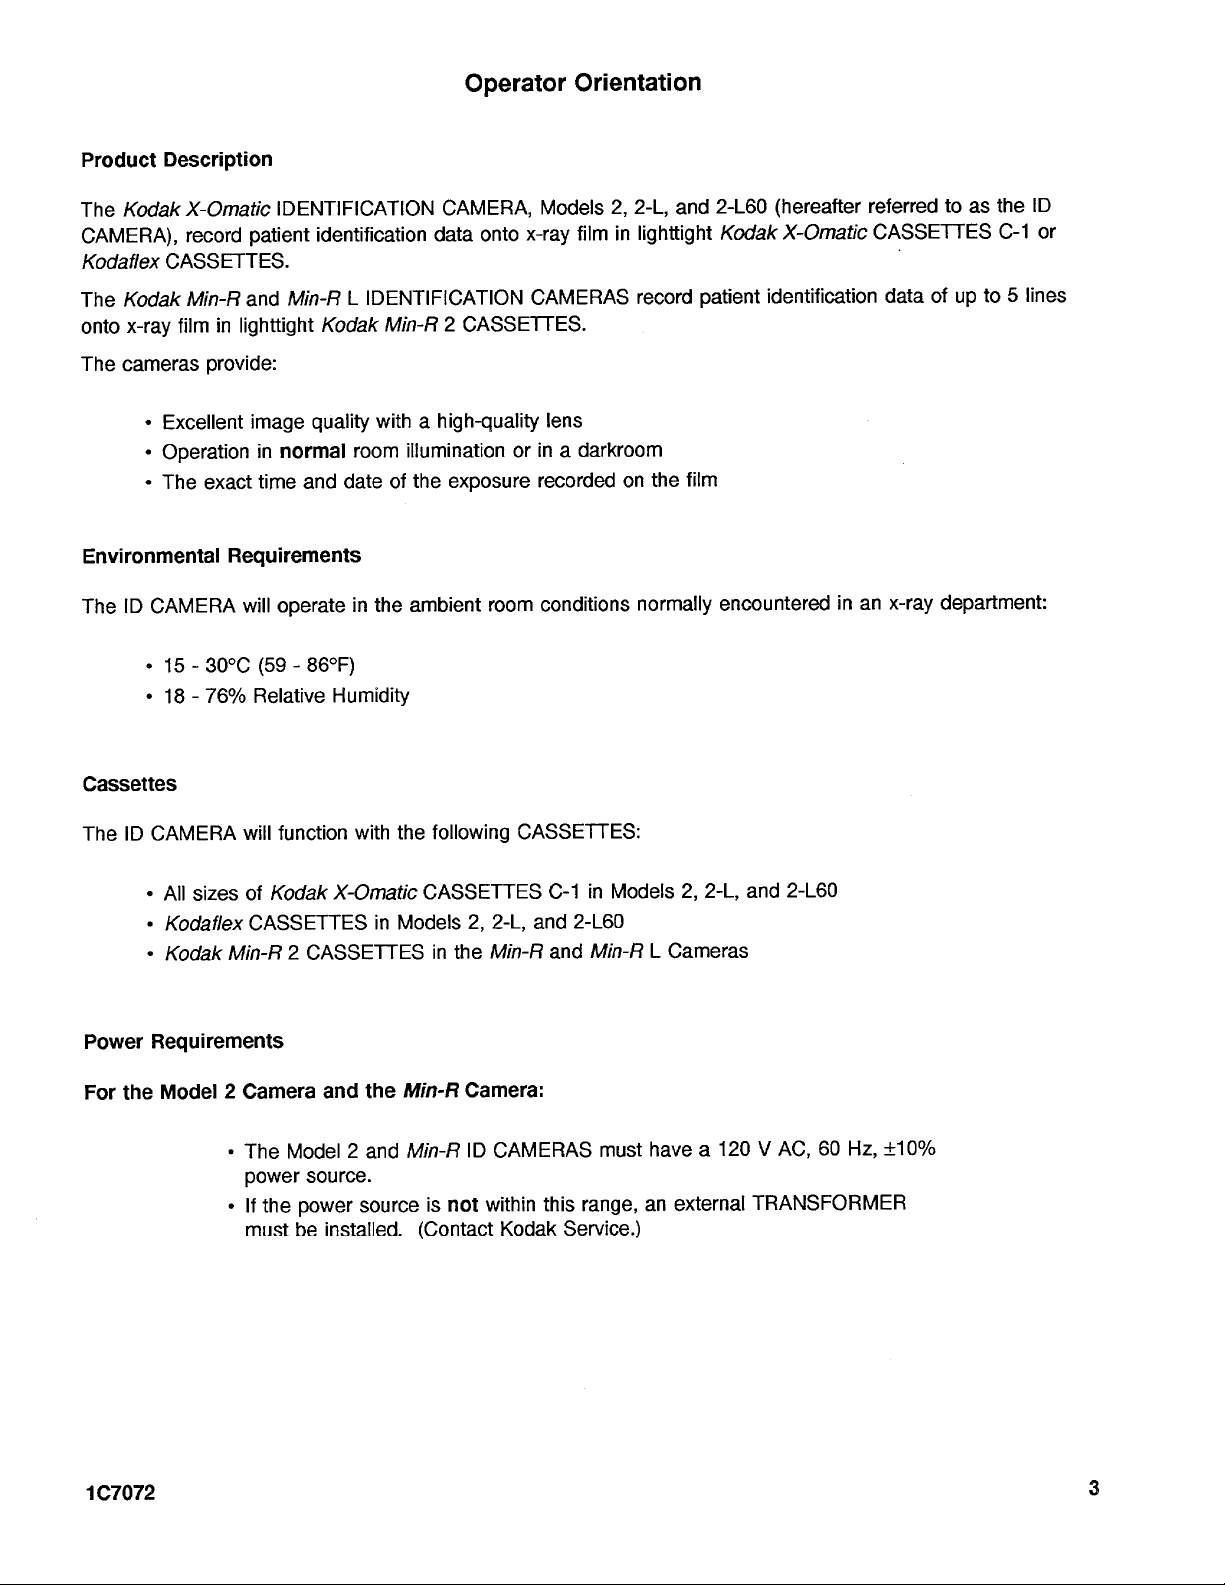
Product
The
CAMERA),
Kodaflex
The
onto
The
Description
Kodak
X-Omatic
record
CASSETTES.
x-ray
Min-R
film
Kodak
cameras
+
Excellent
»
Operation
*
The
provide:
exact
Environmental
CAMERA
ID
The
»
15 - 30°C
*
18 - 76%
IDENTIFICATION
patient
and
lighttight
in
image
identification
Min-R
Kodak
quality
in
normal
time
and
Requirements
operate
will
(59 - 86°F)
Relative
CAMERA,
data
IDENTIFICATION
L
CASSETTES.
2
Min-R
with a high-quality
room
illumination
date
of
the
exposure
ambient
the
in
Humidity
onto
or
room
x-ray
film
2,
in
Models
CAMERAS
lens
in a darkroom
recorded
on
conditions
2-L60
and
2-L,
lighttight
record
the
normally
Kodak
patient
film
encountered
(hereafter
X-Omatic
referred
CASSETTES
:
in
an
data
x-ray
identification
the
as
to
C-1
5
to
up
of
department:
ID
or
lines
Cassettes
The
ID
CAMERA
+
ㆍ
*
Power
For
Requirements
the
will
function
All
sizes
of
Kodak
Kodaflex
Kodak
Model 2 Camera
CASSETTES
Min-R 2 CASSETTES
*
The
Model 2 and
power
*
lfthe
must
with
X-Omatic
and
source.
power
be
installed.
the
in
Models
the
Min-R
Min-R
source
following
CASSETTES
2,
2-L,
in
the
Min-R
Camera:
ID
is
not
within
(Contact
CASSETTES:
C-1
and
and
CAMERAS
this
Kodak
in
Models
2-L60
Min-R L Cameras
must
have a 120 V AC,
range,
an
Service.)
2,
2-1,
and
external
2-160
60
Hz,
TRANSFORMER
+10%
1C7072
Page 4
For
For
the
Model
the
Model
*
Small
variations
*
If
your
necessary
*
Use a reliable
2-L
Camera
*
The
+10%
*
If
the
CAMERA;
CAMERA
2-L60
*
The
power
*
If
the
CAMERA;
CAMERA
ID
CAMERA
to
Model
power
power
must
Camera:
Model
source.
power
must
in
the
have
a
earth
and
the
2-L
and
source.
source
however,
be
2-L60
ID
source
however,
be
voltage
is
installed
voltage
ground.
Min-R L Camera:
Min-R
L
ID
CAMERAS
is
not
240
V
the
connections
changed
CAMERA
is
the
changed
regulator
by
not
220
connections
by
can
cause
in
an
area
Kodak
will
V
AC,
Kodak
IMPORTANT
variations
installed
AC,
50
to
operate
60
to
where
to
will
Hz,
you
the
TRANSFORMER
Service.
on
a
Hz,
you
the
TRANSFORMER
Service.
in
the
voltage
ensure
operate
220
fluctuations
a
on
can
still
V
AC,
can
still
density
constant
a
use
use
of
240
V
the
inside
60
Hz,
the
inside
the
film.
are
occurring,
AC
voltage
AC,
ID
the
+10%
ID
the
50
ID
ID
to
Hz,
it
the
may
be
camera.
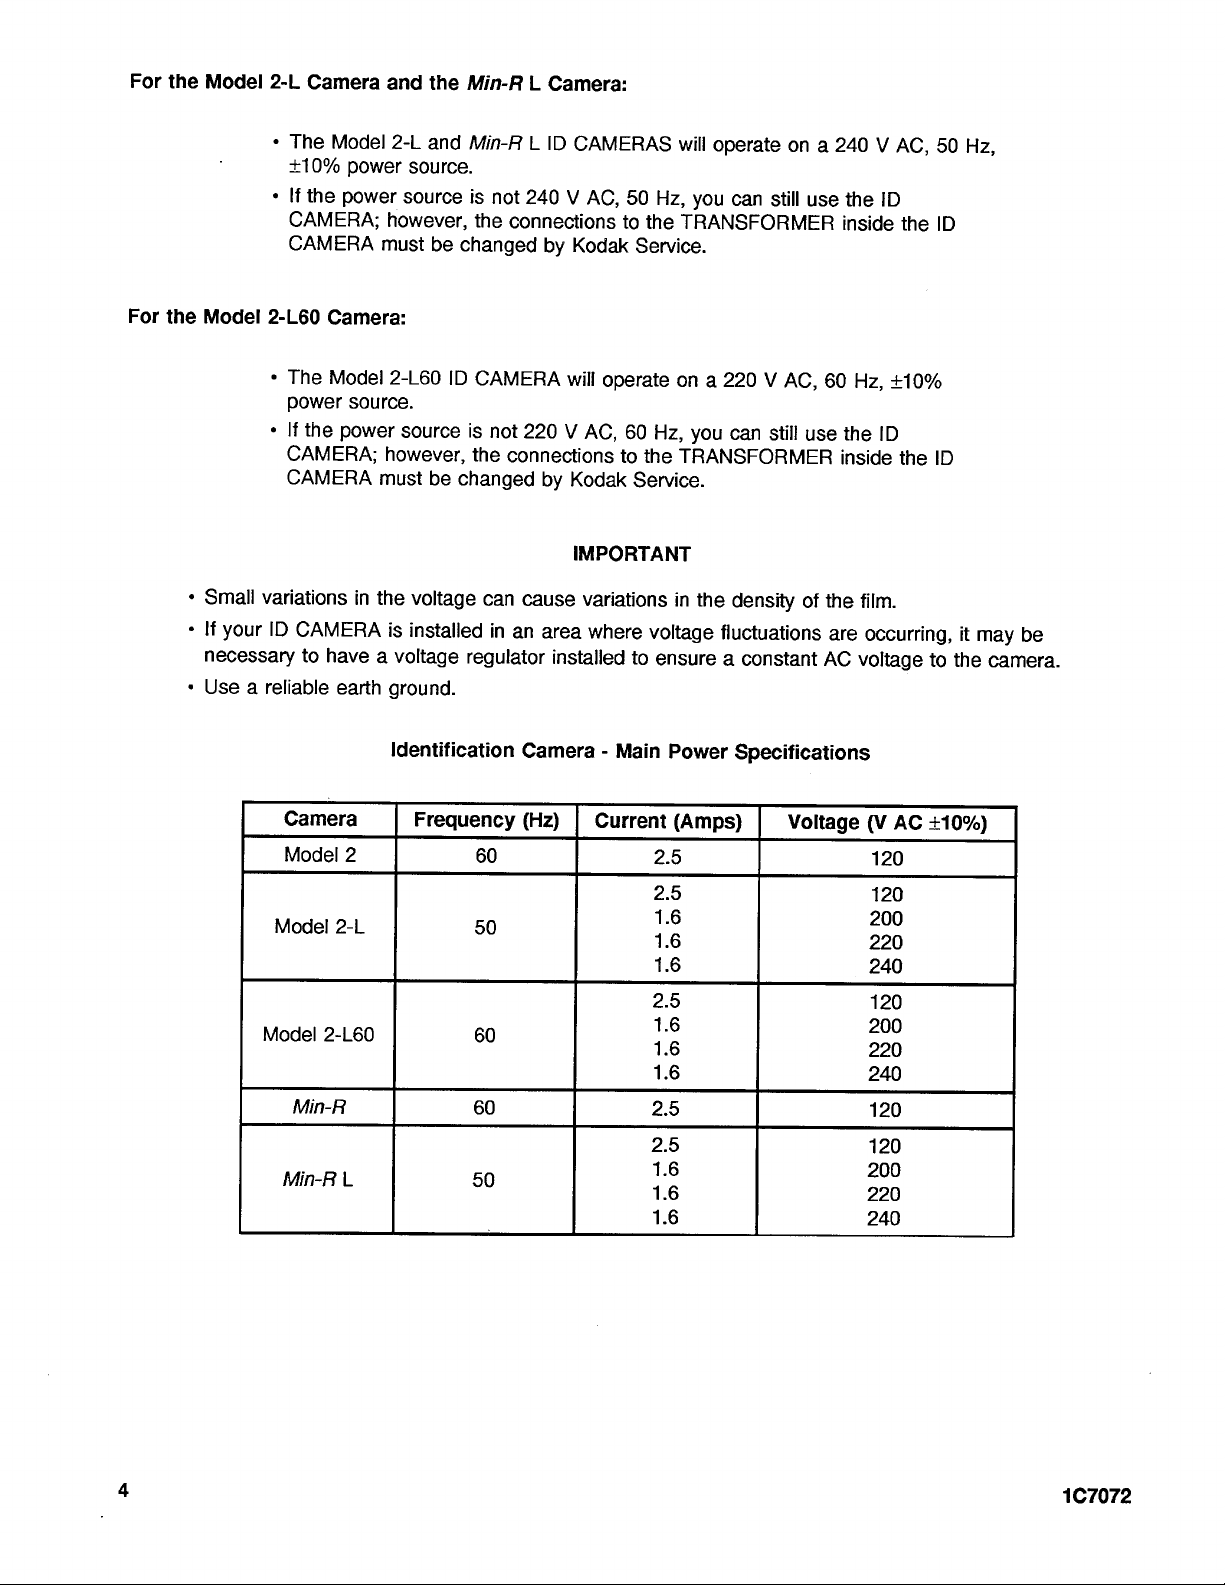
Camera
Model
Model
Model
2-L60
Min-R
.
Min-R
Identification
2
2-L
L
Frequency
60
50
60
60
50
Camera - Main
(Hz)
|
Current
Power
(Amps)
2.5
2.5
1.6
16
1.6
2.5
1.6
16
1.6
2.5
2.5
1.6
16
1.6
Specifications
Voltage
(V
120
120
200
220
240
120
200
220
240
120
120
200
220
240
AC
+10%)
1C7072
Page 5
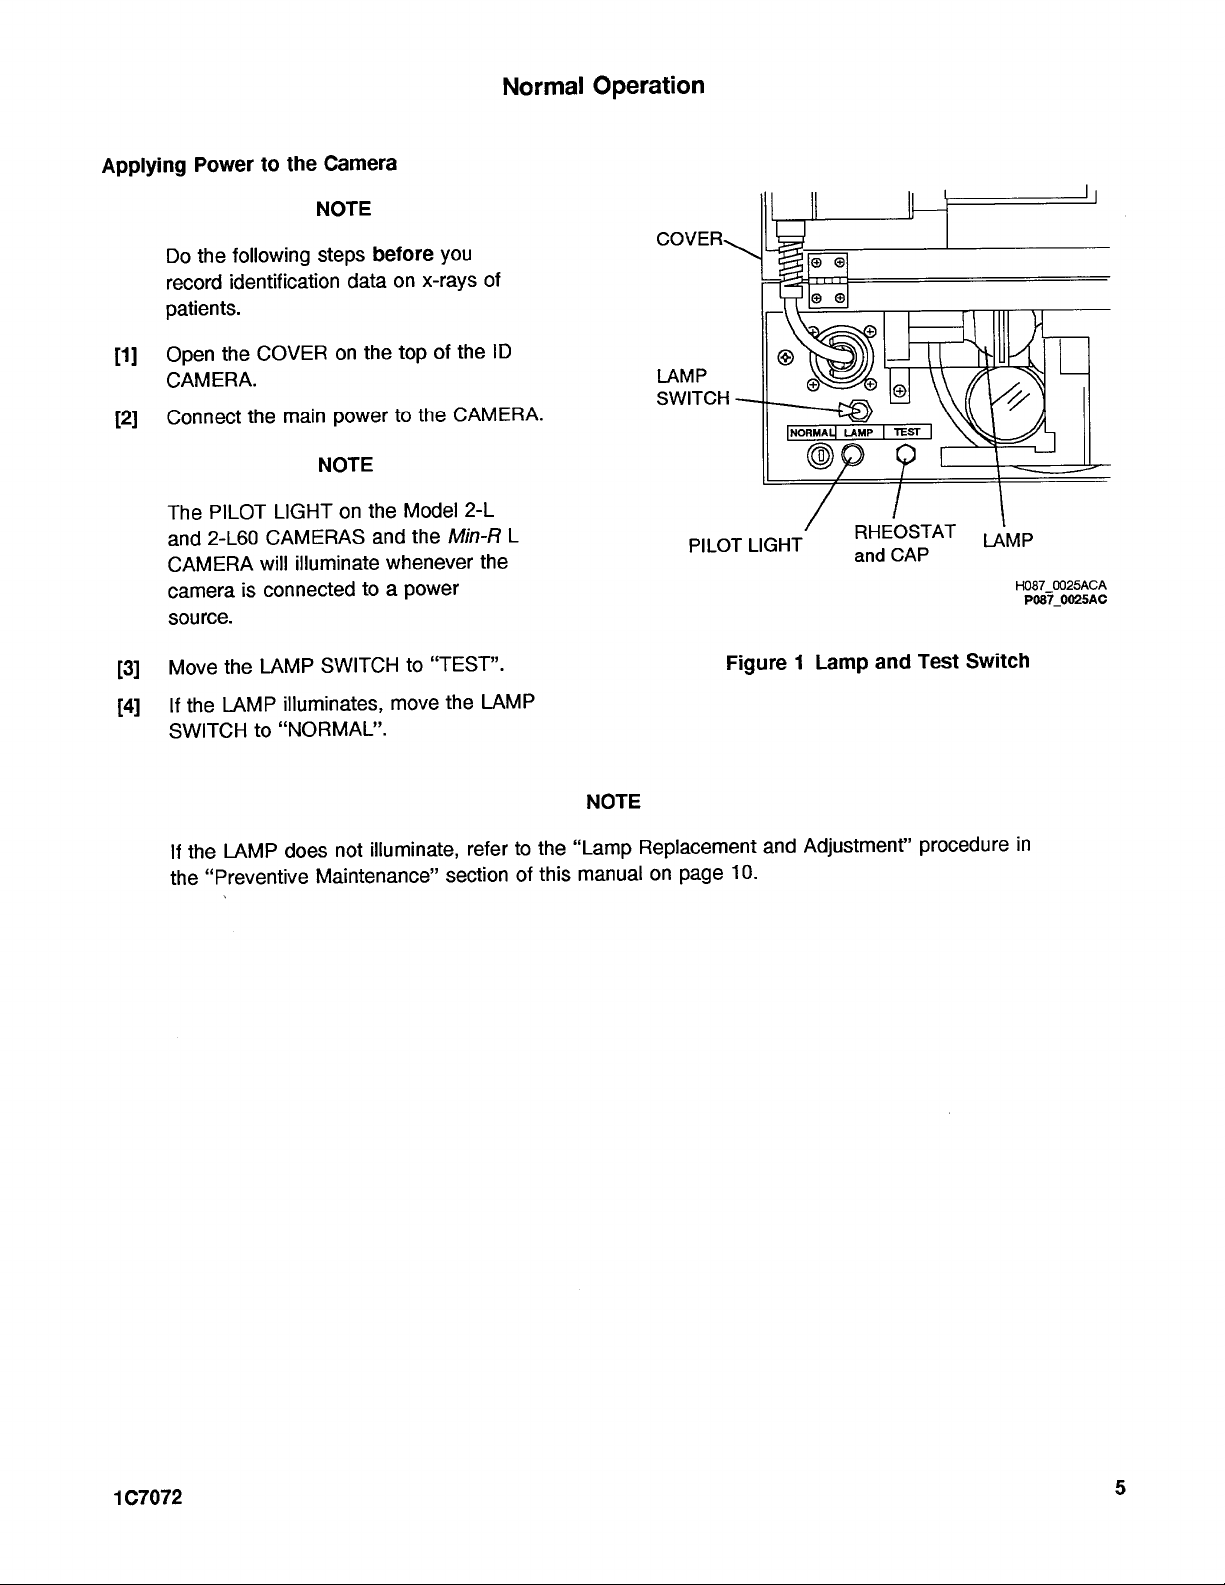
Normal
Operation
Applying
Do
record
patients.
Open
[1]
CAMERA.
Connect
[2]
The
and
CAMERA
camera
source.
Move
[3]
If
[4]
SWITCH
Power
the
the
to
following
identification
COVER
the
the
PILOT
2-160
will
is
LAMP
the
LAMP
to
the
Camera
NOTE
steps
data
on
power
main
NOTE
LIGHT
CAMERAS
connected
“NORMAL”.
on
illuminate
SWITCH
illuminates,
before
the
the
and
to a power
you
on
x-rays
of
top
the
to
Model
the
whenever
“TEST”.
to
move
of
ID
the
CAMERA.
2-L
Min-R
the
LAMP
the
L
COVER
LAMP
SWITCH
PILOT
LIGHT
Figure 1 Lamp
RHEOSTAT
and
CAP
and
Test
LAMP
H087.
Switch
P087
0025ACA
0025AC
LAMP
the
If
“Preventive
the
not
does
Maintenance”
illuminate,
refer
section
to
of
the
this
“Lamp
manual
Replacement
10.
page
on
Adjustment”
and
procedure
in
107072
Page 6

Setting
[1]
Open
[2]
Check
[3]
If
The
the
Clock
the
that
necessary,
Press
(a)
you
*
Day
*
Month
*
Year
*
Hour
*
Minute
+
Month
selected
Continue
(b)
the
to
flash.
COVER
the
CLOCK
change
the S BUTTON
want
to
set:
Location
NOTE
field
will
to
press
field
that
you
is
set
the
time
flash
ON
the S BUTTON
want
correctly.
and
date:
to
select
the
and
OFF.
to
change
field
until
starts
S
BUTTON
Figure 2 Clock
C
BUTTON
Settings
R
BUTTON
CLOCK
P087
0026ACA
P087_0026AC
(c)
(d)
*
If
you
will
have
*
The
location
*
When
day.
*
The
seconds,
the
month
month
*
When
numbers
to
set
Press
value
of
Continue
the
CLOCK
want
in
wait
longer
to
CLOCK
field
you
select
The
“M”
CLOCK
it
will
to
location
you
install
will
the
correct
the C BUTTON
the
selected
to
press
the C BUTTON
displays
that
field.
than
5
press
the
S
can
display
sets
the
format.
the
month
will
move
will
allow
you
reset
to
the
February,
is
blink
first.
a
new
5
times.
time
and
in
BATTERY
to
change
field.
the
number
seconds
BUTTON
the
date
location
with
the
to
set
first
5
seconds
The
date.
between
again.
in
2
formats:
The
CLOCK
field
month
non-valid
day
of
the
or
if
CLOCK
the
until
you
IMPORTANT
pressing
will
and
to
the
dates
the
month.
CLOCK
the
CLOCK
will
then
the
S
month/day/year
display
then
new
an
press
the
position.
while
you
For
example,
will
change
malfunctions,
display
the
BUTTON
or
“M”
above
C
BUTTON,
are
setting
the
default
and
the
C
day/month/year.
the
month.
you
reverse
the
fields;
if
you
set
the
day
date
to
“01:02”,
press
the
R
BUTTON.
date
and
time.
BUTTON,
The
however,
to
“30”
or
to
Do
you
month
the
month
in
or
“02:01”
All
the
Step
5
“81”
if
3
above
and
and
the
107072
Page 7

Typical
Data
Gard
|
4
mm
(5/32
or
0.150
in.)
Dull
White
Preferred
-
Making
[1]
8.3
an
Invert
it
under
should
the
CARD
cm
(3
1/4
2.4
in.)
cm
Figure 5 Patients
Exposure
the
IDENTIFICATION
the
CARD
now
be
under
HOLDER.
.
(15/16
in.)
—
HOLDER.
the
(Patera
Identification
Data
Must
Be
Within
This
Area.
Up
to 5 Lines
Are
Possible,
6.6
ст
(2.60
or 2 19/32
pe
1.27
mm
(0.050
in.)
X
一 一 一 一 一 一 一 18.7
Identification
CARD
bottom
The
and
data
left
insert
corner
in.)
Card
of
>
cm
for
(7
3/8
Min-R
in.)
——
and
EXPOSURE
INTENSITY
一
oe
Min-R L ID
INDICATOR
SWITCH
Jae)
a
U
Cameras
0.2
mm
(0.007
thick
H091
in.)
0044BC
CARD
HOLDER
[2]
Place a CASSETTE
on
the
corner.
[3]
Keep
with
the
Do
not
move
[4]
Insert
above
The
entire
correctly
loaded
BASE
with
the
the
left
side
of
the
thick
section
NOTE
the
CASSETTE
the
CASSETTE
the
BASE.
exposure
into
the
*
Actuate a mechanical
actuate
*
liluminate a LAMP
(You
*
Close
SLOT
the
will
the
cycle
see
WINDOW
with
WINDOW
CASSETTE
of
the
BASE.
during
fully
into
will
above
SHUTTER.
the
LAMP
exposed
in
the top
film
left
flush
the
exposure.
the
SLOT
IMPORTANT
take
approximately 1 second.
the
to
in
ARM
record
BASE,
illuminate
the
the
CAMERA
to
open a WINDOW
the
identification
in
the
CASSETTE.
will
data,
EXPOSURE
WINDOW
When
you
insert a CASSETTE
automatically:
in
the
CASSETTE
time,
and
date
INDICATOR.)
and
on
the
film.
Р087_0027АСА
P087
0027AC
[5]
[6]
107072
Remove
Process
the
CASSETTE
the
film
from
according
to
the
CAMERA.
the
manufacturer’s
specifications.
Page 8
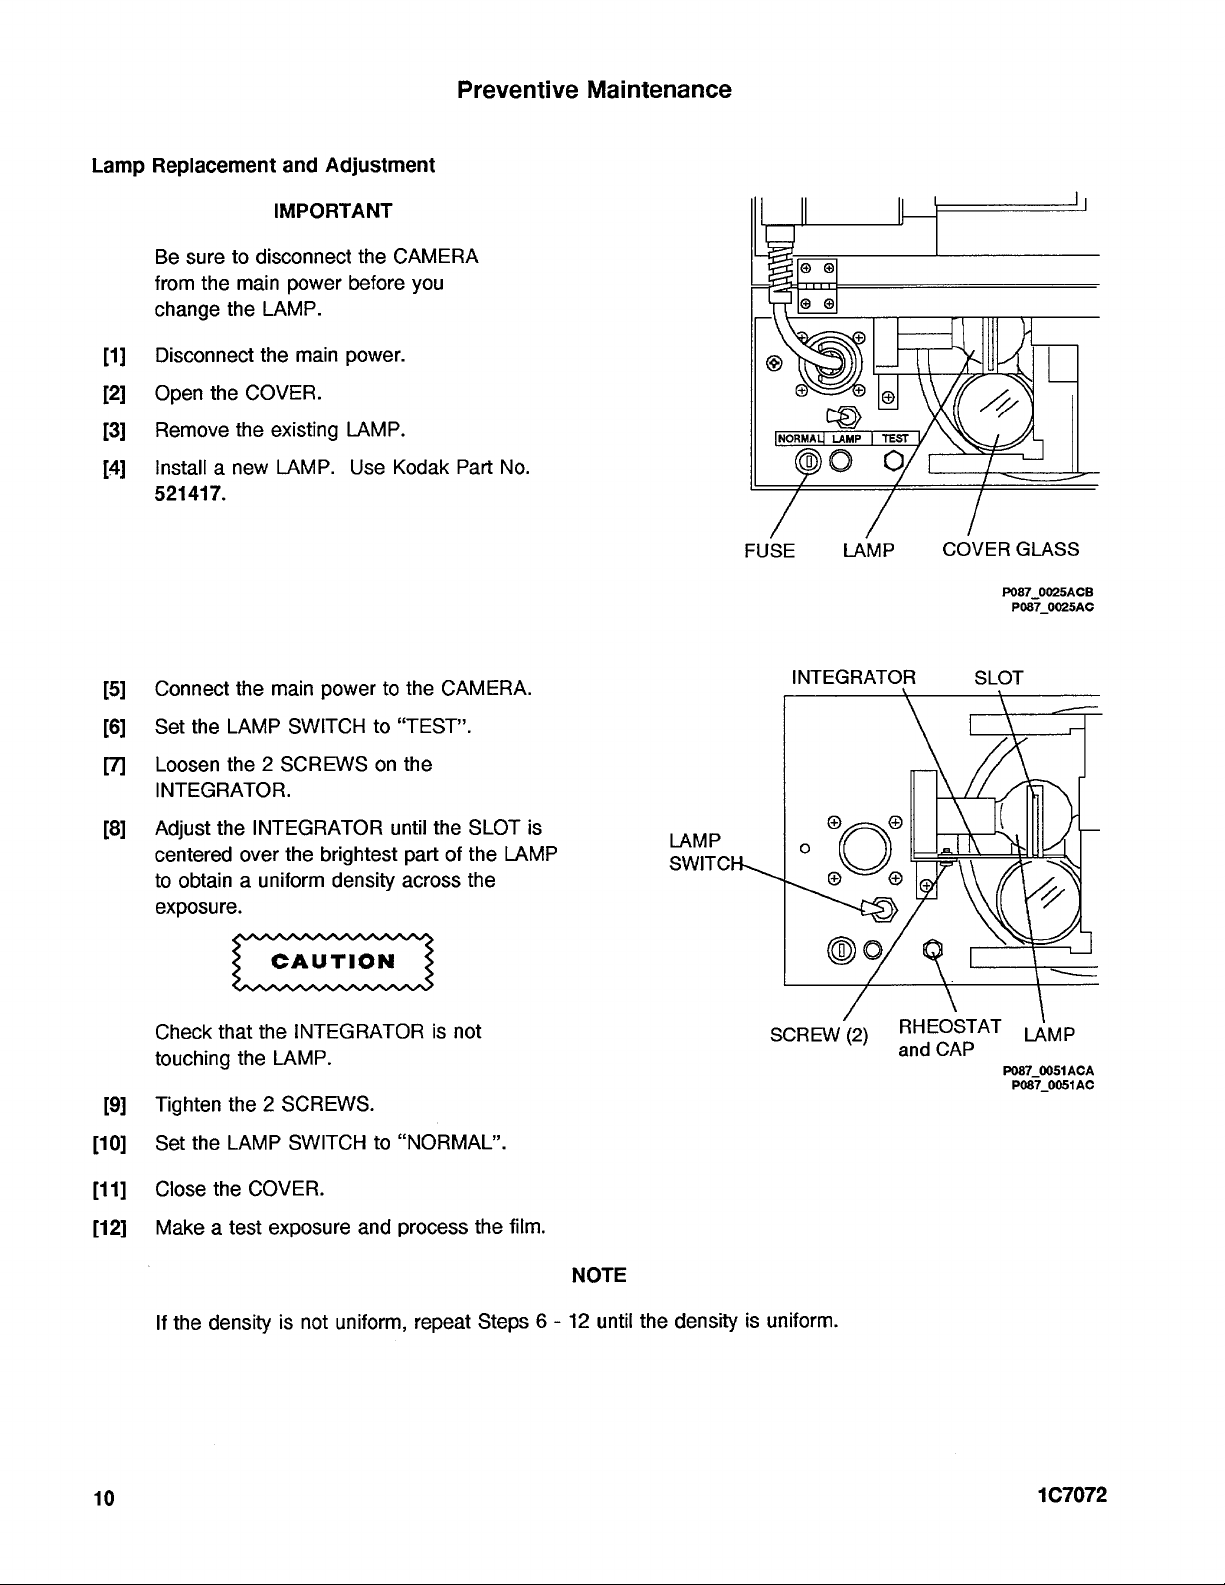
Lamp
Replacement
and
Adjustment
IMPORTANT
Preventive
Maintenance
[1]
[2]
[3]
[4]
[5]
[6]
[8]
Be
sure
to
disconnect
from
the
main
change
Disconnect
Open
Remove
Install a new
521417.
Connect
Set
Loosen
INTEGRATOR.
Adjust
centered
to
exposure.
the
LAMP.
the
the
COVER.
the
existing
the
main
the
LAMP
the 2 SCREWS
the
INTEGRATOR
over
obtain a uniform
power
main
LAMP.
power
SWITCH
the
brightest
the
CAMERA
before
power.
LAMP.
Use
Kodak
to
to
on
until
density
you
Part
the
CAMERA.
“TEST”.
the
the
part
of
across
SLOT
the
the
No.
is
LAMP
LAMP
SWITCH
©
8
ーーー
ITIT
© ©
Ze
LAMP
|
la
/
RATOR
|
DO
/
FUSE
INTEG
oo!
o
|
OX
O
pøj
ENT
0
|
я
COVER
4
4
P087_0025ACB
SLOT
{
\
|
GLASS
P087_0025AC
Y
[9]
[10]
[11]
[12]
10
Check
touching
Tighten
Set
Close
Make a test
If
that
the 2 SCREWS.
the
LAMP
the
the
density
the
the
COVER.
INTEGRATOR
LAMP.
SWITCH
exposure
is
not
uniform,
to
“NORMAL”.
and
process
is
not
repeat
the
film.
Steps 6 -
12
until
the
density
SCREW
is
uniform.
O
(2
(2)
RHEOSTAT
and
CAP
|
P
LAM
P087_0051ACA
P087_0051AC
107072
Page 9

Adjusting
*
The
x-ray
*
Before
+
If
Lamp
Intensity
intensity,
films.
you
it
becomes
or
brightness
record
necessary
the
patient’s
to
of
the
LAMP
identification
make
an
adjustment,
NOTE
is
factory-set
data
on
follow
to
the
the
produce
x-ray
film,
procedure
the
correct
make a test
below.
density
exposure.
on
most
Load a sheet
[1]
in a darkroom.
Insert
[2]
data
Place
[3]
WINDOW
corner.
+
+
Fully
[4]
the
Remove
[5]
Check
[6]
If
[7]
“MED”,
an
IDENTIFICATION
under
the
CASSETTE
of
The
left
side
be
flush
with
BASE.
Do
not
move
exposure.
will
illuminate
insert
film.
the
the
density
the
density
or
of
x-ray
the
CARD
the
CASSETTE
IMPORTANT
of
the
the
the
The
EXPOSURE
during
the
CASSETTE
CASSETTE
is
too
“HI”
(“low”,
film
into a CASSETTE
HOLDER.
on
the
CASSETTE
thick
section
CASSETTE
the
and
of
the
film
dark
or
“medium”,
CARD
with
BASE
in
the
upper
must
of
the
during
INDICATOR
exposure.
into
the
process
in
the
exposed
too
light,
or
patient
with
the
left
the
SLOT
the
above
film
change
“high”).
EXPOSURE
the
BASE.
in a darkroom.
area.
the
position
.
INTENSITY
INDICATOR
SWITCH
Figure 3 Inserting a Cassette
The
ID
of
the
INTENSITY
CAMERA
will
SWITCH
CARD
HOLDER
P087_0027ACA
P087_0027AC
automatically
between
“LO”,
expose
[8]
107072
If
a
density
problem
on
the
continues,
film
repeat
Steps
resolved.
problem
the
until
7
-
1
is
Page 10

Recording a Patient’s
[1]
[2]
8.3
Prepare
film.
*
The
*
The
Refer
below
+
Minimum
«
Maximum
*
Maximum
*
Card
*
Standard
*
The
*
If
cm
a
WINDOW
WINDOW
to
the
and
Color:
dimensions
the
ink
2.4
cm
(15/16
patient's
following
on
the
size:
size:
thickness:
Dull
white
is
not
in.)
Data
IDENTIFICATION
in
Model
in
Min-R
next
7.5
12.5
white
tab
of
black,
list
page.
x
7.5
x
0.3
or
data
these
the
2,
and
for
the
cm
20.5
mm
with
cards
density
©
Patient
Identification
Data
Must
Within
This
Lt
(2.60
CARD
2-L,
and
2-L60
Min-R
cm
black
cards
Be
Area
6.6
or 2 19/32
L
Cameras
specifications
(3
x
3
in.)
(5
x
8
in.)
(0.012
cm
with
are
ink
of
in.)
rounded
8.3
the
_
in.)
for
Cameras
NOTE
X
18.7
patient
|
Å
a
CASSETTE
will
of
the
corners
cm
data
4
mm
that
will
accommodate
accommodate
IDENTIFICATION
are
ideal.
(3%
x
7%
in.).
on
the
film
(5/82
or
0.150
in.)
has
may
exposed
5
lines
CARD
not
3
lines
of
be
correct.
but
unprocessed
of
patient
patient
and
to
Typical
Data
Dull
White
n
data.
data.
the
illustration
Card
-
Preferred
x-ray
(3
1/4
in.)
Figure
—
-a—
No
4
Patient's
1.27
mm
(0.050
in.)
Identification
18.7
cm
Card
(7
3/8
for
in.)
Model
2,
2-L,
and
0
2-L60
nan
Cameras
0.2
mm
(0.007
in.)
thick
Ho91
004380
8
107072
Page 11

Cleaning
[1
Disconnect
[2]
Clean
at
the
the
least
Cover
the
top
once
Glass
main
surface
each
week.
NOTE
power
of
the
to
the
COVER
CAMERA.
GLASS
o
©
==
그
Φ @
Use
Kodak
or a soft,
[3]
Connect
Battery
When
the
within 5 days.
bottom
[1]
[2]
Replacement
“LOBAT”
x-ray
film,
of
the
Remove
Remove
of
properly.
LENS
lint-free
the
appears
you
must
“LOBAT”
CLOCK.
the
the
CLEANING
cloth.
main
power
in
the
install a new
will
BATTERY
existing
PAPER
to
the
CAMERA.
identification
BATTERY
also
be
visible
LID.
BATTERY
and
area
on
at
the
dispose
SEUL
SS
NORMALI
DO
/
FUSE
Figure 6 Cover
LAMP
LAMP
o)
°
ll
O
/
Glass
z
COVER
R
GLASS
P087
0025ACB
P087
BUTTON
CLOCK
0025AC
し
[3]
[4]
[5]
Install a new
Close
the
BATTERY
Press
the R BUTTON
Refer
to
the
procedure
9-volt
NOTE
“Setting
on
page 6 of
alkaline
LID.
and
the
Clock”
this
BATTERY.
reset
the
manual.
CLOCK.
BATTERY
LID
Figure 7 Clock
Battery
P087_0026ACB
P087_0026AC
107072
11
Page 12

Troubleshooting
WARNING
Procedures
Dangerous
MALFUNCTION
Camera
with a cassette
does
voltage.
not
operate
inserted
Disconnect
POSSIBLE
Camera
*
Power
*
Voltage
power
for
camera.
*
The
the
your
fuse
ID
CAMERA
has
no
cord
output
source
model
is
blown
PROBLEM
power:
is
damaged
at
the
is
incorrect
of
from
the
main
Order a new
See
Replace
page
If
Kodak
For
the
Requirements”
replacement
power
page
10.
the
CAMERA
Service.
protection
FUSE.
before
3.
the
FUSE.
Refer
FUSE
you
ACTION
power
still
against
to
on
do
these
cord.
See
the
illustration
has
no
power,
the
risk
the
“Power
pages 3 and
must
be:
procedures.
on
contact
of fire,
4.
replace
The
Cassette
not
open
window
correctly
does
Cassette
correctly
Cassette
Lamp
“TEST”
is
not
is
damaged
switch
inserted
S4
is
set
to
+
the
same
*
the
same
fast-blo,
+
of
the
(1)
Insert
of
(2)
Check
»
Window
*
with
of
Load
the
Set
the
Contact
physical
type
or
same
the
the
CAMERA.
that
Left
side
the
the
film
SWITCH
Kodak
medium-blo)
BASE.
size
(for
example,
ampere
CASSETTE
the:
is
facing
of
the
thick
section
into a new
to
“NORMAL”.
Service.
rating
up.
CASSETTE
Slo-Blo
fully
to
on
the
CASSETTE.
the
is
left
Fuse,
back
flush
side
12
107072
Page 13

MALFUNCTION
No
date
with
the
Time
is
Patient
or
too
Patient
focus
Patient
uniform
or
time
patient
incorrect
data
light
data
data
or
is
appears
data
is
too
is
out
is
not
missing
dark
of
POSSIBLE
Dead
The
The
set
The
battery
clock
intensity
correctly
lens
PROBLEM
is
incorrectly
switch
or
cover
is
glass
set
not
is
dirty
The
cassette
during
the
lens
the
moved
exposure,
or
cover
or
glass
is
dirty
The
hinges
are
loose
Lamp
malfunctioned
Exposure
by
the
Identification
inserted
on
the
is
discolored
path
is
cable
card
incorrectly
cover
or
has
blocked
is
ACTION
Install a new
problem
Set
the
“Setting
this
manual.
(1)
Move
next
.
+
-Hi
(2)
Make
Step
(3)
if
problem,
Clean
the
Kodak
CLEANING
+
Repeat
CASSETTE
exposure.
*
If
the
Service.
(1)
Tighten
(2)
Make a test
(3)
If
the
Install a new
Replacement
page
10
(1)
Move
path.
(2)
Make a test
(3)
If
necessary,
Insert
the
data
inverted
battery.
continues,
CLOCK
the
LO
MED
you
LENS
problem
necessary,
HINGES
in
to
Clock”
the
INTENSITY
higher
the
identification
another
1.
are
unable
contact
LENS
CLEANER
PAPER.
exposure
does
the
LAMP.
and
this
manual.
the
CABLE
in
or
or
continues,
HINGES.
the
See page
contact
the
correct
procedure
lower
exposure
to
Kodak
the
COVER
and
not
move
exposure.
repeat
are
correctly
See
Adjustment”
from
exposure.
repeat
card
bottom
11.
If
the
Kodak
SWITCH
position:
correct
and
contact
Steps 1 and 2 until
the
Steps 1 and
left
Service.
time.
on
page 6 in
and
repeat
the
Service.
GLASS
Kodak
be
sure
during
aligned.
“Lamp
procedure
the
exposure
with
the
corner.
See
to
the
with
LENS
that the
the
Kodak
2.
printed
the
on
107072
13
Page 14

New
Equipment
Warranty
Kodak
from
Warranty
If
warrants
date
this
equipment
of
Repair
PROCESSORS
normal
necessary
How
Should
the
Limitations
Warranty
Alaska.
This
working
to
to
Obtain
equipment
dealer
for
service
warranty
accessories,
the
use
of
such
supply
Kodak
Repair
-
*
This
negligence
items.
makes
without
Kodak
use,
or
other
fault
Such
damages
profit,
downtime
claims
of
limitation
will
improper
your
or
the
Kodak
initial
installation,
Coverage
does
who
sold
hours.
maintain
Service
require
Kodak
does
or
X-Omat
is
limited
not
alterations
attachments,
no
other
charge
not
be
responsible
functioning
of
Kodak.
for
which
costs,
customers
of
liability
fault
of
Kodak
X-Omatic
when
not
function
the
equipment
Such
repair
your
equipment
service,
PROCESSORS
to
the
cover:
circumstances
not
marketed
accessories
warranties,
is
Kodak’s
Kodak
loss
of
use
for
such
will
not
apply
or
by
and
Min-R
installed
properly
will
service
in
good
refer
to
the
contiguous
by
or
express,
and
the
dealer’s
for
any
consequential
of
this
equipment
will
not
be
of
the
equipment,
damages.
to
claims
persons
under
IDENTIFICATION
within
one
during
will
Kodak
the
provide
include
working
sales
who
sold
United
beyond
(including
warranty
or
arrange
any
order.
contract
the
States,
Kodak’s
alterations);
implied,
or
of
only
obligation
even
responsible,
cost
for
injury
its
direction
CAMERAS
year
from
the
date
period,
for
repair
necessary
for
adjustments
details
equipment.
the
island
control;
service
failure
to
follow
of
misuse;
or
merchantability
under
or
incidental
if
loss
or
damage
include,
of
to
but
any
substitute
persons
or
control.
are
or
of
the
dealer
of
the
on
whom
Oahu
parts
Kodak’s
for
this
this
warranty.
damages
not
equipment,
damage
to
function
shipment.
for
equipment
and/or
to
call
in
Hawaii,
abuse;
to
correct
operating
equipment.
resulting
is
caused
limited
to,
to
property
properly
Kodak
X-Omat
during
replacement
for
service,
and
any
attachments,
problems
instructions;
from
by
the
loss
of
facilities
caused
for
one
the
or
certain
areas
resulting
the
negligence
revenue
or
services
by
year
dealer’s
of
parts
contact
of
from
or
sale,
or
or
or
the
sole
3202CM_A.txt
14
107072
Page 15

Revision
Date
Pub.
No. | Affected
Publication
Pages
Change
Filename
Table
Description
10/91
1/92
28JUL1994
240996
968361
107072
all
all
all
32020m_a.txt | First
32020m
3202cm_a.txt
atxt | Revision
printing
Revision
Cameras.
to
to
ECO
for
Models 2 and
add
the
Min-R
add
Model
No.
2537-128.
Camera.
2-L60
2-L.
and
Min-R
L
107072
Page 16

Health
Sciences
EASTMAN
Rochester,
Printed
on
inks.
of
Eastman
KODAFLEX,
X-OMATIC
recycled
The
post-consumer
based
up
waste.
KODAK,
and
_
The
new
vision
of
Kodak
Division
KODAK
NY
14650
paper
waste
fiber,
post-consumer
Kodak
Company
MIN-R,
are
trademarks.
COMPANY
containing
using
soybean-
fiber
office
X-OMAT,
10%
is
paper
made
Pub. No.
1C7072
7/94
Eastman
Kodak
Company,
1994
Printed
in
U.S.A.
 Loading...