

Page 1
SRP 30
LASER PRINTER
OPERATOR'S GUIDE
Page 2
Operator’s Guide
KODAK PROFESSIONAL SRP 30
Laser Printer
P/N 6B7503
December 2002
Page 3

© Eastman Kodak Company, 2002
All rights reserved. Contents of this publication may not be reproduced in any form without permission from
Eastman Kodak Company.
Page 4

Table of Contents
Regulatory and Safety Information.............................................................iii
Regulatory Compliance.................................................................................. iv
Cautionary Symbols and Labels..................................................................... iv
Laser Compliance and Safety.........................................................................v
Safety Precautions ........................................................................................viii
Handling of Processing Chemicals................................................................. ix
Warranty Information...................................................................................... xi
Chapter 1 Introduction...............................................................................1-1
Using the Documentation.............................................................................1-2
Safety Precautions .......................................................................................1-3
Storage of Chemicals and Paper .................................................................1-3
Chapter 2 Overview....................................................................................2-1
General Description......................................................................................2-3
Starting the Equipment...............................................................................2-11
End of Work................................................................................................2-15
Description of the Operating Controls........................................................2-19
Screen Structure.........................................................................................2-21
Menu Overview...........................................................................................2-31
Info and Help..............................................................................................2-40
Chapter 3 Chemicals..................................................................................3-1
Preparation of Chemicals.............................................................................3-3
Other Operations to Perform Prior to Production.........................................3-8
Chapter 4 Settings......................................................................................4-1
From the Order Receipt to the Finished Print ..............................................4-3
Settings.........................................................................................................4-5
Machine Settings..........................................................................................4-8
Print Configurations....................................................................................4-48
Pricing Configurations ................................................................................4-80
Save / Load Settings and Configurations...................................................4-81
Chapter 5 Tests...........................................................................................5-1
Introduction...................................................................................................5-3
Printer Tests.................................................................................................5-3
Testing the Paper Processor......................................................................5-12
KODAK PROFESSIONAL SRP 30 Laser Printer i
Page 5

Operator’s Guide
Chapter 6 Production.................................................................................6-1
Preparing the Equipment for Different Orders.............................................6-3
APS Film......................................................................................................6-9
Order Handling........................................................................................... 6-10
Print Modes Overview................................................................................6-14
Using Print Configurations.........................................................................6-15
Changing the Order Number...................................................................... 6-18
Printing.......................................................................................................6-18
Using Preview............................................................................................6-42
Printing Network Orders............................................................................. 6-55
Index Prints................................................................................................ 6-57
Printing Price Labels (Option)....................................................................6-60
Statistics.....................................................................................................6-61
Chapter 7 Correcting System Conditions................................................7-1
System Errors .............................................................................................. 7-2
Error Handling..............................................................................................7-7
Removing Paper Jams............................................................................... 7-10
Chapter 8 Maintenance..............................................................................8-1
Maintenance Schedule and Maintenance Intervals..................................... 8-3
Daily Maintenance........................................................................................8-5
Weekly Maintenance.................................................................................. 8-10
Monthly Maintenance.................................................................................8-29
Maintenance When Required ....................................................................8-49
Consumables.............................................................................................8-52
ii KODAK PROFESSIONAL SRP 30 Laser Printer
Page 6

Regulatory and Safety Information
Contents
Regulatory Compliance ............................................................................................ iv
EMC Compliance................................................................................................. iv
CE Compliance.................................................................................................... iv
Cautionary Symbols and Labels..............................................................................iv
Hot Surface Symbol............................................................................................. iv
Electrical Hazard Symbol.................................................................................... iv
Mechanical Hazard Symbol..................................................................................v
Laser Compliance and Safety...................................................................................v
Certification Labels.............................................................................................. vi
Non-interlocked Panel Label............................................................................... vi
Aperture Label..................................................................................................... vi
Laser Source Label .............................................................................................vii
Locations of Laser Safety Labels........................................................................vii
Safety Precautions..................................................................................................viii
Legal Notice........................................................................................................viii
General Precautions...........................................................................................viii
When Operating the Equipment.........................................................................viii
When Disposing of the Equipment.....................................................................viii
Handling of Processing Chemicals.........................................................................ix
Disposal of Chemicals and Containers ............................................................... ix
Effluent Management ..................................................................................... ix
Chemical Concentrates.................................................................................. ix
Chemical Filters..............................................................................................ix
Container Recycling and Disposal ................................................................. ix
Assistance from Kodak...................................................................................ix
Safety Precautions for the Handling of Chemicals...............................................x
General Guidelines..........................................................................................x
Skin and Eye Protection.................................................................................. x
Storage and Disposal...................................................................................... x
Warranty Information................................................................................................ xi
Warranty Period................................................................................................... xi
Warranty Repair Coverage.................................................................................. xi
How to Obtain Service......................................................................................... xi
Limitations ...........................................................................................................xii
KODAK PROFESSIONAL SRP 30 Laser Printer iii
Page 7
Operator’s Guide
Regulatory Compliance
EMC Compliance
NOTE:
This equipment has been tested and found to comply with the limits for a
Class A digital device, pursuant to Part 15 of the FCC rules. These limits are
designed to provide reasonable protection against harmful interference when
the equipment is operated in a commercial environment. This equipment
generates, uses, and can radiate radio frequency energy and, if not installed
and used in accordance with the instruction manual, may cause harmful
interference to radio communications. Operation of this equipment in a
residential area is likely to cause harmful interference in which case the user
will be required to correct the interference at his or her own expense.
CE Compliance
WARNING:
This is a Class A product. In a domestic environment this
product may cause radio interference in which case the user
may be required to take adequate measures.
Cautionary Symbols and Labels
Hot Surface Symbol
CAUTION: Hot surface. Allow the surface to cool before you touch it.
Electrical Hazard Symbol
CAUTION: Risk of electrical shock. To avoid shock, do not remove the
panel.
iv KODAK PROFESSIONAL SRP 30 Laser Printer
Page 8

Regulatory and Safety Information
Mechanical Hazard Symbol
CAUTION:
Moving parts. Avoid contact. Keep your hands, hair, loose
clothing, and jewelry away from moving parts.
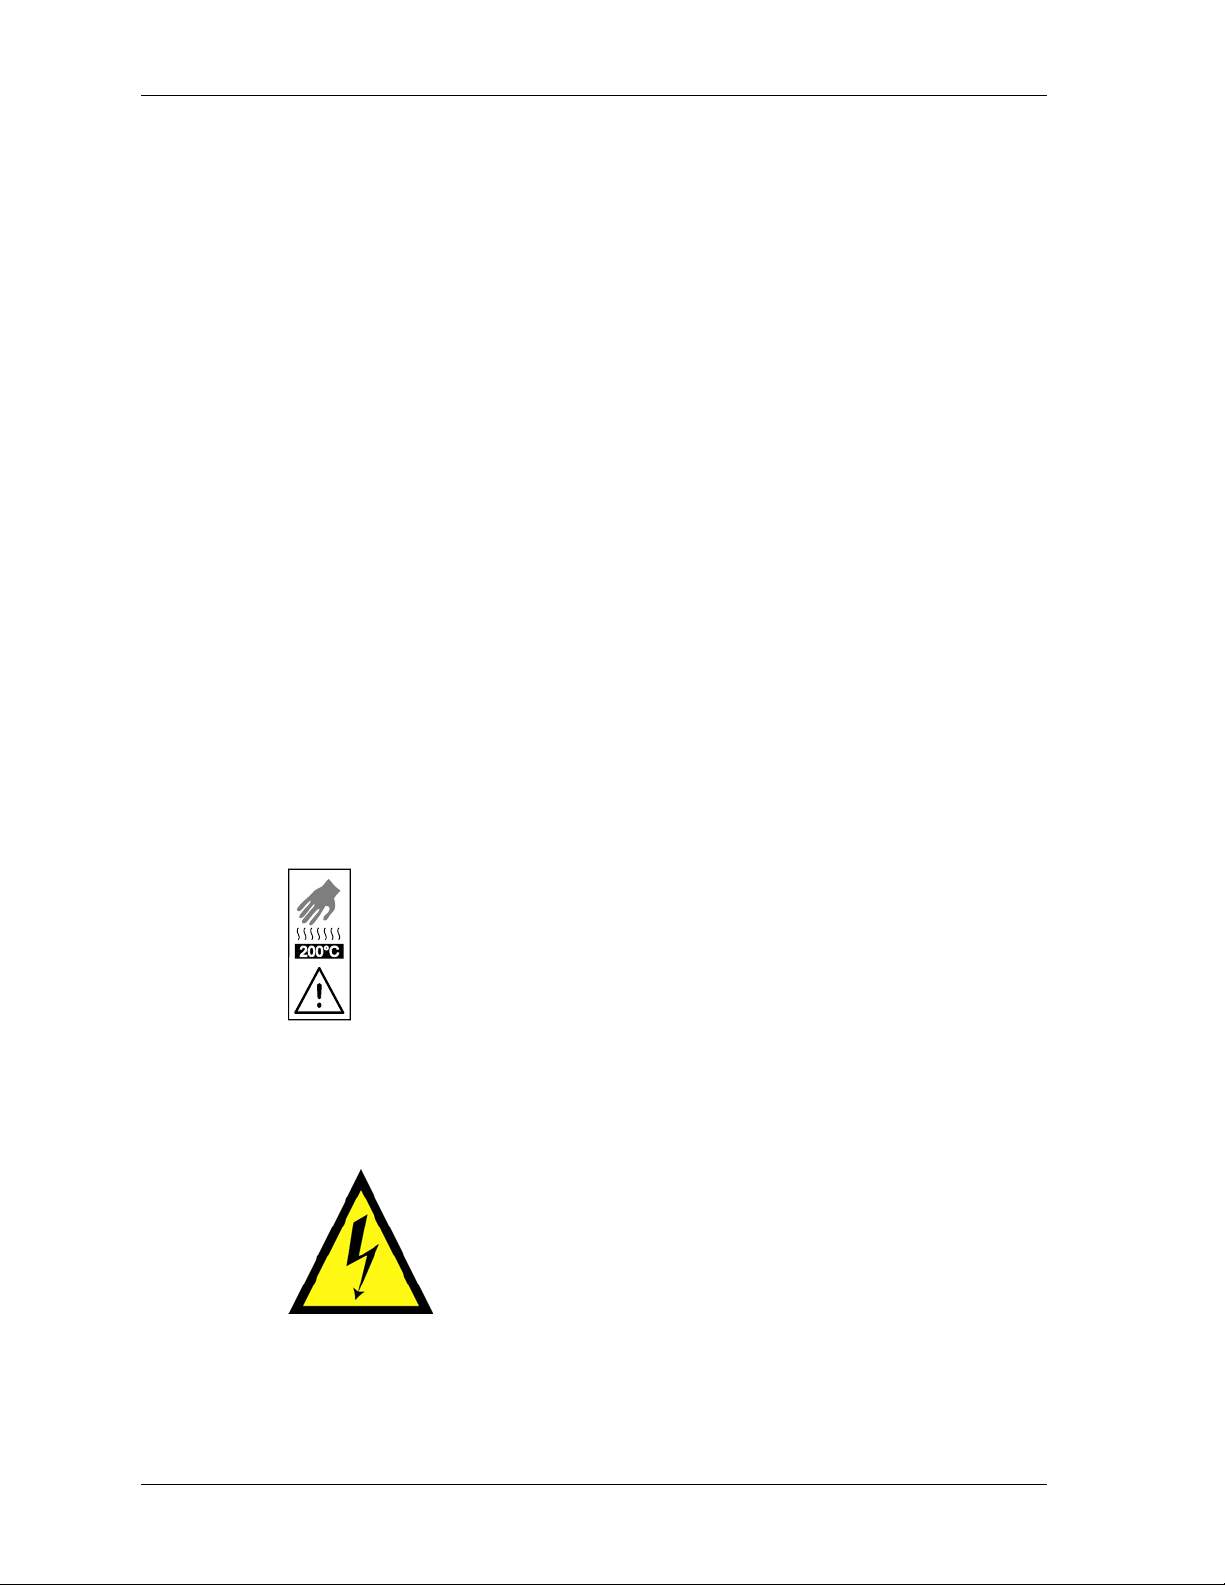
Laser Compliance and Safety
The KODAK PROFESSIONAL SRP 30 Laser Printer is equipped with an Argon Ion
Laser of Class 3B. To prevent damage caused by the laser beam, the laser is
encapsulated. Because the laser is encapsulated, the entire SRP 30 Laser Pri nter is
classified as a Class 1 Laser Device.
This product complies with 21 CFR Chapter I, Subchapter J.
This is a Class 1 laser product.
The laser beam cannot strike the operator when the machine is operated under
normal conditions, even when the machine doors are open.
WARNING:
There are no user-serviceable parts in the laser module of the SRP 30 Laser Printer.
CAUTION:
Never remove or open covers to the laser modules. A laser
beam of class 3B may be accessible after the removal of covers.
Use of controls or adjustments, or performance of procedures
other than those specified herein may result in hazardous
radiation exposure.
Labels on the equipment identify the laser and the laser module.
KODAK PROFESSIONAL SRP 30 Laser Printer v
Page 9

Operator’s Guide
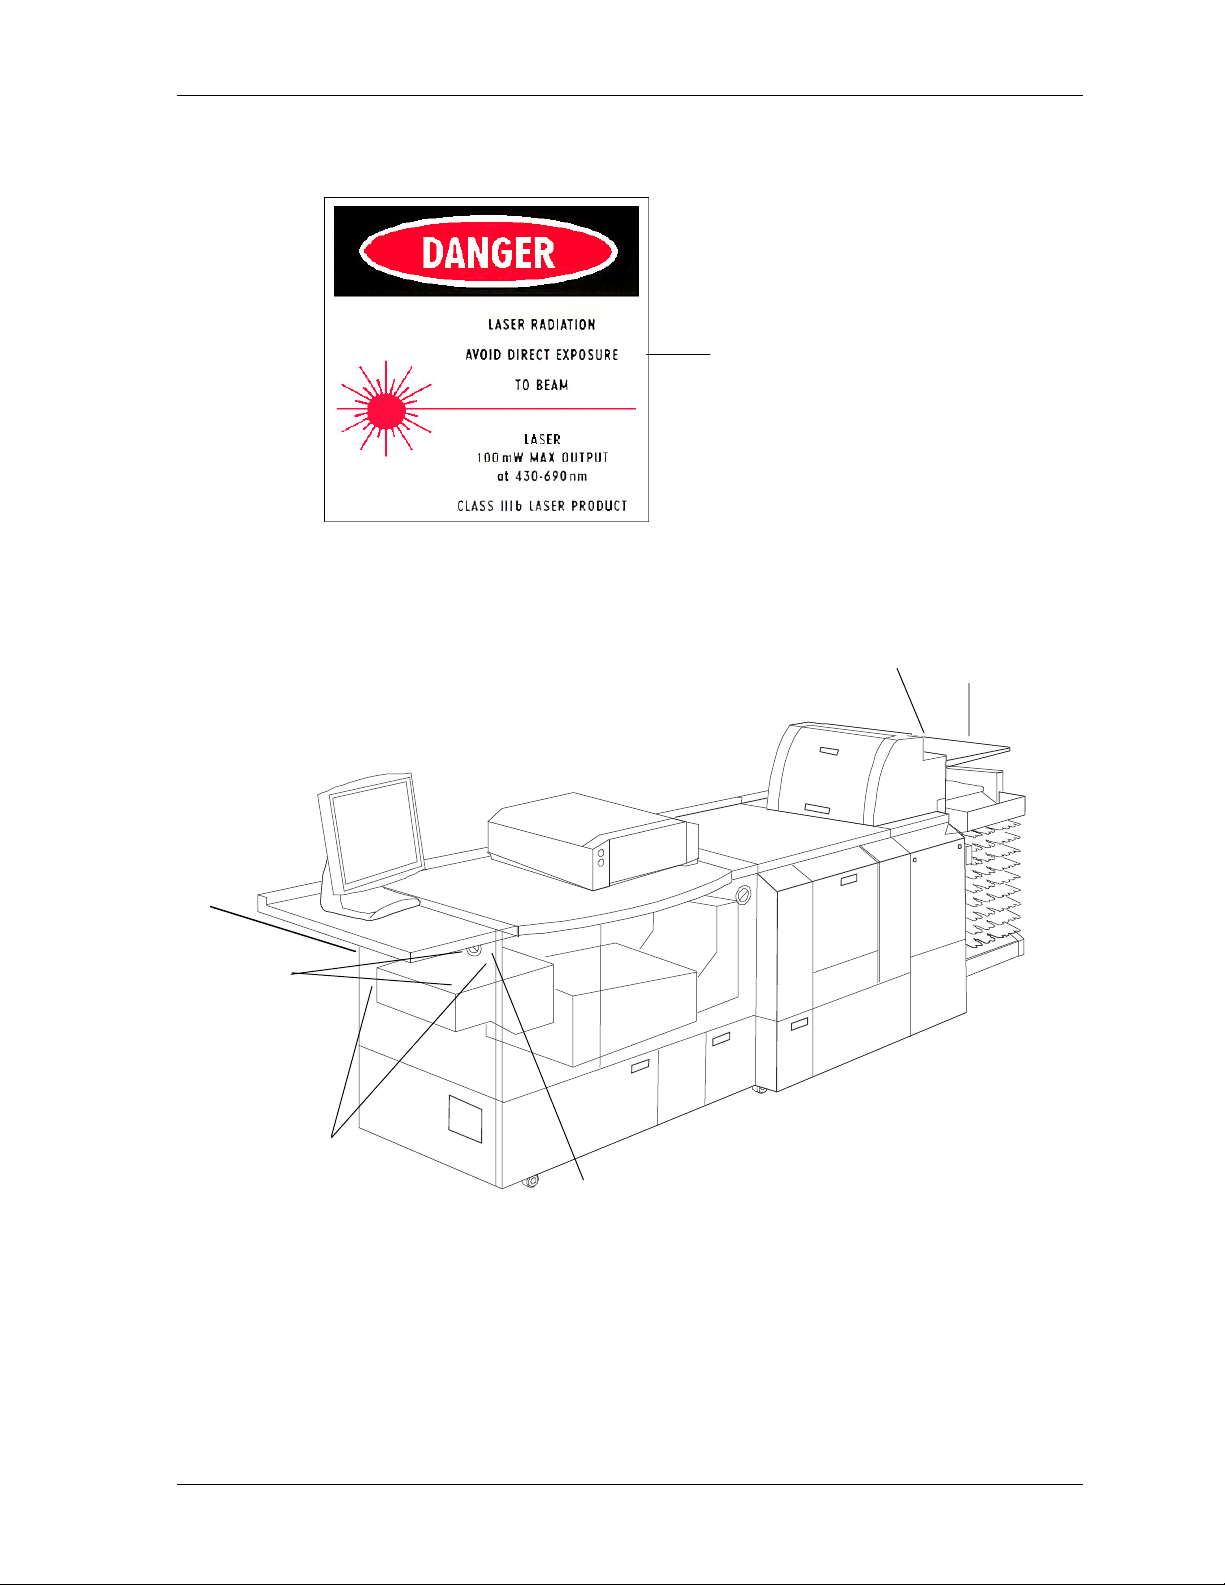
Certification Labels
A
B
Non-interlocked Panel Label
Aperture Label
C
D
E
vi KODAK PROFESSIONAL SRP 30 Laser Printer
Page 10
Regulatory and Safety Information
Laser Source Label
F
Locations of Laser Safety Labels
B
C (side)
A
E
F
KODAK PROFESSIONAL SRP 30 Laser Printer vii
Page 11

Operator’s Guide
Safety Precautions
Legal Notice
The SRP 30 Laser Printer is designed for operation in conformance with all local
safety regulations.
Follow all safety regulations, warnings, and instructions on m achin e labels. Failure to
observe these regulations may result in personal injury or damage to the equipment
and working area.
The manufacturer and service provider will not assume any responsibility for
accidents and damage resulting from incorrect operation.
General Precautions
• Never modify or rewire electrical circuits.
• Do not circumvent or disable the integrated safety devices.
• Do not modify preset values of safety components.
• Replace fuses only with the same type of fuse (amp value, switch-off
characteristics).
When Operating the Equipment
WARNING: Do not operate the equipment without the covers and panels.
Persons who open or remove covers expose themselves to
dangerous voltages and other risks of injury.
• Do not cover or block the vent openings in the housing. Doing so may lead to
overheating of components.
• Do not allow objects or liquids to enter the equipment through the vent openings.
Doing so may cause fire or electrical shock.
• Do not allow the power cable to be squeezed or crimped. Install the power cable so
that it will not cause someone to step on or trip over it.
• Avoid excessive generation of dust. Doing so may damage the components in the
machine.
When Disposing of the Equipment
The SRP 30 Laser Printer contains a small amount of lead in circuit boards and
mercury in the backlight of the LCD monitor. Disposal of these materials may be
regulated due to environmental considerations. For disposal or recycling information,
please contact your local authorities, or in the USA, go to the Electronics Industry
Alliance Web site at www.eiae.org
.
viii KODAK PROFESSIONAL SRP 30 Laser Printer
Page 12

Regulatory and Safety Information
Handling of Processing Chemicals
Disposal of Chemicals and Containers
Effluent Management
IMPORTANT:
If your facility will use on-site waste management procedures (for exam ple, silver
recovery units) for silver-bearing effluents, contact the municipal sanitary sewer
authorities for the discharge requirements and permit application procedures, as
applicable.
If you will manage silver-bearing effluents off-site, contact your local solid waste or
hazardous waste authorities to obtain regulatory and permit guidance.
Because it is customary practice to discharge the non-silver bearing effluents to the
sanitary sewer system, contact the sewer authorities about proper treatment at your
local municipal treatment facility.
Chemical Concentrates
Certain concentrates may be considered hazardous waste and require speci al
attention. If you must dispose of chemical concentrates as waste material, contact
your local solid waste or hazardous waste authorities to obtain disposal information.
Chemical Filters
When you clean the chemical filters for the silver-bearing working solution s, collect
the rinse water and direct it to a silver recovery unit for treatment or colle ct it for
treatment at an off-site facility.
Regulations and requirements regarding the proper disposal of
photographic processing effluents vary by region and by locality.
Container Recycling and Disposal
IMPORTANT:
In most regions, it should be possible to participate in your local community recycli ng
program. Check with the program authorities to determine if the packaging materials
are eligible for local recycling. If they are eligible, disassemble the package and place
the bottles and corrugated material in your recycling bin. Follow all material
preparation instructions from the recycler. If local recycling is not an option, dispose
of the empty bottles and the package with your normal solid waste.
Assistance from Kodak
For more information on waste management and recycling, go to
www.kodak.com/go/kes
KODAK PROFESSIONAL SRP 30 Laser Printer ix
Use cold water for rinsing all containers.
.
Page 13

Operator’s Guide
Safety Precautions for the Handling of Chemicals
WARNING:
General Guidelines
• Be sure that all persons operating the equipment have a complete set of
instructions for the handling of dangerous substances.
• Be sure that all persons operating the equipment have training on the handling of
dangerous substances at least once a year.
• Check for sufficient room ventilation in the working area. The air should be
exchanged at least eight to ten times per hour.
Skin and Eye Protection
Photographic solutions contain substances that may irritate the skin, the mucous
membranes, or the eyes. They may also cause allergic skin reactions. For all
procedures where photographic processing solutions may splash (for example,
preparing and filling in chemical solutions or cleaning processing racks), follow these
guidelines:
• Avoid skin contact, especially with developer solutions.
• Wear protective gloves and change them every day, if possible. It may be
necessary to also wear a rubber apron during some maintenance operations.
• Rinse all solutions that get on the skin with plenty of running water.
• Wear protective goggles. If splashes do get into the eyes, wash them immediately
with plenty of water, lifting the eyelids away from the eyes. Then consult an eye
doctor if irritation occurs.
Follow these guidelines for the safe handling of chemicals in
the equipment working area.
Storage and Disposal
IMPORTANT:
• Store chemicals and processing solutions in a safe place.
• Collect drained chemicals immediately and dispose of the solutions, observing the
above provisions.
• Use cold water to rinse chemical residue from the KODAK EKTACOLOR
Processing Cartridge 75 cartons before disposing of them.
x KODAK PROFESSIONAL SRP 30 Laser Printer
Follow the guidelines for Disposal of Chemicals and Containers on
Page ix.
Page 14

Regulatory and Safety Information
Warranty Information
The following warranty information pertains to equipment that is installed in the
United States only. For equipment installed in countries other than the United States,
the terms and conditions of the new equipment warranty are provided by the Kodak
company in the country in which the sale is finalized, or by a Kodak-appointed
distributor in countries where Kodak does not have direct sales representation.
Warranty Period
Kodak warrants new equipment to function properly for 90 days from the date of
initial installation. This warranty covers the purchaser of the equipment as well as
anyone else who owns it during the warranty period.
Warranty Repair Coverage
If this equipment does not function properly during the warranty period, a Service and
Support Field Engineer from Kodak will repair the equipment without charge during
Kodak’s normal working hours (usually 8:00 a.m. to 5:00 p.m., Monday throu gh
Friday). Such repair service will include any adjustments and/or replaceme nt of parts
required to maintain your equipment in good working order. Supply items are billed
as required.
How to Obtain Service
Before you call, please know your printer’s K-Number.
For service and support:
• In the United States: call Eastman Kodak Company at 1-800-356-3253
(1-800-3KODAK3).
• Outside the United States: contact your local Kodak representative.
KODAK PROFESSIONAL SRP 30 Laser Printer xi
Page 15

Operator’s Guide
Limitations
Warranty service is limited to areas within Kodak’s established marketing centers in
the contiguous United States, the island of Oahu in Hawaii, and some areas of
Alaska.
This warranty does not cover circumstances beyond Kodak’s control; it does not
cover service or parts for any attachments, accessories, or alterations not marketed
by Kodak, nor to correct problems resulting from their use.
Damage caused by failure to meet the electrical specification in this manual is not
covered under the warranty to service agreement claim.
Kodak makes no other warranties, express, implied, or of merchantability, for
this equipment.
Repair or replacement without charge is Kodak’s only obligation under this warranty.
Kodak will not be responsible for any consequential or incidental damages resulting
from the sale, use, or improper functioning of this equipment, even if loss or damage
is caused by the negligence or the fault of Kodak.
Such damages, for which Kodak is not responsible, include, but are not limited to,
loss of revenue or profit, downtime costs, loss of use of the equipment, cost of any
substitute equipment, and facilities or services of claims of your customers for such
damages.
This limitation of liability does not apply to claims for injury to persons or damage to
property caused by the sole negligence or fault of Kodak or by persons under its
direction or control.
xii KODAK PROFESSIONAL SRP 30 Laser Printer
Page 16

Chapter 1 Introduction
Contents
Using the Documentation.......................................................................................1-2
Structure............................................................................................................1-2
Text Styles.........................................................................................................1-2
Notices...............................................................................................................1-2
Safety Precautions..................................................................................................1-3
Storage of Chemicals and Paper...........................................................................1-3
KODAK PROFESSIONAL SRP 30 Laser Printer 1-1
Page 17

Operator’s Guide
Using the Documentation
Structure
This Operator’s Guide contains information about:
• Safety precautions
• Machine settings
• Print configurations
• Production
• Maintenance
Text Styles
In this guide, bold print indicates screen or button designations.
Examples:
“Touch OK to validate the displayed text and close the Input screen.”
“Touch Reorder to process reorders.”
Italic print indicates cross-references.
Example:
“Also see Safety Precautions on the following page.”
Notices
The following notices are used in this manual and on equipment labels:
NOTE: Contains parenthetical (information-only) material. This is the least
IMPORTANT: Contains information essential to correct operation of the equipment.
CAUTION: Indicates the potential for damage to or from the equipment.
WARNING: Indicates the potential for injury to persons operating the
DANGER: INDICATES THE POTENTIAL FOR SEVERE INJURY TO PERSONS
urgent type of notice.
equipment.
OPERATING THE EQUIPMENT.
1-2 KODAK PROFESSIONAL SRP 30 Laser Printer
Page 18
Introduction
Safety Precautions
See the Regulatory and Safety Information in the front of this guide for details about:
• Electrical precautions
• Operation of the equipment
• Disposal of the equipment
• Handling and storage of processing chemicals
• Laser safety
Follow all safety regulations, warnings, and instructions that are on equipm ent labels
and in the guide.
Storage of Chemicals and Paper
Consumable Storage Requirements
Chemicals Store and prepare chemicals according to the
manufacturer’s specifications.
Photographic Paper
IMPORTANT: To avoid visible changes in the photographic paper, do not store the
paper at temperatures above 30°C (86°F).
Store all photographic in a cool and dry location.
Storage Temperature: 2–10°C (35–50°F)
Relative Humidity (for open packages): 50–60%
KODAK PROFESSIONAL SRP 30 Laser Printer 1-3
Page 19

Operator’s Guide
1-4 KODAK PROFESSIONAL SRP 30 Laser Printer
Page 20

Chapter 2 Overview
Contents
General Description ................................................................................................2-3
Product Description ...........................................................................................2-5
Image Editing.....................................................................................................2-6
Functional Procedure.........................................................................................2-7
Film Advance and Paper Transport...................................................................2-7
Scanner ........................................................................................................2-7
Main Computer.............................................................................................2-8
Printer...........................................................................................................2-8
Paper Processor...........................................................................................2-9
Sorter............................................................................................................2-9
Densitometer..............................................................................................2-10
Starting the Equipment.........................................................................................2-11
Automatic Startup............................................................................................2-11
Manual Startup ................................................................................................2-12
System Startup Status.....................................................................................2-13
Readiness for Operation..................................................................................2-13
User Login..................................................................................................2-13
Start Screen................................................................................................2-14
End of Work ...........................................................................................................2-15
Changing Users...............................................................................................2-15
Shutting Down .................................................................................................2-17
Automatic Shutdown...................................................................................2-17
Manual Shutdown.......................................................................................2-17
Turning Off the Equipment Partially (Sleep Mode).....................................2-18
Description of the Operating Controls................................................................2-19
Buttons and Lamp on the Main Computer.......................................................2-19
Touch-screen Monitor......................................................................................2-20
KODAK PROFESSIONAL SRP 30 Laser Printer 2-1
Page 21

Operator’s Guide
Screen Structure................................................................................................... 2-21
Information Area.............................................................................................. 2-22
Touch-sensitive Buttons..................................................................................2-24
Drop-down Menus...................................................................................... 2-25
Pop-up Windows........................................................................................2-26
Input Screen....................................................................................................2-28
Numeric Keypad..............................................................................................2-29
Reorder Keyboard...........................................................................................2-30
Menu Bar.........................................................................................................2-31
Menu Overview...................................................................................................... 2-31
Main Menus.....................................................................................................2-31
Print Mode Menu.............................................................................................2-32
Settings Menu without Equipment Settings ....................................................2-33
Settings Menu with Equipment Settings .........................................................2-34
Test Menu ....................................................................................................... 2-35
Pricing + Statistics Menu.................................................................................2-36
End of Work Menu...........................................................................................2-37
Status Information and Help Menus................................................................ 2-38
Other Screens................................................................................................. 2-39
Info and Help ......................................................................................................... 2-40
Film Drive Info.................................................................................................2-42
Info Printer.......................................................................................................2-43
Info Paper Processor ......................................................................................2-44
Info Order........................................................................................................2-45
Version Info.....................................................................................................2-46
Error List..........................................................................................................2-47
Help................................................................................................................. 2-48
2-2 KODAK PROFESSIONAL SRP 30 Laser Printer
Page 22
Overview
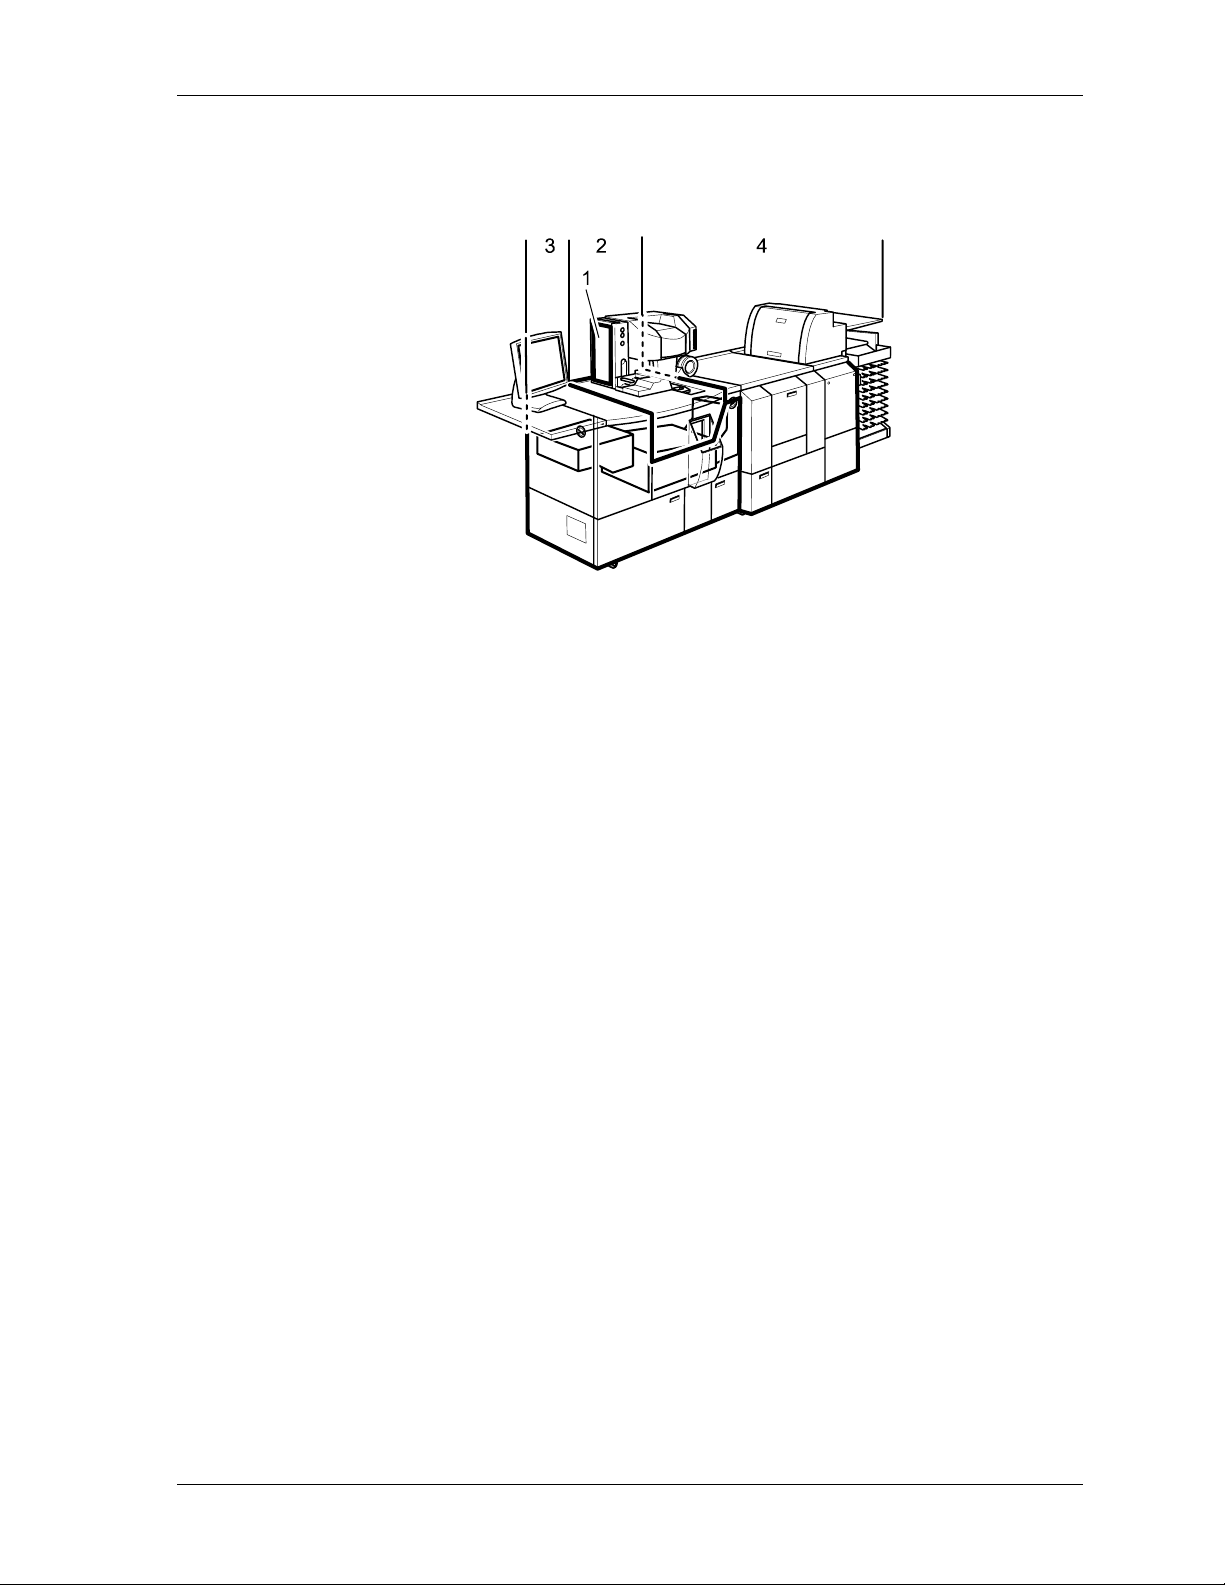
General Description
The SRP 30 Laser Printer contains four major components:
1. Main computer (separate, but integrated into the scanner housing) – controls
the general work process and generates the image exposure data. The monitor
for the operation of the system is connected to the main computer.
2. Scanner – digitizes frames and slides and determines corrections and e xposure
values.
3. Printer – prepares and advances the paper size to be exposed and exposes th e
digital images on paper by means of a laser. Special laser paper is required to
obtain optimum results.
4. Paper Processor – includes a connected sorter and a deposit for the prints.
KODAK PROFESSIONAL SRP 30 Laser Printer 2-3
Page 23
Operator’s Guide
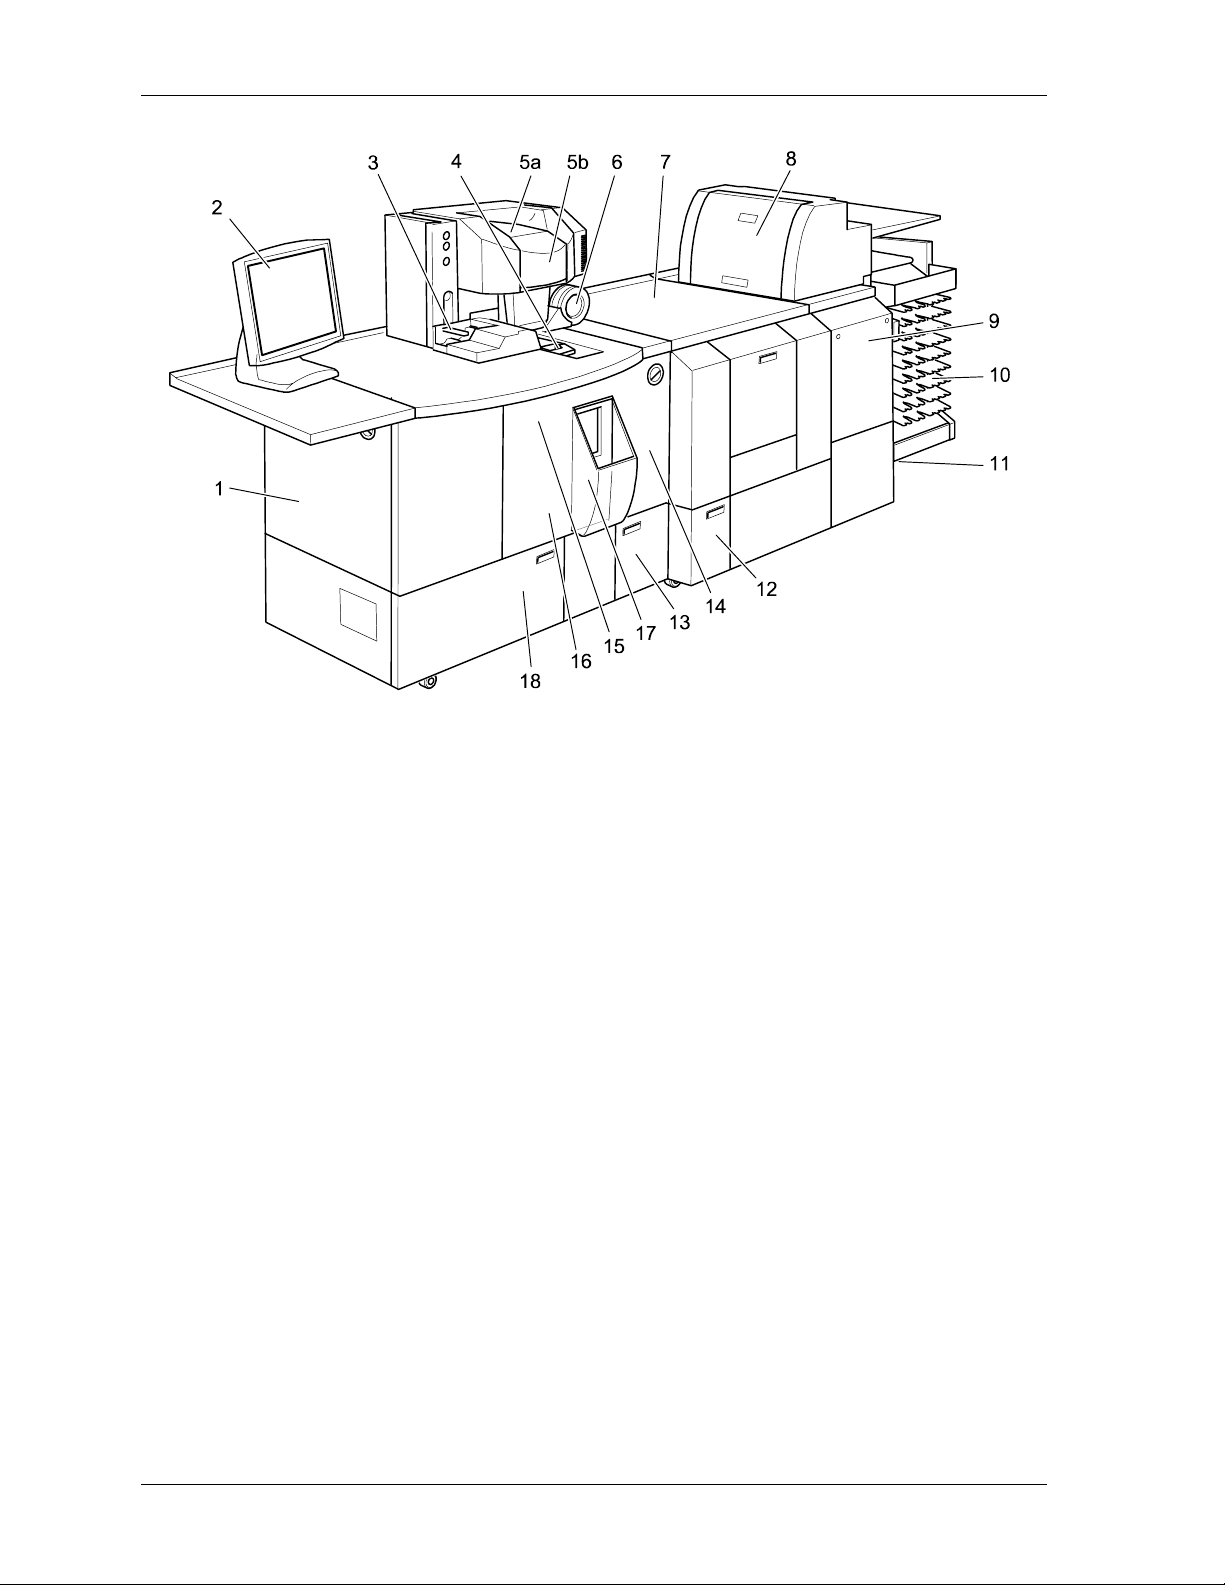
1 Exposure unit with laser fiber and laser module 10 Order sorter
2 Touch-screen monitor 11 Main breaker, ground fault interrupter (GFI) switch
3 Film feeder with a cleaning brush 12 Drain valves for the chemical overflow
4 Film mask for the scanner 13 Right-hand paper magazine
5a Printing lamp 14 Lane distributor
5b Filter wheel 15 Lens and CCD
6 Film take-up 16 Transport unit
7 Wet section with racks, crossovers, and
chemical filters
8 Built-in densitometer 18 Left-hand paper magazine
9 Dryer
17 Film collecting box
2-4 KODAK PROFESSIONAL SRP 30 Laser Printer
Page 24

Overview
Product Description
The SRP 30 Laser Printer provides convenient and quick printing of:
• Black-and-white and color negative films
• Color slides (frames)
• Digital images
The digital image files are transferred to the SRP 30 Laser Printer by:
• Data carriers
− Diskette
− ZIP disk
− CD-ROM or Smart Media card (by way of PCMCIA adapter)
• Network (workstation)
NOTE: It is your responsibility to provide for a network and/or a workstation and to
provide for its connection.
KODAK PROFESSIONAL SRP 30 Laser Printer 2-5
Page 25
Operator’s Guide
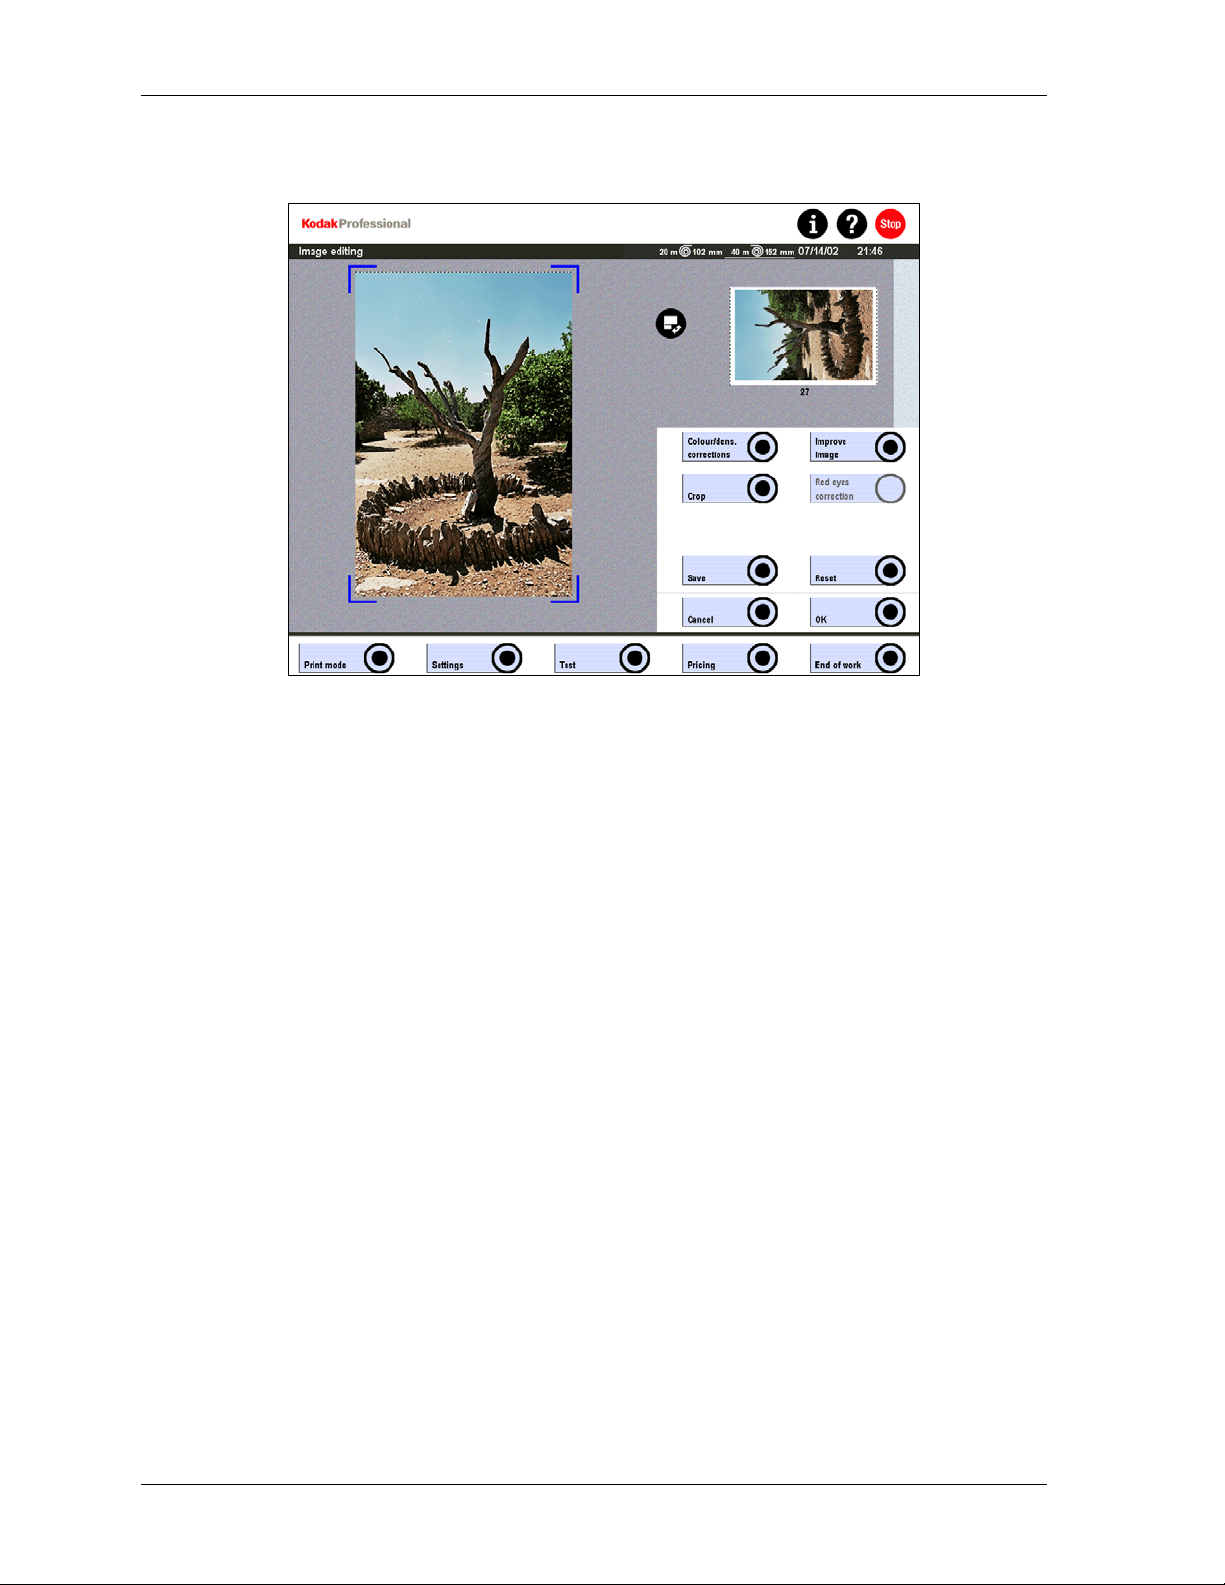
Image Editing
The SRP 30 Laser Printer offers a wide variety of image editing options:
• Color and density corrections
• Cropping
• Image enhancement
− area and detail contrast
− sharpness
− saturation
• Special features
− colored texts
− borders
These modifications are calculated on the image processing board. The image in the
display refreshes immediately.
2-6 KODAK PROFESSIONAL SRP 30 Laser Printer
Page 26
Overview
Functional Procedure
The SRP 30 Laser Printer performs the following functions to process print orders.
• Prescans and scans the image
• Cuts the paper
• Transports the paper
• Edits the image, if necessary
• Exposes the image
• Distributes the paper to the appropriate lane to the processor
• Processes the image
• Deposits the prints in the sorter
These steps are described in the next section, Film Advance and Paper Transport.
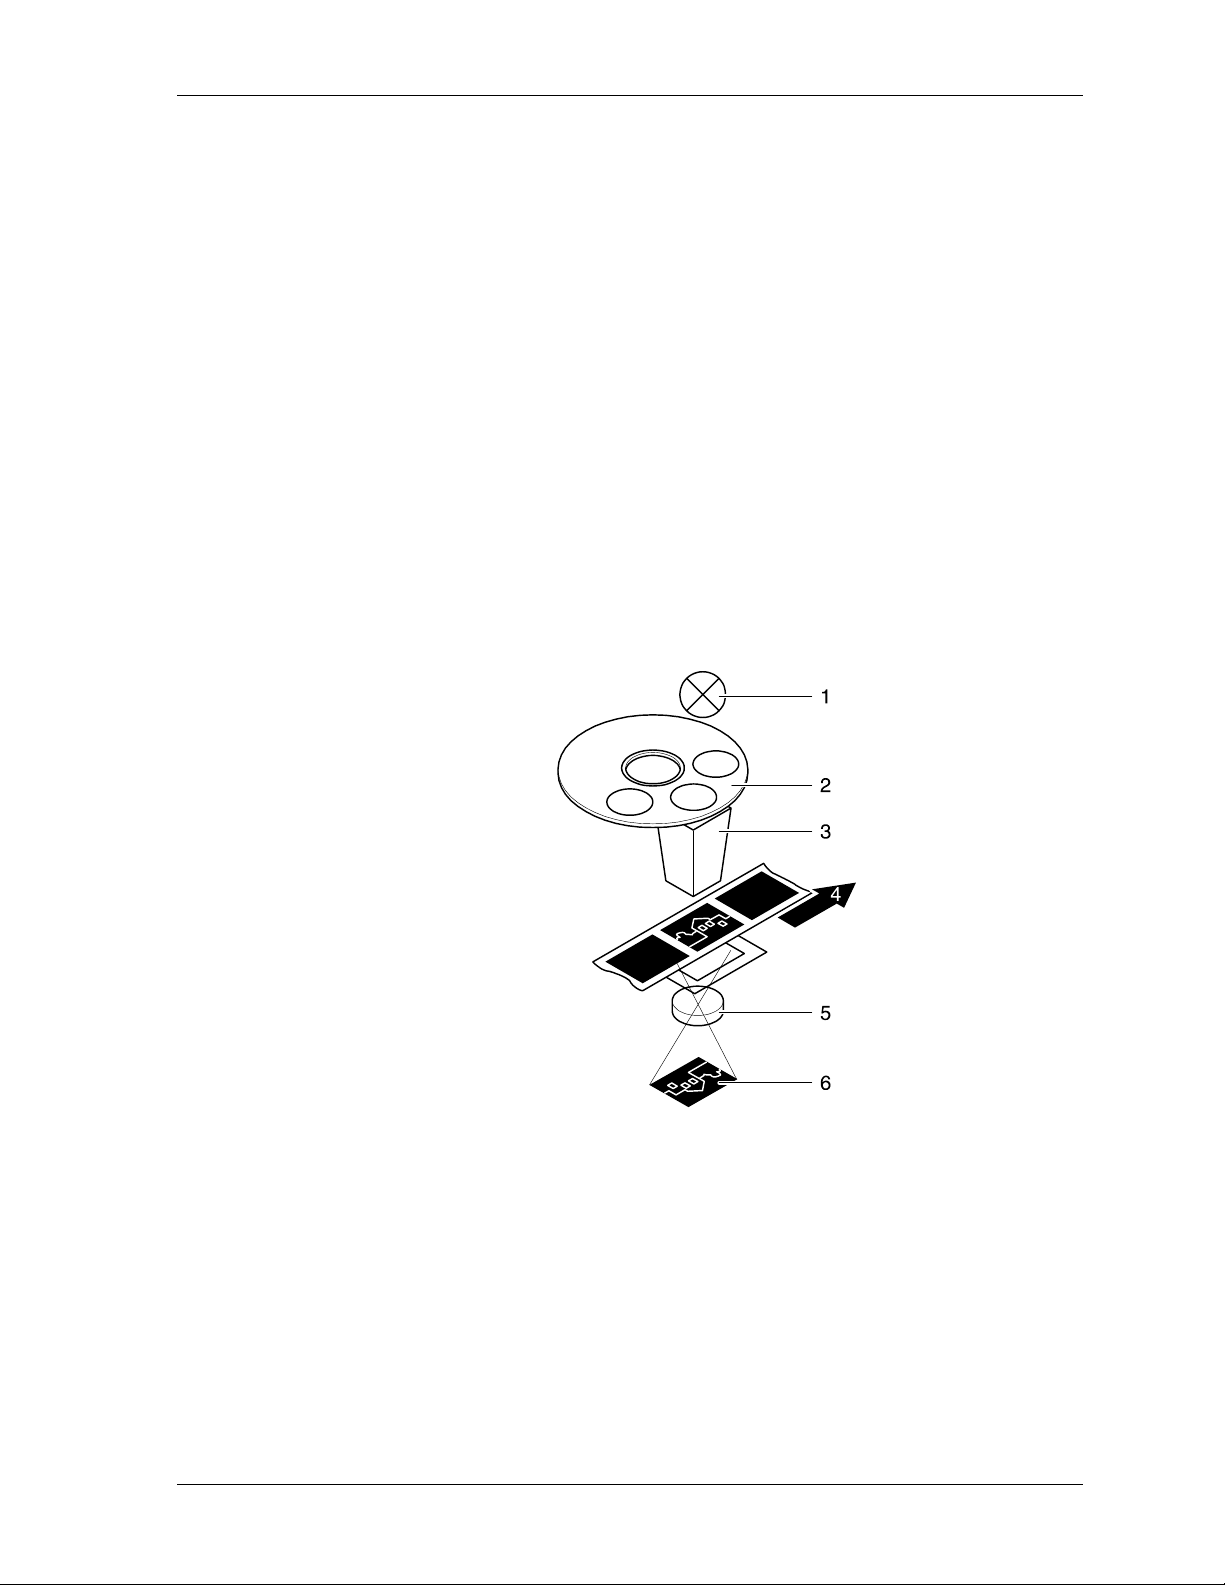
Film Advance and Paper Transport
Scanner
1 Lamp
2 Exposure filter
3 Mirror box
4 Film advance
5 Lens
6 CCD area
After the paper size is selected, the film is fed into the film mask through the film
feeder. While the film is transported through the film mask and into the film take-up, a
prescan determines the exposure data for each frame of the film.
After the main computer calculates the correction data, the frames are digitized. The
film is removed from the film take-up and the frames are positioned and exposed one
by one in the film mask. Three color density extracts are exposed on the CCD of
each frame by means of the color filter wheel (scan, approximately 2000 x 3000
pixels).
For slides, the prescan is also performed by means of the CCD chip.
KODAK PROFESSIONAL SRP 30 Laser Printer 2-7
Page 27
Operator’s Guide
Main Computer
The main computer—by way of the image-processing card—processes the digitized
image data, the prescan data, and your correction and image editing data. The
computer converts the data to an exposable image and sends it to the printer.
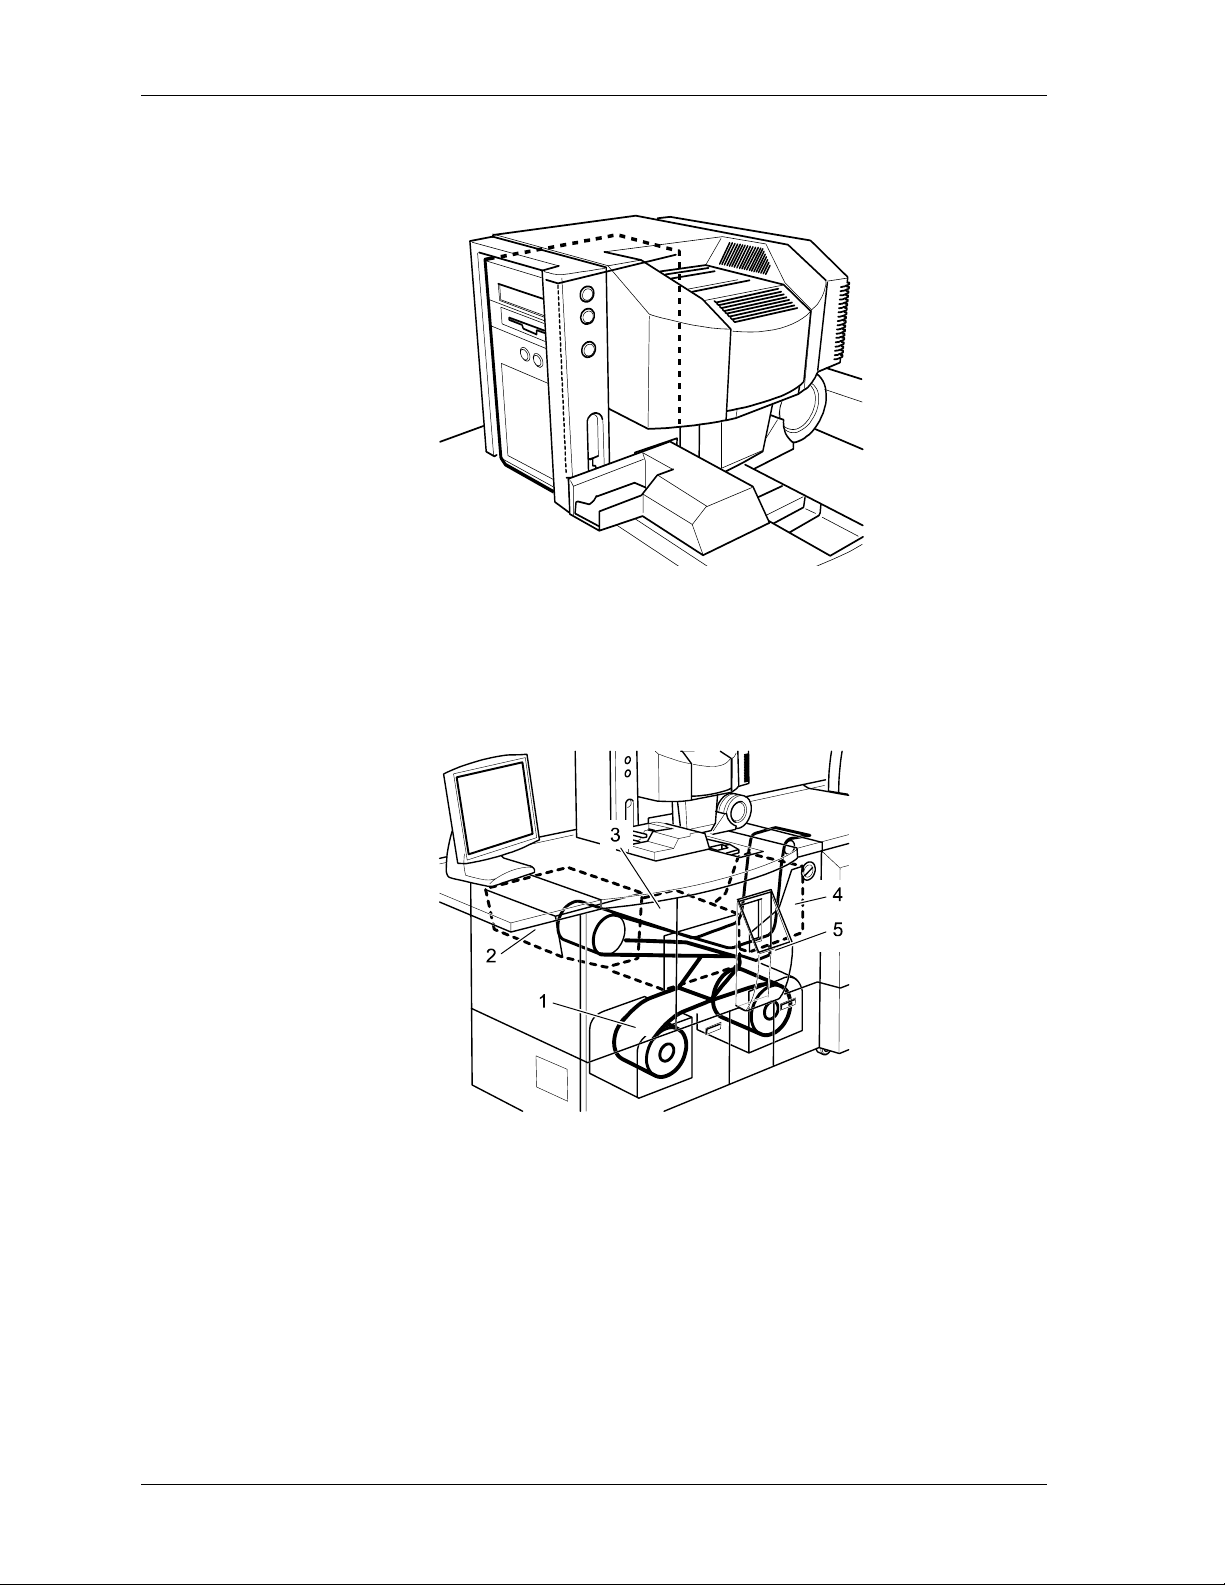
Printer
The printer transports the cut paper (1) to the print engine (2), exposes the paper to
the laser beam, and advances it through the transport unit (3) up to the lane
distributor (4). The back print (5) is applied in the lane distributor.
The lane distributor transports the print to the paper processor.
2-8 KODAK PROFESSIONAL SRP 30 Laser Printer
Page 28
Overview
Paper Processor
The exposed paper advances through the processing solutions (1), whi ch include the
developer, bleach-fix, and stabilizer. The paper then advances through the dryer (2).
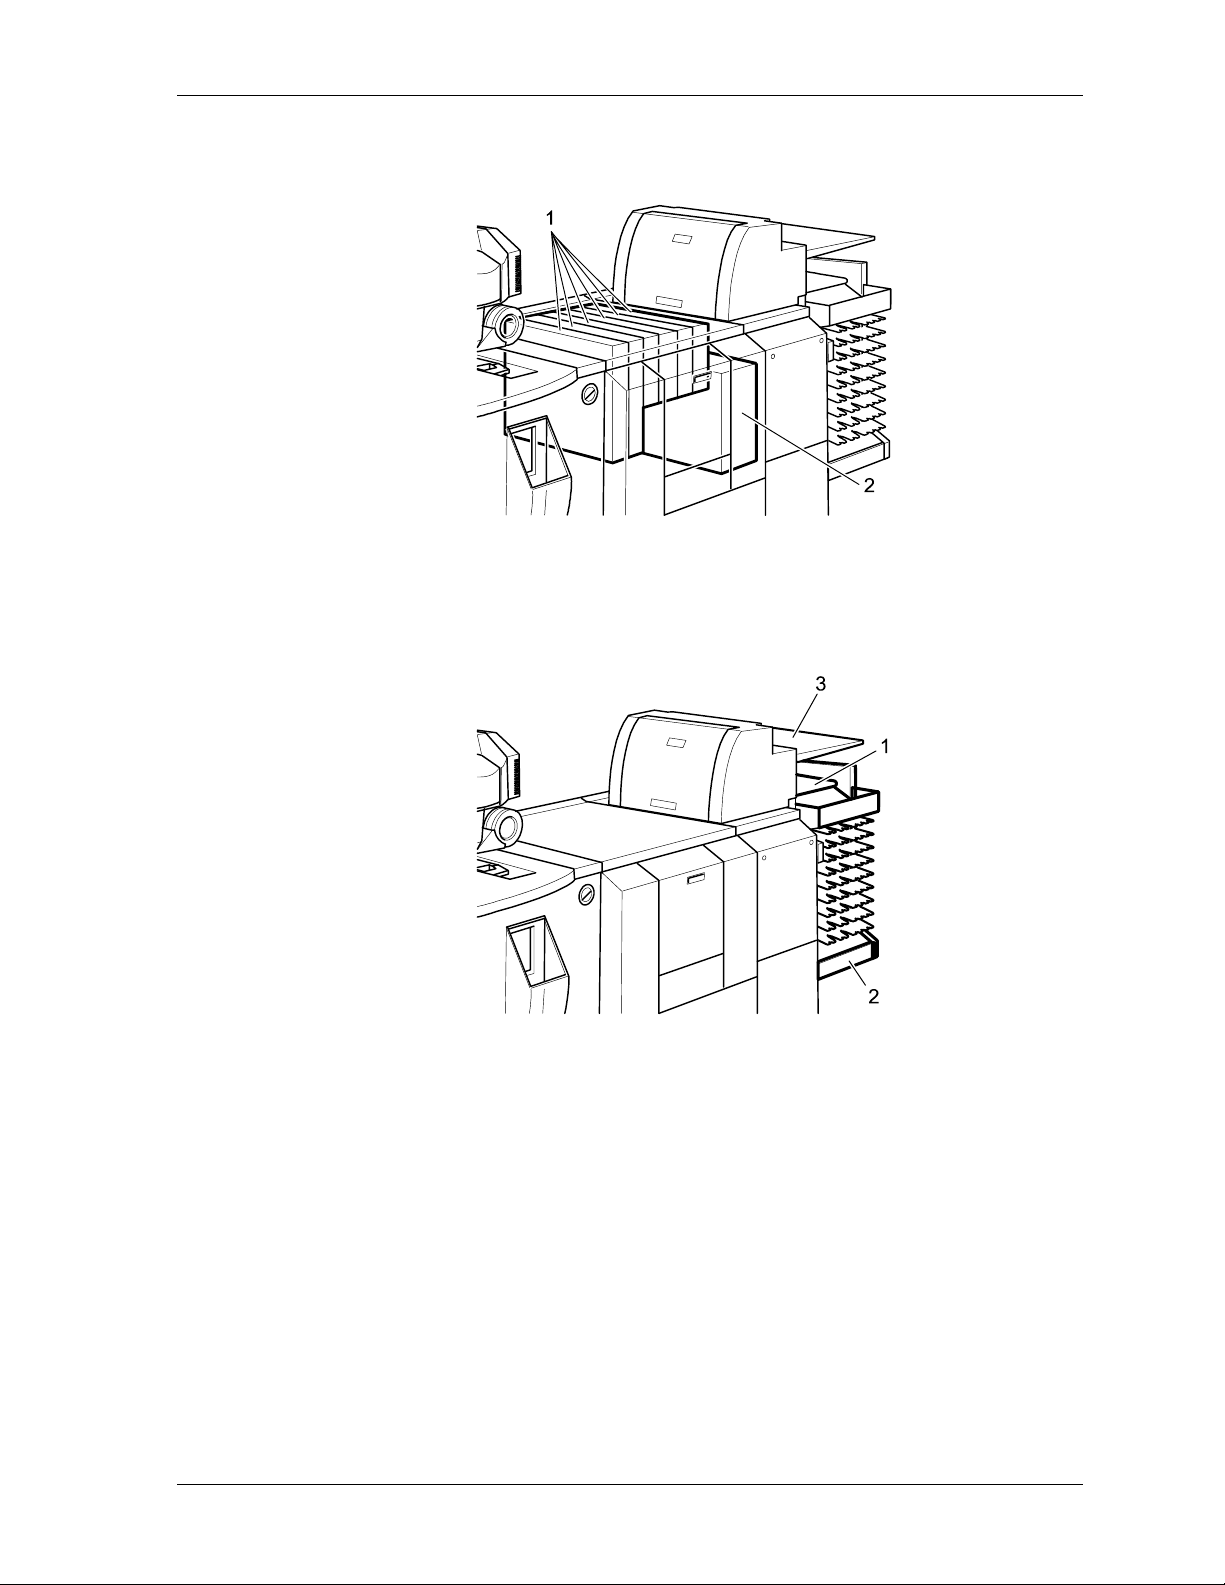
Sorter
After drying, the prints exit from the print chute (1) into the sorter (2) where they are
sorted by orders and stacked in trays.
• If a print order exceeds the capacity of one tray (a maximum of 43 prints), the
sorter automatically switches to the next tray without terminating the print order.
• Splices in the paper rolls are cut separately and the respective pieces of paper are
deposited in the print order stack.
• Large prints are deposited on the large print deposit tray (3).
KODAK PROFESSIONAL SRP 30 Laser Printer 2-9
Page 29
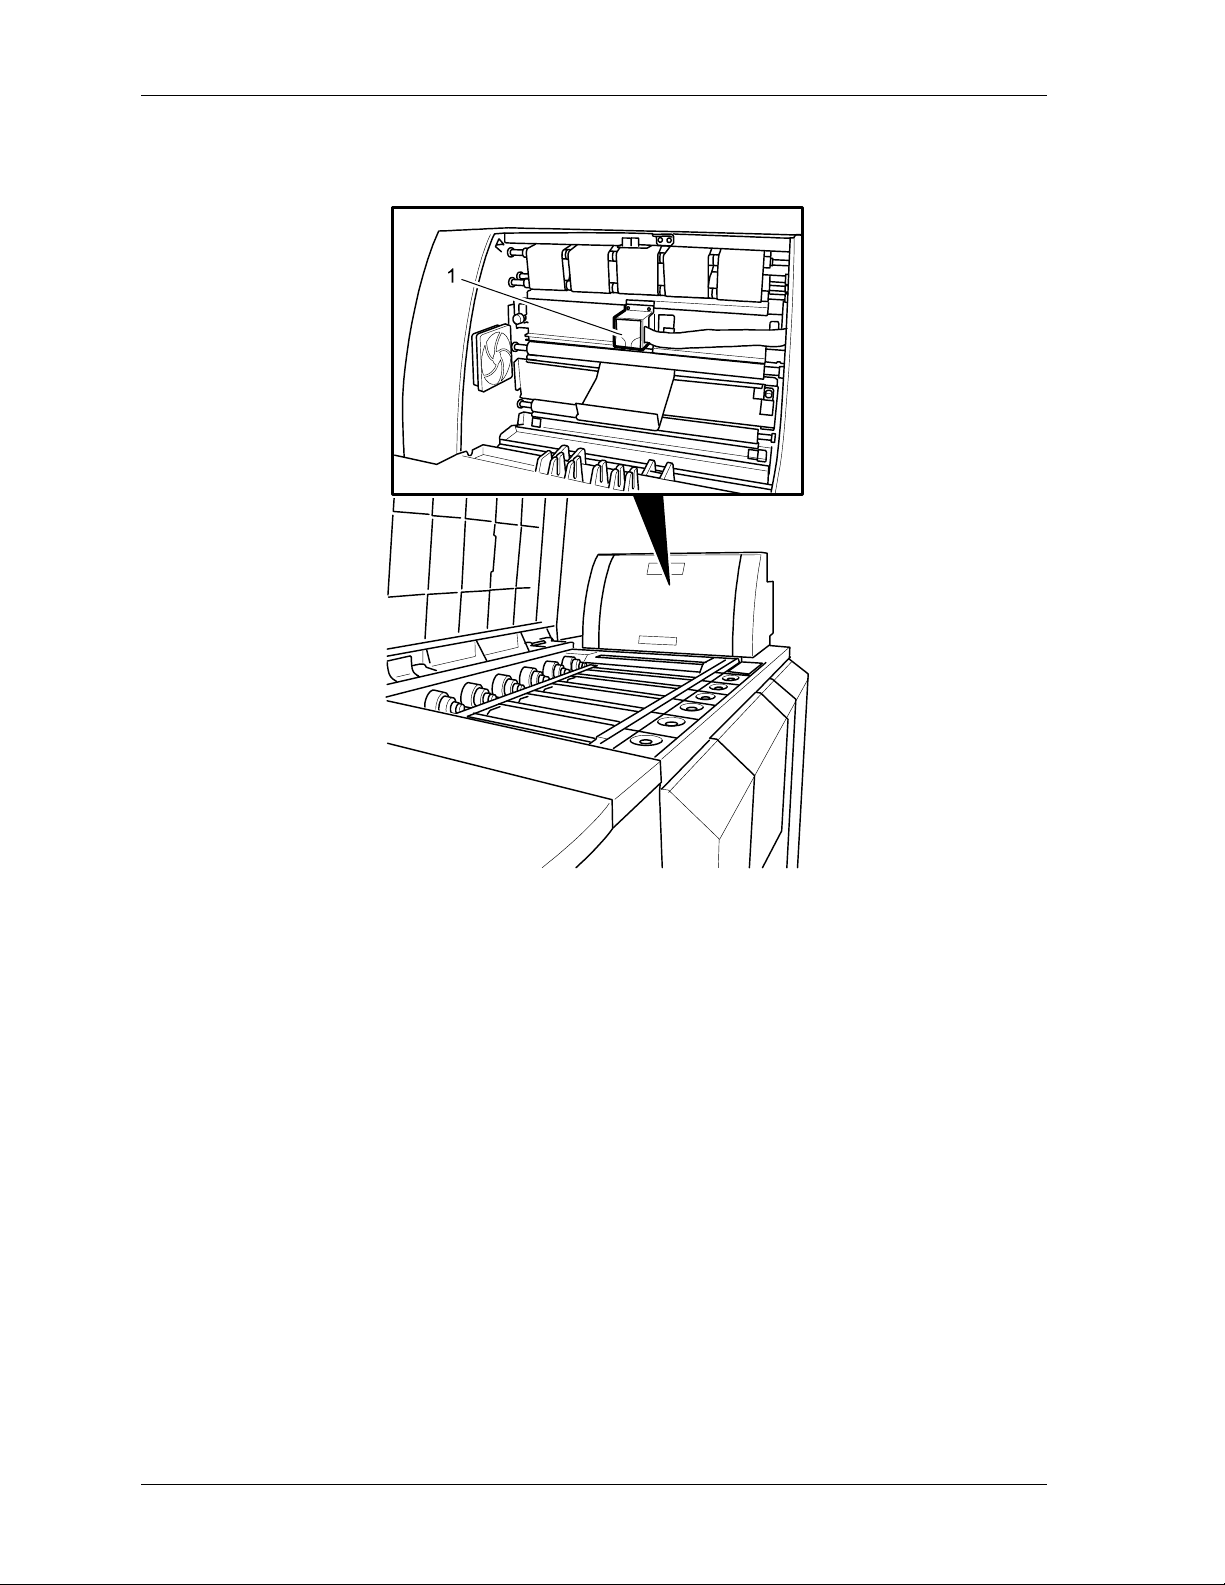
Operator’s Guide
Densitometer
The built-in densitometer (1) above the dryer automatically measures the test print.
2-10 KODAK PROFESSIONAL SRP 30 Laser Printer
Page 30

Overview
Starting the Equipment
IMPORTANT: Before starting the equipment, insert the loaded paper magazines.
Any film mask may be in the equipment when it is started.
The two methods for starting the SRP 30 Laser Printer are:
• Automatically, by means of the integrated timer – the preferred procedure
• Manually, by means of the main switch – the alternate procedure
Automatic Startup
To prepare the equipment to start automatically by way of the timer, set the timer to
workdays, starting times, and off days. See Defining Times for Start up, Shutdown,
and Sleep Mode, in Chapter 4.
KODAK PROFESSIONAL SRP 30 Laser Printer 2-11
Page 31

Operator’s Guide
Manual Startup
1. Turn on the main circuit breaker (1).
2. Press the ON button (2).
The ground fault interrupter (GFI) switch below the main circuit breaker always
remains on.
2-12 KODAK PROFESSIONAL SRP 30 Laser Printer
Page 32

Overview
System Startup Status
After automatic or manual startup, the equipment heats the solutions and the dryer to
nominal temperatures. During this phase, the monitor displays:
• The progress of the heating process
• The remaining time until the equipment is ready to operate
• Any error messages
• The Stop button to shut down the equipment correctly any time during the startup
process
The equipment is ready for operation after the solutions and the dryer have reached
nominal temperatures.
Readiness for Operation
User Login
After the equipment has been started and heated up, the Login screen appears,
where you enter your user name and password (four numbers). The user name is
preset if you have been defined as the first user who must enter a password.
After you enter the user name (if required) and password, the Start screen appears.
The Start screen appears immediately after warm-up if the first user is logged in
automatically (the system does not check for a password). The Start screen also
appears after a new user has logged in.
KODAK PROFESSIONAL SRP 30 Laser Printer 2-13
Page 33

Operator’s Guide
Start Screen
After you log in, the menu bar with the five main menus appears.
• Print mode offers all functions for image editing and printing. (See Production,
Chapter 6.)
• Settings lets you create print configurations, enter system-specific parameters,
and define order prices. (See Settings, Chapter 4.)
• Test lets you test the equipment prior to the production start and during production.
(See Tests, Chapter 5.)
• Pricing + Statistics lets you price orders and print price labels if the Pricing option
is installed (software and label printer). Additionally, this menu provides access to
statistics related to the daily and total counters (prints, index prints, orders,
scanned frames, and paper consumption).
• End of work lets you shut down the equipment completely or partially (Sleep
mode). A different user can also log in from this menu.
NOTE: In the Start screen and in all screens that follow, only the functions that
correspond to the user profile are displayed. Functions that are not available
appear in gray.
If a function is not available, either:
• The logged-in user does not have permission to use this function, or
• The software is not installed.
For more information, see User Administrator: Defining Users and User Rights in
Chapter 4.
2-14 KODAK PROFESSIONAL SRP 30 Laser Printer
Page 34

Overview
End of Work
Changing Users
To change users, you must first log out.
1. Select End of work on the menu bar.
2. Touch Change user.
3. Touch Logout.
KODAK PROFESSIONAL SRP 30 Laser Printer 2-15
Page 35

Operator’s Guide
Work can only continue if you follow these steps to log in.
1. Select the name of the next user.
2. Enter the password (four numbers).
3. Touch Login.
If a different language is allocated to the new user in the system setup, all text is
displayed in that language.
2-16 KODAK PROFESSIONAL SRP 30 Laser Printer
Page 36

Overview
Shutting Down
The two methods of shutting down the SRP 30 Laser Printer are:
• Automatically, by way of the integrated timer – the preferred procedure
• Manually, by selecting End of work on the menu bar – the alternate procedure
Automatic Shutdown
The equipment shuts down automatically if you enter no input within a preset time
period after system start.
To define the preset time period, see Defining Times for Startup, Shutdown, and
Sleep Mode in Chapter 4.
Manual Shutdown
Shutdown is possible with every inserted film mask.
1. Select End of work on the menu bar.
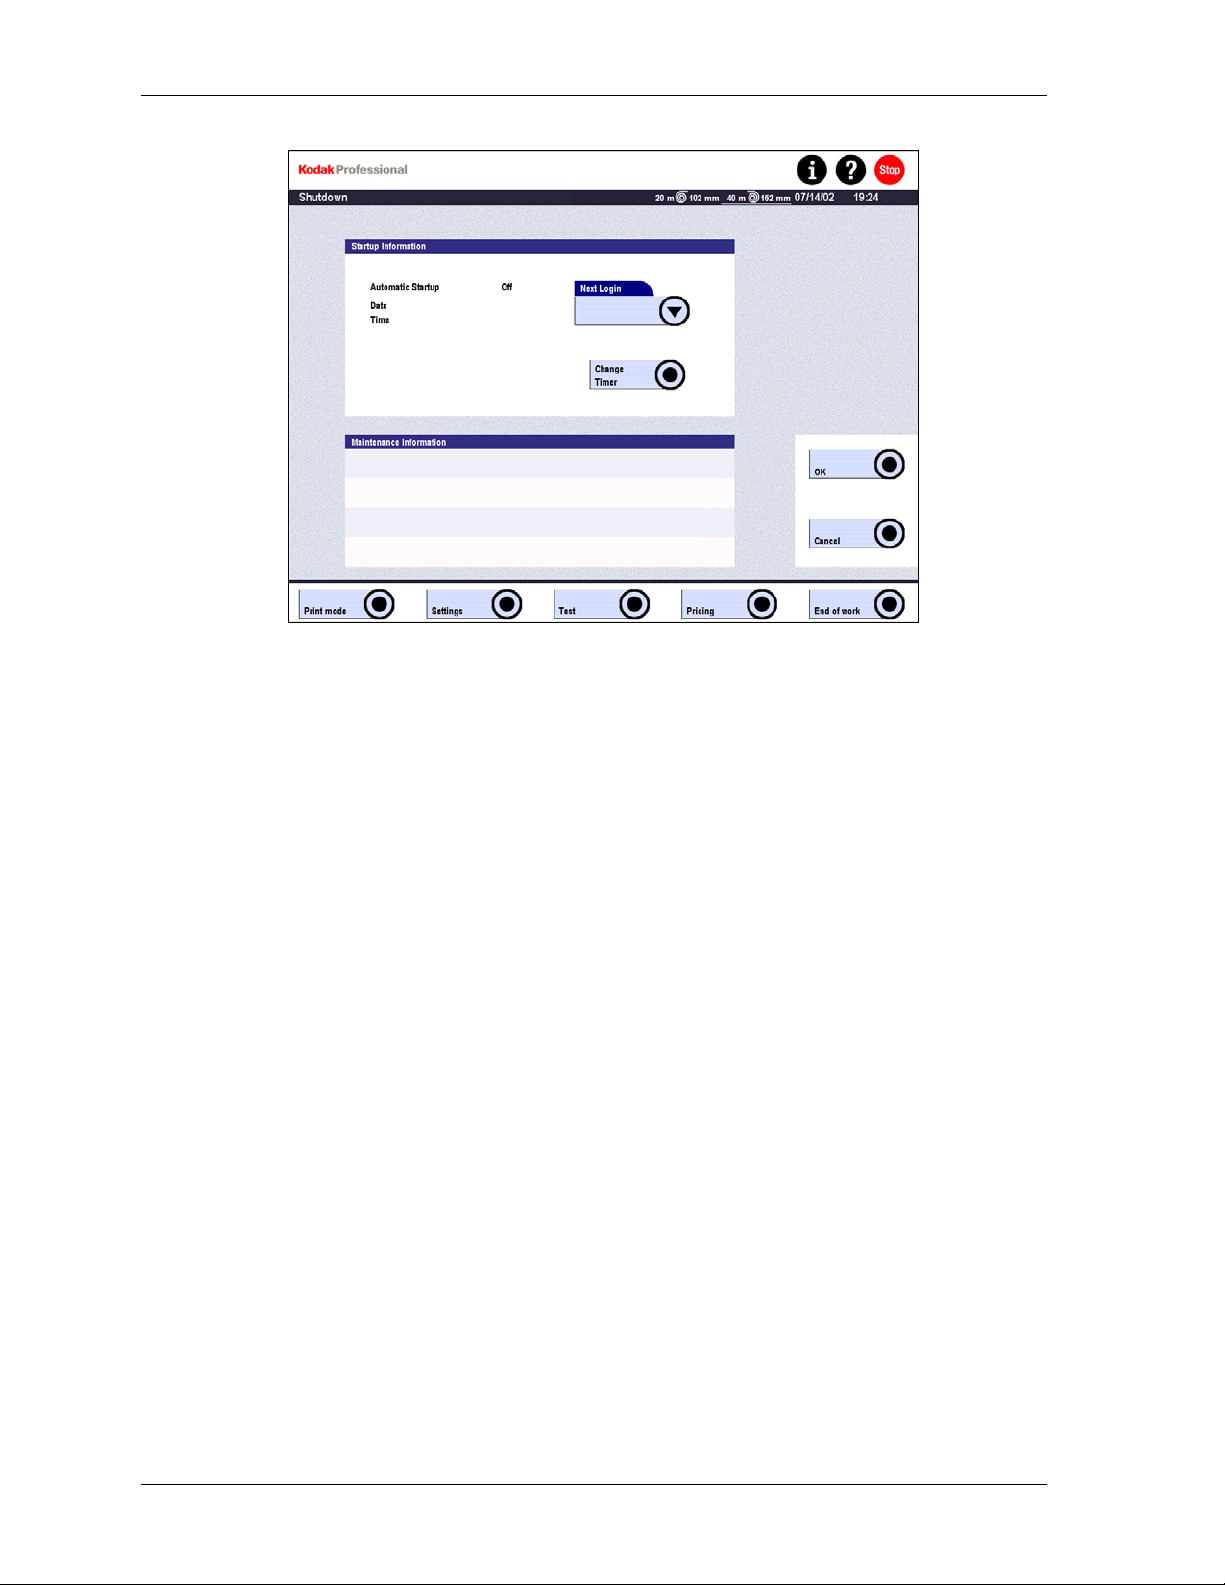
2. Touch Shutdown.
KODAK PROFESSIONAL SRP 30 Laser Printer 2-17
Page 37
Operator’s Guide
3. Change the start information in the display, if necessary:
• Change Timer
Change the date and time for the next startup in the opening screen.
• Next Login
Select the user for the next startup.
NOTE: Changes of the start time and the user are only valid until the next startup.
Permanent changes are only possible using the equipment settings.
4. Perform the daily maintenance procedures. (See Daily Maintenance in
Chapter 8.)
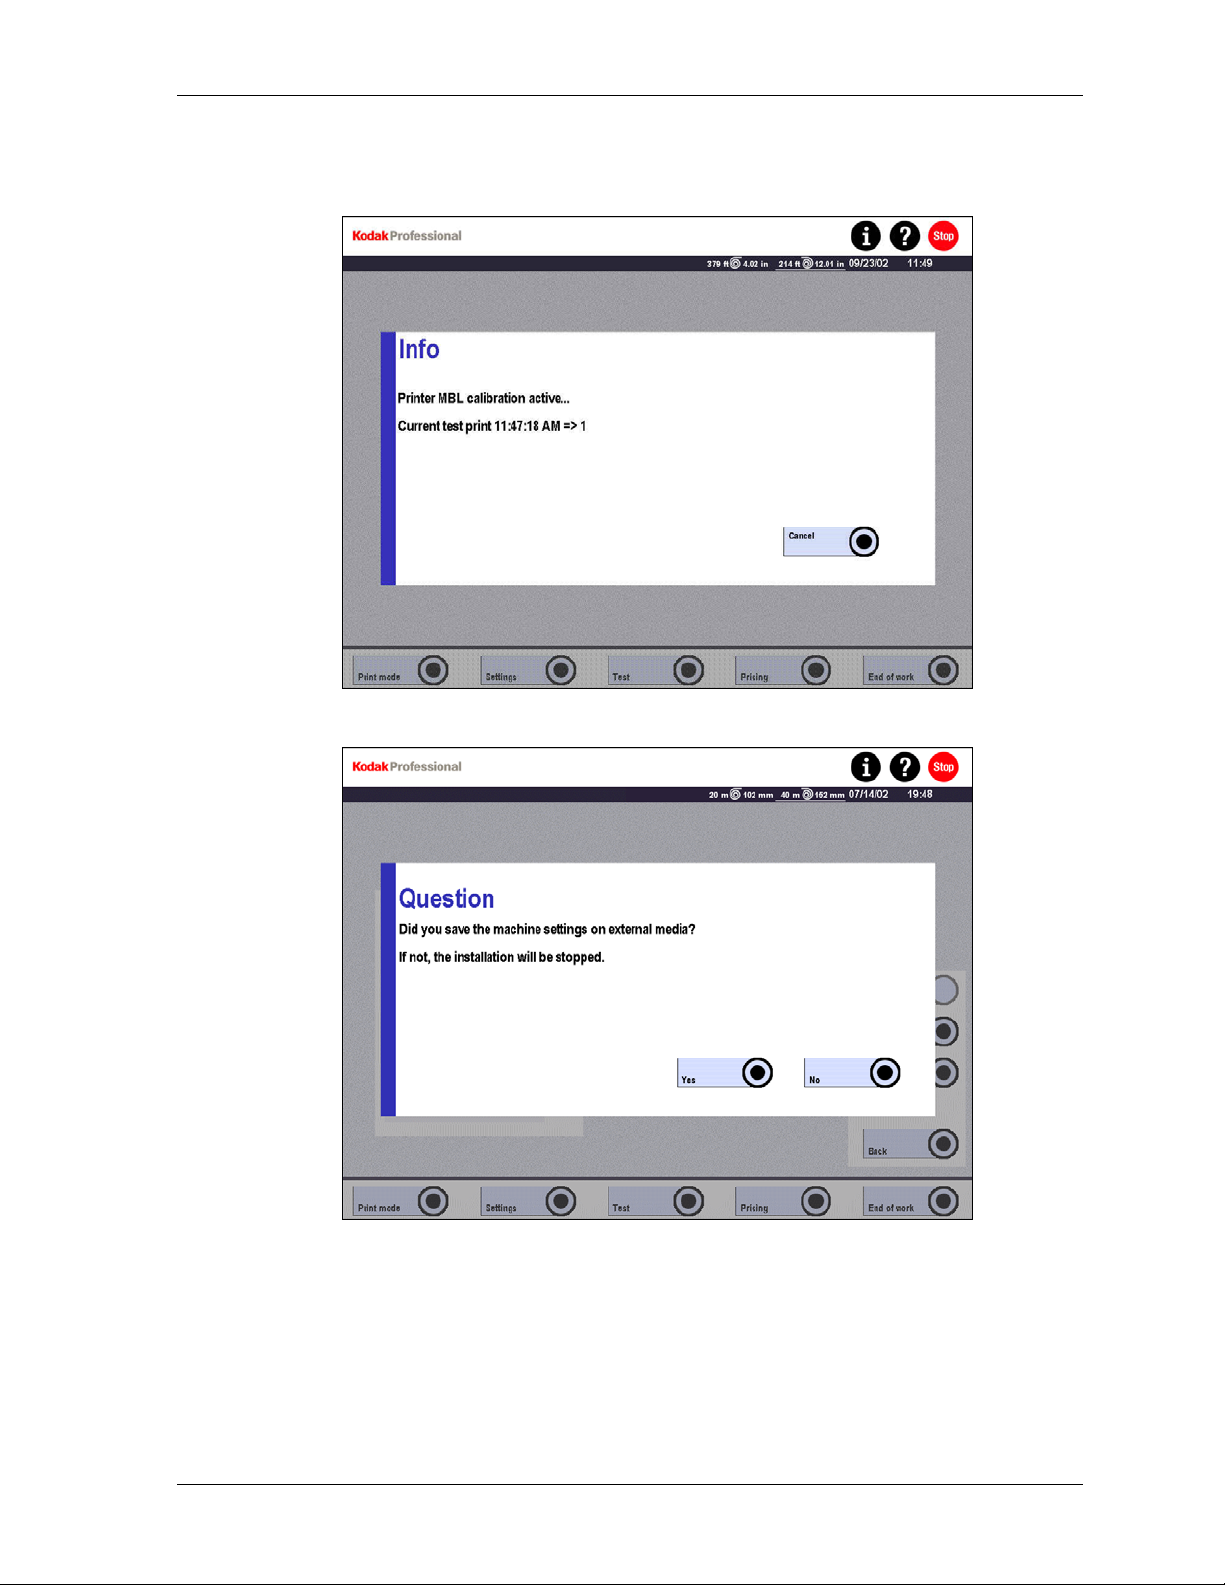
5. Reply to all checks, if any:
a. If unfinished APS orders exist, answer the query as to whether they should
be saved. Orders that are not saved are lost.
b. If orders exist that are not priced, confirm the warning message. All finished
orders are saved, whether or not they are priced.
The equipment is shut down and turned off.
Turning Off the Equipment Partially (Sleep Mode)
It is possible to turn off parts of the system so that only the main computer is running.
This “Sleep” mode allows for statistical checks, locally or by remote control, before
the equipment is turned off completely. While in Sleep mode:
• The printer and paper processor are OFF.
• The main computer is ON.
You can activate the Sleep mode for the desired weekdays and enter the switch-off
time of the main computer. When the Sleep mode is activated, the turn-off time of the
main computer is indicated on the monitor.
For more information, see Defining Times for Startup, Shutdown, and Sleep Mode in
Chapter 4.
2-18 KODAK PROFESSIONAL SRP 30 Laser Printer
Page 38

Overview
Description of the Operating Controls
Buttons and Lamp on the Main Computer
There are two buttons and one lamp on the main computer:
• ON button (1)
If the system is shut down by End of work – Shutdown, it remains in the timer
mode until the next automatic startup. If you must operate the system before the
next automatic startup time, press the ON button. The system will then start up.
You can also press the ON button to initiate a reset.
• The timer lamp (2) lights if the system is in the timer mode after Shutdown.
• Film stop button (3)
If you suspect a film jam, press the Film stop button to stop the system. The film
stops during scanning (orders are interrupted and a reset of the system begins).
The Reset confirmation window opens on the screen. Wait until the paper transport
in the printer is empty. Then touch Yes to confirm.
For more information, see:
• Automatic Startup on Page 2-11.
• Resetting the Equipment in Chapter 7.
KODAK PROFESSIONAL SRP 30 Laser Printer 2-19
Page 39

Operator’s Guide
Touch-screen Monitor
The operation of the equipment is menu-driven by a touch-screen monitor. Activate
the functions by touching the touch-sensitive buttons on the screen.
Specifications:
• 15-inch LCD screen
• SVGA resolution 1024 x 768 pixels
• Screen-refresh frequency > 75 Hz
For more information, see Screen Structure on Page 2-21, Touch-sensitive Buttons
on Page 2-24, and Menu Overview on Page 2-31.
2-20 KODAK PROFESSIONAL SRP 30 Laser Printer
Page 40

Overview
Screen Structure
9
NOTE: This operator’s guide refers to the touch-sensitive fields of the touch-screen
monitor as “buttons.”
The screen is divided into several areas:
1 Information area with
2 fixed buttons (i, ?, Stop) and
3 status line
4 Active screen with
5 buttons and
6 a popup window, if available (not shown in the above example)
7 Menu bar with five main menus
The areas 1, 2, 3 and 7 are always displayed. However, the menu bar (7) cannot
always be used. When certain errors occur, it is disabled until the errors are
removed.
KODAK PROFESSIONAL SRP 30 Laser Printer 2-21
Page 41

Operator’s Guide
Information Area
The Information area includes the fixed buttons (i, ?, and Stop) and the status line.
Because the fixed buttons are always accessible, you can open the Info and Help
screens at any time. For more information, see Info and Help on Page 2-40.
The fixed buttons are described below.
i Status information
? Context-related help for all screens and error messages
Stop If the system does not respond to operator entries, you can use this button to
initialize a software reset. The entire SRP 30 Laser Printer is stopped (orders
are interrupted and all major assemblies are reset).
For more information, see Resetting the Equipment in Chapter 7.
2-22 KODAK PROFESSIONAL SRP 30 Laser Printer
Page 42

Overview
The display in the status line includes:
• Information, warnings, and requests
• Error messages
The messages in the status line require different actions:
• Some messages let you continue working without confirmation or action.
• Some messages can be ignored several times until the system forces you to act.
• Error messages must be resolved before work can continue.
All error messages are saved. You can view a list of the messages by touching i,
then Error list. Below is an example of an error list.
For more information, see Correcting System Conditions in Chapter 7.
KODAK PROFESSIONAL SRP 30 Laser Printer 2-23
Page 43

Operator’s Guide
Touch-sensitive Buttons
NOTE: Only one screen is active. It is not possible to open several screens at the
same time.
The buttons in areas of the screen other than the Information line (i, ?, and Stop)
change with the functions of the associated menu.
Touch the buttons to initiate the desired action, such as to:
• Select a submenu from the main menu bar
• Open a drop-down menu and make a selection
• Start, interrupt, or stop an action
• Select the desired configurations, images, and text in displayed selection windows
• Perform tests by way of the keyboard shown on the screen
All screens and associated buttons are explained in detail in this guide. Additionally,
the online Help feature, which you initiate when you press ?, provides a detailed
explanation for each screen.
2-24 KODAK PROFESSIONAL SRP 30 Laser Printer
Page 44

Overview
Drop-down Menus
When you touch a button that lets you make a selection, a drop-down menu opens. If
there are more entries than the display can show, arrow keys appear for scrolling.
For example, when you select a paper-width configuration, a drop-down menu
appears with all configurations that you can select for the inserted paper width.
1. Select the desired configuration from the list.
2. Touch OK.
KODAK PROFESSIONAL SRP 30 Laser Printer 2-25
Page 45

Operator’s Guide
Pop-up Windows
Pop-up windows open on the active screen if you must make a confirmation or
perform an action.
• A Reset pop-up appears when you press the Stop button on the main computer (or
the Stop button on the touch screen) when a suspected film jam occurs. The film is
moved out and the order is interrupted.
To prevent subsequent paper jams, empty the paper transport in the printer before
you press Yes to initiate a system reset.
• An Error pop-up appears when either incorrect (or inconsistent) entries or system
errors occur. You must remove these errors before work can continue.
2-26 KODAK PROFESSIONAL SRP 30 Laser Printer
Page 46
Overview
• A Warning pop-up appears if a risk of data loss occurs.
• An Info pop-up appears to provide additional status information.
• A Query pop-up appears for you to avoid potential problems.
KODAK PROFESSIONAL SRP 30 Laser Printer 2-27
Page 47

Operator’s Guide
Input Screen
When you must enter text, numbers, or special characters, the Input screen opens.
• The image of a keyboard includes national special characters in accordance with
the selected keyboard allocation. (For the selection of the keyboard allocation, see
User Interface in Chapter 4.) Touch a button to select the corresponding character.
• Typed characters appear in the blue field and in the button above the image of the
keyboard. This lets you see how much of the entered text will appear in the button
when you select it from a drop-down menu.
• The OK button lets you terminate your entry and return to the previous menu.
2-28 KODAK PROFESSIONAL SRP 30 Laser Printer
Page 48

Overview
Numeric Keypad
Use the numeric keypad in the display to enter the desired number and touch OK to
confirm.
KODAK PROFESSIONAL SRP 30 Laser Printer 2-29
Page 49

Operator’s Guide
y
Reorder Keyboard
The Reorder keyboard on the touch screen lets you edit Reorder lists.
Key Function
YMCD
ACT, DCT, SHP
,
SAT
0 to 9
-
A, X
Í Î
Ï Ð
OK
Color or density corrections: Yellow, Magenta, Cyan, Density
Corrections: Area contrast (ACT), Detail contrast (DCT), Sharpness (SHP)
Comma as separator of frame numbers
Correction: Saturation (SAT)
Entry of digit numbers
• Minus sign for the entry of negative corrections
• Hyphen for the entry of frame numbers
Letters for the DX code
Horizontal navigation in the Reorder list
• Vertical navigation in the Reorder list
• Vertical scrolling in the configuration Pull-up
Terminating the entry of a Reorder list
• For Pull-up transfer of the selection + Pull-up closed
• For Pop-up confirmation of the order number
DEL
2-30 KODAK PROFESSIONAL SRP 30 Laser Printer
• Deletes a position in the negative number field (example: 1A-3A, 13A)
• Deletes the whole number in the PpF (Prints per frame) field (example: 10)
The delete key is inactive in the configuration and correction field. Wrong
entries in the correction field are corrected b
reentry. If no correction is
Page 50

Overview
desired, 0 must be entered.
Menu Bar
The main menus are always accessible, except when either a pop-up window is open
or the Help screen is open.
Menu buttons that appear gray indicate that the function is not available.
The structure of the menus is described in the next subsection, Menu Overview.
Menu Overview
Main Menus
The following main menus are available on the menu bar:
• Print mode
• Settings
• Test
• Pricing + Statistics
• End of work
Other menus are available by pressing i and ?:
• Status Information
• Help
All menus and associated screens are outlined on the following pages.
KODAK PROFESSIONAL SRP 30 Laser Printer 2-31
Page 51

Operator’s Guide
Print Mode Menu
Image editing:
Crop
files
Position text
Enter border
positioning
2-32 KODAK PROFESSIONAL SRP 30 Laser Printer
Page 52

Overview
Settings Menu without Equipment Settings
Machine
Machine
Indexprint
Indexprint
KODAK PROFESSIONAL SRP 30 Laser Printer 2-33
Page 53

Operator’s Guide
Settings Menu with Equipment Settings
ar
Machine
Machine
balance
Remote
2-34 KODAK PROFESSIONAL SRP 30 Laser Printer
Page 54

Overview
Test Menu
Piko
KODAK PROFESSIONAL SRP 30 Laser Printer 2-35
Page 55

Operator’s Guide
Pricing + Statistics Menu
Statistics
2-36 KODAK PROFESSIONAL SRP 30 Laser Printer
Page 56

Overview
End of Work Menu
Login
Timer
KODAK PROFESSIONAL SRP 30 Laser Printer 2-37
Page 57

Operator’s Guide
Status Information and Help Menus
Film drive Info
2-38 KODAK PROFESSIONAL SRP 30 Laser Printer
Page 58

Overview
Other Screens
These screens are accessible at any time. They are displayed when:
• Configurations can be modified on demand with the Display Config. button
• Text input (user names, back print text) is required, by touching the appropriate
field
• Number input (order numbers, passwords) is required, by touching the respective
field
• Errors occur that require removal before work can continue
• You must make a decision
KODAK PROFESSIONAL SRP 30 Laser Printer 2-39
Page 59
Operator’s Guide
Info and Help
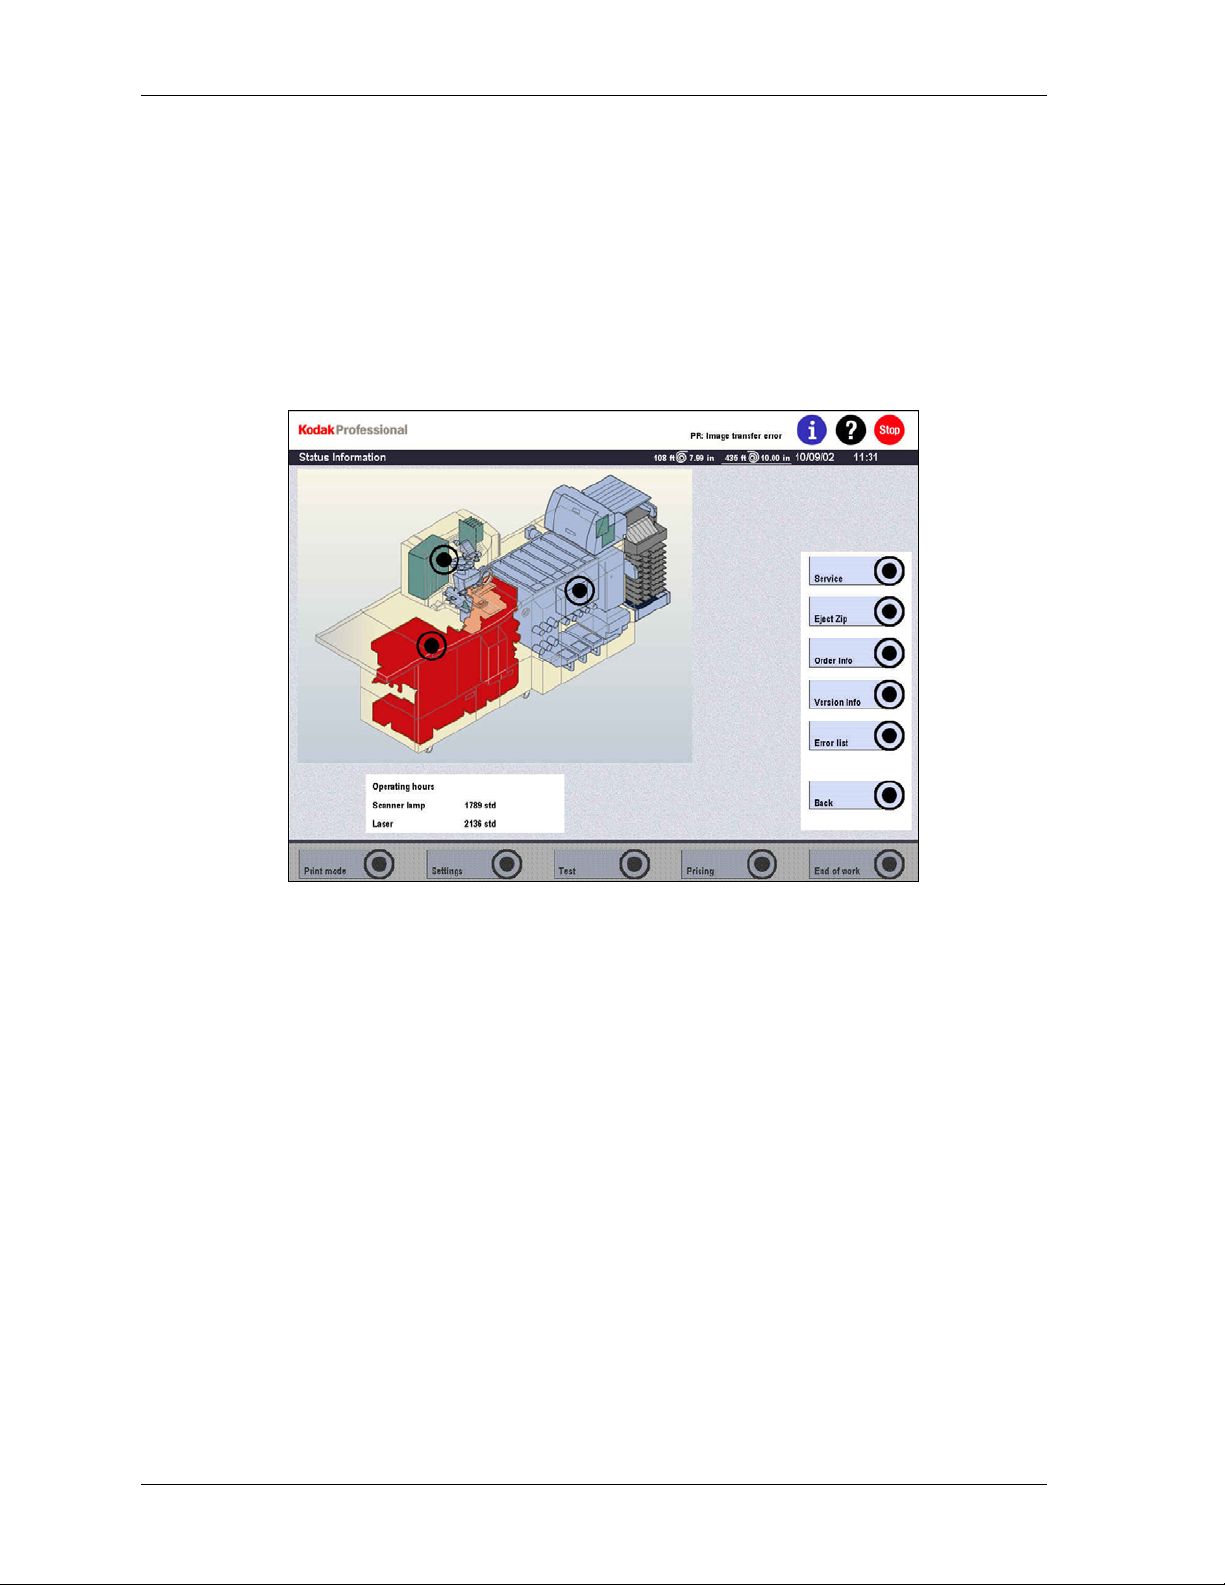
Information is available in every screen by pressing i in the Info field.
The Info screen displays the operating hours of the scanner lamp and the laser. You
can reset the counter for the operating hours of the scanner lamp in the Test /
Maintenance menu.
For all other information, a separate screen opens.
• To open the Film drive Info, Printer Info, and Paper Processor Info screens,
touch the module in the illustration that appears on the touch-screen.
• To open the Order Info, Version Info, or Error list screens, touch the buttons with
the respective names.
• To close the Info screen, touch Back.
2-40 KODAK PROFESSIONAL SRP 30 Laser Printer
Page 60
Overview
NOTE: When an error occurs, the module concerned appears in red.
Touch the button on the module to localize the error more precisely. The
defective component is shown below (in red).
KODAK PROFESSIONAL SRP 30 Laser Printer 2-41
Page 61
Operator’s Guide
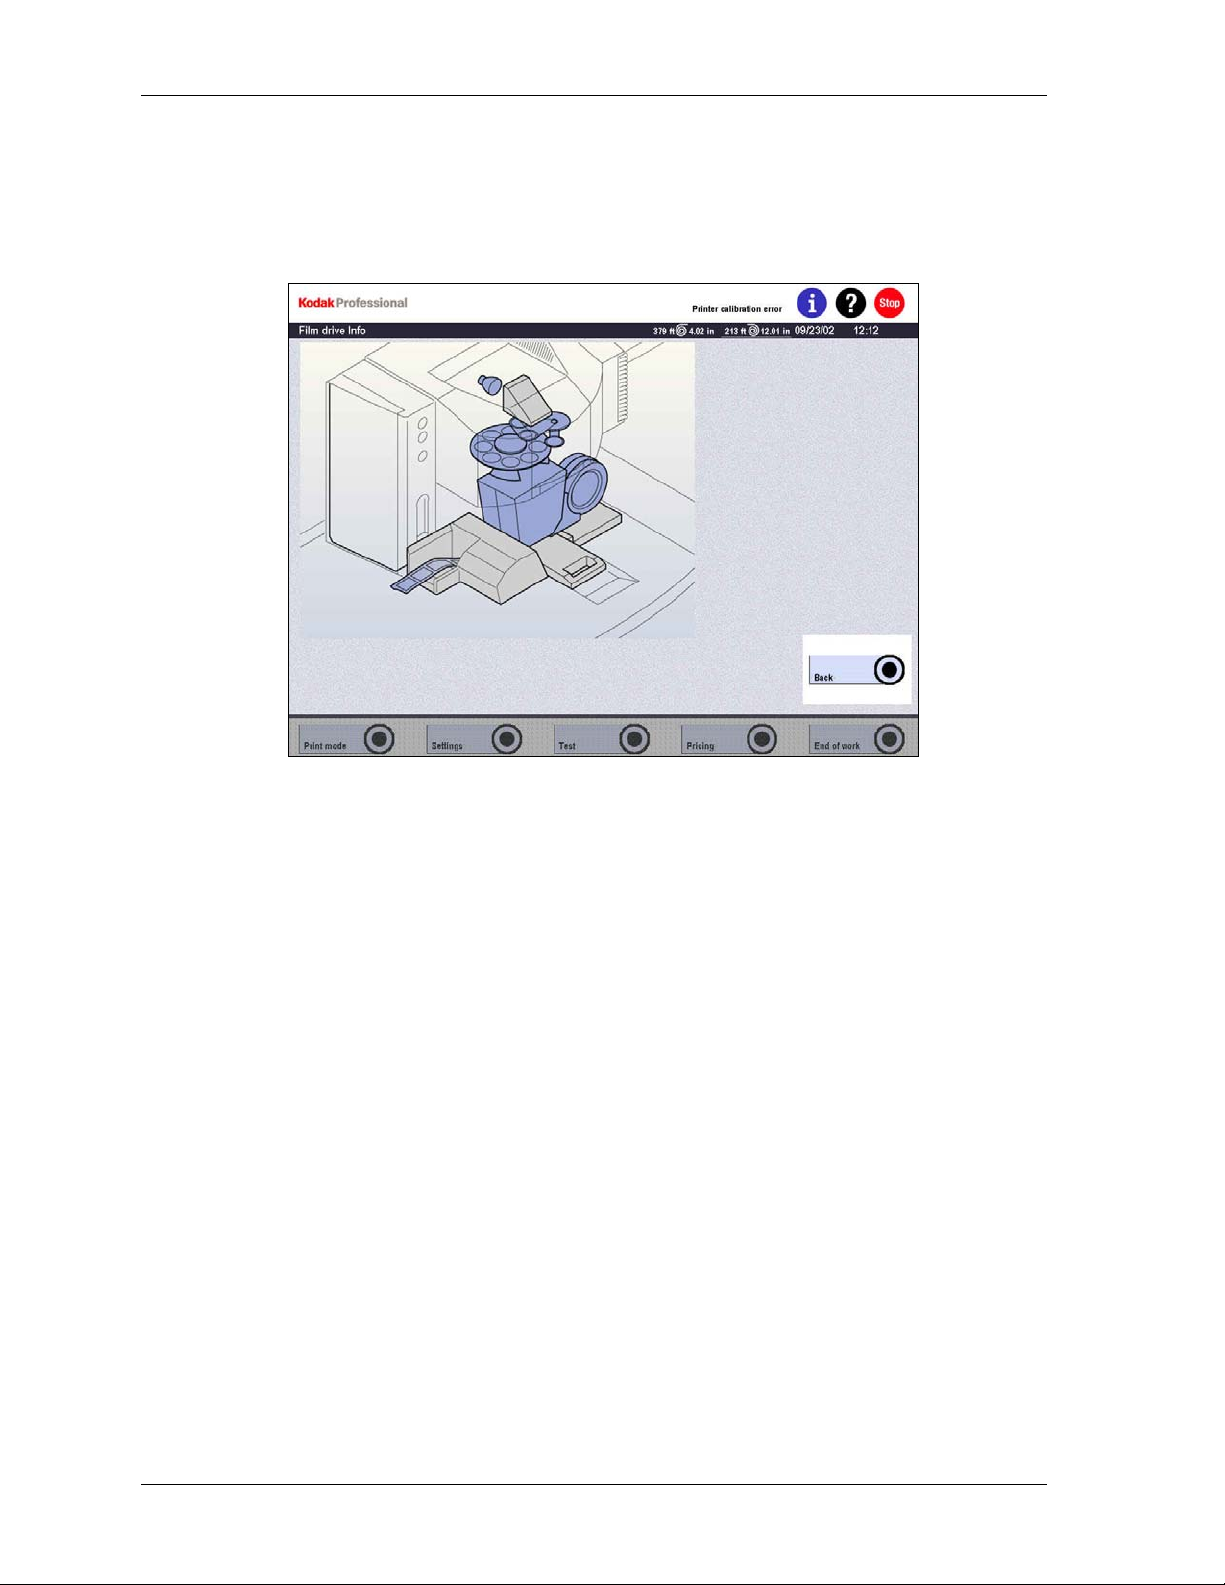
Film Drive Info
The Film drive Info screen provides a graphic representation of the film advance.
If an error occurs, the corresponding component of the film advance appears in red.
To return to the Info screen, touch Back.
2-42 KODAK PROFESSIONAL SRP 30 Laser Printer
Page 62

Overview
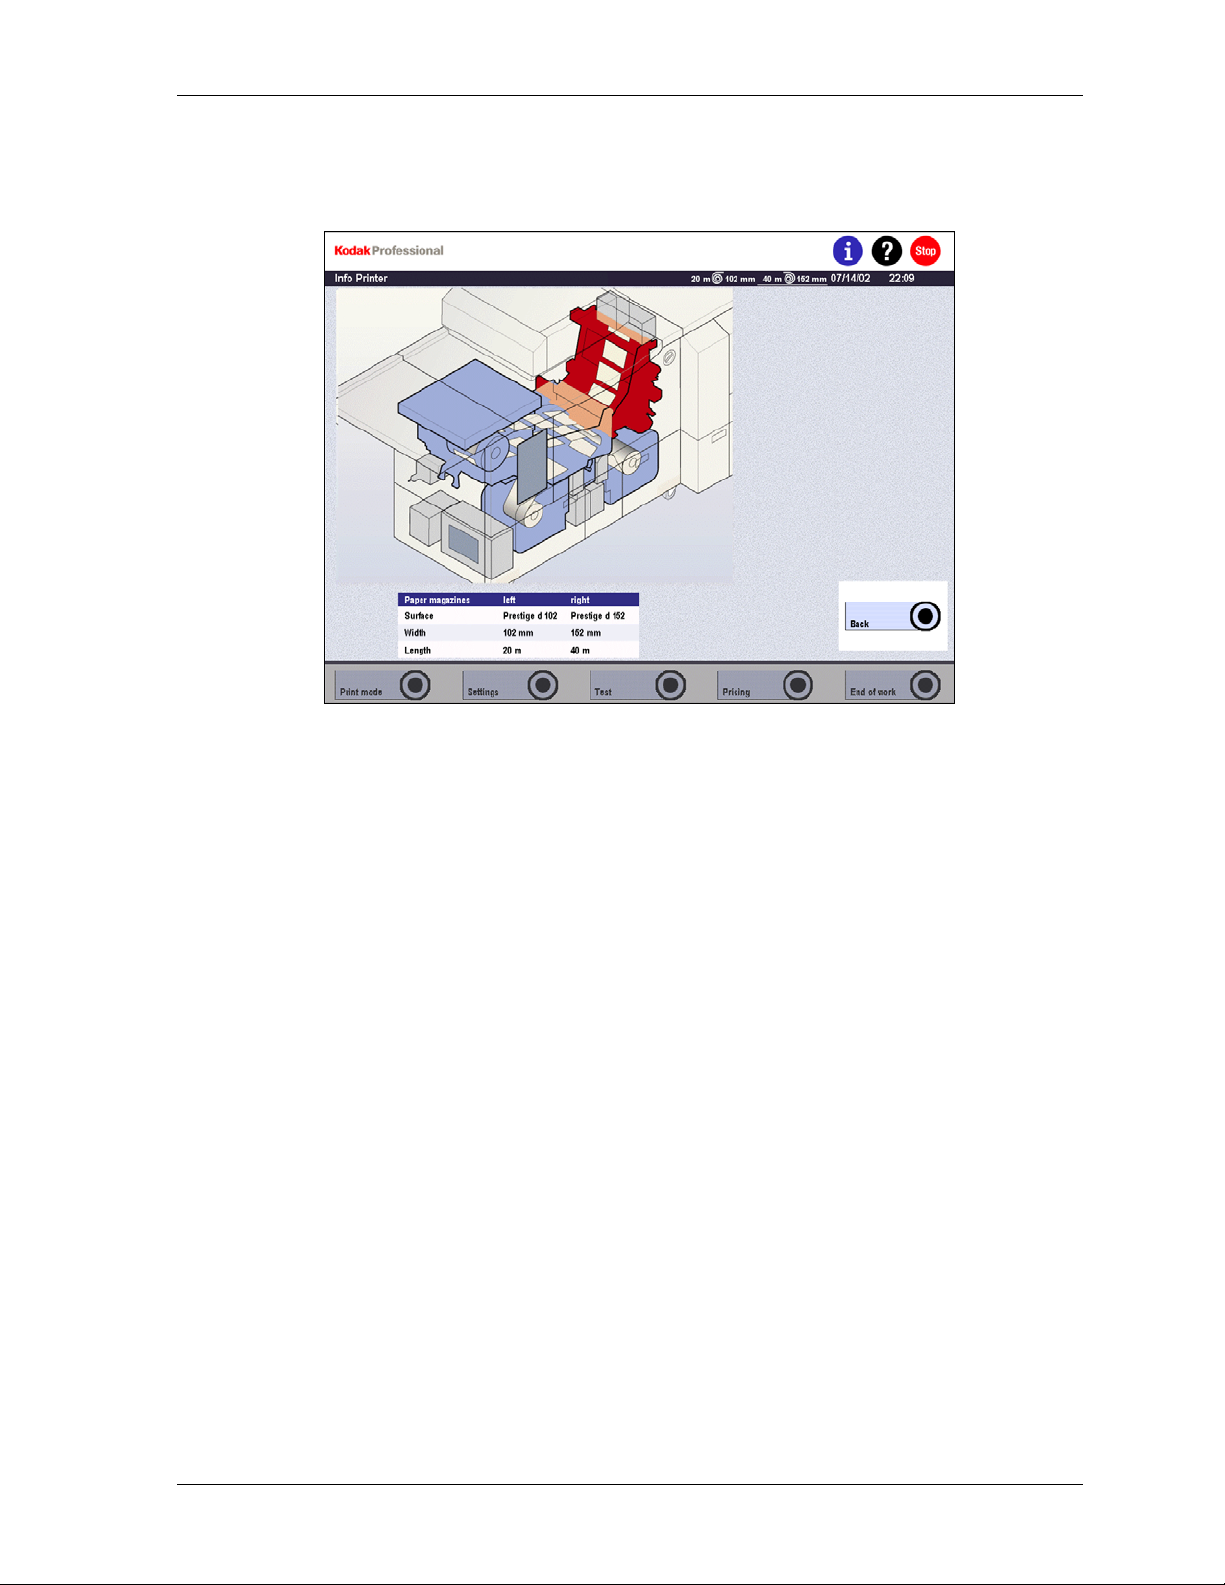
Info Printer
Info Printer is a graphic representation of the paper transport. This screen shows the
width, surface, and residual length for each paper magazine.
If an error occurs, the corresponding component of the printer appears in red.
To return to the Info screen, touch Back.
KODAK PROFESSIONAL SRP 30 Laser Printer 2-43
Page 63
Operator’s Guide
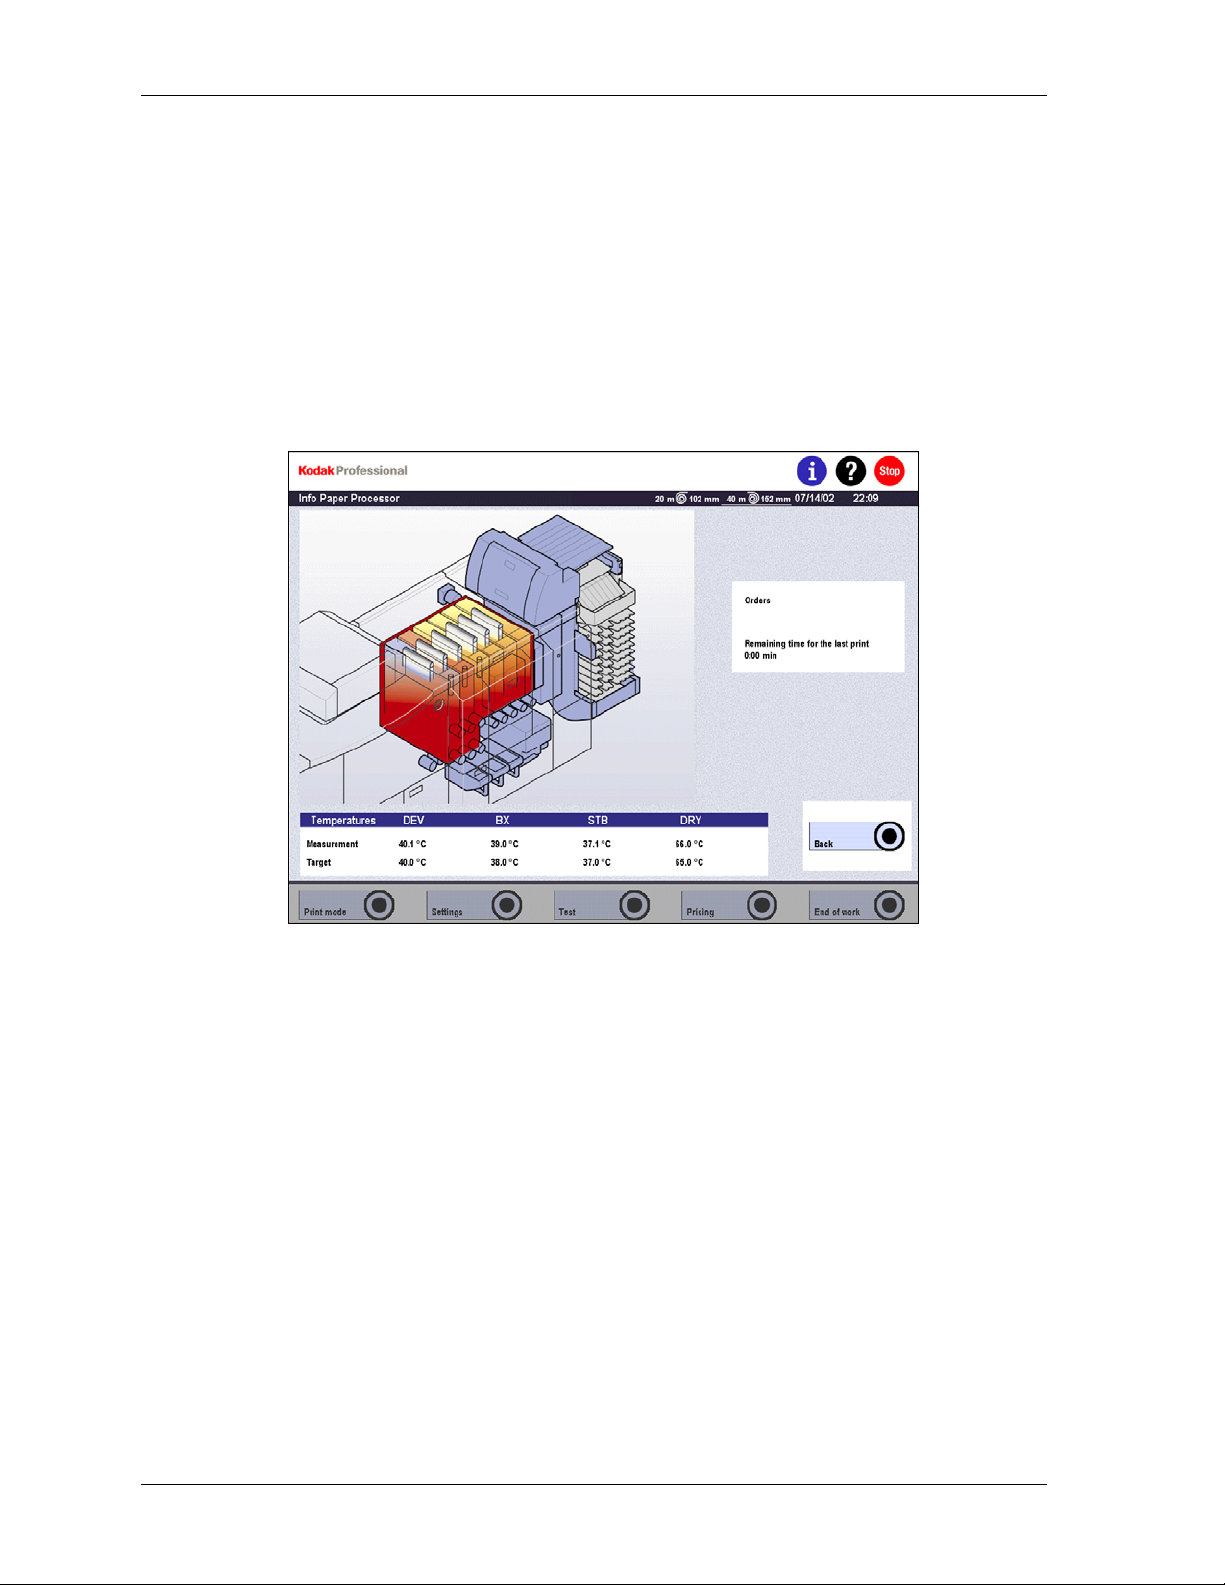
Info Paper Processor
Info Paper Processor is a graphic representation of the solutions and the dryer. This
screen also displays:
• Number of prints moving through the paper processor
• Order numbers of the orders in the paper processor
• Time remaining until the last print will exit
• Reference and actual temperatures of the solutions and the dryer
If an error occurs, the corresponding component of the paper processor appears in
red.
To return to the Info screen, touch Back.
2-44 KODAK PROFESSIONAL SRP 30 Laser Printer
Page 64

Overview
Info Order
The Info Order screen displays the number of orders that are not yet processed:
• APS reorders
• Network orders
• Orders stored for file prints (Backup)
To return to the Info screen, touch Back.
KODAK PROFESSIONAL SRP 30 Laser Printer 2-45
Page 65

Operator’s Guide
Version Info
The Version Info screen displays:
• Current versions of the installed software and firmware
• Serial number of the hardware
• License ID of the equipment
To return to the Info screen, touch Back.
2-46 KODAK PROFESSIONAL SRP 30 Laser Printer
Page 66

Overview
Error List
All error messages shown in the status line are saved. To view the error list, touch i,
then Error list.
The Error list screen shows the date, time, type, and text for each error.
• Disable Display all errors if the error list only shows the errors encountered since
the last start or reset.
• If the error message is not displayed completely in the error list, touch the message
to display the complete text below the error list.
• To delete the message from the list, mark the message and touch Remove
selection.
• To return to the Info screen, touch Back.
The error list and error removal are described in Correcting System Conditions,
Chapter 7.
KODAK PROFESSIONAL SRP 30 Laser Printer 2-47
Page 67

Operator’s Guide
Help
You can access Help from every screen that has a ? in the information area. (See
Screen Structure on Page 2-21.)
NOTE: For operations requiring significant computing time, the Help wind ow does
not display immediately. A pop-up window opens with the following options:
• Waiting
• Cancel
Help text appears for the screen in which you touched ?. The display includes links to
the Help texts.
To go to the pertinent section in the Help text, touch the area concerned (such as the
button, field, or list). Touch Ï to go back.
Other buttons are provided on the right side of the Help window:
• Help Index
To view the associated Help text, touch a keyword in the alphabetic list.
• Error Help Index
This feature is not yet implemented.
• Documentation
Touch this button to view the Operator’s Guide.
• Touch Close to return to the screen where you touched ?.
In the Help window, i and Stop are accessible, but the menu bar is not. NOTE:
2-48 KODAK PROFESSIONAL SRP 30 Laser Printer
Page 68

Chapter 3 Chemicals
Contents
Preparation of Chemicals.......................................................................................3-3
Rinsing the Tanks..............................................................................................3-4
Mixing the Tank Solutions .................................................................................3-5
Stabilizer.......................................................................................................3-6
Bleach-Fix.....................................................................................................3-6
Developer .....................................................................................................3-6
Inserting the Chemical Filters............................................................................3-6
Installing the Racks and Bringing the Tank Solutions to Temperature.............3-7
Preparing Replenisher.......................................................................................3-7
Other Operations to Perform Prior to Production................................................3-8
KODAK PROFESSIONAL SRP 30 Laser Printer 3-1
Page 69

Operator’s Guide
3-2 KODAK PROFESSIONAL SRP 30 Laser Printer
Page 70

Chemicals
Preparation of Chemicals
WARNING: A risk of injury is possible if the cover of the wet section is
unlocked (when PUSH is pressed unintentionally).
• When opening the cover:
Check that the cover lock fully engages in the vertical
position.
• When closing the cover:
Support the cover with one hand. Press the unlocking lever
(PUSH), and close the cover.
A water temperature of approximately 30°C (86°F) is recommende d for the
preparation of the individual tank fillings.
The chemicals are prepared directly in the tanks.
KODAK PROFESSIONAL SRP 30 Laser Printer 3-3
Page 71

Operator’s Guide
CAUTION: To prevent contamination of the chemicals, always fill the tanks
in the following order:
SB Ö BX Ö CD
After each preparation of a solution, thoroughly rinse the
containers used for the preparation first with cold water, then
with hot water.
Rinsing the Tanks
1. Open the wet section cover.
2. Fill the replenisher tank with water until the lower level sensors are covered to
avoid the request for the connection of an EKTACOLOR Processi ng Cartridge.
3. Fill all machine tanks with hot water.
4. Let the equipment run for a short while to rinse the circulation system and to
remove any chemical residues.
5. Switch off the equipment and completely drain the cleaning water. Check that all
drain valves are closed firmly.
6. Check the hose positioning. Check that the hose has no:
• Leaks
• Sharp bends
• Crimps
• Air bubbles
3-4 KODAK PROFESSIONAL SRP 30 Laser Printer
Page 72

Chemicals
Mixing the Tank Solutions
The instructions assume that you are mixing the fresh-tank solutions directly in the
processor tank.
WARNING: Use cold water when you mix solutions to prevent you from
unnecessary exposure to fumes that can be released at higher
temperatures.
Handle all chemicals carefully. When you mix solutions, wear
goggles or a face shield, a protective rubber apron, and
protective gloves made with either neoprene or nitrile rubber.
Clean protective clothing after use to remove any chemical
residue that can cause contamination.
For more information about potential health hazards and safe
handling of specific Kodak chemicals, see the label and the
Material Safety Data Sheet (MSDS) for the chemical. Consult the
MSDS for regional contact information.
MSDS copies are available at the Kodak Web site
http://www.kodak.com/US/en/corp/hse/prodSearchMSDS.jhtml
IMPORTANT: To make sure that no chemicals splash on the equipment, fasten the
plastic covers from the accessory pack on the equipment.
Open two KODAK EKTACOLOR Processing Cartridge 75 cartons and remove the
four bottles from each carton.
When you remove the cap of a bottle, the label printed on the seal identifies the bottle
as either the developer bottle (CD), one of the two bleach-fix bottles (BX-A or BX-B),
or the stabilizer bottle (SB).
You need:
• Two bottles of each part to make up the fresh-tank solutions
• A solution measuring device, such as a graduated cylinder that can accurately
measure volumes up to 900 mL
• The ability to measure up to 10 L of water
For the developer you need KODAK EKTACOLOR RA Developer Starter. The Kodak
catalog numbers are:
Region CAT No.
United States, Canada, and Latin
America (Northern)
Europe, Middle East, Africa 527 8957
Latin America (Southern) 632 0238
102 6681
Greater Asia Region 444 5839, 403 6596
China 660 0315
Japan 660 0647
KODAK PROFESSIONAL SRP 30 Laser Printer 3-5
Page 73

Operator’s Guide
Stabilizer
1. Add 10.3 L of water to the first tank.
2. Add one-half the contents (approximately 72 mL) of one bottle of stabilizer
concentrate (labeled SB).
3. Repeat Steps 1 and 2 for each of the three remaining stabilizer tanks.
The total volume for each tank is 11 L.
Bleach-Fix
You can mix the working bleach-fix tank directly from the two-part concentrates. Use
two EKTACOLOR Processing Cartridge 75 units to supply the two bottles of each of
the two concentrate solutions.
CAUTION:
1. Add 12.7 L of water to the tank.
2. Add the entire contents of two bottles of bleach-fix concentrate, Part A
(labeled BX-A).
3. Add the entire contents of two bottles of bleach-fix concentrate, Part B
(labeled BX-B).
The total volume in the tank is 18.0 L.
Developer
IMPORTANT:
1. Add 15.9 L of water to the tank.
2. Slowly add the entire contents of two bottles of developer concentrate
(labeled CD).
3. Add 900 mL of EKTACOLOR RA Developer Starter, Catalog No. 102 6681.
The total volume in the tank is 18.5 L.
Avoid contamination of the developer with bleach-fix.
To obtain good performance, take special care in mixing the
developer tank.
Inserting the Chemical Filters
1. Take the chemical filters out of the accessory pack.
2. Rinse the filters in water to remove loose fibers and attach the filters to the
holders.
3. Put them in the appropriate tanks corresponding to the colored stickers. You may
need to turn the filter rods slightly so that the filters sit correctly.
3-6 KODAK PROFESSIONAL SRP 30 Laser Printer
Page 74

Chemicals
Installing the Racks and Bringing the Tank Solutions to
Temperature
When you fill the tanks with the new mixes, they appear only partially filled. When
you reinstall the racks in the tanks, the racks displace more solution volume to fill the
tanks.
1. Install each rack by slowly lowering it into the tank; the rack displaces additional
volume to fill the tank and partially mix the solution.
2. When you have reinstalled all the racks, verify that all tanks are filled with
solution.
3. Restore power to the equipment.
4. Start the recirculation pumps to complete the mixing of the solutions.
5. Let the processor reach operating temperature.
Tank Temperature °C
Developer 40.0 +/- 0.3
Bleach-Fix 38 +/- 2
Stabilizer 37 +/- 3
Preparing Replenisher
1. Fill 7 L (1.8 gal) of water in the ASTOR tank (1).
2. Fill the water tank until the upper one of the two float sensors is activated or the
overflow indicator sticks out of the tank.
3. Prior to the first paper transport, use water to wet the foam rollers of the
squeegee unit (2). Otherwise the wet paper could stick to the dry rollers.
KODAK PROFESSIONAL SRP 30 Laser Printer 3-7
Page 75

Operator’s Guide
4. Put the EKTACOLOR Processing Cartridge in the docking station with the sticker
facing up.
The preparation of the replenishers starts as soon as the docking station is
closed. During this procedure, the door is locked mechanically and the LED on
the left side of the docking station illuminates steadily.
IMPORTANT: To reduce oxidation, a cartridge should always be in the docking
station. After the LED is turned off, the cartridge can be removed and
replaced by a full one. Alternatively, an empty cartridge can remain
in the docking station until you get a message to insert a new
cartridge.
The replenishers are mixed automatically by the integrated electrically driven mixers.
2
One preparation is sufficient for about 75 m
equivalent to approximately 1400 8 x 10-in. (20 x 25-cm) prints.
(807 ft²) of color negative paper,
Other Operations to Perform Prior to Production
1. Set the reference values. (See Paper Processor Settings in Chapter 4.)
2. Test the chemicals. (See Testing the Paper Processor in Chapter 5.)
3. Adjust the equipment to the operators’ needs (such as national settings) and to
the production requirements (such as configurations and price categories).
(See Settings, Chapter 4.)
4. Calibrate the equipment. (See Tests, Chapter 5.)
3-8 KODAK PROFESSIONAL SRP 30 Laser Printer
Page 76

Chapter 4 Settings
Contents
From the Order Receipt to the Finished Print ......................................................4-3
Administrator .....................................................................................................4-3
Operator ............................................................................................................4-4
Settings.....................................................................................................................4-5
Entering Names.................................................................................................4-6
Entering Numbers..............................................................................................4-7
Machine Settings.....................................................................................................4-8
Defining Surfaces..............................................................................................4-9
Defining Paper Settings...................................................................................4-11
Coding the Paper Magazine............................................................................4-13
Defining the Cut Lengths.................................................................................4-14
User Interface..................................................................................................4-15
User Administrator: Defining Users and User Rights......................................4-16
User Profiles....................................................................................................4-18
Defining Times for Startup, Shutdown, and Sleep Mode................................4-19
Calendar: Defining Off Days............................................................................4-20
Installing the Software.....................................................................................4-21
Enabling the Software.....................................................................................4-22
Importing a Combiprint Layout........................................................................4-23
Importing an Index Print Layout ......................................................................4-24
Printer Settings................................................................................................4-25
Scanner Settings.............................................................................................4-26
Paper Processor Settings................................................................................4-27
Setting the Replenishment Rates...............................................................4-27
Default Replenishment Rates.....................................................................4-28
Calibrating the Temperature Sensors and Water Pumps..........................4-28
Production Balance – TFS Logic.....................................................................4-29
Impact.........................................................................................................4-29
Sharpen Edges, Saturation, and Sharpen Grain........................................4-30
Contrast Management: Area Contrast, Detail Contrast..............................4-31
Panorama Identification..............................................................................4-31
Learning TFS Learns and Learning TFS Used..........................................4-32
TFS Color ...................................................................................................4-33
TFS Density................................................................................................4-38
Selector Logic and TFS Selector................................................................4-39
Color Correction .........................................................................................4-40
DX Correction.............................................................................................4-41
KODAK PROFESSIONAL SRP 30 Laser Printer 4-1
Page 77

Operator’s Guide
Production Balance – Digital...........................................................................4-43
Digital Order Settings......................................................................................4-45
Other Settings................................................................................................. 4-47
Print Configurations ............................................................................................. 4-48
Creating, Editing, and Deleting Configurations............................................... 4-50
Creating a New Configuration....................................................................4-50
Creating a New Configuration Based on an Existing One.........................4-50
Modifying a Configuration..........................................................................4-51
Deleting a Configuration ............................................................................4-51
Exiting the Screen......................................................................................4-51
Paper Configurations......................................................................................4-51
Print Sizes..................................................................................................4-52
APS Sizes..................................................................................................4-52
Back Print Configurations ............................................................................... 4-53
Additional Information Regarding Certain Parameters.............................. 4-54
APS Film Coding........................................................................................ 4-55
APS Back Print...........................................................................................4-56
Index Print Configurations............................................................................... 4-56
Correction Configurations...............................................................................4-58
Autosave Configurations.................................................................................4-60
Front Print Configurations...............................................................................4-63
Combiprint Configurations .............................................................................. 4-65
Order Configurations....................................................................................... 4-67
Single Configurations.................................................................................4-69
Package Configurations.............................................................................4-75
Combiprint Configurations .........................................................................4-76
Reproduction Configurations .....................................................................4-77
Configuration Types in the Order Configuration List..................................4-78
Black-and-White Prints ...................................................................................4-78
When Scanning Color Negative Film.........................................................4-78
When Scanning Black-and-White Film ...................................................... 4-78
Defining a Standard Configuration.................................................................. 4-79
Pricing Configurations ......................................................................................... 4-80
Save / Load Settings and Configurations........................................................... 4-81
4-2 KODAK PROFESSIONAL SRP 30 Laser Printer
Page 78

Settings
From the Order Receipt to the Finished Print
Administrator
Administrator actions Initiated using the following buttons
Settings for the automatic Startup by the timer:
start times, first user, calendar with off-days and
company holidays
Configuration settings:
Used as a basis for the Print configuration.
Definition of paper widths and surfaces,
appropriate coding of the paper magazines,
definition of cut lengths
Performing machine settings:
Country-specific settings, machine set tings,
importing layouts for combiprints and index
prints, production balance, communication with
other machines (remote orders).
Creating an operator with password, language,
user levels
Creating sub-configurations
Settings
Machine settings
Startup
Settings
Machine settings
Surface, Paper settings, or Cut length
Settings
Machine settings
User interface
Combiprint Layout
Indexprint Layout
Printer (example: MBL repetitions)
Scanner (example: scratch correction)
Paper Processor (example: replenishment rates)
Production balance
Network orders
Settings
Machine settings
User manager
Settings
Print configurations
Paper
Back print
Indexprint
Correction
Autosave
Front print
Combiprint
Combining sub-configurations to create order
configurations: Single, Package, Combiprint
If the Pricing + Label Printer option is available,
definition of price categories
Creating a backup copy of the settings and
configurations
KODAK PROFESSIONAL SRP 30 Laser Printer 4-3
Settings
Print configurations
Order
Settings
Pricing settings
Settings
Save settings
Page 79
Operator’s Guide
Operator
Operator actions Initiated using the following buttons or actions
Operator logon
Preparing the machine for the order 1. Mount a suitable mirror box and film mask.
Testing the paper and the machine:
Be sure to use MBL (Master Balance) paper for
the first PBL (Paper Balance).
Order handling:
First order
Reorder
Reorder for single frames or films without DX
code
– without preview or
– with preview and image editing
If the Pricing + Label Printer option is available:
Printing a price tag
End of work
Change user
1. Select a name for the operator.
2. Enter the Password.
3. Touch Login.
2. Prepare paper magazines (insert paper, code
magazine) and mount them
Test
Start MBL
Start PBL
Use print modes:
Autoprint, File print, or Slide print
Reorder
Manual positioning
If the Statistical option is available: Saving and
displaying statistics
4-4 KODAK PROFESSIONAL SRP 30 Laser Printer
Page 80

Settings
Settings
You can only modify settings when the film drive, the printer, and the paper processor
are empty:
• No film in the film mask
• No paper in the printer
• No paper in the paper processor
The Settings menu is disabled as long as film or paper is advancing through the
system.
To open the Setting screen, touch Settings on the menu bar. The following options
are available:
• Print configurations
For creating print configurations for production, with all associated subconfigurations.
• Machine settings
For adjusting the equipment to user needs and lab requirements.
• Pricing settings
For entering all prices. (Available only with the Pricing + Label Printer option.)
• Load settings
For reloading saved settings and/or configurations.
• Save settings
For saving all machine settings, print configurations, and pricing settings.
KODAK PROFESSIONAL SRP 30 Laser Printer 4-5
Page 81

Operator’s Guide
Entering Names
If a name is required (for new configurations, for example), the Input screen opens
automatically.
Configuration names have a maximum length of 30 characters. Special charact ers
are permitted, except for quotation marks.
1. Touch the appropriate characters on the keyboard.
Characters appear in the blue field above the keyboard as you enter them. They
also appear in the button next to the blue field. This lets you see immediately
how much of the entered text will appear on the button when it is selected from a
list or pull-down menu.
2. Touch OK to confirm.
4-6 KODAK PROFESSIONAL SRP 30 Laser Printer
Page 82

Settings
Entering Numbers
If a number is required (for the numeric user password, for example) the numeric
keypad opens automatically.
1. Touch the appropriate numbers on the keypad.
The numbers appear in the blue field above the keypad as you enter them.
2. Touch OK to confirm.
KODAK PROFESSIONAL SRP 30 Laser Printer 4-7
Page 83
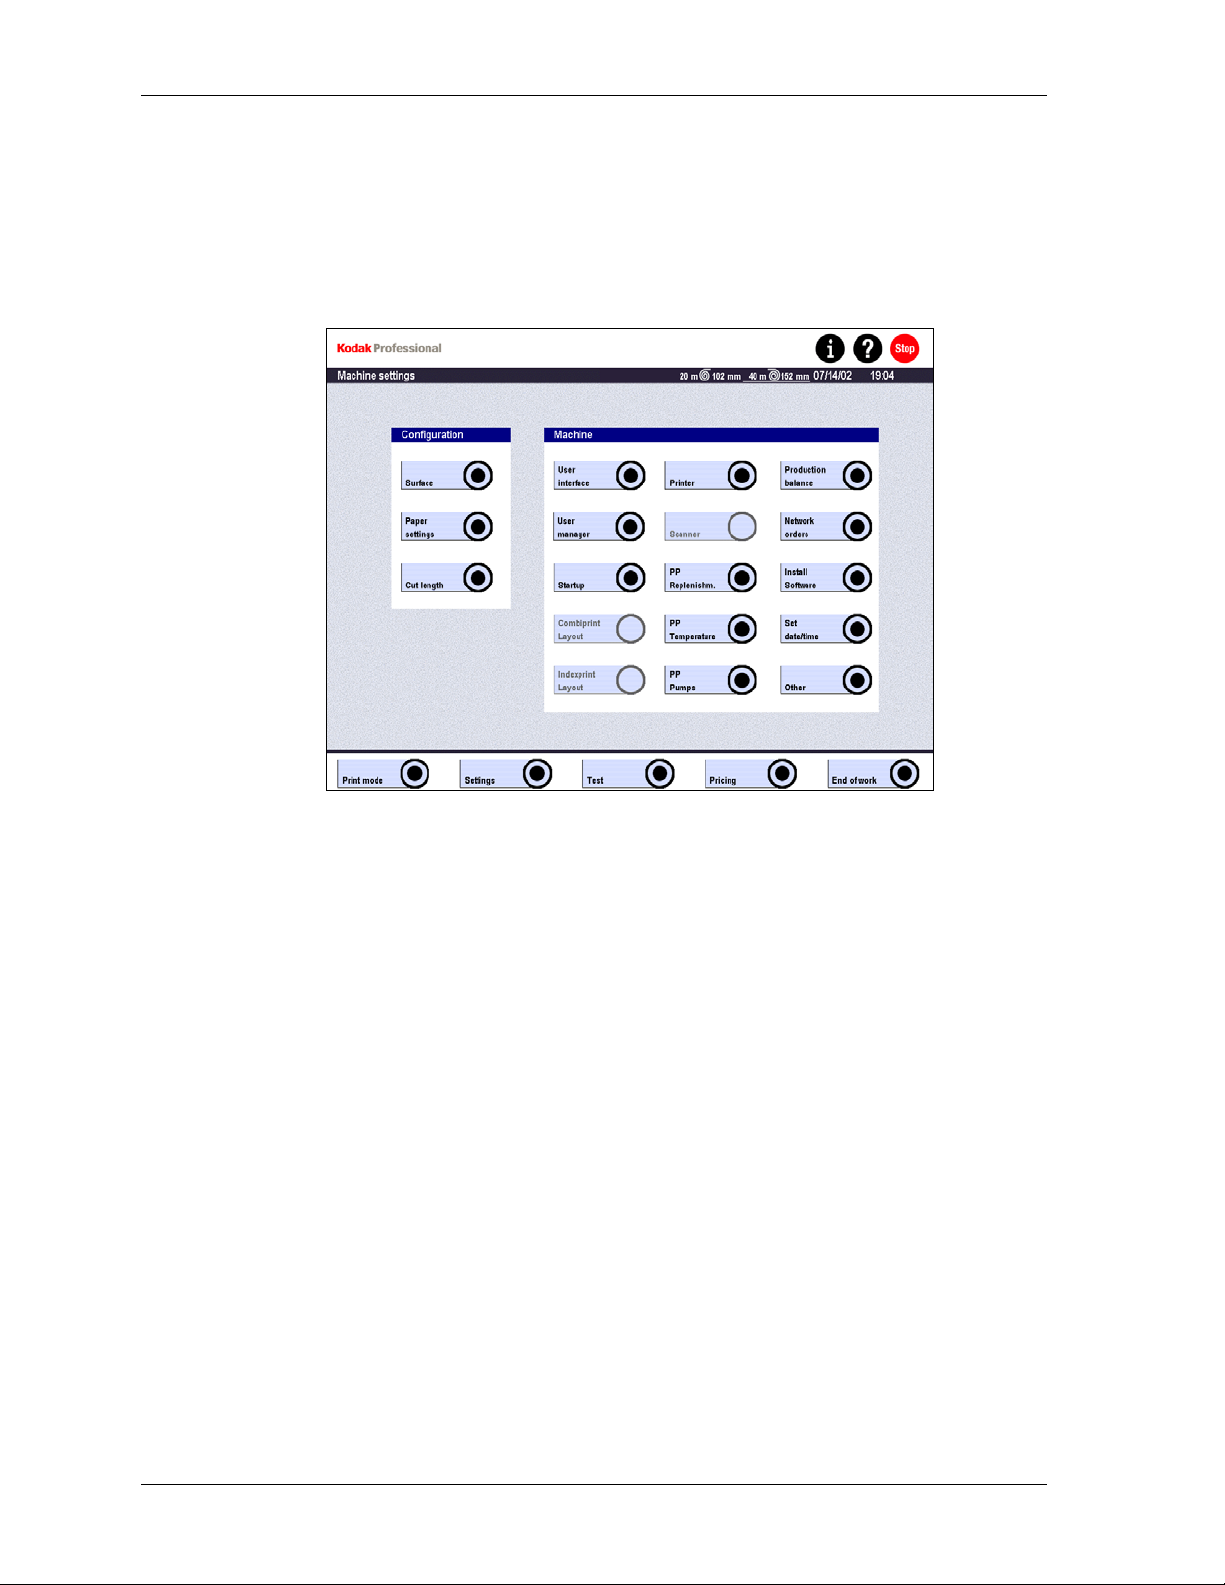
Operator’s Guide
Machine Settings
To open, touch:
• Settings
• Machine settings
The settings are divided into two sections: Configuration and Machine. This division
has an effect on Saving and Loading. The configuration settings are saved and
loaded together with the print configurations.
Configuration:
• Surface and Paper settings
Set the switches according to the paper magazine coding for the surfaces (5 and 6)
and the paper widths (1–4). (See Coding the Paper Magazine on Page 4-13.
• Cut length
Machine:
• User interface for country-specific settings such as language, keyboard, and
measurement system
• User manager to create users with name, password, and access rights
• Settings for the automatic Startup, such as workdays with start times / first user,
calendar (holidays, company holidays)
• Combiprint Layout
Importing of predefined layouts for printing multiple pictures of the same size
(passport photos) or different sizes on the same sheet of paper
• Index print Layout
Import of predefined layouts
• Settings for the Scanner, Printer, and Paper Processor (PP Replenishm.,
PP Temperature, and PP Pumps)
4-8 KODAK PROFESSIONAL SRP 30 Laser Printer
Page 84

Settings
• Production balance
Color/density corrections, surface and detail contrast, sharpness, saturation, and
TFS logic (color, density selector)
• Network orders (Digital orders)
Settings to receive and send remote orders (file print / Autosave) and network
orders
• Install Software
Updating the system software and installation of optional software components
(such as Pricing)
• Set date/time
• Other
Entry of lab name/ID for the back print, settings for the automatic end of order and
automatic order number, and settings to prevent excess prints caused by input
errors
NOTE: IP Layout Software 4.95 is provided for creating your own layouts for
Combiprints and Index prints.
Defining Surfaces
1. Touch:
• Settings
• Machine settings
• Surface
Surface XYZ
2. Touch New or select an existing configuration and touch Edit.
KODAK PROFESSIONAL SRP 30 Laser Printer 4-9
Page 85

Operator’s Guide
Surface XYZ
3. Touch PFDF surface and select from a list of standard PFDF surfaces such as
Matte, Glossy, or Lustre.
4. Touch Switches 5 and 6 to define the name of the paper surface. (See Coding
the Paper Magazine on Page 4-13).
5. Touch Save as if you are creating a new configuration, and enter a name.
Touch Save to save changes to an existing configuration.
Touch Cancel to return to the previous screen without saving.
4-10 KODAK PROFESSIONAL SRP 30 Laser Printer
Page 86

Settings
Defining Paper Settings
1. Touch:
• Settings
• Machine settings
• Paper settings
2. Touch New or select an existing configuration and touch Edit.
KODAK PROFESSIONAL SRP 30 Laser Printer 4-11
Page 87

Operator’s Guide
3. Touch Switches 1 to 4 to define the paper width. (See Coding the Paper
Magazine on Page 4-13.)
4. Touch Save as if you are creating a new configuration, and enter a name.
Touch Save to save changes to an existing configuration.
Touch Cancel to return to the previous screen without saving.
The total number of paper widths usable without modification is 16. Up to four
different surfaces can be used in the same way for all widths.
4-12 KODAK PROFESSIONAL SRP 30 Laser Printer
Page 88

Settings
Coding the Paper Magazine
White slide tabs located on the paper magazine let you code the width (1–4) and
surface (5 and 6) of the paper in use. Whenever you change paper, set the slide tabs
accordingly. The meaning of the coding is described below.
Slide tab closed (corresponds to switch setting on the SRP 30 screen)
Slide tab open (corresponds to switch setting on the SRP 30 screen)
Paper Width
3.25 inch (82 mm)
3.50 inch (89 mm)
3.75 inch (95 mm)
4.00 inch (102 mm)
4.75 inch (120 mm)
5.00 inch (127 mm)
6.00 inch (152 mm)
6.50 inch (165 mm)
7.00 inch (178 mm)
8.00 inch (203 mm)
8.25 inch (210 mm)
8.50 inch (216 mm)
10.0 inch (254 mm)
11.0 inch (279 mm)
12.0 inch (305 mm)
Width Indicators Surface Indicators
1 2 3 4 5 6
GLOSSY
MATTE
CUSTOM1
CUSTOM2
NOTE: The table shows the Kodak standard. If required, you can define a different
allocation of the switches to paper widths and surfaces. Each switch
combination can only be used once. (See Paper Configurations on Page
4-51.)
When the magazine is in place, the system automatically recognizes the paper width
and the paper surface and offers the corresponding sizes for selection in the print
menus.
KODAK PROFESSIONAL SRP 30 Laser Printer 4-13
Page 89

Operator’s Guide
Defining the Cut Lengths
1. Touch:
• Settings
• Machine settings
• Cut length
2. Touch New cut length or Delete cut length to update the list of created cut
lengths. The range is 82–305 mm (3.2–12.0 in.).
Paper width Minimum cut length Comments
<121 mm (4.75 in.) 121 mm (4.75 in.)
121–178 mm (4.75–7.00 in.) 82 mm (3.25 in.) Images are rotated
before printing
>178 mm (7.00 in.) 121 mm (4.75 in.)
3. Touch Save.
The cut lengths defined here appear in the selection boxes of the order
configurations.
4-14 KODAK PROFESSIONAL SRP 30 Laser Printer
Page 90

Settings
User Interface
1. Touch:
• Settings
• Machine settings
• User interface
2. Select the data for the user-specific settings:
• Language
German, English, French, Italian, Spanish, etc.
• Keyboard for the input screen on the touch screen
• Preview freq.
The frequency with which the Preview images advance in the Autoprint,
Reorder, and File Print modes. The fastest possible frequency is preset
(3 seconds).
• Beep Touch on/off
Acoustic feedback after a button has been touched
• Measuring system, Temperature, Decimal sign and Separator,
Time format and Date format
After language selection, the system presets the national standards
automatically. Changes are permitted. Date and time appear in the indicated
format in the timer settings and in the back print.
• a.m. / p.m.
If you select a 24-hour format for the time display, the buttons for the entry and
selection of shortcuts for morning and afternoon (a.m. / p.m.) are not
available.
• Save
Modifications become effective only after they have been saved.
KODAK PROFESSIONAL SRP 30 Laser Printer 4-15
Page 91

Operator’s Guide
User Administrator: Defining Users and User Rights
The User interface settings are needed for user-specific functions and must be in
place before users can logon to the system.
You can define any number of users, but two user types are required:
• Administrator – with user rights for all functions, except Service.
• Service – with unlimited rights for all functions.
1. Touch:
• Settings
• Machine settings
• User manager
2. Touch New or select an existing user and touch Edit.
4-16 KODAK PROFESSIONAL SRP 30 Laser Printer
Page 92

Settings
NOTE: Changes to these settings become effective only after the next user login.
tom
3. Define or change the password. (Passwords are a maximum of four digits.)
a. For a new user, touch Password.
For an existing user:
• Touch Old Password.
• Enter the existing password and touch OK.
• Touch Password.
b. Enter the new password and touch OK.
c. Touch Repeat and enter the new password again for verification.
4. Enable or disable Language, Keyboard, Preview freq., and Beep Touch.
These functions are described in the previous section. You can change the
settings for each individual user.
5. Enable or disable the user rights (buttons in the lower half of the screen). For
descriptions of the user rights, see User Profiles on Page 4-18.
6. Touch Save as if you are creating a new user. Enter a user name with a
maximum of 20 characters. Special characters ( „ / \ [ ] : ; | = + * ? < >) are not
permitted.
Touch Save to save changes for an existing user.
Touch Cancel to return to the previous screen without saving.
KODAK PROFESSIONAL SRP 30 Laser Printer 4-17
Page 93

Operator’s Guide
User Profiles
Rights Button Description
Print modes
Settings
Pricing
Test
Autoprint
Reorder
File print
Preview
Manual positioning
Network orders
Configurations
Machine settings
Edit Pricing
Test
First-time (new) orders
Reorders
Image files of an order (loaded from data media)
Autoprint, Reorder, File print with Preview
Originals that cannot be handled in Autoprint or
Reorder mode: Single frames, strips without space
detection
File print (Remote), Autosave (Remote), Network
orders from a workstation
Create or modify order configurations, including
sub-configurations
Modify Machine settings
Create or edit pricing configurations
MBL, PBL, Remote
4-18 KODAK PROFESSIONAL SRP 30 Laser Printer
Page 94

Settings
Defining Times for Startup, Shutdown, and Sleep Mode
1. Touch:
• Settings
• Machine settings
• Startup
2. Touch the buttons under the Start and Sleep mode/shutdown headings to
define the times for each day. Set to Off for off days.
• For the automatic start times, allow approximately one hour for the system to
preheat the solutions and dryer to the correct operating temperature.
• In sleep mode, most of the system components are shut down, but the main
computer remains on for checking statistics. When the main computer is
finished, it automatically shuts down at the indicated time.
3. Under the Standard Login heading:
a. Touch the top button and select the user to be logged in at the beginning of
work.
b. Enable Automatic Login to let the standard login user have automatic
access after system startup, or disable the function to require the user to
enter a password.
4. Under the No operator actions heading:
a. Touch Printer Standby after and set the number of minutes for the system
to wait between user actions before it automatically puts the printer in
standby.
b. Touch Shutdown when no action and set the number of hours/minutes
after startup for the system to wait for a user action before it automatically
shuts down. (The preset is 3 hours.)
5. Touch Edit calendar and follow the steps in Calendar: Defining Off Days on
Page 4-20.
6. Touch Save to save the settings or Cancel to return to the previous screen
without saving.
KODAK PROFESSIONAL SRP 30 Laser Printer 4-19
Page 95

Operator’s Guide
Calendar: Defining Off Days
1. Touch:
• Settings
• Machine settings
• Startup
• Edit calendar
2. Touch the arrow keys to select the month and year.
3. Touch the buttons to set work days and off days.
• Black buttons: Workdays
• Blue buttons: Off days
NOTE: The current day has a ring around the number.
4. Touch OK to save and return to the Startup settings screen. Or touch Cancel to
return without saving.
4-20 KODAK PROFESSIONAL SRP 30 Laser Printer
Page 96

Settings
Installing the Software
1. Touch:
• Settings
• Machine settings
• Install Software
2. Touch Load CD or select the software component in the list that you wish to
enable. (See Enabling the Software on Page 4-22.)
3. Touch Install.
The screen displays a safety check message asking if the machine settings were
saved on an external data medium.
a. If you answer Yes, the input screen opens.
If you answer No, the system stops the operation. Save the machine settings
before proceeding.
b. If you are loading a CD, or if you selected a software component in the list,
enter the alphanumeric enable code that you received from Kodak.
After you install or enable the software, the system performs an automatic
restart. After the restart, the buttons pertaining to the new software functions are
accessible.
If the equipment does not function correctly after the new start, touch Preversion
(previous version) to restore the software to the configuration before the update.
KODAK PROFESSIONAL SRP 30 Laser Printer 4-21
Page 97

Operator’s Guide
Enabling the Software
Some optional programs are available in the main software and are enabled when
purchased:
• Pricing
• Saving statistics
• Index print layouts
• Combiprint layouts to print Combiprints and passport photos
Follow these steps to enable the optional programs:
1. Touch:
• i
• Version Info
2. Find the option program’s license ID in the bottom left area of the screen.
3. Contact Kodak and order the option. Indicate the license ID. Kodak will provide
you with an alphanumeric enable code.
4. Install the software as described in Installing the Software on Page 4-21.
4-22 KODAK PROFESSIONAL SRP 30 Laser Printer
Page 98

Settings
Importing a Combiprint Layout
In addition to the standard Combiprint layouts available on the printer, you can create
customized layouts using the layout software provided by Kodak. A licen se key is
required to import these customized layouts. (See Enabling the Software on Page
4-22.)
To import Combiprint layouts:
1. Touch:
• Settings
• Machine settings
• Combiprint Layout
2. Touch Film mask and make a selection.
The file extension of the layout patterns is .pas.
Only the layout files appropriate for the selected film mask appear in the list. You
can see all of the available layout files by selecting No filter.
3. Select a Drive (and in the next screen, a Folder, if needed) in which to store the
layout files.
4. Touch the arrow buttons to transfer single files (single arrow) or all files (double
arrow) to the selection list.
5. Touch OK to import the selected layout files.
To remove an unwanted layout file, select the file and touch Delete.
KODAK PROFESSIONAL SRP 30 Laser Printer 4-23
Page 99

Operator’s Guide
Importing an Index Print Layout
In addition to the standard Index print layouts available on the printer, you can create
customized layouts using the layout software provided by Kodak. A license key is
required to import these customized layouts. (See Enabling the Software on Page
4-22.)
To import Index print layouts:
1. Touch:
• Settings
• Machine settings
• Index print layout
2. Touch Film mask and make a selection.
The file extensions of the layout patterns are based on the film mask (for
example, .135 or .240).
Only the layout files appropriate for the selected film mask appear in the list. You
can see all of the available layout files by selecting No filter.
3. Select a Drive (and in the next screen, a Folder, if needed) in which to store the
layout files.
4. Touch the arrow buttons to transfer single files (single arrow) or all files (double
arrow) to the selection list.
5. Touch OK to import the selected layout files.
To remove an unwanted layout file, select the file and touch Delete.
4-24 KODAK PROFESSIONAL SRP 30 Laser Printer
Page 100

Settings
Printer Settings
1. Touch:
• Settings
• Machine settings
• Printer
2. Touch the following buttons to define the printer settings:
• Overlapping
Indicate the percentage by which the digitized image will overlap the exposed
paper. The range is 0 to 10%.
• Master Paper
Define the paper used most frequently as the Master paper. The MBL (Master
Balance) is performed on this paper.
• Auto-MBL
Enable or disable.
• MBL max. rep.
When Auto-MBL is enabled, enter how often the system should automatically
repeat the MBL test if the result is not within tolerance. The range is 1 to 10.
• PBL max. rep.
Enter how often the system should automatically repeat the PBL (Paper
Balance) test if the result is not within tolerance. The range is 1 to 10.
3. Touch Save to save the settings or Cancel to return to the previous screen
without saving.
KODAK PROFESSIONAL SRP 30 Laser Printer 4-25
 Loading...