

Page 1

KODAK SMILE
INSTANT PRINT DIGITAL CAMERA
Appareil photo numérique à impression instantanée
Fotocamera digitale a stampa istantanea
Cámara digital con impresión instantánea
Digitale Sofortdruckkamera
User Guide
Guide de l'utilisateur
Guida utente
Benutzerhandbuch
Guía del usuario
Page 2

TABLE OF CONTENTS
TABLE DES MATIÈRES INDICE INHALTSVERZEICHNIS TABLA DE CONTENIDO
English
Français
4
32
Deutsche
Español
92
124
Italiana
2 | EN EN | 3
62
Page 3

INTRODUCTION
Thank you for purchasing the KODAK SMILE
Instant Print Digital Camera. This User Guide
is intended to provide you with guidelines
to ensure that operation of this product is
safe and does not pose risk to the user. Any
use that does not conform to the guidelines
described in this User Guide may void the
limited warranty.
Please read all directions before using the
product and retain this guide for reference.
This product is intended for household use
only. It is not intended for commercial use.
4 | EN EN | 5
This product is covered by a limited one-year
warranty. Coverage is subject to limits and
exclusions. See warranty for details.
SPECIFICATIONS
• Dimensions: 4.875 L x 3.125 W x 0.938 H
(12.35 x 8 x 2.5 cm)
• Weight: 7.2 oz (204 g)
• Colors Available: Black/White, White/
Yellow, Blue, Green, Red
• Supported Storage: MicroSD™ cards up to
256GB
• Images: 10MP equivalent
• Battery Capacity: 700mAh
• Battery Type: Lithium-polymer
• Prints Per Charge: ~40
• Supported Photo Paper: KODAK ZINK 2 x
3 sticky-back photo paper
BOX CONTENTS
KODAK SMILE Instant Digital Camera
Charging Cable
Starter Pack of KODAK ZINK Paper
User Guide
SAFETY PRECAUTIONS
• Seizure warning: This device repeatedly
utilizes lashing LED lights which may
potentially trigger seizures for people
with photosensitive epilepsy and/or
other seizure disorders. User discretion is
advised.
• Do not attempt to disassemble this device
for any reason.
• Never leave your camera or the ZINK®
paper in an area that might become
extremely hot or where it will be exposed
to direct sunlight for a long time. This can
cause your camera to overheat or suer
other problems.
• Never handle the camera with damp or wet
hands. This could damage the camera or
Page 4

create the risk of electric shock.
• Do not use products such as alcohol,
gasoline, diluent, or any other organic
solvent when cleaning or attempting to
clean this product.
can fall or be pulled into a tub or sink.
• Do not place, drop, or submerge the
camera in water or any other liquid.
• Take care that objects do not fall and
liquids are not spilled onto the camera.
PRODUCT OVERVIEW
Flash
• Do not use this device in an environment
where it will be exposed to heavy dust or
humidity/moisture.
Cover
panel
Paper exit
• Never drop or shake the camera, as
this could cause it to malfunction or
permanently damage the inside parts.
• Do not use this camera while bathing or in
a showe r.
• Do not place or store the camera where it
6 | EN EN | 7
Camera lens
Page 5
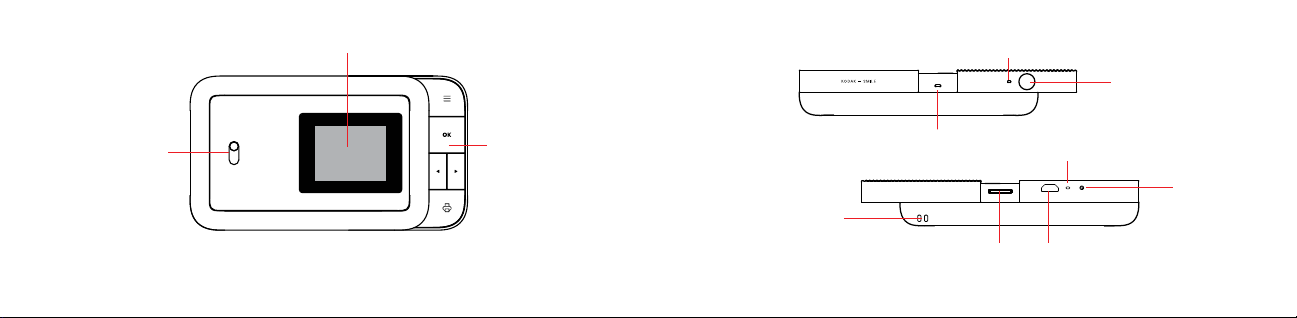
Viewing screen
Power indicator
LED
Shutter
button
Paper
tray door
release
8 | EN EN | 9
Navigation
panel
Lanyard
attachment
Speaker
MicroSD™
card slot
Charging
indicator LED
Micro USB
charging port
Reset
button
Page 6

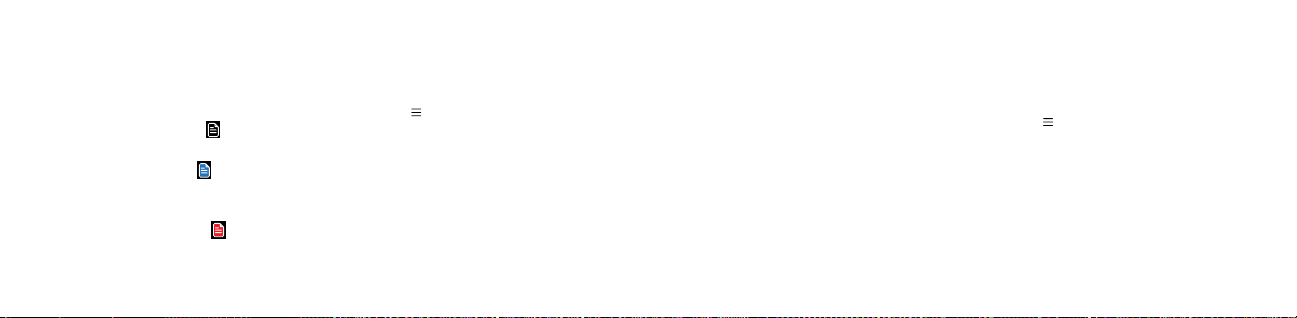
NAVIGATION PANEL OVERVIEW
Buttons:
: Pressing this button will take you to the main menu,
Menu
from which you can access the gallery, ilter, border, photobooth,
lash, and settings menus. The menu button also works as a back
button. Press it from any screen to go back by one screen. Pressing it while on the main menu will return you to the live viewinder.
OK: Press this button to conirm a choice or take a picture. In
certain scenarios, the OK button will also operate as a function
button (e.g., right after taking a picture, pressing the OK button
will take you to the edit screen).
: Use these arrow keys to navigate between options in menus,
10 | EN EN | 11
as well as between photos in the gallery.
: Press this button while viewing a
Print
photo to be taken to the print menu to begin
the process of printing your picture.
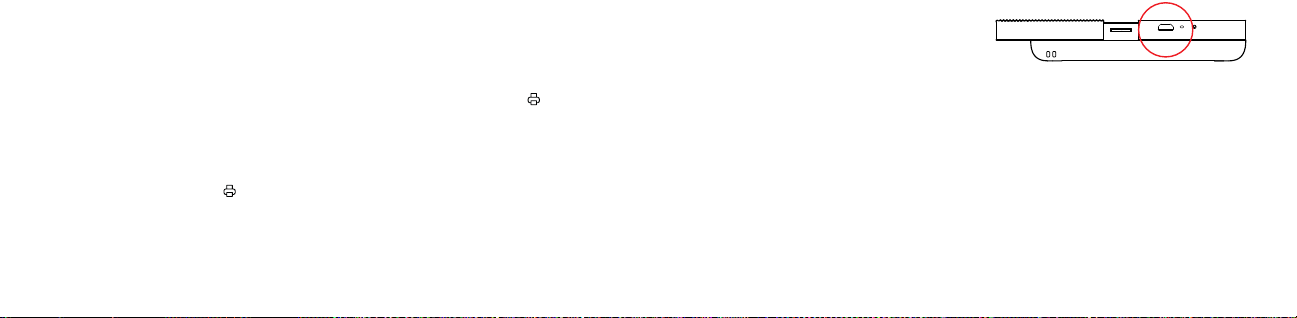
GETTING READY FOR USE
Charge the SMILE
Before using the camera, connect it to the
charger by plugging the micro USB cable
into the designated micro USB charging port
on the bottom and allow it to fully charge.
Always use the original charger that was
provided to ensure proper charging.
If the red indicator LED light is lashing, this
means that the battery is low and you should
plug the camera in for it to recharge. While
the camera is charging, the indicator LED will
be a solid red light. Once the process has
completed, the indicator LED will change to
a solid green light.
Load the Paper
Load your ZINK® paper into the camera:
Follow the steps below to quickly and easily
get your new camera loaded with ZINK®
sticky-back paper so you can start printing
Page 7

photos!
1. Open the paper tray in the back by
pressing down on the latch and pulling it
toward you.
glossy side to prevent getting ingerprints
on the paper.
3. When you print your irst photo after loading
the ZINK® paper, the blue calibration sheet
will be slowly ejected from the printing slot.
4. Your photo will print after the calibration
sheet inishes.
2. Place the blue calibration sheet in the tray
with the barcode facing down. Place the
other plain sheets on top, with the glossy
side facing you. Try to avoid touching the
12 | EN EN | 13
Note: Only KODAK ZINK paper will work
in your KODAK SMILE camera. Other
branded papers are not compatible.
Power it On/O
To turn the camera on, slide the ridged panel
away from the center. This will expose the
navigation panel, camera lens, and lash, and
the LCD screen on the back will light up. The
camera will also beep a musical tune to let you
know it is powered on.
To turn the camera o, simply slide the panel
back toward the center.
Insert a MicroSD™ Card
Page 8

The camera has limited internal memory
and can only store three photos at a time; a
The SMILE supports microSD™ cards up to
256GB.
microSD™ card is necessary if you wish to
edit and save more than three photos to print
out later. The SMILE can per form without
a microSD™ card, but using one is strongly
recommended.
Insert the microSD™ card into the slot at the
bottom when the camera lens is exposed, with
the metal pins facing the front of the camera.
To remove, press the card in gently with your
ingernail, and it should pop out.
14 | EN EN | 15
NAVIGATING THE MENU
There are six options on the KODAK SMILE
Camera menu, which is accessed by
pressing the top button on the navigation
and using the arrow keys to move
panel
between options. This section will review
those options and their usage.
GALLERY
Select the Gallery
menu to view your photos. From the Gallery
icon from the main
you can edit and print any photos you’ve
previously taken with your SMILE camera,
or any existing images already on your
microSD™ card.
After selecting Gallery from the main menu,
you will need to choose between photos
stored in internal memory and the SD card.
Make your selection, then use the arrow keys
to cycle through the photos you’ve taken.
The pictures will have two options at the
bottom: EDIT, and PRINT.
Press the OK button to enter the EDIT menu,
which will give you three options: ilter
,
border
, and delete . Select Filter to
pick between ilter options for your photo.
Select Border
to add a white border to
your photo, or keep it borderless. Select
and you will be prompted one more
Delete
time to be certain you want to delete the
photo. Hit OK to delete the photo from your
SD card.
Hit PRINT at any time to print the photo as
is from your gallery. You will be asked to
conirm by hitting the OK button before the
photo prints out.
NOTE: Without a microSD™ card, the camera
Page 9

can only save the 3 most recent photos that
were taken. We highly recommend using a
microSD™ card to get the most out of your
KODAK SMILE Camera.
FI LTER
The Filter
menu oers a variety of ilters
to choose from that will be applied to your
photo. Press the OK button and then use the
arrows to navigate through the ilters
available. The LCD screen will give you a live
preview of that ilter; press the OK button
again to conirm and apply the ilter.
BORDERS
The Borders
menu oers the option to add
a border to your photo. Press the OK button
to open the Borders menu.
The Borders menu gives you two options to
choose from: O and On.
• O: a photo with no border. If you choose
this option, you’ll be taken back to the live
viewinder.
• On: a photo with a border. If you choose
this, you’ll be taken to the live viewinder
with a solid white border around the image. There will be an icon on the bottom
16 | EN EN | 17
right side of the status bar in the live
viewinder to indicate your border status
as well. The border will stay applied until
you manually re-enter the border menu
and deactivate it, or until you turn the
camera o.
PHOTOBOOTH
The Photobooth
menu allows you to print
out two photos side-by-side in the same
image.
• The live viewinder will give you guide-
lines to make sure your image its within
the space allotted, and there will be an
icon on the bottom right side of the status
bar in the live viewinder to indicate booth
mode status.
• Tap the shutter button once and you’ll see
guidelines for you to take your irst shot
on the screen. For the second shot, the
other side of the screen will be active, and
the irst image you captured will be visible
on the left side of the image.
• The camera will stay in photobooth mode
until you return to the border menu and
deactivate it, or until you turn the camera
o, so you can take as many photobooth
Page 10

style shots as you want!
FLASH
Use the arrows to highlight the Flash icon
and press the OK button to open the Flash
menu.
Use the arrows to cycle through the options:
Flash On
, Flash O , and Auto Flash .
SETTINGS
The Settings
menu allows you to access
and adjust multiple camera settings. The
options available in the settings menu are
as follows:
18 | EN EN | 19
TIMER
Select the Timer
menu to set a timer for your next picture
(great for selies and group shots!) Choose
icon from the settings
from timer settings of o, three (3) seconds,
or ten (10) seconds. When you take a photo
with the timer applied, the camera lash will
blink once each second as a countdown.
The timer will remain applied until you
manually re-enter the timer menu and turn
it o, or until you turn the camera o, so take
as many timed shots as you want!
VOLUME
Select the Volume
icon from the settings
menu to open the volume menu. Use the
arrow keys to raise and lower the volume
of key presses and the shutter sound when
taking a picture.
AUTOPRINT
Select the Auto-Print
icon from the
settings menu to turn auto-print on or o.
If auto-print is turned on, your pictures will
print out immediately after being taken. The
option will stay enabled until you disable it
from this menu.
LANGUAGE
Select the Language
icon from the
settings menu to change the language
displayed on your camera. You may
choose from English, Spanish, and German
language options.
PRODUCT INFO
Select the Product Info
icon from the
settings menu to view information about
your camera. The irmware version, serial
number, and color table version will all be
displayed here. You can press the menu
button to exit this page and return to the
Page 11

settings menu.
THE LIVE VIEWFINDER AND
STATUS BAR
The main screen of the live viewinder will
show a live feed of the image as it will be
captured (including ilters or a border) once
you press the shutter button. The status bar
at the bottom will display various icons as
well, depending on the options you have
selected and other factors:
1. Battery: the battery icon is ixed in the
bottom left corner of the status bar, and
20 | EN EN | 21
displays four bars or less depending on
its charge status.
a. White icon with four bars displayed
b. White icon with three bars displayed
c. White icon with two bars displayed
d. White icon with one bar displayed
battery is 625% charged.
e. Red blinking icon
charge or less remaining. Charge
: battery is 76100% charged.
: battery is 5175% charged.
: battery is 2650% charged.
: battery has 5%
ASAP.
2. Flash status:
a. Lightning with an A next to it
set to automatic
b. Lightning by itself
all photos
c. Lightning with a slash through it
:
lash turned o for all photos
3. microSD™ card status:
a. microSD™ card icon
is inserted
4. Timer status: if the timer icon
: lash turned on for
: lash
: microSD™ card
appears
in the status bar, there is a timer applied
to your photos, meaning there will be a
delay between when you press the
shutter and when the photo is captured.
The camera lash light will blink in a
countdown when the shutter button is
pressed.
:
5. Border status:
a. Border icon
applied, and should be visible on the
live viewinder.
6. Photobooth status:
a. Photobooth icon
: a border has been
: the camera is in
Page 12

photobooth mode (two photos side-by side). Guidelines in the viewinder will
help you line up your photobooth shot.
7. Auto Print status:
a. Auto Print icon
has been activated, and your camera
will immediately print an image after
capturing it.
8. Tray status:
a. Icon with black background
currently loaded in camera
b. Icon with blue background
22 | EN EN | 23
: auto print mode
: paper
: paper
loaded with blue calibration sheet
ready to print
c. Icon with red background
loaded
: no paper
TAKING A PICTURE
1. Power the camera on by sliding the ridged
panel away from the center and exposing
the navigation panel.
2. Click the
menu.
3. Use the arrows to go through the main
menu options and choose your ilters,
button to access the main
lash and general camera settings, and
the options for a border, or photobooth
mode. Or, choose none of those and just
proceed with the default settings.
4. Line up your shot (or shots) in the live
viewinder.
5. When you’re ready, press the yellow
shutter button to capture your picture, or
press the OK button on the navigation
panel.
6. After you take the picture, the image
you’ve captured will appear on the screen
with two options at the bottom: Edit, and
Print. If you press the OK button to edit,
you’ll be taken to a screen to add a ilter
or border to the picture and then have
the option to print or delete it. If you press
Print, you’ll be able to print the photo
immediately. If you want to return to the
live viewinder, press the shutter button
once, or press the
PRINTING A PICTURE
From Gallery
1. Select Gallery from the main menu and
press the OK button.
button.
Page 13

2. Use the arrows to choose either internal
memory or microSD™ card, then press
the OK button.
3. Use the arrows to ind the photo you want
to print.
4. OPTIONAL: To edit the photo further
press the OK button, and then use the
arrows to select ilter (add a ilter), and/or
border (add a border).
5. Press the print
6. Use the arrow keys to increase/decrease
the number of copies to print out.
24 | EN EN | 25
button.
7. Press the OK button to conirm.
8. Wait for the photo(s) to print.
After Taking a Photo
1. Press the Print
2. Use the arrow keys to increase/decrease
the number of copies to print out.
3. Press OK to conirm.
4. Wait for the photo to print.
button.
TRANSFER PHOTOS TO
YOUR COMPUTER
If you have a microSD™ card installed in
your KODAK SMILE camera, you can easily
download and view higher-resolution copies
of your photos from any laptop or personal
computer. Follow these steps to access
and save your photos from your computer/
laptop.
1. Plug the USB connector end of your
charging cable into any USB port on your
computer (or laptop). Plug the micro USB
connector into the charging port of your
camera.
2. Slide open the camera to power it on.
3. The irst time you connect your camera, it
will take a few minutes to automatically
download the drivers and recognize the
camera as an external storage device. Do
not disconnect your camera during this
process.
4. After the camera is plugged in and drivers
have been installed, you can access the
Page 14

pictures you’ve taken by going to your
computer’s menu and viewing it as an
external storage device (usually defaults
to E:\). You will see a folder called DCIM,
and inside that folder will be another
folder called SMILE_CAM. This is where
device” to prevent any issues with your
microSD™ card.
NOTE: Please note that while the camera
is plugged into the computer, you will not
be able to use it to take or edit photos on
the microSD™ card.
you will ind copies of all your photos.
5. Have fun with viewing, editing, printing,
and/or posting these higher-resolution
versions of your KODAK SMILE photos
from your computer!
6. When you’re inished, be sure to choose
the option to “eject removable storage
26 | EN EN | 27
FIRMWARE UPDATES
From time to time, we will release updates
that will improve the quality and/or
performance of the software on your KODAK
SMILE camera. Follow these instructions to
download and install those updates.
1. Visit our website at www.kodakphotoplus.
com/pages/Kodak-Smile-Series and look
for your camera, the KODAK SMILE
Instant Print Digital Camera.
2. If the site has a irmware update available,
download the ile and save it to a location
you will remember.
3. Connect the camera to your computer
via the micro USB cable.
4. Visit the location where you saved the
irmware update ile, and run the update
program (will end in .exe).
5. The update should detect the installed
camera, but if it asks, direct it to the
removable storage location of the
camera (usually defaults to E:\).
6. Do not disconnect the camera while the
update installs.
7. When inished, make sure to choose the
option to “eject removable storage
device” to prevent any issues with your
camera.
Page 15

WARRANTY INFORMATION
LIMITED WARR ANTY ON KODAK SMILE INSTANT
PRINT DIGITAL CAMERA
THIS LIM ITED WARRANTY GIVES YOU SPECIFIC
LEGAL RIGHTS A ND YOU MAY ALSO HAVE
OTHER RIGHTS, WHICH VARY FROM STATE TO
STATE.
WE WARRANT THAT DURING THE WARRANTY
PERIOD, TH E PRODUCT WILL BE FREE F ROM
DEFECTS IN MATERIALS AN D WORKMANSHIP.
LIMITATION OF LIABILITY
TO THE EXTEN T NOT PROHIB ITED BY LAW,
THIS WARR ANTY IS EXCLUSIVE AND IN LIEU
28 | EN EN | 29
OF ALL OTHER WARR ANTIES, ORAL, WRITTEN,
STAT UTORY, EXPRESS OR I MPLIED. EXCEPT
FOR THE EXPRESS WARRANTIES CONTAINED
IN THIS LIMITED WARRANTY STATEMENT
AND TO THE EX TENT NOT PROHIBITED BY
LAW, WE DISCL AIM ALL OTHER WARRANTIES,
EXPRESS ED OR IMPLIED, STATUTORY OR
OTHERWISE, INCLUDING WITHOUT LIMITATION,
THE WARRANTIES OF MERCHANTABILITY AND
FITNESS FOR A PARTICULA R PURPOSE. SOM E
STAT ES DO NOT ALLOW DISCLAIMERS OF
IMPLIED WARR ANTIES, SO THIS D ISCLAIMER
MAY NOT APPLY TO YOU. TO TH E EXTENT
SUCH WARR ANTIES CANNOT BE DIS CLAIMED
UNDER THE LAWS OF YOUR J URISDICTIO N,
WE LIMIT TH E DURATION AND REMED IES OF
SUCH WARR ANTIES TO THE DURATION O F THIS
EXPRESS LIMITED WARR ANTY.
OUR RESP ONSIBILIT Y FOR DEFECTIVE GOODS
IS LIMITED TO REPAIR, REPLAC EMENT OR
REFUND AS DESCRIB ED BELOW IN THIS
WARRANTY STATEMENT.
WHO MAY USE THIS WARR ANTY? C&A
Marketing, I nc. located at 114 Tived La ne East,
Edison, NJ (“we”) extend thi s limited warranty
only to the consumer wh o originally purchas ed
the product (“you”). It doe s not extend to any
subseq uent owner or other transferee of the
product.
WHAT DOES THI S WARRANT Y COVER? This
limited warranty covers defects in materia ls and
workmanship of the KODAK SMILE Instant Digital
Camera (the “product”) for th e Warranty Period as
deined below.
WHAT DOES THI S WARRANT Y NOT COVER?
This limited warranty do es not cover any damage
due to: (a) transportation; (b) storage; (c) improper
use; (d) failure to follow the product i nstructions
or to perform any preventive maintenance; (e)
modiications; (f) unauthorized repair; (g) normal
wear and tear; or (h) external causes such as
accide nts, abuse, or other actions or eve nts
beyond our reasonable control.
WHAT IS THE PERI OD OF COVERAGE? This
limited warranty starts on the date of your
purchase a nd lasts for one year (the “ Warranty
Page 16

Period” ). The Warranty Period is not extended i f
we repair or rep lace the product. We may change
the availability of this li mited warranty at our
discretio n, but any changes will n ot be retroactive.
WHAT ARE YOUR REMED IES UNDER THI S
WARRANTY? With respect to any de fective
product during the Warrant y Period, we will, at our
sole dis cretion, either: (a) repair or replac e such
product (or the d efective part) free of cha rge or
(b) refund the purchase pric e of such product if
an exchange u nit cannot be provide d.
HOW DO YOU OBTAIN WARR ANTY SERVICE ?
To obtain warranty se rvice, you must co ntact us at
844516 1 539 or by email at kodak@ camarketing.
com durin g the Warranty Period to obtai n a
30 | EN EN | 31
Defective Merchandise Authorization (“DMA”)
number. No warranty serv ice will be provided
without a DMA number a nd return shipping
costs to our facilities shall be assumed by you, th e
purchase r. Shipping costs of the repl acement unit
to you shall be assumed by u s.
CUSTOMER SERVICE CONTACT
INFORMATION
Should you experience any problems with your
product, p lease contact us b efore returning the
item to the plac e of purchase. WE’RE HERE TO
HELP!
U.S. Supp ort:
kodak@camarketing.com
8445161539
International Support:
kodakintl@camarketing.com
8445161540
kodakphotoplus.com
The Kodak trademark, logo, and trade dress are used
under license from Eastman Kodak Company.
Android is a trademark of Google Inc.
IOS is a trademark of Cisco in the U.S. and other
countries and is used under license.
All other products, brand names, company names, and
logos are trademarks of their respective owners, used
merely to identify their respective products, and are
not meant to connote any sponsorship, endorsement
or approval.
Distributed by: C&A Marketing, Inc., 114 Tived Lane East,
Edison, NJ 08837, USA
C&A Marketing UK LTD, 167 Hermitage Road, Crusader
Industrial Estate, London N4 1LZ, UK
©2019. All Rights Reserved. Made in Vietnam.
Page 17

INTRODUCTION
Merci d'avoir acheté l'appareil photo
numpérique à impression instantanée
KODAK SMILE. Ce manuel d'utilisation a
pour but de vous fournir des indications
ain d'utiliser ce produit de manière sûre et
pour qu'il ne présente aucun risque pour
l'utilisateur. Toute utilisation non conforme
aux indications décrites dans ce manuel
d'utilisation peut annuler la garantie limitée.
Veuillez lire toutes les instructions avant
d'utiliser le produit et conserver ce guide
pour référence. Ce produit est destiné à un
32 | FR FR | 33
usage domestique uniquement. Il n'est pas
destiné à un usage commercial.
Ce produit est couvert par une garantie
limitée d'un an. La garantie est sujette à des
limites et à des exclusions. Voir la garantie
pour plus de détails.
CARACTÉRISTIQUES TECHNIQUES
• Dimensions : L 12,35cm x l 8cm x H 2,5cm
(4,875" x 3,125" x 0,938")
• Poids : 204 g (7,2 oz)
• Couleurs disponibles : Noir/Blanc, Blanc/
Jaune, Bleu, Vert, Rouge
• Cartes mémoire compatibles : Cartes
MicroSD™ jusqu'à 256 Go
• Images : Équivalent 10 mégapixels
• Capacité de la batterie : 700 mAh
• Type de batterie : Lithium-polymère
• Photos par recharge : ~ 40
• Papier photo compatible : Papier photo
adhésif KODAK ZINK 2 x 3
CONTENU DE LA BOÎTE
Appareil photo numérique instantané KODAK
SMILE
Câble de recharge
Kit de démarrage de papier photo KODAK ZINK
Manuel d'utilisation
PRÉCAUTIONS DE SÉCURITÉ
• Avertissement contre les troubles convulsifs
: Cet appareil utilise de façon répétée des
voyants LED clignotants qui peuvent potentiellement déclencher des crises chez les personnes sourant d'épilepsie photosensible
ou d'autres troubles convulsifs. La discrétion
de l'utilisateur est conseillée.
• N'essayez pas de démonter cet appareil pour
quelque raison que ce soit.
• Ne laissez jamais votre appareil photo ou le
papier ZINK® dans un endroit qui pourrait
devenir extrêmement chaud ou exposé à la
lumière directe du soleil pendant une longue
période. Cela peut entraîner une surchaue
de votre appareil photo ou causer d'autres
Page 18

problèmes.
• Ne manipulez jamais l'appareil photo avec
des mains humides ou mouillées. Cela pourrait endommager l'appareil photo ou créer un
risque de choc électrique.
• N'utilisez pas de produits tels que de l'alcool,
de l'essence, un diluant ou tout autre solvant
organique lorsque vous nettoyez ou essayez
de nettoyer ce produit.
• N'utilisez pas cet appareil dans un environnement où il sera exposé à beaucoup de
poussière ou à l'humidité.
• Ne laissez jamais tomber et ne secouez
jamais l'appareil photo, car cela pourrait
entraîner un dysfonctionnement ou endom-
34 | FR FR | 35
mager de façon permanente les parties
internes.
• N'utilisez pas cet appareil photo pendant le
bain ou sous la douche.
• Ne placez pas ou ne rangez pas l'appareil
photo dans un endroit où il pourrait tomber
ou être tiré dans une baignoire ou un évier.
• Ne placez pas, ne laissez pas tomber ou ne
plongez pas l'appareil photo dans l'eau ou
tout autre liquide.
• Veillez à ce qu'aucun objet ne tombe sur
l'appareil et qu'aucun liquide ne soit renversé
dessus.
APERÇU DU PRODUIT
Protection
Flash
Sortie papier
Objectif de l'appareil photo
Page 19

Voyant
d'alimentation
Bouton de
l'obturateur
Ouverture de
la réserve de
papier
Panneau de
navigation
Attache de la
bandoulière
Écran de visualisation
36 | FR FR | 37
Haut-
parleur
Fente pour la
carte MicroSD™
Voyant de
charge
Port de recharge
Micro USB
Bouton de
réinitialisation
Page 20

APERÇU DU PANNEAU DE NAVIGATION
Boutons :
Menu
: En appuyant sur ce bouton, vous accéderez au menu
principal à partir duquel vous pourrez accéder aux menus Galerie,
Filtre, Cadre, Photobooth, Flash et Paramètres. La touche Menu sert
également de touche Retour. Appuyez sur cette touche à partir de
n'importe quel écran pour revenir à l'écran précédent. Appuyez sur
cette touche pendant que vous êtes dans le menu principal pour
revenir au viseur en direct.
OK : Appuyez sur cette touche pour conirmer un choix ou prendre
une photo. Dans certains scénarios, le bouton OK fonctionnera
également comme bouton de fonction (par exemple, juste après
avoir pris une photo, un appui sur le bouton OK vous amènera sur
l'écran d'édition).
38 | FR FR | 39
: Utilisez les touches de lèches pour
naviguer entre les options dans les menus et
entre les photos dans la galerie.
Impression
pendant l'aichage d'une photo à prendre
dans le menu d'impression pour commencer
le processus d'impression de votre photo.
: Appuyez sur ce bouton
POUR DÉMARRER L'UTILISATION
Charger le SMILE
Avant d'utiliser l'appareil photo, branchez-le en
connectant le câble micro USB dans le port de
chargement micro USB prévu à cet eet au bas
de l'appreil et laissez-le se charger complète-
ment. Utilisez toujours le chargeur d'origine
fourni pour assurer une charge optimale.
Si le voyant LED rouge clignote, cela signiie
que la batterie est faible et que vous devez
brancher l'appareil photo pour qu'il se
recharge. Pendant le chargement de l'appareil
photo, le voyant LED s'allume en rouge ixe.
Une fois le processus terminé, le voyant LED
passe au vert ixe.
Charger le papier
Insérez le papier photo ZINK® dans l'appareil
photo : Suivez les étapes ci-dessous pour
charger rapidement et facilement votre nouvel
Page 21

appareil photo avec du papier adhésif ZINK®
pour commencer à imprimer des photos !
1. Ouvrez le bac à papier à l'arrière en appuyant sur le loquet et en le tirant vers vous.
le côté brillant pour ne pas laisser d'empreintes digitales sur le papier.
3. Lorsque vous imprimerez votre première
photo après avoir chargé le papier ZINK®,
la feuille de calibrage bleue sera lentement
éjectée de la fente d'impression. .
4. Votre photo sera imprimée une fois la feuille
de calibrage terminée.
2. Placez la feuille de calibrage bleue dans le
bac avec le code-barres orienté vers le bas.
Placez les autres feuilles unies sur le dessus,
le côté brillant vers vous. Évitez de toucher
40 | FR FR | 41
Remarque : Seul le papier ZINK de KODAK
fonctionnera avec votre appareil photos
SMILE. Les papiers d'autres marques ne
sont pas compatibles.
Allumer/Éteindre
Pour mettre l'appareil sous tension, éloignez le
panneau rainuré du centre. Cela dévoilera alors
l'écran de navigation, l'objectif de l'appareil
photo et le lash, et l'écran LCD à l'arrière s'allume. L'appareil émet également un bip sonore
pour vous indiquer qu'il est allumé.
Pour éteindre l'appareil, faites simplement
glisser le panneau vers le centre.
Insérez une carte MicroSD™
L'appareil photo possède une mémoire interne
limitée et ne peut stocker que trois photos à
la fois. Une carte microSD™ est nécessaire si
vous souhaitez modiier et enregistrer plus
de trois photos pour les imprimer ultérieurement. Le SMILE peut fonctionner sans carte
microSD™, mais son utilisation est fortement
recommandée.
Insérez la carte microSD™ dans la fente en bas
Page 22

lorsque l'objectif de l'appareil photo est ouvert,
avec les broches métalliques vers l'avant
de l'appareil. Pour retirer la carte, appuyez
doucement sur la carte avec votre ongle et elle
devrait sortir.
Le SMILE est compatible avec les cartes
microSD™ jusqu'à 256 Go.
NAVIGATION DANS LE MENU
Le menu de l'appareil photo KODAK SMILE
comporte six options auxquelles vous pouvez
accéder en appuyant sur le bouton supérieur
du panneau de navigation
42 | FR FR | 43
et en utilisant
les lèches pour passer d'une option à l'autre.
Cette section détaille ces options et leur
utilisation.
GALERIE
Sélectionnez l'icône Galerie
dans le menu
principal pour aicher vos photos. Dans la
Galerie, vous pouvez éditer et imprimer toutes
les photos que vous avez déjà prises avec votre
appareil photo SMILE, ou toutes les images
déjà existantes sur votre carte microSD™.
Après avoir sélectionné Galerie dans le menu
principal, vous devrez choisir entre les photos
stockées dans la mémoire interne et sur la
carte SD. Faites votre sélection, puis utilisez les
lèches pour faire déiler les photos que vous
avez prises. Vous verrez deux options en bas
des photos : MODIFIER et IMPRIMER.
APPUYEZ SUR LE BOUTON OK POUR OUVRIR
LE MENU ÉDITION. TROIS OPTIONS SERONT
DISPONIBLES : iltre
suppression
. Sélectionnez Filtre tpour
, cadre , et
choisir parmi les options de iltre de votre
photo. Sélectionnez Cadre
pour ajouter un
cadre blanc à votre photo ou pour la laisser
sans cadre. Sélectionnez Suppression
et
vous serez invité à conirmer la suppression
déinitive de la photo. Appuyez sur OK pour
supprimer la photo de votre carte SD.
Appuyez sur IMPRIMER à tout moment pour
imprimer la photo telle quelle dans votre
galerie. Il vous sera demandé de conirmer en
appuyant sur le bouton OK avant l'impression
de la photo.
REMARQUE : Sans carte microSD™, l'appareil
photo ne peut enregistrer que les 3 dernières
photos prises. Nous vous recommandons
vivement d'utiliser une carte microSD™ pour
tirer le meilleur parti de votre appareil photo
KODAK SMILE.
Page 23

FI LTRE
Le menu Filtre
ore une variété de iltres à
appliquer à votre photo. Appuyez sur le bouton
OK, puis utilisez les lèches pour naviguer
parmi les iltres disponibles. L'écran LCD vous
donnera un aperçu en direct de ce iltre ;
appuyez de nouveau sur le bouton OK pour
conirmer et appliquer le iltre.
CADRES
Le menu Cadres
ore la possibilité d'ajouter
une bordure à votre photo. Appuyez sur le
bouton OK pour ouvrir le menu Cadres.
44 | FR FR | 45
Le menu Cadres vous ore deux options au
choix : O et On.
• O : photo sans cadre. Si vous choisissez
cette option, vous serez ramené au viseur
en direct.
• On : photo avec un cadre. Si vous choisissez
cette option, vous serez dirigé vers le viseur
en direct avec un cadre blanc autour de
l'image. Il y aura une icône en bas à droite
de la barre d'état dans le viseur en direct
pour indiquer également le statut de votre
cadre. Le cadre restera appliqué jusqu'à ce
que vous reveniez manuellement dans le
menu Cadre et que vous le désactiviez ou
que vous éteignez l'appareil photo.
PHOTOBOOTH
Le menu Photobooth
vous permet
d'imprimer deux photos côte à côte dans la
même image.
• Le viseur en direct vous donnera des
instructions pour vous assurer que votre
image correspond à l'espace alloué, et il y
aura une icône en bas à droite de la barre
d'état dans le viseur en direct pour indiquer
le mode Photobooth.
• Appuyez une fois sur le bouton de prise
de vue pour voir apparaître les lignes vous
permettant de prendre votre premier cliché.
Pour la deuxième photo, l'autre côté de
l'écran sera actif et la première image que
vous aurez capturée sera visible à gauche
de l'image.
• L'appareil photo restera en mode Photobooth jusqu'à ce que vous reveniez au
menu Cadre et que vous le désactiviez
ou jusqu'à ce que vous éteignez l'appareil
photo. Cela vous permet de prendre autant
de photos de style « cabine photo » que
vous le souhaitez !
Page 24

FLASH
Utilisez les lèches pour mettre en évidence
l'icône Flash
et appuyez sur le bouton OK
pour ouvrir le menu Flash.
Utilisez les lèches pour faire déiler les options:
Flash activé
automatique
, Flash désactivé , et Flash
.
PARAMÈTRES
Le menu Paramètres
vous permet
d'accéder et de régler plusieurs paramètres de
l'appareil photo. Les options disponibles dans
le menu Paramètres sont les suivantes :
46 | FR FR | 47
RETARDATEUR
Sélectionnez l'icône Retardateur
dans le
menu Paramètres pour déinir un délai pour
votre prochaine photo (idéal pour les selies et
les photos de groupe !). Choisissez parmi les
options suivantes : désactivé, trois (3) secondes
ou dix (10) secondes. Lorsque vous prenez une
photo avec le retardateur, le lash clignote une
fois par seconde comme compte à rebours.
Le retardateur restera activé jusqu'à ce que
vous reveniez manuellement dans le menu du
retardateur et que vous le désactiviez ou que
vous éteigniez l'appareil photo. Vous pouvez
donc prendre autant de selies et de photos de
groupe que vous le souhaitez !
VOLUME
Sélectionnez l'icône de Volume
dans les
paramètres pour ouvrir le menu du volume.
Utilisez les lèches pour augmenter et
diminuer le volume des touches et du son de
l'obturateur lorsque vous prenez une photo.
IMPRESSION AUTOMATIQUE
Sélectionnez l'icône Impression automatique
dans le menu Paramètres pour activer
ou désactiver l'impression automatique. Si
l'impression automatique est activée, vos
photos seront imprimées immédiatement
après avoir été prises. L'option restera activée
jusqu'à ce que vous la désactiviez dans ce
menu.
LANGUE
Sélectionnez l'icône Langue
dans le menu
Paramètres pour modiier la langue aichée
sur votre appareil photo. Vous avez le choix
entre l'anglais, l'espagnol et l'allemand.
INFORMATIONS DU PRODUIT
Sélectionnez l'icône d'Informations du produit
Page 25

dans le menu Paramètres pour aicher
des informations sur votre appareil photo.
La version du logiciel, le numéro de série et
la version de la table des couleurs seront
disponibles ici. Vous pouvez appuyer sur le
bouton de menu pour quitter cette page et
revenir au menu des paramètres.
LE VISEUR EN DIRECT ET LA BARRE
D' ÉTAT
L'écran principal du viseur en direct aichera
un lux en direct de l'image telle qu'elle sera
capturée (avec les iltres ou un cadre) lorsque
vous appuierez sur le déclencheur. La barre
48 | FR FR | 49
d'état au bas de l'écran aiche également
diverses icônes, en fonction des options que
vous avez sélectionnées et d'autres facteurs :
1. Batterie : l'icône de batterie se trouve dans
le coin inférieur gauche de la barre d'état et
aiche quatre barres ou moins en fonction
de son état de charge.
a. Icône blanche avec quatre barres
aichées
entre 76 et 100%.
b. Icône blanche avec trois barres aichées
et 75%.
: la batterie est chargée
: la batterie est chargée entre 51
c. Icône blanche avec deux barres
aichées
entre 26 et 50%.
d. Icône blanche avec une barre aichée
et 25%.
e. Icône rouge clignotante
ou moins de charge à la batterie.
Rechargez immédiatement.
2. Mode du lash :
a. Éclair avec un A à côté
automatique
: la batterie est chargée
: la batterie est chargée entre 6
: il reste 5%
: lash réglé sur
b. Éclair seul
photos
c. Éclair avec une barre oblique
désactivé pour toutes les photos
3. Statut de la carte microSD™ :
a. Icône de la carte microSD™
microSD™ est insérée
4. Statut du retardateur : si l'icône du
retardateur
c'est que le retardateur est activé, ce qui
signiie qu'il y aura un délai entre le moment
où vous appuierez sur le déclencheur
et celui où la photo sera prise. Le lash
: lash activé pour toutes les
: lash
: la carte
apparaît dans la barre d'état,
Page 26

clignote comme un compte à rebours
après appui sur le bouton de prise de vue
5. Statut du cadre :
a. Icône de bordure
: un cadre a été
appliqué et doit être visible dans le viseur.
6. Statut Photobooth :
a. Icône Photobooth
: l'appareil photo
est en mode Photobooth (deux photos
côte à côte). Les instructions dans le
viseur vous aideront à aligner vos deux
photos.
7. Statut de l'Impression automatique :
50 | FR FR | 51
a. Icône d'impression auto
d'impression automatique a été activé et
votre appareil imprimera immédiatement
une photo après l'avoir prise.
8. Statut de la réserver de papier :
a. Icône avec fond noir
actuellement chargé dans l'appareil
photo
b. Icône avec fond bleu
avec une feuille de calibrage bleue prête
à imprimer
c. Icône avec fond rouge
: le mode
: papier
: papier chargé
: pas de papier
chargé
PRENDRE UNE PHOTO
1. Allumez l'appareil photo en éloignant le
panneau rainuré du centre et en exposant
le panneau de navigation.
2. Cliquez sur le
menu principal.
3. Utilisez les lèches pour parcourir les
options du menu principal et choisir vos
iltres, les réglages du lash et de l'appareil
photo en général, ainsi que les options pour
le mode Cadre ou Photobooth. Ou bien, ne
bouton pour accéder au
choisissez aucune de ces options et
continuez simplement avec les paramètres
par défaut.
4. Alignez vos photos dans le viseur en direct.
5. Lorsque vous êtes prêt, appuyez sur le
déclencheur jaune pour prendre votre
photo ou appuyez sur le bouton OK du
panneau de navigation.
6. Après avoir pris la photo, l'image que vous
avez capturée apparaîtra à l'écran avec
deux options en bas : Modiier et Imprimer.
Si vous appuyez sur Modiier, vous serez
dirigé vers un écran vosu permettant
Page 27

d'ajouter un iltre ou un cadre à la photo,
puis vous aurez la possibilité de l'imprimer
ou de la supprimer. Si vous appuyez sur le
bouton OK pour modiier, vous serez dirigé
vers un écran vous permettant d'ajouter un
iltre ou un cadre à la photo. Vous aurez
ensuite la possibilité de l'imprimer ou de la
supprimer. Si vous appuyez sur
Imprimer, vous pourrez imprimer la photo
immédiatement. Si vous souhaitez revenir
au viseur en direct, appuyez une fois sur le
déclencheur ou appuyez sur le
bouton.
52 | FR FR | 53
IMPRIMER UNE PHOTO
Depuis la Galerie
1. Sélectionnez Galerie dans le menu
principal et appuyez sur le bouton OK.
2. Utilisez les lèches pour choisir la mémoire
interne ou la carte microSD™, puis appuyez
sur le bouton OK.
3. Utilisez les lèches pour trouver la photo
que vous voulez imprimer.
4. OPTIONNEL : Pour continuer à modiier la
photo, appuyez sur le bouton OK, puis
utilisez les lèches pour choisir un iltre
(ajouter un iltre) et/ou un cadre (ajouter un
cad re).
5. Appuyez sur le bouton
6. Utilisez les lèches pour augmenter/
diminuer le nombre de copies à imprimer.
7. Appuyez sur le bouton OK pour conirmer.
8. Patientez pendant l'impression de la/des
photo(s).
Après avoir pris une ph oto
1. Appuyez sur le bouton d'impression
2. Utilisez les lèches pour augmenter/
diminuer le nombre de copies à imprimer.
3. Appuyez sur OK pour conirmer.
4. Patientez pendant l'impression de la photo.
d'impression.
.
TRANSFÉRER DES PHOTOS SUR
VOTRE ORDINATEUR
Si vous avez inséré une carte microSD™ dans
votre appareil photo KODAK SMILE, vous
pouvez facilement télécharger et visualiser des
copies haute résolution de vos photos depuis
n'importe quel ordinateur portable ou de
bureau. Suivez ces étapes pour accéder à vos
photos et les enregistrer sur votre ordinateur/
ordinateur portable.
1. Branchez le câble USB sur n'importe quel
port USB de votre ordinateur (ou
ordinateur portable). Branchez l'autre
Page 28

extrémité du câble micro USB à votre
appareil photo.
2. Mettez l'appareil photo sous tension.
3. La première fois que vous connectez votre
appareil photo, il vous faudra patienter
quelques minutes pour télécharger
automatiquement les pilotes et reconnaître
l'appareil comme périphérique de stockage
externe. Ne débranchez pas votre appareil
photo pendant ce processus.
54 | FR FR | 55
4. Une fois l'appareil photo branché et les
pilotes installés, vous pouvez accéder aux
photos que vous avez prises en allant dans
le menu de votre ordinateur et en les
visualisant comme périphérique de
stockage externe (généralement E:\ par
défaut). Vous verrez un dossier appelé
DCIM, et dans ce dossier se trouvera un
autre dossier appelé SMILE _CAM. C'est ici
que vous trouverez des copies de toutes
vos photos.
5. Amusez-vous à visualiser, retoucher,
imprimer ou aicher ces versions haute
résolution de vos photos KODAK SMILE sur
votre ordinateur !
6. Lorsque vous avez terminé, assurez-vous de
choisir l'option « Éjecter le périphérique de
stockage amovible en toute sécurité » pour
éviter tout problème avec votre carte
microSD™.
REMARQUE: Veuillez noter que tant que
l'appareil photo est branché sur
l'ordinateur, vous ne pourrez pas l'utiliser
pour prendre ou modiier des photos sur
la carte microSD™
MISES À JOUR DU LOGICIEL
De temps à autre, nous publierons des mises
à jour qui amélioreront la qualité ou les
performances du logiciel de votre appareil
photo KODAK SMILE. Suivez ces instructions
pour télécharger et installer ces mises à jour.
1. Consultez notre site web à l'adresse
www.kodakphotoplus.com/pages/KodakSmile-Series et cherchez votre appareil
photo, l'appareil photo numérique à
impression instantanée KODAK SMILE.
2. Si une mise à jour du logiciel est
disponible sur le site, téléchargez le
Page 29

ichier et enregistrez-le à un
emplacement dont vous vous
souviendrez.
3. Connectez l'appareil photo à votre
ordinateur via le câble micro USB.
4. Allez à l'emplacement où vous avez
enregistré le ichier de mise à jour du
logiciel et exécutez le programme de
mise à jour (il se termine par .exe).
5. La mise à jour doit détecter l'appareil
photo installé, mais si il le demande,
dirigez-le vers l'emplacement de
stockage amovible de l'appareil photo
56 | FR FR | 57
(généralement E:\ par défaut).
6. Ne débranchez pas l'appareil photo
pendant l'installation de la mise à jour.
7. Lorsque vous avez terminé, assurezvous de choisir l'option « Éjecter le
périphérique de stockage amovible en
toute sécurité » pour éviter tout problème
avec votre appareil photo.
INFORMATIONS DE GARANTIE
GARANTIE LIMITÉE DE L' APPAREIL PHOTO
NUMÉRIQUE À IMPRESSION INSTANTANÉE
KODAK SMILE
CETTE GARANTIE LIMITÉE VOUS CONFÈRE
DES DROITS SPÉCIFIQUES RECONNUS PAR LA
LOI. VOUS POURRIEZ DISPOSER DE DROITS
SUPPLÉMENTAIRES QUI VARIENT D'UN PAYS À
UN AUTRE.
NOUS GARANTISSONS QUE CE PRODUIT SERA
EXEMPT DE TOUT DÉFAUT DE FABRICATION
ET DE MATÉRIAUX PENDANT LA PÉRIODE DE
GARANTIE.
LIMITATION DE RESPONSABILITÉ
Dans la mesure où le droit ne l'interdit pas, cette
garantie est exclusive et vient en lieu et place
de toute autre garantie écrite, orale, légale,
expresse ou implicite. À L'EXCEPTION DES
GARANTIES EXPRESSES CONTENUES DANS
LA DÉCLARATION DE GARANTIE LIMITÉE ET
DANS LA MESURE OÙ CELA NE CONTREVIENT
PAS À LA LOI, NOUS DÉCLINONS TOUTES
LES AUTRES GARANTIES, EXPLICITES
OU IMPLICITES, LÉGALES OU AUTRES,
INCLUANT SANS LIMITATION, LES GARANTIES
COMMERCIALES ET D'USAGE POUR UN
BUT PARTICULIER. DANS LA MESURE OÙ
CERTAINES JURIDICTIONS N'AUTORISENT PAS
Page 30

LA LIMITATION DES GARANTIES TACITES, CES
INFORMATIONS PEUVENT NE PAS S’APPLIQUER
À VOTRE CAS. DANS LA MESURE OÙ DE
TELLES GARANTIES NE PEUVENT ÊTRE EN
CONTRADICTION AVEC LES LOIS EN VIGUEUR
SOUS VOTRE JURIDICTION, NOUS LIMITONS
LA DURÉE ET LA PRISE EN CHARGE À LA DURÉE
DE CETTE GARANTIE LIMITÉE EXPRESSE.
NOTRE RESPONSABILITÉ QUANT AUX
ARTICLES DÉFECTUEUX SE LIMITE À LA
RÉPARATION, AU REMPLACEMENT OU
AU REMBOURSEMENT COMME DÉCRIT
CIDESSOUS DANS LA DÉCLARATION DE
GARANTIE.
QUI PEUT BÉNÉFICIER DE CETTE GARANTIE?
C&A Marketing, Inc., situé 114 Tived Lane East,
Edison, NJ, USA («nous») n'accorde cette
garantie limitée qu'au client d'origine du produit
(«vous»). Elle ne s'étend pas au propriétaire
suivant ou à un bénéiciaire du transfert du
produit.
QUE COUVRE CETTE GARANTIE? Cette
garantie limitée englobera toutes les
défectuosités de matériels et de fabrication
éventuelles de l'Appareil photo numérique
à impression instantanée KODAK SMILE (le
“produit”) pendant la période de garantie déinie
ci-dessous.
QU'ESTCE QUI N'EST PAS COUVERT
PAR CETTE GARANTIE? Cette garantie
limitée ne couvre pas les dégâts dus aux cas
suivants: (a) transport ; (b) entreposage ; (c)
mauvaise utilisation ; (d) non-respect des
consignes d'utilisation du produit ou omission
des opérations d'entretien préventif ; (e)
modiications; (f) réparation non autorisée ; (g)
usure normale ; ou (h) causes externes comme
des accidents, usage abusif ou toute autre
action ou événement au-delà de notre contrôle.
QUELLE EST LA PÉRIODE DE COUVERTURE?
Cette garantie limitée commence le jour de
votre achat et dure pendant un an (la «Période
prolonge pas si nous réparons ou remplaçons
le produit. Nous pouvons changer à notre
discrétion la disponibilité de cette garantie
limitée, mais les changements ne seront pas
rétroactifs.
QUELS SONT VOS RECOURS SOUS CETTE
GARANTIE? En cas de défectuosité du produit
pendant la période de garantie, nous pourrons,
à notre entière discrétion: (a) réparer ou
remplacer le produit (ou la pièce défectueuse)
gratuitement ou (b) rembourser le prix d'achat
du produit si une unité de remplacement ne
peut être fournie.
de garantie»). La Période de garantie ne se
58 | FR FR | 59
Page 31

COMMENT BÉNÉFICIER DE LA GARANTIE?
Pour bénéicier du service de garantie, vous
devez nous contacter au +1 8445161539 ou par
courriel à l'adresse kodak@camarketing.com
pendant la Période de garantie pour obtenir
un numéro d'autorisation de marchandise
défectueuse («DMA», Defective Marchandise
Authorization). Aucun service de garantie ne
sera eectué sans numéro DMA et les frais de
retour vers nos installations doivent être pris en
charge par vous, l'acheteur. Nous prendrons à
notre charge les frais d'expédition de l'unité de
remplacement.
INFORMATIONS DE CONTACT DE
SERVICE À LA CLIENTÈLE
Si vous rencontrez des problèmes avec votre
produit, veuillez nous contacter avant de
ramener le produit au point de vente. Nous
somme s là pour vous aide r!
Suppor t technique aux US A:
kodak@camarketing.com
8445161539
Suppor t technique intern ational:
kodakintl@camarketing.com
8445161540
kodakphotoplus.com
60 | FR FR | 61
La marque commerciale Kodak, le logo et l'habillage
sont utilisés sous licence de Eastman Kodak Company.
Android est une marque commerciale de Google Inc.
IOS est une marque commerciale de Cisco aux États-
Unis et dans d’autres pays et est utilisée sous licence.
Tous les autres produits, noms de produits, noms
de sociétés ainsi que les logos sont des marques
de commerce ou des marques déposées de leur
détenteur respectif, et ne signiient aucun parrainage,
autorisation ou approbation.
Distribué par: C&A Marketing, Inc., 114 Tived Lane East,
Edison, NJ 08837, USA
C&A Marketing UK LTD, 167 Hermitage Road, Crusader
Industrial Estate, London N4 1LZ, UK
©2019. Tous droits réservés. Fabriqué en Vietnam.
Page 32

INTRODUZIONE
Grazie per aver acquistato la fotocamera
digitale a stampa istantanea KODAK SMILE. Il
presente manuale dell'utente contiene le linee
guida che garantiscono un utilizzo sicuro di
questo prodotto, e che questo non comporti
alcun rischio per l'utente. Qualsiasi utilizzo non
conforme alle linee guida riportate in questo
manuale dell'utente può invalidare la garanzia
del prodotto.
Leggere tutte le istruzioni prima di utilizzare
il prodotto, e conservare questa guida come
materiale di riferimento. Questo prodotto è
62 | IT IT | 63
destinato esclusivamente all'uso domestico.
Non è destinato ad un uso commerciale.
Questo prodotto è coperto da una garanzia
limitata di un anno. La copertura è soggetta
a limiti ed esclusioni. Per maggiori dettagli,
consultare la garanzia.
CARATTERISTICHE TECNICHE
• Misure: 4,875 L x 3,125 W x 0,938 H (12,35
x 8 x 2,5 cm)
• Peso: 7,2 oz (204 g)
• Colori disponibili: Nero/bianco, bianco/
giallo, blu, verde, rosso
• Memorie supportate: Schede MicroSD™
ino a 256GB
• Immagini: 10MP o equivalenti
• Capacità della batteria: 700mAh
• Tipo di batteria: Ai polimeri di litio
• Stampe per carica: ~40
• Carta fotograica supportata: KODAK ZINK
2 x 3 carta fotograica con retro adesivo
CONTENUTO DELLA CONFEZIONE
Fotocamera digitale istantanea KODAK SMILE
Cavo per la ricarica
Pacchetto iniziale di carta KODAK ZINK
Manuale dell'utente
AVVERTENZE PER LA SICUREZZA
• Pericolo di attacchi epilettic i: Questo dispositivo
utilizza ripetutamente luci LED lampeggianti,
che posso no potenzi almente provo care
crisi epilettiche a persone aette da epilessia
fotosensib ile e/o altri disturbi epilettici. Si
consiglia agli utenti d i fare attenzione
• Non tentare di smontare il dispo sitivo per
nessu n motivo.
• Non lasciare mai la fotocame ra o la carta
ZINK® in un amb iente che potrebbe diventare
estremamente caldo o dove potrebbero
essere esposti alla luce diret ta del sole per un
Page 33

lungo pe riodo di tempo. In cas o contrario, la
fotocamera p otrebbe surriscal darsi o sorire di
altri problemi.
• Non utilizza re la fotocame ra con le mani umide
o bagnate. In c aso contrario, si potreb be
danneg giare la fotocamera o caus are scosse
elettriche.
• Non utilizza re prodotti c ome alcool, benzina,
diluenti o altri solventi o rganici p er pulire o
provare a pulire que sto prodotto.
• Non utilizza re questo dis positivo in un ambiente
in cui pos sa essere esposto a polveri pe santi o
umidità.
• Non far cadere o scuotere la fotocam era,
64 | IT IT | 65
perché qu esto potrebbe causa re
malfunzionamenti o danneggiare
permanentemente le parti interne.
• Non utilizza re questa fotoc amera mentre si fa il
bagno o si è s otto la doccia.
• Non riporre la fotocamera in un luogo in cui
possa c adere o essere spint a in una vasca o in
un lavandino.
• Non mettere, far c adere o immergere la
fotocamera in a cqua o liquidi di altro tip o.
• Accertars i che sulla fotocamera n on cadano
oggetti e non vengano versati liquidi.
INFORMAZIONI SUL PRODOTTO
Pannello di
copertura
Lenti della fotocamera
Flash
Uscita carta
Page 34

LED indicatore
dell'alimentazione
Pulsante
dell'otturatore
Sgancio dello
sportello del
cassetto della
carta
Schermata di visualizzazione
66 | IT IT | 67
Pannello di
navigazione
Ancoraggio del
cordino
Altoparlante
Ingresso scheda
MicroSD™
Indicatore di
carica LED
Porta Micro USB
per ricarica
Pulsante
reset
Page 35

PANORAMICA DEL PANNELLO DI NAVIGAZIONE
Pulsanti:
: Premendo questo pulsante accedi al menu principale,
Menu
dal quale puoi accedere ai menu iltro, bordo, galleria, cabina fotograica, lash e impostazioni. Il pulsante del menu funziona anche
come pulsante "Indietro". Premendolo, da una qualsiasi schermata,
si torna indietro alla schermata precedente. Premendolo mentre si è
nel menu principale, si ritorna alla schermata di live view.
OK: Premere questo pulsante per confermare una scelta o per
scattare una foto. In alcune situazioni, il tasto OK funge anche da
tasto funzione (ad esempio, subito dopo aver scattato una foto,
premendo il tasto OK si accede alla schermata di modiica).
: Usa i tasti freccia per scorrere le opzioni dei menu, oltre che
tra le foto della galleria.
68 | IT IT | 69
Stampa
la visione di una foto che deve essere trasferita
al menu di stampa per iniziare il processo di
stampa della foto.
PREPARAZIONE ALL'USO
Caricare SMILE
Prima di utilizzare la fotocamera, collegarla al
caricabatterie, inserendo il cavo micro USB
nell'apposita porta di ricarica micro USB sul
fondo e lasciare che si carichi completamente.
Utilizzare sempre il caricabatterie originale fornito in dotazione per assicurarsi che la carica
: Premere questo pulsante durante
sia appropriata.
Quando l'indicatore LED rosso lampeggia, la
batteria è scarica, e la fotocamera deve essere
collegata per ricaricarla. Mentre la fotocamera è in carica, il LED indicatore si accende
di una luce rossa issa. Una volta completato
il processo, il LED di segnalazione diventerà
verde isso.
Caricare la carta
Caricare la carta ZINK® nella fotocamera:
Seguire i passaggi sotto indicati per caricare in
modo semplice e veloce la nuova fotocamera
con carta adesiva ZINK® così da poter iniziare a
Page 36

stampare le foto!
1. Aprire il cassetto della carta sul retro premendo il fermo e tirandolo verso di sé.
impronte digitali sulla carta.
3. Quando stampi la prima foto dopo aver caricato la carta ZINK® , il foglio di calibrazione
blu viene lentamente espulso dalla fessura
di stampa.
4. La foto verrà stampata dopo l'espulsione del
foglio di calibrazione.
2. Collocare il foglio di calibrazione blu nel
cassetto, lasciando il codice a barre rivolto
verso il basso. Posizionarci sopra gli altri
fogli, con il lato lucido rivolto verso di sé. Evitare di toccare il lato lucido per non lasciare
70 | IT IT | 71
Attenzione: Nella fotocamera KODAK SMILE
funziona solo la carta KODAK ZINK. Carte di
altri marchi non sono compatibili.
Accensione/spegnimento
Per accendere la fotocamera, far scorrere il
pannello scanalato verso l'esterno. In questo
modo vengono scoperti il pannello di navigazione, l'obiettivo della fotocamera e il lash,
inoltre lo schermo LCD sulla parte posteriore
si illumina. Inoltre, la fotocamera emetterà un
segnale acustico, per segnalare che è accesa.
Per spegnere la fotocamera, basta far scorrere
il pannello verso il centro.
Inserire una scheda MicroSD™
La fotocamera ha una memoria interna limitata
e può memorizzare solo tre foto alla volta; per
modiicare e salvare più di tre foto da stampare
in un secondo momento è necessaria una
scheda microSD™. SMILE può funzionare senza
una scheda microSD™, ma è consigliabile
utilizzarne una.
Inserire la scheda microSD™ nella fessura in
Page 37

basso mentre l'obiettivo della fotocamera è
aperto, con i pin metallici rivolti verso la parte
anteriore della fotocamera. Per rimuoverla,
premere delicatamente la scheda con l'unghia,
in modo da farla uscire.
SMILE supporta schede microSD™ ino a
256GB.
SCORRERE IL MENU
Nel menu della fotocamera KODAK SMILE sono
dispon ibili sei opzioni, a cui s i accede premen do
il pulsante superiore d el pannello di navig azione
e usando i t asti freccia per scorrere le opzioni.
72 | IT IT | 73
Questa s ezione riesaminerà queste opzioni e il
loro utilizzo.
GALLERIA
Selezionare l'ico na Galleria
dal menu
principale per visualizz are le foto. Dalla Galleria
è possibile modi icare e stampare qual siasi foto
scattat a in precedenza co n la fotocamera SMILE
o qualsia si immagine già pres ente sulla scheda
microSD™.
Dopo aver s elezionato Galleria dal menu
principale, è nec essario scegli ere tra le foto
memorizzate nella memoria interna e quelle
memorizzate nella scheda S D. Eettuare la
selezione, dopo diché utilizzare i ta sti freccia
per sco rrere le foto scattate. Le immagin i
presenteranno due opzio ni in basso: MODI FICA
e S TAMPA.
Premi il puls ante OK per entrare nel me nu
MODIFI CA, che ti darà tre opzioni: iltro
, e elimina . Sel ezionare Filtro per
bordo
,
scegliere tra le varie funzioni di iltro fotograico.
Selezionare Bordo
per aggi ungere un bordo
bianco alla foto o per lasciarla senza bordi.
Selezionare Elimina
averrà richiesta
nuovamente la conferma di vo ler eliminare la foto.
Premere OK per eliminare la foto dal la scheda SD.
Selezionare Stampa , in qualsiasi mom ento, per
stampare la foto così come appare nella galleria .
Prima che la foto venga stampata, viene richiesto
di confermare premend o il pulsante OK.
ATTENZ IONE : Senz a una scheda microS D™, la
fotocamera può salvare solo le 3 foto scattate più
di recente. C onsigliamo vivamente di utiliz zare
una sche da microSD™ per sfru ttare al meglio la
fotocamera KODAK SMILE.
FI LTRO
Il menu Fil tro
ore la pos sibilità di scegli ere tra
una varietà di iltri da app licare alla foto. Premere il
pulsante OK e utilizzare le frecce pe r navigare tra i
Page 38

iltri disponibili. Lo schermo LCD fornisce
un'anteprima in tempo reale di quel iltro; premere
nuovamente il p ulsante OK per confermare e
applicare il iltro.
BORDI
Il menu Bo rdi
ore la pos sibilità di aggiungere
un bordo alla foto. Premere il puls ante OK per
aprire il men u Bordi.
Il menu Bo rdi ore due opzi oni tra cui scegliere:
O e On.
• O: una foto senza bo rdi. Se si sc eglie questa
opzione, si viene riportati alla visualizzazione
74 | IT IT | 75
live view.
• On: una foto con il bordo. Selezio nando
questa opzione, si viene por tati nella modalit à
live view, con un bordo bianc o isso intorno
all'imm agine. Nella par te inferiore destra
della barra di stato della live view è prese nte
un'icon a che indica anche l o stato del bordo.
Il bordo resterà applicato ino a quando non si
rientra manu almente nel menu de i bordi e lo
si disattiva, o ino a quando la fotoca mera non
viene spenta.
CABINA FOTOGRAFICA
Il menu Ca bina fotograica
permette di
stampare du e foto aiancate nella stessa
immagine.
• La m odalità live view fornis ce le indicazion i
per ass icurarsi che l'imm agine si colloch i nello
spazio assegnato, e su l lato inferiore destro
della barra di stato della m odalità live view è
presente un'icona che indica lo stato della
modalità della cabina.
• Tocca un a volta il pulsante dell 'otturatore e
sullo sch ermo appariranno l e linee guida per
scatta re il tuo primo s catto. Per il second o
scatto, l'altro lato dello sc hermo rimarrà attivo
e la prima immagine catturata sarà vi sibile sul
lato sinistro de llo schermo.
• La fotocamera rimarrà in modalità cabin a fotograica ino a quando non ritorni al menu dei
bordi e lo dis attivi, o ino a quand o non spegni
la fotocame ra, così potrai scattare tutte le foto
e gli scatti che vuoi!
FLASH
Utilizz are le frecce per evide nziare l'icona Fla sh
preme re il pulsante OK per aprire il m enu Flash.
Utilizz are le frecce per scorrere le opzioni: At tivare
, disattivare il lash , e lash automatico .
il lash
e
Page 39

IMPOSTAZIONI
Il menu Impostazioni
permette di accedere e
regolare molteplici impostazioni della fotocamera.
Le opzioni disponibili nel menu delle impostazioni
sono le se guenti:
TIMER
Selezionare l'ico na Timer
idal menu delle
impostazioni per impostare un timer per
l'imma gine successiva (ottimo per i s elie e le
foto di gruppo!) Scegliere tra l e impostazioni de l
timer: spento, tre (3) secondi o dieci (10) secondi.
Quando s catti una foto con il tempo rizzatore
attivo, il la sh della fotocamera la mpeggerà una
76 | IT IT | 77
volta al secondo, co me conto alla rovescia.
Il timer reste rà attivo in o a quando non rientri
manualm ente nel menu del time r e lo disattivi, o
ino a quan do non spegni la fotoc amera, quindi
puoi scattare tutte le immagini a tem po che vuoi!
VOLUME
Per aprire il menu del volu me, selezionare l'icona
Volume
dal menu d elle impostazio ni. Utilizzare
le frecce p er alzare e abbassa re il volume de lla
pressione dei tasti e il suono dell'otturatore
quando si scatta un a foto.
STAMPA AUTOMATICA
Selezionare l'icona Stampa automatica
dal menu d elle impostazio ni per attivare o
disattivare la stampa automatica. S e l'opzione
Stampa au tomatica è at tiva, le immagini verranno
stampate immediatamente dopo essere state
scattate. L'opzione rest a attiva ino a quando n on
viene dis attivata da questo menu.
LINGUA
Selezionare l'ico na Lingua
dal menu d elle
impostazioni per cambiare la lingua visualizzata
sulla fotocamera. È pos sibile sceglie re tra ingles e,
spagnolo e tedesco.
INFORMAZIONI SUL PRODOTTO
Selezionare l'icona Informazioni sul prodotto
dal menu d elle impostazio ni per visualizz are
le informazi oni sulla fotocamera. Q ui vengono
visualiz zati la versione de l irmware, il numero
di serie e la ve rsione della tab ella colori. Puoi
premere il pulsante menu per uscire da questa
pagina e torn are al menu delle impostazion i.
IL LIVE VIEW E LA BARRA DI STATO
La schermata principale del live view mostra un
feed in tempo reale dell'immagine così come
sarà acquisita (completa di iltri o bordo) una
Page 40

volta premuto il pulsante dell'otturatore. La
barra di stato in basso mostrerà inoltre varie
icone, a seconda delle opzioni selezionate e di
altri fattori:
1. Batteria: l'icona della batteria è posizionata
nell'angolo in basso a sinistra della barra di
stato, e mostra quattro barre o meno, a
seconda dello stato di caricamento.
a. Icona bianca che mostra quattro barre
: la batteria è carica al 76- 100%.
b. Icona bianca che mostra tre barre
batteria è carica al 5175%.
c. Icona bianca che mostra due barre
78 | IT IT | 79
la batteria è carica al 2650%
d. Icona bianca che mostra una barra
la batteria è carica al 625%.
e. Icona rossa lampeggiante
batteria ha una carica residua pari o
inferiore al 5%. Ricaricare appena
possibiile.
2. Stato del lash:
a. Lampo con una A vicino
impostato su automatico
: la
b. Solo lampo
le foto
:
: il lash è attivo su tutte
: il lash è
:
: la
c. Lampo sbarrato
: il lash è disattivato
per tutte le foto
3. Stato della scheda microSD™:
a. Icona della scheda microSD™
: la
scheda microSD™ è inserita
4. Status del timer
se nella barra di stato è
visualizzata l'icona del timer, alle foto viene
applicato un timer, quindi tra la pressione
dell'otturatore e lo scatto della foto
intercorre un intervallo di tempo. Puoi
premere il pulsante menu per uscire
da questa pagina e tornare al menu delle
impostazioni.
5. Stato del bordo:
a. Icona del bordo
: è stato applicato un
bordo, e sarà visibile in modalità live view.
6. Stato della Cabina fotograica:
a. Icona della cabina fotograica
: la
fotocamera è in modalità cabina
fotograica (due foto aiancate). Le
indicazioni presenti nel live view
permettono di allineare le foto scattate in
modalità cabina.
7. Stato Stampa Automatica:
a. Icona stampa automatica
: la
Page 41
modalità di stampa automatica è attiva e
la fotocamera stamperà
immediatamente un'immagine dopo lo
scatto.
8. Stato del cassetto:
a. Icona con sfondo nero
nella fotocamera
b. Icona con sfondo blu
foglio di calibrazione blu pronto per la
stampa
c. Icona con sfondo rosso
di carta
80 | IT IT | 81
: carta caricata
: carta caricata e
: assenza
SCATTARE UNA FOTO
1. Accendere la fotocamera facendo scorrere
il pannello scanalato verso l'esterno ed
aprendo il pannello di navigazione.
2. Premere il
principale.
3. Utilizzare le frecce per scorrere le opzioni
del menu principale e scegliere le
impostazioni dei iltri, del lash e della
fotocamera in generale, nonché le opzioni
per una modalità bordo o cabina
fotograica. In alternativa, si può evitare di
sceglierne una e procedere con le
pulsante per accedere al menu
impostazioni predeinite.
4. Mettere a fuoco lo scatto (o gli scatti) in
modalità live view.
5. Una volta pronti, premere il pulsante giallo
dell'otturatore per scattare la foto, oppure
premere il pulsante OK sul pannello di
navigazione.
6. Dopo aver scattato la foto, l'immagine
acquisita apparirà sullo schermo,
mostrando nella parte inferiore due opzioni:
Modiica e Stampa. Se premi il pulsante
OK per modiicare, verrai portato ad una
schermata, dove potrai aggiungere un
iltro o un bordo all'immagine, per poi avere
l'opzione di stamparla o cancellarla.
Se premi Stampa, potrai stampare
immediatamente la foto. Se desideri tornare
alla visualizzazione Live view, premi una
volta il pulsante dell'otturatore, oppure
pulsante.
premi il
STAMPARE UNA FOTO
Dalla Galleria
1. Selezionare Galleria dal menu principale
e premere il pulsante OK.
2. Utilizzare le frecce per scegliere tra
memoria interna o scheda microSD™,
Page 42
quindi premere il pulsante OK.
3. Utilizzare le frecce per trovare la foto che
si intende stampare.
4. FACOLTATIVO: Per modiicare
ulteriormente la foto, premi il pulsante OK,
dopodiché usa le frecce per selezionare il
iltro (aggiungi iltro) e/o il bordo (aggiungi
bordo).
5. Premere il pulsante stampa
6. Usare le frecce per aumentare/diminuire
il numero di copie da stampare.
7. Premere il pulsante OK per confermare.
82 | IT IT | 83
.
8. Attendere che la stampa della/delle foto
sia completata.
Dopo aver scattato una foto
1. Premere il pulsante Stampa
2. Usare le frecce per aumentare/diminuire
il numero di copie da stampare.
3. Premere il pulsante OK per confermare.
4. Attendere che la stampa della foto sia
completata.
.
TRASFERIRE LE FOTO AL
COMPUTER
Se nella fotocamera KODAK SMILE è
installata una scheda microSD™, è possibile
scaricare e visualizzare facilmente copie ad
alta risoluzione delle foto su qualsiasi computer portatile o personal computer. Seguire
questi passaggi per accedere e salvare le
foto da computer o portatile.
1. Inserire l'estremità del connettore USB
del cavo di ricarica in qualsiasi porta
USB del computer (o portatile). Inserire il
connettore micro USB nella porta di
ricarica della fotocamera.
2. Aprire la fotocamera per attivarla.
3. La prima volta che la fotocamera viene
collegata, occorreranno alcuni minuti
per scaricare automaticamente i driver e
riconoscere la fotocamera come
dispositivo di archiviazione esterno. Non
scollagare la fotocamera durante questo
processo.
4. Dopo aver collegato la fotocamera e
aver installato i driver, è possibile
Page 43

accedere alle immagini scattate
andando nel menu del computer, dove
sarà visualizzata come un dispositivo
di archiviazione esterno (solitamente è
impostato automaticamente su E:\). Verrà
visualizzata una cartella chiamata DCIM,
all'interno della quale sarà presente
un'altra cartella, chiamata SMILE_CAM. In
questa cartella si trovano le copie di tutte
le foto.
5. È possibile divertirsi a visualizzare,
modiicare, stampare e/o pubblicare
queste versioni ad alta risoluzione delle
foto di KODAK SMILE dal computer!
84 | IT IT | 85
6. Una volta terminato, assicurarsi di
selezionare l'opzione "espelli il dispositivo
di archiviazione rimovibile", per prevenire
problemi alla scheda microSD™.
ATTENZ IONE : Si prega di notare che, mentre
la fotocamera è collegata al computer,
non sarà possibile utilizzarla per scattare o
modiicare foto sulla scheda microSD™.
AGGIORNAMENTI DEL FIRMWARE
Di tanto in tanto, rilasceremo aggiornamenti
che miglioreranno la qualità e/o le
prestazioni del software della fotocamera
KODAK SMILE. Seguire queste istruzioni per
scaricare e installare gli aggiornamenti.
1. Visitare il nostro sito web all'indirizzo
www.kodakphotoplus.com/pages/
Kodak-Smile-Series per cercare la propria
fotocamera, la fotocamera digitale a
stampa istantanea KODAK SMILE.
2. Nel caso in cui il sito disponga di un
aggiornamento del irmware, scaricare
il ile e salvarlo in una posizione
facilmente ricordabile.
3. Collegare la fotocamera al computer
tramite il cavo micro USB.
4. Andare nel punto in cui è stato salvato
il ile di aggiornamento del irmware, e
lanciare il programma di aggiornamento
(che termina in .exe)..
5. L'aggiornamento dovrebbe rilevare la
videocamera installata, ma, se richiesto,
indirizzarla alla posizione di archiviazione
rimovibile della videocamera (di solito è
impostata di default su E:\).
6. Non scollegare la fotocamera durante
l'installazione dell'aggiornamento.
7. Una volta terminato, assicurarsi di
selezionare l'opzione "espelli il dispositivo
Page 44

di archiviazione rimovibile", per prevenire
problemi alla fotocamera.
INFORMAZIONI SULLA GARANZIA
GARANZIA LIMITATA PER LA KODAK ISTANT
PRINT DIGITAL CAMERA
QU ESTA GAR ANZ IA LIM ITATA C ONFE RIS CE
ALL’UTENTE DIRITTI LEGITTIMI E SPECIALI,
OLTRE AI DIRITTI CHE POSSONO ESSERE
RICONOSCIUTI A SECONDA DELLO STATO.
NOI GARANTIAMO CHE, NEL CORSO DEL
PERIODO DI GARANZIA, IL PRODOTTO NON
PRESENTER À DIFETTI DI FABBRICAZIONE O
NEI MATERIALI.
LIMITAZIONE DELLA RESPONSABILITÀ
NELLA MISURA NON VIETATA DALLA LEGGE,
QUESTA GARANZIA È DA INTENDERSI
86 | IT IT | 87
ESCLUSIVA E SOSTITUTIVA DI TUT TE LE
ALTRE GARANZIE, SIANO ESSE VERBALI,
SCRITTE, OBBLIGATORIE, ESPRESSE O
IMPLICITE, FATTE SALVE LE GARANZIE
ESPRESSE CONTEMPLATE IN QUESTA
DI CHIA RA ZIO NE D I GARAN ZIA LI MITATA.
NELLA MISURA NON VIETATA DALLA LEGGE,
NOI NON RICONOSCIAMO TUTTE LE
ALTRE GARANZIE, SIANO ESSE ESPRESSE
O IMPLICITE, OBBLIGATORIE O ALTRO,
INCLUSE, SENZA LIMITAZIONI, LE GARANZIE
DI COMMERCIABILITÀ E ADEGUATEZZA A
PARTICOLARI FINALITÀ. ALCUNI STATI NON
AMMETTONO IL DISCONOSCIMENTO DI
GARANZIE IMPLICITE, PERTANTO QUESTO
DOCUMENTO POTREBBE NON ESSERE
Page 45

APPLICABILE A OGNI UTENTE. NELLA MISURA
IN CUI TALI GARANZIE NON POSSONO
ESSERE DISCONOSCIUTE IN VIRTÙ DI LEGGI
VIGENTI NELLA SUA GIURISDIZIONE, NOI
LIMITIAMO LA VALIDITÀ E I RIMEDI SANCITI
DALLE STESSE ALLA VALIDITÀ DI QUESTA
GARANZIA ESPRESSA E LIMITATA.
LA NOSTR A RESPONSABILITÀ IN MERITO
A PRODOTTI DIFETTOSI È LIMITATA ALLA
RIPARAZIONE, SOSTITUIZIONE O AL
RIMBORSO, NELLE MODALITÀ DESCRITTE A
PIÈ DI PAGINA DI QUESTA DICHIARAZIONE DI
GARANZIA.
CHI PUÒ RICORRERE A QUESTA GARANZIA?
C&A Marketing, Inc. domiciliata in 114 Tived
88 | IT IT | 89
Lane East, Edison, NJ (in prosieguo la “Società”)
estende questa garanzia limitata solo al cliente
che ha eettivamente acquistato il prodotto
(in prosieguo il “Cliente”). Questa garanzia non
viene estesa ai proprietari successivi o agli altri
destinatari del prodotto.
COSA COPRE QUESTA GARANZIA? Questa
garanzia limitata copre i difetti di fabbricazione
e nei materiali della KODAK SMILE Instant
Digital Camera (in prosieguo il “Prodotto”)
per il periodo di garanzia stabilito in questo
documento.
COSA NON C OPRE QUESTA GARANZIA?
Questa garanzia limitata non copre danni
dovuti a: (a) trasporto; (b) stivaggio/
immagaz zinamento; (c) uso improprio; (d)
mancato rispetto delle istruzioni del prodotto
o mancata manutenzione preventiva; (e)
modiiche; (f) riparazioni non autorizzate;
(g) normale usura; (h) cause esterne, come
incidenti, abusi o altre azioni o eventi al di fuori
del nostro ragionevole controllo.
QUAL È IL PERIODO DI COPERTUR A? La
validità di questa garanzia limitata decorre
dalla data di acquisto e ha la durata di un anno
(in prosieguo “Periodo di garanzia”). Il Periodo
di garanzia non viene prorogato a seguito
di interventi di riparazione o sostituzione
del prodotto. Noi ci riserviamo la facoltà di
modiicare la disponibilità di questa garanzia
limitata a nostra discrezione; le modiiche non
avranno eetto retroattivo.
QUALI SONO I RIMEDI PREVISTI DA QUESTA
GARANZIA? Relativamente ai prodotti che
presentino difetti nel corso del Periodo di
garanzia, a nostra esclusiva discrezione
provvederemo a: (a) riparare o sostituire
il prodotto difettoso (o la parte difettosa)
gratuitamente; (b) rimborsare il prezzo di
acquisto del prodotto difettoso, nel caso non
fosse possibile sostituirlo con un altro.
COME È POSSIBILE OTTENERE INTERVENTI
IN GARANZIA? Per ottenere interventi
in garanzia, è necessario contattarci
telefonicamente al numero 8445161539 o via
Page 46

email all’indirizzo kodak@camarketing.com
durante il Periodo di garanzia, e richiedere il
numero di autorizzazione alla restituzione della
merce (ossia il numero “DMA”). In assenza di un
numero DMA non verrà erogato alcun servizio
di garanzia e le spese di restituzione saranno
a carico del Cliente, ossia dell’acquirente. La
Società si farà carico delle spese di spedizione
dei prodotti sostitutivi.
INFORMAZIONI DI CONTATTO DEL
SERVIZIO CLIENTI
In caso di p roblemi c on il prodotto, si prega di
contatt arci prima di restituire l'ar ticolo al luogo di
acquisto. Siamo qui per aiutare!
Supporto USA:
kodak@camarketing.com
8445161539
Supporto internazionale:
kodakintl@camarketing.com
8445161540
Il marchio, il logo e il vestito commerciale Kodak sono
utilizzati su licenza di Eastman Kodak Company.
Android è un marchio di Google Inc.
IOS è un marchio di Cisco negli Stati Uniti e in altri paesi
e viene utilizzato su licenza.
Tutti gli altri prodotti, nomi di marchi, nomi di società e
loghi sono marchi dei rispettivi proprietari, utilizzati solo
per identiicare i loro rispettivi prodotti e non intendono
connotare alcuna sponsorizzazione, approvazione o
approvazione.
Distribuito da: C&A Marketing, Inc., 114 Tived Lane East,
Edison, NJ 08837, USA
C&A Marketing UK LTD, 167 Hermitage Road, Crusader
Industrial Estate, London N4 1LZ, UK
©2019. Tutti i diritti riservati. Prodotto in Vietnam.
kodakphotoplus.com
90 | IT IT | 91
Page 47

EINFÜHRUNG
Vielen Dank, dass Sie sich für die KODAK
SMILE Instant Print Digital Camera entschieden
haben. Diese Bedienungsanleitung soll Ihnen
Hilfestellung geben, die Sicherheit im Umgang
mit diesem Produkt zu gewährleisten und Sie
vor Gefahren schützen. Die Verwendung einer
anderen als der in diesem Benutzerhandbuch
beschriebenen Weise kann dazu führen, dass
die beschränkte Garantie erlischt.
Bitte lesen Sie vor der Verwendung des
Produkts alle Hinweise und bewahren Sie
die vorliegende Bedienungsanleitung zum
späteren Nachschlagen auf. Dieses Produkt
ist nur zur Verwendung im privaten Bereich
92 | DE DE | 93
bestimmt. Gewerbliche Nutzung ist nicht
vorgesehen.
Für dieses Produkt besteht eine beschränk te
Garantie von einem Jahr. Der Umfang
unterliegt Beschränkungen und Ausnahmen.
Einzelheiten hierzu entnehmen Sie bitte der
Garantie.
TECHNISCHE DATEN
• Abmessungen: 4,875 L x 3,125 B x 0,938
H (12,35 x 8 x 2,5 cm)
• Gewicht: 7.2 oz (204 g)
• Verfügbare Farben:Schwarz/Weiß, Weiß/
Gelb, Blau, Grün, Rot
• Unterstützter Speicher: MicroSD™-Karten
bis zu 256 GB
• Bilder: 10MPÄquivalent
• Akkuleistung: 700mAh
• Akku-Typ: Lithium-Polymer
• Drucke pro Charge: ~40
• Unterstütztes Fotopapier: KODAK ZINK 2 x
3 rückseitig haftendes Fotopapier
LIEFERUMFANG
KODAK SMILE Instant Digital Camera
Ladekabel
Einsteigerpaket mit KODAK ZINKPapier
Bedienungsanleitung
SICHERHEITSVORKEHRUNGEN
• Warnung vor Anfällen In diesem Gerät
werden immer wieder blinkende
LEDLeuchten eingesetzt. Blitz- oder
Flackereekte können bei Menschen mit
fotosensitiver Epilepsie oder anderen
Anfallserkrankungen zu Anfällen führen. Es
empiehlt sich daher ein angemessener
Umgang.
• Versuchen Sie keinesfalls, dieses
Gerät aus irgendwelchen Gründen
auseinanderzubauen.
• Lassen Sie Ihre Kamera oder das ZINK®Papier niemals in Bereichen, wo es extrem
heiß werden kann oder wo sie längere Zeit
direktem Sonnenlicht ausgesetzt sind. Dies
kann dazu führen, dass Ihre Kamera überhitzt
Page 48

oder anderweitig Probleme macht.
• Fassen Sie die Kamera niemals mit feuchten
oder nassen Händen an. Dadurch kann
die Kamera beschädigt werden oder ein
Stromschlag kann eintreten.
• Verwenden Sie bei der Reinigung
keine Produkte wie Alkohol, Benzin,
Verdünnungsmittel oder andere organische
Lösungsmittel.
• Verwenden Sie dieses Gerät nicht in
Bereichen, wo es starker Staubentwicklung
oder Feuchtigkeit ausgesetzt ist.
• ·Lassen Sie die Kamera niemals fallen
und schütteln Sie sie nicht, da dies zu
Fehlfunktionen führen oder die inneren
Komponenten dauerhaft beschädigen
könnte.
94 | DE DE | 95
• Verwenden Sie diese Kamera nicht beim
Baden oder unter der Dusche.
• Stellen oder platzieren Sie die Kamera
niemals so, dass sie herunterfallen oder in
eine Wanne oder Spüle gezogen werden
kann.
• Achten Sie darauf, dass die Kamera nicht
in Wasser oder andere Flüssigkeiten
eingetaucht wird.
• Achten Sie darauf, dass keine Objekte auf die
Kamera fallen und keine Flüssigkeiten auf die
Kamera gelangen.
PRODUKTÜBERSICHT
Blitz
PapierausgangAbdeckplatte
Kameraobjektiv
Page 49

Sichtfenster
Betriebsanzeige-
LED
Auslöser
Türentriegelung
NavigationsleistePapierschacht-
Lautsprecher
Ladestatus-LED
Reset-
Taste
Trageband
MicroSD™
Kartenschlitz
96 | DE DE | 97
Micro USB-
Ladeanschluss
Page 50

ÜBERSICHT ÜBER DIE NAVIGATIONSLEISTE
Tasten:
: Durch Drücken dieser Taste gelangen Sie zum Haupt-
Menü
menü, von dem aus Sie auf die Menüs Galerie, Filter, Rahmen,
Photo Booth, Blitz und Einstellungen zugreifen können. Die
Menütaste fungiert auch als Zurück-Taste. Drücken Sie diese von
einem beliebigen Bildschirminhalt aus, und Sie gelangen jeweils
um einen Bildschirm zurück. Wenn Sie diese Taste drücken,
während Sie sich im Hauptmenü beinden, gelangen Sie zurück
zum Sucher.
OK: Drücken Sie diese Taste, um eine Auswahl zu bestätigen
oder ein Bild aufzunehmen. In bestimmten Szenarien wird die
OKTaste auch als Funktionstaste verwendet (z. B. direkt nach der
Aufnahme eines Bildes führt Sie ein Druck auf die OKTaste zum
Bearbeitungsbildschirm).
98 | DE DE | 99
: Verwenden Sie diese Pfeiltasten, um
sowohl zwischen den Optionen in Menüs
als auch zwischen Fotos in der Galerie zu
wechseln.
: Um den Druckvorgang zu starten,
Druck
drücken Sie diese Taste, während Sie ein
Foto ansehen. Das Foto wird zum Druckmenü hinzugefügt.
VORBEREITUNGEN VOR DER
ANWENDUNG
Laden Sie das Gerät
Bevor Sie die Kamera in Gebrauch nehmen,
verbinden Sie sie mit dem Ladegerät,
indem Sie das Mikro-USBKabel in den dafür
vorgesehenen Micro USBLadeanschluss
auf der Unterseite stecken und vollständig
auladen. Verwenden Sie immer das
mitgelieferte Original-Ladegerät, damit eine
ordnungsgemäße Auladung sichergestellt
ist.
Wenn die rote LEDAnzeige blinkt, bedeutet
dies, dass der Akku schwach ist und Sie die
Kamera zum Auladen anschließen sollten.
Während die Kamera aufgeladen wird,
leuchtet die LEDAnzeige dauerhaft rot.
Nach Abschluss des Vorgangs leuchtet die
LEDAnzeige konstant grün.
Page 51

Legen Sie das Papier ein
Legen Sie Ihr ZINK®-Papier in die Kamera ein:
Führen Sie die folgenden Schritte aus, um
Ihre neue Kamera schnell und einfach mit
ZINK® Haftpapier zu befüllen. Dann können
Sie damit beginnen, Fotos zu drucken!
1. Önen Sie das Papierfach auf der
Rückseite, indem Sie die Verriegelung
nach unten drücken und zu sich ziehen.
2. Legen Sie das blaue Kalibrierungsblatt
mit dem Barcode nach unten in das
Fach ein. Legen Sie die anderen
unbedruckten Blätter mit der glänzenden
Seite nach oben darauf. Versuchen Sie,
die glänzende Seite nicht zu berühren,
vermeiden.
3. Wenn Sie Ihr erstes Foto nach dem
Einlegen des ZINK®-Papiers drucken, wird
das blaue Kalibrierungsblatt langsam aus
dem Druckschlitz ausgeworfen.
4. Ihr Foto wird gedruckt, sobald das
Kalibrierungsblatt fertig ist.
um Fingerabdrücke auf dem Papier zu
100 | DE DE | 101
Anmerkung: Nur KODAK ZINKPapier
wird in Ihrer KODAK SMILE Kamera
funktionieren. Andere Markenpapiere sind
nicht kompatibel.
Ein- und Aussch alten des Gerät s
Um die Kamera einzuschalten, schieben Sie
das gerielte Bedienfeld nach außen von der
Mitte weg. Dadurch werden die
Navigationsleiste, das Kameraobjektiv und der
Blitz freigelegt, und der LCDBildschirm auf der
Rückseite leuchtet auf. Die Kamera gibt
außerdem einen Musikton aus, damit Sie
wissen, dass sie eingeschaltet ist.
Page 52

Um die Kamera auszuschalten, schieben Sie
das Bedienfeld einfach wieder in Richtung
Mitte.
Einlegen einer MicroSD™-Karte
102 | DE DE | 103
Die Kamera verfügt über einen begrenzten
internen Speicher und kann nur drei Fotos
gleichzeitig speichern; wenn Sie mehr als drei
Fotos bearbeiten und speichern möchten, um
sie später auszudrucken, ist eine microSD™
Speicherkarte erforderlich Das SMILE kann
ohne microSD™-Karte verwendet werden.
Es wird jedoch dringend empfohlen, eine
derartige Karte zu nutzen.
Stecken Sie die microSD™-Karte in den
Steckplatz an der Unterseite, wenn das
Objektiv der Kamera sichtbar ist. Dabei sollten
die Metallstifte zur Vorderseite der Kamera
zeigen. Um die Karte zu entfernen, drücken
Sie sie vorsichtig mit dem Fingernagel ein. Sie
sollte herausspringen.
Das SMILE unterstützt microSD™-Karten bis
zu 256 GB.
NAVIGATION IM MENÜ
Es gibt sechs Optionen im Menü der KODAK
SMILE Kamera. Der Zugri erfolgt durch
Drücken der oberen Schaltläche in der
Navigationsleiste
Pfeiltasten, um zwischen den Optionen zu
wechseln. In diesem Abschnitt werden diese
Optionen und ihre Verwendung erläutert.
und verwenden der
GALERIE
Wählen Sie das Symbol
Galerei aus
dem Hauptmenü, um Ihre Fotos anzusehen.
In der Galerie können Sie alle Fotos
bearbeiten und drucken, die Sie zuvor mit
Ihrer SMILEKamera aufgenommen haben.
Ebenso alle vorhandenen Bilder, die sich
bereits auf Ihrer microSD™-Karte beinden.
Nachdem Sie im Hauptmenü den
Menüpunkt Galerie ausgewählt haben,
müssen Sie zwischen Fotos im internen
Speicher und der SDKarte wählen. Treen
Sie Ihre Auswahl und blättern Sie dann mit
Page 53

den Pfeiltasten durch die aufgenommenen
Fotos. Es gibt zwei Optionen für die Bilder,
die unten angezeigt werden: BEARBEITEN
und DRUCKEN.
Drücken Sie die OKTaste, um in das Menü
BEARBEITEN zu gelangen, welches Ihnen
drei Optionen bieten wird: FILTER
Rahmen
Filter
, und Löschen . Mit der Option
können Sie unter den
Filteroptionen für Ihr Foto eine Auswahl
treen. Wählen Sie Rahmen
t damit Ihr
Foto einen weißen Rahmen erhält oder
lassen Sie es ohne Rahmen. Wählen Sie
Löschen
104 | DE DE | 105
und Sie werden nochmals
gefragt, ob Sie das Foto löschen möchten.
Klicken Sie auf OK, um das Foto von Ihrer
SDKarte zu löschen.
Sie können jederzeit auf Drucken klicken,
um das Foto so zu drucken, wie es in Ihrer
Galerie gezeigt wird. Vor dem Ausdruck
,
werden Sie aufgefordert, dies mit der
Schaltläche OK zu bestätigen.
HINWEIS: Ohne eine microSD™
Speicherkarte kann die Kamera nur die 3
zuletzt aufgenommenen Fotos speichern.
Alle anderen Fotos werden überschrieben.
Wir empfehlen dringend, eine microSD™-
Karte zu verwenden, um Ihre KODAK SMILE
Kamera optimal zu nutzen.
FI LTER
Das Menü
Filter stellt eine Vielzahl von
Filtern zur Verfügung, die auf Ihr Foto
angewandt werden können. Drücken Sie die
OKTaste und verwenden Sie dann die Pfeile,
um zwischen den verfügbaren Filtern zu
wechseln. Auf dem LCDBildschirm können
Sie eine Vorschau bei Anwendung des
entsprechenden Filters sehen; drücken Sie
erneut die OKTaste, um den Filter zu
bestätigen und anzuwenden.
RAHMEN
Das Menü
Rahmen bietet die Möglichkeit,
Ihrem Foto einen Rahmen hinzuzufügen.
Drücken Sie die OK-Taste, um das
Rahmenmenü zu önen.
Das Menü Rahmen stellt Ihnen zwei
Optionen zur Auswahl: Aus und Ein.
• Aus: ein Foto ohne Rahmen. Wenn Sie
diese Option wählen, werden Sie zurück
zum Sucher geführt.
• Ein: ein Foto mit Rahmen. Wenn Sie diese
Option wählen, werden Sie zum Sucher
mit einem weißen Rahmen um das Bild
Page 54

herum geleitet. Im Sucher erscheint
unten rechts in der Statusleiste ein
Symbol, das auch Ihren Rahmenstatus
anzeigt. Der Rahmen bleibt erhalten, bis
Sie manuell wieder in das Rahmenmenü
gelangen und es deaktivieren, oder bis
Sie die Kamera ausschalten.
FOTOKABINE
Das Menü
Fotokabine erlaubt Ihnen, im
gleichen Bild zwei Fotos nebeneinander
auszudrucken.
• Der Sucher gibt Ihnen Hilfestellung,
um sicherzustellen, dass Ihr Bild in den
106 | DE DE | 107
vorgegebenen Bereich passt. Außerdem
beindet sich unten rechts in der Statusleiste des Suchers ein Symbol, das den
Status des Kabinenmodus anzeigt.
• Wenn Sie den Auslöser einmal drücken,
werden Ihnen Anweisungen angezeigt,
die Ihnen helfen, Ihre erste Aufnahme auf
dem Display zu machen. Bei der zweiten
Aufnahme wird die andere Seite des Bildschirms aktiv sein, bei der das erste Bild,
das Sie aufgenommen haben, auf der
linken Seite des Bildes sichtbar sein wird.
• Die Kamera bleibt im Photo Booth-Modus,
bis Sie zum Rahmenmenü zurückkehren und es deaktivieren, oder bis Sie
die Kamera ausschalten, damit Sie so
viele Photo Booth-Stile und Aufnahmen
machen können, wie Sie möchten!
BLITZ
Verwenden Sie die Pfeile, um das BlitzSymbol
zu markieren. Drücken Sie dann
die OK-Taste, um das Blitz-Menü zu önen.
Verwenden Sie die Pfeiltasten, um zwischen
den Optionen zu wechseln: Blitz ein
, und Blitzautomatik .
aus
, Blitz
EINSTELLUNGEN
Mit dem Menü
Einstellungen können Sie
auf mehrere Kameraeinstellungen zugreifen
und diese anpassen. Folgende Optionen
stehen im Einstellungsmenü zur Verfügung:
TIMER
Wählen Sie das Symbol
Timer aus dem
Einstellungsmenü, um einen Timer für
Ihr nächstes Bild einzustellen (ideal für
Selies und Gruppenaufnahmen!) Wählen
Sie aus den Timereinstellungen drei (3)
oder zehn (10) Sekunden. Wenn Sie mit
angewendetem Zeitgeber ein Foto machen,
Page 55

wird das Kamera-Blitzlicht einmal pro
Sekunde als Countdown blinken.
Der Zeitgeber bleibt so lange aktiviert, bis
Sie manuell wieder in das Zeitgebermenü
einsteigen und es abschalten, oder bis Sie
die Kamera ausschalten, damit Sie so viele
zeitgesteuerte Aufnahmen machen können,
wie Sie möchten!
LAUTSTÄRKE
Wählen Sie das Symbol
Lautstärke
aus dem Menü Einstellungen, um in das
Menü Lautstärke zu gelangen. Verwenden
Sie die Pfeiltasten, um die Lautstärke der
108 | DE DE | 109
Tastendrucke und den Auslöseton während
der Aufnahme eines Bildes zu erhöhen oder
zu verringern.
AUTOPRINT
Wählen Sie das Symbol
für den
Autoprint-Druck aus dem Einstellungsmenü,
um den automatischen Druck ein- oder
auszuschalten. Wenn die Funktion AutoPrint eingeschaltet ist, werden Ihre Bilder
sofort nach der Aufnahme ausgedruckt.
Die Option bleibt aktiviert, bis Sie diese in
diesem Menü deaktivieren.
SPRACHE
Wählen Sie das Symbol
iSprache
aus dem Einstellungsmenü, um die
Sprachauswahl Ihrer Kamera zu ändern. Sie
können zwischen den Sprachen Englisch,
Spanisch und Deutsch wählen.
PRODUKTINFORMATIONEN
Wählen Sie das Symbol
Produktinfo aus
dem Einstellungsmenü, um Informationen
über Ihre Kamera anzuzeigen. Hier werden
Firmware-Version, Seriennummer und
Farbtabellenversion angezeigt. Sie können
die Menütaste drücken, um diese Seite
zu verlassen und zum Einstellungsmenü
zurückzukehren.
SUCHER UND STATUSLEISTE
Der Hauptbildschirm des Suchers zeigt
eine aktuelle Aufnahme des Bildes, so
wie es aufgenommen wird (einschließlich
Filter oder Rahmen), wenn Sie den
Auslöser drücken. Abhängig von den von
Ihnen gewählten Optionen und anderen
Faktoren werden in der Statusleiste unten
verschiedene Symbole angezeigt:
1. Akku: Das Akku-Symbol erscheint in der
Page 56

linken unteren Ecke der Statusleiste und
zeigt je nach Ladezustand maximal vier
Balken an.
a. Bei weißem Symbol mit vier Balken
: Der Akku ist zu 76100% geladen.
b. Bei weißem Symbol mit drei Balken
: Der Akku ist 5175% geladen.
c. Bei weißem Symbol mit zwei Balken
: Der Akku ist 2650% geladen.
d. Bei weißem Symbol mit zwei Balken
e. Rot blinkendes Symbol
: Der Akku ist 625% geladen.
: Der Akku
ist maximal 5% geladen. Laden Sie den
110 | DE DE | 111
Akku so schnell wie möglich auf.
2. Blitzstatus:
a. Blitz mit einem A daneben
:
Blitzautomatik
b. Blitz allein
: Blitz ist für alle Fotos
eingeschaltet
c. Durchgestrichener Blitz
: Blitz für alle
Fotos ausgeschaltet
3. microSD™-Karte Status:
a. microSD™-Kartensymbol
:
microSD™-Karte ist eingelegt
4. Timer-Status: Wenn das Timer-Symbol
in der Statusleiste erscheint, wird
ein Timer auf Ihre Fotos angewendet.
Das bedeutet, dass zwischen dem
Drücken des Auslösers und der
Aufnahme des Fotos eine Verzögerung
vorhanden ist. Das Kamera-Blitzlicht
blinkt im Countdown, wenn den Auslöser
gedrückt wird.
5. Rahmenstatus:
a. Rahmensymbol
: ein Rahmen wurde
hinzugefügt und sollte auf dem Sucher
angezeigt werden.
6. Fotokabinenstatus:
a. Fotokabinensymbol
beindet sich im Fotokabinenmodus
(zwei Fotos nebeneinander). Bei der
Ausrichtung Ihrer
Fotokabinenaufnahme helfen Ihnen
Hinweise im Sucher.
7. Status Auto Print:
a. Auto-Druck-Symbol:
automatische Druckmodus wurde
aktiviert, und Ihre Kamera druckt
unmittelbar nach der Aufnahme das Bild.
8. Papierfachstatus:
a. Symbol mit schwarzem Hintergrund
: die Kamera
: Der
Page 57

: Papier, das gerade in der Kamera
eingelegt ist
b. Symbol mit blauem Hintergrund
eingelegtes Papier mit blauem
Kalibrierungsblatt ist druckbereit
c. Symbol mit rotem Hintergrund
Papier eingelegt
: kein
EIN FOTO MACHEN
1. Um die Kamera einzuschalten, schieben
Sie das gerielte Bedienfeld nach außen
von der Mitte weg. Die Navigationslseiste
112 | DE DE | 113
wird freigelegt.
2. Klicken Sie auf die
:
zum Hauptmenü zu gelangen.
3. Verwenden Sie die Pfeile, um durch die
Optionen des Hauptmenüs zu navigieren
und wählen Sie Ihre Filter, die
Einstellungen für Blitz und Kamera
sowie die Optionen für den Rahmen oder
Fotokabinenmodus. Sie können auch
keine dieser Optionen auswählen und
einfach mit den Standardeinstellungen
fortfahren.
4. Ordnen Sie Ihre Aufnahme (oder
Schaltläche, um
Aufnahmen) im Sucher an.
5. Wenn Sie bereit sind, drücken Sie den
gelben Auslöser, um Ihr Foto
aufzunehmen, oder drücken Sie die OKTaste im Navigationsbereich.
6. Nachdem Sie das Foto aufgenommen
haben, erscheint die Aufnahme mit
zwei Optionen am unteren Rand auf
dem Bildschirm: Bearbeiten und Drucken.
Beim Drücken der OKTaste zum
Bearbeiten werden Sie zu einem
Bildschirm weitergeleitet, wo Sie dem
Bild einen Filter oder Rahmen hinzufügen
können, und haben anschließend die
Möglichkeit, es zu drucken oder zu
löschen. Wenn Sie auf Drucken klicken,
werden Sie in der Lage sein, das Foto
sofort zu drucken. Wenn Sie zum LiveSucher zurückkehren möchten, drücken
Sie einmal den Auslöser oder drücken Sie
Tas te .
die
EIN BILD DRUCKEN
Von der Galerie aus
1. Wählen Sie im Hauptmenü die Option
Galerie aus und drücken Sie die OK-Tas te.
Page 58
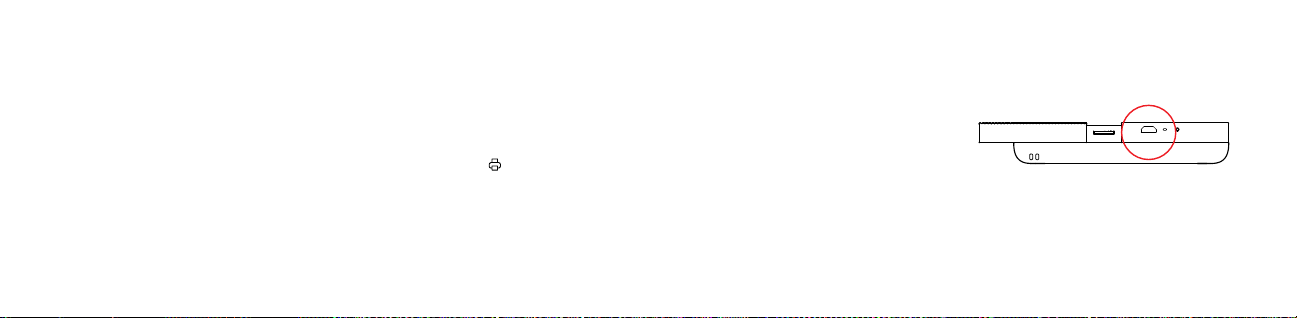
2. Verwenden Sie die Pfeile, um entweder
den internen Speicher oder die
microSD™-Karte auszuwählen, und
drücken Sie dann die OK-Tas te.
3. Wählen Sie mithilfe der Pfeile das Foto
aus, das Sie drucken möchten.
4. OPTIONAL: Um das Foto weiter zu
bearbeiten, drücken Sie die OK-Taste und
wählen Sie dann mit den Pfeilen Filter
(Filter hinzufügen) und/oder Rahmen
(Rahmen hinzufügen).
5. Drücken Sie die Taste Drucken.
6. Verwenden Sie die Pfeiltasten, um
114 | DE DE | 115
die Anzahl der Ausdrucke zu erhöhen/
verringern.
7. Drücken Sie zur Bestätigung die OK-Taste.
8. Warten Sie, bis das/die Foto(s) gedruckt
werden.
Nach dem Fotograieren
1. Drücken Sie die Taste
2. Verwenden Sie die Pfeiltasten, um
die Anzahl der Ausdrucke zu erhöhen/
verringern.
3. Drücken Sie zur Bestätigung die
OK-Taste.
Drucken.
4. Warten Sie, bis das Foto gedruckt wurde.
FOTOS AUF DEN COMPUTER
ÜBERTRAGEN
Wenn Sie eine microSD™-Karte in Ihrer
KODAK SMILEKamera installiert haben,
können Sie problemlos von jedem Laptop
oder Personalcomputer Kopien Ihrer Fotos
in höherer Aulösung herunterladen und
ansehen. Führen Sie diese Schritte aus,
um auf Fotos von Ihrem Computer/Laptop
zuzugreifen und diese zu speichern.
1. Stecken Sie die USBSteckerseite Ihres
Ladekabels in einen beliebigen USB Anschluss Ihres Computers (oder
Laptops). Stecken Sie den Micro-USB Anschluss in die Ladebuchse Ihrer Kamera.
1. Stecken Sie die USBSteckerseite Ihres
Ladekabels in einen beliebigen USB Anschluss Ihres Computers (oder
Laptops). Stecken Sie den Micro-USB Anschluss in die Ladebuchse Ihrer
Kamera.
Page 59

2. Zum Einschalten der Kamera schieben
Sie sie auf.
3. Wenn Sie Ihre Kamera zum ersten
Mal anschließen, dauert es einige
Minuten, bis die Treiber automatisch
heruntergeladen und die Kamera als
externes S peiche rmedium er kannt wird.
Trennen Sie während dieses Vorgangs
nicht die Verbindung zur Kamera.
4. Nachdem die Kamera angeschlossen
und die Treiber installiert wurden,
können Sie auf die Bilder zugreifen, die
Sie aufgenommen haben. Gehen
116 | DE DE | 117
Sie dazu in das Menü Ihres Computers
und betrachten Sie diese als externes
Speicherm edium (normale rweise ist E: \
voreingestellt). Sie inden einen Ordner
mit der Bezeichnung DCIM. In diesem
Ordner b eindet s ich ein weite rer Ordner
mit der Bezeichnung SMILE_CAM. Hier
inden Sie Kopien aller Ihrer Fotos.
5. Viel Spaß beim Anzeigen, Bearbeiten,
Drucken und/oder Publizieren dieser
hochaulösenden Versionen Ihrer KODAK
SMILE Fotos von Ihrem Computer aus!
6. Wenn Sie fertig sind, wählen Sie die
Option "Wechseldatenträger auswerfen",
um Probleme mit Ihrer microSD™-Karte
zu vermeiden.
HINWEIS: Bitte beachten Sie, dass Sie die
Kamera, solange sie an den Computer
angeschlossen ist, nicht verwenden
können, um Fotos auf der Karte microSD™
aufzunehmen oder zu bearbeiten.
FIRMWARE UPDATES
Von Zeit zu Zeit werden wir Updates
veröentlichen, die die Qualität und/
oder Leistung der Software auf Ihrer
KODAK SMILE verbessern. Befolgen Sie
diese Anweisungen, um diese Updates
herunterzuladen und zu installieren.
1. Besuchen Sie unsere Website unter
www.kodakphotoplus.com/pages/
Kodak-Smile-Series und suchen Sie nach
Ihrer Kamera, der KODAK SMILE Instant
Print Digitalkamera.
2. Wenn auf der Website ein FirmwareUpdate verfügbar ist, laden Sie die Datei
herunter und speichern Sie sie an einem
Ort, den Sie sich merken können.
3. Schließen Sie die Kamera über das Micro-
Page 60

USBKabel an Ihren Computer an.
4. Gehen Sie zu dem Ort, an dem
Sie die Firmware-Update-Datei
gespeichert haben, und führen Sie das
Aktualisierungsprogramm aus
(endet mit .exe).
5. Das Update sollte die installierte Kamera
erkennen. Auf Anfrage richten Sie es
jedoch an den Wechseldatenträger der
Kamera (normalerweise voreingestellt ist E:\).
6. Trennen Sie die Kamera nicht vom
Computer, während das Update installiert
wird.
118 | DE DE | 119
7. Wenn Sie fertig sind, achten Sie darauf,
die Option "Wechselmedien auswerfen"
zu wählen, um Probleme mit Ihrer Kamera
zu vermeiden.
GARANTIEINFORMATIONEN
BESCHR ÄNKTE GARANTIE AUF KODAK SMILE
INSTANT PRINT DIGITAL KAMERA
DIESE BESCHRÄNKTE GARANTIE GIBT IHNEN
BESTIMMTE RECHTE UND SIE KÖNNTEN
AUCH WEITERE RECHTE HABEN, DIE
VON LAND ZU LAND UNTERSCHIEDLICH
AUSFALLEN.
WIR GARANTIEREN, DASS DAS PRODUKT
WÄHREND DER GARANTIEZEIT FREI VON
MATERIAL- UND HERSTELLUNGSMÄNGELN
IST.
HAFTUNGSBEGRENZUNGEN
SOWEIT ES NICHT GESETZLICH VERBOTEN
IST, IST DIESE GARANTIE EXKLUSIV UND
ERSETZT ALLE ANDEREN GARANTIEN,
SEIEN SIE MÜNDLICH, SCHRIFTLICH,
GESETZLICH, AUSDRÜCKLICH ODER
STILLSCHWEIGEND. MIT AUSNAHME
DER IN DIESER BESCHRÄNKTEN
GARANTIEERKLÄRUNG ENTHALTENEN
AUSDRÜCKLICHEN GARANTIEN UND SOWEIT
NICHT GESETZLICH VERBOTEN, LEHNEN
WIR ALLE ANDEREN AUSDRÜCKLICHEN
ODER STILLSCHWEIGENDEN,
GESETZLICHEN ODER SONSTIGEN
GARANTIEN AB, EINSCHLIESSLICH UND
OHNE EINSCHRÄNKUNG AUCH DIE
GEWÄHRLEISTUNG DER MARKTGÄNGIGKEIT
UND EIGNUNG FÜR EINEN BESTIMMTEN
Page 61

ZWECK. EINIGE LÄNDER ERLAUBEN
KEINE HAFTUNGSAUSSCHLÜSSE FÜR
STILLSCHWEIGENDE GARANTIEN,
SODASS DIESER HAFTUNGSAUSSCHLUSS
MÖGLICHERWEISE NICHT FÜR SIE GILT.
SOWEIT SOLCHE GARANTIEN NACH DEN
GESETZEN IHRER RECHTSORDNUNG NICHT
AUSGESCHLOSSEN WERDEN KÖNNEN,
BEGRENZEN WIR DIE DAUER UND DIE
RECHTSMITTEL SOLCHER GARANTIEN
AUF DIE DAUER DIESER AUSDRÜCKLICH
BEGRENZTEN GARANTIE.
UNSERE VERANTWORTUNG FÜR
FEHLERHAFTE WAREN BESCHRÄNKT
SICH AUF REPARATUR, ERSATZ ODER
120 | DE DE | 121
RÜCKERSTATTUNG, WIE UNTEN IN DIESER
GARANTIEERKLÄRUNG BESCHRIEBEN.
WER DARF DIESE GARANTIE NUTZEN? C&A
Marketing, Inc. mit Sitz in 114 Tived Lane East,
Edison, NJ („wir“), erstreckt diese beschränkte
Garantie nur auf den Verbraucher, der das
Produkt ursprünglich gekauft hat („Sie“).
Diese erstreckt sich nicht auf einen späteren
Eigentümer oder sonstigen Übernehmer des
Produkts.
WAS DECKT DIESE GARANTIE? Diese
beschränkte Garantie erstreckt sich auf
Material- und Verarbeitungsfehler der KODAK
SMILE Instant Digitalkamera (das „Produkt“) für
die unten deinierte Garantiezeit.
WAS WIRD DIESE GARANTIE NICHT
DECKEN? Diese beschränkte Garantie deckt
keine Schäden, die durch: (a) Transport; (b)
Lagerung; (c) unsachgemäße Verwendung;
(d) Nichteinhaltung der Produkthinweise oder
vorbeugende Wartung; (e) Modiikationen;
(f) nicht autorisierte Reparaturen; (g) normale
Abnutzung; oder (h) äußere Ursachen wie
Unfälle, Missbrauch oder andere Handlungen
oder Ereignisse verursacht wurden, und die
außerhalb unserer angemessenen Kontrolle
liegen.
WIE LANGE IST DIE GELTUNGSDAUER?
Diese beschränkte Garantie beginnt mit
dem Datum Ihres Kaufs und dauert ein Jahr
(die „Garantiezeit“). Die Gewährleistungsfrist
verlängert sich nicht, wenn wir das Produkt
reparieren oder ersetzen. Wir können die
Verfügbarkeit dieser eingeschränkten Garantie
nach unserem Ermessen ändern, aber alle
Änderungen werden nicht rückwirkend gültig
sein.
WELCHE RECHTSMITTEL STEHEN
IHNEN UNTER DIESER GARANTIE ZUR
VERFÜGUNG? In Bezug auf ein defektes
Produkt während der Garantiezeit werden
wir nach eigenem Ermessen entweder
(a) dieses Produkt (oder das defekte Teil)
kostenlos reparieren oder ersetzen oder (b)
den Kaufpreis dieses Produkts erstatten, wenn
Page 62

keine Austauscheinheit bereitgestellt werden
kann.
WIE ERHALTEN SIE DEN GARANTIE
-SERVICE? Um den Garantie-Service in
Anspruch zu nehmen, müssen Sie sich
innerhalb der Garantiezeit unter 8445161539 oder per EMail an kodak@camarketing.
com wenden, um eine Nummer für defekte
Warenautorisierung („DMA“) zu erhalten. Ohne
DMANummer wird keine Garantieleistung
erbracht und die Rücksendekosten an unsere
Einrichtungen werden von Ihnen, dem
Käufer, übernommen. Die Versandkosten
des Ersatzgerätes an Sie werden von uns
übernommen.
122 | DE DE | 123
KUNDENDIENST
KONTAKTINFORMATIONEN
Sollten Sie Probleme mit Ihrem Produk t haben,
setzen Si e sich bitte mit uns in Verbindung,
bevor Sie den Artikel an d ie Verkaufsstelle
zurücksenden. Wir sind hier um zu h elfen!
USUnterstützung:
kodak@camarketing.com
8445161539
Internationale Unterstützung:
kodakintl@camarketing.com
8445161540
kodakphotoplus.com
Die Marke, das Logo und die Handelskleidung von Kodak
werden unter Lizenz der Eastman Kodak Company
verwendet.
Android ist eine Marke von Google Inc.
IOS ist eine Marke von Cisco in den USA und anderen
Ländern und wird unter Lizenz verwendet.
Alle anderen Produkte, Markennamen, Firmennamen
und Logos sind Warenzeichen der jeweiligen
Eigentümer. Sie dienen lediglich zur Identiizierung
der jeweiligen Produkte und sind nicht als Sponsoring,
Bestätigung oder Genehmigung zu verstehen.
Vertrieben von: C&A Marketing, Inc., 114 Tived Lane
East, Edison, NJ 08837, USA
C&A Marketing UK LTD, 167 Hermitage Road, Crusader
Industrial Estate, London N4 1LZ, UK
©2019. Alle Rechte vorbehalten. In Vietnam hergestellt.
Page 63

INTRODUCCIÓN
Gracias por comprar la Cámara digital
con impresión instantánea KODAK SMILE
El objetivo de esta guía de usuario es
proporcionarle pautas para asegurarnos
de que este producto funcione de manera
segura y no represente un riesgo para el
usuario. Cualquier uso que se le dé a este
producto que no cumpla con las pautas
descritas en esta Guía de usuario puede
anular la garantía limitada.
Lea todas las instrucciones antes de usar
el producto y guarde esta guía para futuras
referencias. Este producto ha sido diseñado
solo para uso doméstico. No ha sido
124 | ES ES | 125
diseñado para uso comercial.
Este producto está cubierto por una garantía
de un año. La cobertura de la garantía está
sujeta a límites y exclusiones. Consulte la
garantía para conocer más detalles.
ESPECIFICACIONES
• Dimensiones: 4,875 L x 3,125 An x 0,938
A (12,35 x 8 x 2,5 cm)
• Peso: 7,2 oz (204 g)
• Colores disponibles: Negro/Blanco,
Blanco/Amarillo, Azul, Verde, Rojo
• Tipo de almacenamiento compatible:
Tarjetas MicroSD™ de hasta 256 GB
• Imágenes: Equivalente a 10 MP
• Capacidad de la batería: 700 mAh
• Tipo de batería: Polímero de litio
• Impresiones por carga: ~40
• Papel fotográico compatible: Papel
fotográico adhesivo KODAK ZINK de 2 x
3 (5 cm x 7,5 cm)
CONTENIDO DE LA CAJA
Cámara digital instantánea KODAK SMILE
Cable de carga
Paquete de principiante de papel KODAK ZINK
Guía de usuario
PRECAUCIONES DE SEGURIDAD
• Riesgo de convulsión: Este dispositivo
utiliza luces de LED parpadeantes
de manera repetida que pueden
desencadenar posibles convulsiones en
personas con epilepsia fotosensible y/u
otros trastornos convulsivos. Se aconseja
la discreción del usuario.
• No intente desarmar este dispositivo por
ningún motivo.
• Nunca deje su cámara o el papel ZINK®
en un área que pueda calentarse mucho
o que se exponga a la luz solar directa
durante mucho tiempo. Esto puede hacer
que su cámara se sobrecaliente o sufra
Page 64

otros problemas.
• Nunca manipule la cámara con las manos
húmedas o mojadas. Esto podría dañar
la cámara o hacerle correr el riesgo de
descarga eléctrica.
• No use productos como alcohol, gasolina,
disolvente o cualquier otro solvente
orgánico al limpiar o intentar limpiar este
producto.
• No use este dispositivo en un entorno en
el que estará expuesto a polvo pesado o
partes internas.
• No use esta cámara cuando esté en la
bañera o en la ducha.
• No coloque ni almacene la cámara en un
lugar en el que pueda caerse o caer a una
bañera o lavabo.
• No coloque, deje caer ni sumerja la cámara
en agua ni en ningún otro líquido.
• Tenga cuidado de que no caigan objetos ni
se derramen líquidos sobre la cámara.
DESCRIPCIÓN DEL PRODUCTO
Panel de la
cubierta
Flash
Salida de
papel
humedad.
• Nunca deje caer ni agite la cámara, ya que
esto podría hacer que no funcione bien
o podría dañar de forma permanente las
126 | ES ES | 127
Lentes de la cámara
Page 65

Pantalla de visualización
Luz LED indicadora
de energía
Botón del
obturador
Liberación de
la bandeja para
el papel
128 | ES ES | 129
Panel de
navegación
Accesorio
para cordón
Altavoz
Ranura de tarjeta
MicroSD™
Luz LED indicadora
de carga
Puerto de carga
Micro USB
Botón de
reinicio
Page 66

VISTA GENERAL DEL PANEL DE NAVEGACIÓN
Botones:
: Presionar este botón te llevará al menú principal, desde el
Menú
cual puedes acceder a los menús de galería, iltro, borde, fotomatón,
lash y coniguración. El botón de menú también funciona como
botón para ir atrás. Presiónelo desde cualquier pantalla para ir a la
pantalla anterior. Si lo presiona al estar en el menú principal, regresará al visor en vivo.
OK: Presione este botón para conirmar una elección o hacer una
foto. En ciertos casos, el botón de OK también funcionará como un
botón de función (p. ej., justo después de realizar una foto, presionar
el botón OK te llevará a la pantalla de edición).
: Utiliza estas teclas de lecha para navegar entre las opciones
de los menús, así como entre las fotos de la galería.
130 | ES ES | 131
Imprimir
la foto que llevará al menú de impresión para
comenzar el proceso de impresión.
PREPARARSE PARA EL USO
Cargue la cámara SMILE
Antes de usar la cámara, cárguela
conectando el cable micro USB al puerto
de carga micro USB designado en la
parte inferior y deje que se cargue por
completo. Siempre use el cargador original
proporcionado para garantizar una carga
adecuada.
: Presione este botón cuando vea
Si la luz LED indicadora de color rojo está
parpadeando, signiica que la batería está
baja y debe enchufar la cámara para volver
a cargarla. Mientras la cámara se está
cargando, la luz LED indicadora será roja sin
parpadear. Una vez que el proceso de carga
se haya completado, la luz LED indicadora
cambiará a color verde sin parpadear.
Colocación del papel
Coloque su papel ZINK® en la cámara: ¡Siga
los siguientes pasos para colocar el papel
adhesivo ZINK® en su cámara nueva de
forma rápida y fácil y así poder comenzar a
Page 67

imprimir fotografías!
1. Abra la bandeja para el papel en la parte
posterior presionando el pestillo y tirando
de él hacia usted.
2. Coloque la hoja de calibración azul en la
bandeja con el código de barras hacia
abajo. Coloque las otras hojas planas
en la parte superior, con el lado brillante
132 | ES ES | 133
hacia usted. Trate de no tocar el lado
brillante para evitar que se formen huellas
dactilares en el papel.
3. Cuando imprimas tu primera foto
después de cargar el papel ZINK®,
se expulsará lentamente la hoja de
calibración azul por la ranura de
impresión.
4. Su foto se imprimirá después de que
termine la hoja de calibración.
Nota: Solo funcionará el papel KODAK
ZINK en tu cámara KODAK SMILE.
Los papeles de otras marcas no son
compatibles.
Encendido/Apagado
Para encender la cámara, deslice el panel
acanalado alejándolo del centro. Esto
expondrá el panel de navegación, la lente de
la cámara y el lash, y se iluminará la pantalla
LCD en la parte posterior. La cámara también
emitirá un pitido musical para avisarle que está
encendida.
Page 68

Para apagar la cámara, simplemente deslice
el panel de nuevo hacia el centro.
Inserte una tarjeta MicroSD™
recomienda usar una.
Inserte la tarjeta microSD™ en la ranura de la
parte inferior cuando la lente de la cámara
esté expuesta, con los pasadores metálicos
orientados hacia la parte frontal de la cámara.
Para retirarla, presione la tarjeta suavemente
con la uña y saldrá.
La cámara tiene una memoria interna limitada
y solo puede almacenar tres fotos a la vez;
es necesaria una tarjeta microSD™ si deseas
editar y guardar más de tres fotos para
imprimirlas más tarde. La cámara SMILE puede
funcionar sin una tarjeta microSD™, pero se
134 | ES ES | 135
La cámara SMILE es compatible con tarjetas
microSD™ de hasta 256 GB.
NAVEGAR EN EL MENÚ
Hay seis opciones en el menú de la
cámara KODAK SMILE, a las que se accede
presionando el botón superior en el panel
de navegación
y se utilizan las teclas de
lecha para moverse entre las opciones. Esta
sección mostrará esas opciones y su uso.
GALERÍA
Seleccione el icono Galería
idel menú
principal para ver sus fotos. Desde la Galería,
podrá editar e imprimir cualquier foto que
haya realizado con su cámara SMILE, o
cualquier imagen que contenga su tarjeta
microSD™.
Después de seleccionar Galería en el menú
principal, deberá elegir entre las fotos
almacenadas en la memoria interna y la
tarjeta SD. Realice su selección, después
use las teclas de lecha para desplazarse
por las fotos que ha realizado. Las imágenes
tendrán dos opciones en la parte inferior:
EDITAR e IMPRIMIR.
Presiona el botón OK para acceder al menú
EDITAR, que te ofrecerá tres opciones:
FI LTRO
Seleccione Filtro
, borde , y eliminar .
para elegir entre las
opciones de iltro para su foto. Seleccione
para agregar un borde blanco a su
Borde
foto, o manténgala sin borde. Seleccione
Eliminar
y se le preguntará una vez más si
Page 69

está seguro de que desea eliminar la foto.
Presione OK para eliminar la foto de su
tarjeta SD.
Presione Imprimir en cualquier momento
para imprimir la foto tal como está en
su galería. Se le pedirá que conirme
presionando el botón OK antes de imprimir
la foto.
NOTA: Sin una tarjeta microSD™, la cámara
solo puede guardar las 3 fotos más recientes
que se hayan realizado. Recomendamos
enormemente que utilice una tarjeta
microSD™ para aprovechar al máximo su
136 | ES ES | 137
cámara KODAK SMILE.
FI LTRO
El menú Filtro
ofrece una variedad de
iltros a escoger que se aplicarán a su foto.
Presione el botón OK y después use las
lechas para navegar a través de los iltros
disponibles. La pantalla LCD le dará una vista
previa en vivo de ese iltro; presione
nuevamente el botón OK para conirmar y
aplicar el iltro.
BORDES
El menú Bordes
ofrece la opción de
agregar un borde a su foto. Presione el
botón OK para abrir el menú Bordes.
El menú Bordes le ofrece dos opciones a
escoger: Apagar y encender.
• Apagar: una foto sin borde. Si elige esta
opción, volverá al visor en vivo.
• Encender: una foto con un borde. Si elige
esta opción, volverá al visor en vivo con
un borde blanco sólido alrededor de
la imagen. Habrá un icono en la parte
inferior derecha de la barra de estado en
el visor en vivo para indicar también el
estado de su borde. El borde se manten-
drá aplicado hasta que vuelvas a acceder
manualmente al menú de bordes y lo desactives, o hasta que apagues la cámara.
FOTOMATÓN
El menú de Fotomatón
le permite
imprimir dos fotos, una al lado de la otra, en
la misma imagen.
• El visor en vivo le dará pautas para
asegurarse de que su imagen se ajuste
al espacio asignado, y habrá un icono en
la parte inferior derecha de la barra de
estado en el visor en vivo para indicar el
estado del modo de cabina.
Page 70

• Toca el botón del obturador una vez y
verás las pautas para tomar tu primera
foto en la pantalla. Para el segundo disparo, estará activo el otro lado de la pantalla,
y la primera imagen que captures estará
visible en el lado izquierdo de la imagen.
• La cámara permanecerá en modo de
fotomatón hasta que regreses al menú
de borde y lo desactives, o hasta que apagues la cámara, ¡de modo que puedes
utilizar tantos estilos y sacar tantas fotos
como quieras!
138 | ES ES | 139
FLASH
Use las lechas para resaltar el icono de
y presione el botón OK para abrir el
Flash
menú de Flash.
Usa las lechas para desplazarse por
las opciones: Flash activado
desactivado
, y lash automático .
, lash
CONFIGURACIÓN
El menú de Coniguración
le permite
acceder y ajustar múltiples coniguraciones
de la cámara. Las opciones disponibles en el
menú de coniguración son las siguientes:
TEMPORIZADOR
Seleccione el icono
de Temporizador en
el menú de coniguración para establecer
un temporizador para su próxima imagen
(¡ideal para selis y tomas grupales!) En la
coniguración del temporizador, elija entre
apagado, tres (3) segundos o diez (10)
segundos. Cuando realices una foto con el
temporizador aplicado, el lash de la cámara
parpadeará una vez por segundo a modo de
cuenta regresiva.
El temporizador permanecerá aplicado
hasta que vuelvas a acceder al menú del
temporizador y lo apagues, o hasta que
apagues la cámara, ¡así que saca todas las
tomas con temporizador que desees!
VOLUMEN
Seleccione el icono de Volumen
en el
menú de coniguración para abrir el menú
de volumen. Utilice las teclas de lecha
para subir y bajar el volumen de las teclas
al presionarlas y el sonido del obturador al
hacer una foto.
IMPRESIÓN AUTOMÁTICA
Seleccione el icono
de Impresión
Page 71

automática n el menú de coniguración
para activar o desactivar la impresión
automática. Si la impresión automática
está activada, sus imágenes se imprimirán
inmediatamente después de hacerlas. La
opción permanecerá activada hasta que la
desactive desde este menú.
IDIOMA
Seleccione el icono de Idioma
menú de coniguración para cambiar el
idioma que se muestra en su cámara.
140 | ES ES | 141
en el
INFORMACIÓN DEL PRODUCTO
Seleccione el icono de Información del
producto
para ver la información de su cámara. La
versión del irmware, el número de serie y la
versión de la tabla de colores se mostrarán
aquí. Puedes presionar el botón de menú
para salir de esta página y volver al menú de
coniguración.
EL VISOR EN VIVO Y LA BARRA DE
ESTADO
La pantalla principal del visor en vivo
en el menú de coniguración
mostrará la imagen en vivo, tal y como se
capturará (incluidos los iltros o el borde) una
vez que presione el botón del obturador. La
barra de estado en la parte inferior también
mostrará varios iconos, dependiendo de
las opciones que haya seleccionado y otros
factores:
1. Batería: el ícono de la batería se
encuentra ijo en la esquina inferior
izquierda de la barra de estado y muestra
cuatro barras o menos, dependiendo de
su estado de carga.
a. Icono blanco con cuatro barras
: la
batería está 76100% cargada.
b. Icono blanco con tres barras
batería está 5175% cargada.
c. Icono blanco con dos barras
batería está 2650% cargada.
d. Icono blanco con una barra
batería está 625% cargada.
e. Icono en rojo parpadeante
batería tiene un 5% de carga o menos.
Cargue tan pronto como sea posible.
2. Estado del lash:
a. El rayo con una A al lado
: la
: la
: la
: la
: el lash
Page 72

está activado en modo automático
b. El rayo solo
para todas las fotos
c. El rayo está atravesado con una barra
: el lash está desactivado para todas
las fotos
3. estado de la tarjeta microSD™:
a. Icono de tarjeta microSD™
microSD™ ha sido insertada
4. Estado del temporizador
del temporizador aparece en la barra de
estado, se aplica un temporizador en sus
142 | ES ES | 143
: el lash está activado
: la tarjeta
si el icono
fotos, lo que signiica que habrá un
retraso entre el momento en el que
presiona el obturador y el momento en
que se captura la foto. La luz del lash de
la cámara parpadeará a modo de cuenta
regresiva cuando se presione el botón del
disparador.
5. Estado del borde:
a. Icono de borde
borde y debe verse en el visor en vivo.
6. Estado del fotomatón:
a. Icono del fotomatón
está en modo fotomatón (dos fotos
: se ha aplicado un
: la cámara
una al lado de la otra). Las pautas en el
visor le ayudarán a alinear la captura
de su fotomatón.
7. Estado de la impresión automática:
a. Icono de impresión automática
modo de impresión automática se ha
activado y su cámara imprimirá una
imagen inmediatamente después de
capturarla.
8. Estado de la bandeja:
a. Icono con fondo negro
cargado actualmente en la cámara
: el
: hay papel
b. Icono con fondo azul
cargado con hoja de calibración azul
listo para imprimir
c. Icono con fondo rojo
cargado
: papel
: no hay papel
HACER UNA FOTO
1. Encienda la cámara deslizando el
panel acanalado alejándolo del centro y
exponiendo el panel de navegación.
2. Pulse el
menú principal.
botón para tener acceso al
Page 73

3. Use las lechas para navegar a través de
las opciones del menú principal y elegir
sus iltros, lash y la coniguración general
de la cámara, y las opciones para un
borde, o el modo de fotomatón. O,
no elija ninguno de esos y simplemente
proceda con la coniguración
predeterminada.
4. Alinee su captura (o tomas) en el visor
en vivo.
5. Cuando esté listo, presione el botón
amarillo del obturador para capturar su
imagen o presione el botón OK del panel
144 | ES ES | 145
de navegación.
6. Después de hacer la foto, la imagen que
ha capturado aparecerá en la pantalla con
dos opciones en la parte inferior: Editar e
Imprimir. Si presionas el botón OK para
editar, se te llevará a una pantalla para
añadir un iltro o borde a la imagen y
después tendrás la opción de imprimirla o
borrarla. Si presionas imprimir, podrás
imprimir la foto inmediatamente. Si deseas
volver al visor en vivo, presiona el botón del
disparador una vez, o presiona el
botón.
IMPRIMIR UNA IMAGEN
Desde la galería
1. Seleccione Galería en el menú principal y
presione el botón OK.
2. Use las lechas para elegir la memoria
interna o la tarjeta microSD™, después
presione el botón OK.
3. Use las lechas para encontrar la foto que
desea imprimir.
4. OPCIONAL: Para editar aún más la foto,
presiona el botón OK y después usa las
lechas para seleccionar el iltro (añadir un
iltro) o el borde (añadir un borde).
5. Presione el botón
6. Use las teclas de lecha para aumentar/
disminuir el número de copias a imprimir.
7. Presione el botón OK para conirmar.
8. Espere a que se imprima(n) la(s) foto(s).
Después de hacer una foto
1. Presione el botón
2. Use las teclas de lecha para aumentar/
disminuir el número de copias a imprimir.
3. Presione OK para conirmar.
imprimir.
imprimir.
Page 74

4. Espere a que se imprima la foto.
TRANSFERIR LAS FOTOS A SU
ORDENADOR
Si ha instalado una tarjeta microSD™ en su
cámara KODAK SMILE, fácilmente podrá
descargar y ver copias de sus fotografías
con mayor resolución en cualquier
ordenador portátil o personal. Siga estos
pasos para acceder y guardar sus fotos
desde su ordenador/portátil.
1. Enchufe el extremo del conector USB
de su cable de carga en cualquier puerto
146 | ES ES | 147
USB de su ordenador (o portátil). Enchufe
el conector micro USB en el puerto de
carga de su cámara.
2. Abra la cámara deslizándola para
encenderla.
3. La primera vez que conecte su cámara,
la descarga automática de los
controladores tardará unos minutos y el
ordenador reconocerá la cámara como
un dispositivo de almacenamiento
externo. No desconecte la cámara
durante este proceso.
4. Después de conectar la cámara y de
instalar los controladores, podrá acceder
a las fotos que ha realizado al dirigirse
al menú de su ordenador y visualizarlas
como un dispositivo de almacenamiento
externo (normalmente está
predeterminado como E:\). Verá una
carpeta llamada DCIM, y dentro de esa
carpeta habrá otra carpeta llamada
SMILE_CAM. Aquí encontrará las copias
de todas sus fotos.
5. ¡Diviértase viendo, editando,
imprimiendo y/o publicando estas
versiones de alta resolución de sus fotos
KODAK SMILE desde su ordenador!
6. Cuando haya terminado, asegúrese de
elegir la opción de "expulsar el dispositivo
de almacenamiento extraíble" para evitar
problemas con su tarjeta microSD™.
NOTA: Tenga en cuenta que mientras la
cámara esté conectada al ordenador, no
podrá usarla para tomar ni editar fotos en la
tarjeta microSD™.
Page 75

ACTUALIZACIONES DE FIRMWARE
De vez en cuando, lanzaremos
actualizaciones que mejorarán la calidad y/o
el rendimiento del software en su cámara
KODAK SMILE. Siga estas instrucciones para
descargar e instalar esas actualizaciones.
1. Visite nuestro sitio web en
www.kodakphotoplus.com/pages/KodakSmile-Series y busque su cámara, la
cámara digital con impresión instantánea
KODAK SMILE.
2. Si el sitio tiene una actualización de
irmware disponible, descargue el archivo
148 | ES ES | 149
y guárdelo en una ubicación que
recordará.
3. Conecte la cámara a su ordenador
usando el cable micro USB.
4. Visite la ubicación en la que guardó
el archivo de actualización del irmware
y ejecute el programa de actualización
(inalizará en .exe).
5. La actualización debe detectar la
cámara instalada, pero si la pide, diríjala
a la ubicación de almacenamiento
extraíble de la cámara (por lo general, el
valor predeterminado es E:\).
6. No desconecte la cámara cuando instale
la actualización.
7. Cuando haya terminado, asegúrese de
elegir la opción de "expulsar el dispositivo
de almacenamiento extraíble" para evitar
cualquier problema con su cámara.
Page 76

INFORMACIÓN DE GARANTÍA
GARANTÍA LIMITADA PARA LA CÁMARA
DIGITAL CON IMPRESIÓN INSTANTÁNEA
KODAK SMILE
ESTA GARANTÍA LIMITADA LE OTORGA
DERECHOS LEGALES ESPECÍFICOS Y ES
POSIBLE QUE TAMBIÉN TENGA OTROS
DERECHOS, QUE VARÍAN DE UN ESTADO A
OTRO.
GARANTIZAMOS QUE, DURANTE EL PERÍODO
DE LA GARANTÍA, EL PRODUCTO NO
PRESENTARÁ FALLAS DE MATERIALES O DE
MANO DE OBRA.
LIMITACIÓN DE LA RESPONSABILIDAD
150 | ES ES | 151
EN LA MEDIDA EN QUE NO LO PROHÍBA LA LEY,
ESTA GARANTÍA ES EXCLUSIVA Y REEMPLAZA
TODA OTRA GARANTÍA, SEA VERBAL,
ESCRITA, LEGAL, EXPRESA O IMPLÍCITA. CON
EXCEPCIÓN DE LAS GARANTÍAS EXPRESAS
QUE FIGURAN EN ESTA DECLARACIÓN DE
GARANTÍA LIMITADA Y EN LA MEDIDA EN
QUE NO LO PROHÍBA LA LEY, NOS EXIMIMOS
DE TODA OTRA GARANTÍA, EXPRESA O
IMPLÍCITA, LEGAL O DE OTRA ÍNDOLE,
INCLUIDAS ENTRE OTRAS, LAS GARANTÍAS
DE COMERCIABILIDAD E IDONEIDAD PARA UN
FIN DETERMINADO. ALGUNOS ESTADOS NO
PERMITEN DESCARGOS DE RESPONSABILIDAD
DE GARANTÍAS IMPLÍCITAS, DE MODO QUE
ES POSIBLE QUE ESTE DESCARGO NO SEA
APLICABLE EN SU CASO. EN LA MEDIDA
EN QUE DICHAS GARANTÍAS NO PUEDAN
EXIMIRSE CONFORME A LAS LEYES DE SU
JURISDICCIÓN, LIMITAMOS LA DURACIÓN Y
LOS RECURSOS DE DICHAS GARANTÍAS A
LA DURACIÓN DE ESTA GARANTÍA LIMITADA
EXPRESA.
NUESTRA RESPONSABILIDAD POR
PRODUCTOS DEFECTUOSOS SE LIMITA
A LA REPARACIÓN, LA SUSTITUCIÓN O
EL REEMBOLSO SEGÚN SE DESCRIBE A
CONTINUACIÓN EN ESTA DECLARACIÓN DE
GARANTÍA.
¿QUIÉN PUEDE USAR ESTA GARANTÍA? C&A
Marketing, Inc., ubicado en 114 Tived Lane East,
Edison, Nueva Jersey (“nosotros”) extendemos
la presente garantía limitada únicamente
al consumidor que adquirió originalmente
el producto (“usted”). No abarca a ningún
propietario posterior u a otra persona a quien se
le transiera el producto.
¿QUÉ CUBRE ESTA GARANTÍA? Esta garantía
limitada cubre las fallas de materiales o de mano
de obra de la Cámara digital con impresión
instantánea KODAK SMILE (el "producto")
durante el período de garantía que se deine
debajo.
¿QUÉ NO CUBRE ESTA GARANTÍA? Esta
Page 77

garantía limitada no cubre ningún daño que
se deba a: (a) transporte; (b) almacenamiento;
(c) uso inadecuado; (d) incumplimiento de
las instrucciones del producto o falta de
mantenimiento preventivo; (e) modiicaciones;
(f) reparación no autorizada; (g) uso y desgaste
normales; o (h) causas externas, como
accidentes, uso indebido u otras acciones o
sucesos más allá de nuestro control razonable.
¿CUÁL ES EL PERÍODO DE COBERTURA?
La garantía limitada comienza en la fecha de
compra y se extiende por un año (el “Período de
garantía”). El período de garantía no se extiende
si reparamos o sustituimos el producto. Es
posible que cambiemos la disponibilidad de
152 | ES ES | 153
esta garantía limitada a nuestro criterio, pero
ningún cambio se aplicará de modo retroactivo.
¿CUÁLES SON LOS RECURSOS DISPONIBLES
CONFORME A ESTA GARANTÍA? En lo que
respecta a cualquier producto que resulte
defectuoso durante el período de la garantía,
aplicaremos, a nuestro criterio exclusivo, una de
las siguientes opciones: (a) reparar o sustituir el
producto (o la pieza defectuosa) sin cargo o (b)
reembolsar el precio de compra del producto si
no se proporciona una unidad de cambio.
¿CÓMO SE OBTIENE EL SERVICIO POR LA
GARANTÍA? Para obtener el servicio por la
garantía, debe comunicarse con nosotros
al 8445161539 o por correo electrónico a
kodak@camarketing.com durante el Período
de la garantía para obtener un número de
Autorización de producto defectuoso (“DMA”,
por sus siglas en inglés). No se brindará servicio
alguno por la garantía si no tiene un número de
DMA y será usted, el comprador, quien deba
asumir los costos de envío por devolución a
nuestras instalaciones. Nosotros asumiremos
los costos de envío de la unidad de sustitución.
INFORMACIÓN DE CONTACTO DE
ATENCIÓN AL CLIENTE
En caso de experimentar problemas con su
producto, comuníquese con nosotros antes
de devolver el artículo al lugar de compra.
¡Estamos aquí para ayudarle!
Soporte en EE.UU.:
kodak@camarketing.com
8445161539
Soporte internacional:
kodakintl@camarketing.com
8445161540
Page 78

kodakphotoplus.com
La marca registrada Kodak, el logotipo y la
presentación del producto se usan bajo licencia de
Eastman Kodak Company.
Android es una marca registrada de Google Inc.
IOS es una marca comercial de Cisco en los EE. UU.
Y otros países y se utiliza bajo licencia.
Todos los otros productos, nombres de marcas,
nombres de compañías y logotipos son marca
registrada de sus respectivos propietarios, se utilizan
solo para identiicar sus correspondientes productos
y no pretenden connotar patrocinio, aprobación o
autorización.
Distribuido por: C&A Marketing, Inc., 114 Tived Lane
East, Edison, NJ 08837, USA
C&A Marketing UK LTD, 167 Hermitage Road,
154 | ES ES | 155
Crusader Industrial Estate, London N4 1LZ, UK
©2019. Todos los derechos reservados. Fabricado
en Vietnam.
Page 79

 Loading...