

Page 1
Page 2

Using Smart Touch Functionality
Contents Overview............................................................................................1
Starting Smart Touch......................................................................... 2
Using Smart Touch with default function numbers and
predefined tasks............................................................................3
Configuration window ........................................................................4
Scan To settings .......................................................................... 4
Scan As settings...........................................................................8
Customizing tasks..............................................................................9
Third party applications.....................................................................11
Custom destinations ........................................................................12
Setting up Smart Touch to scan to a SharePoint Server..................14
Smart Touch SharePoint tool ....................................................... 16
Possible error conditions..............................................................17
Printing a Smart Touch Shortcut index............................................. 18
Smart Touch Edit window.................................................................19
Removing the Scanner icon from the system tray........................... 21
Overview
(Windows operating
systems only)
This document is for use with the following Kodak Scanners:
Kodak i1120 Scanner
Kodak i1210 Scanner
Kodak i1220 Scanner
Kodak i1310 Scanner
Kodak i1320 Scanner
Kodak i4200 Scanner
Kodak i4600 Scanner
For the purpose of this manual all information is the same for each
scanner model unless otherwise noted. Screenshots may differ slightly
depending on your scanner model.
Smart Touch allows you to quickly and easily perform common
scanning tasks. Nine different functions can be assigned and
performed. Predefined tasks are assigned to the functions so you can
immediately use the functions after installation. However, you can
easily configure each function to handle the tasks that are most
important to you.
A-61629 October 2009 1
Page 3
Starting Smart Touch Smart Touch runs from the system tray. After the software drivers and
Scroll
Start
Start
Scroll
scanner are properly installed, Smart Touch is started and a Scanner
icon will be displayed on the system tray.
Ready
Not Ready
Launching from the scanner:
• Press the Scroll button to go through the function numbers and
select the desired function, then press the Start button. The task
associated with the selected function number will be run.
NOTE:The Scroll and Start buttons are located on the front of the
scanner.
Kodak i1200/i1300 Series Scanners Kodak i4000 Series Scanner
Launching from the Smart Touch function listing:
• Click the Scanner icon to display the function listing and select the
function number you want to run.
2 A-61629 October 2009
Page 4

Using Smart Touch with default function numbers and predefined tasks
The following is a list of the default function numbers and tasks. These
can be easily customized to fit into your application needs. For more
information, see the next section, “Customizing tasks”.
1. E-mail Color PDF — select this option when you want to a scan
color document(s) and send a color PDF to an email recipient.
2. Color PDF — select this option when you want to scan a color
document(s) and save it as a PDF file.
3. Color Photo — select this option when you want to scan a color
photograph(s) and save it as a JPG file.
4. Print Color Document — select this option when you want to scan
a color document(s) and send it to a printer.
5. E-mail Black and White PDF — select this option when you want
to a scan a document(s) and send a black and white PDF to an
email recipient.
6. Black and White PDF — select this option when you want to scan a
document(s) and save it as black and white PDF file.
7. Print Black and White Document — select this option when you
want to scan a document(s) and print a black and white copy.
8. Custom PDF — scans the document and launches the Smart
Touch Editing window. When you have finished editing the image
and clicked Done, the image will be displayed as a PDF file.
9. Custom File(s) — select this option when you want to setup the
scanner settings before the document is scanned. The document
will be saved as a color JPG file.
A-61629 October 2009 3
Page 5

Configuration window
Following are descriptions of the options on the Configuration window.
Task shortcut — select the function (1 through 9) that you want to
modify.
Rename — displays the Rename dialog box which allows you to enter
a new name for the Task shortcut.
Scan To settings Destination — select one of the following options:
• File: creates an electronic file from the scanned documents and
saves it in the location specified in the Folder path.
• Application: creates an electronic file from the scanned documents
and launches the application program for the saved file. For example,
if your system is set up to use Adobe Reader to read PDF files, the
saved file will be opened using Adobe Reader.
• E-mail: creates an electronic file from the scanned documents and
launches your default E-mail program with the saved file included as
an attachment. If your email requires a login password, you may
need to log on to your E-mail program before using this option.
4 A-61629 October 2009
Page 6

• Printer/Fax Printer: sends the scanned documents to the printer or
fax printer.
NOTE:If you select Printer/Fax Printer, the Scan To options
change.
- Display settings prior to printing: if selected, the Print dialog
box will be displayed after the document(s) are scanned, allowing
you to select the printer and set the print options. The Print dialog
box will be displayed each time the function is run.
- Settings: displays the Print dialog box allowing you to select a
different printer or different print options for this function. These
settings will be saved and used by default each time the function
is run. This option is not available if Display settings prior to
printing is checked.
• SharePoint: creates an electronic file from the scanned document
and sends it to the SharePoint site. SharePoint allows groups to
manage documents and collaborate. See the section entitled,
“Setting up Smart Touch to scan to a SharePoint Server”.
• Third party applications: applications included with this scanner, if
installed, will also be displayed as Destination options. See the
section entitled, “Third party applications”.
• Other applications: custom destinations can be created to
application programs installed on your PC. See the section entitled,
“Custom destinations”.
Edit images prior to saving/emailing/printing — if selected, the
scanned images will be displayed in an Edit window to allow for editing.
See the section entitled, “Smart Touch Edit window”.
Custom Scan To Destination icons — for detailed information see
the section entitled, “Custom destinations”.
A-61629 October 2009 5
Page 7

File Type — select one of these formats based on how you want to
save or send the scanned image(s):
• PDF (Portable Document Files): looks exactly like the original
document and preserves the fonts, images, graphics and layout of
the source files regardless of the application and platform used to
create it.
• PDF - Searchable: same as a PDF file with the addition of full text
search features for locating words.
• PDF - Single page: if you are scanning documents with multiple
pages or sides, each page or side is saved as a separate PDF file.
• PDF - Single-page searchable: same as a PDF - Single page with
the addition of full text search features for locating words.
• RTF (Rich Text Format): a document file format which allows easy
portability from one PC to another regardless of the operating system
that is running on the PC.
• JPEG/TIFF - Single page: if you are scanning documents with
multiple pages or sides, each page or side is saved as a separate
JPEG or TIFF file. JPEG files are created if JPEG compression is
enabled, otherwise TIFF images are created.
• TIFF - Multi-page: combines all the scanned images into a single
TIFF file.
• BMP: if you are scanning documents with multiple pages or sides,
each page or side is saved as a separate bitmap file.
6 A-61629 October 2009
Page 8

Settings button — if you select PDF - Searchable, PDF - Single-p age
searchable or RTF as the File Type, the OCR Setup dialog box will be
displayed allowing you to select the language of the document you are
scanning. For example, if you are scanning a document that is in Italian,
select Italiano as the language to be used to scan the document and
click OK.
Folder: enter the folder name where you want to save the scanned
images or click Browse to locate the folder. The Browse for Folder
dialog box will be displayed where you can search for an existing folder
or click Make New Folder to create a new folder.
File name prefix: when images are scanned, they are automatically
assigned a unique file name. For example, if you scan your documents
as PDF files, the software automatically assigns the date and sequence
number for each image: 2008-08-27(1).pdf (for the first PDF file
created), 2008-08-27(2).pdf for the second PDF file created, etc. If you
want to add a prefix to the file name, it will be attached to the beginning
of each file name. This prefix, along with the date, sequence number
and appropriate file extension (e.g., .pdf, .tif) will be appended to it. For
example, if you want the word Invoice before the file name, enter
“Invoice” in the File name prefix field. The files will be named:
Invoice2008-08-27(1).pdf; Invoice2008-08-27(2).pdf, etc.
Name file prior to saving/sending: if selected, the Save As dialog box
will be displayed after the documents are scanned, allowing you to
specify the name of the file and the location where it will be stored. The
Save As dialog box will be displayed each time the function is run.
A-61629 October 2009 7
Page 9

Scan As settings Setting s shortcut — displays the na me of a group of scanner setting s
currently defined for use by the Kodak Scanner. This named group of
scanner settings is called a shortcut.
Settings: displays the Kodak Scanner window allowing you to select a
different scanner Settings Shortcut. The new Settings Shortcut will be
saved and used by default each time the function is run.
NOTE: For detailed information about the main Kodak Scanner window
and the TWAIN Datasource, see the Image Processing Guide
located on the Installation CD.
Display settings prior to scanning: if selected, the Kodak Scanner
window will be displayed before the document(s) is scanned, allowing
you to select the scanner Settings Shortcut. The Kodak Scanner
window will be displayed each time the function is run.
OK — closes the Configuration window. If you made changes and did
not save them, a message will be displayed asking if you want to save
your changes.
Cancel — closes the Configuration window without saving any
changes.
Apply — saves any changes.
8 A-61629 October 2009
Page 10

Customizing tasks If you want to customize your tasks and function numbers, follow these
procedures. For detailed information about the options on the Smart
Touch configuration window, see the section entitled, “Configuration
window”.
1. Click on the Scanner icon on the system tray.
2. Select Configure.
The Configuration window will be displayed.
3. Select the Task shortcut you want to configure from the Task
shortcut drop-down list.
• If you want to rename the Task Shortcut, click Rename. When
the Rename Shortcut dialog box is displayed, enter the new
name for the shortcut in the Name field and click OK.
A-61629 October 2009 9
Page 11

4. Select the desired destination from the Destination drop-down list.
NOTE: If you select Printer/Fax Printer as your destination, the Scan
To: File type options are not available. Instead you have the
option of selecting a different printer than the default.
5. Select the desired file type from the File Type drop-down list. This
determines the file type of the electronic file to be created.
6. If you want to edit the images before saving, emailing or printing,
check the Edit images prior to sending option.
7. By default your documents will be stored in your “My Documents”
folder. If you want to change the location, enter the folder name or
click Browse to select a different folder.
8. If desired, add a file name prefix by entering the text in the File
name prefix field.
9. If you want to provide your own file name, select the Name file prior
to saving checkbox on the Configuration window.
10.If desired, select a different scanner Settings Shortcut based on the
type of document you are scanning, by selecting Settings. When
you click Settings, the TWAIN Datasource is launched and the
main Kodak Scanner window is displayed.
NOTE: Detailed information about the TWAIN Datasource can be
found in the Image Processing Guide located on the
installation CD.
11. If you want to change your scanner Settings Shortcut before
scanning, check Display settings prior to scanning from the
Smart Touch Configuration window.
12.Click Apply.
13.Modify other function numbers by repeating Steps 3 - 12.
14.When finished, click OK.
10 A-61629 October 2009
Page 12

Third party applications
If installed, the PaperPort and OmniPage applications provided with the
scanner can be selected as a destination for scanned documents.
To configure a task shortcut to one of the application programs, select it
from the Destination list box.
When the documents have been scanned, the application is launched
and the images are available. You can use these applications to
enhance, process, or convert the images.
• ScanSoft PaperPort — use this software to scan your documents
into organized files that you can quickly find, use and share.
PaperPort provides a unique visual desktop that displays thumbnails
of your documents so you can quickly and easily browse and locate
information.
• ScanSoft OmniPage — this productivity application delivers
accurate document conversion for turning paper and PDF files into
electronic files that you can edit, search and share. Its OCR engines
and precise formatting ensure that your electronic documents look
exactly like the original - complete with text, graphics, columns and
tables.
NOTES:
• Uninstall any previous versions of the third-party applications before
installing the new ones to ensure a successful upgrade. Use the
versions provided with the scanner, as the older versions will not
work with Smart Touch.
• Not all applications are included with all scanner models.
• Files created by Smart Touch that are no longer needed should be
periodically deleted from the Output folder. The Output folder is
displayed in the Folder setting for the Task shortcut.
• Other third party applications may be included with your scanner.
A-61629 October 2009 11
Page 13

Custom destinations Destinations can be added for software applications that are installed
on your PC.
Use these icons to create, modify or delete custom destinations:
Allows you to create a custom Scan To destination.
Allows you to modify a custom Scan To destination.
Allows you to delete a custom Scan To destination.
1. Click the New icon to create a custom destination.
The New dialog box will be displayed
2. Enter a name in the Destination name field as you want it to appear
in the Destination drop-down list, then click Browse to select the
application program.
12 A-61629 October 2009
Page 14

The Open dialog box will be displayed.
3. Locate and select the application program (e.g., .exe file) and click
Open. The selected program will be added to the New dialog box.
4. Click OK. The new destination is now available in the list.
5. Click Apply to save the new destination.
A-61629 October 2009 13
Page 15
Setting up Smart Touch to scan to a Microsoft Office SharePoint server
SharePoint is a collaboration and document library tool. Similar to a
conventional network file server, SharePoint provides a centrallyaccessible library where you can collaborate and save documents that
others need shared access to. Better than a network file server,
SharePoint also provides advanced built-in document management
functionality and is accessible anytime by anyone who is authorized to
access scanned documents.
The SharePoint server is typically setup on a central networked server
which is separate from Smart Touch. Smart Touch provides a way to
scan documents that you want to share and send to the SharePoint
server. Once the electronic file is uploaded to SharePoint, you can use
the capabilities of SharePoint to manage your scanned documents.
You may need to contact your System Adminstrator to get the correct
URL for the SharePoint server . Your System Administrator will also give
you access to the SharePoint site and a valid user login and password.
You must have contributor-level access to upload the electronic files to
SharePoint.
To setup a task shortcut or function:
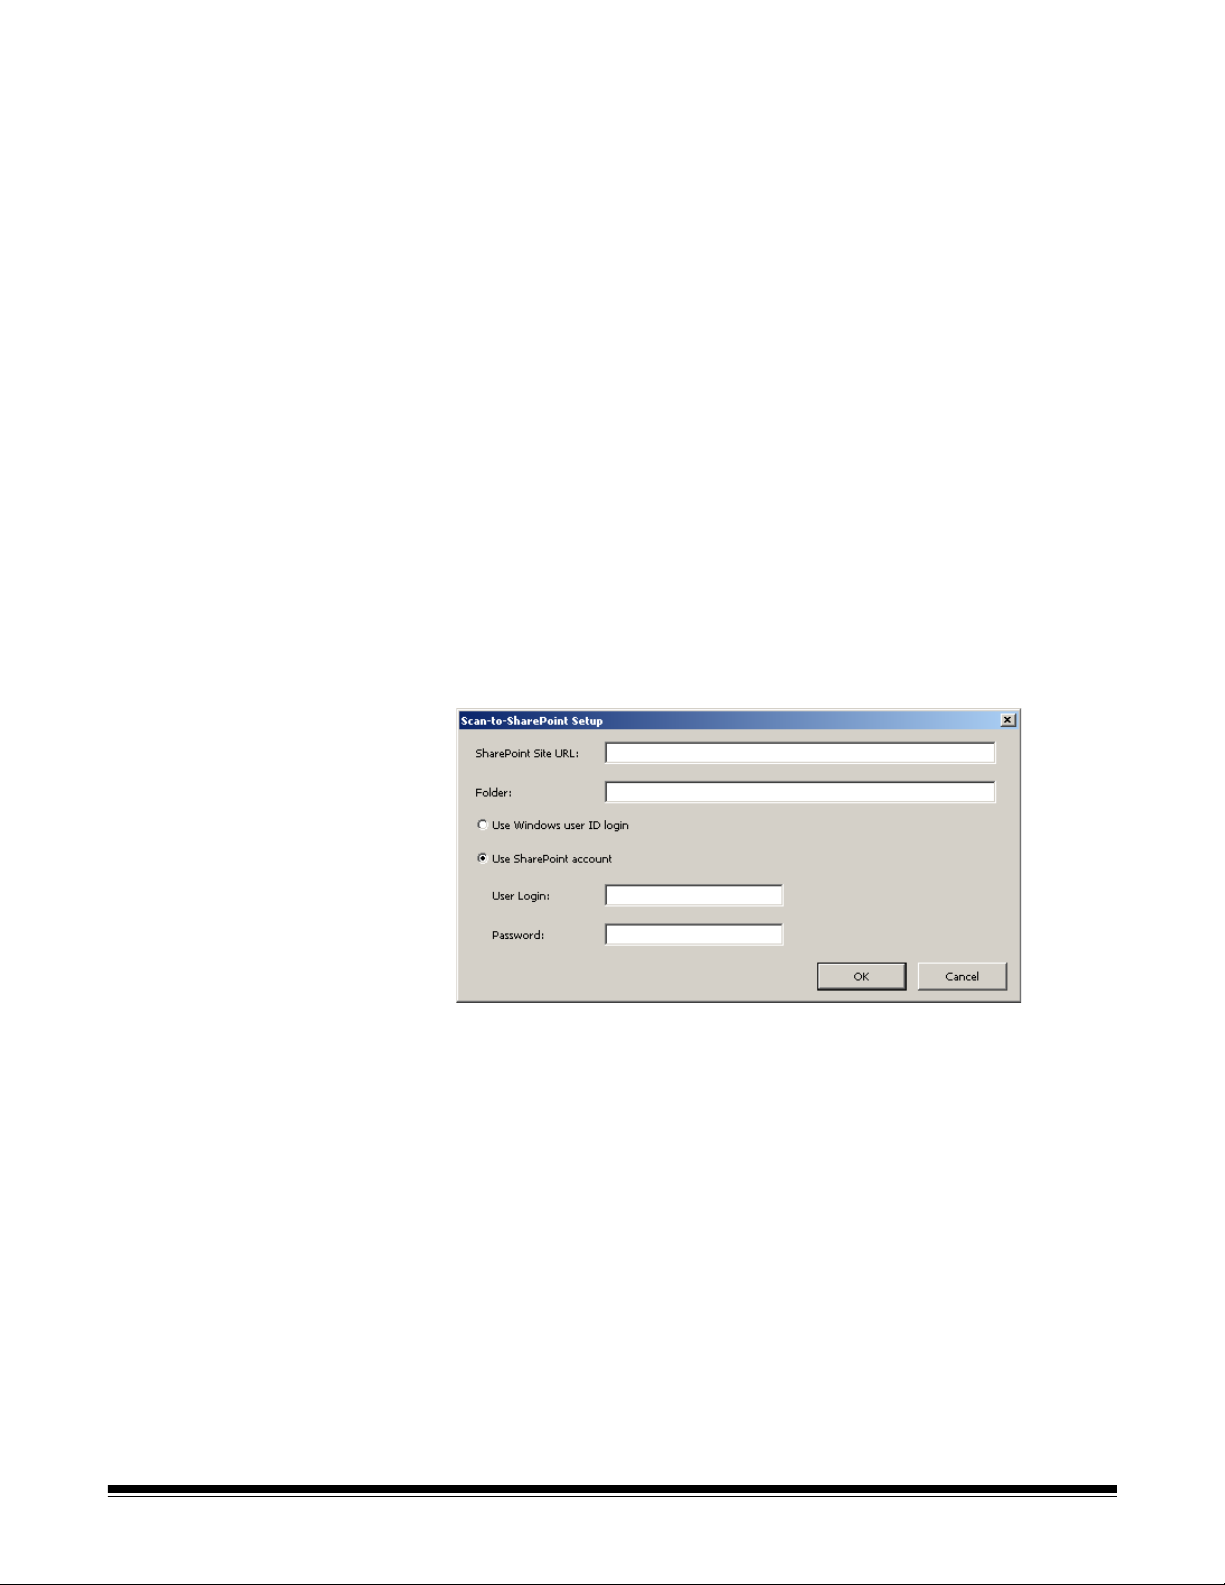
1. Select SharePoint as your Scan To destination.
2. Select the Modify icon next to the Destination field. The Scan-to
SharePoint Setup dialog box will be displayed.
3. Enter the full URL in the SharePoint Site URL field. This URL
typically consists of the host, site/subsite and document library for
the images to be uploaded.
NOTE: Contact your System Administrator for the correct URL and
password.
14 A-61629 October 2009
Page 16

The format of the URL is: http://yourhostname/yoursite/
yourlibrary.
The SharePoint site URL consists of the following:
• Scheme — either http or https for a secure server.
• Hostname — either a server name or website. You may need
to include the port number as part of the hostname.
• Site — name of the SharePoint site located on the server.
• Subsite — name of the SharePoint subsite.
• Library — a SharePoint document or image library.
• Folder — a folder within the library. This is similar to folders
setup within a directory on any Windows operating system.
4. If desired, enter the folder name where the images will be stored.
The Folder field can also be used to specify a fold er and sub-folders
on the SharePoint server. For example, within a folder for an
organization there could be sub-folders for individual users. The
Folder field may be accounting/client 1.
5. Select a login option. Contact your System Administrator for
authorization to send documents to the site.
•Select Use Windows user ID login if you want to access the
SharePoint server by using the same user login and password
that you use to login into Windows on your PC.
•Select Use SharePoint account if you want to access the
SharePoint server with a unique user login and password. If you
check this option, you must make an entry in the User Login and
Password fields.
The User Login name may include a domain name. If a domain
name is included, the format that is required by the user would
be: domain\username (domain name followed by a backslash
then the user login name).
NOTES:
• All file types supported by Smart Touch can be scanned and
uploaded to a SharePoint server. Ho wever, the BMP file type creates
larger files and therefore, will take longer to upload.
• Y ou may wa nt to rename the shortcut to indicate that it is for scanning
to SharePoint.
• Smart Touch automatically generates the file names using the date
and a sequence number. It is recommended that you check the
Name file prior to saving option. If this option is checked, you will
be prompted to enter a filename, thus making it easier to find the
scanned document on the SharePoint site. You could also use the
File name prefix field on the Configuration window to add a prefix to
your files for easy identification.
• If you frequently scan to different SharePoint sites or folders, you
may want to set up a shortcut for each SharePoint destination.
• The standard SharePoint limits for maximum file size and maximum
length of the file name will apply to any electronic files uploaded to
SharePoint.
A-61629 October 2009 15
Page 17

Smart Touch SharePoint tool
The Smart Touch SharePoint tool allows you to check the status of
scanned files being uploaded to the SharePoint server by Smart Touch.
Smart Touch maintains a log file (.txt) that has the status of all
SharePoint jobs.
The Smart Touch SharePoint tool is available in the system tray once
you have initiated a job to SharePoint. The tool icon is available in the
System Tray until you exit the tool.
NOTE: If you are scanning many files to SharePoint, you may want to
leave the Status window open so you can easily monitor the
status of the files as they are being uploaded.
• Click the Smart Touch SharePoint tool icon to display the options.
From the tool you can:
- Click Status to display the progress of the current scan job.
NOTE: To close the Status window, click on the in the window.
- Click Show log to view the log file.
- Click Clear log to remove all information about the previous scan
jobs from the log file.
- Click About which provides information about the Smart Touch
SharePoint tool.
- Click Exit to close the Smart Touch SharePoint tool. If you exit
the tool while a file is being uploaded the message, Uploading
files in process. Are you sure you wish to stop uploading
and exit the application? will be displayed.
NOTE: Exiting the Smart Touch SharePoint tool while you have
other documents to scan to SharePoint may prevent the
files from uploading.
16 A-61629 October 2009
Page 18

Possible error conditions The following conditions may occur and be posted to the error log while
Smart Touch is uploading a file to a SharePoint site.
Error Message Description Possible Solution
Invalid SharePoint site URL
format.
Invalid host or site name. The server hostname or SharePoint site or sub-
Unauthorized account or
invalid site name or folder
path.
Invalid library or folder path
or filename conflict.
Unauthorized account or
invalid User Login or Password.
Upload to SharePoint failed
because of time out.
Unknown error. The document failed to upload for an undeter-
The entry in the SharePoint URL field is not correctly formatted.
site could not be found.
The user login may not be authorized to access
the SharePoint site, the site name could not be
found on the host, or the folder name may not
be correct.
The library name or folder name could not be
found on the server or a file with the same name
has already been checked in to the SharePoint
site and the site has been configured to require
documents to be checked out before they can
be edited.
The user login may not be authorized to access
the SharePoint site or the incorrect password
was entered.
The scanned file could not be uploaded to the
SharePoint server before the connection timed
out. This may occur when uploading very large
files.
mined reason.
This may also occur if Smart Touch cannot
establish a connection with the SharePoint site.
Make sure the syntax is correct and
the required parts of the path to the
SharePoint site are provided.
Make sure that the hostname, site
and subsite names are correct.
• Make sure the user login and
password are correct. You may
also need to contact your System
Administrator to make sure you
have permission to access the
SharePoint site.
• Make sure that the site name and
folder name are correct.
• Make sure the library and folder
names are correct.
• Change the filename that Smart
Touch is using for the scanned
image to a unique filename.
Make sure the user login and password are correct. You may also
need to contact your System
Administrator to make sure you
have permission to access the
SharePoint site.
Change the Scan As scanner settings so that a smaller file is created
or separate the pages to scan as
multiple documents.
Check all of the Smart Touch
SharePoint settings to make sure
they are correct.
NOTES:
• If you are having trouble uploading files, make sure you can access
the SharePoint site using an internet browser. If the SharePoint
server is not working or there is a problem with the network
connection between your PC and the SharePoint server, Smart
Touch will not be able to upload files.
• Special characters that appear in the SharePoint URL when using an
internet browser should be replaced by the corresponding character
in the Smart Touch SharePoint Site URL field. For example, “%20” in
a browser URL should be replaced by a blank space in the Smart
Touch SharePoint Site URL field.
A-61629 October 2009 17
Page 19

Printing a Smart Touch Shortcut Index
Once you have customized your function numbers and tasks, you may
want to print a Shortcut Index of your task list and put it in the sleeve on
your scanner for easy access.
To create a Shortcut Index:
1. Right-click on the Scanner icon in the system tray to display the
function list and select Print. The Print Smart Touch Shortcuts Index
dialog box will be displayed
2. If desired, click the Settings button to change the printer.
3. Check Print multiple labels on one sheet if you want to print more
than one label on a sheet of paper. If you check this option, select
the number of Columns and Rows to equal the number of labels
you would like to print. Up to 6 labels per page can be printed.
4. If desired, click Preview to see how your labels will be printed.
5. Click Print.
18 A-61629 October 2009
Page 20

Smart Touch Edit window
The Smart Touch Edit window allows you to view the scanned images
before sending them to the final destination. As documents are
scanned, the images will be displayed in the Edit window.
From this window you can perform common editing tasks such as,
rotating and deleting blank pages, etc. When finished, click Done to
send the images to the final destination.
To enable the Edit window, check the Edit images prior to sending
option on the Configuration window for the function you are configuring.
A-61629 October 2009 19
Page 21

These icons are available on the Edit window . To use a tool, click on the
icon to select the tool, then apply it to the desired image.
Start — allows you to scan additional documents and append
them to the current images.
Stop — cancels the scanning of docu m ents.
Done — click this icon when you have finished viewing or editing
the images and you want to send them to the destination.
Tools
Magnifier— magnifies a portion of the image. Press and hold
the left mouse button inside an image to magnify it. Dra g the tool
across the image to magnify different areas of the image.
Pan — allows you to move the image freely around the window.
Use this tool inside an image when the entire image is not visible
in the display window, for exampl e after zooming in.
Rotate 90 — rotates the image 90 degrees to the right. Click
inside an image to rotate it.
Rotate 180 — rotates the image 180 degrees to the right. Click
inside an image to rotate it.
Rotate 270 — rotates the image 270 degrees to the right. Click
inside an image to rotate it.
Delete — deletes an image. Click inside and image to delete it.
A confirmation dialog box will be displayed before the image is
deleted.
Select Region — allows a rectangular region to be drawn in
each image. Use this tool with the Crop and Blank tools. Click on
the icon in the lower left corner of an image to remo ve (deselect)
the region.
Crop — crops the image, keeping only the portion of the image
inside the region. A confirmation dialog box will be displayed
before the image is cropped.
Blank — replaces the portion of the image insi de the region with
a white background. A confirmation dialog box will be displayed
before the image is modified.
More Editing Tools — these are tools and shortcuts to get
different views of the images, including tools to Zoom in and
Zoom out. Normally the shortcuts (i.e., hotkeys) would be used
for these tools. For example, use the + and - keys to zoom in
and zoom out on all images.
20 A-61629 October 2009
Page 22

Removing the
1. Click on the Scanner icon on the system tray.
Scanner icon from
the system tray
2. Select Remove Icon. The Remove Icon dialog box will be
displayed.
When you click Yes, you will close Smart Touch and remove the
Smart Touch icon from the system tray.
• If the checkbox is selected when you exit, Smart Touch will
restart automatically and appear in the system tray the next time
you login.
• If the checkbox is unchecked, Smart Touch will not be started on
subsequent logins. Administrator rights are required to change
this setting.
NOTES:
- Smart Touch can be started from the Program group by
selecting Star>Programs>Kodak>Document Imaging>
i1310,i1320 (or i1120, i1210,1220, i4200, i4600)>
Smart Touch.
- Smart Touch will also start automatically if you scan
documents using the Start button on the scanner.
A-61629 October 2009 21
Page 23

 Loading...