

Page 1

KODAK SCANZA
DIGITAL FILM SCANNER
User Manual
4.7"W | 4.7"H | 5"D (120 x 120 x 127mm)
Please read all directions before using the product and retain this guide for reference.
Page 2

2
Page 3

CONTENTS
INTRODUCTION
1
FEATURES
2
BOX CONTENTS
3
SAFETY PRECAUTIONS
4
TIPS
5
OPERATING INSTRUCTIONS
6
A. CONTROLS
B. PREPARING MEDIA TO SCAN
C. OPERATION
7
CAPTURE MODE
A. COLOR & BRIGHTNESS ADJUSTMENT
8
GALLERY MODE
A. ROTATE IMAGE
B. FLIP IMAGE
C. DELETE IMAGE
D. SLIDESHOW
9
SETTINGS
A. FILM TYPE
B. RESOLUTION
C. LCD BRIGHTNESS
D. USB UPLOAD
E. FILM TRAY
F. MEMORY
G. LANGUAGE
812
911
1315
1415
1826
1820
2021
2122
2223
2324
2425
2526
5
5
6
6
7
8
12
15
16
16
17
17
3
Page 4

SPECIFICATIONS
10
CUSTOMER SERVICE CONTACT INFORMATION
11
WARRANTY
12
26
27
2730
4
Page 5

1. INTRODUCTION
Thank you for purchasing the KODAK SCANZA Digital Film Scanner. This User
Guide is intended to provide you with guidelines to ensure that operation of
this product is safe and does not pose risks to the user. Any use that does not
conform to the guidelines described in this User Guide may void the limited
warranty.
This product is intended for household use only.
This product is covered by a limited warranty and is subject to conditions
and exclusions.
Easily convert your slides, negatives, and even Super 8 frames to digital
images that you can store and preserve. Save your treasured memories on
an SD™ card (not included), or to your computer. You can also directly connect
to a TV or HDTV to view images.
2. FEATURES
• Converts 35mm, 126, 110 and Super 8 and 8mm ilm negatives and slides
to JPEGS in seconds
• 14/22 megapixel resolution
• No computer or software required
• Adjustable scanning resolution, brightness and coloration
• Tilt-up 3.5" color TFT color LCD screen
• Saves images to SD memory card (not included) or computer
• Video-out for TV connection (TV and HDMI cables included)
• Convenient, easy-loading ilm and negative adapters and inserts
• MAC and PC compatible
5
Page 6

3. BOX CONTENTS
Digital ilm scanner Video cable AC adapter Warranty card
3 Adapter trays HDMI cable Cleaning brush
3 Inserts USB cable User guide
4. SAFETY PRECAUTIONS
• Important: Do not expose this product to liquids or high humidity.
• Do not handle this product with wet hands. Risk of electric shock.
• Warning: Do not attempt to disassemble or alter this unit. This device
contains no user-serviceable parts.
• Do not block any ventilation openings.
• Do not operate this device near heat sources such as radiators or stoves.
• When connecting the KODAK SCANZA Scanner directly to your computer,
be careful to not over load the USB connections. If you have too many
devices connected to your computer, such as a wireless mouse, media
player, mobile phone or other USB powered devices, there may not be
enough power for the product to function properly.
• Do not move or disconnect the device from the computer while the device is
reading/writing data. This may cause damage to the data and/or the device.
• Slides and negatives MUST be placed in the proper adapter tray and insert
before inserting them into the product. Failure to do so may result in losing
media inside the unit and will void the warranty. Resultant media loss is NOT
covered under warranty.
• Always turn o and unplug the device when it is not in use. Unplug the USB
cable from your computer and unplug the AC adapter from the socket.
With the exception of Slideshow in Playback or ile transfer in USB mode, this
unit will automatically power o after 10 minutes of inactivity.
6
Page 7

5. TIPS
• Place the scanner on a lat, stable surface with the LCD display facing you.
• Use the included cleaning brush to clean the backlight, adapter, or insert.
Insert the brush — CLEANING PAD SIDE DOWN — into the adapter opening
on the bottom of the unit. Gently wipe the inside bottom of the unit. Never
use alcohol, detergents, or abrasive cleaning agents to clean this device.
• Always remember to save your scanned image before inserting another slide
or negative into the scanner.
• For clear images, clean your ilm with a soft cloth or compressed air prior to
inserting it into the scanner.
• Negatives and slides should be inserted with the shiny side up. Super 8 ilm
should be inserted with the perforated holes facing up.
• Always handle ilms with care to avoid scratches or ingerprints.
• View your images on your TV. Simply connect the included video or HDMI
cable to the scanner and your TV. Note that when using this mode, the
screen on the ilm scanner will turn black. To reactivate the screen, the
HDMI cable will need to be unplugged.
7
Page 8
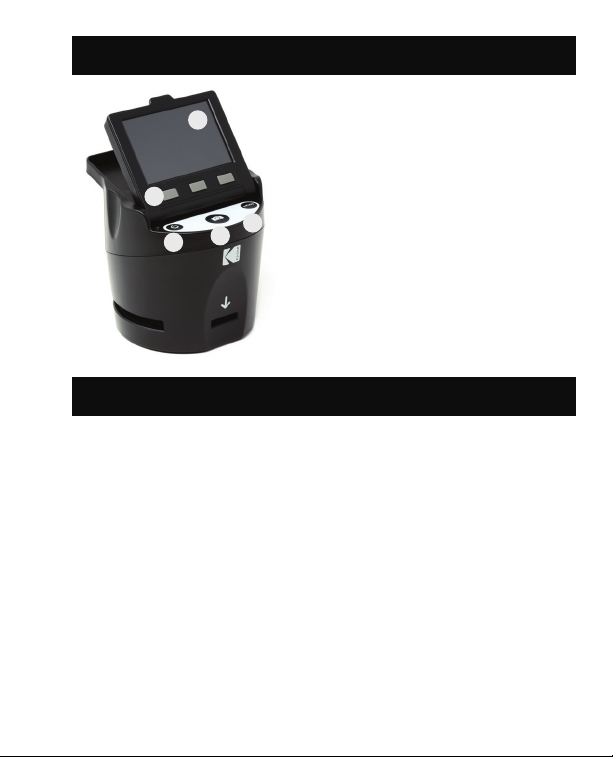
6. OPERATING INSTRUCTIONS
4
NOTE: Illustrations are for instructional
purposes only, and may be dierent
from the actual product.
1
3
2
1. Function Keys
2. Power On/O Button
5
3. Capture Button
4. Tilt-up LCD Screen
5. Home Button
6A. CONTROLS
1. Function keys (soft keys): The function is indicated by the text that will
appear on the screen above the corresponding key.
2. Power button: Press and hold to turn the device on and o.
3. Capture button: Captures the image or brings up the capture view screen.
4. Tilt-up LCD screen: Displays the image to be captured and scanned as well
as functions and menus.
5. Home button: Takes you to the Home screen.
8
Page 9

6B. PREPARING MEDIA TO SCAN
Before using your ilm scanner, you must insert an SDTM card (not included) or
the unit will not operate. There is no built-in memory.
Load your ilm/slide into the appropriate adapter and insert according
to the Tray Directory below. (Table can be found onscreen at
Home>Settings>Film Tray).
Each adapter tray and insert is clearly marked and numbered.
9
Page 10

TRAY DIRECTORY
FILM
TYPE
Negative Color Negative 135 No. 2 None
Slide Slide Positive 135 No. 1* None
Black &
White
*Note: Use adapter # 3 for slides with a thicker casing (plastic).
Use adapter # 1 for slides with a thin cardboard casing.
Slides 35mm 110 110 126 127
Mount 2"x2" 2"x2" 1"x1" 2"x2" 2"x2"
Film Size 24x36mm 13x17mm 13x17mm 28x28mm 40x40mm
FILM TYPE ADAPTER
NEEDED
Color Negative 126 No. 1 None
Color Negative 110 No. 2 No. 5
Slide Positive 126KPK No. 1* None
Slide Positive 110 No. 1* No. 6
Slide Positive Super 8 None No. 4
Slide Positive 8MM None No. 4
Black & White 135 No. 2 None
Black & White 126KPK No. 1 None
Black & White 110 No. 2 No. 5
INSERT
NEEDED
10
Page 11

Flip up the top cover of the adapter. Place
insert with your slide or ilm into adapter.
This ilm scanner features speed-load
adapters to make scanning easy and
straightforward. Simply push them into
the device until you hear a click, and
you can feed in slides or negatives one
after the other without needing to
remove and reload the adapters.
Note: When loading 8mm
ilm, always ensure that the
side ridges are facing to the
right side of the adapter,
towards where the
number is written.
11
Page 12

6C. OPERATION
Upon powering on, and before
displaying the HOME screen,
the screen displays the currently
selected ilm type, adapter, and
insert information for 5 seconds
and then brings up the capture
mode screen.
HOME SCREEN
The Home screen will appear when the unit is powered on, whenever
the Home button is pushed, and any time SAVE/EXIT is selected.
Note: There is a dierence
between SAVE/EXIT and
SAVE/BACK. SAVE/EXIT takes
you back to the Home screen.
SAVE/BACK takes you back to
the submenu you are using.
The Home screen features 3
submenus: Gallery, Capture,
and Settings.
Note: Anytime the capture button is pressed, the ilm scanner will automatically
enter Capture mode.
12
Page 13

7. CAPTURE MODE
1. Press the soft function key under
the Capture icon on the screen
to go to the capture mode. Your
loaded image will appear on the
LCD screen. The status bar on
the top, indicating the active
mode and settings, will disappear
after 15 seconds. Press any of the
function keys to bring back the
status bar.
• The underlined text indicates the highlighted setting. The highlighted
setting can be accessed by pressing the Select button.
• By selecting color adjustment, you will be taken to the settings menu to
adjust the color of the photo.
• By selecting Info, you will be taken to a screen that tells you which adapters
are needed for the current mode. If you wish to change the ilm type, you
will need to do so manually in the Film Type settings.
2. Press the hard Capture button (camera icon) to capture and save an image.
The screen will display “Saving.”
Note: An ERROR message will
appear if the SD™ card (not
included)
is full or if no memory card is
inserted into the unit.
Note: Pressing the soft keys will
activate the status bar, where you
can select color adjustment or
info. To return to capture mode,
select the camera icon on the status bar.
3. Press any function button to bring up the status bar at the top of the screen.
13
Page 14

4. The Color Adjustment screen
will appear.
• Press the right function key
(“Info”) to review your ilm type,
adapter and insert.
• Press the center function key
(“Select”) to adjust color
and brightness.
• Press the left function key to
return to the image and then
press “Select” to go back to
the capture mode.
7A. COLOR AND BRIGHTNESS ADJUSTMENT
To adjust brightness and color, press
the center soft function key (“Select”).
“Brightness” will be highlighted in
the status bar. Press the center key
(“Adjust”) to bring up the brightness
scale. Use the keys under the left <
and right > arrows to increase (>) or
decrease (<) the brightness.
Press the center key (“Save/Back”).
Choose the right function key
(down arrow) to scroll through
brightness and color settings.
There are 4 color adjustment settings:
R = Red G = Green B = Blue RESET = Default color and brightness setting
14
Home
Home
Page 15

For each setting (R, G, B) a scale will appear at the bottom of the screen. Press
the center function key (“Adjust”) to adjust each color, then press the function
keys under the decrease (–) and increase (+) symbols. Press the center key again
(“Save/Back”) to save your selection. Use the right key (down arrow) to navigate
each color setting.
Home Home Home
Note: The color adjustment resets to the default setting “0” after the ilm
scanner has been restarted.
8. GALLERY MODE
Press the Home button and then select the function key under “Gallery” to view
and edit your images.
Use the left < and right > function
keys to scroll through images.
To edit or delete an image, choose
the center function key (“Select”)
when that image appears on
the screen.
Press the function keys under
the right > symbol to navigate
the choices in the top status bar:
Rotate, Flip (>|<), Delete, and Slideshow.
Press the function key under “Select”
when you’ve made your choice.
Home
15
Page 16

8A . ROTATE
You can rotate the image left
or right.
To select an image to rotate:
1. Enter gallery mode as
described above.
2. Use the left < and right > function
keys to scroll through images.
3. To rotate the image, press the
center soft key (select). Then
press the right soft key to cycle
through the editing options listed
at the top of the screen (Rotate,
Flip (>|<), Delete, and Slideshow).
8B. FLIP IMAGE
Home
You can lip the image vertically
or horizontally.
Before
16
Home
After
Page 17

8C. DELETE
To delete an image, navigate the
top status bar to display the trash
can icon. Press the center function
key to “Select.” You will be asked
to conirm if you want to delete
that image.
8D. SLIDESHOW
View stored images in succession.
In the slideshow mode you can
pause (||) or play (>) by pressing
the center function key.
Home
Home
17
Page 18

9. SETTINGS MODE
From the Home screen, select
Settings by pressing the soft
function key under the
Settings icon.
Press the corresponding soft
function key under the left < and
right > arrow symbols to scroll
through the settings:
• Film Type
• Resolution
• LCD Brightness
• USB Upload
• Film Tray
• Memory
• Language
Press the soft function key under any of the icons that appear on the screen
to enter that function’s submenu.
Home
9A. FILM TYPE
Negative: 135, 110, 126
Slides: 135, 110, 126, SUPER8, 8MM
B&W: 135, 110, 126
18
Page 19

1. Choose one of the 3 ilm types by pressing the center function key (“Select”).
Choose Back to return to the Settings menu.
Home Home
2. For each ilm type, select the ilm size.
Home Home
19
Page 20

3. Once the ilm type and size are
selected, a conirmation screen
will appear with directions. Press
Save/Exit to save and return to
the Home screen.
4. Repeat the process to change
ilm types or sizes.
From the Settings menu, continue
to select additional settings from
the submenus. Press the function
key under “Save/Exit” after
each selection.
Note: Selecting “Save/Exit” will redirect
you back to the Home screen.
9B. RESOLUTION
1. Select Resolution from the
settings menu.
2. You can choose between the
standard 14-megapixel scan,
or enable the built-in software
interpolation, which, through a
specialized algorithm, enhances
the image quality to 22
megapixels.
Cycle between these 2 options
using the arrow keys.
Home
Home
20
Page 21

3. Select the desired setting by
pressing the Save/Exit button.
Note: This will then take you
back to the Home screen.
4. To go to the previous slide, press
the Back button.
9C. LCD BRIGHTNESS
1. Select LCD Brightness from the
settings menu.
2. Use the + and – keys to adjust the
brightness of the LCD screen.
Home
Home
21
Page 22

3. To conirm your selection, press
the Save/Exit button.
Note: This will then take you back
to the Home screen.
9D. USB UPLOAD
This mode will allow you to access
your SD™ card (not included)
from your computer. Note: While
connected to a computer, you will
be unable
to use the ilm scanner.
1. Use the included USB cable to
connect the scanner directly to
a computer.
2. Select USB Upload from the
settings menu.
Home
Home
22
Page 23

3. Wait for the scanner to connect to the computer. This may take a
few seconds. When connecting, your computer will recognize the scanner
as an external device.
4. When inished, press the disconnect button and then unplug the USB cable.
9E. FILM TRAY
1. Select Film Tray from the
settings menu.
Home
23
Page 24

2. From the Tray Directory, you will
be able to see which adapter you
need for each compatible ilm or
slide type.
Note: The ilm type cannot be
actively changed from the Tray
Directory. To change the ilm
type, select Film Type from the
Settings menu, as described in
section 9A of this user manual.
9F. MEMORY
1. Select Memory from the
settings menu.
Home
Home
24
Page 25

2. You will be able to see the
currently used and available
space on the inserted SD™ card
(not included).
The image count is approximate
and may not be an exact
relection of available space.
Note: This ilm scanner is not
equipped with internal memory
and an SD™ card (not included)
must be inserted in order to
save photos.
9G. LANGUAGE
1. Select Language from the
settings menu.
Home
Home
25
Page 26

2. Cycle through the available
languages using the arrow
buttons. To conirm your
selection, press the
Save/Exit button.
Note: This will redirect you
back to the Home screen.
Available languages include:
English Italian
German Spanish
French
Home
10. SPECIFICATIONS
Power source: AC adapter, USB DC5V output
Sensor: 14MP CMOS sensor
File format: JPEG
Resolution: 14MP/22MP interpolation
Supported ilm/negative types: 135mm, 126, 110, Super 8, 8mm
LCD: 3.5” TFT LCD
External memory: SD™/SDHC™ memory card (not included)
vInterfaces: USB (2.0) port, SD™ card slot, TV-out (3.5mm phone jack), HDMI
port
Dimensions: 4.7” x 4.7” x 5” (120 x 120 x 127mm)
Weight: 16.2 oz. (460g)
26
Page 27

11. CUSTOMER SERVICE CONTACT INFORMATION
Should you experience any problems with your product, please contact us
before returning the item to the place of purchase. We’re here to help!
U.S. Support: kodak@camarketing.com, 8445161539
International Support: kodakintl@camarketing.com, 8445161540
12. WARRANTY
LIMITED WARRANTY TO ORIGINAL CONSUMER
This KODAK SCANZA Digital Film Scanner (“Product”), including any accessories
included in the original packaging, as supplied and distributed new by an
authorized retailer is warranted by C&A Marketing, Inc. (the “Company”) to
the original consumer purchaser only, against certain defects in material and
workmanship (“Warranty”) as follows:
To receive Warranty service, the original consumer purchaser must contact
the Company or its authorized service provider for problem determination and
service procedures. Proof of purchase in the form of a bill of sale or receipted
invoice, evidencing that the Product is within the applicable Warranty period(s),
MUST be presented to the Company or its authorized service provider in order
to obtain the requested service.
Service options, parts availability, and response times may vary and may
change at any time. In accordance with applicable law, the Company may
require that you furnish additional documents and/or comply with registration
requirements before receiving warranty service. Please contact our customer
service for details on obtaining warranty service:
USA: kodak@camarketing.com, 8445161539
International: kodakintl@camarketing.com, +18445161540
Shipping expenses to the Company’s Return Facility are not covered by this
warranty, and must be paid by the consumer. The consumer likewise bears all
risk of loss or further damage to the Product until delivery to said facility.
27
Page 28

EXCLUSIONS AND LIMITATIONS
The Company warrants the Product against defects in materials and
workmanship under normal use for a period of ONE (1) YEAR from the date
of retail purchase by the original end-user purchaser (“Warranty Period”). If a
hardware defect arises and a valid claim is received within the Warranty Period,
the Company, at its sole option and to the extent permitted by law, will either
(1) repair the Product defect at no charge, using new or refurbished replacement
parts, (2) exchange the Product with a Product that is new or which has been
manufactured from new or serviceable used parts and is at least functionally
equivalent to the original device, or (3) refund the purchase price of the Product.
A replacement Product or part thereof shall enjoy the warranty of the original
Product for the remainder of the Warranty Period, or ninety (90) days from the
date of replacement or repair, whichever provides you longer protection. When
a Product or part is exchanged, any replacement item becomes your property,
while the replaced item becomes the Company’s property. Refunds can only be
given if the original Product is returned.
This Warranty does not apply to:
(a) Any non-KODAK SCANZA Digital Film Scanner product, hardware or
software, even if packaged or sold with the Product;
(b) Damage caused by use with non-KODAK SCANZA Digital Film
Scanner products;
(c) Damage caused by accident, abuse, misuse, lood, ire, earthquake, or other
external causes;
(d) Damage caused by operating the Product outside the permitted or intended
uses described by the Company;
(e) Damage caused by third party services;
(f) A Product or part that has been modiied to alter functionality or capability
without the written permission of the Company;
(g) Consumable parts, such as batteries, fuses and bulbs;
(h) Cosmetic damage; or
(i) If any KODAK SCANZA Digital Film Scanner serial number has been removed
or defaced.
28
Page 29

This Warranty is valid only in the country where the consumer purchased the
Product, and only applies to Products purchased and serviced in that country.
This Warranty does not cover images “burnt” into the screen.
The Company does not warrant that the operation of the Product will be
uninterrupted or error-free. The Company is not responsible for damage arising
from your failure to follow instructions relating to its use.
NOTWITHSTANDING ANYTHING TO THE CONTRARY AND TO THE MAXIMUM
EXTENT PERMITTED BY APPLICABLE LAW, THE COMPANY PROVIDES THE
PRODUCT “ASIS” AND “ASAVAILABLE” FOR YOUR CONVENIENCE AND THE
COMPANY AND ITS LICENSORS AND SUPPLIERS EXPRESSLY DISCLAIM ALL
WARRANTIES AND CONDITIONS, WHETHER EXPRESSED, IMPLIED, OR
STATUTORY, INCLUDING THE WARRANTIES OF MERCHANTABILITY, FITNESS
FOR A PARTICULAR PURPOSE, TITLE, QUIET ENJOYMENT, ACCURACY, AND
NONINFRINGEMENT OF THIRDPARTY RIGHTS. THE COMPANY DOES NOT
GUARANTEE ANY SPECIFIC RESULTS FROM THE USE OF THE PRODUCT, OR THAT
THE COMPANY WILL CONTINUE TO OFFER OR MAKE AVAILABLE THE PRODUCT
FOR ANY PARTICULAR LENGTH OF TIME. THE COMPANY FURTHER DISCLAIMS
ALL WARRANTIES AFTER THE EXPRESS WARRANTY PERIOD STATED ABOVE.
YOU USE THE PRODUCT AT YOUR OWN DISCRETION AND RISK. YOU WILL BE
SOLELY RESPONSIBLE FOR (AND THE COMPANY DISCLAIMS) ANY AND ALL
LOSS, LIABILITY, OR DAMAGES RESULTING FROM YOUR USE OF THE PRODUCT.
NO ADVICE OR INFORMATION, WHETHER ORAL OR WRITTEN, OBTAINED BY YOU
FROM THE COMPANY OR THROUGH ITS AUTHORIZED SERVICE
PROVIDERS SHALL CREATE ANY WARRANTY.
IN NO EVENT WILL THE COMPANY’S TOTAL CUMULATIVE LIABILITY ARISING
FROM OR RELATED TO THE PRODUCT, WHETHER IN CONTRACT OR TORT OR
OTHERWISE EXCEED THE FEES ACTUALLY PAID BY YOU TO THE COMPANY OR
ANY OF ITS AUTHORIZED RESELLERS FOR THE PRODUCT AT ISSUE IN THE LAST
YEAR FROM YOUR PURCHASE. THIS LIMITATION IS CUMULATIVE AND WILL NOT
BE INCREASED BY THE EXISTENCE OF MORE THAN ONE INCIDENT OR CLAIM.
THE COMPANY DISCLAIMS ALL LIABILITY OF ANY KIND OF ITS LICENSORS
AND SUPPLIERS. IN NO EVENT WILL THE COMPANY OR ITS LICENSORS,
MANUFACTURERS AND SUPPLIERS BE LIABLE FOR ANY INCIDENTAL, DIRECT,
INDIRECT, SPECIAL, PUNITIVE OR CONSEQUENTIAL DAMAGES (SUCH AS, BUT
29
Page 30

NOT LIMITED TO, DAMAGES FOR LOSS OF PROFITS, BUSINESS, SAVINGS,
DATA OR RECORDS) CAUSED BY THE USE, MISUSE OR INABILITY TO USE THE
PRODUCT.
Nothing in these terms shall attempt to exclude liability that cannot be excluded
under applicable law. Some countries, states or provinces do not allow the
exclusion or limitation of incidental or consequential damages or allow
limitations on warranties, so certain limitations or exclusions may not apply to
you. This warranty gives you speciic legal rights, and you may have other rights
that vary from state to state or province to province. Contact your authorized
retailer to determine if another warranty applies.
Kodak does NOT manufacture this Product or provide any Warranty or support.
Authorized KODAK Brand Licensee
C&A Marketing, Inc.
Distributed by: C&A Marketing, Inc.
30
Page 31

31
Page 32

www.kodakphotoplus.com
The Kodak trademark, logo and trade dress are used under license from Kodak.
SD is a trademark of SD3C LLC in the United States, other countries or both.
Mac is a trademark of Apple Inc., registered in the U.S. and other countries.
Distributed by: C&A Marketing, Inc., 114 Tived Lane East, Edison, NJ 08837 USA
C&A Marketing UK LTD, 167 Hermitage Road, Crusader Industrial Estate, London N4 1LZ, UK
©2017, C&A Marketing LTD. All Rights Reserved. Made in China.
 Loading...