

Page 1
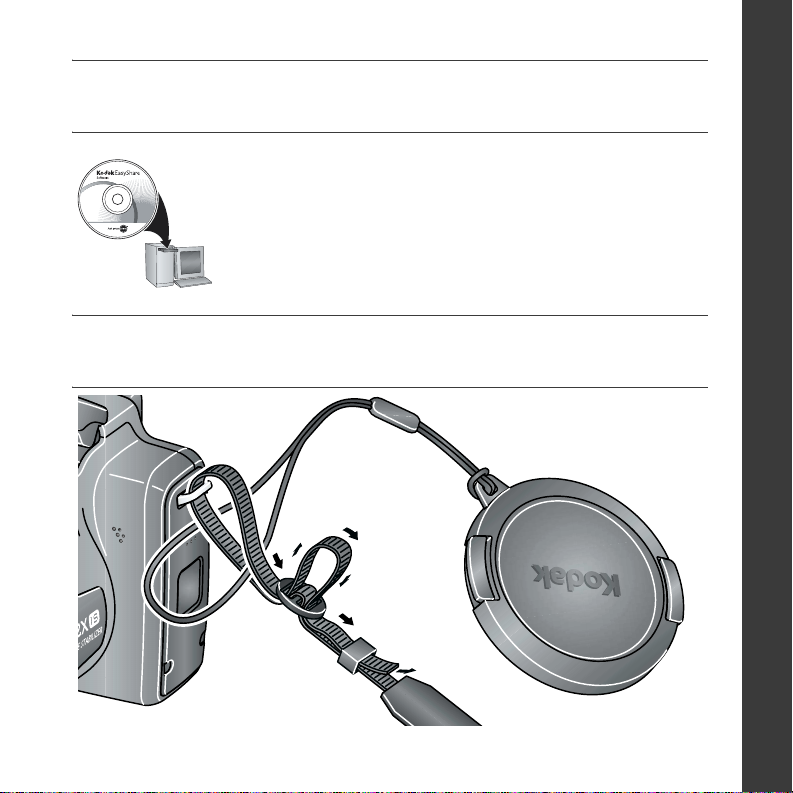
Installing the software
Before connecting any cables, install the software
that was included with your camera. Follow the
on-screen instructions.
After installing the software, return to this Getting
Started Guide.
Attaching the lens cap and strap
ENGLISH
www.kodak.com/go/z812support 1
Page 2
ENGLISH
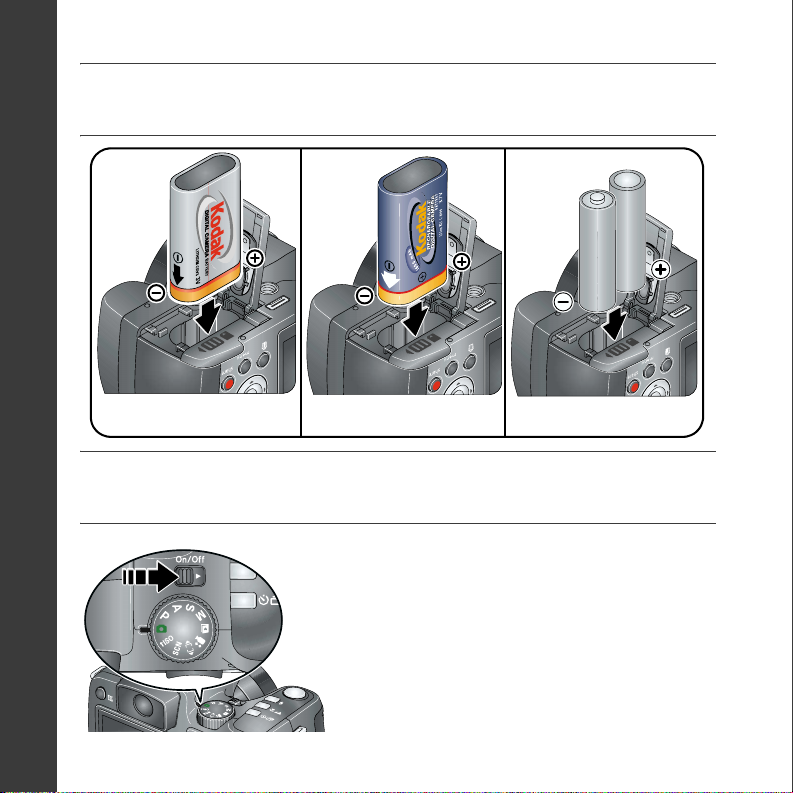
Loading the battery
Kodak lithium digital camera
battery CRV3 (non-rechargeable)
Kodak Li-Ion rechargeable digital
camera battery KLIC-8000
AA lithium batteries
Turning on the camera
2 www.kodak.com/go/easysharecenter
Page 3
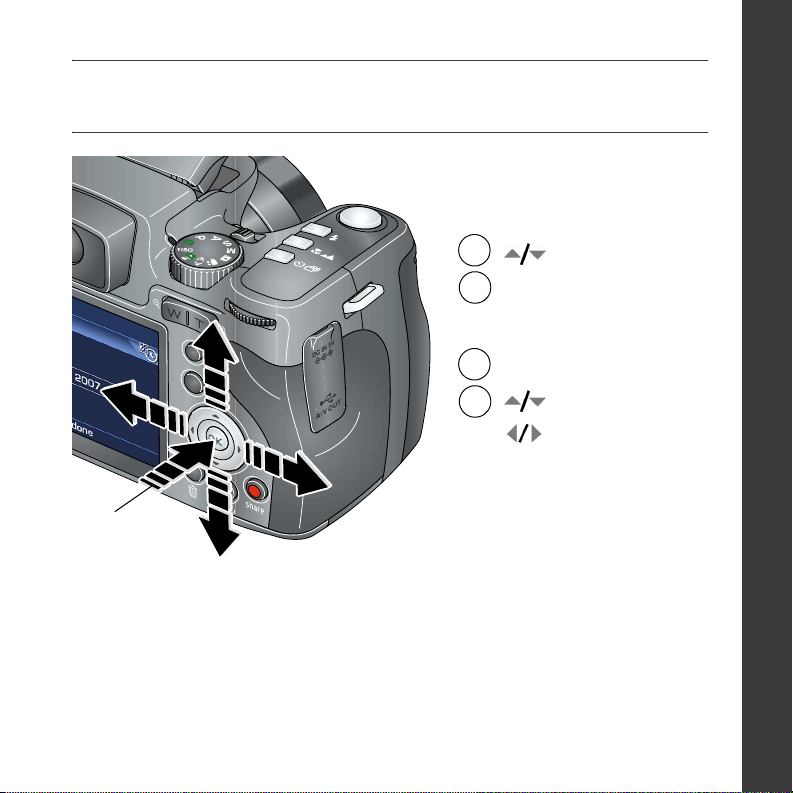
Setting the language, date/time
Language:
1
2
1
to change.
to accept.
OK
Date/Time:
At the prompt, press OK.
ENGLISH
2
OK
To update these settings in the future, see the User’s Guide at
www.kodak.com/go/z812support.
www.kodak.com/go/z812support 3
to change.
for previous/next field.
to accept.
OK
Page 4
ENGLISH
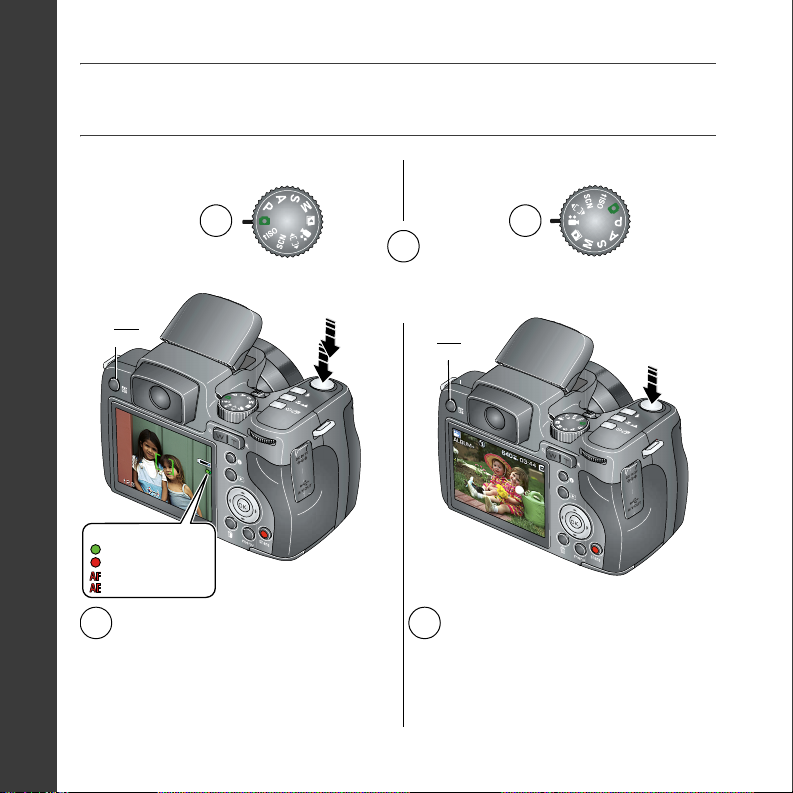
Taking a picture/video
Pictures Videos
1
1
2
Press the EVF/LCD button to turn on
LCD or EVF (electronic viewfinder).
EVF
LCD
AF/AE indicator:
Green—successful
Red—failed
Failed focus
Failed exposure
Press the Shutter button halfway
3
to focus and set exposure.
When the AF/AE indicator turns
green, press the Shutter button
EVF
LCD
Press the Shutter button
3
completely down, then release.
To stop recording, press and
release the Shutter button again.
completely down.
4 www.kodak.com/go/easysharecenter
Page 5
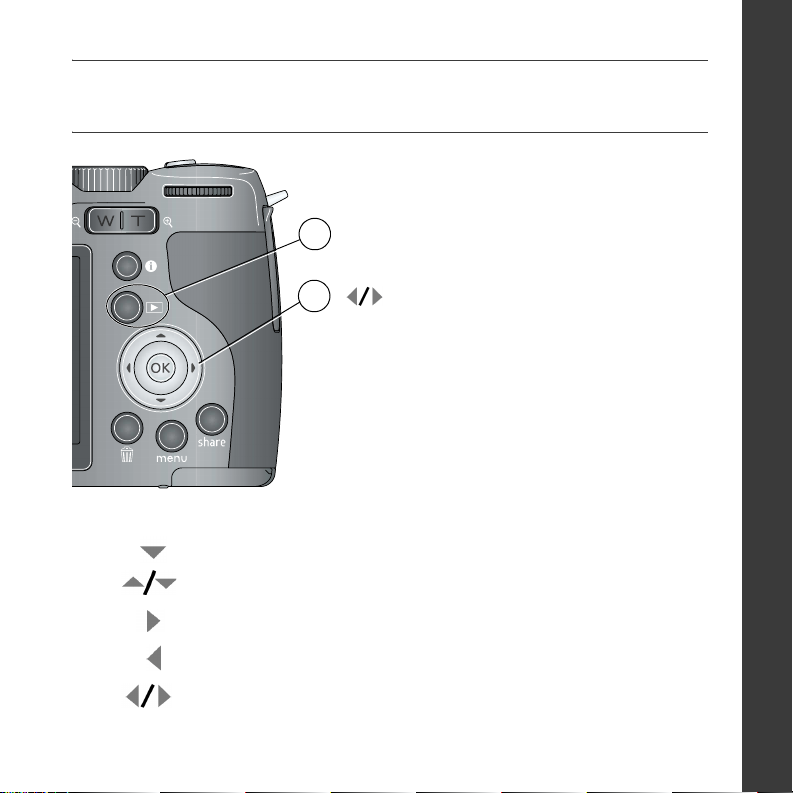
Reviewing pictures/videos
1
Press Review.
(Press again to exit.)
ENGLISH
2
Videos:
Play. (Press OK to pause/unpause.)
During playback to adjust the volume.
During playback to play at 2X speed; press again for 4X.
During playback to reverse at 2X speed; press again for 4X.
Press and hold for 4 seconds to jump to a bookmark.
www.kodak.com/go/z812support 5
for previous/next.
Page 6
ENGLISH
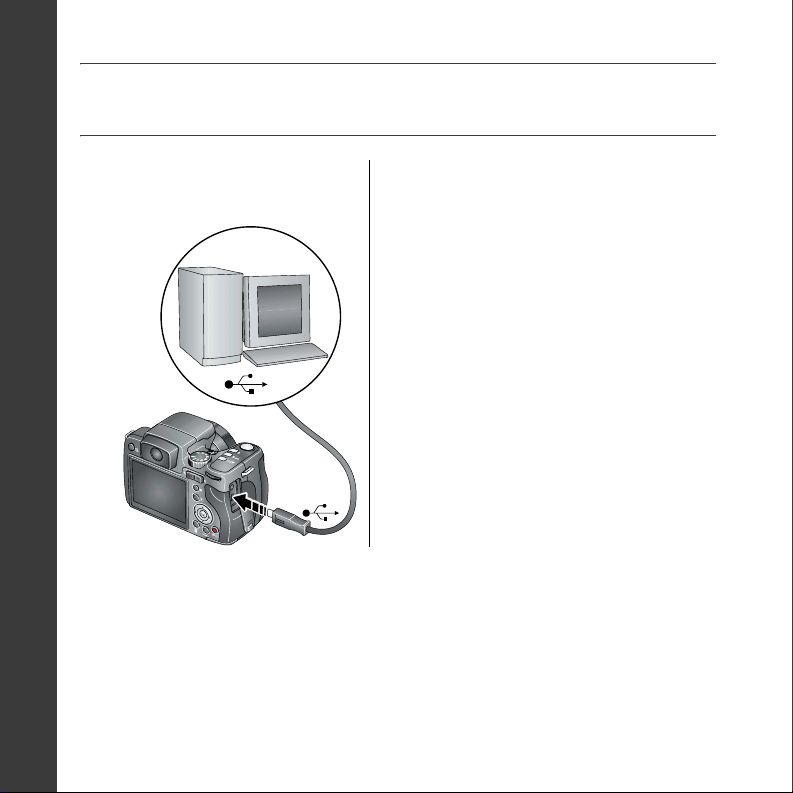
Transferring pictures/videos
USB cable (U-8)
(included)
6 www.kodak.com/go/easysharecenter
Kodak EasyShare printer
dock or camera dock
(May be sold separately.)
For dock compatibility, visit
www.kodak.com/go/dockcompatibility.
To purchase accessories, visit
www.kodak.com/go/z812accessories.
To use an EasyShare dock, see its
Getting Started Guide.
Page 7
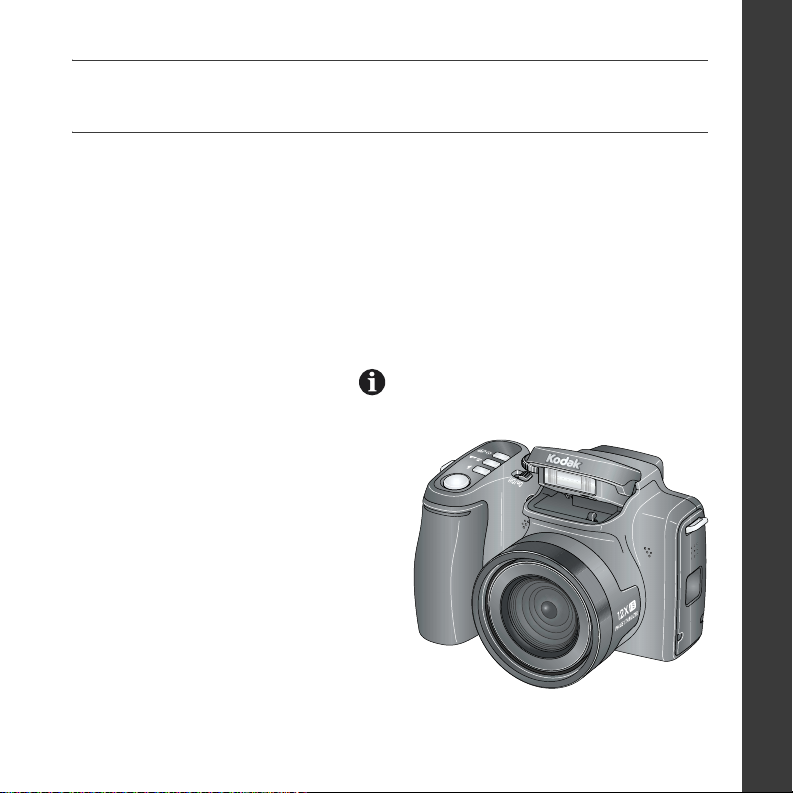
Keep learning about your camera!
Congratulations!
You have:
• set up your camera
• taken pictures
• transferred pictures to your computer
Keep learning!
Finish reading this book, so you can take and share your best pictures!
To better understand each menu option, use camera Help.
Highlight a menu choice, then press
Visit www.kodak.com/go/z812support for:
• the user’s guide
• interactive troubleshooting and repairs
• interactive tutorials
• FAQs
• downloads
• accessories
• printing information
• product registration
.
ENGLISH
www.kodak.com/go/z812support 7
Page 8

ENGLISH
Front view
9
8
10
7
6
1211
5
4
3
11
2
1
1 Lens 7 Drive button (Self-timer, Burst, Exposure
Bracketing)
2 Low-light assist, Self-timer light, Video light 8 Mode dial
3 Shutter button 9 On/Off switch
4 Flash button 10 Flash
5 Strap post 11 Microphones
6 Focus button (Close-up/Macro, Landscape,
Manual Focus)
12 Speaker
8 www.kodak.com/go/easysharecenter
Page 9
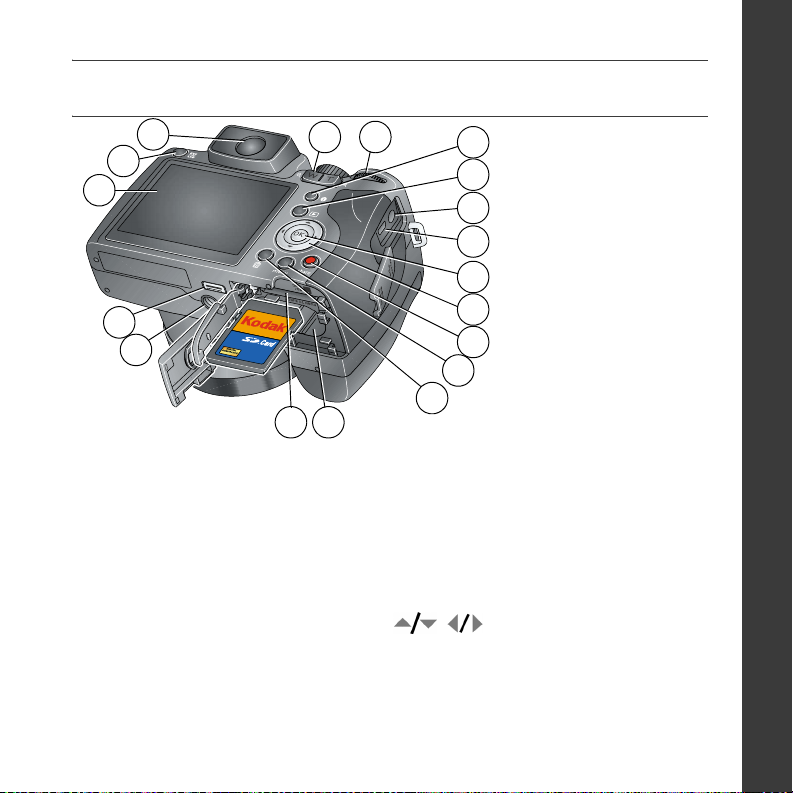
Back view
7
6
5
4
3
1 Battery compartment 10 Info button
2 Slot for optional SD card 11 Review button
3 Tripod socket 12 DC-In (3V) for optional AC adapter
4 Dock connector 13 USB, A/V Out
5 LCD 14 OK button
6 EVF/LCD button 15
7 EVF (Electronic viewfinder) 16 Share button
8 Zoom (Wide Angle/Telephoto) button 17 Menu button
9 Jog dial 18 Delete button
2 1
8
9
10
11
12
13
14
15
Note:
16
17
18
Before inserting/removing
an optional SD card, turn
off the camera.
ENGLISH
www.kodak.com/go/z812support 9
Page 10

1 Doing more with your camera
Using the 12X optical zoom
Use optical zoom to get closer to your subject.
1 Use the EVF or LCD to frame your subject.
2 Press Telephoto (T) and Wide Angle (W) to zoom
in/out.
NOTE: To get a focused picture every time, remember:
Zoom indicator
Optical
zoom
range
WT
Digital
zoom
range
D
Using digital zoom
Use digital zoom in any Still mode to get up to 4.2X magnification beyond optical
zoom. Press the Telephoto (T) button past the optical zoom limit (12X).
NOTE: You may notice decreased image quality when using digital zoom. The blue slider on the zoom
indicator pauses and turns red when the picture quality reaches the limit for an acceptable 4 x 6-in.
(10 x 15 cm) print. You cannot use digital zoom for video recording.
■ Always use the auto focus framing marks.
■ If you are using no zoom (1X, wide angle), you
can be as close as 24 in. (60 cm) to your subject.
(For Close-up/Macro mode, see
■ As you zoom in (up to 12X), you need to move
page 12).
further from your subject.
10 www.kodak.com/go/easysharecenter
Page 11

Doing more with your camera
Using the Flash button
Use the flash when you take pictures at night, indoors, or outdoors in heavy shadows.
Press the flash button repeatedly to scroll through
flash modes.
The current flash mode appears in the status area.
NOTE: If the flash is needed, it opens automatically when the Shutter
button is pressed halfway down.
Wide Angle: 1.6–25.6 ft (0.5–7.8 m)
Telephoto: 4–14.4 ft (1.2–4.4 m)
Mode Icon The flash fires
Auto
Flash
Off Never
Fill Every time you take a picture, regardless of the lighting conditions. Use
Red Eye If Red Eye Preflash is on, the flash fires twice. If Red Eye Preflash is off,
When the lighting conditions require it.
when the subject is in shadow or is “backlit” (when light is behind the
subject). In low light, hold the camera steady or use a tripod.
the camera corrects red eye without using an extra flash.
www.kodak.com/go/z812support 11
Page 12

Doing more with your camera
Using the Focus button
Press the Focus button to have more control over camera focusing.
1 Turn the Mode dial to P, A, S, or M mode (see
page 18).
Close-up/Macro,
Landscape,
Manual
Mode Icon Purpose Details
Close-up/
Macro
Landscape For distant
Manual
Focus
Normal (none) For auto
For pictures
in close range
scenes
MF To control
focusing
focus
2 Press the Focus button repeatedly until the , ,
or MF icon appears in the status area.
NOTE: After you take the picture, the camera stays in the
Close-up/Macro, Landscape, or Manual Focus setting. To exit,
press the
Use available light instead of flash if possible. Camera
automatically sets the focus distance depending on the
zoom position:
Wide angle: 4.7–27.6 in. (12–70 cm)
Telephoto: 2–4.3 ft (0.6–1.3 m)
Camera uses infinity auto-focus. Auto-focus framing marks
are not available in Landscape.
Press to view 2X magnification of the central area of
focus. During magnification, press to adjust focal
length. Digital zoom is not available in manual focus mode.
The camera focuses when the Shutter button is pressed
halfway down.
button until the icon turns off.
12 www.kodak.com/go/easysharecenter
Page 13

Doing more with your camera
Using the Drive button
Mode Icon(s) Purpose
Self-timer See Using the self-timer
Burst See page 14
Exposure Bracketing See page 14
Normal (none) Normal picture taking
Using the self-timer
10
1
2
3
4
2
2X
Place camera on a tripod or flat surface.
In any Still mode, press the Drive button.
• Once for a 10-sec. delay (so you have time to get into the scene)
• Again for a 2-sec. delay (for a steady, shutter release on a tripod)
• Again for 2 pictures (after a 10- and 18-second delay)
Compose the scene.
Press the Shutter button halfway, then completely down.
The picture is taken after the delay.
To cancel the Self-timer before the picture is taken, press the Drive button. (The
Self-timer setting remains active.)
www.kodak.com/go/z812support 13
Page 14

Doing more with your camera
Using burst
Press the Drive button to choose a burst mode.
Mode Icon Description Purpose
First
Burst
Camera takes up to 5 pictures while the Shutter
button is pressed.
Capture an expected event.
Example: A person
swinging a golf club.
Last
Burst
Camera takes up to 30 pictures while the Shutter
button is pressed. When the Shutter button is
released, only the last 5 pictures are saved.
Capture an event when the
precise timing is uncertain.
Example: A child blowing
out birthday candles.
Using exposure bracketing
Use exposure bracketing to determine the best exposure (light) level for your conditions.
During exposure bracketing, the camera takes 3 pictures:
■ One at + (above current) exposure
■ One at 0 (normal) exposure
■ One at - (below current) exposure
Evaluate the 3 pictures, and decide which exposure level is right for you. (Exposure
bracketing is not available in all modes.)
14 www.kodak.com/go/easysharecenter
Page 15

Doing more with your camera
Using the Info button
Repeatedly press info In To turn on/off
picture-taking mode status icons, histogram
review mode status icons, histogram, and
Info
any menu Help
What the capture icons mean
Capture modes—no buttons pressed
Focu s
Date stamp
Mode
Album name
AF control
setting
Aperture
Flash
Drive
picture/video information
Picture/video size
Compression
Pictures/time remaining
Storage location
Zoom
Low battery
AF zone
Exposure metering
White Balance
Image stabilization
ISO
Flash compensation
Shutter speed
Exposure compensation
www.kodak.com/go/z812support 15
Page 16

Doing more with your camera
Capture modes
Choose the mode that best suits your
subjects and surroundings.
Capture mode For
Smart
Scene
P, A, S, M More creative control. (See page 18.) Program, Aperture Priority,
Favorites Viewing favorite pictures.
Video Video with sound.
Scene Point-and-shoot simplicity when taking pictures under special
High-ISO People in low-light scenes.
ISO
General picture taking—offers an excellent balance of image quality
and ease of use. When the Shutter button is pressed halfway, faces are
detected, the scene is analyzed, and the best settings are applied.
Shutter Priority, and Manual mode.
conditions. (See
page 17.)
Panorama “Stitching” 2 or 3 pictures into 1 panoramic scene.
16 www.kodak.com/go/easysharecenter
Page 17

Doing more with your camera
SCN (Scene) modes
1 Turn the Mode dial to .
2 Press to highlight a SCN mode and view its description.
NOTE: If the SCN mode description turns off, press OK.
3 To choose the SCN mode, either press OK or keep that SCN mode highlighted.
Using the Menu button
You can change settings to get the best results from your camera.
NOTE: Some settings remain until you change them; others, until you change modes or turn off the camera.
Some modes offer limited settings.
1 Press the Menu button.
2 Press to highlight a tab:
■ Capture for the most common picture-taking settings
■ Capture Plus for other picture-taking settings
■ Video for video settings
■ Setup for other camera settings
3 Press to highlight a setting, then press OK.
4 Highlight an option, then press OK.
NOTE: To better understand each menu option, press the Info button (see page 15).
www.kodak.com/go/z812support 17
Page 18

Doing more with your camera
P, A, S, and M modes
Use these modes when you want more control over your camera and pictures.
Mode Benefits Press Jog dial to control
Program
Aperture
Priority
Offers the ease of auto shooting with full access to all
menu options. Automatically sets the shutter speed
and aperture (f-stop) based on lighting.
Controls depth of field (the range of sharpness). The
aperture setting may be affected by optical zoom.
Exposure compensation (how
much light enters the camera),
flash compensation, and ISO
Aperture, exposure
compensation, flash
compensation, and ISO
Shutter
Priority
Manual
Prevents blur when your subject is moving. The camera
automatically sets the aperture for proper exposure.
(To prevent blur, use a tripod for slow shutter speeds.)
Offers the highest level of creative control. (To prevent
blur, use a tripod for slow shutter speeds.)
Jog dial:
• Turn to access a setting.
• Press to unlock the setting.
• Turn to edit the setting.
• Press to lock the setting.
Shutter speed, exposure
compensation, flash
compensation, and ISO
Aperture, shutter speed, flash
compensation, and ISO
NOTE: Settings you change in P, A, S, or M modes apply only to pictures taken in those modes. The settings,
including Flash, are maintained for P, A, S, and M modes—even when you change modes or turn off
the camera. Use Reset Camera to reset P, A, S, or M mode to its default setting.
18 www.kodak.com/go/easysharecenter
Page 19

Changing P, A, S, or M mode settings
Doing more with your camera
PAS M Opt i ons
White—selectable
ISO
Grey—non-selectable
Yellow—changeable value
Red—out of range
Aperture Shutter
speed
Exposure
compensation
Flash
compensation
ISO—adjust the camera’s sensitivity to light. Higher ISO indicates greater sensitivity.
NOTE: A higher ISO may produce unwanted “noise” in a picture. ISO 3200 and 6400 are available only in
2.2, 2.1, and 1.2 MP picture sizes.
Flash Compensation—adjust flash brightness.
Exposure Compensation—adjust the exposure. If the picture is too light, decrease
the setting; if it’s too dark, increase the setting.
Shutter speed—control how long the shutter stays open. A shaking hand icon
warns of slow shutter speeds. (Use a tripod for slow shutter speeds.)
Aperture—(also known as f-stop) control the size of the lens opening, which
determines the depth of field.
■ Smaller f-stop numbers indicate a larger lens opening; good for low-light.
■ Larger f-stop numbers indicate a smaller lens opening; keeps the main subject
sharp; good for landscapes and well-lit conditions.
www.kodak.com/go/z812support 19
Page 20

2 Working with pictures/videos
Magnifying a picture
Press Review.
1
Magnify 1X - 8X.
T
2
View other parts of the picture.
3
Deleting pictures and videos
Press Review.
1
Return to 1X.W
2
3
4
View previous/next.
Press Delete.
Follow the screen prompts.
Using the undo delete feature
If you accidentally delete a picture/video, you may be able to use Undo Delete to
retrieve it. This feature is only available immediately after you delete a picture/video.
20 www.kodak.com/go/easysharecenter
Page 21

Working with pictures/videos
Viewing pictures as multi-up thumbnails
1 Press the Review button.
2 Press the Zoom Wide Angle (W) button to change
from single-picture view to multi-up thumbnails.
3 Press Telephoto (T) to return to single-picture view.
■ To select multiple pictures/videos, see page 21.
■ Press the Review button to exit Review.
Selecting multiple pictures/videos
Use the multi-select feature when you have two or more pictures/videos to print,
transfer, or delete. (Multi-select is used most effectively in Multi-Up mode.)
1 Press the Review button, then to find a
picture/video.
2 Press OK to select pictures/videos.
A check mark appears on the picture. You can now print,
Selected
pictures
email, copy, protect, delete, or run a slide show of the
selected pictures. You can press OK a second time to
remove a check mark.
www.kodak.com/go/z812support 21
Page 22

3 Solving camera problems
For step-by-step product support, visit www.kodak.com/go/z812support and select
Interactive Troubleshooting & Repairs.
If Try one or more of the following
Camera does not
turn on
Battery life is short ■ Make sure the correct battery type is installed (page 2).
You cannot take a
picture
■ Insert a new or charged battery.
■ If practical, connect the camera to a Kodak 3-volt AC adapter
(sold separately), then try again.
■ Wipe the contacts with a clean, dry cloth before inserting a
battery in the camera.
■ Insert a new or charged battery (page 2).
■ Turn camera off, then on again. Make sure the camera is not in
Favorites mode. If prompted, set language and date/time.
■ Press Shutter button all the way down.
■ Insert a new or charged battery (page 2).
■ Wait until the AF/AE indicator turns green before attempting to
take another picture.
■ Memory full. Transfer pictures to the computer (page 6), delete
pictures (page 20), change image storage location, or insert
another card.
22 www.kodak.com/go/easysharecenter
Page 23

4 Appendix
Important safety instructions
CAUTION:
Do not disassemble this product; there are no user-serviceable parts inside. Refer servicing to
qualified service personnel. Kodak AC adapters and battery chargers are intended for indoor use
only. The use of controls, adjustments, or procedures other than those specified herein may
result in exposure to shock and/or electrical or mechanical hazards. If the LCD breaks, do not
touch the glass or liquid. Contact Kodak customer support.
■ The use of an accessory that is not recommended by Kodak may cause fire, electric shock, or injury. For
approved accessories, visit
■ Use only a USB-certified computer equipped with a current-limiting motherboard. Contact your computer
manufacturer if you have questions.
■ If using this product in an airplane, observe all instructions of the airline.
■ Follow all warnings and instructions supplied by the battery manufacturer.
■ Use only batteries approved for this product to avoid risk of explosion.
■ Keep batteries out of the reach of children.
■ Do not allow batteries to touch metal objects, including coins. Otherwise, a battery may short circuit,
discharge energy, become hot, or leak.
■ Do not disassemble, install backward, or expose batteries to liquid, moisture, fire, or extreme temperature.
■ Remove the battery when the product is stored for an extended period of time. In the unlikely event that
battery fluid leaks inside the product, contact Kodak customer support.
■ In the unlikely event that battery fluid leaks onto your skin, wash immediately with water and contact your
local health provider. For additional health-related information, contact your local Kodak customer support.
■ Dispose of batteries according to local and national regulations. Visit www.kodak.com/go/kes.
■ Do not charge non-rechargeable batteries. Visit www.kodak.com/go/batterytypes. For digital camera
disposal or recycling information, contact your local authorities. In the US, visit the Electronics Industry
Alliance Web site at
www.kodak.com/go/accessories.
www.eiae.org.
www.kodak.com/go/z812support 23
Page 24

Appendix
Upgrading your software and firmware
Download the latest versions of the software included on the Kodak EasyShare software CD and the camera
firmware (the software that runs on the camera). See
Limited warranty
Kodak warrants Kodak consumer electronic products and accessories (“Products”), excluding batteries, to be
free from malfunctions and defects in both materials and workmanship for one year from the date of purchase.
Retain the original dated sales receipt. Proof of the date of purchase will be required with any request for
warranty repair.
Limited warranty coverage
Warranty service is only available from within the country where the Products were originally purchased. You
may be required to ship Products, at your expense, to the authorized service facility for the country where the
Products were purchased. Kodak will repair or replace Products if they fail to function properly during the
warranty period, subject to any conditions and/or limitations stated herein. Warranty service will include all
labor as well as any necessary adjustments and/or replacement parts. If Kodak is unable to repair or replace a
Product, Kodak will, at its option, refund the purchase price paid for the Product provided the Product has been
returned to Kodak along with proof of the purchase price paid. Repair, replacement, or refund of the purchase
price are the sole remedies under the warranty. If replacement parts are used in making repairs, those parts may
be remanufactured, or may contain remanufactured materials. If it is necessary to replace the entire Product, it
may be replaced with a remanufactured Product. Remanufactured Products, parts and materials are warranted
for the remaining warranty term of the original Product, or 90 days after the date of repair or replacement,
whichever is longer.
Limitations
This warranty does not cover circumstances beyond Kodak's control. This warranty does not apply when failure
is due to shipping damage, accident, alteration, modification, unauthorized service, misuse, abuse, use with
incompatible accessories or attachments (such as third party ink or ink tanks), failure to follow Kodak's
operation, maintenance or repacking instructions, failure to use items supplied by Kodak (such as adapters and
cables), or claims made after the duration of this warranty. Kodak makes no other express or implied warranty
for this product, and disclaims the implied warranties of merchantability and fitness for a particular purpose. In
the event that the exclusion of any implied warranty is ineffective under the law, the duration of the implied
warranty will be one year from the purchase date or such longer period as required by law. The option of repair,
replacement, or refund is Kodak's only obligation. Kodak will not be responsible for any special, consequential
www.kodak.com/go/z812downloads.
24 www.kodak.com/go/easysharecenter
Page 25

Appendix
or incidental damages resulting from the sale, purchase, or use of this product regardless of the cause. Liability
for any special, consequential or incidental damages (including but not limited to loss of revenue or profit,
downtime costs, loss of the use of the equipment, cost of substitute equipment, facilities or services, or claims
of your customers for such damages resulting from the purchase, use, or failure of the Product), regardless of
cause or for breach of any written or implied warranty is expressly disclaimed.
Your rights
Some states or jurisdictions do not allow exclusion or limitation of incidental or consequential damages, so the
above limitation or exclusion may not apply to you. Some states or jurisdictions do not allow limitations on how
long an implied warranty lasts, so the above limitation may not apply to you. This warranty gives you specific
rights, and you may have other rights which vary from state to state or by jurisdiction.
Outside the United States and Canada
In countries other than the United States and Canada, the terms and conditions of this warranty may be
different. Unless a specific Kodak warranty is communicated to the purchaser in writing by a Kodak company,
no warranty or liability exists beyond any minimum requirements imposed by law, even though defect, damage,
or loss may be by negligence or other act.
FCC compliance and advisory
Kodak EasyShare Z812 IS zoom digital camera
This equipment has been tested and found to comply with the limits for a Class B digital device, pursuant to
Part 15 of the FCC Rules. These limits are designed to provide reasonable protection against harmful
interference in a residential installation.
This equipment generates, uses, and can radiate radio frequency energy and, if not installed or used in
accordance with the instructions, may cause harmful interference to radio communications. However, there is
no guarantee that interference will not occur in a particular installation.
If this equipment does cause harmful interference to radio or television reception, which can be determined by
turning the equipment off and on, the user is encouraged to try to correct the interference by one or more of the
following measures: 1) reorient or relocate the receiving antenna; 2) increase the separation between the
equipment and the receiver; 3) connect the equipment to an outlet on a circuit different from that to which the
receiver is connected; 4) consult the dealer or an experienced radio/TV technician for additional suggestions.
Any changes or modifications not expressly approved by the party responsible for compliance could void the
www.kodak.com/go/z812support 25
Page 26

Appendix
user’s authority to operate the equipment. Where shielded interface cables have been provided with the
product or specified additional components or accessories elsewhere defined to be used with the installation of
the product, they must be used in order to ensure compliance with FCC regulation.
MPEG-4
Use of this product in any manner that complies with the MPEG-4 visual standard is prohibited, except for use
by a consumer engaging in personal and non-commercial activities.
Waste Electrical and Electronic Equipment labeling
In Europe: For human/environmental protection, it is your responsibility to
dispose of this equipment at a collection facility established for this purpose
(separate from municipal waste). For more information, contact your retailer,
collection facility, or appropriate local authorities; or visit
www.kodak.com/go/recycle. (Product weight: 330 g.)
Australian C-Tick
N137
Canadian DOC statement
DOC Class B Compliance—This Class B digital apparatus complies with Canadian ICES-003.
Observation des normes-Classe B—Cet appareil numérique de la classe B est conforme à la norme
NMB-003 du Canada.
Korean Class B ITE
26 www.kodak.com/go/easysharecenter
Page 27

Appendix
China RoHS
VCCI Class B ITE
Russian GOST-R
Eastman Kodak Company
Rochester, NY 14650
AIO-40
Eastman Kodak Company
Rochester, New York 14650
© Eastman Kodak Company, 2007
Kodak and EasyShare are trademarks of Eastman Kodak Company.
2F6566_en
www.kodak.com/go/z812support 27
 Loading...