

Page 1

Aberdeenshire Council ASPECTS Training
e
Education & Recreation Kodak DX4330 Digital Camera D32
G Bruce, 2003
Simplified Guide
to Using the Camera.
ASPECTS
Aberdeenshire Spe cial Technology Servic
Please note that these materials were primarily created to accompany ‘hands on’ training for
Aberdeenshire Teaching Staff . They may be freely copied and distributed within the authority. (This
Other parties wishing to use the materials should not do so without prior consent from ASPECTS.
extends to parents and professionals involved with Aberdeenshire children.)
Page 1 of 13
Page 2

Aberdeenshire Council ASPECTS Training
Education & Recreation Kodak DX4330 Digital Camera D32
G Bruce, 2003
1. What does the camera do?
Takes still photos and short videos…..
The DX4330 is a good quality digital camera, which takes ‘normal’ still
photos as well as (very!) short videos.
Uses a ‘docking station’ for quick, simple downloading…..
It is part of a system which Kodak call ‘Easyshare’ and by using the
docking station it is extremely simple to download the pictures into the
computer, just by standing the camera on the station. While it is left
sitting there, the batteries also recharge. It’s the ‘cordless kettle’ of the
digital camera world!
2.
Can also use removable memory cards for greater
flexibility…..
Pictures are normally stored inside the camera’s memory until you are
ready to download, however, the DX4330 also has the option of using
memory cards. These work like a removable film in a ‘normal’ camera.
They can sometimes be a handy idea for schools, because each class can
have its own card. The card can be taken out and kept safe while another
class takes off with the camera. When it comes to downloading, the class
can either wait until the camera is free again or use a ‘card reader’ .
3. How do I take photos?
Before starting, take a close look at the camera to see what everything
does. The controls you’re likely to use a lot take the form of push buttons
or a knob, whereas the ‘once in a lifetime’ settings are hidden away in
menus that you access on the screen at the back.
The following instructions assume that the camera has a battery in and
all the ‘menu’ options have already been set up.
Page 2 of 13
Page 3
Aberdeenshire Council ASPECTS Training
Education & Recreation Kodak DX4330 Digital Camera D32
G Bruce, 2003
4. Turn the ‘Mode Dial’ to ‘Auto’
This sets the type of pictures you’re going to be taking. It also switches
the camera off and on. For most pictures, set it at ‘Auto’ and it will be
fine.
Note that the lens automatically comes out as you do this and if you have
left the lens cap on, it will pop off! It won’t do the camera any harm, but
it might startle you!
Lens opens automatically – watch out!
You will also notice that the screen on the back of the camera lights up
and tells you what conditions you have set the camera for. If you like, you
can take a minute to experiment with the other settings of the ‘Mode
Dial’. It will tell you on the screen what they are for – pretty
straightforward, really! Leave it at ‘Auto’ until you are familiar with the
camera.
Set this dial to ‘Auto’.
Page 3 of 13
Page 4

Aberdeenshire Council ASPECTS Training
Education & Recreation Kodak DX4330 Digital Camera D32
G Bruce, 2003
5. Look through the viewfinder and ‘frame’ your subject.
The viewfinder is very small on the
DX4330 – you need to get your
eye close up and exactly in line.
6. Check the camera is ready for taking photos.
You will notice a little light on just to the right of the viewfinder. It is
there to warn you if the light level is too low or if the camera hasn’t
finished storing the previous picture. It’s pretty much like traffic lights –
steady green means ‘go ahead’, flashing green means ‘wait a second’, red
means ‘don’t even think about it!’
Assuming you have a steady green light…….get the picture in your
sights exactly as you want it. At this point, you might want to try using
the zoom lens to make it appear ‘closer’ or further away. To do this, keep
looking through the viewfinder and move the zoom control with your
thumb (you’ll see what effect it has as you look through the viewfinder.)
This little button makes the camera
zoom in and out. Try it!
When you are satisfied with what you see, squeeze the shutter button
verrrrrrrry gently (!) – about halfway down. You will hear a ‘purring
sound’. This is the camera setting the focus and exposure.
Now squeeze even more firmly and the picture will be taken. (The camera
‘beeps’.) Remember – no ‘beep’ – no photo! Push harder next time!
Page 4 of 13
Page 5

Aberdeenshire Council ASPECTS Training
Education & Recreation Kodak DX4330 Digital Camera D32
G Bruce, 2003
7. Check the photo has come out properly.
Unlike ‘ordinary’ cameras, digital cameras allow you to have a look at
your handiwork and if you don’t like it, you can just wipe it out and start
again before the moment is lost! Here’s how….
With the camera still switched on, press the ‘Review’ button. It’s at the
back of the camera – bottom right.
On the first press of the ‘Review’ button, you see the picture you have
just taken, but if you’ve taken a few and would like to see them all, use
the ‘4 way’ control to scroll backwards and forwards. Just press on the
‘left arrow’ or ‘right arrow’ edges of the control.
This is the button that lets you see
what you have taken.
This control lets you move
backwards and forwards through
your pictures when the
‘Review’button is pressed.
Page 5 of 13
Page 6

Aberdeenshire Council ASPECTS Training
Education & Recreation Kodak DX4330 Digital Camera D32
G Bruce, 2003
8. Can I wipe out pictures I don’t like?
If you decide you don’t like a picture (or if you’d like to wipe the whole
lot) you can press the ‘Delete’ button at the top left of the camera..
When you press the ‘Delete’ button, a menu appears on the screen, giving
you the option to delete that particular picture or ‘All’. Use the ‘arrow up’
and arrow down’ edges of the ‘4 way’ control to make your selection.
Finally, press in the WHOLE of the ‘4 way control’ (thumb-in-themiddle!) and that will actually perform the deletion. You will be asked to
confirm this.
The ‘Delete’ button is just above
the ‘4 way’ control. It’s used for
wiping pictures you don’t want.
9. What are all the other buttons for?
The button on the top of the camera with a little ‘spark’ icon on it
controls the flash. By pushing it repeatedly while the
‘Mode Dial’ is set at ‘Auto’ you can move through a
range of options. For most purposes it will be fine left at
‘Autoflash’. It might be worth checking this control if
the camera seems to have stopped flashing for no good
reason………!
Page 6 of 13
Page 7

Aberdeenshire Council ASPECTS Training
Education & Recreation Kodak DX4330 Digital Camera D32
G Bruce, 2003
The button below the ‘4 way’ control is the ‘Menu’ setting. This
shouldn’t really be tampered with unless you really
know what all the settings are for (see the ‘official’
manual) This allows you to change such things as the
date, picture quality, self-timer etc. The options are
also there to stamp the date on the finished photo and
to decide if you want the photos going into the internal
memory or onto a card.
9. Where do the batteries go?
This camera comes with special Kodak
battery packs, although it is possible to use 2
NIMH AA batteries instead. It is
recommended that the camera is not used
with the docking station while AA batteries
are in – recharge them in a separate NIMH
charger to be on the safe side.
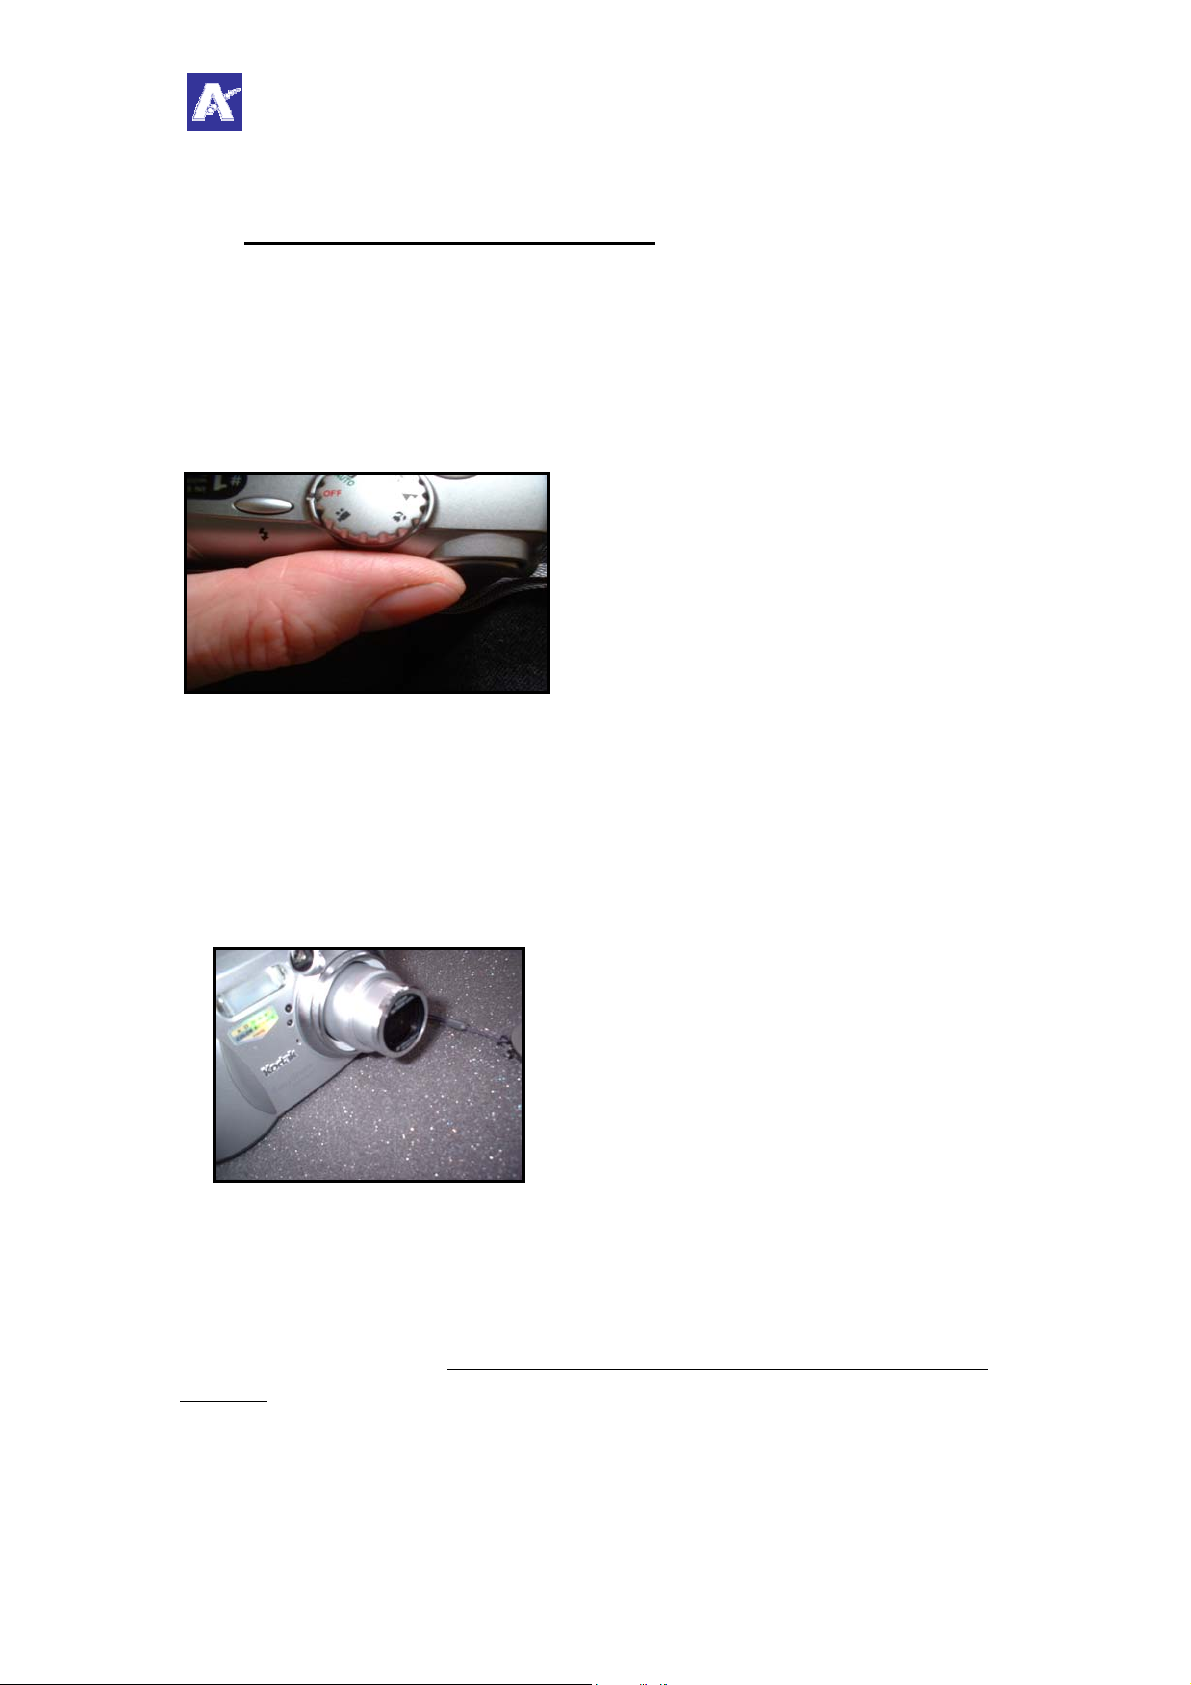
10. What about memory cards?
The memory cards fit into a slot which is
concealed by a plastic flap at the side of the
camera. The picture shows the flap open.
The DX4330 takes MMC (‘Multimedia’) cards
or ‘SD’ (‘Secure Data’) cards
Multimedia card
Page 7 of 13
Secure Data card
Page 8

Aberdeenshire Council ASPECTS Training
Education & Recreation Kodak DX4330 Digital Camera D32
G Bruce, 2003
11. Now that I have taken my pictures, how do I get them
into the computer?
With the DX4330, this is very simple indeed!
Sit the camera on its docking station, taking care to ensure that the
docking flap under the camera has had its door opened. The pictures
below show the flap open and closed.
Check the
docking flap
has been
opened!
The camera should sit in snugly. Be careful that
you don’t trap the carrying strap or the cord
holding the lens cap.
With the computer switched on, and power on to the docking station
(green lights on) press the ‘Kodak’ button on the docking station.
Usually this starts the software on the computer automatically, but if this
function has been disabled by the person who installed the software, you
can start it normally from the ‘Start Menu’ on the computer.
Page 8 of 13
Page 9

Aberdeenshire Council ASPECTS Training
Education & Recreation Kodak DX4330 Digital Camera D32
G Bruce, 2003
One of the two following screens should appear. Normally it will be the
first, but if someone has ticked ‘one touch transfer’ before, you will get
the second! (If you want to restore it to the original version, click on
‘Cancel Transfer’ and untick ‘One Touch Transfer’– otherwise, it will
keep on sending all the pictures without giving you the chance to pick
and choose.)
STOP!! HAVE A CLOSE LOOK AT THE ‘PATHWAY’ THE
PICTURES WILL TAKE INTO THE COMPUTER!
THE PICTURES DON’T EVEN NEED TO BE WITHIN ‘My
Documents’ SEE ‘PREFERENCES’ IF YOU FEEL ADVENTUROUS!
12. Downloading ALL your pictures in one go.
Assuming you have the first screen shown
above and you have noted the ‘pathway’
click on ‘Transfer’.
Page 9 of 13
Page 10

Aberdeenshire Council ASPECTS Training
Education & Recreation Kodak DX4330 Digital Camera D32
G Bruce, 2003
Your pictures will all download and be
shown on the screen as ‘thumbnails’
At this point, you can have a look through the pictures and decide what
you want to do with them.
13. How do I get rid of pictures that are not worth keeping?
Tick each photo you want to get rid of. (See pic above)
Go to ‘File’…….’Delete’
If the camera has been set to ‘protect’ your photos, you might be ask to
confirm each deletion.
Page 10 of 13
Page 11

Aberdeenshire Council ASPECTS Training
Education & Recreation Kodak DX4330 Digital Camera D32
G Bruce, 2003
14. How do I make improvements to the photos, such as
cropping etc?
Click ONCE on the actual ‘thumbnail’ so that the picture takes on an
orange border.
Click on ‘Edit Picture’
Click on ‘Crop’ (eg) – make the changes needed and click on ‘Accept’
Click on ‘Save as..’ (you might need to save it under a different name if
the first version in protected)
Click ‘Close’
If you want to see the results, you may have to change from
viewing ‘Last Acquired’ to ‘Entire Collection’.
Both versions of the photo should now be visible.
You can delete the original if you want to – but it might be
best to hold onto it in case you want to start again!
Page 11 of 13
Page 12

Aberdeenshire Council ASPECTS Training
Education & Recreation Kodak DX4330 Digital Camera D32
G Bruce, 2003
You can explore the other ‘improvements’ that can be made to photos
when you are a little more confident.
15. I just want to see all my pictures as a slide show, how
can I do that?
This is very simple. Just ‘tick’ all the photos you would like to see
displayed and click on the ‘Slide Show’ button. (Top Bar)
The pictures move automatically, but if you would
like to stop for a minute, click on the ‘pause’ button.
16. Other features of the software.
This software has other features, such as making picture albums etc,
which have not been included here. You are advised to come back to
these when you are more confident with the basics. By that time, they
will be almost self-explanatory, but remember, there is a Help File which
you can use for specific points.
17. Finding the pictures again and loading them into
documents such as ‘Word’
You’ll recall that as the photos were being transferred to the computer,
the ‘pathway’ was shown. Unless changes have been made by someone
else, the pictures should still be stored there.
On networked systems, the pictures may have to be copied to a ‘shared’
folder. If this hasn’t been done, the pictures might not be accessible
throughout the school. Ask your network administrator how your
particular system works.
Page 12 of 13
Page 13

Aberdeenshire Council ASPECTS Training
Education & Recreation Kodak DX4330 Digital Camera D32
G Bruce, 2003
IT IS NOW RECOMMENDED THAT YOU USE
THE ASPECTS BOOKLET
‘Using ‘Word’ As a Simple DTP
Programme.’
This will take you through the process of finding the
pictures, dropping them into a document and adding
borders, etc.
18. Final Notes!
The camera’s internal memory will hold about 15 – 24 photos when the
camera is set at ‘best’ quality. Poorest quality will give you 69 – but once
you’ve seen ‘best’ you are unlikely to want anything else!
The battery will take about 2 – 3 hours to charge up from flat. You’ll
know it’s ready if all 3 green lights are on. Leave the camera on the
docking station all the time.
A fully charged battery is supposed to take 180 pictures, but this varies a
great deal on how the camera is used. Use of the colour screen on the
back of the camera and flash photography takes most power.
A ‘low battery’ icon will appear when it gets low and will start to blink
when nearly exhausted.
Page 13 of 13
 Loading...