

Page 1

DVD-845
DVDPLAYER
INSTRUCTION MANUAL
Page 2
FEATURES
Thank you for choosing the DVD player. For maximum enjoyment and prolonged
life of the DVD player, we strongly recommend that you read the instruction
manual carefully before attempting to operate the unit. Please store this manual
in a safe place for future reference.
Digital Video Discs is the best source of movies for your home theatre. The
latest digital technology allows compression of an entire movie onto one disc
and combined with Dolby Digital (5.1 channel) digital surround sound, provides
greater picture clarity and sound fidelity of any video player on the market.
Built-in DTS, Dolby Digital (AC-3), HDCD, PCM Decoder
Hi-Fi sound quality; 96kHz/24bit's digital to analog converter
Software intelligent upgrade
YUV high luminance chromatism component output
Professional digital Karaoke
Optical/Coaxial output
3D virtual surround sound
Compatible with DTS-CD/DVD-Video/DVD-R/W/HDCD/CVD/VCD/SVCD
/DVCD/CD/CD-R/W/MP3/Kodak Picture CD/MR.OKO
Latest fourth generation server has superior error-correction to provide greater
picture clarity
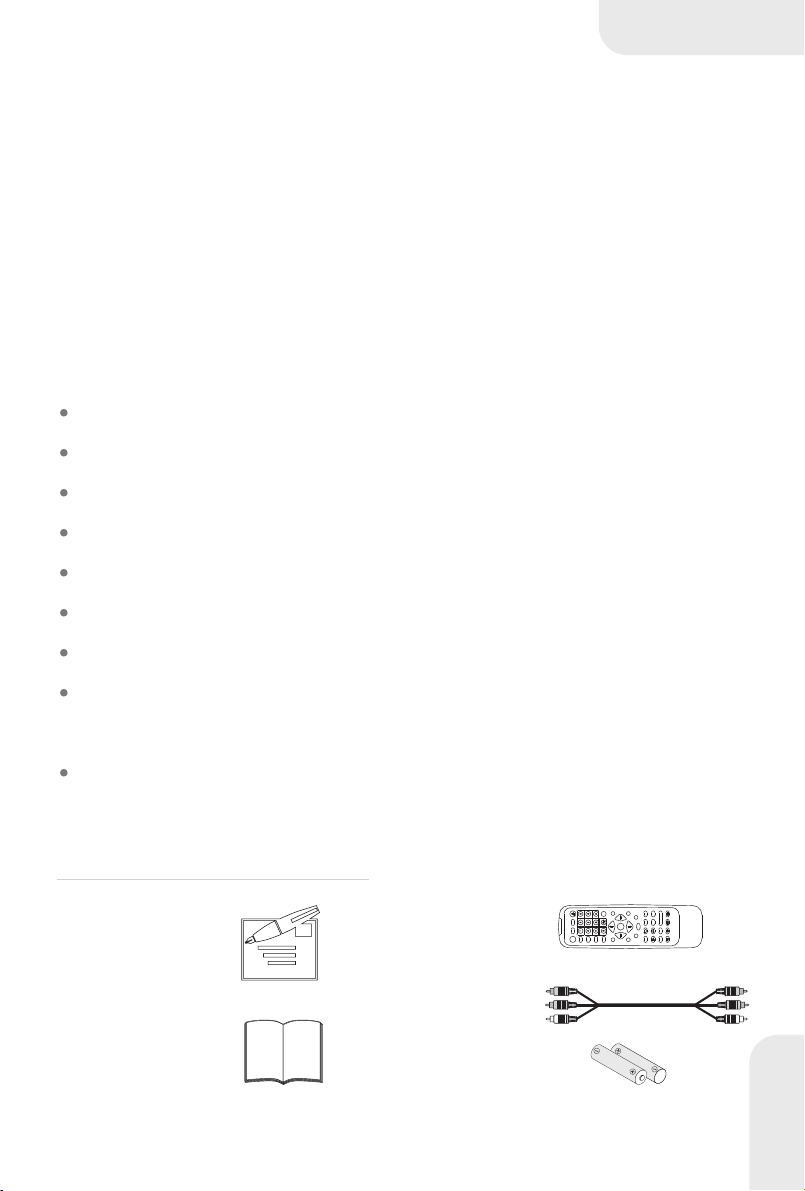
Accessories:
Guarantee Card
Instruction Manual
Remote control
Audio/Video cable
AAA Battery
A1
Page 3
POINTS FOR ATTENTION
Attention: To reduce the risk of fire and electric shock, do not expose this unit to rain or moisture.
CAUTION
RISK OF ELECTRIC SHOCK
DO NOT OPEN
CLASS 1
LASER PRODUCT
CAUTION:
To reduce the risk of fire and electrical shock, do not remove the cover of this unit. Please refer all
servicing difficulties to qualified technicians . This lightning flash arrow symbol in a triangle, is
intended to alert users to the presence of non-insulated high voltage within the product`s enclosure
that may be of sufficient magnitude to constitute a risk of electric shock to person. The exclamation
point symbol in a triangle is intended to alert users to the presence of important operating and
maintenance instructions in the literature accomnying the unit.
CLASS1:
LASER PRODUCT - This marking indicates the presence of laser beams used in this unit, and
CLASS 1 refers to laser beams of the weaker class. There is no danger of hazardous radiation
outside this unit.
IMPORTANT NOTICE:
Read through this instruction manual before installation and use.
To disconnect the power cord, hold the plug instead of pulling on the cord.
Switch off the main power when the unit is not in use. (Disconnect the power plug from the power
outlet when you do not intend to use the unit for a prolonged period of time.) Before moving the
unit, remove the disc from the unit`s tray first.
Do not open the cover or touch any of the components inside the unit.
Do not operate or install the unit under direct sunlight or near objects that radiate heat. This may
lead to overheating of the unit.
Do not operate or install the unit in moist or humid conditions. This may affect the pick-up of the
unit.
IInstall the unit on a flat surface with good air circulation. Please ensure the ventilation holes are
not covered otherwise the unit will overheat and malfunction.
Wipe the panel and case with soft dry cloth only. Do not apply any kind of thinner, alcohol or sprays
when cleaning the unit.
B1
REFER SERVICING ONLY TO QUALIFIED SERVICE PERSONNEL
Page 4
POINTS FOR ATTENTION
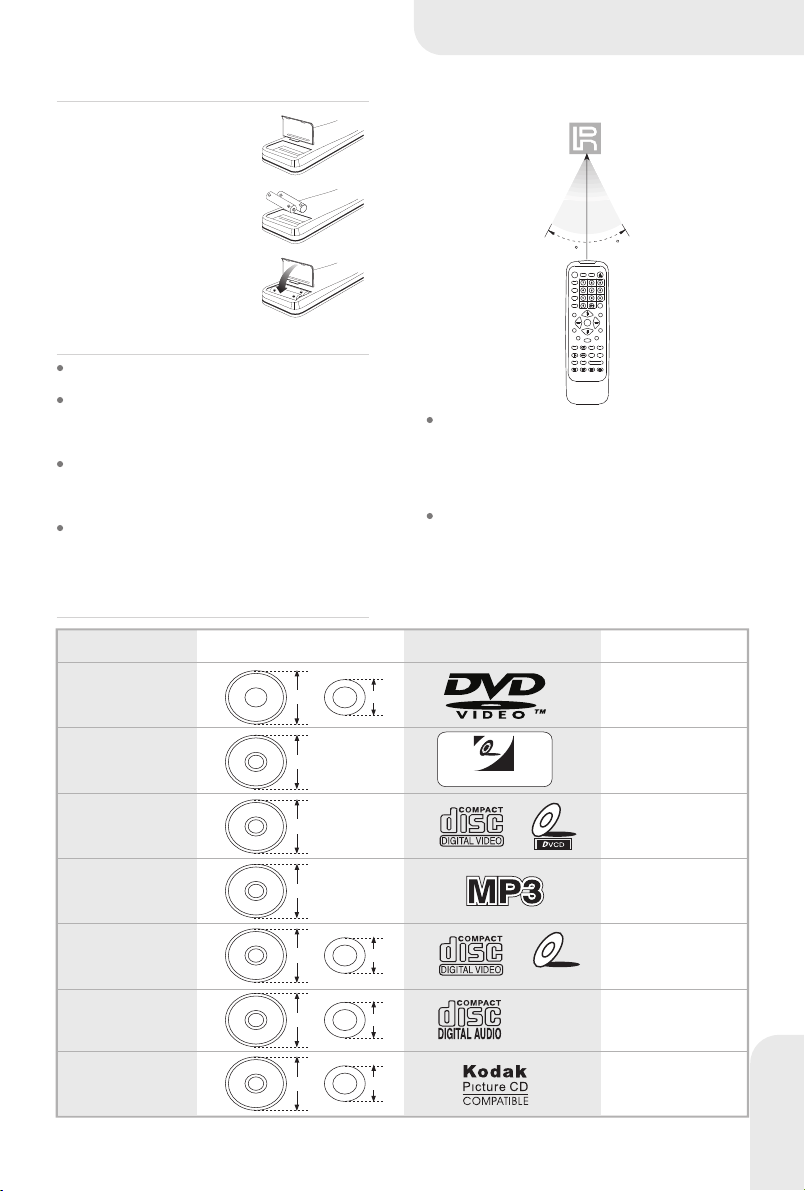
REMOTE CONTROL OPERATION:
* remove battery
cover
* insert
batteries
* close the
battery cover
CARE OF REMOTE CONTROL:
Aim remote control at remote sensor of DVD.
Do not drop the unit from a high position or
cause high imct
Do not place the remote control in hot or
moist environments
Do not splash water or any other liquid on
remote control
TYPES OF DISCS THAT CAN BE USED:
Disc
Size
* point remote control directly to the remote
sensor
-
3
0
0
3
+
within 7 meters
Distance:
the remote control works best within 7 metres
from the DVD player
Do not expose the remote control sensor
directly to a heat source or it will malfunction
Symbol
Content
DVD
SUPER VCD
(SVCD.CVD)
DVCD
MP3
Video-CD
(VCD)
CD-DA
Kodak
Picture CD
12cm
12cm
12cm
12cm
12cm
12cm
12cm
8cm
8cm
8cm
8cm
VIDEO CD
audio+video
audio+video
audio+video
audio
audio+video
audio
video
B2
Page 5
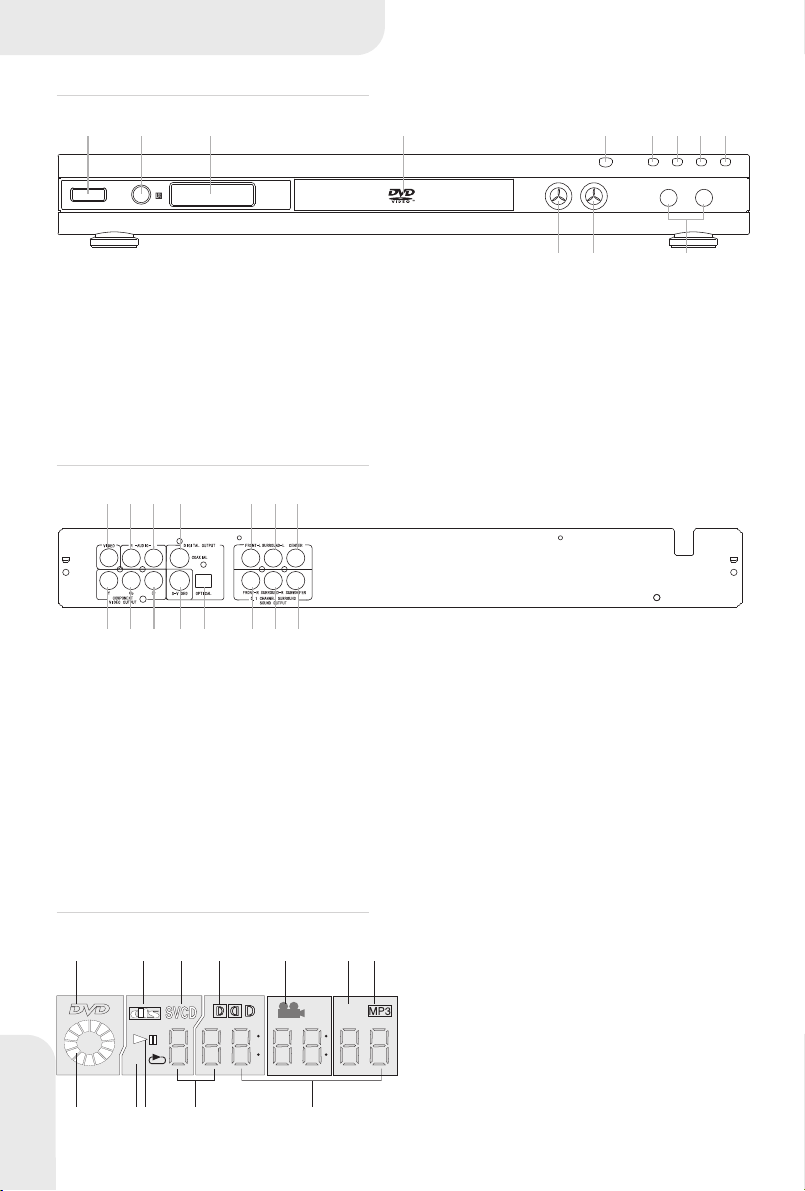
OPERATION INTERFACE
FRONT PANEL:
1 2 3 4 5 6 7 8 9
10 11 12
1. power on/off
2. receiver window
3. VFD display unit
4. disc tray
REAR PANEL:
1 2 3 4 5 6 7
5. open/close
6. play/pause
7. stop
8. skip forward
9. skip backward
10. Mic volume
11. Echo volume
12. Mic input jack
8 9 10 1112 131415
1. composite video output
2. right audio output
3. left audio output
4. digital coaxial output
5. left front channel output
6. left surround channel
VFD DISPLAY:
1 2 3 4 5 6 7
ALL
C1
8 9 10 11 12
7. center channel output
8. component video (Y) output
9. component video (Cb) output
10. component video (Cr)
output
11. S-video output
1. DVD Disc
Indication
2. DTS Indication
PBC
3. SVCD/VCD/CD
Disc Indication
4. Dolby Digital
Indication
5. Multi-angle
12. digital optical audio output
13. right front channel output
14. right surround channel
output
15. subwoofer output
6. PBC Playback
7. MP3 Disc
Indication
8. Playing Status
9. Repeat
10. Play/Pause
11. Chapter Indication
12. Time Indication
Page 6
OPERATION INTERFACE
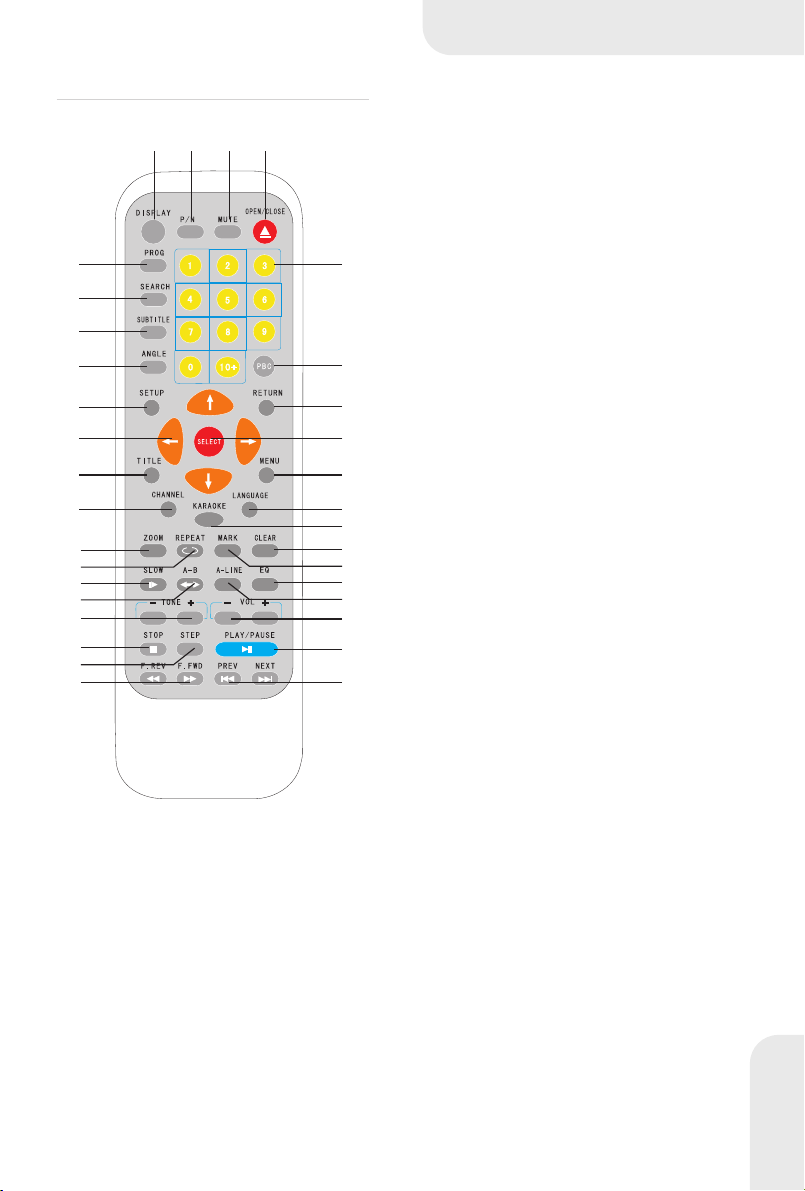
REMOTE CONTROL:
1234
5
6
7
8
11
12
15 16
17 18
20
21
24
25
28
30
31
33 34
1. OPEN/CLOSE: open or close disc tray.
2. MUTE: close audio
3. P/N: Switch video output PALoutput
between NTSC
4. DISPLAY: time indication, title indication,
chapter indication
5. PROGRAM: programing the play list
6. SEARCH: select playback-place directly
7. SUBTITLE: select subtitle of disc supply
or cancel subtitle
9
10
13
14
19
22
23
26
27
29
32
8. ANGLE: select different angle which
recorded on disc
9. CHOOSE: number key
10. PBC: open/close PBC
11. SETUP: menu setup
12. direction key: move cursor direction
13. RETURN: return to disc menu playback
14. SELECT: confirm all of the operation for
selection
15. TITLE: enter to title playback
16. MENU: enter to menu playback
17. CHANNEL: choose output channel
18. LANGUAGE: choose different output
language
19. KARAOKE: on or off karaoke function
20. ZOOM: zoom in or out the current picture
21. REPEAT : repeat play the current chapter
22. CLEAR: clear function
23. BOOKMARK: memory play
24. SLOW: play the formal at slow motion
25. A-B: setup repeat play segment
26. EQ: select different audio effect
27. A-LINE: indicate current frequency chart
28. TONE: change melody by "-" debase "+"
rise
29. VOL: "-" debase current volume"+"rise
current volume
30. stop: stop play
31. STEP: playback current menu
32. PLAY/PAUSE: press one time to step,
press twice to renew playback
33. FASTBACKWARD&FASTFORWARD
34. SKIPBACKWARD&SKIPFORWARD
C2
Page 7
OPERATION INTERFACE
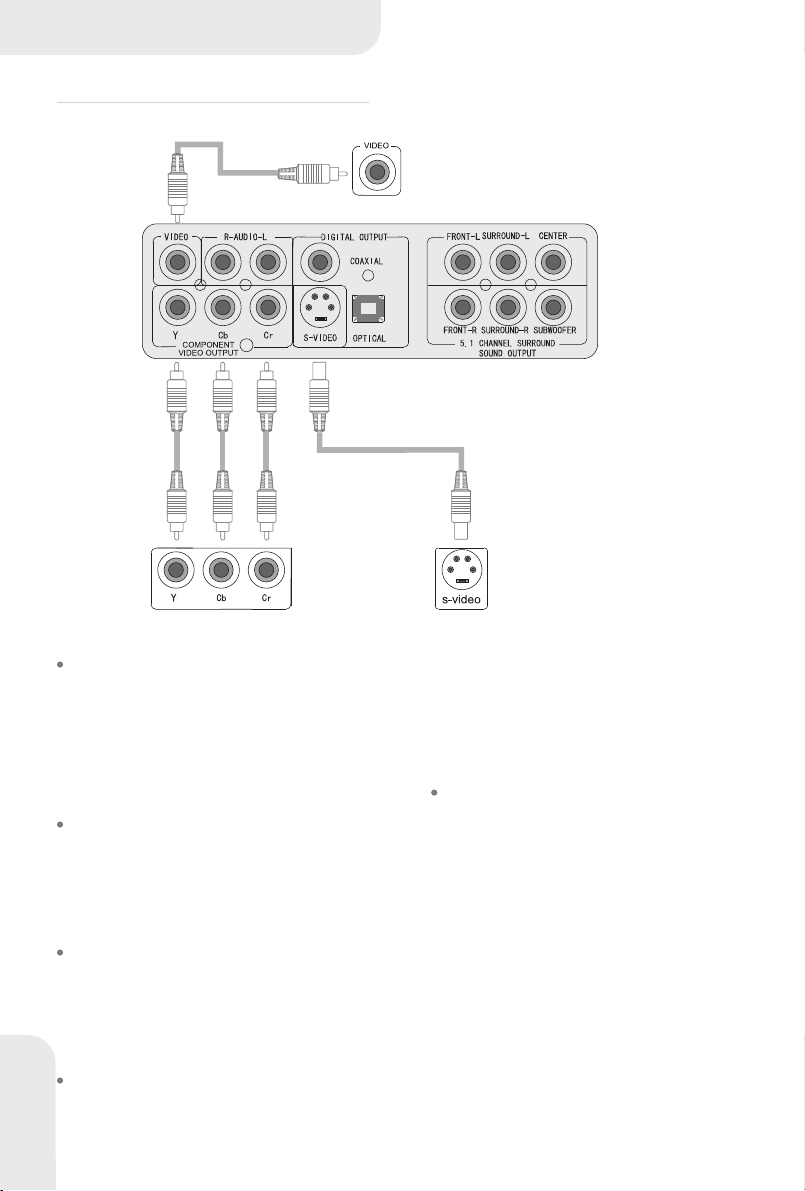
VIDEO SYSTEM CONNECTION:
TV/MONITOR COMPONENT INPUTC3TV/MONITOR S-VIDEO INPUT
TV/MONITOR STANDARD VIDEO INPUT
The unit supports three choices of video
output: composite video, S-video, and
Component video output. Component video
output obtains the best picture quality, followed
by S-video.
Composite video output:
Connect the AV cable (yellow) to the video
output (yellow) of the unit and to the video
input of your TV or monitor.
S-video output:
Connect a S-video cable (not included ) to the
S-video output of the unit and to the S-video
input of your TV or monitor.
Component video output:
Connect a component video cable (Cb,Cr,Y)
to the component video output of the unit and
to the component video input of your TV or
monitor. Cart input of TV or monitor.
Note:
Select the type of audio output in the menu
depending on the type of connection that is
used.
To get a better picture effect, these four
methods can not be applied simultaneously.
Page 8
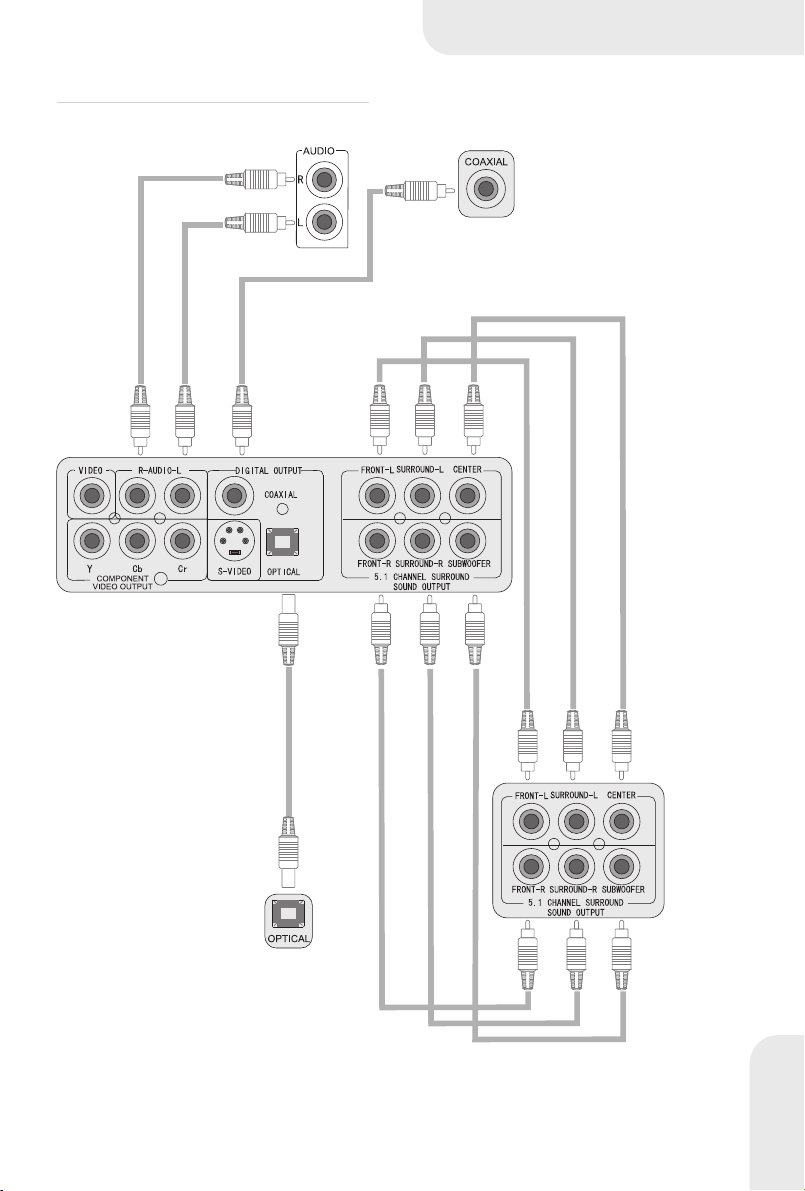
AUDIO SYSTEM CONNECTION:
TV INPUT
OPERATION INTERFACE
AMPLIFIER INPUT
AMPLIFIER INPUT
AMPLIFIER INPUT
C4
Page 9

OPERATION INTERFACE
The unit supports two choices of audio
output: Analogy audio and digital audio.
Analog audio includes stereo 2 channel and
5.1 channel. Digital audio includes optical and
coaxial output. Digital audio obtains a better
effect than analog.
Stereo Output:
Connect with audio output jack for the mixing
audio of the unit and the stereo input of TV
or amplifier by audio cable.
5.1 channel output:
Connect with 5.1 channel output of the unit
and corresponding input of amplifier by audio
5.1 channel cable.
Coaxial output:
Connect the Digital coaxial cable to the coaxial
output of the unit and the corresponding input
of amplifier.(with digital coaxial inlet)
Optical output:
Connect the T oslink optical cable to the optical
output of the unit and the corresponding input
of amplifier.(with digital optics inlet).
stereo input of TV or amplifier.
Each connection must match to the internal
setup of the unit. Please refer to the unit and
the connection equipment before connection.
DVD player supplies a wide dynamic range
of frequencies so the amplifier volume must
be suitable levels or the speakers may be
damaged from sudden bursts of high volume
sounds.
During the operation, please power off
amplifier before power on/off DVD player, the
speaker may be damaged.
Setup Before Operation:
Before operation, please make sure the
following setup is correct.
Audio Output:
The unit has four choices of audio output: 2
channel, digital, 5.1 channel and stereo PCM.
Select different setup depending on your
connection. For more information, please refer
to system setup.
TV System:
Select the corresponding system depending
on your TV system. For more information,
please refer to system setup.
Video Output:
The unit has three choices of video output:
composite video, S-video, component video
output. Select different setup depending on
your connection. For more information, please
refer to system setup.
Note:
DVD disc can support different scale of
pictures. Maybe picture is not full screen or
part of picture has been blocked.
The manual refer to English OSD.
C5
Page 10

BASIC PLAYBACK:
BASIC PLAYBACK
OPEN /CLOSE
MUTE
P/N
DISPLAY
Press POWER key on the panel to turn on the DVD player.
Press OPEN/CLOSE to open the tray, and then place the disc on it ,press this button
again to close the tray. When finishing loading the disc , the TV screen will display
the disc type and the disc will be automatically played .(MP3 and JPEG disc can not
be automatically played)
Press MUTE to close the audio output and you can't hear the sound on TV or Amplier.
Press this button to mute the sound and press it again to renew the sound .
Press P/N to adapt the TV system with changing from PAL to NTSC or from NTSC
to PAL .If you find the picture on the TV has no color ,please press this button .
Press DISPLAY to display the information referring to the disc on the TV screen.
playback DVD disc state play super VCD,VCD2.0 in the state of opening PBC
Play time menu time
Title- -/- -chapter- -/- - 0:00:00 menu- -/- - 00:00
Title spare time single song menu spare time
Title- -/- -chapter- -/- - 0:00:00 menu- -/- - 00:00
Title spare time OSD OFF
Title- -/- -chapter- -/- - 0:00:00
chapter spare time
Title- -/- -Title- -/- - 0:00:00
OSD OFF
play super VCD,VCD2.0 in the state of closeing PBC Playback MP3 disc state
menu time menu time 00:00
menu- -/- - 00:00 sing menu spare time 00:00
menu spare time OSD OFF
menu- -/- - 00:00
full disc tiem
menu- -/- - 00:00
full disc spare time
menu- -/- - 00:00
OSD OFF
D1
Page 11

BASIC PLAYBACK
PROGRAM
1 2 3
5
4
6
7
8 9
+
10
10
If the disc has over two chapter or title, you can press this button to setup the playing
order which you want.
PRGO TT- -/CH- - [TT- -(TITLE)CH- -(CHAPTER)]
01 TT:__ CH:__ 06 TT:__ CH:__
02 TT:__ CH:__ 07 TT:__ CH:__
03 TT:__ CH:__ 08 TT:__ CH:__
04 TT:__ CH:__ 09 TT:__ CH:__
05 TT:__ CH:__ 10 TT:__ CH:__
EXIT START BACK
Press PROGRAM key to indicate in TV screen when play super VCD,DVD,CD disc.
PROG:MENU 00-00
01 __ 06 00(MENU)
02 __ 07 __
03 __ 08 __
04 __ 09 __
05 __ 10 __
EXIT START BACK
Press number key to select chapter and title, and then move the cursor to "START"
by the direction key, finally, press SELECT to enter program playing. If the number you
want to program is over 10, please select "NEXT" to enter the next page. (the player
can program 20 chapter at most.)
Playing MP3, press PROGRAM key, the TV screen will indicate the program mode.
Press direction key to select song menu what you want to program. Press Select key
to confirm menu. The system will program the current song to menu automatically.
Press direction key again entering the programmed system. Press select key to playback.
NOTE:
When the unit read MP3 menu, press PROGRAM the first time, entering the program
mode. Press the second time, displaying file mode. Press the third time entering the
normal mode playback.
SEARCH
D2
Press SERCH to select some chapter or title or time quickly which you want when
playing DVD disc.
Press SERCH to select some song or time quickly which you want when playing SVCD,VCD,CD disc.
Page 12

BASIC PLAYBACK
Press SEARCH key indicating: Title--/-- Chapter--/--. press direction key selecting
chapter search or title search. Press number key, selecting your desired title chapter.
press SEARCH key again indicating: Title Time00/00. Select title playback at random
by number key. press SEARCH key the third time indicating: Chapter Time00/00.
Playback super VCD.VCD2 CD. press SEARCH key the first time, indicating: Disc
00/00. tray time press number key, selecting random time playback in full disc. press
SEARCH key again, indicating: Menu Time00/00
SUBTITLE
ANGEL
1 2 3
5
4
7
8 9
+
10
10
PBC
RETURN
TITLE
If the disc has multi subtitle, you can press this button to select some subtitle. Press
subtitle key, indicating as following: Subtitle1/3 Subtitle2/3 Subtitle3/3 Subtitle cancel.
If the disc has multi-angle ,you can press this button to switch observation angle.
Press ANGEL key will have change as following when playing multi-angel: Angel/3
Angel2/3 Angel3/3
Displaying VCD MP3 , press number key, selecting your desired menu or chapter
6
directly after reading disc content. If menu number litter than 10, press 10+ key and
then press another number key.
Note:The number key work just only closing the PBC in Super VCD,VCD2.0.
Displaying super VCD,VCD2.0 can playing menu. The disc can enter PBC menu
automatically when starting playback. And then press number key selecting your desired
song, if cancel disc playback, please press PBC key. TV screen indication: Memu1
Menu2 Menu3 Menu4. press number key directly to close PBC, choosing song menu
which you want.
Press RETURN to return to the menu when playing the DVD disc. Press RETURN
to return to the menu and re-enter the menu-playing mode at the same time when
playing S-VCD,VCD2.0 disc
Press this button to return to the first title playback.
MENU
CHANNEL
In play DVD mode, press MENU key the first time back to submenu and press again
back to the main menu.
If the S-VCD,VCD,CD disc has multi channel, you can press this button to select the
sound from left vocal channel out or right vocal channel out or stereo out or downmix
out .
D3
Page 13

BASIC PLAYBACK
LANGUAGE
ZOOM
REPEAT
BOOK
MARK
CLEAR
A-LINE
Press this button to select your desired language when playing DVD,S-VCD which
has multi-language.
Pressing this button, you can appreciate the zoom picture. Just only in the state of
zoom-in, you can move the picture by direction key.
Press this button to repeat playing some song, some chapter , some title , or full disc.
When playing DVD SVCD VCD CD, press this key can set many memory position .
You can select any memory position to play. Press this key, the screen will be disply :
01 02 03 04 05 06
07 08 09 10 11 12
Chapter : 00 Time: 00:00
Press "SELECT" key to play and press "CLEAR" to cancel
One playing , press "SELECT" key for the first time, the first blank will disply "01" , it
means to play the first memory position. Then press direction key to select the secont
blank, press selection key to play the second memory position. The same, you can
select 12 times memory position playing.
Clear memory playing : Select the memeory position you want to play by direction press,
then press selection direction to play.
Note: If power off or disc out, all the memorized position will giving up automatically.
Press this key to display the dynamic frequency chart which refer to the sound on the
disc.
D4
TONE
VOL
EQ
SLOW
Press this button to increase or decrease the tone.
Press this button to adjust the volume.
Press this button to select one of the following equalizer: ROCK , POP, LIVE,DANCE,
TECHO,CLASSIC,SOFT
Press this key, Appreciate slow picture, When play DVD, The class as bellows:
1/2* 1/4* 1/8* 1/16
1/16* 1/8* 1/4* 1/2
Page 14

A-B
BASIC PLAYBACK
Press A-B button at the beginning of the desired passage, memorizing the starting
point A.
Press A-B button at the end of the desired passage. The unit will repeat your selected
passage A-B.
Press A-B button to clearing the setting and returning to normal.
STOP
STEP
Press STOP one time, memorizing the stopped position. When the unit continues
playing. It will play from the stopped position. Press STOP the second time, the unit
stops play and gives up the memorized position.
Every press next will move the picture one frame. Press "PLAY" again to resume
normal play.
In play mode, press this key to pause, press again, resume to play.
When play DVD, SVCD, VCD, CD, MP3, press this key to play forward speedily. The
class as bellows: 2x* 4x* 8x* 16x*
When play DVD, SVCD, VCD, CD, MP3, press this key to play backward speedily.
The class as bellows: 2x* 4x* 8x* 16x*
When play DVCD, VCD, CD, MP3, Press skipbackward to play last chapter.
To play DVD, press skipbackward to next chapter or title.
When play SVCD, VCD, CD, MP3, Press skipforward to play next chapter.
To play DVD, press skipforward to next chapter or title.
Karaoke:
Volume
MIC
Turndown the "Mic V olume" "Echo Volue" to lowest, insert Mic to "MIC" jacle. You can
insert two Mic meachtime. Press karaoke key on remote control, open karaoke function.
Turn "MIC" to control Mic volume.
Turn "Echo Volume" to control karaoke echo volume.
Clear the original sound. if you find the original sound exists when you sing, press
channel key to select left channel or right channel(VCD), or press language key(DVD,
D5
Page 15

BASIC PLAYBACK
PICTURE CD
Press Stop, TV screen show the following
12 small pictures.
Random Instruction Previous next
Press direction key to select the picture you
want to play.
Press direction key to select "Random" then
press select key to play random.
Press direction key to select "Instruction" then
press select key to the function keys instruction
menu.
Instruction Menu as follows:
Programme:To change picture transform
mode,
Stop: entering picture preview mode.
Skipbackward:last picture
Skipforward:next picture
Play: to play picture. Direction key up: up
and down image.
Direction key down: move image left and right.
Direction key left: rotate 90 degree in reverse.
Direction key right: rotate 90 degree in
sequence.
Zoom in : change to zoom in mode.
Fastforward: zoom in picture.
Fastbackward: zoom out picture
Direction key: move zoom center.
D6
MP3:
When plaly mp3 disc, this player can search
disc content automatically and enter into play
mode, TV screen display the playing content.
01 __ (MENU) 06 __ (MENU)
02 __ (MENU) 07 __ (MENU)
03 __ (MENU) 08 __ (MENU)
04 __ (MENU) 09 __ (MENU)
05 __ (MENU) 10 __ (MENU)
PLAY MODE MENU PLAY
Press PROG to select three playmode.
1.PROG
In PROG mode to press direction key to select
the chapters play turn. select the chapter, add
it to the play menu one by one. Then press
direction key to enter into edited programm.
press SELECT to play.
2 FOLDER
In FOLDER mode, to press dirction key to
select the folder you want to play. Press
SELECT to enter into current folder catalogue,
the press direction key to select chapter. you
can also press number key to select chapter.
3.NORMAL
In normal mode, the player will read all chapter
in disc. and play in the folder turn. you can
press number keys to select.
PLAY MODE
When playing disc, press dirction key to select
play mode , Then press dirction key to choose
play mode item: SINGLE FOLDER SHUFFLE
REPEAT FOLDER REPEAT ONE.
Page 16

SYSTEM SETUP
MENU OPERATION:
Press setup key, screen shows set up menu,
In setup mode, Press setup key again, quit
setup menu.
Press direction key to relevant item, press
select key to confirm.
Note:
1) To move cursor to relevant item, the menu
showed on the screen accordingly.
2) Some menu setup is related with other set
up and status, if it's grey, can not setup.
3) The setup can be memorized (except
kalaoke) continue though power off.
GENERAL SETUP PAGE:
TV DISPLAY NORMAL/PS
NORMAL/LB
WIDE
ANGLE MARK ON
OFF
OSD LANG
CAPTIONS ON
OFF
SCREEN SAVER ON
OFF
MENU STYLE YPE 1
TYPE 2
LAST MEMORY ON
OFF
MAIN PAGE
ENGLISH
FRENCH
GERMAN
ITALIAN
DANISH
PORTUGUSES
SPANISH
General Setup page
TV Display
Normal/PS: When the unit connect with TV
set, wide image showed on the whole screen,
but a part is cut.
Normal/LB: When the unit connect with TV
set, playing wide image, there ard black bands
showed on the up and down screen.
Wide: Choose this when the unit connects with
wide screen TV set.
Angle mark
T o select display angel, When play multi angle
DVD disc.
OSD LANG
To select operation language.
Captions
This function is unuseful if no caption record
in the disc. If the caption is close, press captions
key on remote control to open captions function
to select captions language. The original setup
of this is open.
Screen saver
When the unit is in stop mode, a moving picture
will appear several minutes later if Screen
saver is set on. screen saver will protect TV
screen.
Menu Style
To choose display style for setup.
Last Memory
To remember the current play time, if this
function setup is on, can play from the
memorized play time. If powering off the unit
give up.
E1
Page 17

SYSTEM SETUP
AUDIO SETUP:
SPEAKER OUTPUT
SPDIF OUTPUT
CHANNEL EQUALIZER
3D PROCESSING
HDCD
KARAOKE SETUP
MAIN PAGE
Note: A submenu page in every setup item.
The detail see the vary setup page.
SPEAKER SETUP:
DOWN MIX LT/RT
STEREO
5.1 CHANNEL
FRONTSPEAKER LARGE
SMALL
CNTR SPEAKER ON
OFF
REAR SPEKER ON
OFF
SUB WOOFER ON
OFF
TEST TONE ON
OFF
DIALOG
POST DRC ON
OFF
AUTO
GOTO AUDIO SETUP PAGE
E2
SPEAKER SETUP PAGE
DOWN MIX
LT/RT: If DOLBY PRO-LOGIC in the disc, when
connected 2 channel stereo speaker, please
choose LT/RT. If play 5.1 channel disc, the
system can change 5.1ch to 2ch automatically.
STEREO
If connected audio output is normal TV set,
then output stereo, If DOLBY PRO-LOGIC and
5.1 channel function, both will be compressed
to stereo output.
5.1 CHANNEL
If connected 5.1 channel input amplifier, the
disc has 5.1 channel function, please choose
this mode to output 5.1 channel DOLBY, you
can setup the following stereo output setup on
or off. The reference setup is stereo.
SPEAKER
Turn ON these speakers and setup speaker's
volume, This system can transmit the sound
signal to different channel for 5.1 channel
output. If karaoke is on or DOWN MIX 5.1
channel, these items can not be setup.
TEST TONE
To test whether speaker system connects
properly, also can adjust each channel's
volume. If the function is on, the tested channel
display on the left down corner: FRONT LEFT ,
CENTRE, FRONT RIGHT, RIGHT
SURROUND, LEFT SURROUND, Audio
output from each channel, To setup off or
exiting setup menu if want to stop.
Page 18

Note: Please set up this items in the case of
opening disc tray.
DIALOG
When playing the disc, set up this item to
adjust voice dialog on, In DOWNMIX 5.1
CHANNEL mode, the function is not available.
The reference set up is minimum volume.
POST DRC
Enable the item, when system power on,
current increases slowly to the speaker, to
prevent the speaker from electrical shork.
Disable the item, the function is no use. When
Automatic, system can setup automatically.
The reference set up is on.
SPDIF SETUP PAGE:
SPDIF OUTPUT SPDIF OFF
SPDIF RAW
SPDIF/PCM
MANUAL
CD SPDIF OFF
SPDIF RAW
SPDIF/PCM
DOBLY DIGITAL SPDIF OFF
SPDIF RAW
SPDIF/PCM
DTS SPDIF OFF
SPDIF RAW
SPDIF/PCM
MPEG SPDIF OFF
SPDIF RAW
SPDIF/PCM
SYSTEM SETUP
LPCM OUTPUT 48K
_
96K
DYNAMIC
AUDIO SETUP
SPDIF SETUP PAGE
SPDIF OUTPUT
Turn OFF the optical and coaxial output, only
analog output. If in manual mode, you can
choose different output mode according with
different disc. Reference setup is "SPDIF
RAW".
CD, DOBLY DIGITAL, DTS, MPEG
When SPDIF output is manual, please setup
SPDIF output setup according with CD, DOLBY
digital, DTS, MPEG Disc. If no optical output
on these four modes, please set up SPDIF
output to "SPDIF RAW". Reference setup is
SPDIF RAW.
LPCM OUTPUT
To set up different mode bwtween 48HKz to
96KHz according with different audio signal
source.
Note: some amplifier cannot support 96HZ
signal, and lead to unnormal sound from optical
or coaxial digital output.
The reference setup is 48 KHZ.
DYNAMIC
If watch dynamic scope large movie
programmer at night, to select this mode to
reduce the volume, meantime keep the little
_
FULL
_
_
_
_
6/8
_
_
_
_
_
_
4/8
_
_
_
_
2/8
_
_
_
_
OFF
E3
Page 19

SYSTEM SETUP
CHANNEL EQUALIZER :
EQ TYPE NONW
ROCK
POP
LIVE
DANCE
TECHNO
CLASSIC
SOFT
BASS BOOST ON
OFF
SUPER BASS ON
OFF
CLEAR BOOST ON
OFF
AUDIO SETUP
EQ TYPE
Seven modes are available. Select "Live", to
get live music effect, when EQ TYPE is off,
the sound of the disc will output directly. You
can setup the other items to reach your
requirement. The reference setup is OFF.
BASS BOOST, SUPER BASS and CLEAR
BOOST
T o setup BASS BOOST, super BASS, CLEAR
BOOST to assort with EQ TYPE to reach a
perfect status.
3D PROCESSING:
PRO LOGIC ON
OFF
AUTO
REVERB MODE OFF
CONCEPT
LIVING ROOM
HALL
BATHROOM
CAVE
ARENA
CHURCH
CHANNEL DELAY
AUDIO SETUP
PRO LOGIC
PRO-Logic mode setup, when it's on, the output
mode is Dolby PRO-LOGIC as same as original
record channel. When it's auto, the system
select type automatically. The reference setup
is on.
REVERB MODE
When PROLOGIC is ON, you can select
REVERB MODE, 7 types are available. The
reference setup is OFF.
E4
Page 20

SYSTEM SETUP
CHANNEL DELAY:
CENTER 0CM
LS 170CM
RS 170CM
SUBWOOFER 0CM
3D PROCESSING
CHANNEL DELAY PAGE
If you're not satisfied with the above REVERB
MODE, you can choose MANUAL. Please
refer to CHANNEL DELAY to setup.
CENTER, LS, RS, SUBWOOFER, 3D
PROCESSING DELAY SETUP
If you put DOLBY DIGITAL(AC-3) surround
sound speakers in a circle around, the sound
effect will be perfect. But normally it's hard to
do so. Then you can setup these items to
reach the original sound effect . Meantime,
you can setup distance by manual of each
audio channel. The reference setup is 0,
170cm, 170cm, 0
HDCD SETUP PAGE:
FILTER OFF
44.1K
88.2K
AUDIO SETUP
FILTER
This setup can change output sample rate
when playing HDCD disc.
Setup for 44.1KHz, the system can output all
signal of the disc sample rate between 0 to
44.1KHz
the signal over 44.1KHz will be cut .
Setup for 88.2KHz, the system can output all
signal of the disc sample rate between 0 to
88.2KHz , the signal over 88.2KHz will be cut
Setup for off, the system will output all signal
without any limit.
KARAOKE SETUP:
MIC ON
OFF
AUDIO SETUP
VIDEO SETUP PAGE:
SHARPNESS HIGH
MEDIUM
LOW
BRIGHTNESS 0
CONTRAST 0
LUMA DELAY 0T
1T
SCART YCbCr
RGB OUTPUT
MAIN PAGE
SHARPNESS, BRIGHTNESS, CONTRAST ,
LUMA DELAY
Please set up these three items to control the
video output terminal, such as TV set, display
screen etc, to reach a satisfied image. The
refence setup is "MEDIUM", O, O, OT.
E5
Page 21

SYSTEM SETUP
PREFERENCE PAGE :
TY TYPE PAL
MULTI
NTSC
AUDIO
SUBTITLE
DISC MENU
PARETVTAL 1KID SAFE
2 G
3 PG
4 PG 13
5 PG R
6 R
7 NC 17
8 ADULT
OFF
PASSWORD CHANGE
DEFAULT RESET
MAIN PAGE
ENGLISH
FRENCH
SPANISH
CHINESE
JAPANESE
KOREAN
RUSSIAN
THAI
OTHERS
You can setup the parental through inputing
password, the default password is 8806.
The preference setup is ON.
When play the grade control disc, press
parental to select grade.
Reset the setup mode to the preference.
E6
Page 22

TROUBLE SHOOTING
SYMPTOM AND SOLUTION:
When having problem with the unit, please check this list for a possible solutionbefore asking for
service.
Symptom
No power
No picture
No sound
Distorted picture
Luminance unsteady
or picture with noise
Unable to play
Reason(s)
Do not connect power cord to the wall outlet
Do not set up TV in correct setting
Do not connect video cable securely
Do not connect audio cable securely
Do not power the audio connection system on
The audio output setting is not correct.
Disc is dirty.
In fastforward or fastbackward mode
Circuitry influence
Do not load disc in
The disc loaded in can not play
The disc is loaded upside down
Do not load disc in guide slot
Disc dirty
Solution(s)
Connect them well
Set up TV in correct mode
Connect them well
Connect them well
Power it on
Set it in correct mode
Clean the disc or try another one.
Sometimes, the tiny distortion appears, itis normal
condition.
Connect DVD video player to TV directly
Place disc in
Place readable disc in(check the disc type)
Replace the disc with the label side up
Load the disc correctly
Clean the disc
Key no function
Remote control
does not work
TV screen has menu
Parental lock function
Power wave or other abnormal
phenomeno (such as static) disturbs
the normal condition.
Do not point remote control at the remote
sensor directly.
Remote control is too far from DVD unit.
Batteries are exhausted.
Press Setup turning off the menu.
Unlock it or change the rating
Switch on/off power or unplug/replug the power
cord.
Point remote control at the remote
sensor directly.
Operate remote control within 7 meters
Replace the batteries and insert in correct polarities.
F1
Page 23

SPECIFICATIONS
DVDPLAYER/OUTPUT:
DVD Player
Power Supply
Power Consumption
Weight
Dimension
Video System
Optical read-out system
Audio Frequency Response
S/N Ratio
Audio Dynamic Range
Rotating Ratio
Operation Condition
Output
~90-240V AC 50/60Hz
25W
3.1Kg
430x50x250mm(W/H/D)
NTSC/PAL
Semiconductor AIGaAs Weam, wave length: 650nm,780nm
DVD audio: Fs 48KHz PCM 4 Hz~22Hz
Fs 96KHz PCM 4Hz~44KHz
Audio CD Fs 44.1Hz 4Hz~20KHz
>90dB
>90dB
Within measurable range
Temperature 00c ~ 400c; Operation status: horizotion
Video Output
S-video Output
Audio Output(Analog Audio)
G1
1.0 V(P-P), 75
(Y) 1.0V (P-P), 75
(C) 0.286 V (P-P), 75
2.0 V(rms)
Page 24

LANGUAGE ABBREVIATION:
ADDITIONAL INFORMATION
Language Abbreviation
----- (no language)
CHI
DUT
ENG
FRE
GER
ITA
JPN
KOR
MAY
SPA
AA
AB
AF
AM
AR
AS
AY
AZ
BA
BE
BG
BH
BI
BN
BO
BR
CA
CO
CS
CY
DA
DZ
EL
EO
Language Abbreviation
ET
EU
FA
FI
FJ
FO
FY
GA
GD
GL
GN
GU
HV
HI
HR
HU
HY
IA
IE
IK
IN
IS
IW
JI
JW
KA
KK
KL
KM
KN
KS
KU
KY
LA
LN
Language Abbreviation
LO
LT
LV
MG
MI
MK
ML
MN
MO
MR
MT
MY
NA
NE
NO
OC
OM
OR
PA
PL
PS
PT
QU
RM
RN
RO
RU
RW
SA
SD
SG
SH
SI
SK
Language Abbreviation
SL
SM
SN
SO
SQ
SR
SS
ST
SU
SV
SW
TA
TE
TG
TH
TI
TK
TL
TN
TO
TR
TS
TT
TW
UK
UR
UZ
VI
VO
WO
XH
YO
ZU
H1
Page 25

ADDITIONAL INFORMATION
Care of disc:
Do not touch the signal surface.
Do not add labels or adhesive tapes on the
discs.
Cleaning of discs:
Finger prints or stains on the surface of the
disc
will directly affect signal recording and result
in a poorer picture quality. Therefore, please
use a soft cloth and wipe in a radiating
manner from the centre to the outer rims
when cleaning the disc.
If the surface of your disc is very dirty, wipe
the disc with a moist cloth. Finally use a
dry soft cloth to remove all the water stains.
Never use electrostatic prevention products
as well as sloutions which contain benzene,
thinner or any other vaporizing substances,
as they may damage the disc surface.
Storage of disc:
Do not keep the disc in the direct sunlight,
near the heat source, in the dusty places
or moisture (kitchen, bathroom). Keep the
disc vertically in the disc storage case.
Heavy objects on the disc case will cause
deformation to the disc.
Copyright Attention:
Copy, broadcast, play or rent the disc is
forbidden without legal permission.
TV System:
Please connect the unti to the TV
compatible with
PAL/NTSC.
About this manual
This manual explains the basic
specifications of this unit. Some DVD disc
may have special requirement and the unit
may not play such discs. Please refer to
the disc instruction.
Storage of disc:
H2
Page 26

TERMS:
ADDITIONAL INFORMATION
DTS digital theatre system
PBC play back control
PCM pulse code modulation
DTS is a kind of surround sound system different
from Dolby digital system. Now, it is widely used in
movie and CD disc field.
PBC is a recorded signal which can control SVCD
or VCD playback. Through PBC menu, you can
search your desired track/title conviently. Besides,
you can also appreciate the high resolution still
picture.
PCM is a kind of digital sound. The digital sound
which CD disc adopts is PCM.
H3
Page 27

CONTENTS
FEATURES...................................................................A1
POINTS FOR ATTENTION.....................................B1-B2
OPERATION INTERFACE..................... ...............C1-C5
BASIC PLAYBACK................................................D1-D6
SYSTEM SETUP.....................................................E1-E6
TROUBLE SHOOTING.................................................F1
SPECIFICATIONS........................................................G1
ADDITIONAL INFORMATION...............................H1-H3
 Loading...