

Page 1

Page 2
This
manual
Kodak
arranged
have
cording
You
understand
loading, unloading, setting
basic
camera
BLrT
signed
the basic
correct way
raphy-for
for
many
You
in
knowing all you
T.
M.
REG.
U.
S.
PAT.
OFF.
is
your
guide
for
Special
II
,Camera
the detail,
to
full advantage. We
as
far
to its relative importance.
can
use
your
camera
the
sections on
the
the
operation.
the Cine-Kodak Special
for
versatility. After
camera
to
operation,
use
your
animation,
other
special applications.
have
a fine, precision camera.
can
camera
for
fades
about
you
read
it.
using
the
as possible, ac-
successfully
if
film chambers,
film meters,
II
Camera is de-
are
familiar with
on.
There
for effect photog-
and
dissolves,
Take
Cine-
you
and
is a
and
pride
Page 3
contents
Film
Chambers
Loading
Setting
Unloading
Basic
Th
The
the
Camera
Winding
e lOO-foot film chamber
200-foot film chamber
Film
Meters
Operation
the camera motor
Setting
the speed dial
Focusing the lens
Setting
the
lens opening
Depth
of
field
Using the finders
Mak
ing the exposure
Tripod
Picture
Effect
Controls
Photography
Animation by single-frame exposures
Use
of
the
single-frame
shaft
Using the crank attached to the
To
To
run
Ii
ow to
make
Other uses
single-frame
hand
crank the camera
down the camera motor
fades
of
and
the variable shutter
shaft
dissolves
Using the frame counter
Mult
ipl
e exposures
with
mask
without masks
Titl
es for films
Duplicates
Films
for
the
Camera
Magnetic
film
Care
of
Camera
Picture
sound
the
Cine-Kodak
making
Cine-Kodak
track
aids
for
Special
Special
16mm
II
2
5
8
12
12
14
14
15
15
16
16
18
18
19
22
22
23
23
24
25
26
27
28
28
31
32
34
II
35
36
37
40
Page 4
how
to
use
the
Cine-Kodak
FILM
Any
16mm, single
can
be
used. Detailed
16mm
films is given on
Special
or
inform
page
double
35.
perforated
ation
I.
Camera
about
Kodak
film
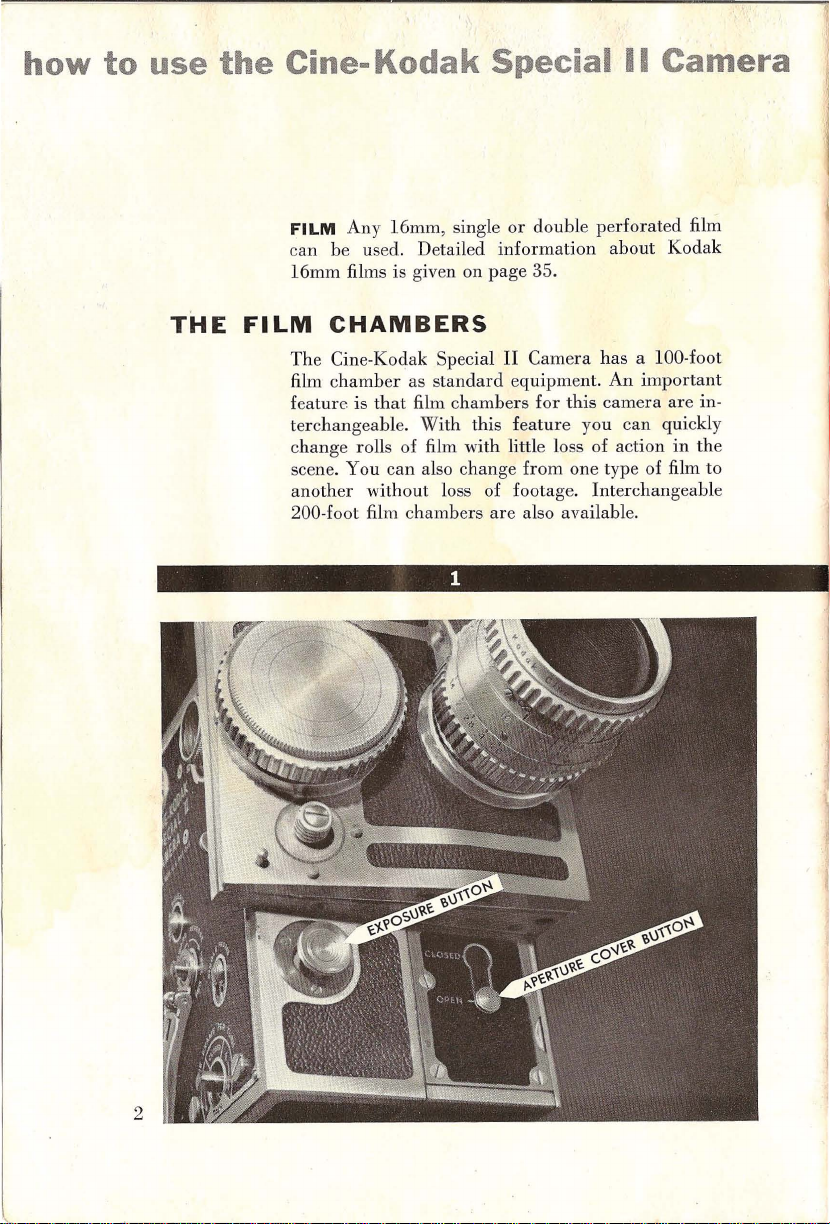
THE
FILM
CHAMBERS
Th
e Cine-Kod
film c
hamber
feature
terchangeable. W
c
scene.
another
200-foot film cham bers
hange
is
that
rolls
You
without
ak
Special
as
standard
film c
ith
of
film
can
also
loss of footage.
II
Camera
equipment.
hambers
this
with
change
for
feature you
little loss of action
from
are
also available.
has
a 100-foot
An
important
this
camera are in-
can
quickly
in
one type of film
Interchangeable
the
to
2
Page 5
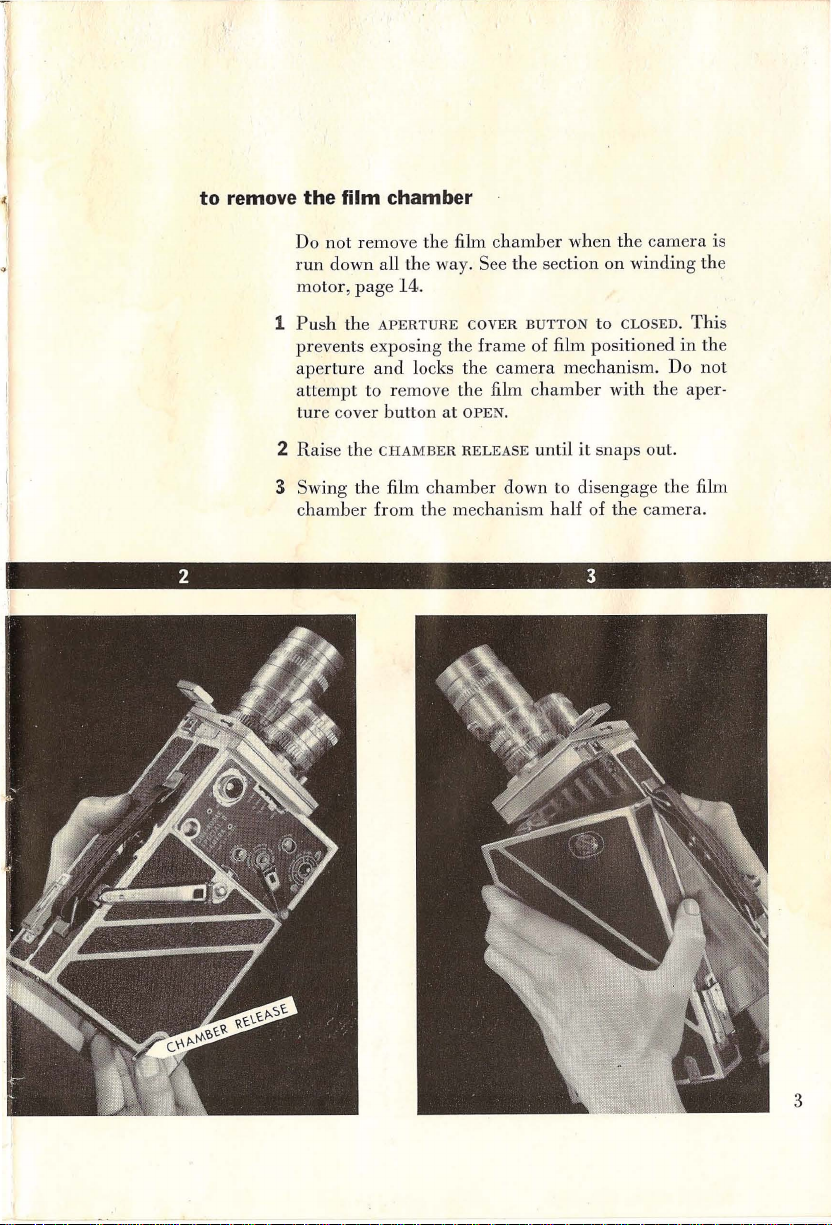
to
remove
the
film chamber
Do
not
remove
run
down all the way. See
motor,
page
Push
the
1
APERTURE
prevents exposing
aperture
attempt
ture
and
to remove
cover
butt
14.
the
locks
on
at
film
COVER
the
the
the
OPEN.
chamber
the
section on winding
BUTTON
frame
of film positioned
camera
film
chamber
when
the
camera
to CLOSED.
in
mechanism. Do
with
the
is
the
This
the
not
aper·
2 Raise
3
Swing
chamber
the
the
from
CHAMBER
film c
hamber
the
RELEASE
until
down to disengage
mechanism
half
it
snaps
of
the
out
.
the
camera.
film
3
Page 6
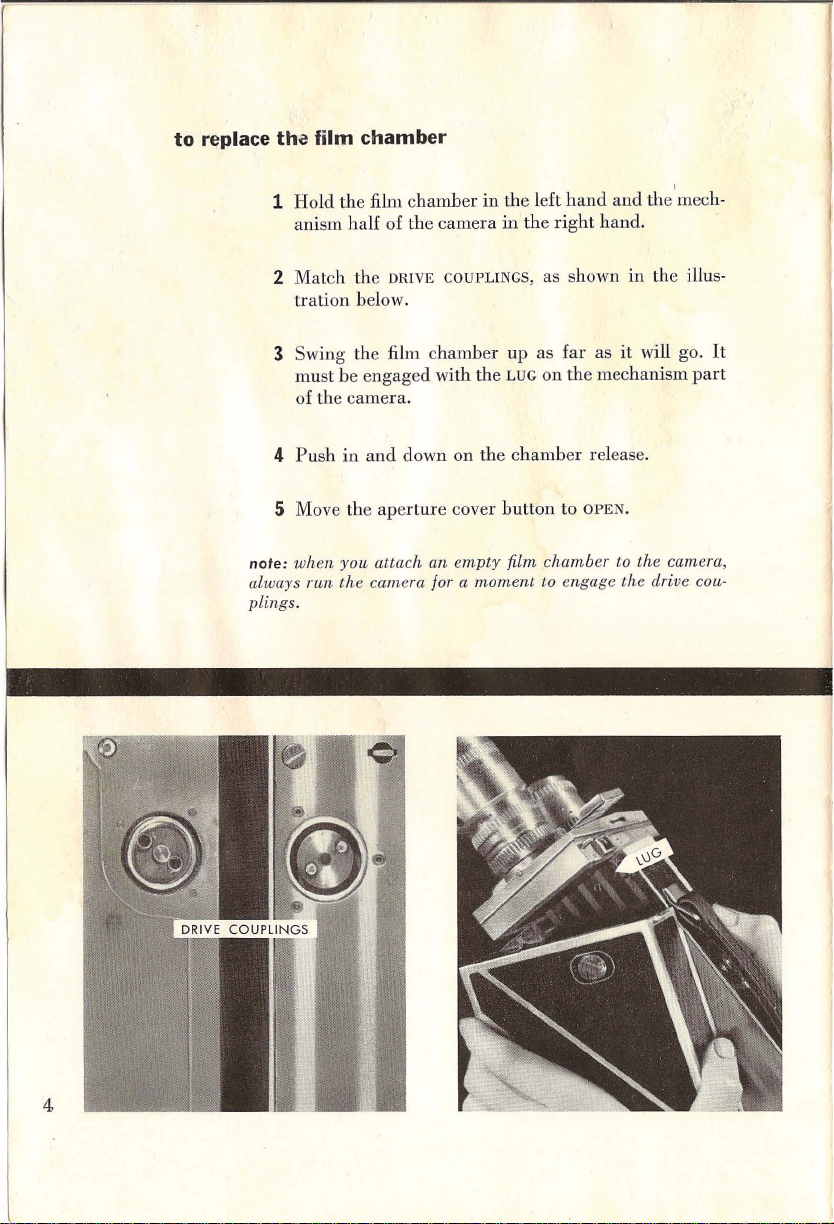
to
r~place
tha film chamber
1
Hold
the
film
chamber
anism
half of
the
in
camera
the
in
left
the
hand
right
and
hand.
the
'mech-
2 Match
tration
the
below.
3 Swing the film
must
be
of
the
camera.
4
Push
in
5 Move
note:
always
plings.
the
when
you attach an
run the camera for a
DRIVE
COUPLINGS,
chamber
engaged with
and
down
on
aperture
cover
empty
as shown in
up as
far
as
it
will go.
the
LUG
on
the
mechanism
the
chamber
button
film chamber to the camera,
moment
release.
to
OPEN.
to engage the drive cou-
the
illus-
It
part
4
Page 7
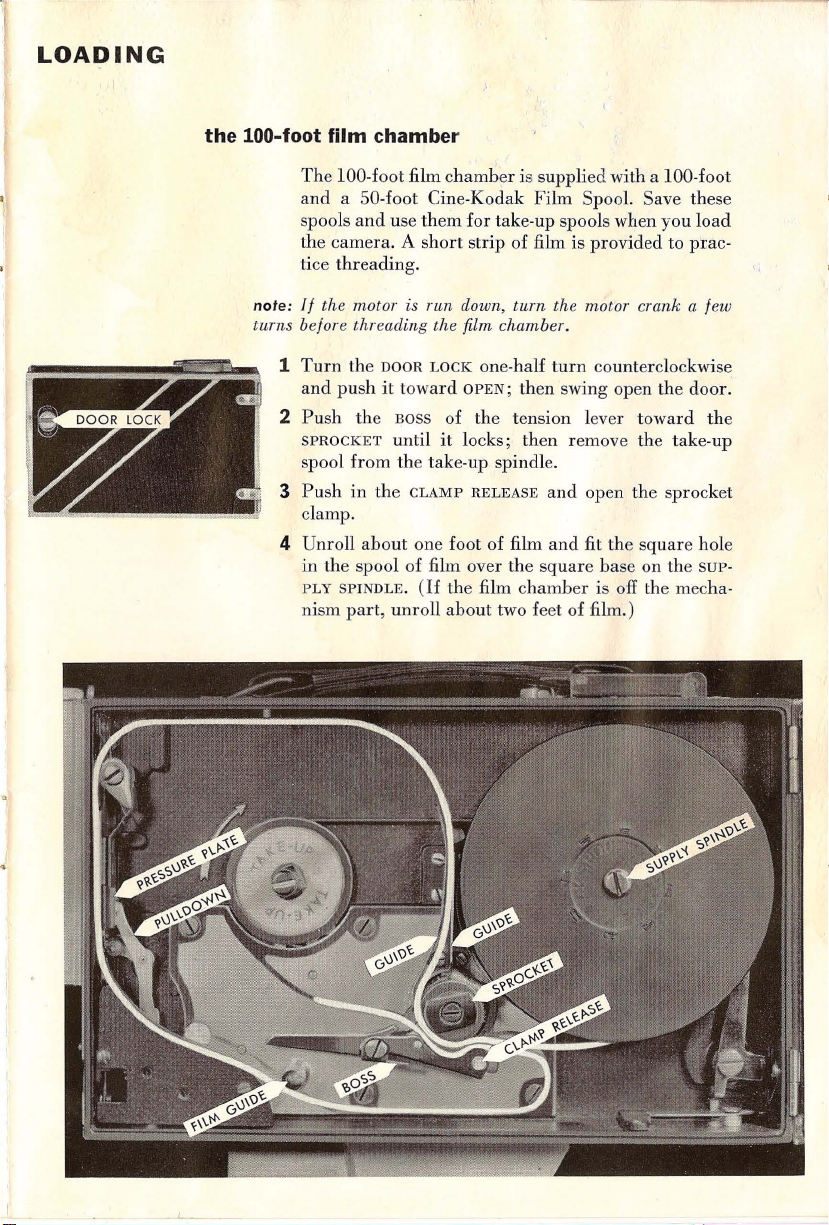
LOADING
the
100-foot film chamber
The 100-foot film chamber is supplied with a 100-foot
and
a 50-foot Cine-Kodak Film Spool. Save these
spools
and
the
camera
tice threading.
note:
If
the
turns before threading
1
2
3
motor is run down,
Turn
the DOOR
and
push
Push
the BOSS of the tension lever toward the
SPROCKET
spool
from
Push
in
clamp.
4 Unroll
about
in
the spool of film over the
PLY
SPINDLE.
nism
part,
use them for
. A
short
the
LOCK
it
toward
until
tak
strip of film is provided to prac-
film chamber.
one-half
OPEN;
it
locks; then remove the take-up
the take-up spindle.
the
CLAMP
RELEASE
one foot of film
(If
the film
unroll
about
two feet of film.)
e-up spools when you
turn
the motor crank a few
turn
counterclockwise
load
then swing open the door.
and
open the sprocket
and
fit the square hole
square
chamber
base on the sup-
is off the mecha-
Page 8
5 Refer to the illustration. The white line represents
the
path the film mZlst follow.
6
Engage
and
clamp
7 Follow
PRESSURE
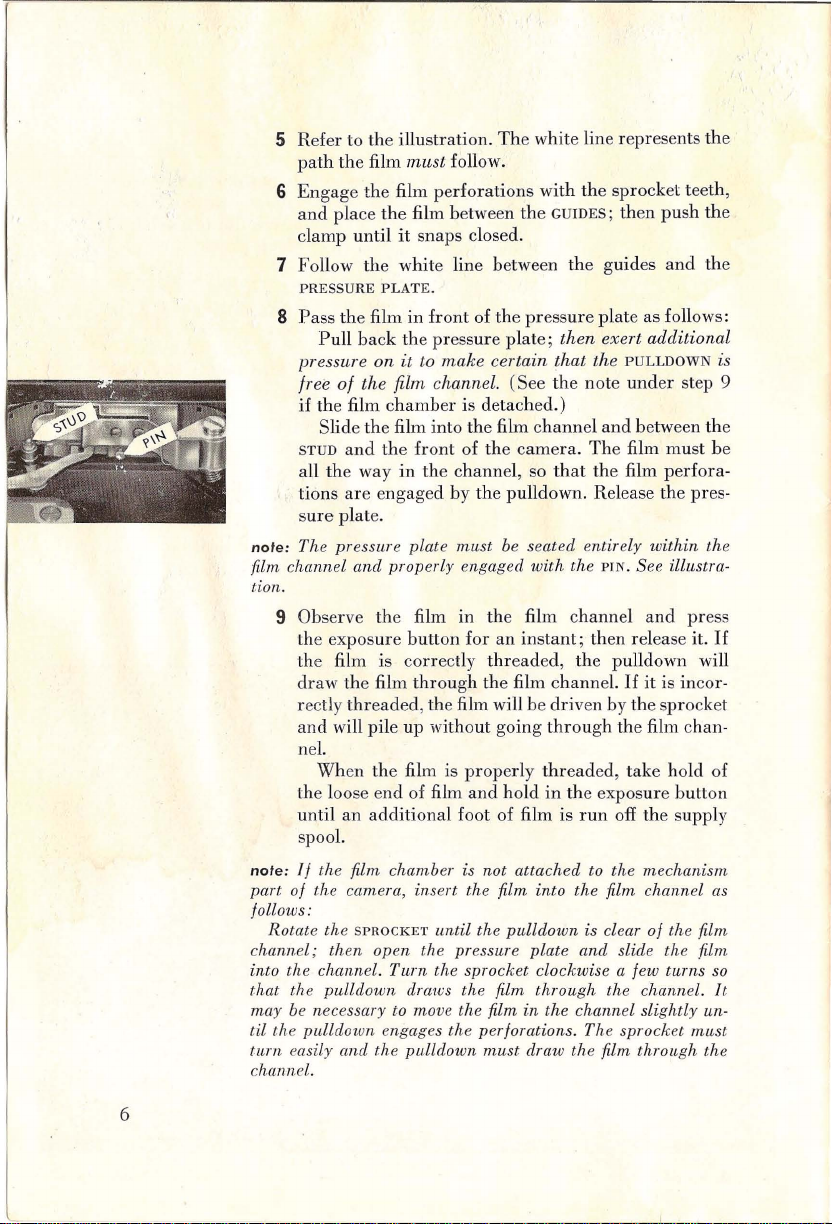
S Pass
pressure on
free
if the film
STUD
all the way
tions
s
note: The pr essure plate must be seated entire
film channel
tion.
9 Observe
the exposure button for
the film is
draw the film
rectly
and
the
film
perforat
place
the
film between
until
it
snaps closed.
the
white line between the guides
PLATE.
th
e film
in
front
of the
Pull
back
the pressure
it
to
make
of the
film channel.
chamb
er is detached.)
Slide
the
film into the film c
and
the
front
of the
in the channel, so
ure
are engag
plate.
and
ed by
the
prop erly engaged
the
film in the film channel
corr
ectly
through
threaded, th
e film will be
will pile up without going
ions with
the
the
GUIDES;
sprocket teeth,
then
push
and
pressure
plat
certain
(See the
e;
plate as follows:
then
exert
that
the
note under
hannel
and
additional
PULLDOWN
between the
camera. The film must
that
the
film perfora-
pulldown. Release the pres-
ly
within
with
the
PIN
. See illustra·
and
an
instant; then release it.
thr
eaded, the pulldown will
the film channel.
driv
through
If
it
is
en by the sprocket
the film chan-
the
the
step 9
be
the
press
If
incor
nel.
When the film is
the loose e
until an
nd
additional
properly threaded
of film
and
foot of film is
hold
in
, take hold of
the exposure
run
off the supply
button
spool.
note: 1/ the film chamber is not attached to the mechanism
ca
part of the
follows:
Rotate the
channel;
into the channel.
that the pulldown draws the film through the channel. It
may be necessary to move the film in the channel slightly
til the pulldown engages the per/orations . The sprock et must
tum easily and the pulldown
channel.
mera, insert the film into the film channel
SPROCKET
th
en open the pressure plate
until the
Tum
the sprocket clockwise a few turns
pulldown
must
is clear
and
draw the film through the
slide the film
0/
as
the film
so
un-
is
-
6
Page 9
10
Open
the
the
Fit
guide
the
film
sprocket
line
perforations
and
clamp.
between
over
Thread
the
sprocket
the
the
and
sprocket
film
the
teeth, which
already engage the film coming from the supply
spool.
Close
the
11
snaps
into
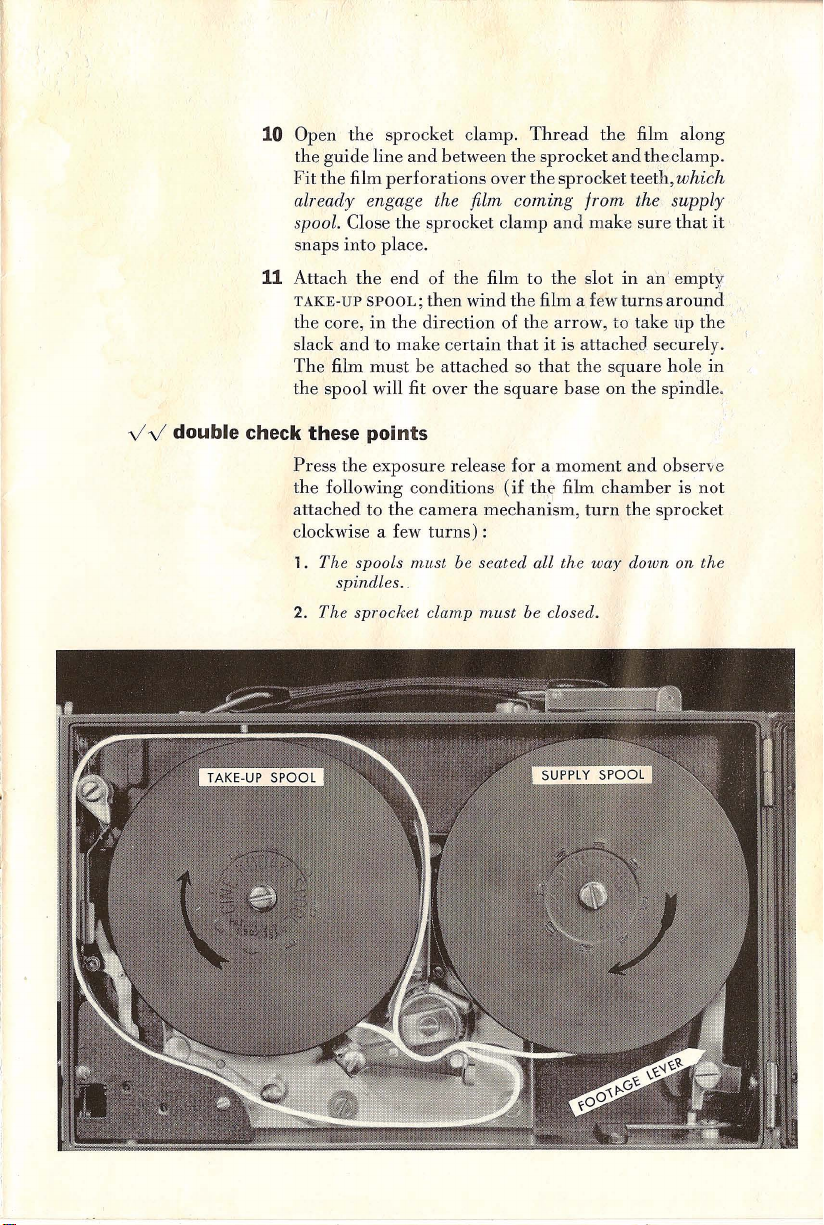
Attach
TAKE·UP
the
core,
slack
and
The
film
the
spool
place.
the
SPOOL;
in
to
must
will fit
end
the
make
be
sprocket
of
then
direction
over
the
film
wind
certain
attached
the
clamp
to
the
of the
that
so
square
and
make
the
slot
film a few
arrow,
it
is
attached
that
the
base
sure
in an'
turns
to
take
square
on
the
along
clamp.
that
it
empty
around
up
the
securely.
hole in
spindle
.
v V double check
these
points
Press
the
exposure
the
following
attached
clockwise a few
1. The spools must be seated all the
2. The sprocket clamp
to
the
spindles.
release
conditions
camera
turns)
:
must
for a moment
(if
the
film
mechanism,
be closed.
chamber
turn
way
and
the
observe
is
not
sprocket
down on the
Page 10
3.
The
film
must
by
the
threading guide line.
4. The film loops
move evenly along the
must
be maintained.
path
designated
caulion:
taking satisfactory pictures,
gage the film perforations. This is because the
force comes from the sprocket.
pulldown
It
is possible to run film
engages
Close
door
lock
in
the
direction
the
tension
will
ride
rear
FOOTAGE LEVER
supply
nole:
Never force the door.
object
may
be obstructing it. Forcing
spring at
the
200-foot film chamber
the
The
accessory 200-foot film
the
mechanism
ner
as
on
the
it
13) as
to
load
chamber
film
foot spool. Save
spools
film is
the
the
film
toward
lever will
against
spool.
hinges
and cause
the
100-foot film
mechanism
described
the
200-foot
is supplied with a 200-foot
when
you
provided
through
when
the
Always
film perforations.
chamber
CLOSE
of the
and
and
arrow.
turning
When
automatically
the
film
on
the
will
ride
If
it does
not
light
leak
chamber
half
of
the
camera
chamber
half
(page
for
the
100-foot
film
chamber-The
the
spools
and
load
the
camera. A short
to
practice
threading.
the camera without
pulldown
make
lock
it
it
you
certain
by
'one-half
close
does not en-'
main
driving
that
pushing
the
close so
take-up spool.
against
the
the film
close easily, a foreign
door can cause
.
is removed from
in
the
same man-
(page
3);
replace
4)
and
unload
chamber.
200-foot
and
use
them
for
take-up
strip
the
the
turn
door
that
The
on
the
it
(page
a 100-
it
to
of
nole:
If
turns before threading the film chamber.
the motor is run down,
1
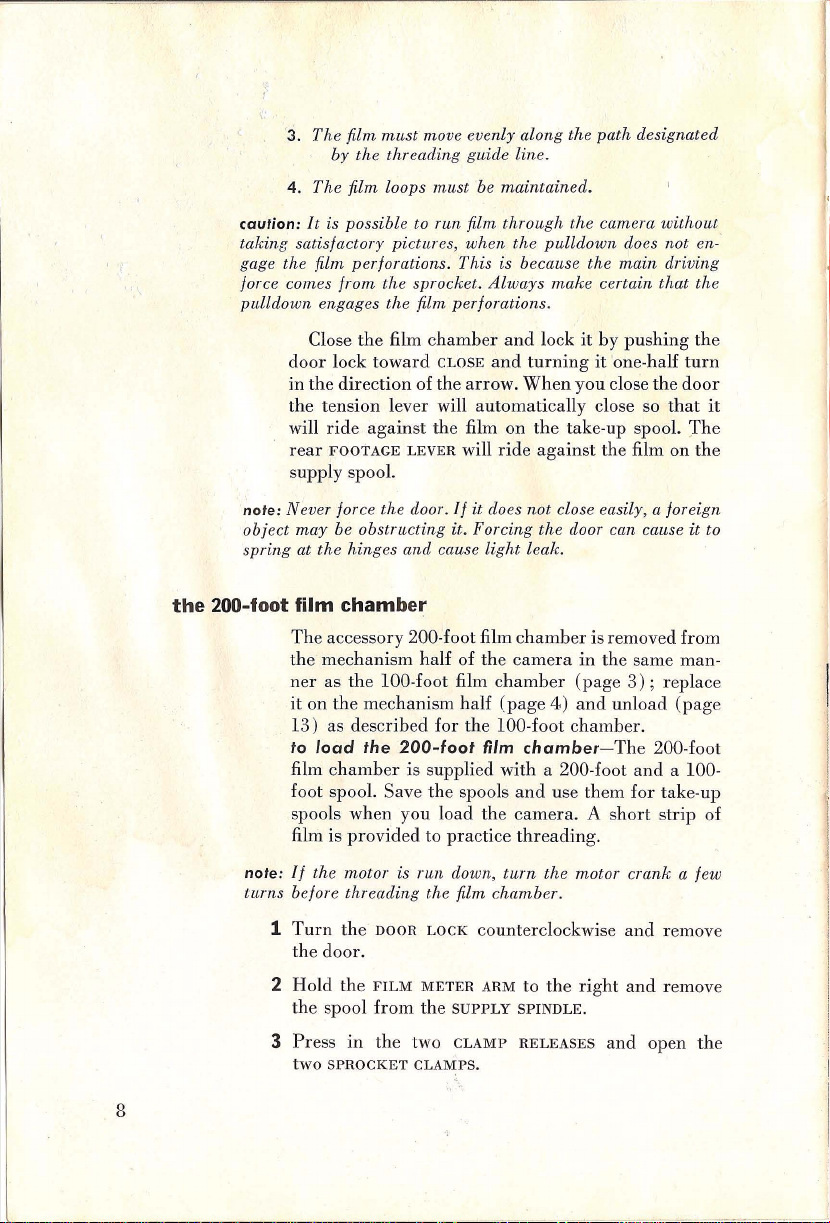
Turn
the
DOOR
the
door.
2
Hold
the
FILM
the
spool
from
3
Press
in
the
two
SPROCKET
LOCK
METER
the
two
CLAMPS.
turn
the
counterclockwise
ARM
to
the
SUPPLY
CLAMP
SPINDLE.
RELEASES
motor crank a few
and
remove
right
and
remov
and
open
the
e
8
Page 11
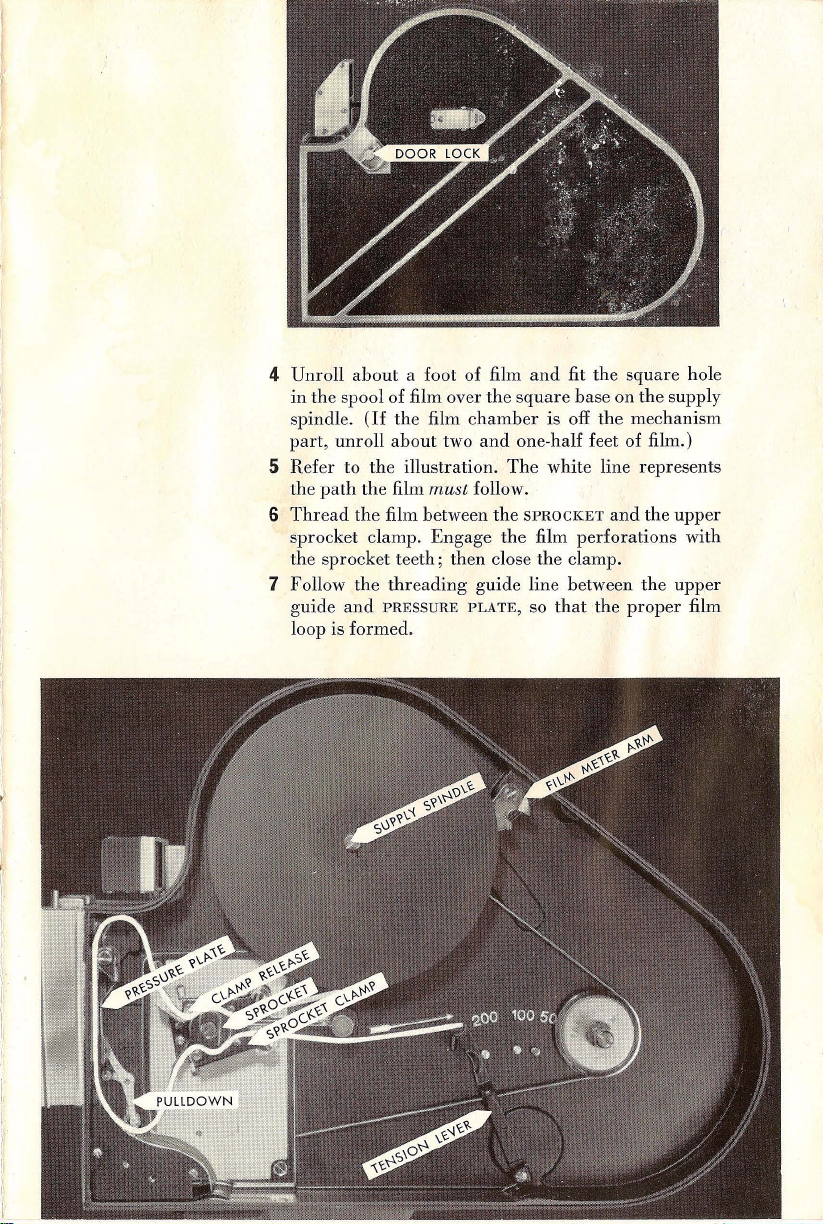
4 Unroll
in
spindle.
part,
Refer
5
the
6
Thread
about
the
spool of film over
(If
unroll
to
path
the
the
sprocket clamp.
the
sprocket
7 Follow
guide
the
and
loop is formed.
a foot of film
the
film
about
two
the
illustration.
film
must
film between
Engage
teeth;
threading
PRESSURE
and
fit
the
square
chamber
and
is off
one-half feet of film.)
The
white line represents
follow.
the
SPROCKET
the
film
then
close
the
clamp.
guide line between
PLATE,
so
that
the
square
base on
the
the
mechanism
and
the
perforations
the
the
proper
hole
supply
upper
with
upper
film
Page 12

8
Pass
the
film in
front
Pu
ll
back
the pressure
pressure
is free
9
if the film
the film
of the
channel
on
it
of
the
chamber
channel
camera.
so
that
to
make
film
channel
and
The
the film pe
the pulldown. Release the
of
the
pressure
plate;
certain
. (See
plate as follows:
then
exert
that
the
note
is detached.) Slide
between the STUD
film
must
be all the way in the
rforations
pressure
plate.
the
the
and
are
engaged
additional
PULLDqWN
under
step
film into
the
front
by
note: The pressure plate
film channel
tion.
9 Observe
note:
part of the camera, insert the film into
follows:
Rotat
channel;
the channel.
so
that the
may
be necessary to move the film in the channel slightly until
pulldown
th e
turn
easily
channel.
10
and
properly engaged
the
th
e exposu
the film
draw
rectly
spool
channe
When
the loose
until
off
If
the film chamber is not attached to the mechanism
e the
Follow
plate
re
is
the film
thread
and
will pile
l.
the
end
about
an ad
the
supply spool.
SPROCKET
then
open the pressure plate
Turn
pulldown
engages the perforations. The sprocket
and
the
the
thr
and the lower
tween the sprocket
Engage
the film
then close the clamp to
must
be seated entirely with
with
the
PIN.
See
film in the film
button
for
an
correctly
threaded,
through the film channel.
ed, the film will
up
without
film is
properly
of film
and
hold
ditional foot
until the
the sprocket counterclockwise a few times
draws the film through the channel.
pulldown
eading
pulldown
must
guide line between
guide;
and
the lower sprocket clamp.
perforations
hold
channel
instant;
then
release it.
the
pulldown will
If
unwind
and
draw
from
going
through
threaded,
in
the
exposure
a half of film is
the
film channel as
is clear
and
slide the film into
the
film through
take
the
then
thread
the
with the sprocket te
the
film
in
position.
in
illustra-
and
press
it
is incor-
the suppl
the
film
hold
button
run
of
the film
must
pressure
film be-
eth;
the
If
y
of
It
the
10
11 Locate
marked
the
with
TENSION
the
LEVER
size of the spool used.
to
the
left of
the
stud
Page 13
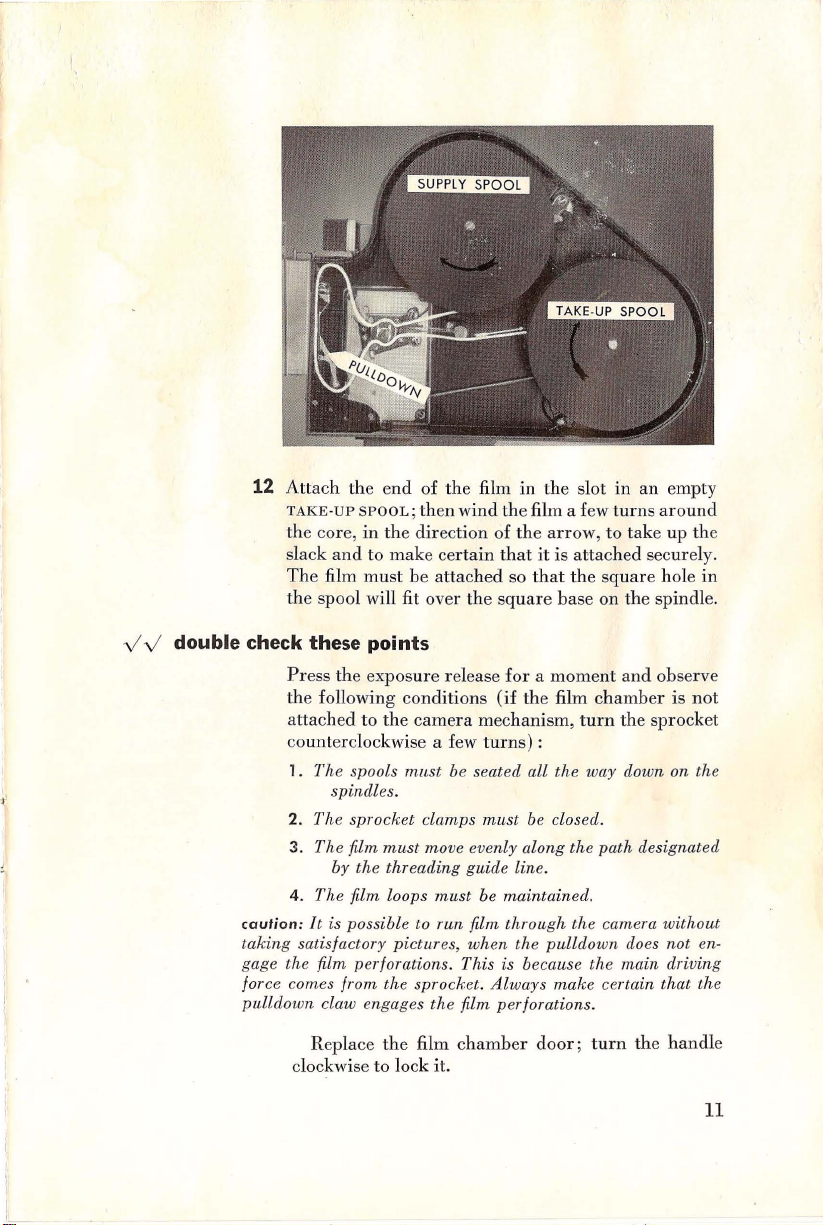
12
Attach the
TAKE-UP
the core,
slack
The
the
end
of
the
SPOOL;
and
film
th
in
the
direction
to
make certain
must be
en wind the film a few
attached
spool will fit over the
film
of
that
square
so
--
in
the
the
arrow,
it
is
that
base
---
slot
in
turns
to
attached
the
square
on
-
--
an
take
securely.
the
spindle.
-
----_._-
empty
around
up the
hole
in
- -
v V double check
Press the exposure
th
attached
counterclockwise a few
1.
2.
3.
4. The film loops
caution:
takin
g satisfactory pictur es,
gage the film perforations. This is because the main driving
co
force
pulldown claw engages
clockwise to lock it.
these
points
release
e following
Th
e spools
spindles.
Th
e sprocket clamps
Th
e film
by
It
is possible to
mes from the sprocket.
Replace
conditions
to
the
camera
mnst
be seated all the way down on the
must
move evenly along the path designated
tlJ,e threading guide line.
must
run
the
film per/orations.
the
film
chamber
for a moment
(if
the film
mechanism,
turn
s) :
must
be closed.
be maintained.
film through
when
the pulldo
Always
make ce
door;
and
chamber
turn
the
the camera
wn
does not e
rtain that the
turn
the
observe
is
not
sprocket
wit
hout
handle
11
n-
Page 14
I
SETTING
THE
FILM
There
exposing film.
The
of
the
200-foot
exposed
The
carrying
posed
camera
or
when
motor.
thumb.
After
meter
until
Additional
film to allow
mits
you
the film
for
actual
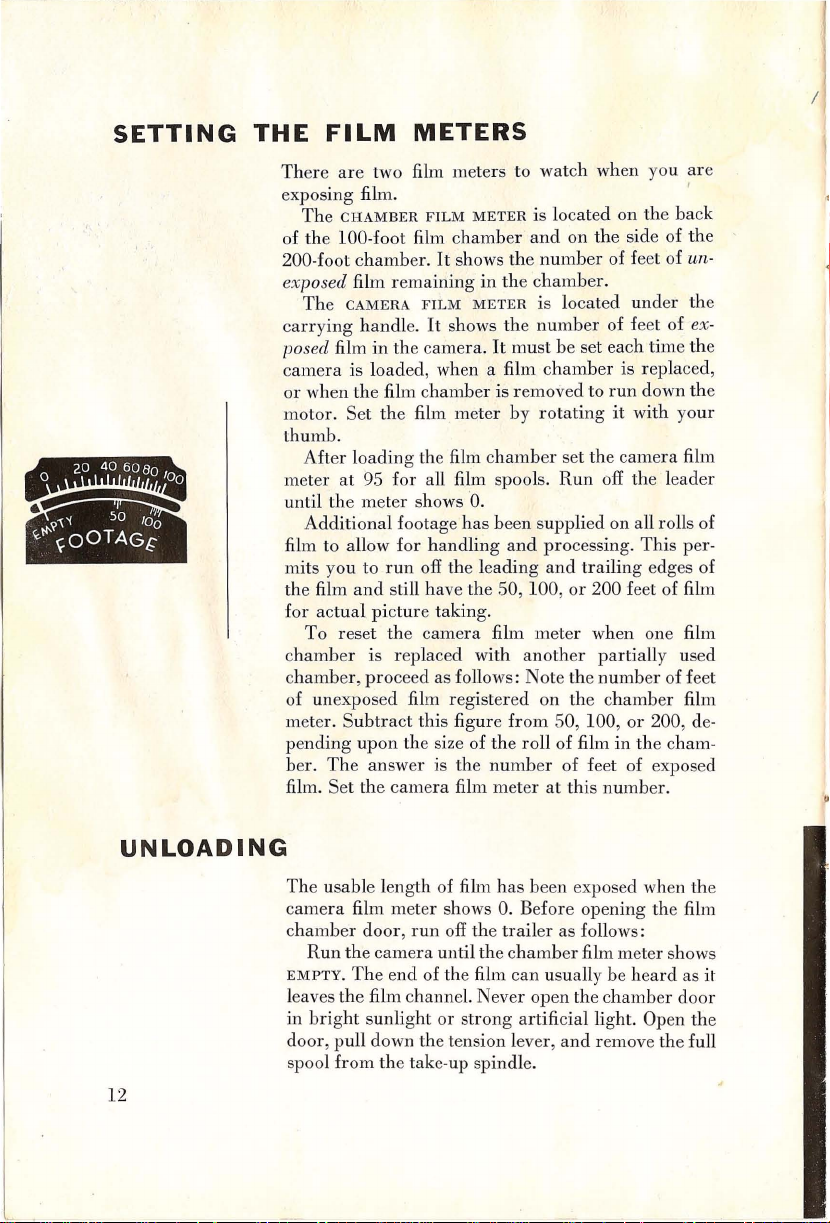
To
chamber
hamber, proc
c
of
unexposed
meter.
p
end
ing
ber.
The
film.
METERS
are
two film meters to
CHAMBER
100-foot film
chamb
film
CAMERA
handl
film
is
the
Set
loadin
at
95
the
met
to
and
reset the
Subtract
upon the size of
Set
the
FILM
er.
remaining
FILM
e.
It
in the camera.
load
ed, when a film
film c
hamber
the
film
g the film
for
all film spools.
er shows '0.
footage
for
handling
run
off
still have
pictur
e taking.
camera
is replaced w
eed as follows:
film registered on the
this figure
answ
er
camera
METER
chamber
It
shows
in
METER
shows the
meter
chamb
has
the
leading
the
is
the
film
watch
when you
is located on the
and
on
the
side
of
the
number
the
chamber.
is located
number
It
must
chambe
is removed to
by
rotating
er
of feet of
under
of feet of ex-
be set each
r is
run
it
set
the
camera
Run
off
the
time the
repla
down
with your
leader
been supplied on all rolls
and
50,
film
ith
processing.
and
trailing edg
100, or
meter
another
Note
the
This
200
feet of film
when one film
partiall
numb
y used
er of feet
chamber
from
the
roll of film
numb
meter
50, 100,
er
of
at
this
or
200, de-
in
the cham-
feet of exposed
numb
er.
are
I
back
the
un-
the
ced,
the
film
of
per
es of
film
-
UNLOADING
12
Th
e usable le
camera
c
hamber
Run
EMPTY.
leaves
in
bright
door
, pull down the tension lever,
spool
from the
film
door, run
the
camera
The
the
film
sunlig
ngth
meter
end
of
channe
ht
tak
of film
shows
off
until
the
l.
or
strong
e-up spindle.
has
been exposed when
O.
Be
for
e opening the film
the
trail
er as follows:
the
chamber
film
can
usually be hea
Never open the
artific
ial
and
the
film meter shows
rd
as it
chamber
light. Open
door
the
remove the full
Page 15
L
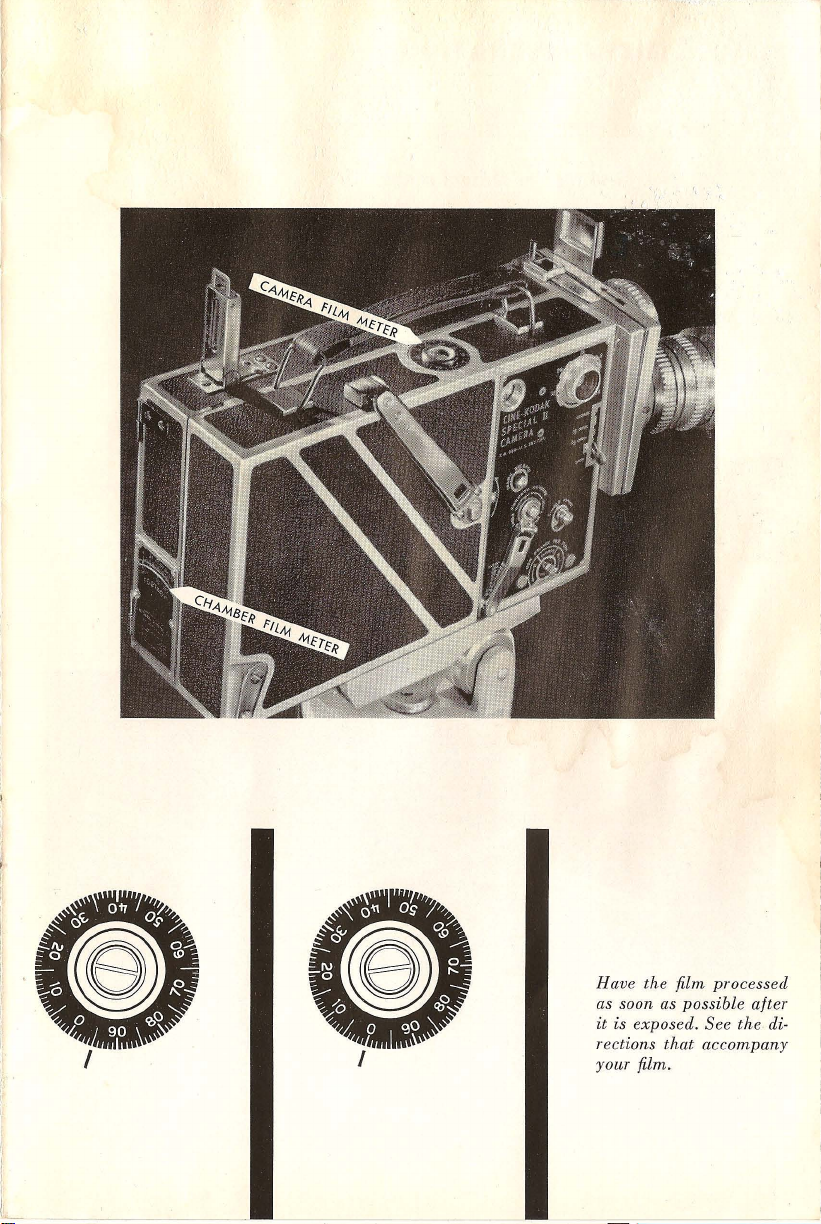
Have the film processed
as soon as possible after
it is exposed. See the
I
rections
yonr film.
that
accompany
di-
Page 16

BASIC
CAMERA
OPERATION
winding
setting
the
camera
Make
MOTOR
the
camera
gages
mo
tor
motor
sure
the
CRANK down
so that
the
square
in
the
direction of
EXPOSURE
from
the
square
end
of
the
when the warning bell sounds.
can
be
exposed with this
If
the
stop,
about
mately
The
nearly
after the bell
the
speed dial
Turn
the
the
mark
and
64
be
obtained
numb
two
camera
38
warning
run
frames
is
three
turns
feet of film
bell also
down.
About
rings
SPEED
DIAL
for
anyone
per
by setting
ers
.
wound
after
can
3 feet
.
until
of the five speeds
second).
the
BUTTON
its
winding
the
winding.
slowly
be
sounds
the
ind
is
position
hole on
SHAFT.
arrow
About
and
the
bell sounds, approxi-
exposed.
when
of
film
index
mark
Intermediate
ex
mark
out. Bring the
on
the
top
of
the
handle
. Stop winding
35 feet of film
care/Idly to
the
can
be
is opposite
(8,16,24,32,
speeds
between any
Wind
motor
exposed
en-
the
the
is
can
Page 17

For
normal
index
mark
Sound
pictures
ond.
If
sound
mark
opposite
Any
camera
produce
picture.
tion
in
slower-than-normal
Conversely,
speed
the
projected
Do
not
operate the camera
exceeding 32.
screen
opposite
are
is
to
be
24
for
speed
will
produce
picture.
action
in
silent pictures, set
16.
projected
added
normal
faster
any
at
to
the
screen
than
action
speed
faster-than-normal
without
24
frames
film, set
action.
projection
in
the
slower
than
film at speeds
the
per
sec·
the
index
speed will
projected
projec-
action
focusing
setting
j
the
lens
Turn
the
representing
site
the
You
described
When
measure
forward
the
lens opening
Turn
the
opening
The
sources.
instruction
FOCUSING
index
can
use
in
you
from
edge
LENS
is
opposite
lens
opening
The
sheet
RING
the
camera-to-subject
mark.
the
reflex
The
Reflex Finder,
focus
by
actual
the
subject
of
the
film
OPENING
the
index
can
latest
exposure
packed
with
on
the
finder
to
measurement,
to
the
chamber.
RING
until
mark.
be
determined
data
every
lens
until
distance
determine
page
17.
film
plane
the
from
will
be
found
roll
of
the
figure
is
oppo-
focus,
as
always
</>
on
the
selected lens
several
on
the
Cine-Kodak
15
Page 18

film.
The
Movie
mation.
Kodak
Dial
See
Cine
contain
your
Kodak
Photo
guide
and
the
Kodaguide
on-the-spot movie-making infor-
dealer.
depth
using
of
field
In
addition
tar
lenses
field is
marker
be
greater
ing
farthest
In
thing
the
from
in
sharp
the
To
read
ring
and
distances opposite
the
illustration,
from
distances less
depth-of-field table
Lens
manual
the
finders
The
Eye-Level Finder consists
and
the
REAR
SPRING
STUD as shown
When
it
to swing the finder
page
on
frame
17. Make
is over
to
the
distance scale, all
have
a
DEPTH-OF-FIELD
distance
the
focus.
depth
the
the
measured
nearest
The
to
the
smaller
of field.
depth-of. field scale, set
focusing ring.
the
page
15
(10
6 feet to 30 feet will
than
3 feet,
you
found
in
packed with
FINDER.
is
not
being used,
the
side locating stud.
Attach
to
sure
in
the
the
the
that
Kodak
Cine Ek-
SCALE.
from
farthest
the
lens opening,
Read
I-number
feet
be
in
may
prefer
the
Kodak
the
point
the
the
index
at
f /
sharp
Depth
film·
plane
that
lens open-
nearest
marks.
5.6),
every-
focus.
to use
Cine
Ektar
of
will
the
and
For
the
camera.
of
the
FRONT
the
front
illustration
it
is usually convenient
finder
.
FINDER
to
the
side position as shown
the
hole
in
the
finder
16
~J
Page 19

note:
When
the rear finder is used
Regular
hinged lens.
Sports finders
sight through the
rear finder.
Other
move the small
the
scale.
hole
which
the
front finders
Use the
Use the RED parallax correction scale.
sports
finders
in
the rear finder. Use the
The
rear
compensates
finder
distance.
slide
at
infinity
Always use
subject
It
The
down
ing.
picture.
main
before
distance
The
Reflex
shows
the
reflex finder
To
use
until
Center
Turn
subject
taking
The
reflex
exposure
BLACK
(marked
small
hinged
finder
and
lens. Set
For
distances
the
Finder is
actual
the
finder
it
locks.
your
the
is
pictures.
finder
button
with
the:
with
lenses,
parallax correction scale.
in red) for
rectangular opening at the top
and
regular
lens out
sight through the small
25mm
and
40mm
front
finders
without
of
position
BLACK
and
sight through
parallax correction
has a parallax-correcting
for
sighting
the
greater
differences between
slide
at
camera-to-subject
than
20
(00).
REFLEX
is closer
can
eye
in
is pressed. Never
FINDER
than
used
image
also
push
the
Open
over
focusing
sharp
focus. Reset the lens opening
will close
when
2 feet.
for
precision
formed
be
the
the
used
REFLEX
lens
finder
ring
by
for
on
automatically
the
the
focusing.
FINDER
to
its
and
the
try
to use the re-
camera
largest
compose
lens
lenses,
of
lenses,
feet, set
camera-to-
framing.
PLUNGER
open-
until
when
the
slide
the
lens.
the
the
the
17
Page 20

fle
x finder while the camera is running,
hold
it
open
when
starting
the
camera motor.
and
do
not
making
caution:
tendency to lock
pressure on it.
tripod
the
exposure
See
that
the
camera
focusing
OPEN
LEVER is
and
the des
and
ring,
Make
certain
.
For
normal
at
OPEN.
Push
the
exposure
up
for
the
ired
scene,
down. To unlock the
is wound. Set the speed dial, the
and
the lens opening ring.
that
the
operation, see
button
leng
th
of time necess
or
lock
lease it.
When
the
exposure
in
running position unless
button
Satisfactory results for sports
can
be obtained
by
hand-holding the camera. However, when convenient, a
used. Always use a
tripod
tures with telephoto lenses.
screw will fit into the
th
e camera.
tripod
aperture
cover button is
that
the
all the way in. Hold
ary
for exposing
it
in
position
button
is
pushed
by
push
it
up;
in, it will have a
you
exert upward
pushing
or field type operation
sturdy
when
you
Any
tripod
are
standard
should be
taking pic-
socket on the bottom of
at
SHUTTER
it
in
in
then
reo
tripod
Page 21

I
r
I
I
PI
CTU
RE
CO N
TROLS
Kodak cine len ses
A wide variety of lenses
Cine-Kodak Special
No
adapter
camera. You will find two slots
side the
the lens to the slot which
focusing
position.
index
marks
sure
th
knurled collar.
f
is necessary
KNURLED
and
lens openi
If
the
lens is not
will be
e lens is properly seated; then tighten the
are
available for use with
II
Camera. See page 40.
for
attaching
on
the lens
COLLAR.
Match
the
locating
brings
the
index marks for
ng
to a convenient
in
the
taking
on
the bottom of the lens. Make
the
lenses to the
mount in-
pin
on
reading
position, the
the
Except for the
era, a clip-on
every new lens.
length of the lens with which
tions
for
attaching the finder
turret
The
lens
turret
is
made
to
accommodate
either one of which
without optical interference
change the lens position,
rection indicated by the
is
in
taking
position when
the
camera
--------------
directly below the reflex finder.
front
finder supplied with the cam-
front
finder must be purchased for
Each
finder is engraved with the focal
it
is to be used . Direc-
are
on page 16.
on
the Cine-Kodak Special
any
two
Kodak
can
be
in
the
taking
from
the other lens. To
rotate
the
turret
arrow
on
the
turret. A lens
it
is
on
the chamber side of
,
--------
II
Camera
cine lenses,
position
in
the di-
19
Page 22

the
masks
The
set of six masks
for
effect
masks
is given
packed
photography.
on
page
with
Detailed
28.
your
camera
information
is used
about
variable
shutter
The
tel'
film
fades
ing
hand crank
The
winding
or
era
single-frame exposures
crank release
The
crank
the
release
release
ther
ei
the
eight
-frame
The
reversing
exposure
the
lever
SHUTTER
when
it
without
and
dissolves;
objects;
HAND
CRANK is used
the
reverse.
to
make
It
is
used
CRANK
to
the
crank
from
and
to
shaft.
shaft
EIGHT-FRAME
the
work.
film
channel
LEVER
is used
is necessary
exposing
and
(5)
film
through
The
film
can
exposures,
on
the
RELEASE
eight-
or
the
eight-frame
pull
the
crank
the
lower
SHAFT
film.
It
The
film moves
with
for
(1)
closing the
to
reverse
it;
(2)
(4,)
sharpening
out-of-focus
on
the
the
camera,
be
cranked
if
desired.
single-frame
and
exact
is used
single-frame shaft.
from
position
is
used
is used extensively
each
turn
or
exposure
images
background.
eight
-frame shaft
through
shaft
wind·backs.
for
holding
shaft,
push
the
shaft.
to
lock
for
eight
frames
of
the
either
advance
control;
of
forward
the
for
making
the
To
remove
up
on
Return
the
crank
advancing
for
multiple-
through
shaft.
shut
the
(3)
mov-
for
cam-
hand
the
the
on
or
·
20
the
single-frame
The
SINGLE-FRAME
frame
frame
shaft.
the
single-frame release
Th
e
SINGLE-FRAME
frame
shaft
or
prolonged
through
exposures.
the
SHAFT
exposures.
film
channel
RELEASE
To
use,
is
used
is used
pull
for
making
The
film moves one
with
each
for
making
out
by
the
single-
turn
single-
grooved
of
the
Page 23

the
frame counter
edge
of
the
button.
the release
use,
The
used
single·frame, and
work.
lever
push
the release lever
FRAME
together
The
counter
COUNTER
to
One
is
pressed
make
double·
is
frame
downward.
back
and
the
accurate
and
numbered
is
exposed
When
into
the
camera.
camera
film
runs
and
multiple-exposure
from
0 to 40.
each
time
not
meter
rewinds
in
are
in
audible
shutter
If
the
lever
the
camera. There
ter
is left closed,
dible
the
hand
The
for
ward
shutter
warning
exposure
at
CLOSED, a buzzing noise will be heard.
shutt
crank
same
or
closed.
er
warning
attached
warning
backward
button
need
the
film
is
is
be
no
can
will
again
to
the
heard
through
pressed
loss
of
be
wound
sound)
eight-frame
when
the
with the
film;
Lack
the
film is
camera
if
by
shutt
the
(the
means
shaft
wound
with
er
Stop
shut-
au·
of
.
the
Page 24

EFFECT
PHOTOGRAPHY
•
•
•
•
•
•
•
•
•
•
, T
•
TH
THE
THE
THE
THE
THE
THE
THE
THE
THE
S
ST
STO
STOR
STORY
STORY
0
STORY
MET
STORY
OF
META
animation
1
•
•
•
2
3
•
•
•
•
•
•
by single-frame exposures
Animation has a wide
in
used
trace the
in titles,
tur
posur
For
Although the ex
the
the single
This
is
for
ample, f
release is u
Pull
Make
frame
frame,
frame,
upon
film
on the screen.
second s on
16
frames
time-lapse
era
full bloom,
formations
seconds'
vals
tervals between exposures will
subj ect
use
single.
22
television
path
of
in
the
assembly
ed
products,
Anim
ation
es
as
exposure co
camera
admits
continuously
thi
s exposure, close
/8
out the single-frame release.
the
release.
To
give movement to the
move the s
move
The number
(1)
and
frames
(5
Your
tin g a
which
matter.
of
the
frame exposur
etc.
is accomplished
follows:
ntrol
is
operating
frame
twice as
operated
to
f / 11. Best results will
sed
only when the
exposure by
the
of frames to
th
e speed
(2)
the
For
the
screen,
per
second,
x
16).
Cine-Kodak Special
photography-a method
period
rapid
for
an
proj
ection. Expose
will
produce the
single-frame
variety
com
mer
travel
, set the speed-
posur
e is
is exposed
much
the
ubject
subject
of time.
again, and
at which
leng
th
example:
and your
you
movement
entire
es
can
cials,
across a map,
or
disassembly
about
at
16
at
lig
ht
at
speed 16 .
lens one
motor
pressing
subject,
slig
be
you
of
time the action is
If
will have
II
The
of
day,
can
one
desired
shaft-A
be
connected to
of
applications.
in
travelogues
in
of
man
with
single-
frame
dial
ind
ex
1/35
second when
frames
about
as
htl
exposed will
intend
th
e ac
projection
is also excellent
growth
street
frame at
per
1/ 17 second.
when the
To
compensate
opening;
be
obtained
is fully
down
the
expose a single
y, expose
so on.
to
project the
tion
is
to
expose
of
greatly
of a flower
traffic,
be
shown
time
effects. The in-
vary
according
motor
for
the
wound.
in
It
to
graphs,
ufac-
ex-
to
16.
second,
camera
for
ex-
if
the
single-
anoth
er
depend
to last
to
last 5
speed is
80
for
accel-
to
cloud
a few
inter-
to
making
singl
e-
is
1
•
•
THE
STORY
OF
METAL
•
•
Page 25

frame
shaft.
Write
to
the
Eastman
Rochester 4, New
ers'
names.
using
the
crank
-P
lace
the
push
down
the
shaft.
To
sure
button
the
arrow
F;
posure
arrow
arrow
warning:
crank in a reverse direction, stop winding.
tor as described on page 24. The strong mechanical leverage that is obtained
frame
shaft
niSin of your camera.
is useful
winding
number
s
moving
being
luust
nole:
Each exposure
there will be a variation in density from frame to frame.
is up,
down,
button
R.
Turning the
R also
If
the warning bell sounds while you are turning
can cause serious damage to
The
hand
for
the
of
ures
of
long
The
shutter
the
exposed.
be
at
OPEN.
When
the
the
came
the
shutter
York
for
attached
hand
crank on
on
the
cran
k release
move
the
film
in
and
turn
the
to
wind
the
film
in
and
turn
crank
winds
the
camera
when
l~'inding
crank
attached
multiple-exposure
film
forward
turns.
It
is also useful
duration
lever
film
must
dot
must
through
When
be
on
the
ra
shutter
.
the
exposing film
of
the same duration, otherwise
end
is open.
to
the
in
always
is closed; when
Kodak
details
and
the
single-frameshaft
single-frame
to
lock
forward,
crank in
in
in
in
lock
the
reverse, lock
the
dir
ection of the
the
direction
motor.
Run
reverse
with
the
stopping
to
the single-frame
work
which
or
in
reverse a definite
for
making
be
at
CLOSED when
camera
unless
the
of
the
single-frame
Compan
manufactur-
shaft
and
the
crank
on
the
expo-
direction
the
ex-
of
the
down the mo-
the
the single-
nucha-
shaft
requires
expo-
the
film is
shutter
lever
shaft
the
dot
of
y,
is
to
hand-crank
the
camera
One
of
the
most
wind the film
as
effects
lap
frames, etc.
hand
crank.
came
ra
either
reverse-To
reverse
without
frequent
through
dissolves,
There
The
in
hand-
the
are,
in
hand
crank
reverse
cran
k film
exposing
uses
for
camera
double
addition,
winds
or
forward.
through
film,
the
hand
crank
in
reverse
exposures, split
other
uses
film
through
the
camera
proceed
as
is
to
for
such
for
the
the
follows:
23
in
Page 26

Move
the
shutt
crank
to
the
pressing
lar
and
crank
zer will
the
channe
hand
warning
motor
forward-For
of
era
when
per
camera
the eight·
down the
crank
ture·taking
the
crank
at
motor
crank
down
opening
hold
(or
in
the
sound
required
l, release
cran
k to
Winding
bell sounds, stop
as
described below.
film
(the
after
the
the
camera
second.
Before
When
When
the same
starting
motor
frame
crank
the
will
you
camera
and
governor
at
excessive speed.
er
lever to CLOSED
eight.
frame
the
crank
in
the
handle
lock
in)
the
direction of the
when
the
amount
the
in
reverse winds the
run
motor
exposure
turn.
position.
hear
motor
follow it while
rat
of
the
exposure
picture·
scenes
that
of
the
motor),
has
run
is set
at
an
extended exposure, wind
to
the
stop.
shaft. Lock
release.
Lock
the
the
warning
is
nearly
e of speed when
will resist
and
attach the
shaft. Lock
release.
over
exposure
REVERSE
shutter
film is
taking
winding
require
down. Do
speeds exceeding
Attach
it
button
exposure
run
it
turns.
any
it
Place
the
shaft;
button.
arrow.
lever is closed .
wound
button
to
and
position.
camera
and
more
hand
crank
not
the
the
shaft
is pressed,
button
bell, whi
down,
grasp
Continue
the
motor
attempt
to
the
the
then
through
return
motor.
run
than
hand
hand
by
in
ch
stops.
to
hand
shaft
by
rectangu·
push
Turn
the
The
buz·
When
the
the
If
the
down
the
38
feet
the
cam·
crank
24
frames
the
crank
pressing
the
hand
the
pic·
indicates
the
hand
turning
The
turn
the
in
'1
to
24
to
run down
the
camera motor
Winding
frame
tor.
be
run
warning
quired,
ber;
PLUNGER.
the
camera
shaft
or
For
multiple exposures, split frames, etc.,
necessary to wind the film
of
the
motor
Always stop reverse
bell.
proceed
then
push
Lock the exposure
in
the
eight·
(about
If
additional winding
as follows: Remove
in
reverse
35
winding
the
with
frame
shaft
back
feet).
exposure
button
either
more
when
in
button
in
the
winds
than
you
reverse is
the
film
until
single.
the
it
may
one full
hear
cham·
and
the
mo·
the
reo
the
mo·
Page 27

tor
stops.
When
the
motor
is completely
release
the
exposure
ber;
then
continue
ner
you
can
wind
how
to
make
If
fades and dissolves
A fade-out is a
until
as a
properly
scene.
speed
lever
to
it
black-out
with
the
may
scene
starts
scene is
out
of one scene
the
next
The
determines
shutter
regulated
button
and
winding
back
gradual
is completely
and
in
the
entire
darkening
blacked
gradually
exposed. A dissolve is
with
the
simultaneous
which
the
shutter
length
match
be
the
of
the
opened
tempo
and
attach
reverse.
roll
fade
closed
of
the
run
the
film cham-
In
this
of film.
of
the
end
out. A fade-in
lightens
the
until
fading-
fading-in of
lever is
or
operated
dissolve.
uniformly
subject
down,
man-
of a
the
The
or
being
filmed.
not
make
fades
or
lever,
the
making
before
the
exposure
the
action
upper
(or
shutter
at
the
OPEN.
dissolves
lever will
taking
end
stop
Do
operating
the
notches.
the
to
ning
point
past
motor
Allow
the
to
fade
exposure
the
for
fj.
camera
Practice
cam
era
fade
out-Lock
position.
for
CLOSED
will
about
fade-out.
in-S
shutter
the
fade-in.
the
shutter
so
that
empty
When
the
fade-out, slowly
to
the
automatically
64
frames
et
the
button, and
lever
toward
at
bear
toward
fades
and
actual
button
in
a scene reaches
move
of
the
and
4 seconds
lever
at
same
time,
Allow
speed
64.
When
the
front
of
not
catch
in
the
dissolves with
scenes.
in
the
run-
the
the
shutter
slot.
The
lever
camera
end the fade-out.
at
speed
16)
for
CLOSED.
start
about
Press
to
64
frames
the
move
Page 28

to
dissolve-Fade
in. Standard
(about
2V2
seconds
3%
seconds
For
most
the
fade·out
at
16
frames
eight·frame
in
in
one
one
exposed
per
second,
exposed
out,
wind
dissolves
at
speed 16).
purposes
and
fade·in
per
second, two complete
shaft
are
second.
three
second.
contain
at
speed 16)
you
by
required
When
complete
back
the
or
can
gage
counting.
to
wind
exposing
turns
wind
film;
either
60
frames
the
When
then
40
duration
exposing
turns
back
the
at
24
back
the
fade
frames
(about
of
of
the
film
frames
film
®
t§
0-
EXPOSURE
other uses of
CLOSED
'I.·OPEN
~
'h
· OPEN
OPEN
TIME
PER
FRAME
the
A
wide
number
the
variable
follows:
When
the
second
individual
posure
OPEN.
speed
two-f/8
it is simple
with
is
The
and
speed
32
changing
while
ing
factors.
For
example, a
per
second
to
change
the
(twice
lens
opening
Similarly,
ing
to
:1f2-0PEN,
exposure
lens
opening
variable
frame
about
other
lens
admits
is twice as fast as
to
with
the
speed of 16),
at
shutter
of effects
shutter.
film is
the
The
being
shutter
is 1/35
at
1/70 second,
controls affecting
opening)
twice
keep
the
exposure
one
or
more
certain
a lens
opening
shutter
to
if
16
to
//8
(twice
you
you
frames
//8.
speed
wish
can
as
per
can
be
principle
exposed
OPEN,
the
second;
or
also
change
much
speed
at
of
the
exposure
of
to
32
it
is necessary
the
light
to
change
maintain
second
obtained
of
at
exposure
at
:1f2
exposure
light
16.
the
exposure-govern-
calls
//11.
frames
admitted
the
the
by
by
the
shutter
16
frames
V2-0PEN,
the
exposure
in
multiples of
as
//11,
For
this
correct
for
16
If
y
per
to
adjust
shutter
same
changing
to
the
(camera
reason
frames
ou
second
at
//11) .
relative
using
is
as
per
each
ex-
of
and
value
wish
the
open-
the
Angle
0/
Adjust- Opening
ment
0/
Shutter
OPEN
lh
OPEN
14
OPEN
~n
Shutter··
Degrees
165
82.5
41.25
EXPOSURE
8
Single Frames
Frames per per per per
Second
1/17 1/17 1/35
1/35 1/35
1/70 1/70
TIME
IN
SECONDS
16
Frames
Second
24
Frames Frames
Second
1/52
32
Second
1/70
1/70 1/105 1/140
1/140
1/210 1/280
64
Frames
per
Second
1/140
1/280
1/560
Page 29

exposure
the
move
lens
openings
to
sharpen
the
objects
falls,
OPEN.
and
ing
control-If
smallest lens
the
shutter
opening
smaller)
smaller)
images
image
of
each
(sports
etc.),
move
This
shortens
results
in
sharper
the
lens one
opening
lever
.
of
frame
events,
the
the
or
two stops
the
light
is so intense
will give overexposure,
to
or
to
moving
showing
industrial
shutter
exposure
pictures.
Y2-0PEN
1;!
lever to
to
(equal
-OPEN
objects-To
rapidly
processes, water-
Y2-0PEN
time
for
Compensate
maintain
that
(equal
each
correct
even
to
one
to
two
sharpen
moving
or
frame
by
open-
1;4-
ex-
posure.
for
out-of-focus
at
times
to
throwing
lens
shutter
not use
moving
using
The
button
One
film
the
opening
lever
the
subjects
the
frame
is
pressed
foot
of
channel
40. One complete
camera
film
of
for
"
film
When
the
meter,
film
can
accurate
1
Load
until the film meter reads between
background-It
emphasize
an
object
background
to
decrease
at
shutter
1;4-0PEN
close
at
1;4-0PEN
to
the
to
the
frame counter
counter
film,
each
meter
frame
anyone
be
readings
the camera
rotates
or
whenever
or
40
time
revolution
one
counter
of
relocated
as
frames, passes
the
division.
thousands
exactly.
follows:
and
may
be
desirable
in
the
foreground
out-of-focus. Use a
depth
of field
avoid
overexposure. Do
while
taking
large
and
set
pictures
camera.
whenever
the
hand
the
crank
exposure
is used.
through
counter
is
of
the
matched
Adjust
travels
counter
to
of
frames
from 0 to
moves
the
camera
in
the
two dials
a roll
advance the film leader
99 and
by
the
of
the
the
O.
2 Operate the single-frame release until the
frame
3
Set
the film meter
When
this
have a range
countel' reads
adjustment
of
4000
O.
at
O.
is followed,
frames
(or
100
the
two dials
feet)
before
repeating.
An
example
frame
is given
exposure
when
of
using
as
follows:
the
film
the
You
meter
dials
to
locate
wish
to s·tart a double
is
between 7 and
an
exact
8 feet
27
Page 30

and
the
frame
exposure
counter
hand
again
counter
exposing
frame
quires
it
stop
there
of
lease. See
the
edited.
shows 16.
crank,
shows between 7
shows 23.
counter
Stopping
some
will
be
as
close as possible
is
no
the
desired
longer
counter
the
film
as
shown
when
the
shows 16.
at
the
practice.
necessary
motion,
position
page
22.
of
the
is
meter
Wind
on
Make
film
exact
If
to
it
is possible
Another
double
at
23.
At
the
end
reads
12
feet
the
film
in
reverse with
page
23,
until
and
8 feet
and
the
second exposure. Stop
meter
shows
12
frame
the
second
there
is
motion
watch
the
rotating
to
the
desired
to
stop a little
and
use
the
single-frame re-
alternative
exposures
when
of
and
the
the
film
the
feet
in
position.
is
the
the
and
time
the
dials
to
cut
first
frame
the
meter
frame
the
re-
scene,
and
If
short
off
film is
multiple
multiple
exposures
Double
by
times.
the
the
camera
and
mum
locked
or
exposing
The
use
of
rigidity
speed,
focusing
rigidity
to
the
exposures
The
set of
Special
effects.
matic
tively used
that
be
hind
the
reaching
part
II,
They
and
we suggest
able to
To
use
the
reflex finder. Always replace
masks
the
of
the
The
masks
other
types
of
multiple
the
same
strip
exposures
the
masks. Successful results
of
the
the
and
tripod
with
six
can
are
humorous
in
industrial
think
the
mask, lift
are
film . Replace
top
are
tripod,
and
lens opening.
picture,
be
sure
head.
masks
masks,
be
used to
easy
results.
are
intended
of
many
not
in
use
is
toward
inserted
can
be
uniformity
adjust
that
packed
produce
to
use
cine
other
out
the
to
the
the
behind
and
prevent . stray
exposures
of
film two
made
with
depend
of
the
After
the
tripod
the
camera
with
your
a wide
can
create
They
can
be
photography.
only
as
guides.
uses
for
them.
mask
plug
the
plug
so
that
rear
of
the
the
reflex
are
made
or
more
or
without
upon
exposure,
composing
for
maxi-
is securely
Cine-Kodak
variety
very
located be-
plug
light
camera.
both
The
You
the
finder;
of
dra-
effec-
uses
will
when
from
thick
28
Page 31

therefore
effect of
Because
cross as
side of
film
tom
and
of
the
they
the
the
the
the
image
masks.
the
pass
subject
top of
film.
light
Remember
place the solid part
in
the
finder does
rays
reflected
through the
is
recorded
the
subject
this simple
of
the
mask
camera
on
the
is
recorded
on
from
not
show
the
subject
lens,
the
right
side
of
on the bot-
rule:
Always
the same side
the
left
the
as
the subject
subj ect is on
you
front finder) ,
the left as it is
using the
solid
appear
Place
the
Push
that
horizontal
part
at the top
at
the
the
mask
pin
toward the reflex finder.
the
mask
the
pin
fits
wish to reco
the
left side (as viewed through the
pla
ce
the
inserted
for
top of
the
in
the
into
in
the
rd.
solid
part
into
the
masks, us e
photo
gra
front
finder.
slot
in
the
the
slot as
recess
in
For
slot.
the
phing
film
far
the
example,
of the
When
mask
subjects
chamber
as
it
slot.
if the
mask
on
you
are
with
the
that
with
will go so
29
Page 32

important: Do not use a lens opening smaller
//5.6
when
half
masks
formed
by the overlapping areas, at the
will be less conspicuous.
this lin e is across a dark area
bright, avoid overexposure
shutter lever at
Now,
ve
rtical masks, one set of
mask,
and
the
vertical
can
be
produced
of
operations
versation
p
ear
ing
air,
subj ects
Select either
graphed
solid
part
photographing
Af
ter the
mask
the
having
rectly,
will
Use
appear
a line
th
but
are used.
Y2-0PEN
exam
ine the masks_
a circ
ular
masks-Eff
seen
from
two different places, people disap -
behi
nd
appearing
the
first.
Insert the
on the same side as the subj ect
.
mask
toward
formed
e reflex
remember,
on
the
Note the readings on
the
frame
counter. Make the exposure
side
of the
picture;
CLOSED
and rew
ind
position. Move the s
move
the
mask used
unu
sed
vertical mask (pin toward
pose the second half of
th
e top
of
the
mask
the
horizontal
separa
te action t
izontal middl
masks
aking
e of
to the following
masks:
compar
ison of mechanical
ferent types of mechanic
ous effects such as heads movin g
Select the
upp
If
this rule is follow ed, the line
jun
ction
If
possibl
e,
compose the scene
of
the
pictur
e.
by using a filter
or
lM-OPEN.
You
will find one set of
horizontal
mask.
ects sim ilar to the following
with
the
vertical
at
the
same
thin
trees,
twice
right
or
mask
has
been inser
the
film
in
the
finder to
the side
opposite side
the
then
the
film
hutter
for
the
masks;
tim
e,
subj
ects
in the same picture,
the
left side to
into
the
ted,
chamber
middle
of
frame your
to be
of
the
camera
move the
to the
lever to
first exposure_ Inse
the
the
pictur
e.
Remember
toward
the
film
-Use the horizontal masks to
place above
the
projected picture. Effects
can
be
produ
al
and
ced
operations,
without
er
or
lower
half
of the
(in
area)
of
the masks,
If
the light is too
or
by setting the
masks,
a telep
an
com
parison
hone con
vanishing
be
slot with
you
push
the
door
to avoid
the
picture_
subject
photographed
find e
r_
film
meter
for
the
shutter
original
OPEN,
len
s),
lever to
starting
and
and ex-
to
chamber
door.
below the
similar
by
usi
ng
opera
tions,
many
humor-
bod ies, etc.
picture
than
so
that
oval
into
etc_
photo
the
are
top of
cor-
and
one
re-
rt
the
push
hor
these
dif
and
-
-
-
-
30
Page 33

frame
your
subject
insert
the
mask
half
being
photographed.
exp
lain
ed
for
using
the
oval
and
these masks will
correspondi
masks
masks.
When
important
Special effects
co
mbin
this
case,
The
so
lid
ng
are
inserted
using
part
ed
with
the
result will
black
obtained
of
exposure
in
the
reflex find er.
so
that the solid
Follow the
vert
ical
mas
circular
shape
the
double
be a shaded
masks-The
produce a projected
of
the
mask
in the
same
oval
or
circu
the
scene
in
the
can
be
created
exposures of still subj ects.
should
be
mask
by using a normal
part
is
same
ks.
use of
being
manner
lar
masks, keep
center
if
masked
halved
area
Remember
on
the
procedure
either
image
of
used.
These
as
the
of
the
picture.
shots
for
each
in
place
of
exposure.
to
same
of
the
other
the
are
In
run.
the
multiple
exposures
making
nique
dustry.
screen
Variations
jects. Use a
posure
footage
and
Hold the
ning
which
sure
Move
pea
rs as
the
second
they
disappear
b
utt
Note
out.
a fade-in of
ing
and
or
object
make
without
miniatures-The "imp
has
long
The
effect is
imprisoned
of
thi
bla
of
the
small subject
readings.
attach
the
cra
nk
position.
the
exposure
button.
on
Rewind the film to the
the
sma
exposure
iust
fade
from
in
the
th
e footage
expose
appear,
an
immediate
Move
camera
ll as
running
the
masks
been
used
in
this: A person
in
a bottle
s can
be
done
ck
background.
and
Move
the
shutter
hand crank
and
lock
Wind the film
the shutt
desired
.
away-To
the
scene, do
reading
scene with
as long
reverse
to
the
was
started.
er
back
until
in
make a person
position,
at
the
start
the
as
you
the
appearance
in
the
the
motion-picture
many
with
Make
note
lever
the
eight-frame
exposure
back
Release
lever
to
the
large
the
reflex finder.
this:
Lock
and
fade out
beginning
of
the
person
wish.
To
above
or
bottle"
appears
times
people
a close-up ex-
the
button
to
OPEN.
the
fade-out.
or
make a person
procedure. To
disappearance,
tech·
on
his
size.
and
frame
and
to
CLOSED,
shaft.
in
run
the
point
the
expo-
subject ap-
Make
or
object
exposure
the
scene.
of
the
fade-
Make
object miss -
in-
the
ob -
-
at
31
Page 34

stop
the
camera,
ject,
and
Whenever
in
the
scene,
while
the
be
imperfect.
twin
results-To
scene
severa
or
if
the
a
black
piece of
in
front
of
Make
the
frame
counter
CLOSED
to
shutter
the
and
point
lever
the filming
e
ssary
to
When
continue
scene covers too
using
place
filming.
people
make
camera
is stopped, otherwise register will
have
l times, do
paper,
the
camera
first exposure
readings
rewind
where
the
to
OPEN.
and
rewinding
make
the
the
black
or
or
sure
the
this:
lens.
the
exposure
Reposition
desired effect.
lens, use the reflex finder
laps
the
background
being
photographed.
ghosts
images, set
the
ing
the
sure
described
was
"
scene
all types of
sults show
ing
ings.
e
readings
the film
ing_
for
and
x-rays-To
the
exposure
or
footage
without
by
either
setting
and
the
before,
started
. Do
ghost"
makes
until
X-ray
effects are useful
the
mechanical
the
seemingly disappears,
To
do this,
quipment
the
of
to
Leave
second
against
the
the
the
and
camera
by
the
for
stopping
shutter
frame
subject
to
the
not
change
an
appearance. Rephotograph
rewound
equipment;
photograph
a black
film
meter
original
shutter
exposure.
take
away
other
moving
that
there
subject
Use a
large
an
and
hold the
and
note
. Move
film
as
previously
was
the
number
paper
in
to
see
does
not
make
ghost
the
correct
lever
readings
in
the
point
at
the
film
has
in
showing
equipment.
then
revealing
background,
and
frame
reading
lever
and
at
the
is
appear
black
area,
the
person
objects
no
paper
the
shutter
or
ob-
appear
movement
in
the
same
background,
cut
a hole
in
two feet
footage
lever
and
to
described
started. Move
the
subject.
the
Repeat
of times nec-
front
of
the
camera
that
the
paper
over-
cut
into
the
field
or
transparent
exposure.
Halve
down one lens open-
to
lj2-0PEN.
and
make
picture.
which
the
exposure. Now
Note
the
expo-
Rewind, as
exposure
your
the
been
used.
the
interiors
The
finished re-
the
protective hous-
the
inner
work
(full exposure)
counter.
remove
CLOSED,
and
noting
Rewind
the
fade
the
the
hous-
of
in
J
I
-
32
Page 35

titles
for films
Almost every
shifts
in
subject
of action.
can
to
of a sign
bridge a gap
At
printed
more
should be
Printed
fi
cial light.
solid
table
To center
reflex finder.
wipe
contain
of title, a l
off one scene as
Set
ruled
between
Attach
card
camera
two feet
th
e reflex finder, determine
paper
represent
is
to
picture
Photograph
the came
necessary
work.
square,
square,
camera
s
hutt
Users
make
their
make
titles
or a name, made
other
title,
desirable.
in
titles
support.
or
mount
titles-A
no
action,
ine
the
camera
paper
the
camera
a piece of dull
being of such a size as to
field when
in
front
(at a marked
the
be
drawn
to
the
ra
exposure
Draw
expose one frame, move
expose
field is completely blocked.
Count
the
er,
and
motion
in
tim
or
a 3 x 4
Mount
cards
appears
(such
two sides of
is stopped
the
number
wind
picture
materia
of
the
own titles.
with
the
a film story.
es a
a close -up of a
The
height
proportion.
can
be
the
Lay
the
it
upright.
or
wipe title
or
it
uncovers
on a table
as
and
the
of
the
distance
square
other.
the subj ect in
block
another
the film
requires
l,
or
to clarify
Cine·Kodak Special
Special-Many
outdoors,
typewritt
and
made
by
camera
copy to be
other
copy
can
be
from
photographs.
to
pass
across
another
and
graph
pap
the
vertically
bla
ck
obstruct
block is placed vertically
25mm
the
the
picture
by
square,
the
at
the
end
adjustments
acro
ss
fram
e,
of
squares
back
titles to exp
certain
II
times a shot
is sufficient to
en, hand-lettered,
map
or
folder
width
of all such titles
daylight
on a
photographed
for
made
place a piece of fin eer)
card
lens.
points
from
from
usual
of
the
the
and
tra
that
or
tripod
filming, us e
of scenes
In
the
screen wiping
scene
or
flat on
the
mountedsubj
to a block,
completely
With the
on the
the
camera)
area. The
one side of
manner.
the
scene,
for
single
graph
paper
block
so on
versed, close the
number
of
lain
types
Camera
or
may
be
by
arti
or
other
on a
the
that
this type
title.
table
ecL
the
the
about
aid
of
graph
that
block
the
When
make
·frame
one
another
until
the
frames
-
33
Page 36

duplicates
by
means
of
the
single-frame
tate
removal
With
relation
before the
edge is
was
when
scene
the
scene is entirely cleared. Be
in
the
speed
consumed
least sixty
the
to
at
by
one
same
of
the
of
the
camera
the
graph
camera,
exactly
the
wipe was
square
direction
wipe
in
blocking
squares
camera
returned
place
the
, expose a
for
depends
should
effect.
All Cine-Kodak film
white.
Kodachrome
color
or
black
and
can
film
white.
paper,
the
same
started.
both
upon
off
or
be
be
shaft.
from
the
to
the
and
a new scene
block
place
as
frame,
sure
phases
the
unblocking
used
duplicated
can
be
This
may
necessi-
table_
same
positioJ,l
or
so
that
the
trailing
the
leading
Uncover
to
number
and
move
of
the
the
the
so
the
wipe.
of
scene.
on
for a smooth
in
black
duplicated
in
title
edge
new
until
block
The
frames
At
wipe
and
in
full
t
, II
SERIAL
NUMBERS -________________________
Your Cine-Kodak Special
numbers-one
film chamber. Record these
safe placetion in case your camera is lost or stolen. Too, most insurance companies require serial numbers on equip-
ment
Camera
Film Chamber Owner's
they
policies.
Mechanism-beneath
Name
34
_
II
Camera has two serial
on the camera mechanism and one on the
numbers
will be a means
next
to the drive coupling.
Plate- bottom
the chamber release lever.
- keep
them
of
positive identifica-
of
turret mounting block_
in a
Page 37

F I L M S
FOR
THE
CINE-KODAK
SPECIAL
Cine-Kodak Reversal Films
Four 16mm
in
50·, 100·,
with
out addition
ing laboratories.
cated
dup
licated in full color.
Kodachrome
or
col
Koda
t
ographic
used.
daylight with the
Type
Cine-Kodak
general black·
used with
grained.
fine
Cine-Kodak
and-whit
jects
under
tionallight.
indoor·lighted
events.
Cine·Kodak rev
and
in
black
when exposed
chrome
flood lamps
The film
A Co
lor
natural
e film ideally
normal
It
II
CAMERA
All 16mm
either single
per/orated can be used.
ersa
l films
films
are
available
or
200-foot rolls. Scientific processing,
al charge, is done
All Cine-Kodak film
and whit
Film
e.
Daylight
Kodachrome
under dayli
Film
Type
A is color-
and
requires
can
also be used
Kodak Daylight Filt
Films (see page
Super-X
and
Super-XX
Film
·white
picture
or
artificial illumin
Film
suited
indoor
illuminati
is used
for
sporting
events,
and
by
Kodak pro
can
films
Type
r
epr
oduces in full
ght
condi.tions.
ba
lanced
no
filter when so
for
taking
pictures
er
for
42)
.
is
the
first choice for
making
.
ation
is a ve
ry
fast black·
for
photographing
on wit
events on dull days,
night-lighted
be dupli.
for
It
.
It
hout
double
cess·
can
be
pho·
in
Kodak
can be
is very
sub·
addi·
outdoor
'.
Cine-Kodak C-P Reversal Films
(Plus-X,
Super-X, and Super-XX)
These films
processing
are
intend
films
All
exte
rior
vision
scope reco
ods,
co
ntra
are
by the
ed
for
or
to have
are high
and
.speed
interior
photography
rding.
the
y yie
ld
st
and
graininess
sold
at a price
Eastman
those who desire to process their
them
processed elsewhere.
panchromatic
work.
for
When
proc
a positive
characteristics.
Cine-Kodak Negative Films
The
purchase
cessing
informa
price does
tion is
pack
which does
Kod
ak
not
Company.
films sui
They
are
used
either
stud
io
work
essed
by
reversal
image having
not
include processing; pro·
ed
with the films.
both
include
They
own
table for
for
tele·
or
kine-
meth
good
35
·
Page 38

Panchromatic
negative film
negatives
ground
t
erior
proj
photography
is a very fine
intended
from
which
ection.
It
.
for
prints
is also
use
are
suitab
Super-XX is a high-speed negative film of
graininess.
where
obtained
be used
emulsion
Tri-X
its emulsion speed is
times as fast as Super-XX,
poor
It
is
photographs
und
er
for
production
speed
is
an extremel
lighting
condit
particularly
of
poor
arises.
y high-speed negative film. Since
approximatel
ions.
suited
important
lighting conditions.
work wherever
it
can
magnetic sound track for 16mm film
Kodak
coating
or
16mm
either sound
of
widths. Single-p
track
tra
film,
of the optical track, unless you specify
width
able
fi
Kodak
dealer when he
for
Sonotrack
service-is
double-perforated
Cine-
Kodak
Sonotrack
th
e film
Kodak
will
ck area.
th
with
lm.
Sono
processing
See
Coating
or
silent speed.
that
faces
Sonotrack
erforated
be
Sonotrack
When
e~
it
will be
of the
opt
ical
edge-coating
tra
ck Coating
dealer.
This
returns your
.
your
dea ler for compl ete
Coating-a magnetic
now
available
Kodachrome
film.
can
be
applied
It
the
projection
Coating is available
16mm
coated
an
optical
Sonotrack
track
must
coa
be coated .
for
double-pe
be
ting
can be
sound
ord
16m
grain,
medium-speed
in
making
to be
le
to newsreel work,
news events must
y two
be used
for
proc
or
black-and-white
to film
is
placed
lamp
film
having
the
full width of
track
coated
ered
ordered
m Cin e-
information
original
made
for b,ack-
for
genera
medi
It
can
the
need
and
one-half
under
sound
essed,
taken
on
the sid
.
in
no sound
is on
half the
that
the
It
is also avail-
rforat
ed
through your
by y
Kodak
.
l ex-
um
be
also
for
very
track
sing
le-
at
three
the
the
width
full
16mm
our
film
e
.'
36
Page 39

CAR
E
OF
THE
CINE-KODAK
SPECIAL
II
CAMERA
to
to
clean
clean
Proper
to satisfactory
pressure
front
be free
should
and
care
of
the
performance.
plate
must
and
rear
outside surfaces
of
finger
marks
be cleaned whenever necessary.
inside
working
regularly.
the
lens
It
is impossible to
trast
unless
the
lens is kept clean.
To
clean
the
lens, carefully
grit
with
wadded
fine camel's -
hair
faces gently with a
lens cleaning
Always wipe
or
spots,
drop
of
the
film chamber
Remove
ARM
to the
With
tion
of
a
match
dipped
move
any
plate
and
ing
agent.)
Remove
tangular
paper
with a circular
other
scum deposits
Kodak
Lens
the
PRESSURE
right
the ball
dirt
on
the
covered with a clean cloth
in
Stoddard's
accumulation
FILM
GUIDE. (Do
any
dust
aperture.
Be extremely
surfaces over which
the
tracks
with a metallic tool.
Since
the
film rides on
the
aperture
and
two
these surfaces
threaded
near
for
plate
the
are
use.
Cine-Kodak Special
The
be
kept
clean
of
and
dirt,
and
parts
of
the
camera
obtain
sharp
pictures
brush
Kodak
brush.
Lens
Cleaning
If
necessary, wipe
wad
of
one
or
or
a clean, soft, lint· free cloth.
motion.
can
Cleaner on the cloth.
PLATE
by
pushing
and
of
the
polished
or
careful
(four
bottom
clean
lifting out
thumb,
Solvent,
on
lint
th
e film travels. Never scrape
at
the
rub
tracks
or
the
tracks
not
use alcohol as a clean ·
on
the
not
to
scratch
the
six
the
corners
of
the
plate) ,
before
II
is essential
film
at
the
the
lens used
channel
all times,
reflex finder
The
and
the
must
outside
must be oiled
of
good
con-
off
any
dust
or
Paper
or
a
the
sur-
several sheets
Fingerprints,
be
removed
the
of
oil
with
PRESSURE
a
plate.
off
any
accumula-
of
the
plate.
With
that
has been
its equivalent, re-
of
the
aperture
edges of
circular
the
surfaces on
of
the
aperture,
make
the
rec-
polished
sure
that
each roll of film is
37
Page 40

To
replace
the
edge
the
pressure
,
to
clean
the
reflex finder
When
surface
reflex finder, slide
hold
the
finder
To
reach
turret.
finder lens
to
oil
the
camera
A bottle
applicator
II
Camera.
speed
and
be
seriously
Oil
the
100-foot rolls) is
months
six
period.
To
oil
trol
plate
the
pressure
over
the
pin
plate
the
reflex finder is
must
be
kept clean.
camera
with a rubber
To
reach
of
Kodak
is
cold
camera
the
facing
upside down,
the
mirror,
the
toward
Special
furnished
Never use
weather
impaired.
after
run
if less
than
camera,
up_
plate, fit
on
the
aperture
seats
properly.
used
If
dust
the
magnifier
pinch
bulb
remove
top
of
the
ground
the
right
side of
Lubricating
with
the
any
other
operation
Use
very
about
5,000
through
5,000 feet is used
place
it
on
Apply
the
the
small slot
plate. Be
for
focusing,
collects
lens
and
or
the
lens
Cine-
lubricant,
of
little oil.
the
its side with
oil with
inside
to
the
blow
similar
from
glass, slide
the
camera.
Oil with a
Kodak
the
camera
feet of film (fifty
camera
during
the
sure
the
right,
into
device.
the
lens
wire
Special
or
high
or
every
the
con-
wire at-
on
top
the
the
the
will
this
38
Page 41

tached
the
to
the
cork.
illustration
sides
of
the
shafts.
normal
times
faces.
lustrated.
take-up spindles
Do
intermittently
ticularly
the
Follow
200-foot film
half
indicated
operate
cess oil
(16)
to
allow
Wipe
Oil
the
not
lift
at
film will
this
Remove
of
the
the
and
speed.
off
inside
Remove
the
those
same
chambers.
the
camera
in
the
camera
replace
Just
touch
so
that a drop
After
Start
the
oil to
the
excess oil.
of
the
film
the
screws
and
place a
spindles off
as
before.
points
cause
spots
procedure
film
chamber
face
up
illustration.
intermittently.
the
film
the
of oil
oiling,
and
stop
spread
near
over
chamber
from
drop
the
studs.
Wipe
off
the
film
in
the
for
both
and
on a support.
Press
chamber.
points
indicated
runs
down
run
the
camera
the
camera
the
at
the
of
oil
Run
the
excess oil,
track,
developed image.
the
lay
the
the
Wipe
several
bearing
the
points
supply
on
the
studs.
the
camera
as oil on
100-foot
mechanism
Oil
the
points
plunger,
off
the
sur·
and
par-
and
and
in
the
at
il-
ex-
39
Page 42

PICTURE-MAKING
film
chambers
who feel that, in order
the best results, lenses
film chambers should be individually fitted
ing
frame
ally necessary for
most
ice is available for those who
wish
further in/ormation, write
Apparatus Service Department, Eastman Kod
pany,
critical
to
have
Roch
There are some
with
lin
es_
Thi
s is usu-
only
work
. This se
it
done. For
ester 4,
ak
New York.
to
give
and
match
the
Com-
AIDS
lenses
Th
ere a
re
seven Kodak Cine
the finest lenses ever made
cameras_
The
lon
ger
focal-leng
fect; they will also magnify objects close by, give
concentrated field cove
eliminate undesired backgrounds_
The
ISmm
lenses cover a wider-than-normal field
and
are
called wide-angle lenses.
lems of filmin g
in cramp
up space is limited .
The
your
deal
25mm
sidered
Kodak
er
f/J.4
best
Cine
Ektar
about more
or
f/J.9
for
general work. These lenses can
used as fixed-focus lenses (except
ups) when set
smaller.
fe
et to infinity will be
at
IS feet
With
these settings, all objects
21.5 ° x 16.2°. Focusing Range: 12 inches to infinity.
A screw-type filter holder ,
Series
VI No. 27, screws directly to the lens .
15mm
fl2.5
Kodak
This lens includ
the
standard
ject.
It
focuses to the r
Cine
es
an
lens at the same distanc e from th e sub-
six inches. Angle of
Range: 6 inches to infinity. Adap t
28 Sc rew-in. Seri
es
Attachments.
40mm
f
/1.6
Kodak
twice the image size of
13.7°
-
rv-
x 10.3°. Focusing Range: 2 feet to infini ty.
Adapter Ring
Combi
nati
63mm
Size: No. 27 Screw-in. Series VI
on Lens Attachments.
f/2
.0
Kodak
times the image size of the 25mm lens. Angle of View:
to
40
Ektar
lenses availabl
for
16mm
th
lenses give a telephoto
rag
e,
improv
e perspective,
They
ed
quarters
lenses
are
as follows: (See
information.)
Kodak
Cine
Ektar
for
and
lens openings of f
in sharp
focus. Angle of View:
Kodak
Ektar
Wide-Angle
area
over 2
Y2
tim
emar
kably sh
View: 34.0° x
25.
er
VI
Kodak
Cine
th
e 25mm lens. Angle of View:
Cine
Combination Lens
Ektar
Lens-Gives
Ektar
Lens-Gives
e-
motion-picture
ef-
and
solve the prob-
where backing
Lens-Con-
be
extreme close-
/5
.6
or
from
about
Adapter Ring
Lens-
es
as great as
ort
distance of
r . Focusing
Ring Size: No.
about
Kodak
2Y2
8
.
Page 43

8.7 ° x 6.5 0 .
adapter
Lens
Attachments.
102mm
times
5.4° x
adapter
Lens
Attachments.
152mm
the
image
3.6° x
Adapter
Lens
Attachments.
Kodak
an
optical accessory
length of
approximately
is accomplished with all
ing
the
Covers a field
All
the
menized.
ring
f/2.7
the
image
4.1°.
ring
f 1
4.0
size
2.7°.
Ring
Ektar
the
fast speed
glass-air
Focusing
needed. Series
Kodak Cine Ektar
size of
the
Focusing
needed. Series
Kodak
Cine
of
the
Focusing
needed. Series
fl1.4
Converter
which
Kodak
15mm.
and
about
surfaces
Cine
image
600/0
Range:
25mm
Range:
Ektar
25mm
Range:
reduces
Ektar
The
reduction
the
larger
of
2 feet
to
infinity. No
VI
Kodak
3 feet
VI
Kodak
lens. Angle of View:
6 feet
VI
25mm
advantages
quality
the
Combination
Lens-Gives
lens.
Angle
of
View:
to
infinity. No
Combination
Lens-Gives 6 times
to
infinity. No
Kodak
Combination
to
15mm-Is
the
effective focal
Lens
25mm f /1.4
in
focal length
of
maintain-
of
the
fl1.4 lens.
than a 25mm
converter
are
4
to
lens.
Lu-
Kodak
combination
Kodak
for
attachments
such
a filter
manuals
Combination
use
on
as a filter,
and a Portra
Cine-Kodak filters
Filters
to
obtain
sky
and
moonlight
tain
contrast
wise use of a filter will often
between excellent
Correction
grays
in
them. Oftentimes
lens
all
Kodak
permits
packed
are
used
correct
between
the
relative
attachments
Lens
Cine lenses.
their
or
as a
combination
Lens. Details
with
your
in
black
tone
rendering,
effects, to
areas
photography
filters
aid
brightnesses
blue
reproduces
Attachments
The
use
either
as
of
are
lenses.
-and-white
to
reduce
haze,
differing
make
and a mere
in
reproducing
that
too
are
available
design of these
a single unit,
units,
such
as
included
create
in
the
light
in
the
photography
special
and
to ob-
color.
The
difference
record_
colors as
the eye sees
without
41
a
Page 44

filter
and
there
Filters
also
scenes.
The
following filters
and·
white
supplied as
. . .
In
senes
sIzes.
Additional
film.
Kodachrome filters
The
Kodak Skylight Filter is
chrome
for
pictures
scenes
scenes,
The
Type
chrome
flood
only.
flood illumination.
The
Films is
exposed
filter
chrome
Film
pictures
made
(mountain
and
Kodak Photoflood Filter for Kodak Daylight
Color Films is needed
is to
lamp
Type
Kodak Daylight Filter for Kodak Type A Color
needed
outdoors
are
the
Film
is no
contrast
cut
bluish
photography:
Kodak
Combination
information
Daylight
in
open
shade
on overcast
or
aerial
photographs.
be
exposed
illumination.
A film should
if
Kodachrome
in
same as those
Daylight
between sky
atmospheric
are
recommended
CK·3, G, A,
on filters comes
for
Type
.
It
under
or
marine
if
regular
views),
indoors
This
is
be
used
Film
daylight.
Exposures
recommended
Type
.
and
clouds.
haze
on
distant
I
for
black·
and
Xl.
All
Lens Attachments
with
your
use
with
Koda
is especially
useful
a clear blue sky,
hazy
days,
distant
sunlit snow
daylight
with
for
emergency use
for
Type
Koda·
photographic
photographic
A is to be
with this
for
Koda
are
·
I
I
\
·
42
carrying cases
Sturdily
Carrying
is supplied
There
Kodak
and
built
Case
for
is ample
Combination
an
extra
and
smart
for
the Cine-
100-and
room
Lens Attachments, rolls
film chamber.
reflex finder image magnifier
A device which magnifies
makes
it
possible to use
appearing,
Kodak
the
Special
200-foot film chambers.
in
the
cases
for
several lenses,
the
reflex finder image
the
reflex finder
Cine-
II
from
Kodak
Camera
of
film,
and
the
Page 45

..
back
of
the
camera. Images
app
ear
to the eye
maintained.
filming
The magnifier
commo
Ima
ge Magnifier
fac
tor
chamber.
Th
e Optical
Camera corrects
ha
s a
indi
cate
lenses.
fere
nt foca
ti
cal
ch
ambers
An
that requires
date individual
y.
It
c
annot
Finder
grad
uat
ed
the
field covered
It
is
particularly
l lengths
Finder
at
must
the
right
especially
extensive use of
also
has
must
be
for
for
parallax
magnifying
are
be
fitted to th e
factory
are
seen as they actually
side
up
with
lefts
and
rights
valuabl
e accessory
the
an
adjustabl
vision .
be
fitted to the
used with the 200-foot film
the
by
useful when lenses of dif·
often
.
e eyepiece to ac -
The
Cine-
Kodak
down to two feet and
lens which ca n be set to
any
of
the
interchanged.
came
for
reflex finder.
Reflex
camera
Special
Kodak
The Op-
ra
and all film
Finder
at
any
the
Cine
II
Cine-Kodak lens spacer rings
Th
ese simple
means
for
p
erm
it
to be used
make po ssib le
in
ch
in width
fil
exten
ming
with
and
effective accessories provide the
ding
the
very
small movie subjects. Designed
standard
the
coverage of fields as small as
.
camer
a's
close-up
or
accessory lenses,
rang
e to
the
y
lj
~
43
Page 46

Cine-Kodak sports finders
These open-frame finders
mal size
The sports finder can be used with the 100-foot film
chamber
and
only.
make
it
Kodascope projectors
The Kodascope projectors answer all your needs for
so
und
or
silent motion pictures. The projectors come
equipped with powerful 750-watt lamps amply
for average projection. A 1000-watt lamp can be
used
for larg
with a 2-inch
Ektanon Lens. The following
non Lens
inch
//2.0,
The
Kodascope
on ac
2000 feet of film.
sp
ee
ds. An accessory microphone plugged into the
amplifier e
and
to use the
e audiences.
1/
1.6
es
are
also available: a I ljz-inch // 2.0, a
and
a 4-inch
Pageant
or
dc, 105 to 125 volts
It
operates
nabl
es
you to
Pageant
provide
especially easy to follow action.
The
Lumenized
//2.5.
Sound
narrate your
as a public
an
image of nor-
proj
ectors
Kodak
Kodak
Projection
Projector operates
and
has
a capacity of
at
both
sound
silent movies
addr
ess system.
bright
are
fitted
Projection
Ekta-
3-
and
silent
44
I
1
Page 47

The
Kodascope
the
best
both
ac
reverse
in
or
and
Royal Projector is designed
silent movie
dc,
105
to
125
has
a speed
wind.
The
Kodascope
60-cycle ac only,
ion
on
a screen
light
on
its
remote ,control
verse
operation.
applications
Analyst
can
project
and
also
own built-in screen.
switch of immediate
It
is ideally
as
sports
analysis,
The Eastman 16mm Pro-
jector,
heavy-duty
tor.
ment
ous
supplied
ed
torium
installed.
available
watt
ampere
Model
16mm
It
is a
precision
designed
professional
The
projector
in
form
to
the
particular
in
which
The
either
tungsten
arc
illumination.
25
is a
projec-
instru
for
continu-
operation.
can
best suit-
audi-
it
is to be
Model 25 is
with 1000-
or
with 46-
to
give
projection.
volts,
control
both
knob
It
operates
forward
for
rapid
and
Projector, illustrated above,
movies
on
suited
in
a table
It
also operates
for
motion
normal
top
in
natural
forward
such special
study, etc.
fash-
by
or
-
be
on
in
re-
a
re-
EASTMAN
12-54-CH-C
KODAK
COMPANY,
ROCHESTER
PRINTED
IN
THE
UNITED
STATES
4,
OF
N.
AMERICA
Y.
Page 48

· \
 Loading...