

KSM1JA
INSTRUCTIONS
INSTRUCTIONS
INSTRUCCIONES
The KitchenAid® Juicer is designed exclusively for use with all KitchenAid® household
Stand Mixers, except KSM6573C. For complete information on the use of these
Stand Mixers, please read the instructions that came with your Stand Mixer.
L’extracteur à jus KitchenAid® est conçu pour être utilisé exclusivement avec des batteurs sur
socle à usage domestique KitchenAid®, à l’exception du modèle KSM6573C. Pour des renseignements
complets sur l’utilisation de ces batteurs sur socle, lire le guide d’instructions fourni avec le batteur sur socle.
La juguera KitchenAid® está diseñada exclusivamente para usarse con todas las batidoras domésticas
con base KitchenAid®, excepto el modelo KSM6573C. Para obtener la información completa sobre
el uso de estas batidoras con base, lea las instrucciones que vienen con su batidora con base.
WELCOME TO THE WORLD OF KITCHENAID.
We’re committed to helping you
create a lifetime of delicious meals for
family and friends. To help ensure the
longevity and performance of your
appliance, keep this guide handy. It will
empower you with the best way to
use and care for your product. Your
satisfaction is our #1 goal. Remember
to register your product online at
www.kitchenaid.com or by
mail using the enclosed
Product Registration Card.
USA: 1.800.541.6390
Canada: 1.800.807.6777
2
Join us in the kitchen at www.kitchenaid.com.
KitchenAid.com
KitchenAid.ca

JUICER INSTRUCTIONS
TABLE OF CONTENTS
JUICER SAFETY
Important safeguards .......................................................................................... 4
PARTS AND FEATURES
Parts and accessories ........................................................................................... 6
ASSEMBLING THE JUICER
Assembling the Juicer parts ................................................................................ 7
Attaching the Juicer assembly to the Stand Mixer .............................................. 8
OPERATING THE JUICER
Making juice ...................................................................................................... 10
TIPS FOR GREAT RESULTS
Quick tips ......................................................................................................... 11
RECIPES.................................................................................................................. 12
CARE AND CLEANING
Cleaning the Juicer ............................................................................................ 17
TROUBLESHOOTING ......................................................................................... 18
WARRANTY AND SERVICE ............................................................................... 19
English
PROOF OF PURCHASE & PRODUCT REGISTRATION
Always keep a copy of the itemized sales receipt showing the date of purchase of your Juicer.
Proof of purchase will assure you of in-warranty service. Before you use your Juicer, please
ll out and mail your product registration card packed with the unit, or register on-line
at www.kitchenaid.com. This card will enable us to contact you in the unlikely event of a
product safety notication and assist us in complying with the provisions of the Consumer
Product Safety Act. This card does not verify your warranty. Please complete the following
for your personal records:
Model Number ______________________________________________________________________
Serial Number ______________________________________________________________________
Date Purchased _____________________________________________________________________
Store Name ________________________________________________________________________
3

JUICER SAFETY
4

JUICER SAFETYJUICER SAFETY
IMPORTANT SAFEGUARDS
When using electrical appliances, basic safety precautions should always be
followed, including the following:
1. Read all instructions.
2. Always make sure Juicer lid is securely closed before Stand Mixer motor is
turned on. Do not remove the lid while Juicer is in operation.
3. Be sure to turn the Stand Mixer OFF (and detach Juicer from Stand Mixer)
after each use of the Juicer and before cleaning. Make sure the motor stops
completely before disassembling.
4. Do not put your ngers or other objects into the Juicer opening while it is in
operation. If food becomes lodged in opening, use pusher or another piece of
fruit or vegetable to push it down. Never feed by hand. Always use the pusher.
When this method is not possible, turn the motor off and disassemble Juicer to
remove the remaining food.
5. Avoid contacting moving parts.
6. The use of attachments not recommended or sold by KitchenAid may cause
re, electric shock, or injury.
7. Do not use outdoors.
8. Close supervision is necessary when any appliance is used by or near children.
9. Do not use the appliance if the rotating auger or rotating parts are damaged.
Contact the Authorized Service Facility for information on product examination,
repair, or electrical or mechanical adjustment.
10. To protect against risk of electrical shock, do not put mixer in water or
other liquid.
11. Do not let the cord hang over the edge of table or counter.
12. Blades are sharp. Handle carefully.
13. Do not open until blade stops.
14. To prevent damage to gear assembly, do not immerse in water or other liquids.
15. This product is designed for household use only.
English
SAVE THESE INSTRUCTIONS
5
PARTS AND FEATURES
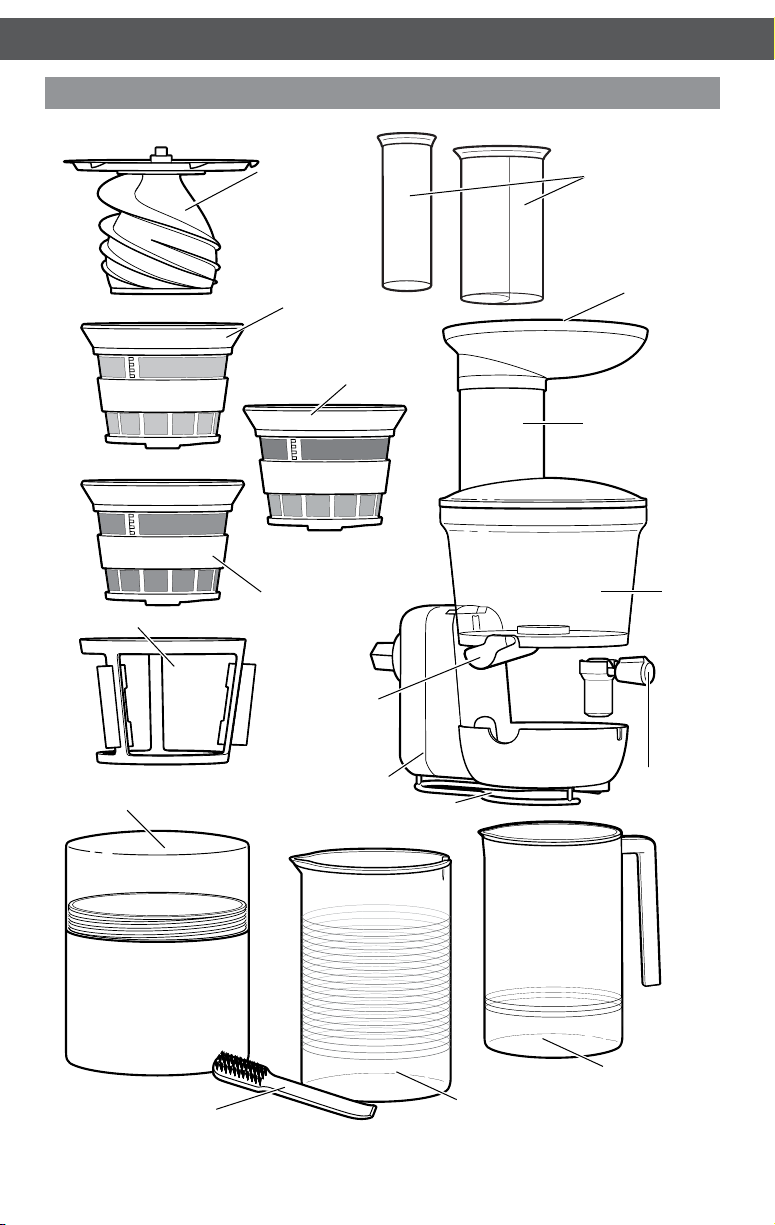
Parts and accessories
Screen wiper basket
Auger/blade
assembly
Low pulp
screen
High pulp
screen
Pulp chute
Saucing
screen
2-in-1 food pusher
Hopper
Feed chute
Juicing
bowl
Screen storage
container
Cleaning brush
(for screens)
*Wipe clean only. See “Care and cleaning” section for more information.
**Removable drip stop valve can be cleaned as an assembly.
6
Drive assembly*
Counter rest
Pulp container
Removable
drip stop
valve**
Juice container
ASSEMBLING THE JUICER
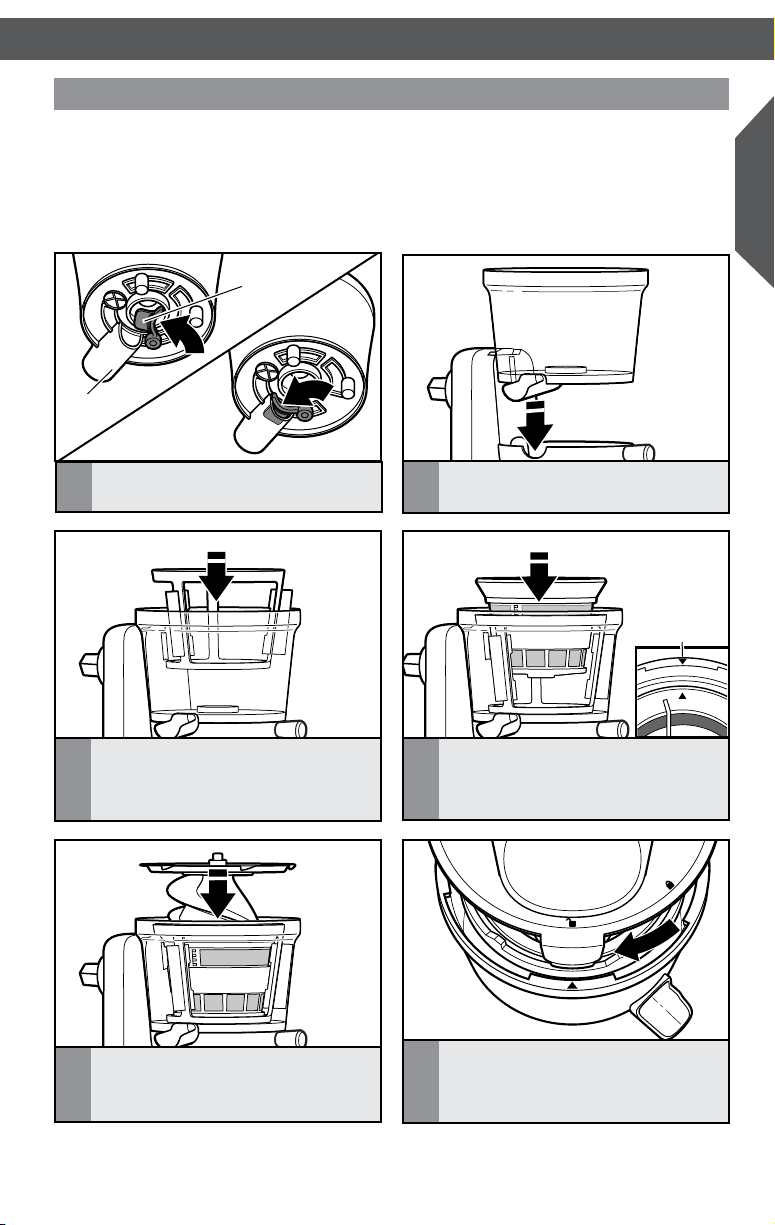
Assembling the Juicer parts
Before First Use
Before using your Juicer for the first time, wipe Juicer parts with a warm damp cloth,
then wipe clean with a damp cloth. To avoid damaging the juicer, do not wash or
immerse the drive assembly in water or other liquids. Dry with a soft cloth. See “Care
and Cleaning” section.
Gasket
Pulp
chute
English
Slide pulp chute out and insert gasket
1
behind chute as shown.
Put the screen wiper basket into
3
the bowl.
Place the auger/blade assembly inside
5
the screen.
Place the bowl into the drive assembly.
2
Place the screen of your choice into the
4
screen wiper basket, matching up the
red alignment marks on the screen and
bowl as shown.
Place the lid on the juicer, aligning the
6
unlocked icon on the lid with the red
arrow on the juicing bowl. Rotate lid
clockwise until lid locks into place.
Alignment
marks
7
 Loading...