

Kitchenaid KDTM504EPA Instructions
INSTALLATION INSTRUCTIONS
†®TORX, and T15 are registered trademarks of Acument Intellectual Properties, LLC.
FOR CUSTOM PANEL ATTACHMENT
UNDERCOUNTER DISHWASHER
STAINLESS STEEL TUB
IMPORTANT: Before installing your dishwasher, please use this instruction sheet as a supplement to the installation instructions.
Custom Panel Models Only
Gather these additional tools and parts before starting attachment
of the custom panel. Read and follow the instructions provided in
this Instruction Sheet.
Additional Tools Needed:
³⁄₃₂" Drill bit
Additional Parts Supplied with Custom Panel Models:
Plastic studs (attached to each other by runners) (4)
Short screws (10-16 hex-head screw) (4)
Long screws (8-18 Torx
Template (1) (located inside Use and Care Guide bag assembly)
Instruction sheet (1) (located inside Use and Care Guide
bag assembly)
NOTE: The screws supplied are used for only 3¾" (9.5 cm) thick
wooden panel. If the wooden panel is less than 3³⁄₈" (8.6 cm) thick,
customer must purchase screws locally.
Make sure all these parts are included in the literature package.
If parts are not included, call 1-800-422-1230. In Canada, call
1-800-807-6777.
®†
head screws) (4)
Install Custom Panel
Follow Steps Below:
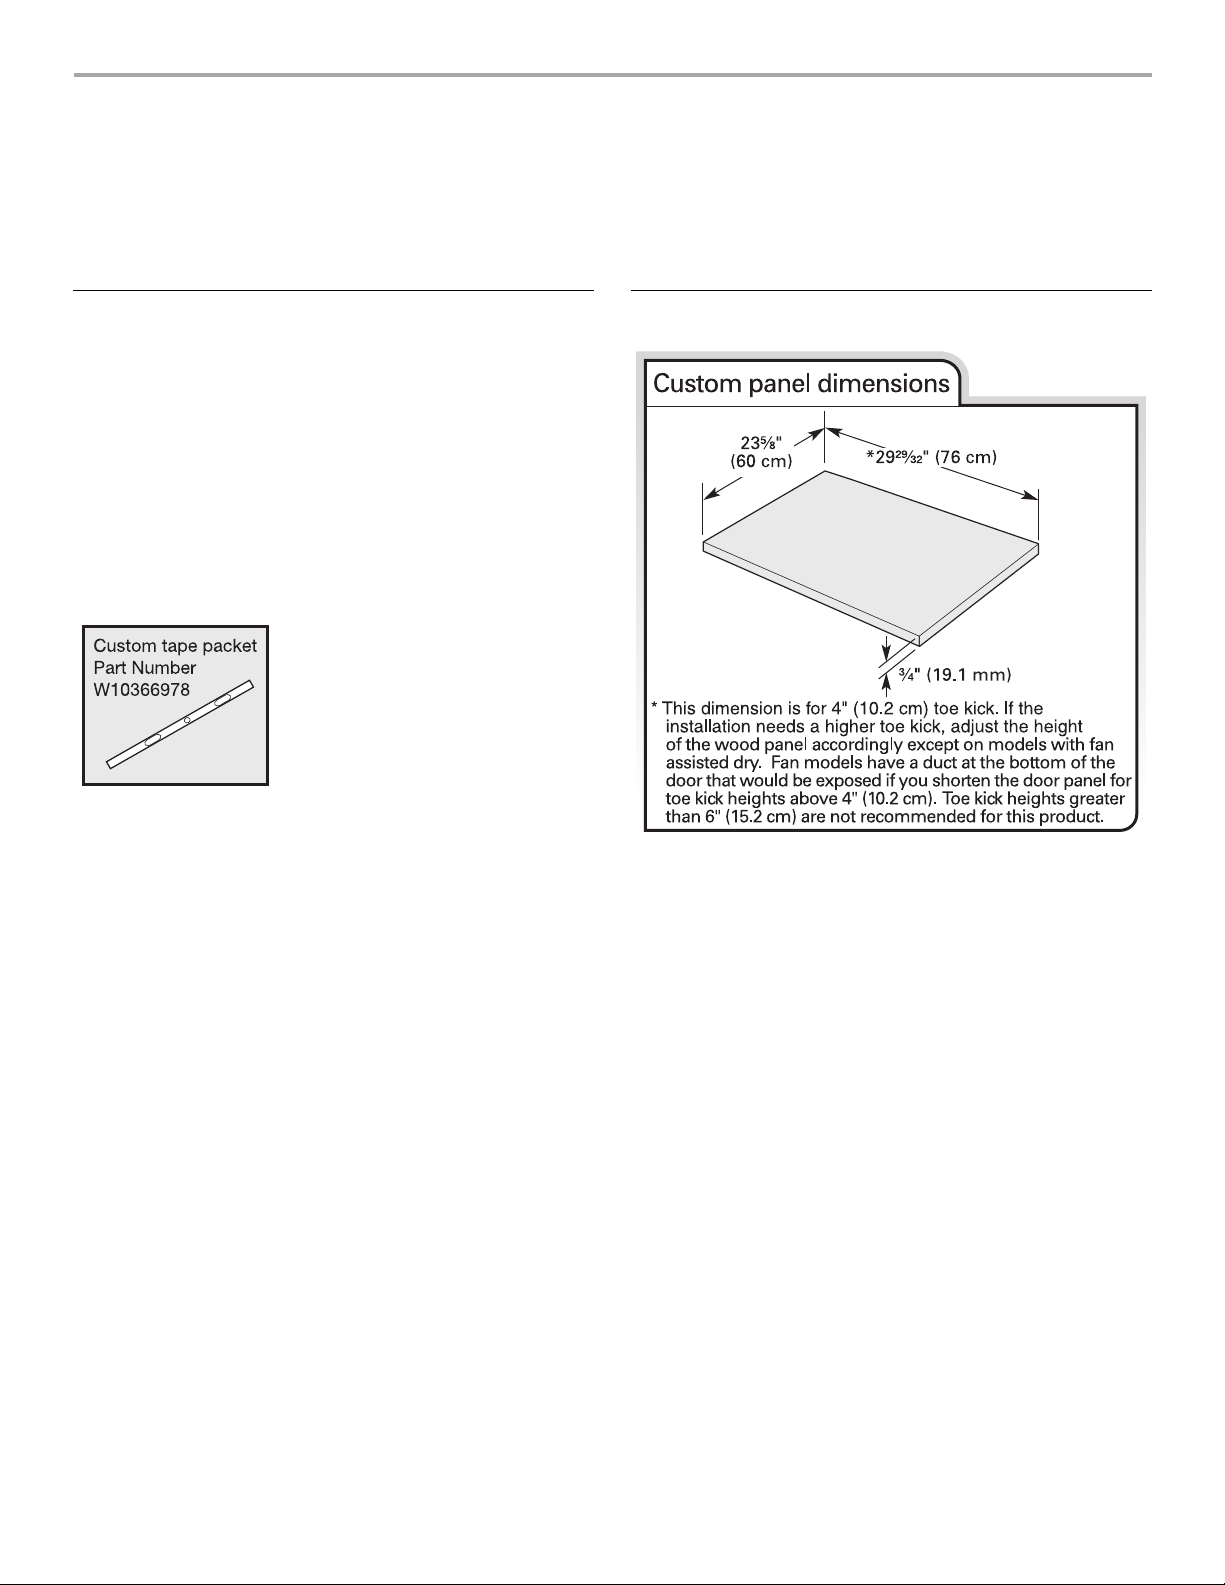
A customer supplied panel must weigh no more than 16 lbs
(7.3 kg) and must be made to specific dimensions. It is
recommended that a cabinetmaker cut the customer panel
because of the precise dimensions needed.
NOTES:
■ The handle for the custom panel is not included.
■ All mounting hardware supplied is for a ³⁄₄" (19.1 mm) thick
wood panel. If a thinner wood panel or materials other than
wood are used, it is the customer’s responsibility to obtain the
proper length screws and adjust the pilot holes accordingly.
IMPORTANT: Use a moisture-resistant sealer on both sides
and all edges of the panel to avoid damage from moisture.
W10750117B
WARNING
Excessive Weight Hazard
Use two or more people to move and install
dishwasher.
Failure to do so can result in back or other injury.
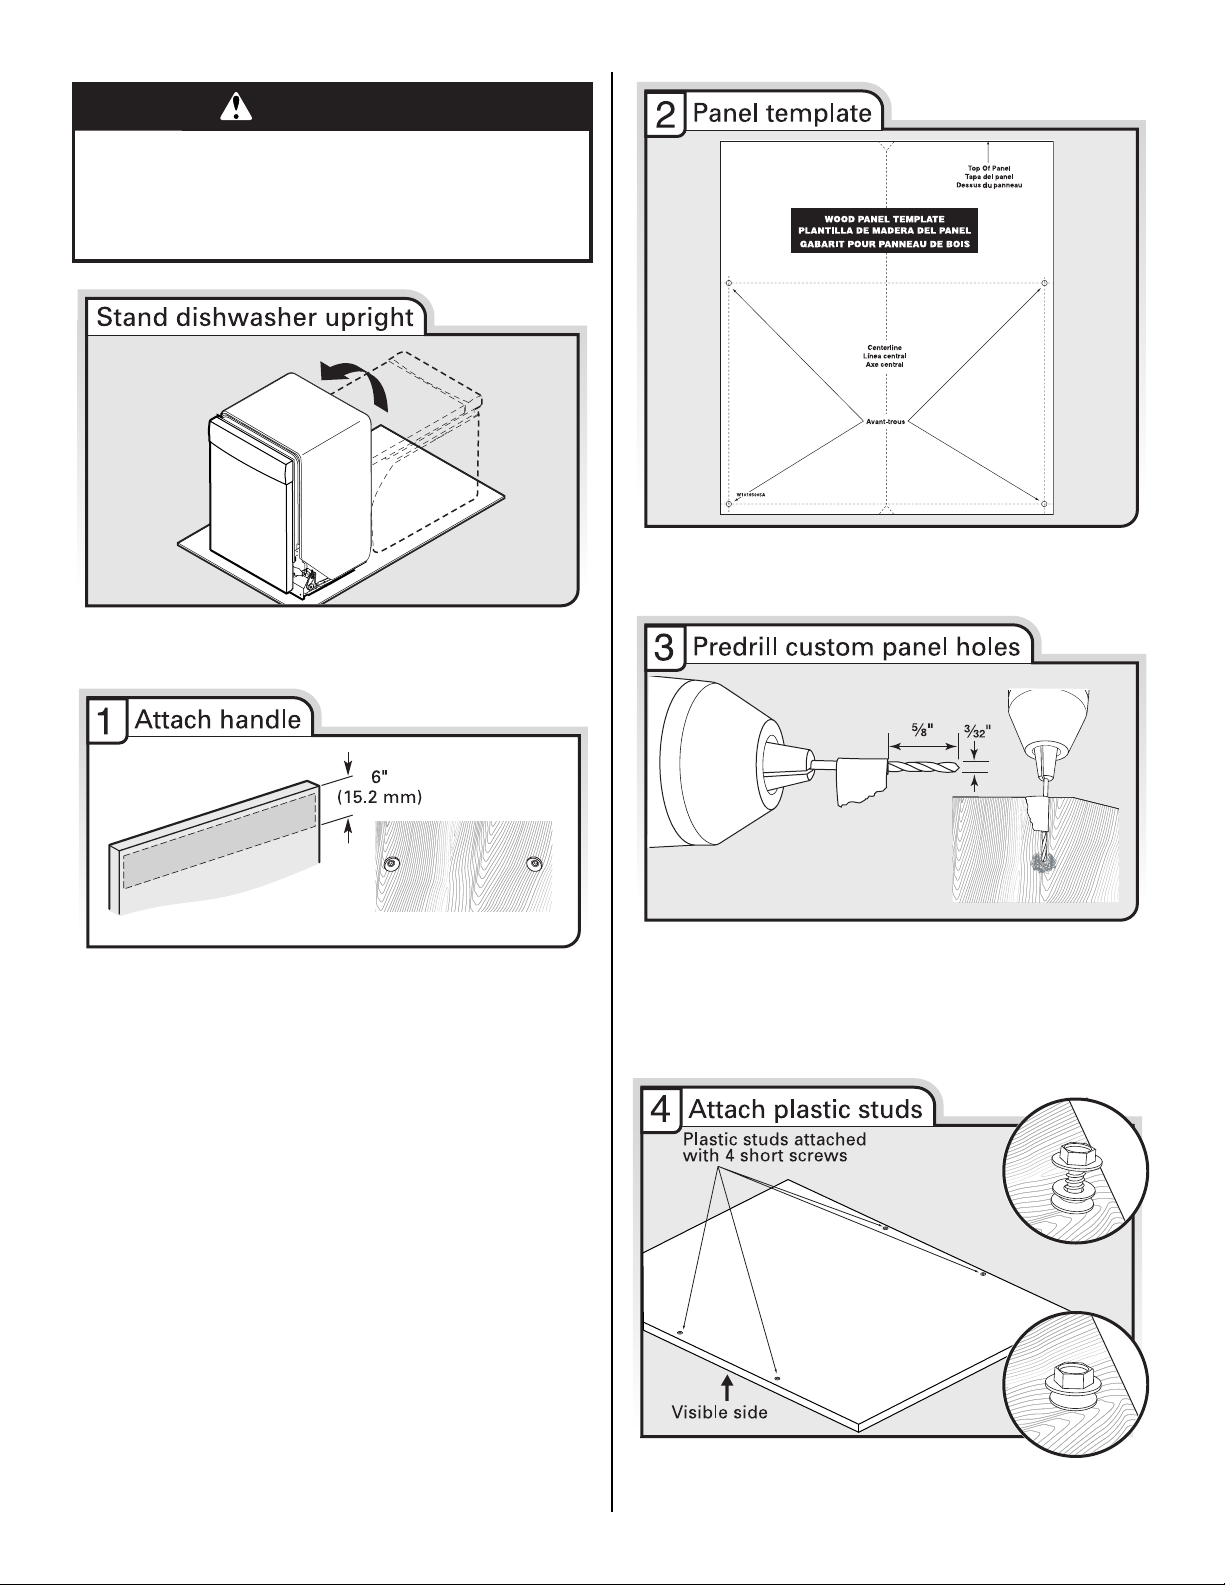
Using 2 or more people, stand the dishwasher up.
NOTE: Do not install kick plate until instructed to do so.
Using the template provided, attach it to the backside of the
custom panel with tape. Make sure that the center of the template
is aligned with the center of the wooden panel and top of the
template is aligned to the top face of the wooden panel.
Install the custom hardware handle(s) on the front of the wooden
panel inside dotted line.
IMPORTANT: If the handle is attached from the back of the
custom panel, the screw holes should be countersunk for the
screws heads to be flush with the panel. If the handle is attached
to the front of the custom panel, the screw lengths cannot exceed
the panel thickness.
222222
NOTE: Do not drill deeper then ⁵⁄₈" (16 mm) to keep from
drilling through panel. Pilot hole depths given are for ³⁄₄"
(19 mm) thick panel.
Mark 4 pilot holes on the wooden panel using the template
provided. Pre-drill 4 pilot holes using a ³⁄₃₂" drill bit. Use tape
to mark the drill bit to gauge hole depth. Drill pilot holes
approximately ⁵⁄₈" (16 mm) into the custom panel.
Attach the 4 plastic studs to the wooden panel using the four
⁵⁄₁₆" hex-head (short) screws provided.
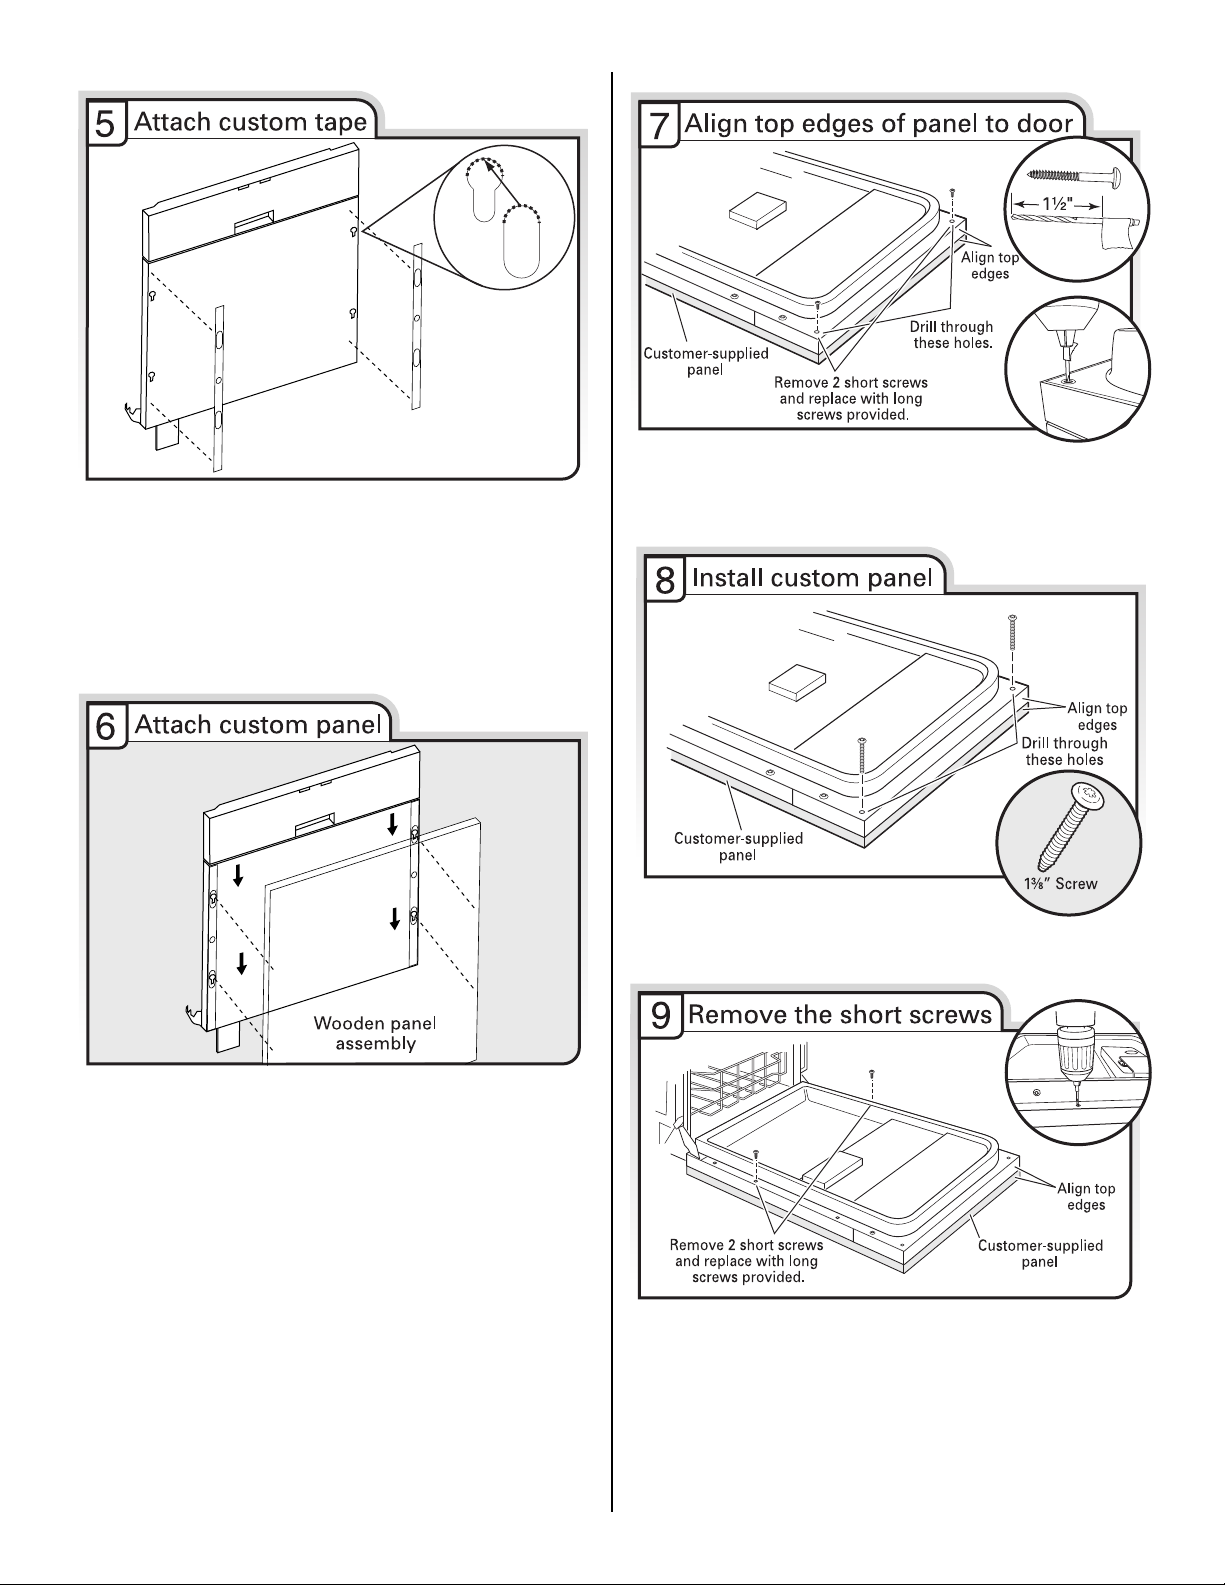
Check custom tape alignment with metal door slots; verify tape
is right-side up, and that the tape does not overhang the metal
door on the top, bottom or side interfaces. Remove the backing
from the custom tape by pulling straight down on the liner. Align
the custom tape to the keyhole slots on the metal door (see the
previous illustration) and apply. Repeat steps for one side and
then the other.
NOTE: The adhesive on the tape is aggressive, so proper
alignment and attachment to the metal door needs to occur
on the first try.
Open the door and align top edges. Use tape to mark a ³⁄₃₂" drill
bit to gauge the hole depth of approximately 1¹⁄₂" (3.8 cm).
Drill pilot holes into the top corners of the door, using hole in
liner as a guide.
®
Using a Torx
T15® screwdriver, install two #8 x 1³⁄₈" screws
in top corners to secure custom wood panel in place.
Align the studs on the custom wood panel to the keyhole slots on
the door assembly. Ensure that all 4 plastic studs are engaged in
the keyhole slots. Slide wood panel down until the top surface of
the wooden panel is flush with the top of the door.
Remove the short screws (3rd from top) on either side of the
inner door panel. Use tape to mark a ³⁄₃₂" drill bit to gauge the
hole depth of approximately 1¹⁄₂" (3.8 cm). Drill 2 pilot holes using
the door liner hole as a guide into the panel. Install the 2 remaining
long screws.
333333

INSTRUCCIONES DE INSTALACIÓN
†®TORX y T15 son marcas registradas de Acument Intellectual Properties, LLC.
PARA COLOCAR EL PANEL A LA MEDIDA
LAVAVAJILLAS PARA INSTALARSE DEBAJO DEL
MOSTRADOR TINA DE ACERO INOXIDABLE
IMPORTANTE: Antes de instalar la lavavajillas, use esta hoja de instrucciones como complemento para las
instrucciones de instalación.
Solo para modelos con panel
alamedida
Reúna estas herramientas y piezas adicionales antes de
comenzar la colocación del panel a la medida. Lea y siga
las instrucciones provistas en la hoja de instrucciones.
Herramientas necesarias adicionales:
Broca de ³⁄₃₂"
Piezas adicionales suministradas con los modelos del panel
a la medida:
Taquetes de plástico (sujetados unos a otros con correderas) (4)
Tornillos cortos (tornillo de cabeza hexagonal de 10-16) (4)
Tornillos largos (tornillos Torx
Plantilla (1) (ubicada dentro de la bolsa del Manual de uso
y cuidado para el ensamblaje)
Hoja de instrucciones (1) (ubicada dentro de la bolsa del
Manual de uso y cuidado para el ensamblaje)
NOTA: Los tornillos provistos se utilizan únicamente para
un panel de madera de 3¾" (9,5 cm) de espesor. Si el panel
de madera tiene un espesor inferior a 3³⁄₈" (8,6 cm), el cliente
debe adquirir los tornillos en su localidad.
Cerciórese de que se hayan incluido todas estas piezas en la
bolsa con el material impreso.
Si faltan piezas, llame al 1-800-422-1230. En Canadá, llame al
1-800-807-6777.
®†
de 8-18) (4)
Instalación del panel a la medida
Siga los pasos a continuación:
Un panel provisto por el cliente deberá pesar no más de 16 lb
(7,3 kg) y deberá hacerse de acuerdo a dimensiones específicas.
Es recomendable que un fabricante de armarios corte el panel
provisto por el cliente ya que se necesitan dimensiones precisas.
NOTAS:
■ No se incluye la manija para el panel a la medida.
■ Todos los herrajes provistos para el montaje son para un
panel de madera con un espesor de ³⁄₄" (19,1 mm). Si se utiliza
un panel de madera con menor espesor o materiales que no
sean madera, será responsabilidad del cliente obtener los
tornillos del largo adecuado y ajustar los orificios piloto en
consecuencia.
IMPORTANTE: Use un sellador resistente a la humedad a ambos
lados y en todos los bordes del panel para evitar daños causados
por la humedad.
444444
 Loading...