

Kia 3.5L V6 User Manual
2002 ENGINES
3.5L V6 - Sedona
GENERAL
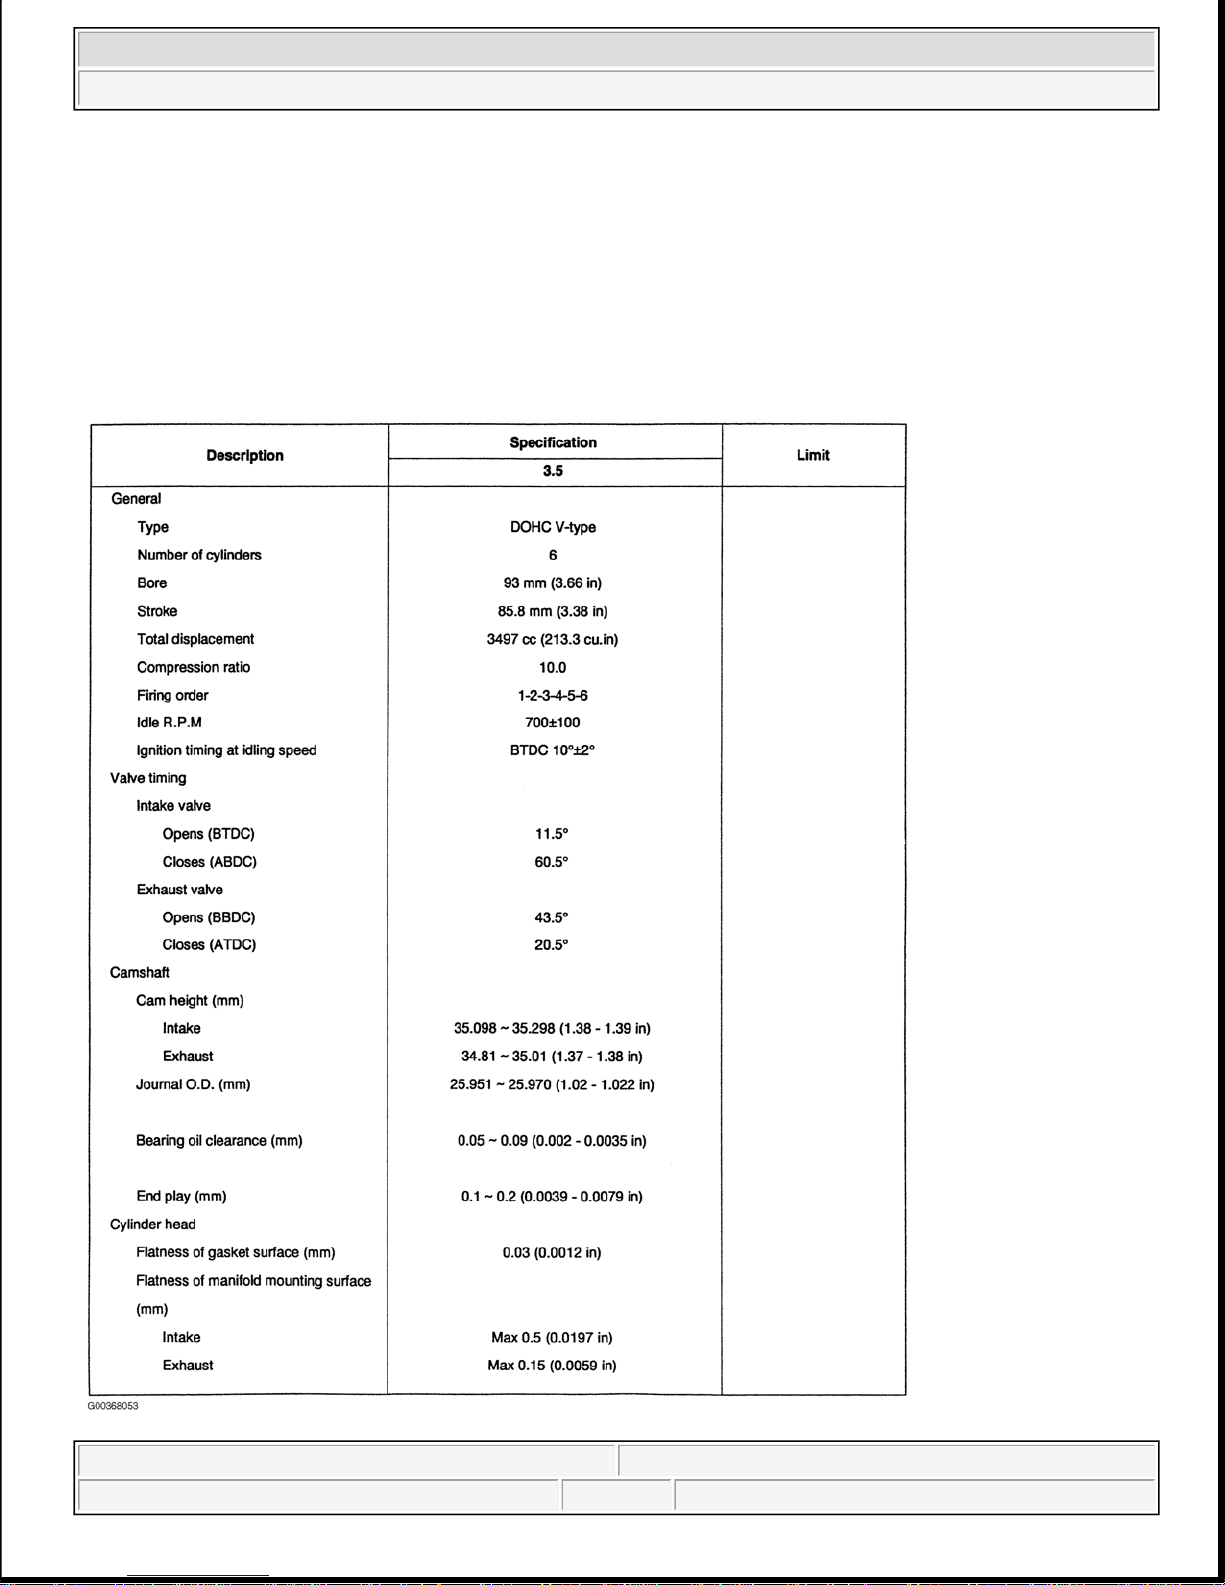
SPECIFICATIONS
2002 Kia Sedona EX
2002 ENGINES 3.5L V6 - Sedona
2002 Kia Sedona EX
2002 ENGINES 3.5L V6 - Sedona
Helpmelearn
June-06-08 8:54:28 AM Page 1 © 2005 Mitchell Repair Information Company, LLC.
Helpmelearn
June-06-08 8:54:36 AM Page 1 © 2005 Mitchell Repair Information Company, LLC.
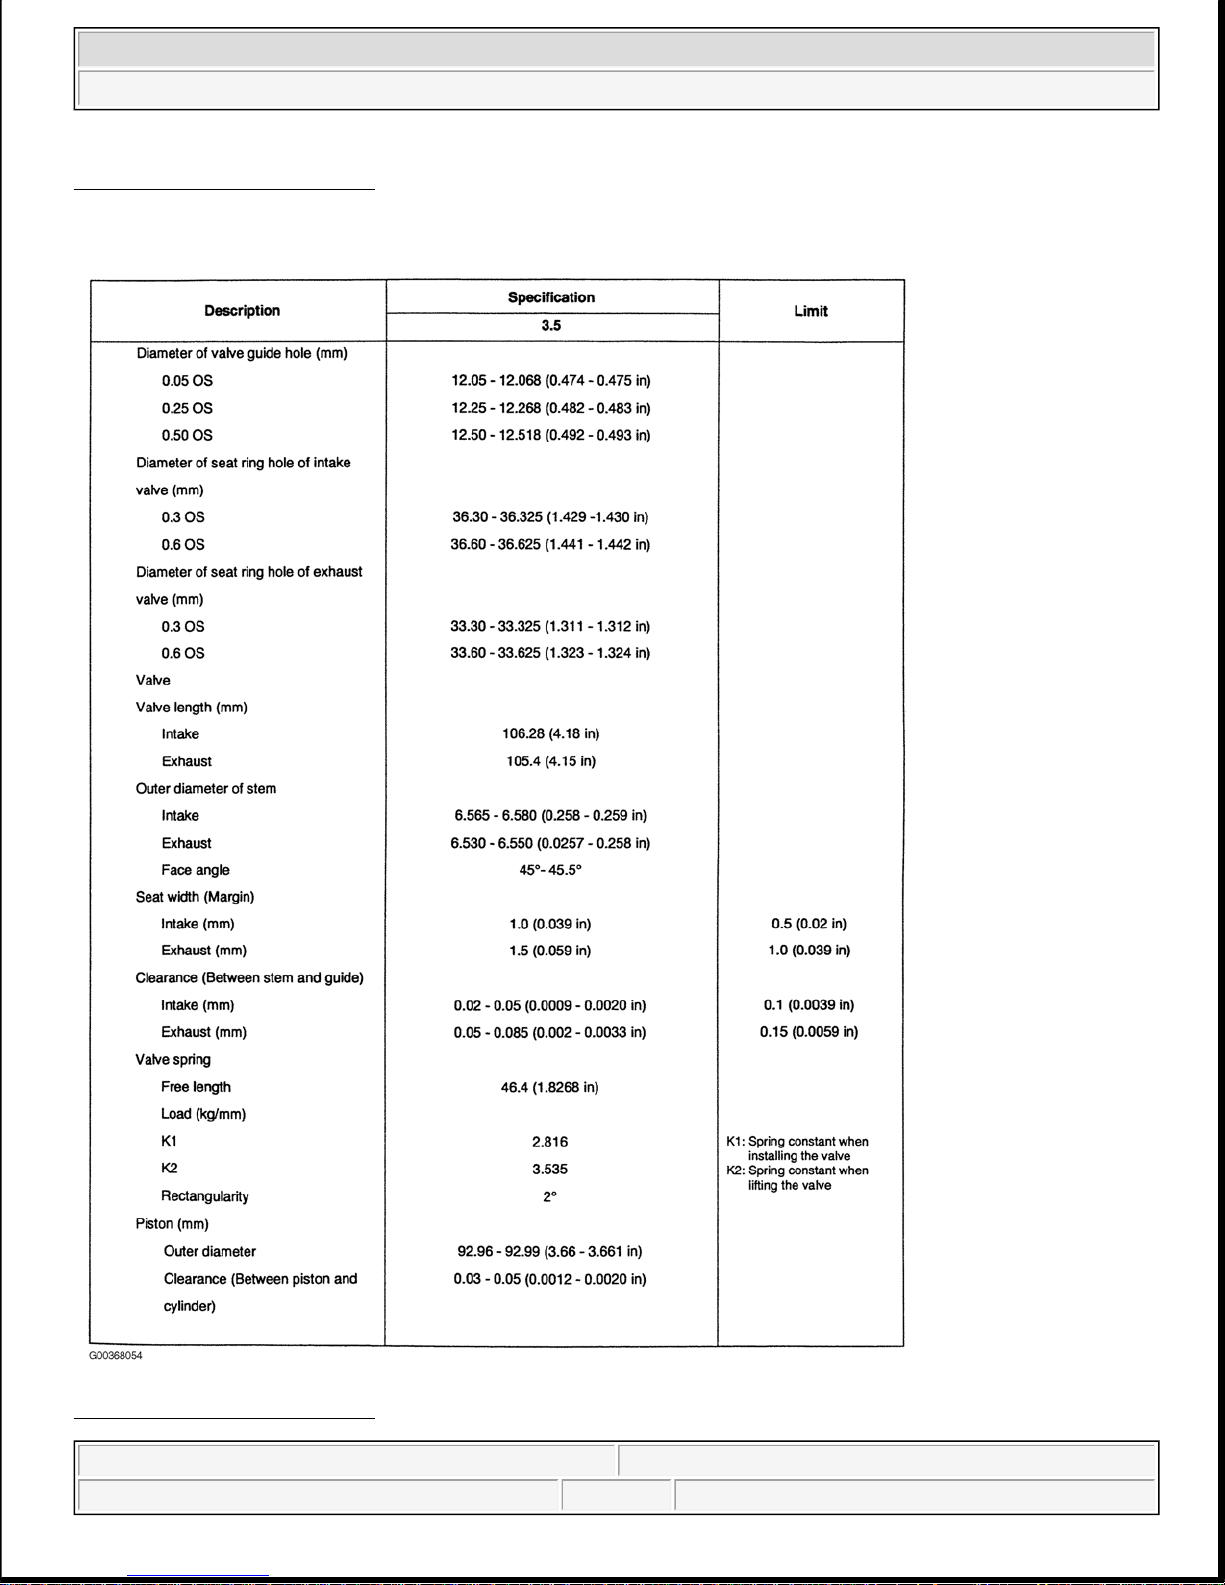
Fig. 1: General Specifications
Courtesy of KIA MOTORS AMERICA, INC.
Fig. 2: General Specifications
2002 Kia Sedona EX
2002 ENGINES 3.5L V6 - Sedona
Helpmelearn
June-06-08 8:54:28 AM Page 2 © 2005 Mitchell Repair Information Company, LLC.
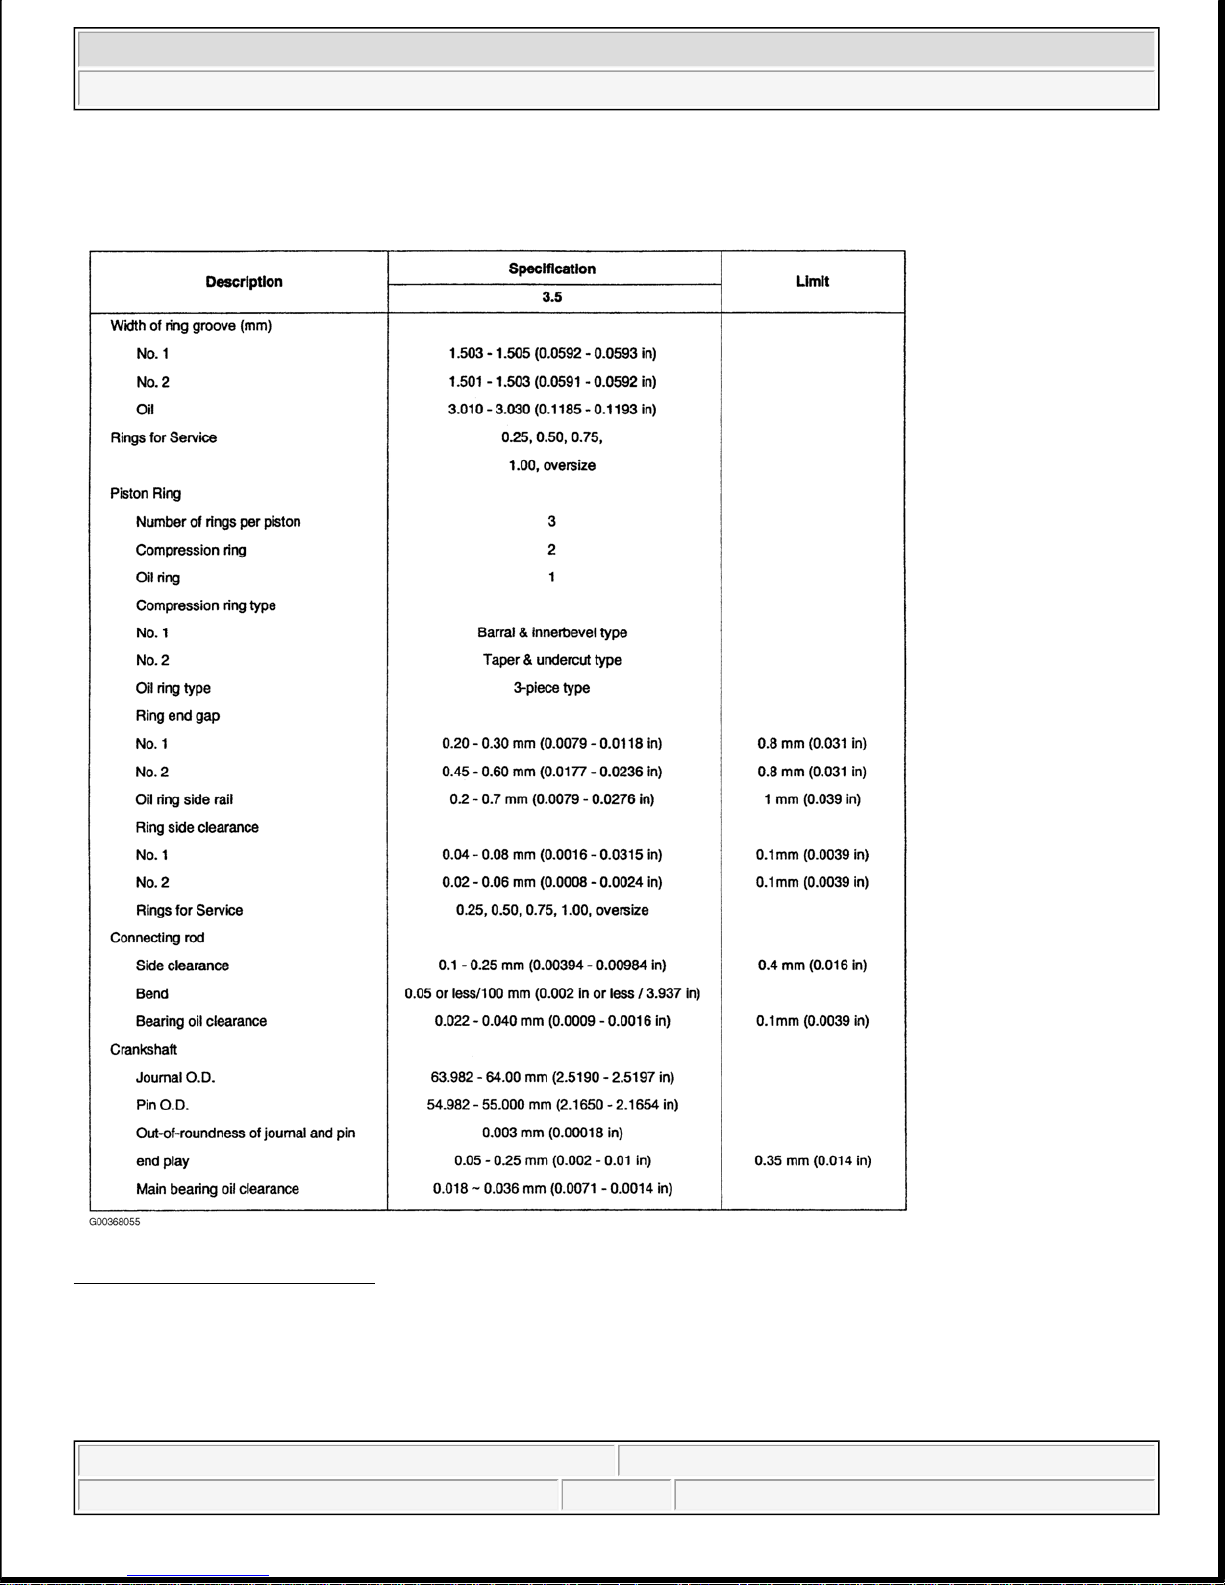
Courtesy of KIA MOTORS AMERICA, INC.
Fig. 3: General Specifications
Courtesy of KIA MOTORS AMERICA, INC.
2002 Kia Sedona EX
2002 ENGINES 3.5L V6 - Sedona
Helpmelearn
June-06-08 8:54:28 AM Page 3 © 2005 Mitchell Repair Information Company, LLC.
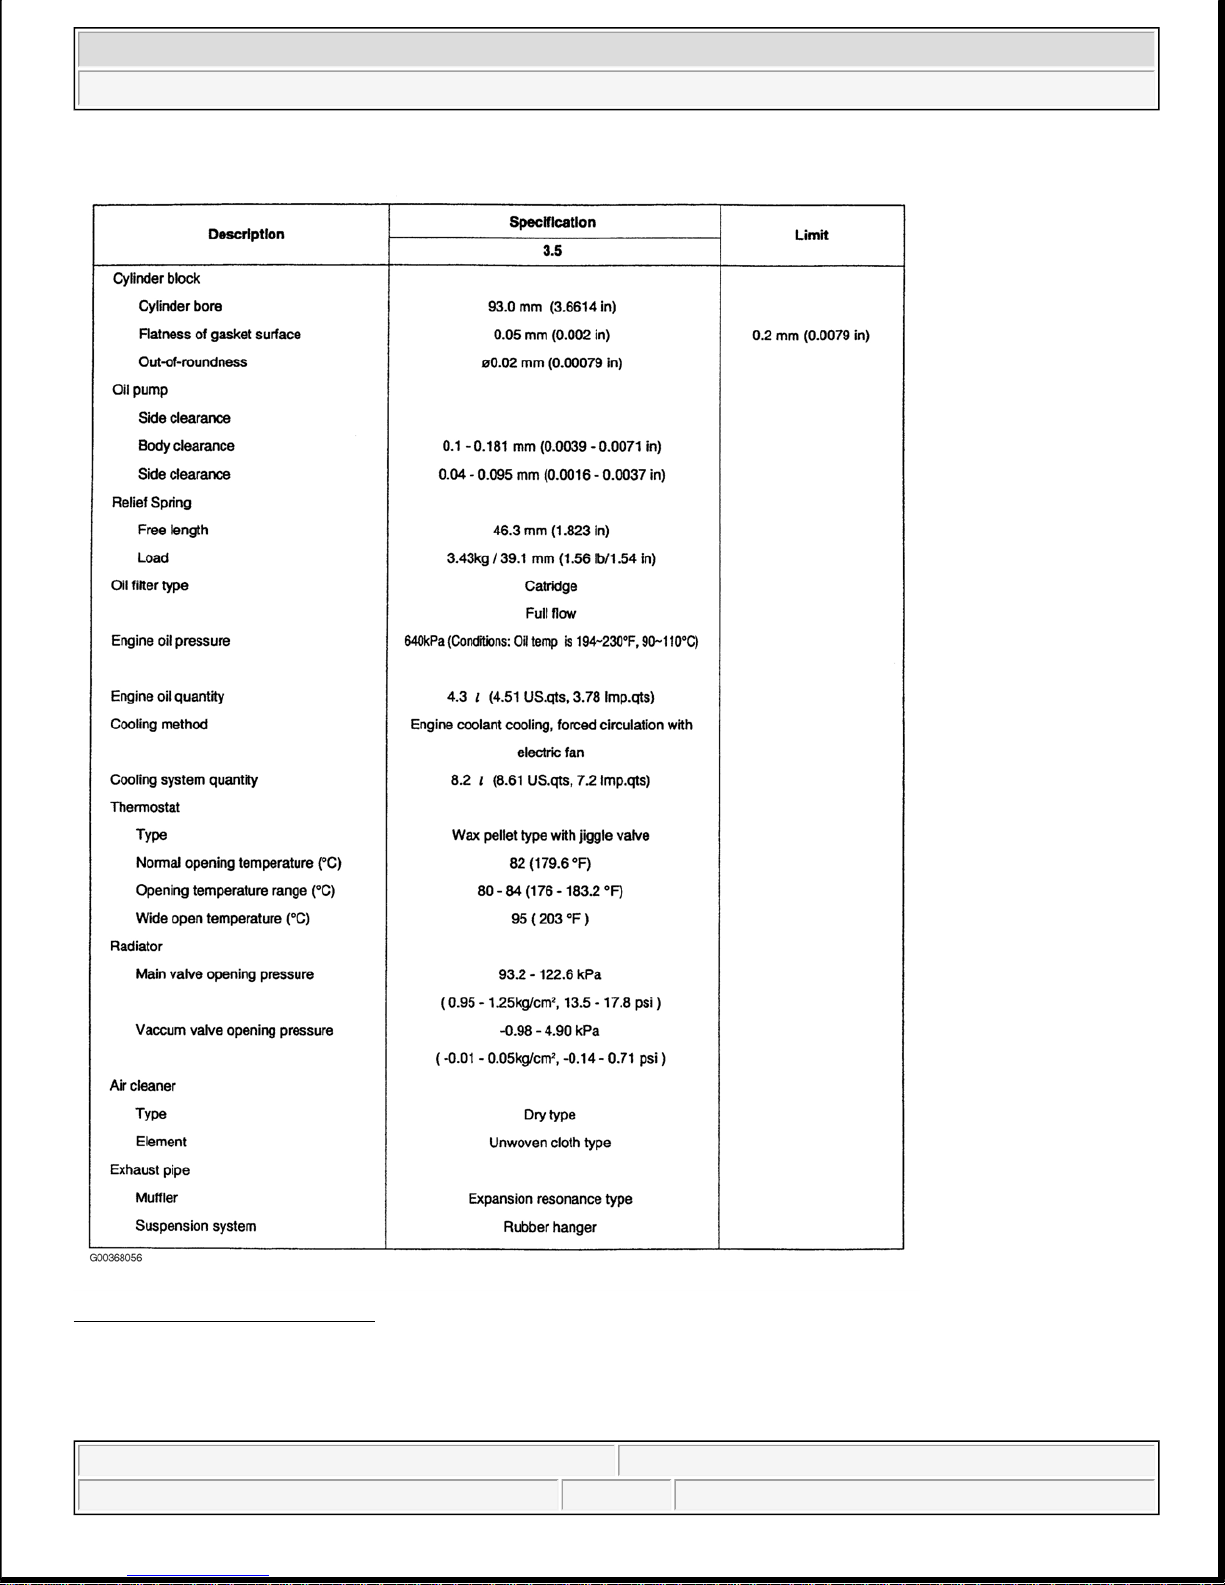
Fig. 4: General Specifications
Courtesy of KIA MOTORS AMERICA, INC.
TORQUE SPECIFICATIONS
2002 Kia Sedona EX
2002 ENGINES 3.5L V6 - Sedona
Helpmelearn
June-06-08 8:54:28 AM Page 4 © 2005 Mitchell Repair Information Company, LLC.
TORQUE SPECIFICATIONS
Application Ft. Lbs. (N.m)
Air Intake Surge Tank-To-Intake Manifold Bolt\Nut 11-15 (15-20)
Auto Tensioner Fixing Bolt 15-20 (20-27)
Camshaft Bearing Cap Bolt
(1)
Inner Bolt
(2)
Outer Bolt 14-15 (19-21)
Camshaft Sprocket Bolt 58-72 (79-98)
Catalytic Converter Nut 22-30 (30-40)
Center Exhaust Pipe Nut 22-30 (30-40)
Connecting Rod Nut
Step 1 26 (35)
Step 2 Plus Torque Angle 92 Degrees
Crankshaft Main Bearing Cap Bolt
(1)
51-58 (69-79)
Crankshaft Pulley Bolt 133-140 (180-190)
Cylinder Head Bolts
(3)
77-85 (105-115)
Drive Belt Pulley Bolt 26-41 (35-55)
Drive Belt Tensioner Nut 33-37 (45-50)
Drive Plate & Adapter Plate Bolt 54-57 (73-77)
Engine Cooling Inlet Fitting Attaching Bolt 13-15 (17-20)
Engine Coolant Pump Bolt
M8 11-16 (15-22)
M10 24-37 (33-50)
Engine Coolant Temperature Sensor & Gauge Unit Bolt 15-30 (20-40)
Engine Hanger Bracket Bolt 20-26 (27-35)
Exhaust Manifold Nut 20-24 (27-32)
Front Exhaust Pipe-To-Converter Bolt 30-44 (40-60)
Front Exhaust Pipe-To-Manifold Nut 22-30 (30-40)
Generator Mount Bolt (Bracket Side) 15-22 (20-30)
Generator Mount Bracket-To-Engine Bolt 15-22 (20-30)
Generator Mount Nut (Engine Front Case Side) 15-22 (20-30)
Intake Manifold Surge Tank Stay Bolt 11-15 (15-20)
Intake Manifold-To-Cylinder Head Bolt
(4)
15-17 (20-23)
Oil Pan Drain Plug 26-33 (35-45)
Oil Relief Valve Plug 30-37 (40-50)
Oil Screen Bolt 11-16 (15-22)
Oxygen Sensor 30-37 (40-50)
Power Steering Oil Pump Bracket-To-Cylinder Head Bolt 13-19 (17-26)
Power Steering Oil Pump-To-Bracket Bolt 13-19 (17-26)
Starter-To-Engine Bolt 20-25 (27-34)
2002 Kia Sedona EX
2002 ENGINES 3.5L V6 - Sedona
Helpmelearn
June-06-08 8:54:28 AM Page 5 © 2005 Mitchell Repair Information Company, LLC.
Starter-To-Engine Nut 15-22 (20-30)
Timing Belt Cover Bolt
M6 Bolt
(2)
M8 Bolt 15-20 (20-27)
Timing Belt Idler Pulley Bolt 37-44 (50-60)
Timing Belt Tensioner Arm Fixing Bolt 26-41 (35-55)
Timing Belt Tensioner Pulley Bolt 32-41 (43-55)
Upper Oil Pan Bolt (10x38 mm)
(5)
22-31 (30-42)
Water Outlet Fitting Bolt 13-15 (17-20)
INCH Lbs. (N.m)
Air Cleaner Mounting Bolt 71-106 (8-12)
Crank Position Sensor Wheel Screw 44-53 (5-6)
Cylinder Head Cover Bolt
(6)
71-89 (8-10)
Delivery Pipe Installation Bolt 89-133 (10-15)
Fuel Hose Clamp 106-133 (12-15)
Generator Inlet Pipe-To-Front Cylinder Head Assembly Bolt 106-133 (12-15)
Heat Shield-To-Exhaust Manifold Bolt 106-133 (12-15)
Lower Oil Pan Bolt
(7)
89-106 (10-12)
Main Muffler Hanger Support Bracket Bolt 89-133 (10-15)
Oil Filter 106-142 (12-16)
Oil Level Gauge Guide-To-Engine Bolt 106-133 (12-15)
Oil Pressure Switch 71-106 (8-12)
Oil Pump Case Bolts 106-133 (12-15)
Oil Pump Cover Screw 71-133 (8-15)
Oil Seal Case Bolt 89-106 (10-12)
Upper Oil Pan Bolt
171.5 mm 44-62 (5-7)
152.5 mm 44-62 (5-7)
Rear Plate Bolt 89-106 (10-12)
Throttle Body-To-Surge Tank Bolt 89-115 (10-13)
Transaxle Mounting Plate Bolt 89-106 (10-12)
(1)
Tighten bolts evenly in 3-4 steps to specification.
(2)
Tighten bolt to 89-106 INCH lbs. (10-12 N.m)
(3)
Tighten in sequence to specification. See Fig. 5 .
(4)
Tighten in sequence to specification. See Fig. 6 .
(5)
Tighten in sequence to specification. See Fig. 7 .
(6)
Tighten in sequence to specification. See Fig. 8 .
Tighten in sequence to specification. See Fig. 9
.
2002 Kia Sedona EX
2002 ENGINES 3.5L V6 - Sedona
Helpmelearn
June-06-08 8:54:28 AM Page 6 © 2005 Mitchell Repair Information Company, LLC.
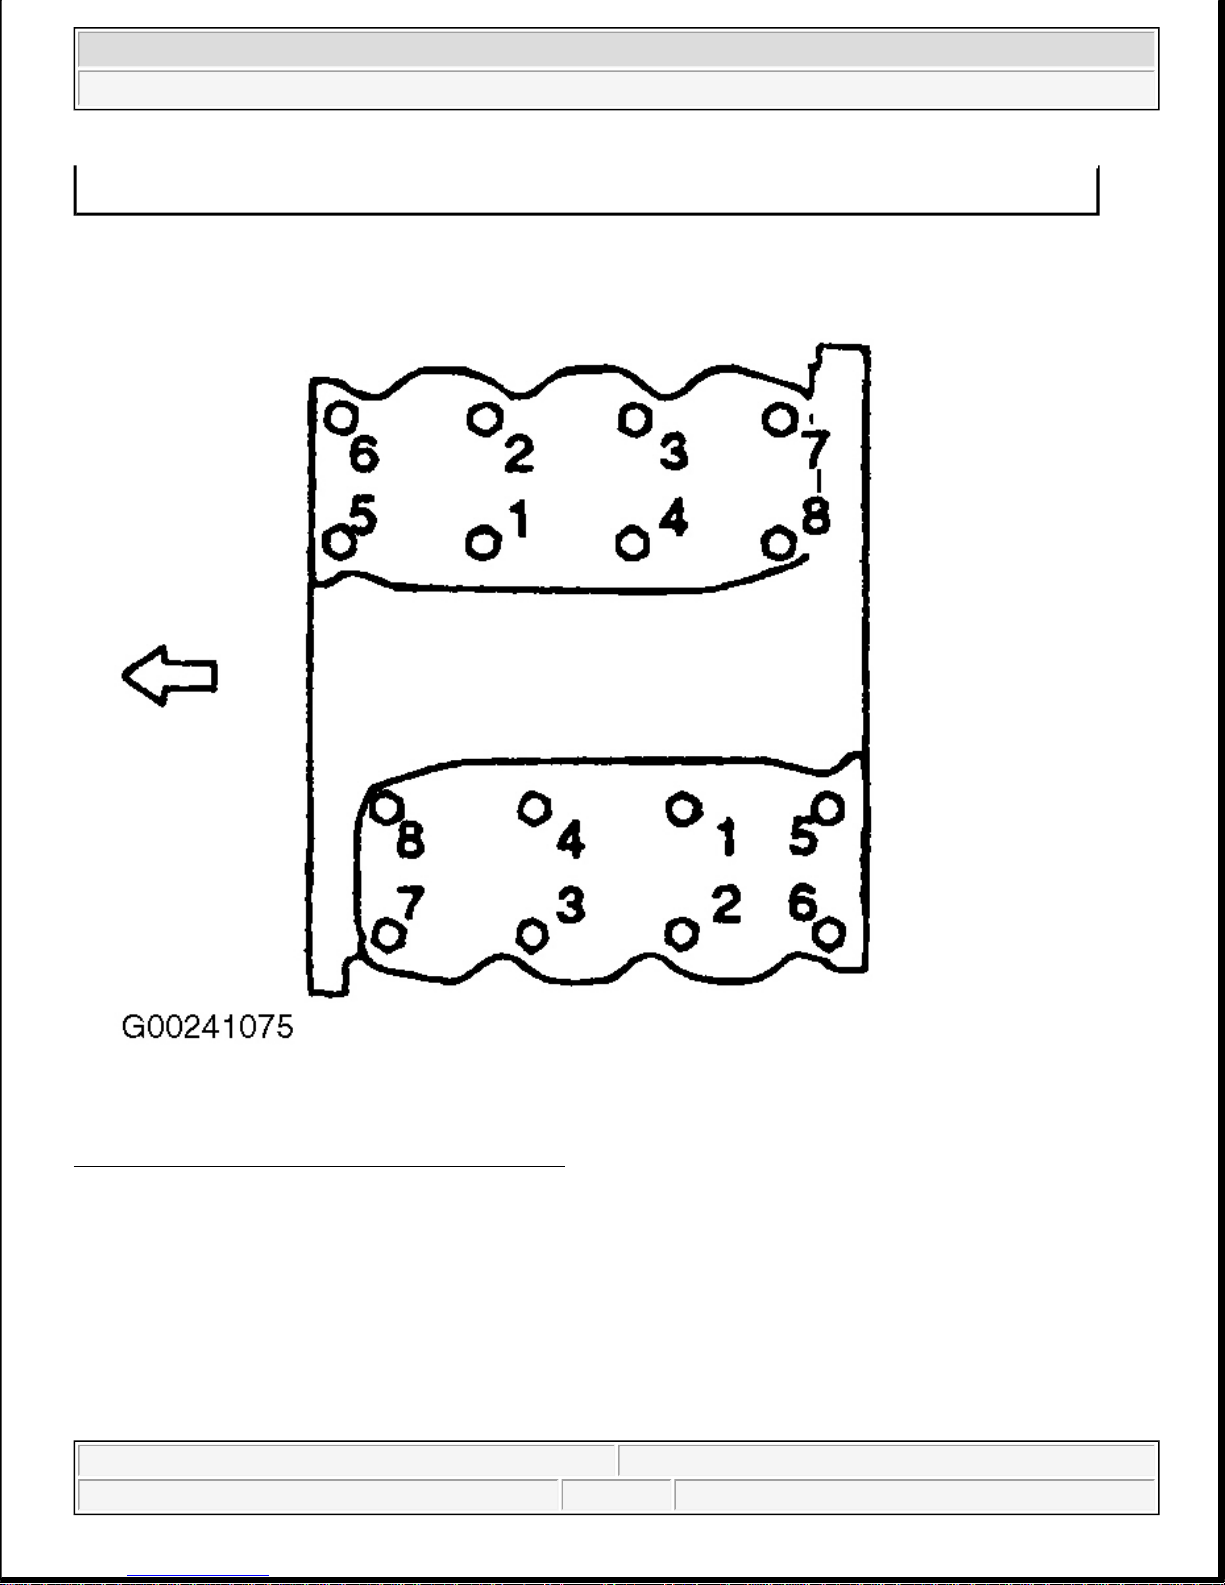
Fig. 5: Cylinder Head Bolt Tightening Sequence
Courtesy of KIA MOTORS AMERICA, INC.
(7)
2002 Kia Sedona EX
2002 ENGINES 3.5L V6 - Sedona
Helpmelearn
June-06-08 8:54:28 AM Page 7 © 2005 Mitchell Repair Information Company, LLC.
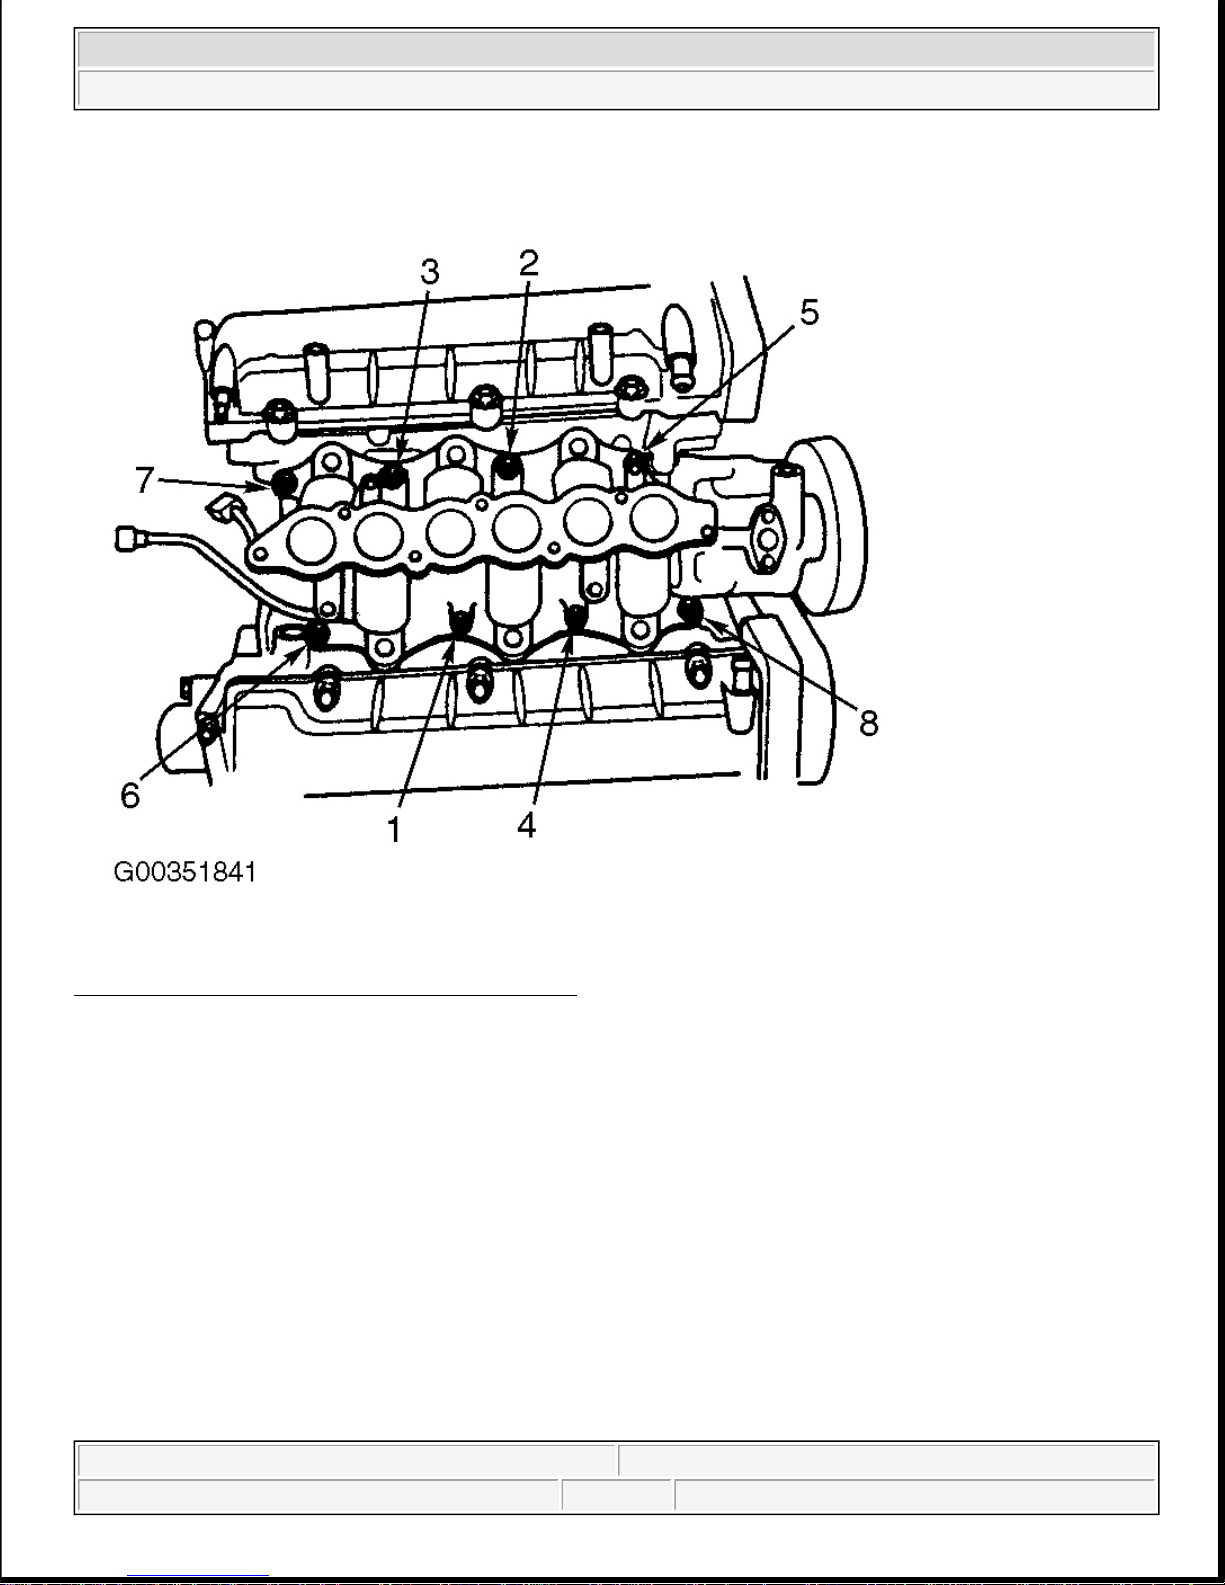
Fig. 6: Intake Manifold Nut Tightening Sequence
Courtesy of KIA MOTORS AMERICA, INC.
2002 Kia Sedona EX
2002 ENGINES 3.5L V6 - Sedona
Helpmelearn
June-06-08 8:54:28 AM Page 8 © 2005 Mitchell Repair Information Company, LLC.
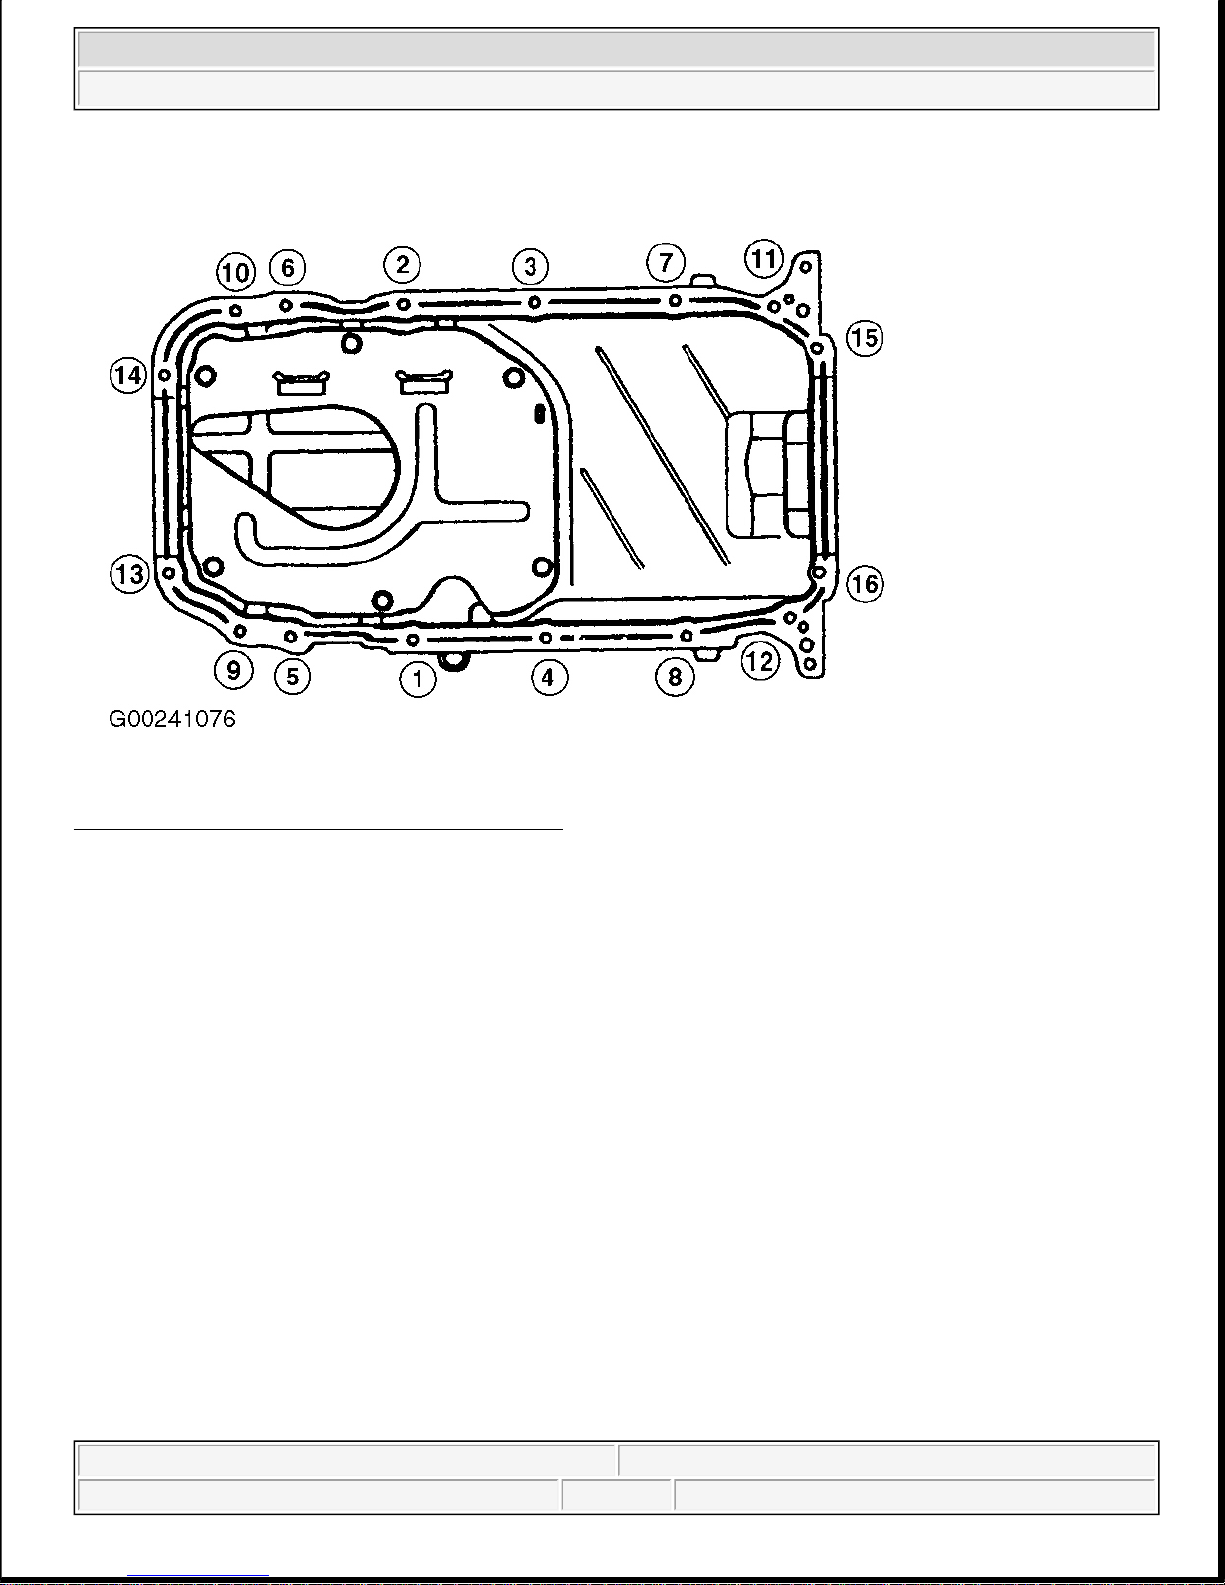
Fig. 7: Upper Oil Pan Bolt Tightening Sequence
Courtesy of KIA MOTORS AMERICA, INC.
2002 Kia Sedona EX
2002 ENGINES 3.5L V6 - Sedona
Helpmelearn
June-06-08 8:54:28 AM Page 9 © 2005 Mitchell Repair Information Company, LLC.
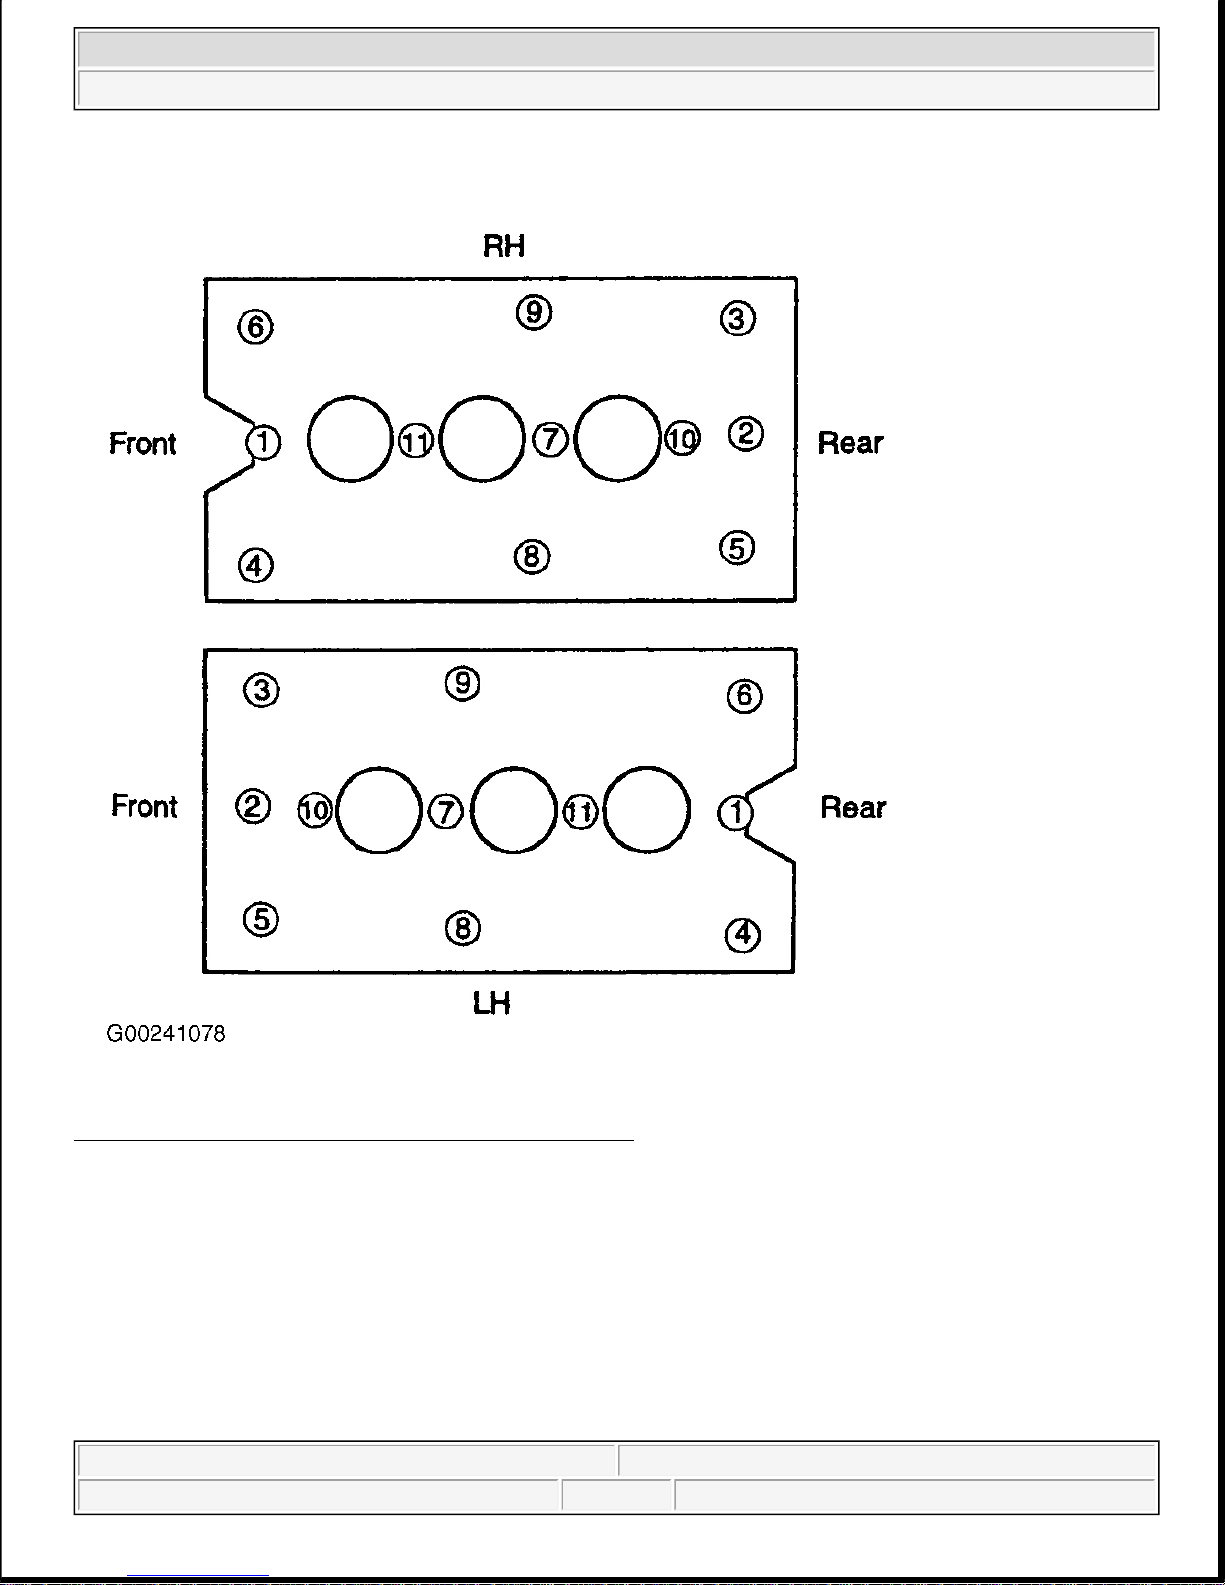
Fig. 8: Cylinder Head Cover Bolt Tightening Sequence
Courtesy of KIA MOTORS AMERICA, INC.
2002 Kia Sedona EX
2002 ENGINES 3.5L V6 - Sedona
Helpmelearn
June-06-08 8:54:28 AM Page 10 © 2005 Mitchell Repair Information Company, LLC.
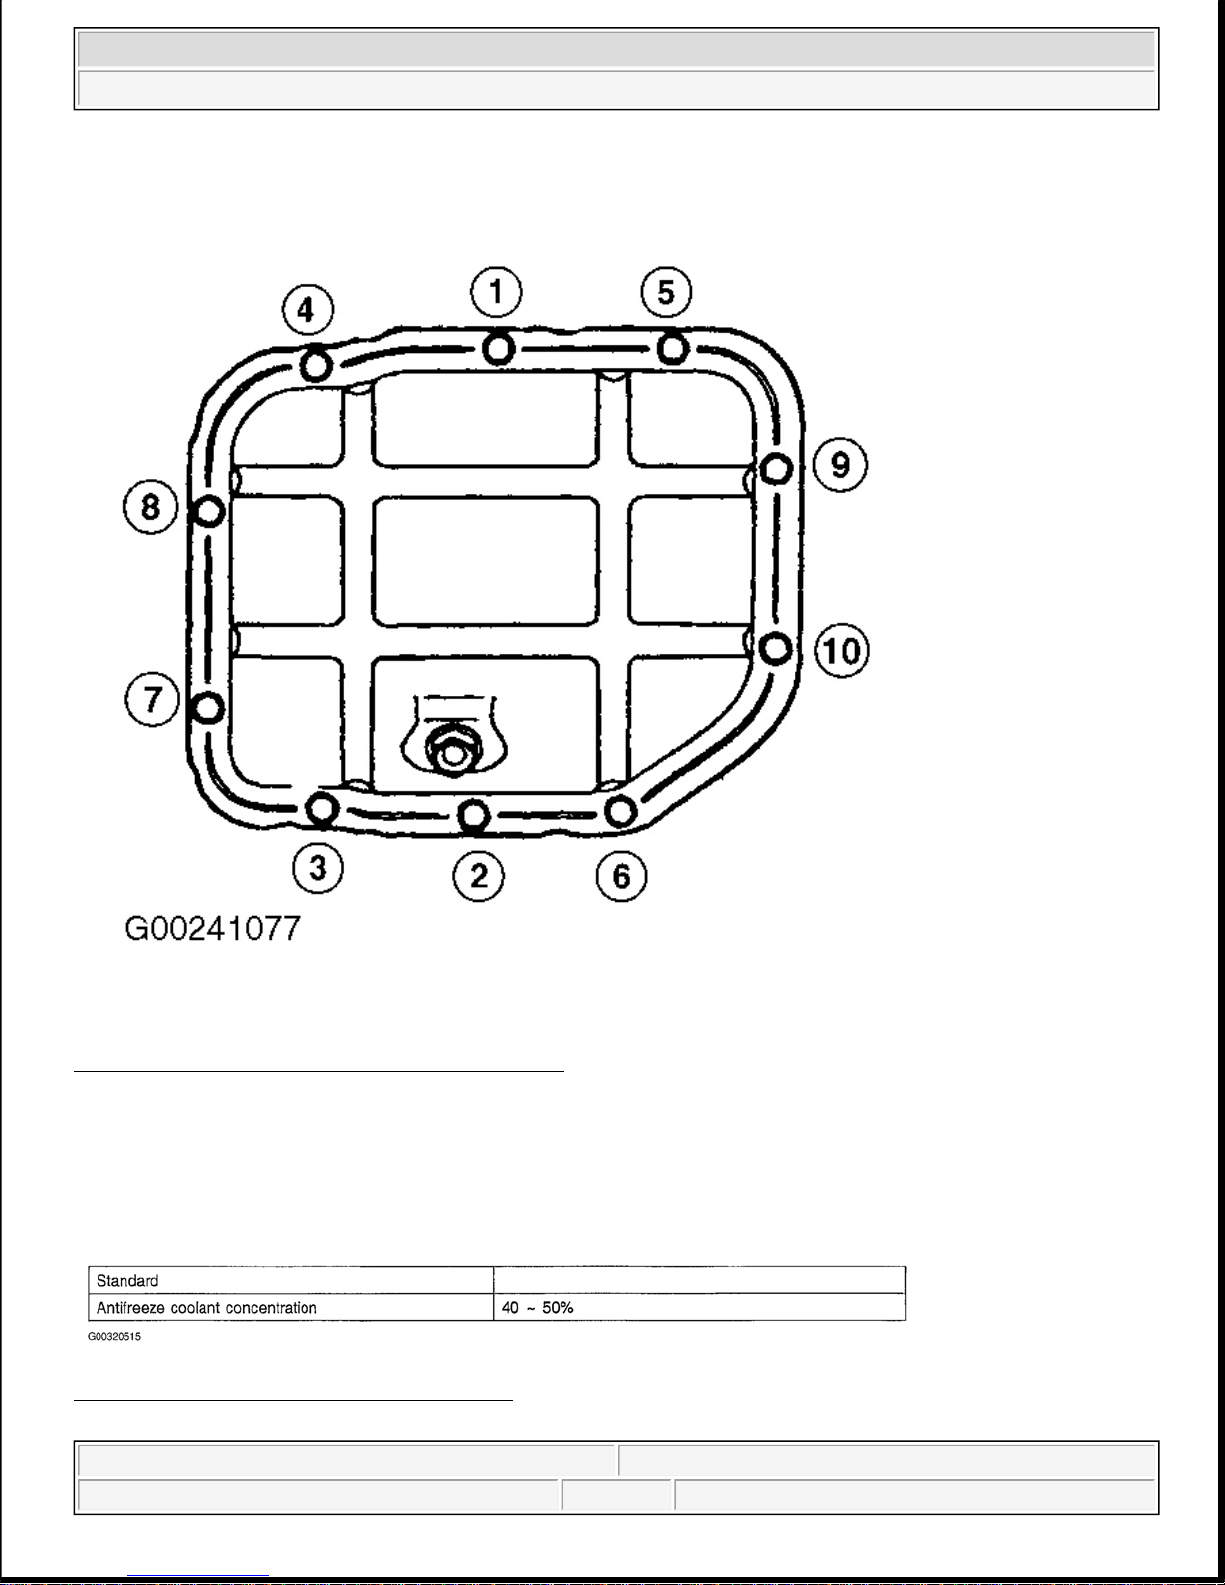
Fig. 9: Lower Oil Pan Bolt Tightening Sequence
Courtesy of KIA MOTORS AMERICA, INC.
FLUIDS
ANTIFREEZE SERVICE STANDARD
Fig. 10: Antifreeze Service Standard Chart
Courtesy of KIA MOTORS AMERICA, INC.
2002 Kia Sedona EX
2002 ENGINES 3.5L V6 - Sedona
Helpmelearn
June-06-08 8:54:28 AM Page 11 © 2005 Mitchell Repair Information Company, LLC.
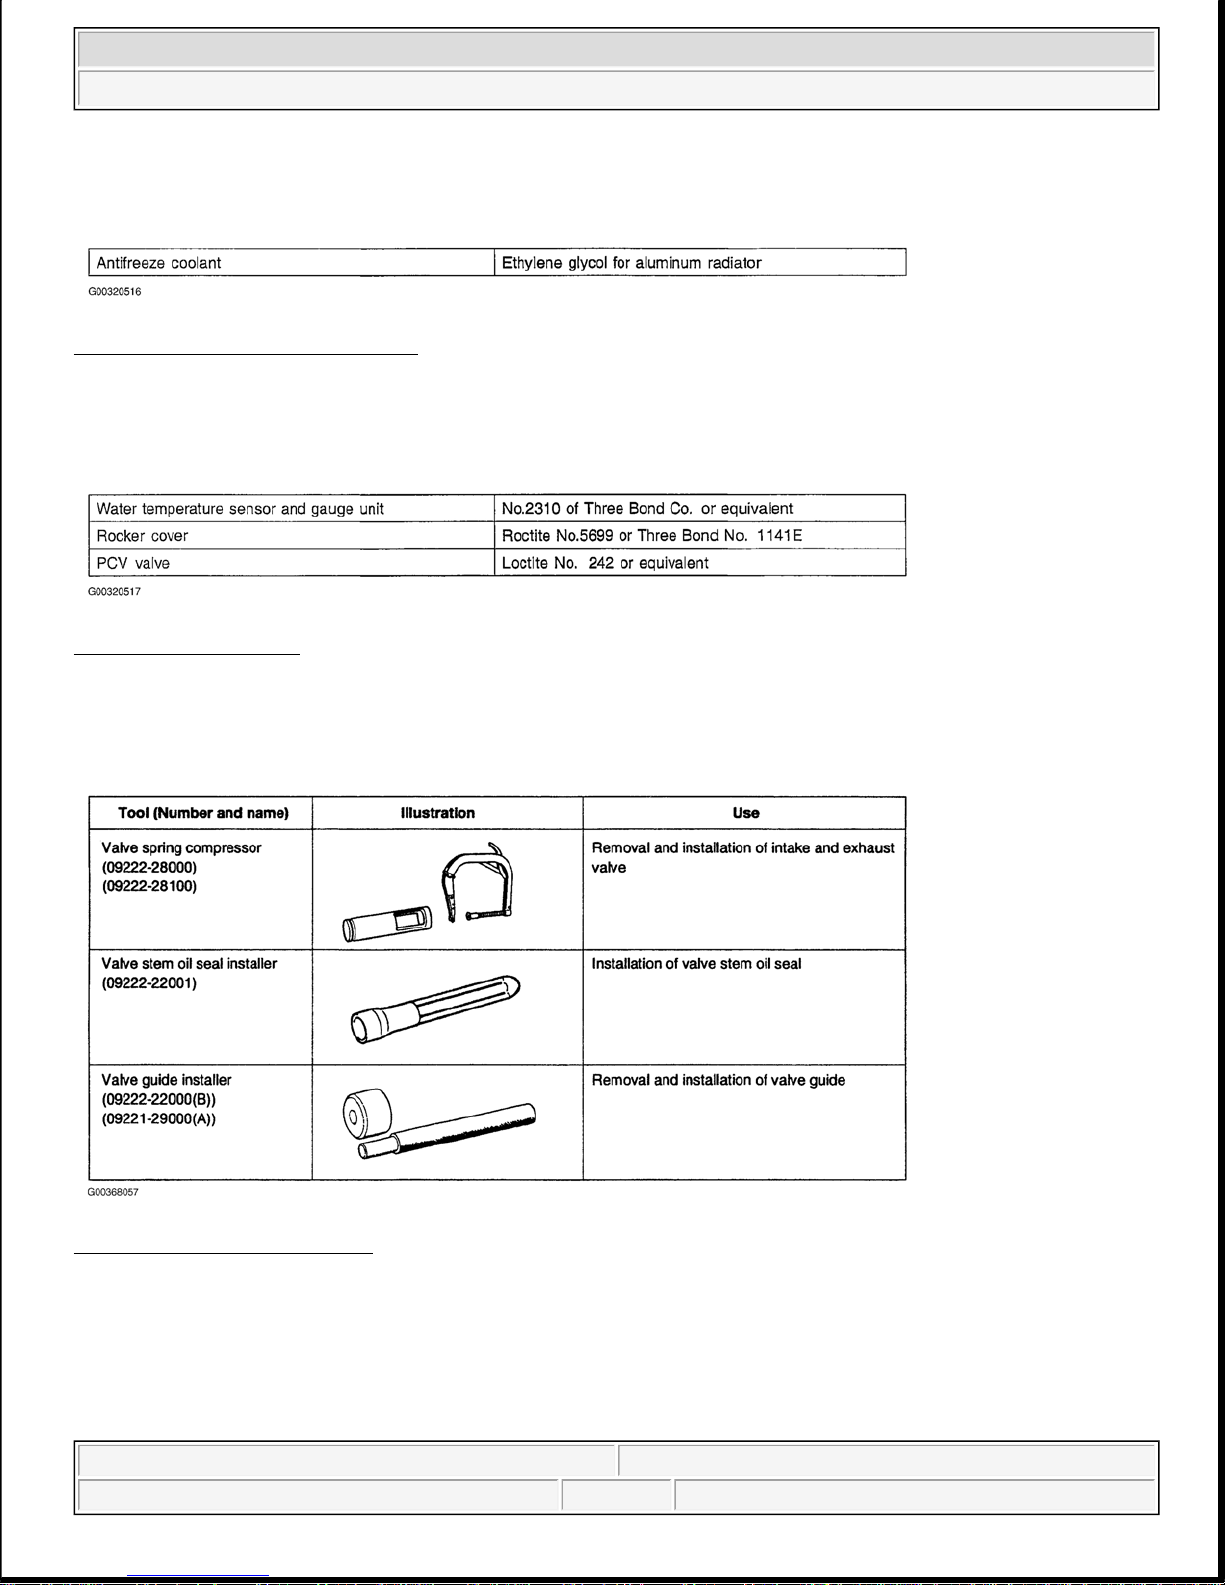
ANTIFREEZE COOLANT
Fig. 11: Antifreeze Coolant Chart
Courtesy of KIA MOTORS AMERICA, INC.
SEALANT
Fig. 12: Sealant Chart
Courtesy of KIA MOTORS AMERICA, INC.
SPECIAL SERVICE TOOLS
Fig. 13: Special Service Tools
Courtesy of KIA MOTORS AMERICA, INC.
2002 Kia Sedona EX
2002 ENGINES 3.5L V6 - Sedona
Helpmelearn
June-06-08 8:54:28 AM Page 12 © 2005 Mitchell Repair Information Company, LLC.
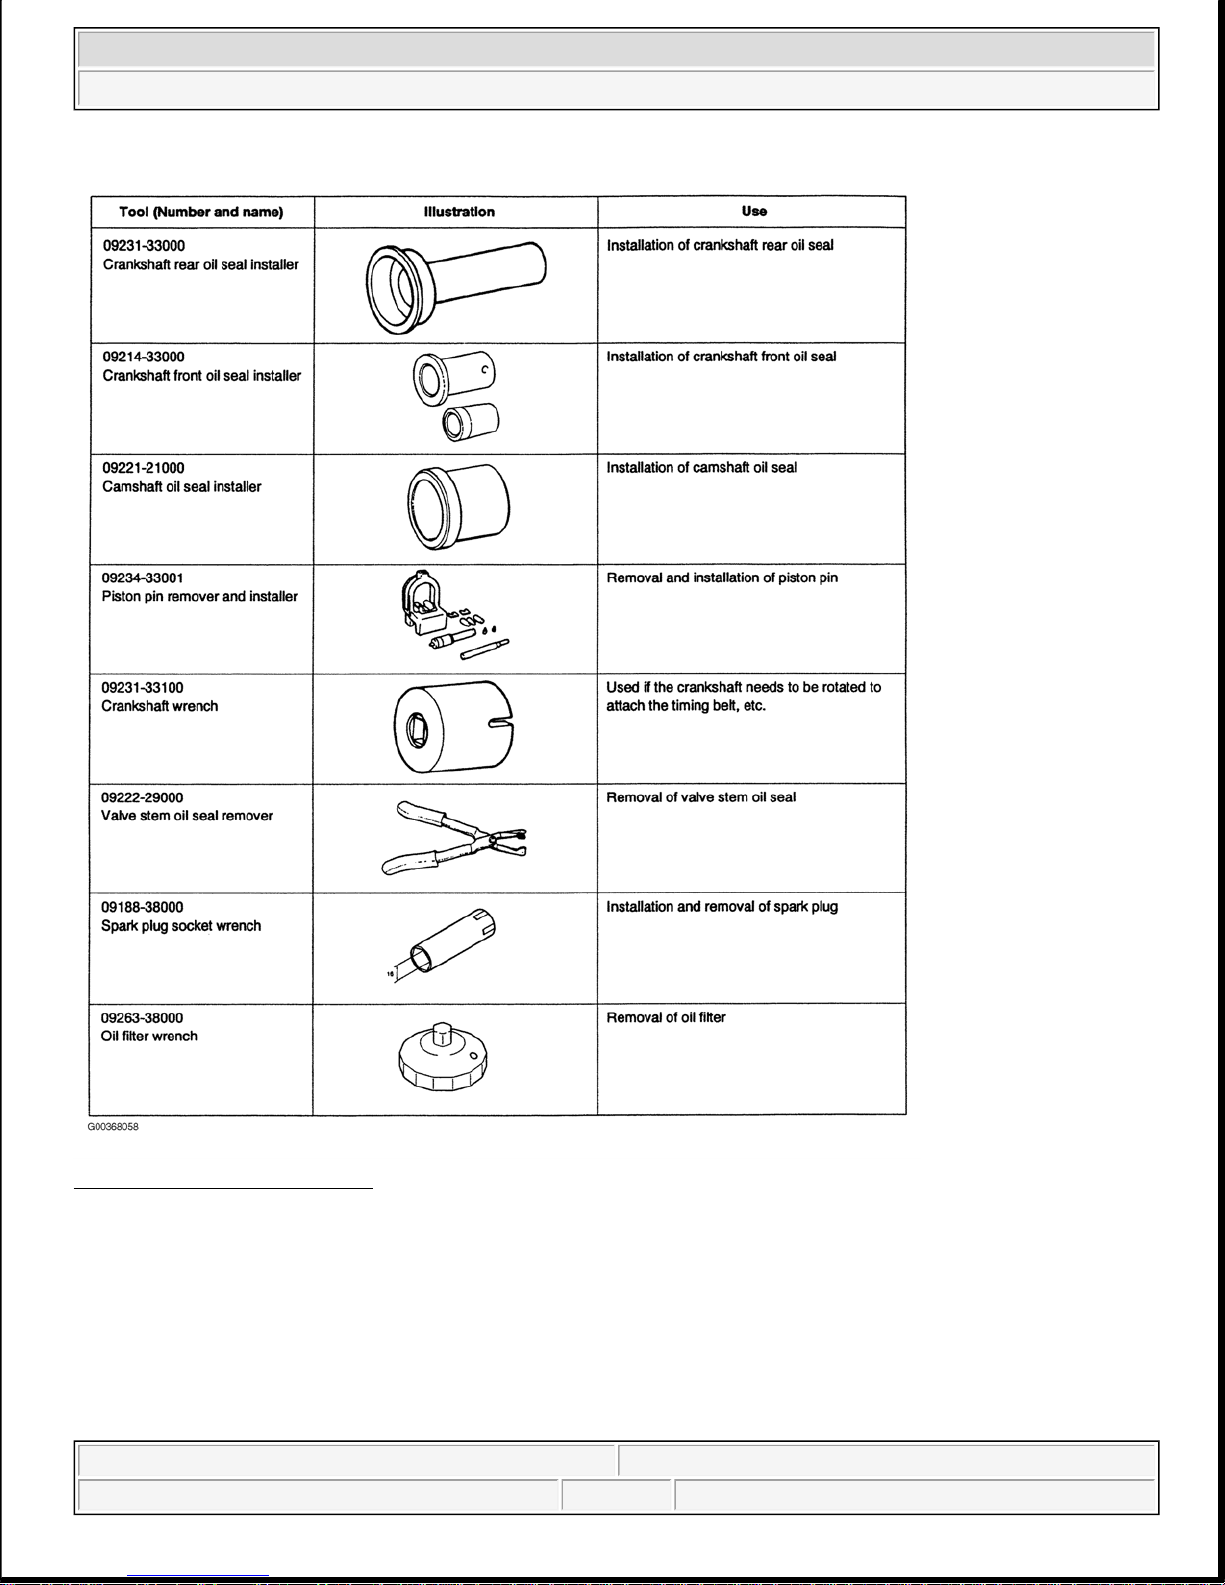
Fig. 14: Special Service Tools
Courtesy of KIA MOTORS AMERICA, INC.
CHECKING COMPRESSION PRESSURE
1. Before checking compression, check the engine oil level and that the starter motor and battery are all in
normal operating condition.
2. Start the engine and wait until engine coolant temperature has risen to 80-95°C
3. Stop the engine and disconnect the spark plug cables.
2002 Kia Sedona EX
2002 ENGINES 3.5L V6 - Sedona
Helpmelearn
June-06-08 8:54:28 AM Page 13 © 2005 Mitchell Repair Information Company, LLC.

4. Remove the spark plugs.
5. Turn over the engine to remove any foreign objects in the cylinders.
6. Attach the compression gauge to the spark plug hole.
7. Depress the accelerator pedal to fully open the throttle valve.
8. Turn over the engine and read the gauge.
Standard value: 1,200 kPa (12.2 kg.cm2 , 170 psi)
Limit: 1,050 kPa (10.7 kg.cm2 , 149 psi)
Fig. 15: Testing Compression
Courtesy of KIA MOTORS AMERICA, INC.
9. Repeat steps 6 through 8 on all cylinders, making sure ensuring that the pressure difference for each of
the cylinders is within the specified limit.
Limit: Max 100 kPa (1.0 kg/cm2 , 14 psi) for all cylinders.
2002 Kia Sedona EX
2002 ENGINES 3.5L V6 - Sedona
Helpmelearn
June-06-08 8:54:28 AM Page 14 © 2005 Mitchell Repair Information Company, LLC.
10. If a cylinder's compression or pressure difference is below the specification, add a small amount of oil
through the spark plug hole and repeat steps 6 through 9 .
a. If the addition of oil causes the compression to rise, it is possible that there is wear between the
piston ring and cylinder wall.
b. If the compression doesn't rise, valve seizure, poor valve seating or a compression leak from the
cylinder head gasket are all possible causes.
Spark plug tightening torque: 20-30 N.m (200 - 300 kg.cm, 14.75 - 22.13 lb.ft.)
ENGINE OIL
CHECKING ENGINE OIL
1. Position vehicle on a level surface
2. Stop the engine
3. If the oil is found to have fallen to the lower limit (the L mark), refill to the (F) mark.
4. Check that the oil is not dirty or mixed with coolant or gasoline, and that it has the proper viscosity.
SELECTION OF ENGINE OIL
z Recommended API classification : SD or above.
z Recommended SAE viscosit
y g
rades :
CAUTION: In the case of a vehicle that has been out of service for a prolonged
period, run the engine for several minutes. Stop the engine and wait
a few minutes, then check the oil level.
CAUTION: When filling, use the same type of engine oil as the one currently
being used.
2002 Kia Sedona EX
2002 ENGINES 3.5L V6 - Sedona
Helpmelearn
June-06-08 8:54:28 AM Page 15 © 2005 Mitchell Repair Information Company, LLC.
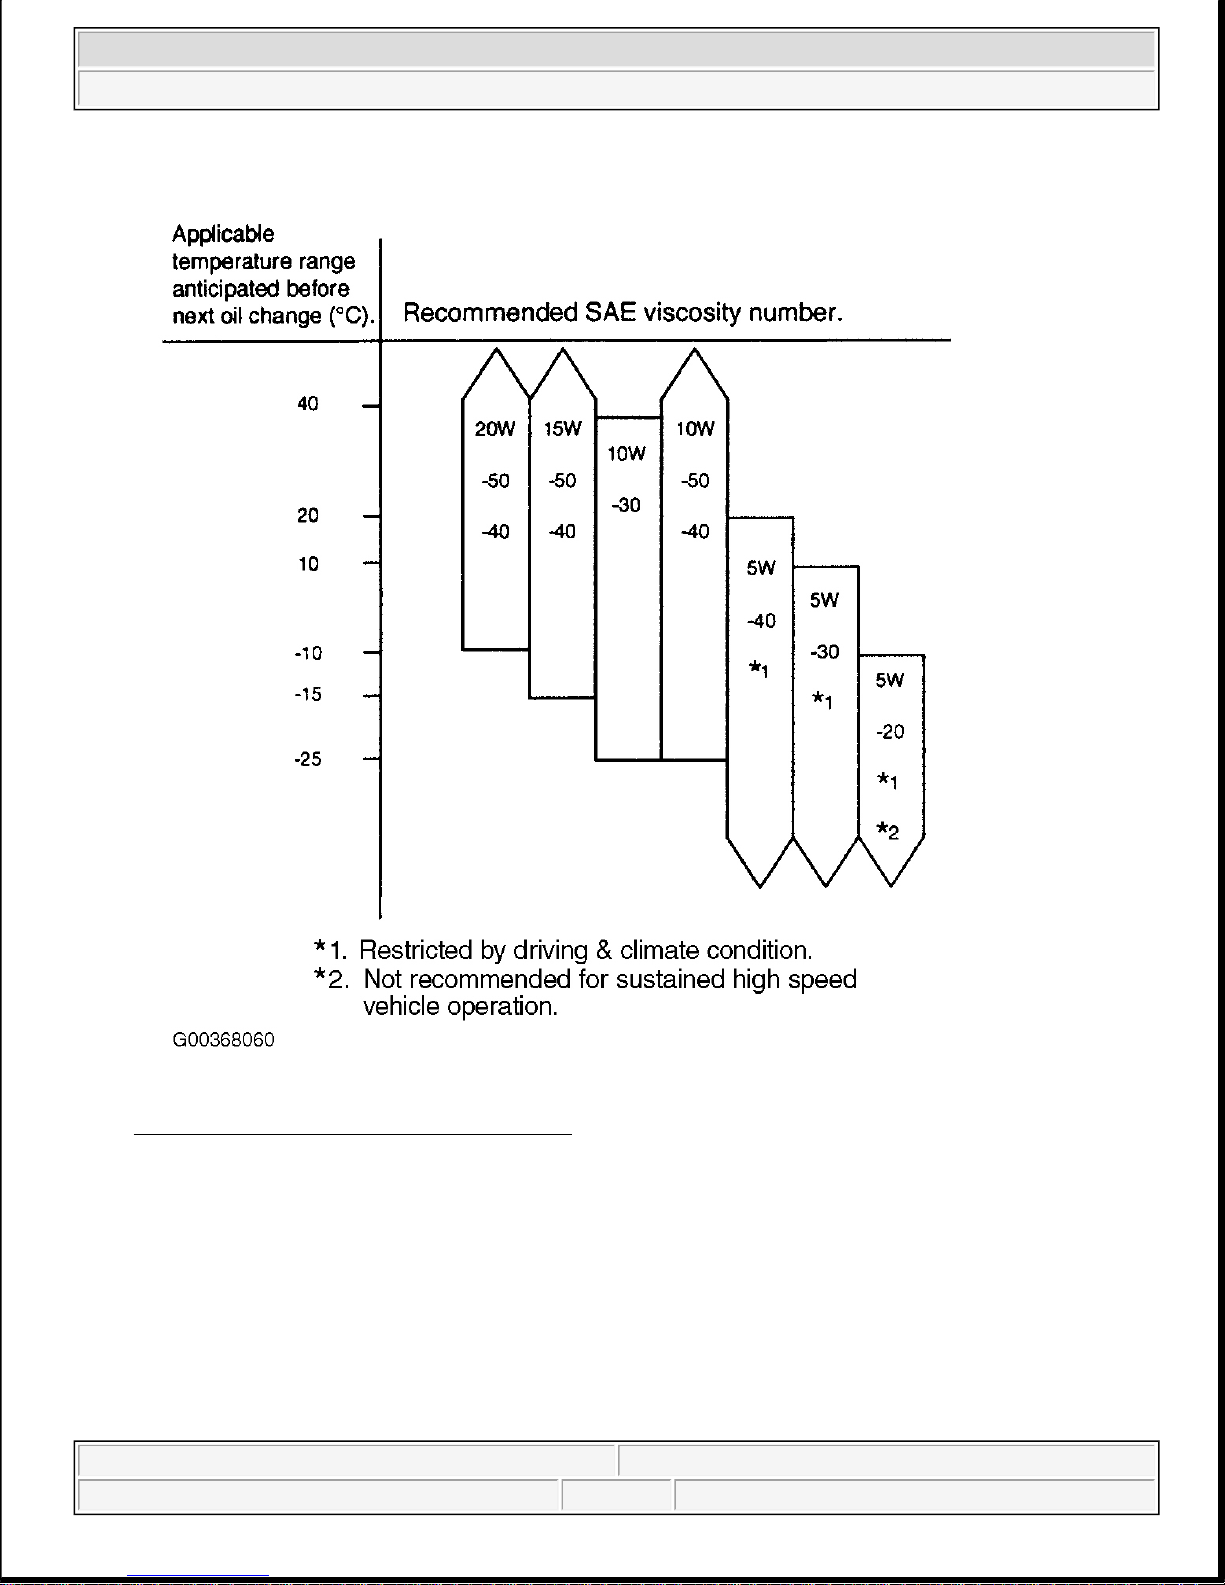
Fig. 16: Recommended Oil Viscosity Chart
Courtesy of KIA MOTORS AMERICA, INC.
NOTE: For best performance and for maximum protection for all types of
operation, select only those lubricants which:
a. Confirm to the requirements of the API classification.
b. Have proper SAE grade number for expected ambient temperature
range. Lubricants which do not have both an SAE grade number and
an API service classification on the container should not be used.
2002 Kia Sedona EX
2002 ENGINES 3.5L V6 - Sedona
Helpmelearn
June-06-08 8:54:28 AM Page 16 © 2005 Mitchell Repair Information Company, LLC.
CHANGING ENGINE OIL
1. Runt the engine until it reaches normal operating temperature.
2. Stop the engine.
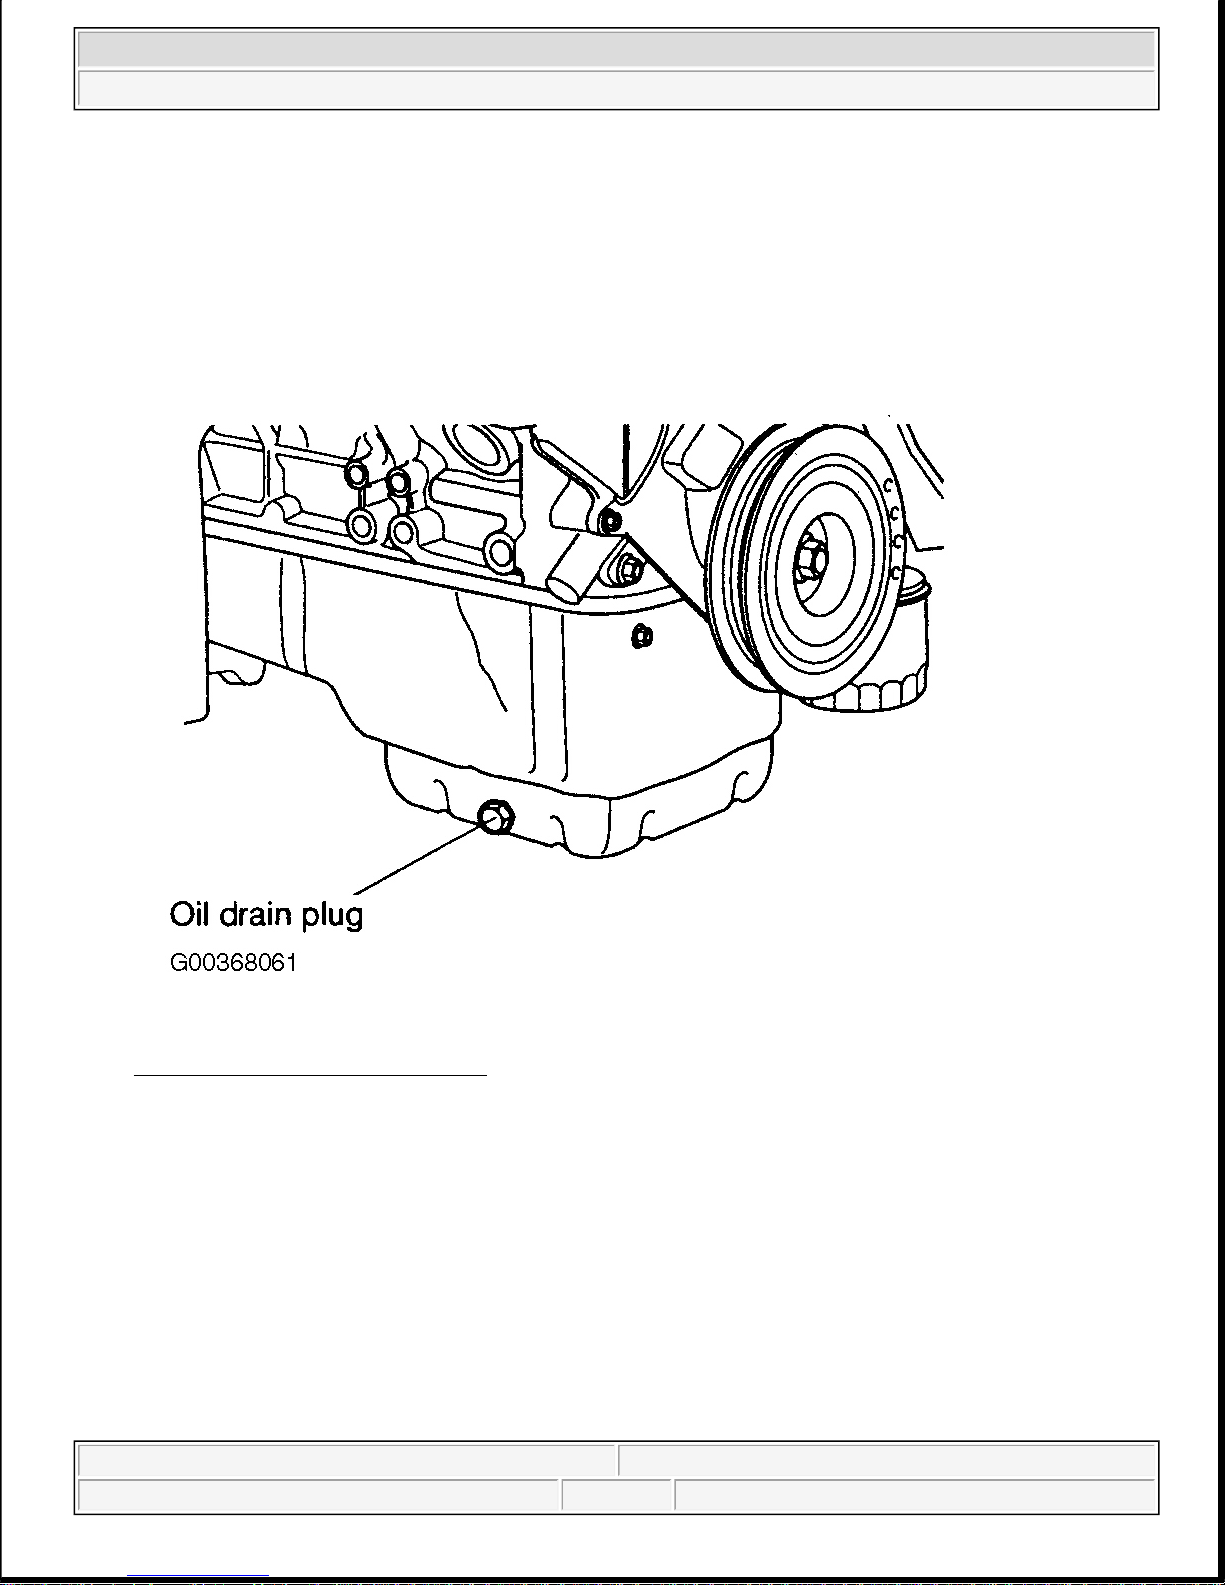
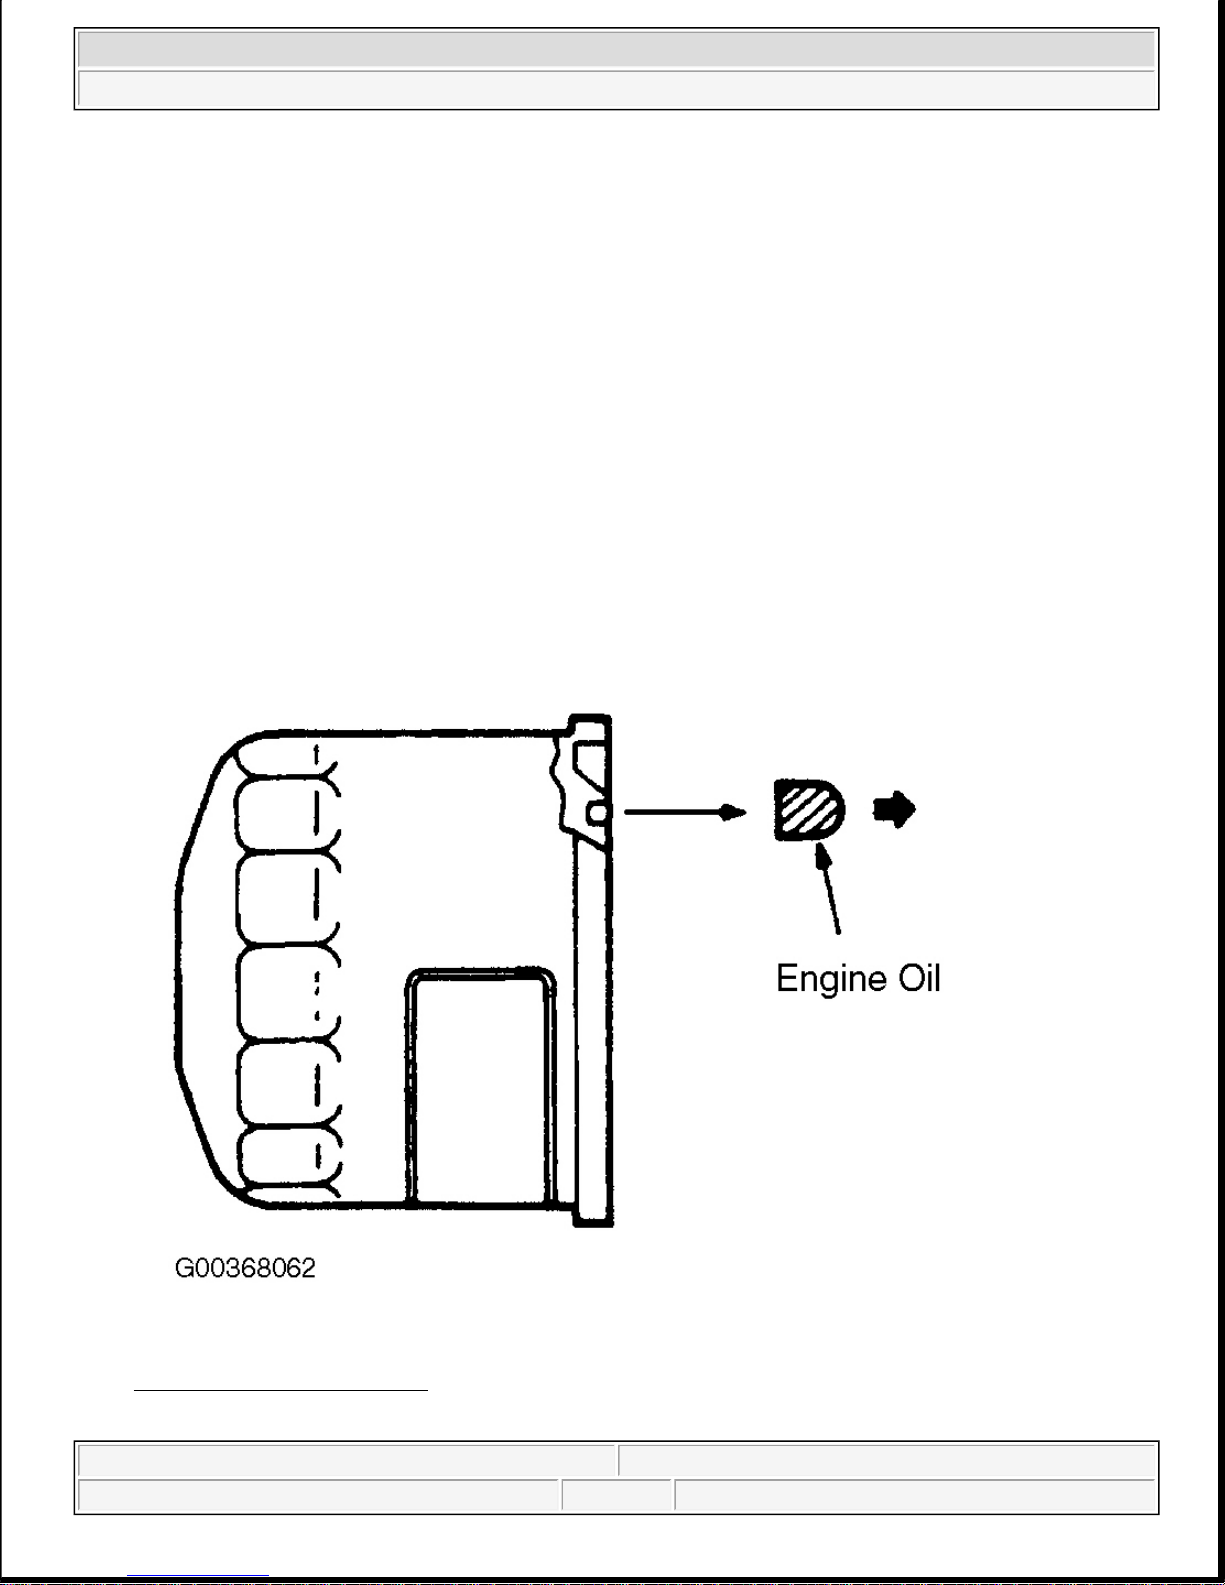
3. Remove the oil filler cap and the drain plug. Drain the engine oil.
Fig. 17: Identifying Oil Drain Plug
Courtesy of KIA MOTORS AMERICA, INC.
4. Tighten the drain plug to the specified torque. 26-30 ft.lbs. (35-45 N.m).
5. Install oil filter.
6. Fill the engine with new engine oil through the oil filling hole. Amount of oil 4.5 qts (4.3Liters))
CAUTION: Whenever tightening an oil drain plug, use a new drain plug gasket.
CAUTION: Do not overfill the crankcase. This will cause oil aeration and loss of
oil pressure.
2002 Kia Sedona EX
2002 ENGINES 3.5L V6 - Sedona
Helpmelearn
June-06-08 8:54:29 AM Page 17 © 2005 Mitchell Repair Information Company, LLC.
7. Reinstall the oil filler cap.
8. Start the engine.
9. Stop the engine and check the oil level. If not sufficient, refill engine.
REPLACING OIL FILTER
All Kia Motor Company engines are equipped with a quality, throw-away oil filter. This filter is recommended
as a replacement filter on all vehicles. The quality of replacement filters varies considerable. Only high quality
filters should be used to assure the most efficient service. Make sure that the rubber gasket from the old filter is
completely removed from the mating surfaces on the engine block, before installing the new filter.
1. Use a filter wrench to remove the oil filter.
2. Before installing the new oil filter on the engine, apply clean engine oil to the surface of the rubber
gasket.
Fig. 18: Illustrating Oil filter
Courtesy of KIA MOTORS AMERICA, INC.
2002 Kia Sedona EX
2002 ENGINES 3.5L V6 - Sedona
Helpmelearn
June-06-08 8:54:29 AM Page 18 © 2005 Mitchell Repair Information Company, LLC.
3. Tighten the oil filter to the specified amount. 13-18 ft.lbs. (17-25 N.m))
4. Fill the engine with engine oil.
5. Start and run the engine and check for oil leaks.
6. After stopping the engine, check the oil level and add as much oil as necessary.
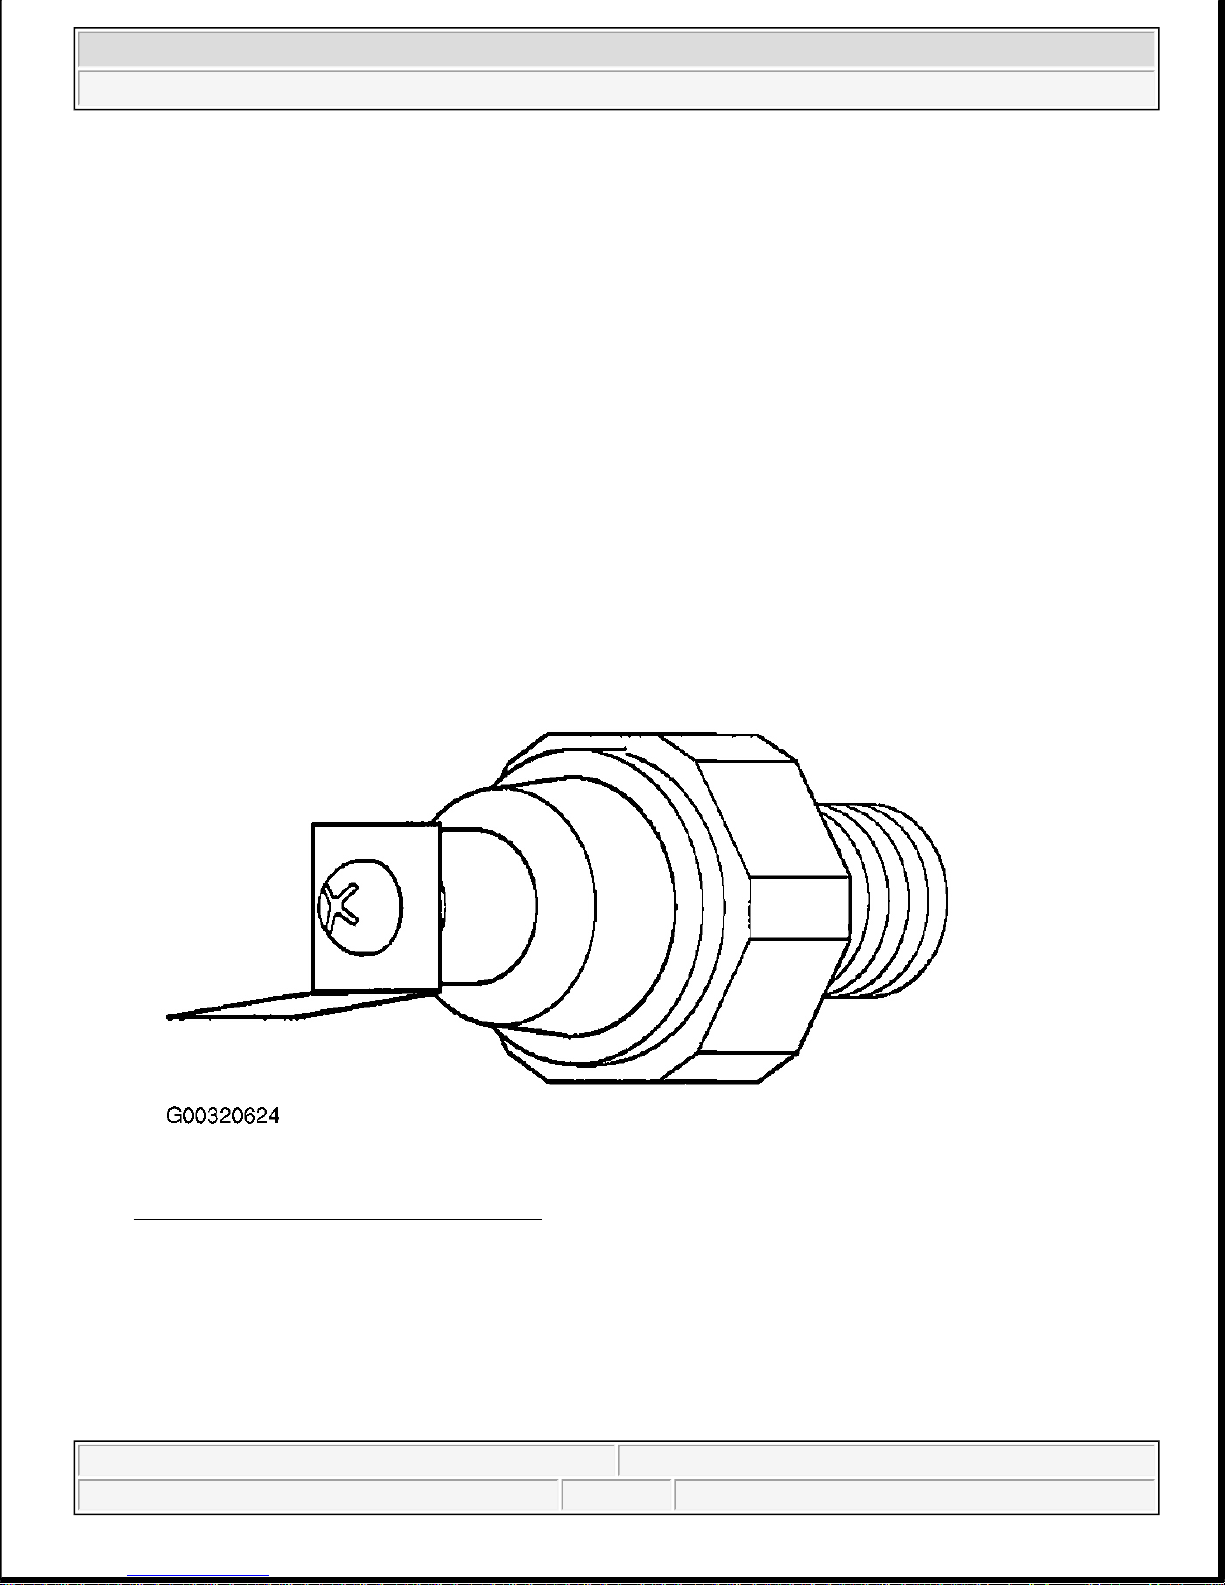
OIL PRESSURE SWITCH
1. If "OIL PRESSURE" indicating lamp lights when ignition switch is set to "ON" and goes out when
engine is started and runs at idle, then everything is in order. If "OIL PRESSURE" lamp does not light
when ignition switch is set to "ON" check switch, lamp and wiring.
2. If there is current flow when ignition switch is set to "ON" and if there is no current flow when engine is
running at idle, switch is good.
If switch is good, check lamp and wiring.
Operating pressure of oil pressure switch: 19.6 - 39.2 kPa (0.2 - 0.4 kg.cm2 , 2.84 - 5.69 psi)
Fig. 19: Illustrating Oil Pressure Switch
Courtesy of KIA MOTORS AMERICA, INC.
3. Using 24 mm deep socket, tighten the switch to the specified torque.
Tightening torque
NOTE: Do not tighten the oil pressure switch to the excessive torque.
2002 Kia Sedona EX
2002 ENGINES 3.5L V6 - Sedona
Helpmelearn
June-06-08 8:54:29 AM Page 19 © 2005 Mitchell Repair Information Company, LLC.
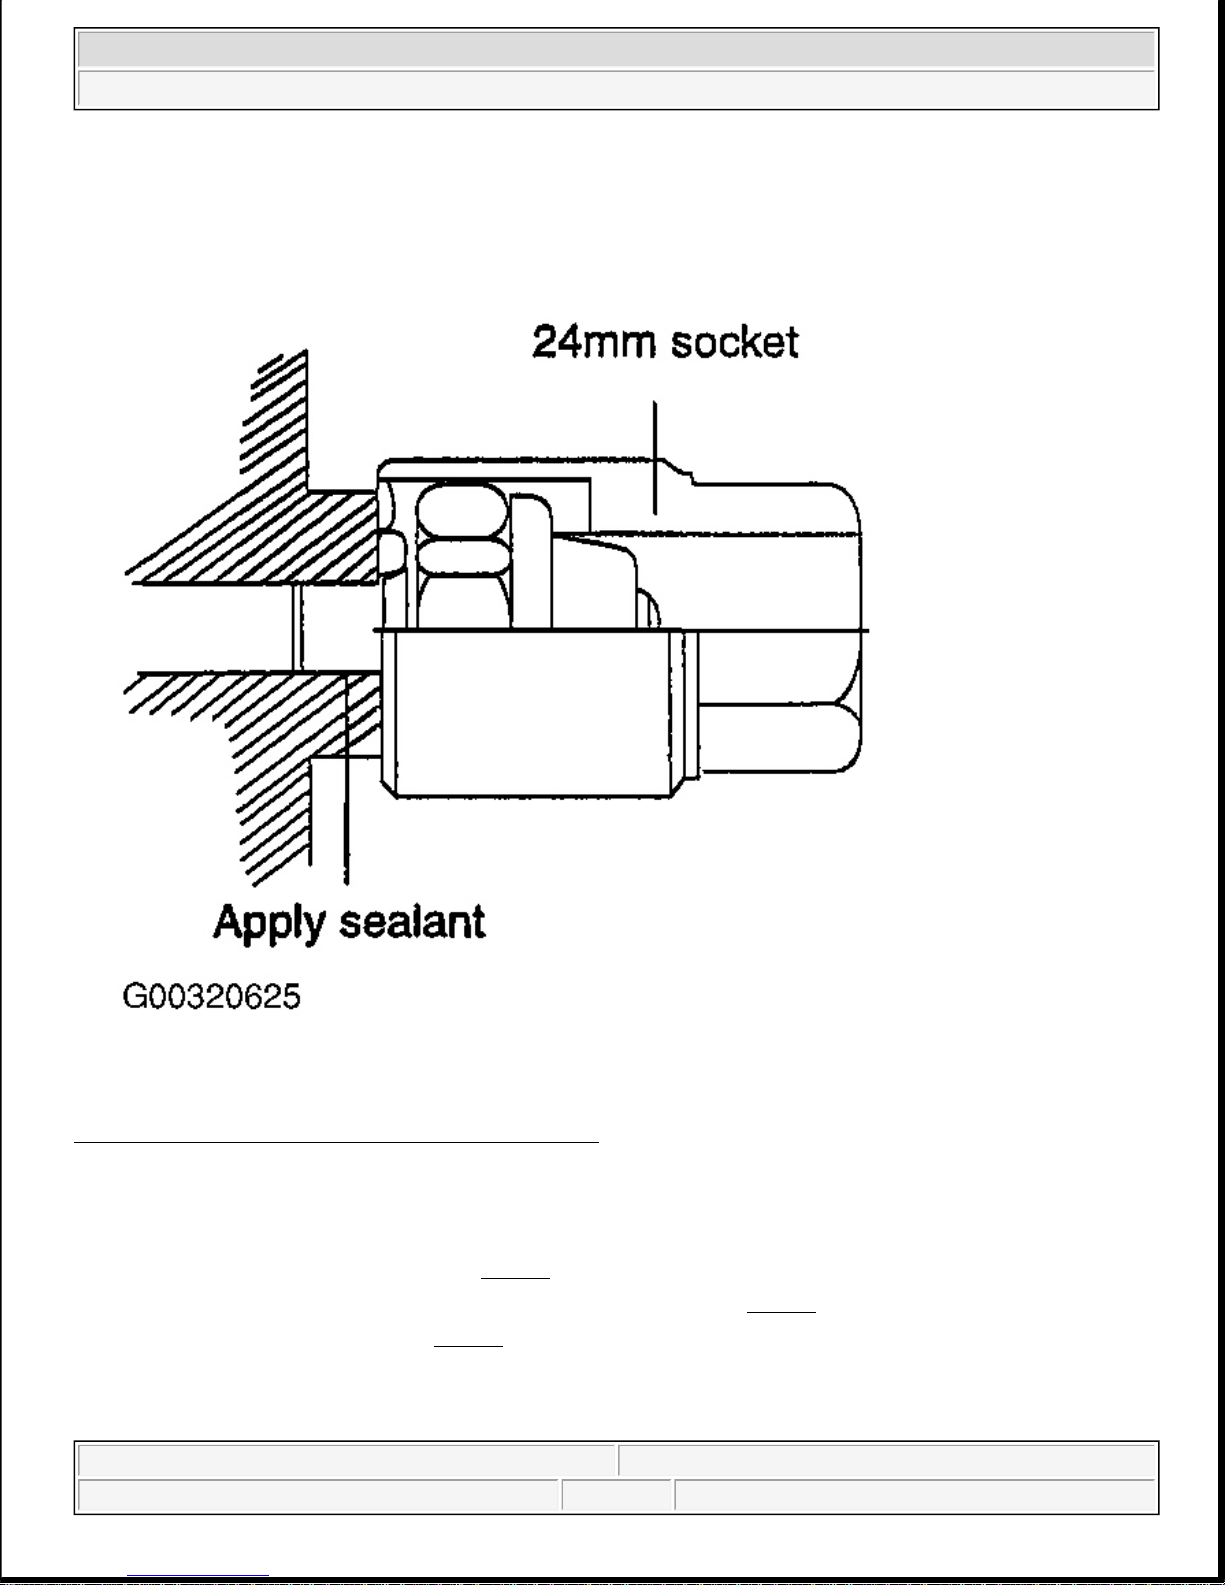
Oil pressure switch and sensor assembly: 8-12 N.m (80~120 kg.cm, 5.91-8.85 lb.ft)
Fig. 20: Removing & Installing Oil Pressure Switch
Courtesy of KIA MOTORS AMERICA, INC.
DRIVE BELT ROUTING
1. For power steering belt routing, see Fig. 21
.
2. For air conditioning compressor and alternator belt routing, see Fig. 22 .
3. For combined belt routing, see Fig. 23 .
2002 Kia Sedona EX
2002 ENGINES 3.5L V6 - Sedona
Helpmelearn
June-06-08 8:54:29 AM Page 20 © 2005 Mitchell Repair Information Company, LLC.
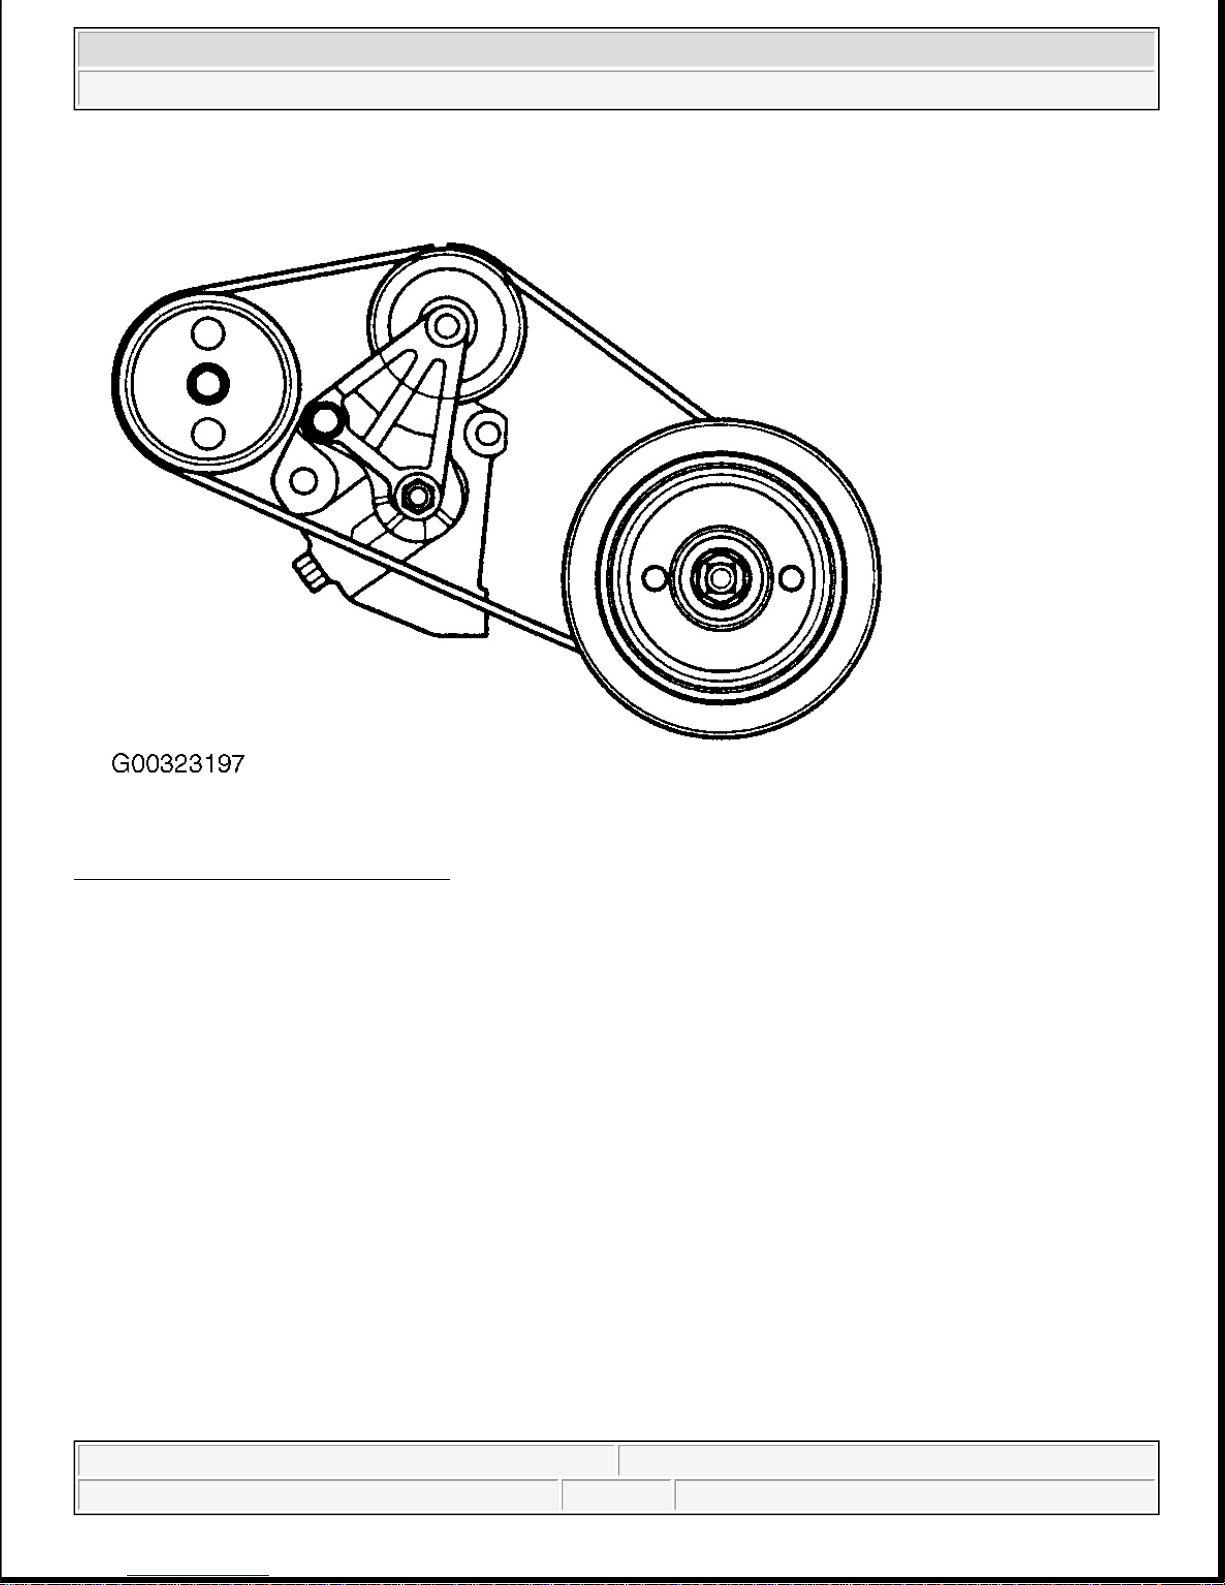
Fig. 21: Power Steering Belt Routing
Courtesy of KIA MOTORS AMERICA, INC.
2002 Kia Sedona EX
2002 ENGINES 3.5L V6 - Sedona
Helpmelearn
June-06-08 8:54:29 AM Page 21 © 2005 Mitchell Repair Information Company, LLC.
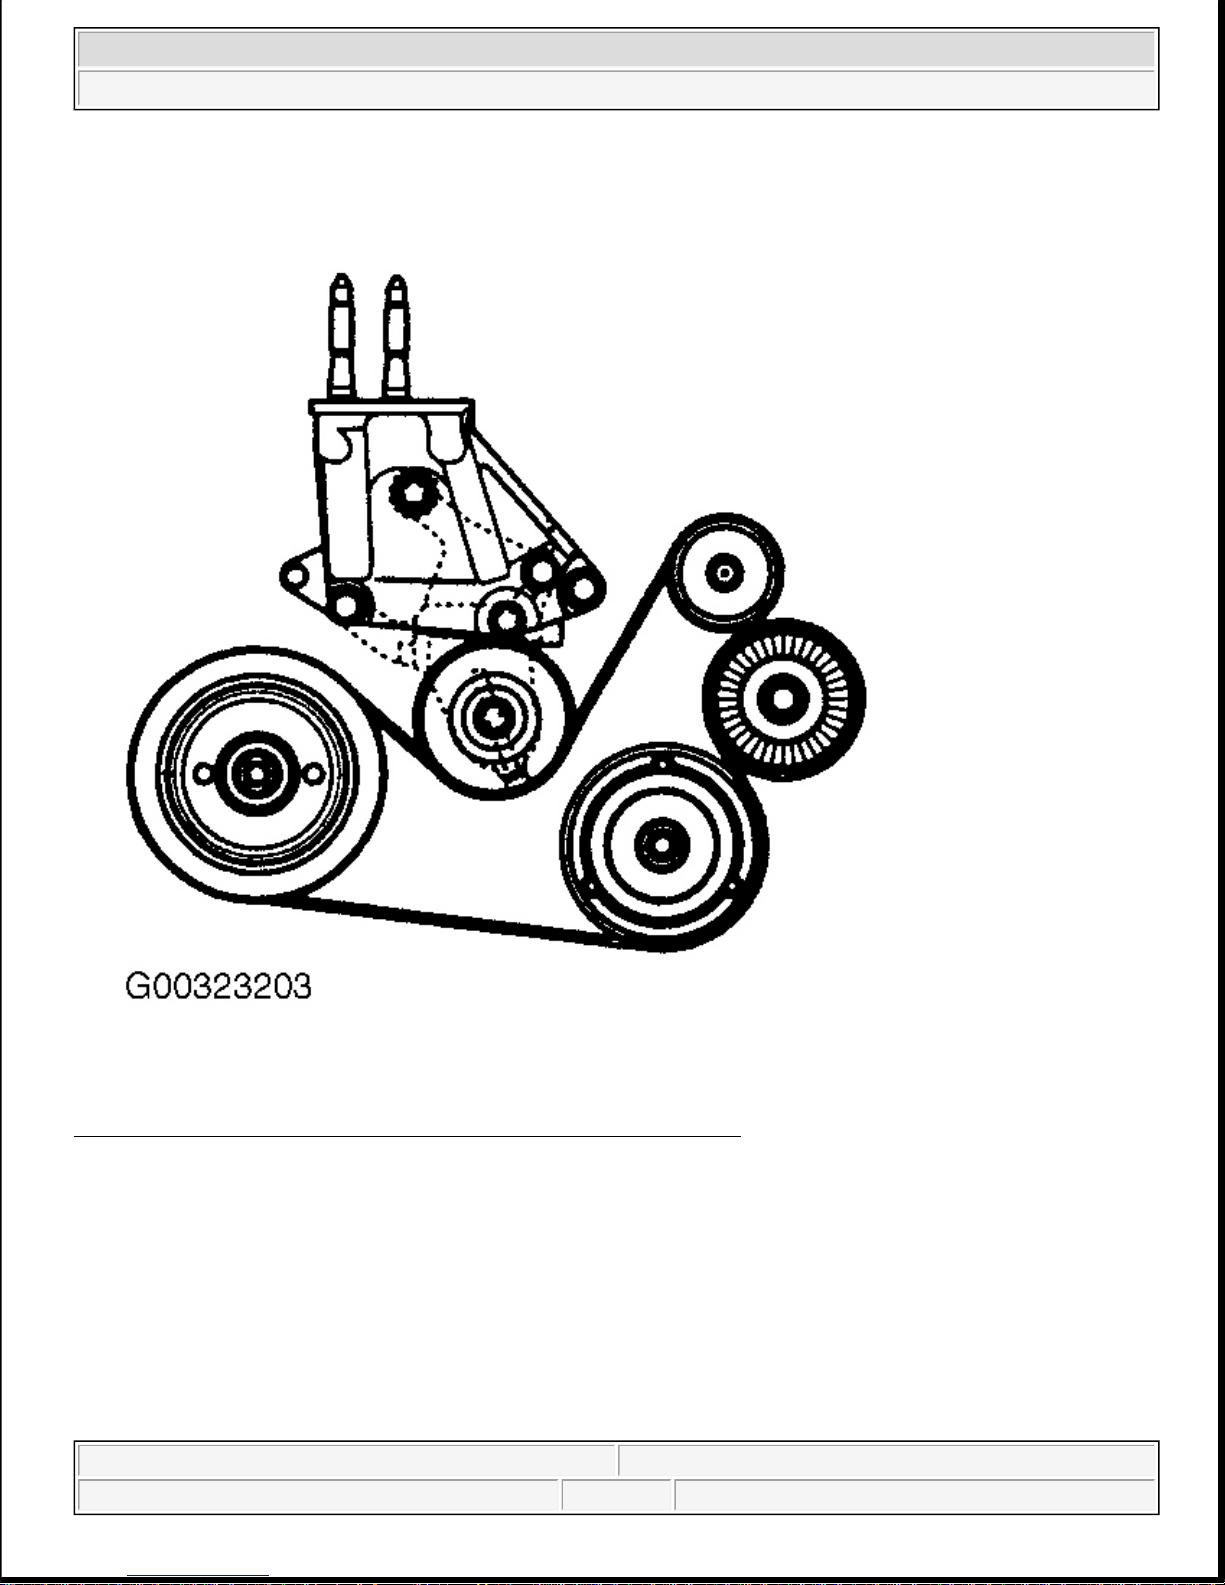
Fig. 22: Air Conditioning Compressor & Alternator Belt Routing
Courtesy of KIA MOTORS AMERICA, INC.
2002 Kia Sedona EX
2002 ENGINES 3.5L V6 - Sedona
Helpmelearn
June-06-08 8:54:29 AM Page 22 © 2005 Mitchell Repair Information Company, LLC.
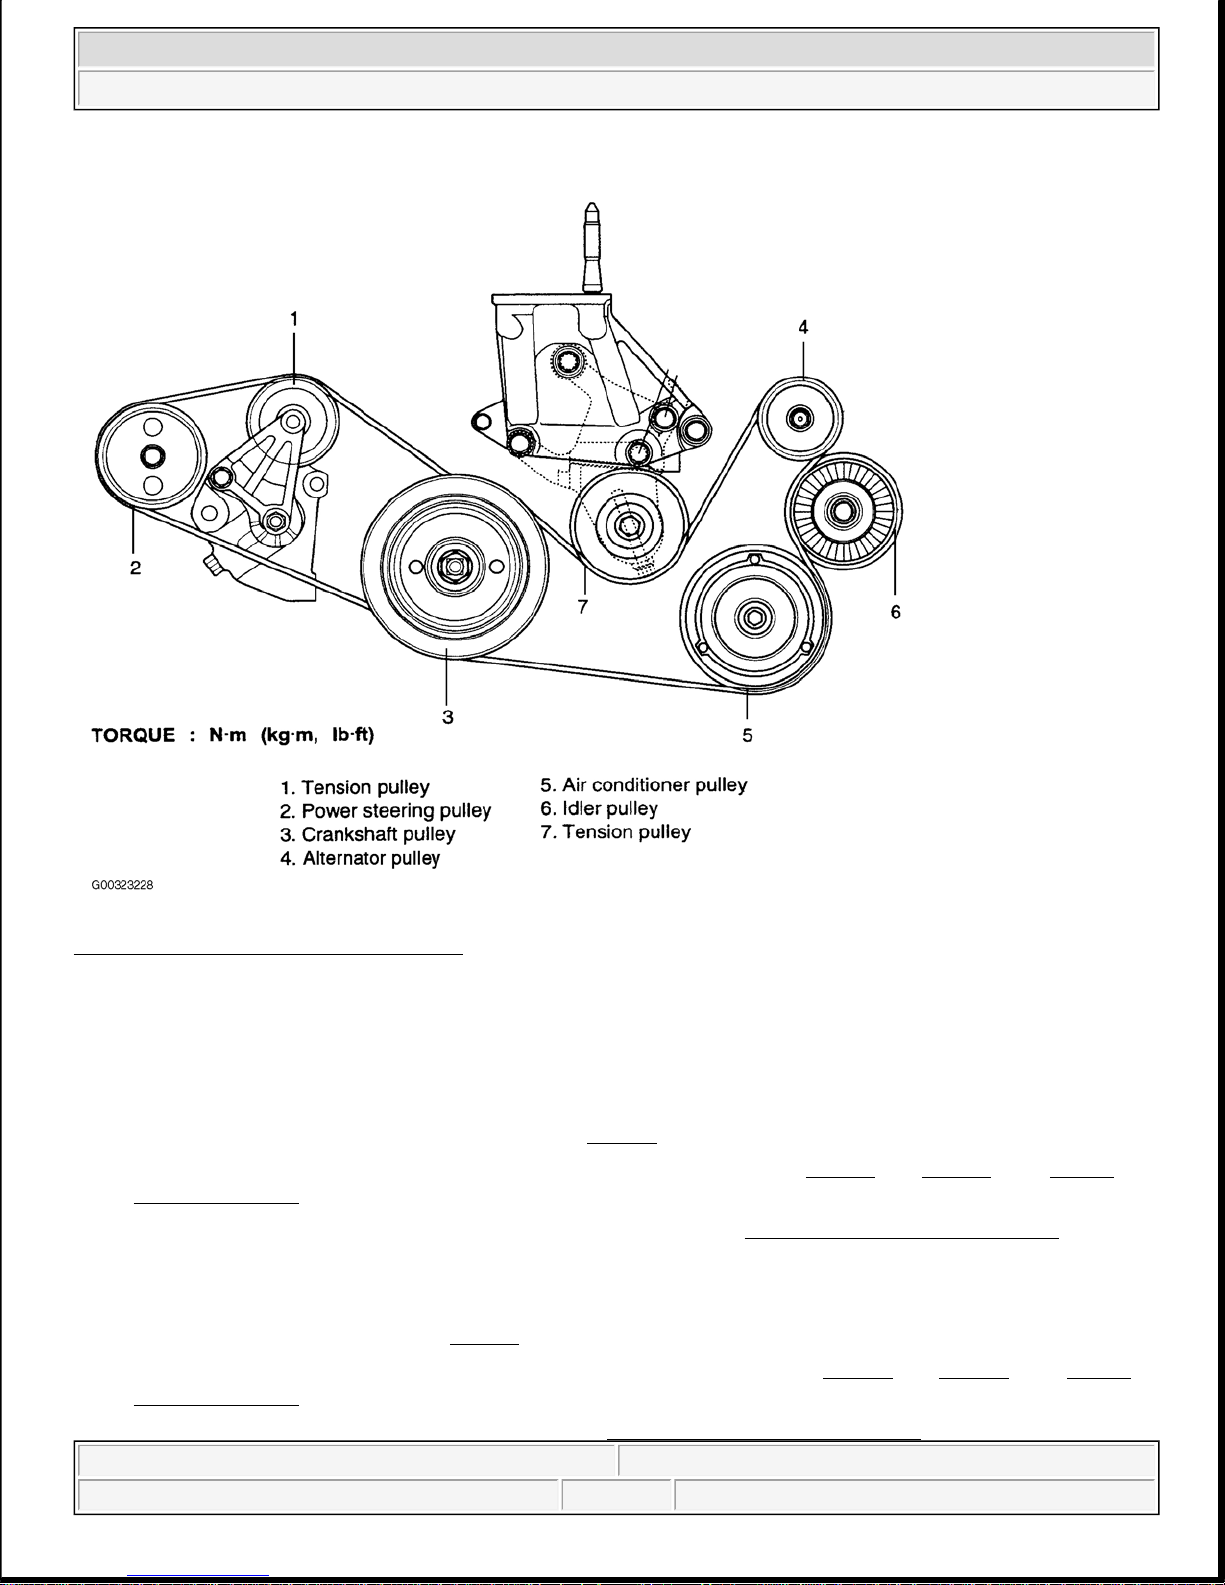
Fig. 23: Combined Drive Belt Routing
Courtesy of KIA MOTORS AMERICA, INC.
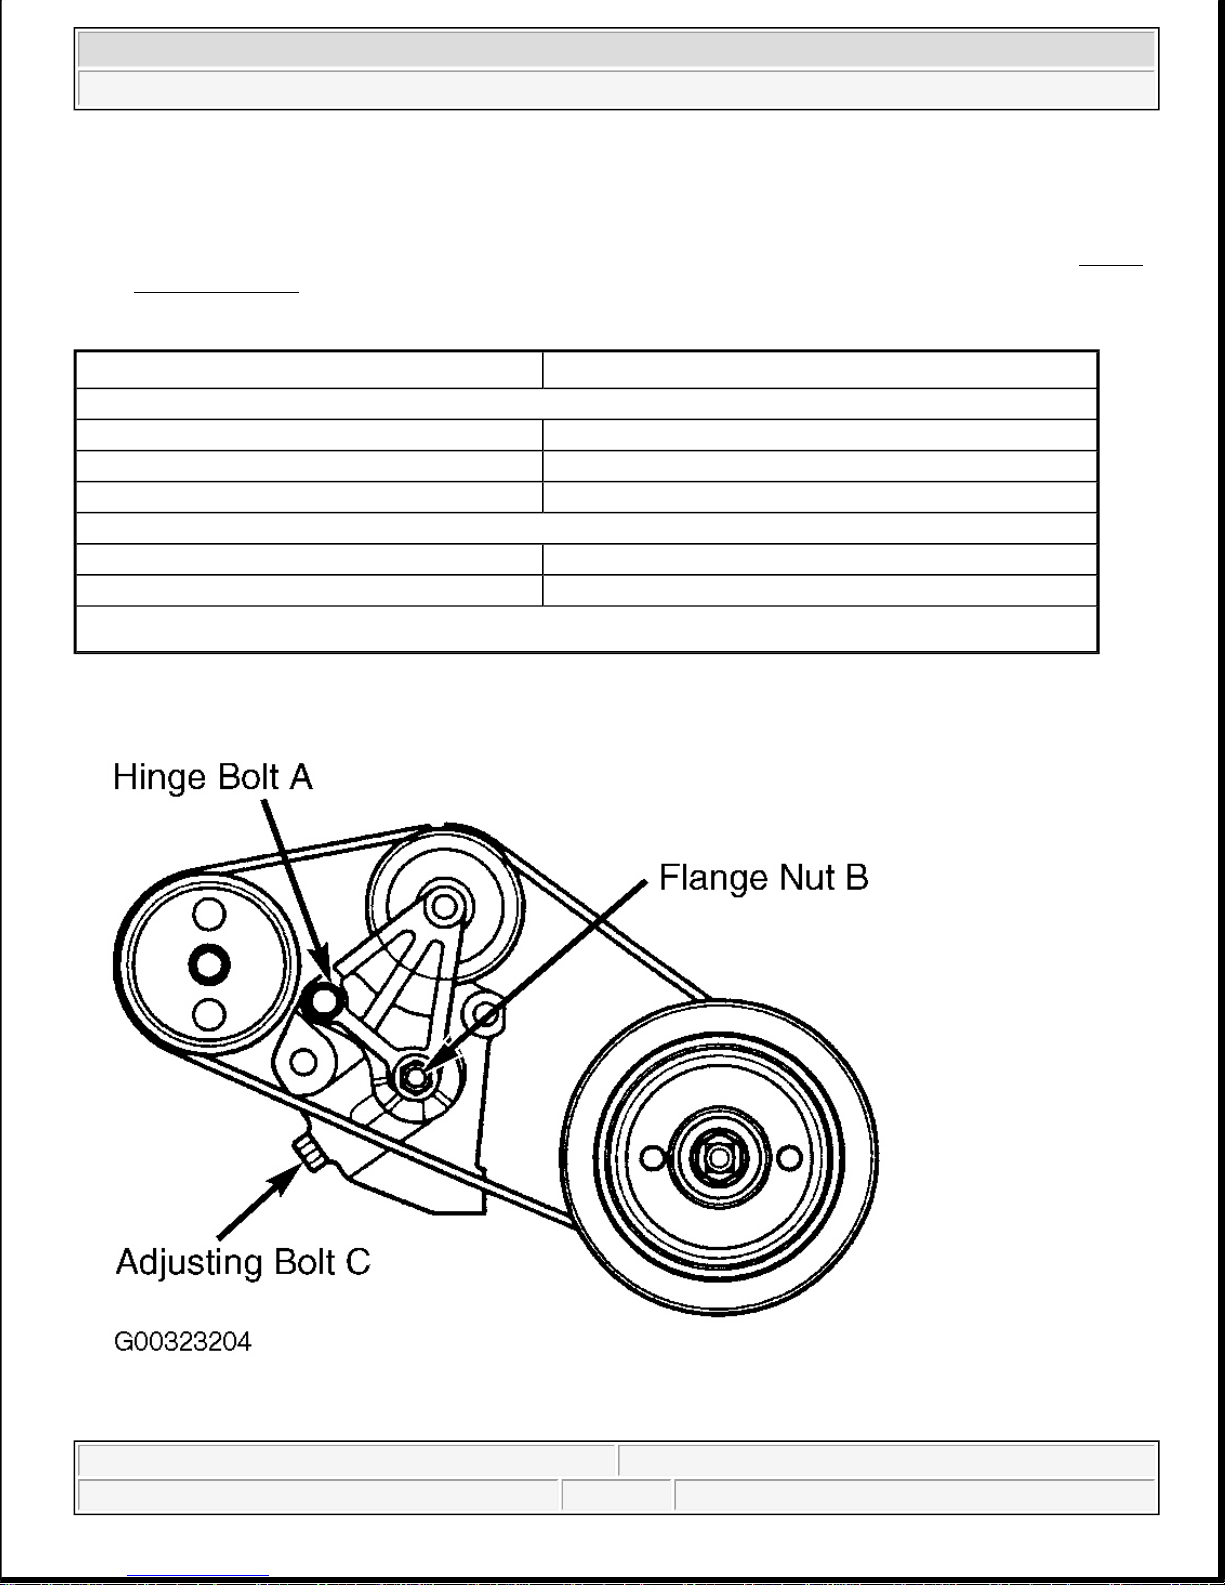
DRIVE BELT ADJUSTMENT
Power Steering
1. Loosen hinge bolt "A" and flange nut "B". See Fig. 24 .
2. Turn adjusting bolt "C" to set belt tension to specified deflection. See Fig. 24
and Fig. 25 . See BELT
ADJUSTMENT table.
3. Tighten hinge bolt "A" and flange nut "B" to specification. See TORQUE SPECIFICATIONS
table.
Alternator & Air Conditioning Compressor
1. Loosen pulley lock nut "A". See Fig. 26 .
2. Turn adjustment bolt "B" to set belt tension to specified deflection. See Fig. 26
and Fig. 27 . See BELT
ADJUSTMENT table.
3. Ti
g
hten pulley lock nut "A" to specification. See TORQUE SPECIFICATIONS table.
2002 Kia Sedona EX
2002 ENGINES 3.5L V6 - Sedona
Helpmelearn
June-06-08 8:54:29 AM Page 23 © 2005 Mitchell Repair Information Company, LLC.
4. Start engine and turn A/C on.
5. Allow vehicle to run until normal operating temperature is reached.
6. Turn engine off, recheck belt deflection after operation and readjust belt tension as necessary. See BELT
ADJUSTMENT table.
BELT ADJUSTMENT
Application
(1)
Deflection - In. (mm)
Alternator & Air Conditioning Compressor
New Belt Deflection .20-.22 (5-5.5)
Used Belt Deflection .24-.28 (6-7)
After Operation .31 (8)
Power Steering
New Belt Deflection .35-.43 (9-11)
Used Belt Deflection .47-.59 (12-15)
(1)
Deflection is measured at the contact point with 22 lbs. (10 kg) of deflection force.
2002 Kia Sedona EX
2002 ENGINES 3.5L V6 - Sedona
Helpmelearn
June-06-08 8:54:29 AM Page 24 © 2005 Mitchell Repair Information Company, LLC.
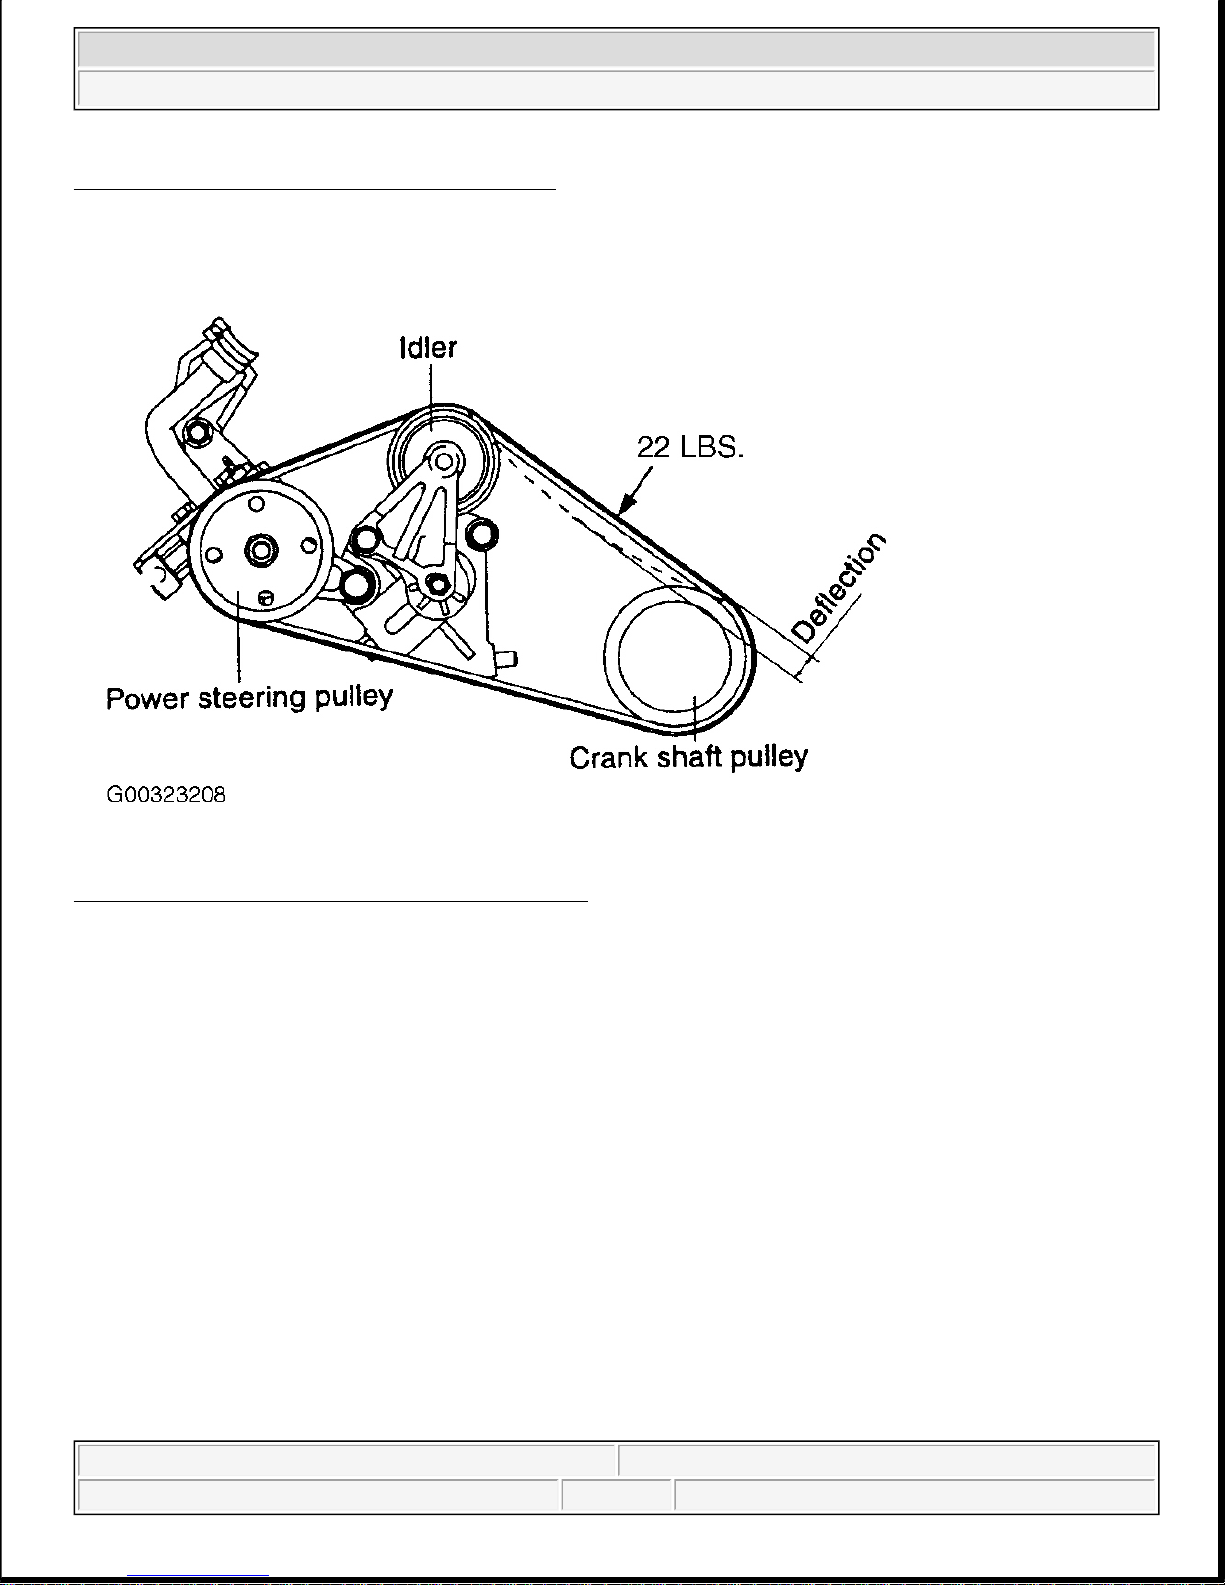
Fig. 24: Adjusting Power Steering Belt Tension
Courtesy of KIA MOTORS AMERICA, INC.
Fig. 25: Measuring Power Steering Belt Deflection
Courtesy of KIA MOTORS AMERICA, INC.
2002 Kia Sedona EX
2002 ENGINES 3.5L V6 - Sedona
Helpmelearn
June-06-08 8:54:29 AM Page 25 © 2005 Mitchell Repair Information Company, LLC.
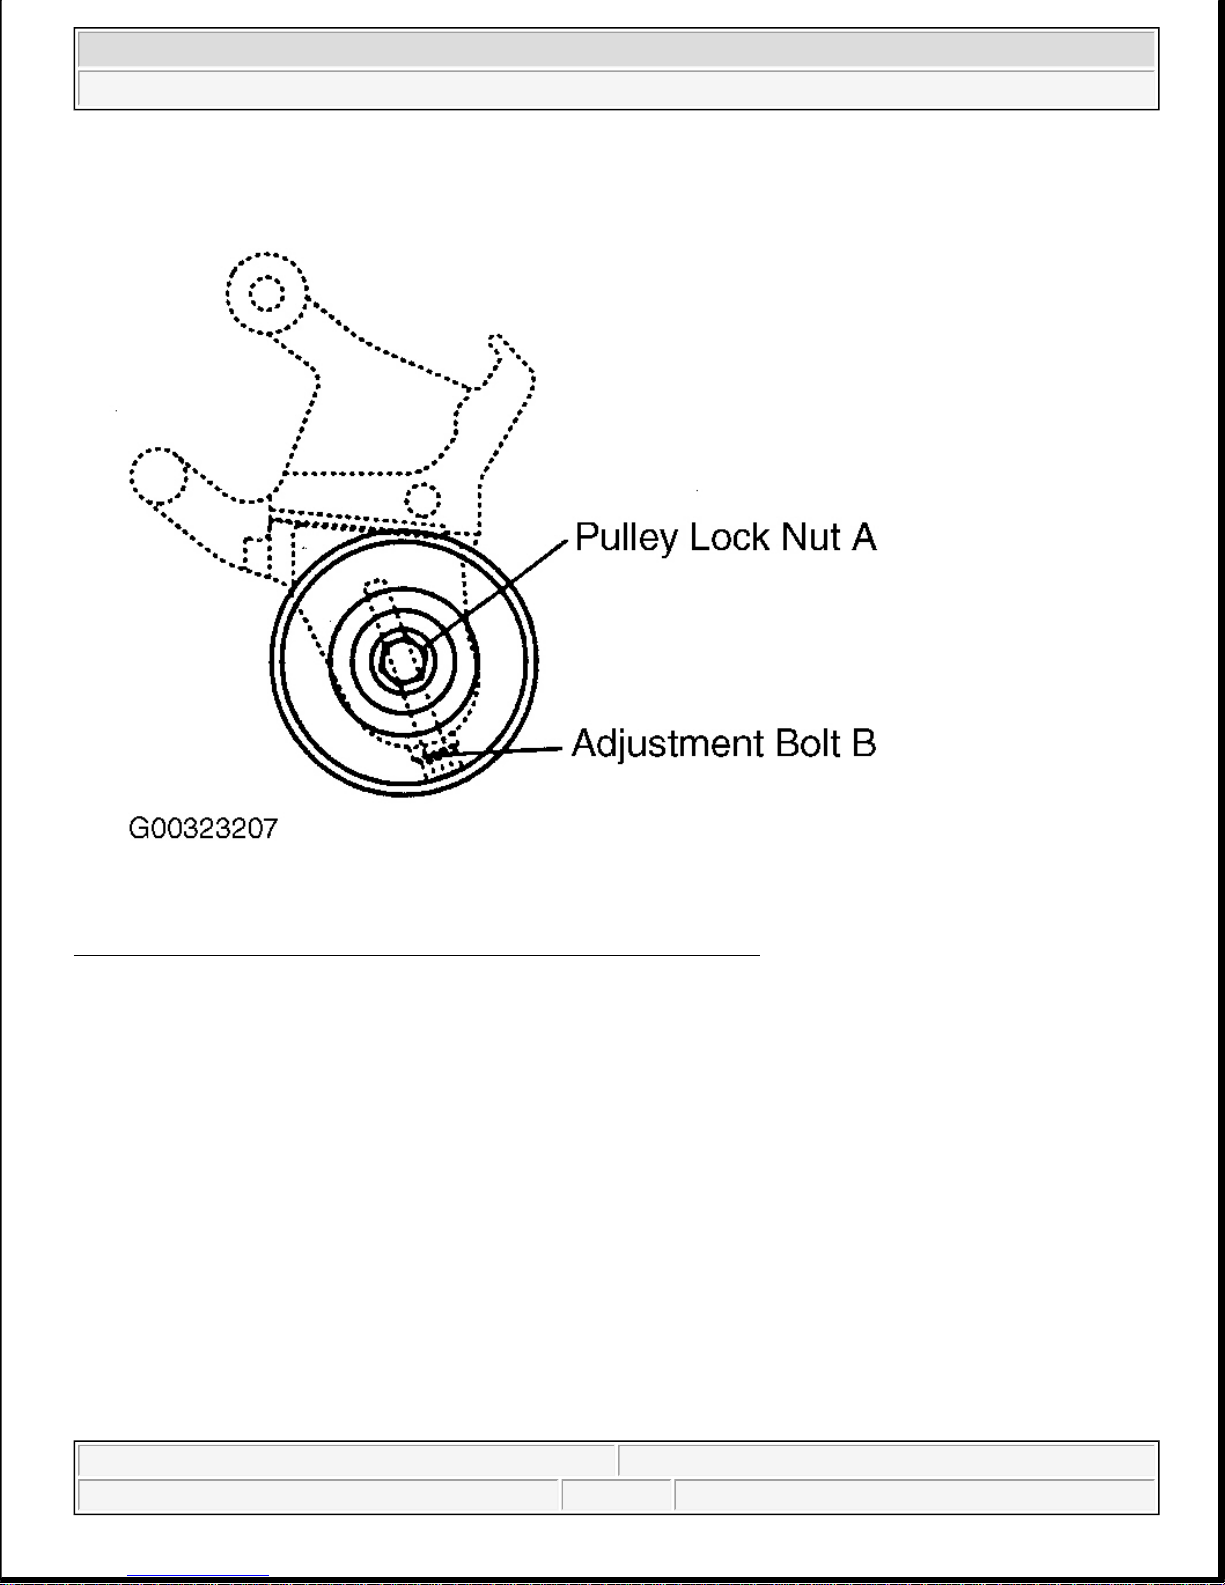
Fig. 26: Adjusting Alternator & Air Conditioning Compressor Belt
Courtesy of KIA MOTORS AMERICA, INC.
2002 Kia Sedona EX
2002 ENGINES 3.5L V6 - Sedona
Helpmelearn
June-06-08 8:54:29 AM Page 26 © 2005 Mitchell Repair Information Company, LLC.
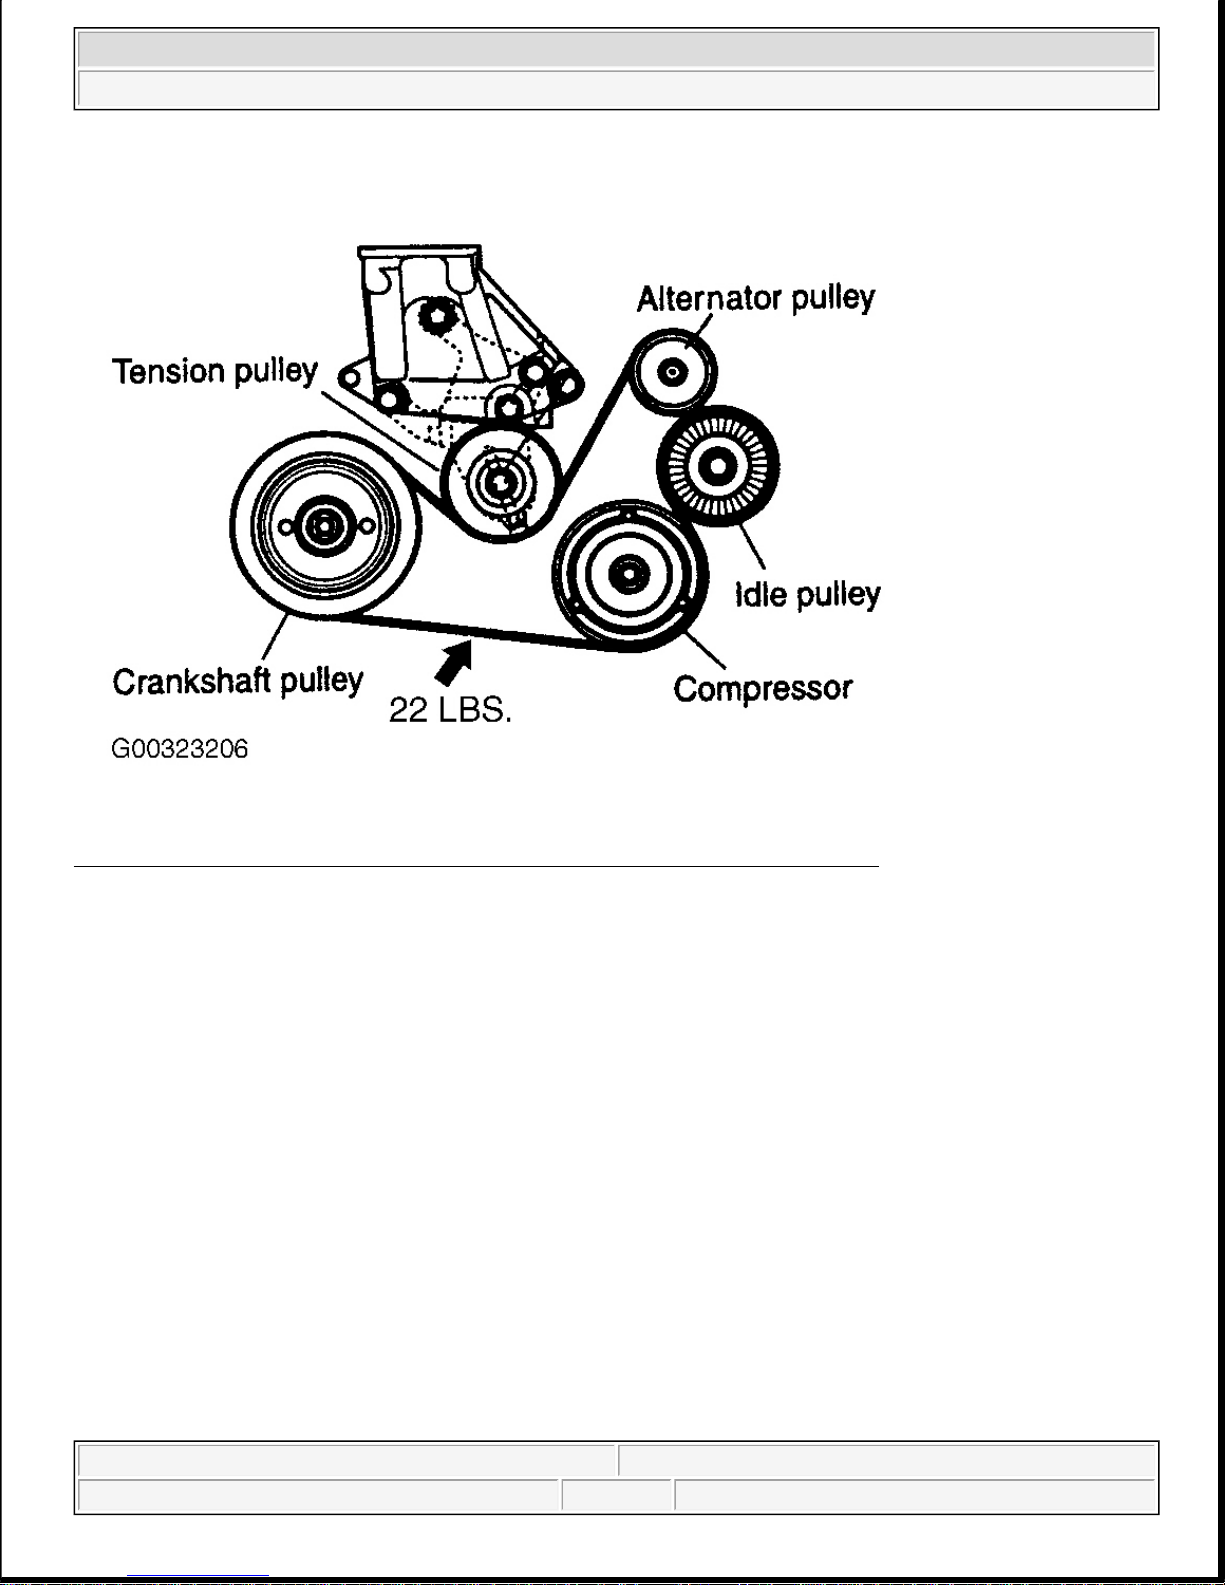
Fig. 27: Measuring Alternator & Air Conditioning Compressor Belt Deflection
Courtesy of KIA MOTORS AMERICA, INC.
COOLANT LEAK CHECK
1. Loosen the radiator cap.
2. Confirm that the coolant level is up to the filler neck.
3. Install a radiator cap tester to the radiator filler neck and apply 22 lbs. of pressure. Hold for two minutes
in that condition, while checkin
g
, hose connections.
2002 Kia Sedona EX
2002 ENGINES 3.5L V6 - Sedona
Helpmelearn
June-06-08 8:54:29 AM Page 27 © 2005 Mitchell Repair Information Company, LLC.
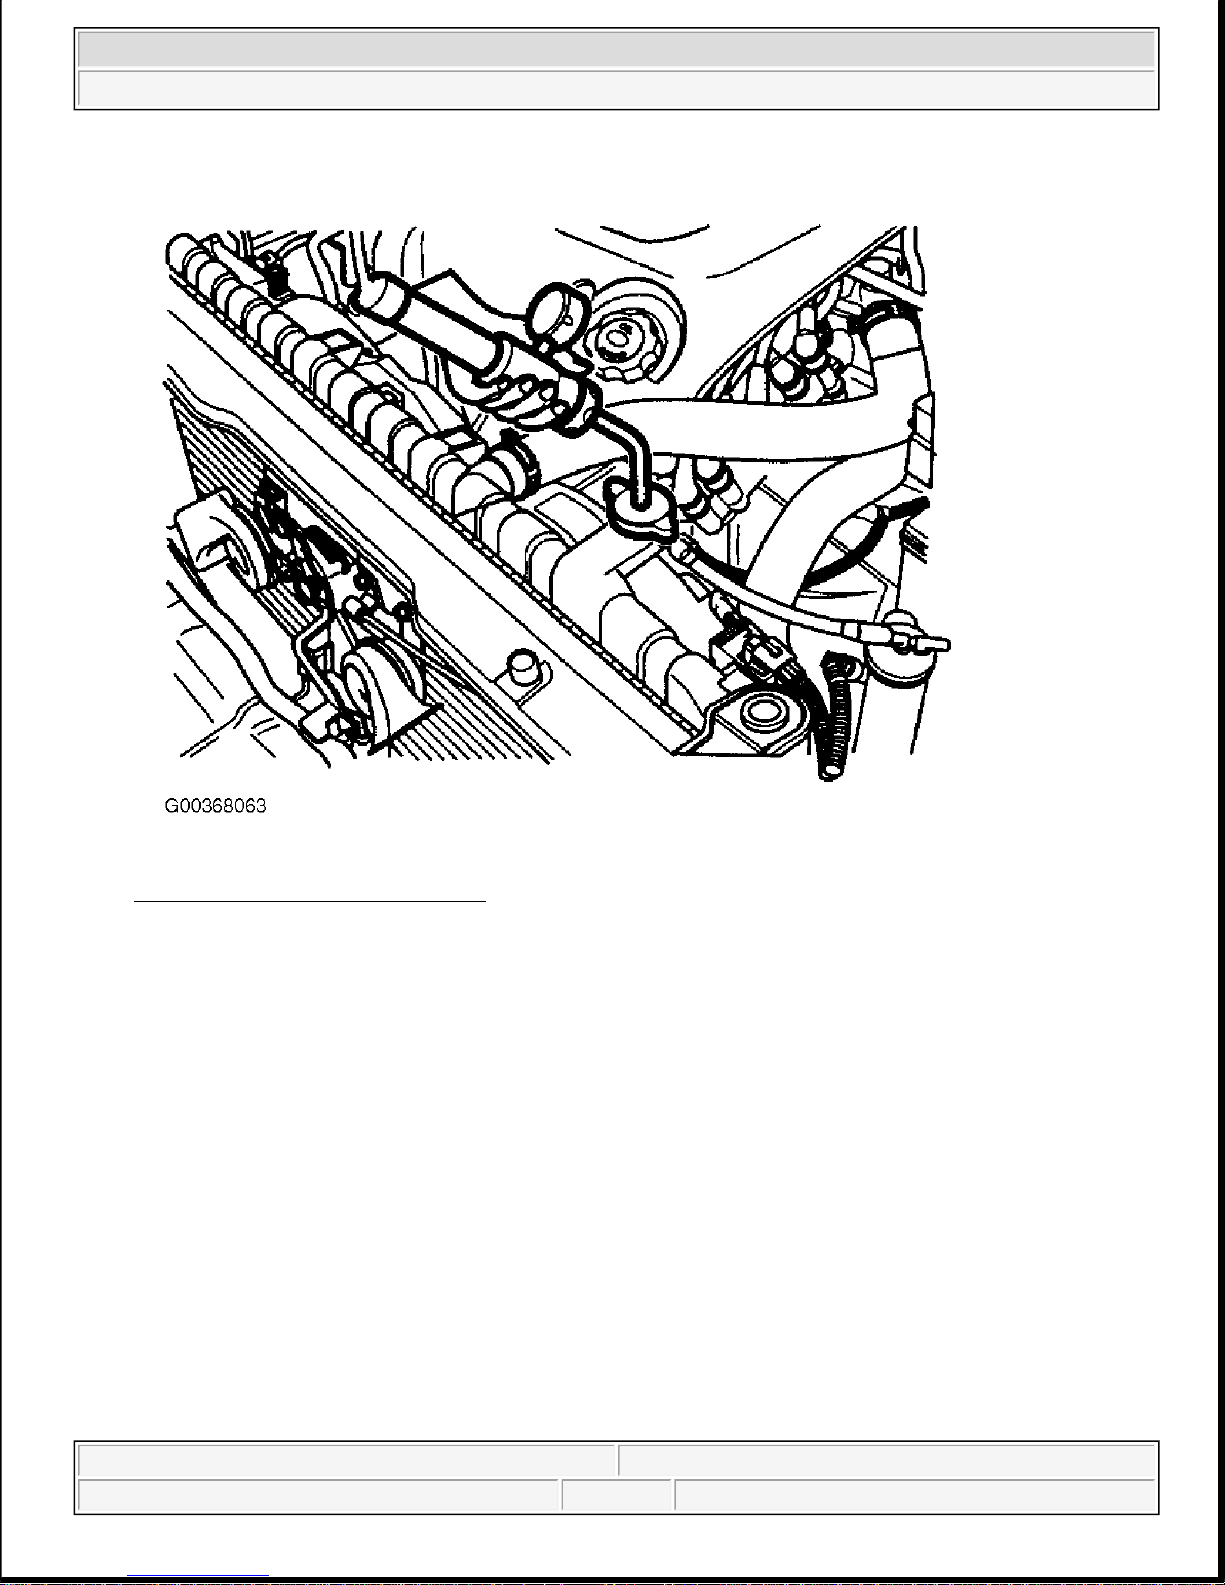
Fig. 28: Pressure Testing Radiator
Courtesy of KIA MOTORS AMERICA, INC.
4. If there is any leakage, repair or replace the appropriate part.
RADIATOR CAP PRESSURE TEST
1. Use an adapter to attack the cap to tester.
CAUTION:
z Radiator coolant may be extremely hot. Do not open the system
while hot, or scalding. Engine coolant could spray out causing
personal injury. Allow the vehicle to cool before servicing this
system.
z Be sure to completely clean away any moisture from the places
checked.
z When the tester is removed, be careful not to spill any coolant
from tester.
z Be careful, when installing and removing the tester and when
testing, not to deform the filler neck of the radiator.
2002 Kia Sedona EX
2002 ENGINES 3.5L V6 - Sedona
Helpmelearn
June-06-08 8:54:29 AM Page 28 © 2005 Mitchell Repair Information Company, LLC.
Fig. 29: Testing Radiator Cap
Courtesy of KIA MOTORS AMERICA, INC.
2. Increase the pressure until the gauge indicator stops moving.
z Main valve opening pressure: 14-18 psi (86-125 kPa).
z Main valve closing pressure: 12 psi (83 kPa)
3. Check that the pressure level is maintained at or above the limit.
4. Replace that radiator cap if the reading does not remain at or above the limit.
SPECIFIC GRAVITY TEST
1. Measure the specific gravity of the coolant with a hydrometer.
2. Measure the coolant temperature, and calculate the concentration from the relation between the specific
g
ravity and temperature, using the following table for reference.
NOTE: Be sure that the cap is clean before testing, since rust or other foreign
material on the cap seal will cause an improper reading.
2002 Kia Sedona EX
2002 ENGINES 3.5L V6 - Sedona
Helpmelearn
June-06-08 8:54:29 AM Page 29 © 2005 Mitchell Repair Information Company, LLC.
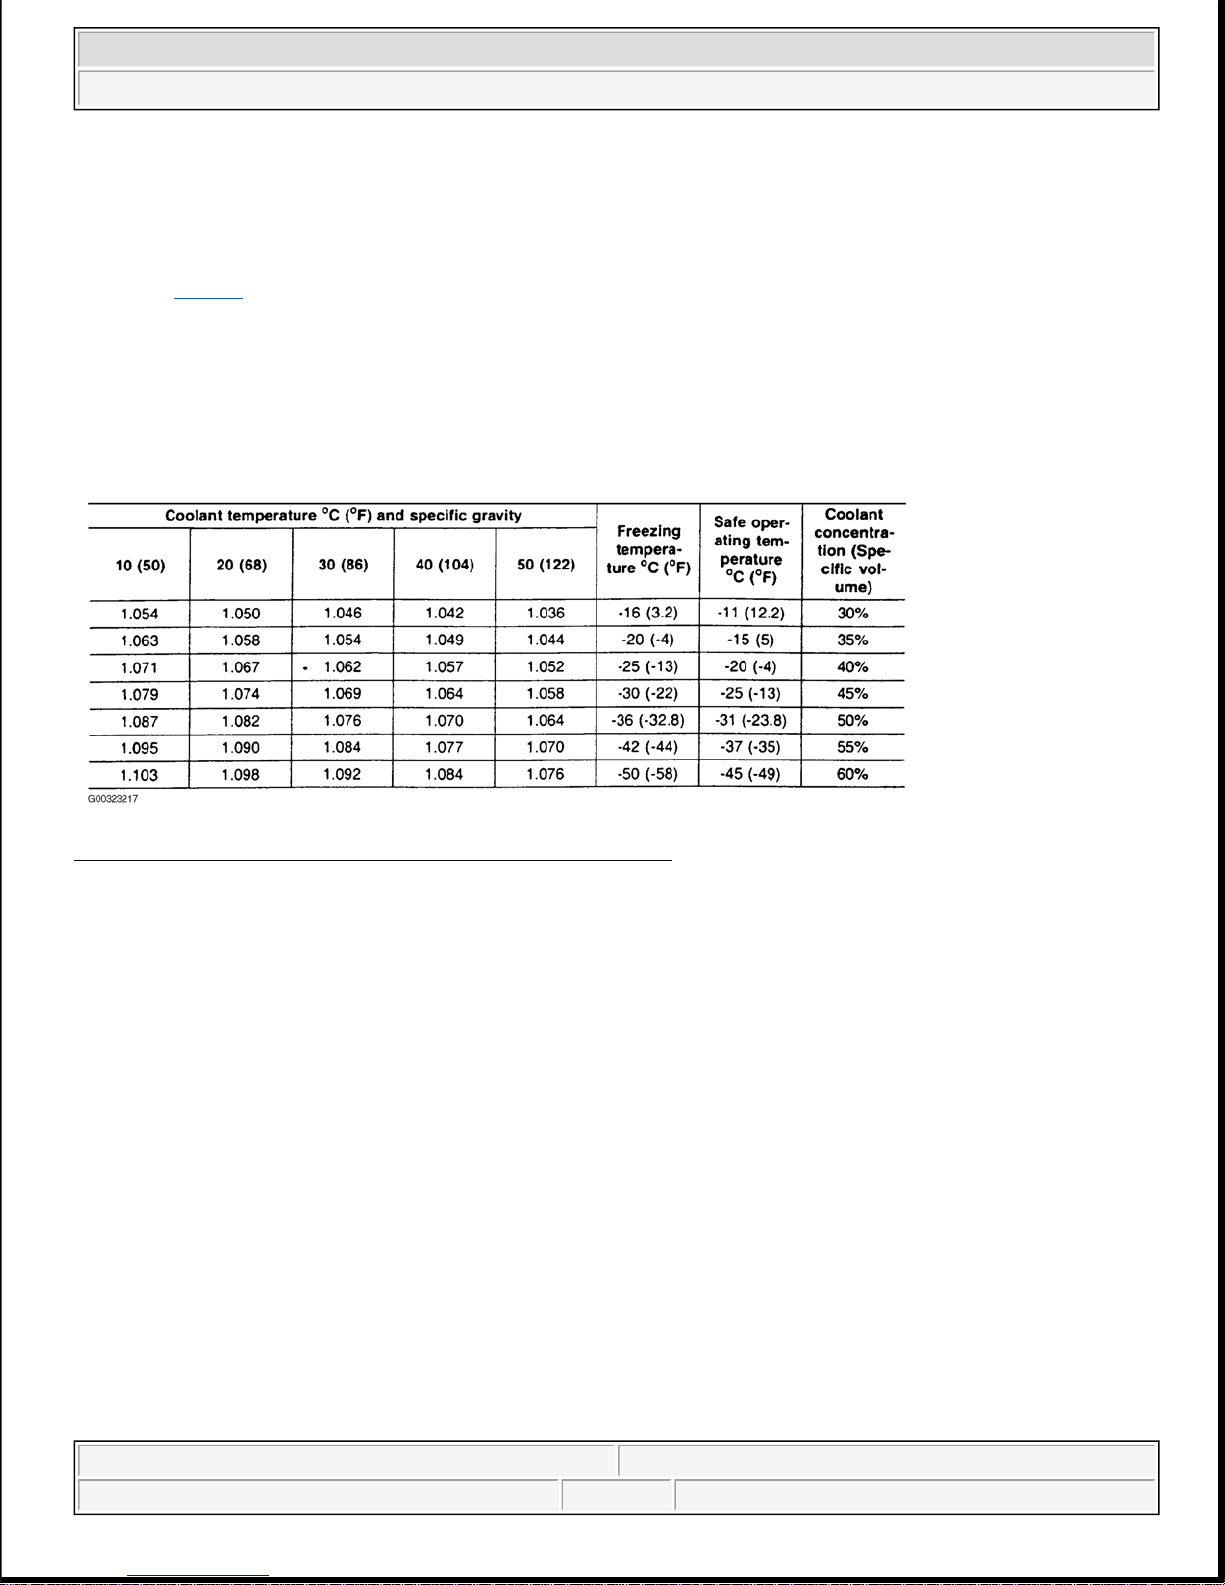
COOLING SYSTEM SPECIFICATIONS
The coolant concentration can be calculated by measuring coolant temperature and specific gravity. After
coolant temperature and specific gravity is obtained, a concentration can be calculated using the following
chart. See Fig. 30 . If the concentration of coolant is below 30 percent, the anti-corrosion property will be
adversely affected. If the concentration is above 60 percent, both the antifreeze and engine cooling properties
will decrease and may adversely affect the engine.
Fig. 30: Testing Coolant Concentration & Specific Gravity
Courtesy of KIA MOTORS AMERICA, INC.
ENGINE MOUNTING
ENGINE MOUNTS
NOTE: Recommended coolant concentration is 40-50 percent, using only ethylene
glycol for aluminum type coolant.
2002 Kia Sedona EX
2002 ENGINES 3.5L V6 - Sedona
Helpmelearn
June-06-08 8:54:29 AM Page 30 © 2005 Mitchell Repair Information Company, LLC.
 Loading...