

Page 1
®
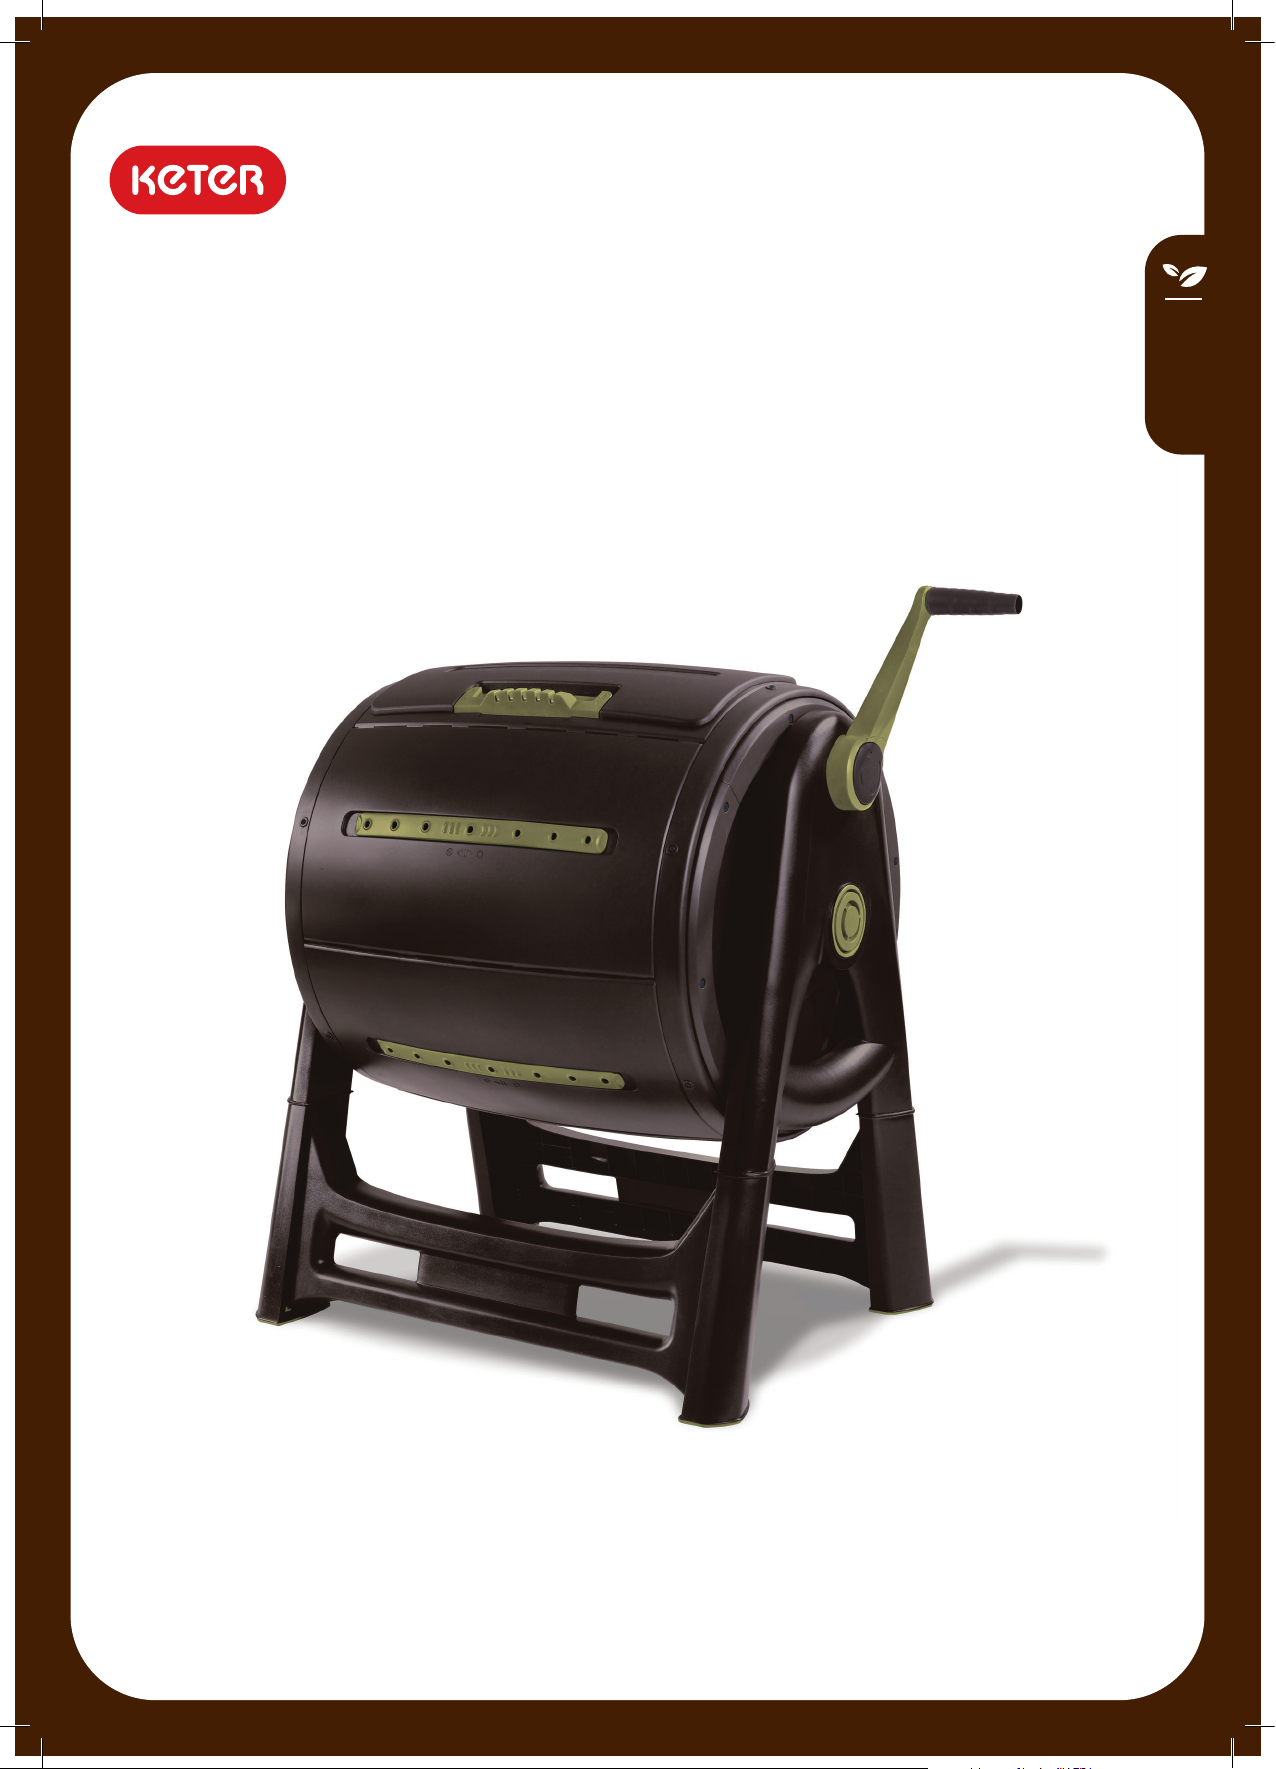
Dynamic Turn & Go Composter
Assembly Manual | Detailed Product Features | Composting Instructions
Manual de armado | Características detalladas del producto |
Instrucciones sobre el compost
KETER.CO M
Page 2

EN
TABLE OF CONTENTS
General Instructions
Assembly Instructions
Compost Mixer features
Composting Essentials (EN)
Composting with COMPOST MIXER (EN)
Composting Essentials (ES)
Making compost with COMPOST MIXER (ES)
ES
TABLA DE CONTENIDOS
Instrucciones generales
Instrucciones para el montaje
Características de la MEZCLADORA DE COMPOST
Puntos esenciales del compostaje (EN)
Preparación de compost con la MEZCLADORA DE COMPOST (EN)
3-4
5-23
24-25
26-27
28-32
34-35
36-40
3-4
5-23
24-25
26-27
28-32
Puntos esenciales del compostaje (ES)
Preparación de compost con la MEZCLADORA DE COMPOST (ES)
EN
FOR ANY ASSISTANCE PLEASE CONTACT OUR CUSTOMER SERVICE:
SP
PARA RECIBIR ASISTENCIA, CONTACTE A NUESTRO SERVICIO DE ATENCIÓN AL CLIENTE:
U.S.A
Keter North America, 11495 North Pennsylvania St. Suite 110, Carmel, Indiana 46032,
Tel: 1-888-374-4262
CANADA
ISRAEL
EUROPE
Accent Home Products 1-800-661-6721
Keter Plastic Ltd. 2 Sapir St. industrial area, Herzliya 46852, Israel, Tel: 972-9-9591212
Keter Europe Gardening, Ericssonstraat 17, Postbus 224,5120 AE RIJEN, the Netherlands
Tel: 31-161-228301
UK
Keter UK Ltd. Unit 4, Woodgate Business Park, Clapgate Lane, Birmingham B32 3DB,
Tel 44-121-506-0008
GERMANY
Test Rite International (Germany) GMBH. Merkurring 82,22143 Hamburg, Tel: 49-40-606870-0
34-35
36-40
1
Page 3

IMPORTANT | IMPORTANTE
EN
You must read these instructions carefully before you start to assemble the Compost Mixer. The steps must be
followed as they are laid out in the instructions. Keep these instructions in a safe place for future reference.
ES
Debe leer estas instrucciones detenidamente antes de comenzar el montaje de la Mezcladora de Compost. Siga
los pasos en el orden establecido en estas instrucciones. Guarde estas instrucciones en un lugar seguro para futuras
referencias.
SAFETY ADVICE | RECOMENDACIONES DE SEGURIDAD
EN
Before beginning assembly, identify and inventory all parts using the parts lists and identifiers in this document.
Proper and complete assembly, use and supervision are essential for proper orientation and to reduce the risk
of accident or injury. A high probability of serious injury exists in this product is not installed, maintained, and/or
operated properly. Failure to comply with any of the warnings in this instruction manual may result in serious personal
injuries such as cuts, broken bones, nerve damage, paralysis, brain injury, or death. Failure to comply may also result
in property damage. Please heed all warnings and cautions..
ES
Antes de comenzar el montaje, identifique y clasifique todas las partes utilizando la lista de partes e
identificadores de este documento. El montaje, el uso y la supervisión adecuados y completos son necesarios para la
apropiada orientación y reducción de riesgos de accidentes o lesiones. Existe alta probabilidad de lesiones graves si el
producto no se instala, mantiene y/u opera de manera adecuada. El incumplimiento de cualquiera de las advertencias
de este manual de instrucciones puede resultar en lesiones graves tales como cortes, fracturas de huesos, daños en
nervios, parálisis, lesiones cerebrales, o muerte. El incumplimiento también puede resultar en daño a la propiedad.
Por favor, respete todas las advertencias y precauciones.
CARE & MAINTENANCE | CUIDADO Y MANTENIMIENTO
EN
When your Composter Mixer needs a clean, use a mild detergent solution and rinse with cold clean water.
DO NOT use acetone, abrasive cleaners or other special detergents to clean the Composter Mixer.
ES
Cuando sea necesario limpiar el Mezcladora de Compost, utilice un detergente suave y enjuague con agua fría.
NO utilice acetona, limpiadores abrasivos u otros detergentes especiales para limpiar el Mezcladora de Compost.
GENERAL ADVICE | RECOMENDACIONES DE SEGURIDAD
EN
Selecting a site – choose a sunny, level position for your Composter Mixer away from overhanging trees.
The component parts should be checked and laid out in an orderly way, close at hand. Position the Compost Mixer on
smooth, level ground. Its placement is important to make sure that the heavy Compost Mixer will not tip over.
ES
Escoger la ubicación – elija una zona donde el Mezcladora de Compost reciba sol, lejos de árboles que cuelguen sobre
el mismo. Las partes que lo componen deben revisarse y estar dispuestas de forma ordenada, al alcance de la mano.
Coloque la Mezcladora de Compost en una superficie suave y nivelada. Al colocarla es importante asegurarse de que la
pesada Mezcladora de Compost no se caiga.
DO NOT EXCEED MAXIMUM WEIGHT OF 65 Lbs. / 30 kg.
!
NO EXEDA EL PESO MÁXIMA DE 65 Lbs. / 30 kg.
2
Page 4
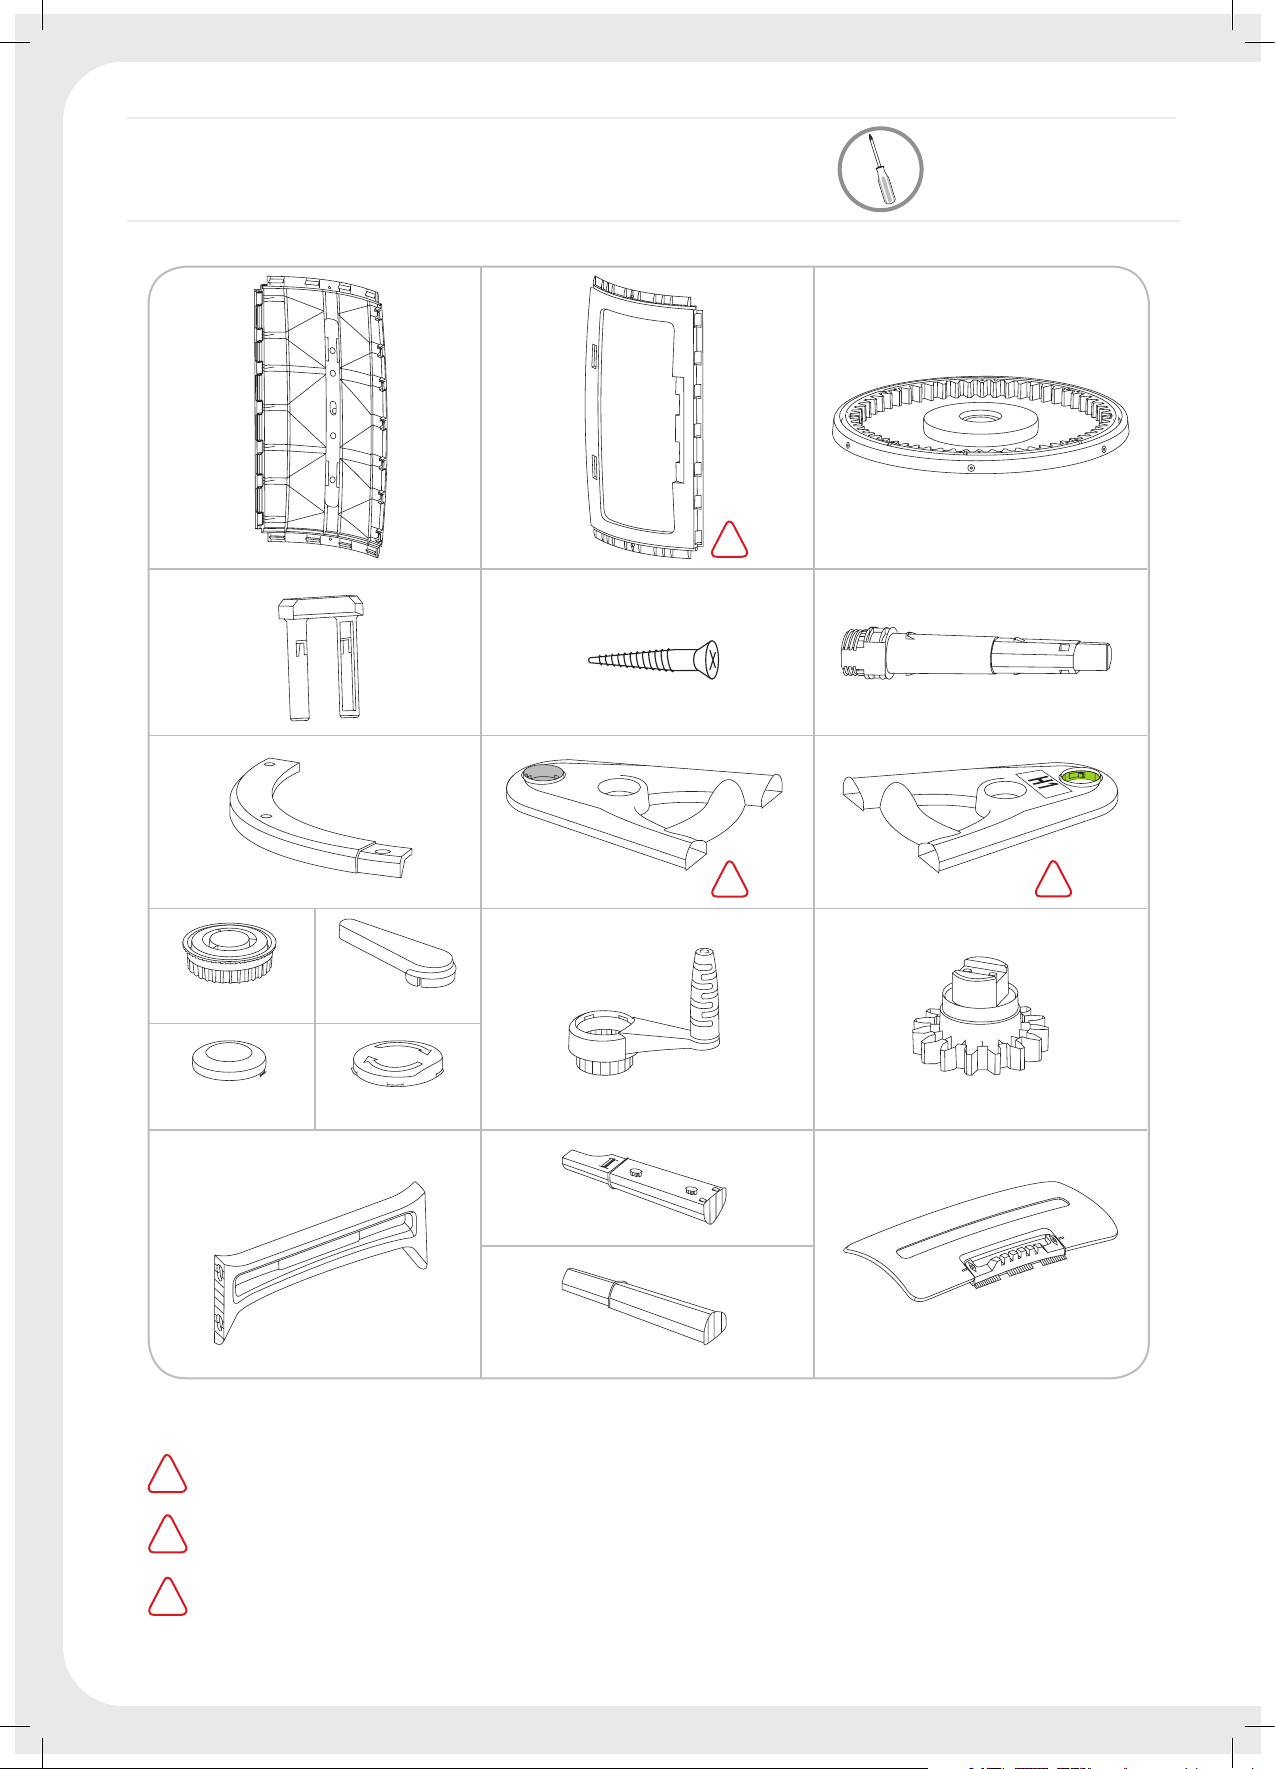
CONTENTS |
CONTENIDOS
Tool required
Herramienta necesaria
!
!!
J (Key) x 1I x 2
N x 1K x 1
!!!
C x 2B x 1A x 5
D x 2x 30F x 1
H1 x 1H x 1G x 8
L x 1M x 1
Q x 2
O x 2 P x 2
REMOVE DOOR (T) BEFORE ASSEMBLING DOOR FRAME (B) ! | RETIRAR LA PUERTA (T) ANTES DE
!
COLOCAR EL MARCO DE LA PUERTA (B)
!!
TO BE USED DURING STEP 12 | PARA UTILIZARSE EN EL PASO 12
!!!
TO BE USED DURING STEP 16 | PARA UTILIZARSE EN EL PASO 16
3
T x 1
Page 5
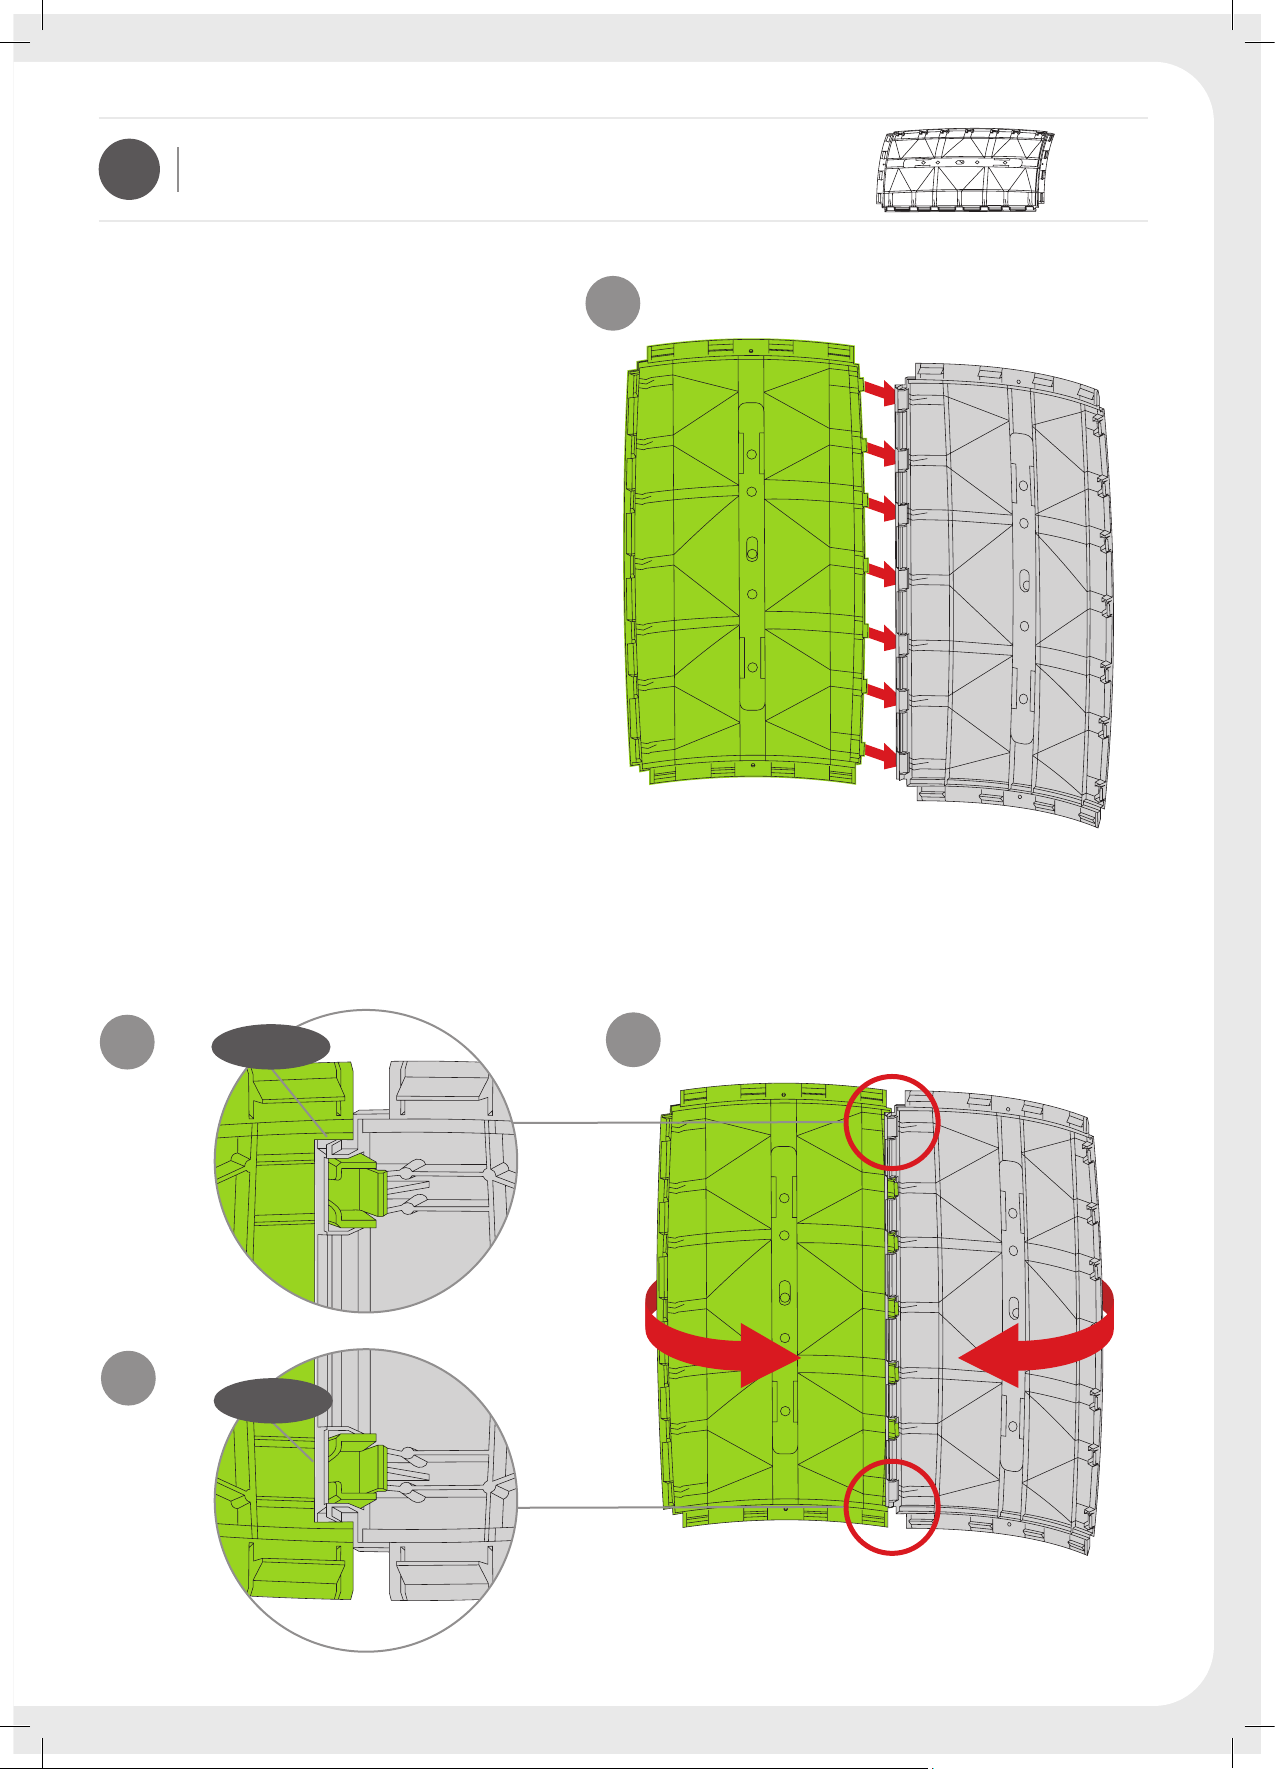
1
BARREL ASSEMBLY |
MONTAJE DEL TAMBOR
A x 2
INSERT DRUM PANEL (A) INTO A
SECOND DRUM PANEL (A) |INSERTE
EL PANEL DEL TAMBOR (A) EN EL
SEGUNDO PANEL DEL TAMBOR (A).
GENTLY PULL UNTIL PANELS “SNAP
LOCK” INTO POSITION | EMPUJE
CON DELICADEZA HASTA QUE LOS
PANELES SE SELLEN EN POSICIÓN.
1
A
A
3
CLICK
2
3
CLICK
A A
4
Page 6
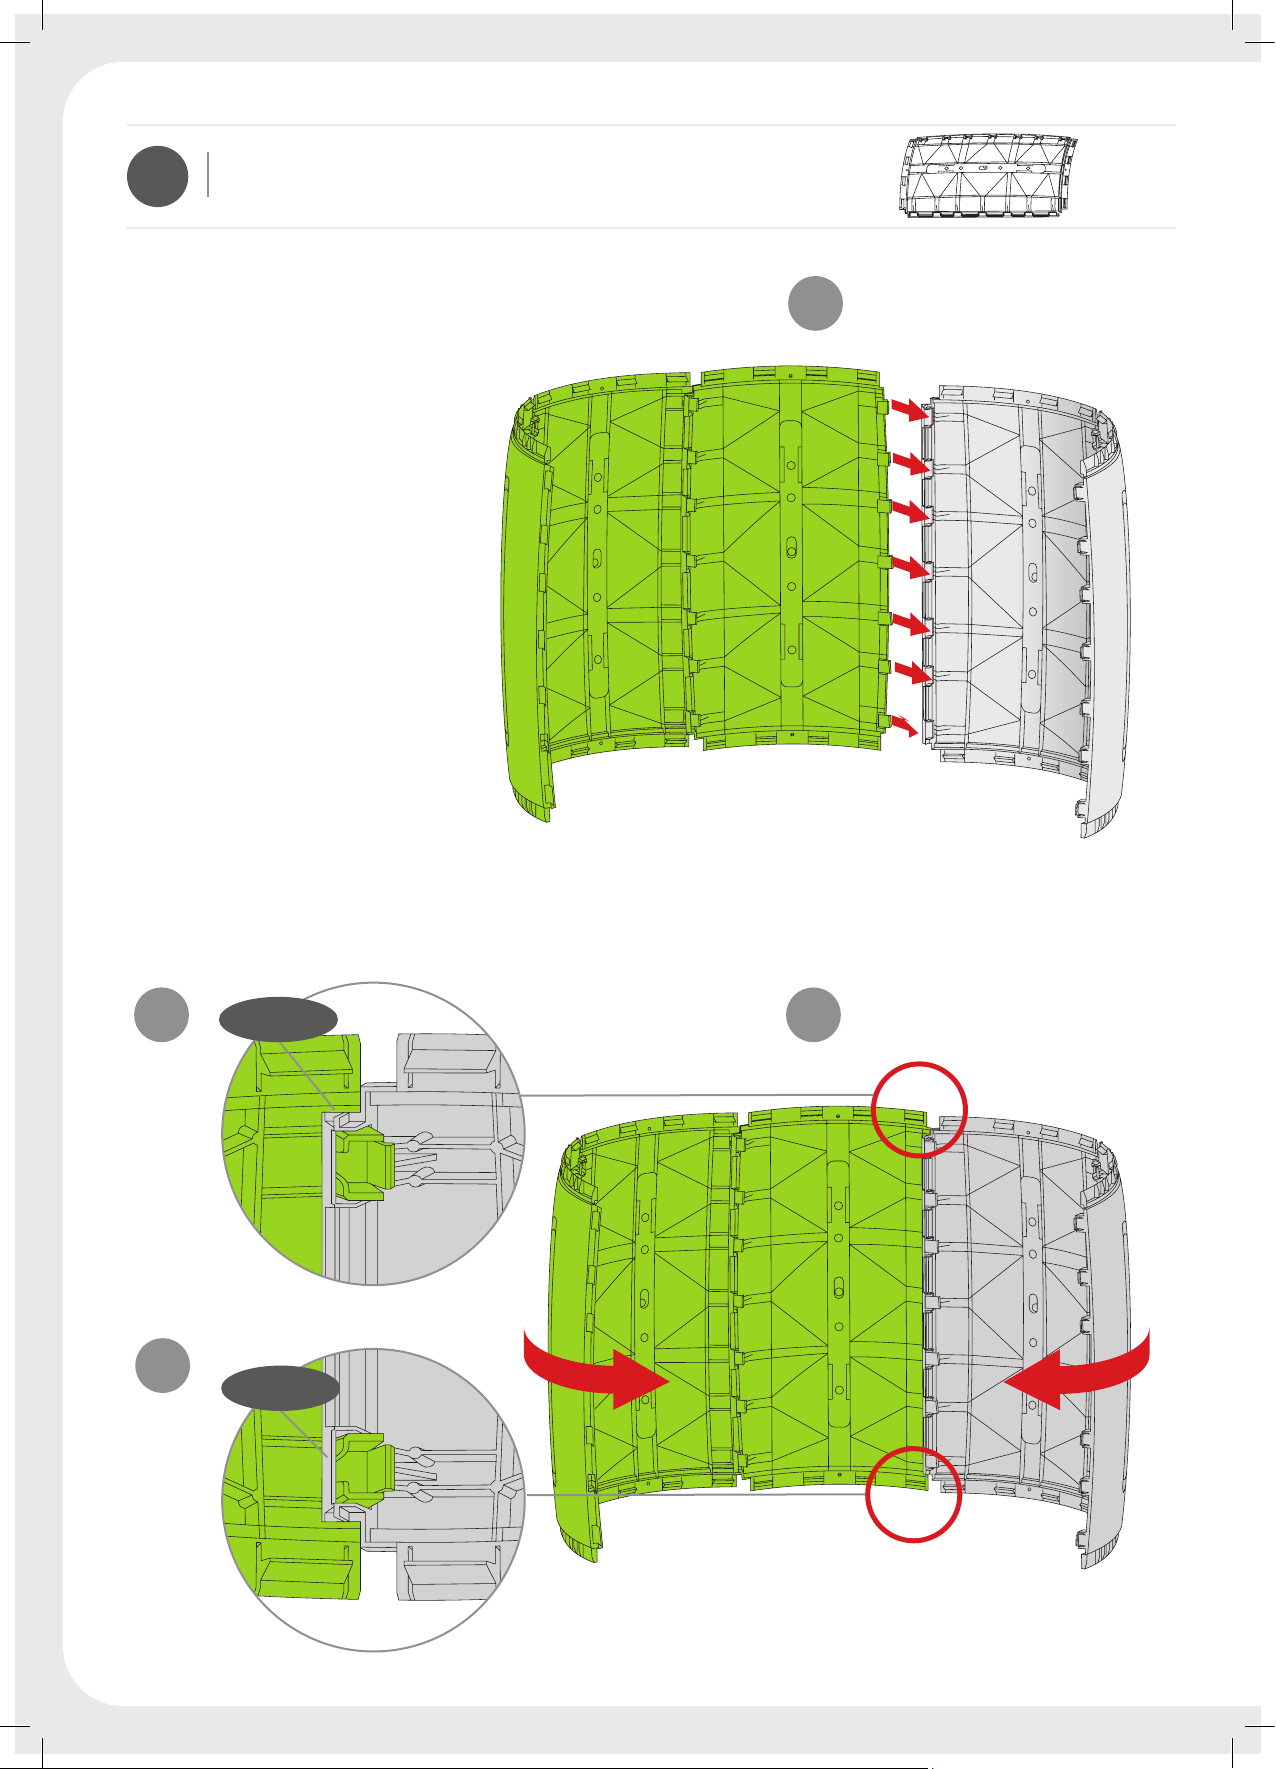
2
REPEAT STEP 1 FOR REMAINING
DRUM PANELS (A) | REPITA EL PASO 1
CON EL RESTO DE LOS PANELES
DEL TAMBOR (A).
BARREL ASSEMBLY |
MONTAJE DEL TAMBOR
A x 3
1
A
3
CLICK
A
A
2
3
CLICK
5
Page 7
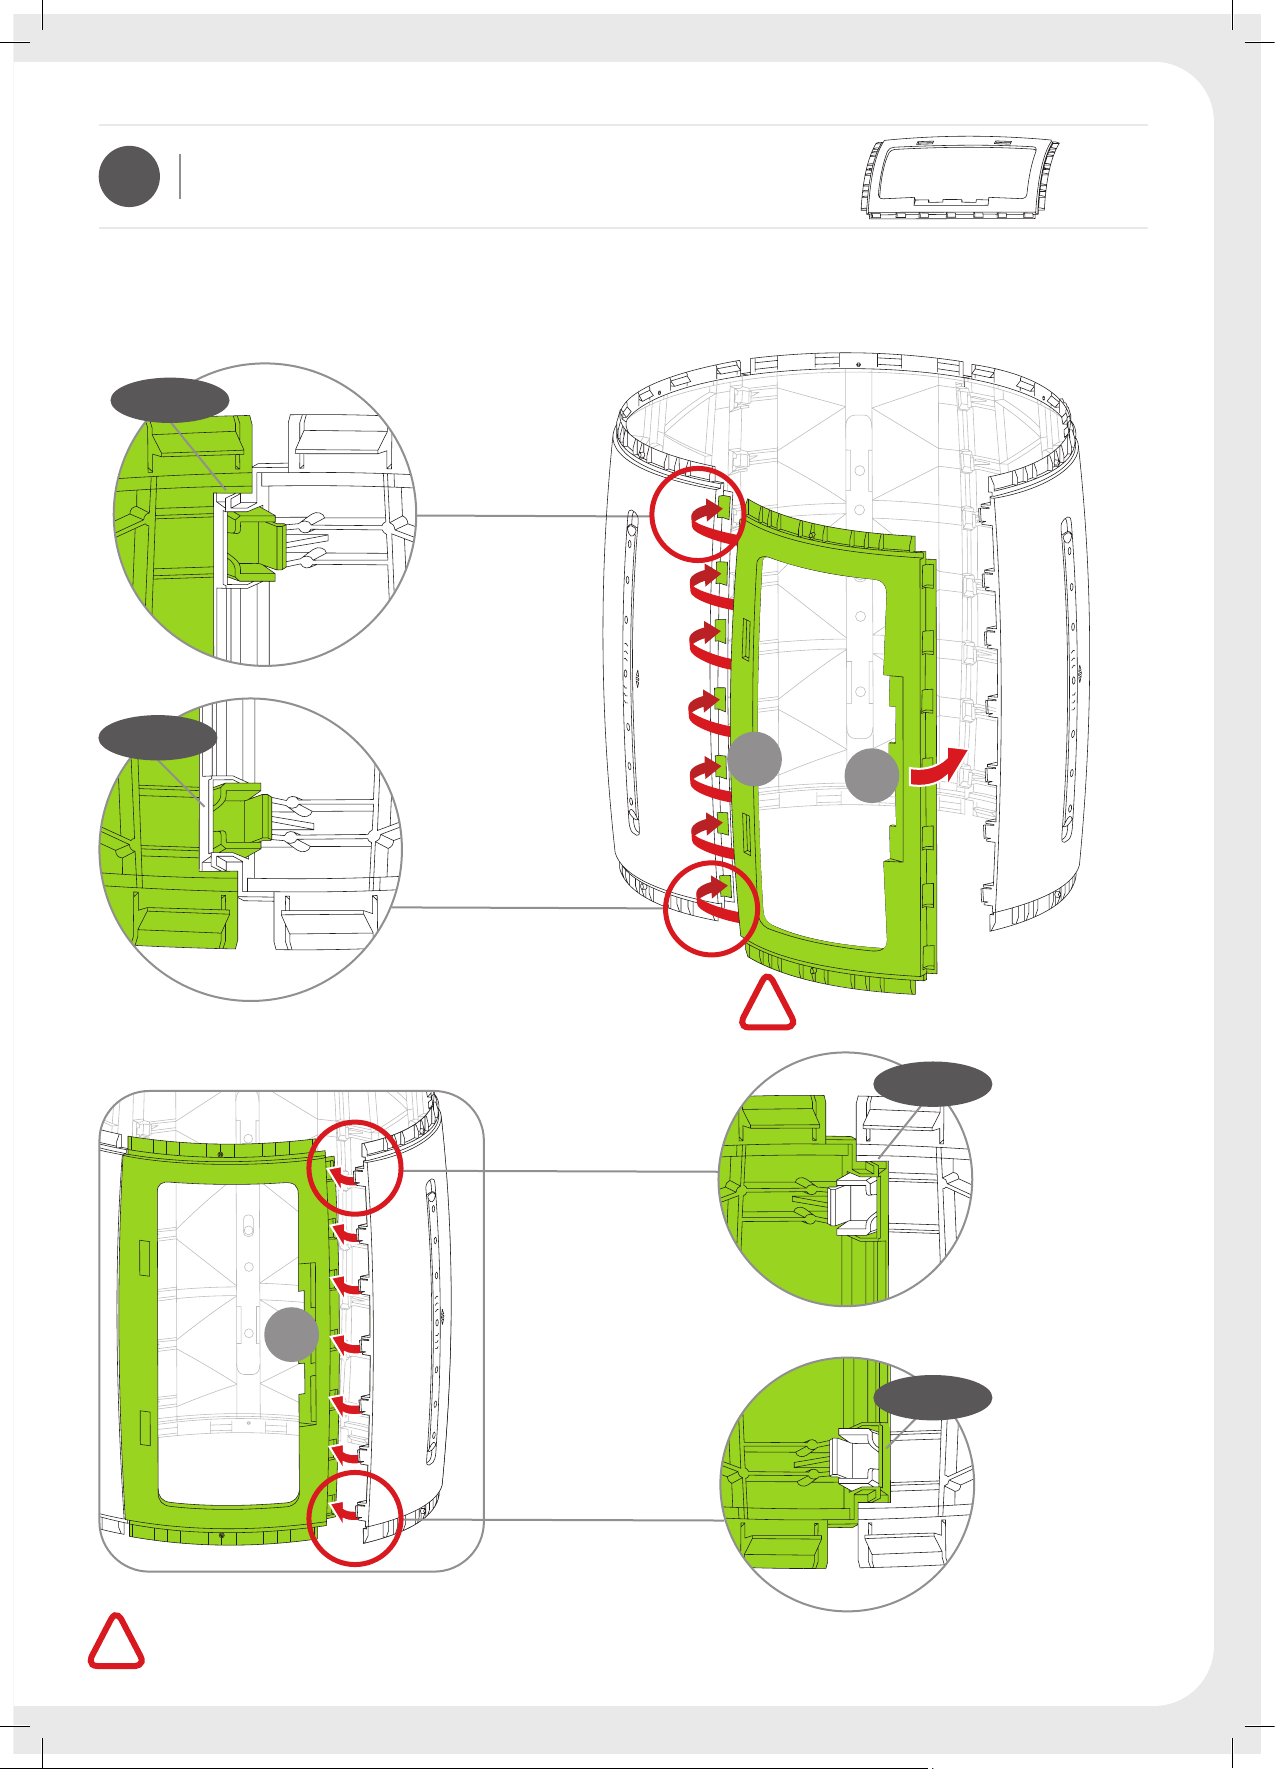
3
ATTACH DOOR FRAME (B) | COLOQUE
EL MARCO DE LA PUERTA (B)
CLICK
CLICK
DOOR FRAME ASSEMBLY |
MONTAJE DEL MARCO DE LA PUERTA
B x 1
1
2
A
!
B
CLICK
3
CLICK
REMOVE DOOR (T) BEFORE ASSEMBLING DOOR FRAME (B) | RETIRAR LA PUERTA (T) ANTES DE COLOCAR EL
!
MARCO DE LA PUERTA (B)
6
Page 8
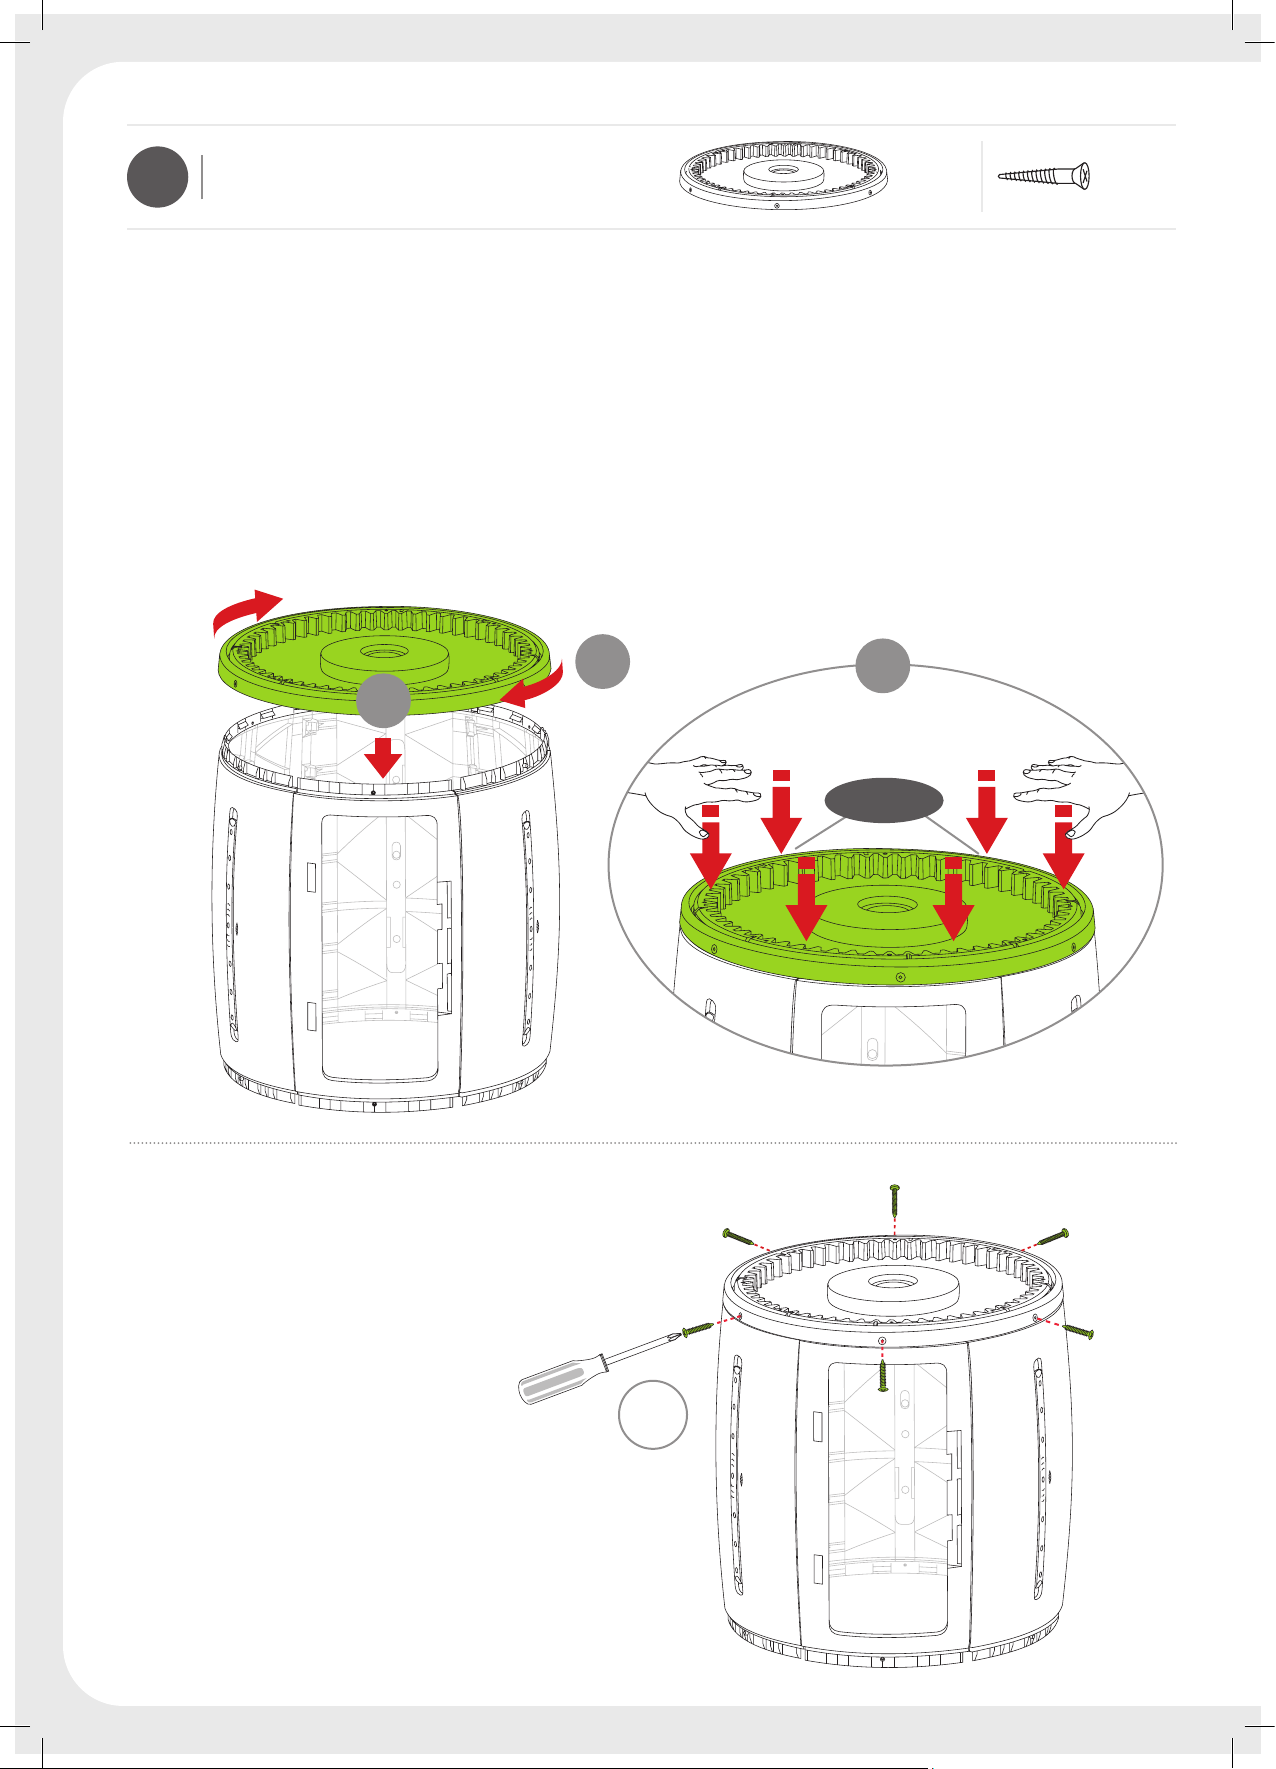
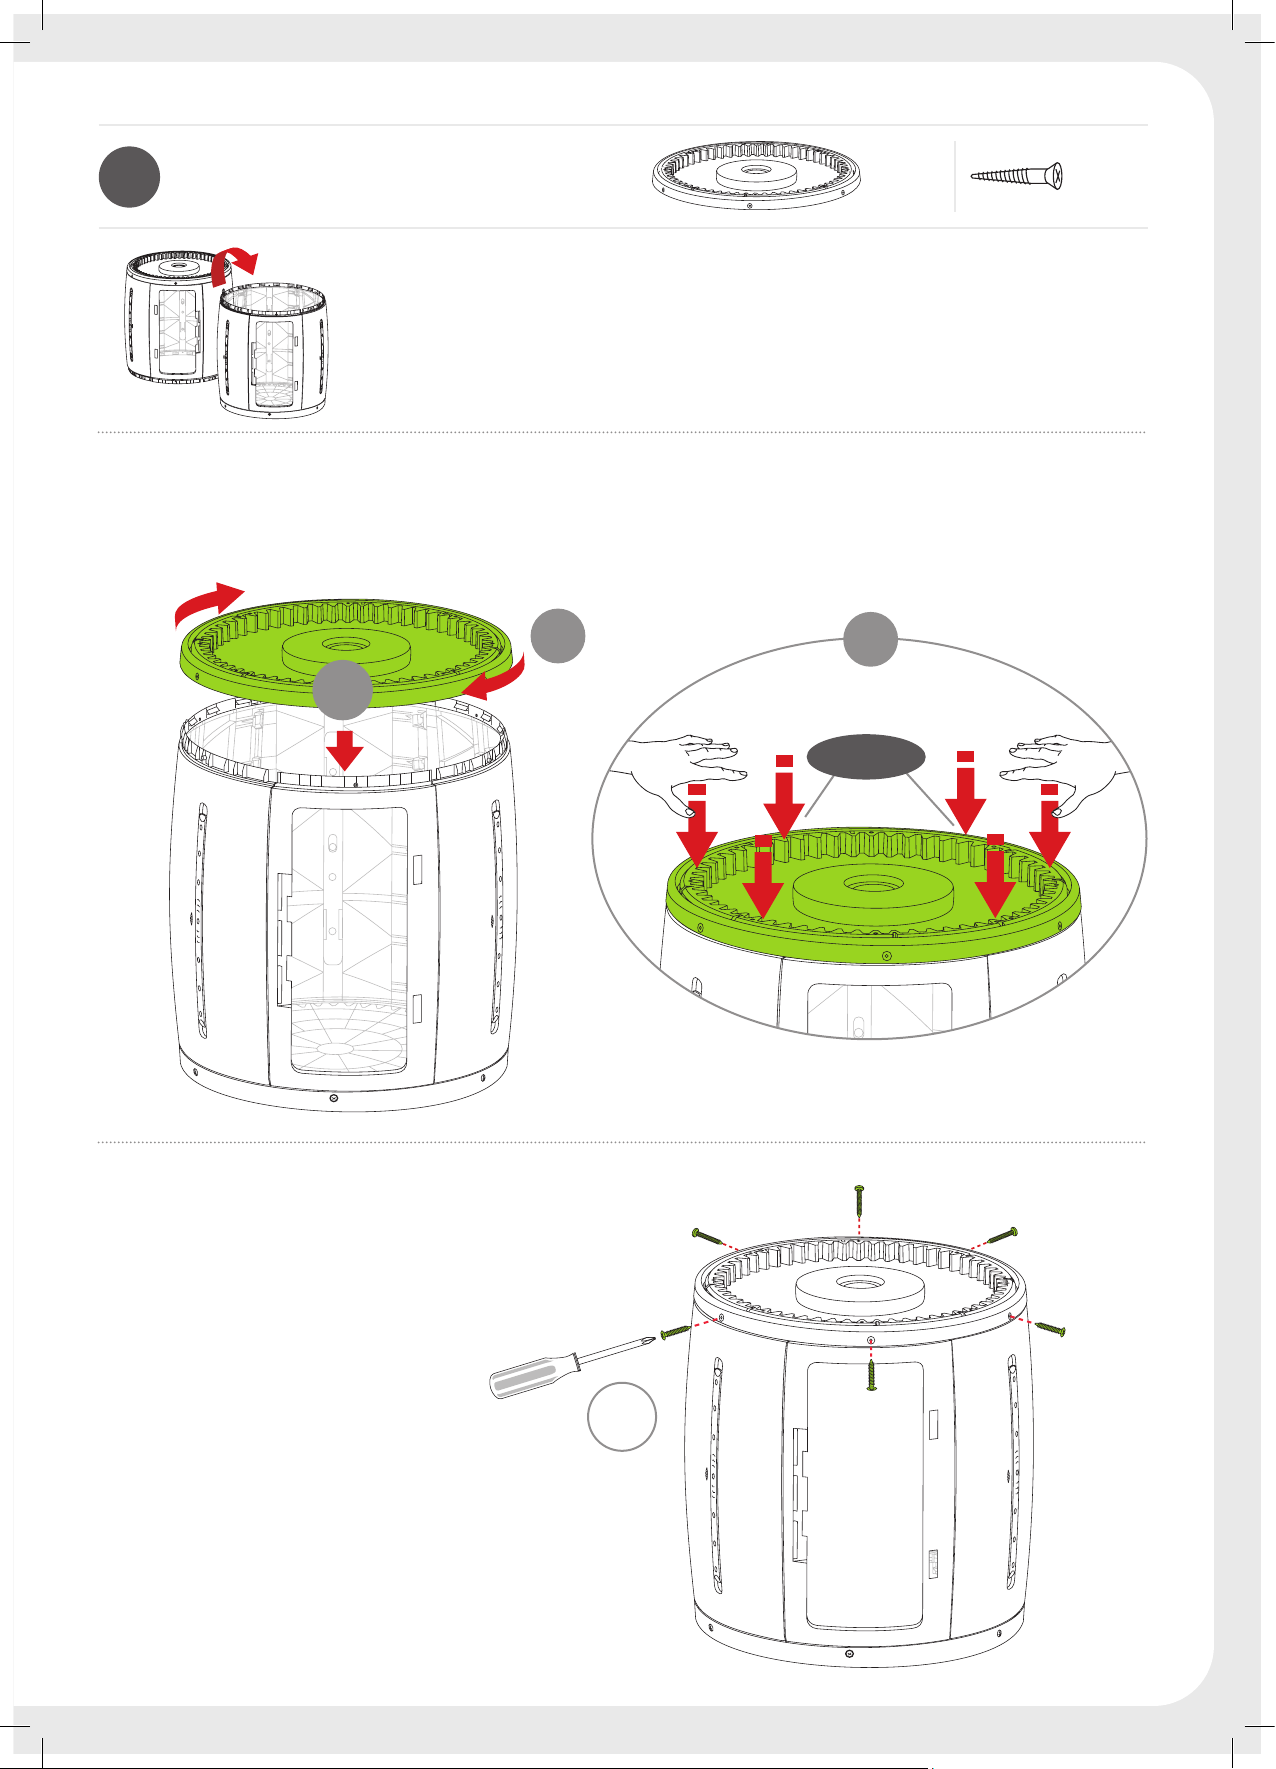
4
ROTATE DRUM WHEEL (C) INTO
POSITION (LINE UP SCREW HOLES)
| GIRE LA RUEDA DEL TAMBOR (C)
HASTA QUE ESTÉ EN POSICIÓN
(LOS ORIFICIOS PARA LOS TORNILLOS
DEBEN ESTAR ALINEADOS)
DRUM WHEEL ASSEMBLY |
MONTAJE DE LA RUEDA DEL TAMBOR
C
C x 1
x 6
1
FASTEN USING 6 SCREWS |
AJUSTE UTILIZANDO 6 TORNILLOS.
2
3
CLICK
x 6
7
Page 9
5
REPEAT STEP 4 ON REVERSE SIDE |
REPITA EL PASO 4 EN EL OTRO
EXTREMO.
C
C x 1
x 6
1
FASTEN USING 6 SCREWS |
AJUSTE UTILIZANDO 6 TORNILLOS.
2
3
CLICK
x 6
8
Page 10
6
SNAP AXLE (D) INTO POSITION |
COLOQUE LA GUÍA (D) EN POSICIÓN
AXLE ASSEMBLY |
MONTAJE DE LA GUÍA
CLICK
D
D x 1
9
Page 11
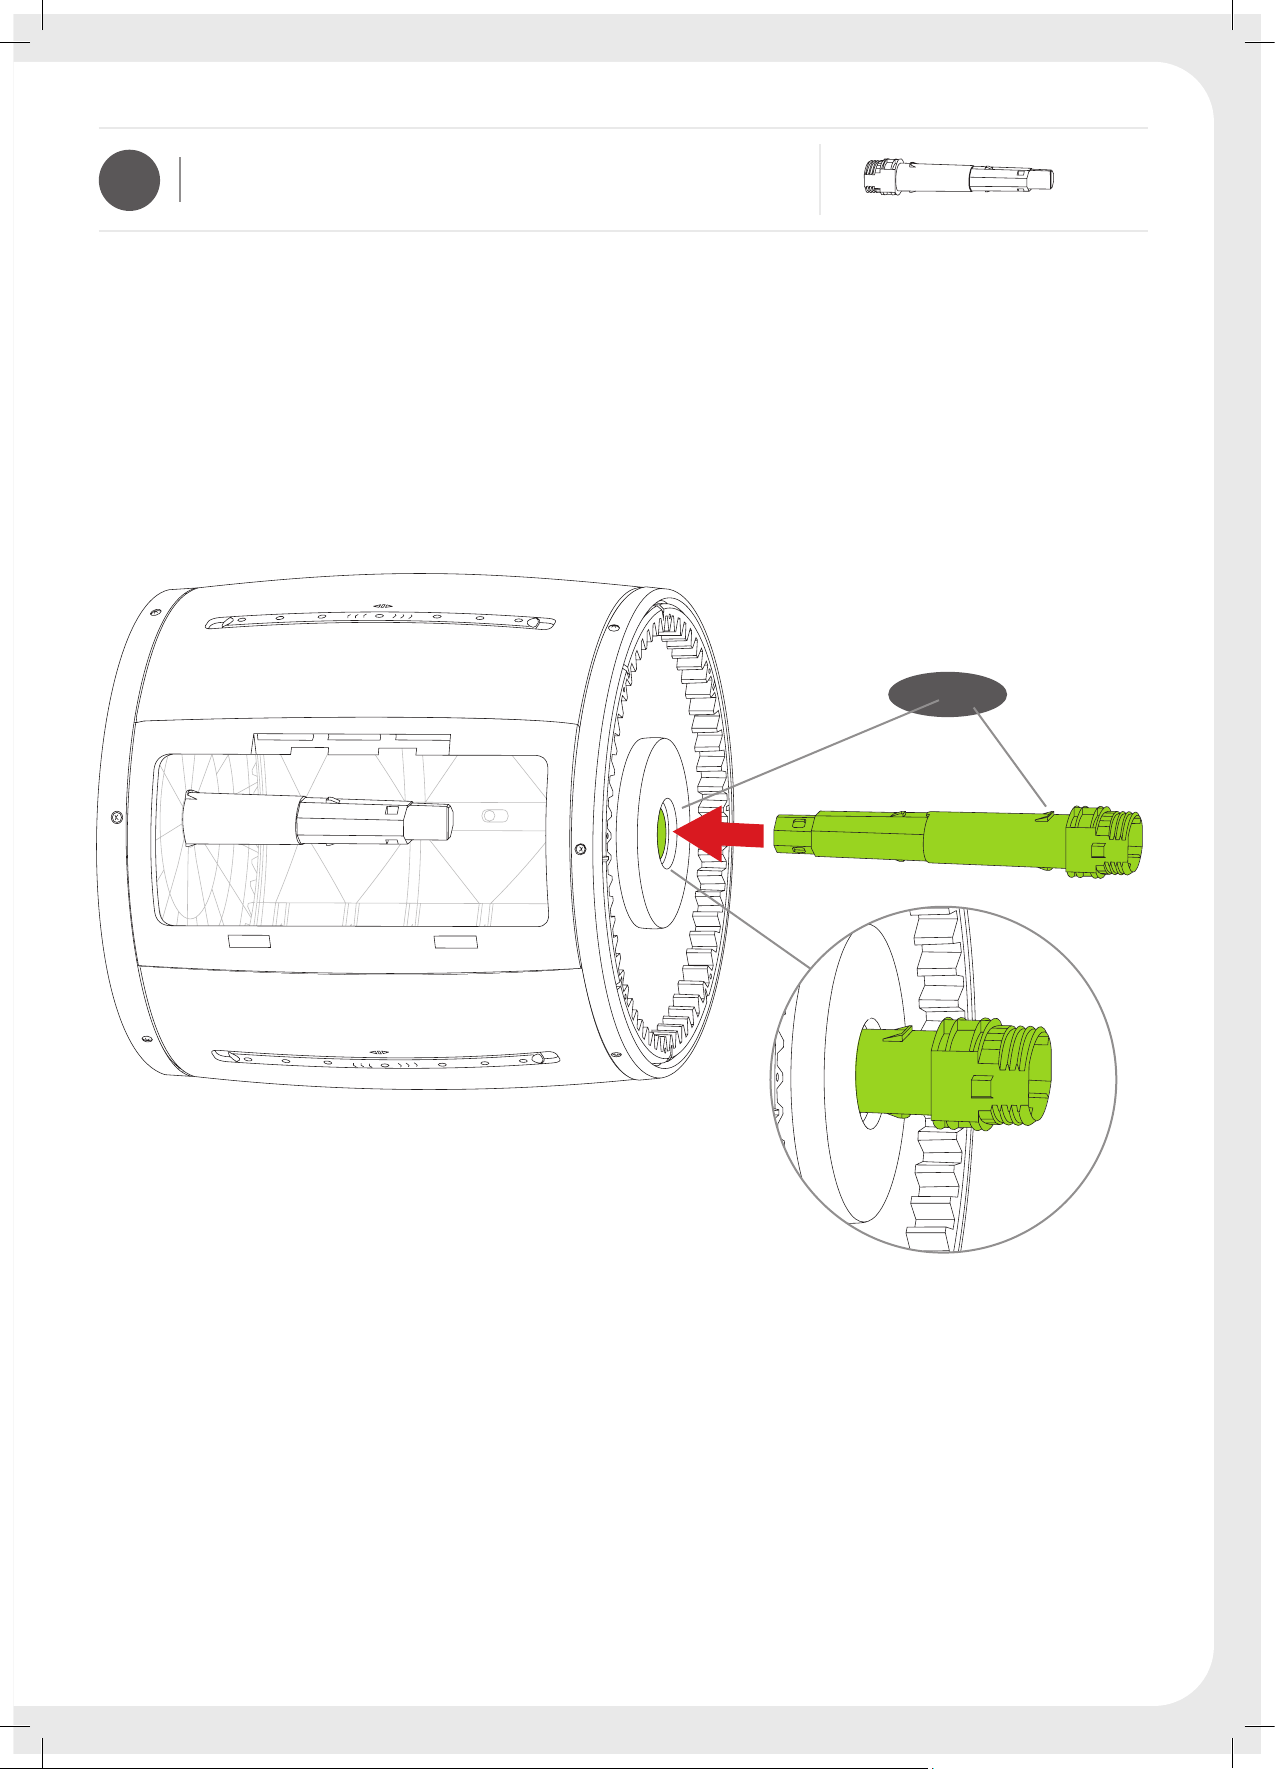
7
PLACE AXLE (D) INTO BARREL
WITHOUT CLICKING INTO POSITION
| COLOQUE LA GUÍA (D) EN EL
TAMBOR EN FORMA PARCIAL SIN
QUE LLEGUE A SU POSICIÓN FINAL.
AXLE ASSEMBLY |
MONTAJE DE LA GUÍA
D x 1
CLICK
D
10
Page 12

8
CONNECT AXLES USING THE U-PIN (F)
| CONECTE LAS GUÍAS UTILIZANDO
EL PASADOR EN FORMA DE U (F).
AXLES CONNECTION |
CONEXIÓN DE LAS GUÍAS
F x 1
F
1 2
CLICK
11
Page 13

9
GEAR COVER ASSEMBLY |
MONTAJE DE LA CUBIERTA DE LA RUEDA
G x 4
x 8
G
3
ASSEMBLE GEAR COVER (G) |COLOQUE
LA CUBIERTA DE LA RUEDA (G).
SCREW HOLES MUST BE ALIGNED |
!
LOS ORIFICIOS PARA LOS TORNIL LOS DEBEN ESTAR ALINEADOS.
G
2
!
G
4
1
G
FASTEN USING 8 SCREWS |
AJUSTE UTILIZANDO 8 TORNILLOS.
x 8
12
Page 14

10
LEG BRACKET ASSEMBLY |
MONTAJE DE LA MÉNSULA DE LA PATA
I x 1 J(KEY) x 1H x 1
ASSEMBLE LEG BRACKET (H) USING
KEY (J), TIGHTLY FASTEN SCREW (I)
| COLOQUE LA MÉNSULA DE LA PATA
(H) UTILIZANDO LA LLAVE (J) Y AJUSTE
FIRMEMENTE CON EL TORNILLO (L).
USE LEG BRACKET (H) | UTILIZAR
!
EL SOPORTE DE PATA (H)
J (KEY)
I
1
!
H
2
J (KEY)
H
11
INSERT BRACKET COVER (K) | COLOQUE
LA CUBIERTA DE LA MÉNSULA (K).
BRACKET COVER ASSEMBLY |
MONTAJE DE LA MÉNSULA DE LA PATA
CLICK
K x 1
K
K
13
Page 15

12
PLACE GEAR (L) INTO DRUM WHEEL
(C) | COLOQUE EL ENGRANAJE (L)
EN LA RUEDA DEL TAMBOR (C).
GEAR ASSEMBLY |
MONTAJE DEL ENGRANAJE
L x 1
L
14
Page 16

13
GEAR COVER ASSEMBLY |
MONTAJE DE LA CUBIERTA DE LA RUEDA
G x 4
x 8
ASSEMBLE GEAR COVER (G) | COLOQUE
LA CUBIERTA DE LA RUEDA (G)
G
G
3
2
4
1
!
G
G
SCREW HOLES MUST BE ALIGNED |
!
LOS ORIFICIOS PARA LOS TORNILLOS DEBEN ESTAR ALINEADOS.
FASTEN USING 8 SCREWS |
AJUSTE UTILIZANDO 8 TORNILLOS.
x 8
15
Page 17

14
ASSEMBLE LEG BRACKET (H1) USING
KEY (J), TIGHTLY FASTEN SCREW (I)
| COLOQUE LA MÉNSULA DE LA PATA
(H1) UTILIZANDO LA LLAVE (J) Y AJUSTE
FIRMEMENTE CON EL TORNILLO (L).
!
LEG BRACKET ASSEMBLY |
MONTAJE DE LA MÉNSULA DE LA PATA
USE LEG BRACKET (H1) | UTILIZAR
EL SOPORTE DE PATA (H1)
2
H1 x 1
I x 1 J(KEY) x 1
J (KEY)
I
!
H1
GEAR POSITION |
POSICIÓN DEL
ENGRANAJE
1
16
Page 18

15
PLACE HANDLE (M) IN POSITION AND
FASTEN USING 2 SCREWS. SNAP
HANDLE COVER (N) INTO POSITION |
COLOQUE LA MANIJA (M) EN POSICIÓN
Y ATORNILLE 2 TORNILLOS. AJUSTE
LA CUBIERTA DE LA MANIJA (N) EN
POSICIÓN.
MONTAJE DE LA MANIJA
HANDLE ASSEMBLY |
M x 1
x 2
N x 1
3
2
N
M
1
3
2
17
Page 19

16
LEG ASSEMBLY |
MONTAJE DE LAS PATAS
Q x 1P x 1O x 1
P
CLICK
SNAP LEGS ASSEMBLY INTO POSITION
| COLOQUE LAS PATAS EN POSICIÓN.
O
Q
CLICK
CLICK
18
Page 20

17
REPEAT STEP 18 | REPITA EL PASO 18
LEGS ASSEMBLY |
MONTAJE DE LAS PATAS
Q x 1P x 1O x 1
P
CLICK
O
Q
CLICK
CLICK
19
Page 21

18
DOOR ASSEMBLY |
MONTAJE DE LA PUERTA
T x 1
1
T
2
20
Page 22

COMPOST MIXER FEATURES | CARACTERÍSTICAS DE LA MEZCLADORA DE COMPOST
WIDE REMOVABLE DOOR FOR EASY ACCESS | AMPLIA
PUERTA DESMONTABLE PARA UN ACCESO SENCILLO
CENTERED POSITION ALLOWS FOR FLOW OF COMPOST TEA |
LA POSICIÓN CENTRADA PERMITE EL FLUJO DEL TÉ DE COMPOST
CONTROLLED AIR CIRCULATION (AERATION) |
CIRCULACIÓN DE AIRE CONTROLADA (AERACIÓN)
21
Page 23

INNOVATIVE GEAR ALLOWS EFFORTLESS TUMBLING
EVEN WITH A FULL LOAD | INNOVADOR ENGRANAJE QUE
PERMITE GIRARLO SIN ESFUERZO, INCLUSO CUANDO ESTÁ
LLENO
UNIQUE LOCKING GEAR RATCHET PREVENTS REVERSE
DRUM MOVEMENT | ÚNICO ENGRANAJE DE TRINQUETE
QUE PREVIENE EL MOVIMIENTO EN REVERSA DEL TAMBOR
22
Page 24

EN
Composting is a simple, natural, biological process that breaks down organic waste into a crumbly, dark brown,
earthy-smelling humus material with a soil-like texture.
Compost humus is the end product of a complex natural process involving bacteria, fungi, worms, and insects that leads
to the breakdown of the organic materials within the compost pile.
Compost humus is often dubbed the “life-force” of soil. Although its benefits are abundant, humus is a highly complex
substance that is difficult to define in precise terms. It can best be described as the transformation of organic matter
into carbon dioxide, water, humic substances, valuable microorganisms and inorganic plant nutrients, and energy in the
form of heat that is generated from the compost pile.[1] Adding compost to your garden stimulates seed germination
and plant growth, and also reduces the garden's susceptibility to pest attacks. Compost humus enriches your garden,
enabling it to flourish and prosper.
Compost humus also acts like a sponge and improves soil structure, helping to break up clay soil with the help of
bacteria. When adding compost to sandy soils, we are in essence improving the soil's water retention properties and
improving its nutrient content.
By adding compost to any soil we increase the availability of this rich humus material to the plants, flowers, and trees it
sustains. Improving your soil is the first step toward improving the health of your plants, resulting in improved nutrient
values, greater water retention, increased water infiltration, and reduced crusting problems, all of which enhance plant
resilience during dry seasons.
COMPOSTING ESSENTIALS
COMPOSTING CYCLE TIME DEPENDS ON A NUMBER OF MAJOR VARIABLES:
Oxygenation – Oxygen is required for respiration by all aerobic inhabitants within the compost pile. Aerobic microbes
decompose waste at a faster rate than their anaerobic counterparts, and will not produce the foul odors associated with
anaerobic decomposition. Adequate ventilation and periodic turning of the compost pile inside the COMPOST MIXER will
increase the rate of the composting process. An unmixed compost pile may take up to three to four times longer to turn
into compost humus.
Temperature – Heat is a byproduct of decomposition, and accelerates the composting process. The optimum temperature
for a rapid composting process is 90-135°F (30-60°C). Due to the cold climate or insufficient bacterial activity, the
composting process will slow, but not cease, when the temperature falls below this temperature. To keep temperatures
elevated, keep the Carbon/Nitrogen Ratio (see below), and adjust the aeration vents of the COMPOST MIXER to increase
the available oxygen.
Water Content – An efficient COMPOST MIXER needs to have a moisture content of approximately 50% (it should feel like
a damp towel) allowing the compost pile to sustain microbial activity. If the compost pile is too dry, decomposition will
slow down considerably, while overly wet piles can trigger anaerobic conditions and begin to smell. Keep the COMPOST
MIXER door and air vents closed during heavy rains, to avoid anaerobic composting and prevent valuable nutrients to be
washed away. Add more water if you feel the compost pile is too dry.
Waste Surface Area – Speed up the composting process by shredding and chipping all garden clippings and kitchen
scraps into smaller pieces. The more surface area that is exposed to microorganisms, the faster the composting process
will be.
Carbon/Nitrogen Ratio – Organic materials rich in nitrogen are referred to as GREENS (fresh vegetable scraps or grass
clippings, etc.). Other composting materials can be referred to as BROWNS (hay, twigs, dried leaves, etc.).
A good general rule of thumb is to use 2-3 parts brown to 1 part green.
[1] For further information, please refer to the below paragragh titled Temperature.
23
Page 25

WHAT CAN I COMPOST?
GREENS (N) (Nitrogenous):
Grass clippings
Spent flowers and plants
Table scraps
Eggshells (crushed)
Fruit scraps
Vegetable scraps
Coffee and tea grounds
Vegetarian animal manure (e.g., that of cows
and chickens)
WHAT NOT TO COMPOST?
Meat
Fat
Bones
Fish
Dairy products
Pet or human waste
Stones
Metal
Plastic
Large branches or wood chips
Diseased plants or weeds
BROWNS (C) (Carbonaceous):
Dry leaves
Sawdust
Shredded newspaper*
Straw
Small twigs
Wood chips and shavings Corncobs
Cornstalks
Hay
Nutshells
* Newspapers and paper can be added in small crumpled amounts,
but it is better to recycle them if you can.
LIQUID FERTILIZING – COMPOST TEA & COMPOST BOOSTER
COMPOST TEA
Compost tea is, in essence, liquid fertilizer. You can easily extract it by using your COMPOST MIXER. Compost tea is
created by suspending the ready humus in water, and is a very mild, organic liquid fertilizer. Applying compost to the
soil in this liquid form is a quick way to enrich the soil with nutrients, dissolved organic matter, and active organisms
such as bacteria, protozoa, actinomycetes, and fungi.
Compost tea can even eliminate pathogens.
Compost tea is applied to the soil by watering or foliar spraying.
COMPOST BOOSTER
Compost Booster is a dark-colored solution liquid that drains out of a compost pile when it is overly-moist (i.e., at
or above saturation level). The Compost Booster contains a large quantity of dissolved organic matter, bacteria, and
potassium ions. As a result, it is not compost tea nor should it be used as such, largely because it may represent the
result of overly-wet and potentially anaerobic conditions. Compost Booster should be reinserted into the COMPOST
MIXER in order to boost the number of microorganisms present.
24
Page 26

EN
SAFETY INSTRUCTIONS!
!
1. Place the COMPOST MIXER on smooth, level ground. Its placement is important to make sure that the heavy
COMPOST MIXER will not tip over.
2. Always make sure that the door is securely closed before turning the drum.
3. Keep your hands out of the way while the drum is turning.
4. Keep children clear when the drum is turning.
5. Always leave the door in an upright position to avoid long term damage to the product.
COMPOSTING WITH YOUR COMPOST MIXER
1
YOUR COMPOST MIXER SHOULD
BE LOCATED ON LEVEL GROUND,
PREFERABLY IN THE SUN TO
FACILITATE HEATING OF THE MIXING
DRUM.
THE AREA USED SHOULD BE CLOSE TO
A WATER SOURCE, AND CONVENIENT
TO ACCESS FOR LOADING PURPOSES.
2
MIXER IN YOUR GARDEN
FILLING COMPOST
PLACING THE COMPOST
FILLING THE COMPOST MIXER
IS QUICK AND SIMPLE!
OPEN THE DOOR AND FILL THE
DRUM WITH THE RECOMMENDED
MATERIALS (AS SHOWN IN TABLE A).
25
Page 27

3
ADD WATER THROUGH THE DOOR
USING YOUR GARDEN HOSE OR
WATERING CAN.
CHECK YOUR LOAD REGULARLY FOR
MOISTURE CONTENT. IF THE LOAD IS
TOO DRY, SPRINKLE IT WITH WATER TO
RESTORE THE MOISTURE CONTENT. DO
NOT OVER WATER! IF THERE ARE SIGNS
OF TOO MUCH MOISTURE (EVIDENCED
BY A STRONG FOUL ODOR), ADD DRY
MATERIALS SUCH AS SAWDUST OR
SHREDDED LEAVES TO ABSORB THE
EXCESS MOISTURE.
ADDING WATER
4
GOOD AERATION IS ESSENTIAL FOR THE PROCESS OF DECOMPOSITION IN YOUR COMPOST MIXER.
YOU CAN EASILY CONTROL THE AIR CIRCULATION BY SWITCHING THE AERATION VENTS BETWEEN THE OPEN
AND CLOSED POSITIONS. IN COLDER CLIMATES IT IS RECOMMENDED TO CLOSE MOST OF THE VENTS IN ORDER
TO MAINTAIN THE COMPOST PILE CORE WARMTH (LEAVING A FEW VENTS OPEN TO ALLOW OXYGEN TO FLOW IN).
(AERATION)
CLOSED OPEN
CONTROLLING AIR CIRCULATION
26
Page 28

5
THE DESIGN OF THE COMPOST MIXER
TAKES THE HARD WORK OUT OF
COMPOSTING.
YOU CAN ONLY TURN THE HANDLE IN
ONE DIRECTION (AS INDICATED). THIS
WILL ALLOW YOU TO LOCK THE DRUM
INTO POSITION WHEN UNLOADING.
FIVE REVOLUTIONS EVERY FEW
DAYS ARE SUFFICIENT ENOUGH FOR
THOROUGH MIXING OF YOUR COMPOST
PILE.
WHEN YOU HAVE FINISHED ROTATING
THE DRUM, PLACE THE DOOR IN AN
UPRIGHT POSITION. THIS PLACES THE
AERATION/DRAINAGE UNIT AT THE
BOTTOM AND WILL ALLOW FOR THE
EXTRACTION OF COMPOST TEA.
MIXING THE COMPOST
!
ALWAYS ENSURE THAT THE DOOR IS SECURELY CLOSED BEFORE TURNING THE DRUM.
6
AFTER PLACING THE DOOR IN AN
UPRIGHT POSITION, SWITCH THE
BOTTOM AERATION VENT TO THE
MIDDLE, ALLOWING THE LIQUID
COMPOST TEA TO DRAIN. PLACE A
BUCKET UNDER THE DRUM, AND THE
COMPOST TEA WILL SLOWLY FLOW OUT
EXTRACTING COMPOST LIQUIDS (TEA)
IF YOU WANT TO KEEP “COMPOST TEA” FLUID INSIDE THE DRUM,
!
MAKE SURE THE BOTTOM AERATION VENT ARE SWITCHED TO THE CLOSED POSITION
27
Page 29

7
COMPOST CAN BE USED WHEN IT
TURNS INTO CRUMBLY, DARK BROWN,
EARTHY-SMELLING HUMUS MATERIAL
WITH A SOIL-LIKE TEXTURE, AND
THE ORIGINAL INGREDIENTS ARE NO
LONGER RECOGNIZABLE. IN ORDER TO
UNLOAD THE PROCESSED COMPOST,
SIMPLY PLACE A BUCKET OR CART IN
FRONT OF THE DRUM, REMOVE THE
DETACHABLE DOOR, AND ROTATE THE
DRUM UNTIL THE LOAD CAN BE EASILY
REMOVED.
UNLOADING THE COMPOST
8
SPREAD THE PREPARED COMPOST IN
A THICK LAYER OVER THE SURFACE OF
THE SOIL.
FROM THERE IT WILL SLOWLY BE
ABSORBED INTO THE SOIL BY WORMS
AND OTHER CREATURES.
MULCHING KEEPS DOWN ANNUAL
WEEDS, AND HELPS TO RETAIN
MOISTURE AS WELL AS FEEDING THE
SOIL WITH VALUABLE NUTRIENTS.
COMPOST CAN BE USED:
1. TO ENRICH FLOWER AND VEGETABLE
GARDENS.
2. TO IMPROVE SOIL SURROUNDING
TREES AND SHRUBS.
3. AS A SOIL SUPPLEMENT FOR
HOUSEPLANTS AND PLANTERS.
4. AS PART OF A SEED-STARTING MIX.
5. AS LAWN TOP-DRESSING.
SPREADING COMPOST IN YOUR GARDEN
28
Page 30

SP
El compostaje es un proceso simple, natural y biológico que descompone desechos orgánicos y los convierte en un
material húmico que se desmigaja con facilidad, de color marrón oscuro y que huele y tiene una textura similar a la de
la tierra.
El compost humus es el producto final de un complejo proceso natural que involucra bacterias, hongos, gusanos, e
insectos que llevan a la descomposición de los materiales orgánicos dentro del compost.
El compost humus generalmente recibe el nombre de “vida y fuerza” de la tierra. A pesar de que sus beneficios
son muchos, el humus es una sustancia muy compleja y resulta difícil definirla con precisión. Es mejor describirlo
como la trasformación de material orgánico en dióxido de carbono, agua, sustancias húmicas, valiosos nutrientes
microorgánicos e inorgánicos para plantas, y energía en forma de calor que es generada por el compost.
Agregar compost en su jardín estimula la germinación de semillas y el crecimiento de las plantas, y también reduce
la susceptibilidad del jardín a los ataques de pestes. El compost humus enriquece su jardín, permitiéndole florecer y
prosperar.
El compost humus también actúa como absorbente y mejora la estructura de la tierra, ayudando a quebrar el suelo de
arcilla con la ayuda de bacterias. Al agregar compost a suelos salados, de alguna manera mejoramos las propiedades
de absorción de agua del suelo y mejoramos su contenido de nutrientes.
Al agregar compost a cualquier tipo de suelo, aumentamos la disponibilidad de su rico material húmico para las plantas,
las flores y los árboles que éste mantiene. Mejorar el suelo es el primer paso para mejorar la salud de sus plantas,
resultando en mejores valores nutritivos, mayor retención de agua, mayor infiltración de agua, y menos problemas de
costras; todo esto mejora la resistencia de la planta durante estaciones secas.
PUNTOS ESENCIALES DEL COMPOSTAJE
EL TIEMPO DEL CICLO DEL COMPOSTAJE DEPENDE DE VARIAS VARIABLES IMPORTANTES:
Oxigenación – El oxígeno es necesario para la respiración de todos los habitantes aeróbicos dentro del compost.
Los microbios aeróbicos descomponen desechos más rápidamente que sus homólogos anaeróbicos, y no producen
los olores nauseabundos asociados con la descomposición anaeróbica. La ventilación adecuada y la colocación del
compost dentro de la MEZCLADORA DE COMPOST aumentarán el ritmo del proceso de compostaje. El compost no
mezclado demorará tres o cuatro veces más en convertirse en compost humus.
Temperatura – El calor es una consecuencia de la descomposición y acelera el proceso del compostaje. La
temperatura óptima para un proceso rápido de compostaje es de 90-135°F (30-60°C). Ante clima frío o insuficiente
actividad bacterial, el proceso de compostaje se hará más lento, pero no se detendrá cuando la temperatura sea
menor a la temperatura mencionada anteriormente. Para conservar la temperatura elevada, mantenga la proporción
Carbono/Nitrógeno (vea más abajo), y ajuste los respiraderos de la MEZCLADORA DE COMPOST para aumentar el
oxígeno disponible.
Contenido del agua – Una MEZCLADORA DE COMPOST eficiente necesita tener una humedad de aproximadamente
50% (debe sentirse como una toalla húmeda) para permitir que el compost mantenga la actividad microbiana. Si el
compost está demasiado seco, el ritmo de descomposición disminuirá considerablemente, mientras que el compost
demasiado húmedo puede provocar condiciones anaeróbicas y emanar olor desagradable.
Mantenga la puerta y los respiraderos de la MEZCLADORA DE COMPOST cerrados durante lluvias fuertes para evitar
compostaje anaeróbico y prevenir la eliminación de valiosos nutrientes. Agregue más agua si cree que el compost
está demasiado seco.
Área de la superficie de desechos – Acelere el proceso de compostaje triturando y rompiendo en trocitos todas las
hierbas cortadas del jardín y las sobras de la cocina en trozos más pequeños. Cuanto mayor sea el área de superficie
expuesta a los microorganismos, más rápido será el proceso de compostaje.
Proporción Carbono/Nitrógeno – Los materiales orgánicos ricos en nitrógeno reciben el nombre de VERDES (restos
vegetales frescos o recortes de césped, etc.). Otros materiales de compostaje reciben el nombre de CASTAÑOS (heno,
ramas, hojas secas, etc.).
Una regla general es utilizar 2-3 partes de castaños y 1 parte de verdes.
29
Page 31

¿QUÉ SE PUEDE UTILIZAR EN EL COMPOST?
VERDES (N) (nitrogenados):
Recortes de césped
Flores y plantas marchitas
Restos de cocina
Cáscaras de huevo (trituradas)
Restos de frutas
Restos de vegetales
Posos de café y té
Estiércol de animales vegetarianos (por ejemplo:
de vacas y gallinas)
QUÉ NO SE UTILIZA EN EL COMPOST
Carne
Grasa
Huesos
Pescado
Productos lácteos
Desechos humanos o de animales domésticos
Piedras
Metales
Plásticos
Ramas o astillas de madera grandes
Plantas o malezas muertas
CASTAÑOS (C) (cabronáceos):
Hojas secas
Aserrín
Papel de periódico triturado*
Paja
Ramas pequeñas
Astillas y virutas de madera
Mazorcas
Tallos de maíz
Heno
Cáscaras de nuez
* Los periódicos y papeles pueden agregarse en pequeñas
cantidades abolladas, pero es mejor reciclarlos si es posible.
LÍQUIDO FERTILIZANTE – TÉ DE COMPOST Y ACELERADOR DE COMPOST
TÉ DE COMPOST
El té de compost es, en esencia, un líquido fertilizante. Puede extraerlo fácilmente utilizando su MEZCLADORA
DE COMPOST. El té de compost se produce al suspender el humus preparado en agua, y es un fertilizante líquido
orgánico y muy suave. Aplicar compost a la tierra con esta forma líquida es una forma rápida de enriquecer el suelo
con nutrientes, materia orgánica disuelta y organismos activos tales como bacterias, protozoa, actinomiceta, y
hongos.
El té de compost también elimina agentes patógenos.
El té de compost se aplica al suelo mediante riego o atomización foliar.
ACELERADOR DE COMPOST
El Acelerador de compost es una solución líquida oscura que drena del compost cuando está muy húmedo (es decir, a
nivel de saturación o más). El Acelerador de compost contiene gran cantidad de materia orgánica disuelta, bacteria,
e iones de potasio. Como resultado, no es té de compost ni debe utilizarse como tal, ya que es el resultado de
condiciones de demasiada humedad y potencialmente anaeróbicas. El Acelerador de compost debe volver a colocarse
en la MEZCLADORA DE COMPOST para incrementar el número de microorganismos presentes.
30
Page 32

SP
¡INSTRUCCIONES DE SEGURIDAD!
!
1. Coloque la MEZCLADORA DE COMPOST en una superficie suave y nivelada. Al colocarla es importante
asegurarse de que la pesada MEZCLADORA DE COMPOST no se caiga.
2. Siempre asegúrese de que la puerta esté cerrada de manera segura antes de girar el tambor.
3. Mantenga las manos alejadas cuando el tambor está girando.
4. Mantenga a los niños alejados cuando el tambor está girando.
5. Siempre deje la puerta en posición vertical para evitar daños a largo plazo en el producto.
PREPARACIÓN DE COMPOSTAJE CON SU MEZCLADORA DE COMPOST
1
SU MEZCLADORA DE COMPOST
DEBE ESTAR UBICADA SOBRE
UNA SUPERFICIE NIVELADA,
PREFERENTEMENTE BAJO EL SOL,
PARA FACILITAR EL CALENTAMIENTO
DEL TAMBOR MEZCLADOR (VEA LA
TABLA A) EL ÁREA UTILIZADA DEBE
SER CERCANA A ALGUNA FUENTE DE
AGUA Y DE ACCESO CONVENIENTE
PARA REALIZAR LA CARGA
2
UBICAR LA MEZCLADORA
DE COMPOST EN SU JARDÍN
COLOCAR EL COMPOST
¡LLENAR LA MEZCLADORA DE
COMPOST ES RÁPIDO Y SENCILLO!
ABRA LA PUERTA Y LLENE EL
TAMBOR CON LOS MATERIALES
RECOMENDADOS (COMO SE INDICA EN
LA TABLA A).
31
Page 33

3
AGREGUE AGUA A TRAVÉS DE LA
PUERTA, UTILIZANDO LA MANGUERA
O REGADERA DEL JARDÍN. REVISE
REGULARMENTE QUE EL CONTENIDO
ESTÉ HÚMEDO. SI LA CARGA ESTÁ
DEMASIADO SECA, ROCÍELA CON AGUA
PARA DEVOLVERLE LA HUMEDAD.
¡NO COLOQUE AGUA DE MÁS! SI HAY
SEÑALES DE DEMASIADA HUMEDAD
(FUERTE OLOR NAUSEABUNDO),
AGREGUE MATERIALES SECOS,
TALES COMO ASERRÍN U HOJAS
TRITURADAS PARA QUE ABSORBAN
EL EXCESO DE HUMEDAD.
AGREGAR AGUA
4
UNA BUENA AERACIÓN ES ESENCIAL PARA EL PROCESO DE DESCOMPOSICIÓN EN SU MEZCLADORA DE
COMPOST. PUEDE CONTROLAR LA CIRCULACIÓN DE AIRE FÁCILMENTE CAMBIANDO LAS POSICIONES
DE LOS RESPIRADORES DE ABIERTA A CERRADA. EN CLIMAS MÁS FRÍOS, SE RECOMIENDA CERRAR
LA MAYORÍA DE LOS RESPIRADORES PARA MANTENER CALIENTE EL CENTRO DEL COMPOST
(DEJANDO UNOS POCOS RESPIRADORES ABIERTOS PARA PERMITIR QUE INGRESE OXÍGENO)
(AERACIÓN)
CERRADO ABIERTO
CONTROLAR LA CIRCULACIÓN DE AIRE
32
Page 34

5
EL DISEÑO DE LA MEZCLADORA
DE COMPOST ELIMINA EL
TRABAJO DURO DEL COMPOSTAJE.
SÓLO PUEDE GIRAR LA MANIJA EN UNA
DIRECCIÓN (COMO SE INDICA). ESTO
LE PERMITIRÁ CERRAR EL TAMBOR
EN POSICIÓN PARA DESCARGAR.
CINCO REVOLUCIONES CADA ALGÚN
DÍA SON SUFICIENTES PARA UNA
MEZCLA COMPLETA DEL COMPOST.
CUANDO HAYA TERMINADO DE GIRAR
EL TAMBOR, COLOQUE LA PUERTA EN
POSICIÓN VERTICAL. ESTO COLOCA
LA UNIDAD DE AERACIÓN/DRENAJE
EN EL FONDO, PERMITIENDO LA
EXTRACCIÓN DEL TÉ DE COMPOST.
MEZCLAR EL COMPOST
!
ASEGÚRESE SIEMPRE DE QUE LA PUERTA ESTÉ CERRADA CORRECTAMENTE ANTES DE GIRAR EL TAMBOR.
6
LUEGO DE COLOCAR LA PUERTA
EN POSICIÓN VERTICAL, COLOQUE
EL BOTÓN DEL RESPIRADOR EN EL
MEDIO PARA PERMITIR QUE EL TÉ
DE COMPOST DRENE. COLOQUE UN
BALDE DEBAJO DEL TAMBOR, Y EL
TÉ DE COMPOST COMENZARÁ A CAER
LENTAMENTE.
EXTRACCIÓN DE LÍQUIDOS DE COMPOST (TÉ)
SI DESEA MANTENER EL FLUIDO DEL “TÉ DE COMPOST” DENTRO DEL TAMBOR,
!
ASEGÚRESE DE QUE EL BOTÓN DEL RESPIRADOR ESTÉ EN LA POSICIÓN DE CERRADO
33
Page 35

7
EL COMPOST PUEDE UTILIZARSE
CUANDO SE CONVIERTE EN MATERIAL
HÚMICO QUE SE DESMIGAJA CON
FACILIDAD, DE COLOR MARRÓN
OSCURO Y QUE HUELE Y TIENE
UNA TEXTURA SIMILAR A LA DE LA
TIERRA, Y CUANDO YA NO PUEDEN
RECONOCERSE LOS INGREDIENTES
ORIGINALES. A FIN DE DESCARGAR EL
COMPOST PROCESADO, SIMPLEMENTE
COLOQUE UN BALDE O UNA
CARRETILLA FRENTE AL TAMBOR,
RETIRE LA PUERTA DESMONTABLE Y
GIRE EL TAMBOR HASTA QUE LA CARGA
PUEDA DESCARGARSE FÁCILMENTE.
DESCARGA DEL COMPOST
8
ESPARZA EL COMPOST PREPARADO
EN UNA CAPA ESPESA (3"-4" / 7-10CM)
SOBRE LA SUPERFICIE DEL SUELO.
DESDE ALLÍ SERÁ LENTAMENTE
ABSORBIDO EN LA TIERRA POR
GUSANOS Y OTRAS CRIATURAS. EL
DESMENUZADO ORGÁNICO DISMINUYE
LAS MALEZAS ANUALES, AYUDA A
RETENER LA HUMEDAD, Y ALIMENTA
A LA TIERRA CON VALIOSOS
NUTRIENTES.
EL COMPOST PUEDE UTILIZARSE:
1. PARA ENRIQUECER JARDINES
DE FLORES Y VEGETALES.
2. PARA MEJORAR LA TIERRA QUE
RODEA ÁRBOLES Y ARBUSTOS.
3. COMO SUSTITUTO DE LA TIERRA
PARA PLANTAS DE INTERIOR
Y MACETAS.
4. COMO PARTE DE UNA MEZCLA
INICIAL DE SEMILLAS.
5. COMO CAPA DE ABONO PARA
EL CÉSPED.
ESPARCIR COMPOST EN SU JARDÍN
34
Page 36

Made in Israel by Keter Plastic Ltd.
2 Sapir St. Industrial Area,
Herzliya 46852, Israel
A-2160-0 554390
 Loading...