


14-6, 1-chome, Dogenzaka, Shibuya-ku, Tokyo, 150-8501 Japan
Tel: 81(3)5457-7111 • Fax: 81(3)5457-7110
http://www.kenwoodcorp.com
1701 Junction Court, Suite 100 • San Jose, CA., USA 95112
Tel: (408) 467-7900 • Fax: (408) 451-1150
Toll-Free: 1-888-730-4206
Web: http://www.kenwoodtech.com
Technical Support: http://www.kenwoodtech.com/tech_support.html
BLK
52X TrueX™SCSI CD-ROM Drive
Thanks for choosing KENWOOD.
Simply follow the quick installation steps in this guide and
the 52X TrueX™ SCSI CD-ROM drive will take you to the next
level of CD-ROM performance.
Part No. UCRC5012
BLK
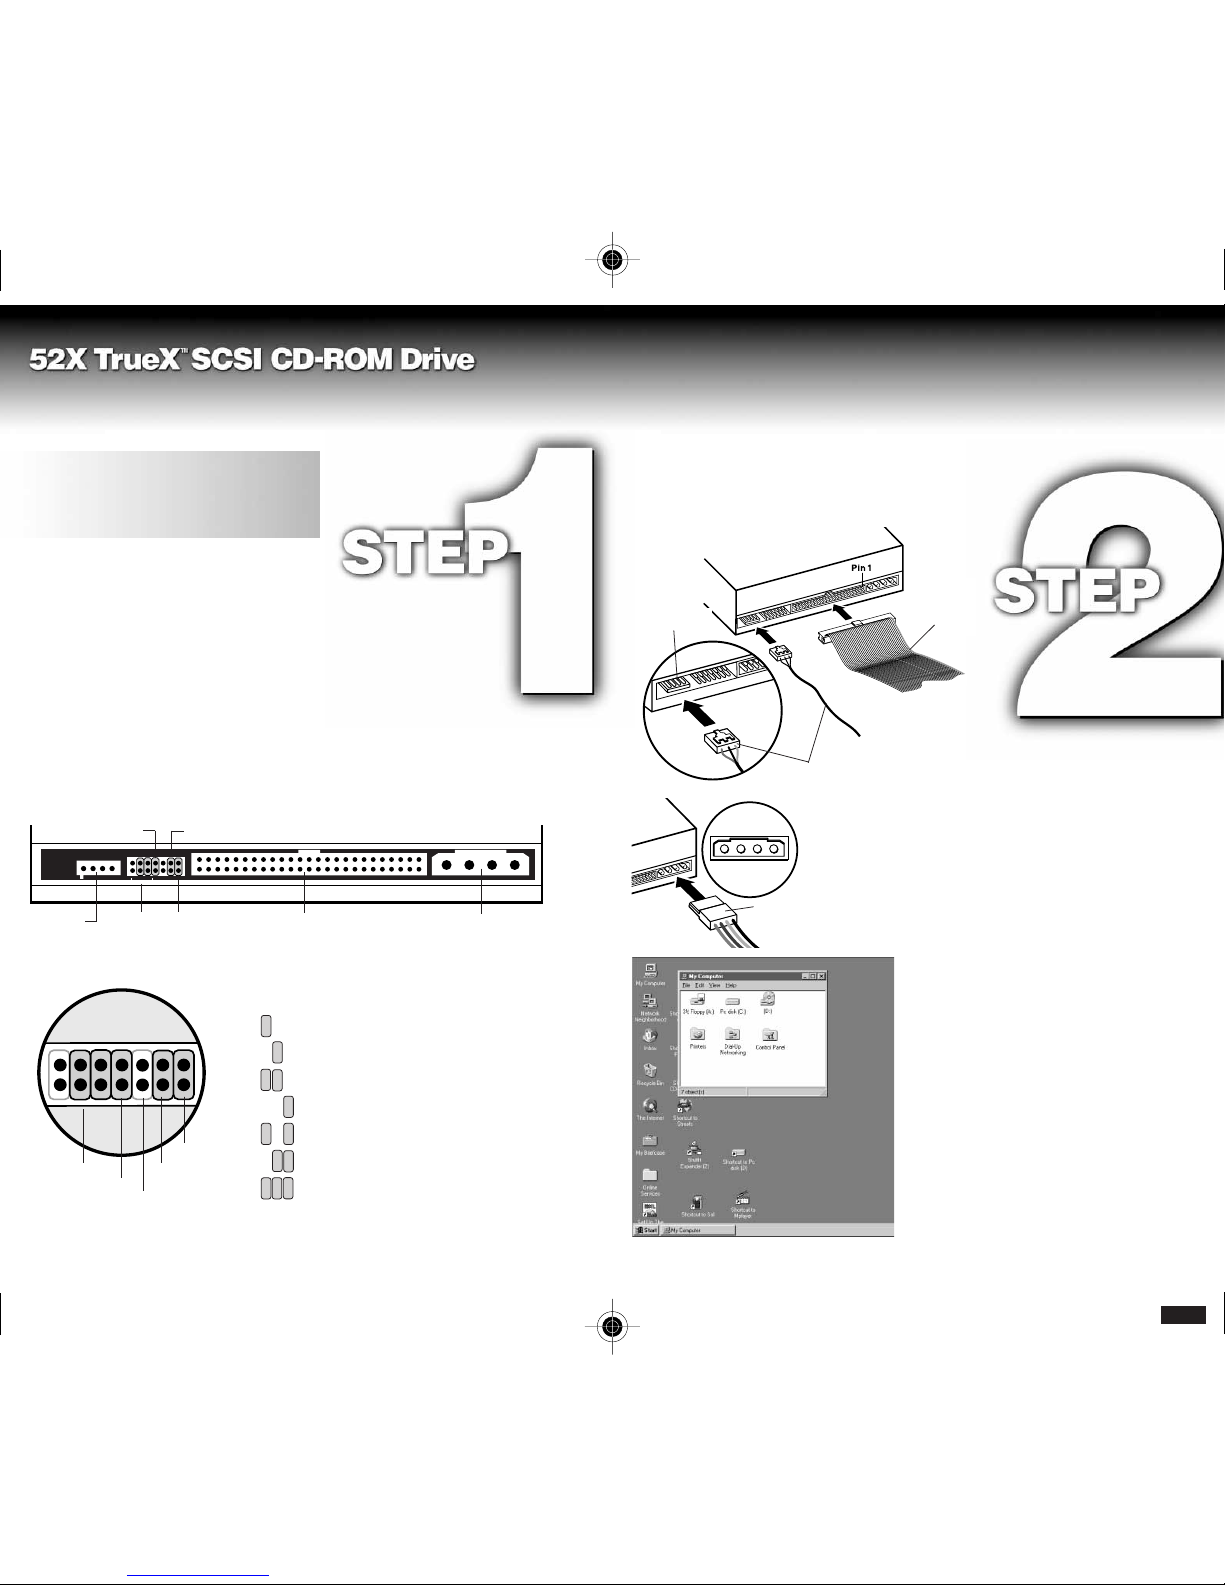
TURN THE POWER OFF
Locate SCSI ID Settings and Termination
NOTE: This Quick Install Guide is for
experienced users only!
For less experienced users, please refer to the
installation sections of your User’s Guide.
INSTALL YOUR KENWOOD 52X TRUEX SCSI CD-ROM DRIVE
INTO AN AVAILABLE 5.25" HALF-HEIGHT DRIVE BAY
INSTALLATION
COMPLETED!
Congratulations– your Kenwood drive should be
successfully installed. If there are problems accessing
the drive, refer to the Troubleshooting section which is
in your User’s Guide as well as on the web at:
http://www.kenwoodtech.com/tech_support.html.
If you are still having problems, please call our toll-free
technical support center at 1-888-730-4206 or
send email at support@kenwoodtech.com
Connect the SCSI ribbon cable from the SCSI
interface card to the back of the 52X TrueX™
SCSI CD-ROM drive
Connect the existing audio cable to
the audio connector pins, and the power
cable to the power connector
Your Kenwood drive will automatically be detected by
Windows® 95 or higher.
Parity
ON
Block size
(2048 Bytes default)
Termination ON
The 52X TrueX™ SCSI CD-ROM drive ships with the SCSI ID set to 6, Parity ON, block size
set to 2048 Bytes* and Termination ON. Unless you are adding additional devices to the SCSI
chain, you won’t need to change these settings. To change the SCSI ID, pull on the two left side jumpers,
and use the chart (see Figure 1-2) to reconfigure the ID. To turn the termination off (multiple devices), remove the
jumper on Pin 5. In a multiple device configuration, DO NOT remove the jumper on Pin 5 when the 52X TrueX™
SCSI CD-ROM drive is the last device on your SCSI daisy chain.
0 1 2 3 4 5 6
•••••••
•••••••
SCSI ID 6
(factory
default)
SCSI ID= 0 (Pins 0-3 removed)
SCSI ID= 1 (Jumper on Pin 0)
SCSI ID= 2 (Jumper on Pin 1)
•••••••
•••••••
SCSI ID= 3 (Jumpers on Pins 0, 1)
•••••••
•••••••
SCSI ID= 4 (Jumper on Pin 2)
•••••••
•••••••
SCSI ID= 5 (Jumpers on Pins 0, 2)
•••••••
•••••••
SCSI ID= 6 (Pins 1, 2– factory default)
•••••••
•••••••
SCSI ID= 7 (reserved)
•••••••
•••••••
•••••••
•••••••
0123456
* To change the Block Size from the default of 2048 Bytes
(no jumper) to a Block Size of 512 Bytes, remove jumper
from Pin 6 and install jumper on Pin 4.
{
Audio out
SCSI ID
Jumpers
Parity Jumper (on)
Termination Jumper (on)
50-pin internal SCSI connector Power connector
{
SCSI cable
(red line
aligns with
Pin 1)
Audio connector
Audio connector
pins
Power cable
After the hardware installation and your system restart, Windows® 95
should automatically find and install the appropriate drivers. The 52X
TrueX™ SCSI CD-ROM drive is Plug and Play, which means that in a
Plug and Play system, it will be recognized immediately by Windows®
95. If your system supports Plug and Play, after double-clicking on the
‘My Computer’ icon on the Windows desktop, you should see a
CD-ROM drive icon (see Figure 2-2). If Windows 95 does not have the
necessary files, you will need to use the software provided by the SCSI
Interface card manufacturer.
Figure 1-1
Figure 1-2 SCSI ID Jumper Settings
Reserved
Reserved
Figure 2-2
Figure 2-1
 Loading...