

Page 1

INSTRUCTION MANUAL
MODE D’EMPLOI
MANUAL DE INSTRUCCIONES
MANUALE DI ISTRUZIONI
BEDIENUNGSANLEITUNG
GEBRUIKSAANWIJZING
ProTalk
TK-3201
UHF FM TRANSCEIVER
ÉMETTEUR-RÉCEPTEUR FM UHF
TRANSCEPTOR DE FM UHF
RICETRASMETTITORE FM UHF
UHF-FM-TRANSCEIVER
UHF FM ZENDONTVANGER
© B62-1807-20 (E, T)
09 08 07 06 05 04 03 02
Page 2

ProTalk
TK-3201
UHF FM TRANSCEIVER
INSTRUCTION MANUAL
Page 3

THANK YOU
We are grateful for your purchase of this KENWOOD product
and welcome you to the Private Mobile Radio service
(PMR 446). PMR is a mobile communication system for both
business and personal use without the need for a license and
with no call charges.
Your KENWOOD 2-way Private Radio is called a
“transceiver”, meaning “transmitter & receiver”. We believe
this easy-to-use transceiver will provide you with dependable
and reliable communications. This KENWOOD transceiver is
a precision device. Treat it with care, and you will enjoy years
of reliable operation.
FEATURES
• 16 channels with 8 operating frequencies and 38 tone/ code
settings for each channel allows you to ignore unwanted calls.
• Built in voice scrambler gives you complete privacy for your
conversations.
• Hands free operation when using an optional headset.
•Voice announcement lets you know which channel you have
selected and which settings you have made when reassigning
key functions and channel settings.
OPERATING CONDITIONS
snoitacolnepO
)snoitcurtsboon(
saeralaitnediseR
)sgnidliubraen(
decrofnieretercnoc/leetsnI
sgnidliub
sesirhgihnIsroolf51otpU
mk4.6otpU
mk4.2otpU
2
m085,81otpU
Note: The listed ranges are based on field testing and may vary with
your operating conditions and individual transceiver.
Page 4

PRECAUTIONS
• Refer service to qualified technicians only. Do not modify
or attempt to adjust this transceiver for any reason.
• Do not expose the transceiver to long periods of direct
sunlight, nor place it close to heating appliances.
• Do not place the transceiver in excessively dusty, humid,
or wet areas, nor on unstable surfaces.
•Avoid extremes in exposure to weather, heat, and cold.
This transceiver can be used in mild weather conditions,
but it is not waterproof.
•Turn OFF your transceiver while taking on fuel or while
parked in gasoline service stations.
• Do not operate your transceiver or charge your battery
pack in an explosive atmosphere (gases, dust, fumes,
etc.).
• If an abnormal odor or smoke is detected coming from the
transceiver, immediately switch OFF the power and
remove the battery pack from the transceiver. Contact
your KENWOOD dealer.
◆ Government law prohibits the operation of unlicensed radio
transmitters within the territories under government control.
◆ Illegal operation is punishable by fine and/or imprisonment.
Safety: It is important that the operator is aware of, and
understands, hazards common to the operation of any
transceiver.
i
Page 5

CONTENTS
UNPACKING AND CHECKING EQUIPMENT ................................... 1
SUPPLIED ACCESSORIES ......................................................... 1
ORIENTATION .................................................................... 3
PREPARATION ................................................................... 4
INSTALLING/ REMOVING THE BATTERY PACK ...................................... 4
CHARGING THE Ni-MH BATTERY PACK .......................................... 5
INSTALLING THE BELT CLIP ...................................................... 7
INSTALLING THE COVER OVER THE SPEAKER/ MICROPHONE JACKS .................. 7
INSTALLING THE OPTIONAL SPEAKER/ MICROPHONE (OR HEADSET) ................. 8
GETTING STARTED .............................................................. 9
VOICE OPERATED TRANSMISSION (VOX) .................................. 10
VOX GAIN ................................................................... 10
VOX OPERATION .............................................................. 12
KEY FUNCTIONS ............................................................... 13
CALL KEY .................................................................... 13
MONITOR KEY ................................................................ 13
BACKGROUND OPERATIONS ................................................. 14
TIME-OUT TIMER (TOT) ....................................................... 14
LOW BATTERY WARNING ....................................................... 14
CHANNEL ANNUNCIATION ....................................................... 14
QUIET TALK (QT)/ DIGITAL QUIET TALK (DQT) ................................ 15
CHANNEL SETUP MODE ....................................................... 16
CHANNEL OPERATING FREQUENCIES ............................................. 17
QUIET TALK (QT)/ DIGITAL QUIET TALK (DQT) SETTINGS ....................... 19
CHANNEL CONFIRMATION MODE ................................................ 22
KEY ASSIGNMENT MODE ..................................................... 23
CALLING ALERT ............................................................... 25
KEY LOCK .................................................................... 26
MONITOR/ SQUELCH OFF ...................................................... 26
SCAN ......................................................................... 27
SCRAMBLER ................................................................... 29
OPTIONAL ACCESSORIES ..................................................... 30
TROUBLESHOOTING GUIDE .................................................. 31
ii
Page 6

UNPACKING AND CHECKING EQUIPMENT
Carefully unpack the transceiver. We recommend you identify
the items listed in the following table before discarding the
packing material. If any items are missing or have been
damaged during shipment, file a claim with the carrier
immediately.
SUPPLIED ACCESSORIES
metI rebmuNtraP ytitnauQ
regrahcyrettaBXX-9690-80W1
rotpadaCA
tekcarb
pilctleBXX-3170-92J1
teswercSXX-3402-99N1
dracytnarraW——1
launamnoitcurtsnIXX-7081-26B1
Note: A market code (E or T) can be found on the label attached to
the package box.
EedoctekraMXX-1790-80W1
TedoctekraMXX-2790-80W1
)N92-BNK(kcapyrettabHM-iNXX-0001-90W1
revockcajenohporcim/rekaepSXX-0860-90B1
gnikcolenohporcim/rekaepS
XX-2745-91J1
1
Page 7
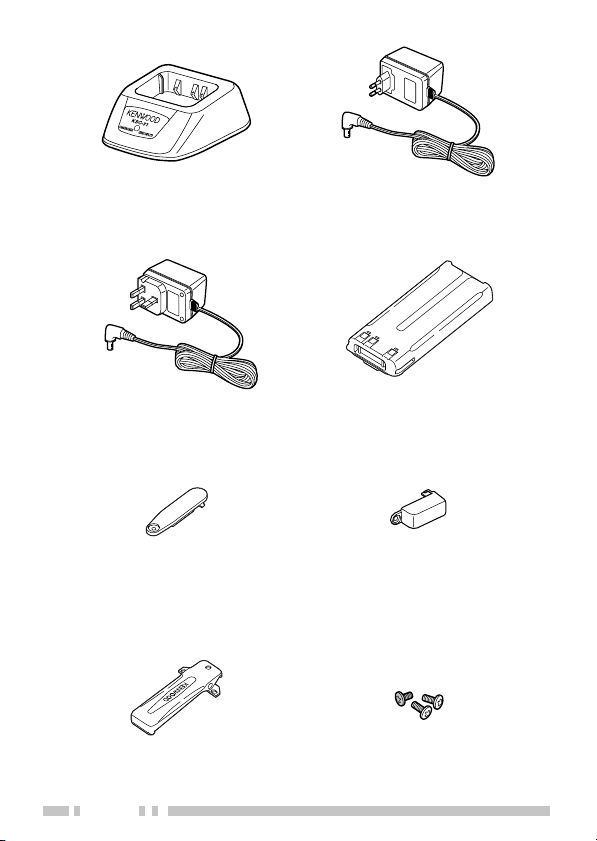
Battery charger
AC adaptor (E)
AC adaptor (T)
Speaker/ microphone
jack cover
Belt clip
2
Ni-MH battery pack
(KNB-29N)
Speaker/ microphone
locking bracket
Screw set
Page 8

Antenna
LED indicator
Indicates the transceiver
status. Lights red while
transmitting, green while
receiving, and flashes
red while the battery
power is low while
transmitting.
PTT (Push to
Talk) switch
Press and hold,
then speak into
the microphone
to transmit.
Call key
Press before
making a call, to
alert the other
party members
{page 13}.
ORIENTATION
Channel selector
Rotate to change the
operating channel
from 1 ~ 16.
Power switch/
Volume control
Turn clockwise to
switch the power ON
and counterclockwise
to switch the power
OFF. Rotate to adjust
the volume.
Speaker/
microphone
jacks
Monitor key
Press and hold
to hear background
noise and listen
for weak signals
{page 13}.
Note: The Call and Monitor keys can be reprogrammed {page 23}.
Battery pack
(KNB-29N)
3
Page 9
PREPARATION
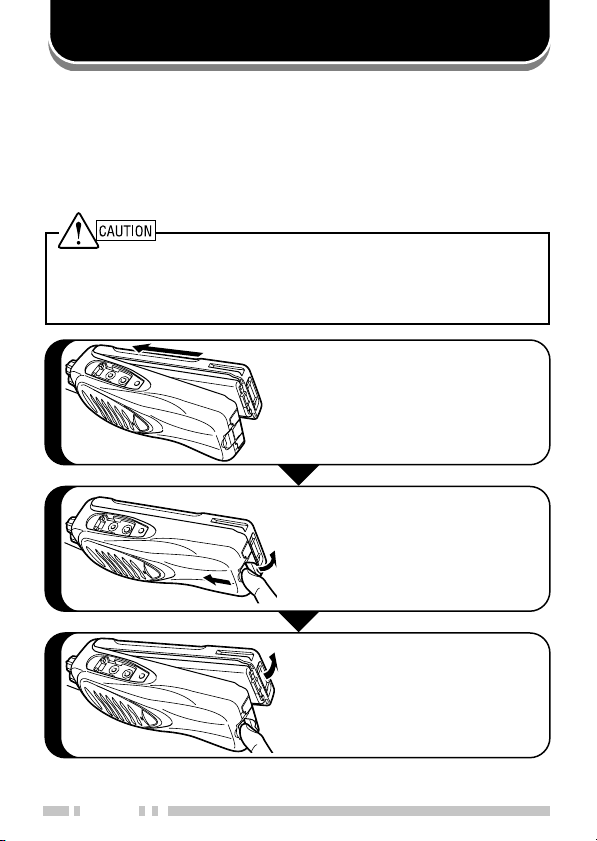
INSTALLING/ REMOVING THE BATTERY PACK
The battery pack is not charged at the factory; charge it
before use {pages 5 and 6}.
Average battery pack life (calculated using 5% transmit time,
5% receive time, and 90% standby time) is 16 hours.
◆ Do not short the battery terminals.
◆ Do not dispose of the battery by fire.
◆ Never attempt to remove the casing from the battery pack.
Align the battery pack with the
back of the transceiver, then
1
2
press the battery pack and
transceiver firmly together until
the release latch on the base of
the transceiver locks.
To remove the battery pack, lift
the safety catch on the base of
the transceiver, then press the
release latch underneath the
safety catch.
While pressing the release
3
4
latch, pull the battery pack
away from the transceiver.
Page 10

CHARGING THE Ni-MH BATTERY PACK
The initial charging of the battery pack after purchase or
extended storage (greater than 2 months) will not bring the
battery pack to its normal operating capacity. After repeating
the charge/ discharge cycle 2 or 3 times, the operating
capacity will increase to normal.
◆ Do not recharge the battery pack if it is already fully charged.
Doing so may cause the life of the battery pack to shorten or the
battery pack may be damaged.
◆ After charging the battery pack, disconnect it from the charger.
Charging the battery pack for more than 5 days may reduce the
battery pack life due to overcharging.
Note:
◆ The ambient temperature should be between 5°C and 40°C while
charging is in progress. Charging outside this range may not
fully charge the battery.
◆ Always switch OFF the transceiver equipped with a Ni-MH
battery pack before charging. Using the transceiver while
charging its battery pack will interfere with correct charging.
◆ The battery pack life is over when its operating time decreases
even though it is fully and correctly charged. Replace the battery
pack.
5
Page 11
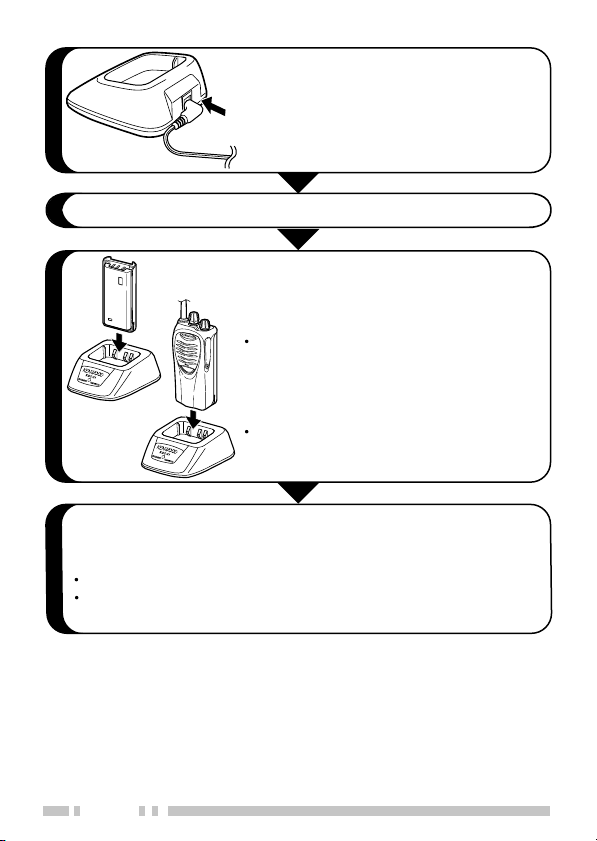
Plug the AC adaptor cable into the
1
adaptor jack located at the rear of
the charger.
2
Plug the AC adaptor into an AC outlet.
Slide the Ni-MH battery pack or
transceiver with a Ni-MH battery
pack into the charger.
Make sure the battery pack terminals
3
are in contact with the charger
terminals by aligning the grooves of
the battery pack with the tabs of the
charger.
The charger LED lights red and
charging begins.
When charging is completed, the indicator lights green.
Remove the battery pack or the transceiver with a battery
pack from the charger.
4
It takes approximately 3 hours to charge the battery pack.
When the charger will not be used for a long time, unplug the
AC adapter from the AC outlet.
6
Page 12

INSTALLING THE BELT CLIP
If necessary, attach the belt clip using
the two supplied 3 x 8 mm screws.
Note: If the belt clip is not installed, its
mounting location may get hot during
continuous transmission or when left
sitting in a hot environment.
Do not use glue which is designed to prevent screw loosening when
installing the belt clip, as it may cause damage to the transceiver.
Acrylic ester, which is contained in these glues, may crack the
transceiver’s back panel.
INSTALLING THE COVER OVER THE SPEAKER/ MICROPHONE JACKS
If you are not using a speaker/
microphone, install the cover over
the speaker/ microphone jacks using
the supplied 3 x 6 mm screw.
Note: To keep the transceiver water
resistant, you must cover the speaker/
microphone jacks with the supplied
cover.
7
Page 13

INSTALLING THE OPTIONAL SPEAKER/ MICROPHONE (OR HEADSET)
Insert the speaker/ microphone
(or headset) plugs into the
speaker/ microphone jacks.
1
2
Note: Always switch OFF the
transceiver power when installing
or removing a speaker/ microphone
or headset.
Attach the locking bracket using
the supplied 3 x 6 mm screw.
Note: The transceiver is not fully
water resistant while using the
speaker/ microphone.
8
Page 14

GETTING STARTED
Turn the Power switch/ Volume control
1
1
2
3
4
1
1
clockwise to switch the transceiver
power ON.
A beep sounds.
Press and hold the Monitor key to hear
background noise, then rotate the
Power switch/ Volume control to adjust
the volume.
Rotate the Channel selector to select
your desired channel.
When you receive an appropriate signal,
you will hear audio from the speaker.
To make a call, press and hold the PTT
switch, then press the Call key to alert
the other party members that you are
making a call. Release the Call key to
stop sending your alert tone.
Continue pressing the PTT switch, then
speak into the microphone to transmit.
Release the PTT switch to receive.
5
The LED lights red while transmitting.
For best sound quality, speak into the
microphone in your normal voice while
holding the microphone approximately
3 to 4 cm from your lips.
9
Page 15

VOICE OPERATED TRANSMISSION (VOX)
Using the VOX feature, you can operate the transceiver
hands-free. In order to use this feature, however, you must
use an optional headset; VOX will not function with the built-in
microphone. For best operating conditions, we recommend
you use an optional headset with both an ear piece and a
microphone on a boom that rests in front of your mouth.
With VOX activated, your voice level will determine when the
transceiver transmits. Because of this, you must take care
that the ambient noise around you is not so loud that it causes
the transceiver to transmit. Due to the automatic switching
between transmission and reception, we recommend you set
the VOX Gain level such that it will not activate transmission
when in an area with excessive ambient noise.
VOX GAIN
To activate VOX and set the VOX Gain level:
With the transceiver power OFF,
connect the headset to the transceiver
1
{page 8}.
The VOX function does not activate
when a headset is not connected to
the speaker/ microphone jack of the
transceiver.
Press and hold the Call key while
turning the transceiver power ON.
2
1
Continue to hold the Call key until the
LED lights orange and the transceiver
announces “VOX ”, then release the key.
Upon releasing the key, the transceiver
will announce the current VOX Gain level.
10
Page 16

Press the Call key to increase the
VOX Gain level and the Monitor key
to decrease the level.
3
The VOX Gain can be adjusted from
level 1 to level 10 and OFF.
The transceiver announces the VOX
Gain level as you adjust it. If OFF is
selected, the transceiver announces “Off”.
Press the PTT switch within 5 seconds
to save the setting, otherwise the
4
operation will cancel.
A beep will sound and the transceiver
will announce the new VOX Gain level.
5
1
Note:
◆ VOX Gain level 1 is the least sensitive and VOX Gain level 10 is
the most sensitive.
◆ If a speaker/ microphone is connected to the transceiver while
the VOX function is switched ON and the VOX Gain level is
configured to a higher, more sensitive level, louder received
signals may cause the transceiver to start transmission.
◆ The transceiver will automatically return to normal operation if no
action is performed for 5 seconds.
Turn the transceiver power OFF and
then ON again to activate VOX.
11
Page 17

VOX OPERATION
Set up a VOX Gain level from 1 to 10 {page 10}.
1
To transmit, simply speak into the headset microphone.
You do not need to press the PTT switch; the transceiver
2
automatically detects your voice and begins transmitting.
To stop transmitting, stop speaking.
Transmission will continue momentarily after you stop
3
speaking, so ensure your transmission will not be cut off.
To exit VOX mode, set the VOX Gain level {page 10} to
4
OFF.
Note:
◆ While transmitting via VOX, all keys other than power OFF are
disabled.
◆ When you operate the VOX function, you must use an optional
KHS-1 or KHS-21 accessory.
◆ VOX will not operate when the battery level becomes too low.
(The LED will flash red in this state.)
12
Page 18

KEY FUNCTIONS
CALL KEY
The default function of the Call key is Calling Alert.
Calling alert tones are used to identify yourself to your party
members and inform them that you are about to make a call.
Your dealer can set up your transceiver with 1 of 10 different
calling alert tones. If each party member uses a different
calling alert tone, it is easy to know who is making the call
To make a call using the calling alert tone, press and hold the
PTT switch, then press the Call key.
• The calling alert tone will transmit for the duration you press the
Call key.
MONITOR KEY
The default function of the Monitor key is Squelch Off
Momentary.
When no signals are present, the squelch on the transceiver
automatically mutes the speaker so you will not hear
background noise. Using the Monitor key, you can disable the
squelch to unmute the speaker at any time. This feature is
useful for a variety of reasons:
• It allows you to confirm the channel activity so you don’t make a
call while another party is using the same channel.
• It allows you to adjust the volume level without having to wait for
a call.
• When receiving a call that is intermittent due to a weak signal,
disabling the squelch will allow you to listen to the call without it
continuously cutting out.
To manually deactivate the squelch, press and hold the
Monitor key.
To return to normal operation, simply release the Monitor key.
13
Page 19

BACKGROUND OPERATIONS
TIME-OUT TIMER (TOT)
The purpose of the Time-out Timer is to prevent you from
using a channel for an extended period of time. This function
is useful, for example, when you accidentally keep the PTT
switch pressed. Additionally, by limiting the amount of time
you can continuously transmit, this feature helps you save on
battery power consumption.
If you continuously transmit for 60 seconds (default), the
transceiver will stop transmitting and an alert tone will sound.
To stop the tone, release the PTT switch. You can press the
PTT switch again to resume transmitting.
LOW BATTERY WARNING
Low Battery Warning alerts you when the battery needs to be
recharged or replaced.
While operating the transceiver, if the battery power becomes
low, an alert tone will sound every 30 seconds and the LED
indicator will blink red. Replace or recharge the battery pack
at this time.
CHANNEL ANNUNCIATION
When changing the channel, the transceiver will announce the
selected channel number after you stop changing the
channel. Likewise, the transceiver will announce the current
channel after you turn the transceiver power ON. (Channel
Annunciation can be activated or deactivated by your dealer.)
14
Page 20

QUIET TALK (QT)/ DIGITAL QUIET TALK (DQT)
Quiet Talk (QT) and Digital Quiet Talk (DQT) are functions that
reject signals from undesired parties that are using the same
channel as you. You will hear audio from the speaker only
when you receive a signal that contains a QT tone or a DQT
code that matches the one set up on the channel you are
using. If a call containing a different tone or code is made on
the same channel you are using, squelch will not open and
you will not hear the call. Likewise, when you transmit on a
channel set up with QT or DQT, the receiving station must
have a matching tone or code in order to hear your call.
Although it may seem like you have your own private channel
while using QT or DQT, other parties can still hear your calls if
they set up their transceiver with the same tone or code.
The default QT/DQT settings for each channel are provided in
the table on page 16.
15
Page 21

CHANNEL SETUP MODE
This transceiver allows you to reprogram each of the channels
with different frequencies and Quiet Talk/ Digital Quiet Talk
settings. The table below lists the default channel settings.
lennahC
rebmuN
1 152600.64401zH8.49
2 857390.64480zH5.88
3 352130.64431zH5.301
4 657860.64450zH7.97
5 457340.64471zH8.811
6 257810.64481zH0.321
7 752180.64491zH3.721
8 552650.64470zH4.58
9 152600.64441zH2.701
01 857390.64451zH9.011
11 352130.64461zH8.411
21 657860.64460zH5.28
31 457340.64472N231D
41 257810.64482N551D
51 552650.64492N431D
61 752180.64403N342D
Note: If you do not select an operating frequency for a channel, you
will not be able to select a Quiet Talk/ Digital Quiet Talk setting for that
same channel.
elbaT
rebmuN
enoT
)zHM(ycneuqerF
rebmuN
gnitteSTQD/TQ
16
Page 22

CHANNEL OPERATING FREQUENCIES
To change the operating frequency of a channel:
With the transceiver power OFF, press
and hold the PTT switch and Call key
1
Release the PTT switch and Call key.
2
The transceiver announces “Channel”.
3
4
while turning the transceiver power ON.
1
Continue to hold the PTT switch and Call
key until the LED lights orange and the
transceiver announces “Self”.
Press and release the PTT switch, then
rotate the Channel selector to your
desired channel.
1
Upon pressing and releasing the PTT
switch, a beep will sound and the
transceiver announces “S`akdydqn”-
Press the Call key to increment the
Table number or the Monitor key to
decrement the number, to select the
new channel frequency.
Table numbers and their corresponding
operating frequencies are provided in the
table on page 18.
A voice announcement will inform you of
the currently selected Table number.
17
Page 23

Press the PTT switch within 5 seconds
to save the setting, otherwise the
5
operation will cancel.
A beep will sound.
Repeat steps 3 to 5 to set up another
channel.
6
1
Note: The transceiver will automatically return to normal operation if
no action is performed for 5 seconds.
rebmuNelbaT
then ON again to activate the new
settings.
gnitarepO
ycneuqerF
rebmuNelbaT
0 ——
1 zHM52600.644 5 zHM52650.644
2 zHM57810.644 6 zHM57860.644
3 zHM52130.644 7 zHM52180.644
4 zHM57340.644 8 zHM57390.644
18
Turn the transceiver power OFF and
gnitarepO
ycneuqerF
Page 24

QUIET TALK (QT)/ DIGITAL QUIET TALK (DQT) SETTINGS
To change the QT/DQT settings of a channel:
With the transceiver power OFF, press
and hold the PTT switch and Call key
1
Release the PTT switch and Call key.
2
The transceiver announces “Channel”.
while turning the transceiver power ON.
1
Continue to hold the PTT switch and Call
key until the LED lights orange and the
transceiver announces “Self”.
3
select QT/DQT setup.
The transceiver announces “Tone”.
Press the Call key or Monitor key to
Press and release the PTT switch, then
rotate the Channel selector to your
4
desired channel.
1
Upon pressing and releasing the PTT
switch, a beep will sound and the
transceiver announces “Tone one”.
19
Page 25

Press the Call key to increment the
Tone number or the Monitor key to
decrement the number, to select the
new tone or code.
Tone numbers and their corresponding
5
tones/ codes are provided in the table
on page 21.
Press and hold the Call or Monitor key
to increment/ decrement the Tone
number by 5 at a time.
A voice announcement will inform you of
the currently selected Tone number.
Press the PTT switch within 5 seconds
to save the setting, otherwise the
6
operation will cancel.
A beep will sound.
Repeat steps 4 to 6 to set up another
channel.
7
1
Note: The transceiver will automatically return to normal operation if
no action is performed for 5 seconds.
then ON again to activate the new
settings.
20
Turn the transceiver power OFF and
Page 26

enoT
rebmuN
TQD/TQ
gnitteS
enoT
rebmuN
TQD/TQ
gnitteS
enoT
rebmuN
1 zH0.76 41 zH2.701 72 N231D
2 zH9.17 51 zH9.011 82 N551D
3 zH4.47 61 zH8.411 92 N431D
4 zH0.77 71 zH8.811 03 N342D
5 zH7.97 81 zH0.321 13 N113D
6 zH5.28 91 zH3.721 23 N643D
7 zH4.58 02 zH8.131 33 N513D
8 zH5.88 12 zH5.631 43 N153D
9 zH5.19 22 zH3.141 53 N324D
01 zH8.49 32 zH2.641 63 N466D
11 zH4.79 42 zH4.151 73 N134D
21 zH0.001 52 zH7.651 83 N327D
31 zH5.301 62 zH2.261 ffO FFO
Note: The QT/DQT settings can be changed by your dealer.
TQD/TQ
gnitteS
21
Page 27

CHANNEL CONFIRMATION MODE
To confirm your channel settings:
With the transceiver power OFF, press
and hold the PTT switch while turning
1
Release the PTT switch.
The transceiver announces the channel Table number and
2
Tone number of the current channel.
3
1
Note: The transceiver will automatically return to normal operation if
no action is performed for 5 seconds.
the transceiver power ON.
1
Continue to hold the PTT switch until the
LED lights orange and the transceiver
announces “Channel Confirm”.
Rotate the Channel selector to your
desired channel within 5 seconds,
otherwise the operation will cancel.
The transceiver announces the channel
Table number and Tone number of the
selected channel.
22
Page 28

KEY ASSIGNMENT MODE
This transceiver allows you to reprogram the Call and
Monitor keys with any of the functions listed in the table
below. Explanations on the use of each function are provided
on the following pages.
rebmuNelbaT emaNnoitcnuF
0 )noitcnufon(enoN
1 (trelAgnillaC llaC )tluafedyek
2 kcoLyeK
3 pukcaBhtiwkcoLyeK
4 rotinoM
5 yratnemoMrotinoM
6 nacS
7 eteleDyraropmeT+nacS
8 relbmarcS
9 ffOhcleuqS
01 (yratnemoMffOhcleuqS rotinoM )tluafedyek
11 eteleDyraropmeT
23
Page 29

To change the functions of the Call and Monitor keys:
With the transceiver power OFF, press
and hold the Call and Monitor keys
1
while turning the transceiver power ON.
1
Continue to hold the Call and Monitor
keys until the LED lights orange and
the transceiver announces “Setup”.
Continue to press and hold the key to
be reprogrammed (either the Call key
or the Monitor key), while releasing the
remaining key.
2
Release the key.
3
The transceiver will announce “Table
zero” {page 23}.
If you continue to hold both keys, or if
you release both keys, the operation will
cancel in 5 seconds.
Press the Call key to increment the
Table number or the Monitor key to
decrement the number, to select the
4
new key function
Table numbers and their corresponding
functions are provided in the table on
page 23.
A voice announcement will inform you of
the currently selected Table number.
24
Page 30

Press the PTT switch within 5 seconds
to save the setting, otherwise the
5
operation will cancel.
A beep will sound and the transceiver
will announce the new Table number.
6
1
Note: The transceiver will automatically return to normal operation if
no action is performed for 5 seconds.
then ON again to activate the new
settings.
CALLING ALERT
Calling alert tones are used to identify yourself to your party
members and inform them that you are about to make a call.
Your dealer can set up your transceiver with 1 of 10 different
calling alert tones. If each party member uses a different
calling alert tone, it is easy to know who is making the call.
To make a call using the calling alert tone, press and hold the
PTT switch, then press the key programmed as Calling Alert.
• The calling alert tone will transmit for the duration you press the
Calling Alert key.
25
Turn the transceiver power OFF and
Page 31

KEY LOCK
Press and hold the key programmed as Key Lock for
1 second to lock/ unlock the transceiver keys. The following
keys/ functions can still be used when Key Lock is active:
Calling Alert, Key Lock, Monitor, Monitor Momentary, PTT,
Squelch Off, Squelch Off Momentary, and Volume.
If the key is programmed “with Backup”, when the transceiver
power is turned OFF and then ON again, the keys remain
locked. Otherwise, when the transceiver power is turned OFF
and then ON again, the Key Lock function will be cancelled.
MONITOR/ SQUELCH OFF
You can use the key programmed as Monitor or Squelch Off
to listen to weak signals that you cannot hear during normal
operation, to deactivate channel signalling, and to adjust the
volume when no signals are present on your selected
channel.
• Monitor: Momentarily press to deactivate Quiet Talk or Digital
Quiet Talk signalling. Press the key again to return to normal
operation.
• Monitor Momentary: Press and hold to deactivate Quiet Talk or
Digital Quiet Talk signalling. Release the key to return to normal
operation.
• Squelch Off: Momentarily press to hear background noise.
Press the key again to return to normal operation.
• Squelch Off Momentary: Press and hold to hear background
noise. Release the key to return to normal operation.
Note: The default Squelch level is set to 5 (out of 10). This value
can be adjusted by your dealer.
26
Page 32

SCAN
Scan is useful for monitoring signals on the transceiver
channels. When scanning, the transceiver checks for a signal
on each channel and only stops if a signal is present.
If the QT/DQT matches, the transceiver stops at the channel
and opens the squelch so you can listen to the call. If the
QT/DQT does not match, the call is ignored and scanning
continues.
Note: You can only use Scan if there are at least 2 channels
available on your transceiver that are not locked out of Scan.
To start scanning, momentarily press the key programmed as
either Scan or Scan + Temporary Delete.
• The LED indicator flashes green and scanning starts from the
current channel and ascends through the channel numbers.
• When a signal is detected on a channel and the QT/DQT
matches, scan pauses at that channel and the LED indicator
lights green.
• When the signal is no longer present, scanning continues after
3 seconds (default).
To end Scan, press the Scan or Scan + Temporary Delete
key again.
■ Priority Scan
The Priority channel is a channel that is given first priority
to while scanning. The Priority channel is set by your
dealer.
During Scan, the transceiver will automatically change to
the Priority channel when a call is received on it, even if
a call is already being received on any of the other
channels.
27
Page 33

■ Temporary Delete
You can temporarily remove specific channels from the
scanning sequence during Scan. When Scan pauses at a
channel, you can remove that channel from the scanning
sequence by pressing and holding the key programmed
as Temporary Delete for 1 second or Scan + Temporary
Delete for 3 seconds.
•You cannot remove a channel if there will be less than
2 channels available for scanning remaining.
•To add the removed channels back into the Scan list, simply
exit Scan mode or switch the transceiver power OFF and then
ON again.
■ Revert Channel
During Scan, pressing the PTT switch will automatically
select the transceiver’s Revert channel and you will begin
transmitting. Your dealer can program the Revert channel
using one of the following methods:
• Selected: The last channel selected prior to scanning is
assigned as the Revert channel.
• Selected + Talkback: The last channel selected prior to
scanning is assigned as the Revert channel. However, the
transceiver also transmits on the channel where Scan is
currently paused. This is the default Revert channel setting.
• Priority: If your dealer has programmed a Priority channel,
it is the Revert channel.
• Priority + Talkback: If your dealer has programmed a
Priority channel, it is the Revert channel. However, the
transceiver also transmits on the channel where Scan is
currently paused.
28
Page 34

SCRAMBLER
Whereas the Quiet Talk and Digital Quiet Talk functions
{page 15} allows you to ignore unwanted calls, Scrambler
allows you to hold a conversation in complete privacy. When
activated, any other party listening in on your channel will be
unable to understand your conversation. The transceiver
scrambles your voice so that anybody listening to your
conversation will not be able to understand what you are
saying.
In order for members of your own group to understand your
call while you are using the Scrambler, all other members
must also activate the Scrambler on their transceivers. This
scrambles everybody’s voice while transmitting and
unscrambles the voice message on your own transceiver
when you receive the message.
To activate the Scrambler, press the key programmed as
Scrambler.
To deactivate the Scrambler, press the Scrambler key again.
29
Page 35

OPTIONAL ACCESSORIES
KMC-17 (Speaker/ microphone) KMC-21 (Speaker/ microphone)
KHS-1 (Headset) KHS-21 (Headset)
SENS.
PTT
VOX
PTT
KWR-1 (Water resistant bag)
30
Page 36

TROUBLESHOOTING GUIDE
melborP noituloS
•
nruttonnaC
reviecsnarteht
•
.NOrewop
.niagallatsnidna
rewopyrettaB
•.dehsinifsiefilkcapyrettabehT
yltrohsseid
.gnigrahcretfa
otklattonnaC
rehtoraehro
nisrebmem
.puorgruoy
seciovrehtO
puorgsediseb(
era)’srebmem
ehtnotneserp
.lennahc
.eno
•
•
•
•ekaM.sgnittesTQD/TQehtegnahC
.daedebyamkcapyrettabehT
.kcapyrettabehtecalperroegrahceR
dellatsniebtonyamkcapyrettabehT
kcapyrettabehtevomeR.yltcerroc
wenahtiwkcapyrettabehtecalpeR
emasehtgnisuerauoyerusekaM
sasgnittesTQD/TQdnaycneuqerf
.puorgruoynisrebmemrehtoeht
gnisuebyamsrebmempuorgrehtO
ruoynonruT.noitcnufrelbmarcSeht
.relbmarcSs’reviecsnart
rafootebyamsrebmempuorgrehtO
nihtiwerauoyerusekaM.yawa
.sreviecsnartrehtoehtfoegnar
ehtegnahcsrebmempuorgllaerus
hctamotsreviecsnartriehtnosgnittes
.gnittesTQD/TQweneht
31
 Loading...