

Kenwood FreeTalk UBZ-GR14, TK-3130 - ProTalk XLS UHF Instruction Manual

KENWOOD CORPORATION
© B62-XXXX-00 (K)
09 08 07 06 05 04 03 02 01 00
UBZ-GR14
FM TRANSCEIVER/ STEREO RADIO
INSTRUCTION MANUAL
EMETTEUR-RECEPTEUR FM
MODE D’EMPLOI
TRANSCEPTOR FM/ RADIO ESTÉREO
MANUAL DE INSTRUCCIONES
UBZ-GR14 E 0 cover 01.4.12, 9:35 AM1
ENGLISH
i
THANK YOU
We are grateful for your purchase of this KENWOOD product
and welcome you to the Family Radio Service (FRS). FRS is a
personal, short range 2-way radio band for family & friends to
keep in touch without the need for a license, radio knowledge, or
monthly charges. Your KENWOOD
radio is called a
“transceiver”, meaning “transmitter & receiver”. Your transceiver
provides safety and convenience almost anywhere.
Communication distance depends on your location; you’ll get a
maximum distance of up to approximately 2 miles (3.2 km) in
open areas, less in buildings and vehicles.
PRECAUTIONS
• Do not modify or attempt to adjust the transceiver for any
reason.
• Avoid extremes in exposure to weather, heat, and cold. This
transceiver can be used in mild weather conditions, but it is
not waterproof.
• Do not expose the transceiver to long periods of direct
sunlight, nor place it close to heating appliances.
• Do not place the transceiver in excessively dusty, humid, or
wet areas, nor on unstable surfaces.
• If an abnormal odor or smoke is detected coming from the
transceiver, immediately switch OFF the power and remove
the batteries from the transceiver. Contact your KENWOOD
dealer.
FEATURES
• 14 transceiver channels
• 38 code settings for each channel
• Call alert
• Automatic battery power saver
• Low battery power warning tone
• Key lock
• 2 mile (3.2 km) communication range
• FM radio (in stereo when using the supplied headphones)
UBZ-GR14 E 0i contents 01.4.12, 9:35 AM1

ENGLISH
ii
CONTENTS
ORIENTATION.......................................................................... 1
DISPLAY ................................................................................2
PREPARATION.........................................................................3
INSTALLING/ REMOVING THE BATTERIES ......................................3
INSTALLING/ REMOVING THE BELT HOOK .................................... 4
INSTALLING/ REMOVING THE STEREO HEADPHONES ..................... 4
INSTALLING/ REMOVING OPTIONAL ACCESSORIES ........................ 5
GETTING STARTED ................................................................ 6
1 SWITCHING THE POWER ON/ OFF......................................6
2 SELECTING AN OPERATING MODE ........................................ 6
3 ADJUSTING THE VOLUME ..................................................... 6
FRS MODE ............................................................................... 7
1 SELECTING A CHANNEL ....................................................... 7
2 LISTENING FOR A CALL ....................................................... 7
3 MAKING A CALL .................................................................8
4 CHANNEL SCANNING .......................................................... 9
5 CODE SCANNING ............................................................... 9
FM MODE ............................................................................... 10
1 SELECTING A STATION ...................................................... 10
2 SCANNING THE FM BAND ................................................. 10
FRS/FM MODE.......................................................................11
1 SELECTING AN FRS CHANNEL .......................................... 11
2 SELECTING AN FM STATION .............................................. 11
3 SCANNING THE FM BAND ................................................. 12
4 MAKING A CALL ............................................................... 12
OPERATING FEATURES.......................................................13
MONITORING AN FRS CHANNEL............................................. 13
KEY LOCK ........................................................................... 13
DISPLAY ILLUMINATION........................................................... 14
BATTERY POWER SAVER........................................................ 14
LOW BATTERY WARNING ....................................................... 14
NOTICES TO THE USER ....................................................... 15
LIMITED WARANTY STATEMENT (U.S.A.) .......................... 17
LIMITED WARANTY STATEMENT (CANADA)...................... 19
UBZ-GR14 E 0i contents 01.4.12, 9:35 AM2
1
ENGLISH
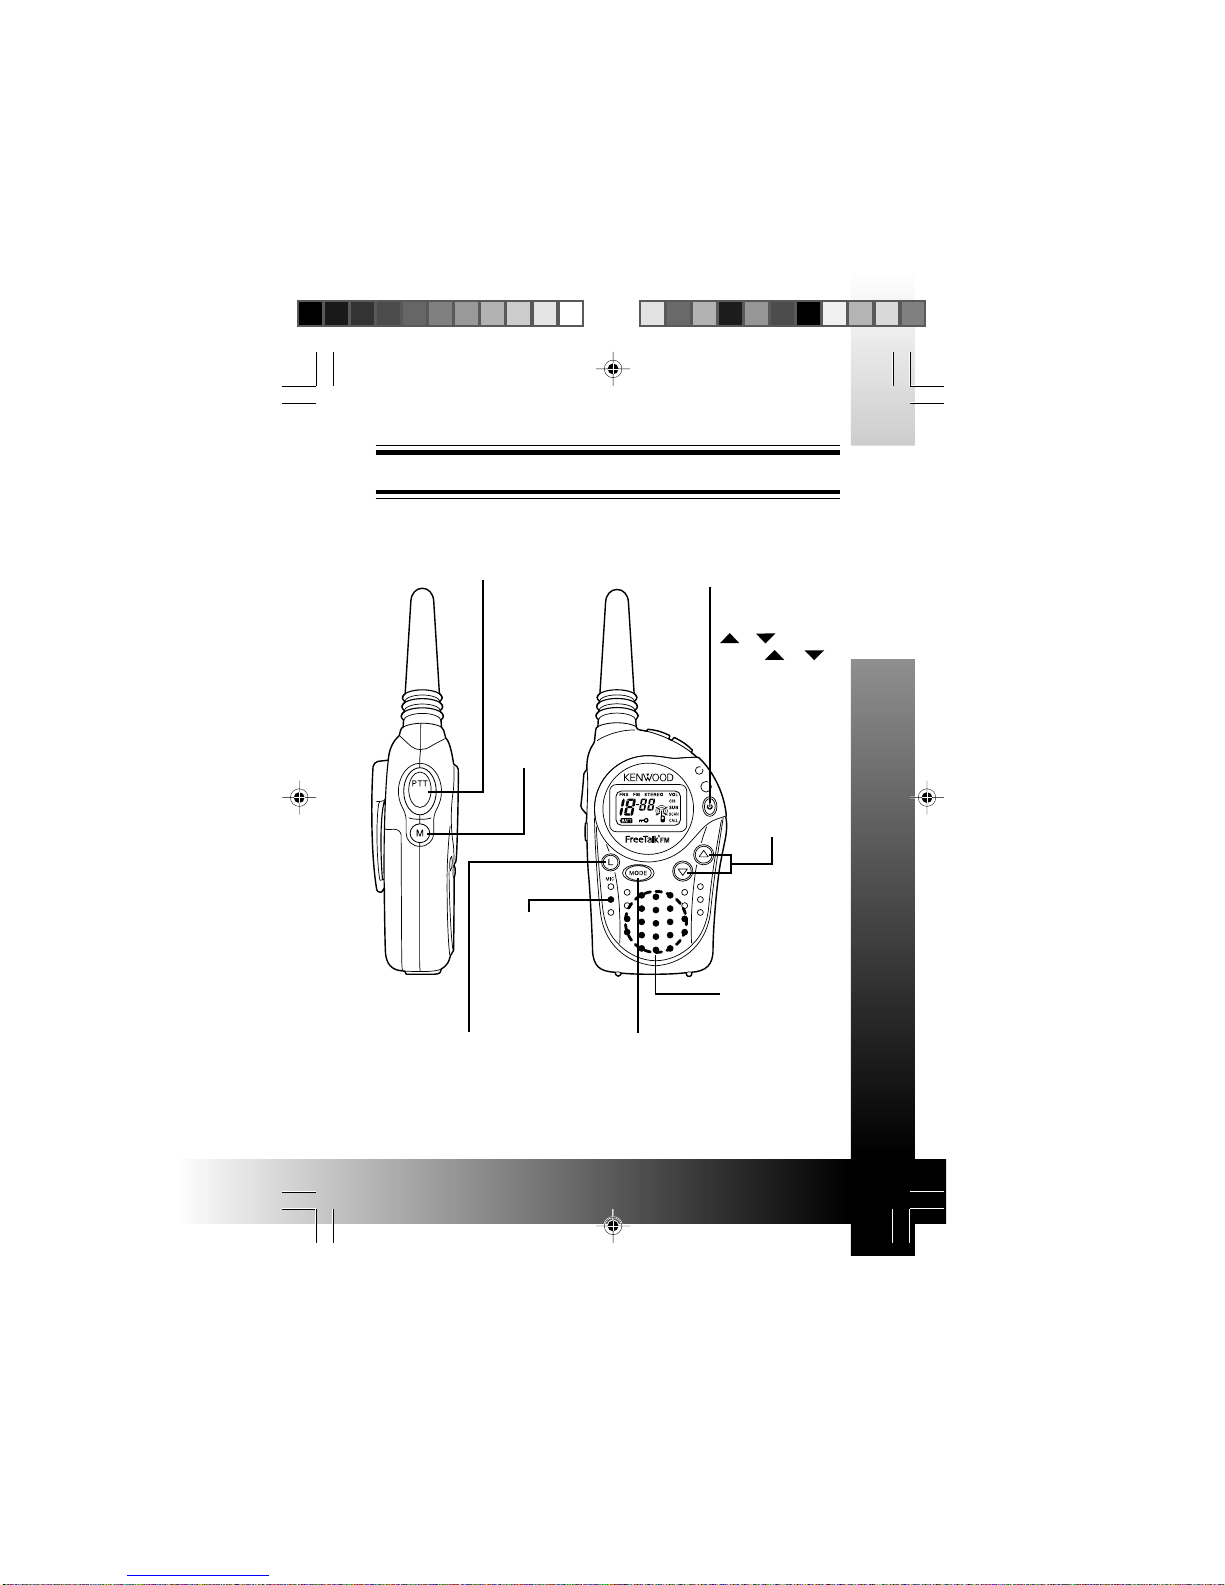
ORIENTATION
PTT switch
Press and hold while speaking
into the microphone, to transmit.
M key
Press before
making a call,
to alert the
other party.
Press and
hold to turn
the squelch
OFF.
/ keys
Press or
to increase or
decrease the
volume, channel
number, channel
code, or station
when in the
appropriate
mode. Also
used to scan
the radio band.
MODE key
Press and hold to select the FRS,
FM, or FRS/FM operating mode.
Press while in an operating mode to
change the transceiver settings.
Power switch
Press and hold for 3 seconds
to switch the transceiver ON
or OFF.
Speaker
Listen here for
received calls.
Microphone
Speak here
when making
a call.
L key
Press to turn the display
backlight ON. Press and
hold to lock the MODE
key and Power switch.
UBZ-GR14 E 1-20 01.4.12, 9:35 AM1

2
ENGLISH
DISPLAY
.levelemulovehtdnarebmunlennahcehtsyalpsiD
.lennahcdetcelesehtrofedocehtsyalpsiD
.edomgnitarepoSRFehtstneserpeR
.edomgnitarepoMFehtstneserpeR
.edomgnitarepoMF/SRFehtstneserpeR
.oeretsninoitatsMFnaotgninetsilnehwsraeppA
.levelemulovehtgnitsujdaerauoyelihwsknilB
gnitarepoehtegnahcotelbaerauoynehwsknilB
.lennahc
lennahcehttsujdaotelbaerauoynehwsknilB
.edoc
.gninnacselihwsknilB
ehtgnisserpelihwsraeppA M .llacaekamotyek
ehtgnisserpelihwsraeppA TTP .timsnartothctiws
detcelesehtnotneserpsilangisanehwsraeppA
.lennahc
.detavitcasinoitcnufkcoLyeKehtelihwsknilB
.wolsirewopyrettabehtnehwsknilB
UBZ-GR14 E 1-20 01.4.12, 9:35 AM2
3
ENGLISH
PREPARATION
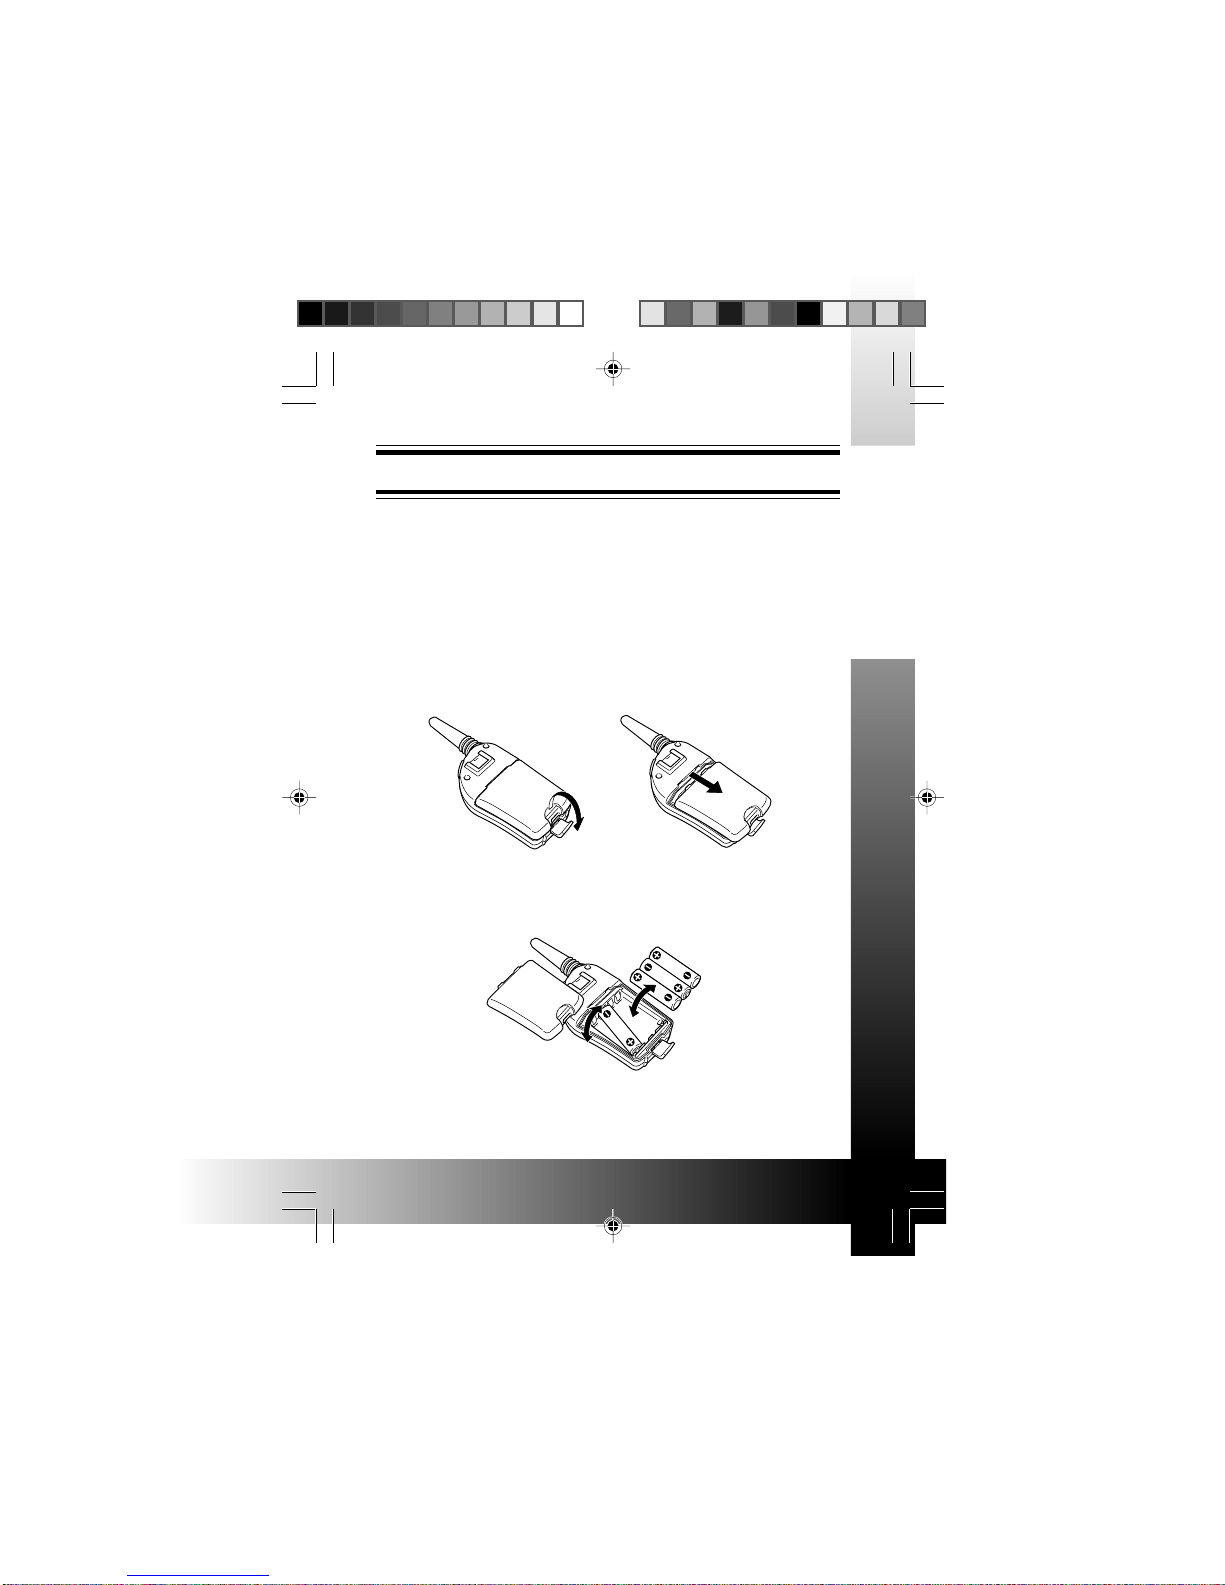
INSTALLING/ REMOVING THE BATTERIES
This transceiver requires 4 AAA batteries. Use high quality
alkaline batteries to enjoy longer periods of battery life.
1 If the belt hook is installed, first remove it from the
transceiver (refer to “INSTALLING/ REMOVING THE BELT HOOK”
on page 4).
2 Pull back on the battery cover latch, then remove the
battery cover.
3 Insert or remove 4 AAA batteries.
• When inserting batteries, be sure to match the battery
polarities with those marked in the battery compartment.
4 Replace the battery cover, making sure the battery cover
latch locks in place.
UBZ-GR14 E 1-20 01.4.12, 9:35 AM3
4
ENGLISH
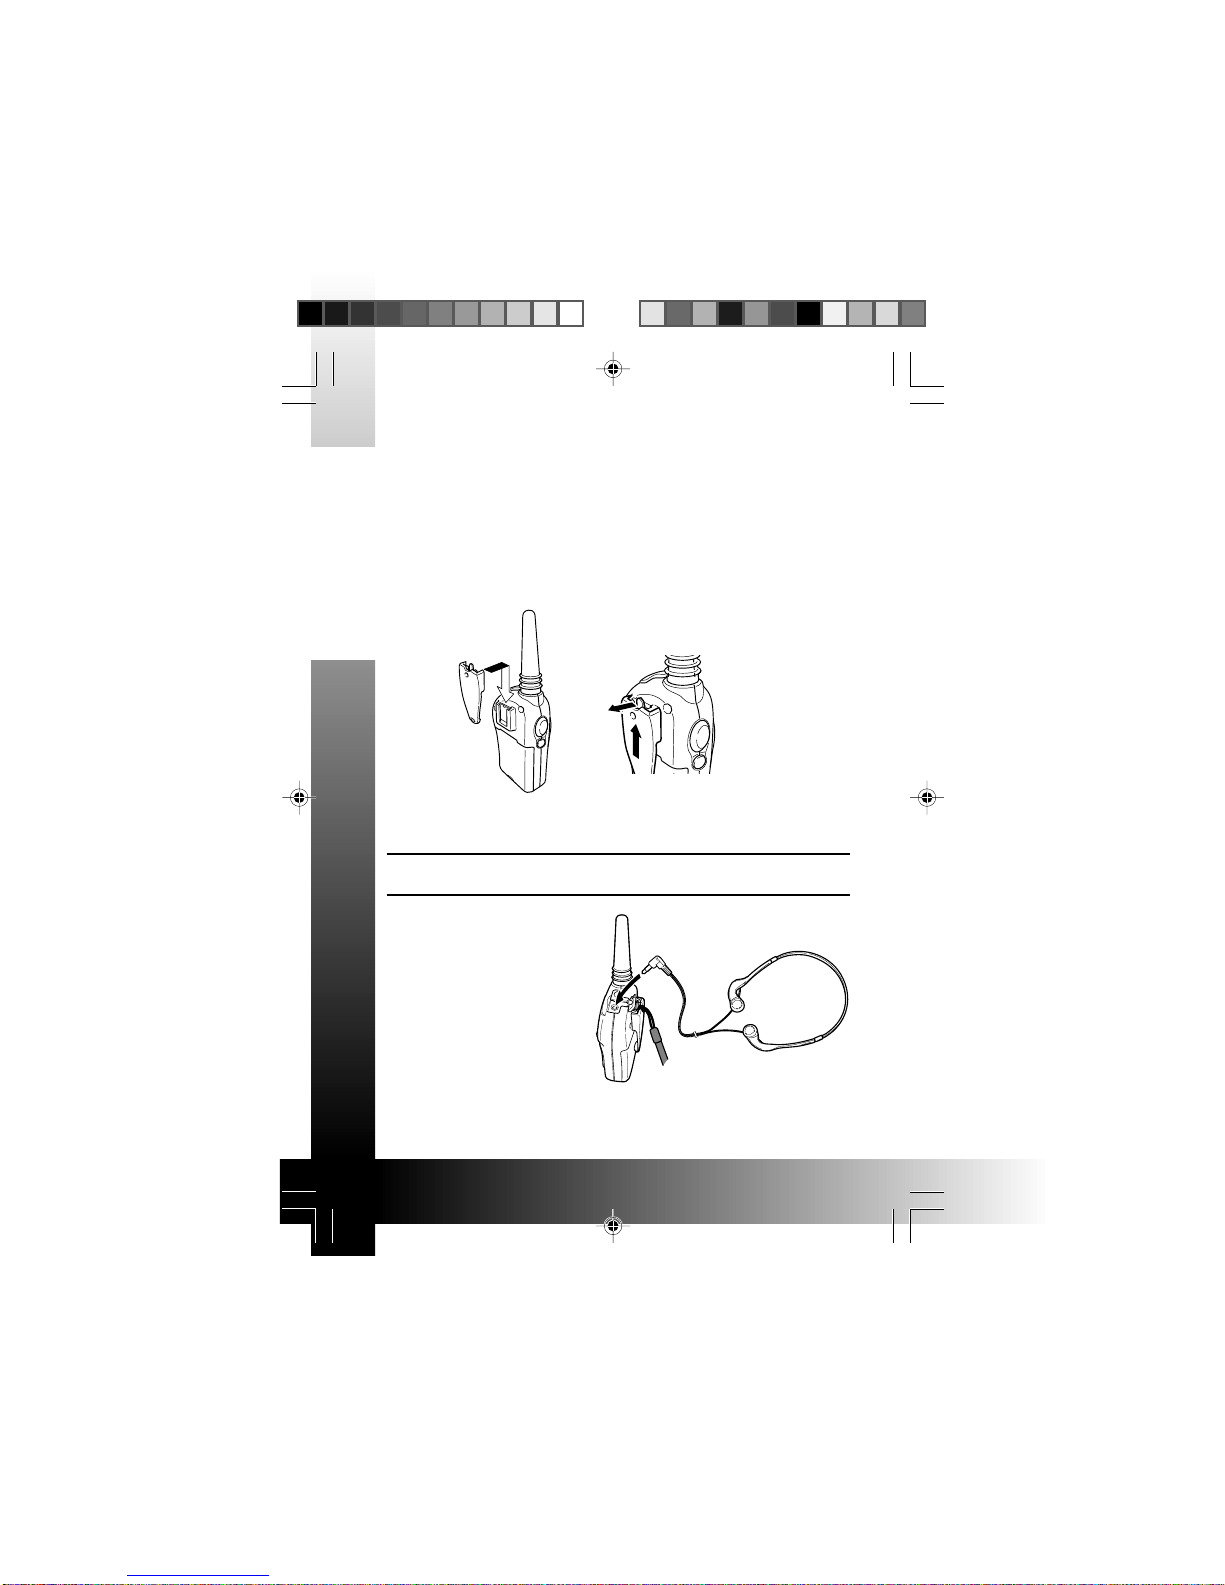
INSTALLING/ REMOVING THE BELT HOOK
1 Align the belt hook tabs with the guides on the rear of the
transceiver.
2 Slide the belt hook down the guides until it locks in place.
3 To remove the belt hook, pull back on the lever on the top
of the belt hook and slide the belt hook out of the guides.
INSTALLING/ REMOVING THE S TEREO HEADPHONES
Note: Always switch OFF the tr ansceiv er pow er when installing or
removing the headphones.
1 Open the SP tab on the
top of the transceiver.
2 Insert the headphone
plug into the SP jack.
3 When you remove the
head-phones from the
transceiver, be sure to
cover the SP jack with
the attached tab in
order to keep dust and
dirt away from the contacts.
UBZ-GR14 E 1-20 01.4.12, 9:35 AM4

5
ENGLISH
INSTALLING/ REMOVING OPTIONAL ACCESSORIES
Note: Always switch OFF the transceiver power when installing or
removing the optional accessories.
The following accessories can be used with this transceiver:
• SMC-34 Speaker-Microphone
• HMC-3 Headset
• EMC-3 Clip Microphone with Earphone
To install these accessories:
1 Open the MIC-SP tabs on the top of the transceiver.
2 Insert the accessory’s plugs into the MIC-SP jacks.
3 When you remove the accessory from the transceiver, be
sure to cover the MIC-SP jacks with the attached tabs in
order to keep dust and dirt away from the contacts.
Note:
◆ Refer to the accessory instruction manuals for detailed instruction
on each of the accessories.
◆ The 3 programmable function keys on the SMC-34 cannot be used
with this transceiver. To use the speaker-microphone, press the
PTT switch to transmit and release it to receive. You can also
adjust the volume level using the SMC-34 Volume control.
UBZ-GR14 E 1-20 01.4.12, 9:35 AM5
 Loading...