


NX-200/ NX-300
MIC
MIC |
|
1 |
|
4 |
GHI |
7 |
|
PQRS |
|
2 |
3 DEF |
ABC |
|
5 |
6 MNO |
JKL |
|
8 |
9WXYZ |
TUV |
|
|
# |
|
0 |
VHF DIGITAL TRANSCEIVER/ UHF DIGITAL TRANSCEIVER
INSTRUCTION MANUAL
ÉMETTEUR-RÉCEPTEUR NUMÉRIQUE VHF/ ÉMETTEUR-RÉCEPTEUR NUMÉRIQUE UHF
MODE D’EMPLOI
TRANSCEPTOR DIGITAL VHF/
TRANSCEPTOR DIGITAL UHF
MANUAL DE INSTRUCCIONES
© B62-2014-00 (K,K2,K3,K4) 09 08 07 06 05 04 03 02 01 00

VHF DIGITAL TRANSCEIVER/ UHF DIGITAL TRANSCEIVER
NX-200/ NX-300
INSTRUCTIoN MANUAL
ENGLISH

Thank You
We are grateful you have chosen Kenwood for your land mobile radio applications. We believe this easy-to-use transceiver will provide dependable communications to keep
personnel operating at peak eff
Kenwood transceivers incorporate the latest in advanced technology. As a result, we feel strongly that you will be pleased with the quality and features of this product
NXDNTM
NXDNTM is a protocol name for the new digital communication system using 4-level FSK technology which has been codeveloped by Kenwood and Icom.
Models Covered bY This Manual
The models listed below are covered by this manual: NX-200: VHF Digital Transceiver
NX-300: UHF Digital Transceiver
noTiCes To The user
Government law prohibits the operation of unlicensed radio transmitters within the territories under government control.
Illegal operation is punishable
Refer service to qualified techn
SAFETY: It is important that the operator is aware of and understands hazards common to the operation of any transceiver.
The AMBE+2TM voice coding Technology embodied in this product is protected by intellectual property rights including patent rights, copyrights and trade secrets of Digital Voice Systems, Inc. This voice coding Technology is licensed solely for use within this Communications Equipment. The user of this Technology is explicitly prohibited from attempting to extract, remove, decompile, reverse engineer, or disassemble the Object Code, or in any other way convert the Object Code into a human-readable form. U.S. Patent Nos. #5,870,405, #5,826,222, #5,754,974, #5,701,390, #5,715,365, #5,649,050, #5,630,011, #5,581,656, #5,517,511, #5,491,772, #5,247,579, #5,226,084 and #5,195,166.

One or more of the following statements may be applicable:
FCC WARNING
Th s equ pment generates or uses rad o frequency energy. Changes or mod f cat ons to th s equ pment may cause harmfulnterference unless the mod f cat ons are expressly approved n thenstruct on manual. The user could lose the author ty to operate th s equ pment f an unauthor zed change or mod f cat on s made.
INFORMATION TO THE DIGITAL DEVICE USER REQUIRED BY THE FCC
Th s equ pment has been tested and found to comply w th the l m ts for a Class B d g tal dev ce, pursuant to Part 15 of the FCC Rules.
These l m ts are des gned to prov de reasonable protect on aga nst harmful nterference n a res dent al nstallat on.
Th s equ pment generates, uses and can generate rad o frequency energy and, f not nstalled and used n accordance w th the nstruct ons, may cause harmful nterference to rad o commun cat ons. However, there s no guarantee that the
nterference w ll not occur n a part cular nstallat on. If th s equ pment does cause harmful nterference to rad o or telev s on recept on, wh ch can be determ ned by turn ng the equ pment off and on, the user s encouraged to try to correct the nterference by one or more of the follow ng measures:
•Reor ent or relocate the rece v ng antenna.
•Increase the separat on between the equ pment and rece ver.
•Connect the equ pment to an outlet on a c rcu t d fferent from that to wh ch the rece ver s connected.
•Consult the dealer for techn cal ass stance.
The RBRC Recycle seal found on Kenwood l th umon (L - on) battery packs nd cates Kenwood’s voluntary part c pat on n an ndustry program to collect and recycle L - on batter es after the r operat ng l fe has exp red. The RBRC program s an alternat ve to d spos ng L - on
batter es w th your regular refuse or n mun c pal waste streams, wh ch s llegal n some areas.
For nformat on on L - on battery recycl ng n your area, call (toll free) 1-800-8-BATTERY (1-800-822-8837).
Kenwood’s nvolvement n th s program s part of our comm tment to preserve our env ronment and conserve our natural resources.

Precautions
•Do not charge the transce ver and battery pack when they are wet.
•Ensure that there are no metall c tems located between the transce ver and the battery pack.
•Do not use opt ons not spec f ed by Kenwood.
•If the d e-cast chass s or other transce ver part s damaged, do not touch the damaged parts.
•If a headset or headphone s connected to the transce ver, reduce the transce ver volume. Pay attent on to the volume level when turn ng the squelch off.
•Do not place the m crophone cable around your neck wh le near mach nery that may catch the cable.
•Do not place the transce ver on unstable surfaces.
•Ensure that the end of the antenna does not touch your eyes.
•When the transce ver s used for transm ss on for many hours, the rad ator and chass s w ll become hot. Do not touch these locat ons when replac ng the battery pack.
•Do not mmerse the transce ver n water.
•When water gets nto the m crophone open ng or the speaker gr ll, the vo ce level may become ncoherent or d storted. L ghtly
shake the transce ver to remove the water from the speaker and/or m crophone before operat ng the transce ver.
•Always sw tch the transce ver power off before nstall ng opt onal accessor es.
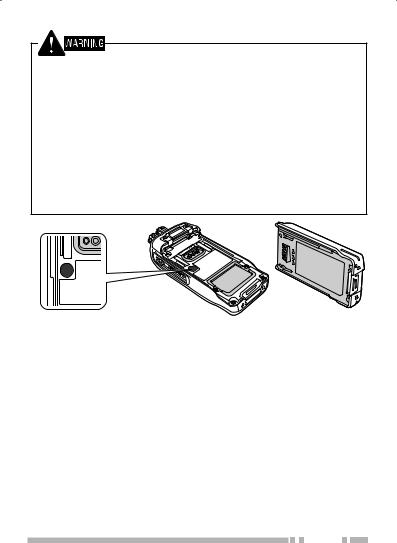
•Do not remove the black sheet from the reverse s de of the transce ver (refer to the llustrat on below). Removal of th s sheet decreases the waterproof eff c ency of the transce ver and may cause malfunct ons f water seeps nto the transce ver.
•The orange pack ng mater al on the reverse s de of the transce ver s mportant w th respect to the waterproof eff c ency of the transce ver. Do not place st ckers or other mater als
on or around the pack ng mater al shown n the f gure, or on the reverse s de of the battery pack. Do ng so w ll mpa r the waterproof eff c ency of the transce ver and may cause t to break down. Add t onally, n order to prevent damage to the pack ng mater al, do not allow t to come n contact w th fore gn mater als.
Turn the transceiver power off in the following locations:
•Near explos ves or blast ng s tes.
•In a rcrafts. (Any use of the transce ver must follow thenstruct ons and regulat ons prov ded by the a rl ne crew.)
•Where restr ct ons or warn ngs are posted regard ng the use of rad o dev ces, nclud ng but not l m ted to med cal fac l t es.
•Near persons wear ng pacemakers.
Turn the transceiver power off in the following locations, unless the model is specifically qualified for such use (Intrinsically Safe such as approved by Factory Mutual, CSA):
•In explos ve atmospheres ( nflammable gas, dust part cles, metall c powders, gra n powders, etc.).
•Wh le tak ng on fuel or wh le parked at gasol ne serv ce stat ons.
•Do not d sassemble or mod fy the transce ver for any reason.
•Do not place the transce ver on or near a rbag equ pment wh le the veh cle s runn ng. When the a rbag nflates, the transce ver may be ejected and str ke the dr ver or passengers.
•Do not transm t wh le touch ng the antenna term nal or f any metall c parts are exposed from the antenna cover ng.
Transm tt ng at such a t me may result n a h gh-frequency burn.
•If an abnormal odor or smoke s detected com ng from the transce ver, sw tch the transce ver power off mmed ately, remove the battery pack from the transce ver, and contact your
Kenwood dealer.
•Use of the transce ver wh le you are dr v ng may be aga nst traff c laws. Please check and observe the veh cle regulat ons
n your area.
•Do not expose the transce ver to extremely hot or cold cond t ons.
•Do not carry the battery pack (or battery case) w th metal objects, as they may short the battery term nals.
v

CONTENTS |
|
UNPACKING AND CHECKING EQUIPMENT .............................. |
1 |
Supplied AcceSSorieS ............................................................... |
1 |
PREPARATION ............................................................................ |
2 |
BAttery pAck precAutionS ....................................................... |
2 |
inStAlling/ removing the (optionAl) BAttery pAck.................... |
7 |
inStAlling the (optionAl) AntennA ............................................ |
8 |
inStAlling the Belt clip............................................................ |
8 |
inStAlling the cAp over the univerSAl connector ................... |
9 |
inStAlling the (optionAl) SpeAker/ microphone or heAdSet...... |
9 |
GETTING ACQUAINTED ........................................................... |
10 |
diSplAy................................................................................... |
13 |
PROGRAMMABLE FUNCTIONS................................................ |
15 |
BASIC OPERATIONS ................................................................. |
18 |
Switching power on/ oFF .................................................... |
18 |
AdjuSting the volume............................................................. |
19 |
Selecting A Zone And chAnnel/group id ................................ |
19 |
trAnSmitting........................................................................... |
20 |
receiving................................................................................ |
21 |
MENU MODE .............................................................................. |
23 |
menu AcceSS.......................................................................... |
23 |
menu conFigurAtion ............................................................... |
24 |
chArActer entry ................................................................... |
26 |
SCAN........................................................................................... |
27 |
temporAry chAnnel lockout .................................................. |
27 |
priority ScAn......................................................................... |
28 |
ScAn revert .......................................................................... |
28 |
ScAn delete/Add.................................................................... |
29 |
priority-chAnnel Select ........................................................ |
29 |
FleetSync: ALPHANUMERIC 2-WAY PAGING FUNCTION ...... |
30 |
SelcAll (Selective cAlling).................................................... |
30 |
StAtuS meSSAge ..................................................................... |
31 |
Short meSSAgeS..................................................................... |
33 |
long meSSAgeS ...................................................................... |
33 |
gpS report .......................................................................... |
33 |
v

DTMF (DUAL TONE MULTI FREQUENCY) CALLS.................. |
34 |
mAking A dtmF cAll.............................................................. |
34 |
AutodiAl................................................................................. |
35 |
Stun code.............................................................................. |
35 |
TRUNKING CALLS (ANALOG)................................................... |
36 |
mAking A telephone cAll........................................................ |
36 |
receiving A telephone cAll.................................................... |
36 |
EMERGENCY CALLS................................................................. |
37 |
SCRAMBLER .............................................................................. |
38 |
Secure (encrypted) trAnSmiSSion .......................................... |
38 |
SIGNALING................................................................................. |
39 |
Quiet tAlk (Qt)/ digitAl Quiet tAlk (dQt) ............................ |
39 |
rAdio AcceSS numBer (rAn).................................................. |
40 |
optionAl SignAling ................................................................. |
40 |
viBrAtor................................................................................. |
40 |
VOICE OPERATED TRANSMISSION (VOX) ............................ |
41 |
voX gAin level ..................................................................... |
41 |
voX operAtion ...................................................................... |
42 |
CLOCK ........................................................................................ |
43 |
clock AdjuStment .................................................................. |
43 |
BACKGROUND OPERATIONS .................................................. |
44 |
time-out timer (tot)............................................................. |
44 |
BAttery SAver........................................................................ |
44 |
key lock ................................................................................ |
45 |
low BAttery wArning ............................................................ |
45 |
SignAl Strength indicAtor ..................................................... |
45 |
compAnder ............................................................................. |
46 |
BuSy chAnnel lockout (Bcl)................................................. |
46 |
control chAnnel hunt........................................................... |
46 |
ptt id................................................................................... |
47 |
VGS-1 OPTIONAL VOICE GUIDE & STORAGE UNIT.............. |
48 |
voice recorder ..................................................................... |
48 |
voice guide............................................................................ |
49 |
v
UNPACKING AND CHECKING EQUIPMENT
Note: The following unpacking instructions are for use by your Kenwood dealer, an authorized Kenwood service facility, or the factory.
Carefully unpack the transceiver. We recommend that you identify the items listed in the following table before discarding the packing material. If any items are missing or have
been damaged during shipment, file a claim with the carrier immediately.
Supplied AcceSSorieS
|
Item |
Part Number |
Quantity |
|
|
|
|
Belt clip |
J29-0730-XX |
|
|
|
|
|
|
• |
Screws for belt clip |
N30-3008-XX |
2 |
|
|
|
|
Universal connector cap |
B09-07 2-XX |
|
|
|
|
|
|
• |
Dressing screw (preassembled) |
N08-0564-XX |
|
|
|
|
|
• |
Packing (preassembled) |
G53- 769-XX |
|
|
|
|
|
Instruction manual |
B62-20 4-XX |
|
|
|
|
|
|
Belt clip + screws |
Universal |
|
connector cap |
PREPARATION
BAttery pAck precAutionS
Do not use battery packs or battery chargers not recommended by Kenwood.
Do not recharge the battery pack if it is already fully charged. Doing so may cause the life of the battery pack to shorten or the battery pack may be damaged.
After charging the battery pack, disconnect it from the charger. If the charger power is reset (turned ON after being turned OFF), recharging will start again and the battery pack will become overcharged.
Do not use the transceiver while charging the battery pack. We recommend you switch the transceiver power OFF while charging is taking place.
Do not charge the battery pack when the battery pack or transceiver is wet, to avoid the risk of fire or damage. Wipe the water from the battery pack or transceiver using a dry cloth before charging.
Do not short the battery terminals or dispose of the battery by fire.
Never attempt to remove the casing from the battery pack.
■Charging the Battery Pack
For charging procedures, refer to the battery charger Instruction Manual.
2

Information concerning the (optional) Li-ion battery pack:
The battery pack includes flammable objects such as organic solvent. Mishandling may cause the battery to rupture producing flames or extreme heat, deteriorate, or cause other forms of damage to the battery. Please observe the following prohibitive matters.
DANGER
•Do not disassemble or reconstruct battery!
The battery pack has a safety function and protection circuit to avoid danger. If they suffer serious damage, the battery may generate heat or smoke, rupture, or burst into flame.
•Do not short-circuit the battery!
Do not join the + and – terminals using any form of metal (such as a paper clip or wire). Do not carry or store the battery pack in containers holding metal objects (such as wires, chainnecklace or hairpins). If the battery pack is short-circuited, excessive current will flow and the battery may generate heat or smoke, rupture, or burst into flame. It will also cause metal objects to heat up.
•Do not incinerate or apply heat to the battery!
If the insulator is melted, the gas release vent or safety function is damaged, or the electrolyte is ignited, the battery may generate heat or smoke, rupture, or burst into flame.
•Do not use or leave the battery near fires, stoves, or other heat generators (areas reaching over 80°C/ 176°F)!
If the polymer separator is melted due to high temperature, an internal short-circuit may occur in the individual cells and the battery may generate heat or smoke, rupture, or burst into flame.
•Avoid immersing the battery in water or getting it wet by other means!
If the battery becomes wet, wipe it off with a dry towel before use. If the battery’s protection circuit is damaged, the battery may charge at extreme current (or voltage) and an abnormal chemical reaction may occur. The battery may generate heat or smoke, rupture, or burst into flame.
3


 DANGER
•Do not charge the battery near fires or under direct sunlight!
If the battery’s protection circuit is damaged, the battery may charge at extreme current (or voltage) and an abnormal chemical reaction may occur. The battery may generate heat or smoke, rupture, or burst into flame.
•Use only the specified charger and observe charging requirements!
If the battery is charged in unspecified conditions (under high temperature over the regulated value, excessive high voltage or current over regulated value, or with a remodelled charger), it may overcharge or an abnormal chemical reaction may occur. The battery may generate heat or smoke, rupture, or burst into flame.
•Do not pierce the battery with any object, strike it with an instrument, or step on it!
This may break or deform the battery, causing a short-circuit. The battery may generate heat or smoke, rupture, or burst into flame.
•Do not jar or throw the battery!
An impact may cause the battery to leak, generate heat or smoke, rupture, and/or burst into flame. If the battery’s
protection circuit is damaged, the battery may charge at an abnormal current (or voltage), and an abnormal chemical reaction may occur.
•Do not use the battery pack if it is damaged in any way!
The battery may generate heat or smoke, rupture, or burst into flame.
•Do not solder directly onto the battery!
If the insulator is melted or the gas release vent or safety function is damaged, the battery may generate heat or smoke, rupture, or burst into flame.
•Do not reverse the battery polarity (and terminals)!
When charging a reversed battery, an abnormal chemical reaction may occur. In some cases, an unexpected large amount of current may flow upon discharging. The battery may generate heat or smoke, rupture, or burst into flame.
4


 DANGER
•Do not reverse-charge or reverse-connect the battery!
The battery pack has positive and negative poles. If the battery pack does not smoothly connect with a charger or operating equipment, do not force it; check the polarity of the battery. If the battery pack is reverse-connected to the charger, it will be reverse-charged and an abnormal chemical reaction may occur. The battery may generate heat or smoke, rupture, or burst into flame.
•Do not touch a ruptured and leaking battery!
If the electrolyte liquid from the battery gets into your eyes, wash your eyes out with fresh water as soon as possible, without rubbing your eyes. Go to the hospital immediately. If left untreated, it may cause eye-problems.
•Do not charge the battery for longer than the specified time!
If the battery pack has not finished charging even after the regulated time has passed, stop it. The battery may generate heat or smoke, rupture, or burst into flame.
•Do not place the battery pack into a microwave or high pressure container!
The battery may generate heat or smoke, rupture, or burst into flame.
•Keep ruptured and leaking battery packs away from fire!
If the battery pack is leaking (or the battery emits a bad odor), immediately remove it from flammable areas. Electrolyte leaking from battery can easily catch on fire and may cause the battery to generate smoke or burst into flame.
•Do not use an abnormal battery!
If the battery pack emits a bad odor, appears to have different coloring, is deformed, or seems abnormal for any other reason, remove it from the charger or operating equipment and do not use it. The battery may generate heat or smoke, rupture, or burst into flame.
5

■Using the Li-ion Battery Pack
•Charge the battery pack before using it.
•To keep the battery discharge at a minimum, remove the battery pack from the equipment when it is not in use. Store the battery pack in a cool and dry location.
•When storing the battery pack for a long period:
1 Remove the battery pack from the equipment.
2 Discharge the battery pack, if possible.
3 Store the battery pack in a cool (below 25°C/ 77°F) and dry location.
■Characteristics of the Li-ion Battery Pack
•As the battery pack is charged and discharged repeatedly, the battery capacity decreases.
•Even if the battery pack is unused, the battery pack degrades.
•It takes a longer time to charge the battery pack in cooler areas.
•The life of battery pack is shortened when it is charged and discharged in hotter areas. When the battery pack is stored in a hot location, the battery pack degrades quicker. Do not leave the battery pack in vehicles or near heating appliances.
•When the battery pack operating time becomes short, even if it is fully charged, replace the battery pack. Continuing to
charge and discharge the battery pack may result in electrolyte leakage.
6
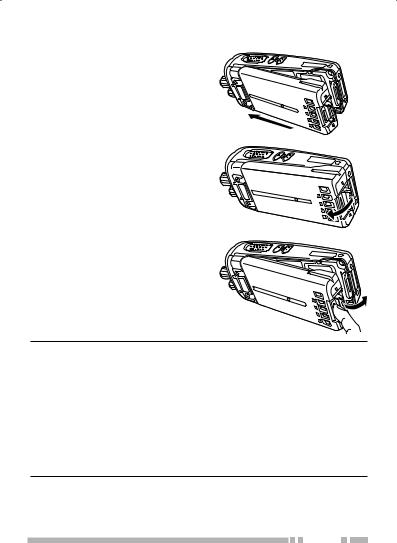
inStAlling/ removing the (optionAl) BAttery pAck
1 Match the guides of the battery pack with the corresponding grooves on the upper rear of the transceiver, then firmly press the battery pack to lock it in place.
2 Lock the safety catch to prevent accidentally pressing the release latch and removing the battery pack.
3 To remove the battery pack, lift the safety catch, press the release latch, then pull the battery pack away from the transceiver.
Note:
To lift the battery pack safety catch, use a piece of hardened plastic or metal, such as a screwdriver, that is no more than 6 mm wide and mm thick. It is imperative that you place the
implement under only the lip of the safety catch so that you do not damage the release latch.
Before charging a battery pack that is attached to the transceiver, ensure that the safety catch is firmly closed.
While operating the transceiver using a Li-ion battery pack in areas with an ambient temperature of – 0°C/ + 4°F and lower, operating time may be shortened.
7
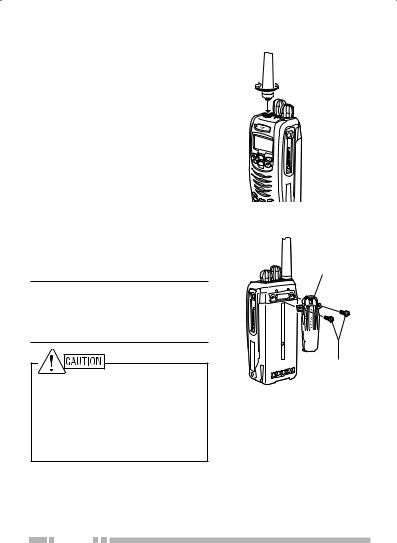
inStAlling the (optionAl) AntennA
Screw the antenna into the connector on the top of the transceiver by holding the antenna at its base and turning it clockwise until secure.
Optional
antenna
MIC |
|
1 |
|
4G |
2ABC |
HI |
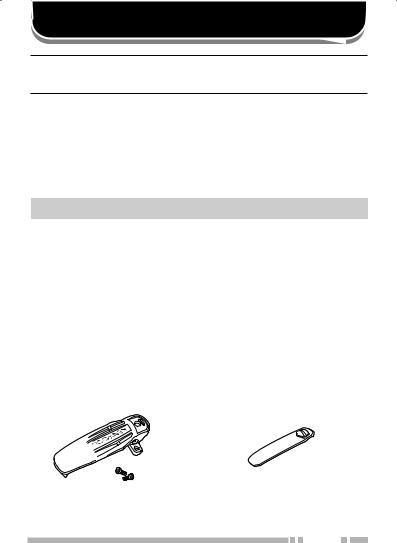
inStAlling the Belt clip
If necessary, attach the belt clip using the two supplied 3 x 8 mm binding screws.
Note: If the belt clip is not installed, its mounting location may get hot during continuous transmission or when left sitting in a hot environment.
Do not use glue which is designed to prevent screw loosening when installing the belt clip, as it may cause damage to the transceiver. Acrylic ester, which is contained in these glues, may crack the transceiver’s back panel.
Belt clip
Binding screws
8

inStAlling the cAp over the univerSAl connector
1If you are not using an optional speaker/ microphone or headset, install the cap over the universal connector.
2Secure the cap in place using the attached screw.
Universal connector cap
MIC
1
4
G
H
I
2
ABC
inStAlling the (optionAl) SpeAker/ microphone or heAdSet
1Insert the guide of the speaker/ microphone or headset connector into the groove of the universal connector.
2Secure the connector in place using the attached screw.
Note: When not using an optional speaker/ microphone or headset, install the cap over the universal connector.
MIC
1
4 G H I
7 PQRS
2ABC 5 8
0
Optional speaker/ microphone
9
 Loading...