

Page 1

KDC-X702
KDC-X502
KDC-BT772HD
KDC-BT572U
KMR-D772BT
CD-RECEIVER
INSTRUCTION MANUAL
AMPLI-TUNER LECTEUR DE CD
MODE D’EMPLOI
REPRODUCTOR DE DISCOS COMPACTOS RECEPTOR DE FM/AM
MANUAL DE INSTRUCCIONES
For your records
Record the serial number, found on the back of the unit, in the spaces designated on the warranty card, and in the space provided below.
Refer to the model and serial numbers whenever you call upon your Kenwood dealer for information or service on the product.
Model KDC-X702/KDC-BT772HD/KMR-D772BT/KDC-X502/KDC-BT572U
Serial number
US Residents Only
Register Online
Register your Kenwood product at http://www.kenwood.com/usa/
B5A-2116-00 (KN)© 2017 JVC KENWOOD Corporation
Page 2
CAUTION
Use of controls or adjustments or performance of procedures other than those specified
herein may result in hazardous radiation exposure.
In compliance with Federal Regulations, following are reproductions of labels on, or inside
the product relating to laser product safety.
JVC KENWOOD Corporation
2967-3, ISHIKAWA-MACHI,
HACHIOJI-SHI, TOKYO, JAPAN
THIS PRODUCT COMPLIES WITH DHHS RULES 21CFR
SUBCHAPTER J IN EFFECT AT DATE OF MANUFACTURE.
Location : Top Plate
FCC WARNING
This equipment may generate or use radio frequency energy. Changes or modifications to this
equipment may cause harmful interference unless the modifications are expressly approved in the
instruction manual. The user could lose the authority to operate this equipment if an unauthorized
change or modification is made.
FCC NOTE
This equipment has been tested and found to comply with the limits for a Class B digital device,
pursuant to Part 15 of the FCC Rules. These limits are designed to provide reasonable protection against
harmful interference in a residential installation. This equipment may cause harmful interference to
radio communications, if it is not installed and used in accordance with the instructions. However,
there is no guarantee that interference will not occur in a particular installation. If this equipment does
cause harmful interference to radio or television reception, which can be determined by turning the
equipment off and on, the user is encouraged to try to correct the interference by one or more of the
following measures:
• Reorient or relocate the receiving antenna.
• Increase the separation between the equipment and receiver.
• Connect the equipment into an outlet on a circuit different from that to which the receiver is
connected.
• Consult the dealer or an experienced radio/TV technician for help.
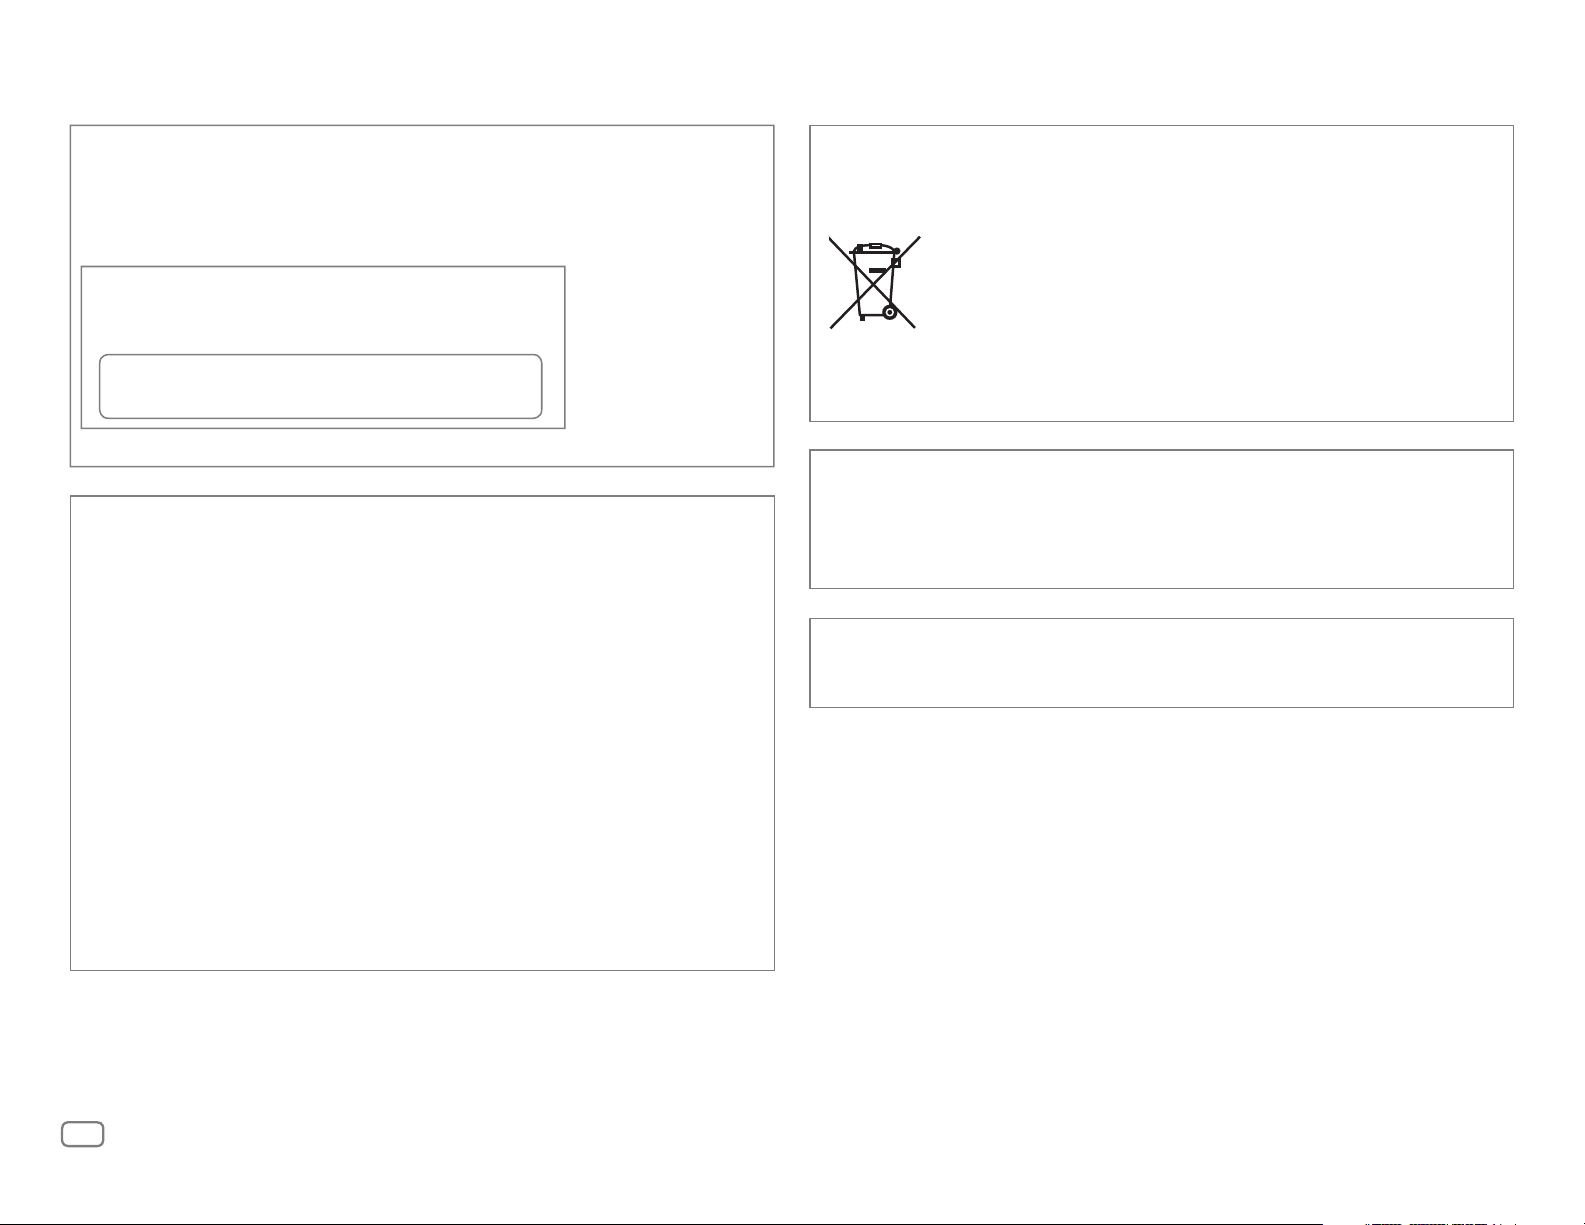
Información acerca de la eliminación de equipos eléctricos y electrónicos al final de la vida
útil (aplicable a los países que hayan adoptado sistemas independientes de recogida de
residuos)
Los productos con el símbolo de un contenedor con ruedas tachado no podrán ser
desechados como residuos domésticos. Los equipos eléctricos y electrónicos al final
de la vida útil, deberán ser reciclados en instalaciones que puedan dar el tratamiento
adecuado a estos productos y a sus subproductos residuales correspondientes.
Póngase en contacto con su administración local para obtener información sobre el
punto de recogida más cercano. Un tratamiento correcto del reciclaje y la eliminación
de residuos ayuda a conservar los recursos y evita al mismo tiempo efectos
perjudiciales en la salud y el medio ambiente.
Informação sobre a eliminação de pilhas
Este produto não deve ser eliminado como lixo doméstico geral. Devolva a pilha usada ao revendedor ou
entidade autorizada para que a mesma seja devolvida ao fabricante ou importador.
A reciclagem e a eliminação de lixo de maneira apropriada ajudarão a conservar os recursos naturais ao
mesmo tempo que prevenirão os efeitos prejudicais à nossa saúde e ao meio ambiente.
CALIFORNIA, USA ONLY
This product contains a CR Coin Cell Lithium Battery which contains Perchlorate Material—special
handling may apply. See www.dtsc.ca.gov/hazardouswaste/perchlorate
i
Page 3
IC (Industry Canada) Notice
This device complies with Industry Canada’s licence-exempt RSSs.
Operation is subject to the following two conditions:
(1) This device may not cause interference; and
(2) This device must accept any interference, including interference that may cause undesired
operation of the device.
CAUTION
This equipment complies with FCC/IC radiation exposure limits set forth for an uncontrolled
environment and meets the FCC radio frequency (RF) Exposure Guidelines and RSS-102 of the IC radio
frequency (RF) Exposure rules. This equipment has very low levels of RF energy that is deemed to
comply without maximum permissive exposure evaluation (MPE). But it is desirable that it should be
installed and operated keeping the radiator at least 20cm or more away from person’s body.
Note de IC (Industrie Canada)
Le présent appareil est conforme aux CNR d’Industrie Canada applicables aux appareils
radio exempts de licence.
L’exploitation est autorisée aux deux conditions suivantes:
(1) l’appareil ne doit pas produire de brouillage;
(2) l’utilisateur de l’appareil doit accepter tout brouillage radioélectrique subi, même si le brouillage
est susceptible d’en compromettre le fonctionnement.
(For / / )
Contains Bluetooth Module FCC ID: ZWY8350X
IC ID: 12033A-8350X
(For
Contains Bluetooth Module FCC ID: ZWY8811X
IC ID: 12033A-8811X
This transmitter must not be co-located or operated in conjunction with any other antenna or
transmitter.
/ )
ATTENTION
Cet équipement est conforme aux limites d’exposition aux rayonnements énoncées pour un
environnement non contrôlé et respecte les règles les radioélectriques (RF) de la FCC lignes directrices
d’exposition et d’exposition aux fréquences radioélectriques (RF) CNR-102 de l’IC. Cet équipement émet
une énergie RF très faible qui est considérée comme conforme sans évaluation de l’exposition maximale
autorisée (MPE). Cependant, il est souhaitable qu’il devrait être installé et utilisé en gardant une
distance de 20 cm ou plus entre le radiateur et le corps humain.
Para cumplimiento de la IFT:
“La operación de este equipo está sujeta a las siguientes dos condiciones:
(1) es posible que este equipo o dispositivo no cause interferencia perjudicial y
(2) este equipo o dispositivo debe aceptar cualquier interferencia, incluyendo la que pueda causar su
operación no deseada”
ii
Page 4

SOFTWARE LICENSE AGREEMENT
Article 3 Conditions for Grant of License
The software embedded in the Product (hereinafter the "Licensed Software") provided by Licensor is
copyrighted to or sublicensable by the Licensor, and this Agreement provides for the terms and conditions
which Users shall follow in order to use the Licensed Software.
The User shall use the Licensed Software by agreeing with the terms of this Software License Agreement.
This Agreement shall be deemed completed at the time the User (hereinafter the "User") initially used the
Product in which the "Licensed Software" is embedded.
The Licensed Software may include the software which has been licensed to the Licensor directly or
indirectly from any third party. In such case, some third parties require the Users to follow their conditions
for use separately from this Software License Agreement. Such software shall not be subject to this
Agreement, and the Users are urged to read the "Important Notice concerning the Software" to be provided
separately below.
Article 1 General Provision
The Licensor shall grant to the User a non-exclusive and non-transferable (other than the exceptional case
referred to in Article 3, Paragraph 1) licensed to use the Licensed Software within the country of the User.
(the country where the User bought the Product(hereinafter the "Country")
Article 2 License
1. The license granted under this Agreement shall be the right to use the Licensed Software in the
Product.
2. The User shall not duplicate, copy, modify, add, translate or otherwise alter, or lease the Licensed
Software and any related documents, whether in whole or in part.
3. The use of the Licensed Software shall be limited to personal purpose, and the Licensed Software shall
not be distributed, licensed or sub-licensed whether it is for commercial purpose or not.
4. The User shall use the Licensed Software according to the directions described in the operation
manual or help file, and is prohibited to use or duplicate any data in a manner violating the Copyright
Law or any other laws and regulations by applying whole or a part of the Licensed Software.
1. When the User transfers the Product, it may also transfer the license to use the Licensed Software
embedded in the Product (including any related materials, updates and upgrades) on condition that
no original, copies or related materials continue in the possession of the User, and that the User shall
cause the transferee to comply with this Software License Agreement.
2. The User shall not carry out reverse engineering, disassembling, decompiling or any other code
analysis works in connection with the Licensed Software.
Article 4 Right pertaining to the Licensed Software
Any and all copyrights and other rights pertaining to the Licensed Software and related documents
shall belong to the Licensor or the original holder of the right who granted to the Licensor the license or
sublicense for the Licensed Software (hereinafter the "Original Rightholder"), and the User shall not be
entitled to any right other than the license granted hereunder, in respect of the Licensed Software and any
related documents.
Article 5 Indemnification of Licensor
1. Neither the Licensor nor the Original Rightholder shall be liable for any damage incurred by the User
or any third party due to the exercise of the license granted to the User under this Agreement, unless
otherwise restricted by law.
2. The Licensor will offer no guarantee for the merchantability, convertibility and consistency with
certain objective of the Licensed Software.
Article 6 Liability to Third Party
If any dispute has arisen with any third party due to an infringement upon a copyright, patent or any
other intellectual property right that was caused by the User's use of the Licensed Software, the User shall
settle such dispute at its own cost and hold the Licensor and the Original Rightholder harmless from any
inconvenience it may cause.
Article 7 Confidentiality
iii
The User shall keep the confidentiality of such portion of the Licensed Software, related documents thereof
or any other information to be granted under this Agreement, as well as the conditions of this Agreement
as has not yet entered the public domain, and shall not disclose or divulge the same to any third party
without approval of the Licensor.
Page 5

Article 8 Termination
Important Notice concerning the Software
In case the User falls under any of the events described in the following items, the Licensor may immediately terminate this
Agreement or claim that the User compensates for the damage incurred by the Licensor due to such event:
(1) when the User violated any provision of this Agreement; or
(2) when a petition has been filed against the User for an attachment,
provisional attachment, provisional disposition or any other compulsory execution.
Article 9 Destruction of the Licensed Software
If this Agreement is terminated pursuant to the provision of Article 8, the User shall destroy the Licensed Software, any related
documents and copies thereof within two (2) weeks from such date of termination.
Article 10 Protection of Copyright
1. The copyright and all the other intellectual property rights relating to the Licensed Software shall belong to the Licensor
and the Original Rightholder, and in no event shall they be under the ownership of the User.
2. The User shall, whenever it uses the Licensed Software, comply with any laws relating to the copyright and other
intellectual property rights.
Article 11 Export Restriction
1. It is prohibited to export the Licensed Software and any related documents outside the country of the User (including
transmission thereof outside the country of the User via Internet of other communication tools).
2. The User shall understand that the Licensed Software shall be subject to the export restrictions adopted by the country of
User and any other countries.
3. The User shall agree that the software will be subject to any and all applicable international and domestic laws (including
the export control regulation of the country of User and any other countries, and any restrictions concerning the end-users,
the use by end-users and importing countries to be provided by the country of User and any other countries, and any other
governmental authorities).
-jansson
Copyright (c) 2009-2012 Petri Lehtinen <petri@digip.org>
Permission is hereby granted, free of charge, to any person obtaining a copy of this
software and associated documentation files (the "Software"), to deal in the Software
without restriction, including without limitation the rights to use, copy, modify,
merge, publish, distribute, sublicense, and/or sell copies of the Software, and to
permit persons to whom the Software is furnished to do so, subject to the following
conditions:
The above copyright notice and this permission notice shall be included in all copies
or substantial portions of the Software.
THE SOFTWARE IS PROVIDED "AS IS", WITHOUT WARRANTY OF ANY KIND, EXPRESS OR
IMPLIED, INCLUDING BUT NOT LIMITED TO THE WARRANTIES OF MERCHANTABILITY,
FITNESS FOR A PARTICULAR PURPOSE AND NONINFRINGEMENT. IN NO EVENT SHALL
THE AUTHORS OR COPYRIGHT HOLDERS BE LIABLE FOR ANY CLAIM, DAMAGES OR
OTHER LIABILITY, WHETHER IN AN ACTION OF CONTRACT, TORT OR OTHERWISE,
ARISING FROM, OUT OF OR IN CONNECTION WITH THE SOFTWARE OR THE USE OR
OTHER DEALINGS IN THE SOFTWARE.
Article 12 Miscellaneous
1. In the event any part of this Agreement is invalidated by operation of law, the residual provisions shall continue in force.
2. Matters not stipulated in this Agreement or any ambiguity or question raised in the construction of this Agreement shall be
provided or settled upon good-faith consultation between the Licensor and the User.
3. The Licensor and the User hereby agree that this Agreement is governed by the laws of Japan, and any dispute arising from,
and relating to the rights and obligations under, this Agreement shall be submitted to the exclusive jurisdiction of the
Tokyo District Court for its first instance.
iv
Page 6
CONTENTS
BEFORE USE
BEFORE USE 2
BASICS 3
GETTING STARTED 4
1 Select the display language
and cancel the demonstration
2 Set the clock and date
3 Set the initial settings
HD RadioTM tuner 6
RADIO 8
CD/USB/iPod/ANDROID 10
AUX 13
Pandora® 13
iHeartRadio® 15
Spotify 16
SiriusXM® Radio 17
BLUETOOTH® 20
AUDIO SETTINGS 29
DISPLAY SETTINGS 32
TROUBLESHOOTING 33
REFERENCES 36
Maintenance
More information
IMPORTANT
•
To ensure proper use, please read through this manual before using this product. It is especially important that you read and observe
Warning and Caution in this manual.
•
Please keep the manual in a safe and accessible place for future reference.
WARNING
• Do not operate any function that takes your attention away from safe driving.
• Do not ingest the battery, Chemical Burn Hazard
The remote control supplied with this product contains a coin/button cell battery.
If the coin/button cell battery is swallowed, it can cause severe internal burns in just 2 hours and can lead to death.
Keep new and used batteries away from children.
If the battery compartment does not close securely, stop using the product and keep it away from children.
If you think batteries might have been swallowed or placed inside any part of the body, seek immediate medical attention.
Caution
Volume setting:
•
Adjust the volume so that you can hear sounds outside the car to prevent accidents.
•
Lower the volume before playing digital sources to avoid damaging the speakers by the sudden increase of the output level.
General:
•
Avoid using the external device if it might hinder safe driving.
•
Make sure all important data has been backed up. We shall bear no responsibility for any loss of recorded data.
•
Never put or leave any metallic objects (such as coins or metal tools) inside the unit to prevent a short circuit.
•
If a disc error occurs due to condensation on the laser lens, eject the disc and wait for the moisture to evaporate.
•
USB rating for the USB cables from the rear of the unit is indicated on a label.
•
Depending on the types of cars, the antenna will automatically extend when you turn on the unit with the antenna control wire
connected
Remote control (RC-406):
•
Do not leave the remote control in hot places such as on the dashboard.
•
The Lithium battery is in danger of explosion if replaced incorrectly. Replace it only with the same or equivalent type.
•
The battery pack or batteries shall not be exposed to excessive heat such as sunshine, fire or the like.
( 41)
. Turn off the unit or change the source to STANDBY when parking at a low ceiling area.
( 42)
INSTALLATION/
CONNECTION 39
SPECIFICATIONS 43
2
ENGLISH
How to read this manual
•
Operations are explained mainly using buttons on the faceplate of .
•
English indications are used for the purpose of explanation. You can select the display language from the
• [XX]
indicates the selected items.
• ( XX)
indicates references are available on the stated page.
[FUNCTION]
menu.
( 5)
Page 7
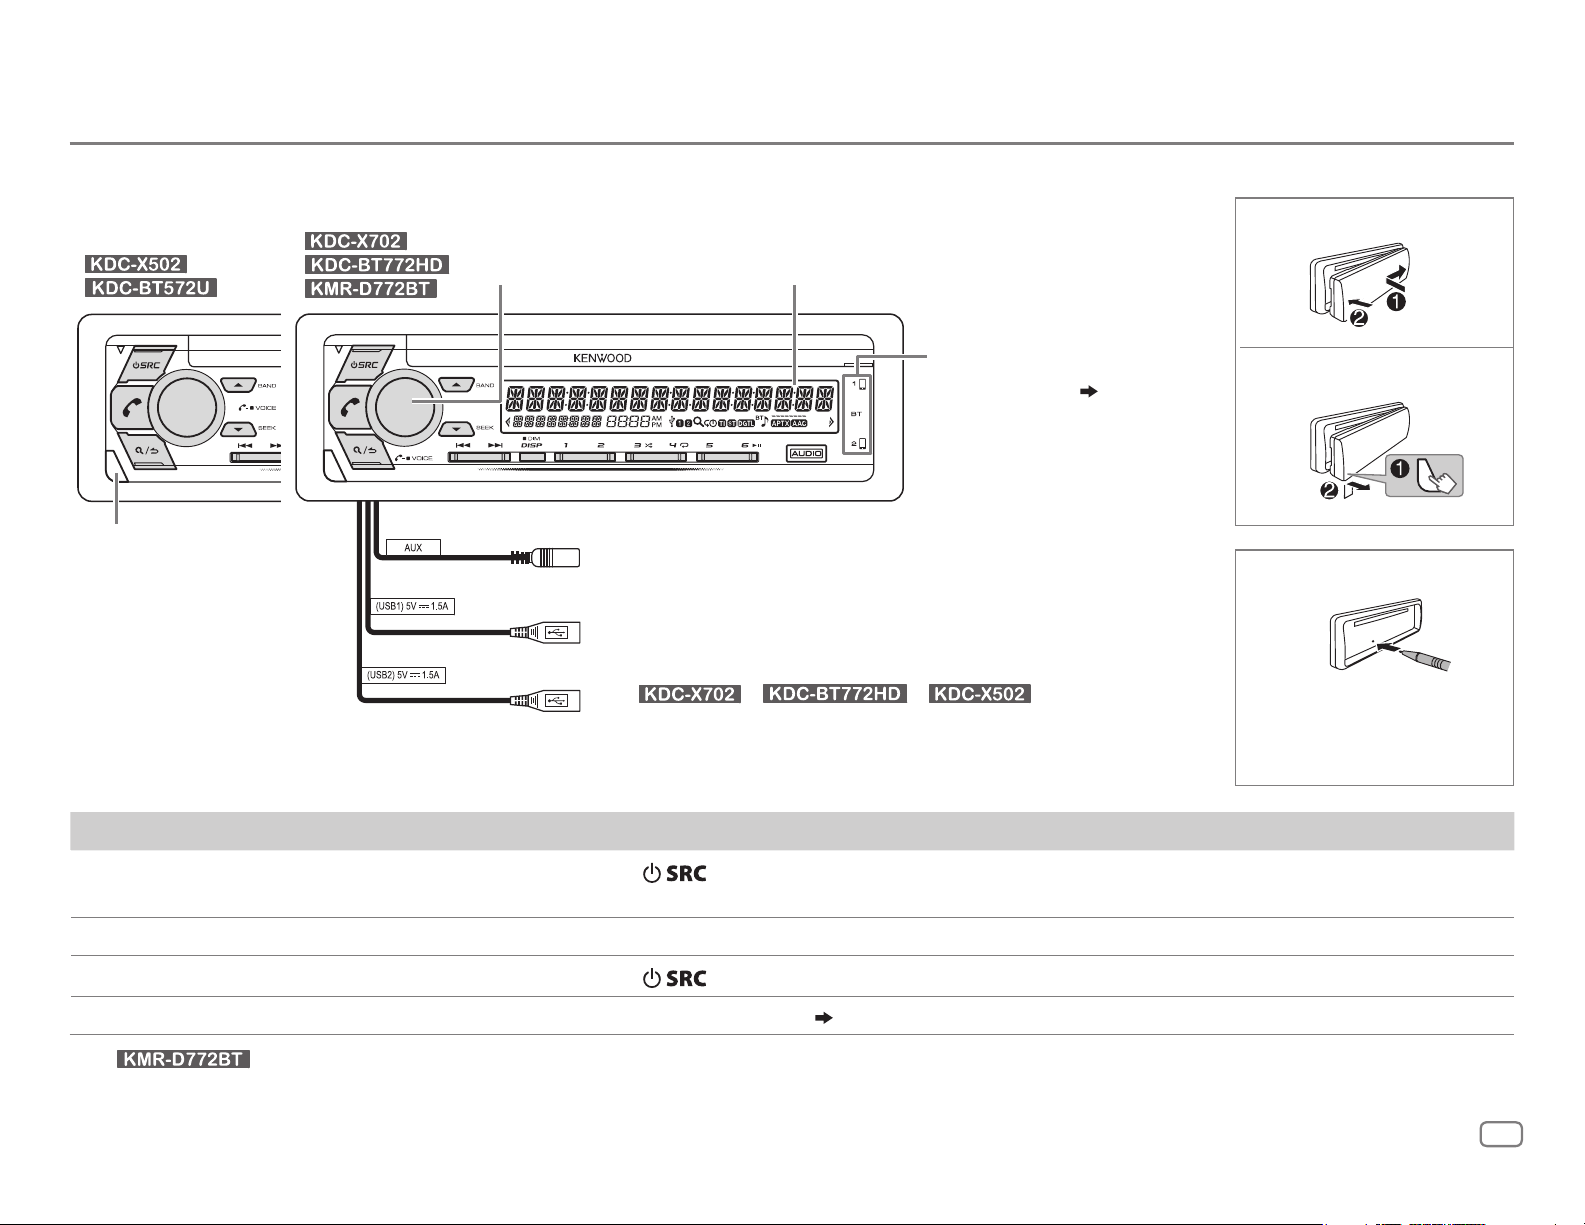
BASICS
Faceplate
Attach
Display windowVolume knob
Lights up when
Bluetooth connection
is established.
( 21)
Detach
Detach button
Note: The highlighted area on the faceplate flashes when the unit enters searching status.
To On the faceplate
Turn on the power
Adjust the volume Turn the volume knob.
Select a source
Change the display information Press DISP repeatedly.
*
For : The power will automatically turn off after 20minutes when in standby mode (Auto Power Off).
Auxiliary cable from the rear of the unit.
USB 1 cable from the rear of the unit.
(For
USB 2 cable from the rear of the unit.
Press
• Press and hold to turn off the power.
Press
/ / )
.
repeatedly.
( 38, 39)
How to reset
Reset the unit within
5seconds after
detaching the faceplate.
*
ENGLISH
3
Page 8

BASICS
Remote control (RC-406)
This unit can be remotely controlled with an optionally purchased remote
control.
Remote sensor
(Do not expose to bright sunlight.)
GETTING STARTED
1
Select the display language and cancel the demonstration
Pull out the insulation sheet when
using for the first time.
: Remote control functions are not available.
How to replace the battery
To On the remote control
Turn on the power Press and hold SRC to turn off the power.
( Pressing SRC does not turn on the power. )
Adjust the volume Press
• Press and hold
the volume to 15.
Press ATT during playback to attenuate the sound.
• Press again to cancel.
or .
to continuously increase
When you turn on the power for the first time (or
[YES], 5
KNOB”
1 Turn the volume knob to select
Then, (except for
), the display shows: “SEL LANGUAGE” “PRESS” “VOLUME
[ENG]
(English) or
then press the knob.
[ENG]
is selected for the initial setup.
) the display shows: “CANCEL DEMO”
“PRESS” “VOLUME KNOB”.
[FACTORY RESET]
[SPA]
(Spanish),
is set to
2 Press the volume knob.
[YES]
is selected for the initial setup.
3 Press the volume knob again.
“DEMO OFF” appears.
2
Set the clock and date
1
Press the volume knob to enter
2 Turn the volume knob to select
To adjust the clock
3 Turn the volume knob to select
[FUNCTION]
[CLOCK]
[CLOCK ADJUST]
.
, then press the knob.
, then press the knob.
4 Turn the volume knob to make the settings, then press the knob.
Hour
5 Turn the volume knob to select
6 Turn the volume knob to select
Minute
[CLOCK FORMAT]
[12H]
or
[24H]
, then press the knob.
, then press the knob.
Select a source Press SRC repeatedly.
4
ENGLISH
Page 9
GETTING STARTED
To set the date
7 Turn the volume knob to select
8 Turn the volume knob to select
the knob.
9 Turn the volume knob to select
[DATE FORMAT]
[DD/MM/YY]
[DATE SET]
, then press the knob.
, then press the knob.
or
[MM/DD/YY]
, then press
10 Turn the volume knob to make the settings, then press the knob.
Day
Month Year or Month Day Year
11 Press and hold to exit.
To return to the previous setting item, press
3
Set the initial settings
1
Press repeatedly to enter STANDBY.
2 Press the volume knob to enter
[FUNCTION]
.
.
3 Turn the volume knob to select an item (see the following table),
then press the knob.
4 Repeat step 3 until the desired item is selected or activated.
5 Press and hold to exit.
To return to the previous setting item, press
DISPLAY
EASY MENU
TUNER SETTING
When entering
ON
:LCD DISPLAY zone illumination changes to white color.;
OFF
:LCD DISPLAY zone illumination remains as
( 32)
•
KEY zone illumination changes to light blue color when you enter
[FUNCTION]
•
Refer to the illustration on page 32 for zone identification.
[FUNCTION]
, irregardless of the
...
[EASY MENU]
.
[COLOR SELECT]
setting.
Default:
color.
SYSTEM
KEY BEEP
SOURCE SELECT
PANDORA SRC
IHEART SRC
SPOTIFY SRC
BUILT-IN AUX
CD READ
F/W UPDATE
UPDATE SYSTEM/UPDATE HD
XX
F/W UPDATE
xxxx/
F/W UPDATE
Vxx
FACTORY RESET YES
CLOCK
CLOCK DISPLAY
ON
:Activates the keypress tone.;
ON
:Enables PANDORA 1/PANDORA 2/PANDORA in source selection.;
OFF
:Disables.
ON
:Enables IHEARTRADIO 1/IHEARTRADIO 2/IHEARTRADIO in source
selection.;
ON
:Enables SPOTIFY 1/SPOTIFY 2/SPOTIFY in source selection.;
OFF
:Disables.
ON
:Enables AUX in source selection.;
1
: Automatically distinguishes between audio file disc and music CD. ;
2
: Forces to play as a music CD. No sound can be heard if an audio file disc
is played.
YES
:Starts upgrading the firmware.; NO:Cancels (upgrading is not
activated).
For details on how to update the firmware, visit
<www.kenwood.com/cs/ce/>.
:Resets the settings to default (except the stored station).;
NO
:Cancels.
(Except for )
ON
:The clock time is shown on the display even when the unit is turned
off.;
OFF
( 13)
OFF
:Disables.
( 16)
(for / )
:Cancels.
( 15)
OFF
:Deactivates.
OFF
:Disables.
( 13)
PRESET TYPE
NORMAL
(FM1/FM2/FM3/AM).;
for each preset button, regardless of the selected band or SiriusXM
channel.
:Memorizes one station for each preset button in each band
MIX
:Memorizes one station or SiriusXM channel
ENGLISH
ESPANOL
Select the display language for
if applicable.
By default,
[ENGLISH]
is selected.
[FUNCTION]
menu and music information
ENGLISH
5
Page 10
GETTING STARTED
HD Radio™ tuner
(for / )
Register the marine remote ID
Applicable only when you connect Kenwood Marine Remote Control unit
(KCA-RC55MR, optional accessory) to this unit.
• For connection,
• Refer also to the supplied instruction manual of the Kenwood Marine
Remote Control unit for more information.
Preparation:
Press
to enter
repeatedly to enter STANDBY, then press the volume knob
[FUNCTION].
42, Connecting external components
(for )
.
1 Turn the volume knob to select an item, then press the knob.
[SYSTEM]
Remote control ID list is displayed.
•
•
2 Turn the volume knob to select an available ID
[REMOTE ID2]/[REMOTE ID3]
“REGISTERING” appears on the display window.
To register, on the Kenwood Marine Remote Control unit:
• Press ENTER to register as
• Press SRC to register as
• Press DISP to register as
Once the ID is registered, “COMPLETED” appears.
To delete the registered ID
[REMOTE SETTING]
[YES]
indicates that this ID is already registered.
[NO]
indicates that this ID is available.
[REMOTE ID SET]
, then press the knob
[REMOTE ID1]
[REMOTE ID2]
[REMOTE ID3]
.
[REMOTE ID1]
.
.
.
/
1 Turn the volume knob to select an item, then press the knob.
[SYSTEM]
2 Turn the volume knob to select the ID to delete [
[
ID2 DELETE]/[ID3 DELETE]
3 Turn the volume knob to select
select
[REMOTE SETTING]
[NO]
to cancel.
[REMOTE ID DELETE]
, then press the knob.
[YES]
to delete the selected ID, and
ID1 DELETE]
/
You can tune in to both conventional and HD Radio broadcasts.
• To find HD Radio stations in your area, visit <http://www.hdradio.com>.
Search for a station
1
Press repeatedly to select HD RADIO.
2 Press repeatedly (or press / on the remote
control) to select FM1/FM2/FM3/AM.
3 Press S/T (or press S/ on the remote control) to
search for a station or channel.
• To change the searching method for S/T: Press
repeatedly.
AUTO1 : Automatically search for a station or channel.
AUTO2 : Search for a preset station or channel.
MANUAL : Manually search for a station or channel.
• To store a station or channel: Press and hold one of the number
buttons (1to6).
• To select a stored station or channel: Press one of the number buttons
(1to6) (or press one of the number buttons (1to6) on the remote
control).
• To exit, press and hold
• To return to the previous setting item, press
6
ENGLISH
.
.
Page 11
HD Radio™ tuner
(for / )
Direct Access Tuning
(using the remote control)
1 Press DIRECT to enter Direct Access Tuning.
2 Press the number buttons to enter a frequency.
3 Press to search for a station or channel.
• To cancel, press
• If no operation is done for 10seconds after step
is automatically canceled.
or DIRECT.
2, Direct Access Tuning
Select an HD Radio multicast channel
Many HD Radio stations offer more than one channel programming.
This service is called multicasting. While receiving HD Radio multicast
channels....
Press S/T to select your desired channel (HD1 to HD8).
“LINKING” appears while linking to a multicast channel.
Receive an Emergency Alert message
You can receive an emergency alert message while listening to another
source or while in STANDBY, via HD Radio Broadcast.
Activate emergency alert message reception
Press the volume knob to enter
1
2 Turn the volume knob to select
3
Turn the volume knob to select
4 Turn the volume knob to select
[FUNCTION]
[TUNER SETTING]
[EMERGENCY ALERT], then press the knob.
[ON]
.
, then press the knob.
, then press the knob.
5 Press and hold to exit.
Receive an emergency alert message
When an emergency alert message is received, it appears and remains on
the display until the user performs the “Ignore” function.
• Press
message.
The same emergency alert message will not interrupt again for 12 hours.
(or press SRC on the remote control) to ignore the alert
Display received emergency alert messages
The received emergency alert messages are stored in the Alert Message
List, and you can check them later. While listening to the HD RADIO
source...
1 Press to display the Alert Message List.
2 Turn the volume knob to select a message.
3 Press the volume knob to display the information related to the
message.
4 Press again to exit.
• “NO LIST” appears when the list is empty.
• This feature can store up to four messages in the list.
• To clear the message list, set
[FACTORY RESET]
to
[YES]. ( 5)
Other settings
1
Press the volume knob to enter
2 Turn the volume knob to select an item
[FUNCTION]
.
( 8)
, then press the knob.
3 Repeat step 2 until the desired item is selected or activated.
4 Press and hold to exit.
To return to the previous setting item, press
.
• To deactivate emergency alert message reception, select
• To return to the previous setting item, press
.
[OFF]
in step 4.
ENGLISH
7
Page 12
HD Radio™ tuner
(for / )
RADIO
(for / / )
TUNER SETTING
IF BAND
AUTO MEMORY YES
RECEIVE MODE
CLOCK
TIME SYNC
AUTO
adjacent FM stations. (Stereo effect may be lost.);
interference noises from adjacent FM stations, but sound quality will not
be degraded and the stereo effect will remain.
NO
•
Selectable only if
Sets the receive mode of the HD Radio receiver.
AUTO
broadcast.;
in to analog broadcast only.
ON
station time.;
Default:
:Increases the tuner selectivity to reduce interference noises from
WIDE
:Subjects to
:Automatically starts memorizing 6 stations with good reception.;
:Cancels.
[NORMAL]
:Automatically tunes to analog broadcast when there is no digital
DIGITAL
:Synchronizes the unit’s time to the Radio Broadcast Data System
:Tunes in to digital broadcast only.;
OFF
:Cancels.
is selected for
[PRESET TYPE]. ( 5)
ANALOG
XX
:Tunes
Search for a station
1
Press repeatedly to select RADIO.
2 Press repeatedly (or press / on the remote
control) to select FM1/FM2/FM3/AM.
3 Press S/T (or press S/ on the remote control) to
search for a station.
• To change the searching method for S/T: Press
repeatedly.
AUTO1 : Automatically search for a station.
AUTO2 : Search for a preset station.
MANUAL : Manually search for a station.
• To store a station: Press and hold one of the number buttons (1to6).
• To select a stored station: Press one of the number buttons (1to6) (or
press one of the number buttons (1to6) on the remote control).
Direct Access Tuning
(using the remote control)
1 Press DIRECT to enter Direct Access Tuning.
2 Press the number buttons to enter a frequency.
3 Press to search for a station.
• To cancel, press
• If no operation is done for 10seconds after step
is automatically canceled.
8
ENGLISH
or DIRECT.
2, Direct Access Tuning
Page 13
RADIO
(for / / )
Other settings
1
Press the volume knob to enter
2
Turn the volume knob to select an item (see the following table), then
press the knob.
[FUNCTION]
.
3 Repeat step 2 until the desired item is selected or activated.
4 Press and hold to exit.
To return to the previous setting item, press
TUNER SETTING
AUTO MEMORY
MONO SET
TI ON
PTY SEARCH
YES
:Automatically starts memorizing 6 stations with good reception.;
NO
:Cancels.
•
Selectable only if
ON
:Improves the FM reception, but the stereo effect may be lost.;
OFF
:Cancels.
:Allows the unit to temporarily switch to Traffic Information if
available (“TI” lights up).;
Select the available Program Type (see the following), then press
S
/T to start.
[NORMAL]
OFF
is selected for
:Cancels.
.
Default:
[PRESET TYPE]. ( 5)
Available Program Type for
:
SPEECH
MUSIC
XX
The unit will search for the Program Type categorized under [SPEECH]
[MUSIC]
•
[MONO SET]/[TI]/[PTY SEARCH]
FM2/FM3.
• If the volume is adjusted during reception of traffic information, the
adjusted volume is memorized automatically. It will be applied the next
time traffic information is turned on.
NEWS, INFORM
(religious talk),
(spanish talk),
:
ROCK, CLS ROCK
(softrock),
JAZZ, CLASSICL
(soft rhythm and blues),
(spanish music),
if selected.
(information),
WEATHER
(classic rock),
TOP 40, COUNTRY, OLDIES, SOFT, NOSTALGA
(classical),
[PTY SEARCH]
SPORTS, TALK, LANGUAGE, REL TALK
PERSNLTY
HIP HOP
(personality),
ADLT HIT
R & B
(rhythm and blues),
REL MUSC
is selectable only when the band is FM1/
PUBLIC, COLLEGE, HABL ESP
(adult hits),
(religious music),
SOFT RCK
(nostalgia),
SOFT R&B
MUSC ESP
or
CLOCK
TIME SYNC
ON
:Synchronizes the unit’s time to the Radio Broadcast Data System
station time.;
OFF
:Cancels.
ENGLISH
9
Page 14
CD/USB/iPod/ANDROID
Start playback
The source changes automatically and playback starts.
CD
Label side
USB 1 cable from the
rear of the unit
(USB input terminal).
/
/
:
You can also connect to
the USB 2 cable from the
rear of the unit
(USB input terminal).
M
Eject disc
USB
CA-U1EX (max.: 500mA)
(optional accessory)
iPod/iPhone
KCA-iP102/KCA-iP103
(optional accessory)
or accessory of the iPod/
2
*
iPhone
3
ANDROID
USB cable
(commercially available)
*
2
*
Selectable source:
•
/ / : CD/USB 1/USB 2/iPod 1/iPod 2/ANDROID 1/
ANDROID 2
•
/ : CD/USB/iPod USB/ANDROID
To On the faceplate On the remote control
Playback/pause Press .
4
Reverse/Fast-forward
Select a track/file
5
Select a folder
Repeat play
*
6
*
*
Press and hold S/T. Press and hold S/ .
Press S/T. Press S/
Press J/K.
Press repeatedly.
TRACK REPEAT/ALL REPEAT
FILE REPEAT/FOLDER REPEAT/ALL REPEAT
Press
Press
: Audio CD
: MP3/WMA/AAC/WAV/
.
.
/ .
FLAC file
1
*
Random play
6
*
FILE REPEAT/FOLDER REPEAT/REPEAT OFF
Press repeatedly.
DISC RANDOM/RANDOM OFF
FOLDER RANDOM/RANDOM OFF
: Audio CD
: MP3/WMA/AAC/WAV/FLAC file,
: iPod or ANDROID
iPod or ANDROID
7
Press and hold
1
*
KCA-iP102 : 30-pin type, KCA-iP103 : Lightning type
2
*
Do not leave the cable inside the car when not using.
3
*
When connecting an Android device, “Press [VIEW] to install KENWOOD MUSIC PLAY APP” is shown. Follow the
to select
ALL RANDOM
*
.
instructions to install the application. You can also install the latest version of KENWOOD MUSIC PLAY application
on your Android device before connecting. For more information, visit <www.kenwood.com/cs/ce/>.
10
ENGLISH
Page 15
CD/USB/iPod/ANDROID
4
*
For ANDROID: Applicable only when
5
*
For CD: Only for MP3/WMA/AAC files. This does not work for iPod/ANDROID.
6
*
For iPod/ANDROID: Applicable only when
7
*
For CD: Only for MP3/WMA/AAC files.
[BROWSE MODE]
[MODE OFF]/[BROWSE MODE]
is selected.
is selected.
Select a file from a folder/list
For iPod/ANDROID, applicable only when
selected.
[MODE OFF]/[BROWSE MODE]
is
Select control mode
While in iPod 1/iPod 2/iPodUSB source, press 5 repeatedly.
MODE ON
MODE OFF
While in ANDROID 1/ANDROID 2/ANDROID source, press 5 repeatedly.
BROWSE MODE
HAND MODE
: Control iPod using the iPod itself. However, you can still play/
pause, file skip, fast-forward or reverse from this unit.
: Control iPod from this unit.
: Control Android device from this unit via KENWOOD
MUSIC PLAY application installed in the Android device.
: Control Android device using the Android device itself via
other media player applications installed in the Android
device. However, you can still play/pause and file skip from
this unit.
Select music drive
While in USB 1/USB 2/USB source, press 5 repeatedly.
Stored songs in the following drive will be played back.
• Selected internal or external memory of a smartphone (Mass Storage
Class).
• Selected drive of a multiple drives device.
Listen to TuneIn Radio/TuneIn Radio Pro/Aupeo
While listening to TuneIn Radio, TuneIn Radio Pro or Aupeo, connect the
iPod/iPhone to the USB input terminal of the unit.
• The unit will output the sound from these applications.
1 Press .
2 Turn the volume knob to select a folder/list, then press the knob.
3 Turn the volume knob to select a file, then press the knob.
Quick Search
ANDROID 2 and ANDROID source)
If you have many files, you can search through them quickly.
Turn the volume knob quickly to browse through the list quickly.
Skip Search
ANDROID 2 and ANDROID source)
Press S/T to search at a preset skip search ratio.
[SKIP SEARCH])
• Pressing and holding S/T searches at a 10% ratio.
Alphabet search
ANDROID 1, ANDROID 2 and ANDROID source)
You can search for a file according to the first character.
For iPod 1/iPod 2/iPod USB source
(applicable only for CD, USB 1, USB 2, USB, ANDROID 1,
(applicable only for iPod 1, iPod 2, iPod USB, ANDROID 1,
( 12,
(applicable only for iPod 1, iPod 2, iPod USB,
1 Turn the volume knob quickly to enter character search.
2 Turn the volume knob to select the character.
• Select “
” to search for a character other than AtoZ, 0to9.
*
3 Press S/T to move to the entry position.
• You can enter up to 3characters.
4 Press the volume knob to start searching.
ENGLISH
11
Page 16

CD/USB/iPod/ANDROID
For ANDROID 1/ANDROID 2/ANDROID source
1 Press J/K to enter character search.
2 Turn the volume knob to select the character.
^A^: Upper case letters (A to Z)
_A_: Lower case letters (a to z)
-0-: Numbers (0 to 9)
: Character other than AtoZ, 0to9
***
3 Press the volume knob to start searching.
• To return to the root folder/first file/top menu, press 5.
BT AUDIO source.)
• To return to the previous setting item, press .
• To cancel, press and hold
Direct Music Search
(using the remote control)
.
(Not applicable for
1 Press DIRECT.
2 Press the number buttons to enter a track/file number.
3 Press to search for music.
• To cancel, press
• Not available if Random Play is selected.
• Not applicable for iPod 1, iPod 2, iPodUSB, ANDROID 1, ANDROID 2 and
ANDROID source.
or DIRECT.
Other settings
1
Press the volume knob to enter
[FUNCTION]
.
2 Turn the volume knob to select an item (see the following table),
then press the knob.
3 Repeat step 2 until the desired item is selected or activated.
4 Press and hold to exit.
To return to the previous setting item, press
USB
MUSIC DRIVE DRIVE CHANGE
automatically and playback starts.
Repeat steps
SKIP SEARCH 0.5%/1%/5%/10%
ANDROID1, ANDROID2 or ANDROID source, selects the skip search ratio over
the total files.
:The next drive (
1
to 3 to select the following drives.
: While listening to iPod 1, iPod 2, iPodUSB,
[DRIVE 1]
.
to
[DRIVE 4]
Default:
) is selected
XX
Settings to use KENWOOD Remote application
KENWOOD Remote application is designed to control the KENWOOD car
receiver’s operations from the iPhone/iPod (via USB input terminal).
Preparation:
Install the latest version of KENWOOD Remote application on your device
before connecting. For more information, visit
<www.kenwood.com/cs/ce/>.
You can make the settings in the same way as connection via Bluetooth.
( 27)
12
ENGLISH
Page 17

AUX
Pandora®
Preparation:
Select
[ON]
for
[BUILT-IN AUX]
for
[SOURCE SELECT]. ( 5)
Start listening
1
Connect a portable audio player (commercially available).
Auxiliary cable from
the rear of the unit
3.5mm (1/8") stereo mini plug with “L”
shaped connector (commercially available)
Portable audio player
2 Press repeatedly to select AUX.
3 Turn on the portable audio player and start playback.
Set the AUX name
While listening to a portable audio player connected to the unit...
1 Press the volume knob to enter
2 Turn the volume knob to select
3 Turn the volume knob to select
[FUNCTION]
[SYSTEM]
[AUX NAME SET]
.
, then press the knob.
, then press the knob.
4 Turn the volume knob to select an item, then press the knob.
AUX
(default)/
DVD/PORTABLE/GAME/VIDEO/TV
5 Press and hold to exit.
Preparation:
Install the latest version of the Pandora application on your device
(iPhone/iPod touch), then create an account and log in to Pandora.
• Select
[ON]
for
[PANDORA SRC]
in
[SOURCE SELECT]. ( 5)
Start listening
1
Open the Pandora application on your device.
2 Connect your device to the USB input terminal.
USB 1 cable from the rear
of the unit.
also connect to the USB 2 cable from the rear of the unit.
KCA-iP102/KCA-iP103
1
(optional accessory)
accessory of the iPod/iPhone
/ / : You can
*
or
2
*
3 Press repeatedly to select PANDORA 1/PANDORA 2/
PANDORA.
Broadcast starts automatically.
1
*
KCA-iP102 : 30-pin type, KCA-iP103 : Lightning type
2
*
Do not leave the cable inside the car when not using.
To return to the previous setting item, press
.
ENGLISH
13
Page 18

Pandora®
To On the faceplate On the remote control
Playback/pause
Skip a track
Thumbs up or
thumbs down
If thumbs down is selected, the current track is skipped.
*
*
Press
Press T.
Press J/K.
. Press
Press
Press
.
.
/ .
Create and save a new station
1
Press .
2 Turn the volume knob to select
3 Turn the volume knob to select
press the knob.
A new station is created based on the artist or current song.
[NEW STATION]
[FROM ARTIST]
, then press the knob.
or
[FROM TRACK]
, then
4 Press and hold one of the number buttons (1to5) to store.
To select a stored station: Press one of the number buttons (1to5).
Search for a registered station
Bookmark current song information
Press and hold the volume knob.
“BOOKMARKED” appears and the information is stored to your device.
• The bookmark is available on your Pandora account but not on this
unit.
Delete a station
While listening to PANDORA...
1 Press .
2 Turn the volume knob to select
knob.
3 Turn the volume knob to select
press the knob.
[STATION DELETE]
[SORT BY DATE]
, then press the
or
[SORT BY A-Z]
, then
4 Turn the volume knob to select the desired station to delete, then
press the knob.
5 Turn the volume knob to select
[YES]
, then press the knob.
6 Press and hold to exit.
To return to the previous setting item, press
.
1
Press .
2 Turn the volume knob to select an item, then press the knob.
[SORT BY DATE]
[SORT BY A-Z]
: According to the registered date
: By alphabetical order
3 Turn the volume knob (or press J / K on the remote control) to
select the desired station.
4 Press the volume knob (or press on the remote control) to
confirm.
To cancel, press and hold
14
ENGLISH
.
Page 19

iHeartRadio®
Preparation:
Install the latest version of iHeartAuto application on your device
(iPhone/iPod touch), then create an account and log in to iHeartRadio.
• Select
[ON]
for
[IHEART SRC]
in
[SOURCE SELECT]. ( 5)
Start listening
1
Open the iHeartAuto application on your device.
2 Connect your device to the USB input terminal.
USB 1 cable from the rear
of the unit.
also connect to the USB 2 cable from the rear of the unit.
KCA-iP102/KCA-iP103
1
(optional accessory)
accessory of the iPod/iPhone
/ / : You can
*
or
2
*
3 Press repeatedly to select IHEARTRADIO 1/IHEARTRADIO 2/
IHEARTRADIO.
Broadcast starts automatically.
1
*
KCA-iP102 : 30-pin type, KCA-iP103 : Lightning type
2
*
Do not leave the cable inside the car when not using.
To On the faceplate On the remote control
Playback/pause
Skip a track for
custom station
Thumbs up or
thumbs down
Create a new/custom
station
Scan for live station
Press
Press T.
Press J/K.
Press 1.
1 Press 2 to start
scanning.
2 Press 2 again
to listen to the
station.
. Press
Press
( Not available )
( Not available )
( Not available )
.
.
Search and store a station
1
Press .
2 Turn the volume knob to select a category, then press the knob.
3 Turn the volume knob (or press J / K on the remote control) to
select the desired station.
4 Press the volume knob (or press on the remote control) to
confirm.
When a city list appears, you can search cities in alphabetical order by
turning the volume knob quickly.
To cancel, press and hold
.
To store a station: Press and hold one of the number buttons (3, 4or5).
To select a stored station: Press one of the number buttons (3, 4or5).
ENGLISH
15
Page 20

Spotify
Preparation:
Install the latest version of the Spotify application on your device (iPhone/
iPod touch), then create an account and log in to Spotify.
• Select
[ON]
for
[SPOTIFY SRC]
in
[SOURCE SELECT]. ( 5)
Start listening
1
Open the Spotify application on your device.
2 Connect your device to the USB input terminal.
USB 1 cable from the rear
of the unit.
also connect to the USB 2 cable from the rear of the unit.
KCA-iP102/KCA-iP103
1
(optional accessory)
accessory of the iPod/iPhone
*
or
2
*
/ / : You can
3 Press repeatedly to select SPOTIFY 1/SPOTIFY 2/SPOTIFY.
Broadcast starts automatically.
To On the faceplate On the remote control
Playback/pause
Skip a track
Thumbs up or
thumbs down
*
Press
Press S
Press J/K.
3
. Press
4
*
/ T. Press S
Press
.
4
*
/ .
/ .
Start radio Press and hold 5. ( Not available )
5
Repeat play
*
Press
repeatedly.
( Not available )
REPEAT ALL/REPEAT
4
*
ONE
/
REPEAT OFF
5
Random play
*
Press
repeatedly.
4
*
( Not available )
SHUFFLE ON/SHUFFLE
OFF
3
*
This feature is available for tracks in Radio only. If thumbs down is selected, the current
track is skipped.
4
*
Available for premium account users only.
5
*
Available for tracks in Playlists only.
Save favorite song information
1
*
KCA-iP102 : 30-pin type, KCA-iP103 : Lightning type
2
*
Do not leave the cable inside the car when not using.
16
ENGLISH
While listening to the Radio on Spotify...
Press and hold the volume knob.
“SAVED” appears and the information is stored to “Your Music” or “Your
Library” on your Spotify account.
To unsave, repeat the same procedure.
“REMOVED” appears and the information is removed from “Your Music”
or “Your Library” on your Spotify account.
Page 21

Spotify
SiriusXM® Radio
Search for a song or station
1
Press .
2 Turn the volume knob to select a list type, then press the knob.
The list types displayed differ depending on the information sent
from Spotify.
3 Turn the volume knob (or press J/K on the remote control) to
select the desired song or station.
4 Press the volume knob (or press on the remote control) to
confirm.
You can browse through the list quickly by turning the volume knob
quickly.
To cancel, press and hold
.
Only SiriusXM® brings you more of what you love to listen to, all in one
place. Get over 140 channels, including commercial-free music plus the
best sports, news, talk, comedy and entertainment. Welcome to the world
of satellite radio. A SiriusXM Vehicle Tuner and Subscription are required.
For more information, visit <www.siriusxm.com>.
Preparation:
1 Connect the optional SiriusXM Vehicle Tuner (commercially
available).
Antenna
Expansion port on
the rear panel
SiriusXM Vehicle Tuner
2 Check your Radio ID for activation.
The SiriusXM Radio ID is required for activation and can be found by
tuning to Channel 0 as well as on the label found on the SiriusXM
Connect tuner and its packaging.
The Radio ID does not include the letters I, O, S or F.
3 Activate the subscription.
For users in the U.S.A.:
Online: Go to <www.siriusxm.com>
Phone: Call 1-866-635-2349
For users in Canada:
Online: Go to <www.siriusxm.ca/activatexm>
Phone: Call 1-877-438-9677
4 Press repeatedly to select SIRIUSXM to start updating.
ENGLISH
17
Page 22

SiriusXM® Radio
Start listening
1
Press repeatedly to select SIRIUSXM.
2 Press repeatedly to select a band.
3 Press .
“
” lights up.
4 Turn the volume knob to select a category, then press the knob.
If “ALL CHANNELS” is selected, all the available channels will be
shown.
5 Turn the volume knob to select a channel, then press the knob.
(or)
Press S/T to search for a channel manually.
• Pressing and holding S/T changes the channel rapidly.
If a locked channel or a mature channel is selected, a pass code input
screen appears. Enter the pass code to receive the channel.
To change the tuning method for S/T: Press .
Each time you press
“CHANNEL” (manually search for a channel) and “PRESET” (searches for a
preset channel of the selected band).
, the tuning method switches between
( 19)
SiriusXM Keymode
Press and hold to change the keymode (channel or replay).
(Default: Channel keymode)
“
” lights up when replay keymode is selected.
When channel keymode is selected...
To On the faceplate On the remote control
Select a channel
Change a channel
rapidly
Store a channel of
the current band
Select a stored
channel of the
current band
When replay keymode is selected...
To On the faceplate On the remote control
Press S/T. Press S/
Press and hold
S/T.
Press and hold
one of the number
buttons (1to6).
Press one of the number buttons (1to6).
Press and hold S/
.
( Not available )
.
Direct Access Tuning
(using the remote control)
1 Press DIRECT to enter Direct Access Tuning.
2 Press the number buttons to enter a channel number.
3 Press to start searching.
• To cancel, press
• If no operation is done for 10seconds after step
is automatically canceled.
18
ENGLISH
or DIRECT.
2, Direct Access Tuning
Playback/pause
Skip backward/
forward
Rewind/Fast-forward Press and hold
Go to Live Press 1.
Press
Press S/T. Press S/
S/T.
.
Press
Press and hold S/
.
.
.
Page 23

SiriusXM® Radio
SmartFavorites and TuneStart™
User stored channels are recognized as SmartFavorite channels*. The
SiriusXM Vehicle Tuner automatically buffers the broadcast content in the
background.
• SmartFavorites feature is available with SXV200 or later SiriusXM
Vehicle Tuner.
*
SXV300 (and later) SiriusXM Vehicle Tuner can use all 18 stored channels as SmartFavorites.
The SXV200 SiriusXM Vehicle Tuner can use 6 stored channels from the current band as
SmartFavorites.
When you select a SmartFavorite channel, you can rewind and replay up
to 30minutes of any of the missed news, talk, sports or music content.
• Playback starts from the beginning of the song if
[ON] ( 20)
Press one of the number buttons (1 to 6) to select a stored channel.
for most music channels stored as a SmartFavorite.
[TUNE START]
is set to
TuneScan™
You can get a short preview of the songs that you have missed on each of
your SmartFavorite music channels or currently tuned music channel.
Press and hold
recorded music contents.
• To listen to the current song, press the volume knob to stop scanning.
The unit continues playing the current song.
• To select the previous/next song, press S/T.
• To cancel scanning, press and hold the volume knob. Playback returns
to the channel before you entered TuneScan.
to start scanning the first 6 seconds of the
SiriusXM settings
1
Press the volume knob to enter
[FUNCTION]
.
2 Turn the volume knob to select an item (see the following table),
then press the knob.
3 Repeat step 2 until the desired item is selected/activated or follow
the instructions stated on the selected item.
4 Press and hold to exit.
To return to the previous setting item, press
SIRIUS XM
CHANNEL LOCK
CODE SET
LOCK SETTING MATURE CH
To unlock settings:
1
Turn the volume knob to select a number.
2
Press
S/T
3
Repeat steps 1 and 2 to enter the current pass code.
(Initial pass code is 0000.)
4
Press the volume knob to confirm.
1
Turn the volume knob to select a number.
2
Press
S/T
3
Repeat steps 1 and 2 to enter a new 4-digit pass code.
4
Press the volume knob to confirm.
5
Repeat steps 1 to 4 to reconfirm the pass code.
•
Make a note of the new pass code to enter channel lock settings for
next time.
:Selects the SiriusXM-defined lock setting.;
USER DEFINED
lock.;
OFF
:Cancels.
to move to the entry position.
to move to the entry position.
:Selects the individual channels the user wants to
.
Default:
XX
ENGLISH
19
Page 24

SiriusXM® Radio
BLUETOOTH®
1
CHANNEL EDIT
*
1
Turn the volume knob to select a category, then press the knob.
2
Turn the volume knob to select a channel you want to lock, then
press the knob.
“L” appears in front of the channel number.
3
Press and hold to exit.
1
CHANNEL CLEAR
TUNE START
SIGNAL LEVEL
*
YES
:Clears all the locked channels.; NO:Cancels.
2
*
ON
:All qualified music channels in the SmartFavorite will start
playback from the beginning of the song.;
Shows the strength (
NO SIGNAL/WEAK/GOOD/STRONG)
OFF
:Cancels.
current received signal.
BUFFER USAGE
SXM RESET YES
1
*
Displayed only when
2
*
Available only if the connected SiriusXM Vehicle Tuner is SXV200 or later that supports
Shows the memory usage (0%to
100%
) for Replay buffer.
:Resets stored channel and lock setting to default.;
[USER DEFINED]
is selected.
SmartFavorites.
of the
NO
:Cancels.
BLUETOOTH — Connection
Supported Bluetooth profiles
– Hands-Free Profile (HFP)
– Advanced Audio Distribution Profile (A2DP)
– Audio/Video Remote Control Profile (AVRCP)
– Serial Port Profile (SPP)
– Phonebook Access Profile (PBAP)
Supported Bluetooth codecs
– Sub Band Codec (SBC)
– Advanced Audio Coding (AAC)
– aptX codec (Qualcomm® aptX™) (for
)
Connect the microphone
MIC (microphone input terminal)
Microphone
(supplied)
/ /
Rear panel
20
Adjust the microphone angle
Secure using cord clamps
(not supplied) if necessary.
ENGLISH
Page 25

BLUETOOTH®
Pair and connect a Bluetooth device for the first time
1
Press to turn on the unit.
2 Search and select this unit model name (KDC-X7**/KDC-BT7**HD/
KMR-D7**BT/KDC-X5**/KDC-BT5**U) on the Bluetooth device.
“PAIRING”
KNOB” appears on the display.
“PASS XXXXXX” Device name “PRESS” “VOLUME
• For some Bluetooth devices, you may need to enter the Personal
Identification Number (PIN) code immediately after searching.
3 Press the volume knob to start pairing.
“PAIRING OK” appears when pairing is completed.
Once pairing is completed, Bluetooth connection is established
automatically.
• “BT1” and/or “BT2” indicator on the faceplate lights up.
• This unit supports Secure Simple Pairing (SSP).
• Up to five devices can be registered (paired) in total.
• Once the pairing is completed, the Bluetooth device will remain
registered in the unit even if you reset the unit. To delete the paired
device,
• A maximum of two Bluetooth phones and one Bluetooth audio device
can be connected at any time.
However, while in BT AUDIO source, you can connect to five Bluetooth
audio devices and switch between these five devices.
• Some Bluetooth devices may not automatically connect to the unit
after pairing. Connect the device to the unit manually.
• Refer to the instruction manual of the Bluetooth device for more
information.
25, [DEVICE DELETE]
.
( 27)
Auto Pairing
When you connect iPhone/iPod touch/Android device to the USB input
terminal, pairing request (via Bluetooth) is automatically activated.
Press the volume knob to pair once you have confirmed the device
name.
Automatic pairing request is activated only if:
– Bluetooth function of the connected device is turned on.
–
[AUTO PAIRING]
– KENWOOD MUSIC PLAY application is installed on the Android device
( 10)
and
is set to
[BROWSE MODE]
[ON]. ( 26)
is selected.
( 11)
ENGLISH
21
Page 26

BLUETOOTH®
Connect with a remote device by One-touch (NFC)
(for / / )
Near Field Communication (NFC) enables short-range wireless
communication between the unit and remote devices such as
smartphones.
By holding an NFC-compatible remote device near to the N-Mark on
the unit (right side of the panel), the unit and remote device proceed
to complete pairing and established the BLUETOOTH connection
automatically.
1 Activate the NFC function on the remote device.
Refer to the instruction manual of the remote device for more
information.
2 Hold the remote device near to the N-Mark on the unit (right side of
the panel).
The device vibrates when pairing is completed.
BLUETOOTH — Mobile phone
KEY
Receive a call
When there is an incoming call:
• The KEY zone illuminates in green color and flashes.
• The unit answers the call automatically if
selected time.
During a call:
• The LCD DISPLAY zone illuminates according to the settings made for
[DISPLAY] ( 32)
• If you turn off the unit or detach the faceplate, the Bluetooth
connection is disconnected.
( 24)
and the KEY zone illuminates in green color.
[AUTO ANSWER]
is set to a
• Depending on the type of remote device used, the strength of the NFC
signal may vary. For a stronger NFC signal, user must understand the
position of the remote device’s NFC antenna and hence tap the NFC
antenna with the NFC logo.
• To disconnect, hold the remote device near to the N-Mark on the unit
again.
• This unit only can recognize and connect to one NFC-compatible device
at a time.
22
ENGLISH
The following operations may differ or not available depending on the
connected phone.
To On the faceplate On the remote control
First incoming call...
Answer a call
Reject a call
End a call
Press
volume knob or one of
the number buttons
(1 to 6).
Press
Press
or the
.
.
Press
Press
Press
.
.
.
Page 27

BLUETOOTH®
To On the faceplate On the remote control
While talking on the first incoming call...
Answer another
incoming call and
hold the current call
Reject another
incoming call
While having two active calls...
End current call and
activate held call
Swap between the
current call and
held call
Adjust the phone
volume
[00]
to
[35]
(Default:
Switch between
hands-free and
private talk modes
[15]
)
Press
Press
Press
Press
Turn the volume knob
during a call.
• This adjustment will not affect the volume of
the other sources.
Press
a call.
• Operations may vary
according to the
connected Bluetooth
device.
. Press .
.
.
. Press .
during
Press
Press
Press
( Not available )
.
.
or
.
Improve the voice quality
While talking on the phone...
1 Press the volume knob to enter
[FUNCTION]
.
2 Turn the volume knob to select an item (see the following table),
then press the knob.
3 Repeat step 2 until the desired item is selected or activated.
4 Press and hold to exit.
To return to the previous setting item, press
MIC GAIN LEVEL –10
microphone increases as the number increased.
NR LEVEL LEVEL –5
until the least noise is being heard during a phone conversation.
ECHO CANCEL LEVEL –5
time until the least echo is being heard during a phone conversation.
to
LEVEL +10(LEVEL –4
to
LEVEL +5(LEVEL 0
to
LEVEL +5(LEVEL 0
.
Default:
):The sensitivity of the
):Adjust the noise reduction level
):Adjust the echo cancellation delay
Make the settings for receiving a call
Press to enter Bluetooth mode.
1
2 Turn the volume knob to select an item
( 24
), then press the knob.
3 Repeat step 2 until the desired item is selected or activated.
4 Press and hold to exit.
To return to the previous setting item, press
.
XX
ENGLISH
23
Page 28

BLUETOOTH®
SETTINGS
AUTO ANSWER
BATTERY/SIGNAL* AUTO
*
Functionality depends on the type of the phone used.
1
to30:The unit answers incoming call automatically in the
selected time (in seconds).;
:Shows the strength of the battery and signal when the unit
detects a Bluetooth device and the Bluetooth device is connected.;
OFF
:Cancels.
OFF
Default:
:Cancels.
XX
Make a call
You can make a call from the call history, phonebook, or dialing the
number. Call by voice is also possible if your mobile phone has the
feature.
1 Press to enter Bluetooth mode.
“(First device name)” appears.
• If two Bluetooth phones are connected, press again to switch to
another phone.
“(Second device name)” appears.
2 Turn the volume knob to select an item (see the following table),
then press the knob.
3 Repeat step 2 until the desired item is selected/activated or follow
the instructions stated on the selected item.
4 Press and hold to exit.
To return to the previous setting item, press
.
CALL HISTORY
PHONE BOOK
NUMBER DIAL
(Applicable only if the phone supports PBAP.)
1
Press the volume knob to select a name or a phone number.
• “INCOMING”, “OUTGOING”, or “MISSED” is shown on the lower part
of the display to indicate the previous call status.
• Press
• “NO DATA” appears if there is no recorded call history.
2
Press the volume knob to call.
(Applicable only if the phone supports PBAP.)
1
Turn the volume knob quickly to enter alphabet search mode (if the
phonebook contains many contacts).
The first menu (ABCDEFGHIJKLMN) appears.
• To go to the other menu (OPQRSTUVWXYZ1
• To select the desired first letter, turn the volume knob or press
Select “1” to search with numbers and select “
2
Turn the volume knob to select a name, then press the knob.
3
Turn the volume knob to select a phone number, then press the knob
to call.
•
The phonebook of the connected phone is automatically transferred to
the unit when pairing.
•
Contacts are categorized as: HOME, OFFICE, MOBILE, OTHER, GENERAL.
•
This unit can display only non-accent letters. (Accent letters such as
“Ú” is shown as “U”.)
1
Turn the volume knob to select a number (0 to 9) or character
(
2
Press
Repeat steps
3
Press the volume knob to call.
(or using the remote control)
1
Press the number buttons (0 to 9) to enter the phone number.
2
Press to call.
DISP
S/T
symbols.
, #, +).
S/T
to change the display category (NUMBER or NAME).
), press
J / K
, then press the knob.
” to search with
to move the entry position.
1
and 2 until you finish entering the phone number.
.
24
ENGLISH
Page 29

BLUETOOTH®
VOICE
BATTERY LVL LOW
NO SIGNAL/SIGNAL LVL LOW/MID/MAX*:Shows the strength of the current received signal.
*
Functionality depends on the type of the phone used.
Speak the name of the contact you want to call or the voice command to
control the phone functions.
/
MID/FULL*:Shows the strength of the battery.
( Make a call using voice recognition)
Make a call using voice recognition
Press and hold to activate the voice recognition of the
1
connected phone.
2 Speak the name of the contact you want to call or the voice
command to control the phone functions.
• Supported Voice Recognition features vary for each phone. Refer to the
instruction manual of the connected phone for details.
• This unit also supports the intelligent personal assistant function of
iPhone.
Settings in memory
Store a contact in memory
You can store up to 6 contacts into the number buttons (1 to 6).
1 Press to enter Bluetooth mode.
2 Turn the volume knob to select
[NUMBER DIAL]
, then press the knob.
[CALL HISTORY], [PHONE BOOK]
, or
3 Turn the volume knob to select a contact or enter a phone number.
If a contact is selected, press the volume knob to show the phone
number.
4 Press and hold one of the number buttons (1 to 6).
“STORED” appears when the contact is stored.
To erase a contact from the preset memory, select
and store a blank number.
[NUMBER DIAL]
in step 2
Make a call from memory
Press to enter Bluetooth mode.
1
2 Press one of the number buttons (1 to 6).
3 Press the volume knob to call.
“NO MEMORY” appears if there is no contacts stored.
Other settings
1
Press the volume knob to enter
[FUNCTION]
.
2 Turn the volume knob to select an item (see the following table),
then press the knob.
3 Repeat step 2 until the desired item is selected/activated or follow
the instructions stated on the selected item.
4 Press and hold to exit.
[YES]
or
.
[NO]
, then press the knob.
Default:
To return to the previous setting item, press
BT MODE
PHONE SELECT
AUDIO SELECT
DEVICE DELETE
PIN CODE EDIT
(0000)
Selects the phone or audio device to connect or disconnect.
“
” appears in front of the device name when connected.
*
“
” appears in front of the current playback audio device.
•
You can only connect a maximum of two Bluetooth phones and one
Bluetooth audio device at any time.
1
Turn the volume knob to select a device to delete, then press the
knob.
2
Turn the volume knob to select
Changes the PIN code (up to 6 digits).
1
Turn the volume knob to select a number.
2
Press S/T to move the entry position.
Repeat steps
3
Press the volume knob to confirm.
1
and 2 until you finish entering the PIN code.
XX
ENGLISH
25
Page 30

BLUETOOTH®
RECONNECT ON
AUTO PAIRING ON
INITIALIZE YES
:The unit automatically reconnect when the last connected
Bluetooth device is within range.;
:The unit automatically pair supported Bluetooth device (iPhone/
iPod touch/Android device) when it is connected through USB input
terminal.Depending on the operating system of the connected device,
this function may not work. ;
:Initializes all the Bluetooth settings (including stored pairing,
phonebook, and etc.).;
NO
OFF
:Cancels.
:Cancels.
OFF
:Cancels.
Bluetooth test mode
You can check the connectivity of the supported profile between the
Bluetooth device and the unit.
• Make sure there is no Bluetooth device paired.
1 Press and hold .
“PLEASE PAIR YOUR PHONE PIN 0000” appears.
2 Search and select this unit model name (KDC-X7**/KDC-BT7**HD/
KMR-D7**BT/KDC-X5**/KDC-BT5**U) on the Bluetooth device.
3 Operate the Bluetooth device to confirm pairing.
“TESTING” flashes on the display.
The connectivity result (OK or NG) appears after the test.
PAIRING: Pairing status
HF CONNECT: Hands-Free Profile (HFP) compatibility
AUDIO CONNECT: Advanced Audio Distribution Profile (A2DP)
compatibility
PHONEBOOK DL: Phonebook Access profile (PBAP) compatibility
To cancel test mode, press and hold
to turn off the unit.
BLUETOOTH — Audio
While in BT AUDIO source, you can connect to five Bluetooth audio
devices and switch between these five devices.
Audio player via Bluetooth
1
Press repeatedly (or press SRC on the remote control) to
select BTAUDIO.
2 Operate the Bluetooth audio player to start playback.
To On the faceplate On the remote control
Playback/pause
Select group or
folder
Reverse/Forward
skip
Reverse/Fastforward
Repeat play Press
Random play Press and hold
Press
Press J / K.
Press S/T. Press S/
Press and hold
S/T.
ALL REPEAT, FILE REPEAT
REPEAT OFF
select
• Press
RANDOM OFF
. Press
repeatedly.
ALL RANDOM
.
to select
.
Press
Press and hold S/
.
( Not available )
,
to
( Not available )
.
/ .
.
26
ENGLISH
Page 31

BLUETOOTH®
To On the faceplate On the remote control
Select a file from a
folder/list
Switch between
connected
Bluetooth audio
devices
*
Pressing the “Play” key on the connected device itself also causes switching of sound output
from the device.
Operations and display indications may differ according to their
availability on the connected device.
Refer to “Select a file
from a folder/list” on
page 11.
Press 5.*
( Not available )
( Not available )
Settings to use KENWOOD Remote application
KENWOOD Remote application is designed to control the KENWOOD
car receiver’s operations from the iPhone/iPod (via Bluetooth or via USB
input terminal) or Android smartphone (via Bluetooth).
Preparation:
Install the latest version of KENWOOD Remote application on your device
before connecting. For more information, visit
<www.kenwood.com/cs/ce/>.
REMOTE APP
SELECT
IOS YES
ANDROID YES
ANDROID LIST
STATUS
* Selects the Android smartphone to use from the list.
Default:
Select the device (IOS or ANDROID) to use the application.
:Selects iPhone/iPod to use the application via Bluetooth or
connected via USB input terminal.;
If IOS is selected, select iPod BT source (or iPod 1/iPod 2/iPod USB if
your iPhone/iPod is connected via USB input terminal) to activate the
application.
•
The connectivity of the application will be interrupted or disconnected
if:
– You change from iPod BT source to any playback source connected
via the USB input terminal.
– You change from iPod 1/iPod 2/iPod USB source to iPod BT source.
:Selects Android smartphone to use the application via Bluetooth.;
NO
: Cancels.
Shows the status of the selected device.
IOS CONNECTED
iPod connected via Bluetooth or USB input terminal.
IOS NOT CONNECTED
ANDROID CONNECTED
Android smartphone connected via Bluetooth.
ANDROID NOT CONNECTED
application.
: You are able to use the application using the iPhone/
: No IOS device is connected to use the application.
: You are able to use the application using the
NO
:Cancels.
: No Android device is connected to use the
XX
1 Press the volume knob to enter
[FUNCTION]
.
2 Turn the volume knob to select an item (see the following table),
then press the knob.
3
Repeat step 2 until the desired item is selected or activated.
4 Press and hold to exit.
To return to the previous setting item, press
.
*
Displayed only when
[ANDROID]
of
[SELECT]
is set to
[YES]
.
ENGLISH
27
Page 32

BLUETOOTH®
Listen to iPhone/iPod via Bluetooth
You can listen to the songs on the iPhone/iPod via Bluetooth on this unit.
Press
• You can operate the iPod/iPhone in the same way as iPod/iPhone via
USB input terminal.
• If you plug in an iPhone/iPod to the USB input terminal while listening
to iPodBT source, the source automatically change to iPod 1/iPod 2/
iPod USB. Press
via Bluetooth.
repeatedly to select iPodBT.
( 10)
to select iPodBT if the device is still connected
Internet radio via Bluetooth
You can listen to internet radio (Pandora, iHeartRadio and Spotify) on the
iPhone/iPod/Android device via Bluetooth on this unit.
• Make sure the USB input terminal is not connected to any device.
Listen to Pandora
Preparation:
Select
[ON]
for
[PANDORA SRC]
in
[SOURCE SELECT]. ( 5)
1 Open the Pandora application on your device.
2 Connect your device via Bluetooth connection.
( 21)
3 Press repeatedly to select PANDORA (for iPhone/iPod) or
PANDORA BT (for Android device).
The source switches and broadcast starts automatically.
Listen to iHeartRadio
Preparation:
Select
[ON]
for
[IHEART SRC]
in
[SOURCE SELECT]. ( 5)
1 Open the iHeartAuto application on your device.
2 Connect your device via Bluetooth connection.
( 21)
3 Press repeatedly to select IHEARTRADIO.
The source switches and broadcast starts automatically.
• You can operate iHeartRadio in the same way as iHeartRadio via USB
input terminal.
( 15)
Listen to Spotify
Preparation:
Select
[ON]
for
[SPOTIFY SRC]
in
[SOURCE SELECT]. ( 5)
1 Open the Spotify application on your device.
2 Connect your device via Bluetooth connection.
( 21)
3 Press repeatedly to select SPOTIFY (for iPhone/iPod) or
SPOTIFY BT (for Android device).
The source switches and broadcast starts automatically.
• You can operate Spotify in the same way as Spotify via USB input
terminal.
( 16)
• You can operate Pandora in the same way as Pandora via USB input
terminal.
28
( 13)
ENGLISH
Page 33

AUDIO SETTINGS
While listening to any source...
1 Press AUDIO to enter
2
Turn the volume knob to select an item (see the following table),
then press the knob.
[AUDIO CONTROL]
directly.
3 Repeat step 2 until the desired item is selected or activated.
4 Press and hold to exit.
(or using the remote control)
1 Press AUD to enter
[AUDIO CONTROL]
.
2 Press J / K to select an item, then press .
To return to the previous setting item, press
AUDIO CONTROL
SUB-W LEVEL
MANUAL EQ
62.5HZ LEVEL LEVEL LEVEL –9
100 HZ/160 HZ/250 HZ/
400 HZ/630 HZ/1 KHZ/
1.6KHZ/2.5KHZ/4 KHZ/
6.3KHZ/10 KHZ/16 KHZ
LEVEL
Q FACTOR 1.35/1.50/2.00
LEVEL –50
output level.
The sound elements (frequency level, tone level, Q factor) are
preset into each selection.
BASS EXTEND ON
LEVEL –9
memorize for each source. (Before making an adjustment,
select the source you want to adjust.)
to
LEVEL +10 (LEVEL 0
the level to memorize for each source.
(Before making an adjustment, select the
source you want to adjust.)
:Turns on the extended bass.;
OFF
:Cancels.
to
LEVEL +9 (LEVEL 0
:Adjust the quality factor.
.
): Adjusts the subwoofer
to
LEVEL +9 (LEVEL 0
):Adjusts the level to
Default:
):Adjusts
PRESET EQ NATURAL/ROCK/POPS/EASY/TOP40/JAZZ/POWERFUL/USER
Selects a preset equalizer suitable to the music genre. (Select
to use the settings made in
BASS BOOST LEVEL1/LEVEL2/LEVEL3/LEVEL4/LEVEL5
LOUDNESS LEVEL1/LEVEL2
SUBWOOFER SET ON
FADER REAR 15
BALANCE LEFT 15
XX
VOLUME OFFSET LEVEL –15
SOUND EFFECT
SOUND RECONSTRA
(Sound
reconstruction)
SPACE ENHANCER
SOUND REALIZER LEVEL1/LEVEL2/LEVEL3
STAGE EQ LOW/MIDDLE/HIGH
DRIVE EQ ON
bass boost level.;
boost to produce a well-balanced sound at a low volume level.;
OFF
:Cancels.
:Turns on the subwoofer output.;
to
balance.
to
balance.
of each source. (Before adjustment, select the source you want to
adjust.)
(Not applicable for RADIO source, AUX source and SIRIUS XM source.)
ON
:Creates realistic sound by compensating the high-frequency
components and restoring the rise-time of the waveform that are
lost in audio data compression.;
(Not applicable for RADIO source.)
SMALL/MEDIUM/LARGE
OFF
:Cancels.
OFF
:Cancels.
the speakers.;
: Boosts the frequency to reduce the noise heard from outside the
car or running noise of the tyres.;
OFF
:Selects your preferred low and high frequencies
FRONT15 (0
RIGHT15 (0
to
LEVEL +6 (LEVEL 0
OFF
:Cancels.
[MANUAL EQ]
:Cancels.
):Adjusts the rear and front speaker output
):Adjusts the left and right speaker output
OFF
:Virtually enhances the sound space.;
:Virtually makes the sound more realistic.;
:Virtually adjust the sound position heard from
OFF
.)
:Selects your preferred
OFF
:Cancels.
):Preset the initial volume level
:Cancels.
:Cancels.
:
[USER]
ENGLISH
29
Page 34

AUDIO SETTINGS
SPEAKER SIZE
FRONT SIZE 3.5"/4"/4.75"/5"/6.5"/6.75"/7"/4×6/5×7/6×8
REAR 3.5"/4"/4.75"/5"/6.5"/6.75"/7"/4×6/5×7/6×8/6×9/7×10
SUBWOOFER 6.5"/8"/10"/12"/15" OVER
X ' OVER
TWEETER FRQ
The frequency and slope settings are automatically set for the crossover of
the selected speaker.
6×9/7×10
size for optimum performance.
TWEETER SMALL/MIDDLE/LARGE
size range of the connected tweeter for optimum
performance.;
Selects according to the connected speaker size for optimum
performance.;
size for optimum performance.;
GAIN LEFT
GAIN RIGHT –8
NONE
:Not connected.
1KHZ/1.6KHZ/2.5KHZ/4KHZ/5KHZ/6.3KHZ/8KHZ
10KHZ/12.5KHZ: Adjusts the crossover frequency for
the tweeter speaker.
–8
to 0:Adjusts the output volume of the left tweeter.
to 0:Adjusts the output volume of the right tweeter.
: Selects according to the connected speaker
:Selects according to the
NONE
:Not connected.
: Selects according to the connected speaker
NONE
:Not connected.
REAR HPF REAR - HPF FRQ
(Refer
REAR - HPF SLOPE
/
SUBWOOFER
LPF
:
/
DTA SETTINGS
CAR SETTINGS
REAR - HPF GAIN
SW LPF FRQ
SW LPF SLOPE –6DB/–12DB/–18DB/–24DB: Adjusts the
SW LPF PHASE REVERSE
SW LPF GAIN –8
For settings,
31, Digital Time Alignment settings
FRONT HPF
30HZ/40HZ/50HZ/60HZ/70HZ/80HZ/90HZ
100HZ/120HZ/150HZ/180HZ/220HZ/250HZ
Adjusts the crossover frequency for the subwoofer
(low pass filter).;
the subwoofer.
crossover slope.
(Selectable only if a setting other than
selected for
(180°)/
of the subwoofer output to be in line with the
speaker output for optimum performance.
to 0:Adjusts the output volume of the
subwoofer.
settings.)
THROUGH
[SW LPF FRQ]
NORMAL
: All signals are sent to
[THROUGH]
.)
(0°): Selects the phase
.
/
:
is
FRONT HPF FRONT - HPF
FRQ
FRONT - HPF
SLOPE
FRONT - HPF
GAIN
30
ENGLISH
30HZ/40HZ/50HZ/60HZ/70HZ/80HZ/90HZ/100HZ
120HZ/150HZ/180HZ/220HZ/250HZ: Adjusts the
crossover frequency for the selected speakers (high
pass filter).
selected speakers.
–6DB/–12DB/–18DB/–24DB: Adjusts the crossover
slope.
(Selectable only if a setting other than
selected for
–8
to 0:Adjusts the output volume of the selected
speaker.
;
THROUGH
[FRONT - HPF FRQ]
: All signals are sent to the
[THROUGH]
.)
is
/
•
The following item is selectable only if
–
[SUB-W LEVEL]
–
[SUBWOOFER]
–
[SUBWOOFER LPF]
–
[SUBWOOFER]
•
The following item is selectable only if a setting other than
[TWEETER], [REAR]
–
[TWEETER], [REAR HPF], [SUBWOOFER LPF]
of
[SPEAKER SIZE]
of
[X ’ OVER]
of
[DISTANCE]
and
[SUBWOOFER]
[SUBWOOFER SET]
and
[GAIN]
in
of
[SPEAKER SIZE]
is set to
[DTA SETTINGS]
[NONE]
:
of
[X ’ OVER]
[ON] ( 29)
is selected for
:
Page 35

AUDIO SETTINGS
Digital Time Alignment settings
Digital Time Alignment sets the delay time of the speaker output to
create a more suitable environment for your vehicle.
• For more information,
[DTA SETTINGS]
.
Determining the value for [DISTANCE] and [GAIN] of
Default:
•
Before making an adjustment for
speaker you want to adjust:
FRONT LEFT/FRONT RIGHT/REAR LEFT/REAR RIGHT/SUBWOOFER:
You can only select
[NONE]
• [REAR - SP LOCATION]
is selected for
XX
[REAR LEFT], [REAR RIGHT]
is selected for
[REAR]
[DISTANCE]
[REAR]
and
[SUBWOOFER]
of
[CAR SETTINGS]
of
[SPEAKER SIZE]. ( 30)
and
[GAIN]
of
[DTA SETTINGS]
and
[SUBWOOFER]
of
[SPEAKER SIZE]. ( 30)
is selectable only if a setting other than
if a setting other than
, select the
[NONE]
DTA SETTINGS
POSITION
DISTANCE 0FT
GAIN –8DB
DTA RESET YES
CAR SETTINGS
CAR TYPE COMPACT/FULL SIZE CAR/WAGON/MINIVAN/SUV
REAR - SP
LOCATION
Selects your listening position (reference point).
ALL
:Not compensating;
FRONT LEFT
to
making an adjustment, select the speaker you want to adjust.)
(Before making an adjustment, select the speaker you want to adjust.)
:Resets the settings (
[POSITION]
Identify your car type and rear speaker location in order to make the
adjustment for
MINIVAN(LONG)
Selects the location of the rear speakers in your vehicle to calculate the
furthest distance from the listening position selected (reference point).
• DOOR/REAR DECK
[OFF], [COMPACT], [FULL SIZE CAR], [WAGON]
• 2ND ROW/3RD ROW
as
[MINIVAN]
:Front left seat;
20.01FT
to
:Fine adjust the distance to compensate. (Before
0DB
:Fine adjust the output volume of the selected speaker.
to default.; NO:Cancels.
[DTA SETTINGS]
or
FRONT RIGHT:
FRONT ALL
[DISTANCE]
.
:Selects the type of vehicle.;
:Selectable only when
:Selectable only when
[MINIVAN(LONG)]
Front right seat;
:Front seat
and
[GAIN]
.
[CAR TYPE]
) of the selected
/
OFF:
Not compensating.
is selected as
or
[SUV]
[CAR TYPE]
.
is selected
Determining the value for [DISTANCE] and [GAIN] of [DTA SETTINGS]
If you specify the distance from the center of the currently set listening position to every
speaker, the delay time will be automatically computed and set.
1
Determine the center of the currently set listening position as the reference point.
2
Measure the distances from the reference point to the speakers.
3
Calculate the differences between the distance of the furthest speaker (rear speaker) and
other speakers.
4
Set the
5
Adjust
Example: When
[DISTANCE]
[GAIN]
calculated in step 3 for individual speakers.
for individual speakers.
[FRONT ALL]
is selected as the listening position
ENGLISH
31
Page 36

DISPLAY SETTINGS
Zone identification for color and brightness settings
Set the dimmer
Press and hold DISP (DIM) to turn on or off the dimmer.
• If you have set
hold this button.
[DIMMER TIME]
, it will be canceled once you press and
Other settings
1
Press the volume knob to enter
2 Turn the volume knob to select an item
then press the knob.
[FUNCTION]
.
(see the following table)
,
3 Repeat step 2 until the desired item is selected/activated or follow
the instructions stated on the selected item.
4 Press and hold to exit.
To return to the previous setting item, press
.
DISPLAY
COLOR
SELECT
DIMMER
BRIGHTNESS
TEXT SCROLL AUTO/ONCE
Select color for
1
Select a zone. (See the illustration on the left column.)
2
Select a color for the selected zone.
INITIAL COLOR/VARIABLE SCAN/CUSTOM R/G/B
Default:
To make your own color, select
will be stored in
1
Press the volume knob to enter the detailed color adjustment.
2
Press S/T to select the color (R/G/B) to adjust.
3
Turn the volume knob to adjust the level (0 to 9), then press the knob.
Dim the illumination.
ON
:Dimmer is turned on.;
DIMMER TIME
1
Turn the volume knob to adjust the
2
Turn the volume knob to adjust the
(Default:
1
2 LEVEL 0
or scroll only once.;
[ON]: PM6:00; [OFF]: AM6:00
Select a zone. (See the illustration on the left column.)
selected zone.
Default:
ALL ZONE, LCD DISPLAY
[CUSTOM R/G/B]
:Set the dimmer on and off time.
to
LEVEL 31
:Select whether to scroll the display information automatically,
/ / /
: VARIABLE SCAN
:
[CUSTOM R/G/B]
OFF
:Cancels.
: Select your preferred brightness level for the
OFF
:Cancels.
and
KEY
INITIAL COLOR
.
[ON]
time, then press the knob.
[OFF]
time, then press the knob.
)
separately.
/preset colors*
. The color you have made
XX
32
ENGLISH
*
Preset colors:
BLUE2/BLUE3/SKYBLUE1/SKYBLUE2/LIGHTBLUE/AQUA1/AQUA2/GREEN1
GREEN2/GREEN3/YELLOWGREEN1/YELLOWGREEN2/YELLOW/ORANGE1/ORANGE2
ORANGERED
RED1/RED2/RED3/PURPLE1/PURPLE2/PURPLE3/PURPLE4/BLUE1
/
/
/
Page 37

TROUBLESHOOTING
Symptom Remedy
Sound cannot be heard.
“MISWIRING CHECK WIRING
THEN POWER ON” appears.
“PROTECTING SEND TO
SERVICE” appears.
•
Sound cannot be heard.
General
•
The unit does not turn on.
•
Information shown on the
display is incorrect.
The unit does not work at all. Reset the unit.
(For )
“SET ERROR”/
“DELETE ERROR”
•
Radio reception is poor.
•
Static noise while listening
to the radio.
Radio
•
Adjust the volume to the optimum level.
•
Check the cords and connections.
Turn the power off, then check to be sure the
terminals of the speaker wires are insulated properly.
Turn the power on again.
Send the unit to the nearest service center.
Clean the connectors.
Setting/deleting the remote control ID is
unsuccessful. Turn the power off, then turn on the
power and perform the operation again.
Connect the antenna firmly.
( 3)
( 36)
( 6)
Symptom Remedy
Elapsed playing time is not
correct.
“LOADING” appears when
you enter search mode by
pressing
Correct characters are not
displayed (e.g. album name).
“NA FILE” Make sure the media contains supported audio files.
“NO DISC” Insert a playable disc into the loading slot.
“TOC ERROR” Make sure the disc is clean and inserted properly.
“PLEASE EJECT” Reset the unit. If this does not solve the problem,
CD/USB/iPod
“NO DEVICE” Connect a USB device, and change the source to USB
.
This is caused by how the tracks are recorded.
This unit is still preparing the iPod/iPhone music list. It
may take some time to load, try again later.
•
This unit can only display uppercase letters,
numbers, and a limited number of symbols.
•
Depending on the display language you have
selected
displayed correctly.
( 37)
consult your nearest service centre.
again.
( 5)
, some characters may not be
HD Radio tuner/
Disc cannot be ejected.
Noise is generated. Skip to another track or change the disc.
Tracks do not play back as
CD/USB/iPod
you intended them to play.
“READING” keeps flashing. Do not use too many hierarchical levels or folders.
Press and hold
not to drop the disc when it is ejected. If this does not
solve the problem, reset the unit.
Playback order is determined when files are
recorded.
M
to forcibly eject the disc. Be careful
( 3)
“COPY PROTECTED” A copy-protected file is played.
“UNSUPPORTED DEVICE”
“UNRESPONSIVE DEVICE” Make sure the device is not malfunction and reattach
“USB HUB IS NOT
SUPPORTED”
•
Check whether the connected device is compatible
with this unit and ensure the file systems are in
supported formats.
•
Reattach the device.
the device.
This unit cannot support a USB device connected via
a USB hub.
( 37)
ENGLISH
33
Page 38

TROUBLESHOOTING
Symptom Remedy
•
The source does not
change to “USB” when
you connect a USB
device while listening to
another source.
•
“USB ERROR” appears.
CD/USB/iPod
“NO MUSIC” Connect a USB device that contains playable audio files.
“iPod ERROR”
•
Sound cannot be heard
during playback.
•
Sound output only from
the Android device.
Cannot playback at
[BROWSE MODE]
ANDROID
“NO DEVICE” or “READING”
keeps flashing.
.
The USB port is drawing more power than the design limit. Turn
the power off and unplug the USB device. Then, turn on the
power and reattach the USB device. If this does not solve the
problem, turn the power off and on (or reset the unit) before
replacing with another USB device.
•
Reconnect the iPod.
•
Reset the iPod.
•
Reconnect the Android device.
•
If in
[HAND MODE]
the Android device and start playback.
•
If in
[HAND MODE]
application or use another media player application.
•
Restart the Android device.
•
If this does not solve the problem, the connected Android
device is unable to route the audio signal to unit.
•
Make sure KENWOOD MUSIC PLAY APP is installed on the
Android device.
•
Reconnect the Android device and select the appropriate
control mode.
•
If this does not solve the problem, the connected Android
device does not support
•
Switch off the developer options on the Android device.
•
Reconnect the Android device.
•
If this does not solve the problem, the connected Android
device does not support
, launch any media player application on
, relaunch the current media player
( 10)
[BROWSE MODE]. ( 37)
[BROWSE MODE]. ( 37)
( 37)
Symptom Remedy
Playback is intermittent
or sound skips.
“ANDROID ERROR”/
ANDROID
“NADEVICE”
“ADDERROR” New station creation is unsuccessful.
“CHECKDEVICE” Check the Pandora application on your device.
“NOSKIPS” The skip limit has been reached.
“NOSTATIONS” No stations are found.
“STATIONLIMIT” The number of registered stations has reached its
Pandora
“CONNECT ERROR” Communication is unstable.
“RATING ERROR” Registration of thumbs up/thumbs down has failed
“THUMBS N/A” Registration of thumbs up/thumbs down is not
“LICENSE ERROR” You try to access from a country which Pandora is
iHeartRadio station
cannot be selected.
iHeartRadio
“NOT CONNECTED” Link to the application is impossible.
Turn off the power saving mode on the Android
device.
•
Reconnect the Android device.
•
Restart the Android device.
limit. Retry after deleting unnecessary stations
from your device.
due to insufficient network connectivity.
allowed.
not deliverable.
If “Explicit Content” in [Account Settings] is checked
in the web version of iHeartRADIO, custom stations
become unavailable.
34
ENGLISH
Page 39

TROUBLESHOOTING
Symptom Remedy
“DISCONNECTED” USB is disconnected from the head unit. Please make sure
the device is connected properly through USB.
“CONNECTING”
Spotify
“CHECK APP” The Spotify application is not connected properly, or user is
“CHANLOCKED ENTER
CODE:”
“CHUNSUBSCRIBED” The selected channel is unsubscribed. Call 1-866-635-2349 in
“CHANUNAVAILABLE” The selected channel is unavailable. Visit www.siriusxm.com
“CHECKANTENNA” Check that the antenna and its connection are in good
“CHECKTUNER” Make sure the SiriusXM Vehicle Tuner is connected to the
SiriusXM® Radio
“NOSIGNAL” Make sure the antenna is mounted outside the vehicle.
“SUBSCRIPTION
UPDATED – PRESS
ENTER TO CONTINUE.”
“CODE ERROR” Make sure you have entered the correct pass code.
•
Connected via USB input terminal: The device is
connecting to the head unit. Please wait.
•
Connected via Bluetooth: The Bluetooth is disconnected.
Please check Bluetooth connection and make sure both
the device and the unit are paired and connected.
not login. End the Spotify application and restart, then login
to your Spotify account.
The selected channel is locked. Enter the correct pass code to
unlock.
( 19)
the U.S.A. or 1-877-438-9677 in Canada to subscribe.
for more information about the SiriusXM channel lineup.
condition.
unit.
Your subscription is updated. Press the volume knob to
continue.
( 17)
( 19)
Symptom Remedy
No Bluetooth device is
detected.
Bluetooth pairing cannot
be made.
Echo or noise is heard
during a phone
conversation.
Phone sound quality is
poor.
Voice calling method is not
Bluetooth®
successful.
Sound is being interrupted
or skipped during playback
of a Bluetooth audio
player.
The connected Bluetooth
audio player cannot be
controlled.
•
Search from the Bluetooth device again.
•
Reset the unit.
•
Make sure you have entered the same PIN code to both
the unit and Bluetooth device.
•
Delete pairing information from both the unit and the
Bluetooth device, then perform pairing again.
•
Adjust the microphone unit’s position.
•
Check the
•
Reduce the distance between the unit and the
Bluetooth device.
•
Move the car to a place where you can get a better
signal reception.
•
Use voice calling method in a more quiet environment.
•
Reduce the distance from the microphone when you
speak the name.
•
Make sure the same voice as the registered voice tag is
used.
•
Reduce the distance between the unit and the
Bluetooth audio player.
•
Turn off, then turn on the unit and try to connect again.
•
Other Bluetooth devices might be trying to connect to
the unit.
•
Check whether the connected Bluetooth audio player
supports Audio/Video Remote Control Profile (AVRCP).
(Refer to the instructions of your audio player.)
•
Disconnect and connect the Bluetooth player again.
( 3)
[ECHO CANCEL]
setting.
( 21)
( 20)
( 23)
“NO CONTENT”
“SCAN CANCEL”
There is insufficient content to start TuneScan.
TuneScan has been aborted.
ENGLISH
35
Page 40

TROUBLESHOOTING
REFERENCES
Symptom Remedy
“DEVICE FULL” The number of registered devices has reached its limit.
Retry after deleting an unnecessary device.
DEVICE DELETE)
“N/A VOICE TAG” Make sure the same voice as the registered voice tag is used.
“NOT SUPPORT” The connected phone does not support Voice Recognition
feature or phonebook transfer.
“NO ENTRY”/“NO PAIR” There is no registered device connected/found via Bluetooth.
“ERROR” Try the operation again. If “ERROR” appears again, check if
Bluetooth®
“NO INFO”/“NO DATA” Bluetooth device cannot get the contact information.
“HF ERROR XX”/
“BT ERROR”
“SWITCHING NG” The connected phones might not support phone switching
the device supports the function you have tried.
Reset the unit and try the operation again. If this does not
solve the problem, consult your nearest service center.
feature.
( 25,
Maintenance
Cleaning the unit
Wipe off dirt on the faceplate with a dry silicone or soft cloth.
Cleaning the connector
Detach the faceplate and clean the connector
gently with a cotton swab, being careful not to
damage the connector.
Handling discs
•
Do not touch the recording surface of the disc.
•
Do not stick tape etc. on the disc, or use a disc with tape stuck on it.
•
Do not use any accessories for the disc.
•
Clean from the center of the disc and move outward.
•
Clean the disc with a dry silicone or soft cloth. Do not use any solvents.
•
When removing discs from this unit, pull them out horizontally.
•
Remove burrs from the center hole and disc edge before inserting a disc.
More information
For: – Latest firmware updates and latest compatible item list
– KENWOOD original application
– Any other latest information
Visit <www.kenwood.com/cs/ce/>.
Connector (on the reverse
side of the faceplate)
36
ENGLISH
General
•
This unit can only play the following CDs:
•
For detailed information and notes about the playable audio files, visit
<www.kenwood.com/cs/ce/audiofile/>.
Page 41

REFERENCES
Playable files
•
Playable audio file:
For disc: MP3 (.mp3), WMA (.wma), AAC (.aac)
For USB mass storage class device: MP3 (.mp3), WMA (.wma), AAC (.aac), AAC (.m4a),
WAV (.wav), FLAC (.flac)
•
Playable disc media: CD-R/CD-RW/CD-ROM
•
Playable disc file format: ISO 9660 Level 1/2, Joliet, Long file name.
•
Playable USB device file system: FAT12, FAT16, FAT32
Even when audio files comply with the standards listed above, playback may be impossible
depending on the types or conditions of media or device.
The AAC (.m4a) file in a CD encoded by iTunes cannot be played on this unit.
Unplayable discs
•
Discs that are not round.
•
Discs with coloring on the recording surface or discs that are dirty.
•
Recordable/ReWritable discs that have not been finalized.
•
8cm CD. Attempting to insert using an adapter may cause malfunction.
About USB devices
•
You cannot connect a USB device via a USB hub.
•
Connecting a cable whose total length is longer than 5m may result in abnormal playback.
•
This unit cannot recognize a USB device whose rating is other than 5V and exceeds 1.5A.
About iPod/iPhone
•
Via USB:
Made for
– iPod touch (5th and 6th generation)
– iPod nano (7th generation)
– iPhone 4S, 5, 5S, 5C, 6, 6 Plus, 6S, 6S Plus, SE, 7, 7 Plus
•
Via Bluetooth:
Made for
– iPod touch (5th and 6th generation)
– iPhone 4S, 5, 5S, 5C, 6, 6 Plus, 6S, 6S Plus, SE, 7, 7 Plus
•
You cannot operate iPod if “KENWOOD” or “ ” is displayed on iPod.
•
Depending on the version of the operating system of the iPod/iPhone, some functions may
not operate on this unit.
About Android device
•
This unit supports Android OS 4.1 and above.
• Some Android devices (with OS 4.1 and above) may not fully support Android Open Accessory
(AOA) 2.0.
•
If the Android device supports both mass storage class device and AOA 2.0, this unit always
playback via AOA 2.0 as priority.
About Pandora
•
Pandora is only available in certain countries.
For more information, visit <http://www.pandora.com/legal>.
•
Because Pandora is a third-party service, the specifications are subject to change without
prior notice. Accordingly, compatibility may be impaired, or some or all of the services may
become unavailable.
•
Some functions of Pandora cannot be operated from this unit.
•
For issues using the application, please contact Pandora at pandora-support@pandora.com.
About iHeartRadio
•
iHeartRadio® is a third-party service, therefore the specifications are subject to change
without prior notice. Accordingly, compatibility may be impaired or some or all of the
services may become unavailable.
•
Some iHeartRadio® functionality cannot be operated from this unit.
About Spotify
•
Spotify application supports:
– iPhone 4S, 5, 5S, 5C, 6, 6 Plus, 6S, 6S Plus, SE, 7, 7 Plus (iOS 8 or above)
– iPod touch (5th and 6th generation)
– Android OS 4.0.3 or above
•
Spotify is a third-party service, therefore the specifications are subject to change without
prior notice. Accordingly, compatibility may be impaired or some or all of the services may
become unavailable.
•
Some functions of Spotify cannot be operated from this unit.
•
For issues using the application, please contact Spotify at <www.spotify.com>.
ENGLISH
37
Page 42

REFERENCES
About Bluetooth
•
Depending on the Bluetooth version of the device, some Bluetooth devices may not be able
to connect to this unit.
•
This unit may not work with some Bluetooth devices.
•
Signal conditions vary, depending on the surroundings.
•
/ / :
Compatible remote device for NFC function:
Remote devices with a NFC function (OS: Android™ 2.3.3 or later, excluding Android 3.x).
If the OS version of your remote device is older than Android 4.1.x, download and start the
“NFC Easy Connect” application. (“NFC Easy Connect” is a free application available at Google
Play.)
About HD Radio™ Technology
•
Adjacent to traditional main stations are extra local FM channels.
These HD2/HD3 Channels provide new, original music as well as
deep cuts into traditional genre.
•
Digital, CD-quality sound. HD Radio Technology enables local radio
stations to broadcast a clean digital signal. AM sounds like today’s
FM and FM sounds like a CD.
•
Program Info provides song name, artist, station ID, and other
relevant data to enrich the listening experience.
•
Emergency Alert delivers critical and life-saving messages to the
public during emergency situations.
Change the display information
Each time you press
•
If the information is unavailable or not recorded, “NO TEXT”, “NO INFO”, or other information
(eg. station name, playing time) appears.
Source name Display information
STANDBY Source name (Date)*
HD RADIO
RADIO
DISP
, the display information changes.
(For
(For digital stations only)
Station name (Date)* Song title (Artist) Song title (Album title)
Song title (Date)*
(For FM Radio Broadcast Data System stations only)
Station name (Date)* Radio text+ (R.TEXT+/Artist) Radio text+
(R.TEXT+/Album title)
(back to the beginning)
(For
Frequency (Date)*
(For FM Radio Broadcast Data System stations only)
Station name (Date)* Radio text (Date)* Radio text+ (R.TEXT+)
Song title (Artist)
(back to the beginning)
/ )
Frequency (Date)* (back to the beginning)
Song title (Date)* Frequency (Date)*
/ / )
Song title (Date)* Frequency (Date)*
38
ENGLISH
CD or USB 1/
USB 2/USB
:
*
( 39)
(For CD-DA)
Track title (Artist) Track title (Disc name) Track title (Date)*
Playing time (Date)*
(For MP3/WMA/AAC/WAV/FLAC files)
Song title (Artist) Song title (Album title) Song title (Date)*
File name (Folder name)
(back to the beginning)
(back to the beginning)
File name (Date)* Playing time (Date)*
Page 43

REFERENCES
INSTALLATION/CONNECTION
Source name Display information
iPod 1/iPod 2/iPod USB/
iPod BT or ANDROID 1/
ANDROID 2/ANDROID
PANDORA 1/
PANDORA 2/PANDORA/
PANDORA BT
IHEARTRADIO 1/
IHEARTRADIO 2/
IHEARTRADIO
SPOTIFY 1/SPOTIFY 2/
SPOTIFY/SPOTIFY BT
SIRIUS XM Channel number (Status)
BT AUDIO
AUX
*
Battery and signal strength of the Bluetooth device will be shown if
set to
[AUTO]. ( 24)
When
[MODE OFF]/[BROWSE MODE]
Song title (Artist) Song title (Album name) Song title (Date)*
Playing time (Date)* (back to the beginning)
Station name (Date)* Shared/Radio station (Date)* Song title
(Artist)
Playing time (Date)*
Station name (Date)* Song title (Artist) Song title (Date)*
(back to the beginning)
Context title (Date)* Song title (Artist) Song title
(Album name)
(back to the beginning)
Artist name (Status)
(Status)
(back to the beginning)
Song title (Artist) Song title (Album name) Song title (Date)*
Source name (Date)*
Song title (Album title) Song title (Date)*
(back to the beginning)
Song title (Date)* Playing time (Date)*
Channel name (Status)
Song title (Status) Content information
Category name (Status) Date (Status)
Playing time (Date)* (back to the beginning)
is selected
[BATTERY/SIGNAL]
( 11)
Warning
•
:
The unit can only be used with a 12V DC power supply, negative ground.
•
Disconnect the battery’s negative terminal before wiring and mounting.
•
Do not connect Battery wire (yellow) and Ignition wire (red) to the car chassis or Ground wire
(black) to prevent a short circuit.
•
To prevent short-circuit:
– Insulate unconnected wires with vinyl tape.
– Be sure to ground this unit to the car’s chassis again after installation.
– Secure the wires with cable clamps and wrap vinyl tape around the wires that come into
contact with metal parts to protect the wires.
Caution
•
For safety’s sake, leave wiring and mounting to professionals. Consult the car audio dealer.
•
Install this unit in the console of your vehicle. Do not touch the metal parts of this unit during
and shortly after use of the unit. Metal parts such as the heat sink and enclosure become hot.
•
Do not connect the [ wires of speakers to the car chassis or Ground wire (black), or connect
them in parallel.
•
is
Mount the unit at an angle of less than 30º.
•
If your vehicle wiring harness does not have the ignition terminal, connect Ignition wire (red)
to the terminal on the vehicle’s fuse box which provides 12 V DC power supply and is turned
on and off by the ignition key.
•
Keep all cables away from heat dissipate metal parts.
•
After the unit is installed, check whether the brake lamps, blinkers, wipers, etc. on the car are
working properly.
•
If the fuse blows, first make sure the wires are not touching car’s chassis, then replace the old
fuse with one that has the same rating.
ENGLISH
39
Page 44

INSTALLATION/CONNECTION
Part list for installation
(A)
Faceplate
(C)
Mounting sleeve
(E)
Extraction key
(B)
Trim plate
(D)
Wiring harness
(F)
Screws (supplied for
/ )
Basic procedure
1
Remove the key from the ignition switch, then disconnect the
[
terminal of the car battery.
2
Connect the wires properly.
See Wiring connection.
3
Install the unit to your car.
See Installing the unit (in-dash mounting).
4
Connect the [ terminal of the car battery.
5
Press to turn on the power.
6
Detach the faceplate and reset the unit within 5 seconds.
( 41)
( 3)
Installing the unit (in-dash mounting)
Hook on the top side
Orientate the trim plate
as illustrated before
fitting.
When installing without the mounting
sleeve
1
Remove the mounting sleeve and trim plate from
the unit.
2
Align the holes in the unit (on both sides) with
the vehicle mounting bracket and secure the unit
with screws (supplied/commercially available).
Use only the specified screws. Using wrong screws
might damage the unit.
Do the required wiring.
( 41)
Dashboard of
your car
Bend the appropriate tabs to hold the
mounting sleeve firmly in place.
How to remove the unit
1
Detach the faceplate.
2
Fit the catch pin on the extraction keys into
the holes on both sides of the trim plate, then
pull it out.
3
Insert the extraction keys deeply into the slots
on each side, then follow the arrows as shown
on the illustration.
40
ENGLISH
Page 45

INSTALLATION/CONNECTION
Wiring connection
Antenna terminal
To front speaker (right)
Ignition switch
Car fuse box
Car fuse box
Battery
To front speaker (left)
To rear speaker (left)
To rear speaker (right)
Red (Ignition wire)
Yellow (Battery wire)
Black (Ground wire)
To the metallic body or chassis of the car
Fuse (10A)
White
White/Black
Gray
Gray/Black
Green
Green/Black
Purple
Purple/Black
If no connections are made, do not let the wire come out from the tab.
Brown
(Mute control wire)
Blue/White
(Power control wire/
Antenna control wire)
(12 V
Light blue/yellow
(Steering remote control
wire)
350 mA)
IMPORTANT :
available custom wiring harness specific for your car and leave this job to
professionals for your safety. Consult your car audio dealer.
When connecting to an external amplifier, connect its ground wire to the
car’s chassis to avoid damaging the unit.
We recommend installing the unit with a commercially
To connect the Kenwood navigation system, refer your
navigation manual
To the power control terminal when using the optional
power amplifier or to the antenna control terminal in
the vehicle
(For / /
/ )
To the steering wheel remote control adapter
(For
To Kenwood Marine Remote Control unit (optional
accessory)
For the latest information on marine accessories, visit
<http://www.kenwood.com/usa/car/marine/>
)
ENGLISH
41
Page 46

INSTALLATION/CONNECTION
Connecting external components
Output terminals
Expansion port (12 V 500mA)
To the optional SiriusXM Vehicle Tuner
(commercially available)
( 17)
MIC (Microphone input terminal)
(For )
To Kenwood Marine Remote Control unit, KCA-RC55MR (optional accessory)
(For / / )
USB 2 cable (DC 5 V
USB 1 cable (DC 5 V 1.5 A)
Auxiliary cable
1.5 A)
( 20)
( 6)
42
ENGLISH
Page 47

SPECIFICATIONS
FM Frequency Range 87.9 MHz — 107.9 MHz (200 kHz space)
Usable Sensitivity 7.2dBf (0.63μV/75Ω)
(S/N=30dB, Dev 22.5kHz)
Quieting Sensitivity 15.2dBf (1.58μV/75Ω)
(DINS/N=46dB, Dev 40kHz)
Frequency Response
(±3dB)
Signal-to-Noise Ratio HD Radio Broadcast: 75 dB (STEREO)
Tuner
/ )
Stereo Separation (1kHz)
AM Frequency Range 530kHz — 1700kHz (10kHz space)
(
)
Usable Sensitivity
(S/N=20dB)
Frequency Response
(±3dB)
Signal-to-Noise Ratio HD Radio Broadcast: 70 dB (STEREO)
FM Frequency Range 87.9 MHz — 107.9 MHz (200 kHz space)
Usable Sensitivity 8.2dBf (0.71μV/75Ω) (S/N=26dB)
Quieting Sensitivity 17.2dBf (2.0μV/75Ω) (DIN S/N=46dB)
Frequency Response
(±3dB)
Signal-to-Noise Ratio 64 dB (MONO)
Stereo Separation (1kHz)
AM Frequency Range 530kHz — 1700kHz (10kHz space)
HD Radio Broadcast: 20 Hz — 20 kHz
Conventional Broadcast: 30 Hz — 15 kHz
Conventional Broadcast: 68 dB (MONO)
40dB
29dBμ (28.2μV)
HD Radio Broadcast: 40 Hz — 15 kHz
30 Hz — 15 kHz
40dB
Laser Diode GaAIAs
Digital Filter (D/A) 8 times over sampling
Spindle Speed 500rpm — 200rpm (CLV)
Wow & Flutter Below measurable limit
Frequency Response (±1dB) 20Hz — 20kHz
Total Harmonic Distortion (1kHz) 0.01%
Signal-to-Noise Ratio (1kHz)
CD player
Dynamic Range 90dB
Channel Separation 85dB
MP3 Decode Compliant with MPEG-1/2 Audio Layer-3
WMA Decode Compliant with Windows Media Audio
AAC Decode AAC-LC “.aac” files
USB Standard USB1.1/USB2.0 Full Speed
File System FAT12/16/32
Maximum Supply Current
MP3 Decode Compliant with MPEG-1/2 Audio Layer-3
USB
WMA Decode Compliant with Windows Media Audio
AAC Decode AAC-LC “.aac”, “.m4a” files
WAV Decode Linear-PCM
FLAC Decode FLAC file (Up to 96kHz/24bit)
DC5V
/ : 110 dB
/ /
: 105 dB
1.5A
Usable Sensitivity
Tuner ( / /
(S/N=20dB)
29dBμ (28.2μV)
ENGLISH
43
Page 48

SPECIFICATIONS
Version Bluetooth 3.0
Frequency Range 2.402GHz — 2.480GHz
Output Power +4dBm (MAX), 0dBm (AVE) Power Class 2
Maximum Communication Range Line of sight approx. 10m (32.8ft)
Profile HFP 1.6 (Hands-Free Profile)
Bluetooth
A2DP (Advanced Audio Distribution Profile)
AVRCP 1.5 (Audio/Video Remote Control Profile)
SPP (Serial Port Profile)
PBAP (Phonebook Access Profile)
Frequency Response (±3dB) 20Hz—20kHz
Input Maximum Voltage 1000mV
Auxiliary
Input Impedance 30kΩ
Maximum Output Power 50W×4
Full Bandwidth Power 22W×4 (at less than 1% THD)
Speaker Impedance 4Ω—8Ω
Tone Action Band 1: 62.5Hz±9dB
Band 2: 100Hz±9dB
Band 3: 160 Hz±9dB
Band 4: 250 Hz±9dB
Audio
Band 5: 400 Hz±9dB
Band 6: 630Hz±9dB
Band 7: 1kHz±9dB
Band 8: 1.6kHz±9dB
Band 9: 2.5kHz±9dB
Band 10: 4kHz±9dB
Band 11: 6.3kHz±9dB
Band 12: 10kHz±9dB
Band 13: 16kHz±9dB
Preout Level/Load (CD)
Audio
Preout Impedance ≤600Ω
Operating Voltage 14.4V (10.5V—16V allowable)
Maximum Current Consumption 10A
Operational Temperature Range –10°C—+60°C
Installation Size (W×H×D) 182mm×53mm×158mm
General
Net Weight (includes Trimplate,
Mounting Sleeve)
Subject to change without notice.
(7-3/16”×2-1/16”×6-1/4”)
/ /
: 5000mV/10kΩ
/ : 1.4kg (3.0lbs)
: 4000mV/10kΩ
: 2500mV/10kΩ
: 1.4kg (3.1lbs)
: 1.4kg (2.9lbs)
: 1.3kg (2.9lbs)
44
ENGLISH
Page 49

SPECIFICATIONS
•
Microsoft and Windows Media are either registered trademarks or trademarks of Microsoft
Corporation in the United States and/or other countries.
•
HD Radio Technology manufactured under license from iBiquity Digital Corporation. U.S.
and Foreign Patents. For patents see http://dts.com/patents. HD Radio™ and the HD,
HD Radio, and “ARC” logos are registered trademarks or trademarks of iBiquity Digital
Corporation in the United States and/or other countries.
•
“Made for iPod,” and “Made for iPhone” mean that an electronic accessory has been
designed to connect specifically to iPod, or iPhone, respectively, and has been certified
by the developer to meet Apple performance standards. Apple is not responsible for the
operation of this device or its compliance with safety and regulatory standards. Please
note that the use of this accessory with iPod or iPhone may affect wireless performance.
•
iPhone, iPod, iPod classic, iPod nano, and iPod touch are trademarks of Apple Inc.,
registered in the U.S. and other countries.
•
Lightning is a trademark of Apple Inc.
•
Pandora, the Pandora logo, and the Pandora trade dress are trademarks or registered
trademarks of Pandora Media, Inc., used with permission.
•
iHeartRadio® and iHeartAuto™ are trademarks owned by iHeartMedia, Inc. All uses are
authorized under license.
•
SPOTIFY and the Spotify logo are among the registered trademarks of Spotify AB.
•
Sirius, XM and all related marks and logos are trademarks of Sirius XM Radio Inc. All rights
reserved.
•
The “AAC” logo is a trademark of Dolby Laboratories.
•
Google, Google Play and Android are trademarks of Google Inc.
•
The Bluetooth® word mark and logos are registered trademarks owned by Bluetooth
SIG, Inc. and any use of such marks by JVC KENWOOD Corporation is under license. Other
trademarks and trade names are those of their respective owners.
•
The N-Mark is a trademark or registered trademark of NFC Forum, Inc. in the United States
and in other countries.
•
Qualcomm aptX is a product of Qualcomm Technologies International, Ltd. Qualcomm is a
trademark of Qualcomm Incorporated, registered in the United States and other countries,
used with permission. aptX is a trademark of Qualcomm Technologies International, Ltd.,
registered in the United States and other countries, used with permission.
libFLAC
Copyright (C) 2000-2009 Josh Coalson
Copyright (C) 2011-2013 Xiph.Org Foundation
Redistribution and use in source and binary forms, with or without modification, are
permitted provided that the following conditions are met:
-
Redistributions of source code must retain the above copyright notice, this list of
conditions and the following disclaimer.
-
Redistributions in binary form must reproduce the above copyright notice, this list of
conditions and the following disclaimer in the documentation and/or other materials
provided with the distribution.
-
Neither the name of the Xiph.org Foundation nor the names of its contributors may be
used to endorse or promote products derived from this software without specific prior
written permission.
THIS SOFTWARE IS PROVIDED BY THE COPYRIGHT HOLDERS AND CONTRIBUTORS “AS
IS” AND ANY EXPRESS OR IMPLIED WARRANTIES, INCLUDING, BUT NOT LIMITED TO, THE
IMPLIED WARRANTIES OF MERCHANTABILITY AND FITNESS FOR A PARTICULAR PURPOSE
ARE DISCLAIMED. IN NO EVENT SHALL THE FOUNDATION OR CONTRIBUTORS BE LIABLE FOR
ANY DIRECT, INDIRECT, INCIDENTAL, SPECIAL, EXEMPLARY, OR CONSEQUENTIAL DAMAGES
(INCLUDING, BUT NOT LIMITED TO, PROCUREMENT OF SUBSTITUTE GOODS OR SERVICES;
LOSS OF USE, DATA, OR PROFITS; OR BUSINESS INTERRUPTION) HOWEVER CAUSED AND ON
ANY THEORY OF LIABILITY, WHETHER IN CONTRACT, STRICT LIABILITY, OR TORT (INCLUDING
NEGLIGENCE OR OTHERWISE) ARISING IN ANY WAY OUT OF THE USE OF THIS SOFTWARE,
EVEN IF ADVISED OF THE POSSIBILITY OF SUCH DAMAGE.
ENGLISH
45
Page 50

H?)
This
RadioQD
HD
Radio
receiver
enables:
(((Siriusxm,>)
READY
Oualcomm· m
aptX"'
HD2/HD3)
Dig;tal
Program
Emergency
Sound)
Info)
Alerts)
w
iHeart
RADIO
••
••
Designed
Windows
TM
MeclialM
for
pandora®
Made
for
~iPod
DiPhone
GspotifY"
0
Bluetooth·
Ill
((t
Page 51

Uni
ts
pur
cha
sed
through
the U.S.A.
overseas may
be serviced u
U.S.
A, subject
to the
1)
T
he ori
ginal warranty
2)
Proal of purc
hase
WARRANTY
JVC KENWOOD corpora
workmanshi
p at itsaudio equip
designed
, test
ed and inspected be
properly install
ed
fur
Th
of
Except
ma
Duri
Cent
ca
requir
The
1.
2.
3. C
4.
5. Insta
6.
7.
8.
9.
•
specification
• Misuse,
*Accidental
• R
Serv
*
·
As the purc
equested
r
warran
1.
2. Make your
Dea
and o
nished.
it shou
ld give you
WARRANTY PERIOD
is pro
duct is
warranted
the origina
l pu
rch
SCOPE OF WARRANTY
as specifi
ed belo
terials a
nd
workmanshi
ng
lh
e waua
nty
er
in t
he milita
rd wi
Vo
Periodic
by
and
Un
or
Da
Hou
Shippin
Kenwo
T
fo
of the authori
Improper mainten
parts
or fai
Manual.
epa
(A
Dam
mu
Damage
or repl
PURCHASER'S RESPONSIBILmES
Ret
yo
Cent
w
or
to t
ry market listed
ll prov1de you
ed to correc
t any
following are not cvvered
ltage conver
sions
chec
k-u
ps which
the warran
ty.
ab
inets. grilles. o
other non-durable
its on which the s
rem
oved
.
ll
ation an
d/o
mag
ed
magne
tic t
se
ca
ll
charges for
g or delive
od Servi
ce Center.
his warranty will
not
ll
owing co
nditions
zed Kenwood Ser
ance
or
accessories
s of the
abuse
. neglect.
lure to
foll
ow instruct
or inte
ntional
irs
OJ
attempt
ll r
epairs must
ice Center.)
ages
or d
eterio
st
be
pr
esented to t
s or deteri01ations resu
ace
men
t.
has
ed ol a n
to do
the
ty servi
ce
ainyoUJ sal
es slip
ur e
lig
ibili
ty
lor requesting
unit
available
er
in t
he
m
ilita
aHan
ty
serv
ice. or ship
equivalent, t
ullv insu1ed an
he
authorized
r Custome
military exchange service
nder
warranty m the continental
following
condition
is
is p
rovided
FOR
perat
ase
w, this
perio
fr
ee-of~c
detect
ther
eri
al
r re
mov
apes
ry
cover
in
accordance
or
that do not
ong~nal
ed
repa
be
perf
rations
he carrier).
ew Kenwood brand
follo
or
oth
ry
mark
Kenwood
s
in
effect
to
the
servic
MILITARY
tiOn IS pro
ud
of the
men
t. This
unit
fore
it was shipped
ed
in
accordan
an opt
imum reliable pertormance
for a period
ot (1)
warranty cov
p of t
he Kenwood bra
d.
a
ny
author
ized Kenwo
in the back of this warran
harge
b
oth parts
in
material
s or
by
this war
rant
do
not
disclose
exterior finishe
s, belts. tape head
parts and access
number has been e
al charges.
any repairs
charges
to
or
from
anyiai
lure
that
with the visual inspectl
vic
e Ce
nter
repa
ir, including the insta
conform
parts
.
unauthorized product modificati
ions contain
dama
ges.
irs
by
an
unauthorized agen
ormed
at
an authorized Kenwood
caused
during shipment
ltin
g from
win
g in
ord
er to obtain Kenwood
er
evidence
of
pur
Kenwood warranty
to
an
autho
riz
ed
et
for
inspe
cti
you
r u
nit
in its origi
d s
hipping charges
ServiCe Center.
r,
er.
MARKET
qua
lity and
has bee
n pro
per
to you.
ce with instructions
yea
r from t
he date
ers
all de
fects
nd products.
od Service
and labor
wor
kmanship.
y.
any det
ect cove
red
ori
es.
lla
ced. modifi
an a
uth
ori
zed
is duetoanyoi the
:
llation
to
th
e
quality
and
ed
in t
he
Owner'
cy.
(Clai
ms
removal an
product. you are
chase lor proving
service
Kenwo
od Service
on and app
rov
nal
car
ton box
prepaid.
ly
If
.
in
ty
s.
ed
on
of
on
s
d/
.
ed
Thank you for purchasing this kenwood produ
in the countries listed. If
valid
pro
ce
dure
, or write to:
yo
ur country is not listed please contact your retailer for information on warranty
LIMITATION OF IMPLIED
Any
and
all implied warran
fTl€rchantab
ilitv and
limited
in dura
tio
EXCLUSION OF CERTAIN
KE
Nwoo
o·s liabili
the repair
or replacement
sh
all
not include damag
co
nseque
nti
al
or o
by applica
ble
ta
w.
KENWOOD AUTHORIZED SERVICE
CENTERS
IN
JAPAN:
Yokota
Kenwood
Yoko
Rep
ta BX,
APO San Fr
Zama
Kenwood
Rep,; c/o
JAA
Zama PX,
Francisco 96343
APO San
Misawa
Kenw ood Rep
Mi
sawa BX, JAAX AAFES
Francisco 96
APO San
Yokosuka
Kenwood Rep,; c/o
A-33, Yokosuka NEX
FPO
Seattle 98760
Atsugi
Kenwo
od
Rep,; c/o
gi
NEX No. 260-020 FPO Sea
Atsu
98767
lwakuni
Kenwood Rep,; c/o
Corps
Marine
Air
Station
,
FPO
Seattle 98764
Sasebo
Sasebo NEX;
Navy E
xc
han
ox
115 FPO Seattle 98766
B
FA
Okinawa
Kenwood Rep,; c/o
OWAX, AAFES-PAC, A
96230
ct
As ment
JVC KENWOOD Customer Information Center
3-12, Moriy
ach
o, K
anagawa-ku , Yokohama-shi, K
WARRANTIES
ties,
fit
n lo the leng
ty lor any defective
therwise.
including
ness for a particular
th
of t
his
warranty.
of
sa
id prod
uc
es
ot any
kin
d, whether inc
expect to the
product
t,
MILITARY MARKET
,;
c/o
JAAX
AAFES-PAC
anci
sco
96328
X AAFES-PAC,
,;
c/o
-PA
51
9
No
. 260-010
Exchange,
ge
anagawa
260-040
PO
ioned
Marine
San Francisco
in
221-0022, Japan
KOREA:
Kenw
warr
anti
es
purpose,
shall
DAMAGES
rs li
mit
ed to
at
our
potion. a
idental,
exte
nt proh
ibit
of
be
nd
ed
ood
OAX
K
DO
-Ca
mp
9
64
88
GUAM:
Kenw
ood
Guam
FP
O San Francisco 96630
Kenw
ood
GUAX,
96334
U.S.A.:
The
In
For Nearest
,
Tel: 1-800-536-9663
www
.us.jvckenwood.com
EUROPE:
Please
outlets
Ken
wood
JVCKENWOOD DEUTSCHLA
K
onr
ad-Adenauer
bel,
Vii
C,
ttl
e
Corps
the pages of this bookle
Rep,; c/o
Repair Shop, AAF
Market
, APO San Francisco
Rep
,;
c/o
NE
X No. 230-010,
Rep,; c/o
AAFES-PA
Continental
inquire
where
Germany
C, APO
U.S.A,
Authori
zed Service Center;
at
the military resale
you boug
products, or
Allee
t,
our warranty is only
ES-PAC
San Francisco
ht
your
ND GMBH:
1-11, 61118 Bad
Warranty Card
lde
nlilication
du
produ
M
ode
Mod
Re
vendeu
Nome
De
aler & stamp
Dat
e d'ach
Data
Purch
Nom
Nome
Na
me & address
Attention:
This card and receipt (or invoice) are necessary to purch
or damage.
Attention:
Vous
aurez besoin de cette carte
panneau en
cas devo
Aten~ao:
Em
caso de da
na
ou perda
de compra serao requ
©
84
6-0824-00/04
(K)
l ou d'
isi
(15/11)
et
du
re
~u
endo
mmagement
(ou de Ia factur
do paine I frontal, este Certificado
tados para a
a
quisi~ao
de
um
lo
do
el nu
da loja e carim
da
compr
ase date
& adr
e end
ase
novo paine I
it
apa
rel
ho
e nume
& se
rial nu
t
du clien
do cliente
of
custome
bo
t
ro
mbe
r
mber
r & cache
lat
a
esse
ereco
a new panel in
e)
pour acheter un nouv
de
Garantia e a
de ser
r
case
Not
ie
of
theft
eau
a Fi
sca
l
Page 52

Thrs
warra
nty will
oo
h
onored
only m the
U.S.A
.
KENWOOD LIMITED WARRANTY
FOR
CAR STEREO COMPONENTS
HOW
LONG IS THE
JVCKENWOOO USA
product
for a peri
purchase.
Except
material
The
1.
2.
3.
0
qualquer delei
~
v.llida
peta
Este
a
de
E
ven1uais
drlalavao
(a)
(b)
(c)
(d)
(e)
(f)
(g)
(h)
(i)
(j)
(k)
(I)
od
WHAT
IS
COVERED
NOT
as
specif
ied
and
workmanship
followi
ng
are not
Any
product
which
Kenwood
or
which is not
authorized Kenwood
dealer. unless
the
Military
Exc
hange
Any
product
on
modified
Damage, deteriora
a.
b. Installati
c
d.
e.
labrtcante
partir
wflich the s
or remo
Any shi
pment of
to thecarrim
).
on
or
Accid
ent,
acts
unaut
hmi
zed
instructi
ons suppli
Repair
or
attempted
by
Ke
nwood
Any oth
er
cause
de
lee
I
garante
to
de
no
te
rri
tOr
io
JVC KENWO
OD
prod
uto e garantido
da data
de
venda
ao consumidor final
reparos realizados
do
seu prazo
Produtos
como nUme
Defeitos resultantes
de instru
V(!es, rna
de
l
nstm~Oes
,
modifi
Danos
causados
Defeitos
ou
danos
Oeleitos
ou danos
da
JVC
KENWOOD:
Danos
ou
deteriorac~es
paratuso
s de
lixa,ao.
gravadoras, COs
Deteilo
s ou
dan
tr
ansport
adora):
Oua
lqu
er outra
causa
Danos
causados
Danos causados por
Danos
decorrent
Dan
oscausados por
exposir;aoa
umi
of
below, this
product
ved.
tion
removal
product
fabrica~o
brasileiro
aquisicao,
par
ou
os de
por
es
dade
Cmpmatron
("Kenwood")
one
(1)
year
AND
COVERED
warranty
in
Kenwood
covered
by
the
is
not
distributed
purchased
car
stereo
dealer
is
purchased
Service.
erral
number
or
malfunction
the
product
(claims
of
the
product
of
nature.
misuse,
modification
ed
w1th
the
product
repa1r
by
which
does
o produto
identiiicado
au
de
desde
do
Brasil
Comercio
PERiODO
pelo
prazo
comprovada
no
produto
EXCLUSAO
ro
de serie
au
de acidentes (queda
utiliz(j(,:3o, ligacao
cav5es
nao
aqentes
da
natureza
em
decorrencia
resu
ltantes
d a
usa
aos
acabamentos
tuvas, at1as.
danos causados
vido
ao
tran
que
nao esteja relacio
tentativa
de
uso
de
COs
do
desgasle
natural
mau
usa. ( derramamento
ou
situacoes
WARRANTY
warrants this
from
the
date
WHAT
covers
all
car
ste
reo
components
warranty:
in
the
in
the U.S.
or
an auto
through the U
has
been defaced,
resulti
ng
must
be
abuse
or
!aiiUJe
anyone not
not rel
ate
to a product
na
materi
a-prima
que
o pr
odu
de
EtetrO
DE
de
01
(urn) ana,
mediante
durante o periodo
DA
certificadode
s.
balidas
a !
ante
de
autorizada
s;
{Ex: chuvas
de con
sertos
de
pecas
ou
exte
balsas, eslotos,
par
pilhas defeitu
spone
(rect
nadaa
roubo
au furta;
de
ma qualidade
do
produto:
de
clirrtaticas
of origina
l
IS
defect
s in
.
U.S.A.
by
A.
from an
mobile
.S.A
from:
presented
. neglect.
to f
ollo
w
authori
zed
N
ota
F1
sca
l
de
duran
te o perfodo
to
tenha
si
do
adQuirido
nic
os Llda
GARANTIA
inctuindo o perfodo
a
apr
esenta~
de
GARANTIA
garantia rasurados,
e etc).
usa
tensa
o difer
ente
, raios.
maresia,
reali
zad
os
par
dispositivos
nao
rnos. pa
rtes
ada
ptadore
osas
ou
ama(iles devem
defei
tos
de
:
liquid
os
e/ou alimentos,
exl
rem
as, riscos
WHO
This
warranty
is
enforceab
WHAT
We
will
pay
for
all
items.
section
II
your
1.
Take
in
problem.
rsauthorized, pleaseca
Servrce Center.
2.
Although
to
shipping
within
3.
Whenever yo
you
as
labor
Payme
nt of
shipping
of
th
is
warranty.
HOW
TO
KEN
WOOD pro
or
ship
it
to any
the U.S.A. along wi
(if
you
are uncerta
1-800-
you
must
ship
the product lor
charges
it the repai
the
Unite
d Stales.
ur uni
must
include
a co
proof
of
wananty coverage.
LIMITATION OF IMPLIED
ALL
OF
PURPOSE.
THIS
venda
de
o
da
qarantia
em desa
da
pessoas
cantor
cosmelicas.
s,
com
ser tertas
materia-primae
au
quedas)
WARRANTIES
IMPLIED
WARRANTIES
MERCHANTABILIT
ARE
LIMITED
WARRANTY.
ao
consumi
dor
co
garantia. Esta g
arant
no
Bra
sil e distribuido
estabelecido
pm lei.
respectiva Nota Fi
nao impticam
adulte
rado
s ou i
legiveis
cordo
como manu
especif
icada
no Manual
enchentes
e et
c}:
nao
autorizadas
mes
as
especilica90es
cabos,
chi
antenas, litas, cabevas
vazamento:
jun
to a empresa
de
fabrica~o
corrosao. oxidacJ
IS
PROTECTED
le only
by
the
original
purchase
WE
WILL
PAY
material
charges
expenses for
is
discussed
FOR
in
and
OBTAIN WARRANTY
SERVICE
duct
ever
nee
ds
KENWOO
pay any shipping
ts
Y
ntr
sca
;
cotes.
service
D A
utho
rized
th & co
mplete
descripti
in
as
to
whether a Service Cent
ii1-800-K
ENWOODiorlhenearesl
536-9663
)
charges
warr
anty ser
vice.
we
rs
are
covered
are
take
n
or
sent
py
AND
na
tor
of the original
dated
, INCLUDING
FIT
NESS
FOR A PARTICULAR
IN DURAT
ION
TO
a
ia
E
indrspen
acompanhado
ras
uras
au
0
consumidor
no
balcao
l
l
nsta!ayao e remo(ilo
do
propriet3rio
Es
te
produto e destinad
;
al
P
ara
qualquer
Se
rvice
Autorizado mais
de
Atendrmento JVC KENWOOD-Tel +
JVC
KENWOOD
Nome
do
E
ndere,o
:
C
idade:
Telefone:
o,
D
ata
da
Serv
ice
on
it
it
is
necessary
will
pay
the
by
the
warranty
sales rece
WAR
RAN
THE
LENGTH
savel
da
modili~
so
men
de
um
Servi,
0 QUE
inlorm
consumidor: ----------------
_________
________
compra:
r.
cove
red
the
ne
xt
Cen
ter
ol
the
er
return
warra
nty
service,
ipt
TIE
S
OF
CONSERTO
a ap
resenta,ao
respectiva Nota
Oes
.
te !era direito a es
a A
NAO
do produto.
o exclu
acao
sobre
prOx
DO
EXCLUSION OF DAMAGES
KENWOOD
LIM
ITED TO
AT
OUR OPTION.
1. INSTALLATION
TO
OTH
KENWO
BAS
ED UPON
P
RODUCT;
2.
ANY OTHER
CO
NSEQUENTIAL
SOME STATES
L
ONG
AN
ALLOW THE
C
ONSEQUEN
AND EXC
rranty
This wa
ha
ve
other
lla
problemdevelopsduringorahll!lhe
or
it
yo
u h
pr
oduct, you
or Au
thorized
n
ot hand
Relatio
ns Department
JVCKENWOOD
PO
Box 22745, 2201 E. Dominguez St.
Long Beach,
deste Ce
Fiscal de compra
tes ben
utorizado
da
JVC
E COBERTO PELA
despesas de
sivamente
ao
IMPORT ANTE:
seu
equipamento
imo. aces
se o s
55 (11)
BRASIL
COMERCIO
Tel: (11) 3777-6771
www.kenwood-com_br
__
I
__
/__
'S
LIABILIT
Y FOR ANY DEFECTIVE
THE
REPAIR OR
REPLACEM
KENWO
OD SHAL
OR
REMO
ER
PROPER
TY CA
OD
OR
IMPLIED
EXCLUSION
TIAL
LUSIONS
gives you sp
rights which vary
ave
shou
Service
led
to your
USED
CAR
STEREO COM
INCONVENIENCE, LOSS OF USE
DAMAGES, WHETH
OR OTHERWI
DO
NOT
ALLOW LIMITATIONS
WARRAN
TY
OR
LIMI
DAMAGE
S.
SO THE ABOVE
MAY
NOT
APPLY
ecific l
!ro
any
que
stio
ns
regarding
ld
conta
ct your
Cente
r.
I!
th
satisfacti
on.
at
the
address
USA
CA
ENT
OF
L N
OT
BE
VAL
CHA
RGE
BY
ANY DEFEC
PONENTS, DA
ER INCIDENTA
SE
LAS
TS AND/
TATION
OF
TO YOU.
ega
l rights.
and you m
m st
ate
to
state
limil
edW
the oper
KENW
OOD
Authorized
e
problem
or
please
contact our C
listed
belo
Corporation
90810-5745
PRODUCT IS
THE
LIAB
S. DAMAGE
OR
INCIDENTAL
LIMITATIONS
arra
your
w
Tel: (800)536-9663
www.us.jvckenwood.com
EM
GARANTIA
rtilicado
de
do
effcios, quand
KENWOOD
frete,
seguroeembalagem
usa
domestico.
JVC KENWOOD.
ite
www.kenwooU.
3777-6771
CEP
_
Es
tad
_
Nota
Garantia devidamen
produto.
o o p
10d
GARANTIA
com
com
DE
ELETRQNICOS
_____
o:
_____
Fiscal·
le preenchrdo.
desde
que ~a apresente
uto for entreg
ue
sao
de r
espon
ou
para obte
r o endereco
_br. ou ligue para a Central
as dado
s abai
xo
pree
_____
PRO
LE
MAGES
OF THE
ON
00
nty
ation at
que
ustomer
dir
eta
sab
nchidos.
LTDA
_
_
DUC
FOR
TS
HOW
NOT
OR
ay also
Period
the
Dealer
stion
m81ll
i I
ida
do
_
(e)
Def
(f) D
r
(g)
(h)
( i) Oelects or
(j) P
{k)
a
Should your Kenwood
l
il
the orig
as
freight prepa
centre. To
product is proper
bil
wolh
a
fa
freight pre
is
produ
ects resulting from disaste
lightning,
power
ma
intena
nce
, u
i
nstruct
ions in
efects
or
dama
person or party
De
fec
ts resultin
not
co
nform to KENWOO
Dam
age
or
deterior
cosmetic
parts
tape
s. di
scs
or faults or damage
leaking
batte
ries.
damal)e
be pr
esented
Ia
roduc
t volta
ge
Product insta
llat
TO
OBTAIN WARRANTY SERVICE
to any author
ized KENWOOD servi
inal copy
p
roof
ol warr
anty
id
to
avoi
d p
ly
l of
sale and this warranty
your name
, h
comple
te retu
rn address and a d
ull
(s)_ Products
paid Ia desti
responsible for
all
cl(s) to
deslina
KENWOOD WARRANTY
JVCKENWOOD Cana
ves the follow
gi
T
each
new
.
and purch
KENW
mal use,
nor
co
nditions set f
wa
rra
nty perr
and labour
or its'
ma
ter
cont
act KENWO
aulho
This Ke
period
or rental, except
or
commerci
nrn
ol
terms and conditio
This warranty excludes
{
a) Produc
Ca
{b) Products
K
ENWO
{c) Pro
iss
m
(d) Period
cove
IN
L,
is
da
Inc
. (
nereina
fierc
all
rant
ributed
a d
et
oo
made tree
tres
if a
dale
which
whi
ch are
nd labour
ran
y to
ect
determined by
to
dea
of original pur
are use
ty
ed 'KE
the original custome
in Canada
by
KEN
ood product, unde
should occu
at
be attr
of
man
ler or servi
ts and lab
d in a professiona
war
ranted f
and
ing wr
itten war
Kenwoo
d product dist
ased
from a
deal
er authorized
OOD war
ran
ts t
hat
each new Kenw
is
fre
e from any defects, subject
orth below
.
tl
od, r
eparrs
will
whe
n such
authorize
ial
rized
of o
ety
detects are
d servi
ce
s or wo
nwood product
(9
cen
rkmans
hip at time
OD
to
confirm
by
KENWOOD
.
WARRANTY PERIOD
is
warranted for par
ne (1)
yea
r f
rom
the
for
products
al applicat
ion,
0)
days
lor parts a
ns
of the war
WARRANTY EXCLUSIONS
ts
purchased in a foreign country
nada and
taken
to a forei
chased
his war
lrom a dea
whi
ch
ranty.
gn country.
ler not aut
mbe
r defaced
do
not drsclose a
pur
OD.
ducts
with the serial nu
ing.
ic
chec!-ups
red by t
NWOOD"),
by KEN
WOOD.
to the t
erms and
r within the
charge lor
KENWO
ibutab
le
to faulty
ufa
cture. Ple
ce
centr
our
chase
or a period
are
subject to
or purchase
horized
, al
tered
ny detec
r of
WOOD
parts
OD
ase
e is
for
, l
ease
the
d in
by
or
ts
sur
ges. neglect or lack
nauthorized
modifica
the owner's ma
ge
as a result of r
nol author
ized
g !rom the u
D specification
ati
on
occurri
, t
ape
heads, ad
occurri
ng during shipping
the shrpping
and
/or
line
ion or removal ch
product
requirewarranty ser
of your bi
ll
or sale and this w
, or
send your pro
the neares
t au
ossib
le ship
packe
d.
Include a co
card
ome
and /or w
repaired with
nations with
freight and rel
lio
ns outside Canada
r. accident. abuse. m
tio
n or
fai
nual
.
epa
irs p
by
KENW
OOO
se
of
par
is
or
devices tha
s.
ng
to
any
exteri
aptors, ant
ennas, cables
caused
by defective
( clai
company
).
frequen
cy conversi
arges.
oe
centre
duct tully insur
tho
riz
ed
KEN
WOOD
ping
damage, make sure
py
of
as
proo
f of w
ork telepho
ne num
etailed descript
in warran
ty will
in
Can
ada. The custo
ated
costs
for the r
isuse
of
period
lure
to foll
erfo
rmed
.
or fini
rns
sho
ons
vice, deliver
and
prese
arranty
ed
servrce
your original
arranty
along
ber(s)
ion
of
be
returned
eturn
by
t do
shes
card
and
mer
ow
uld
the
the
ic
a
,
.
or
nt
,
of
ENTIRE WARRANTY
This
warranty consti
by
KENWOO
D.
or
th
eir agen
ts
en
lar
ge lhi
s w
arranty
or verbal statem
te
nded warra
any ex
by
the
dealer
01
by KENWOOD
.
K
ENW
OOD disclai
of the prod
uct or
da
mage
to
othe
commercial loss
NO
T
he prov
isi
ons contain
to limit. modify
. ta
or
righ
ts you m
provincial
or f
ede
Th
is
warranty card
a
valid proof of
purchase
you mu
st pr
ese
nt the
wa
rra
nty
card as proof
kep
t in a
safe place
JV
CKENWOOD
Kestrel Road,
6070
Ontario,
Tel.:
tut
es
the enti
re wri
No
person,
or
employees
on
ent
or ad
nty
program
serv
ice
DISCLAIMER
ms
any resp
any other indirect, inciden
r produ
.
TICE TO CONSUMER
ed
in thi
ke
away
ay have whi
ral law
s or l
IMPORTANT
by its
elf is
_ When apply
origina
of warranty
. sh
oul
tten wa
party
, d
eale
r or servi
are authorized
beha
lf
ol KEN
WODO
vertisement or promoti
or plan
that
centre. unl
ess app
onsi
bil
ity
lor loss
or goo
ds, mconvemen
swrittenwarrantyare
im
or exclude any warranties
ch
are set fort
egislatio
n.
not consid
ered
ing l
l co
py
of your bill of sale and this
, so
we
recommend
d they
be req
uir
tal or
h in
or war
ed
cts
. discla
Canada
by
may
roved
conse<:~uential
any
by KENWOOD
in the future.
Inc.
Mississauga
Canada L5T
(9051
158
670-7211
rranty
given
ce
cen
to extend or
any wri
llen
on, including
be
offered
in wri
tin
of
lime
or
us
ce
rmt
inte
nded
applica
ble
ran
ty repairs,
that they be
,
tre
g
e
or
as
Fax: (905) 670-7248
(
e)
les
ctefauts ca
uses
GARANTIE KENWOOD
J
VCKENWOOD Cana
don
ne par etrit
cha
que nouveau
NWOOD
KE
NWOOD
KE
KE
NWOOD gar
enonce
e
de
da
ns
des conditions d'emptoi normales, es
detauts. Si
NWOOD
KE
et de
Ia
pourvu que
detectueuses
Kenwood
pa
r l'un
pour
verifie
autori
se par KEN
Les pieces
des pro
an a ca
sa
ul dans les
un
but p
et de Ia mai
de
quat
cond
iti
Cettegaran
{a) les produits
tra
nsp
(b)
les produits
p
ar
(c) les prod
oum
d) les serv
(
d!t
da
Inc.
(ci
-apres appe
Ia garantie suivante a !'
pro
duit Kenwoo
et
ach
ete
a un c
.
antrt, sous reserve
s ci-d
essous
. q
ue cha
l'un def
aut
se
produit
s'engage
aassumer lecoUtdes pieces d8fectueu
main-d'oeuvre
nOCessairespoureftectuer !
de
leis defauts
employ
ees
ou
de
ses
duits Ke
mpier
rof
re-vi
ons
EXCLUSIONS DE GARANTIE
ortesa
KENWOOD:
od1fi8;
aut couve
Iars
a !a
mai
n-d'oeuvre
centres
de
serviceautori
r si
un
conc
essionnaire
WOO
D
PERIODE
et Ia main-
ess
n-d'oeu
de laga
tie n
uits dontle numero
ices
nwood so
de
!a date
cas
oU l
ionnel au
vre
ngt-dix
ecouvre
achetes
retra
achetes a un
d'e
ntretien periodiqu
rt par
es pro
(90)
rantie
d'oeuv
nt gara
d'acha
com
demeu
.iours
pas:
a r
nger
ceHe
DE
duits
etran
;
garanti
tee "KENWOOD").
ach
eteur origi
d distribue
au Canada par
oncessionnai
re aut
des termes
et
t ex
penda
nt !a pBriod
de
Ia
fabrication
tel qu'etabli par KE
ses.
Appelez KEN
au
un cent
re
GARANTIE
ndant
Ia peri
de
locat
Kenwo
od sont
employes
cia
l,
oU
Ia garantie des pi
pendant une perio
reser
ve
des
ger
au achetes au
de
sfir
ie
manque
es qui
n'indi
e:
des
empt
e de garan
es
NWOOD
de serv
Ia reparat
ode d'un (
ion
ter
non autorise
. a
que
que nouveau produit
son! atlribuables a des pieces
re nllcessaires pour
ntiespe
l,
de bail ou
mer
re
en vigueur
sous
concessionnaire
nal
ori
se par
cond
ili
Kenwood
de
repa
rations
du
prod
WOOD
ice
origina
mes
et
Cana
ete
efface
nt
auc
abus.l
co
de
les
du mode d'
(f)
tes deta
elfec
ons
par KENWOOD
,
{g)
l
es~faut
taus
ne
tie
,
es
(h) l
ses
de
les
d
flfau
uit
ou
au
(i) l
es
!'e
est
tell
(j) t
es
pr
(k
) t
es frai
ion
1)
COMMENT OBTENIR
le,
dans
Au
cas
eces
s'
ave
re
de
re
cent
des
con1ral de
de
garantie
port pay!
proche.
le t
ra
da
nspo
et
une co
tan
en
nu
meros
votre acr
pr
odui
destinat
un
es
pon
r
rapport
l'
exterie
urant, l
modifications
se
lin
bandes, les ada
bandes, les disques end
qui fu
xpediti
es
oduit:
oU
de servi
pie du contra\
t que
ts sous gar
sab
ent po
par les d€sastres
es
emp
lois in
corrects, lese
es
manques
de
non autori
emp
lor
:
uts
ou les domma
!u~es
pa
r une per
son
:
scauses
pa
r l
con
ts ou dommages ca
dl§fau
reclamati
conversions
necess
Pour eviter toutes possibilites
de telephon
esse
ions a l
ur du
'emp
forment pas aux
1ti
ons extt!rieu
res
ptateurs
ien
t;
ts
ou
dommages
on des pr
odurts
ons
aup
de tension eVou
s d'i
nstallat
ion
ou d'enlfNemenl
SOUS
un service
sous gara
aire. veuill
ez livrer
ce KENWOOD et
ven
te
et
celle carte de
au
veuillez faire parvenir votre produit
au
cent
re
de
serv
rt.
veuillez
bien
de vent
preu
ve
de garant1e a
e au pas
el une descnp
ant
ie
repares
'int
erieur
du
le de taus frais
ur faire expMie
Canada
, l
es
cta
irs
, l
es surtensions
so ins
ou d'eotre
tiens
s8es
au
l
es man
ges
causes
tors de
ne
au
par
une
par1
loidepietes
ou
exigences
de KENW
, les pi
llres cosmetiques. les tet
, l
es
anten
nes
ommages
ou d
uses
par des pil
qui
se produisent
Kenwood
(On
res
GARANTIE
emballer le
de tran
devrail
des
compa
gni
de
du produ
DU
SERVICE
ntie de votre produit
le produit a n'i
presenter Ia copie origina
garant
ie
en 1ant
ice KENWOOD autonse
de domma
produit.
e origin
al
el
cette car
uss
i bi
en que vot
te
de travail
eVo
lio
n d
i'lta
iii
OO des defauts. Les
ser
ont
retoumes port paye
Canada. le
consommateur sera
spo
rt et d'autres lra
r les
produits a
accidents, l
pf:riodiq
ques
de
reparatio
ie n
on autorisee
dedispositifs
OOD
, l
es
t!pt!
ris,
es
detectueuses
pendan
d!poser
es
de
transport
trequence
it
Kenwood
mporte
que preuve
assure
ges penda
Veu
i!l
ez
te
de garantie
re nom,
u
au domicile,
is
destinations
es
de
ues,
respect
ns
qui
;
es
cables
ni l
es
de
du
quel
le
du
le pl
us
inclure
aux
qui
s'y
et
nt
Ce
KENWOOD
de toutes extensions
ga
concession
ou
ver
pr
es
l
KENWOOD
,
KENWOOD r
d"emploi
t
cau
de
):
Les
pas
d'
exclure d"aut
quell
KE
etan
sousgaran
ven
de
au
a
L'ENTIERE
tte garant
ie represente l'entiere
. KEN
ran
lie taites
nair
employes
au n
bales
ou
ecri
ogrammes
ou pla
con
cess
ionn
n'y ail
eno
du produi
ses
a d'autr
es
toules pertes
AV
IS
AUX
stipulationsco
pour
but
de limi
res garan
es
lois
au
NWOOD ne conside
l une preuve d'
lie. il faud
1e
aus
si b
ien
g
arantie.
On
ca
s au elles
GARANTIE
WOOD
ne
se tie
ni de tou
ou entrepris
es
par
es
au centres
de serv
om
de
KENWOOD
tes, d'an
nonces
ns
de garan
air
es
ou
les
centres
consenti pa
r
RENONCIATION
ncea toutes responsabilitesde perle
t.
de lou s dom
produits
ou
biens. de t
commerc
ial
es
CONSOMMATEURS
ntenu
es dans Ia
ter, de
modi
ties ni dro
legisl
ati
ons provinci
IMPORTANT
re
pas
cette
achat val ide. Lorsqu'on
ra pr
esenter
que cette carte
reromman
de de
s'avereraient
necesaire
JVCKENWOOD
Kestrel Road,
6070
tario,
Canada L5T
On
Telephone:
Te
lecopieur: (905) 670-7248
(9051
garant
ie donn
ee
pa
r
nt
aucunemenl
tes aug
toutes personnes, parties
au moye
ou
de promollons
tie etend
de ser
~crit
d"avance
mages
presentegarantieecrite n'ont
fie
r.
de dimlnue
its eno
ales ou feder
garanti
Ia copie originate ducontr
de garanlie en lant que preuve
les conserver
Canada
Mississau
responsable
mentations
ice
ou par
leu
rs a
n d'
athrmat
. y inclus t
ue
que puissent of
vice
. a main
de temp
indi
rects
ou
accessoires
aus inco
nvenients
r.
de
re1
nces dans n'importe
ates
e l
ouie seule com
demande du ser
dans
un lieu sOr
s a r
avenir
Inc.
ga,
ecrit par
de
cett
gents
rons
s q
ete
.
vice
at
1S8
670-7211
aus
fri
r ni
me
e
.
r
ue
s,
ou
de
 Loading...