

Kenwood KID60S10, KID60B10 Installation Instructions Manual
Dishwasher
KID60S10
installation / instructions manual
KID60S10_IB_110426.indd 1 4/27/11 5:46 PM

KID60S10_IB_110426.indd 2 4/27/11 5:46 PM

contents
unpacking ............................................................................................................................ 5
Installation ........................................................................................................................... 6
location ............................................................................................................................ 6
product overview .............................................................................................................. 12
front view ....................................................................................................................... 12
upper basket .................................................................................................................. 12
internal view .................................................................................................................. 12
lower basket .................................................................................................................. 12
rear view ........................................................................................................................ 12
cutlery basket ................................................................................................................ 12
control panel .................................................................................................................. 13
wash cycle table ............................................................................................................... 14
before operating ............................................................................................................... 15
to open the door ............................................................................................................ 15
to close the door ............................................................................................................ 15
items not suitable for use in the dishwasher ................................................................. 15
adding detergent power or tablet .................................................................................... 16
adding rinse aid ................................................................................................................ 17
adjusting the rinse aid reservoir .................................................................................... 17
adding salt ..................................................................................................................... 18
Adjusting Salt Consumption .......................................................................................... 19
loading the dishwasher .................................................................................................... 20
before loading the dishwasher ...................................................................................... 20
upper basket .................................................................................................................. 21
- adjusting the upper basket ...................................................................................... 21
- loading the upper basket for 12 place settings ........................................................ 21
- hinged cup rack ....................................................................................................... 22
lower basket .................................................................................................................. 22
- hinged spikes .......................................................................................................... 22
- loading the lower basket for 12 place settings ........................................................ 23
cutlery basket ................................................................................................................ 23
starting a wash cycle ....................................................................................................... 24
changing a programme .................................................................................................... 24
at the end of a programme .............................................................................................. 24
switching off the unit ....................................................................................................... 25
KID60S10_IB_110426.indd 3 4/27/11 5:46 PM

unloading the dishwasher ............................................................................................... 25
delay start.......................................................................................................................... 25
half load ............................................................................................................................. 25
cleaning after use ............................................................................................................. 26
external care .................................................................................................................. 26
- the door and the door seal ...................................................................................... 26
- the control panel ...................................................................................................... 26
internal care ................................................................................................................... 26
- ltering system ........................................................................................................ 26
- spray arms............................................................................................................... 27
frost precaution ................................................................................................................ 27
moving the dishwasher.................................................................................................... 27
maintenance after a prolonged period of non-operation .............................................. 27
hints and tips .................................................................................................................... 28
fault code ....................................................................................................................... 28
technical problems ........................................................................................................ 28
disposal of the dishwasher ............................................................................................. 30
disposal of packing material ........................................................................................... 30
specications.................................................................................................................... 31
safety warnings ................................................................................................................ 32
KID60S10_IB_110426.indd 4 4/27/11 5:46 PM
5
Thank you for purchasing your new Kenwood Dishwasher.
These operating instructions will help you use it properly and safely.
We recommend that you spend some time reading this installation/instruction
manual in order that you fully understand all the operational features it offers.
Read all the safety instructions carefully before use and keep this installation/
instruction manual for future reference.
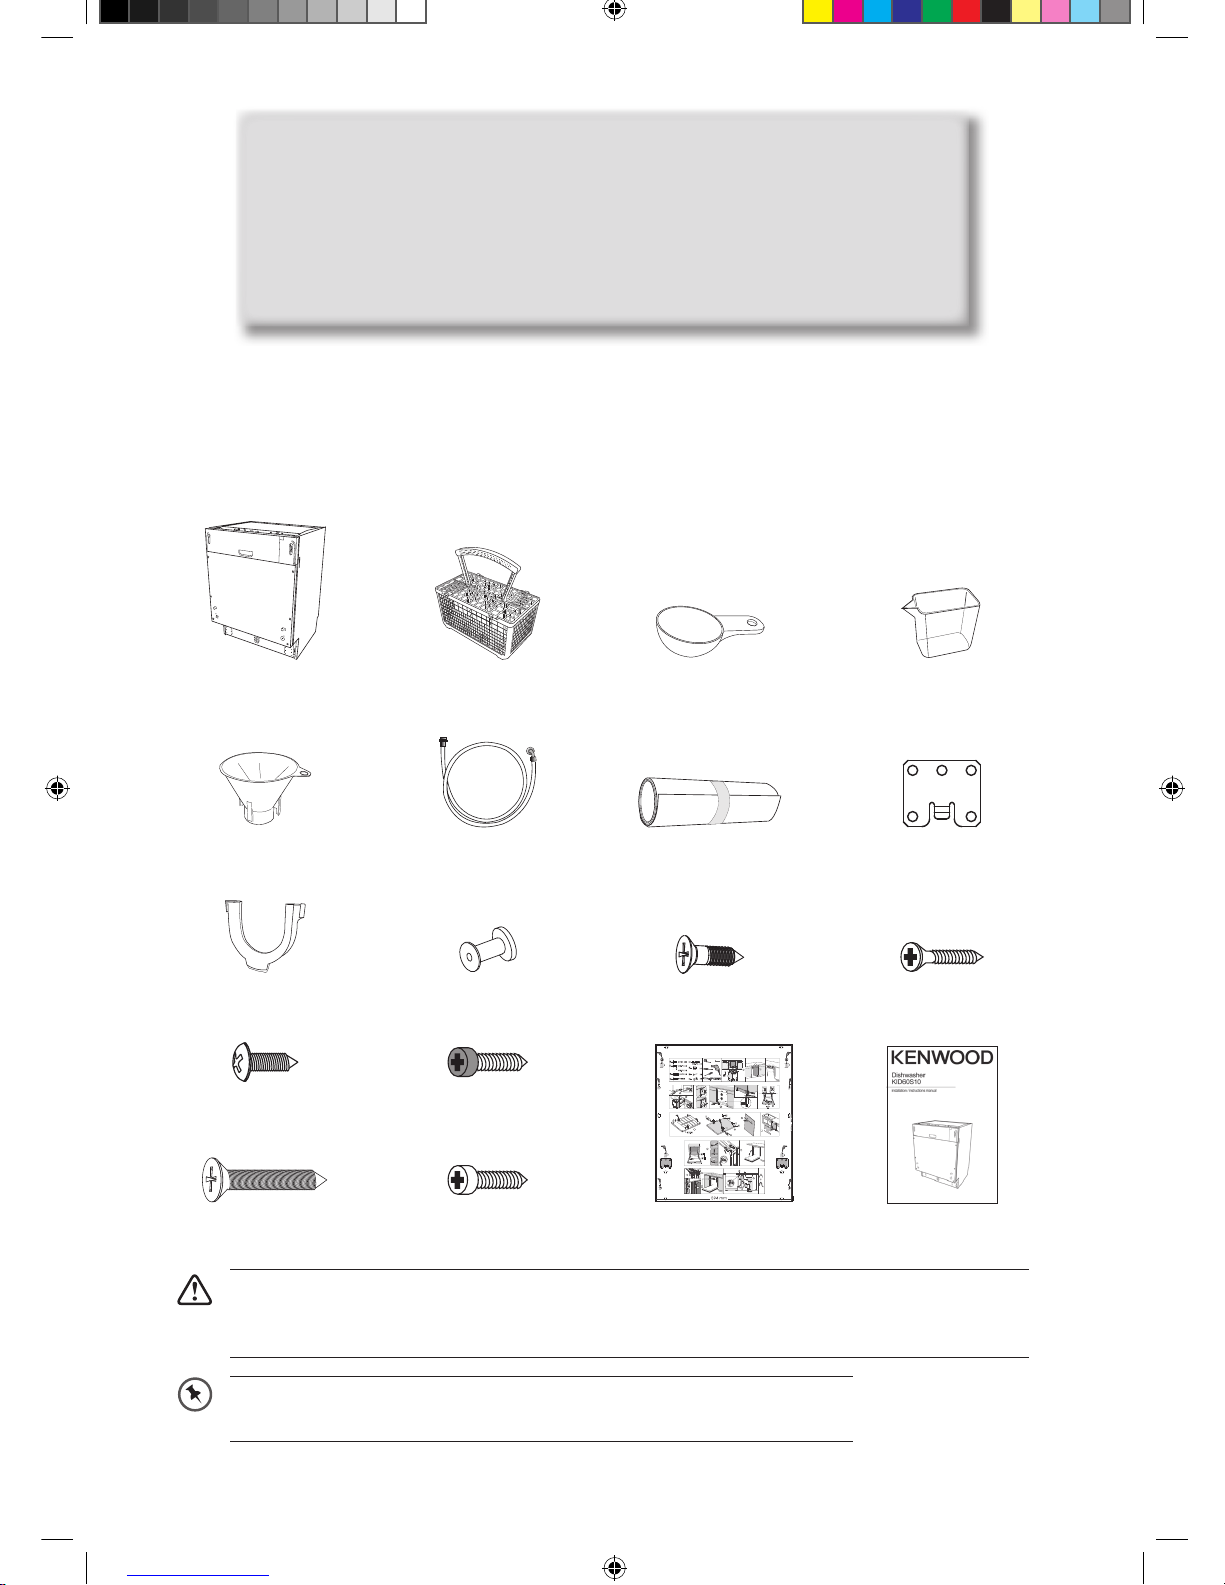
unpacking
Remove all packaging from the unit. Retain the packaging. If you dispose of it please do so
according to local regulations.
The following items are included:
the main unit
lower hook X 2
P.N.: 672000200103
detergent measuring spoon X 1
1 full spoon = 20g (approx.)
P.N.: 673002200079
instruction manual x 1
P.N.: KID60B10-002
door template x 1
P.N.: 675001800313
ST4 screws X 10
P.N.: 672000900040
ST3.9x13 screws (white) X 2
P.N.: 672000900078
4x18 screws X 2
P.N.: 672000900039
4x20 screws X 2
P.N.: 672000900036
condensation strip X 1
P.N.: 675001300716
ST3.9x13 screws (black) X 2
P.N.: 672000900079
3.5x25 screws X 2
P.N.: 672000900041
U-shape hose holder X 1
P.N.: 673006200003
salt funnel X 1
P.N.: 673002200043
hop hook X 2
P.N.: 672000200023
measuring cup X 1
60ml (approx.)
P.N.: 673006200004
water supply hose X 1
P.N.: 673000900060
cutlery basket
P.N.: 673002200099
This product has been wet tested to ensure correct operation. As a result some water
may remain inside the unit. This is normal and safe. Remove any water droplets from the
exterior if necessary.
If items are missing, or damaged please contact Partmaster (UK only).
Tel: 0844 800 3456 for assistance.
KID60S10_IB_110426.indd 5 4/27/11 5:47 PM
6
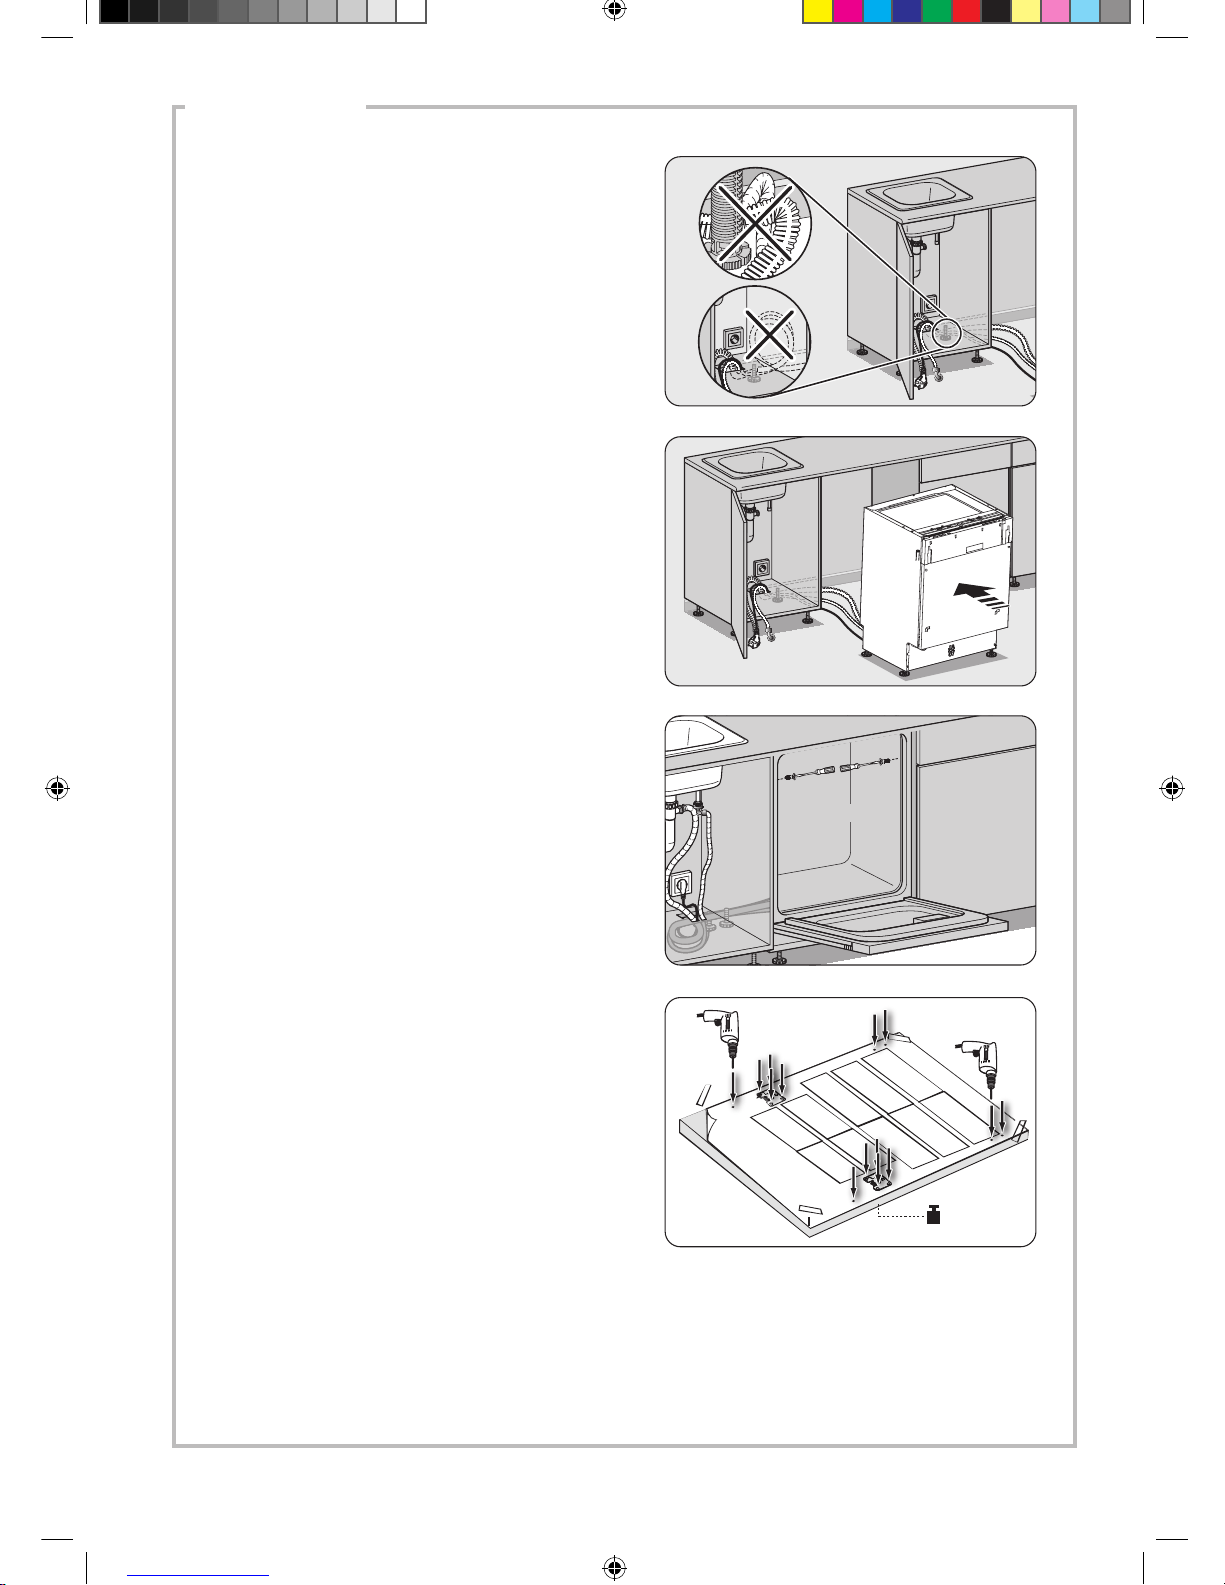
installation
1. Please ensure the dishwasher is installed
by a qualified technician. Refer to the tools
required.
location
When selecting a position for your dishwasher
you should make sure the installation surface
is flat and firm, and the room is well ventilated.
Avoid locating your dishwasher near a heat
source, e.g. cooker, boiler or radiator. Extreme
cold ambient temperatures may also cause
the appliance not to perform properly. This
dishwasher is not designed for use in a garage
or outdoor installation.
Do not drape the dishwasher with any covering.
When installing, ensure that free space is left at
the sides.
2. Ensure there is clearance each side of the
unit to allow slight sideways movement for
servicing when required. Good levelling is
essential for correct closure and sealing of
the door. When the unit is correctly levelled,
the door should not catch the inner liner on
either side of the cabinet. The adjustable
feet may be loosened or tightened in order to
obtain the optimum levelling of the unit.
level
level
level
level
screw
cone
gear
level
Installation
All parts removed must be saved to do
the reinstallation in the future. Ensure
the dishwasher is unplugged and empty.
We recommend that 2 people handle
the dishwasher during installation.
The supplied door template also
contains installation steps which will
assist installation.
KID60S10_IB_110426.indd 6 4/27/11 5:47 PM
7
installation
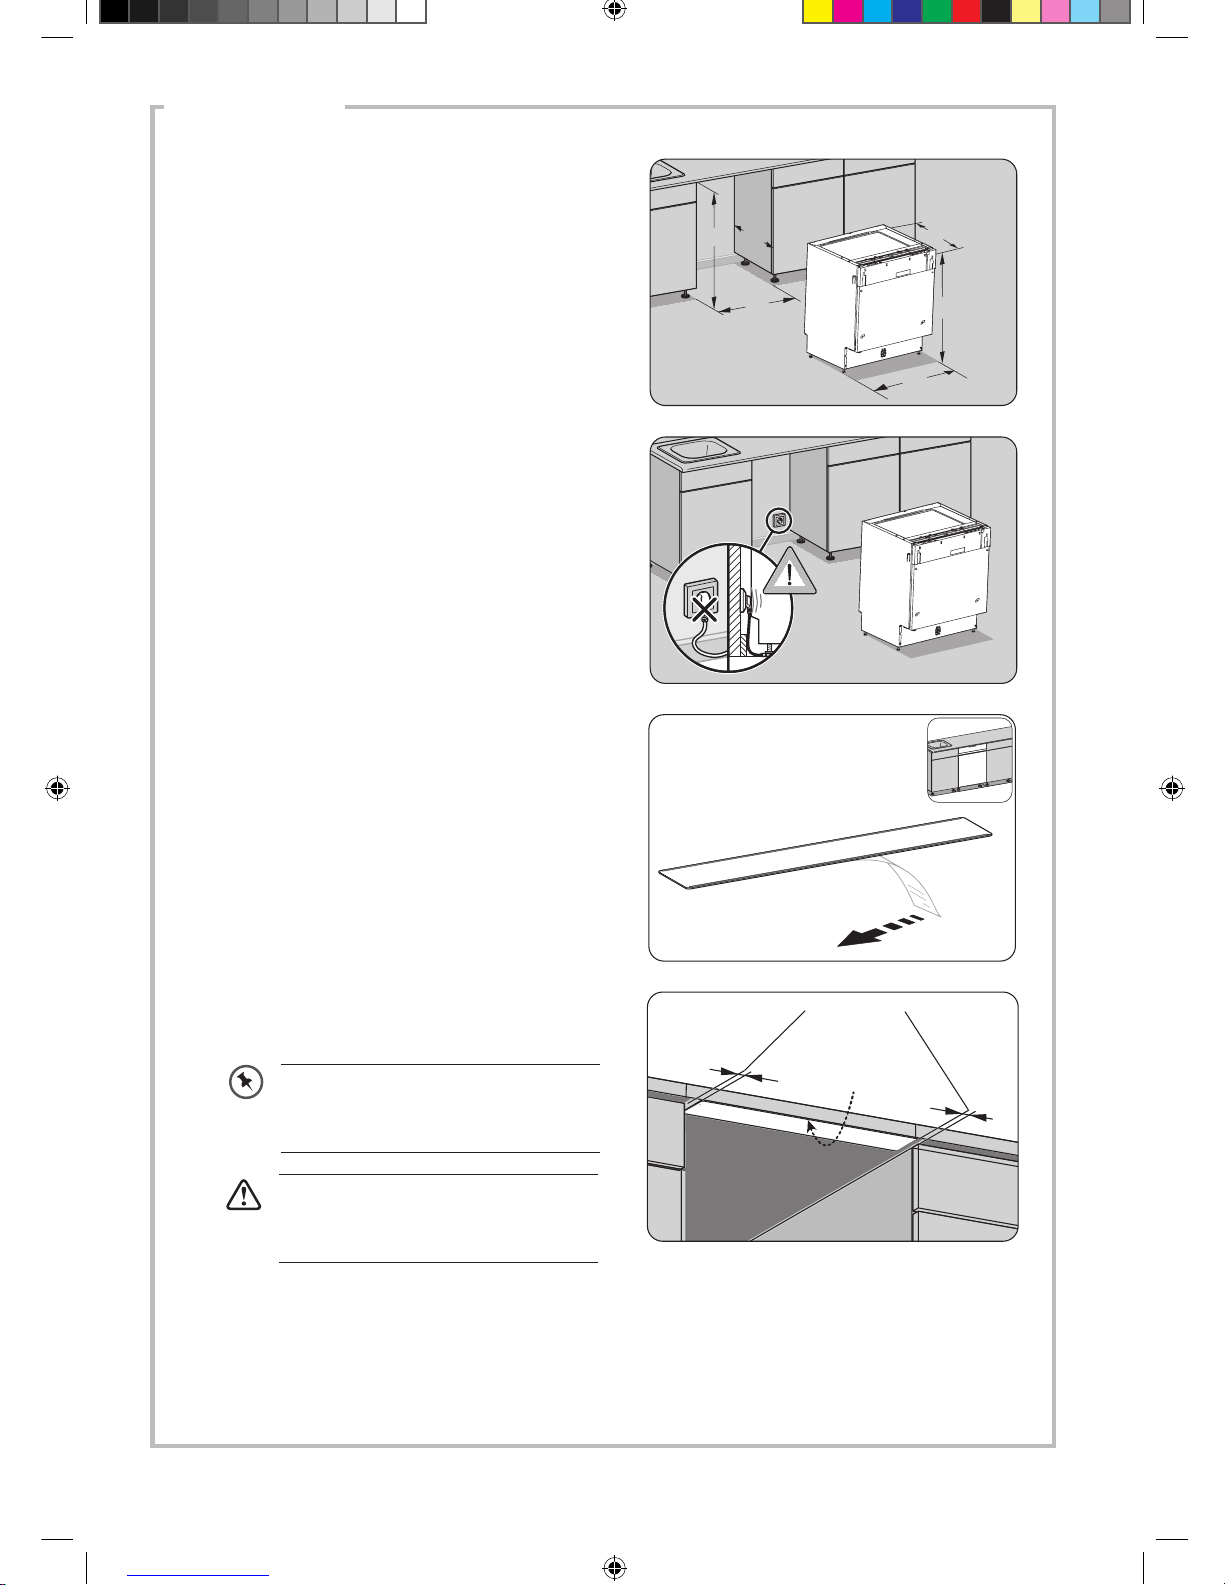
3. The height of the unit is 820 mm. The figure
outlines the minimum dimensions required
to accommodate the dishwasher within fitted
kitchen furniture units.
820
600
560
595
540
820
unit in mm
4. Do not connect the unit to the mains socket
before installation. Ensure you are not
installing the unit right in front of the mains
socket. This is to avoid potential damage to
the back of the unit.
5. The condensation strip must be fitted to
the underside of the worktop above your
dishwasher to protect it against any moisture.
Its purpose is to protect your worktop’s
underside from steam rising from the
dishwasher.
Remove the backing paper from the
condensation strip.
Leave some space
Stick the Condensation
Strip under the worktop,
where you want to
install the dishwasher.
6. Stick the condensation strip to the underside
of the worktop.
Ensure the surface is clean prior to
sticking the condensation strip to
the underside of the worktop.
Failure to attach the condensation
strip could result in damage to the
underside of your worktop!
KID60S10_IB_110426.indd 7 4/27/11 5:47 PM
8
installation
7. Position the dishwasher next to a water tap
and a drain. Ensure the water inlet and drain
hoses are not kinked or squashed. The unit
must not stand on the mains cable.
<6.5kg
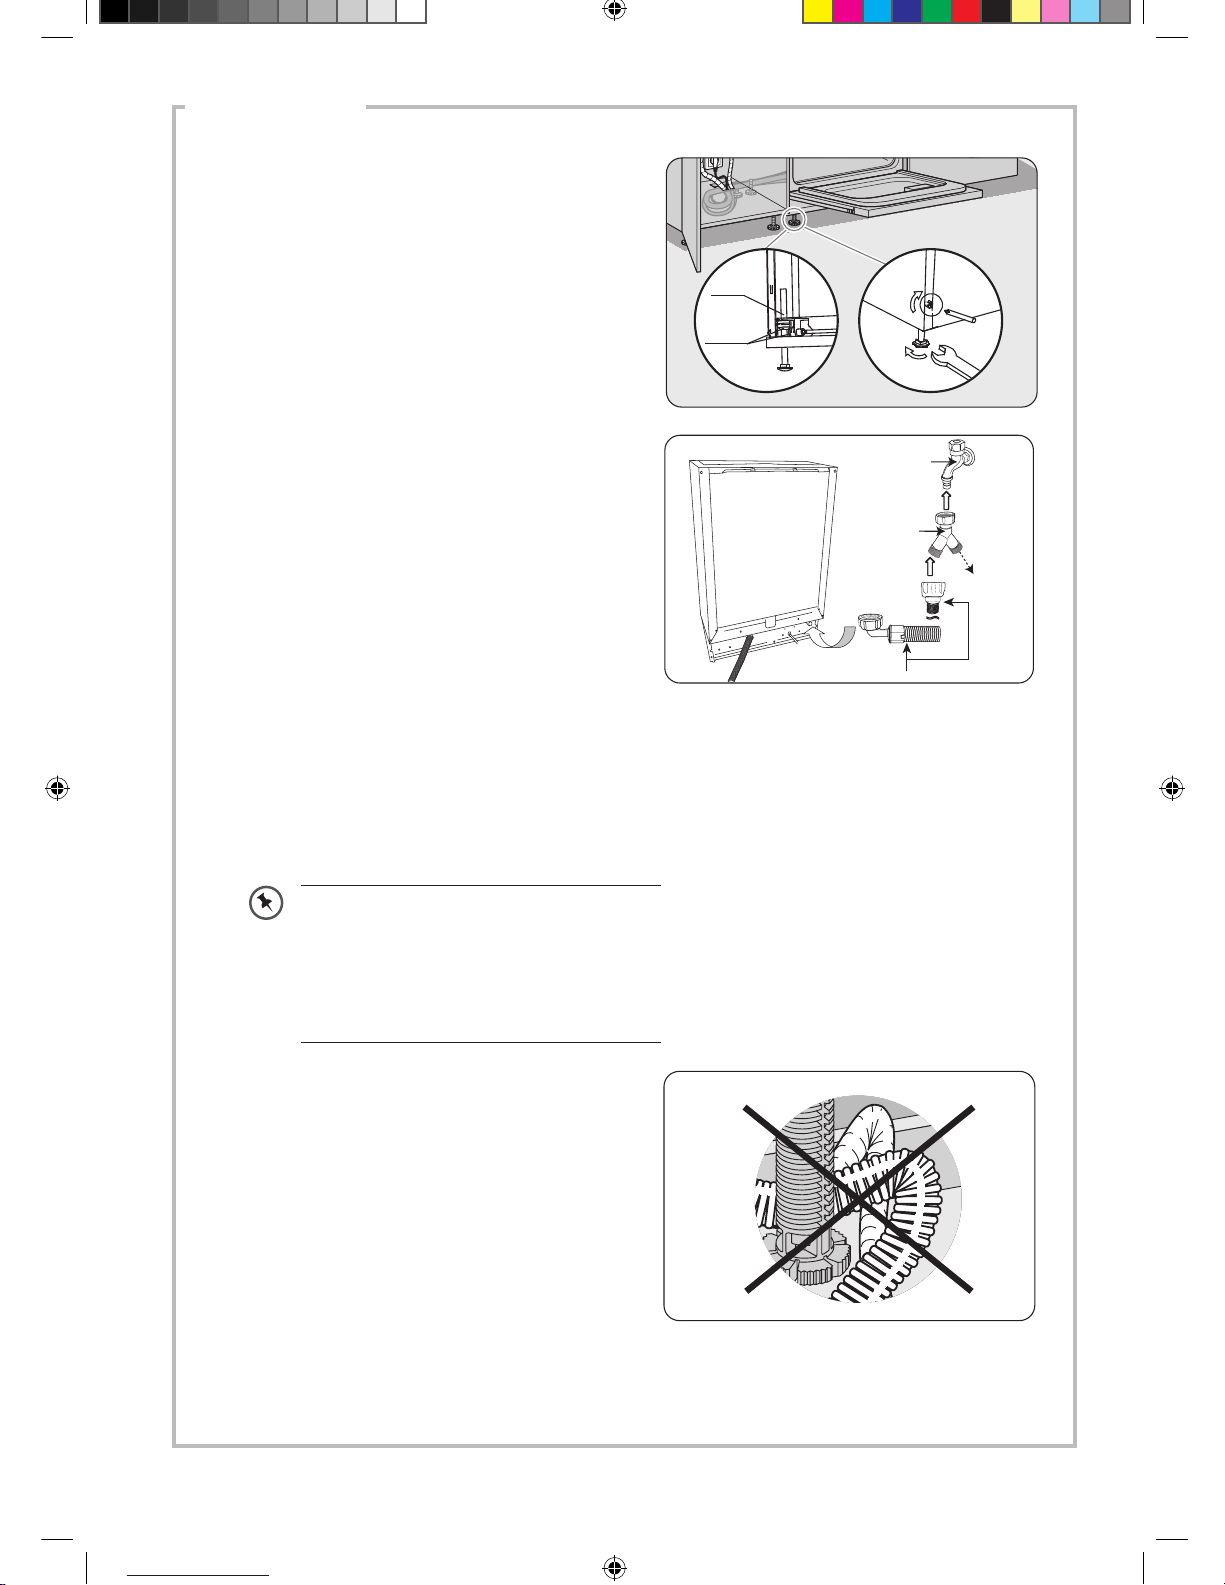
8. To secure the dishwasher under the table top,
tighten the screws through the top sides of
the unit onto the table top.
9. Tape the supplied Door Template to the
dishwasher door. Make sure the top of
the template is at the top of the door. Drill
the required holes following the depth and
diametre shown on the Door Template.
KID60S10_IB_110426.indd 8 4/27/11 5:47 PM

9
installation
10. Install the Aesthetic Panel onto the dishwasher door. Ensure the aesthetic panel weight is a
minimum of 3kg and a maximum of 6kg. After the aesthetic panel is installed, the tension of
the dishwasher door spring can be adjusted by rotating the adjusting bolt. If the tension is
right, the door will remain horizontal in the fully open position.
4 X 18 screw
Cover
Spacer for
aesthetic
panel
Hook for
aesthetic panel
Aesthetic panel
Outer door of
dishwasher
Lower hook
Hop hook
ST4 countersunk
head screw
11. Ensure to tighten the screws on both sides
of the dishwasher door and to secure the
Aesthetic Panel.
Rubber cover
Screw
4*14 screw
Loosen
12. Adjust the bolt to loosen or tighten the
tension of the dishwasher door.
KID60S10_IB_110426.indd 9 4/27/11 5:47 PM
10
installation
• Do not bend your drain hose.
14. Make sure your plumbing is suitable for
use with the dishwasher. If in doubt contact
a qualified plumber. This unit MUST BE
connected to COLD WATER MAINS using
the new water inlet hose. OLD HOSE SETS
MUST NOT BE RE-USED. The water
pressure from the water mains needs to be at
a minimum of 0.04 MPa and a maximum of
1.00MPa.
• Connect one end of the safety water
supply hose to your dishwasher, and then
connect the other end of the hose to your
water mains. Please ensure the black
rubber seal is in place.
• After connecting the hose, turn on your
water mains and check for leaks.
• Connect the dishwasher to the mains
socket.
water mains
water supply hose
Y-Adaptor
(not included)
Connect to
another
appliance
if required.
You may use a Y-Adaptor (not included)
for an additional water feed for another
appliance, for example a washing
machine. This is only applicable for cold
water mains. A Y-Adaptor is available
from most DIY stores.
screw
cone
gear
level
13. Adjust the adjustable feet again to obtain the
optimum levelling of the unit.
KID60S10_IB_110426.indd 10 4/27/11 5:47 PM
11
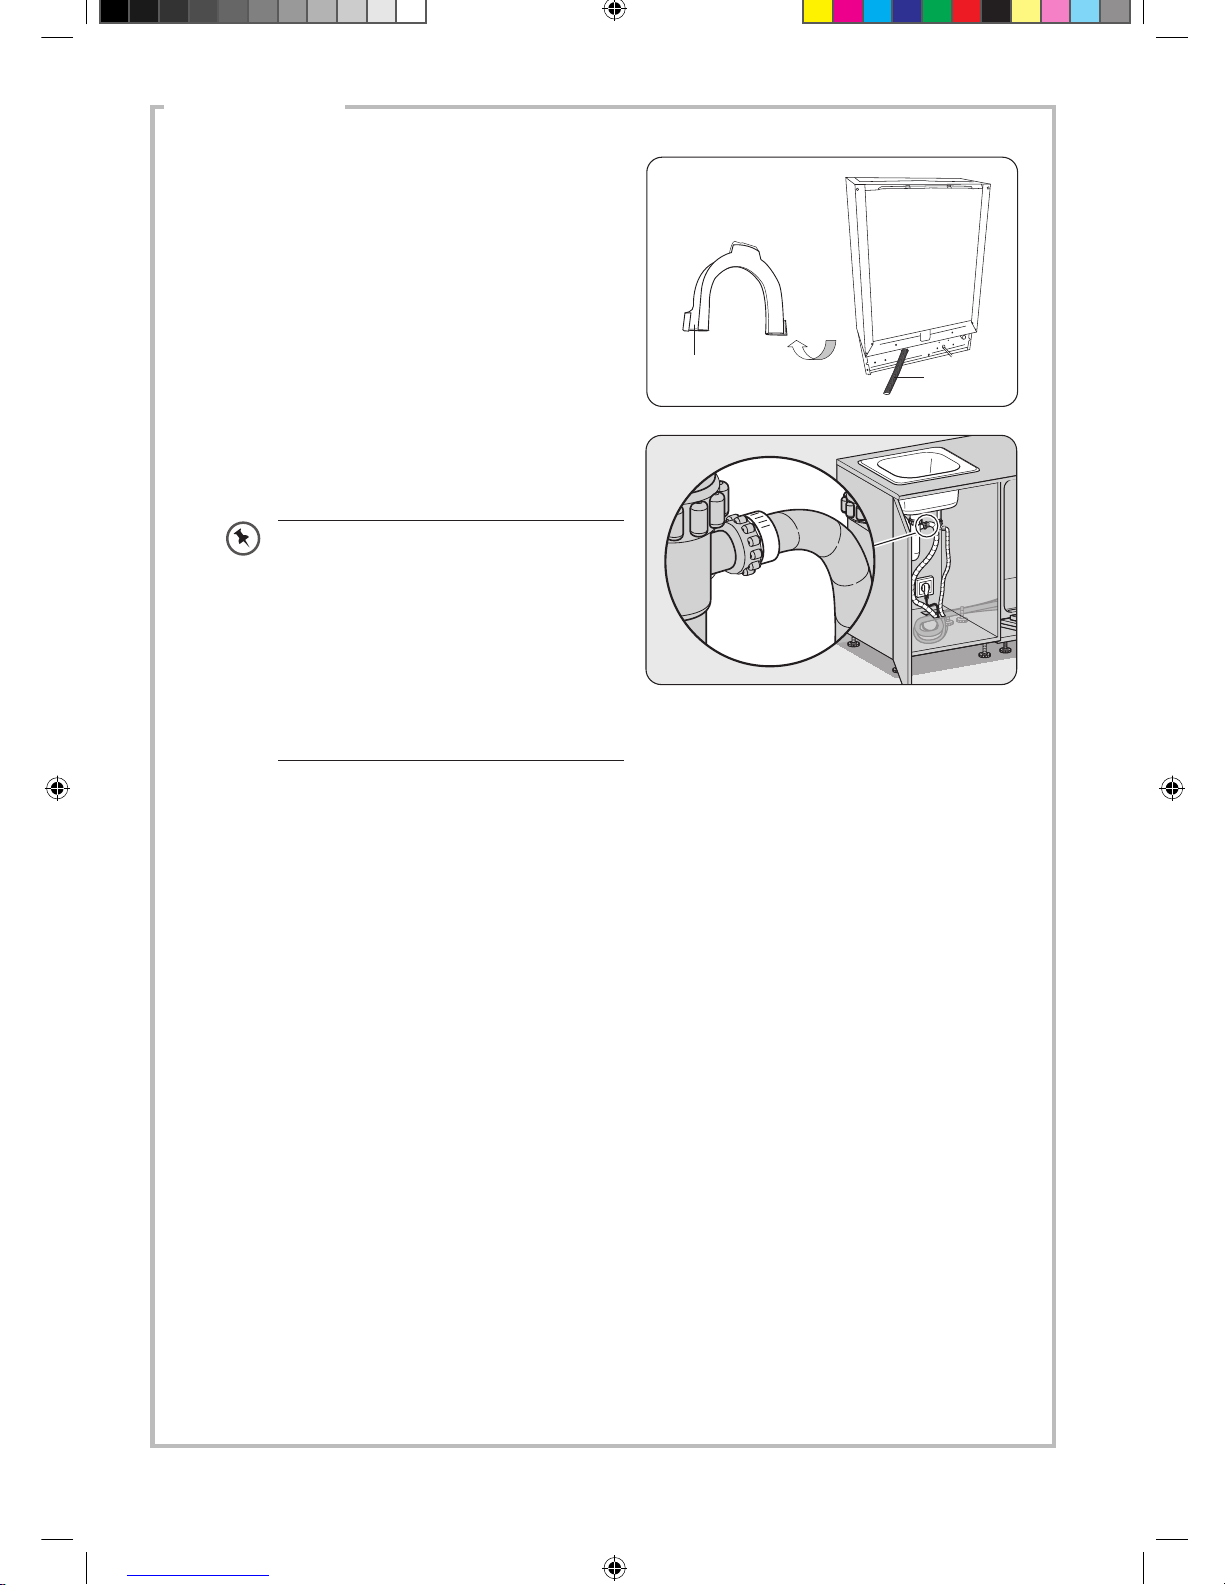
installation
water drain
hose
U-shaped drain
hose holder
• You may use the U-shaped drain hose
holder to secure your drain hose and to
avoid bending it.
• Secure the water drain hose to the waste
pipe to avoid it coming off during the
washing process.
• The waste pipe must only be
connected to the foul drains and not
the surface water drainage system.
• The water drain hose should be
placed between 40 cm and 100 cm
from the floor level and must not be
extended, otherwise the unit may
not be able to expel the waste water
properly.
KID60S10_IB_110426.indd 11 4/27/11 5:47 PM
 Loading...