

Page 1

KDV-S220P
DVD PLAYER
INSTRUCTION MANUAL
LECTEUR DE DVD
MODE D’EMPLOI
DVD-Player
BEDIENUNGSANLEITUNG
DVD-SPELER
GEBRUIKSAANWIJZING
LETTORE DVD
ISTRUZIONI PER L’USO
REPRODUCTOR-DVD
MANUAL DE INSTRUCCIONES
LEITOR DE DVD
MANUAL DE INSTRUÇÕES
© B64-2855-00/02 (E)
Page 2

Contents
Safety precautions 3
Before Use 4
Notes on playing MP3 6
About the remote 7
About discs 8
Basic features 9
Power
Play
Mute
Skip
Fast Forward and Reverse
Repeat Play
A-B Repeat Play [DVD][VCD][CD]
Switching Display
DVD Video/Video CD features 12
Search Play
Slow Motion play
DVD menu/Top (title) menu [DVD]
Audio Language select [DVD]
Subtitle Language select [DVD]
Picture Angle select [DVD]
Zoom [DVD]
PBC [VCD]
Digest Screen [DVD]
CD/MP3 features 15
MP3 Folder List [MP3]
Program Play
Direct Skip Play
Play Time Search [CD]
MP3 Play Mode [MP3]
Random Play
Setup menu 18
Setup menu
General Setup
Speaker Setup
Audio setup
Preferences
Accessories 22
Installation 22
Connecting Wires to Terminals 23
Troubleshooting Guide 24
Specifications 25
2
|
English
[DVD]: Function of during DVD playback only.
[VCD]: Function of during Video CD playback only.
[CD]: Function of during CD playback only.
[MP3]: Function of during MP3 playback only.
Page 3

Safety precautions
2WARNING
To prevent injury or fire, take the
following precautions:
• Insert the unit all the way in until it is fully locked
in place. Otherwise it may fall out of place when
jolted.
• To prevent a short circuit, never put or leave any
metallic objects (such as coins or metal tools)
inside the unit.
• If the unit starts to emit smoke or strange smells,
turn off the power immediately and consult your
Kenwood dealer.
• Do not connect the unit to the front monitor. This
unit is for rear seat entertainment.
• Do not use any power cable other than the
accessory. This could cause fire.
2CAUTION
To prevent damage to the machine, take
the following precautions:
• Make sure to ground the unit to a negative 12V
DC power supply.
• Do not open the top or bottom covers of the unit.
• Do not install the unit in a spot exposed to direct
sunlight or excessive heat or humidity. Also avoid
places with too much dust or the possibility of
water splashing.
• Do not use your own screws. Use only the screws
provided. If you use the wrong screws, you could
damage the unit.
• When replacing a fuse, only use a new one with
the prescribed rating. Using a fuse with the wrong
rating may cause your unit to malfunction.
Restrictions due to difference between
discs
Inhibition
work as intended by you. Please be sure to read
the instructions provided with each disc. When
an inhibition icon is displayed on the monitor, it
indicates that the disc being played is under the
restriction as described above.
Some DVD and VCD discs can be
played only in certain playback
icon
modes according to the intentions
of the software producers. As this
player plays discs according to their
intentions, some functions may not
Lens Fogging
Right after you turn on the car heater in cold
weather, dew or condensation may form on
the lens in the CD player of the unit. Called lens
fogging, CDs may be impossible to play. In such
a situation, remove the disc and wait for the
condensation to evaporate. If the unit still does
not operate normally after a while, consult your
Kenwood dealer.
Cleaning the Unit
If the faceplate of this unit is stained, wipe it with a
dry soft cloth such as a silicon cloth.
If the faceplate is stained badly, wipe the stain off
with a cloth moistened with neutral cleaner, then
wipe neutral detergent off.
• Applying spray cleaner directly to the unit may affect its
mechanical parts. Wiping the faceplate with a hard cloth
or using a volatile liquid such as thinner or alcohol may
scratch the surface or erases characters.
NOTE
• If you experience problems during installation,
consult your Kenwood dealer.
• The illustrations of the display and the panel
appearing in this manual are examples used to
explain more clearly how the controls are used.
Therefore, what appears on the display in the
illustrations may differ from what appears on
the display on the actual equipment, and some
of the illustrations on the display may represent
something impossible in actual operation.
• If the unit fails to operate properly, turn the power
off and then on. If the unit still fails to operate
properly after the power has been turned off
and on, contact your local Kenwood dealer for
assistance.
English
|
3
Page 4

Before Use
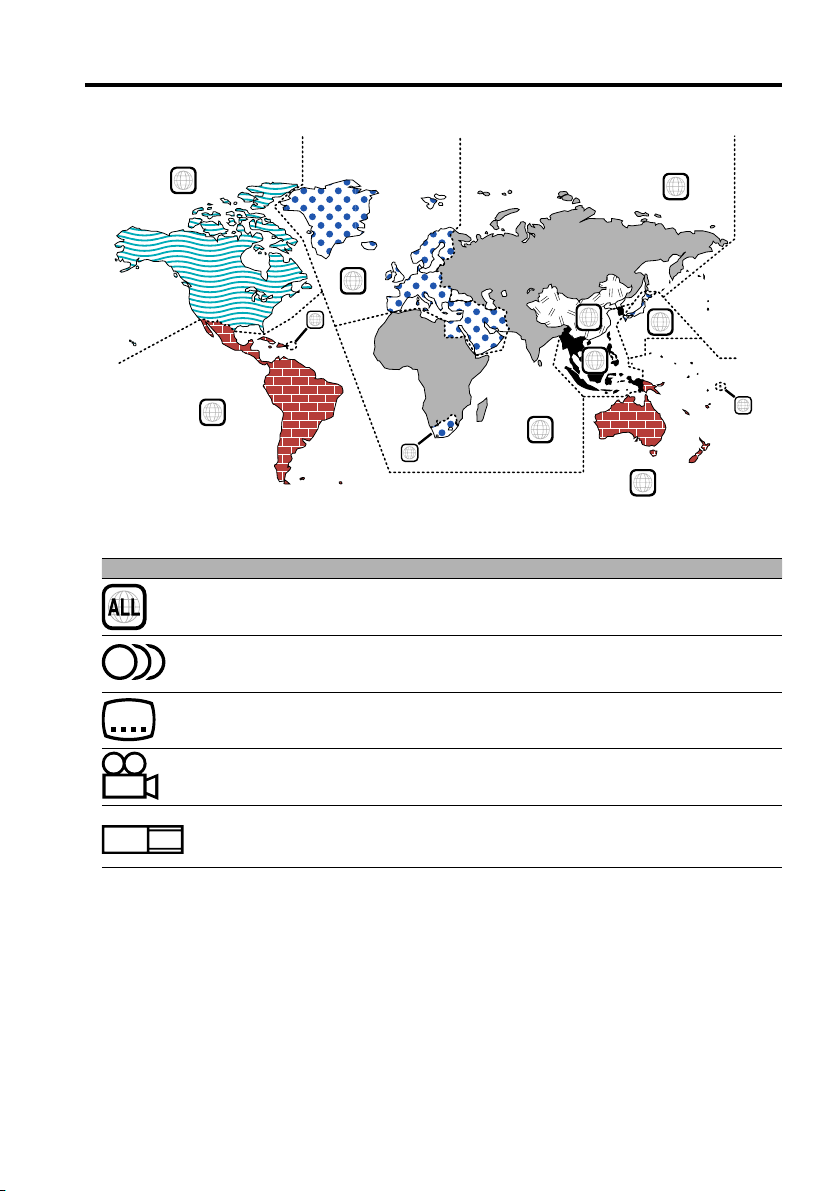
Region codes in the world
1
4
Icons on the DVD discs
Icon Description
Indicates the region code where the disc can be played.
8
32
Number of voice languages recorded with the audio function. The number in the
icon indicates the number of voice languages. (Max. 8 languages)
Number of subtitle languages recorded with the subtitle function. The number in the
icon indicates the number of subtitle languages. (Max. 32 languages)
5
2
1
2
6
3
5
2
1
4
Number of angles provided by the angle function. The number in the icon indicates
9
16:9 LB
the number of angles. (Max. 9 angles)
Aspect ratios that can be selected. "LB" stands for Letter Box and “PS” for Pan/Scan. In
the example on the left, the 16:9 video can be converted into letter box video.
Playable discs
• DVD-Video
• Audio Disc (CD)
• MP3 format Disc (CD)
• CD-R/RW format Disc
• Video CD Disc
Also, you cannot play back the DVD-R discs if not recorded in the DVD-Video format.
About the usable temperatures
The protective circuit in the unit activates when the temperature inside the DVD player exceeds 60°C
(140°F). Refer to Trouble Shootiing Guide (p 24).
|
4
English
Page 5
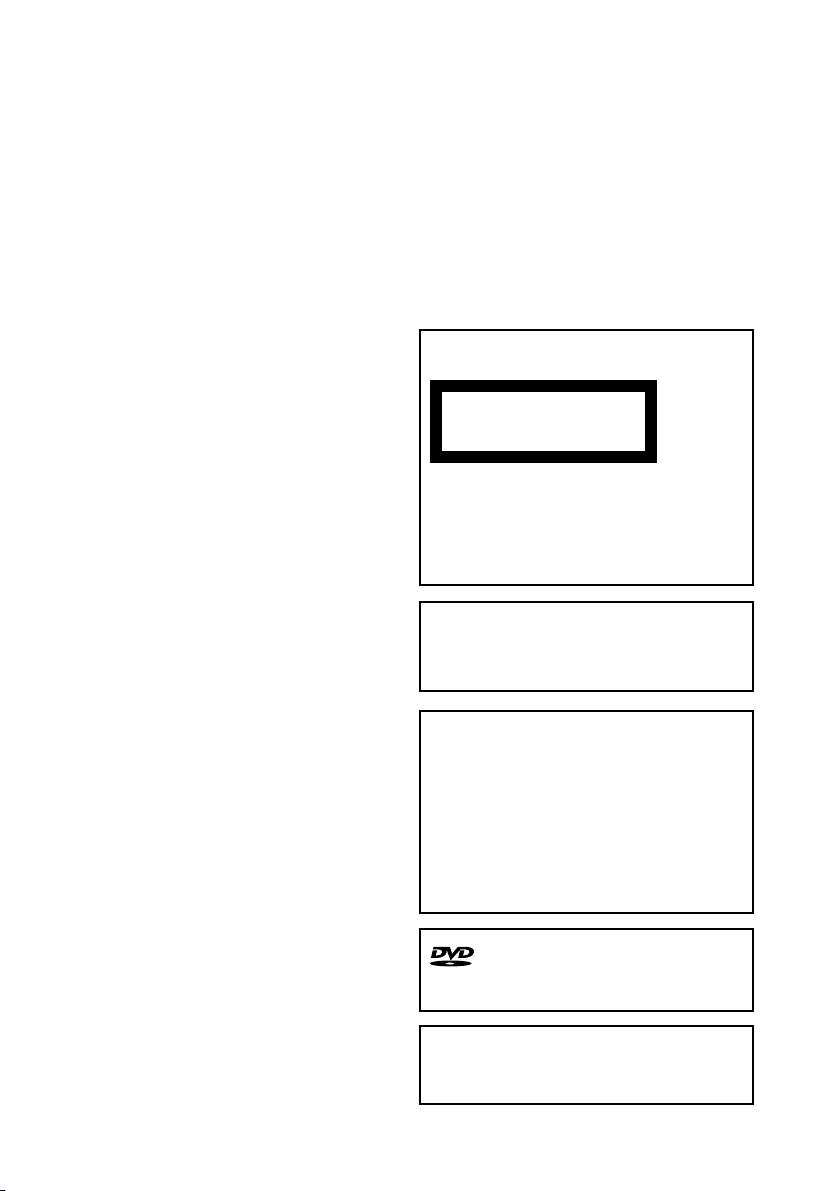
The marking of products using lasers
(Except for some areas)
CLASS 1
LASER PRODUCT
The label is attached to the chassis/case and
says that the component uses laser beams that
have been classified as Class 1. It means that the
unit is utilizing laser beams that are of a weaker
class. There is no danger of hazardous radiation
outside the unit.
This Product is not installed by the manufacturer
of a vehicle on the production line, nor by the
professional importer of a vehicle into an EU
Member State.
This product incorporates copyright protection
technology that is protected by U.S. patents
and other intellectual property rights. Use of
this copyright protection technology must be
authorized by Macrovision, and is intended
for home and other limited viewing uses only
unless otherwise authorized by Macrovision.
Reverse engineering or disassembly is
prohibited.
is a trademark of DVD Format/Logo
Licensing Corporation registered in the U.S.,
Japan and other countries.
Manufactured under license from Dolby
Laboratories.
"Dolby" and the double-D symbol are
trademarks of Dolby Laboratories.
English
|
5
Page 6
Notes on playing MP3
KDV-S220P can play MP3 (MPEG1, 2 Audio Layer 3).
Note, however, that the MP3 recording media and
formats acceptable are limited. When writing MP3,
pay attention to the following restrictions.
Acceptable media
The MP3 recording media acceptable to this unit
are CD-ROM, CD-R, and CD-RW.
When using CD-RW, do full format not quick format
to prevent malfunction.
Acceptable medium formats
The following formats are available for the media
used in this unit. The maximum number of
characters used for file and folder name including
the delimiter (".") and three-character extension are
indicated in parentheses.
• ISO 9660 Level 1 (12 characters; Up to 11
characters are displayed)
• ISO 9660 Level 2 (31 characters; Up to 11
characters are displayed)
• Joliet (64 character; Up to 11 characters are
displayed)
• Romeo (128 character; Up to 11 characters are
displayed)
• Long file name (200 characters; Up to 11
characters are displayed)
• Maximum number of characters for folder name:
128 (Up to 11 characters are displayed)
For a list of available characters, see the instruction
manual of the writing software and the section
Entering file and folder names below.
The media reproducible on this unit has the
following limitations:
• Maximum number of directory levels: 8
• Maximum number of files per folder: 185
• Maximum number of folders: 127
MP3 written in the formats other than the above
may not be successfully played and their file names
or folder names are not properly displayed.
Settings for your MP3 encoder and CD
writer
Do the following setting when compressing audio
data in MP3 data with the MP3 encoder.
• Transfer bit rate: 56 – 320 kbps
• Sampling frequency
: 11.025, 12, 16, 22.05, 24, 32, 44.1, 48 kHz
When you use your CD writer to record MP3 up
to the maximum disc capacity, disable additional
writing. For recording on an empty disc up to the
maximum capacity at once, check Disc at Once.
ID3 tag display
The ID3 tag cannot be displayed.
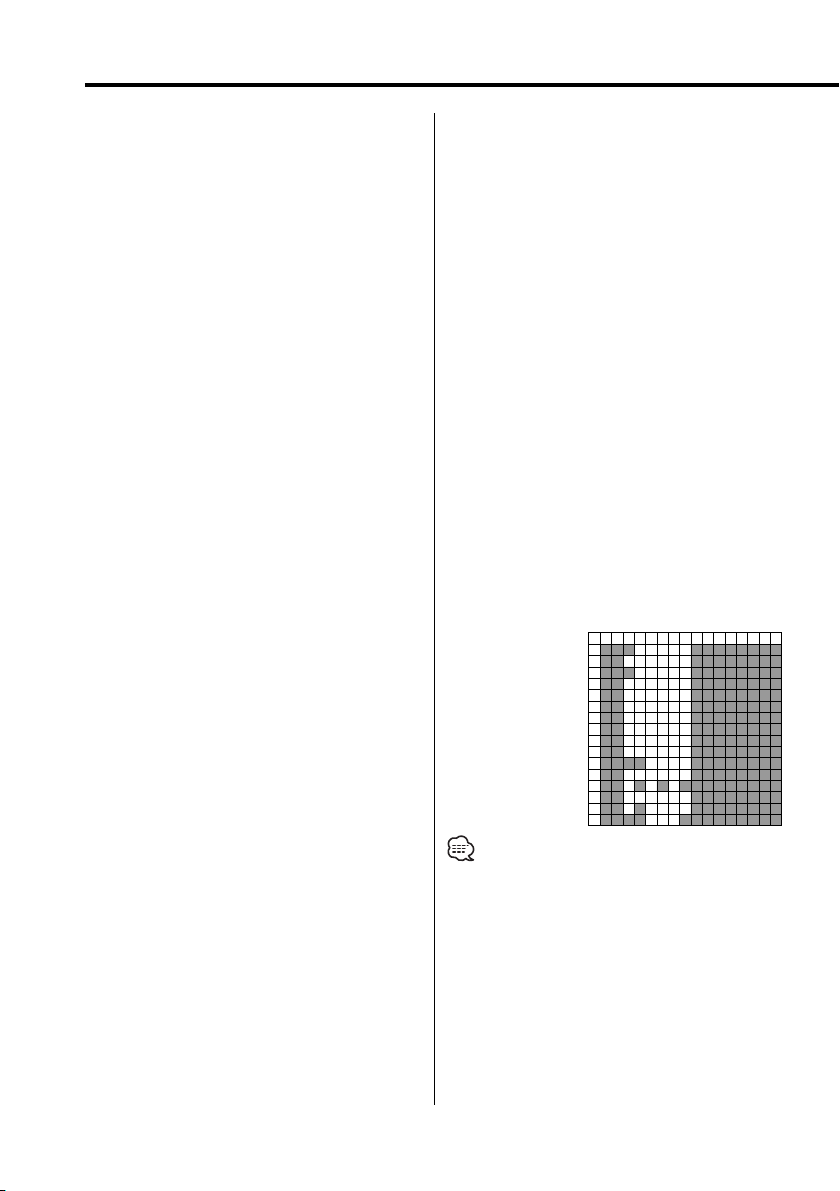
Entering file and folder names
The code list characters are the only file names and
folder names that can be entered and displayed.
If you use any other character for entry, the file and
folder names are not displayed correctly. They may
neither be displayed correctly depending on the CD
writer used.
The unit recognizes and plays only those MP3
which have the MP3 extension (.MP3).
0123456789ABCDEF
00@P‘p
1!1AQaq
22BRbr
3#3CScs
4$4DTdt
5%5EUeu
6&6FVfv
7’7GWgw
8(8HXhx
9)9IYiy
AJZjz
B+;K[k{
C,Ll
D -=M]m}
E . N^n~
FO_o
• A file with a name entered with characters not on the
code list may not play correctly.
Writing files into a medium
When a medium containing MP3 data is loaded,
the unit checks all the data on the medium. If the
medium contains a lot of folders or non-MP3 files,
therefore, it takes a long time until the unit starts
playing MP3.
In addition, it may take time for the unit to move to
the next MP3 file or a File Search or Folder Search
may not be performed smoothly.
Loading such a medium may produce loud noise to
damage the speakers.
• Do no attempt to play a medium containing a non-MP3
file with the MP3 extension.
The unit mistakes non-MP3 files for MP3 data as long as
they have the MP3 extension.
• Do not attempt to play a medium containing non MP3.
6
|
English
Page 7
About the remote
MP3 playing order
When selected for play or Skip, files and folders are
accessed in the order in which they were written by
the CD writer.
Because of this, the order in which they are
expected to be played may not match the order
in which they are actually played. You may be able
to set the order in which MP3 are to be played by
writing them onto a medium such as a CD-R with
their file names beginning with play sequence
numbers such as "01" to "99", depending on your
CD writer.
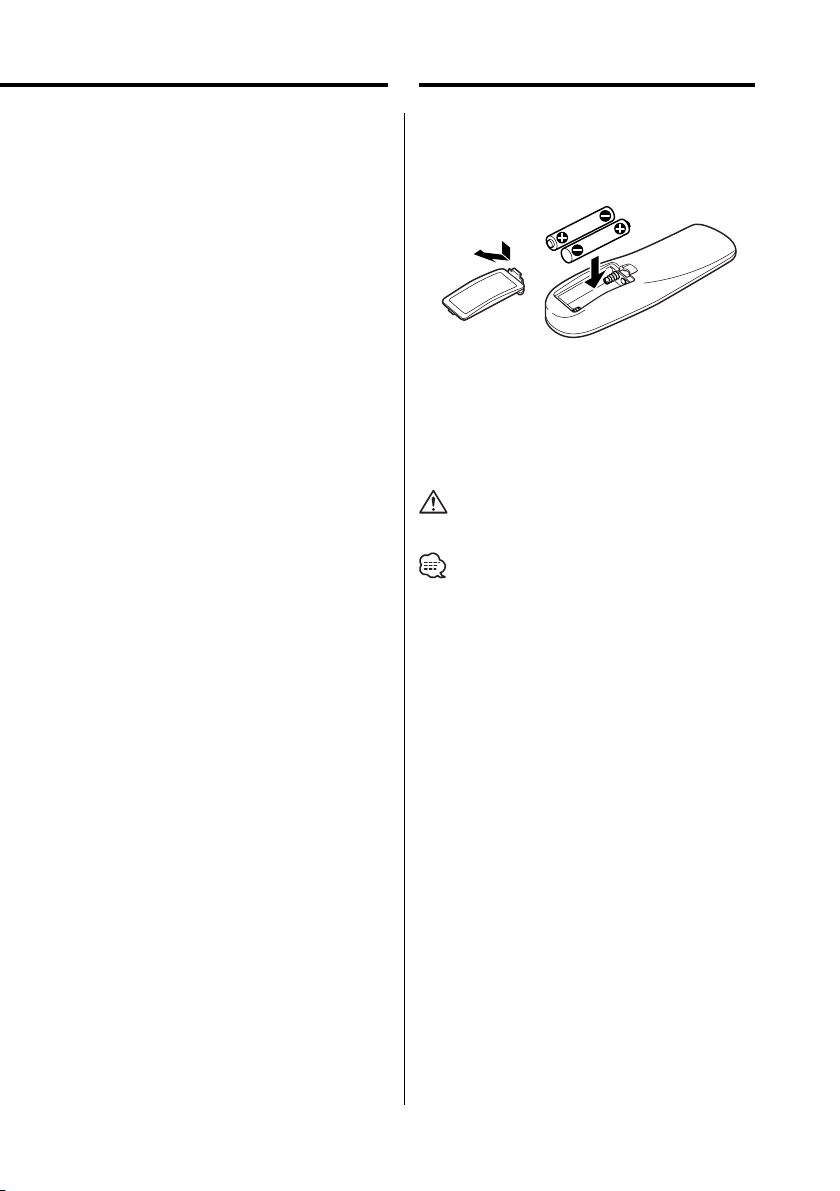
Loading the battery
1. Use two "AAA"-size batteries.
Remove the cover as illustrated.
2. Insert the batteries with the + and - poles aligned
properly, following the illustration inside the case.
2WARNING
• Store unused batteries out of the reach of
children. Contact a doctor immediately if the
battery is accidentally swallowed.
• Do not put the remote in a place where it moves
when you drive. If it falls under the brake pedal,
etc., it will hinder your driving, causing danger.
• Do not set the remote on hot places such as above the
dashboard.
• The provided batteries are intended for use in operation
checking, and their service life may be short.
• When the remote controllable distance becomes short,
replace both of the batteries with new ones.
English
|
7
Page 8
About discs
Handling discs
• Don’t touch the recording surface of the disc.
• CD-R/RW and DVD-R are easier to damage than a
normal music CD. Use a CD-R/RW or a DVD-R after
reading the caution items on the package etc.
• Don’t stick tape etc. on the disc.
Also, don’t use a disc with tape stuck on it.
When using a new disc
If the disc center hole or outside rim has burrs, use
it after removing them with a ball pen etc.
Burrs
Burrs
Removing discs
When removing discs from this unit pull them out
horizontally.
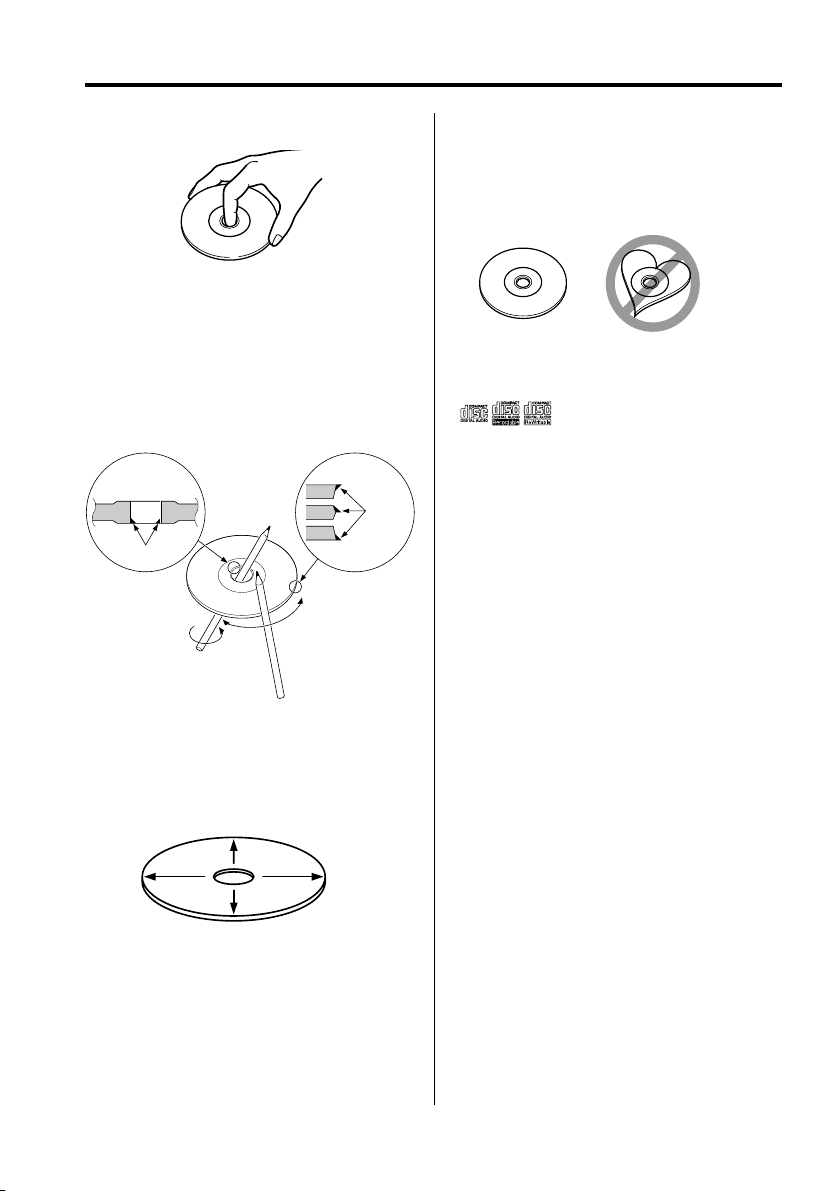
Discs that can’t be used
• Discs that aren’t round can’t be used.
• Discs with coloring on the recording surface or
that are dirty can’t be used.
• This unit can only play the CDs with
It may not correctly play discs which do not have
the mark.
• A CD-R or CD-RW that hasn’t been finalized can’t
be played. (For the finalization process refer to
your CD-R/CD-RW writing software, and your CDR/CD-RW recorder instruction manual.)
.
Disc storage
• Don’t place them in direct sunlight (On the seat
or dashboard etc.) and where the temperature is
high.
• Store discs in their cases.
Disc accessories
Don’t use disc type accessories.
Disc cleaning
Clean from the center of the disc and move
outward.
|
8
English
Page 9
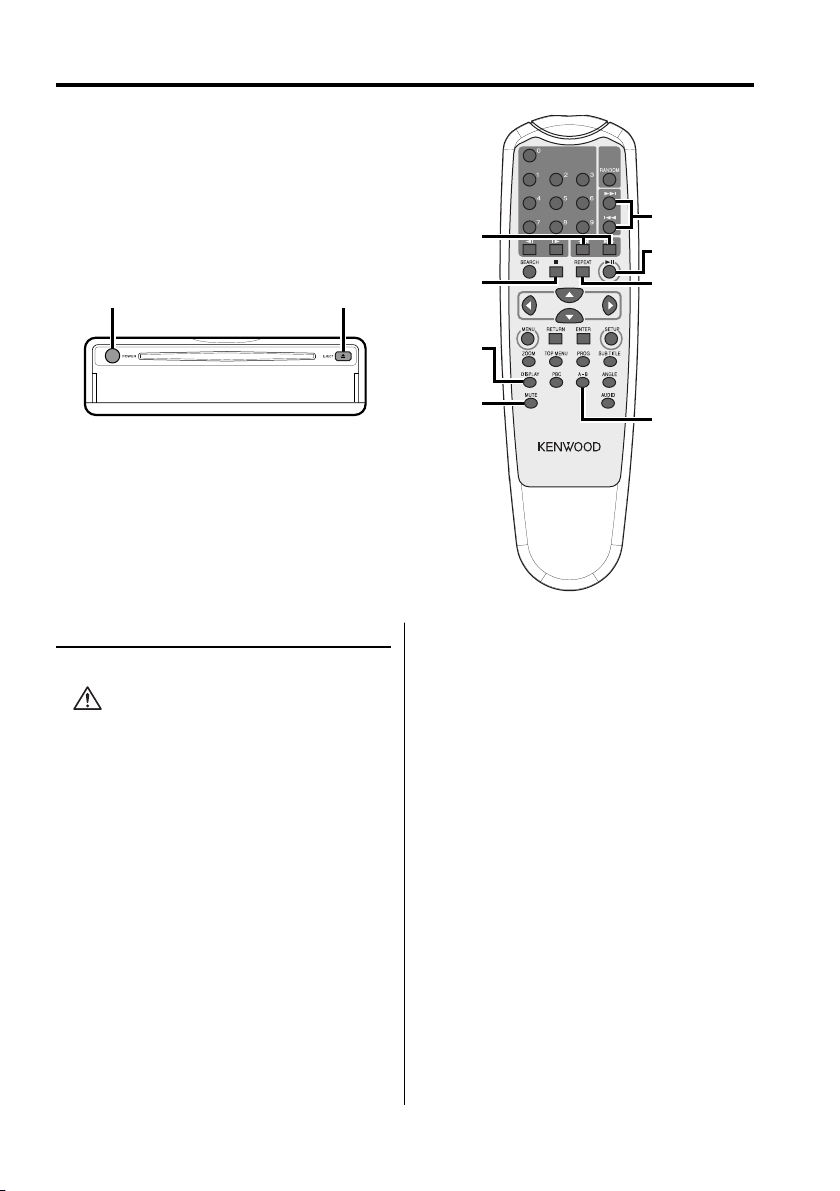
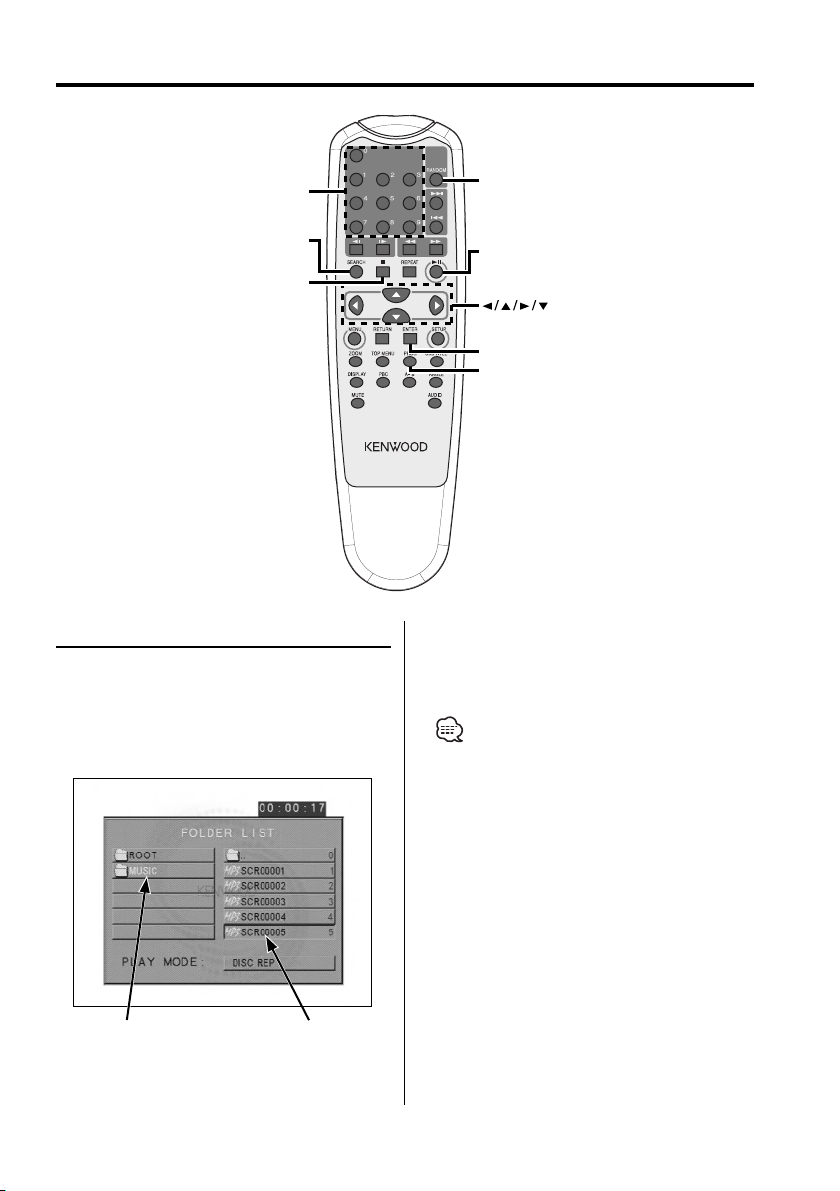
Basic features
POWER EJECT
1
/¡
DISPLAY
4/¢
38
7
REPEAT
Power
Press the [POWER] button.
• Unplug the cigarette lighter plug when you turn
off the ignition in order to prevent the battery from
running out.
MUTE
A–B
English
|
9
Page 10
Basic features
Play
Play
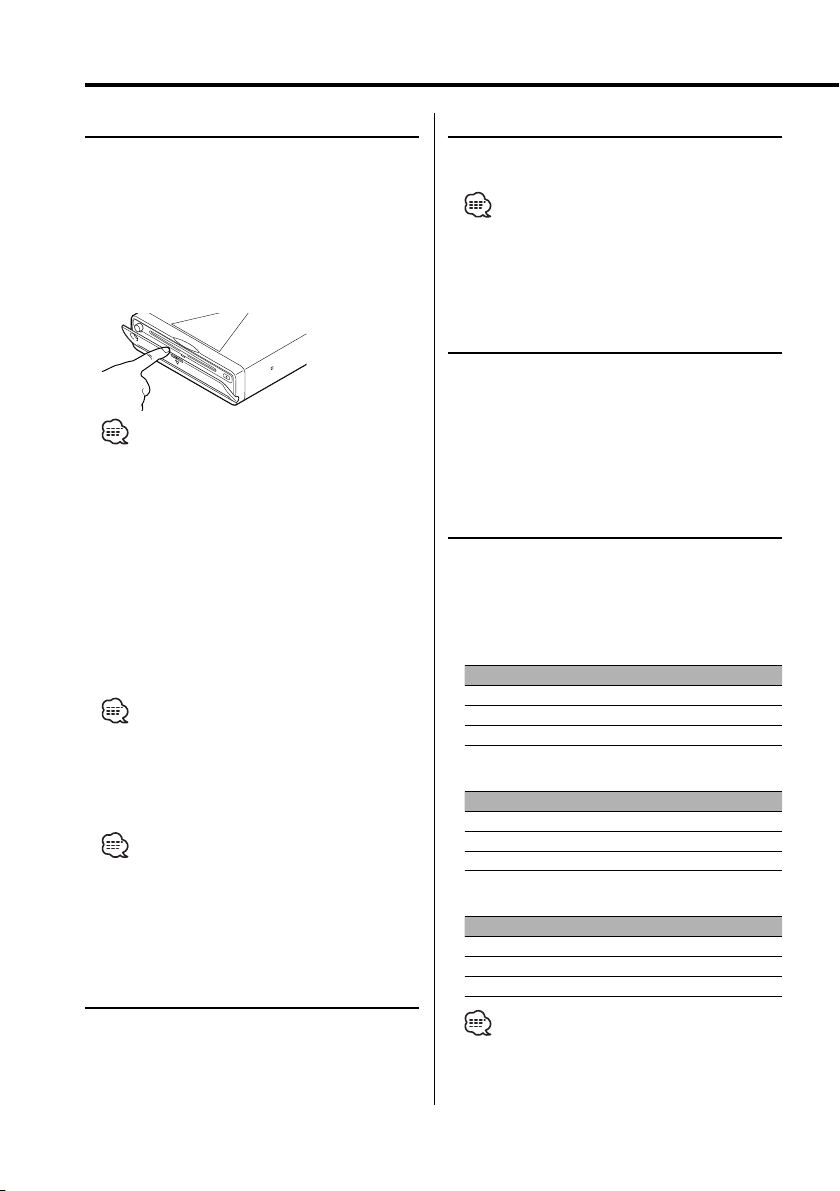
Open the cover and insert a disc into the unit.
If a disc has been inserted, press the [38]
button.
To play back MP3 when 'FOLDER LIST' is set to
"WITH MENU", refer to 'MP3 Folder List' (page 15)
to select the file you want to play back.
Starts playing the disc.
• If you insert a disc, it will start playing from the
beginning of the disc.
If you turn the power off while playing a disc, turning
the power back on will resume playing the disc where
it stopped.
Pause
Press the [38] button.
Each time the button is pressed, it pauses or
plays.
Stop
Press the [7] button.
To restart playback, press the [38] button.
• If you press the [7] button twice during DVD
playback, it starts from the beginning of the disc next
time you play it.
Eject
Press the [EJECT] button.
• If you want to restart playback with the disc ejected
from the unit, press the [EJECT] button again. The disc
is inserted into the unit, and playback is restarted.
Mute
Turning the volume down quickly.
Press the [MUTE] button.
Each time the button is pressed, the Mute turns
ON or OFF.
|
10
English
Skip
Skips a chapter, select, track or song.
Press the [4] or [¢] button.
• To skip on a VCD, turn the PBC function off by pressing
the [PBC] button.
Fast Forward and Reverse
Press the [1] or [¡] button.
The speed changes at 4 levels (X2, X4, X6, X8)
each time the button is pressed.
To restart playback, press the [38] button.
Repeat Play
Plays a song, a chapter, a title, etc. repeatedly.
Press the [REPEAT] button.
Each time the button is pressed, the Repeat Play
function switches as shown below.
In DVD source
Display Setting
"CHAPTER REPEAT ON" Plays the chapter repeatedly.
"TITLE REPEAT ON" Plays the title repeatedly.
"REPEAT OFF" Turns Repeat Play off.
In CD/VCD source
Display Setting
"REP-ONE" Plays the track repeatedly.
"REP-ALL" Plays the disc repeatedly.
"REPEAT OFF" Turns Repeat Play off.
In MP3 source
Display Setting
"REP-ONE" Plays the song repeatedly.
"FOLDER-REP"/ "REP-ALL" Plays the songs in the folder repeatedly.
"FOLDER"/ "REPEAT OFF" Turns Repeat Play off.
• To repeat play a VCD, turn the PBC function off by
pressing the [PBC] button.
Page 11

A-B Repeat Play [DVD][VCD][CD]
Specify the Start and End points to play the
portion between the specified points repeatedly.
1 Specify Point A (Start point)
Press the [A-B] button.
2 Specify Point B (End point)
Press the [A-B] button.
Plays from Point A to Point B repeatedly.
Canceling A-B Repeat
Press the [A-B] button.
Switching Display
Switches the information displayed on the
monitor screen.
Press the [DISPLAY] button.
Each time the button is pressed, the display
switches as shown below.
In DVD source
Display Information
"TITLE CHAPTER" Title / chapter elapsed time
"TITLE REMAIN" Title remaining time
"CHAPTER ELAPSED" Chapter elapsed time
"CHAPTER REMAIN" Chapter remaining time
"OFF" Not displayed
In VCD (with PBC on) /MP3 source
Display Information
"SINGLE ELAPSED" Song elapsed time
"SINGLE REMAIN" Song remaining time
"OFF" Not displayed
In VCD (with PBC off) /CD source
Display Information
"SINGLE ELAPSED" Track elapsed time
"SINGLE REMAIN" Track remaining time
"TOTAL ELAPSED" Disc elapsed time
"TOTAL REMAIN" Disc remaining time
"OFF" Not displayed
English
|
11
Page 12
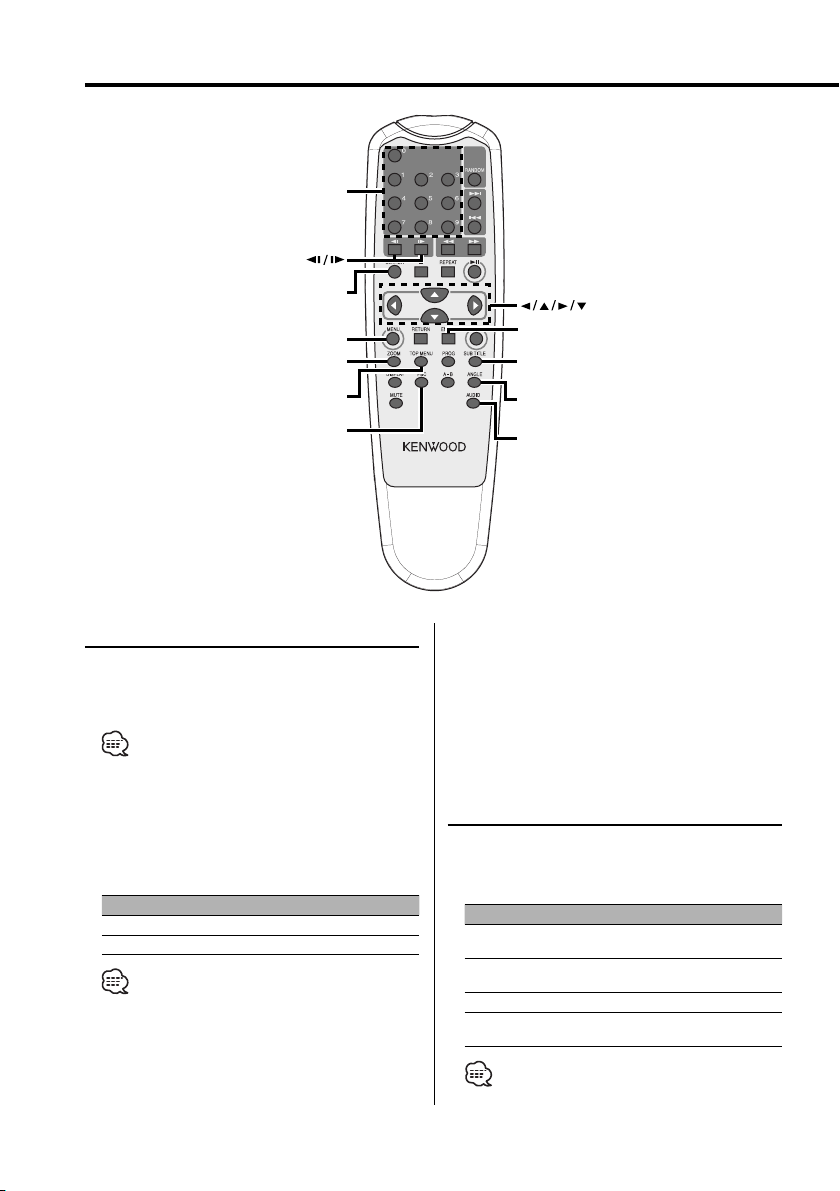
DVD Video/Video CD features
0–9
SEARCH
MENU
ZOOM
TOP MENU
PBC
Search Play
Directly calls the scene you want to play.
1 Enter the Search mode
Press the [SEARCH] button.
• To search play a VCD, turn the PBC function off by
pressing the [PBC] button.
2 For DVD, select the Search mode
Press the [SEARCH] button.
Each time the button is pressed, the item that
can be called switches as shown below.
Item
Chapter number
Play time
• If you press the [2] or [3] button during the
Chapter Number Search mode, you can search for a
title number.
3 Enter the scene you want to play
Press the [0] – [9] button.
|
12
English
ENTER
SUB TITLE
ANGLE
AUDIO
Starts playing the scene you entered during VCD
playback.
4 For DVD, start Search Play
Press the [ENTER] button.
Starts playing the scene you entered.
Slow Motion play
Press the [2 I] or [I 3] button.
Each time the button is pressed, it plays in slow
motion as shown below.
Disc Button Movement
2
I
DVD
DVD
VCD
VCD
• To return to the normal speed, press the [38] button.
The speed of slow reverse changes in order of
2X, 4X and 8X.
3
I
The speed of slow forward changes in order of
2X, 4X and 8X.
2 I
Reverses by one step.
3
I
The speed of slow forward changes in order of
1X, 2X and 3X.
Page 13

DVD menu/Top (title) menu [DVD]
Calls the DVD menu and the Top (title) menu to
set up various settings.
1 Display the DVD menu
Press the [MENU] button.
Display the Top (title) menu
Press the [TOP MENU] button.
2 Select the item
Press the [2]/[5]/[3]/[∞] or [0] – [9] button.
3 Finalize the item
Press the [38] button.
Refer to the disc manual for instructions on using
each menu.
4 Cancel the menu display
Press the [MENU] or [TOP MENU] button.
Audio Language select [DVD]
Press the [AUDIO] button.
Switches the languages recorded on the disc in
order.
• If no more than one language is recorded on the disc,
it does not switch.
Subtitle Language select [DVD]
Press the [SUB TITLE] button.
Switches the languages recorded on the disc in
order.
• If no more than one language is recorded on the disc,
it does not switch.
Picture Angle select [DVD]
Press the [ANGLE] button.
Switches the angles recorded on the disc in
order.
• If no more than one angle is recorded on the disc, it
does not switch.
Zoom [DVD]
Zooms the image.
1 Select the zoom ratio
Press the [ZOOM] button.
Each time the button is pressed, the zoom ratio
changes at 3 levels (X1.5, X2, X3).
2 Select the displaying position
Press the [2]/[5]/[3]/[∞] button.
PBC [VCD]
Uses the playback control (PBC) function.
1 Turn the PBC function on
Press the [PBC] button.
Each time the button is pressed, the PBC function
turns ON or OFF.
2 Select the item
Press the [0] – [9] button.
3 Finalize the item
Press the [38] button.
Refer to the disc manual for instructions on using
PBC.
• You can use the PBC function when playing a VCD of
Ver2.0 or higher.
English
|
13
Page 14
DVD Video/Video CD features
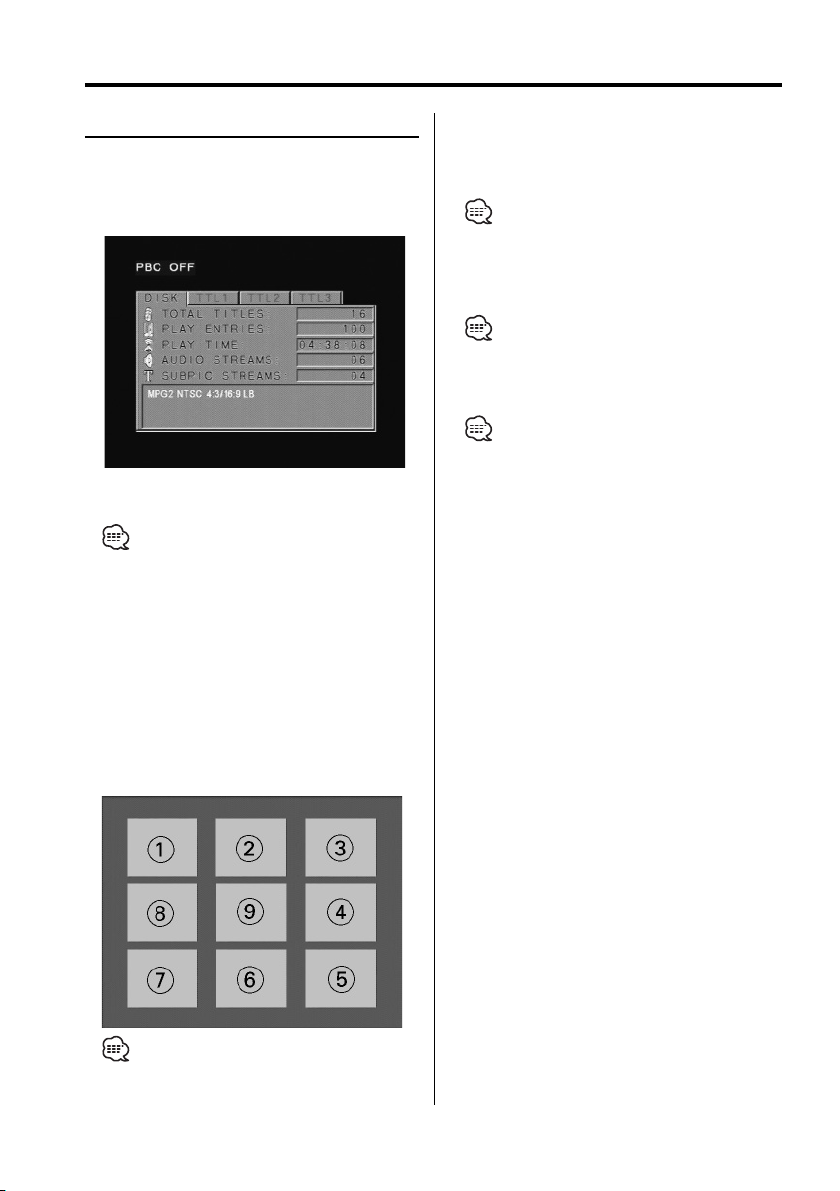
Digest Screen [DVD]
Displays the chapters of a title to call the scene
you want to see.
1 Enter Title Information
Press the [PBC] button.
2 Select Title
Press the [2] or [3] button.
• Press the [1] or [¡] button to change 10 titles at a
time.
• Press the [4] or [¢] button to switch to the first
or last title.
3 Play Title
Press the [ENTER] button.
Selecting Scene
4 Stop play
Press the [7] button.
5 Display Digest Screen
Press the [MENU] button.
6 Play the scene you want to see
Press the [1] – [9] button.
Press the [1] – [9] button corresponding to the
number displayed on the Digest screen.
• Press the [4] or [¢] button to go to the previous
or next page.
7 Play the scene you selected
Press the [ENTER] button.
• Press the [7] button to return to the previous screen.
Canceling Digest Screen
Press the [PBC] button.
• Some titles or chapters may not be displayed. In this
case, the previous screen will be displayed.
• Press the [7] button to return to the previous screen.
|
14
English
Page 15
CD/MP3 features
0–9
SEARCH
7
MP3 Folder List [MP3]
Select the foler or file you want to play back.
1 Stop playback
Press the [7] button.
2 Move the cursor to the Folder List
Press the [2]/[3] button.
RANDOM
38
ENTER
PROG
4 Finalize your selection
Press the [ENTER] button.
5 Select the file
Press the [5]/[∞] button.
• Press the [4] or [¢] button to scroll the list up or
down.
6 Play back the selected file
Press the [ENTER] button.
Folder List
3 Select the folder
Press the [5]/[∞] button.
File List
English
|
15
Page 16

CD/MP3 features
Program Play
Plays the selected songs only in order.
1 Stop playback
Press the [7] button.
2 Enter the Program mode
Press the [PROG] button.
Switches "PLAY MODE" displayed at the bottom
of the screen to "PROGRAM PO" during MP3
playback.
3 Select the song you want to play
Press the [2]/[5]/[3]/[∞] (during MP3
playback only) or [0] – [9] button.
Specifies the file containing the song you want
to play.
4 Finalize the song you want to play
Press the [ENTER] button.
The song selected in Step 3 is registered as
Program number 1.
5 Repeat Steps 3 and 4 to register all the songs
you want to program play.
For MP3, if you have finished programming, press
the [7] button to exit the Program mode.
6 Start Program Play
Press the [38] button.
Plays the registered songs in order.
Canceling Program Play for CD
Press the [7], [PROG] and [ENTER] buttons in
order.
Canceling Program Play for MP3
Press the [7] and [PROG] buttons in order.
Direct Skip Play
Directly calls the song you want to play.
1 Enter the Track, File, or Folder number you
want to play
Press the [0] – [9] button.
2 Play
Press the [ENTER] button.
• If you do not perform the operation of Step 2 for
about 5 seconds, the song entered in Step 1 is
automatically searched for.
Play Time Search [CD]
Enter the play time to start from where you want.
1 Enter the Play Time Search mode
Press the [SEARCH] button.
2 Enter the play time where you want to start
Press the [0] – [9] button.
For example
5:07 ➪ [0], [5], [0], [7]
Starts playing from the time you entered.
16
|
English
Page 17
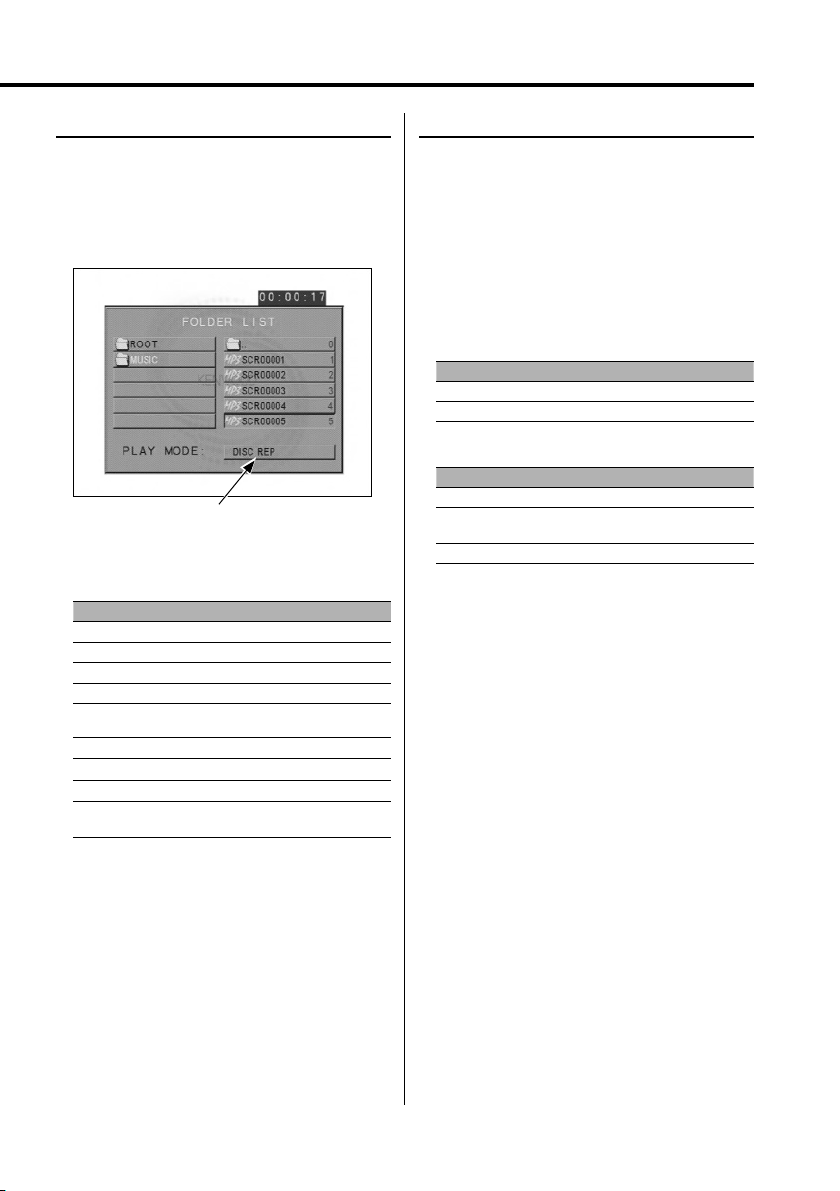
MP3 Play Mode [MP3]
Select the play method.
1 Stop playback
Press the [7] button.
2 Highlight the Play mode button
Press the [2]/[3] button.
Play mode button
3 Select the play method
Press the [5]/[∞] button.
You can select the play method as shown below.
Display Setting
"SINGLE" Stops after playing one song.
"REP-ONE" Plays one song repeatedly.
"FOLDER" Stops after playing the songs in the folder.
"FOLDER REP" Plays the songs in the folder repeatedly.
"DISC SCAN" Plays approximately the first 10 seconds of each
song on the disc.
"DISC" Stops after playing the songs on the disc.
"DISC REP" Plays the songs on the disc repeatedly.
"RANDOM" Plays the songs in the folder in random order.
"SHUFFLE ON" Stops after playing the songs in the folder in
random order.
Random Play
Songs are chosen from those recorded on the
disc opened at random and are played.
1 Stop playback
Press the [7] button.
2 Select the Random Play mode
Press the [RANDOM] button.
Each time the button is pressed, the Random
Play mode switches as shown below.
In CD source
Display Setting
"RANDOM ON" Plays the songs on the CD in random order.
"RANDOM OFF" Turns Random Play off.
In MP3 source
Display Setting
"RANDOM" Plays the songs in the folder in random order.
"SHUFFLE ON" Stops after playing the songs in the folder in
random order.
"FOLDER" Turns Random Play off.
3 For MP3, select the folder
Press the [2]/[5]/[3]/[∞] button.
Place the cursor to any file in the folder you want
to random play.
4 Start Random Play
Press the [38] button.
4 Select the song(s)
Press the [2]/[5]/[3]/[∞] button.
Select the file or folder you want to play.
5 Play
Press the [ENTER] button.
Plays the song(s) in the selected play method.
English
|
17
Page 18
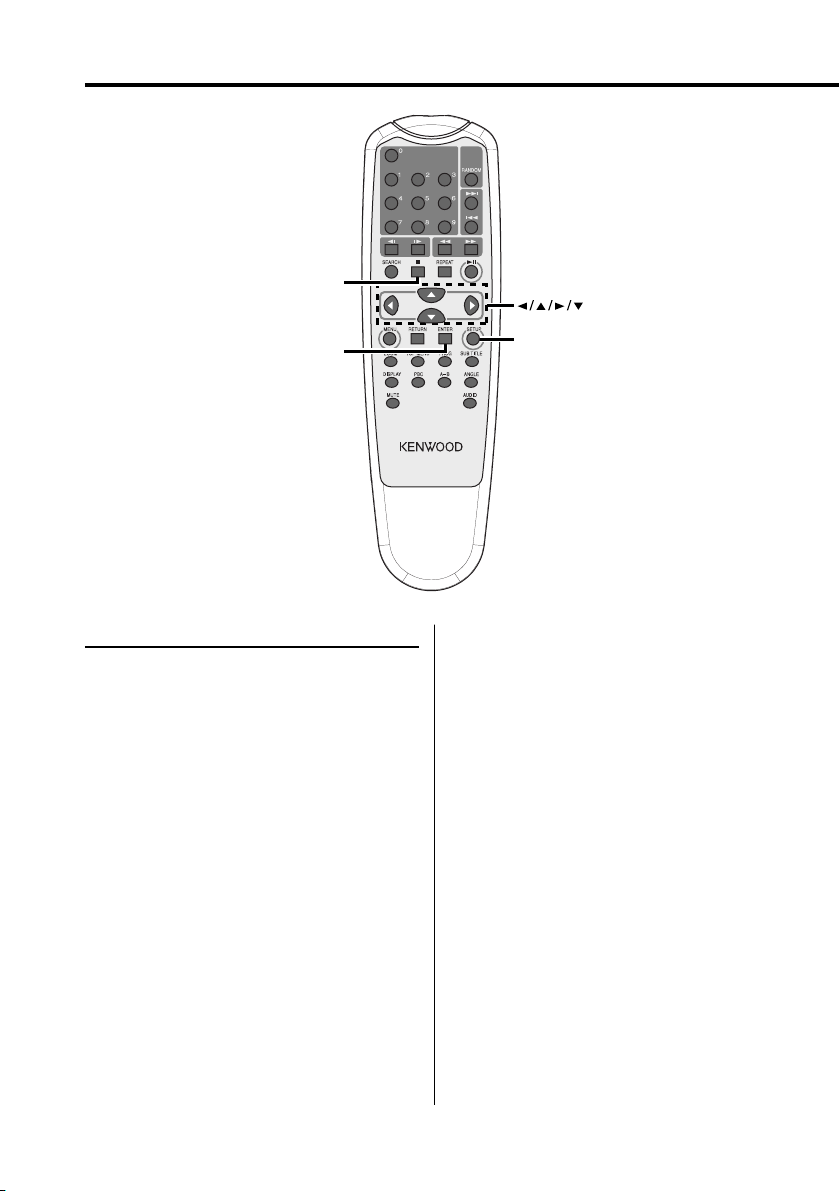
Setup menu
7
ENTER
Setup menu
You can customize default settings for various
functions of the unit using the Setup menu.
1 Stop playback
Press the [7] button.
During DVD playback, press the button twice.
During VCD playback, turn the PBC function off
by pressing the [PBC] button first.
2 Display the SETUP MENU screen
Press the [SETUP] button.
SETUP MENU is displayed on the monitor screen
connected.
3 Select the menu page you want to set up
Press the [2]/[5]/[3]/[∞] button.
4 Enter the selected menu page
Press the [ENTER] button.
The menu page selected in Step 3 is displayed.
5 Select the setup item and the option
Press the [2]/[5]/[3]/[∞] button.
Refer to the subsequent descriptions for the
setup items and options on each menu.
|
18
English
SETUP
6 Finalize your selection
Press the [ENTER] button.
7 Exit the Setup menu
Press the [2]/[5]/[3]/[∞] and [ENTER]
buttons.
Select and execute "MAIN PAGE" and "EXIT
SETUP" in order.
Page 19

General Setup
TV DISPLAY
Use the procedure described below to set the
output screen.
Display Setting
"NORMAL/PS" Wide-screen software with pan & scan
specification is played in a panned & scanned
screen (with the left and right sides cut off).
"NORMAL/LB" Wide-screen software with pan & scan
specification is played in a letter box screen (with
black stripes on the top and bottom).
"WIDE" Set the picture mode of the wide-screen monitor
to "FULL".
PIC (Picture) MODE
Select a DVD image mode.
Display Setting
"AUTO" The image is switched automatically depending
on the original image.
"HI-RES" The original image recorded on the DVD is the
Video mode.
"N-FLICKER" The original image recorded on the DVD is the
Movie Picture mode.
ANGLE MARK
When multiple image angles are recorded on
a DVD, they are shown by the mark during
playback.
SCR (Screen) SAVER
To prevent the screen burn-out, you can start the
screen saver automatically when the on-screen
image does not change for a certain time period.
Display Setting
"ON" Star ts the screen saver automatically.
"OFF" Does not use the screen saver.
Speaker Setup
DOWNMIX
Set the mixed sound output to the 2-channel
stereo port.
Display Setting
"LT/RT" Outputs the sound mixed to the Dolby Surround audio.
"STEREO" Outputs the sound mixed to the stereo sound.
Display Setting
"ON" Displays the Angle mark.
"OFF" Does not display the Angle mark.
OSD LANG (On Screen Display Language)
Use it in "ENGLISH" as it is.
CAPTIONS
When a disc having the Closed Captions
information is played back, this information can
be output.
Display Setting
"ON" Outputs the Closed Captions signal.
"OFF" Does not output the Closed Captions signal.
English
|
19
Page 20
Setup menu
Audio setup
AUDIO OUT
Display Setting
"ANALOG" Outputs an analog sound. (No digital signal is
"SPDIF/RAW" Outputs a 5.1ch S/PDIF Bitstream digital sound. (No
"SPDIF/PCM" O utputs a 2ch S/PDIF PCM digital sound. (No
OP MODE
Display Setting
"LINE MODE" Outputs a Normal LINE sound.
"RF MODE" Narrows down the dynamic range of an audio
DUAL MODE
Set the output sound of a Karaoke DVD (for a
sing-along machine).
Display Setting
"STEREO" Stereo (L / R)
"L-MONO" Monaural Left (L / L)
"R-MONO" Monaural Right (R / R)
"MIX-MONO" Mixed Left and Right (L+R / L+R)
DYNAMIC
Sets the dynamic range of playback sound
recorded on a Dolby Digital system DVD.
Display Setting
"FULL"
"7/8"
"6/8" / "3/4"
"5/8"
"4/8" / "1/2"
"3/8"
"2/8" / "1/4"
"1/8"
"OFF" For the regular sound
LPCM OUTPUT
Display Setting
"LPCM 48k" Outputs a song of 96kfs in 48kfs from DIGITAL OUT.
"LPCM 96k" Outputs a song of 96kfs in 96kfs from DIGITAL OUT.
output.)
analog signal is output.)
analog signal is output.)
signal to output via the RF modulator.
For more powerful sound at regular volumes
Large
±
Compression rate
≠
Small
Preferences
TV TYPE
A TV type can be set according to the TV color
display mode.
Display Setting
"MULTI" The color signal output is switched automatically
according to the recording system of the current disc.
"NTSC" The color signals are output in the standard NTSC system.
"PAL" The color signals are output in the standard PAL system.
AUDIO
Set the audio language produced from the
speakers.
Display Setting
"ENGLISH" English
"FRENCH" French
"SPANISH" Spanish
"CHINESE" Chinese
"JAPANESE" Japanese
SUB TITLE
Set the language of the subtitles displayed on the
screen.
Display Setting
"ENGLISH" English
"FRENCH" French
"SPANISH" Spanish
"CHINESE" Chinese
"JAPANESE" Japanese
"OFF" No subtitle is displayed
DISC MENU
Set the language of the disc menu.
Display Setting
"ENGLISH" English
"FRENCH" French
"SPANISH" Spanish
"CHINESE" Chinese
"JAPANESE"
Japanese
20
|
English
Page 21
PARENTAL
Set the parental level. The higher the level is, the
higher protection you get.
Display Setting
"1 G" G-rated movies (for children) can only be played.
"2"
"3 PG"
"4 PG 13"
"5"
"6 PG-R"
"7 NC-17"
"8 ADULT"
"NO_PARENTAL" Cancels the parental protection.
1 Press the [ENTER] button on the remote.
2 Set up the parental level.
3 Enter the password.
4 Press the [ENTER] button on the remote.
• The password is set to "0000" by default.
• The parental setting is enabled for "R" sign discs only.
PASSWORD
CHANGE: Change the password.
1 Select "CHANGE" and press the [ENTER] button
on the remote.
2 Enter the current password.
3 Enter the new password twice.
4 Press the [ENTER] button on the remote.
• The password is set to "0000" by default.
DEFAULTS
RESET: Resets the customized items on the Setup
menu other than the password.
FOLDER LIST
Set to display the directory on the monitor screen
when MP3 is played back.
Display Setting
"NO MENU" The directory is not displayed.
"WITH MENU" The directory is displayed.
English
|
21
Page 22
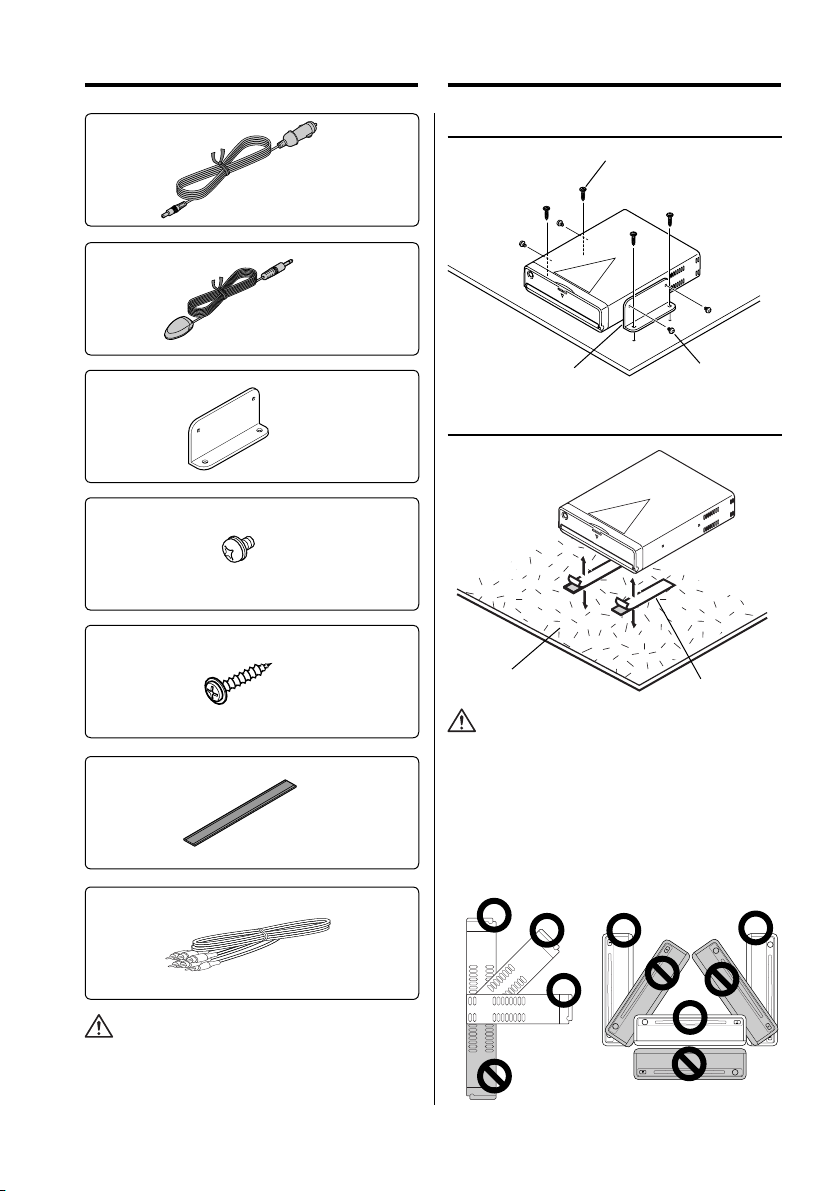
Accessories Installation
1
2
3
4
5
..........1
..........1
..........2
..........4
Installation using the Brackets
Tapping Screw 5
Bracket 3
Semusu Screw 4
Installation using the velcro tapes
Carpet
Velcro tape 6
..........4
6
..........2
7
..........1
• If the fuse blows, first make sure that the wires have not
caused a short circuit, then replace the old fuse with one
with the same rating.
|
22
English
• Do not use your own screws. Use only the screws
provided. If you use the wrong screws, you could
damage the unit.
• Do not install the unit to an unatable place and a place
where it vibrates.
• You can mount the unit at any angle between the
regular horizontal position and the vertical position on
its back (0° through 90°). You cannot mount the unit with
the disc slot facing downwards, angled or upside down.
Page 23
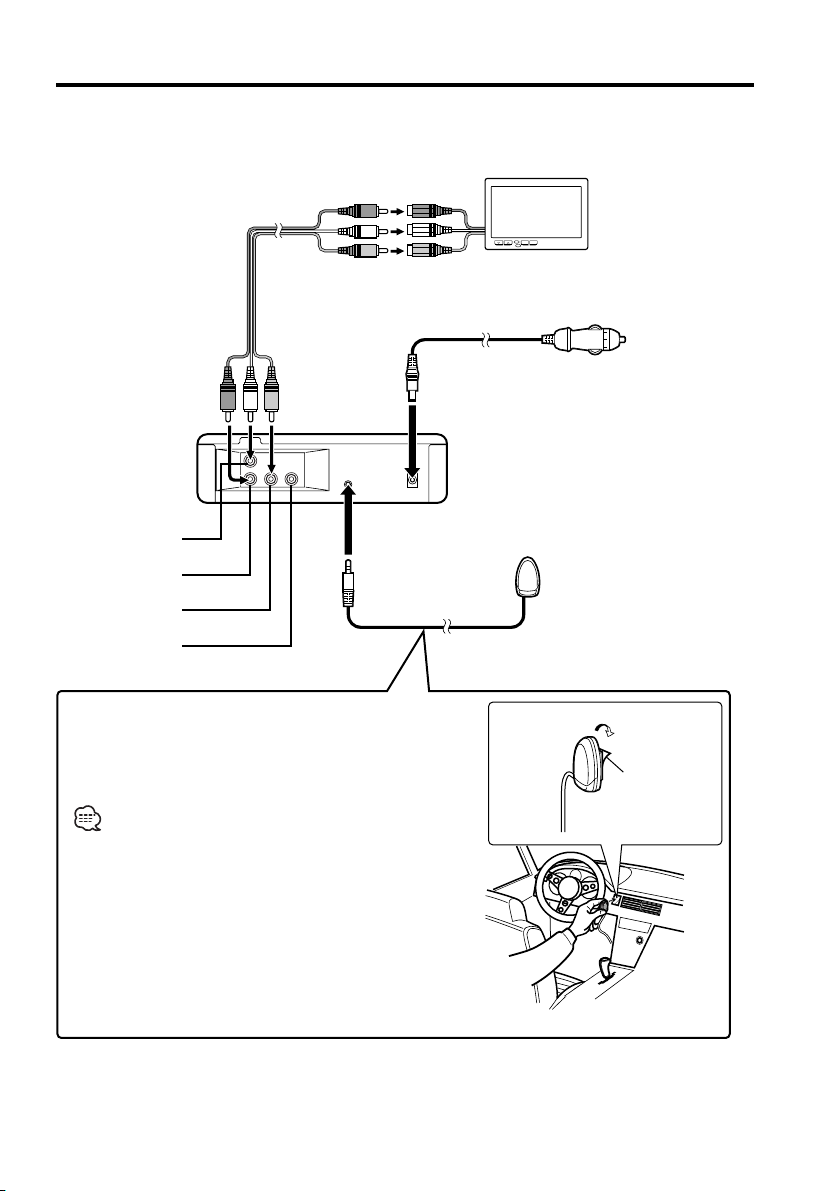
Connecting Wires to Terminals
RCA AV Cable 7
Audio left output
Audio right output
Video output
Digital output
Remote Control Sensor 2
TV, Monitor, etc.
(optional accessory)
Power Cable 1
DVD Player back view
Cigarette Lighter Plug
Fuse (3A) built in
To Cigarette
Lighter Socket
Attaching Remote Control Sensor
1 Remove the backing paper from the Velcro tape on the
back of the Remote Control Sensor.
2 After wiping off the dirt or oil from the attachment location,
attach the Remote Control Sensor.
• Wipe off the dirt or oil from the surface to which the Sensor is
attached.
• Avoid locations under direct sunlight or near the TV monitor where
signals from the remote controller are not received easily.
Backing paper
English
|
23
Page 24

Troubleshooting Guide
What might seem to be a malfunction in your unit
may just be the result of slight misoperation or
miswiring. Before calling service, first check the
following table for possible problems.
? No sound can be heard, or the volume is low.
✔ Mute is turned on.
☞ Turn off Mute.
? The sound/picture skips on a DVD/VCD/CD.
✔ The disc is scratched or dirty.
☞ Clean the disc, referring to the section on
"Disc cleaning" (see page 8).
? A VCD cannot be played using menus.
✔ The VCD disc being played is not compatible with
P.B.C.
☞ Menu playback is available only with VCD discs
recorded with P.B.C.
? The subtitle is not displayed.
✔ The DVD disc being played does not contain the
recording of subtitles.
☞ The subtitle cannot be displayed when the
DVD disc being played does not contain the
recording of subtitles.
? The voice (or subtitle) language cannot be
changed.
✔ The DVD disc being played does not contain the
recording of more than one audio (or subtitle)
language.
☞ The voice (or subtitle) language cannot be
changed when the DVD disc being played
does not contain the recording of more than
one voice (or subtitle) language.
? The specified disc does not play, but another one
plays instead.
✔ The specified disc is quite dirty.
☞ Clean the disc.
✔ The disc is upside-down.
☞ Load the disc with the labeled side up.
✔ The disc is severely scratched.
☞ Try another disc instead.
? Cannot perform operations for MP3 Folder List,
MP3 Play Mode, Program Play or Random Play
during MP3 playback.
✔ 'FOLDER LIST' is set to "NO MENU" on the Setup
menu.
☞ Set 'FOLDER LIST' to "WITH MENU" (see
page21).
The messages shown below display your
systems condition.
"THERMAL PROTECTION PLEASE SHUT OFF POWER"
: The protective circuit in the unit activates when the
temperature inside the DVD player exceeds 60°C (140°F),
stopping all operation.
➪ Cool down the unit by opening the windows or
turning on the air conditioner. As the temperature
falls below 60°C (140°F), the disc will start playing
again.
To eject the disc in this situation, turn the power off
and then turn it back on.
"NO DISC"
: No disc is inserted in the unit.
"WRONG REGION"
: A DVD with the wrong region code was inserted into
the unit.
"DISC ERROR"
: A disc that cannot be played in the unit was inserted.
"INVALID ENTRY"
: The disc inserted contains damaged or non-standard
data.
"PASSWORD INCORRECT"
: The password entered does not match the one
registered.
"NEW PASSWORD NOT CONFIRMED"
: Appears if the second new password entered does not
match the first one when changing the password.
➪ When you enter the new password, you are required
to enter the same password twice for confirmation
purposes.
24
|
English
Page 25

Specifications
Specifications subject to change without notice.
DVD section
D/A Converter
: 8Level∆Σ, 24bit
Wow & Flutter
: Below Measurable Limit
Frequency response
: 17- 44 kHz (DVD96kHz Sampling)
Total harmonic distortion 1kHz
: 0.02 %
Signal to noise ratio
: 106 dB
Dynamic range
: 90 dB
MP3 Decode
: Compliant with MPEG-1/2 Audio Layer-3
DISC Format
: DVD-VIDEO/ VIDEO-CD/ CD-DA/ MP3
Output
Composite Video Output Level (V)
: 1V p-p (75Ω)
Audio 2ch Output Level (V)
:1.2 V/ 10 kΩ (DVD/CD)
Coaxial Digital Audio Interface Output Level (V )
: 0.5 V/ 75 Ω
General
Operating voltage
: 14.4 V (11 – 16 V)
Current consumption
: 2 A
Dimensions WxHxD
: 194 mm x 54 mm x 245 mm
Weight
: 1.85 kg
English
|
25
Page 26

Table des matiéres
Précautions de sécurité 27
Avant l’utilisation 28
Remarques sur la lecture de MP3 30
Concernant la télécommande 31
Au sujet des disques 32
Fonctions élémentaires 33
Alimentation
Lecture
Sourdine
Saut
Avance et retour rapide
Répétition de lecture
Répétition A-B [DVD][VCD][CD]
Mode de commutation de l'affichage
Fonctions DVD vidéo/CD vidéo 36
Lecture par recherche
Lecture au ralenti
Menu DVD/menu supérieur (titre) [DVD]
Sélection de la langue audio [DVD]
Sélection de la langue de sous-titrage [DVD]
Sélection de l'angle d'image [DVD]
Zoom [DVD]
PBC [VCD]
Écran de sommaire [DVD]
Fonctions CD/MP3 39
Liste de dossier MP3 [MP3]
Lecture programmée
Lecture par saut direct
Recherche de temps de lecture [CD]
Mode de lecture MP3 [MP3]
Lecture aléatoire
Menu de configuration 42
Menu de configuration
Configuration générale
Configuration des enceintes
Réglage audio
Préférences
|
26
Français
Accessories 46
Installation 46
Connexion des fils aux bornes 47
Guide de depannage 48
Spécifications 49
[DVD]: Fonction disponible uniquement pendant la
lecture de DVD.
[VCD]: Fonction disponible uniquement pendant la
lecture de CD Vidéo.
[CD]: Fonction disponible uniquement pendant la
lecture de CD.
[MP3]: Fonction disponible uniquement pendant la
lecture de MP3.
Page 27
Précautions de sécurité
2AVERTISSEMENT
Pour éviter toute blessure et/ou incendie,
veuillez prendre les précautions
suivantes:
• Insérez l’appareil à fond jusqu’à ce qu’il soit
complètement calé. Sinon, il risquerait d’être
projeté en cas de collisions ou de cahots.
• Pour éviter les court-circuits, ne jamais mettre ou
laisser d’objets métalliques (comme une pièce
de monnaie ou un outil en métal) à l’intérieur de
l’appareil.
• Si l’appareil commence à émettre de la fumée
ou une odeur bizarre, mettez immédiatement
l’appareil hors tension et consultez un revendeur
Kenwood.
• Ne pas connecter l'unité au moniteur avant. Cette
unité est destinée au divertissement pour les
sièges arrière.
• Ne pas utiliser un autre câble d’alimentation
que celui de l’accessoire. Ceci pourrait causer un
incendie.
2ATTENTION
Pour éviter tout dommage à l’appareil,
veuillez prendre les précautions
suivantes:
• Assurez-vous de mettre l’appareil à la masse sur
une alimentation négative de 12V CC.
• N’ouvrez pas le couvercle supérieur ou inférieur de
l’appareil.
• N’installez pas l’appareil dans un endroit exposé
directement à la lumière du soleil, à une chaleur
excessive ou à l’humidité. Evitez aussi les endroits
trop poussiéreux et où l’appareil risque d’être
éclaboussé.
• Pendant l’installation, n’utilisez aucunes autres vis
que celles fournies. L’utilisation de vis incorrectes
pourrait endommager l’appareil.
• Lors du remplacement d’un fusible, utilisez
seulement un fusible neuf avec la valeur indiquée.
L’utilisation d’un fusible d’une valeur différente
peut être la cause d’un mauvais fonctionnement
de votre appareil.
REMARQUE
• Si vous rencontrez des problèmes pendant
l’installation, consultez votre revendeur Kenwood.
• Les illustrations de l’affichage et du panneau
apparaissant dans ce manuel sont des exemples
utilisés pour expliquer avec plus de clarté
comment les commandes sont utilisées. Il est
donc possible que les illustrations d’affichage
puissent être différentes de ce qui réellement
affiché sur l’appareil et aussi que certaines
illustrations représentent des choses impossibles à
réaliser en cours de fonctionnement.
• Si l’unité ne fonctionne pas correctement,
éteignez puis rallumez-la. Si l’unité ne fonctionne
toujours pas correctement après l’avoir éteinte
puis rallumée, contactez votre revendeur
Kenwood local pour obtenir de l’aide.
Restrictions dues aux différences entre
les disques
Inhibition
de ne pas fonctionner comme vous le souhaitez.
Veuillez consulter les instructions fournies avec
chaque disque. Lorsqu'une icône d'interdiction
s'affiche sur le moniteur, cela signifie que le disque
est lu avec les restrictions décrites ci-dessus.
Certains disques DVD et VCD ne
peuvent être lus que dans certains
icon
modes de lecture suivant les intentions
de leurs concepteurs. Puisque ce
lecteur lit les disques suivant ces
intentions, certaines fonctions risquent
Condensation sur la lentille
Juste après avoir mis le chauffage de la voiture
par temps froid, de l’humidité risque de se former
sur la lentille à l’intérieur du lecteur CD (voile). La
reproduction de CD peut être impossible. Dans
ce cas, retirez le disque et attendez que l’humidité
s’évapore. Si l’appareil ne fonctionne toujours pas
normalement après quelques temps, consultez
votre revendeur Kenwood.
Nettoyage de l’appareil
Si le panneau avant de cet appareil est taché,
essuyez-le avec un chiffon sec et doux comme
ceux au silicone. Si le panneau avant est très taché,
essuyez-le avec un chiffon imbibé d’un produit de
nettoyage neutre et ensuite essuyez toute trace de
ce produit.
• La pulvérisation directe de produit de nettoyage sur
l’appareil risque d’affecter les pièces mécaniques.
L’utilisation d’un chiffon rugueux ou d’un liquide volatile
tel que solvant ou alcool pour essuyer le panneau avant
peut rayer la surface ou effacer des caractères.
|
Français
27
Page 28
Avant l’utilisation
Codes de région dans le monde
1
4
Icônes sur les disques DVD
Icône Description
Indique le code de région où le disque peut être joué.
8
32
Nombre de langues de bande son enregistrées avec la fonction audio. Le nombre
dans l’icône indique le nombre de langues de la bande son. (Maximum : 8 langues)
Nombre de langues de sous-titre enregistrées avec la fonction sous-titre. Le nombre
dans l’icône indique le nombre de langues de sous-titre. (Maximum : 32 langues)
5
2
1
2
6
3
5
2
1
4
Nombre d’angles disponibles par la fonction angle de prise de vue. Le nombre dans
9
16:9 LB
l’icône indique le nombre d’angles de prise de vue. (Maximum : 9 angles)
Rapport d’aspect disponibles. “LB” signifie Ecran type Boîte à lettres et “PS” Ecran
compressé. Dans l’exemple à gauche, la vidéo 16:9 peut être convertie en image
vidéo de type boîte lettres.
Disques lisibles
• DVD-Vidéo
• Disque audio (CD)
• Disque au format MP3 (CD)
• Disque au format CD-R/RW
• Disque CD Vidéo
De même, il n'est pas possible de lire les disques DVD-R s'ils n'ont pas été enregistrés en format DVDVidéo.
Concernant les températures d'utilisation
Le circuit de protection l’intérieur de l’unit entre en activit lorsque la température l’intérieur de l’unit
dépasse 60°C (140°F). Se reporter au guide de résolution des problèmes (p 48).
|
28
Français
Page 29
Etiquetage des produits utilisant un laser
(Sauf pour certaines régions)
CLASS 1
LASER PRODUCT
L’étiquette est collée au chassis/boîtier de
l’appareil et indiquant que l’appareil utilise
des rayons laser de classe 1. Cela signifie que
l’appareil utilise des rayons laser d’une classe
faible. Il n’y a pas de danger de radiation
accidentelle hors de l’appareil.
Ce produit n’est pas install par le constructeur
d’un véhicule sur le site de production, ni par
l’importateur professionnel d’un véhicule dans
un Etat membre de l’UE.
Ce produit comprend une technologie de
protection de copyright qui est protégée
par des brevets aux Etats-Unis et par d’autres
droits de propriét intellectuelle. L’utilisation de
cette technologie de protection de copyright
requiert l’autorisation de Macrovision, et est
strictement limitée un usage domestique et
d’autres utilisations restreintes sauf autorisation
spéciale de Macrovision. L’ingénierie inverse ou
le démontage sont interdits.
is a trademark of DVD Format/Logo
Licensing Corporation registered in the U.S.,
Japan and other countries.
Fabriqu sous licence de Dolby Laboratories.
"Dolby" et le symbole double D sont des
marques de commerce de Dolby Laboratories.
|
Français
29
Page 30
Remarques sur la lecture de MP3
Le KDC-S220P peut lire les MP3 (MPEG1, 2 Audio
Layer 3). Notez, cependant, que les MP3 et les
formats acceptables sont limités. Pour la gravure de
MP3, soyez attentifs aux restrictions suivantes.
Supports acceptables
Les supports d’enregistrement MP3 acceptables
dans cet appareil sont les CD-ROM, CD-R et CDRW. Lorsque vous utilisez le CD réinscriptible et
afin d’éviter tout dysfonctionnement, procéder
au formatage complet et non au seul formatage
rapide.
Formats de support acceptables
Les formats de supports suivants peuvent être
utilisés dans cet appareil. Le nombre maximum
de caractères utilisés pour le nom de fichier et
de dossier, y compris le délimiteur (".") et les
trois caractères de l'extension, est indiqué entre
parenthèses.
• ISO 9660 Level 1 (12 caractères; Jusqu'à 11
caractères sont affichés.)
• ISO 9660 Level 2 (31 caractères; Jusqu'à 11
caractères sont affichés.)
• Joliet (64 caractères ; Jusqu'à 11 caractères sont
affichés.)
• Romeo (128 caractères; Jusqu'à 11 caractères
sont affichés.)
• Nom de fichier long (200 caractères; Jusqu'à 11
caractères sont affichés.)
• Nombre maximum de caractères pour les noms
de dossier:
128 (Joliet; Jusqu'à 11 caractères sont affichés.)
Une liste des caractères est incluse dans le mode
d’emploi du logiciel d’écriture ainsi que dans la
section Entrée de noms de fichiers et de dossiers
ci-dessous. Les supports utilisables dans cette unité
sont restreints aux limitations suivantes:
• Nombre maximum de niveaux de dossiers: 8
• Nombre maximum de fichiers par dossier: 185
• Nombre maximum de dossiers: 127
Les MP3 écrits dans d’autres formats que ceux
indiqués ci-dessus risquent de ne pas être
correctement lus et leurs noms de fichiers risquent
de ne pas être correctement affichés.
Réglages de votre décodeur MP3 et
graveur de CD
Effectuer le réglage suivant lors de la compression
de données MP3 à l’aide d’un codeur MP3.
• Débit de Transfer: MP3: 56 —320 kbps
• Fréquence d’échantillonage:
:11.025, 12, 16, 22.05, 24, 32, 44.1, 48 kHz
Lorsque vous utilisez votre graveur de CD pour
enregistrer des fichiers MP3 jusqu’au maximum
de la capacité du disque, désactivez l’écriture
supplémentaire. Pour l’enregistrement sur un disque
vierge jusqu’au maximum de la capacité, vérifiez la
fonction “Disc at Once”.
Affichage de repère ID3
Le repère ID3 ne peut être affiché.
Entrer les noms des fichiers et des
dossiers
Les caractères de la liste des codes sont les seuls
noms de fichier et de dossier pouvant être saisis
et affichés. Si vous utilisez d’autres caractères pour
ces entrées, les noms de fichier et de dossier ne
s’afficheront pas correctement. Ils peuvent ne pas
être affichés correctement en fonction du graveur
de CD utilisé.
L’appareil reconnaît et lit uniquement les fichiers
MP3 qui ont l’extension de nom de fichier MP3
(.MP3).
• Un fichier portant un nom saisi à l’aide de caractères ne
figurant pas sur la liste des codes peut ne pas être lu
correctement.
0123456789ABCDEF
00@P‘p
1!1AQaq
22BRbr
3#3CScs
4$4DTdt
5%5EUeu
6&6FVfv
7’7GWgw
8(8HXhx
9)9IYiy
AJZjz
B+;K[k{
C,Ll
D -=M]m}
E . N^n~
FO_o
30
|
Français
Page 31

Concernant la télécommande
Graver des fichiers sur un support
Lorsqu’un support contenant des données MP3
est chargé, l’appareil vérifie tous les fichiers sur
le support. Si le support contient beaucoup de
dossiers ou de fichiers qui ne sont pas de type
MP3, l’appareil met beaucoup de temps avant de
commencer la lecture des fichiers MP3.
De plus, il est possible que le passage au fichier
MP3 suivant prenne du temps ou que la recherche
de fichier ou de dossier ne s’effectue sans heurt.
Le fait de charger un support qui produit du bruit risque
d’endommager les enceintes.
• N’essayez pas de lire un support contenant un fichier qui
n’est pas de type MP3 portant l’extension MP3. L’appareil
risque de considérer des fichiers qui ne sont pas de type
MP3 comme des fichiers MP3 si ils ont l’extension MP3.
• N’essayez pas de lire un support contenant des fichiers
qui ne sont pas de type MP3.
Ordre de lecture d’un fichier MP3
Lorsqu'ils sont sélectionnés pour la lecture, la
recherche de fichier ou la sélection de fichier, les
fichiers et dossiers sont atteints dans l'ordre dans
lequel ils ont été enregistrés par le graveur de CD.
Pour cette raison, l’ordre dans lequel ils devraient
être lus ne correspond pas à l’ordre dans lequel ils
seront effectivement lus. Vous pouvez régler l’ordre
dans lequel les fichiers MP3 doivent être lus en les
gravant sur un support, par exemple un CD-R avec
leurs noms de fichier commençant par le numéro
d’ordre de lecture, ex. "01" à "99", en fonction de
votre graveur de CD.
Chargement de la pile
1. Utiliser deux piles “AAA”.
Retirer le couvercle comme indiqué sur
l'illustration.
2. Insérer les batteries avec les pôles – et + alignés
correctement suivant l’illustration à l’intérieur du
boîtier.
2ATTENTION
• Ranger les piles inutilisées hors de portée des
enfants.
Consulter immédiatement un médecin si une
pile est avalée accidentellement.
• Ne pas placer la télécommande dans un endroit
où elle bougera lorsque vous conduisez. Si elle
tombe sous pédale de frein, etc. cela gênera
votre conduite et entraînera un danger.
• Ne posez pas la télécommande sur des endroits chauds
tels que sur le tableau de bord.
• Les piles fournies sont conçues pour un essais de
fonctionnement, et leur durée de vie peut être courte.
• Lorsque la portée de la télécommande devient courte,
les deux piles doivent être remplacées par des nouvelles.
Français
|
31
Page 32

Au sujet des disques
Manipulation des disques
• Ne pas toucher la surface d’enregistrement des
disques.
• Les disques CD-R/RW et DVD-R sont plus
fragiles que les CD musicaux ordinaires. Avant d
’utiliser des CD-R/RW ou DVD-R, veuillez lire les
précautions à prendre sur l’emballage, etc.
• Ne pas coller de ruban adhésif ou autre sur les
disques. Ne pas non plus utiliser de disque avec
du ruban adhésif collé dessus.
Lors de l’utilisation d’un disque neuf
Si le trou central ou le bord extérieur comporte
des bavures, éliminez- les avec un stylo ou similaire
avant de l’utiliser.
Bavures
Bavures
Retraits des disques
Extraire les disques de cet appareil à l’horizontale.
Disques ne pouvant être utilisés
• Les disques non circulaire ne peuvent être utilisés.
• Les disques sales ou comportant des colorations
sur la surface d’enregistrement ne peuvent être
utilisés.
• Cet appareil ne peut lire que les CD comportant
Il ne peut jouer les disques qui ne comportent pas
la marque.
• Un CD-R ou CD-RW qui n’a pas été finalisé ne
peut être lu. (pour le procédé de finalisation,
veuillez consulter votre programme de gravure
de CD-R/CD-RW et les instructions du manuel
d’utilisation de votre graveur de CD-R/CD-RW).
.
Conservation des disques
• Ne pas les placer à la lumière solaire directe (sur le
siège ou tableau de bord, etc.) et dans les endroits
où la température est élevée.
• Conservez les disques dans leur boîtier.
Accessoires de disque
Ne pas utiliser d’accessoires de type disque CD.
Nettoyage de disques
Nettoyez un CD en partant du centre vers
l’extérieur.
|
32
Français
Page 33

Fonctions élémentaires
POWER EJECT
1
/¡
DISPLAY
4/¢
38
7
REPEAT
Alimentation
Appuyez sur la touche [POWER].
• Débranchez la prise allume cigare lorsque vous
coupez le contact afin de préserver la batterie.
MUTE
A–B
Français
|
33
Page 34

Fonctions élémentaires
Lecture
Lecture
Ouvrez le couvercle et insérez un disque
dans l'unité.
Après avoir inséré un disque, appuyez sur
la touche [38].
Pour lire un MP3 lorsque 'FOLDER LIST' est réglé
sur "WITH MENU", reportez-vous à la section 'Liste
de dossier MP3' (page 39) pour sélectionner le
fichier que vous voulez lire.
La lecture du disque s'amorce.
• Lorsque vous insérez un disque, il commence à jouer
à partir du début.
Si vous coupez l'alimentation pendant la lecture d'un
disque, le fait de rallumer l'appareil fera reprendre la
lecture à partir de l'endroit où elle s'était arrêtée.
Pause
Appuyez sur la touche [38].
Chaque fois que l'on appuie sur cette touche,
l'appareil se met en pause ou en lecture.
Arrêt
Appuyez sur la touche [7].
Pour relancer la lecture, appuyez sur la touche
[38].
Sourdine
Baisser le volume rapidement.
Appuyez sur la touche [MUTE].
Chaque fois que l'on appuie sur cette touche,
la sourdine est mise en/hors service.
Saut
Saute un chapitre, une sélection, une piste ou une
chanson.
Appuyez sur la touche [4] ou [¢].
• Pour sauter d’une plage à une autre sur un VCD,
désactivez la fonction PBC en appuyant sur la touche
[PBC].
Avance et retour rapide
Appuyez sur la touche [1] ou [¡].
La vitesse change en quatre étapes (X2, X4, X6,
X8) chaque fois que l'on appuie sur la touche.
Pour relancer la lecture, appuyez sur
la touche [38].
• Si vous pressez deux fois la touche [7] pendant la
lecture d'un DVD, la lecture reprend depuis le début
du disque la prochaine fois que vous le faites jouer.
Éjection
Appuyez sur la touche [EJECT].
• Pour relancer la lecture du disque éjecté de l'unité,
appuyez de nouveau sur la touche [EJECT]. Le disque
entre dans l'unité, et la lecture redémarre.
|
34
Français
Page 35

Répétition de lecture
Lit une chanson, un chapitre, un titre, etc.,
à répétition.
Appuyez sur la touche [REPEAT].
Chaque fois que l'on appuie sur cette touche,
la fonction répétition de lecture change de la
manière suivante.
En source DVD
Affichage Réglage
"CHAPTER REPEAT ON" Lit le chapitre en boucle.
"TITLE REPEAT ON" Lit le titre en boucle.
"REPEAT OFF" Désactive la lecture en boucle.
En source CD/VCD
Affichage Réglage
"REP-ONE" Lit la plage en boucle.
"REP-ALL" Lit le disque en boucle.
"REPEAT OFF" Désactive la lecture en boucle.
En source MP3
Affichage Réglage
"REP-ONE" Lit la chanson en boucle.
"FOLDER-REP"/"REP-ALL" Lit les chansons du dossier à répétition.
"FOLDER"/"REPEAT OFF" Désactive la lecture en boucle.
• Pour répéter un VCD, désactivez la fonction PBC en
appuyant sur la touche [PBC].
Mode de commutation de l'affichage
Fait commuter l'information affichée sur le
moniteur.
Appuyez sur la touche [DISPLAY].
Chaque fois que l'on appuie sur la touche,
l'affichage change de la manière suivante.
En source DVD
Affichage Information
"TITLE CHAPTER" Durée écoulée du titre ou du chapitre
"TITLE REMAIN" Durée restante du titre
"CHAPTER ELAPSED" Durée écoulée du chapitre
"CHAPTER REMAIN" Durée restante du chapitre
"OFF" Pas d'affichage
En source VCD (avec PBC activé) /MP3
Affichage Information
"SINGLE ELAPSED" Durée écoulée de la chanson
"SINGLE REMAIN" Durée restante de la chanson
"OFF" Pas d'affichage
En source VCD (avec PBC désactivé) /CD
Affichage Information
"SINGLE ELAPSED" Durée écoulée de la piste
"SINGLE REMAIN" Durée restante de la piste
"TOTAL ELAPSED" Durée écoulée du disque
"TOTAL REMAIN" Durée restante du disque
"OFF" Pas d'affichage
Répétition A-B [DVD][VCD][CD]
Spécifiez les points de départ et d'arrivée pour lire
la partie entre ces points à répétition.
1 Spécifiez le point A (point de départ)
Appuyez sur la touche [A-B].
2 Spécifiez le point B (point d'arrivée)
Appuyez sur la touche [A-B].
Lit du point A au point B à répétition.
Annulation de la répétition A-B
Appuyez sur la touche [A-B].
Français
|
35
Page 36

Fonctions DVD vidéo/CD vidéo
0–9
SEARCH
MENU
ZOOM
TOP MENU
PBC
Lecture par recherche
Appelle directement la scène à lire.
1 Entrer en mode de recherche
Appuyez sur la touche [SEARCH].
• Pour faire une recherche sur un VCD, désactivez la
fonction PBC en appuyant sur la touche [PBC].
2 Pour les DVD, sélectionner le mode de
recherche
Appuyez sur la touche [SEARCH].
Chaque fois que l'on appuie sur cette touche,
l'élément qui peut être appelé change de la
manière suivante.
Elément
Numéro de chapitre
Temps de lecture
ENTER
SUB TITLE
ANGLE
AUDIO
3 Entrez la scène à lire
Appuyez sur la touche [0] – [9].
Commence à lire la scène que vous avez
sélectionné pendant la lecture VCD.
4 Pour les DVD, démarrez la lecture de
recherche
Appuyez sur la touche [ENTER].
Démarre la lecture de la scène sélectionnée.
• Si vous appuyez sur la touche [2] ou [3] pendant
le mode de recherche de numéro de chapitre, vous
pouvez rechercher un numéro de titre.
|
36
Français
Page 37

Lecture au ralenti
Sélection de la langue audio [DVD]
Appuyez sur la touche [2 I] ou [I 3].
Chaque fois que l'on appuie sur cette touche, la
lecture au ralenti change de la manière suivante.
Disque Touche Mouvement
2
DVD
DVD
VCD
VCD
• Pour revenir à la vitesse normale, appuyez sur
I
3
I
2
I
3
I
la touche [38].
La vitesse du retour lent commute entre
2X, 4X et 8X.
La vitesse de l'avance lente commute entre
2X, 4X et 8X.
Recule en une étape.
La vitesse de l'avance lente commute entre
1X, 2X et 3X.
Menu DVD/menu supérieur (titre)
[DVD]
Appelle le menu DVD et le menu supérieur (titre)
pour effectuer divers réglages.
1 Affichez le menu DVD
Appuyez sur la touche [MENU].
Affichez le menu supérieur (titre)
Appuyez sur la touche [TOP MENU].
2 Sélectionnez l'élément
Appuyez sur la touche [2]/[5]/[3]/[∞]
ou [0] - [9].
3 Confirmez l'élément
Appuyez sur la touche [38].
Consultez le manuel du disque pour savoir
comment utiliser chaque menu.
4 Annulez l'affichage du menu
Appuyez sur la touche [MENU] ou [TOP
MENU].
Appuyez sur la touche [AUDIO].
Commute les langues enregistrées sur le disque
en séquence.
• Si une seule langue est enregistrée sur le disque, elle
ne change pas.
Sélection de la langue de sous-titrage
[DVD]
Appuyez sur la touche [SUB TITLE].
Commute les langues enregistrées sur le disque
en séquence.
• Si une seule langue est enregistrée sur le disque, elle
ne change pas.
Sélection de l'angle d'image [DVD]
Appuyez sur la touche [ANGLE].
Commute les angles enregistrés sur le disque en
séquence.
• Si un seul angle est enregistré sur le disque, il ne
change pas.
Zoom [DVD]
Agrandit l'image.
1 Sélectionnez le rapport de zoom
Appuyez sur la touche [ZOOM].
Chaque fois que l'on appuie sur cette touche,
le rapport de zoom change entre 3 niveaux
(X1.5, X2, X3).
2 Sélectionnez la position d'affichage
Appuyez sur la touche [2]/[5]/[3]/[∞].
Français
|
37
Page 38

Fonctions DVD vidéo/CD vidéo
PBC [VCD]
Utilise la fonction commande de lecture (PBC).
1 Activez la fonction PBC
Appuyez sur la touche [PBC].
Chaque fois que l'on appuie sur cette touche,
la fonction PBC est mise en/hors service.
2 Sélectionnez l'élément
Appuyez sur la touche [0] – [9].
3 Confirmez l'élément
Appuyez sur la touche [38].
Consultez le manuel du disque pour savoir
comment utiliser la commande de lecture.
• La fonction PBC est utilisable avec un VCD
de Ver2.0 ou plus.
Écran de sommaire [DVD]
Affiche les chapitres d'un titre en vue d'appeler
la scène désirée.
1 Entrez les données de titre
Appuyez sur la touche [PBC].
Sélection d'une scène
4 Arrêtez la lecture
Appuyez sur la touche [7].
5 Écran d'affichage du sommaire
Appuyez sur la touche [MENU].
• Appuyez sur la touche [7] pour revenir à l'écran
précédent.
6 Lisez la scène désirée
Appuyez sur la touche [1] – [9].
Appuyez sur la touche [1] – [9] qui correspond
au nombre affiché sur l'écran de sommaire.
• Appuyez sur la touche [4] ou [¢] pour aller à la
page précédente ou la page suivante.
7 Lisez la scène sélectionnée
Appuyez sur la touche [ENTER].
2 Sélectionnez un titre
Appuyez sur la touche [2] ou [3].
• Appuyez sur la touche [1] ou [¡] pour changer
10 titres à la fois.
• Appuyez sur la touche [4] ou [¢] pour passer
au premier ou au dernier titre.
3 Lisez un titre
Appuyez sur la touche [ENTER].
|
38
Français
• Appuyez sur la touche [7] pour revenir à l'écran
précédent.
Annulation de l'écran de sommaire
Appuyez sur la touche [PBC].
• Il se peut que certains titres ou chapitres ne soient pas
Page 39

Fonctions CD/MP3
0–9
SEARCH
7
Liste de dossier MP3 [MP3]
Sélectionnez le dossier ou le fichier que vous
voulez lire.
1 Arrêtez la lecture
Appuyez sur la touche [7].
2 Déplacez le curseur sur la liste de dossier
Appuyez sur la touche [2]/[3].
RANDOM
38
ENTER
PROG
4 Confirmez votre sélection
Appuyez sur la touche [ENTER].
5 Sélectionnez le fichier
Appuyez sur la touche [5]/[∞].
• Appuyez sur la touche [4] ou [¢] pour faire
défiler la liste par le haut ou par le bas.
6 Lisez le fichier sélectionné
Appuyez sur la touche [ENTER].
Liste de dossier
3 Sélectionnez le dossier
Appuyez sur la touche [5]/[∞].
Liste de fichier
Français
|
39
Page 40

Fonctions CD/MP3
Lecture programmée
Lit uniquement les chansons sélectionnées en
séquence.
1 Arrêtez la lecture
Appuyez sur la touche [7].
2 Passez au mode de programmation
Appuyez sur la touche [PROG].
Commute le "PLAY MODE" affiché au bas de
l'écran sur "PROGRAM PO" pendant la lecture
MP3.
3 Sélectionnez la chanson désirée
Appuyer sur la touche [2]/[5]/[3]/[∞]
(pendant la lecture MP3 uniquement ) ou [0]
– [9].
Indique le fichier qui contient la chanson désirée.
4 Confirmez la chanson à lire
Appuyez sur la touche [ENTER].
La chanson sélectionnée à l'étape 3 est
enregistrée comme programme numéro 1.
5 Répétez les démarches des étapes 3 et 4 pour
mémoriser toutes les chansons voulues dans
la séquence programmée.
Dans le cas de MP3, si vous avez fini de
programmer, appuyez sur la touche [7] pour
sortir du mode programmation.
6 Lancez la lecture programmée
Appuyez sur la touche [38].
Lit les chansons mémorisées dans l'ordre.
Annulation de la lecture programmée pour
CD
Appuyer sur les touches [7], [PROG] et
[ENTER] dans l'ordre.
Annulation de la lecture programmée pour
MP3
Appuyer sur les touches [7] et [PROG] dans
l'ordre.
Lecture par saut direct
Appelle directement la chanson à lire.
1 Entrez le numéro de piste, de fichier
ou de dossier désiré
Appuyez sur la touche [0] – [9].
2 Faites jouer
Appuyez sur la touche [ENTER].
• Si vous n'exécutez pas l'étape 2 dans les 5 secondes
environ, la chanson entrée à l'étape 1 est cherchée
automatiquement.
Recherche de temps de lecture [CD]
Entrez le temps de lecture où vous désirez
commencer.
1 Passez au mode recherche de temps
de lecture
Appuyez sur la touche [SEARCH].
2 Entrez le temps de lecture où vous désirez
commencer
Appuyez sur la touche [0] – [9].
Par exemple
5:07 ➪ [0], [5], [0], [7]
Démarre la lecture à partir de l'instant
sélectionné.
40
|
Français
Page 41

Mode de lecture MP3 [MP3]
Sélectionnez la méthode de lecture.
1 Arrêtez la lecture
Appuyez sur la touche [7].
2 Mettez en évidence la touche de mode
lecture.
Appuyez sur la touche [2]/[3].
Bouton de mode lecture
3 Sélectionnez la méthode de lecture
Appuyez sur la touche [5]/[∞].
Vous pouvez sélectionner la méthode de lecture
comme suit.
Affichage Réglage
"SINGLE" S'arrête après avoir lu une chanson.
"REP-ONE" Lit une chanson à répétition.
"FOLDER" S'arrête après avoir lu les chansons du dossier.
"FOLDER REP" Lit les chansons du dossier à répétition.
"DISC SCAN" Lit environ les 10 premières secondes de chaque
chanson sur le disque.
"DISC" S'arrête après avoir lu les chansons du disque.
"DISC REP" Lit les chansons du disque à répétition.
"RANDOM" Lit les chansons du dossier au hasard.
"SHUFFLE ON" S'arrête après avoir lu les chansons du dossier
au hasard.
Lecture aléatoire
Les chansons sont choisies et lues au hasard
parmi celles enregistrées sur le disque.
1 Arrêtez la lecture
Appuyez sur la touche [7].
2 Sélectionner le mode de lecture aléatoire
Appuyez sur la touche [RANDOM].
Chaque fois que la touche est enfoncée le
mode de lecture aléatoire est commuté comme
indiqué ci-dessous.
In CD source
Affichage Réglage
"RANDOM ON" Lit les chansons du disque dans un ordre aléatoire.
"RANDOM OFF" Désactive la lecture aléatoire.
In MP3 source
Affichage Réglage
"RANDOM" Lit les chansons du dossier au hasard.
"SHUFFLE ON" S'arrête après avoir lu les chansons du dossier
au hasard.
"FOLDER" Désactive la lecture aléatoire.
3 Dans le cas de MP3, sélectionnez le dossier
Appuyez sur la touche [2]/[5]/[3]/[∞].
Placer le curseur sur n'importe quel fichier du
dossier que vous voulez lire de manière aléatoire.
4 Lancez la lecture aléatoire
Appuyez sur la touche [38].
4 Sélectionnez la ou les chansons
Appuyez sur la touche [2]/[5]/[3]/[∞].
Choisissez le fichier ou le dossier désiré.
5 Faites jouer
Appuyez sur la touche [ENTER].
Lit la ou les chansons par la méthode de lecture
sélectionnée.
Français
|
41
Page 42

Menu de configuration
7
ENTER
Menu de configuration
Vous pouvez personnaliser les réglages par défaut
de nombreuses fonctions de l'unité grâce au
menu de configuration.
1 Arrêtez la lecture
Appuyez sur la touche [7].
Pendant la lecture d'un DVD, appuyez deux fois
sur la touche.
Pendant la lecture d'un VCD, désactivez la
fonction PBC en pressant d'abord la touche
[PBC].
2 Affichez l'écran SETUP MENU
Appuyez sur la touche [SETUP].
SETUP MENU s'affiche sur le moniteur raccordé.
3 Sélectionnez la page de menu à configurer
Appuyez sur la touche [2]/[5]/[3]/[∞].
4 Entrez la page de menu sélectionnée
Appuyez sur la touche [ENTER].
La page de menu sélectionnée à l'étape 3
s'affiche.
SETUP
5 Sélectionnez l'élément de configuration
et l'option
Appuyez sur la touche [2]/[5]/[3]/[∞].
Reportez-vous aux descriptions subséquentes
des éléments de configuration et des options
à chaque menu.
6 Confirmez votre sélection
Appuyez sur la touche [ENTER].
7 Sortez du menu de configuration
Appuyez sur les touches [2]/[5]/[3]/[∞]
et [ENTER].
Sélectionnez et exécutez "MAIN PAGE" et "EXIT
SETUP" dans l'ordre.
42
|
Français
Page 43

Configuration générale
TV DISPLAY
Suivez la démarche ci-dessous pour configurer
l'écran de sortie.
Affichage Réglage
"NORMAL/PS" Le logiciel pour écran large à recadrage
automatique (pan & scan) s'affiche sur écran
de format recadré (coupé sur les côtés gauche
et droit).
"NORMAL/LB" Le logiciel pour écran large à recadrage
automatique (pan & scan) s'affiche sur écran de
format boîte aux lettres (avec des bandes noires
dans le haut et le bas).
"WIDE" Réglez le mode image du moniteur à large écran
sur "FULL"
PIC (Image) MODE
Sélectionnez un mode d'image DVD.
Affichage Réglage
"AUTO" L'image commute automatiquement en fonction
de l'image originale.
"HI-RES" L'image originale enregistrée sur le DVD est au
mode vidéo.
"N-FLICKER" L'image originale enregistrée sur le DVD est au
mode cinéma.
ANGLE MARK
Quand des angles d'image multiples sont
enregistrés sur un DVD, ils se manifestent par
la marque en cours de lecture.
SCR (Ecran) SAVER
Pour prévenir le grillage de l'écran, vous pouvez
démarrer automatiquement l'écran de veille
quand l'affichage reste le même un certain temps.
Affichage Réglage
"ON" Lance automatiquement l'écran de veille.
"OFF" N'utilise pas l'écran de veille.
Configuration des enceintes
DOWNMIX
Régler la sortie de son mixé sur le port stéréo 2canaux.
Affichage Réglage
"LT/RT" Reproduit le son mixé au format audio Dolby Surround.
"STEREO" Reproduit le son mixé en stéréophonie.
Affichage Réglage
"ON" Affiche la marque d'angle.
"OFF" N'affiche pas la marque d'angle.
OSD LANG (Langue de l'affichage)
Gardez-la sur "ENGLISH" (anglais).
CAPTIONS
À la lecture d'un disque offrant des données de
sous-titrage codé, ces données peuvent être
affichées.
Affichage Réglage
"ON" Émet le signal de sous-titrage codé.
"OFF" N'émet pas le signal de sous-titrage codé.
Français
|
43
Page 44

Menu de configuration
Réglage audio
AUDIO OUT
Affichage Réglage
"ANALOG" Émet un son analogique. (Aucun sortie de signal
numérique.)
"SPDIF/RAW" Émet un son numérique à train binaire S/PDIF 5.1
canaux. (Aucune sortie de signal analogique.)
"SPDIF/PCM" Émet un son numérique PCM S/PDIF 2 canaux.
(Aucune sortie de signal analogique.)
OP MODE
Affichage Réglage
"LINE MODE" Émet un son normal de sortie LINE.
"RF MODE" Réduit la dynamique d'un signal audio à émettre
par le modulateur RF.
DUAL MODE
Configurez le son de sortie d'un DVD de karaoké
(pour machine à chanter sur fond musical).
Affichage Réglage
"STEREO" Stéréophonique (G / D)
"L-MONO" Monophonique gauche (G / G)
"R-MONO" Monophonique droit (D / D)
"MIX-MONO" Mixé gauche et droit (G+D / G+D)
DYNAMIC
Configure la gamme dynamique d'un son
à reproduire enregistré sur un DVD de type
Dolby Digital.
LPCM OUTPUT
Affichage Réglage
"LPCM 48k" Émet une chanson de 96 kfs en 48 kfs par
DIGITAL OUT.
"LPCM 96k" Émet une chanson de 96 kfs en 96 kfs par
DIGITAL OUT.
Affichage Réglage
"FULL" Pour un son puissant à des volumes ordinaires
"7/8"
"6/8" / "3/4"
"5/8"
"4/8" / "1/2"
"3/8"
"2/8" / "1/4"
"1/8"
"OFF" Pour un son ordinaire
|
44
Français
Grand
±
Taux de compression
≠
Petit
Page 45

Préférences
TV TYPE
Un type à définir selon le mode d'affichage de la
couleur du téléviseur.
Affichage Réglage
"MULTI" La sortie de signal couleur commute automatiquement en
fonction de la norme d'enregistrement du disque actuel.
"NTSC" Les signaux couleur sont émis au format NTSC standard.
"PAL" Les signaux couleur sont émis au format PAL standard.
AUDIO
Définissez la langue audio reproduite par les
enceintes.
Affichage Réglage
"ENGLISH" Anglais
"FRENCH" Français
"SPANISH" Espagnol
"CHINESE" Chinois
"JAPANESE" Japonais
PARENTAL
Définissez le niveau parental. Plus le niveau est
élevé, plus la protection obtenue est grande.
Affichage Réglage
"1 G" Seuls les films cotés G (pour les enfants) sont
lisibles.
"2"
"3 PG"
"4 PG 13"
"5"
"6 PG-R"
"7 NC-17"
"8 ADULT"
"NO_PARENTAL" Annule la protection parentale.
1 Appuyez sur la touche [ENTER] de la
télécommande.
2 Définissez le niveau parental.
3 Entrez le mot de passe.
4 Appuyez sur la touche [ENTER] de la
télécommande.
SUB TITLE
Définissez la langue des sous-titres affichés à l'écran.
Affichage Réglage
"ENGLISH" Anglais
"FRENCH" Français
"SPANISH" Espagnol
"CHINESE" Chinois
"JAPANESE" Japonais
"OFF" Aucun sous-titre n'est affiché
DISC MENU
Définissez la langue du menu de disque.
Affichage Réglage
"ENGLISH" Anglais
"FRENCH" Français
"SPANISH" Espagnol
"CHINESE" Chinois
"JAPANESE" Japonais
• Par défaut, le mot de passe est réglé sur "0000".
• Le réglage parental ne fonctionne qu'avec les disques
marqués "R".
PASSWORD
CHANGE : Changez le mot de passe.
1 Sélectionnez "CHANGE" et appuyez sur la
touche [ENTER] de la télécommande.
2 Entrez le mot de passe actuel.
3 Entrez le nouveau mot de passe deux fois.
4 Appuyez sur la touche [ENTER] de la
télécommande.
• Par défaut, le mot de passe est réglé sur "0000".
DEFAULTS
RESET : réinitialise les éléments personnalisés
dans le menu de configuration
à l'exception du mot de passe.
FOLDER LIST
Optez pour l'affichage du répertoire sur
le moniteur à la lecture de MP3.
Affichage Réglage
"NO MENU" Le répertoire ne s'affiche pas.
"WITH MENU" Le répertoire s'affiche.
|
Français
45
Page 46

Accessories Installation
1
2
3
4
5
..........1
..........1
..........2
..........4
Installation à l'aide des supports
Vis autotaraudeuse 5
Support 3
Vis Semusu 4
Installation à l'aide de bandes velcro
Tapis
Bande velcro 6
..........4
6
..........2
7
..........1
• Si le fusible grille, s’assurer que les fils n’ont pas causé de
court-circuit, puis remplacer le vieux fusible par un fusible
de même capacité
|
46
Français
• Pendant l’installation, n’utilisez aucunes autres vis que
celles fournies. L’utilisation de vis incorrectes pourrait
endommager l’appareil.
• Ne pas installer l'unité dans un endroit instable ou soumis
à des vibrations.
• Vous pouvez monter l'unité à n'importe quel angle
compris entre la position horizontale et la position
verticale sur son arrière (de 0° à 90°). Vous ne pouvez pas
installer l'unité avec la fente de disque orientée vers le
bas, en biais ou à l'envers.
Page 47

Connexion des fils aux bornes
Câble RCA AV 7
Sortie Audio gauche
Sortie Audio droite
Sortie vidéo
Sortie numérique
Câble d'alimentation 1
Capteur de
télécommande 2
TV, moniteur, etc.
(accessoire en option)
Prise allume cigare
Fusible (3A) intégré
Vue arrière du lecteur DVD
Vers la prise
allume cigare
Fixation du capteur de télécommande
1 Retirez le papier protecteur de la bande velcro située à
l'arrière du capteur de télécommande.
2 Après avoir nettoyé l’endroit de fixation de toute poussière
ou salissure, fixez le capteur de télécommande.
• Nettoyez toute poussière ou salissure de la surface où le capteur est
fixé.
• Evitez de fixer sur un endroit directement exposé à la lumière du
soleil ou près du moniteur TV, où les signaux de la télécommande
sont captés avec difficulté.
.
Papier de
protection
Français
|
47
Page 48

Guide de depannage
Ce qui peut apparaître comme un mauvais
fonctionnement de votre appareil n’est peut être
que le résultat d’une mauvaise opération ou
d’une mauvaise connexion. Avant d’appeler un
centre de service, vérifiez d’abord dans le tableau
suivant les problèmes possibles.
? Aucun son ne peut être entendu, ou le volume
est faible.
✔ La sourdine est activée.
☞ Désactiver la sourdine.
? Le son/image du DVD/VCD/CD saute.
✔ Le disque est rayé ou sale.
☞ Nettoyez le disque en vous référant à la
section <Nettoyage des disques> (voir page
32).
? La lecture d’un VCD commandée par menu n’est
pas possible.
✔ Le VDC utilisé n’est pas compatible avec le
système "Play Back Control (P.B.C.)".
☞ La lecture commandée par menus n’est
possible que si le VCD porte les informations
requise par le système “Play Back Control
(P.B.C.)”.
? Les sous-titres ne sont pas affichés.
✔ Le DVD ne porte aucun enregistrement de
soustitres.
☞ Aucun sous-titrage n’est possible si le DVD
ne comporte aucun enregistrement de soustitres.
? On ne peut pas changer la langue parlée (ou celle
du sous-titrage).
✔ Une seule langue parlée (langue de sous-titrage) a
fait l’objet d’enregistrement sur le disque.
☞ La langue parlée (langue de sous-titrage)
ne peut pas être choisie si l’oeuvre (le soustitrage) n’a enregistrée qu’en une seule langue.
? Le disque spécifié n’est pas reproduit mais un
autre est reproduit à sa place.
✔ Le disque spécifié est très sale.
☞ Nettoyez le disque.
✔ Le disque est à l’envers.
☞ Insérez un disque avec la face imprimée
dirigée vers le haut.
✔ Le disque est très rayé.
☞ Essayez un autre disque.
? Impossible d'effectuer les opérations pour la
liste de dossier MP3, le mode de lecture MP3,
la lecture programmée ou la lecture aléatoire
pendant la lecture MP3.
✔ 'FOLDER LIST' est réglé sur "NO MENU" dans le
menu de configuration.
☞ Régler 'FOLDER LIST' sur "WITH MENU" (voir
page 45).
Les messages montrés ci-dessous
affichent l’état de votre système.
"THERMAL PROTECTION PLEASE SHUT OFF POWER"
: Le circuit de protection à l’intérieur de l’unité entre en
activité lorsque la température à l’intérieur de l’unité
dépasse 60°C (140°F), et arrête tout fonctionnement.
➪ Refroidissez l’appareil en ouvrant les fenêtres ou
en mettant en service l’air conditionné Lorsque la
température passe sous 60°C (140°F), la lecture du
disque débute à nouveau.
Pour éjecter le disque dans cette situation, éteignez
puis rallumez l'appareil.
"NO DISC"
: Aucun disque n'est inséré dans cette unité.
"WRONG REGION"
: Un DVD au code de région incompatible a été inséré
dans l'unité.
"DISC ERROR"
: Un disque ne pouvant pas être lu par cette unité a été
inséré.
"INVALID ENTRY"
: Le disque inséré contient des données endommagées
ou non-standard.
"PASSWORD INCORRECT"
: Le mot de passe saisi ne correspond pas à celui
enregistré.
"NEW PASSWORD NOT CONFIRMED"
: Ceci apparait si le deuxième mot de passe saisi ne
correspond pas au premier lors du changement de mot
de passe.
➪ Lorsque vous saisissez un nouveau mot de passe,
vous devez saisir deux fois le même mot de passe
pour le confi rmer.
48
|
Français
Page 49

Spécifications
Les spécifications sont sujettes changements sans notification.
Section DVD
Convertisseur A/N
: 8Level∆Σ, 24bit
Pleurage et scintillement
: Non mesurables
Fréquence response
: 17- 44 kHz (DVD96kHz Echantillonnage)
Distorsion harmonique totale 1kHz
: 0.02 %
Taux de Signal/Bruit
: 106 dB
Dynamic range
: 90 dB
Décoder MP3
: Compatible avec MPEG-1/2 Audio Layer-3
Format de DISQUE
: DVD-VIDEO/ VIDEO-CD/ CD-DA/ MP3
Sortie
Niveau de sortie vidéo composite (V)
: 1V p-p (75Ω)
Niveau de sortie audio 2can (V)
:1.2 V/ 10 kΩ (DVD/CD)
Niveau de sortie d'interface audio numérique
coaxiale (V )
: 0.5 V/ 75 Ω
Général
Tension de fonctionnement
: 14.4 V (11 – 16 V)
Consommation
: 2 A
Dimensions (LxHxP)
: 194 mm x 54 mm x 245 mm
Masse
: 1.85 kg
Français
|
49
Page 50

Inhalt
Sicherheitshinweise 51
Vor der Inbetriebnahme 52
Hinweise zum Abspielen
von MP3-Dateien 54
Wissenswertes über die
Fernbedienung 55
Über Discs 56
Grundfunktionen 57
Strom
Wiedergabe
Stummschaltung
Überspringen
Schnellvorlauf und -rücklauf
Wiedergabewiederholung
A-B-Wiedergabewiederholung [DVD][VCD][CD]
Display-Umschaltung
DVD-Video-/
Video-CD-Funktionen 60
Suchwiedergabe
Zeitlupenwiedergabe
DVD-Menü/Obermenü (Titel) [DVD]
Audio-Sprachauswahl [DVD]
Untertitel-Spracheauswahl [DVD]
Bildwinkel-Auswahl [DVD]
Zoom [DVD]
PBC [VCD]
Übersichtsbildschirm [DVD]
CD/MP3-Funktionen 63
MP3-Ordnerliste [MP3]
Programmwiedergabe
Direktwiedergabe
Wiedergabezeitsuche [CD]
MP3-Wiedergabemodus [MP3]
Zufallswiedergabe
Einrichtungsmenü 66
Einrichtungsmenü
Allgemeine Einrichtung
Lautsprechereinrichtung
Audio-Einrichtung
Voreinstellungen
|
50
Deutch
Zubehör 70
Installation 70
Anschluss der Leitungen an die
Anschlüsse 71
Fehlersuche 72
Technishe Daten 73
[DVD]: Funktion ausschließlich während der DVD-
Wiedergabe verfügbar.
[VCD]: Funktion ausschließlich während der Video-
CD-Wiedergabe verfügbar.
[CD]: Funktion ausschließlich während der CD-
Wiedergabe verfügbar.
[MP3]: Funktion ausschließlich während der MP3-
Wiedergabe verfügbar.
Page 51

Sicherheitshinweise
2WARNUNG
Zur Vermeidung von Bränden und
Verletzungen beachten Sie bitte die
folgenden Hinweise:
• Befestigen Sie das Gerät sicher im Einbauschacht,
damit es bei einem Unfall nicht durch das
Wageninnere geschleudert wird.
• Stellen Sie sicher, dass keine Metallgegenstände
(Münzen, Nadeln, Werkzeuge etc.) ins In nere des
Geräts gelangen und Kurzschlüsse verursachen.
• Schalten Sie das Gerät bei Geruch- oder
Rauchentwicklung sofort aus und suchen Sie
einen KENWOOD-Fachhändler auf.
• Schließen Sie das Gerät nicht an den vorderen
Monitor an. Dieses Gerät wurde für die
Verwendung für das Entertainment auf den
Rücksitzen konzipiert.
ă Verwenden Sie kein anderes Netzkabel als das im
Lieferumfang enthaltene. Anderenfalls könnte ein
Brand entstehen.
2ACHTUNG
Bitte beachten Sie folgende
Vorsichtsmaßnahmen, damit Ihr Gerät
stets einwandfrei funk tioniert:
• Betreiben Sie das Gerät ausschließlich mit 12-VoltGleichstrom und negativer Masseverbin dung.
• Entfernen Sie nicht die oberen oder unteren
Gehäuseabdeckungen.
• Schützen Sie das Gerät vor direkter
Sonneneinstrahlung, zu hohen Temperaturen,
Feuchtig keit, Spritzwasser und Staub.
• Verwenden Sie für den Einbau ausschließlich die
mitgelieferten Schrauben. Zu lange oder zu dicke
Schrauben können das Gerät beschädigen.
• Achten Sie beim Austauschen einer Sicherung
darauf, dass der Wert der Sicherung mit den
Angaben am Gerät übereinstimmt. Sicherungen
mit einem falschen Wert können Fehlfunktionen
verursachen oder zur Beschädigung des Geräts
führen.
ANMERKUNGEN
• Sollten Sie Probleme bei der Installation
des Geräts haben, lassen Sie sich von Ihrem
KEN WOOD-Fachhändler beraten.
• Die in dieser Bedienungsanleitung gezeigten
Abbildungen des Autoradio-Displays
und der Frontblende dienen lediglich als
Erklärungshinweise für die vielseitigen
Einstellmöglichkeiten Ihres Geräts. Deshalb
können sich geringfügige Abweichungen
zwischen der Display-Darstellung Ihres Geräts und
den Illustrationen in der Anleitung ergeben.
ă Falls das Gerät nicht ordnungsgemäß funktioniert,
schalten Sie die Stromversorgung bitte aus
und anschließend wieder ein. Falls das Gerät
selbst nach dem Aus- und Wiedereinschalten
der Stromversorgung nicht ordnungsgemäß
funktioniert, konsultieren Sie bitte einen
Kenwood-Händler in Ihrer Nähe, um sich beraten
zu lassen.
Beschränkungen bedingt durch
Unterschiede zwischen verschiedenen
Discs
Inhibition
solche Beschränkungen berücksichtigt, können
einige Funktionen möglicherweise nicht wie
angegeben zur Verfügung stehen. Lesen Sie
unbedingt die bei jeder Disc mitgelieferten
Anweisungen durch. Sollte auf dem am CDSpieler
angeschlossenen Fernsehbildschirm ein
Sperrsymbol erscheinen, bedeutet dies, daß diese
Disc gewissen Beschränkungen unterworfen ist, wie
oben beschrieben.
Einige DVDs und VCDs lassen sich
nur in gewissen Wiedergabe-Modi
icon
abspielen, entsprechend den vom
Software-Hersteller eingegebenen
Beschränkungen. Da dieses Gerät
Beschlagen der Laser-Linse
Bei kaltem Wetter kann die Laserlinse des CDSpielers nach dem Einschalten der Fahrzeughei zung
beschlagen. In diesem Fall lässt sich keine CD
abspielen. Nehmen Sie dann die CD aus dem Gerät
und warten Sie eine Zeitlang, bis der Beschlag
abgetrocknet ist. Arbeitet der CD-Spieler nach 1-2
Stunden noch nicht richtig, wenden Sie sich an
Ihren KENWOOD-Fachhänd ler.
Reinigung
Sollte die Frontblende Ihres Gerätes verschmutzt
oder verstaubt sein, reinigen Sie die Blende nur
mit einem weichen Tuch (z. B. Silikontuch). Bei
stärkeren Verschmutzungen verwenden Sie
bitten ein feuchtes Tuch und Neutralreiniger.
Bitte nicht vergessen: Auch die Rückstände des
Neutralreinigers müssen entfernt werden.
• Bei der Verwendung von Reinigungssprays kann eine
Beschädigung der mechanischen Teile des Gerätes nicht
ausgeschlossen werden. Rauhe Tücher und flüchtige
Lösungsmittel wie Verdünner, Spiritus oder Alkohol
zerstören die Blendenoberfläche oder den Aufdruck.
|
Deutch
51
Page 52

Vor der Inbetriebnahme
Weltweite Gebiets-Codes
1
4
DVD-Symbole
Symbole Beschreibung
Weist auf den Code des Gebiets hin, in dem diese Disc abgespielt werden kann.
8
32
9
16:9 LB
Anzahl der Sprachen, die für die Audio-Funktionen aufgenommen wurden. Die Ziff er
weist auf die Anzahl der Sprachen hin (maximal 8 Sprachen).
Anzahl der Sprachen, die für die Untertitel-Funktionen aufgenommen wurden. Die
Ziff er weist auf die Anzahl der Sprachen hin (maximal 32 Sprachen).
Anzahl der Blickwinkel, die über die Blickwinkel-Funktion verfügbar sind. Die Ziff er
weist auf die Anzahl der Blickwinkel hin (maximal 9 Blickwinkel).
Wählbare Bildseitenverhältnisse. “LB” bedeutet “Letter Box”, während “PS” für Pan/Scan
steht. Das nebenstehende Beispiel bedeutet, daß ein 16:9-Video in ein Letter BoxVideo umgewandelt werden kann.
5
2
1
2
6
3
5
2
1
4
Wiederzugebende Discs
• DVD-Video
• Audio-Disc (CD)
• Disc im MP3-Format (CD)
• Disc im CD-R/RW-Format
• Video-CD
Wenn DVD-R-Discs nicht im DVD-Video- Format aufgenommen worden sind, können diese nicht
wiedergegeben werden.
Wissenswertes über anwendbare Temperaturen
Die Schutzschaltung im Gerät wird aktiviert, wenn die Temperatur im Inneren des Gerätes 60°C
(140°F) überschreitet. Lesen Sie hierzu die Anleitung zur Fehlersuche (S.72).
|
52
Deutch
Page 53

Hinweis zur Entsorgung der Batterien :
Verbrauchte Batterien dürfen nach der
Batterieverordnung nicht mehr mit dem
Hausmüll entsorgt werden. Kenwood
beteiligt sich daher am „Gemeinsamen
Rücknahmesystem Batterien“ (GRS Batterien).
Werfen Sie verbrauchte Batterien
unentgeltlich in die beim Handel aufgestellten
Sammelbehälter. Auch bei Ihrem Fachhändler
finden Sie einen Sammelbehälter für
verbrauchte Batterien.
Auch Batterien, die in Geräten fest eingebaut
sind, unterliegen diesen gesetzlichen
Vorschriften.
Kennzeichnung von Geräten mit
Laser-Abtastern
CLASS 1
LASER PRODUCT
Dieser Aufkleber ist am Chassis oder Gehäuse
angebracht und weist darauf hin, daß das Gerät
mit einem als Class 1 eingestuften Laserstrahl
arbeitet. Das bedeutet, daß durch den sehr
schwachen Laserstrahl keine Gefahr durch
gefährliche Strahlungen außerhalb des Geräts
besteht.
Dieses Produkt enthält Technologie zum Schutz
von Urheberrechten, die durch US-Patente und
anderer geistige Eigentumsrechte geschützt ist.
Die Verwendung dieser Technologie zum Schutz
der Urheberrechte muss durch Macrovision
autorisiert werden, und ist ausschließlich für
den Hausgebrauch und andere eingeschränkte
Zwecke vorgesehen, wenn keine andere
Verwendung durch Macrovision autorisiert
wurde. Eine Rückentwicklung oder eine
Demontage des Produktes ist untersagt.
Dieses Produkt wird weder vom Hersteller
eines Fahrzeugs während der Produktion noch
von einem professionellen Importeur eines
Fahrzeugs in einen EU-Mitgliedsstaat eingebaut.
is a trademark of DVD Format/Logo
Licensing Corporation registered in the U.S.,
Japan and other countries.
In Lizenz von Dolby Laboratories hergestellt.
"Dolby" und das Doppel-D-Symbol sind
Warenzeichen der Dolby Laboratories.
Deutch
|
53
Page 54

Hinweise zum Abspielen von MP3-Dateien
Der KDV-S220P kann MP3 (MPEG1, 2 Audio Layer 3)
wiedergeben. Nehmen Sie aber bitte zur Kenntnis,
dass das akzeptable MP3-Aufnahme-Medium und
-Format beschränkt ist. Achten Sie beim Schreiben
von MP3 auf die folgenden Einschränkungen.
Verwendbare Medien
Bei mit diesem Gerät verwendbaren MP3Aufnahmemedien sind CD-ROMs, CD-Rs und
CD-RWs. Wenn Sie eine CD-RW verwenden,
sollten Sie eine vollständige Formatierung und
keine Schnellformatierung durchführen, um eine
Fehlfunktion zu verhindern.
Verwendbare Medienformate
Die folgenden Formate sind für Medien verfügbar,
die mit diesem Gerät verwendet werden. Die
Höchstanzahl der für den Datei- und Ordnernamen
zu verwendenden Zeichen einschließlich der
Abgrenzung (".") und der Erweiterung mit ihren drei
Buchstaben ist in Klammern angegeben.
• ISO 9660-Level 1 (12 Stellen; Bis zu 11 Zeichen
werden angezeigt.)
• ISO 9660-Level 2 (31 Stellen; Bis zu 11 Zeichen
werden angezeigt.)
• Joliet (64 Stellen; Bis zu 11 Zeichen werden
angezeigt.)
• Romeo (128 Stellen; Bis zu 11 Zeichen werden
angezeigt.)
• Langer Dateiname (200 Stellen; Bis zu 11
Zeichen werden angezeigt.)
• Maximale Anzahl der Stellen für einen
Ordnernamen:
128 (Joliet; Bis zu 11 Zeichen werden angezeigt.)
Lesen Sie sich für eine Auflistung aller verfügbarer
Zeichen bitte die Bedienungsanleitung der
Schreibsoftware und den unten stehenden
Abschnitt "Eingabe eines Datei- und Ordnernamens"
durch. Hinsichtlich der Medien, die mit diesem
Gerät reproduziert werden können, bestehen die
folgenden Einschränkungen:
• Maximale Anzahl der Verzeichnis-Levels: 8
• Maximale Anzahl der Datein pro Ordner: 185
• Maximale Anzahl der Ordner: 127
MP3-Dateien, die in anderen als den oben
angeführten Formaten aufgenommen worden
sind, können unter Umständen nicht erfolgreich
wiedergegeben werden und Dateinamen
oder Ordnernamen werden eventuell nicht
ordnungsgemäß angezeigt.
Einstellungen für Ihren MP3-Encoder und
Ihren CDBrenner
Führen Sie die folgende Einstellung durch, wenn Sie
Audio-Daten mithilfe eines MP3-Kodierers in MP3Daten komprimieren.
• Übertragungs-Bitrate: : 56 —320 kbps
• Abtastfrequenz
: 11.025, 12, 16, 22.05, 24, 32, 44.1, 48 kHz
Wenn Sie Ihren CD-Brenner zur Aufnahme von
MP3/WMA bis zur maximalen Disc-Kapazität
verwenden, deaktivieren Sie zusätzliche Schriften.
Wenn Sie eine leere Disc in einem Arbeitsgang
beschreiben möchten, wählen Sie die Einstellung
"Disc at Once", damit Sie die volle Kapazität
ausnutzen können.
ID3-Taganzeige
Das ID3-Tag kann nicht angezeigt werden.
Eingabe der Datei- und Ordnernamen
Für Dateinamen und Ordnernamen können nur die
Zeichen der Codeliste eingegeben und angezeigt
werden. Wenn Sie für die Eingabe irgendwelche
anderen Zeichen verwenden, werden Datei- und
Ordner-Namen nicht ordnungsgemäß angezeigt.
Je nach verwendetem CD-Brenner werden beide
möglicherweise nicht korrekt angezeigt. Das Gerät
erkennt und gibt ausschließlich MP3-Files wieder,
die über die MP3-Erweiterung (.MP3) verfügen.
• Eine Datei mit einem Namen, der Zeichen enthält, die
nicht auf der Codeliste sind, wird möglicherweise nicht
korrekt abgespielt.
0123456789ABCDEF
00@P‘p
1!1AQaq
22BRbr
3#3CScs
4$4DTdt
5%5EUeu
6&6FVfv
7’7GWgw
8(8HXhx
9)9IYiy
AJZjz
B+;K[k{
C,Ll
D -=M]m}
E . N^n~
FO_o
54
|
Deutch
Page 55

Wissenswertes über die
Fernbedienung
Schreiben von Dateien auf ein Medium
Wenn ein Medium eingelegt wird, das MP3-Daten
enthält, überprüft das Gerät sämtliche Daten auf
dem Medium. Wenn das Medium eine große Anzahl
von Ordnern oder Dateien enthält, die nicht dem
Format MP3 entsprechen, nimmt es eine längere
Zeit in Anspruch, bis das Gerät mit dem Abspielen
von MP3 beginnt.
Ferner kann es eine Weile dauern, bis das Gerät
zur nächsten MP3-Datei weiterschaltet, oder eine
Dateisuche oder Ordnersuche wird möglicherweise
nicht einwandfrei ausgeführt.
Das Laden eines solchen Mediums kann laute Geräusche
produzieren und die Lautsprecher beschädigen.
• Versuchen Sie nicht, ein Medium mit einer MP3Erweiterung abzuspielen, das eine nicht dem MP3Format entsprechende Datei enthält. Das Gerät erkennt
Dateien, die nicht dem Format MP3 entsprechen, als
MP3-Daten, wenn sie mit der MP3-Erweiterung versehen
sind.
• Versuchen Sie nicht, ein Medium abzuspielen, das Daten
enthält, die nicht dem Format MP3 entsprechen.
MP3-Abspielreihenfolge
Bei eingestellter Wiedergabe, Ordnersuche,
Dateisuche oder Ordnerauswahl werden auf
Dateien und Ordner in der Reihenfolge zugegriffen,
in der sie vom CD-Writer eingeschrieben wurden.
Aufgrund dessen kann es passieren, dass die zu
erwartende Abspielreihenfolge nicht mit der
Reihenfolge übereinstimmt, in der die Spuren oder
Alben schließlich tatsächlich abgespielt werden. Sie
können die Reihenfolge des Abspielens von MP3
dadurch beeinflussen, dass Sie die Daten auf ein
Medium wie beispielsweise eine CD-R schreiben
und dabei die jeweiligen Dateinamen an ihrem
Anfang mit Abspielsequenznummern - wie z.B "01"
bis "99", entsprechend Ihrem CD-Brenner - versehen.
Einlegen der Batterie
1. Zwei “AAA” Batterien verwenden.
Entfernen Sie die Abdeckung wie in der
Abbildung dargestellt.
2. Die Batterien mit der richtigen Polarität + und
– wie dargestellt, in das Fach einlegen.
2WAARSCHUWING
• Nicht gebrauchte Batterien für Kinder
unzugänglich aufbewahren. Wenden Sie
sich sofort an einen Arzt, wenn die Batterie
versehentlich verschluckt wurde.
• Legen Sie die Fernbedienung an keinem Ort
ab, an dem sie sich bewegen könnte, während
Sie fahren. Falls die Fernbedienung unter das
Bremspedal o.Ä. fällt, könnte es den Betrieb Ihres
Fahrzeugs behindern und eine Gefahr darstellen.
• Legen Sie die Fernbedienung nicht auf Stellen, an denen
es heiß werden könnte, wie z.B. auf das Armaturenbrett.
• Die mitgelieferten Batterien sind für die Betriebsprüfung
gedacht, deshalb ist es möglich, daß die Lebensdauer
sehr kurz ist.
• Wenn die für die Fernbedienung erforderliche Distanz
kurz wird, beide Batterien durch Neue austauschen.
Deutch
|
55
Page 56

Über Discs
Handhabung von Discs
• Berühren Sie nicht die Aufnahmeoberfläche der
Disc.
• CD-R/RW und DVD-R können leichter beschädigt
werden als einen normale Musik-CD.
Verwenden Sie eine CD-R/RW oder DVD-R erst,
nachdem Sie die Achtungshinweise auf der
Verpackung etc. gelesen haben.
• Kleben Sie keine Klebebänder etc. auf die
Disc. Verwenden Sie auch keine Discs, die mit
Aufklebern versehen sind.
Wenn Sie eine neue Disc verwenden
Wenn das mittlere Loch oder der äußere Rand
einer CD durch die Fertigung bedingte Grate
aufweist, verwenden Sie diese CD erst, nachdem
Sie diese Grate mit Hilfe eines Kugelschreibers oder
ähnlichem entfernt haben.
Grate
Grate
Entfernen von Discs
Wenn Sie Discs diesem Gerät entnehmen, ziehen
Sie sie waagerecht heraus.
Discs, die nicht wiedergegeben werden
können
• CDs, die nicht rund sind, können nicht verwendet
werden.
• Discs mit Verfärbungen auf der
Aufnahmeoberfläche oder Disc, die schmutzig
sind, können nicht verwendet werden.
• Dieses Gerät kann nur CDs mit der Kennung
abspielen.
Discs ohne diese Kennung werden unter
Umständen nicht korrekt abgespielt.
• Eine CD-R oder CD-RW, die nicht abgeschlossen
(finalized) worden ist, kann nicht abgespielt
werden. (Einzelheiten hinsichtlich der Finalisierung
finden Sie bitte in den Bebienungsanleitungen
Ihrer Brennsoftware sowie Ihres CD-R/CD-RWRecorders.)
Aufbewahrung von CDs
• Bewahren Sie CDs nicht in direktem Sonnenlicht
auf (beispielsweise auf dem Armaturenbrett), wo
hohe Temperaturen herrschen.
• Bewahren Sie Discs in deren Hüllen auf.
Zubehör
Verwenden Sie kein Zubehör für Ihre Discs.
Reinigung einer Disc
Reinigen Sie CDs stets von der Mitte einer Disc nach
außen hin.
|
56
Deutch
Page 57

Grundfunktionen
POWER EJECT
1
/¡
DISPLAY
4/¢
38
7
REPEAT
Strom
Drücken Sie die [POWER]-Taste.
• Trennen Sie den Zigarettenanzünder-Stecker ab, wenn
Sie die Zündung ausschalten, damit ein Entladen der
Batterie verhindert wird.
MUTE
A–B
Deutch
|
57
Page 58

Grundfunktionen
Wiedergabe
Wiedergabe
Öffnen Sie den Deckel und legen Sie eine Disc
in das Gerät ein.
Wenn eine Disc eingelegt wurde, drücken Sie
die [38]-Taste.
Lesen Sie hinsichtlich der Wiedergabe von
MP3 bei der Einstellung von 'FOLDER LIST' auf
"WITH MENU" den Abschnitt 'MP3-Ordnerliste'
(Seite 63), um eine Datei auszuwählen, die Sie
wiedergeben lassen möchten.
Die Wiedergabe der Disc beginnt.
• Wenn Sie eine Disc einlegen, beginnt die Wiedergabe
am Discanfang.
Wenn Sie die Stromversorgung während der
Wiedergabe einer Disc ausschalten, führt das erneute
Einschalten der Stromversorgung zur Wiedergabe der
Disc von der Stelle aus, an der sie gestoppt wurde.
Pause
Drücken Sie die [38]-Taste.
Bei jedem Drücken der Taste wird die
Wiedergabe entweder unterbrochen oder
fortgesetzt.
Stopp
Drücken Sie die [7]-Taste.
Drücken Sie die [38]-Taste, um die Wiedergabe
neu zu starten.
Stummschaltung
Schnelles Senken der Lautstärke
Drücken Sie die [MUTE]-Taste.
Bei jedem Drücken der Taste wird die
Stummschaltung ein- oder ausgeschaltet.
Überspringen
Überspringt ein Kapitel, eine Auswahlmöglichkeit,
ein Track oder ein Lied.
Drücken Sie die [4]- oder [¢]-Taste.
ă Schalten Sie die PBC-Funktion durch Drücken der PBC-
Taste aus, um auf einer VCD zu springen.
Schnellvorlauf und -rücklauf
Drücken Sie die [1]- oder [¡]-Taste.
Bei jedem Drücken der Taste ändert sich die
Geschwindigkeit in 4 Stufen (x 2, x 4, x 6, x 8).
Drücken Sie die [38]-Taste, um die Wiedergabe
neu zu starten.
• Wenn Sie die [7]-Taste während der DVD-Wiedergabe
zweimal drücken, wird die DVD bei der nächsten
Wiedergabe ab Discanfang wiedergegeben.
Auswerfen
Drücken Sie die [EJECT]-Taste.
• Drücken Sie die [EJECT]-Taste noch einmal,
wenn Sie die Wiedergabe mit der aus dem Gerät
ausgeworfenen Disc neu starten möchten. Die Disc
wird in das Gerät eingelegt und die Wiedergabe
startet neu.
|
58
Deutch
Page 59

Wiedergabewiederholung
Gibt ein Lied, ein Kapitel, ein Titel usw. wiederholt
wieder.
Drücken Sie die [REPEAT]-Taste.
Bei jedem Drücken der Taste wird die
Wiedergabewiederholung wie nachfolgend
dargestellt umgeschaltet.
In der DVD-Quelle
Display Einstellung
"CHAPTER REPEAT ON" Gibt das Kapitel wiederholt wieder.
"TITLE REPEAT ON" Gibt den Titel wiederholt wieder.
"REPEAT OFF" Schaltet die wiederholte Wiedergabe aus.
In der CD/VCD-Quelle
Display Einstellung
"REP-ONE" Gibt die Spur wiederholt wieder.
"REP-ALL" Gibt die Disc wiederholt wieder.
"REPEAT OFF" Schaltet die wiederholte Wiedergabe aus.
In der MP3-Quelle
Display Einstellung
"REP-ONE" Gibt das Musikstück wiederholt wieder.
"FOLDER-REP"/"REP-ALL" Gibt Lieder in dem Ordner wiederholt
wieder
"FOLDER"/"REPEAT OFF" Schaltet die wiederholte Wiedergabe aus.
• Um eine VCD wiederholt wiedergeben zu lassen,
schalten Sie bitte die PBC-Funktion aus, indem Sie
die [PBC]-Taste drücken.
Display-Umschaltung
Schaltet die auf dem Monitorbildschirm
angezeigten Informationen um.
Drücken Sie die [DISPLAY]-Taste.
Bei jedem Drücken der Taste schaltet sich das
Display wie nachfolgend dargestellt um.
In der DVD-Quelle
Display Information
"TITLE CHAPTER" Titel/Kapitel verstrichene Zeit
"TITLE REMAIN" Titel verbleibende Zeit
"CHAPTER ELAPSED" Kapitel verstrichene Zeit
"CHAPTER REMAIN" Kapitel verbleibende Zeit
"OFF" Nicht angezeigt
In einer VCD (bei eingeschaltetem PBC)-/MP3Quelle
Display Information
"SINGLE ELAPSED" Lied verstrichene Zeit
"SINGLE REMAIN" Lied verbleibende Zeit
"OFF" Nicht angezeigt
In einer VCD (bei ausgeschaltetem PBC)-/CDQuelle
Display Information
"SINGLE ELAPSED" Track verstrichene Zeit
"SINGLE REMAIN" Track verbleibende Zeit
"TOTAL ELAPSED" Disc verstrichene Zeit
"TOTAL REMAIN" Disc verbleibende Zeit
"OFF" Nicht angezeigt
A-B-Wiedergabewiederholung
[DVD][VCD][CD]
Spezifizieren Sie den Start- und Endpunkt, um
einen Abschnitt zwischen den spezifizierten
Punkten wiederholt wiedergeben zu lassen.
1 Spezifizieren Sie Punkt A (Startpunkt)
Drücken Sie die [A-B]-Taste.
2 Spezifizieren Sie Punkt B (Endpunkt)
Drücken Sie die [A-B]-Taste.
Gibt den Abschnitt zwischen Punkt A und Punkt
B wiederholt wieder.
A-B-Wiederholung beenden
Drücken Sie die [A-B]-Taste.
Deutch
|
59
Page 60

DVD-Video-/Video-CD-Funktionen
0–9
SEARCH
MENU
ZOOM
TOP MENU
PBC
Suchwiedergabe
Ruft direkt die Szene auf, die Sie wiedergeben
lassen möchten.
1 Gehen Sie in den Suchmodus
Drücken Sie die [SEARCH]-Taste.
• Schalten Sie die PBC-Funktion durch Drücken der
PBC-Taste aus, um eine Suchwiedergabe einer VCD
durchzuführen.
2 Wählen Sie den Suchmodus für DVD aus
Drücken Sie die [SEARCH]-Taste.
Bei jedem Drücken der Taste werden die
aufrufbaren Einzelheiten wie unten gezeigt
umgeschaltet.
Einzelheit
Kapitelnummer
Wiedergabezeit
ENTER
SUB TITLE
ANGLE
AUDIO
3 Rufen Sie die Szene auf, die Sie wiedergeben
lassen möchten
Drücken Sie die [0] – [9]-Taste.
Das Gerät beginnt mit der Wiedergabe der
Szene, die Sie während der VCD-Wiedergabe
eingegeben haben.
4 Beginnen Sie mit der Suchwiedergabe für
DVD
Drücken Sie die [ENTER]-Taste.
Das Gerät beginnt mit der Wiedergabe der von
Ihnen eingegebenen Szene.
• Wenn Sie die [2]- oder[3]-Taste während des
Kapitelnummern-Suchmodus drücken, können Sie
nach einer Titelnummer suchen.
|
60
Deutch
Page 61

Zeitlupenwiedergabe
Audio-Sprachauswahl [DVD]
Drücken Sie die [2 I]- oder [I 3]-Taste.
Bei jedem Drücken der Taste wird in Zeitlupe
wie nachfolgend dargestellt wiedergegeben.
Disc Taste Bewegung
I
2
DVD
DVD
VCD
VCD
• Drücken Sie die [38]-Taste, um zur normalen
Geschwindigkeit zurückzukehren.
Die Geschwindigkeit für langsam rückwärts
ändert sich in der Reihenfolge 2X, 4X und 8X.
I 3
Die Geschwindigkeit für langsam vorwärts ändert
sich in der Reihenfolge 2X, 4X und 8X.
2
I
Rückwärts um einen Schritt.
I
3
Die Geschwindigkeit für langsam vorwärts ändert
sich in der Reihenfolge 1X, 2X und 3X.
DVD-Menü/Obermenü (Titel) [DVD]
Ruft das DVD-Menü und das Obermenü
(Titel) auf, um verschiedene Einstellungen
vorzunehmen.
1 Rufen Sie das DVD-Menü auf
Drücken Sie die [MENU]-Taste.
Rufen Sie das Obermenü (Titel) auf
Drücken Sie die [TOP MENU]-Taste.
2 Wählen Sie den Punkt aus
Drücken Sie die [2]/[5]/[3]/[∞]- oder
[0] - [9] -Taste.
3 Beenden Sie den Punkt
Drücken Sie die [38]-Taste.
Lesen Sie hinsichtlich der Anleitung über die
Verwendung aller Menüs das Disc-Handbuch.
4 Beenden Sie die Menüanzeige
Drücken Sie die [MENU]- oder [TOP MENU]Taste.
Drücken Sie die [AUDIO]-Taste.
Schaltet zwischen den auf der Disc
aufgenommenen Sprachen der Reihe nach um.
• Wenn nicht mehr als eine Sprache auf der Disc
aufgenommen ist, erfolgt keine Umschaltung.
Untertitel-Spracheauswahl [DVD]
Drücken Sie die [SUB TITLE]-Taste.
Schaltet zwischen den auf der Disc
aufgenommenen Sprachen der Reihe nach um.
• Wenn nicht mehr als eine Sprache auf der Disc
aufgenommen ist, erfolgt keine Umschaltung.
Bildwinkel-Auswahl [DVD]
Drücken Sie die [ANGLE]-Taste.
Schaltet zwischen den auf der Disc
aufgezeichneten Winkeln der Reihe nach um.
• Wenn nicht mehr als ein Winkel auf der Disc
aufgezeichnet ist, erfolgt keine Umschaltung.
Zoom [DVD]
Zoomt das Bild.
1 Wählen Sie das Zoomverhältnis aus
Drücken Sie die [ZOOM]-Taste.
Bei jedem Drücken der Taste ändert sich das
Zoomverhältnis in 3 Stufen (X1.5, X2, X3).
2 Wählen Sie die Anzeigeposition aus
Drücken Sie die [2]/[5]/[3]/[∞]-Taste.
Deutch
|
61
Page 62

DVD-Video-/Video-CD-Funktionen
PBC [VCD]
Verwendet die Wiedergabesteuerfunktion (PBC).
1 Schalten Sie die Wiedergabesteuerfunktion
ein
Drücken Sie die [PBC]-Taste.
Bei jedem Drücken der Taste wird die PBCFunktion ein- oder ausgeschaltet.
2 Wählen Sie den Punkt aus
Drücken Sie die [0] – [9]-Taste.
3 Beenden Sie den Punkt
Drücken Sie die [38]-Taste.
Lesen Sie hinsichtlich der Anleitung über die
Verwendung von PBC das Disc-Handbuch.
• Sie können die PBC-Funktion verwenden, wenn eine
VCD der Ver2.0 oder höher wiedergegeben wird.
Übersichtsbildschirm [DVD]
Zeigt die Kapitel eines Titels an, um die Szene
aufzurufen, die Sie sich ansehen möchten.
1 Geben Sie die Titelinformationen ein
Drücken Sie die [PBC]-Taste.
Auswahl einer Szene
4 Stoppen Sie die Wiedergabe
Drücken Sie die [7]-Taste.
5 Lassen Sie den Übersichtsbildschirm
anzeigen
Drücken Sie die [MENU]-Taste.
• Drücken Sie die [7]-Taste, um zum vorherigen
Bildschirm zurückzukehren.
6 Lassen Sie die Szene wiedergeben,
die Sie sich ansehen möchten
Drücken Sie die [1] – [9]-Taste.
Drücken Sie die [1] – [9]-Taste entsprechend
der auf dem Übersichtsbildschirm angezeigten
Nummer.
2 Wählen Sie den Titel aus
Drücken Sie die [2]- oder [3]-Taste.
• Drücken Sie die [1]- oder [¡]-Taste, um 10 Titel
gleichzeitig zu ändern.
• Drücken Sie die [4]- oder [¢]-Taste, um zum
ersten oder letzten Titel zu schalten.
3 Lassen Sie den Titel wiedergeben
Drücken Sie die [ENTER]-Taste.
|
62
Deutch
• Drücken Sie die [4]- oder [¢]-Taste, um zur
vorherigen oder zur nächsten Seite zu gehen.
7 Lassen Sie die Szene wiedergeben,
die Sie ausgewählt haben
Drücken Sie die [ENTER]-Taste.
• Drücken Sie die [7]-Taste, um zum vorherigen
Bildschirm zurückzukehren.
Übersichtsbildschirm beenden
Drücken Sie die [PBC]-Taste.
• Einige Titel oder Kapitel werden möglicherweise nicht
angezeigt. In diesem Fall wird der vorherige Bildschirm
angezeigt.
Page 63

CD/MP3-Funktionen
0–9
SEARCH
7
MP3-Ordnerliste [MP3]
Wählen Sie den Ordner oder die Datei aus, den
bzw. die Sie wiedergeben lassen möchten.
1 Stoppen Sie die Wiedergabe
Drücken Sie die [7]-Taste.
2 Verschieben Sie den Cursor zur Ordnerliste
Drücken Sie die [2]/[3]-Taste.
RANDOM
38
ENTER
PROG
4 Beenden Sie Ihre Auswahl
Drücken Sie die [ENTER]-Taste.
5 Wählen Sie die Datei aus
Drücken Sie die [5]/[∞]-Taste.
• Drücken Sie die [4]- oder [¢]-Taste, um die Liste
hinauf- oder hinabzuscrollen.
6 Lassen Sie die ausgewählte Datei
wiedergeben
Drücken Sie die [ENTER]-Taste.
Ordnerliste
3 Wählen Sie den Ordner aus
Drücken Sie die [5]/[∞]-Taste.
Dateiliste
Deutch
|
63
Page 64

CD/MP3-Funktionen
Programmwiedergabe
Gibt die ausgewählten Lieder nur der Reihe nach
wieder.
1 Stoppen Sie die Wiedergabe
Drücken Sie die [7]-Taste.
2 Rufen Sie den Programmiermodus auf
Drücken Sie die [PROG]-Taste.
Während der MP3-Wiedergabe schaltet sich der
an der Unterseite des Bildschirms angezeigte
"PLAY MODE" zu "PROGRAM PO" um.
3 Wählen Sie das Lied aus, das Sie
wiedergeben lassen möchten
Drücken Sie die [2]/[5]/[3]/[∞]- (nur
während der MP3-Wiedergabe) oder [0] – [9]Taste.
Spezifiziert die Datei, die das Lied enthält,
das Sie wiedergeben lassen möchten.
4 Beenden Sie das Lied, das Sie wiedergeben
lassen möchten
Drücken Sie die [ENTER]-Taste.
Das in Schritt 3 ausgewählte Lied wird als
Programmnummer 1 registriert.
5 Wiederholen Sie die Schritte 3 und 4, um
alle Lieder zu registrieren, die Sie per
Programmwiedergabe wiedergeben lassen
möchten.
Drücken Sie für MP3, nachdem Sie die Programmierung abgeschlossen haben, die [7]-Taste,
um den Programmiermodus zu verlassen.
6 Starten Sie die Programmwiedergabe
Drücken Sie die [38]-Taste.
Gibt die registrierten Lieder der Reihe nach
wieder.
Abbrechen der Programmwiedergabe für CD
Drücken Sie die [7]-, [PROG]- und [ENTER]Tasten in dieser Reihenfolge.
Abbrechen der Programmwiedergabe für
MP3
Drücken Sie die [7]- und [PROG]-Tasten in
dieser Reihenfolge.
Direktwiedergabe
Ruft direkt das Lied auf, das Sie wiedergeben
lassen möchten.
1 Geben Sie die Track-, Datei oder
Ordnernummer ein, die Sie wiedergeben
lassen möchten
Drücken Sie die [0] – [9]-Taste.
2 Starten Sie die Wiedergabe
Drücken Sie die [ENTER]-Taste.
• Wenn Sie den Betrieb von Schritt 2 für etwa
5 Sekunden nicht ausführen, wird nach dem in
Schritt 1 eingegebenen Lied automatisch gesucht.
Wiedergabezeitsuche [CD]
Geben Sie die Wiedergabezeit ein, ab der Sie
die Wiedergabe starten möchten.
1 Rufen Sie den Wiedergabezeitsuchmodus
auf
Drücken Sie die [SEARCH]-Taste.
2 Geben Sie die Wiedergabezeit ein, ab der
Sie die Wiedergabe starten möchten
Drücken Sie die [0] – [9]-Taste.
Zum Beispiel
5:07 ➪ [0], [5], [0], [7]
Das Gerät beginnt mit der Wiedergabe von der
von Ihnen eingegebenen Zeit aus.
64
|
Deutch
Page 65

MP3-Wiedergabemodus [MP3]
Wählen Sie das Wiedergabeverfahren aus.
1 Stoppen Sie die Wiedergabe
Drücken Sie die [7]-Taste.
2 Markieren Sie die Wiedergabemodus-Taste
Drücken Sie die [2]/[3]-Taste.
Wiedergabemodus-Taste
3 Wählen Sie das Wiedergabeverfahren aus
Drücken Sie die [5]/[∞]-Taste.
Sie können das Wiedergabeverfahren wie unten
dargestellt auswählen.
Display Einstellung
"SINGLE" Stoppt nach der Wiedergabe eines Liedes.
"REP-ONE" Gibt ein Lied wiederholt wieder.
"FOLDER" Stoppt nach der Wiedergabe der Lieder in einem
Ordner.
"FOLDER REP" Gibt Lieder in dem Ordner wiederholt wieder.
"DISC SCAN" Gibt ca. die ersten 10 Sekunden aller Lieder auf
der Disc ab.
"DISC" Stoppt nach der Wiedergabe der Lieder auf der
Disc.
"DISC REP" Gibt die Lieder auf der Disc wiederholt wieder.
"RANDOM" Gibt Lieder in dem Ordner in zufälliger
Reihenfolge wieder.
"SHUFFLE ON" Stoppt nach der zufälligen Wiedergabe der Lieder
in dem Ordner.
Zufallswiedergabe
Lieder werden aus den auf der Disc gespeicherten
zufällig ausgewählt, geöffnet und wiedergegeben.
1 Stoppen Sie die Wiedergabe
Drücken Sie die [7]-Taste.
2 Auswahl der Zufallswiedergabe
Drücken Sie die [RANDOM]-Taste.
Bei jedem Drücken der Taste schaltet sich der
Zufallswiedergabemodus wie folgt um:
In der CD-Quelle
Display Einstellung
"RANDOM ON" Gibt das Musikstück auf der CD in zufälliger
"RANDOM OFF" Schaltet die Zufallswiedergabe aus.
In der MP3-Quelle
Display Einstellung
"RANDOM"
"SHUFFLE ON" Stoppt nach der zufälligen Wiedergabe der Lieder
"FOLDER" Schaltet die Zufallswiedergabe aus.
Reihenfolge
Gibt Lieder in dem Ordner in zufälliger
Reihenfolge wieder.
in dem Ordner.
3 Wählen Sie bei MP3 den Ordner aus
Drücken Sie die [2]/[5]/[3]/[∞]-Taste.
Platzieren Sie den Cursor auf einer beliebigen
Datei in dem Ordner, die Sie in zufälliger
Reihenfolge wiedergeben lassen möchten.
4 Starten Sie die Zufallswiedergabe
Drücken Sie die [38]-Taste.
4 Wählen Sie das(die) Lied(er) aus
Drücken Sie die [2]/[5]/[3]/[∞]-Taste.
Wählen Sie die Datei oder den Ordner aus, die/
den Sie wiedergeben lassen möchten.
5 Starten Sie die Wiedergabe
Drücken Sie die [ENTER]-Taste.
Gibt das(die) Lied(er) im ausgewählten
Wiedergabeverfahren wieder.
Deutch
|
65
Page 66

Einrichtungsmenü
7
ENTER
Einrichtungsmenü
Sie können die Grundeinstellung für
mehrere Funktionen des Gerätes mithilfe des
Einrichtungsmenüs individuell anpassen.
1 Stoppen Sie die Wiedergabe
Drücken Sie die [7]-Taste.
Drücken Sie während der DVD-Wiedergabe
die Taste zweimal.
Schalten Sie während der VCD-Wiedergabe
die PBC-Funktion aus, indem Sie zuerst die
[PBC]- Taste drücken.
2 Lassen Sie sich den SETUP MENU-Bildschirm
anzeigen
Drücken Sie die [SETUP]-Taste.
SETUP MENU wird auf dem angeschlossenen
Monitorbildschirm angezeigt.
3 Wählen Sie die Menüseite aus, die Sie
einrichten möchten
Drücken Sie die [2]/[5]/[3]/[∞]-Taste.
4 Rufen Sie die ausgewählte Menüseite auf
Drücken Sie die [ENTER]-Taste.
SETUP
Die in Schritt 3 ausgewählte Menüseite wird
angezeigt.
5 Wählen Sie den Einrichtungspunkt und die
Option aus
Drücken Sie die [2]/[5]/[3]/[∞]-Taste.
Lesen Sie sich hinsichtlich der
Einrichtungspunkte und Optionen aller Menüs
die nachfolgenden Beschreibungen.
6 Beenden Sie Ihre Auswahl
Drücken Sie die [ENTER]-Taste.
7 Verlassen Sie das Einrichtungsmenü
Drücken Sie die [2]/[5]/[3]/[∞]- und
[ENTER]-Taste.
Wählen und führen Sie "MAIN PAGE" und "EXIT
SETUP" nacheinander aus.
66
|
Deutch
Page 67

Allgemeine Einrichtung
TV DISPLAY
Verwenden Sie das unten beschriebene
Verfahren, um den Ausgabebildschirm
einzustellen.
Display Einstellung
"NORMAL/PS" Breitbildschirm-Software mit Pan- und Scan-
Spezifikation wird in einem Pan- und ScanBildschirm wiedergegeben (linke und rechte Seite
ist abgeschnitten).
"NORMAL/LB" Breitbildschirm-Software mit Pan- und Scan-
Spezifikation wird in einem Letterbox-Bildschirm
wiedergegeben (schwarze Balken oben und
unten).
"WIDE" Stellen Sie den Bildmodus des Breitbildmonitors
auf "FULL".
PIC (Bild) MODE
Wählen Sie einen DVD-Bildmodus aus.
Display Einstellung
"AUTO" Das Bild wird je nach Originalbild automatisch
umgeschaltet.
"HI-RES" Das auf der DVD aufgenommene Originalbild ist
der Videomodus.
"N-FLICKER" Das auf der DVD aufgenommene Originalbild ist
der Filmbildmodus.
ANGLE MARK
Wenn mehrere Bildwinkel auf einer DVD
aufgenommen wurden, werden sie während der
Wiedergabe durch die Markierung angezeigt.
SCR (Bildschirm) SAVER
Um zu verhindern, dass der Bildschirm
übersteuert, können Sie den Bildschirmschoner
automatisch starten, wenn sich das angezeigte
Bild für eine bestimmte Zeitdauer nicht verändert.
Display Einstellung
"ON" Star tet den Bildschirmschoner automatisch.
"OFF" Bildschirmschoner wird nicht verwendet.
Lautsprechereinrichtung
DOWNMIX
Stellen Sie den gemischten Tonausgang auf den
2-Kanal-Stereo-Port ein.
Display Einstellung
"LT/RT" Gibt den Ton mit gemischten Dolby Surround-Audio
aus.
"STEREO" Gibt den Ton in Stereo aus.
Display Einstellung
"ON" Zeigt die Winkelmarkierung an.
"OFF" Zeigt die Winkelmarkierung nicht an.
OSD LANG (Bildschirmanzeigesprache)
Verwenden Sie "ENGLISH" wie eingestellt.
CAPTIONS
Wenn eine Disc mit Untertitel für Hörbehinderten-Informationen wiedergegeben wird,
Informationen diese ausgegeben werden.
Display Einstellung
"ON" Gibt das Untertitel für Hörbehinder ten-Signal aus.
"OFF"
Gibt das Untertitel für Hörbehinderten-Signal
nicht aus.
Deutch
|
67
Page 68

Einrichtungsmenü
Audio-Einrichtung
AUDIO OUT
Display Einstellung
"ANALOG" Gibt einen analogen Ton aus. (Es wird kein
Digitalklang ausgegeben.)
"SPDIF/RAW" Gibt einen 5.1-Kan. S/PDIF Bitstream-Digitalton aus.
(Es wird kein Analogklang ausgegeben.)
"SPDIF/PCM" Gibt einen 2-Kan. S/PDIF PCM-Digitalton aus. (Es
wird kein Analogklang ausgegeben.)
OP MODE
Display Einstellung
"LINE MODE" Gibt einen normalen LINE-Ton aus.
"RF MODE" Schmälert den Dynamikbereich eines Audiosignals,
das über den RF- Modulator ausgegeben wird.
DUAL MODE
Stellen Sie den Ausgangston einer Karaoke-DVD
ein (für Einzelgerät).
Display Einstellung
"STEREO" Stereo (L / R)
"L-MONO" Mono links (L / L)
"R-MONO" Mono rechts (R / R)
"MIX-MONO" Gemischt links und rechts (L+R / L+R)
DYNAMIC
Stellt den Dynamikbereich des auf einer
Dolby Digital-System-DVD aufgenommenen
Wiedergabetons ein.
LPCM OUTPUT
Display Einstellung
"LPCM 48k" Gibt ein Lied mit 96 kfs in 48 kfs vom DIGITAL OUT aus.
"LPCM 96k" Gibt ein Lied mit 96 kfs in 96 kfs vom DIGITAL OUT aus.
Display Einstellung
"FULL" Für kraftvolleren Ton bei normalen Lautstärken
"7/8"
"6/8" / "3/4"
"5/8"
"4/8" / "1/2"
"3/8"
"2/8" / "1/4"
"1/8"
"OFF" Für normalen Ton
|
68
Deutch
Groß
±
Kompressionsrate
≠
Klein
Page 69

Voreinstellungen
TV TYPE
Ein TV-Typ kann entsprechend dem TVFarbanzeigemodus eingestellt werden.
Display Einstellung
"MULTI" Der Farbsignalausgang wird entsprechend dem
"NTSC" Die Farbsignale werden im Standard-NTSC-System
"PAL" Die Farbsignale werden im Standard-PAL-System
AUDIO
Stellen Sie die Audiosprache ein, die von den
Lautsprechern ausgegeben wird.
Display Einstellung
"ENGLISH"
"FRENCH" Französisch
"SPANISH" Spanisch
"CHINESE" Chinesisch
"JAPANESE" Japanisch
SUB TITLE
Stellen Sie die Sprache für die Untertitel ein, die
auf dem Bildschirm angezeigt werden.
Display Einstellung
"ENGLISH"
"FRENCH" Französisch
"SPANISH" Spanisch
"CHINESE" Chinesisch
"JAPANESE" Japanisch
"OFF" Es werden keine Untertitel angezeigt.
DISC MENU
Stellen Sie die Sprache des Discmenüs ein.
Display Einstellung
"ENGLISH"
"FRENCH" Französisch
"SPANISH" Spanisch
"CHINESE" Chinesisch
"JAPANESE" Japanisch
Aufnahmesystem der aktuellen Disc automatisch
umgeschaltet.
ausgegeben.
ausgegeben.
Englisch
Englisch
Englisch
PARENTAL
Stellen Sie die Kindersichtungsstufe ein. Je höher
die Stufe, desto höher ist der Schutz.
Display Einstellung
"1 G"
"2"
"3 PG"
"4 PG 13"
"5"
"6 PG-R"
"7 NC-17"
"8 ADULT"
"NO_PARENTAL" Beendet die Kindersicherung.
1 Drücken Sie die [ENTER]-Taste auf der
Fernbedienung.
2 Richten Sie das Kindersicherungsniveau ein.
3 Geben Sie das Passwort ein.
4 Drücken Sie die [ENTER]-Taste auf der
Fernbedienung.
• Das Passwort ist ab Werk auf "0000" eingestellt.
• Die Kindersicherungseinstellung ist nur für "R"gekennzeichnete Discs aktiviert.
Es können nur G-bewertete Filme (für Kinder)
wiedergegeben werden.
PASSWORD
CHANGE: Ändern Sie das Passwort.
1 Wählen Sie "CHANGE" und drücken Sie die
[ENTER]-Taste auf der Fernbedienung.
2 Geben Sie das aktuelle Passwort ein.
3 Geben Sie das neue Passwort zweimal ein.
4 Drücken Sie die [ENTER]-Taste auf der
Fernbedienung.
• Das Passwort ist ab Werk auf "0000" eingestellt.
DEFAULTS
RESET: Stellt die kundenspezifischen Punkte im
Einrichtungsmenü außer dem Passwort
zurück.
FOLDER LIST
Stellen Sie diesen Punkt ein, um das Verzeichnis
auf dem Monitorbildschirm anzeigen zu lassen,
wenn MP3 wiedergegeben wird.
Display Einstellung
"NO MENU"
"WITH MENU" Das Verzeichnis wird angezeigt.
Das Verzeichnis wird nicht angezeigt.
Deutch
|
69
Page 70

Zubehör Installation
1
2
3
4
5
..........1
..........1
..........2
..........4
Installation unter Verwendung der
Halterungen
Gewindeschraube 5
Halterung 3
Semusu-Schraube 4
Installation unter Verwendung von
Klettverschluss
Teppichboden
Klettverschluss 6
..........4
6
..........2
7
..........1
• Falls die Sicherung durchbrennt, stellen Sie bitte zuerst
sicher, dass die Leitunge keinen Kurzschluss verursachte
haben, und tauschen Sie anschließend die alte Sicherung
mit einer neuen aus, die die gleichen Werte aufweist.
|
70
Deutch
• Verwenden Sie für den Einbau ausschließlich die
mitgelieferten Schrauben. Zu lange oder zu dicke
Schrauben können das Gerät beschädigen.
• Installieren Sie das Gerät an keinem instabilen Ort oder an
einem Ort, an dem es Vibrationen ausgesetzt wäre.
• Sie können das Gerät in jedem beliebigen Winkel
zwischen der herkömmlichen horizontalen Position und
der vertikalen Position an seiner Rückseite (0° bis 90°)
installieren. Sie können das Gerät nicht mit nach unten
weisendem Discfach befestigen, oder in einer verdrehten
oder auf dem Kopf stehenden Stellung.
Page 71

Anschluss der Leitungen an die Anschlüsse
TV, Monitor usw.
(optionales Zubehör)
Linker Audio-Ausgang
Rechter
Audio-Ausgang
Videoausgang
Digitalausgang
RCA AV-Kabel 7
Fernbedienungssensor 2
Netzkabel 1
Rückansicht DVD-Player
Zigarettenanzünder-Stecker
Eingebaute
Sicherung (3A)
Zur ZigarettenanzünderBuchse
Befestigung des Fernbedienungssensors
1 Entfernen Sie die Schutzfolie vom Klettverschluss auf der
Rückseite des Fernbedienungssensors.
2 Befestigen Sie den Fernbedienungssensor, nachdem Sie
eventuell vorhandene Verschmutzungen oder Öl von der
Befestigungsstelle beseitigt haben.
• Beseitigen Sie eventuelle Verschmutzungen oder Öl von der
Oberfläche, an der der Sensor befestigt werden soll.
• Vermeiden Sie bei der Befestigung Stellen unter direktem
Sonnenlicht oder in der Nähe eines Fernsehbildschirmes, bei denen
die Signale von der Fernbedienung nicht so leicht empfangen
werden können.
Schutzfolier
Deutch
|
71
Page 72

Fehlersuche
Manchmal funktioniert das Gerät nicht richtig,
weil ein einfacher Bedienungsfehler vorliegt.
Schauen Sie daher zunächst in die nachfolgende
Übersicht, bevor Sie Ihr Gerät zur Reparatur
geben. Vielleicht läßt sich der Fehler ganz leicht
beheben.
? Kein Ton oder zu geringe Lautstärke.
✔ Die Stummsschaltung ist eingeschaltet.
☞ Schalten Sie die Stummschaltung aus.
? Während der DVD/CD/VCD-Wiedergabe treten
Bild/Tonaussetzer auf.
✔ Die Disc ist verschmutzt oder beschädigt.
☞ Reinigen Sie die Disc (siehe Kapitel
<Reinigung einer Disc>) (Siehe Seite 56).
? Eine VCD kann nicht mit Hilfe der Menüs
wiedergegeben werden.
✔ Die wiedergegebene VCD weist keine P.B.C.-Daten
auf.
☞ Eine Men-Wiedergabe ist nur bei VCDs
möglich, die über P.B.C.-Funktionen verfügen.
? Es werden keine Untertitel angezeigt.
✔ Die wiedergegebene DVD weist keine Untertitel-
Daten auf.
☞ Untertitel können nicht angezeigt werden,
wenn die wiedergegebene DVD keine
Untertitel-Funktionen enthält.
? Die Wiedergabe-Sprache (oder Untertitel-
Sprache) kann nicht geändert werden.
✔ Die wiedergegebene DVD enthält nur eine
Wiedergabe- bzw. Untertitel-Sprache.
☞ Die Wiedergabe-Sprache (oder Untertitel-
Sprache) kann nur dann geändert werden,
wenn die DVD mehrere Wiedergabe- bzw.
Untertitel-Sprachen enthält.
? Statt der angewählten Disc wird eine andere
abgespielt.
✔ Die angewählte Disc ist sehr verschmutzt oder
beschädigt.
☞ Die Disc überprüfen und ggf. reinigen. .
✔ Die Disc ist verkehrt herum eingelegt.
☞ Nehmen Sie das Magazin heraus und legen
die Disc richtig herum ein.
✔ Die Disc ist beschädigt.
☞ Tauschen Sie die Disc aus.
? Während der MP3-Wiedergabe können die
Betriebe für die MP3-Ordnerliste, für den MP3Wiedergabemodus, für die Programmwiedergabe
oder für die Zufallswiedergabe nicht
durchgeführt werden.
✔ Im Setup-Menü ist die Option 'FOLDER LIST' auf
"NO MENU" eingestellt.
☞ Stellen Sie die Option 'FOLDER LIST' auf "WITH
MENU" (siehe Seite 69).
Die unten aufgeführten Meldungen
zeigen den Zustand Ihres Systems an.
"THERMAL PROTECTION PLEASE SHUT OFF POWER"
: Die Schutzschaltung im Gerät wird aktiviert, wenn
die Temperatur im Inneren des Gerätes 60°C (140°F)
überschreitet, und der Betrieb wird gestoppt.
➪ Lassen Sie das Gerät durch Öffnen der Fenster
oder Einschalten der Lüftung abkühlen. Sobald die
Temperatur unter 60°C (140°F) fällt, wird die DiscWiedergabe fortgesetzt.
Um eine Disc in dieser Situation auswerfen zu lassen,
schalten Sie bitte die Stromversorgung aus und
schalten sie anschließend wieder ein.
"NO DISC"
: Es wurde keine Disc in das Gerät eingelegt.
"WRONG REGION"
: Es wurde eine DVD mit falschem Regionencode in das
Gerät eingelegt.
"DISC ERROR"
: Es wurde eine Disc eingelegt, die mit diesem Gerät nicht
wiedergegeben lassen werden kann.
"INVALID ENTRY"
: Die eingelegte Disc enthält beschädigte oder nicht
standardisierte Daten.
"PASSWORD INCORRECT"
: Das eingegebene Passwort stimmt nicht mit dem
ursprünglich registrierten Passwort überein.
"NEW PASSWORD NOT CONFIRMED"
: Diese Anzeige erscheint, wenn das zweite neue
Passwort nicht mit dem ersten übereinstimmt, wenn das
Passwort geändert wird.
➪ Wenn Sie das neue Passwort eingeben, müssen
Sie aus Bestätigungsgründen zweimal das gleiche
Passwort eingeben.
72
|
Deutch
Page 73

Technishe Daten
Die technischen Daten können sich ohne besonderen Hinweis ändern.
DVD-Abschnitt
D/A-Umwandlung
: 8-Pegel∆Σ, 24 -Bit
Tonhöhenschwankungen
: Unterhalb der Meßgrenze
Frequenzgang
: 17- 44 kHz (DVD96kHz Abtastung)
Gesamtklirrgrad 1kHz
: 0,02 %
Signal/Rauschabstand
: 106 dB
Dynamikbereich
: 90 dB
MP3-Decodierung
: mit MPEG-1/2 Audio Layer-3 kompatibel
DISC-Format
: DVD-VIDEO/ VIDEO-CD/ CD-DA/ MP3
Ausgang
Komposit-Videoausgangspegel (V )
: 1V p-p (75Ω)
2-kan. Audio-Ausgangspegel (V)
:1,2 V/ 10 kΩ (DVD/CD)
Koaxial-Digital-Audio-Schnittstellenausgangsp
egel (V )
: 0,5 V/ 75 Ω
Allgemein
Betriebsspannung
: 14,4 V (11 – 16 V)
Stromaufnahme
: 2 A
Abmessungen (BxHxT)
: 194 mm x 54 mm x 245 mm
Gewicht
: 1,85 kg
Deutch
|
73
Page 74

Inhoud
Veiligheidsvoorschriften 75
Voor de ingebruikname gebruik 76
Opmerkingen over weergave van
MP3 78
Over de afstandsbediening 79
Over discs 80
Basisfuncties 81
In-/uitschakelen
Afspelen
Dempen
Overslaan
Snel vooruit- en achteruitspoelen
Afspelen herhalen
A-B herhaald afspelen [DVD][VCD][CD]
Veranderen van display
DVD Video-/Video CD-functies 84
Afspelen zoeken
Afspelen in slowmotion
DVD menu/Bovenste (titel) menu [DVD]
Selecteren van de gesproken taal [DVD]
Selecteren van de taal van de ondertiteling
[DVD]
Selecteren van de camerahoek [DVD]
Zoomen [DVD]
PBC [VCD]
Overzichtsscherm [DVD]
CD/MP3-functies 87
MP3-mappenlijst [MP3]
Programma afspelen
Direct afspelen
Opzoeken van afspeeltijd [CD]
Afspeelmodus MP3 [MP3]
Willekeurige afspeelvolgorde
Instelmenu 90
Instelmenu
Algemene Setup
Speaker-instelling
Audio-instelling
Voorkeuren
Toebehoren 94
Installatie 94
Bedrading op de klemmen
aansluiten 95
Oplossen van problemen 96
Technische gegevens 97
74
Nederlands
|
[DVD]: Functie alleen tijdens afspelen van DVD's.
[VCD]: Functie alleen tijdens afspelen van Video CD's.
[CD]: Functie alleen tijdens afspelen van CD's.
[MP3]: Functie alleen tijdens afspelen van MP3's.
Page 75

Veiligheidsvoorschriften
2WAARSCHUWING
Voorkom persoonlijk letsel en/of
brand en let derhalve op de volgende
voorzorgen:
• Steek het toestel geheel in totdat het op zijn
plaats vergrendelt. Het toestel schiet anders
namelijk in geval van een botsing of schokken
mogelijk van zijn plaats.
• Voorkom kortsluiting en steek derhalve
nooit metalen voorwerpen (zoals munten en
gereedschap) in het toestel.
• Schakel de spanning direkt uit en raadpleeg
uw Kenwood handelaar indien er rook of een
vreemde geur uit het toestel komt.
• Verbind de eenheid niet met de monitor aan de
voorzijde. Deze eenheid is bestemd voor gebruik
op de achterbank.
• Gebruik geen andere voedingskabel dan de
meegeleverde kabel. Dit kan brand veroorzaken.
2LET OP
Voorkom beschadiging van het toestel en
let derhalve op de volgende voorzorgen:
• Zorg dat het toestel op een negatief 12 Volt
gelijkstroomsysteem is geaard.
• Open nooit de boven- of onderpanelen van het
toestel.
• Installeer het toestel niet op plaatsen die aan het
direkte zonlicht, hitte of extreme vochtigheid
blootstaan. Vermijd tevens zeer stoffige plaatsen
of plaatsen waar het toestel nat zou kunnen
worden.
• Gebruik bij het installeren uitsluitend de
bijgeleverde schroeven. Het toestel wordt
mogelijk beschadigd door gebruik van andere
schroeven.
• Bij het vervangen van een zekering moet u altijd
een nieuwe zekering van hetzelfde ampèrage
gebruiken. Het gebruik van een andere zekering
veroorzaakt mogelijk een onjuiste werking van het
toestel.
OPMERKING
• Raadpleeg uw Kenwood handelaar indien u
problemen of vragen over het installeren heeft.
• De afbeeldingen van de display en het
voorpaneel in deze gebruiksaanwijzing zijn slechts
voorbeelden en zijn bedoeld om het gebruik
van de bedieningsorganen te verduidelijken.
Derhalve kan het voorkomen dat datgene wat
op de afgebeelde display afwijkt van wat in
werkelijkheid op de display kan verschijnen.
• Schakel de eenheid uit en weer in wanneer deze
niet correct functioneert. Functioneert de eenheid
nog steeds niet correct nadat u deze hebt uit- en
weer ingeschakeld, neem dan voor ondersteuning
contact op met uw plaatselijke Kenwood-dealer.
Restricties vanwege verschillen in disks
Inhibition
speler geeft disks weer in overeenstemming met
de intenties van de software-fabrikant en bepaalde
functies kunnen derhalve niet voor bepaalde disks
worden gebruikt.
Lees de aanwijzingen die bij iedere disk worden
geleverd. Indien een “verbodicoon” op het scherm
van de aangesloten TV wordt getoond, betekent dit
dat de geplaatste disk bepaalde restricties heeft.
Bepaalde DVD’s en VCD’s kunnen
uitsluitend met bepaalde
icon
weergavefuncties worden afgespeeld,
in overeenstemming met de intenties
van de fabrikant van de software. Deze
Kondens op de lens
Nadat u de autoverwarming aanzet bij lage
temperaturen wordt er mogelijk kondens op de
lens van de CD-speler gevormd. De lens "beslaat"
en CD’s kunnen niet worden afgespeeld. Verwijder
in zo’n geval de CD en wacht totdat de kondens
is verdampt. Raadpleeg uw Kenwood handelaar
indien het toestel na een tijdje nog niet normaal
functioneert.
Reinigen van het toestel
Als het voorpaneel van dit toestel vuil is, moet u
het met een droge zachte doek, bijvoorbeeld een
siliconendoek, schoonvegen. Als het voorpaneel
erg vuil is, veegt u het vuil weg met een doek die is
bevochtigd met een neutraal reinigingsmiddel en
veegt u vervolgens het reinigingsmiddel weg.
• Spuit geen reinigingsmiddel rechtstreeks op het toestel,
want dit kan de mechanische onderdelen beschadigen.
Veeg het voorpaneel niet schoon met een harde doek of
met een vluchtig middel als verdunner of alcohol, want
dit kan leiden tot krassen of het verdwijnen van letters.
Nederlands
|
75
Page 76

Voor de ingebruikname gebruik
Regiocodes in de wereld
1
4
Iconen op DVD’s
Icoon Beschrijving
Toont de code van het gebied waar deze disk kan worden afgespeeld.
8
32
Aantal talen voor de tekst van de audiofunctie. Het nummer in de icoon toont het
aantal. (max. 8 talen)
Aantal talen voor de ondertitels. Het nummer in de icoon toont het aantal beschikbare
talen voor de ondertitels. (max. 32 talen)
5
2
1
2
6
3
5
2
1
4
Aantal hoeken voor de perspectieff unctie. Het nummer in de icoon toont het aantal
9
16:9 LB
beschikbare hoeken. (max. 9 hoeken)
Kiesbare aspectverhoudingen. "LB" staat voor "Letter en Box" en "PS" voor "Pan/Scan".
In geval van deze ter voorbeeld gegeven aanduiding, kan het 16:9 beeld met het
letterbox-formaat worden weergegeven.
Afspeelbare discs
• DVD-Video
• Audio Disc (CD)
• Disc met MP3-indeling (CD)
• Disc met CD-R/RW-indeling
• Video-CD
Ook kunt u de DVD-r-discs niet weergeven indien ze niet zijn opgenomen in het DVD-videoformaat.
Over de gebruikstemperaturen
Het beveiligingscircuit van het toestel treedt in werking wanneer de temperatuur in het toestel tot meer
dan 60°C oploopt en zet elke bediening stop. Zie de Oplossen van problemen (pag 96).
Nederlands
|
76
Page 77

Markering op produkten die laserstralen
gebruiken
(Uitgezonderd voor bepaalde gebieden)
CLASS 1
LASER PRODUCT
Dit label is aangebracht op de behuizing/houder
en toont dat het komponent een laserstraal
gebruikt die als Klasse 1 is geclassificeerd. Dit
betekent dat de laserstraal relatief zwak is en er
geen gevaar van straling buiten het toestel is.
Batterij niet
weggooien, maar
inleveren als KCA.
Dit product wordt niet geïnstalleerd door de
fabrikant van een voertuig op de productielijn,
noch door de professionele invoerder van een
voertuig in EU-lidstaten.
Dit product bevat technologie voor
auteursrechtbescherming die wordt beschermd
door Amerikaanse octrooien en andere
intellectuele eigendomsrechten. Het gebruik van
deze technologie voor auteursrechtbescherming
moet worden goedgekeurd door Macrovision,
en is uitsluitend bedoeld voor thuisgebruik
en ander beperkt kijkgebruik, tenzij anders
goedgekeurd door Macrovision. Reverse
engineering of disassembleren is verboden.
is a trademark of DVD Format/Logo
Licensing Corporation registered in the U.S.,
Japan and other countries.
Vervaardigd in licentie van Dolby Laboratories.
"Dolby" en het dubbel D-symbool zijn
handelsmerken van Dolby Laboratories.
Nederlands
|
77
Page 78

Opmerkingen over weergave van MP3
KDV-S220P kan MP3 (MPEG1, 2 Audio Layer 3)
afspelen. Er wordt evenwel slechts een beperkt
aantal MP3-opnamemedia en -formaten aanvaard.
Bij het schrijven van MP3 dient u rekening te
houden met de volgende beperkingen.
Aanvaardbare geluidsdragers
De voor dit toestel aanvaardbare MP3
geluidsdragers zijn CD-ROM, opneembare CD (CDR) en herschrijfbare CD (CD-RW). Om problemen
tegen te gaan moet u bij gebruik van CD-RW een
volledige formattering uitvoeren in plaats van een
snelle formattering.
Aanvaardbare opnameformaten
De volgende formaten zijn beschikbaar voor de
met dit toestel te gebruiken geluidsdragers. Het
maximumaantal tekens dat kan worden gebruikt
voor bestands- en mapnamen, inclusief het
scheidingsteken (".") en de extensie van drie tekens,
wordt tussen haakjes aangegeven.
• ISO 9660 niveau 1 (12 tekens; Maximaal 11
tekens worden weergegeven.)
• ISO 9660 niveau 2 (31 tekens; Maximaal 11
tekens worden weergegeven.)
• Joliet (64 tekens; Maximaal 11 tekens worden
weergegeven.)
• Romeo (128 tekens; Maximaal 11 tekens worden
weergegeven.)
• Lange bestandsnaam (200 tekens; Maximaal
11 tekens worden
weergegeven.)
• Maximum aantal tekens voor de mapnaam:
128 (Joliet; Maximaal 11 tekens worden
weergegeven.)
Zie de gebruiksaanwijzing van het
branderprogramma en het onderstaande Invoeren
van bestandst- en mapnamen voor een lijst van
beschikbare tekens. De met dit toestel weer te geven
geluidsdragers hebben de volgende beperkingen:
• Maximum aantal directory niveaus: 8
• Maximum aantal bestanden per map: 185
• Maximum aantal mappen: 127
MP3 geschreven in andere dan de bovenstaande
formaten kunnen niet naar behoren worden
afgespeeld en de bestands- en mapnamen kunnen
niet naar behoren worden weergegeven.
Instellingen voor uw MP3-encoder en CDbrander
Kies voor het comprimeren van audiogegevens in
MP3-gegevens met behulp van de MP3-encoder
voor de volgende instellingen.
• Overdrachtssnelheid: 56 —320 kbps
• Bemonsteringsfrequentie
: 11.025, 12, 16, 22.05, 24, 32, 44.1, 48 kHz
Wanneer u uw CD-brander gebruikt om een CD
tot maximale capaciteit met MP3 te beschrijven,
schakelt u extra beschrijvingen uit. Voor het tot
maximale capaciteit beschrijven van een lege disk
in één keer klikt u Disc at Once aan.
ID3 tag-weergave
De ID3 tag kan niet worden weergegeven.
Invoeren van bestands- en mapnamen
De codelijsttekens zijn de enige tekens die
kunnen worden ingevoerd en weergegeven voor
bestandsnamen en mapnamen. Bij invoer van enige
andere tekens worden de bestands- en mapnamen
niet goed weergegeven.
Afhankelijk van de gebruikte CD-brander kunnen
namen niet naar behoren worden weergegeven.
Het toestel herkent alleen die MP3 met de MP3extensie (.MP3).
• De mogelijkheid bestaat dat een bestand met een
naam die is ingevoerd met tekens die niet in de codelijst
voorkomen, niet goed kan worden afgespeeld.
0123456789ABCDEF
00@P‘p
1!1AQaq
22BRbr
3#3CScs
4$4DTdt
5%5EUeu
6&6FVfv
7’7GWgw
8(8HXhx
9)9IYiy
AJZjz
B+;K[k{
C,Ll
D -=M]m}
E . N^n~
FO_o
78
Nederlands
|
Page 79

About the remote
Bestanden naar een geluidsdrager
schrijven
Wanneer een geluidsdrager met MP3 gegevens
wordt geplaatst, controleert het toestel alle
gegevens op die geluidsdrager. Wanneer de
geluidsdrager veel mappen of niet-MP3 bestanden
bevat, kan het enige tijd duren voordat de MP3
bestanden worden weergegeven.
Daarenboven kan het even duren voordat de
eenheid naar het volgende MP3-bestand overgaat
of is het mogelijk dat het zoeken naar een bestand
of een map niet vlot verloopt.
Het plaatsen van een dergelijke geluidsdrager kan een luid
geluid produceren waardoor de luidsprekers beschadigd
kunnen worden.
• Probeer geen geluidsdrager weer te geven waarop een
niet-MP3 bestand met de MP3 extensie staat. Dit toestel
herkent niet-MP3 bestanden als MP3-gegevens wanneer
ze de MP3 extensie hebben.
• Probeer geen geluidsdragers weer te geven waarop nietMP3 bestanden staan.
Weergavevolgorde van MP3
Wanneer bestanden en mappen worden gekozen
voor weergave, zoeken naar mappen, zoeken
naar bestanden of kiezen van mappen, worden
de bestanden en mappen gelezen in de volgorde
waarin ze door de cd-schrijver zijn geschreven.
Hier door is het mogelijk dat de volgorde waarin
ze worden weergegeven anders is dan verwacht.
Mogelijk kunt u de volgorde waarin de MP3bestanden weergegeven moeten worden bepalen
door bij het schrijven naar de geluidsdrager zoals
CD-R de bestandsnamen vooraf te laten gaan door
volgnummers, zoals "01" t/m "99". Dit hangt echter
af van uw CD-brander.
Loading the battery
1. Gebruik twee "AAA" batterijen.
Verwijder de afdekklep zoals getoond.
2. Leg de batterijen in het compartiment met de
+ en – polen in de goede richting, zoals in het
compartiment wordt afgebeeld.
2WAARSCHWING
• Bewaar batterijen die u niet gebruikt buiten het
bereik van kinderen. Raadpleeg direct een arts
wanneer een batterij wordt ingeslikt.
• Leg de afstandsbediening niet op een plaats
waar deze kan bewegen tijdens het rijden. De
afstandsbediening kan dan bijvoorbeeld onder
het rempedaal terechtkomen of u hinderen
tijdens het rijden, wat gevaar oplevert.
• Leg de afstandsbediening niet op hete plaatsen zoals
boven het dashboard.
• De bijgeleverde batterijen zijn bedoeld om de werking
van het toestel te controleren en kunnen een beperkte
levensduur hebben.
• Vervang de batterijen door nieuwe zodra u merkt dat
de afstand waarover de afstandsbediening werkt, korter
wordt.
Nederlands
|
79
Page 80

Over discs
Omgaan met discs
• Raak het opnameoppervlak van de disc niet aan.
• CD-R/RW en DVD-R raken makkelijker beschadigd
dan een normale muziek-CD. Lees alvorens
een CD-R/RW of DVD-R te gebruiken eerst de
waarschuwingen op de verpakking etc.
• Breng geen plakband etc. op de disc aan.
Gebruik ook geen disc waarop plakband zit.
Gebruik van een nieuwe disc
Indien er bramen zitten in het gat of op de rand van
de disc, moet u die verwijderen met een balpen etc.
alvorens de disc te gebruiken.
Bramen
Bramen
Discs verwijderen
Verwijder discs uit deze unit door horizontaal
uittrekken.
Discs die niet kunnen worden gebruikt
• Discs die niet rond zijn kunnen niet worden
gebruikt.
• CD’s met kleuren op het opgenomen oppervlak
kunnen niet worden gebruikt.
• Deze eenheid kan alleen cd’s met
weergeven.
Het is mogelijk dat disks zonder dit kenteken niet
foutloos worden weergegeven.
• Een niet afgewerkte CD-R of CD-RW kan niet
worden weergegeven. (Raadpleeg de instructies
van de CD-R/CD-RW-brander software en de
gebruiksaanwijzing van uw CD-R/CD-RW-brander
voor details over het afwerkingsproces.)
Bewaren van CD’s
• Stel de CD’s niet bloot aan direct zonlicht (op
de zitting of het dashboard, enz.) en hoge
temperaturen.
• Bewaar de CD’s in de daarvoor bestemde doosjes.
Disc-accessoires
Gebruik geen accessoires voor disktypes, e.d.
Disc reinigen
Veeg vanuit het midden van de disk naar de rand.
Nederlands
|
80
Page 81

Basisfuncties
POWER EJECT
1
/¡
DISPLAY
4/¢
38
7
REPEAT
In-/uitschakelen
Druk op de [POWER] toets.
• Verwijder de aansluiting uit de sigarettenaansteker
wanneer u het contact uitschakelt, om te voorkomen
dat de accu leegloopt.
MUTE
A–B
Nederlands
|
81
Page 82

Basisfuncties
Afspelen
Afspelen
Open de lade en plaats een disc in de
eenheid.
Druk, na het plaatsen van een disc, op de [38]
knop.
Voor het afspelen van MP3's wanneer 'MP3mappenlijst' is ingesteld op "WITH MENU", zie
'MP3 Folder List' (blz. 87) om het bestand te
selecteren dat u wilt afspelen.
De disc wordt afgespeeld.
• Wanneer u een disc plaatst, wordt het afspelen gestart
vanaf het begin van de disc.
Als u de spanning uitschakelt tijdens het afspelen van
een disc, wordt de disc verder afgespeeld vanaf het
punt waarop ze is gestopt wanneer u de spanning
weer inschakelt.
Pauze
Druk op de [38] toets.
Elke keer dat de toets wordt ingedrukt, wordt
de weergave tijdelijk onderbroken of hervat.
Stop
Druk op de [7] toets.
Druk om af te spelen op de [38] toets.
Dempen
Snel dempen van het volume.
Druk op de [MUTE] toets.
U schakelt de dempingsfunctie telkens in of uit
wanneer u op de Mute-toets drukt.
Overslaan
Slaat een hoofdstuk, selectie, track of nummer
over.
Druk op de [4] of [¢] toets.
• Om de functie Overslaan te gebruiken tijdens het
afspelen van een VCD, schakelt u de PBC-functie uit
door op de [PBC] toets te drukken.
Snel vooruit- en achteruitspoelen
Druk op de [1] of [¡] toets.
Elke keer dat de toets wordt ingedrukt verandert
de snelheid in 4 niveaus (X2, X4, X6, X8).
Druk om het afspelen opnieuw te starten
op de [38] toets.
• Wanneer u tijdens het afspelen van een DVD twee
maal op de [7] toets drukt, begint de disc de
volgende keer af te spelen vanaf het begin van de
disc.
Uitwerpen
Druk op de [EJECT] toets.
• Wanneer de disclade geopend is en u opnieuw wilt
afspelen, drukt u nogmaals op de [EJECT] toets.
De disclade wordt weer gesloten, en het afspelen
wordt gestart.
Nederlands
|
82
Page 83

Afspelen herhalen
Speelt een muzieknummer, hoofdstuk, titel, etc.
herhaaldelijk af.
Druk op de [REPEAT] toets.
Telkens wanneer deze toets wordt ingedrukt,
wisselt de functie Afspelen herhalen als volgt.
Met DVD als geluidsbron
Display Instelling
"CHAPTER REPEAT ON" Herhaalt de weergave van het hoofdstuk.
"TITLE REPEAT ON" Herhaalt de weergave van de titel.
"REPEAT OFF" Schakelt de weergaveherhaling uit.
In CD/VCD-geluidsbron
Display Instelling
"REP-ONE" Herhaalt de weergave van het fragment.
"REP-ALL" Herhaalt de weergave van de disk.
"REPEAT OFF" Schakelt de weergaveherhaling uit.
Met MP3 als geluidsbron
Display Instelling
"REP-ONE" Herhaalt de weergave van het liedje.
"FOLDER-REP"/"REP-ALL" Speelt de muzieknummers in de map
herhaald af.
"FOLDER"/"REPEAT OFF" Schakelt de weergaveherhaling uit.
• Wanneer u een VCD herhaald wilt afspelen, schakel
dan de PBC-functie uit door drukken op de [PBC]
toets.
Veranderen van display
Wijzigt de informatie die op het monitorscherm
wordt weergegeven.
Druk op de [DISPLAY] toets.
Elke keer dat de toets wordt ingedrukt, verandert
de display in onderstaande volgorde.
Met DVD als geluidsbron
Display Informatie
"TITLE CHAPTER" Titel / hoofdstuk, verstreken tijd
"TITLE REMAIN" Titel, resterende tijd
"CHAPTER ELAPSED" Hoofdstuk, verstreken tijd
"CHAPTER REMAIN" Hoofdstuk, resterende tijd
"OFF" Niet weergegeven
Bij VCD (met PBC aan) /MP3-bron
Display Informatie
"SINGLE ELAPSED" Muzieknummer, verstreken tijd
"SINGLE REMAIN" Muzieknummer, resterende tijd
"OFF" Niet weergegeven
Bij VCD (met PBC uit) /CD-bron
Display Informatie
"SINGLE ELAPSED" Track, verstreken tijd
"SINGLE REMAIN" Track, resterende tijd
"TOTAL ELAPSED" Disc, verstreken tijd
"TOTAL REMAIN" Disc, resterende tijd
"OFF" Niet weergegeven
A-B herhaald afspelen
[DVD][VCD][CD]
Specificeer de start- en eindpunten om het
gedeelte tussen de opgegeven punten herhaald
af te spelen.
1 Specificeer punt A (startpunt)
Druk op de [A-B] toets.
2 Specificeer punt B (eindpunt)
Druk op de [A-B] toets.
Het gedeelte van punt A tot punt B wordt
herhaald afgespeeld.
Uitschakelen van herhalen A-B
Druk op de [A-B] toets.
Nederlands
|
83
Page 84

DVD Video-/Video CD-functies
0–9
SEARCH
MENU
ZOOM
TOP MENU
PBC
Afspelen zoeken
Roept direct de scene op die u wilt afspelen.
1 Start de zoekmodus
Druk op de [SEARCH] toets.
• Om de functie Afspelen zoeken te gebruiken tijdens
het afspelen van een VCD, schakelt u de PBC-functie
uit door op de [PBC] toets te drukken.
2 Kies de zoekmodus voor DVD
Druk op de [SEARCH] toets.
Telkens wanneer de toets wordt ingedrukt,
verandert het item dat kan worden opgeroepen
als volgt.
Item
Hoofdstuknummer
Weergavetijd
ENTER
SUB TITLE
ANGLE
AUDIO
3 Selecteer de scene die u wilt afspelen
Druk op de [0] – [9] toets.
De scène die u hebt ingevoerd wordt afgespeeld
tijdens de VCD-weergave.
4 Start de zoekafspeelfunctie voor DVD
Druk op de [ENTER] toets.
De scène die u hebt ingevoerd wordt afgespeeld.
• Door de toets [2] of [3] in te drukken in de
zoekmodus voor het hoofdstuknummer, kunt u
zoeken naar een titelnummer.
Nederlands
|
84
Page 85

Afspelen in slowmotion
Druk op de [2 I] of [I 3] toets.
Telkens wanneer deze toets wordt ingedrukt,
wordt als volgt in slowmotion afgespeeld.
Disc Toets Beweging
2
I
DVD
DVD
VCD
VCD
• Druk, om terug te keren naar normale snelheid,
op de [38] toets.
De snelheid van het achterwaarts afspelen in
slowmotion wijzigt in volgorde 2X, 4X en 8X.
3
I
De snelheid van het voorwaarts afspelen in
slowmotion wijzigt in volgorde 2X, 4X en 8X.
2
I
Gaat één stap terug.
I
3
De snelheid van het voorwaarts afspelen in
slowmotion wijzigt in volgorde 1X, 2X en 3X.
Selecteren van de gesproken taal
[DVD]
Druk op de [AUDIO] toets.
Wisselt in volgorde tussen de gesproken talen
die op de disc zijn opgenomen.
• Wanneer er slechts één taal beschikbaar is, wordt deze
niet gewisseld.
Selecteren van de taal van de
ondertiteling [DVD]
Druk op de [SUB TITLE] toets.
Wisselt in volgorde tussen de talen van de
ondertiteling die op de disc zijn opgenomen.
DVD menu/Bovenste (titel) menu
[DVD]
Roept het DVD-menu en het bovenste (titel)
menu op voor het maken van verschillende
instellingen.
1 Weergeven van het DVD-menu
Druk op de [MENU] toets.
Weergeven van het bovenste (titel) menu
Druk op de [TOP MENU] toets.
2 Selecteer het item
Druk op de [2]/[5]/[3]/[∞] of [0] – [9] toets.
3 Voltooi het item
Druk op de [38] toets.
Lees de handleiding van de disc voor instructies
over het gebruik van elk menu.
4 Menuweergave sluiten
Druk op de [MENU] of [TOP MENU] toets.
• Wanneer er slechts één taal beschikbaar is, wordt deze
niet gewisseld.
Selecteren van de camerahoek
[DVD]
Druk op de [ANGLE] toets.
Wisselt in volgorde tussen de camerahoeken die
op de disc zijn opgenomen.
• Wanneer er slechts één camerahoek beschikbaar is,
wordt deze niet gewisseld.
Zoomen [DVD]
Inzoomen op het beeld.
1 Selecteer de zoomratio
Druk op de [ZOOM] toets.
Telkens wanneer deze toets wordt ingedrukt,
wijzigt de zoomratio op 3 niveaus (X1.5, X2, X3).
2 Selecteer de weergavepositie
Druk op de [2]/[5]/[3]/[∞] toets.
Nederlands
|
85
Page 86

DVD Video-/Video CD-functies
PBC [VCD]
Gebruikt de functie playback control (PBC).
1 Inschakelen van de PBC-functie
Druk op de [PBC] toets.
Telkens wanneer deze toets wordt ingedrukt,
wordt de PBC-functie in- of uitgeschakeld.
2 Selecteren van het item
Druk op de [0] – [9] toets.
3 Voltooien van het item
Druk op de [38] toets.
Zie de handleiding van de disc voor instructies
over het gebruik van PBC.
• U kunt de PBC-functie gebruiken tijdens het afspelen
van een VCD van Ver2.0 of hoger.
Overzichtsscherm [DVD]
Geeft de hoofdstukken van een titel weer waaruit
u een scene kunt kiezen om af te spelen.
1 Open de titelinformatie
Druk op de [PBC] toets.
Scène selecteren
4 Afspelen stoppen
Druk op de [7] toets.
5 Weergave overzichtsscherm
Druk op de [MENU] toets.
• Druk op de toets [7] om terug te gaan naar het vorige
scherm.
6 Afspelen van de gewenste scene
Druk op de [1] – [9] toets.
Druk op [1] – [9], afhankelijk van het nummer dat
wordt weergegeven op het overzichtsscherm.
• Druk op de toets [4] of [¢] om naar de vorige of
volgende pagina te gaan.
7 Geselecteerde scene afspelen
Druk op de [ENTER] toets.
2 Selecteer een titel
Druk op de [2] of [3] toets.
• Druk op [1] of [¡] om 10 titels tegelijk te
verspringen.
• Druk op [4] of [¢] om naar de eerste of laatste
titel te springen.
3 Afspelen titel
Druk op de [ENTER] toets.
Nederlands
|
86
• Druk op de toets [7] om terug te gaan naar het vorige
scherm.
Sluiten van het overzichtsscherm
Druk op de [PBC] toets.
• Het is mogelijk dat sommige titels of hoofdstukken
niet worden weergegeven. In dit geval wordt het
voorgaande scherm weergegeven.
Page 87

CD/MP3-functies
0–9
SEARCH
7
MP3-mappenlijst [MP3]
Kies de map of het bestand dat u wilt afspelen.
1 Afspelen stoppen
Druk op de [7] toets.
2 Cursor verplaatsen naar mappenlijst
Druk op de [2]/[3] toets.
RANDOM
38
ENTER
PROG
5 Kies het bestand
Druk op de [5]/[∞] toets.
• Druk op de toets [4] of [¢] om naar boven of
naar onder te bladeren in de lijst.
6 Speel het gekozen bestand af
Druk op de [ENTER] toets.
Mappenlijst
3 Kies de map
Druk op de [5]/[∞] toets.
4 Voltooi de selectie
Druk op de [ENTER] toets.
Bestandslijst
Nederlands
|
87
Page 88

CD/MP3-functies
Programma afspelen
Speelt de geselectede muzieknummers in
volgorde af.
1 Afspelen stoppen
Druk op de [7] toets.
2 Open de programmeermodus
Druk op de [PROG] toets.
Verandert de "PLAY MODE" die wordt
weergegeven onder aan het scherm in
"PROGRAM PO" tijdens het afspelen van MP3.
3 Selecteer het muzieknummer dat u wilt
afspelen
Druk op de toets [2]/[5]/[3]/[∞] (alleen
tijdens MP3-weergave) of [0] – [9].
Specificeert het bestand waarin het
muzieknummer staat dat u wilt afspelen.
4 Voltooi het muzieknummer dat u wilt
afspelen
Druk op de [ENTER] toets.
Het muzieknummer dat is geselecteerd in stap 3
wordt geregistereerd als programmanummer 1.
5 Herhaal stap 3 en 4 om alle muzieknummers
die u voor afspelen wilt programmeren, te
registreren.
Na het programmeren van MP3-muzieknummers
drukt u op de [7] toets om de programmeermodus
te verlaten.
6 Start geprogrammeerd afspelen
Druk op de [38] toets.
De geregistreerde muzieknummers worden in
volgorde afgespeeld.
Geprogrammeerde CD-weergave annuleren
Druk achtereenvolgens op de toetsen [7],
[PROG] en [ENTER].
Geprogrammeerde MP3-weergave annuleren
Druk achtereenvolgens op de toetsen [7] en
[PROG].
Direct afspelen
Roept direct het muzieknummer op dat u wilt
afspelen.
1 Voer track, bestand, of mapnummer in dat
u wilt afspelen
Druk op de [0] – [9] toets.
2 Afspelen
Druk op de [ENTER] toets.
• Wanneer u ongeveer 5 seconden wacht voordat u
stap 2 uitvoert, wordt het muzieknummer dat u in
stap 1 hebt gekozen automatisch gezocht.
Opzoeken van afspeeltijd [CD]
Voer de afspeeltijd in vanwaar u wilt afspelen.
1 Open de zoekmodus voor de afspeeltijd
Druk op de [SEARCH] toets.
2 Voer de afspeeltijd in vanwaar u wilt starten
Druk op de [0] – [9] toets.
Bijvoorbeeld
5:07 ➪ [0], [5], [0], [7]
Het afspelen begint vanaf de ingevoerde tijd.
88
Nederlands
|
Page 89

Afspeelmodus MP3 [MP3]
Selecteer de afspeelmethode.
1 Afspelen stoppen
Druk op de [7] toets.
2 Afspeelmodus-knop selecteren.
Druk op de [2]/[3] toets.
Willekeurige afspeelvolgorde
De muzieknummers op de disc worden in
willekeurige volgorde afgespeeld.
1 Afspelen stoppen
Druk op de [7] toets.
2 Functie voor willekeurige weergave
selecteren afspeelvolgorde
Druk op de [RANDOM] toets.
Telkens wanneer deze toets wordt ingedrukt,
wisselt de functie voor willekeurige weergave
als volgt.
In CD-geluidsbron
Display Instelling
"RANDOM ON" Geeft alle liedjes op de CD in willekeurige
volgorde weer.
"RANDOM OFF" Schakelt de willekeurige weergave uit.
Toets afspeelmodus
3 Afspeelmethode selecteren
Druk op de [5]/[∞] toets.
U kunt de afspeelmethode als volgt selecteren.
Display Instelling
"SINGLE" Stopt na het afspelen van een enkel
muzieknummer.
"REP-ONE" Speelt één muzieknummer herhaald af.
"FOLDER" Stopt na het afspelen van de muzieknummers
in een map.
"FOLDER REP" Speelt de muzieknummers in de map herhaald af.
"DISC SCAN" Speelt de eerste 10 seconden van elk
muzieknummer op de disc.
"DISC" Stopt na het afspelen van de muzieknummers
op de disc.
"DISC REP" Speelt de muzieknummers op de disc herhaald af.
"RANDOM" Speelt de muzieknummers in de map in
willekeurige volgorde af.
"SHUFFLE ON" Stopt na het in willekeurige volgorde afspelen van
de muzieknummers in de map.
4 Selecteer muzieknummer(s)
Druk op de [2]/[5]/[3]/[∞] toets.
Selecteer het bestand of de map die u wilt
afspelen.
5 Afspelen
Druk op de [ENTER] toets.
Speelt de muzieknummers af in de geselecteerde
afspeelmethode.
Met MP3 als geluidsbron
Display Instelling
"RANDOM" Speelt de muzieknummers in de map in
willekeurige volgorde af.
"SHUFFLE ON" Stopt na het in willekeurige volgorde afspelen van
de muzieknummers in de map.
"FOLDER" Schakelt de willekeurige weergave uit.
3 Selecteer de map voor MP3
Druk op de [2]/[5]/[3]/[∞] toets.
Plaats de cursor op een bestand in de map dat u
in willekeurige volgorde wilt afspelen.
4 Start willekeurige afspeelvolgorde
Druk op de [38] toets.
Nederlands
|
89
Page 90

Instelmenu
7
ENTER
Instelmenu
U kunt de standaard instellingen voor
verschillende functies van de eenheid wijzigen
via het instelmenu.
1 Afspelen stoppen
Druk op de [7] toets.
Druk twee maal op deze toets tijdens het
afspelen van een DVD.
Schakel de PCB-functie tijdens het afspelen van
een VCD uit door eerst op de [PBC] toets te
drukken.
2 Weergeven van het scherm SETUP MENU
Druk op de [SETUP] toets.
SETUP MENU wordt weergegeven op het
aangesloten monitorscherm.
3 Selecteer de menupagina die u wilt instellen
Druk op de [2]/[5]/[3]/[∞] toets.
4 Open de geselecteerde menupagina
Druk op de [ENTER] toets.
De onder stap 3 geselecteerde menupagina
wordt weergegeven.
SETUP
5 Selecteer het setup-item en de optie
Druk op de [2]/[5]/[3]/[∞] toets.
Zie de volgende beschrijvingen voor de setupitems en opties in elk menu.
6 Voltooi de selectie
Druk op de [ENTER] toets.
7 Het instelmenu verlaten
Druk op de [2]/[5]/[3]/[∞] en [ENTER] toets.
Selecteer eerst "MAIN PAGE" en vervolgens "EXIT
SETUP".
90
Nederlands
|
Page 91

Algemene Setup
TV DISPLAY
Volg onderstaande procedure voor het instellen
van het weergavescherm.
Display Instelling
"NORMAL/PS" Breedbeeldsoftware met pan & scan specificatie
wordt afgespeeld in een panned & scanned
screen (waarbij de linker- en rechterzijde worden
bijgesneden).
"NORMAL/LB" Breedbeeldsoftware met pan & scan specificatie
wordt afgespeeld in een versmald scherm (met
zwarte strepen boven en onder).
"WIDE" Zet de beeldmodus van de breedbeeldmonitor
op "FULL"
PIC (Beeld) MODE
Selecteer een beeldmodus voor DVD.
Display Instelling
"AUTO" Het beeld wordt automatisch geschakeld,
afhankelijk van het oorspronkelijke beeld.
"HI-RES" Het oorspronkelijke beeld op de DVD is de Video-
modus.
"N-FLICKER" Het oorspronkelijke beeld op de DVD is de Movie
Picture-modus.
ANGLE MARK
Wanneer er meerdere camerahoeken op een DVD
zijn opgenomen, worden deze tijdens afspelen
door een markering weergegeven.
SCR (Scherm) SAVER
Om inbranden van het scherm te voorkomen,
kunt u automatisch een screensaver starten
wanneer het beeld gedurende een bepaalde tijd
niet wijzigt.
Display Instelling
"ON" De screensaver wordt automatisch gestart.
"OFF" De screensaver is uitgeschakeld.
Speaker-instelling
DOWNMIX
Stel de gemengde geluidsuitgang in op de 2kanaals stereopoort.
Display Instelling
"LT/RT" Het geluid wordt gemengd uitgevoerd naar de Dolby
Surround audio.
"STEREO" Het geluid wordt gemengd uitgevoerd naar de stereo-
uitgang.
Display Instelling
"ON" Geeft de markering voor de camerahoek weer.
"OFF" De markering voor de camerahoek wordt niet
weergegeven.
OSD LANG (Weergavetaal op het scherm)
Gebruik in "ENGLISH" zoals ingesteld.
CAPTIONS
Wanneer er een disc wordt afgespeeld waarop
ondertiteling is opgenomen, kunnen deze
worden weergegeven.
Display Instelling
"ON" Voert het signaal voor de ondertiteling uit.
"OFF" Het signaal voor de ondertiteling wordt niet
uitgevoerd.
Nederlands
|
91
Page 92

Instelmenu
Audio-instelling
AUDIO OUT
Display Instelling
"ANALOOG" Geeft een analoog geluid weer. (Er wordt geen
"SPDIF/RAW" Geeft 5.1kan S/PDIF Bitstream digitaal geluid weer.
"SPDIF/PCM" Geeft 2kan S/PDIF PCM digitaal geluid weer. (Er
OP MODE
Display Instelling
"LINE MODE" Voert normaal LINE-geluid uit.
"RF MODE" Versmalt het dynamisch bereik van een audiosignaal
DUAL MODE
Stel het weergavegeluid van een Karaoke DVD in
(voor meezingen).
Display Instelling
"STEREO" Stereo (L / R)
"L-MONO" Mono Links (L / L)
"R-MONO" Mono Rechts (R / R)
"MIX-MONO" Gemengd Links en Rechts (L+R / L+R)
DYNAMIC
Stelt het dynamisch bereik van weergegeven
geluid in dat is opgenomen op een Dolby Digital
DVD.
Display Instelling
"FULL"
"7/8"
"6/8" / "3/4"
"5/8"
"4/8" / "1/2"
"3/8"
"2/8" / "1/4"
"1/8"
"OFF" Voor normaal geluid
LPCM OUTPUT
Display Instelling
"LPCM 48k" Speelt een muzieknummer van 96kfs in 48kfs op
"LPCM 96k" Speelt een muzieknummer van 96kfs in 96kfs op
digitaal signaal uitgevoerd.)
(Er wordt geen analoog signaal uitgevoerd.)
wordt geen analoog signaal uitgevoerd.)
voor uitvoer via de RF modulator.
Voor krachtiger geluid op normaal geluidsniveau
Groot
±
Compressie
≠
Klein
DIGITAL OUT.
DIGITAL OUT.
Voorkeuren
TV TYPE
U kunt een TV-type instellen op basis van de
kleurweergavemodus van de televisie.
Display Instelling
"MULTI" De weergave van het kleursignaal wordt automatisch
gewisseld op basis van het opnamesysteem van de huidige
disc.
"NTSC" Het kleursignaal wordt weergegeven in standaard NTSC-
systeem.
"PAL" Het kleursignaal wordt weergegeven in standaard PAL-
systeem.
AUDIO
Stelt de gesproken taal op de speakers in.
Display Instelling
"ENGLISH" Engels
"FRENCH" Frans
"SPANISH" Spaans
"CHINESE" Chinees
"JAPANESE" Japans
SUB TITLE
Stelt de taal van de ondertitels in die op het
scherm worden weergegeven.
Display Instelling
"ENGLISH" Engels
"FRENCH" Frans
"SPANISH" Spaans
"CHINESE" Chinees
"JAPANESE" Japans
"OFF" Geen ondertitels
DISC-MENU
Stelt de taal van het disc-menu in.
Display Instelling
"ENGLISH" Engels
"FRENCH" Frans
"SPANISH" Spaans
"CHINESE" Chinees
"JAPANESE" Japans
92
Nederlands
|
Page 93

PARENTAL
Zet het niveau van ouderlijk toezicht in. Hoe
hoger het niveau, hoe hoger de beveiliging.
Display Instelling
"1 G" Alleen films voor kinderen kunnen worden
"2"
"3 PG"
"4 PG 13"
"5"
"6 PG-R"
"7 NC-17"
"8 ADULT"
"NO_PARENTAL" De functie ouderlijk toezicht is uitgeschakeld.
1 Druk op de [ENTER] toets op de
afstandsbediening.
2 Stel het niveau van ouderlijk toezicht in.
3 Voer het wachtwoord in.
4 Druk op de [ENTER] toets op de
afstandsbediening.
• Het wachtwoord is standaard ingesteld op "0000".
• Het ouderlijk toezicht wordt alleen ingesteld discs met
de markering "R".
afgespeeld.
PASSWORD
CHANGE: Wijzig het wachtwoord.
1 Selecteer "CHANGE" en druk op de [ENTER]
toets op de afstandsbediening.
2 Voer het huidige wachtwoord in.
3 Voer twee maal het nieuwe wachtwoord in.
4 Druk op de [ENTER] toets op de
afstandsbediening.
• Het wachtwoord is standaard ingesteld op "0000".
DEFAULTS
RESET: De aangepaste items in het Instelmenu
– behalve het wachtwoord – worden
gereset.
FOLDER LIST
Tijdens het afspelen van MP3's wordt er een lijst
van mappen op het scherm weergegeven.
Display Instelling
"NO MENU" Map wordt niet weergegeven.
"WITH MENU" Map wordt weergegeven.
Nederlands
|
93
Page 94

Toebehoren Installatie
1
2
3
4
5
..........1
..........1
..........2
..........4
Plaatsing met gebruik van beugels
Tapschroef 5
Beugel 3
Semusu-schroef 4
Plaatsing met gebruik van
klittenband
Vloerbedekking
Klittenband 6
..........4
6
..........2
7
..........1
• Wanneer de zekering doorbrandt, controleer dan eerst
dat de bedrading geen kortsluiting heeft veroorzaakt, en
vervang vervolgens de zekering door een zekering van
hetzelfde vermogen.
Nederlands
|
94
• Gebruik bij het installeren uitsluitend de bijgeleverde
schroeven. Het toestel wordt mogelijk beschadigd door
gebruik van andere schroeven.
• Plaats de eenheid niet op een moeilijk bereikbare plaats
of op een plaats waar deze zal trillen.
• De eenheid kan in elke hoek worden geplaatst tussen
een normale horizontale positie en een verticale
rugpositie (0° tot 90°). De eenheid kan niet gemonteerd
met de disksleuf naar beneden, schuin of op zijn kop.
Page 95

Bedrading op de klemmen aansluiten
RCA AV-kabel 7
Netsnoer 1
Linkse audio-uitgang
Rechtse audio-uitgang
Video-uitgang
Digitale uitgang
Aansluiting van de afstandsbedieningssensor
1 Verwijder de afdeklaag van het klittenband aan de
achterzijde van de sensor voor de afstandsbediening.
2 Bevestig de afstandsbedieningssensor nadat u vuil of vet
hebt verwijderd van het installatieoppervlak.
Sensor
afstandsbediening 2
TV, monitor, enz.
(optioneel accessoire)
Aansluiting sigarettenaansteker
Ingebouwde zekering (3A)
DVD-speler achteraanzicht
Naar sigarettenaanst
ekeraansluiting
Dekpapier
• Verwijder vuil of vet van het oppervlak waarop de sensor wordt
bevestigd.
• Vermijd plaatsen die blootstaan aan direct zonlicht of in de buurt van
de TV-monitor, waar de ontvangst van de afstandsbedieningssignale
n kan worden bemoeilijkt.
Nederlands
|
95
Page 96

Oplossen van problemen
Vele problemen worden slechts veroorzaakt
door een verkeerde bediening of verkeerde
verbindingen. Kontroleer voordat u uw handelaar
raadpleegt eerst de volgende lijst voor een
mogelijke oplossing van uw probleem.
? Geen geluidsweergave of zeer laag volume.
✔ Dempen is ingeschakeld.
☞ Dempen uitschakelen.
? Het Beeld/geluid van de disk slaat over.
✔ De disk heeft krassen of is vuil.
☞ Reinig de disk aan de hand van het gedeelte
<Disc reinigen> (zie blz.80).
? Een VCD kan niet met gebruik van menu's
worden afgespeeld.
✔ De geplaatste VCD is niet geschikt voor P.B.C.
☞ Menuweergave is uitsluitend mogelijk met
VCD's die voor P.B.C. geschikt zijn.
? Ondertitels worden niet getoond.
✔ Er zijn geen ondertitels op de geplaatste DVD
opgenomen.
☞ Er kunnen geen ondertitels worden getoond
indien er geen signalen voor de ondertitels op
de DVD zijn opgenomen.
? De taal voor de gesproken tekst (of ondertitels)
kan niet worden veranderd.
✔ De geplaatste DVD bevat geen signalen voor
meerdere talen voor de gesproken tekst (of
ondertitels).
☞ De taal kan niet worden veranderd indien er
geen signalen voor meerdere talen voor de
gesproken tekst (of ondertitels) op de DVD zijn
opgenomen.
? Niet de gekozen disk maar een andere wordt
weergegeven.
✔ De gekozen disk is vuil.
☞ Reinig de disk.
✔ De disk is verkeerd om geplaatst.
☞ Plaats de disk. met het label omhoog.
✔ De disk heeft krassen.
☞ Probeer een andere disk.
? Kan geen bewerkingen uitvoeren voor
MP3-mappenlijst, MP3-afspeelmodus,
geprogrammeerd afspelen of willekeurig
afspelen tijdens het afspelen van MP3.
✔ 'FOLDER LIST' is ingesteld op "NO MENU" in het
setup-menu.
☞ Stel 'FOLDER LIST' in op "WITH MENU" (zie
blz.93).
Onderstaande meldingen geven de
systeemtoestand weer.
"THERMAL PROTECTION PLEASE SHUT OFF POWER"
: Het beveiligingscircuit van het toestel treedt in werking
wanneer de temperatuur in het toestel tot meer dan
60°C oploopt en zet elke bediening stop.
➪ Laat het toestel afkoelen door de ramen te openen
of de airconditioning in te schakelen. Wanneer de
temperatuur opnieuw onder 60°C akt, wordt de
weergave van de disc hervat.
Wilt u de schijf in deze situatie uitwerpen, schakel
dan de voeding uit en weer in.
"NO DISC"
: Er is geen schijf in de eenheid geplaatst.
"WRONG REGION"
: Er is een DVD met onjuiste regiocode in de eenheid
geplaatst.
"DISC ERROR"
: Er is een onafspeelbare schijf in de eenheid geplaatst.
"INVALID ENTRY"
: De geplaatste schijf bevat beschadigde of niet-
standaard gegevens.
"PASSWORD INCORRECT"
: Het ingevoerde wachtwoord komt niet overeen met het
geregistreerde wachtwoord.
"NEW PASSWORD NOT CONFIRMED"
: Het nieuwe wachtwoord dat u hebt ingevoerd komt
niet overeen met het eerste wachtwoord dat u invoerde
voor het wijzigen van het wachtwoord.
➪ Wanneer u het nieuwe wachtwoord invoert, moet u
twee keer hetzelfde wachtwoord invoeren om dit te
bevestigen.
96
Nederlands
|
Page 97

Technische gegevens
Technische gegevens zijn zonder voorafgaande kennisgeving wijzigbaar.
DVD-spelergedeelte
D/A-omzetter
: 8-niveaus∆Σ, 24-bits
Wow & Flutter
: Onder meetbare limiet
Frequentie response
: 17- 44 kHz (DVD96kHz Sampling)
Totale harmonische vervorming 1kHz
: 0,02 %
Signaal/ruisverhouding
: 106 dB
Dynamisch bereik
: 90 dB
MP3 decoderen
: Compatibel met MPEG-1/2 Audio Layer-3
DISC-formaat
: DVD-VIDEO/ VIDEO-CD/ CD-DA/ MP3
Uitgangen
Samengesteld Video-uitgangsniveau (V)
: 1V p-p (75Ω)
Audio 2-kan. uitgangsniveau (V )
:1,2 V/ 10 kΩ (DVD/CD)
Coax Digitale Audio Interface uitgangsniveau (V )
: 0,5 V/ 75 Ω
Algemeen
Bedrijfsvoltage
: 14,4 V (11 – 16 V)
Stroomverbruik
: 2 A
Afmetingen (BxHxD)
: 194 mm x 54 mm x 245 mm
Gewicht
: 1,85 kg
Nederlands
|
97
Page 98

Indice
Precauzioni di sicurezza 99
Prima dell'uso 100
Note sulla riproduzione del formato
MP3 102
Sul telecomando 103
Sui dischi 104
Caratteristiche principali 105
Alimentazione
Riproduzione
Silenziamento
Salto
Avanzamento ed indietreggiamento rapido
Riproduzione ripetuta
Riproduzione ripetuta A-B [DVD][VCD][CD]
Commutazione del display
Caratteristiche DVD Video/Video CD
108
Riproduzione a ricerca
Riproduzione a moviola
Menu DVD/Top (titolo) [DVD]
Selezione della lingua dell'audio [DVD]
Selezione della lingua dei sottotitoli [DVD]
Selezione dell'angolazione dell'immagine [DVD]
Zoom [DVD]
PBC [VCD]
Schermo di selezione [DVD]
Caratteristiche CD/MP3 111
Lista cartella MP3 [MP3]
Riproduzione programmata
Riproduzione diretta a salti
Ricerca dell'indicazione temporale della
riproduzione [CD]
Modalità di riproduzione MP3 [MP3]
Riproduzione casuale
Menu di registrazione 114
Menu di registrazione
Registrazione generale
Registrazione dell'altoparlante
Registrazione audio
Preferenze
Italiano
|
98
Accessorio 118
Installazione 118
Collegamento dei cavi ai terminali
119
Guida alla soluzione di problemi 120
Caratteristiche tecniche 121
[DVD]: Funzione solo durante riproduzione DVD.
[VCD]: Funzione solo durante riproduzione Video CD.
[CD]: Funzione solo durante riproduzione CD.
[MP3]: Funzione solo durante riproduzione MP3.
Page 99

Precauzioni di sicurezza
2AVVERTENZA
Per evitare lesioni e/o incendi, osservare
le seguenti precauzioni:
• Inserire l’apparecchio fino in fondo finc hé si
blocca saldamente in posizione, altrimenti
potrebbe fuoriuscire in caso di scontri o altre
scosse.
• Per evitare cortocircuiti, non inserire mai oggetti
di metallo (come monete o strumenti di metallo)
all’interno dell’apparecchio.
• Se l’apparecchio comincia ad emettere fumo
o odori strani, spegnerlo immediatamente e
rivolgersi ad un Centro di Assistenza Autorizzato
Kenwood.
• Non collegare l'unità al monitor anteriore.
Quest'unità è per l'intrattenimento per il sedile
posteriore.
ă Non utilizzare nessun altro cavo d’alimentazione
che non sia quello accessorio. Ciò potrebbe
causare un incendio.
2ATTENZIONE
Per evitare danni all’apparecchio,
osservare le seguenti precauzioni:
• Alimentare l’apparecchio esclusivamente con una
tensione nominale di 12 V CC, con polo negativo
a massa.
• Non aprire il coperchio superiore o il coperchio
inferiore dell’apparecchio.
• Non installare l’apparecchio in un luogo esposto
alla luce solare diretta, o al calore o all’umidità
eccessivi. Evitare anche luoghi molto polverosi o
soggetti a schizzi d’acqua.
• Quando si sostituisce un fusibile, usarne solo
uno nuovo di valore prescritto. L’uso di un
fusibile di valore errato può causare problemi di
funzionamento dell’apparecchio.
• Durante l’installazione, non usare alcuna vite
all’infuori di quelle fornite. L’uso di viti diverse
potrebbe causare danni all’apparecchio principale.
NOTA
• Se si incontrano difficoltà durante l’installazione,
rivolgersi ad un rivenditore o ad un installatore
specializzato Kenwood.
• Le illustrazioni contenute in questo manuale
che raffigurano il display ed il pannello sono
degli esempi usati per spiegare come vengono
usati i controlli. Pertanto, l’indicazione sul
display dell’illustrazione può essere diversa da
quella effettivamente visualizzata sul display
dell’apparecchio ed alcune illustrazioni del display
possono rappresentare un evento impossibile
durante l’operazione in corso.
ă Se l’unità non funziona in modo corretto,
spegnere e riaccendere l’alimentazione. Se l’unità
non funziona in modo corretto dopo aver spento
e riacceso l’alimentazione, contattate il vostro
rappresentante di zona Kenwood per l’assistenza.
Restrizioni dovute a differenze fra dischi
Icona di
inibizione
o non funzionare affatto. In tal caso, leggere le
istruzioni fornite con ciascun disco. Se un segnale
indicante un’icona di inibizione viene visualizzato
sullo schermo, il disco è soggetto ad alcune delle
limitazioni indicate qui sopra.
Alcuni dischi DVD e VCD possono
venire riprodotti solo in certi modi
di riproduzione che cambiano a
seconda della volontà dei fabbricanti
del software. Alcune funzioni possono
quindi funzionare in modo parziale
Appannamento della lente
Subito dopo aver acceso il riscaldamento
dell’automobile quando fa freddo, l’umidità può
condensarsi sulla lente all’interno del lettore CD
dell’apparecchio. A causa dell’appannamento della
lente, la riproduzione di compact disc potrebbe non
iniziare. In questi casi, estrarre il disco e attendere
che l’umidità evapori. Se dopo un po’ l’apparecchio
continua a non funzionare normalmente, rivolgersi
ad un Centro di Assistenza Autorizzato o ad un
rivenditore Kenwood.
Pulizia dell’apparecchio
Se il frontalino di quest’unità è macchiato,
strofinatelo con un panno asciutto e morbido, ad
esempio un panno al silicone. Se il frontalino è
molto sporco, strofinatelo con un panno inumidito
con un detergente neutro, poi rimuovetelo.
• Se spruzzate il prodotto di pulizia a spray direttamente
sull’unità, si possono danneggiare le parti meccaniche.
Se strofinate il frontalino con un panno duro o usando
un liquido volatile, ad esempio acquaragia o alcool, si
può graffiare la superficie o possono venire cancellati i
caratteri.
Italiano
|
99
Page 100

Prima dell'uso
Codici regionali del mondo
1
4
Icone sui dischi DVD
Icone Descrizione
Indica il codice della regione nella quale il disco può venire riprodotto.
8
32
Numero delle lingue della funzione audio. Il numero all'interno dell'icona è appunto il
numero delle lingue in cui il parlato è disponibile (massimo 8).
Numero delle lingue della funzione dei sottotitoli. Il numero all'interno dell'icona è
appunto il numero delle lingue in cui i sottotitoli sono disponibili (massimo 32).
5
2
1
2
6
3
5
2
1
4
Numero delle angolazioni della funzione di angolazione. Il numero all'interno
9
16:9 LB
dell'icona è appunto il numero delle angolazioni disponibili (al massimo 9).
Proporzioni possibili dell'immagine. "LB" ad esempio sta per "Letter Box" e "PS" per
Pan/Scan, due formati diversi. Nell'esempio qui a destra, un video di proporzioni 16:9
può venire convertito in un video Letter Box.
Dischi riproducibili
• DVD-Video
• Disco audio (CD)
• Disco formato MP3 (CD)
• Disco formato CD-R/RW
• Disco Video CD
Inoltre, non è possibile eseguire i dischi DVD-R se non sono registrati nel formato DVD-Video.
Sulle temperature da utilizzare
Il circuito protettivo dell'unità si attiva quando la temperatura all’interno dell’unità eccede i 60°C (140°F).
Vedere nella guida alla risoluzione dei problemi (p 120).
Italiano
|
100
 Loading...