

Page 1

KDV-S211P
DVD PLAYER
INSTRUCTION MANUAL
LECTEUR DE DVD
MODE D’EMPLOI
REPRODUCTOR-DVD
MANUAL DE INSTRUCCIONES
Take the time to read through this instruction manual.
Familiarity with installation and operation procedures will help you
obtain the best performance from your new DVD player.
For your records
Record the serial number, found on the back of the unit, in the spaces
designated on the warranty card, and in the space provided below. Refer to the
model and serial numbers whenever you call upon your Kenwood dealer for
information or service on the product.
Model KDV-S211P Serial number
US Residence Only
Register Online
Register your Kenwood product at
www.Kenwoodusa.com
© B64-3819-08/00 (K)
Page 2

Contents
Safety precautions 3
Notes 4
Common features 8
Power
Play
Mute
Skip
Fast Forward and Reverse
Repeat Play
A-B Repeat Play
Random Play
Program Play
Switching Display
DVD Video/Video CD/Video file/Picture
file features 12
Search Play
DVD menu/Top (title) menu
Audio Language select
Subtitle Language select
Picture Angle select
Zoom
PBC
Slow Motion play
Frame-by-frame playback
Slide show
Picture Rotation
CD/Audio file features 15
Direct Skip Play
Play Time Search
Search Play
Setup menu 16
Setup menu
DISC menu
VIDEO menu
AUDIO menu
DISPLAY
OTHER
Accessories 19
Installation 19
Connecting Wires to Terminals 20
Troubleshooting Guide 21
Specifications 22
|
2
KDV-S211P
Page 3

Safety precautions
2WARNING
To prevent injury or fire, take the following
precautions:
• To prevent a short circuit, never put or leave any
metallic objects (such as coins or metal tools) inside
the unit.
• Do not watch or fix your eyes on the unit’s display
when you are driving for any extended period.
• Mounting and wiring this product requires skills and
experience. For safety’s sake, leave the mounting
and wiring work to professionals.
• Do not connect the unit to the front monitor. This
unit is for rear seat entertainment.
• Do not use any power cable other than the
accessory. This could cause fire.
2CAUTION
To prevent damage to the machine, take
the following precautions:
• Make sure to ground the unit to a negative 12V DC
power supply.
• Do not install the unit in a spot exposed to direct
sunlight or excessive heat or humidity. Also avoid
places with too much dust or the possibility of
water splashing.
• When replacing a fuse, only use a new fuse with
the prescribed rating. Using a fuse with the wrong
rating may cause your unit to malfunction.
• Use only the screws provided or specified for
installation. If you use wrong screws, you could
damage the unit.
Lens Fogging
Right after you turn on the car heater in cold weather,
dew or condensation may form on the lens in the CD
player of the unit. Called lens fogging, CDs may be
impossible to play. In such a situation, remove the disc
and wait for the condensation to evaporate. If the unit
still does not operate normally after a while, consult
your Kenwood dealer.
Cleaning the Unit
If the faceplate of this unit is stained, wipe it with a
dry soft cloth such as a silicon cloth.
If the faceplate is stained badly, wipe the stain off with
a cloth moistened with neutral cleaner, then wipe
neutral detergent off.
¤
• Applying spray cleaner directly to the unit may affect its
mechanical parts. Wiping the faceplate with a hard cloth or
using a volatile liquid such as thinner or alcohol may scratch
the surface or erases characters.
NOTE
• If you experience problems during installation,
consult your Kenwood dealer.
• The illustrations of the display and the panel
appearing in this manual are examples used to
explain more clearly how the controls are used.
Therefore, what appears on the display in the
illustrations may differ from what appears on the
display on the actual equipment, and some of the
illustrations on the display may be inapplicable.
English
|
3
Page 4
Notes
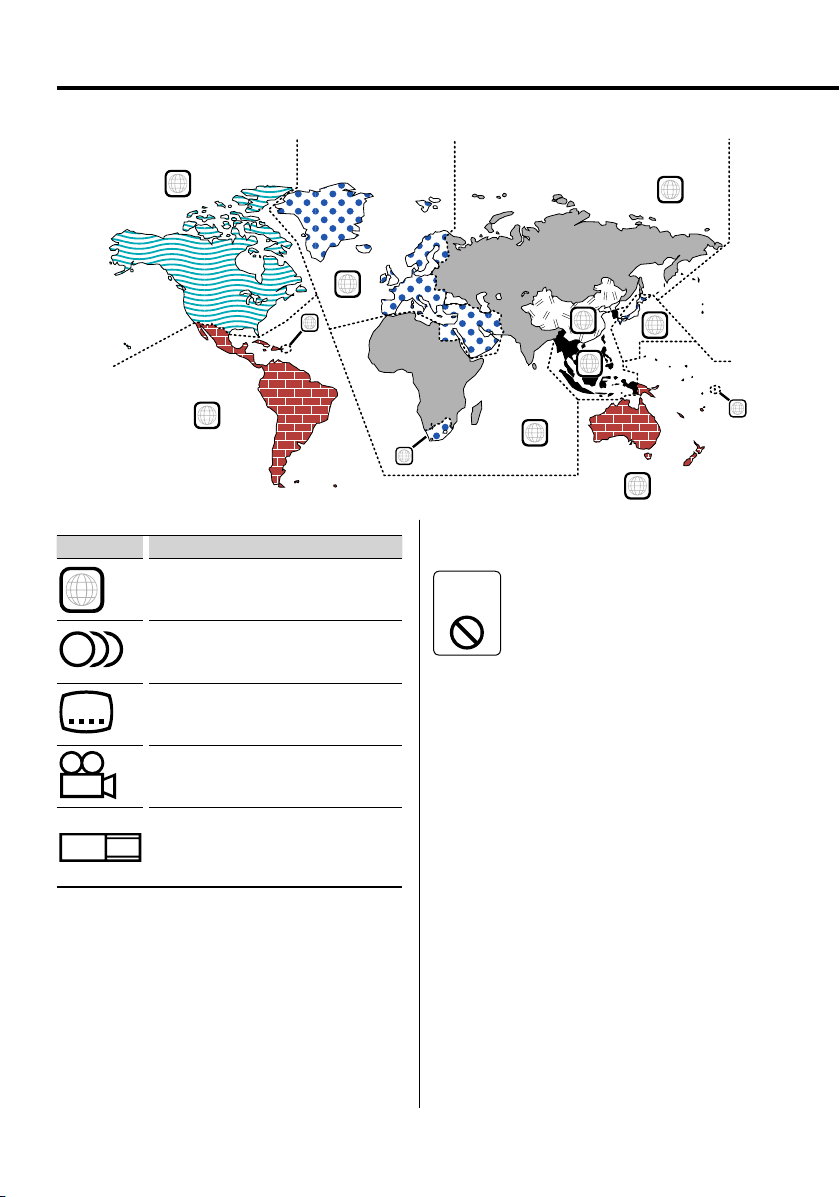
Region codes in the world
1
DVD disc marks
Symbol Description
ALL
8
32
9
16:9 LB
Indicates a region number. The discs with this mark can
be played with any DVD player.
Indicates the number of audio languages recorded. Up
to 8 languages can be recorded in a movie. You can
select a favorite language.
Indicates the number of subtitled languages recorded.
Up to 32 languages can be recorded.
If a DVD disc has scenes shot from multiple angles, you
can select a favorite angle.
Indicates the type of screen for the image. The left mark
indicates that a wide image picture (16:9) is displayed
on a standard TV set screen (4:3) with a black band at
both the top and bottom of the screen (letter box).
5
2
1
4
2
6
3
5
2
1
4
Restrictions due to difference between
discs
Inhibition
you. Please be sure to read the instructions provided
with each disc. When an inhibition icon is displayed
on the monitor, it indicates that the disc being played
is under the restriction as described above.
Some DVD and VCD discs can be played
only in certain playback modes according
icon
to the intentions of the software
producers. As this player plays discs
according to their intentions, some
functions may not work as intended by
Use of "DualDisc"
When playing a "DualDisc" on this unit, the surface of
the disc that is not played may be scratched while the
disc is inserted or ejected. Since the music CD surface
does not conform to the CD standard, playback may
be impossible.
(A "DualDisc" is a disc with one surface containing
DVD standard signals and the other surface
containing music CD signals.)
|
4
KDV-S211P
About the usable temperatures
The protective circuit in the unit activates when the
temperature inside the DVD player exceeds 60°C
(140°F). Refer to <Troubleshooting Guide> (p 21).
Page 5
List of playable discs
Disc
types
DVD DVD Video
CD Music CD
Others Dualdisc ×
‡ : Playback is possible.
% : Playback is partly possible.
× : Playback is impossible.
Standard Support Remark
DVD Audio ×
DVD-R
DVD-RW
DVD+R
DVD+RW
DVD-R DL (Dual layer)
DVD+R DL (Double layer)
DVD-RAM ×
CD-ROM
CD-R
CD-RW
DTS-CD
Video CD (VCD)
Super video CD ×
Picture CD
CD-EXTRA
HDCD
CCCD ×
Super audio CD
‡
‡
‡
‡
‡
‡
‡
‡
‡
‡
‡
‡
‡
‡
%
%
%
MP3/WMA/AAC/JPEG/
DivX Playback
Multi-border/Multisession
(Playback depends on
authoring conditions)
Only video format
CD-TEXT/8-cm (3 inch)
discs supported.
MP3/WMA/AAC/JPEG/
DivX playback
Multisession supported
Packet write not supported.
Only music CD session can
be played.
Sound quality of normal
CD music
Only CD layer can be
played.
⁄
• When buying DRM enabled contents, check the
Registration Code in the <REGISTRATION> (page 18).
Registration Code changes each time a file with the
displayed Registration Code is played to protect against
copying.
Handling discs
• Do not touch the recording surface of the disc.
• Do not stick tape etc. on the disc, or use a disc with
tape stuck on it.
• Do not use disc type accessories.
• Clean from the center of the disc and move
outward.
• When removing discs from this unit, pull them out
horizontally.
• If the disc center hole or outside rim has burrs,
use the disc only after removing the burrs with a
ballpoint pen etc.
Discs that cannot be used
• Discs that are not round cannot be used.
• Discs with coloring on the recording surface or discs
that are dirty cannot be used.
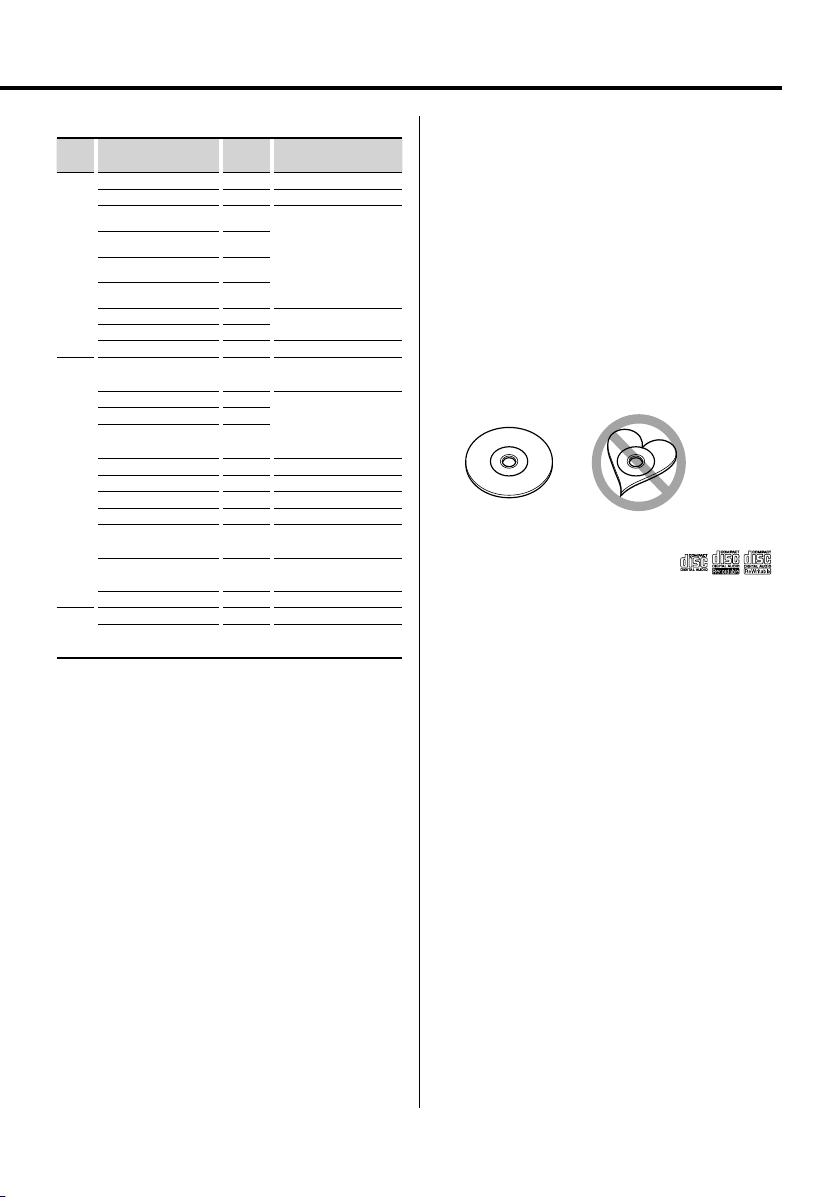
• This unit can only play the CDs with
This unit may not correctly play discs which do not
have the mark.
• You cannot play a CD-R or CD-RW that has not been
finalized. (For the finalization process refer to your
CD-R/CD-RW writing software, and your CD-R/CDRW recorder instruction manual.)
.
About the functions by playback source
In this manual, functions that can be used with
various playback sources are indicated as follows:
[DVD]: Function of during DVD playback only.
[VCD]: Function of during Video CD playback only.
[CD]: Function of during CD playback only.
[AUDIO]: Function of during Audio file playback only.
[DivX]: Function of during Video file playback only.
[PIC]: Function of during JPEG/Picture CD
playback only.
English
|
5
Page 6

Notes
About Audio files
• Playable Audio file
MP3 (.mp3), WMA (.wma), AAC (.m4a)
⁄
• If music of normal CD and other playback systems are
recorded in the same disc, only the playback system
recorded at the first setout is played.
• Playable MP3 file
MPEG 1/2 Audio Layer 3 file
Transfer bit rate: 8 – 320 kbps/ VBR
Sampling frequency: 8 – 48 kHz
• Playable WMA file
The file in accordance with Windows Media Audio
(Except for the file for Windows Media Player 9 or
after which applies the new functions)
Transfer bit rate: 5 – 320 kbps/ VBR
Sampling frequency: 8 – 48 kHz
• Playable AAC file
Transfer bit rate: 8 – 384 kbps/ VBR
Sampling frequency: 8 – 48 kHz
• Playable disc media
CD-R/RW/ROM, DVD-ROM/±R/RW
• Playable disc file format
ISO 9660 Level 1/2, Joliet, Romeo
• The maximum number of characters for display
12 characters
• Limitation of structure for the file and the folder
Maximum number of directory levels: 8
Maximum number of folders: 255
Maximum number of files per folder: 999
Maximum number of files per disc: 1254
Although the audio files are complied with the
standards listed above, the play maybe impossible
depending on the types or conditions of media or
device.
⁄
• Attach the correct extension for the Audio file ( MP3: ".MP3",
WMA: ".WMA", AAC: ".m4a")
• Do not attach the extensions to files other than the Audio
file. If the extension is attached, the file, which is not the
Audio file, will play and outputs a loud noise, causing
damage to the speaker.
• The files with copy protection cannot be played.
• The unit may not be compatible with upgrade of
compression format standard and additional specifications.
• CD-RW discs which are quick formatted by the writing
software cannot be used.
• When recording to the maximum CD-R/RW media capacity
at once, the writing software is set to "Disc at once".
• File/Folder name is the number of the characters including
the extensions.
|
6
KDV-S211P
About Picture files
Acceptable picture files
• Format: JPEG
• Baseline format:
Up to a maximum of 8192(W) × 7680(H) pixels
• Progressive format:
Up to a maximum of 1600(W) × 1200(H) pixels
⁄
• Enlarges and reduces images up to the size shown above to
fit to the screen.
• The picture files with information attached (such as Exif )
may not be displayed or operated (e.g.: rotation display)
properly.
Extension
Picture file must have the following extension:
jpg
Acceptable discs, disc formats, file and folder names
and playing order are the same as those for audio
files. Refer to <About Audio files>.
About Video files
Acceptable video files
• Format: DivX
• Version: 3, 4, 5
• Sound Format: MP3, AC3
• Transfer bit rate: 8 – 320 kbps/ VBR
• Size of picture
PAL: 720(W ) × 576(H) pixels
NTSC: 720(W) × 480(H) pixels
⁄
• Enlarges and reduces images up to the size shown above to
fit to the screen.
• The picture files with information attached (such as Exif )
may not be displayed or operated (e.g.: rotation display)
properly.
Extensions
Picture files must have one of the following
extensions:
avi,
divx
Acceptable discs, disc formats, file and folder names
and playing order are the same as those for audio
files. Refer to <About Audio files>.
Page 7
About DivX
DivX is a popular media technology created by DivX,
Inc. DivX media Files contain highly compressed video
with high visual quality that maintains a relatively
small file size. DivX files can also include advanced
media features like menus, subtitles, and alternate
audio tracks. Many DivX media files are available for
download online, and you can create your own using
your personal content and easy-to-use tools from
DivX.com.
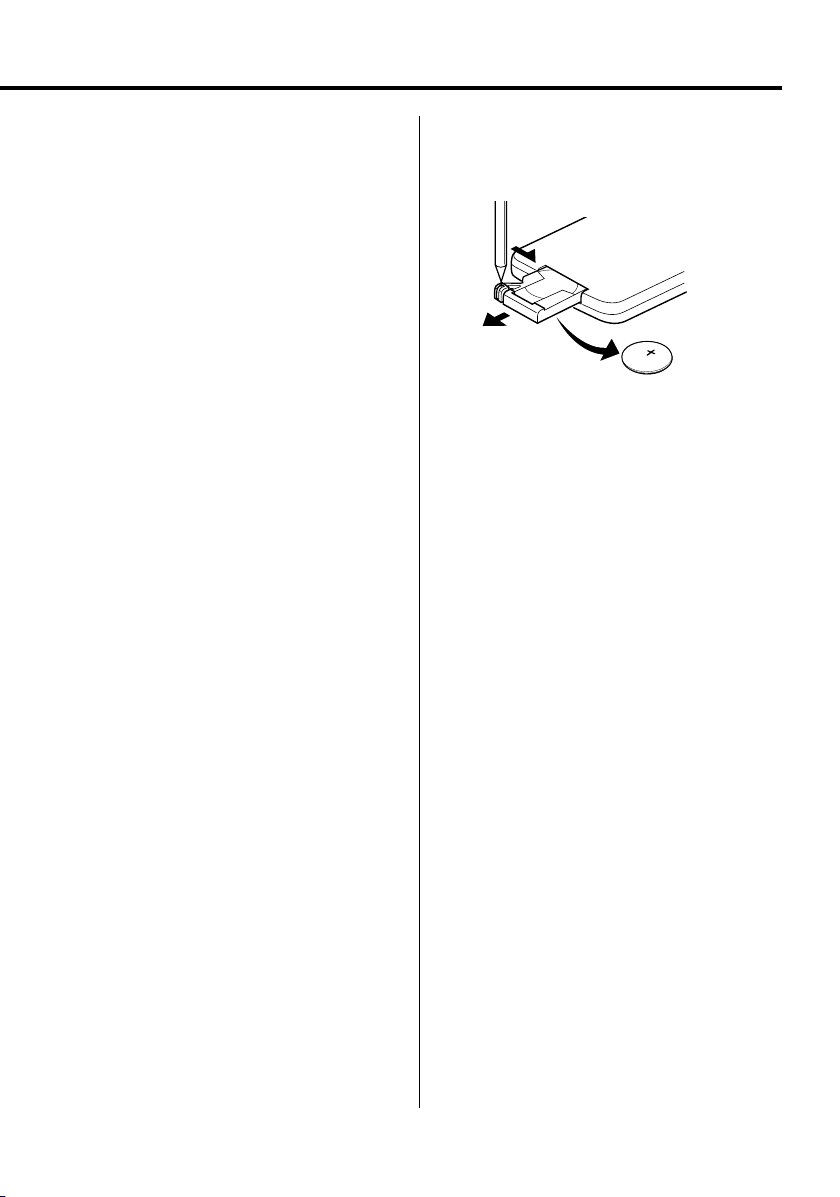
Loading the battery
Use one lithium battery (CR2025).
Insert the battery with the + and – poles aligned
properly, following the illustration inside the case.
1 Keep on slide
About DivX Certified
DivX Certified products are officially tested by the
creators of DivX and guaranteed to play all versions
of DivX video, including DivX 6. Certified products
qualify for one of several DivX Profiles that designate
the type of video the product supports, from compact
portable video to high-definition video.
2 Pull out
B
A
T
T
R
B
Y
A
B
T
A
T
T
R
T
B
Y
R
A
B
Y
T
A
T
R
3 Replace the battery
2WARNING
• Store unused batteries out of the reach of children.
Contact a doctor immediately if the battery is
accidentally swallowed.
• Do not put the remote in a place where it moves
when you drive. If it falls under the brake pedal, etc.,
it will hinder your driving, causing danger.
¤
• Do not set the remote on hot places such as above the
dashboard.
⁄
• The provided battery is intended for use in operation
checking, and their service life may be short.
• When the remote controllable distance becomes short,
replace the battery with a new one.
English
|
7
Page 8
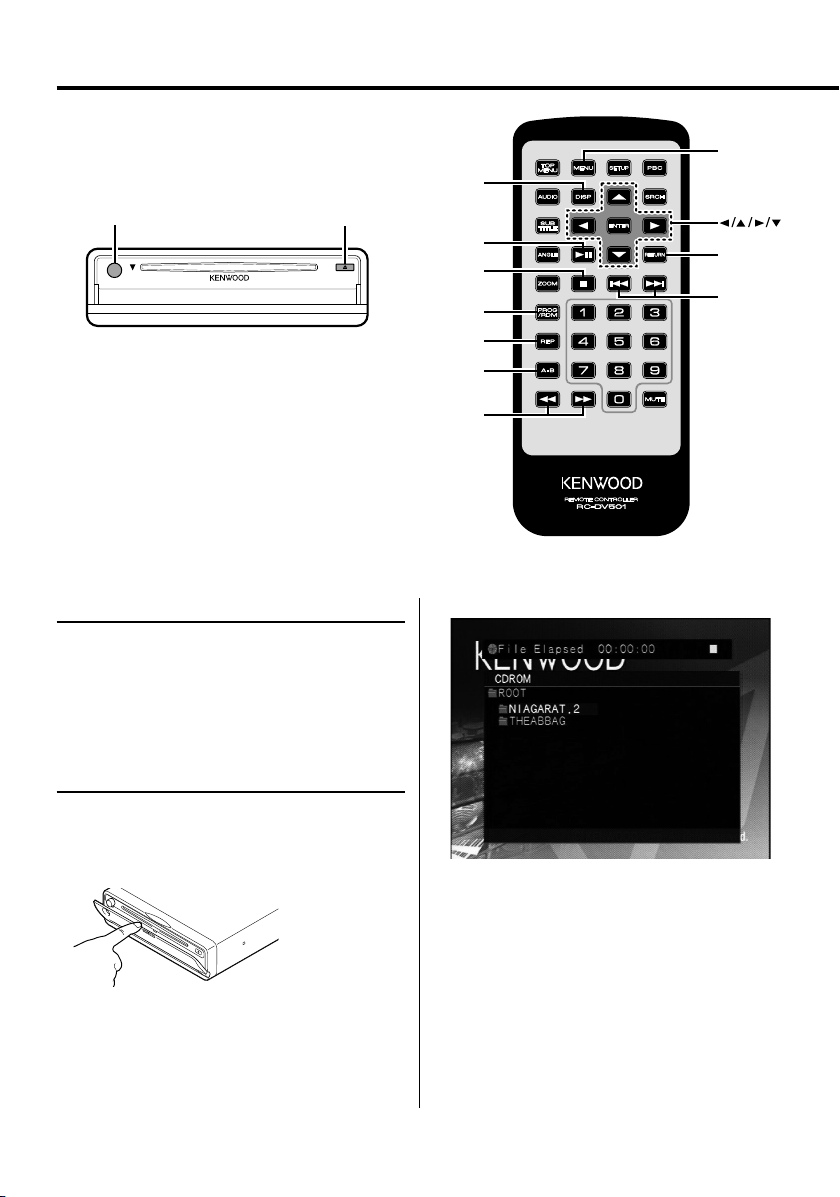
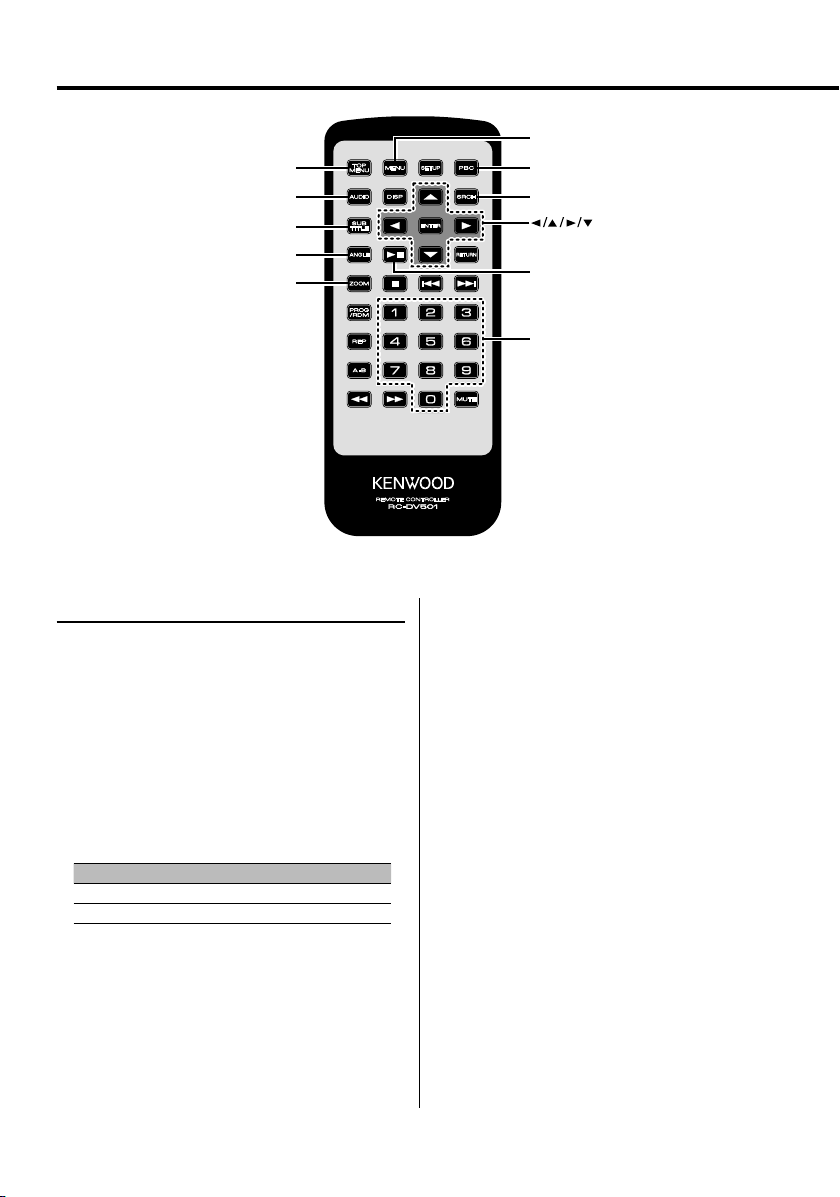
Common features
MUTE
DISP
POWER
POWER
EJECT
EJECT
Power
Press the [POWER] button.
¤
• Unplug the cigarette lighter plug when you turn off the
ignition in order to prevent the battery from running out.
Play
PROG/RDM
REP
A–B
/Y
Play of Audio file/Picture file/Video file
& ENTER
RETURN
/D
Play
Open the cover and insert a disc into the unit.
If a disc has been inserted, press the [38] button.
Starts playing the disc.
⁄
• If you insert a disc, it will start playing from the
beginning of the disc.
If you turn the power off while playing a disc, turning
the power back on will resume playing the disc where
it stopped.
|
8
KDV-S211P
1 Select the folder
Press the [2]/[5]/[3]/[∞] button.
2 Determine the folder
Press the [ENTER] button.
The music in the determined folder are displayed.
3 Select the file you want to listen to
Press the [2]/[5]/[3]/[∞] button.
To return to Step 1 to select a folder again, press
the [RETURN] button.
Page 9

4 Play the selected file
Press the [ENTER] button.
Pause
Press the [38] button.
Each time the button is pressed, it pauses or plays.
Stop
Press the [7] button.
To restart playback, press the [38] button.
⁄
• If you press the [7] button twice during DVD playback, it
starts from the beginning of the disc next time you play
it.
Eject
Press the [EJECT] button.
⁄
• If you want to restart playback with the disc ejected
from the unit, press the [EJECT] button again. The disc is
inserted into the unit, and playback is restarted.
• If you turn off the power or start the engine while
playing an audio file, playback may not resume (restart
from the point where playback stopped).
Repeat Play
Plays a song, chapter, title, etc. repeatedly.
Press the [REP] button.
Each time the button is pressed, the Repeat Play
function switches as shown below.
In DVD source
Display Setting
"CHAPTER REPEAT" Plays the chapter repeatedly.
"TITLE REPEAT" Plays the title repeatedly.
"REPEAT CANCELED" Turns Repeat Play off.
In Video file source
Display Setting
"FILE REPEAT" Plays the file repeatedly.
"FOLDER REPEAT" Plays the folder repeatedly.
"ALL REPEAT" Plays the disc repeatedly.
"REPEAT CANCELED" Turns Repeat Play off.
In CD/VCD source
Display Setting
"TRACK REPEAT" Plays the track repeatedly.
"ALL REPEAT" Plays the disc repeatedly.
"REPEAT CANCELED" Turns Repeat Play off.
Mute
Turning the volume down quickly.
Press the [MUTE] button.
Each time the button is pressed, the Mute turns ON
or OFF.
Skip
Skips a chapter, track or file.
Press the [4] or [¢] button.
⁄
• To skip on a VCD, turn the PBC function off by pressing
the [PBC] button.
Fast Forward and Reverse
Press the [1] or [¡] button.
The speed changes at 5 levels each time the
button is pressed.
To restart playback, press the [38] button.
In Audio file source
Display Setting
"FILE REPEAT" Plays the song repeatedly.
"FOLDER REPEAT" Plays the songs in the folder repeatedly.
"ALL REPEAT" Plays the disc repeatedly.
"REPEAT CANCELED" Turns Repeat Play off.
In Picture file source
Display Setting
"FILE REPEAT" Plays the picture file repeatedly.
"FOLDER REPEAT" Plays the folder repeatedly.
"ALL REPEAT" Plays the disc repeatedly.
"REPEAT CANCELED" Turns Repeat Play off.
⁄
• To repeat play a VCD, turn the PBC function off by
pressing the [PBC] button.
English
|
9
Page 10

Common features
A-B Repeat Play
[DVD] [VCD] [DivX] [CD] [AUDIO]
Specify the Start and End points to play the portion
between the specified points repeatedly.
1 Specify Point A (Start point)
Press the [A-B] button.
2 Specify Point B (End point)
Press the [A-B] button.
Plays from Point A to Point B repeatedly.
Canceling A-B Repeat
Press the [A-B] button.
Random Play
[CD] [AUDIO] [DivX] [PIC]
Songs are chosen from those recorded on the disc
opened at random and are played.
1 Stop playback
Press the [7] button twice.
2 Select the Random Play mode
Press the [RDM] button twice.
3 For Audio file, select the folder
Select a folder using the [2]/[5]/[3]/[∞]
buttons and press the [ENTER] button.
Place the cursor to any file in the folder you want to
random play.
4 Start Random Play
Press the [38] button.
Canceling Random Play
Press the [7] button twice and [RDM] buttons
in order.
Program Play
Plays the selected scene, songs, or files only in
order.
1 Stop playback
Press the [7] button twice.
2 Enter the Program mode
Press the [PROG] button.
3 Select the scene, song, or file you want to play
Press the [2]/[5]/[3]/[∞] button.
4 Determine the scene, songs, or file you want
to play
Press the [ENTER] button.
When programming for a DVD, select and
determine the title and chapter in this order.
5 Repeat Steps 3 and 4 to register all the scenes,
songs, or files you want to program play.
6 Start Program Play
Press the [38] button.
Canceling Program Play
Press the [7] and [PROG] buttons in order.
⁄
• To cancel a programmed song and others, select "CLEAR
ALL" and press the [ENTER] button.
10
|
KDV-S211P
Page 11

Switching Display
Switches the information displayed on the monitor
screen.
Press the [DISP] button.
Each time the button is pressed, the display
switches as shown below.
In DVD source
Display Information
"Chapter Elapsed" Chapter elapsed time
"Chapter Remain" Chapter remaining time
"Title Elapsed" Title elapsed time
"Title Remain" Title remaining time
"Display Off" Not displayed
In DivX source
Display Information
"File Elapsed" Video elapsed time
"File Remain" Video remaining time
"Display Off" Not displayed
In VCD (with PBC on) /Audio file source
Display Information
"Track Elapsed" Track/file elapsed time
"Track Remain" Track/file remaining time
"Display Off" Not displayed
In VCD (with PBC off) /CD source
Display Information
"Track Elapsed" Track elapsed time
"Track Remain" Track remaining time
"Disc Elapsed" Disc elapsed time
"Disc Remain" Disc remaining time
"Display Off" Not displayed
English
|
11
Page 12
DVD Video/Video CD/Video file/Picture file features
MENU
TOP MENU
AUDIO
SUB TITLE
ANGLE
ZOOM
PBC
SRCH
& ENTER
0 – 9
Search Play [DVD] [VCD] [DivX]
Directly calls the scene you want to play.
1 Enter the Search mode
Press the [SRCH] button.
⁄
• To search play a VCD, turn the PBC function off by
pressing the [PBC] button.
2 For DVD, select the Search mode
Press the [SRCH] button.
Each time the button is pressed, the item that can
be called switches as shown below.
Item
Chapter number
Title number
⁄
• If you press the [2] or [3] button during the Chapter
Number Search mode, you can search for a title number.
3 Enter the scene you want to play
Press the [0] – [9] button.
Starts playing the scene you entered during VCD
playback.
|
12
KDV-S211P
4 For DVD, start scene Search Play
Press the [ENTER] button.
Starts playing the scene you entered.
5 For DVD, enter the time you want to play
Press the [0] – [9] button.
Starts playing the time you entered.
6 For DVD, start time Search Play
Press the [ENTER] button.
Starts playing the time you entered.
Canceling Search Play
Press the [SRCH] button.
Page 13

DVD menu/Top (title) menu [DVD]
Calls the DVD menu and the Top (title) menu to set
up various settings.
1 Display the DVD menu
Press the [MENU] button.
Display the Top (title) menu
Press the [TOP MENU] button.
2 Select the item
Press the [2]/[5]/[3]/[∞] or [0] – [9] button.
3 Finalize the item
Press the [38] button.
Refer to the disc manual for instructions on using
each menu.
4 Cancel the menu display
Press the [MENU] or [TOP MENU] button.
Audio Language select [DVD]
Press the [AUDIO] button.
Switches the languages recorded on the disc in
order.
⁄
• If no more than one language is recorded on the disc, it
does not switch.
Picture Angle select [DVD]
Press the [ANGLE] button.
Switches the angles recorded on the disc in order.
⁄
• If no more than one angle is recorded on the disc, it
does not switch.
Zoom
Zooms the image.
1 Select the zoom ratio
Press the [ZOOM] button.
Each time the button is pressed, the zoom ratio
changes as follows:
DVD/ VCD: x1.0, x2.0, x3.0
Video file: x1.0, x1.5, x2.0, JUST
Picture file: 50, 100, 150, 200 %
2 Select the displaying position (during
playback of moving picture only)
Press the [2]/[5]/[3]/[∞] button.
PBC [VCD]
Uses the playback control (PBC) function.
Subtitle Language select [DVD]
Press the [SUB TITLE] button.
Switches the languages recorded on the disc in
order.
⁄
• If no more than one language is recorded on the disc, it
does not switch.
1 Turn the PBC function on
Press the [PBC] button.
Each time the button is pressed, the PBC function
turns ON or OFF.
2 Select the item
Press the [0] – [9] button.
3 Finalize the item
Press the [38] button.
Refer to the disc manual for instructions on using
PBC.
⁄
• You can use the PBC function when playing a VCD of
Ver2.0 or higher.
English
|
13
Page 14

DVD Video/Video CD/Video file/Picture file features
Slow Motion play
[DVD] [VCD] [DivX]
Pause playback
1
Press the [38] button.
2 Slow Motion play
Press the [1
Each time the button is pressed, it plays in slow
motion as shown below.
Disc Button Movement
DVD 1
¡
DVD
¡
VCD/
DivX
] or [¡] button.
The speed of slow reverse changes in order of 5 steps.
The speed of slow forward changes in order of 5
steps.
The speed of slow forward changes in order of 5
steps.
⁄
• To return to the normal speed, press the [38] button.
Frame-by-frame playback
[DVD] [VCD] [DivX]
1 Pause playback
Press the [38] button.
2 Frame-by-frame playback
Press the [2] or [3] button.
⁄
• During playback of a video file, frames cannot be
advanced in the reverse direction ([2]).
Slide show [PIC]
Displays the slide show of pictures.
1 Select the folder to view a slide show
Press the [2]/[5]/[3]/[∞]/[ENTER] button.
2 Start the slide show
Press the [38] button.
⁄
• To specify the display time of a file, select "OTHER" /
"JPEG TIME" from <Setup menu> (18 page).
Picture Rotation [PIC]
Rotates the displayed picture.
1 Display the picture you want to rotate
Press the [2]/[5]/[3]/[∞]/[ENTER] button.
2 Rotate the picture
Button Display
[2] Rotate the picture 90˚ counterclockwise.
[5] Rotate the picture 180˚.
[3] Rotate the picture 90˚ clockwise.
[∞] Rotate the picture 180˚.
14
|
KDV-S211P
Page 15
CD/Audio file features
SRCH
Direct Skip Play [CD]
Directly calls the song you want to play.
1 Enter the song number you want to play
Press the [0] – [9] button.
2 Play
Press the [ENTER] button.
⁄
• If you do not perform the operation of Step 2 for about
5 seconds, the song entered in Step 1 is automatically
searched for.
Play Time Search [CD]
Enter the play time to start from where you want.
1 Enter the Play Time Search mode
Press the [SRCH] button.
2 Enter the play time where you want to start
Press the [0] – [9] button.
For example
5:07 ➪ [0], [5], [0], [7]
Starts playing from the time you entered.
& ENTER
0 – 9
3 Play
Press the [ENTER] button.
Search Play [AUDIO]
Directly calls the song you want to play.
1 Select the folder
Press the [2]/[5]/[3]/[∞] button.
2 Determine the folder
Press the [ENTER] button.
The music in the determined folder are displayed.
3 Enter the Search Play mode
Press the [SRCH] button.
4 Enter the song number you want to play
Press the [0] – [9] button.
5 Play
Press the [ENTER] button.
English
|
15
Page 16
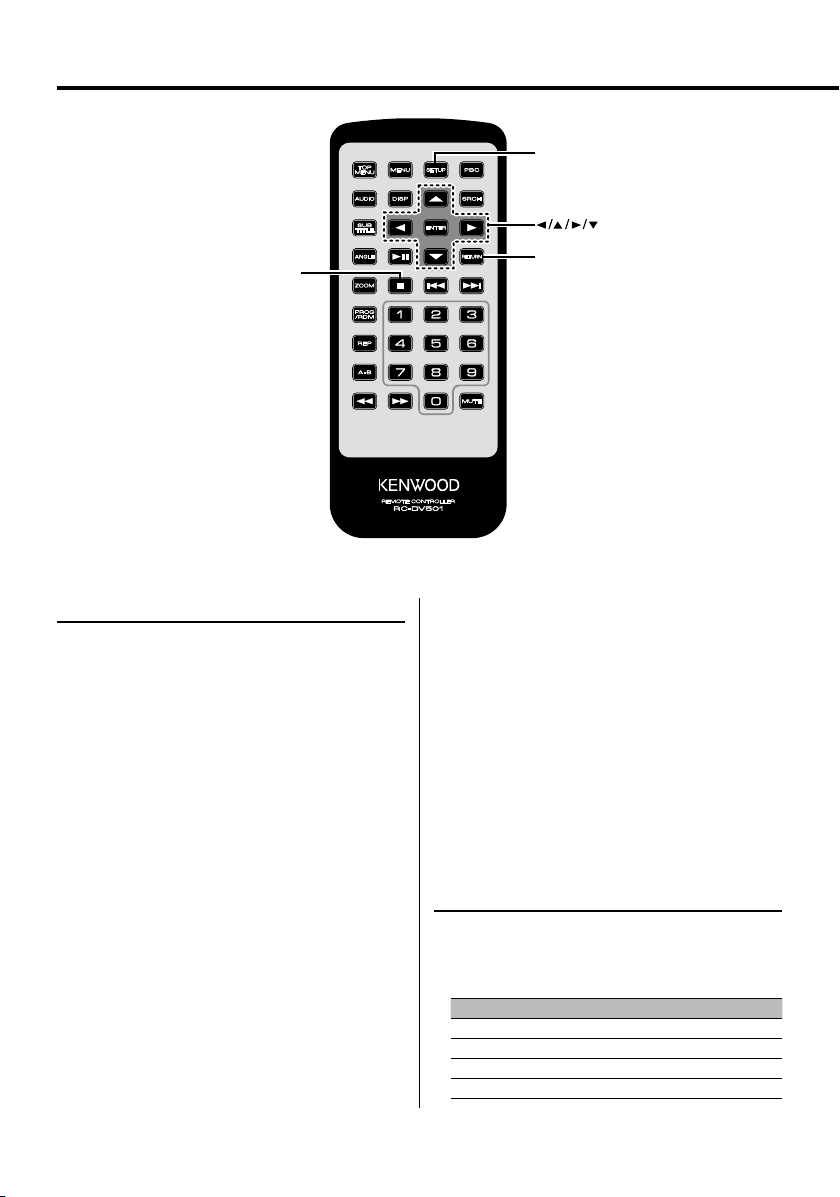
Setup menu
SETUP
& ENTER
RETURN
Setup menu
You can customize default settings for various
functions of the unit using the Setup menu.
1 Stop playback
Press the [7] button.
During DVD playback, press the button twice.
During VCD playback, turn the PBC function off by
pressing the [PBC] button first.
2 Display the SETUP MENU screen
Press the [SETUP] button.
SETUP MENU MAIN is displayed on the monitor
screen connected.
3 Select the menu page you want to set up
Press the [5]/[∞] button.
4 Enter the selected menu page
Press the [ENTER] button.
The menu page selected in Step 3 is displayed.
5 Select the setup item and option
Press the [2]/[5]/[3]/[∞] button.
Refer to the subsequent descriptions for the setup
items and options on each menu.
|
16
KDV-S211P
6 Finalize your selection
Press the [ENTER] button.
To return to Step 2 to display the SETUP MENU
MAIN screen, press [RETURN].
7 Exit the Setup menu
Press the [SETUP] button.
⁄
• To exit the Setup menu, press [SETUP]. If you exit the
Setup menu by turning off the power, the settings are
not saved.
DISC menu
AUDIO
Set the audio language produced from the
speakers.
Display Setting
"JAPANESE" Japanese
"ENGLISH" English
"CHINESE" Chinese
"ORIGINAL" Original language
Page 17
SUBTITLE
Set the language of the subtitles displayed on the
screen.
Display Setting
"AUTO" Original language
"JAPANESE" Japanese
"ENGLISH" English
"CHINESE" Chinese
MENUS
Set the language of the disc menu.
Display S etting
"AUTO" Original language
"ENGLISH" English
"CHINESE" Chinese
RATINGS
Set the parental level. The higher the level is, the
higher protection you get.
Display Setting
"0 LOCK ALL"
"1 KID SAF" G-rated movies (for children) can only be played.
"2 G"
"3 PG"
"4 PG 13"
"5 PGR"
"6 R"
"7 NC17"
"8 ADULT"
1 Press the [ENTER] button on the remote.
2 Set up the parental level.
3 Enter the password.
4 Press the [ENTER] button on the remote.
⁄
• The password is set to "0000" by default.
• The parental setting is enabled for "R" sign discs only.
PASSWORD
CHANGE: Change the password.
1 Select "SETTING" and press the [ENTER] button
on the remote.
2 Enter the current password.
3 Enter the new password twice.
4 Press the [ENTER] button on the remote.
⁄
• The password is set to "0000" by default.
VIDEO menu
TV ASPECT
Use the procedure described below to set the
output screen.
Display Setting
"16:9" Set the picture mode of the wide-screen monitor
"4:3 PS" Wide-screen software with pan & scan specification
"4:3 LB" Wide-screen software with pan & scan specification
TV SYSTEM
Select the video output signal suitable for the TV
monitor you use.
Display Setting
"NTSC"
"PAL"
"AU TO "
to "16:9".
is played in a panned & scanned screen (with the left
and right sides cut off).
is played in a letter box screen (with black stripes on
the top and bottom).
Outputs the video signal using the NTSC system.
Outputs the video signal using the PAL system.
Switches between the NTSC and PAL systems
automatically according to the type of the video
signal of the disc you play.
⁄
• Turning off the power restores the default setting
("NTSC").
STILL MODE
Set the still (pause) image display mode.
Display Setting
"AU TO "
"FIELD"
"FRAME"
Detects the image motion speed automatically to
perform the optimum image processing.
Performs the optimum image processing when the
image motion is fast.
Performs the optimum image processing when the
image motion is slow.
English
|
17
Page 18
Setup menu
AUDIO menu
LPCM DOWNSMPL
Display Setting
"OFF" Does not perform down-sampling.
"48kHz" Outputs a song of 96kfs in 48kfs from DIGITAL OUT.
"96kHz" Outputs a song of 96kfs in 96kfs from DIGITAL OUT.
DOLBY DIGITAL
Sets the Dolby digital sound output form.
Display S etting
"BITSTREAM" Outputs sound in Bits stream form.
"PCM" Outputs sound in PCM form.
"OFF" Does not output sound.
DTS
Sets the DTS sound output form.
Display S etting
"BITSTREAM" Outputs sound in Bits stream form.
"PCM" Outputs sound in PCM form.
"OFF" Does not output sound.
MPEG
Sets the MPEG sound output form.
Display S etting
"BITSTREAM" Outputs sound in Bits stream form.
"PCM" Outputs sound in PCM form.
"OFF" Does not output sound.
DYNAMIC RANGE
Narrows the dynamic range to allow you to listen to
movie dialogues clearly.
Display S etting
"ON" Narrows the dynamic range.
"OFF" Does not adjust the dynamic range.
DISPLAY
LANGUAGE
Sets the language of the setup menu.
Display S etting
"
中文" Chinese
"ENGLISH" English
"FRANÇAIS" French
"ESPAÑOL" Spanish
"DEUTSCH" German
"ITALIANO" Italian
OTHER
JPEG TIME
Sets the picture display time.
Display Setting
"1 SEC" Displays the picture for 1 second.
…
"180 SEC" Displays the picture for 180 seconds.
Press the [5] or [∞] button to select the second.
DEFAULTS
RESET: Resets the customized items on the Setup
menu.
REGISTRATION
SHOW CODE: Displays the DivX registration code.
⁄
• When downloading a DivX VOD file controlled by DRM,
register the code appeared on the screen. Otherwise the
file may not be able to play with this unit.
Remaining number of viewing is displayed when playing
a DivX VOD file with the viewing restriction. When the
remaining number of viewing reached 0, a warning
message appears and the file cannot be played.
18
|
KDV-S211P
Page 19
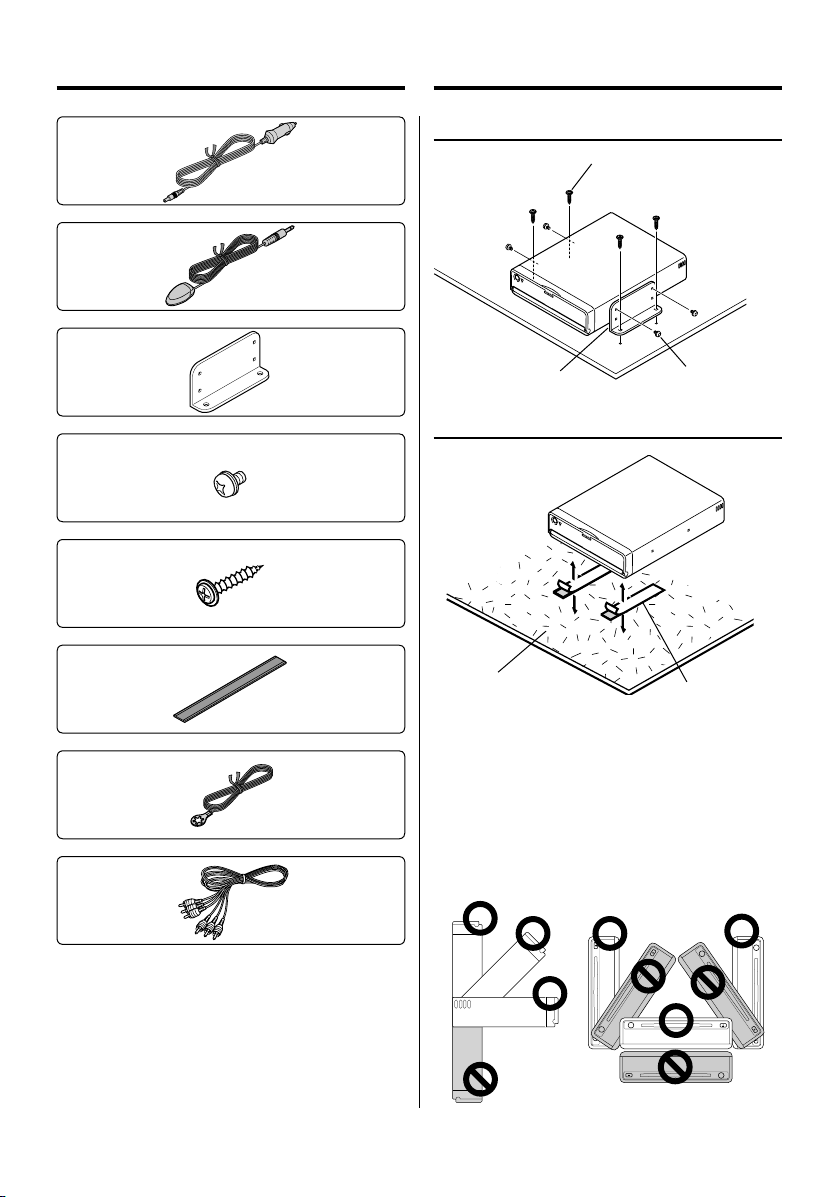
Accessories
Installation
1
2
3
4
5
6
7
8
..........1
..........1
..........2
..........5
..........4
..........2
..........1
Installation using the brackets
Tapping Screw 5
(Φ5 x 20 mm)
Bracket 3
Semusu Screw 4
(M4 x 5 mm)
Installation using the Velcro tapes
Carpet
Velcro tape 6
¤
• Do not use your own screws. Use only the screws provided.
If you use the wrong screws, you could damage the unit.
• Do not install the unit to an unstable place and a place
where it vibrates.
• You can mount the unit at any angle between the regular
horizontal position and the vertical position on its back (0°
through 90°). You cannot mount the unit with the disc slot
facing downwards, angled or upside down.
..........1
¤
• If the fuse blows, first make sure that the wires have not
caused a short circuit, then replace the old fuse with one
with the same rating.
English
|
19
Page 20
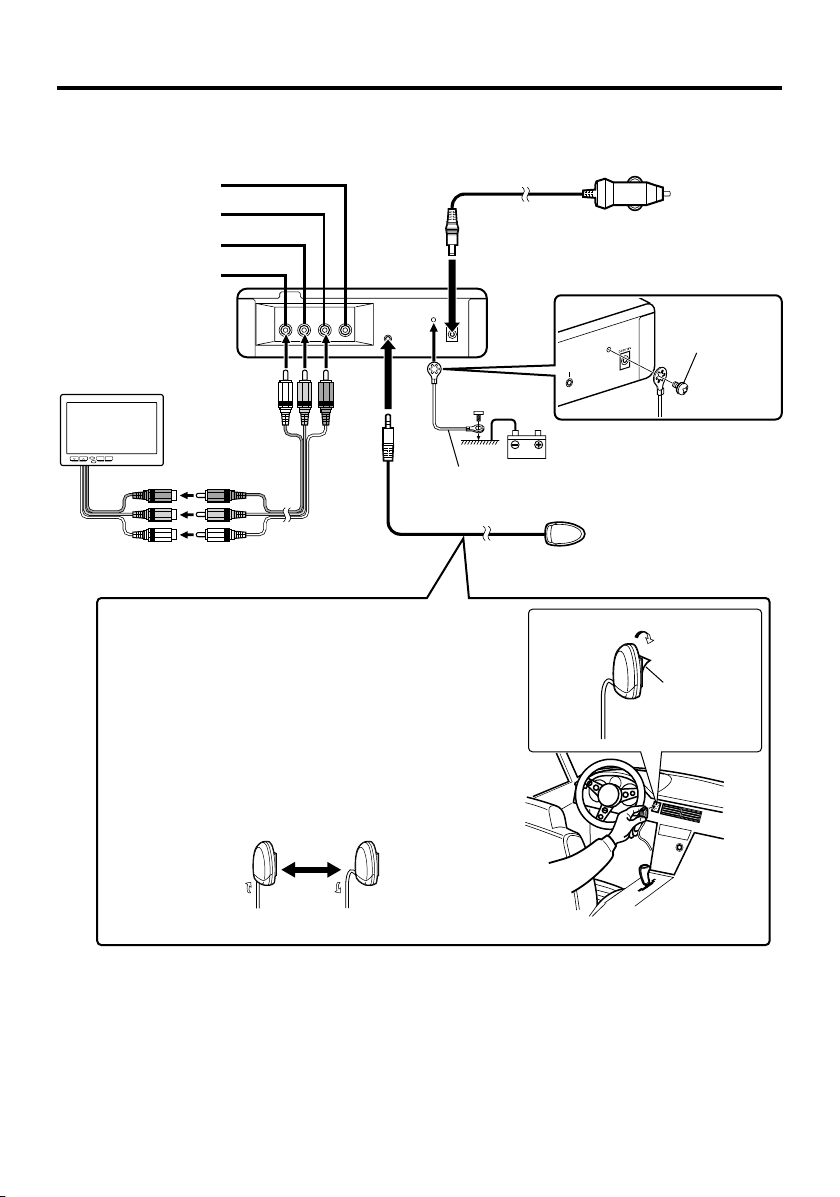
Connecting Wires to Terminals
Digital output
Video output (Yellow)
Audio left output (White)
Audio right output (Red)
DVD Player back view
TV Monitor
(Optional Accessory)
AV Cable 8
Attaching Remote Control Sensor
1 Remove the backing paper from the Velcro tape on the
back of the Remote Control Sensor.
2 After wiping off the dirt or oil from the attachment location,
attach the Remote Control Sensor.
⁄
• Wipe off the dirt or oil from the surface to which the Sensor is
attached.
• Avoid locations under direct sunlight or near the TV monitor where
signals from the remote controller are not received easily.
• You can change the direction of the remote control sensor cable.
Power Cable 1
M4 X 5mm
Ground wire 7 (Black) - (To car chassis)
Remote Control Sensor 2
Cigarette Lighter Plug
Fuse (5A) built in
M4 X 5mm
TE
O
REM
Battery
To Cigarette
Lighter Socket
Semusu Screw 4
(M4 x 5 mm)
Backing paper
20
|
KDV-S211P
¤
• Connect the power cable 1 to the DVD player first, and
connect it to the cigarette lighter socket last. Connecting it
to the cigarette lighter socket first may blow the fuse.
Page 21

Troubleshooting Guide
What might seem to be a malfunction in your unit
may just be the result of slight misoperation or
miswiring. Before calling service, first check the
following table for possible problems.
? The sound/picture skips on a DVD/VCD/CD.
✔ The disc is scratched or dirty.
☞ Clean the disc, referring to the section on
<Handling discs> (see page 5).
? A VCD cannot be played using menus.
✔ The VCD disc being played is not compatible with
P.B.C.
☞ Menu playback is available only with VCD discs
recorded with P.B.C.
? The subtitle is not displayed.
✔ The DVD disc being played does not contain the
recording of subtitles.
☞ The subtitle cannot be displayed when the
DVD disc being played does not contain the
recording of subtitles.
? The voice (or subtitle) language cannot be
changed.
✔ The DVD disc being played does not contain the
recording of more than one audio (or subtitle)
language.
☞ The voice (or subtitle) language cannot be
changed when the DVD disc being played does
not contain the recording of more than one
voice (or subtitle) language.
The messages shown below display your
systems condition.
"Thermal Protect. Off Power!"
: The protective circuit in the unit activates when the
temperature inside the DVD player exceeds 60°C (140°F),
stopping all operation.
➪ Cool down the unit by opening the windows or turning
on the air conditioner. As the temperature falls below
60°C (140°F), the disc will start playing again.
To eject the disc in this situation, turn the power off and
then turn it back on.
"NO DISC"
: No disc is inserted in the unit.
"THIS DISC MAY NOT BE PLAYED IN YOUR REGION"
: A DVD with the wrong region code was inserted into the
unit.
"Unknown DISC"
: A disc that cannot be played in the unit was inserted.
: The disc inserted contains damaged or non-standard data.
"PASSWORD IS DIFFERENT!"
: The password entered does not match the one registered.
: Appears if the second new password entered does not
match the first one when changing the password.
➪ When you enter the new password, you are required to
enter the same password twice for confirmation.
English
|
21
Page 22

Specifications
Specifications subject to change without notice.
DVD section
D/A Converter
: 8LevelΔΣ, 24bit
Wow & Flutter
: Below Measurable Limit
Frequency response
: 17- 44 kHz (DVD 96kHz Sampling)
Total harmonic distortion 1kHz
: 0.02 %
Signal to noise ratio
: 110 dB (DVD Video 96k)
Dynamic range
: 90 dB
Decode Format
: Linear PCM, Dolby Digital, dts, MP3, WMA, AAC
DISC Format
: DVD-VIDEO/ VIDEO-CD/ CD-DA
Output
Composite Video Output Level (V)
: 1 Vp-p (75Ω)
Audio 2ch Output Level (V)
:1.2 V/ 10 kΩ (DVD/CD)
Coaxial Digital Audio Interface Output Level (V )
: 0.5 V/ 75 Ω
General
Operating voltage
: 14.4 V (11 – 16 V)
Current consumption
: 2 A
Dimensions WxHxD
: 195 mm x 45 mm x 210 mm
7-11/16 x 1-6/8 x 8-2/8 inch
Weight
: 1.7 kg
3.75 lbs
22
|
KDV-S211P
Page 23

DivX, DivX Certified, and associated logos are trademarks of
DivX, Inc. and are used under license.
is a trademark of DVD Format/Logo Licensing
Corporation registered in the U.S., Japan and other countries.
This product incorporates copyright protection technology
that is protected by U.S. patents and other intellectual
property rights. Use of this copyright protection technology
must be authorized by Macrovision, and is intended for
home and other limited viewing uses only unless otherwise
authorized by Macrovision. Reverse engineering or
disassembly is prohibited.
Manufactured under license from Dolby Laboratories.
"Dolby" and the double-D symbol are trademarks of Dolby
Laboratories.
"DTS" is a registered trademark of DTS, Inc. and "DTS 2.0 +
Digital Out" is a trademark of DTS, Inc.
The "AAC" logo is trademark of Dolby Laboratories.
2CAUTION
Use of controls or adjustments or performance of procedures
other than those specified herein may result in hazardous
radiation exposure.
In compliance with Federal Regulations, following are
reproductions of labels on, or inside the product relating to
laser product safety.
Kenwood Corporation
2967-3, ISHIKAWA-MACHI,
HACHIOJI-SHI
TOKYO, JAPAN
KENWOOD CORP. CERTIFIES THIS EQUIPMENT
CONFORMS TO DHHS REGULATIONS N0.21 CFR
1040. 10, CHAPTER 1, SUBCHAPTER J.
Location : Bottom Panel
FCC WARNING
This equipment may generate or use radio frequency energy.
Changes or modifications to this equipment may cause
harmful interference unless the modifications are expressly
approved in the instruction manual. The user could lose
the authority to operate this equipment if an unauthorized
change or modification is made.
NOTE
This equipment has been tested and found to comply
with the limits for a Class B digital device, pursuant to Part
15 of the FCC Rules. These limits are designed to provide
reasonable protection against harmful interference in a
residential installation. This equipment may cause harmful
interference to radio communications, if it is not installed and
used in accordance with the instructions. However, there is
no guarantee that interference will not occur in a particular
installation. If this equipment does cause harmful interference
to radio or television reception, which can be determined by
turning the equipment off and on, the user is encouraged to
try to correct the interference by one or more of the following
measures:
• Reorient or relocate the receiving antenna.
• Increase the separation between the equipment and
receiver.
• Connect the equipment into an outlet on a circuit different
from that to which the receiver is connected.
• Consult the dealer or an experienced radio/TV technician
for help.
NOTE
This Class B digital apparatus complies with Canadian
ICES-003.
English
|
23
Page 24

Table des matières
Précautions de sécurité 25
Remarques 26
Fonctions de base 30
Alimentation
Lecture
Sourdine
Passage rapide
Avance et retour rapide
Lecture à répétitions
Lecture à répétitions A-B
Lecture aléatoire
Lecture programmée
Commutation de l’affichage
Fonctions spécifiques aux
DVDs vidéo/CDs vidéo/fichiers vidéo/
fichiers d'images 34
Lecture avec recherche
Menu DVD/Menu principal (titre)
Sélection de la langue audio
Sélection de la langue des sous-titres
Sélection de l'angle d'affichage des images
Zoom
PBC
Lecture au ralenti
Lecture trame par trame
Diaporama
Rotation d'images
Fonctions spécifiques aux CDs/
fichiers audio 37
Lecture avec passage rapide
Lecture par recherche temporelle
Lecture par recherche
Menu de configuration 38
Menu de configuration
Menu DISC
Menu VIDEO
Menu AUDIO
DISPLAY
OTHER
Accessoires 41
Installation 41
Connexion des câbles aux bornes 42
Guide de depannage 43
Spécifications 44
24
|
KDV-S211P
Page 25

Précautions de sécurité
2AVERTISSEMENT
Pour éviter toute blessure et/ou incendie,
veuillez prendre les précautions suivantes:
• Pour éviter les court-circuits, ne placez jamais des
objets métalliques (comme une pièce de monnaie ou
un outil en métal) à l’intérieur de l’appareil.
• Ne regardez pas l'affichage de l'appareil de manière
prolongée lorsque vous conduisez.
• Le montage et le câblage de ce produit nécessitent
des compétences et de l'expérience. Pour des raisons
de sécurité, laissez un professionnel effectuer le travail
de montage et de câblage.
• Ne connectez pas cette unité à un moniteur situé
à l'avant du véhicule. Il s'agit en effet d'un appareil
destiné principalement aux passagers en zone arrière.
• Ne jamais utiliser un cordon d'alimentation autre que
celui fourni. Ceci pourrait déclencher un incendie.
2ATTENTION
Pour éviter tout dommage à l’appareil,
veuillez prendre les précautions suivantes:
• Assurez-vous de mettre l’appareil à la masse sur une
alimentation négative de 12V CC.
• N’installez pas l’appareil dans un endroit exposé
directement à la lumière du soleil, à une chaleur
excessive ou à l’humidité. Évitez également
les endroits trop poussiéreux ou exposés aux
éclaboussures.
• Lors du remplacement d’un fusible, n'utilisez que des
fusibles neufs et de même calibre. L’utilisation d’un
fusible de calibre différent pourrait causer un mauvais
fonctionnement de votre appareil.
• Utilisez uniquement les vis fournies ou spécifiées
pour l'installation. Si vous utilisez les mauvaises vis,
vous pourriez endommager l'appareil.
Condensation d'eau sur la lentille
En hiver, ou d'une manière générale lorsqu'il fait
froid, il arrive assez souvent que des vapeurs d'eau
se condensent sur la lentille située à l'intérieur du
lecteur de CD. Ce phénomène, connu sous le nom de
condensation sur la lentille, rend impossible la lecture
des CDs. Dans ce cas, retirez le disque et attendez que
l’humidité s’évapore. Si l’appareil ne fonctionne toujours
pas normalement après quelques instants, consultez
votre revendeur Kenwood.
Nettoyage de l’appareil
Si le panneau avant de cet appareil est souillé, essuyezle avec un chiffon sec et doux, par exemple un chiffon
au silicone.
Si le panneau avant de cet appareil est fortement
souillé, essuyez-le à l'aide d'un linge imbibé d'un
détergent neutre, puis essuyez toute trace du
détergent neutre.
¤
• La pulvérisation directe de produit de nettoyage sur l’appareil
risque d’affecter les pièces mécaniques. L’utilisation d’un
chiffon rugueux ou d’un liquide volatile tel qu'un solvant
ou de l'alcool pour essuyer le panneau avant peut rayer la
surface ou effacer des caractères.
REMARQUE
• Si vous rencontrez des problèmes pendant
l’installation, consultez votre revendeur Kenwood.
• Les illustrations de l’affichage et du panneau
apparaissant dans ce manuel sont des exemples
utilisés pour expliquer avec plus de clarté comment
les commandes sont utilisées. Il est donc possible que
les illustrations d’affichage puissent être différentes
de celles réellement affichées sur l’appareil, et
également que certaines illustrations représentent
des opérations impossibles à réaliser en cours de
fonctionnement.
Français
|
25
Page 26

Remarques
Codes de régions
1
1
4
Symboles utilisés sur les disques DVD
Symbole Description
Indique le numéro de région. Les disques portant ce
ALL
8
32
9
16:9 LB
symbole peuvent être lus sur n'importe quel lecteur
de DVDs.
Indique le nombre de pistes de langues audio
enregistrées. Un film peut comporter jusqu'à 8 langues.
Vous pourrez donc sélectionner votre langue favorite.
Indique le nombre de langues de sous-titres enregistrées.
Un film peut comporter jusqu'à 32 langues de soustitres.
Permet de sélectionner un angle de visualisation
lorsqu'un DVD comporte des scènes filmées sous
plusieurs angles.
Indique le type d'écran préféré pour visualiser un film.
Le symbole de gauche indique une image grand écran
(format 16:9) affichée sur un écran TV classique (format
4:3), avec des bandes noires sur le haut et le bas de
l'image (format lettre).
5
2
6
3
5
2
2
1
4
Restrictions dues aux différences entre les
disques
Certains disques DVD et VCD ne peuvent
Icône
d'inhibition
pas comme vous l'espériez. Veuillez dans ce cas
consulter les instructions fournies avec chaque disque.
Lorsqu'une icône d'inhibition s'affiche à l'écran, ceci
indique que la fonction en cours est prohibée sur le
disque.
être reproduits que dans certains modes,
en raison des intentions de leurs
producteurs. Etant donné que le disque
sera alors lu en conséquence, il est possible
que certaines fonctions ne fonctionnent
Utilisation de disques "DualDisc"
Lors de la lecture de disques "DualDisc" sur cet appareil,
il est possible que la face qui n'est pas en cours de
lecture soit éraflée à chaque insertion ou éjection du
disque. Etant donné que la surface du CD de musique
n'est pas conforme à la norme CD, la lecture peut être
impossible.
(En effet, un disque "DualDisc" comporte deux faces,
l'une contenant des données de DVD classique, et
l'autre des données de CD musical.)
26
|
KDV-S211P
A propos des températures d'utilisation
Un circuit de protection thermique s'enclenche dès
que la température à l'intérieur du lecteur de DVD
dépasse 60°C (140°F). Veuillez vous reporter au chapitre
<Guide de depannage> (page 43).
Page 27

Liste des disques pouvant être reproduits
Types de
disques
DVD DVD Vidéo
CD CD musical
Autres Disque double ×
‡ : Reproduction possible.
% : Reproduction partielle possible.
× : Reproduction impossible.
Standard Support Remarque
DVD Audio ×
DVD-R
DVD-RW
DVD+R
DVD+RW
DVD-R DL
(Double couche)
DVD+R DL
(Double couche)
DVD-RAM ×
CD-ROM
CD-R
CD-RW
DTS-CD
CD vidéo (VCD)
CD Super vidéo ×
CD d'images
CD-EXTRA
HDCD
CCCD ×
CD Super audio
‡
‡
Reproduction de MP3/WMA/
AAC/JPEG/DivX
‡
Multi-bordures/
‡
Multi-sessions
(La lecture dépend cependant
‡
du système auteur)
‡
Format vidéo uniquement
‡
‡
Disques avec CD-TEXT/8 cm
(3 pouces) supportés.
‡
Reproduction de MP3/
‡
WMA/AAC/JPEG/DivX
‡
Multisessions supportées
Ecriture par paquets non
supportée.
‡
‡
‡
%
Seules les sessions de CD
musical seront lues.
%
Qualité de son équivalente
à celle d'un CD musical
classique
%
Seules la couche de CD
musical sera lue.
⁄
• Si vous achetez un disque dont le contenu est protégé selon
la norme DRM, veuillez vous reporter au chapitre concernant
la procédure d'<REGISTRATION> (page 40). Le code
d'enregistrement change à chaque fois qu'un fichier avec
le code d'enregistrement affiché est lu, afin de le protéger
contre les copies non autorisées.
A propos des fonctions dépendant de la
source reproduite
Les fonctions pouvant être utilisées sur ce lecteur
dépendent des sources reproduites, et sont indiquées
de la façon suivante dans ce mode d'emploi:
[DVD]: S'affiche uniquement lors de la reproduction
[VCD]: S'affiche uniquement lors de la reproduction
[CD]: S'affiche uniquement lors de la reproduction
[AUDIO]: S'affiche uniquement lors de la reproduction
[DivX]: S'affiche uniquement lors de la reproduction
[PIC]: S'affiche uniquement lors de l'affichage
de DVDs.
de CDs Vidéo.
de CDs.
de fichiers audio.
de fichiers vidéo.
d'images au format JPEG/Picture CD.
Manipulation des disques
• Ne touchez jamais la face enregistrée du disque.
• Ne collez jamais du ruban adhésif, etc. sur le disque,
et n'utilisez jamais un disque sur lequel du ruban
adhésif a été collé.
• N'utilisez jamais des accessoires en forme de disque
sur cet appareil.
• Nettoyez le disque en partant du centre vers l'extérieur.
• A chaque fois qu'un disque doit être retiré de
l'appareil, faites-le toujours à l'horizontale.
• Si vous remarquez des bavures au centre du disque
ou sur sa bordure externe, n'utilisez le disque
qu'aprèsl es avoir effacées, à l'aide d'un stylo, etc.
Disques ne pouvant être reproduits
• Il est impossible de reproduire des disques qui ne
sont pas totalement ronds.
• De même, les disques dont la surface enregistrée est
colorée et, d'une façon générale, les disques sales ne
pourront être lus.
• Cet appareil ne peut lire que les CD comportant
Il ne peut lire les disques qui ne comportent pas cette
marque.
• Un CD-R ou CD-RW qui n’a pas été finalisé ne peut
être lu. (Pour le procédé de finalisation, veuillez
consulter votre programme de gravure de CD-R/CDRW et les instructions du manuel d’utilisation de votre
graveur de CD-R/CD-RW).
.
Français
|
27
Page 28

Remarques
A propos des fichiers audio
• Fichiers audio compatibles
MP3 (.mp3), WMA (.wma), AAC (.m4a)
⁄
• Lorsqu'un disque comprend des pistes enregistrées à la fois
selon la norme standard CD et avec d'autres systèmes de
codage, seul le premier système enregistré sera reproduit.
• Fichiers MP3 compatibles
Fichiers MPEG 1/2 Audio Layer 3
Débit de transfert: 8 – 320 kbps/ VBR
Fréquence d'échantillonage: 8 – 48 kHz
• Fichiers WMA compatibles
Fichiers en accord avec la norme Windows Media
Audio (mis à part les fichiers pour Windows Media
Player 9 ou plus récent, incorporant de nouvelles
fonctions)
Débit binaire de transfert: 5 – 320 kbps/ VBR
Fréquence d'échantillonage: 8 – 48 kHz
• Fichiers AAC compatibles
Débit binaire de transfert: 8 – 384 kbps/ VBR
Fréquence d'échantillonage: 8 – 48 kHz
• Supports de disque compatibles
CD-R/RW/ROM, DVD-ROM/±R/RW
• Formats de fichiers de disque compatibles
ISO 9660 Niveau 1/2, Joliet, Romeo
• Nombre maximal de caractères affichables
12 caractères
• Limitations concernant l'arborescence des
dossiers et fichiers
Nombre maximum de niveaux pour l'arborescence
de dossiers: 8
Nombre maximum de dossiers: 255
Nombre maximum de fichiers par dossier: 999
Nombre maximum de fichiers par disque: 1254
Bien que les fichiers audio soient conformes aux
normes établies ci-dessus, il est possible que la
reproduction ne soit pas possible suivant le type ou les
conditions du support ou périphérique.
⁄
• Attribuez l'extension correcte pour les fichiers audio
(MP3: ".MP3", WMA: ".WMA", AAC: ".m4a")
• N’attribuez pas ces extensions à d’autres fichiers que les
fichiers audio. Si un fichier qui n’est pas de format audio porte
une telle extension, un bruit intense sera émis à la lecture et
les enceintes seront endommagées.
• Les fichiers protégés contre la copie sont illisibles.
• L'appareil peut ne pas être compatible avec une mise à
niveau du format de compression et d'autres caractéristiques
techniques.
• Impossible d’utiliser un CD-RW à format rapide.
• Lorsque vous enregistrez à sa capacité maximale et en une
fois un CD-R/RW, le logiciel d'écriture doit être réglé sur "Disc
at once".
|
28
KDV-S211P
• Le nombre de caractères du nom de fichier/dossier inclut les
extensions.
A propos des fichiers d'images
Fichiers d'images compatibles
• Format: JPEG
• Format de base:
Jusqu'à un maximum de 8192 (L) × 7680 (H) pixels
• Format progressif:
Jusqu'à un maximum de 1600 (L) × 1200 (H) pixels
⁄
• Agrandit ou réduit les images pour qu'elles correspondent à
la taille d'écran ci-dessus.
• Les fichiers d'images comportant des données
supplémentaires (comme les images Exif par exemple) ne
pourront pas être affichés correctement (lors des rotations
par exemple).
Extensions
Les fichiers d'images doivent être d'un des types
suivants:
jpg
Les disques compatibles, formats de disques, règles
de dénomination des fichiers et dossiers, ainsi que
l'ordre de lecture sont les mêmes que pour les fichiers
audio. Veuillez vous reporter au chapitre <A propos des
fichiers audio>.
A propos des fichiers vidéo
Fichiers vidéo compatibles
• Format: DivX
• Versions: 3, 4, 5
• Format de son: MP3, AC3
• Débit binaire de transfert: 8 – 320 kbps/ VBR
• Taille de l'image
PAL: 720 (L) × 576 (H) pixels
NTSC: 720 (L) × 480 (H) pixels
⁄
• Agrandit ou réduit les images pour les afficher sur l'écran à la
résolution ci-dessus.
• Les fichiers d'images comportant des données
supplémentaires (comme les images Exif par exemple) ne
pourront pas être affichés correctement ( lors des rotations
par exemple).
Extensions
Les fichiers d'images doivent être d'un des types
suivants:
avi,
divx
Les disques compatibles, formats de disques, règles
de dénomination des fichiers et dossiers, ainsi que
l'ordre de lecture sont les mêmes que pour les fichiers
audio. Veuillez vous reporter au chapitre <A propos des
fichiers audio>.
Page 29

À propos de DivX
DivX est une technologie de support très populaire
créée par DivX, Inc. Les fichiers de support DivX
contiennent de la vidéo hautement comprimée avec
une qualité visuelle très élevée qui maintient une taille
de fichier relativement petite. Les fichiers DivX peuvent
aussi inclure des fonctions de support avancées
telles que des menus, des sous-titres et des pistes
audio alternatives. De nombreux fichiers DivX sont
disponibles pour le téléchargement en ligne, et vous
pouvez créer votre propre fichier DivX en utilisant votre
propre contenu personnel et des outils faciles à utiliser
trouvés sur DivX.com.
À propos de la certification DivX
Les produits certifiés DivX font l'objet de tests officiels
par les créateurs de DivX et prennent en charge toutes
les versions de vidéo DivX, y compris DivX 6. Les
produits certifiés sont classés à l'aide des profils DivX,
qui désignent le type de vidéo pris en charge, de la
vidéo embarquée à la vidéo haute définition.
Installation de la pile
Utilisez une pile au lithium (CR2025).
Alignez correctement les pôles + et – de la pile, en
vous fiant au dessin gravé à l'intérieur du boîtier.
1 Bien appuyer sur la glissière
2 Extraire
B
A
T
T
R
B
Y
A
B
T
A
T
T
R
T
B
Y
R
A
B
Y
T
A
T
R
3 Remplacez la pile
2AVERTISSEMENT
• Conservez les piles usagées hors de portée des
enfants. Contactez un docteur immédiatement si la
pile est avalée.
• Ne laissez pas la télécommande à un endroit soumis
à de fortes vibrations pendant la conduite. En effet,
elle pourrait entraver vos mouvements si elle venait
à tomber sous la pédale des freins, etc. ce qui peut
être très dangereux.
¤
• Ne placez jamais la télécommande dans des endroits très
chauds, comme par exemple sur le tableau de bord.
⁄
• La pile fournie avec l'appareil sert principalement à vérifier
son bon fonctionnement, et il est donc possible que sa durée
de vie soit raccourcie.
• Dès que la portée de la télécommande commence à
diminuer, remplacez-la par une nouvelle pile.
Français
|
29
Page 30

Fonctions de base
MUTE
DISP
POWER
POWER
EJECT
EJECT
Alimentation
Appuyez sur la touche [POWER].
¤
• Déconnectez le connecteur de l'allume-cigare à chaque
fois que vous coupez le contact, pour éviter d'épuiser
inutilement la pile.
Lecture
Lecture
Ouvrez le couvercle, puis placez un disque dans
l'unité.
Si un disque se trouve déjà à l'intérieur, appuyez sur
la touche [38].
L'unité lance alors automatiquement la lecture du
disque.
PROG/RDM
REP
A–B
/Y
⁄
• Le disque introduit dans le lecteur sera lu du début à la fin.
Cependant, si vous éteignez l'appareil pendant la lecture
d'un disque, sa lecture reprendra au même instant dès
que l'appareil sera remis en marche.
Lecture de fichiers audio/d'images/vidéo
& ENTER
RETURN
/D
30
|
KDV-S211P
1 Sélection du dossier
Appuyez sur la touche [2]/[5]/[3]/[∞].
2 Déterminez le dossier
Appuyez sur la touche [ENTER].
Les morceaux contenus dans le dossier déterminé
s'affichent.
Page 31

3 Sélection du type de fichiers que vous désirez
écouter
Appuyez sur la touche [2]/[5]/[3]/[∞].
Si vous désirez choisir un autre dossier, appuyez sur
la touche [RETURN] pour retourner à l'étape 1.
4 Lecture du fichier sélectionné
Appuyez sur la touche [ENTER].
Pause
Appuyez sur la touche [38].
La lecture est soit stoppée, soit relancée à chaque
pression sur cette touche.
Arrêt
Appuyez sur la touche [7].
Appuyez sur la touche [38] pour relancer la lecture.
⁄
• Si vous appuyez deux fois de suite sur la touche [7]
pendant la lecture d'un DVD, elle reprendra la prochaine
fois à partir du début du disque.
Ejection
Appuyez sur la touche [EJECT].
⁄
• Si vous désirez continuer la lecture d'un disque que vous
venez d'éjecter, appuyez une nouvelle fois sur la touche
[EJECT ]. Le disque sera alors réintroduit dans l'appareil,
puis la lecture redémarre.
• Notez cependant que si vous éteignez l'appareil, ou démarrez
le moteur pendant la lecture d'un fichier audio, il est possible
que la lecture ne redémarre pas au même endroit (c'est-àdire à partir de l'endroit où elle a été stoppée).
Sourdine
Permet de baisser le volume rapidement.
Appuyez sur la touche [MUTE].
La fonction de mise en sourdine soit désactivée, soit
relancée à chaque pression sur cette touche.
Passage rapide
Permet de sauter un chapitre, piste ou fichier.
Appuyez sur la touche [4] ou [¢].
⁄
• Si vous désirez sauter un élément sur un VCD, désactivez la
fonction PBC en appuyant sur la touche [PBC].
Avance et retour rapide
Appuyez sur la touche [1] ou [¡].
La vitesse de reproduction change sur 5 niveaux à
chaque pression sur la touche.
Appuyez sur la touche [38] pour relancer la lecture.
Lecture à répétitions
Permet de lire une chanson, chapitre, titre, etc. à
répétitions.
Appuyez sur la touche [REP].
La fonction de lecture à répétitions change de mode
de la façon suivante à chaque pression sur cette
touche.
Sur une source DVD
Affichage Réglage
"CHAPTER REPEAT" Lance la lecture à répétitions du chapitre en
"TITLE REPEAT" Lance la lecture à répétitions du titre en cours.
"REPEAT CANCELED" Annule le mode de lecture à répétitions.
Sur une source de fichiers vidéo
Affichage Réglage
"FILE REPEAT" Lance la lecture à répétitions du fichier en cours.
"FOLDER REPEAT" Lance la lecture à répétitions du dossier en cours.
"ALL REPEAT" Lance la lecture à répétitions de tout le disque.
"REPEAT CANCELED" Annule le mode de lecture à répétitions.
Sur une source CD/VCD
Affichage Réglage
"TRACK REPEAT" Lance la lecture à répétitions de morceau en
"ALL REPEAT" Lance la lecture à répétitions de tout le disque.
"REPEAT CANCELED" Annule le mode de lecture à répétitions.
En source de fichier audio
Affichage Réglage
"FILE REPEAT" Lance la lecture à répétitions du morceau en
"FOLDER REPEAT" Lance la lecture à répétitions de toutes les
"ALL REPEAT" Lance la lecture à répétitions de tout le disque.
"REPEAT CANCELED" Annule le mode de lecture à répétitions.
Sur une source de fichiers d'images
Affichage Réglage
"FILE REPEAT" Lance la lecture à répétitions du fichier d'image
"FOLDER REPEAT" Lance la lecture à répétitions du dossier en
"ALL REPEAT" Lance la lecture à répétitions de tout le disque.
"REPEAT CANCELED" Annule le mode de lecture à répétitions.
cours.
cours.
cours.
chansons du dossier en cours.
en cours.
cours.
⁄
• Si vous désirez lire un VCD en boucle, désactivez au
préalable la fonction PBC en appuyant sur la touche [PBC].
Français
|
31
Page 32

Fonctions de base
Lecture à répétitions A-B
[DVD] [VCD] [DivX] [CD] [AUDIO]
Cette fonction permet de spécifier les points de
démarrage et d'arrêt d'une portion particulière, qui
sera alors lue à répétitions.
1 Spécification du point A (Point de démarrage)
Appuyez sur la touche [A-B].
2 Spécification du point B (Point d'arrêt)
Appuyez sur la touche [A-B].
La lecture s'effectue alors en boucle du point A au
point B.
Annulation de la lecture à répétitions A-B
Appuyez sur la touche [A-B].
Lecture aléatoire
[CD] [AUDIO] [DivX] [PIC]
Les morceaux reproduits sont choisis au hasard
parmi tous ceux enregistrés sur le disque en cours de
lecture.
1 Arrêt de la lecture
Appuyez deux fois de suite sur la touche [7].
2 Sélection du mode de lecture aléatoire
Appuyez deux fois de suite sur la touche [RDM].
3 Pour les fichiers audio, sélectionnez le dossier
en question
Sélectionnez un dossier à l'aide des touches
[2]/[5]/[3]/[∞], puis appuyez sur la touche
[ENTER].
Placez le curseur sur n'importe quel dossier
contenant des fichiers devant être lus de façon
aléatoire.
4 Lancement de la lecture aléatoire
Appuyez sur la touche [38].
Annulation de la lecture aléatoire
Appuyez deux fois de suite sur la touche [7], puis
sur la touche [RDM].
Lecture programmée
Cette fonction permet de lire des scènes, chansons
ou fichiers sélectionnés dans un ordre programmé.
1 Arrêt de la lecture
Appuyez deux fois de suite sur la touche [7].
2 Utilisation du mode de programmation
Appuyez sur la touche [PROG].
3 Sélection des scènes, chansons ou fichiers que
vous désirez écouter
Appuyez sur la touche [2]/[5]/[3]/[∞].
4 Spécifiez la scène, chansons ou fichier à lire
Appuyez sur la touche [ENTER].
Si vous désirez programmer la lecture d'un DVD,
sélectionnez puis déterminez les titres et chapitres,
dans cet ordre.
5 Retournez alors aux étapes 3 et 4 pour
enregistrer toutes les scènes, chansons ou
fichiers à inclure dans la lecture programmée.
6 Lancement de la lecture programmée
Appuyez sur la touche [38].
Annulation de la lecture programmée
Appuyez sur les touches [7] et [PROG], dans cet
ordre.
⁄
• Pour annuler une chanson programmée ou autre,
sélectionnez "CLEAR ALL", puis appuyez sur la touche
[ENTER].
32
|
KDV-S211P
Page 33

Commutation de l’affichage
Il est possible de commuter le type de données
affichées à l'écran.
Appuyez sur la touche [DISP].
Les messages affichés à l'écran changent de la façon
suivante à chaque pression sur cette touche.
Sur une source DVD
Affichage Information
"Chapter Elapsed" Durée écoulée pour le chapitre en cours
"Chapter Remain" Durée restante pour le chapitre en cours
"Title Elapsed" Durée écoulée pour le titre en cours
"Title Remain" Durée restante pour le titre en cours
"Display Off" Aucun type de données n'est affiché
Sur une source DivX
Affichage Information
"File Elapsed" Durée écoulée pour le fichier vidéo en cours
"File Remain" Durée restante pour le fichier vidéo en cours
"Display Off" Aucun type de données n'est affiché
Sur une source VCD (avec PBC activé) /fichier
audio
Affichage Information
"Track Elapsed" Durée écoulée pour la piste/fichier en cours
"Track Remain" Durée restante pour la piste/fichier en cours
"Display Off" Aucun type de données n'est affiché
Sur une source VCD (avec PBC désactivé) /source
CD
Affichage Information
"Track Elapsed" Durée écoulée pour la piste en cours
"Track Remain" Durée restante pour la piste en cours
"Disc Elapsed" Durée écoulée pour le disque en cours
"Disc Remain" Durée restante pour le disque en cours
"Display Off" Aucun type de données n'est affiché
Français
|
33
Page 34

Fonctions spécifiques aux DVDs vidéo/CDs vidéo/fichiers vidéo/
fichiers d'images
MENU
TOP MENU
AUDIO
SUB TITLE
ANGLE
ZOOM
PBC
SRCH
& ENTER
0 – 9
Lecture avec recherche
[DVD] [VCD] [DivX]
Permet de rappeler directement la scène que vous
désirez voir.
1 Entrée en mode de recherche
Appuyez sur la touche [SRCH].
⁄
• Si vous désirez lancer une lecture avec recherche sur un
VCD, désactivez au préalable la fonction PBC en appuyant
sur la touche [PBC].
2 Sélection du mode de recherche sur un DVD
Appuyez sur la touche [SRCH].
A chaque pression sur cette touche, l'élément à
rechercher sera modifié de la façon suivante.
Elément
Numéro de chapitre
Numéro de titre
⁄
• Si vous appuyez sur la touche [2] ou [3] en mode de
recherche par numéro de chapitre, il est possible de
rechercher par numéro de titre.
|
34
KDV-S211P
3 Sélection de la scène à lire
Appuyez sur la touche [0] – [9].
Ceci permet de lancer la lecture de la scène saisie
pendant la reproduction du VCD.
4 Lancement de la lecture avec recherche de
scène, pour un DVD
Appuyez sur la touche [ENTER].
Ceci permet de lancer la lecture de la scène saisie.
5 Sélection de l'instant choisi, pour un DVD
Appuyez sur la touche [0] – [9].
Ceci permet de lancer la lecture à partir de l'instant
choisi.
6 Lancement de la lecture avec recherche par
durée, pour un DVD
Appuyez sur la touche [ENTER].
Ceci permet de lancer la lecture à partir de l'instant
choisi.
Annulation de la lecture par recherche
Appuyez sur la touche [SRCH].
Page 35

Menu DVD/Menu principal (titre)
[DVD]
Permet de rappeller le menu du DVD ainsi que
le menu principal (titre) pour configurer divers
paramètres.
1 Affichage du menu DVD
Appuyez sur la touche [MENU].
Affichage du menu principal (titre)
Appuyez sur la touche [TOP MENU].
2 Sélection d'un élément
Appuyez sur la touche [2]/[5]/[3]/[∞] ou [0]
– [9].
3 Finalisation d'un élément
Appuyez sur la touche [38].
Veuillez vous reporter aux instructions fournies avec
chaque disque pour plus de détails sur l'utilisation
des menus du disque.
4 Annulation de l'affichage des menus
Appuyez sur la touche [MENU] ou [TOP MENU].
Sélection de la langue audio [DVD]
Appuyez sur la touche [AUDIO].
Permet de commuter les langues enregistrées sur le
disque.
⁄
• Lorsqu'une seule langue est enregistrée sur le disque,
cette fonction ne permet pas de commuter la langue.
Sélection de la langue des sous-titres
[DVD]
Appuyez sur la touche [SUB TITLE].
Permet de commuter les langues enregistrées sur le
disque.
⁄
• Lorsqu'une seule langue est enregistrée sur le disque,
cette fonction ne permet pas de commuter la langue.
Sélection de l'angle d'affichage des
images [DVD]
Appuyez sur la touche [ANGLE].
Permet de commuter les angles d'images enregistrés
sur le disque.
⁄
• Lorsqu'un seul angle est enregistré sur le disque, cette
fonction ne permet pas de commuter l'image.
Zoom
Permet de zoomer l'image.
1 Sélection du taux d'agrandissement
Appuyez sur la touche [ZOOM].
Le taux d'agrandissement de l'image change de la
façon suivante à chaque pression sur cette touche:
DVD/ VCD: x1,0, x2,0, x3,0
Fichier vidéo: x1,0, x1,5, x2,0, AJUSTER
Fichier d'images: 50, 100, 150, 200 %
2 Sélection de la position d'affichage (lors de
l'affichage d'images animées uniquement)
Appuyez sur la touche [2]/[5]/[3]/[∞].
PBC [VCD]
Ce lecteur vous permet d'utiliser la fonction de
contrôle de lecture (PBC).
1 Activation de la fonction de PBC
Appuyez sur la touche [PBC].
La fonction de contrôle PBC est soit désactivée, soit
relancée à chaque pression sur cette touche.
2 Sélection d'un élément
Appuyez sur la touche [0] – [9].
3 Finalisation d'un élément
Appuyez sur la touche [38].
Veuillez vous reporter aux instructions fournies avec
chaque disque pour plus de détails sur l'utilisation
de la fonction PBC.
⁄
• La fonction PBC ne peut être utilisée qu'avec des disques
VCD de Ver2.0 ou plus.
Français
|
35
Page 36

Fonctions spécifiques aux DVDs vidéo/CDs vidéo/fichiers vidéo/
fichiers d'images
Lecture au ralenti
[DVD] [VCD] [DivX]
Pause de lecture
1
Appuyez sur la touche [38].
2 Lecture au ralenti
Appuyez sur la touche [1] ou [¡].
La vidéo sera lue au ralenti de la façon suivante à
chaque pression sur cette touche.
Disque Touche Mouvement
1
DVD
DVD
VCD/
DivX
La vitesse de retour au ralenti change alors sur
5 niveaux.
¡
La vitesse d'avance au ralenti change alors sur
5 niveaux.
¡
La vitesse d'avance au ralenti change alors sur
5 niveaux.
⁄
• Pour retourner à la vitesse normale, appuyez sur la
touche [38].
Lecture trame par trame
[DVD] [VCD] [DivX]
1 Pause de lecture
Appuyez sur la touche [38].
2 Lecture trame par trame
Appuyez sur la touche [2] ou [3].
⁄
• Les trames ne peuvent être avancées dans la direction
opposée pendant la lecture d'un fichier vidéo ([2]).
Diaporama [PIC]
Cette fonction permet d'afficher un diaporama
composé de plusieurs images.
1 Sélection du dossier à partir duquel le
diaporama sera effectué
Appuyez sur la touche [2]/[5]/[3]/[∞]/[ENTER].
2 Lancement du diaporama
Appuyez sur la touche [38].
⁄
• Si vous désirez spécifier la durée d'affichage d'un fichier,
sélectionnez "OTHER" / "JPEG TIME" à partir du <Menu de
configuration> (page40).
Rotation d'images [PIC]
Cette fonction permet d'effectuer une rotation de
l'image affichée.
1 Affichage de l'image devant être tournée
Appuyez sur la touche [2]/[5]/[3]/[∞]/[ENTER].
2 Rotation de l'image
Touche Affichage
[2] Rotation de l'image de 90˚ dans le sens contraire des aiguilles
d'une montre.
[5] Rotation de l'image de 180˚.
[3] Rotation de l'image de 90˚ dans le sens des aiguilles d'une
montre.
[∞] Rotation de l'image de 180˚.
36
|
KDV-S211P
Page 37

Fonctions spécifiques aux CDs/fichiers audio
SRCH
Lecture avec passage rapide [CD]
Permet de passer directement au morceau que vous
désirez écouter.
1 Saisie du numéro de morceau à écouter
Appuyez sur la touche [0] – [9].
2 Lecture
Appuyez sur la touche [ENTER].
⁄
• Si l'opération décrite à l'étape 2 n'est pas effectuée en
moins de 5 secondes, le morceau saisi à l'étape 1 est
automatiquement recherché.
Lecture par recherche temporelle [CD]
Saisir l'instant correspondant au démarrage souhaité
de la lecture.
1 Entrée en mode lecture par recherche
temporelle
Appuyez sur la touche [SRCH].
2 Saisir l'instant correspondant au démarrage
souhaité de la lecture
Appuyez sur la touche [0] – [9].
Par exemple
5:07 ➪ [0], [5], [0], [7]
& ENTER
0 – 9
Ceci permet de lancer la lecture à partir de l'instant
choisi.
3 Lecture
Appuyez sur la touche [ENTER].
Lecture par recherche [AUDIO]
Permet de passer directement au morceau que vous
désirez écouter.
1 Sélectionnez le dossier
Appuyez sur la touche [2]/[5]/[3]/[∞].
2 Déterminez le dossier
Appuyez sur la touche [ENTER].
Les morceaux contenus dans le dossier déterminé
s'affichent.
3 Entrée en mode lecture par recherche
Appuyez sur la touche [SRCH].
4 Saisie du numéro de morceau à écouter
Appuyez sur la touche [0] – [9].
5 Lancez la lecture
Appuyez sur la touche [ENTER].
Français
|
37
Page 38

Menu de configuration
SETUP
& ENTER
RETURN
Menu de configuration
Ce menu vous permet de configurer de nombreux
paramètres et fonctions.
1 Arrêt de la lecture
Appuyez sur la touche [7].
Appuyez sur la touche deux fois de suite pendant la
lecture d'un DVD.
Lors de la lecture d'un VCD, désactivez au préalable
la fonction PBC en appuyant sur la touche [PBC].
2 Affichage de l'écran SETUP MENU
Appuyez sur la touche [SETUP].
Le message SETUP MENU MAIN s'affiche alors sur
l'écran du moniteur connecté.
3 Sélectionnez la page correspondant au menu à
configurer
Appuyez sur la touche [5]/[∞].
4 Entrez la page du menu sélectionné
Appuyez sur la touche [ENTER].
La page correspondant au menu sélectionné à
l'étape 3 s'affiche alors.
5 Sélection de l'élément et des options à
configurer
Appuyez sur la touche [2]/[5]/[3]/[∞].
Reportez-vous aux tableaux ci-dessous pour plus
de détails sur la configuration de chacun de ces
éléments.
|
38
KDV-S211P
6 Finalisation de votre choix
Appuyez sur la touche [ENTER].
Si vous désirez retourner au SETUP MENU MAIN,
appuyez sur la touche [RETURN] pour retourner à
l'étape 2.
7 Sortir du menu de configuration
Appuyez sur la touche [SETUP].
⁄
• Appuyez sur [SETUP] pour sortir du mode de
configuration. Notez cependant que si vous quittez ce
mode en éteignant l'appareil, les nouvelles valeurs des
paramètres ne seront pas enregistrées.
Menu DISC
AUDI O
Permet de configurer la langue reproduite au niveaux
des enceintes connectées.
Affichage Réglage
"JAPANESE" Japonais
"ENGLISH" Anglais
"CHINESE" Chinois
"ORIGINAL" Langue d'origine
Page 39

SUBTITLE
Permet de configurer la langue des sous-titres
affichés à l'écran.
Affichage Réglage
"AUTO" Langue d'origine
"JAPANESE" Japonais
"ENGLISH" Anglais
"CHINESE" Chinois
MENUS
Permet de configurer la langue d'affichage des
menus du disque.
Affichage Réglage
"AUTO" Langue d'origine
"ENGLISH" Anglais
"CHINESE" Chinois
RATINGS
Permet de configurer le niveau de contrôle parental.
Plus ce niveau est élevé, plus la protection sera
élevée.
Affichage Réglage
"0 LOCK ALL"
"1 KID SAF" Seuls les films ayant reçu une note de G (films
"2 G"
"3 PG"
"4 PG 13"
"5 PGR"
"6 R"
"7 NC17"
"8 ADULT"
1 Appuyez sur la touche [ENTER] de la
télécommande.
2 Configurez le niveau de contrôle parental.
3 Saisir le mot de passe.
4 Appuyez sur la touche [ENTER] de la
télécommande.
pour enfants) pourront être lus
⁄
• Le mot de passe par défaut est "0000".
• Le niveau de protection parentale est uniquement activé
pour les disques avec le symbole "R".
MOT DE PASSE
CHANGE: Permet de changer le mot de passe.
1 Sélectionnez "SETTING", puis appuyez sur la
touche [ENTER] de la télécommande.
2 Saisir le mot de passe actuel.
3 Saisir le nouveau mot de passe deux fois de suite.
4 Appuyez sur la touche [ENTER] de la
télécommande.
⁄
• Le mot de passe par défaut est "0000".
Menu VIDEO
TV ASPECT
Utilisez la procédure décrite ci-dessous pour
configurer l'écran d'affichage.
Affichage Réglage
"16:9" Permet de configurer le mode d'affichage des images
"4:3 PS" Les images à recadrage automatique seront
"4:3 LB" Les images à recadrage automatique seront
TV SYSTEM
Ce paramètre permet de sélectionner le type de
signal vidéo le mieux adapté au moniteur utilisé.
Affichage Réglage
"NTSC" Les signaux vidéo sont émis selon la norme NTSC.
"PAL" Les signaux vidéo sont émis selon la norme PAL.
"AUTO" Permet de commuter automatiquement entre les
sur "16:9".
automatiquement recadrées (les bords droit et gauche
de l'image seront coupés).
automatiquement recadrées et affichées au format
lettre (des bandes noires seront affichées en haut et en
bas de l'image).
normes NTSC et PAL en fonction du type de signal
vidéo compris sur le disque en cours de lecture.
⁄
• Le réglage par défaut ("NTSC") sera réactivé après avoir
éteint l'appareil.
STILL MODE
Ce paramètre permet de configurer le mode de gel
d'image (pause).
Affichage Réglage
"AUTO" Détecte la vitesse d'animation de l'image afin d'utiliser
"FIELD" Utilise les méthodes de traitement de l'image les mieux
"FRAME" Utilise les méthodes de traitement de l'image les mieux
les meilleures méthodes de traitement lors du gel
d'image.
adaptées aux images rapides.
adaptées aux images lentes.
Français
|
39
Page 40

Menu de configuration
Menu AUDIO
LPCM DOWNSMPL
Affichage Réglage
"OFF" N'effectue aucun échantillonage vers le bas
"48kHz" Emet les chansons 96kfs en 48kfs au niveau de la
"96kHz" Emet les chansons 96kfs en 96kfs au niveau de la
DOLBY DIGITAL
Permet de configurer le format de sortie de son
numérique Dolby digital.
Affichage Réglage
"BITSTREAM" Emet les sons sous la forme d'un débit binaire
"PCM" Emet les sons au format PCM.
"OFF" Aucun son n'est émis.
DTS
Permet de configurer le format de sortie de son DTS.
Affichage Réglage
"BITSTREAM" Emet les sons sous la forme d'un débit binaire
"PCM" Emet les sons au format PCM.
"OFF" Aucun son n'est émis.
MPEG
Permet de configurer le format de sortie de son
MPEG.
Affichage Réglage
"BITSTREAM" Emet les sons sous la forme d'un débit binaire
"PCM" Emet les sons au format PCM.
"OFF" Aucun son n'est émis.
DYNAMIC RANGE
Réduit la gamme dynamique afin de pouvoir mieux
écouter les dialogues des films.
Affichage Réglage
"ON" Réduit la gamme dynamique.
"OFF" La gamme dynamique n'est pas ajustée.
(avec pertes).
sortie DIGITAL OUT.
sortie DIGITAL OUT.
simple.
simple.
simple.
DISPLAY
LANGUAGE
Permet de configurer la langue d'affichage des
menus du disque.
Affichage Réglage
"中文" Chinois
"ENGLISH" Anglais
"FRANÇAIS" Français
"ESPAÑOL" Espagnol
"DEUTSCH" Allemand
"ITALIANO" Italien
OTHER
JPEG TIME
Permet de configurer la durée d'affichage des
images.
Affichage Réglage
"1 SEC" L'image est affichée pendant 1 seconde.
…
"180 SEC" L'image est affichée pendant 180 secondes.
Appuyez sur la touche [5] ou [∞] pour sélectionner
les secondes.
DEFAULTS
RESET: Permet de réinitialiser les éléments du menu
de configuration à leurs valeurs par défaut.
REGISTRATION
SHOW CODE: Affiche le code d'enregistrement DivX.
⁄
• Après avoir téléchargé un fichier DivX VOD contrôlé par
DRM, enregistrez le code affiché à l'écran. Autrement, le
fichier ne pourra $être lu sur cette unité.
Le nombre de visualisations restantes s'affiche à chaque
fois qu'un fichier DivX VOD à restrictions est lu. Dès que ce
numéro atteint 0, un message de mise en garde s'affiche
et le fichier ne pourra plus être lu.
40
|
KDV-S211P
Page 41

Accessoires
Installation
1
2
3
4
5
6
7
8
..........1
..........1
..........2
..........5
..........4
..........2
..........1
Installation à l'aide des supports de
montage
Vis autotaraudeuse 5
(Φ5 x 20 mm)
Support 3
Vis Semusu 4
(M4 x 5 mm)
Installation à l'aide de bandes velcro
Tapis
Bande velcro 6
¤
• N'utilisez pas vos propres vis. N'utilisez que les vis fournies.
L’utilisation de vis incorrectes pourrait endommager l’appareil.
• N'installez pas l'unité à un emplacement instable ou soumis à
de fortes vibrations.
• Vous pouvez installer l'unité sous n'importe quel angle, allant
de la position horizontale classique, jusqu'à la verticale (de 0°
à 90°). Il est cependant interdit d'installer l'unité en orientant
la fente d'introduction du disque vers le bas, en l'inclinant, ou
vers le haut.
..........1
¤
• Si le fusible saute, assurez-vous d'abord que les câbles n'ont
pas causé de court-circuit, puis remplacez le vieux fusible par
un fusible neuf de même calibre.
Français
|
41
Page 42

Connexion des câbles aux bornes
Sortie numérique
Sortie vidéo (jaune)
Sortie audio gauche (blanc)
Sortie audio droite (rouge)
Câble d'alimentation 1
Prise pour
allume-cigare
Fusible (5A)
incorporé
Vers la prise de
l'allume-cigare
Vude arrière du
lecteur de DVDs
Moniteur TV
(Accessoires optionnel)
Câble AV 8
Installation du capteur de la télécommande
1 Retirez le papier de protection de la bande velcro fixée sur
l'arrière du capteur de la télécommande.
2 Après avoir essuyé toute trace de graisse et de souillures
de l'endroit d'installation, y apposer le capteur de la
télécommande.
⁄
• Bien essuyer toute trace de graisse et de souillures de l'emplacement
d'installation du capteur de la télécommande.
• Evitez les endroits soumis à la lumière directe du soleil ou situés à
proximité d'un moniteur, car ceci empêcherait une réception correcte
des signaux de la télécommande.
• Il est possible de modifier la cheminement du câble du capteur de la
télécommande.
M4 X 5mm
M4 X 5mm
TE
O
EM
R
Vis Semusu 4
(M4 x 5 mm)
Batterie
Fil de la masse 7 (noir) - (vers le châssis de la voiture)
Capteur de télécommande 2
Film de protection
42
|
KDV-S211P
¤
• Connectez tout d'abord le câble d'alimentation 1 au lecteur
de DVDs, avant de le connecter à la prise de l'allume-cigare.
En effet, vous risqueriez de déclencher un fusible dans le cas
contraire.
Page 43

Guide de depannage
Ce qui peut apparaître comme un mauvais
fonctionnement de votre appareil n’est peut être
que le résultat d’une mauvaise opération ou d’une
mauvaise connexion. Avant d’appeler un centre de
service, vérifiez d’abord dans le tableau suivant les
problèmes possibles.
? Le son/image du DVD/VCD/CD saute.
✔ Le disque est rayé ou sale.
☞ Nettoyez le disque en vous référant à la section
<Manipulation des disques> (voir page 27).
? La lecture d’un VCD commandée par menu n’est
pas possible.
✔ Le VDC utilisé n’est pas compatible avec le système
"Play Back Control (P.B.C.)".
☞ La lecture commandée par menus n’est possible
que si le VCD porte les informations requise par
le système “Play Back Control (P.B.C.)”.
? Les sous-titres ne sont pas affichés.
✔ Le DVD ne porte aucun enregistrement de soustitres.
☞ Aucun sous-titrage n’est possible si le DVD ne
comporte aucun enregistrement de sous-titres.
? On ne peut pas changer la langue parlée (ou celle
du sous-titrage).
✔ Une seule langue parlée (langue de sous-titrage) a
fait l’objet d’enregistrement sur le disque.
☞ La langue parlée (langue de sous-titrage) ne
peut pas être choisie si l’oeuvre (le sous-titrage)
n’a enregistrée qu’en une seule langue.
Les messages montrés ci-dessous
affichent l’état de votre système.
"Thermal Protect. Off Power!"
: Le circuit de protection à l’intérieur de l’unité entre en
activité lorsque la température à l’intérieur de l’unité
dépasse 60°C (140°F), et arrête tout fonctionnement.
➪ Refroidissez l’appareil en ouvrant les fenêtres ou
en mettant en service l’air conditionné Lorsque la
température passe sous 60°C (140°F), la lecture du
disque débute à nouveau.
Pour éjecter le disque dans cette situation, éteignez
puis rallumez l'appareil.
"NO DISC"
: Aucun disque n'est inséré dans cette unité.
"THIS DISC MAY NOT BE PLAYED IN YOUR REGION"
: Un DVD au code de région incompatible a été inséré dans
l'unité.
"Unknown DISC"
: Un disque ne pouvant pas être lu par cette unité a été
inséré.
: Le disque inséré contient des données endommagées ou
non-standard.
"PASSWORD IS DIFFERENT!"
: Le mot de passe saisi ne correspond pas à celui enregistré.
: Ceci apparait si le deuxième mot de passe saisi ne
correspond pas au premier lors du changement de mot de
passe.
➪ Lorsque vous saisissez un nouveau mot de passe, vous
devez saisir deux fois le même mot de passe pour le
con rmer.
Français
|
43
Page 44

Spécifications
Les spécifications sont sujettes changements sans notification.
Section DVD
Convertisseur A/N
: 8LevelΔΣ, 24bit
Pleurage et scintillement
: Non mesurables
Fréquence response
: 17 – 44 kHz (DVD 96kHz Echantillonnage)
Distorsion harmonique totale 1kHz
: 0,02 %
Taux de Signal/Bruit
: 110 dB (DVD Vidéo 96k)
Dynamic range
: 90 dB
Format de décoder
: PCM linéaire, Dolby Digital, dts, MP3, WMA, AAC
Format de DISQUE
: DVD-VIDEO/ VIDEO-CD/ CD-DA
Sortie
Niveau de sortie vidéo composite (V)
: 1 Vp-p (75Ω)
Niveau de sortie audio 2can (V)
: 1,2 V/ 10 kΩ (DVD/CD)
Niveau de sortie d'interface audio numérique
coaxiale (V )
: 0,5 V/ 75 Ω
Général
Tension de fonctionnement
: 14,4 V (11 – 16 V)
Consommation
: 2 A
Dimensions LxHxP
: 195 mm x 45 mm x 210 mm
7-11/16 x 1-6/8 x 8-2/8 pouces
Masse
: 1,7 kg
3,75lbs
44
|
KDV-S211P
Page 45

DivX, la certification DivX et les logos associés sont des
marques de DivX, Inc. et sont utilisés sous licence.
is a trademark of DVD Format/Logo Licensing
Corporation registered in the U.S., Japan and other countries.
Ce produit comprend une technologie de protection de
copyright qui est protégée par des brevets aux Etats-Unis
et par d’autres droits de propriété intellectuelle. L’utilisation
de cette technologie de protection de copyright requiert
l’autorisation de Macrovision, et est strictement limitée à un
usage domestique et à d’autres utilisations restreintes sauf
autorisation spéciale de Macrovision. L'ingénierie inverset out
comme le démontage sont interdits.
Fabriqué sous licence de Dolby Laboratories.
Le terme "Dolby" et le sigle double D sont des marques
commerciales de Dolby Laboratories.
"DTS" is a registered trademark of DTS, Inc. and "DTS 2.0 +
Digital Out" is a trademark of DTS, Inc.
The "AAC" logo is trademark of Dolby Laboratories.
REMARQUE
Cet appareil numérique de la classe B est conforme à la
morme NMB-003 du Canada.
Français
|
45
Page 46

Índice
Precauciones de seguridad 47
Notas 48
Funciones principales 52
Alimentación
Reproducción
Silenciamiento
Omisión
Avance y retroceso rápido
Repetición
Repetición A-B
Reproducción aleatoria
Reproducción programada
Cambio de visualización
Funciones para vídeo DVD/
CD de vídeo/archivos de vídeo/
archivos de imagen 56
Búsqueda¥
Menú DVD/menú superior (título)
Selección de idioma de audio
Selección de idioma de subtítulos
Selección de ángulo de imagen
Zoom
PBC
Reproducción en cámara lenta
Reproducción cuadro por cuadro
Presentación de diapositivas
Rotación de la imagen
Funciones de CD/archivos de audio 59
Reproducción directa
Búsqueda de tiempo de reproducción
Reproducción con búsqueda
Menú de configuración 60
Menú de configuración
Menú DISC
Menú VIDEO
Menú AUDIO
DISPLAY
OTHER
Accesorios 63
Instalación 63
Conexión de cables a los
terminales 64
Guia Sobre Localización
De Averias 65
Especificaciones 66
46
|
KDV-S211P
Page 47

Precauciones de seguridad
2 ADVERTENCIA
Para evitar el riesgo de lesiones y/o fuego,
observe las siguientes precauciones:
• Para evitar cortocircuitos, nunca coloque ni deje
objetos metálicos (por ejemplo, monedas o
herramientas metálicas) dentro del equipo.
• No mire ni fije sus ojos en la pantalla del equipo
en ningún momento por períodos de tiempo
prolongados mientras esté conduciendo.
• La instalación y cableado de este producto requiere
de habilidad y experiencia. Por motivos de seguridad,
deje la labor de instalación y montaje en manos de
profesionales.
• No conecte el equipo al monitor delantero. Este
equipo está diseñado para los asientos traseros.
• No utilice ningún cable de alimentación distinto del
suministrado como accesorio. De lo contrario, podría
producirse un incendio.
2 PRECAUCIÓN
Para evitar daños en el equipo, tome las
siguientes precauciones:
• Asegúrese de utilizar para el equipo una fuente de
alimentación de 12V CC con masa negativa.
• No instale el equipo en un sitio expuesto a la luz
directa del sol, o excesivamente húmedo o caluroso.
Asimismo, deberá evitar sitios con mucho polvo o la
posibilidad de que se derrame agua sobre el equipo.
• Cuando tenga que reemplazar un fusible, utilice
únicamente uno del régimen prescrito. El uso de un
fusible de régimen incorrecto podría ocasionar un
funcionamiento defectuoso del equipo.
• Utilice sólo los tornillos proporcionados o
especificados para la instalación. Si utiliza tornillos
incorrectos, podría dañar el equipo.
Empañamiento de la lente
Al encender la calefacción del vehículo en un día frío,
se puede formar condensación o rocío en la lente
del reproductor de CD del equipo. Este fenómeno,
conocido como empañamiento de la lente, puede
impedir la reproducción de CD. En tal caso, retire el
disco y espere hasta que se evapore la condensación. Si
el equipo no funciona de la manera normal después de
un tiempo, consulte con su distribuidor Kenwood.
Limpieza del equipo
Si la placa frontal del equipo está manchada, límpiela
con un paño seco tal como un paño de silicona.
Si la placa frontal está muy sucia, límpiela con un paño
humedecido en un detergente neutro, y luego séquela
con otro paño.
¤
• Si se aplica algún spray de limpieza directamente al equipo,
puede que afecte a sus partes mecánicas. Si se limpia la placa
frontal con un paño duro o utilizando un líquido volátil como
disolvente o alcohol, puede que se raye la superficie o que se
borren algunos caracteres.
NOTA
• Si tiene problemas durante la instalación, consulte
con su distribuidor Kenwood.
• Las ilustraciones de la pantalla y el panel que
aparecen en este manual son ejemplos utilizados
para explicar con mayor claridad cómo se utilizan los
mandos. Por lo tanto, las ilustraciones de la pantalla
que aparecen pueden ser distintas a las que aparecen
realmente en la pantalla del equipo, y algunas de las
ilustraciones de la pantalla puede que representen
algo imposible durante el funcionamiento actual.
Español
|
47
Page 48

Notas
Códigos de región en el mundo
1
4
Símbolos de los discos DVD
Símbolo Descripción
Indica un número de región. Los discos que tienen esta
ALL
8
32
9
16:9 LB
marca pueden reproducirse en cualquier reproduc tor
de DVD.
Indica el número de idiomas de audio grabados. Una
película puede contener hasta 8 idiomas grabados.
Puede elegir el idioma de su preferencia.
Indica el número de idiomas de subtítulos grabados.
Puede haber hasta 32 idiomas grabados.
Si un disco DVD contiene escenas tomadas desde
distintos ángulos, puede elegir el ángulo de su
preferencia.
Indica el tipo de pantalla para la imagen. La marca
de la izquierda indica que una imagen ancha (16:9)
se visualiza en una pantalla de TV estándar (4:3) con
una banda negra en la parte superior e inferior de la
pantalla (buzón).
5
2
1
2
6
3
5
2
1
4
Restricciones debido a diferencias entre
discos
Icono de
restricción
funciones pueden no funcionar de la forma esperada.
Asegúrese de leer las instrucciones suministradas con
cada disco. Cuando se visualiza un icono de restricción
en el monitor, significa que el disco que se está
reproduciendo tiene alguna de las restricciones
descritas anteriormente.
Algunos discos DVD y VCD sólo pueden
reproducirse en determinados modos de
reproducción, según las intenciones de los
fabricantes del software. Puesto que este
reproductor reproduce los discos según las
intenciones de los fabricantes, algunas
Uso de discos "DualDisc"
Al reproducir un disco "DualDisc" en este equipo, la
superficie del disco que no se va a reproducir puede
rayarse al insertar o expulsar el disco. Puesto que la
superficie de CD de música no se ajusta al estándar CD,
la reproducción puede no ser posible.
(Un "DualDisc" es un disco en que una superficie
contiene señales del estándar DVD y la otra superficie
contiene señales de CD de música.)
48
|
KDV-S211P
Acerca de las temperaturas de
funcionamiento
El circuito de protección del equipo se activa cuando
la temperatura en el interior del reproductor de DVD
sobrepasa los 60°C (140°F). Consulte la <Guia Sobre
Localización De Averias> (página 65).
Page 49

Lista de discos reproducibles
Tipos
Estándar Compatibilidad Notas
de
disco
DVD Vídeo DVD
Audio DVD ×
DVD-R
DVD-RW
DVD+R
DVD+RW
DVD-R DL
(doble capa)
DVD+R DL
‡
‡
Reproducción de archivos
MP3/WMA/AAC/JPEG/DivX
‡
Multiborde/Multisesión
‡
(Las posibilidades de
reproducción varían según
‡
las condiciones de autoría.)
‡
Sólo formato de vídeo
‡
(doble capa)
DVD-RAM ×
CD CD de música
CD-ROM
CD-R
CD-RW
‡
Compatibilidad con discos
CD-TEXT/8 cm (3 pulgadas).
‡
Reproducción de archivos
‡
MP3/WMA/AAC/JPEG/DivX
‡
Compatibilidad con discos
multisesión
No admite escritura en
paquetes.
DTS-CD
CD de vídeo
‡
‡
(VCD)
CD "supervídeo" ×
CD de imagen
CD-EXTRA
HDCD
‡
%
Sólo es posible reproducir CD
de música.
%
Calidad de sonido
equivalente a la de la música
de CD normal
CCCD ×
Otros DualDisc ×
CD Super Audio
%
Sólo se puede reproducir la
capa de CD.
: La reproducción es posible.
‡
% : La reproducción es parcialmente posible.
× : La reproducción no es posible.
⁄
• Al comprar contenido habilitado para DRM, compruebe el
código de registro en el <REGISTRATION> (página 62). Para
evitar la copia no autorizada, el código de registro cambia
cada vez que se reproduce un archivo con el código de
registro visualizado.
Acerca de las funciones disponibles para
las distintas fuentes de reproducción
En este manual, las funciones que se pueden utilizar
con las diversas fuentes de reproducción se indican de
la siguiente forma:
[DVD]: Función que sólo se puede utilizar durante la
[VCD]: Función que sólo se puede utilizar durante la
[CD]: Función que sólo se puede utilizar durante la
[AUDIO]: Función que sólo se puede utilizar durante la
[DivX]: Función que sólo se puede utilizar durante la
[PIC]: Función que sólo se puede utilizar durante la
reproducción de discos DVD.
reproducción de discos CD de vídeo.
reproducción de discos CD.
reproducción de archivos de audio.
reproducción de archivos de vídeo.
reproducción de discos CD JPEG/imagen.
Manipulación de los discos
• No toque la superficie de grabación del disco.
• No pegue cintas, etc. en el disco, y no utilice discos
con cintas adheridas.
• No utilice accesorios del tipo disco.
• Limpie los discos desde el centro hacia fuera.
• Al extraer los discos del equipo, extráigalos
horizontalmente.
• Si el agujero central del disco, o el borde exterior,
tiene rebabas, utilice el disco sólo después de
eliminar las rebabas con un bolígrafo u otro
instrumento similar.
Discos que no es posible utilizar
• No es posible utilizar discos que no son redondos.
• No es posible utilizar discos cuya superficie de
grabación está coloreada o sucia.
• Este equipo sólo puede reproducir CD marcados con
El equipo puede no reproducir correctamente los
discos que no tienen esta marca.
• No es posible reproducir discos CD-R o CD-RW que
no han sido finalizados. (Para obtener información
sobre el proceso de finalización, consulte el software
de escritura de CD-R/CD-RW y el manual de
instrucciones del grabador de CD-R/CD-RW.
.
Español
|
49
Page 50

Notas
Acerca de los archivos de audio
• Archivos de audio reproducibles
MP3 (.mp3), WMA (.wma), AAC (.m4a)
⁄
• Si en un mismo disco se ha grabado música de CD normal y
otros sistemas de reproducción, sólo se reproduce el sistema
de reproducción grabado en primer término.
• Archivos MP3 reproducibles
Archivos MPEG 1/2, capa de audio 3
Velocidad de transferencia de bits: 8 – 320 kbps/ VBR
Frecuencia de muestreo: 8 – 48 kHz
• Archivos WMA reproducibles
Archivos compatibles con Windows Media Audio
(excepto archivos para Windows Media Player 9 o
posterior, que requieren nuevas funciones).
Velocidad de transferencia de bits: 5 – 320 kbps/ VBR
Frecuencia de muestreo: 8 – 48 kHz
• Archivos AAC reproducibles
Velocidad de transferencia de bits: 8 – 384 kbps/ VBR
Frecuencia de muestreo: 8 – 48 kHz
• Discos de medios reproducibles
CD-R/RW/ROM, DVD-ROM/±R/RW
• Formatos de archivo de disco reproducibles
ISO 9660 Nivel 1/2, Joliet, Romeo
• Número máximo de caracteres de visualización
12 caracteres
• Limitación de la estructura de archivos y carpetas
Número máximo de niveles de directorio: 8
Número máximo de carpetas: 255
Número máximo de archivos por carpeta: 999
Número máximo de archivos por disco: 1254
Aunque los archivos de audio cumplen los estándares
anteriores, puede que no sea posible la reproducción
según los tipos o condiciones del medio o dispositivo.
⁄
• Añada la extensión correcta para el archivo de audio
(MP3: ".MP3", WMA: ".WMA", AAC: ".m4a")
• No añada extensiones a otros archivos que no sean archivos
de audio. De lo contrario, los archivos que son archivos de
audio producirán un gran ruido al reproducirse, con lo que el
altavoz puede dañarse.
• Los archivos con protección anticopia no pueden
reproducirse.
• Es posible que el equipo no sea compatible con la
actualización del formato de compresión estándar y con las
especificaciones adicionales.
• No es posible utilizar discos CD-RW a los que se les ha dado
formato rápido con el software de escritura.
• Al grabar a la capacidad máxima del medio CD-R/RW de una
vez, el software de escritura se ajusta a "Disc at once".
• El nombre de archivo/carpeta corresponde al número de
caracteres, incluidas las extensiones.
Acerca de los archivos de imagen
Archivos de imagen admitidos
• Formato: JPEG
• Formato de línea de base:
Hasta un máximo de 8192 (ancho) × 7680 (alto)
píxeles
• Formato progresivo:
Hasta un máximo de 1600 (ancho) × 1200 (alto)
píxeles
⁄
• Las imágenes se amplían y reducen al tamaño indicado
anteriormente para adaptarlas a la pantalla.
• No es posible visualizar ni reproducir correctamente (p. ej.,
visualización con rotación de la imagen) archivos de imagen
que tienen información adjunta (como Exif).
Extensiones
Los archivos de imagen deben tener una de las
extensiones siguientes:
jpg
Los tipos de disco admitidos, formatos de disco,
nombres de archivo y carpeta y orden de reproducción
son los mismos que para los archivos de audio.
Consulte <Acerca de los archivos de audio>.
Acerca de los archivos de vídeo
Archivos de vídeo admitidos
• Formato: DivX
• Versión: 3, 4, 5
• Formato de sonido: MP3, AC3
• Velocidad de transferencia de bits: 8 – 320 kbps/ VBR
• Tamaño de la imagen
PAL: 720 (ancho) × 576 (alto) píxeles
NTSC: 720 (ancho) × 480 (alto) píxeles
⁄
• Las imágenes se amplían y reducen al tamaño indicado
anteriormente para adaptarlas a la pantalla.
• No es posible visualizar ni reproducir correctamente (p. ej.,
visualización con rotación de la imagen) archivos de imagen
que tienen información adjunta (como Exif) .
Extensiones
Los archivos de imagen deben tener una de las
extensiones siguientes:
avi,
divx
Los tipos de disco admitidos, formatos de disco,
nombres de archivo y carpeta y orden de reproducción
son los mismos que para los archivos de audio.
Consulte <Acerca de los archivos de audio>.
50
|
KDV-S211P
Page 51

Acerca de DivX
DivX es una conocida tecnología de medios creada por
DivX, Inc. Los vídeos de los archivos multimedia DivX
tienen gran calidad de imagen y están sumamente
comprimidos, lo que hace que el tamaño del archivo
sea relativamente pequeño. Los archivos DivX pueden
contar también con características multimedia
avanzadas, como menús, subtítulos y pistas de audio
alternas. Es posible descargar una gran variedad de
archivo multimedia DivX que están y crear archivos
propios con contenido personal mediante las
herramientas de fácil manejo disponibles en DivX.com.
Instalación de la pila
Utilice una pila de litio (CR2025).
Inserte la pila, con los polos + y – alineados
correctamente, observando la ilustración que hay en el
interior del compartimiento.
1 Deslizar
Acerca de la certificación DivX Certified
Los creadores de la tecnología DivX realizan pruebas
oficiales de todos los productos con certificación DivX
Certified y garantizan que éstos pueden reproducir
todas las versiones de vídeo DivX, incluida la versión
DivX 6. Los productos con certificación se clasifican
en alguno de los diversos perfiles DivX que designan
el tipo de vídeo que es compatible con el producto,
desde el vídeo compacto portátil al vídeo de alta
definición.
2 Tirar
B
A
T
T
R
B
Y
A
B
T
A
T
T
R
T
B
Y
R
A
B
Y
T
A
T
R
3 Sustituir la pila
2 ADVERTENCIA
• Guarde las pilas que no utilice fuera del alcance de
los niños. Llame al médico inmediatamente si la pila
fuera ingerida por accidente.
• No deje el mando a distancia en un lugar donde
pueda moverse mientras conduce. Si cae debajo
del pedal de freno, etc., obstaculizará la conducción,
causando una situación de peligro.
¤
• No deje el mando a distancia en lugares excesivamente
calurosos, por ejemplo, encima del salpicadero.
⁄
• La pila suministrada sólo tiene por finalidad comprobar el
funcionamiento del equipo, por lo que su vida útil puede ser
corta.
• Cuando el alcance del mando a distancia disminuya
considerablemente, sustituya la pila por una nueva.
Español
|
51
Page 52

Funciones principales
MUTE
DISP
POWER
POWER
EJECT
EJECT
Alimentación
Pulse el botón [POWER].
¤
• Para evitar que la batería se agote, desconecte la clavija
del encendedor de cigarrillos al desconectar el encendido
del vehículo.
Reproducción
Reproducción
Abra la tapa e inserte un disco en el equipo.
Si ya hay un disco cargado, pulse el botón [38].
Se inicia la reproducción del disco.
⁄
• Cuando inserte un disco, la reproducción comenzará
desde el principio del mismo.
Si desconecta la alimentación durante la reproducción
de un disco, la reproducción se reanudará desde el punto
donde fue interrumpida cuando vuelva a conectar la
alimentación.
|
52
KDV-S211P
& ENTER
RETURN
PROG/RDM
REP
A–B
/Y
/D
Reproducción de archivos de audio/archivos de
imagen/archivos de vídeo
1 Selección de carpeta
Pulse el botón [2]/[5]/[3]/[∞].
2 Especifique la carpeta
Pulse el botón [ENTER].
Se visualiza la música contenida en la carpeta
especificada.
3 Seleccione el archivo que desea escuchar
Pulse el botón [2]/[5]/[3]/[∞].
Para volver al paso 1 y seleccionar otra carpeta, pulse
el botón [RETURN].
Page 53

4 Reproduzca el archivo seleccionado
Pulse el botón [ENTER].
Pausa
Pulse el botón [38].
Cada vez que se pulsa el botón, el modo alterna
entre pausa y reproducción.
Parada
Pulse el botón [7].
Para reanudar la reproducción, pulse el botón [38].
⁄
• Si pulsa el botón [7] dos veces durante la reproducción de
un DVD, la reproducción comenzará desde el principio del
disco la próxima vez que lo reproduzca.
Expulsión
Pulse el botón [EJECT].
⁄
• Si desea reiniciar la reproducción del disco después
de que ha sido expulsado del equipo, vuelva a pulsar
el botón [EJECT]. El disco se reinserta en el equipo y la
reproducción vuelve a comenzar.
• Si desconecta la alimentación o arranca el motor
mientras reproduce un archivo de audio, es posible que la
reproducción no se reanude (vuelva a comenzar desde el
punto donde fue interrumpida).
Silenciamiento
Para bajar el volumen rápidamente.
Pulse el botón [MUTE].
Cada vez que se pulsa el botón, la función de
silenciamiento se activa (ON) o desactiva (OFF).
Omisión
Permite omitir un capítulo, pista o archivo.
Pulse el botón [4] o [¢].
⁄
• Para omitir capítulos, pistas o archivos en un VCD,
desactive la función PBC pulsando el botón [PBC].
Avance y retroceso rápido
Pulse el botón [1] o [¡].
La velocidad cambia en 5 niveles cada vez que se
pulsa el botón.
Para reanudar la reproducción, pulse el botón [38].
Repetición
Permite reproducir una canción, capítulo, título, etc.
de forma repetida.
Pulse el botón [REP].
Cada vez que pulse el botón, la función de
repetición cambiará como se indica a continuación.
Cuando la fuente es un DVD
Visualización Preajuste
"CHAPTER REPEAT" Reproduce el capítulo repetidamente.
"TITLE REPEAT" Reproduce el título repetidamente.
"REPEAT CANCELED" Desactiva la función de repetición.
Cuando la fuente es un archivo de vídeo
Visualización Preajuste
"FILE REPEAT" Reproduce el archivo repetidamente.
"FOLDER REPEAT" Reproduce la carpeta repetidamente.
"ALL REPEAT" Reproduce el disco repetidamente.
"REPEAT CANCELED" Desactiva la función de repetición.
Cuando la fuente es un CD/VCD
Visualización Preajuste
"TRACK REPEAT" Reproduce la pista repetidamente.
"ALL REPEAT" Reproduce el disco repetidamente.
"REPEAT CANCELED" Desactiva la función de repetición.
En la fuente de archivo de audio
Visualización Preajuste
"FILE REPEAT" Reproduce la canción repetidamente.
"FOLDER REPEAT" Reproduce repetidamente las canciones de
"ALL REPEAT" Reproduce el disco repetidamente.
"REPEAT CANCELED" Desactiva la función de repetición.
Cuando la fuente es un archivo de imagen
Visualización Preajuste
"FILE REPEAT" Reproduce el archivo de imagen
"FOLDER REPEAT" Reproduce la carpeta repetidamente.
"ALL REPEAT" Reproduce el disco repetidamente.
"REPEAT CANCELED" Desactiva la función de repetición.
la carpeta.
repetidamente.
⁄
• Para reproducir repetidamente un VCD, desactive la
función PBC pulsando el botón [PBC].
Español
|
53
Page 54

Funciones principales
Repetición A-B
[DVD] [VCD] [DivX] [CD] [AUDIO]
Especifique un punto de inicio y un punto de
término para reproducir repetidamente la sección
comprendida entre dichos puntos.
1 Especifique el punto A (punto de inicio)
Pulse el botón [A-B].
2 Especifique el punto B (punto de término)
Pulse el botón [A-B].
La sección comprendida entre los puntos A y B se
reproduce repetidamente.
Para cancelar la función de repetición A-B
Pulse el botón [A-B].
Reproducción aleatoria
[CD] [AUDIO] [DivX] [PIC]
El equipo elige y reproduce en orden aleatorio las
canciones grabadas en el disco.
1 Detenga la reproducción
Pulse el botón [7] dos veces.
2 Seleccione el modo de reproducción aleatoria
Pulse el botón [RDM] dos veces.
3 En el caso de un archivo de audio, seleccione la
carpeta correspondiente
Seleccione una carpeta utilizando los botones
[2]/[5]/[3]/[∞] y, a continuación, pulse el botón
[ENTER].
Sitúe el cursor en cualquier archivo de la carpeta que
desea reproducir en orden aleatorio.
4 Inicie la reproducción aleatoria
Pulse el botón [38].
Para cancelar la reproducción aleatoria
Pulse el botón [7] dos veces y luego el botón
[RDM], en este orden.
Reproducción programada
Permite reproducir la escena, canciones o archivos
seleccionados en un determinado orden.
1 Detenga la reproducción
Pulse el botón [7] dos veces.
2 Seleccione el modo de programa
Pulse el botón [PROG].
3 Seleccione la escena, canción o archivo que
desea reproducir
Pulse el botón [2]/[5]/[3]/[∞].
4 Determine la escena, canción o archivo que
desea reproducir
Pulse el botón [ENTER].
Al establecer un programa para un DVD, seleccione y
determine el título y el capítulo, en este orden.
5 Repita los pasos 3 y 4 para registrar todas
las escenas, canciones o archivos que desea
reproducir de forma programada.
6 Inicie la reproducción programada
Pulse el botón [38].
Para cancelar la reproducción programada
Pulse los botones [7] y [PROG], en este orden.
⁄
• Para cancelar una canción programada, etc., seleccione
"CLEAR ALL" y pulse el botón [ENTER].
54
|
KDV-S211P
Page 55

Cambio de visualización
Puede cambiar la información que se muestra en la
pantalla.
Pulse el botón [DISP].
Cada vez que pulse el botón, la visualización
cambiará como se indica a continuación.
Cuando la fuente es un DVD
Visualización Información
"Chapter Elapsed" Tiempo transcurrido del capítulo
"Chapter Remain" Tiempo restante del capítulo
"Title Elapsed" Tiempo transcurrido del título
"Title Remain" Tiempo restante del título
"Display Off" No se visualiza información
Cuando la fuente es DivX
Visualización Información
"File Elapsed" Tiempo transcurrido de vídeo
"File Remain" Tiempo restante del vídeo
"Display Off" No se visualiza información
Cuando la fuente es un VCD (con la función PBC
activada) o un archivo de audio
Visualización Información
"Track Elapsed" Tiempo transcurrido de la pista/archivo
"Track Remain" Tiempo restante de la pista/archivo
"Display Off" No se visualiza información
Cuando la fuente es un VCD (con la función PBC
desactivada) o un CD
Visualización Información
"Track Elapsed" Tiempo transcurrido de la pista
"Track Remain" Tiempo restante de la pista
"Disc Elapsed" Tiempo transcurrido del disco
"Disc Remain" Tiempo restante del disco
"Display Off" No se visualiza información
Español
|
55
Page 56

Funciones para vídeo DVD/CD de vídeo/archivos de vídeo/
archivos de imagen
MENU
TOP MENU
AUDIO
SUB TITLE
ANGLE
ZOOM
PBC
SRCH
& ENTER
0 – 9
Búsqueda [DVD] [VCD] [DivX]
Permite seleccionar directamente la escena que se
desea reproducir.
1 Seleccione el modo de búsqueda
Pulse el botón [SRCH].
⁄
• Para buscar en un VCD, desactive la función PBC pulsando
el botón [PBC].
2 Para DVD, seleccione el modo de búsqueda
Pulse el botón [SRCH].
Cada vez que pulse el botón, el elemento que
se puede seleccionar cambiará como se indica a
continuación.
Elemento
Número de capítulo
Número de título
⁄
• Si pulsa el botón [2] o [3] durante el modo de búsqueda
de números de capítulo, puede buscar el número de un
título.
3 Introduzca la escena que desea reproducir
Pulse el botón [0] – [9].
Se inicia la reproducción de la escena introducida
durante la reproducción del VCD.
|
56
KDV-S211P
4 Para DVD, inicie el modo de búsqueda de
escenas
Pulse el botón [ENTER].
Se inicia la reproducción de la escena introducida.
5 Para DVD, introduzca el tiempo desde donde
desea iniciar la reproducción
Pulse el botón [0] – [9].
Se inicia la reproducción desde el tiempo
introducido.
6 Para DVD, inicie el modo de búsqueda de
tiempo
Pulse el botón [ENTER].
Se inicia la reproducción desde el tiempo
introducido.
Para cancelar el modo de búsqueda
Pulse el botón [SRCH].
Page 57

Menú DVD/menú superior (título)
[DVD]
Puede acceder al menú DVD y al menú superior
(título) para realizar diversos ajustes.
1 Visualice el menú DVD
Pulse el botón [MENU].
Visualice el menú superior (título)
Pulse el botón [TOP MENU].
2 Seleccione un elemento
Pulse el botón [2]/[5]/[3]/[∞] o [0] – [9].
3 Finalice el elemento
Pulse el botón [38].
Consulte las instrucciones suministradas con el disco
para obtener información sobre cómo utilizar cada
menú.
4 Cancele la visualización del menú
Pulse el botón [MENU] o [TOP MENU].
Selección de idioma de audio [DVD]
Pulse el botón [AUDIO].
Cambia entre los distintos idiomas grabados en el
disco (en orden).
⁄
• Si sólo hay un idioma grabado en el disco, el idioma no
cambia.
Selección de idioma de subtítulos
[DVD]
Pulse el botón [SUB TITLE].
Cambia entre los distintos idiomas grabados en el
disco (en orden).
⁄
• Si sólo hay un idioma grabado en el disco, el idioma no
cambia.
Selección de ángulo de imagen [DVD]
Pulse el botón [ANGLE].
Cambia entre los distintos ángulos grabados en el
disco (en orden).
⁄
• Si sólo hay un ángulo grabado en el disco, el ángulo no
cambia.
Zoom
Para ampliar la imagen.
1 Seleccione el factor de ampliación
Pulse el botón [ZOOM].
Cada vez que pulse el botón, el factor de ampliación
cambiará como se indica a continuación.
DVD/ VCD: x1,0, x2,0, x3,0
Archivo de vídeo: x1,0, x1,5, x2,0, JUST
Archivo de imagen: 50, 100, 150, 200 %
2 Seleccione la posición de visualización (sólo
durante la reproducción de imágenes en
movimiento)
Pulse el botón [2]/[5]/[3]/[∞].
PBC [VCD]
Utiliza la función de control de reproducción (PBC).
1 Active la función PBC
Pulse el botón [PBC].
Cada vez que se pulsa el botón, la función PBC se
activa (ON) o desactiva (OFF).
2 Seleccione un elemento
Pulse el botón [0] – [9].
3 Finalice el elemento
Pulse el botón [38].
Consulte las instrucciones suministradas con el disco
para obtener información sobre cómo utilizar la
función PBC.
⁄
• Puede utilizar la función PBC al reproducir discos VCD
versión 2.0 o posterior.
Español
|
57
Page 58

Funciones para vídeo DVD/CD de vídeo/archivos de vídeo/archivos
de imagen
Reproducción en cámara lenta
[DVD] [VCD] [DivX]
Para hacer una pausa en la reproducción
1
Pulse el botón [38].
2 Reproducción en cámara lenta
Pulse el botón [1] o [¡].
Cada vez que se pulsa el botón, la reproducción
en cámara lenta se lleva a cabo como se indica a
continuación.
Disco Botón Movimiento
1
DVD
DVD
VCD/
DivX
La velocidad de reproducción lenta en dirección de
retroceso cambia en 5 pasos.
¡
La velocidad de reproducción lenta en dirección de
avance cambia en 5 pasos.
¡
La velocidad de reproducción lenta en dirección de
avance cambia en 5 pasos.
⁄
• Para restablecer la velocidad normal, pulse el botón
[38].
Reproducción cuadro por cuadro
[DVD] [VCD] [DivX]
1 Para hacer una pausa en la reproducción
Pulse el botón [38].
2 Reproducción cuadro por cuadro
Pulse el botón [2] o [3].
⁄
• Durante la reproducción de un archivo de vídeo, no es
posible retroceder cuadro por cuadro ([2]).
Presentación de diapositivas [PIC]
Permite visualizar las imágenes como una
presentación de diapositivas.
1 Seleccione la carpeta cuyos archivos desea
visualizar como una presentación de
diapositivas
Pulse el botón [2]/[5]/[3]/[∞]/[ENTER].
2 Inicie la presentación de diapositivas
Pulse el botón [38].
⁄
• Para especificar el tiempo de visualización de un archivo,
seleccione "OTHER" / "JPEG TIME" en el <Menú de
configuración> (página 62).
Rotación de la imagen [PIC]
Permite girar la imagen que se está visualizando.
1 Visualice la imagen que desea girar
Pulse el botón [2]/[5]/[3]/[∞]/[ENTER].
2 Gire la imagen
Botón Visualización
[2] Gira la imagen 90˚ en el sentido contrario a las agujas del
reloj.
Gira la imagen 180˚.
[5]
Gira la imagen 90˚ en el sentido de las agujas del reloj.
[3]
Gira la imagen 180˚.
[∞]
58
|
KDV-S211P
Page 59

Funciones de CD/archivos de audio
SRCH
Reproducción directa [CD]
Permite seleccionar directamente la canción que se
desea reproducir.
1 Introduzca el número de la canción que desea
reproducir
Pulse el botón [0] – [9].
2 Reproducción
Pulse el botón [ENTER].
⁄
• Si transcurren aproximadamente 5 segundos sin que
se realice ninguna operación en el paso 2, el equipo
comienza a buscar automáticamente la canción
introducida en el paso 1.
Búsqueda de tiempo de reproducción
[CD]
Introduzca el tiempo de reproducción desde donde
desea comenzar.
1 Seleccione el modo de búsqueda de tiempo de
reproducción
Pulse el botón [SRCH].
2 Introduzca el tiempo de reproducción desde
donde desea comenzar
& ENTER
0 – 9
Pulse el botón [0] – [9].
Por ejemplo
5:07 ➪ [0], [5], [0], [7]
La reproducción comienza desde el tiempo
introducido.
3 Reproducción
Pulse el botón [ENTER].
Reproducción con búsqueda [AUDIO]
Permite seleccionar directamente la canción que se
desea reproducir.
1 Seleccione la carpeta
Pulse el botón [2]/[5]/[3]/[∞].
2 Especifique la carpeta
Pulse el botón [ENTER].
Se visualiza la música en la carpeta especificada.
3 Seleccione el modo de reproducción con
búsqueda
Pulse el botón [SRCH].
4 Introduzca el número de la canción que desea
reproducir
Pulse el botón [0] – [9].
5 Reproducción
Pulse el botón [ENTER].
Español
|
59
Page 60

Menú de configuración
SETUP
& ENTER
RETURN
Menú de configuración
En el menú de configuración puede personalizar los
ajustes predeterminados de diversas funciones del
equipo.
1 Detenga la reproducción
Pulse el botón [7].
Durante la reproducción de un DVD, pulse el botón
dos veces.
Durante la reproducción de un VCD, primero
desactive la función PBC pulsando el botón [PBC].
2 Visualice la pantalla SETUP MENU
Pulse el botón [SETUP].
Se visualiza SETUP MENU MAIN en la pantalla
conectada.
3 Seleccione la página del menú en que desea
realizar ajustes
Pulse el botón [5]/[∞].
4 Introduzca la página seleccionada
Pulse el botón [ENTER].
Se visualiza la página seleccionada en el paso 3.
5 Seleccione el elemento que desea ajustar y la
opción correspondiente
Pulse el botón [2]/[5]/[3]/[∞].
Consulte las descripciones correspondientes de los
elementos y opciones de ajuste de cada menú.
|
60
KDV-S211P
6 Finalice su selección
Pulse el botón [ENTER].
Vuelva al paso 2 para visualizar la pantalla SETUP
MENU MAIN y pulse [RETURN].
7 Salga del menú de configuración
Pulse el botón [SETUP].
⁄
• Para salir del menú de configuración, pulse [SETUP].
Si sale del menú de configuración desconectando la
alimentación del equipo, los ajustes realizados no se
guardarán.
Menú DISC
AUDI O
Establece el idioma de audio apropiado para los
altavoces.
Visualización Preajuste
"JAPANESE" Japonés
"ENGLISH" Inglés
"CHINESE" Chino
"ORIGINAL" Idioma original
Page 61

SUBTITLE
Establece el idioma de los subtítulos que se muestran
en la pantalla.
Visualización Preajuste
"AUTO" Idioma original
"JAPANESE" Japonés
"ENGLISH" Inglés
"CHINESE" Chino
MENUS
Establece el idioma de los menús del disco.
Visualización Preajuste
"AUTO" Idioma original
"ENGLISH" Inglés
"CHINESE" Chino
RATINGS
Establece el nivel de control parental. Mientras
más alto es el nivel, mayor es la protección que se
obtiene.
Visualización Preajuste
"0 LOCK ALL"
"1 KID SAF" Sólo es posible reproducir películas con
"2 G"
"3 PG"
"4 PG 13"
"5 PGR"
"6 R"
"7 NC17"
"8 ADULT"
1 Pulse el botón [ENTER] del mando a distancia.
2 Establezca el nivel de control parental.
3 Introduzca la contraseña.
4 Pulse el botón [ENTER] del mando a distancia.
calificación G (para niños).
⁄
• La contraseña predeterminada es "0000".
• La función de control parental sólo puede utilizarse en
discos marcados con una "R".
PASSWORD
CHANGE: Cambia la contraseña.
1 Seleccione "SETTING" y pulse el botón [ENTER] del
mando a distancia.
2 Introduzca la contraseña actual.
3 Introduzca la nueva contraseña dos veces.
4 Pulse el botón [ENTER] del mando a distancia.
⁄
• La contraseña predeterminada es "0000".
Menú VIDEO
TV ASPECT
Siga el procedimiento que se describe a continuación
para configurar la pantalla de salida.
Visualización Preajuste
"16:9" Establece el modo de imagen de un monitor de
"4:3 PS" El software de pantalla ancha con especificación
"4:3 LB" El software de pantalla ancha con especificación "pan
TV SYSTEM
Seleccione una señal de salida de vídeo apropiada
para el monitor de TV que va a utilizar.
Visualización Preajuste
"NTSC" Emite la señal de vídeo en el formato NTSC.
"PAL" Emite la señal de vídeo en el formato PAL.
"AUTO" Cambia automáticamente entre los sistemas NTSC y
pantalla ancha en "16:9".
"pan & scan" se reproduce en una pantalla "pan &
scan" (con los lados izquierdo y derecho de la imagen
recortados.
& scan" se reproduce en una pantalla de formato
"buzón" (con franjas negras en la parte superior e
inferior).
PAL según el tipo de señal de vídeo del disco que se
reproduce.
⁄
• Cuando se desconecta la alimentación se restablece el
ajuste predeterminado ("NTSC").
STILL MODE
Establece el modo de vista fija de imagen (pausa).
Visualización Preajuste
"AUTO" Detecta automáticamente la velocidad de movimiento
"FIELD" Realiza el procesamiento de imagen óptimo cuando el
"FRAME" Realiza el procesamiento de imagen óptimo cuando el
de la imagen para procesarla de forma óptima.
movimiento de la imagen es rápido.
movimiento de la imagen es lento.
Español
|
61
Page 62

Menú de configuración
Menú AUDIO
LPCM DOWNSMPL
Visualización Preajuste
"OFF" No se realiza ningún remuestreo de compresión
"48kHz" Emite una canción de f 96kfs a 48kfs a través de
"96kHz" Emite una canción de f 96kfs a 96kfs a través de
DOLBY DIGITAL
Establece el formato de salida de sonido Dolby
Digital.
Visualización Preajuste
"BITSTREAM" Emite el sonido en formato de flujo de bits.
"PCM" Emite el sonido en formato PCM.
"OFF" No se emite sonido.
DTS
Establece el formato de salida de sonido DTS.
Visualización Preajuste
"BITSTREAM" Emite el sonido en formato de flujo de bits.
"PCM" Emite el sonido en formato PCM.
"OFF" No se emite sonido.
MPEG
Establece el formato de salida de sonido MPEG.
Visualización Preajuste
"BITSTREAM" Emite el sonido en formato de flujo de bits.
"PCM" Emite el sonido en formato PCM.
"OFF" No se emite sonido.
DYNAMIC RANGE
Reduce el margen dinámico para que los diálogos de
las películas se escuchen claramente.
Visualización Preajuste
"ON" Reduce el margen dinámico.
"OFF" No se ajusta el margen dinámico.
de imagen.
DIGITAL OUT.
DIGITAL OUT.
DISPLAY
LANGUAGE
Establece el idioma del menú de configuración.
Visualización Preajuste
"中文" Chino
"ENGLISH" Inglés
"FRANÇAIS" Francés
"ESPAÑOL" Español
"DEUTSCH" Alemán
"ITALIANO" Italiano
OTHER
JPEG TIME
Establece el tiempo de visualización de la imagen.
Visualización Preajuste
"1 SEC" La imagen se visualiza durante 1 segundo.
…
"180 SEC" La imagen se visualiza durante 180 segundos.
Pulse el botón [5] o [∞] para seleccionar los
segundos.
DEFAULTS
RESET: Restablece los elementos personalizados del
menú de configuración.
REGISTRATION
SHOW CODE: Muestra el código de registro DivX.
⁄
• Cuando se descarga un archivo DivX VOD controlado por
DRM, el código de registro aparece en la pantalla. De no
ser así, es posible que el archivo no pueda reproducirse en
este equipo.
Cuando se reproduce un archivo DivX VOD con restricción
de visualización, se muestra el número de visualizaciones
restantes. Cuando el número de visualizaciones restantes
llega a 0, aparece un mensaje de advertencia indicando
que ya no es posible reproducir el archivo.
62
|
KDV-S211P
Page 63

Accesorios
Instalación
1
2
3
4
5
6
7
8
..........1
..........1
..........2
..........5
..........4
..........2
..........1
Instalación con los soportes de
montaje
Tornillo autorroscante 5
(Φ5 x 20 mm)
Soporte de
montaje 3
Tornillo Semusu 4
(M4 x 5 mm)
Instalación con cintas Velcro
Alfombra
Cinta Velcro 6
¤
• No utilice sus propios tornillos. Utilice sólo los tornillos
incluidos. El uso de tornillos diferentes podría causar daños
en la unidad principal.
• No instale el equipo en un lugar inestable o donde pueda
vibrar.
• Se puede instalar el equipo en cualquier ángulo entre la
posición horizontal normal y la posición vertical (0° a 90°). No
es posible instalar el equipo con la ranura de inserción del
disco orientada hacia abajo, en ángulo o al revés.
..........1
¤
• Si se funde el fusible, en primer lugar asegúrese de que los
cables no hayan causado un cortocircuito, y luego reemplace
el fusible usado por uno nuevo del mismo régimen.
Español
|
63
Page 64

Conexión de cables a los terminales
Salida digital
Salida de vídeo (amarilla)
Salida de audio izquierda
Salida de audio derecha
Monitor de TV
(Accesorio opcional)
(blanca)
(roja)
Vista posterior del
reproductor de DVD
M4 X 5mm
Cable de tierra 7 (negro) - (Al chasis del coche)
Cable AV 8
Instalación del sensor de mando a distancia
1 Retire el papel protector de la cinta Velcro, situado en la parte
posterior del sensor de mando a distancia.
2 Después de quitar la suciedad y huellas de aceite de la
posición de instalación, fije el sensor de mando a distancia.
⁄
• Quite la suciedad o huellas de aceite de la superficie en que vaya a
instalar el sensor.
• Evite instalar el sensor en lugares expuestos a la luz directa del sol o
cerca del monitor de TV, donde las señales del mando a distancia no se
reciban con facilidad.
• Puede cambiar la dirección del cable del sensor de mando a distancia.
Cable de alimentación 1
Batería
Sensor de mando a distancia 2
Clavija para
encendedor de
cigarrillos
Fusible (5A)
incorporado
M4 X 5mm
TE
O
EM
R
Al conector del
encendedor de
cigarrillos
Tornillo Semusu 4
(M4 x 5 mm)
Papel protector
64
|
KDV-S211P
¤
• Conecte el cable de alimentación 1 al reproductor de DVD
primero, y luego al conector del encendedor de cigarrillos. Si
lo conecta al conector del encendedor de cigarrillos primero,
el fusible podría quemarse.
Page 65

Guia Sobre Localización De Averias
Lo que podría parecer un fallo de funcionamiento
de su unidad podría ser simplemente el resultado
de un pequeño error de operación o de un defecto
de conexión. Antes de acudir al servicio, verifique
primero el siguiente cuadro sobre los problemas que
se podrían presentar.
? Salta el Imagen/sonido en un DVD/VCD/CD.
✔ El disco está sucio o rayado.
☞ Limpie el disco refiriéndose a la sección
<Manipulación de los discos> (véase la página
49).
? No se puede reproducir un disco compacto de
vídeo utilizando menús.
✔ El disco compacto de vídeo no es compatible con
P.B.C.
☞ La reproducción con menú sólo es posible con
videodiscos digitales grabados con P.B.C.
? No se visualizan subtítulos.
✔ El videodisco digital que está siendo reproducido no
tiene grabados subtítulos.
☞ Los subtítulos no se pueden visualizar cuando el
videodisco digital que está siendo reproducido
no tiene grabados subtítulos.
? El idioma de voz (o subtítulos) no se puede
cambiar.
✔ El videodisco digital que está siendo reproducido
no tiene grabados más de un idioma de audio (o de
subtítulos).
☞ El idioma de voz (o subtítulos) no se puede
cambiar cuando el videodisco digital que está
siendo reproducido no tiene grabado más de un
idioma de voz (o subtítulos).
Los mensajes mostrados a continuación
muestran las condiciones del sistema.
"Thermal Protect. Off Power!"
: El circuito de protección de la unidad se activa cuando la
temperatura interior de la misma excede los 60°C (140°F),
deteniendo todo el funcionamiento.
➪ Enfríe la unidad abriendo las ventanas o encendiendo el
aire acondicionado. Cuando la temperatura descienda
a menos de 60°C (140°F), la reproducción del disco
comenzará nuevamente.
Para eyectar el disco en este caso, desactive y vuelva a
activar la alimentación.
"NO DISC"
: No se ha insertado ningún disco insertado en la unidad.
"THIS DISC MAY NOT BE PLAYED IN YOUR REGION"
: Se ha insertado en la unidad un DVD con un código de
región incorrecto.
"Unknown DISC"
: Se ha insertado un disco que no se puede reproducir en la
unidad.
: El disco insertado contiene datos dañados o datos que no
son estándar.
"PASSWORD IS DIFFERENT!"
: La contraseña que se ha introducido no coincide con la
contraseña registrada.
: Aparecerá si la nueva contraseña que se ha introducido
por segunda vez no coincide con la primera cuando se
está modificando la contraseña.
➪ Cuando introduzca la nueva contraseña, con el
propósito de confirmarla, será necesario introducir
dicha contraseña dos veces.
Español
|
65
Page 66

Especificaciones
Las especificaciones se encuentran sujetas a cambios sin previo aviso.
Sección DVD
Convertidor D/A
: Nivel 8 ΔΣ, 24bit
Fluctuación y trémolo
: Menos del límite medible
Respuesta de frecuencia
: 17 – 44 kHz (DVD 96kHz Muestreo)
Distorsión armónica total 1kHz
: 0,02 %
Relación señal a ruido
: 110 dB (DVD de vídeo 96k)
Gama dinámica
: 90 dB
Formato decodificado
: PCM lineal, Dolby Digital, dts, MP3, WMA, AAC
Formato DISC
: DVD-VIDEO/ VIDEO-CD/ CD-DA
Salida
Nivel de salida de vídeo compuesto (V )
: 1 Vp-p (75Ω)
Nivel de salida de audio de 2 canales (V )
:1,2 V/ 10 kΩ (DVD/CD)
Nivel de salida de interfaz de audio digital coaxial (V)
: 0,5 V/ 75 Ω
General
Tensión de funcionamiento
: 14,4 V (11 – 16 V)
Consumo
: 2 A
Dimensiones AnchxAltxProf
: 195 mm x 45 mm x 210 mm
7-11/16 x 1-6/8 x 8-2/8 pulg.
Peso
: 1,7 kg
3,75 lbs
66
|
KDV-S211P
Page 67

DivX, DivX Certified y los logotipos asociados son marcas
comerciales de DivX, Inc. y deben utilizarse en virtud de una
licencia.
is a trademark of DVD Format/Logo Licensing
Corporation registered in the U.S., Japan and other countries.
Este producto incorpora tecnología de protección de
derechos de autor protegida por patentes de EE.UU. y otros
derechos de propiedad intelectual. El uso de esta tecnología
de protección de derechos de autor debe ser autorizado por
Macrovision, y solo está destinado a uso doméstico y a otros
usos solamente con previa autorización de Macrovision. La
ingenería inversa o el desensamble están prohibidos.
Fabricado bajo licencia de Dolby Laboratories.
"Dolby" y el símbolo de la doble D son marcas comerciales de
Dolby Laboratories.
"DTS" is a registered trademark of DTS, Inc. and "DTS 2.0 +
Digital Out" is a trademark of DTS, Inc.
The "AAC" logo is trademark of Dolby Laboratories.
Español
|
67
Page 68

 Loading...