

Page 1

©B64-2788-00/00 (KW/EW)
COMPACT
DIGITAL AUDIO
Take the time to read through this instruction manual.
Familiarity with installation and operation procedures will help you
obtain the best performance from your new compact disc auto changer.
For your records
Record the serial number, found on the back of the unit, in the spaces designated on the warranty card, and in the space provided below. Refer to the
model and serial numbers whenever you call upon your KENWOOD dealer for
information or service on the product.
Model KDC-C521FM, KDC-C471FM Serial number
CD AUTOCHANGER / CONTROLLER / FM MODULATOR SYSTEM
INSTRUCTION MANUAL
CHANGEUR AUTOMATIQUE DE CD / CONTROLEUR / SYSTEME
A MODULATION DE FM
SISTEMA DEL MODULADOR DE FM / CONTROLADOR / CAMBIADOR
AUTOMATICO DE DISCOS COMPACTOS
MANUAL DE INSTRUCCIONES
KDC-C521FM
KDC-C471FM
MODE D’EMPLOI
Page 2
— 2 —
English
Contents
Before use
Safety Precautions ........................................................................3
Handling Compact Discs...............................................................4
Loading Compact Discs ................................................................5
General features
Power............................................................................................6
Selecting the Source.....................................................................6
Sirius satellite radio tuner features
Selecting Sirius Mode ...................................................................7
Switching Seek Mode...................................................................7
Selecting the Preset Band.............................................................7
Channel Preset Memory ...............................................................8
Preset Tuning................................................................................8
Channel Scan ................................................................................8
Channel Search ............................................................................8
Direct Access Tuning ....................................................................9
Switching Display..........................................................................9
Disc control features
Playing Disc.................................................................................10
Fast Fowarding and Reversing....................................................10
Track Search................................................................................10
Disc Search .................................................................................11
Direct Track Search.....................................................................11
Direct Disc Search.......................................................................11
Track/Disc Repeat .......................................................................11
Track Scan...................................................................................11
Random Play ...............................................................................11
Magazine Random Play...............................................................12
Switching Display........................................................................12
Menu system
Menu System..............................................................................13
Changing the Transmission Frequency.......................................14
Modulation level..........................................................................14
Dynamic control ..........................................................................14
Text Scroll ...................................................................................14
Sirius ID (ESN).............................................................................14
Basic Operations of remote .............................................15
Installation
Accessories.................................................................................17
Installation Procedure..................................................................17
Installation...................................................................................18
Connecting Wires to Terminals...................................................20
Troubleshooting guide .......................................................22
Specifications .........................................................................25
Warning ......................................................................................26
Page 3
— 3 —
Take the following precautions to prevent
fire and avoid personal injury:
• When extending the ignition wire, battery
wire, or ground wire, use 0.75mm2(AWG18)
or larger automotive grade wire to avoid wire
deterioration or damage to the covering.
• Check that no metal objects (coins, tools,
etc.) are left inside the unit to avoid short
circuits.
• If you smell or see smoke, turn the power off
immediately and consult your Kenwood
dealer.
• Do not touch the liquid crystal fluid if the LCD
is damaged or broken due to shock. The
liquid crystal fluid may be dangerous to your
health or even fatal.
If the liquid crystal fluid from the LCD
contacts your body or clothing, wash it off
with soap immediately.
Take the following precautions to
keep the unit in proper working order.
• Be sure the unit is connected to a 12V DC
power supply with a negative ground
connection.
• Do not open the top or bottom cover.
• Do not install the unit in places it is exposed
to direct sunlight, high heat or humidity,
water may splash over it, or dust exists.
2CAUTION
2WARNING
• When replacing a fuse, only use a new one
with the prescribed rating. Using a fuse with
the wrong rating may cause your unit to
malfunction.
• To prevent a short circuit when replacing a
fuse, first disconnect the wiring harness.
• If you have difficulty in installing this unit in
your vehicle, contact your Kenwood dealer.
• If it doesn’t seem to be working properly,
first press the Reset button. If the
malfunction persists, consult your Kenwood
dealer.
• Some car stereos cause the sound of the
tuner to make for a moment when an
engine is activated.
•The reception of the tuner may be reduced
a little if the KDC-C521FM, KDC-C471FM is
used.
• If the sound is lower than the tuner sound,
raise up the volume level of the CD with
using the receiver.
• Do not use your own screws. Use only the
screws provided. If you use the wrong
screws, you could damage the unit.
NOTE
Cleaning the Unit
If the front panel gets dirty, turn off the
power and wipe the panel with a dry silicon
cloth or soft cloth.
Do not use hard cloths or paint thinner,
alcohol, or other volatile solvents. These may
damage external surfaces or remove
indicator characters.
Lens fogging
In cold climates, there may be a period after
you turn on your vehicle’s heater when the
lens that guides the laser beam used in your
CD player fogs up. If this happens, you
cannot play compact discs. Take out discs
and the fogging will disappear. If it does not
return to normal after several hours, contact
your Kenwood dealer.
2CAUTION
Safety Precautions
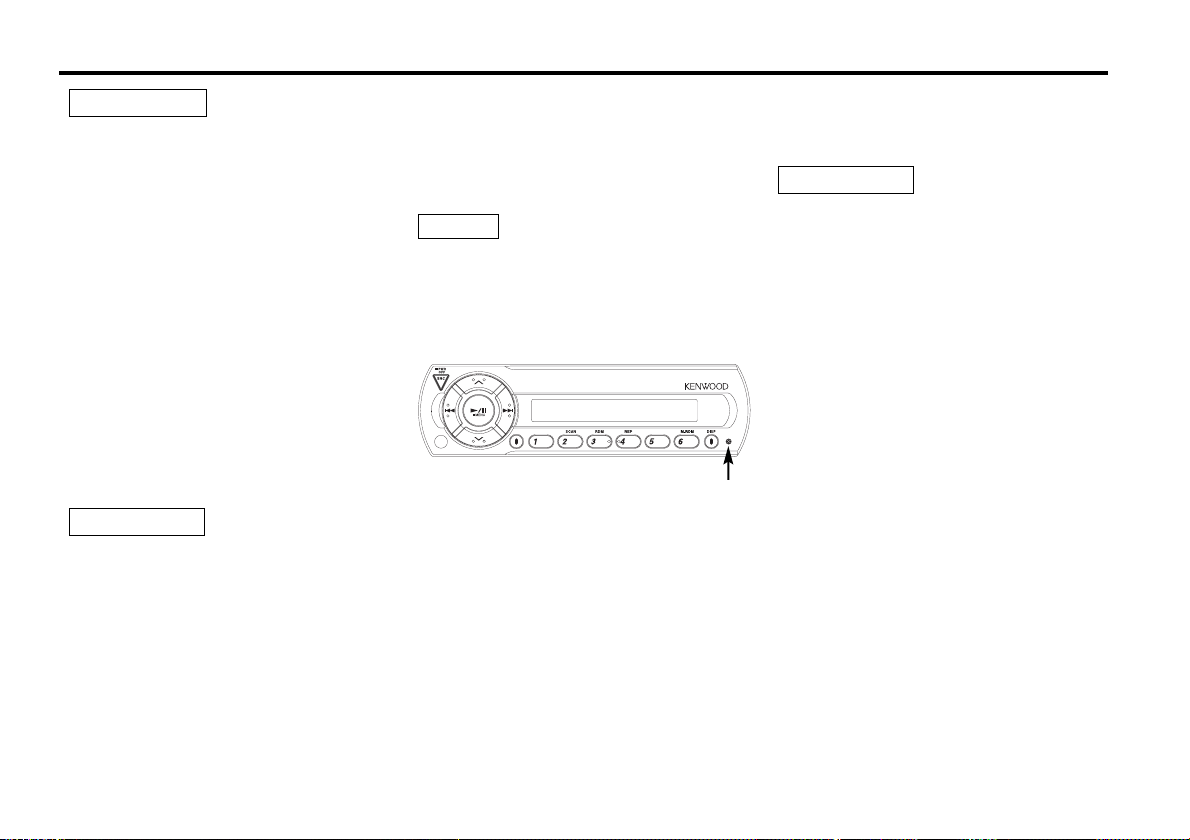
Reset button
Page 4
— 4 —
English
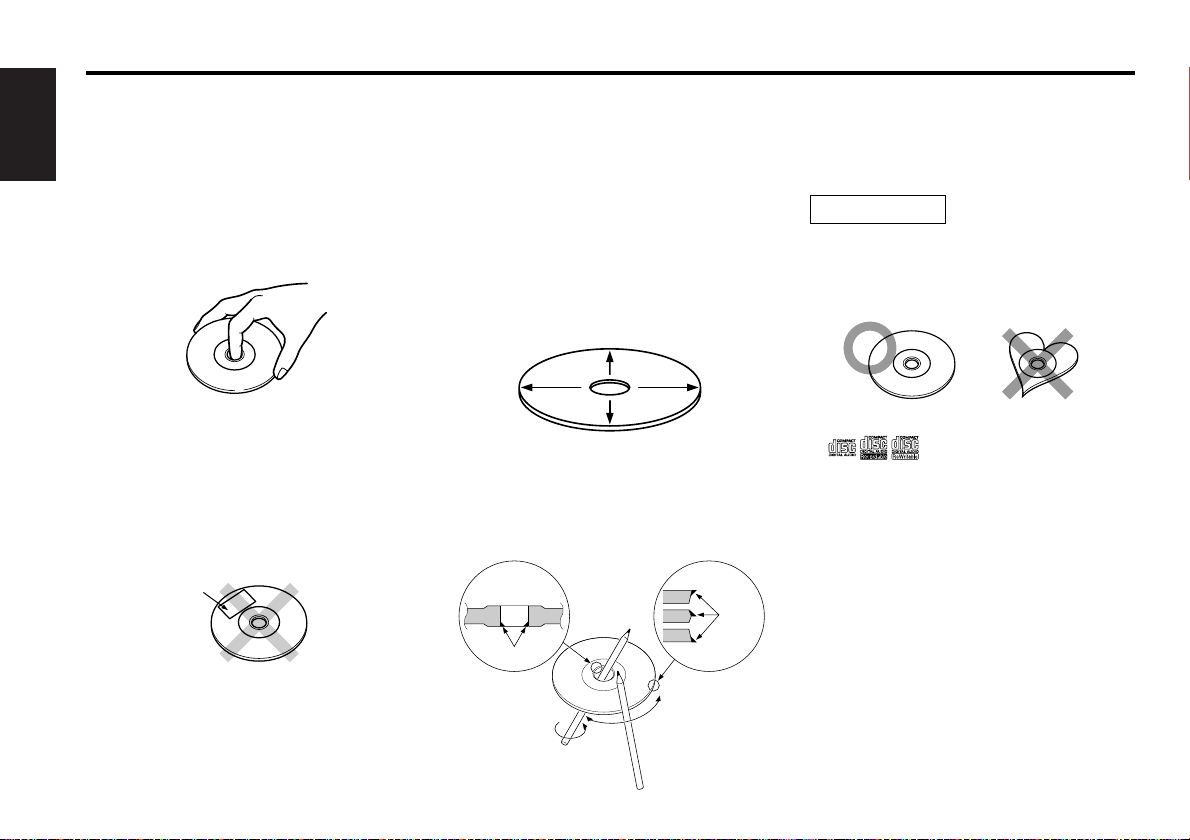
Handling Compact Discs
Playing a CD that is dirty, scratched or
warped can cause the sound to skip and
the unit to operate incorrectly, resulting in
worsened sound quality. Take the
following precautions to prevent your CDs
from getting scratched or damaged.
Handling CDs
• Do not touch the recorded side of the CD (the
side opposite the label) when holding it.
• The reflective film on a CD-R or a CD-RW is more
fragile than that on an ordinary music CD, and may
peel off if scratched. Fingerprints on a CD-R or CDRW are also more likely to cause skipping when
the disc is played. For these reasons, handle the
disc very carefully. Detailed handling instructions
will appear on the CD-R or CD-RW package: read
this information carefully before using the disc.
• Do not stick tape on either side of the CD.
Storing CDs
• Do not store CDs in areas exposed to direct
sunlight (such as a car seat or the dashboard) or
other hot places.
•A CD-R or CD-RW is more susceptible than a
music CD to damage from high temperatures and
humidity, and in some cases, may become
unusable if left in the car for long periods of time.
• Remove CDs from the unit when not listening to
them for a while, and put them back in their
cases. Do not pile up CDs that are removed from
their cases or prop them against something.
Cleaning CDs
If a CD has gotten dirty, wipe it off gently using a
commercially available cleaning cloth or a soft
cotton cloth, starting from the center of the disc
and moving outward. Do not clean CDs with
conventional record cleaners, anti-static formulas,
or chemicals such as paint thinner or benzene.
Checking New CDs for Burrs
When playing a new CD for the first time, check
that there are not any burrs stuck to the perimeter
of the disc or in the central hole. CDs with burrs
stuck on them may not load properly or may skip
while playing. Remove burrs using a ballpoint pen
or a similar utensil.
Do Not Load CD Accessories
Do not use commercially available CD accessories
that can be loaded into the CD slot, such as
stabilizers, protective sheets, or CD cleaning discs,
since they can cause the unit to malfunction.
Do Not Use Special Shape CDs
• Be sure to use round shape CDs only for this unit
and do not use any special shape CDs. Use of
special shape CDs may cause the unit to
malfunction.
• This unit can only play the CDs with
.
It may not correctly play disks which do not have
the mark.
• CD-Rs and CD-RWs which have not undergone
finalization processing cannot be played. (For
more information on finalization processing, refer
to the manual for your CD-R/CD-RW writing
software or CD-R/CD-RW recorder.) Additionally,
depending on the recording status, it may prove
impossible to play certain CDs recorded on CD-R
or CD-RW.
Do Not Use CDs with Sticker on the
Labeled Side
Do not use the CD with the label sticker stuck on
it.
Using such a CD may cause the CD to be
deformed and the sticker to peel off, resulting in
malfunction of the unit.
2CAUTION
Tape
Burrs
Burrs
Page 5
— 5 —
'
'
'
'
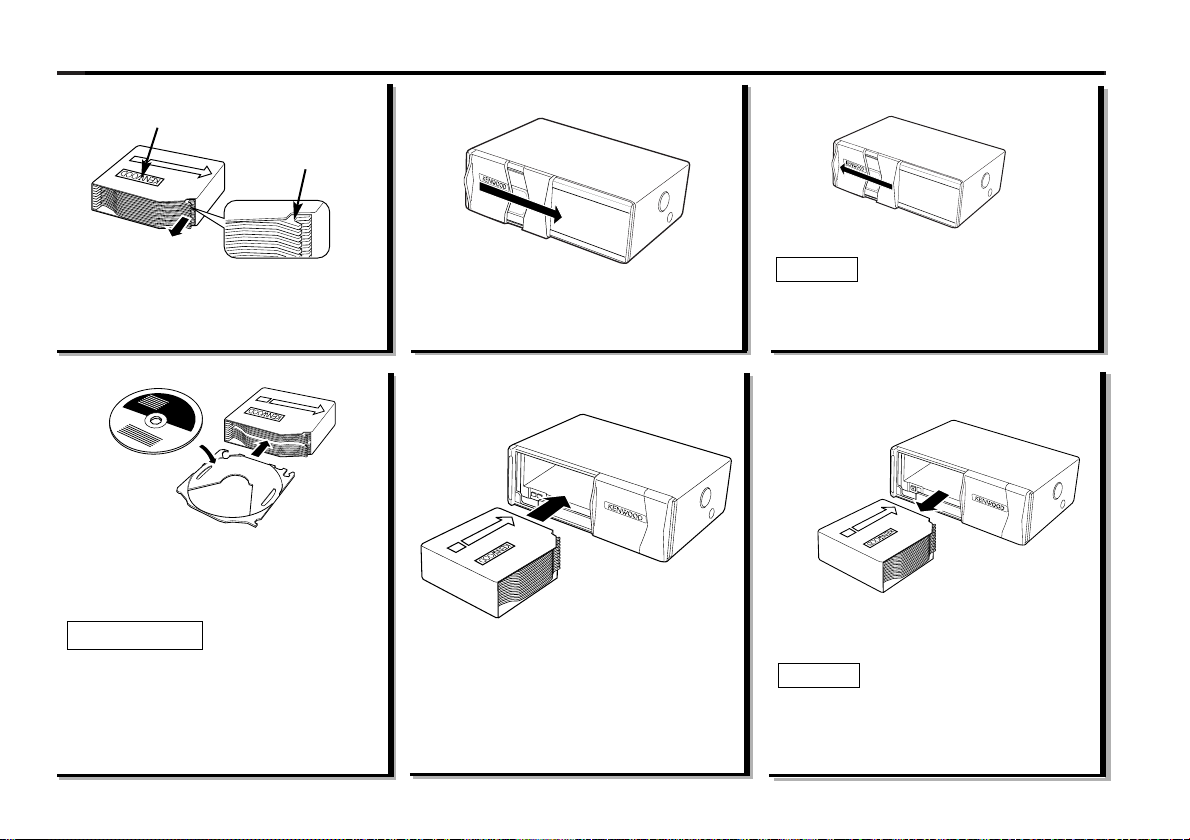
Make sure the disc magazine is the
right way up with the Kenwood logo
on the top.Pull the tray out by the
projection.
Insert the magazine into the CD changer
until it clicks.
Open the CD changer door.
Place the disc on the tray with the label
facing upwards. Insert the tray into the
disc magazine until it locks. The discs
are numbered from the bottom from 1
to 6 or 10.
• Take care to insert the tray into the
correct grooves in the disc magazine.
• Keep all the trays in the magazine even
when empty.
• 8-cm discs cannot be used. If an 8-cm disc
adapter is used, the disc cannot be ejected.
2CAUTION
Loading Compact Discs
1
2
"KENWOOD"
Projection
4
3
'
Open the CD changer door, and press the
EJECT button.
Be sure to open the door completely before
pressing the EJECT button. If the door is not
completely open, the magazine may hit the
door and cause damage of malfunction.
NOTE
Magazine ejection
5
6
Use the CD changer with its door closed
to prevent the entry of dust into the
changer.
NOTE
Close the CD changer door.
Page 6
— 6 —
English
General features
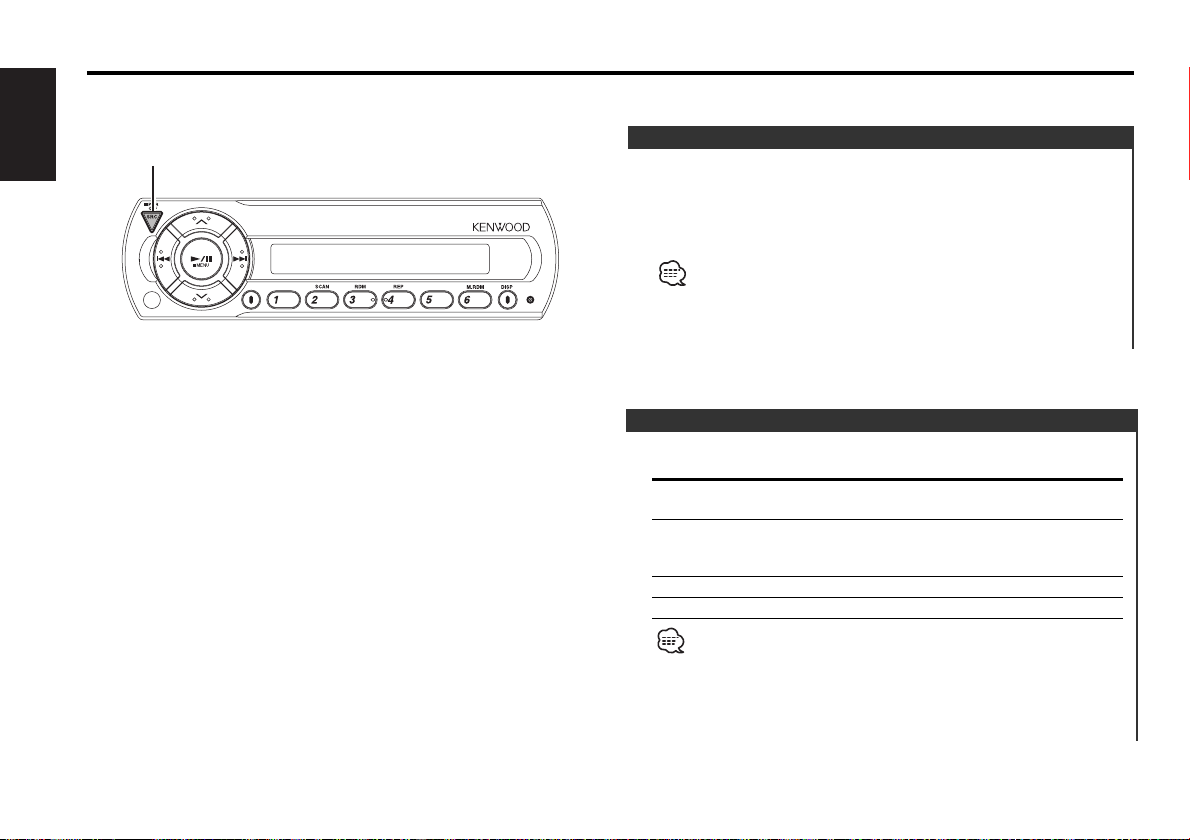
SRC
Turning ON the Power
Press the [SRC] button.
Turning OFF the Power
Press the [SRC] button for at least 1 second.
The FM modulator is turned OFF and the radio can be heard.
• Be sure to turn down the volume whenever you listen to the radio
or a cassette tape after stopping the disc play.
• During the disc play is being conducted, you are not able to
receive ordinary Radio broadcasting because antenna output is
switched into compact disc player‘s side.
Power
Set the car radio FM station to 88.3 MHz. See Page 14 for
more information on changing the transmission frequency.
Press the [SRC] button.
Source required Display
Sirius (Function of the KDC-C521FM/ "SIRIUS"
C471FM for the Americans Market)
CD auto-changer "CHANGER"/
"CHANGER-1"/
"CHANGER-2"
Auxiliary input "AUX"
Off
• For Sirius the KTC-SR901 or KTC-SR902 is necessary.
• For Auxiliary input one of the below optional accessories is
necessary.
- KCA-S210A
- CA-C1AX
- CD changer with an Auxiliary input function installed.
Selecting the Source
Page 7
— 7 —
Sirius satellite radio tuner features
(Function of the KDC-C521FM/ C471FM for the Americans Market)
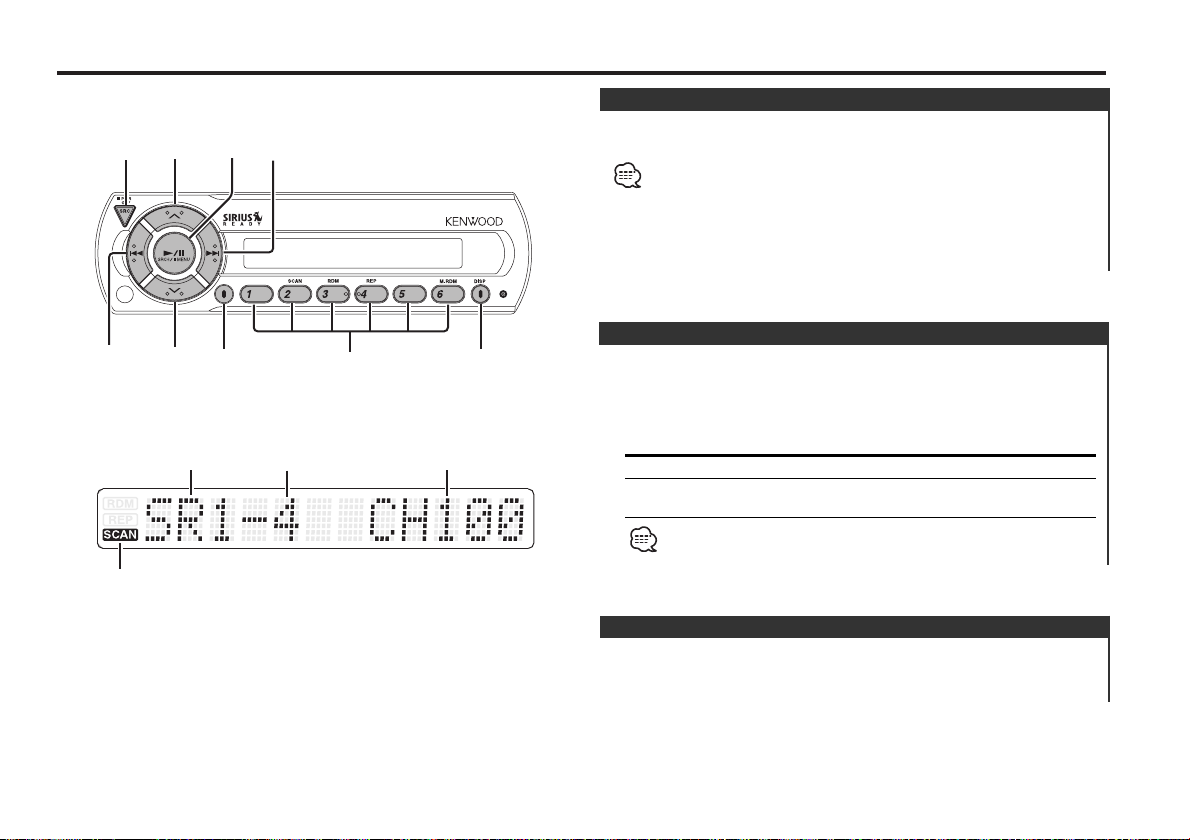
d
u
4
SRCH
¢
SRC
DISP
1-6
SEEK
Band display Channel number
Preset station number
Press the [SRC] button.
Select the "SIRIUS" display.
• You need to subscribe to SIRIUS to receive the service by Sirius
Satellite Radio. Consult SIRIUS if "CALL 888-539 SIRIUS TO
SUBSCRIBE" appears.
• It may take a little time to start receiving after you selected the
SIRIUS source.
• If the signal receiving fails, "ACQUIRING SIGNAL" appears.
Selecting Sirius Mode
Press the [u] button.
Each time the button is pressed the preset band switches
between the SR1,SR2,SR3, and SR4.
Selecting the Preset Band
Sets the seeking mode.
Press the [SEEK] button.
Each time the button is pressed the Seek mode switches as
shown below.
Display Operation
"SEEK 1" Normal manual seeking control.
"SEEK 2" Search in order of the channels in the
Preset memory.
You cannot operate this unit during switching Channel or Category.
Switching Seek Mode
SCAN indicator
Page 8

— 8 —
English
Putting the channel in the memory.
1 Select the preset band
Press the [u] button.
2 Select the channel to put in the memory
Press the [4] or [¢] button.
3 Put the channel in the memory
Press the [1] — [6] button for at least 2 seconds.
The preset number display blinks 1 time.
On each band, 1 channel can be put in the memory on each [1] —
[6] button.
Only the channel number is stored. Category information is not
stored.
Channel Preset Memory
Calling up the channels in the memory.
1 Select the preset band
Press the [u] button.
2 Call up the channel
Press the [1] — [6] button.
Preset Tuning
You can switch from Up/Down of Channel in a category being
selected to Previous/Next of Category that includes Channel
being received and vice versa.
1 Enter Channel Search mode
Press the [SRCH] button.
2 Select the Category
Press the [u] or [d] button.
3 Select the Channel
Press the [4] or [¢] button.
Canceling Channel Search
Press the [SRCH] button.
You cannot operate this unit until all the Category information is
acquired.
Channel Search
Scanning for the channel you want to listen to.
1 Start Channel Scan
Press the [SEEK] button for at least 1 second.
"SCAN" indicator is ON.
2 Release it when the channel you want to listen to is received
Press the [SEEK] button for at least 1 second.
Channel Scan
Sirius satellite radio tuner features
(Function of the KDC-C521FM/ C471FM for the Americans Market)
Page 9
— 9 —
You can display various kinds of text data transmitted from
broadcasting stations by switching as follows.
Press the [DISP] button.
Each time the button is pressed the display switches as shown
below.
Information Display
Channel Number
Channel Name "CHANNEL"
Song Title "SONG"
Artist Name "ARTIST"
Category Name "CATEGORY"
Album Title "ALBUM"
Switching Display
Entering the channel and tuning.
1 Enter Direct Access Tuning mode
Press the [DIRECT] button on the remote.
2 Enter the channel number
Press the number buttons.
3 Do Channel Search
Press the [4] or [¢] button.
Canceling Direct Access Tuning
Press the [DIRECT] button on the remote.
• If you make no button operation for 10 seconds, the Direct Access
Tuning mode is automatically canceled.
• You can set up to Channel number 223.
• If there is no signal in the input Channel, "NO CHANNEL" appears.
• If you cannot receive any signal in the input Channel due to a bad
condition on radio wave or another problem, "ACQUIRING SIGNAL"
appears.
Direct Access Tuning (Function of remote)
Page 10
— 10 —
English
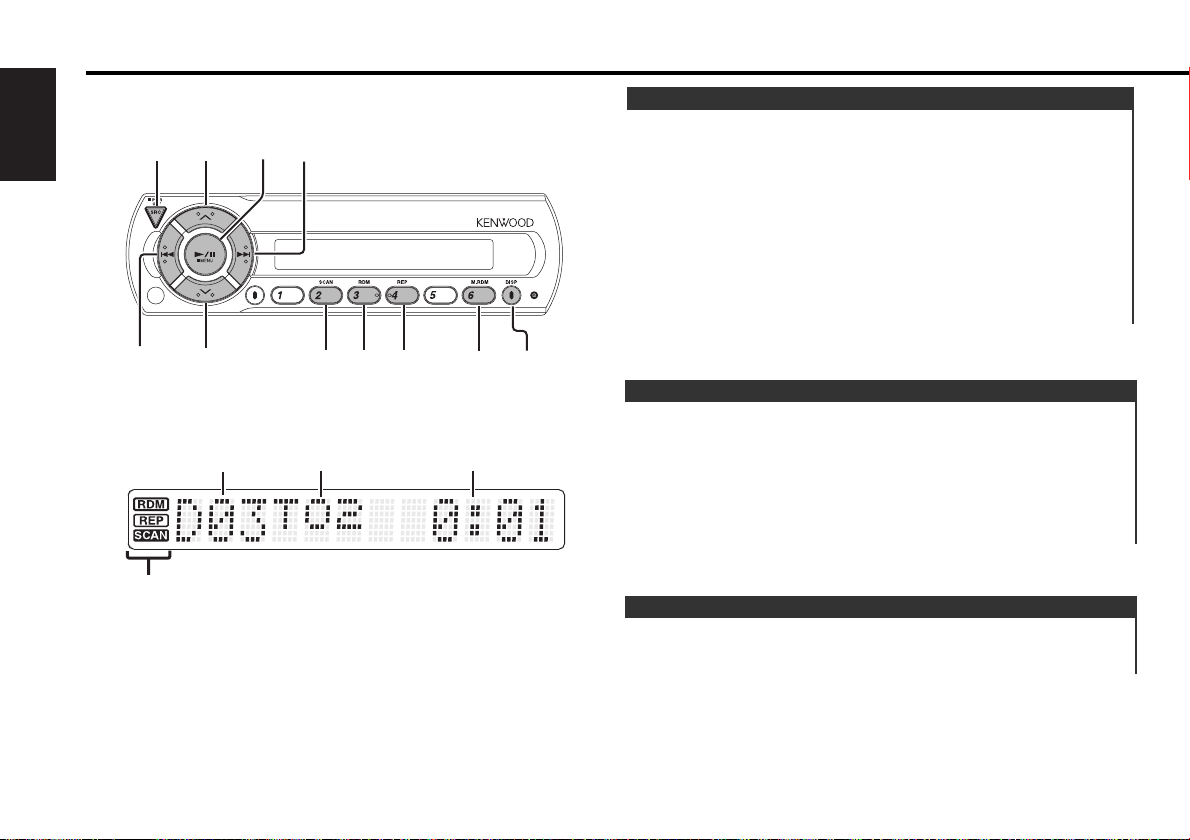
Disc control features
d
u
4
6
¢
SRC
DISP
SCAN
RDM REP
M.RDM
Track number
Track time
Disc number
Indicator
Play:
Press the [SRC] button.
Select the "CHANGER"/ "CHANGER-1"/ "CHANGER-2" display.
Stop the play:
Press the [SRC] button for at least 1 second.
The FM modulator is turned OFF and the radio can be heard.
Pause and play:
Press the [6](38...Remote) button.
Each time the button is pressed it pauses and plays.
If you press the switch once more, the disc is replayed from
the paused part.
Playing Disc
Fast Forwarding
Hold down on the [¢] button.
Release your finger to play the disc at that point.
Reversing
Hold down on the [4] button.
Release your finger to play the disc at that point.
Fast Forwarding and Reversing
Searching for a song on the disc.
Press the [4] or [¢] button.
Track Search
Page 11
— 11 —
Doing Disc Search by entering the disc number.
1 Enter the disc number
Press the number buttons on the remote.
2 Do Disc Search
Press the [+] or [–] button.
Canceling Direct Disc Search
Press the [38] button.
Input "0" to select disc 10.
Direct Disc Search
(Function of disc changers with remote)
Replaying the song, disc in the Disc changer you're listening to.
Press the [REP] button.
When it's ON, the "REP" indicator is ON.
Each time the button is pressed the Repeat Play switches as
shown below.
Repeat play Display
Track Repeat Track No. blinks.
Disc Repeat Disc No. blinks.
OFF —
Track/Disc Repeat
Play all the songs on the disc in random order.
Press the [RDM] button.
Each time the button is pressed Random Play turns ON or OFF.
When it's ON, the "RDM" indicator is ON and the track number
blinks.
When the [¢] button is pressed, the next song select starts.
Random Play
Playing the first part of each song on the disc you are listening to
and searching for the song you want to listen to.
1 Start Track Scan
Press the [SCAN] button.
"SCAN" indicator is ON.
2 Release it when the song you want to listen to is played
Press the [SCAN] button.
Track Scan
Doing Track Search by entering the track number.
1 Enter the track number
Press the number buttons on the remote.
2 Do Track Search
Press the [T.UP] or [T.DOWN] button.
Canceling Direct Track Search
Press the [38] button.
Direct Track Search (Function of remote)
Selecting the disc set in the Disc changer.
Press the [u] or [d] button.
Disc Search
Page 12
— 12 —
English
Play the songs on all the discs in the disc changer in random
order.
Press the [M.RDM] button.
Each time the button is pressed the Magazine Random Play turns
ON or OFF.
When it's ON, the "RDM" indicator is ON and the track and disc
number blink.
When the [¢] button is pressed, the next song select starts.
Magazine Random Play
(Function of disc changer)
Disc control features
Switching the information displayed.
Press the [DISP] button.
Each time the button is pressed the display switches as shown
below.
Information Display
P-Time
Disc title "DISC TITLE"
Track title "TRACK TITLE"
This unit does not display the information of Disc title and Track title.
Select the information of P-Time.
Switching Display
Page 13
— 13 —
Menu system
The Menu system basic operation method is explained here. The
reference for the Menu items and their setting content is after
this operation explanation.
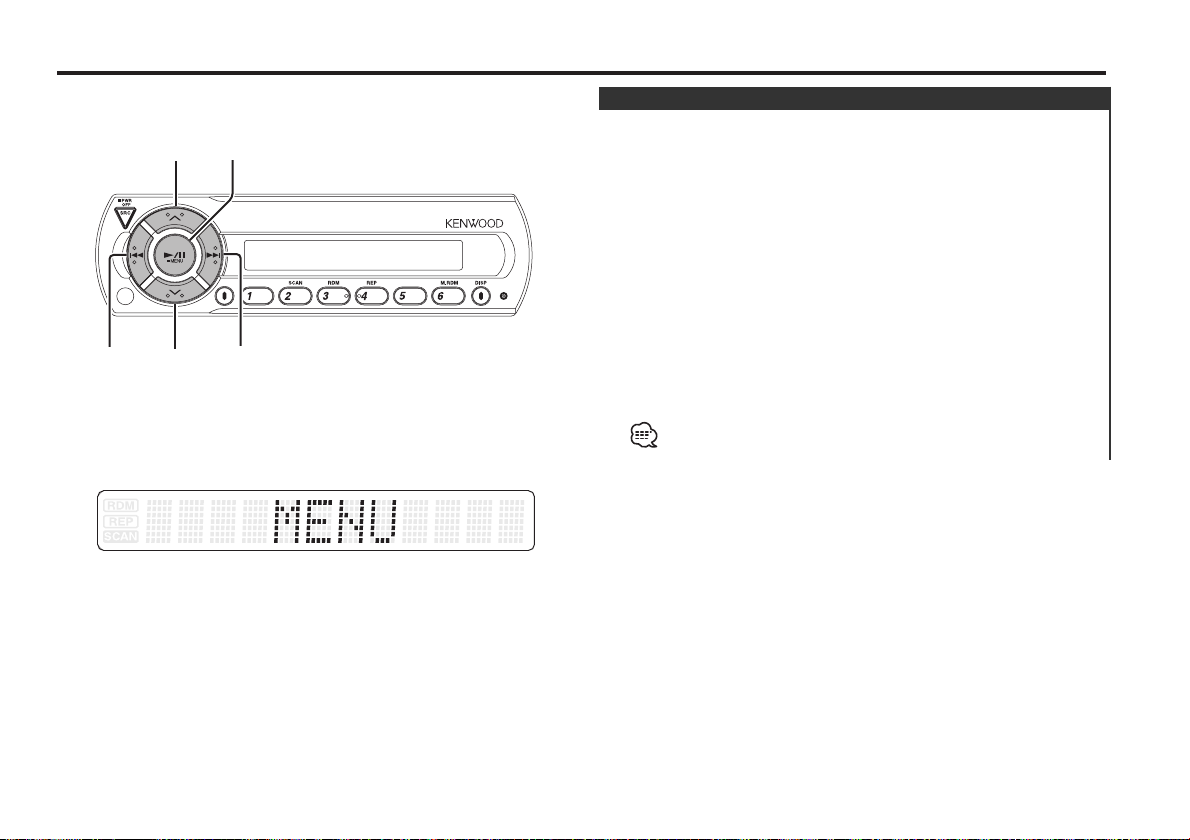
1 Enter Menu mode
Press the [MENU] button for at least 1 second.
"MENU" is displayed.
2 Select the menu item
Press the [u] or [d] button.
3 Set the menu item
Press the [4] or [¢] button.
You can continue by returning to step 2 and setting other items.
4 Exit Menu mode
Press the [MENU] button.
When other items that are applicable to the basic operation method
above are displayed afterwards their setting content chart is entered.
Menu System
d
u
¢
4
MENU
Page 14
Sirius ID (Electronic Serial Number) is displayed.
Sirius ID (ESN)
<When the KTC-SR901 or KTC-SR902 is
connected>
Menu system
Function of the KDC-C521FM/ C471FM for the Americans Market
— 14 —
English
Select the frequency.
Display Setting
"T-FREQ 87.7" 87.7 MHz
"T-FREQ 87.9" 87.9 MHz
"T-FREQ 88.1" 88.1 MHz
"T-FREQ 88.3" 88.3 MHz (Initial setting)
"T-FREQ 88.5" 88.5 MHz
"T-FREQ 88.7" 88.7 MHz
"T-FREQ 88.9" 88.9 MHz
"T-FREQ 89.1" 89.1 MHz
"T-FREQ 89.3" 89.3 MHz
"T-FREQ 89.5" 89.5 MHz
"T-FREQ 89.7" 89.7 MHz
"T-FREQ 89.9" 89.9 MHz
Some car radios cannot receive a 87.7 MHz frequency.
Changing the Transmission Frequency
Select the modulation level.
Display
"MOD LEVEL 1"
"MOD LEVEL 2" (Initial setting)
"MOD LEVEL 3"
"MOD LEVEL 4"
Modulation level
Settingt the Dynamic control.
Display Setting
"D-CONT ON" The dynamic control is ON.
"D-CONT OFF" The dynamic control is OFF. (Initial setting)
The unit comes with the prevention of distortion function to reduce
sound distortion.
If the sound is distorted severely, press the [4]or[¢] button on
the display unit and then set the function to "ON". If the prevention
of distortion function is set to "ON", the sound extension is reduced.
If a disc with a high recording level is used, the sound may distort
even if the prevention of distortion function is set to "ON". In this
case, reduce the modulation level.
Dynamic control
Setting the displayed text scroll.
Display Setting
"SCROLL MANU" Doesn't scroll.
"SCROLL AUTO" Scrolls when the display changes.
The texts scrolled are shown below.
- Song title/ Artist name/ Album title/ Category name
Text Scroll
Page 15
— 15 —
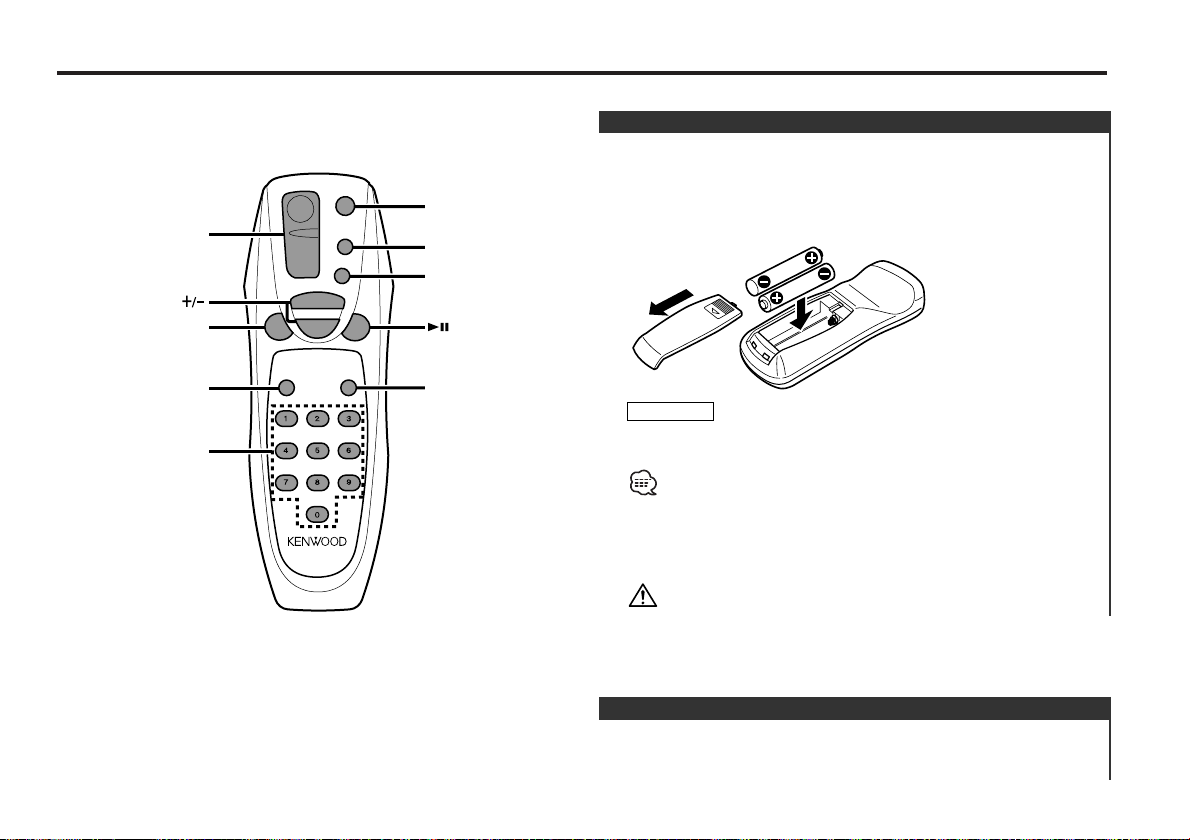
[0] – [9]
SRC
M.RDM
DIRECT
SCAN
T.
DOWN
T.
UP
D.REP
REP
RDM
DISC
+
–
38
SRC
D.REP
RDM
/ CH SEARCH
M.RDM/ DIRECT
T.UP/T.DOWN
REP
SCAN
Basic Operations of remote
[SRC] button
Each time the button is pressed the source switches.
Basic operations
Use two "AA" batteries.
Slide the cover while pressing downwards to remove it as
illustrated.
Insert the batteries with the + and –poles aligned properly,
following the illustration inside the case.
Store unused batteries out of the reach of children. Contact a doctor
immediately if the battery is accidentally swallowed.
• The provided batteries are intended for use in operation
checking, and their service life may be short.
• When the remote controllable distance becomes short, replace
both of the batteries with new ones.
•A portion of the operations may not be possible, depending on
the unit that is connected.
Do not set the remote on hot places such as above the dashboard.
2WARNING
Loading and Replacing the battery
Function of the KDC-C521FM/ C471FM for the European Market
Function of the KDC-C521FM/ C471FM for the European Market
Page 16

— 16 —
English
[T.UP]/ [T.DOWN] buttons
Doing track forward and backward.
[+]/ [–] buttons
Doing disc forward and backward.
[38] button
Each time the button is pressed the song pauses and plays.
[REP] button
Each time the button is pressed Track Repeat function turns ON
or OFF.
[D.REP] button
Each time the button is pressed Disc Repeat function turns ON or
OFF.
[RDM] button
Each time the button is pressed Random Play turns ON or OFF.
[M.RDM] button
Each time the button is pressed Magazine Random function turns
ON or OFF.
[SCAN] button
Each time the button is pressed Trak Scan function turns ON or
OFF.
[0] — [9] buttons
When in <Direct Track Search> (page 11) and <Direct Disc
Search> (page 11), enter the track/disc number.
In Disc source
[+] buttons
Select the band.
Each time the [+] button is pressed it switches between the
SR1, SR2, SR3, and SR4 bands.
[T.UP]/ [T.DOWN] buttons
Tune up or down the channels.
[0] — [9] buttons
Press buttons [1] — [6] to recall preset channels.
[DIRECT] button
Enters and cancels the <Direct Access Tuning> (page 9) mode.
[CH SEARCH] button
Enters and cancels the <Channel Search> (page 8) mode.
In Sirius source
Basic Operations of remote
Function of the KDC-C521FM Function of the KDC-C521FM/ C471FM for the European Market
Page 17
— 17 —
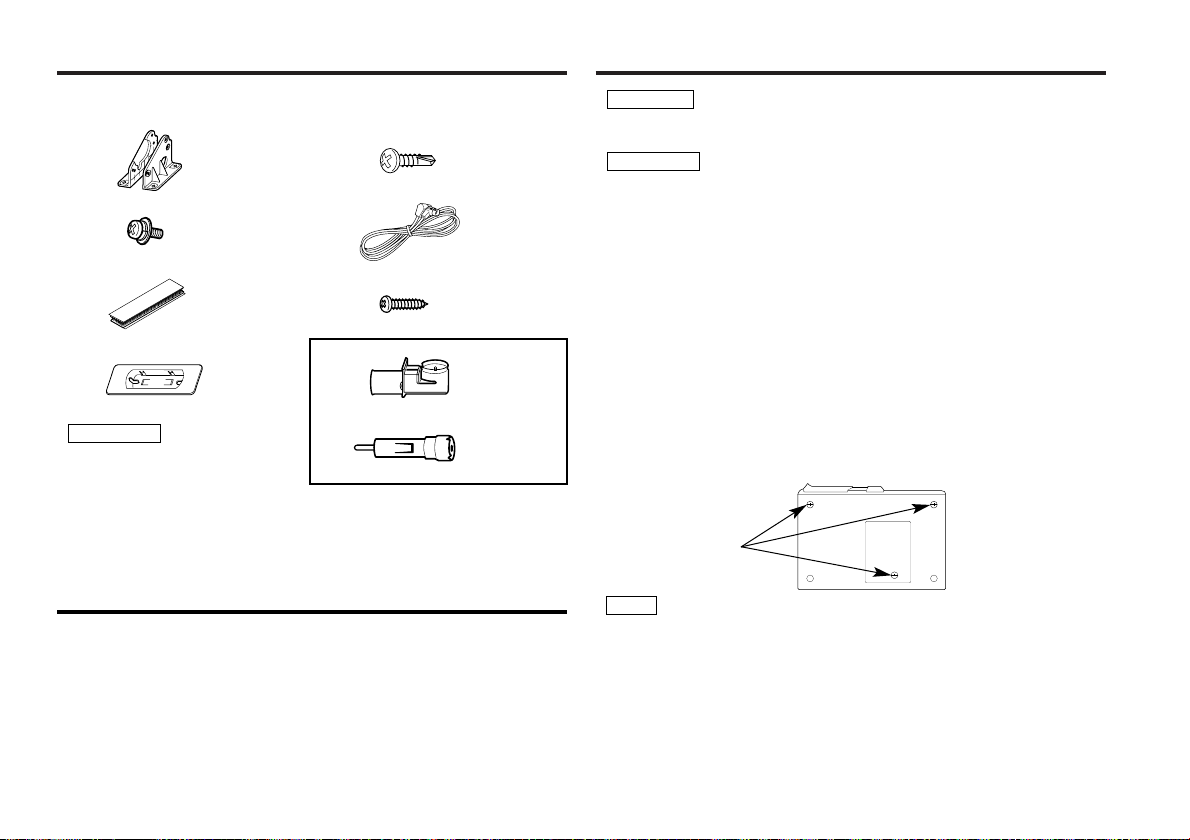
.........1
1
.........4
2
.........4
3
.........1
4
External view
......... Number of items
The use of any accessories
except for those provided
might result in damage to the
unit. Make sure only to use
the accessories shipped with
the unit, as shown above.
2CAUTION
When drilling a hole in the car chassis to install the unit, check
first that nothing is on the other side.
• If the fuse blows, first make sure the wires aren’t touching to
cause a short circuit, then replace the old fuse with one with the
same rating.
• Do not let unconnected wires or terminals touch metal on the car
or anything else conducting electricity. To prevent a short circuit,
do not remove the caps on the ends of the unconnected wires or
the terminals.
• After the unit is installed, check whether the brake lamps,
blinkers, wipers, etc. on the car are working properly.
• Insulate unconnected wires with vinyl tape or other similar
material.
• Some disc changers need conversion cords for connection. See
the section on "Safety Precautions" for details.
2CAUTION
2WARNING
Removing the transportation screws
■
Transportation
screws
Remove all 3 transportation screws for protecting the internal
mechanism before you start to install the unit.
After removing the transport screw, retain it carefully and
attach it again before transporting the unit again.
NOTE
.........1
5
.........2
6
.........1
7
8
9
For the model of European Market.
.........1
.........1
Accessories
1. To prevent a short circuit, remove the key from the ignition and
disconnect the - battery.
2. Make the proper input and output wire connections for each unit.
3. Connect the wiring harness wires in the following order: ground,
battery, ignition.
4. Install the unit in your car.
5. Reconnect the - battery.
6. Press the reset button.
Installation Procedure
Page 18
— 18 —
English
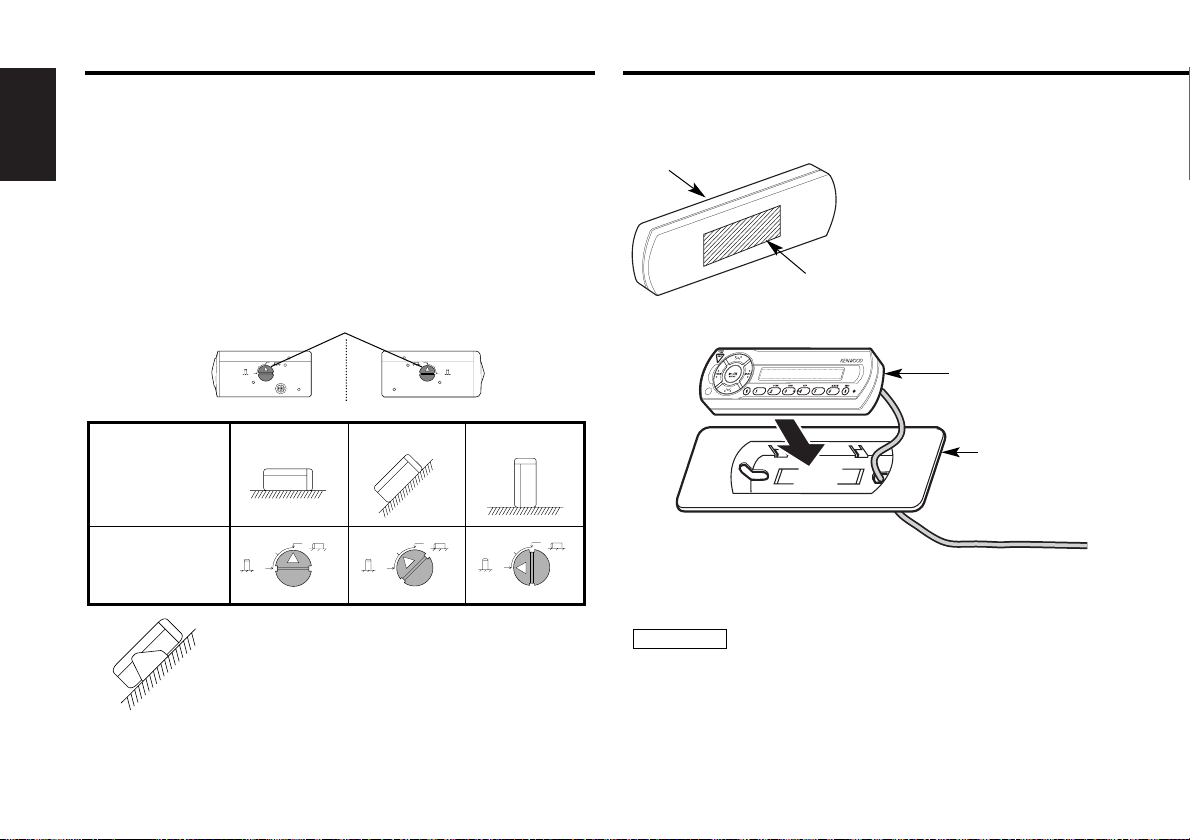
Angle adjustment switches
■
The angle adjustment switches on the both saides of the unit
are to be set according to the angle of installation of the CD
auto changer. Set both of the two switches to the same
position. If the switches are not set properly, sound skip or
other malfunction may occur.
Set the angle adjustment switches with a coin or other flat
object.
Change the switch step by step by detaching and reusing the
object at the end of each step.
Right side
Left side
Angle adjustment switches
9090
0
45
90
0
45
Installation
angle
0°~5° 40°~50°
85°~90°
90
0
45
90
0
45
90
0
45
Angle
adjustment
switch
position
• It is not possible to install at an angle of
40°~50° if only 1 is used.
Installation of Display unit
■
• Installation without using the trim mount plate 7
Attach one velcro to the
slanted-line of the the display
units as shown above, and
attach the other velcro to the
parts where you wish to
attach the display units.
Then, put velcros together
and install the display units.
• Installation using the trim mount plate 7
Display unit
Display unit
5
7
Pass the wire from the display unit through the hole on the
trim mount plate and push fit the display unit into the trim
mount plate until it locks.
• Be sure not to place the unit on such place as where it is
exposed to direct sunlight and temperature eventually rises.
It results in the deformation of the case.
• Depending on the installing location, the display unit may not
be able to receive the signals from the controller unit. Install
them after confirming that the signals can be received.
• Install the unit in such a way that it does not disturb driving.
2CAUTION
Installation
Installation Procedure
Page 19
— 19 —
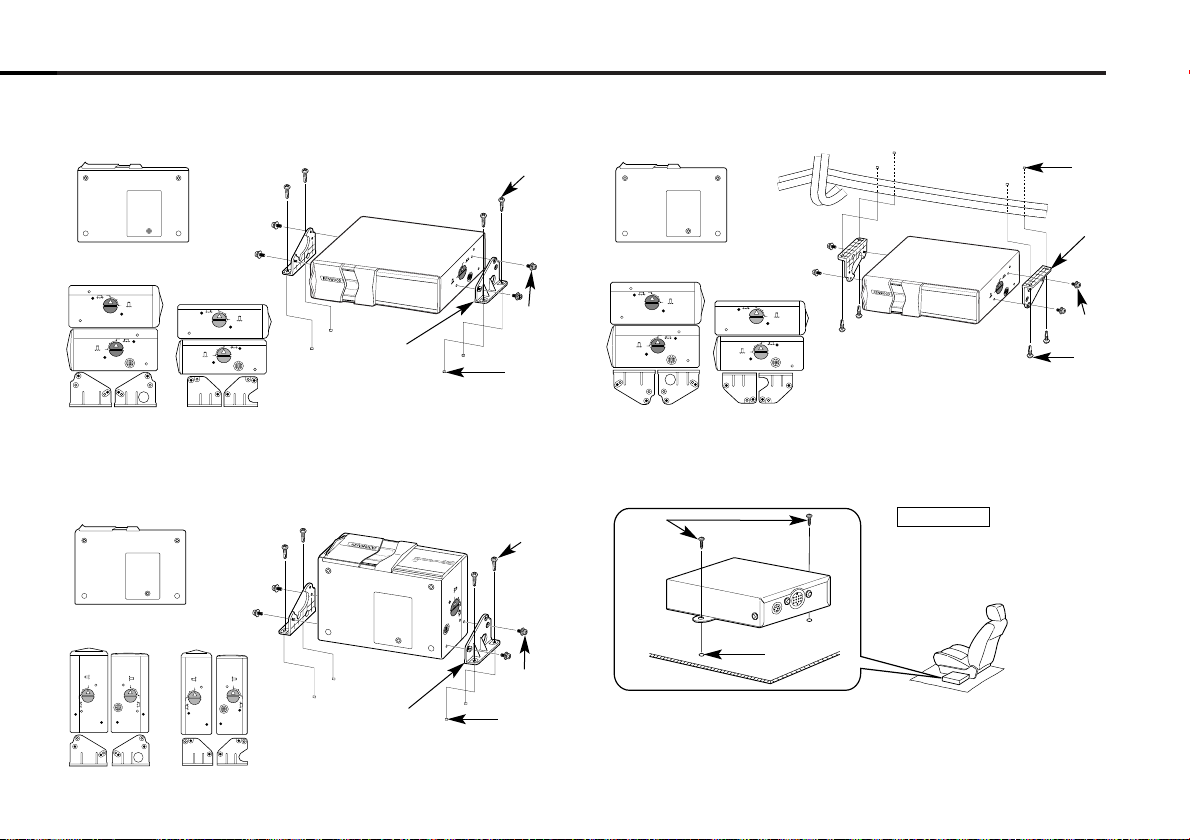
Use the holes marked (¶) to install the unit.
Use the holes marked (¶) to install the unit.
Horizontal installation
■
Vertical installation
■
Bottom view
Side view
KDC-C521FM
90
0
45
90
0
45
90
0
45
90
0
45
90
0
45
90
0
45
90
0
45
90
0
45
90
0
45
90
0
45
90
0
45
90
45
0
2
3
φ
4
1
2
3
φ
4
1
Use the holes marked (¶) to install the unit.
In case of hanging in the trunk
■
Installation of FM modulator unit
■
90
0
45
90
0
45
90
0
45
Install the FM modulator unit beneath the front seat using
Metal fixture and Bind head screw as shown in the above
figure.
Take sufficient care so
that the wires are not
caught under the seat.
If they are caught, they
may break.
2CAUTION
φ
3
φ
4
2
3
1
6
KDC-C471FM
Bottom view
Side view
KDC-C521FM
KDC-C471FM
Bottom view
Side view
KDC-C521FM
KDC-C471FM
Page 20
— 20 —
English
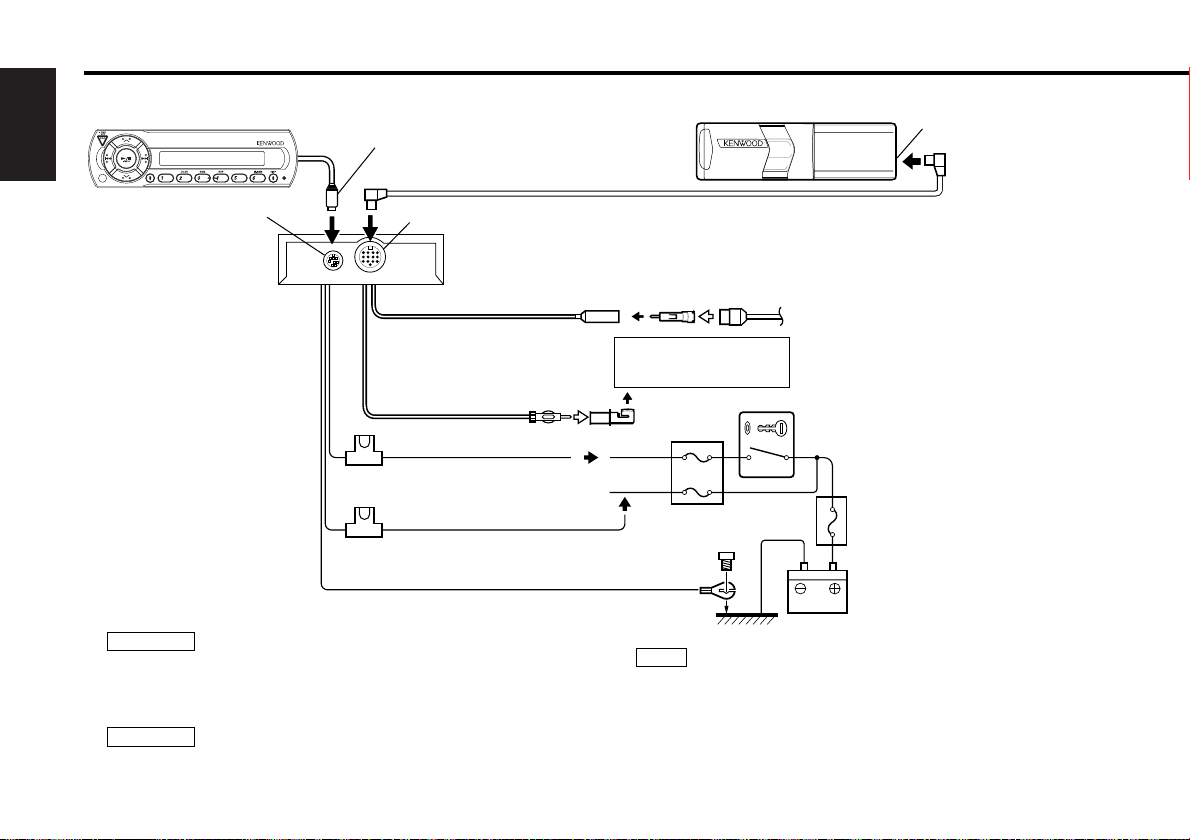
To prevent fire when the ignition wire (Red) or battery wire
(Yellow) is short-circuited by coming into contact with the
vehicle chassis (ground), only connect the power supply after
making the fuse box connections.
Be sure to press the reset button after installation.
2CAUTION
2WARNING
Control output
Control input
CD auto-changer
Changer connection wire 4
FM modulator unit
FM/AM antenna input
FM/AM antenna output
Ground wire (Black) - (To car chassis)
Car fuse box
ACC
Ignition key
switch
Antenna plug
for automobile
Output
Car stereo
with FM tuner
Battery
Display unit
Battery wire + (Yellow)
CD auto - changer input
Do not install an antenna of radio equipment or distribute the
antenna wire near the changer output wire, for this could
cause malfunction with this unit.
NOTE
Connecting Wires to Terminals
*8 & *9 : For the model of European Market.
Ignition wire + (Red)
*8
*9
Page 21
— 21 —
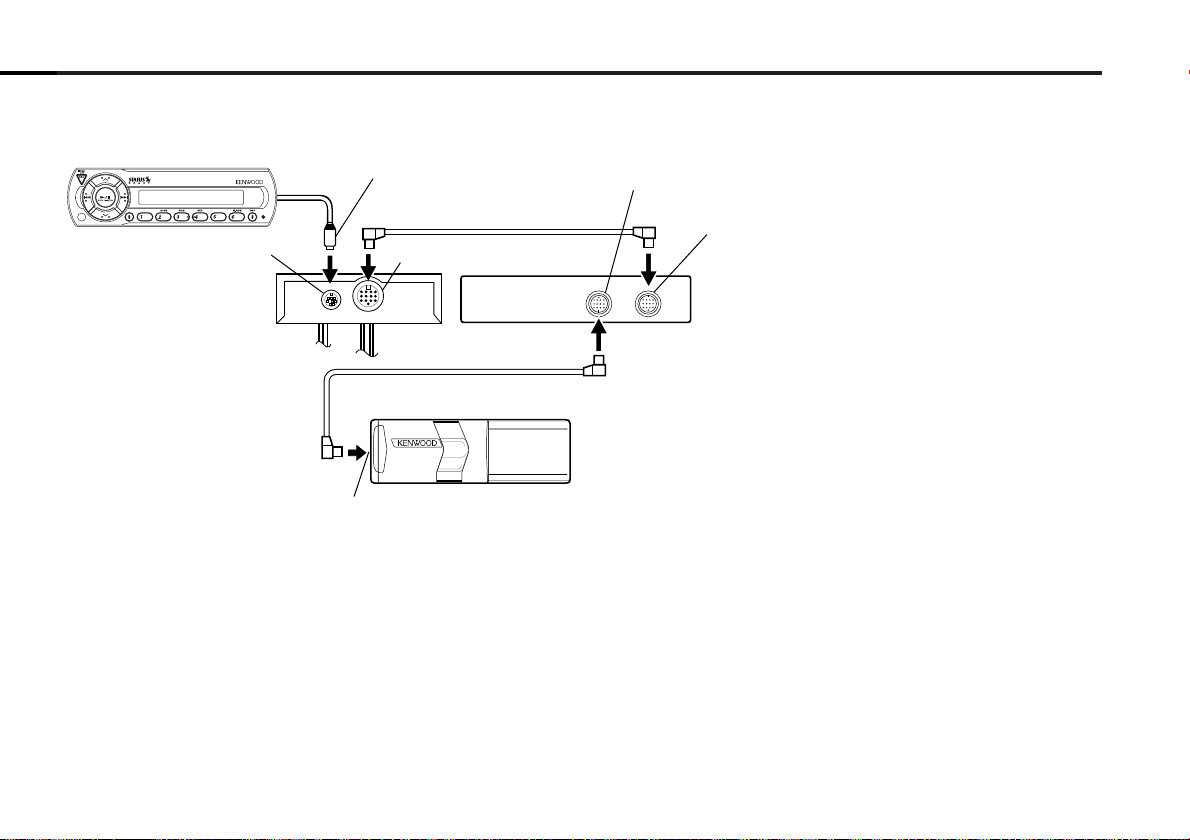
Control output
Control input
CD auto-changer
FM modulator unit
Output
Display unit
CD auto - changer input
Sirius satellite
radio tuner unit
Changer connection wire 4
Connection wire
"TO CHANGER"
"TO HEAD UNIT"
Connecting Sirius satellite radio tuner unit
■
Page 22

— 22 —
English
Troubleshooting Guide
What might seem to be a malfunction in your unit may
just be the result of slight misoperation or miswiring.
Before calling service, first check the following table for
possible problems.
General
? The power does not turn ON.01
✔ The fuse has blown.
☞ After checking for short circuits in the wires, replace the fuse with
one with the same rating.
✔ No ACC position on vehicle ignition.
02
☞ Connect the same wire to the ignition as the battery wire.
? Nothing happens when the buttons are pressed.
04
✔ The computer chip in the unit is not functioning normally.
☞ Press the Reset button on the display unit (page 3).
? No sound or sound is low.
52
✔ The radio volume is sets to the minimum level.3
☞ Turn the radio volume up.
✔ The input/output wire or wiring harness is connected incorrectly.
55
☞ Connect the input/output wire or wiring harness correctly. See
"Connecting Wires to Terminals" (Page 20).
? Sound distortion.
67
✔ The signal levels differ depending on sources.
☞ Change the Modulation level / Dynamic control setting. (Page 14)
? Nothing appears on the display.
04
✔ The control output of the display unit is not connected properly.
☞ Connect the control output properly.
Sirius source
? The Sirius mode cannot be selected.
2
✔ The Sirius connection wire is not connected.
☞ Use the Sirius connection wire to connect the control unit and the
Sirius satellite radio tuner.
✔ Connect the power supply of the Sirius satellite radio tuner.
53
☞ Connect the battery wire and ground wire to the Sirius satellite radio
tuner.
✔ The Sirius satellite radio tuner is not connected properly.
55
☞ Connect the Sirius satellite radio tuner directly to this unit.
? No sound can be heard, or the volume is low.
58
✔ The input/output wires or wiring harness are connected incorrectly.
☞ Reconnect the input/output wires and/or the wiring harness
correctly.
? No broadcast can be received
2
✔ The Sirius antenna is not connected.
☞ Connect it properly.
✔ No subscription is established.
53
☞ Subscribe to SIRIUS.
? No sound is heard even though the information concerning the Sirius
satellite radio tuner is displayed.
67
✔ The radio volume is sets to the minimum level.
☞ Turn the radio volume up.
✔ The microcomputer does not function correctly.
68
☞ Press the Reset button of the display unit.(Page 3)
✔ The system is not connected properly.
69
☞ Connect the system properly. See <Connecting Wires to
Terminals>. (Page 20)
Page 23
— 23 —
Disc source
? CD play does not start.
52
✔ CD auto-changer input is not connected to the unit.
☞ Connect the CD auto-changer input to the unit.
✔ Power button is not turned ON.
53
☞ Turn the power button ON.
? The specified disc does not play, but another one plays instead.
52
✔ The specified CD is quite dirty.
☞ Clean the CD.
✔ The CD is upside-down.
53
☞ Load the CD with the labeled side up.
✔ The disc is loaded in a different slot from that specified.
54
☞ Eject the disc magazine and check the number for the specified disc.
✔ The disc is severely scratched.
55
☞ Try another disc instead.
? The specified track will not play.
58
✔ Random play or magazine random play has been selected.
☞ Turn off random play or magazine random play.
? Cannot play CD-R or CD-RW.
60
✔ Finalization processing is not being conducted for CD-R/CD-RW.
☞ Conduct finalization processing with CD recorder.
? Direct Track Search and Direct Disc Search can’t be done.
66-1
✔ Another function is ON.
☞ Turn Random Play or other functions OFF.
? Track Search can't be done.
66-2
✔ For the discs first or last song.
☞ For each disc, Track Search can't be done in the backward direction
for the first song or in the forward direction for the last song.
? Sound skips due to vibration.67
✔ Something is touching the CD auto-changer.
☞ Keep it away from the CD auto-changer.
✔ The disc is dirty or damaged.
68
☞ If sound skips at the same part, the disc is faulty. Check and, if
possible, clean the disc.
✔ Changer unit is mounted on the a slant.
69
☞ Mount the unit so that is level.
✔ Changer unit is mounted in an unstable place.
8
☞ Mount the unit in a stable place.
✔ The angle adjustment switches are set improperly.
69
☞ Set the angle adjustment switches to the correct positions.
? Sound quality is poor.
67
✔ The recording of the disc is poor.
☞ Try playing another disc. If the sound is good, the fault was with
the original disc.
✔ The disc is dirty or damaged.
8
☞ Check and, if possible, clean the disc.
? No sound is heard even though the information concerning the CD
auto-changer is displayed.
67
✔ The radio volume is sets to the minimum level.
☞ Turn the radio volume up.
✔ The microcomputer does not function correctly.
68
☞ Press the Reset button of the display unit. (Page 3)
✔ The system is not connected properly.
69
☞ Connect the system properly. See <Connecting Wires to
Terminals>. (Page 20)
Page 24

— 24 —
English
The messages shown below display your systems condition.
EJECT: No disc magazine has been loaded in the changer. The disc magazine is not completely loaded.
E01
➪ Load the disc magazine properly.
NO DISC: No disc has been loaded in the disc magazine.E02
➪ Load a disc into the disc magazine.
TOC Error: No disc has been loaded in the disc magazine.E04
➪ Load a disc into the disc magazine.
The CD is quite dirty. The CD is upside-down. The CD is scratched a lot.
➪ Clean the CD and load it correctly.
E-77: The unit is malfunctioning for some reason.E77
➪ Press the reset button on the display unit. If the "E-77" code does not disappear, consult your nearest service center.
Mecha Error: Something is wrong with the disc magazine. Or the unit is malfunctioning for some reason.E99
➪ Check the disc magazine, and then press the reset button on the display unit. If the "Mecha Error" code does not disappear,
consult your nearest service center.
Hold Error: The protective circuit in the unit activates when the temperature inside the automatic disc changer exceeds 60°C (140°F),
stopping all operation.E0d
➪ Cool down the unit by opening the windows or turning on the air conditioner. As the temperature falls below 60°C (140°F),
the disc will start playing again.
ANTENNA ERR: The antenna is not connected correctly.E77
➪ Make sure the antenna is connected correctly and then turn OFF/ON the SIRIUS source or Display unit.
TUNER ERROR: Broadcast cannot be received due to an error in this unit.E77
➪ Turn OFF/ON the SIRIUS source or Control unit, or press the reset button on the Display unit.
ESN ERROR: The ESN (Electronic Serial Number) is not registered in Sirius satellite radio tuner unit.E77
➪ Consult your nearest service center.
LINE ERROR: Neither a disc changer nor the Sirius satellite radio tuner is connected.E77
➪ Connect a disc changer or the Sirius satellite radio tuner.
The number of disc changers and Sirius satellite radio tuners exceeds the limit of connection to this system.E77
➪ Up to two units can be connected. Rearrange your connection not to exceed the limit of the connection.
Troubleshooting Guide
Page 25

— 25 —
Disc section
Laser Diode.....................................................GaAlAs (λ=780 nm)
Digital Filter (D/A)......................................8 Times Over Sampling
D/A Converter.........................................................................1 bit
Spindle speed ...............................................500 ~ 200 rpm (CLV)
Wow & Flutter.........................................Below Measurable Limit
Frequency Response (±1 dB) ................................10 Hz ~ 20 kHz
Modulating Frequency (200KHz STEP) ........87.7, 87.9, 88.1, 88.3,
88.5, 88.7, 88.9, 89.1,
89.3, 89.5, 89.7, 89.9,
MHz
General
Operating Voltage..............................................14.4 V (11 ~ 16 V)
Current consumption.............................................................1.4 A
Operating Temperature...............................................–10 ~ 50 °C
Size (W × H × D)
CD changer
(KDC-C521FM) .............................................250 × 80 × 176 mm
(9-13/16 × 3-1/8 × 6-13/16 in.)
(KDC-C471FM) ............................................250 × 64 × 176 mm
(9-13/16 × 2-1/2 × 6-13/16 in.)
Controller .......................................................45 × 140 × 29 mm
(1-12/16 × 5-8/16 × 1-1/8 in.)
Display unit ....................................................154 × 43 × 17 mm
(6-1/16 × 1-11/16 × 11/16 in.)
FM modulator unit .........................................126 × 30 × 69 mm
(4-15/16 × 1-3/16 × 2-6/8 in.)
Trim mount plate ...........................................188 × 58 × 18 mm
(7-3/8 × 2-5/16 × 11/16 in.)
Weight
CD changer
(KDC-C521FM) .......................................................2 kg (4.4 lbs)
(KDC-C471FM).....................................................1.8 kg (4.0 lbs)
Controller...........................................................0.09 kg (0.2 lbs)
Display unit....................................................0.145 kg (0.32 lbs)
FM modulator unit .............................................0.4 kg (0.88 lbs)
Specifications subject to change without notice.
Specifications
(KDC-C521FM/
C471FM for European Market)
(KDC-C521FM/
C471FM for European Market)
Page 26

— 26 —
English
Use of controls or adjustments or
performance of procedures other than those
specified herein may result in hazardous
radiation exposure.
In compliance with Federal Regulations,
following are reproductions of labels on, or
inside the product relating to laser product
safety.
Location : Rear Panel
FCC WARNING
This equipment may generate or use radio
frequency energy. Changes or modifications
to this equipment may cause harmful
interference unless the modifications are
expressly approved in the instruction manual.
The user could lose the authority to operate
this equipment if an unauthorized change or
modification is made.
2CAUTION
KENWOOD CORPORATION
2967-3, ISHIKAWA-CHO,
HACHIOJI-SHI
TOKYO, JAPAN
KENWOOD CORP. CERTIFIES THIS EQUIPMENT
CONFORMS TO DHHS REGULATIONS N0.21 CFR
1040. 10, CHAPTER I, SUBCHAPTER J.
This equipment has been tested and found to
comply with the limits for a Class B digital
device, pursuant to Part 15 of the FCC Rules.
These limits are designed to provide
reasonable protection against harmful
interference in a residential installation. This
equipment may cause harmful interference
to radio communications, if it is not installed
and used in accordance with the instructions.
However, there is no guarantee that
interference will not occur in a particular
installation. If this equipment does cause
harmful interference to radio or television
reception, which can be determined by
turning the equipment off and on, the user is
encouraged to try to correct the interference
by one or more of the following measures:
• Reorient or relocate the receiving antenna.
• Increase the separation between the
equipment and receiver.
• Connect the equipment into an outlet on a
circuit different from that to which the
receiver is connected.
• Consult the dealer or an experienced radio/TV
technician for help.
This Class B digital apparatus complies with
Canadian ICES-003.
NOTE
NOTE
2Warning
Page 27

Page 28

— 28 —
Français
Table des matières
Avant l'utilisation
Précautions de sécurité...............................................................29
Manipulation des disques compacts...........................................30
Chargement des disques ............................................................31
Caractéristiques générales
Alimentation................................................................................32
Sélectionner la source.................................................................32
Caractéristiques du syntoniseur radio par
satellite Sirius
Sélectionnez le mode Sirius........................................................33
Commutation du mode de recherche .........................................33
Sélection des gammes préréglées..............................................33
Mémoire de canaux préréglés ....................................................34
Accord pré-réglé..........................................................................34
Balayage de canal........................................................................34
Recherche de canal.....................................................................34
Syntonisation à accès direct........................................................35
Mode de commutation de l'affichage .........................................35
Fonctions de contrôle de disque
Lire un disque .............................................................................36
Avance rapide et retour...............................................................36
Recherche de plages ..................................................................36
Recherche de disques ................................................................37
Recherche de plage directe ........................................................37
Recherche directe de disque ......................................................37
Répétition de plage/disque .........................................................37
Balayage des plages ...................................................................37
Lecture aléatoire .........................................................................38
Lecture aléatoire du chargeur .....................................................38
Mode de commutation de l'affichage .........................................38
A propos du menu
A propos du menu ......................................................................39
Comment changer la fréquence de transmission .......................40
Niveau de modulation .................................................................40
Contrôle dynamique....................................................................40
Défilement du texte ....................................................................40
L'identification Sirius (ESN) .........................................................40
Opérations de base de la télécommande.....................41
Installation
Accessoires.................................................................................43
Procédure d'installation...............................................................43
Installation...................................................................................44
Connexion des cables sur les prises...........................................46
Guide de depannage ............................................................48
Fiche technique......................................................................51
Page 29

Pour éviter tout risque de feu et de
blessures physiques, observer les
précautions suivantes:
• Enfoncer la façade amovible à fond sur l'appareil
principal de façon à ce qu'elle soit fermement
encastrée, et ainsi éviter qu'elle ne se détache lors
d'un éventuel accident. Si le besoin de rallonger l'un
des câbles d'alimentation (masse, mémoire...)
utiliser des câbles de catégorie automobile d'une
section minimum de 0,75 mm2(AWG 18) ou plus
afin d'éviter toute détérioration de ces derniers.
• Vérifier que l'on n’a pas laissé d'objets
métalliques (pièces de monnaie, outils, etc.) à
l'intérieur de l'appareil, afin d'éviter les
courts-circuits.
• Lors d'un dégagement d'odeur ou de fumée,
éteindre immédiatement l'appareil et
consulter son agent Kenwood.
• Ne touchez pas le cristal liquide si l'affichage
LCD était endommagé ou cassé à cause d'un
choc. Le cristal liquide peut être dangereux
pour votre santé et même mortel. Si le cristal
liquide de l'affichage LCD entrait en contact
avec votre corps ou un vêtement, lavez-le
immédiatement avec du savon.
Pour maintenir l'appareil en parfait
état de marche, observer les
précautions suivantes.
• Assurez-vous de mettre l'appareil à la masse
sur une alimentation négative de 12V CC.
• N'ouvrez pas le couvercle supérieur ou
inférieur de l'appareil.
2ATTENTION
2AVERTISSEMENT
• N'installez pas l'appareil dans un endroit
exposé directement à la lumière du soleil, à
une chaleur excessive ou à l'humidité. Evitez
aussi les endroits trop poussiéreux et où
l'appareil risque d'être éclaboussé.
• Lors du remplacement d'un fusible, utilisez
seulement un fusible neuf avec la valeur
indiquée. L'utilisation d'un fusible d'une
valeur différente peut être la cause d'un
mauvais fonctionnement de votre appareil.
• Pour éviter les courts-circuits lors du
remplacement d'un fusible, déconnectez
d'abord le faisceau de câbles.
• Si l'on rencontre des difficultés pour installer
l'appareil dans le véhicule, consulter son
agent Kenwood.
• Si l'appareil semble ne pas fonctionner
correctement, appuyer tout d'abord sur la
touche "reset" (réinitialisation). Si l'appareil ne
fonctionne toujours pas, consulter son agent
Kenwood.
• Sur certains auto-radios, le tuner n'entre en
fonction que quelques instans après la mise
en route du moteur.
• La réception du tuner rusque d'être
un peu monis forte avec le KDC-C521FM,
KDC-471FM.
REMARQUE
• Si le son du CD est plus faible que le son du
tuner, augmenter le volume sonore du CD à
partir du réoepteur.
• Pendant l'installation, n'utilisez aucunes
autres vis que celles fournies. L'utilisation de
vis incorrectes pourrait endommager
l'appareil.
Nettoyage de l'appareil
Si le panneau avant est sale, l'essuyer avec
un chiffon au silicone ou un chiffon doux et
sec après avoir éteint l'appareil.
Ne pas utiliser de chiffons durs ni de diluant
pour peinture, alcool ou autre solvant volatile.
Ces produits risqueraient d'abîmer les
surfaces externes ou d'effacer les
inscriptions.
Condensation sur la lentille
Dans les climats froids, quelque temps après
avoir allumé le chauffage de la voiture, il peut
arriver que la lentille qui guide le rayon laser
du lecteur CD s'embue. Dans ce cas, la
lecture des disques n'est plus possible. Sortir
les disques et la buée devrait disparaître. Si la
difficulté persiste, consulter son agent
Kenwood.
Cet appareil numérique de la classe B est
conforme à la morme NMB-003 du Canada.
REMARQUE
2ATTENTION
Précautions de sécurité
Touche "Reset"
— 29 —
Page 30

— 30 —
Français
Manipulation des disques compacts
La reproduction d'un CD sale, rayé ou
gondolé peut être la cause d'un son qui
saute et d'un mauvais fonctionnement
provoquant une qualité sonore de plus en
plus mauvaise. Prenez les précautions
suivantes pour éviter de rayer ou
d'endommager vos CD.
Manipulation des CD
• Ne touchez pas la face enregistrée du CD (la face
opposée à la face imprimée) quand vous le prenez.
• Le film réfléchissant sur un CD-R ou un CD-RW est
plus fragile que celui sur un CD musical ordinaire et
risque de se détacher s’il est rayé. Des traces de
doigt sur un CD-R ou CD-RW peuvent également
provoquer un sautillement du disque lors de sa
lecture. Pour cette raison, manipulez
soigneusement le disque.
Des instructions de manipulation détaillées figurent
sur l’emballage du CD-R ou CD-RW: lisez
attentivement cette information avant d’utiliser le
disque.
• Ne collez pas de ruban adhésif sur aucune des
faces du CD.
Rangement des CD
• Ne rangez pas les CD dans un endroit directement
exposé à la lumière du soleil —comme sur le siège
d'une voiture ou son tableau de bord— ou dans
d'autres endroits chauds.
• Un CD-R ou CD-RW est plus susceptible d’être
endommagé par des températures élevées et un
haut degré d‘humidité qu’un CD musical, et dans
certains cas, il peut devenir inutilisable s’il est
laissé à l’intérieur d’un véhicule pendant de
longues périodes.
• Retirez les CD de l'appareil quand vous ne les
écoutez pas et remettez les dans leur boîte.
N'empilez pas des CD qui ont été retirés de leur
boîte et ne les posez pas contre quelque chose.
Nettoyage des CD
Si un CD devient sale, essuyez-le délicatement en
utilisant un tissu de nettoyage disponible dans le
commerce ou un tissu en coton doux, en
commençant du centre du disque et en allant vers
l'extérieur. Ne nettoyez pas les CD avec un
nettoyant conventionnel pour disque analogique,
de type antistatique ou chimique comme un diluant
à peinture ou du benzine.
Recherche de bavures sur les nouveaux
CD
Lors de la reproduction d'un nouveau CD pour la
première fois, vérifiez qu'il n'y a aucunes bavures
collées sur le périmètre du disque ou sur le trou
central. Les CD avec des bavures collées peuvent
ne pas être chargés correctement ou sauter lors de
la reproduction. Retirez les bavures en utilisant un
stylo-bille ou un objet similaire.
Ne chargez pas d'accessoires de CD
N'utilisez pas d'accessoires de CD disponibles
dans le commerce qui peuvent être introduits dans
la fente à CD comme des stabilisateurs, des
feuilles de protection ou des disques de nettoyage
de CD car ils pourraient être la cause d'un mauvais
fonctionnement de l'appareil.
Ne pas utiliser de CD de formespéciale
• Veiller à n'utiliser que des CD ronds pour cet
appareil et n'utiliser jamais de CD de forme
spéciale. Cela nuirait au bon fonctionnement de
l'appareil.
• Cet appareil ne peut lire que les CD comportant
.
Il ne peut jouer les disques qui ne comportent pas
la marque.
• Les disques CD-R et CD-RW qui n'ont pas été mis
au point ne peuvent être joués. (Pour plus
d'information sur la mise au point, référez-vous au
manuel pour le logiciel d'inscription de CD-R / CDRW ou pour l'enregistreur de CD-R / CD-RW). En
outre, dépendant du statut d'enregistrement, il
peut s'avérer impossible de faire jouer certains
CDs enregistrés sur les enregistreurs de CD-R ou
de CD-RW.
Ne pas utiliser de CD avec une étiquette
collée sur la face portant l'étiquette
d'origine.
Ne pas utiliser le CD si une étiquette a été collée
dessus.
L'utilisation d'un tel CD peut occasionner la
déformation du CD et le décollement de l'étiquette,
ce qui résulterait en un mauvais fonctionnement de
l'autoradio.
2ATTENTION
Bavures
Ruban adhésif
Bavures
Page 31

— 31 —
'
'
'
'
Assurez-vous que le magasin de disque
est correctement inséré avec le logo
Kenwood dirigé vers le haut. Tirez le
plateau vers l'extérieur par la saillie.
IIntroduire le chargeur dans le changeur de
CD jusqu'à encliquètement.
Ouvrir le volet du changeur de CD.
Placez le disque sur le plateau avec la face
imprimée dirigée vers le haut. Insérez le
plateau dans le magasin de disque jusqu'à
ce qu'il soit verrouillé. Les disques sont
numérotés à partir du bas, de 1 à 6/10.
•
Faites attention de bien insérer le plateau dans
les fentes correctes du magasin de disque.
• Laissez tous les plateaux dans le magasin
même s'ils sont vides.
• L'appareil n'accepte pas les disques de 8cm.
Si on utilise un adaptateur pour disque de
8cm, l'éjection du disque devient impossible.
2ATTENTION
Chargement des disques
1
2
"KENWOOD"
Saillie
4
3
'
Ouvrir le volet du changeur de CD et appuyer
sur le bouton EJECT.
Vérifier que le volet est ouvert en grand avant
d'appuyer sur le bouton EJECT. Si la volet
n'est pas complètement ouvert, le chargeur
rsique de buter contre, ce qui pourrait
entraîner un mauvais fonctionnement.
REMARQUE
Ejection du chargeur
5
6
Le changeur de CD doit s'utiliser avec le
vlet fermé pour éviter que la poussière ne
pénètre à l'intérieur de l'appareil.
REMARQUE
Refermer le volet du changeur de CD.
Page 32

— 32 —
Français
Caractéristiques générales
Allumer l'alimentation
Appuyer sur la touche [SRC].
Eteindre l'alimentation
Appuyez sur la touche [SRC] pendant au moins 1 seconde.
Le modulateur FM est mis hors tension et on entend le son de
la radio.
• Ne pas oublier de baisser le volume pour écouter la radio ou une
cassette après lecture d'un disques.
•Pendant la lecture d'un disques., il n'est pas possible d'écouter
la radio car la sortie de l'antenne est commuté côté lecture de
disques.
Alimentation
Appuyer sur la touche [SRC].
Source requise Affichage
Sirius (Fonction du KDC-C521FM/ "SIRIUS"
C471FM pour les marchés Américains)
Changeur automatiqu de CD "CHANGER"/
"CHANGER-1"/
"CHANGER-2"
Entrée auxiliaire "AUX"
Désactivé
• Pour Sirius le KTC-SR901 or KTC-SR902 est nécessaire.
• Pour l'entrée auxiliaire un des accessoires optionnels ci-dessous
est nécessaire.
- KCA-S210A
- CA-C1AX
- Changeur de CD avec une fonction d'entrée auxiliaire installée.
Sélectionner la source
Régler la station FM de la radio de voiture à 88,3 MHz. Voir la
page 40 pour avoir plus d'informations sur le changement de
la fréquence de transmission.
SRC
Page 33

d
u
4
SRCH
¢
SRC
DISP
1-6
SEEK
— 33 —
Caractéristiques du syntoniseur radio par satellite Sirius
(Fonction du KDC-C521FM/ C471FM pour les marchés Américains)
Appuyez sur la touche [SRC].
Sélectionnez l'affichage "SIRIUS".
• Vous devez vous abonner à SIRIUS pour recevoir le service par le
biais de Sirius Radio par satellite. Consultez SIRIUS si "CALL 888539 SIRIUS TO SUBSCRIBE" apparaît.
• Cela peut prendre quelques instants avant de recevoir le signal
après avoir sélectionné la source SIRIUS.
• Si la réception de signal échoue, "ACQUIRING SIGNAL" apparaît.
Sélectionnez le mode Sirius
Appuyez sur la touche [u].
Chaque fois que l'on appuie sur la touche, la bande préréglée
bascule entre SR1, SR2, SR3 et SR4.
Sélection des gammes préréglées
Règle le mode de recherche.
Appuyez sur la touche [SEEK].
Chaque fois que l'on appuie sur la touche, le mode de recherche
change de la manière suivante.
Affichage Fonctionnement
"SEEK 1" Commande de recherche manuelle normale.
"SEEK 2" Recherche dans l'ordre des canaux dans
la mémoire préréglée Mémoire préréglée.
Vous ne pouvez pas utiliser cet appareil pendant la commutation de
canal ou de catégorie.
Commutation du mode de recherche
Affichage de bande Numéro de canal
Numéro de station préréglé
Indicateur SCAN
Page 34

— 34 —
Français
Mettre le canal en mémoire.
1 Sélectionnez la bande préréglée
Appuyez sur la touche [u].
2 Sélectionnez le canal à mettre en mémoire
Appuyez sur la touche [4] ou [¢].
3 Mettre le canal en mémoire
Appuyez sur la touche [1] — [6] pendant au moins 2
secondes.
Le numéro pré-réglé affiché clignote 1 fois.
Sur chaque bande, 1 station peut être mise en mémoire sur
chaque touche [1] — [6].
Uniquement le numéro de canal est enregistré. Les informations de
catégorie ne sont pas enregistrées.
Mémoire de canaux préréglés
Rappel des canaux en mémoire.
1 Sélectionner la bande préréglée
Appuyez sur la touche [u].
2 Rappelez le canal
Appuyez sur la touche [1] — [6].
Accord pré-réglé
Vous pouvez commuter entre Haut/Bas du canal dans une
catégorie sélectionnée dans Précédent/Suivant de la catégorie
incluant le canal reçu et vice versa.
1 Entrez dans le mode de recherche de canal
Appuyez sur la touche [SRCH].
2 Sélectionnez la catégorie
Appuyez sur la touche [u] ou [d].
3 Sélectionnez le canal
Appuyez sur la touche [4] ou [¢].
Annulation de la recherche de canal
Appuyez sur la touche [SRCH].
Vous ne pouvez pas utiliser cet appareil tant que toutes les informations
de catégorie ne sont pas acquises.
Recherche de canal
Balayage du canal que vous souhaitez écouter.
1 Commencez le balayage de canal
Appuyez sur la touche [SEEK] pendant au moins 1 seconde.
L'indicateur "SCAN" est activé.
2 Relâchez la touche lorsque vous entendez le canal que vous
souhaitez écouter
Appuyez sur la touche [SEEK] pendant au moins 1 seconde.
Balayage de canal
Caractéristiques du syntoniseur radio par satellite Sirius
(Fonction du KDC-C521FM/ C471FM pour les marchés Américains)
Page 35

— 35 —
Vous pouvez afficher différentes données de texte transmises par
les stations de radiodiffusion en procédant comme ce qui suit.
Appuyez sur la touche [DISP].
Chaque fois que l'on appuie sur la touche, l'affichage change de la
manière suivante.
Information Affichage
Numéro de chaîne
Nom de canal "CHANNEL"
Titre de la chanson "SONG"
Nom de l'artiste "ARTIST"
Nom de la catégorie "CATEGORY"
Titre de l'album "ALBUM"
Mode de commutation de l'affichage
Entrez le canal et effectuez l'accord.
1 Entrez en mode de syntonisation à accès direct
Appuyez sur la touche [DIRECT] sur la télécommande.
2 Entrez le numéro de canal
Appuyez sur les touches avec les numéros.
3 Effectuez la recherche de canal
Appuyez sur la touche [4] ou sur la touche [¢].
Annulez l'accord à accès direct
Appuyez sur la touche [DIRECT] de la télécommande.
• Si vous ne touchez aucune touche pendant 10 secondes, le mode
de syntonisation à accès direct est automatiquement annulé.
• Vous pouvez effectuer un réglage jusqu'au canal 223.
• S'il n'y pas de signal dans le canal d'entrée, "NO CHANNEL" apparaît.
• Si vous ne pouvez pas recevoir de signal dans le canal d'entrée en
raison d'une mauvaise condition sur les ondes radio ou d'un autre
problème, "ACQUIRING SIGNAL" apparaît.
Syntonisation à accès direct (Fonction de
commande à distance)
Page 36

d
u
4
6
¢
SRC
DISP
SCAN
RDM REP
M.RDM
— 36 —
Français
Fonctions de contrôle de disque
Lecture:
Appuyez sur la touche [SRC].
Sélectionnez l'affichage "CHANGER"/ "CHANGER-1"/
"CHANGER-2".
Arrêter la lecture:
Appuyez sur la touche [SRC] pendant au moins 1 seconde.
Le modulateur FM est mis hors tension et on entend le son de
la radio.
Pause et lecture:
Appuyez sur la touche [6] (38...Télécommande).
Chaque fois que l'on appuie sur ce bouton, le CD se met en
pause ou en lecture.
Si l'on appuie une fois de plus sur l'interrupteur, la reproduction
du disque recommence partie de l'endroit elle a ét
momentanément arrêt.
Lire un disque
Avance rapide
Maintenez la touche [¢] enfoncée.
Relâchez la touche pour reproduire le disque à partir de ce point.
Retour
Maintenez la touche [4] enfoncée.
Relâchez la touche pour reproduire le disque à partir de ce point.
Avance rapide et retour
Recherche de chanson ou de disque.
Appuyez sur la touche [4] ou [¢].
Recherche de plages
Numéro de plage
Durée de la plage
Numéro de disque
Indicateur
Page 37

— 37 —
Exécuter la recherche de disque en saisissant le numéro de
disque.
1 Saisissez le numéro de disque
Appuyez sur les touches numériques de la télécommande.
2 Exécutez la recherche d‘album
Appuyez sur la touche [+] ou [–].
Annuler la recherche directe d'album
Appuyez sur la touche [38].
Tapez "0" pour sélectionner le disque 10.
Recherche directe de disques (Fonction de
changeurs de disques avec commande à distance)
Réécouter la chanson, le disque dans le changeur de disque que
vous êtes en train d'écouter.
Appuyez sur la touche [REP].
Lorsque la fonction est activée, l'indicateur "REP" est allumé.
Chaque fois que l'on appuie sur le bouton, la fonction Répétition
de la lecture change de la manière suivante.
Répétition de la lecture Affichage
Répétition de plage Le No. de plage clignote.
Répétition de disque Le No. de disque clignote.
Désactivé —
Répétition de plage/disque
Ecouter le début de chaque chanson du disque que vous écoutez
et rechercher la chanson que vous souhaitez écouter.
1 Commencez le balayage des plages
Appuyez sur la touche [SCAN].
Le voyant "SCAN" est allumé.
2 Relâchez la touche lorsque vous entendez la chanson que
vous souhaitez écouter
Appuyez sur la touche [SCAN].
Balayage des plages
Exécuter la recherche de plage en saisissant le numéro de plage.
1 Saisissez le numéro de plage
Appuyez sur les touches numériques de la télécommande.
2 Exécutez la recherche de plage
Appuyez sur la touche [T.UP] ou [T.DOWN].
Annuler la recherche de plage directe
Appuyez sur la touche [38].
Recherche de plage directe
(Fonction de commande à distance)
Sélectionner le disque activé dans le changeur de disques.
Appuyez sur la touche [u] ou [d].
Recherche de disques
Page 38

— 38 —
Français
Ecoutez toutes les chansons du disque dans un ordre aléatoire.
Appuyez sur la touche [RDM].
Chaque fois que l'on appuie sur la touche, la lecture aléatoire est
activée ou désactivée.
Lorsque la fonction est activée, l'indicateur "RDM" est allumé et le
numéro de la plage clignote.
Lorsque l'on appuie sur la touche [¢], la chanson suivante
sélectionnée commence.
Lecture aléatoire
Ecoutez les chansons de tous les disques présents dans le
changeur de disque dans un ordre aléatoire.
Appuyez sur la touche [M.RDM].
Chaque fois que l'on appuie sur la touche, la lecture aléatoire du
chargeur est activée ou désactivée.
Lorsque la fonction est activée, l'indicateur "RDM" est allumé et le
numéro de la plage et du disque clignotent.
Lorsque l'on appuie sur la touche [¢], la chanson suivante
sélectionnée commence.
Lecture aléatoire du chargeur
(Fonction du changeur de disque)
Fonctions de contrôle de disque
Changer les informations affichées.
Appuyez sur la touche [DISP].
Each time the button is pressed the display switches as shown
below.
Information Affichage
P-Time
Titre du disque "DISC TITLE"
Titre de la plage "TRACK TITLE"
Cette unité n'affiche pas les informations Titre du disque et Titre de
la plage. Sélectionner l'information de P-Time.
Mode de commutation de l'affichage
Page 39

— 39 —
A propos du menu
Activer en cours de fonctionnement des fonctions de signaux
sonores etc.
La méthode de base d'utilisation du système du menu est
expliquée ici. Les références pour les éléments du menu et leur
réglage se trouve après l'explication de cette opération.
1 Entrez en mode menu
Appuyez sur la touche [MENU] pendant au moins 1 seconde.
"MENU" est affiché.
2 Sélectionnez l'élément du menu
Appuyez sur la touche [u] ou [d].
3 Réglez l'élément du menu
Appuyez sur la touche [4] ou [¢].
Vous pouvez continuer en retournant à l'étape 2 et en réglant
d'autres éléments.
4 Sortez du mode menu
Appuyez sur la touche [MENU].
Lorsque d'autres éléments pour lesquels la méthode de
fonctionnement normale ci-dessus est applicable sont affichés, on
entre ensuite dans le graphique de réglage.
A propos du menu
d
u
¢
4
MENU
Page 40

— 40 —
Français
Sélectionnez la fréquence.
Affichage Réglage
"T-FREQ 87.7" 87.7 MHz
"T-FREQ 87.9" 87.9 MHz
"T-FREQ 88.1" 88.1 MHz
"T-FREQ 88.3" 88.3 MHz (Réglage initial)
"T-FREQ 88.5" 88.5 MHz
"T-FREQ 88.7" 88.7 MHz
"T-FREQ 88.9" 88.9 MHz
"T-FREQ 89.1" 89.1 MHz
"T-FREQ 89.3" 89.3 MHz
"T-FREQ 89.5" 89.5 MHz
"T-FREQ 89.7" 89.7 MHz
"T-FREQ 89.9" 89.9 MHz
Certaines radios de voiture ne peuvent pas recevoir une fréquence
de 87,7 MHz.
Comment changer la fréquence de transmission
Sélectionnez le niveau de modulation.
Affichage
"MOD LEVEL 1"
"MOD LEVEL 2" (Réglage initial)
"MOD LEVEL 3"
"MOD LEVEL 4"
Niveau de modulation
Réglage de la commande dynamique.
Affichage Réglage
"D-CONT ON" La commande dynamique est activée.
"D-CONT OFF" La commande dynamique est désactivée.
(Réglage initial)
L'unité est fournie avec la fonction de prévention de distorsion pour
diminuer la distorsion acoustique.
Si le son est déformé excessivement, appuyer sur la touche [4]ou
[¢] sur l'unité d'affichage, puis régler la fonction à "ON".
Si la fonction de prévention de distorsion est réglée à "ON",
l'extension du son sera réduit.
Si un disque ayant un haut niveau d'enregistrement est utilisé, le son
pourrait être déformé même si la fonction de prévention de
distorsion est réglée à "ON". Dans ce cas, diminuer le niveau de
modulation.
Contrôle dynamique
A propos du menu
L'identification Sirius (numéro de série électronique) est affichée.
L'identification Sirius (ESN:Electronic Serial
Number)
<Lorsque le KTC-SR901 ou KTC-SR902 est
connecté>
Fonction du KDC-C521FM/ C471FM pour les marchés Américains
Régler le défilement du texte affiché.
Affichage Réglage
"SCROLL MANU" Ne défile pas.
"SCROLL AUTO" Défile lorsque l'affichage change.
Le texte qui défile est indiqué ci-dessous.
- Titre de la chanson/ Nom de l'artiste/ Titre de l'album/
Nom de la catégorie
Défilement du texte
Page 41

— 41 —
Opérations de base de la télécommande
Touche [SRC]
Chaque fois que l'on appuie sur la touche, la source change.
Opérations de base
Utiliser deux piles format "AA".
Faire coulisser le couvercle tout en l'appuyant vers le bas
pour l'enlever comme indiqué sur l'illustration.
Insérer les piles en alignant correctement les pôles + et –,
suivant l'illustration gravée à l'intérieur du compartiment.
Conserver les piles inutilisées hors de portée des enfants. Contacter
immédiatement un médecin si une pile est accidentellement avalée.
• Les piles fournies sont conçues pour être utilisée pour une
opération vérification, et leur durée de vie peut être courte.
• Lorsque la distance télécommandable devient courte, remplacer
les deux piles par des nouvelles.
• Une partie des opérations ne peut pas être effectuée, selon
l'unité connectée.
Ne laissez pas la télécommande dans des endroits chauds comme
sur le tableau de bord.
2AVERTISSEMENT
Recharger et remplacer la pile
Fonction du KDC-C521FM/ C471FM pour le marché Européen
Fonction du KDC-C521FM/ C471FM pour le marché Européen
[0] – [9]
SRC
M.RDM
DIRECT
SCAN
T.
DOWN
T.
UP
D.REP
REP
RDM
DISC
+
–
38
SRC
D.REP
RDM
/ CH SEARCH
M.RDM/ DIRECT
T.UP/T.DOWN
REP
SCAN
Page 42

— 42 —
Français
Touches [T.UP]/ [T.DOWN]
Avancer ou reculer dans la plage.
Touches [+]/ [–]
Avancer ou reculer dans le disque.
Touches [38]
Chaque fois que l'on appuie sur cette touche, la chanson se met
en pause ou en lecture.
Touches [REP]
Chaque fois que l'on appuie sur la touche, la fonction de répétition
de plage est activée ou désactivée.
Touches [D.REP]
Chaque fois que l'on appuie sur la touche, la fonction de répétition
de disque est activée ou désactivée.
Touches [RDM]
Chaque fois que l'on appuie sur la touche, la lecture aléatoire est
activée ou désactivée.
Touches [M.RDM]
Chaque fois que l'on appuie sur la touche, la lecture aléatoire du
chargeur est activée ou désactivée.
Touches [SCAN]
Chaque fois que l'on appuie sur la touche, la fonction de balayage
de plages est activée ou désactivée.
Touches [0] — [9]
Lorsque vous êtes en mode <Recherche de plage directe> (page
37) et <Recherche directe de disques> (page 37), saisissez le
numéro de plage/disque.
En source disque
Fonction du KDC-C521FM/ C471FM pour le marché Européen
Touches [+]
Sélectionnez la bande.
Chaque fois que l'on appuie sur la touche [+] la gamme d'onde
change parmi SR1, SR2, SR3 et SR4.
Touches [T.UP]/ [T.DOWN]
Réglez un canal supérieur ou inférieur.
Touches [0] — [9]
Appuyez sur les touches [1] — [6] pour rappeler des canaux
préréglés.
Touches [DIRECT]
Sélectionne et annule le mode <Syntonisation à accès direct>
(page 35).
Touches [CH SEARCH]
Sélectionne et annule le mode <Recherche de canal > (page 34).
En source Sirius
Fonction du KDC-C521FM
Opérations de base de la télécommande
Page 43

— 43 —
Vue externe
......... Nombre d'éléments
L'utilisation d'accessoires
autres que les accessoires
fournis pourrait
endommager l'appareil.
Assurez-vous d'utiliser les
accessoires fournis,
indiqués ci-dessus.
2ATTENTION
5. Reconnectez la borne - de la batterie.
6. Appuyez sur la touche de réinitialisation.
Avant de forer un trou dans le châssis du véhicule, s'assurer
d'abord que rien ne se trouve de l'autre côté.
• Si un fusible grille, assurez-vous d'abord que les câbles n'ont
pas causé de court-circuit puis remplacez le vieux fusible par
un nouveau de même valeur.
• Ne laissez pas des câbles non-connectés ou des prises toucher
les parties métalliques de la voiture ou autres conducteurs
électriques. Pour éviter, les courts-circuits, ne retirez pas non
plus les capuchons à l'extrémité des câbles non-connectés ou
des prises.
• Après avoir installé l'appareil, vérifiez si les lampes de frein, les
indicateurs, les clignotants, etc de la voiture fonctionnent
correctement.
• Isolez les câbles non-connectés avec un ruban vinyle ou autre
matériel similaire.
• Certains changeurs de disques nécessitent un câble de
conversion pour la connexion. Voir la section sur les
"Précautions de sécurité" pour les détails.
2ATTENTION
2AVERTISSEMENT
Comment enlever les vis de transport
■
Vis de transport
Retirez les 3 vis de transport (moins) pour la protection du
mécanisme interne avant de commencer l'installation.
Après avoir retiré la vis de transport, rangez-la avec soin et
n'omettez pas de la poser à nouveau avant de transporter
l'appareil.
REMARQUE
1. Pour éviter les courts-circuits, retirez la clef de contact et
déconnectez la borne - de la batterie.
2. Effectuez les connexions d'entrée et sortie correctement pour
chaque appareil.
3. Connectez les câbles du faisceau dans l'ordre suivant : masse,
batterie, allumage.
4. Installez l'appareil dans votre voiture.
.........1
1
.........4
2
.........4
3
.........1
4
.........1
5
.........2
6
.........1
7
8
9
.........1
.........1
Accessoires
Procédure d'installation
Pour le modèle du marché Européen.
Page 44

— 44 —
Français
Commutateur de réglage d'angle
■
Côté droi
Côté gauche
Commutateur de réglage d'angle
9090
0
45
90
0
45
Angle
d'installation
0°~5° 40°~50°
85°~90°
90
0
45
90
0
45
90
0
45
Position des
commutateurs
de réglage
d'angle
• L'installation à une inclinaison de
40°~50° est impossible en utilisant 1.
Les commutateurs de réglage d'angle qui se trouvent de
chaque coté de l'appareil doivent être placés dans la position
correspondant à l'angle d'installation du changeur de CD. Les
deux commutateurs doivent être dans la même position.
SI ces commutateurs ne sont pas convenablement réglés, il
peut y avpir des ratées de son ou d'autres problèmes de
fonctionnement.
Réglez les commutateurs d'angle d'ajustement avec une pièce
de monnaie ou un autre objet plat.
Changer le commutateur graduellement en détachant et en
utilisant de nouveau le objet à la fin de chaque opération.
Installation de l'unité d'affichage
■
• Installation sans la platine enjoliveur de fixation 7
Fixer une bande Velcro à la ligne
oblique de l'unité d'affichage
comme illustré ci-dessus, puis
fixer l'autre bande Velcro aux
parties auxquelles l'on désire
fixer les unités d'affichage.
Puis, tirer ensemble les bandes
Velcro et installer les unités
d'affichage.
• Installation avec la platine enjoliveur de fixation 7
Unité d'affichage
Unité d'affichage
5
7
Engager le cable de l'afficheur dans la découpe de la platine
enjoliveur de fixation et appuyer sur l'afficheur de manière
qu'il vienne se fixer dans la platine enjoliveur de fixation.
• Veiller à ne pas placer l'unité sur les emplacements où elle
sera exposée aux rayons du soleil ou aux températures
élevées, pour éviter toutes déformations du boîtier.
• Selon l'emplacement d'installation, l'unité d'affichage pourrait
recevoir des signaux provenant de l'unité du contrôleur. Les
installer après avoir vérifier si les signaux peuvent être captés.
• Installer l'unité de manière qu'elle ne dérange pas le
conducteur durant la marche en voiture.
2ATTENTION
InstallationProcédure d'installation
Page 45

— 45 —
Utilisez les trous marqués (¶) pour installer l'appareil.
Utilisez les trous marqués (¶) pour installer l'appareil.
Installation horizontale
■
Installation verticale
■
Vue de dessous
Vue de côté
KDC-C521FM
90
0
45
90
0
45
90
0
45
90
0
45
90
0
45
90
0
45
90
0
45
90
45
0
2
3
φ
4
2
3
φ
4
1
Utilisez les trous marqués (¶) pour installer l'appareil.
Lorsqu'on suspend le changeur à l’intérieur du coffre
■
Montage du modulateur FM
■
90
0
45
90
0
45
90
0
45
Installer le modulateur FM dissimulé sous la plaque avant en
utilisant la fixation de métal et la vis de blocage comme
indique dans la figure ci-dessus.
Faire bien attention que les
câbles ne soient pas pris sous le
siège. Si cette précaution n'est
pas observée, ils risquent de se
rompre.
2ATTENTION
φ
3
φ
4
2
3
1
6
KDC-C471FM
Vue de dessous
Vue de dessous
Vue de côté
KDC-C521FM
KDC-C471FM
90
0
45
90
0
45
90
0
45
90
0
45
1
Vue de côté
KDC-C521FM
KDC-C471FM
Page 46

— 46 —
Français
Batterie
Pour éviter tout risque d'incendie en cas de court-circuit du
câble de l'allumage (rouge) ou du câble de la batteria (jaune)
par entrée en contact des câbles avec le châssis du véhicule,
raccorder l'alimentation uniquement après avoir effectué les
raccordements de la boîte à fusibles.
2AVERTISSEMENT
ACC
Après l'installation de l'appareil, n'oubliez pas d'appuyer sur le
buton de réinitialisation.
Sous peine de provoquer une défaillance, ne pas installer
l'antenne d'un équipement radio ou faire passer le câble
d'antenne près du câble de sortie du changeur.
REMARQUE
2ATTENTION
Unité de affichage
Boîtier à fusible
de la voiture
Commutateur
de la clé de
contact
Fiche d'antenne
pour automobile
Fil de masse (Noir) (au châssis de la voiture)
Câble de la batterìe + (jaune)
Câble de l'allumage + (rouge)
FM/AM sortie d'antenne
Auto-radio
avec tuner FM
FM/AM entrée d'antenne
Unité de
modulation FM
Entrée de contrôle
CEntrée de changeur automatique de CD
Câble de raccordement de changeur 4
Sortie de contrôle
Sortie
Changeur automatiqu
de compact disc
Connexion des câbles sur les prises
*8 & *9 : Pour le modèle du marché Européen.
*8
*9
Page 47

— 47 —
Syntoniseur radio par
satellite Sirius
"TO CHANGER"
"TO HEAD UNIT"
Unité de affichage
Unité de
modulation FM
Entrée de changeur
automatique de CD
Entrée de contrôle
Sortie de contrôle
Sortie
Changeur automatiqu de CD
Câble de raccordement
Câble de raccordement 4
Connexion des Syntoniseur radio par satellite Sirius
■
Page 48

— 48 —
Français
Ce qui peut apparaître comme un mauvais
fonctionnement de votre appareil n’est peut être que le
résultat d’une mauvaise opération ou d’une mauvaise
connexion. Avant d’appeler un centre de service, vérifiez
d’abord dans le tableau suivant les problèmes possibles.
Général
? L’appareil ne se met pas sous tension.
01
✔ Le fusible a grillé.
☞ Après avoir vérifiez qu'il n'y a pas de court-circuits dans les câbles,
remplacez le fusible par un de la même valeur.
✔ Pas de position ACC sur l'allumage du véhicule.
02
☞ Connectez le même câble à l'allumage comme câble de batterie.
? Rien ne se passe quand les touches sont pressées.
04
✔ Le microprocesseur dans l’appareil ne fonctionne pas correctement.
☞ Appuyez sur la touche de réinitialisation sur l’affichage (page 29).
? Pas de son ou le son est faible.
52
✔ Le volume de la radio est réglé au minimum.3
☞ Augmenter le volume de la radio.
✔ Le câble d'entrée/sortie ou le faisceau de fils n'est pas raccordé
correctement.
55
☞ Raccorder le câble d'entrée/sortie ou le faisceau de fils
correctement. Voir <Connexion des câbles sur les prises> (page 46).
? Distorsion du son.
67
✔ Les niveaux de signal varient en fonction de la source sélectionnée.
☞ Changer le Niveau de modulation/Contrôle dynamique. (page 40)
? Rien apparaît à l'affichage.
04
✔ La sortie de contrôle de l'unité d'affichage n'est pas branchée de
manière appropriée.
☞ Connecter la sortie de contrôle de manière appropriée.
Source Sirius
? Le mode Sirius ne peut pas être sélectionné.
2
✔ Le câble de connexion Sirius n'est pas connecté.
☞ Utilisez le câble de connexion Sirius pour connecter l'unité de
commandes et le syntoniseur radio par satellite Sirius.
✔ Branchez l'alimentation électrique du syntoniseur radio par satellite
Sirius.
53
☞ Branchez le cordon de la batterie et le câble à la masse sur le
syntoniseur radio par satellite Sirius.
✔ Le syntoniseur radio par satellite Sirius n'est pas connecté
correctement.
55
☞ Branchez le syntoniseur radio par satellite Sirius directement sur cet
appareil.
? Aucun son n'est émis ou le volume est faible.
58
✔ Les câbles d'entrée/sortie ou le faisceau de conducteurs ne sont pas
connectés correctement.
☞ Rebranchez les câbles d'entrée/sortie et/ou le faisceau de
conducteurs correctement.
? Aucune radiodiffusion ne peut être reçue.
2
✔ L'antenne Sirius n'est pas connectée.
☞ Connectez-la correctement.
✔ Aucun abonnement n'est établi.
53
☞ Abonnez-vous à SIRIUS.
? Aucun son n'est émis bien que les informations concernant le
syntoniseur radio par satellite Sirius soient affichées.
67
✔ Le volume est réglé au niveau minimum.
☞ Augmenter le volume de la radio.
✔ Le microprocesseur ne fonctionne pas correctement.
68
☞ Appuyez sur la touche de réinitialisation sur l'appareil. (Page 29)
✔ Le combiné autoradio n’est pas raccordé correctement.
69
☞ Raccorder le combiné autoradio correctement. Voir <Connexion des
câbles sur les prises>. (Page 46)
Guide de depannage
Page 49

— 49 —
En source disque
? La lecture du CD ne commence pas.
52
✔ L'entrée du changeur automatique de CD est débranchée de l'appareil.
☞ Raccorder l'entrée du changeur automatique de CD à l'appareil.
✔ L'interrupteur d'alimentation n'est pas sur ON.
53
☞ Mettre l'interrupteur d'alimentation sur ON.
? Le disque spécifié n’est pas reproduit mais un autre est reproduit à sa
place.
552
✔ Le disque spécifié est très sale.
☞ Nettoyez le CD.
✔ Le CD est à l’envers.
53
☞ Insérez un CD avec la face imprimée dirigée vers le haut.
✔ Le disque a été inséré dans une autre fente que celle spécifiée.
54
☞ Ejectez le magasin et vérifiez le numéro du disque spécifié.
✔ Le disque est très rayé.
55
☞ Essayez un autre disque.
? La plage spécifiée n’est pas reproduite.
58
✔ La lecture aléatoire ou la lecture aléatoire de magasin a été choisie.
☞ Mettez hors service la lecture aléatoire ou la lecture aléatoire de
magasin.
? Ne peut lire de CD-R ou de CD-RW.
60
✔ Le processus de finalisation du CD-R/CD-RW n'a pas été effectué.
☞ Effectuez le processus de finalisation avec le graveur de CD.
? La recherche directe par piste et la recherche directe par album ne
peuvent pas être effectuées.
66-1
✔ Une autre fonction est activée.
☞ Désactivez la lecture aléatoire ou les autres fonction.
? La recherche par piste ne peut pas être effectuée.66-2
✔ Pour la première ou la dernière chanson du disque.
☞ La recherche par piste ne peut jamais être effecutée, sur aucun
disque, vers l'arrière pour la première chanson ou vers l'avant pour
la dernière chanson.
? Le son saute à cause des vibrations.
67
✔ Il y a quelque chose qui touche le changeur automatique de CD.
☞ L'éloigner du changeur automatique de CD.
✔ Le disque est sale ou abîmé.
68
☞ Si le son saute au même endroit, le disque est défectueux. Vérifier
et, si possible, nettoyer le disque.
✔ Le changeur est incliné.
69
☞ Monter l'appareil sur une surface parfaitement plate.
✔ Le changeur est placé dans un endroit instable.
8
☞ Monter l'appareil dans un endroit stable.
✔ Les commutateurs de réglage d'angle ne sont pas dans la bonne
position.
69
☞ Mettre les commutateurs de réglage dans la position qui convient.
? Médiocre qualité du son.
67
✔ L’enregistrement du disque est médiocre.
☞ Essayer de lire un autre disque. Si le son est bon, le problème tient
au premier disque.
✔ Le disque est sale ou abîmé.
8
☞ Vérifier et, si possible, nettoyer le disque.
? Pas de son bien que les informations relatives au changeur
automatique de CD soient affichées.
67
✔ Le volume est réglé au niveau minimum.
☞ Augmenter le volume de la radio.
✔ Le microprocesseur ne fonctionne pas correctement.
68
☞ Appuyez sur la touche de réinitialisation sur l'appareil. (Page 29)
✔ Le combiné autoradio n’est pas raccordé correctement.
69
☞ Raccorder le combiné autoradio correctement. Voir <Connexion des
câbles sur les prises>. (Page 46)
Page 50

— 50 —
Français
Les messages ci-dessous indiquent l’état de votre système.
EJECT: Aucun magasin à disque n’a été inséré dans le changeur. Le magasin à disque n'est pas complètement inséré.
E01
➪ Insérez le magasin à disques correctement.
NO DISC: Aucun disque n'a été inséré dans le magasin à disque.E02
➪ Insérez un disque dans le magasin à disques.
TOC Error: Aucun disque n'a été inséré dans le magasin à disque.E04
➪ Insérez un disque dans le magasin à disques.
Le CD est très sale. Le CD est à l'envers. Le CD est très rayé.
➪ Nettoyez le CD et insérez-le correctement.
E-77: L'appareil fonctionne mal pour certaines raisons.E77
➪ Appuyez sur la touche Reset de l'affichage. Si le code "E-77" ne disparaît pas, consultez la station technique la plus proche.
Mecha Error: Il y a une anomalie dans le magasin de disque. Ou l'unité fonctionne mal pour une raison quelconque.E99
➪ Vérifiez le magasin de disques. Appuyez sur la touche reset de l'appareil. Si le message "Mecha Error" ne disparaît pas,
veuillez consulter votre centre de réparation le plus proche.
Hold Error: Le circuit de protection de l'appareil se met en service quand la température à l'intérieur du changeur de disques automatique
dépasse 60°C (140°F), arrêtant toutes les opérations.E0d
➪ Quand la température descend au dessous de 60°C (140°F), la lecture du disque reprend de nouveau.
ANTENNA ERR: L'antenne n'est pas connectée correctement.E77
➪ Assurez-vous que l'antenne est connectée correctement et désactivez/activez la source SIRIUS ou l'affichage.
TUNER ERROR: Les radiodiffusions ne peuvent pas être reçues en raison d'une erreur dans cet appareil.E77
➪ Inactivez/activez la source SIRIUS ou l'unité de commandes ou appuyez sur la touche de réinitialisation de l'affichage.
ESN ERROR: Le ESN (numéro de série électronique) n'est pas enregistré dans le syntoniseur radio par satellite Sirius.E77
➪ Consultez le centre de service après-vente le plus proche.
LINE ERROR: Aucun changeur de disques ou syntoniseur radio par satellite Sirius n'est connecté.E77
➪ Branchez un changeur de disques ou un syntoniseur radio par satellite Sirius.
Le nombre de changeurs de disques et de syntoniseurs radio par satellite Sirius dépasse la limite de connexion de ce
système.E77
➪ Jusqu'à deux appareils peuvent être connectés. Modifiez la connexion de sorte à ne pas dépasser la limite.
Guide de depannage
Page 51

— 51 —
Fiche technique
Section Disque Compact
Diodes laser ....................................................GaAlAs (λ=780 nm)
Filtre numérique (A/N) ............................8 fois Suréchantillonnage
Convertisseur A/N ..................................................................1 bit
Vitesse de l'axe ..............................................500~200 rpm (CLV)
Pleurage et scintillement......................................Non mesurables
Réponse en fréquence (±1 dB)..............................10 Hz ~ 20 kHz
Fréquence de modulation (200KHz Intervalle)
....87,7/ 87,9/ 88,1/ 88,3/
88,5/ 88,7/ 88,9/ 89,1/
89,3/ 89,5/ 89,7/ 89,9,
MHz
Généralités
Tension d'utilisation ..........................................14,4 V (11 ~ 16 V)
Consommation de courant ....................................................1,4 A
Température de fonctonnement ..................................–10 ~ 50˚C
Taille (L × H × P)
Changeur de CD)
(KDC-C521FM) ............................................250 × 80 × 176 mm
(9-13/16 × 3-1/8 × 6-13/16 in)
(KDC-C471FM) ............................................250 × 64 × 176 mm
(9-13/16 × 2-1/2 × 6-13/16 in.)
Unité de contrôleur ........................................45 × 140 × 29 mm
(1-12/16 × 5-8/16 × 1-1/8 in.)
Unité d'affichage............................................154 × 43 × 17 mm
(6-1/16 × 1-11/16 × 11/16 in.)
Unité de modulation FM ................................126 × 30 × 69 mm
(4-15/16 × 1-3/16 × 2-6/8 in.)
Platine enjoliveur de fixation ..........................188 × 58 × 18 mm
(7-3/8 × 2-5/16 × 11/16 in.)
Mass
Changeur de CD
(KDC-C521FM) ......................................................2 kg (4,4 lbs)
(KDC-C471FM) ....................................................1,8 kg (4,0 lbs)
Unité de contrôleur............................................0,09 kg (0,2 lbs)
Unité d'affichage ..........................................0,145 kg (0,32 lbs)
Unité de modulation FM ....................................0,4 kg (0,88 lbs)
Les spécifications sont sujettes à modifications sans préavis.
(Fonction du KDC-C521FM/
C471FM pour le marché Européen)
(Fonction du KDC-C521FM/
C471FM pour le marché Européen)
Page 52

— 52 —
Español
Índice
Antes de usar
Precauciones de Seguridad.........................................................53
Manipulación de los Discos Compactos .....................................54
Introducción de Discos Compactos ............................................55
Características generales
Alimentación ...............................................................................56
Selección de la fuente.................................................................56
Características del sintonizadora de radio
satélite Sirius
Seleccionar el Modo Sirius..........................................................57
Cambiar el Modo de Búsqueda...................................................57
Selección de banda de presintonización .....................................57
Memoria de presintonización de canal........................................58
Sintonización preajustada............................................................58
Exploración de canal....................................................................58
Buscar canal................................................................................58
Sintonización de Acceso Directo.................................................59
Cambio de Visualización..............................................................59
Características control de disco
Reproducción de disco................................................................60
Avance rápido y rebobinado........................................................60
Búsqueda de pista ......................................................................60
Búsqueda de disco......................................................................61
Búsqueda de Pista Directa..........................................................61
Búsqueda de disco directa..........................................................61
Repetición de Pista/disco............................................................61
Exploración de Pista....................................................................61
Reproducción aleatoria................................................................62
Reproducción Aleatoria de Magazine..........................................62
Cambio de Visualización..............................................................62
Acerca del Menú
Sistema de Menús......................................................................63
Cambio de la Frecuencia de Transmisión....................................64
Nivel de Modulación....................................................................64
Control Dinámico.........................................................................64
Despliegue de Texto ...................................................................64
Sirius ID (ESN).............................................................................64
Operaciones básicas del control remoto ..................65
Instalación
Accesorios...................................................................................67
Procedimiento de Instalación......................................................67
Instalación ...................................................................................68
Conexión de Cables a los Terminals ...........................................70
Guia sobre localización de averias...............................72
Especificaciones....................................................................75
Page 53

Para evitar incendios y daños
personales respete las siguientes
precauciones :
• Cuando extienda el cable del encendido, el
cable de la batería, o el cable de toma de
tierra, utilice un cable de 0,75 mm2(AWG18)
o de grado automotriz más grande para evitar
el deterioro o daño de la cubierta.
• Para evitar cortocircuitos, verifique que
ningún objeto metálico (monedas,
herramientas, etc.) quede dentro de la
unidad.
• Si huele u observa humo, desactive
inmediatamente la unidad y consulte con su
concesionario autorizado Kenwood.
• Si se daña o rompe la LCD debido a un golpe,
no toque nunca el fluido de cristal líquido
contenido en su interior. El fluido de cristal
líquido podría ser perjudicial e incluso fatal
para su salud. Si el fluido de cristal líquido
entrara en contacto con su cuerpo o
vestimenta, lave inmediatamente con agua y
jabón.
Cumpla con las precauciones
siguientes para que la unidad
funcione adecuadamente.
• Asegúrese de utilizar para la unidad una
fuente de alimentación de 12V CC con masa
negativa.
• No abra las cubiertas superior o inferior de la
unidad.
•No instale la unidad en un sitio expuesto a la
2PRECAUCIÓN
2ADVERTENCIA
luz directa del sol, o excesivamente húmedo
o caluroso. Asimismo evite los lugares muy
polvorientos o sujetos a salpicaduras de agua.
• Cuando tenga que reemplazar un fusible,
utilice únicamente uno del régimen prescrito.
El uso de un fusible de régimen incorrecto
podría ocasionar un funcionamiento
defectuoso de la unidad.
• Para evitar cortocircuitos mientras sustituye
el fusible, desconecte previamente el mazo
de conductores.
• Si tiene dificultades en instalar esta unidad en
su vehículo, comuníquese con su
concesionario Kenwood.
• Si parece que la unidad no funciona bien,
presione el botón de reset (si el panel
ocultador esta cerrado, abrirlo manualmente
y presionar la tecla de reset). Si la unidad
sigue sin funcionar bien, consulte con su
concesionario Kenwood.
• Algunos estéreos de automóviles ocasionan
que suene el sonido del sintonizador por un
momento cuando el motor es activado.
• La recepción del sintonizador puede ser
reducida un poco si se usa el KDC-C521FM,
KDC-C471FM.
• Si el sonido está más bajo que el sonido del
NOTA
sintonizador, eleve el nivel del volumen del
disco compacto mediante el uso del receptor.
• Durante la instalación, no utilice otros
tornillos que no sean los suministrados. El
uso de tornillos diferentes podría causar
daños en la unidad principal.
Limpieza de la unidad
Si la carátula está sucia, apague la unidad y
limpie con un paño siliconado suave y seco.
No utilice paños duros ni disolventes de
pintura, alcohol u otros disolventes volátiles.
Esto elementos pueden ocasionar daños a
las superficies externas o quitar los
caracteres indicadores.
Empañado de lente
En climas fríos, puede haber un período
después del cual enciende el calefactor del
vehículo, cuando la lente que guía el rayo
láser usado en su reproductor de compact
disc se empaña. Si esto ocurre, no podrá
reproducir los compact discs. Saque los
discos y el empañamiento desaparecerá. Si
después de varias horas no ha vuelto a la
normalidad, acuda a su concesionario
autorizado Kenwood.
2PRECAUCIÓN
Precauciones de Seguridad
Botón de reposición
— 53 —
Page 54

— 54 —
Español
Manipulación de los Discos Compactos
La reproducción de un CD sucio, rayado o
doblado podría ocasionar saltos de sonido
o impedir que la unidad funcione
correctamente, degradando la calidad del
sonido. Observe las siguientes
precauciones para evitar que se rayen o
dañen sus discos compactos.
Manipulación de los discos CD
• No toque el lado grabado del CD (o sea, el lado
opuesto a la etiqueta).
• La película reflectora de un CD-R o un CD-RW es
más frágil que la de un CD normal de música y
puede desprenderse si se raya. Las huellas de
dedos en un CD-R o un CD-RW también es más
probable que ocasionen saltos al reproducir el
disco. Por estas razones, se recomienda manipular
el disco con mucho cuidado.
En el paquete de CD-R o CD-RW aparece
información detallada acerca las instrucciones de
manipulación: lea atentamente esta información
antes de utilizar el disco
• No pegue etiquetas en ninguno de los lados del
CD.
Almacenamiento de los discos CD
• No guarde los CD en lugares expuestos a la luz
solar directa - tales como sobre el asiento del
automóvil o sobre el cubretablero - u otros lugares
calientes.
• Un CD-R o un CD-RW es más susceptible a los
daños por altas temperaturas o la humedad que un
CD de música, y en algunos casos, pueden quedar
inutilizados si se dejan en el coche durante
períodos de tiempo prolongados.
• Retire los CD de la unidad cuando no los va a
escuchar por un tiempo, y guárdelos en sus
estuches. No apile los CD extraídos de sus
estuches ni los deje recostados sobre algún objeto.
Limpieza de los discos CD
Cuando se ensucie un CD, límpielo frotando
suavemente desde el centro del disco hacia afuera,
utilizando un paño limpiador disponible en el
comercio o un paño de algodón suave. No limpie
los CD con limpiadores de discos convencionales,
fórmulas antiestáticas ni sustancias químicas tales
como diluyente o bencina.
Veritique sus discos nuevos
Cuando se ensucie un CD, límpielo frotando
suavemente desde el centro del disco hacia afuera,
utilizando un paño limpiador disponible en el
comercio o un paño de algodón suave. No limpie
los CD con limpiadores de discos convencionales,
fórmulas antiestáticas ni sustancias químicas tales
como diluyente o bencina.
Inspección de rebabas en los CD nuevos
Antes de reproducir un CD nuevo por primera vez,
compruebe la inexistencia de rebabas sobre el
perímetro del disco o alrededor del orificio central. Las
rebabas existentes en los CD podrían impedir que
sean correctamente cargados o podrían ocurrir saltos
de sonido durante la reproducción. Si hay rebabas,
sáquelas utilizando un bolígrafo u objeto similar.
No utilizar discos CD de tamaño especial
• Para este equipo exclusivamente discos CD
Asegurarse de utilizar para este equipo
exclusivamente discos CD de tamaño redondo. El
uso de discos CD de tamaño especial puede causar
malfuncionamiento del equipo.
• Esta unidad sólo puede reproducir los CD con
.
Puede que no reproduzca correctamente los discos
que no tienen la marca.
• Los discos CD-R y CD-RW que no hayan sido
finalizados no se pueden reproducir. (Para más
información sobre la finalización, remítase al
manual del software de escritura de sus CD-R / CDRW o grabador CD-R/CD-RW). Adicionalmente, y
según sea el estado de grabación, puede resultar
imposible reproducir ciertos CD grabados en
grabadores CD-R o CD-RW.
No utilice discos compactos que tengan
pegatinas en el lado etiquetado
No utilice el disco compacto con etiqueta pegadas
sobre este.
Esto puede causar una deformación al disco y que
la pegatina se despegue resultando en un
funcionamiento anómalo de la unidad.
2PRECAUCIÓN
Etiquetas
Rebabas
Rebabas
Page 55

— 55 —
'
'
'
'
Asegúrese de que el cartucho de
discos esté debidamente orientado
hacia arriba, con el logotipo Kenwood
hacia arriba. Extraiga la bandeja por
medio del saliente.
Introduzca el cargador en el cambiador de
discos compactos hasta que haga un ruido
seco.
Abra la puerta del cambiador de
discos compactos.
Coloque el disco en la bandeja con la
etiqueta dirigida hacia arriba. Inserte la
bandeja en el cartucho de discos hasta
que encaje. Los discos se enumeran
desde abajo del 1 al 6/10.
• Tenga cuidado de insertar la bandeja en las
ranuras correctas del cartucho de discos.
• Guarde todas las bandejas en el cartucho,
incluso cuando estén vacías.
• No pueden utilizarse discos de 8 cm. Si se
emplea un disco de 8 cm, el disco no podrá
expulsarse.
2PRECAUCIÓN
Introducción de Discos Compactos
1
2
"KENWOOD"
Saliente
4
3
'
Abra la puerta del cambiador de discos
compactos y presione el botón EJECT .
Asegúrese de abrir la puerta completamente
antes de pulsar el botón EJECT. Si la puerta
no está completamente abierta, el cargador
podrá golpearla y podrá producirse una avería
o un mal funcionamiento.
NOTA
Expulsión del cargador
5
6
Utilice el cambiador de discos compactos
con su puerta cerrada para evitar que
entre polvo al cambiador.
NOTA
Cierre la puerta del cambiador de discos
compactos.
Page 56

— 56 —
Español
Características generales
Allumer l'alimentation
Cada vez que pulsa el botón [SRC].
Eteindre l'alimentation
Pulse el botón [SRC] durante más de 1 segundo.
El modulador FM se desconecta y puede escucharse la radio.
• Be Asegúrese de disminuir el volumen cada vez que escucha la
radio o una cinta cassette después de interrumpir la reproduoción
de disco.
• Durante la reproducción de disco, no podrá recibir la transmisión
de radio ordinaria porque la salida de antena cambia al lado del
reproductor de disco.
Alimentación
Cada vez que pulsa el botón [SRC].
Fuente requerida Visualización
Sirius (Función del KDC-C521FM/ "SIRIUS"
C471FM para el mercado Americano)
Cambiador automático de CD "CHANGER"/
"CHANGER-1"/
"CHANGER-2"
Entrada auxiliar "AUX"
Désactivé
• Para Sirius es necesario el KTC-SR901 o el KTC-SR902.
• Para la entrada Auxiliar, uno de los accesorios opcionales
siguientes es necesario.
- KCA-S210A
- CA-C1AX
- Cambiador de CD con una función de entrada Auxiliar
incorporada.
Selección de la fuente
Ajustar la estación FM de radio del coche a 88,3 MHz. Véase a
Página 64 para más información acerca del cambio de la
frecuencia de transmisón.
SRC
Page 57

d
u
4
SRCH
¢
SRC
DISP
1-6
SEEK
— 57 —
Características del sintonizadora de radio satélite Sirius
(Función del KDC-C521FM/ C471FM para el mercado Americano)
Pantalla de banda Número de canal
Número de la emisora preajustada
Pulse el botón [SRC].
Seleccione la visualización "SIRIUS".
• Es necesario subscribirse a SIRIUS para recibir los servicios de la
Radio por Satélite Sirius. Póngase en contacto con SIRIUS si
aparece el mensaje "CALL 888-539 SIRIUS TO SUBSCRIBE".
• Puede tardar cierto tiempo en empezar a recibir después de que
haya seleccionado la fuente SIRIUS.
• Si falla la recepción de la señal, aparecerá el mensaje "ACQUIRING
SIGNAL".
Seleccionar el Modo Sirius
Pulse el botón [u].
Cada vez que se pulsa el botón,la banda preajustada cambia
entre la SR1, SR2, SR3 y SR4.
Selección de banda de presintonización
Ajusta el modo de búsqueda.
Pulse el botón [SEEK].
Cada vez que se pulsa el botón, el modo de búsqueda cambia
como se muestra a continuación.
Visualización Funcionamiento
"SEEK 1" Control de búsqueda manual normal.
"SEEK 2" SBúsqueda en orden de las emisoras en
la memoria preajustada.
No puede utilizar esta unidad mientras cambia de Canal o de
Categoría.
Cambiar el Modo de Búsqueda
Indicador SCAN
Page 58

— 58 —
Español
Almacenamiento de el canal en la memoria.
1 Seleccione la banda de presintonización
Pulse el botón [u].
2 Seleccione el canal para guardarla en la memoria
Pulse el botón [4] o [¢].
3 Put the channel in the memory
Pulse el botón [1] — [6] durante más de 2 segundos.
La visualización del número predefinido parpadea 1 vez.
En cada banda, se puede guardar 1 canal en la memoria de cada
botón [1] — [6].
Sólo se almacena el número de canal. La información de categoría
no se almacena.
Memoria de presintonización de canal
Recuperación de los canels de la memoria.
1 Seleccione la banda de presintonización
Pulse el botón [u].
2 Recupere el canal
Pulse el botón [1] — [6].
Sintonización preajustada
Puede cambiar de Canal a través de Arriba/Abajo dentro de una
categoría seleccionada y cambiar de Categoría que incluya al
canal de recepción a través de Anterior/Siguiente y viceversa.
1 Entrar en modo de Búsqueda de Canal
Pulse el botón [SRCH].
2 Seleccione la categoría
Pulse el botón [u] o [d].
3 Seleccione el canal
Pulse el botón [4] o [¢].
Cancelar la Buscar Canal
Pulse el botón [SRCH].
No puede utilizar esta unidad hasta que no se obtenga toda la
información sobre la Categoría.
Buscar canal
Búsqueda del canal que desea escuchar.
1 Comience la Exploración de Canal
Pulse el botón [SEEK] durante más de 1 segundos.
El indicador "SCAN" se iluminará.
2 Libere cuando se recibe el canal que desee escuchar
Pulse el botón [SEEK] durante más de 1 segundos.
Exploración de canal
Características del sintonizadora de radio satélite Sirius
(Función del KDC-C521FM/ C471FM para el mercado Americano)
Page 59

— 59 —
Puede visualizar distintos tipos de datos de texto transmitidos a
través de emisoras de radiodifusión haciendo lo siguiente.
Pulse el botón [DISP].
Cada vez que se pulse el botón, la visualización cambiará como se
indica a continuación.
Información Visualización
Número de Canal
Nombre del Canal "CHANNEL"
Título de la Canción "SONG"
Nombre del Artista "ARTIST"
Nombre de la Categoría "CATEGORY"
Título del Álbum "ALBUM"
Cambio de Visualización
Introducción de el canal y sintonización.
1 Acceda al modo de Sintonización de Acceso Directo
Pulse el botón [DIRECT] del mando a distancia.
2 Introduzca el número de Canal
Pulse los botones numérico.
3 Realizar la Búsqueda de Canal
Pulse el botón [4] o [¢].
Cancelación de la Sintonización de Acceso Directo
Pulse el botón [DIRECT] del mando a distancia.
• Si no presiona ningún botón en los siguientes 10 segundos, se
desactiva automáticamente el modo de Sintonización de acceso
directo.
• Puede cambiar hasta el Canal número 223.
• Si no hay señal en el Canal de entrada, aparecerá el mensaje "NO
CHANNEL".
• Si no puede recibir señal en el Canal de Entrada debido a las malas
condiciones de las ondas de radio o al cualquier otro motivo,
aparecerá el mensaje "ACQUIRING SIGNAL" .
Sintonización de Acceso Directo (función del
mando a distancia)
Page 60

d
u
4
6
¢
SRC
DISP
SCAN
RDM REP
M.RDM
— 60 —
Español
Características control de disco
Reproducción:
Pulse el botón [SRC].
Seleccione la visualización "CHANGER"/ "CHANGER-1"/
"CHANGER-2".
Detener la reproducción :
Pulse el botón [SRC] durante más de 1 segundo.
El modulador FM se desconecta y puede escucharse la radio.
Pausa y Reproducción:
Pulse el botón [6](38...Control remoto).
Cada vez que se pulse el botón, el disco queda en el estado de
pausa o es reproducido.
Si presiona el interruptor una vez más, el disco vuelve a
reproducirse desde la parte interrumpida.
Reproducción de disco
Avance rápido
Mantenga pulsado el botón [¢].
Libere el botón en el punto en el que desea reanudar la
reproducción.
Inversión
Mantenga pulsado el botón [4].
Libere el botón en el punto en el que desea reanudar la
reproducción.
Avance rápido y rebobinado
Búsqueda de una canción en el disco.
Pulse el botón [4] o [¢].
Búsqueda de pista
Número de pista
Tiempo de pista
Número de disco
Indicador
Page 61

— 61 —
Repetición de la canción, disco del cambiador de discos que esté
escuchando.
Pulse el botón [REP].
Cuando está activado, el indicador "REP" se activa.
Cada vez que se pulse el botón, la Repetición de Reproducción
cambiará como se indica a continuación.
Repetición de reproducción Visualización
Repetición de Pista No. de pista parpadea.
Repetición de Disco No. de disco parpadea.
DESACTIVADO —
Repetición de Pista/disco
Reproducción de la primera parte de cada canción de disco que
esté escuchando y búsqueda de la canción que desee escuchar.
1 Comience la Exploración de Pistas
Pulse el botón [SCAN].
El indicador "SCAN" se iluminará.
2 Libere cuando se reproduzca la canción que desee escuchar
Pulse el botón [SCAN].
Exploración de Pista
Selección del ajuste de disco en el cambiador de disco.
Pulse el botón [u] o el botón [d].
Búsqueda de disco
Búsqueda de Pista mediante la introducción del número de pista.
1 Introduzca el número de pista
Pulse los botones numérico en el mando a distancia.
2 Búsqueda de Pista
Pulse el botón [T.UP] o [T.DOWN].
Cancelación de la Búsqueda de Pista Directa
Pulse el botón [38].
Búsqueda de Pista Directa (Función de mando a
distancia)
Búsqueda de Disco mediante la introducción del número de
pista.
1 Introduzca el número de disco
Pulse los botones numérico en el mando a distancia.
2 Realice la búsqueda de álbum
Pulse el botón [+] o [–].
Cancelación de la Búsqueda de Álbum Directa
Pulse el botón [38].
Introduzca "0" para seleccionar el disco 10.
Búsqueda de disco directa (Función de
cambiadores de discos con mando a distancia)
Page 62

— 62 —
Español
Reproduzca las canciones de todos los discos del cambiador de
discos en orden aleatorio.
Pulse el botón [M.RDM].
Cada vez que se pulsa el botón, la Reproducción Aleatoria
Magazine se activa o desactiva.
Cuando está activa, el indicador "RDM" se enciende y el número
de pista y disco parpadean.
Cuando se pulsa el botón [¢], comenzará la selección de la
siguiente canción.
Reproducción Aleatoria de Magazine
(Función de cambiador de discos)
Cambio de la información visualizada.
Pulse el botón [DISP].
Cada vez que se pulse el botón, la visualización cambiará como se
indica a continuación.
Información Visualización
Tiempo P
Título del disco "DISC TITLE"
Título de la pista "TRACK TITLE"
En esta unidad no se visualiza la información de Título del disco y
Título de la pista. Seleccione la información de Tiempo P.
Cambio de Visualización
Reproduzca todas las canciones del disco en orden aleatorio.
Pulse el botón [RDM].
Cada vez que se pulsa el botón, la Reproducción Aleatoria se
activa o desactiva.
Cuando está activado, el indicador "RDM" se enciende y el
número de pista parpadea.
Cuando se pulsa el botón [¢], comenzará la selección de la
siguiente canción.
Reproducción aleatoria
Características control de disco
Page 63

— 63 —
Acerca del Menú
Aquí se explica el método de funcionamiento básico del sistema
de Menús. La referencia a los elemento de menús y el contenido
de sus ajustes se encuentra a continuación de esta explicación de
funcionamiento.
1 Acceda al modo de Menús
Pulse el botón [MENU] durante más de 1 segundo.
Se visualiza "MENU".
2 Seleccione el elemento de menú
Pulse el botón [u] o [d].
3 Ajuste el elemento de menús
Pulse el botón [4] o [¢].
Puede continuar volviendo al paso 2 y ajustando otras opciones.
4 Salga del modo de Menús
Pulse el botón [MENU].
Cuando se visualizan otras opciones, aplicables al método de
funcionamiento básico mencionado, se introduce la tabla de
contenidos de sus ajustes.
Sistema de Menús
d
u
¢
4
MENU
Page 64

— 64 —
Español
Seleccione la frecuencia.
Visualización Preajuste
"T-FREQ 87.7" 87.7 MHz
"T-FREQ 87.9" 87.9 MHz
"T-FREQ 88.1" 88.1 MHz
"T-FREQ 88.3" 88.3 MHz (Ajuste inicial)
"T-FREQ 88.5" 88.5 MHz
"T-FREQ 88.7" 88.7 MHz
"T-FREQ 88.9" 88.9 MHz
"T-FREQ 89.1" 89.1 MHz
"T-FREQ 89.3" 89.3 MHz
"T-FREQ 89.5" 89.5 MHz
"T-FREQ 89.7" 89.7 MHz
"T-FREQ 89.9" 89.9 MHz
Algunas radios de coche no pueden recibir una frecuencia de 87,7
MHz.
Cambio de la Frecuencia de Transmisión
Seleccione el nivel de modulación.
Visualización
"MOD LEVEL 1"
"MOD LEVEL 2" (Ajuste inicial)
"MOD LEVEL 3"
"MOD LEVEL 4"
Nivel de Modulación
Ajuste del control dinámico.
Visualización Preajuste
"D-CONT ON" El control dinámico está activado.
"D-CONT OFF" El control dinámico está desactivado.
(Ajuste inicial)
La unidad viene con una función de distorsión para reducir la
distorsión de sonido.
Si es sonido resulta severamente distorsionado, presione el botón
[4] o [¢] en la unidad de visualización y luego ajuste la función a
"ON". Si la función de prevención de distorsión está ajustada al valor
"ON", se reduce la extensión del sonido.
Si se usa un disco con un nivel alto de reproducción, el sonido puede
estar deformado aunque si se ajuste la función de prevención de
distorsión al valor "ON". En este caso, reducir el nivel de modulación.
Control Dinámico
Ajuste del Despliegue de texto visualizado.
Visualización Preajuste
"SCROLL MANU" No hace eldespliegue.
"SCROLL AUTO" Hace el despliegue cuando la
visualización cambia.
El texto desplegado se indica a continuación.
- Título de la Canción/ Nombre del Artista/ Título del Álbum/
Nombre de la Categoría
Despliegue de Texto
Acerca del Menú
Se visualiza el Sirius ID (número de serie electrónico).
Sirius ID (ESN:Electronic Serial Number)
<Cuando el KTC-SR901 o KTC-SR902 está
conectado>
Función del KDC-C521FM/ C471FM para el mercado Americano
Page 65

— 65 —
Operaciones básicas del control remoto
Botón [SRC]
Cada vez que se pulse el botón, la fuente cambiará.
Operaciones básicas
Utilice dos pilas tamaño "AA".
Deslice la cubierta del compartimiento de las pilas
presionándola ligeramente como se muestra en la figura.
Inserte la pila con los polos + y –orientados en la dirección
correcta, de acuerdo con la ilustración provista en el interior
de la caja.
Guarde las pilas no usadas fuera del alcance de los niños. Vea a un
médico inmediatamente si una pila fuese ingerida.
• Las pilas provistas se han instalado sólo para la verificación del
funcionamiento de la unidad, por lo tanto la vida útil de éstas
puede ser corta.
• Cuando la distancia efectiva de mando del control remoto se
acorte, cambie ambas pilas y ponga dos nuevas.
•A Dependiendo de la unidad conectada, cierta parte de las
operaciones puede no ser posible.
Dependiendo de la unidad conectada, cierta parte de las operaciones
puede no ser posible.
2ADVERTENCIA
Carga y reemplazo de las pilas
[0] – [9]
SRC
M.RDM
DIRECT
SCAN
T.
DOWN
T.
UP
D.REP
REP
RDM
DISC
+
–
38
SRC
D.REP
RDM
/ CH SEARCH
M.RDM/ DIRECT
T.UP/T.DOWN
REP
SCAN
Función del KDC-C521FM/ C471FM para el mercado Europeo
Función del KDC-C521FM/ C471FM para el mercado Europeo
Page 66

— 66 —
Español
Botones [T.UP]/ [T.DOWN]
Realiza el movimiento por las pistas hacia adelante o hacia atrás.
Botones [+]/ [–]
Realiza el movimiento por el álbum hacia adelante o hacia atrás.
Botones [38]
Cada vez que se pulse el botón, la canción queda en el estado de
pausa o es reproducida.
Botones [REP]
Cada vez que se pulsa el botón, la función de repetición de pista
se activa o desactiva.
Botones [D.REP]
Cada vez que se pulsa el botón, la función de repetición de disco
se activa o desactiva.
Botones [RDM]
Cada vez que se pulsa el botón, la Reproducción Aleatoria se
activa o desactiva.
Botones [M.RDM]
Cada vez que se pulsa el botón, la Reproducción Aleatoria
Magazine se activa o desactiva.
Botones [SCAN]
Cada vez que se pulsa el botón, la función de exploración de
pistas se activa o desactiva.
Botones [0] — [9]
Cuando se encuentra en <Búsqueda de Pista Directa> (página 61)
y <Búsqueda de disco directa> (página 61), introducen el número
de pista/disco.
En fuente de Disco
Botones [+]
Seleccione la banda.
Cada vez que pulse el botón [+] cambiará entre las bandas SR1,
SR2, SR3, y SR4.
Botones [T.UP]/ [T.DOWN]
Sintonice la banda hacia arriba o hacia abajo.
Botones [0] — [9]
Pulses los botones [1] — [6] para recuperar las emisoras
predefinidas.
Botones [DIRECT]
Selecciona y cancela el modo <Sintonización de Acceso Directo>
(página 59).
Botones [CH SEARCH]
Selecciona y cancela el modo <Buscar canal> (página 58).
En fuente de Sirius
Función del KDC-C521FM Función del KDC-C521FM/ C471FM para el mercado Europeo
Operaciones básicas del control remoto
Page 67

— 67 —
Vista exterior
......... Número de ítems
El uso de accesorios distintos
de los suministrados podría
causar daños en la unidad.
Asegúrese de utilizar
únicamente los accesorios
entregados con la unidad,
mencionados arriba.
2PRECAUCIÓN
5. Vuelva a conectar el terminal - de la batería.
6. Pulse el botón de reposición.
Cuando taladre el chasis del automóvil un orificio para instalar la
unidad, verifique primero que no exista nada al otro lado pudiera dañar.
• Si se funde el fusible, en primer lugar asegúrese de que los
cables no hayan causado un cortocircuito, y luego reemplace el
fusible usado por otro del mismo régimen.
• No permita que los cables o terminales no conectados entren en
contacto con las partes metálicas del automóvil o con cualquier
otra parte conductora de electricidad. Para evitar cortocircuitos,
no retire las tapas de los extremos de los cables o terminales no
conectados.
• Después de instalar la unidad, compruebe que las lámparas de
freno, las lámparas de destello, el limpiaparabrisas, etc.
funcionen satisfactoriamente.
• Enrolle los cables no conectados con una cinta de vinilo u otro
material similar para que queden aislados.
• Algunos cambiadores de discos requieren cables convertidores
para su conexión. Para los detalles, consulte la sección de
"Precauciones de Seguridad".
2PRECAUCIÓN
2 ADVERTENCIA
Cómo remover los tornillos de transporte
■
Tornillos de
transporte
Antes de comenzar a instalar la unidad, saque los 3 tornillos
de transporte (ranurados) empleados para proteger el
mecanismo interno.
Después de quitar el tornillo de transporte,guárdelo
cuidadosamente y vuelva a utilizarlo antes de transportar de
nuevo la unidad.
NOTA
1. Para evitar cortocircuitos, retire la llave del encendido y desconecte
el terminal - de la batería.
2. Conecte correctamente los cables de entrada y de salida de cada
unidad.
3. Conecte los cables del mazo de conductores en el siguiente orden:
masa, batería, encendido.
4. Instale la unidad en su automóvil.
.........1
1
.........4
2
.........4
3
.........1
4
.........1
5
.........2
6
.........1
7
8
9
.........1
.........1
Accesorios
Para el modelo del mercado Europeo.
Procedimiento de instalación
Page 68

Español
— 68 —
Conmutadores de ajuste de ángulo
■
Los conmutadores de ajuste de ángulo ubicados en ambos
lados del aparato deberán ajustarse según el ángulo de
instalación del cambiador de discos compactos automático.
Ponga ambos conmutadores en la misma posición. Si los
conmutadores están mal ajustados, el sonido saltará o podrá
producirse un mal funcionamiento.
Efectúe el reglaje de los interruptores de ajuste de ángulo con
una moneda u otro objeto plano.
Cambiar el interruptor gradualmente removiendo y usando de
nuevo el objeto al final de cada paso.
Lado de
derecha
Conmutadores de ajuste de ángulo
9090
0
45
90
0
45
Angulo de
instalación
0°~5° 40°~50°
85°~90°
90
0
45
90
0
45
90
0
45
Posición de los
conmutadores
de ajuste de
ángulo
• No es posible realizar una instalación con
un ángulo de 40°~50° si sólo se utiliza 1.
Lado de
izquierda
Instalación de la unidad de visualización
■
• Instalación sin utilizar la placa de montajedeadorno 7
Fijar una cinta Velcro a la
línea oblicua de la unidad de
visualización como se ilustra
anteriormente, luego fijar la
otra cinta Velcro a las partes
donde se desea fijar las
unidades de visualización.
Tirar juntamente las cintas
Velcro e instalar las unidades
de visualización.
• Instalación utilizando la placa de montaje de adorno 7
Unidad de visualización
Unidad de visualización
5
7
Pase el cable procedente de la unidad de visualización a
través del orificio de la placa de montaje de adorno y
presione la unidad de visualización hacia el interior de la
placa de montaje de adorno hasta que quede trabada.
• Asegúrese de que la unidad no esté posicionada en posiciones
donde sea expuesta directamente al sol o donde la temperatura
es muy elevada, para evitar cualquier deformación de la caja.
• Según la posición de instalación, la unidad de visualización
puede recibir señales desde la unidad de controlador. Instalarla
después de comprobar que se pueden recibir las señales.
• Instalar la unidad de modo que no moleste el conductor
durante la marcha del coche.
2PRECAUCIÓN
Instalación
Procedimiento de instalación
Page 69

— 69 —
90
0
45
φ
4
2
3
1
90
0
45
90
0
45
90
0
45
90
0
45
Utilice los agujeros marcados (¶) para instalar la unidad.
Utilice los agujeros marcados (¶) para instalar la unidad.
Instalación horizontal
■
Instalación vertical
■
Vista del panel inferior
Vista del lado
KDC-C521FM
90
0
45
90
0
45
90
0
45
90
0
45
90
0
45
90
0
45
90
0
45
90
45
0
2
3
φ
4
1
2
φ
4
Utilice los agujeros marcados (¶) para instalar la unidad.
En el caso de instalarla en el portaequipajes
■
Instalación de modulador FM
■
90
0
45
90
0
45
Instale la unidad de modulador FM debajo del asiento frontal
utilizando el aditamento metálico y el torníllo de cabeza ciega
como se muestra en la figura de arriba.
Asegúrese de que los cables
no sean cogidos bajo el
asiento. Si no se toma esta
precaución, podrán cortarse
los cables.
2PRECAUCIÓN
φ
3
6
Vista del panel inferior
Vista del lado
KDC-C521FM
Vista del panel inferior
Vista del lado
KDC-C471FM
KDC-C471FM
KDC-C521FM
KDC-C471FM
1
3
Page 70

— 70 —
Español
Para evitar incendios cuando el cable del encendido (Rojo) o el
cable de batería (Amarillo) se cortocircuiten al ponerse en
contacto con el chasis del automóvil (masa), solamente conecte
el suministro de alimentación después de realizar las
conexiones en la caja de fusibles.
2 ADVERTENCIA
ACC
Asegúrese de pulsar el botón de reposición una vez realizada
la instalación.
No instale una antena de un equipo de radio ni los cables de la
antena cerca del cable de salida del cambiador porque esto
podría ser la causa de que este aparato funcione mal.
NOTA
2PRECAUCIÓN
Batería
Caja de fusible
de automóvil
Interruptor de llave
de contacto
Estéreo de
automóvil con
sintonizador FM
Cable de toma de tierra(negro) (Al chasis del automóvil)
Cable de la batería + (amarillo)
Cable del encendido + (rojo)
Enchufe de
antena para coche
Salida de antena de FM/AM
Entrada de antena de FM/AM
Unidad de
presentación
Unidad del
modulador de FM
Salida
cambiador automático de CD
Salida de control
cambiador automático de CD 4
Entrada
de control
Entrada del cambiador automático
de discos compactos
Conexión de Cables a los Terminals
*8 & *9 : Para el modelo del mercado Europeo.
*8
*9
Page 71

— 71 —
Sintonizadora de
radio satélite Sirius
Cable de conexión 4
Cable de conexión
Conexión de Sintonizadora de radio satélite Sirius
■
"TO CHANGER"
"TO HEAD UNIT"
Salida de control
Entrada de control
Cambiador automático de CD
Unidad del
modulador de FM
Salida
Unidad de
presentación
Entrada del cambiador
automático de discos
Page 72

— 72 —
Español
Guia Sobre Localización de Averias
Lo que podría parecer una falla de funcionamiento de su
unidad podría ser simplemente el resultado de un
pequeño error de operación o de un defecto de conexión.
Antes de acudir al servicio, verifique primero el siguiente
cuadro sobre los problemas que se podrían presentar.
General
? No se puede conectar la alimentación.
01
✔ El fusible está fundido.
☞ Después de verificar si hay cortocircuitos en los cables, reemplace el
fusible por otro del mismo régimen.
✔ No hay posición ACC en el encendido del vehículo.
02
☞ Conecte al encendido el mismo cable que el de la batería.
? No ocurre nada al pulsar los botones.
04
✔ El chip de computadora en la unidad no está funcionando de la manera
habitual.
☞ Pulse el botón de reposición de la unidad (página 53).
? No hay sonido, o es muy bajo.
52
✔ El volumen de radio se ajusta al nivel mínimo.3
☞ Incremente el volumen de radio.
✔ El cable de entrada/salida o conjunto de conectores está conectado
incorrectamente.
55
☞ Conecte el cable de entrada/salida o conjunto de conectores
correctamente. Vea <Conexión de Cables a los Terminals> (Página
70).
? Distorsión del sonido.
67
✔ Los niveles de señal difieren dependiendo de la fuente seleccionada.
☞ Cambiar el ajuste del Nivel de Modulación/Control Dinámico. (Página
64)
? No hay indicación al visualizador.
04
✔ La salida de control de la unidad del visualizador no está conectada de
modo apropiado.
☞ Conectar correctamente la salida de control.
Fuente Sirius
? No se puede seleccionar el Sirius.
2
✔ El cable de conexión Sirius no está conectado.
☞ Utilice el cable de conexión Sirius para conectar la unidad de control
y el sintonizador de radio satélite Sirius.
✔ Conecte la fuente de alimentación del sintonizador de radio satélite
Sirius.
53
☞ Conecte el cable de la batería y el cable a tierra al sintonizador de
radio satélite Sirius.
✔ El sintonizador de radio satélite Sirius no está conectado
correctamente.
55
☞ Conecte directamente el sintonizador de radio satélite Sirius a esta
unidad.
? No se escucha ningún sonido, o el volumen está demasiado bajo.
58
✔ Los cables de entrada/salida o el cableado preformado están conectados
incorrectamente.
☞ Conecte nuevamente en forma correcta los cables de entrada/salida
y/o el cableado preformado.
? No se puede recibir ninguna emisión.
2
✔ La antena Sirius no está conectada.
☞ Conéctela en forma apropiada.
✔ No se ha establecido suscripción.
53
☞ Suscribirse a SIRIUS.
? No se escucha ningún sonido pero se visualiza la información
concerniente al sintonizador de radio satélite Sirius.
67
✔ El volumen de radio se ajusta al nivel mínimo.
☞ Incremente el volumen de radio.
✔ El microordenador no funciona correctamente.
68
☞ Presione el botón de reposición de esta unidad. (página 53)
✔ El sistema no está conectado adecuadamente.
69
☞ Conecte el sistema adecuadamente. Vea <Conexión de Cables a los
Terminals"> (Página 70).
Page 73

— 73 —
Fuente de Disco
? La reproducción del disco no se inicia.
52
✔ El cambiador automático de CD no está conectado a la unidad.
☞ Conecte la entrada del cambiador automático de CD a la unidad.
✔ El botón de alimentación no está activado.
53
☞ Active con el botón de alimentación.
? No se reproduce el disco especificado, sino otro.
52
✔ El CD especificado está muy sucio.
☞ Limpie el CD.
✔ El CD está al revés.
53
☞ Cargue el CD con el lado de la etiqueta hacia arriba.
✔ El disco está cargado en una ranura diferente de la especificada.
54
☞ Saque el cartucho del disco y verifique el número del disco
especificado.
✔ El disco está muy rayado.
55
☞ Pruebe otro disco.
? No se reproduce la pista especificada.
58
✔ Se ha seleccionado reproducción al azar o reproducción al azar de
cartucho.
☞ Desactive la función de reproducción al azar o de reproducción al
azar de cartucho.
? No es posible reproducir discos CD-R o CD-RW.
60
✔ No se está realizando el proceso de finalización para el CD-R/CD-RW.
☞ Lleve a cabo el proceso de finalización con el grabador de CD.
? La búsqueda de pista directa y de disco directa no se pueden llevar a
cabo.
66-1
✔ Otra función se activa.
☞ Desactive la reproducción aleatoria u otras funciones.
? No se puede realizar la búsqueda de pistas.66-2
✔ Para el primer álbum o última canción.
☞ Para cada álbum, la búsqueda de pistas no se puede realizar en
retroceso para la primera canción o en dirección de avance para la
última canción.
? Hay omisiones de sonido debido a vibraciones.
67
✔ Algo está tocando el cambiador de discs.
☞ Aleje dicho objeto del cambiador de discs.
✔ El disco está sucio o dañado.
68
☞ Si el sonido se omite ("salta") en el mismo lugar, el disco está
dañado. Verifique y si es posible, limpie el disco.
✔ La unidad de cambio se instala con un ángulo de inclinación.
69
☞ Monte el aparato en un lugar nivelado.
✔ El cambiador está montado en un lugar inestable.
8
☞ Monte el aparato en un lugar estable.
✔ Los conmutadores de ajuste de ángulo están mal ajustados.
69
☞ Ponga los conmutadores de ajuste de ángulo en las posiciones
correctas.
? La calidad de sonido es deficiente.
67
✔ La grabación del disco es deficiente.
☞ Intente reproducir otro disco. Si el sonido es bueno, quiere decir que
el disco original estaba defectuoso.
✔ El disco está sucio o dañado.
8
☞ Verifique y si es posible, limpie el disco.
? No hay sonido aunque se visualiza la información relacionada con
cambiador de discs.
67
✔ El volumen de radio se ajusta al nivel mínimo.
☞ Incremente el volumen de radio.
✔ El microordenador no funciona correctamente.
68
☞ Presione el botón de reposición de esta unidad. (Página 53)
✔ El sistema no está conectado adecuadamente.
69
☞ Conecte el sistema adecuadamente. Vea <Conexión de Cables a los
Terminals> (Página 70).
Page 74

— 74 —
Español
Los mensajes mostrados a continuación presentan las condiciones de su sistema.
EJECT: No se ha cargado el cartucho de discos en el cambiador. El cartucho de discos no está completamente cargado.
E01
➪ Cargue correctamente el cartucho de discos.
NO DISC: No se ha cargado el disco en el cartucho de discos.E02
➪ Cargue un disco en el cartucho de discos.
TOC Error: No se ha cargado el disco en el cartucho de discos.E04
➪ Cargue un disco en el cartucho de discos.
El CD está muy sucio. El CD está boca abajo. El CD está muy rayado.
➪ Limpie el CD y cárguelo correctamente.
E-77: Por algún motivo, la unidad funciona en forma defectuosa.E77
➪ Pulse el botón de Reinicio en la unidad de visualización. Si el código "E-77" no desaparece, consulte a su centro de servicio
más cercano.
Mecha Error: El magazín de disco tiene algún problema. O la unidad está funcionando incorrectamente por alguna razón.E99
➪ Verifique el depósito de disco, y luego pulse el botón de reinicio en la unidad de visualización. Si el código "Mecha Error" no
desaparece, consulte a su centro de servicio más cercano.
Hold Error: El circuito de protección de la unidad se activa cuando la temperatura interior del cambiador de discos automático excede de
60˚C (140˚F), interrumpiendo toda operación.E0d
➪ Enfríe la unidad abriendo las ventanillas o encendiendo el acondicionador de aire.
Cuando la temperatura disminuya por debajo de 60˚C (140˚F), se reanudará la reproducción del disco.
ANTENNA ERR: La antena no está conectada correctamente.E77
➪ Asegúrese de que la antena esté conectada correctamente y luego active y desactive la fuente SIRIUS o la unidad de
visualización.
TUNER ERROR: No se puede recibir la emisión debido a un error en esta unidad.E77
➪ Active/desactive la fuente SIRIUS o la unidad de control, o pulse el botón de reinicio de la unidad de visualización.
ESN ERROR: El ESN (Número de serie electrónico) no está registrado en la unidad sintonizadora de radio satélite Sirius.E77
➪ Consulte a su centro de servicio más cercano.
LINE ERROR: No esta conectado un cambiador de discos ni un sintonizador de radio satélite Sirius.E77
➪ Conecte un cambiador de discos o un sintonizador de radio satélite Sirius.
El número de cambiadores de discos y de sintonizadores de radio satélite Sirius excede el límite de conexión para este
sistema.E77
➪ Se pueden conectar máximo dos unidades. Organice nuevamente su conexión para que no sobrepase el límite de conexión.
Guia Sobre Localización de Averias
Page 75

— 75 —
Sección de disco
Diodo láser......................................................GaAlAs (λ=780 nm)
Filtro digital (D/A) ..............Frecuencia de sobremuestreo 8 veces
Convertidor D/A......................................................................1 bit
Velocidad de giro ..........................................500 ~ 200 rpm (CLV)
Fluctuación y trémolo ............................Menos del límite medible
Respuesta de frecuencias (± 1 dB)........................10 Hz ~ 20 kHz
Frecuencia de modulación (200KHz Intervalo)
....87,7/ 87,9/ 88,1/ 88,3/
88,5/ 88,7/ 88,9/ 89,1/
89,3/ 89,5/ 89,7/ 89,9,
MHz
Generalidades
Voltaje de operación..........................................14,4 V (11 ~ 16 V)
Consumo de corriente ..........................................................1,4 A
Temperatura de operación ..........................................–10 ~ 50 °C
Tamaño (An x Al x Pr)
Cambiador de discos compactos
(KDC-C521FM) .............................................250 × 80 × 176 mm
(9-13/16 × 3-1/8 × 6-13/16 in.)
(KDC-C471FM) ............................................250 × 64 × 176 mm
(9-13/16 × 2-1/2 × 6-13/16 in.)
Unidad de Controlador ..................................45 × 140 × 29 mm
(1-12/16 × 5-8/16 × 1-1/8 in.)
Unidad de presentación ................................154 × 43 × 17 mm
(6-1/16 × 1-11/16 × 11/16 in.)
Unidad del modulador de FM ........................126 × 30 × 69 mm
(4-15/16 × 1-3/16 × 2-6/8 in.)
Placa de montaje de adorno ..........................188 × 58 × 18 mm
(7-3/8 × 2-5/16 × 11/16 in.)
Peso
Cambiador de discos compactos
(KDC-C521FM) .......................................................2 kg (4,4 lbs)
(KDC-C471FM).....................................................1,8 kg (4,0 lbs)
Controlador ......................................................0,09 kg (0,2 lbs)
Unidad de presentación ................................0,145 kg (0,32 lbs)
Unidad del modulador de FM ............................0,4 kg (0,88 lbs)
Las especificaciones están sujetas a cambios sin previo aviso.
Especificaciones
(Función del KDC-C521FM/
C471FM para el mercado Europeo)
(Función del KDC-C521FM/
C471FM para el mercado Europeo)
Page 76

Page 77

documentation manual, user maintenance, brochure, user reference, pdf manual
This file has been downloaded from:
User Manual and User Guide for many equipments like mobile phones, photo cameras, monther board, monitors, software, tv, dvd, and othes..
Manual users, user manuals, user guide manual, owners manual, instruction manual, manual owner, manual owner's, manual guide,
manual operation, operating manual, user's manual, operating instructions, manual operators, manual operator, manual product,
 Loading...