

Page 1

KDC-400U
CD-RECEIVER
Quick Start Guide
REPRODUCTOR DE DISCOS COMPACTOS RECEPTOR DE FM/AM
Guía de inicio rápido
Take the time to read through this instruction manual.
Familiarity with installation and operation procedures will help you obtain the best
performance from your new CD-Receiver.
For your records
Record the serial number, found on the back of the unit, in the spaces designated on the
warranty card, and in the space provided below. Refer to the model and serial numbers
whenever you call upon your Kenwood dealer for information or service on the product.
Model KDC-400U Serial number
US Residence Only
Register Online
Register your Kenwood product at www.Kenwoodusa.com
B59 -2154 -00 /00 (KW/KO)© 2012 JVC KENWOOD Corporation
Page 2

Contents
About the Quick Start Guide.......................... 2
Before use ............................................................. 3
Preparations .........................................................4
Basic operations ..................................................5
Playing music (CD/USB/iPod).........................6
Listening to the Pandora® Internet radio ..7
Listening to the radio/
SiriusXM™ Satellite Tuner.............................8
Installation .........................................................10
Before installation ............................................11
Connecting wires to terminals ....................12
Installing/Removing the unit .......................14
Appendix ............................................................15
The illustrations of the display and panel appearing
in this manual are examples used to explain more
clearly how the controls are used. Therefore, what
appears on the display in the illustrations may differ
from what appears on the display on the actual
equipment, and some of the images on the display
may be inapplicable.
2 | Quick Start Guide
About the Quick Start
Guide
This Quick Start Guide explains the basic
functions of this unit. For functions
that are not explained here, refer to the
relevant Instruction manual which can be
downloaded at http://manual.kenwood.
com/edition/im360.
To refer to Instruction manual, a PC loaded
with Microsoft® Windows XP/Vista/7 or Mac
OS X® 10.4 or later is required in addition to
Adobe® Reader™ 7.1 or Adobe® Acrobat®
7.1 or later.
The Instruction manual is subject to change
for modification of specifications and so
forth. Be sure to download the latest edition
of the Instruction manual for reference.
¤ CAUTION
• Keep battery out of reach of children
and in original package until ready to
use. Dispose of used batteries promptly.
If swallowed, contact a physician
immediately.
• Do not leave the battery near fire or
under direct sunlight. A fire, explosion
or excessive heat generation may result.
• Do not set the remote control in hot
places such as on the dashboard.
• The Lithium battery is in danger of
explosion if replaced incorrectly.
Replace it only with the same or
equivalent type.
Page 3

Before use
2 WARNING
To prevent injuries or a fire, take
the following precautions:
• Stop the car before operating the unit.
• To prevent a short circuit, never put or
leave any metallic objects (such as coins
or metal tools) inside the unit.
¤
CAUTION
• Adjust the volume so that you can hear
sound outside the car. Driving with the
volume adjusted to a too high level may
cause an accident.
• Wipe off the dirt on the panel with a dry
silicon or soft cloth.
Failure to observe this precaution may
result in damage to the monitor or unit.
Cleaning the connector
The unit may not function properly if the
connector between the unit and faceplate
are dirty. Detach the faceplate and clean the
connector with a cotton swab gently, being
careful not to damage the connector.
Connector
Condensation
When the car is air-conditioned, moisture
may collect on the laser lens. This may cause
disc read errors. In this case, remove the disc
and wait for the moisture to evaporate.
Notes
• If you experience problems during
installation, consult your Kenwood dealer.
• When you purchase optional accessories,
check with your Kenwood dealer to make
sure that they can work with your model
and in your area.
• Characters that conform to ISO 8859-1
can be displayed.
About the discs used with this unit
• This unit can only play the CDs with
• The following discs cannot be used:
- A disc that is not round
- A disc with coloring on the recording
surface or a disc that is dirty
- A recordable/rewritable disc that has
not been finalized (For the finalization
process, refer to the instruction manual
that came with your disc writing
software or your disc recorder.)
- An 8 cm (3 inch) disc (An attempt
to insert using an adapter can cause
malfunction.)
.
Handling discs
• Do not touch the recording surface of
the disc.
• Do not stick tape etc. on the disc, or use a
disc with tape stuck on it.
• Do not use any accessories for the disc.
• Do not use any solvents to clean discs.
Use a dry silicon or soft cloth.
• Clean the disk by moving the cloth
outward from the center of the disc.
• When removing a disc from this unit, pull
it out horizontally.
• If the center hole or outside rim of a disc
has burrs, remove them before inserting
a disc.
How to reset your unit
If the unit fails to operate properly, press the
Reset button. The unit returns to the factory
settings when the Reset button is pressed.
Reset button
English | 3
Page 4

Preparations
Control knob (Volume knob)Release
[DISP]
Exiting the Demonstration mode
Turn off the Demonstration mode when
you use the unit for the first time after
installation.
Press the Control knob to quit the
Demonstration mode when the message
“To cancel DEMO Press the volume knob”
is displayed (approx. 15 seconds).
Turn the Control knob and press it
when “YES” is displayed.
The Demonstration mode can also be
canceled in the Function Setting mode.
Refer to <Demonstration mode setting>
(page 32) in Instruction manual
Adjusting the clock
Press the [DISP] button several times to
display the clock.
Press and hold [DISP] button.
Turn the Control knob to adjust the
hour, and then press the Control knob.
Turn the Control knob to adjust the
minute, and then press the Control
knob.
4 | Quick Start Guide
Detaching/ Reattaching the
faceplate
Press the Release
button.
¤
• Remove the faceplate at once after
pressing the Release button; otherwise it
can fall down due to vibration.
• The faceplate is a precision component of
the unit and can be damaged by shocks
or jolts.
• Keep the faceplate in its case while
detached.
• Do not place the faceplate (and case) in
areas exposed to direct sunlight, excessive
heat or humidity. Also avoid places with
too much dust or the possibility of water
splashing.
Page 5
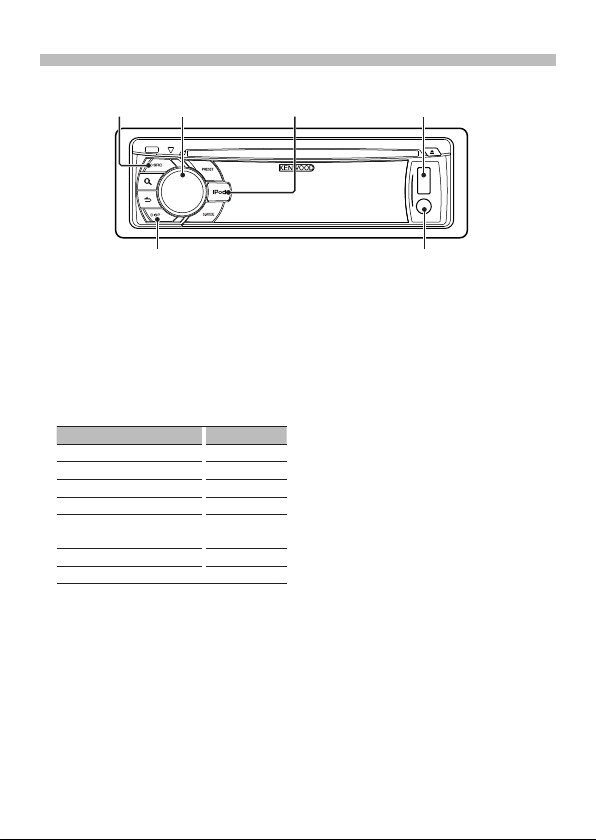
Basic operations
[SRC]
Control knob
[DISP]
Power
Turn the power on by pressing the [SRC]
button.
Press and hold [SRC] button to turn the
power off.
Source selection
Pressing the [SRC] button repeatedly
switches among sources.
Source Display
Standby “STANDBY”
SiriusXM (optional accessory) “SiriusXM”
Tuner “TUNER”
USB or iPod “USB” or “iPod”
Pandora® Internet radio (Function
of iPhone®)
CD “CD”
Auxiliary Input “AU X”
The source “iPod”, “CD”, and “Pandora” can
be selected when it is ready
Press the [iPod] button to switch the
source to iPod.
“Pandora”
to play.
Volume
Turn the Control knob to adjust the
sound volume.
[iPod]
USB terminal
Auxiliary input
USB terminal
A USB device or iPod can be connected.
The CA-U1EX or KCA-iP102 (optional
accessories) is recommended to connect
a USB device or iPod.
Auxiliary input
A portable audio device can be
connected with a stereo mini-plug (3.5
mm ø).
Display selection
Pressing the [DISP] button repeatedly
switches among 5 types of display.
You can select the information to be
displayed. Refer to <Display settings>
(page 24) in Instruction manual.
Display scroll
Keep the [DISP] button pressed down
to scroll through the CD or audio file text
display.
English | 5
Page 6
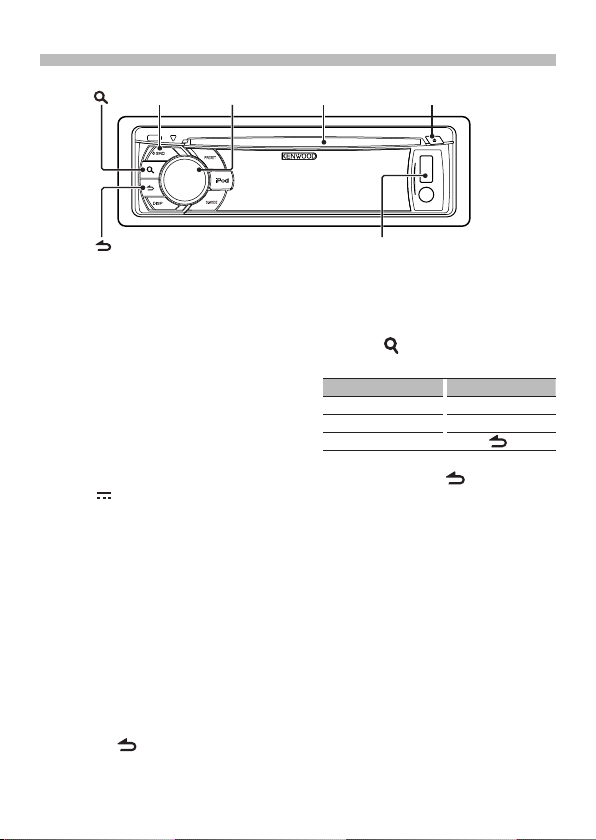
Playing music (CD/USB/iPod)
Control knob Disc slot
[SRC]
[ ]
[0]
[ ]
Playing a disc
Insert a disc in the Disc slot.
When it is inserted, the source is
switched automatically and playback
starts.
Playing a USB device/ iPod
Connect a USB device or iPod to the USB
terminal.
When it is connected, the source is
switched automatically and playback
starts.
(USB terminal maximum supply current:
1 A)
DC 5 V
Selecting an audio file folder
Push the Control knob upward or
downward to select a folder.
Selecting a song
Push the Control knob rightward or
leftward to select a song (track or file).
Fast-forwarding or fastbackwarding a song
Push and hold the Control knob
rightward or leftward to fast-forward or
fast-backward the song (track or file).
Pause and play
Press the [ ] button to interrupt or
resume playing a song (track or file).
6 | Quick Start Guide
USB Terminal
Music search
You can search for the song you want to
play.
Press the [ ] button.
Search for a song.
Operation type Operation
Movement between items Turn the Control knob.
Selection of item Press the Control knob.
Return to previous item
To cancel music search in audio files or
iPod, Press and hold [
Removing disc
Press the [0] button to eject a disc.
Removing USB device/ iPod
Press the [SRC] button to switch the
source to a device other than USB, iPod,
and Pandora Internet radio, and then
remove the USB device.
Data contained in the USB device/ iPod
may be damaged if you remove it when
it is used as the active source.
Press the [
] button.
] button.
Page 7

Listening to the Pandora® Internet radio
Control knob
[PRESET]
[ ]
Listening to the Pandora® Internet
radio
Install the Pandora Internet radio
application in your iPhone.
Connect your iPhone to this unit using a
KCA-iP102 (optional accessory), and then
select the Pandora Internet radio source.
The application starts automatically,
allowing you to listen to the Pandora
Internet radio.
When the iOS version is earlier than 4.0,
start the Internet radio application before
selecting the Pandora Internet radio
source.
Thumbs up
Press and hold [PRESET] button.
Thumbs down
Press and hold [S.MODE] button.
[S.MODE]
USB Terminal
Song skip
Push the Control knob rightward.
Pause and play
Press the [ ] button to interrupt or
resume playing a song.
English | 7
Page 8

Listening to the radio/ SiriusXM™ Satellite Tuner
[SRC] [PRESET]
Control knob
Selecting a tuner source
Press the [SRC] button to select “TUNER”
or “SiriusXM” (optional accessory).
Selecting a band (Tuner only)
Push the Control knob downward to
select a band (FM or AM).
Selecting a station
Push the Control knob leftward or
rightward to select the station you want
to listen to.
The tuning mode can be changed.
Refer to <Tuner setting> (page 20) in
Instruction manual
Station preset memory
Push the Control knob downward to
select a band. (Tuner only)
Push the Control knob leftward or
rightward to select the station you want
to save in the station preset memory.
Press the [PRESET] button.
Press the [PRESET] button again to enter
the Mix Station preset mode. In this
mode, different bands and tuner sources
(Radio, SiriusXM etc.) can be saved in the
same preset layer, which allows you to
recall a desired station without switching
between bands and/or tuner sources.
Maximum of 6 stations can be preset in
the Mix Station preset mode.
Turn the Control knob to select preset
number (FM: “1” – “18”, AM: “1” – “6”,
SiriusXM: “1” – “24”), and then press and
hold Control knob.
8 | Quick Start Guide
Page 9

Recalling the stations in the
memory
Push the Control knob downward to
change the band. (Tuner only)
Press the [PRESET] button.
Turn the Control knob to select a preset
number (FM: “1” – “18”, AM: “1” – “6”,
SiriusXM: “1” – “24”), and then press the
Control knob.
In the Mix Station preset mode, band
names of tuner sources are displayed as
follows:
FM: FM broadcast station
AM: AM broadcast station
English | 9
Page 10

Installation
1
2
3
4
.....1
.....2
.....4
.....4
10 | Quick Start Guide
Page 11

Before installation
2 WARNING
• The unit can only be installed in a car with
a 12V DC power supply, negative ground.
• If you connect the ignition wire (red)
and the battery wire (yellow) to the car
chassis (ground), you may cause a short
circuit, that in turn may start a fire. Always
connect those wires to the power source
running through the fuse box.
¤
CAUTION
• Install this unit in the console of your
vehicle.
• Do not touch the metal parts of this unit
during and shortly after use of the unit.
Metal parts such as the heat sink and
enclosure become hot.
• Mounting and wiring this product
requires skills and experience. For safety’s
sake, leave the mounting and wiring work
to professionals.
• If you experience any problem during
installation, consult your Kenwood dealer.
• Disconnect the battery’s negative terminal
before installing the unit.
• Insulate unconnected wires with vinyl
tape or other similar materials. To prevent
a short circuit, do not remove the caps on
the ends of the unconnected wires and
terminals.
• Be sure to ground this unit to the car’s
chassis again after mounting.
• If the fuse blows, first make sure the wires
are not touching other parts to cause a
short circuit, and then replace the old fuse
with one with a new the same rating.
• When connecting only two speakers,
connect the connectors either to both
of the front output terminals or to both
of the rear output terminals (do not mix
front and rear terminals). For example, if
you connect the + connector of the left
speaker to a front output terminal, do
not connect the - connector to a rear
output terminal.
• Connect the speaker wires correctly to the
corresponding terminals. The unit may
be damaged or fail to work if you share
the - wires or ground them to any metal
part in the car.
• Do not use your own screws. Use only
the supplied screws. Using wrong screws,
could damage the unit.
• If your car’s ignition key switch does
not have an ACC position, connect the
ignition wires to a power source that can
be turned on and off with the ignition
key. If you connect the ignition wires to
a constant-voltage power source, as with
battery wires, the battery may die.
• If the console has a lid, make sure to
install the unit so that the faceplate will
not hit the lid when it is closed or opened.
• After the installing the unit, check
whether the brake lamps, blinkers, wipers,
etc. on the car are working properly.
• Mount the unit so that the mounting
angle is 30° or less.
English | 11
Page 12

Connecting wires to terminals
To SiriusXM Connect Vehicle Tuner
(optional accessory)
Car fuse box
(Main fuse)
+
Battery
12 | Quick Start Guide
Ignition key
switch
–
To front left speaker
To front right speaker
To rear left speaker
To rear right speaker
Car fuse
box
ACC
Black (Ground wire) · (To car chassis)
White
White/Black
Gray
Gray/Black
Green
Green/Black
Purple
Purple/Black
⁄
• Speaker Impedance: 4 – 8 Ω
Red (Ignition wire)
Yellow (Battery wire)
Page 13

Fuse (10A)
Wiring harness
(Accessory1)
Blue/White
(Power control wire)
Blue (Antenna control wire)
Brown (Mute control wire)
Orange/ White
(Dimmer control wire)
Light Blue/ Yellow
(Steering remote control wire)
Rear output
R
L
Front output
FRONTSW REAR
Subwoofer output
FM/AM antenna input
L
R
If no connections are made, do not let the wire come out from
the tab.
When using the optional power amplifier,
P.CONT
connect this wire to its power control
terminal.
Depending on what antenna you are
using, connect either to the control
ANT.
CONT
terminal of the motor antenna, or to the
power terminal for the booster amplifier of
the film-type or short pole type antenna.
(Max. 300mA, 12V)
Connect to the terminal that is grounded
when the telephone rings or during
MUTE
ILLUMI
REMOTE CONT
STEERING WHEEL
REMOTE INPUT
conversation.
To connect the Kenwood navigation
⁄
system, consult your navigation
manual.
To car light control switch
To use the steering wheel remote control
feature, an exclusive remote adapter (not
supplied) that matches your car is required.
English | 13
Page 14

Installing/Removing the unit
Non-Japanese cars
Bend the tabs of the mounting sleeve
with a screwdriver or the like and
attach it in place.
⁄
• Make sure that the unit is installed
securely in place. If the unit is unstable, it
may malfunction (for example, the sound
may skip).
Japanese cars
Remove the hard rubber frame with
reference to <Removing the hard rubber
frame>.
Align the holes in the unit (two locations
on each side) with the vehicle mounting
bracket and secure the unit with the
accessory screws.
N
T
N
3
ø5mm
Accessory3...For Nissan car
Accessory4...For Toyota car
14 | Quick Start Guide
8 mm
MAX.
4
ø5mm
T/N
T
T: Toyota cars
N: Nissan cars
8mm
MAX.
Removing the hard rubber frame
Engage the catch pins on the removal
tool and release the two locks on the
upper part of frame.
Lift up and pull the frame forward as
shown in the figure.
Catch
Lock
Removal tool (Accessory
When the upper part of frame is
removed, remove the lower part of frame.
2)
⁄
• The frame can be removed from the
bottom side in the same manner.
Removing the unit
Remove the hard rubber frame with
reference to <Removing the hard rubber
frame>.
Remove the faceplate.
Insert the two removal tools deeply into
the slots on both sides as shown.
Lower the removal tool toward the
bottom, and then pull out the unit
halfway while pressing the removal tool
towards the inside.
Accessory2
¤
• Be careful to avoid injury from the catch
pins on the removal tool.
Pull the unit all the way out with your
hands, being careful not to drop it.
Page 15

Appendix
About Audio file
• Playable Audio files
AAC-LC (.m4a), MP3 (.mp3), WMA (.wma)
• Playable disc media
CD-R/RW/ROM
• Playable disc file formats
ISO 9660 Level 1/2, Joliet, Romeo, Long
file name.
• Playable USB devices
USB mass storage class
• Playable USB device file systems
FAT16, FAT32
The online manual about
audio files is put on the site,
www.kenwood.com/cs/ce/audiofile/.
Models of iPods/iPhones that can
be connected to this unit
Made for
• iPod touch (4th generation)
• iPod touch (3rd generation)
• iPod touch (2nd generation)
• iPod touch (1st generation)
• iPod classic
• iPod with video
• iPod nano (6th generation)
• iPod nano (5th generation)
• iPod nano (4th generation)
• iPod nano (3rd generation)
• iPod nano (2nd generation)
• iPod nano (1st generation)
• iPhone 4S
• iPhone 4
• iPhone 3GS
• iPhone 3G
• iPhone
For information on the compatibility with
iPod/iPhone software, visit www.kenwood.
com/cs/ce/ipod/.
English | 15
Page 16

Índice
Acerca de la guía de inicio rápido ..............16
Antes de usar .....................................................17
Preparación.........................................................18
Funciones básicas ............................................19
Reproducción de música
(CD/USB/iPod)................................................20
Escuchar la radio por Internet
Pandora® ..........................................................21
Escuchar el sintonizador de radio/
Sintonizador satelital SiriusXM™ .............22
Instalación ..........................................................24
Antes de la instalación ...................................25
Conexión de cables a los terminales .........26
Montaje y desmontaje de la unidad .........28
Apéndice ............................................................29
Las ilustraciones de este manual donde puede verse
la pantalla de visualización y el panel son sólo
ejemplos que se utilizan para explicar claramente
la forma en la cual se utilizan los controles. Por
lo tanto, lo que aparece en la pantalla en las
ilustraciones puede diferir de lo que aparece
realmente en la pantalla del equipo; asimismo,
algunas de las imágenes de la pantalla pueden no
ser aplicables.
16 | Guía de inicio rápido
Acerca de la guía de
inicio rápido
En esta guía de inicio rápido se explican
las funciones básicas de esta unidad. Si
precisa información sobre alguna función no
descrita en esta guía, consulte el manual de
instrucciones correspondiente disponible en
http://manual.kenwood.com/edition/im360.
Para consultar el Manual de instrucciones será
necesario un PC en el que se haya instalado
Microsoft® Windows XP/Vista/7 o Mac OS X®
10.4 o posterior además de Adobe® Reader™
7.1 o Adobe® Acrobat® 7.1 o posterior.
El manual de instrucciones está sujeto
a cambios por modificaciones de las
especificaciones, etc. Asegúrese de descargar la
última edición del manual de instrucciones.
¤ PRECAUCIÓN
• Mantenga la batería fuera del alcance
de los niños y en su embalaje original
hasta que esté listo para su uso. Deseche
diligentemente las baterías usadas. Si se
produce una ingestión de las mismas,
póngase en contacto de inmediato con
un médico.
• No deje la batería cerca del fuego o
expuesta a la luz solar directa. Puede
producirse un incendio, una explosión o
un calor excesivo.
• No deje el mando a distancia en
superficies calientes como el salpicadero.
• La batería de litio presenta riesgo de
explosión si se sustituye de forma
incorrecta.Sustituya la batería solo con
una batería del mismo tipo o de un tipo
equivalente.
Page 17

Antes de usar
2 ADVERTENCIA
Para evitar el riesgo de lesiones o
de fuego, observe las siguientes
precauciones:
• Detenga el coche antes de comenzar a
utilizar la unidad.
• Para evitar cortocircuitos, nunca coloque
ni deje objetos metálicos (por ejemplo,
monedas o herramientas metálicas) dentro
de la unidad.
¤
PRECAUCIÓN
• Ajuste el volumen a un nivel que le permita
oír los sonidos procedentes del exterior.
Conducir con el volumen demasiado alto
puede provocar un accidente.
• Retire la suciedad del panel con un paño
suave o una gamuza seca.
La no observación de esta precaución puede
provocar daños en el monitor o en la unidad.
Limpieza del conector
La unidad puede no funcionar adecuadamente
si los conectores entre la unidad y la placa
frontal están sucios. Extraiga la placa frontal
y utilice un algodón para limpiar el conector,
teniendo cuidado de no dañarlo.
Condensación
Si el aire acondicionado del coche está
encendido, se puede producir condensación
de humedad en la lente del láser. Esto puede
provocar errores en la lectura del disco. En
tal caso, retire el disco y espere hasta que la
humedad se evapore.
Notas
• Si tiene problemas durante la instalación,
consulte a su distribuidor Kenwood.
• Antes de comprar accesorios opcionales,
consulte a su distribuidor Kenwood para
asegurarse de que funcionan con su modelo
en su área.
Conector
• Pueden mostrarse en pantalla caracteres de
conformidad con la norma ISO 8859-1.
Acerca de los discos utilizados en
esta unidad
• Esta unidad sólo puede reproducir los CD
con
• No se pueden utilizar los siguientes discos:
- Discos que no sean redondos
- Discos coloreados en la superficie de
grabación o discos que estén sucios
- Discos regrabables/reescribibles que
no hayan sido finalizados (para obtener
detalles sobre el proceso de finalización,
consulte el manual de instrucciones que se
le entregó con el software de escritura de
discos o con grabador de discos.)
- Discos de 8 cm (3 pulgadas). (Intentar
insertar uno con un adaptador puede
provocar una avería.)
Manejo de los discos
• No toque la superficie de grabación del disco.
• No pegue cintas etc. sobre el disco ni utilice
un disco con cinta pegada sobre él.
• No utilice accesorios para el disco.
• No utilice disolventes para limpiar los discos.
Use un paño suave o una gamuza seca.
• Limpie el disco moviendo el paño desde el
centro hacia el borde.
• Cuando extraiga los discos de esta unidad,
tire de ellos en sentido horizontal.
• Si el orificio central o el borde del disco
presentan rebabas, elimínelas antes de
insertar dicho disco.
Cómo reiniciar su unidad
Si la unidad no funciona correctamente, pulse
el botón de reinicio. La unidad se restaura a los
ajustes de fábrica al pulsar el botón de reinicio.
Botón de reinicio
.
Español | 17
Page 18

Preparación
Mando de control
(control del volumen)Liberación
[DISP]
Salir del modo de demostración
Desconecte el modo de demostración
cuando utilice la unidad por primera vez
después de la instalación.
Pulse el mando de control para salir
del modo de demostración si aparece el
mensaje “To cancel DEMO Press the volume
knob” (aprox. 15 segundos).
Gire el mando de control y púlselo cuando
se muestre “YES”.
El modo de demostración también puede
cancelarse en el modo de configuración
de las funciones. Consulte <Ajuste del
modo de demostración> en el manual de
instrucciones.
Ajuste del reloj
Pulse el botón [DISP] repetidas veces para
visualizar el reloj.
Mantenga pulsado el botón [DISP].
Gire el mando de control para ajustar la
hora y, a continuación, púlselo.
Gire el mando de control para ajustar el
minuto y, a continuación, púlselo.
18 | Guía de inicio rápido
Cómo extraer y cómo colocar la
placa frontal
Pulse el botón de
liberación.
¤
• Extraiga la placa frontal después de pulsar el
botón de liberación; en caso contrario, podría
caerse debido a la vibración.
• La placa frontal es un componente de
precisión que puede resultar dañado por
golpes o sacudidas.
• Guarde la placa frontal en su estuche cuando
no la tenga conectada.
• No deje la placa frontal desmontada (ni
su estuche) en lugares expuestos a la luz
directa del sol o excesivamente húmedos o
calurosos. Además deberá evitar sitios con
mucho polvo o la posibilidad de que se
derrame agua sobre ella.
Page 19

Funciones básicas
Mando de
[SRC]
control
[DISP]
Encendido
Encienda la unidad pulsando el botón
[SRC].
Mantenga pulsado el botón [SRC] para
apagar la alimentación.
Selección de fuente
Pulse el botón [SRC] repetidamente para
pasar de una fuente a otra.
Fuente Visualización
Espera “STANDBY”
SiriusXM (accesorio opcional) “SiriusXM”
Sintonizador “TUNER”
USB o iPod “USB” o “iPod”
Radio por Internet Pandora® (función
del iPhone®)
CD “CD”
Entrada auxiliar “AU X”
Puede seleccionarse la fuente “iPod”, “CD”
y “Pandora” cuando este preparada
reproducir.
Pulse el botón [iPod] para cambiar la
fuente a iPod.
Volumen
Gire el mando de control para ajustar el
volumen.
“Pandora”
[iPod]
Entrada auxiliar
Terminal USB
Puede conectar un dispositivo USB o un
iPod.
Se recomiendan CA-U1EX o KCA-iP102
(accesorios opcionales) para conectar un
dispositivo USB o un iPod.
Entrada auxiliar
Es posible conectar un dispositivo de audio
portátil con un conector mini estéreo (3,5
mm ø).
Selección de la visualización
Pulse el botón [DISP] repetidamente para
pasar entre 5 tipos de visualización.
Puede seleccionar la información que
debe visualizarse. Consulte <Ajustes
de la visualización> en el manual de
instrucciones.
Desplazamiento del texto de
para
visualización
Mantenga pulsado el botón [DISP] para ir
pasando el texto del CD o del archivo de
audio.
Terminal USB
Español | 19
Page 20

Reproducción de música (CD/USB/iPod)
[ ]
control
Mando de
[SRC]
[ ]
Reproducción de un disco
Inserte un disco en la ranura para discos.
Una vez introducido el disco, la fuente
cambia automáticamente y comienza la
reproducción.
Reproducción de un dispositivo
USB/iPod
Conecte un dispositivo USB o un iPod en el
terminal USB.
Una vez conectado, la fuente cambia
automáticamente y comienza la
reproducción.
(Corriente máxima de suministro del
terminal USB: CC 5 V
1 A)
Selección de una carpeta de
archivos de audio
Pulse el mando de control hacia arriba o
hacia abajo para seleccionar una carpeta.
Selección de una canción
Pulse el mando de control hacia la derecha
o la izquierda para seleccionar una canción
(pista o archivo).
Avance o retroceso rápido de una
canción
Mantenga pulsado el mando de control
hacia la derecha o la izquierda para avanzar
o retroceder rápidamente una canción (pista
o archivo).
20 | Guía de inicio rápido
Ranura para
discos
[0]
Terminal USB
Pausa y reproducción
Pulse el botón [ ] para interrumpir o
reanudar la reproducción de una canción
(pista o archivo).
Búsqueda de música
Puede buscar la canción que desea
reproducir.
Pulse el botón [ ].
Busque una canción.
Tipo de operación Operación
Desplazamiento entre los
elementos
Selección del elemento Pulse el mando de control.
Volver al elemento anterior
Para cancelar la búsqueda de música en
archivos de audio o en el iPod, mantenga
pulsado el botón [
Extracción del disco
Pulse el botón [0] para expulsar un disco.
Extracción del dispositivo USB/
iPod
Pulse el botón [SRC] para cambiar la fuente
a un dispositivo distinto de USB e iPod y
radio por Internet Pandora y, a continuación,
retire el dispositivo USB.
Los datos contenidos en el dispositivo USB/
iPod pueden resultar dañados si lo retira
mientras lo está utilizando como fuente
activa.
Gire el mando de control.
Pulse el botón [
].
].
Page 21

Escuchar la radio por Internet Pandora®
Mando de
control
[ ]
Escuchar la radio por Internet
Pandora®
Instale la radio por Internet Pandora en su
iPhone.
Conecte su iPhone a esta unidad con
un KCA-iP102 (accesorio opcional) y, a
continuación, seleccione la fuente de radio
por Internet Pandora. La aplicación se inicia
automáticamente para permitirle escuchar
la radio por Internet Pandora®
Cuando la versión de iOS es anterior a 4.0,
inicie la aplicación de radio por Internet
antes de seleccionar la fuente de radio por
Internet Pandora.
Pulgares arriba
Mantenga pulsado el botón [PRESET].
Pulgares abajo
Pulse y mantenga pulsado el botón
[S.MODE].
[PRESET]
Omitir canción
Pulse el mando de control hacia la derecha.
Pausa y reproducción
Pulse el botón [ ] para interrumpir o
reanudar la reproducción de una canción.
[S.MODE]
Terminal USB
Español | 21
Page 22

Escuchar el sintonizador de radio/ Sintonizador satelital SiriusXM™
Mando de
[SRC] [PRESET]
control
Selección de una fuente del
sintonizador
Pulse el botón [SRC] para seleccionar
“TUNER” o “SiriusXM” (accesorio opcional).
Selección de una banda
(Solo sintonizador)
Pulse el mando de control hacia abajo para
seleccionar una banda (FM o AM).
Selección de una emisora
Pulse el mando de control hacia la
izquierda y hacia la derecha para seleccionar
la emisora que desee escuchar.
El modo de sintonización se puede
modificar. Consulte <Configuración del
sintonizador> en el Manual de instrucciones
22 | Guía de inicio rápido
Memoria de presintonización de
emisoras
Pulse el mando de control hacia abajo para
seleccionar una banda. (Solo sintonizador)
Pulse el mando de control hacia la
izquierda y hacia la derecha para seleccionar
la emisora que desee memorizar.
Pulse el botón [PRESET ].
Vuelva a pulsar el botón [PRESET] para
acceder al modo de presintonización de
emisoras combinadas. En este modo, se
pueden guardar diferentes bandas y fuentes
del sintonizador (Radio, SiriusXM etc.) en la
misma capa predefinida, para que pueda
recuperar la emisora que desee sin cambiar
entre bandas y/o fuentes del sintonizador.
En el modo de presintonización de emisoras
combinadas se puede presintonizar un
máximo de 6 emisoras.
Gire el mando de control para seleccionar
el número presintonizado (FM: “1” – “18”,
AM: “1” – “6”, SiriusXM: “1” – “24”), y, a
continuación, mantenga pulsado el mando
de control.
Page 23

Recuperación de las emisoras de la
memoria
Pulse el mando de control hacia abajo para
cambiar la banda. (Solo sintonizador)
Pulse el botón [PRESET ].
Gire el mando de control para seleccionar
un número de presintonización (FM: “1” –
“18”, AM: “1” – “6”, SiriusXM: “1” – “24”) y, a
continuación, pulse el mando de control.
En el modo de presintonización de Mix
Station, se muestran los nombres de las
bandas como se indica a continuación:
FM: Emisora de difusión FM
AM: Emisora de difusión AM
Español | 23
Page 24

Instalación
1
2
3
4
.....1
.....2
.....4
.....4
24 | Guía de inicio rápido
Page 25

Antes de la instalación
2 ADVERTENCIA
• La unidad sólo se puede instalar en un coche
que disponga de una fuente de alimentación
de 12 V CC con conexión a tierra negativa.
• Si conecta el cable de encendido (rojo) y
el cable de la batería (amarillo) al chasis
del automóvil (tierra), podría producir un
cortocircuito y esto, a su vez, un incendio.
Conecte siempre esos cables a la fuente de
alimentación que pasa por la caja de fusibles.
¤
PRECAUCIÓN
• Instale esta unidad en la consola de su
vehículo.
• No toque las partes metálicas de la unidad
mientras la esté utilizando ni poco después
de utilizarla. Las partes metálicas, tales como
el disipador de calor o la carcasa, pueden
estar muy calientes.
• La instalación y el cableado de este producto
requieren de habilidad y experiencia. Por
motivos de seguridad, deje la labor de
montaje y conexión de cables en manos de
profesionales.
• Si tiene problemas durante la instalación,
consulte a su distribuidor Kenwood.
• Desconecte el borne negativo de la batería
antes de instalar la unidad.
• Aísle los cables no conectados con una cinta
de vinilo u otros materiales similares. Para
evitar cortocircuitos, no retire los tapones de
los extremos de los cables o terminales no
conectados.
• Después de la instalación compruebe otra
vez que esta unidad está conectada a tierra a
través del chasis del coche.
• Si se funde el fusible, asegúrese en primer
lugar de que los cables no se están
tocando otros componentes y causando un
cortocircuito y, a continuación, reemplace el
fusible usado por otro del mismo amperaje.
• Si sólo va a conectar dos altavoces, enchufe
los conectores a ambos terminales de salida
delanteros o a ambos terminales de salida
traseros (es decir, no mezcle terminales
delanteros y traseros). Por ejemplo, si conecta
el conector + del altavoz izquierdo a un
terminal de salida delantero, no conecte
el conector - del altavoz derecho a un
terminal de salida trasero.
• Conecte los cables de los altavoces a
los terminales que les corresponden. La
conexión compartida de los cables - o
la conexión a tierra de los mismos a través
de cualquier parte metálica del automóvil
pueden dañar la unidad o impedir su
correcto funcionamiento.
• No utilice sus propios tornillos. Utilice solo
los tornillos suministrados. El uso de tornillos
diferentes podría causar daños en la unidad.
• Si la llave de encendido de su automóvil
no está provista de la posición de contacto,
conecte los cables de encendido a una
fuente de alimentación que pueda
conectarse y desconectarse con la llave
de encendido. Si conecta los cables de
encendido a una fuente de alimentación que
recibe un suministro constante de corriente,
tales como los cables de la batería, la batería
podría descargarse.
• Si la consola tiene una tapa, asegúrese de
instalar la unidad de modo que la placa
frontal no golpee dicha tapa al abrir y cerrar.
• Después de instalar la unidad, compruebe
que las luces de freno, las luces intermitentes,
el limpiaparabrisas, etc. funcionen
correctamente.
• Instale la unidad en un ángulo de 30˚ o
menos.
Español | 25
Page 26

Conexión de cables a los terminales
Para el sintonizador para vehículo
SiriusXM Connect (accesorio opcional)
⁄
• Impedancia del altavoz:
4 – 8 Ω
Caja de fusibles
del vehículo
(fusible principal)
+
Batería
26 | Guía de inicio rápido
Interruptor
de la llave de
encendido
–
Hacia el altavoz delantero
Hacia el altavoz delantero
Hacia el altavoz trasero
Hacia el altavoz trasero
Caja de
fusibles del
vehículo
izquierdo
derecho
izquierdo
derecho
ACC
Negro (cable a tierra) · (al chasis del vehículo)
Blanco
Blanco/Negro
Gris
Gris/negro
Verde
Verde/negro
Púrpura
Púrpura/negro
Rojo (cable de encendido)
Amarillo (cable de la batería)
Page 27

Fusible (10 A)
Mazo de
conductores
(accesorio1)
Azul/blanco (cable del
control de alimentación)
Azul (cable de control de la
antena)
Marrón (cable de control de
silenciamiento)
Naranja/blanco
(cable del reductor de luz)
Luz azul/amarilla
(cable del mando a distancia de
la dirección)
Salida trasera
R
L
Salida delantera
FRONTSW REAR
Salida de subwoofer
Entrada de antena FM/AM
L
R
Si no se ha realizado ninguna conexión, no deje que el cable
sobresalga de la lengüeta.
Si utiliza el amplificador de potencia opcional,
P.CONT
ANT.
CONT
MUTE
ILLUMI
REMOTE CONT
STEERING WHEEL
REMOTE INPUT
conecte este cable a su terminal de control de
alimentación.
Según el tipo de antena que utilice, conéctela
al terminal de control de la antena del motor
o al terminal de alimentación del amplificador
del sobrealimentador de la antena de película
o de polo corto. (Máx. 300 mA, 12 V)
Conéctelo al terminal de tierra cuando suene
el teléfono o durante la conversación.
Para conectar el sistema de navegación
⁄
Kenwood, consulte su manual de
navegación.
A interruptor de control de luces del vehículo
Para utilizar la función de mando a distancia
en el volante es necesario un adaptador
remoto exclusivo (no suministrado) para su
vehículo.
Español | 27
Page 28

Montaje y desmontaje de la unidad
Automóviles no japoneses
Doble las lengüetas del manguito
de montaje con un destornillador o
similar y fíjelo.
⁄
• Asegúrese de que la unidad esté firmemente
instalada en su lugar. Si está instalada de
forma inestable, podrían ocurrir fallos de
funcionamiento (p. ej., saltos de sonido).
Automóviles japoneses
Retire el marco de goma rígida tal como
se describe en <Extracción del marco de
goma rígida>.
Alinee los orificios de la unidad (dos
ubicaciones a cada lado) con el soporte de
montaje del vehículo y fíjelo a la unidad con
los tornillos accesorios.
N
T
N
3
8 mm
MAX.
ø5mm
Accesorio3...para automóviles Nissan
Accesorio4...para automóviles Toyota
28 | Guía de inicio rápido
T
4
ø5mm
T/N
T: Automóviles Toyota
N: Automóviles Nissan
8mm
MAX.
Extracción del marco de goma
rígida
Enganche las uñas de agarre en la
herramienta de extracción y quite los dos
enganches del nivel superior del marco.
Suba el bastidor y tire de él hacia adelante
tal como se indica en la imagen.
Uña
Fijador
Herramienta de extracción (accesorio
Después de extraer la parte superior del
marco, libere de la misma manera la parte
inferior del marco.
⁄
• Se puede quitar el marco desde la parte de
abajo de la misma forma.
Desmontaje de la unidad
Retire el marco de goma rígida tal como
se describe en <Extracción del marco de
goma rígida>.
Extraiga la placa frontal.
Inserte las dos herramientas de extracción
profundamente en las ranuras de cada lado,
tal como se muestra.
Mueva la herramienta de extracción hacia
abajo y extraiga la unidad hasta la mitad
mientras presiona hacia dentro.
Accesorio2
¤
• Preste atención para no lastimarse con
las uñas de agarre de la herramienta de
extracción.
Termine de sacar la unidad con las manos,
prestando atención para no dejarla caer.
2)
Page 29

Apéndice
Acerca de los archivos de audio
• Archivos de audio reproducibles
AAC-LC (.m4a), MP3 (.mp3) y WMA (.wma)
• Soportes de disco reproducibles
CD-R/RW/ROM
• Formatos de archivo de disco reproducibles
ISO 9660 Nivel 1/2, Joliet, Romeo y nombre
de archivo largo.
• Dispositivos USB reproducibles
Clase de almacenamiento masivo USB
• Sistemas de archivos del dispositivo USB
reproducibles
FAT16 y FAT32
Puede encontrar un manual en línea
sobre los archivos de audio en el sitio web
www.kenwood.com/cs/ce/audiofile/.
Modelos de iPod/iPhone que
pueden conectarse a esta unidad
Made for
• iPod touch (4th generation)
• iPod touch (3rd generation)
• iPod touch (2nd generation)
• iPod touch (1st generation)
• iPod classic
• iPod with video
• iPod nano (6th generation)
• iPod nano (5th generation)
• iPod nano (4th generation)
• iPod nano (3rd generation)
• iPod nano (2nd generation)
• iPod nano (1st generation)
• iPhone 4S
• iPhone 4
• iPhone 3GS
• iPhone 3G
• iPhone
Para obtener información sobre la
compatibilidad con el software iPod/iPhone,
visite www.kenwood.com/cs/ce/ipod/.
Español | 29
Page 30

2CAUTION
Use of controls or adjustments or performance of
procedures other than those specified herein may
result in hazardous radiation exposure.
In compliance with Federal Regulations, following
are reproductions of labels on, or inside the
product relating to laser product safety.
JVC KENWOOD Corporation
2967-3, ISHIKAWA-MACHI,
HACHIOJI-SHI, TOKYO, JAPAN
THIS PRODUCT COMPLIES WITH DHHS RULES
21 CFR SUBCHAPTER J IN EFFECT AT DATE OF
MANUFACTURE.
Location : Top plate
FCC WARNING
This equipment may generate or use radio
frequency energy. Changes or modifications to
this equipment may cause harmful interference
unless the modifications are expressly approved
in the instruction manual. The user could lose
the authority to operate this equipment if an
unauthorized change or modification is made.
FCC NOTE
This equipment has been tested and found to
comply with the limits for a Class B digital device,
pursuant to Part 15 of the FCC Rules. These limits
are designed to provide reasonable protection
against harmful interference in a residential
installation. This equipment may cause harmful
interference to radio communications, if it is
not installed and used in accordance with the
instructions. However, there is no guarantee
that interference will not occur in a particular
installation. If this equipment does cause harmful
interference to radio or television reception, which
can be determined by turning the equipment off
and on, the user is encouraged to try to correct
the interference by one or more of the following
measures:
• Reorient or relocate the receiving antenna.
• Increase the separation between the equipment
and receiver.
• Connect the equipment into an outlet on a
circuit different from that to which the receiver
is connected.
• Consult the dealer or an experienced radio/T V
technician for help.
Requirements Pandora® internet radio:
Requirements for listening to the Pandora® internet
radio are as follows:
iPhone or iPod touch
• Use an Apple iPhone or iPod touch running
under iOS3 or later.
• Install the latest version of the Pandora®
application on your iPhone. (Search for
“Pandora” in the Apple iTunes App Store to find
and install the most current version.)
• Create an account with Pandora®. (If you are
not already a registered user, an account can
be established at www.pandora.com.)
• Internet connection by 3G, EDGE, or WiFi.
• iPhone connected to this unit with a
KCA-iP102.
NOTE
• In the application on your device, log in and
create an account with Pandora.
(If you are not already a registered user, an
account can also be created at www.pandora.
com.)
• Pandora® is available only in the U.S.
• Because Pandora® is a third-party service, the
specifications are subject to change without
prior notice. Accordingly, compatibility may
be impaired or some or all of the services may
become unavailable.
• Some functions of Pandora® cannot be
operated from this unit.
• For issues using the application, please contact
Pandora® at pandora-support@pandora.com
Page 31

CALIFORNIA, USA
This product contains a CR Coin Cell Lithium
Battery which contains
Perchlorate Material – special handling may apply.
See www.dtsc.ca.gov/hazardouswaste/perchlorate
• The “AAC” logo is a trademark of Dolby
Laboratories.
• “Made for iPod” and “Made for iPhone” mean that
an electronic accessory has been designed to
connect specifically to iPod or iPhone, respectively,
and has been certified by the developer to meet
Apple performance standards. Apple is not
responsible for the operation of this device or its
compliance with safety and regulatory standards.
Please note that the use of this accessory with iPod
or iPhone may affect wireless performance.
• iPhone, iPod, iPod classic, iPod nano, and iPod
touch are trademarks of Apple Inc., registered in
the U.S. and other countries.
• Sirius, XM and all related marks and logos are
trademarks of Sirius XM Radio Inc. All rights
reserved.
• Adobe, Acrobat and Reader are either registered
trademarks or trademarks of Adobe Systems
Incorporated in the United States and/or other
countries.
• PANDORA, the PANDORA logo, and the Pandora
trade dress are trademarks or registered trademarks
of Pandora Media, Inc., used with permission.
Page 32

 Loading...