

Page 1
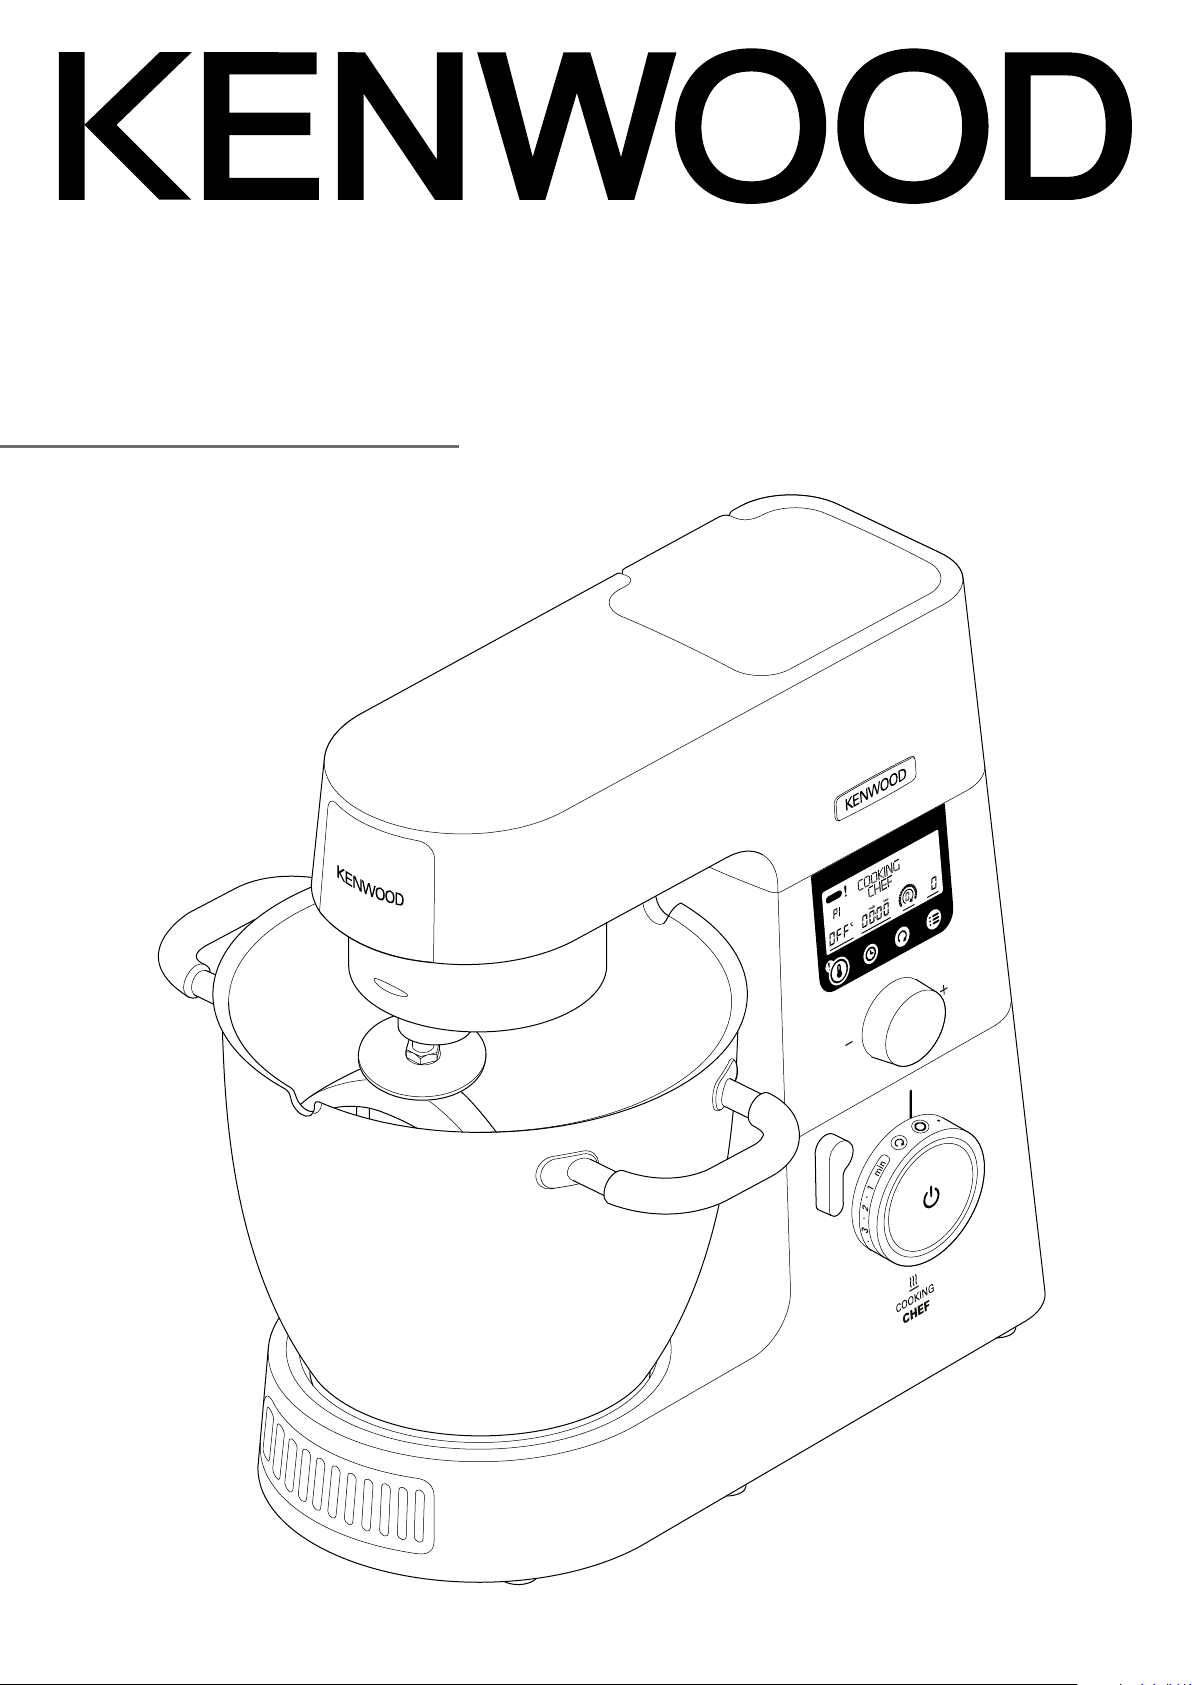
TYPE KCC90
instructions
2
Page 2

English 2 - 25
Français 26 - 49
Deutsch 50 - 73
Italiano 74 - 97
Español 98 - 121
3
Page 3
5
7
8
6
2
3 4
9 k
1
l
l
3
k
4
s
t
q
dl
d
d
d d ddq ds
q
t
s
dt
dk
k l
Page 4
1 2 3
1
2
8
3
54
9
6/7
1
4
10
1211
13
Page 5

English
contents
safety 3 – 4
key 5
language selection 5
the bowl tools and some of their uses 6
to use your Cooking Chef 6 – 7
to use your Cooking Chef as a mixer 7
display screen symbols explained 8
manual mode 9 – 10
using the pre-set programmes 11
Savoury programmes 11 – 12
main meals 11
sauce 12
Sweet programmes 13 – 16
chocolate tempering 13
doughs 13 – 14
meringue 14
compote 15
sauces 15 – 16
others 16
Slow cook programmes 17
high 17
low 17
Steam programme 18
adjusting the bowl tools 19
to fit and use your splashguard assembly 20
to remove and fit outlet covers 21
to fit and remove your stir assist clip 21
assembling the high temperature creaming beater 21
maximum capacities and recommended speeds 22
care and cleaning 23
service and customer care 23
troubleshooting guide 24 – 25
2
Page 6

English
safety
l
Read these instructions carefully and retain for future reference.
l
Remove all packaging and any labels.
l
If the cord is damaged it must, for safety reasons, be replaced by KENWOOD or an
authorised KENWOOD repairer.
important note - electronic medical implants
l
Like all induction heating products, this appliance generates short-range magnetic fields.
If any user or person in close proximity has a pacemaker or other active implants, please
consult a doctor before use, concerning any possible incompatibility to prevent any risk to
health.
l
Switch off and unplug the appliance before fitting or removing tools/attachments, after use
and before cleaning.
l
Keep body parts, hair, jewellery and loose clothing away from moving parts and fitted
attachments.
l
Never put your fingers etc., into the hinge mechanism.
l
Never leave the appliance on unattended.
l
Never use a damaged appliance. Get it checked or repaired: see ‘service and customer
care’.
l
Never use an unauthorised attachment or more than one attachment at once.
l
Never exceed the maximum capacities and when using the induction heater never exceed the
3 litre maximum fill level marked on the inside of the bowl.
l
When using an attachment, read the safety and usage instructions that come with it.
l
Take care when lifting this appliance as it is heavy. Ensure the head is locked and that the
bowl, tools, outlet covers and cord are secure before lifting.
l
Never let the cord hang down where a child could grab it.
l
Never let the power unit, cord or plug get wet.
l
Be careful when handling or touching any part of the appliance when being used in the cook
mode or after cooking, IN PARTICULAR THE BOWL, SPLASHGUARD AND TOOLS as they
will remain HOT long after the appliance has been switched off. Use the handles to remove
and carry the bowl. Use oven gloves when handling the hot bowl and hot mixing tools.
l
The underside of the bowl will remain hot long after the heating has stopped. Use caution
when handling and use the work surface protection mat when placing the bowl on heat
sensitive surfaces.
l
Be careful of steam escaping from the mixer bowl particularly when opening the lid in the
splashguard or when raising the mixer head.
l
If transferring hot food from the mixer to the blender, always allow the ingredients to cool to
room temperature before placing in the blender.
l
Only use the bowl and tools supplied with this appliance. Never use the bowl with any other
heat source.
l
Never operate the appliance in the cook mode with the bowl empty.
l
Never insert anything through the air vents.
l
When using this appliance ensure it is positioned on a level surface away from the edge.
Make sure it is at least 10 cm from walls and ensure that the vents are not blocked. Do not
position below overhanging cupboards.
l
For the correct and safe operation of the induction cooker ensure that the bowl base and
temperature sensors are clean and dry before cooking.
l
As with all induction cooking appliances do not place credit cards, magnetic media or
sensitive electronic equipment near to the appliance when in use.
3
Page 7

l
Do not use the appliance for deep frying foods.
l
Always ensure food is thoroughly cooked before eating.
l
Do not exceed 250ml when cooking with oil.
l
Food should be eaten shortly after cooking or allowed to cool quickly and then refrigerated
as soon as possible.
l
Misuse of your appliance can result in injury.
l
The power-supply cord is used to reduce risk resulting from becoming entangled in or
tripping. Extension cords may be used if care is exercised in their use. If an extension cord
is used: 1) The marked electrical rating of the extension cord should be at least as great
as the electrical rating of the appliance; and 2) The cord should be arranged so that it will
not drape over the countertop or tabletop where it can be pulled on by children or tripped
over unintentionally. If the appliance is of the earthed type, the extension cord should be a
earthing-type 3-wire cord. The electrical rating of the appliance is listed on the bottom of the
unit.
l
Appliances can be used by persons with reduced physical, sensory or mental capabilities
or lack of experience and knowledge if they have been given supervision or instruction
concerning use of the appliance in a safe way and if they understand the hazards involved.
l
Children should be supervised to ensure that they do not play with the appliance.
l
This appliance shall not be used by children. Keep the appliance and its cord out of reach of
children.
l
Only use the appliance for its intended domestic use. Kenwood will not accept any liability if
the appliance is subject to improper use, or failure to comply with these instructions.
before plugging in
• Make sure your electricity supply is the same as the one
shown on
• WARNING: THIS APPLIANCE MUST BE EARTHED.
• This appliance conforms to EC Regulation 1935/2004 on
materials and articles intended to come into contact with
food.
the underside of the appliance.
before using for the first time
• Wash the parts: see ‘care and cleaning’.
4
Page 8
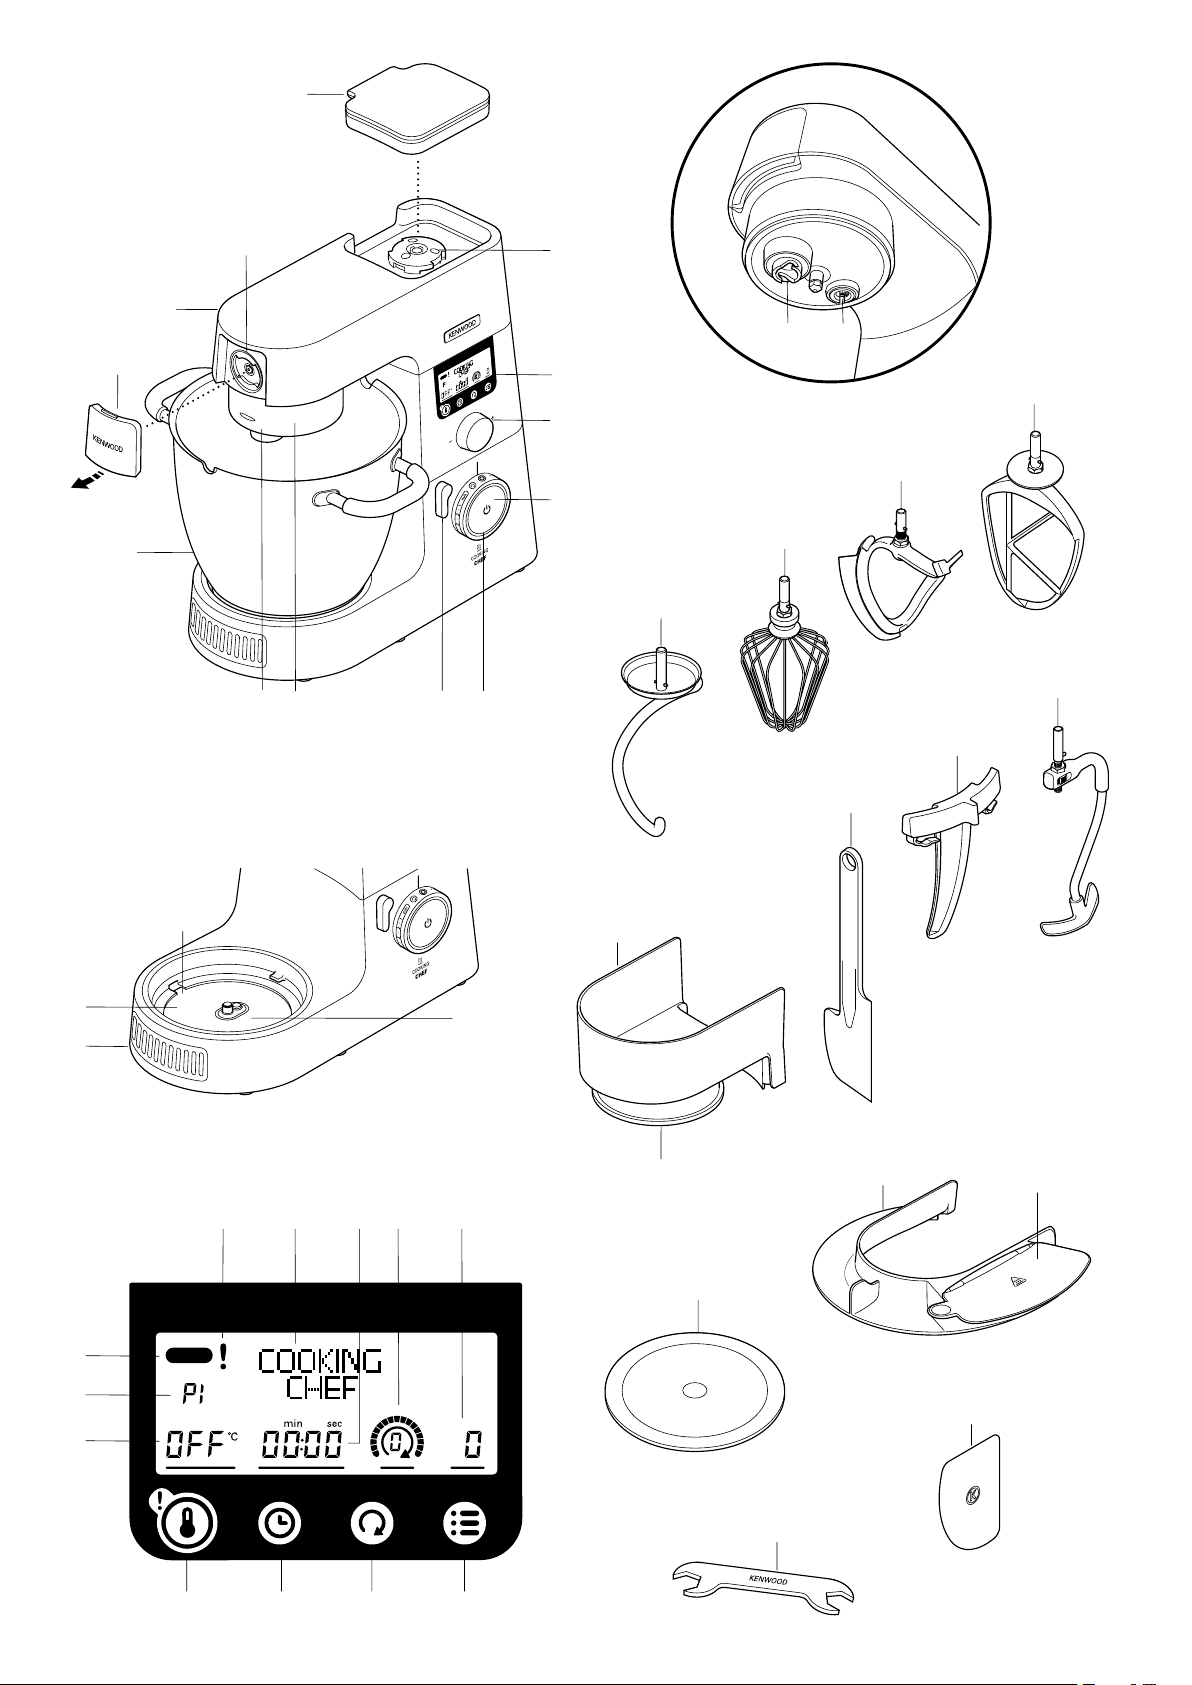
know your Kenwood Cooking Chef
Key
Attachment outlets
high speed outlet (HSO)
1
slow speed outlet (SSO)
2
bowl tool socket
3
stir tool socket
4
Mixer
high speed outlet cover
5
mixer head
6
slow speed outlet cover
7
cooking chef bowl
8
head - lift lever
9
speed control
k
standby button
l
display dial/enter button
display screen
drain hole
bowl pedestal/induction area
air vents
q
temperature sensors
K beater
s
high temperature creaming beater
t
power whisk
k
dough hook
l
stir tool
stir assist clip
high temperature spatula
heat shield
rubber seal (removable)
q
splashguard
feed chute lid
s
work surface protection mat
t
spanner
dk
Display screen graphics
hot temperature warning
dl
programme phase
d
temperature selection
d
high speed high temperature warning
d
text display
d
time selection
dq
stir delay selection
d
power selection
ds
Display panel
temperature button
dt
time button
k
stir setting button
l
menu button
dough scraper
Note: Slow Speed outlet attachments
The slow speed outlet on your Kitchen Machine model features
the Twist Connection System. It is designed to accept Twist
Connection System attachments.
When purchasing new attachments for the slow speed outlet you
should check compatibility with your Kitchen Machine. All Twist
Connection System attachments can be identified by the product
code which starts with KAX and also by the Twist logo
is visible on packaging.
If you own attachments featuring the Bar Connection System
you will need to use the KAT002ME adaptor to connect these to
the Twist Connection System
For more information visit www.kenwoodworld.com/twist.
on your Kitchen Machine.
which
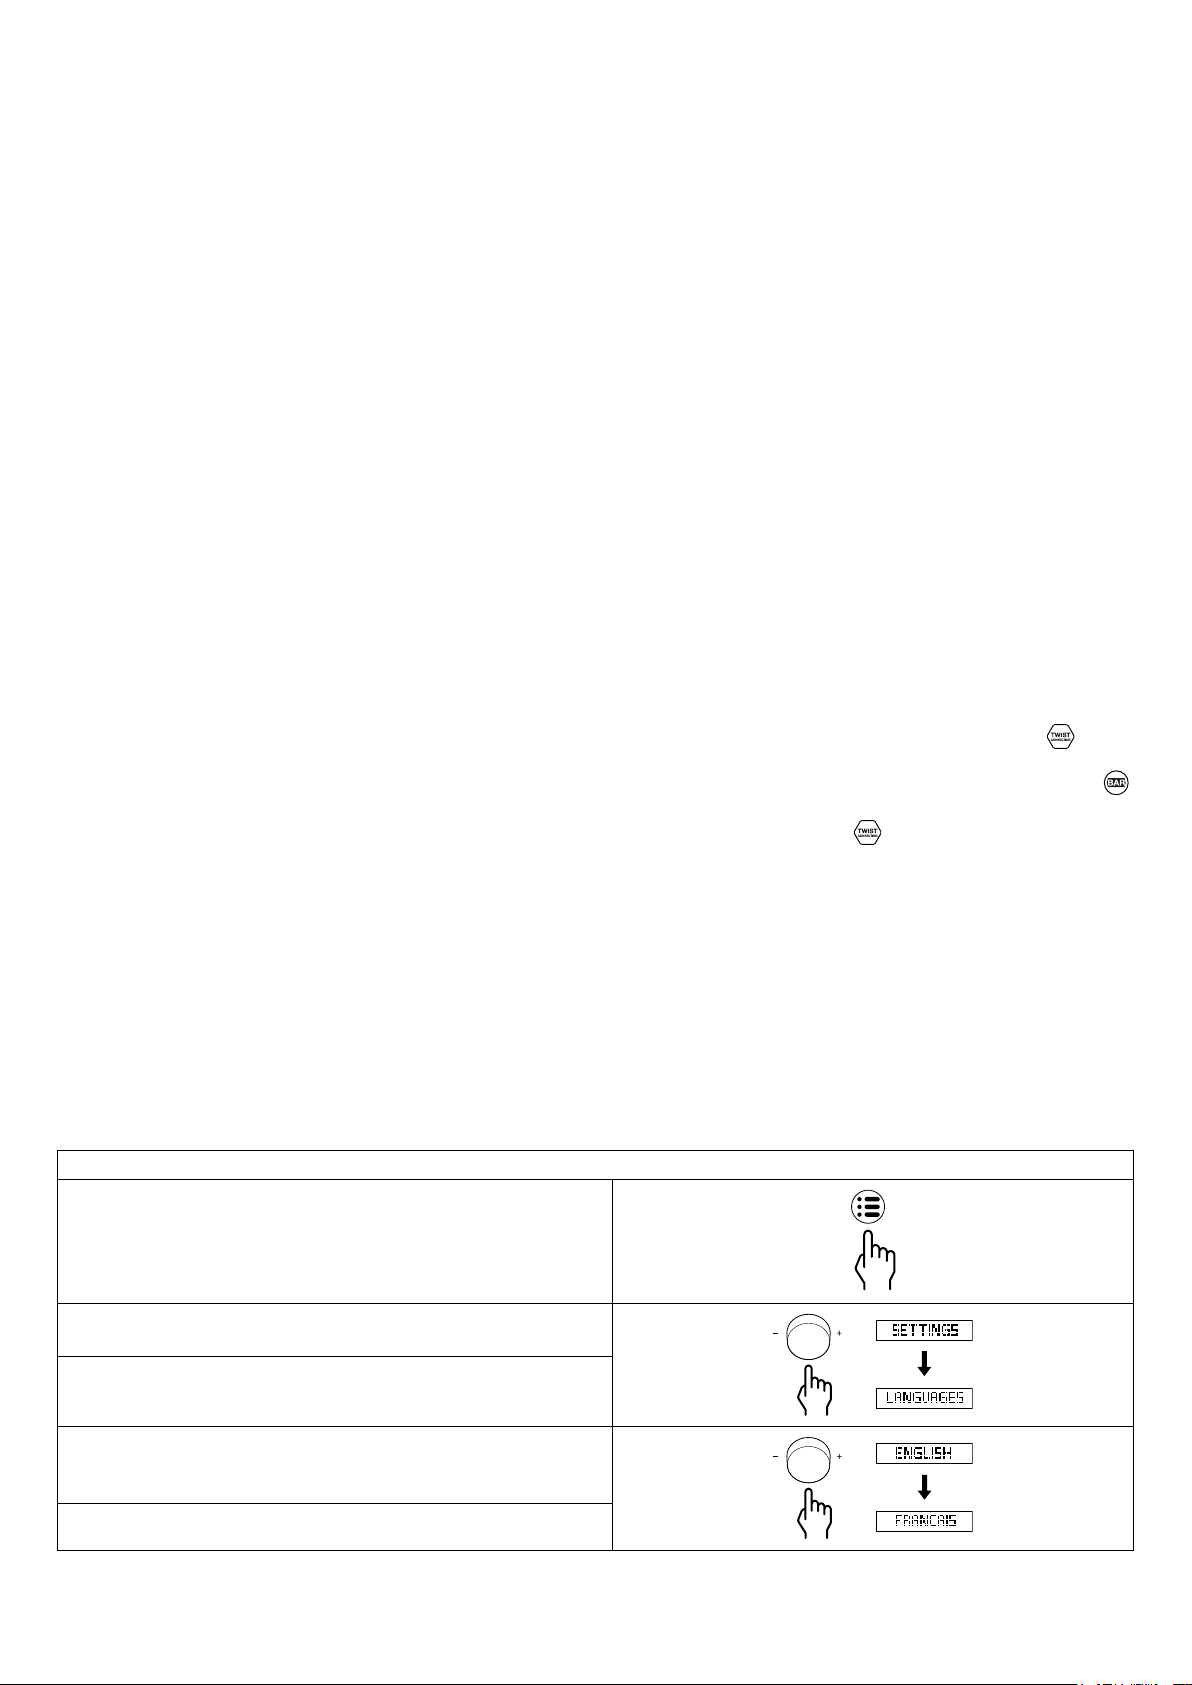
language selection
When turning on your Cooking Chef for the first time, the display screen language will default to “English”.
1 To change language press the menu button.
2 Use the display dial/enter button to select “SETTINGS” and press
the display dial/enter button to confirm.
3 Use the display dial/enter button to select “LANGUAGES” and
press the display dial/enter button to confirm.
4 Use the display dial/enter button to select the required language.
Once the required language is selected, press the display dial/
enter button to confirm.
5 To change the language again, repeat the process.
5
Page 9
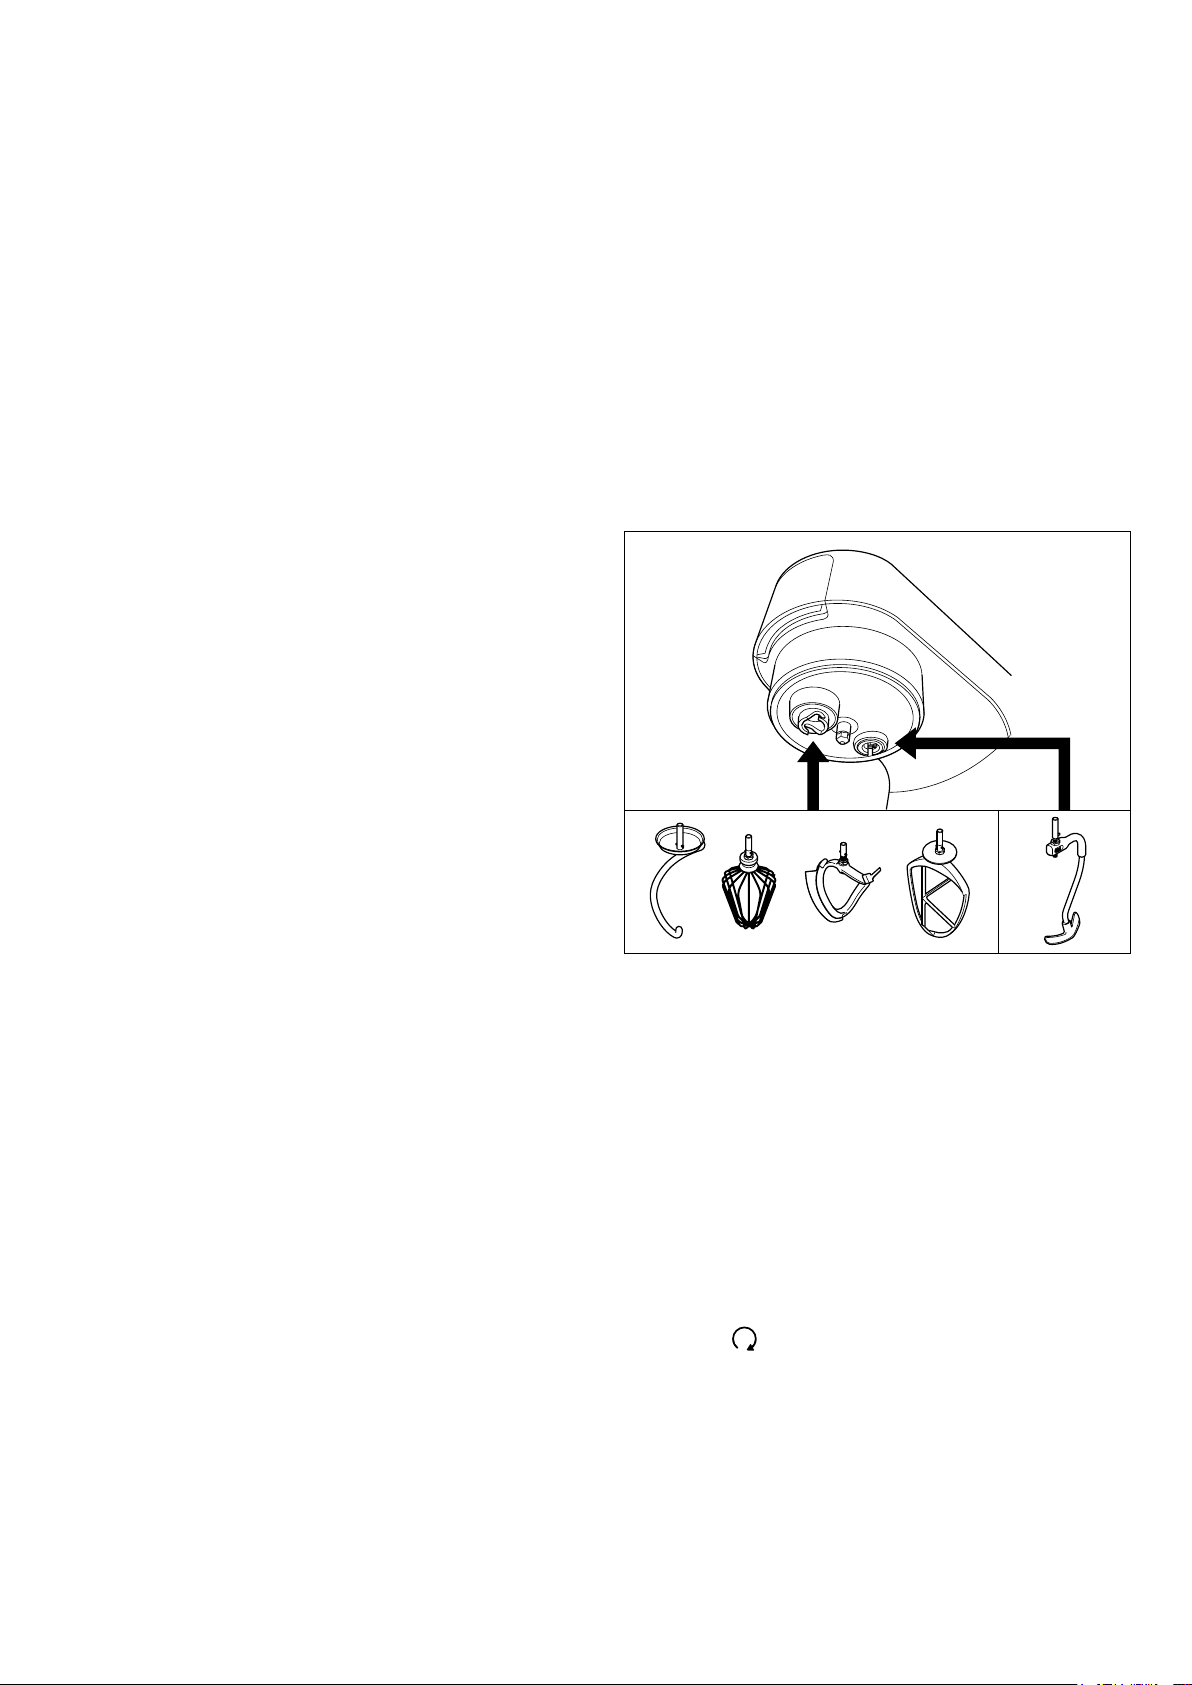
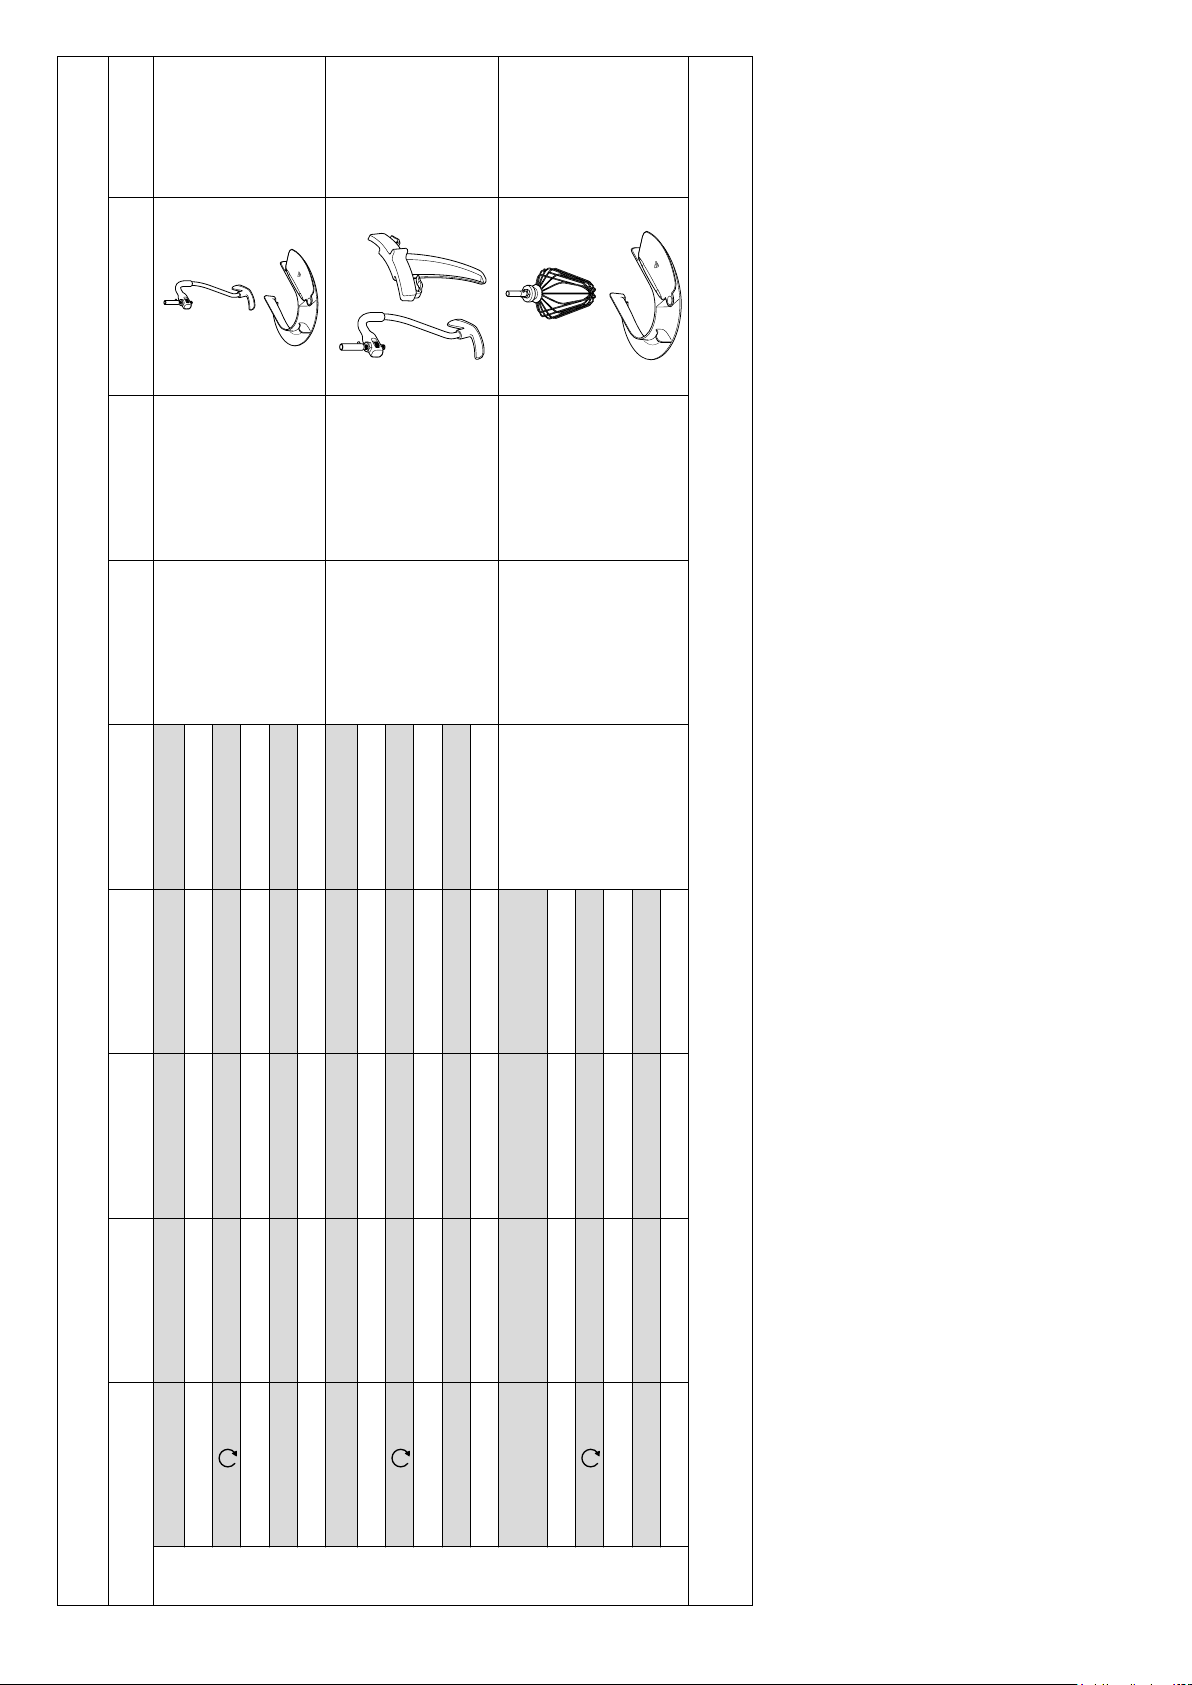
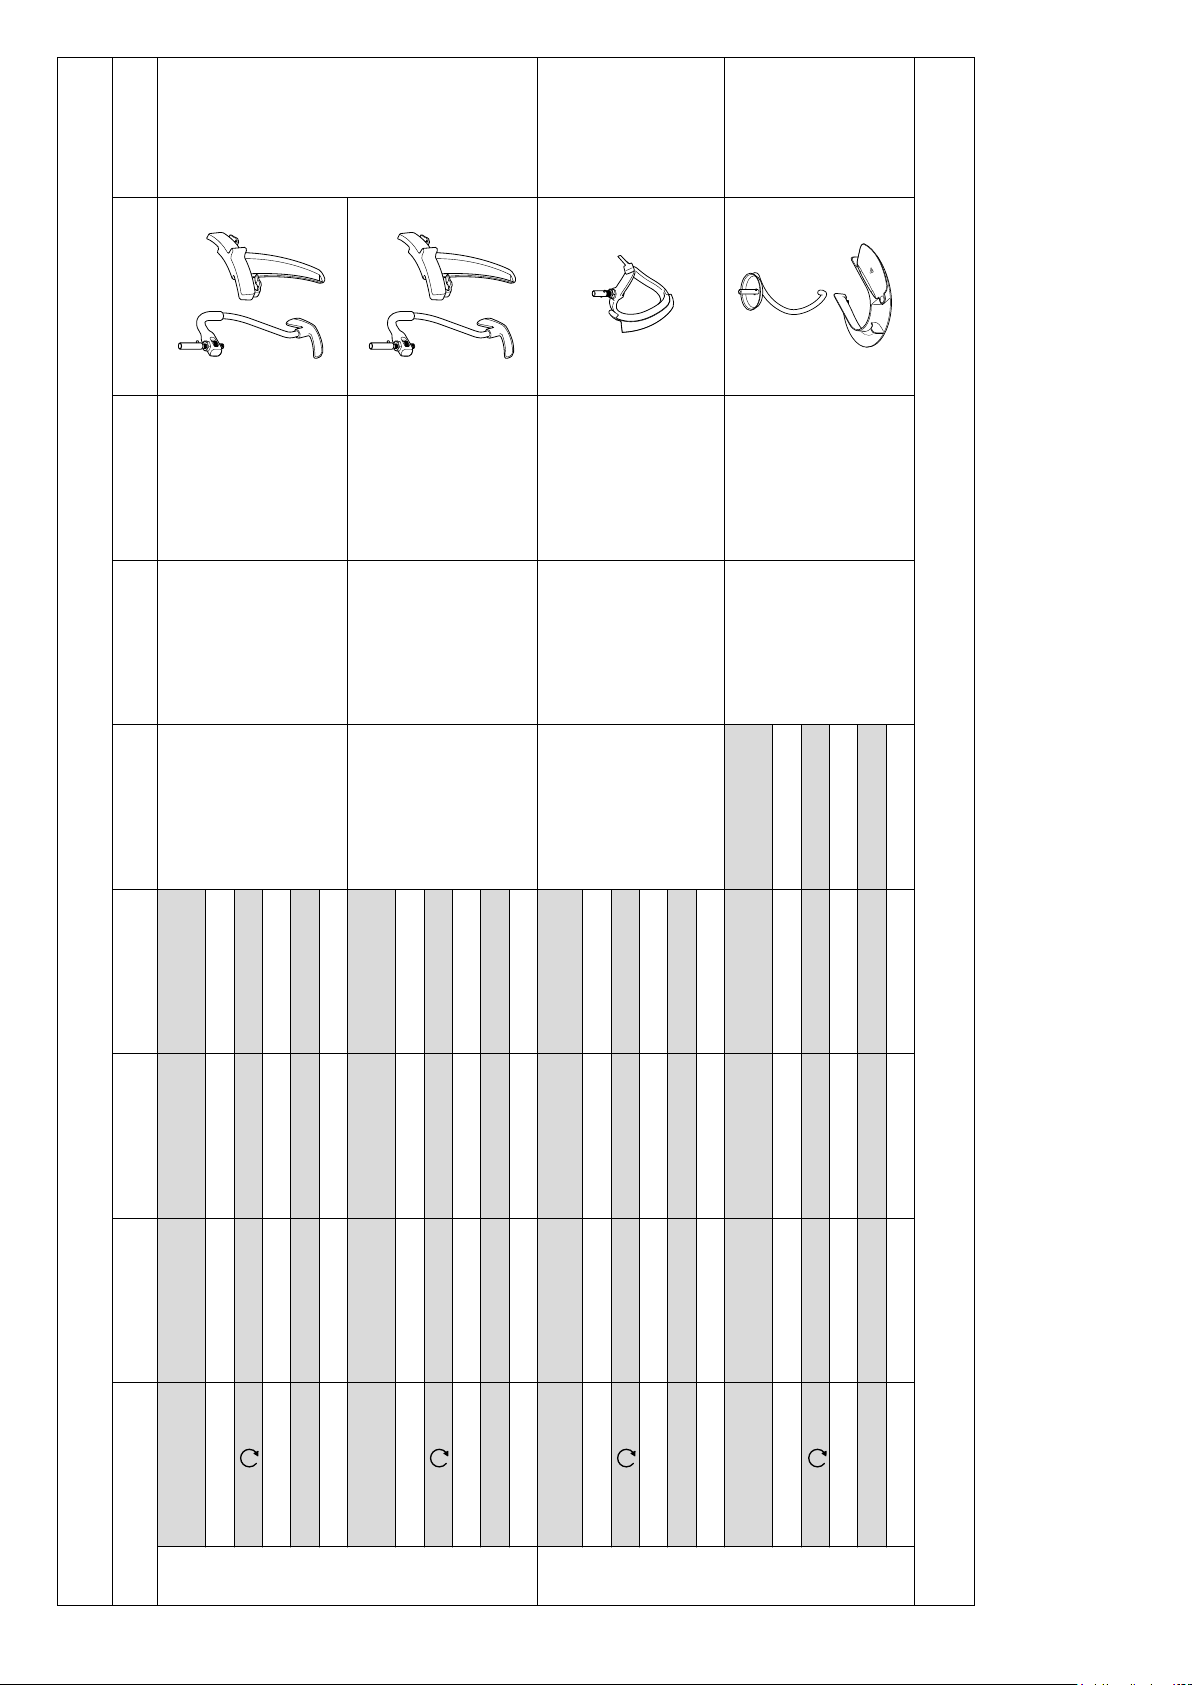
the bowl tools and some of their uses
K-beater
For making cakes, biscuits, pastry, icing, fillings, éclairs and
mashed potato.
Whisk
For eggs, cream, soufflés. Do not use the whisk for heavy
mixtures (e.g. creaming fat and sugar) - you could damage it.
Suitable to combine with the stir tool when whisking with heat,
e.g. Italian and Swiss meringues.
Dough Hook
For yeast mixtures only.
to use your Cooking Chef
IMPORTANT
• Make sure the induction area, temperature sensors and
external surface of the bowl base are clean. Failure to do
this will affect the heat sensor, resulting in poor cooking
performance.
• Check that all the outlet covers including the heat shield are
fitted. If they are not correctly fitted the heating function will
not operate.
• Always use oven gloves to remove the bowl and tools after
cooking.
High temperature creaming beater
Suitable for creaming butter and sugar, choux pastry and polenta. Ideal
for scraping mixes both hot and cold from the sides of the bowl during
mixing.
Stir tool
Suitable to use during cooking to maintain the texture of food e.g.
chicken, fish, vegetables and fruit. Ideal for browning meat. Also
suitable for risottos, sauces and melting chocolate.
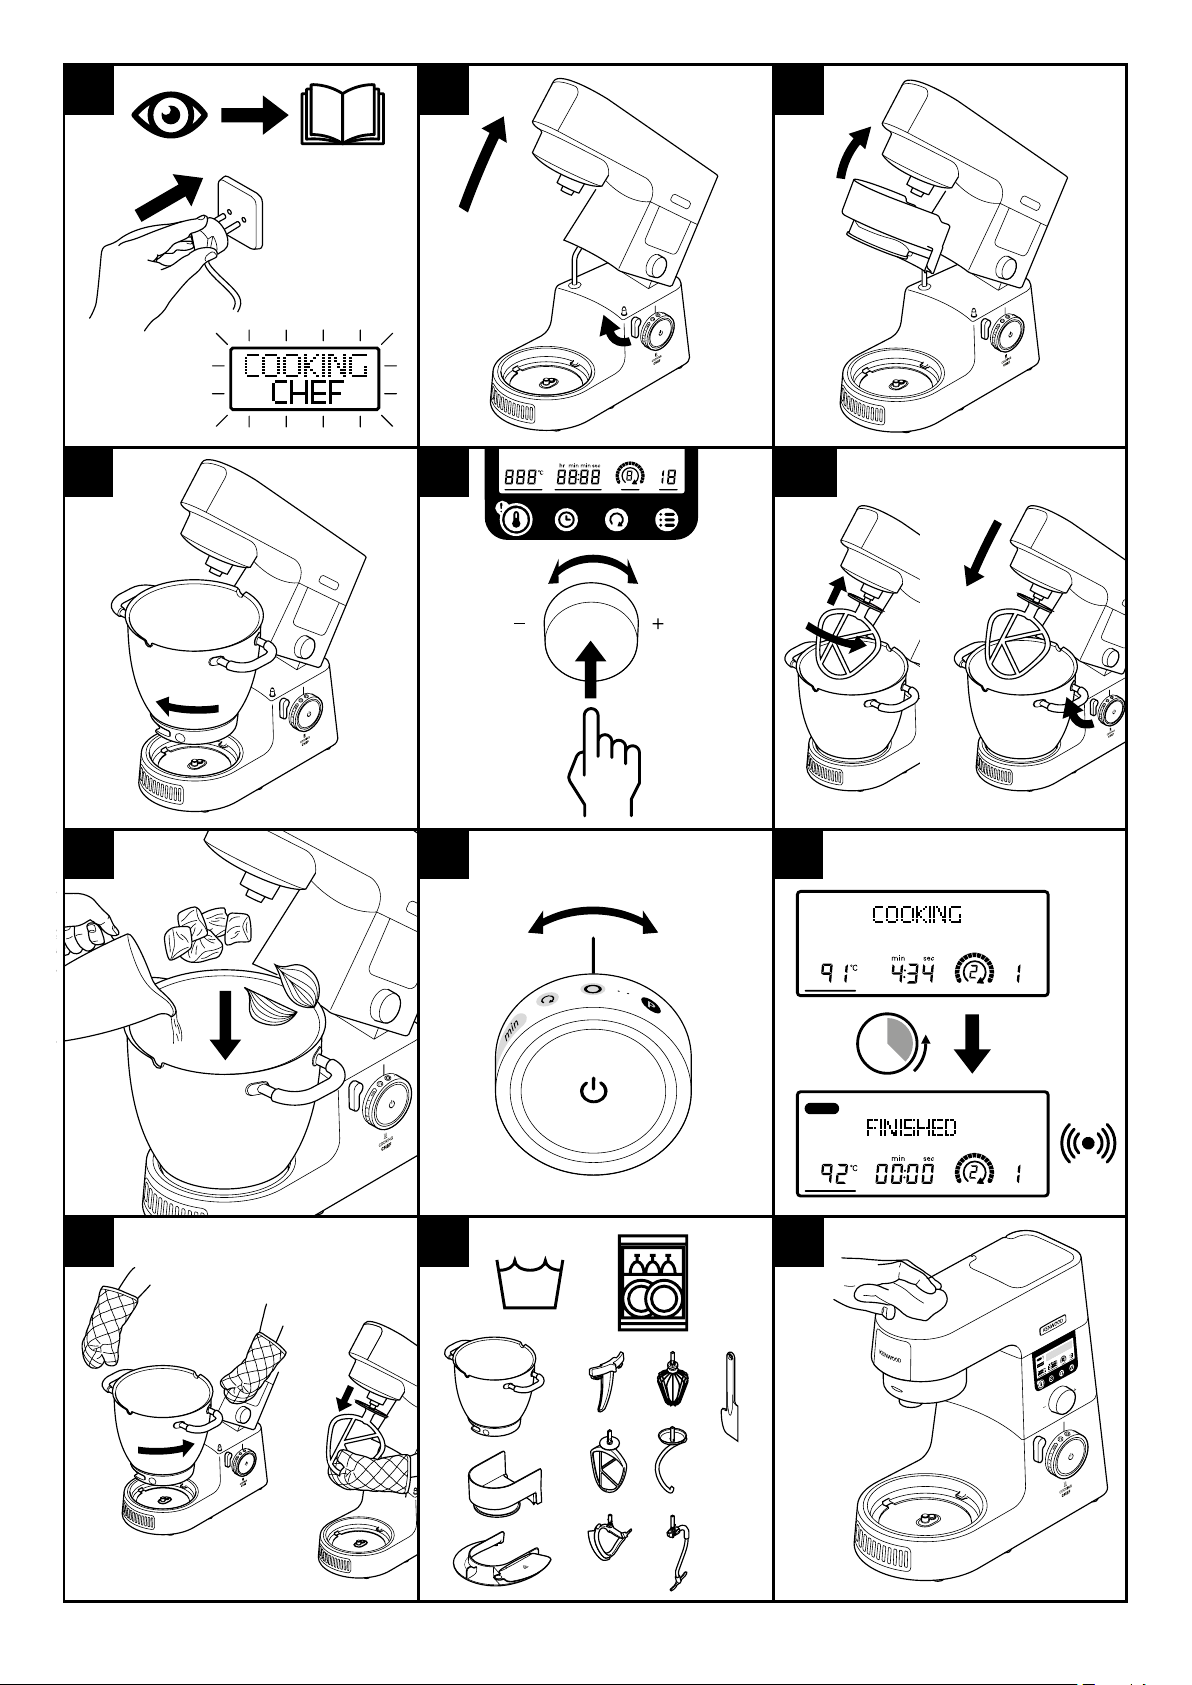
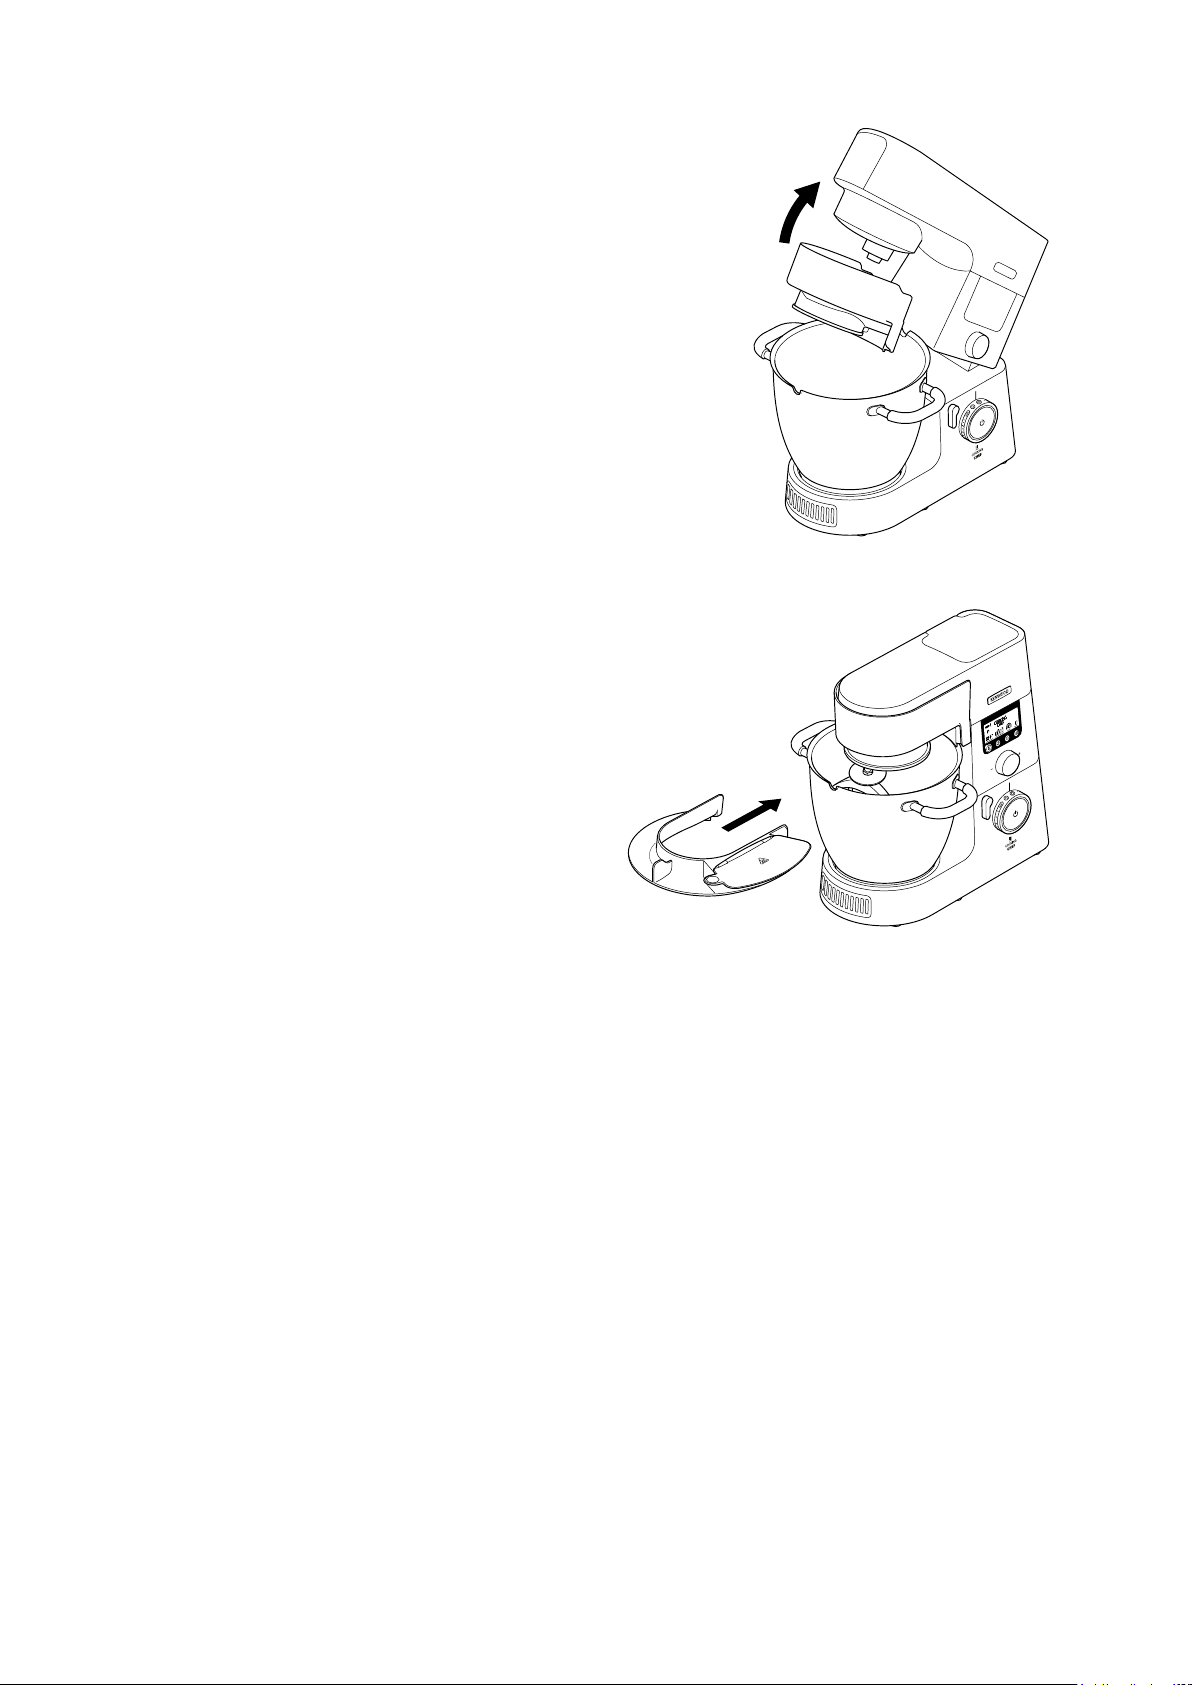
1 Connect the machine to the power supply. The display screen
will illuminate.
2 Turn the head-lift lever clockwise
until it locks.
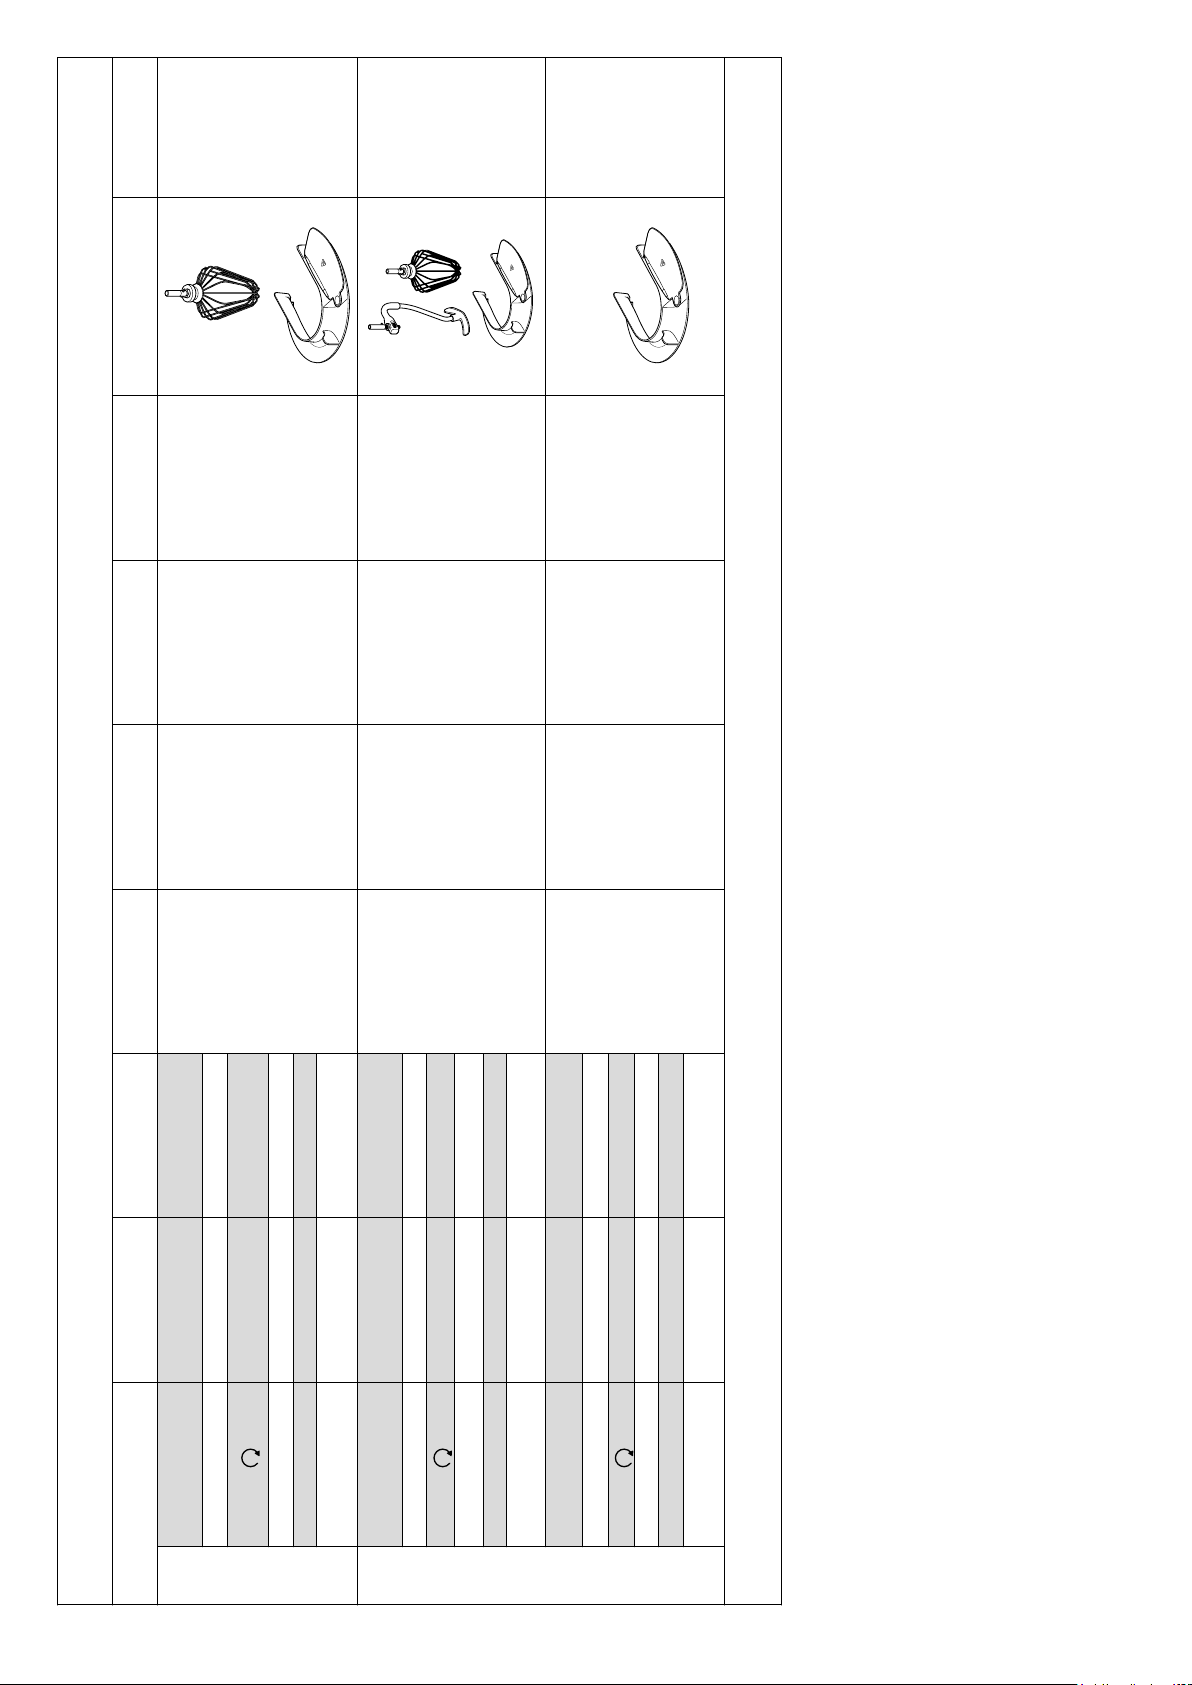
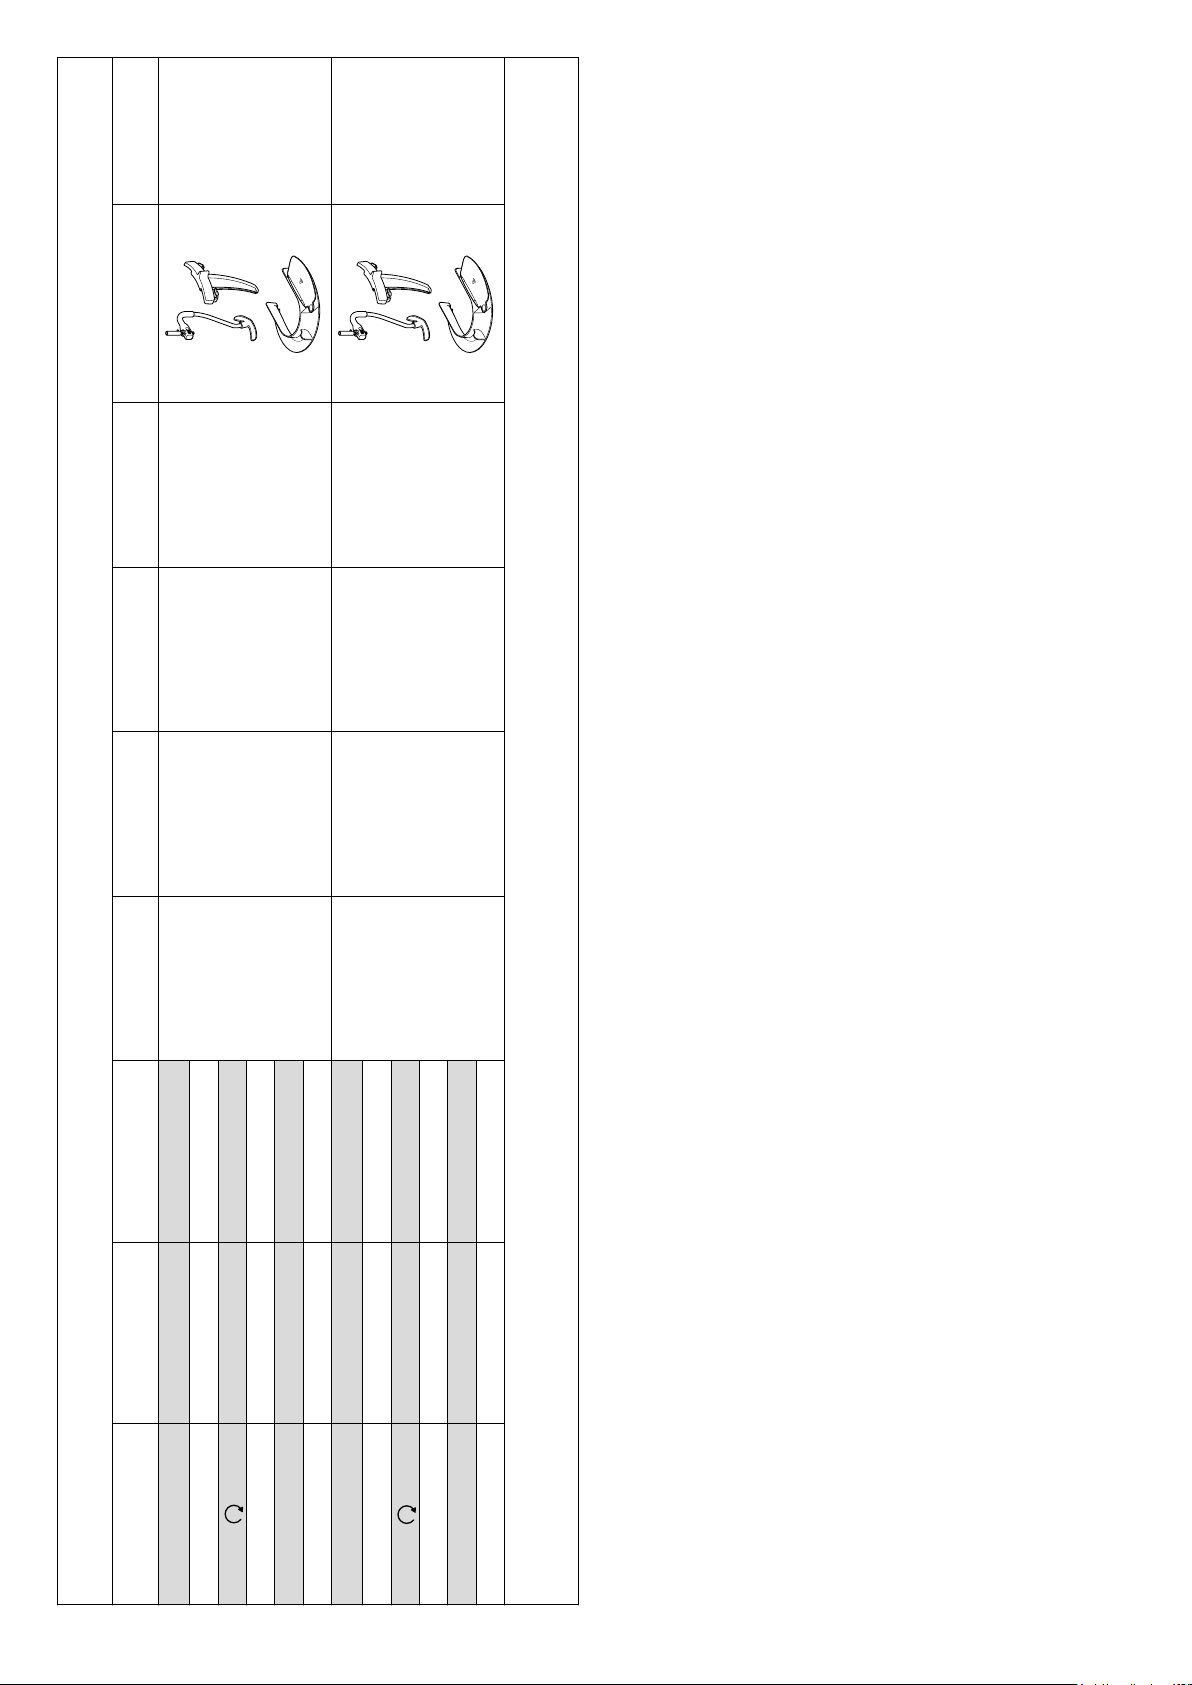
3 Push the heat shield
mixer head
be used without the rubber seal
• If using the Cooking Chef without heat, it is not necessary to
fit the heat shield unless using the splashguard. Refer to ‘to fit
and use your splashguard assembly’ section.
4 Fit the bowl to the base – press down and turn clockwise
5 Select one of the following options:
Manual Cooking.
Refer to manual mode section.
Pre-set Programmes:
Refer to ‘using the pre-set programmes’ section for usage
information.
• Refer to the Quick Start Guide for more recipe ideas.
6 Place the required tool in the bowl tool socket
socket
and then turn to lock into position
until fully located. The heat shield must never
2
if using the stir tool, locating the pin in the groove
4
upwards onto the underside of the
and raise the mixer head
1
fitted correctly.
q
or stir tool
3
.
4
3
.
stir tool – when using the stir tool the stir assist clip can also
be used to assist the mixing action, see ‘to fit and use your
stir assist clip'. The stir tool can also be used with the whisk,
e.g. making meringues. Do not use the stir tool with the
dough hook.
Note: If the K-beater, whisk or creaming beater are not picking
up ingredients from the bottom of the bowl refer to the “Tool
Adjustment” section.
• To remove a tool, reverse step 6 above. (Always use oven
gloves to remove tools after cooking).
7 To lower the mixer head, raise it slightly, then turn the head lift
lever clockwise.
Lower into the locked position.
8 Add the relevant ingredients to be cooked/mixed.
9 Turn the speed control to the desired setting. Turn the speed
control to
to use the stir settings.
6
Page 10

• If the bowl temperature exceeds 60°C, for safety reasons
the speed is automatically limited even if a higher speed has
been selected. The speed will not automatically increase when
the temperature drops below 60°C. The speed control must
be turned to the off 'O' position first and the desired speed
reselected.
See 'Manual Mode' section for how to use high speed high
temperature (HSHT) mode.
10 Once a programme has finished, the unit will beep 3 times.
• Note: If no time has been set, the heating and stirring
processes will automatically end once the timer has reached 8
hours.
11 To stop or pause the mixing process, return the speed control
to the off ‘O’ position. To resume operation select a speed.
IMPORTANT
• Heating will continue when the mixing process is
stopped or paused.
12 To stop the heating process, change the temperature to ‘OFF’.
Alternatively, press the standby button.
Important – If at any time the mixer head is raised during an
operation, the heating process will pause. The bowl tool will
stop and will not restart when the mixer head is lowered, to
re-start the mixer turn the speed control to the off ‘O’ position
and then re-select a speed.
after cooking
• Be careful when handling or touching any part of the mixer
when being used in the cook mode or after cooking, IN
PARTICULAR THE BOWL, SPLASHGUARD AND TOOLS
as they will remain HOT long after the appliance has been
switched off. Use the handles to remove and carry the bowl.
Use oven gloves when handling the hot bowl and hot mixing
tools.
• The underside of the bowl will remain hot long after the
heating has stopped. Use caution when handling and use the
work surface protection mat provided to protect heat sensitive
surfaces.
hints
• Some recipes, in particular those with a high water content,
will not be able to reach a cooking temperature above 100°C
(as this is the boiling point of water).
• When adding ingredients to the bowl during cooking, turn the
speed down and add the ingredients slowly and evenly.
• To heat sauces quickly use a continuous stir setting.
• If using the splashguard during cooking, always remove
it before lifting the mixer head. Be aware of condensation
formed on the splashguard and heat shield.
• When lifting the mixer head lift it slowly to allow any liquid on
the underside of the heat shield to flow back into the bowl.
• Ten stir delay functions are available which enable you to
select the appropriate amount of stirring for individual recipes.
Some recipes will require constant stirring to stop ingredients
from sticking to the bottom of the bowl, whereas others will
benefit from intermittent stirring to maintain the texture of the
food.
to use your Cooking Chef as a mixer
Assemble the mixer as described previously in 'to use your
Cooking Chef'. Turn the speed control to the desired setting.
The speed can be changed at any time whilst the mixer is
operating. Stop the mixer by returning the speed control to
the off ‘O’ position.
Use the pulse (P) position for short bursts of maximum speed.
general hints
• Stop mixing and scrape down the bowl with the spatula
frequently.
• Eggs at room temperature are best for whisking.
• Before whisking egg whites, make sure there is no grease or
egg yolk on the whisk or bowl.
• Use cold ingredients for pastry unless your recipe says
otherwise.
points for bread making
important
• Never exceed the maximum capacities stated - you will
overload the machine.
• If you hear the machine labouring, switch off, remove half the
dough and do each half separately.
• The ingredients mix best if you put the liquid in first.
recipe
chilli marinade
200g cold clear runny honey (refrigerated
overnight)
1 chilli (whole)
5ml (1tsp) crunchy peanut butter
Seasoning
1 Place all the ingredients into the mini chopper/mill.
2 Fit the attachment to the Kitchen Machine and allow the
ingredients to settle around the blade.
3 Switch to pulse for 10 seconds.
4 Use as required.
7
Page 11
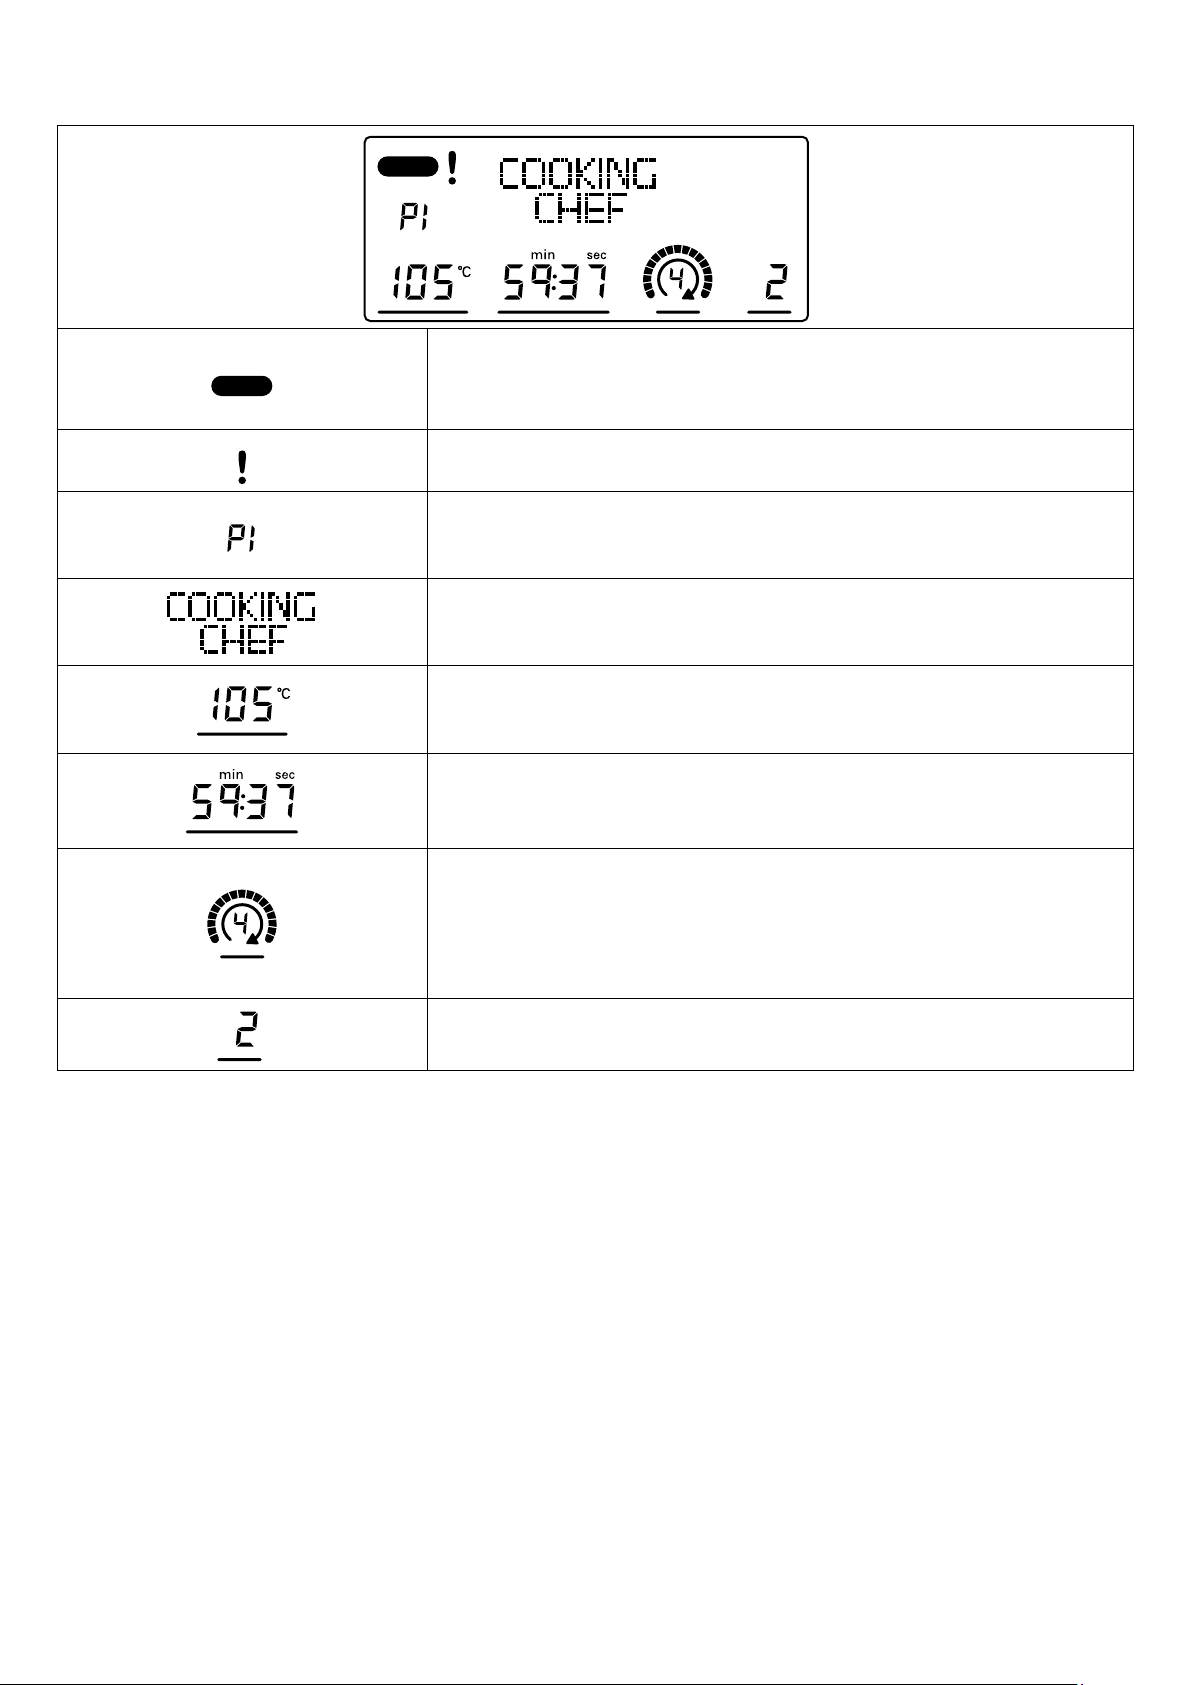
display screen symbols explained
Hot warning indicator
Below 40°C - no red bar
40°C-60°C - flashing red bar
Above 60°C - solid red bar
Shows when mixer is being operated in high speed high temperature mode (HSHT).
Shows current phase of a programme when using the pre-set programmes.
Text display shows status information, programme information and error messages.
Shows the selected temperature.
Temperature can be set from, “OFF”, 20°C - 180°C.
Shows the time selected in hours, minutes and seconds.
Time can be set from 5 seconds 8 hours and will count down once a temperature
has been selected.
Shows the stir setting selected, ranging from 0 9.
• The outer bars will progressively light up to indicate the length of time before the next
stirring action.
• The inner stir arrow will start flashing 3 seconds before the next stirring action.
• At the start of a stirring action, there may be a brief boost in speed in order to
separate pieces of food.
Shows the power setting selected.
Power settings range from Auto, 1 7.
8
Page 12
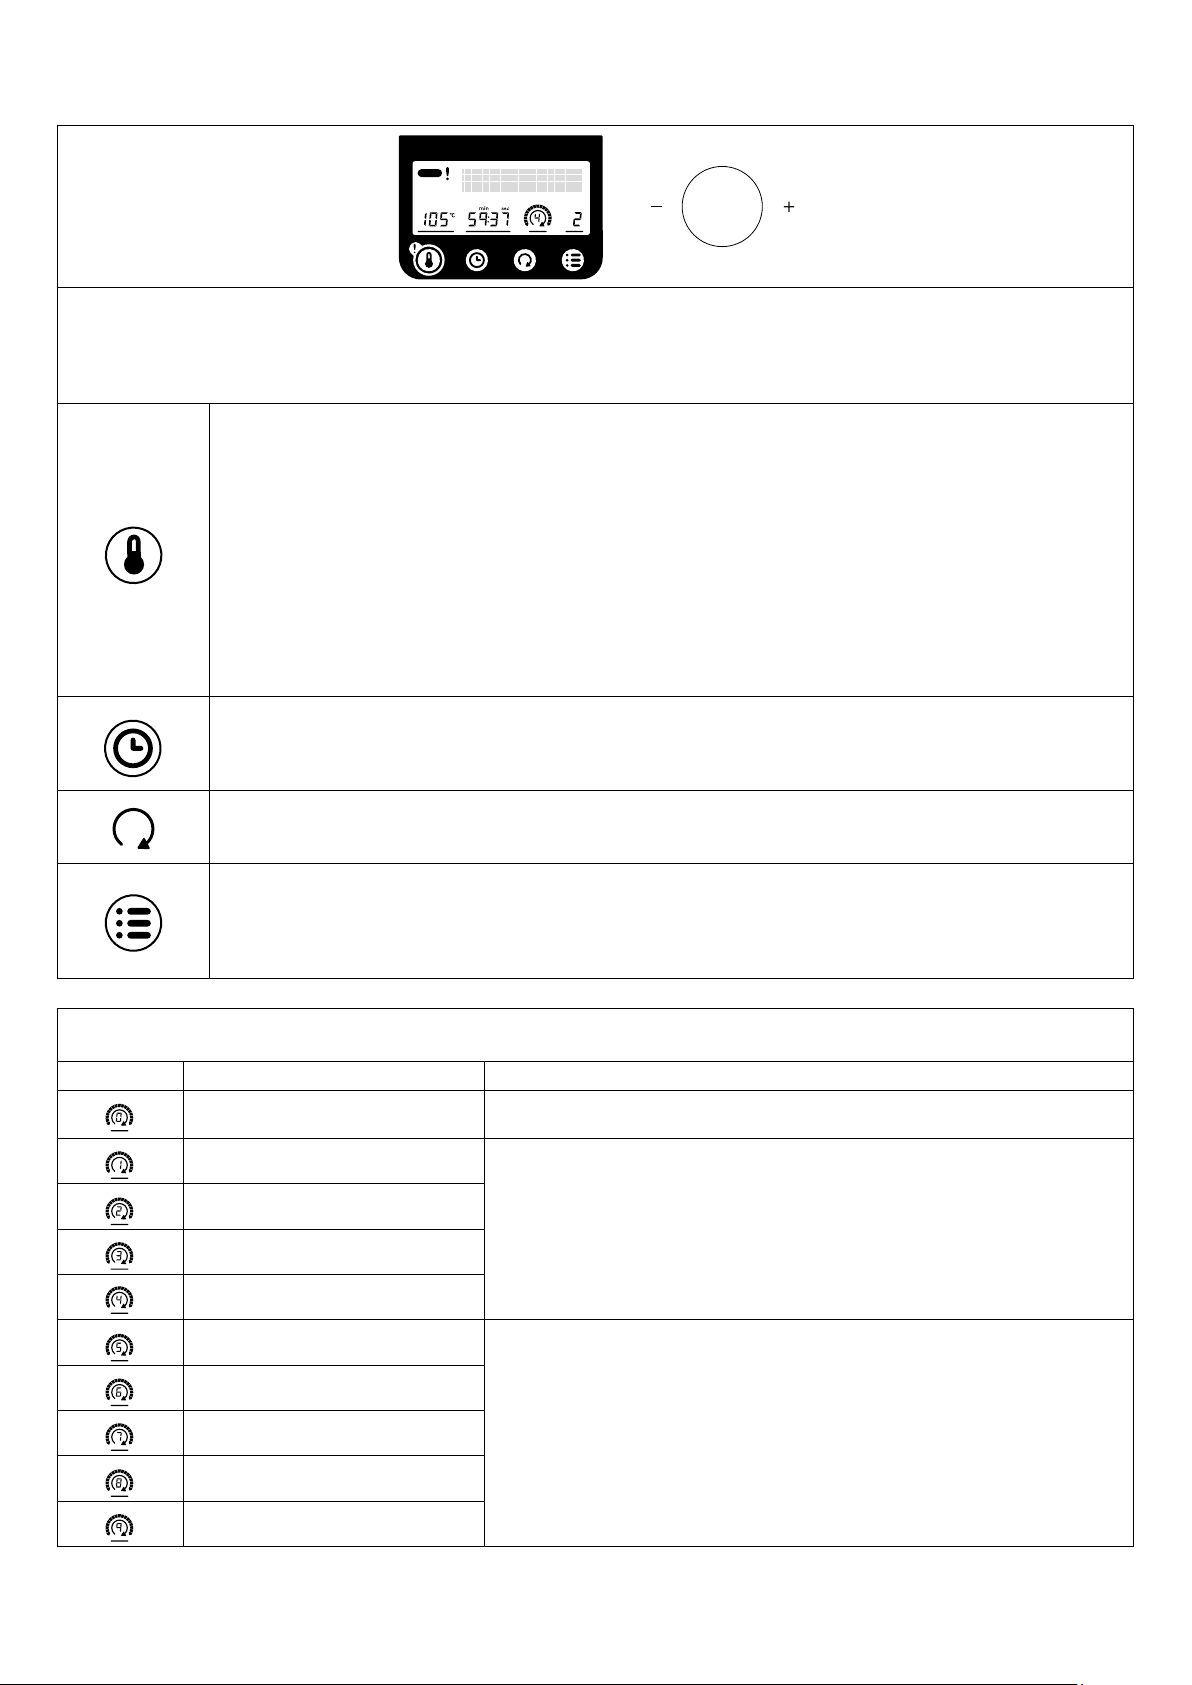
manual mode
• Press the setting you wish to alter and use the display dial to adjust the setting.
• Press the display dial to confirm.
Note:
• When a setting is selected, the bar underneath the corresponding display screen symbol will illuminate.
• The setting will time out after 4 seconds if no action is taken.
Temperature can be set from 20°C - 180°C in 1°C increments.
Alternatively, the unit can be used without setting a temperature by selecting “OFF”.
Note: The Cooking Chef will not achieve a temperature lower than the ambient temperature.
High speed, high temperature mode (HSHT)
To mix at high speed at temperatures above 60°C:
• Press and hold for 3 seconds. The red ! will illuminate on the display screen and “CAUTION HSHT MODE” will be
displayed. The mixer will also make a beeping sound every 30 seconds.
• Turn the speed control to the desired speed, the mixer will slowly increase to the selected speed.
• You can reduce the speed as normal.
• To exit this mode, press and hold the temperature button for 5 seconds or return the speed control to 'O'.
This function MUST ONLY be used with the whisk and/or stir tool. You should not exceed the maximum
cooking capacity of 3 litres and you must ensure the splashguard is fitted. The machine must not be left
unattended.
The timer can be used in cooking mode.
If a countdown time is not selected, the timer will automatically count up in 1 second intervals whilst the machine is in
operation.
The maximum running time is 8 hours.
There are ten stir delay settings. These are most suitable when the mixer is used in the cook mode. Please note, to
use the stir settings all outlet covers must be fitted.
Power settings can be adjusted through the menu button.
Power will default to Auto.
The power can be adjusted to from 250W to 1500W.
• Choose a lower power setting to gently heat ingredients.
• Choose a higher power setting to heat ingredients quickly.
stir delay settings
The stirring settings are ideal to use with the stir tool.
Speed Delay intervals Uses
No delay
(Continuous stirring)
5 seconds
10 seconds
20 seconds
30 seconds
40 seconds
50 seconds
1 minute
Continuous stirring for sauces and risottos.
Browning meat and sautéing vegetables.
Stirring stews, casseroles, broths, etc.
2 minutes
5 minutes
9
Page 13

temperature settings
Temperature Uses
50°C Chocolate tempering
72°C - 82°C Poaching
98°C - 99°C Simmering
100°C Boiling, steaming
130°C - 140°C Sautéing vegetables
180°C Browning meat
power settings
Power settings Watts Uses
A Auto Power input varies to optimise temperature setting
1 - 2 1500W - 1200W Browning meat, sautéing vegetables, boiling water
3 - 5 1000W - 500W Melting butter, dairy-based sauces, simmering, heated whisking
6 - 7 375W - 250W Proofing doughs
10
Page 14
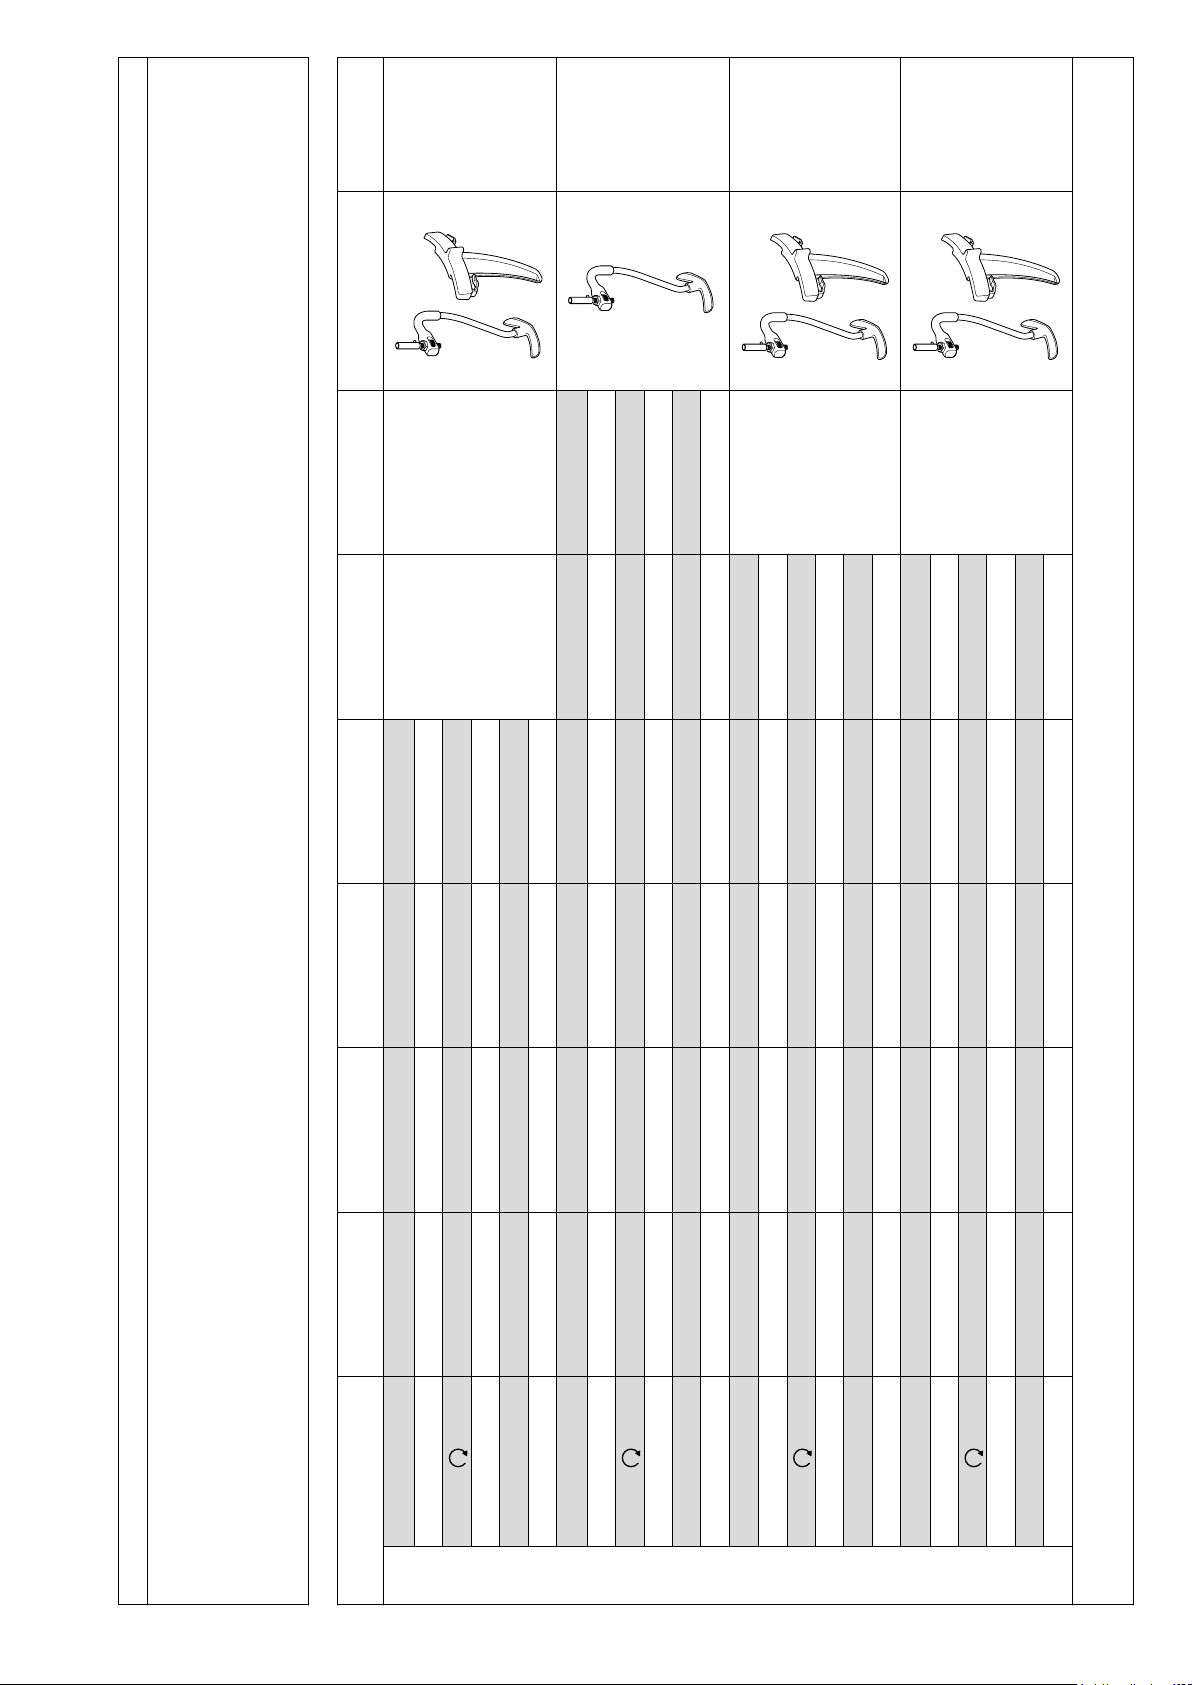
Stir fry
Chicken risotto
Beef casserole
Salmon broth
Add avourings Additional ingredients
N/A N/A
0
75°C
01
99°C99°C
0
140°C
Add rice Add wine Add liquid Keep warm
Auto
1200W
1500W
1500W
1200W1500W
5mins
3mins10mins
1min
Add liquid Keep warm
4 9 9
140°C 95°C 80°C
Add veg
N/A
1500W Auto Auto
10mins 4hrs 30mins
9 – 9
99°C 98°C 80°C
Add liquid Add meat/sh Keep warm
N/A
Auto Auto Auto
10mins 20mins 30mins
Select the programme
1 Press the menu button.
2 Turn the display dial/enter button to select “Programmes”.
3 Press the display dial/enter button to confirm.
using the pre-set programmes
4 Turn the display dial/enter button to select either “Savoury”, “Sweet”, “Slow Cook” or “Steam” programmes. See the tables below for sub-programme options.
1500W
Add meat & veg
Phase 1 (P1) Phase 2 (P2) Phase 3 (P3) Phase 4 (P4) Phase 5 (P5) Phase 6 (P6) Tools used Recipe ideas
Wok Add oil
°C 140°C 180°C 160°C 120°C
– 3 2 2
✓ ✓ ✓ ✗
W Auto Auto 1500W 1500W
Heating stage
3 ½mins 2mins 45 secs
100°C100°C 130°C130°C
Add veg & meat
✗
°C 130°C
Risotto Add oil
Cooking time
24 02
–
1000W
✓ ✗ ✓ ✓ ✓ ✗
W 1200W
Heating stage
2mins3mins 1min3mins
✗
Cooking time
180°C180°C
°C 140°C
Ragout Add oil Add meat
01
–
1500W1500W
W 1200W
SAVOURY
main meals
5 Press the display dial/enter button to confirm.
6 Follow the instructions on the display screen.
Note: If no action is taken between phases, the machine will time out after 15 minutes.
11
Add veg
2mins3½mins
✗
✓ ✓ ✓ ✓ ✗
Broth Add oil
Cooking time
Heating stage
130°C
130°C
°C 140°C
24
-
1500W
1200W
✓ ✓ ✓ ✓ ✗
W 1200W
Heating stage
1min5mins
✗
Cooking time
Note:
• Some programme phases have heating stages that allow ingredients to reach the specified temperature before the phase starts.
• HSHT (as displayed on screen) = High Speed, High Temperature mode
Page 15
parsley sauce
cheese sauce,
Béchamel sauce,
Tomato pasta sauce
sauce
Béarnaise sauce,
Hollandaise
99°C 85°C
N/A N/A
750W 500W
HSHT 6 HSHT 6
HSHT 6HSHT 6
15mins 30mins
9
80°C
Keep warm
22
Add liquid
110°C98°C
N/A N/A
Auto
1500W1500W
Auto
30mins
butter
4mins15mins
Slowly add melted
10mins
Add yolks & liquid
N/A N/A N/A
750W
750W
– 0
Phase 1 (P1) Phase 2 (P2) Phase 3 (P3) Phase 4 (P4) Phase 5 (P5) Phase 6 (P6) Tools used Recipe ideas
80°C80°C 110°C110°C
°C
Béchamel Add butter Add our Add liquid Keep warm
750W750W 1000W750W
W
SAVOURY
programmes
✓ ✓ ✓ ✗
1min15secs 1min4mins
Traditional Add oil Add veg
Cooking time
Heating stage
°C 120°C 120°C
– 3
✓ ✓ ✓ ✗
W Auto
Heating stage
sauce
✗
remove
Melt butter and
Hollandaise
Cooking time
°C 60°C 72°C 72°C
2 HSHT 6 HSHT 6
12
✓ ✓ ✗
W Auto
Heating stage
Cooking time 10mins 4mins 2mins
Note:
• Some programme phases have heating stages that allow ingredients to reach the specified temperature before the phase starts.
• HSHT (as displayed on screen) = High Speed, High Temperature mode
Page 16
Coating truffles,
cake decorating
Profiteroles,
eclairs
White bread
N/A N/A
Keep warm
Add
chocolate 2
Add
Phase 1 (P1) Phase 2 (P2) Phase 3 (P3) Phase 4 (P4) Phase 5 (P5) Phase 6 (P6) Tools used Recipe ideas
chocolate 1
31°C
42°C42°C 42°COFF31°C
0
94 444
N/A N/A N/A
1000W
AutoAuto
Auto
Auto
Auto
N/A N/A N/A
2hrs
Keep warm
10mins
–
–
✓ ✗ ✗
10mins20mins
31°C
47°C47°C 47°COFF31°C
0
94 444
1000W
Auto
Auto
Auto
Auto
Auto
2hrs
10mins
–
–
✓ ✗ ✗
10mins20mins
N/A N/A N/A
2 0 Speed 4
Auto Auto Auto
✓ ✗ ✗
Proong Knocking back
–
yeast
Add liquid, our &
250W OFF
OFF
8mins 1hr 1min
✗ ✗ ✗ ✗
2mins
°C
SWEET
White/Milk chocolate
programmes
W
Heating stage
Cooking time
Plain chocolate Add chocolate 1 Add chocolate 2
W
°C
Cooking time
Heating stage
Choux pastry Add water & butter Add our Add eggs
chocolate tempering
°C 90°C OFF OFF
W
Heating stage
Cooking time 1min – –
0 Speed 1 OFF 0
°C OFF OFF 28°C OFF
Standard Doughs
doughs
W OFF
Heating stage
Mixing time
Note:
• Some programme phases have heating stages that allow ingredients to reach the specified temperature before the phase starts.
• HSHT (as displayed on screen) = High Speed, High Temperature mode
13
Page 17
Brioche
N/A
Frosting
Baked Alaska, cake
Buttercream frostings
Proong Knocking back
Add butter
–
yeast
Phase 1 (P1) Phase 2 (P2) Phase 3 (P3) Phase 4 (P4) Phase 5 (P5) Phase 6 (P6) Tools used Recipe ideas
Add liquid, our &
OFF 350W OFF
OFF
8mins 5mins 1hr 1min
Keep warm
✓ ✗ ✗ ✗ ✗
2mins
& water
Add egg whites, sugar
OFF
118°COFF
N/A N/A N/A N/A
750W
HSHT 6
Auto
750W
HSHT 6HSHT 6
N/A N/A N/A N/A
OFF
45°COFF
750W
Speed 6
750WAuto
Speed 6Speed 6
10mins
10mins
✓ ✗
1min
10mins
Keep warm
✓ ✗
ar & water
1min10mins
Add egg whites, sug-
0 Speed 1 Speed 1 OFF 0
°C OFF OFF OFF 28°C OFF
Enriched doughs
SWEET
programmes
W OFF
Mixing time
Heating stage
doughs
Italian
W
°C
Heating stage
Swiss
Cooking time
W
°C
Cooking time
Heating stage
meringue
Note:
• Some programme phases have heating stages that allow ingredients to reach the specified temperature before the phase starts.
• HSHT (as displayed on screen) = High Speed, High Temperature mode
14
Page 18
Strawberry compote
Pâte de fruit
Profiterole filling
Crème Anglaise
sugar
Phase 1 (P1) Phase 2 (P2) Phase 3 (P3) Phase 4 (P4) Phase 5 (P5) Phase 6 (P6) Tools used Recipe ideas
Add fruit, pectin &
104°COFF
20
N/A N/A N/A N/A N/A
750WAuto
✓
Add sugar & glucose Add citric acid
10mins10mins
Add puree, sugar &
100°C70°C
pectin
N/A N/A N/A
N/A N/A N/A
0
Auto
2mins-
✓ ✓ ✓
70°C
Keep warm
00
101°C70°C
AutoAuto
✗ ✓ ✗
30mins
5mins-
2mins
Keep warm
Add liquid
N/A N/A N/A
✗ ✓ ✗
°C
Fruit compote
SWEET
programmes
W
Heating stage
Cooking time
Pate de Fruit
HSHT 3 HSHT 3 HSHT 3
W Auto Auto Auto
°C 100°C 107°C
Heating stage
compote
Cooking time 2mins 10mins
°C OFF
Crème Patisserie Add egg & sugar Add liquid
15
Speed 2
W –
Cooking time
Heating stage
Crème Anglaise Add egg & sugar
Speed 2 0 0
W OFF Auto Auto
°C OFF 87°C 80°C
sauces
Cooking time 3mins 12mins 30mins
Heating stage
Note:
• Some programme phases have heating stages that allow ingredients to reach the specified temperature before the phase starts.
• HSHT (as displayed on screen) = High Speed, High Temperature mode
Page 19
Sabayon
Popcorn
Base for mousses
50°C
liquid
74°COFF
HSHT Max
°C
HSHT Max
HSHT Max
Keep warm
Phase 1 (P1) Phase 2 (P2) Phase 3 (P3) Phase 4 (P4) Phase 5 (P5) Phase 6 (P6) Tools used Recipe ideas
Add egg, sugar &
Sabayon
SWEET
programmes
N/A N/A N/A N/A
500W
750WAuto
W
15mins
–
✓ ✗
2mins
Cooking time
Heating stage
Pate de Bombe Add eggs & sugar Keep warm
sauces
OFF
OFF 118°COFF
°C
N/A N/A N/A N/A
HSHT 6 HSHT 6
W 500W 500W
10mins
–
1
✓ ✗
2
Cooking time
Heating stage
– –
°C 180°C 180°C
Popcorn Add oil Add popcorn kernals
others
N/A N/A N/A N/A
W Auto Auto
10mins
✗
✓ ✗
Cooking time
Heating stage
Note:
• Some programme phases have heating stages that allow ingredients to reach the specified temperature before the phase starts.
• HSHT (as displayed on screen) = High Speed, High Temperature mode
16
Page 20
Casseroles
Casseroles
N/A N/A N/A N/A
–
80°C
09
Phase 1 (P1) Phase 2 (P2) Phase 3 (P3) Phase 4 (P4) Phase 5 (P5) Phase 6 (P6) Tools used Recipe ideas
SLOW COOK
programmes
98°C 95°C
°C
High Add ingredients Keep warm
Auto
1000W
✓ ✗
1500W
W
Heating stage
80°C
30mins
20mins2hrs
98°C 85°C
°C
Low Add ingredients Keep warm
Cooking time
9
09
N/A N/A N/A N/A
Auto
1000W
1500W
W
30mins
✓ ✗
10mins7hrs
Heating stage
Cooking/mixing time
Note:
• High slow cook operates at 95°C and is ideal for slow cooking tougher meats.
• Low slow cook operates at 85°C and is ideal for slow cooking meats such as chicken and vegetables.
• Some programme phases have heating stages that allow ingredients to reach the specified temperature before the phase starts.
17
Page 21
programmes
STEAM
°C 102°C 65°C
– –
W Auto Auto
Heating stage
Cooking time 10mins 30mins
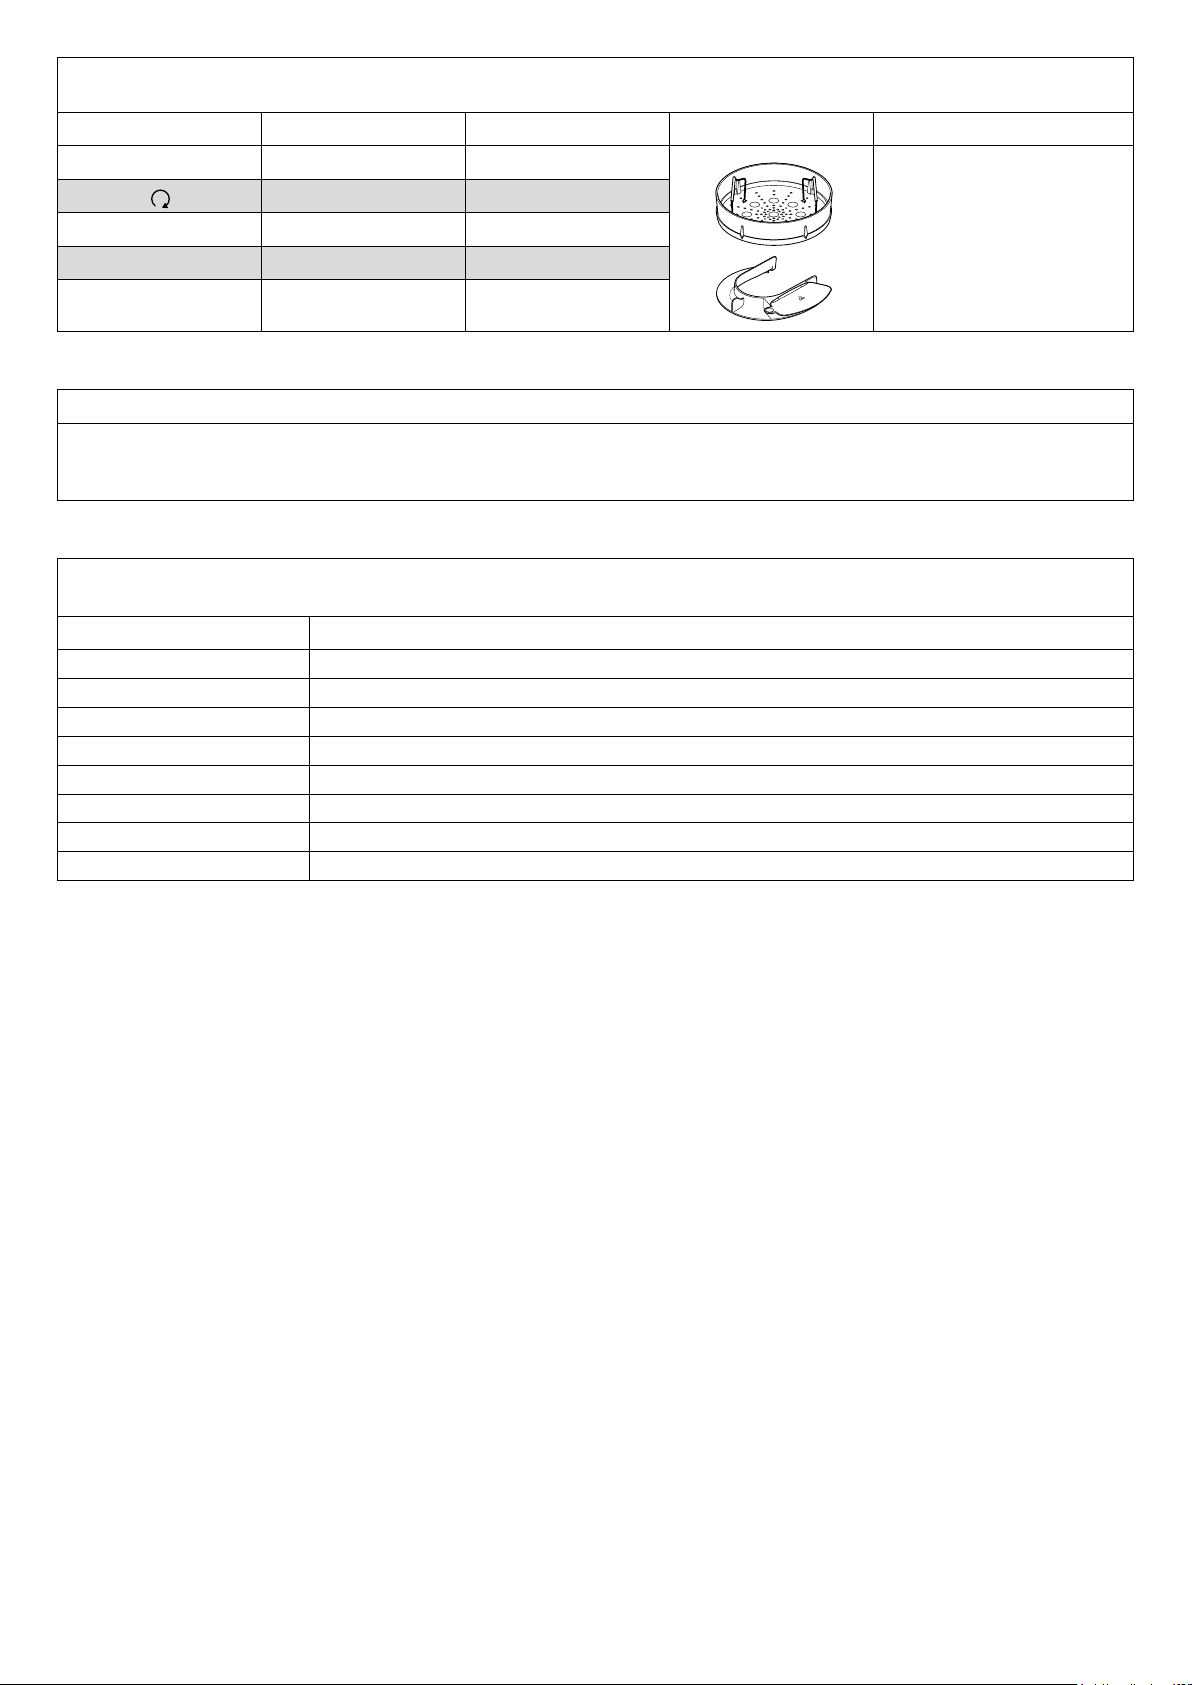
Phase 1 (P1) Keep Warm Tools used Comments
Note:
• Refer to steamer basket instruction
manual for recommended quantities
✓ ✗
and times – adjust the cooking time
as required.
how to skip programme phases
1 Press and hold the display dial for 5 seconds. “RECIPE PHASES” will appear on the display screen.
2 Turn the display dial to choose the desired phase (P1, P2, P3, etc.) and press the dial to confirm.
3 Follow the instructions on the display screen.
Display screen text explained
During the pre-set programmes, various messages will appear on the display screen.
Message Description
COOLING DOWN The bowl is cooling to a set temperature.
HEATING The bowl is getting up to temperature.
HSHT MODE High Speed High Temperature mode.
KNEADING A process in bread making when the dough is stretched.
KNOCK BACK Knocking back removes large pockets of air bubbles to create an even texture.
PROOFING A stage in bread making where the dough is allowed to rise.
TEMPERING Accurately controlling the temperature of chocolate to obtain a smooth, glossy finish.
PROCESSING Part of a programme where the Cooking Chef is mixing without heating.
18
Page 22
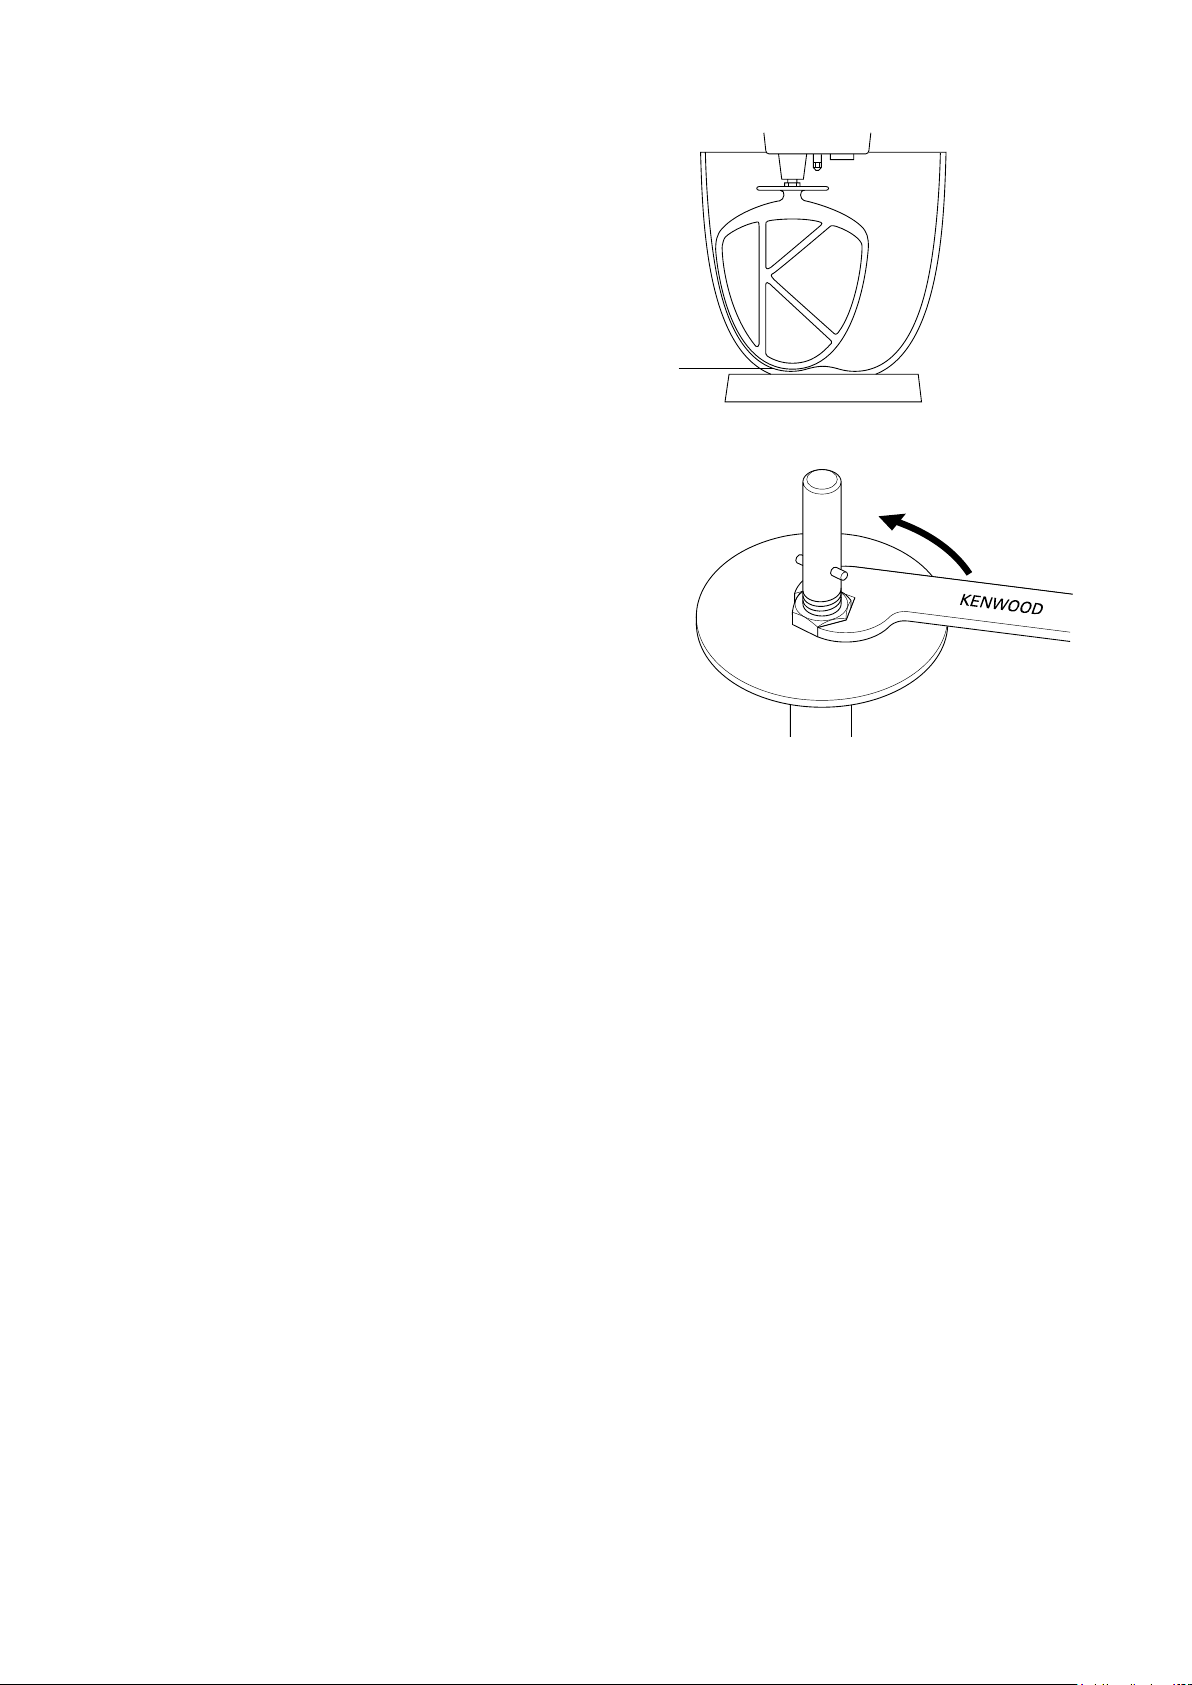
adjusting the height of the tools
whisk, stainless steel K beater
For best performance the whisk and K beater should be
almost touching the bottom of the bowl
adjust the height using the spanner provided.
1 Unplug the appliance.
2 Raise the mixer head and insert the whisk or beater.
3 Lower the mixer head. If the clearance needs to be adjusted,
raise the mixer head and remove the tool.
4 Using the spanner provided loosen the nut
to allow adjustment of the shaft
to the bottom of the bowl, turn the shaft anti-clockwise. To
raise the tool away from the bottom of the bowl turn the shaft
clockwise.
5 Re-tighten the nut.
6 Fit the tool to the mixer and lower the mixer head. (Check its
position see points above).
7 Repeat the above steps as necessary until the tool is set
correctly. Once this is achieved tighten the nut securely.
high temperature creaming beater - this tool should just
touch the bottom of the bowl.
stir tool - this tool should just touch the bottom of the bowl.
1 Unplug the appliance.
2 Raise the mixer head and insert the stir tool.
3 Lower the mixer head. If the tool needs adjustment, raise the
mixer head and use the spanner to loosen the nut, then lower
the mixer head.
4 To lower the tool closer to the bottom of the bowl, turn the
adjustment wheel clockwise. To raise the tool away from the
bottom of the bowl, turn the adjustment wheel anti-clockwise.
5 Re-tighten the nut.
dough hook - this tool is set at factory and is not adjustable.
. To lower the tool closer
7
. If necessary
5
sufficiently
6
5
7
6
19
Page 23
to fit and use your splashguard assembly
The splashguard assembly consists of 2 pieces: the heat
shield and the splashguard.
The heat shield must be fitted during cooking
operations otherwise the machine will not operate
and "Fit heat shield" will be displayed. The heat shield is
to protect the mixer head from steam produced during the
cooking process.
The splashguard should not be fitted to the bowl unless used
in conjunction with the heat shield.
1 Raise the mixer head until it locks.
2 Push the heat shield upwards onto the underside of the mixer
head
used without the rubber seal correctly fitted.
3 Fit the bowl onto the base.
4 Lower the mixer head.
5 Rest the splashguard on the bowl rim and then slide forward
until fully located
• During mixing, ingredients can be added directly to the bowl
via the feed chute.
6 To remove the splashguard simply slide it away from the
appliance.
7 To remove the heat shield, raise the mixer head until it locks.
Remove the tool, then pull the heat shield downwards from
the underside of the mixer head.
Note: Only fit or remove the splashguard when the mixer head
is in the locked position.
until fully located. The heat shield must never be
8
.
9
8
9
20
Page 24
to remove and fit outlet covers
High-speed outlet cover
1 To remove the cover, use the grip and lift upwards.
2 To fit, place the cover over the outlet and push downwards.
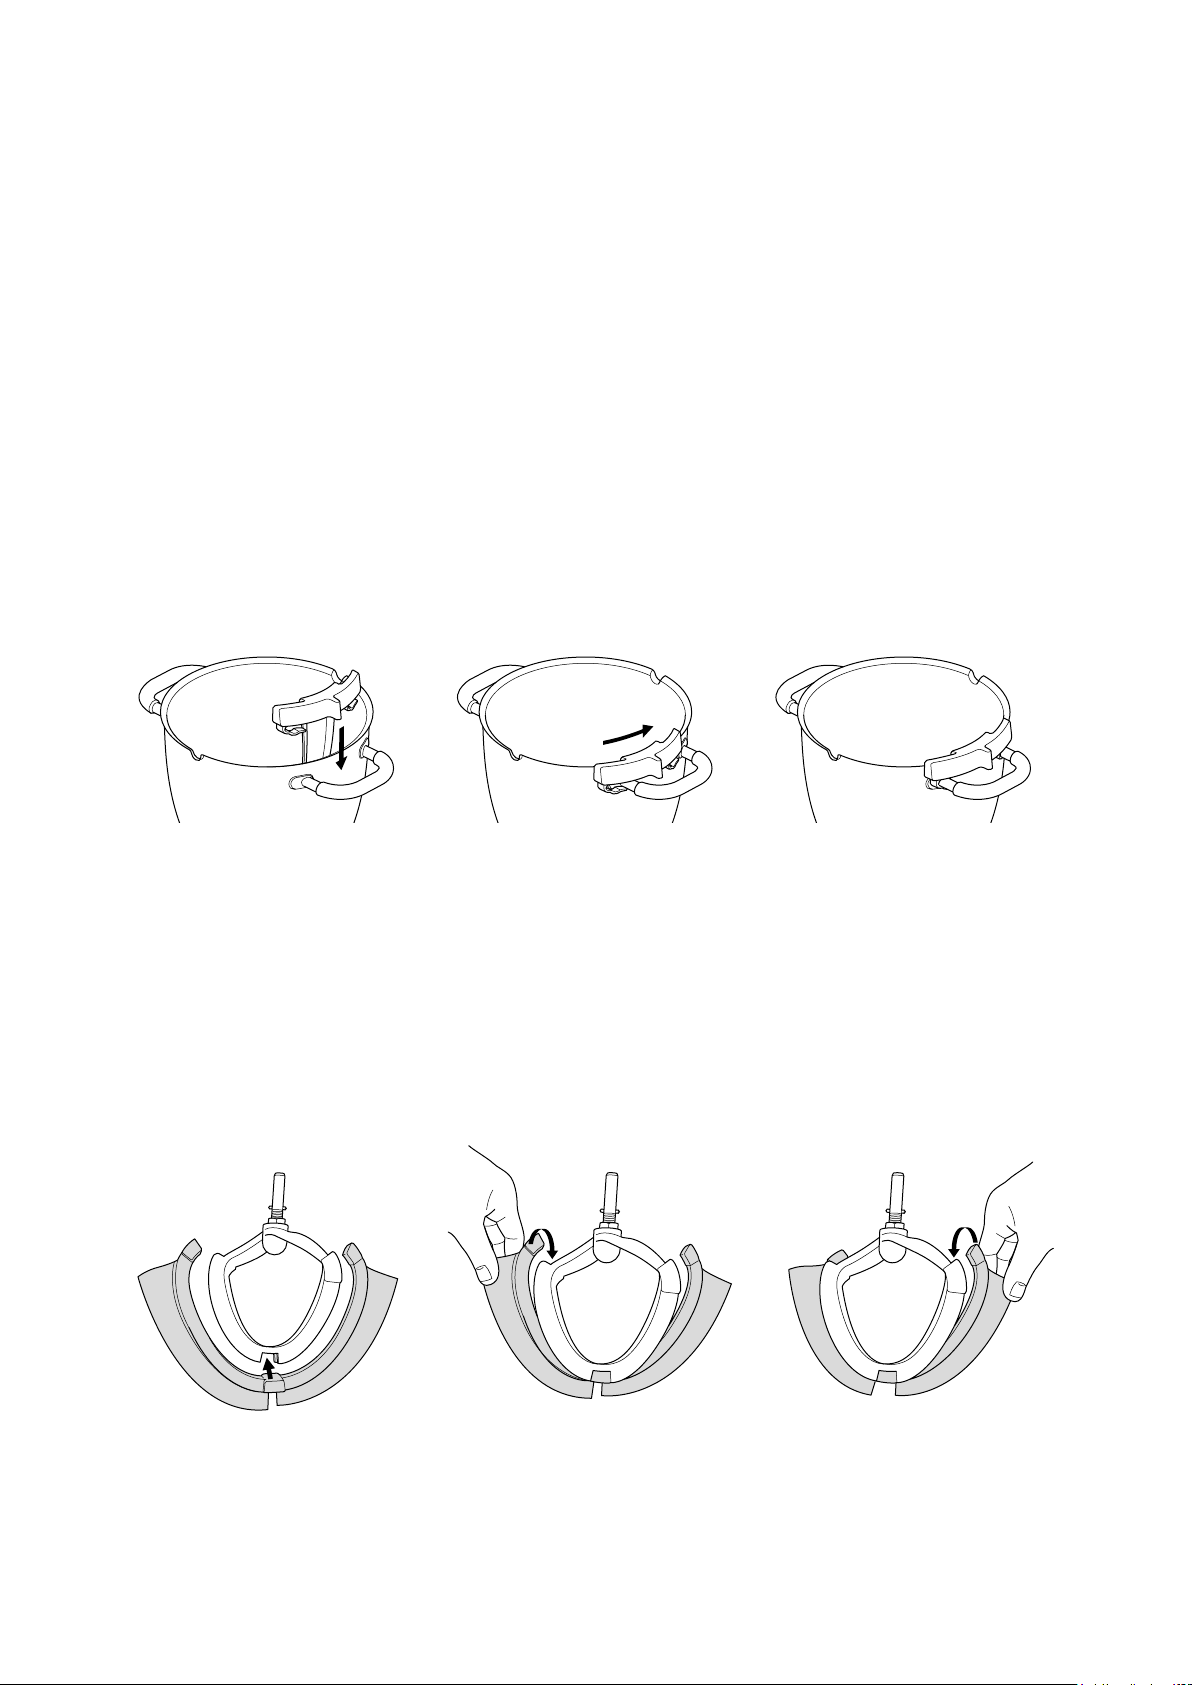
to fit and remove your stir assist clip
The stir assist clip can be used to assist the mixing action.
1 Slot the stir assist clip over the side of the bowl with the
vertical ridge on the inside and the clips on the outside
2 Turn the clip anti-clockwise onto the bowl handles
.
.
Slow-speed outlet cover
1 To remove the cover, use the grip on the underside and pull
outwards.
2 To fit, locate the catch at the top of the cover into the outlet
recess and push to clip into position.
3 To remove, reverse the procedure.
IMPORTANT - The stir assist clip should not be fitted when
using the K beater, whisk, dough hook or creaming beater.
assembling the high temperature creaming beater
fitting the wiper blade
The wiper blade is supplied already fitted and should always
be removed before cleaning.
1 Carefully fit the flexible wiper blade onto the tool by locating
the base of the wiper blade into the slot then fit one side into
the groove before gently hooking the end in place. Repeat
with the other side.
21
Page 25

Maximum capacities and recommended speeds
The following speeds are a guide only and will vary depending upon the quantity and the temperature of the ingredients being mixed etc.
Shortcrust pastry Flour weight 910g/2lb
Stiff yeast dough Flour weight 350g/12oz – 1.6kg/3lb 8oz
Total weight 550g/1lb 3oz – 2.56kg/5lb 10oz
Soft yeast dough Flour weight 250g/9oz – 2.6kg/5lb 12oz
Total weight 480g/1lb 1oz – 5kg/11lb
Fruit cake mix Total weight 4.55kg/10lb
Egg whites Number
Weight
Cooking mode Total capacity 3L
Oil Total capacity 250ml
* Egg sizes used = medium sized (Weight 50g)
Tool Recipe/Process Recommended Speed
K-beater Creaming butter/margarine and
sugar
Beating eggs into creamed
mixtures
Folding in flour, fruit, etc. ‘Min’ – 1
All in one cakes Start on ‘Min’, gradually increasing to ‘Max’
16
(605g)
Start on ‘Min’, gradually increasing to ‘Max’
4 – ‘Max’
Rubbing fat into flour ‘Min’ to 2
High temperature creaming beater Creaming butter/ margarine and
sugar
Scraping mixes both hot and
cold from the sides of the bowl
Whisk For eggs, cream, soufflés. Gradually increase to ‘Max’
Dough hook For yeast mixtures only. Start on ‘Min, gradually increasing to 1
Stir tool Suitable to use during cooking
to maintain the consistency of
food e.g. chicken, fish, vegeta-
bles and fruit.
Start on ‘Min’ gradually increasing to 3
Start on ‘Min’ gradually increasing to 3
Use with stir settings only
22
Page 26

care and cleaning
• Always switch off and unplug before cleaning.
• A little grease may appear at outlet
This is normal - just wipe it off.
• The metal surfaces of the temperature sensors may show
signs of wear during normal use. This does not affect the
performance of the product.
• Do not leave the high temperature flexible beater fitted to the
mixer when not in use.
appliance, outlet covers
• Wipe with a damp cloth, then dry.
• Never use abrasives or immerse in water.
high temperature creaming beater
• Always remove the flexible wiper blade from the tool before
cleaning.
• Wash the flexible wiper blade and tool in hot soapy water,
then dry thoroughly. Alternatively the parts can be washed in
a dishwasher.
Note: Please inspect the condition of the tool body before and
after use and also regularly inspect the condition of the wiper
blade and replace it if there are any signs of wear.
bowl, tools, splashguard, stir assist clip
• Wash by hand, then dry thoroughly or wash in the dishwasher.
• Never use a wire brush, steel wool or bleach to clean your
stainless steel bowl. Use vinegar or a suitable descaler to
remove limescale.
when you first use it.
2
• If food sticks or burns on the inside of the bowl, remove as
much as possible using the spatula provided. Fill the bowl with
warm soapy water and allow to soak. Remove any stubborn
deposits using a nylon brush.
• Any discolouration of the bowl will not affect its performance.
drain hole
• Ensure this area is free from food. If necessary use a pipe
cleaner or cotton bud to clean.
temperature sensors
• Wipe with a damp cloth then dry thoroughly. Never use
abrasives or sharp instruments to clean the sensors.
Item Suitable for
Bowl
K-beater, whisk, creaming beater, stir tool
Dough hook
Stir assist clip
Outlet covers
Spatula
Splashguard and heat shield
Rubber seal
Work surface protection mat
Dough scraper
dishwashing
✓
✓
✓
✓
✗
✓
✓
✓
✓
✓
service and customer care
• If you experience any problems with the operation of
your appliance, before requesting assistance refer to the
“troubleshooting guide” section in the
kenwoodworld.com.
• Please note that your product is covered by a warranty, which
complies with all legal provisions concerning any existing
warranty and consumer rights in the country where the
product was purchased.
• If your Kenwood product malfunctions or you find any defects,
please send it or bring it to an authorised KENWOOD Service
Centre. To find up to date details of your nearest authorised
KENWOOD Service centre visit www.kenwoodworld.com or
the website specific to your Country.
• Designed and engineered by Kenwood in the UK.
• Made in China.
manual or visit www.
IMPORTANT INFORMATION FOR CORRECT DISPOSAL OF
THE PRODUCT IN ACCORDANCE WITH THE EUROPEAN
DIRECTIVE ON WASTE ELECTRICAL AND ELECTRONIC
EQUIPMENT (WEEE)
At the end of its working life, the product must not be disposed of
as urban waste.
It must be taken to a special local authority differentiated waste
collection centre or to a dealer providing this service.
Disposing of a household appliance separately avoids possible
negative consequences for the environment and health deriving
from inappropriate disposal and enables the constituent materials
to be recovered to obtain significant savings in energy and
resources. As a reminder of the need to dispose of household
appliances separately, the product is marked with a crossed-out
wheeled dustbin.
23
Page 27

troubleshooting guide
Problem Cause Solution
The machine will not operate in the heat
mode and displays an error message
and gives a warning beep.
The machine changes speed or speed
is limited during cooking.
Food burning on the base of the bowl. 1 The temperature setting selected may be
One of the safety sensors has been
activated.
The speed is automatically limited when
the bowl contents reach 60°C and the hot
temperature warning indicator will be on.
too high.
2 Incorrect tool being used.
3 The stir delay is too long.
Check display screen for notification of cause.
• Ensure the head is lowered and locked.
• Ensure all outlet covers are correctly fitted.
• Ensure the heat shield is correctly fitted.
• Ensure the cooking chef bowl is corrected
fitted.
This is a safety feature.
1 Reduce the temperature or power settings.
2 Check the most suitable tool is being used
and adjusted correctly.
3 Increase the frequency of the stir delay or
increase to a continuous operation.
4 The tool may not be low enough in the
bowl.
5 The timer has been set for too long.
6 The sensor and/or the underside of bowl
may not be clean.
Consistency of food not maintained. 1 Temperature selected too high.
2 Stir delay too frequent.
3 Ingredients cooked for too long.
4 Incorrect tool being used.
Inconsistent mixing speed. 1 Ingredients too large, hard or too firm. 1 Cut food into smaller pieces, remove stones
Difficult to shut mixer head. 1 Firm ingredients such as chocolate in the
bottom of the bowl prevent the mixer head
from locking down.
2 Stir tool has been incorrectly fitted.
Mixer runs continuously when stir
speeds are selected.
Motor speed is limited when using
attachments
The whisk or K-beater knocks against
the bottom of the bowl or not reaching
the ingredients in the bottom of the
bowl.
The whisk, K-beater or creaming beater
knock against the stir assist clip.
Outlet covers are incorrectly fitted. Ensure the outlet covers are correctly fitted.
Hot bowl fitted. Remove the bowl, or cool the bowl to below
Tool at the wrong height and needs
adjusting.
Stir assist clip is fitted. Remove stir assist clip – this should be used
4 Adjust the tool.
5 Cook for a shorter length of time (ensure food
is thoroughly cooked).
6 Ensure that these areas are kept clean and
dry.
1 Reduce temperature.
2 Reduce stir delay.
3 Reduce the cooking time (ensure food is
thoroughly cooked).
4 Check the most suitable tool is being used.
from fruit, slowly melt ingredients without a
tool in position (but ensure a speed has been
selected).
2 Add ingredients after the head is lowered.
3 Check the most suitable tool is being used.
1 Add ingredients after the mixer head is
lowered.
2 Ensure the stir tool is fitted into the stir tool
outlet.
60°C.
Adjust the height using a suitable spanner – see
“Tool Adjustment” section.
when using the stir tool only.
Slow speed attachment cannot be
fitted.
Check your attachment is compatible for
use with your model.
Twist connection system required (Model
KAX)
24
Attachment must have the KAX twist
connection system
If you own attachments featuring the Bar
Connection System you will need to use
the KAT002ME adaptor to connect these to
the Twist Connection System on your Kitchen
Machine.
For more information visit
www.kenwoodworld.com/twist.
to fit the outlet.
Page 28

Problem Cause Solution
Standby light flashing when Kitchen
Machine first plugged in.
The Kitchen Machine stops during
operation.
Standby light flashing rapidly.
The Kitchen Machine stops during
operation. Standby light is flashing
slowly.
Standby light off whilst machine plugged
in.
Display screen shows an alpha/
numerical error code.
When contacting customer care, you may be required to supply details of the software version. This can be found by pressing the menu
button and selecting “SETTINGS” then “VERSION”.
Speed control not in the ‘O’ position.
Mixer head in the raised position or not
locked down correctly.
Overload protection or overheat system
activated.
Maximum capacity exceeded.
1 Heat shield removed or an outlet cover
removed.
2 Mixer head lifted.
3 Outlet attachment has exceeded its
maximum running time.
Kitchen machine has been left plugged in
for more than 30 minutes without being
operated and has gone into Standby mode.
Appliance not functioning properly. Contact an authorised Kenwood Service
Check and turn speed control to the ‘O’
position.
Check Kitchen Machine head is locked down
correctly.
Unplug and check for obstruction or
overloading.
Turn the speed control to “O” and then restart.
If the machine will not operate, remove some of
the ingredients to reduce the load and restart.
If this still does not resolve the problem, unplug
and allow to stand for 15 minutes. Plug in and
reselect the speed.
If the machine does not restart following the
above procedure contact “customer care” for
further advice.
1 Fit heat shield or outlet cover. Turn the speed
control to “O” and then restart.
2 Lower mixer head. Turn the speed control to
“O” and then restart.
3 Turn the speed control to “O” and then
restart.
Press the Standby button once to reset.
Centre. To find up to date details of your
nearest Kenwood Service Centre visit
www.kenwoodworld.com or the website
specific to your country.
25
Page 29

Table des matières
sécurité 27 – 28
légende 29
choix de la langue 29
accessoires du bol et utilisations 30
utilisation de votre Cooking Chef 30 – 31
utilisation de votre Cooking Chef comme robot 31
explication des symboles affichés à l'écran 32
mode manuel 33 – 34
utilisation des programmes prédéfinis 35
Programmes plats salés 35 – 36
plats principaux 35 – 36
sauces 36
Programmes préparations sucrèes 37 – 40
chocolat 37
pâtes 37 – 38
meringue 38
fruit 39
crème 39 – 40
autres 40
Programmes Cuisson lente 41
haute T° 41
basse T° 41
Programme Cuisson vapeur 42
ajustement des accessoires du bol 43
installation et utilisation de votre couvercle anti-éclaboussure 44
installation et retrait des caches sorties 45
installation et retrait de la pince d'aide au mélange 45
montage du batteur à crème haute température 45
capacités maximales et vitesses recommandées 46
entretien et nettoyage 47
service après-vente 47
guide de dépannage 48 – 49
26
Page 30

Français
sécurité
l
Lisez et conservez soigneusement ces instructions pour pouvoir vous y
référer ultérieurement.
l
Retirez tous les éléments d’emballage et les étiquettes.
l
Si le cordon est endommagé, il doit être remplacé, pour des raisons de sécurité, par
Kenwood ou par un réparateur agréé Kenwood.
remarque importante – implants médicaux électroniques
l
Comme tous les produits de cuisson par induction, cet appareil génère des champs
magnétiques à ondes courtes. Si l’utilisateur ou une personne se tenant à proximité de
l’appareil porte un pacemaker ou tout autre implant actif, il est recommandé de consulter un
médecin avant utilisation au sujet d’une possible incompatibilité afin de prévenir tout risque
pour la santé.
l
Éteignez et débranchez l’appareil avant d'installer ou de retirer les accessoires, après
utilisation et avant de le nettoyer.
l
N’approchez pas des parties de votre corps, cheveux, bijoux ou vêtements amples des
parties en mouvement et des accessoires installés.
l
Ne mettez pas les doigts dans le mécanisme de charnière.
l
Ne laissez jamais l’appareil allumé sans surveillance.
l
N’utilisez jamais un appareil endommagé. Faites-le vérifier et réparer : voir la rubrique “service
après-vente”.
l
N’utilisez jamais d’accessoire non prévu pour cet appareil ou plus d’un accessoire à la fois.
l
Ne dépassez jamais les capacités maximales ; quand vous utilisez la cuisson par induction,
ne dépassez jamais le niveau de remplissage maximum de 3 litres indiqué à l’intérieur du bol.
l
Quand vous utilisez un accessoire supplémentaire, lisez les instructions d’utilisation qui
l’accompagnent.
l
Faites attention en soulevant cet appareil car il est assez lourd. Assurez-vous que la tête est
verrouillée et que le bol, les accessoires, les couvercles et le cordon sont bien attachés avant
de soulever l’appareil.
l
Ne laissez jamais le cordon pendre de sorte qu’un enfant puisse l’attraper.
l
Ne laissez jamais le bloc moteur, le cordon d’alimentation ou la prise se mouiller.
l
Faites attention en manipulant ou en touchant toute partie de l’appareil quand il est utilisé
en mode cuisson ou après la cuisson, EN PARTICULIER, LE BOL, LE COUVERCLE ANTIÉCLABOUSSURE ET LES ACCESSOIRES car ils restent CHAUDS longtemps après l'arrêt de
l’appareil. Utilisez les poignées pour retirer et porter le bol. Utilisez un gant anti-chaleur pour
manipuler le bol et les accessoires de mélange chauds.
l
Le dessous du bol restera chaud longtemps après la fin de la cuisson. Faites attention en
manipulant le bol et protégez votre plan de travail ou les surfaces sensibles à la chaleur.
l
Prenez garde à la vapeur s’échappant du bol, particulièrement quand vous enlevez le
couvercle ou quand vous soulevez la tête du robot.
l
Si vous transférez des ingrédients chauds dans le robot, laissez-les refroidir à température
ambiante avant de les placer dans le robot.
l
N’utilisez que le bol et les accessoires fournis avec cet appareil. N’utilisez jamais le bol avec
une autre source de chaleur.
l
Ne jamais faire fonctionner l’appareil en mode cuisson si le bol est vide.
l
N'insérez rien dans les grilles de ventilation.
l
Quand vous utilisez cet appareil, posez-le sur une surface plane loin du bord. Placez-le à au
moins 10 cm des murs et assurez-vous que la ventilation n’est pas bloquée. Ne placez pas
l’appareil sous un placard saillant.
27
Page 31

l
Pour une utilisation correcte et sûre du cuiseur par induction, assurez-vous que la base du bol
et les capteurs de température sont propres et secs avant de lancer la cuisson.
l
Comme pour tous les appareils de cuisson par induction, ne placez pas de cartes de crédit,
appareils magnétiques ou électroniques sensibles à proximité de l’appareil pendant son
utilisation.
l
N’utilisez pas l’appareil pour frire des aliments.
l
Assurez-vous toujours que les ingrédients sont complètement cuits avant de les consommer.
l
Lorsque vous utilisez de l’huile, ne dépassez jamais 250 ml.
l
Il est recommandé de consommer les aliments peu de temps après leur préparation ou de les
refroidir rapidement et de les réfrigérer le plus vite possible.
l
Toute mauvaise utilisation de votre appareil peut être source de blessures.
l
Le cordon d'alimentation est utilisé pour réduire les risques d'enchevêtrement ou de chute.
Il est possible d'utiliser des rallonges avec la plus grande précaution. Si vous utilisez une
rallonge : 1) La puissance électrique indiquée sur la rallonge doit être au moins égale à
la puissance électrique de l'appareil ; et 2) le cordon doit être placé de telle sorte qu'il ne
reposera pas sur le comptoir ou la table et ne pourra pas être attrapé par un enfant ou tiré de
manière accidentelle. Si l'appareil est équipé d'une mise à la terre, le cordon d'alimentation
doit être un câble à trois fils avec terre. La puissance électrique de l'appareil figure sous
l'unité.
l
Les appareils peuvent être utilisés par des personnes dont les capacités physiques,
sensorielles ou mentales sont diminuées, ou qui ne disposent pas des connaissances ou de
l’expérience nécessaires, si elles ont été formées et encadrées pour l’utilisation des appareils,
et si elles ont conscience des risques encourus.
l
Les enfants doivent être surveillés afin qu’ils ne puissent pas jouer avec cet appareil.
l
Cet appareil ne doit pas être utilisé par des enfants. Veuillez garder l’appareil et le cordon hors
de portée des enfants.
l
N’employez l’appareil qu’à la fin domestique prévue. Kenwood décline toute responsabilité
dans les cas où l’appareil est utilisé incorrectement ou que les présentes instructions ne sont
pas respectées.
avant de brancher l’appareil
•
Assurez-vous que votre alimentation électrique corresponde à
celle qui est indiquée sur la partie inférieure de votre appareil.
•
AVERTISSEMENT : CET APPAREIL DOIT ÊTRE RELIÉ À
LA TERRE
•
Cet appareil est conforme au règlement 1935/2004 de
la CE sur les matériaux et les articles destinés au contact
alimentaire.
avant d’utiliser votre appareil pour la
première fois
l
Lavez les pièces : voir «Entretien et nettoyage ».
28
Page 32

découvrez votre Cooking Chef
légende
Points de branchement
sortie rapide (HSO)
1
sortie lente (SSO)
2
prise des accessoires du bol
3
prise de l'accessoir mélangeur
4
Robot
cache de la sortie rapide
5
tête du robot
6
cache sortie lente
7
bol
8
tête – levier pour soulever
9
contrôle de la vitesse
k
touche de mise en attente
l
cadran d'affichage/saisie
écran d'affichage
orifice d’écoulement
socle du bol/ zone de cuisson par induction
ventilation
q
capteurs de température
batteur- K
s
batteur à crème à haute température
t
fouet
k
crochet de pétrissage
l
outil mélangeur
pince d'aide au mélange
spatule haute température
protège-chaleur
joint en caoutchouc (amovible)
q
couvercle anti-éclaboussure
couvercle de la cheminée d’alimentation
s
tapis de protection du plan de travail
t
clé de serrage
dk
Symboles de l'écran d'affichage
avertissement température élevée
dl
phase de programme
d
touche de sélection de la température
d
avertissement température et vitesse élevées
d
affichage des textes
d
sélection de la durée
dq
sélection du réglage de mélange
d
sélection de la puissance
ds
Panneau d'affichage
touche de sélection des températures
dt
touche de sélection des temps de cuisson
k
touche de réglage de mélange
l
touche de menu
corne
Remarque : accessoires pour la sortie lente
La sortie lente sur votre modèle de robot comporte le Système
de connexion Twist. Il est conçu pour accepter les accessoires du
Système de connexion Twist.
Lorsque vous achetez de nouveaux accessoires pour la sortie
lente, vous devez vérifier leur compatibilité avec votre robot. Tous
les accessoires du Système de connexion Twist sont identifiables
par le code produit commençant par KAX, de même que par le
symbole Twist
Si vos accessoires comportent le Système de connexion Bar
, vous devez utiliser l’adaptateur KAT002ME pour raccorder ces
derniers au Système de connexion Twist
Pour plus d’informations, veuillez consulter le site
www.kenwoodworld.com/twist.
dessiné sur l’emballage.
sur votre robot.
choix de la langue
Lorsque vous utilisez votre Cooking Chef pour la première fois, la langue de l'écran d'affichage est par défaut l'anglais.
1 Pour changer la langue, appuyez sur la touche de menu.
2 Utilisez le cadran d'affichage/saisie pour sélectionner « SETTINGS » puis
appuyez sur le cadran d'affichage/saisie pour confirmer.
3 Utilisez le cadran d'affichage/saisie pour sélectionner « LANGUAGES » puis
appuyez sur le cadran d'affichage/saisie pour confirmer.
4 Utilisez le cadran d'affichage/saisie pour sélectionner la langue souhaitée.
Une fois la langue requise sélectionnée, appuyez sur le cadran d'affichage/
saisie pour confirmer.
5 Pour modifier à nouveau la langue, recommencez la procédure.
29
Page 33

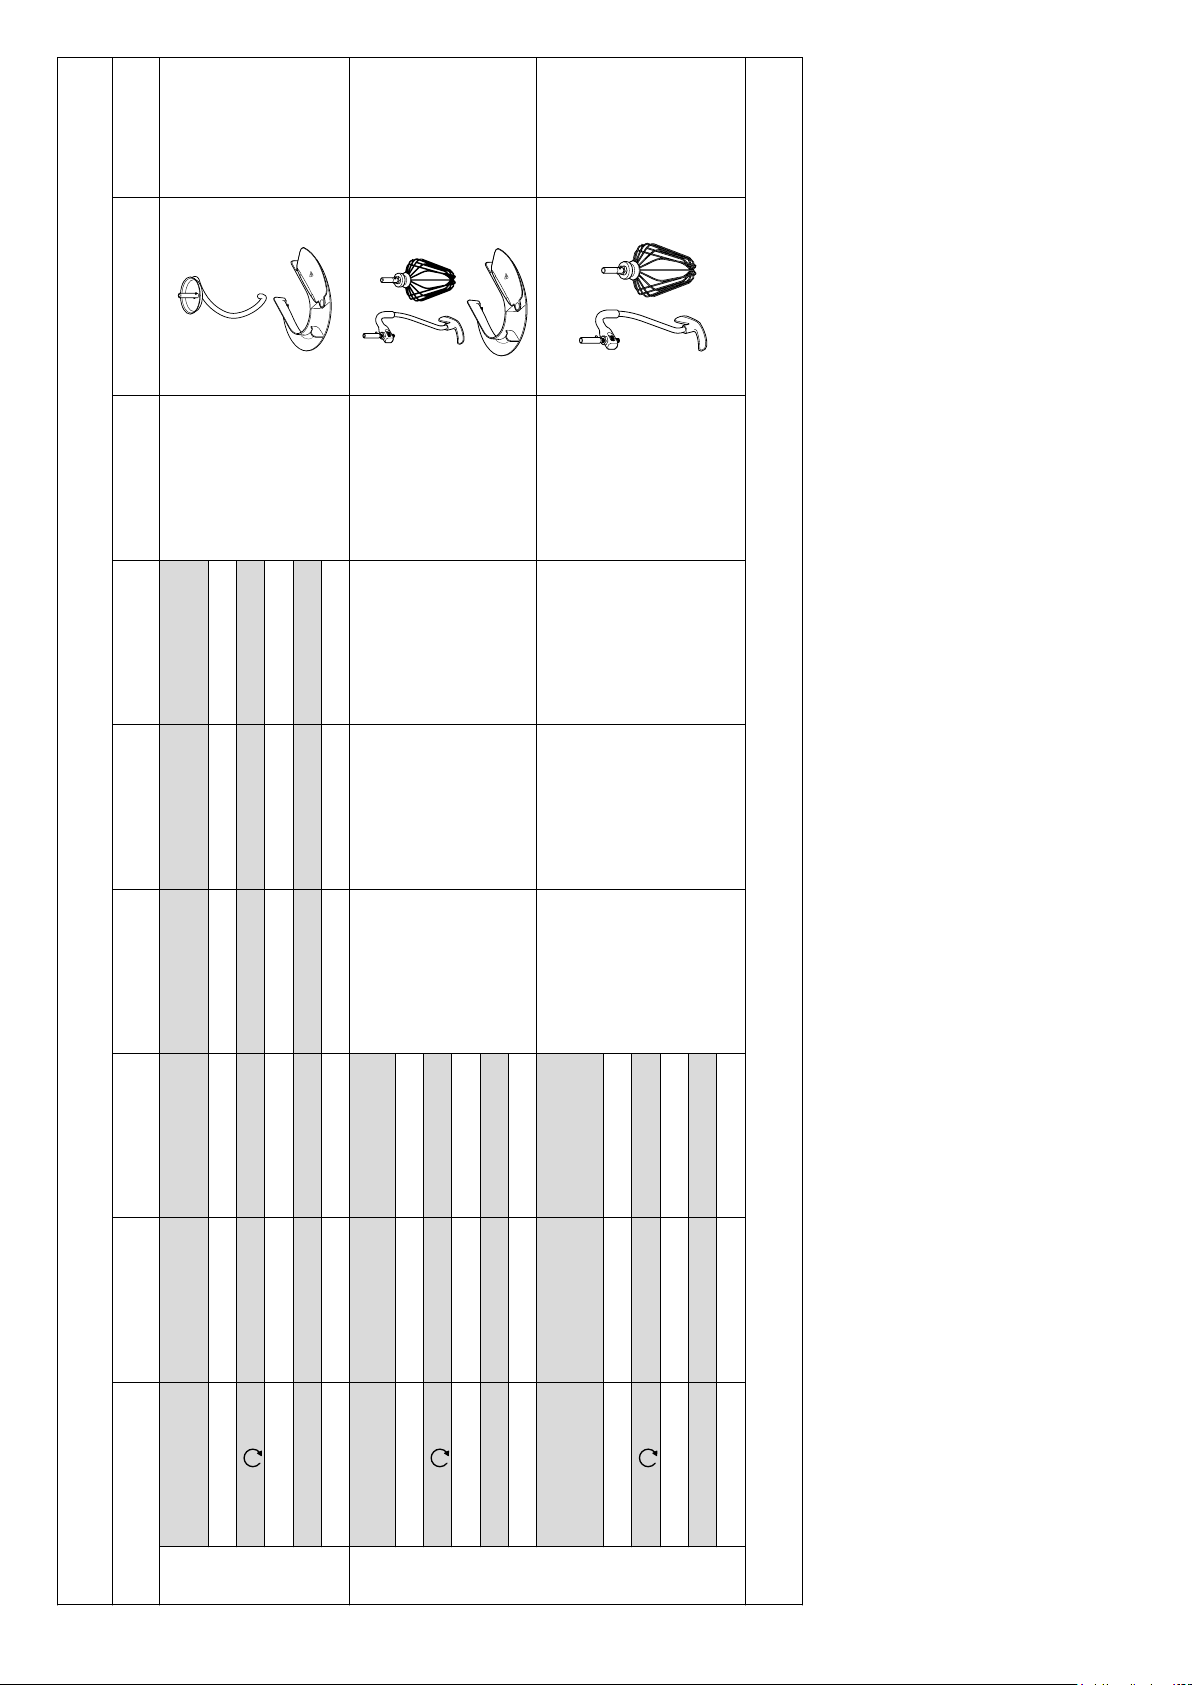
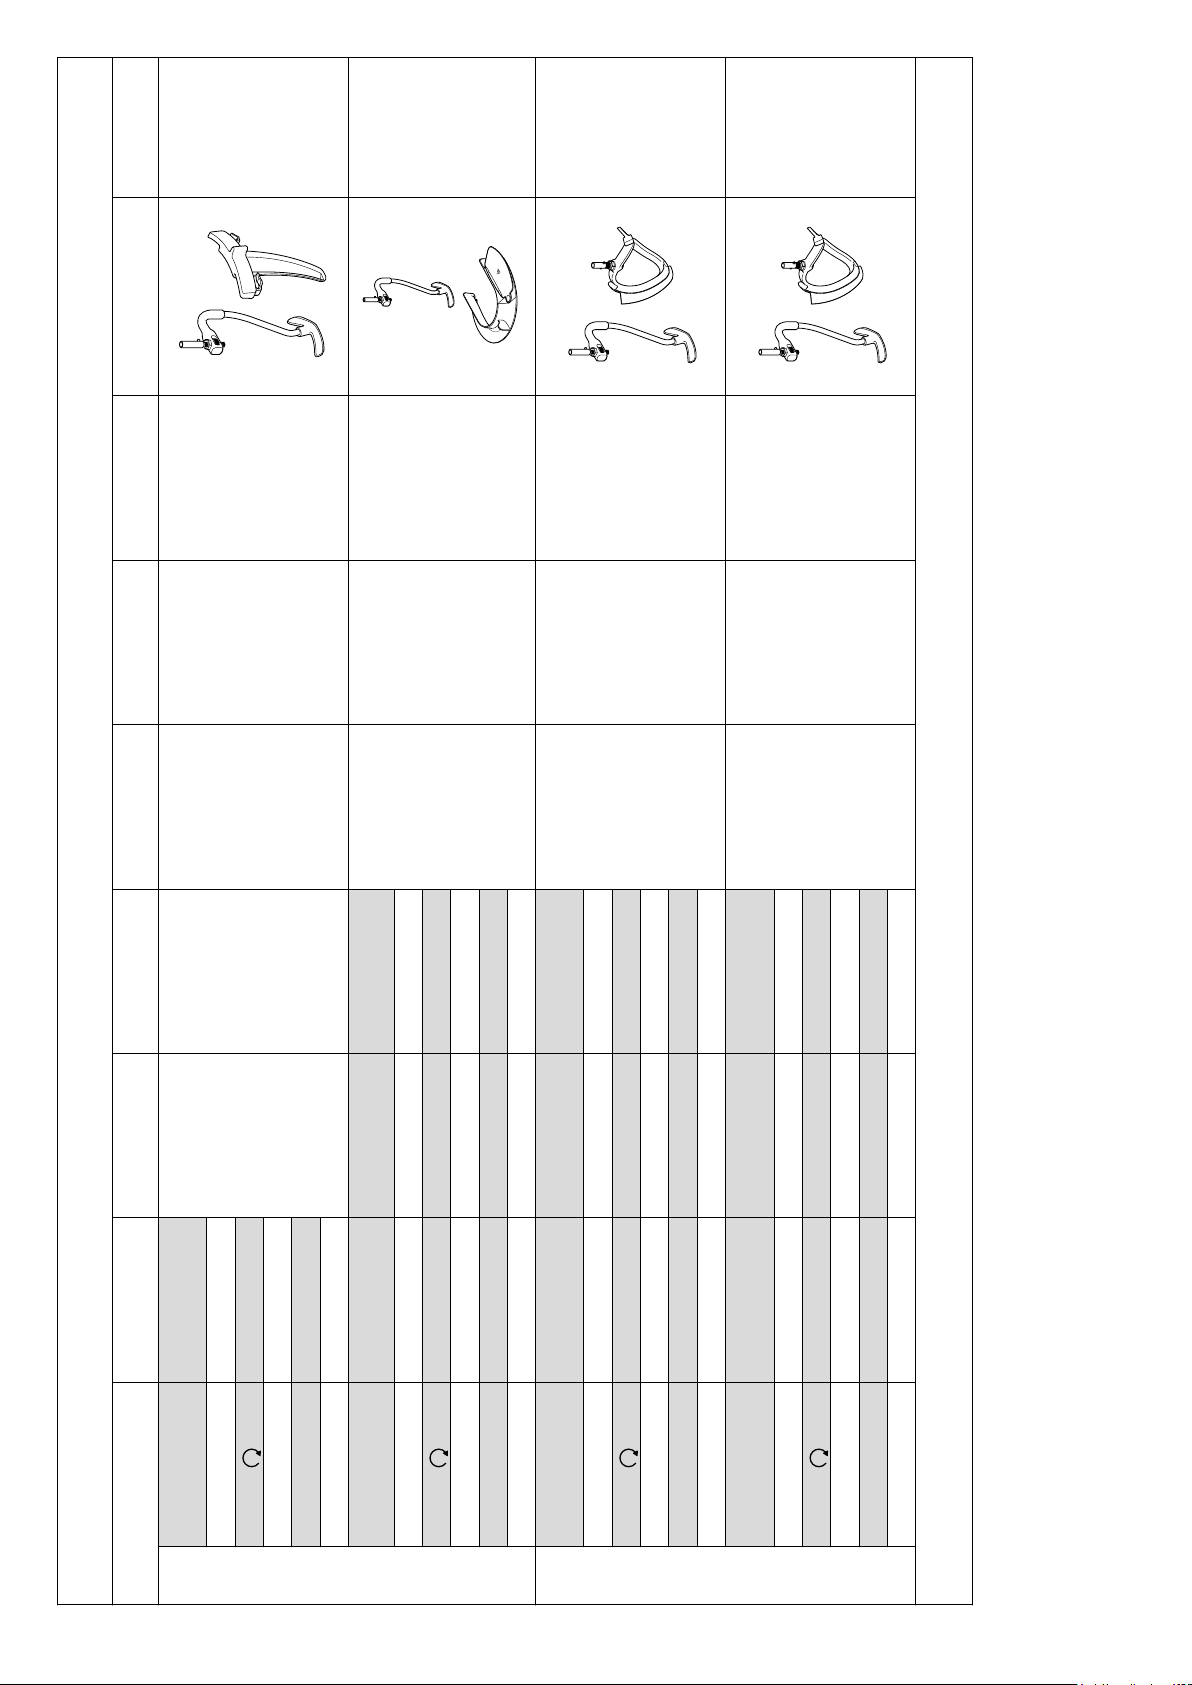
accessoires du bol et utilisations
Batteur K
Permet de préparer des gâteaux, biscuits, glaçages, garnitures,
éclairs et purées de pommes de terre.
Fouet
Pour les œufs, crèmes et soufflés. N'utilisez pas le fouet pour les
mélanges épais (ex. crème épaisse et sucre), vous risqueriez de
l'endommager.
Peut être associé à l'accessoire mélangeur lorsque vous fouettez
en chauffant, par exemple pour des meringues suisses ou
italiennes.
Crochet de pétrissage
Uniquement pour les mélanges à base de levure.
utilisation de votre Cooking Chef
IMPORTANT
• Vérifiez que la zone d’induction, les capteurs de température
et la surface de la base du bol sont propres. Faute de quoi,
le capteur de température fonctionnera mal ce qui entraînera
une mauvaise cuisson.
• Vérifiez que tous les couvercles de l’appareil, y compris le
protège-chaleur sont installés. S’ils ne sont pas correctement
placés, la fonction cuisson ne marchera pas.
• Utilisez des maniques pour retirer le bol et les accessoires
après la cuisson.
Batteur à crème haute température
Convient pour battre en crème le beurre et le sucre, la pâte à
choux et la polenta. Idéal pour racler les mélanges chauds ou
froids des côtés du bol pendant qu'ils sont mélangés.
Mélangeur
Utilisable pendant la cuisson pour maintenir la texture des
aliments tels que le poulet, le poisson, les légumes et les fruits.
Idéal pour faire brunir la viande. Convient aussi pour les risottos,
les sauces et pour faire fondre le chocolat.
1 Branchez l’appareil à l'alimentation électrique. L'écran
d'affichage s'allume.
2 Basculez le levier de levage de la tête dans le sens des
aiguilles d'une montre
qu'elle se verrouille.
3 Poussez le protège-chaleur
la tête du robot
protège-chaleur ne doit jamais être utilisé sans que le joint en
caoutchouc
• Si vous utilisez le Cooking Chef sans chauffer, il n'est pas
nécessaire d'installer le protège-chaleur sauf si vous utilisez le
couvercle anti-éclaboussure. Consultez la section « installation
et utilisation de votre couvercle anti-éclaboussure ».
4 Installez le bol sur l'embase, enfoncez et tournez dans le sens
des aiguilles d'une montre
5 Sélectionnez l'une des options suivantes :
Utilisation manuelle.
Consultez la section consacrée au mode manuel.
Programmes prédéfinis :
Consultez la section « utilisation des programmes prédéfinis »
pour obtenir l informations pertinentes.
• Reportez-vous au Guide de démarrage rapide pour des idées
de recettes supplémentaires.
6 Placez l'accessoire requis dans la prise l'accessoire
la prise du mélangeur
insérant l'embout dans l'orifice prévu à cet effet avant de le
tourner pour le verrouiller
2
soit correctement ajusté.
q
et levez la tête du robot jusqu'à ce
1
contre la partie inférieure de
jusqu'à ce qu'il soit entièrement inséré. Le
.
3
ou
3
si vous utilisez le mélangeur, en
4
.
4
mélangeur – Lorsque vous utilisez le mélangeur, la pince
d'aide au mélange peut également être utilisée pour faciliter
l'action de mélange. Voir la section « installation et retrait de la
pince d'aide au mélange ». Le mélangeur peut également être
utilisé avec le fouet, par exemple pour faire des meringues.
En revanche, n'utilisez pas le mélangeur avec le crochet
pétrisseur.
Remarque : si le batteur K, le fouet ou le batteur à crème ne
ramassent pas les ingrédients dans le fond du bol, consultez
la section « Ajustement des accessoires ».
• Pour retirer un outil, procédez selon les 6 étapes ci-dessus,
dans l'ordre inverse. (Toujours utiliser des gants pour retirer les
outils après l'utilisation).
7 Pour baisser la tête du mixeur, soulevez-la légèrement, puis
basculez le levier de levage de la tête dans le sens des
aiguilles d'une montre.
Baissez en position verrouillée
8 Ajoutez les ingrédients nécessaires pour les cuire/mélanger.
9 Tournez la commande de vitesse sur la valeur désirée.
Tournez la commande de vitesse sur
réglages de mélange.
pour utiliser les
30
Page 34

• Si les températures du bol dépassent les 60°C, pour des
raisons de sécurité, la vitesse est automatiquement limitée,
même si une vitesse supérieure a été sélectionnée. La
vitesse n'augmentera pas automatiquement lorsque la
température descend sous 60°C. La commande de vitesse
doit être tournée en position « O » d'abord, puis sur la vitesse
souhaitée.
Voir la section « Mode manuel » pour savoir comment utiliser
le mode de vitesse et température élevée (HSHT).
10 Une fois le programme terminé, l'unité sonne 3 fois.
• Remarque : si aucun temps n'a été défini, les processus de
chauffe et de mélange se terminent automatiquement quand
la minuterie atteint 8 heures.
11 Pour arrêter ou mettre sur pause le processus de mélange,
replacez la commande de vitesse sur la position arrêt « O ».
Pour reprendre l'opération, sélectionnez une vitesse.
IMPORTANT
• Le chauffage continue lorsque le processus de
mélange est arrêté ou mis en pause.
12 Pour arrêter le processus de chauffage, réglez la température
sur « OFF ». Vous pouvez également appuyer sur le bouton de
mise en attente.
Important – Si à n'importe quel moment la tête du robot
est soulevée pendant le fonctionnement, le processus de
chauffage est mis en pause. L'accessoire du bol s'arrête et
ne redémarre pas tant que la tête de robot n'est pas baissée.
Pour redémarrer le robot, tournez la commande de vitesse
en position "arrêt" « OFF » « O », puis sélectionnez à nouveau
une vitesse.
après la cuisson
•Faites attention en manipulant ou en touchant toute partie
de l’appareil quand il est utilisé en mode cuisson ou après la
cuisson, EN PARTICULIER, LE BOL, LE COUVERCLE ANTIÉCLABOUSSURE ET LES ACCESSOIRES car ils restent
CHAUDS longtemps après l'arrêt de l’appareil. Utilisez les
poignées pour retirer et porter le bol. Utilisez une manique
pour manipuler le bol et les accessoires chauds.
•Le dessous du bol restera chaud longtemps après la fin de
la cuisson. Faites attention en manipulant le bol et utilisez le
tapis de protection pour protéger les surfaces sensibles à la
chaleur.
astuces
• Certaines recettes, en particulier à forte teneur en eau, ne
pourront pas atteindre une température de cuisson supérieure
à 100°C (la température d’ébullition de l’eau).
• Pour ajouter des ingrédients dans le bol pendant la cuisson,
diminuez la vitesse et ajoutez les ingrédients lentement et
régulièrement.
• Pour chauffer rapidement une sauce, utilisez le réglage de
mélange continuel.
• Si vous utilisez le couvercle anti-éclaboussure pendant la
cuisson, enlevez-le toujours avant de soulever la tête du
robot. Faites attention à la condensation qui se forme sur le
couvercle et le protège-chaleur.
• Soulevez la tête du robot lentement pour permettre au liquide
se trouvant sous le protège-chaleur de couler dans le bol.
• Dix fonctions de mélange sont disponibles pour sélectionner
le réglage de mélange appropriée pour chaque recette.
Certaines recettes demandent un mélange continu pour
empêcher les ingrédients de coller au fond du bol, tandis que
d'autres ont besoin d'un mélange intermittent pour conserver
la texture des aliments.
utilisation de votre Cooking Chef comme robot
Assemblez le robot comme décrit précédemment dans
« utilisation de votre Cooking Chef ». La vitesse peut être
modifiée à n'importe quel moment pendant le fonctionnement
du robot. Arrêtez le robot en replaçant la commande de
vitesse sur "la position arrêt" « O ».
Utilisez la position Pulse (P) pour obtenir de courtes
impulsions à vitesse maximale.
conseils généraux
• Arrêtez de mélanger et raclez fréquemment le bol avec la
spatule.
• Pour battre des œufs, il est conseillé d’utiliser des œufs à
température ambiante.
• Avant de monter les blancs en neige, vérifiez qu’il n’y a pas
de restes de graisse ou de jaune d’œuf sur le fouet ou dans le
bol.
• Utilisez des ingrédients froids pour la pâte, sauf indication
contraire dans votre recette.
points importants pour faire du pain
• Ne dépassez jamais les capacités maximales car vous
risqueriez de surcharger l’appareil.
• Si vous entendez l’appareil forcer, éteignez-le, retirez la moitié
de la pâte et travaillez chaque moitié séparément.
• Les ingrédients se mélangeront mieux si vous mettez les
liquides en premier.
recette
marinade au piment
200 g de miel clair, liquide et froid (conservé préalablement une
nuit au réfrigérateur)
1 piment (entier)
5 ml (1 cuillère à café) de beurre d’arachide croquant
Assaisonnement
1 Insérez tous les ingrédients dans le mini hachoir / moulin.
2 Installez l’accessoire sur le Cooking Chef et laissez les
ingrédients se répartir autour de la lame.
3 Actionnez la fonction pulse pendant 10 secondes.
4 Utilisez selon vos besoins.
31
Page 35

explication des symboles affichés à l'écran
Avertissement de température élevée
Sous 40°C - aucune barre rouge
40°C-60°C - barre rouge clignotante
Au-dessus de 60°C - barre rouge fixe
S'affiche lorsque le robot fonctionne en mode température et vitesse élevées
(HSHT).
Affiche la phase en cours pendant l'utilisation d'un programme prédéfini.
Le texte affiche les informations concernant l'état, les informations concernant
le programme et les messages d'erreur.
Affiche la température sélectionnée.
La température peut être réglée aux des valeurs « OFF », 20°C - 180°C.
Affiche la durée sélectionnée en heures, minutes et secondes.
Vous pouvez définir une durée entre 5 secondes et 8 heures et le décompte
commence à partir de la sélection d'une température.
Affiche le réglage de mélange sélectionné, entre 0 et 9.
• Les barres extérieures s'allument progressivement pour indiquer la durée
restant avant la prochaine action de mélange.
• La flèche rotative intérieure clignote 3 fois avant l'action de mélange suivante.
• Au début d'une action de mélange, il peut être nécessaire d'accélérer
brièvement afin de séparer les morceaux d'aliments.
Affiche le réglage de puissance sélectionné.
Les réglages de puissance possibles sont Auto, 1 7.
32
Page 36

mode manuel
• Appuyez sur le réglage à modifier et procédez au réglage avec le cadran de saisie.
• Appuyez sur le cadran de saisie pour confirmer.
Remarque :
• Lorsqu'un réglage est sélectionné, la barre sous le cadran d'affichage correspondant affiche un symbole qui s'illumine à l'écran.
• Le réglage s'annule au bout de 4 secondes si aucune action n'est effectuée.
La température peut être réglée entre 20°C et 180°C par incréments de 1°C.
Il est également possible d'utiliser le robot sans définir de température, en sélectionnant « OFF ».
Remarque : le Cooking Chef ne peut pas atteindre une température inférieure à la température ambiante.
Mode vitesse et température élevées (HSHT)
Pour mélanger à grande vitesse et à des températures dépassant 60°C :
• Appuyez et maintenez enfoncé pendant 3 secondes. L'écran affiche rouge ! et « ATTENTION HSHT MODE »
s'affiche. Le robot sonne également toutes les 30 secondes.
• Tournez la commande de vitesse sur la vitesse souhaitée, le mixeur augmeute progressivement jusqu'à la
vitesse sélectionnée.
• Vous pouvez réduire la vitesse comme d'habitude.
•
Pour quitter ce mode, appuyez sur le bouton de température et maintenez-le enfoncé pendant 5 secondes ou
replacez la commande de vitesse sur « O ».
Cette fonction DOIT UNIQUEMENT être utilisée avec le fouet ou le mélangeur. Veillez à ne pas
dépasser la capacité de cuisson maximale de 3 litres et vérifiez bien que le couvercle antiéclaboussure est installé. L’appareil ne doit pas être laissé sans surveillance.
La minuterie peut être utilisée en mode de cuisson.
Si aucune durée de décompte n'est sélectionnée, la minuterie compte automatiquement par intervalles de 1
seconde pendant le fonctionnement de l’appareil.
La durée maximale de fonctionnement est de 8 heures.
Dix réglages de mélange sont disponibles. Ce sont les plus adaptés lorsqu'un robot est utilisé en mode cuisson.
Notez que pour utiliser les réglages de mélanges, tous les caches sorties doivent être installés.
Les réglages de puissance peuvent être ajustés à l'aide du bouton menu.
Par défaut, la puissance est Auto.
La puissance peut être ajustée entre 250W et 1500W.
• Choisissez le réglage de puissance le plus bas pour chauffer délicatement les ingrédients.
• Choisissez un réglage de puissance plus élevé pour chauffer rapidement les ingrédients.
33
Page 37

réglages de mélange par intermittence
Ces réglages de mélange conviennent parfaitement à l'accessoire mélangeur.
Vitesse Intervalles d'attente Utilisations
Aucune attente
(mélange en continu)
5 secondes
10 secondes
20 secondes
30 secondes
40 secondes
50 secondes
Mélanger en continu pour les sauces et les risottos.
Faire brunir la viande et sauter les légumes.
1 minute
2 minutes
5 minutes
Réglages de température
Température Utilisations
50°C Tempérage du chocolat
72°C - 82°C Pochage
98°C - 99°C Mijotage
100°C Ébullition, vapeur
130°C - 140°C Légumes sautés
180°C Brunissement de la viande
réglages de la puissance
Réglages de la puissance Watts Utilisations
Mélanger les ragoûts, plats traditionnels et bouillons, etc.
A Auto La puissance en entrée varie pour optimiser le réglage de la température
1 - 2 1500W - 1200W Faire brunir la viande, sauter les légumes, bouillir de l'eau
3 - 5 1000W - 500W
6 - 7 375W - 250W Faire lever les pâtes
Faire fondre du beurre, sauces à base de produits laitiers, frémir, fouetter
avec chauffage
34
Page 38

Sauté
Risotto au poulet
Ragoût
de bœuf
N/A N/A
Ingrédients
supplémentaires
Ajoutez
l'assaisonnement
0
Auto
75°C
1200W
01
99°C99°C
1500W
0
140°C
1500W
Ajoutez le riz Ajoutez le vin Ajoutez le liquide Maintien au chaud
1200W1500W
5 min
3 min10 min
Maintien au chaud
1 min
Ajoutez le liquide
4 9 9
140°C 95°C 80°C
Ajoutez les légumes
N/A
1500W Auto Auto
10 min 4 heures 30 min
Sélectionnez le programme
1 Appuyez sur la touche menu.
utilisation des programmes prédéfinis
2 Tournez le cadran d’affichage/saisie pour sélectionner « Programmes ».
tableaux ci-dessous pour les options des sous-programmes.
3 Appuyez sur le cadran d’affichage/saisie pour confirmer.
4 Tournez le cadran d’affichage/saisie pour sélectionner les programmes « Savoury » (Salé), « Sweet » (Sucré), « Slow Cook » (Cuisson lente) ou « Steam » (Vapeur). Veuillez vous reporter aux
Ajoutez les légumes et la
Phase 1 (P1) Phase 2 (P2) Phase 3 (P3) Phase 4 (P4) Phase 5 (P5) Phase 6 (P6) Accessoires utilisés Idées de recettes
Wok Ajoutez de l'huile
PLATS SALÉS
5 Appuyez sur le cadran d’affichage/saisie pour confirmer.
6 Suivez les instructions affichées à l'écran.
Remarque : si aucune action n'est effectuée entre les phases, la machine s'arrête au bout de 15 minutes.
viande
°C 140°C 180°C 160°C 120°C
1500W
3 min et ½ 2 min 45 sec
✗
✓ ✓ ✓ ✗
– 3 2 2
W Auto Auto 1500W 1500W
Étape de chauffage
Temps de cuisson
100°C100°C 130°C130°C
Ajoutez les légumes et la
–
°C 130°C
Risotto Ajoutez de l'huile
1000W
✓ ✗ ✓ ✓ ✓ ✗
W 1200W
Étape de chauffage
2 min3 min 1 min3 min
✗
Temps de cuisson
24 02
viande
01
180°C180°C
°C 140°C
1500W1500W
-
W 1200W
Ajoutez la viande
Ajoutez de l'huile
Plats mijotés
2 min3½ min
✗
✓ ✓ ✓ ✓ ✗
Étape de chauffage
Temps de cuisson
plats principaux
Remarque :
• Certaines phases de programme sont associées à un chauffage pour permettre aux ingrédients d'atteindre la température spécifiée avant que la phase démarre.
• HSHT (tel qu'affiché à l'écran) = Mode vitesse et température élevées.
35
Page 39

bouillon
Saumon au court-
N/A
sauce persillée
Sauce Béchamel,
sauce au fromage,
les pâtes
Sauce tomate pour
Sauce béarnaise,
sauce hollandaise
Maintien au chaud
poisson
Ajouter la viande/le
9 – 9
Auto Auto Auto
99°C 98°C 80°C
Ajoutez du liquide
1500W
130°C
24
130°C
Ajoutez les légumes
1200W
Maintien au chaud
99°C 85°C
10 min 20 min 30 min
1 min5 min
Ajouter la farine Ajoutez le liquide
N/A N/A
750W 500W
HSHT 6 HSHT 6
HSHT 6HSHT 6
80°C
Maintien au chaud
15 min 30 min
liquide
Ajoutez le
110°C98°C
Ajoutez les légumes
9
22
N/A N/A
Auto
1500W1500W
Auto
30 min
beurre fondu
4 min15 min
Ajouter doucement le
10 min
Ajouter les jaunes
d'œufs et le liquide
N/A N/A N/A
750W
750W
Phase 1 (P1) Phase 2 (P2) Phase 3 (P3) Phase 4 (P4) Phase 5 (P5) Phase 6 (P6) Accessoires utilisés Idées de recettes
–
°C 140°C
Soupes Ajoutez de l'huile
PLATS SALÉS
Programmes
✗
✓ ✓ ✓ ✓ ✗
W 1200W
Étape de chauffage
Temps de cuisson
principaux
plats
80°C80°C 110°C110°C
Ajoutez le beurre
°C
Béchamel
✗
✓ ✓ ✓ ✗
– 0
750W750W 1000W750W
W
Étape de chauffage
l'huile
Ajoutez
1 min15 sec 1 min4 min
°C 120°C 120°C
Classique
Temps de cuisson
✓ ✓ ✓ ✗
et retirer
Faire fondre le beurre
– 3
W Auto
Étape de chauffage
Temps de cuisson
°C 60°C 72°C 72°C
Sauce hollandaise
2 HSHT 6 HSHT 6
W Auto
✓ ✓ ✗
10 min 4 min 2 min
Étape de chauffage
Temps de cuisson
sauces
Remarque :
• Certaines phases de programme sont associées à un chauffage pour permettre aux ingrédients d'atteindre la température spécifiée avant que la phase démarre.
• HSHT (tel qu'affiché à l'écran) = Mode vitesse et température élevées.
36
Page 40

glaçage de gâteau
Enrobage de truffes,
Pain blanc
Profiteroles, éclairs
N/A N/A
Maintien au chaud
Phase 1 (P1) Phase 2 (P2) Phase 3 (P3) Phase 4 (P4) Phase 5 (P5) Phase 6 (P6) Accessoires utilisés Idées de recettes
31°C
42°C42°C 42°COFF31°C
0
94 444
N/A N/A N/A
1000W
AutoAuto
Auto
Auto
Auto
N/A N/A N/A
0
31°C
1000W
Auto
Auto
Auto
Auto
Auto
2 heures
10mins
–
–
✓ ✗ ✗
10 min20 min
Ajouter la farine Ajouter les œufs
beurre
Ajouter l'eau et le
2 heures
Maintien au chaud
10mins
–
–
✓ ✗ ✗
10 min20 min
94 444
47°C47°C 47°COFF31°C
N/A N/A N/A
2 0 Vitesse 4
Auto Auto Auto
250W OFF
Levée de la pâte Expulsion de l'air
–
✓ ✗ ✗
1 min – –
la levure
Ajouter le liquide, la farine et
OFF
8 min 1 heure 1 min
✗ ✗ ✗ ✗
2 min
°C
Chocolat blanc /lait Ajouter le chocolat 1 Ajouter le chocolat 2
programmes
PRÉPARATIONS SUCRÈES
W
Étape de chauffage
Temps de cuisson
W
°C
Chocolat noir Ajouter le chocolat 1 Ajouter le chocolat 2
Étape de chauffage
chocolat
°C 90°C OFF OFF
Temps de cuisson
Pâte à choux
37
W
Étape de chauffage
Pâtes
Temps de cuisson
a pain
°C OFF OFF 28°C OFF
0 Vitesse 1 OFF 0
W OFF
Étape de chauffage
Temps de mixage
pâtes
Remarque :
• Certaines phases de programme sont associées à un chauffage pour permettre aux ingrédients d'atteindre la température spécifiée avant que la phase démarre.
• HSHT (tel qu'affiché à l'écran) = Mode vitesse et température élevées.
Page 41

Brioche
N/A
glaçage de gâteaux
Omelette norvégienne,
beurre
Glaçage à la crème au
Phase 1 (P1) Phase 2 (P2) Phase 3 (P3) Phase 4 (P4) Phase 5 (P5) Phase 6 (P6) Accessoires utilisés Idées de recettes
Ajoutez le
Ajouter le liquide,
Levée de la pâte Expulsion de l'air
beurre
–
la farine et la levure
OFF 350W OFF
OFF
OFF
45°COFF
N/A N/A N/A N/A
Vitesse 6
Vitesse 6Vitesse 6
750W
750WAuto
10 min
10 min
✓ ✗
1 min
N/A N/A N/A N/A
8 min 5 min 1 heure 1 min
✓ ✗ ✗ ✗ ✗
2 min
OFF
HSHT 6
Maintien au chaud
118°COFF
Ajouter les blancs
d'œufs, le sucre et l'eau
HSHT 6HSHT 6
750W
Auto
750W
10 min
Maintien au chaud
✓ ✗
1 min10 min
le sucre et l'eau
Ajouter les blancs d'œufs,
0 Vitesse 1 Vitesse 1 OFF 0
°C OFF OFF OFF 28°C OFF
Pâtes
a brioche
programmes
PRÉPARATIONS SUCRÈES
W OFF
Étape de chauffage
pâtes
Italienne
Temps de mixage
W
°C
Étape de chauffage
Suisse
Temps de cuisson
W
°C
Étape de chauffage
Temps de cuisson
meringue
Remarque :
• Certaines phases un programme sont associées à du chauffage pour permettre aux ingrédients d'atteindre la température spécifiée avant que la phase démarre.
• HSHT (tel qu'affiché à l'écran) = Mode vitesse et température élevées.
38
Page 42

fraise
Compote de
Pâte de Fruits
Garniture de
profiterole
Crème anglaise
N/A N/A N/A N/A N/A
20
et le sucre
Phase 1 (P1) Phase 2 (P2) Phase 3 (P3) Phase 4 (P4) Phase 5 (P5) Phase 6 (P6) Accessoires utilisés Idées de recettes
104°COFF
Ajouter les fruits, la pectine
750WAuto
N/A N/A N/A
100°C70°C
Ajouter l'acide citrique
glucose
Ajouter le sucre et le
✓
la pectine
10 min10 min
Ajouter la compote, le sucre et
2 min-
Maintien au chaud
Ajoutez le liquide
✓ ✓ ✓
2 min 10 min
Ajouter les oeufs et le
sucre
70°C
101°C70°C
0
00
N/A N/A N/A
Auto
Auto
Auto
30 min
Maintien au chaud
5 min–
Ajoutez du liquide
✗ ✓ ✗
2 min
Ajouter les oeufs et le
N/A N/A N/A
12 min 30 min
✗ ✓ ✗
sucre
3 min
°C
Conture
programmes
PRÉPARATIONS SUCRÈES
W
Étape de chauffage
Temps de cuisson
°C 100°C 107°C
Pâte de fruit
fruit
HSHT 3 HSHT 3 HSHT 3
W Auto Auto Auto
Étape de chauffage
Temps de cuisson
Vitesse 2
W –
°C OFF
Crème pâtissière
Étape de chauffage
Crème anglaise
Temps de cuisson
°C OFF 87°C 80°C
Vitesse 2 0 0
W OFF Auto Auto
Étape de chauffage
Temps de cuisson
crème
Remarque :
• Certaines phases de programme sont associées à un chauffage pour permettre aux ingrédients d'atteindre la température spécifiée avant que la phase démarre.
• HSHT (tel qu'affiché à l'écran) = Mode vitesse et température élevées.
39
Page 43

Sabayon
Pop-corn
Base de mousses
Maintien au chaud
liquide
Phase 1 (P1) Phase 2 (P2) Phase 3 (P3) Phase 4 (P4) Phase 5 (P5) Phase 6 (P6) Accessoires utilisés Idées de recettes
Ajouter œufs, sucre et
Sabayon
50°C
74°COFF
HSHT Max
°C
N/A N/A N/A N/A
500W
HSHT Max
HSHT Max
750WAuto
W
15 min
–
✓ ✗
2 min
Étape de chauffage
Temps de cuisson
N/A N/A N/A N/A
OFF
Maintien au chaud
HSHT 6 HSHT 6
W 500W 500W
✓ ✗
Étape de chauffage
sucre
OFF 118°COFF
Ajouter les œufs et le
°C
Pâte à bombe
10 min
Ajouter les
grains de maïs
–
1
l'huile
2
Ajoutez
°C 180°C 180°C
Pop-corn
Temps de cuisson
N/A N/A N/A N/A
10 min
✗
✓ ✗
– –
W Auto Auto
Étape de chauffage
Temps de cuisson
programmes
PRÉPARATIONS SUCRÈES
crème
autres
40
Remarque :
• Certaines phases un programme sont associées à du chauffage pour permettre aux ingrédients d'atteindre la température spécifiée avant que la phase démarre.
• HSHT (tel qu'affiché à l'écran) = Mode vitesse et température élevées.
Page 44

Daubes
Daubes
80°C
Phase 1 (P1) Phase 2 (P2) Phase 3 (P3) Phase 4 (P4) Phase 5 (P5) Phase 6 (P6) Accessoires utilisés Idées de recettes
LENTE
CUISSON
98°C95°C
°C
Haute T° Ajouter les ingrédients Maintien au chaud
programmes
–
09
N/A N/A N/A N/A
Auto
1000W
1500W
W
30 min
✓ ✗
20 min2 heures
Temps de cuisson
Étape de chauffage
N/A N/A N/A N/A
9
80°C
98°C85°C
°C
Basse T° Ajouter les ingrédients Maintien au chaud
Auto
1000W
09
1500W
W
30 min
✓ ✗
10 min7 heures
Étape de chauffage
Temps de cuisson/mélange
Remarque :
• Cuisson lente "Élevée" fonctionne à 95°C et est idéale pour la cuisson lente des morceaux moins tendres.
• Cuisson lente "Basse" fonctionne à 85°C et est idéale pour la cuisson lente des viandes telles que le poulet et pour les légumes.
• Certains programmes sont associés à un chauffage pour permettre aux ingrédients d'atteindre la température spécifiée avant que la phase démarre.
41
Page 45

programmes
CUISSON
Phase 1 (P1) Maintien au chaud Accessoires utilisés Commentaires
VAPEUR
°C 102°C 65°C
- -
W Auto Auto
Étape de chauffage
Temps de cuisson 10 min 30 min
✓ ✗
comment ignorer des phases du programme
1 Appuyez et maintenez enfoncé le cadran de saisie pendant 5 secondes. “RECIPE PHASES” apparaît à l'écran.
2 Tournez le cadran de saisie pour choisir la phase désirée (P1, P2, P3, etc.) et appuyez sur le cadran pour confirmer.
3 Suivez les instructions affichées à l'écran.
Explication du texte affiché à l'écran
Pendant les programmes prédéfinis, différents messages s'afficheront à l'écran.
Message Description
REFROIDISSEMENT Le bol refroidit jusqu'à une température définie.
CHAUFFE Le bol chauffe jusqu'à la température définie.
MODE HSHT Mode vitesse et température élevées (HSHT).
PÉTRISSAGE Processus de la fabrication du pain consistant étirer la pâte.
EXPULSION DE L'AIR Frapper la pâte permet de retirer les poches d'air pour créer une texture lisse.
LEVEE DE LA PATE Étape de la fabrication du pain au cours de laquelle on laisse la pâte lever.
CHOCOLAT Contrôle précis de la température du chocolat pour obtenir un résultat lisse et brillant.
PREPARATION Phase d'un programme pendant lequel le Cooking Chef mélange sans chauffer.
Remarque :
• Consulter les instructions du panier vapeur pour
connaître les quantités et durées recommandées –
ajuster le temps de cuisson selon les besoins.
42
Page 46

ajustement des accessoires du bol
Fouet, batteur K en acier inoxydable
Pour obtenir un résultat optimal, le fouet et le batteur K
doivent presque toucher le fond du bol
la hauteur à l'aide de la clé fournie.
1 Débranchez l’appareil.
2 Soulevez la tête du robot et insérez le fouet, le batteur ou le
mélangeur.
3 Abaisser la tête du robot. Si la hauteur doit être ajustée,
soulevez la tête du robot et retirez l’accessoire.
4 Utilisez la clé pour desserrer l’écrou
l’axe
inverse des aiguilles d’une montre. Pour le lever par rapport
au fond du bol, tournez l’axe dans le sens des aiguilles d’une
montre.
5 Resserrez l’écrou.
6 Insérez l’accessoire dans la tête du robot. (Vérifiez sa position,
voir ci-dessus).
7 Répétez les étapes précédentes jusqu’à ce que l’accessoire
soit correctement placé. Resserrez alors l’écrou fermement.
batteur à crème haute température – cet accessoire doit
toucher le fond du bol.
mélangeur - cet accessoire doit juste toucher le fond du bol.
1 Débranchez l'appareil.
2 Levez la tête du mixeur et insérez l'accessoire.
3 Baissez la tête du robot. Si l'accessoire nécessite un
ajustement, levez la tête du robot et desserrez l'écrou à l'aide
de la clé, puis baissez la tête du robot.
4 Pour baisser l'accessoire plus près du fond du bol, tournez la
molette d'ajustement dans le sens des aiguilles d'une montre.
Pour lever l'accessoire et l'éloigner du fond du bol, tournez la
molette d'ajustement dans le sens inverse des aiguilles d'une
montre.
5 Resserez l'écrou.a
crochet de pétrissage – cet outil est réglé en usine et ne
peut pas être ajusté.
. Pour baisser l’accessoire, tournez l’axe dans le sens
7
. Au besoin, ajustez
5
afin de pouvoir ajuster
6
5
7
6
43
Page 47

installation et utilisation du couvercle anti-éclaboussure
L’ensemble du couvercle anti-éclaboussure consiste en deux
éléments : le protège-chaleur et le couvercle anti-projections.
Le protège-chaleur doit être installé pendant les
opérations de cuisson sinon la machine ne fonctionnera
pas et le message « (Installer le protège-chaleur) »
s'affichera. Le protège-chaleur protège la tête du robot de la
vapeur produite par la cuisson.
Le couvercle anti-éclaboussure ne doit pas être installé sur le
bol s'il n'est pas utilisé conjointement avec le protège-chaleur.
1 Levez la tête du robot jusqu’en position verrouillée.
2 Poussez le protège-chaleur vers le haut sur la partie inférieure
de la tête du robot
chaleur ne doit s’utiliser que si le joint en caoutchouc est
correctement installé.
3 Installez le bol sur le socle.
4 Abaissez la tête du robot.
5 Placez le couvercle anti-éclaboussure sur le bord du bol et
faites-le glisser vers l’avant jusqu’à sa mise en place complète
.
9
• Pendant la préparation du mélange, on peut ajouter
des ingrédients directement dans le bol par la cheminée
d’alimentation.
6 Pour retirer le couvercle, faites-le simplement glisser vers
vous.
7 Pour retirer le protège-chaleur, levez la tête du robot jusqu’en
position verrouillée. Retirez l’accessoire, puis tirez le protège-
chaleur vers le bas de la partie inférieure de la tête du robot.
Remarque : pour installer ou retirer le protège-chaleur, la tête
du robot doit être en position verrouillée.
jusqu’à sa mise en place. Le protège-
8
8
9
44
Page 48

installation et retrait des caches sorties
Cache sortie rapide
1 Pour retirer le couvercle, utilisez la prise et soulevez.
2 Pour mettre en place, installez le cache sur la sortie et
enfoncez vers le bas.
Cache de sortie lente
1
Pour retirer le
vers l'extérieur.
2 Pour installer, repérez la prise en haut du cache dans la cavité
de la sortie et poussez pour le clipser en position.
cache
, utilisez la prise présente dessous et tirez
installation et retrait de la pince d'aide au mélange
La pince d'aide au mélange peut être utilisé pour faciliter l'action de mélange.
1 Insérez la pince d'aide au mélange sur le côté du bol avec
l'arête verticale vers l'intérieur et les pinces vers l'extérieur
2 Tournez la pince dans le sens inverse des aiguilles d'une
montre sur les poignées du bol
.
.
3 Pour la retirer, inversez la procédure.
IMPORTANT - La pince d'aide au mélange ne doit pas
être installée si vous utilisez le batteur K, le fouet, le crochet
pétrisseur ou le batteur à crème.
montage du batteur à crème haute température
1
installation de la spatule à haute température
La spatule est fournie déjà installée et doit toujours être retirée
avant le nettoyage.
Installez avec précaution la spatule flexible sur l'accessoire en
insérant la base de la spatule dans la fente puis placez un côté
dans l'encoche avant de crocheter délicatement l'extrémité en
place. Recommencez avec l'autre côté.
45
Page 49

Capacités maximales et vitesses recommandées
Les vitesses suivantes ne sont données qu'à titre d'indication et dépendront de la quantité et de la température des ingrédients mixés, etc.
Pâte brisée Quantité de farine 910 g
Pâte à pain Quantité de farine 350 g – 1,6 kg
Poids total 550 g – 2,56 kg
Pâte levée souple Quantité de farine 250 g – 2,6 kg
Poids total 480 g – 5 kg
Préparation pour cake aux fruits Poids total 4,55 kg
Blancs en neige Nombre
Mode de cuisson Capacité totale 3 l
Huile Capacité totale 250 ml
* Taille des œufs utilisés = taille moyenne (50 g)
Accessoire
Batteur K Monter en crème du beurre / de la
Batteur à crème haute température Battre le beurre/la margarine et le sucre
Fouet Pour les œufs, crèmes et soufflés. Passer graduellement sur “ Max “
Crochet de pétrissage Pour les préparations à base de pâte
Mélangeur
Poids
Recette / Action
margarine et du sucre
Battre des œufs dans des mélanges
crémeux
Incorporer de la farine, des fruits, etc. “ Min “ – 1
Préparations pour gâteau
tout-en-un
Incorporer la graisse dans la farine ‘Min’ à 2
en crème
Racler les mélanges qu'ils soient chauds
ou froid sur les côtés du bol
levurée
Utilisable pendant la cuisson pour
conserver la texture des aliments, par
exemple le poulet, le poisson, les légumes
et les fruits.
16
(605g)
Vitesse recommandée
Démarrer sur vitesse “ Min “ et augmenter
graduellement jusqu’à “ Max “
4 – “ Max “
Démarrer sur vitesse “ Min “ et augmenter
graduellement jusqu’à “ Max “
Démarrer sur “ Min “ en augmentant progressivement
jusqu'à 3
Démarrer sur “ Min “ en augmentant progressivement
jusqu'à 3
Démarrer sur vitesse “ Min “ et augmenter
graduellement jusqu’à “ 1 “
Utiliser les réglages du mélangeur uniquement
46
Page 50

entretien et nettoyage
•Éteignez et débranchez toujours votre appareil avant de le
nettoyer.
•Un peu de graisse peut apparaître à l’orifice
première utilisation. C’est normal, il vous suffit de l’essuyer.
•Les surfaces en métal des capteurs de température peuvent
montrer des signes d’usure lors d’une utilisation normale.
Cela n’affecte pas les performances de l’appareil.
•Ne laissez pas le batteur souple haute température installé
dans le robot quand celui-ci n’est pas utilisé.
robot, couvercles des sorties
• Essuyez avec un chiffon humide, puis séchez.
•N’utilisez jamais d’abrasifs et ne les plongez jamais dans
l’eau.
batteur à crème haute température
•Retirez toujours la lame du batteur souple de l’accessoire
avant le nettoyage.
•Lavez la lame du batteur souple et l’accessoire dans de
l’eau chaude savonneuse, puis séchez minutieusement.
Autrement, les pièces peuvent être passées au lave-vaisselle.
Remarque : veuillez inspecter l’état du corps de l’accessoire
avant et après utilisation ; vérifiez aussi régulièrement l’état de
la lame du fouet et remplacez-la en cas de signe d’usure.
bol, accessoires, couvercle
anti-éclaboussure, pince d'aide au mélange
• Lavez à la main puis essuyez, ou lavez en lave-vaisselle.
•N’utilisez jamais de brosse métallique, de paille de fer ou de
chlore pour nettoyer votre bol en inox. Utilisez du vinaigre
pour enlever le calcaire.
lors de la
2
•Si des ingrédients sont restés collés ou brûlés au fond,
enlevez le plus gros à l’aide de la spatule fournie. Remplissez
le bol d’eau chaude savonneuse et laissez tremper. Retirez
les dépôts récalcitrants à l’aide d’une brosse en nylon.
•Toute décoloration du bol n’affecte pas sa performance.
orifice d’écoulement
• Vérifiez que cet endroit n’est pas obstrué par des déchets. Si
nécessaire, nettoyez-le avec un goupillon ou un coton-tige.
capteurs de température
• Essuyez avec un chiffon humide, puis séchez minutieusement.
N’utilisez jamais d’abrasifs ou d’instruments pointus pour
nettoyer les capteurs.
pièces lavable en
Bol
Batteur K, fouet batteur à crème, mélangeur
Crochet de pétrissage
Pince d'aide au mélange
Caches sorties
Spatule
Couvercle anti-éclaboussure et protège-chaleur
Joint de caoutchouc
Tapis de protection du plan de travail
Corne
lave-vaisselle
✓
✓
✓
✓
✗
✓
✓
✓
✓
✓
service après-vente
•Si vous rencontrez des problèmes lors de l’utilisation de votre
appareil, reportez-vous à la section « guide de dépannage »
de ce manuel ou consultez la page www.kenwoodworld.com
avant de contacter le service après-vente.
•N’oubliez pas que votre appareil est couvert par une garantie,
qui respecte toutes les dispositions légales concernant les
garanties existantes et les droits du consommateur dans le
pays où vous avez acheté le produit.
•Si votre appareil Kenwood fonctionne mal ou si vous trouvez
un quelconque défaut, veuillez l’envoyer ou l’apporter à un
centre de réparation KENWOOD autorisé. Pour trouver des
détails actualisés sur votre centre de réparation KENWOOD le
plus proche, veuillez consulter www.kenwoodworld.com ou le
site internet spécifique à votre pays.
•Conçu et développé par Kenwood au Royaume-Uni.
•Fabriqué en Chine.
AVERTISSEMENTS POUR L’ÉLIMINATION CORRECTE
DU PRODUIT CONFORMÉMENT AUX TERMES DE LA
DIRECTIVE EUROPÉENNE RELATIVE AUX DÉCHETS
D’ÉQUIPEMENTS ÉLECTRIQUES ET ÉLECTRONIQUES
(DEEE).
Au terme de son utilisation, le produit ne doit pas être éliminé
avec les déchets urbains.
Le produit doit être remis à l’un des centres de collecte sélective
prévus par l’administration communale ou auprès des revendeurs
assurant ce service.
Éliminer séparément un appareil électroménager permet d’éviter
les retombées négatives pour l’environnement et la santé dérivant
d’une élimination incorrecte, et permet de récupérer les matériaux
qui le composent dans le but d’une économie importante en
termes d’énergie et de ressources. Pour rappeler l’obligation
d’éliminer séparément les appareils électroménagers, le produit
porte le symbole d’un caisson à ordures barré.
47
Page 51

guide de dépannage
Problème Cause Solution
Le batteur ne fonctionne pas en
mode cuisson, l’appareil affiche
un message d’erreur et émet un
bip.
L’appareil change de vitesse ou
la vitesse est limitée pendant la
cuisson.
Des ingrédients brûlent au fond
du bol.
Les aliments ne gardent pas leur
consistance.
Vitesse de mélange irrégulière. 1 Ingrédients trop gros ou trop durs. 1 Coupez les ingrédients en plus petits morceaux, dénoyautez
Difficile de fermer la tête du robot. 1 Des ingrédients durs, comme
Le robot fonctionne en continu
quand les vitesses de mélange
sont sélectionnées.
La vitesse du moteur est limitée
quand on ajoute des accessoires.
Le fouet ou le batteur K racle le
fond du bol ou n’atteint pas les
ingrédients dans le fond du bol.
Le fouet, le batteur K ou le
batteur à crème cogne contre la
pince d'aide au mélange.
L'un des capteurs de sécurité a été
activé.
La vitesse est automatiquement
limitée lorsque le contenu du
bol atteint 60°C et l'indicateur
d'avertissement de température
élevée s'allume.
1 La température sélectionnée est
peut-être trop élevée.
2 Un accessoire incorrect est utilisé.
3 Le délai d'attente du mélange est
trop long.
4 L’accessoire n’est peut-être pas
positionné assez bas dans le bol.
5 Le minuteur a été réglé sur une
durée trop longue.
6 Le capteur et/ou le dessous du
bol ne sont peut-être pas propres.
1 Température sélectionnée trop
élevée.
2 Le réglage du mélange est trop
fréquent.
3 Les ingrédients ont cuit trop
longtemps.
4 Accessoire incorrect utilisé.
du chocolat au fond du bol
empêchent la tête du robot de se
verrouiller.
2 Le mélangeur n'est pas
correctement installé.
Caches sorties mal installés. Vérifiez que les caches de l’appareil sont bien installés.
Bol chaud installé. Retirez le bol ou laissez le bol refroidir en dessous de 60°C.
La pièce n’est pas à la bonne
hauteur et nécessite d’être réglée.
La pince d'aide au mélange est
installée.
Vérifiez si l'écran affiche une notification qui indiquerait la
cause.
• Vérifiez que la tête du batteur est abaissée et verrouillée.
• Vérifiez que tous les couvercles sont correctement installés
• Vérifiez que le protège-chaleur est correctement installé.
• Vérifiez que le bol du robot est correctement installé.
C’est une mesure de sécurité.
1 Réduisez la température ou les réglages de la puissance.
2 Vérifiez que l'accessoire le plus adapté est utilisé et ajusté
correctement.
3 Augmentez la fréquence des délais d'attente de mélange ou
augmentez-la pour un fonctionnement en continu.
4 Ajustez l’accessoire.
5 Cuire pendant moins longtemps (assurez-vous que les
aliments sont bien cuits)
6 Vérifiez que ces zones sont propres et sèches.
1 Réduisez la température.
2 Réduisez le délai d'attente de mélange.
3 Réduisez le temps de cuisson (assurez-vous que les
aliments sont bien cuits).
4 Vérifiez que l’accessoire le plus approprié est utilisé.
les fruits, mélangez doucement les ingrédients sans
accessoire (mais sélectionnez une vitesse).
2 Ajoutez les ingrédients une fois la tête du robot rabaissée.
3 Vérifiez que l’accessoire le plus approprié est utilisé.
1 Ajoutez les ingrédients une fois la tête du robot rabaissée.
2 Vérifiez que le mélangeur est installé dans la sortie du
mélangeur.
Réglez la hauteur à l’aide d’une clé adaptée – reportez-vous à
la rubrique “ Réglage des pièces “.
Retirez la pince d'aide au mélange – elle doit être utilisée
uniquement avec le mélangeur.
48
Page 52

Problème Cause Solution
L’accessoire sur la sortie lente ne
peut pas être installé.
Le témoin lumineux Marche /
Arrêt clignote lorsque le robot est
branché pour la première fois.
Le robot s’arrête en cours de
fonctionnement.
Le témoin lumineux Marche /
Arrêt clignote rapidement.
Le robot de cuisine s'arrête
pendant l'opération. Le voyant
de mise en attente clignote
lentement.
Le témoin lumineux Marche /
Arrêt s’éteint lorsque l’appareil
est branché.
L'écran affiche un code d'erreur
alphanumérique.
Lorsque vous contacterez le service client, vous devrez fournir les détails de la version du logiciel.
Vous lez trouverez en appuyant sur la touche menu et en sélectionnant “PARAMETRES”, puis “VERSION”.
Vérifiez la compatibilité de votre
accessoire avec votre modèle.
Système de connexion Twist requis
(Modèle KAX)
La commande de vitesse n’est pas
sur la position “O”.
La tête du robot est relevée ou n’est
pas correctement verrouillée vers le
bas.
La protection anti-surcharge ou
surchauffe du système est activée.
La capacité maximale est dépassée.
1 Protège-chaleur ou cache sortie
retiré.
2 Tête de robot soulevée.
3 L'accessoire de sortie a dépassé
son temps d'exécution maximale.
Le robot est resté branché plus de
30 minutes sans fonctionner. Il est
donc passé en mode Pause.
L'appareil ne fonctionne pas
correctement.
L’accessoire doit être équipé du système de connexion Twist
KAX
comportent le Système de connexion Bar
utiliser l’adaptateur KAT002ME pour raccorder ces derniers au
Système de connexion Twist sur votre robot.
Pour plus d’information, veuillez consulter le site
www.kenwoodworld.com/twist
Vérifiez et mettez la commande de vitesse sur la position “O”.
Vérifiez si la tête du robot est correctement verrouillée vers le
bas.
Débranchez et vérifiez qu’il n’y a pas d'obstruction ou de
surcharge.
Mettez la commande de vitesse sur “O” et redémarrez.
Si l’appareil ne fonctionne pas, retirez une partie des
ingrédients pour réduire la charge et redémarrez.
Si le problème n’est pas résolu, débranchez l’appareil
et laissez-le au repos pendant 15 minutes. Branchez et
sélectionnez de nouveau la vitesse.
Si le robot ne redémarre pas après la procédure
susmentionnée, contactez le service “après-vente” pour plus
de conseils.
1 Installez le protège-chaleur ou le cache sortie. Tournez la
2 Baissez la tête du robot. Tournez la commande de vitesse
3 Tournez la commande de vitesse sur “O”, puis redémarrez.
Appuyez sur le bouton Marche / Arrêt une fois pour le remettre
en marche.
Contactez un service après-vente autorisé par Kenwood. Pour
connaître les coordonnées du service après-vente Kenwood le
plus proche, consultez le site www.kenwoodworld.com ou le
site Web spécifique à votre pays.
pour être installé sur la sortie. Si vos accessoires
commande de vitesse sur “O”, puis redémarrez.
sur “O”, puis redémarrez.
, vous devez
49
Page 53

Inhalt
Sicherheit 51 – 52
Anschlüsse 53
Spracheinstellung 53
Die Rührelemente und einige ihrer Einsatzmöglichkeiten 54
Verwendung Ihrer Cooking Chef 54
Verwendung Ihrer Cooking Chef als Küchenmaschine 55
Display-Symbole und ihre Bedeutung 56
Manueller Betrieb 57 – 58
Verwendung der Programme 59
Programme: herzhaft 59 – 60
Hauptgericht 61
Sauce 62
Programme: süß 61 – 64
Schokolade temperieren 61
Teig 61 – 62
Meringue 62
Kompott 63
Creme 63 – 64
Sonstiges 64
Programme: Slow Cooking 65
Hoch 65
Niedrig 65
Programm: Dampfgaren 66
Einstellen der Rührelemente 67
Anbringen und Verwendung des Spritzschutzes 68
Entfernen und Anbringen der Anschlussdeckel 69
Anbringen und Entfernen des Rührhilfe-Clips 69
Zusammenbau des Flexi-Rührelements 69
Höchstmengen und empfohlene Geschwindigkeiten 70
Pflege und Reinigung 71
Kundendienst und Service 71
Fehlerbehebung 72 – 73
50
Page 54

Deutsch
Sicherheit
l
Lesen Sie diese Anleitungen sorgfältig durch und bewahren Sie sie zur
späteren Bezugnahme auf.
l
Entfernen Sie sämtliche Verpackungen und Aufkleber.
l
Ein beschädigtes Netzkabel muss aus Sicherheitsgründen von KENWOOD oder einer
autorisierten KENWOOD-Kundendienststelle ausgetauscht werden.
Wichtiger Hinweis zu elektronischen medizinischen Implantaten
l
Wie alle Induktionsheizprodukte erzeugt dieses Gerät Magnetfelder in seiner unmittelbaren
Umgebung. Benutzer oder Personen mit Herzschrittmachern oder anderen aktiven
Implantaten sollten ärztlichen Rat einholen, bevor sie in Berührung mit dem Gerät kommen,
um etwaige Gesundheitsrisiken aufgrund von Unverträglichkeit zu verhindern.
l
Das Gerät vor dem Anbringen von Rührelementen/Zubehör, nach Gebrauch und vor dem
Reinigen ausschalten und den Netzstecker ziehen.
l
Körperteile, Haar, Schmuck und lockere Kleidung von beweglichen Teilen und angebrachten
Aufsätzen fernhalten.
l
Niemals Ihre Finger o.ä. in den Klappmechanismus stecken.
l
Das Gerät niemals unbeaufsichtigt lassen.
l
Niemals ein beschädigtes Gerät benutzen. Überprüfen oder reparieren lassen. Siehe
„Kundendienst und Service“.
l
Niemals unzulässiges Zubehör oder mehr als ein Zubehörteil gleichzeitig benutzen.
l
Niemals die angegebenen Höchstmengen überschreiten und bei Verwendung des
Induktionsheizers die Schüssel immer nur bis zur inneren 3-Liter-Markierung füllen.
l
Beim Verwenden eines Zubehörteils die entsprechenden Sicherheits- und
Gebrauchsanweisungen lesen.
l
Vorsicht beim Anheben dieses Geräts, es ist schwer. Vor dem Anheben sicherstellen, dass
der Maschinenkopf verriegelt ist und Schüssel, Rührelemente, Anschlussdeckel und Kabel
fest sitzen bzw. gut verstaut sind.
l
Niemals das Kabel so herabhängen lassen, dass ein Kind danach greifen könnte.
l
Antriebseinheit, Netzkabel und Netzstecker niemals nass werden lassen.
l
Vorsicht bei der Berührung irgendwelcher Teile der Maschine im Kochmodus oder nach
dem Kochen. Dies gilt INSBESONDERE FÜR DIE SCHÜSSEL, DEN SPRITZSCHUTZ UND
DIE RÜHRELEMENTE, da diese noch lange nach Ausschalten des Geräts HEISS bleiben.
Schüssel zum Abnehmen und Tragen an ihren Griffen anfassen. Zum Handhaben der heißen
Schüssel und Rührelemente Topflappen verwenden.
l
Die Unterseite der Schüssel bleibt noch lange nach dem Erhitzen heiß. Seien Sie daher
vorsichtig im Umgang damit und verwenden Sie die Schutzmatte, wenn Sie die Schüssel auf
hitzeempfindlichen Oberflächen absetzen.
l
Vorsicht mit heißem Dampf, der aus der Schüssel austreten kann, insbesondere beim Öffnen
des Spritzschutzes oder Aufklappen des Maschinenkopfes.
l
Heiße Zutaten vor dem Umfüllen von der Rührschüssel in den Mixer immer erst auf
Raumtemperatur abkühlen lassen.
l
Nur Originalteile bzw. die Schüssel und das Zubehör benutzen, die zum Lieferumfang dieses
Geräts gehören. Die Schüssel niemals mit einer anderen Hitzequelle verwenden.
l
Das Gerät niemals im Kochmodus bei leerer Schüssel betreiben.
l
Niemals irgendwelche Gegenstände in die Entlüftungsschlitze einführen.
51
Page 55

l
Bei Gebrauch dieses Geräts sicherstellen, dass es auf einer ebenen Oberfläche und nicht
zu nah an der Kante steht. Darauf achten, dass ein Abstand von mindestens 10 cm zu den
Wänden besteht und die Entlüftungsschlitze nicht blockiert sind. Nicht unter Hängeschränken
aufstellen.
l
Zum ordnungsgemäßen und sicheren Betrieb des Induktionskochers vor dem Kochen
sicherstellen, dass Schüsselboden und Temperaturfühler sauber und trocken sind.
l
Wie bei allen Induktionskochern während des Gebrauchs keine Kreditkarten, magnetischen
Medien oder empfindlichen elektronischen Geräte in der Nähe platzieren.
l
Vor dem Verzehr immer sicherstellen, dass die Speisen gar sind.
l
Beim Frittieren/Kochen mit Öl nur maximal 250 ml verwenden.
l
Speisen sollten kurz nach dem Kochen verzehrt oder schnell abgekühlt und so bald wie
möglich in den Kühlschrank gestellt werden.
l
Unsachgemäßer Gebrauch Ihres Geräts kann zu Verletzungen führen.
l
Dieses Netzkabel bietet ein geringeres Risiko, sich darin zu verfangen oder darüber zu
stolpern. Im Bedarfsfall kann – mit angemessener Vorsicht – ein Verlängerungskabel
verwendet werden. Bei Verwendung eines Verlängerungskabels: 1) Die angegebene
Spannung und Stromstärke des Verlängerungskabels müssen zumindest den Werten des
Geräts entsprechen. 2) Das Kabel darf nicht von der Arbeitsplatte bzw. dem Tisch hängen, so
dass Kinder daran ziehen oder Personen darüber stolpern können. Wenn das Gerät geerdet
ist, sollte das Verlängerungskabel einen geerdeten Stecker mit dreiadriger Leitung aufweisen.
Spannung und Stromstärke des Geräts sind auf der Unterseite angegeben.
l
Geräte können von Personen mit körperlichen, sensorischen oder geistigen Behinderungen
oder von Personen mit mangelnder Erfahrung oder Kenntnis verwendet werden, sofern diese
beaufsichtigt oder in die sichere Verwendung des Geräts eingewiesen wurden und sofern sie
die damit verbundenen Gefahren verstehen.
l
Kinder müssen überwacht werden, damit sie mit dem Gerät nicht spielen.
l
Dieses Gerät darf nicht von Kindern verwendet werden. Gerät und Netzkabel müssen für
Kinder unzugänglich sein.
l
Verwenden Sie das Gerät nur für seinen vorgesehenen Zweck im Haushalt. Bei
unsachgemäßer Benutzung oder Nichteinhaltung dieser Anweisungen übernimmt Kenwood
keinerlei Haftung.
Vor dem Anschluss
• Sicherstellen, dass die Netzspannung mit den Angaben auf der
Unterseite des Geräts übereinstimmt.
• WARNUNG: DIESES GERÄT MUSS GEERDET SEIN.
• Das Gerät entspricht der EG-Verordnung Nr. 1935/2004 über
Materialien und Gegenstände, die dazu bestimmt sind, mit
Lebensmitteln in Berührung zu kommen.
Vor erstmaligem Gebrauch
• Die Teile waschen: Siehe „Pflege und Reinigung“.
52
Page 56

Komponenten Ihres Kenwood Cooking Chef
Übersicht
Zubehör-Anschlüsse
Hochgeschwindigkeits-Anschluss (HSO)
1
Niedriggeschwindigkeits-Anschluss (SSO)
2
Rührelement-Steckplatz
3
Koch-Rührelement-Steckplatz
4
Küchenmaschine
Deckel für Hochgeschwindigkeits-Anschluss
5
Maschinenkopf
6
Deckel für Niedriggeschwindigkeits-Anschluss
7
Cooking Chef Schüssel
8
Maschinenkopf - Lifthebel
9
Geschwindigkeitsregler
k
Standby-Taste
l
Dreh-/Eingabetaste
Display
Abflussöffnung
Schüsselsockel/Induktionsbereich
Entlüftungsschlitze
q
Temperaturfühler
K-Haken
s
Flexi-Rührelement
t
Profi-Ballonschneebesen
k
Knethaken
l
Koch-Rührelement
Rührhilfeclip
Hochtemperatur-Spatel
Hitzeschild
Gummidichtung (abnehmbar)
q
Spritzschutz
Füllschachtdeckel
s
Arbeitsflächen-Schutzmatte
t
Schraubenschlüssel
dk
Display-Symbole
Temperatur-Warnanzeige
dl
Programmphase
d
Temperatureinstellung
d
Warnung für hohe Geschwindigkeit, hohe Temperatur (HSHT)
d
Textanzeige
d
Zeiteinstellung
dq
Rührintervall-Einstellung
d
Leistungseinstellung
ds
Anzeigefeld
Temperaturtaste
dt
Zeittaste
k
Taste „Rührintervall“
l
Menütaste
Teigschaber
Hinweis: Aufsätze für den NiedriggeschwindigkeitsAnschluss
Der Niedriggeschwindigkeits-Anschluss Ihrer Küchenmaschine ist
zum Anbringen von Aufsätzen mit TWIST-System ausgelegt.
Wenn Sie neue Aufsätze für den NiedriggeschwindigkeitsAnschluss kaufen, sollten Sie deren Kompatibilität mit Ihrer
Küchenmaschine überprüfen. Alle Aufsätze mit TWIST-System
sind durch Produktcodes beginnend mit KAX gekennzeichnet
sowie durch das auf der Packung abgebildete TWIST-Logo
Wenn Sie Aufsätze für das BAR-System
Sie den Adapter KAT002ME verwenden, um diese an das TWISTSystem
Für weitere Informationen besuchen Sie
http://www.kenwoodworld.com/de-de/kenwood-adapter
www.kenwoodworld.com/twist.
Ihrer Maschine anschließen zu können.
besitzen, müssen
.
Spracheinstellung
Beim erstmaligen Einschalten Ihrer Cooking Chef ist die Display-Sprache auf „English“ eingestellt.
1 Drücken Sie zum Ändern der Sprache die Menütaste.
2 Wählen Sie mit der Dreh-/Eingabetaste „EINST.“ aus und drücken
Sie die Dreh-/Eingabetaste, um die Auswahl zu bestätigen.
3 Wählen Sie mit der Dreh-/Eingabetaste „SPRACHEN“ aus
und drücken Sie die Dreh-/Eingabetaste, um die Auswahl zu
bestätigen.
4 Wählen Sie mit der Dreh-/Eingabetaste die gewünschte Sprache
aus. Drücken Sie nach Auswahl der gewünschten Sprache die
Dreh-/Eingabetaste, um die Auswahl zu bestätigen.
5 Zum erneuten Ändern der Sprache wiederholen Sie die Schritte.
53
Page 57

Die Rührelemente und einige ihrer Einsatzmöglichkeiten
K-Haken
Zur Zubereitung von Kuchen, Plätzchen, Gebäck, Zuckerguss,
Füllungen, Brandteig und Kartoffelpüree.
Profi-Ballonschneebesen
Für Eier, Sahne, Soufflés. Den Schneebesen nicht für schwere
Mischungen (z. B. zum Schaumigrühren von Fett und Zucker)
verwenden – er könnte dadurch beschädigt werden.
Kann beim warmen Schlagen zusammen mit dem Rührer
verwendet werden, z. B. für Italienische und Schweizer Meringue.
Knethaken
Für schwere Teige, wie Hefe- oder Brotteige.
Verwendung Ihrer Cooking Chef
WICHTIG
• Sicherstellen, dass Induktionsbereich, Temperaturfühler und
Oberfläche des Schüsselsockels sauber sind. Ansonsten
könnte der Temperaturfühler beeinträchtigt werden, was zu
mangelhaften Kochergebnissen führt.
• Überprüfen, dass alle Anschlussdeckel und das Hitzeschild
angebracht sind. Wenn dies nicht der Fall ist, funktioniert der
Kochmodus nicht.
• Zum Entfernen von Schüssel und Rührelementen nach dem
Kochen grundsätzlich TopfIappen verwenden.
Flexi-Rührelement
Zum Schaumigrühren von Butter und Zucker, für Brandteig
Polenta oder Risotto. Ideal zum Abkratzen heißer und kalter
Mischungen von den Schüsselseiten beim Verrühren.
Koch-Rührelement
Geeignet beim Kochen zur Beibehaltung der Konsistenz von
Kochgut wie Hühnchen, Fisch, Gemüse und Obst. Ideal zum
Bräunen von Fleisch. Auch geeignet für Risotto und Soßen sowie
zum Schmelzen von Schokolade.
1 Schließen Sie das Gerät an die Steckdose an. Das Display
leuchtet auf.
2 Drehen Sie den Maschinenkopf-Lifthebel im Uhrzeigersinn
und klappen Sie den Maschinenkopf hoch, bis er einrastet.
3 Schieben Sie das Hitzeschild
Unterseite des Maschinenkopfes
Hitzeschild darf niemals ohne ordnungsgemäß angebrachte
Gummidichtung
• Beim Betrieb der Cooking Chef ohne Hitze ist das Hitzeschild
nicht erforderlich (außer wenn Sie den Spritzschutz
verwenden). Siehe „Anbringen und Verwendung des
Spritzschutzes“.
4 Setzen Sie die Schüssel auf den Sockel – drücken Sie sie
nach unten und drehen Sie sie im Uhrzeigersinn
5 Wählen Sie eine der folgenden Optionen:
Manueller Betrieb:
Siehe Abschnitt „Manueller Betrieb“.
Programme:
Siehe Abschnitt „Verwendung der Programme“ für weitere
Informationen.
• In der Kurzanleitung finden Sie weitere Rezeptideen.
6 Führen Sie das gewünschte Rührelement in den
Rührelemente-Steckplatz
Steckplatz
Richten Sie dazu den Schaftstift an der Kerbe aus und drehen
Sie das Element, bis es einrastet
4
verwendet werden.
q
(bei Verwendung des Koch-Rührelements) ein.
nach oben auf die
, bis es fest sitzt. Das
2
oder Koch-Rührelement-
3
.
4
3
1
.
Koch-Rührelement – Bei Verwendung des Rührelements
kann auch der Rührhilfeclip eingesetzt werden, um das
Vermischen zu unterstützen. Siehe Abschnitt „Anbringen
und Entfernen des Rührhilfeclips“. Das Koch-Rührelement
lässt sich auch zusammen mit dem Profi-Ballonschneebesen
verwenden, z. B. für Baiser. Verwenden Sie das KochRührelement nicht zusammen mit dem Knethaken.
Hinweis: Sollte der K-Haken, Profi-Ballonschneebesen
oder Flexi-Rührelement am Schüsselboden befindliche
Zutaten nicht verarbeiten, siehe Abschnitt „Einstellen der
Rührelemente“.
• Zum Entfernen eines Rührelements führen Sie Schritt
6 in umgekehrter Reihenfolge aus. (Zum Entfernen von
Rührelementen nach dem Kochen grundsätzlich TopfIappen
verwenden.)
7 Klappen Sie den Maschinenkopf herunter, indem Sie
ihn zunächst leicht anheben und dann den Lifthebel im
Uhrzeigersinn drehen.
Klappen Sie den Kopf herunter, so dass er einrastet.
8 Geben Sie die Zutaten hinein, die Sie kochen/verarbeiten
möchten.
9 Stellen Sie den Geschwindigkeitsregler auf die gewünschte
Stufe. Stellen Sie den Geschwindigkeitsregler auf
Rühreinstellungen zu verwenden.
, um die
54
Page 58

• Übersteigt die Schüsseltemperatur 60 °C, wird die
Geschwindigkeit aus Sicherheitsgründen automatisch
begrenzt, selbst wenn eine höhere Geschwindigkeit
eingestellt ist. Fällt die Temperatur unter 60 °C, erhöht sich die
Geschwindigkeit nicht automatisch. Dazu muss zunächst der
Geschwindigkeitsregler auf „O“ geschaltet und dann eine neue
Geschwindigkeit ausgewählt werden.
Siehe Abschnitt „Manueller Betrieb“ für nähere Informationen
zur Verwendung des HSHT-Modus (hohe Geschwindigkeit,
hohe Temperatur).
10 Nach Ablauf eines Programms gibt das Gerät drei Signaltöne
ab.
• Hinweis: Wenn keine Zeit eingestellt wurde, endet der Heizund Rührvorgang automatisch nach Ablauf von 8 Stunden.
11 Zum Stoppen oder Unterbrechen des Rührvorgangs
stellen Sie den Geschwindigkeitsregler zurück auf „O“.
Zur Wiederaufnahme des Betriebs wählen Sie eine
Geschwindigkeit.
WICHTIG
• Der Heizvorgang läuft weiter, wenn das Rühren
gestoppt oder unterbrochen wurde.
12 Zum Stoppen des Heizvorgangs stellen Sie die Temperatur auf
„AUS“. Sie können auch die Standby-Taste drücken.
Wichtig: Wenn der Maschinenkopf während des Betriebs
angehoben wird, unterbricht dies den Heizvorgang.
Das Rührelement stoppt und nimmt beim Absenken
des Maschinenkopfes nicht automatisch wieder seinen
Betrieb auf. Um das Rühren fortzusetzen, stellen Sie den
Geschwindigkeitsregler auf „O“ und wählen Sie dann wieder
eine Geschwindigkeit.
Nach dem Kochvorgang
• Vorsicht bei der Berührung irgendwelcher Teile der
Maschine im Kochmodus oder nach dem Kochen. Dies gilt
INSBESONDERE FÜR DIE SCHÜSSEL, DEN SPRITZSCHUTZ
UND DIE RÜHRELEMENTE, da diese noch lange nach
Ausschalten des Geräts HEISS bleiben. Schüssel zum
Abnehmen und Tragen an ihren Griffen anfassen. Zum
Handhaben der heißen Schüssel und Rührelemente
Topflappen verwenden.
• Die Unterseite der Schüssel bleibt noch lange nach dem
Erhitzen heiß. Seien Sie daher vorsichtig im Umgang damit
und verwenden Sie die Schutzmatte, wenn Sie die Schüssel
auf hitzeempfindlichen Oberflächen absetzen.
Hinweise
• Einige Rezepte, insbesondere solche mit hohem
Flüssigkeitsgehalt, können keine Kochtemperaturen von über
100°C erreichen, da dies der Siedepunkt für Wasser ist.
• Um Zutaten während des Kochens in die Schüssel zu geben,
reduzieren Sie die Geschwindigkeit und fügen Sie die Zutaten
langsam und gleichmäßig hinzu.
• Wählen Sie zum schnellen Erhitzen von Saucen eine
kontinuierliche Rühreinstellung.
• Wenn Sie den Spritzschutz beim Kochen verwenden,
entfernen Sie diesen immer, bevor Sie den Maschinenkopf
anheben. Denken Sie daran, dass sich auf Spritzschutz und
Hitzeschild Kondensation bilden kann.
• Klappen Sie den Maschinenkopf grundsätzlich langsam
nach oben, damit etwaige Flüssigkeit an der Unterseite des
Hitzeschilds in die Schüssel ablaufen kann.
• Es stehen zehn Rührintervall zur Verfügung, mit denen Sie die
richtige Rührstärke für das jeweilige Rezept einstellen können.
Einige Rezepte erfordern ständiges Rühren, damit Zutaten
nicht am Schüsselboden festhaften, während bei anderen nur
gelegentliches Rühren angebracht ist, um die Konsistenz der
Speise zu erhalten.
Verwendung Ihrer Cooking Chef als Küchenmaschine
Bauen Sie die Küchenmaschine zusammen, wie beschrieben
im Abschnitt „Verwendung Ihrer Cooking Chef“. Stellen Sie
den Geschwindigkeitsregler auf die gewünschte Stufe.
Die Geschwindigkeit lässt sich jederzeit bei laufender
Maschine ändern. Zum Stoppen der Küchenmaschine drehen
Sie den Geschwindigkeitsregler zurück auf „O“.
Verwenden Sie die Puls-Position (P), um das Gerät stoßweise
bei Höchstgeschwindigkeit zu betreiben.
Allgemeine Hinweise
• Maschine regelmäßig stoppen und Mischgut mit dem Spatel
von den Schüsselwänden nach unten schaben.
• Eier sollten zum Schlagen am besten Raumtemperatur haben.
• Vor dem Zubereiten von Eischnee sicherstellen, dass sich
keine Spuren von Fett oder Eigelb an Profi-Ballonschneebesen
oder Schüssel befinden.
• Beim Zubereiten von Teig kalte Zutaten verwenden (wenn
nicht im Rezept anders angegeben).
Hinweise zu Brotteigen
Wichtig
• Niemals die angegebenen Höchstmengen überschreiten – Sie
würden die Maschine überlasten.
• Wenn Sie hören, dass die Maschine überlastet ist: Gerät
ausschalten, die Hälfte des Teiges entnehmen und die halben
Mengen separat verarbeiten.
• Die Zutaten vermengen sich am besten, wenn Sie zuerst die
Flüssigkeit eingeben.
Rezept
Chili-Marinade
200 g kalter klarer, flüssiger Honig (über Nacht gekühlt)
1 Chili (ganz)
5 ml (1 TL) grobe Erdnussbutter
Gewürze
1 Alle Zutaten in die Kräuter- und Gewürzmühle geben.
2 Den Aufsatz an der Küchenmaschine anbringen und die
Zutaten um die Klinge herum absinken lassen.
3 Impuls-Funktion 10 Sekunden lang einschalten.
4 Nach Bedarf verwenden.
55
Page 59

Display-Symbole und ihre Bedeutung
Temperatur-Warnanzeige
Unter 40 °C: kein roter Balken
40 °C – 60 °C: blinkender roter Balken
Über 60 °C: konstanter roter Balken
Zeigt an, wenn das Gerät im HSHT-Modus (hohe Geschwindigkeit, hohe Temperatur)
arbeitet.
Gibt aktuelle Programmphase an, wenn ein Programm eingestellt ist.
Textanzeige für Statusinformationen, Programminformationen und Fehlermeldungen.
Zeigt die eingestellte Temperatur an.
Mögliche Temperatureinstellungen sind „AUS“ und 20 °C bis 180 °C.
Zeigt die eingestellte Zeit in Stunden, Minuten und Sekunden an.
Die eingestellte Zeit kann zwischen 5 Sekunden 8 Stunden liegen und beginnt
abzulaufen, sobald eine Temperatur eingestellt wurde.
Zeigt die Rührintervall-Einstellung zwischen 0 9 an.
• Die Balken außen leuchten nacheinander auf und zeigen den Zeitraum bis zum
nächsten Rührschritt an.
• Der Rührpfeil innen beginnt 3 Sekunden vor dem nächsten Rührschritt zu blinken.
• Zu Beginn eines Rührschritts steigt die Geschwindigkeit ggf. kurz an, um stückige
Zutaten besser voneinander zu trennen.
Zeigt die eingestellte Leistungsstufe an.
Mögliche Leistungsstufen sind Auto und 1 7.
56
Page 60

Manueller Betrieb
• Drücken Sie die Taste für die Einstellung, die Sie ändern möchten, und stellen Sie den gewünschten Wert über die Dreh-/
Eingabetaste ein.
• Drücken Sie die Dreh-/Eingabetaste, um die Einstellung zu bestätigen.
Hinweis:
• Bei Bestätigung der Einstellung leuchtet der Balken unter dem zugehörigen Display-Symbol auf.
• Erfolgt keine Bestätigung, erlischt die Einstellung nach 4 Sekunden.
Mögliche Temperatureinstellungen liegen zwischen 20 °C und 180 °C in Schritten von 1°C.
Das Gerät kann auch ohne Temperatureinstellung betrieben werden. Wählen Sie dazu „AUS“.
Hinweis: Die Cooking Chef kann keine Temperaturen unterhalb der Umgebungstemperatur erreichen.
HSHT-Modus (hohe Geschwindigkeit, hohe Temperatur)
Zum Rühren bei hoher Geschwindigkeit und bei Temperaturen über 60 °C:
• 3 Sekunden lang drücken. Das rote ! im Display leuchtet auf und es erscheint „!!! HSHT-MODUS“. Außerdem
ertönt alle 30 Sekunden ein Piepsignal.
• Stellen Sie den Geschwindigkeitsregler auf die gewünschte Stufe ein. Die Küchenmaschine erreicht allmählich die
eingestellte Geschwindigkeit.
• Die Geschwindigkeit lässt sich wie gewohnt reduzieren.
• Zum Beenden dieses Modus drücken Sie die Temperaturtaste 5 Sekunden lang oder stellen Sie den
Geschwindigkeitsregler zurück auf „O“.
Diese Funktion darf AUSSCHLIESSLICH mit dem Profi-Ballonschneebesen und/oder Koch-Rührelement
verwendet werden. Sie sollten auf keinen Fall die Höchstmenge von 3 Litern überschreiten, und der
Spritzschutz muss angebracht sein. Das Gerät darf im Betrieb nicht unbeaufsichtigt bleiben.
Der Timer kann im Kochmodus verwendet werden.
Wird keine Countdown-Zeit eingestellt, zählt der Timer automatisch in 1-Sekunden-Schritten aufwärts, solange das
Gerät in Betrieb ist.
Die maximale Laufzeit beträgt 8 Stunden.
Es gibt zehn Rührintervall-Einstellungen. Diese eignen sich am besten für den Betrieb im Kochmodus. Beachten Sie,
dass zum Benutzen der Rühreinstellungen alle Anschlussdeckel angebracht sein müssen.
Die Leistungseinstellungen lassen sich über die Menütaste anpassen.
Die Standardeinstellung ist „Auto“.
Die Leistung lässt sich zwischen 250 W und 1500 W einstellen.
• Wählen Sie eine niedrigere Einstellung, um Zutaten schonend zu erwärmen.
• Wählen Sie eine höhere Einstellung, um Zutaten schnell zu erhitzen.
57
Page 61

Rührintervall-Einstellungen
Die Rührintervall-Einstellungen sind ideal bei Verwendung des Koch-Rührelements.
Geschw. Intervalle Verwendung
Keine Pausen
(kontinuierliches Rühren)
5 Sekunden
10 Sekunden
20 Sekunden
30 Sekunden
40 Sekunden
50 Sekunden
Kontinuierliches Rühren für Soßen und Risotto.
Anbraten von Fleisch und Dünsten von Gemüse.
1 Minute
2 Minuten
5 Minuten
Temperatureinstellungen
Temperatur Verwendung
50 °C Temperieren von Schokolade
72 °C – 82 °C Pochieren
98 °C – 99 °C Sieden
100 °C Kochen, Dampfgaren
130 °C – 140 °C Dünsten von Gemüse
180 °C Anbraten von Fleisch
Leistungseinstellungen
Leistungseinstellung Watt Verwendung
A Auto Leistungsaufnahme variiert, um optimale Temperatur zu halten
1 – 2 1500 W – 1200 W Anbraten von Fleisch, Dünsten von Gemüse, Kochen von Wasser
3 – 5 1000 W – 500 W Schmelzen von Butter, Soßen auf Milchbasis, Sieden, warmes Schlagen
6 – 7 375 W – 250 W Aufgehen von Hefeteig
Rühren von Eintöpfen, Brühe usw.
58
Page 62

Wokgericht
Hühnchen-Risotto
Rindereintopf
Lachsbrühe
NZ NZ
Weitere Zutaten
hinzugeben
Geschmackszutaten
0
Auto
75 °C
Warmhalten
1200 W
01
99 °C99 °C
1500 W
Flüssigkeit hinzugeben
0
140 °C
1500 W
Reis hinzugeben Wein hinzugeben
1200 W1500 W
5 Min.
Warmhalten
3 Min.10 Min.
1 Min.
Gemüse hinzugeben Flüssigkeit hinzugeben
NZ
4 9 9
140 °C 95 °C 80 °C
1500 W Auto Auto
NZ
Warmhalten
Fleisch/Fisch hinzugeben
9 – 9
Auto Auto Auto
99 °C 98 °C 80 °C
10 Min. 4 Std. 30 Min.
Flüssigkeit hinzugeben
10 Min. 20 Min. 30 Min.
Wahl des Programms
1 Drücken Sie die Menütaste.
2 Drehen Sie die Dreh-/Eingabetaste, bis „Programme“ erscheint.
3 Drücken Sie die Dreh-/Eingabetaste, um die Auswahl zu bestätigen.
Verwendung der Programme
4 Drehen Sie die Dreh-/Eingabetaste, bis die gewünschte Einstellung „Herzhaft“, „Süß“, „Slow Cooking“ oder „Dampfgaren“ erscheint. Optionen für Unterprogramme sind in den nachfolgenden
Min. 2 Min. 45 Sek.
✓ ✓ ✓ ✗
W Auto Auto 1500 W 1500 W
Heizphase
3½
✗
Garzeit
hinzugeben
Fleisch und Gemüse
Phase 1 (P1) Phase 2 (P2) Phase 3 (P3) Phase 4 (P4) Phase 5 (P5) Phase 6 (P6) Rührelemente Rezeptideen
°C 140 °C 180 °C 160 °C 120 °C
Wok Öl hinzugeben
– 3 2 2
HERZHAFT
Tabellen zu finden.
5 Drücken Sie die Dreh-/Eingabetaste, um die Auswahl zu bestätigen.
6 Befolgen Sie die Anleitungen auf dem Display.
Hinweis: Wenn zwischen den Programmphasen keine Eingaben erfolgen, schaltet sich das Gerät nach 15 Minuten aus.
1500 W
24 02
hinzugeben
100 °C100 °C 130 °C130 °C
°C 130 °C
–
1000 W
W 1200 W
Fleisch und Gemüse
Risotto Öl hinzugeben
59
2 Min.3 Min. 1 Min.3 Min.
✗
✓ ✗ ✓ ✓ ✓ ✗
Garzeit
Heizphase
01
180 °C180 °C
1500 W1500 W
✓ ✓ ✓ ✓ ✗
–
W 1200 W
°C 140 °C
Ragout Öl hinzugeben Fleisch hinzugeben
Heizphase
Hauptgericht
Min.
130 °C
3½
Min.
2
✗
Garzeit
24
130 °C
Gemüse hinzugeben
-
°C 140 °C
Brühe Öl hinzugeben
1500 W
1200 W
✓ ✓ ✓ ✓ ✗
W 1200 W
Heizphase
1 Min.5 Min.
✗
Garzeit
Hinweis:
• Einige Programmphasen beinhalten Heizphasen, in denen die Zutaten die erforderliche Temperatur erreichen, bevor die eigentliche Phase beginnt.
• HSHT (Display-Anzeige) = Modus mit hoher Geschwindigkeit und hoher Temperatur
Page 63

Käsesoße,
Petersiliensoße
Béchamelsoße,
Nudeln
Tomatensoße für
Sauce béarnaise,
Sauce hollandaise
NZ NZ
Warmhalten
99 °C 85 °C
750 W 500 W
HSHT 6 HSHT 6
Flüssigkeit hinzugeben
HSHT 6HSHT 6
NZ NZ
9
80 °C
Warmhalten
15 Min. 30 Min.
22
110 °C98 °C
Flüssigkeit hinzugeben
Auto
1500 W1500 W
Auto
30 Min.
4 Min.15 Min.
langsam hinzugeben
Geschmolzene Butter
10 Min.
hinzugeben
Eigelb und Flüssigkeit
NZ NZ NZ
750 W
750 W
– 0
Phase 1 (P1) Phase 2 (P2) Phase 3 (P3) Phase 4 (P4) Phase 5 (P5) Phase 6 (P6) Rührelemente Rezeptideen
80 °C80 °C 110 °C110 °C
°C
Béchamel Butter hinzugeben Mehl hinzugeben
HERZHAFT
Programme
750 W750 W 1000 W750 W
W
✓ ✓ ✓ ✗
1 Min. 15 Sek. 1 Min.4 Min.
Garzeit
Heizphase
✓ ✓ ✓ ✗
– 3
W Auto
°C 120 °C 120 °C
Traditionell Öl hinzugeben Gemüse hinzugeben
Heizphase
Sauce
✗
entnehmen
Butter schmelzen und
Garzeit
°C 60 °C 72 °C 72 °C
Hollandaise
60
2 HSHT 6 HSHT 6
W Auto
✓ ✓ ✗
Garzeit 10 Min. 4 Min. 2 Min.
Heizphase
Hinweis:
• Einige Programmphasen beinhalten Heizphasen, in denen die Zutaten die erforderliche Temperatur erreichen, bevor die eigentliche Phase beginnt.
• HSHT (Display-Anzeige) = Modus mit hoher Geschwindigkeit und hoher Temperatur
Page 64

Trüffel überziehen,
Kuchen dekorieren
Weißbrot
Windbeutel, Eclairs
NZ NZ
Warmhalten
Schokolade
hinzugeben 2
Phase 1 (P1) Phase 2 (P2) Phase 3 (P3) Phase 4 (P4) Phase 5 (P5) Phase 6 (P6) Rührelemente Rezeptideen
Schokolade
hinzugeben 1
31 °C
42 °C42 °C 42 °CAUS31 °C
0
94 444
NZ NZ NZ
1000 W
AutoAuto
Auto
✓ ✗ ✗
Auto
Auto
2 Std.
10 Min.
–
Schokolade
–
Schokolade
10 Min.20 Min.
31 °C
Warmhalten
hinzugeben 2
47 °C47 °C 47 °CAUS31 °C
hinzugeben 1
0
94 444
NZ NZ NZ
1000 W
Auto
Auto
Auto
✓ ✗ ✗
Auto
Auto
2 Std.
10 Min.
–
–
Mehl hinzugeben Eier hinzugeben
hinzugeben
10 Min.20 Min.
Wasser und Butter
NZ NZ NZ
2 0 Stufe 4
Auto Auto Auto
Aufgehen Zweites Kneten
– –
–
✓ ✗ ✗
Min.
Flüssigkeit, Mehl und
Hefe hinzugeben
Min.
1 Std. 1
Min.
8
✗ ✗ ✗ ✗
2 Min.
°C
SÜSS
Weisse / Milchschoko
Programme
W
Garzeit
Heizphase
Dunkle Schokolade
W
°C
Garzeit
Heizphase
Brandteig
Schokolade temperieren
°C 90 °C AUS AUS
W
Garzeit 1
Heizphase
Normaler Teig
°C AUS AUS 28 °C AUS
0 Stufe 1 AUS 0
W AUS AUS 250 W AUS
Rührzeit
Heizphase
Teig
Hinweis:
• Einige Programmphasen beinhalten Heizphasen, in denen die Zutaten die erforderliche Temperatur erreichen, bevor die eigentliche Phase beginnt.
• HSHT (Display-Anzeige) = Modus mit hoher Geschwindigkeit und hoher Temperatur.
61
Page 65

Brioche
NZ
Kuchenüberzug
Omelette Surprise,
Buttercreme
Aufgehen Zweites Kneten
Butter hinzugeben
–
Phase 1 (P1) Phase 2 (P2) Phase 3 (P3) Phase 4 (P4) Phase 5 (P5) Phase 6 (P6) Rührelemente Rezeptideen
Hefe hinzugeben
Flüssigkeit, Mehl und
AUS 350 W AUS
AUS
8 Min. 5 Min. 1 Std. 1 Min.
✓ ✗ ✗ ✗ ✗
2 Min.
Eiweiß, Zucker und
NZ NZ NZ NZ
AUS
Warmhalten
HSHT 6
118 °CAUS
HSHT 6HSHT 6
Wasser hinzugeben
750 W
Auto
750 W
✓ ✗
10 Min.
Warmhalten
Min.
10
Min.
1
Eiweiß, Zucker und
Wasser hinzugeben
AUS
45 °CAUS
NZ NZ NZ NZ
Stufe 6
Stufe 6Stufe 6
750 W
750 WAuto
✓ ✗
10 Min.
10 Min.
1 Min.
°C AUS AUS AUS 28 °C AUS
Weicher Teig
SÜSS
Programme
0 Stufe 1 Stufe 1 AUS 0
W AUS
Rührzeit
Heizphase
Italienischer
W
°C
Garzeit
Heizphase
Schweizer
Teig
W
°C
Heizphase
Meringue
Garzeit
Hinweis:
• Einige Programmphasen beinhalten Heizphasen, in denen die Zutaten die erforderliche Temperatur erreichen, bevor die eigentliche Phase beginnt.
• HSHT (Display-Anzeige) = Modus mit hoher Geschwindigkeit und hoher Temperatur.
62
Page 66

Erdbeerkompott
Pâte de Fruit
Windbeutelfüllung
Crème Anglaise
Phase 1 (P1) Phase 2 (P2) Phase 3 (P3) Phase 4 (P4) Phase 5 (P5) Phase 6 (P6) Rührelemente Rezeptideen
Obst, Pektin und
NZ NZ NZ NZ NZ
✓
20
750 WAuto
104 °CAUS
Zucker hinzugeben
hinzugeben
100 °C70 °C
Zitronensäure
hinzugeben
Zucker und Glukose
10 Min.10 Min.
Püree, Zucker und
Pektin hinzugeben
NZ NZ NZ
2 Min. -
✓ ✓ ✓
NZ NZ NZ
0
70 °C
Warmhalten
00
Flüssigkeit
hinzugeben
101 °C70 °C
hinzugeben
Eier und Zucker
Auto
AutoAuto
Min.
30
-
Min.
5
✗ ✓ ✗
2 Min.
NZ NZ NZ
Warmhalten
Flüssigkeit hinzugeben
hinzugeben
Eier und Zucker
Min.
30
Min.
12
✗ ✓ ✗
3 Min.
°C
Obstkompott
SÜSS
Programme
W
Garzeit
Heizphase
Geleefrüchte
°C 100 °C 107 °C
HSHT 3 HSHT 3 HSHT 3
W Auto Auto Auto
Garzeit 2 Min. 10 Min.
Heizphase
Konditorcreme
°C AUS
Stufe 2
W –
Garzeit
Heizphase
Crème Anglaise
Kompott
Creme
°C AUS 87 °C 80 °C
Stufe 2 0 0
W AUS Auto Auto
Garzeit
Heizphase
Hinweis:
• Einige Programmphasen beinhalten Heizphasen, in denen die Zutaten die erforderliche Temperatur erreichen, bevor die eigentliche Phase beginnt.
• HSHT (Display-Anzeige) = Modus mit hoher Geschwindigkeit und hoher Temperatur.
63
Page 67

Zabaione
Mousse
Grundmischung für
Popcorn
50 °C
Warmhalten
Phase 1 (P1) Phase 2 (P2) Phase 3 (P3) Phase 4 (P4) Phase 5 (P5) Phase 6 (P6) Rührelemente Rezeptideen
74 °CAUS
Ei, Zucker und
Flüssigkeit hinzugeben
°C
Zabaione
SÜSS
NZ NZ NZ NZ
500 W
HSHT Max
HSHT Max
HSHT Max
750 WAuto
W
Min.
15
–
✓ ✗
2 Min.
Garzeit
Heizphase
AUS
Warmhalten
zugeben
AUS 118°CAUS
Eier und Zucker hin-
HSHT 6 HSHT 6
°C
Pâte à Bombe
NZ NZ NZ NZ
W 500 W 500 W
Heizphase
NZ NZ NZ NZ
Min.
10
–
1
✓ ✗
2
– –
Garzeit
°C 180 °C 180 °C
Popcorn Öl hinzugeben Maiskörner hinzugeben
W Auto Auto
10 Min.
✗
✓ ✗
Garzeit
Heizphase
Programme
Creme
Sonstiges
64
Hinweis:
• Einige Programmphasen beinhalten Heizphasen, in denen die Zutaten die erforderliche Temperatur erreichen, bevor die eigentliche Phase beginnt.
• HSHT (Display-Anzeige) = Modus mit hoher Geschwindigkeit und hoher Temperatur.
Page 68

Eintöpfe
Eintöpfe
–
80 °C
09
Phase 1 (P1) Phase 2 (P2) Phase 3 (P3) Phase 4 (P4) Phase 5 (P5) Phase 6 (P6) Rührelemente Rezeptideen
SLOW COOKING
Programme
98 °C 95 °C
°C
Hoch Zutaten hinzugeben Warmhalten
NZ NZ NZ NZ
Auto
1000 W
1500 W
W
Min.
30
✓ ✗
20 Min.2 Std.
Garzeit
Heizphase
80 °C
98 °C 85 °C
°C
Niedrig Zutaten hinzugeben Warmhalten
9
09
NZ NZ NZ NZ
Auto
1000 W
1500 W
W
Min.
30
✓ ✗
10 Min.7 Std.
Heizphase
Koch-/Rührzeit
Hinweis:
• Langsamkochen bei hoher Temperatur (95 °C) ist ideal für eher zähes Fleisch.
• Langsamkochen bei niedriger Temperatur (85 °C) ist ideal für Fleischsorten wie Hühnchen und Gemüse.
• Einige Programmphasen beinhalten Heizphasen, in denen die Zutaten die erforderliche Temperatur erreichen, bevor die eigentliche Phase beginnt.
65
Page 69

Programme
DAMPFGAREN
°C 102 °C 65 °C
– –
W Auto Auto
Heizphase
Garzeit 10 Min. 30 Min.
Phase 1 (P1) Warmhalten Rührelemente Kommentare
Hinweis:
• Lesen Sie die Anleitungen zum
Dämpfeinsatz für empfohlene Mengen
✓ ✗
und Garzeiten – passen Sie die
Kochzeit nach Bedarf an.
Überspringen von Programmphasen
1 Drücken Sie 5 Sekunden lang die Dreh-/Eingabetaste. Im Display erscheint „REZEPTPHASEN“.
2 Drehen Sie die Dreh-/Eingabetaste, um die gewünschte Phase zu wählen (P1, P2, P3 usw.), und drücken Sie die Taste, um die Ein-
stellung zu bestätigen.
3 Befolgen Sie die Anleitungen auf dem Display.
Textanzeigen und ihre Bedeutung
Im Verlauf der Programme zeigt das Display verschiedene Meldungen an.
Meldung Beschreibung
ABKÜHLEN Die Schüssel kühlt bis auf eine voreingestellte Temperatur ab.
AUFHEIZEN Die Schüssel wird auf die gewünschte Temperatur aufgeheizt.
HSHT-MODUS Modus mit hoher Geschwindigkeit und hoher Temperatur.
KNETEN Ein Verfahren, bei dem der Brotteig elastisch geknetet wird.
ZWEITES KNETEN Das zweite Kneten nach dem Aufgehen entfernt große Luftblasen und sorgt für eine ebenmäßige Krume.
AUFGEHEN Eine Phase, in der Brotteig ruht und aufgehen kann.
TEMPERIEREN Präzise Kontrolle der Temperatur von Schokolade, für eine schöne, glänzende Oberfläche.
VERARBEITEN Programmphase, in der die Cooking Chef ohne Wärme rührt.
66
Page 70

Einstellen der Rührelemente
Profi-Ballonschneebesen, K-Haken aus Edelstahl
Die beste Leistung erzielen Sie, wenn der Profi-
Ballonschneebesen oder K-Haken fast den Boden der
Schüssel berührt
dem Schraubenschlüssel (im Lieferumfang).
1 Ziehen Sie den Netzstecker.
2 Klappen Sie den Maschinenkopf hoch und führen Sie den
Schneebesen oder den K-Haken ein.
3 Klappen Sie den Kopf nach unten. Wenn Sie den Abstand
ändern müssen, klappen Sie den Maschinenkopf wieder hoch
und nehmen Sie das Rührelement ab.
4 Lösen Sie die Mutter
Schraubenschlüssel genügend, um die Höhe des Schafts
zu verstellen. Zum Senken des Rührelements drehen Sie
7
den Schaft gegen den Uhrzeigersinn. Zum Anheben des
Rührelements drehen Sie den Schaft im Uhrzeigersinn.
5 Ziehen Sie die Mutter wieder fest.
6 Bringen Sie das Rührelement erneut am Maschinenkopf an
und klappen Sie ihn nach unten. (Prüfen Sie seine Position –
siehe obige Punkte.)
7 Wiederholen Sie die oben genannten Schritte nach Bedarf,
bis das Rührelement richtig sitzt. Ziehen Sie daraufhin die
Mutter wieder fest an.
Flexi-Rührelement - Dieses Rührelement sollte den
Schüsselboden gerade berühren.
Koch-Rührelement - dieses Rührelement sollte den Boden
der Schüssel gerade eben berühren.
1 Ziehen Sie den Netzstecker des Geräts.
2 Klappen Sie den Maschinenkopf hoch und führen Sie den
Rührer ein.
3 Klappen Sie den Maschinenkopf nach unten. Wenn
Sie den Abstand ändern müssen, klappen Sie den
Maschinenkopf nach oben, lockern Sie die Mutter mit dem
Schraubenschlüssel und senken Sie den Maschinenkopf
wieder ab.
4 Zum Senken des Rührers drehen Sie das Stellrad im
Uhrzeigersinn. Zum Anheben des Rührers drehen Sie das
Stellrad gegen den Uhrzeigersinn.
5 Ziehen Sie die Mutter wieder fest.
Knethaken - dieses Rührelement wird im Werk eingestellt
und lässt sich nicht anpassen.
. Verändern Sie bei Bedarf die Höhe mit
5
mit dem beiliegenden
6
5
7
6
67
Page 71

Anbringen und Verwendung des Spritzschutzes
Die Spritzschutzeinheit besteht aus zwei Teilen: dem
Hitzeschild und dem Spritzschutz.
Das Hitzeschild muss während des Kochens
angebracht sein, ansonsten funktioniert das Gerät nicht
und im Display erscheint „Hitzeschild anbringen“. Das
Hitzeschild schützt den Maschinenkopf vor dem Dampf, der
sich beim Kochvorgang entwickelt.
Der Spritzschutz sollte nur in Kombination mit dem Hitzeschild
angebracht werden.
1 Klappen Sie den Maschinenkopf nach oben, bis er einrastet.
2 Schieben Sie das Hitzeschild nach oben auf die Unterseite
des Maschinenkopfes
Hitzeschild niemals ohne ordnungsgemäß angebrachte
Gummidichtung verwenden.
3 Setzen Sie die Schüssel auf den Sockel.
4 Klappen Sie den Kopf nach unten.
5 Setzen Sie den Spritzschutz auf den Schüsselrand und
schieben Sie ihn nach vorne, bis er komplett einrastet
• Während des Rührvorgangs können Zutaten direkt über den
Füllschacht hinzugegeben werden.
6 Zum Entfernen des Spritzschutzes schieben Sie diesen
einfach vom Gerät weg.
7 Zum Abnehmen des Hitzeschilds klappen Sie den
Maschinenkopf hoch, bis er einrastet. Entfernen Sie das
Rührelement und ziehen Sie dann das Hitzeschild von der
Unterseite des Maschinenkopfes nach unten.
Hinweis: Den Spritzschutz nur anbringen oder abnehmen,
wenn der der Maschinenkopf eingerastet ist.
, bis es fest einrastet. Das
8
9
.
8
9
68
Page 72

Entfernen und Anbringen der Anschlussdeckel
Deckel für Hochgeschwindigkeits-Anschluss
1 Entfernen Sie den Deckel, indem Sie den Griff nach oben
ziehen.
2 Bringen Sie den Deckel an, indem Sie ihn auf den Anschluss
setzen und nach unten drücken.
Deckel für Niedriggeschwindigkeits-Anschluss
1 Entfernen Sie den Deckel, indem Sie den Griff an der
Unterseite nach außen ziehen.
2 Bringen Sie den Deckel an, indem Sie den Vorsprung oben
am Deckel in die Aussparung am Anschluss stecken und den
Deckel herunterdrücken, bis er einrastet.
Anbringen und Entfernen des Rührhilfe-Clips
Der Rührhilfe-Clip kann verwendet werden, um den Rührvorgang zu unterstützen.
1 Stecken Sie den Rührhilfe-Clip auf den Rand der Schüssel;
der senkrechte Vorsprung sollte dabei nach innen weisen, die
Clips nach außen
2 Schieben Sie den Clip gegen den Uhrzeigersinn auf die
Schüsselgriffe
.
.
3 Führen Sie die obigen Schritte in umgekehrter Reihenfolge
aus, um den Rührclip abzunehmen.
WICHTIG - Der Rührhilfe-Clip sollte nicht angebracht werden,
wenn Sie den K-Haken, Profi-Ballonschneebesen, Knethaken
oder Flexi-Rührelement verwenden.
Zusammenbau des Flexi-Rührelements
Anbringen der Gummilippe
Das Flexischaberblatt ist bei Lieferung bereits angebracht und
sollte zur Reinigung stets entfernt werden.
1 Bringen Sie die Gummilippe am Rührelement an, indem Sie
den unteren Teil des Schaberblatts in den Schlitz stecken,
dann eine Seite in die Rille einsetzen und vorsichtig das Ende
festhaken. Wiederholen Sie den Vorgang auf der anderen
Seite.
69
Page 73

Höchstmengen und empfohlene Geschwindigkeiten
Die folgenden Geschwindigkeitsangaben dienen lediglich als Richtlinien, da sie je nach Menge und Temperatur des Mischguts usw.
unterschiedlich sein können.
Mürbeteig Mehlgewicht 910 g
Fester Hefeteig Mehlgewicht 350 g – 1,6 kg
Gesamtgewicht 550 g – 2,56 kg
Weicher Hefeteig Mehlgewicht 250 g – 2,6 kg
Gesamtgewicht 480 g – 5 kg
Rührteig Gesamtgewicht 4,55 kg
Eiweiß Anzahl
Gewicht
Kochmodus Gesamtmenge 3 l
Öl Gesamtmenge 250 ml
* Eiergröße in der Tabelle = mittelgroß (50 g)
Rührelement Rezept/Verfahren Empfohlene Geschwindigkeit
K-Haken Schaumigschlagen von Butter/
Margarine und Zucker
Einrühren von Eiern in Teig „4“ bis „Max“
Unterheben von Mehl, Rosinen
usw.
Schneller Kuchenteig (alles in
einem)
Einarbeiten von Fett in Mehl „Min“ bis 2
Flexi-Rührelement Schaumigschlagen von Butter/
Margarine und Zucker
Abkratzen heißer und
kalter Mischungen von den
Schüsselseiten
Profi-Ballonschneebesen Für Eier, Sahne, Soufflés Verhoog geleidelijk maar ‘max’
Knethaken Für schwere Teige, wie Hefe-
oder Brotteige.
Koch-Rührelement Geeignet beim Kochen zur
Beibehaltung der Konsistenz
von Kochgut wie Hühnchen,
Fisch, Gemüse und Obst.
16
(605 g)
Mit „Min“ starten und stufenweise auf „Max“ erhöhen
„Min“ – 1
Mit „Min“ starten und stufenweise auf „Max“ erhöhen
Mit „Min“ starten und stufenweise auf „3“ erhöhen.
Mit „Min“ starten und stufenweise auf „3“ erhöhen.
Mit „Min“ starten und stufenweise auf „1“ erhöhen.
Nur mit Rühreinstellungen verwenden
70
Page 74

Pflege und Reinigung
• Das Gerät vor dem Reinigen immer ausschalten und den
Netzstecker ziehen.
• Beim ersten Gebrauch erscheint u.U. ein wenig Schmierfett an
Anschluss
• Die Metalloberflächen der Temperaturfühler können im Verlauf
des normalen Gebrauchs Verschleißerscheinungen aufweisen.
Dies beeinträchtigt die Leistung des Produkts in keiner Weise.
• Den Flexi-Rührelement abnehmen, wenn die Maschine nicht
benutzt wird.
Gerät, Anschlussdeckel
• Mit einem feuchten Tuch abwischen und trocknen lassen.
• Niemals Scheuermittel benutzen oder in Wasser eintauchen.
Flexi-Rührelement
• Nehmen Sie der Gummilippe zum Reinigen grundsätzlich vom
Rührelement ab.
• Waschen Sie Gummilippe und Rührelement in heißem Wasser
und Spülmittel und trocken Sie beides gründlich ab. Die Teile
lassen sich auch in der Geschirrspülmaschine waschen.
Hinweis: Bitte überprüfen Sie den Zustand des Gerätekörpers
vor und nach Gebrauch. Überprüfen Sie außerdem
regelmäßig die Gummilippe und ersetzen Sie es, wenn es
Verschleißerscheinungen aufweist.
Schüssel, Rührelemente, Spritzschutz, Rührhilfe-Clip
• Von Hand spülen und gründlich abtrocknen oder in die
Spülmaschine geben.
• Die Schüssel aus Edelstahl niemals mit einer Drahtbürste,
Stahlwolle oder Bleichmittel reinigen. Zum Entfernen von Kalk
Essig oder einen geeigneten Entkalker verwenden.
. Dies ist normal – einfach abwischen.
2
• Wenn Zutaten am Innern der Schüssel kleben oder
einbrennen, diese so bald wie möglich mit dem Spatel
(im Lieferumfang) abschaben. Die Schüssel mit warmem
Seifenwasser füllen und einweichen. Alle hartnäckigen Reste
mit einer Nylonbürste entfernen.
• Eine Verfärbung der Schüssel führt nicht zu einer
Beeinträchtigung ihrer Leistung.
Abflussöffnung
• Sicherstellen, dass der Bereich frei von Mischgutresten
ist. Wenn erforderlich, mit einem Pfeifenreiniger oder
Wattestäbchen reinigen.
Temperaturfühler
• Mit einem feuchten Tuch abwischen und gründlich trocknen
lassen. Niemals Scheuermittel oder scharfe Gegenstände zum
Reinigen der Fühler verwenden.
Teil Spülmaschinen-
Schüssel
K-Haken, Profi-Ballonschneebesen, Flexi-
Rührelement, Koch-Rührelement
Knethaken
Rührhilfe-Clip
Anschlussdeckel
Spatel
Spritzschutz und Hitzeschild
Gummidichtung
Arbeitsflächen-Schutzmatte
Teigschaber
fest
✓
✓
✓
✓
✗
✓
✓
✓
✓
✓
Kundendienst und Service
• Sollten Sie irgendwelche Probleme mit dem Betrieb
Ihres Geräts haben, ziehen Sie bitte den Abschnitt
„Fehlerbehebung“ zu Rate oder besuchen Sie
www.kenwoodworld.com, bevor Sie Hilfe anfordern.
• Bitte beachten Sie, dass Ihr Produkt durch eine Garantie
abgedeckt ist – diese erfüllt alle gesetzlichen Anforderungen
hinsichtlich geltender Garantie- und Verbraucherrechte in dem
Land, in dem das Produkt gekauft wurde.
• Falls Ihr Kenwood-Produkt nicht ordnungsgemäß
funktioniert oder Defekte aufweist, bringen Sie es bitte
zu einem autorisierten KENWOOD Servicecenter oder
senden Sie es ein. Aktuelle Informationen zu autorisierten
KENWOOD Servicecentern in Ihrer Nähe finden Sie bei
www.kenwoodworld.com bzw. auf der Website für Ihr Land.
• Gestaltet und entwickelt von Kenwood GB.
• Hergestellt in China.
WICHTIGER HINWEIS FÜR DIE KORREKTE
ENTSORGUNG DES PRODUKTS IN
ÜBEREINSTIMMUNG MIT DER EG-RICHTLINIE ÜBER
ELEKTRO- UND ELEKTRONIK-ALTGERÄTE (WEEE)
Am Ende seiner Nutzungszeit darf das Produkt NICHT mit
dem Hausmüll entsorgt werden. Es muss zu einer örtlichen
Sammelstelle für Sondermüll oder zu einem Fachhändler gebracht
werden, der einen Rücknahmeservice anbietet. Die getrennte
Entsorgung eines Haushaltsgeräts vermeidet mögliche negative
Auswirkungen auf die Umwelt und die menschliche Gesundheit,
die durch eine nicht vorschriftsmäßige Entsorgung bedingt sind.
Zudem ermöglicht dies die Wiederverwertung der Materialien, aus
denen das Gerät hergestellt wurde, was erhebliche Einsparungen
an Energie und Rohstoffen mit sich bringt. Zur Erinnerung an
die korrekte getrennte Entsorgung von Haushaltsgeräten ist
das Gerät mit dem Symbol einer durchgestrichenen Mülltonne
gekennzeichnet.
71
Page 75

Fehlerbehebung
Problem Ursache Lösung
Die Küchenmaschine arbeitet nicht
im Kochmodus. Sie zeigt eine
Fehlermeldung an und gibt einen
Warnton aus.
Geschwindigkeit ändert sich oder ist
beim Kochen begrenzt.
Das Mischgut brennt auf dem
Schüsselboden an.
Einer der Sicherheitsfühler wurde aktiviert. Display auf Fehlermeldungen überprüfen.
• Sicherstellen, dass Maschinenkopf
heruntergeklappt und eingerastet ist.
• Sicherstellen, dass alle Anschlussdeckel
korrekt aufgesetzt sind.
• Sicherstellen, dass das Hitzeschild korrekt
angebracht ist.
• Sicherstellen, dass die Cooking Chef Schüssel
korrekt aufgesetzt ist.
Die Geschwindigkeit wird automatisch
begrenzt, wenn der Schüsselinhalt 60 °C
erreicht, und die Temperatur-Warnanzeige
leuchtet auf.
1 Die ausgewählte Temperatur könnte zu
hoch sein.
2 Es wird ein falsches Rührelement
verwendet.
3 Hoheren Rührintervall ist zu langsam.
Dies ist eine Sicherheitsfunktion.
1 Temperatur oder Leistungsstufe reduzieren.
2 Überprüfen, dass das richtige Rührelement
eingesetzt und korrekt eingestellt ist.
3 Höhere Rührfrequenz einstellen oder
Dauerbetrieb wählen.
4 Das Rührelement sitzt vielleicht nicht tief
genug in der Schüssel.
5 Der Timer wurde auf eine zu lange Zeit
eingestellt.
6 Der Fühler und/oder die Unterseite der
Schüssel sind eventuell nicht sauber.
Die Konsistenz des Mischguts bleibt
nicht erhalten.
Ungleichmäßige Rührgeschwindigkeit. 1 Zutaten sind zu groß, zu hart oder zu fest. 1 Zutaten in kleinere Stücke schneiden,
Maschinenkopf lässt sich nur schwer
einrasten.
Küchenmaschine läuft ununterbrochen,
wenn Rühreinstellungen ausgewählt
sind.
Motorgeschwindigkeit ist bei
Verwendung von Aufsätzen begrenzt.
Der Schneebesen oder K-Haken schlägt
gegen den Boden der Schüssel oder
reicht nicht bis zu den Zutaten unten in
der Schüssel.
Schneebesen, K-Haken oder Flexirührer
schlagen gegen den Rührclip.
1 Die ausgewählte Temperatur ist zu hoch.
2 Hoheren Rührintervall ist zu schnell.
3 Zutaten werden zu lange gekocht.
4 Es wird ein falsches Rührelement
verwendet.
1 Feste Zutaten wie Schokolade
auf dem Schüsselboden hindern
den Maschinenkopf daran, in
heruntergeklappter Position einzurasten.
2 Rührer wurde falsch eingesetzt.
Anschlussdeckel sind nicht korrekt
aufgesetzt.
Es ist eine heiße Schüssel aufgesetzt. Schüssel entfernen oder auf unter 60°C
Rührelement hat nicht die richtige Höhe und
muss angepasst werden.
Rührclip ist angebracht. Rührclip entfernen – er sollte ausschließlich mit
4 Position des Rührelements korrigieren.
5 Kochdauer verkürzen (sicherstellen, dass
Speisen gar werden).
6 Diese Bereiche sauber und trocken halten.
1 Temperatur reduzieren.
2 Hoheren Rührintervall reduzieren.
3 Kochdauer reduzieren (sicherstellen, dass
Speisen gar werden).
4 Überprüfen, dass das richtige Rührelement
verwendet wird.
Obststeine entfernen, Zutaten langsam
ohne Rührelement (aber mit eingestellter
Geschwindigkeit) schmelzen.
2 Zutaten nach dem Herunterklappen des
Maschinenkopfes in die Schüssel geben.
3 Überprüfen, dass das richtige Rührelement
verwendet wird.
1 Zutaten nach dem Herunterklappen des
Maschinenkopfes in die Schüssel geben.
2 Sicherstellen, dass Rührer in den Rührer-
Steckplatz eingeführt ist.
Sicherstellen, dass die Anschlussdeckel korrekt
aufgesetzt sind.
abkühlen.
Die Höhe mit einem geeigneten
Schraubenschlüssel anpassen – siehe Abschnitt
„Anpassung von Rührelementen”.
dem Rührer verwendet werden.
72
Page 76

Problem Ursache Lösung
Niedriggeschwindigkeits-Aufsatz lässt
sich nicht anbringen.
Standby-Anzeige blinkt beim ersten
Einschalten der Küchenmaschine.
Die Küchenmaschine stoppt während
des Betriebs. Standby-Anzeige blinkt
schnell.
Die Küchenmaschine stoppt während
des Betriebs. Standby-Anzeige blinkt
langsam.
Standby-Anzeige leuchtet nicht, obwohl
die Maschine eingeschaltet ist.
Display zeigt alphanumerischen
Fehlercode an.
Wenn Sie den Kundenservice kontaktieren, werden Sie u. U. um Informationen zur Softwareversion gebeten. Sie finden diese Angaben, indem
Sie die Menütaste drücken und „EINSTELLUNGEN“ -> „VERSION“ wählen.
Überprüfen, dass Ihr Aufsatz für das Modell
geeignet ist.
Drehanschluss-System erforderlich (Modell
KAX)
Geschwindigkeitsregler nicht auf „O“ gestellt.
Maschinenkopf hochgeklappt oder nicht
richtig eingerastet.
Überlastungs- oder Überhitzungssystem
aktiviert. Höchstmengen wurden
überschritten.
1 Hitzeschild oder Anschlussdeckel entfernt.
2 Maschinenkopf angehoben.
3 Aufsatz an Anschluss hat maximale
Die eingeschaltete Küchenmaschine wurde
30 Minuten lang nicht betrieben und ist in
den Standby-Modus übergegangen.
Gerät funktioniert nicht korrekt. Kontaktieren Sie ein autorisiertes Kenwood
.
Betriebszeit überschritten.
Aufsatz muss das Drehanschluss-System KAX
besitzen, um auf den Anschluss zu passen.
Wenn Sie Aufsätze für das SteckschlitzSystem
Adapter KAT002ME verwenden, um diese an
das Drehanschluss-System Ihrer Maschine
anschließen zu können.
Für weitere Informationen besuchen Sie
www.kenwoodworld.com/twist
Überprüfen und Geschwindigkeitsregler auf „O“
stellen.
Überprüfen, dass der Maschinenkopf
heruntergeklappt und eingerastet ist.
Ausschalten und auf Blockierung oder
Überlastung überprüfen.
Den Geschwindigkeitsregler auf „O“ stellen und
erneut einschalten.
Wenn die Maschine nach wie vor nicht
funktioniert, einige Zutaten entfernen, um
die Last zu reduzieren, und erneut starten.
Wenn auch dies das Problem nicht löst, den
Netzstecker ziehen und die Maschine 15
Minuten ruhen lassen. Wieder einschalten und
die Geschwindigkeit neu auswählen.
Sollte die Maschine danach immer noch nicht
starten, den Kundendienst zu Rate ziehen.
1 Hitzeschild oder Anschlussdeckel anbringen.
Den Geschwindigkeitsregler auf „O“ stellen
und erneut einschalten.
2 Maschinenkopf nach unten klappen. Den
Geschwindigkeitsregler auf „O“ stellen und
erneut einschalten.
3 Den Geschwindigkeitsregler auf „O“ stellen
und erneut einschalten.
Zum Zurücksetzen der Maschine einmal die
Standby-Taste drücken.
Servicecenter. Aktuelle Informationen zu einem
Kenwood Servicecenter in Ihrer Nähe finden
Sie bei www.kenwoodworld.com bzw. auf der
Website für Ihr Land.
besitzen, müssen Sie den
73
Page 77

Contenuti
sicurezza 75 – 76
legenda 77
selezione lingua 77
utensili del recipiente e possibili usi 78
uso del Cooking Chef 78 – 79
uso del Cooking Chef come mixer 79
spiegazione simboli schermo di visualizzazione 80
modalità manuale 81
utilizzo programmi preimpostati 82
Programmi salati 83 – 84
piatti principali 83
salse 84
Programmi dolci 85 – 88
temperare il cioccolato 85
impasti 85 – 86
meringhe 86
composte 87
salse 87 – 88
altri 88
Programmi a cottura lenta 89
alta temperatura 89
bassa temperatura 89
Programmi a vapore 90
regolazione utensili recipiente 91
montare e utilizzare il gruppo paraschizzi 92
rimuovere e inserire i coperchi degli attacchi 93
montare e smontare l’accessorio di co-miscelazione 93
montaggio della frusta flessibile ad alta temperatura 93
massime capacità e velocità consigliate 94
cura e pulizia 95
manutenzione e assistenza tecnica 95
guida alla risoluzione dei problemi 96 – 97
74
Page 78

Italiano
sicurezza
l
Leggere attentamente le presenti istruzioni e conservarle come futuro
riferimento.
l
Rimuovere la confezione e le etichette.
l
In caso il cavo sia danneggiato, per ragioni di sicurezza deve esser sostituito solo dal
fabbricante oppure da un Centro Assistenza KENWOOD autorizzato alle riparazioni.
Importante – impianti medici elettronici
l
Come tutti i prodotti generanti riscaldamento a induzione, questo apparecchio genera
campi magnetici a corto raggio. Se l’utilizzatore o una persona nelle immediate vicinanze
dell’apparecchio ha un pacemaker o altro impianto medico attivo, prima dell’uso si prega di
consultare il medico per escludere eventuali incompatibilità e rischi per la salute.
l
Spegnere l’apparecchio e disinserire la spina dalla presa elettrica prima di montare o staccare
utensili/accessori, dopo l’uso e prima della pulizia.
l
Tenere lontano il corpo, i capelli, gli articoli di gioielleria/bigiotteria e gli indumenti larghi dalle
parti in movimento e dagli accessori installati.
l
Non inserire mai le dita ecc. nel meccanismo della cerniera.
l
Non lasciare mai l’apparecchio incustodito dopo averlo acceso.
l
Non usare mai un accessorio danneggiato. Farlo controllare o riparare: vedere alla sezione
‘manutenzione e assistenza tecnica’.
l
Non usare mai un accessorio non approvato, oppure più di un accessorio alla volta.
l
Non superare mai le capacità massime e, quando si utilizza la cottura ad induzione, non
superare mai il livello massimo di 3 litri indicato all’interno del recipiente.
l
Se viene usato un accessorio, leggere le istruzioni di sicurezza e di impiego che lo corredano.
l
Fare attenzione nel sollevare questo apparecchio, per via del peso. Verificare che la testa sia
bloccata in posizione e che recipiente, utensili, coperchi degli attacchi e cavo elettrico siano
ben saldi prima di sollevare l’apparecchio.
l
Non lasciare mai che il cavo penzoli da dove un bambino potrebbe afferrarlo.
l
Non lasciare mai che corpo motore, il filo o la spina elettrica si bagnino.
l
Attenzione nel maneggiare o toccare qualsiasi parte dell’apparecchio durante o dopo
la cottura, IN PARTICOLARE IL RECIPIENTE, IL PARASCHIZZI E GLI UTENSILI, che
continueranno a SCOTTARE anche diverso tempo dopo che l’apparecchio è stato spento.
Per estrarre e spostare il recipiente, servirsi dei manici. Usare guanti da forno al momento di
maneggiare il recipiente caldo e gli utensili caldi per miscelare.
l
La base del recipiente continua a scottare anche parecchio tempo dopo il termine della
cottura. Fare attenzione nel maneggiare il recipiente e usare il tappetino di protezione prima di
appoggiarlo a superfici sensibili al calore.
l
Fare attenzione al vapore che fuoriesce dal recipiente del mixer, in particolare nell’aprire il
coperchio del paraschizzi, oppure al momento di sollevare la testa del mixer.
l
Se si desidera versare alimenti caldi dal mixer al frullatore, lasciarli sempre raffreddare a
temperatura ambiente prima di versarli nel frullatore.
l
Usare solo il recipiente e gli utensili in dotazione con questo apparecchio. Non utilizzare mai il
recipiente con altre sorgenti di calore.
l
Non azionare mai l’apparecchio nella modalità di cottura se il recipiente è vuoto.
l
Non cercare di inserire nulla attraverso le bocchette per l’aria.
l
Prima di usare questo apparecchio, verificare di collocarlo in piano, lontano dal bordo del
piano di lavoro. Assicurarsi che vi sia una distanza di almeno 10 cm dalle pareti, e che le
bocchette dell’aria non siano ostruite. Non collocare l’apparecchio sotto a una credenza.
75
Page 79

l
A garanzia dell’uso corretto e sicuro della piastra ad induzione, controllare che la base del
recipiente e i sensori della temperatura siano puliti ed asciutti prima di avviare la cottura.
l
Come per qualunque apparecchio per cottura a induzione, evitare di collocare carte di
credito, supporti magnetici o altri apparecchi elettronici sensibili vicino all’apparecchio dopo
averlo acceso.
l
Non usare questo apparecchio per friggere i cibi.
l
Controllare sempre che i cibi siano ben cotti prima di mangiarli.
l
Non superare i 250 ml quando si cucina con l’olio.
l
Consumare i cibi entro breve tempo dopo averli cotti; in alternativa, farli raffreddare
velocemente e poi refrigerarli non appena possibile.
l
Un utilizzo scorretto dell’apparecchio può provocare serie lesioni fisiche.
l
Il cavo di alimentazione deve essere utilizzato riducendo al minimo il rischio che l’utilizzatore
s’ingarbugli o s’inciampi. È permesso l’uso delle prolunghe se si presta la dovuta attenzione
durante l’uso. Se è utilizzata una prolunga: 1) il valore nominale della tensione contrassegnato
sulla prolunga deve essere almeno equivalente a quello dell’apparecchio; 2) il cavo deve
essere sistemato in modo che non penzoli dai piani di lavoro o dai tavoli per evitare che possa
essere afferrato dai bambini o che causi cadute accidentali. Se l’apparecchio è di modello
provvisto di messa a terra, la prolunga deve essere costituita da un cavo elettrico triplo
inclusivo di messa a terra. Il valore nominale della tensione dell’apparecchio è indicato sotto
l’unità.
l
Gli apparecchi possono essere utilizzati da persone con ridotte capacità psicofisico-sensoriali,
o con esperienza e conoscenze insufficienti solo nel caso in cui siano state attentamente
sorvegliate e istruite da un responsabile su come utilizzare un apparecchio in modo sicuro e
siano consapevoli dei pericoli.
l
Sorvegliare i bambini, assicurandosi che non giochino con l’apparecchio.
l
Questo apparecchio non dev’essere utilizzato dai bambini. Tenere apparecchio e cavo lontani
dalla portata dei bambini.
l
Utilizzare l’apparecchio solo per l’uso domestico per cui è stato realizzato. Kenwood non si
assumerà alcuna responsabilità se l’apparecchio viene utilizzato in modo improprio o senza
seguire le presenti istruzioni.
prima di collegare l’apparecchio alla rete
elettrica
• Assicurarsi che la tensione della vostra rete elettrica sia la
stessa di quella indicata sulla targhetta sotto l’apparecchio.
• AVVERTENZA: L’APPARECCHIO DEVE ESSERE
MESSO A TERRA.
• Questo apparecchio è conforme al regolamento (CE) No.
1935/2004 sui materiali e articoli in contatto con alimenti.
prima dell’uso
• Lavare i componenti: vedere la sezione ‘cura e pulizia’.
76
Page 80

conoscere Kenwood Cooking Chef
Legenda
attacchi per gli accessori
attacco ad alta velocità (HSO)
1
attacco a bassa velocità (SSO)
2
attacco recipiente
3
attacco mescolatore
4
Mixer
coperchio attacco ad alta velocità
5
testa mixer
6
coperchio attacco per lavorazioni a bassa velocità
7
recipiente di Kenwood Cooking Chef
8
levetta alza-testa
9
comando della velocità
k
pulsante di stand-by
l
manopola display / pulsante avvio
schermo di visualizzazione
foro di scarico
piedistallo del recipiente/area ad induzione
bocchette per l’aria
q
sensori della temperatura
frusta K
s
frusta flessibile ad alta temperatura
t
frusta a fili grossi a palloncino
k
gancio impastatore
l
mescolatore
accessorio di co-miscelazione
spatola per alta temperatura
protezione termica
tenuta di gomma (rimuovibile)
q
paraschizzi
coperchio dell’introduttore per alimenti
s
tappetino di protezione
t
chiave
dk
simboli sul display
avviso alta temperatura
dl
fase programma
d
selezione temperatura
d
avviso alta temperatura alta velocità
d
visualizzazione di testo
d
selezione tempo
dq
selezione intervallo di miscelazione
d
selezione potenza
ds
display
pulsante temperatura
dt
timer
k
pulsante d'impostazione della miscelazione
l
pulsante menù
raschietto per impasto
Nota: Attrezzature da inserire nell’attacco per lavorazioni a
bassa velocità
L’attacco delle attrezzature per lavorazioni a bassa velocità
presente nella Kitchen Machine utilizza il sistema di innesto a
rotazione (Twist Connection System). È stato progettato per le
attrezzature da collegare mediante innesto a rotazione.
Quando si intendono acquistare nuovi accessori da inserire
nell’attacco per lavorazioni a bassa velocità, occorre verificarne
la compatibilità con la propria Kitchen Machine. Tutti gli accessori
del sistema di innesto a rotazione sono identificabili con il codice
prodotto che inizia con KAX e dalla presenza del logo Twist
visibile sull’imballaggio.
Se gli accessori di cui si dispone si avvalgono di sistema di
attacco a barra (Bar Connection System)
l’adattatore KAT002ME per inserirli mediante l’innesto a rotazione
(Twist Connection System)
Per maggiori informazioni, visitare il sito
www.kenwoodworld.com/twist.
sulla Kitchen Machine.
si dovrà utilizzare
selezione lingua
Quando si accende il Cooking Chef per la prima volta, la lingua dello schermo di visualizzazione sarà preimpostata su “Inglese”.
1 Per cambiare lingua premere il pulsante menù.
2 Utilizzare la manopola display / pulsante avvio per selezionare
“IMPOSTAZIONI” e premere la manopola display / pulsante avvio
per confermare.
3 Utilizzare la manopola display / pulsante avvio per selezionare
“LINGUE” e premere la manopola display / pulsante avvio per
confermare.
4 Utilizzare la manopola display / pulsante avvio per selezionare
la lingua richiesta. Una volta che la lingua richiesta è stata
selezionata, premere la manopola display / pulsante avvio per
confermare.
5 Per cambiare la lingua di nuovo, ripetere la procedura.
77
Page 81

utensili per il recipiente e possibili usi
Frusta K
Per preparare torte, biscotti, dolci, glassa, ripieni, bignè e altri
impasti semi-duri.
Frusta a fili grossi
Per uova, panna, soufflé. Non utilizzare la frusta a fili grossi per
miscele dense (es. per amalgamare burro/margarina e zucchero)
altrimenti si rischia di danneggiarla.
Da utilizzare insieme al mescolatore quando si desideri sbattere
miscele riscaldandole, es. meringhe italiane e svizzere.
Gancio impastatore
Per impastare pane, pizza, focacce, pasta ed altri composti
elastici e compatti.
uso del Cooking Chef
IMPORTANTE
• Controllare che l’area ad induzione, i sensori della temperatura
e l’esterno della base del recipiente siano puliti. In caso
contrario, il sensore termico viene compromesso e si avrà una
cottura scadente.
• Verificare che tutti i coperchi degli attacchi, compresa la
protezione termica, siano installati. Se non sono stati montati
correttamente, la funzione di riscaldamento non si attiva.
• Usare sempre dei guanti da forno per estrarre gli utensili dopo
la cottura.
Frusta flessibile ad alta temperatura
Adatta a sbattere burro e zucchero, pasta per bigné e polenta.
Ideale per staccare miscele sia calde che fredde dai lati del
recipiente durante la lavorazione.
Mescolatore
Adatto da utilizzare durante la cottura per preservare la
consistenza di alimenti come pollo, pesce, verdura e frutta. Ideale
per rosolare le carni. Indicato inoltre per risotti, salse e per fondere
il cioccolato.
1 Collegare l’apparecchio alla presa di corrente e lo schermo di
visualizzazione s’illuminerà.
2 Ruotare la leva alza-testa in senso orario
testa del mixer fino a quando non si blocca in posizione.
3 Spingere la protezione termica
inferiore della testa del mixer
ben alloggiata. La protezione termica non deve mai
essere utilizzata se la tenuta in gomma
correttamente.
• Se si utilizza il Cooking Chef senza riscaldare gli alimenti, non
è necessario montare la protezione termica a meno che non
si utilizzi il paraschizzi. Fare riferimento alla sezione ‘montare e
utilizzare il gruppo paraschizzi’.
4 Fissare il recipiente sulla base: premere verso il basso e
ruotare in senso orario
5 Selezionare una delle opzioni seguenti:
Cottura manuale.
Fare riferimento alla sezione modalità manuale.
Programmi preimpostati:
Fare riferimento alla sezione ‘utilizzo dei programmi
preimpostati’.
• Fare riferimento alla Guida Rapida per altre possibili ricette.
6 Posizionare l’utensile richiesto nell’attacco del recipiente
nell’attacco del mescolatore
posizionando il perno nell’incavo e poi ruotando fino a
bloccarlo in posizione
4
3
.
.
verso l’alto sulla superficie
fino a quando non risulta
2
, se si utilizza il mescolatore,
4
e sollevare la
1
non è montata
q
3
o
mescolatore – quando si utilizza il mescolatore si può anche
utilizzare l’accessorio di co-miscelazione per favorire l’azione
di miscelazione, vedere ‘montare ed utilizzare l’accessorio di
co-miscelazione'. Il mescolatore può anche essere utilizzato
con la frusta a fili grossi, per esempio per preparare meringhe.
Non utilizzare il mescolatore con il gancio impastatore.
N.B.: se la frusta K, la frusta a fili grossi o la frusta flessibile
non raccolgono bene gli ingredienti dal fondo del recipiente,
fare riferimento alla sezione “Regolazione utensili”.
• Per rimuovere un utensile, eseguire la procedura descritta al
punto 6 in senso contrario (Utilizzare sempre guanti da forno
per rimuovere utensili dopo la cottura).
7 Per abbassare la testa del mixer, sollevarla leggermente e
ruotare la leva alza-testa in senso orario.
Abbassarla fino a quando non si bloccherà in posizione.
8 Aggiungere gli ingredienti in questione da cucinare/miscelare.
9 Ruotare il comando della velocità sull’impostazione
desiderata. Ruotare il comando della velocità su
utilizzare le impostazioni di miscelazione.
per
78
Page 82

• Se la temperatura del recipiente supera 60°C, per ragioni di
sicurezza, la velocità viene automaticamente limitata anche se
ne viene selezionata una maggiore. La velocità non aumenta
automaticamente quando la temperatura scende al di sotto
dei 60 °C. Il comando della velocità deve essere prima ruotato
sulla posizione spento ‘O’ e la velocità desiderata deve essere
riselezionata.
Vedere la sezione 'Modalità manuale' per informazioni su
come utilizzare la modalità alta velocità alta temperatura
(HSHT).
10 Una volta che un programma sarà terminato, l’apparecchio
emetterà 3 segnali acustici.
• N.B.: se non è stato impostato alcun valore di tempo,
i processi di cottura e miscelazione termineranno
automaticamente quando il timer avrà raggiunto 8 ore.
11 Per interrompere o sospendere il processo di miscelazione,
riposizionare il comando della velocità sulla posizione spento
‘O’. Per riprendere la lavorazione, selezionare una velocità.
IMPORTANTE
• Quando il processo di miscelazione sarà interrotto
o sospeso, gli alimenti continueranno ad essere
scaldati.
12 Per interrompere la cottura, impostare il valore della
temperatura su spento ‘OFF’, oppure premere il pulsante di
standby.
Importante: se la testa del mixer viene sollevata in qualsiasi
momento durante l’uso, il processo di cottura viene sospeso.
Il recipiente si arresta e non riparte quando la testa del mixer
viene riabbassata. Per riavviare il mixer, ruotare il comando
della velocità sulla posizione spenta ‘O’ e riselezionare una
velocità.
dopo la cottura
• Attenzione nel maneggiare o toccare qualsiasi parte del mixer,
quando viene usato nella modalità di cottura o dopo la cottura,
IN PARTICOLARE IL RECIPIENTE, IL PARASCHIZZI E GLI
UTENSILI, che continueranno a SCOTTARE anche diverso
tempo dopo che l’apparecchio è stato spento. Per estrarre e
spostare il recipiente, servirsi dei manici. Usare guanti da forno
al momento di maneggiare il recipiente caldo e gli utensili caldi
per miscelare.
• La base del recipiente continua a scottare anche parecchio
tempo dopo il termine della cottura. Fare attenzione nel
maneggiare il recipiente e usare il tappetino di protezione
prima di appoggiarlo a superfici sensibili al calore.
consigli
• Per alcune ricette, in particolare quelle ad alto contenuto di
acqua, non sarà possibile raggiungere temperature di cottura
oltre 100ºC (ossia il punto di ebollizione dell’acqua).
• Quando si desidera aggiungere ingredienti nel recipiente in
fase di cottura, ridurre la velocità e versarli in modo lento e
continuo.
• Per riscaldare velocemente le salse, mescolarle in modo
continuo.
• Se durante la cottura viene utilizzato il paraschizzi, toglierlo
sempre prima di sollevare la testa del mixer. Attenzione alla
condensa che si forma sul paraschizzi e sulla protezione
termica.
• Sollevare la testa del mixer lentamente, per consentire
all’eventuale liquido presente sulla parte sottostante della
protezione termica di rifluire nel recipiente.
• Sono disponibili dieci funzioni di miscelazione a intervalli
che permettono di selezionare la frequenza di miscelazione
adatta alle singole ricette. Alcune ricette richiederanno un
tipo di miscelazione costante per evitare che gli ingredienti si
attacchino al fondo del recipiente, mentre altre risulteranno
favorite da un tipo di miscelazione intermittente idonea a
preservare la consistenza degli ingredienti utilizzati.
uso del Cooking Chef come mixer
Montare il mixer come precedentemente descritto nella
sezione 'uso del Cooking Chef'. Ruotare il comando della
velocità sull’impostazione desiderata. La velocità può essere
cambiata in qualsiasi momento durante l’uso del mixer.
Arrestare il mixer riposizionando il comando della velocità sulla
posizione spenta ‘O’.
Utilizzare la posizione Pulse (P) per lavorazioni a brevi impulsi
erogati alla massima velocità.
consigli generali
• Fermare frequentemente l’apparecchio e staccare con la
spatola gli ingredienti aderiti al recipiente.
•
Per frullare è preferibile usare uova a temperatura ambiente.
• Prima di montare gli albumi, controllare che sulla frusta a fili o nel
recipiente non vi siano residui di grasso o di tuorlo d’uovo.
• Per la pastafrolla usare ingredienti dal frigorifero, salvo indicato
diversamente nella ricetta.
promemoria per fare il pane
importante
• Non superare mai le capacità massime indicate, altrimenti
l’apparecchio verrà sovraccaricato.
•
Se l’apparecchio impasta a fatica spegnerlo, togliere metà
dell’impasto e impastare in due volte.
• Gli ingredienti si impastano meglio aggiungendo per primi i liquidi.
ricetta
peperoncini marinati
200 g di miele freddo, trasparente e liquido (refrigerato
la notte prima)
1 peperoncino chili (intero)
5ml (1 cucchiaino) di burro di arachidi croccante
Condimenti
1 Versare tutti gli ingredienti nel mini tritatutto/macinino.
2 Montare l’accessorio sulla Kitchen Machine e lasciare che gli
3 Accendere l’unità e lavorare a impulsi per 10 secondi.
4 Usare la marinatura a piacere.
79
ingredienti si assestino attorno alla lama.
Page 83

spiegazione simboli schermo di visualizzazione
Spia di avviso alta temperatura
Sotto 40°C: nessuna barra rossa visualizzata
40°C-60°C: visualizzazione barra rossa lampeggiante
Oltre 60°C: visualizzazione barra rossa fissa
Indica che il mixer sta funzionando in modalità alta velocità alta temperatura (HSHT).
Indica la fase corrente di un programma quando si utilizzano i programmi
preimpostati.
Il display di testo mostra informazioni di stato, informazioni sui programmi e messaggi
di errore.
Indica la temperatura selezionata.
La temperatura può essere impostata su “OFF, e tra i 20°C e i 180°C.
Indica il tempo selezionato in ore, minuti e secondi.
Il tempo può essere selezionato indicando valori compresi tra 5 secondi e 8 ore. Il
conto alla rovescia inizierà una volta che la temperatura sarà stata selezionata.
Indica l’impostazione di miscelazione selezionata, compresa tra 0 e 9.
• Le barre esterne s’illumineranno progressivamente per indicare quanto tempo dovrà
intercorrere prima dell’azione di miscelazione successiva.
• La freccia di miscelazione interna comincerà a lampeggiare 3 secondi prima
dell’azione di miscelazione successiva.
• All’avvio di un’azione di miscelazione, si potrà verificare un improvviso aumento della
velocità finalizzato a separare i pezzi degli ingredienti rimasti attaccati tra loro.
Indica l’impostazione di potenza selezionata.
Opzioni d’impostazione della potenza disponibili: Auto, da 1 a 7.
80
Page 84

modalità manuale
• Premere in corrispondenza dell’impostazione che si desidera alterare e utilizzare la manopola display per regolare il valore
d’impostazione.
• Premere la manopola display per confermare.
N.B.:
• Quando si seleziona un valore d’impostazione, la barra ubicata sotto il simbolo dello schermo di visualizzazione corrispondente
s’illuminerà.
• La selezione del valore d’impostazione scomparirà dopo 4 secondi se non seguirà alcuna azione.
La temperatura può essere impostata su valori compresi tra 20°C e 180°C, con incrementi di 1°C.
In alternativa, l’apparecchio può essere utilizzato senza impostare la temperatura selezionando l’opzione
spento “OFF”.
N.B.: Il Cooking Chef non raggiungerà una temperatura inferiore alla temperatura ambiente.
Modalità alta velocità, alta temperatura (HSHT)
Per miscelare ad alta velocità a temperature superiori a 60°C:
• Premere e tenere premuto per 3 secondi. S’illuminerà il ! rosso sullo schermo e sarà visualizzato il messaggio
“ATTENZIONE MODALITÀ HSHT”. Il mixer emetterà anche un segnale acustico ogni 30 secondi.
• Ruotare il comando della velocità sulla velocità desiderata e il mixer aumenterà gradualmente fino a raggiungere il
valore selezionato.
• La velocità può essere ridotta normalmente.
• Per uscire da questa modalità, tenere premuto il pulsante della temperatura per 5 secondi o riposizionare il
comando della velocità su ‘O’.
Questa funzione DEVE SOLO essere utilizzata con la frusta a fili grossi e/o il mescolatore. Non si deve
superare la capacità massima di cottura consentita di 3 litri e occorre assicurarsi che il paraschizzi sia
installato. Non lasciare incustodito l’apparecchio.
Il timer può essere utilizzato nella modalità di cottura. Se l’utilizzatore non seleziona un tempo per il conto alla
rovescia, il timer conta automaticamente in intervalli di 1 secondo durante il funzionamento dell’apparecchio.
Il tempo massimo è 8 ore.
Ci sono dieci impostazioni di miscelazione ad intervalli. Queste impostazioni sono particolarmente indicate quando il
mixer è usato nella modalità di cottura. Si ricorda che per usare le impostazioni di miscelazione, tutti i coperchi degli
attacchi devono essere installati.
Le impostazioni di potenza possono essere regolate con il pulsante del menù.
Il valore di potenza è preimpostato su Auto.
La potenza può essere regolata tra 250 W e 1500 W.
• Impostare un valore di potenza basso per riscaldare moderatamente gli alimenti.
• Impostare un valore di potenza più elevato per riscaldare rapidamente gli alimenti.
81
Page 85

Impostazioni di miscelazione ad intervalli
Le impostazioni di miscelazione sono ideali da utilizzare con il mescolatore.
Velocità Intervalli di tempo Usi
Nessun intervallo di tempo
(Miscelazione continua)
5 secondi
10 secondi
20 secondi
30 secondi
40 secondi
50 secondi
Miscelazione continua per salse e risotti.
Per rosolare le carni e per sauté di verdure.
1 minuto
2 minuti
5 minuti
Impostazioni di temperatura
Temperatura Usi
50°C Temperare cioccolato
72°C - 82°C Cuocere uova in camicia
98°C - 99°C Sobbollire
100°C Bollire, cuocere a vapore
130°C - 140°C Sauté di verdure
180°C Rosolare carni
impostazioni di potenza
Impostazioni di
potenza
A Auto Input di potenza varia per ottimizzare l’impostazione della temperatura
1 - 2 1500 W - 1200 W Rosolare carni, preparare sauté di verdure, portare l’acqua ad ebollizione
3 - 5 1000 W - 500 W
6 - 7 375 W - 250 W Lievitazione di impasti
Watt Usi
Per mescolare stufati, pasticci, brodi, ecc.
Sciogliere burro, salse a base di latticini, sobbollire, sbattere riscaldando
ingredienti
82
Page 86

Sauté
Non pertinente Non pertinente
Risotto al pollo
0
75 °C
01
99 °C99 °C
Auto
1500 W1200 W
5 min
3 min10 min
di manzo
Pasticcio di carne
Non pertinente
Brodo di salmone
Non pertinente
Mantenere in caldo
Ingredienti aggiuntivi
condimenti
Aggiungere
verdure
Aggiungere carne e
Fase 1 (P1) Fase 2 (P2) Fase 3 (P3) Fase 4 (P4) Fase 5 (P5) Fase 6 (P6) Utensili utilizzati Idee per ricette
0
140 °C
Aggiungere riso Aggiungere vino Aggiungere liquido Mantenere in caldo
24 02
carne
3 ½ min 2 min 45 sec
100 °C100 °C 130 °C130 °C
Aggiungere verdure e
✗
✓ ✓ ✓ ✗
1500 W
1200 W1500 W
1500 W
1000 W
✓ ✗ ✓ ✓ ✓ ✗
1 min
2 min3 min 1 min3 min
✗
Aggiungere liquido Mantenere in caldo
140 °C 95 °C 80 °C
Aggiungere verdure
180 °C180 °C
4 9 9
01
1500 W Auto Auto
1500 W1500 W
✓ ✓ ✓ ✓ ✗
10 min 4 ore 30 min
2 min3½ min
✗
Aggiungere carne/pesce
99 °C 98 °C 80 °C
Aggiungere liquido
130 °C
130 °C
Aggiungere verdure
9 – 9
24
Auto Auto Auto
1500 W
1200 W
10 min 20 min 30 min
1 min5 min
✗
✓ ✓ ✓ ✓ ✗
Selezionare il programma
1 Premere il pulsante del menù.
2 Ruotare la manopola display / pulsante avvio per selezionare “Programmi”.
3 Premere la manopola display / pulsante avvio per confermare.
4 Ruotare la manopola display / pulsante di avvio per selezionare i programmi “Salati”, “Dolci”, “A cottura lenta” o “A vapore”. Vedere le tabelle qui di seguito per le opzioni offerte dai sotto-programmi.
utilizzo programmi preimpostati
5 Premere la manopola display / pulsante di avvio per confermare.
Wok Aggiungere olio
SALATI
6 Seguire le istruzioni sullo schermo di visualizzazione.
N.B.: se non viene svolta alcuna azione tra una fase e l’altra, l’apparecchio si arresta dopo 15 minuti.
Risotto Aggiungere olio
Tempo di preparazione
Stadio di riscaldamento
– 3 2 2
W Auto Auto 1500 W 1500 W
°C 140 °C 180 °C 160 °C 120 °C
83
°C 130 °C
–
W 1200 W
Stadio di riscaldamento
Ragout Aggiungere olio Aggiungere carne
Tempo di preparazione
–
W 1200 W
°C 140 °C
Stadio di riscaldamento
Zuppe Aggiungere olio
Tempo di preparazione
piatti principali
°C 140 °C
-
W 1200 W
Stadio di riscaldamento
Tempo di preparazione
N.B.:
• Alcune fasi di programma prevedono stadi di riscaldamento che permettono agli ingredienti di raggiungere le temperature specificate prima che inizi la fase.
• HSHT (come visualizzato sullo schermo) = modalità alta velocità, alta temperatura
Page 87

Besciamella,
Salsa al formaggio,
Salsa al prezzemolo
Salsa olandese
Sugo di pomodoro
Salsa béarnaise,
99° C 85 °C
HSHT 6 HSHT 6
HSHT 6HSHT 6
Non pertinente Non pertinente
750 W 500 W
15 min 30 min
80 °C
Mantenere in caldo
110 °C98 °C
Aggiungere liquido
Non pertinente Non pertinente
9
Auto
22
1500 W1500 W
Auto
30 min
il burro fuso
4 min15 min
Aggiungere gradualmente
10 min
liquido
Aggiungere tuorli e
Non pertinente Non pertinente Non pertinente
750 W
750 W
Fase 1 (P1) Fase 2 (P2) Fase 3 (P3) Fase 4 (P4) Fasi 5 (P5) Fase 6 (P6) Utensili utilizzati Idee per ricette
80 °C80 °C 110 °C110 °C
°C
Besciamella Aggiungere burro Aggiungere farina Aggiungere liquido Mantenere in caldo
– 0
SALATE
programmi
✓ ✓ ✓ ✗
1 min15 sec 1 min4 min
750 W750 W 1000 W750 W
W
Classiche Aggiungere olio Aggiungere verdure
Tempo di preparazione
Stadio di riscaldamento
°C 120 °C 120 °C
✓ ✓ ✓ ✗
– 3
W Auto
Stadio di riscaldamento
salse
✗
Sciogliere burro e
Olandese
Tempo di preparazione
✓ ✓ ✗
rimuovere
2 HSHT 6 HSHT 6
W Auto
°C 60 °C 72 °C 72 °C
Tempo di preparazione 10 min 4 min 2 min
Stadio di riscaldamento
N.B.:
• Alcune fasi di programma prevedono stadi di riscaldamento che permettono agli ingredienti di raggiungere le temperature specificate prima che inizi la fase.
• HSHT (come visualizzato sullo schermo) = modalità alta velocità, alta
84
Page 88

Decorare torte
Ricoprire tartufi,
Profiterole,
Bignè lunghi
Pane bianco
Non pertinente Non pertinente
Mantenere in caldo
Aggiungere
cioccolato 2
Fase 1 (P1) Fase 2 (P2) Fase 3 (P3) Fase 4 (P4) Fase 5 (P5) Fase 6 (P6) Utensili utilizzati Idee per ricette
Aggiungere
cioccolato 1
Non pertinente Non pertinente Non pertinente
0
31 °C
94 444
42 °C42 °C 42 °COFF31 °C
1000 W
AutoAuto
Auto
✓ ✗ ✗
Auto
Auto
2 ore
––10 min
10 min20 min
31 °C
Mantenere in caldo
Aggiungere
cioccolato 2
Aggiungere
cioccolato 1
47 °C47 °C 47 °COFF31 °C
Non pertinente Non pertinente Non pertinente
0
1000 W
✓ ✗ ✗
Auto AutoAutoAuto
94 444
Auto
2 ore
––10 min
10 min20 min
Aggiungere farina Aggiungere uova
burro
Aggiungere acqua e
Non pertinente Non pertinente Non pertinente
2 0 Velocità 4
✓ ✗ ✗
Auto Auto Auto
-
do le bolle d’aria
Rimpastare eliminan
Lievitazione
–
farina e lievito
Aggiungere liquido,
250 W OFF
OFF
8 min 1 ora 1 min
✗ ✗ ✗ ✗
2 min
°C
al latte
Cioccolato bianco/
programmi
PREPARAZIONI DOLCI
W
Stadio di riscaldamento
°C
Cioccolato fondente
Tempo di preparazione
W
Stadio di riscaldamento
temperare il cioccolato
Pasta per bigné
Tempo di preparazione
85
°C 90 °C OFF OFF
W
Stadio di riscaldamento
Tempo di preparazione 1 min – –
°C OFF OFF 28 °C OFF
Impasti standard
impasti
0 Velocità 1 OFF 0
W OFF
Stadio di riscaldamento
Tempo di preparazione
N.B.:
• Alcune fasi di programma prevedono stadi di riscaldamento che permettono agli ingredienti di raggiungere le temperature specificate prima che inizi la fase.
• HSHT (come visualizzato sullo schermo) = modalità alta velocità, alta temperatura
Page 89

le bolle d’aria
Rimpastare eliminando
Brioche
Non pertinente
Baked Alaska,
glassature di torte
di burro
Glassature di crema
Lievitazione
Aggiungere burro
–
Fase 1 (P1) Fase 2 (P2) Fase 3 (P3) Fase 4 (P4) Fase 5 (P5) Fase 6 (P6) Utensili utilizzati Idee per ricette
farina e lievito
Aggiungere liquido,
OFF 350 W OFF
OFF
Non pertinente Non pertinente Non pertinente Non pertinente
8 min 5 min 1 ora 1 min
✓ ✗ ✗ ✗ ✗
2 min
OFF
Mantenere in caldo
118 °COFF
zucchero e acqua
Aggiungere albumi,
750 W
HSHT 6
Auto
750 W
HSHT 6HSHT 6
10 min
Mantenere in caldo
✓ ✗
1 min10 min
zucchero e acqua
Aggiungere albumi,
Non pertinente Non pertinente Non pertinente Non pertinente
OFF
Velocità 6
45 °COFF
Velocità 6Velocità 6
750 W
750 WAuto
10 min
10 min
✓ ✗
1 min
°C OFF OFF OFF 28 °C OFF
Impasti arricchiti
programmi
PREPARAZIONI DOLCI
0 Velocità 1 Velocità 1 OFF 0
W OFF
Stadio di riscaldamento
Impasti
Italiane
Tempo di preparazione
W
°C
Svizzere
Tempo di preparazione
Stadio di riscaldamento
W
°C
Tempo di preparazione
Stadio di riscaldamento
meringhe
N.B.:
• Alcune fasi di programma prevedono stadi di riscaldamento che permettono agli ingredienti di raggiungere le temperature specificate prima che inizi la fase.
• HSHT (come visualizzato sullo schermo) = modalità alta velocità, alta temperatura
86
Page 90

Composta di fragole
Gelatine
Farcitura profiterole
Crema inglese
Fase 1 (P1) Fase 2 (P2) Fase 3 (P3) Fase 4 (P4) Fase 5 (P5) Fase 6 (P6) Utensili utilizzati Idee per ricette
Aggiungere frutta,
pectina e zucchero
Non pertinente Non pertinente Non pertinente Non pertinente Non pertinente
20
104 °COFF
750 WAuto
Non pertinente Non pertinente Non pertinente
citrico
100 °C70 °C
Aggiungere acido
e glucosio
Aggiungere zucchero
✓
10 min10 min
Aggiungere purea,
zucchero e pectina
2 min-
Mantenere in caldo
Aggiungere liquido
✓ ✓ ✓
zucchero
Aggiungere uova e
Non pertinente Non pertinente Non pertinente
0
70 °C
00
101 °C70 °C
Auto
AutoAuto
30 min
Mantenere in caldo
5 min-
Aggiungere liquido
✗ ✓ ✗
2 min
zucchero
Aggiungere uova e
Non pertinente Non pertinente Non pertinente
12 min 30 min
✗ ✓ ✗
3 min
°C
Composta di frutta
programmi
PREPARAZIONI DOLCI
W
Fase di riscaldamento
Gelatine
Tempo di preparazione
HSHT 3 HSHT 3 HSHT 3
W Auto Auto Auto
°C 100 °C 107 °C
Fase di riscaldamento
Tempo di preparazione 2 min 10 min
composte
Velocità 2
°C OFF
Crema pasticcera
87
W –
Fase di riscaldamento
Tempo di preparazione
Velocità 2 0 0
°C OFF 87 °C 80 °C
Crema inglese
salse
W OFF Auto Auto
Fase di riscaldamento
Tempo di preparazione
N.B.:
• Alcune fasi di programma prevedono stadi di riscaldamento che permettono agli ingredienti di raggiungere le temperature specificate prima che inizi la fase.
• HSHT (come visualizzato sullo schermo) = modalità alta velocità, alta temperatura
Page 91

Zabaglione
Popcorn
Base per mousse
50 °C
Mantenere in caldo
Fase 1 (P1) Fase 2 (P2) Fase 3 (P3) Fase 4 (P4) Fase 5 (P5) Fase 6 (P6) Utensili utilizzati Idee per ricette
programmi
PREPARAZIONI DOLCI
74 °COFF
Aggiungere uova,
zucchero e liquido
°C
Zabaglione
Non pertinente Non pertinente Non pertinente Non pertinente
500 W
HSHT Max
HSHT Max
HSHT Max
750 WAuto
W
Stadio di riscaldamento
salse
✓ ✗
15 min
Mantenere in caldo
–
2 min
Aggiungere uova e
Pate a Bombe
Tempo di preparazione
Non pertinente Non pertinente Non pertinente Non pertinente
OFF
zucchero
OFF 118 °COFF
HSHT 6 HSHT 6
°C
10 min
–
1
✓ ✗
2
W 500 W 500 W
Tempo di preparazione
Stadio di riscaldamento
Popcorn Aggiungere olio Aggiungere popcorn
Non pertinente Non pertinente Non pertinente Non pertinente
– –
°C 180 °C 180 °C
10 min
✗
✓ ✗
W Auto Auto
Tempo di preparazione
Stadio di riscaldamento
altri
N.B.:
• Alcune fasi di programma prevedono stadi di riscaldamento che permettono agli ingredienti di raggiungere le temperature specificate prima che inizi la fase.
• HSHT (come visualizzato sullo schermo) = modalità alta velocità, alta temperatura
88
Page 92

Pasticci di carne
Pasticci di carne
80 °C
Fase 1 (P1) Fase 2 (P2) Fase 3 (P3) Fase 4 (P4) Fase 5 (P5) Fase 6 (P6) Utensili utilizzati Idee per ricette
98 °C 95 °C
°C
Alta Aggiungere ingredienti Mantenere in caldo
LENTA
A COTTURA
programmi
Non pertinente Non pertinente Non pertinente Non pertinente
–
Auto
1000 W
✓ ✗
09
1500 W
W
Stadio di riscaldamento
30 min
20 min2 ore
Bassa Aggiungere ingredienti Mantenere in caldo
Tempo di preparazione
80 °C
98 °C 85 °C
°C
9
09
Non pertinente Non pertinente Non pertinente Non pertinente
Auto
30 min
1000 W
✓ ✗
10 min7 ore
1500 W
W
Stadio di riscaldamento
Tempo di cottura/miscelazion
N.B.:
• La cottura lenta ad alta temperatura opera a 95 °C ed è ideale per la cottura lenta di carni più dure.
• La cottura lenta a bassa temperatura opera a 85 °C ed è ideale per la cottura lenta di carni come pollo e di verdure.
• Alcuni programmi hanno stadi di riscaldamento che permettono agli ingredienti di raggiungere le temperature specificate prima che inizi la fase.
89
Page 93

programmi
A VAPORE
°C 102 °C 65 °C
– –
W Auto Auto
Stadio di riscaldamento
Tempo di preparazione 10 min 30 min
Fase 1 (P1) Mantenere in caldo Utensili utilizzati Commenti
N.B.:
• Fare riferimento al manuale
d’istruzioni del cestello per cottura
a vapore per quantità consigliate e
✓ ✗
tempi di cottura: regolare il tempo di
cottura secondo necessità.
come saltare le fasi dei programmi
1 Premere e tenere premuta la manopola display per 5 secondi. “FASI RICETTE” apparirà sullo schermo di visualizzazione.
2 Ruotare la manopola display per scegliere la fase desiderata (P1, P2, P3, ecc.) e premere la manopola display per confermare.
3 Seguire le istruzioni sullo schermo di visualizzazione
Spiegazione testo visualizzato sullo schermo
Durante i programmi preimpostati, appariranno vari messaggi sullo schermo di visualizzazione.
Messaggio Descrizione
RAFFREDDAMENTO Il recipiente si sta raffreddando fino a una determinata temperatura.
RISCALDRE Il recipiente si sta riscaldando fino alla temperatura selezionata.
MODALITÀ HSHT Modalità alta velocità alta temperatura.
IMPASTARE Un processo di lavorazione del pane durante il quale l’impasto viene tirato.
RIMPASTARE ELIMINANDO
Quest’azione di rimpasto rimuove le ampie sacche d’aria per creare una consistenza omogenea.
LE BOLLE D’ARIA
LIEVITAZIONE Uno stadio della lavorazione del pane dove l’impasto è lasciato crescere di volume.
TEMPERARE Il preciso controllo della temperatura del cioccolato per ottenere una finitura lucida e liscia.
LAVORAZIONE Parte di un programma in cui il Cooking Chef miscela senza riscaldare.
90
Page 94

regolazione utensili recipiente
frusta a fili grossi, frusta K in acciaio inossidabile
Per ottenere i migliori risultati, la frusta a fili grossi e la frusta
K devono quasi essere in contatto con il fondo del recipiente
. Se necessario, regolare la loro altezza con la chiave in
5
dotazione.
1 Disinserire la spina dell’apparecchio dalla presa elettrica.
2 Sollevare la testa del mixer e inserire la frusta.
3 Abbassare la testa della macchina. Se occorre regolare il
gioco, sollevare la testa e staccare l’utensile.
4 Usando la chiave fornita, allentare a sufficienza il dado
per consentire la regolazione dell’alberino
l’utensile verso il fondo del recipiente, ruotare in senso
antiorario l’alberino. Per sollevare l’utensile allontanandolo dal
fondo del recipiente, ruotare l’alberino in senso orario.
5 Ristringere il dado.
6 Montare l’utensile sul mixer e abbassare la testa
dell’apparecchio. (Controllare la sua posizione – vedi i punti
suddetti).
7 Se necessario, ripetere questa procedura fino a quando
l’utensile è regolato in modo corretto. A questo punto,
ristringere a fondo il dado.
fusta flessibile ad alta temperatura - questo utensile
deve toccare appena il fondo del recipiente.
mescolatore: - questo utensile deve toccare appena il fondo
del recipiente.
1 Staccare l’apparecchio dalla presa di corrente.
2 Sollevare la testa del mixer e inserire il mescolatore.
3 Abbassare la testa del mixer. Se l’utensile deve essere
regolato, sollevare la testa del mixer e utilizzare la chiave
inglese per allentare il dado e poi abbassare la testa del mixer.
4 Per abbassare l’utensile più vicino al fondo del recipiente,
ruotare la ruota di regolazione in senso orario. Per alzare
l’utensile più lontano dal fondo del recipiente, ruotare la ruota
di regolazione in senso antiorario.
5 Riserrare il dado.
gancio impastatore: questo utensile è impostato presso il
luogo di fabbricazione e non è regolabile.
. Per abbassare
7
6
5
7
6
91
Page 95

montare e utilizzare il gruppo paraschizzi
Il gruppo del paraschizzi comprende 2 componenti: la
protezione termica e il paraschizzi.
La protezione termica deve essere montata durante
le operazioni di cottura altrimenti l’apparecchio non
funzionerà e sarà visualizzato il messaggio "Montare
protezione termica". La protezione termica protegge la
testa del mixer dal vapore generato in fase di cottura.
Il paraschizzi non deve essere montato sul recipiente a meno
che non sia utilizzato insieme alla protezione termica.
1 Sollevare la testa del mixer fino a quando non si blocca.
2 Spingere verso l’alto la protezione termica, sulla parte
sottostante della testa del mixer
fondo. Non usare mai la protezione termica senza inserire
correttamente la tenuta di gomma.
3 Ora inserire il recipiente sulla base.
4 Abbassare la testa del mixer.
5 Appoggiare il paraschizzi sul bordo del recipiente e poi
spostarlo in avanti fino a inserirlo bene
• Durante la miscelazione è possibile aggiungere gli ingredienti
direttamente nel recipiente, utilizzando l’introduttore.
6 Per estrarre il paraschizzi basta semplicemente allontanarlo
dall’apparecchio.
7 Per togliere la protezione termica, sollevare la testa del mixer
finché non si blocca. Estrarre l’utensile, quindi spingere la
protezione termica verso il basso per staccarla dalla base
della testa del mixer.
NB: Installare od estrarre il paraschizzi solo quando la testa
del mixer si trova in posizione bloccata.
, fino a inserirla a
8
.
9
8
9
92
Page 96

rimuovere o inserire i coperchi degli attacchi
Coperchio attacco alta-velocità
1 Per rimuovere il coperchio, afferrare l’impugnatura e sollevare
verso l’alto.
2 Per inserire il coperchio, posizionarlo sull’attacco e spingere
verso il basso.
Coperchio per attacco a bassa-velocità
1 Per rimuovere il coperchio, afferrare l’impugnatura sulla parte
inferiore e tirare verso l’esterno.
2 Per inserire, posizionare il fermo in cima al coperchio nella
rientranza dell’attacco e spingere per incastrare in posizione.
montare e smontare l’accessorio di co-miscelazione
L’accessorio di co-miscelazione può essere utilizzato per favorire l’azione di miscelazione.
1 Incastrare l’accessorio di co-miscelazione sul lato del
recipiente con il rilievo verticale sull’interno e la clip di fermo
sull’esterno
2 Ruotare la clip di fermo in senso antiorario posizionandola in
asse con i manici del recipiente
.
.
3 Per smontare, svolgere la procedura in senso inverso.
IMPORTANTE - L’accessorio di co-miscelazione non deve
essere montato quando si usa la frusta K, la frusta a fili grossi,
il gancio impastatore o la frusta flessibile.
montaggio della frusta flessibile ad alta temperatura
installazione lama dell’aletta
La lama dell’aletta è fornita già installata in dotazione e deve
sempre essere rimossa prima delle operazioni di pulizia.
1 Installare l’aletta della lama flessibile con cautela sull’utensile
posizionando la base dell’aletta della lama nella scanalatura
e poi fissando un lato nell’incavo prima di agganciare
delicatamente l’estremità in posizione. Ripetere dall’altro lato.
93
Page 97

massime capacità e velocità consigliate
Le seguenti velocità hanno solo valore indicativo e potranno variare a seconda della quantità e della temperatura di miscelazione
degli ingredienti.
Pasta frolla Peso farina 910 g
Impasto per pane (impasto compatto) Peso farina 350 g – 1,6 kg
Peso totale 550 g – 2,56 kg
Impasto semi-duro Peso farina 250 g – 2,6 kg
Peso totale 480 g – 5 kg
Miscela per dolce alla frutta Peso totale 4,55 kg
Albumi Numero
Peso
Modalità di cottura Capacità totale 3 l
Olio Total capacity 250 ml
* Dimensioni uova = medie (Peso 50 g)
Utensile Ricetta/Procedura Velocità consigliata
Frusta K Amalgamare burro/margarina e
zucchero
Sbattere le uova per ottenere
miscele cremose
16
(605 g)
Iniziare alla velocità ‘Min’ e passare gradualmente alla
‘Max’
Da ‘4’ a ‘Max’
Amalgamare farina, frutta, ... ‘Min’ – 1
Impastare ciambelle, polpettoni,
ripieni, ...
Mescolare burro/margarina a
pezzetti nella farina
Frusta flessibile ad alta temperatura Amalgamare burro/margarina e
zucchero
Staccare miscele d’ingredienti
sia caldi che freddi dai lati del
recipiente
Frusta a fili grossi Per uova, panna e soufflé. Aumentare gradualmente fino alla velocità ‘Max’
Gancio impastatore Per miscele di impasti con
lievito
Mescolatore Indicato durante la cottura per
preservare la consistenza di
alimenti come pollo, pesce,
verdura e frutta.
Iniziare alla velocità ‘Min’ e passare gradualmentealla
‘Max’
‘Min’ fino a 2
Avviare al ‘Min’ aumentando gradualmente a 3
Avviare al ‘Min’ aumentando gradualmente a 3
Avviare al ‘Min’ aumentando gradualmente a 1
Utilizzare solo con le impostazioni di miscelazione
94
Page 98

cura e pulizia
• Spegnere sempre l’apparecchio e togliere la spina dalla presa
elettrica prima di pulirlo.
• Con il primo uso, dall’attacco
poco di grasso.
Questo è normale – asportare i residui.
• Le superfici metalliche dei sensori della temperatura possono
mostrare segni
di usura durante l’uso normale. Tuttavia, questo non
compromette il rendimento del prodotto.
• Non lasciare la frusta flessibile ad alta temperatura montata
sull’apparecchio quando non viene utilizzata.
Apparecchio e copripres
• Passarli con un panno umido e poi asciugare.
• Non usare mai prodotti abrasivi né immergere in acqua questi
componenti.
frusta flessibile ad alta temperatura
• Rimuovere sempre la lama dell’aletta flessibile prima di pulire.
• Lavare la lama dell’aletta flessibile e l’accessorio con acqua
calda e detergente, poi asciugare bene, oppure le parti
possono essere lavate in lavastoviglie.
NB: Si prega di verificare le condizioni del corpo dell’accessorio
e dopo l’uso e di verificare regolarmente le condizioni
prima
della lama dell’aletta flessibile e di sostituirla nel caso siano
evidenti segni di usura.
recipiente, utensili, paraschizzi, accessorio di co-
miscelazione
• Lavarli a mano e asciugarli a fondo, oppure lavarli in
lavastoviglie
•
Non usare spazzole metalliche, pagliette o candeggina per pulire il
recipiente in
acciaio inox. Per asportare il calcare, utilizzare aceto o un prodotto
idoneo.
potrebbe essere visibile un
2
• Se i cibi aderiscono o si bruciano nel recipiente, asportarli per
quanto possibile usando la spatola in dotazione. Riempire il
recipiente di acqua calda saponata e lasciare a bagno. Asportare i
residui più ostinati con una spazzola in nylon.
• L’eventuale scolorimento del recipiente non ne compromette il
rendimento.
foro di scarico
l
Controllare che non vi siano residui di alimenti. Se necessario,
pulire con uno spazzolino per tubature o con un bastoncino di
cotone idrofilo.
sensori della temperatura
l
Passarli con un panno umido e poi asciugare. Non usare mai
prodotti abrasivi o utensili appuntiti per pulire i sensori.
Item Suitable for
Recipiente
Frusta K, frusta a fili grossi, frusta flessibile,
mescolatore
Gancio impastatore
Accessorio di co-miscelazione
Coperchi attacchi
Spatola
Paraschizzi e protezione termica
Tenuta in gomma
Tappetino di protezione piano di lavoro
Raschietto impasto
dishwashing
✓
✓
✓
✓
✗
✓
✓
✓
✓
✓
manutenzione e assistenza tecnica
• In caso di qualsiasi problema relativo al funzionamento
dell’apparecchio, prima di contattare il servizio assistenza
si consiglia di consultare la sezione “guida alla risoluzione
problemi”, o di visitare il sito www.kenwoodworld.com.
• NB L’apparecchio è coperto da garanzia, nel rispetto di tutte
le disposizioni di legge relative a garanzie preesistenti e ai
diritti dei consumatori vigenti nel Paese ove l’apparecchio è
stato acquistato.
• In caso di guasto o cattivo funzionamento di un apparecchio
Kenwood, si prega di inviare o consegnare di persona
l’apparecchio a uno dei centri assistenza KENWOOD. Per
individuare il centro assistenza KENWOOD più vicino, visitare
il sito www.kenwoodworld.com o il sito specifico del Paese di
residenza.
• Disegnato e progettato da Kenwood nel Regno Unito.
• Prodotto in Cina.
IMPORTANTI AVVERTENZE PER IL CORRETTO
SMALTIMENTO DEL PRODOTTO AI SENSI
DELLA DIRETTIVA EUROPEA SUI RIFIUTI DI
APPARECCHIATURE ELETTRICHE ED ELETTRONICHE
(RAEE)
Alla fine della sua vita utile il prodotto non deve essere smaltito
insieme ai rifiuti urbani.
Deve essere consegnato presso gli appositi centri di raccolta
differenziata predisposti dalle amministrazioni comunali, oppure
presso i rivenditori che offrono questo servizio.
Smaltire separatamente un elettrodomestico consente di evitare
possibili conseguenze negative per l’ambiente e per la salute
derivanti da un suo smaltimento inadeguato e permette di
recuperare i materiali di cui è composto al fine di ottenere notevoli
risparmi in termini di energia e di risorse.
Per rimarcare l’obbligo di smaltire separatamente gli
elettrodomestici, sul prodotto è riportato il simbolo del bidone a
rotelle barrato.
95
Page 99

guida alla risoluzione problemi
Problema Causa Soluzione
L'apparecchio non funziona nella
modalità di cottura, viene visualizzato
un messaggio di errore ed emesso un
segnale acustico.
L’apparecchio cambia velocità o la
velocità viene limitata durante la cottura.
I cibi si bruciano sul fondo del recipiente. 1 La temperatura impostata potrebbe essere
Uno dei sensori di sicurezza si è attivato. Verificare se sullo schermo di visualizzazione è
La velocità viene limitata in modo
automatico quando i contenuti del recipiente
raggiungono 60 °C e l’indicatore di avviso di
alta temperatura si accende.
eccessiva.
2 Viene usato l’utensile sbagliato.
3 L’intervallo tra le azioni di miscelazione è
troppo lungo.
stata notificata la causa.
• Controllare che la testa sia abbassata e
bloccata.
• Verificare che tutti i coperchi degli attacchi
siano correttamente inseriti.
• Verificare che la protezione termica sia
montata in modo corretto.
• Controllare che il recipiente di Kenwood
Cooking Chef sia ben inserito.
Questo è un accorgimento di sicurezza.
1 Ridurre i valori d’impostazione di temperatura
e di potenza.
2 Verificare se è utilizzato l’utensile più adatto e
se è stato regolato correttamente.
3 Aumentare la frequenza delle azioni di
miscelazione o selezionare miscelazione
continua.
4 L’utensile potrebbe non raggiungere la
parte bassa del recipiente.
5 Il tempo impostato per il timer è troppo
lungo.
6 Il sensore e/o la base del recipiente
possono non essere puliti.
La consistenza dei cibi non viene
mantenuta.
La velocità di miscelazione non è
uniforme.
È difficile chiudere la testa del mixer. 1 Ingredienti duri, come il cioccolato, sul
Il mixer continua a funzionare quando
sono selezionate le velocità di
miscelazione.
L’uso degli accessori limita la velocità
del motore.
La frusta a filo o la frusta K sbatte
contro il fondo della ciotola o non
raggiunge gli ingredienti sul fondo della
ciotola.
1 La temperatura selezionata è eccessiva.
2 L’intervallo tra le azioni di miscelazione è
troppo breve.
3 Gli ingredienti sono stati cotti per troppo
tempo.
4 Viene usato l’utensile sbagliato.
1 Ingredienti troppo grossi, troppo duri o
troppo solidi.
fondo del recipiente possono impedire alla
testa del mixer di bloccarsi in posizione
abbassata.
2 Il mescolatore è stato montato in modo
scorretto.
I coperchi sono montati in modo non corretto
sugli attacchi.
È stato inserito un recipiente caldo. Estrarre il recipiente, oppure lasciarlo raffreddare
L’accessorio è posizionato ad un’altezza
sbagliata che deve essere regolata.
4 Regolare l’utensile.
5 Cuocere per meno tempo (ma verificare che i
cibi non siano crudi).
6 Controllare che queste aree vengano tenute
pulire e asciutte.
1 Ridurre la temperatura.
2 Ridurre la frequenza delle azioni di
miscelazione.
3 Ridurre il tempo di cottura (controllando che i
cibi non siano crudi).
4 Verificare che l’utensile usato sia quello più
adatto.
1 Tagliare gli ingredienti a pezzetti più piccoli,
asportare i noccioli dalla frutta, fondere
lentamente gli ingredienti senza usare alcun
utensile (ma verificare di aver selezionato una
velocità).
2 Aggiungere gli ingredienti dopo aver
abbassato la testa.
3 Verificare che l’utensile usato sia quello più
adatto.
1 Aggiungere gli ingredienti dopo aver
abbassato la testa.
2 Assicurarsi che il mescolatore sia montato
sull’attacco del mescolatore.
Verificare che tutti i coperchi degli attacchi siano
correttamente inseriti.
fino a 60°C.
Regolare l’altezza con una chiave inglese
idonea, fare riferimento alla sezione
“Regolazione dei ganci di miscelazione”.
96
Page 100

Problema Causa Soluzione
La frusta a fili grossi, la frusta K o
la frusta flessibile sbattono contro
l’accessorio di co-miscelazione.
Impossibile montare un accessorio per
lavorazione a bassa velocità.
La spia di stand-by lampeggia quando
il cavo elettrico della Kitchen Machine
viene inserito per la prima volta nella
presa di corrente.
La Kitchen Machine si arresta durante
il funzionamento. La spia di stand-by
lampeggia rapidamente.
La Kitchen Machine si arresta durante
il funzionamento. La luce di standbay
lampeggia lentamente.
La spia di stand-by si spegne quando la
macchina è collegata alla corrente.
Lo schermo di visualizzazione mostra un
codice di errore alfanumerico.
Quando si contatta l’assistenza clienti, potranno essere richiesti i dati della versione software utilizzata. Le informazioni sul software si
possono trovare premendo il pulsante del menù e selezionando "IMPOSTAZIONI” e, successivamente, “VERSIONE”.
L’accessorio di co-miscelazione è montato. Rimuovere l’accessorio di co-miscelazione:
deve essere utilizzato solo quando si usa il
mescolatore.
Verificare che l’accessorio sia compatibile
con il modello di macchina. È necessario un
accessorio dotato di sistema di innesto a
rotazione (Modello KAX)
Il controllo della velocità non è nella
posizione ‘O’.
La testa del mixer è nella posizione alzata o
non è bloccata correttamente verso il basso.
Attivazione della protezione da sovraccarico
o surriscaldamento del sistema. Quantità
massima superata.
1 Protezione termica rimossa o coperchio di
attacco rimosso.
2 Testa mixer sollevata.
3 Accessorio dell’attacco ha superato il suo
tempo di funzionamento massimo.
La Kitchen Machine è stata collegata per
oltre 30 minuti senza funzionare per cui è
entrata in modalità Stand-by.
L’apparecchio non funziona correttamente. Contattare uno dei centri assistenza autorizzati
L’accessorio deve essere dotato di
per poter essere montato sull’attacco.
Se le attrezzature di cui si dispone si avvalgono
di sistema di attacco a barra (Bar Connection
System)
KAT002ME per inserirle mediante l’innesto
a rotazione (Twist Connection System) sulla
Kitchen Machine.
Per maggiori informazioni, visitare il sito
www.kenwoodworld.com/twist.
Verificare e ruotare il controllo della velocità nella
posizione ‘O’.
Controllare che la testa della Kitchen Machine
sia correttamente bloccata verso il basso.
Scollegare il cavo elettrico e verificare che non
vi siano ostruzioni o surriscaldamento. Ruotare
il controllo della velocitàsulla posizione ‘O’ e
riaccendere la macchina.
Se la macchina non funziona, rimuovere
parte degli ingredienti per ridurre il carico e
riaccenderla.
Se il problema persiste, scollegare il cavo
elettrico e lasciare riposare la macchina per 15
minuti. Inserire la spina nella presa di corrente e
selezionare nuovamente la velocità.
Se la macchina non si riavvia dopo aver seguito
la procedura indicata in precedenza, contattare
il “Servizio Assistenza Clienti” per richiedere
ulteriore assistenza.
1 Montare la protezione termica o il coperchio
dell’attacco. Ruotare il comando della velocità
su “O” e poi riavviare.
2 Abbassare la testa del mixer. Ruotare il
comando della velocità su “O” e poi riavviare.
3 Ruotare il comando della velocità su “O” e poi
riavviare.
Premere una volta il pulsante di stand-by per
resettare la macchina.
KENWOOD. Per individuare il centro assistenza
KENWOOD più vicino, visitare il sito
www.kenwoodworld.com o il sito specifico del
Paese di residenza.
si dovrà utilizzare l’adattatore
97
 Loading...