

Page 1
DRV-A610W
GPS Integrated Dashboard Camera
INSTRUCTION MANUAL
• Updated information (the latest Instruction Manual, etc.) is available from
<https://www.kenwood.com/cs/ce/>.
For your records
Record the serial number, found on the back of the unit in the spaces designated on the
warranty card, and in the space provided below. Refer to the model and serial numbers
whenever you can upon your KENWOOD dealer for information or service on the product.
Model DRV-A610W
Serial Number______________
US Residents Only
Register your KENWOOD product at www.kenwood.com/usa
© 2024 JVCKENWOOD Corporation 610-V2.0.M.A-EN
Register Online
Page 2

TABLE OF CONTENT
Before Use.............................................................................................. .....................
Dashboard Camera Function Guide..............................................................................
Precautions for Use............................................................................... ......... ...............
Accessories............................................................................................... ........... ..... .....
Key Features............................................................................................... ........... ..... ...
Parts Name and Functions........................................................................ ......... ...........
Installation and Connection................................................................ ......... ................
On Screen Notifications........................................................................ ......... ...............
Video Mode.................................................................................................... ....... ........
Video Menu.................................................................................................... ....... ........
Setup Menu.......................................................................................................... .........
Playback Mode........................................................................................................... ...
Using the Desktop Software...................................................................................... ...
Using the Smartphone App..................................................................................... ......
Connection with Computer.............................................................................. .............
Firmware Update Instruction................................. .......................................................
Troubleshooting.................................................... ........ ..... ............... ........ ............... ....
Appendix.................................................. ........ .................... ........ ........ ........... ..... .......
Specifications....................................... ........ ................... ......... ........ ........... ........... ......
01
01
02
11
11
12
15
27
31
32
34
36
42
52
68
69
75
77
78
Page 3

Before Use
The screen images and operation examples in this document were created for explaining the
•
operating procedures.
There may be screen images that differ from the actual screens or examples of operations not
•
actually performed.
Disclaimer
Please note that JVCKENWOOD shall not be responsible for any damages suffered by the customer
•
or a third party as a result of incorrectly using this product, a failure during use of this product, or
other trouble, or due to the use of this product, unless such liability is acknowledged by law.
Copyrights
Recorded video, image, and audio content cannot be used for other than personal enjoyment
•
without the consent of the copyright holder as specified in the Copyright Act.
Please note that the recording of an event such as a show, performance, or exhibition may be
•
restricted even when doing so for personal enjoyment.
Dashboard Camera Function Guide
With new technology readily available, JVCKENWOOD has developed an easy to use dashboard
camera for everyday use. The device allows its user to record files in1 minute lengths. These files are
easy to download to your desktop or laptop. In most instances, the video files are easily played on
your mobile device. While most cameras traditionally use the entire capacity of the SD card until it is
removed, the device automatically deletes the oldest file to create space for the new video.
Dashboard camera offers two modes:
1. Video Mode: Video mode will set to default when the device is active.
2. Playback Mode: Users can view all previously recorded videos and photos taken.
FEATURES:
Automatic Start/Stop Technology:
Maintain full focus on the road! The vehicles ignition will let the device turn on while connected to
your vehicles 12 V outlet or cigarette lighter socket. When the vehicle is turned off, the device will
automatically shut down, preserving the device power for those moments you are not connected to
permanent power.
The device lets users adjust camera settings to get the perfect shot. For a great photo every time,
here are a few tips from the designers:
1. Reduce the amount of sky in the picture. By adjusting the device towards the road, the automatic
exposure compensation will be focused on the road and not the light from the sky.
2. Position the device in the center of the dash. If you place the device behind the rearview
mirror, you will avoid all distractions from the road.
3. Remove any objects that will obstruct your shot such as the protective lens cover.
Clear vision will allow you to record everything in one shot.
01
Page 4

Precautions for Use
Precautions and notices
Warning! Do not operate the device while driving. Using this product does not change the
requirement for a driver to take full responsibility for his or her behavior. This responsibility includes
observing all traffic rules and regulations in order to avoid accidents, personal injury or property
damage.
For your own safety, do not operate the controls of the product while driving.
•
A window mount is needed when using the device in a car. Make sure that you place the device in
•
an appropriate place, so as not to obstruct the driver's view or deployment of airbags.
Make sure that no object is blocking the camera lens and no reflective material is placed near the
•
lens. Please keep the lens clean.
If the car's windscreen is tinted with a coating, this may impact the recording quality.
•
Connect the charger to a proper power source. The voltage requirements are found on the product
•
case and/or packaging.
Do not use the charger if the cord becomes damaged.
•
Do not attempt to service the unit. There are no serviceable parts inside. Replace the unit if it is
•
damaged or exposed to excess moisture.
Risk of explosion if the battery is replaced by an incorrect type.
•
Disposal of a battery into fire or a hot oven, or mechanically crushing or cutting of a battery, that
•
can result in an explosion.
Leaving a battery in an extremely high temperature surrounding environment that can result in an
•
explosion or the leakage of flammable liquid or gas.
A battery subjected to extremely low air pressure that may result in an explosion or the leakage of
•
flammable liquid or gas.
Do not ingest battery, Chemical Burn Hazard.
•
This product contains a button cell battery. If the button cell battery is swallowed, it can cause
•
severe internal burns in just 2 hours and can lead to death.
Keep new and used batteries away from children.
•
If the battery compartment does not close securely, stop using the product and keep it away from
•
children.
If you think batteries might have been swallowed or placed inside any part of the body, seek
•
immediate medical attention.
Caring for your device
Taking good care of your device will ensure trouble-free operation and reduce the risk of damage.
Keep your device away from excessive moisture and extreme temperatures.
•
Avoid exposing your device to direct sunlight or strong ultraviolet light for extended periods of
•
time.
Do not place anything on top of your device or drop objects on your device.
•
Do not drop your device or subject it to severe shock.
•
Do not subject your device to sudden and severe temperature changes. This could cause moisture
•
condensation inside the unit, which could damage your device. In the event of moisture
condensation, allow the device to dry out completely before use.
The screen surface can easily be scratched. Avoid touching it with sharp objects. Nonadhesive
•
generic screen protectors designed specifically for use on portable devices with LCD panels may be
used to help protect the screen from minor scratches.
Never clean your device with the power on. Use a soft, lint-free cloth to wipe the screen and the
•
exterior of your device.
Do not use paper towels to clean the screen.
•
Never attempt to disassemble, repair or make any modifications to your device. Disassembly,
•
modification or any attempt at repair could cause damage to your device and even bodily injury or
property damage and will void any warranty.
02
Page 5

Do not store or carry flammable liquids, gases or explosive materials in the same compartment as
•
your device, its parts or accessories.
To discourage theft, do not leave the device and accessories in plain view in an unattended vehicle.
•
Overheating may damage the device.
•
Precautions for installation
•
Install the device in a position where it will not block the front view of the driver (position where
hidden by the rear-view mirror).
•
Install the device so that it is within the wiping range of the wiper.
•
Install the device in a position where it will not interfere with the movement of the rear-view
mirror.
•
Take care not to install the device over the vehicle inspection sticker or other sticker.
•
Take care not to install the device where it will interfere with driving or airbag operation.
•
When installing the device in a vehicle equipped with a driving support system, check the
instruction manual of the vehicle and then select an installation position that will not interfere
with the driving support system.
•
If the device is installed incorrectly, event recording or parked recording may not work correctly.
•
Refer to “Installation and Connection” for the loosening of fixing knob, installation orientation,
installation angle, and other information and then install the device correctly.
•
Do not install the device near a digital terrestrial television antenna or an electrical component.
•
Doing so may reduce television receiver sensitivity or cause flickering and noise.
•
When selecting a position for the suction mount, make sure it’s on a glass surface that is smooth
and free of paint.
•
Before mounting, clean the area with a dry/clean cloth and add a small amount of moisture to the
windshield. This allows a stronger bond to form between the glass and the suction mount.
•
When fixing the device with the adhesive mount, use a commercially available cleaning cloth or
the like to wipe off all dirt and grease on the mounting surface. If the device is re-affixed or
mounted using, for example, general-purpose double-sided tape, the adhesion strength may
weaken and cause the device to fall.
•
After mounting the device, leave it for 24 hours before use to enable the mounting strength of the
adhesive mount to improve. Failing to do so may result in the adhesion of the adhesive mount
becoming weak and the device falling.
•
Fix the cord in place with tape or the like so that it does not interfere with driving.
Precautions for use
•
Do not block the camera lens, get dirt on it, or place a reflective object near it.
•
When LED traffic lights are recorded, video in which they appear to be flickering or flashing may
be recorded. JVCKENWOOD assumes no responsibility with regard to the distinguishing or
recording of traffic lights.
If coating is used on the windshield of the vehicle, recording quality may be affected.
•
There is no guarantee that the device can record video in all conditions.
Cleaning the device
•
When the device is dirty, wipe it with a dry silicone cloth or other soft cloth. If the device is very
dirty, remove the dirt with a cloth with neutral cleaner on it then wipe off the cleaner. Wiping the
device with a hard cloth or using a volatile substance such as thinner or alcohol may cause
scratches, deformation, deterioration or other damage.
•
When the lens is dirty, gently wipe it with a soft cloth dampened with water. Rubbing the lens
strongly with a dry cloth may cause scratches.
If you notice a problem with the device
If you notice a problem with the device, first refer to “Troubleshooting” (P. 75) and check whether
there is a way to resolve the problem.
If the device does not return to normal after the reset, turn off the power of the device and then
contact your dealer or nearest JVCKENWOOD service center.
03
Page 6

Information on Disposal of Old Electrical and Electronic Equipment and Batteries (applicable for
countries that have adopted separate waste collection systems)
Products and batteries with the symbol (crossed-out wheeled bin) cannot be disposed of as
household waste.
Old electrical and electronic equipment and batteries should be recycled at a facility capable of
handling these items and their waste by products.
Contact your local authority for details in locating a recycle facility nearest to you.
Proper recycling and waste disposal will help conserve resources while preventing detrimental effects
on our health and the environment.
04
Page 7

Declaration of Conformity with regard to the RE
Directive 2014/53/EU
Declaration of Conformity with regard to the RoHS
Directive 2011/65/EU
Declaration of Conformity with regard to the
Battery Regulation 2023/1542
Manufacturer:
JVCKENWOOD Corporation
3-12, Moriyacho, Kanagawa-ku, Yokohama-shi,
Kanagawa 221-0022, JAPAN
EU Representative:
JVCKENWOOD Europe B.V.
Rendementsweg 20 B-9, 3641 SL Mijdrecht, THE
NETHERLANDS
Déclaration de conformité se rapportant à la
directive RE 2014/53/UE
Déclaration de conformité se rapportant à la
directive RoHS 2011/65/UE
Déclaration de conformité à la réglementation
sur les batteries 2023/1542
Fabricant:
JVCKENWOOD Corporation
3-12, Moriyacho, Kanagawa-ku, Yokohama-shi,
Kanagawa 221-0022, JAPON
Représentant dans l’UE:
JVCKENWOOD Europe B.V.
Rendementsweg 20 B-9, 3641 SL Mijdrecht, PAYS-BAS
Konformitätserklärung in Bezug auf die RERichtlinie 2014/53/EU
Konformitätserklärung in Bezug auf die RoHSRichtlinie 2011/65/EU
Konformitätserklärung bezüglich der
Batterieverordnung 2023/1542
Hersteller:
JVCKENWOOD Corporation
3-12, Moriyacho, Kanagawa-ku, Yokohama-shi,
Kanagawa 221-0022, JAPAN
EU-Vertreter:
JVCKENWOOD Europe B.V.
Rendementsweg 20 B-9, 3641 SL Mijdrecht,
NIEDERLANDE
Declaração de Conformidade relativa à Diretiva
RE 2014/53/UE
Declaração de conformidade relativa à Diretiva
RoHS 2011/65/UE
Declaração de conformidade relativa ao
Regulamento de baterias 2023/1542
Fabricante:
JVCKENWOOD Corporation
3-12, Moriyacho, Kanagawa-ku, Yokohama-shi,
Kanagawa 221-0022, JAPÃO
Representante na UE:
JVCKENWOOD Europe B.V.
Rendementsweg 20 B-9, 3641 SL Mijdrecht, PAÍSES BAIXOS
Conformiteitsverklaring met betrekking tot RErichtlijn 2014/53/EU
Conformiteitsverklaring met betrekking tot RoHSrichtlijn 2011/65/EU
Conformiteitsverklaring met betrekking tot de
batterijverordening 2023/1542
Fabrikant:
JVCKENWOOD Corporation
3-12, Moriyacho, Kanagawa-ku, Yokohama-shi,
Kanagawa 221-0022, JAPAN
EU-vertegenwoordiger:
JVCKENWOOD Europa B.V.
Rendementsweg 20 B-9, 3641 SL Mijdrecht,
NEDERLAND
Dichiarazione di conformità relativa alla
direttiva RE 2014/53/UE
Dichiarazione di conformità relativa alla
direttiva RoHS 2011/65/UE
Dichiarazione di conformità secondo il
Regolamento sulle batterie 2023/1542
Produttore:
JVCKENWOOD Corporation
3-12, Moriyacho, Kanagawa-ku, Yokohama-shi,
Kanagawa 221-0022, JAPAN
Rappresentante UE:
JVCKENWOOD Europe B.V.
Rendementsweg 20 B-9, 3641 SL Mijdrecht, PAESI BASSI
Declaración de conformidad con respecto a la
Directiva RE 2014/53/UE
Declaración de conformidad con respecto a la
Directiva RoHS 2011/65/UE
Declaración de conformidad con respecto al
Reglamento 2023/1542 relativo a las pilas y
baterías
Fabricante:
JVCKENWOOD Corporation
3-12, Moriyacho, Kanagawa-ku, Yokohama-shi,
Kanagawa 221-0022, JAPAN
Representante en la UE:
JVCKENWOOD Europe B.V.
Rendementsweg 20 B-9, 3641 SL Mijdrecht, PAÍSES
BAJOS
RE Direktifi 2014/53/EU ile ilgili Uyum Beyanı
RoHS Direktifi 2011/65/EU için Uyum Beyanı
Pil Düzenlemesi 2023/1542 için Uyum Beyanı
Üretici:
JVCKENWOOD Corporation
3-12, Moriyacho, Kanagawa-ku, Yokohama-shi,
Kanagawa 221-0022, JAPONYA
AB Temsilcisi:
JVCKENWOOD Europe B.V.
Rendementsweg 20 B-9, 3641 SL Mijdrecht, HOLLANDA
05
Page 8

English
Hereby, JVCKENWOOD declares that the radio equipment DRV-A610W is in compliance with Directive
2014/53/EU. The full text of the EU declaration of conformity is available at the following internet
address:
Français
Par la présente, JVCKENWOOD déclare que l’équipement radio DRV-A610W est conforme à la
directive 2014/53/UE. L’intégralité de la déclaration de conformité UE est disponible à l’adresse
Internet suivante:
Deutsch
Hiermit erklärt JVCKENWOOD, dass das Funkgerät DRV-A610W der Richtlinie 2014/53/EU entspricht.
Der volle Text der EUKonformitätserklärung steht unter der folgenden Internetadresse zur
Verfügung:
Nederlands
Hierbij verklaart JVCKENWOOD dat de radioapparatuur DRV-A610W in overeenstemming is met
Richtlijn 2014/53/EU. De volledige tekst van de EU-verklaring van overeenstemming is te vinden op
het volgende internetadres:
Italiano
Con la presente, JVCKENWOOD dichiara che l’apparecchio radio DRV-A610W è conforme alla
Direttiva 2014/53/UE. Il testo integrale della dichiarazione di conformità UE è disponibile al seguente
indirizzo internet:
Español
Por la presente, JVCKENWOOD declara que el equipo de radio DRV-A610W cumple la Directiva
2014/53/EU. El texto completo de la declaración de conformidad con la UE está disponible en la
siguiente dirección de internet:
Português
Deste modo, a JVCKENWOOD declara que o equipamento de radio DRV-A610W está em
conformidade com a Diretiva 2014/53/UE. O texto integral da declaração de conformidade da UE está
disponível no seguinte endereço de internet:
Polska
Niniejszym, JVCKENWOOD deklaruje, że sprzęt radiowy DRV-A610W jest zgodny z dyrektywą
2014/53/UE. Pełny tekst deklaracji zgodności EU jest dostępny pod adresem:
ije o usklađenosti dostupan je na sljedećoj internet adresi:
Český
Společnost JVCKENWOOD tímto prohlašuje, že rádiové zařízení DRV-A610W splňuje podmínky
směrnice 2014/53/EU. Plný text EU prohlášení o shodě je dostupný na následující internetové adrese:
Magyar
JVCKENWOOD ezennel kijelenti, hogy a DRV-A610W rádióberendezés megfelel a 2014/53/EU
irányelvnek. Az EU konformitási nyilatkozat teljes szövege az alábbi weboldalon érhető el:
Hrvatski
JVCKENWOOD ovim izjavljuje da je radio oprema DRV-A610W u skladu s Direktivom 2014/53/EU.
Cjeloviti tekst deklaracije Europske un
06
Page 9

Svenska
Härmed försäkrar JVCKENWOOD att radioutrustningen DRV-A610W är i enlighet med direktiv
2014/53/EU. Den fullständiga texten av EUförsäkran om överensstämmelse finns på följande
Internetadress :
Suomi
JVCKENWOOD julistaa täten, että radiolaite DRV-A610W on direktiivin 2014/53/EU mukainen.
EU-vaatimustenmukaisuusvakuutus löytyy kokonaisuudessaan seuraavasta internet-osoitteesta:
Slovensko
S tem JVCKENWOOD izjavlja, da je radijska oprema DRV-A610W v skladu z Direktivo 2014/53/EU.
Celotno besedilo direktive EU o skladnosti je dostopno na tem spletnem naslovu:
Slovensky
Spoločnosť JVCKENWOOD týmto vyhlasuje, že rádiové zariadenie DRV-A610W vyhovuje smernici
2014/53/EÚ. Celý text EÚ vyhlásenia o zhode nájdete na nasledovnej internetovej adrese:
Dansk
Herved erklærer JVCKENWOOD, at radioudstyret DRV-A610W er i overensstemmelse med Direktiv
2014/53/EU. EUoverensstemmelseserklæringens fulde ordlyd er tilgængelig på følgende
internetadresse:
Norsk
JVCKENWOOD erklærer herved at radioutstyret DRV-A610W er i samsvar med Direktiv 2014/53/EU.
Den fullstendige teksten til EU-konformitetserklæringen er tilgjengelig på følgende internettaddresse:
Ελληνικά
Με το παρόν, η JVCKENWOOD δηλώνει ότι ο ραδιοεξοπλισµός DRV-A610W συµµορφώνεται µε την
Οδηγία 2014/53/ΕΕ. Το πλήρες κείµενο της δήλωσης συµµόρφωσης της ΕΕ είναι διαθέσιµο στην
ακόλουθη διεύθυνση στο διαδίκτυο:
Malti
B’dan, JVCKENWOOD jiddikjara li t-tagħmir tar-radju DRV-A610W huwa konformi mad-Direttiva
2014/53/UE. It-test kollu tad-dikjarazzjoni ta’ konformità huwa disponibbli fl-indirizz intranet li ġej:
Українська
Таким чином, компанія JVCKENWOOD заявляє, що радіообладнання DRV-A610W відповідає
Директиві 2014/53/EU. Повний текст декларації про відповідність ЄС можна знайти в Інтернеті за
такою адресою:
Türkçe
Burada, JVCKENWOOD DRV-A610W radyo ekipmanının 2014/53/AB Direktifine uygun olduğunu
bildirir. AB uyumluluk deklarasyonunun tam metni aşağıdaki internet adresinde mevcuttur.
Limba română
Prin prezenta, JVCKENWOOD declară că echipamentul radio DRV-A610W este în conformitate cu
Directiva 2014/53/UE. Textul integral al declarației de conformitate UE este disponibil la urmatoarea
adresă de internet:
Български език
С настоящото JVCKENWOOD декларира, че радиооборудването на DRV-A610W е в съответствие с
Директива 2014/53/ЕС. Пълният текст на ЕС декларацията за съответствие е достъпен на следния
интернет адрес:
URL: https://www.kenwood.com/euukdoc/
07
Page 10

Declaration of Conformity with regard to the Radio Equipment Regulations 2017 (S.I.2017/1206)
Declaration of Conformity with regard to the Restriction of the Use of Certain Hazardous
Substances in Electrical and Electronic Equipment Regulations 2012 (S.I. 2012/3032)
Manufacturer:
JVCKENWOOD Corporation
3-12, Moriyacho, Kanagawa-ku, Yokohama-shi, Kanagawa 221-0022, JAPAN
UK Importer:
JVCKENWOOD U.K. Limited
First Floor, Gleneagles, the Belfry, Colonial Way, Watford, Hertfordshire WD24 4WH, UNITED
KINGDOM
Hereby, JVCKENWOOD declares that the radio equipment “DRV-A610W” is in compliance with the
relevant statutory requirements.
The full text of the declaration of conformity is available at the following internet address:
https://www.kenwood.com/euukdoc/
FCC CAUTION
Changes or modifications not expressly approved by the party responsible for compliance could void
the user’s authority to operate the equipment.
FCC NOTE
• This equipment has been tested and found to comply with the limits for a Class B digital
device, pursuant to Part 15 of the FCC Rules. These limits are designed to provide reasonable
protection against harmful interference in a residential installation.
• This equipment may cause harmful interference to radio communications, if it is not installed
and used in accordance with the instructions. However, there is no guarantee that
interference will not occur in a particular installation. If this equipment does cause harmful
interference to radio or television reception, which can be determined by turning the
equipment off and on, the user is encouraged to try to correct the interference by one or
more of the following measures:
- Reorient or relocate the receiving antenna.
- Increase the separation between the equipment and receiver.
- Connect the equipment into an outlet on a circuit different from that to which the receiver is
connected.
- Consult the dealer or an experienced radio/TV technician for help.
This transmitter must not be co-located or operated in conjunction with any other antenna or
transmitter.
08
Page 11

ISED Notice
CAN ICES-3(B)/ NMB-3(B)
This device contains licence-exempt transmitter(s)/receiver(s) that comply with Innovation, Science
and Economic Development Canada’s licence-exempt RSS(s). Operation is subject to the following
two conditions:
1. This device may not cause interference.
2. This device must accept any interference, including interference that may cause undesired
operation of the device.
CAUTION
This equipment complies with FCC/ISED radiation exposure limits set forth for an uncontrolled
environment and meets the FCC radio frequency (RF) Exposure Guidelines and RSS-102 of the ISED
radio frequency (RF) Exposure rules.
This equipment has very low levels of RF energy that is deemed to comply without maximum
permissive exposure evaluation (MPE). But it is desirable that it should be installed and operated
keeping the radiator at least 20 cm or more away from person’s body.
Pour le Canada
Note de ‘ISDE
L’émetteur/récepteur exempt de licence contenu dans le présent appareil est conforme aux CNR
d’Innovation, Sciences et Développement économique Canada applicables aux appareils radio
exempts de licence. L’exploitation est autorisée aux deux conditions suivantes :
1. L’appareil ne doit pas produire de brouillage;
2. L’appareil doit accepter tout brouillage radioélectrique subi, même si le brouillage est susceptible
d’en compromettre le fonctionnement.
ATTENTION
Cet équipement est conforme aux limites d’exposition aux rayonnements énoncées pour un
environnement non contrôlé et respecte les règles les radioélectriques (RF) de la FCC lignes
directrices d’exposition et d’exposition aux fréquences radioélectriques (RF) CNR-102 de l’ISDE. Cet
équipement doit être installé et utilisé en gardant une distance de 20 cm ou plus entre le radiateur
et le corps humain.
Supplier’s Declaration of Conformity
Trade Name: KENWOOD
Products: Dashboard Camera
Model Name: DRV-A610W
Responsible Party:
JVCKENWOOD USA CORPORATION
4001 Worsham Avenue, Long Beach,
CA 90808, U.S.A.
PHONE : 1-800-252-5722
THIS DEVICE COMPLIES WITH PART 15 OF THE FCC RULES. OPERATION IS SUBJECT TO THE
FOLLOWING TWO CONDITIONS:
(1)THIS DEVICE MAY NOT CAUSE HARMFUL INTERFERENCE, AND
(2)THIS DEVICE MUST ACCEPT ANY INTERFERENCE RECEIVED, INCLUDING INTERFERENCE THAT MAY
CAUSE UNDESIRED OPERATION.
09
Page 12

Para cumplimiento de la IFT
“La operación de este equipo esta sujeta a las siguientes dos condiciones:
(1) es posible que este equipo o dispositivo no cause interferencia perjudicial y
(2) este equipo o dispositivo debe aceptar cualquier interferencia, incluyendo la que pueda causar su
operación no deseada.”
Trademarks
SDXC and microSDXC Logos are trademarks of SD-3C LLC.
Apple, iOS, Mac and macOS are trademarks of Apple Inc., registered in the U.S. and other countries.
App Store is a service mark of Apple Inc., registered in the U.S. and other countries.
IOS is a trademark or registered trademark of Cisco in the U.S. and other countries and is used under
license.
Google, Android, Google Maps and Google Pay are trademarks of Google LLC.
USB Type-C® and USB-C® are registered trademarks of USB Implementers Forum.
Microsoft, Windows, and DirectX are registered trademark or trademark of Microsoft Corporation in
the U.S and other countries.
Macintosh, Mac are trademarks of Apple Inc., registered in the U.S. and other countries.
The Bluetooth® word mark and logos are registered trademarks owned by Bluetooth SIG, Inc. and
any use of such marks by JVCKENWOOD Corporation is under license. Other trademarks and trade
names are those of their respective owners.
10
Page 13
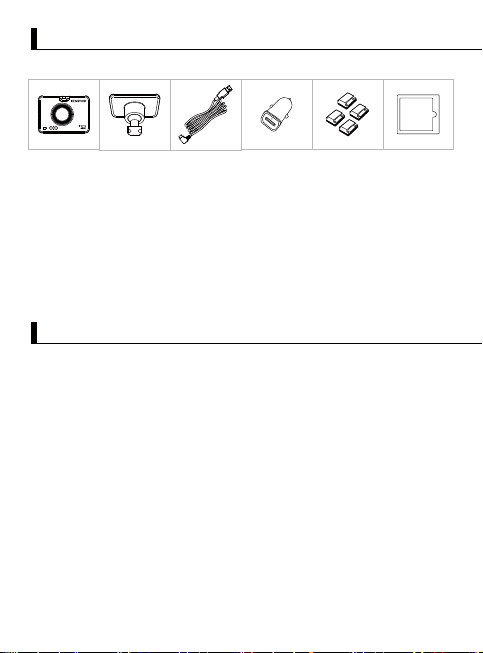
Accessories
Before you get started, check you have everything below.
Dashboard Camera
(with 64GB microSD card)
Note:
The provided Type-C car power cable in the package does not have data transfer
-
functionality and is only for power supply purposes. If you wish to view videos, please
remove the memory card and read it on a computer, or use the KENWOOD DASH CAM
MANAGER APP on your mobile to view via wireless link, or use a third-party USB-A to
USB-C cable with data transfer capabilities to connect and view on a computer. The
device does not support Type-C USB cables with PD (Power Delivery) fast charging or
USB-C to USB-C cables.
Product appearance may differ slightly to that shown above.
-
Adhesive Mount Car Power Cable USB Car Charger Cable Clips Static Side Film
Key Features
2” LCD Color Screen
-
We developed a screen that perfectly fits your camera, without any loss of resolution.
This design allows you to use the playback feature, instantly letting you view the shot
you just captured.
G sensor/File Protection
-
The dashboard camera's built-in sensor detects an outside force, forcing the device to
save what has been just recorded. The file can also be manually saved. By pressing our
easy to access button around the screen, you are able to save an individual file.
Automatic Start/Stop Tech
-
The dashboard camera comes with built-in sensors that automatically turn the device on
and off with the vehicle.
Built-In Microphone & Speaker
-
A built-in microphone and speaker come standard. The feature also works with the
device’s playback feature.
GPS Data
-
Dashboard camera is able to record your location and speed while filming with the
magnetic GPS mount.
11
Page 14
05:20:43
04/25/2024
11:17:01
00:22
04/25/2024
11:17:01
00:22
04/25/2024
11:17:01
Parking Mode
-
The dashboard camera has a parking mode, but a unique feature enables the device to
automatically record 30 seconds of video if there is any physical movement of the vehicle.
This feature requires hardwire kit CA-DR1031(optional accessory) to permanent power.
2K Rear Camera Recording (Optional)
-
DRV-A610W supports the rear camera recording. You can purchase the rear camera as a
front and rear 4K+2K dual-camera recording. (sold separately, please see KENWOOD
website for more detail).
Parts Name and Functions
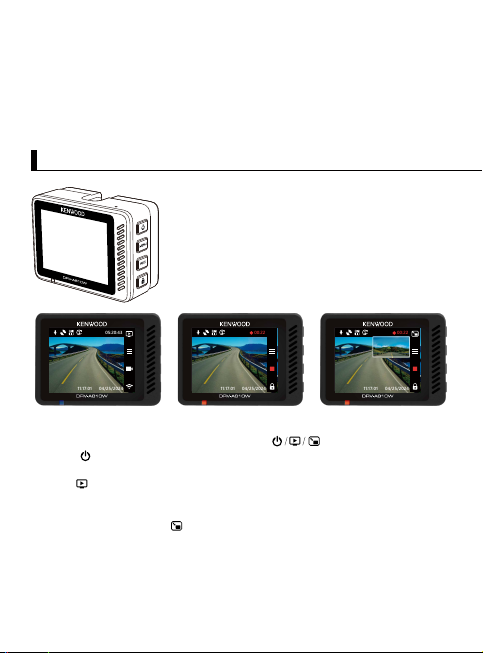
The buttons of the KENWOOD dash cam will correspond to
the functions currently represented by the displayed icons at
the right side of the screen. Please follow the corresponding
displayed icons to operate.
The printed icons are more important and commonly used
functions in the video mode, so the printed icons are as
reference, but please use the icon displayed on the screen as
a guideline.
When DRV-A610W is not recording When DRV-A610W is recording When DRV-A610W is recording
Power Button / Mode / Screen Select
•
Power
Press and hold the button for 3 seconds to turn the camera on/off.
Mode
In Video mode, press to navigate between Video and Playback mode when it is not
recording.
Screen Select (Optional)
Press to switch the main camera to display on PIP screen.
When you have not installed a rear camera and only have a dashboard camera, no icon
will be displayed here, and there will be no screen selecting functionality. The icon will
only appear when connecting the rear camera while recording.
Note:
- PIP screen function is only available when connecting the rear camera. (sold separately)
12
(Rear camera is sold separately)
with rear camera
Page 15
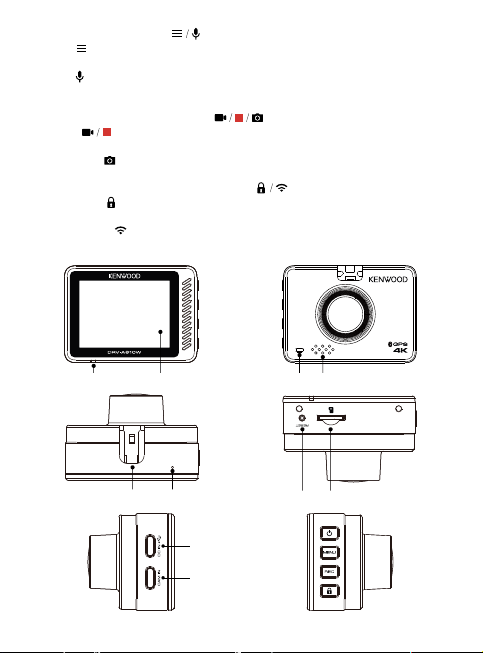
Menu / Mute Button
•
Menu
Press this button to open the Video or Setup menu.
Mute
Press and hold the button for 2 seconds to turn on or off the audio recording
function while in video mode.
Record / Screenshot Button
•
Record
In Video mode, press to start or stop recording.
Screenshot
Press and hold the button for 2 seconds to take a screenshot when recording.
File Protect / Wireless Link Button
•
File Protect
When recording, simply press the button and to protect the current video file from overwriting.
Wireless Link
In Video mode, press to start the wireless link when it is not recording.
1 2
43
65
9
10
13
8
7
Page 16

Status LED Indicator
1.
Red: Power On Red (Flashing): Recording Blue: Charging
Screen
2.
The device is equipped with a standard 2” LCD color screen to let you view.
Parking Mode LED Indicator
3.
Orange (Flashing): Parking Mode in Operation. The setting can be adjusted in the Video Menu.
Speaker
4.
System sound and playback footage sound.
Bracket Slot
5.
Slide the slots into the 3M bracket to complete the installation.
Microphone
6.
Built-in microphone for audio recording.
Reset Button
7.
On the rare occasions the camera has a problem, use the reset button to shut down the
camera. Simply press the reset until the camera turn off and press power button to turn on.
microSD Card Slot
8.
Insert your microSD card here. Push your memory card into the slot until you hear a click.
(microSD card is inserted into microSD Card Slot at the factory shipment condition)
DC-IN/Data transfer Port
9.
By connecting DRV-A610W with the supplied car power cable, you are able to charge
the camera.
Note:
The provided Type-C car power cable in the package does not have data transfer
functionality and is only for power supply purposes. If you wish to view videos,
please remove the memory card and read it on a computer, or use the KENWOOD
DASH CAM MANAGER APP on your mobile to view via wireless link, or use a
third-party USB-A to USB-C cable with data transfer capabilities to connect and view
on a computer. The device does not support Type-C USB cables with PD (Power
Delivery) fast charging or USB-C to USB-C cables.
Rear Camera Port (Optional)
10.
By connecting DRV-A610W rear camera, you are able to record a 4K+2K resolution video
simultaneously for your rearview. (sold separately)
14
Page 17
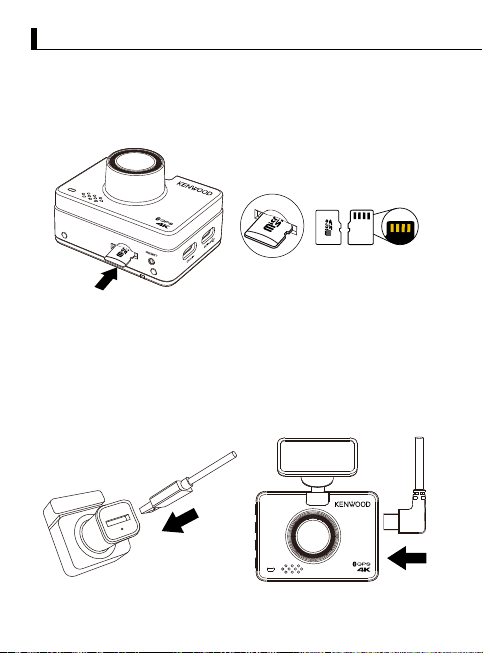
Installation and Connection
For the first installation, follow the instructions below :
Insert Your microSD Card Into The Device
1.
The device is designed to allow a standard microSD card to record your footage. Before
installing, make sure the gold end of the card is facing the LCD screen. Once it’s aligned
with the slot, push the card in and listen for the CLICK that will confirm it is secure.
TIP:
If you cannot hear the CLICK, take a small coin by the edge and push on the outside
end of the card until the sound is made.
Remember: DO NOT REMOVE OR INSERT THE MEMORY CARD WHILE THE DEVICE IS
TURNED ON.
The device will power off automatically when you insert or remove the SD card.
-
CONNECTING TO CAR POWER OUTLET
2.
Connect the USB car charger that is included in the package to your vehicle’s 12V
outlet, and then connect the car power cable that is included in the package.
15
Page 18
Note:
Select Time Zones
United States (EST)
United States (CST)
United States (MST)
United States (PST)
English
Español
Deutsch
Pусский
Language
Set Time and Date
MM/DD/YYYY
DD/MM/YYYY
12
13
14
151617181920212223001213141516
17
121314
15
161718192021222300
01
2020
2021
2012
2013
2014
2015
2016
2017
2018
2019
2024
01
02
0304050607
08
09
101112
01
United States
Canada
China
Mexico
Select Country
The KENWOOD dash cam does not support Type-C USB cables with PD (Power
Delivery) fast charging or USB-C to USB-C cables. We recommend using the car
power cable provided by us.
The KENWOOD dash cam requires a 2A current for normal operation, and the
KENWOOD USB car charger provides a 2.6A output current. We recommend using
the USB car charger provided by us.
Please do not use other USB ports in the car to connect the KENWOOD dash cam,
as most car USB ports deliver less than 1A output, while the KENWOOD dash cam
requires a 2A current for normal operation.
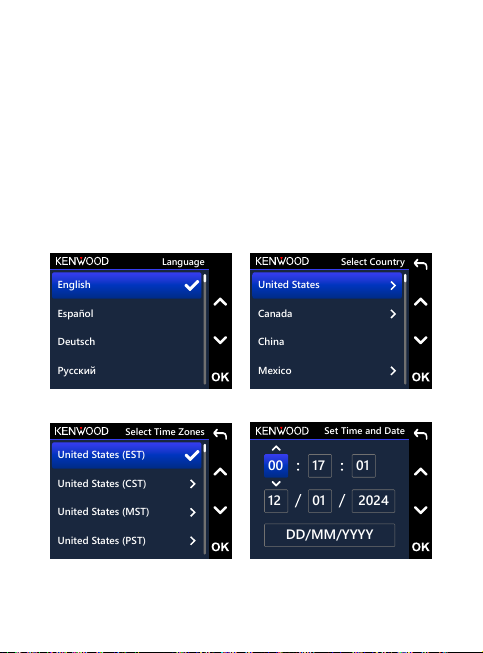
THE FIRST-TIME SETUP
3.
When connecting the power, DRV-A610W will turn on and display the first-time
setup guide below.
1. Select the Language
2. Select the Country
3. Select Time Zone
4. Set the Time and Date
16
Page 19
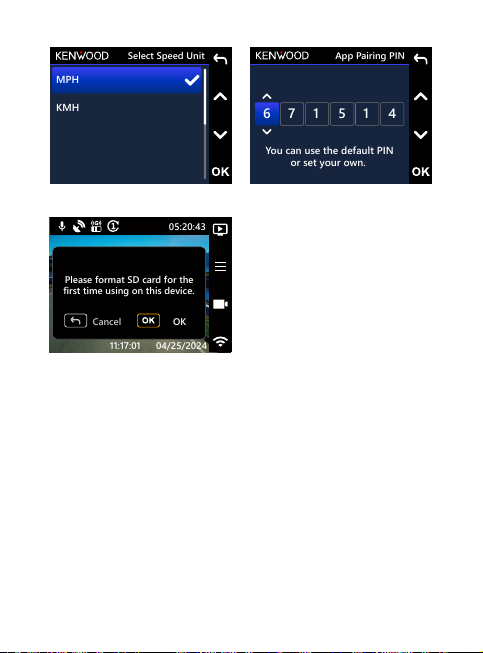
5. Select the Speed Unit
Select Speed Unit
MPH
KMH
05:20:43
04/25/2024
11:17:01
Please
format SD card
for the
first time using on this device.
Cancel
OK
App Pairing PIN
0
1
2
3
4
5
6
0
1
2
3
4
5
0
1
2
3
4
5
67010
101
2
3
4
You can use the default PIN
or set your own.
7. First Time Use SD Card Format.
Press OK button to format
TIP:
You can reset the settings either by operating inside of the SETUP MENU, or by
restoring defaults.
From now on, DRV-A610W will automatically turn on and start recording once
power has been made available from the 12V outlet. Just start the vehicle and
start driving!
If there is no 12V outlet or cigarette lighter for your vehicle, use the included
USB power cable but please notice that your USB power output port should
provide 2A current to make sure the device work properly.
DO NOT wire DRV-A610W directly to the car cigarette outlet or any 12V outlet.
Doing so will result in permanent damage to the camera.
You can purchase our hardwire kit from the KENWOOD official website that will
directly connect to your vehicle’s fuse box. This will allow you to
have your 12V outlet available for other use. Please read carefully and follow
the instructions below to help you operate DRV-A610W safely and refer to the
official website for accessory instructions.
6. Set the App Pairing PIN
Default PIN: 671514
17
Page 20
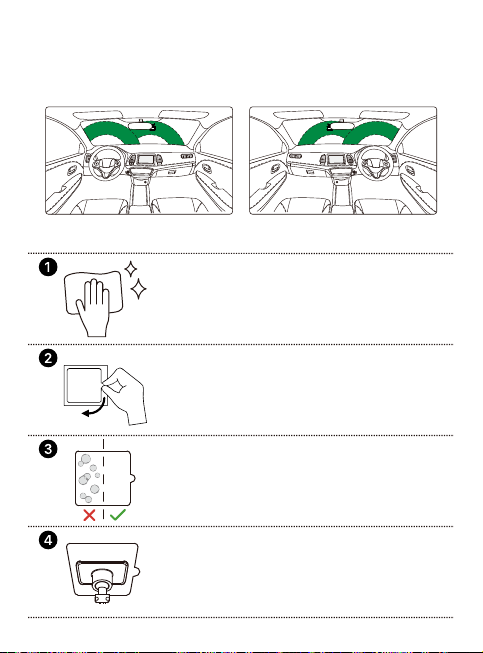
ATTACH THE STATIC SIDE FILM AND MOUNT TO THE WINDSHIELD
4.
Select a location on the windshield where it won’t distract you. We recommend you
place the mount behind the rearview mirror on the passenger side, within the
windshield wiping area.
CAM clearly needs to view through CAM clearly needs to view through
Left-hand Drive
1. Position film location and clean windshield
Before applying, clean windshield location, remove any dust,
oil and use any cloth to give one last polish for best
performance.
2. Remove the protective layer
Before sticking, pull out the actual film protector.
Pull out and remove the protective layer on one side.
3. Attach static side film to the windshield
Adhere the static side to the windshield, press out and remove
excess bubbles using a squeegee or plastic card.
Make sure to press it fully to adhere on the windshield.
4. Install 3M adhesive mount
Mount 3M adhesive mount within the surface of the film and
avoid the area that spans between windshield and film.
18
Right-hand Drive
Page 21
Note:
Do not reuse windshield sticker applicator film repeatedly. This will reduce the
adhesion performance and cause the static film to fall off.
TIP:
When selecting a location for the mount, make sure it’s on a glass surface that is
smooth and free of paint.
Before mounting, clean the area with a dry / clean cloth and add a small amount of
moisture to the windshield. This allows a stronger bond to form between the glass
and the mount.
Remember to place the mount within the area of the vehicle’s windshield wipers.
-
5.
HIDE AND TRIM THE CABLE
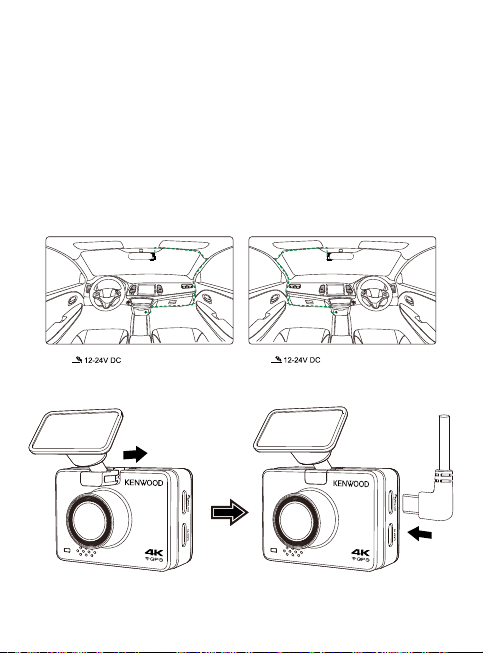
Unplug DRV-A610W first to hide and trim the car power cable into the roof and
panel. The provided cable clips can help you keep the power cable neat.
After the installation, slide and attach it onto the 3M mount and re-plug the power
cable to DRV-A610W to power on the device.
Left-hand Drive Right-hand Drive
19
Page 22
Note:
The KENWOOD dash cam does not support Type-C USB cables with PD (Power
Delivery) fast charging or USB-C to USB-C cables. We recommend using the car
power cable provided by us.
The KENWOOD dash cam requires a 2A current for normal operation, and the
KENWOOD USB car charger provides a 2.6A output current. We recommend using
the USB car charger provided by us.
Please do not use other USB ports in the car to connect the KENWOOD dash cam,
as most car USB ports deliver less than 1A output, while the KENWOOD dash cam
requires a 2A current for normal operation.
ADJUST THE ANGLE
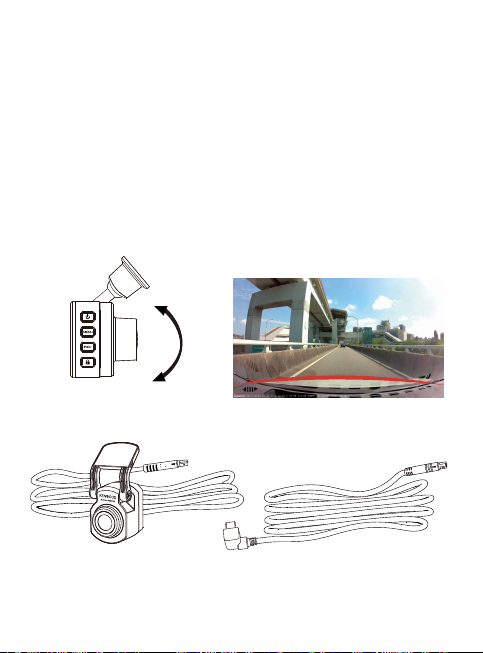
6.
Adjust the camera to the angle you want, the lens can be rotated up and down 180
degree. We recommend that the hood of the car should occupy at least 1/5 of the
screen.
Congrats! Now you are all set!
REAR CAMERA INSTALLATION (OPTIONAL)
7.
The 2K resolution rear camera KCA-R210 is sold separately on the official website.
20
Page 23
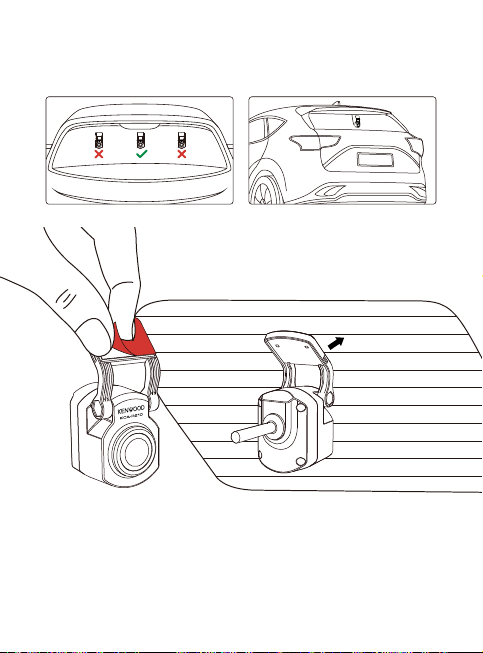
(1) SELECT A LOCATION ON THE REAR WINDSHIELD
Select a location on the rear windshield, attach the adhesive mount, and place the
rear camera in place. The rear camera mount is designed for sloping windows or
vertical / flat windows.
Note:
It is recommended to place the rear windshield camera within the windshield
wiping area at the top of the rear windshield to record as clear an image as
possible. Make sure the heating grid lines do not obstruct the view.
The additional special double-joint bracket allows you to install the rear camera on
a vertical surface, supporting various angles of installation and compatibility with
various car models.
21
Page 24
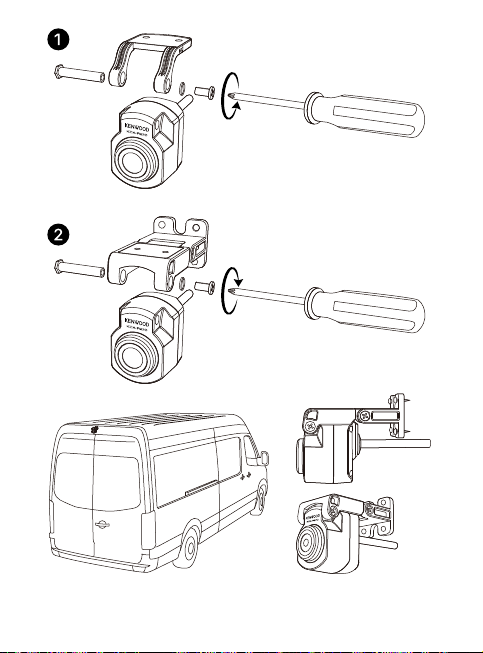
Loosen
Tighten
22
Page 25
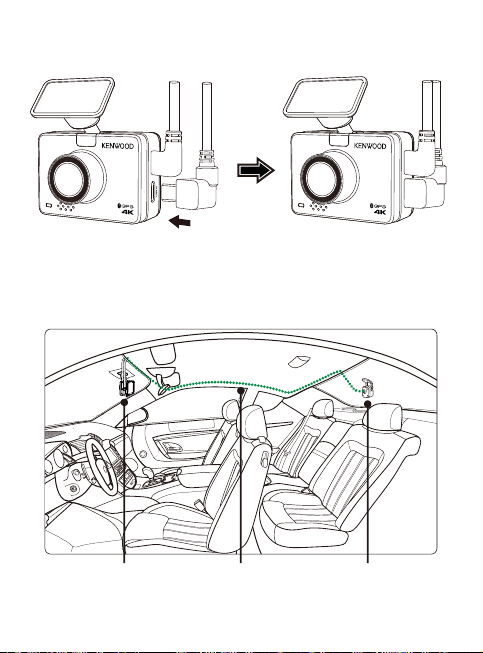
(2) CONNECT THE REAR CAMERA CABLE
Use the CAM IN port on the side of the front dash cam and plug in the rear camera
cable.
(3) ROUTE THE REAR CAMERA CABLE
Route the rear camera cable through the vehicle to the rear windshield and tuck
the cable away. The end of the cable should run through from the side of the
headliner at the rear of the vehicle for you to connect and mount the rear camera
to your selected position.
Dash Cam Rear Camera Cable Rear Camera
23
Page 26
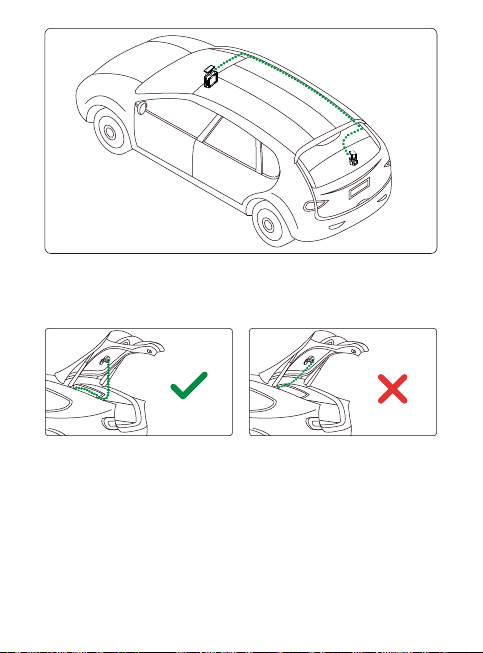
Note:
For hatch back trunk opening, leave about 3-5 inches of extra cable at the
vehicle’s end to ensure adequate cable connections, and comfortably open the
trunk without moving the rear camera.
Check all airbags locations on the vehicle owner’s manual. DO NOT route cable
over the airbags to avoid potential interference with airbag deployment and
posing a problem with proper airbag operation.
For vehicles that have headliner and curtain airbag, the wire should run through
from the bottom of the passenger side carpet trim, along the rear seat side, to
the rear windshield molding, and to the selected position.
24
Page 27
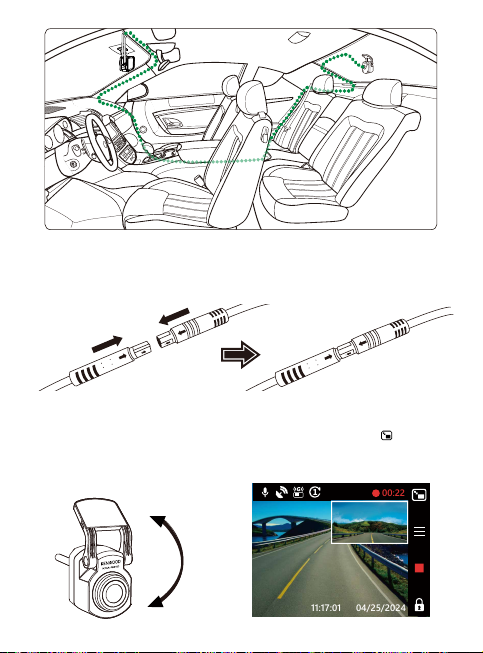
(4) CONNECT THE REAR CAMERA CABLE TO THE REAR CAMERA
00:22
04/25/2024
11:17:01
When all the cable is in place, connect the rear camera cable to the rear camera,
line up cable pins to secure the cable connection. Check the front dash cam to
ensure the rear camera is working correctly.
(5) ADJUST THE REAR CAMERA
Once the mount is set to the rear windshield, ensure the display on the front dash
cam (front and rear views) are level. Press the Screen Select Button when
recording to switch from the rear display to full screen, adjusting the rear camera
accordingly. Ensure the display is in the center, DO NOT attempt to adjust the dash
cam while driving.
25
Page 28

Note:
You can also connect the dash cam to your mobile device and download
KENWOOD DASH CAM MANAGER on App Store / Google Play. Use its Live View
function to adjust the rear camera.
If you still find it too much trouble or don't want to do it yourself. It is
recommended to find your local reliable Auto Dealer Service Department,
Car stereo Installer, and Auto Mechanic shop to ask about dash cam
installation. Fees may vary from one shop to another. Please ask and check the
reputation of the shop before installing it.
We have designed the rear camera to be waterproof with an IP67 rating (IP67
waterproof rating for the camera part), allowing you to place the camera
outside of the car without fear of heavy rain or snow. This provides you with
clearer video footage. Unlike regular dash cams that can only be placed on the
rear windshield, placing the camera outside of the car directly captures better
quality footage as there are no heat-insulating films obstructing the view.
However, installing it outside your car requires professional wiring and
installation. If you want to install it externally, please go to a relevant store and
have a professional install it for you to avoid danger or damage.
WARNING
:
ALWAYS pay attention to the road ahead of you. Driving with distractions on the road
may result in penalties, accidents, or even death. PLEASE DRIVE CAREFULLY.
ALWAYS place the mount in a location that will not obstruct the driver's view of the
road. We recommend you place the mount behind the rearview mirror on the passenger
side, within the windshield wiping area.
DO NOT place the camera in front of the driver’s side.
DO NOT place the mount within the airbag deployment area or near any mirrors.
DO NOT operate the DRV-A610W while driving. Remember, the camera will
automatically record when the vehicle engine has started.
PLEASE place the camera where the power cable is easily concealed and will not
distract the driver. Avoid areas such as the steering wheel, pedals, or gear shifter.
PLEASE remember to clean the area where the mount will be placed.
PLEASE adjust your camera settings before you begin driving.
26
Page 29
05:20:43
04/25/2024
11:17:01
Remember to reformat
SD card once in a while
Cancel
OK
05:20:43
04/25/2024
11:17:01
Please
format SD card
for the
first time using on this device.
Cancel
OK
On Screen Notifications
The following information will help you better understand the On Screen
Notifications when corresponding alert is detected.
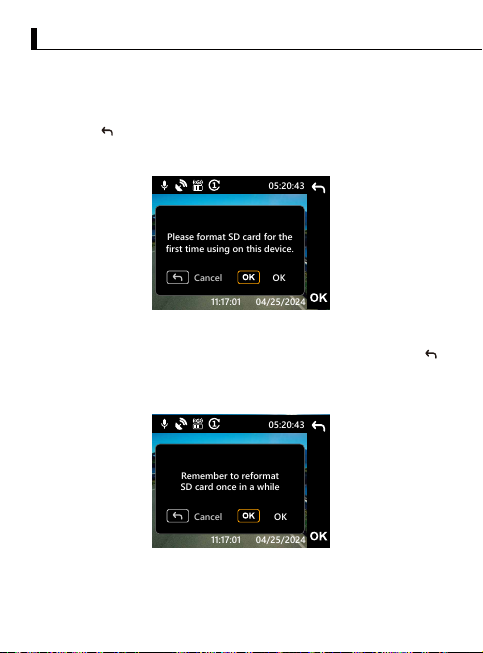
First Time Use SD Card Format: when the SD card is inserted into the device for
•
the first time, the device will ask you to format the card. Press OK button to format
and LEAVE button to cancel.
Note: Please save the important file before formatting the card.
OPTIONS: Format (Recommended) / Cancel
30 Days SD Card Reformat: When the SD card has been formatted for 30 days,
•
the device will ask you to reformat the card every 30 days to days to keep the
storage of SD card is working correctly. Press OK button to format and LEAVE
button to cancel.
Note: Please save the important file before formatting the card.
OPTIONS: Format (Recommended) / Cancel
27
Page 30
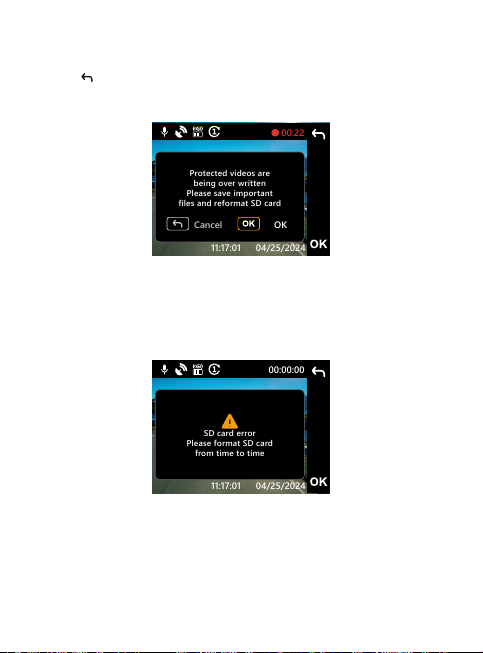
Protected Files Over Written: When the protected space of SD card is full, the
00:22
04/25/2024
11:17:01
Cancel
Protected videos are
being over written
Please save important
files and reformat SD card
OK
00:00:00
04/25/2024
11:17:01
SD card error
Please format SD card
from time to time
•
device will ask you to reformat the card, otherwise the first protected file will be
overwritten when the protected space is full. Press OK button to format and
LEAVE button to cancel.
Note: Please save the important file before formatting the card.
OPTIONS: Format (Recommended) / Cancel
SD Card Error: When there is any writing / reading issue with the SD card, the
•
device will ask you to replace the card.
Note: Please save the important file before formatting the card.
Note: If the notification keeps showing up, please check if the SD card is still
working. The life of SD cards is limited, it could be from 3 months to a year or more
depends on usage. Check with your SD card manufacturer for warranty information.
28
Page 31
00:00:00
04/25/2024
11:17:01
Please insert SD card
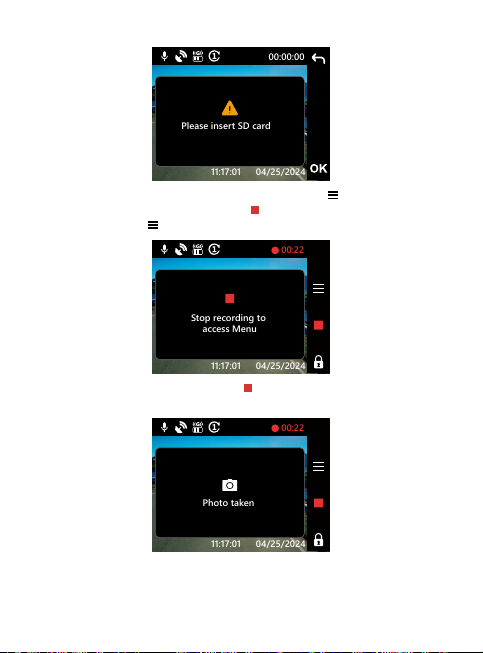
Insert SD card: This is a notification to remind you to insert the SD card.
00:22
04/25/2024
11:17:01
Stop recording to
access Menu
00:22
04/25/2024
11:17:01
Photo taken
•
Access Menu During Recording: When pressing MENU button during
•
recording, you may need to press Record button to stop recording first then
you can press MENU button to access Menu.
Screenshot: Press and hold the Record button for two seconds during
•
recording to take a snapshot of the photo. The image will be saved in the photo
folder
29
Page 32
04/25/2024
11:17:01
00:22
Screen will be turned off
in 5 seconds
5
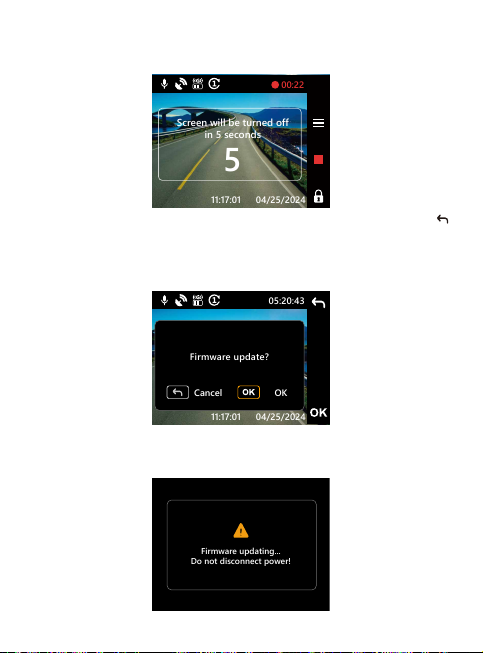
Screen Saver: When screen saver is turned on, the device will automatically turn
Firmware updating...
Do not disconnect power!
05:20:43
04/25/2024
11:17:01
Cancel
Firmware update?
OK
•
off the screen after 30 seconds or 2 minutes of inactivity, and 5 seconds before the
screen is turned off The display will indicate that the device is about to turn off
the screen.
•
Update Firmware: Press OK button to start updating the firmware and LEAVE
button to cancel.
Note: Please save the important file before formatting the card.
Note: For more information about firmware update, please read page 69.
OPTIONS: Update (Recommended) / Cancel
•
Updating Firmware: Do not disconnect power or press any button during this
period, it may cause update failure.
Note: For more information about firmware update, please read the page 69.
30
Page 33
00:22
04/25/2024
11:17:01
Video Mode
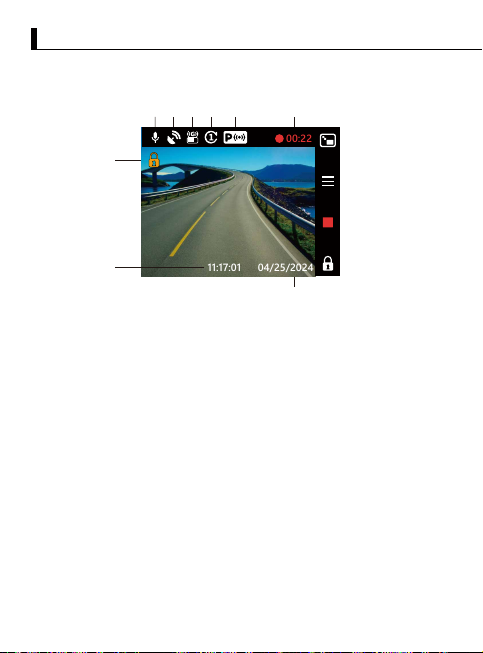
The following information will help you better understand the icons in VIDEO MODE
and their relative functions. Some icons show up only when corresponding functions
are activated.
7
9
Microphone: When the audio recording function is off, there will be a red line
1.
across the icon.
GPS: If this icon flashes, it indicates DRV-A610W is locating GPS signal. When the
2.
GPS signal is found, the icon will stop flashing and remain stable on the screen.
G Sensor: The current sensitivity level of G-Sensor.
3.
Video Length: The duration of each video clip.
4.
Parking Mode Sensor: Indicates whether the parking mode function is enabled
5.
or not. (Optional)
Recording Duration: This will indicate the length of the current recording.
6.
File Protection: Indicates the current video clip is protected.
7.
Date: Displays current date.
8.
Time: Displays current time.
9.
2
1
5
3
4
6
8
31
Page 34
Video Menu
Setup Menu
Video Menu
Video Menu
Parking Mode Sensor
Video Length
Exposure
G Sensor
Parking Mode LED
Video Menu
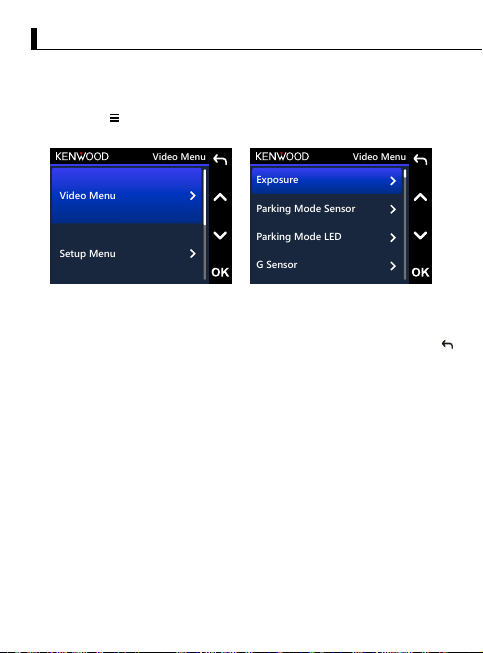
DRV-A610W’s default settings have been set for you to use the camera without needing
to change the settings. If you need to make adjustments to the settings, the following
instructions will help you.
Press the MENU button and select Video Menu while in VIDEO MODE while
DRV-A610W is not recording.
Use the UP and DOWN buttons to select setting options and press the OK button to
enter the sub-menu.
Once you access the sub-menu, highlight the desired setting and press the OK button
to confirm your selection and to return to the VIDEO MENU. Press twice the LEAVE
button twice to return to video mode.
TIP:
You are not able to access DRV-A610W menu while the camera is recording.-
Exposure: Adjust exposure levels settings.
•
OPTIONS:
Front Camera: +2 / +1 / 0 (default) / -1 / -2
Rear Camera: +2 / +1 / 0 (default) / -1 / -2 (Optional)
Parking Mode Sensor (Optional): The parking mode sensor has three
•
functions: Vibration detection, Motion detection and Time-lapse. Only one of these
functions can be activated at a time; they cannot be enabled simultaneously. When
this function is activated, the ICON on the screen will be displayed in white. When
not activated, it will be displayed in gray.
Vibration Detection: If the vibration detection is turned on, the device will enter
sleep mode after 1 minute when the vehicle is turned off or when the device loses
its power supply. In sleep mode, if the device detects any external forces, it will
automatically turn on, record a 30-second video, and then turn off afterward.
32
Page 35

Motion Detection: If the motion detection is turned on, the device will enter
standby mode when the vehicle is turned off or when the device loses its power
supply. In standby mode, if the device detects any moving objects, it will
automatically record a 30-second video and then stop recording until there are no
more moving objects.
Time-Lapse: If the time-lapse is on, the device will begin capturing time-lapse
video when the engine is turned off until the next time the car is started or until
triggered by a timer or voltage threshold.
OPTIONS:
Vibration Detection: High / Medium / Low / Off (default)
Motion Detection: High / Medium / Low / Off (default)
Time-lapse: On / Off (default)
Parking Mode LED: The orange indicator light on the front of the device is the
•
parking mode LED light. It serves as a warning to others, indicating that the device
is recording. It flashes once every two seconds. Options are available to turn it on,
off, or only on during parking mode is activated.
OPTIONS: Always on / On when parking (default) / Off
G Sensor: G sensor is the sensor that can detect forces. When it senses any forces,
•
it will protect the current file automatically. Adjust the sensitivity of G sensor here.
OPTIONS: High / Medium (default) / Low / Off
GPS: Turn the GPS function ON or OFF.
•
OPTIONS: On (default) / Off
Speed Units: Adjust the unit for speed data.
•
OPTIONS: MPH (default) / KMH
Data Privacy: Stores up to 4 sets of latest video files when Data Privacy set to ON.
•
OPTIONS: On / Off (default)
Screen Saver: DRV-A610W has a function to let the screen dim or shut down after
•
a period of inactivity. Press any button to re-activate the display.
OPTIONS:
LCD Always on / LCD Dim after 30 sec (default) / LCD Dim after 2 min / LCD Off
after 30 sec / LCD Off after 2 min
Parking LCD Off: On (default) / Off
Note: When this option is enabled, the screen will automatically turn off after two
minutes once parking mode has been activated, and will not turn back on until
there is interaction or the car is started.
33
Page 36
System Menu
Video Menu
Setup Menu
System Menu
Wireless Link
Device Sounds
Time & Date
Format SD Card
KENWOOD Stamp: Turn the KENWOOD logo stamp ON or OFF on the recorded files.
•
OPTIONS: On (default) / Off
Time & Date Stamp: Turn ON or OFF the date stamp mark on the recorded files.
•
OPTIONS: On (default) / Off
Information Stamp: Turn ON or OFF the information stamp including the
•
acceleration, speed, longitude and latitude data on the recorded files.
OPTIONS: On (default) / Off
Speed Stamp: Turn ON or OFF only the speed stamp mark on the recorded files.
•
OPTIONS: On (default) / Off
License Plate Stamp: Input your license plate number to put your license plate
•
stamp on the recorded files.
Note:
When you are in the SETUP MENU -> Restore Defaults, you will be able to
restore all the settings to DRV-A610W’s default settings.
Setup Menu
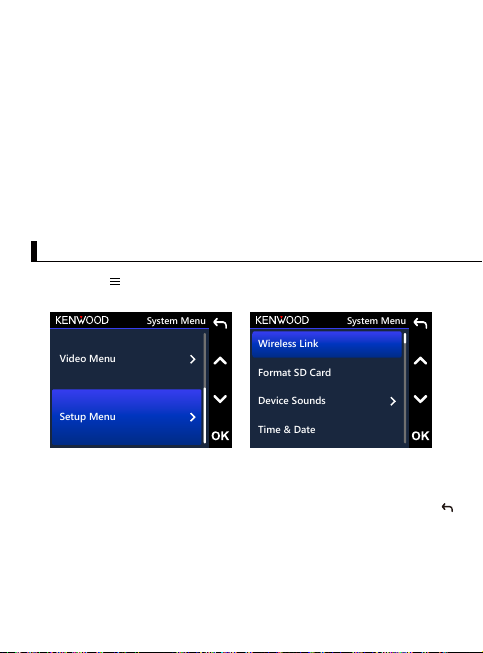
Press the MENU button and select Setup Menu while in VIDEO MODE while
DRV-A610W is not recording.
Use the UP and DOWN buttons to select setting options and press the OK button to
enter the sub-menu.
Once you access the sub-menu, highlight the desired setting and press the OK button
to confirm your selection and to return to the SETUP MENU. Press twice the LEAVE
button to return to the video mode.
Note:
DRV-A610W default settings have been selected for great image quality and ease of
operation. Under most circumstances, you don’t need to change the settings.
The setup menu cannot be accessed while the camera is recording.
-
34
Page 37

Wireless Link: Turn on the wireless function to connect your mobile device.
•
OPTIONS: Connect / Disconnect
Format SD Card: Format the memory card. Formatting will remove ALL the files
•
in the card.
OPTIONS: Format / Cancel
Device Sounds: Adjust the button beep sound, volume, and voice recording.
•
OPTIONS:
Beep: On (default) / Off
Audio Rec: On (default) / Off
Time & Date: Adjust the TIME and DATE as required by using use the UP and
•
DOWN buttons to set the value. Press the OK button to save the setting and press
the MENU button to return to the SETUP MENU.
Time Zone / DST: Select the time zone setting.
•
OPTIONS: -12 / -11 / -10 / -9 / -8 / -7 / -6 / -5 / -4 / -3.5 / -3 / -2.5 / -2 /
-1 / GMT / +1 / +2 / +3 / +4 / +5 / +6 / +7 / +8 / +9 / +10 / +11 / +12
Language: Select a preferred language.
•
OPTIONS: English(default) / Deutsche / Français / Nederlands / Italiano / Español /
Português / Polska / Česky / Română
Country: Select a country and time zone setting.
•
OPTIONS: United States / Canada / China / Mexico / Korea / Japan / Taiwan / Russia /
Spain / Norway / Finland / Sweden / Germany / France / Italy / Netherlands / Belgium /
Denmark / Poland / United Kingdom / Ireland / India / Others
Display Invert: Rotate the LCD display for upside down footage recording only.
•
Note: Up and down buttons remain the same as the default configuration.
OPTIONS:
Front Camera: On / Off (default)
Rear Camera: On / Off (default)
Display Mirror: Flip the LCD display horizontally for mirror footage recording only.
•
OPTIONS:
Front Camera: On / Off (default)
Rear Camera: On / Off (default)
Restore Defaults: Reset all the settings to KENWOOD factory default.
•
System Info: Displays the firmware version.
•
OPTIONS:
System Info: Displays the current firmware version and the FCC ID and IC ID.
Card Info: Displays the memory card information.
Satellite Signal: The count of how many satellite signals DRV-A610W is receiving.
App Pairing PIN: This is the PIN used for connecting with the App. If you forget you
PIN, you can always view or change your PIN here. The default PIN is 671514.
35
Page 38
Playback
Protected
Video
Photo
05:20:43
04/25/2024
11:17:01
System Info
Model:
Firmware:
FCC ID:
IC:
Check updates:
www.kenwood.com/cs/ce/
V1.0_ABCDEF_A
IOMDRVA6510W
282C-DRVA6510W
DRV-A610W
System Info
This device complies with part
15 of the FCC Rules.Operation
is subject to the following two
conditions:(1) This device may
not cause harmful interference,
System Info
and (2) this device must accept
any interference received,
including interference that may
cause undesired operation.
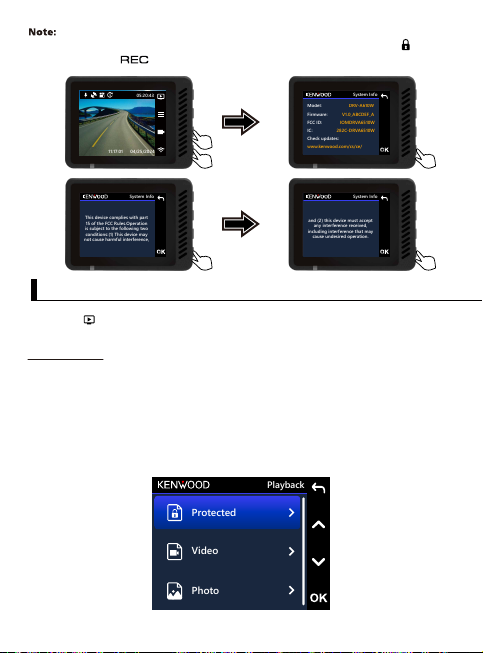
Make sure the Dash Cam is not recording. Press and Hold the File Protect button
and the Record button for 3 seconds on the device to enter the System Info.
Playback Mode
Use MODE button to access PLAYBACK MODE while DRV-A610W is not recording.
In PLAYBACK MODE, you are able to review the videos you have stored.
DIRECTORIES
Press the UP or DOWN buttons to navigate through the menu.
Protected: The directory for all protected videos.
Video: The directory for all unprotected videos.
Note: If the video file is protected under playback mode, the file will remain in video
directory.
Photo: All photos in the file.
36
Page 39
VIDEO FILES
Video
1/5
20240425_111701_F
20240425_111801_F
20240425_111901_F
11:17:01
2024/04/25
1/5
Video
20240425_111901_F
Play
Protect
Delete
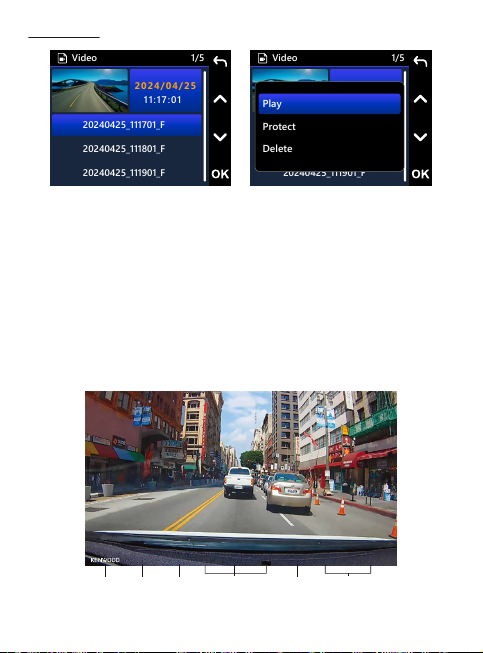
Use the UP and DOWN buttons to select the video file and press the OK button to
select play this video.
Video file name: The format of video file name is YYYYMMDD_HHMMSS_[F/R]
For example, 20240425_111701_F mean this file was taken at Apr 25, 2024, 11: 17: 01,
F means front camera.
When using parking mode, the file name of the parking mode recording starts with a
"P", for example, P20240425_111701_F.
YYYY: Years.
HH : Hours.
F/R: Front or rear camera.
MM: Months.
MM: Minutes.
DD: Days.
S S : Seconds.
The watermark in the image file is described below.
X: +3.80Y: +1.02Z: +1.6530MPH
04/25/2024
Logo Date
11: 17: 01
Time
Accelerator
Data
Speed
N5° 41’33.15”
Latitude &
Longitude
W62”42”33.15
37
Page 40
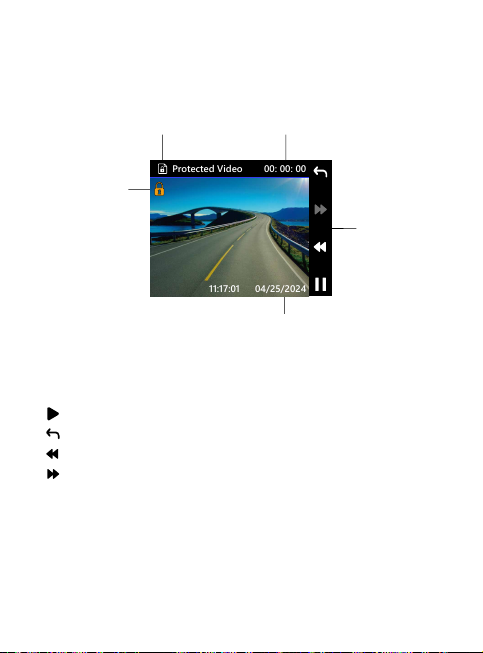
KENWOOD Stamp: Logo, can be turned on / off in VIDEO MENU.
Protected Video
00: 00: 00
04/25/2024
11:17:01
Time & Date Stamp: Date, Time, can be turned on / off in VIDEO MENU.
Information Stamp: Accelerator Data, Speed, Latitude & Longitude, can be turned
on / off in VIDEO MENU.
Speed Stamp: Speed Data, can be turned on / off individually.
License Plate Stamp: License plate number, can be turned on / off in VIDEO MENU.
1
2
5
3
1. File Type: Indicates the file type is video.
2. Playback: Displays the current playback time.
3. Playback Controls: Use DRV-A610W buttons as instructed below.
4. Date & Time: Indicates the date and time of the recorded file.
PLAY / PAUSE.
GO BACK to Video / Protected directory.
REWIND.
FAST FORWARD.
5. Protected File: Indicates the selected file is protected.
4
38
Page 41
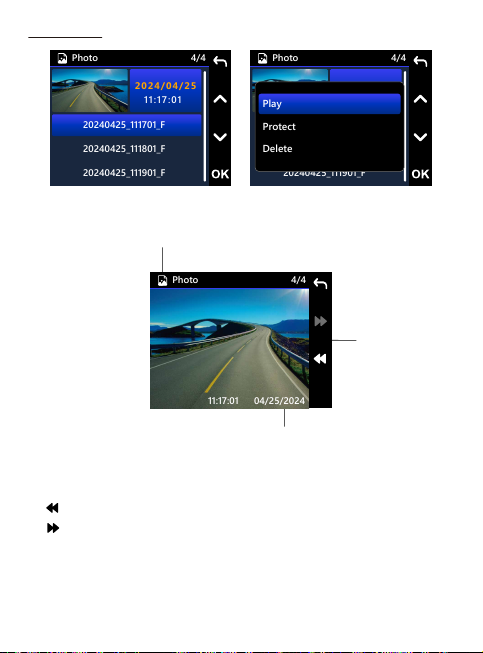
PHOTO FILES
Photo
4/4
20240425_111701_F
20240425_111801_F
20240425_111901_F
11:17:01
2024/04/25
Photo
4/4
20240425_111901_F
Play
Protect
Delete
Photo
4/4
04/25/2024
11:17:01
Use the UP and DOWN buttons to select the photo file and press the OK button to
select play this photo.
1
2
1. File Type: Indicates the file type is photo.
2. Playback Controls: Use DRV-A610W buttons as instructed below.
3. Date & Time: Indicates the date and time of the shoot file.
Previous.
Next.
3
39
Page 42
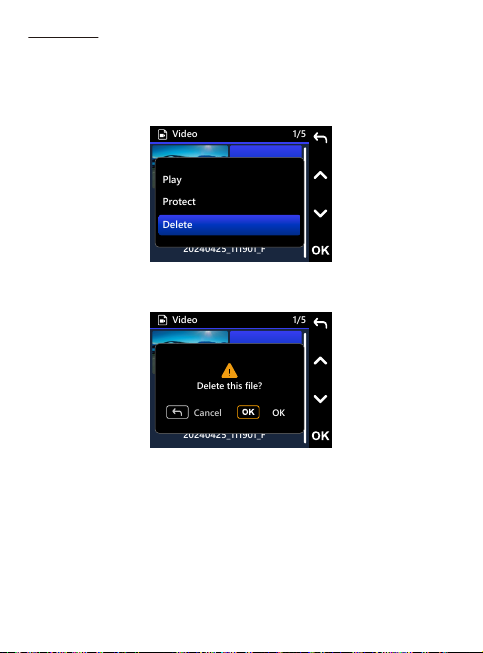
DELETE FILE
Video
1/5
20240425_111901_F
Play
Protect
Delete
Video
1/5
20240425_111901_F
Delete this file?
Cancel
OK
Use the UP and DOWN buttons to select the video file and press the OK button to
select delete this video.
Note: PROTECTED FILES CANNOT BE DELETED.
You will have the following options:
Once selected, follow the on screen
instructions to delete the current file.
40
Page 43
Protected Video
1/5
20240425_111901_F
Play
Unprotect
Delete this Video
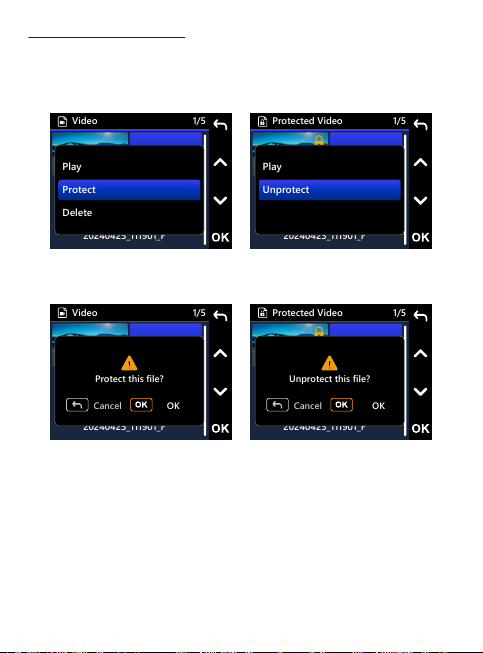
PROTECT / UNPROTECT FILE
Video
1/5
20240425_111901_F
Protect this file?
Cancel
OK
Protected Video
1/5
20240425_111901_F
Unprotect this file?
Cancel
OK
Video
1/5
20240425_111901_F
Play
Protect
Delete
Use the UP and DOWN buttons to select the video file and press the OK button to
select protect / unprotect this video.
You will have the following options:
Once selected, follow the on screen
instructions to protect the current file.
Once selected, follow the on screen
instructions to unprotect the current file.
41
Page 44
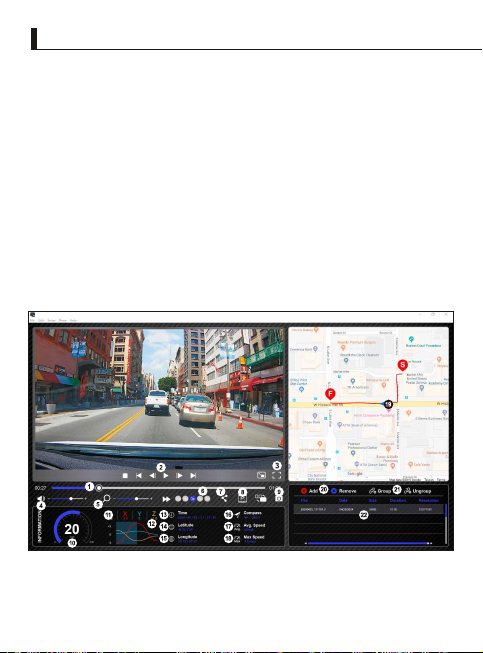
Using the Desktop Software
“KENWOOD VIDEO PLAYER” is a desktop software for displaying video recorded
with the device.
System Requirements for “KENWOOD VIDEO PLAYER”
OS: Microsoft Windows 11, Windows 10*
*Microsoft Visual C++ must be installed.
*DirectX XAudio2 must be installed.
OS: Apple macOS 12 (Monterey) or later
Installing the Software
Install the software in a computer environment in which you have administrator's rights.
1. Download the installer from https://www.kenwood.com/cs/ce/
2. Install according to the on-screen instructions.
3. We recommend installing it in a location other than the C drive.
Playback:
KENWOOD VIDEO PLAYER
KENWOOD VIDEO PLAYER
JVC VIDEO PLAYER
File
Edit Setup Share Help
01:0000:27
Add Remove Group Ungroup
File Date Size Duration Resolution
171129_191823_016 11/29/2017 96MB 01:00 1920*1080
Compass
Compass
-W -263.12024 / 04 / 25 , -11 : 17 : 01
-W -263.1
20240425_111701_F 04/25/2024
Avg. Speed
20240425_111701_F 04/25/2024
-65mph
Max Speed
-135mph
96MB 01:00 1920*1080
96MB 01:00 1920*1080
INFORMATION
20
mph
0 200
G
Sensor
+3
0
-3
X
-2.0Y0Z+1.0
Time
Latitude
-N 25 1”56”
Longitude
-W 121 33”32”
42
Page 45

Video time line :
1.
Drag the Video time line bar to Rewind or
Forward to cue Video, Speed and G-Sensor
date.
Video play control buttons :
2.
Available options from left to right are stop,
last clip, last frame, play, next frame next clip.
Available hot keys for individual options are
(1) Play / Pause: space
(2) Stop: esc
(3) Last frame: left
(4) Next frame: right
(5) Next clip: N
(6) Last clip: B
Full screen display :
3.
Toggle to fit the image to the entire screen.
- Hot key: Alt + Enter
Video volume adjustment :
4.
Drag this to change the audio volume.
- Default volume: 100%
Digital zoom in / out :
5.
Roll the mouse wheel forward/backward on
the video area or drag this to change the
zoom in/out.
Video play speed :
6.
Click to speed up / down videos on the main
screen.
Available speed options may range from one
quater to quadruple to original one.
-Default speed : 1X
Share Button :
7.
Click to open different sharing options.
Video edit mode :
8.
Click to open the video edit function window.
Screen shot :
9.
Click to capture the current image displayed
on the main screen and save the file in a given
space.
-Default location : installation root directory
/Snapshot.
Speed :
10.
Display the speed of the car in the video when
it was recorded. You may change the UOM of
speed under Setup → Speed Unit.
(Function available on the device with built-in
GPS)
-Unit of measure (UOM) option : Imperial Unit
or Metric Unit
-Default unit of measure : MPH
G-sensor data :
11.
Display the G-data of the vehicle in the video
when it was recorded.
12.
Chart of G-sensor data :
Display the G-data of the vehicle in the
video when it was recorded.
13.
Time :
Display date and time of the video when it
was recorded.
14.
Latitude :
Display the latitude of the video where it
was recorded.
(Function available on the device with
built-in GPS)
15.
Longitude :
Display the longitude of the video where it
was recorded.
(Function available on the device with
built-in GPS)
16.
Compass :
Display the direction of the video where it
was recorded.
(Function available on the device with
built-in GPS)
17.
Avg. Speed :
Display the average speed of the video
where it was recorded.
(Function available on the device with
built-in GPS)
18.
Max Speed :
Display the max speed of the video where it
was recorded.
(Function available on the device with
built-in GPS)
19.
Google Maps :
Display the location of the video where it
was recorded.
(Function available on the device with
built-in GPS)
20.
Add the file / Remove the file :
Click the “Add” key to display the “add
file” window. Click the “Remove” key to
erase the selected files from the play list.
21.
File group / File ungroup :
You may group multiple files into the playlist then play
them in one file and link the data of each file to display
in data table. For example, adding 5 1-minute length
files into one group will end up with a 5 minutes display
time shown in the data table. The name of a group is a
string of the name of the first file suffixed with the
number of files in the group. That is, for a group of 5
files with the first name “20180925_191823”, the name
of the group is “20180925_191823(5)”.
22.
Video playlist :
A video thumbnail will show in this table
after the videos added in the list.
43
Page 46
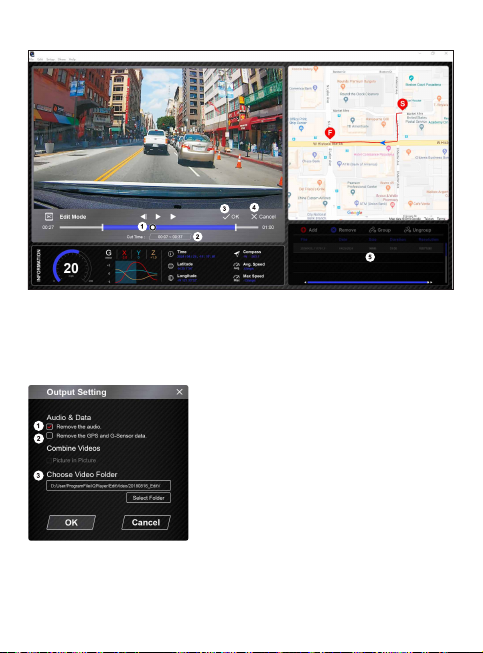
How to Edit the Video:
KENWOOD VIDEO PLAYER
JVC VIDEO PLAYER
File
Edit Setup Share Help
Edit Mode
20
INFORMATION
0 200
Edit the timeline of the video by moving the white block on the timeline to set up
1.
the edit scope of video.
Edit scope of the video. You may input a number to change the size of this scope.
2.
Confirm and click to validate the current work and proceed with the next step.
3.
Click to exit the video edit mode.
4.
The software system bar and video playlist stop functioning in video edit mode.
5.
Cut Time : 00:07 ~ 00:37
X
G
Sensor
-2.0Y0Z+1.0
+3
0
mph
-3
OK Cancel
01:0000:27
Add Remove Group Ungroup
File Date Size Duration Resolution
171129_191823_016 11/29/2017 96MB 01:00 1920*1080
Time
Latitude
-N 25 1”56”
Longitude
-W 121 33”32”
Compass
Compass
-W -263.12018 / 08 / 14 , -19 : 33 : 03
-W -263.1
171129_191823_017 11/29/2017 96MB 01:00 1920*1080
Avg. Speed
171129_191823_018 11/29/2017 96MB 01:00 1920*1080
-65mph
Max Speed
-135mph
Remove audio file:
1.
Check to remove the audio file of the exported
video.
Remove the GPS and G-sensor data:
2.
Check to remove the GPS and G-sensor file of the
exported video.
Image export:
3.
Select the target storage location of the image
file and its name.
Default location: installation root directory / Edit
video
44
Page 47
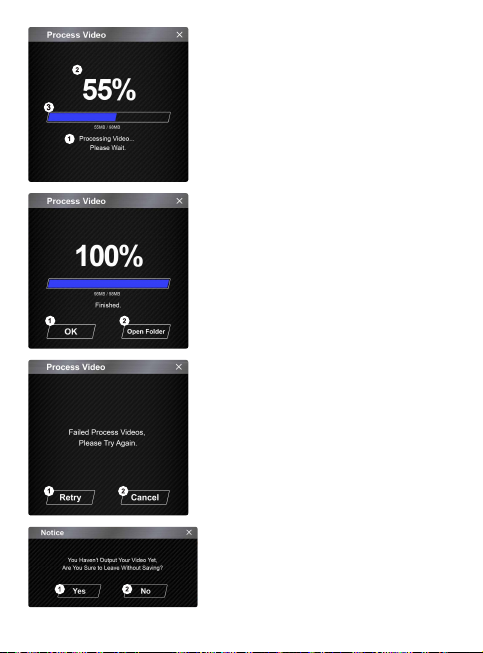
Image processing:
1.
Proceed with image processing once the image
export options are setup.
Export status (1):
2.
The image file export progress is presented as a
percentage symbol "%" and is synced with
item 3.
Export status (2):
3.
The image file export progress is presented by
a frame being filled with layered colors ink and
synced with item 2. The export is finished once
the frame is fully inked in layered colors.
OK:
1.
Click to go back to the play mode page.
Open folder:
2.
Click to open folders with image files saved in
there.
Retry:
1.
Click to export the image file again with the
previous settings.
Cancel:
2.
Click to abort image file export and go back to
the video edit page.
Yes:
1.
Click to go back to the play mode page.
No:
2.
Click to abort image file export and go back to
the video edit page.
45
Page 48
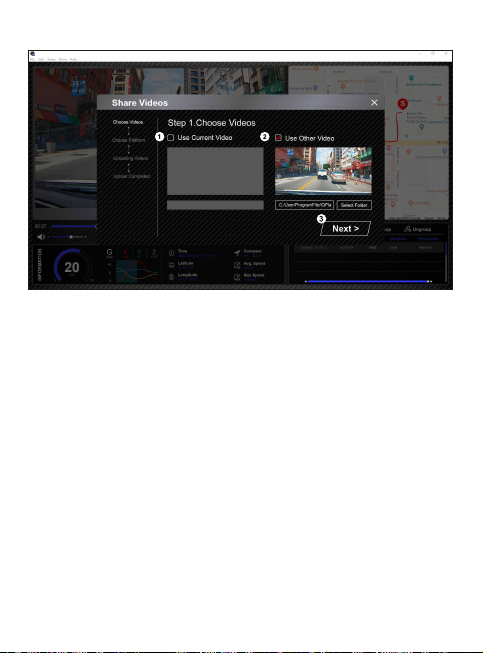
Share Mode
KENWOOD VIDEO PLAYER
00:27
INFORMATION
Click Share → Share Videos in the software system bar at the top of the window or the
community sharing icon in the interface to display the sharing window.
To share the current video:
1.
When two files are playing, the one with the active speaker icon will be shared.
To share the non-current video:
2.
Click and open the file selection window.
Next step:
3.
Click to go to the next step.
46
Page 49
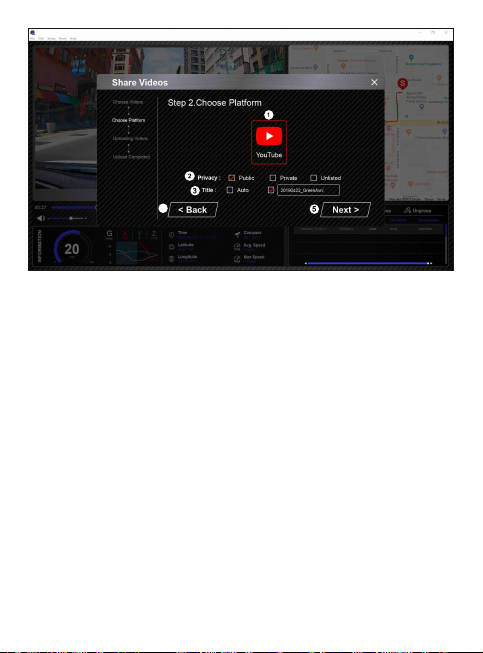
KENWOOD VIDEO PLAYER
Public Private Unlisted
4
Select a community platform:
1.
You can select just one community platform and the one being selected will be circled in
layered colors.
Select the privacy mode:
2.
You can select the privacy mode of Public, Private, and Unlisted when you upload the
video.
Upload title:
3.
The title item will define the name of the video when you upload the video, you can
select the Auto: “DD/MM/YYYY (default) – Dash Cam – KENWOOD VIDEO PLAYER” or
define the title by yourselves.
Last step:
4.
Click to go back to the last step.
Next step:
5.
Click to go to the next step. (When you click on YouTube, a webpage will open for you
to log into your account. After completing the login authorization, the Next button will
be displayed.)
01:0000:27
47
Page 50
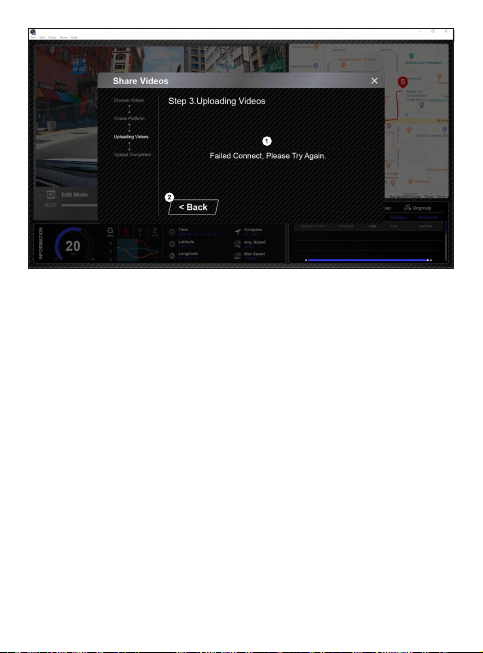
KENWOOD VIDEO PLAYER
JVC VIDEO PLAYER
File
Edit Setup Share Help
00:27
INFORMATION
1.
File upload failure:
This page displays if an upload failed or there is a server connection timeout.
2.
Last step:
Click to go back to the last step.
48
Page 51
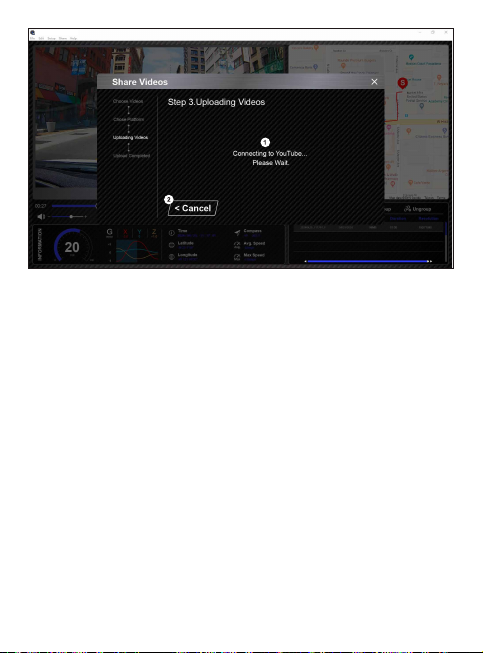
KENWOOD VIDEO PLAYER
00:27
INFORMATION
Connect to community platform:
1.
The message "Connecting to Social Media…… Please Wait." displays when a
connection is being initiated. Your default browser will display and connect to the
selected community platform. You are required to bundle your account ID with the
platform for connection the first time only (no longer needed once bundled).
Cancel:
2.
Click to go back to the last step.
49
Page 52
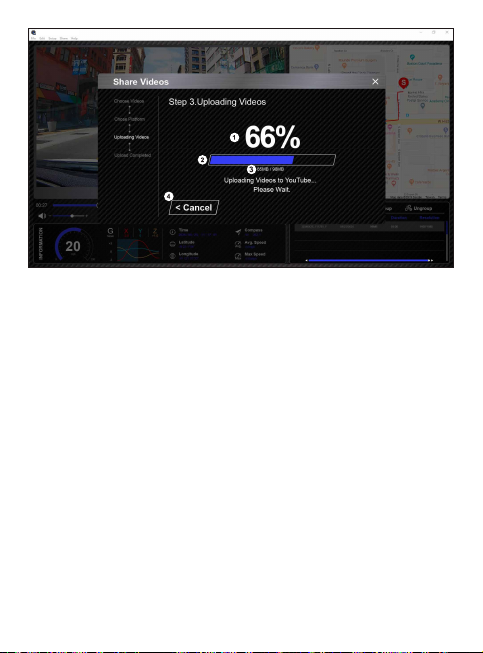
KENWOOD VIDEO PLAYER
1.
Upload status (1):
The file upload progress is presented as a percentage symbol "%" and synced with
item 2.
2.
Upload status (2):
The file upload progress is presented by a frame being filled with layered colors ink
and synced with item 1. The file is uploaded successfully once the frame is fully inked
in layered colors.
3.
Upload progress:
The former number is the MB uploaded and the latter is the total for the upload.
4.
Cancel:
Click to go back to the last step.
50
Page 53
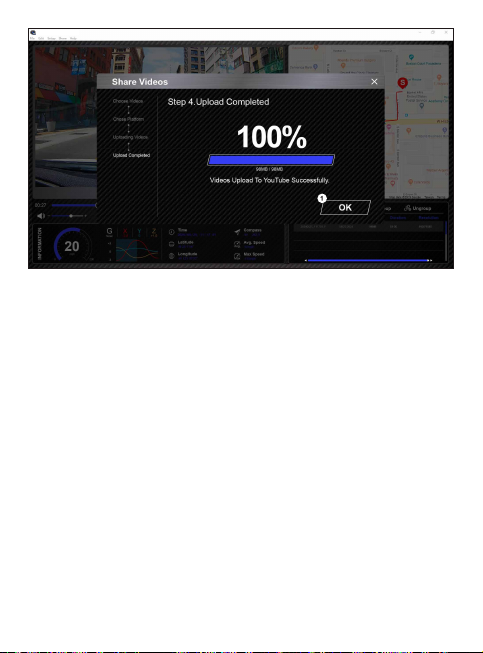
KENWOOD VIDEO PLAYER
Confirm:
1.
Click to go back to play mode information.
51
Page 54
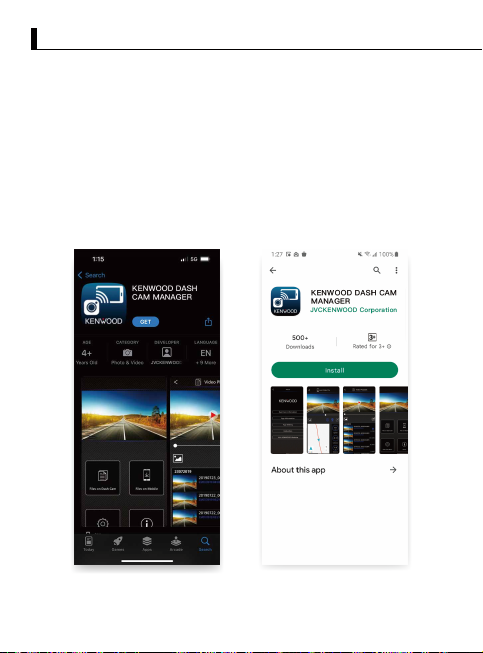
Using the Smartphone App
Connect DRV-A610W with your mobile devices by using wireless link function.
DOWNLOAD KENWOOD DASH CAM MANAGER
1.
KENWOOD DASH CAM MANAGER is a completely free set of video playback
application. Which can be used to remote control and live stream preview in a short
distance or download and review videos from DRV-A610W. With its mapping
function, users can view the route, speed, latitude, longitude, and direction of the
drive at the time. In addition, users can easily edit the length of the video for quick
upload to share with friends, relatives, and insurance companies.
Please download KENWOOD DASH CAM MANAGER from App Store / Google Play.
Operating System Minimum Requirements: iOS 15 and above / Android 10 and above.
52
Page 55
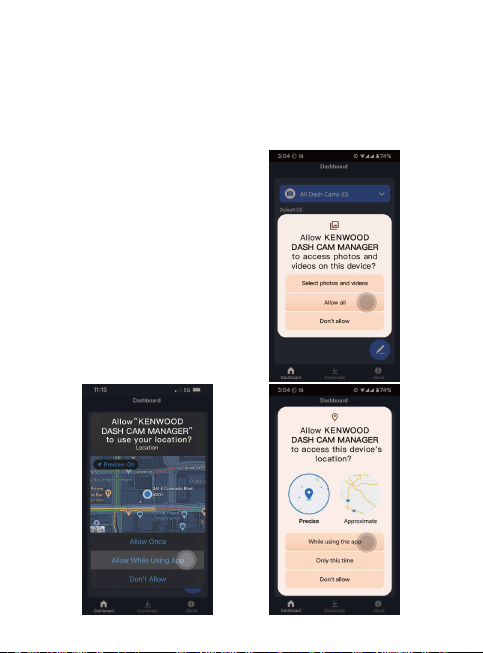
OPEN KENWOOD DASH CAM MANAGER APP ON YOUR MOBILE DEVICE
2.
The first time you open the app, two notifications will pop up.
1. You will need to allow "KENWOOD DASH CAM MANAGER" to access photos and
videos on this device "Allow all".. (Android users only)
2. You will need to allow "KENWOOD DASH CAM MANAGER" to access the location
information of this device "While using the app". (Both Android and iOS users)
The following pictures are provided for reference.
iOS
Android
53
Page 56
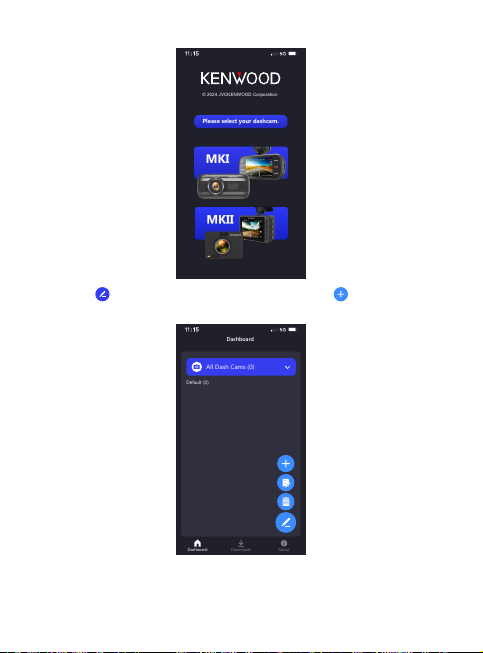
© 2024 JVCKENWOOD Corporation
Please select your dashcam.
Please select the MKII image to enter the MKII dedicated app
All Dash Cams (7)
Default (0)
Dashboard
Dashboard
Downloads
About
All Dash Cams (0)
3.
Press PEN icon on DASHBOARD page and then press + icon to enter ADD
DEVICE page.
54
Page 57
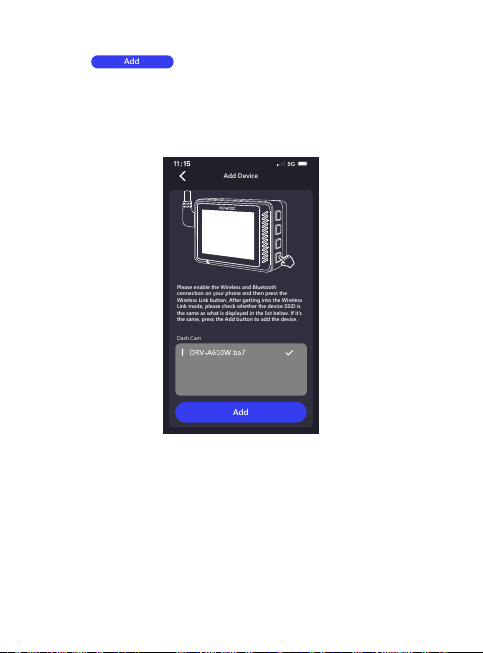
Add Device
Please enable the Wireless and Bluetooth
connection on your phone and then press the
Wireless Link button. After getting into the Wireless
Link mode, please check whether the device SSID is
the same as what is displayed in the list below. If it's
the same, press the Add button to add the device.
Dash Cam
Add
The phone will start scanning for nearby devices. If any are found, they will be
Add
displayed in the list below. Next, please select the device you want to add and press
the ADD button.
Note:
Please ensure that your dash cam is currently powered on and not in Menu or
Playback mode. Wireless Link activation is not supported in these modes.
However, it is supported in Video mode and Wireless Link mode.
55
Page 58
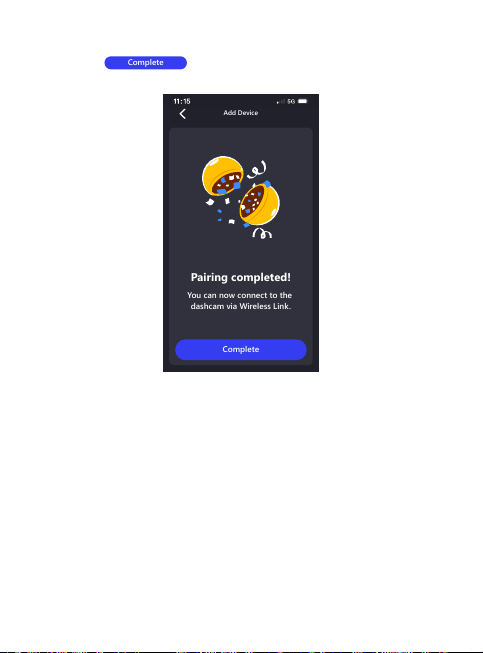
Add Device
Complete
Pairing completed!
You can now connect to the
dashcam via Wireless Link.
READY TO GO
Complete
4.
Congratulations on successfully adding and pairing the device. Please press the
COMPLETE button to return to the DASHBOARD page.
56
Page 59
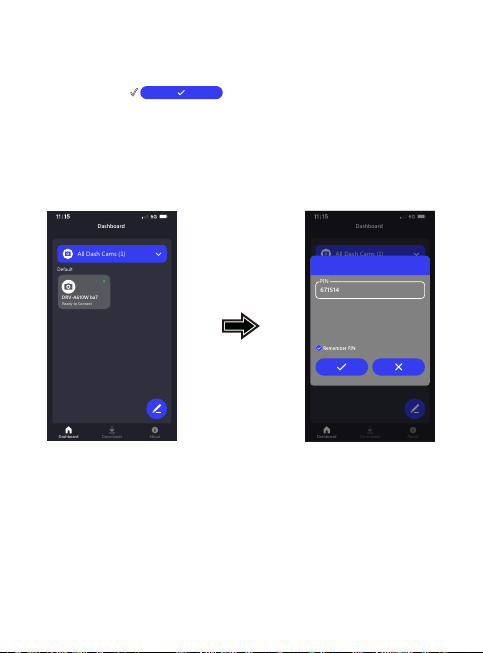
After returning to the DASHBOARD page, you can see the device you just added has
All Dash Cams (7)
Default
Dashboard
Dashboard
Downloads
About
All Dash Cams (1)
DRV-A610W ba7
Ready to Connect
All Dash Cams (7)
Default
Dashboard
Dashboard
Downloads
About
All Dash Cams (1)
DRV-A610W ba7
Ready to Connect
671514
PIN
appeared. A green light indicates the device is within connection range. After clicking
on the device, a window for entering the App Pairing PIN will pop up. If you use the
default PIN on the device, the App has already entered the default PIN for you:
671514. Click on the
own PIN for your device, please enter the PIN you set.
Note:
Please ensure that your dash cam is currently powered on and not in Menu or
Playback mode. Wireless Link activation is not supported in these modes.
However, it is supported in Video mode and Wireless Link mode.
✓
to connect the device. If you have set your
App Pairing PIN
Please enter the App pairing PIN. The default
pairing PIN is 671514, but if you have set your own
PIN on your dash cam, please enter the PIN you
have set. If you forget you PIN, you can always
view or change your PIN through your dash cam by
entering dash cam's Setup Menu > System Info >
App Pairing PIN.
57
Page 60
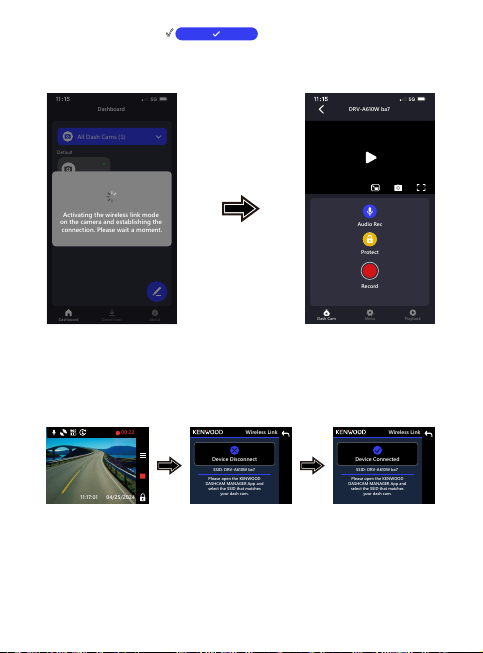
All Dash Cams (7)
Default
Dashboard
Dashboard
Downloads
About
All Dash Cams (1)
DRV-A610W
Connected
Activating the wireless link mode
on the camera and establishing the
connection. Please wait a moment.
DRV-A610W ba7
Audio Rec
Record
Protect
Menu
Playback
Dash Cam
00:22
04/25/2024
11:17:01
Wireless Link
Device Connected
Please open the KENWOOD
DASHCAM MANAGER App and
select the SSID that matches
your dash cam.
SSID: DRV-A610W ba7
Wireless Link
Device Disconnect
Please open the KENWOOD
DASHCAM MANAGER App and
select the SSID that matches
your dash cam.
SSID: DRV-A610W ba7
After clicking After clicking
and then take you to the DASH CAM page. Your dash cam side will switch from Video
mode to Wireless Link mode, and once the connection is complete, your dash cam will
display Connected. Congratulations! You can use all wireless functions now.
Note:
Sometimes, due to certain connection anomalies, a connection cannot be
established. Please follow the prompts displayed on the app to complete the
connection.
A mobile device can only connect to one dash cam at a time through a wireless
network, and you must connect your device to use it.
✓
, your phone will display connecting
58
Page 61
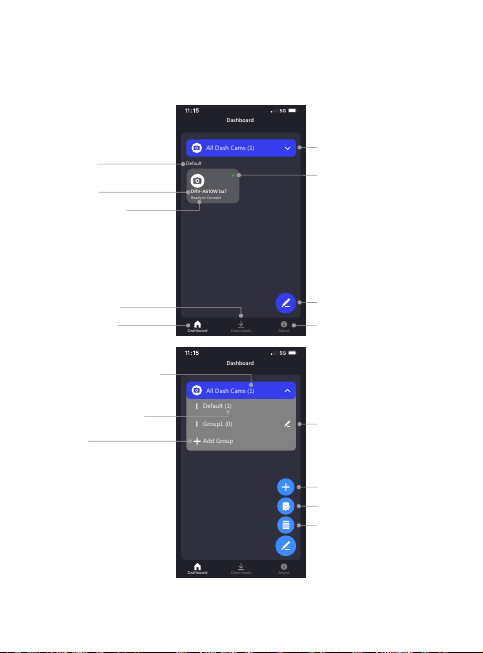
Dashboard
Dashboard
Downloads
About
Didault
DRV-A610W
Connected
Default (1)
Group1 (0)
Add Group
All Dash Cams (1)
MANAGE CONNECTED DEVICES (DASHBOARD PAGE)
All Dash Cams (7)
Default
Dashboard
Dashboard
Downloads
About
All Dash Cams (1)
DRV-A610W ba7
Ready to Connect
ADD / DELETE / RENAME / REGROUP connected devices on your mobile device.
Press the connected device you just added on the DASHBOARD page. You will see a
green light ● next to the device meaning the device is connecting to your mobile
device correctly and then you will enter the DASH CAM page.
Group name
Device name
Connection status
Downloads page
Dashboard page
The total device amount
The device amount in
the group
Add group
Group setup
Signal status indicator
Green light:
Within the connection range
Red light:
Outside the connection range
Edit devices menu
About page
Rename / Delete group
Add device
Rename / Regroup device
Delete device
59
Page 62
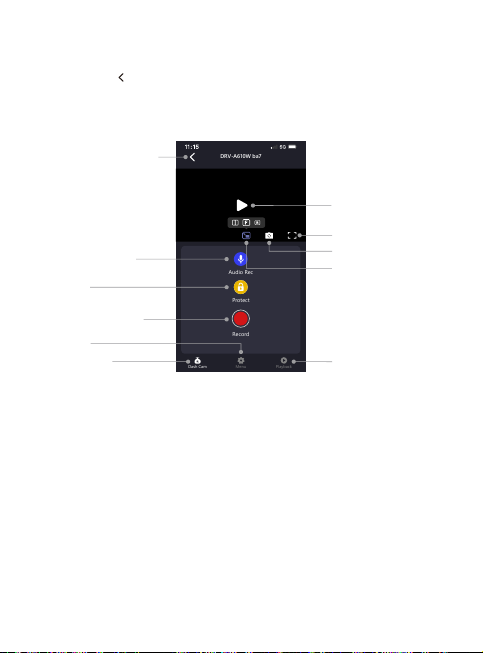
DRV-A610W ba7
Audio Rec
Record
Protect
Menu
Playback
Dash Cam
After you enter DASH CAM page, you can find there will be three pages (DASH CAM /
MENU / PLAYBACK) in the bottom navigation bar. You can always press it to switch the
page. If you want to go back to DASHBOARD page, just simply press BACK TO
PREVIOUS PAGE button.
CONTROL AND OPERATE (DASH CAM PAGE)
Control the LIVE STREAM / VIDEO RECORD / AUDIO RECORD / PROTECT FILE
function on your mobile device.
Back to Dashboard page
Start / Stop live stream
Full screen
Audio record / mute
Protect file
Start / Stop recording
Screenshot
Screen Select
Dual cameras display
Front camera display
Rear camera display
Menu page
Dash Cam page
Playback page
60
Page 63
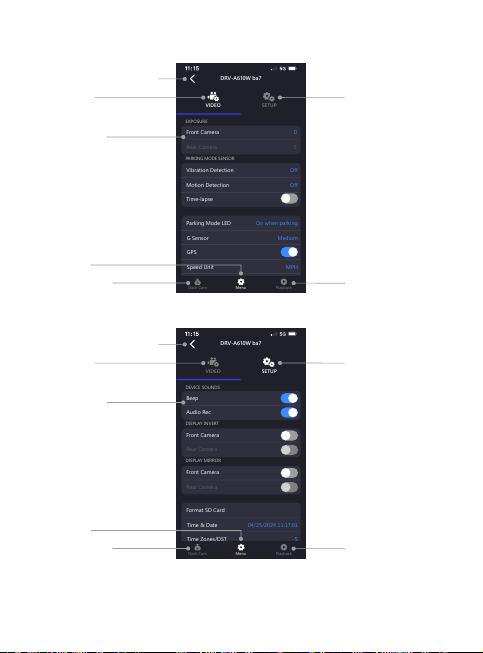
DRV-A610W ba7
VIDEO
SETUP
Menu
Playback
Dash Cam
MPH
Speed Unit
GPS
G Sensor
Medium
On when parking
Front Camera
0
Rear Camera
0
EXPOSURE
PARKING MODE SENSOR
Vibration Detection
Off
Motion Detection
Off
Time-lapse
Parking Mode LED
ACCESS VIDEO AND SETUP MENU (MENU PAGE)
DRV-A610W ba7
VIDEO
SETUP
Menu
Playback
Dash Cam
Time & Date
04/25/2024 11:17:01
Beep
Audio Rec
DEVICE SOUNDS
Format SD Card
Front Camera
Rear Camera
DISPLAY INVERT
Front Camera
Rear Camera
DISPLAY MIRROR
ADJUST SETTINGS on your mobile device. These settings will be synced with the dash
cam.
Back to Dashboard page
Video menu
Setup menu
Menu settings
Menu page
Dash Cam page
Back to Dashboard page
Video menu
Menu settings
Menu page
Dash Cam page
Playback page
Setup menu
Playback page
61
Page 64
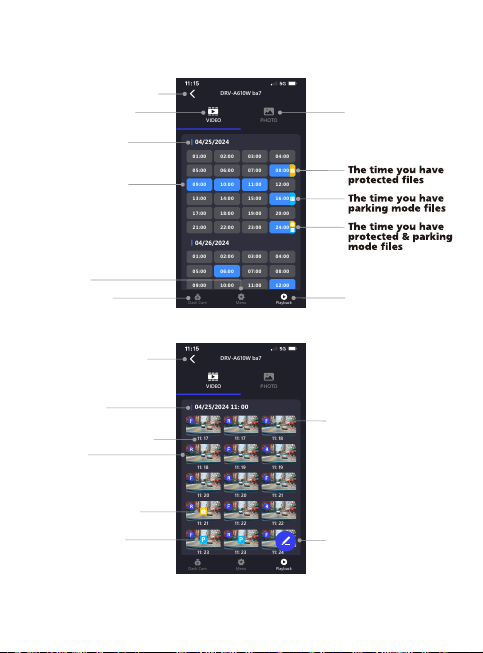
04/25/2024 11: 00
11: 17
11: 17
11: 18
11: 18
11: 19
11: 19
11: 20
11: 20
11: 21
11: 21
11: 22
11: 22
11: 23
11: 23
11: 24
DRV-A610W ba7
VIDEO
PHOTO
Menu
Playback
Dash Cam
04/25/2024
01:00
02:00
03:00
04:00
05:00
06:00
07:00
08:00
09:00
10:00
11:00
12:00
13:00
14:00
15:00
16:00
17:00
18:00
19:00
20:00
21:00
22:00
23:00
24:00
04/26/2024
01:00
02:00
03:00
04:00
05:00
06:00
07:00
08:00
09:00
10:00
11:00
12:00
DRV-A610W ba7
Menu
Playback
VIDEO
PHOTO
Dash Cam
PLAYBACK AND DOWNLOAD FILES (PLAYBACK PAGE)
PLAYBACK (PROTECT / UNPROTECT / DELETE) or DOWNLOAD the videos from the
connected DRV-A610W on your mobile device.
Back to Dashboard page
Playback video files
The date you have
video files
The time you have
video files (Highlight)
Playback photo files
Menu page
Dash Cam page
Back to previous page
Date and time
Exact time of the video
Video files
Protected video files
Protected parking
video files
Playback page
F: Front camera
R: Rear camera (Optional)
Edit files menu
62
Page 65
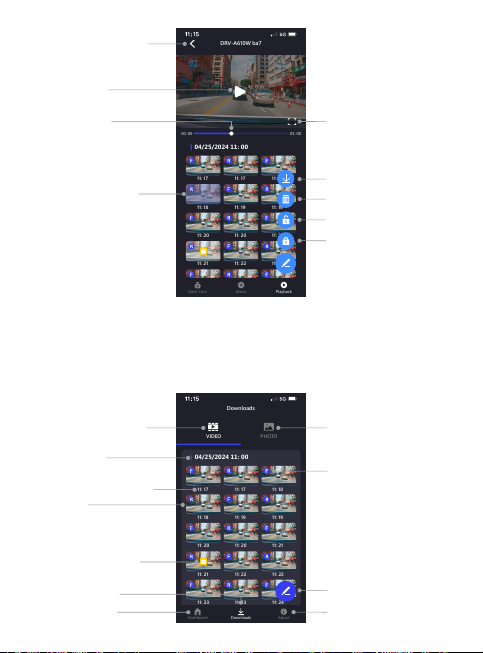
04/25/2024 11: 00
11: 17
11: 17
11: 18
11: 18
11: 19
11: 19
11: 20
11: 20
11: 21
11: 21
11: 22
11: 22
11: 23
11: 23
11: 24
Downloads
VIDEO
PHOTO
Dashboard
Downloads
About
08: 12
08: 13
08: 14
04/25/2024 11: 00
11: 17
11: 17
11: 18
11: 18
11: 19
11: 19
11: 20
11: 20
11: 21
11: 21
11: 22
11: 22
11: 29
11: 30
11: 31
DRV-A610W ba7
00: 00
01: 00
Menu
Playback
Dash Cam
Back to previous page
Play / Stop the
selected video
Timeline of the
selected video
Full screen
The video you select
(Highlight)
Download files
Delete files
Unprotect files
Protect files
CUT AND SHARE DOWNLOADED FILES (DOWNLOADS PAGE)
Not only PLAYBACK (PROTECT / UNPROTECT / DELETE) the downloaded files with
speed data and Google Maps function but also CUT and SHARE the files to your
friends and relatives on your mobile device.
Playback downloaded
video files
Date and time
Exact time of the video
Video files
Playback downloaded
photo files
F: Front camera
R: Rear camera (Optional)
E: Edited video
Protected video files
Downloads page
Dashboard page
63
Edit files menu
About page
Page 66
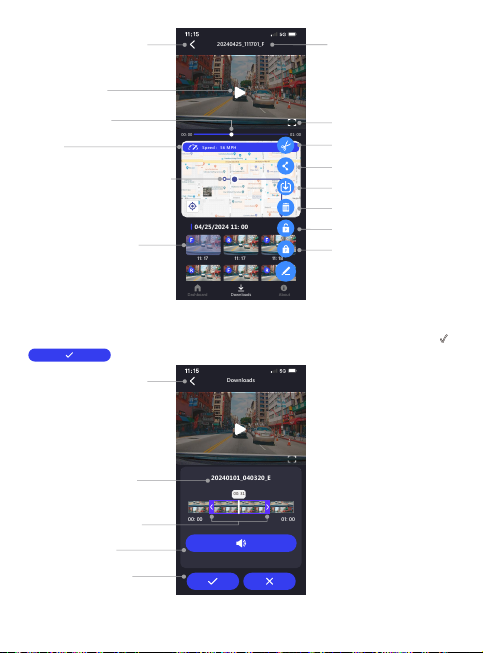
00: 00
01: 00
Downloads
20240101_040320_E
00: 00
01: 00
00: 31
Speed : 56 MPH
04/25/2024 11: 00
11: 17
11: 17
11: 17
11: 18
20240425_111701_F
00: 00
01: 00
Dashboard
Downloads
About
Back to previous page
Play / Stop the
selected video
Timeline of the
selected video
Speed
Google Maps tracking logs
(Note : After downloading your video,
please disconnect the device and
connect to the Internet to download
the Google Maps map data to watch.)
The video you select
(Highlight)
Cut / edit function is very simple, select the length of the video you want, and press ✓
button to output the edited video.
File name
Full screen
Edit the selected file
Share files
Share files to
phone's Photos(iOS)
Delete files
Unprotect files
Protect files
Back to previous page
The file name under
editing
Choose the spectrum
you want to keep
You can keep or
remove the audio
Press to output the
edited video
64
Page 67
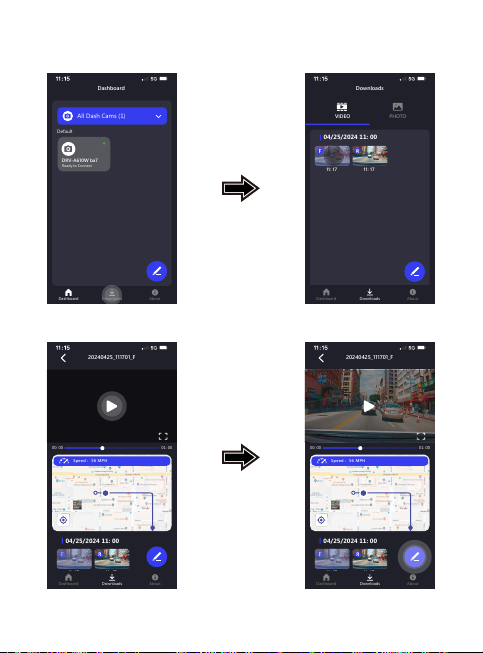
All Dash Cams (7)
Default
Dashboard
Dashboard
Downloads
About
All Dash Cams (1)
DRV-A610W ba7
Ready to Connect
04/25/2024 11: 00
11: 17
11: 17
Downloads
VIDEO
PHOTO
Dashboard
Downloads
About
Speed : 56 MPH
04/25/2024 11: 00
20240425_111701_F
00: 00
01: 00
Dashboard
Downloads
About
Speed : 56 MPH
04/25/2024 11: 00
20240425_111701_F
00: 00
01: 00
Dashboard
Downloads
About
How to edit the video:
2. Click on the file you want to edit.1. Enter the Downloads page.
4. Click on the Pen icon.3. Click Play to review the video.
65
Page 68
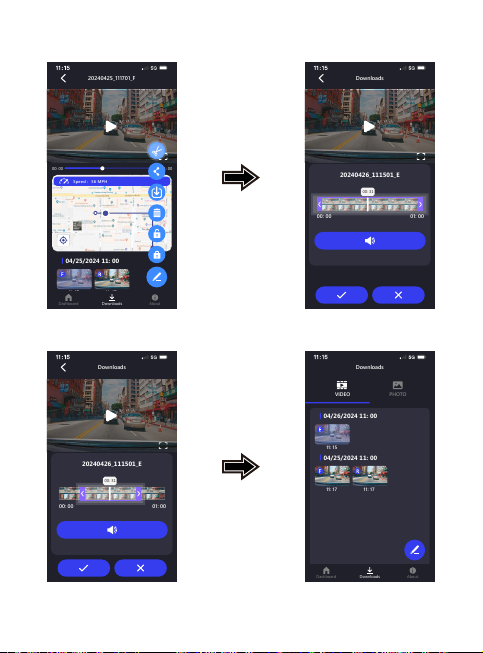
04/26/2024 11: 00
11: 15
04/25/2024 11: 00
11: 17
11: 17
Downloads
VIDEO
PHOTO
Dashboard
Downloads
About
00: 00
01: 00
Downloads
20240426_111501_E
00: 00
01: 00
00: 31
Speed : 56 MPH
04/25/2024 11: 00
20240425_111701_F
00: 00
01: 00
Dashboard
Downloads
About
00: 00
01: 00
Downloads
20240426_111501_E
00: 00
01: 00
00: 31
5. Click on the Edit icon.
6. Drag the time sliders on
both sides to determine the
range of the clip.
7. Once decided, press the
✓ icon to export the video.
8. The video with “E” is the
Edited video.
66
Page 69
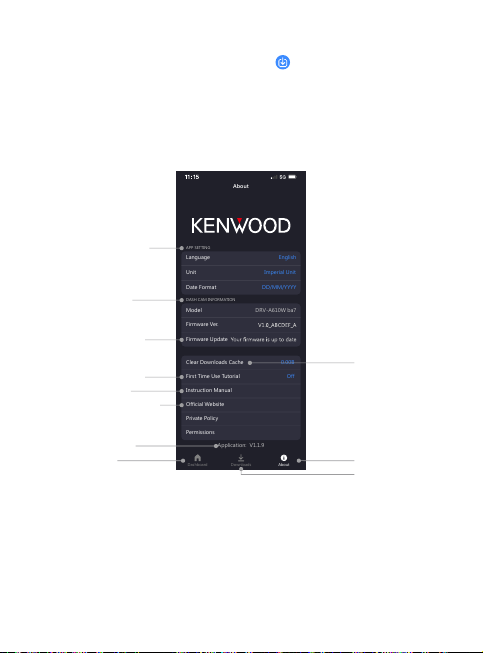
About
Application: V1.1.9
Dashboard
Downloads
About
First Time Use Tutorial
Clear Downloads Cache
Model
DRV-A610W ba7
Firmware Ver.
Firmware Update
Language
English
Unit
Imperial Unit
Date Format
DD/MM/YYYY
APP SETTING
DASH CAM INFORMATION
0.00B
Off
Instruction Manual
Official Website
Private Policy
Permissions
If you are using an Android system, the video will automatically be saved in your
Photos App. If you are using an iOS system, please transfer it to your Photos App by
clicking on the Pen icon / Share to Phone's Photos icon.
APP SETTINGS AND HELPFUL INFO (ABOUT PAGE)
Change LANGUAGE / SPEED UNIT / DATE FORMAT settings and check the MODEL /
FIRMWARE VER. / FIRMWARE UPDATE / SOFTWARE VERSION / CLEAN
DOWNLOADS CACHE / FIRST TIME USE TUTORIAL / INSTRUC TION MANUAL /
OFFICIAL WEBSITE on your mobile device.
App universal settings
Connected device’s
information
Update firmware
through the mobile app
First time use tutorial
Instruction manual
Visit the official website
Clear the cache of
unfinished video
downloads
Current app version
Dashboard page
About page
Downloads page
67
Page 70
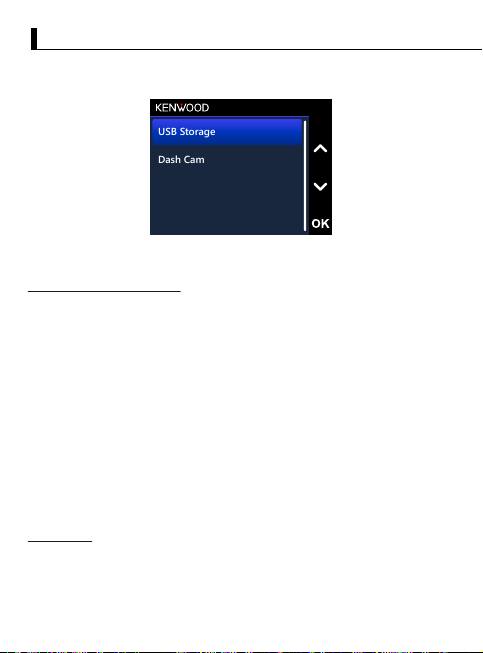
USB Storage
Dash Cam
Connection with Computer
When you use the third-party USB cable (Only support USB-A to USB-C) to connect
DRV-A610W to your computer, the LCD screen will show two available options.
Use the UP and DOWN buttons to select the necessary function, and press the OK
button to continue.
USB STORAGE (OPTIONAL)
When you have connected DRV-A610W to the computer, the camera will operate as a
card reader. Your computer will have a pop up of a new drive for you to browse all
the video and picture files.
Note:
DRV-A610W is a “Read Only” device If you want to copy / delete / edit the files,
remove the Micro SD Card and use another card reader to connect your computer.
REMEMBER: Turn your DRV-A610W off before you disconnect it from your
computer.
The provided Type-C car power cable does not have data transfer capabilities; it's
solely for power supply. When using a third-party USB-A to USB-C cable with data
transfer functionality to connect the camera to a computer, the camera will operate
as a card reader when selecting USB Storage on the camera. Your computer will pop
up with a new drive, allowing you to browse all video and picture files. The device
does not support Type-C USB cables with PD (Power Delivery) fast charging or USB-C
to USB-C cables.
DASH CAM
When you choose this option, DRV-A610W will turn on and work normally while the
device is being charged.
Note:
REMEMBER: To always turn off DRV-A610W before disconnecting it from your
computer.
68
Page 71
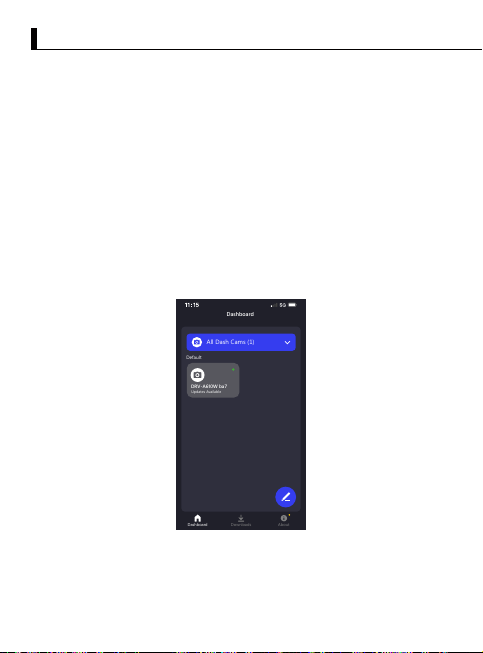
Firmware Update Instruction
All Dash Cams (7)
Default
Dashboard
Dashboard
Downloads
About
All Dash Cams (1)
DRV-A610W ba7
Updates Available
Team KENWOOD will keep update the firmware to improve the better user experience
for our valued customers. Once you register your product on KENWOOD website, we
will send you information about our new firmware update. Or you can visit the link
below once for a while to check if there is any new firmware update:
https://www.kenwood.com/cs/ce/firmware/option/
There are two ways to update the device’s firmware: (A) OTA updates via the
KENWOOD DASH CAM MANAGER APP on a smartphone and (B) Download the latest
firmware from the internet and updating the device using a memory card with your PC.
Please follow the step by step instruction below:
OTA updates via the KENWOOD DASH CAM MANAGER APP on a smartphone(A)
1.
Open the KENWOOD DASH CAM MANAGER APP on your phone and navigate
to the MKII DASHBOARD page. When your phone detects a new firmware
version, "Updates Available" will be displayed beneath your device name, and a
yellow dot will appear next to ABOUT page indicating the presence of new
firmware.
69
Page 72
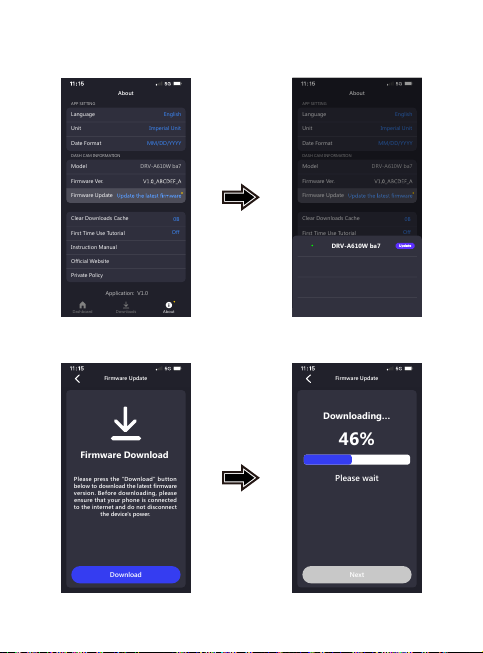
About
Application: V1.0
Dashboard
Downloads
About
First Time Use Tutorial
Clear Downloads Cache
Model
DRV-A610W ba7
Firmware Ver.
Firmware Update
Language
English
Unit
Imperial Unit
Date Format
MM/DD/YYYY
APP SETTING
DASH CAM INFORMATION
0B
Off
Instruction Manual
Official Website
Private Policy
About
First Time Use Tutorial
Clear Downloads Cache
Model
DRV-A610W ba7
Firmware Ver.
Firmware Update
Language
English
Unit
Imperial Unit
Date Format
MM/DD/YYYY
APP SETTING
DASH CAM INFORMATION
0B
Off
Instruction Manual
Official Website
Private Policy
Application: V1.0
Dashboard
Downloads
About
DRV-A610W ba7
2.
Firmware Update
Download
Please press the "Download" button
below to download the latest firmware
version. Before downloading, please
ensure that your phone is connected
to the internet and do not disconnect
the device's power.
Firmware Download
Firmware Update
Next
Downloading…
46%
Please wait
Go to the ABOUT page, and you'll see the "Firmware Update" option showing
"Update the latest firmware" accompanied by a yellow dot. Click on it and select
the device you wish to update.
3.
After clicking, you'll be directed to the FIRMWARE UPDATE page. Follow the
on-screen instructions to download the latest Firmware and confirm the update.
70
Page 73
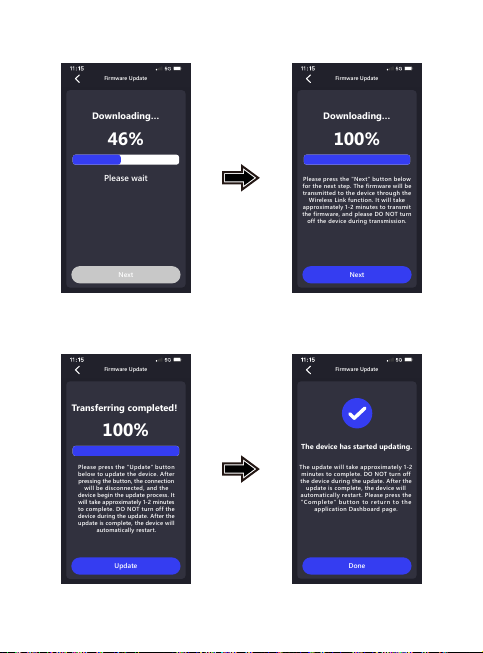
4.
Firmware Update
Update
Transferring completed!
100%
Please press the "Update" button
below to update the device. After
pressing the button, the connection
will be disconnected, and the
device begin the update process. It
will take approximately 1-2 minutes
to complete. DO NOT turn off the
device during the update. After the
update is complete, the device will
automatically restart.
Firmware Update
Done
The device has started updating.
The update will take approximately 1-2
minutes to complete. DO NOT turn off
the device during the update. After the
update is complete, the device will
automatically restart. Please press the
"Complete" button to return to the
application Dashboard page.
Firmware Update
Next
Downloading…
100%
Please press the "Next" button below
for the next step. The firmware will be
transmitted to the device through the
Wireless Link function. It will take
approximately 1-2 minutes to transmit
the firmware, and please DO NOT turn
off the device during transmission.
Firmware Update
Next
Downloading…
46%
Please wait
At this point, the phone will transmit the downloaded firmware to the device
using the wireless link function.
5.
Once the transfer is complete, press "Update" on your phone, and the device will
begin the update process. Please do not disconnect the device’s power during this
time. The update will take approximately 1-2 minutes.
71
Page 74
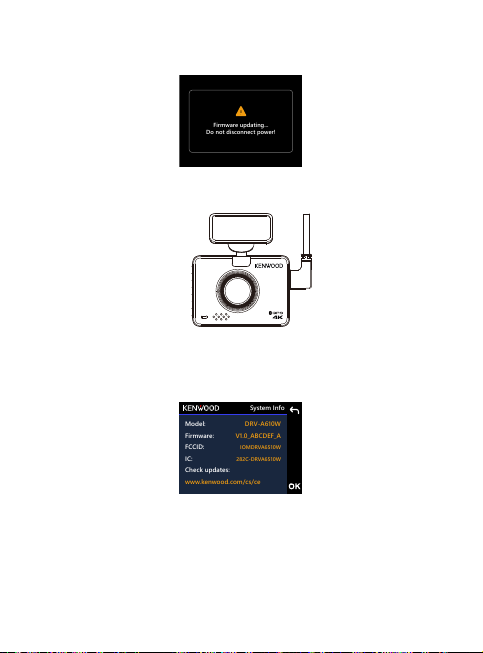
System Info
Model:
Firmware:
FCCID:
IC:
Check updates:
www.kenwood.com/cs/ce
DRV-A610W
IOMDRVA6510W
282C-DRVA6510W
V1.0_ABCDEF_A
6.
Firmware updating...
Do not disconnect power!
When the update starts, there will be a popup message as picture below.
DO NOT TURN OFF OR PRESS ANY BUTTON DURING THIS PERIOD, IT MAY
CAUSE THE UPDATE FAILURE.
7.
It may take a while for updating. Once it finishes the update, DRV-A610W will
turn off the device automatically.
8.
Turn on the dash cam and reset the first time settings. Press MENU button
twice to entry SETUP MENU and select the System Info and select Firmware
Version to check if the Version is the latest one [V1.0_ABCDEF_A] as shown on
website, then it is successfully updated.
72
Page 75
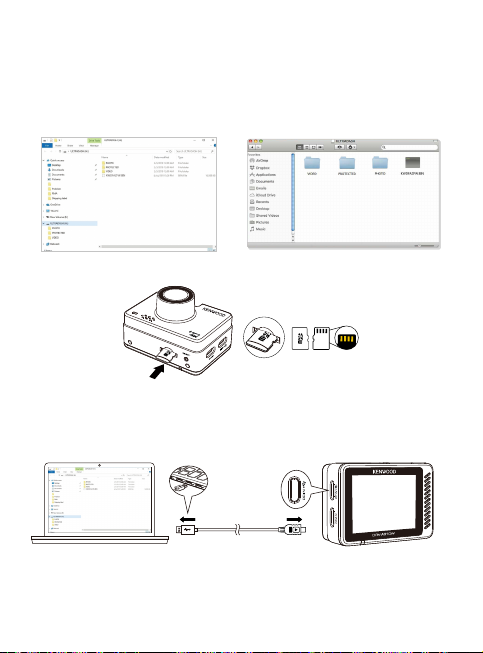
Download the latest firmware from the internet and updating the device
(B)
using a memory card with your PC
1. Make sure your SD card is formatted and copy the KWDFAZFW.BIN into the root
directory of the SD card.
Notice: Make sure the file name is KWDFAZFW.BIN If you see KWDFAZFW.BIN(1)
or so on, please rename the file name to KWDFAZFW.BIN
2. Insert the SD card into the dashcam.
3. Connect DRV-A610W to your PC or Mac with the 3rd party USB A to USB C cable,
and make sure the dashcam is charging.
The device does not support Type-C USB cables with PD (Power Delivery) fast
charging or USB-C to USB-C cables.
3rd party USB A to USB C cable
73
Page 76
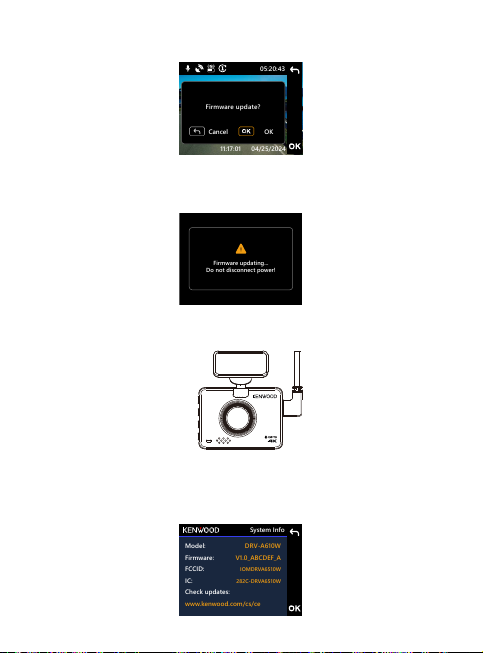
4.
05:20:43
04/25/2024
11:17:01
OK
Cancel
Firmware update?
Firmware updating...
Do not disconnect power!
System Info
Model:
Firmware:
FCCID:
IC:
Check updates:
www.kenwood.com/cs/ce
DRV-A610W
IOMDRVA6510W
282C-DRVA6510W
V1.0_ABCDEF_A
When turning on the dashcam, select Dash Cam and there will be a popup message
as picture below. Please press OK button to start the update.
5.
When the update starts, there will be a popup message as picture below.
DO NOT TURN OFF OR PRESS ANY BUTTON DURING THIS PERIOD, IT MAY
CAUSE THE UPDATE FAILURE.
6.
It may take a while for updating. Once it finishes the update, DRV-A610W will
turn off the device automatically.
7.
Turn on the dash cam and reset the first time settings. Press MENU button
twice to entry SETUP MENU and select the System Info and select Firmware
Version to check if the Version is the latest one [V1.0_ABCDEF_A] as shown on
website, then it is successfully updated.
74
Page 77

TroubleshootingTroubleshooting
Blurred Image (Video)
DRV-A610W comes with a protective lens cover for the camera's lens, be
sure to remove it. Wipe the lens with a soft cloth until any debris / stains
are removed. Clean your vehicle's windshield where the camera is placed.
Unable to insert Micro SD
Memory Card
Memory card does not
release from DRV-A610W
DRV-A610W video files can
not be played
Video files jump when they
are being played
The total video recording
time is only a few minutes
long
I cannot save my video files
to my computer through the
USB storage feature
DRV-A610W shuts down on
its own
DRV-A610W does not charge
in my car
Make sure the metal portion of the memory card faces the screen side.
Once inserted, push the card until a CLICK sound is heard.
DRV-A610W releases the Micro SD Memory Card by pressing the memory
card forward. By applying the pressure on the memory card, a small click
sound will be made.
If you are unable to remove the memory card, use the edge of a small coin
to push forward until the click sound is made.
These files may not be played on your PC if you do not have a suitable
video player installed. Please refer to page 42. Download
Link: https://www.kenwood.com/cs/ce/
The memory card that we recommends for best quality is the UHS type 3
Max Endurance Micro SD Card.
If your PC does not recognize the video files, try another PC to view the
recorded video.
You may have a small amount of available space left for your memory card.
Back up all the files you need from the memory card. Only AFTER you back
up all the files you need, format the memory card with DRV-A610W.
The functions have been optimized to work properly with both PC and Mac
computers. Please reboot your computers. Make sure DRV-A610W is
connected properly.
Auto power off function will turn off DRV-A610W automatically after it
loses its power supply. Make sure DRV-A610W is connected properly to the
car power cable.
If your car power cable is not working properly with your DRV-A610W,
check your car’s power fuses. Also check your power cord and replace it if
there is an issue.
75
Page 78

Micro SD Card is not letting
me view my files
I cannot delete the file on
DRV-A610W
My screen turns off
after I just turned it on
The message “Please Format
SD Card” appears on my
screen
DRV-A610W does not charge
A “Card Error” message
appears on my DRV-A610W
A “Card Full” message
appears on my DRV-A610W
DRV-A610W always turn on
by itself.
I press the MENU button but
nothing happens
When I download files from
the KENWOOD website a
malicious software message
appears
Try some different card readers and computers to see if any of them can
view the files. If none of them work, the files are probably damaged. Use
DRV-A610W to format the memory card. (WARNING: formatting the
memory card will remove all the files saved), We recommended using the
branded UHS 3 Max Endurance Micro SD Card. Note: You must format the
memory card with DRV-A610W for first time use.
Be sure the file you are trying to delete is unprotected.
If the file is protected, please follow the instruction on page 40 to
unprotect the file first, and then delete the file.
The screen saver function turns off the screen after a period of inactivity. If
you want to turn off this function, go to VIDEO menu -> Screen Saver,
and turn it off.
DRV-A610W requires formatting the Micro SD card if the card is used on
DRV-A610W for the first time. Please format the SD card in the SETUP
menu.
Be sure the power cord is connected properly. When DRV-A610W is being
charged, the blue LED indicator will illuminate.
This indicates that the Micro SD card is not properly formatted to your
DRV-A610W. Please remove the files you would like to keep on to your PC,
and perform a “Format SD Card” procedure to allow your memory card to
function properly with DRV-A610W.
When this message appears, your Micro SD card is at full capacity.
Reminder: When you have protected files, you limit the use of your
memory card. Delete unnecessary files to allow maximum use of your
memory card.
The parking mode function will automatically start recording a 30 second
video clip and turn off when external forces are detected. If you want to
turn off this function, go to VIDEO menu -> Parking Mode Sensor, and turn
it off.
Reminder: DRV-A610W will not let you access the menu while it is
recording. To access the menu, stop recording and the MENU feature will
be accessible.
If this message appears, simply adjust your browser settings and allow for
the download to proceed. Once complete, reset your browser security to
protect your PC.
76
Page 79
If you continue to have problems with your device, please reset your device
Unresolved Issues
to default settings in the setup menu and begin the process over again. If
these problems remain, Please contact your store of purchase or a service
center.
Appendix
Wireless Link Specification
Standard
Security
Frequency Range
Transfer Rate
Output Power
Bluetooth Specification
Standard
Frequency Range
Output Power
Standard
Frequency Range
Output Power
GPS Specification
Frequency Range
Important Notice Concerning the Software
About Open Source Software included in the Desktop Software
The KENWOOD VIDEO PLAYER includes certain open source or other software
originating from third parties that is subject to the GNU Lesser General Public License
version 2.1 (LGPLv2.1) and different copyright licensees, disclaimers and notices.
The source code of software licensed under LGPLv2.1 and different copyright licenses,
disclaimers and notices are distributed at the website below,
http://www.kenwood.com/gpl.
FFmpeg
•
This software uses libraries from the FFmpeg project (http://ffmpeg.org/) under the
LGPLv2.1
License: GUN Lesser General Public License (LGPL) version 2.1
NSIS
•
This software’s installer is made using NSIS (http://nsis.sourceforge.net) which is
licensed under zlib/libpng license.
IEEE802.11n
WPA2
2400-2483MHz ISM band
72.2Mbps (802.11n)
15.46dBm±1.5dB (802.11n)
BT
2402-2480MHz
8.59dBm
BLE
2402-2480MHz
4.55dBm
1559-1610MHz
77
Page 80
Specifications
Product Name / Model Number
Power Requirements
Power Supply
(Car power cable)
Power Input(Car power cable)
Front Sensor Resolution
Rear Sensor Resolution
(Rear camera is sold separately)
Front Lens Angle / Aperture
Rear Lens Angle / Aperture
(Rear camera is sold separately)
Front Recording Resolution
Rear Recording Resolution
(Rear camera is sold separately)
Screen Size
Screen Resolution 320 (W) X 240 (H) pixel x RGB
Screen Ratio 4 : 3
Card Reader Micro SD, SDHC, up to 256GB
SD Card (Recommended Type)
SD Card Recorded File Capacity
(Based on Default Settings)
Unit Dimensions 2.3 x 1.68 x 0.96 inches (5.85 x 4.28 x 2.44 cm)
Dash Cam / DRV-A610W
5V / 1.5A ; 12-24V DC
Input: 12-24V DC
Output: 5V DC
Fuse Type: SMD/4A
Built-in super capacitor
8M Pixel
5M Pixel
135.6° / F1.8
123.6° / F2.0
4K (3840 x 2160 pixel) @ 30fps
2K (2560 x 1440 pixel) @ 30fps
2.0”
micro SDXC/SDHC card 8GB to 256GB supported,
UHS type 3 recommended for best resuts use a
regonized brand
32 GB Micro SD = 120 mins of recording
64 GB Micro SD = 240 mins of recording
128 GB Micro SD = 480 mins of recording
256 GB Micro SD = 960 mins of recording
72gUnit Weight
78
Page 81

The provided Type-C car power cable in the package DOES
NOT HAVE DATA TRANSFER functionality and is ONLY FOR
POWER SUPPLY purposes. If you wish to view videos, please
remove the memory card and read it on a computer, or use
the KENWOOD DASH CAM MANAGER APP on your mobile to
view via wireless link, or use a third-party USB-A to USB-C
cable with data transfer capabilities to connect and view on
The KENWOOD dash cam DOES NOT SUPPORT Type-C USB cables with PD
•
(Power Delivery) fast charging or USB-C to USB-C cables. We recommend
using the car power cable provided by us.
The KENWOOD dash cam requires a 2A current for normal operation, and the
•
KENWOOD USB car charger provides a 2.6A output current. We recommend using
the USB car charger provided by us.
Please DO NOT USE the other USB ports in the car to connect the KENWOOD
•
dash cam, as most car USB ports deliver less than 1A output, while the KENWOOD
dash cam requires a 2A current for normal operation.
DRV-A510W and DRV-A610W use HEVC (H.265) compression technology, so if your
•
computer does not support playback of this codec, please download a player
that supports HEVC (H.265) , such as KENWOOD VIDEO PLAYER, or search online
for free third-party players like VLC or MPC-HC.
a computer.
79
Page 82

 Loading...