


MONITOR WITH RECEIVER
DMX8019DABS
INSTRUCTION MANUAL
• Updated information (the latest Instruction Manual, system updates, new
functions, etc.) is available from
<http://www.kenwood.com/cs/ce/>.
B5A-2890-00 (E)© 2019 JVC KENWOOD Corporation

Contents
Before Use 4
Precautions ................................................................... 4
How to read this manual ......................................... 5
Basic Operations 6
Functions of the Buttons on the Front Panel ... 6
Turning on the Unit ................................................... 7
Initial Settings .............................................................. 8
Adjusting the volume .............................................10
Viewing Angle ...........................................................11
Touch screen operations .......................................11
HOME screen descriptions ....................................12
Popup menu ..............................................................12
Source selection screen description ..................13
Source control screen descriptions ...................15
List screen ...................................................................16
Widget 17
Widget ..........................................................................17
Multi Widget ...............................................................17
Photo Frame Widget ...............................................19
Widget Setup .............................................................19
APPS 21
Wireless Mirroring Operation ...............................21
Apple CarPlay Operation .......................................21
Android Auto™ Operation .....................................24
Spotify Operation .....................................................26
USB 28
Connecting a USB device ......................................28
USB Basic Operation ................................................28
Search Operation ......................................................30
iPod/iPhone 31
Preparation .................................................................31
iPod/iPhone Basic Operation ...............................32
Search Operation ......................................................33
Radio 34
Radio Basic Operation ............................................34
Memory Operation ..................................................35
Selecting Operation ................................................36
Traffic Information ...................................................36
Radio Setup ................................................................37
DAB 38
DAB Basic Operation ...............................................38
Storing Service in Preset Memory ......................39
Selecting Operation ................................................39
Traffic Information ...................................................40
DAB Setup ...................................................................41
Bluetooth Control 42
Information for using Bluetooth® devices .......42
Register the Bluetooth device .............................43
Bluetooth Setup ........................................................44
Playing the Bluetooth Audio Device .................46
Using the Hands-Free Unit ....................................48
Hands-Free Setup .....................................................52
Other External Components 54
View Camera ..............................................................54
Use Dashboard Camera..........................................57
External audio/video players (AV-IN).................57
HDMI source ...............................................................57
TV tuner .......................................................................58
2

Setup 59
Monitor Screen Setup .............................................59
System Setup .............................................................59
User Interface Setup ................................................59
Special Setup .............................................................61
Display Setup .............................................................61
AV Setup ......................................................................63
Controlling Audio 65
3-way speaker system setup ................................65
Speaker / X’over setup ............................................66
Controlling General Audio ....................................68
Equalizer Control ......................................................68
Volume Offset ............................................................69
Zone Control ..............................................................70
Sound Effect ...............................................................71
Listening Position / DTA .........................................72
Audio Setup memory .............................................73
Remote control 74
Battery Installation ...................................................74
Functions of the Remote control Buttons .......74
Connection/Installation 77
Before Installation ....................................................77
Installing the unit .....................................................78
Troubleshooting 86
Problems and Solutions .........................................86
Error Messages ..........................................................86
Appendix 88
Playable Media and Files........................................88
Specifications .............................................................89
About this Unit ..........................................................92
3English

Before Use
Before Use
Precautions
# WARNINGS
Ñ To prevent injury or fire, take
the following precautions:
• To prevent a short circuit, never put or leave
any metallic objects (such as coins or metallic
tools) inside the unit.
• Do not watch or fix your eyes on the unit’s
display when you are driving for any extended
period.
• If you experience problems during installation,
consult your KENWOOD dealer.
Ñ Precautions on using this unit
• When you purchase optional accessories,
check with your KENWOOD dealer to make
sure that they work with your model and in
your area.
• You can select a language to display menus,
audio file tags, etc. See User Interface Setup
(P. 59).
• The Radio Data System or Radio Broadcast
Data System feature won’t work in areas
where the service is not supported by any
broadcasting station.
Ñ Acquiring GPS signal
The first time you turn on this unit, you must
wait while the system acquires satellite signals
for the first time. This process could take up
to several minutes. Make sure your vehicle
is outdoors in an open area away from tall
buildings and trees for fastest acquisition.
After the system acquires satellites for the first
time, it will acquire satellites quickly each time
thereafter.
Ñ About GLONASS
This unit uses Global Navigation Satellite System
(GLONASS) in addition to GPS.
Combining GPS and GLONASS can refine
positioning accuracy than using GPS only.
Ñ Caution for Smartphone Users
Simultaneously running multiple applications
on your smartphone while screen sharing places
heavy demand on the microprocessor of the
phone, potentially affecting communication and
performance.
For best results while pairing with your Kenwood
receiver, please be sure to close any unused
applications.
Ñ Protecting the monitor
• To protect the monitor from damage, do not
operate the monitor using a ball point pen or
similar tool with a sharp tip.
Ñ Cleaning the unit
• If the faceplate of this unit is stained, wipe it
with a dry soft cloth such as a silicon cloth.
If the faceplate is stained badly, wipe it with
a cloth moistened with neutral cleaner, then
wipe it again with a clean soft dry cloth.
NOTE
• Applying spray cleaner directly to the unit
may damage its mechanical parts. Wiping the
faceplate with a hard cloth or using a volatile
liquid such as thinner or alcohol may scratch the
surface or erase the screened print.
4

How to read this manual
• The screens and panels shown in this
manual are examples used to provide a clear
explanation of operations.
For this reason, they may be different from
the actual screens or panels, or some display
patterns may be different from the actual ones.
• Display language: English is used for the
purpose of explanation. You can select a
display language from the [SETUP] menu. See
User Interface Setup (P.59).
Before Use
5English
Basic Operations
Basic Operations
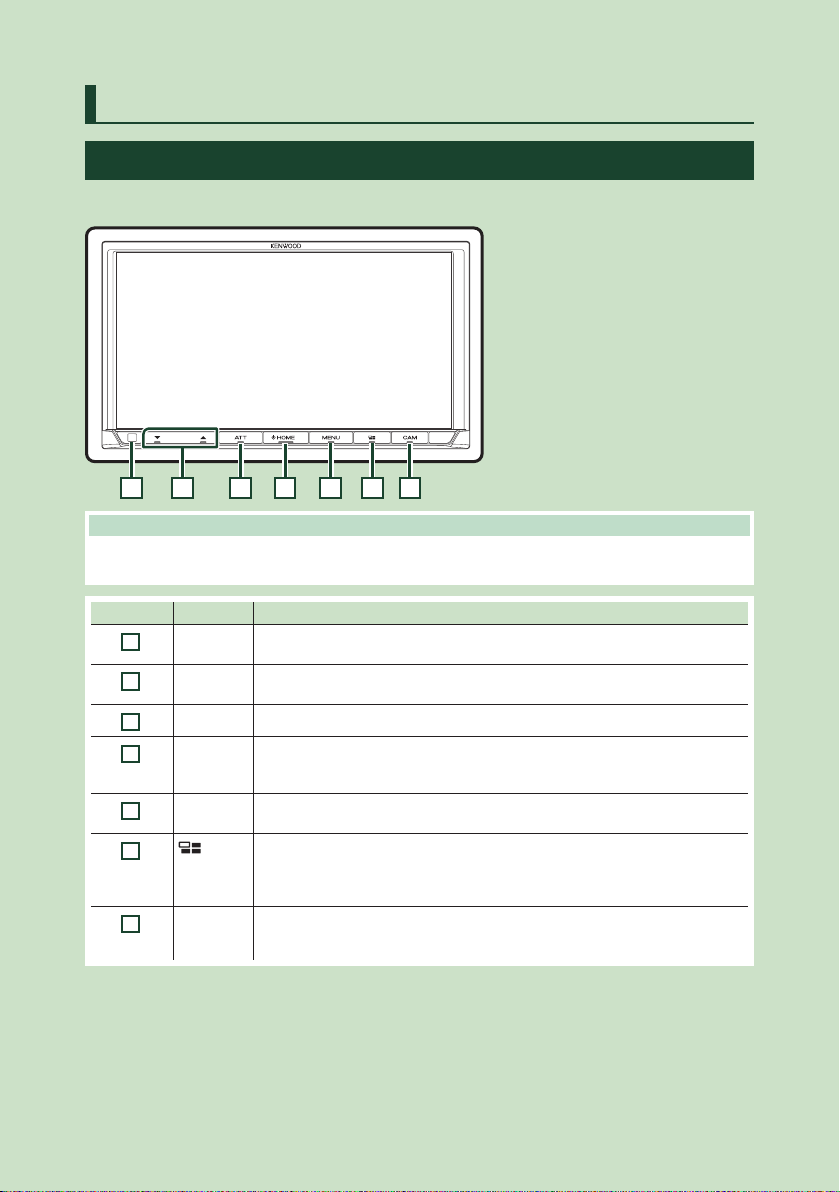
Functions of the Buttons on the Front Panel
DMX8019DABS
1 2 3 4 5 6 7
NOTE
• The panels shown in this manual are examples used to provide a clear explanation of operations. For this reason,
they may be different from the actual panels.
Number Name Motion
Remote
1
Sensor
S, R
2
(Volume)
AT T • Switches attenuation of the volume on/off.
3
HOME • Displays the HOME screen (P.12).
4
MENU • Displays the popup menu screen.
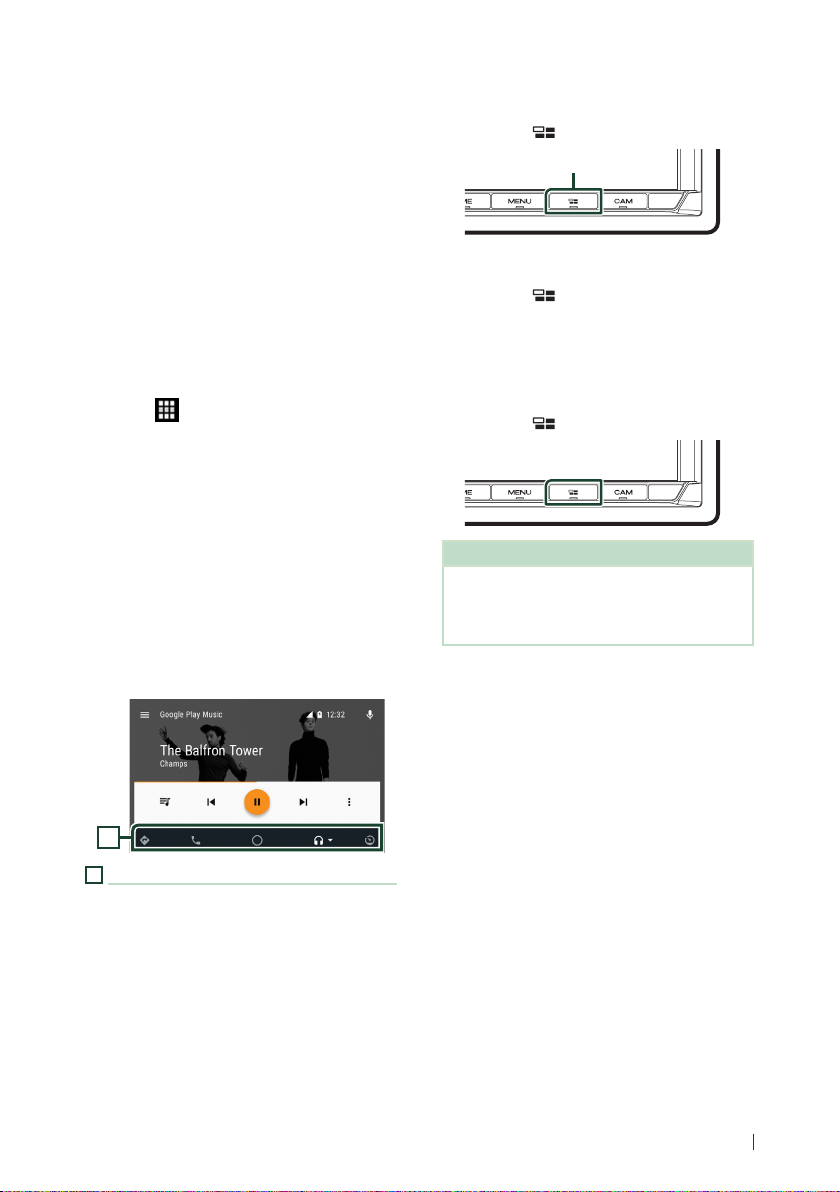
5
6
CAM • Switches view camera display on/off. (P. 54)
7
• Receives the remote control signal.
• Adjusts the volume.
The volume will go up to 15 when you keep pressing R. (P. 10)
• Pressing for 1 second turns the power off.
• When the power is off, turns the power on.
• Pressing and holding turns the screen off.
• Displays the APP (Apple CarPlay/Android Auto/Wireless Mirroring) screen.
• Pressing and holding displays the Voice Recognition screen (P.50).
• When neither Apple CarPlay, Android Auto, nor a Bluetooth Hands-Free phone is
connected, pressing and holding displays Bluetooth pairing waiting dialog. (P. 43)
– The camera whose view is displayed first changes according to the "Camera
Setup" setting and the shift lever position in the shift gate.
6
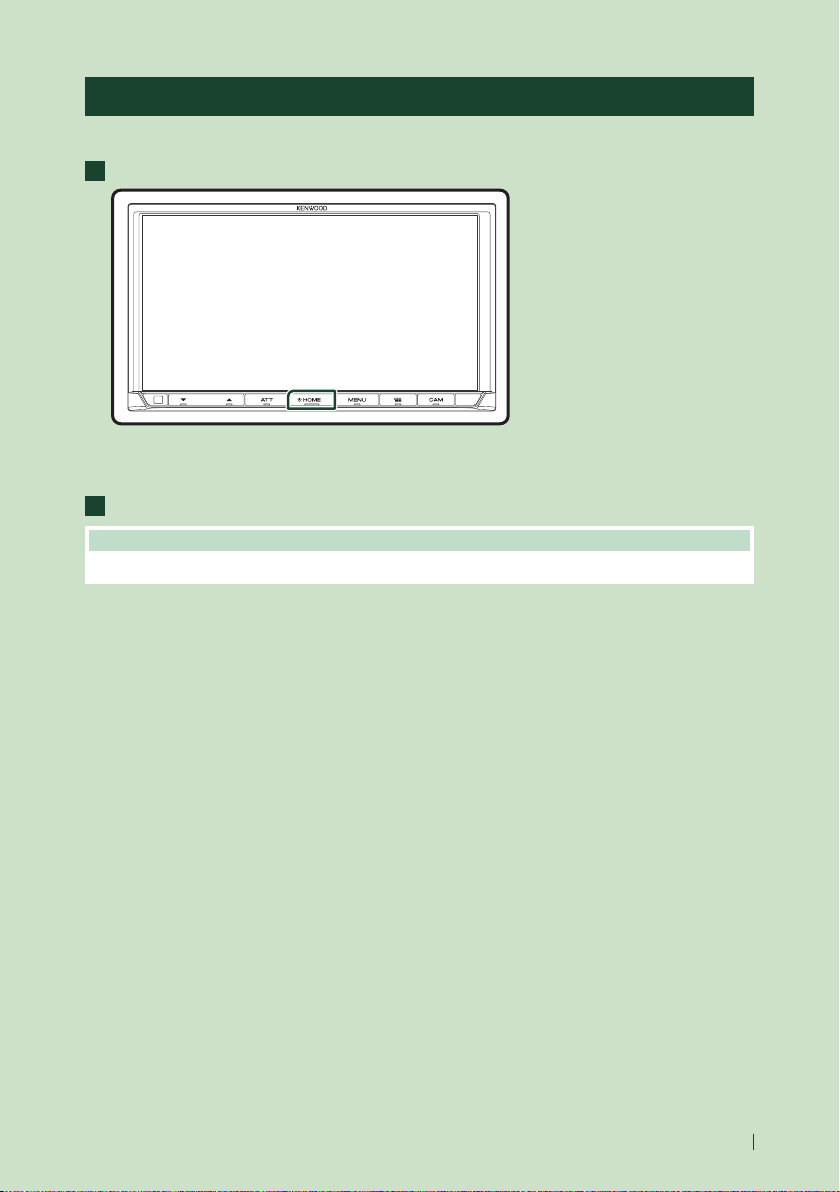
Basic Operations
Turning on the Unit
The method of turning on is different depending on the model.
Press the [HOME] button.
1
The unit is turned on.
● To turn off the unit:
Press the [HOME] button for 1 second.
1
NOTE
• If it is your first time to turn the unit on after installation, it will be necessary to perform Initial setup (P. 8).
7English
Basic Operations
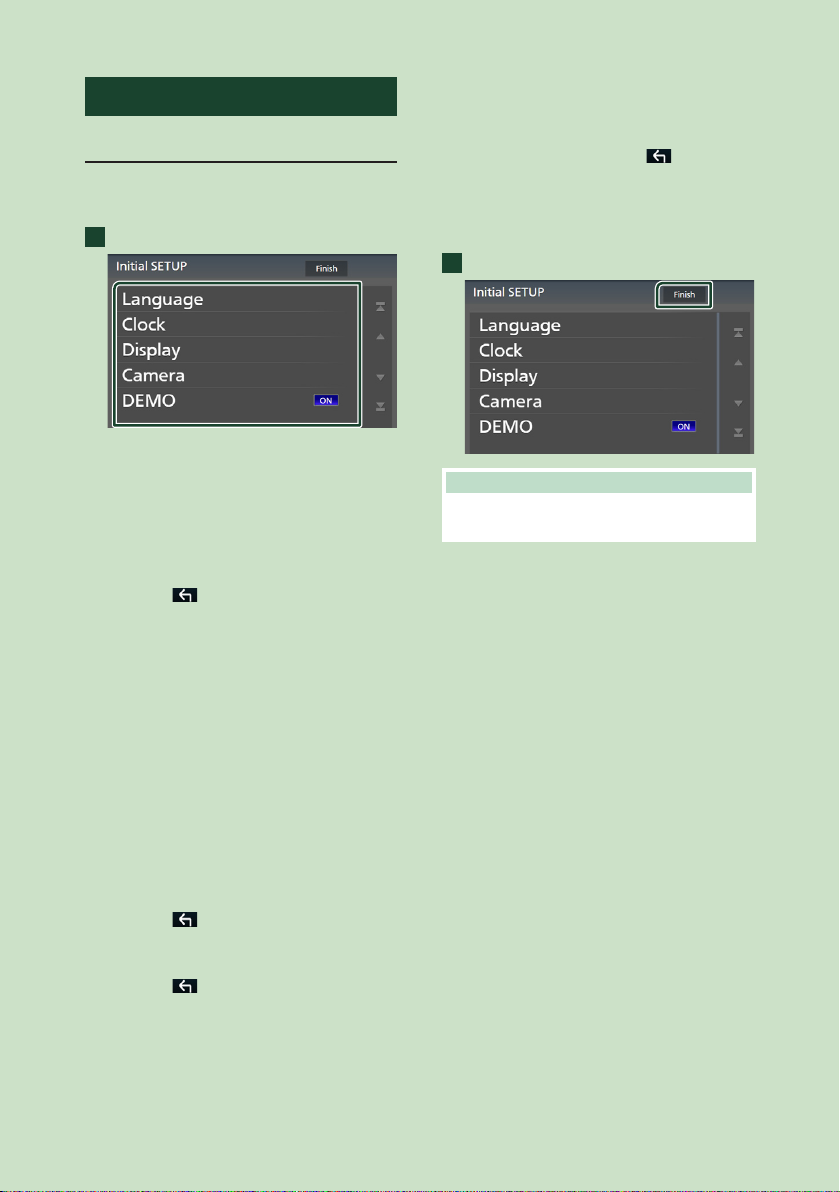
Initial Settings
Initial setup
Perform this setup when you use this unit first
time.
Set each item as follows.
1
■ [Language]
Select the language used for the control
screen and setting items. Default is "British
English(en)”.
1 Touch [Language].
2 Touch [Language Select].
3 Select the desired language.
4 Touch [
For details, see User Interface Setup
(P. 59).
■ [Clock]
Sets the synchronization of the clock and
adjusts it.
For detailed operation, see Calendar/clock
settings (P.10).
■ [Display]
Set the key illumination color.
If it is hard to see the image on the screen
even, adjust the viewing angle.
1 Touch [Display].
2 Touch [Key Colour].
3 Select the desired color.
4 Touch [
5 Touch [Viewing Angle].
6 Select a viewing angle.
7 Touch [
For details, see Viewing Angle (P.11).
].
].
].
■ [Camera]
Set the parameters for the camera.
1 Touch [Camera].
2 Set each item and touch [
For details, see Camera Setup (P.54).
■ [DEMO]
Set the demonstration mode. Default is “ON”.
Touch [Finish].
2
NOTE
• These settings can be made from the SETUP
menu. See Setup (P.59).
].
For details, see Display Setup (P.61).
8
Basic Operations
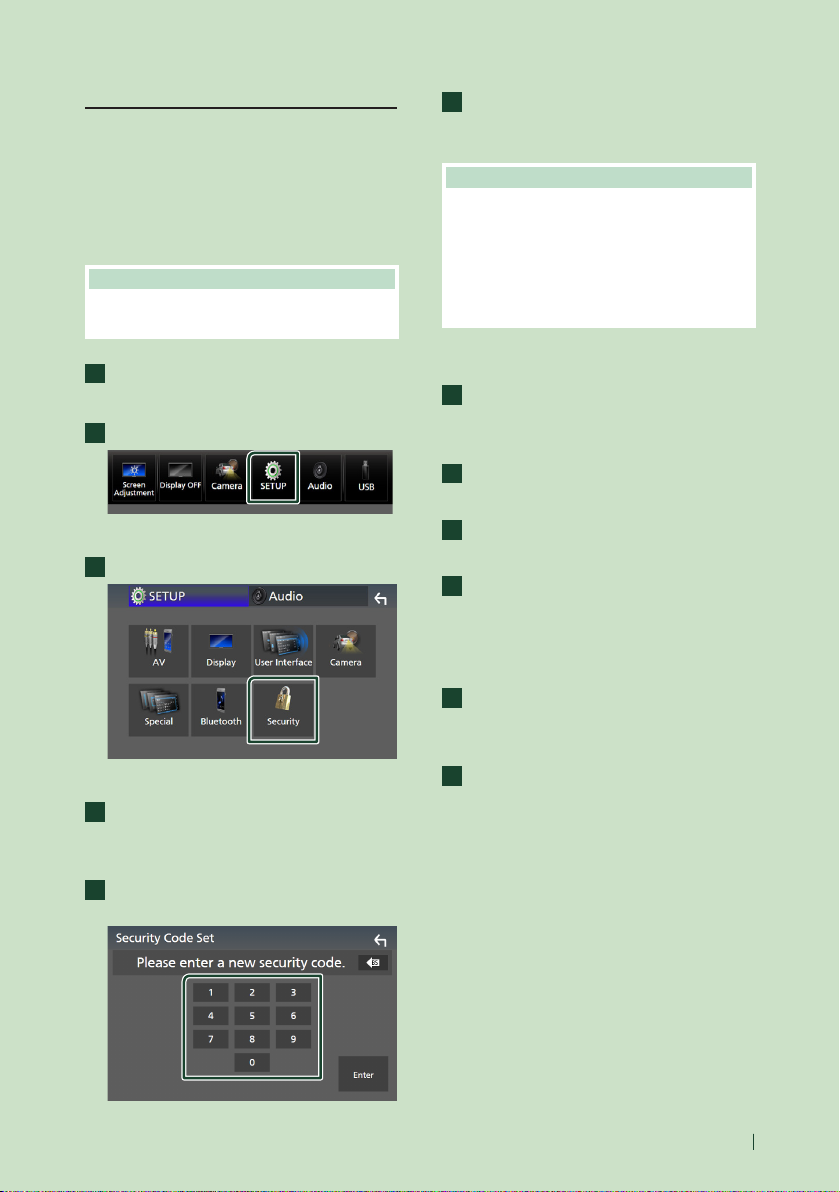
Security Code Setup
You can set up a security code to protect your
receiver system against theft.
When the Security Code function is activated,
the code cannot be changed and the function
cannot be released. Note the Security Code
can be set as the 4 to 8 digit number of your
choice.
Preparation
• Set [DEMO] to [OFF] in the Special screen
(P. 61).
Press the [MENU] button.
1
Popup menu appears.
Touch [SETUP].
2
SETUP Menu screen appears.
Touch [Security].
3
Enter the same code again and touch
6
[Enter].
Now, your security code is registered.
NOTE
• Touch [BS] to delete the last entry.
• If you enter a different security code, the screen
returns to step 5 (for the first code entry).
• If you have disconnected the Receiver from
battery, enter the correct security code as that
you have entered in step 5 and touch [Enter]. You
can use your receiver.
To change the security code:
Touch [Security Code Change] on the
1
Security screen.
Security Code Set screen appears.
Enter the current registered security code
2
and touch [Enter].
Enter a new security code with 4 to 8
3
digit number and touch [Enter].
Enter the same code again and touch
4
[Enter].
The new security code is registered.
To clear the security code:
Security screen appears.
Touch [Security Code Set] on the Security
4
screen.
Security Code Set screen appears.
Enter a security code with 4 to 8 digit
5
number and touch [Enter].
Touch [Security Code Cancellation] on
1
the Security screen.
Security Code Set screen appears.
Enter the current registered security code
2
and touch [Enter].
The security code is cleared.
9English
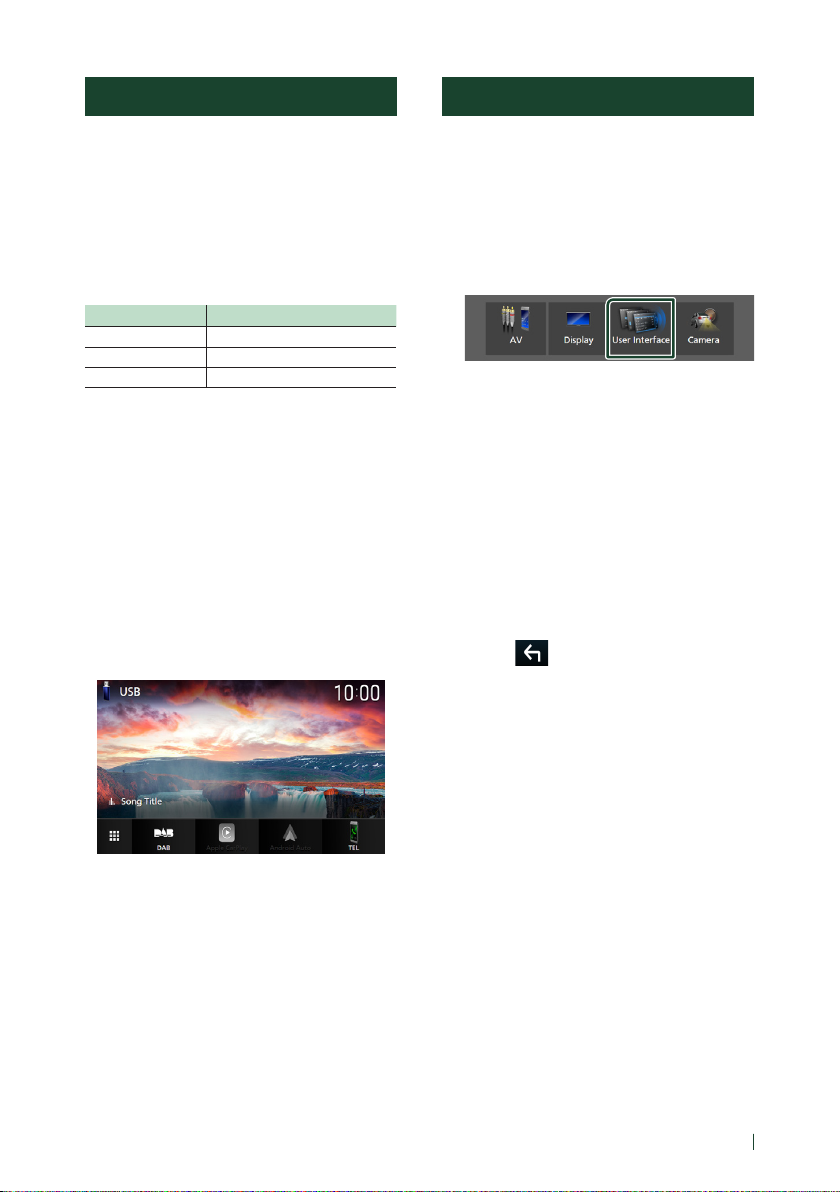
Basic Operations
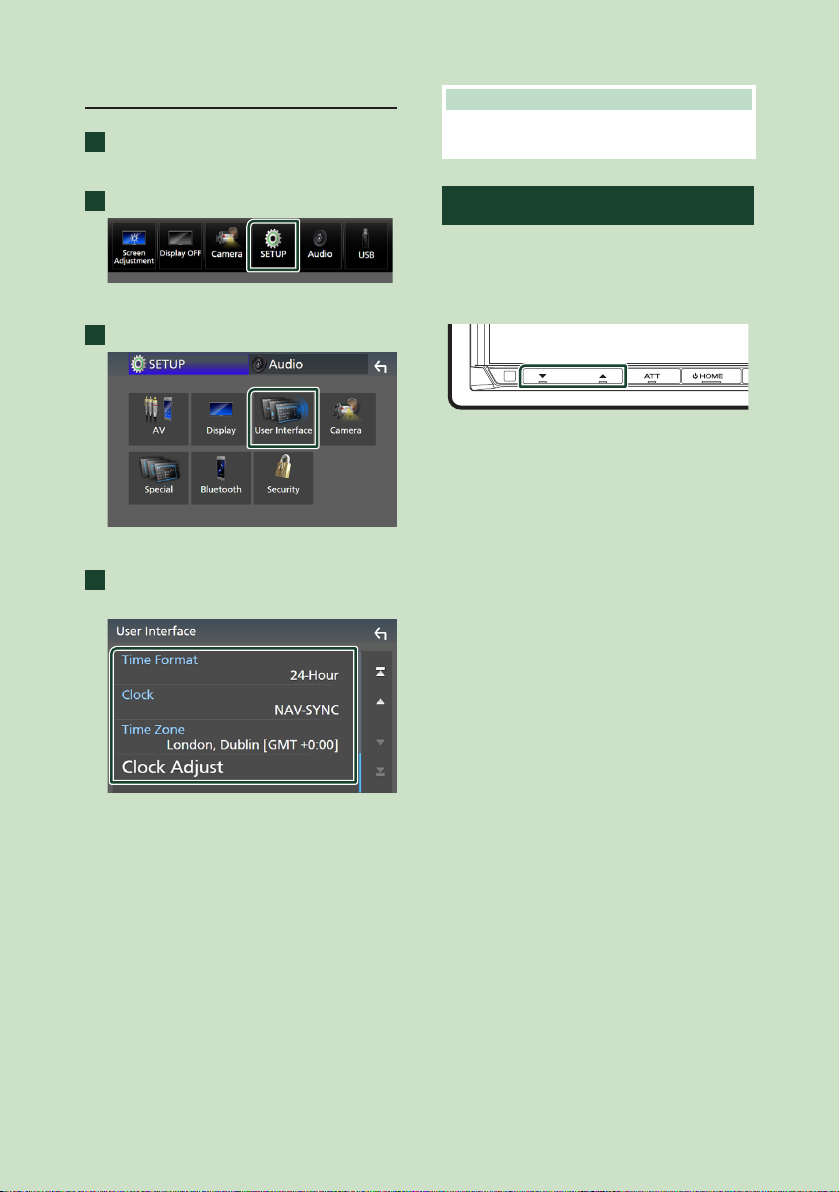
Calendar/clock settings
Press the [MENU] button.
1
Popup menu appears.
Touch [SETUP].
2
SETUP Menu screen appears.
Touch [User Interface].
3
User Interface screen appears.
Set each item as follows.
4
Scroll the page to show hidden items.
NOTE
• Please set the date and time. If they are not set,
some functions may not work.
Adjusting the volume
You can adjust the volume (0 to 40).
Press [R] to increase, and press [S] to decrease.
Holding [R] increases the volume continuously
to level 15.
■ [Time Format]
Select the time display format.
[12-Hour]/[24-Hour] (Default)
■ [Clock]
[GPS-SYNC] (Default): Synchronizes the clock
time with the GPS.
[Manual]: Set the clock manually.
■ [Time Zone]
If you have selected [Manual] for Clock,
select the time zone.
■ [Clock Adjust]
If you select [Manual] for Clock, adjust the
date and time manually. (P. 60)
10
Basic Operations
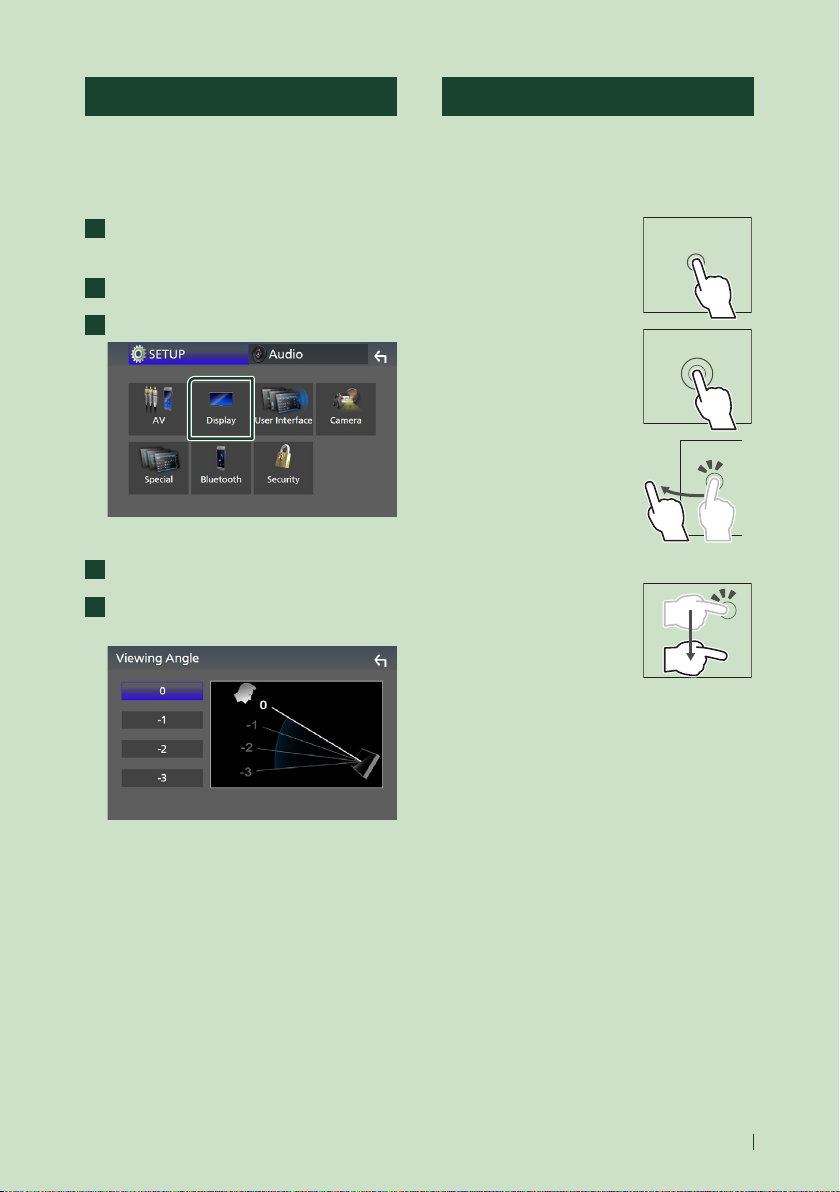
Viewing Angle
You can adjust the viewing angle when the
image on the screen is difficult to see evenly.
The smaller the (negative) value, the more
whitish the image on the screen looks.
Press the [MENU] button.
1
Popup menu appears.
Touch [SETUP].
2
Touch [Display].
3
Display screen appears.
Touch [Viewing Angle].
4
Select an angle you want to set up.
5
Default is "0". (P. 61)
Touch screen operations
To perform operations on the screen, you need
to touch, touch and hold, flick or swipe to
select an item, display a setting menu screen
or change pages.
● Touch
Touch the screen gently to
select an item on the screen.
● Touch and hold
Touch the screen and keep
your finger in place until
the display changes or a
message is displayed.
● Flick
Slide your finger quickly
to the left or right on the
screen to change the page.
You can scroll a list screen
by flicking up/down on the
screen.
● Swipe
Slide your finger up or down
on the screen to scroll the
screen.
11English
Basic Operations
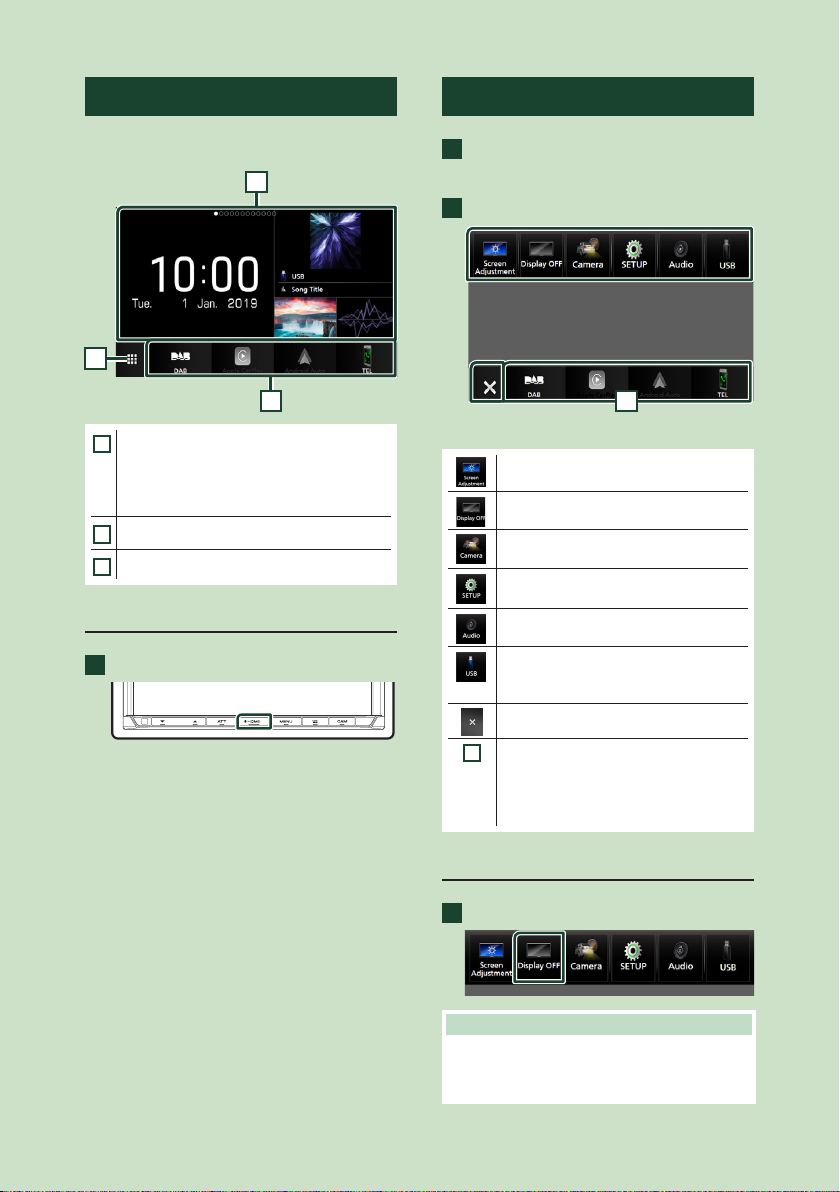
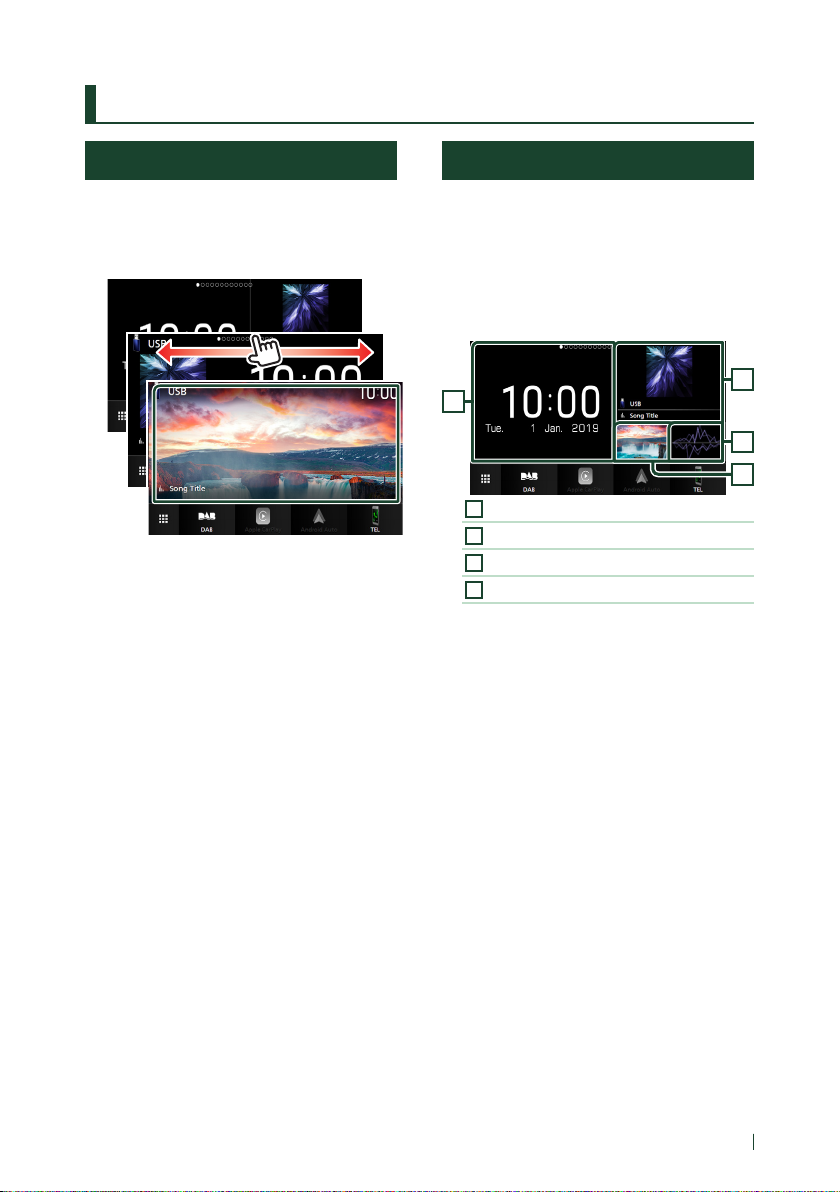
HOME screen descriptions
Most functions can be performed from the
HOME screen.
1
2
3
• Widget (P.17)
1
– You can change the widget by flicking left
or right on the widget area.
– Touch the widget to display the detailed
screen.
• Displays the source selection screen. (P.13)
2
• Short-cut playback source icons (P. 14)
3
Display the HOME screen
Press the [HOME] button.
1
HOME screen appears.
Popup menu
Press the [MENU] button.
1
Popup menu appears.
Touch to display the popup menu.
2
1
The contents of the menu are as follows.
• Displays the Screen Adjustment screen.
(P. 59)
• Turns the display off. (P. 12)
• Displays the view camera screen.
(P. 54)
• Displays the SETUP Menu screen.
(P. 59)
• Displays the Audio screen. (P. 65)
• Displays the control screen of current
source. Icon feature differs depending on
the source. This icon is for USB source.
• Close the popup menu.
• Short-cut source icons: The source
1
changes to the one you have set with a
short-cut. For the short-cut setting, refer
to Customize Short-cut source icons on
HOME screen (P.14).
12
Turn off the screen
Select [Display OFF] on the popup menu.
1
NOTE
• Touch the display to turn on the screen.
• To display the clock while the screen is off, it is
necessary to set "OSD Clock" to "ON". (P.61)

Basic Operations
Source selection screen description
You can display icons of all playback sources
and options on the source selection screen.
1
4 5
• Changes playback sources.
1
For playback sources, see P.13.
• Page indication
2
3
• Changes pages. (Touch [ ]/[ ].)
You can also change pages by flicking left or
right on the screen.
• Returns to the previous screen.
4
• Displays the SETUP Menu screen. (P. 59)
5
Select the playback source
2
• Switches to the DAB broadcast. (P. 38)
• Plays a Bluetooth audio player. (P. 42)
• Plays an iPod/iPhone. (P. 31)
3
• Plays files on a USB device. (P. 28)
• Switches to Spotify. (P. 26)
• Plays a device connected to the HDMI
input terminal. (P. 57)
• Switches to an external component
connected to the AV-IN input terminal.*2
(P. 57)
• Switches to the Wireless Mirroring screen
from the connected Android device.
(P. 21)
• Displays the Audio screen. (P. 65)
• Puts the unit in standby. (P. 14)
*1 When connecting as Apple CarPlay or Android Auto,
it works as a phone provided in Apple CarPlay or
Android Auto. If Apple CarPlay or Android Auto are
connected during talking by the Bluetooth device,
the current call will be continued.
*2 CA-C3AV (optional accessory) is connected to the
AV-IN input terminal for visual. (P.83)
Press the [HOME] button.
1
HOME screen appears.
Touch [ ].
2
From the screen, you can select the
following sources and functions.
• Switches to the Apple CarPlay screen
from the connected iPhone. (P. 21)
• Switches to the Android Auto screen
from the connected Android device.
(P. 24)
• Displays the Hands Free screen. (P. 48)
When neither Apple CarPlay, Android
Auto, nor a Bluetooth Hands-Free phone
is connected, displays Bluetooth pairing
waiting dialog.*1 (P. 43)
• Switches to the Radio broadcast.
(P. 34)
13English

Basic Operations
To select the playback source on the
HOME screen
The 4 items displayed on the source selection
screen with large icons are shown on the
HOME screen.
You can change the items displayed on this
area by customizing the source selection
screen. (P. 14)
To select the playback source on the
source control screen
Customize Short-cut source icons
on HOME screen
You can arrange the positions of the source
icons as you like.
Press the [HOME] button.
1
HOME screen appears.
Touch [ ].
2
Touch and hold the icon which you want
3
to move in the customizing mode.
Drag the icon to the desired position.
4
Changes the page
Display source selection icons by touching
[
]/[ ] or flicking left or right on the source
control screen, then select a playback source.
Put the unit in standby
Press the [HOME] button.
1
HOME screen appears.
Touch [ ].
2
Touch [STANDBY].
3
14
Basic Operations
Source control screen descriptions
There are some functions which can be
performed from most screens.
Indicators
4
5
6
7
1 2
Short-cut source icons
1
All sources icon
Displays the source selection screen. (P. 13)
2
Secondary screen
• [
]/[ ] : The Secondary screen changes to
another one every time you touch it. You can
also change the Secondary screen by flicking
left or right on the screen.
• Indicators: Displays the current source
condition and so on.
– [AT T]: The attenuator is active.
– [DUAL]: The dual zone function is active.
– [MUTE]: The mute function is active.
– [LOUD]: The loudness control function is active.
• Short-cut source icons: The source changes to
the one you have set with a short-cut. For the
short-cut setting, refer to Customize Short-
cut source icons on HOME screen (P.14).
3
Content list
Displays the track/file/station/channel list.
4
• Connected Bluetooth device information.
3
5
Artwork & information
You can select whether to display an artwork
and song information or only song information
in more detail.
Touching the artwork area switches to the VU
meter. (The USB, iPod, Bluetooth audio sources
only)
Change the text size of song information when
the "Small Audio Text" is set to "ON"/"OFF" in the
User Interface screen ( P.60).
6
Function panel
Touch the left side of the screen to display the
function panel. Touch again to close the panel.
7
Operation keys
You can operate the current source with these
operation keys. The available functions are
different depending on the source type.
15English
Basic Operations
List screen
There are some common function keys in the
list screens of most sources.
See (P.30, 33, 47).
Display the list screen
For USB/iPod:
Touch [1] or the item listed on the
1
information area in the source control
screen.
The list screen appears.
For Bluetooth audio:
Touch [1].
1
The list screen appears.
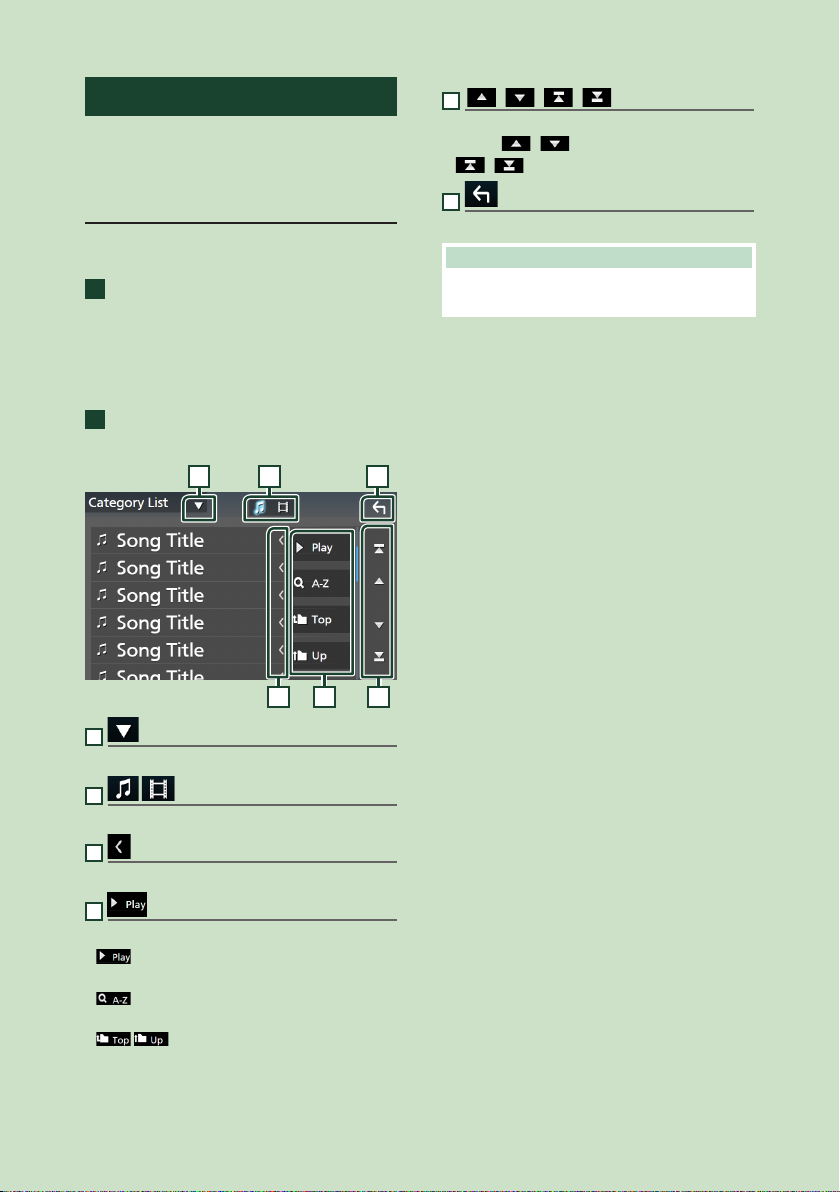
5
[ ]/[ ]/[ ]/[ ] Page scroll
You can change pages to display more items by
pressing [
• [
6
Return
Returns to the previous screen.
NOTE
• Depending on the current source or mode, some
function key may not appear.
]/[ ].
]/[ ] : Displays the top or bottom page.
61 2
3 4 5
1
Displays the list type selection window.
2
Displays a music/movie file list.
3
Text scroll
Scrolls the displayed text.
4
etc.
Keys with various functions are displayed here.
•
: Plays all tracks in the folder containing
the current track.
•
: Jumps to the letter you entered
(alphabetical search).
•
: Moves to the upper hierarchy
level.
16
Widget
Widget
Widget
Press the [HOME] button.
1
You can change the widget by flicking left
2
or right on the widget area.
Widget list
• Multi Widget *
• Clock Widget
• Tire Pressure Widget *
• Climate Widget *
• Photo Frame Widget
*1 Up to 3 pages can be set to the multi widget screen.
*2 This can be selected when a commercial adaptor is
connected.
1
2
2
Multi Widget
You can place a widget on each of the
following areas. Up to 4 widgets can be placed
per a multi widget screen.
Press the [HOME] button.
1
Flick the widget area to the left/right to
2
display the multi widget.
1
1
Widget (L)
2
Widget (M)
3
Widget (S1)
4
Widget (S2)
Ñ Replace the widget
● To move the widget
Touch and hold the widget.
1
Widget customize mode is activated.
Drag the widget to the desired position.
2
● To delete the widget
Touch and hold the widget.
1
Widget customize mode is activated.
Touch [×] on the right top corner of the
2
widget.
The selected widget is deleted.
2
4
3
17English
Widget
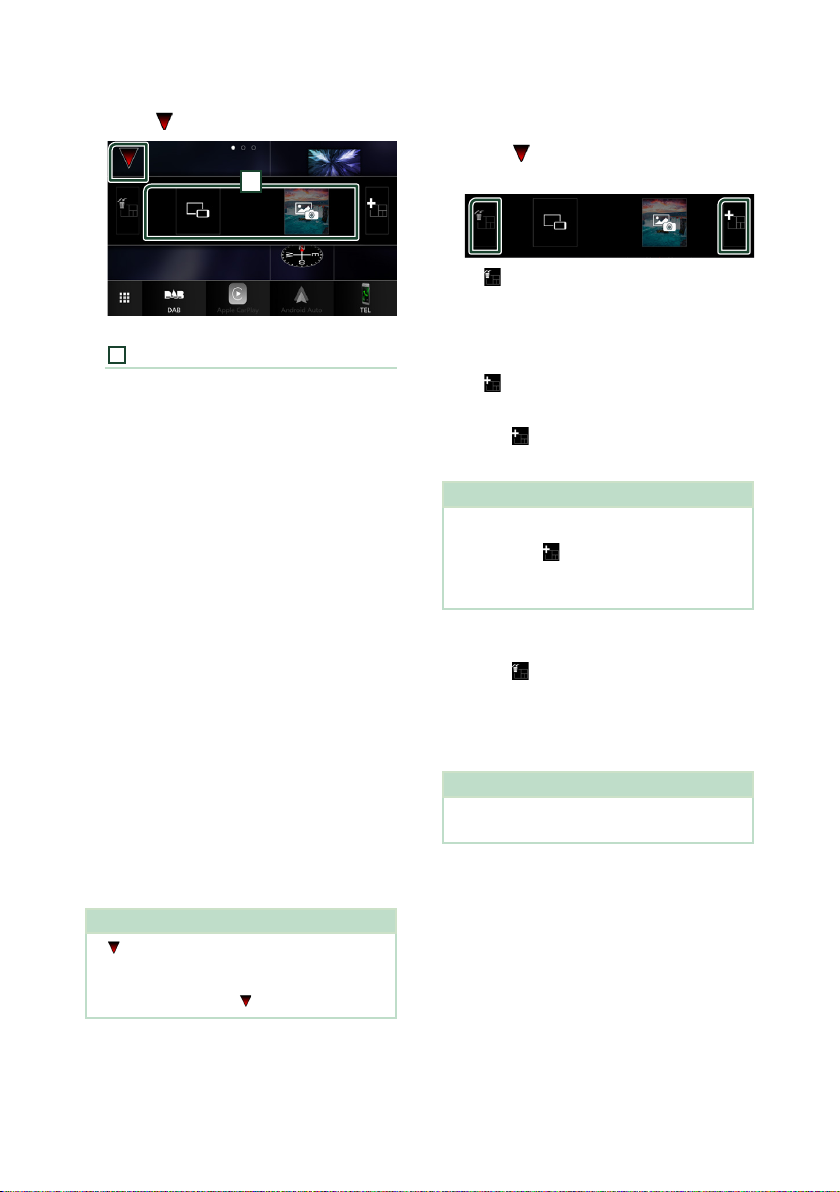
● To replace the widget
Touch [ ] on the multi widget screen.
1
1
Widget list popup appears.
1
Widget icon
The widgets which can be placed to the
multi widget screen are listed.
Flick the widget list popup to the left/
2
right to select the widget to replace.
Touch and hold the new widget.
3
Widget customize mode is activated.
Drag the widget from the widget list
4
popup to the desired widget area.
You can set up following items.
• Clock Widget
• Current source information *
• Visualizer Widget
• Mirroring Widget *
• Photo Frame Widget
• Climate Widget *
• Tire Pressure Widget *
*1 You cannot display the screen of Wireless Mirroring
on this widget. To display the screen of the source,
select the Mirroring Widget.
*2 This can be selected when using Wireless Mirroring.
*3 You cannot play the audio/video file on the USB
when using Wireless Mirroring.
*4 This can be selected when a commercial adaptor is
connected.
NOTE
• [ ] and the widget list popup disappear when no
operation is done for 5 seconds.
• When the screen is switched from another widget
to multi widget screen, [
2 *3
4
1
4
] appears again.
Ñ Add a new multi widget
You can add pages to the multi widget screen.
Touch [ ] on the multi widget screen.
1
Widget list popup appears.
■ [ ]
Displays confirmation message to delete the
current page from the multi widget screen.
For details, see To delete the multi widget
(P. 18).
■ [
]
Adds a page to the multi widget screen.
Touch [ ] on the widget list popup.
2
A new page is added.
NOTE
• You can add up to pages to the 2 multi widget
screen. If you have already added 2 pages, you
cannot select [
• The widget tray is displayed on the new page
until you place a widget to.
To delete the multi widget
Touch [ ] on the widget list popup.
1
Confirmation message appears.
Touch [YES].
2
Current page is deleted.
NOTE
• You cannot delete the first page of the multi
widget screen.
].
18
Widget
Photo Frame Widget
You can display a slideshow of the image
files stored in the USB memory on the Home
screen.
Ñ Preparation
• Select “ON” for Photo Frame Widget. See
Widget Setup (P.19).
● Acceptable Picture files
Max. Picture size
JPEG (.jpg, .jpeg) *15,000 × 5,000
PNG (.png) 1,000 × 1,000
BMP (.bmp) 1,000 × 1,000
• This unit can only play back files which are less
than 50 MB.
• The maximum number of files per device is
500.
• Picture files may not be played depending on
their condition.
*1 A progressive format is not supported.
Ñ Photo Frame
Press the [HOME] button.
1
Flick the widget area to the left/right to
2
display the photo frame widget.
Widget Setup
Set up the widgets on the Home screen.
Press the [MENU] button.
1
Popup menu appears.
Touch [SETUP].
2
SETUP screen appears.
Touch [User Interface].
3
User Interface screen appears.
Touch [Widget SETUP] in the User
4
Interface screen.
Set each item as follows.
5
■ [Photo Frame Widget]
Determine whether to use the photo frame
widget.
"ON" (Default)/"OFF"
■ [Photo Frame SETUP]
Make settings related to display of the photo
frame widget.
Touch [ ].
6
• Scroll the screen to display the hidden part.
19English

Widget
To Photo Frame Setup
Make settings related to display of the photo
frame widget.
Touch [Photo Frame SETUP] on the
1
Widget SETUP screen.
Set each item as follows.
2
■ [Sort Order]
Specify a file sorting criterion.
"By Name(Ascending)"/
"By Name(Descending)"/
"By Date(Newest First)" (Default)/
"By Date(Oldest First)"
■ [Slide Show Interval]
Specify the slideshow interval.
"5" to "30" seconds.
Default is "5" seconds.
■ [Photo Frame is • • • • •]
Display help topics about the photo frame.
Touch [ ].
3
20
APPS
APPS
Wireless Mirroring Operation
You can display the same screen of the
Android device on the monitor of the unit
using the Wireless Mirroring function of the
Android device.
Preparation
• You can use the Wireless Mirroring function with
Android devices compatible with this function.
• This function may be called Wireless Display,
Screen Mirroring, AllShare Cast, etc., depending
on the manufacturer.
• The settings on the Android device differ
depending on the device type. For details, refer
to the instruction manual supplied with your
Android device.
• If your Android device is locked, Mirroring screen
may not appear.
• If the Android device is not ready for UIBC, you
cannot perform touch operation.
Press the [HOME] button.
1
Touch [ ].
2
Touch [Wireless Mirroring]. (P. 13)
3
The App screen is displayed.
Operate your Android device to activate
4
the Wireless Mirroring function, then
connect to this unit.
Select (”DMX8190DABS”) as the network
5
to use.
When the connection is established,
then the same screen displayed on the
Android device is displayed.
NOTE
• Apps is discontinued when the power is turned
ON/OFF or you leave the vehicle. To restart Apps,
operate the Android device.
• When the Apps source is displayed, you cannot
register or reconnect a Bluetooth device. Switch
the Apps source to another source, and then
operate the Bluetooth device.
Apple CarPlay Operation
Apple CarPlay is a smarter, safer way to use
your iPhone in the car. Apple CarPlay takes
the things you want to do with iPhone while
driving and displays them on the screen of
the product. You can get directions, make
calls, send and receive messages, and listen to
the music from iPhone while driving. You can
also use Siri voice control to make it easier to
operate iPhone.
For details about Apple CarPlay, visit https://
apple.com/ios/carplay/.
Compatible iPhone devices
You can use Apple CarPlay with the following
iPhone models.
• iPhone X
• iPhone 8 Plus
• iPhone 8
• iPhone 7 Plus
• iPhone 7
• iPhone SE
• iPhone 6s Plus
• iPhone 6s
• iPhone 6 Plus
• iPhone 6
• iPhone 5s
• iPhone 5c
• iPhone 5
Ñ Connecting an iPhone
Wired connection
Connect your iPhone using KCA-iP103 via
1
the USB (Black) terminal. (P. 84)
When an iPhone compatible with Apple
CarPlay is connected to the USB (Black)
terminal, the Bluetooth Hands-Free phone
currently connected is disconnected. If the
Bluetooth Hands-Free phone is being used,
disconnection will occur after ending the
call.
Unlock your iPhone.
2
21English
APPS
Wireless connection
You can select the iPhone registered as the
Bluetooth device from [Apple CarPlay Device
List] and use it as the Apple CarPlay device.
Preparation
• To register an iPhone by the connection via the
USB (Black) terminal
– Connect an iPhone via the USB (Black) terminal
and operate the iPhone according to the
confirmation messages displayed on the
iPhone. The iPhone is registered in [Apple
CarPlay Device List]. Removing the iPhone
from the USB (Black) terminal and selecting
the registered iPhone from [Apple CarPlay
Device List], the iPhone will be connected
wirelessly.
• To register an iPhone by the connection via
Bluetooth
– Touching [
List] screen (P. 22), displays Bluetooth
pairing waiting dialog. Referring to Register
the Bluetooth device (P.43) and registering
the iPhone, the iPhone will be connected
wirelessly.
Press the [HOME] button.
1
Touch [ ].
2
Touch [Apple CarPlay]. (P. 13)
3
NOTE
• Turn on the Bluetooth function and Wi-Fi function
of an iPhone.
• If two or more iPhones have been registered,
select the iPhone to be used as the [Apple
CarPlay] source. (P. 22)
• You can also select the iPhone registered in
[Apple CarPlay Device List] (P. 22) even
when the [Apple CarPlay] icon is not activated
on the source selection screen.
• It is necessary to connect the GPS antenna and
the speed pulse input in order to use a wireless
Apple CarPlay.
] on the [Apple CarPlay Device
NOTE
• The connection message appears when;
– The iPhone you used previously is connected
again.
– The screen other than HOME and the source
selection screen is displayed.
• The connection message is displayed for about
5 seconds.
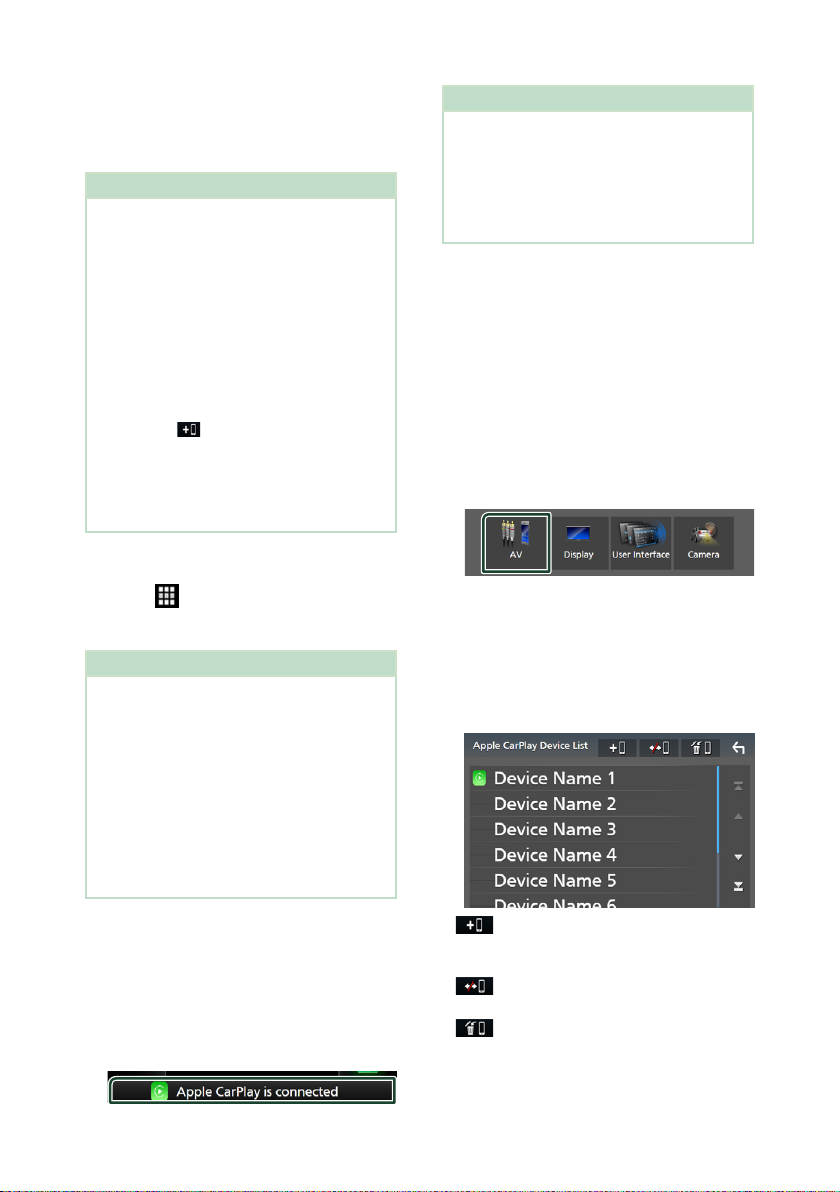
Ñ Select an Apple CarPlay device
If two or more iPhones compatible with Apple
CarPlay have been registered, select the
iPhone to be used as the Apple CarPlay source.
Press the [MENU] button.
1
Popup menu appears.
Touch [SETUP].
2
SETUP screen appears.
Touch [AV].
3
Touch [Apple CarPlay Device List].
4
Select a device.
5
The Apple CarPlay device connected via
the USB and the registered Apple CarPlay
devices ready for wireless connection are
displayed.
To switch the Current Screen to the
Apple CarPlay Screen When Connecting
Your iPhone
• Touch [Apple CarPlay] icon on the source
selection screen. (P. 13)
• Touch the following connection message if the
message appears.
22
• [ ] : Displays a Bluetooth pairing waiting
dialog. For details, see Register the Bluetooth
device (P.43).
• [
] : Displays confirmation message to
disconnect the device.
• [
] : Displays Device Remove screen.
(P. 23)
APPS
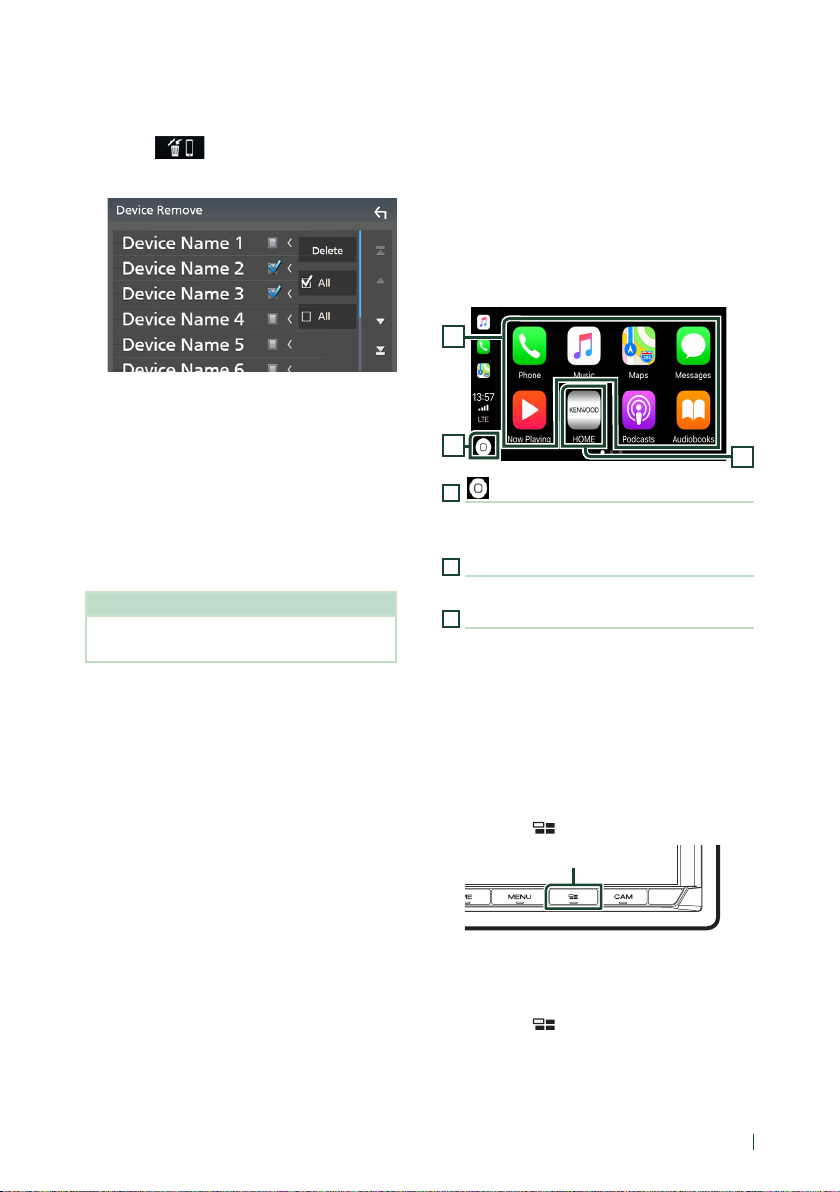
To delete the registered Apple CarPlay
device
Touch [ ].
1
Touch the device name to check.
2
■ [þ [ALL]
Selects all Apple CarPlay devices.
■ [¨ [ALL]
Clears all check marks.
Touch [Delete].
3
Confirmation message appears.
Touch [Yes ].
4
All the selected device(s) is deleted.
NOTE
• This operation also deletes the same device(s)
from the Bluetooth device list screen. (P. 45)
Ñ Operation buttons and
available Apps on the home
screen of Apple CarPlay
You can use the Apps of the connected iPhone.
The items displayed and the language used
on the screen differ among the connected
devices.
To enter the Apple CarPlay mode, touch
[Apple CarPlay] icon on the source selection
screen. (P. 13)
2
1
1
[ ]
• Displays the home screen of Apple CarPlay.
• Touch and hold to activate Siri.
2
Application buttons
Starts the application.
3
[HOME]
Exits the Apple CarPlay screen and displays the
Home screen.
To exit the Apple CarPlay screen
Press the [HOME] button.
1
3
Ñ Use Siri
You can activate Siri.
Press the [ ] button for 1 second.
1
Press for 1 second
Talk to Siri.
2
To deactivate
Press the [ ] button.
1
23English
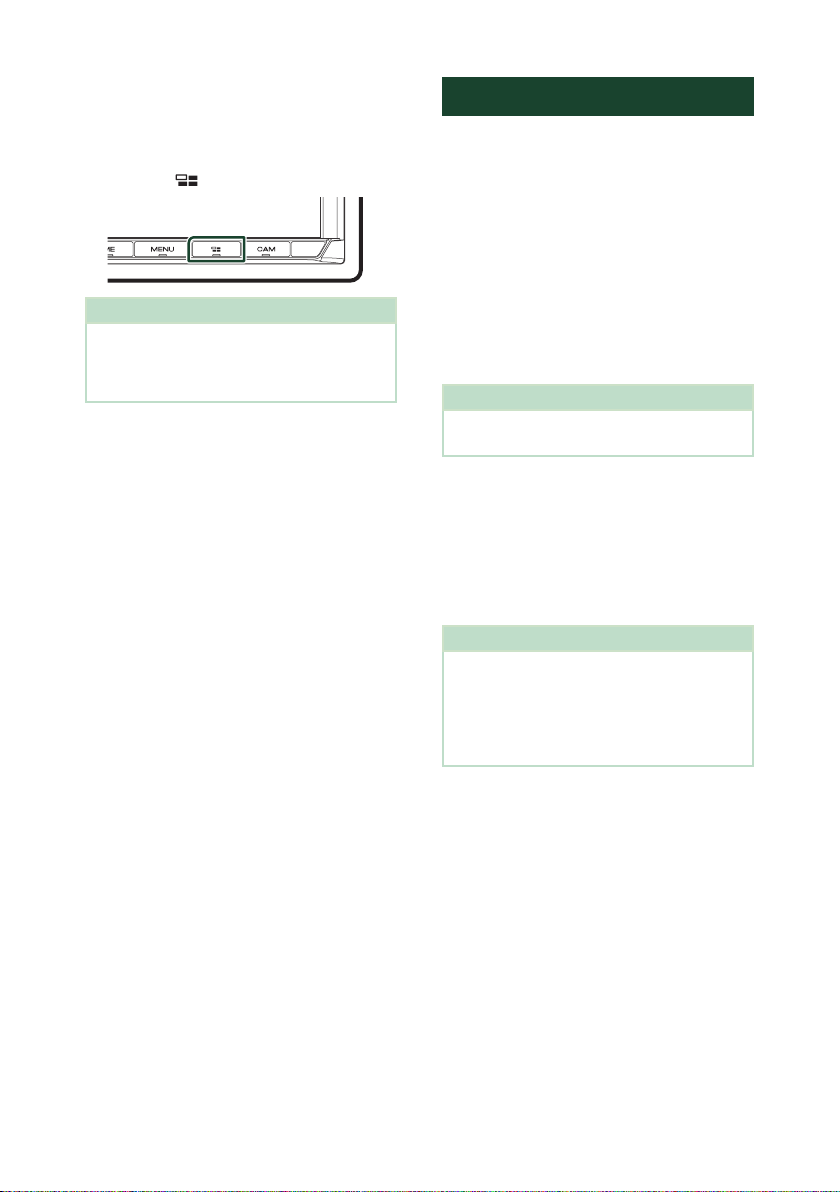
APPS
Ñ Switch to the Apple CarPlay
screen while listening to
another source
Press the [ ] button.
1
NOTE
• When listening to another source with the Apple
CarPlay screen displayed, playing music in the
Apple CarPlay mode will switch the current
source to the Apple CarPlay source.
Android Auto™ Operation
Android Auto enables you to use the functions
of your Android device convenient for driving.
You can easily access route guidance, make
calls, listen to music, and access convenient
functions on the Android device while driving.
For details about Android Auto, visit https://
www.android.com/auto/ and https://support.
google.com/androidauto.
Compatible Android devices
You can use Android Auto with Android
devices of Android version 5.0 (Lollipop) or
later.
NOTE
• Android Auto may not be available on all devices
and may not be available in all countries or regions.
● About the placement of smartphone
Install the smartphone connected as Android
Auto device in the place where it can receive
the GPS signals.
When using Google Assistant, install the
smartphone in the place where the smartphone
easily catch a voice by the microphone.
NOTE
• Do not put the smartphone in a spot exposed
to direct sunlight or near an air blowing out
port of an air conditioner. The placement of
the smartphone in such places can lead to
malfunction or damage of your smartphone.
• Do not leave the smartphone in the vehicle.
24
APPS
Ñ Connect Android device
Connect an Android device via the USB
1
terminal. (P. 85)
To use the hands-free function, connect the
Android device via Bluetooth.
When an Android device compatible
with Android Auto is connected to the
USB terminal, the device is connected via
Bluetooth automatically, and the Bluetooth
Hands-Free phone currently connected is
disconnected.
Unlock your Android device.
2
Press the [HOME] button.
3
Touch [ ].
4
Touch [Android Auto]. (P. 13)
5
Ñ Operation buttons and
available Apps on the Android
Auto screen
You can perform the operations of the Apps of
the connected Android device.
The items displayed on the screen differ
among the connected Android devices.
To enter the Android Auto mode, touch the
[Android Auto] icon on the source selection
screen. (P. 13)
Ñ Using voice control
Press the [ ] button for 1 second.
1
Press for 1 second
To cancel
Press the [ ] button.
1
Ñ Switch to the Android Auto
screen while listening to
another source
Press the [ ] button.
1
NOTE
• When listening to another source with the
Android Auto screen displayed, playing music in
the Android Auto mode will switch the current
source to the Android Auto source.
1
1
Application/information buttons
Starts the application or displays information.
To exit the Android Auto screen
Press the [HOME] button.
1
25English
APPS
Spotify Operation
You can listen to Spotify on this unit by
controlling the application installed in the
iPhone or Android.
To select the Spotify source, touch [Spotify]
icon on the source selection screen. (P. 13)
Preparation
• Install the latest version of the Spotify application
"Spotify" on your iPhone or Android.
iPhone: Search for "Spotify" in the Apple App
Store to find and install the most current version.
Android: Search for "Spotify" in Google play to
find and install the most current version.
• iPhones are connected via either USB or
Bluetooth.
• Android devices are connected via Bluetooth.
• To connect a smartphone via Bluetooth, register
it as the Bluetooth device and do the App (SPP)
profile setting for the connection beforehand.
See Register the Bluetooth device (P.43) and
Connect the Bluetooth device (P.44).
• When an Apple CarPlay is connected, you can
use Spotify.
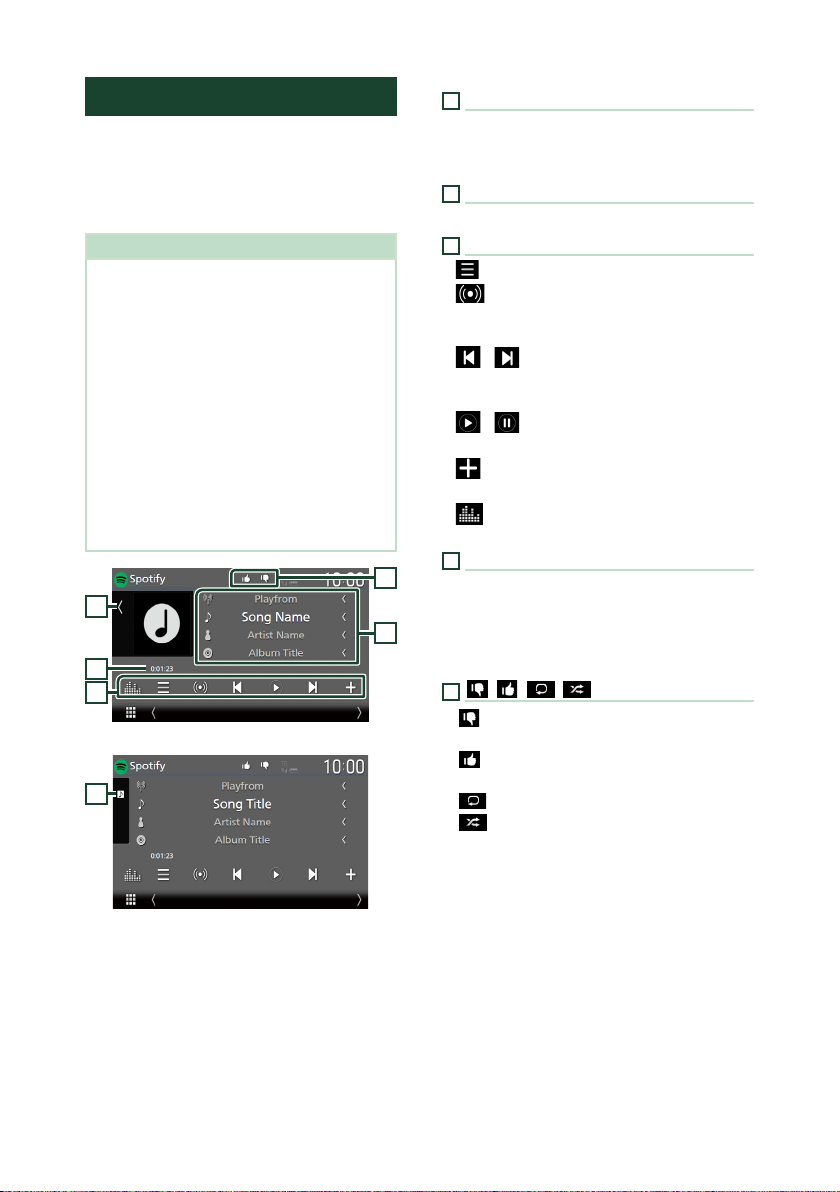
1
2
3
Close the drawer
1
1
Artwork
• Displays/hides artwork area.
• Picture data is displayed if available from the
current content.
2
Playing time
• For confirmation of play time.
3
Operation keys
• [
] : Displays the Station list screen.
• [
] : New radio station that relates to the
artist of the currently being played song is
selected and playback starts.
• [
] , [ ] : Skips the current song. (Note that
this function is disabled when the Spotify skip
limitation is exceeded.)
• [
] , [ ] : Plays or pauses the content of the
current station.
] : Saves the currently being played song
• [
to My Music.
• [
] : Displays the Graphic Equalizer screen.
(P. 68)
4
5
Content information
• Displays the information on the current
content being played.
4
• Change the text size of the information when
the "Small Audio Text" is set to "ON"/"OFF" in
the User Interface screen ( P.60).
5
[ ]/[ ]/[ ]/[ ]
• [
] : Thumbs down to the current contents
and skips to the next content.
• [
] : Registers the current content as a
favorite content.
• [
] : Repeats the current song.
• [
] : Randomly plays all songs in the current
playlist.
26
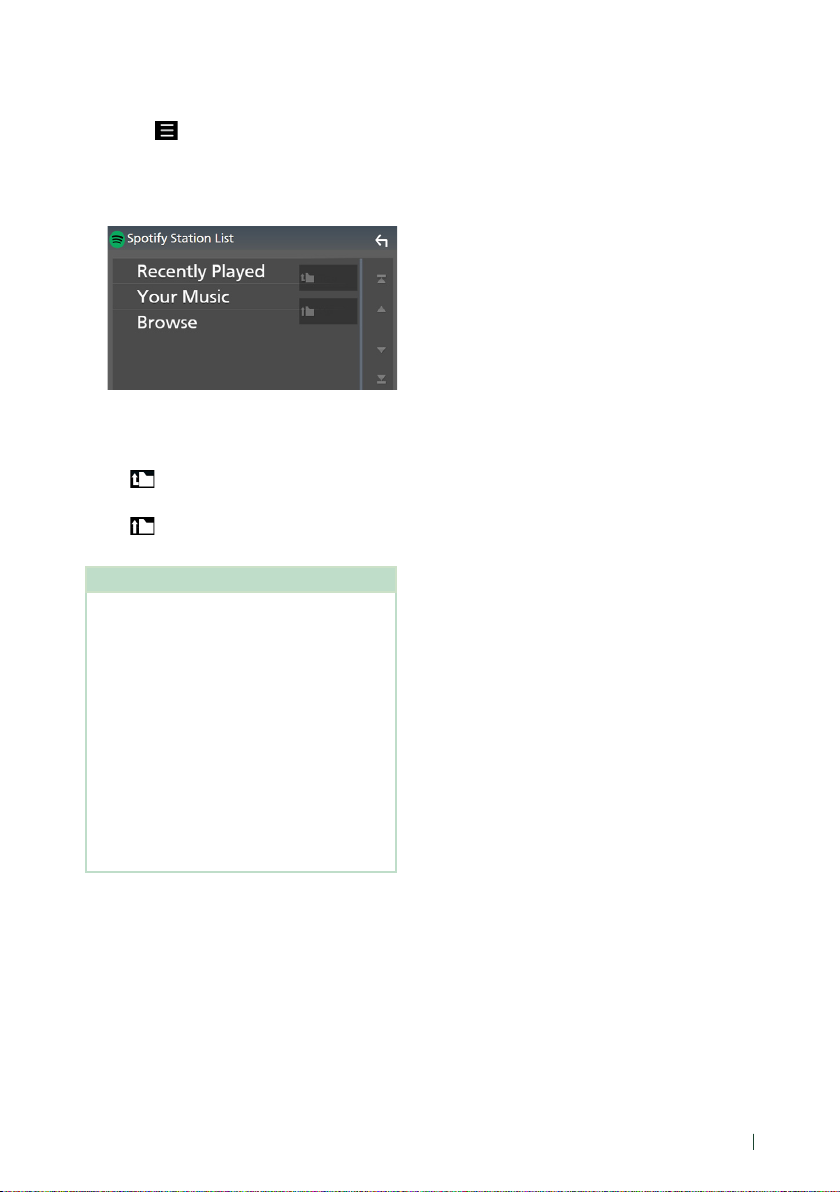
Ñ Selecting a track
Touch [ ].
1
Station list screen appears.
Select the list type, then select a desired
2
item.
■ To select the category and station
Touch the category and station name in the
list.
To p]
■ [
Returns to the top of the list.
Up]
■ [
Returns to the previous list.
About Spotify®
Note
• Ensure you are logged in to your smartphone
application. If you do not have an Spotify account,
you can create one for free from your smartphone
or at www.spotify.com.
• Because Spotify is a third-party service, the
specifications are subject to change without
prior notice. Accordingly, compatibility may
be impaired or some or all of the services may
become unavailable.
• Some functions of Spotify cannot be operated
from this unit.
• For issues on using the application, contact
Spotify at www.spotify.com.
• Establish an Internet connection.
APPS
27English
USB
USB
Connecting a USB device
Connect the USB device with the USB
1
cable. (P. 84)
Press the [HOME] button.
2
Touch [ ].
3
Touch [USB]. (P.13)
4
Ñ Disconnect the USB device
Press the [HOME] button.
1
Touch a source other than [USB].
2
Detach the USB device.
3
Ñ Usable USB device
You can use a mass-storage-class USB device
with this unit.
The word “USB device” appearing in this manual
indicates a flash memory device.
● About the file system
The file system should be the one of the
following.
• FAT16 • FAT32 • exFAT • NTFS
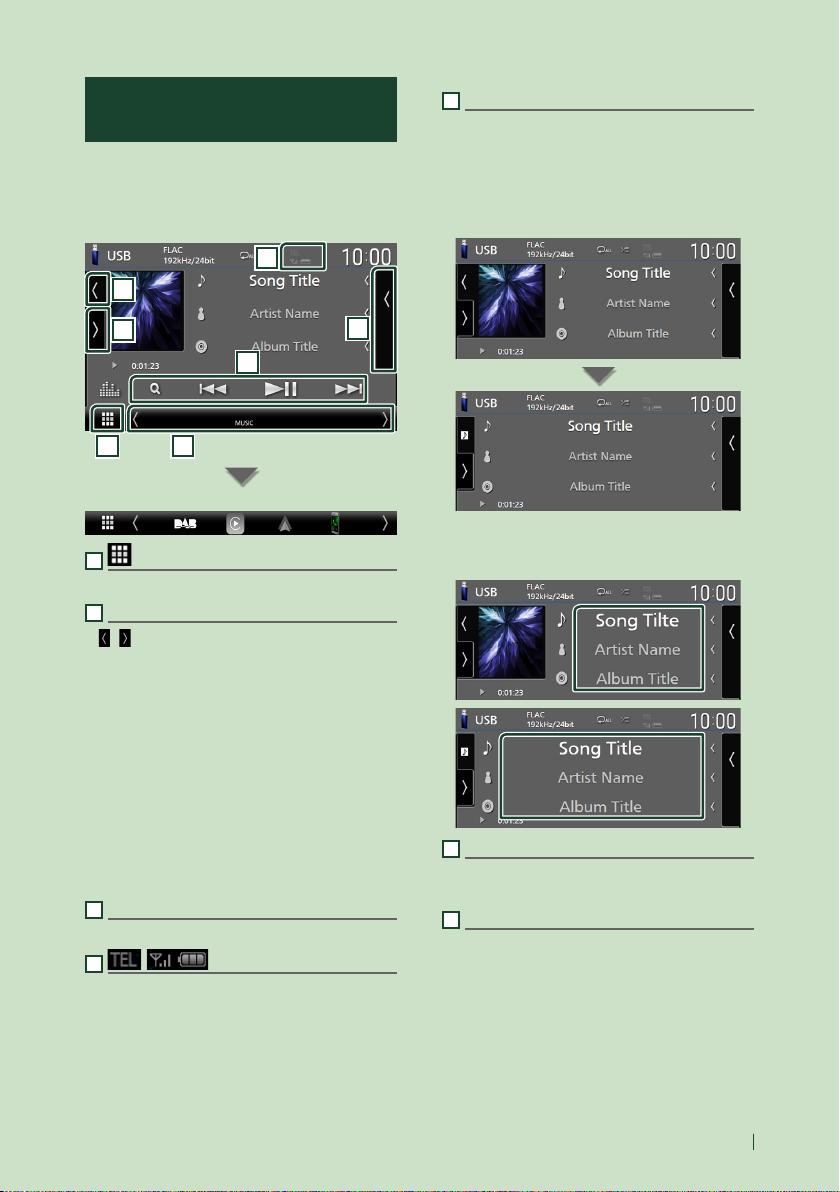
USB Basic Operation
Most functions can be controlled from the
source control screen and playback screen.
NOTE
• Set the remote controller mode switch to AUD
mode before starting operation, see Switch the
operation mode (P.74).
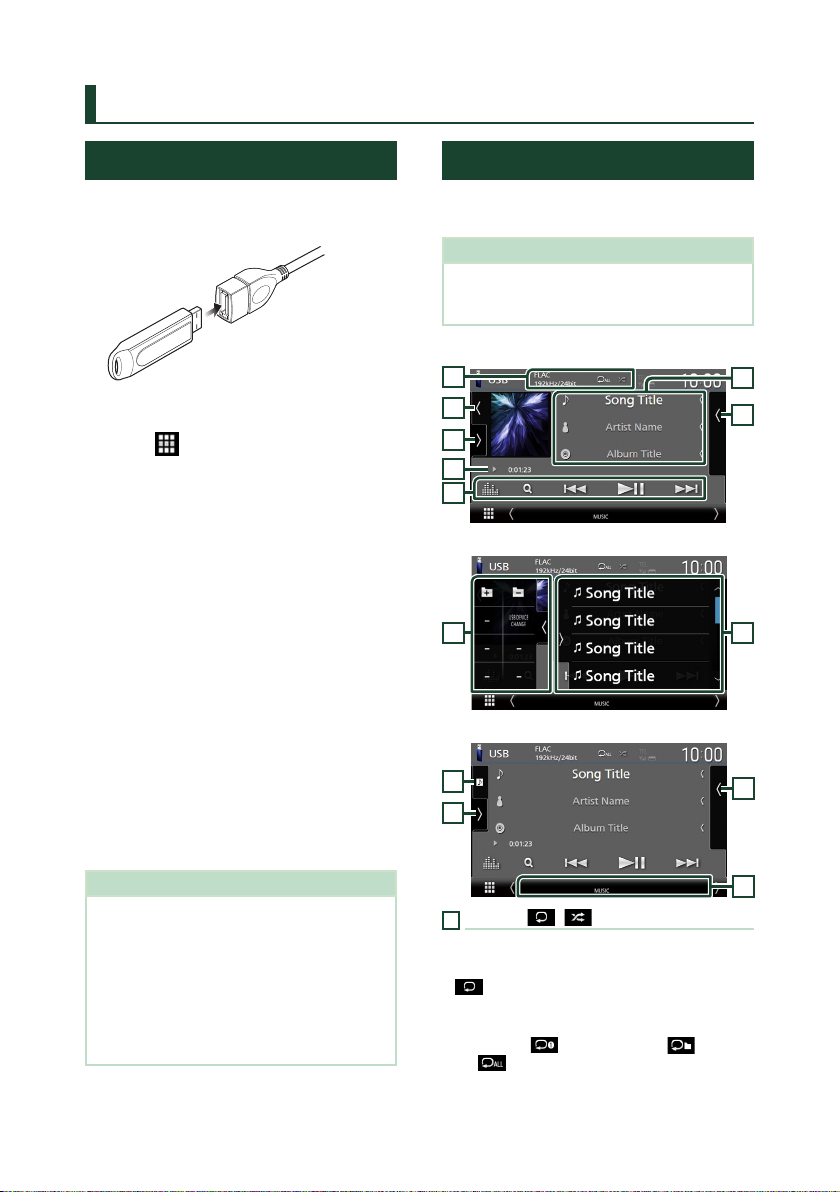
Control screen
1
6
7
3
4
Open the drawer
Close the drawer
6
7
2
5
57
5
NOTE
• Install the USB device in the place where it will
not affect safe driving.
• You cannot connect a USB device via a USB hub
and Multi Card Reader.
• Take backups of the audio files used with this
unit. The files can be erased depending on the
operating conditions of the USB device.
We shall have no compensation for any damage
arising from any erased data.
28
1
[CODEC]/[ ]/[ ]
• When a high-resolution source is played, its
format information is displayed.
• [
] : Repeats the current track/folder. Each
time you touch the key, repeat modes are
switched in the following sequence:
File repeat ( ), Folder repeat ( ), Repeat
all ( )
8
USB
• [ ] : Randomly plays all tracks in the current
folder. Each time you touch the key, random
modes are switched in the following sequence:
File random ( ), Random off ( )
2
Track information
• Displays the information on the current file.
Only a file name and a folder name are
displayed if there is no tag information.
• Change the text size of the information when
the "Small Audio Text" is set to "ON"/"OFF" in
the User Interface screen ( P.60).
3
Play mode indicator/Playing time
• D, B, etc.: Current play mode indicator
Meanings of individual icons are as follows:
D (play), B (fast forward), A (fast
backward), H (pause).
• For confirmation of current playing position.
You can drag the circle left or right to change
the playing position. (Video file only)
4
Operation keys
• 1] : Searches track/file. For details on search
operation, see Search Operation (P.30).
• E] [F] : Searches the previous/next track/
file.
Touch and hold to fast forward or fast
backward. (It will be cancelled automatically
after about 50 seconds.)
• [DH] : Plays or pauses.
• [
] : Displays the Graphic Equalizer screen.
(P. 68)
5
Content list
• Touch the right side of the screen to display
the Content list. Touch again to close the list.
• Displays the playing list. When you touch a
track/file name on the list, playback will start.
6
Artwork/VU meter
• Displays/hides artwork area.
• The jacket of the currently playing file is
displayed.
• Touch to switch between the artwork and VU
meter.
7
Function panel
Touch the left side of the screen to display the
function panel. Touch again to close the panel.
• [
] [ ] : Searches for the previous/next
folder.
• [USB DEVICE CHANGE]:
Switches to another USB device when two USB
devices are connected.
8
Indicator Items
• [VIDEO]: Identifies the video file.
• [MUSIC]: Identifies the music file.
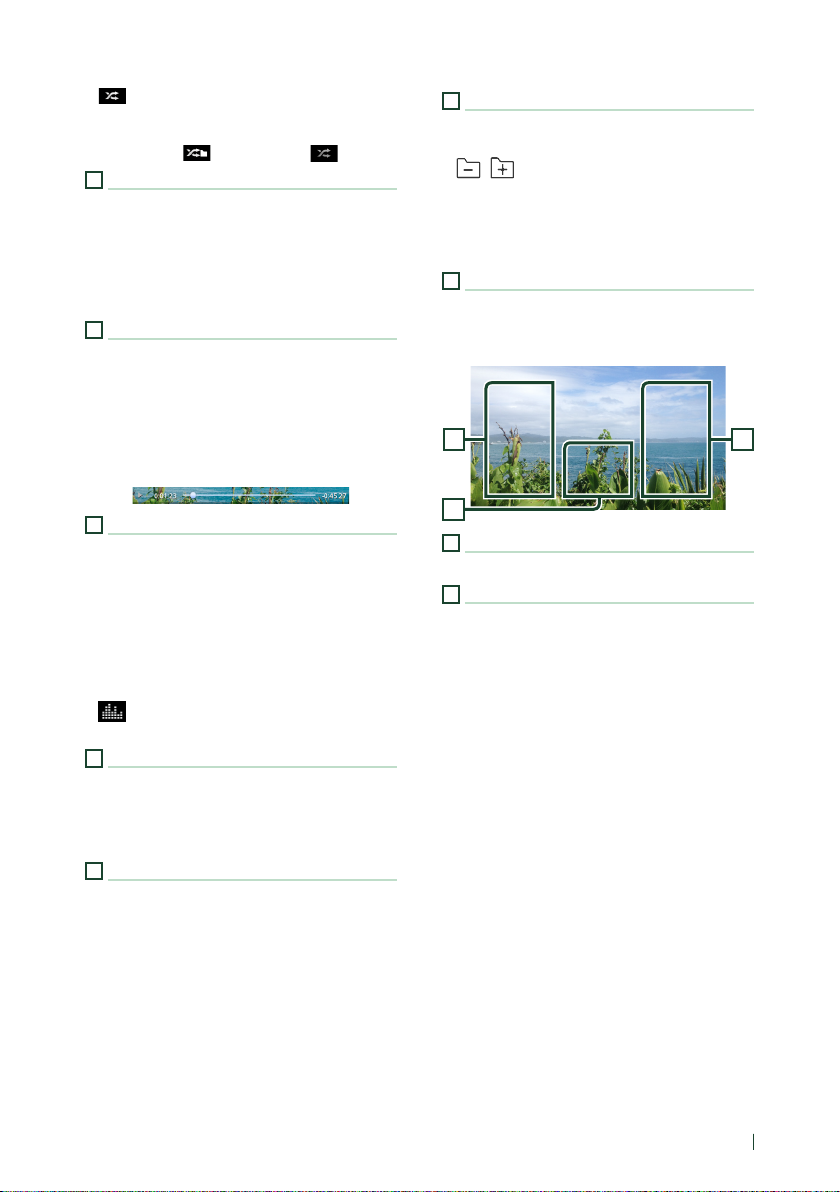
Video screen
10
9
File search area (Video file only)
Touch to search for the next/previous file.
10
Key display area (Video file only)
Touch to display the control screen.
99
29English
 Loading...