

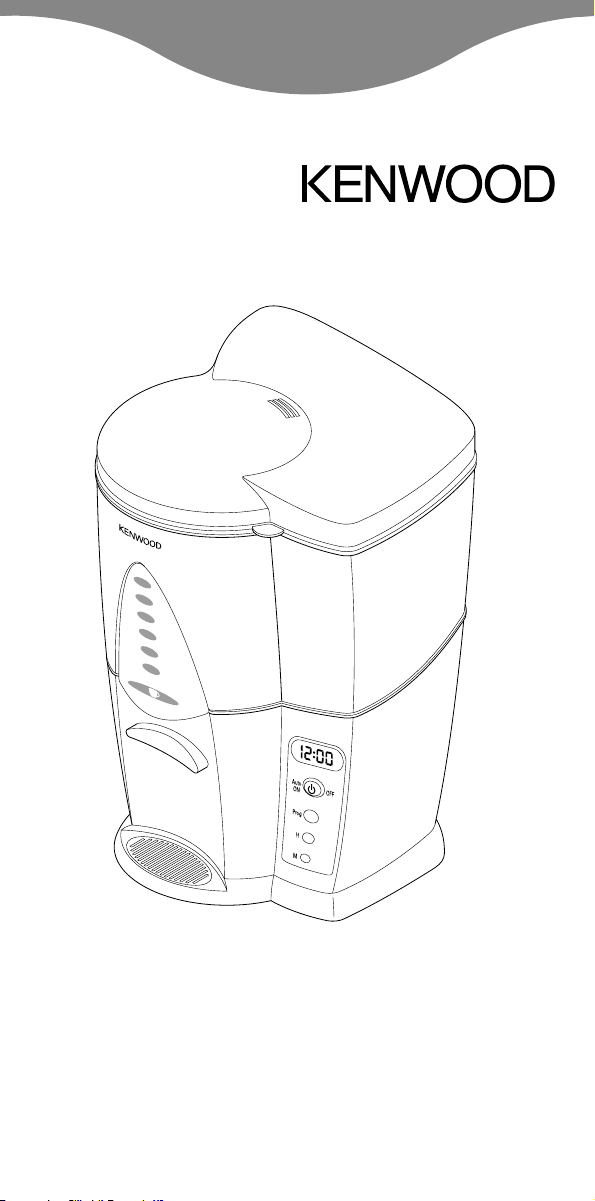
Page 1

Kenwood Limited, New Lane, Havant, Hampshire PO9 2NH, UK
www.kenwoodworld.com
56850/1
Page 2
CM450 series
CM460 series
CM550 series
CM560 series
12
10
8
6
4
2
Page 3

English 2 - 4
Français 5 - 7
Türkçe 8 - 10
´¸∂w
11
- 13
UNFOLD
≠U¸ßv
14 - 16
Page 4
CM450/460
series
CM550/560
series
CM460/560
series
CM450/550
series
12
10
8
6
4
2
OFFON
Auto
OFF
ON
Prog
H
M
Page 5

safety
● Never operate the coffee dispensing
lever by hand, always use a cup or
mug.
● Watch out for steam, never lift the lid
or remove parts during the brewing
cycle.
● Take care when dispensing coffee,
as burns can occur from touching
hot liquids.
● Never touch the keep warm plate
during or after the brewing cycle.
● Always use the handles provided to
remove parts from the BrewMaster.
● Keep children away from the
machine. And never let the cord
hang down where a child could grab
it.
● Never use a damaged machine. Get
it checked or repaired: see ‘service’.
● Never put the machine in water or let
the cord or plug get wet - you could
get an electric shock.
● Unplug:
●●
before filling with water
●●
before cleaning
●●
after use.
● Never leave the machine on
unattended.
● Don’t let the cord touch hot parts.
● Don’t let infirm people use the
machine without supervision.
● Don’t let children play with this
machine.
● Only use the machine for its
intended domestic use.
● Always make sure there is water in
the water reservoir before switching
on.
before plugging in
Make sure your electricity supply is
the same as the one shown on the
underside of your machine.
●
This machine complies with
European Economic Community
Directive 89/336/EEC.
before using for the first time
1 Remove all packaging
2 Wash the parts: see ‘care and
cleaning’.
3 Run two lots of water through the
machine (without coffee) to clean it
out. Each time pour one coffee tank
of cold water filled to the ‘MAX’ level
into the water reservoir. See ‘to
make coffee’.
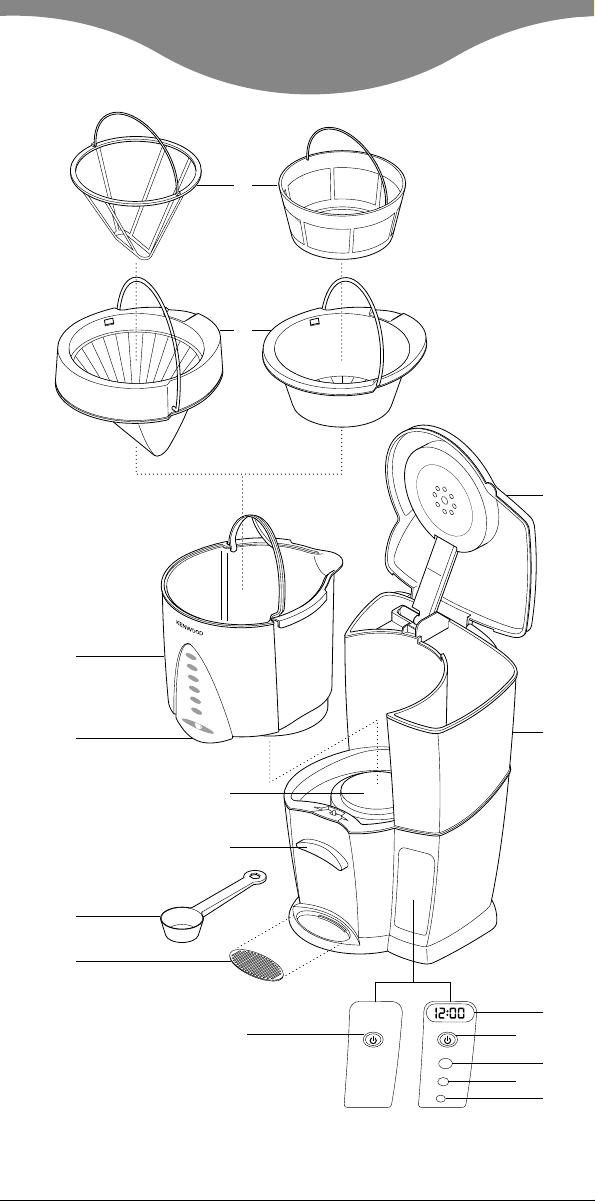
key
permanent filter
filter holder
coffee tank
hot coffee outlet
lid
water reservoir
keep warm plate
coffee dispensing lever
measuring scoop
drip tray
ON/OFF button (CM450/CM460
series only)
CM550/CM560 series only
clock
Auto/ON/OFF button
Prog (programme) button
hour button
minute button
to make coffee
1 Fill the coffee tank with the desired
amount of water. Use the markings
on the inside below the pouring
spout as a guide. Do not exceed the
‘MAX’ level.
● Use cold water. We recommend
using filtered water from a Kenwood
Water Filter as it reduces limescale.
Never use warm or fizzy water.
2 Pour the water from the coffee tank
into the water reservoir.
3 Place the coffee tank on the keep
warm plate, then fit the filter holder.
4 Place the permanent filter into the
filter holder.
2
Page 6

5 For each cup of coffee required,
place one level spoon of filter coffee
into the permanent filter. Adjust
quantity to taste.
6 Close the lid.
7 Plug into the power supply.
CM450/CM460 series
● Press the ON/OFF button, the light
will come on and brewing will
commence.
CM550 and CM560 series
● Press the Auto/ON/OFF button
twice for coffee to be produced
straight away, the light will come on
and brewing will commence. If you
want to use the automatic brew
facility follow the instructions to set
the clock and to programme
automatic brew.
8 To dispense coffee, press the coffee
dispensing lever with a cup and
coffee will flow out. Never press the
dispensing lever with your hand. To
stop the flow remove the cup.
Coffee may be dispensed during and
after brewing.
● To preserve heat and flavour, DO
NOT open the lid during or just after
brewing.
9 The BrewMaster will keep the coffee
warm and then automatically switch
off after 2 hours. To manually switch
off earlier, press the ON/OFF button.
to make tea
Follow the procedure for making
coffee using tea leaves instead of
filter coffee.
Place the desired amount of loose
tea into the permanent filter using
the spoon provided. The amount
will vary depending upon the type of
tea used and individual tastes but as
a guide use 4 - 6 spoons of loose
tea per maximum capacity of water.
Some experimentation will be
necessary to obtain the desired
result.
For best results we recommend that
only the required amount of tea is
made at one time and that the tea is
drunk within half an hour of brewing.
You may notice fragments of tea
leaves in the dispensed tea – this is
normal.
After use always wash the parts
thoroughly. If alternating between tea
and coffee making, take extra care
to ensure the coffee tank and
permanent filter are well washed and
rinsed.
You may wish to purchase an
additional permanent filter and coffee
tank to have dedicated parts for tea
and coffee making.
CM550 and CM560
series only
to set the clock.
1 Plug in the BrewMaster. The
numbers on the clock will flash until
the time of day is set or one minute
elapses.
2 To set the time of day:
● Press the ‘H’ button to set the
current hour with AM or PM.
● Press the ‘M’ button until you reach
the current time.
to select 12 or 24 hour
clock.
To change from a 12 hour clock
(AM/PM) to a 24 hour clock or vice
versa. Press the H and M buttons
simultaneously for 2 seconds.
to programme automatic brew
1 Set the clock to the correct time of
day.
2 Press the ‘Prog’ button and the
digits will flash.
3 Press the H and M buttons until the
desired brewing time is reached.
4 Press the ‘Prog’ button to confirm
setting. The digits will stop flashing
and return to the set time of day.
3
Page 7

5 Push the Auto/ON/OFF button once
and ‘PRO’ will show in the display
indicating that the brew cycle will
begin at the set time. The light will
flash on and off.
Note: if the Auto/ON/OFF button is
pushed twice, brewing will begin
immediately.
● To check the programmed time,
press the ‘Prog’ button and the
programmed time will flash. Press
‘Prog’ button again to return back to
the clock.
care and cleaning
● Always switch off, unplug and allow
to cool before cleaning.
● Never put the machine in water or let
the cord or plug get wet.
● Don’t wash parts in the dishwasher,
except the filter holder and coffee
tank.
coffee tank, drip tray, filter
holder and permanent filter
● Wash, then dry thoroughly.
body
● Wipe with a damp cloth, then dry.
Don’t use abrasives – they’ll scratch
the plastic.
descaling
Regularly descale to optimise your
BrewMaster’s performance. We
recommend once a month for heavy
usage.
to descale
1 Buy a suitable descaler.
2 Descale the machine following the
instructions on the descaler.
3 After descaling, run at least 2 lots of
water through the machine to clean
it out. Each time pour one coffee
tank of cold water filled to the ‘MAX’
level into the water reservoir.
4 Wash the parts.
service
●
If the cord is damaged it must, for
safety reasons, be replaced by
Kenwood or an authorised Kenwood
repairer.
If you need help with:
●
using your machine or
●
servicing, spare parts or repairs
Contact the shop where you bought
your machine.
4
Page 8

sécurité
●
N’actionnez jamais le levier
distributeur de café à la main,
employez toujours une tasse ou une
gobelet.
●
Faites attention à la vapeur, ne
soulevez jamais le couvercle et ne
retirez jamais d’éléments pendant le
cycle de préparation.
●
Faites attention pendant le
versement du café, le contact avec
des liquides chauds pouvant
entraîner des brûlures.
●
Ne touchez jamais la plaque de
maintien au chaud pendant ou après
le cycle de préparation.
●
Employez toujours les poignées
prévues à cet effet pour retirer tout
élément de votre BrewMaster.
●
Conservez l’appareil hors de portée
des enfants. Ne laissez jamais
pendre le cordon un enfant pourrait
l’attraper.
●
N’utilisez jamais un appareil
endommagé. Faites-le vérifier et
réparer. Voir “Service après-vente”.
●
N’immergez jamais la cafetière ni ne
mouillez le cordon ou la prise
électrique – vous pourriez vous
électrocuter.
●
Débranchez la cafetière :
●●
avant de la remplir d’eau
●●
avant de la nettoyer
●●
après utilisation.
●
Ne laissez jamais l’appareil sans
surveillance.
●
Ne laissez pas le cordon en contact
avec des éléments chauds.
●
Ne laissez pas les enfants jouer avec
l’appareil.
●
N’utilisez cet appareil que pour un
usage domestique prévu.
●
Assurez-vous toujours de la
présence d’eau dans le réservoir
avant de mettre l’appareil en
marche.
avant le branchement
Vérifiez correspond à celui indiqué
sous votre appareil.
●
Cet appareil est conforme à la
directive 89/336 de la C.E.E.
avant la première utilisation
1 Retirez tous les emballages.
2 Lavez les différents éléments de
l’appareil : voir ‘entretien et
nettoyage’.
3 Faites couler deux réservoirs d’eau
(sans café) pour nettoyer l’appareil.
Versez à chaque fois dans le
réservoir d’eau une cafetière remplie
d’eau froide jusqu’au niveau ‘MAX’.
Voir ‘faire du café’.
légende
filtre permanent
porte-filtre
réservoir à café
sortie du café chaud
couvercle
réservoir d’eau
plaque chauffante
levier distributeur de café
cuillère de mesure
bac de récupération
bouton ON/OFF (série
CM450/CM460 uniquement)
série CM550/CM560
uniquement
horloge
bouton Auto/ON/OFF
bouton Prog (programme)
bouton des heures
bouton des minutes
5
Français
Veuillez déplier les illustrations de la première page
Page 9

faire du café
1 Remplissez le réservoir à café avec
la quantité d’eau voulue. Utilisez
comme guide les graduations
situées à l’intérieur sous le bec
verseur. Ne dépassez pas le niveau
‘MAX’.
●
Utilisez de l’eau froide. Nous vous
recommandons d’utiliser de l’eau
filtrée à l’aide d’un Filtre Kenwood
afin de réduire l’entartrage.
N’employez jamais d’eau chaude ou
gazeuse.
2 Versez l’eau du réservoir du café
dans le réservoir d’eau.
3 Placez le réservoir du café sur la
plaque chauffante, puis mettez le
porte-filtre en place.
4 Installez le filtre permanent dans le
porte-filtre.
5 Pour chaque tasse de café, mettez
une cuillère rase de café moulu dans
le filtre permanent. Adaptez la
quantité à votre goût.
6 Fermez le couvercle.
7 Branchez l’appareil.
série CM450/CM460
●
Appuyez sur le bouton
Auto/ON/OFF, le voyant s’allume et
la préparation commence.
série CM550 et CM560
●
Appuyez sur le bouton Auto/ON/OFF
deux fois pour obtenir du café
immédiatement, le voyant s’allume et
la préparation commence. Si vous
souhaitez employer la fonction de
préparation automatique, suivez les
instructions de réglage de l’horloge
et de programmation automatique.
8 Pour verser le café, appuyez sur le
levier distributeur avec une tasse et
le café s’écoule. N’appuyez jamais
sur le levier distributeur avec la main.
Pour arrêter l’écoulement, retirez la
tasse. Le café peut être versé
pendant et après la préparation.
●
Afin de préserver l’arôme et la
température, n’ouvrez PAS le
couvercle pendant ou juste après la
préparation.
9 Votre BrewMaster garde le café
chaud, puis s’éteint
automatiquement après 2 heures.
Pour l’éteindre manuellement plus
tôt, appuyez sur le bouton ON/OFF.
série CM550 et CM560
uniquement
réglage de l’horloge
1 Branchez votre BrewMaster. Les
chiffres de l’horloge clignotent
jusqu’à ce que le réglage de l’heure
soit achevé ou qu’une minute se soit
écoulée.
2 Pour régler l’heure :
●
Appuyez sur le bouton ‘H’ pour le
réglage des heures en mode matin
ou soir (AM ou PM).
●
Appuyez sur le bouton ‘M’ jusqu’au
réglage de l’heure exacte.
sélection du mode
horloge 12 ou 24
heures.
Pour passer du mode 12 heures
(AM/PM) au mode 24 heures ou vice
versa. Appuyez sur les boutons H et
M simultanément pendant 2
secondes.
programmation de la
préparation automatique
1 Réglez l’horloge à l’heure exacte.
2 Appuyez sur le bouton ‘Prog’, les
chiffres clignotent.
3 Appuyez sur les boutons H et M
jusqu’au réglage de l’heure de
préparation souhaitée.
4 Appuyez sur le bouton ‘Prog’ pour
confirmer le réglage. Les chiffres
arrêtent de clignoter et repassent à
l’heure présente.
6
Page 10

5 Appuyez une fois sur le bouton
Auto/ON/OFF, ‘PRO’ s’affiche sur
l’écran, indiquant que le cycle de
préparation débutera à l’heure
programmée. Le voyant clignote en
alternance.
Remarque : si vous appuyez deux
fois sur le bouton Auto/ON/OFF, la
préparation commence
immédiatement.
●
Pour vérifier l’heure programmée,
appuyez sur le bouton ‘Prog’,
l’horaire programmé clignote.
Appuyez de nouveau sur le bouton
‘Prog’ pour repasser à l’horloge.
entretien et nettoyage
●
Éteignez toujours l’appareil,
débranchez-le et laissez-le refroidir
avant de le nettoyer.
●
N’immergez jamais l’appareil ni ne
mouillez le cordon d’alimentation ou
la prise électrique.
●
Ne lavez pas les éléments de votre
appareil au lave-vaisselle, à
l’exception du porte-filtre et du
réservoir du café.
cafetière, bac de
récupération, porte-filtre et
filtre permanent
●
Lavez, puis séchez soigneusement.
corps
●
Essuyez avec un chiffon humide,
puis séchez. N’utilisez pas de
produits abrasifs : ils rayeraient le
plastique.
détartrage
Effectuez un détartrage régulier afin
d’optimiser les performances de
votre BrewMaster. Nous
recommandons une fois par mois en
cas d’utilisation fréquente.
pour détartrer
1 Prenez un détartrant adapté.
2 Détartrez l’appareil conformément
aux instructions fournies avec le
détartrant.
3 Après le détartrage, faites couler au
moins 2 réservoirs d’eau pour
nettoyer l’appareil. Remplissez d’eau
froide jusqu’au niveau ‘MAX’.
4 Lavez les différents éléments de
l’appareil.
service après-vente
●
Si le cordon est endommagé, il doit
être remplacé pour des raisons de
sécurité par Kenwood ou par un
réparateur Kenwood-agréé.
Veuillez prendre contact avec votre
revendeur pour tous renseignements
sur :
●
l’emploi de la cafetière ou
●
l’entretien, les pièces de rechange
ou les réparations
7
Page 11

güvenlik önlemleri
●
Kahve boşaltma kolunu hiçbir
zaman elle çalıştırmayınız. Her
zaman bir kap ya da büyük kahve
fincanı kullanınız.
●
Kahve makinesinden çıkan buhara
dikkat ediniz. Kahve demlenirken
kahve makinesinin kapağını
kaldırmayınız ve herhangi bir
parçasını çıkarmaya çalışmayınız.
●
Kahveyi boşaltırken dikkatli olunuz.
Ellerinizi sıcak kahve ile
yakabilirsiniz.
●
Kahve demlenirken ve
demlendikten sonra sıcak tutma
tablasına hiçbir zaman
dokunmayınız.
●
BrewMaster’dan herhangi bir parça
çıkarmak için her zaman verilen
tutamaçları kullanınız.
●
Çocukları kahve makinesine
yaklaştırmayınız. Kordonu sarkık
bırakmayınız. Çocuklar kordonunu
çekip kahve makinesinin düşürebilir.
●
Hasarlı kahve makinelerini hiçbir
biçimde kullanmayınız. Kahve
makinesini denetimden geçirtiniz ya
da onarıma gönderiniz. Bu konuda
‘hizmet’ bölümüne bakınız.
●
Kahve makinesini hiçbir biçimde
suya daldırmayınız. Kordonunu ve
fişini ıslatmayınız. Çünkü, ceryana
çarpılabilirsiniz.
●
Kahve makinesine su doldurmadan
ve temizlik yapmadan önce ve
kullandıktan sonra fişini prizden
çekiniz.
●
Kahve yaparken kahve makinesinin
başından hiçbir zaman
ayrılmayınız.
●
Kordonu kahve makinesinin sıcak
yüzeylerine değdirmeyiniz.
●
Çocukların aygıtla oynamalarına
izin vermeyiniz.
●
Kahve makinesini evde ve yalnızca
kahve yapmak için kullanınız.
●
Kahve makinesinin fişini prize
takmadan önce su haznesinin dolu
olduğundan emin olunuz.
elektrik akımına bağlanması
Kahve makinesini kullanmadan
önce evinizdeki elektrik akımının
aygıtın altında belirtilen akımla aynı
olduğuna dikkat ediniz.
●
Bu kahve makinesi, 89/336/EEC
sayılı Avrupa Ekonomik Topluluğu
Yönergesi’ne uygun olarak
üretilmiştir.
ilk kullanımdan önce
1 Kahve makinesinin tüm ambalajını
açınız.
2 Aygıtın tüm parçalarını yıkayınız.
Bu konuda ‘bakım ve temizlik’
bölümüne bakınız.
3 Kahve makinesini içine kahve
koymadan önce iki kez bol suyla
yıkayınız. Kahve yapmak için her
zaman su haznesini ‘MAX’ işaretli
düzeye kadar kahve haznesi
miktarında soğuk su ile doldurunuz.
Bu konuda ‘kahve hazırlama’
bölümüne bakınız.
kahve makinesinin
parçaları
sürekli filtre
filtre kabı
kahve haznesi
sıcak kahve çıkışı
kapak
su haznesi
sıcak tutma tablası
kahve boşaltma kolu
kahve ölçek kaşığı
damlama tablası
ON/OFF düğmesi (yalnızca
CM450 ve CM460 modelleri için)
Yalnızca CM550 ve CM560
modelleri için
saat
Auto/ON/OFF düğmesi
Prog (programlama) düğmesi
saat düğmesi
dakika düğmesi
8
Türkçe
Kullanım yönergelerini okumaya ba…lamadan önce ön sayfayı açınız ve
açıklayıcı resimlere bakınız
Page 12

kahve hazırlama
1 Kahve haznesine istenen miktarda
su koyunuz. Kahve haznesi
ağızlığının altındaki işaretleri
kılavuz olarak kullanınız. ‘MAX’
işaretli düzeyinden fazla miktarda
su doldurmayınız.
●
Kahve yapmak için soğuk su
kullanınız. Bunun için, Kenwood Su
Filtresi kullanarak suyu filtre
etmenizi öneririz. Çünkü, su filtresi
kireçlenmeyi azaltır. Hiçbir zaman
ılık ya da gazlı su kullanmayınız.
2 Kahve haznesinden su haznesine
su doldurunuz.
3 Kahve haznesini sıcak tutma
tablasına koyunuz. Arkasından filtre
kabını takınız.
4 Filtre kabına sürekli filtreyi takınız.
5 Bir kap kahve için sürekli filtreye bir
kaşık filtre kahve koyunuz. Damak
tadınıza göre kullanacağınız miktarı
seçiniz.
6 Kapağı kapatınız.
7 Kahve makinesinin fişini prize
takınız.
CM450 ve CM460 dizisi
●
Auto/ON/OFF düğmesine basınız.
Işık yanacak ve kahve demlenmeye
başlayacaktır.
CM550 ve CM560 dizisi
●
Çabuk kahve yapmak için
Auto/ON/OFF düğmesine iki kez
basınız. Bu durumda ışık yanacak
ve kahve demlenmeye
başlayacaktır. Kahveyi otomatik
olarak demlemek isterseniz, saati
ayarlamak ve otomatik demlemeyi
programlamak için yönergeleri
izleyiniz.
8 Hazırladığınız kahveyi boşaltmak
için kahve boşaltma koluna bir kap
ile bastırınız ve kahve kaba akmaya
başlayacaktır. Kahve boşaltma
koluna hiçbir biçimde elinizle
basmayınız. Kahve boşaltmayı
kesmek için kabı çekiniz. Kahveyi
demlenme sırasında ve daha sonra
kaba boşaltabilirsiniz.
●
Kahveyi sıcak tutmak ve tadını
bozmamak için kahveyi
demlediğiniz sırada ve
demlendikten sonra kapağı
AÇMAYINIZ.
9 BrewMaster kahveyi sıcak tutacak
ve 2 saat sonra otomatik olarak
çalışmasını durduracaktır. Daha
önce çalışmasını elle durdurmak
isterseniz, ON/OFF düğmesine
basınız.
yalnızca CM550 ve
CM560 dizileri için
saatin ayarlanması
1 BrewMaster’ı prize takınız. Saat
üzerindeki numaralar günün saati
ayarlanıncaya kadar yanıp
sönecektir ya da ayarlanan saati bir
dakika geçmiş gösterecektir.
2 Günün saatinin ayarlanması:
●
Saati Öğleden Önce (AM) ya da
Öğreden Sonra (PM) olarak
ayarlamak için ‘H’ düğmesine
basınız.
●
Saati günün saatine ayarlamak için
tam saat belirinceye kadar ‘M’
düğmesine basınız.
12 saatlik ya da 24
saatlik saat ayarının
seçilmesi
Saati 12 saat esasından (Öğleden
Önce / Öğleden Sonra – AM/PM)
24 saat saat esasına ya da 24
saatten 12 saate çevirmek için H ve
M düğmelerine aynı anda 2 saniye
basınız.
otomatik demlemenin
programlanması
1 Saati günün saatine ayarlayınız.
2 ‘Prog’ düğmesine basınız ve
üzerindeki rakamlar yanıp sönmeye
başlayacaktır.
3 İstenen demleme süresine
ulaşıldığı zaman H ve M
düğmelerine basınız.
9
Page 13

4 Ayarı onaylamak için ‘Prog’
düğmesine basınız. Saattaki
rakamlar yanıp sönmeyi durduracak
ve günün saati belirecektir.
5 Auto/ON/OFF düğmesine bir kez
basınız ve ‘PRO’ ayarlanan saatte
demlenmenin başlayacağı
göstergede görünecektir. Işık
yanacak ve sönecektir.
Not: Auto/ON/OFF düğmesine iki
kez basıldığı takdirde, demleme
derhal başlayacaktır.
●
Programlanan zamanı kontrol
etmek için ‘Prog’ düğmesine
basınız ve programlanan zaman
yanıp sönmeye başlayacaktır.
Saate dönmek için tekrar ‘Prog’
düğmesine basınız.
bakım ve temizlik
●
Temizlemeye başlamadan önce
kahve makinesinin fişini prizden
çekiniz ve soğumasını bekleyiniz.
●
Kahve makinesini hiçbir biçimde
suya batırmayınız. Kordonunu ve
fişini ıslatmayınız.
●
Kahve makinesinin parçalarını
bulaşık makinesinde yıkamayınız.
Yalnızca filtre kabını ve kahve
haznesini bulaşık makinesinde
yıkayabilirsiniz.
kahve haznesi, damlama tablası,
filtre kabı ve sürekli filtre
●
Yıkayınız ve arkasından tamamen
kurulayınız.
gövde
●
Nemli bir bezle sildikten sonra
kurulayınız. Aşındırıcı temizlik
gereçleri kullanmayınız. Bu tür
maddeler plastik gövdeyi çizebilir.
kireç giderme
BrewMaster’ın en etkin bir biçimde
çalışması için düzenli olarak
kireçlenmeyi gideriniz. Ayda bir kez
iyi bir kireç temizliği yapılmasını
öneririz
kireç gidermek için
1 Uygun bir kireç giderici alınız.
2 Kireç gidericide belirtilen
yönergeleri izleyerek kahve
makinesini temizleyiniz.
3 Kireç giderme işleminden sonra
kahve makinesine enaz 2 kez su
doldurup çalkalayınız. Kahve
yapmak için her zaman su
haznesini ‘MAX’ işaretli düzeye
kadar kahve haznesi miktarında
soğuk su ile doldurunuz.
4 Kahve makinesinin parçalarını
yıkayınız.
bakım
●
Aygıtın elektrik kordonunda
herhangi bir hasar varsa, güvenlik
için yeni kordon Kenwood ya da
yetkili bir Kenwood onarımcısı
tarafından değiştirilmelidir.
●
BrewMaster’ın kullanımı, bakımı ya
da onarımı için yardıma gereksinim
duyarsanız, kahve makinesini satın
aldığınız yere başvurunuz.
10
Page 14

«“«∞W «∞IAu¸ «∞JKºOW
¢e«‰ «∞IAu¸ «∞JKºOW ´Kv «≤∑EU ∞πFq ´Lq
Ë•b…
retsaMwerB ´Kv «∞u§t «ô±∏q. «≤MU
≤uÅw °U§d«¡ –∞p ±d… °U∞ANd ∞öß∑FLU‰
«∞∏IOq.
ô“«∞W «∞IAu¸ «∞JKºOW
1 «Æ∑s ±e¥q ¢dß∂U‹ ØKºOW ±MUßV.
2 «“‰ «∞∑dß∂U‹ «∞JKºOW ±∑∂FU «∞∑FKOLU‹
«∞Lu§uœ… ´Kv «∞Le¥q.
3 °Fb ´LKOW «“«∞W «∞∑dß∂U‹ «∞JKºOW ±d¸ ´Kv
«ôÆq œ≠F∑Os ±s «∞LU¡ îö‰ «∞LJMW
∞∑MEOHNU. ≠w Øq ±d…, ÅV îe«Ê ÆNu…
Ë«•b ±LKu¡ °LU¡ °U¸œ «∞v «∞Fö±W "
XAM"
≠w ±º∑uœŸ «∞LU¡.
4 ¢Gºq «ô§e«¡.
«∞ªb±W
●
«–« ¢Cd¸ ßKp «∞JNd°U¡ ≠OπV, ôß∂U»
¢∑FKo °U∞ºö±W, «ß∑∂b«∞t ±s Æ∂q ØOMuËœ «Ë
§NW ¢BKO` ±ªu∞W ±s Æ∂q ØOMuËœ.
«–« «•∑π∑r «∞v ±ºU´b… ¢∑FKo °‡:
●
«ß∑FLU‰ «∞LJMW «Ë
●
«∞ªb±W «Ë ÆDl «∞GOU¸ «Ë «∞∑BKO`, «¸§U¡
«ô¢BU‰ °U∞L∑πd «∞cÍ «®∑d¥∑r ±Mt «∞LJMW.
13
Page 15

4 {l «∞Ld®` «∞b∞µr ´Kv ±Ußp «∞Ld®`.
5 ∞Jq ≠MπUÊ ÆNu…, {l ±KFIW ±Lºu•W
Ë«•b… ±s «∞INu… ≠w «∞Ld®` «∞b«zr. «{∂j
«∞JLOW •ºV «∞cË‚.
6 «¨Ko «∞GDU¡.
7 «ËÅq °U∞JNd°U¡.
«∞ºKºKW
064MC/054MC
●
«{Gj “¸ FFO/NO, ßu· ¥CU¡ «∞Cu¡
Ë¢∂b√ ´LKOW «´b«œ «∞INu….
«∞ºKºKW
065MC/055MC
●
«{Gj “¸ FFO/NO/otuA ±d¢Os ∞Jw ¢Fb
«∞INu… ´Kv «∞Hu¸, ßu· ¥CU¡ «∞Cu¡ Ë¢∂b√
´LKOW «ô´b«œ. «–« «¸œ‹ «ß∑FLU‰ Ë™OHW
«ô´b«œ «ôË¢u±U¢OJw ∞KINu…, «¢∂l «∞∑FKOLU‹
∞C∂j «∞ºU´W Ë°d±πW ´LKOW «ô´b«œ
«ôË¢u±U¢OJw.
8 ∞BV «∞INu…, «{Gj ´∑KW ÅV «∞INu…
°u«ßDW ≠MπUÊ Ëßu· ¢MºU» «∞INu…. «°b«
ô ¢CGj «∞F∑KW °Ob„. ∞uÆn «∞πd¥UÊ, «“‰
«∞HMπUÊ.
¥LJs ÅV «∞INu… «£MU¡ Ë°Fb ´LKOW «ô´b«œ.
●
∞K∫HUÿ ´Kv «∞∫d«¸… Ë«∞MJNW, ô ¢H∑` «∞GDU¡
«£MU¡ «Ë ±∂U®d… °Fb «ô´b«œ.
9 ß∑∂Iw Ë•b…
retsaMwerB «∞INu… ßUîMW
£r ¢uÆn «∞∑AGOq ¢KIUzOU °Fb ßU´∑Os.
∞uÆn «∞∑AGOq ¥bË¥U Æ∂q –∞p, «{Gj “¸
FFO/NO.
«∞ºKºKW 055MC Ë 065MC
≠Ij
∞C∂j «∞ºU´W
1 «ËÅq Ë•b…
retsaMwerB °U∞JNd°U¡.
ßu· ¢u±i «ô¸ÆU «∞u«ÆFW ´Kv «∞ºU´W
«∞v «Ê ¥∑r {∂j «∞uÆX «Ë °Fb ±d˸ œÆOIW
Ë«•b….
2 ∞C∂j «∞uÆX:
●
«{Gj “¸ "H" ∞C∂j «∞ºU´W «∞∫U∞OW ±l
Æ∂q «∞ENd «Ë °Fb «∞ENd (
MA «Ë MP).
●
«{Gj “¸ "M" «∞v «Ê ¢Bq «∞v «∞∑uÆOX
«∞∫U∞w «∞B∫O`.
ô≤∑IU¡ «∞∑uÆOX °‡ 21 «Ë 42
ßU´W.
∞K∑GOOd ±s ¢uÆOX 21 ßU´W (Æ∂q «∞ENd/°Fb
«∞ENd) «∞v ¢uÆOX °Uß∑FLU‰ 42 ßU´W «Ë
°U∞FJf, «{Gj “¸Í
H Ë M ±FU ≠w –«‹
«∞uÆX ∞Lb… 2 £U≤OW.
∞∂d±πW «∞LJMW ∞ö´b«œ «ôË¢u±U¢OJw
∞KINu…
1 «{∂j «∞ºU´W ´Kv «∞∑uÆOX «∞B∫O` ∞KOuÂ.
2 «{Gj “¸ "
gorP" Ë´Mb≥U ßu· ¢u±i
«ô¸ÆUÂ.
3 «{Gj
H Ë M «∞v •Os «∞uÅu‰ «∞v ËÆX
«ô´b«œ «∞Ld¨u».
4 «{Gj “¸ "
gorP" ∞∑QØOb ´LKOW «∞C∂j.
ßu· ¢∑uÆn «ô¸ÆU ´s «∞u±Oi Ë¢Fuœ «∞v
´d÷ «∞uÆX «∞LF∑Uœ.
5 «œ≠l “¸
FFO/NO/otuA ±d… Ë«•b… Ëßu·
¥ENd “¸ "
gorP" ´Kv ∞u•W «∞Fd÷ ±∂OMU «Ê
´LKOW «´b«œ «∞INu… ßu· ¢∂b√ ≠w «∞uÆX
«∞cÍ ¢r {∂Dt. ßu· ¥u±i «∞Cu¡.
±ö•EW: «–« ¢r œ≠l “¸
FFO/NO/otuA
∞Ld¢Os, ≠ºu· ¢∂b√ ´LKOW «ô´b«œ ´Kv «∞Hu¸.
●
∞KJAn ´Kv «∞uÆX «∞L∂d±Z, «{Gj “¸
"
gorP" Ë´Mb≥U ßu· ¥u±i «∞∑uÆOX
«∞L∂d±Z. «{Gj “¸ "
gorP" ±d… «îdÈ
∞KFuœ… «∞v «∞ºU´W.
«∞FMU¥W Ë«∞∑MEOn
●
œ«zLU «ËÆn «∞∑AGOq Ë«≠Bq ±s «∞JNd°U¡
ËœŸ «∞u•b… ¢∂dœ Æ∂q «∞∑MEOn.
●
«°b« ô ¢Cl «∞LJMW ≠w «∞LU¡ «Ë ¢ºL`
°U°∑ö‰ «∞ºKp «Ë «∞IU°f.
●
ô ¢Gºq «ô§e«¡ ≠w ¨ºU∞W «∞B∫uÊ, ±U
´b« ±Ußp «∞Ld®` Ëîe«Ê «∞INu….
îe«Ê «∞INu…, ÅOMOW «∞IDd, ±Ußp
«∞Ld®` Ë«∞Ld®` «∞b«zr
●
¢Gºq £r ¢πHn §Ob«.
«∞πºr
●
¥Lº` °IDFW ÆLU‘ ¸©∂W, £r ¥πHn. ô
¢º∑FLq ËßUzq ¢MEOn «ØÒU∞W - ≠Nw ßu·
¢ªb‘ «∞∂öß∑p.
12
Page 16

«∞ºö±W
●
«°b« ô ¢AGq ´∑KW ÅV «∞INu… °U∞Ob,
«ß∑FLq œ«zLU ≠MπUÊ «Ë ÆbÕ.
●
«≤∑∂t ±s «∞∂ªU¸, «°b« ô ¢d≠l «∞GDU¡ «Ë ¢e¥q
«ô§e«¡ «£MU¡ œË¸… «ô´b«œ.
●
«≤∑∂t ´Mb ÅV «∞INu…, ≠Ib ¢∑Fd÷ «∞v
«ôØ∑u«¡ °º∂V «∞∑ö±f ±l «∞ºu«zq
«∞ºUîMW.
●
«°b« ô ¢KLf ∞uÕ «∞L∫U≠EW ´Kv «∞∑ºªOs
«£MU¡ «Ë °Fb «ô´b«œ.
●
«ß∑FLq œ«zLU «∞LIU°i «∞LeËœ… ô“«∞W
«ô§e«¡ ±s Ë•b…
retsaMwerB.
●
«°o «ô©HU‰ °FOb« ´s «∞LJMW. Ë«°b« ô ¢ºL`
∞KºKp °U∞∑b∞w •OY ¥LJs ∞DHq «ô±ºU„ °t.
●
«°b« ô ¢º∑FLq ±JMW ±∑Cd¸…. °q ∞OJAn
´KONU «Ë ¥∑r «Åö•NU: «≤Ed "«∞ªb±W".
●
«°b« ô ¢Cl «∞LJMW ≠w «∞LU¡ «Ë ¢ºL`
°U°∑ö‰ «∞ºKp «Ë «∞IU°f - ≠Ib ¢∑Fd÷ «∞v
Åb±W ØNd°UzOW.
●
«≠Bq ±s «∞JNd°U¡:
●●
Æ∂q «∞∑F∂µW °U∞LU¡
●●
Æ∂q «∞∑MEOn
●●
°Fb «ôß∑FLU‰.
●
«°b« ô¢∑d„ «∞LJMW ±A∑GKW ∞u•b≥U.
●
ô ¢ºL` ∞KºKp °U∞∑ö±f ±l «ßD`
ßUîMW.
●
ô ¢ºL` ∞ö©HU‰ °U∞KFV °Nb–Á «∞LJMW.
●
«ß∑FLq «∞LJMW ∞KGd÷ «∞LMe∞w «∞LF∑e ∞NU
≠Ij.
●
¢QØb œ«zLU ±s ˧uœ «∞LU¡ ≠w «∞ªe«Ê Æ∂q
«∞∑AGOq.
Æ∂q «∞∑uÅOq °U∞JNd°U¡
¢QØb ±s «Ê ±Bb¸ «∞JNd°U¡ «∞L∑u≠d ∞b¥Jr
±DU°o ∞LU ≥u ±∂Os ´Kv «∞πNW «∞∑∫∑W ±s
«∞LJMW.
●
¢∑DU°o ≥cÁ «∞LJMW ±l ¢u§Ot «∞LπLu´W
«ôÆ∑BUœ¥W «ô˸˰OW ¸Ær
98/633/CEE.
Æ∂q «ôß∑FLU‰ ∞KLd… «ôË∞v
1 ¢e«‰ §LOl ±u«œ «∞∑GKOn.
2 ¢Gºq «ô§e«¡: «≤Ed " «∞FMU¥W Ë«∞∑MEOn".
3 ¢Ld¸ œ≠F∑UÊ ±s «∞LU¡ îö‰ «∞LJMW (°bËÊ
ÆNu…) ∞∑MEOHNU. ≠w Øq ±d…, ÅV îe«Ê
ÆNu… Ë«•b ±LKu¡ °LU¡ °U¸œ «∞v «∞Fö±W
"
XAM" ≠w ±º∑uœŸ «∞LU¡. «≤Ed "∞FLq
«∞INu…".
±H∑UÕ «∞d±u“
±d®` œ«zr
±Ußp «∞Ld®`
îe«Ê «∞INu…
±ªdà «∞INu… «∞ºUîMW
¨DU¡
±º∑uœŸ «∞LU¡
∞uÕ «∞L∫U≠EW ´Kv «∞INu… ßUîMW
´∑KW ÅV «∞INu…
±Gd≠W «∞IOU”
ÅOMOW «∞IDd
“¸
FFO/NO («∞ºKºKW 064MC/054MC
≠Ij)
«∞ºKºKW
065MC/055MC ≠Ij
ßU´W
“¸
FFO/NO/otuA
“¸ gorP («∞∂d±πW)
“¸ «∞ºU´U‹
“¸ «∞bÆUzo
∞FLq «∞INu…
1 «±ú îe«Ê «∞INu… °U∞JLOW «∞Ld¨u°W ±s
«∞LU¡. «ß∑FLq «∞Fö±U‹ «∞u«ÆFW ≠w «∞b«îq
¢∫X ≠u≥W «∞BV Øb∞Oq. ô ¢∑πUË“
«∞Lº∑uÈ «ôÆBv "
XAM".
●
«ß∑FLq ±U¡« °U¸œ«. «≤MU ≤uÅw °Uß∑FLU‰
±U¡« ±d®∫U ±s ±d®` ±U¡ ØOMuËœ ô≤t ¥IKq
¢JuÊ «∞IAu¸( «∞∑dß∂U‹) «∞JKºOW. «°b« ô
¢º∑FLq ±U¡ ßUîs «Ë ¨U“Í.
2 ÅV «∞LU¡ ±s îe«Ê «∞INu… ≠w ±º∑uœŸ
«∞LU¡.
3 {l îe«Ê «∞INu… ´Kv ∞uÕ «∞L∫U≠EW ´Kv
«∞∑ºªOs. £r ¸ØV ±Ußp «∞Ld®`.
11
´d°w
«∞d§U¡ ≠∑` «∞BH∫W «ô±U±OW «∞∑w ¢∫∑uÍ ´Kv «∞dßu±U‹ «∞∑u{O∫OW
Page 17

●
«§e«È §b« ®u≤bÁ ¸« œ¸±U®Os ™d≠Au¥v
Æd«¸≤b≥Ob.
●
°b≤t œÂ ¬Ë¸ ¸« °U ¥@ ÄU¸Çt ∞DOn Ë ±d©u»
¢LOe ØMOb.
¸¸ßßuu»» ““œœ««¥¥vv ¢¢uuÅÅOOtt ±±OO~~ddœœœœ ≥≥dd ±±UU ÁÁ ¥¥JJ∂∂UU¸¸
««¥¥MMJJUU¸¸ ¸¸«« ««≤≤ππUU œœ≥≥OObb..
1 °d«È ¸ßu» “œ«¥v œß∑~UÁ •bËœ 4 ≠MπUÊ
¬» °t ≥Ld«Á œË ÆU®o ßuĪu¸È ¬°Gu¸Á ¥U
ßdØt œ¸ ±ªeÊ ¬» ßdœ °d¥e¥b Ë œß∑~UÁ
¸« °bËÊ ÇUÈ ¸Ë®s ØMOb ¢U ®dËŸ °JU¸
ØMb °U «¥MJU¸ œß∑~UÁ ®LU ¸ßu» “œ«¥v
îu«≥b ®b.
2 Äf «“ ¸ßu» “œ«¥v ¢uÅOt ±O~dœœ •b«Æq
œË°U¸ œÂ ¬Ë¸ ¸« °U °Uô¢d¥s •πr ¬» ¸Ë®s
ØMOb.
3 «§e«È §b«®u≤bÁ ¸« °Au¥Ob.
ßdË¥f
●
ÇMU≤ât ßOr ¥U œË®Uît œÂ ¬Ë¸ ¬ßOV œ¥bÁ
°U®b °U¥b •∑LU ¢ußj ßdË¥ºJU¸«Ê ±πU“
Øs ËËœ ¢Fu¥i Ödœœ.
●
«Öd œ¸ ¸«°Dt °U ØU¸Ødœ œÂ ¬Ë¸ Ë ¥U
¢FLOd«‹ ≤OU“ °t ¸«≥MLU¥v œ«®∑Ob °U «±u¸
±A∑dØOs Øs ËËœ 9181082 ¢LU” •UÅq
≠d±U¥Ob.
16
Page 18

3 ±ªeÊ ¸« œ¸ §UÈ îuœ ¸ËÈ «∞LMX ÖdÂ
≤~Nb«¸≤bÁ Æd«¸ œ≥Ob.
4 ≠OK∑d œ«zLv ¸« ¸ËÈ §U¥~UÁ ≠OK∑dÆd«¸œ≥Ob.
5 °d«È ≥dœË≠MπUÊ ¬», ¥@ ÄOLU≤t ÇUÈ œ¸≤Ed
°~Od¥b. «∞∂∑t ±Ib«¸ÇUÈ °º∑~v °t –«zIt
œ«¸œ.
6 œ¸Äu‘ ≠uÆU≤v ¸« °∂Mb|b.
7 œË®Uît ¸« °t Äd¥e °e≤Ob.
œœ¸¸ ±±bb∞∞NNUUÈÈ 006644
MC/
005544
MC
●
ØKOb FFO/NO ¸« ≠AU¸ œ≥Ob ô±é
¸Ë®s îu«≥b ®b Ë ´Lq œÂ ¬Ë¸œÊ ®dËŸ
±OAuœ.
œœ¸¸ ±±bb∞∞NNUUÈÈ 006655
MC/
005555
MC
●
ØKObFFO/NO/otuA ¸« œË °U¸ ≠AU¸
œ≥Ob ô±é ¸Ë®s îu«≥b ®b Ë ´Lq œÂ
¬Ë¸œÊ ®dËŸ ±OAuœ ÇMU≤ât °d≤U±t œÂ
¬Ë¸œÊ «¢u±U¢O@ ¸« œ¸ ≤Ed œ«¸¥b ∞DHU °t
ƺLX °d≤U±t ¸¥eÈ œÂ ¬Ë¸œÊ «¢u±U¢O@
±d«§Ft ØMOb.
8 °d«È ¸¥ª∑s ÇUÈ œß∑~OdÁ ®Od îd˧v ¸«
°U ¥@ ≠MπUÊ ≠AU¸ œ≥Ob, ≥dØe œß∑~OdÁ
®Od îd˧v ¸« °U œßX ≠AU¸ ≤b≥Ob.
●
°d«È «¥MJt ©Fr Ë ±eÁ ÇUÈ ¢GOOd ≤JMb
≥Oâ~UÁ œ¸Äu‘ ≠uÆU≤v ¸« œ¸ ©v ´Lq œÂ
¬Ë¸œÊ Ë °Fb «“ ¬Ê °d ≤b«¸¥b.
9 œÂ ¬Ë¸ ÇUÈ ¸« ¢U œË ßU´X Öd ≤~UÁ
±Ob«¸œ Ë Äf «“ ¬Ê °t ©u¸ «¢u±U¢O@
îU±u‘ îu«≥b ®b. ÇMU≤ât îuœ¢UÊ
±Oªu«≥Ob Æ∂q «“ œË ßU´X œÂ
¬Ë¸¸«îU±u‘ ØMOb
ØKObFFO/NO/otuA ¸« ¥J∂U¸ ≠AU¸
ϳOb.
œ¸±b∞NUÈ
065MC/055MC
¢¢MMEEOOrr ßßUU´´XX
1 œË ®Uît ¸« °t °d‚ ®Nd ËÅq ≤LU¥Ob œ¸
«¥MBu¸‹ «¸ÆU œ¸ ÅH∫t ≤LU¥A~d
ÇAL@ ±Oe≤Mb ¢U “±U≤OJt ßU´X ¢MEOr
®bÁ Ë ¥U ¥@ œÆOIt ßádÈ ®uœ.
2 §NX ¢MEOr ßU´X ®∂U≤t ¸Ë“È
●
ØKOb H ¸« §NX ¢MEOr ßU´X ®∂U≤t ¸Ë“È
°U ¢u§t °t 21 ßU´∑t ¥U 42 ßU´∑t °uœÊ
≠AU¸ œ≥Ob.
●
ØKOb M ¸« °d«È ¢MEOr œÆOIt ±u¸œ ≤Ed
≠AU¸ œ≥Ob.
¢MEOr 21 ßU´∑t Ë 42 ßU´∑t
°d«È ¢MEOr ßU´X «“ 21 ßU´∑t °t 42
ßU´∑t ≥d œË ØKOb H Ë M ¸« °Du¸ ≥Le±UÊ
œË £U≤Ot ≠AU¸ œ≥Ob.
°°dd≤≤UU±±tt ¸¸¥¥eeÈÈ œœÂ ¬¬Ë˸¸œœÊÊ ««¢¢uu±±UU¢¢OO@@
1 ßU´X ¸« °U ¢u§t °t ßU´X ®∂U≤t ¸Ë“È
¢MEOr ØMOb.
2 ØKOb "gorP" ¸« ≠AU¸ œ≥Ob °U «¥s ØU¸
«¸ÆU °d ¸ËÈ ÅH∫t ≤LU¥A~d ÇAL@
îu«≥Mb “œ.
3 ØKOb≥UÈ H Ë M ¸« °d«È ¢MEOr ßU´∑w Øt
±U¥KOb œÂ ¬Ë¸ ®dËŸ °JU¸ ØMb, ≠AU¸ œ≥Ob.
4 ØKOb "gorP" ¸« œË °U¸Á ≠AU¸ œ≥Ob ¢U
¢MEOLU¢v Øt «≤πU œ«œÁ «¥b ¢∏∂OX ®uœ.
«¸ÆU œ¥~d ÇAL@ ≤ªu«≥Mb “œ Ë ÅH∫t
≤LU¥A~d ßU´X ®∂U≤t ¸Ë“ ¸« ≤LU¥g
îu«≥b œ«œ.
5 ØKLt FFO/NO/otuA ¸« ¥J∂U¸ ≠AU¸
œ≥Ob ØKLt "gorP" œ¸ ßLX Çé ÅH∫t
≤LU¥A~d ™U ≥d±OAuœ Ë´Lq œÂ ¬Ë¸œÊ œ¸
“±UÊ ¢MEOr ®bÁ ®dËŸ îu«≥b ®b.
¢u§t : «Öd ØKOb FFO/NO/otuA ¸« œË
°U¸ ≠AU¸ œ≥Ob œß∑~UÁ °ö≠UÅKt ®dËŸ °t
ØU¸ îu«≥b Ødœ.
●
°d«È °U“°OMv “±UÊ °d≤U±t ¸¥eÈ ®bÁ, ØKOb
"gorP" ¸« ≠AU¸ œ≥Ob ßU´∑v ¸« Øt °d«È
®dËŸ ØU¸ œÂ ¬Ë¸ °d≤U±t ¸¥eÈ ØdœÁ «¥b
ÇAL@ îu«≥b “œ. ØKOb "gorP" ¸« œË°U¸Á
≠AU¸ œ≥Ob ¢U °t ßU´X ®∂U≤t ¸Ë“ œ¸
ÅH∫t ≤LU¥A~d °U“ Ödœ¥b.
≤EU≠X Ë ≤~Nb«¸È
●
Æ∂q «“ ≤EU≠X, «°∑b« œß∑~UÁ ¸« îU±u‘
ØMOb ßáf œË ®Uît ¸« «“ Äd¥e °JAOb ¢U
œÂ ¬Ë¸ Äf «“ ßádÈ ®bÊ “±UÊ ±MUßV
îM@ ®uœ.
●
≥dÖe œÂ ¬Ë¸ ¸« œ¸¬» Æd«¸ ≤b≥Ob Ë ≤~c«¸¥b
¢U œË ®Uît îOf ®uœ.
15
Page 19

≤JU‹ «¥LMw
●
≥dÖe ≥MJU ¸¥ª∑s ÇUÍ (ÆNuÁ) œß∑~OdÁ
®Od îd˧w ¸« °U œßX ≠AU¸ ≤b≥Ob, °KJt
°U ≠MπUÊ ¥U «ß∑JUÊ «¥s ØU¸ «≤πU œ≥Ob.
●
œ¸ “±UÊ ¸Ë®s °uœÊ œÂ ¬Ë¸ °t °ªU¸
îd˧w ¢u§t ≤LuœÁ Ë °NOâu§t œ¸Äu‘ ¸«
°U“≤JMOb.
●
≥M~U ¸¥ª∑s ÇUÍ ±d«ÆV °U®Ob ¢U œÇU¸
ßuî∑~w ≤Au¥b.
●
œ¸ ©w ´Lq œÂ ¬Ë¸œÊ ¥U °Fb «“¬Ê ≥dÖe °t
«∞LMX Öd ≤~Nb«¸≤bÁ œßX ≤e≤Ob.
●
≥M~U «ß∑HUœÁ «“ œÂ ¬Ë¸ «“ œß∑~OdÁ ≥UÍ
«§e«¡ «ß∑HUœÁ ≤LU¥Ob.
●
ßOr œË®Uît °NOâu§t ¬Ë¥e«Ê ≤∂U®b ¢U
œË¸ «“ œß∑d” ØuœØUÊ Æd«¸ ÖOdœË≥LâMOs
œÂ ¬Ë¸ ¸« œË¸«“ œß∑d” ØuœØUÊ ≤~UÁ
œ«¸¥b.
●
ÇMU≤ât ≤IBw œ¸ œÂ ¬Ë¸ ±AU≥bÁ ≤Luœ¥b
«“«ß∑HUœÁ «“ ¬Ê §b« îuœœ«¸Í ØdœÁ Ë °U
«±u¸ ±A∑dØOs Ë ßdË¥f ¢LU” •UÅq
≠d±U¥Ob.
●
≥Oπ~UÁ °b≤t, ßOr °d‚ ¥U œË®Uît œÂ ¬Ë¸
¸« œ«îq ¬» ¥U ±U¥l œ¥~dÍ ≠dË ≤∂d¥b
œ¸Åu¸¢OJt «§e«Í œÂ ¬Ë¸ îOf °U®b ®LU
œÇU¸ ®u„ «∞J∑d¥Jw îu«≥Ob ®b.
●
Æ∂q «“ «¥MJt ±ªeÊ ¸« °U ¬» °d ØMOb, Æ∂q «“
≤EU≠X Ë °Fb «“ «ß∑HUœÁ «“ œÂ ¬Ë¸ œË®Uît
¸« «“ Äd¥e °JAOb.
●
œÂ ¬Ë¸ ¸« °bËÊ ≤EU¸‹ ¸Ë®s ≤~c«¸¥b.
●
≥dÖe ßOr °d‚ œÂ ¬Ë¸ °U ßD` Öd ¢LU”
≤b«®∑t °U®b.
●
≥dÖe «§U“Á ≤b≥Ob Øt «®ªU’ ≤U¢u«Ê «“
œÂ ¬Ë¸ «ß∑HUœÁ ≤LU¥Mb.
●
≥dÖe «§U“Á ≤b≥Ob ØuœØUÊ °U «¥s œß∑~UÁ
°U“Í ØMMb.
●
«“ «¥s œß∑~UÁ ≠Ij °d«Í ±BU¸· îU≤~w
«ß∑HUœÁ ≤LU¥Ob.
●
°NOâu§t œÂ ¬Ë¸ ¸« °bËÊ ¬» ¸Ë®s ≤JMOb.
ÆÆ∂∂qq ««““ ËËÅÅqq ØØddœœÊÊ œœËË ®®UUîîtt °°dd‚‚
±AªBU‹ ≠Mw ±Mb¸Ã °d ¸ËÍ œÂ ¬Ë¸ °U
°d‚ Ë¸ËœÍ ®Nd ±DU°IX œ«®∑t °U®b.
●
¢u§t œ«®∑t °U®Ob Øt œÂ ¬Ë¸ ®LU °U
«ß∑U≤b«¸œ
●
®LU¸Á 98/633/CEE °U“«¸ ±A∑d„
«Æ∑BUœÍ «¸Ë°U ≥LU≥MJw œ«¸œ.Æ∂q «“
«ß∑HUœÁ °d«Í «Ë∞Os °U¸ ≤JU‹ “¥d ¸« ¸´U¥X
≤≤LLUU¥¥OObb
1 «§e«Í °º∑t °MbÍ ¸« «“ œÂ ¬Ë¸ §b« ≤LU¥Ob.
2 «§e«Í §b« ®u≤bÁ œÂ ¬Ë¸ ¸« °Au¥Ob.
3 •b«Æq œË °U¸ ±ªeÊ ¬» ßdœ ¸« Äd ØMOb Ë
œÂ ¬Ë¸ ¸« °bËÊ ÇUÍ ¸Ë®s ØMObØt °U
ßádÍ ®bÊ ßOJq ĪX œß∑~UÁ ØU±ö ¢LOe
îu«≥b ®b.
ØKOb≥U
≠OK∑d œ«zLw
§U¥~UÁ ≠OK∑d
±ªeÊ ÇUÍ
®Od îd˧w
œ¸Äu‘ ≠uÆU≤w
±ªeÊ ¬» ßdœ
«∞LMX Öd ≤~Nb«¸≤bÁ
œß∑~OdÁ ®Od îd˧w
ÄOLU≤t ÇUÍ
ßOMw ≠MπUÊ ¥U «ß∑JUÊ
ØKOb îU±u‘/ ¸Ë®s œ¸ ßdÍ ±b∞NUÍ
006644
MC/
005544
MC
œœ¸¸ ßßddÍÍ ±±bb∞∞NNUUÍÍ 006655
MC/
005555
MC
ÅH∫t ≤LU¥AJd
ØKOb îU±u‘/ ¸Ë®s «¢u±U¢Op
ØKOb °d≤U±t ¸¥eÍ
ØKOb ¢MEOr ßU´X
ØKOb ¢MEOr œÆOIt
¢NOt ÇUÈ (ÆNuÁ)
1 ±ªeÊ ÇUÈ ¸« °t ¢Fb«œ ≠MπUÊ ±u¸œ≤OU“
°d©∂o ±IOU” ±Mb¸Ã °d¸ËÈ ±ªdÊ ÇUÈ
«“¬» ÄdØMOb ±d«ÆV °U®Ob «“•b "XAM"
°OA∑d ≤Auœ.
●
≠Ij «“ ¬» ßdœ «ß∑HUœÁ ØMOb, ¢uÅOt
±O~dœœØt «“ ÄU¸ı ¢BHOt ØMMbÁ Øs ËËœ °U
±b∞NUÈ 79FW Ë 751FW §NX ¢BH}t
¬» «ß∑HUœÁ ≤LU¥Ob ≥dÖe «“ «» Öd ¥U ¬»
ÖU“œ«¸ «ß∑HUœÁ ≤MLU¥Ob.
2 ¬» ±u§uœ œ¸ ±ªeÊ ÇUÈ ¸« œ¸ ±ªeÊ ¬»
ßdœ °d¥e¥b.
14
≠U¸ßv
 Loading...