

OWNER'S MANUAL
MODEL NO.
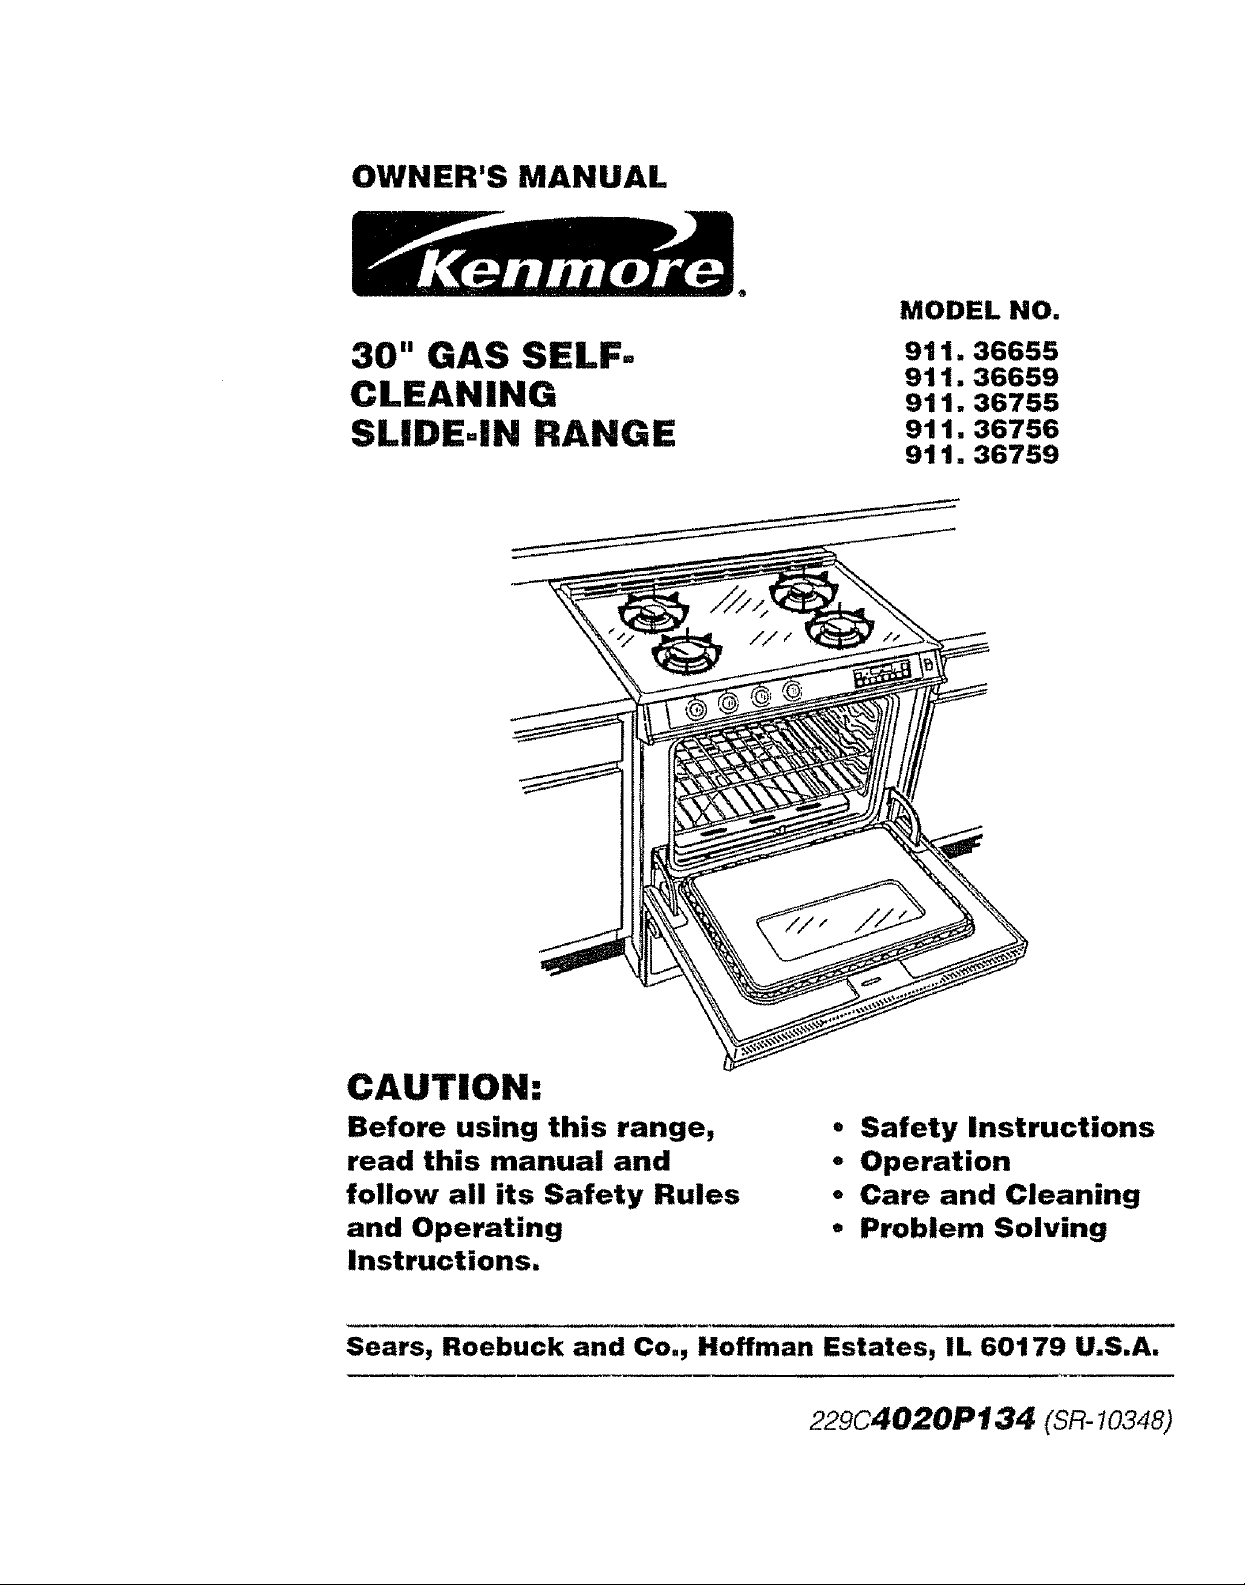
30" GAS SELF-
CLEANING
SLIDE-IN RANGE
911,36655
911.36659
911.36755
911.36756
911.36759
CAUTION:
Before using this range,
read this manual and
follow all its Safety Rules
and Operating
Instructions,
Sears, RoebUck andCo',-Hoffman Estates, IL 60179 U.S.A.
• Safety Instructions
- Operation
• Care and Cleaning
• Problem Solving
229c4020P134 (SR 1o348)
_=

Table of Contents
SLIDE-INRANGE
Range Safety .......................... 3-7
Power Failure ............................. 7
Oven Shut Off Valve .....................7
Cooking Utensils and Woks ..... 7
Removal of Packaging Tape .... 8
Features of Your Range .............8
Cooktop Burners ...................... 9
Control Settings .......................... 9
BurnerIginition..........................9
Simmer Flame .............................9
Home Canning ..........................9
Range Control .......................10
To SettheClock .....................11
To Set the Timer ..................... 11
To Reset The Timer ................. 11
To Cancel The Timer .............. 1't
Oven Cooking Tips ..............12-13
Strong Smell or Odor .............. 12
Aluminum Foil ...........................12
Oven Vent ...............................I2
Preheating .............................12
Oven Temperature Sensor ..... 12
No Peeking ...................................12
Bakeware Placement ..............12
Bakeware .................................. 13
Burner Cycling .......................... 13
Oven Racks ............................. 13
Oven Glow Bar ......................... 13
Oven Temperature
Adjustment ....................... 13, 26
To Set Bake .............................. 14
Broiling ................................... 15
Self-Clean Cycle ................ 16,17
Control Panel ........................... 18
Broiler Pan and Grid ................ 18
Painted Surfaces ..................... 18
Glass Cooktop ........................ 18
Porcelain Cooktop ................... 18
Burner Box Bottom ................... 19
Burner Grates ..........................19
Burner Bowls, Caps,
and Heads .............................. lg
Oven Bottom ............................ 19
Control Knobs ......................... 20
Oven Light Bulb ..........................20
Storage Drawer ....................... 21
Cooktop Burner Components. 22
Oven Racks ............................ 23
Oven Door ...............................23
Before Calling for Service ...........
............................................. 24-25
Temperature Adjustment ........26
Warranty .................................... 27
Consumer Service Numbers .r28
For your convenience and future reference, please write down
your model and serial numbers in the space provided. They are
located on the front frame behind the storage drawer.
MODEL NUMBER: SERIAL NUMBER:
2

IMPORTANTSAFETY
SAVE THESE INSTRUCTIONS
Read all instructions before using this appliance, When using gas or electri-
cal appliances, basic safety precautions should be followed, including the
following:
:_ WARNING!! if the infor-
;_ mation in this manual is
ii not followed exactly, a !i
LI fire, explosion, or gas leak _
,_ may result causing property i
da age p l'njurym , ersona ! , or
;I
ers of potential exposure to such
substances.
Gas appliances can cause minor
exposure to four of these sub-
stances, namely benzene, carbon
monoxide, formaldehyde and soot,
caused primarily by the incom-
plete combustion of natural gas or
L.P. fuels. Properly adjusted appli-
ances, indicated by the bluish
rather than a yellow flame, will
minimize incomplete combustion.
Exposure to these substances can
be minimized by further venting
with an open window or using a
ventilation fan or hood.
The oven, as shipped from the fac-
tory, can only be operated with
natural gas. Do not try to operate
it with L.P. (bottled) gas High
flames and toxic fumes could
cause serious injury. If you wish to
use your oven with L.P. gas, you
must convert the range following
the procedure found in the installa-
tion instructions shipped with your
range.
IMPORTANT SAFETY NOTICE]
The California Safe Drinking Water
and Toxic Enforcement Act re.
quires the governor of California to
publish a list of substances known
to the state to cause birth defects
or other reproductive harm and re-
quires businesses to warn custom-
,, , , , ,, ,, ,,,,,,,, ,,,,,,,,,,,,,,,i,
WARNING-L.P. BURNER
AJ_ ADJUSTMENTS . |
mlm if you intend to use Lique.n
fled Petroleum Gas (bottled gas)
all L.P. adjustments in the Instal-
lation Instructions must be
made before using your oven.
If your oven is not properly ad.
justed, flames may be too high,
or the oven may use too much
fuel, release toxic fumes or cook
poorly.
3
IMPORTANTSAFETY
INSTRUCTIONS
install Anti-tip }_:!!
Device Packed With !_i'
Range ;,1
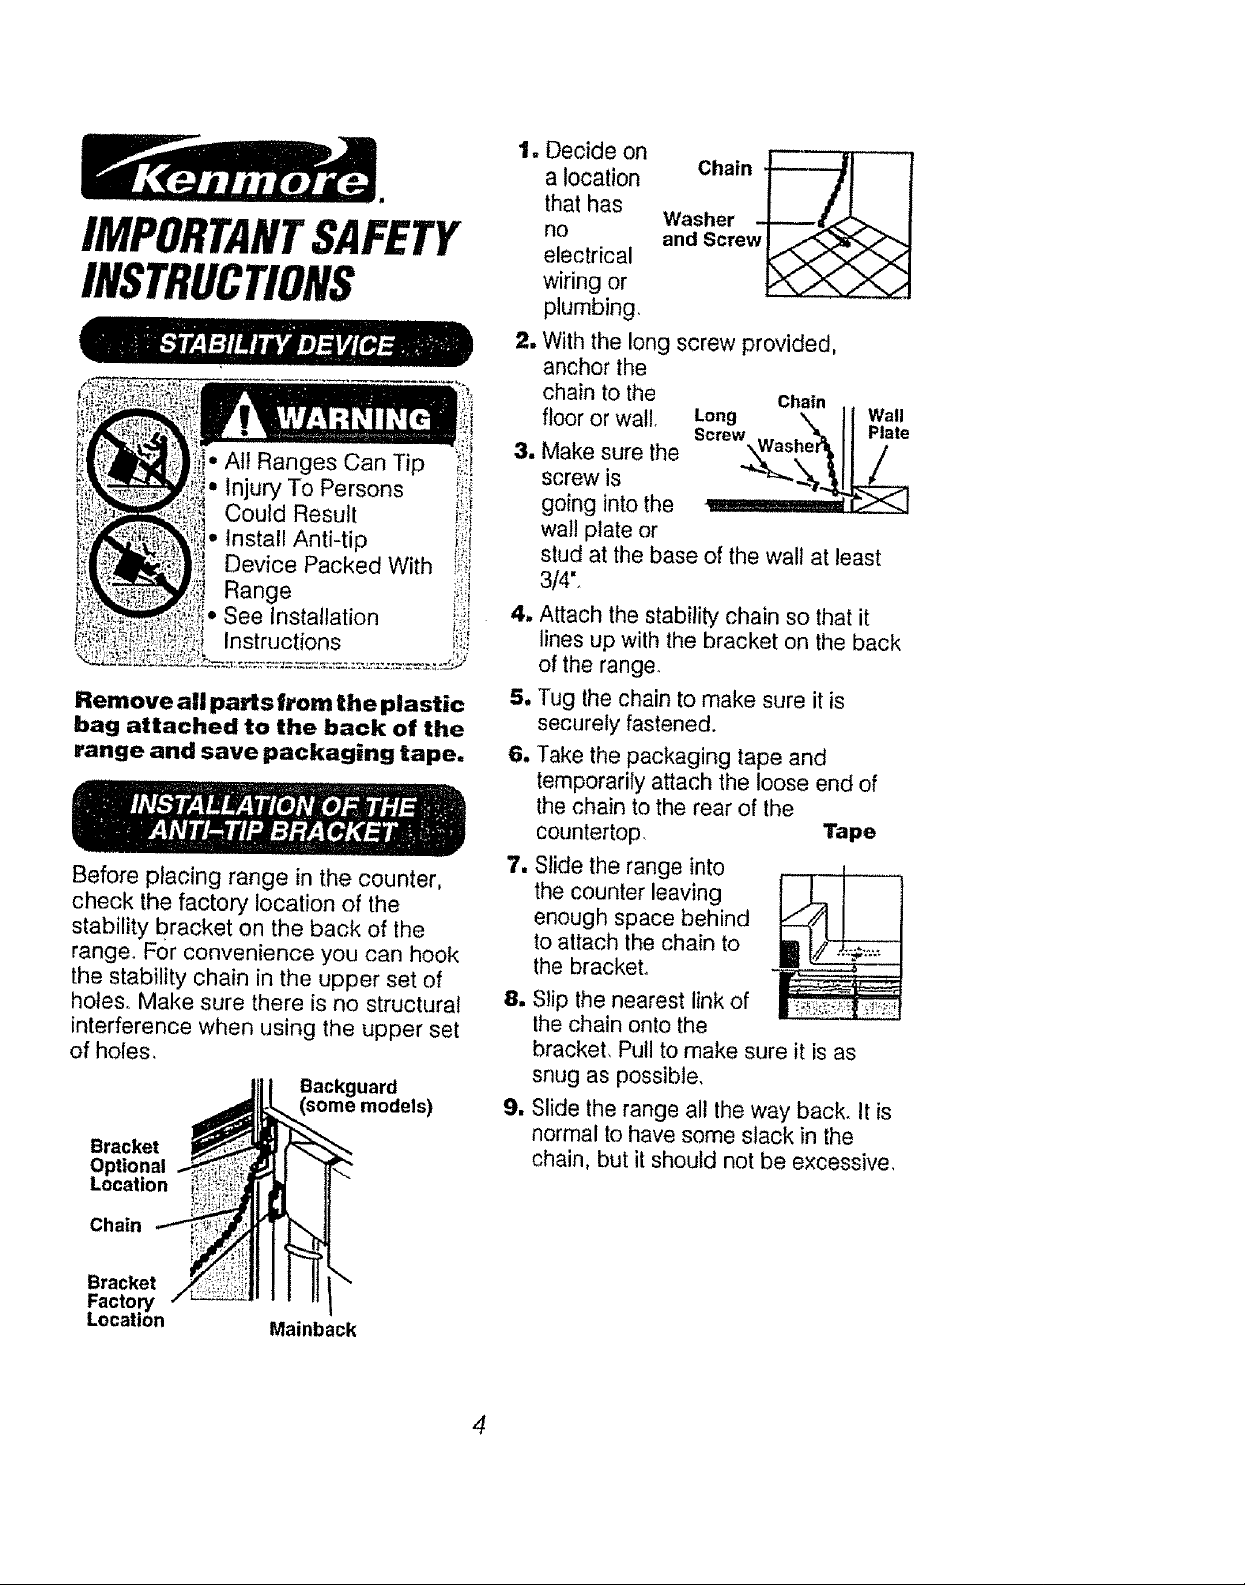
Remove all parts |torn the plastic
bag attached to the back of the
range and save packaging tape=
Before placing range in the counter,
chock the factory location of the
stability bracket on the back of the
range, For convenience you can hook
the stability chain in the upper set of
holes, Make sure there is no structural
interference when using the upper set
of holes,
Bracket
Optional
Location
Decide on
a location
that has
no
electrical
wiring or
plumbing,
1
With the long screw provided.
anchor the
chain to the Chain
floor or wal!. Long \ II wall
1
Make sure the
screw is
going into the
wall plate or
stud at the base of the walt at least
3/4".
4, Attach the stability chain so that it
lines up with the bracket on the back
of the range,
.5. Tug the chain to make sure it is
securely fastened.
6. Take the packaging tape and
temporarily attach the loose end of
the chain to the rear of the
countertop, Tape
7. Slide the range into
the counter leaving
enough space behind
to attach the chain to
the bracket,
1
Slip the nearest link of
the chain onto the
bracket, Pull to make sure it is as
snug as possible,
1
Slide the range all the way back. It is
normal to have some slack in the
chain, but it should not be excessive,
.a;;:'°LlZ
and Screw
Screw Wash& I_ Plate
Chain
Bracket
Factory
Location
Mainback
4
IMPORTANTSAFETY
INSTRUCTIONS
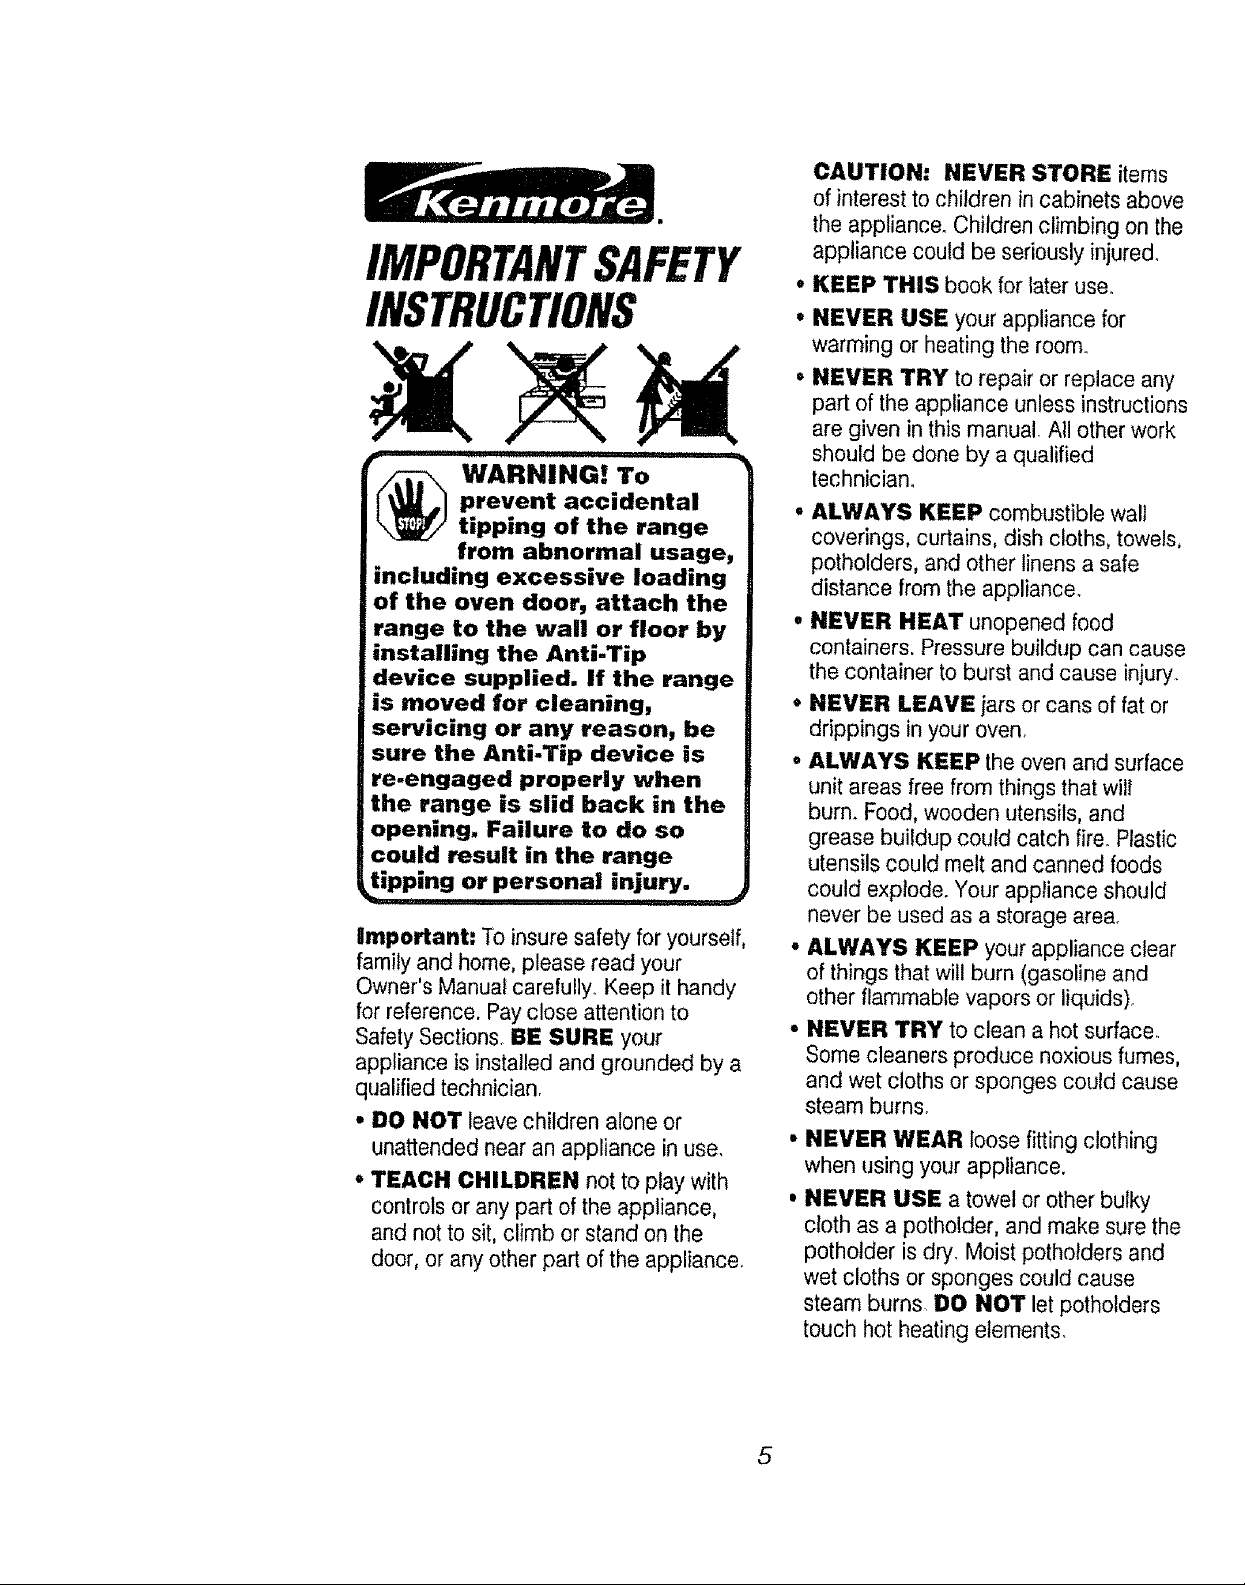
_ WARNING! To
including excessive loading
of the oven door, attach the
range to the wall or floor by
installing the Anti-Tip
device supplied. If the range
is moved for cleaning,
servicing or any reason, be
sure the Anti-Tip device is
re-engaged properly when
the range is slid back in the
opening. Failure to do so
could result in the range
tipping or personal injury.
important: To insure safety foryourself,
family and home, please read your
Owner's Manual carefully Keep it handy
for reference. Pay close attention to
Safety Sections BE SURE your
appliance is installed and grounded by a
qualified technician
• DO NOT leave children alone or
unattended near an appliance in use
,_TEACH CHILDREN not to play with
controls or any part of the appliance,
and not to sit, climb or stand on the
door, or any other part of the appliance
prevent accidental
tipping of the range
from abnormal usage,
CAUTION: NEVER STORE items
of interest to children in cabinets above
the appliance Children climbing on the
appliance could be seriously injured
• KEEP THiS book for later user
• NEVER USE your appliance for
warming or heating the room.
• NEVER TRY to repair or replace any
part of the appliance unless instructions
are given in this manual All other work
should be done by a qualified
technician
• ALWAYS KEEP combustible wall
coverings, curtains, dish cloths, towels,
potholders, and other linens a safe
distance from the appliance
• NEVER HEAT unopened food
containers Pressure buildup can cause
the container to burst and cause injury
• NEVER LEAVE jars or cans of fat or
drippings in your oven
° ALWAYS KEEP the oven and surface
unit areas free from things that will
burn. Food, wooden utensils, and
grease buildup could catch fire Plastic
utensils could melt and canned foods
could exptode. Your appliance should
never be used as a storage area
• ALWAYS KEEP your appliance clear
of things that will burn (gasoline and
other flammable vapors or liquids)°
• NEVER TRY to clean a hot surface.
Some cleaners produce noxious fumes,
and wet cloths or sponges could cause
steam burns°
• NEVER WEAR loose fitting clothing
when using your appliance.
, NEVER USE atowel or other bulky
cloth as a potholder, and make sure the
potholder is dry Moist potholders and
wet cloths or sponges could cause
steam burns DO NOT let pothotders
touch hot heating elements
5

IMPORTANTSAFETY
INSTRUCTIONS
• DO NOT touch cooktop burners,
surfaces near them, or interior oven
surfaces.. These may be hot enough to
cause burns even though they are
dark in color. During and after use, do
not touch or let clothing or flammable
material contact the burners or hot
surfaces until they have had time to
cool, Other surfaces near the oven
vent openings, oven door, window,
and cooktop surfaces may also be hot
enough to cause burns.
° ONLY SOME kinds of glass or
ceramic cookware can be used for
ceoktop cooking. Make sure the
cookware you choose to use is
designed for cooktop cooking without
breaking due to the sudden
temperature change.
• ALWAYS USE care when touching
cooktop burners. They will retain heat
after the range has been turned off.
oNEVER BLOCK the oven air vent
behind the right rear element
• COOKWARE USED for cooktop
cooking should be flat on the bottom
and large enough to cover the heating
area being used. Undersized utensils
expose the open flame and may result
in direct contact or ignition of clothing.
• NEVER LEAVE cooktop burners
unattended at high settings. Boilovers
result in smoking or greasy spills which
could catch fire.
• ALWAYS TURN utensil handles
inward and away from other surface
burners to reduce the risk of burns
ignition unintended contact and
spillage.
• PLACE OVEN RACKS in the
desired position while the oven is
cool. If racks must be moved while
oven is hot, do not let potholder
contact the hot oven element.
° AFTER BROILING always take
the broiler pan and grid out of the
oven and clean them Leftover
grease in the broiler pan could catch
fire the next time you use your oven.
- ALWAYS USE care when opening
the oven door. Let hot air and steam
escape before moving foods.
• NEVER USE aluminum foil to line the
oven bottom. Improper use of foil could
result in the risk of electric shock and
fire.
° CLEAN ONLY the parts listed in this
manual, Follow all cleaning instructions,
Be sure to remove broiler pan and grid
before the self-clean cycle,
° NEVER TRY to clean utensils,
cookware, removable parts, or broiler
pan and grid in the self-clean cycle,
• DO NOT USE oven cleaners - No
commercial oven cleaner, or protective
coating of any kind, should be used in
or around any part of the oven.
6
IMPORTANTSAFETY
INSTRUCTIONS
READ AND UNDERSTAND
THIS INFORMATION NOW!
Be sure everyone in your home
knows what to do in case of fire.
Never use water on a grease fire;
it will only spread the flames,
COOKTOP GREASE FIRE:
Never pick up a flaming pan.,,
1. Turn off the surface burners.
2. Smother the flame with a tightlyfitting
lid Use baking soda or a dry
chemical, foam, or halon type
extinguisher_
OVEN FIRE:
Do not try to move the pan!
1. Close the oven door and turn
controls off.
2. if fire continues, carefully open the
door, throw baking soda on the fire,
or use a dry chemical, foam, or halon
type extinguisher.
During a power failure, the cooktop burners
will not light automatically_In an emer-
gency, a cooktop burner may be lit using a
wooden match. Followthe instructions
below:
1. Light the wooden match.
2. Hold the flame next to the burner you
want to use,
3. Pushin and turn the correct knob to the
light position.
4. When the burner lights turn the knob to
your preferred setting.
.................................. I I '
r w.r.ing,ug.ti.gg.sbur.ers
| a match is dangerous. You should|
| light the burners with this method i
only in an emergency, )
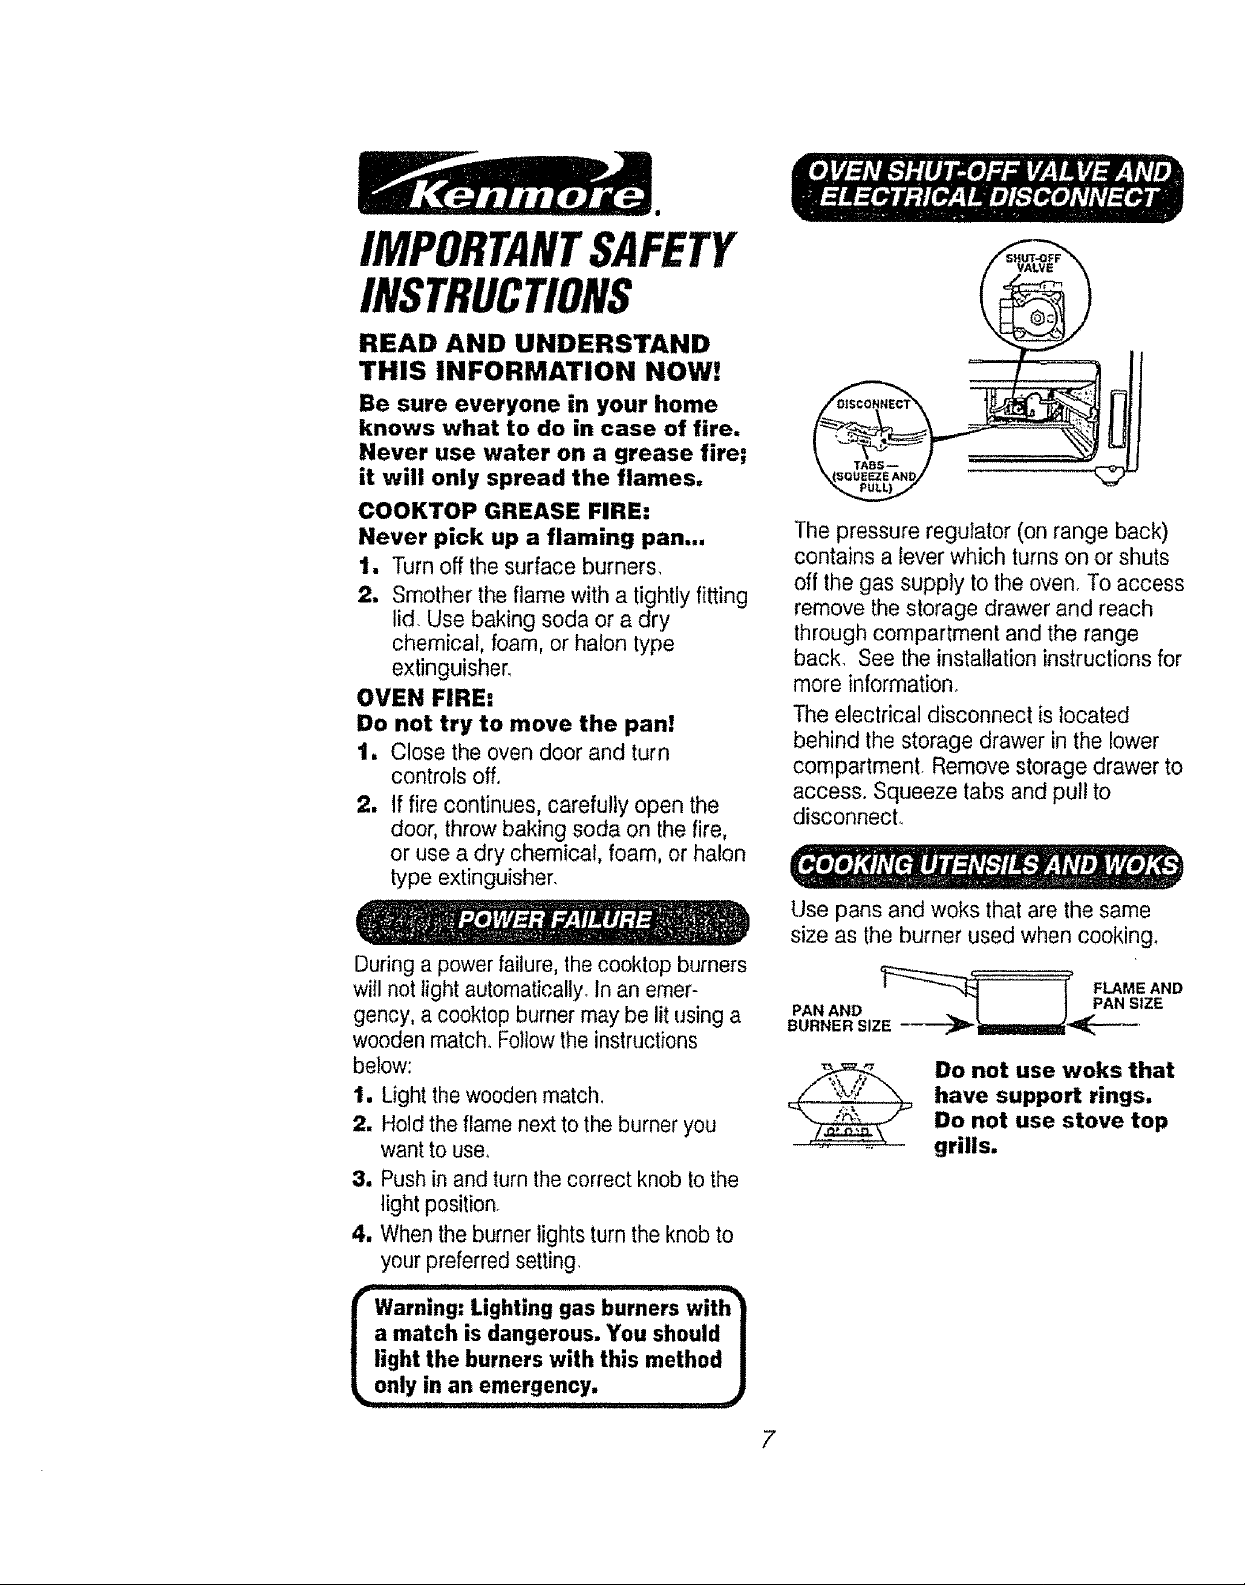
The pressure regulator (on range back)
contains a lever which turns on or shuts
off the gas supply to the oven. To access
remove the storage drawer and reach
through compartment and the range
back_ See the installation instructions for
more information.
The electrical disconnect is located
behind the storage drawer in the lower
compartment. Remove storage drawer to
access. Squeeze tabs and pul! to
disconnect.
Use pans and woks that are the same
size as the burner used when cooking.
PAN AND | _ PAN SIZE
BURNER SIZE ------_miml_-4_Z-_'
Do not use woks that
have support rings.
Do not use stove top
grills.
7
4 Burners
4 Removable
Burner Grates
4 Removable
Cooktop Control
Knobs
Self-Clean Door
Latch
Model and Serial
Number Location
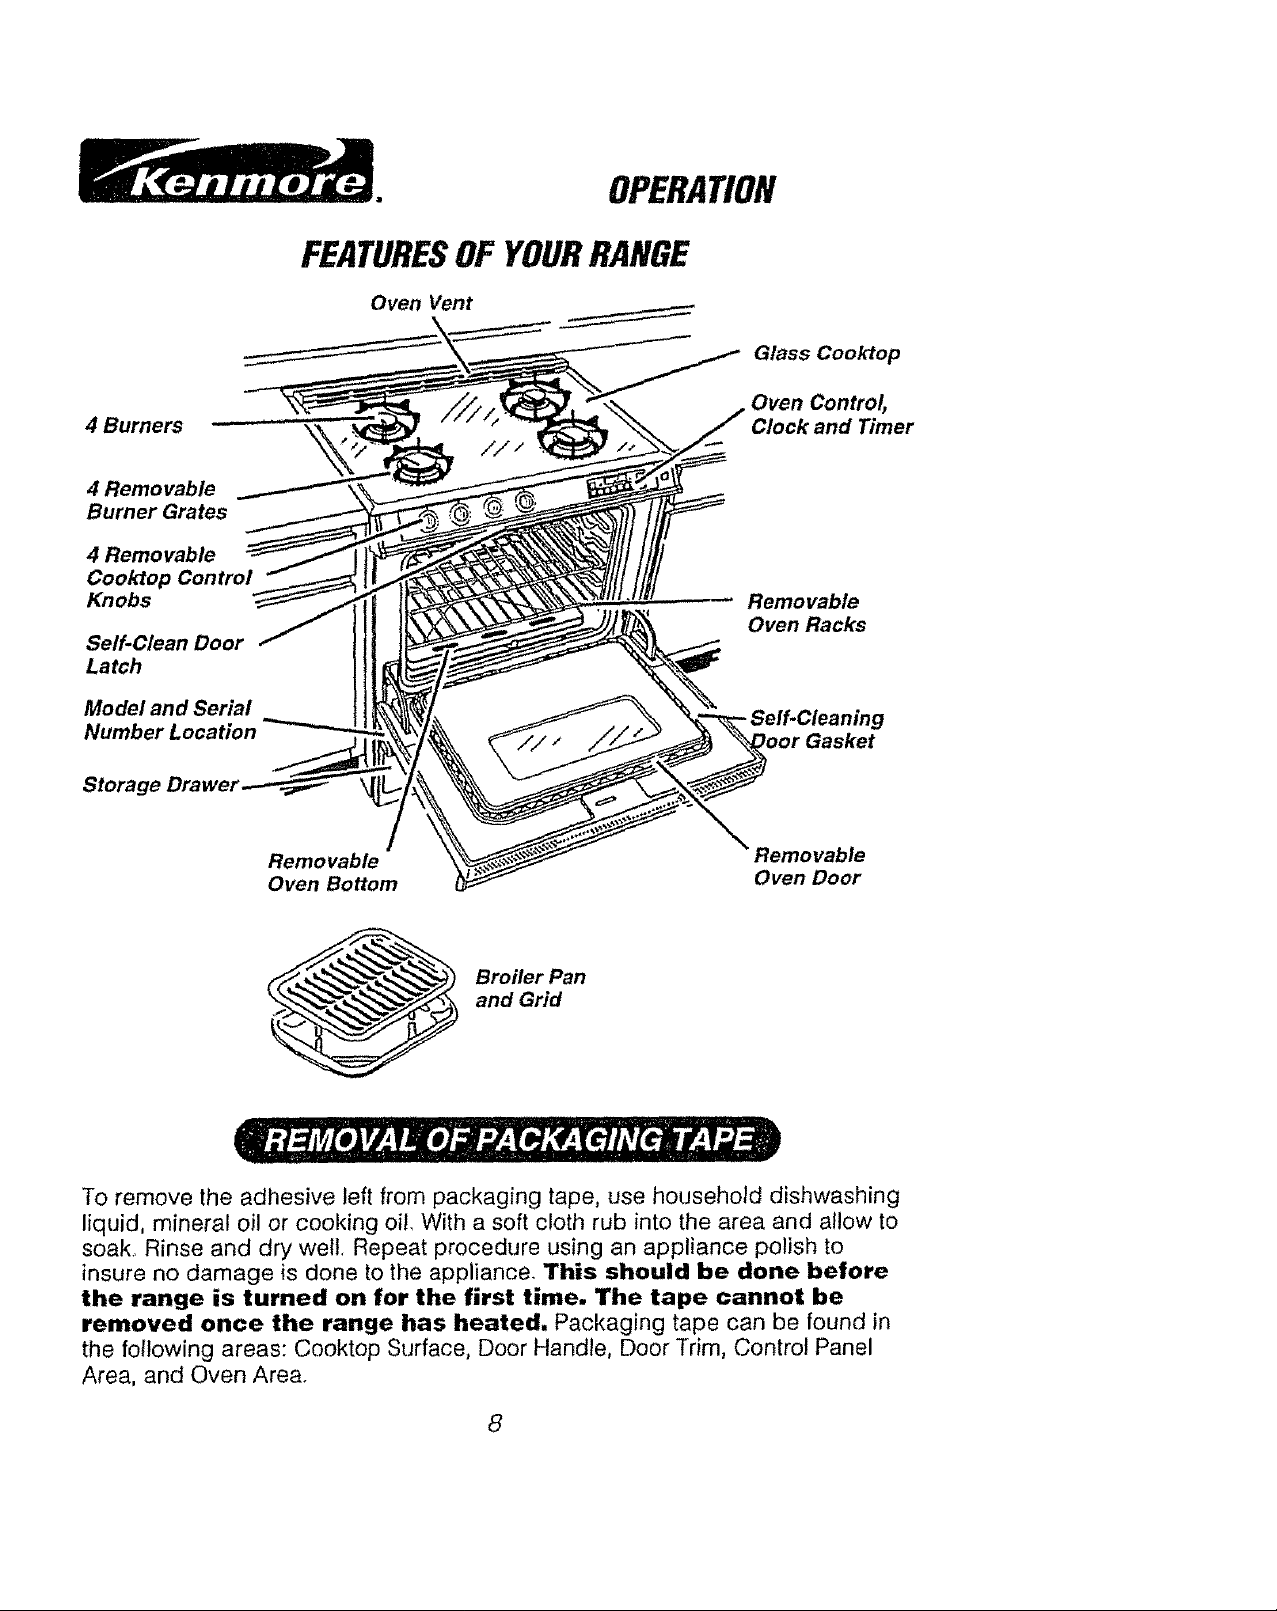
OPERATION
FEATURESOF YOURRANGE
Oven Vent
Glass Cooktop
Oven Control,
Clock and Timer
Removable
Oven Racks
Storage
Removable
Oven Bottom
Broiler Pan
and Grid
Removable
Oven Door
To remove the adhesive left from packaging tape, use household dishwashing
liquid, mineral oil or cooking oi!. With a soft cloth rub into the area and allow to
soak° Rinse and dry well, Repeat procedure using an appliance polish to
insure no damage is done to the appliance. This should be done before
the range is turned on for the first time. The tape cannot be
removed once the range has heated. Packaging tape can be found in
the following areas: Cooktop Surface, Door Handle, Door Trim, Control Panel
Area, and Oven Area°
8
OPERATION
CooktopCooking
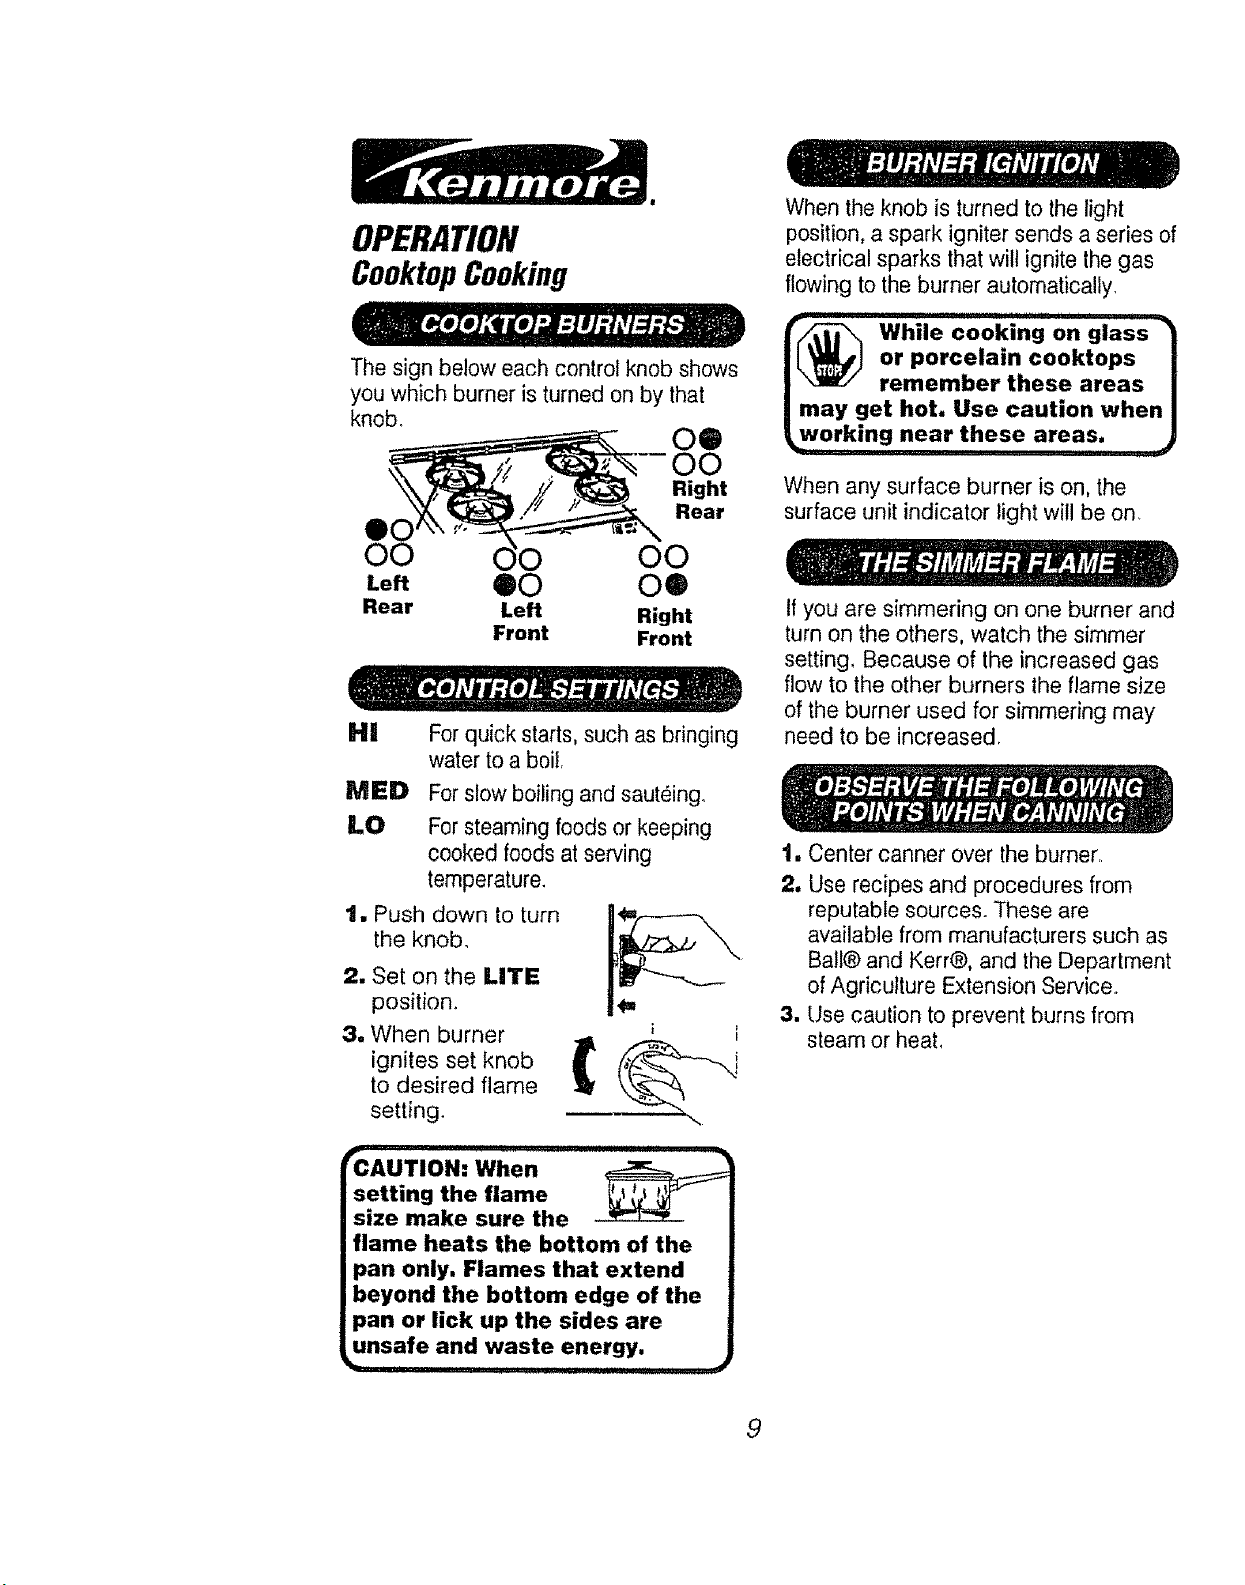
The sign below each control knob shows
you which burner is turned on by that
knob°
00
When the knob is turned to the light
position, a spark igniter sends a series of
electrical sparks that will ignite the gas
flowing to the burner automatically,
Wh.ecookingo.glass-/
IL_ orporcelamcooktops /
/ remember these areas i
|may get hot. Use caution whenl
_working near these areas. )
Right
Rear
eo
O0 O0
Left 00 00
Rear Left Right
Front Front
HI For quick starts, such as bringing
water to a boil,
MED
LO
1, Push down to turn
2. Set on the LITE
3. When burner
For slow boiling and sauteing.
For steaming foods or keeping
cooked foods at serving
temperature.
the knob.
position.
ignites set knob
to desired flame
setting.
When any surface burner is on, the
surface unit indicator light will be on.
If you are simmering on one burner and
turn on the others, watch the simmer
setting, Because of the increased gas
flow to the other burners the flame size
of the burner used for simmering may
need to be increased,
t. Center canner over the burner,
2. Use recipes and procedures from
reputable sources. These are
available from manufacturers such as
Ball@and Kerr@, and the Department
of Agriculture Extension Service..
3, Use caution to prevent burns from
steam or heat,
FCAUTION: When
setting the flame _ _
size make sure the w--I-_-_
flame heats the bottom of the
pan only. Flames that extend
beyond the bottom edge of the
pan or lick up the sides are
unsafe and waste energy,
_k_ II1,1111 II I iiiil,,lu U_t I I ] I_

OPERATION
Clock,TimerandOvenControl
CANCELS BAKE, STMUS TIMER
BROIL OR DISPLAY DISPLAY
CLEAN OPERATION
PRESS TO TURN SETAUTOMATIC
TIMER ON ANDOFF OVEN OPERATIONS
PROGRAM CLOCK /
Your range is controlled with a touch. You
now have the ease of setting the following
operations:
CLOCK
BAKE
BROIL
TIMER
DELAY BAKE
CLEAN
DELAY CLEAN
The UP or DOWN arrow is used toset
an amount of time or change the tem-
perature you want to use. By pressing
and holding down either pad the num-
bering will change quickly. By pressing
and releasing either pad the numbering
will change slowly_
Once you have programmed your con-
trol for any operation, you can display
the setting by pressing the appropriate
pad. For example, if you are using the
TIMER and want to see the time of
day, press CLOCK° The display will
show the time of day
TEMPERATURE FUNCTION UP ARROW PAD
DISPLAY DISPLAY (|NCRF-.ASESTIME
BROIL or COOK TIME
You cannot set BAKE, 1
while the oven door is
OR TEMPERATURE)
DOWN ARROW PAD
{DECREASES TIME
OR TEMP,_IATURE)
III ,,,_
in the locked position.
If you try, the word"DOOR" |
wdl appear in the dzsplay. The |
oven door lock is to be used |
for Self.Cleariing only. j
Theend-of-cycle tonewill soundat the end of
timer use and automatic oven functions. The
end-of-cycle tone is3 short beeps followed by
1beep every 6 seconds that repeat unlil you
press any pad except theUP or DOWN
arrow pad° If you would liketo eliminatethe
repeating beeps, push and hold CLEAR/
OFF for ten seconds. Toreturn lhe ! beep
every6 seconds,push and hold CLEAR/
OFF for 10 seconds.
If thetime display beeps continuously and
flashes an "F" followed by a number, you
have a function error code. Note the
number after the "F"_ Press CLEAR/
OFF. Allow oven to cool for 1 hour. If
problem repeats, disconnect all power to
the range and call for service. Advise your
service technician of the number following
the "F" in the display.
10
OPERATION
Clock and Timer
TO SET THE CLOCK
1, Press the CLOCK pad.
2. Press either the UP or DOWN
arrow pad, until the display shows
the correct time of day.
The UP arrow will change numbering
forward, such as 1,2, 3. The DOWN
arrow will change numbering back-
wards, such as 3, 2, 1..
The clock will automatically start within
one minute after releasing the arrow
pad; or you may press the clock pad
for immediate start,
TO RESET THE TIMER
When you are setting the timer, if you
pause more than 4 seconds while
pressing either the UP or DOWN
arrow pad, "TIMER" will stop
flashing in the display and the timer
will automatically start to count down°
tf this should happen just press the
TIMER ON/OFF pad and you will be
able to continue setting your time_
TO CANCEL THE TIMER
While the timer is counting down,
press and hold down the TIMER
ON/OFF pad for 4 seconds, or until
"TIMER'" quits flashing and the
current time of day returns to the
display.
TO SET THE TIMER
The timer does not control oven
operations, such as bake, broil, clean
or any delay function° It allows you to
set an amount of time and alerts you
when that time is up. An example
would be timing a three minute egg.
The maximum amount of time you
may set is 9 hours and 55 minutes_
1. Press the TIMER ON/OFF pad.
2. Press either the UP or DOWN
arrow pad to set the amount of
time you want.
The timer wil! automatically start to
count down 4 seconds after the time
is set.
1 When the timer counts down to
zero a tone will sound. Press the
CLOCK pad to return to the
current time of day.
11
OPERATION
OvenCooking Tips
It is normal to have some odor when using
your oven for the first time,.To help
eliminate thisodor, ventilate the room
by opening a window or using a
vent hood.
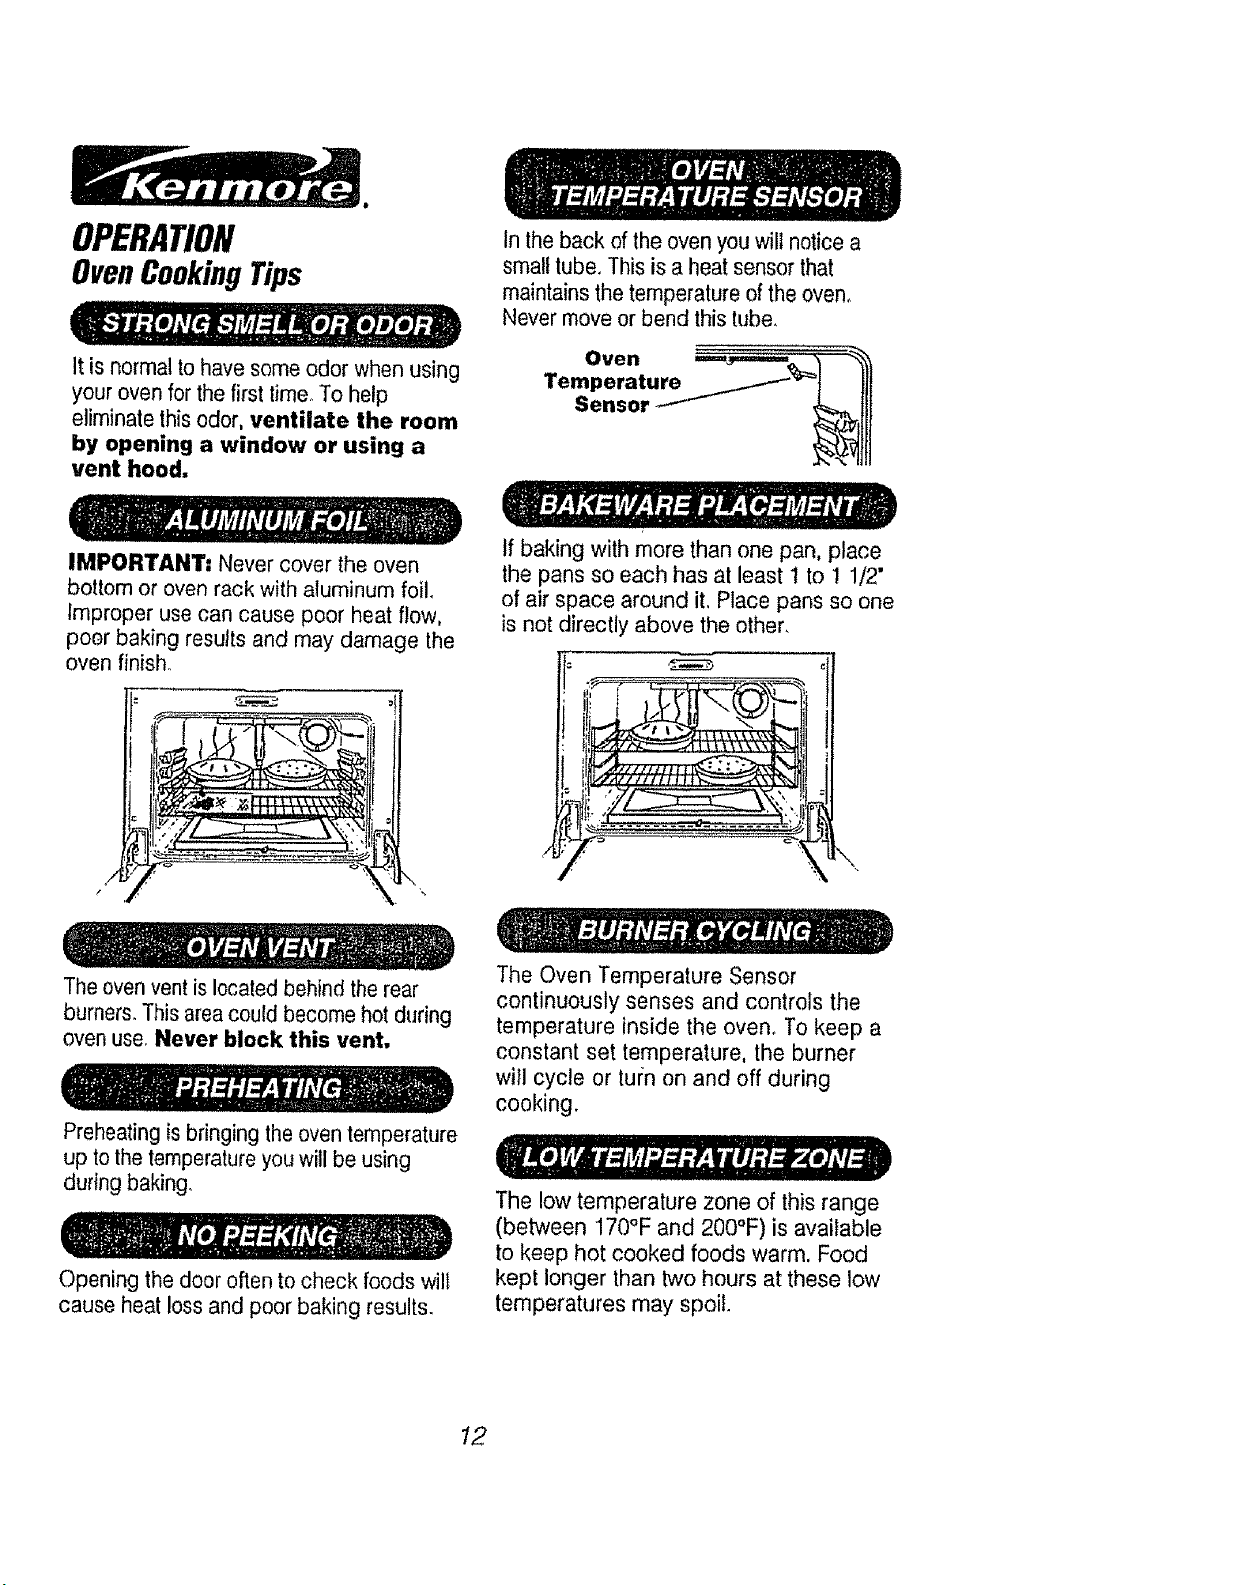
In the back of the oven you will notice a
small tube. This is a heat sensor that
maintains thetemperature ofthe oven_
Never move or bend this tube.
IMPORTANT= Never cover the oven
bottom or oven rack with aluminum foil
Improper use can cause poor heat flow,
poer baking results and may damage the
oven finish.
/
The oven vent is located behind the rear
burners°This areacould become hot during
oven use_Never block this vent,
Preheating isbringing the oven temperature
up to thetemperature you will be using
during baking_
Opening the door often to check foods will
cause heat loss and poor baking results.
If baking with more than one pan, place
the pans so each has at least I to 1 !/2"
of air space around it, Place pans so one
is not directly above the other.
The Oven Temperature Sensor
continuously senses and controls the
temperature inside the oven. To keep a
constant set temperature, the burner
will cycle or turn on and off during
cooking.
The low temperature zone of this range
(between 170°F and 200°F) is available
to keep hot cooked foods warm, Food
kept longer than two hours at these low
temperatures may spoil.
12
OPERATION
OvenCookingTips
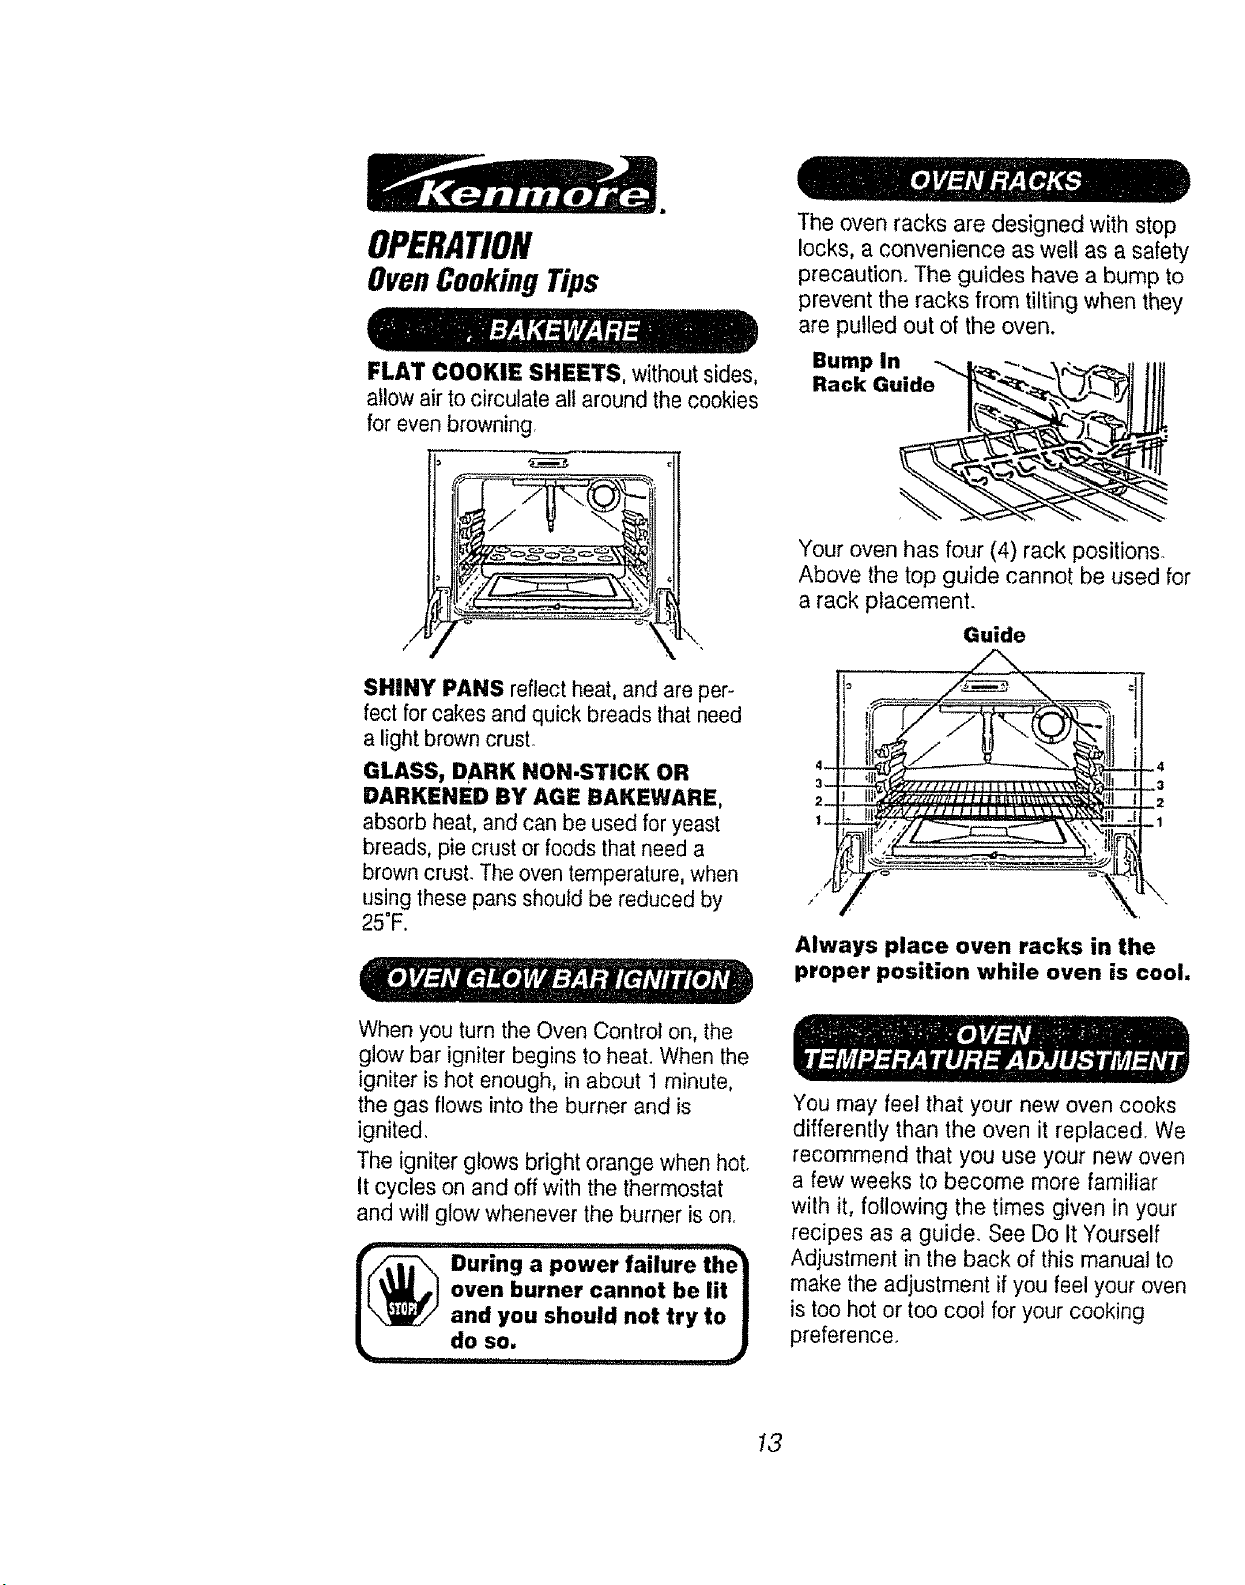
FLAT COOKIE SHEETS, without sides,
allow air to circulate all around the cookies
for even browning.
SHINY PANS reflect heat, and are per-
fect for cakes and quick breads thatneed
a light brown crust.
GLASS, DARK NON-STICK OR
DARKENED BY AGE BAKEWARE,
absorb heat, and can be used for yeast
breads, pie crust or foods that need a
brown crust. The oven temperature, when
using these pans should be reduced by
25"F.
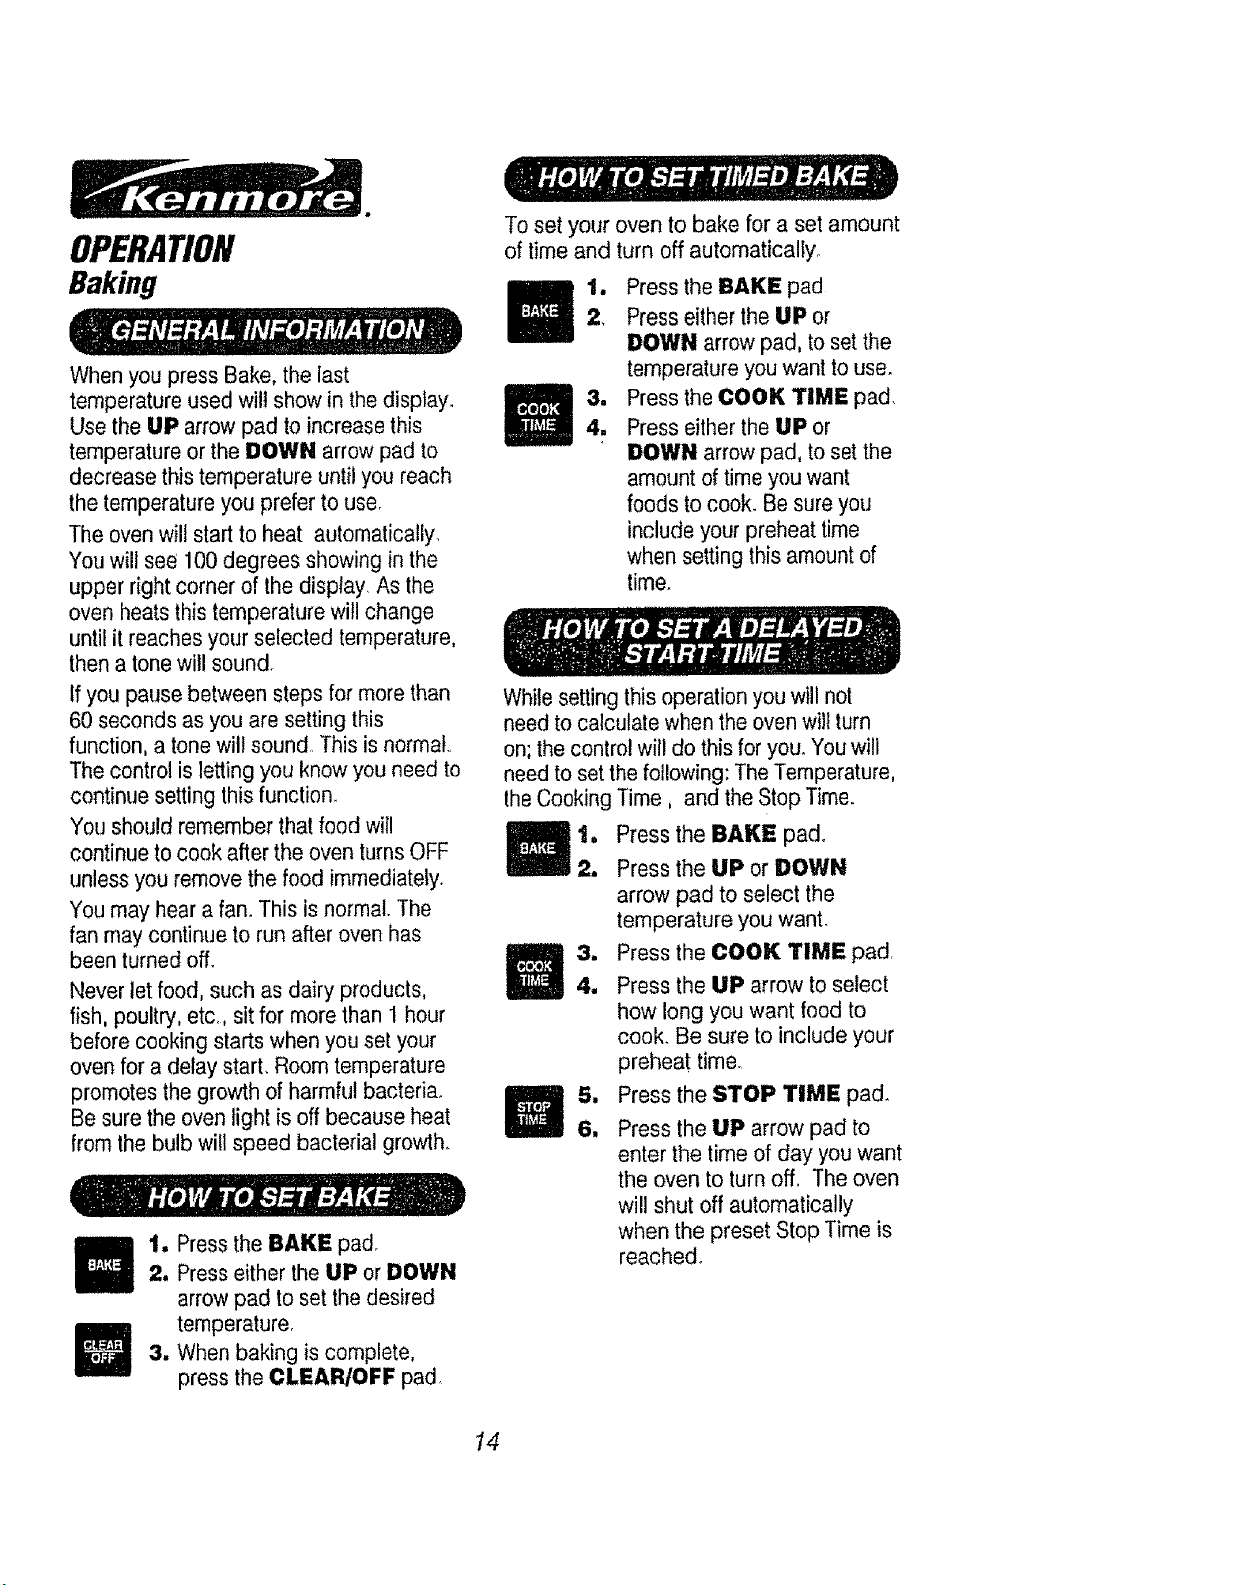
The oven racks are designed with stop
locks, a convenience as welt as a safety
precaution.r The guides have a bump to
prevent the racks from tilting when they
are pulled out of the oven.
Bump In
Rack Guide
Your oven has four (4) rack positions.
Above the top guide cannot be used for
a rack placement.
Guide
Always place oven racks in the
proper position while oven is cool.
When you turn the Oven Control on, the
glow bar igniter begins to heat. When the
igniter is hot enough, in about 1minute,
the gas flows into the burner and is
ignited,
The igniter glows bright orange when hot.
It cycles on and off with the thermostat
and will glow whenever the burner is on.
oven burner cannot be lit/
I[_ During a power"'failure the_
and you should not try to|
do so: ..... )
You may feel that your new oven cooks
differently than the oven it replaced. We
recommend that you use your new oven
a few weeks to become more familiar
with it, following the times given in your
recipes as a guider See Do It Yourself
Adjustment in the back of this manual to
make the adjustment if you feel your oven
is too hot or too cool for your cooking
preference.
13
OPERATION
To set your oven to bake for a set amount
of time and turn off automatically
Baking
When you press Bake, the last
temperature used will show in the display.
Use the UP arrow pad to increase this
temperature or the DOWN arrow pad to
decrease this temperature until you reach
the temperature you prefer to use.
The oven will start to heat automatically.
You will see 100 degrees showing in the
upper right corner of the display, As the
oven heats this temperature will change
until it reaches your selected temperature,
then a tone will sound.
If you pause between steps for more than
60 seconds as you are setting this
function, a tone will sound This is normal.,
The control is letting you know you need to
continue setting this function.
You should remember that food will
continue to cook after the oven turns OFF
unless you remove the food immediately.
You may hear a fan. This is normal. The
fan may continue to run after oven has
been turned off.
Never let food, such as dairy products,
fish, poultry, etc,, sit for more than 1 hour
before cooking starts when you set your
oven for a delay start, Room temperature
promotes the growth of harmful bacteria.
Be sure the oven light is off because heat
from the bulb will speed bacterial growth.
1, Press the BAKE pad,
2. Press either the UP or DOWN
arrow pad to set the desired
temperature.
8. When baking is complete,
press the CLEAR/OFF pad.
t. Press the BAKE pad
2. Press either the UP or
DOWN arrow pad, to set the
temperature you want to use.
3. Press the COOK TIME pad,
4.. Press either the UP or
DOWN arrow pad, to set the
amount of time you want
foods to cook. Be sure you
include your preheat time
when setting this amount of
time.
While setting thisoperation youwill not
need to calculate when the oven will turn
on; the control will do this for you. You will
need to set the following: TheTemperature,
the Cooking Time, and the Stop Time.
1. Press the BAKE pad.
2, Press the UP or DOWN
arrow pad to select the
temperature you want.
8. Press the COOK TIME pad,
4. Press the UP arrow to select
how long you want food to
cook. Be sure to include your
preheat time.
5. Press the STOP TIME pad.
6. Press the UP arrow pad to
enter the time of day you want
the oven to turn off. The oven
will shut off automatically
when the preset Stop Time is
reached.
14
OPERATION
Broiling
Broiling is cooking by direct heat from
the Broil Burner. The oven door should
remain closed during broiling.
It is not necessary to preheat the oven
when broiling. Use the broiler pan and
grid that came with your range. Both are
designed for proper drainage of fat and
liquids,
__ . ........... .............. ,_,;,_,_
/.l|l"'_ If foil ,s used, it must
[ _,l be molded t,ghtly to
_IE_/the gr,d and slits cut
into the foil to match those
of the grid. This allows fats
and liquids to drain into the
broiler pan, preventing fire
and excessive smoke.
Always remove
the pan and grid
from the oven.
Storing or
forgetting a soiled broiler
pan in the oven is a
potential smoke or fire
hazard.
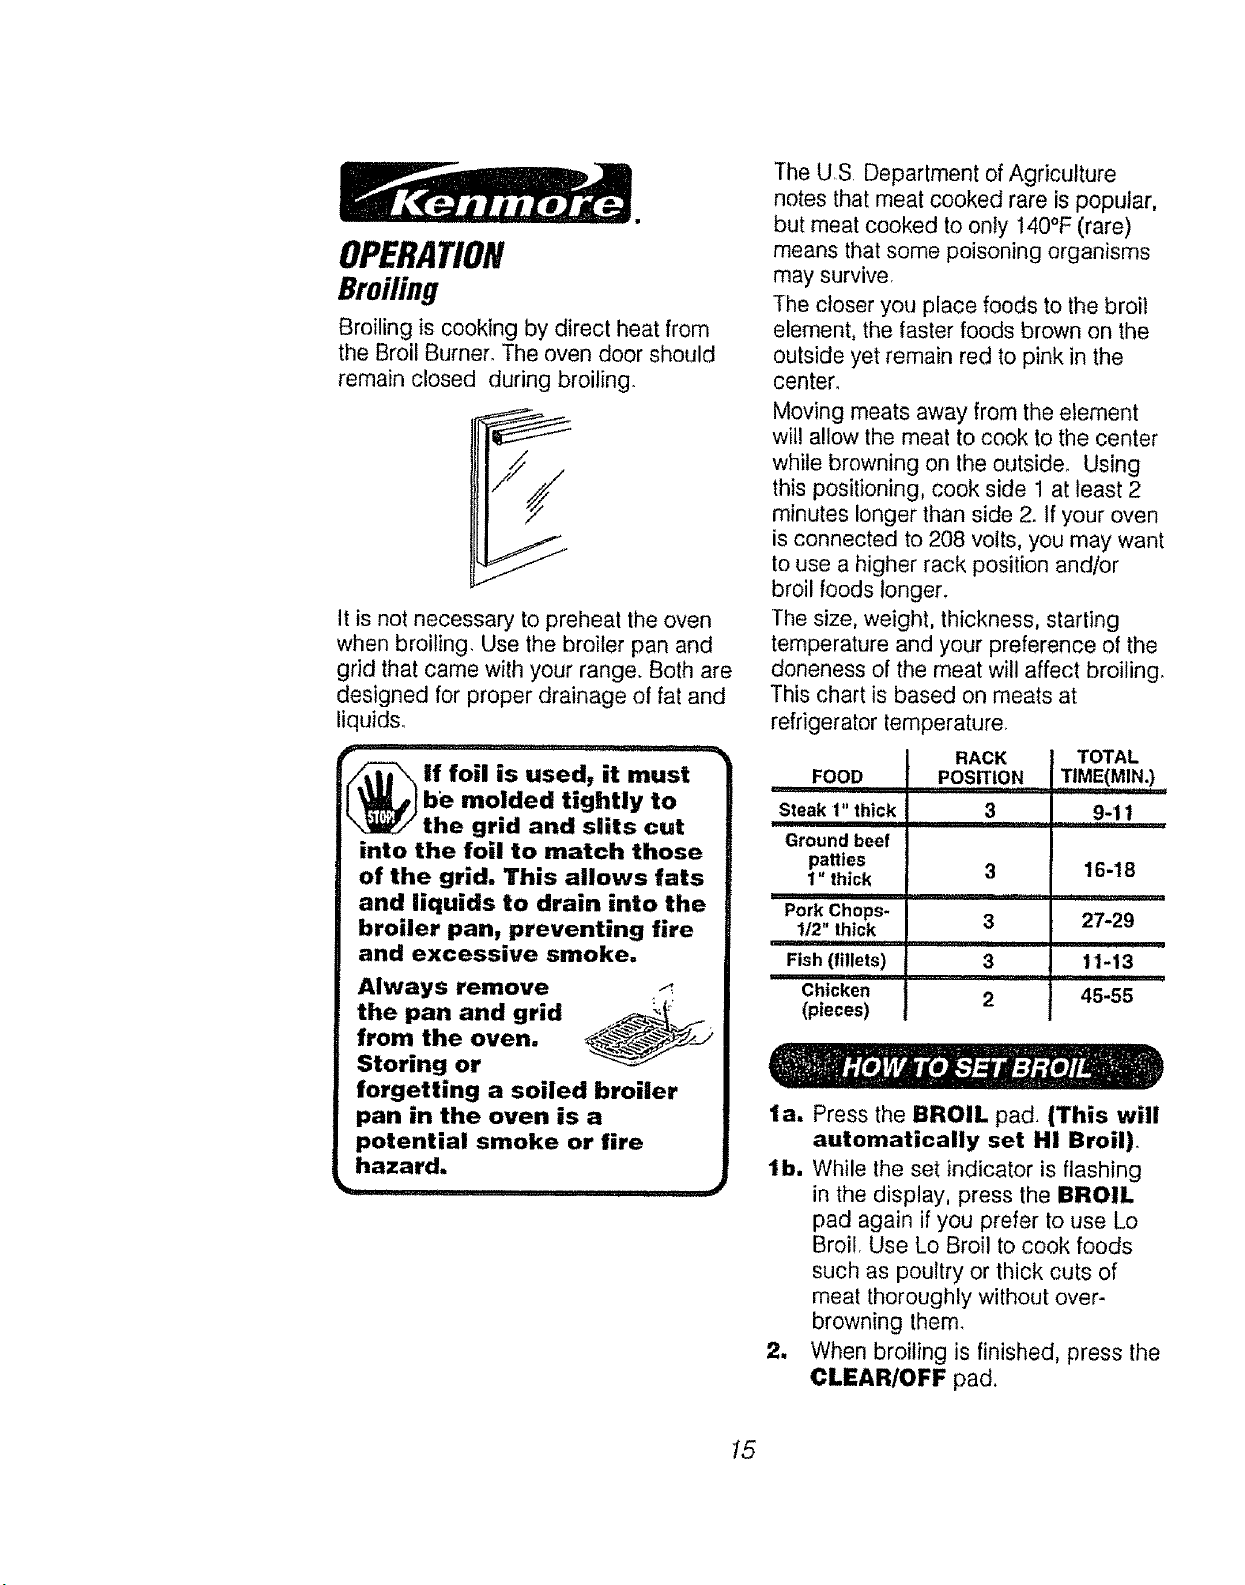
The US Department of Agriculture
notes that meat cooked rare is popular,
but meat cooked to only 140°F (rare)
means that some poisoning organisms
may survive.
The closer you place foods to the broil
element, the faster foods brown on the
outside yet remain red to pink in the
center.
Moving meats away from the element
will allow the meat to cook to the center
while browning on the outside. Using
this positioning, cook side 1 at least 2
minutes longer than side 2. If your oven
is connected to 208 volts, you may want
to use a higher rack position and/or
broil foods longer.
The size, weight, thickness, starting
temperature and your preference of the
aloneness of the meat will affect broiling.
This chart is based on meats at
refrigerator temperature
TOTAL
TIME(MIN,)
..........9"! 1
16-18
i i
27-29
11-13
45-55
,,!1111!1 /
FOOD
Steak 1" thick
Ground beef
patties
I" thick
I i
Pork Chops-
112" thick
Fish (fillets)
Chicken
(pieces)
RACK
POSITION
3
3
,_J_l,ll, i,iiii
3
3
2
la, Press the BROIL pad. (This will
automatically set HI Broil).
lb. While the set indicator is flashing
in the display, press the BROIL
pad again if you prefer to use Lo
Broil. Use Lo Broil to cook foods
such as poultry or thick cuts of
meat thoroughly without over-
browning them.
2. When broiling is finished, press the
CLEAR/OFF pad,
15
Self-CleaningCycle
CAREANDCLEANING
1. Remove the broiler pan and grid,
oven racks, utensils and any foil
that may be in the oven.
2. Soil on the front frame,l" inside
the oven, and outside the door
gasket wilt need to be cleaned
by hand.
Fr_ht Frame
/.
Door Gasket
Door Liner
\\
Clean these areas with hot water,
soap-filled steel wool pads or
cleansers such as Soft Scrub® to
remove any soil. Rinse well with clean
water and dry.
3. Wipe up any heaw spillovers on
the oven bottom.
11
Do not clean the door gasket, The
fiberglass material of the oven
door gasket cannot withstand
abrasion. It is essential for the
gasket to remain intact, if you
notice it becoming worn, frayed or
displaced on the door, it should be
replaced,
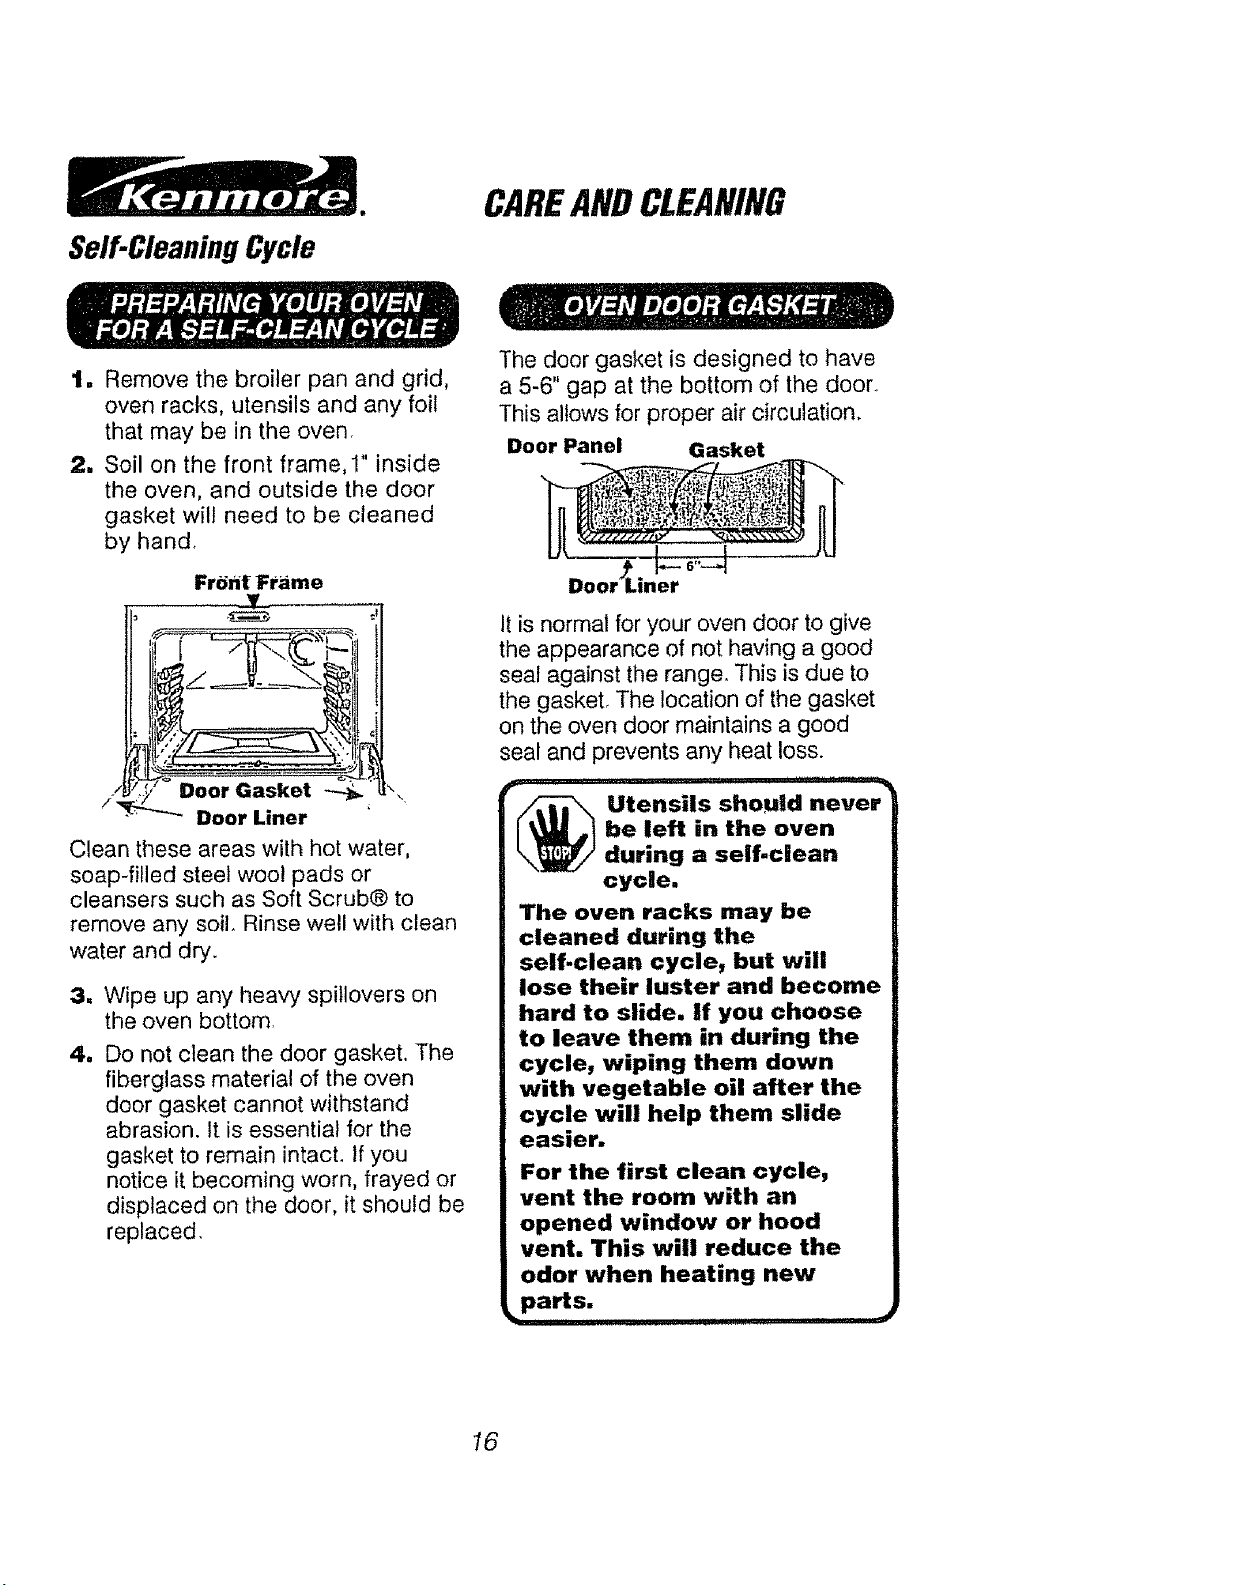
The door gasket is designed to have
a 5-6" gap at the bottom of the door_
This allows for proper air circulation.
Door Panel Gasket
±±
Door Liner
It is normal for your oven door to give
the appearance of not having a good
seal against the range. This is due to
the gasket, The location of the gasket
on the oven door maintains a good
seal and prevents any heat loss.
r
_ tensils should never
The oven racks may be
cleaned during the
self-clean cycle, but will
lose their luster and become
hard to slide, if you choose
to leave them in during the
cycle, wiping them down
with vegetable oil after the
cycle will help them slide
easier.
For the first clean cycle,
vent the room with an
opened window or hood
vent. This will reduce the
odor when heating new
be left in the oven
during a self.clean
cycle.
16
_parts.
ilUll iiii
CAREANDCLEANING
Self-CleaningCycle
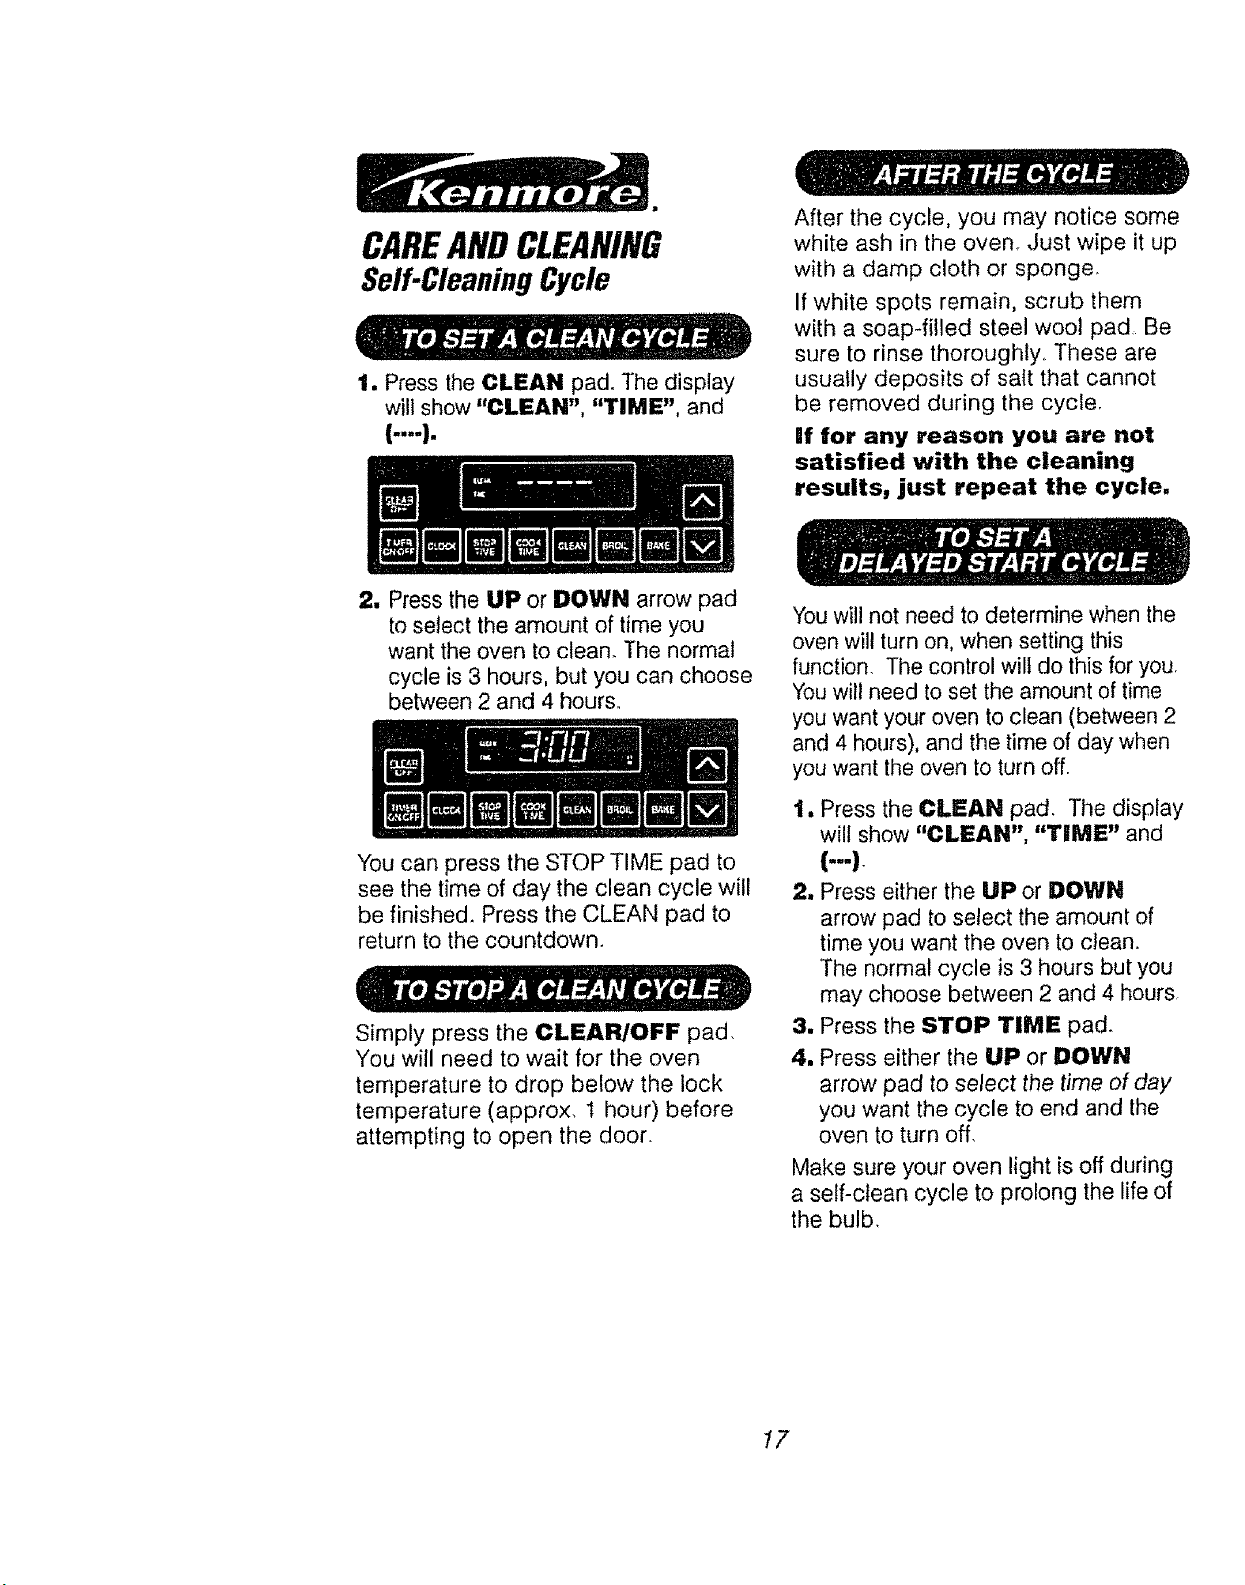
1. Press the CLEAN pad. The display
will show "CLEAN", "TIME", and
(....).
After the cycle, you may notice some
white ash in the oven..Just wipe it up
with a damp cloth or sponge.
If white spots remain, scrub them
with a soap-filled steel wool pad Be
sure to rinse thoroughly,, These are
usually deposits of salt that cannot
be removed during the cycle.
If for any reason you are not
satisfied with the cleaning
results, just repeat the cycle,
2. Press the UP or DOWN arrow pad
to select the amount of time you
want the oven to clean. The normal
cycle is 3 hours, but you can choose
between 2 and 4 hours,
You can press the STOP TIME pad to
see the time of day the clean cycle will
be finished. Press the CLEAN pad to
return to the countdown.
Simply press the CLEAR]OFF pad.
You will need to wait for the oven
temperature to drop below the lock
temperature (approx, 1 hour) before
attempting to open the door
You will not need to determine when the
oven will turnon, when setting this
function The control wilf do this for you
You will need to set the amount of time
you want your oven to clean (between 2
and 4 hours), and the time of day when
you want the oven to turn off
1. Press the CLEAN pad The display
will show "CLEAN", "TIME" and
I--I
2, Press either the UP or DOWN
arrow pad to select the amount of
time you want the oven to clean
The normal cycle is 3 hours but you
may choose between 2 and 4 hours
3. Press the STOP TIME pad.
4, Press either the UP or DOWN
arrow pad to select the time of day
you want the cycle to end and the
oven to turn off.
Make sure your oven light is off during
a self-clean cycle to prolong the life of
the bulb.
I7

CAREANDCLEANING
Cleaning
CLEANING MATERIALS
• Dishwashing detergent
• Warm water
• Soft cloth
Do not use abrasive cleaners,
industrial cleaners, or bleach.
CLEANING MATERIALS
• Dishwashing detergent
• Warm water
• Soap-filled steel wool pad
• Commercial oven cleaner
TO CLEAN
CLEANING MATERIALS
° Dishwashing detergent
* Warm water
. Paper tower
. Dry cloth
° Ammonia or abrasive cleaners and
scouring pad
TO CLEAN
Clean after each spillover. If acidic
foods (such as hot fruit fillings, milk,
tomatoes, sauerkraut or sauces with
vinegar or lemon juice) should spill on
the cooktop, use a dry paper towel or
cloth to wipe up right away. When the
surface has cooled, wash and rinse° For
other spills, such as fat sptatterings,
wash with soap and water when cooled
and then rinse. Polish with a dry cloth,
Allow the pan to soak. Sprinkle the grid
with dishwashing detergent and cover
with a damp cloth or paper towel and let
stand. Scour as needed. Wash, rinse,
and dry well. You may also place both
the pan and grid in the dishwasher.
CLEANING MATERIALS
° Dishwashing detergent
° Warm water
o Paper towels
TO CLEAN
Do not use oven cleaners, cleansing
powder, or harsh abrasives. If mari-
nades, tomato sauce, basting materials,
etco, should spill, wipe up as much as
possible. When surfaces have cooled
thoroughly clean painted areas.
CLEANING MATERIALS
Glass cleaner
• Paper towels
° Baking soda
o Warm water
TO CLEAN
Remove stubborn soi! with paste of
baking soda and water, Do not use
abrasive cleaners_ Rinse thoroughly_
18

CAREANDCLEANING
RemovableParts
CLEANING MATERIALS
• Dishwashing detergent
• Nonabrasive cleaner
• Ammonia
• Warm water
° Soft cloth
TO CLEAN
For stubborn stains, place grates into a
plastic bag. Pour !/4 cups of ammonia
and seal tight. Allow to soak overnight.
Wash and rinse well.
CLEANING MATERIALS
° Dishwashing detergent
• Nonabrasive cleaner
, Warm water
• Soft cloth
TO CLEAN
Soak stubborn stains, rinse and dry
completely. Leave burner cap in place
when cleaning burner bowl.
The oven bottom may be removed for
cleaning heavy spillovers or to reach
the oven burner.
Be careful not to scratch the oven
finish when removing or replacing the
oven bottom.
TO REMOVE
1, Slide the tab at the center front of
the oven bottom to the left,
2, Lift the oven bottom up and out.
CLEANING MATERIALS
• Dishwashing liquid
• Mild abrasive cleaner
. Soap-filled scouring pad
• Commercial oven cleaner
TO CLEAN
Spillovers such as hot fruit fillings or
foods with acidic content (such as
tomatoes, vinegar or lemon juice) may
cause staining to the porcelain
surface. To prevent staining from
spillovers, you may place a piece of
aluminum foil or a cookie sheet on the
rack below the food which may spill
over. Clean after each oven use.
TO REPLACE
1, Slip the oven bottom into the oven
so the tabs in the rear of the oven
bottom fit into the slots in the oven
back.
2, Lower the front of the oven bottom
into place. Slide the tab at the front
of the oven bottom into place.
19

CAREANDCLEANING
RemovableParts
CLEANING MATERIALS
• Dishwashing detergent
• Warm water
• Soft cloth
Molded _"<_2_
r--_ Spring _ _
tv
the oven light
CAUTION: Be sure
switch is in the off
position. Do not
touch a hot light bulb with
wet hands or a wet cloth.
Wait until the bulb has
cooled and use a dry cloth.
Never touch the live collar of
the bulb. |f you are replacing
a broken light bulb, make
sure the power supply is off.
_ , ,i,iii I , ,ll,ln
Glass Retaine__
Clear Groove
in Stem
TO REMOVE
1. Be sure the control knob is in the
off position,
2, Pull straight off the stem
Using a piece of string can make
removing the knob easier, Slip the
string under and around the knob,
pulling straight out°
TO CLEAN
Wash the knob thoroughly with soapy
water. Dry completely with a soft
cloth_ DO NOT let the knob
soak.
TO REPLACE
1. Check the back of the knob,The
molded rib of the knob is designed
to fit perfectly onto the knob stem.
2, Align the molded rib to the clear
groove in the knob stem.
3. Push the knob back as far as it will
go.
oc e,_i
Bulb _ ......--'%.j
Live Collar
Glass Cover
TO REPLACE
1. Remove the three screws and lift
off the glass retainer, glass cover
and gasket.
2. Replace the bulb with a 40 watt
appliance bulb. An appliance
bulb is smaller than a standard 40
watt household bulb.
3. Replace the gasket, glass cover
and glass retainero Tighten screws
securely,
2O

CAREANDCLEANING
RemovableParts
CLEANING MATERIALS
TO REPLACE
1. Lift the front of the drawer stop
and lower the stop of the drawer
through the opening of the base
rail
* Dishwashing detergent
o Damp cloth
. Warm water
TO REMOVE
1. Pull the drawer out until it stops
2, Lift the front of the drawer until the
stop guide of the drawer clears the
stop guide on the base rail..
Stop Guide
Stop Guide
2, Lower the front of the drawer and
push back the drawer until it
stops.
3, Lift up on the front of the drawer
until the stop guide of the drawer
clears the stop guide of the base
rail. Slide the drawer into place.
CAUTION: The drawer
gives you space for
keeping cookware and
bakeware. Plastics and
flammable materials should
not be kept in this drawer.
Do not overload the storage
drawer. If the drawer is too
heavy, it may slip off the
base rail when opened.
.... 4
3. Lift the drawer up and over the
drawer stop
TO CLEAN
Wipe the inside and outside with
warm soapy water and a damp cloth
or sponge Do not use harsh
abrasives or scouring pads on the
drawer
21

CAREANDCLEANING
RemovableParts
TO REMOVE
Be sure that all controls are turned off
and that the unit is coolo Lit off burner
grate, burner cap and burner head,
Do not remove burner bowl.
_ BURNER GRATE
TO REPLACE
1, Place the burner head onto the burner
bowl making sure the location of the
spark igniter matches up with the
opening in the burner head,
2, Place the burner cap on the burner
head_
3, Place the grate over the burner
assembly and onto the burner bowl.
The indentations of the bowl should
match the location pins on the bottom
of the grates.
MIXER TUBE;
BURNER
_ _,.W_ BURNER HF..AO
___._- _jJ_j- MIXERnee
(CHIMNEY)
The electrode of the
spark igniter is ex-
posed beyond the top
of the burner. When
cleaning the burner bowl, be
careful not to snag the electrode
of the spark igniter with your
cleaning cloth. Damage to the ig-
niter could occur. Be careful not
to turn on any cooktop controls
while cleaning burner bowls. A
slight electrical shock might re-
suit, which could cause you to
knock over hot cookware,
k- ii ii iiii1,111i I
22

r__ j
CAREANDCLEANING
RemovableParts
Broil St0p Position
CLEANING MATERIALS
o Dishwashing detergent
• Warm water
,, Scouring pad or soap-filled steel
woo! pad
Bump In
Rack Guide
Raised Back
Of The Rack
TO REMOVE
1, Pull the racks out to the stop lock
position.
2, Pull up the front of the rack and
slide under the bump of the rack
guide°
TO CLEAH
Clean with warm water and detergent.
For hard to remove stains, gently
scrub with a scouring pad or a
soap*filled steel wool pad. Rinse well.
TO REPLACE
1. Place the raised back of the rack
onto the rack guides,
2. Lift the front of the rack until the
raised back slides under the bump
of the rack guides,
3. Slide the rack all the way back.
_nge
TO REMOVE
1, Open the door to the broil stop
position_
2, Grasp the door at each side and
lift up and off the hinges. DO
NOT LIFT DOOR BY THE
HANDLE.
/ J II i HI ii m "_
r_ CAUTION: When the
L_ door msremoved and
the hinge arms are at
the broil stop position, as a
precaution, cover the hinge
arms with toweling or an
empty paper towel roll. Do
not bump or try to move the
hinge arms while working in
the oven area. They could
snap back causing injury to
the hands or damage the
porcelain finish of the front
frame.
TO REPLACE
1. Make sure the hinge arms are in
the broil stop position_
2, Lift the door by the sides.
3, Line up the slots at the bottom
edge of the door with the hinge
arms.
4, Slide the door down onto the hinge
arms as far as it will go.
5. Close the door,
23

BEFORECALLINGFORSERVICE
To save you time and money, before making a service call check the list below for any
problem you may feel you have with the performance of your range, If the problem is
something you cannot fix use the Consumer Service Numbers located at the back of this
manua!, When making any calls have the Model No., Repair Parts list,
Use and Care Manual and the Date of Purchase available.
PROBLEM
The display of your
POSSIBLE CAUSE
Range malfunction.
control is flashing
"F" followed by a
number or letter.
Oven and even
control will not
work.
,It t I i,i 1111111111111111,
No power to range.
Oven temperature Thermostat calibration.
seems inaccurate.
,,,,r,,.
Oven will not Clean cycle is not
unlock, finished.
POSSIBLE SOLUTION
Press the CLEAR/OFF
pad. Let the oven cool for
1 hour and enter an oven
or cleaning operation° If
code repeats, call for
service.
i iluln I_'_1
Check the circuit breaker
or fuse. Make sure the
power cord is plugged in,,
See the adjustments
described following this
section.
Oven temperature must
drop below the lock
temperature before the
door will unlock.,
Oven light will not
work.
Oven did not
clean or results
were poor,
a. Light switch in off
position.
b. Oven light bulb
burned out,
a. Controls were not set
properly,,
b. Clean cycle was
interrupted_
c. Oven was soiled
heavily.
24
a. Check oven light
switch on the control
panel°
b. Check the oven light
bulb.
a. Check the self-cleaning
section of this manual,
b. The normal clean cycle
should last 3 hours.
c. Heavy spillovers
should be removed
before the cycle is set.
You can also repeat
the cycle.

BEFORECALLINGFORSERVICE
PROBLEM
..... • • i,]r Fqr rillq]r _, ........
Oven smokes,
Foods do not a.
bake properly.
POSSIBLE CAUSE
a, Spillage
CD
Broiler pan containing
grease left in the oven.
Oven is not preheated..
b.
Improper rack or pan
placemenL
c, Oven vent blocked or
covered.
d, Improper use of foil.
e, Improper temperature
setting for utensil used
L Recipe not followed.
POSSIBLE SOLUTION
a, Make sure the sump (grease
welt) is to the front of the
range when broiling.
e, Clean pan and grid after each
use.
a. Be sure to preheat untilthe
tone sounds.
b. Maintain uniform air space
around pans and utensils. Se_
oven cooking section.
e, Keep vent clear.
d. Racks should not be covered
during baking.
e. Reduce temperature 25 de-
grees for glass or dull/dark-
ened pans.
L Check recipe and measure-
ment.
Foods do not
broil properly
Burners do not a.
work,
g, Improper oven control
calibration.
h, Range and oven rack not
level.
a, Improper rack position..
g. Check thetemperature adjust
ment following this section.
h, Check the installation instruc-
tions for leveling. ,..................,,,.,.,
a, Check broil pan placement;
see broiling section°
b_
Oven preheated
b. Do not preheat when broil-
ing.
C,,
Improper use of foil
d.
Oven door closed during
e. Check broiling section,
d, Open door to broil slop
broiling
Gas supply not connected a, Check the reducer shut-off
or not turned on; if using
L.P. gas, tank may be
empty.
valve and the gas supply shut-
okff valve to be sure theyare
open (see installation inslruc-
tions).
bl
b, Controls not adjusted
properly.
c. Burners not adjusted
properly
Check operaling inslructions
in this manual.
C,
See the installationinslruc-
tions for adjustments.
25

"DOIT YOURSELF"
1. Press the BAKE pad.
TEMPERATURE
ADJUSTMENT
You may feel that your new oven cooks
differently than lhe oven it replaced. We
recommend that you use your new oven
a few weeks to become more familiar
with it, following the times given in your
recipes as a guide,
If you think your new oven is too hot
(burning foods) or not hot enough
(foods are undercooked) you can
adjust the temperature yourself_ The
appearance and texture of foods is a
better indicator of oven accuracy than
oven lhermometers, to check the
temperature setting of your new oven.
These thermometers can vary by 20-40
degrees. In addition, the oven door
must be opened to read these
thermometers. Opening the door will
change the temperature of the oven_
To decide how much to change the
temperature, set the oven temperature
25 degrees higher (if foods are
undercooked) or 25 degrees lower (if
foods are burning) than the temperature
in your recipe, then bake. The results of
this "test" should give you an idea of
how much the temperature should be
changed.
m
Press the UP arrow pad to
set 550 ° and
IMMEDIATELY press
and HOLD the BAKE pad
for 10 seconds until the
clock disappears and the
display shows a two digit
figure.
( This two digit number may vary according
totheoriginal factory setting,)
3. Press the UP arrow to
increase your oven's
temperature up to +35 °
HOTTER
B Press the DOWH arrow
_ 4.When selection is
Your oven's thermostat will retain this
temperature adjustment until each of
the four steps above are repeated
This adjustment will remain in memory
even after a power failure.
You will not need to do anything else.
Bake as you normally would This
adjustment will not affect broiJ or
clean temperature.
pad to decrease your
oven's temperature down
to -35 ° COOLER,
your
complete press the
CLOCK pad to return to
the time of day.
26

RANGEWARRANTY
rFULL ONE YEAR WARRANTY ON THE FUNCTIONING OF ALL PARTS
EXCEPT GLASS PARTS
If, within one year from the date of installation, any part, other than a glass part, fails to
function properly due to a defect in material or workmanship, Sears will repair or re-
place it, free of charge.
FULL 30.DAY WARRANTY ON GLASS PARTS AND FINISH OF PORCE-
LAIN ENAMEL, PAINTED OR BRIGHT METAL FINISHED PARTS
If, within 30 days from the date of installation, any glass part or the finish on any porce-
lain enamel, painted or bright metal part is defective in material or workmansh p, Sears
will replace the part, free of charge.
FULL 90-DAY WARRANTY ON MECHANICAL ADJUSTMENTS
For 90 days from the date of installation, Sears wilt provide, free of charge, any me-
chanical adjustments necessary for proper operation of the range, except for normal
maintenance°
If the range is subjected to other than private family use, the above warranty coverage
is effective for only 90 days.
WARRANTY SERVICE IS AVAILABLE BY CONTACTING THE NEAREST SEARS SER-
VICE CENTER/DEPARTMENT IN THE UNITED STATES,,
This warranty ap,plies only while this product is in use in the United States Th s warranty
gives you specific legal rights, and you may also have other rights which vary from state
to state,
ears, Roebuck and Co. Dept, 817 WA, Hoffman Estates, IL 60179
_,,,,,,,,,,,,,,
To Further Add To The Value Of Your Range,
Buy a Sears Maintenance Agreement.
Years of Ownership Coverage 3rd Year
,, J'LL
ReplacementofDefective
1 PartsotherthanPorcelain MA
orGlass
2
Mechanical Adjustment
Porcelain and Glass Parts
3
Annual Preventive Maintem
ance Check at your request
W - Warranty MA - Maintenance Agreement
Kenmore Ranges are designed, manufactured and tested for years of dependable
operaEon Yet, any modern appliance may require service from time to time. The Sears
Warranty plus the Sears Maintenance Agreement provides protection from unexpected
repair bills and assures you of enjoying maximum range efficiency.
The chart above compares the Warranty and Maintenance Agreement and shows you the
benefits of owning a Sears Range Maintenance Agreement°
Contact your Sears Sales Associate or Local Sears Service Center today and purchase a
Sears Maintenance Agreement,
1st Year 2nd Year i
90 DAYS
W MA
30DAYS
W MA
MA MA
MA
MA
MA
27

Fortherepair or replacementpartsyouneed #
delivereddirectly to yourhome
Gall7am - 7 pro, 7 daysaweek
t -800-366-PART L
(1-800-366-7278)
Forin-homemajorbrandrepairservice
Call24 hours a day,7 daysaweek
1-800-4-REPAIR
(1-800-473-7247)
For the location of a
Searspartsand RepairCenterinyourarea_____ ,
Call24 hours aday, 7 daysaweek 1BB_ BBB_B]
1-800-488=t 222
Forinformationonpurchasinga Sears
MaintenanceAgreementor to inquire
aboutan existingAgreement
Call9 am - 5 pro, Monday,-Saturday
1-800-827-6655
8W/A S
America's Repair Specialists
28

MANUAL DEL CONSUMIDOR
ESTUFA A GAS DE 30"
"SLIDE-IN" CON
AUTOLIMPIEZA
MODELO NO.
911.36655
911.36659
911.36755
911.36756
91t.36759
PRECAUCION:
Antes de usar esta estufa,
lea este manual y siga
todas las Reglas de
Seguridad y las
Instrucciones para su
funcionamiento.
Sears, Roebuck and Co., Hoffman Estates, IL 60179 U.S.A.
. Instrucciones de
Seguridad
• Funcionamiento
• Cuidado y Limpieza
o C6mo Resolver
Problemas
229C4020Pt 34 (SR- 10348)

Indice
Seguridad en el uso de la estufa 3-7
Corte de corriente .......................... 7
V&tvula de cierre del gas al homo, 7
Utensilios y woks para cocinar ....... 7
CSmo sacar la cinta de empaque ,. 8
Caracteds_icas de su estufa ........... 8
Quemadores de ta cubierta ........... 9
CSmo programar los controles ...... 9
Encendido del quemador ................ 9
Llama para cocinar a fuego lento ,. 9
C6mo hacer conservas en casa ..... 9
Control de la estufa ..........................t0
C6mo poner el reloj ........................ 11
C6mo programar el cron6metro.., t 1
C6mo reprogramar e! cron6metro
.................................................................11
Para cancelar el cron6metro ......... 1!
Consejos para cocinar en
et homo .............................................12_13
Qlor u olor fuerte ............................... 12
Papel de aluminio .............................12
VentilaciSn del homo ...................... 12
Precalentamiento ................................12
Sensor de temperatura dei homo 12
No mire ........................................... 12
C6mo colocar los utensilios .......... 12
Utensilios .............................................I3
Ciclo de los quemadores ................13
Parrillas del homo ............................. 13
Ajuste a la temperatura del homo
.......................................................13, 26
C6mo hornear ................................. 14
Para asar .......................................... 15
ESTUFATIPO"SLIDE.IN"
El ciclo de autolimpieza ............ 16,t7
Panel de control ................................ 18
Cacerola y parrilla para asar ......... t8
Superficies pintadas .........................18
Cubierta de vidrio ..............................18
Cubierta de porcelana .......................18
Fondo de ta caja del quemador .... t9
Parrilla de quemador ..........................19
Recipiente, tapa y cabeza
del quemador ....................................19
Partes de homo ..................................19
Periilas de control ...............................20
Foco de la luz del homo ...................20
Caj6n de almacenamiento .............21
Componentes del quemador de la
cubierta ...............................................22
Parrillas del homo ...............................23
Puerta de! homo ............................. 23
Antes de Ifamar para un servicio ......
...................................................... 24-25
Ajustes a la temperatura .................26
Garantia ................................................27
N_meros para servicios del
consumidor ...................................... 28
Para su conveniencia y referencia futura, por favor esoriba e! nQmero de
mode|o y de serie en el espacio que se provee. Est_n ubicados en el
marco frontal detr;is del caj6n,
NUMERO DE MODELO:
NUMERO DE SERIE:
2

INSTRUCCIONESDE
SEGURIDADIMPORTANTES
GUARDE ESTAS INSTRUCCIONES
Lea todas las instruccionos antes de usar este aparato. Cuando use aparatos a
gas o el_ctricos, se deberian seguir precauclones de seguridad, incluyendo Io
siguiente:
que producen defectos de nacimiento u
....:, ;;ADVERTENC|A!! Si la
, informaci6n en este
:: manual no se sigue
exactamente, podria _
!i resultar un incendio, una i_i
explosi6n, o un escape de !i
_:igas que causen dafio a la i
?_'_propiedad, herzdas _:_
_....personales, o muerte. _
otros da6os reproductivos y requiere
que los hombres de negocios adviertan
a sus clientes del contacto potencial a
tales substancias.
!r_
Las estufas a gas podrian causar un
contacto menor a cuatro de estas
substancias, nominalmente benceno,
mon6xido de carbono, formalina y ollin,
causados principalmente pot la
combusti6n incompleta del gas natural
y el gas licuado, Las estufas ajustadas
adecuadamente, indicado pot una llama
azulada en vez de amarilla, minimizar_n
la combusti6n incompleta. El contacto
a estas substancias puede minimizarse
con m_s ventilaci6n abriendo las
ventanas o usando un ventilador o una
campana de ventilaci6n,
El homo, come sale de f_brica, puede
ser operado solamente con gas natural.
No trate de hacerlo funcionar con gas
L.P. (gas embotellado}. Las llamas altas
y los vapores t6xicos podrfan causar
serlas heridas. Si desea usar su homo
con gas L.P. usted debe co.vertir la
estufa siguiendo el procedi_hiento que
se encuentra en las Instruciones para
Instalaci6n que vienen con el homo',
;ADVERTENCIA DE SEGURIDAD
IMPORTANTE!
California Safe Drinking Water and
Toxic Enforcement Act requiere que el
gobemador de California publique una
lista de substancias que el estado sepa
_ DVERTENCIA AJUSTE A LOS
usar Gas Licuado de Petr61eo, (gas
embotellado) todos los ajustes en las
Instrucciones para la Instalaci6n deben
hacerse antes de usar su homo.
Si su homo no est_ ajustado adecuad,
amente, las llamas podrian estar
demasiado altas, o el homo podria usar
demasiado combustible, emitiendo
vapores t6xicos o cocinando real.
QUEMADORES DE GAS L.P.
Si usted tiene la intenci6n de
3

INSTRUCCIONESDE
SEGURIDAD
IMPORTANTES
° Todas las estufas se
• Personas podrian resultar
heridas
, Instale el dispositivo conlra
;! volcaduras empacado con
ta estufa
• Vea las instrucciones de
Saque todas las partes de la bolsa de
pldstico pegada a la espalda de la
estufa y conserve ]a cinta de empaque,
Antes de poner la eslufa en et mes6n, mire la
ubicaci6n del soporte de estabilidad en la 8,
espalda de la estufa. Para conveniencia usted
puede enganchar la cadena de estabilidad en
etjuego de hoyos superior AsegLirese que no 9.
exista una interferencia estructural cuando use
el juego de hoyos superior
Guarda posterior (Algunos mode,los)
(Se
mueslra
Ublcaci6n modelo
optional de la el6ctrico;
abrazadera Se usa
Cadena para
Ubieaci6n a gas}
fabrica de la
abrazadera
Espalda principal
lado
opuesto
modelos
Elija una
ubicaci6n
donde no
hayan
alambres
electricos o
tubos de
plomerta,
2, Con el tornillo largo que se provee,
ancle la cadena al sueto o a la pared
3, Asegurese Cadena
que el tornillo Tornillo Basede
entre a la largo lapared
base de la
pared o al
list6n de la
base de la
pared pot Io menos 3/4"
4. Enganche la cadena de estabilidad de
manera que quede alineada con la
abrazadera en la espalda de la estufa+
w
Tire la cadena para estar seguro que
est& bien enganchad&
6,
Tome la cinta de
empaque y pegue
provisoriamente la
punta suella a la
cadena a la parte
trasera del mes6n.
1
Deslice la estufa
en el mes6n
dejando suficiente
espacio atr_.s para
enganchar la cadena a la abrazadera+
Meta el eslab6n m_s cercano de la
cadena en la abrazadera Tire para estar
seguro que est& Io m&s tirante posible.
Deslice la estufa hacia atr_s to m_s
posible+ Es normal que quede un poco
de soltura en la cadena, pero no deberia
set"excesiva,
Arandela
y tornillo
Cadena
Empaque
4

INSTRUCCIONES
DESEGURIDAD
IMPORTANTES
I ii a4
Para prevenir que la
estufa se vuelque
;ADVERTENCIA!
accidentalmente
debido a un uso anormal,
incluyendo una carga exceslva
sobre la puerta, eng_nche la
estufa a la pared o al suelo
instalando el dispositivo contra
volcaduras que se provee. Si la
estufa se mueve para limpiarla,
para hacerle servicio o cualquier
raz6n, asegtirese que el
dispositivo contra volcaduras
sea enganchado nuevamente
cuando la estufa se coloque de
vuelta en la abertura. No hacerio
podria resuitar en que la estufa
se vuelque o en heridas
personales. Para inspeccionar el
dispositivo contra volcaduras,
saque el panel frontal y mire
para asegurarse que el nivelador
de la pata trasero est_ bien
enganchado en la ranura de la
abrazadera.
IMPORTANTE: Para garantizar su
seguridad, la de su familia y la de su hogar,
por favor lea su Manual del Consumidor
cuidadosamente Mant_ngalo a la mano
para referencias. Ponga mucha atenci6n a
las secciones de seguridad ASEGURESE
que su estufa sea instalada pot un tecnico
especializado y que haga tierra
adecuadamente.
* NO DEJE a los ni;5ossin vigilancia cerca
de una eslufa que se est_ usando.
. ENSE_IE A LOS NtI_OS a no jugar con
los controles o cualquier parte de la estufa
y no sentarse, subirse o pararse sobre la
puerta de este aparato o de cua;quier otra
parte de la estufa.
• PRECAUCION: NUNCA GUARDE
articulos que sean de interes para los
ni_os en et panel trasero o en los
gabinetes sobre la estufa. Los ni_os que
se suban sobre la estufa podrian resultar
gravemente heridos
,, GUARDE ESTE libro para un uso futuro.
• NUNCA USE su estufa para entibiar o
calentar una habitaci6n
• HUNCA TRATE de reparar 0
reemplazar una parte de ta estufa a menos
que las instrucciones se den en este
manual. Todo otro trabajo deberia ser
hecho por un t_cnico especializado.
• SIEMPRE MANTENGA los
revestimientos combustibles de las
paredes, corlinas y otros paSos a una
distancia prudente de la estufa
• NUNCA CALIEHTE contenedores de
alimentos cerrados.. El aumento de la
presi6n podrta causar que el contenedor
explore y cause heddas_
• NUNCA deje frascos o latas de grasa o
goteaduras sobre o cerca de la estufa
° SIEMPRE MANTENGA e! _rea de la
estufa despejada de cosas que se podrtan
quemar La acumulaci6n de comida y
grasa y los utensilios de madera se
podrlan incendiar. Los utensilios de
pl_stico se podrian derretir y las comidas
en conservas podrtan explotar. Su homo
nunca se debeda usar para almacenar
oosas
° SIEMPRE MANTENGA la estufa
despejada de cosas que se_l::ioddan
quemar (gasolina y otros vapores y
lfquidos inflamables)
• NUNCA trate de limpiar las supedicies
calientes.. Algunos limpiadores producen
vapores nocivos y los paSos y las
esponjas mojadas podrtan causar
quemaduras por vapor
• NUNCA USE ropa suelta cuando use la
estufa_
• NUNCA USE una toalla u otro paso
abultado como agarradera y asegOrese
que ta agarradera est_ seca Las
agarraderas h0medas y los pa_os y
esponjas mojadas podrlan causar
quemaduras por vapor. NO PERMITA
que tas agarraderas toquen las zonas
para cocinar calientes
5

r__ j
INSTRUCCIONES
DESEGURIDAD
IMPORTANTES
• NO TOQUE las superficies para calentar,
las superficies cerca de elias o las
superficies }nteriores. Estas poddan estar
suficientemente catientes para quemar
aunque se vean de color oscuro, Durante y
despu6s del uso, no toque o permita que la
ropa omateriales inflamables hagan
contacto con tassuperficies calientes hasta
que hayan tenido tiempo de enfriarse. Las
otras superficies cerca de las venlanillas de
ventilaciSn del homo, puerlas, ventanas y
las superficies'!para cocinar tambi_n podrlan
estar suficientemente catientes para causar
quemaduras.
o SOLO CIERTAS clases de utensilios de
vidrio o cer_rnica se pueden usarpara
cocinar en la cubierta.. Asegerese que los
utensilios que sefeccione est_n diseSados
para cocinar sobre fa cubierta sin quebrarse
debido a los s,3bitoscarnbios de
temperatura
• SIEMPRE TENGA cuidado cuando toque
los elementos de lacubierta Retendr_n
calor despues de que la estufa se haya
apagado
,, NUNCA OBSTRUYA ]aventilaciSn del
homo bajo elelemento derecho de atr&s
o LAS OLLAS QUE SE USEN para cocinar
en la cubierta deber,_anser de fondo piano y
tosuficientemente grandes para cubrir el
_rea que se est_ utilizando Los utensiiios
que son demasiado pequeSos exponen el
elemento calentador y podr_acausar un
contacto directo o et incendio de la ropa.
• NUNCA DEJE las unidades de superficie
sin vigilancia a ternperaturas alias. Los
derrames podrfan resultar en humo o en
derrames de grasa que se podrfan incendiar
. SIEMPRE COLOQUE las agarraderas
(manillas) de las ollas hacia adentro y lejos
de lasotras unidades de la supedicie para
reducir el riesgo de quemaduras, encendido,
un contacto y derrarne accidental..
• COLOQUE LAS PARRILLAS DEL
HORNO en la posici6n deseada mientras
el homo est_ frio Si las parriIlas se deben
mover mientras el homo est_ calienle, no
permita que ta agarradera haga contacto
con el quemador caliente deÁhomo.
- DESPUES DE ASAR A LA
PARRILLA, siempre saque la cacerola y
la parrilla para asar del homo y I{mpielas
Los sobrados de grasa en la cacerola para
asar podr{an incendiarse la pr6xima vez
que usted use el homo
• SIEMPRE TENGA cuidado cuando abra
la puerta del homo. Deje que el aire
caliente y el vapor escapen antes de
mover los alirnentos.
• NUNCA UTILICE papel de aluminio
para cubrir el fondo del homo° Ebuso
incorrecto del papel de aluminio podria
resu!tar en el riesgo de un golpe de
corriente e incendio
• LIMPIE SOLAMENTE las partes que se
listan en este manual. Siga todas las
instrucciones para la limpieza, Asegurese
de sacar la cacerola y la parri!la para asar
antes del ciclo de autolimpieza.
• NUNCA TRATE de lirnpiar los utensilios,
ollas, partes removibles o la cacerola y la
parrilia para asar en el ciclo de
autotimpieza.
° HO USE limpiadores para homos - No se
deberia usar ninguna clase de limpiador
para hornos o cremas protectoras dentro o
alrededor de cualquier parte del homo.
6

INSTRUCCIONESDE
SEGURIDAD
IMPORTANTES
;LEA Y COMPRENDA ESTA
INFORMACION AHORA!
AsegOrese que todos en su hogar
sepan qu6 hacer en caso de incendio,
Nunca use agua sol)re un incendio de
grasa; esto solamente extender_ las
llamas.
INCENDIO DE GRASA EN LA
CUBIERTA:
Nunca levante una ella en llamas..,
1. Apague los quemador de la superficier
2. Sofoque la llama con una tapa apretada,
soda para cocinar o con un extintor
quimico, a espuma o "halon".
FUEGO EN EL HORNO:
;No trate de mover la cacerola!
t. Cierre Japuerta del homo y apague los
controles
2. Si el incendio continua, cuidadosamente
abra la puerta, arroje soda para cocinar
sobre el fuego, o use un extintor de
quirnico seco, espuma o "halon".
El regulador de presi6n (detrAs de la estufa)
tiene una rnanillaque abre o corta el paso del
gas a! homo, Esla rnaniila es accesible desde el
frente de la estula si se saca el caj6n de
alrnacenamiento y se alcanza a tray,s dee
compartirnento y la parte de atr&s de la estufa
Vea la secci6n de instalaci6n para m_s
informaci6n
El dispositivo para desconeclar la etectricidad
est& ubicado detr_s del caj6n de
armacenamiento en el cornpartimento de abajo.
Saque el caj6n para alcanzarlo. Apriele las
aletillas para desconectarlo,
Durante un corte de corriente, los quemadores
de la cubierta no se encender&n auto-
rn&ticamente, En una emergencia, un
quernador de cubierta se puede encender con
un f6sforo de madera Siga tasinstrucciones
m&s abajo:
1, Encienda el f6sforode madera
2. Sujete la llama junto al quemador que
desea usar.
3, Empuje y haga girar la perilla correcta a la
posici6n de encendido
4. Cuando el quernador se enciende haga
girar la perilla a la posici6n preferida
! I i Hill i1!111
fADVERTENCIA: Encender un
| quemador con un f6sforo es |
| peligroso. Usted deberia encender |
|los quemadores con este m6todo |
_s61o en caso de emergencia. ............J
Use ollas y woks que sean del mismo
tamafio del quemador que use cuando
cocine.
FONDO DE _L=m,_-_ -----_OLLAMA
t,A OLLA _
anillos de soporte, No use
parrillas de superficle de
No use woks que tengan
estufas.
7
TAMANO DE

OPERACION
CARACTERISTICASDESUESTUFA
Ventilaci6n De/Homo
Cubierta de
vidrio
4
quemadores
4 parrillas de
quemadores
4 perillas de
control
removible de
cubierta
Cerrojo de pderta
para
autoiimpieza
Ubicaci6n de placa
con ndmbero de
modelo y serie
Caj6n de almacenaje
,Control del
homo, reloj y
cron_metro
Parri!las
removibles del
homo
Se/Io de la
puertapara
autolimpieza
Puerta
Fondo removible del
removible del homo
homo
Fuente y parri/la
para asar
Para sacar el residuo del adhesivo de la cinta de empaque, use un detergente tiquido
normal para platos, aceite mineral o para cocinar. Con un pa,fio suave frote el &tea y
permita que se remoje. Enjuague y seque bieno Repita e! procedimiento usando un
pulidor para eslufas para asegurarse que la estufa no se daSe. Esto deberia hacerse
antes que la estufa se encienda pot primera vez, La cinta no se puede
saear una vez que el estufa ha sido calentado. La cinta de empaque se puede
encontrar en 1as siguientes areas: Superficie de la cubierta, Manilla de la puerta, Area
det panel de control, Mofdura de la puerta y Area del horno,
8

OPERACION
CSmoCocinaren la Cubierta
La marca cerca de cada peritla de control le
muestra qu_ elemento se enciende con esa
perilla_ O_ I
Derecha
@(
trasera
O0
]zquierda O0
,,a,ora @0 O®
lzquierda Derecha
delantera delantera
H! Para comienzos r_pidos, tal como
para hervir agua,
MED Para hervir tentamente y frefro
LO Para comidas al vapor o para
mantener los alimentos a
temperaturas para set servidos.
t, Ernpuje para hacer
girar la perilla
2, Empuje para hacer
girar las perillas a la
posici6n LITE
(encendido)
3, Despu_s de que e)
quemador se
prenda, ponga )a
perilla al lJpo de
1lamadeseado.
Cuando la perilla se hace girar a la posici6n
de encendido, un encendedor a chispas envia
una serie de chispas et_ctricas que
encender_n el gas que pasa autom&ticamente
al quemador.
Cuando cocine sobre
cubiertas de vidrio o de
porcelana recuerde que
estas _reas se pueden
calentar. Tenga cuidado cuando
trabaje cerca de estas ;_reas.
Cuando cualquier quemador de supedicie
est_ encendido, la luz indicadora de unidad
de superlicie se encender&.
Si est,. cocinando con una llama a fuego
lento sobre un quemador, vigite la posiciOn.
Debido al aumento del paso del gas a los
otros quemadores, el tamaSo de la llama
que se est_ usando para cocinar lentamente
podria necesitar ser aumentada
1. Centre la olla sobre el quemadoro
2, Use recetas y procedlm_entOs de buenas
fuentes, Estas se encuentran disponibles
de fabricantes tales como Ball@ and
Kerr@y del Servicio de ExtensiOn det
Departamento de Agricuftura
3, Tenga cuidado para prevenir
quemaduras a causa de! vapor odel
calor
Como precauci6n
usted deb_r_a poner l_,_ t_ "
los controles de
manera que la llama
caliente solamente el rondo de la
olla y no lama los lados. Las llamas
que lamen los lados de las elias son
=peligrosas y desperdician energfa.
9

OPERACiON
Reloj, CronSmetroy ControlDel
Homo
OrAL PARA
MOSTRAR ESTADO,
DEL PROGRAMA
CANCELA LA
OPERACION
DE HORNEAR,
ASAR, _--
O LtM PtEZA
EMPUJE PARA ENGENDER O
APAGAR ELCRONOMETRO
DIAL D_L RELOJI DIAL DE DIAL DE
CRONOMETRO TEMPERATURA FUNCION
PARA PONER OPERAC|ONES BOTON CON FLECHA HACIA ABAJO
DEL HORNO EN AUTDMATICO (BAJA EL TIEMPO Y LA TEMPERATURA)
Su estufa se controla con un toque. Usted
puede poner ahora las siguientes
operaciones f_0ilmente:
RELOJ
HORNEAR
ASAR
LIMPIEZA DEMORADA
CRONOMETRO
HORNEADO DEMORADO
LIMPIEZA
Las flechas se usan para poner el tiempo o
cambiar la temperatura que desea usar.
Apretando y manteniendo presionadas
cualquiera de las dos, los nL_meros
cambiar&n rdpidamente. Apretando y
soltando las flechas los nL_meroscambiar&n
lentamente_
Una vez que haya programado su control
para cualquier operaciSn, usted puede
mostrarlo apretando el bot6n apropiado, Por
ejemplo, si est_ usando et CRONOME'rRO
y desea ver la hora del dfa, aprete CLOCK.
El dial mostrar_ la hora del dfa,
BOTON CON FLECHA
-- HACIA ARRIBA (SUSE
EL TIEMPO Y LA
TEMPERATURA)
HORNEAR, ASAR o TIEMPO
Usted no puede poner
DE COCINAR mientras la
puerta del homo est&
cerrada con cerrojo. Si Io trata de
hacer, la palabra "DOOR" aparecer&
en el dial. E! cerrojo de ia puerta del
homo se debe usar solamente para
autolimpieza.
El tono de fin de ciclo sonar_ al t_.rmino del
uso del cron6metro y de las funciones
autom_ticas del horno_ El tono de fin de cicto
ee de tree sonidos cortos seguidos por un
sonido cada seis segundos que se repite
hasta que usted apriete cualquier bot6n
excepto las flechas.. Si desea eliminar los
sonidos repetidos, apriete y sujete
CLEARIOFF por 10 segundos_ Para volver
al tono de cada 6 segundos, empuje y sujete
CLEAR/OFF por 10 segundos.
Si el dial de la hora suena continuamente y
una "F" seguida pot un nOmero pestaSea,
usted tiene un c6digo de error de funci6n.
Note et n0mero despu_s de la "F" Empuje
CLEAR/OFF Permita que el homo se enfrle
por 1hora Si el problema se repite,
desconecte toda la electricidad a la estufa y
Ilame para un servicio Dlgale a su t_cnico et
nL_meroque aparece despu_s de la"F" en el
dial
I0

OPERACION
RelojYCronSmetro
COMO PONER EL RELOJ
1, Empuje el bot6n CLOCK,
2, Empuje cualquiera de los botones con
las flechas hasta que et dial muestre la
hora correcta de! dta.
La flecha SUBIR cambiar& los n0meros
hacia adelante, tal como t, 2, 3. La flecha
BAJAR cambiar_ los n0rneros hacia
arras, ta] como 3, 2, 1
El re!oj empezar& autom_ticamente dentro
de un minuto; o usted puede apretar el
bot6n del reloj (clock) para que empiece
inmediatarnente
COMO PONER NUEVAMENTE EL
CRONOMETRO
Cuando est_ poniendo el cron6metro, si
usted hace una pausa de m,_sde 4
segundos mientras empuja cualquiera de
los botones con las flechas SUBIR o
BAJAR, "TIMER" dejar_ de pesta_ear en
el dial y el cron6metro empezarA a contar
hacia atr,_s autom&ticamente. Si esto ocurre
empuja solamente el bot6n TIMER
OINI/OFF y usted podr_ continuar
seleccionando su tiempo
COMO CANCELAR EL
CRONOMETRO
Mientras e! cron6metro est6 contando
hacia atr&s, empuje y mantenga el bot6n
TIMER ONIOFF por 4 segundos, o hasta
que "TIMER" deje de pestaSear y ta hora
correcla de! dfa vuelva a{ dial.
COMO PONER EL CRONOMETRO
El cron6metro no controla las operaciones
del homo, tales corno homear, asar, limpieza
o cualquier funci6n demorada. Le permite
poner una cantidad de tiempo y le avisa
cuando el tiempo ha terminado. Un ejemp!o
serfa porter un huevo a tres minutos. La
cantidad de tiempo m_ima que puede
poner es 9 horas y 55 minutos
1, Empuje el bot6n TIMER ONIOFF.
2. Empuje cualquiera de los botones con
las llechas para seleccionar la cantidad
de tiempo que necesila-
El cron6metro empezar_ a contar hacia atr&s
aulom_ticamente dentro de 4 segundos
3. Cuando el cron6rnetro Ilegue a cero
sonar_ un tono.. Empuje el bot6n del reioj
(clock} para voiver a la hora correcta
del dia,
I1

OPERACION
ConsejosPara Cocinar
EnEl Homo
En la parte trasera del homo usted notar& un
pequeSo tube, Esto es un sensor de calor
que mantiene la temperatura del homo.
Nunca mueva o doble este tube..
Es norma! sentir un poco de olor cuando
use su homo per pdmera vez. Para ayudar a
eliminar este oIor, ventile la habitaci6n
abriendo una ventana o usando una
campana de ventilaci6n,
IMPORTANTE: Nunca cubra e! rondo det
homo o la pari'il[adel homo con papel de
aluminio. El u_b inadecuado puede causar
una mala circulaciOn del cater, pobres
resultados a! hornear, y podria dahar el
acabado de! homo,
\
"Jt
Si est_ horneando con m&s de un utensilio,
col6quetos de manera que cada uno tenga per
Io menos de 1' a 1 1/2' de espacio de aire a su
alrededor CoToquelos utensi!ios de manera
que ninguno quede direclamente encima de
otro.
La ventilaci6n del homo est& ubicada debajo
det eiemento posterior derecho. Esta _rea se
podria calentar touche durante el use del
homo. Nunca obstruya la ventilaci6n,
El precalentamiento es subir la temperaruEa
del homo a la temperaturaque vaa usar
cuando hornee.
Si abre la puerta para mirartosalimentos
causar&una p_rdida de cater y males resu[tados
cuando hornee
E! Sensor de Temperatura deÁHorno en la
parte trasera del homo mide y conlmla
continuamente la temperatura dentro del
homo. Para mantener una temperatura
programada constante, los quemador har_n
un ciclo de encendido y apagado mientras
el homo cocina
La zena de temperatura baja de su homo
(entre 170° y 200°F) est& disponsible para
mantener los alimentos tibios. Sin embargo,
los alimentos que se mantengan a esta
temperatura per m&s de 2 horas se podr_an
echar a perder.
12

r___ ,
OPERACION
ConsejosPara Cocinar
EnEl Homo
BANDEJAS BAJAS PARA GALLETAS, sin
lad0s, permiten que el aire circule alrededor de
lasgal_etasparaque se doren en forma pareja
Hi!," !:
['!1
Las parrilias del homo est_n diseSadas
con topes, una conveniencia y tambi_n
una precauci6n de seguridad, Las gu_as
tienen una tope para prevenir que las
pardllas se den vuelta,
Tope en las
guias para las
parrillas
Su homo tiene cuatro (4) posiciones La
guia de m&s arriba no se puede usar como
una posici6n para la parrilla,
Guias
Las BANDEJAS BRILLANTES reflejanel
calor, y son per|ectas para ]osqueques y
panecillos r&pidosque deben quedar con una
corteza de color cal_ claro,
UTEHSILIOS DE VIDRIO, OSCUROS
CONTRA PEGADURAS, U OPACOS POR
LA EDAD, absorven el calor y pt_eden set
usados para panescon levadura, cortezas para
pasteies o aiimentosque tengan una corteza
caf_. La temperatura del homo se deberia
reducir en 25°F
Cuandoenciendeel controldel homo,la barra
incandescenleemp[ezaacarentarse Cuandoel
encendedorest_suficientementecalienle,en corno
1rninuto,el gasentraa] quernadory seenciende.
Elencendedorseve de corotnaranjobfillante
cuandoest_caliente Haceun cic]ode encendidoy
apagadoconel terrnostatoy estar_}ncandescente
cuandoelquemadorest_encendido,
4-
3_
Siempre coloque las parrillas del
homo en ia posici6n correcta cuando
el homo est6 fri'o.
Usted podr[a pensar que su homo nuevo
cocina diferentemente a! homo que
reemplaz6o Le recomendamos que use su
homo nuevo por varias semanas para que
se fami]iarice m&s con _1,siguiendo los
tiempos que se dan en la receta como una
gufa, Vea Ajustes-H_gatos Usted Mismo
en la parte trasera este manual para hacer
los ajustes si cree que su homo est,_
func{onando demasiado caliente o frio
para su preferencia,
_4
.3
_2
.t
_r/_.._\ Durante un corte de corr:ente el
I L_ quemador del homo no se puede
I _ encender y no deberfa tratar de
_hacerlo.
13

OPERACION
ConsejosPara Cocinar
EnE1Homo
Cuando empuje BAKE la t)]lima temperaluraque
rueusada aparecer&en el dia!. Use la flecha
SUBIR para aumentar falernperalura o la ftecha
BAJAR para disminuir esta temperaturabasra
que llegue a la temperaturaque desea usar.
Elhomo empezar_ a calentarse
autom_.ticamenteUsted vet&que 100grades
aparecen en el fadederecho de arriba del dial A
medida que el homo se caliente, esla
temperaturacarflbiar_ hasla que lteguea la
lemperatura que usted haya seleccionado,
entoncessonar_ un tone.
Sihace una pausaentre poses per m_s de 60
segundos mienlras programa esla funci6n,
sonar_un lone.,Esto esnormal, El homole est&
haciendo saberque debe seguir programando
esta funci6n.
Usted debe recordar que los alimenlos contfn_Jan
cocin&ndose despu_s que el homo se apaga a
menos que saquelos alimentos inmediatamente
Usted podria escuchar un venlilador, Esto es
normal El ventilador podfia continuar
I'uncienadnadodespu_s que el homo se haya
apagado.
Nunca permita que afirnentostales come los
productos l_teos,pescado, aves, etc,,
permanezcan al aire per m&s de una hera antes
de cocinaflos cuando usted haya selecdonado
un programa autom_tico La temperatura
ambiente ayuda el crecimiento de baclerias
daRinas.Cerci6rese que la luz del homo est_
apagada porque el caler del foco aceterar_ e!
desarrollo de las bactefias
1. Empuje el bot6n BAKE
(HORNEAR)
2. Ernpuje el bo!6n con la ftecha
para seteccionar la temperatura
que desea usar.
3. Cuando termine de hornear
empuje el bot6n CLEARJOFF
C6mo programar su homo para que hornee
per un tiempo determinado y se apague
autom&ticamente.
1. Empuje el bot(SnBAKE
(HORNEAR),
2. Empuje los flechaspara seleccionar
el tiempo que desee para cocinar la
comida, Cerci6rese de incluir el
tiempo de precalentamiento cuando
seleccione esta cantidad de tiempo.
e
Empujeel bot6n COOK TIME
(TIEMPO DE COCINAR)
4.
Empujelos flechaspara seleccionar
el tiempo que desee para cocinar la
comida Cerci6rese de incluir el
tiempo de precalentamiento cuando
seleccione esta cantidad de ttempo.
Cuando seleccione esle operaci6n, usted no
necesitar,_catcular cuando el homo se
encender&; el control Iohar_ per usted° Usted
necesitar&seleccionar 1osiguiente: Temperatura,
Percu&nto liempo, y Hera de apagado,
t. Empujeel bot6n BAKE
(HORNEAR)_
2. Empujetasflechaspara seleccionar
el liempoque desee para cocinar la
comida. Cerci6rese de incluir el
tiempo de precalentamiento cuando
seleccione esta cantidad de tiempo.
3, mpuje elbot6n COOK TIME|TIEMPO DE COCINAR),
4. Empuje losflechaspara seleccionar
el tiempo que desee para cocinar la
comida. Cerci6rese de incluir el
tiempo de precalentamiento cuando
seleccione esta canlidad de tiempo,
5. Empujela Ilecha STOP TIME
|HERA DE APAGADO),
6. Empujela flechaSUBIR para
programar la hera del dfa en que
usted desea que el homo se apague.
Elhomo se apagar&
autom_licamenle cuando }legue a la
HeRA DE APAGADO
preseleccionada
14

OPERACION
CSmoAsar A La Parrilla
Asar es cocinar al calor directo del
elemento superior° La puerta del horno
deberfa permanecer cerrada cuando ase
a la parrilla
No es necesario precalentar el horno
cuando ase a la parri!la Use la cacerola y
la parrilla para asar que viene con su
estufa Ambas est,_n diseSadas para
drenar adecuadamente la grasa y los
liquidos.
iii ,_,11111111,,, i ,
aluminio, debe set
moldeado firmemente a
Si usa papel de
la parrilla y debe hacer
cortes en el papel que
est_n alineados con las ranuras
de la parrilla. Esto permite que
la grasa y los liquidos caigan a
la cacerola, evitando que se
produzca un incendio y humo
exceslvo,
Siempre saque la .,_.,...._-_.
cacerola y la parrilla
del horno. Guardar y
olvidar una cacerola para asar
sucia en el homo es un peligro
para producir un incendio o
humo.
El Departamento de Agficultura de los
Estados Unidos nora que las carnes
cocinadas crudas son populares, pero
que ta came que se cocina hasta sSlo
140°F, (cruda) significa que algunos
organismos venenosos podrian sobrevMr.
Mientras m&s cerca coloque los a]imentos
del elemento para asar, m_s r_pido se
dorarAn por afuera, pero quedando rojo o
rosado en el centro.
Cotocando fas carnes lejos del elemento
permitir& que las carnes se cocinen en el
centro mientras se doran por afuera
Usando estas posiciones, cocine el lado 1
por Io menos 2 minutos m_.s que el lado 2.
Si su homo est_ conectado a 208 voltios,
usted podria usar una posiciSn de parfilla
mAs alta y/o cocinar los aFimentos por m&s
tiempo
El tamaho, peso, grosor, ternperatura
inicial y su preferencia personal afectarA el
asado a la parritla. Esta tabia est& basada
en carries a la temperatura de{
refrigerador.
ALtMENTO
Bistec1"degrueso
Tottas de came
mo ;da-1" de grueso
Chuletas de cerdo*
1/2" de grueso
Pescado (filetes)
_' Polio (presas)
I a°
Empuje el botOn BROIL,,
POSICION DE
PARRILLA, ,
3
3
3
3
2
TIEMPO TOTAL
i i, , i -'rll
! II ,,
(mlnutos)
9-11
16-18
27-29
11-13
45-55
(Esto automdticamente
programa ASADO en ALTO-HI)
lb. Mientras el indicador de programa
est_ pestaneando en e! dial, empuje
el bet6n BROIL nuevamente si
prefiere Asar en Bajo-LO Use el
asado en bajo para para cocinar
bien alimentos tales como ayes o
cortes de carries gruesos sin que
queden demasidado dorados.
2, Cuando termine de asar, empuje el
bot6n CLEAR/OFF
'1 '1'"_
i
15

E1CicloDeAutolimpieza
t. Saque la cacerola y la pardlta para
asar, la parfilla det homo, utensilios, y
cualquier papel de aluminio que podria
quedar en el homo
2. La suciedad en el lrente del marco, 1"
dentro de! homo, y alrededor del sello
de la puerta del homo tendr& que ser
limpiada a mano_
Marco Frontal
Sello De La Puerta
Reveslimiento
Limpie estas _reas con agua caliente,
lanillas con jab6n o limpiadores como Soft
Scrub para sacar cualquier suciedad
Enjuague bien con agua limpia y seque
3. Limpie cualquier derrame pesado del
fondo del homo
4. No limpie el sello de la puerta del
homo El material de fibra de vidrio de
la puerta del homo no soporta la
abrasi6n° Es esencial que et sello
permanezca intacto Si nora que se
est& gastando, trizando, o satiendo de
la puerta, debefla ser reemplazado
CUIDADOYLIMPIEZA
m . .
El sello de la puerta est,. disefiado para
que tenga un espacio de 5-6" en el rondo
del homo. Esto permite la circulaci6n
adecuada del aire.
PANEL DE LA PUERTA SELLO
REVES'rlMfENTO DE LA PUERTA
Es normal que su horno d6 la apariencia de
no tener un buen sello sobre el homo Esto
se debe al sello La ubicaci6n del sello
sobre la puerta det homo mantiene la
puerta sellada y previene cualquier p¢ardida
de calor
/_-_\ Los utensihos nunca se
i _l deberian dejar dentro
X_ del homo durante un
ciclo de autolimpieza.
Las parrillas del homo se
podrian limpiar durante el ciclo
de autolimpieza, pero perder:_n
su brillo y se pondr:tn dificiles
de deslizar. Si decide dejarlas
dentro durante el ciclo de
limpieza, p;_seles aceite
vegetal para que se deslicen
mz_s f_cilmente.
Durante el primer ciclo de
limpieza, ventile la habitaci6n
con una ventana abierta o una
campana de ventilaci6n, Esto
evitar:t el olor fuerte producido
pot el calentamiento de las
partes nuevas,
t6

CUIDADOYLIMPIEZA
E1CicloDeAutolimpieza
1. Empuje el bot6n CLEAN, El dia!
mostrar_ "CLEAN", "TIME", y 1----)o
2, Empuje las ftechas para seleccionar la
cantidad de tiempo que desea para
!impiar el homo. El ciclo normal es de 3
horas, pero puede seleccionar entre 2
y 4 horas=
Usted puede empujar el bot6n STOP TIME
para ver a que hora del dfa terminar& el
ciclo de autolimpieza Empuje el bot6n
CLEAN para volver a la cuenta°
Simptemente empuje el bot6n
CLEAR/OFF Usted necesitar& esperar a
que la temperatura del homo baje m_.s
que la temperatura de enganche (aprox 1
hora) antes de tratar de abrir ta puerta
Despues del ciclo usted podrla notar un
poco de cenizas blancas en el homo.
Simplemente limplelas con un patio oesponja
h0meda
Si algunas manchas blancas persisten,
fri_guefas con una lanilla de acero con jab6n..
Asegt:_rese de enjuagar bien Estas son
generaimente depdsitos de sal que no se
pueden sacar durante el cicloo
Si por alguna raz6n usted no queda
satisfecho con los resultados de la
limpieza, sirnplemente repita el ciclo.
COMO PROGRAMAR UN CICLO
DE AUTOLIMPIEZA
AUTOMATICO
Usted no necesitar_ determinar cu_ndo
el homo se encenden_ cuando
seleccione esta funci6n. El control Io
har& pot usted. Usted necesitar&
seteccionar la canlidad de tiempo que
desea para limpiar et homo (entre 2 y 4
horas)0 y la hora del dia en que usled
desee que el homo se apague
t, Empuje el bot6n CLEAN, El dial
mostrar_ "CLEAN", "TIME" y (.--).
2, Empuje una de tas fiechas para
seleccionar la hora del dfa en que
usted desee que el homo se limpie. El
ciclo normal es de 3 horas, pero usted
puede seleccionar entre 2 _44 hora&
3. Empuje el bot6n STOP TIME,
4. Empuje una de las flechas para
seleccionar la hora del dfa en que
desee que el homo se apague..
Cerci6rese de que la luz del homo est,,
apagada durante el ciclo de limpieza para
prolongar la vida del foco
17

CUIDADOYLIIWPIEZA
Limpieza
MATERIALES DE LIMPIEZA
• Detergente lfquido para platos
• Agua tibia
,, PaSo suave
No use limpiadores abrasivos,
limpiadores industriales, o
blanquedores (cloro).
MATERIALES DE LIMPIEZA
• Detergente I[quido para platos
• Agua tibia
• Lanillas de acero con jab6n
• Limpiador comercial para hornos
COMO LIMPIAR
Permita que la cacerola se remoje. Ponga
detergente para platos sobre ta parrilla y
cubra con un paAo o una toalla hOmeda
por un rato. Friegue a medida que sea
necesario. Lave, enjuague, y seque bien.
Usted Iambi_n podria poner la cacerola y
la parrilla en la lavadora de plato&
MATERIALES DE LIMPIEZA
• Detergente liquido para platos
• Agua tibia
• Toalla de papef
° Paf_o seco
,, Amonia o limpiadores abrasivos o lanillas
para fregar.
COMO LIMPIAR
Limpie despu_s de cada derrame.. Si
comidas &cidas (tales como rellenos de
frutas calientes, leche, tomates, col o
salsas con vinagre o jugo de limSn) se
derraman sobre la cubierta, use una
toalla de papel seca o un paAo para
limpiar inmediatamente, Cuando la
superficie est_ fda lave y enjuague. Para
otros derrames, tales como grasa, lave
con jabSn y agua cuando est_ fria y
enjague. Saque brillo con un pafto seco,
MATERIALES DE LIMPIEZA
o Umpiadorde vidrios
. Toallas de papel
Q,Soda para hornear
• Agua tibia
COMO LIMPIAR
Saque la suciedad pegada con una pasta
de soda para hornear y agua. No use
limpiadores abrasivo& Enjuague bien.
MATERIALES DE LIMPIEZA
• Detergente liquido para platos
• Agua tibia
• Toallas de papel
COMO LIMPIAR
No use limpiadores para hornos, polvos
para limpiar, o abrasivos fuertes.. Si salsas
para sasonar, salsa de tomates,
materiales para batidos, etc, se
derraman, limpielos Io mAs posible
Cuando las superficies se enfrten limpie
bien las superficies pintadas.
18

CUIDADOYLIMPIEZA
Limpieza
MATERIALES DE LIMPIEZA
• Detergente liquido para platos
• Limpiador no abrasivo
• Amonia
° Agua tibia
o Pa_fioseoo
PARA LIMPIAR
Para manchas dificiles, coloque las
parrillas en una bolsa de pl&stico. Ponga
1/4 de taza de amonia y cierre bien.
Permita que se remoje toda la noche. Lave
y enjuague bien.
MATERIALES DE LIMP|EZA
o Detergente Iiguido para platos
• Limpiador no abrasivo
° Agua tibia
• PaSo seco
PARA LIMPIAR
Remoje la suciedad pesada, enjuague y
seque completamente. Mantenga las
tapas de los quemadores en su lugar
cuando limpie lot recipienles de los
quemadoreso
El rondo del homo se puede sacar para
limpiar derrames grandes o para alcanzar el
quemador del homo.
Tenga cuidado de no rayar el acabado del
homo cuando saque y ponga nuevamente el
rondo.
COMO SE SACA
1, Corra la manilla del centro del fondo del
homo hacia la izquierda.
2, Levante y saque el rondo def homo.
MATERIALES DE LIMPIEZA
• Detergente liquido para platos
,, Limpiador abrasivo suave
° Laniltas para fregar Ilenas con jab6n
o Limpiador de homo comercial
PARA LIMPIAR
Los derrames tales como los rellenos de
frutas o !os comidas con contenidos &cido
(tales como Iomates, vinagre y jugo de
tim6n) podrian causar manchas sobre _a
superficie de porcelana. Para prevenir
manchas a causa de derrames, usted
podrla colocar un pedazo de papel de
aluminio o una bandeja para galietas sobre
la parrilla debajo de Jacomida qpe se
podrfa derramar. Limpie despu_s de cada
vez que use el homo.
COMO SE COLOCA NUEVAMENTE
1, Deslice el rondo de manera que las
puntas de arras de! rondo entren alas
ranuras en la parte trasera del homo.
2, Baje el frente del rondo det homo en su
lugar y corra la manilla hacia la derecha
para enganchar el fondo en su lugar.
19

CUIDADOYLIMPIEZA
Partes Removibles
MATERIALES DE L|MPIEZA
• Detergente para platos
° Agua tibia
• Patio suave
Canel
PRECAUCION: Asegurese
que el interruptor de la
luz del horno est6 en
posici6n de apagado. No
toque un foco caliente con las
manos o con un patio mojado.
Espere hasta que el foco est_
frio y use un paso seco. Nunca
toque el cellar de un foco que
tenga electricidad. Si est6
reemplazando un foco quemado,
aseg,_rese que la electricidad
est_ desconectada.
Sujetador --_|_
____-de reso__
Ranura plana
en el tallo
COMO SACAR
t. Asegurese que ta peritla este en
posiciSn de apagado,
2. Tire derecho hacia afuera del tallo,,
Usando un pedazo de cuerda podda
facilitar el sacado de la perilla,, Ponga la
cuerda debajo y alrededor de ta perilla, y
tire derecho hacia afuera
PARA LIMPIAR
Lave bien ta perilta con agua con jab6n.
Seque completamente con un patio suave.
No permita que la perilla se
remoje.
PARA COLOCARLA NUEVAMENTE
1. Mire la parte trasera de la perilla
2. El canal moldeado de la perilla est_
dise,fado para quedar perfectamente
ajustado en el tallo de la perilt&
3. Co!oque et cana! moldeado en linea
con ta ranura ptana en el tallo de la
perilla Empuje la perilla hasta Io rn_s
arras posible
Retenedor Del Vidrio
Soquete "_-_
)
Collar Del /_1
Foco b _
Cubierta t\ ]j,j
De Vidrio _J
PARA COLOCARLA NUEVAMENTE
1. Saque los tres tornillos y levante el
retenedor de vidrio, la cubierta de
vidrio y el sello
2. Reemplace el foco con un foco de 40
watts para hornoso Un foco para
homos es rn&s peque_o que un foco
normal de casa de 40 watts
3. Ponga en su lugar el setlo, la cubierta
de vidrio y e! retenedor del vidrio
Apriete los tornillos
20

CUIDADOYLIIWPIEZA
Partes Removibles
COMO COLOCAR NUEVAMENTE
1. Levante el frente del tope del caj6n y
b_jelo a trav_s de la abertura en la
base del riel,
MATERIALES DE LIMPIEZA
° Detergente para platos
• Agua tibia
• PaSo h0medo
COMO SACAR
1. Tire el caj6n hacia afuera hasta que
se detenga+
2. Levante el frente del caj6n hasta que
el tope de la guia del caj6n pase pot
encima del tope de la guia sobre el riel
de la base+
Tope de
la gu_a
2. Baje el frente del caj6n y empuje el
caj6n hacia atr&s hasta que se
detenga+
3. Levante el frente del caj6n hasta que
el tope de la guia del caj6n pase por
encima de la gufa en el riel de la
base, Deslice el caj6n hacia su lugarr
ofrece espacio para
PRECAUCION: El caj6n le"
guardar utensilios para
cocinar y hornear. Los
materiales de pl:;stico no se
deberian guardar en este caj6n.
No sobrecargue el caj6n. Si el
caj6n est;i demasiado pesado,
se podr;a salir del riel de la
base cuando io abra.
Tope de
la guia
3. Levante el caj6n por sobre los topes,
PARA LIMPIAR
Limpie por dentro y fuera del caj6n con
agua tibia con jab6n y un paso o esponja
ht3meda. No use abrasivos fuertes o lanas
para fregar sobre el caj6n
2!

CUIDADOYLIMPIEZA
PartesRemovibles
COMO SACARLOS
AsegOrese que todos los controles est_n
apagados y que la unidad est(_
frfa.Levante la parfilla del quemador, la
tapa det quemador y la cabeza del
quemador, No saque el recipiente de!
quemador,
PARRILLA DEL QUEMADOR
TAPA DEL QUEMADOR
COMO SE PONEN NUEVAMENTE
t. Coloque la cabeza del quemador en el
recipiente det quemador asegur&ndose
que la ubicaciOn del encendedor a
chispa coincide con la abertura en la
cabeza del quemador,
2. Coloque la tapa del quemador sobre la
cabeza del quemador+
3. Cotoque la parrilla sobre el conjunto de!
quemador y et recipiente del
quemador, Las indenciones del
recipiente deben coincidir con las
puntas de ajuste en el rondo de la
parrilla
-_CASEZADELQUEMADOR
RECtPIENTE
__ D£L QUEMADOR
_'_ _ ENCENDEDOR A CH]SPA
__'_'_ TUBO DE MEZCLA (CHIMENEA}
I _ m! encendedor a chispa
1. [_.rlr') se expone mas
arriba de la parte
superior del
quemador. Cuando limpie el
recipiente, est_ seguro de no
enganchar el electrodo del
encendedor a chispa con el
paEo de la limpieza, Esto podria
dafiar el encendedor, Tenga
cuidado de no encender ninguno
de los controles mientras est_
limpiando los recipientes del
quemador. Esto podria resultar
en un leve golpe de corriente
que !o podria hacer golpear y
volcar un utensilio caliente,
22

CUIDADOYLIMPIEZA
Partes Removibles
MATERIALES DE LIMPIEZA
,, Detergente para platos
• Agua tibia
,, Lanas pa'ra fregar o tanilla de acero con
jabSn
Tope en la gu[as
Parte trasera-\ J
levantada de
la parrilla _
COMO SACAR
t. Tire las perrillas hasta la posici6n de
tope.
2, Levante et frente de la parri!la y
desl[cela bajo el tope de la gu[a para
tas parriltas.
PARA LIMPIAR
Limpie con agua tibia y detergente Para
sacar manchas duras, friegue levemente
con lana para fregar o con una lani!la de
acero con jab6n_ Enjuague bien
PARA COLOCAR NUEVAMENTE
1. Coloque ta parte levantada de atr&s de
la parri!la sobre las guias.
2. Levante el frente de la parrilla hasta
que la parte levantada de atrAs se
deslice pot debajo del tope de las
guias.
3. Deslice la pardlfa hasta atr_so
Posici6n de tope para asar a la parrilla
Bisagra
PARA SACAR
1. Abra la puerta hasta la posici6n para
asar a la pardlla.
2, Tome la puerta de cada lado, levAntela
y s&quela de las bisagras_ NO
LEVANTE LA PUERTA DE LA
MANILLA.
puerta se saca y los
PRECAUC|ON: Cuando la
brazos de las bisagras
estdn en ia posici6n de
tope para asar a la parrilla, como
precauci6n cubra los brazos de
las bisagras con toallas o con un
rollo de toallas vacfo. No pase a
Uevar o trate de mover los brazos
de las bisagras mientras est_
trabajando en el drea de! homo.
Se podrian devolver
violentamente y causarle heridas
en las manos o da_ar el acabado
de porcelana en el frente del
marco.
k_ .J
PARA COLOCARLA NUEVAMENTE
1. AsegOrese que los brazos de las
bisagras est&n en la posiciSn de tope
para asar a la pard!la_
2. Levante la puerta de ambos lados,
3, Coloque en I[nea las ranuras en la
orilla del rondo de! horno con los
brazos de las bisagras.
4. Deslice la puerta hacia abajo sobre los
brazos de las bisagras Io m,_s posible.
5. Cierre fa puerta,
23

ANTESDELLAMARPARAUNSERVICiO
Para ahorrar tiempo y dinero, antes de Ilamar para un servicio, revise la lista de mAs abajo
para cualquier problema que usted crea que tiene con el funcionamiento de su estufa. Si
el problema es algo que usted no puede reparar, use los NQmeros de Servicio para el
Consumidor que se encuentran at final de este manual. Cuando haga un Ilamado,
tenga disponible el ntimero de modelo, iista de partes para reparaciones,
manual de uso y cuidado y la fecha de compra.
PROBLEMA
El dial del control
POSlBLE CAUSA
Mat funcionamiento de la
pestafiea una "IF" estufa.
seguida por un ntimero
o letra.
El homo y _el control
dei homo no
No pasa electricidad a la
estufa..
funcionan.
La temperatura del
homo no parece estar
CalibraciSn del control del
homo.
exacta.
La puerta del horno
no so desengancha.
La luz del homo no
funciona
El ciclo de limpieza no ha Latemperatura de! homo debe
terminado, bajar a menos de ta
am
El interruptor de Jaluz a. Revise la posiciSn del
est,, apagado, interruptor_
b.
El foco de la tuz del b. Revise o reemplace el
homo est& quemado_ foco de la luzo
El homo no se
limpi6 o los
resultados fueron
males.
a, Los controles no se
pusieron bien.
b. El ciclo de limpieza fue
interrumpido,
c. El horno estaba
demasiado sucio,
POSIBLE SOLUCION
i ii iltll,iJJJii1_
I , ',' ,,I iii i, i'11,1,,'_;,, i,Ii1,, ,, i,, i1,,,111111
I I ................... _" '
i ii iiii1,1 i1,11
Empuje el bot6n CLEAR/OFF,
Permita que la estufa se enfde
pot una hora y ponga
nuevamente el homo en
funcionamiento_ Si el
problema se repite, tlame para
un servicio.
Revise la caja del circuito de
la casa o los fusibles.
Revise y asegurese que la
estufa est_ enchufada,
Vea la secciSn de c6mo
cocinar en e_horno_
temperatura de enganche antes
que la puerta pueda abrirse
I, _11[ ,11' ,',,',,
a. Lea la secci6n de
autolimpieza de este manual
b. El ciclo de limpieza normal
deberfa durar 3 horas,
c. Los derrames grandes se
deberfan limpiar antes de
programar un ciclo. Usted
tambi_n podrfa repetir el
ciclo.
24
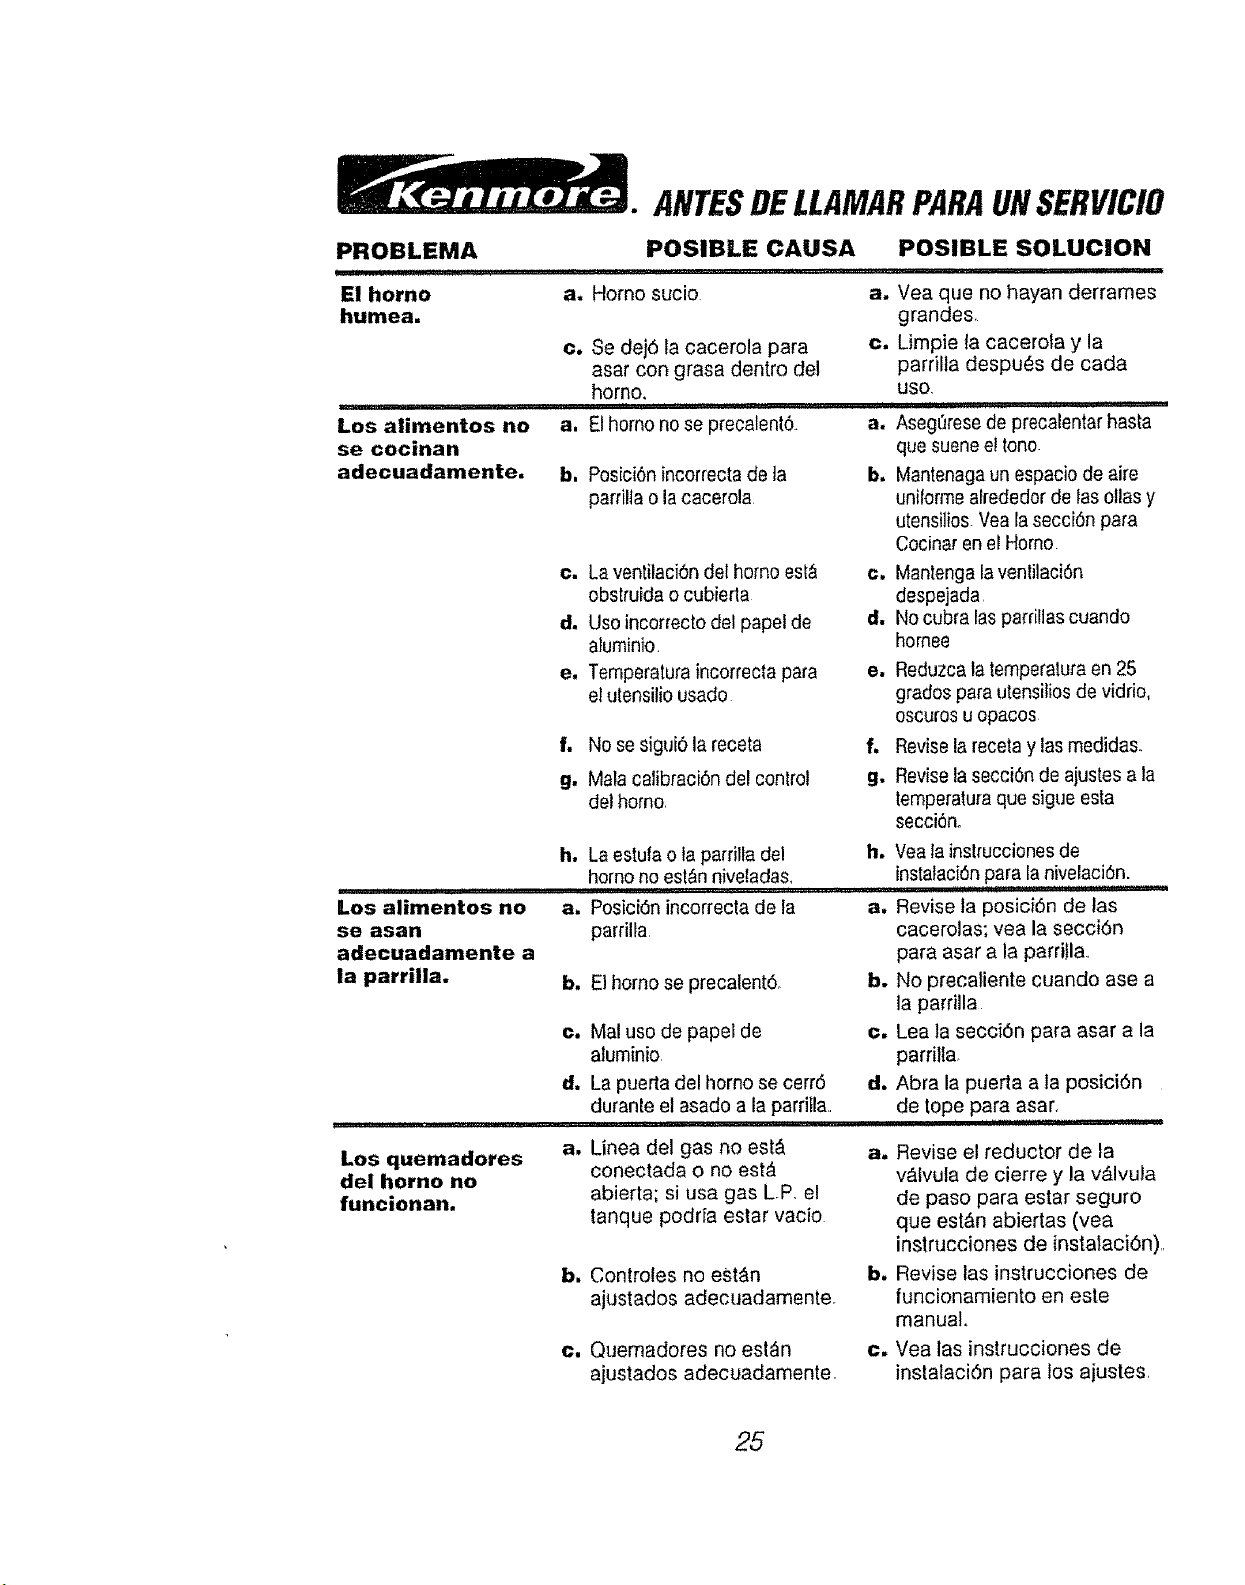
ANTESDELLAMARPARAUNSERVICIO
PROBLEMA
E! homo
humea.
Los alimentos no
se cocinan
adecuadamente,
..................... i,,,1111,
Los alimentos no a,
se asan
adecuadamente a
la parrilla, b.
: ..................... i
Los quemadores
del homo no
funcionan.
a, Elhomo no se precalent6.
b, Posici6n incorrecta de la
c. Laventilaci6n del homo esl_
d, Uso incorrecto del papet de
e, Temperaturaincorrecta para
f, No se sigui6 la receta
g, Malacalibraci6n del conlro!
hl
POSIBLE CAUSA
a, Homo sucio
c. Se dej6 ta cacerola para
asar con grasa dentro del
homo.
parrilta o la cacerola
obstruida o cubieda
aluminio.
el utensilio usado
del homo
La estufa o la parrilla del
homo no est&nniveladas.
Posici6n incorrecta de la
parrilla
Elhomo se precalent&
c. Mal uso de papet de
aluminio
d. La puerta deÁhomo se cerr6
durante el asado a la parritla..
;_llt
Linea del gas no esl&
conectada o no est_
abierta; si usa gas LP, el
tanque podria estar vacio
bi
Controles no eSt_n
ajustados adecuadamente
cl
Quemadores no est_n
ajustados adecuadamente
POSIBLE SOLUCION
a. Vea que no hayan derrames
grandes
c, Limpie ta cacerola y la
parrilla despu_s de cada
uso.
,i , i INN ' II,
a, Asegt'Jresede precalentar hasta
que sueneel tono
b, Mantenagaun espacio de aire
unilorme akededor de las ollas y
utensilios Vea la secci6n para
Cocinar en el Homo
c, Mantengala venlilaci6n
despejada
d, No cubra las pardllas cuando
homee
e, Reduzcalatemperaluraen25
gradosparautensiIiosde viddo,
oscuros u opacos
f, Revisela receta y lasmedidas.
g. Revisela secci6n de ajustes a la
temperaturaque sigue esta
secci6n.
h. Vea Ia instrucciones de
instalaci6n,,paralan!ve!ac!6n:
a, Revise la posici6n de las
cacerolas; vea la secci6n
para asar a la parrilla.
b. No precaliente cuando ase a
la parrilla
c, Lea la secci6n para asar a la
parrilla
d, Abra la puerta ala posici6n
de lope para asar.
a, Revise el reductor de la
v_lvufa de cierre y la v&lvula
de paso para estar seguro
que est_n abiertas (vea
instrucciones de instalaci6n).
b, Revise las instrucciones de
funcionamiento en este
manual.
c, Vea las instrucciones de
instalaci6n para los ajustes.
25

AJUSTESDE
TEMPERATURA-
•'HAGALOSUSTEDMISMO"
Usted podrla pensar que su nuevo homo
cocina diferentemente al homo que
reemplaz6.. Recomendamos que use su
homo nuevo unas pocas semanas para
que se familiarice con el, siguiendo los
tiempos que se dan en las recetas como
una gufa
Si cree que su nuevo homo est&
funcionando demasiado caliente (quema
la comida) o no calienta Io suficiente (la
comida no queda bien cocida) usted
mismo pued_ajustar la temperatura. La
apariencia y la textura de los alimentos
son mejores indicadores de la exactitud
de un homo que un term6metro barato,
come los que se venden en las tiendas,
para controlar la posici6n de la
temperatura de su nuevo homo Estos
term6metros pueden vadar entre 20-40
grados. Adem&s, la puerta se tiene que
abrir para leer estos term6metros Abdr la
puerta cambiarA la temperatura del homo.
Para decidir en cu_nto cambiar ta
temperatura, suba la temperatura del
homo en 25 grados (si los alimentos no
quedan bien cocidos) o baje la
temperatura en 25 grados (si la comida se
quema) de la temperatura de la receta,
luego hornee Los resultados de esta
"prueba" te deberfan dar una idea de
cuAnto se deberla cambiar la temperatur&
1, Empuje el bot6n BAKE
(HORNEAR),
2, Empuje la flecha UP hasta que
muestre 550 ° e
INMEDIATAMENTE empuje y
SUJETE el bot6n BAKE por 10
segundos hasta que el reloj
desaparezca y el dial muestre
una figura de dos digitos.
(Estos dos dfgitos pueden variar de acuerdo
a lo que fue seleccionado en f&brica )
m
Empuje la flecha UP para subir
la temperatura de su homo
+35° m_s CALIENTE
Empuje la flecha DOWN para
bajar la temperatura de su
homo -35 ° m_,s FRIO.
4, Cuando complete su selecci6n
empuje el bot6n CLOCK para
volver a ta hora del dia.
El termostato de su homo retendr& este
ajuste de temperatura hasta que cada uno
de los cuatro pasos de arriba sean
repetidos. Este ajuste se retendr& en la
memoria incluso despu_s de una falta de
corriente.
Usted no necesitar_ hacer nada m&s.
Hornee como de costumbreo Este ajuste
no afectar_ la temperatura de asar o de
limpieza.
26

GARANTIADELAESTUFA
_ToDO UN AITIO DE GARANT|A COMPLETA PARA LAS FUNCIONES DE
TODAS LAS PARTES EXCEPTO LAS DE VIDRIO
Si, dentro det lapso de un a_o a partir de la fecha de instalaci6n, cualquier parte que
no sea de vidrio funciona mal debido a un defecto enet material o en la mano de
obra, Sears la reparar& o la reemplazar_., sin costo alguno.
GARANTIA TOTAL DE 30 DIAS PARA LAS PARTES DE VIDRIO Y EL
ACABADO DE ESMALTE PORCELANIZADO, PARTES DE METAL
P|NTADO 0 BRJLLANTE
Si, dentro de los treinta dfas posteriores a la instalaci6n, cuatquier parte de vidrio o e!
acabado de cualquier esmalte porcelanizado o parte de metal pintado o brillante
tiene defectos en el material o mano de obra, Sears reemplazarA la parte, sin costo
alguno,
GARANTIA TOTAL DE 90 DIAS EN AJUSTES MECANICOS
Durante 90 dfas a partir de la fecha de instalaci6n, Sears proporcionar_, sen costo
afguno, cualquier ajuste mec&nico necesario para la correcta operaciSn de la estufa,
exceptuando el mantenimiento normal.
Si la estufa °st& sujeta a otto uso que no sea el privado familiar, la cobertura de la
garantla mencionada arriba ser_. efectiva s61o durante 90 dias
EL SERVICIO DE GARANTIA ESTA DISPONIBLE CON SOLO PONERSE EN
CONTACTO CON EL CENTRO O DEPARTAMENTO DE SERVICIO SEARS MAS
CERCANO EN LOS ESTADOS UNIDOS
Esta garantia se aplica sSIo cuando este producto se use en los Estados Unidos.
Esta garant[a le brinda derechos legates especificos, y tambien puede tener otros
derechos que varTan deun estado a otto.
Sears, Roebuck and Co,,, Dept, 817 WA, Hoffman Estates, IL 60179
Para Ampliar E! Valor De Su Estufa,
Compre Un Contrato De Mantenimiento Sears.
A5o5 do coborlur,_ d_, It, prepled,'2d
1 ..mp,_odop_,_.dof._,uo...G AM AM
qu° no seon do porcdaP.a o v[ddo
90 DAYS
3O DAYS
,,.....o.°o,ot_u_d°oot°_ AM AM AM
4 .o.t.f6...._,.,..._o.t.,ro.loI I
G -GlrantJn AM - Co_ttllo _J¢Mlnloo_mlordo
Las estufas Kenmore °stUn diseSadas° fabricadas y probadas para brindarle aSos de
operaciSn confiabfe. Sin embargo, cualquier aparato moderno puede requerir de alg0n
servicio de vez en cuando. La garantla Sears, adem_s del contrato de Mantenimiento
Sears, le brinda protecciSn contra cuentas de reparaciones inesperadas y le asegura que
disfrute de la m&xima eficiencia de la estufa.,
La tabla de arriba compara el contrato de Garantla y de Mantenimiento y le muestra los
beneficios de tener un Contrato de Mantenimiento para su estufa Sears.
PSngase en contacto con su vendedor de Sears o con el Centro de Servicio Sears de ta
Iocatidad hoy mismo y compre un contrato de mantenimiento Sears
27

r Sears se complace en ofrecer a sus clientes ----_
servlcmo de re.paraci6n de aparatos |
electrodomestucos y electronicos de todas las II
marcas. |
En Sears usted puede contar con operadores en II
, espaEoi alos que puede llama, sin cargo aiguno.
Para servicio de reparaci6n
a domici!io,
Llame 24 horas al dia, 7 dias a la
semana
1 800-676-5811
Para ordenar piezas con entrega
a domicilio,
Llame de 7 am a 7 pm, 7 dias a la
semana
1 800-659=7084
E
F/77_
28
 Loading...