

30" Self-Cleaning
Gas Slide-In Range
Estufa de Gas "Slide=In"
de 30" con Autolimpieza
Models, Modelos 91 1.36665,_6669, 36764, 36765,
36766, 36'769 _(_
LL_-----J
rrl
z
I.=
u
I11
Z_
O
i"'
229c4020P293
(SR-10485)
Sears, Roebuck and Co.,
Hoffman Estates, IL 60179 U.S.A.
www.sears.com
SLIDE-INRANGE
Table of Contents
Range Safety ......................... 3-7
To Set Bake ...................... 17
Broiling ............................ 18
Self-Clean Cycle ....................19, 20
Special Features ............. 21,22
Power Faiture ....................... 7
Oven Shut-Off Valve ................. 7
Cooking Utensils and Woks .......7
Removal of Packaging Tape .... 8
Features of Your Range ......... 8
Cooktop Burners ..................... 9
Control Settings ..................... 9
Burner ignition ............................... 9
Simmer Flame .......................... 9
Home Canning Tips ................... 9
Oven Control ........................ 10
Control Display ....................... 11
To Set the Clock ................. 12
To Set the Timer ................. !2
Tones ......................................... 13
F Code ................................... 13
Oven Cooking Tips ............. 14-16
Strong Smell or Odor ............... 14
Aluminum Foil ....................... 14
Oven Vent ......................... 14
Preheating ........................ !4
Peeking ........................................ 14
Oven Temperature Sensor ...... 14
Bakeware Placement ............ t 4
Burner Cycling ...................... 15
Low Temperature Zone .......... 15
Baking with Margarine .......... 15
Bakeware ............................. t5
Oven Glow Bar ................ 15
Oven Light .......................... t6
Oven Racks .................................. 16
Oven Temperature
Adjustment ...................... 16, 31
Control Panel .......................... 23
Broiler Pan and Grid ................ 23
Drawer and Side of Range ..... 23
Porcelain Cooktop ............... 23
Glass Cooktop ......................... 23
Oven Door Glass ................... 23
Door Vent Trim ........................ 24
Burner Grates ......................... 24
Burner Bowls, Caps,
and Heads ............................ 24
Oven Bottom ................................. 24
Control Knobs ...................... 25
Oven Light Bulb ......................... 25
Storage Drawer ................... 26
Cooktop Burner Components ...... 27
Oven Racks ............................ 28
Oven Door ....................... 28
Before Calling
for Service ........................ 29-30
Temperature Adjustment ......... 31
Warranty ...................................... 32
Consumer Service Numbers 64
For your convenience and future reference, please write down your model
and serial numbers in the space provided. They are located on the front
frame behind the storage drawer.
MODEL NUMBER:
i u u
© Sears, Roebuck and Co
SERIAL NUMBER:
2

IMPORTANTSAFETYINSTRUCTIONS
SAVE THESE INSTRUCTIONS
Read all instructions before using this appliance. When using gas or electrical
appliances, basic safety precautions should be followed, including the following:
WARNING!! if the
information in this manual :
is not followed exactly, a
i fire, explosion, or gas leak may i'
result causing property damage, iI
personal injury, or death.
IMPORTANT SAFETY NOTICE!
The California Safe Drinking
Water and Toxic Enforcement Act
requires the governor of California
to publish a list of substances
known to the state to cause birth
defects or other reproductive harm
and requires businesses to warn
customers of potential exposure to
such substances.
Gas appliances can cause
minor exposure to four of these
substances, namely benzene,
carbon monoxide, formaldehyde
and soot, caused primarily by the
incomplete combustion of natural
gas or L.P_ fuels. Properly adjusted
appliances, indicated by the bluish
rather than a yellow flame, will
minimize incomplete combustion.
Exposure to these substances can
be minimized by further venting
with an open window or using a
ventilation fan or hood.
The oven, as shipped from the
factory, can only be operated with
natural gas. Do not try to operate it
with LP. (bottled) gas. High flames
and toxic fumes could cause
serious injury. If you wish to use
your oven with LP. gas, you must
convert the range following the
procedt,re found in the installation
instructions shipped with your
range.
IMPORTANT." The health of
some birds is extremely sensitive
to the fumes given off during the
self-cleaning cycle of any oven. Move
birds to another well-ventilated room.
................................. .q
ADJUSTMENTS
WARNING -- L,P, BURNER
if you intend to use
Liquefied Petroleum Gas (bottled
gas) all LP. adjustments in the
Installation Instructions must be
made before using your oven.
If your oven is not properly
adjusted, flames may be too high,
or the oven may use too much
fuel, release toxic fumes or cook
_poorly.
3
IMPORTANTSAFETY
INSTRUCTIONS
Injury to Persons
Could Result
• Install Anti-Tip
Range
• See lristaltation
Instructions
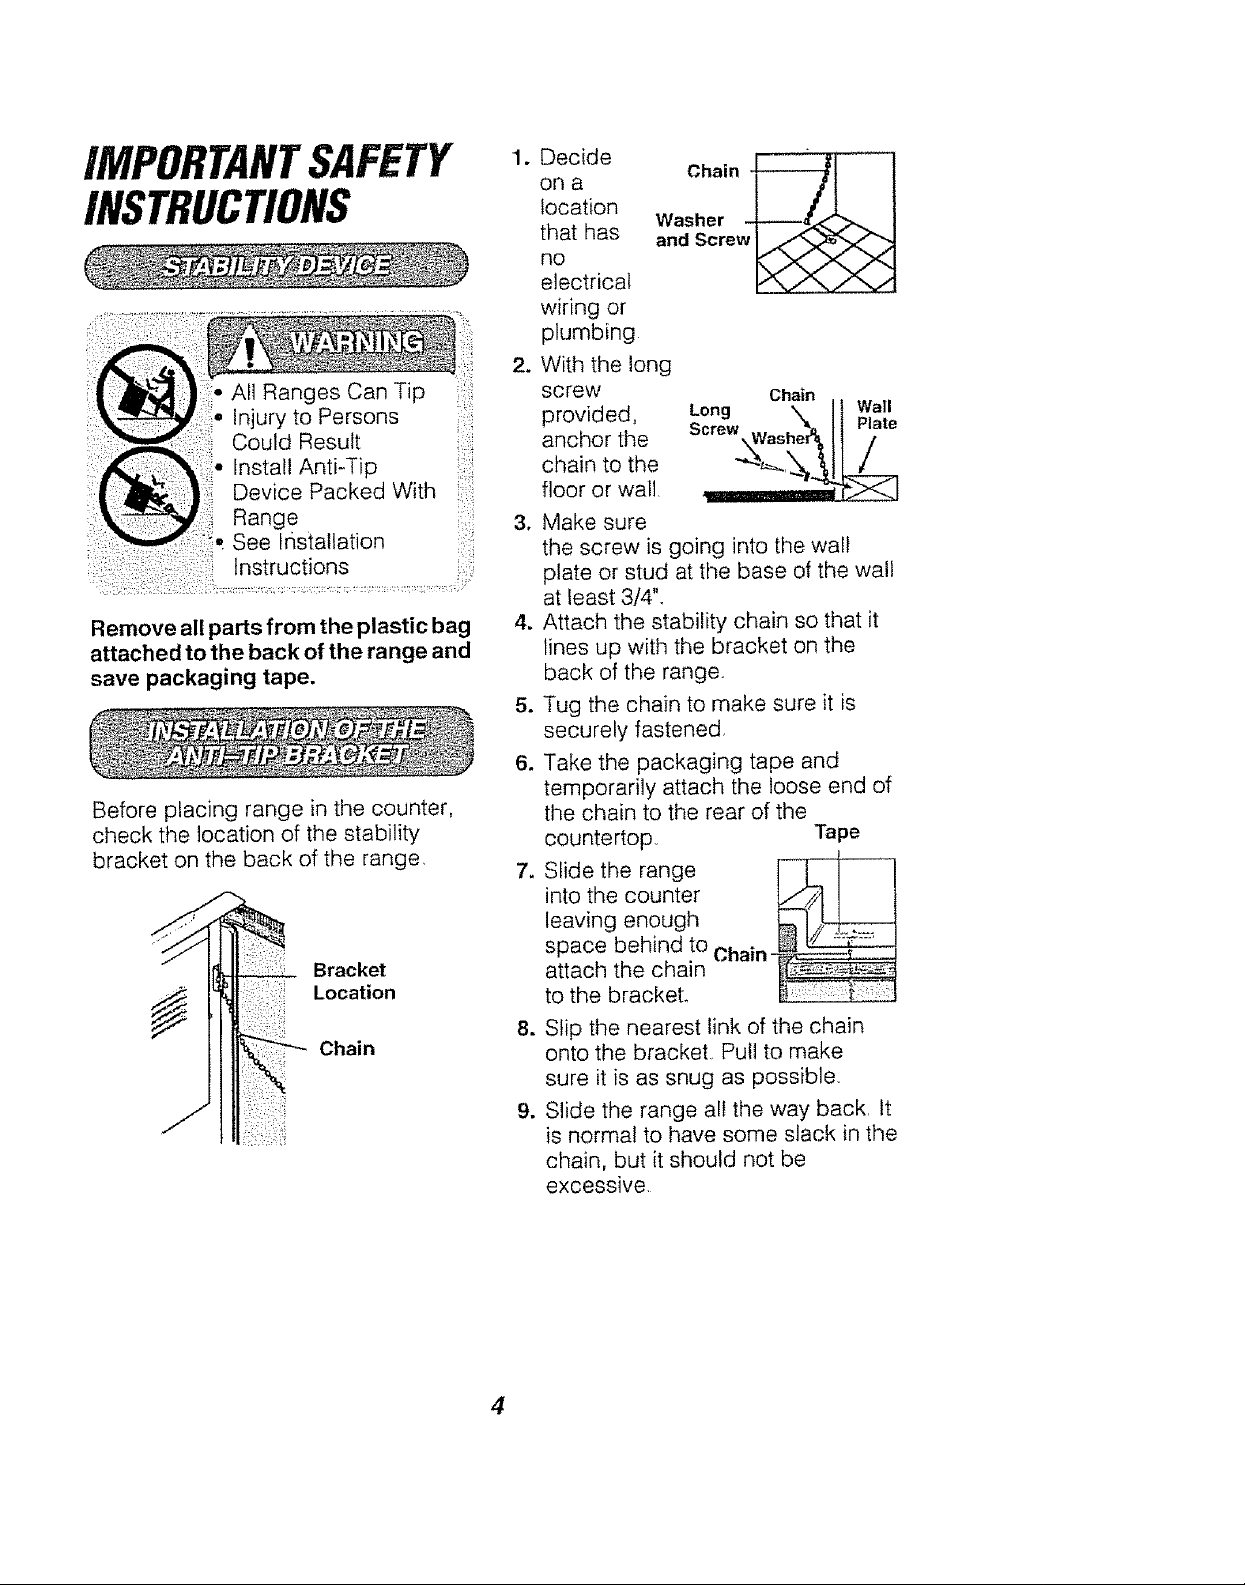
Remove all parts from the plastic bag
attached to the back of the range and
save packaging tape.
Before placing range in the counter,
check the location of the stability
bracket on the back of the range,
Bracket
Loc0tion
1. Decide
on a
location
that has
no
electrical
wiring or
plumbing
2. With the long
screw
provided,
anchor the
chain to the
floor or wall.
3. Make sure
the screw is going into the wall
plate or stud at the base of the wall
at least 3/4".
4. Attach the stability chain so that it
lines up with the bracket on the
back of the range.
5. Tug the chain to make sure it is
securely fastened,
6. Take the packaging tape and
temporarily attach the loose end of
the chain to the rear of the
countertop
.
Slide the range
into the counter
leaving enough
space behind to Chain-
attach the chain
to the bracket.
Chain _--_1 ..............
Washer -_----_
and Screw _
Long k I1 Wall
Screw _,_ l t Plate
Chain
Tape
!1 /
_ Chain
?
8. Slip the nearest link of the chain
onto the bracket. Pull to make
sure it is as snug as possible,
9. Slide the range all the way back, It
is normal to have some slack in the
chain, but it should not be
excessive,
4
IMPORTANTSAFETY
INSTRUCTIONS
p,.-
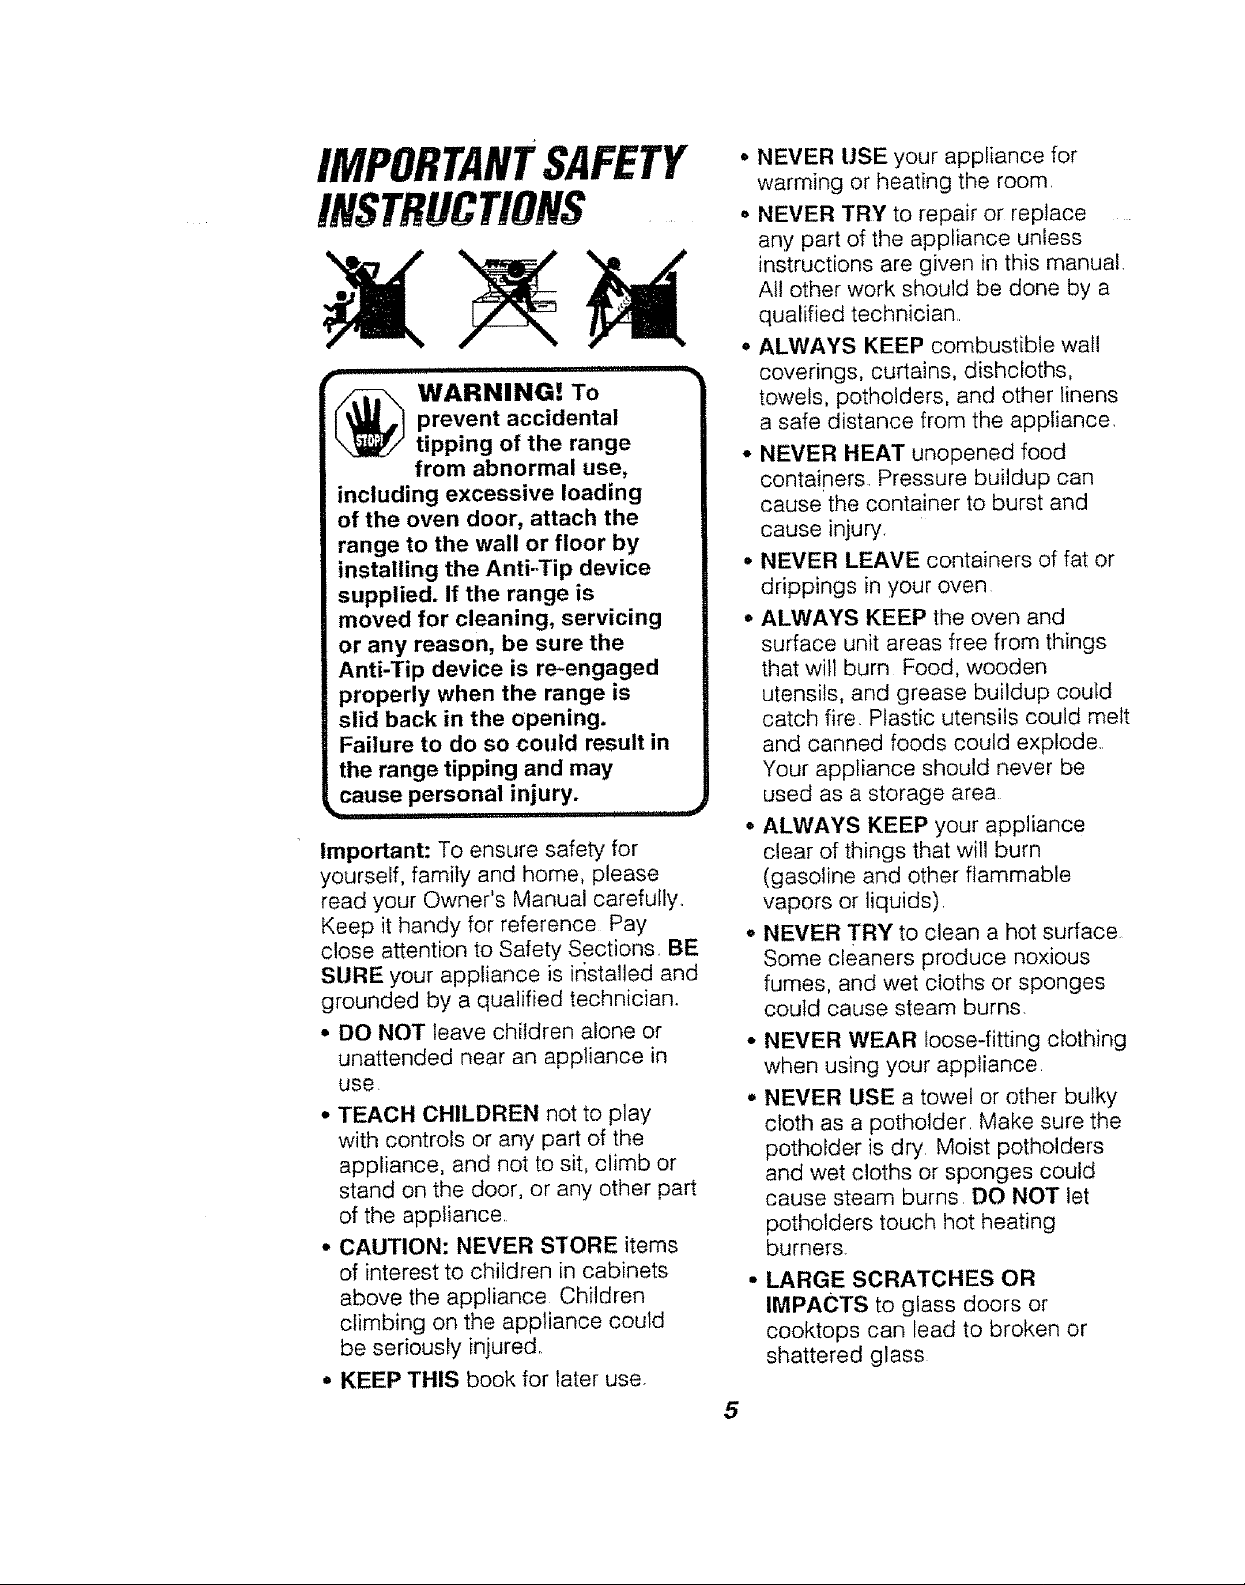
_ WARNING! To
including excessive loading
of the oven door, attach the
range to the wall or floor by
installing the Anti-Tip device
supplied. If the range is
moved for cleaning, servicing
or any reason, be sure the
Anti-Tip device is re-engaged
properly when the range is
slid back in the opening.
Failure to do so could result in
the range tipping and may
cause personal injury.
Important: To ensure safety for
yourself, family and home, please
read your Owner's Manual carefully.
Keep it handy for reference Pay
close attention to Safety Sections. BE
SURE your appliance is irlstalled and
grounded by a qualified technician.
• DO NOT leave children alone or
unattended near an appliance in
use.
° TEACH CHILDREN not to play
with controls or any part of the
appliance, and not to sit, climb or
stand on the door, or any other part
of the appliance.
• CAUTION: NEVER STORE items
of interest to children in cabinets
above the appliance Children
climbing on the appliance could
be seriously injured,
° KEEP THIS book for later use.
i i ii ii nlnllluul
prevent accidental
tipping of the range
from abnormal use,
• NEVER USE your appliance for
warming or heating the room.
° NEVER TRY to repair or replace
any part of the appliance unless
instructions are given in this manual.
All other work should be done by a
qualified technician..
o ALWAYS KEEP combustible wail
coverings, curtains, dishcloths,
towels, potholders, and other linens
a safe distance from the appliance.
• NEVER HEAT unopened food
containers. Pressure buildup can
cause the container to burst and
cause injury.
• NEVER LEAVE containers of fat or
drippings in your oven
° ALWAYS KEEP the oven and
surface unit areas free from things
that will burn Food, wooden
utensils, and grease buildup could
catch fire. Plastic utensils could melt
and canned foods could explode.
Your appliance should never be
used as a storage area
• ALWAYS KEEP your appliance
clear of things that win burn
(gasoline and other flammable
vapors or liquids)
° NEVER TRY to clean a hot surface
Some cleaners produce noxious
fumes, and wet cloths or sponges
coutd cause steam burns.
• NEVER WEAR foose-fitting clothing
when using your appliance
- NEVER USE a towel or other bulky
cloth as a potholder. Make sure the
potholder is dry Moist potholders
and wet cloths or sponges could
cause steam burns DO NOT let
potholders touch hot heating
burners.
• LARGE SCRATCHES OR
IMPACTS to glass doors or
cooktops can lead to broken or
shattered glass
5
IMPORTANTSAFETY
INSTRUCTIONS
,, DO NOT touch cooktop burners,
surfaces near them, or interior oven
surfaces These may be hot enough
to cause burns even though they
are dark in color During and after
use, do not touch or let clothing or
flammable material contact the
burners or hot surfaces untit they
have had time to cool Other
surfaces near the oven vent
openings, oven door, window, and
cooktop surfaces may also be hot
enough to cause burns
• ONLY certain kinds of glass or
ceramic cookware can b'e used for
cooktop cooking, Make sure the
cookware you choose to use is
designed for cooktop cooking
without breaking due to the sudden
temperature change.,
• ALWAYS USE care when touching
cooktop burners They will retain heat
after the range has been turned off.
• NEVER BLOCK the oven air vent
behind the right rear burner
• COOKWARE USED for cooktop
cooking should be flat on the
bottom and large enough to
cover the heating area being used
Undersized utensils expose the open
flame and may result in direct contact
or ignition of clothing. The proper size
utensil will also improve efficiency
• NEVER LEAVE cooktop burners
unattended at high settings Boilovers
result in smoking or greasy spills
which could catch fire.
• ALWAYS TURN utensil handles
inward and away from other surface
burners to reduce the risk of burns,
ignition, unintended contact, and
spillage.
• WHEN PREPARING flaming
foods under the vent hood, turn
the fan on
PLACE OVEN RACKS in the
desired position while the oven is
cool., tf racks must be moved while
oven is hot, do not let potholder
contact the hot oven burner
• AFTER BROILING, always take the
broiler pan and grid out of the oven
and clean them. Leftover grease in
the broiler pan could catch fire the
next time you use your oven..
• ALWAYS USE care when opening
the oven door Let hot air and steam
escape before moving foods.
• NEVER USE aluminum foil to line
the oven bottom Improper use of foil
could result in the risk of electric
shock and fire
• CLEAN ONLY the parts listed in
this manual Follow all cleaning
instructions Be sure to remove
broiler pan and grid before the
self-clean cycle
• NEVER RUB, move, clean, or damage
the door gasket on self-cleaning ovens.
It is essential for a good seal
• NEVER TRY to clean utensils,
cookware, removable parts, or
broiler pan and grid in the self-clean
cycle.
• DO NOT USE oven cleaners -
No commercial oven cleaner,
or protective coating of any kind,
should be used in or around any
part of the oven
• IF THE SELF-CLEANING mode
malfunctions, turn the oven off and
disconnect the power supply. Have
it serviced by a qualified technician.
6
IMPORTANTSAFETY
INSTRUCTIONS
READ AND UNDERSTAND
THIS INFORMATION NOW!
Be sure everyone in your home
knows what to do in case of fire.
Never use water on a grease fire;
it will only spread the flames.
COOKTOP GREASE FIRE:
Never pick up a flaming pan...
1. Turn off the surface burners
2. Smother the flame with a tightly
fitting lid Use baking soda or a
dry chemical, foam, or halon-type
extinguisher,
OVEN FIRE:
Do not try to move the pant
1. Close the oven door and turn
controls off
2. if fire continues, carefully open the
door, throw baking soda on the
fire, or use a dry chemical, foam,
or halon-type extinguisher
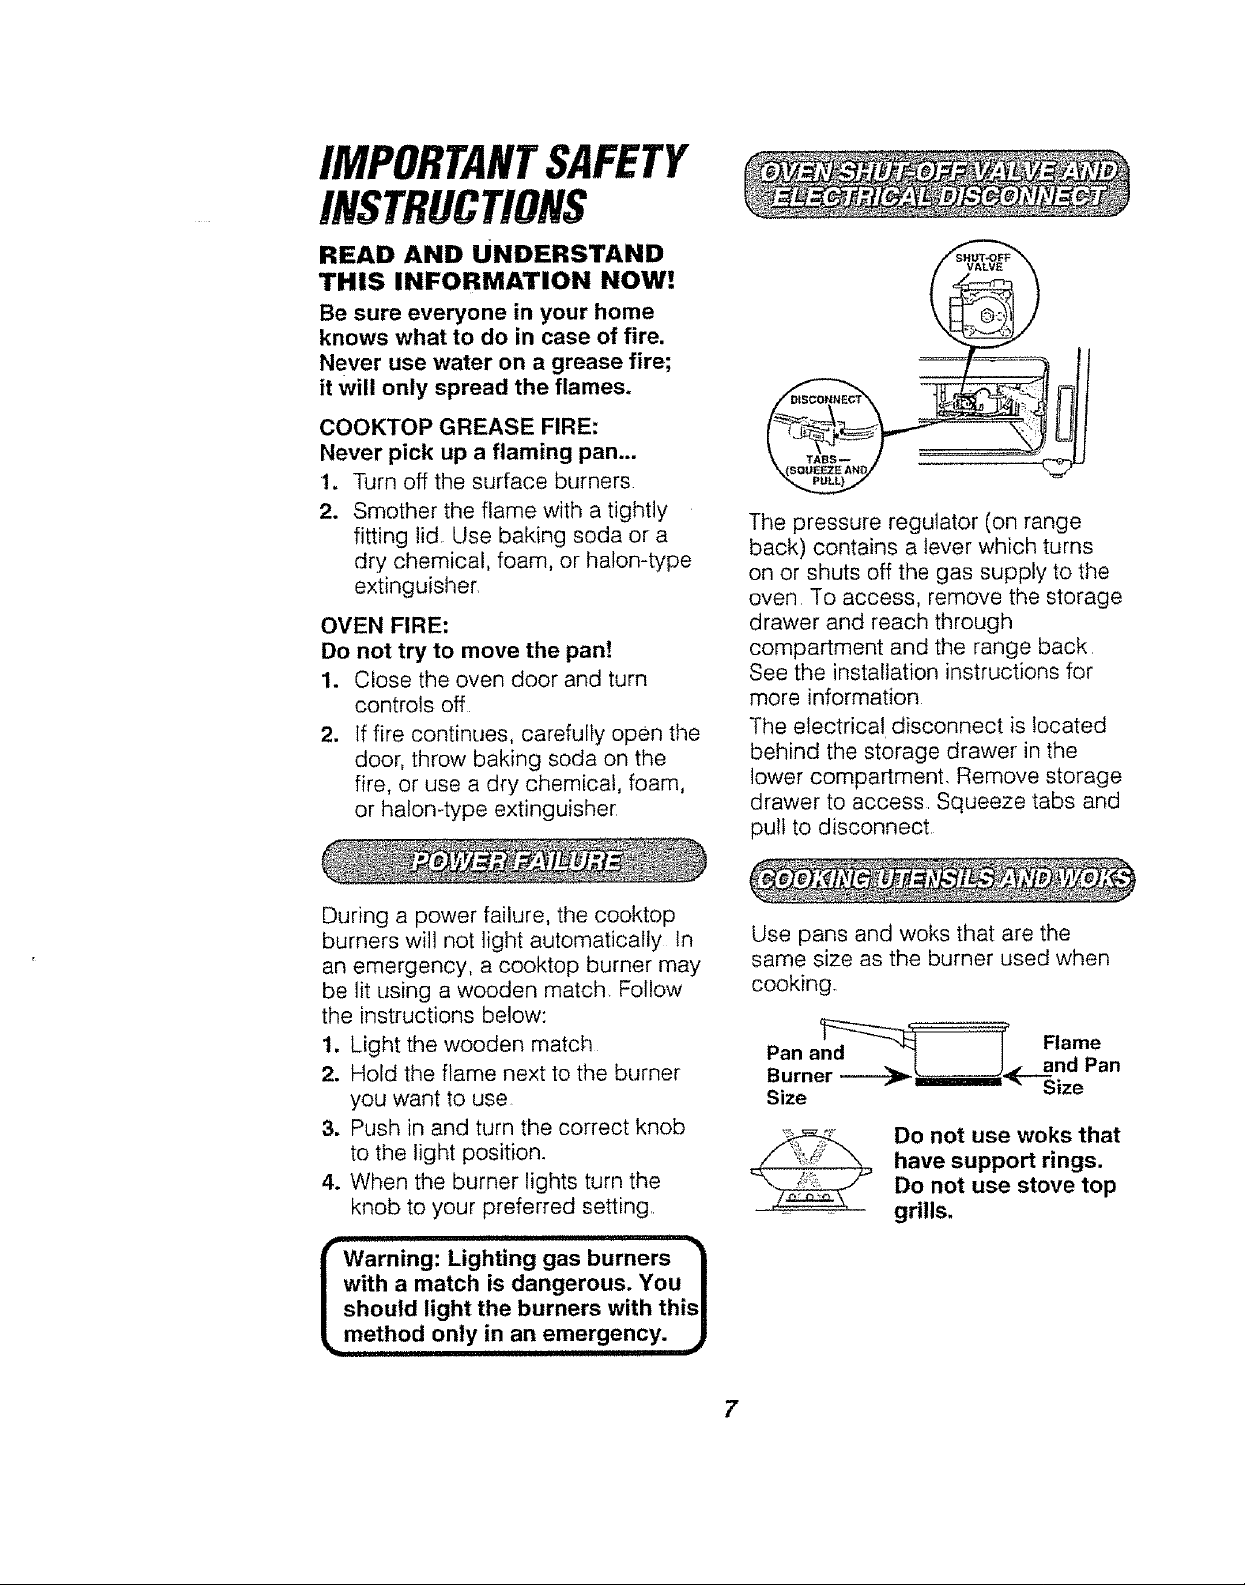
The pressure regulator (on range
back) contains a lever which turns
on or shuts off the gas supply to the
oven To access, remove the storage
drawer and reach through
compartment and the range back
See the installation instructions for
more information
The electrical, disconnect is located
behind the storage drawer in the
lower compartment. Remove storage
drawer to access Squeeze tabs and
pu!l to disconnect
During a power failure, the cooktop
burners will not light automatically In
an emergency, a cooktop burner may
be lit using a wooden match. Follow
the instructions below:
1. Light the wooden match
2. Hold the flame next to the burner
you want to use
3. Push in and turn the correct knob
to the light position.
4. When the burner lights turn the
knob to your preferred setting,.
Warmng: Lighting gas burners
with a match is dangerous. You |
should light the burners with this_
, method only in an emergency. )
I_ l i iI I t it Uut qlttt ii,
Use pans and woks that are the
same size as the burner used when
cooking°
Burner ------___. n
Size _ze
Do not use woks that
have support rings.
Do not use stove top
grills.
7
OPERATION
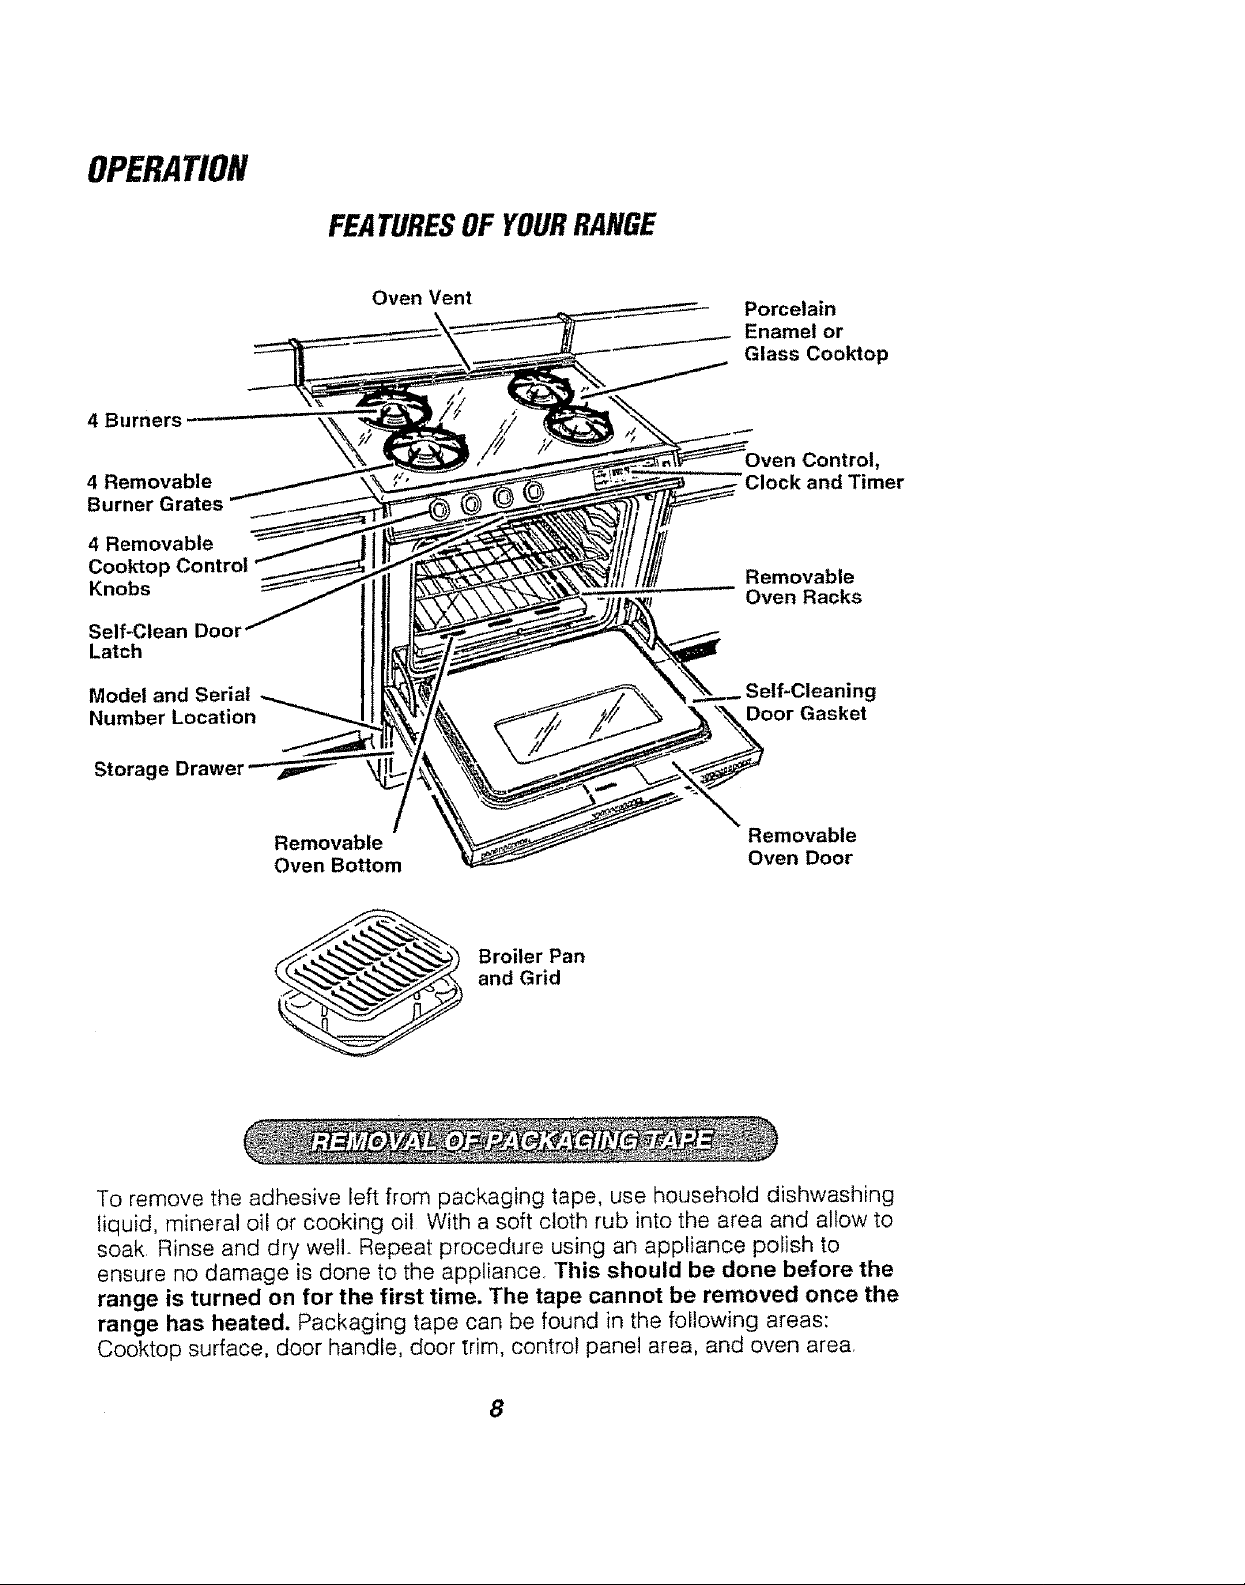
FEATURESOF YOURRANGE
4 Burners
4 Removable
Burner Grates
4 Removable
Cooktop Control
Knobs
Self-Clean Door
Latch
Model and Serial
Number Location
Storage
Oven Vent
Removable Removable
Oven Bottom Oven Door
Porcelain
Enamel or
Glass Cooktop
Control,
Clock and Timer
Removable
Oven Racks
Self-Cleaning
Door Gasket
Broiler Pan
and Grid
To remove the adhesive left from packaging tape, use household dishwashing
liquid, mineral oil or cooking oil With a soft cloth rub into the area and allow to
soak. Rinse and dry well. Repeat procedure using an appliance polish to
ensure no damage is done to the appliance. This should be done before the
range is turned on for the first time. The tape cannot be removed once the
range has heated. Packaging tape can be found in the following areas:
Cooktop surface, door handle, door 1rim, control panel area, and oven area,
8
OPERATION
CooktopCooking
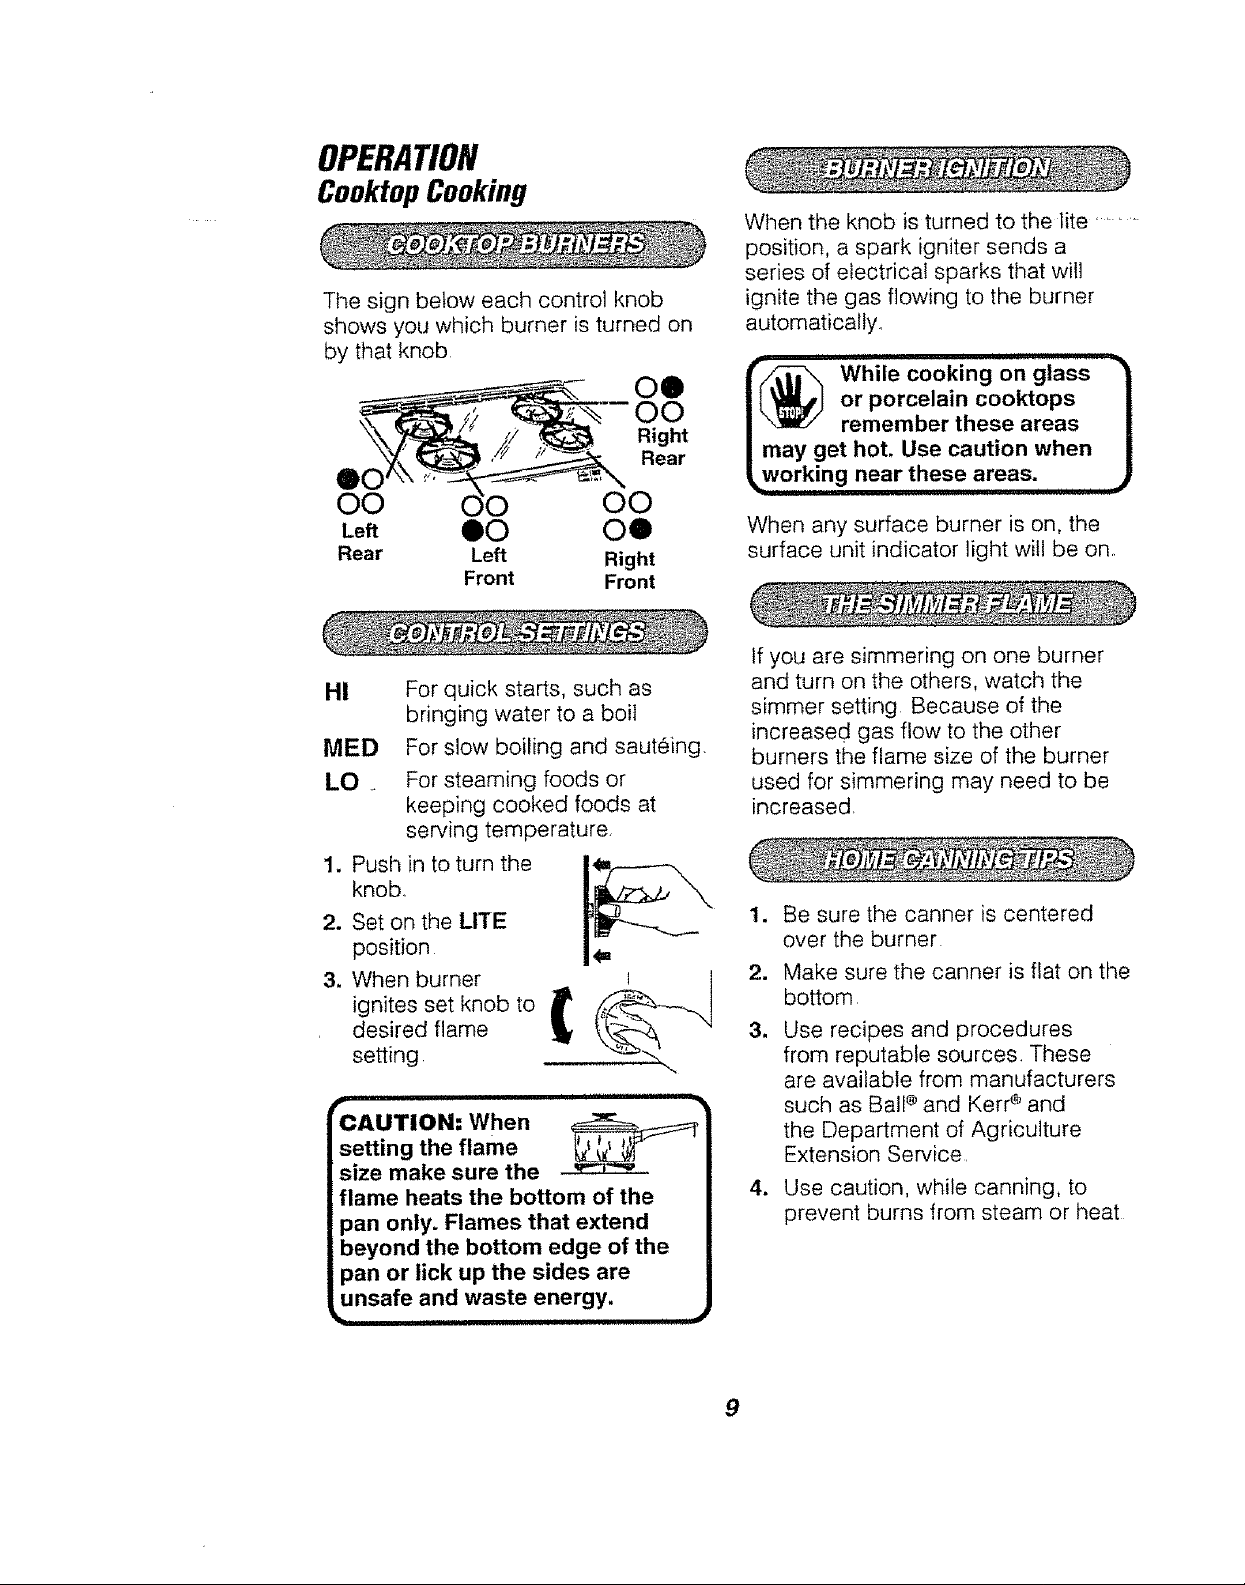
The sign below each control knob
shows you which burner is turned on
by that knob
01t
)0
Right
Rear
O0 O0
Left ti0 00
Rear Left Right
Front Front
HI
MED
LO_
1. Push in to turn the
2. Set on the LITE
3, When burner
CAUTION. When
setting the flame _
size make sure the ___::L--,,
flame heats the bottom of the
pan only. Flames that extend
beyond the bottom edge of the
pan or lick up the sides are
unsafe and waste energy.
For quick starts, such as
bringing water to a boil
For slow boiling and saut6ing.
For steaming foods or
keeping cooked foods at
serving temperature.
knob°
position
ignites set knob to
desired flame
setting
When the knob is turned to the lite .....
position, a spark igniter sends a
series of electrical sparks that win
ignite the gas flowing to the burner
automatically.,
--_ While cooking on glass
or porcelain cooktops |
/ remember these areas |
I may get hot. Use caution when l
!_working near these areas. J
When any surface burner is on, the
surface unit indicator light will be on,
If you are simmering on one burner
and turn on the others, watch the
simmer setting Because of the
increased gas flow to the other
burners the flame size of the burner
used for simmering may need to be
increased,
1. Be sure the canner is centered
over the burner
2. Make sure the canner is flat on the
bottom
3. Use recipes and procedures
from reputable sources. These
are available from manufacturers
such as Ball ® and Kerr e and
the Department of Agriculture
Extension Service,
4. Use caution, while canning, to
prevent burns from steam or heat
9
OPERATION
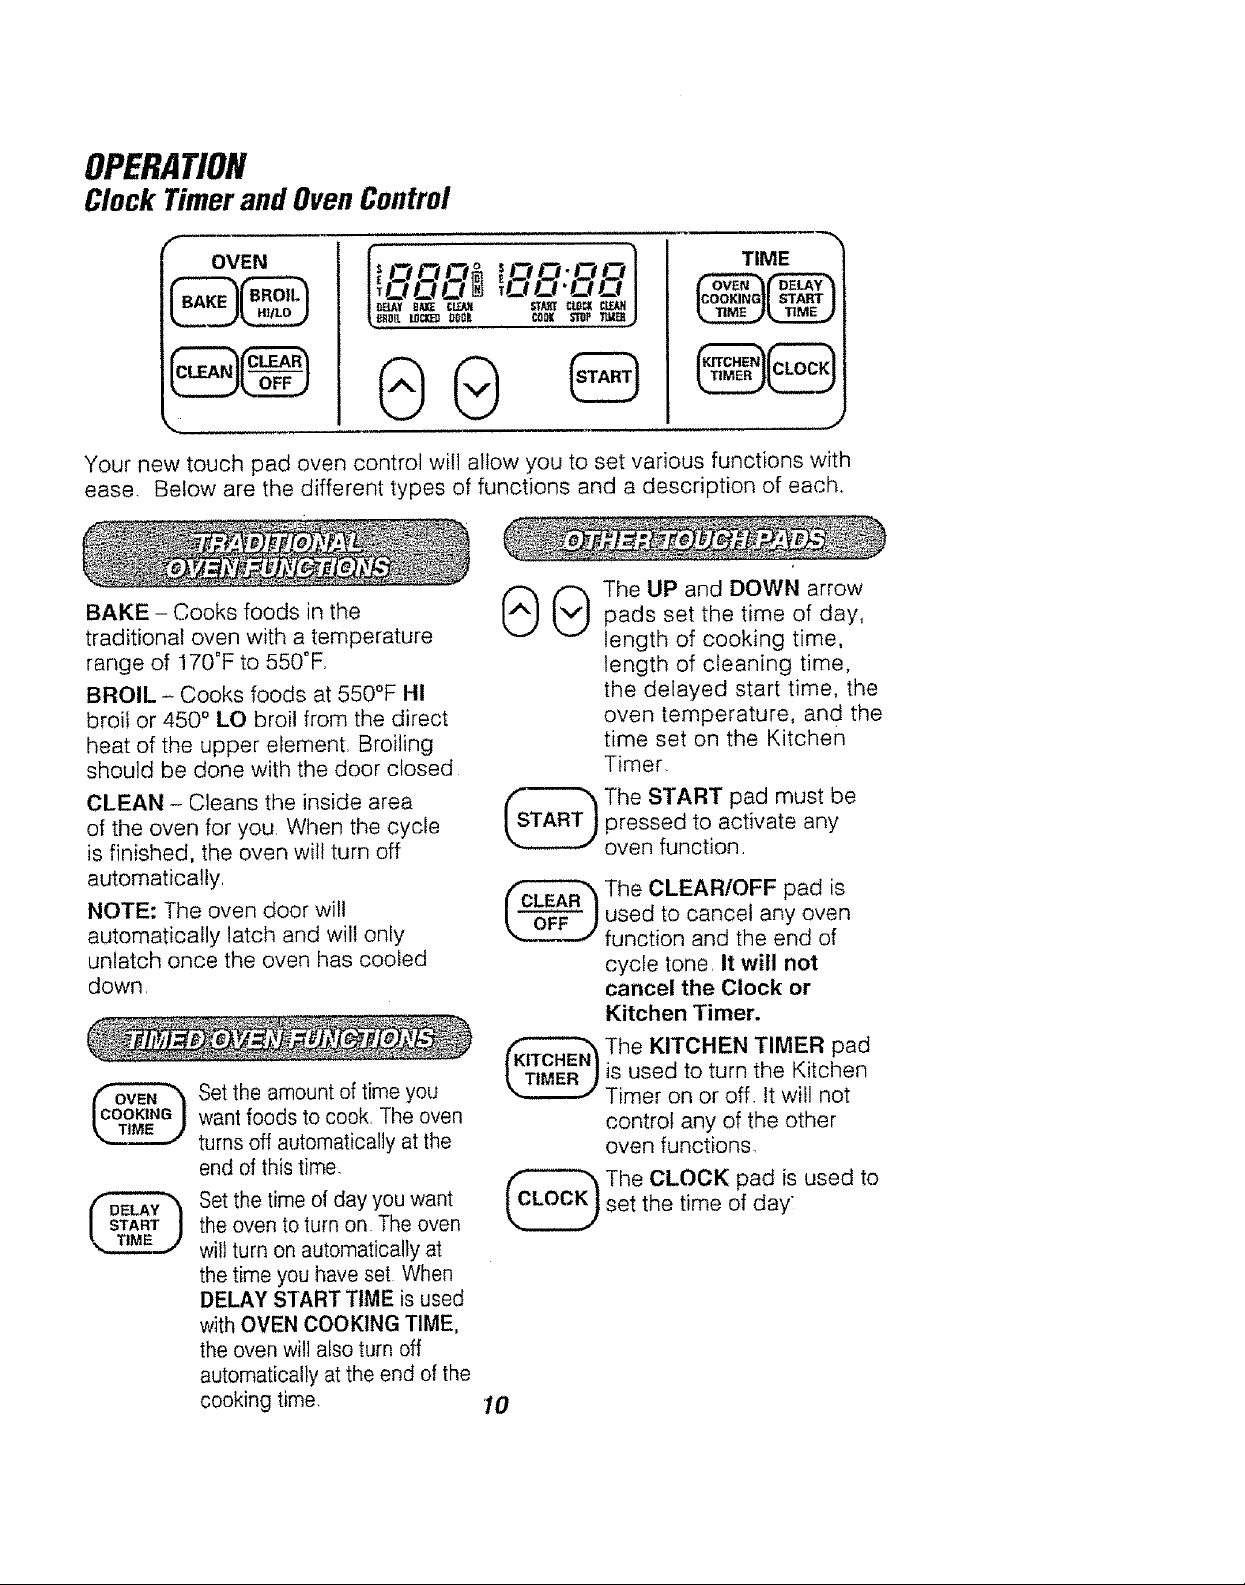
ClockTimerandOvenControl
f
OVEN
TIME
.%
@0
Your new touch pad oven control will allow you to set various functions with
ease. Below are the different types of functions and a description of each.
BAKE - Cooks foods in the
traditional oven with a temperature
range of 170"F to 550°E
BROIL - Cooks foods at 550°F HI
broil or 450 ° LO broil from the direct
heat of the upper element Broiling
should be done with the door closed
CLEAN - Cleans the inside area
of the oven for you When the cycle
is finished, the oven will turn off
automatically.
NOTE: The oven door wilt
automatically latch and will only
unlatch once the oven has cooled
down.
Set the amount of time you
want foods to cook The oven
turns off automatically at the
end of this time
Set the time of day you want
the oven to turn on The oven
will turn on automatically at
the time you have set When
DELAY START TIME is used
with OVEN COOKING TIME,
the oven will also turn off
automatically at the end of the
cooking time,
@@
length of cleaning time,
the delayed start time, the
oven temperature, and the
time set on the Kitchen
Timer.
The START pad must be
pressed to activate any
oven function,
The CLEARIOFF pad is
used to cancel any oven
function and the end of
cycle tone, It will not
cancel the Clock or
Kitchen Timer.
Timer onThe KITCHENisused to tUmoroff TIMERtheltwillKitchennotpad
control any of the other
oven functions,
The CLOCK pad is used to
set the time of day
10
OPERATION
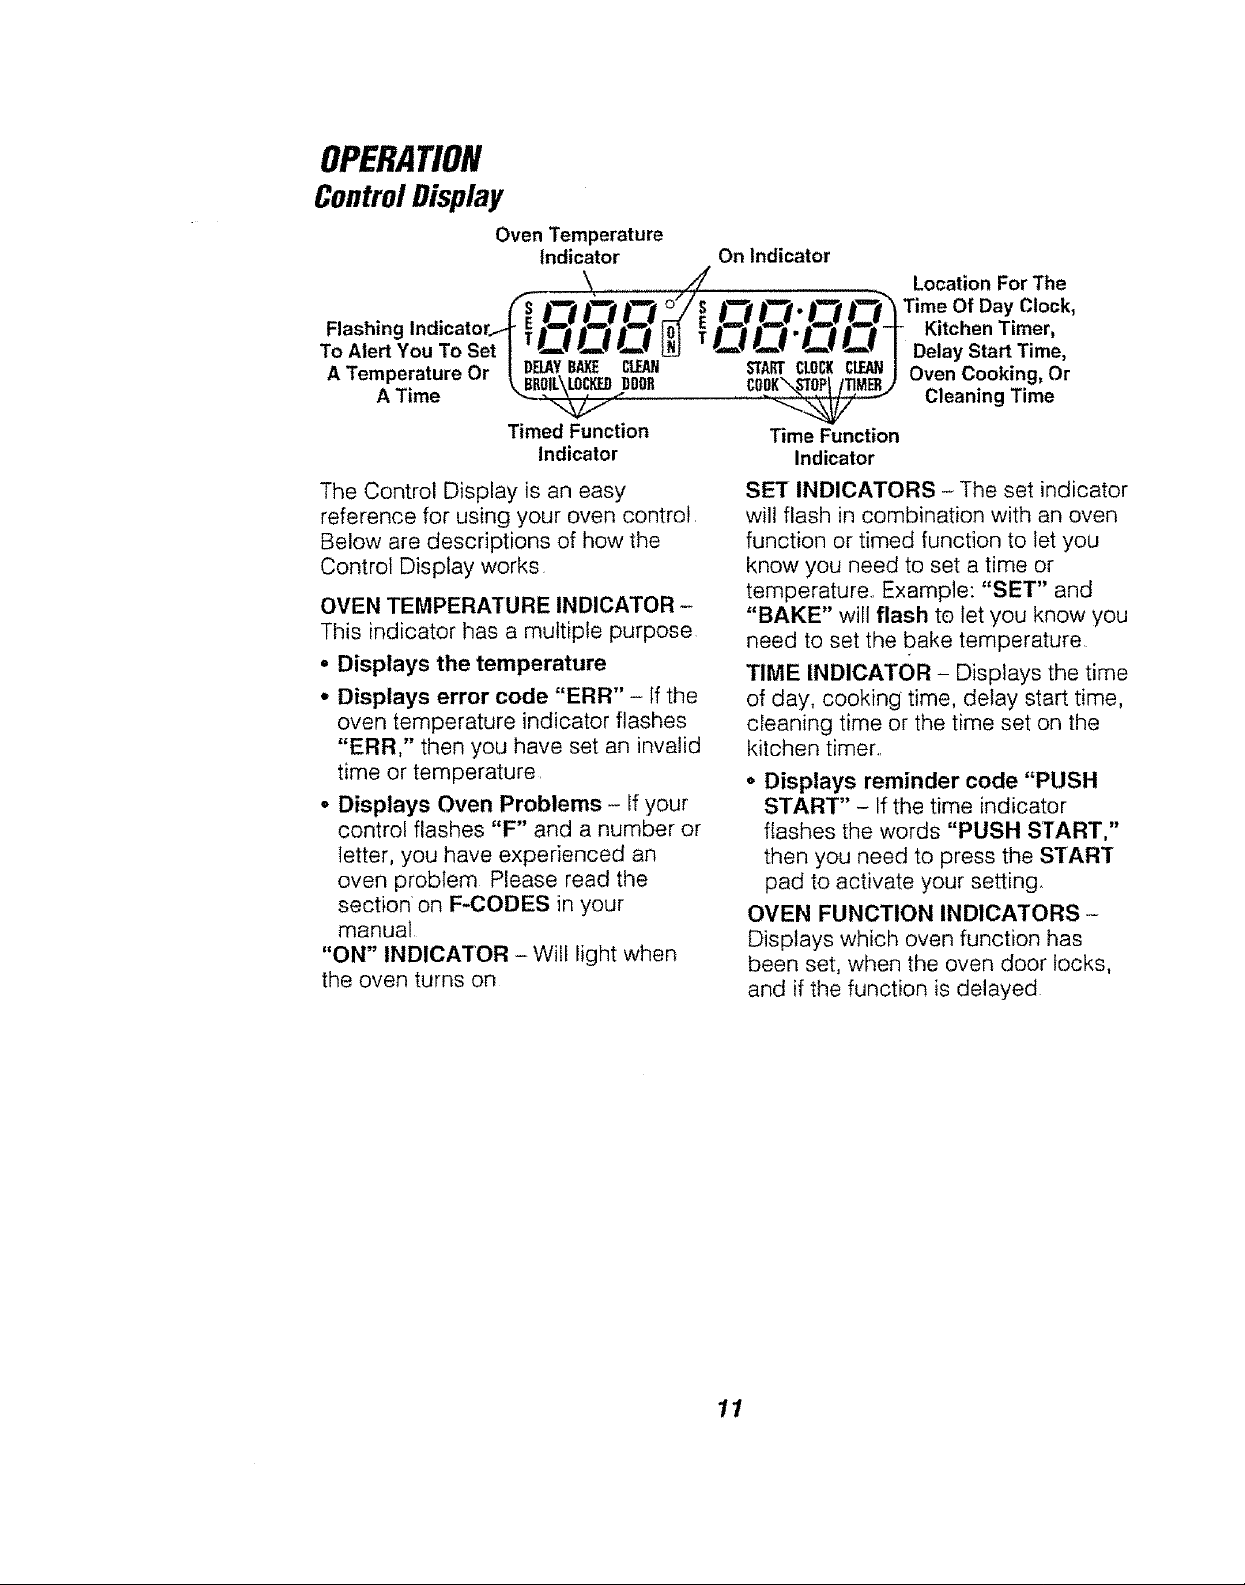
ControlDisplay
Oven Temperature
Indicator On Indicator
\ ........._._ Location For The
('_'lt"='i 1_ }"=_ o'is j'==_]'=_. _ ,'='_'_ Time Of Day Clock,
Flashing Indicator_ 1"._t'J" E .I.,,,l=lfm,[if,,,.[_E w,,_.f,,,_F a_l iw._,,_jFKitchen Timer,
To Alert You To Set I "'='=" "_"_'""" 13! T_ _ _ _'="l Delay Start Time,
A Temperature Or _ DnnE_mY_n_nnCnnLE_ _A_\_OnCpiK,_ul_ ) Oven Cooking, Or
A Time ",_';'_ 7 .... ,_'_.._""_'-_ Cleaning Time
Timed Function Time Function
Indicator Indicator
The Control Display is an easy
reference for using your oven control
Below are descriptions of how the
Control Display works
OVEN TEMPERATURE INDICATOR -
This indicator has a multiple purpose
• Displays the temperature
o Displays error code "ERR" - If the
oven temperature indicator flashes
"ERR," then you have set an invalid
time or temperature
= Displays Oven Problems - If your
control flashes "F" and a number or
letter, you have experienced an
oven problem Please read the
section on F-CODES in your
manual
"ON" INDICATOR - Will light when
the oven turns on
SET INDICATORS - The set indicator
will flash in combination with an oven
function or timed function to let you
know you need to set a time or
temperature, Example: "SET" and
"BAKE" will flash te let you know you
need to set the bake temperature
TIME INDICATOR - Displays the time
of day, cooking time, delay start time,
cleaning time or the time set on the
kitchen timer,,
° Displays reminder code "PUSH
START" - If the time indicator
flashes the words "PUSH START,"
then you need to press the START
pad to activate your setting
OVEN FUNCTION INDICATORS-
Displays which oven function has
been set, when the oven door locks,
and if the function is delayed
11
OPERATION
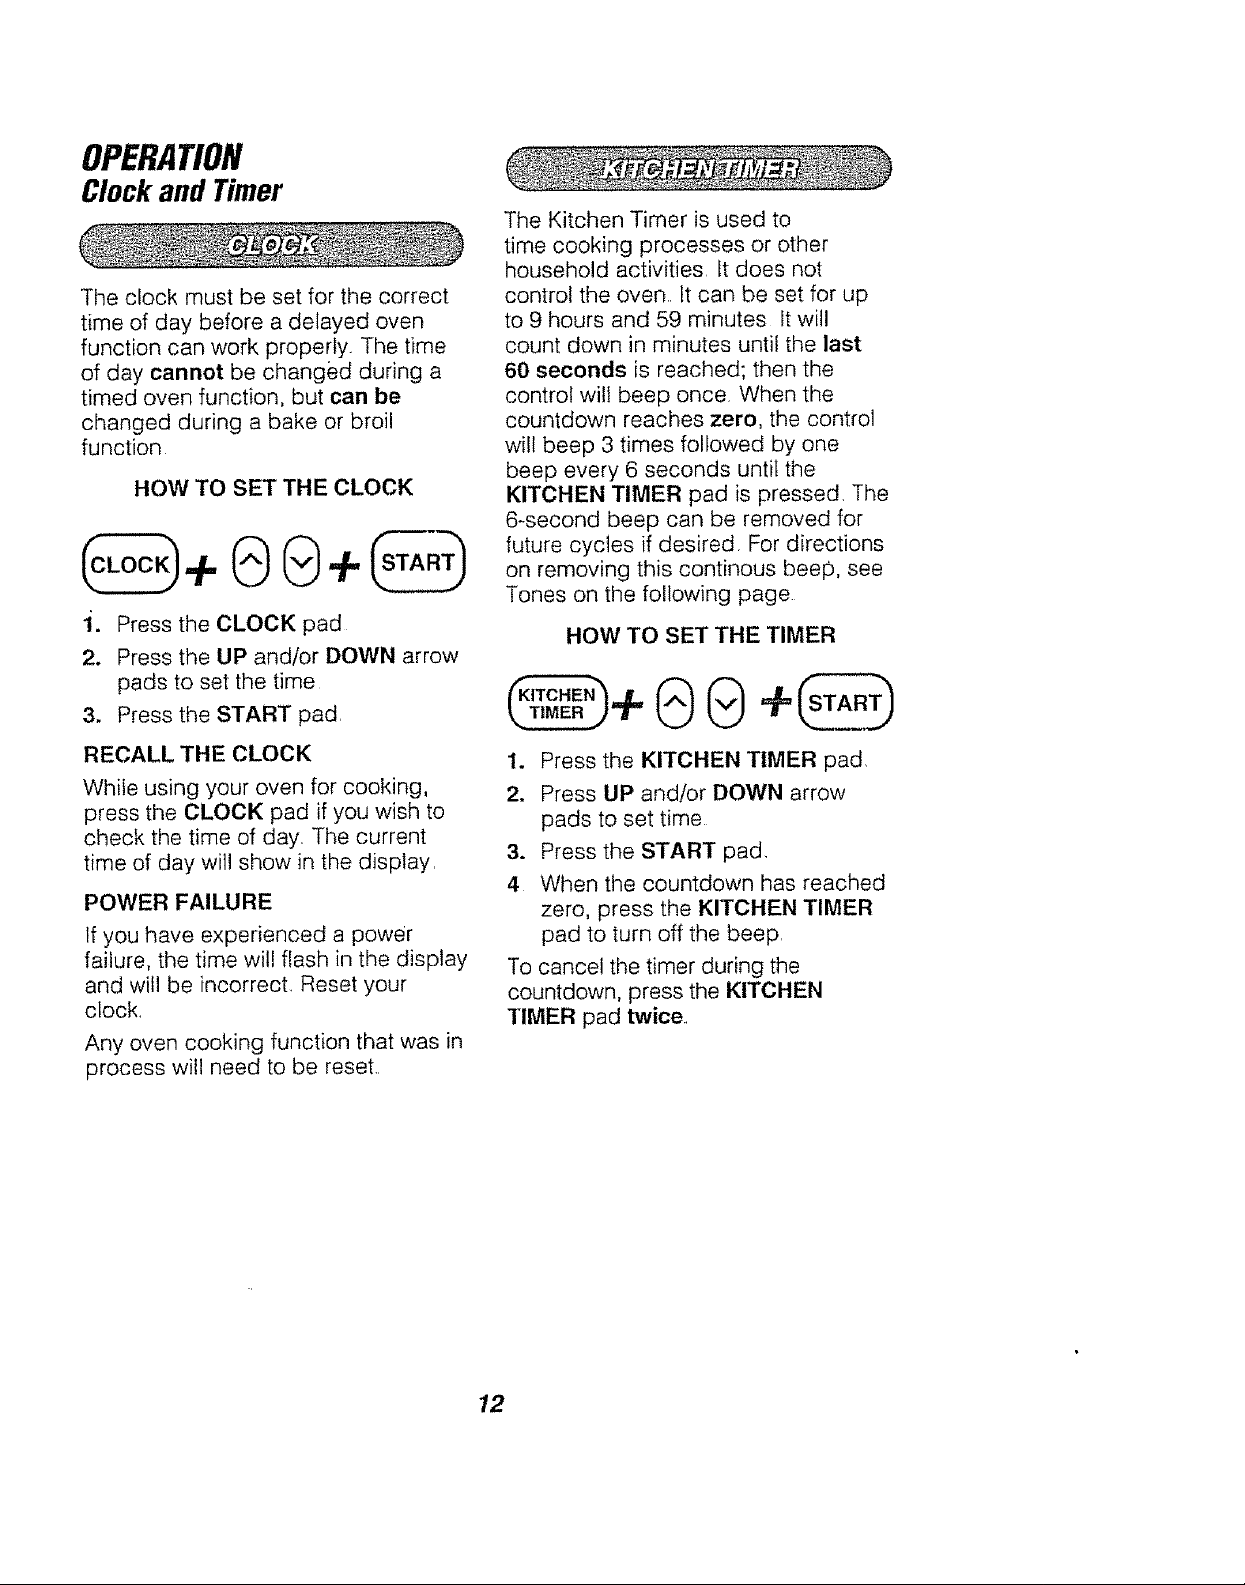
ClockandTimer
The clock must be set for the correct
time of day before a delayed oven
function can work properly. The time
of day cannot be changed during a
timed oven function, but can be
changed during a bake or broil
function
HOW TO SET THE CLOCK
Press the CLOCK pad
2.
Press the UP and/or DOWN arrow
pads to set the time
3_
Press the START pad,
The Kitchen Timer is used to
time cooking processes or other
household activities It does not
control the oven.. It can be set for up
to 9 hours and 59 minutes It will
count down in minutes until the last
60 seconds is reached; then the
control will beep once When the
countdown reaches zero, the control
will beep 3 times followed by one
beep every 6 seconds until the
KITCHEN TIMER pad is pressed, The
6-second beep can be removed for
future cycles if desired. For directions
on removing this continous beep, see
Tones on the following page
HOW TO SET THE TIMER
RECALLTHE CLOCK
While using your oven for cooking,
press the CLOCK pad if you wish to
check the time of day. The current
time of day will show in the display.
POWER FAILURE
If you have experienced a power
failure, the time wil! flash in the display
and will be incorrect, Reset your
clock,
Any oven cooking function that was in
process wil! need to be reset.,
1. Press the KITCHEN TIMER pad
2. Press UP and!or DOWN arrow
pads to set time
3. Press the START pad,
4 When the countdown has reached
zero, press the KITCHEN TIMER
pad to turn off the beep,
To cancel the timer during the
countdown, press the KITCHEN
TIMER pad twice.
12
OPERATION
OvenControl,ClockandTimer
Your new control has a series of
tones that will sound at different times.
These tones may sound while you set
the control for an oven function, or at
the end of the oven function It will
also alert you there may be a problem
with the functions. Below are the
types of tones and a brief description
of each.
TONES WHILE SETTING THE
CONTROL - When you press a touch
pad you will hear a beep. This beep
will let you know you have placed
enough pressure on the pad to
activate it,. (The arrow pads do not
beep )
END OF TIMED CYCLE TONE -
At the end of an automatic timed
cooking function, you will hear
3 short beeps followed by 1 beep
every 6 seconds This 6-second
beep will continue to sound until the
CLEAR/OFF pad is pressed or you
may select the special feature to
cancel this 6-second beep from
sounding at the end of future cycles.
TO CANCEL THE 6-SECOND BEEP
1. Press and hold the BAKE and
BROIL pads, at the same time for
3 seconds, until the display shows
"SF"
2. Press the KITCHEN TIMER
pad The display will show "CON
BEEP" (continuous beep)
3. Press the KITCHEN TIMER
pad again The display will show
"BEEP" (beep canceled),
4. Press the START pad to cancel
the 6-second beep and leave the
special feature mode
If you would like to return the
6-second beep, repeat steps above
until the display shows your choice
and press the START p_ad
ATTENTION TONE - This tone will
sound if you make an error or an
oversight is made while setting-an
oven function
Examples would be:
a. Setting a clean cycle and the oven
door is not properly closed.
b. Setting function and not pressing
the START pad
c. Pressing an additional function pad
without first setting a temperature
or time
d. ERR will flash if you set an invalid
temperature. Press the CLEAR/
OFF pad to clear the control and
reset your oven function
Any of these can be quickly identified
by watching the display°
PREHEAT TONE - When you
set an oven temperature, the oven
automatically starts to heat When the
temperature inside the oven reaches
the temperature you have set, a tone
will sound to let you know the oven is
ready for baking.
tf you set an oven function and the
control beeps while the display is
flashing "F" and a number or letter
such as "F-4" or "FI," there may be
a problem with the control or oven.
Simply press the CLEAR/OFF pad
and wait about an hour. Try setting
the function again. If the code
repeats, write down the flashing
code and call for service. Tell the
technician what code was flashing.
13
OPERATION
OvenCookingTips
It is normal to have some odor when
using your oven for the first time, To
help eliminate this odor, ventilate the
room by opening a window or using
a vent hood.
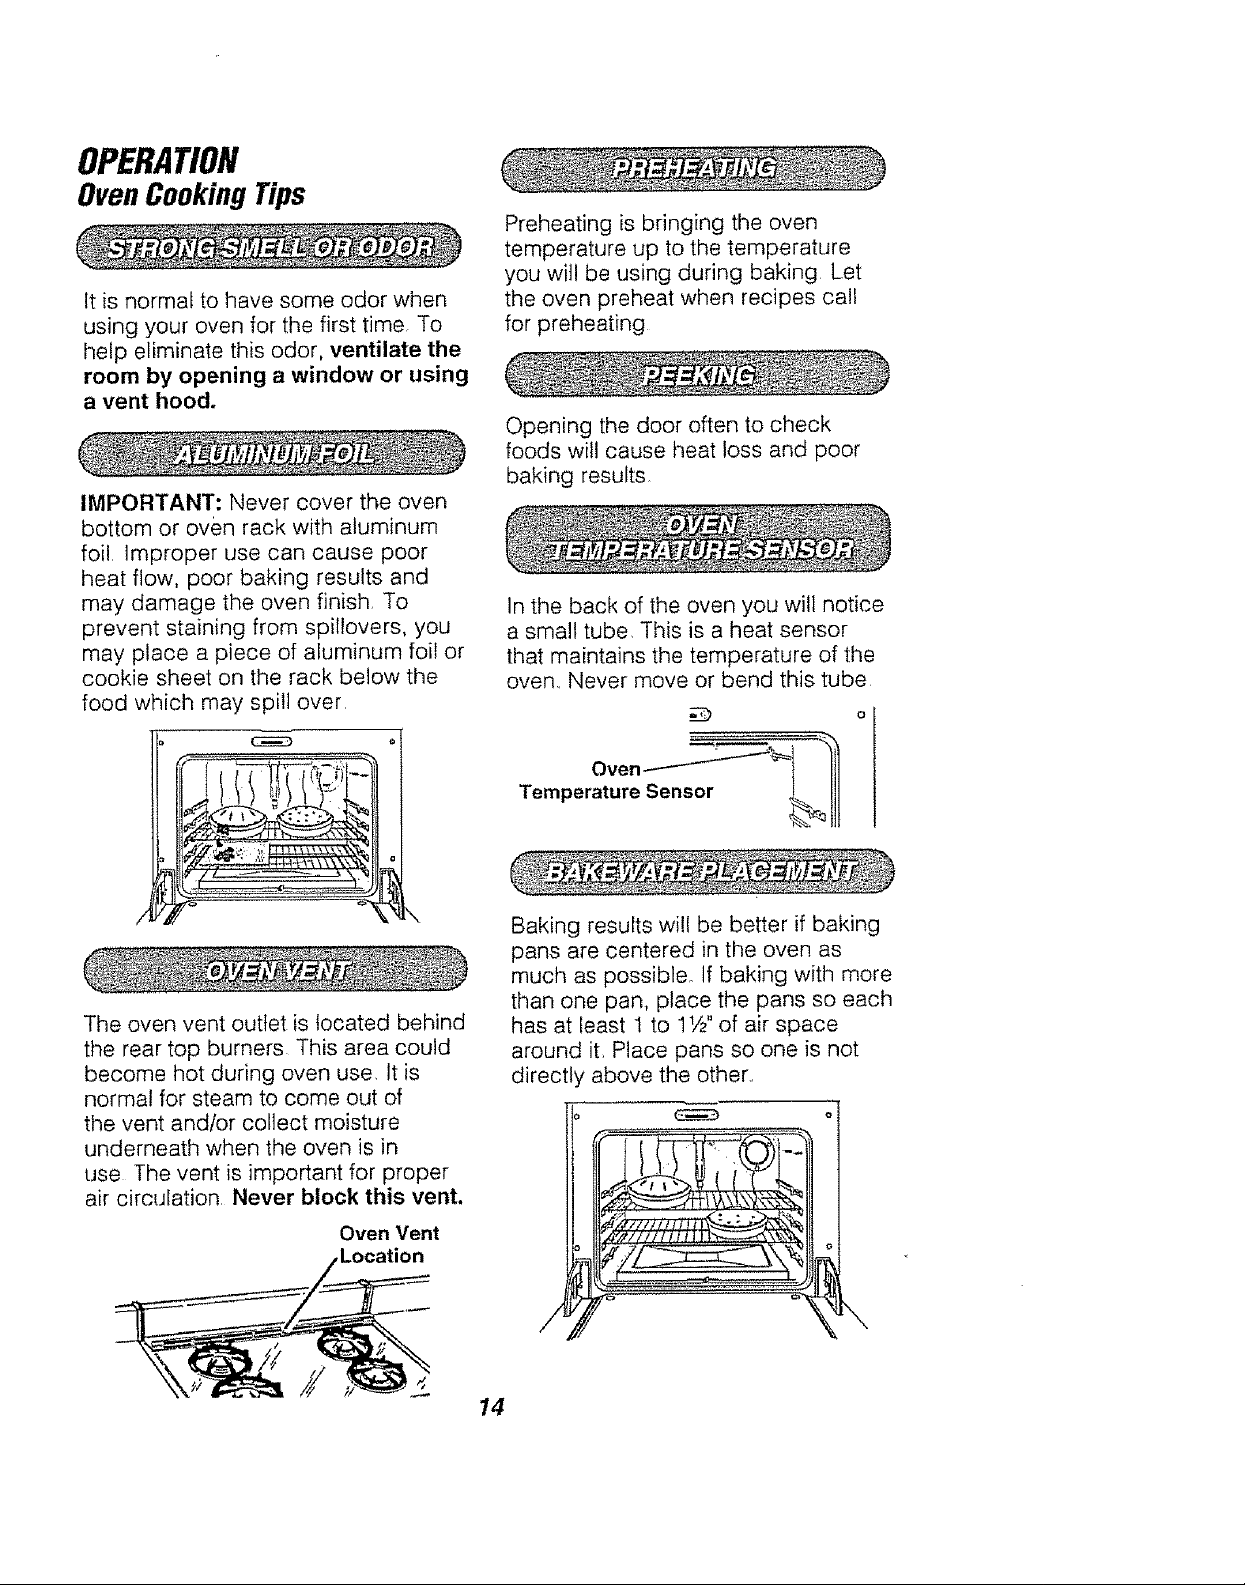
IMPORTANT: Never cover the oven
bottom or oven rack with aluminum
foil, Improper use can cause poor
heat flow, poor baking results and
may damage the oven finish, To
prevent staining from spillovers, you
may place a piece of aluminum foil or
cookie sheet on the rack below the
food which may spill over,
Preheating is bringing the oven
temperature up to the temperature
you wit! be using during baking Let
the oven preheat when recipes call
for preheating
Opening the door often to check
foods will cause heat loss and poor
baking results
In the back of the oven you will notice
a small tube This is a heat sensor
that maintains the temperature of the
oven, Never move or bend this tube
The oven vent outlet is located behind
the rear top burners This area could
become hot during oven use, It is
normal for steam to come out of
the vent and/or collect moisture
underneath when the oven is in
use The vent is important for proper
air circulation Never block this vent.
Oven Vent
Te u,oSono otll
Baking results will be better if baking
pans are centered in the oven as
much as possibleo If baking with more
than one pan, place the pans so each
has at least ! to 11/2"of air space
around it_ Place pans so one is not
directly above the other°
,/
\
14
OPERATION
OvenCooking Tips
The Oven Temperature Sensor
continuously senses and controls
the temperature inside the oven.. To
keep a constant set temperature,
the burner will cycle (turn on and off
during cooking)
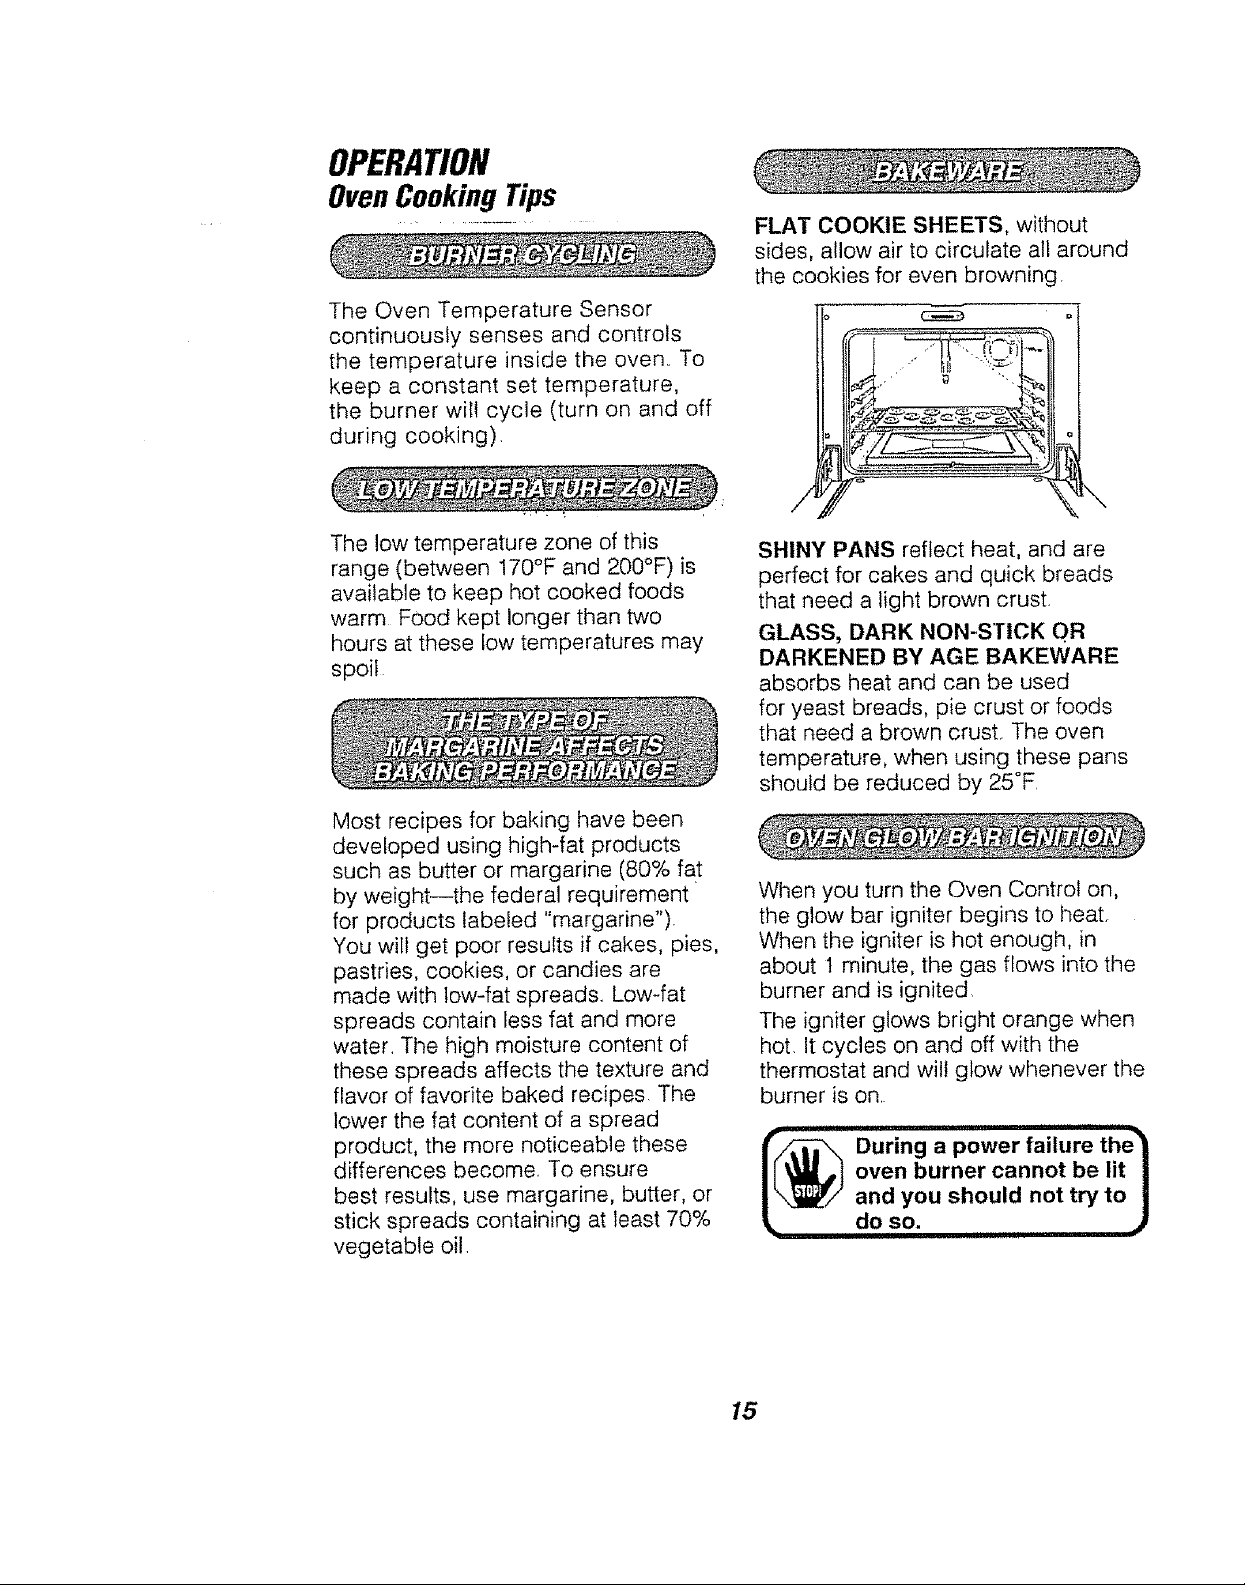
FLAT COOKIE SHEETS, without
sides, allow air to circulate all around
the cookies for even browning.
r _' _ '_
The low temperature zone of this
range (between 170°F and 200°F) is
available to keep hot cooked foods
warm Food kept longer than two
hours at these low temperatures may
spoil
Most recipes for baking have been
developed using high-fat products
such as butter or margarine (80% fat
by weight--the federal requirement
for products labeled "margarine")
You will get poor results if cakes, pies,
pastries, cookies, or candies are
made with low-fat spreads.. Low-fat
spreads contain less fat and more
water. The high moisture content of
these spreads affects the texture and
flavor of favorite baked recipes The
lower the fat content of a spread
product, the more noticeable these
differences become. To ensure
best results, use margarine, butter, or
stick spreads containing at least 70%
vegetable oil.
/
SHINY PANS reflect heat, and are
perfect for cakes and quick breads
that need a light brown crust.
GLASS, DARK NON-STICK OR
DARKENED BY AGE BAKEWARE
absorbs heat and can be used
for yeast breads, pie crust or foods
that need a brown crust.. The oven
temperature, when using these pans
should be reduced by 25°F
When you turn the Oven Control on,
the glow bar igniter begins to heat.
When the igniter is hot enough, in
about t minute, the gas flows into the
burner and is ignited.
The igniter glows bright orange when
hot. It cycles on and off with the
thermostat and will glow whenever the
burner is on.
oven burner cannot be lit |
I_ During a power failure the_
and you should not try to |
\
doso. ,................ J
15
OPERATION
OvenCookingTips
To prolong the life of your oven light
bulb, follow these helpful tips: Always
turn the light off when the oven is not
in use or during a clean cycle If your
oven light is left on for an extended
period of time, the oven will be warm
when the door is opened due to the
heat generated from the oven light
bulb
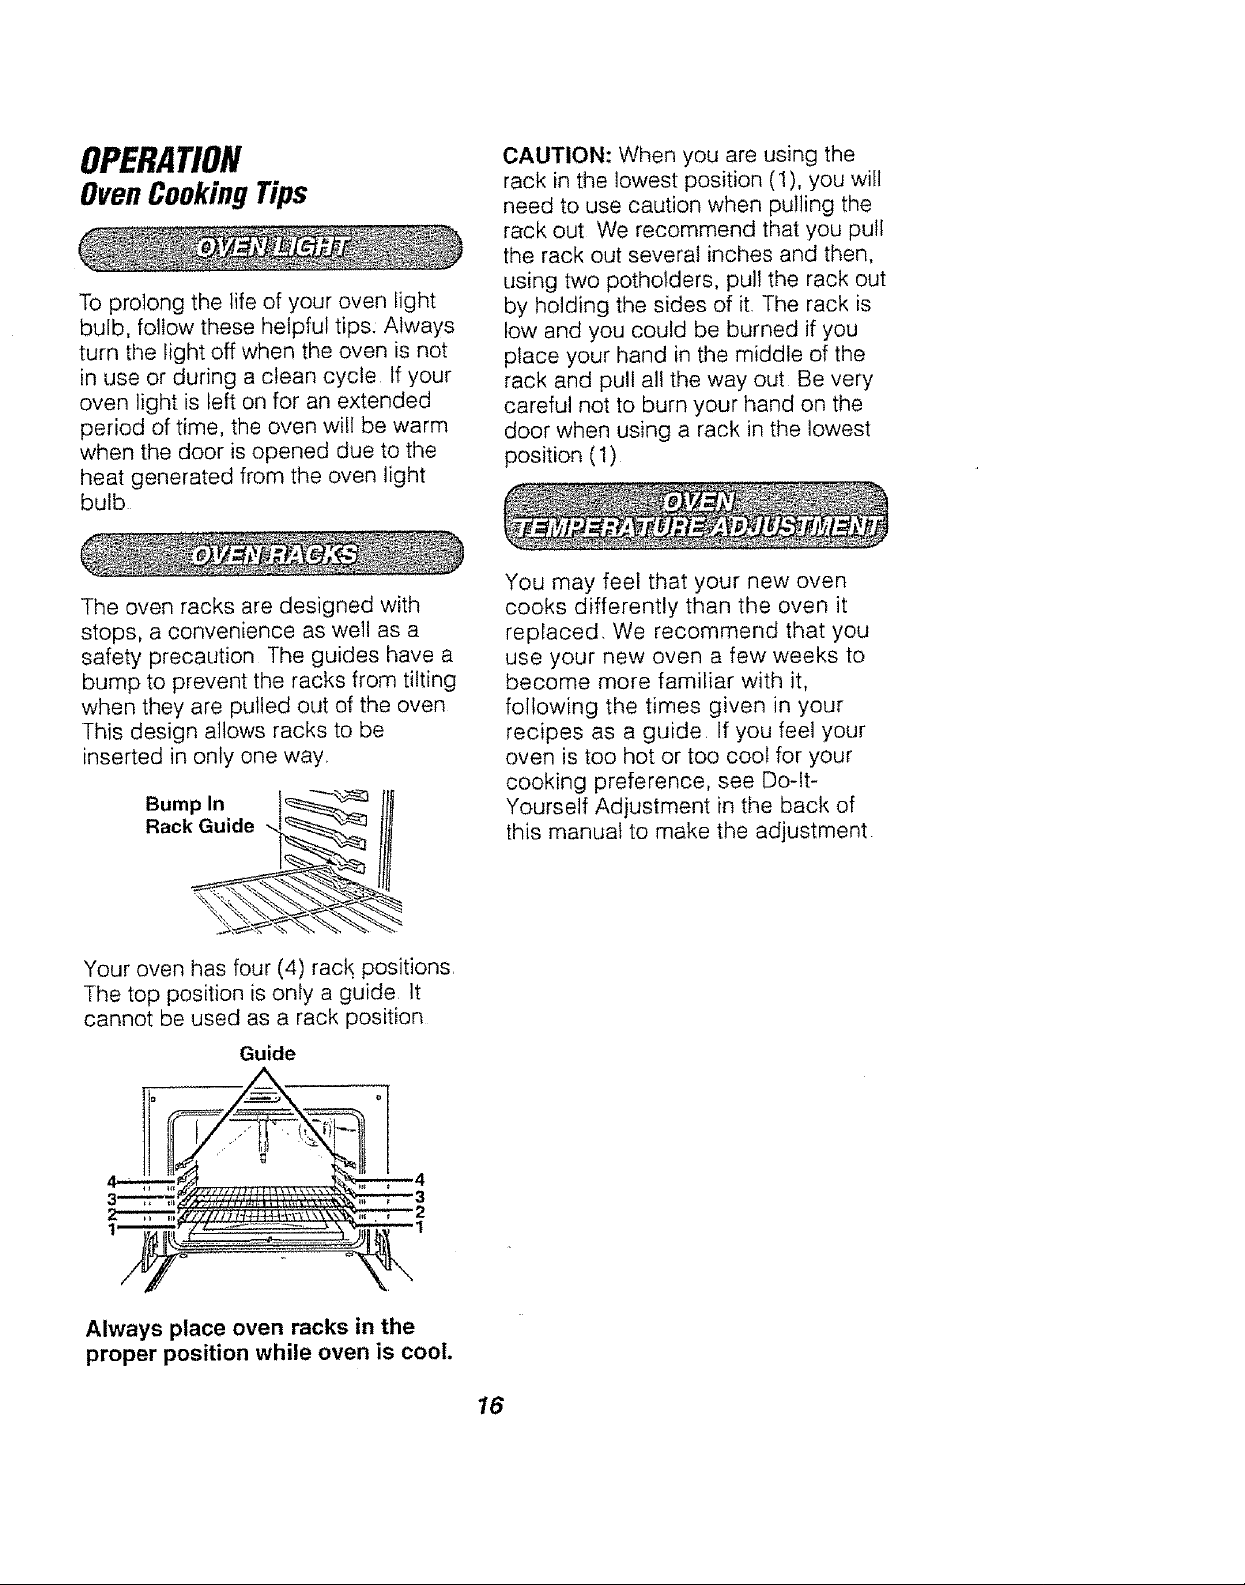
The oven racks are designed with
stops, a convenience as well as a
safety precaution The guides have a
bump to prevent the racks from tilting
when they are pulled out of the oven
This design allows racks to be
inserted in only one way,
Bump In t_
Rack Guide -_.I_ "_
CAUTION: When you are using the
rack in the lowest position (1), you will
need to use caution when pulling the
rack out We recommend that you pull
the rack out several inches and then,
using two potholders, pull the rack out
by holding the sides of it The rack is
tow and you could be burned if you
place your hand in the middle of the
rack and pull all the way out Be very
careful not to burn your hand on the
door when using a rack in the lowest
position (1)
You may feel that your new oven
cooks differently than the oven it
replaced, We recommend that you
use your new oven a few weeks to
become more familiar with it,
following the times given in your
recipes as a guide, If you feel your
oven is too hot or too cool for your
cooking preference, see Do-it-
Yourself Adjustment in the back of
this manual to make the adjustment
_._._.,a-_ _ -%,-_ -,_.
Your oven has four (4) rack positions,
The top position is only a guide It
cannot be used as a rack position
Guide
Always place oven racks in the
proper position while oven is cool.
16
OPERATION
Baking
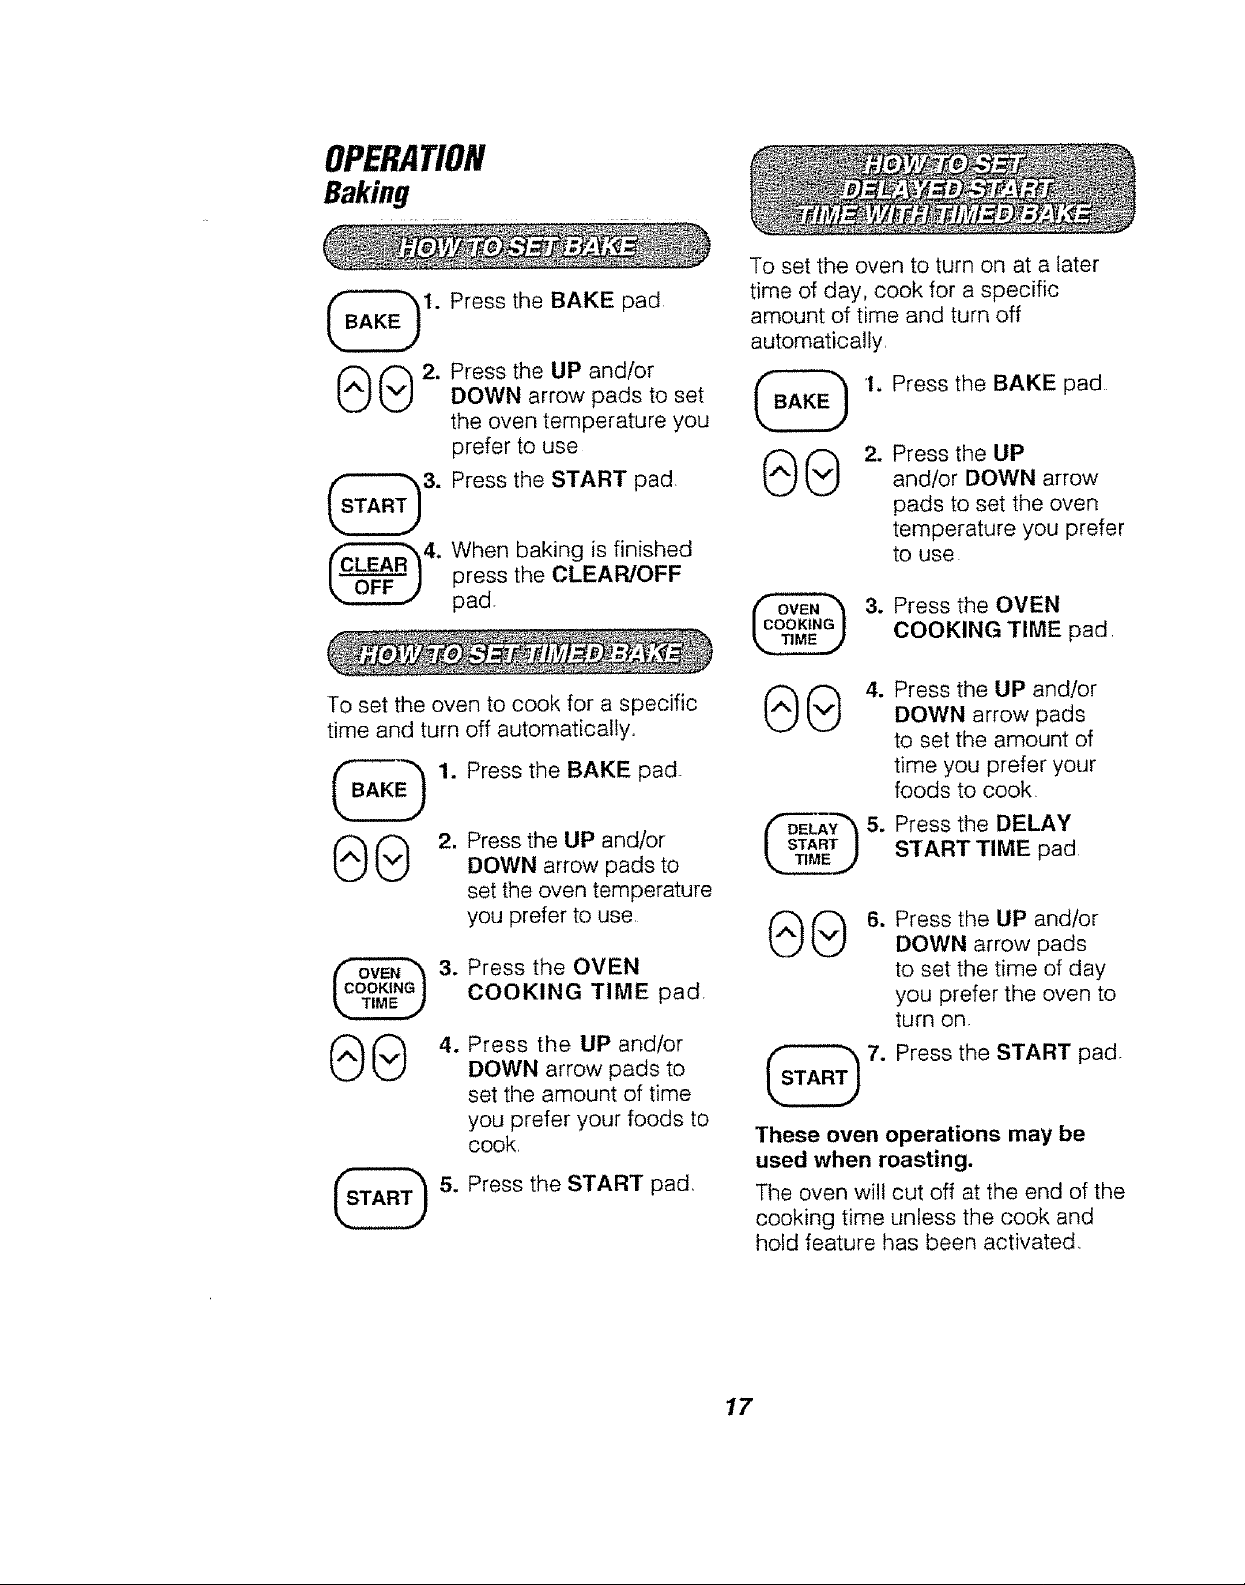
_1. Press the BAKE pad
To set the oven to turn on at a later
time of day, cook for a specific
amount of time and turn off
automatically,
0 0 2. Press the UP andlor
_3. Press the START pad
To set the oven to cook for a specific
time and turn off automatically,,
DOWN arrow pads to set
the oven temperature you
prefer to use
press the CLEAR!OFF
4, hen baking is finished
pad,
Press the BAKE pad_
Press the UP and/or
DOWN arrow pads to
set the oven temperature
you prefer to use
Press the OVEN
COOKING TIME pad,
Press the UP and/or
DOWN arrow pads to
set the amount of time
you prefer your foods to
cook,
Press the START pad,
1o Press the BAKE pad
2. Press the UP
and/or DOWN arrow
pads to set the oven
temperature you prefer
to use
3. Press the OVEN
COOKING TIME pad
. Press the UP and/or
DOWN arrow pads
to set the amount of
time you prefer your
foods to cook
Press the DELAY
START TIME pad
Press the UP and/or
DOWN arrow pads
to set the time of day
you prefer the oven to
turn on,
7. Press the START pad
These oven operations may be
used when roasting.
The oven will cut off at the end of the
cooking time unless the cook and
hold feature has been activated
17
OPERATION
Broiling
Broiling is cooking by direct heat
from the Broil Burner, The oven door
should remain closed during broiling.
It is not necessary to preheat the oven
when broiling Use the broiler pan and
grid that came with your range. Both
are designed for proper drainage of
fat and liquids
molded tightly to the grid
lf foil is used, it must be
and slits cut into the foil
to match those of the grid. This
allows fats and liquids to drain
into the broiler pan, preventing
fire and excessive smoke.
Always remove the
pan and grid from
the oven, Storing or
forgetting a soiled
broiler pan in the
oven is a potential smoke or
fire hazard.
............ ii i, ii,iiii iii
The U S, Department of Agriculture
recommends to cook meat and
poultry thoroughly--meat to at least
an iNTERNAL temperature of 160°F
and poultry to at least an INTERNAL
temperature of 180°F Cooking to
these temperatures usually protects
against food-borne illness.
The closer you place foods to the
broil burner, the faster foods brown on
the outside yet remain red to pink in
the center,
fl
Moving meats away from the burner
will allow the meat to cook to the
center while browning on the outside
Using this positioning, cook side 1 at
least 2 minutes longer than side 2
The size, weight, thickness, starting
temperature and your preference of
the doneness of the meat will affect
broiling This chart is based on meats
at refrigerator temperature
TOTAL
TIME(MtN,)
9-11
16-'18
27-29
11-13
45-55
FOOD
Steak 1" thick
ii
Ground beef
patties
1" thick
Pork Chops-
112"thick
Fish (fillets)
Chicken
(pieces)
RACK
POSITION
iii
i! !ui i1,11,1111,11
3
3
iii1,11,11 , i1,111,1
3
3
la. Press the BROIL pad (This will
automatically set HI Broil).
lb. While the set indicator is flashing
in the display, press the BROIL
pad again if you prefer to use
Lo Broil Use Lo Broil to cook
foods such as poultry or thick
cuts of meat thoroughly without
over-browning them
2. Press the START pad.,
3. When broiling is finished, press
the CLEAR/OFF pad
i
ii1,1
18
OPERATION
Self-CleaningCycle
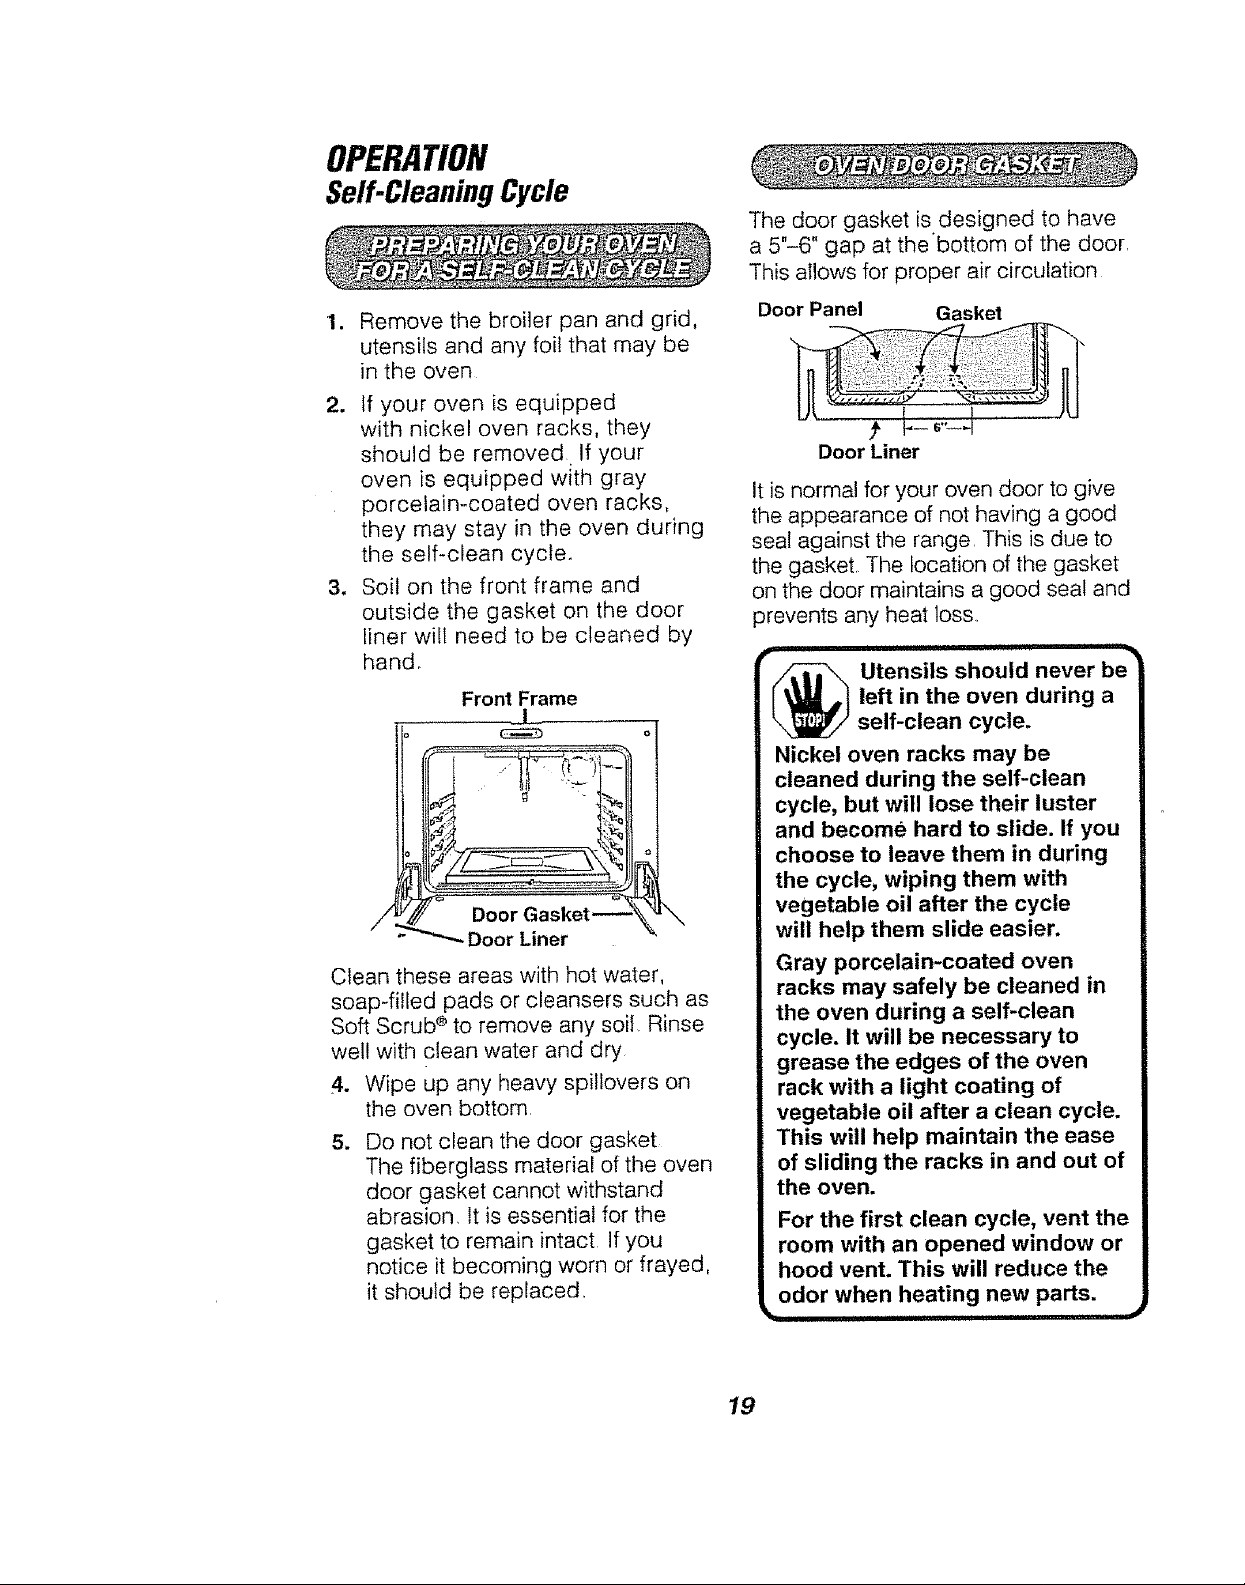
The door gasket is designed to have
a 5"-6" gap at the bottom of the door,
This allows for proper air circulation
,
Remove the broiler pan and grid,
utensils and any foil that may be
in the oven
2. ff your oven is equipped
with nickel oven racks, they
should be removed If your
oven is equipped with gray
porcelain-coated oven racks,
they may stay in the oven during
the self-clean cycle.
3. Soil on the front frame and
outside the gasket on the door
liner wilt need to be cleaned by
hand.
Front Frame
L
_ Door Liner
Clean these areas with hot water,
soap-filled pads or cleansers such as
Soft Scrub ® to remove any soil Rinse
well with clean water and dry
4. Wipe up any heavy spitlovers on
the oven bottom
5_
Do not clean the door gasket
The fiberglass material of the oven
door gasket cannot withstand
abrasion. It is essential for the
gasket to remain intact If you
notice it becoming worn or frayed,
it should be replaced.
Door Panel Gasket
Door Liner
It is normal for your oven door to give
the appearance of not having a good
seal against the range, This is due to
the gasket, The location of the gasket
on the door maintains a good seat and
prevents any heat loss_
,i iii1,1,1 i ii iiiiiii1_
r Utensils should never be
left in the oven during a
self-clean cycle.
Nickel oven racks may be
cleaned during the self-clean
cycle, but will lose their luster
and become hard to slide. If you
choose to leave them in during
the cycle, wiping them with
vegetable oil after the cycle
will help them slide easier.
Gray porcelain-coated oven
racks may safely be cleaned in
the oven during a self-clean
cycle, it will be necessary to
grease the edges of the oven
rack with a light coating of
vegetable oil after a clean cycle.
This will help maintain the ease
of sliding the racks in and out of
the oven.
For the first clean cycle, vent the
room with an opened window or
hood vent. This will reduce the
odor when heating new parts.
j I J IIIIIII I IIIII,IRI
19
OPERATION
Self-CleaningCycle
The Clean Cycle, including cooldown
time, is automatically set for 4 hours,
but you may change this from 3 hours
if oven is lightly soiled up to 5 hours if
oven is heavily soiled,
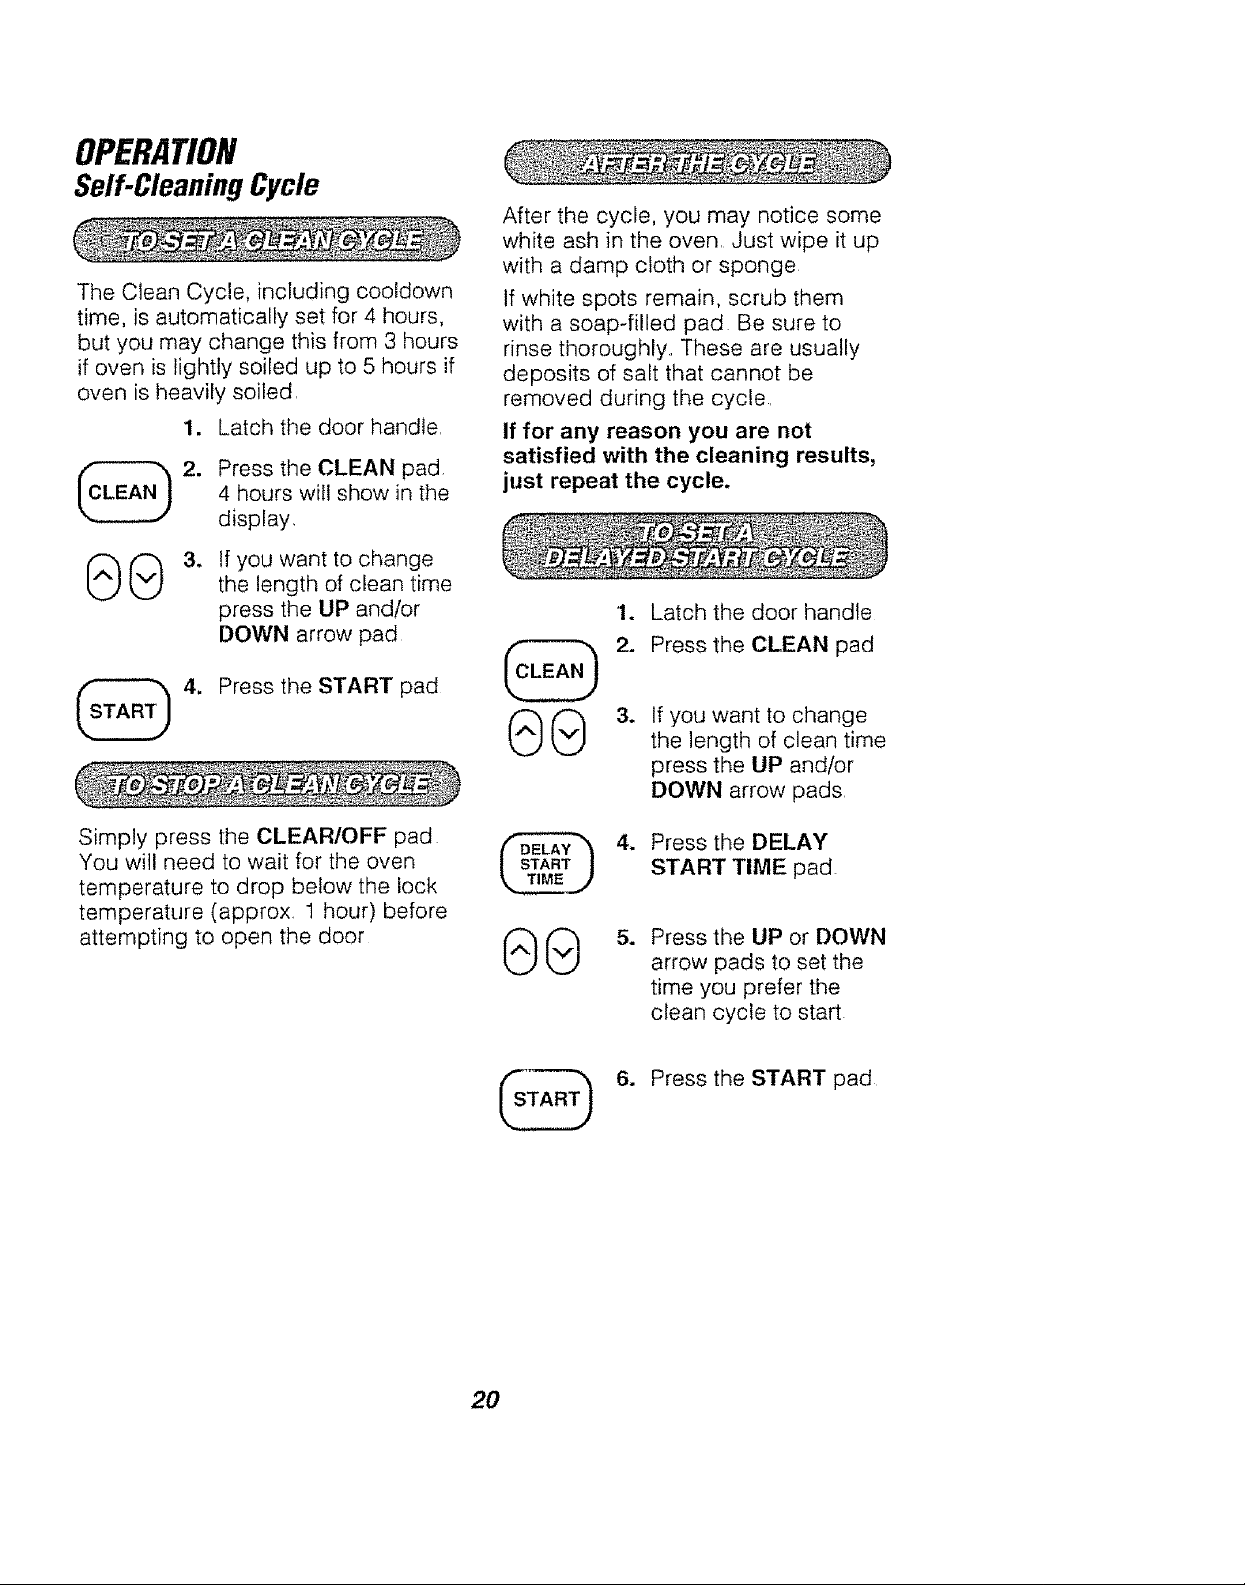
1. Latch the door handle,
Press the CLEAN pad,
4 hours will show in the
display,
If you want to change
the length of clean time
press the UP and/or
DOWN arrow pad
4. Press the START pad
After the cycle, you may notice some
white ash in the oven, Just wipe it up
with a damp cloth or sponge
If white spots remain, scrub them
with a soap-filled pad Be sure to
rinse thoroughly, These are usually
deposits of salt that cannot be
removed during the cycle,
If for any reason you are net
satisfied with the cleaning results,
just repeat the cycle.
1. Latch the door handle
2. Press the CLEAN pad
3_
If you want to change
the length of clean time
press the UP and/or
DOWN arrow pads
Simply press the CLEAR/OFF pad
You will need to wait for the oven
temperature to drop below the lock
temperature (approx. I hour) before
attempting to open the door
20
4.
Press the DELAY
START TIME pad
Press the UP or DOWN
arrow pads to set the
time you prefer the
clean cycle to start
6. Press the START pad

OPERATION
SettingSpecialFeatures
Your new touch pad control has
additional features that you may
choose to use. After making your
selection, if you want to change the
setting, follow the steps until the
display shows your choice
The control is automatically set
to turn off the oven after 12 hours
baking or 3 hours broiling should you
forget and leave the oven on If you
want to remove this feature:
Press and hold, at the same
time, the BAKE and BROIL pads
for 3 seconds, until the display
shows "SF,"
2, Press the DELAY START TIME
pad The display shows
"12Shdn" (12 hour shut-off)
Press the DELAY START TIME
pad again The display will show
"no Shdn" (no shut-off)
3. Press the START pad.
Your oven control is set for the
Fahrenheit temperature selections.
Most recipes are given using the
Fahrenheit scale. You can change
this to use the Celsius selection..
1. Press and hold, at the same
time, the BAKE and BROIL pads
for 3 seconds, until the display
shows "SF?'
2. (a) Press the BROIL pad The
control display will show the
degrees sign and F°,
(b) Press the BROIL pad again.
This wil! change F ° (Fahrenheit) to
C° (Celsius).
3. Press the START pad.
Your control is set to use the 12 hour
clock_ If you prefer to use the 24 hour
Military Time clock or black out the
display:
1. Press and hold, at the same
time, the BAKE and BROIL pads
for 3 seconds, until the display
shows "SF,"
2_
(a) Press the CLOCK pad, The
display shows "12hr," If this is
your choice press the START
pad,
or
(b) Press the CLOCK pad again
The display wilt show "24hr_"
Example: 5:00 on the 12 hour
clock wilt show 17:00 hours on the
military clock If this is your choice
press the START pad
or
(c) Press the CLOCK pad again.
The display will show "OFF" If
this is your choice press START
The display will not show time
(The Delay Start Time feature will
not operate )
21

OPERATION
SettingSpecialFeatures
Your control will allow you to lock
the touch pads so they cannot be
activated when pressed If you're
worried about leaving the oven
unsupervised, activate this feature
1. Press and hold, at the same
time, the BAKE and BROIL pads
for 3 seconds, until the display
shows "SF/'
2. (a) Press the CLEAN pad,
The display shows "LOC OFF"
(lockout off)
(b) Press the CLEAN pad again,
The display will show "LOC ON"
(lockout on),
3. Press the START pad,
This feature can only be set when
the oven is not in use.
Your new control has a cook and
hold feature for timed cooking only
that will keep hot cooked foods warm
up to 3 hours after the timed cooking
is finished. To activate this feature:
1. Press and hold, at the same
time, the BAKE and BROIL pads
for 3 seconds, until the display
shows "SF "
2. (a) Press tt_e OVEN COOKING
TIME pad. The display will show
"HLd OFF"
(b) Press the OVEN COOKING
TIME pad again to activate the
feature The display wilt show
"HLd ON,"
3. Press the START pad
When this feature is on, the display
will show "LOC," if a touch pad is
pressed (This feature wilt not affect
the Clock or Timer pads )
This special feature will allow you to
change the speed; #1 means speed
of change is slow up to #5 which
means speed of change is fast To
set the speed you prefer, follow
these steps:
1. Press and hold, at the same
time, the BAKE and BROIL pads
for 3 seconds, until the display
shows "SF"
2. Press the UP arrow pad The
display will show the current set
speed
3. Press the UP arrow to increase
the speed up to the number 5,
or
Press the DOWN arrow pad to
decrease the speed down to the
number 1
4. Press the START pad.
22

CAREANDCLEANING
Cleaning
CLEANING MATERIALS
• Dishwashing detergent
• Warm water
• Soft cloth
Do net use abrasive cleaners,
industrial cleaners, or bleach.
CLEANING MATERIALS
• Dishwashing detergent
. Warm water
° Soap-filled pad
° Commercial oven cleaner
TO CLEAN
Allow the pan to soak. Sprinkle the
grid with dishwashing detergent and
cover with a damp cloth or paper
towel and let stand Scour as needed.
Wash, rinse, and dry well., You may
also place both the pan and grid in
the dishwasher.
CLEANING MATERIALS
° Dishwashing detergent
. Warm water
° Paper towels
CLEANING MATERIALS
o Dishwashing detergent
o Warm water
° Paper towel
. Dry cloth
° Ammonia or abrasive cleaners and
scouring pad
TO CLEAN
Clean after each spillover If acidic
foods (such as hot fruit fillings,
tomatoes, sauerkraut or sauces with
vinegar or lemon juice) should spill
on the cooktop, use a dry paper
towel or cloth to wipe up right away.,
When the surface has cooled, wash
and rinse For other spills, such as fat
splatterings, wash with soap and
water when cooled and then rinse
Polish with a dry cloth.
CLEANING MATERIALS
° Glass cleaner
o Paper towels
° Baking soda
° Warm water
TO CLEAN
Remove stubborn soil with paste of
baking soda and water. Do not use
abrasive cleaners. Rinse thoroughly.,
TO CLEAN
Do not use oven cleaners, cleansing
powder, or harsh abrasives If
marinades, tomato sauce, basting
materials, etc,, should spill, wipe up
as much as possible, When surfaces
have cooled thoroughly, clean
painted areas
TO CLEAN
For everyday cleaning, use glass
cleaner and a paper towel,, For
stubborn soil, use paste of baking
soda and water Rinse thoroughly
23

CAREANDCLEANING
RemovableParts
CLEANING MATERIALS
* Soft abrasive cleaner
, Sponge scrubber
Do not use hard, abrasive cleaners,
industrial cleaners, or bleach,
CLEANING MATERIALS
° Dishwashing detergent
° Nonabrasive cleaner
° Ammonia
° Warm water
• Soft cloth
TO CLEAN
For stubborn stains, place grates
into a plastic bag Pour in 1/4 cup
of ammonia and seal tight Allow to
soak overnight Wash and rinse well.
CLEANING MATERIALS
° Dishwashing detergent
, Nonabrasive cleaner
° Warm water
• Soft cloth
TO CLEAN
Soak stubborn stains, rinse and dry
completely Leave burner cap in place
when cleaning burner bowl..
The oven bottom may be removed for
cleaning heavy spil!overs or to reach
the oven burner.
Be careful not to scratch the oven
finish when removing or replacing the
oven bottom.
To remove
1. Slide the tab at the center front of
the oven bottom to the left,
2. Lift the oven bottom up and out
CLEANING MATERIALS
° Dishwashing liquid
° Mild abrasive cleaner
° Soap-filled scouring pad
° Commercial oven cleaner
TO CLEAN
Spillovers such as hot fruit fillings or
foods with acidic content (such as
tomatoes, vinegar or lemon juice)
may cause staining to the porcelain
surface To prevent staining from
spillovers, you may place a piece of
aluminum foil or a cookie sheet on the
rack below the food which may spill
over Clean after each oven use
To replace
1. Slip the oven bottom into the oven
so the tabs in the rear of the oven
bottom fit into the slots in the oven
back
2. Lower the front of the oven bottom
into place Slide the tab at the front
of the oven bottom into place
24

CAREANDCLEANING
RemovableParts
CLEANING MATERIALS
* Dishwashing detergent
° Warm water
° Soft cloth
Match Flat
in Stem
Shaft
TO REMOVE
1. Be sure the control knob is in the
off position
2. Pull straight off the stem
Using a piece of string can make
removing the knob easier, Sfip the
string under and around the knob,
Then pull straight out,
TO CLEAN
Wash the knob thoroughly with soapy
water. Dry completely with a soft cloth,
DO NOT let the knob soak
TO REPLACE
1.
Check the back of the knob, The
molded flat of the knob is designed
to fit perfectly onto the knob stem
flat.,
1
Align the molded flat to the flat on
the knob stem
3.
Push the knob back as far as it
will go.
Disconnect electrical
_ AUTION,"
breaker or fuse box before
attempting to replace the oven
light bulb. Do not touch a hot
light bulb with wet hands or a
wet cloth. Wait until the bulb
has cooled and use a dry cloth.
Glass Cover \
TO REPLACE
1. Remove the three screws and lift
off the glass retainer, glass cover
and gasket
2. Replace the bulb with a 40-watt
appliance bulb. An appliance bulb
is smaller than a standard 40-watt
household bulb
3. Replace the gasket, glass cover
and glass retainer Tighten screws
securely,
power to the oven at
the main circuit
Gasket
Gas Retainer
Screw
25

CAREANDCLEANING
RemovableParts
CLEANING MATERIALS
- Dishwashing detergent
o Damp cloth
• Warm water
TO REMOVE
1. Pull the drawer out until it stops_
2. Lift the front of the drawer until the
stop guide of the drawer clears the
stop guide on the base rail
) Guide
TO REPLACE
=
Lift the front of the drawer stop
and lower the stop of the drawer
through the opening of the base
rail,
Stop Guide
2. Lower the front of the drawer
and push back the drawer until
it stops
3. Lift up on the front of the drawer
until the stop guide of the drawer
clears the stop guide of the base
rai!, Slide the drawer into place
i i i1,,11,111,11
CAUTION =The
drawer gives you space
for keeping cookware
and bakeware. Plastics and
flammable materials should not
be kept in this drawer. Do not
overload the storage drawer. If
the drawer is too heavy, it may
slip off the base rail when
opened.
k.. ........ --'_
3. Lift the drawer up and over the
drawer stop
TO CLEAN
Wipe the inside and outside with
warm soapy water and a damp cloth
or sponge Do not use harsh
abrasives or scouring pads on the
drawer
26

CAREANDCLEANING
RemovableParts
TO REMOVE
Be sure that all controls are turned off
and that the unit is cool Lift off burner
grate, burner cap and burner head
Do not remove burner bowl
.<- Burner Grate
Mixer Tube
Burner _ _ Sparklgniter
Bow,--H (J
"_ Mixer Tube
(Chimney)
TO REPLACE
1. Place the burner head onto the
burner bowl making sure the
location of the spark igniter
matches up with the opening
in the burner head
2. Place the burner cap on the burner
head.
3. Place the grate over the burner
assembly and onto the burner
bowl. The indentations of the bowl
should match the Location pins on
the bottom of the grates
iiiii i, i,iii _ _-- i i1,11,1
spark igniter is exposed
r_The electrode ot the
the burner bowl, be careful not to
snag the electrode of the spark
igniter with your cleaning cloth.
Damage to the igniter could
occur. Be careful not to turn
on any cooktop controls while
cleaning burner bowls. A slight
electrical shock might result,
which could cause you to knock
over hot cookware.
beyond the top of the
burner. When cleaning
I!Jl
27

CAREANDCLEANING
RemovableParts
CLEANING MATERIALS
* Dishwashing detergent
. Warm water
* Scouring pad or soap-filled pad
Bump In l_
Rack Guide t_
Of The
Raised Rack
_?._,_'* _ "%, --%.
TO REMOVE
1. Pull the racks out to the stop lock
position
2. Pull up the front of the rack and
slide under the bump of the rack
guide
TO CLEAN
Clean with warm water and detergent,
For hard to remove stains, gently
scrub with a scouring pad or a
soap-filled pad Rinse weft
TO REPLACE
1. Place the raised back of the rack
onto the rack guides
2. Lift the front of the rack until the
raised back slides under the bump
of the rack guides
3. Slide the rack all tlne way back
Broil Stop Position
_Hinge __
TO REMOVE
1. Open the door to the broil stop
position,
2. Grasp the door at each side and
lift up and off the hinges DO NOT
LIFT DOOR BY THE HANDLE.
r III_ILjjI_ ii
-_ AUTION: When the
stop position, as a precaution,
cover the hinge arms with
toweling or an empty paper towel
roll. Do not bump or try to move
the hinge arms while working in
the oven area. They could snap
back causing injury to the hands
or damage the porcelain finish of
_he front frame. ......... _,
TO REPLACE
1. Make sure the hinge arms are in
2. Lift the door by the sides
3. Line up the slots at the bottom
4. Slide the door down onto the hinge
5. Close the door.
door is removed and the
hinge arms are at the broil
the broil stop position
edge of the door with the hinge
arms,
arms as far as it will go
28

BEFORECALLINGFORSERVICE
To save you time and morley, before making a service call check the list below
for any problem you may feel you have with the perf6f_rnarice of your range: If
the problem is something you cannot fix, use the Consumer Service Numbers
located at the back of this manual. When making any calls, have the Model
No., Serial No., Repair Parts list, Use and Care Guide and the Date of
Purchase available.
PROBLEM
i ii i,ii
The display of your
POSSIBLE CAUSE
i i,iii
Range malfunction
control is flashing "F"
followed by a number
or letter.
Oven and oven control a, No power to range
will not work.
b. The clock is in the
black-out mode
n iiii
Oven temperature
Oven control calibration
i, nnn'lu' , ii ii,l,,ll,l=llul
seems inaccurate.
i ,i,u, ii inl I
Oven wilt not unlock. Clean cycle is not
finished
Oven light will
not work.
a. Light switch in off
position°
b. Oven light bulb loose
or burned out,
i ii,]1111
Oven did not clean or a.
results were poor.
Controls were not set
properly,
b.
Oven was soiled
heavily.
c. Clean cycle was c.
interrupted
iiiii
Oven smokes.
a. Spillage a.
i i = i!ql ........................ iiq,
b. Broiler pan containing
grease left in the oven.
[ jill IIIIq III II III
Oven emits
odor.
a. Oven insulation may
emit odor during the
first few usagesk
b. Failure to wipe out
excess soil.
29
POSSIBLE SOLUTION
iqllq qlll ii
Press the CLEARIOFF pad, Let
the oven cool for 1 hour and
enter an oven or cleaning
operation. If code repeats, cal!
for service.
ii ,i !1111,1 , iiii1,11,I
a. Check the circuit breaker or
fuse. Make sure the power
cord is plugged in.
b. See the "Setting Special
Features" section of this
manual.
ii I
See the temperature adjustment
instructions following this
section
, i i ,11,,!1!!,11
Oven temperature must drop
below the lock temperature
before the door will unlock,
I I i ii iii ,11',1
a. Check oven light switch
on the control panel
b. Check the oven light
bulb,
, ii !1,11
a. Check the self-cleaning
section of this manual
b. Heavy spillovers should
be removed before the
cycle is set, You can also
repeat the cycle,
The normal clean cycle
should last 4 hours.
Make sure the sump (grease
well) is to the front of the range
when broiling.,
b. Clean pan and grid after
each use
a. Put oven through self-clean
cycle to speed up process of
odor "wearing off."
b. Wipe excess soi! off before
using oven
i,

BEFORECALLINGFORSERVICE
PROBLEM POSSIBLE CAUSE
F:oods do not a. Oven was not a.
bake properly.
ul, i
Foods do not
broil properly.
tl,,i i ii ii i,ii
Oven rack Racks were left in the
does not oven during a self-clean
slide easily, cycle
Burners do not a, Gas supply not
work. connected or not turned
, iiii ! =!,1111 i!1, iiii
preheated
b, Improper rack or pan
placement
c. Oven vent blocked or c.
covered
do Improper use of foil d.
eo Improper temperature e.
setting for utensil used
f. Oven temperature f.
needs adjustment.
g. Range and oven rack g.
not level
h. Oven controls h.
improperly set
i. Oven floor not in place i.
a. Improper rack position a,
b. Oven preheated b.
c. improper use of foil c.
do Improper broiling time d.
e, Oven controls e.
improperly set
i n I' lu,i, lU
on; if using L P gas,
tank may be empty
b. Controls not adjusted
properly
c. Burners not adjusted
properly
bo
I I' i, ilnll
POSSIBLE SOLUTION
i i!111,111 .... iiiii
Be sure to preheat until the tone
sounds, when recipe calls for it.
Maintain uniform air space around
pans and utensils See oven cooking
tips section
Keep vent clear.
Racks should not be covered during
baking
Reduce temperature 25 degrees for
glass or dul!ldarkened pans
See the temperature adjustment
instructions following this section
Check the installation instructions for
leveling
See the baking section
Replace the floor
iiii fill,
Check broil pan placement; see
broiling section
Do not preheat when broiling
Check broiling section
Check broiling chart in broiling
section
See the broiling section
Wipe the racks down with
vegetable oil
i i, ,nil I ,hi iiil,l,qllllllll I
a, Check the reducer shut-off valve
and the gas supply shut-off valve to
be sure they are open (see installation
instructions)
b. Check operating instructions in this
manual
c. See the installation instructions for
adjustments
30

BEFORECALLINGFORSERVICE
PROBLEM
Burners
have yellow or
yellow-tipped
flames.
iiii , iilJt i hi,ill
POSSIBLE CAUSE
The combustion
#uality of burner
ames needs to
be determined
visually
"DOIT YOURSELF"
TEMPERATURE
ADJUSTMENT
You may feel that your new oven cooks
differently than the oven it replaced.. We
recommend that you useyour newoven a
few weeks to become more familiar with it,
following the times given in your recipes
as a guide.
If you think your new oven is too hot
(burning foods) or not hot enough (foods
are undercooked) you can adjust the
temperature yourself. The appearance
and texture offoods is a better indicator
of oven accuracy than an oven
thermometer. These thermometers can
vary by 20--40degrees from the true
temperature of the oven. In addition, the
oven door must be opened to read these
thermometers..Opening the door wilt
change the temperature of the oven
To decide how much to change the
temperature, set the oven temperature
25 degrees higher (if foods are
undercooked) or 25 degrees lower (if
foods are burning) than the temperature
in your recipe, then bake The results of
this "test" should give you an idea of how
much the temperature should be
changed_
i iii i H i
Use the illustrations below to determine if
your burner flames are normal. If burner
flames took like A, call for service. Normal
burner flames should look like B or C,
depending on the type of gas you use With
LPgas, some yellow tipping on outer cones
is normal.
POSSIBLE SOLUTION
A-Yellow B-Yellow tips C-Soft blue
flames on outer flames
Call for cones Normal Normal for
service for LP gas natural gas
Press and hold down
both the BAKE and
+
This increased or decreased temperature
setting will remain in memory until the
above steps are repeated A power
failure will not affect this setting.
The broil and self-clean temperatures will
not be affected.
BROIL pads for 3
seconds, until the
display shows "SF"
2. Press the BAKE pad A
factory-set 2 digit
number will show in the
display, usually "00"
If you think the oven is
not hot enough,
3a. Press the UP arrow pad
to increase (+) the
temperature up to
+35°F
If you think the oven is
too hot,
3b. Press the DOWN arrow
pad to decrease (-) the
temperature down to
-35°F,
4. Press the START pad
31
I I I i ,i

RANGEWARRANTY
F' "%
FULL-ONE YEAR WARRANTY ON THE FUNCTIONING OF ALL PARTS EXCEPT
GLASS PARTS
If, within one year from the date of installation, any part, other than a glass part, fails
to function properly due to a defect in material or workmanship, Sears will repair or
replace it, free of charge.
=ULL 30-DAY WARRANTY ON GLASS PARTS AND FINISH OF PORCELAIN
ENAMEL, PAINTED OR BRIGHT METAL FINISHED PARTS
ff, within 30 days from the date of installation, any glass part or the finish on any
3orcelain enamel, painted or bright metal part is defective in material or workmanship,
Sears will replace the part, free of charge
FULL 90-DAY WARRANTY ON MECHANICAL ADJUSTMENTS
For 90 days from the date of installation, Sears will provide, free of charge, any
mechanical adjustments necessary for proper operation of the range, except for normal
maintenance,
If the range is subjected to other than private family use, the above warranty coverage
is effective for only 90 days
WARRANTY SERVICE IS AVAILABLE BY CONTACTING THE NEAREST SEARS
SERVICE CENTER IN THE UNITED STATES
This warranty applies only while this product is in use in the United States This warranty
gives you specific legal rights, and you may also have other rights which vary from stale
to state
Sears, Roebuck and Co,, Dept 817 WA, Hoffman Estates, IL 60179
To Further Add To The Value Of Your Range,
Buy a Sears Maintenance Agreement.
of Ownership Coverage
Replacement of Defective
1
Parts other than Porcelain
or Glass
2
Mechanical Adjustment
Porcelain and Glass Paris
3
Annual Preventive Mainten-
4
ance Check at your request
W- Warranty MA * Mainlenance Agreement
Kenmore appliances are designed, manufactured and tested for years of dependable
operation Yet, any appliance may require service from time to timer The Sears
Maintenance Agreement offers you an outstanding service program for your product,
The table above shows the additional benefits a Sears Maintenance Agreement offers
compared to a Sears Warranty
Contacl your Sears Sales Associate or local Sears Service Center to purchase a Sears
Maintenance AgreemenL
lstYear 2nd Year 3rdYear
W MA
90 DAYS
W MA
30 DAYS
W
MA
MAMA
MAMA
MA
MA
32

ESTUFA TIPO "SLIDE-IN"
Indice
Foco de la luz del homo .............. 47
Parrillas del homo .................. 47
Ajuste a la temperatura
del homo .....................................47, 62
Seguridad en
el uso de la estufa ......................34-38
Corte de corriente ....................... 38
Dispositivos para desconectar
el gas y la etectricidad .................. 38
Utensilios y woks para cocinar ,, 38
Caracteristicas de su estufa ..... 39
C6mo sacar la cinta
de empaque .................. 39
Quemadores de la cubierta ....... 40
Posicion de los controles ..... 40
Encendido del quemador ........... 40
Llama para cocinar a fuego lento 40
Consejos para hacer conservas 40
Control del homo ................. 41
Panel de control ......................... 42
C6mo porter el reloj .............. 43
C6mo programar el crondmetro 43
Tonos .......................................... 44
Codigo F ..................................... 44
Consejos para cocinar en
el homo ............................. 45-47
Olor u olor fuerte .................... 45
Papel de aluminio .................. 45
Ventilaci6n del homo ............... 45
Precalentamiento ................... 45
No mire .............................. 45
Sensor de temperatura
del homo ......................... 45
C6mo cotocar los utensilios ...... 45
Ciclo de los quemadores ..... 46
Zona de temperatura baja ........ 46
Horneado con margarina ......... 46
U/ensltfos .................... 46
Como encender el
quemador-barra incandescente ......46
Para su conveniencia y referencia futura, por favor escriba et n_Jmero de modelo y
de serie en el espacio que se provee. Estdn ubicados en el marco frontal detr_s del
caj6n,
C6mo hornear .................................. 48
Para asar ................................................. 49
El cicio de autolimpieza ............50, 51
C6mo seleccionar programas
especiales ..........................................52, 53
Panel de control .................................54
Cacerola y parrilla para asar ..............54
Cajdn y lados de la estufa ............. 54
Cubierta de esmafte porcelanizado 54
Cubierta de vidrio ............................ 54
Vidrio de la puerta del homo ............54
Moldura de la ventilaci6n
de la puerta ...............................................55
Parrilla de quemador .......................55
Recipiente, tapa y cabeza
del quemador .....................................55
Partes de homo removibles ......... 55
Perillas de control ............................56
Foco de la luz del homo ..................56
Caj6n de almacenamiento .............57
Componentes removibles
det quemador de ]a cubierta ........ 58
Parrillas removibfes det homo .........59
Puerta removible del homo ............59
Antes de Ilamar para
un servicio ...................... 60-62
Ajustes a la temperatura ........... 62
Garantia ................................... 63
Numeros para servicios del
consumidor ................ 64
NUMERO DE MODELO: NUMERO DE SERIE:
1,1,11 iii i1[111, , ii,lJ!llll
© Sears, Roebuck and Co.
33

INSTRUCCIONESDE
SEGURIDADIMPORTANTES
GUARDE ESTAS INSTRUCCIONES
Lea todas las instrucciones antes de usar este aparato. Cuando use aparatos a gas o
el_ctricos se deberian seguir precauciones de seguridad, incluyendo Io siguiente:
daSos repmductivos y requiere que los
;;ADVERTENCIA!! Si
la informaci6n en este
manual no se sigue
exactamente, podrfa resultar un
incendio, una explosi6n, o un
escape de gas que causen da_o
a la propiedad, heridas
personales, o muerte.
hombres de negocios adviertan a sus
clientes del contacto potencial a tales
substancias.
Lasestufas a gas podr_ancausar un
contaeto menor a cuatro de estas
substancias, nominaimente benceno,
mon6xido de carbono,formalina y oll_n,
causados principalmente por ?acombusti6n
incompleta del gas natural y el gas licuadoo
Lasestufas ajustadas adecuadamente,
indicado por una llamaazulada en vez de
amarilla, minimizardn la combusti6n
incompleta. El contacto a estas substancias
puede mlnimizarse con mrs ventilaci6n
abriendo las ventanas o usando un
ventilador o una campana de ventitaci6n.
El horno, como sale de f_brica, puede set
operado solamente con gas natural. Notrate
de hacerlo funcionar con gas L.P. (gas
embote|lado). Las llamas altas y los vapores
t6xicos podrian causar serias heridas. Si
desea usar su homo con gas L_Pousted
debe convertir la estufa siguiendo el
procedimiento que se encuentra en las
fnstruciones para lnstalaci6n que vienen
con el horno_
IMPORTANTE: La salud de atgunos
p_jaros es extremadamente sensitiva a
los vapores producidos pot el ciclo de
autotimpieza de cualquier homo. Ponga los
pdjarosen otra habitaci6n que est_ bien
ventilada.
,i,i
;ADVERTENClA DE SEGURIDAD
IMPORTANTE!
Ca|ifornia Safe DrinkingWater andToxic
Enforcement Act requiere que el gobernador
de California publiqueuna lista de
substancias qua el estado sepa que
producen defectos de nacimientou otros
r_lk ADVERTENClA AJUSTE A L0S _
embotellado) todos los ajustes en
deben hacerse antes de usar su
adecuad-amente, las llamas podri'anestar
demasiado altas, o el homo podr_ausar
demasiado combustible, emitiendo
_ap°res t_xlc°s ° c°cinand° mal" .,
QUEMADORES DE GAS L,P,
Si usted tiene la intenci6n de
usar Gas Licuado de Petr61eo,(gas
las Instrucciones parala Instalaci6n
homo° Si su homo no est_ ajustado
34

INSTRUCCIONES
BESEGURIDAD
IMPORTANTES
_,Todas las estufas se
pueden volcar
• Personas podrian resultar!:_
heridas
- lnstale el dispositivo i
empacado con la estufa :;
• Vea las instrucciones de
instalaci6n
7:
Saque todas las partes de la bolsa
de pl_stico pegada a la espalda de la
estufa y conserve la cinta de empaque.
Antes de poner la estufa en el mes6n, mire
la ubicaciOn del soporte de estabilidad en
la espalda de la estufa,
Ubicaci6n de
laabrazadera
J
.
Elija una
ubicaci6n
donde no
hayan
alambres
el6ctficos o
tubos de
ptomeda,
2o Con el
tornitlo largo Tornillo \ 1] Basede
qUeprovee,Se ':i:ide_a,__.,__ re'
anclela " - FAI
cadena al
suelo o a la
pared.
! ii
3. Aseg0rese que el tornillo entre a la
!:
base de la pared o al listOn de la base
de la pared por to menos 3/4"
4. Enganche la cadena de estabilidad
de manera qi.Jequede alineada con la
abrazadera en la espalda de la estufa
=
Tire la cadena para estar seguro que
est_ bien enganchada
6.
Tome la cinta de
empaque y pegue
provisoriamente la
punta suelta a la
cadena a la parle
trasera del mes6n
.
Deslice la Cadena
estufa en el mes6n
dejando suficiente
espacio arras para
enganchar la cadena a la abrazadera.
8, Meta el eslab6n m_s cercano de
fa cadena en la abrazadera Tire para
estar seguro que est& Io m_s tirante
posible
9. Deslice fa estufa hacia arras lo m_s
posibte Es normal que quede un poco
de soltura en la cadena, pero no
deberia set excesiva
Cadena
Al;andela
y tomillo
Oadena
Empaque
!
35

INSTRUCCIONES
DESEGURIDAD
IMPORTANTES
r
a un us0 anormal, incluyendo una
carga excesiva sobre la puerta,
eng_nche la estufa a la pared o a!
suelo instalando el dispositivo contra
volcaduras que se provee. Si la
estufa se mueve para limp!aria, para
hacerle servicio o cualquier raz6n,
aseg_rese que el dispositivo contra
volcaduras sea enganchado
nuevamente cuando la estufa se
coloque de vuelta en la abertura.
No hacerlo podria resuitar en que la
estufa se vuelque y podria causar
heridas personales. Para
inspeccionar el dispositivo contra
volcaduras, saque el panel frontal
y mire para asegurarse que el
nivelador de la pata trasero est_
bien enganchado en la ranura de
la abrazadera.
IMPORTANTE: Para garantizarsu seguridad,
la desu familia y la de su hogar, por favorlea
su Manual detConsumidor cuidadosamente
Mant6ngalo a la mano para referencias Ponga
mucha atenci6n alas secciones de seguridad
ASEGURESE que su estufa sea instatada por
un tecnico especializ.ado y quehaga tierra
adecuadamente
,, NO DEJE a los niflos sin vigitancia cerca de
una estufa que se est6 usando
* ENSE_,tEA LOS NINOS a nojugar con los
controles ocualquier parte de la estufa y no
sentarse, subirse o pararse sobre la puerta
de este aparato o de cualquier otra parte de
la estufa
i ullll i i_1,
Para prevenir que
_ADVERTENC|A!
la estufa se vuelque
accidentalmente debido
* PRECAUCION: NUNCAGUARDE articulos
que sean de inter6s para los nixiesen el
panel trasero o en los gabinetes sobre la
estufa Los niflos que se suban sobre la
estufa podrian resultar gravemenle heridos
,, GUARDE ESTE libro para un uso futuro
o NUNCA USE su estufa para entibiar o
calentar una habitaci6n
* NUNCA TRATE de reparar o reemplazar
una parte de la estufaa menos que las
instrucciones se den en este manual Todo
otto trabajo deberia set hecho por un t6cnico
especializado
, SIEMPRE MANTENGA los revestimientos
combustibles de las paredes, cortinas y
otros paP_osa unadistancia prudente de la
estufa
, NUNCA CALIENTE contenedores de
alimentos cerrados Etaumenlo de ia presi6n
podria causar que el contenedor explore y
cause heridas
• NUNCA deje contenedores de grasa o
goteaduras sobre o cerca de la estufa
° SIEMPRE MANTENGA el area de ia estufa
despejada de cosas que se podrian quemar
La acumulaci6n de comida y grasa y los
utensilios de madera se podrian incendiar
Losutensilios de pl_stico se podrian derretir
y lascomidas en conse_as poddan expiotar
Su homo nunca se debeda usar I_ara
almacenar cosas,
= SIEMPREMANTENGA ]aestufa despejada
de cosas que se poddan quemar (gasoiina y
otros vapores y iiquidos inflamables)
* NUNCA trate de limpiar tassuperficies
calientes Algunos limpiadores producen
vapores nocivos y los patios y tasesponjas
mojadas podrian causar quemaduras por
vapor
, NUNCA USE ropa suelta cuando use ta
estufa
* NUNCA USE una toalIa u otro patio
abultado como agarradera Aseg0rese que
la agarradera este seca Las agarraderas
hL]medasy los patios y esponjas mojadas
podrian causar quemaduras pot vapor NO
PERMITA que tas agarraderas toquen las
quemadores para cocinar calienles
° RASGUNOS GRANDES O IMPACTOS
sobre las superficies de vidrio de las
puertas o de las cubiertas de vidrio podrian
romper o agrietar el vidri
36

INSTRUCCIONES
DESEGURIDAD
IMPORTANTES
* CUANDO PREPARE cemidas a la llama
debajo de ta campana de ventilaci6n,
encienda el ventilado[ ...........
• NO TOQUE las superficies para
quernadores, las superficies cerca de etlas o
tas superficies inleriores Estas podfian estar
suficienternente calientes para quemar
aunque sevean de color oscuro Durante y
despu6s det use, no toque o perrnita que fa
ropa o materialesinflarnables hagan contacto
con las superficies calientes hastaque hayan
tenido tiernpo de enfriarse Las otras
superficies cerca de las ventanillas de
ventitaci6n del homo, puertas, ventanas y las
superficies para cocinar tarnbi6n podrian
estar suficienternente calientes para causar
quemaduras
• SOLO ciertas clases de utensilios de vidrio o
cer_mica se pueden usar para cocinar en la
cubierta Aseg0rese que los utensilios que
seleccione est&n diseSados para cocinar
sobre tacubierta sinquebrarse debido a los
s0bitos cambios de ternperatura
• SIEMPRE TENGA cuidado cuando toque los
quernadores de la cubierta Retendr_n caior
despu6s de que la estufa se haya apagado
• NUNCA OBSTRUYA la ventifaci6n de] homo
bajo el quemadore derecho de arras
• LAS OLLAS QUE SE USEN para cocinar en
facubierta deberian ser de fondo plane y 1o
suficienternente grandes para cubfir el _rea
que se est&utitizando Losutensilios que son
dernasiado pequeSos exponen e! elernento
calentador y podria causar un contacto
directo o el incendio de ta ropa El tarnaRo
correcto de los utensiliostarnbien rnejorar_ la
eficiencia
• NUNCA DEJE las quernadores de supefficie
sin vigilancia a ternperaturas altas Los
derrames podrian resultar en humo o en
derrarnes de grasa que se podrian incendiar
• SIEMPRE COLOQUE tas agarraderas
(rnanitfas)de las eliashacia adentro y lejos
de las otras quernadores de la superficie
para reducir el riesgo de quemaduras,
encendido, un contacto y derrarne
accidental
COLOQUE LAS PARRILLAS DEL HORNO
en ia posiciOn deseada mientras el homo
est6 frio Si las parrillas se deben mover
rnientras el horno estb.caliente, no permita
que la agarradera haga contacto con el
quernador caliente del homo
DESPUES DE ASAR A LA PARRILLA,
siernpre saque facacerota y ta parritla para
asar def homo y lirnpielas Los sobrados de
grasa en ta cacerola para asar podrian
incendiarse la prOximavez que usted use el
homo
SIEMPRE TENGA cuidado cuando abra la
puerta del homo Deje que el aire caliente y
el vapor escapen antes de mover los
alimentos
NUNCA UTILICE papel de ahminio para
cubrir el rondo del horno El use incorrecto
del papel de aluminio podria resultar en el
riesgo de un golpe de corriente e incendio,
* LIMPIE SOLAMENTE laspartes que
se listan en este manual Siga todas
fas instrucciones para la lirnpieza,
AsegOrese de sacar la cacerota y la parri!la
para asar antes del ciclo de autolimpieza
• NUNCA FRIEBUE, rnueva, lirnpie, o daSe
el selIo de la puerta en tas estufascon
autolimpieza Es esencial para un buen
sellado
° NUNCA TRATE de lirnpiar los utensilios,
ollas, partes rernovibtesota cacerola y la
parrilla para asar en el cicto de autolirnpieza
, NO USE lirnpiadores para homes- No se
deberia usar ninguna clase de limpiador para
homes o crernasprotecloras dentro o
afrededor de cuatquier parte deÁhomo
- SI LA FUNCION DEAUTOLtMPIEZA
falla, apague el homo y desconecte la
electricidad H&gale un servicio per un
t_cnico calificado
37

INSTRUCCIONES
DESEGURIDAD
IMPORTANTES
;LEA Y COMPRENDA ESTA
INFORMACION AHORA!
Aseg_rese que todos en su hogar
sepan qu_ hacer en caso de incendio,
Nunca use agua sobre un incendio de
grasa; esto solamente extender& las
llamas.
INCENDIO DE GRASA EN LA
CUBIERTA:
Nunca ievante una olla en llamas...
1. Apague los quemador de la superficie
2. Soloque la llama con una tapa
apretada, soda para cocinar o con un
extintor quimico, a espuma o "halon"
FUEGO EN EL HORNO:
iNo trate de mover la cacerola!
1, Cierre la puerta de! horno y apague
los conlroles,
2. Si el incendio continua,
cuidadosamente abra la pueda, arroje
soda para cocinar sobre el fuego, o
use un extintor de qu[mico seco,
espuma o "halon".
El regulador de presi6n (detr_s de la
estufa) tiene una maniila que abre o corta
el paso del gas al homo Esta manilta es
accesibfe desde el frente de ta estufa si se
saca el cajdn de almacenamiento y se
alcanza a trav6s del compartimento y la
parle de arras de la estufa, Vea la seccidn
de instalacidn para m_s informacidn
El dispositivo para desconeclar la
electricidad estA ubicado detr_s del caj6n
de almacenamiento en el compartimento
de abajo Saque el cajOn para alcanzarto
Apriete tas aletiltas para desconectarfo
Durante un torte de corrienle, los
quemadores de la cubieda no se
encender&n auto-m&ticamente En una
emergencia, un quemador de cubierla se
puede encender con un fdsforo de
madera Siga las instrucciones m_s abajo:
1. Encienda el f6sforo de madera.
2. Sujete la llama junto al quemador que
desea usar
3. Empuje y haga girar la perilla correcla
a la posici6n de encendido,
4. Cuando el quemador se enciende
haga girar ia perilla a la posiciOn
preferida
(eAdve ia ...............
rtenc" : Encender un quemador"|
con un f6sforo es peligroso. Usted |
deberfa encender los quemadores |
con este m_todo s61o en caso de |
mergencia. ....... )
38
Use ollas y woks que sean de! mismo
tamaSo del quemador que use cuando
cocine.
anillos de soporte. No use
No use woks que tengan
parrillas de superficie de
estufas.

OPERACiON
4 quemadores
CARACTERISTICASDESUESTUFA
Ventilaci6n Del Homo
Esmale
porcelanizado o
cubierta de
vidrio
4 parrillas de
quemadores
4 perillas de Parrillas
control removibles del
removible de homo
cubierta
Cerrojo de
puerta para
autolimpiezz
Ubicaci6n de plata
con nt_mbero de
modelo y
Caj6n de almacenaje
Fondc removible del
removible del homo
homo
Fuente y parrilla
para asar
Control del
homo, reloj y
cron6metro
Sello de la
puertapara
autolimpieza
Puerta
Para sacar el residuo del adhesivo de la cinta de empaque, use un detergente liquido
normal para platos, aceite mineral o para cocinar, Con un patio suave frote el area y
permita que se remoje, Enjuague y seque blent Repita et procedimiento usando un
pulidor para estufas para asegurarse que la estufa no se da_e Esto deberia hacerse
antes que la estufa se encienda por primera vez. La cinta no se puede sacar una vez
que el estufa ha sido calentado. La cinta de empaque se puede encontrar en las
siguientes _reas: Superficie de la cubierta, manilla de la puerta, area def panel de
control, moldura de la puerta y area del homo.
39

OPERACiON
CSmoCocinarenla Cubierta
La marca cerca de cada peritla de control
le muestra qu6 elemento se enciende con
esa perilta
Derecha
trasera
Cuando la perilla se hace girar a ta
posici6n de encendido, un encendedor a
chispas envia una serie de chispas
ef6ctricas que encenderAn el gas que
pasa automaticamente al quemador
' III i, lUllll, lll, , Hill'
_r_ Cuando cocine sobre
| I _i_l cubiertas de vidrio o de |
I _ porcelana recuerde que estas I
| _reas se pueden calentar. |
I Tenga cuidado cuando trabaje cerca |
de estas _reas
_d ...................... J
O0
Izquierda
trasera
HI Para comienzos r_pidos, tal como
MED Para hervir lentamente y freir
LO Para comidas al vapor o para
1. Empuje para hacer
girar la perilla
2. Empuje para hacer
girar las peritlas a la
posiciOn LITE
(encendido)
3. Despues de que el
quemador se
prenda, ponga ta
perilla al tipo de
llama deseado
usted deberia porter
_Como precauci6n
los controles de
manera que la llama
caliente solamente el fondo de la olla
y no lama los lados. Las llamas que
lamen los lados de las ollas son
peligrosas y desperdician energia.
• .................. i......... _11
®o o@
tzquierda Derecha
delantera delantera
para hervir agua
mantener los atimentos a
temperaturas para set servidos
oo
Cuando cualquier quemador de superficie
est6 encendido, la luz indicadora de
unidad de superficie se encender&,
Si est#, cocinando con una llama a fuego
lento sobre un quemador, vigile la
posici6n Debido al aumento del paso del
gas a los otros quemadores, el tamaP,o de
la llama que se est_ usando para cocinar
lentamente podria necesitar ser
aumentada.
1. Aseg0rese que la olla est6 centrada
sobre el quemador
2. Asegurese que la otla sea de rondo
plano
3. Use recetas y procedimienlos de
buenas fuentes Estas se encuentran
disponibles de fabricantes tales
como Ball®y Kerr ®y Servicio de
Extensi6n del Departamento de
Agr!cultura..
4. Tenga cuidado, cuand0 haga
conservas, para prevenir quemaduras
a causa de vapor o calor
40

OPERACION
ControlDelHomo,RelojYCron6metro
,,,,,
OVEN
f, l
l{ l tO I
_y BIU_ C_ _i_ _P _,,,,)[eRD__C_:DO00X _A,_ _X _ I
O08
Su nuevo control de homo a botones le permitir& programar las varias lunciones
con facilidad Mas abajo est_n los diferentes tipos de funciones y la descripcidn de
cada uno
Los botones con las flechas
HORNEAR - Cocina tos alimentosen el homo
tradicional a una temperatura que varia de
170°Fa 550°F
ASADO A LA PARRILLA - Asa losalimentos
en ALTO a 550°F o en BAJO a 450°Fa calor
directo del efemento superior. Etasadoa la
parrilla se debe hacer con la puerta abierta en
la posici6n de tope para asar a ta parrilla
LIMPIEZA- Limpia el _rea interior del homo
por usted Cuando el ciclo termina, el homo se
apagar_,autom_ticamente
NOTA" La puerta det horno se cerrar_ con
cerrojo autom_ticamente y el cerrojo se abrir_
s61ocuando et homo se hayaenfriado
Programa lacantidad de tiempo
en que usted desea cocinar los
atimentos Se debe asar a la
parrilla con la puerta abierta en ta
posici6n de tope para asar
Programa la hora del dia en la
cual usted desea que et homo se
encienda E!homo seencender_.
automaticamente a ta hora que
usted ha programado. Cuando se
use elCOMIENZO DEMORADO
(DELAY START) con TIEMPO
PARA COCINAR, el homo se
apagar_ autom_ticamente al
t6rmino del ciclo para cocinar,
41
SUBIR y BAJAR programan
ta hora del dia, la cantidad de
tiempo para cocinar, la
cantidad de tiempo para
timpiar, la hora para un
comienzo demorado, la
temperatura de! homo y la
hora del cron6metro de la
cocina
El botdn START debe
empujarse para activar
cualquier funci6n de1homo
El bot6n CLEAR/OFF se usa
para cancefar cualquier
funciOn del homo y el tono de
fin de ciclo No cancelar_ el
Reloj o el Cron6metro de la
Cocina
El bot6n KITCHEN TIMER
(ENCENDIDO/APAGADO) se
usa para encender o apagar
e! Cron6metro de la Cocina
No controlar_ ninguna otra
funci6n del homo
El bot6n del RELOJ se usa
para poner la hora del dia

OPERACION
Panel De Control
indicador de
temperatura del homo
\ ,//
Indicador que le
avisa para que
programe una
temperatura o un
tiempo
EtDial de Control es una referencia facil
para utilizar el control del homo Mas
abajo est&n 1asdescripciones para indicar
c6mo funciona el Dial de Control.
INDICADOR DE LA TEMPERATURA
DEL HORNO - Este indicador tiene un
prop6sito multiple
• Muestra ta temperatura
- Muestra el c6digo de error "ERR"- Si
el indicador de temperatura del homo
pestaSea "ERR", entonces usted ha
programado un tiempo o una
temperatura incorrecta
• Muestra problemas el horno - Si el
control pesta_ea "F" y un n_Jmeroo
letra, usted est_ experimentando un
probtema del horno.. Por favor lea la
secci6n CO#1GOS-F en su manual
INDICADOR DE ENCENDIDO - Se
encender_ cuando se programe una
funci6n del homo
] DELAYBAKE CLEAN STARTCLOCKCLEAN]
_ DROlL\LOCKEDDOOR COOK'-.,.STOP//TIMER)
indicador de funcidn lndicador de funcidn
de tiempo de tiempo
Indicador de encendido
Ubicaci6n del reloj
para la hora del dia,
cron6metro de la
cocina, hora de
comienzo
demorado, cocci6n
en el homo, o
tiempo de timpieza
INDICADORES DE PROGRAMA - El
indicador de programa pesta_ear_ en
combinaci6n con una funci6n del homo o
una funci6n autom_tica para avisarle que
necesita programar un tiempo o una
temperatura. Ejemplo: "SET" y "BAKE"
pestaSear_n para avisade que necesita
programar la temperatura del homo.
INDICADOR DE LA HORA - Muestra la
hora de1dia, la cantidad de tiempo para
cocinar, la hora para comenzar una
funci6n demorada para cocinar, limpiar, o
la hora programada en el cron6metro de la
cocina
• Muestra un c6digo para recordar
"PUSH START" - Si el indicador de la
hora del homo pestaSea las palabras
"PUSH START", entonces usted tiene
que empujar el bot6n START para
activar su programa
INDICADORES DE LAS FUNCIONES
DEL HORNO - Muestran qu6 funci6n ha
sido programada, cuando la puerta del
homo est& enganchada, y si la funci6n es
demorada
42

OPERACION
RelojYCronSmetro
El refoj debe ponerse a la correcta hora
de! dia antes que una funci6n demorada
del homo funcione correctamente La hora
del dia no se puede cambiar durante una
funci6n autom&tica del homo, pero se
puede cambiar durante una funci6n para
hornear o para asar a la parrilla
COMO PONER EL RELOJ
Empuje el bot6n Ct.OCK
2.
Empuje los botones con las flechas
SUBIR o BAJAR para poner la hora
correcta del dia..
3. Empuje el bot6n START
PARA VOLVER AL RELOJ
Mientras este usando el homo para
cocinar, empuje el bot6n CLOCK, si
desea ver la hora del dia. La hora
presente del dia se ver& en el dial
CORTE DE CORRIENTE
Si ha ocurrido un corte de corriente, la
hora pestaSear& en el dial y estar_
incorrecta Ponga nuevamente et reloj a la
hora
Cualquier funci6n para cocinar del homo
que estaba en proceso tendr_ que ser
reprogramada
El cron6metro de ta cocina se usa para -
medir el tiempo de los procesos para
cocinar u otras actividades del hogar No
controta el homo. Se puede programar
hasta 9 horas y 59 minutos Contar_ hacia
atr_s en minutos basra que Ilegue a los
ULTIMOS 60 SEGUNDOS, entonces el
control sonar& una vez Cuando la cuenta
llegue a CERO, el control sonar,_ 3 veces
seguido de un sonido cada 6 segundos
hasta que el bot6n KITCHEN TIMER se
empuje, El sonido de cada 6 segundos se
puede eliminar para ciclos futuros si se
desea., Para las instrucciones de c6mo
eliminar estos sonidos continuos, vea
TONOS en la p&gina siguiente
COMO PROGRAMAR EL CRONOMETRO
@+@@+@
1. Empuje el bot6n KITCHEN TIMER
2. Empvje los botones con las flechas
SUBIR o BAJAR para poner la hera.,
3. Empuje el bot6n START
4 Cuando la cuenta llegue a cero,
empuje e! bot6n KITCHEN TIMER,,
Para cancelar eFcron6metro durante la
cuenta, empuje el bot6n KITCHEN TIMER
dos veces.
43

OPERACION
Control Del Homo, Reloj Y
CronSmetro
E! nuevo control tiene una serie de lonos
que sonar;&n a tiempos diferentes Estos
tonos pueden sonar mientras usted
programa una funci6n dei homo, o al final
de una funci6n del homo Tambi6n ]e
avisar;& si existe un problema con una de
las funciones M&s abajo est;&n los tipos
de tonos y una breve descripci6n de cada
uno
TONOS MIENTRAS PROGRAMA EL
CONTROL- Cuando empuje un bot6n
usted escuchar;& un tono Este tono te hat;&
saber que aplic6 suficiente presi0n sobre
et bot6n para activarto, (Los botones con
las flechas no suenan ,)
TONO AL FINAL DE UN ClCLO
AUTOMATICO - Despu6s de una funci6n
para cocinar autom;&tica, usted escuchar_
tres tonos cortos seguidos por un tono
cada 6 segundos El tono de cada 6
segundos seguir& sonando hasta que
empuje el bot6n CLEAR!OFF ousted
decida seleccionar el programa especial
para cancelar y evitar que el tono de 6
segundos suene al final de un ciclo futuro
COMO CANCELAR EL TONO DE
6 SEGUNDOS
,
Empuje y sujete los botones
BAKE y BROIL, a la misma vez
por 3 segundos, hasta que el dial
muestre "SF",
2. Empuje el bot6n KITCHEN TIMER
El dial mostrarA "CON BEEP" (tono
continuo)
3. Empuje et bot0n KITCHEN TIMER
nuevamente, El dial mostrar;& "BEEP"
(tono cancelado)
4. Empuje el bot6n START, para
cancelar el tono y salir de este m6dulo
especial.
Si desea regresar a los tonos de 6
segundos, repila los pasos de arriba hasta
que el dial muestre su selecciOn y empuje
el bot{Sn para el COMIENZO (START)
TONO DE ATENCION - Este tono sonar;&
si hace un error u omite algo mientras
programa una funci6n del homo
Unos ejemplos sedan:
a. Programar un ciclo de limpieza y la
puerta del homo no est& bien cerrada
b. Programar una funci6n y no empujar el
bot6n START,.
c. Empujar un bot6n para una funci6n
adicional sin programar primero la
temperatura o el tiempo
d. ERR pestafiear#, si usted programa
una temperatura invalida, Empuje et
boton CLEAR/OFF para poner el dial
en blanco y reprogramar la funci6n dei
homo
Cualquiera de estos se puede identificar
r;&pidamente con mirar el dial,
TONO DE PRECALENTAMIENTO-
Cuando programa una temperatura en el
homo, el homo empieza a calentarse
autom_ticamente Cuando la temperatura
dentro def homo ltega a la temperalura
que usted program6, sonar& un tono para
avisarle que el homo est;& listo para
hornear
Si usted programa una funciOn del homo y
el control suena mientras el dial hace
pestafiear una "F" y un n_Jmeroo letra tal
como "F-4" o "F-I", es posible que exista
un problema con el control o con el homo,
Simplemente empuje et boron CLEAR/
OFF y espere una hora Trate de
programar esa funci6n nuevamente Si el
c6digo se repite, escriba el c6digo que
pestafiea y llame para un servicio, Digale
al tecnico qu6 cOdigo estaba
pesta5eando
44

OPERACION
ConsejosPara Cocinar
EnE1Homo
Es normal sentir un poco de olor cuando
use su homo pot primera vez Para ayudar
a eliminar este olor, ventile la habitaci6n
abriendo una ventana o usando una
campana de ventilaci6n,
IMPORTANTE: Nunca cubra el fondo
del homo o la parrilla del homo con papet
de aluminio El uso inadecuado puede
causar una ma]a circulaci6p del calor,
pobres resultados at hornear, y podria
dafiar et acabado del horno. Para prevenir
manchas debido a derrames, usted podria
cofocar un pedazo de papel de aluminio o
una bandeja para galletas sobre la parrilla
debajo de la comida que se podria
derramar
E1precatentamiento es subir la temPeratura
del homo a la temperatura que va a usar
cuando hornee Permita que el homo se
precaliente cuando las recetas requieren
precalentamiento
Si abre la puerta para mirar los atimentos
causara una perdida de calory malos
resuitados cuando hornee
En la parte trasera del homo usted notarA
un pequeSo tubo Esto es un sensor de
calor que mantiene la temperatura del
homo Nunca mueva o doble este tubo
°°oo,Ue
temperatura de! horno_
La ventilaci6n toma de corriente del
horno est_ ubicada debajo de! elemento
Superficie posterior derecho Esta Area se
podria calentar mucho durante et uso del
homo Es normal que salga vapor de la
ventilaci6n y!o que se acumule humedad
debajo cuando el homo est_ en uso,
La ventilaci6n es importante-para la
circulaci6n adecuada del aire Nunca
obstruya la ventilaci6n,
Ubicaci6n de
la ventilaci6n
Los resultados det horneado serA mejor si
las cacerolas para homear est_n centradas
en e! homo io m_s posible, Si est_
horneando con mAs de un utensilio,
col6quelos de manera que cada uno
tenga pot fo menos de t" a 11/2"de
espacio de aire a su alrededor, Coloque
los utensilios de manera que ninguno
quede directamente encima de otro.
/
45
\

OPERACiON
ConsejosPara Cocinar
EnElHomo
Et Sensor de Temperatura del Homo en la
parte trasera del homo mide y controla
continuamente la temperatura dentro de1
homo Para mantener una temperatura
programada constante, los quemador
har_n un ciclo de encendido y apagado
mientras el homo cocina.
La zona de temperatura baja de su homo
(entre 170° y 200°F) est& disponsible para
mantener los alimentos tibios Sin
embargo, los a/imentos que se mantengan
a esta temperatura por m&s de 2 horas se
poddan echar a perder
La mayoria de las recetas para hornear
hart sido desarrolladas utilizando
productos con un alto contenido de
manteca tales como mantequilla y
margarina (80% de manteca por peso--el
requerimiento federal para los productos
marcados"margarina") Usted obtendr_.
mafos resultados si los queques, pasteles,
tortas, galletas, o dulces son hechos con
mantequilla con bajo contenido de
manteca Las mantequilfas y margarinas
con bajo contenido de aceite contienen
menos manteca y m_s agua El alto
contenido de agua de la mantequilla o
margarina afecta la textura y el sabot de
sus recetas para hornear favoritas.
Mientras mAs bajo sea et contenido de
manteca de la mantequilla o margarina,
m_s se notar&n estas diferencias Para
asegurar los mejores resultadds, use
margarina, mantequilla u otras barras de
estos productos que contengan por lo
menos 70% de ace!re vegetal
BANDEJAS BAJAS PARA GALLETAS,
sin lados, permiten que el aire circule
alrededor de tas galletas para que se doren
en forma pareja
f
/
Las BANDEJAS BRILLANTES reflejan el
cator, y son perfectas para los queques y
panecitlos rapidos que deben quedar con
una corteza de color caf6 claro
UTENSILIOS DE VIDRIO, OSOUROS
CONTRA PEGADURAS, U OPACOS
POR LA EDAD absorven el ca!or y
pueden ser usados para panes con
levadura, cortezas para pasteles o
alimentos que tengan una corteza caf6 La
temperatura del homo se debeda reducir
en 25°F,
Cuando enciende el control de! homo,
la barra incandescente empieza a
calentarse Cuando el encendedor est_
suficientemente catiente, en como t
minuto, el gas entra al quemador y se
enciende
El encendedor se ve de color naranjo
bdllante cuando est& caliente Hace un
ciclo de encendido y apagado con et
termostato y estarA incandescente cuando
el quemador este encendidQ
_/G-_ Durante un corte de corriente
[_1 el quemador del homo no se /
"-_/ puede encender y no debeHa /
tratar de hacerlo.
46

OPERACION
ConsejosParaCocinar
EnE!Homo
Para prolongar la vida det foco de la luz
del homo, siga estos consejos: Siempre
apague la luz cuando el homo no este en
uso 6 durante un ciclo de limpieza, Si la
luz del homo se deja encendida por un
largo periodo de tiempo, el homo estar_
tibio cuando abra Eapuerta debido al calor
generado por el foco de la luz del homo
Las parritlas del homo est&n diseSadas
con topes, una conveniencia y tambi6n
una precauciOn de seguridad Las guias
tienen una tope para prevenir que las
parritlas se den vuelta,, Este diseSo
permite que las parrillas puedan set
insertadas de s61o una manera
PRECAUCION: Cuando usted est6 usando
la parrilla en la posiciOn mAs baja (1),
necesitar__ tener cuidado cuando saque la
parrilla, Recomendamos que tire la p&rrilfa
varias pulgadas hacia afuera y entonces,
usando dos agarraderas, tire la parrilta
hacia afuera sujetAndota de los lados La
parrilla est_ baja y usted se podria quemar
si coloca la mane en et medio de la parrilla
y la saca completamente hacia afuera
Tenga cuidado de no quemarse ta mano
en ta puerta cuando use une parrilla en fa
posici6n m&s baja (1),
Usted podda pensar que su homo
nuevo cocina diferentemente al homo que
reemplaz6 Le recomendamos que use su
homo nuevo per varias semanas para que
se famitiarice m_s con 61,siguiendo los
tiempos que se dan en fa receta como
una guia, Si cree que su homo est&
funcionando demasiado caliente o fdo
para su prderencia, yea Ajustes-Hagalos
Usted Mismo en ta parte trasera este
manual para hacer los ajustes
Su homo tiene cuatro (4) posiciones, La
posici6n de m&s arriba es solamente una
guia No puede ser usada come posici6n
para una parrilla
Guias
Siempre coloque las parrillas del horno
en ia posici6n correcta cuando el homo
est_ frfo.
47

OPERACION
CSmoHornear
1. Empuje el bot6n BAKE
2. Empuje los botones con las
iiecha SUBIR y BAJAR,
para programar fa
temperatura del homo que
desea usar
Para programar que el homo se encienda
a una hora posterior del dia, cocine pot
una cantidad de tiempo especifica y se
apague automAticamente
1. Empuje el bot6n BAKE
,
Empuje el bot6n con las
!lechas SUBIR y/o BAJAR
para seleccionar la
lemperatura det homo que
prefiere usar
_3. Empuje el bot6n START
Hornear empuje el bot6n
4. Cuando termine de
CLEAR/OFF,
Para programar que el homo cocine por
un tiempo determinado y se apague
autom_ticamente:
1. Empuje el bol6n BAKE
2_
Empuje el bot6n con
las flechas SUBIR y/o
BAJAR para seleccionar ta
temperatura del homo que
usted desea usar
3, Empuje el bot6n OVEN
COOKING TIME
4_
Empuje el bot6n
con las ftechas
SUBIR y/o BAJAR para
seleccionar ta cantidad
de tiempo en que desea
que los alimentos se
cocinen
3, Empuje el bot6n OVEN
COOKING TIME,
.
Empuje et bot6n con las
flechas SUBIR y/o BAJAR
para seleccionar la
cantidad de tiempo en
que desea cocinar los
alimentos
START TIME
5. Empuje el bot6n DELAY
6_
Empuje el bot6n con las
flechas SUBIR y/o BAJAR
para seleccionar la hora
del dia en que prefiere
que et homo se encienda,
7. Empuje e! bot6n START
Estas operaciones del horno se pueden
usar para asar.
El homo se apagar_ al t6rmino del tiempo
para cocinar a menos que el progama
para mantenci6n de temperatura se haya
activado
(_ 5, Empuje el bot6n START
48

OPERACION
CSmoAsarA LaParrilla
Asar es cocinar a! calor directo del
elemento superior. La puerta del homo
deberia permanecer cerrada cuando ase
a la parrilla,,
,f ,,
S
No es necesario precalentar el homo
cuando ase a la parrilla, Use la cacerola y
la parrilla para asar que viene con su
estufa Ambas est_n dise_adas para
drenar adecuadamente ta grasa y los
tiquidos,
lull, .............. Ilnlllll, I II '"n'l _1
debe set moldeado
I_ i usa papel de aluminio,
con laS ranuras de la parrilla. Esto
permite que la grasa y los fiquldos
caigan a la cacerola, evitando que se
produzca un incendio y humo
excesivo.
firmemente a la parrilla y
debe hacer cortes en el
pape| que est_n alineados
E1Departamento de Agricultura de los
Estados Unidos recomienda cocinar la
came y las aves compJetamente--la came
a un calor INTERNO de por lo menos
160°F y las aves a un calor INTERNO de
por Io menos 180°F, El cocinar a estas
temperaturas generalmente protege
contra enfermedades causadas por los
alimentoso
Mientras m_s cerca cotoque los alimentos
del quemadore para asar, m&s rApido se
dorar&n por afuera, pero quedando rojo o
rosado en el centro
Colocando las carnes iejos del quemadore
permitir_ que 1as carnes se cocinen en el
centro mientras se doran por afuer&
Usando estas posiciones, cocine el lado t
por 1omenos 2 minutos m_s que eLlado 2
. El tamaRo, peso, grosor, temperatura
inicial y su preferencia personal afectarA el
asado a ta parrilEa. Esta tabLa estA basada
en cames a la temperatura de1
refrigerador
AUMENTO
Bistec 1" de grueso
To.&.
motida- ! = de grueso
Chuletas de cerdo-
I/2" de grueso
I
Pose,ado (filetes)
Polio (presas)
POSICION DE TtEMPO TOTAL
PARRILLA (minUtos)
.....3 9-11
3 16-18
3 27-29
............. i,ii 1,1,11
3 11-13
2 45-55
Siempre saque la
cacerola y la parrilla del _._._'
homo, Guardar y '_ _,'_--_........
olvidar una cacerola _
para asar sucia en el homo es un
peligro para produeir un incendio o
humo.
L
la.
Empuje el bot6n BROIL (Esto
autom_ticamente programa ASADO
en HI-ALTO).
lb°
Mientras el indicador de programa
pestaRea en el dial, empuje
nuevamente el botdn BROIL si
prefiere asar en BAJO (LO),, Ase en
LO (BAJO) para cocinar bien
alimentos tales como aves o cortes de
came gruesos sin que se doren
demasiado
2. Empuje el bot6n START.
3. Cuando termine de asar, empuje el
botSn CLEAR/OFF
49

OPERACION
CicloDeAutolimpieza
El sello de la puerta est,€ dise¢,ado para
que tenga un espacio de 5"-6_en el rondo
det homo. Esto permite ta circutaci6n
adecuada del aire
1. Saque la cacerola y la parritta para
asar, utensilios, y cualquier papel de
aluminio que podria quedar en el
homo
2. Si su homo est_ equipado con
parriltas de niquel, ]as mismas deben
set removidas, Si su homo est_
equipado con parritlas cu'biertas de
porcelana gris, las mismas deben ser
remevidas durante el ciclo de limpieza
autom_tica,
3. La suciedad sobre el marco frontal y
afuera del sello del revestimiento de
la puerta necesitar& ser limpiada a
mano
Marco Frontal
1
2
/" Sello De La Puerta
_.Revestimiento
Limpie estas &reas con agua caliente,
lanillas con jab6n o limpiadores como Soft
Scrub ®para sacar cuatquier suciedad
Enjuague bien con agua fimpia y seque
4. Limpie cualquier derrame pesado del
rondo del homo
5. No limpie el sello de la puerta del
homo E1material de fibra de vidrio de
fa puerta del homo no soporta la
abrasidJn. Es esencial que el setto
permanezca fntacto Si nora que se
est_ gastando o trizando, deberia ser
reemptazado.
\
Panel de la puerta Sello
%
Es normal que su homo de la apariencia de
no tener un buen selto sobre el homo Esto
se debe al selto La ubicaci6n del sello
sobre la puerta mantiene la puerta seflada y
previene cualquier p6rdida de cafor
--_ os utensilios nunca se
Las parrillas de nfquet del homo se
_odrian limpiar durante el ciclo de
autolimpieza, pero perder_n su brillo
y se pondr&n dificiles de deslizar. Si
decide dejarlas dentro durante el ciclo
de limpieza, p_seles aceite vegetal
para que se deslicen m_s f_cilmente.-
Las parrillas cubiertas de porcelana
gris pueden ser limpiadas con
seguridad en el interior del homo
durante el ciclo de limpieza
autom_tica, Ser_ necesariO para
engrasar los extremos de la parrilla
del homo con una capa ligera de
aceite vegetal despu_s de un ciclo
de limpieza. Esto ayudar_ a que se
haga f_cil deslizar los estantes o
rejillas en el homo.
Durante el primer ciclo de limpieza,
ventile la habitaci6n con una ventana
_bierta o una campana de ventilaci6n.
deberian dejar dentro del
homo durante un ciclo de
limpieza.
50

OPERACiON
CicloDe Autolimpieza
El Ciclo de Limpieza, incfuyendo el
tiempo de enfriamiento, est& programado
autom,_ticamente por 4 horas, pero usted
puede cambiar esto de 3 horas si el homo
est,_levemente sucio a 5 horas si el homo
est& muy sucio.
1. Cierre ta manilla con
cerrojo.
Mostrar& 4 horas en el
2. Empuje el bot6n CLEAN
dial
@ 0 3. Si usted desea cambiarla cantidad de tiempo
para iimpiar, empuje los
botones con las flechas
SUBIR y/o BAJAR
4. Empuje el bot6n START
Despues del ciclo usted podfia n0tar un
poco de cenizas btancas en el homo..
Simplemente limpietas con un paso o
esponja humeda
Si algunas manchas blancas persisten,
fri6guelas con una lanilla con jab6n.
Aseg0rese de enjuagar bien Estas son
generalmente dep6sitos de sal que no se
pueden sacar durante el cicto.
Si por alguna raz6n usted no queda
satisfecho con los resuitados de la
limpieza, simplemente repita el ciclo.
1o Cierre la manilla con
oerrojo
2. Empuje el bot6n CLEAN
3_
Si usted desea cambiar la
cantidad de tiempo para
timpiar, empuje los
botones con las flechas
SUBIR y/o BAJAR,
Simplemente empuje el bot6n
CLEAR/OFF,, Usted necesitar_ esperar a
que la temperatura det homo baje a
menos que la temperatura de enganche
(aprox_ 1 hora) antes de tratar de abrir la
puerta
51
.
Empuje e! bot6n DELAY
START TIME
.
Empuje los botones con
las flechas SUBIR y/o
BAJAR para seleccionar
la hora del dla en que
prefiere que el ciclo de
timpieza empiece
6. Empuje el bot6n START.

OPERACION
CSmoSeleccionarProgramas
Especiales
E1nuevo control a botones tiene
programas adicionaies que usted puede
seleccionar, Despues de hacer su
setecci6n, si usted desea cambiada, siga
los pasos hasta que el dial muestre su
nueva sefecciOn
El control se programa autom_ticamente
para apagarse despues de hornear por
12 horas o despu¢s de asar a la parrilta
por 3 horas en caso que se ie ofvide y
deje et homo encendido, Si desea etiminar
este programa:
1_ Empuje y sujete, al mismo tiempo, el
bot6n BAKE y BROIL por 3 segundos,
hasta que el dial muestre "SF,"
2. Empuje el bot6n DELAY START
TIME El dial muestra "12Shdn"
(apagado en 12 horas)
Empuje el bot6n DELAY START TIME
nuevamente, El dial mostrar¢5 "no
shdn" (no apagado).
3. Empuje el botOn START,
El control del homo est& programado
para la sefecci6n de temperaturas en
Fahrenheil, La mayoria de tas recetas se
dan usando la escala Fahrenheit., Usted
puede cambiar esto y usar una selecciOn
en Centigrados
1. Empuje y sujete, al mismo tiempo,
los bolones BAKE y BROIl. por
3 segundos, hasta que el dial
muestre "SF"
.
(a) Empuje el bot6n BROIL. El dial del
control mostrarA el signo para grado y
(b) Empuje el botOn BROIL
nuevamente, Esto cambiar& F°
(Fahrenheit) a C° (Centigrado)
,
Empuje el botOn START.,
Su control est& programado para usar el
reloj en 12 horas Si usted prefiere usar
Hora Militar de 24 horas o poner el dial en
blanco, se hace asi:
1. Empuje y sujete, a la misma vez, el
botOn BAKE y BROIL por 3 segundos,
hasta que el dial muestre "SF"
2. (a) Empuje el bot6n CLOCK El dial
mostrar& "12hr," Siesta es su
selecciOn, empuje el bot6n
START,
(b) Empuje el bot6n CLOCK
nuevamente, El dial mostrar&
"24hr." Ejemplo: 5:00 en el reloj
de 12 horas feer_ 17:00 en el reloj
de 24 horas Empuje el bot6n
START
or
(c)
Empuje el bot6n CLOCK
nuevamente El dial ahora mostrar_
"OFF" Siesta es su seleccidn,
empuje el botOn START, La hora
no se mostrar_ en el dial, (La
funci6n delay start no funcionarA,)
52

OPERACION
CSmoSeleccionar Programas
Especiales
El control le permitir_ cerrar los botones
de manera que no se puedan activar
cuando los empuje Si se preocupa de
dejar et homo sin supervisi6n, active este
programa
1. Empuje y sujete, a ia misma vez por
3 segundos,el bot6n BAKE y BROIL,
hasta que el dial muestre "SF"
2. (a) Empuje el bot6n CLEAN Et diat
muestra "LOC OFF" (cierre inactivo).
(b) Empuje el bot6n CLEAN
nuevamente, El dial mostrar& "LOC
ON" (cierre activado),
3. Empuje el bot6n START,
Este programa se puede seleceionar
solamente euando el homo no estd en
MSO.
Cuando este programa est_ activado, el
control sonar_ y el dial mostrarA "LOC," si
se empuja un bot6n (Los botches Clock o
Timer no son afectados )
Su nuevo control tiene una funcid)n para
cocinar y mantener la temperatura para
cocinar autom&ticamente sotamente que
mantendr& los alimentos tibios hasta 3
horas despu6s que el cocinado
automAtico haya terminado, Para activar
esta funci6n:
.
Empuje y sujete, a la misma vez,
tics botches BAKE y BROIL por
3 segundos, hasta que el dial
muestre "SF"
2. (a) Empuje el bot6n OVEN COOKING
TIME, El dial mostrar& "HLd OFF 7'
(b) Empuje el bot6n OVEN COOKING
TIME nuevamente para activar este
programa El dial mostrar& "HLd ON,"
3. Empuje el bot6n START
Este Programa Especial le permitira
cambiar la velocidad; #1 significa que el
cambio de vetocidad es lento hasta #5
que significa que el cambio de velocidad
es r&pido. Para seteccionar la velocidad
que prefiere, siga estos pasos:
1. Empuje y sujete, a la misma vez,
los botones BAKE y BROIL por
3 segundos, hasta que el dial
muestre "SF"
2. Empuje el bot6n con la flecha SUBIR
El dial le mostrar& una posici6n de
velocidad entre 1 y 5
3. Empuje la flecha SUBIR para
aumentar la velocidad hasta el numero
5.
Empuje el bot6n con ia flecha BAJAR
para disminuir laveiocidad hasta el
n0mero 1
4. Empuje el bot6n START.
53

CUIDADOYLIMPIEZA
Limpieza
MATERtALES DE LIMPIEZA
o Detergente liquido para platos
• Agua tibia
• Pano suave
No use limpiadores abrasivos,
limpiadores industriales, o
blanquedores (cloro),
MATERIALES DE LIMPIEZA
* Detergente liquido para ptatos
* Agua tibia
* Lanillas con jab6n
• Limpiador comercial para homes
COMO LIMPIAR
Permita que la cacerola se remoje Ponga
detergente para platos sobre la parrifla y
cubra con un pane o una toalla humeda
pot un rato Friegue a medida que sea
necesario Lave, enjuague, y seque bien..
Usted tambi_n podria porter la cacerola y
la parrilla en ta lavadora de platos.
MATERIALES DE LIMPIEZA
,, Detergente Iiquido para plates
° Agua tibia
• Toallas de papel
COMO LIMPIAR
No use limpiadores para homos, pelves
para limpiar, o abrasivos fuertes Si salsas
para sasonar, salsa de tomates,
matedales para batidos, etc, se
derraman, limpielos to mAs posibfe
Cuando tas superficies se enfrien limpie
bien las superficies pintadas
MATERIALES DE LIMPIEZA
• Detergente liquido para plates
o Agua tibia
• Toalla de papel
• PaSo seco
° Amonia o limpiadores abrasivos o lanitlas
para fregar
COMO LIMPIAR
Limpie despu_s de cada derrame Si
comidas acidas (tales como reilenos de
frutas calientes, tomates, col o salsas con
vinagre o jugo de tim6n) se derraman
sobre la cubierta, use una toalia de papel
seca o un paso para limpiar
inmediatamente Cuando ta superficie
est6 fria lave y enjuague Para otros
derrames, tales como grasa, lave con
jab6n y agua cuande est_ fria y enjague
Saque brilto con un paso seco.
MATER1ALES DE LIMPIEZA
• Limpiadorde vidrios
• Toallas de papel
o Soda para hernear
- Agua tibia
COMO LIMPIAR
Saque la suciedad pegada con una pasta
de soda para horSear y agua. No use
limpiadores abrasivos Enjuague bien
PARA LIMPIAR
Para limpieza diada, use un limpiador
para vidri0s y una toaila de papeL Para
suciedad pesada, use una pasta de soda
para hornear y agua Enjuague bien.
54

CUIDADOYLIMPIEZA
Limpieza
MATERIALES DE LIMPIEZA
• Limpiador abrasivo suave
• Esponja-fregador
No use limpiadores abrasivos fuertes,
timpiadores industriales, o cloroo
MATERIALES DE LIMPIEZA
• Detergente fiquido para platos
= Limpiador no abrasivo
,, Amonia
• Agua tibia
• Patio seco
PARA LIMPIAR
Para manchas diffciles, coloque las
parriflas en una bolsa de pl_stico Ponga
1/4 de taza de amonia y cierre bien.
Permita que se remoje toda la noche, Lave
y enjuague bien.
MATERIALES DE LIMPIEZA
• Detergente liguido para platos
• Umpiador no abrasivo
- Agua tibia
o Patio seco
PARA LIMPIAR
Remoje la suciedad pesada, enjuague y
seque completamente, Mantenga las
tapas de los quemadores en su lugar
cuando limpie los recipientes de los
quemadores
Abierto Cerrado
E1rondo del homo se puede sacar para
timpiar derrames grandes o para alcanzar
el quemador det homo.
Tenga cuidado de no rayar el acabado del
homo cuando saque y ponga nuevamente
el fondo
COMO SE SACA
'1_ Corra fa manilla del centro del fondo
del homo hacia Laizquierda
2. Levante y saque el fondo del homo
MATERIALES DE LIMPIEZA
• Detergente liquido para platos
• Limpiador abrasivo suave
• Lanillas para fregar llenas con jab6n
= Limpiador de homo comercial
PARA LIMPIAR
Los derrames tales como los re!lenos de
frutas o los comidas con contenidos
Acido (tales como tomates, vinagre y jugo
de lim6n) podrian causar manchas sobre
la superficie de porcelana Para prevenir
manchas a causa de derrames, usted
podria cofocar un pedazo de papet de
aluminio o una bandeja para galtetas
sobre la parrilla debajo de la comida que
se podria derramar Limpie despues de
cada vez que use el homo
COMO SE COLOCA NUEVAMENTE
1. Deslice el fondo de manera que las
puntas de atr_s del rondo entren alas
ranuras en la parte trasera del homo
2. Baje el frente del rondo del homo en su
iugar y corra la manilla hacia Ia
derecha para enganchar el rondo en su
lugar
55

CUIDADOYLIMPIEZA
PartesRemovibles
MATERIALES DE LIMPIEZA
= Detergente para platos
, Agua tibia
,, PaSo suave
Convine la parte plana
de la perilla con ta
plana sobre
COMO SACAR
Asegurese que la perilla est6 en
posici6n de apagado
2.
Tire derecho hacia afuera del tallo
Usando un pedazo de cuerda podria
facititar el sacado de ta perillao Ponga
la cuerda debajo y alrededor de fa
perilla Tire derecho hacia afuera
PARA L1MPIAR
Lave bien la perilla con agua con jab6n
Seque completamente con un paso suave
No permita que la perilla se remoje.
PARA COLOCARLA NUEVAMENTE
1. lnspeccione ta parle poslerior de la
perilla. La parle plana moldeada de la
perilta est_ diseRada para ajustar
perfectamente en el v&stago°
2. Alinee la parle plana motdeada con ta
parle plana del vastago en la perilla
3. Empuje fa perilla hasta Io m&s atrAs
posible
i i ill
Desconecte el poder
_ RECAUCiON:
antes de tratar de reemplazar el foco
de la luz del homo° No toque un foco
de la luz caliente con las manos
mojadas o con un patio h_medoo
Espere a que el foco se enfrfe y use
un patio seco,
_,,
Cubierta de vidrio \
PARA REEMPLAZAR
1. Saque los tres tornillos y levante el
retanedor de vidrio, la cubierta de
vidrio y el sello,.
2. Reemplace el foco con un foco para
hornos. Un foco para homes es m_s
pequeSo que un foco normal de casa
de 40 watts
3. Ponga en su tugar el sello, la cubierta
de vidrio y el relenedor del vidrio
Aprete los lornitlos
el_ctrico hacia el homo en
la caja del circuito principal
o en la caja de los fusibles
Sello
\
Tornillo
56

CUIDADOYLIMPIEZA
PartesRemovibles
MATERIALES DE LIMPIEZA
,, Detergente para platos
° Agua tibia
. Patio humedo
COMO SACAR
1, Tire el caj6n hacia afuera hasta que
se detenga
COMO COLOCAR NUEVAMENTE
1. Levante el frente del tope del caj6n y
b_,jefo a trav6s de la abertura en la
base del riel,,
Tope de la
guia
2o Baje el frente del cajdn y empuje el
caj6n hacia atr_s hasta que se
detenga
3. Levante el frente del caj6n hasta que
el tope de la guia del caj6n pase por
encima de la guia en el riel de la
base Deslice el caj6n hacia su lugar,
i
2.
Levante el frente del cajOn hasta que
el tope de la guia del caj6n pase por
encima del tope de la guia sobre el riel
de la base.
Tope dela
gu_
3, Levante el caj6n por sobre los topes
PARA LIMPIAR
Limpie por dentro y fuera del caj6n con
agua tibia con jab6n y un patio o esponja
homed& No use abrasivos fuertes o lanas
para fregar sobre et*caj6n,
_ PRECAUCiON: E1caj6n le
pi_stico no se deberian guardar en
este caj6n, No sobrecargue el caj6n.
Si el caj6n est_ demasiado pesado,
se podria salir del riel de la base
_ cuando Io abra,
ofrece espacio para guardar
utensilios para cocinar y
hornear. Los materiales de
57

CUIDADOYLIMPIEZA
Partes Removibles
COMO SACARLOS
Asegurese que todos los controles
est6n apagados y que la unidad este
fria. Levante la parrilta del quemador,
ta tapa del quemador y ta cabeza def
quemador No saque el recipiente del
quemador,
Parritla del quemador
-4e----- Tapa del quemador
--_----Cabeza del quemador
COMO SE PONEN NUEVAMENTE
1. Coloque ta cabeza del quemador en el
recipienle del quemador asegur_ndose
que la ubicaci6n del encendedor a
chispa coincide con ta abertura en la
cabeza del quemador
2o Coloque la tapa de! quemador sobre Ia
cabeza del quemador
3. Coloque la parrilla sobre el conjunto de!
quemador y el recipiente del
quemador Las indenciones del
recipiente deben coincidir con las
puntas de ajuste en el fondo de la
parritla.
(chimenea)
El electrodo del
encendedor a chispa se
expone mrs arriba de la
parte superior de!
quemador. Cuando
limpie el recipiente, est_ seguro de
no enganchar et electrodo del
encendedor a chispa con el paso de
la limpieza. Esto podria daSar el
encendedor, Tengacuidado de no
encender ninguno de los controles
mientras est_ limpiando los
recipientes del quemador. Esto
podria resultar en un leve golpe de
corriente que Io podria hacer golpear
y volcar un utensilio caliente,
_l=l In •
58

CUIDADOYLIMPIEZA
PartesRemovibles
MATERIALES DE LIMPIEZA
• Detergente para piatos
,, Agua tibia
• Lanas para fregar o lanilta con jabSn
Posici6n de tope para asar a la parrilla
E
Tope en la guias
Parte trasera
levantada de
la parrilla ___
COMO SACAR
1. Tire las perrillas hasta la posici6n de
tope,
2. Levante el frente de la parrilia y
deslicela bajo el tope de la guia para
las parrilias
PARA LIMPIAR
Limpie con agua tibia y detergenle Para
sacar manchas duras, friegue levemente
con lana para fregar o con una lanilia con
jab6n, Enjuague bien
PARA COLOCAR NUEVAMENTE
1. Co]oque la parte levantada de atr_s de
la parrilla sobre las gu[as
2. Levante el frente de la parrilia hasta
que la parte levantada de atr_s se
deslice pot debajo def tope de las
guias
3. Deslice la parrilla hasta atr_s,
Bisagra
PARA SACAR
Abra la puerta hasta la posici6n para
asar a la parrilia
2.
Tome la puerta de cada ]ado, tev_ntela
y s&quela de las bisagras NO
LEVANTE LA PUERTA DE LA
MANILLA.
r
puerta se saca y los brazos
PRECAUClION: Cuando la
de las bisagras est_n en la
posici6n de tope para asar a
la parrilta, como precauci6n cubra los
brazos de las bisagras con toallas o
con un rollo de toallas vacfo. No pase
a Ilevar o trate de mover los brazos de
las bisagras mientras est_ trabajando
en el _rea del homo. Se podrian
devolver violentamente y causarle
heridas en las manos o da_ar el
acabado de porcelana en el frente
del marco.
PARA COLOCARLA NUEVAMENTE
1. Asegurese que los brazos de las
bisagras est_n en ta posici6n de tope
para asar a la parrilla.,
2. Levante la puerta de ambos lados.
3. Coloque en linea las ranuras en la
orilia del fondo del homo con los
brazos de las bisagras
4. Deslice la puerta hacia abajo sobre los
brazos de 1as bisagras Io mas posibfe.
5. Cierre fa puerta.,
59

ANTESDELLAMARPARAUNSERVICIO
Para ahorrar tiempo y dinero, antes de llamar para un servicio, revise la lista de m&s abajo para
cualquier probfema que usted crea que tiene con el funcionamiento de su estufa Si el probtema es
algo que usted no puede reparar, use los NL]merosde Servicio para el Consumidor que se
encuentran al linal de este manual Cuando haga un Ilamado, tenga disponible el nSmero de
modelo, numero de serie, lista de partes para reparaciones, manual de uso y cuidado y la
fecha de comprao
PROBLEMA
HI'I I II
E1dial del controlpestaSea
una "F" seguida por un
POSIBLE CAUSA
Malfuncionamiento de la
estufa
numero o letra.
ii, i,
Elhomo y el control del
homo no funcionan.
a. No pasa electricidad a el
homo
b. El refojest&en la funciSn
en bfanco.
i i
Latemperatura del homo no
pareceestar exacta.
Jlll,ll,
La puerta del homo no se
desengancha,
i,iii
Calibraci6n del control del Yea las instrucciones para
homo ajustar ta temperatura que
El ciclo de limpieza no ha La temperatura del homo debe
terminado, bajar a menos de la temperatura
La luz del homo no funciona a. El interruptor de la luz est6
apagado
b. El foco de la tuz del homo
est_ suelto o quemado.
POSIBLE SOLUCION
I I '
Empuje elbot6n CLEAR/OFF,
Permita que la estufa se enfrie
pot una hora y ponga
nuevamente ethomo en
funcionamiento SieI probtema
se repite, ltame para un sewicio
a. Revise la caja det circuito o
los fusibles Asegurese que
el cord6n de ta corriente est6
enchufado.
b. Vea la secci6n de "C6mo
Programmar Funciones
Especiaies" en este manuat
siguen esta secci6n
I I ' I' I IIIIHI IIIIHIIIH
de enganche antes que la
puerta pueda abrirse
a. Revise laposici6n del
interruptor
b. Reviseo reemptace etfoco
de la luz
i u
El homo no se limpi6 o a.
los resultados fueron
malos, b.
ii1,111111,
El homo
humea.
Los controtes no se
pusieron bien.
El homo estaba
demasiado sucio
c. E1ciclo de limpieza fue
interrumpido
a, Homo sucio
b. Se dej6 la cacerota para
asar con grasa dentro del
homo
60
a. Lea la secciSn de
autolimpieza de este manual
b. Los derrames grandes se
debedan limpiar antes de
programar un ciclo Usted
tambi6n podda repetir et
ciclo,
c. El ciclo de limpieza normal
deberia durar 4 horas
a. Vea que no hayan derrames
grandes
b. Limpie la cacerola y la
parrilla despu6s de cada
USO

ANTESDELLAMARPARAUNSERVICIO
PROBLEMA
i i i iiiiiil,lll,i
El homo
emite un olor°
i1,111
Los alimentos
no se cocinan
adecuadamente.
Los alimentos
no se asan
adecuadamente
a la parrilla.
La parrilla del
homo no se
desliza con
facilidad.
I H i
ANTESDELLAMARPARAUNSERVICIO
PROBLEMA POSIBLE CAUSA POSIBLE SOLUCtON
Los quemadores
tienen llamas que
terminan en
amarillo
La catidad de ta
combusti6n de tas
IIamasde los
quemadores
necesita ser
determinada
vistJalmente
Use la ilustraci6n a continuaci6n para determinar si las
llamas de los quemadores son normales Si tasllamas
lucen como el ejemp!o A, llamenos enbusca de servicio
Las llamas de los quemadores normales deben tucir
como et ejempio B o el C, dependiendo det tipo de gas
que usled use Con gas LP, un poco de amarillo en los
COHOSextremos de tas llamas es normal
A-Llamas B-Extremos C-Llamasazul
amarillas amaril!osen los suave
Ll_manosen conosexternos Normalparagas
buscade servicio NormalcongasLPnatural
AJUSTESDE
TEMPERATURA-
"HAGALOSUSTEDMISMO"
Usted podria pensar que sunuevo homo
cocina diferentemente al homo que reemplaz6
Recomendamos que use suhomo nuevounas
pocas semanas para que se familiarice con el,
siguiendo los tiempos que se danen las
recetas como una guia
Si cree que sunuevo horno est_ iuncionando
demasiado caliente (quema la comida) o no
calienta Io suficiente (la comida no queda bien
cocida) usted mismo puede ajustar la
temperatura La apariencia y la texturade los
afimentos son mejores indicadoresde la
exactitud de un homo que un lerm0metro,
Estosterm6metros pueden variar entre20-40
grados de la verdarer temperaturade! homo
Adem_s, la puerta se tieneque abrir para leer
estos term6metros Abrir la puertd cambiar_ la
temperatura del homo
Para decidir en cu_nto cambiar la temperatura,
suba la temperatura del homo en 25 qrados (si
los aiimentos noquedan bien cocidos) o baje
la temperaturaen 25grados (si la comida se
quema) de la temperatura de la receta, luego
hornee Los resultados de esta "prueba" te
deberian dar una idea de cu_nto se deberia
cambiar la temperatura
_I.
i i, iiii1,11,11[11!11,111,1, i,ii iiii1! i1,1/ /,111
Empuje y sujete los
botones BAKE y BROIL pot
3 segundos, hasta que el dial
+
muestre "SF"
Empuje el bot6n BAKE Un
numeropuesto en f_brica de
dos digitos aparecera en et
dial, generalmente"00 °
Si piensaque el homo no
est_ Io suficientemente
caliente,
Empujeel bot6n con la fiecha
SUBIR para aumentar(÷) la
temperatura en de la posici6n
original en +35°F
Si piensa qua el homo est_
demasiad 0'caliente,
3b,
Empujeel bot6n con la
flecha BAJAR para bajar
(-) la temperaturaen de la
posici6n original -35°F sicree
que el homo est_ funcionando
demasiado caliente
Empujeel bot6n START
Este aumento o disminuci6n en la posici6n de
la temperaturapermanecer_ en la memoria
hasta que los pasos de arriba sean repetidos
Un corte de corriente no a{ectar_ esta posici0n,
Las temperaturas para asar a la parrilla o para
la autolimpieza no ser_nafecladas
62

GARANTIADELAESTUFA
rTODO UN AI_O DE GARANTIA COMPLETA PARA LAS FUNCIONES DE TODAS
LAS PARTES EXCEPTO LAS DE VIDRIO
Si, dentro del lapso de un aSo a partir de la fecha de instalaci6n, cualquier parle que
no sea de vidrio funciona real debido a un defecto en el material o en la mano de
obra, Sears la reparar& o la reemplazarA, sin costo alguno
GARANTIA TOTAL DE 30 DIAS PARA LAS PARTES DE VIDRIO Y EL ACABADO
DE ESMALTE PORCELANIZADO, PARTES DE METAL PINTADO O BRILLANTE
Si, dentro de los treinta dias posteriores a ta instalaci6n, cualquier parle de vidrio o el
acabado de cualquier esmatte porcelanizado o parle de metal pintado o britlante
tiene defectos en el material o mano de obra, Sears reemplazar_ la par[e, sin costo
alguno.
GARANTtA TOTAL DE 90 DIAS EN AJUSTES MECANICOS
Durante 90 dias a par[ir de la fecha de instalaci6n, Sears proporcionar_, sin costo
alguno, cuatquier ajuste mec_nico necesario para la correcta operaci6n de la estufa,
exceptuando el mantenimiento normal
Si la estufa esla sujeta a otro uso que no sea el privado familiar, la cobertura de ta
garantia mencionada arriba ser_ efectiva s61odurante 90 dias.
EL SERVICIO DE GARANTIA ESTA DISPONIBLE CON SOLO PONERSE EN
CONTACT© CON EL CENTRQ DE SERVICtO SEARS MAS CERCANO EN LOS
ESTADQS UNIDOS
Esta garantia se aplica s61o cuando este producto se use en los Estados Unidos
Esta garantia le brinda derechos legales especificos, y tambien puede tener otros
derechos que varian de un estado a otro
Sears, Roebuck and Co, Dept 817 WA, Hoffman Estates, IL 60179
Para Ampliar El Valor De Su Estufa,
Compre Un Contrato De Mantenimiento Sears.
A_os de cob_:rtur'ado Io pmpir_dod lot" a_o 2",_o 3or aSo
.oomp,o.odopo.o do,ootuo o=G AM AM
'1 que no soon de porcelano o vidrio
,0bA s
2 Al=lo=0o .too G AM AM
3 Patios do porcolana y vidrio
4 Rovtoi6n anus! do m_ntentmt_nto
p,_,,o...,o<,_o,_..d_o..,otodAM AM AM
Los aparatos electrodom6sticos Kenmore est_n disefiados, fabricados y probados por
afios de operaci6n confiable Sin embargo, cualquier aparato electrodom6stico podria
requerir un servicio cada cierto tiempo. E1Contrato de Mantenimiento Sears le ofrece un
excelente programa de servicio para su producto.
La tabla de arriba muestra los beneficios adicionales que un Contrato de Mantenimiento
Sears ofrece comparado a una Garantia Sears.
P6ngase en contacto con su Servicio de Ventas de Sears o con un Centro de Servicio
Sears para comprar un Contrato de Mantenimiento Sears.
3o DAYS
G AM AM
G - Garnnlf_ AM - Contrato da Mantentmlento
63

For repair of major brand appliances in your own home...
no matter who made it, no matter who sold it!
1-800-4-MY-HOME _ Anyiime, dayor n_ght
(1-800469-4663) (USA, and Canada) .......,
www.sear&com www_ca :,,
For repair of carry-in products like vacuums, lawn equipment and
14800-488-1222 AnyUrne,day or night (USA on'y)
www,sears.com
For the replacement parts, accessories and owner's manuals _,::i::
that you need to do-it-yourself, calf Sears PartsDir_tSM!
1-800-366-PART 6 am - 1! p,m, 7 days a week
(14_0-366-7278) (USA. on_)
www_seamconYparL_irect
? 2: _ 2
i¸:i ¸i;i_i:i
To purchase or inquire about a Sears Sewice Agreement
or Sears Maintenance Agreement:
1-800-827-6655 (USA.) 1-800-361-6665 (Canada)
7am, -5 pm, CST, Mon,- Sat 9 am-8 p m EST,M- F,4 p.m Sat,
Parapedk sewbio de reparaci6na Au Canada pour seMce en_:
dombilio, y para ordenar piezas: 1-800,-LE-FOYERMC
14J88-SU-HOGARs_ (1-800-533-6937)
(1-888784-6427) wwwsear&ca
© Sear_ Roebu_ andCo,
® Registered Trademark / TM Trademark / st,_Service Mark of Sears, Roebuck and Co.
® Marca Registrada /_M Marca de F_brica / _ Marca de Servicio de Sears, Roebuck and Co,
_c Marque de commerce / MeMarque d_pos_e de Sears, Roebuck and Co
64
I, !
 Loading...