


79094053310
Table of contents
 Loading...
Kenmore 79094053310, 79094192310, 79094192311, 79094192312, 79094192313 Owner’s Manual
...
Use & Care Guide
Guía de uso y cuidada
English / Español
Model/Modelos: 790.9419*, 9405*, 9618*, 9619*
Kenmore®
Electric Range
Estufa eléctrica
* = color number, número de color
P/N 807190801 Rev D
Sears Brands Management Corporation
Hoffman Estates, IL 60179 U.S.A.
www.kenmore.com
www.sears.com

Table of Contents
Kenmore Limited Warranty.......................................................................... 2
Before Setting Oven Controls...................................................................... 9
Oven vent location .....................................................................................9
Before Setting Surface Controls............................................................... 10
Using proper cookware ..........................................................................10
Cookware Material Types .....................................................................10
About the Ceramic Glass Cooktop .......................................................10
About the Radiant Surface Elements ....................................................11
Element On and Hot Surface Indicator Lights .....................................11
Turbo Boil Feature (some models) ........................................................12
Home Canning ..........................................................................................12
Setting Surface Controls ............................................................................ 13
Radiant Surface Element Settings .........................................................13
Oven Controls ............................................................................................. 16
Minimum and Maximum Control Settings ............................................16
Self Clean ..................................................................................................24
Care & Cleaning ......................................................................................... 27
Before You Call........................................................................................... 31
Oven Baking .............................................................................................31
Solutions to Common Problems ..............................................................32
Types of Cooktop Surface Elements .....................................................11
Please carefully read and save these instructions
This Use & Care Guide contains operating instructions for your appliance and feature information for several models. Your product
may not have all the described features. The graphics shown are representative. The graphics on your appliance may not look
exactly like those shown. Common sense and caution must be practiced with installing, operating and maintaining any appliance.
Kenmore Limited Warranty
FOR ONE YEAR from the date of sale this appliance is warranted against defects in material or workmanship when it is correctly installed, operated and maintained
according to all supplied instructions.
WITH PROOF OF SALE, a defective appliance will receive free repair or replacement at option of seller.
For warranty coverage details to obtain free repair or replacement, visit the web page: www.kenmore.com/warranty
This warranty applies for only 90 DAYS from the sale date in the United States, and is void in Canada, if this appliance is ever used for other than private household
purposes.
This warranty covers ONLY defects in material and workmanship, and will NOT pay for:
1. Cracks in a ceramic glass cooktop that are not a result of thermal shock.
2. Stains and scratches on a ceramic glass cooktop resulting from accident or improper operation or maintenance.
3. Discoloration of cooktop surfaces resulting from normal use.
4. Expendable items that can wear out from normal use, including but not limited to filters, belts, bags or screw-in base light bulbs.
5. A service technician to clean or maintain this appliance, or to instruct the user in correct appliance installation, operation and maintenance.
6. Service calls to correct appliance installation not performed by Sears authorized service agents, or to repair problems with house fuses, circuit breakers, house
wiring, and plumbing or gas supply systems resulting from such installation.
7. Damage to or failure of this appliance resulting from installation not performed by Sears authorized service agents, including installation that was not in accord
with electrical, gas or plumbing codes.
8. Damage to or failure of this appliance, including discoloration or surface rust, if it is not correctly operated and maintained according to all supplied instructions.
9. Damage to or failure of this appliance, including discoloration or surface rust, resulting from accident, alteration, abuse, misuse or use for other than its intended
purpose.
10. Damage to or failure of this appliance, including discoloration or surface rust, caused by the use of detergents, cleaners, chemicals or utensils other than those
recommended in all instructions supplied with the product.
11. Damage to or failure of parts or systems resulting from unauthorized modifications made to this appliance.
12. Service to an appliance if the model and serial plate is missing, altered, or cannot easily be determined to have the appropriate certification logo.
Disclaimer of implied warranties; limitation of remedies
Customer's sole and exclusive remedy under this limited warranty shall be product repair or replacement as provided herein. Implied warranties, including warranties
of merchantability or fitness for a particular purpose, are limited to one year or the shortest period allowed by law. Seller shall not be liable for incidental or consequential damages. Some states and provinces do not allow the exclusion or limitation of incidental or consequential damages, or limitation on the duration of implied
warranties of merchantability or fitness, so these exclusions or limitations may not apply to you.
This warranty applies only while this appliance is used in the United States or Canada*.
This warranty gives you specific legal rights, and you may also have other rights which vary from state to state.
* In-home repair service is not available in all Canadian geographical areas, nor will this warranty cover user or servicer travel and transportation expenses if this
product is located in a remote area (as defined by Sears Canada Inc.) where an authorized servicer is not available.
Sears Brands Management Corporation, Hoffman Estates, IL 60179
Sears Canada Inc., Toronto, Ontario, Canada M5B 2C3
All rights reserved. Printed in the USA.
2
IMPORTANT SAFETY INSTRUCTIONS
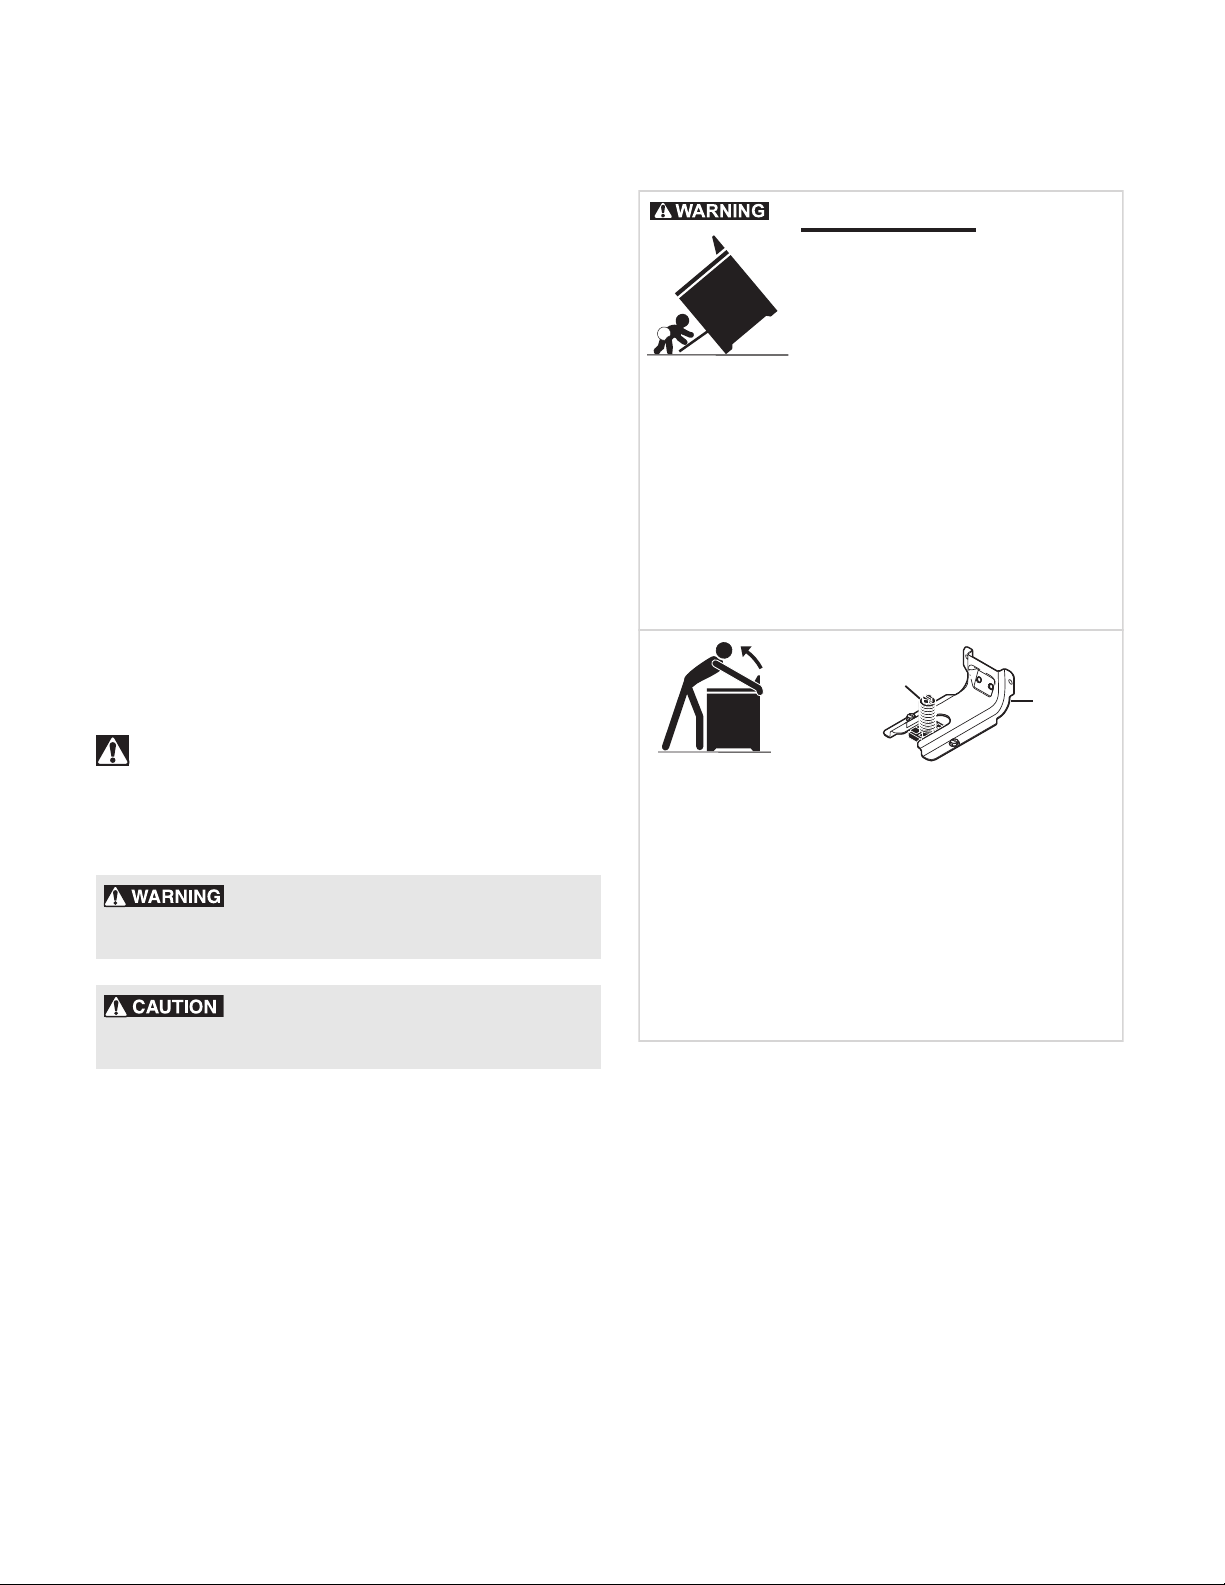
Tip Over Hazard
To check if the anti-tip bracket is installed
properly, use both arms and grasp the rear
edge of the range back. Carefully attempt
to title range forward. When properly
installaed, the range should not tilt forward.
Refer to the anti-tip bracket installation
instructions supplied with your range for
proper installation.
Range
leveling leg
Anti-tip
bracket
• A child or adult can tip the
range and be killed.
• Verify the anti-tip device
has been installed to floor or
wall.
• Ensure the anti-tip device is re-engaged to
floor or wall when the range is moved.
• Do not operate the range without the
anti-tip device in place and engaged.
• Failure to follow these instructions can
result in death or serious burns to children
and adults.
Read all instructions before using this appliance.
Read all instructions before using this appliance.
This manual contains important safety
symbols and instructions. Please pay
attention to these symbols and follow all
instructions given.
Do not attempt to install or operate your
appliance until you have read the safety
precautions in this manual. Safety items
throughout this manual are labeled with a
WARNING or CAUTION statement based on
the risk type.
Warnings and important instructions
appearing in this guide are not meant to
cover all possible conditions and situations
that may occur. Common sense, caution, and
care must be exercised with installing, maintaining, or operating your appliance.
DEFINITIONS
This is the safety alert symbol. It is used to
alert you to potential personal injury
hazards. Obey all safety messageS that
follow this symbol to avoid possible injury or
death.
IMPORTANT – Indicates installation, operation, maintenance, or valuable information
that is not hazard related.
NOTE – Indicates a short, informal reference
– something written down to assist the
memory or for future reference.
hazardous situation which, if not avoided,
may result in death or serious injury
- Indicates a potentially
- Indicates a potentially
hazardous situation which, if not avoided,
may result in minor or moderate injury.
.
Save these instructions for future reference.
3

IMPORTANT SAFETY INSTRUCTIONS
Read all instructions before using this appliance.
IMPORTANT INSTRUCTIONS FOR UNPACKING
AND INSTALLATION
IMPORTANT - Read and follow the below
instructions and precautions for unpacking,
installing, and servicing your appliance:
Remove all tape and packaging before
using the appliance. Destroy the carton and
plastic bags after unpacking the appliance.
Never allow children to play with packaging
material. Do not remove the wiring label and
other literature attached to the appliance.
Do not remove model/serial number plate.
Cold temperatures can damage the electronic control. When using this appliance for
the first time, or when the appliance has not
been used for an extended period of time,
be sure the appliance has been in temperatures above 32ºF (0ºC) for at least 3 hours
before turning on the power to the appliance.
Never modify or alter the construction of the
appliance by removing the leveling legs,
panels, wire covers, anti-tip brackets/screws,
or any other part of the appliance.
Be sure to have an appropriate foam-type
fire extinguisher available, visible, and
easily accessible located near the appliance.
- Air curtain or other overhead
range hoods which operate that operate by
blowing a downward air flow onto a range
or cooktop, shall not be used in conjunction
with gas ranges or cooktops other than when
the range or cooktop and hood have been
designed, tested, and listed by an independent test laboratory for use in combination
with each other.
GROUNDING INSTRUCTIONS
- Avoid fire hazard or electrical
shock. Failure to follow this warning may
cause serious injury, fire, or death.
- Avoid fire hazard or electrical
shock. Do not use an adapter plug, use an
extension cord, or remove grounding prong
from the power cord. Failure to follow this
warning may cause serious injury, fire, or
death.
Proper Installation—Be sure your appliance
is properly installed and grounded by a
qualified technician. In the United States,
install in accordance with the National Fuel
Gas Code ANSI Z223.1/NPFA No. 54, latest
edition and National Electrical Code NFPA
No. 70 latest edition, and local electrical
code requirements. In Canada, install in
accordance with CAN/CGA B149.1 and
CAN/CGA B149.2 and CSA Standard
C22.1, Canadian Electrical code, Part 1latest editions and local electrical code
requirements. Install only per installation
instructions provided in the literature
package for this appliance.
For personal safety, this appliance must be
properly grounded. For maximum safety, the
power cord must be securely connected to an
electrical outlet or junction box that is the
correct voltage, is correctly polarized and
properly grounded, and protected by a
circuit breaker in accordance with local
codes.
It is the personal responsibility of the
consumer to have the appropriate outlet or
junction box with the correct, properly
grounded wall receptacle installed by a
qualified electrician. It is the responsibility
and obligation of the consumer to contact a
qualified installer to assure that the electrical
installation is adequate and is in conformance with all local codes and ordinances.
See the installation instructions packaged
with this appliance for complete installation
and grounding instructions.
Save these instructions for future reference.
4

IMPORTANT SAFETY INSTRUCTIONS
Read all instructions before using this appliance.
IMPORTANT INSTRUCTIONS FOR USING
YOUR APPLIANCE
- Storage In or On Appliance—
Flammable materials should not be stored in
an oven or microwave, near surface burners
or elements, or in the storage or warmer
drawer (if equipped). This includes paper,
plastic, and cloth items, such as cookbooks,
plastic ware, and towels, as well as
flammable liquids. Do not store explosives,
such as aerosol cans, on or near the appliance.
- Do not leave children alone Children should not be left alone or unattended in the area where appliance is in use.
They should never be allowed to sit or stand
on any part of the appliance, including the
storage drawer, lower broiler drawer,
warmer drawer, or lower double oven.
- Do not store items of interest to
children in the cabinets above the appliance
or on the backguards of ranges. Children
climbing on or near the appliance to reach
items could be seriously injured.
- Do not allow children to climb
or play around the appliance. The weight of
a child on an open oven door may cause the
appliance to tip, resulting in serious burns or
other injury. An open drawer when hot may
cause burns.
- Stepping, leaning, or sitting on
the door or drawers of this appliance can
result in serious injuries and also cause
damage to the appliance.
- Never cover any slots, holes, or
passages in the oven bottom or cover an
entire oven rack with any materials, such as
aluminum foil or aftermarket oven liners.
Aluminum foil and other liners may trap heat,
causing a fire hazard.
- Do not use oven or warmer
drawer (if equipped) for storage.
- Never use your appliance as a
space heater to heat or warm the room.
Doing so may result in carbon monoxide
poisoning and overheating of the appliance.
- When heating fat or grease,
watch it closely. Grease may catch fire if it
becomes too hot.
- Do not use water or flour on
grease fires. Smother fire or flame or use
dry chemical or foam-type extinguisher.
Cover the fire with a pan lid or use baking
soda.
- Use dry potholders. Moist or
damp potholders on hot surfaces may result
in burns from steam. Do not let potholders
touch hot cooking areas. Do not use towels or
other bulky cloths.
- Do not heat unopened food
containers - Build-up of pressure may cause
container to burst and result in injury.
- Wear proper apparel - Loosefitting or hanging garments should never be
worn while using the appliance. Do not let
clothing or other flammable materials
contact hot surfaces.
- Do not touch surface burners or
elements, areas near these burners or
elements, interior surfaces of the oven, or the
warmer drawer (if equipped). Surface
burners and elements may be hot even
though they appear cool. Areas near surface
burners and elements may become hot
enough to cause burns. During and after use,
do not touch, or let clothing or other
flammable materials touch these areas until
they are cool. These areas may include the
cooktop, surfaces facing the cooktop, oven
vent areas, oven door, and oven window.
- Do not attempt to operate the
appliance during a power failure. If the
power fails, always turn off the appliance. If
the appliance is not turned off and the
power resumes, electric surface elements
may resume operation when power is
restored. Once the power resumes, reset the
clock and the oven function.
Save these instructions for future reference.
5

IMPORTANT SAFETY INSTRUCTIONS
Read all instructions before using this appliance.
IMPORTANT INSTRUCTIONS FOR USING
YOUR RADIANT COOKTOP
Know which knob or key controls each
surface heating area. Place cookware with
food on the cooking area before turning it
on. Turn the cooking area off before
removing the cookware.
Cookware handles should be turned inward
and not extend over adjacent surface
elements — To reduce the risk of burns,
ignition of flammable materials, and spillage
due to unintentional contact with the utensil,
the handle of the cookware should be positioned so that it is turned inward, and does
not extend over other cooking areas.
Use proper pan size - This appliance is
equipped with one or more surface units of
different sizes. Select cookware with flat
bottoms that match the surface unit size.
Using the proper cookware on the cooking
area will improve efficiency.
Glazed cooking utensils— Only certain
types of glass, glass/ceramic, ceramic,
earthenware, or other glazed utensils are
suitable for cooktop service without breaking
due to the sudden change in temperature.
Check the manufacturer’s recom¬mendations
for cooktop use.
Improper cookware may break due to
sudden changes in temperature. Check the
cookware manufacturer’s recommendations
for cooktop use.
Never leave surface elements unattended.
Boil-overs may cause smoking and greasy
spills that may ignite. A pan that has boiled
dry could be damaged and may damage
the cooktop.
Do not use a searing grill meant for use with
a broiler pan on the cooktop. The searing
grill is not designed for use on the cooktop.
Doing so may result in a fire.
IMPORTANT INSTRUCTIONS FOR GLASS
AND CERAMIC COOKTOPS ONLY
Do Not Clean or Operate a Broken Cooktop.
If cooktop should break, cleaning solutions
and spillovers may penetrate the broken
cooktop and create a risk of electric shock.
Contact a qualified technician immediately.
Clean cooktop glass with caution. If a wet
sponge or cloth is used to wipe spills on a hot
cooking area, be careful to avoid a steam
burn. Some cleaners can produce harmful
fumes if applied to a hot surface.
Avoid scratching the cooktop glass with
sharp objects.
IMPORTANT INSTRUCTIONS FOR USING
YOU R OVEN
Protective liners—Do not use aluminum foil,
aftermarket oven liners, or any other
materials or devices to line oven bottom,
oven racks, or any other part of the appliance. Only use aluminum as recommended
for baking, such as lining cookware or as a
cover placed on food. Any other use of
protective liners or aluminum foil may result
in a risk of electric shock or fire or a short
circuit.
Use care when opening oven door, lower
oven door, or warmer drawer (some models).
Stand to the side of the appliance when
opening the door of a hot oven. Let hot air or
steam escape before you remove or replace
food in the oven.
Keep oven vent ducts unobstructed. Touching
surfaces in this area when the oven is on may
cause severe burns. Do not place plastic or
heat-sensitive items on or near the oven vent.
These items can melt or ignite.
When you are flaming foods under a ventilating hood, turn on the fan.
Save these instructions for future reference.
6

IMPORTANT SAFETY INSTRUCTIONS
Read all instructions before using this appliance.
Placement of oven racks - Always place oven
racks in desired location while oven is cool. If
rack must be moved while oven is hot, do not
let potholder contact hot burner or element
in oven. Use potholders and grasp the rack
with both hands to reposition. Remove all
cookware and utensils before moving the
rack.
Do not use a broiler pan without its insert.
Broiler pans and inserts allow dripping fat to
drain away from the high heat of the broiler.
Do not cover the broiler insert with aluminum
foil; exposed fat and grease could ignite.
Do not cook food on the oven bottom. Always
cook in proper cookware and always use the
oven racks.
IMPORTANT INSTRUCTIONS FOR
CLEANING YOUR OVEN
CAUTION BOX - Before manually
cleaning any part of the appliance, be sure
all controls are turned off and the appliance
is cool. Cleaning a hot appliance can cause
burns.
Clean the appliance regularly to keep all
parts free of grease that could catch fire. Do
not allow grease to accumulate. Greasy
deposits in the fan could catch fire.
Always follow the manufacturer’s recommended directions for use of kitchen cleaners
and aerosols. Be aware that excess residue
from cleaners and aerosols may ignite,
causing damage and injury.
Clean ventilating hoods frequently - Grease
should not be allowed to accumulate on hood
or filter. Follow the manufacturer’s instructions
for cleaning vent hoods.
IMPORTANT INSTRUCTIONS FOR SELFCLEANING OVENS
Do not clean the oven door gasket. The door
gasket is essential for a good seal. Care
should be taken not to rub, damage, or move
the gasket.
Do not use oven cleaners. No commercial
oven cleaner or oven liner protective coating
of any kind should be used in or around any
part of the appliance.
Use the self clean cycle to clean only the
parts listed in this manual.
Before using self clean, remove the broiler
pan, any food, utensils, and cookware from
the oven, storage drawer or warming
drawer (if equipped). Remove oven racks
unless otherwise instructed.
Some birds are extremely sensitive to the
fumes given off during the self clean cycle of
any oven. Move birds to another well-ventilated room.
IMPORTANT INSTRUCTIONS FOR SERVICE
AND MAINTENANCE
Do not repair or replace any part of the
appliance unless specifically recommended
in the manuals. All other servicing should be
done only by a qualified technician. This
reduces the risk of personal injury and
damage to the appliance.
Always contact your dealer, distributor,
service agent, or manufacturer about
problems or conditions you do not understand.
Ask your dealer to recommend a qualified
technician and an authorized repair service.
Know how to disconnect the power to the
appliance at the circuit breaker or fuse box
in case of an emergency.
Save these instructions for future reference.
7
IMPORTANT SAFETY INSTRUCTIONS
Read all instructions before using this appliance.
Remove the oven door from any unused oven
if it is to be stored or discarded.
Do not touch a hot oven light bulb with a
damp cloth. Doing so could cause the bulb to
break. Handle halogen lights (if equipped)
with paper towels or soft gloves. Disconnect
the appliance or shut off the power to the
appliance before removing and replacing
the bulb.
Important Safety Notice - The California
Safe Drinking Water and Toxic Enforcement
Act requires the governor of California to
publish a list of substances known to cause
cancer, birth defects, or other reproductive
harms, and requires businesses to warn
customers of potential exposures to such
substances.
Product Registration and Customer
Information
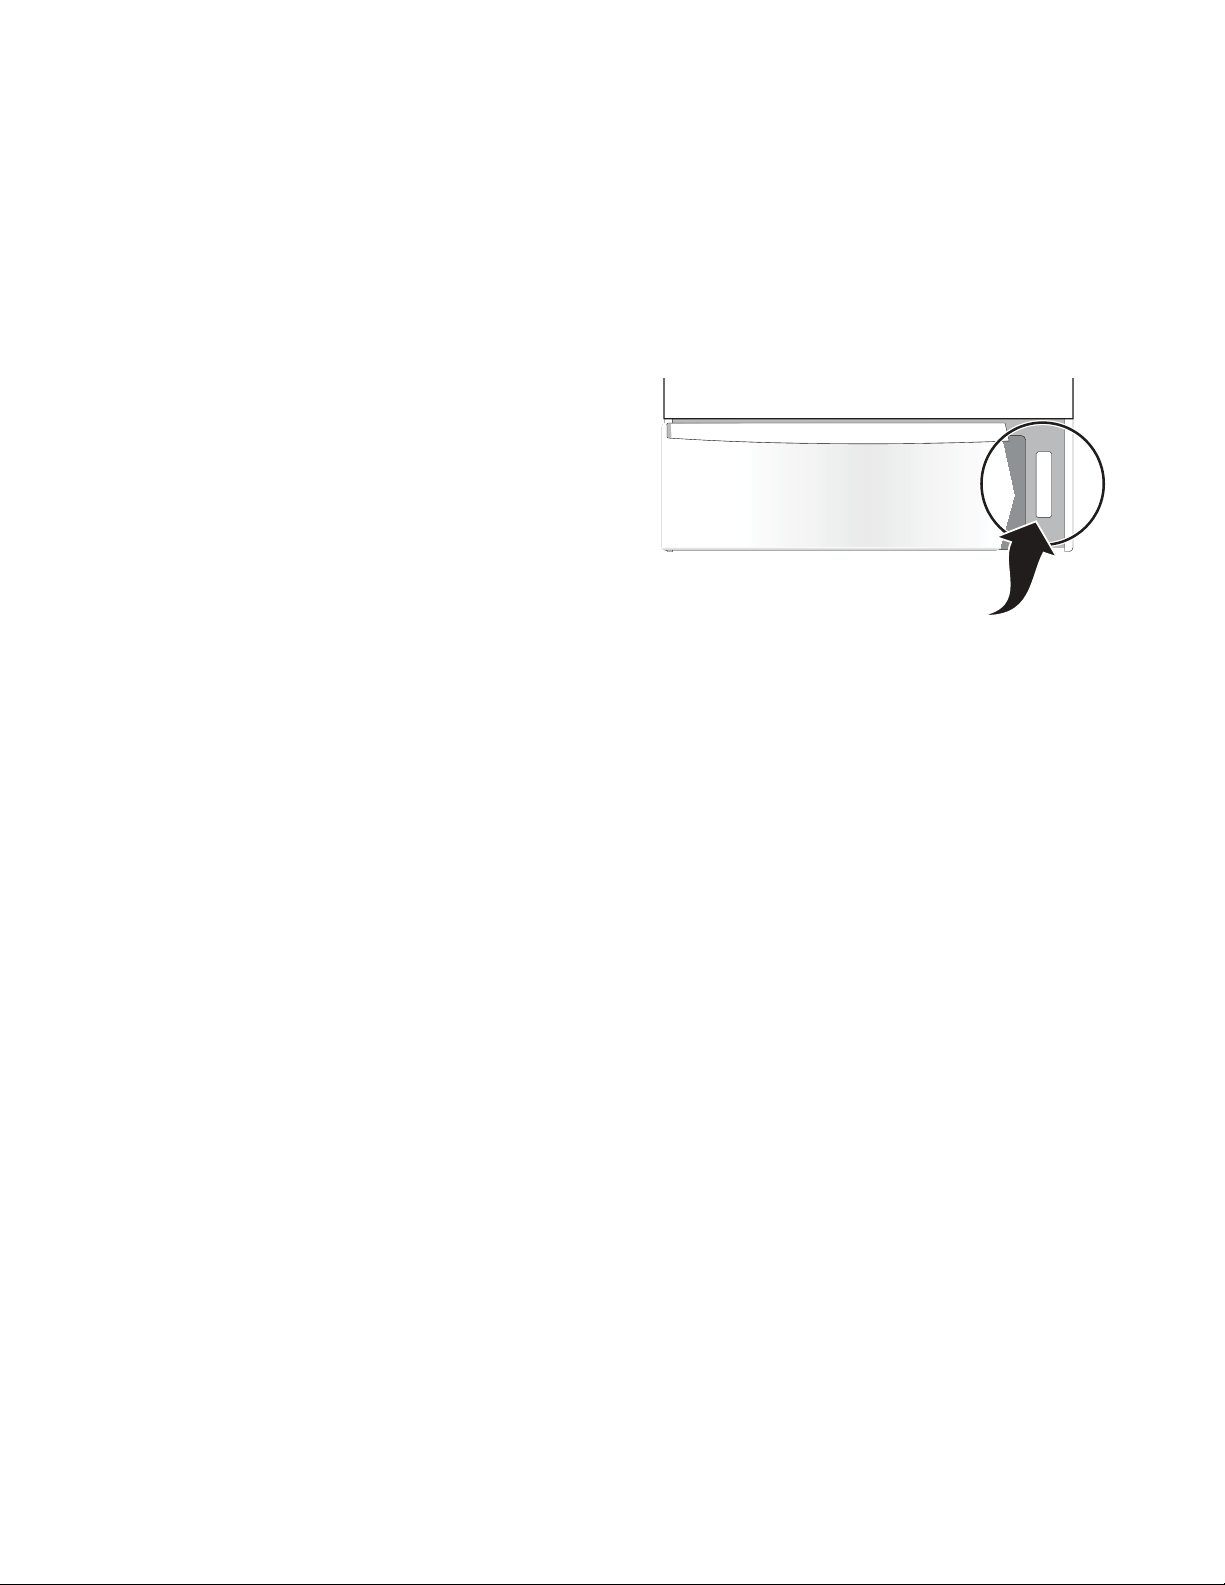
The serial plate is located on the left side of
the range’s warmer door frame, and can be
clearly viewed when the warmer drawer is
open.
Serial Plate Location
Figure 1: Open warmer drawer to view the serial plate
information.
Record the date of purchase, model and
serial number of your product in the corresponding space below.
Model Number:_______________________
Serial Number:_______________________
Date of Purchase: _____________________
Save your sales receipt for future reference.
Save these instructions for future reference.
8
Before Setting Oven Controls
oven vent
at
oven rack
at handle
oven rack
bottom
oven rack
oset
oven rack
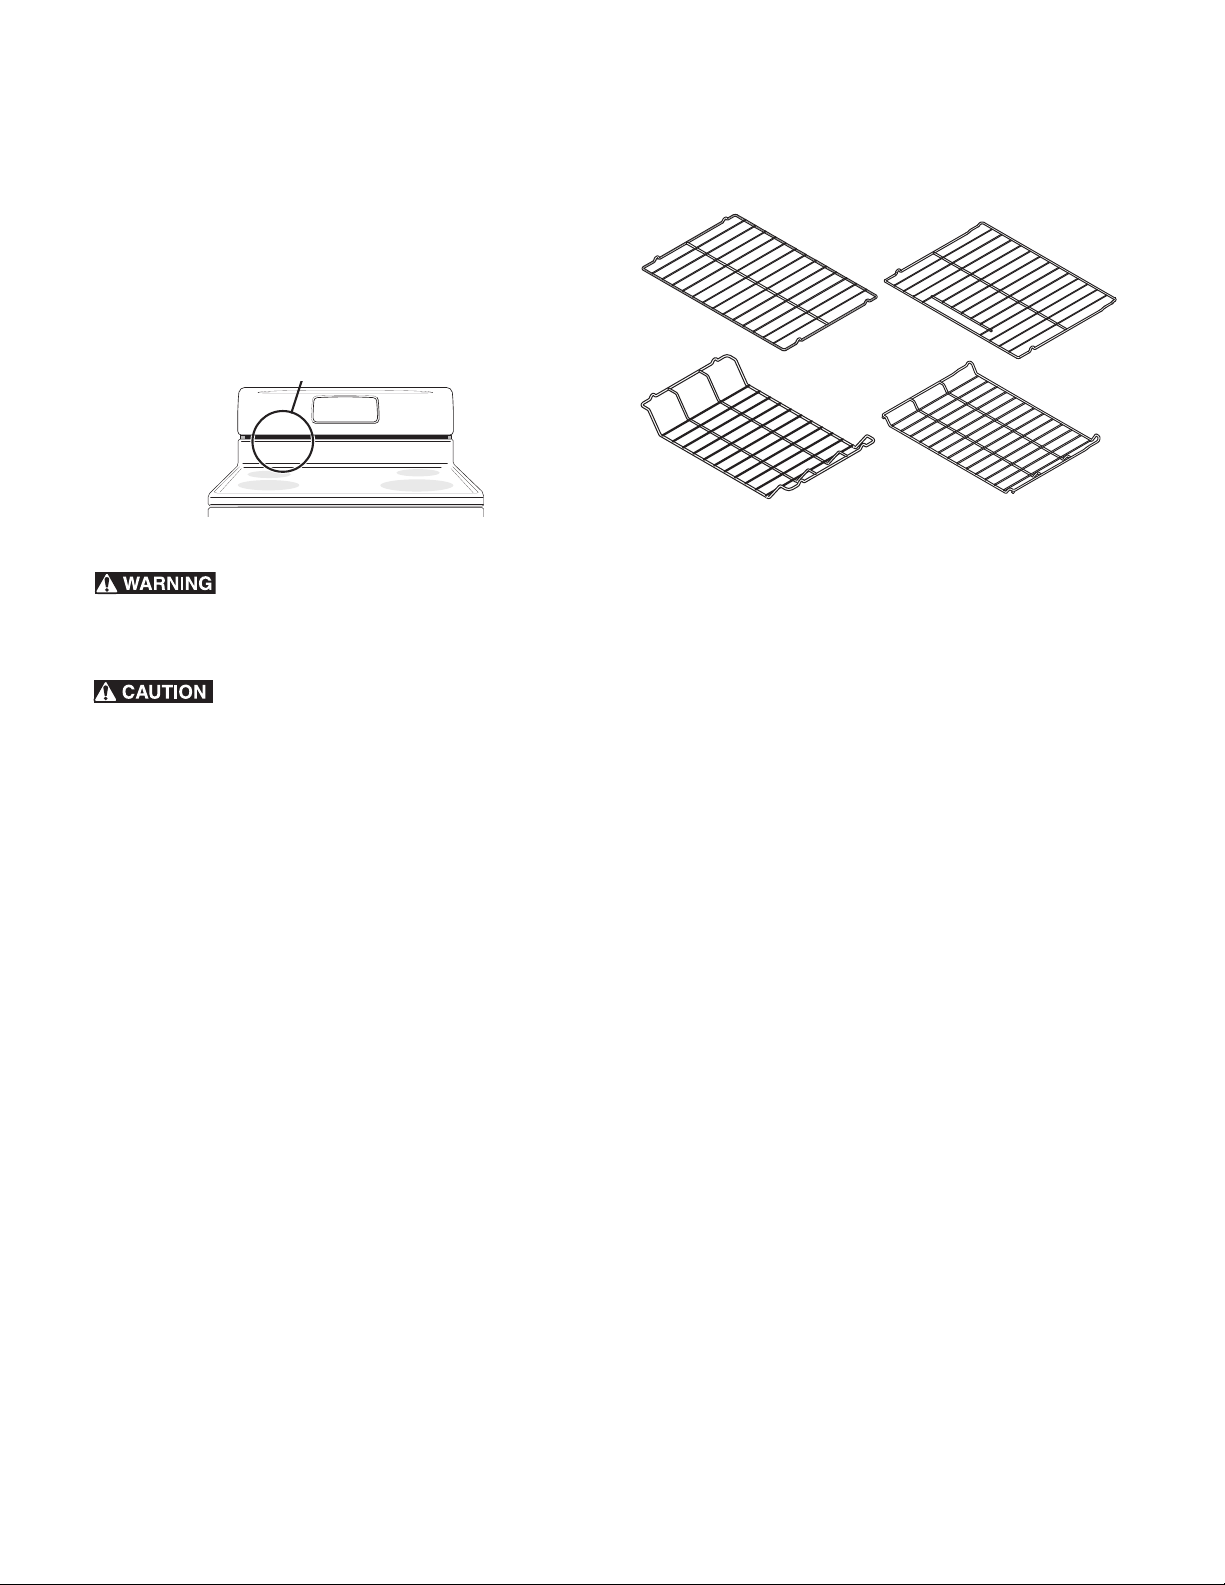
Oven vent location
The oven vent is located under the left side of the control panel.
When the oven is on, warm air passes through this vent. This
venting is necessary for proper air circulation in the oven and
good baking results. Do not block oven vent.
Figure 2: Do not block oven vent location
Protective Liners — Do not use aluminum foil to
line the oven bottom. Only use aluminum foil as recommended
in this manual. Improper installation of these liners may result in
risk of electric shock or fire.
Always use pot holders or oven mitts when using
the oven. When cooking, the oven interior and exterior, as well
as the oven racks, will become very hot which can cause burns.
Removing, replacing, and arranging flat or offset oven
racks
To Arrange - Always arrange the oven racks when the oven is
cool (prior to operating the oven).
To Remove - Pull the oven rack straight forward until it reaches
the stop position. Lift up front of oven rack slightly and slide out.
To Replace - Place the oven rack on the rack guides on both
sides of oven walls. Tilt the front of oven rack upward slightly
and slide the oven rack back into place. Be sure oven racks are
level before using.
Figure 3: Oven rack types
Oven Rack Descriptions
• Flat oven racks (or the flat handle oven rack) may be used
for most cooking needs and may be placed in most oven
rack positions.
• The offset oven rack (some models) provides additional
stepdown positions from the standard flat rack design. The
offset design positions the base of the rack about 1/2 of a
rack position lower than the flat rack and may be used in
most oven rack positions.
• To maximize oven cooking space, place the bottom oven
rack (some models) in the lowest rack position for baking or
roasting large cuts of meat.
Air circulation in the oven
For best baking results allow 2-4" (5-10 cm) around the
cookware for proper air circulation and be sure pans and
cookware do not touch each other, the oven door, sides or back
of the oven cavity. Hot air must be able to circulate around the
cookware in the oven for even heat to reach around the food.
9
Before Setting Surface Controls
Using proper cookware
The size and type of cookware
used will influence the radiant element power level setting needed
for best cooking results. Be sure to
follow the recommendations for
using proper cookware as illustrated in both Figure 4 and
Figure 5.
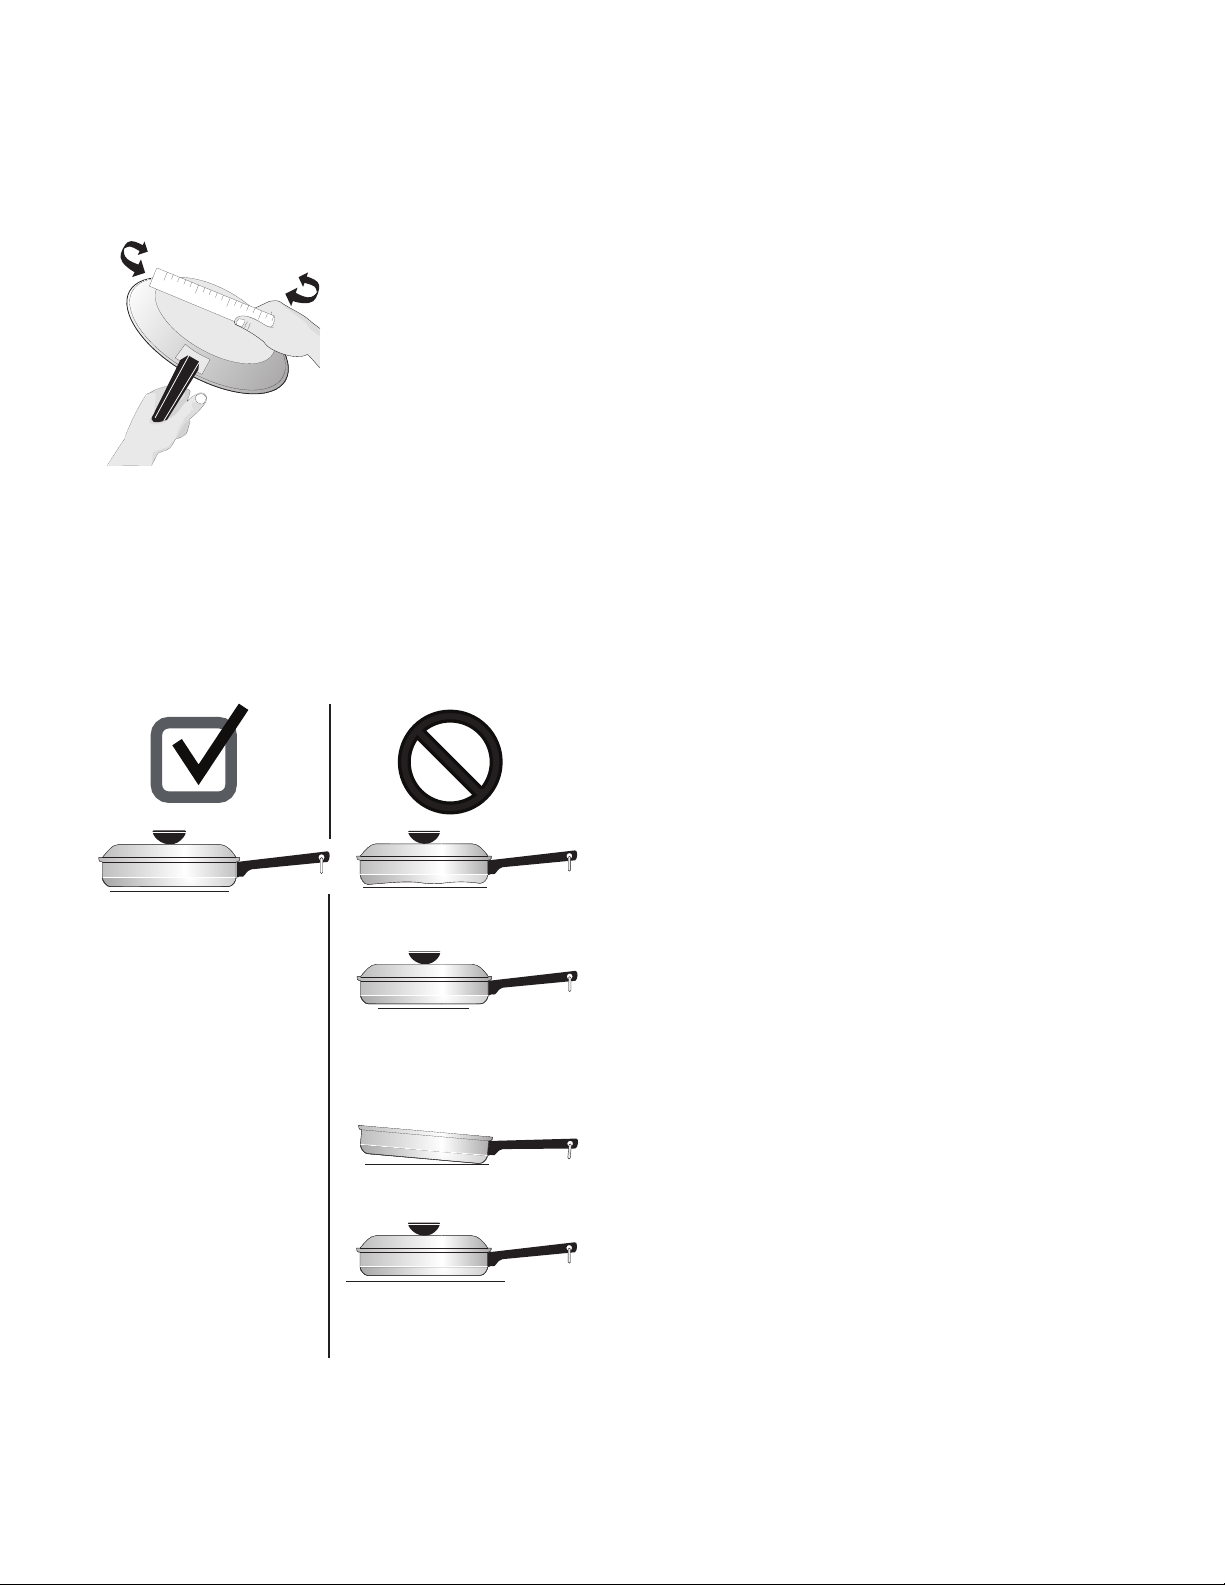
Figure 4: Testing cookware
Check for flatness by rotating a ruler across the bottom of the
cookware (See Figure 4). Cookware should have flat bottoms
that make good contact with the entire surface heating element
(See Figure 5). For detailed information about the ceramic
cooktop, refer to the “Cooktop Maintenance” section starting on
page 28 of the Care & Cleaning chapter.
Cookware Material Types
The cookware material determines how evenly and quickly heat
is transferred from the surface element to the pan bottom. The
most popular materials available are:
Aluminum - Excellent heat conductor. Some types of food will
cause it to darken (Anodized aluminum cookware resists staining
and pitting). If aluminum pans slide across the ceramic cooktop,
they may leave metal marks which will resemble scratches.
Remove these marks immediately.
Copper - Excellent heat conductor but discolors easily (See
Aluminum).
Stainless - Slow heat conductor with uneven cooking results. Is
durable, easy to clean and resists staining.
Cast Iron - A slow heat conductor however will retain heat very
well. Cooks evenly once cooking temperature is reached. Not
recommended for use on ceramic cooktops.
Porcelain-enamel on metal - Heating characteristics will vary
depending on base material. Porcelain-enamel coating must be
smooth to avoid scratching ceramic cooktops.
Glass - Slow heat conductor. Not recommended for ceramic
cooktop surfaces because it may scratch the glass.
Important note:
• Flat bottom and straight
sides.
• Tight fitting lids.
• Weight of handle does
not tilt pan. Pan is well
balanced
.
• Pan sizes match the
amount of food to be
prepared and the size
of the surface element.
• Made of material that
conducts heat well.
• Easy to clean.
• Always match pot
diameter to element
size.
• Curved and warped pans.
• Cookware larger than
cooking area marked on
cooktop by more than
one-half inch or 12mm.
• Heavy handle tilts pan.
• Pan is smaller than the
heating area marked on
cooktop.
Do not place empty aluminum, glass or porcelain-enamel
coated cookware on the ceramic cooktop! The melting point of
cookware made with these materials may be reached quickly
especially if left empty, and they may bond to the ceramic
cooktop. If the cookware melts it will damage the cooktop! Be
sure to follow all the cookware manufacturer’s suggestions when
using any type of cookware on the ceramic cooktop.
About the Ceramic Glass Cooktop
The ceramic cooktop has radiant surface elements located
below the surface of the glass. The design of the ceramic
cooktop outlines the area of the surface element underneath. Be
sure to match the pan size with the diameter of the element
outline on the cooktop and only flat-bottomed cookware should
be used.
The type and size of cookware, the number of surface elements
in use and their settings are all factors that will affect the
amount of heat that will spread to areas beyond the surface
elements. The areas surrounding the elements may become hot
enough to cause burns.
Figure 5: Proper cookware placement
10
Before Setting Surface Controls
About the Radiant Surface Elements
The element temperature rises gradually and evenly. As the
temperature rises, the element will glow red. To maintain the
selected setting the element will cycle on and off. The heating
element retains enough heat to provide a uniform and consistent
heat during the off cycle.
For efficient cooking, turn off the element several minutes before
cooking is complete. This will allow residual heat to complete
the cooking process.
Radiant surface elements may appear to have
cooled after they have been turned off. The glass surface may
still be hot and burns may occur if the glass surface is touched
before it has cooled sufficiently.
Do not place plastic items such as salt and
pepper shakers, spoon holders or plastic wrappings on top of
the range when it is in use. These items could melt or ignite.
Potholders, towels or wooden spoons could catch fire if placed
too close to the surface elements.
Do not allow aluminum foil, empty glass/
porcelain cookware or any material that can melt to make
contact with the ceramic cooktop. If these items melt on the
cooktop they may damage the ceramic cooktop.
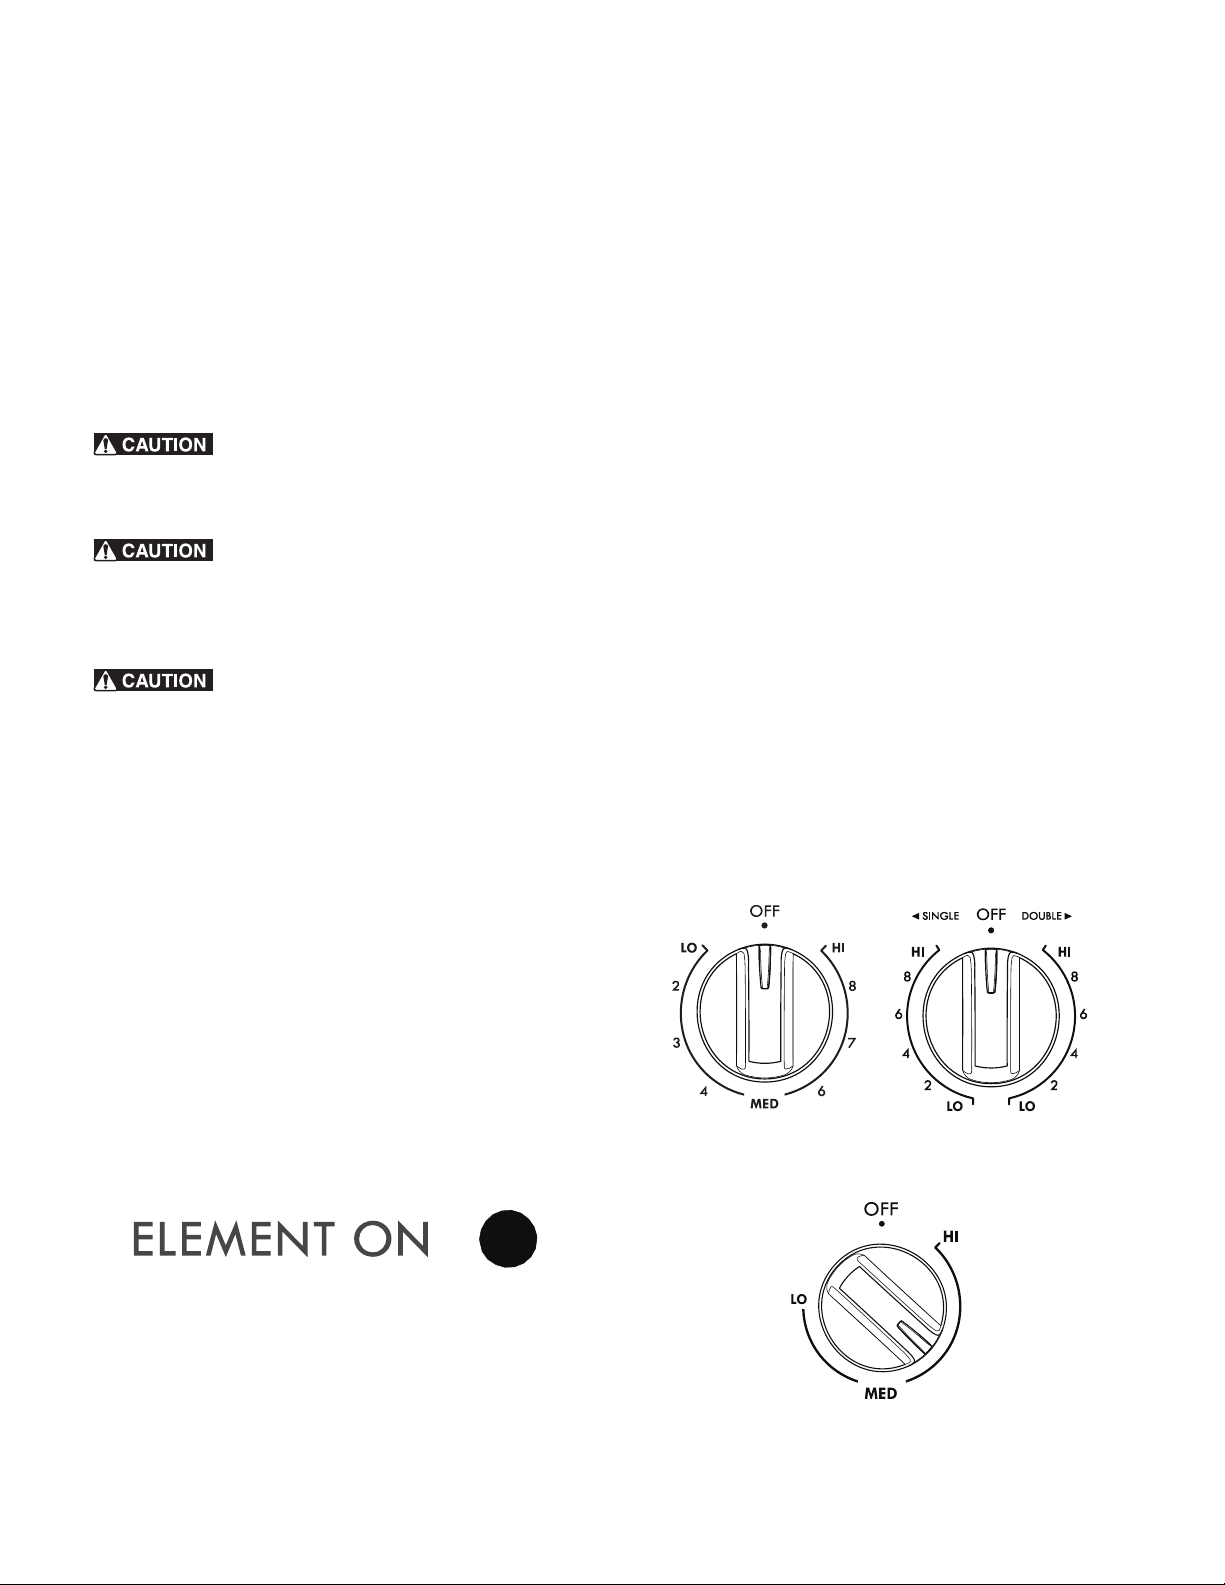
Element On and Hot Surface Indicator Lights
Your appliance is equipped with two different types of surface
control indicator lights that will glow on the control panel — the
ELEMENT ON indicator light and the Hot Surface indicator
lights.
The ELEMENT ON indicator lights are marked on the control
panel and will glow when a surface cooking element is turned
on. A quick glance at these indicator lights after cooking is an
easy check to be sure all surface controls are turned off.
The Hot Surface indicator lights are located on the control panel
just above each surface control knob. They will glow when any
surface cooking area heats up and will remain on until the
cooktop has cooled to a moderate level.
Important notes:
• Never place or straddle a cooking utensil over two different
surface cooking elements at the same time unless the utensil
is designed for that purpose. This can cause uneven heating
results. This can also cause the ceramic cooktop to fracture
(for ceramic cooktop models only).
• Radiant elements have a limiter that allows the radiant
heating element to cycle on and off, even at the HI setting.
This helps to prevent damage to the ceramic smoothtop.
Cycling at the HI setting is normal and will occur more often
if the cookware is too small for the radiant element or if the
cookware bottom is not flat.
• Be sure to read the detailed instructions for ceramic glass
cooktop maintenance and cleaning in the Care & Cleaning
and Before You Call checklist sections of this Use & Care
Guide.
Types of Cooktop Surface Elements
The ceramic glass cooktop has radiant surface elements located
below the surface of the glass. The patterns on the ceramic glass
will outline the size and type of element available. The single
radiant element or elements will have one round outline pattern
shown on the cooktop. The warmer zone feature (on some
models) located on the center rear area of the cooktop uses one
round outline and is designed to keep food warm only. A dual
(on some models) radiant element allows the user to set the
smaller inner portion as a single element or both inner and outer
portions may be set to heat together (See Figure 7).
Figure 7: Single (L) and dual (R) radiant elements
Figure 6: Element indicator light
Figure 8: Warmer zone control (some models)
11
Before Setting Surface Controls
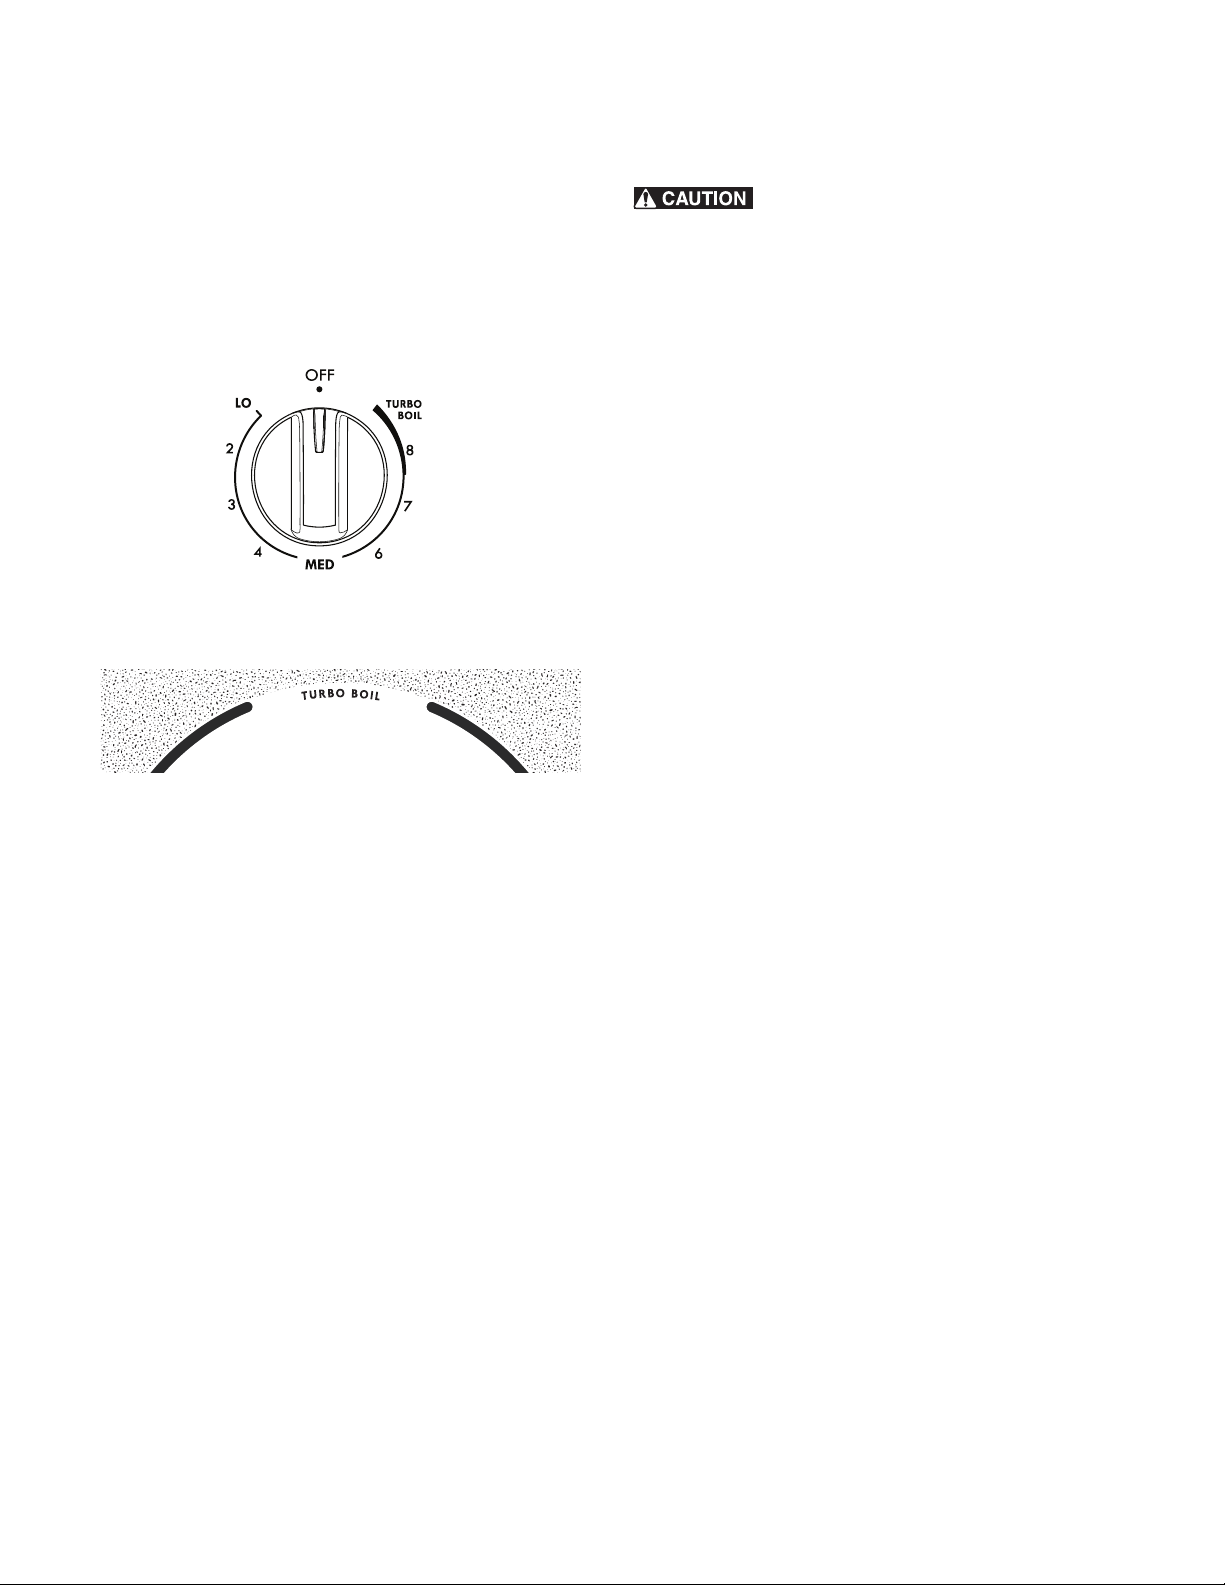
Turbo Boil Feature (some models)
Your appliance may be equipped with a special element on the
ceramic cooktop marked TURBO BOIL.
These higher wattage radiant elements are best used when
bringing larger quantities of liquid to temperature and when
preparing larger quantities of food.
Figure 9: Turbo boil control (some models)
Home Canning
Canning can generate large amounts of steam.
Use extreme caution to prevent burns. Always raise the lid to
vent steam away from you. Safe canning requires that harmful
micro-organisms are destroyed and the jars are sealed
completely. When canning in a water bath canner, a gentle but
steady boil must be maintained continuously for the required
time.
Be sure to read and observe all the following points when home
canning with your appliance. Check with the USDA (United
States Department of Agriculture) Web site and be sure to read
all the information they have available as well as follow their
recommendations for home canning procedures.
• Use only quality flat bottom canners when home canning.
Use a straight-edge to check canner bottom.
• Use only a completely flat bottom canner with no ridges
that radiate from the bottom center when home canning.
Heat is spread more evenly when the bottom surface is flat.
• Make sure the diameter of the canner does not exceed 1
inch beyond the surface element markings or burner. It is
recommended to use smaller diameter canners on electric
coil and ceramic glass cooktops and to center canners on
the burner grates.
• Start with hot tap water to bring water to boil more quickly.
Figure 10: Turbo boil (some models)
• Use the highest heat seating when first bringing the water to
a boil. Once boiling is achieved, reduce heat to lowest
possible setting to maintain that boil.
• Use tested recipes and follow instructions carefully. Check
with your local Cooperative Agricultural Extension Service
or a manufacturer of glass jars for the latest canning information.
• It is best to can small amounts and light loads.
• Do not leave water bath or pressure canners on high heat
for an extended amount of time.
• Alternate surface units between each batch to allow the
units and surrounding surfaces to cool down. Try to avoid
canning on the same burner unit all day.
12
Loading...