


Kenmore 18 Built-In Dishwasher, 14663 Owner's Manual

Use & Care Guide
Guide de L’utilisation et d’entretien
ENGLISH / FRANÇAIS
Model/Modelos:
587.1466*, 587.1465*
Kenmore®
Dishwasher
Lave-vaisselle
* = color number, numéro de couleur
P/N 675000612980
Sears Brands Management Corporation,
Hoffman Estates,
IL 60179 U.S.A.
www.kenmore.com
www.sears.com

Table of Contents
Kenmore Limited Warranty .................................................... 2
IMPORTANT SAFETY INSTRUCTIONS ................................. 3
Before Using Your Dishwasher................................................. 4
Dishwasher Features................................................................. 5
Operating Instructions ..........................................................6-7
Preparing and Loading Dishes............................................8-9
Dishwasher Dispenser and Detergents ............................10-11
Care & Cleaning ......................................................................12
Before You Call - Solutions to common problems......... 13-14
Protection Agreements ............................................................ 15
Sears Service ............................................................ Back Cover
Kenmore Limited Warranty
When installed, operated and maintained according to all instructions supplied with the product, if this appliances fails
due to a defect in material or workmanship within one year fromt he date of purchase, Call 1-800-4-MY-HOME® to
arrange for free repair. If this appliance is used for other than private family purposes, this warranty applies for only 90
days from the date of purchase.
This warranty covers only defects in material and workmanship. Sears will NOT pay for:
1. Expendable items that can wear out from normal use, including but not limited to filters, belts, light bulbs, and bags.
2. A service technician to instruct the user in correct product installation, operation or maintenance.
3. A service technician to clean or maintain this product.
4. Damage to or failure of this product if it is not istalled, operated or maintained according to all instructions supplied
with the product.
5. Damage to or failure of this product resulting from accident, abuse, misuse or use for other than its intended purpose.
6. Damage to or failure of this product caused by the use of detergents, cleaners, chemicals or utensils other than those
recommended in all instructions supplied with the product.
7. Damage to or failure of parts or systems resulting from unauthorized modifications made to this product.
Disclaimer of implied warranties; limitation of remedies
Customer’s sole and exclusive remedy under this limited warranty shall be product repair as provided herein. Implied
warranties, including warranties of merchantability or fitness for a particular purpose, are limited to one year or the
shortest period allowed by law. Sears shall not be liable for incidental or consequential damages. Some states and
provinces do not allow the exclusion or limitation of incidental or consequential damages, or limitation on the duration of
implied warranties of merchantability or fitness, so these exclusions or limitations may not apply to you.
This warranty applies only while this appliance is used in the United States or Canada.
This warranty gives you specific legal rights, and you may also have other rights which vary from state to state.
Sears Brand Management Corporation, Hoffman Estates, IL 60179 USA
Sears Canada Inc., Toronto, Ontario, Canada M5B 2B8
Product Record
In this space below, record the date of purchase, model
and serial number of your product. You will find the
model and serial number printed on an identification
plate. See page 5 Dishwasher Features for serial label
location.
Model No. _____________________________________
Serial No.______________________________________
Date of Purchase _______________________________
Save sales receipt for future reference.
587.
Read all instructions before using this appliance.
This manual contains important safety symbols and
instructions. Please pay attention to these symbols and
follow all instructions given.
Definitions
This is the safety alert symbol. It is used to alert you to
potential personal injury hazards. Obey all safety
messages that follow this symbol to avoid possible injury or
death.
Do not attempt to install or operate your appliance until
you have read the safety precautions in this manual.
Safety items throughout this manual are labeled with a
WARNING or CAUTION statement based on the risk type.
- -
- indicates a potentially hazardous
- -
situation which, if not avoided, may result in death or
serious injury.
- indicates a potentially hazardous
situation which, if not avoided, may result in minor or
moderate injury.
2
All rights reserved. Printed in the USA.
Important Safety Instructions
When using the dishwasher, follow basic precautions,
including the following:
• Read all instructions before using the dishwasher.
• Use your dishwasher only as instructed in this Use
and Care Guide.
• Use only detergents or rinse agents recommended
for use in a dishwasher, and keep them out of reach
of children.
• When loading items to be washed:
- Locate sharp items and knives so that they are not
likely to damage the door seal or tub.
- Load sharp items and knives with the handles up
to reduce the risk of cut-type injuries.
• Do not wash plastic items unless marked
“dishwasher safe” or the equivalent. Check with
manufacturer for recommendations, if not marked.
Items that are not dishwasher safe may melt and
create a potential fire hazard.
• Do not touch the heating element during or
immediately after use.
• Do not operate your dishwasher unless all enclosure
panels are properly in place.
• If the dishwasher drains into a food disposer, make
sure disposer is completely empty before running
dishwasher.
• Disconnect electrical power to dishwasher before
servicing.
• Do no tamper with controls.
• Do not let children abuse, sit, stand or play on door
or racks of a dishwasher.
• Keep young children and infants away from
dishwasher when it is operating.
• Under certain conditions, hydrogen has may be
produced in a hot water system that has not been
used for two weeks or more. HYDROGEN GAS IS
EXPLOSIVE. If the hot water system has not been
used for such a period, before using the dishwasher
turn on all hot water faucets and let the water flow
from each for serveral minutes. This will release any
accumulated hydrogen gas. As the gas is
flammable, do not smoke or use an open flame
during this time.
• Remove the door to the washing compartment when
removing an old dishwasher from service or
discarding it.
Before Using Y our Dishwasher
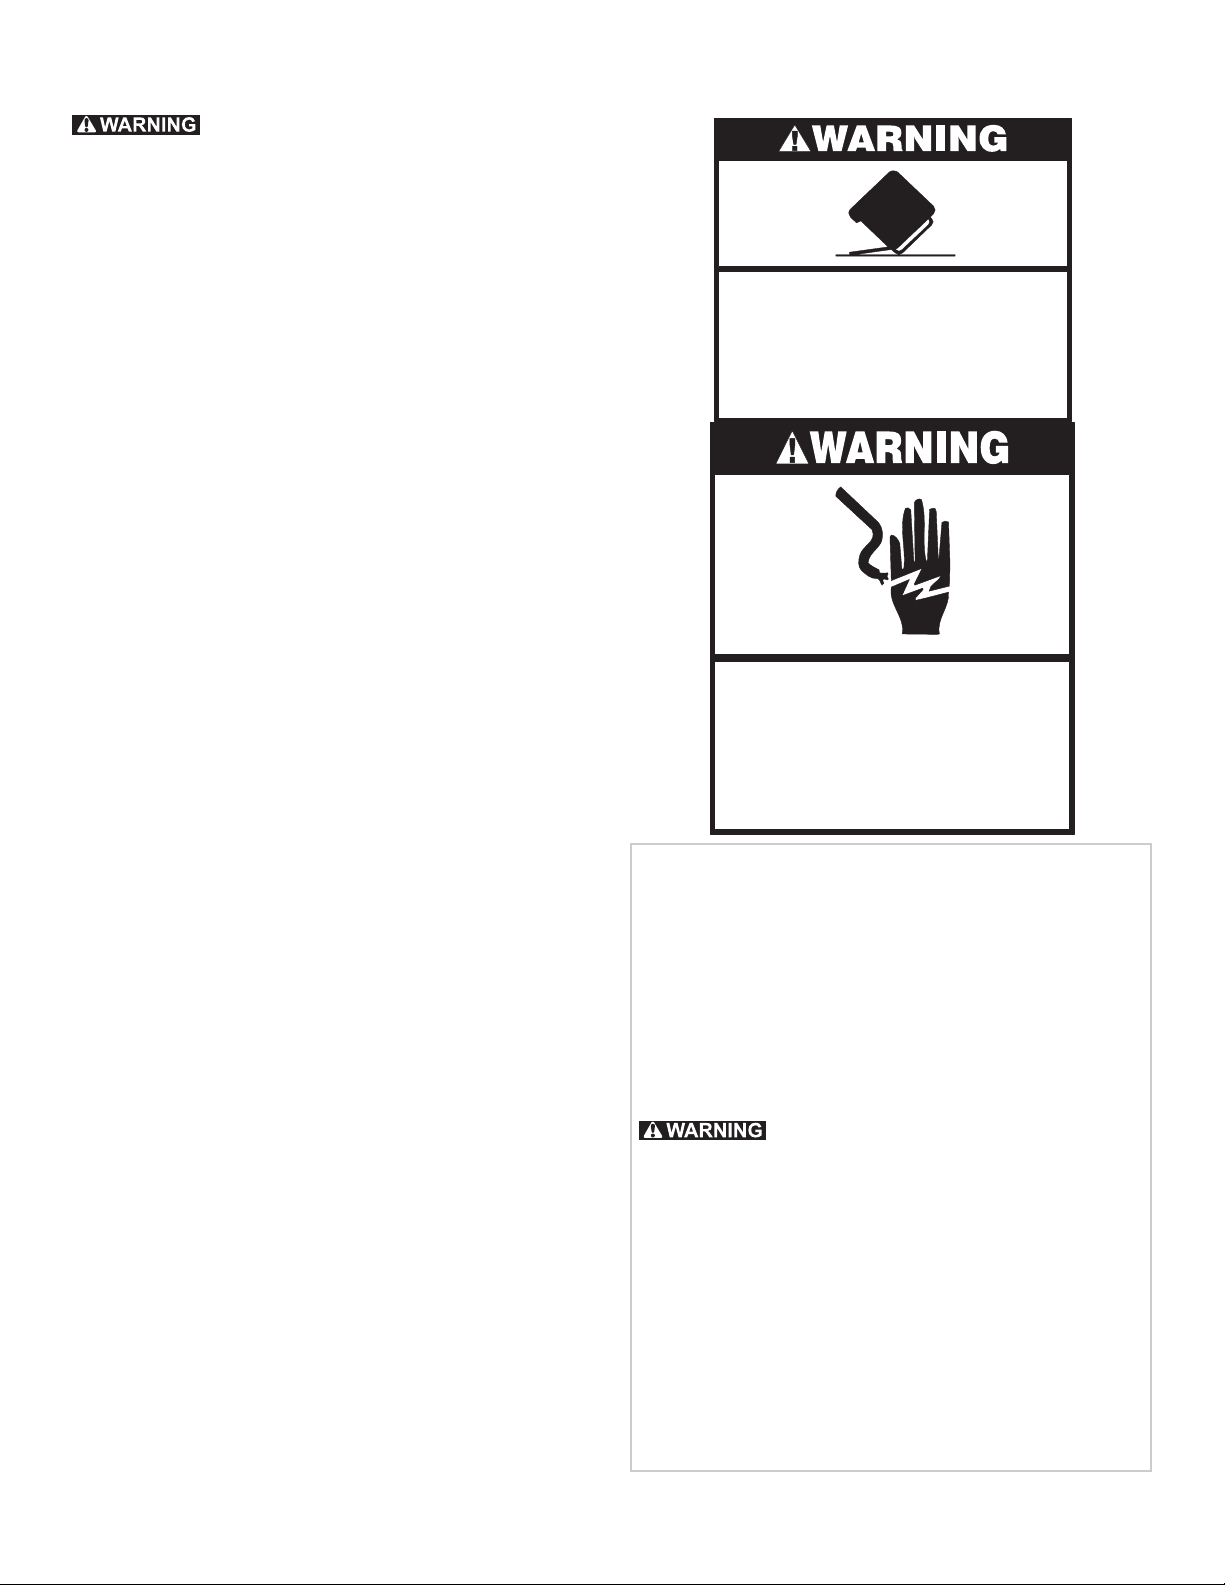
Tip Over HazardTip Over Hazard
Tip Over Hazard
Tip Over HazardTip Over Hazard
Do not use dishwasher untilDo not use dishwasher until
Do not use dishwasher until
Do not use dishwasher untilDo not use dishwasher until
completely installed.completely installed.
completely installed.
completely installed.completely installed.
Do not push down on open door.Do not push down on open door.
Do not push down on open door.
Do not push down on open door.Do not push down on open door.
Doing so can result in serious injury orDoing so can result in serious injury or
Doing so can result in serious injury or
Doing so can result in serious injury orDoing so can result in serious injury or
cuts.cuts.
cuts.
cuts.cuts.
Electrical Shock HazardElectrical Shock Hazard
Electrical Shock Hazard
Electrical Shock HazardElectrical Shock Hazard
Electrically ground dishwasher.Electrically ground dishwasher.
Electrically ground dishwasher.
Electrically ground dishwasher.Electrically ground dishwasher.
Connect ground wire to green groundConnect ground wire to green ground
Connect ground wire to green ground
Connect ground wire to green groundConnect ground wire to green ground
nut in terminal box.nut in terminal box.
nut in terminal box.
nut in terminal box.nut in terminal box.
Do not use an extension cord.Do not use an extension cord.
Do not use an extension cord.
Do not use an extension cord.Do not use an extension cord.
Failure to do so can result in death,Failure to do so can result in death,
Failure to do so can result in death,
Failure to do so can result in death,Failure to do so can result in death,
fire, or electrical shock.fire, or electrical shock.
fire, or electrical shock.
fire, or electrical shock.fire, or electrical shock.
GROUNDING INSTRUCTIONS
• •
• For a grounded, cord-connected dishwasher:
• •
The dishwasher must be grounded. In the event of a
malfunction or breakdown, grounding will reduce the
risk of electric shock by providing a path of least
resistance for electric current. The dishwasher is
equipped with a cord having an plug. The plug must
be plugged into an appropriate outlet that is installed
and grounded in accordance with all local codes and
ordinances.
: Improper connection of the equipmentgrounding conductor can result in a risk of electric shock.
Check with a qualified electrician or service
representative if you are in doubt whether the dishwasher
is properly grounded. Do not modify the plug provided
with the dishwasher. If it will not fit the outlet, have a
proper outlet installed by a qualified electrician.
• •
• For a permanently connected dishwasher:
• •
The dishwasher must be connected to a grounded
metal, permanent wiring system, or a equipmentgrounding conductor must be run with the circuit
conductors and connected to the equipment-grounding
terminal or lead on the dishwasher.
Save these instructions for future reference.
3
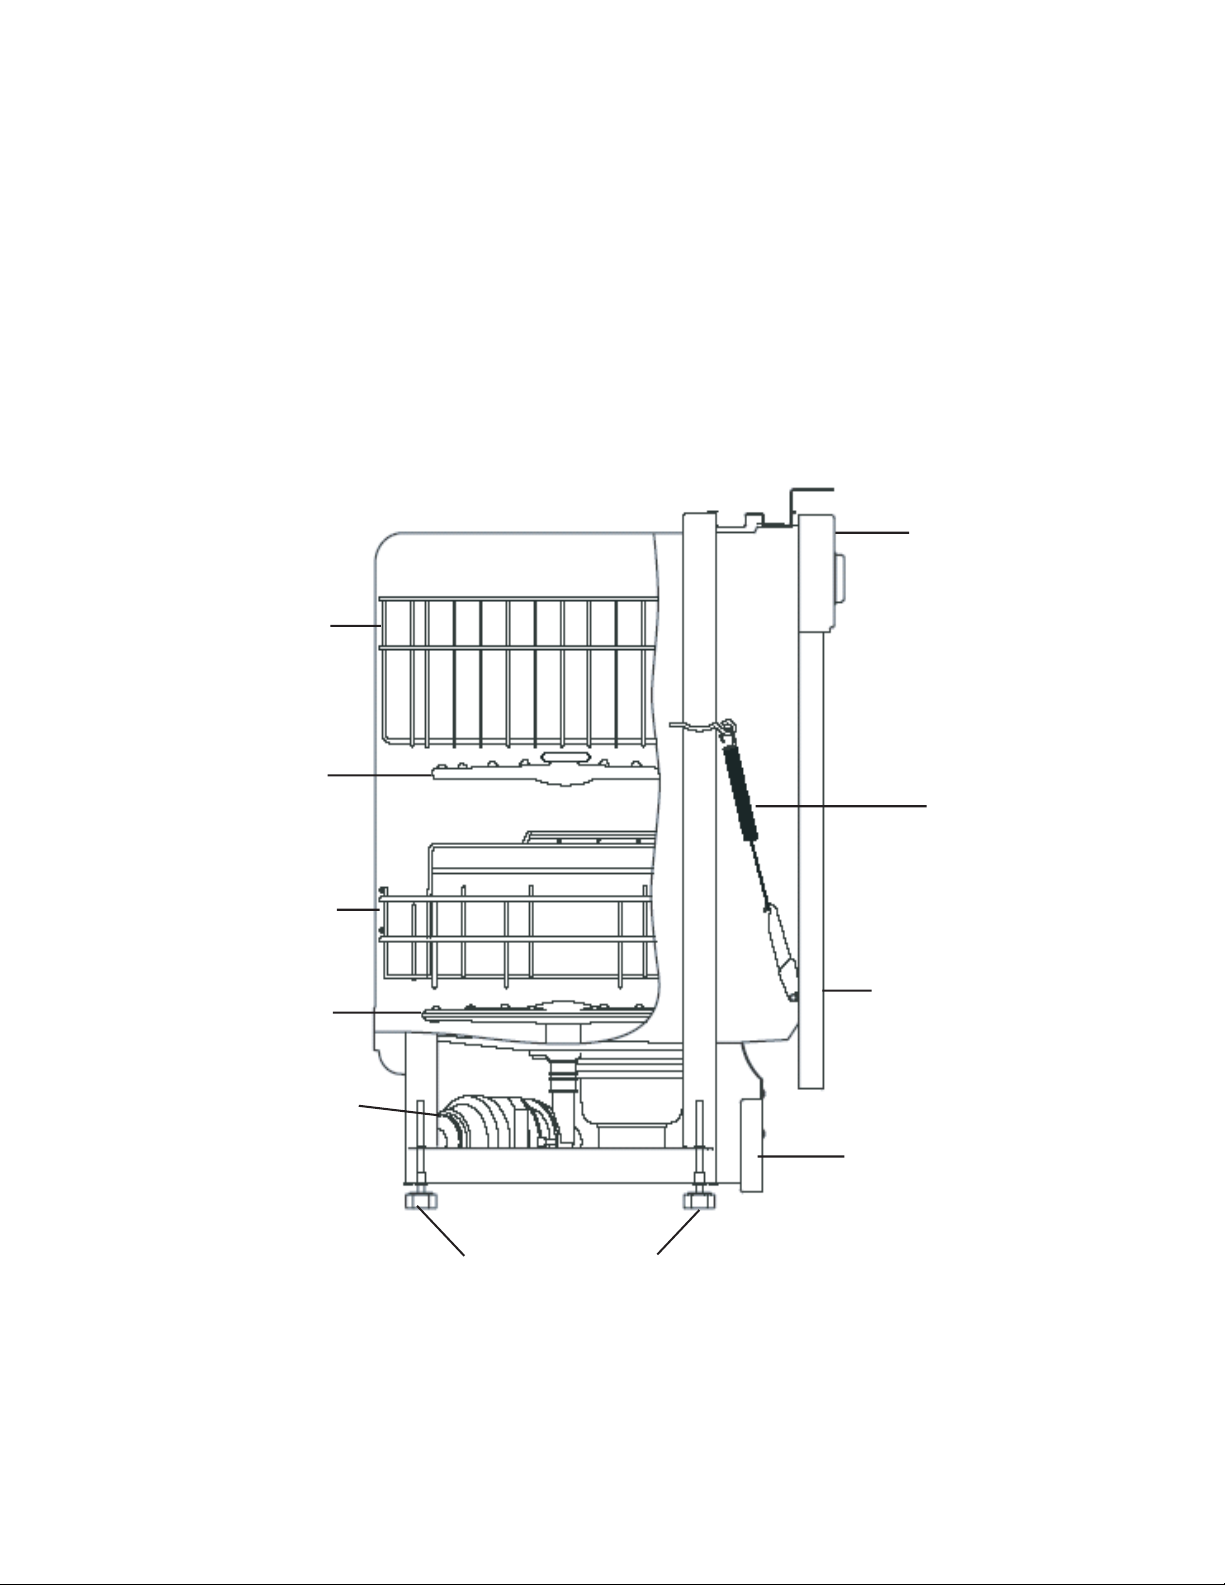
Dishwasher Features
How Your Dishwasher Cleans
Your dishwasher illustrated below, cleans by spraying a
mixture of hot, clean water, and detergent against the
soiled surfaces of your dishes and tableware.
Upper RackUpper Rack
Upper Rack
Upper RackUpper Rack
Each cycle starts with a pre-drain. Next, the dishwasher
fills with water to a level even with the heating element.
This water is constantly pumped through the rotating
spray arm and sprayed on the dishes. Soiled water is
pumped out and replaced with clean water during a
cycle. The number of water fills depends upon the cycle
being used.
Control PanelControl Panel
Control Panel
Control PanelControl Panel
Upper Spray ArmUpper Spray Arm
Upper Spray Arm
Upper Spray ArmUpper Spray Arm
Lower RackLower Rack
Lower Rack
Lower RackLower Rack
Lower Spray ArmLower Spray Arm
Lower Spray Arm
Lower Spray ArmLower Spray Arm
MotorMotor
Motor
MotorMotor
Leveling LegsLeveling Legs
Leveling Legs
Leveling LegsLeveling Legs
Door SpringDoor Spring
Door Spring
Door SpringDoor Spring
PanelPanel
Panel
PanelPanel
Toe & Kick PlateToe & Kick Plate
Toe & Kick Plate
Toe & Kick PlateToe & Kick Plate
Appearance may vary from your model.
4

Operating Instructions
CycleCycle
Cycle
CycleCycle
Pots &Pots &
Pots &
Pots &Pots &
PansPans
Pans
PansPans
DescriptionDescription
Description
DescriptionDescription
For heavily soiled dishes
and silverware.
CC
ycle Chartycle Chart
C
ycle Chart
CC
ycle Chartycle Chart
To Select CycleTo Select Cycle
To Select Cycle
To Select CycleTo Select Cycle
• Select POTS & PANS.
• Select desired OPTIONS.
Appearance may vary from your model.
**
* Includes dry time.
**
WaterWater
Water
WaterWater
(approx.)(approx.)
(approx.)
(approx.)(approx.)
gal.
4.41
liters
16.7
Time*Time*
Time*
Time*Time*
(approx.)(approx.)
(approx.)
(approx.)(approx.)
125 mins.
Washes/Washes/
Washes/
Washes/Washes/
RinsesRinses
Rinses
RinsesRinses
2 washes
5 rinses
NormalNormal
Normal
NormalNormal
WashWash
Wash
WashWash
LightLight
Light
LightLight
WashWash
Wash
WashWash
ChinaChina
China
ChinaChina
GentleGentle
Gentle
GentleGentle
EcoEco
Eco
EcoEco
QuickQuick
Quick
QuickQuick
RinseRinse
Rinse
RinseRinse
Note:Note:
Note: Cycle times are approximate and will vary with options selected. Not all cycles available on all models.
Note:Note:
For regularly soiled dishes
and silverware.
For lightly soiled and
pre-rinsed dishes and
silverware.
For lightly soiled China
and Crystal.
For lightly soiled or prerinsed dishes and
silverware.
For rinsing dishes that
will be washed later.
• Select NORMAL WASH.
• Select desired options.
• Select LIGHT WASH.
• Select desired options.
• Select CHINA GENTLE.
• Select desired options.
• Select ECO.
• Select desired options.
• Select QUICK RINSE.
DO NOT USE detergent.
3.5
13.4
2.7
10.2
2.7
10.2
3.5
12.0
1.8
6.8
gal.
liters
gal.
liters
gal.
liters
gal.
liters
gal.
liters
95 mins.
65 mins.
80 mins.
85 mins.
25 mins.
2 washes
4 rinses
2 washes
2 rinses
1 rinse
2 washes
3 rinses
1 rinse
Getting Started
1. Check Filter (See Cleaning Filter).
2. Load dishwasher (See Preparing and Loading Dishes).
3. Add detergent (See Dishwasher Dispenser &
Detergents).
4. Add rinse aid, if needed (See Rinse Aid).
5. Select wash cycle (See Cycle Chart).
6. Select desired OPTIONS.
7. See Page 12 for instructions on connecting the protable
dishwasher.
8. Run hot water faucet nearest dishwasher until water is
hot. Turn water off.
9. To Start, close door to latch.
5

Operating Instructions
Dish Preparation
It is not necessary to rinse dishes before putting them into
the dishwasher. Just remove large pieces and quantities of
food, bones, pits, etc. Empty glasses and cups. It may be
necessary to presoak or lightly scour firmly cooked-on or
baked-on foods.
Food such as mustard, mayonnaise, vinegar, lemon juice
and tomato-based products may cause discoloration of
stainless steel and plastics if allowed to sit for a long
period of time. Unless the dishwasher is to be operated at
once, it is best to rinse off these food soils.
• Load dishes facing the center of the rack so that the
water spray from the rotating spray arm can reach
soiled surfaces.
• Be sure large items do not block the detergent
dispenser, preventing it from opening during the wash
cycle.
• To be sure an item is dishwasher safe, read the
manufacturer’s care instructions.
• If the dishwasher drains into a food disposer,
disposer is completely empty before dishwasherdisposer is completely empty before dishwasher
disposer is completely empty before dishwasher
disposer is completely empty before dishwasherdisposer is completely empty before dishwasher
is started.is started.
is started.
is started.is started.
be surebe sure
be sure
be surebe sure
Hi-Temp Wash OptionHi-Temp Wash Option
Hi-Temp Wash Option
Hi-Temp Wash OptionHi-Temp Wash Option
When HI-TEMP WASH ON option is selected, the
dishwasher heats the water in the main wash to
approximately 140°F (60°C).
This increase in water temperature helps dishwasher
detergent remove food grease and soil from dishes more
effectively and aids in drying. HI-TEMP WASH option can
be used with all cycles except LIGHT WASH and QUICK
RINSE. HI-TEMP WASH is automatically provided when
HEAVY WASH cycle is selected.
To turn off the HI-TEMP WASH option, press the pad a
second time.
Air Dry OptionAir Dry Option
Air Dry Option
Air Dry OptionAir Dry Option
The unit defaults to heated dry when it is started with any
cycle selected. This drying uses a combination of the
heated dry with rinse aid that achieves enhanced drying
performance. If you prefer to only have AIR DRY for
dishes, you will select AIR DRY and the uit will not energize
the heating element. This will reduce energy consumption,
but reduce drying performance.
• To save energy, wash full loads.
• For best washing results, load correctly and avoid
overloading.
Delay StartDelay Start
Delay Start
Delay StartDelay Start
The DELAY START option allows you to automatically
delay starting your dishwasher from 2 - 4 hours.
Make cycle selections, press the DELAY START key until
the desired delay LED is it, then close the door and the
delay time will start.
To cancel the delay and start the cycle before the delay
period is over, open the door and press the START/
CANCEL key. Close the door and the cycle will start.
6
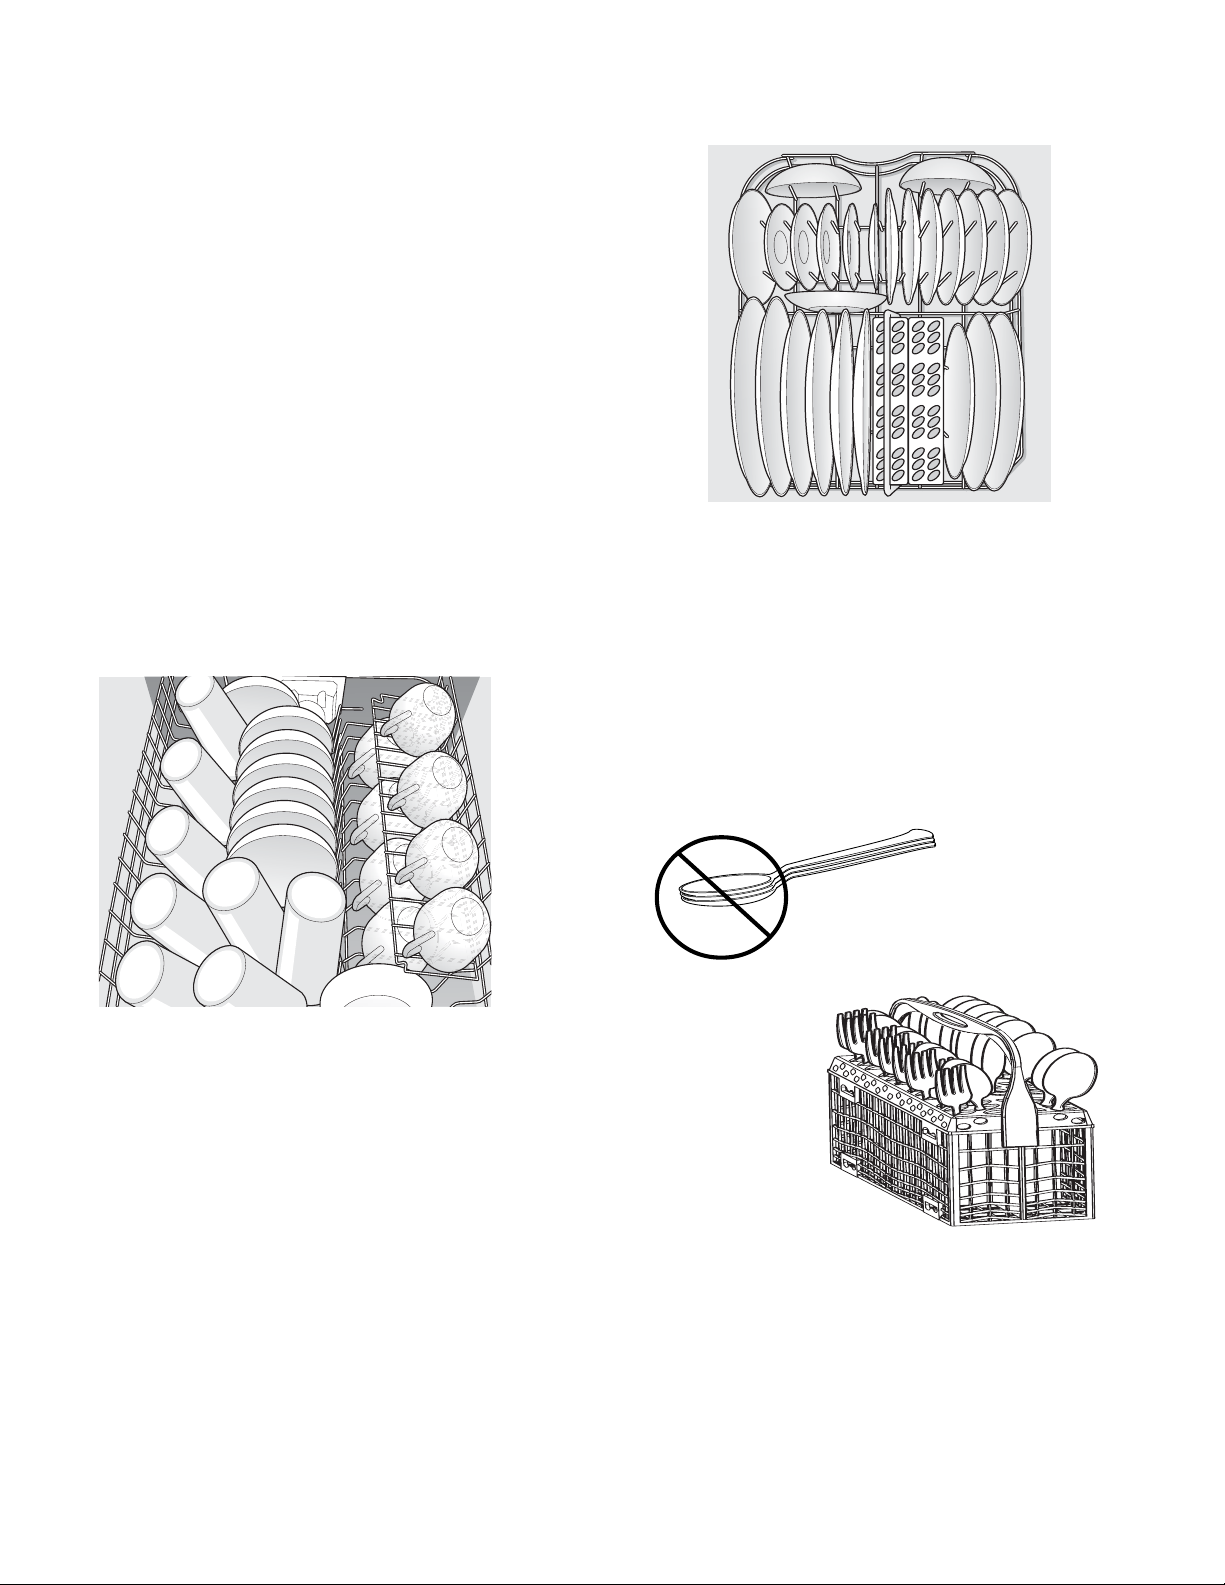
Preparing and Loading Dishes
Loading the Top Rack
Glasses and cupsGlasses and cups
Glasses and cups—Place glasses and cups against
Glasses and cupsGlasses and cups
outside pins at an angle. Cups with a concave bottom will
collect water.
Small plates and saucersSmall plates and saucers
Small plates and saucers—Place dishes between
Small plates and saucersSmall plates and saucers
middle two rows of pins.
PlasticwarePlasticware
Plasticware—Load plasticware in the top rack to avoid
PlasticwarePlasticware
melting.
BowlsBowls
Bowls—Place bowls between the middle 2 rows of pins
BowlsBowls
facing down.
Miscellaneous itemsMiscellaneous items
Miscellaneous items—Place long handled knives and
Miscellaneous itemsMiscellaneous items
utensils in top rack.
Cup ShelfCup Shelf
Cup Shelf—The cup shelf can be folded down over short
Cup ShelfCup Shelf
items (juice glasses, cups, etc.) for more loading space.
When using cup shelf, alternate items with layer below so
that water can reach all inside surfaces.
Loading the Silverware Basket
Load sharp items with handles up.Load sharp items with handles up.
Load sharp items with handles up. Be sure items do
Load sharp items with handles up.Load sharp items with handles up.
not protrude through the holes in the basket and stop the
rotation of the spray arm.
Loading the Bottom Rack
Large plates and plattersLarge plates and platters
Large plates and platters—Place between the support
Large plates and plattersLarge plates and platters
pins with soiled sides facing inward.
Bowls, casseroles and sauce pans— Bowls, casseroles and sauce pans—
Bowls, casseroles and sauce pans— Load upside
Bowls, casseroles and sauce pans— Bowls, casseroles and sauce pans—
down or at an angle facing inward. Slightly tilting items
will provide better drainage.
PP
ots and pansots and pans
P
ots and pans—Place upside down and at an angle. Do
PP
ots and pansots and pans
not allow handles to protrude through bottom of rack,
blocking wash arm rotation. Load large items at the sides
and not across the front so they do not block the detergent
dispenser preventing it from opening.
Load silverware so items are mixed in each section to
prevent nesting. Water spray cannot effectively reach
nested items.
ADDING A DISHADDING A DISH
ADDING A DISH
ADDING A DISHADDING A DISH
1. Make sure there is a full wash cycle yet to be
completed so that any added items are thoroughly
washed and rinsed.
2. Unlatch door and wait for water action to stop.
3. Open door and add dish.
4. Firmly close door to latch and resume cycle.
7
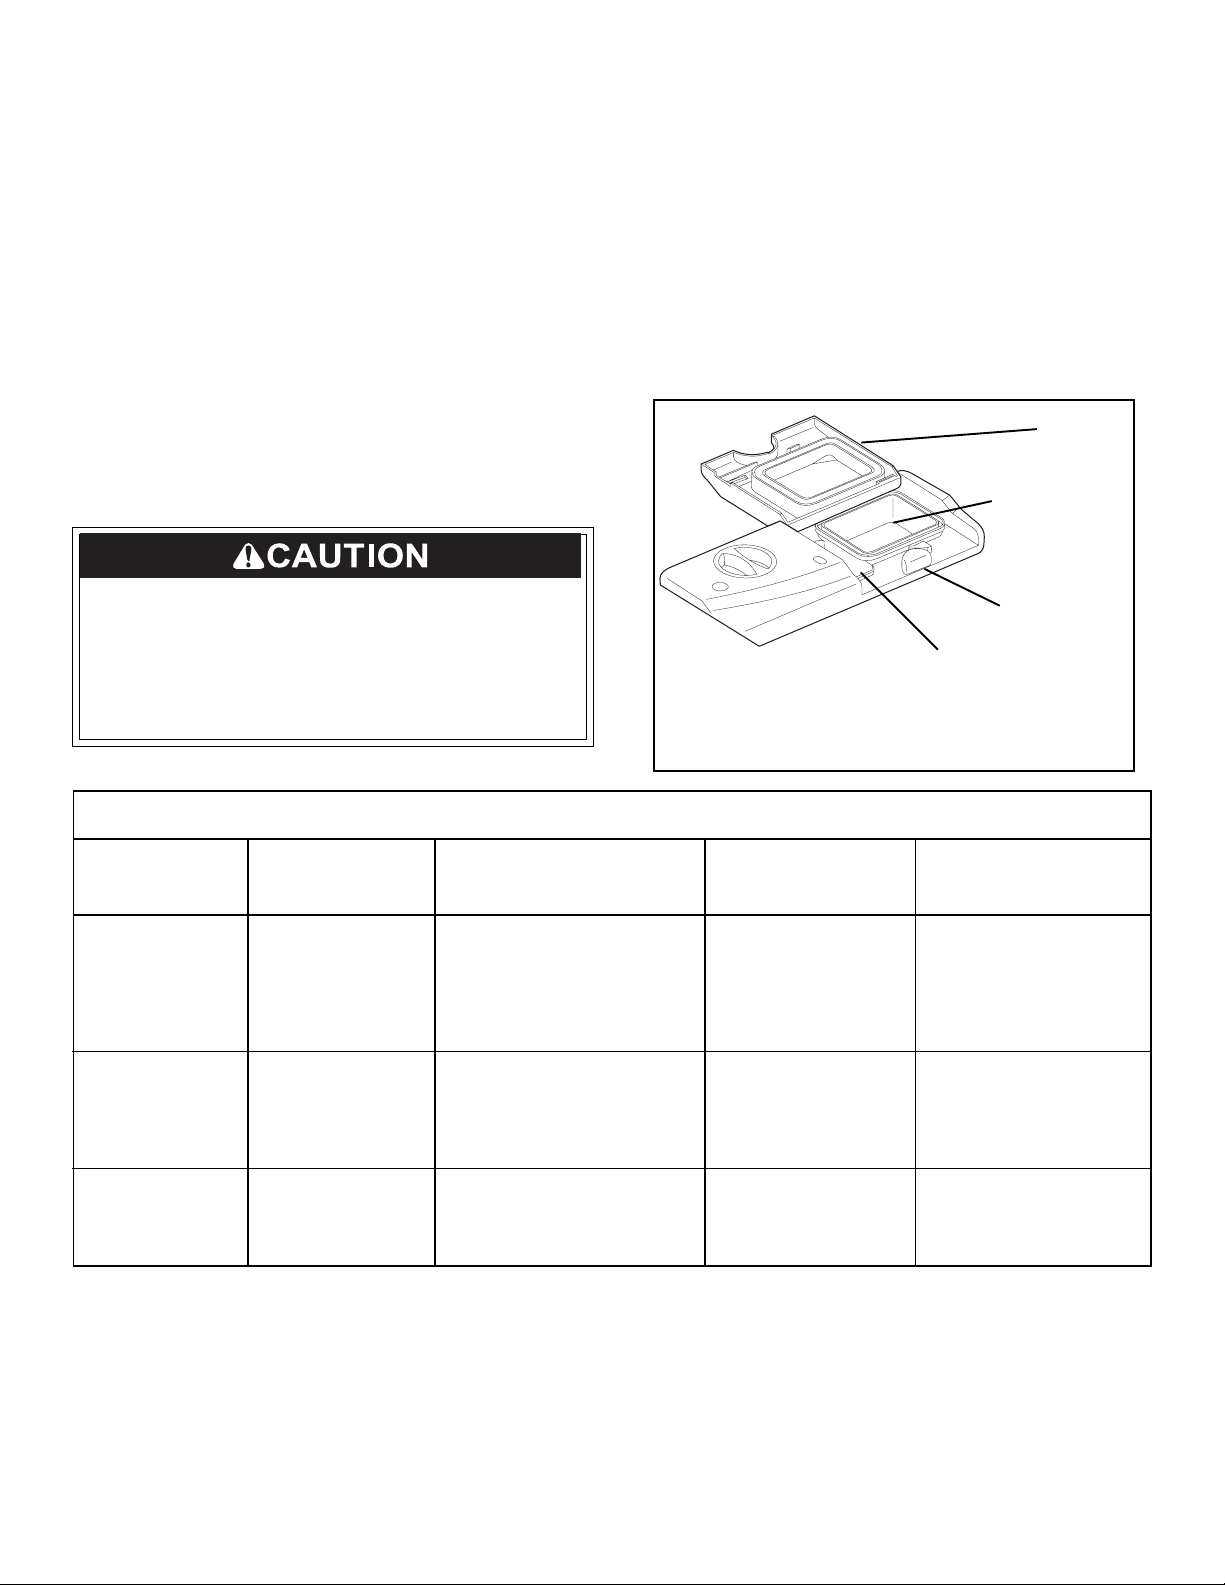
Dishwasher Dispenser & Detergents
Filling the Detergent Dispenser
The detergent dispenser has one main wash cup and
one prewash cup. The covered cup opens automatically
to release detergent.
• Use only fresh automatic dishwashing detergent.
Other detergents will cause oversudsing.
• When using automatic dishwashing detergent tabs,
place one tab in main wash cup and close.
• Add detergent just before starting cycle.
• Store detergent in a cool, dry location. Moist or
caked detergent will not dissolve properly.
The use of industrial grade detergent can damage
the heating coil and other parts of the dishwasher
leading to damage to the unit and surrounding
property. Use only household grade automatic
dishwasher detergents.
How much Detergent to use
The amount of detergent to use depends on the water
hardness. Water hardness is measured in grains per
gallon. Using too little detergent can result in poor
cleaning and hard water filming or spotting. Using too
much detergent in soft water can cause a permanent film
called etching. Your local water company, water softener
company or county extension agent can tell you the water
hardness in your area.
CoverCover
Cover
CoverCover
Main Wash CupMain Wash Cup
Main Wash Cup
Main Wash CupMain Wash Cup
Cover LatchCover Latch
Cover Latch
Cover LatchCover Latch
Pre Wash CupPre Wash Cup
Pre Wash Cup
Pre Wash CupPre Wash Cup
Note: Note:
Note: If the cover is closed on the Main Wash Cup,
Note: Note:
open by pressing the cover latch.
Detergent Usage Guide
Cycle
Pots & Pans
or
Normal Wash
Light Wash
Quick Rinse
*Note: For very hard water, detergent alone may not be enough. A water softener is recommended to improve water
quality and dishwashing performance. Try adding more detergent at the beginning of the main wash portion of the
cycle. As a rule, use 1 teaspoon for each grain above 12. Unlatch the door, open slowly and add detergent to the bottom
of the tub. Close the door to latch and the dishwasher will continue through the cycle.
Soft Water
(0-3 grains)
1.5 teaspoons
(each cup–
1/4 full)
1.5 teaspoons
(Main Wash cup–
1/4 full)
No Detergent No Detergent No Detergent
Medium Hard Water
(4-8 grains)
4 teaspoons
(each cup–fill to line
above "Regular")
4 teaspoons
(Main Wash cup–fill to
line above "Regular")
Hard Water
(9-12 grains)
6 teaspoons
(each cup–
completely full)
6 teaspoons
(Main Wash cup–
completely full)
Very Hard Water*
(over 12 grains)
Each Cup –
Completely Full
(water softener
recommended)
Main Wash Cup –
Completely Full
(water softener
recommended)
No Detergent
(water softener
recommended)
8
Dishwasher Dispenser & Detergents
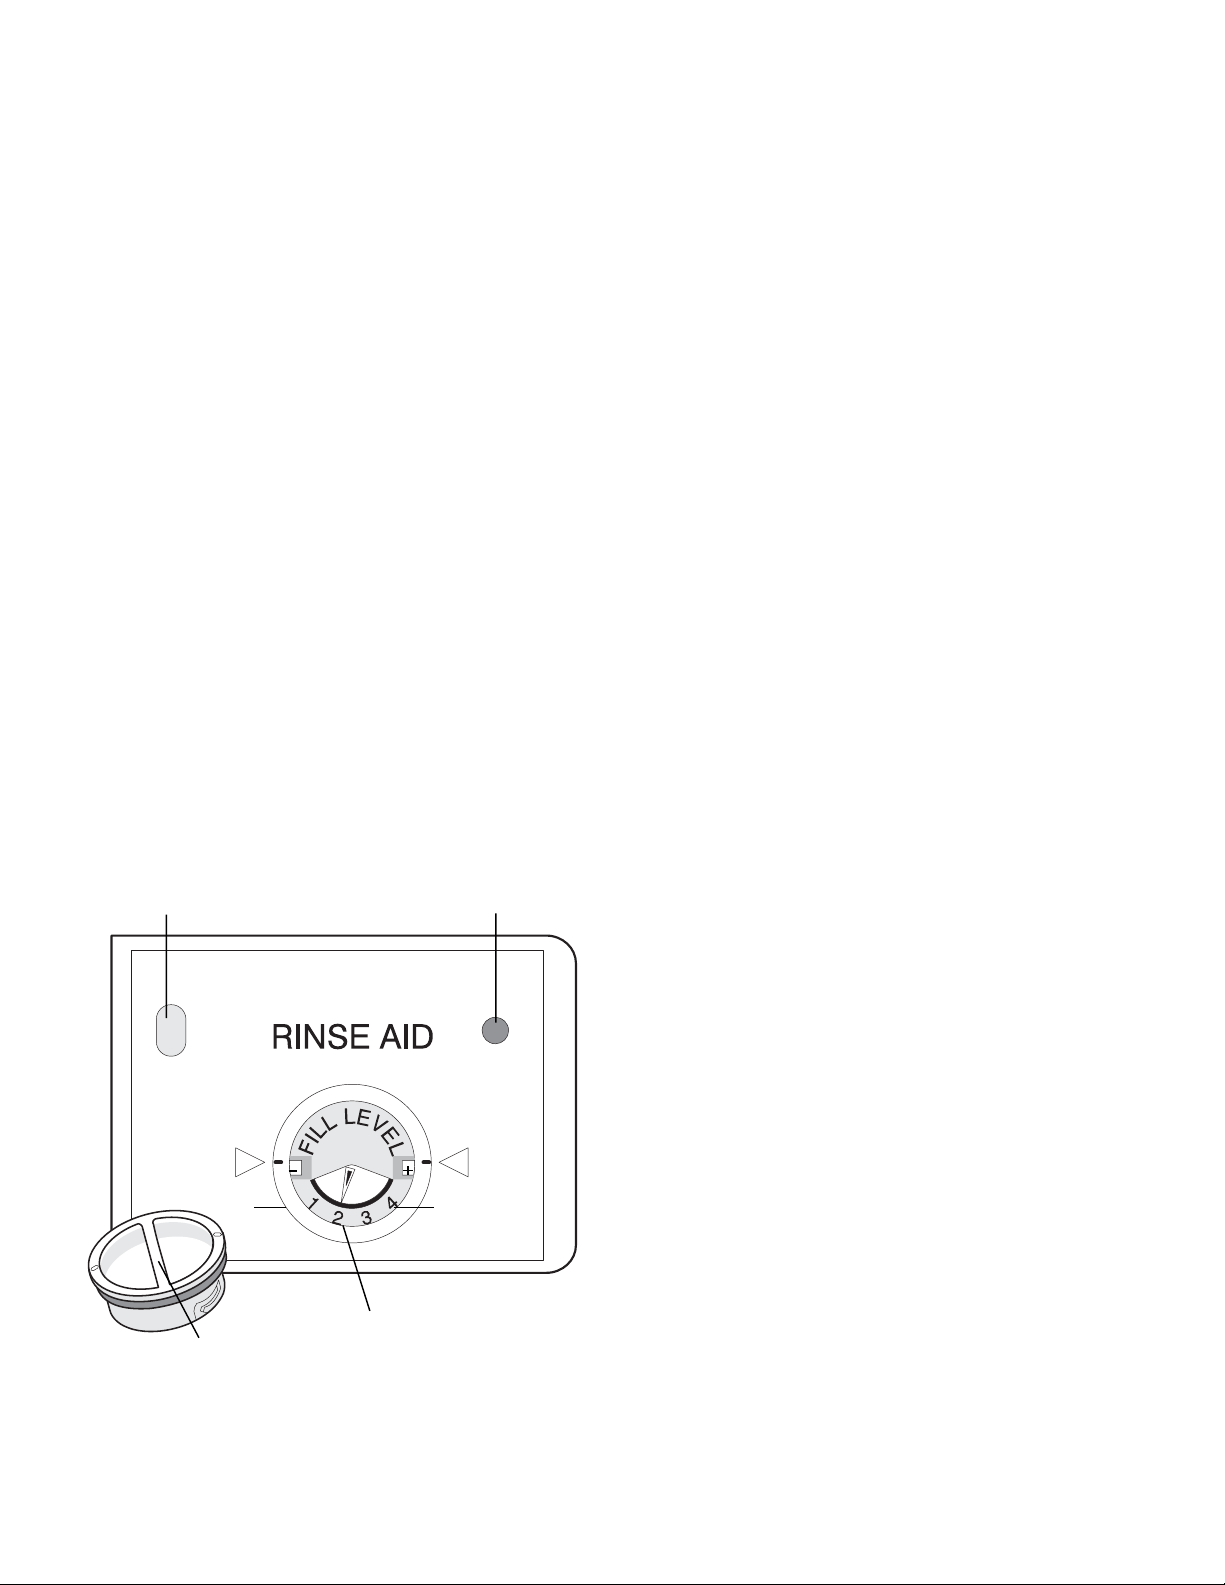
Rinse Aid
Rinse aid greatly improves drying and reducesRinse aid greatly improves drying and reduces
Rinse aid greatly improves drying and reduces
Rinse aid greatly improves drying and reducesRinse aid greatly improves drying and reduces
water spots and filming.water spots and filming.
water spots and filming. Water "sheets" off dishes
water spots and filming.water spots and filming.
rather than forming water droplets that cling and leave
spots.
A dispenser, located next to the detergent cup,
automatically releases a measured amount of rinse aid
during the last rinse. If spotting and poor drying are
problems, increase the amount of rinse aid dispensed by
rotating the dial to a higher number. The dial is located
under the dispenser cap. The indicator will be dark when
full and will show clear when it is time to refill.
To add liquid rinse aid, turn dispenser cap 1/4 turn
counterclockwise and lift out. Pour in rinse aid until liquid
touches the indicated fill level. Replace cap.
Do not overfill since this can cause oversudsing.Do not overfill since this can cause oversudsing.
Do not overfill since this can cause oversudsing.
Do not overfill since this can cause oversudsing.Do not overfill since this can cause oversudsing.
Wipe up any spills with a damp cloth.Wipe up any spills with a damp cloth.
Wipe up any spills with a damp cloth.
Wipe up any spills with a damp cloth.Wipe up any spills with a damp cloth.
The dispenser holds enough for 35 to 140 washes,The dispenser holds enough for 35 to 140 washes,
The dispenser holds enough for 35 to 140 washes,
The dispenser holds enough for 35 to 140 washes,The dispenser holds enough for 35 to 140 washes,
depending on setting.depending on setting.
depending on setting.
depending on setting.depending on setting.
Factors Affecting Performance
Water Pressure
Water pressure should be between 20 and 120 pounds per
square inch. Low water pressure occurs most often during
periods of high water consumption, such as when laundry
or showers are being done. To determine if you have
enough water pressure, put a 2 quart container under fully
opened hot water faucet nearest the dishwasher. It should
fill in less than 14 seconds. Be sure all other faucets are
turned off during test.
Water Temperature
Hot water is needed for best dishwashing and drying
results. Water entering dishwasher should be 120°F (49°C)
to give satisfactory results.
To check water temperature entering dishwasher:
• Turn on hot water faucet nearest dishwasher for several
minutes to clear cool water from pipes.
• Hold a candy or meat thermometer in stream
of water to check the temperature.
Dispenser OpeningDispenser Opening
Dispenser Opening
Dispenser OpeningDispenser Opening
LessLess
Less
LessLess
Dispenser CapDispenser Cap
Dispenser Cap
Dispenser CapDispenser Cap
IndicatorIndicator
Indicator
IndicatorIndicator
MoreMore
More
MoreMore
Adjustable setting Adjustable setting
Adjustable setting
Adjustable setting Adjustable setting
• If temperature is below 120°F (49°C), have a qualified
person raise the hot water heater thermostat setting.
Important: Before starting a cycle, run hot waterImportant: Before starting a cycle, run hot water
Important: Before starting a cycle, run hot water
Important: Before starting a cycle, run hot waterImportant: Before starting a cycle, run hot water
to clear cool water from pipe.to clear cool water from pipe.
to clear cool water from pipe.
to clear cool water from pipe.to clear cool water from pipe.
Not selecting the AIR DRY option in combination with rinse
aid will enhance drying performance. The energy
required to use the AIR DRY option costs pennies per
cycle. You may choose to select the AIR DRY option;
however you will have items in your dish load that will not
be completely dry at the end of the cycle.
9
 Loading...