

Kenmore 116.34722 User Manual
Owner’s Manual
Manual Del Propietano
Vacuum Cleaner
Aspiradora
Model, Modelo 116.34722
116.34723
CAUTION:
Read and follow all
safety and operating
instructions before first
use of this product.
CUIDADO:
Lea y sigua todas ¡as
instrucciones de operación
y seguridad antes del uso de
este producto.
Sears, Roebuck and Co., Hoffman Estates, IL 60179 U.S.A. www.sears.com
Part No. C01ZCGY10U00 - KC01ZCGYZ0U0
Impreso en Mexico
Printed in Mexico

TABLE OF CONTENTS
Before Using Your New Vacuum
Kenmore Vacuum Cleaner Warranty ... 2
Important Safety Instructions
Parts and Features
Operating Instructions
Getting Started
Using Handle.................................................5
Storing Handle
Cord Assembly .............................................5
Using Cord Hook...........................................5
Pile Height Selection and Settings
On/Off Switch
Releasing the Handle ...................................6
Attachments
Attachment Use Chart...................................7
............................................
......................................
..............................................
.............................................
...............................................
..............;...................................
Vacuuming Tips..................................8
Performance Features
.......................
............
................
..............
2
3
4
5
5
5
6
6
7
Vacuum Cleaner Care
Vacuum Storage
Cleaning Exterior and Attachments ...........9
Dust Bin Cleaning ......................................10
Dust Bin Assembly
Dust Bin Filter Changing/Cleaning
Filter Replacement
Cleaning Secondary Filler Screen
Exhaust Filter Cleaning
Replacing Headlight Bulb
Belt Changing and Agitator Cleaning . .15,16
Cleaning Exterior .......................................17
Removing Clogs
Troubleshooting
Requesting service
..................................
..........................................
...................................
...........
....................................
............
.............................
.........................
........................................
...................................
.................
(back page)
9
9
11
12
13
13
13
14
17
18
8
BEFORE USING YOUR NEWVACUUM
Please read this guide. It will help you assemble and operate your new Kenmore vacuum in
the safest and most effective way.
For more information about vacuum cleaner care and operation, call your nearest Sears store.
You will need the complete model and serial numbers when requesting information. Your vacu
um’s model and serial numbers are located on the Model and Serial Number Plate,
Use the space below to record the model number and serial number of your new Kenmore
vacuum.
Model No._
Serial No.
Date of Purchase
Keep this book and your sales check (receipt) in a safe place for future reference.
KENMORE VACUUM CLEANER WARRANTY
LIMITED ONE YEAR WARRANTY ON KENMORE VACUUM CLEANER
This warranty is for one year from the date of purchase, and includes only private household
vacuum cleaner use. During the warranty year, when this vacuum cleaner is operated and
maintained according to the owner's manual instructions. Sears will repair any defects in
material or workmanship free of charge.
This warranty excludes vacuum bags, belts, light bulbs, and filters, which are expendable parts
and become worn during normal use.
For warranty service, return this vacuum cleaner to the nearest Sears Service Center in
the United States.
This warranty applies only while this product is in use in the United States. This warranty gives
you specific legal rights, and you may also have other rights which vary from state to state.
Sears, Roebuck and Co., D/817 WA, Hoffman Estates, IL 60179

IMPORTANT SAFETY INSTRUCTIONS
WARNING
Your safety is important to us. To reduce the risk of fire, electrical shock, injury
to persons or damage when using your vacuum cleaner, follow basic safety pre
cautions including the foilowing:
Read this manual before assembling or
using your vacuum cleaner.
Use your cleaner only as described in
this manual. Use only with Sears recom
mended attachments.
To reduce the risk of electrical shock -
Do not use outdoors or on wet surfaces.
Disconnect electrical supply before any
servicing or cleaning. Failure to do so
could result in electrical shock or person
al injury.
Always turn cleaner off before unplug
ging.
Do not unplug by pulling on cord. To
unplug, grasp the plug, not the cord.
Do not use with damaged cord or plug.
If cleaner is not working as it should, has
been dropped, damaged, left outdoors,
or dropped into water, return it to a
Sears Service Center.
Do not pull or carry by cord, use cord as
a handle, close door on cord, or pull
cord around sharp edges or corners. Do
not run cleaner over cord. Keep cord
away from heated surfaces.
Do not leave cleaner when plugged in.
Unplug from outlet when not in use and
before servicing.
Do not allow to be used as a toy. Close
attention is necessary when used by or
near children.
Do not handle plug or cleaner with wet
hands.
Do not put any objects into openings.
Do not use with any opening blocked;
keep free of dust, lint, hair and anything
that may reduce air flow.
Keep hair, loose clothing, fingers, and all
parts of body away from openings and
moving parts.
Do not use cleaner without dust bin
and/or filters in place.
Always dean the dust bin after vacuum
ing carpet cleaners or freshener, pow
ders and fine dust. These products dog
the filters, reduce airflow and can cause
damage to the cleaner. Failure to clean
the dust bin could cause permanent
damage to the cleaner.
Do not use the cleaner to pick up sharp
hard objects, small toys, pins, paper
clips, etc. They may damage the cleaner
or dust bin.
Do not pick up anything that is burning
or smoking, such as cigarettes, matches,
or hot ashes.
Do not use cleaner to pick up flammable
or combustible liquids (gasoline, cleaning
fluids, perfumes, etc.), or use in areas
where they may be present. The fumes
from these substances can create a fire
hazard or explosion.
Use extra care when cleaning on stairs.
Do not put on chairs, tables, etc. Keep
on floor.
You are responsible for making sure that
your vacuum cleaner is not used by any
one unable to operate it properly.
SAVE THESE INSTRUCTIONS
Proper assembly and safe use of your vacuum cleaner are your responsibilities. Your cleaner
is intended only for household use. Read this Owner’s Manual carefully for important use and
safety information. This guide contains safety statements under warning and caution symbols.
Please pay special attention to these boxes and follow any instructions given. WARNING
statements alert you to such dangers as fire, electrical shock, burns and personal injury. CAU
TION statements alert you to such dangers as personal injury and/or property damage.
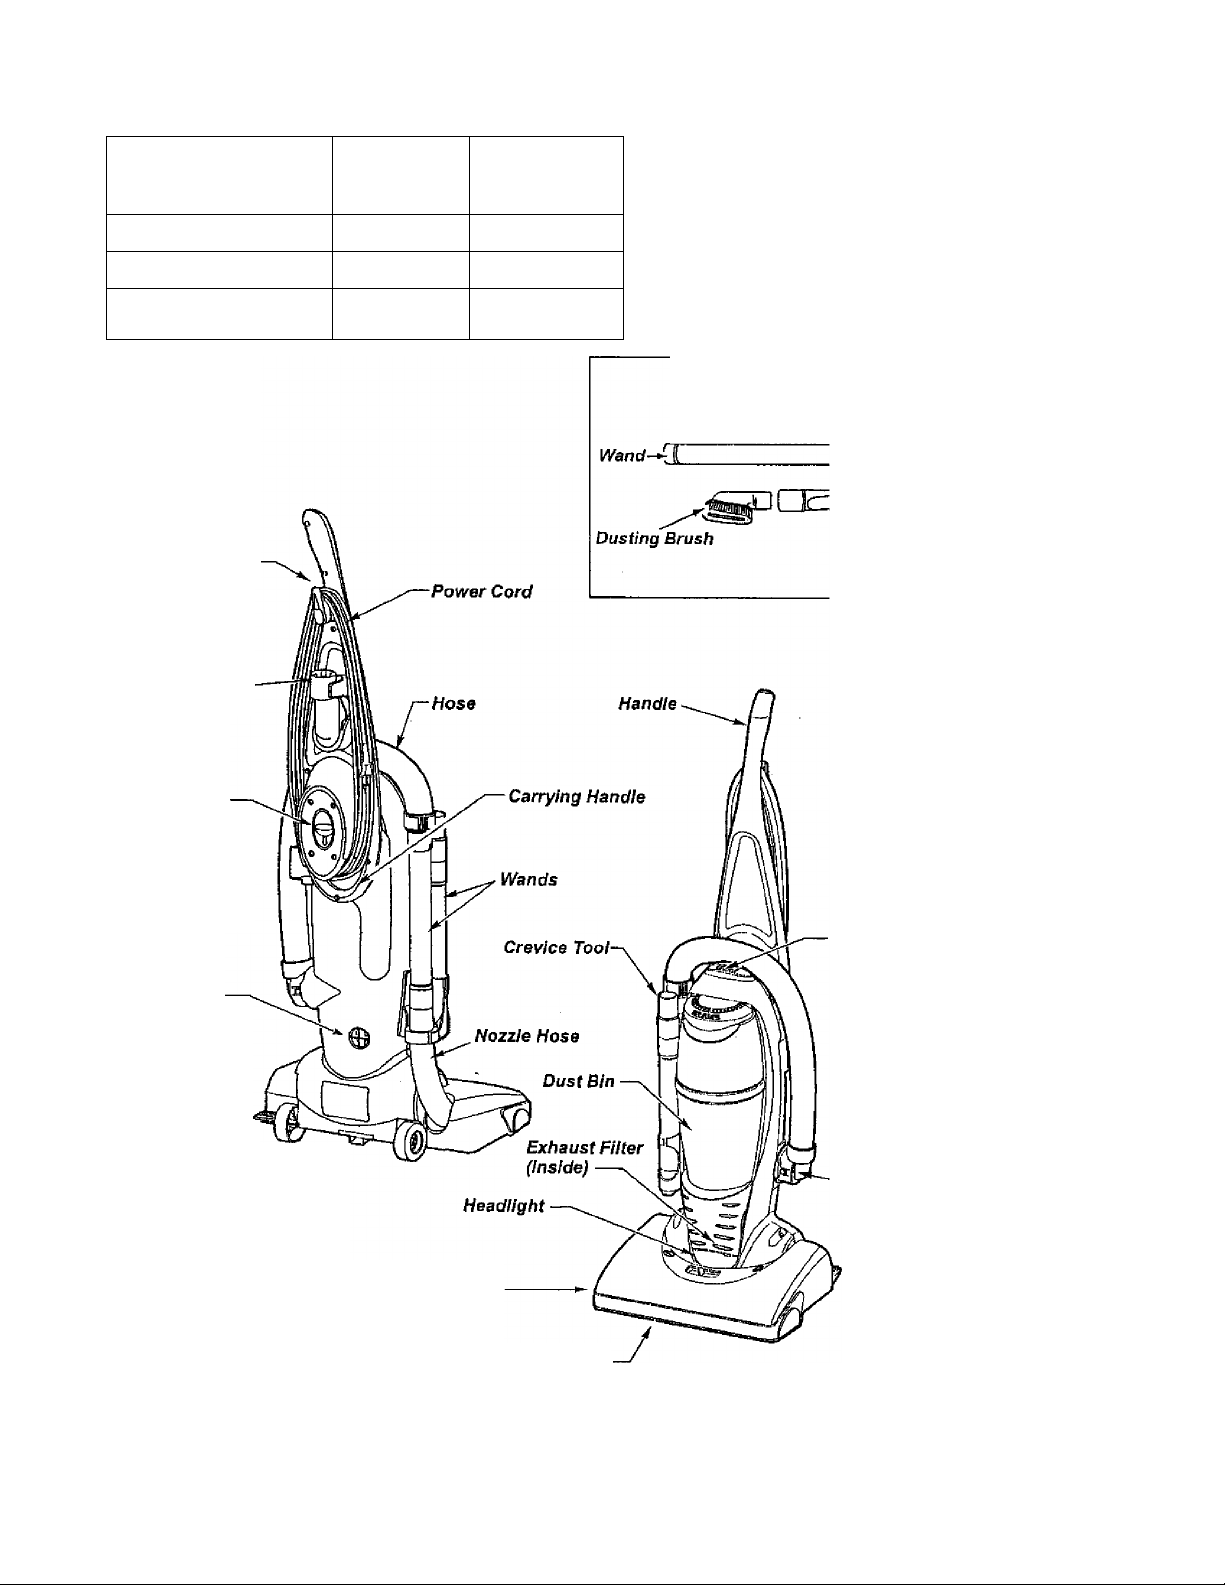
PARTS AND FEATURES
Item
Exhaust Filter
Fleadlight Bulb
Belt
Cord Hook
Dusting
Brush
Part No.
In U.S.
Part No.
In Canada
20-86880 20-86880
20-5248
20-5248C
20-5275 20-5275C
It is important to know your vacuum
cleaner’s parts and features to assure
its proper and safe use. Review these
before using your cleaner.
ATTACHMENTS
Crevice Tool
Handle
Release
Button
Motor
Protector
Handle
Release Pedal
On/Off Switch
Suction
Inlet
Nozzle
Furniture Guard ■
OPERATING INSTRUCTIONS
GETTING STARTED
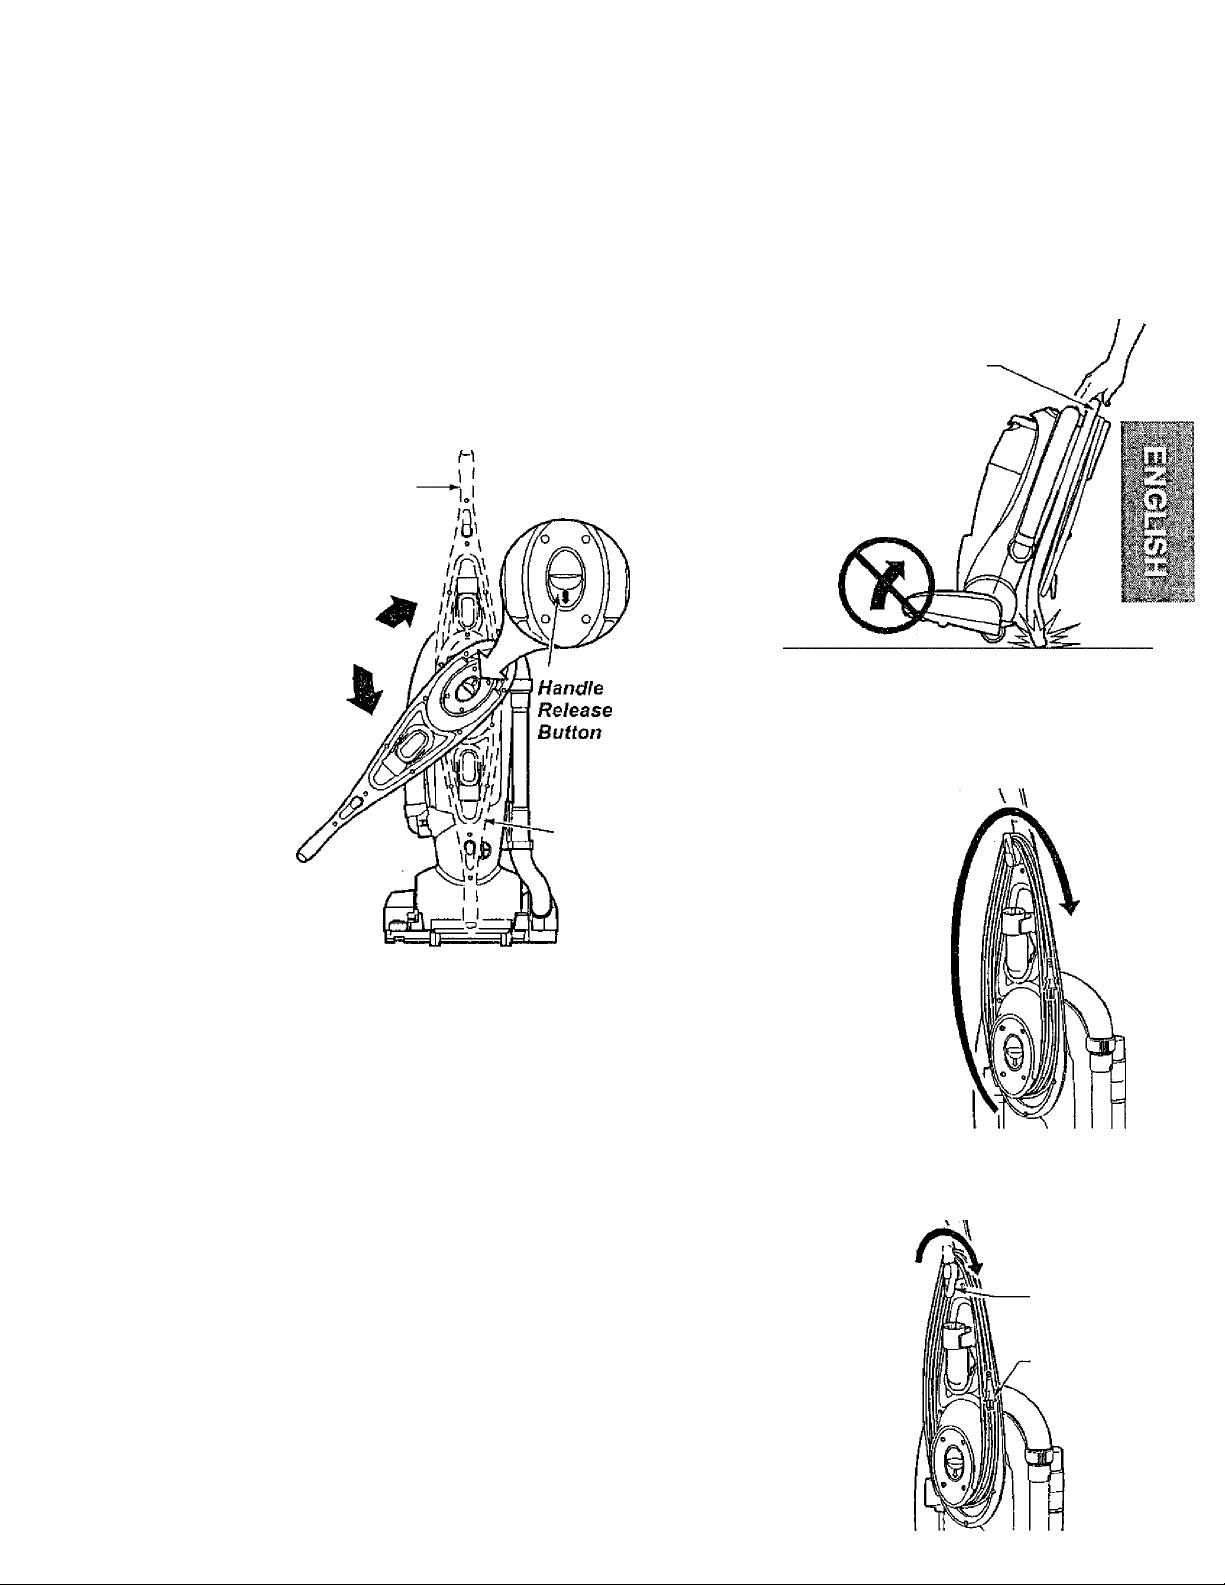
USING HANDLE
To release handle; press handle release
button as shown. With release button
depressed rotate handle clockwise to the
operating position. Once handle reaches
the operating position (up) the handle will
automatically lock into place.
Operating
Position
Storage
Position
NOTE: You should hear a noticeable "click"
sound when handle reaches the operating
position.
NOTE: Make sure the handle is locked in
the operating position before using
vacuum. DO NOT operate vacuum unless
handle Is locked.
STORING HANDLE
To rotate the handle to the storage position
when vacuum is not in use, press handle
release button and rotate handle counter
clockwise for easy storage,
NOTE: You should hear a noticeable “click"
sound when handle reaches the storage
position.
Never puli the vacuum cleaner with the
handle in the storage position, The handle
will drag on the floor.
Always lift the
vacuum by the
carrying handle when
transporting to storage.
Carrying
Handle
CORD ASSEMBLY
Make sure the quick release upper cord hook
is in the upright position. Remove the wire tie
from the power cord,
Make sure the power
cord is placed into the
locking notch. This
helps keep the power
cord out from under
the vacuum cleaner
agitator.
Wrap the power cord
around the upper and
lower cord hooks and
lock the power cord
plug onto the power
cord.
USING CORD HOOK
Detach plug
head from power
cord.
Rotate cord hook
down to release
cord. Return the
cord hook to the
upright position
before
attempting to
rewind the cord.
Quick Release
Cord Hook
Plug Head

PILE HEIGHT SELECTION AND SETTING
SOME MODELS
To select a pile height setting:
Turn off cleaner. Select a pile height setting
by tilting the cleaner back until front wheels
are lifted slightly off the floor as illustrated.
Slide the adjustment lever to the correct
setting.
Models with no selector adjust automatically
for varying carpet heights.
SUGGESTED PILE HEIGHT SETTINGS
You may need to raise the height to make
some jobs easier, such as scatter rugs and
longer pile carpets.
Suggested settings are:
HIGH: shag carpet, long pile, plush, scatter
rugs
MED: medium to long pile.
LOW: short to medium pile.
EX LOW: very low pile.
Place unit in “HiGH” when using attach
ments to prevent possible floor damage.
ATTENTION: Special care is required when
vacuuming certain types of carpet or floor
covering. Always check the carpet or floor
covering manufacturer’s recommended
cleaning instructions before vacuuming.
Pile Height
Adjustment
Lever
A
WARNING
Personal Injury Hazard
To avoid personal injury, DO NOT
place hands or feet underneath the
unit when changing height setting.
ON/OFF SWITCH
Ensure ON-OFF switch is OFF. Plug the
power cord into 120V outlet. ON position
turns vacuum on. OFF position turns
vacuum off.
RELEASING THE HANDLE
Release the handle by pressing down on
the handle release pedal with your foot and
pulling back and down on the handle with
your hand.
 Loading...