

Page 1
Owner’s Manual
Kenmore
Vacuum Cleaner
Mode! 116.38412
CAUTION:
Read and follow all
safety and operating
instructions before first
use of this product-
Sears, Roebuck and Co., Hoffman Estates, IL 60179 U.S.A.
Part No. C01ZAPY00U00-4370481 Printed in U.S.A.
Page 2

TABLE OF CONTENTS
Before Using Your New Vacuum ..... 2
Kenmore Vacuum Cleaner Warranty ,. 2
Important Safety Instructions ...
Parts and Features
Assembly Instructions
Operating Instructions.............. .., 6
Plie Height Selection and Setting
Carpet/Bare Fioor Seiector
Releasing the Handie ................ .8
On/Off Switch ...........
Attachments
Attachment Use Chart .....................10
Vacuuming Tips
Parformance Features .............11-12
..............................
......... ..........
..................
....
...................
............................
.....
...
........
...........
.8-10
4
5
.8
11
Vacuum Cleaner Cara .....
Vacuum Storage
3
7
.7
Cleaning Exterior and Attachments
Bag Changing
Motor Safety Filter Changing ....... .14-15
Exhaust Filter Cleaning ..............15
Beit Changing and Brush Cleaning .. .16-18
Clog Removal.............................. .19
Light Bulb Changing , ..................... .20
Brush Servicing
Agitator Assembly ..........................21
Troubleshooting ..
Requesting Assistance Or Service .. .23
......
..........
........
....................... 22
..............
..........
.....................
.....................
.........
12
.....
12
12
13
21
BEFORE USING YOUR NEW VACUUM
Piease read this guide. It wiil help you assemble and operate your new Kenmore vacuum in
the safest and most effective way.
For more information about the care and operation, call your nearest Sears store. You will
need the complete model and serial numbers when requesting information. Your vacuum's
mode! and serial numbers are located on the Mode! and Serial Number Plate,
Use the space below to record the model number and serial number of your new Kenmore
vacuum.
Model No._
Serial No.
Date of Purchase
Keep this book and your sales check (receipt) in a safe place for future reference.
KENMORE VACUUM CLEANER WARRANTY
LIMITED ONE YEAR WARRANTY ON KENMORE VACUUM CLEANER
This warranty is for one year from the date of purchase, and includes only private household
vacuum cleaner use. During the warranty year, when this vacuum cleaner is operated and
maintained according to the owner’s manual instructions, Sears will repair any defects in
material or workmanship free of charge.
This warranty excludes vacuum bags, belts, light bulbs, and filters, which are expendable parts
and become worn during normal use.
For warranty service, return this vacuum cleaner to the nearest Sears Service Center in
the United States.
This warranty applies only while this product is in use in the United States. This warranty gives
you specific legal rights, and you may also have other rights which vary from state to state.
Sears, Roebuck and Co., D/817 WA, Hoffman Estates, IL 60179
Page 3

МШШЫТ SAFETY ШЗТШСТЮЫЗ
I
WARNING
Your safety is important to us. To reduce the risk of fire, electrical shock, Injury
to persons or damage when using your vacuum cleaner, follow basic safety pre*
cautions including the following;
Read this manual before assembling or
using your vacuum cleaner.
Use your cleaner only as described in
this manual. Use only with Sears recom
mended attachments.
To reduce the risk of electrical shock -
Do not use outdoors or on wet surfaces,
r-fc»
I vl w wl 11 f C wV wlvt« wvl I tiifdl V fn'wtwivJ dlty
servicing or cleaning. Failure to do so
could result in electrical shock or person
al injury
Always turn cleaner off before unplug
ging.
Do not unplug by pulling on cord. To
unplug, grasp the plug, not the cord.
Do not use with damaged cord or plug. If
cleaner is not working as it should, has
been dropped, damaged, left outdoors, or
dropped into water, return it to a Sears
Service Center/Dapartment.
Do not pull or carry by cord, use cord as
a handle, dose door on cord, or pull cord
around sharp edges or corners. Do not
run cleaner over cord. Keep cord away
from heated surfaces
Do not leave cleaner when plugged in
Unplug from outlet when not in use and
before servicing.
Do not allow to be used as a toy. Close
attention is necessary when used by or
near children.
Do not handle plug or cleaner with wet
hands.
Do not put any objects into openings.
4
Qjinfilu Hfifnrp an\/
Do not use with any opening blocked;
keep free of dust, lint, hair and anything
that may reduce air flow.
Keep hair, loose clothing, fingers, and all
parts of body away from openings and
moving parts.
Do not use cleaner without dust bag
and/or filters in place.
Always change the dust bag after vacu
uming carpet cleaners or freshener, pow
ders and fine dust. These products clog
the bag, reduce airflow and can cause
the bag to burst Failure to change bag
could cause permanent damage to the
cleaner.
Do not use the cleaner to pick up sharp
hard objects, small toys, pins, paper, etc.
They may damage the cleaner or dust
bag.
Do not pick up anything that is burning
or smoking, such as cigarettes, matches,
or hot ashes.
Do not use cleaner to pick up flammable
or combustible liquids (gasoline, cleaning
fluids, perfumes, etc.), or use in areas
where they may be present The fumes
from these substances can create a fire
hazard or explosion.
Use extra care when cleaning on stairs.
Do not put on chairs, tables, etc. Keep
on floor.
You are responsible for making sure that
your vacuum cleaner is not used by any
one unable to operate it properly.
SAVE THESE INSTRUCTIONS
Proper assembly and safe use of your vacuum cleaner are your responsibilities. Your
cleaner is intended only for household use. Read this Owner's Manual carefully for
important use and safety information. This guide contains safety statements under
warning and caution symbols. Please pay special attention to these boxes and follow
any instructions given, WARNING statements alert you to such dangers as fire, electri
cal shock, burns and personal Injury CAUTION statements alert you to such dangers
as personal injury and/or property damage.
Page 4
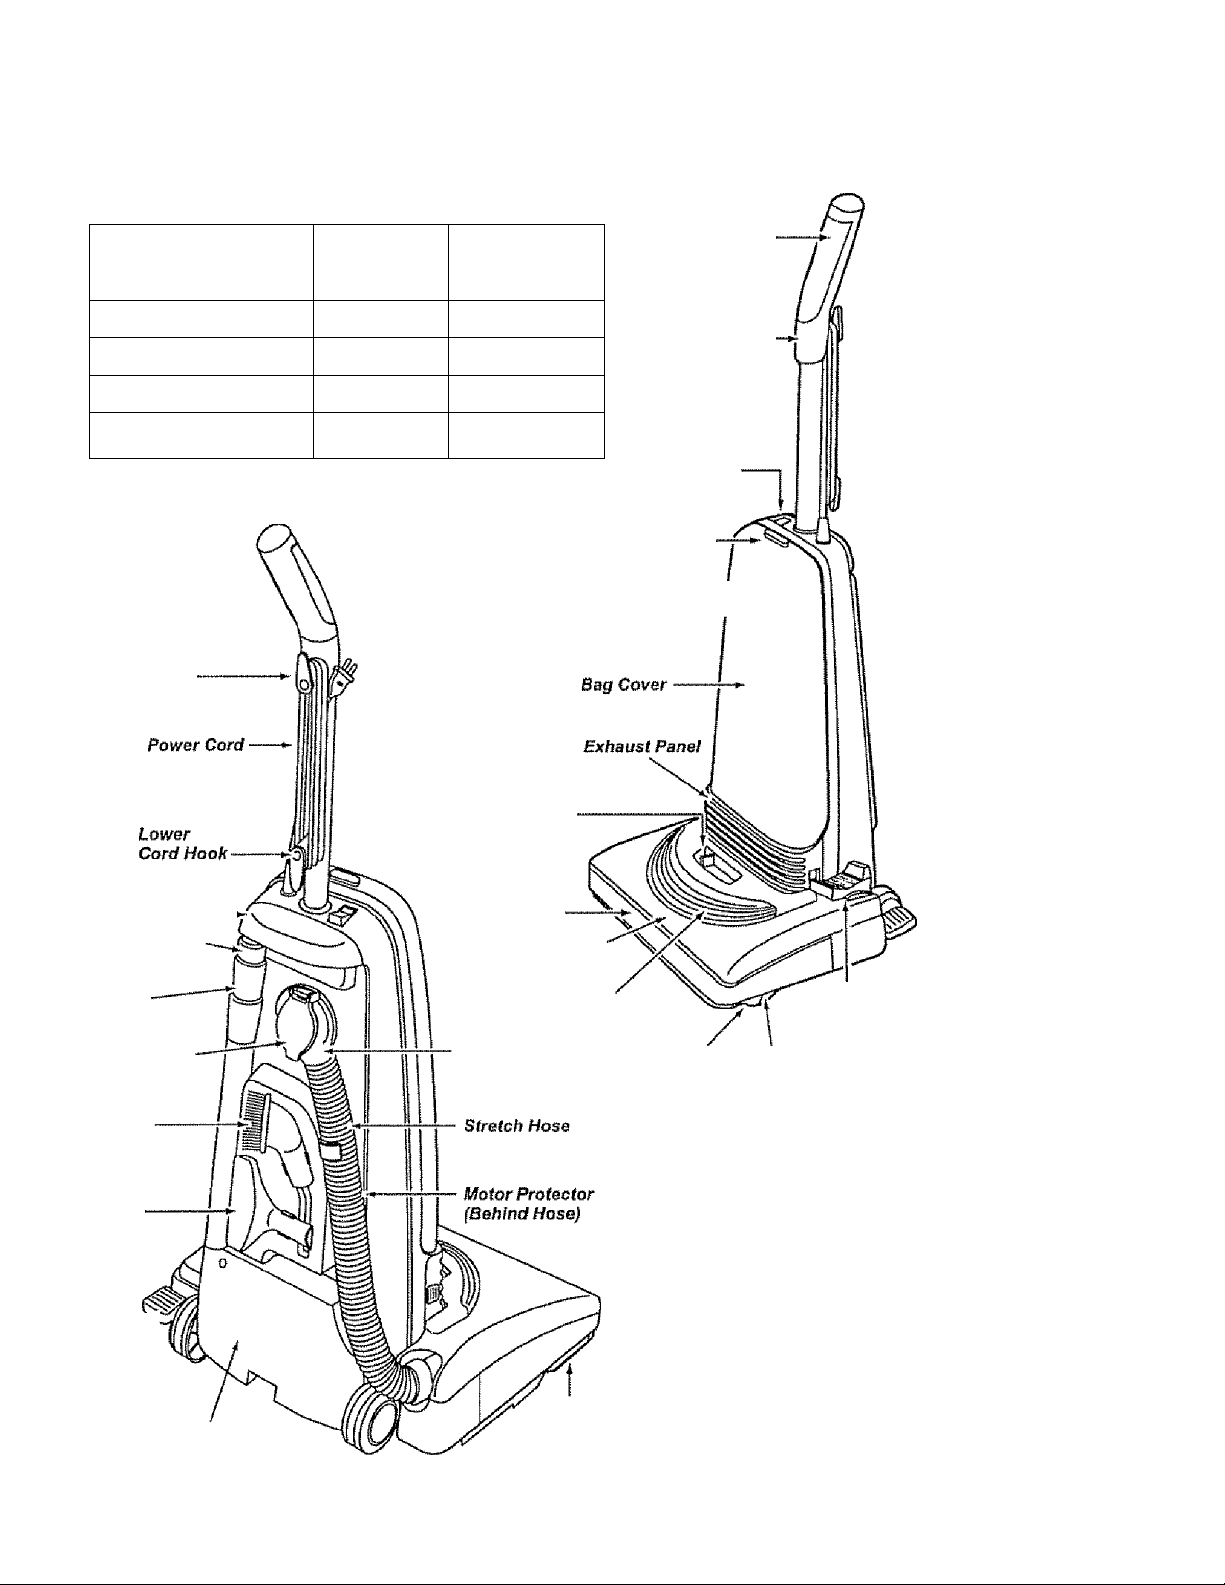
UPRIGHT VACUUM CLEANER PARTS AND FEATURES
It is important to know your vacuum cleaner parts and features to assure its proper and
safe use. Review these before using your cleaner.
item
Part No.
In U.S.
mm- mmm-mm ^ 20**50688 20-50680
Dust Baa
Headlight Bulb
Belt
20-5240
20-5275 20-40096
Motor Safety Filter 20-86886
Quiek Rsfease
Cord Hook
Part No,
In Canada
20-40600
20-86886C
Height Adjus tment
Lever
Handle
On/Off Switch
Handle Mounted
(Some Models) —
On/Off Switch
Body Mounted
(Some Models)
Bag Cover
Release
Performance ,
Indicator
(Some Models) -''i
Carry Handle
Crevice Tool
Telescoping
Wand
Ciesn-Oui
Port Cover
Dusting
Brush
Upholstery
Tool
/■
Handle
ITelease
Pedal
Modet/Serlal
Numbers
Furniture
Guard
Headlight
Ready-to-Use
Swivel Hose
Agitator
Nozzle
Belt
Carpet/Bare
Floor Selector
(Same Models)
Base
Plate
Page 5
A OCCMflOIV IMCTOf c
/\¡)¡>c|Víci1hY INw I rviJi# 1 IwiMo
Before assembling vacuum, check the
PACKING LIST on the cover of the separate
Repair Paris List. Use this list to verify that
you have received al! the components of
your new Kenmore vacuum.
WARNING
Electricai Shock Hazard
Do not plug Into the electrical sup
ply until the assembly Is complete.
Failure to do so could result in
electrical shock or injury.
I Ia a ImV BiMI WMS ln>kS W I mmut g
Before assembling your vacuum cleaner
be sure you have ali the parts shown
AecciyiRiY
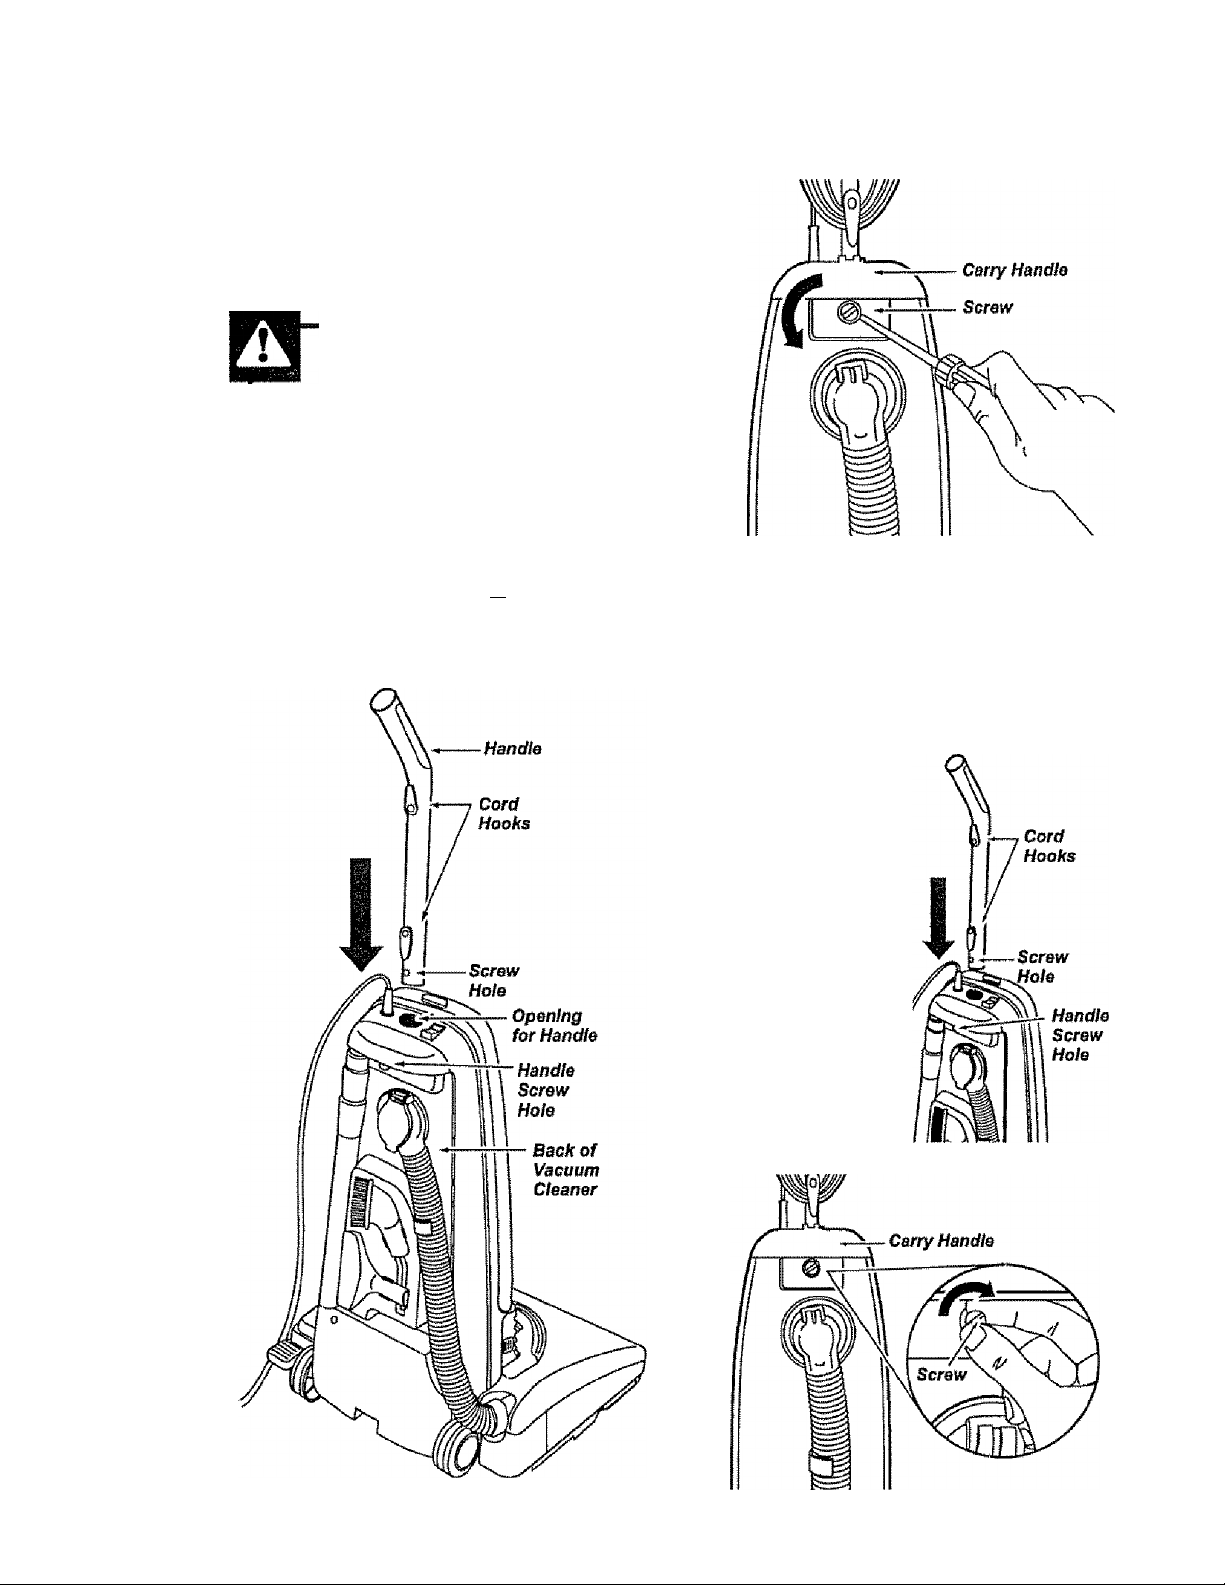
Remove the screw located just below the
carry handle on the back side of the
vacuum.
Position the handle so the cord hooks are
toward the back of the cleaner.
Insert the handle into the opening at the
top of the vacuum.
Align the screw
hole in the handle
with the screw hole
in the vacuum.
Insert the screw so
it passes through
the back of the
vacuum into the
handle.
Begin to tighten
the screw with your
fingers. It may be
necessary to
adjust the handle
slightly.
Page 6
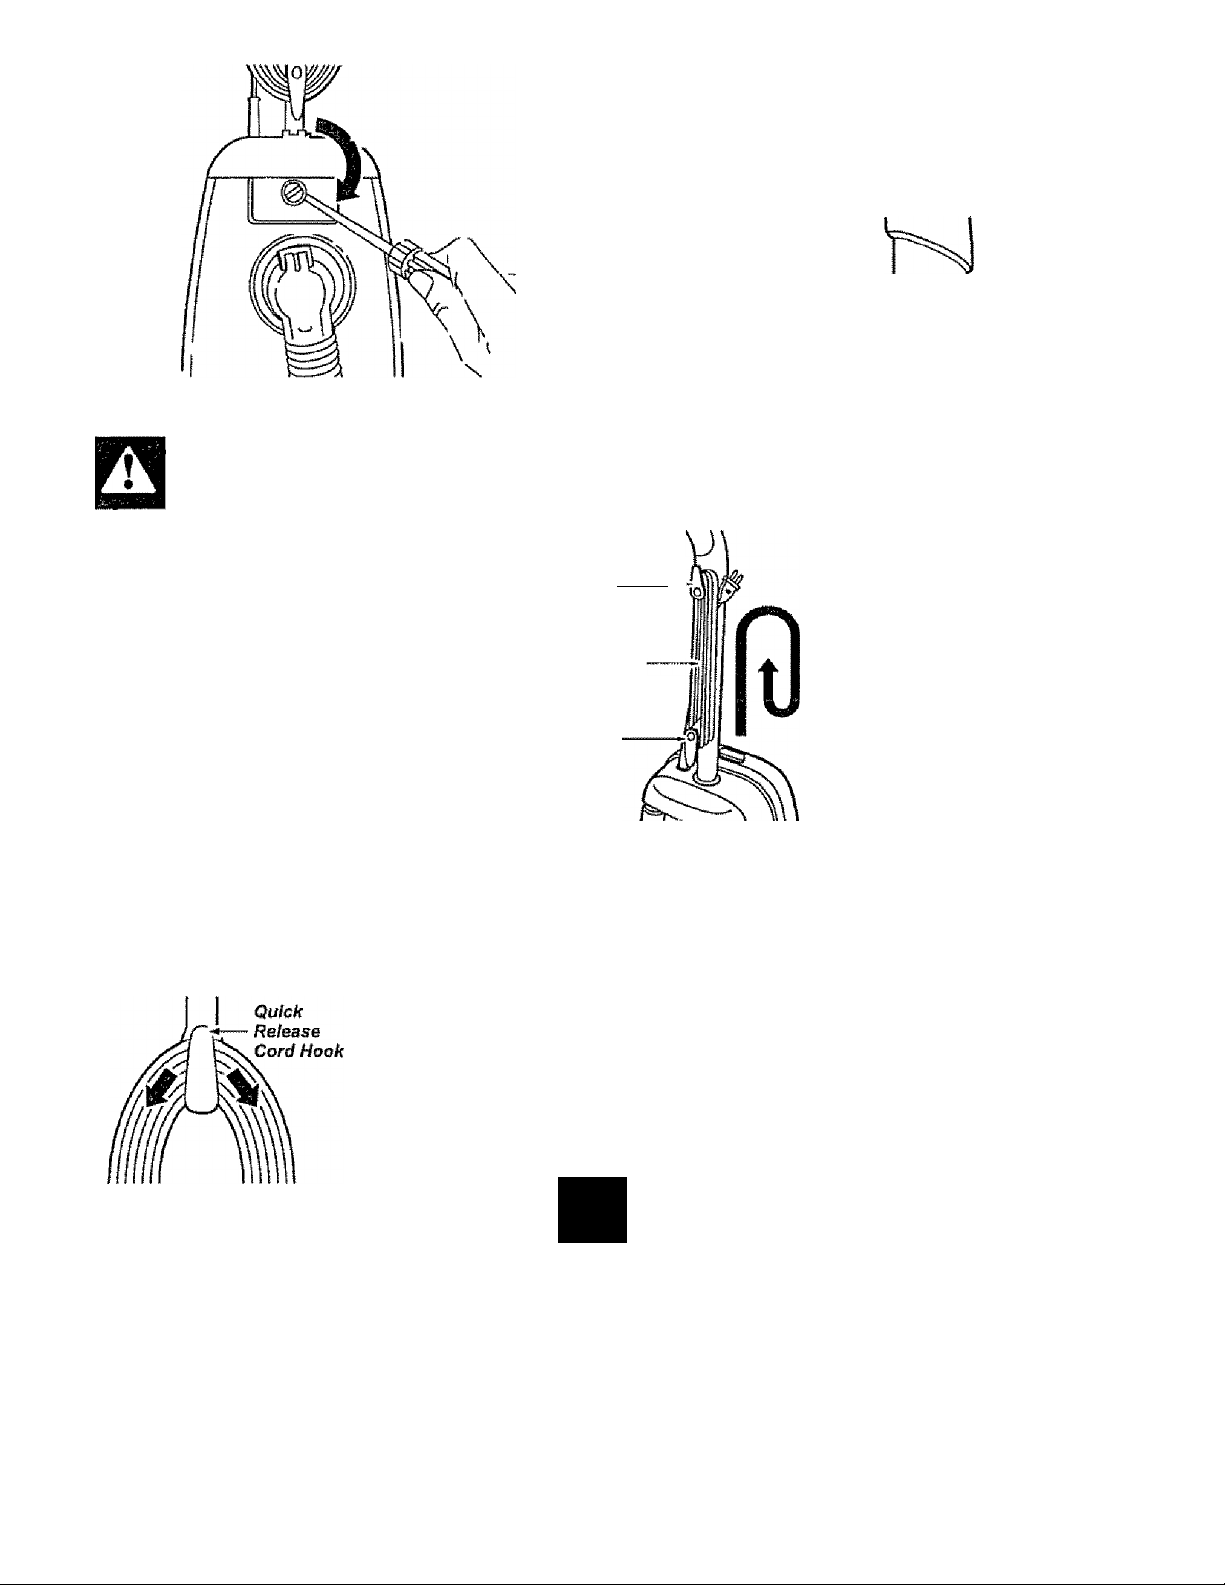
Using a
screw
driver,
tighten
the
screw.
CAUTION
CORD ASSEMBLY
Make sure the quick release upper cord
hook is in the upright position. Remove
the wire tie from the power cord.
Lock the cord
into piace by
forcing it into the
iocking notch on
the body of the
upper cord hook
as shown. This
helps keep the
power cord out
from under the
vacuum cleaner
agitator.
Locking
Notch
Power
Cord
\
/1
Do not overtighten.
Overtightening could strip the
screw holes.
Do not operate the cleaner without
the screw In place.
OPERATING INSTRUCTIONS
HOWTO START
I.Turn the
quick
release cord
hook to
eiUier side
and down to
release the
power cord.
Quick
Refesse Cord
Hook
..........
Power
Cord
Lower Cord
Hook
Ized plug, one blade is wider than the
other. This plug will fit in a polarized outlet
only one way. If the plug does not fit fully
in the outlet, reverse the plug. If it still
does not fit, contact a qualified technician
to Install the proper outlet. Do not change
the plug in any way.
4. Plug the polarized power cord into a
120 Volt outlet located near the floor.
Wrap the
power cord
around the
upper and
lower cord
hooks and
lock the
power cord
plug onto
the power
cord.
2. Release the power cord plug from the
power cord and pull the cord off the upper
cord hook. Check to be sure the power
cord Is still locked into the lock In the
upper cord hook.
3. Check to see if the cleaner has bag
Installed. See BAG CHANGING.
NOTE: To reduce the risk of electric
shock, this vacuum cleaner has a polar-
A
WARNING
Personal Injury and Product Damage
Hazard
• DO NOT plug in if switch is in the ON
position. Personal injury or damage
could result.
iw»Vir f»Lr 1 USB OlJli6i,S 3D0YG GOUiliGiSt'
Damage to items In surrounding area
could occur.
Page 7
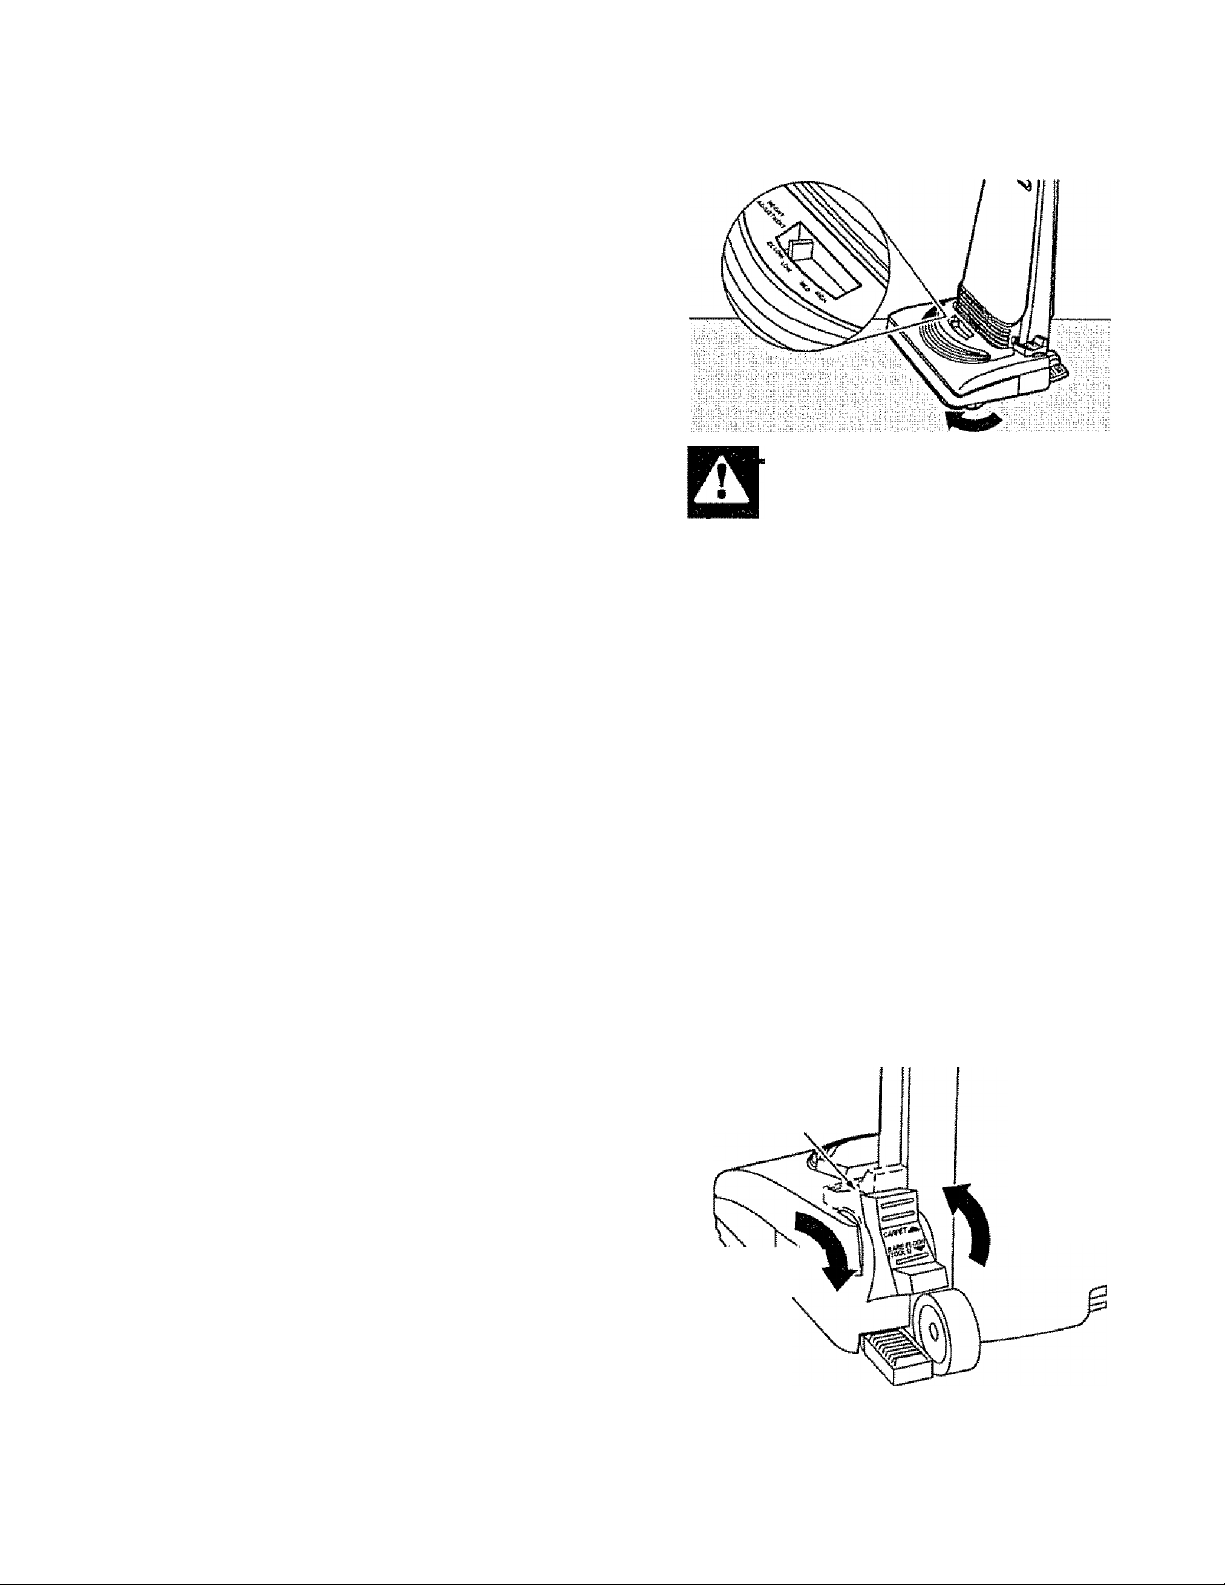
PILE HEIGHT SELECTION AND SETTING
To select a pile height setting:
Turn off cleaner. Select a pile height set
ting by tilting the cleaner back until front
wheels are lifted slightly off the floor as
Illustrated,
Slide the adjustment lever to the correct
setting.
SUGGESTED PILE HEIGHT SETTINGS
You may need to raise the height to make
some jobs easier, such as scatter rugs
and longer pile carpets. Suggested set
tings are:
HIGH; shag carpet, long pile, plush, scat
ter rugs,
MED; medium to iong pile.
LOW; short to medium pile,
EX LOW: very low pile.
WARNING
Personal Injury Hazard
DO NOT place hands or feet
underneath the unit when chang
ing from the bare floor to the car
pet pile height setting. The agitator
begins to revolve rapidly when the
vacuum Is turned on and Is In the
carpet setting.
CARPET/BARE FLOOR SELECTOR
SOME MODELS
Bare floor setting: Rotate the
carpet/bare floor selector all the way back
and down toward the bottom of the nozzle
until it locks into place.
in this position the agitator does not
revolve. This setting should be used for
cleaning hardwood and tile floors and
when any attachments (tools) are
used.
Carpet setting: Slide the selector all the
way forward and up to the carpet
position.
In this position the agitator will turn.
When carpets are being cleaned the
selector should be in this position.
Note: For longer belt life, turn vacuum off
before moving selector, otherwise make
sure the selector is pushed fully and
quickly as possible to the desired posi
tion. Failure to do so can cause the belt
to rub on the selector shaft and may result
in the belt becoming hot and creating a
burning rubber smell.
Carpet/MaF0
Floor Sahcior
To Carpal
Position
To Bara Floor \
Position
Page 8
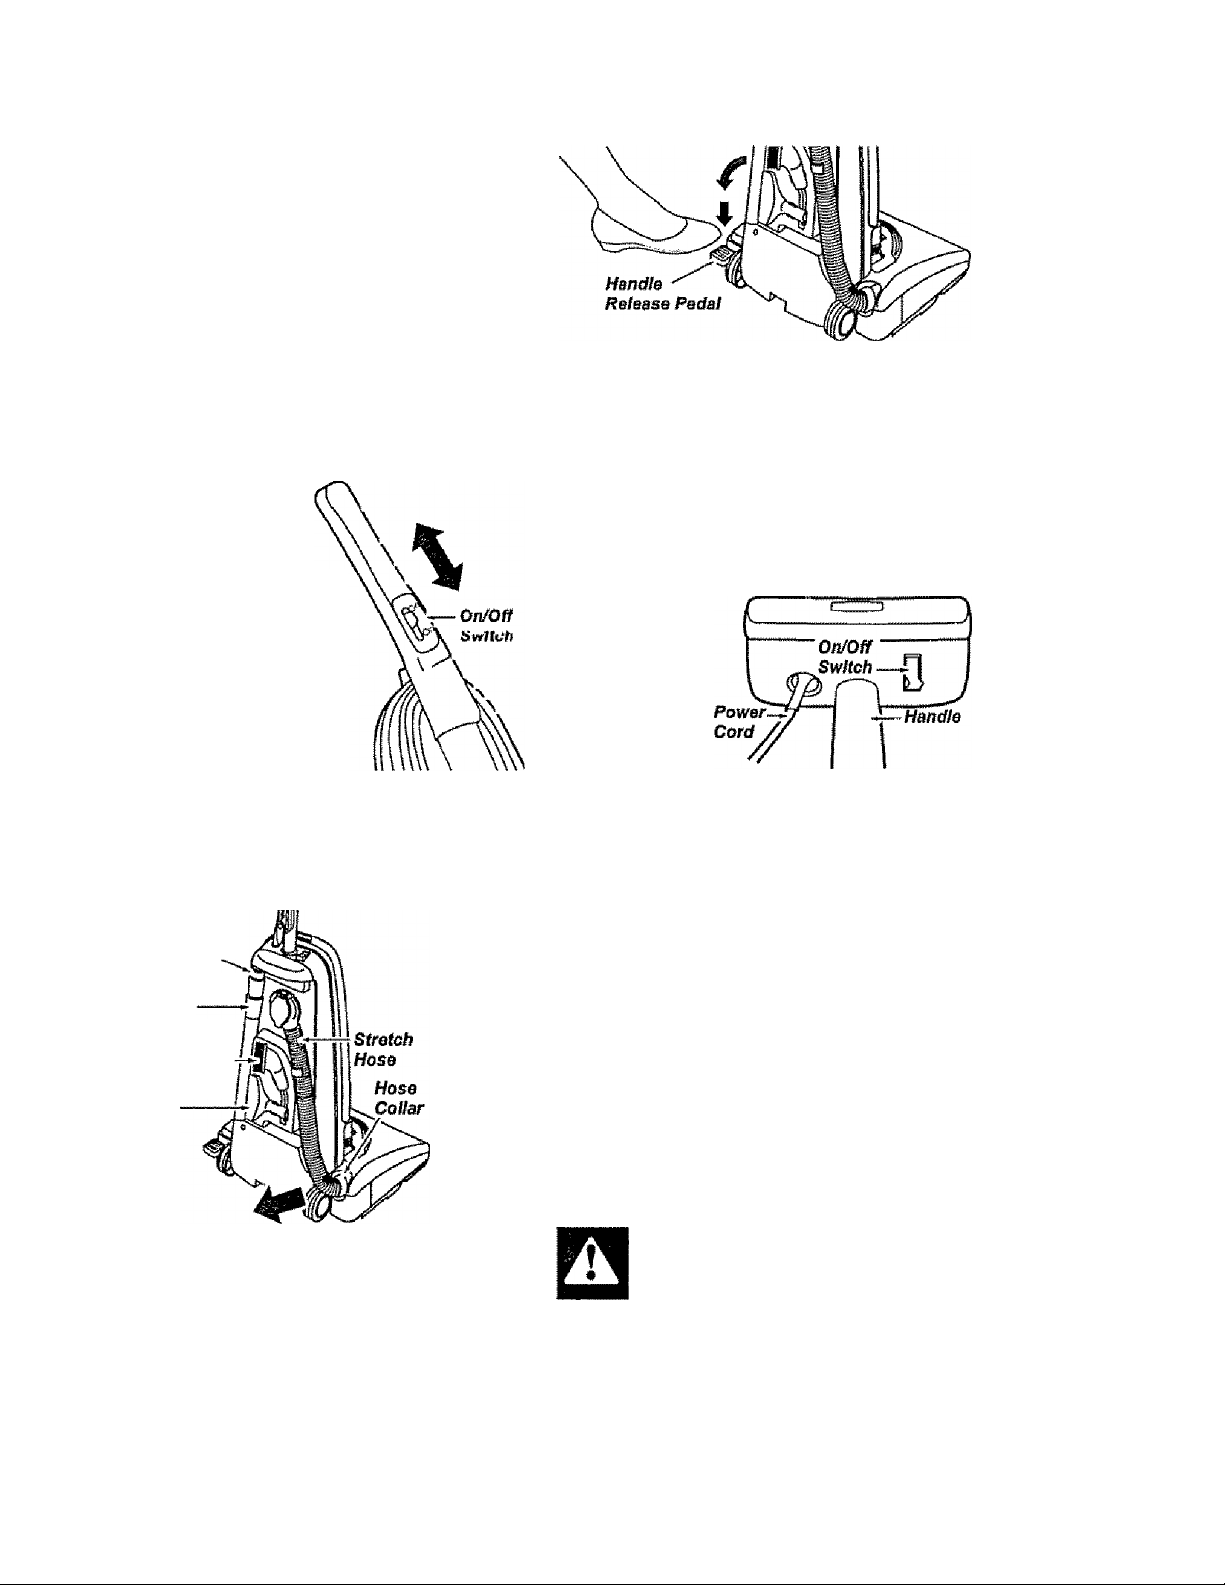
RELEASING THE HANDLE
Release the handle by pressing down on
the handle release pedal with your foot
and pulling back and down on the handle
with your hand.
ON/OFF SWITCH
HANDLE MOUNTED
SOME MODELS
To start the vacuum
cleaner, slide the
On/Off switch from
the OFF position to
the ON position. To
stop the vacuum cleaner,
slide the On/Off switch to
the OFF position.
Crevice
Tool
Telescoping
Wand
Dusting
Brush
Upholstery
Tool
BODY MOUNTED
SOME MODELS
To start the vacuum cleaner, put the
On/Off switch on the top of the body in
the ON position. To stop the cleaner, put
the On/Off
switch in
the OFF
position.
ATTACHMENTS
When returning the bare floor selector to
the carpet setting, use caution as the
selector can move quickly to that setting
due to tension created by the belt
Remove the lower end of the stretch hose
from the cleaner by grasping the hose
collar, twisting and pulling straight out
NOTE: The motor protector may open
when using attachments or when cleaning
new carpet, due to reduced airflow by the
attachments themselves or by new carpet
fuzz filling the bag quickly. See the
TROUBLESHOOTING section.
Identify each of the attachments shown
above.
TO USE ATTACHMENTS:
Flace the bare floor selector In the bare
floor setting by rotating the selector back
and down to the bare floor setting. See
CARPET/BARE FLOOR SELECTOR
section.
WARNING
w wjmki miHiiH%i#
Electrical Shock And Persona!
Injury Hazard
Disconnect electrical supply before
servicing or cleaning the unit.
Failure to do so could result In
electrical shock or pei^onal injury
from cleaner suddenly starting.
Page 9
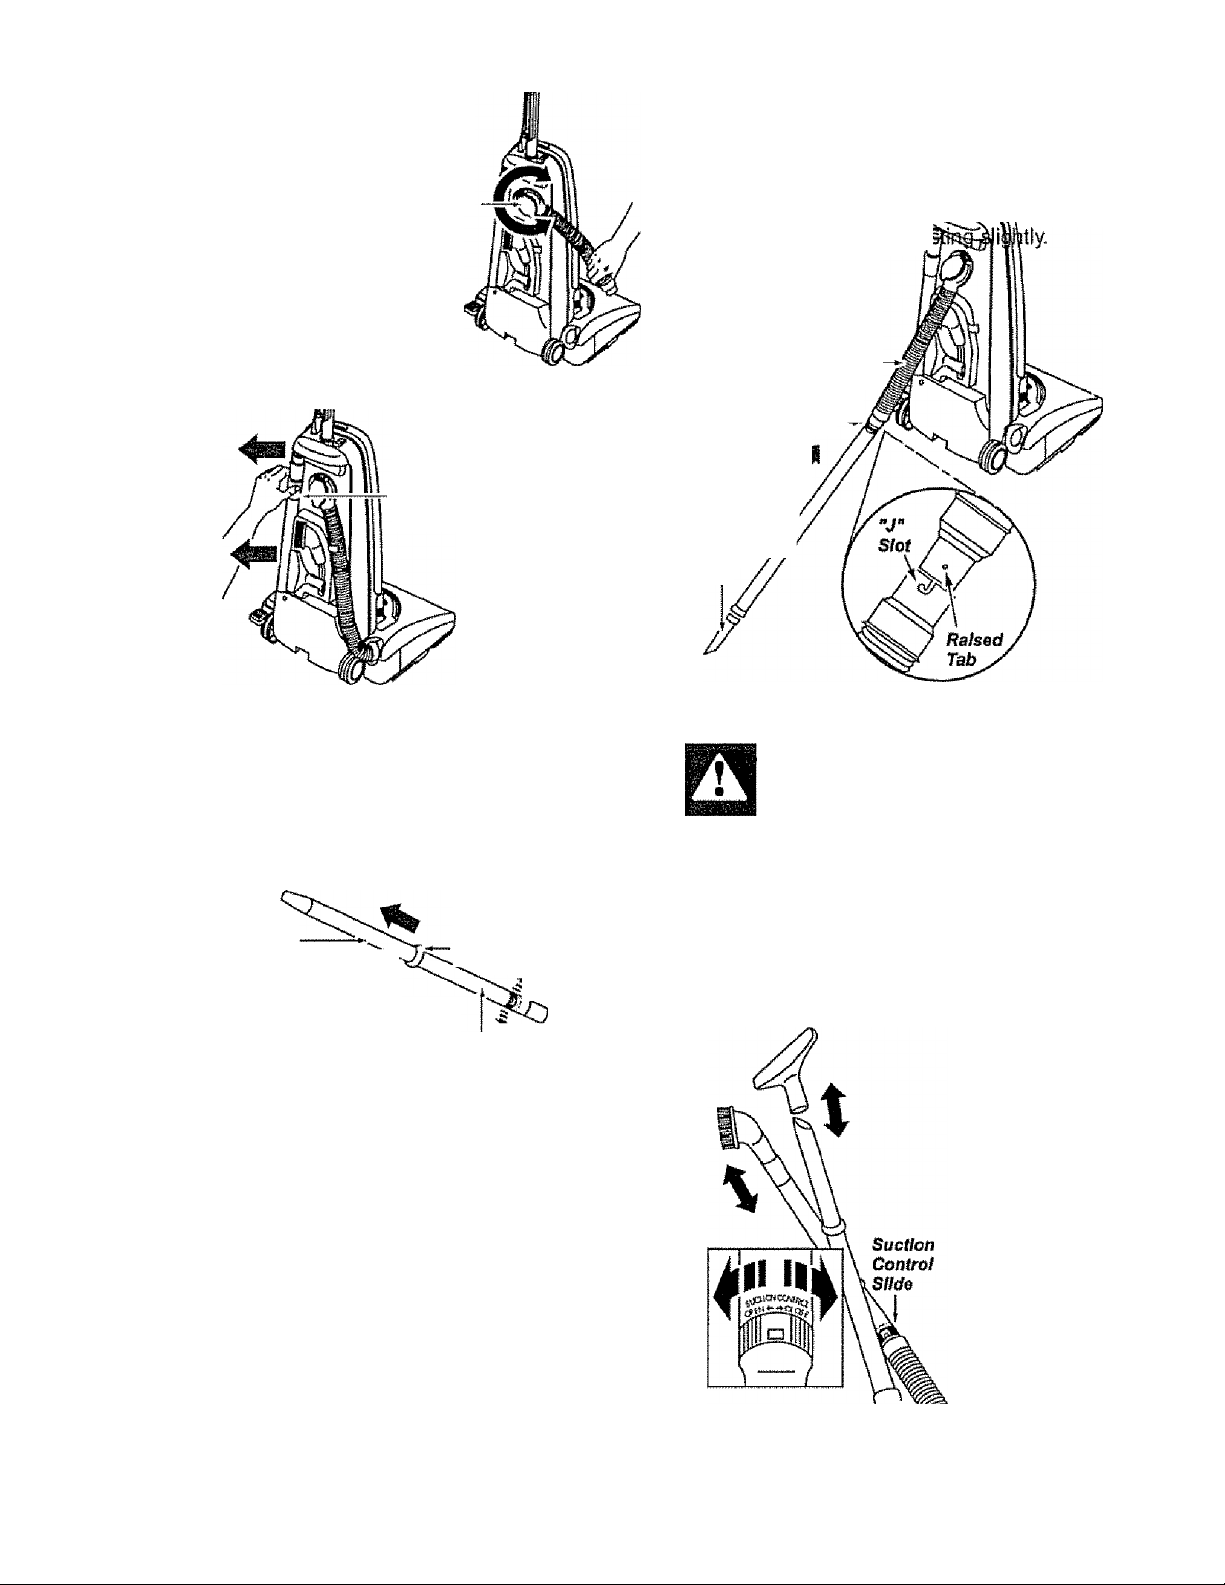
The attached
hose end swivels
to make cleaning
easier in every
direction.
Swivel
Align the tabs on the extension wand with
the "J" slots in the hose. Push the wand into
the hose and twist to the right to lock.
To achieve maximum reach|l|Mhe attach
ments, add the crevice toj^S^^nd of the
wand by inserting and twp
Hose
Suction
Control
Slide
Telescoping
Wand
Remove the
telescoping
wand from
its storage
position.
Remove the crevice tool from its storage
position In the wand. Turn the locking ring to
the UNLOCK position. Extend the wand to
Its full length. Turn the locking ring to the
LOCK position. Attach the extension wand
onto the open end of the hose.
Lower
Wand ^
^^_^Wand
flacking Ring
i Unlock
Wand
Locking Ring
Suction
^ Control
Slide
Upper
Wand
leloscaplitg
Vf vVlCo'^^’
Tool
The dusting brush and the upholstery too!
CAUTION
When using attachments, be careful
not to overextend the stretch hose
when reaching. Trying to reach
beyond the hose stretch capability
could cause the cleaner to tip over.
may be attached directly to the wand or
placed on the
crevice tool
for additional
reach.
TO OPERATE SUCTION CONTROL
SLIDE
TELESCOPING WAND
When using attachments for cleaning
draperies, small rugs with low pile and other
delicate items, twist the suction control slide
to the open position. This slide is located on
the telescoping wand, close to the hose.
This will reduce suction for ease of
cleaning,
NOTE - Return the suction control slide to
the closed position for norma! cleaning.
Page 10
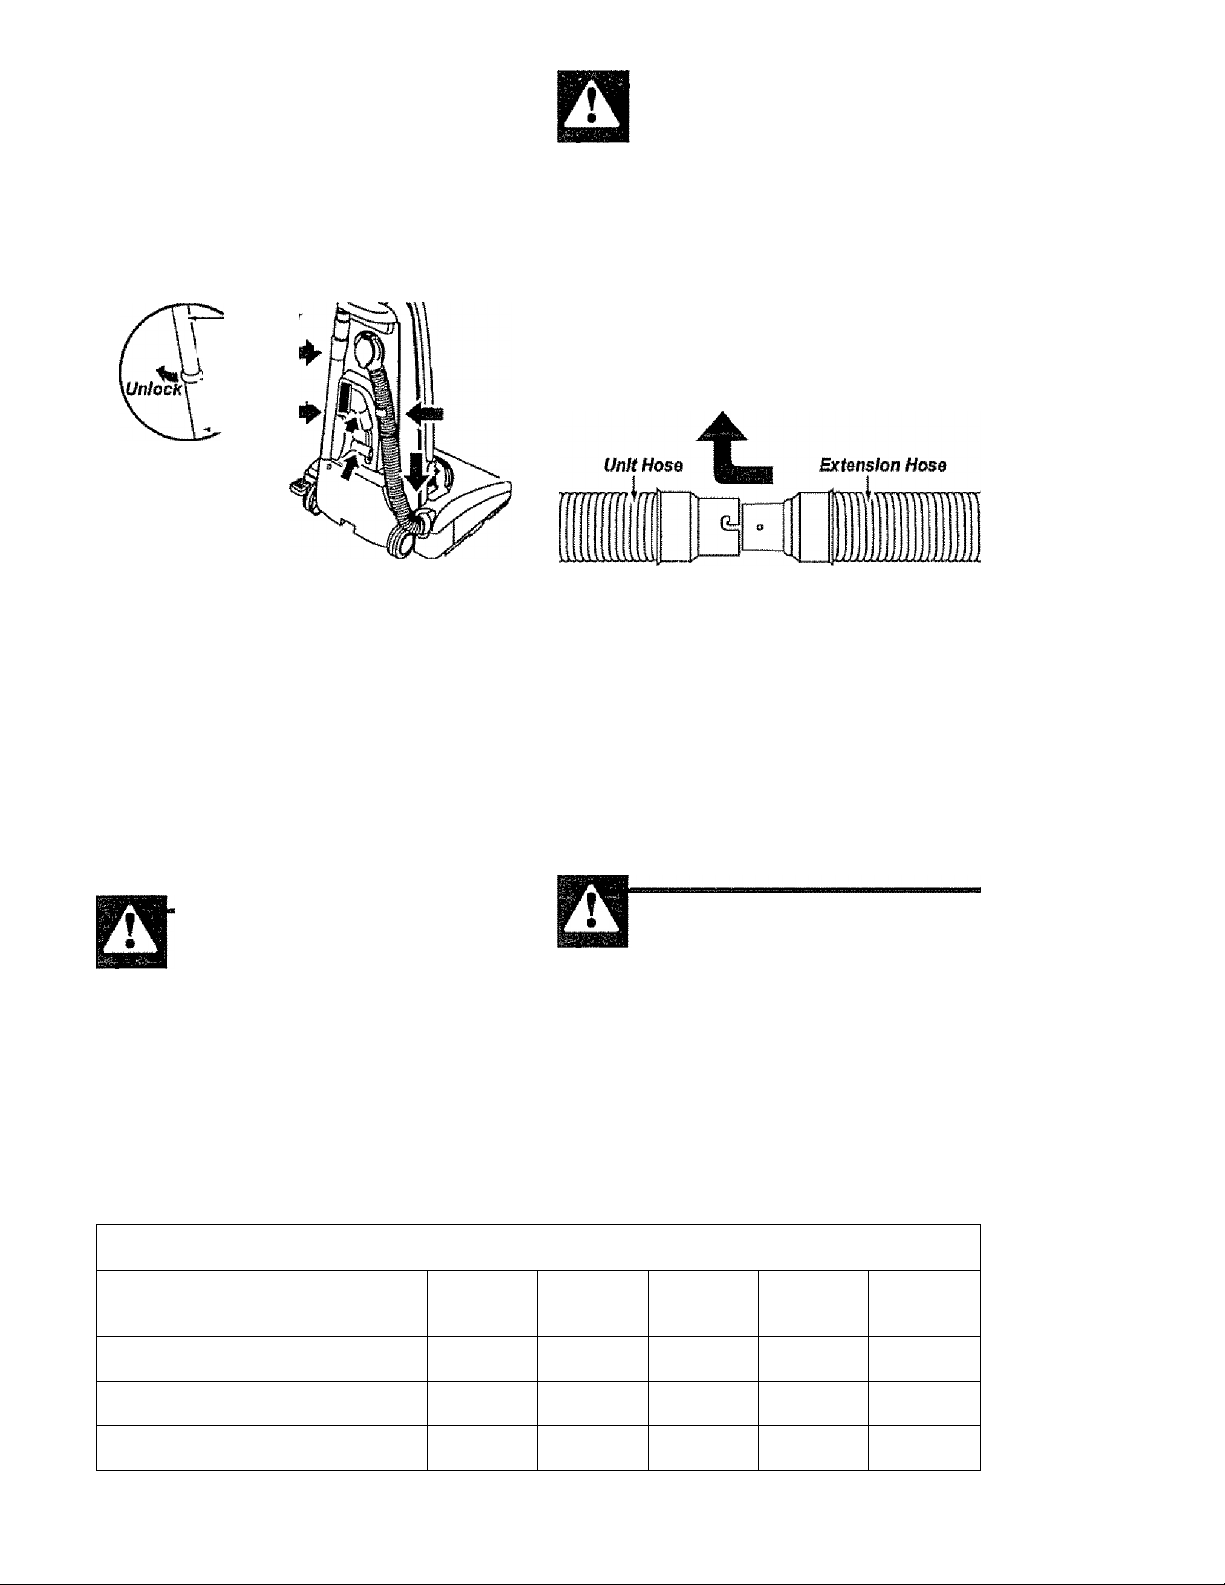
TO STORE ATTACHMENTS:
Remove dusting brush or uphoistery tool
Snap into appropriate storage location.
Remove crevice tool from the wand by
twisting. Lay aside.
Remove the extension wand from the
hose. Twist the wand to the ieft and pull
from the hose end.
qq-i_*u rroj
Lock
p Lacking
\ ■
Ufjpor
Wand
CAUTION
DO NOT pull the vacuum cleaner
around the room by the hose.
Property damage could result
ijrtec.
wOlZL I iMiKiNIOiV^iM Inftill■
TO
SOME MODELS
The stretch hose attached to the vacuum
cleaner has two "J” shaped slots in the
end where attachments fit.
Unlock the wand by turning the wand
locking ring to the UNLOCK position.
Slide the lower wand into the upper wand.
Turn the wand locking ring to the LOCK
position.
Place the crevice tool down into the com»
pressed wand. Snap Into the appropriate
storage location.
Be sure the unit is turned off. Reinsert the
hose fully into the opening on the lower
body from which it was removed. Press
firmly to assure connection.
WARNING
Personal Injury Hazard
DO NOT place hands or feet under
neath the unit when Inserting the
hose. The agitator begins to
revolve rapidly when the vacuum is
turned on.
The extension hose has two tabs on the
end that can be pushed into the slots and
twisted to attach the two hoses together.
Attachments and the telescoping wand
can be attached to the other end of the
extension hose for additional reach.
If your model did not come with an
e)dension hose, you can purchase one at
any SEARS retail store with pari number
20-52571. In Canada 20-40975.
CAUTION
When using the regular hose or
with the extension hose attached,
the cleaner should be on a solid
surface on the same level or below
the level of the user's feet. DO NOT
use the hoses when the cleaner is
above the level of the user’s feet.
■ Jr\ i ■ : I IrWdf IVlItlilM' f ; ■ :
ATTACHMENT
DUSTING BRUSH
CREVICE TOOL
FABRIC BRUSH
"Always dean attachments before using on fabrics.
CLEANING AREA
Between
Furniture*
X X X
X
X X X
Cushions* Drapes* Stairs Watts
X X
10
Page 11
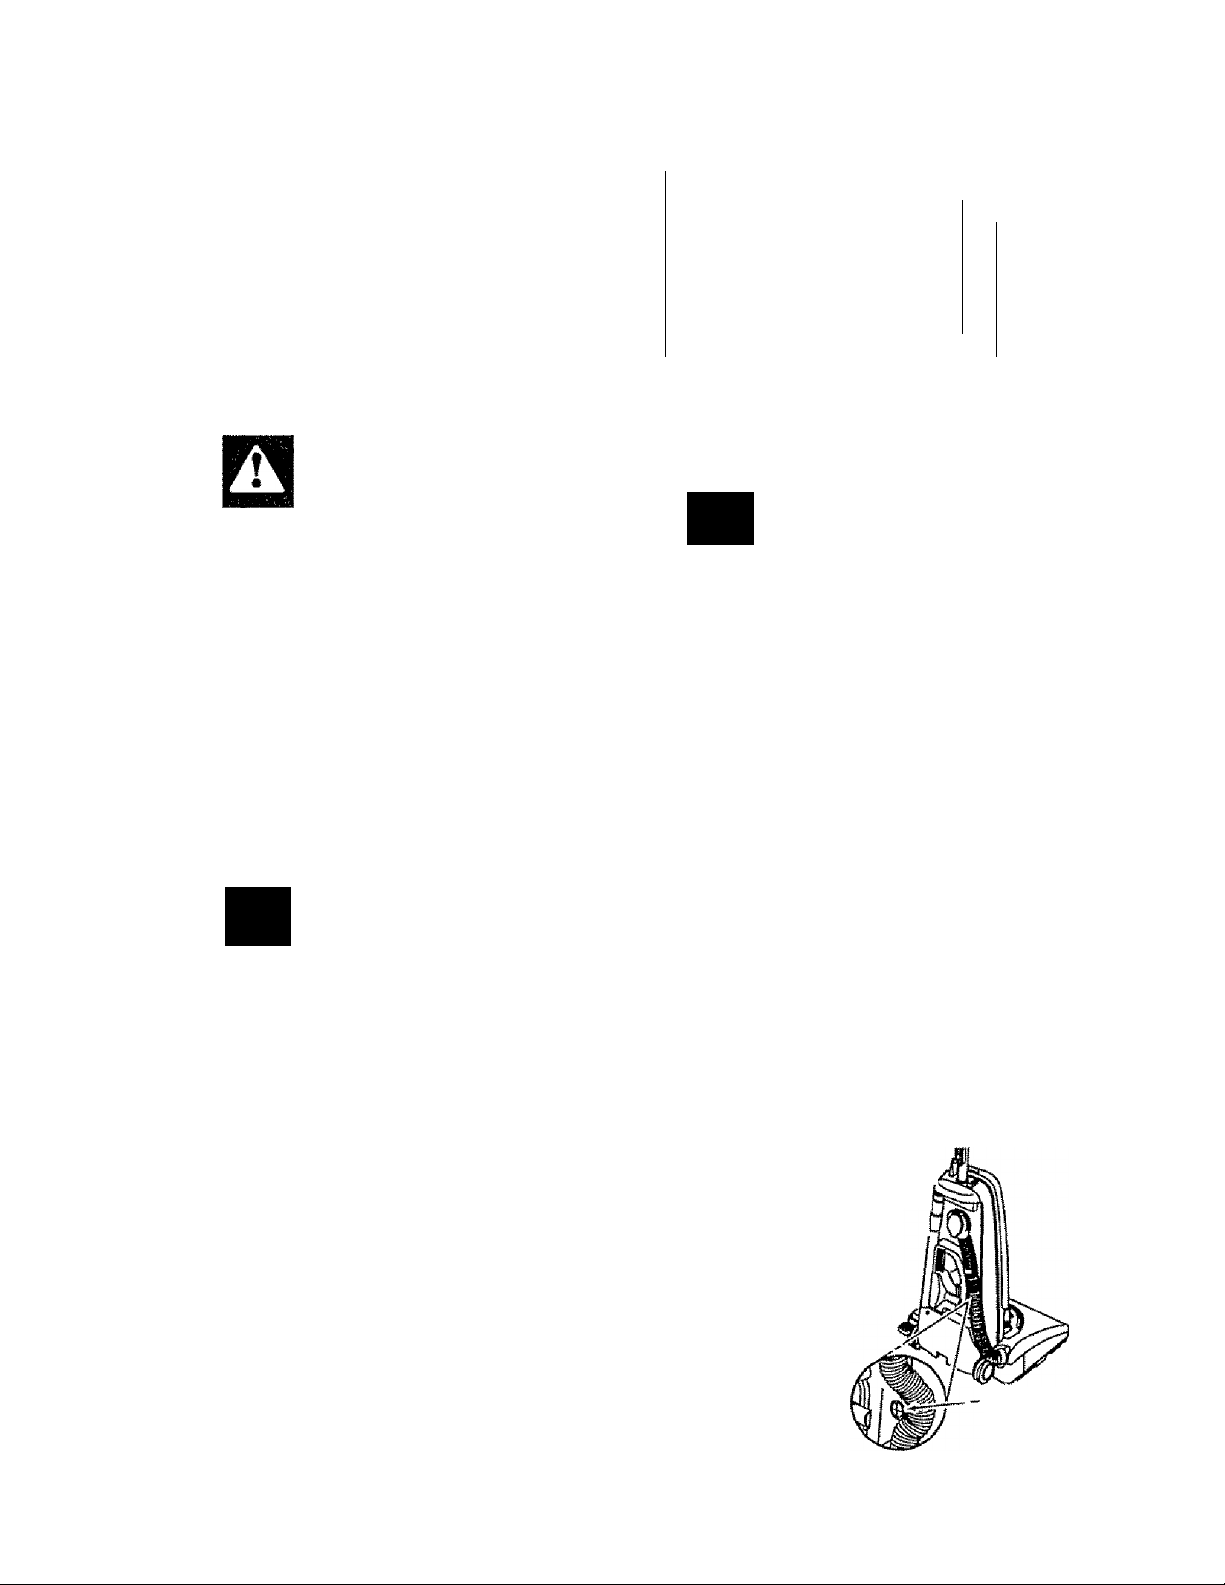
VACUUMING TIPS
Carpet edges. For best cleaning
Guide either side or the front of the noz results, keep the Ij ^ ^
zle along a baseboard. The full length airflow passage
brushes help remove dirt at carpet edges.
1 lljM
T
1
Stairs.
Put handle in full upright position. Use the check each of
crevice too! or fabric brush. the areas indi-
Gated for clogs.
Unplug the cleaner
from the outlet before
checking.
Occasionally, imi^y
WARNING
Personal Injury Hazard
Use care If vacuum cleaner is
placed on stairs, if it faiis, person*
al injury or property damage could
result.
PERFORMANCE FEATURES
A
CAUTION
When using the regular hose or
with the extension hose attached,
the cleaner should be on a solid
surface, such as the fioor, on the
same ievei or below the level of the
user's feet. Do NOT use the hoses
when the cleaner is above the ievei
of the user’s feet.
, 1
7
A
WARNING
Eiectricai Shock And Personai injury Hazard
Disconnect eiectricai supply before
servicing or cleaning the unit.
Failure to do so could result In
electrical shock or personal Injury
from cieaner suddenly starting.
MOTOR PROTECTION
SYSTEM
This vacuum has a motor protector by
pass valve which automatically opens to
provide cooling air to the motor when a
clog prevents the normal flow of air to the
motor. If the by-pass valve opens to
prevent motor overheating and possible
damage to the vacuum, you will notice a
change of sound as air
rushes through the valve^
opening, '
To correct problem:
See the TROUBLE
SHOOTING
chart
Motor
Protector
<Behlná
Hose)
11
Page 12
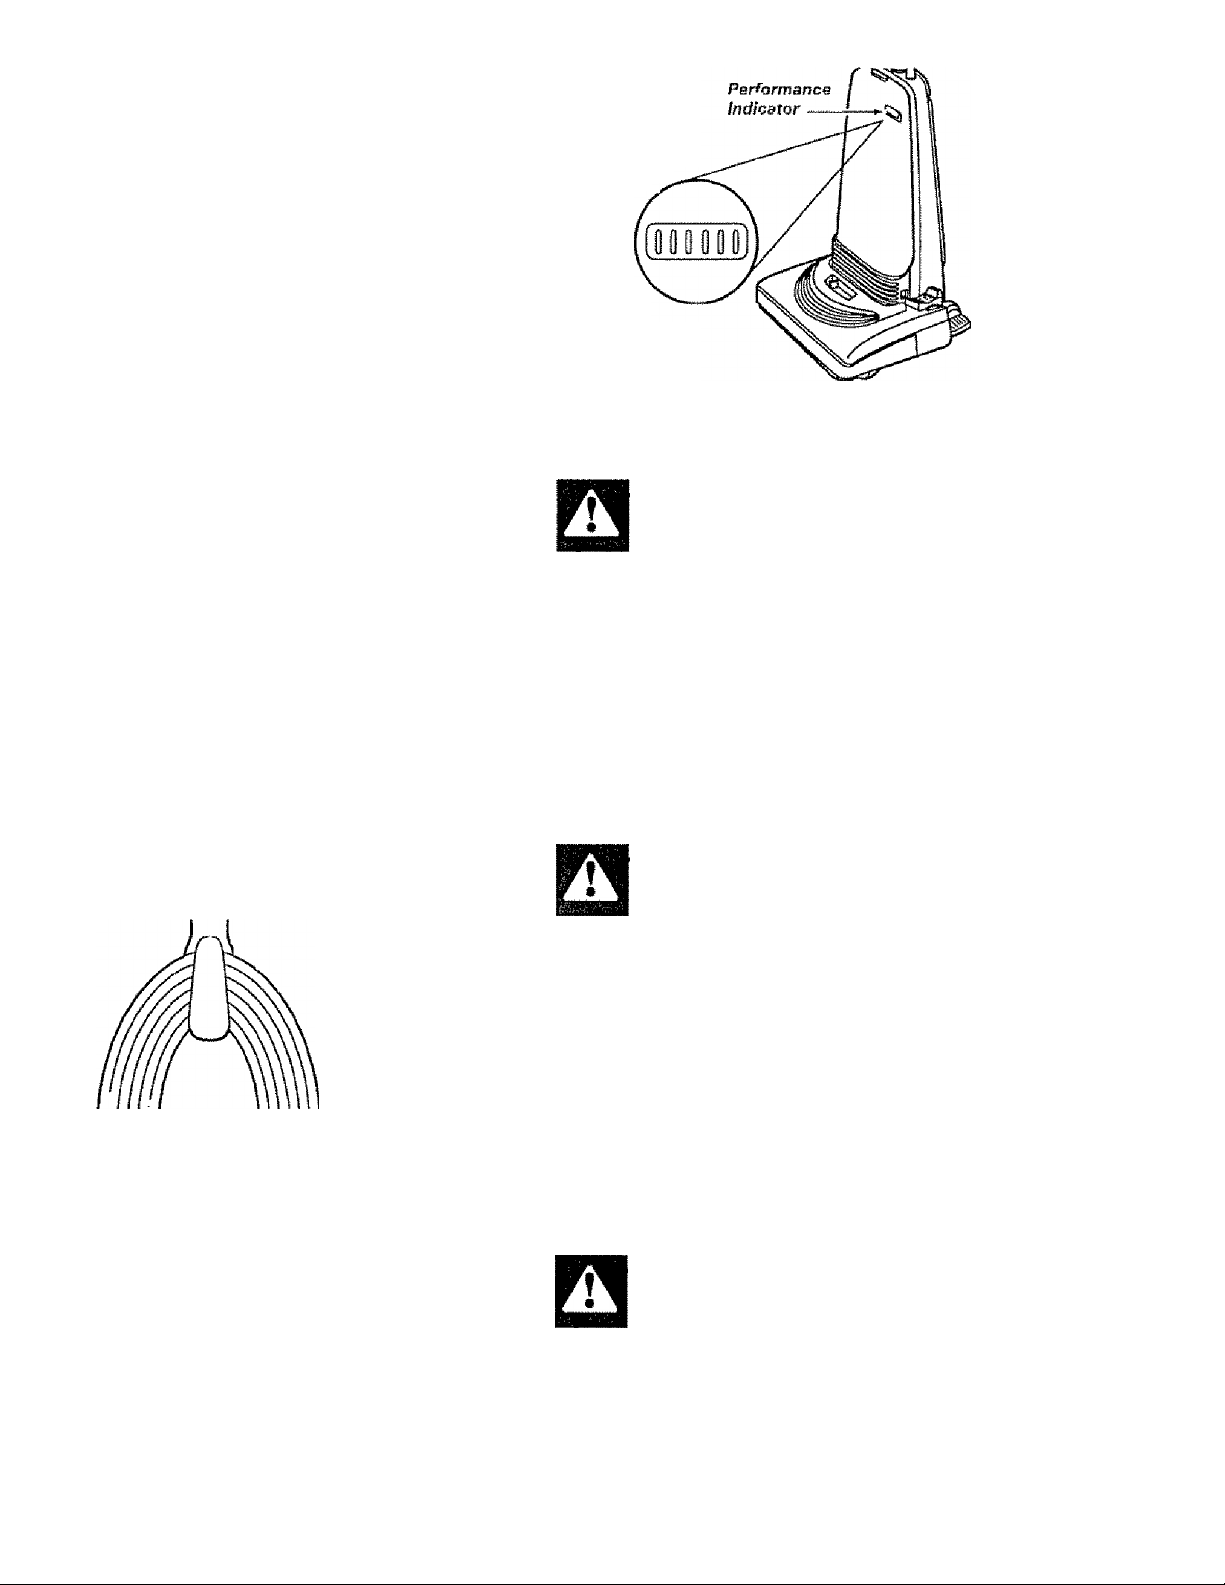
Iwrv#ti!w \«lnC
SOME MODELS
When the unit is running with normal air flow, the lines on the
performance indicator are white. Red lines appear in the
performance indicator whenever the airflow becomes
blocked. If that occurs, check the disposable dust bag,
motor safety filter and other possible clog locations
shown in CLOG REMOVAL.
NOTE: Red lines may appear when using attachments,
due to reduced air flow through the attachment
To correct problem: See the TROUBLESHOOTING chart
VACUUM CLEANER CARE
Always follow all safety precautions when
cleaning and servicing the vacuum
cleaner.
Electrical Shock And Personal
Injury Hazard
Disconnect electrical supply before
servicing or cleaning the unit.
Failure to do so could result In
electrical shock or personal injury
from cleaner suddenly starting.
IN C5
Gather the cord and wrap it loosely
around the upper and lower cord hooks.
Store the cleaner
in a dry, indoor
area, on the floor
with the handle
locked in the
upright
position.
CLEANING EXTERIOR AND ATTACHMENTS
Unplug cord from wall outlet DO NOT drip
water on cleaner.
Clean ©derior using a clean, soft cloth that has
been dipped in a solution of miid liquid deter«
gent and water, then wmng dry. Wipe dry after
cleaning.
To reduce static electricity and dust build-up,
wipe outer siiriacB of cleaner and attadiments.
Wash attachments in warm soapy vi/ater, rinse
and air dry. Do not clean In dishwasher.
IIIRÄ QTIADÂrîC
WARNING
Electrical Shock And Personal injury Hazard
Wrapping the cord too tightly puts
stress on the cord and can cause
cord damage. A damaged cord is an
electrical shock hazartl and could
cause personal injury or damage.
DO NOT USE ATTACHMENTS IF THEY ARE WET.
CAUTION
Attachments used in dirty areas,
such as under a refrigerator,
should not be used on other
surfaces until they are washed.
They could leave marks.
12
Page 13
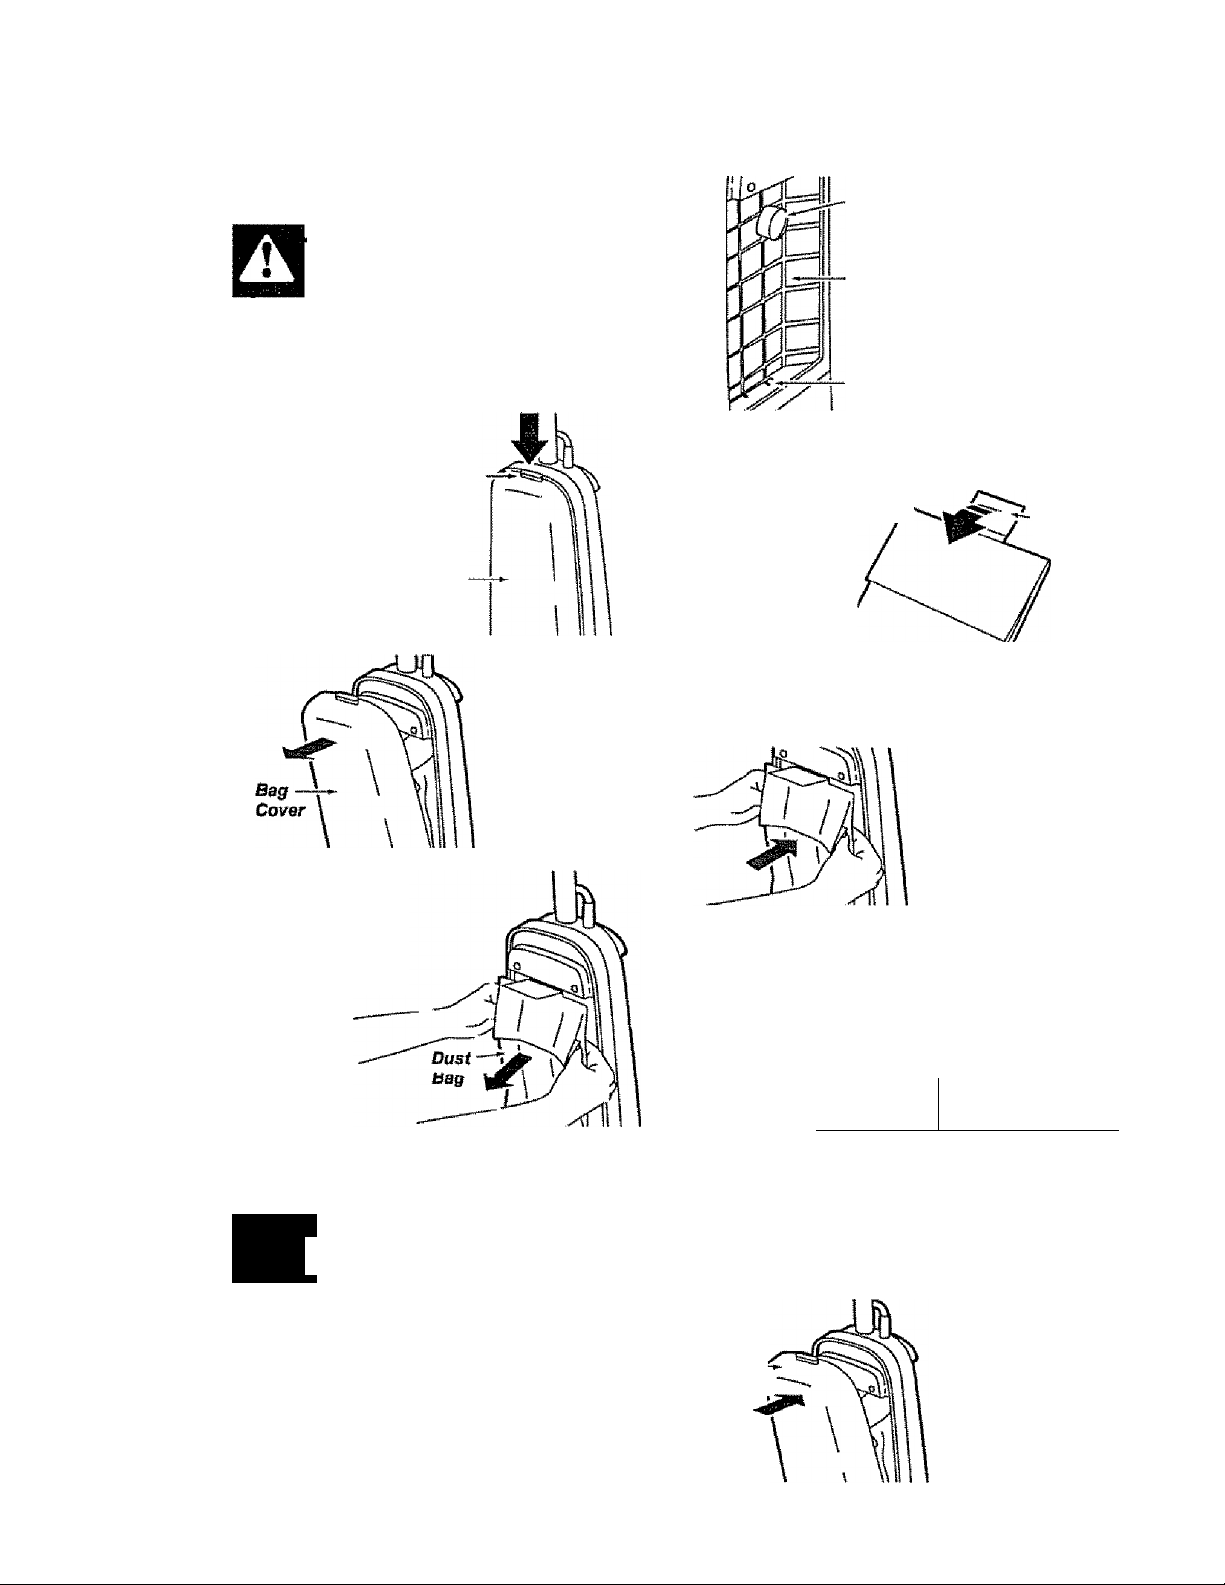
BAG CHANGING
TO REMOVE BAG:
WARNING
Always unpiug powar cord from
electrical outlet before performing
any service on vacuum.
Press the
release button
located on the
top of the bag
cover.
Grasp the dust
bag collar and
pull gently, care
fully removing the
dust bag.
Throw
away the
used dust
bag.
Do not
reuse.
A
CAUTION
HsisssB
Button
Bag
Caver
Pull the bag
cover forward.
Remove and
lay aside.
Dirt Tube/
Bag Holder
Check the dust
tube and the
motor safety
Bacf
Cavity
filter.
If either is
blocked, check
Motar
Safety
Filter
the TROUBLE
SHOOTING
chart.
TO REPLACE BAG:
Fold the safety
seal tab on the
new dust bag
away from the
opening that
fits on the dust
tube,
NOTE: See PARTS AND FEATURES for
Bag #.
Unfold the new dust bag.
Be sure bottom of dust bag Is completely
within bag cavity prior to replacing the
bag cover.
Position
the bag
cover so
its posi
tioning tab
fits into
the body
positioning
tab slot.
Dust Bao
Caver
Body
-------------
Positioning
Slot
Bag Cover
Positioning Tab
Safety
Seal Tab
Insert the dust bag
onto the dust tube
completely by
holding the bag
collar. Snap the
dust bag collar
into position.
».
■
.. .. .. ..........
.. .. ..... .. .. ..... .. .. ..... .. .. ..... .. .. ..
.
NEVER REUSE A DUST BAG. Very
fine materials, such as carpet
freshener, face powder, fine dust,
piaster, soot, etc. can clog the bag
and cause It to burst before It Is
full. Change bag more often when
vacuuming these materials.
13
Bag~j
Cover \
Close the bag
cover.
You wiii hear a
distinct snap
when cover Is
securely closed.
Page 14
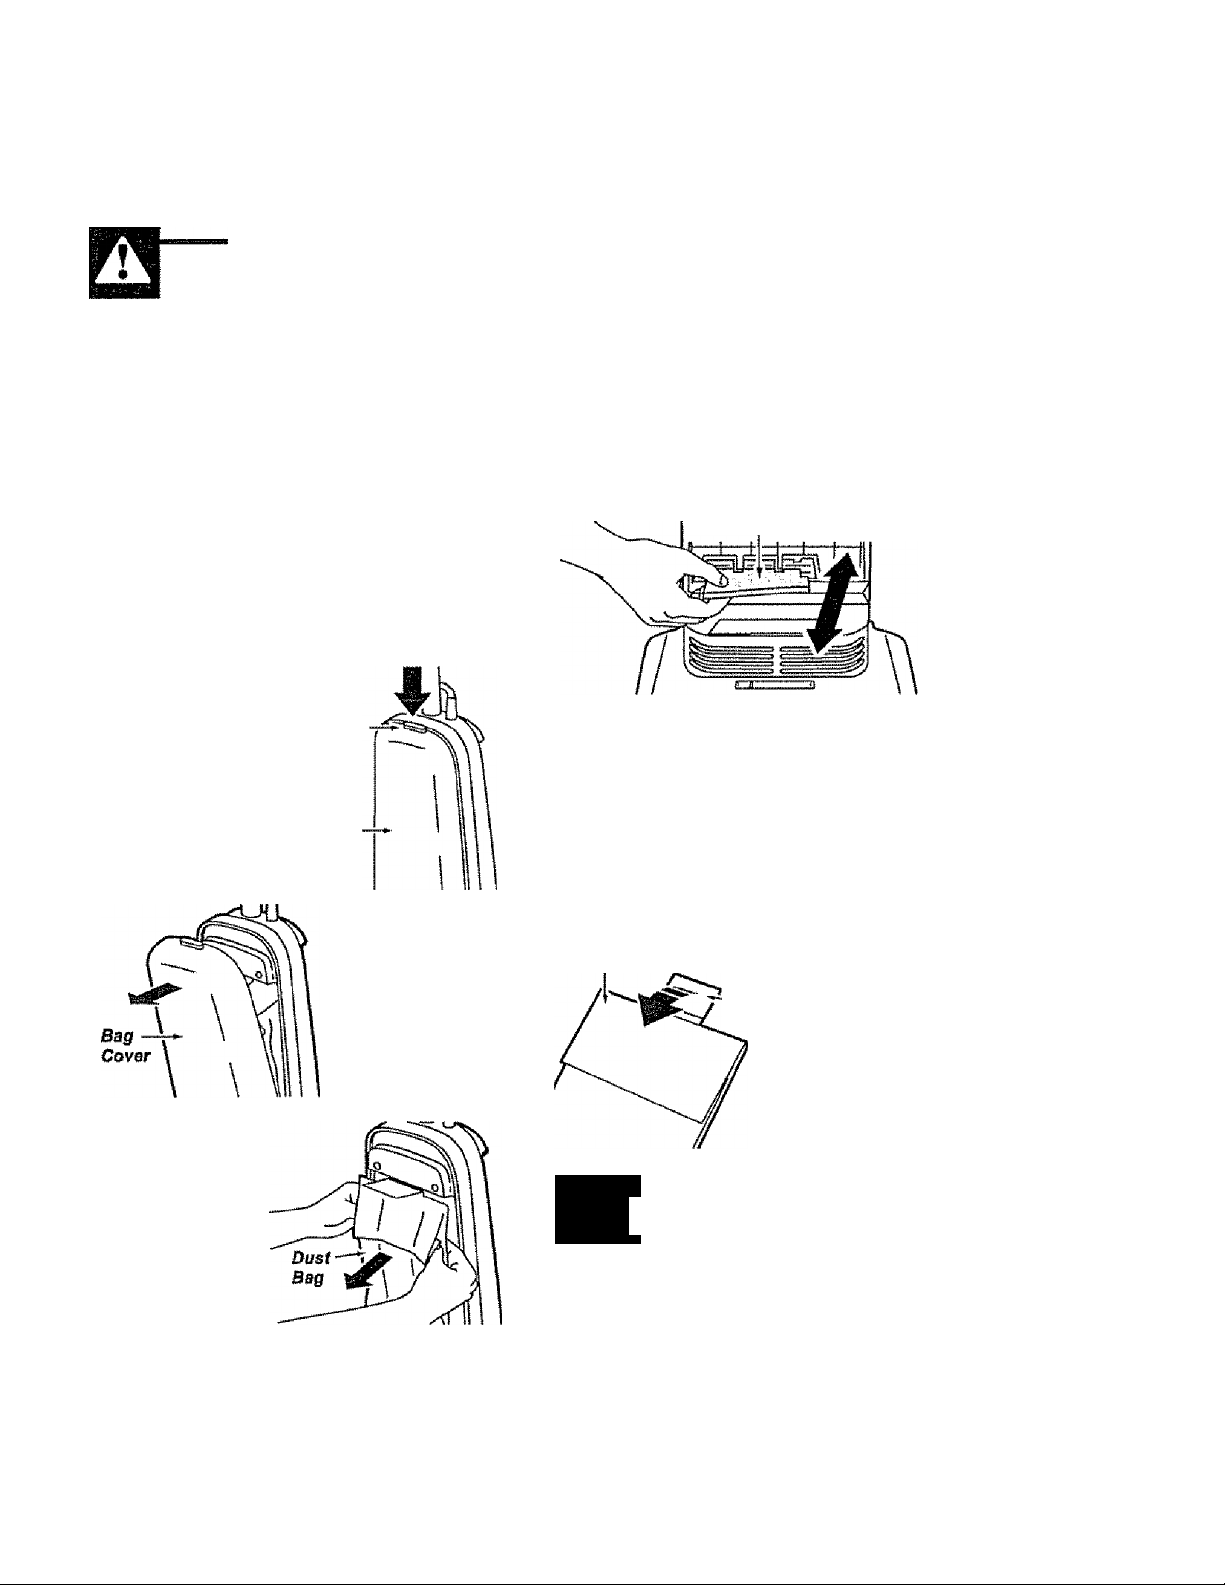
MOTOR SAFETY FILTER CHANGING
Check motor safety filter frequently and
change when dirty.
WARNING
Electrical Shock Hazard
Do not operate the cleaner without
the motor safety filter. Be sure the
filter Is dry and properly Installed
to prevent motor failure and/or
electrical shock.
Always unplug power cord from
electrical outlet before performing
any service on vacuum.
REMOVE BAG:
Press the release Release
button located on Button
the top of the bag
cover.
Sag
Cover
MOTOR SAFETY FILTER
ELECTROSTATIC
This white and grey filter must be
replaced when dirty. !t should be replaced
regularly depending on use conditions.
The filter cannot be washed as it will
lose its dust trapping ability.
NOTE: See PARTS AND FEATURES for
motor safety filter #.
Electrostatic Filter
(White Side Up)
If the motor safety filter located at the
base of the bag cavity is dirty, remove it
by pulling fonvard out from under the ribs.
Replace the filter, white side up, by slid
ing it back into place under the ribs in the
bag cavity.
Grasp the dust
bag collar and
pull gently, care
fully removing
the dust bag.
Pull the bag
cover forward.
Remove and lay
aside.
TO REPLACE BAG;
Dust Bag
Safety
Seal Tab
A
14
CAUTION
fine materials, such as carpet
fresheners, face powder, fine dust,
piaster, soot, etc. can clog the bag
and cause it to burst before it Is
full. Change bag more often when
vacuuming these materials.
Fold the
safety seal
tab on the
new bag
away from the
opening that
fits on the dirt
tube.
^ BAG. Very
Page 15

Unfold the new dust
bag.
Insert the dust bag
completely onto the
dirt tube by holding
the bag collar.
Snap the dust bag
collar into position.
Position the
bag cover so
its position
ing tab fits
into the body
positioning
tab slot.
Close the
bag cover.
Bag -
Cover
Body
Pasttioning
Sfot
Bag Cover
Positfoiiing Tab
Be sure the bottom of dust bag is com
pletely within the bag cavity prior to
replacing the bag cover.
EXHAUST FILTER CLEANING
WARNING
Do not operate without exhaust
filter.
Check filter
frequently.
Clean when dirty
Press the handle
release pedal to
let the upper por
tion of the clean
er lay back
against the floor.
Handle
Release Pedat
Grasp the air
exhaust panel
with a hand on
each side,
press inward
and puli the
pane! forward.
You will hear a
Mbq
..
Cover \
I
snap when the
cover is securely
dosed.
Lift the foam filter to remove. Wash the
foam filter, rinse and dry.
DO NOT
clean in the
dishwasher.
DO NOT
install while
damp.
sms
Silts
Replace the
dry foam filter,
carefully posi
tioning it so
the slits fit
around the
four raised
pins.
Replace the
exhaust panel.
Return the cleaner
to the upright posi
tion.
1S
Pins
Page 16

BELT CHANGING AND BRUSH CLEANING
WARNING
Electrical Shock Or Personal injury Hazard
Disconnect electrical supply before
servicing or cleaning the unit
Failure to do so could result in
electrical shock or personal Injury
from cleaner suddenly starting.
Frequently check and remove hair* siring
and lint build-up in the brush area. If
build-up becomes excessive, follow the
steps below,
TO REMOVE BELT:
The agitator and belt are now exposed.
Carefully remove any residue that may
exist in the belt area.
Disconnect power cord from electrical
oulfet, and place on paper to protect the
floor surface, Place vacuum in the full
upright posiiion.
Turn the
unit over so
the agitator
and base
plate are
facing
Base
upward.
Plate
Ag/tafor
Locate the
two latches
Latches
TWo Locking tabs
and the
two locking
tabs which
secure the
base plate.
To unlock the base plate, slide the left
latch to the right and the right latch to the
left. Push in on the locking tabs toward
the center of the vacuum.
Motor
Shaft
Position hands on the agitator. If the belt
is still attached to the roller, there will be
tension on the agitator. If the belt is not
broken remove it from the motor shaft
before lifting the agitator.
Carefully lift the right end of the agitator
and then lift the left end.
Carefully remove the end cap and washer
from each end and lay them aside. See
the exploded view.
WARNING
Personal Injury Hazard
Be careful when removing the agi
tator as the bait tension is high.
Failure to do so could result In
personal injury from the agitator
releasing quickly and snapping
away.
Pull the base plate away from the nozzle
housing. The sides of the base plate
need to be pulled slightly outward to clear
the wheels.
16
Page 17

CAUTION
When you remove the end caps, a
small metal washer on each end
may come off. DO NOT lose these
two metal washers.
TO CLEAN BRUSH:
NOTE: In order to keep cleaning efficiency
high and to prevent damage to your vacu
um, the brush assembly must be cleaned
every time the belt is changed.
The brush assembly must also be cleaned
according to the following schedule:
Vacuum Use Clean Brush
Assembly
TO REPLACE BELT:
Make sure that the carpet/bare floor
selector is in the carpet position.
Loop the new belt on the motor shaft
HEAVY -
every week
(used daily)
MODERATE -
every month
(used 2-3 times/week)
LIGHT -
every 2 months
(used 1 time/week)
Remove any dirt or debris in the belt path
area or in the brush roller area.
Explododi VI GW" Brush
Assembly
Carefully remove
the brush end
caps and remove
any string or
debris located on
the brush assem
bly, brush sup
ports, washers or
agitator shaft.
NOTE: See PARTS AND FEATURES for
belt #.
Loop the end of the new belt on the brush
assembly.
Align the square extension on each end
cap with the slots in the frame of the
nozzle.
NOTE: Care must be taken due to the
belt tension during reassembly.
IMPORTANT
Replace the washers and the end caps.
See the exploded view for correct
assembly.
17
Page 18
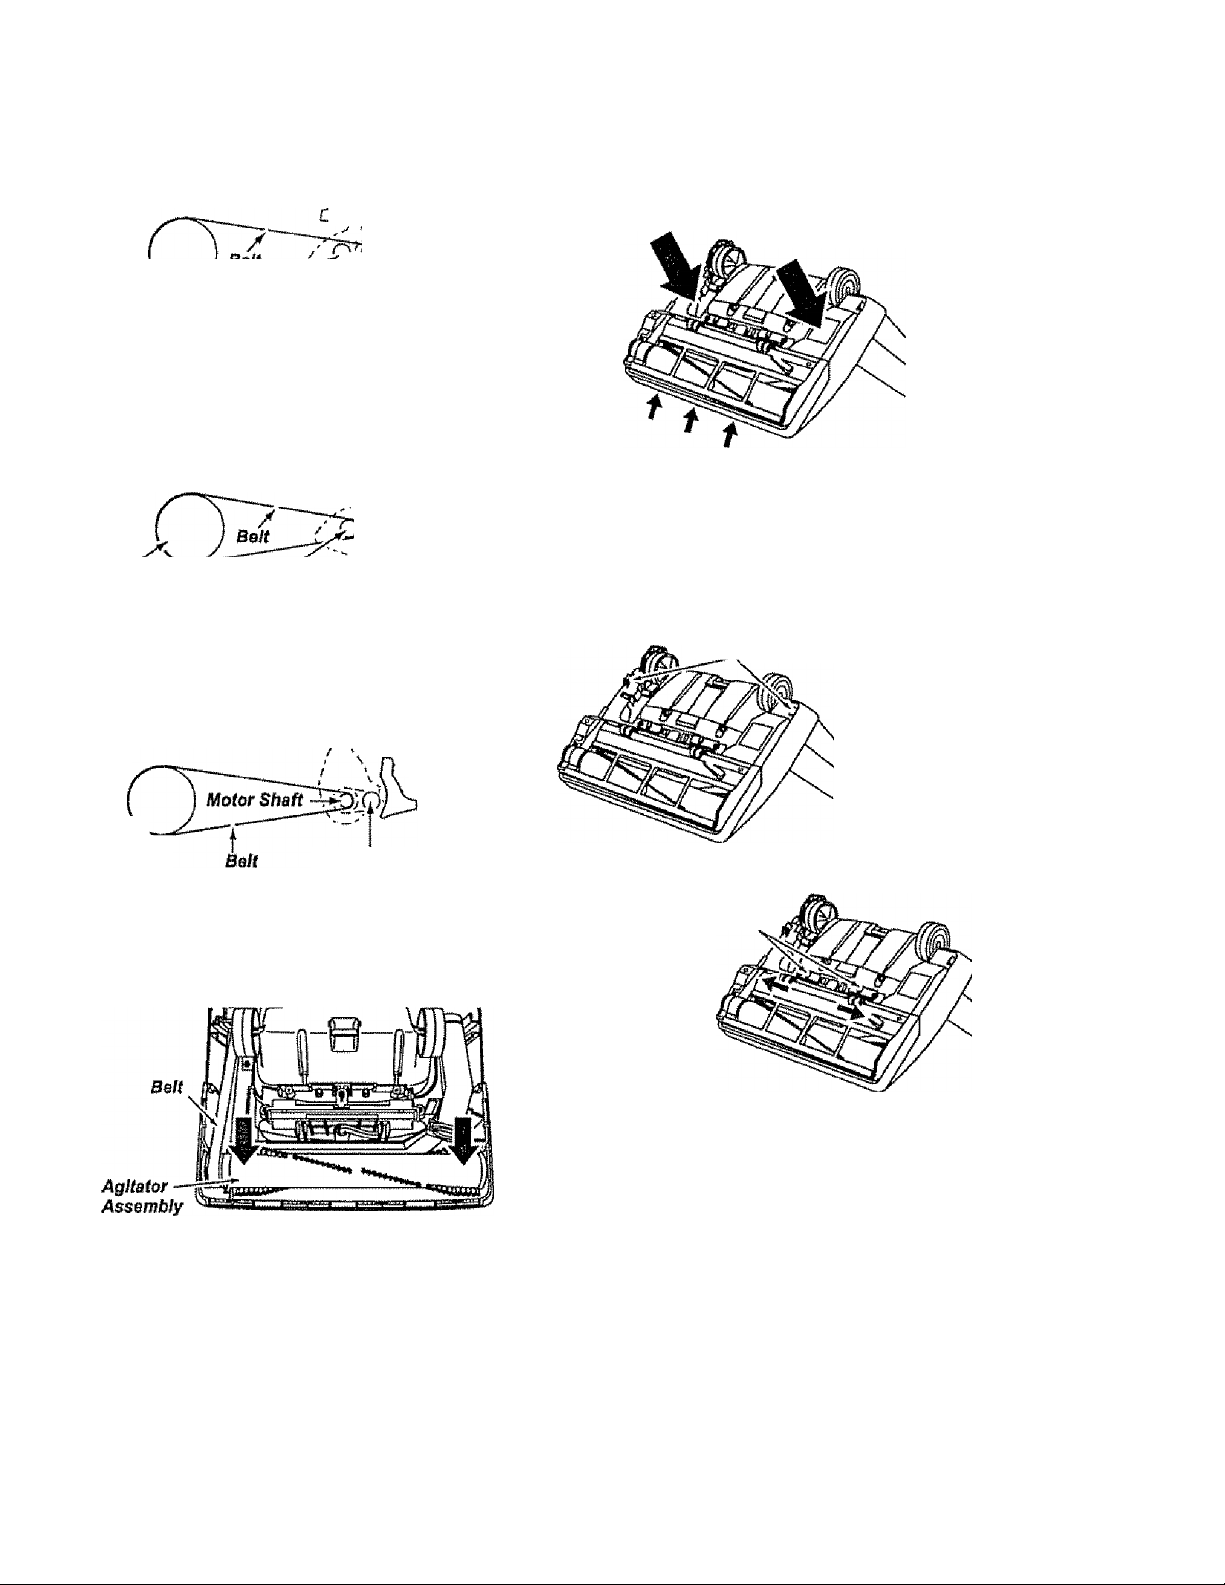
RCi T RnilTIWA
Correct Routing of Beit
{SelectorIn CarpetPaslOon)
To re*attach the base piate, insert the
tabs into the slots along the front edge of
the base. Place the vacuum in full upright
position. Lower the base plate to its origi
nal position.
vN
». / . viirpoi/igafg
Brush ^ ' I
ÌJ ; Carpet/Bare
_l ' Floor Pedal
^®*®'"*'^Ca,pafc®a;aF/oo/ Steft
Setecioj* Shaft
Incorrect Routing of Beit
(Baft on Selector Shaft)
cr:^X
Brush MoioJ*
Assembly Carpet/Bare Floor Shaft
Setecior Shaft
inciBrrect f^^^utin^^ ^^f ¡Beit
(Selector In Bare Floor Position)
' Catpet/Bare
Carpet/Bere
Floor Pedal
y
Full Upright Position
Tab Locations
As the base is lowered the Inner areas
will brush against the dust compartment
wheels. A gentle pull outward may assist
in reassembly.
TWO Locking Tabs
Press the
base plate
down until
the two
locking tabs
snap into
place.
Brush
Assembly
Caipet/Bare Floor
Selector Shaft
Press firmly, checking to see that each
I w I»I3 wv/l I ivrfiy îiiOtîîtwij«
Check to see that the belt is centered in
the belt groove. Turn the brush assembly
with your fingers to see that it turns freely.
Latches
Slide the right
latch to the
right and the
left latch to
the left to
secure.
Return the cleaner to the upright position
before plugging into the electrical outlet.
18
Page 19

CLOG REMOVAL
ЛМ* ImrVir .Imp .-.:i лм# V^^iMr
Always follow all safety precautions when
cleaning and servicing the vacuum
v/i^CII fwi (
A
Etectrical Shock Or Personal injury Hazard
Disconnect electrical supply before
servicing or cleaning the unit.
Failure to do so could result in
electrical shock or personal Injury
from cleaner suddenly starting.
If the cleaner does not seem to have ade
quate suction, first check for a full bag or
filter which is clogged. See instructions in
BAG CHANGING and MOTOR SAFETY
FILTER CHANGING.
If the bag and filter areas are free of
clogs, check the hose area. Remove the
lower end of the stretch hose from the
cleaner by grasping the hose collar, twist
ing, and pulling straight out.
Plug in the
vacuum and
turn it on.
Alternately
open and
shut the
clean-out
port cover.
Stretch the
hose to
Ctea/j-Otfi
Port
Sirefcft
HosB
Visually inspect the clean-out port area
and the base area into which the hose is
inserted.
maximum
length and
then allow
the hose to
return to its
storage
length.
Turn the unit
off and
unplug the
unit.
Close dean-out port cover firmly to insure
seal.
Re-insert the hose into the opening on
the lower body from which it was
removed. Press firmly to assure
connection.
Clmn-Out
Port Cover
WARNING
Personal Injury Hazard
DO NOT place hands or feet
underneath the unit when insert
ing the hose. The agitator begins
to revolve rapidly when the vacu
um is turned on and is in the car
pet setting.
If the bag and filter areas and the hose
areas are free of dogs, check the nozzle
area. To check this area, see the sections
on BELT CHANGING AND BRUSH
CLEANING.
Return the cleaner to the upright position
before plugging into the electrSca! outlet
For best cleaning results, keep the airflow
passage open. You
should check your vac
uum occasionally for
dogs. The diagram has
stars which Indicate the
areas that dogs are most
likely to occur. Unplug the
vacuum before checking.
Remove the visible clog.
19
Page 20
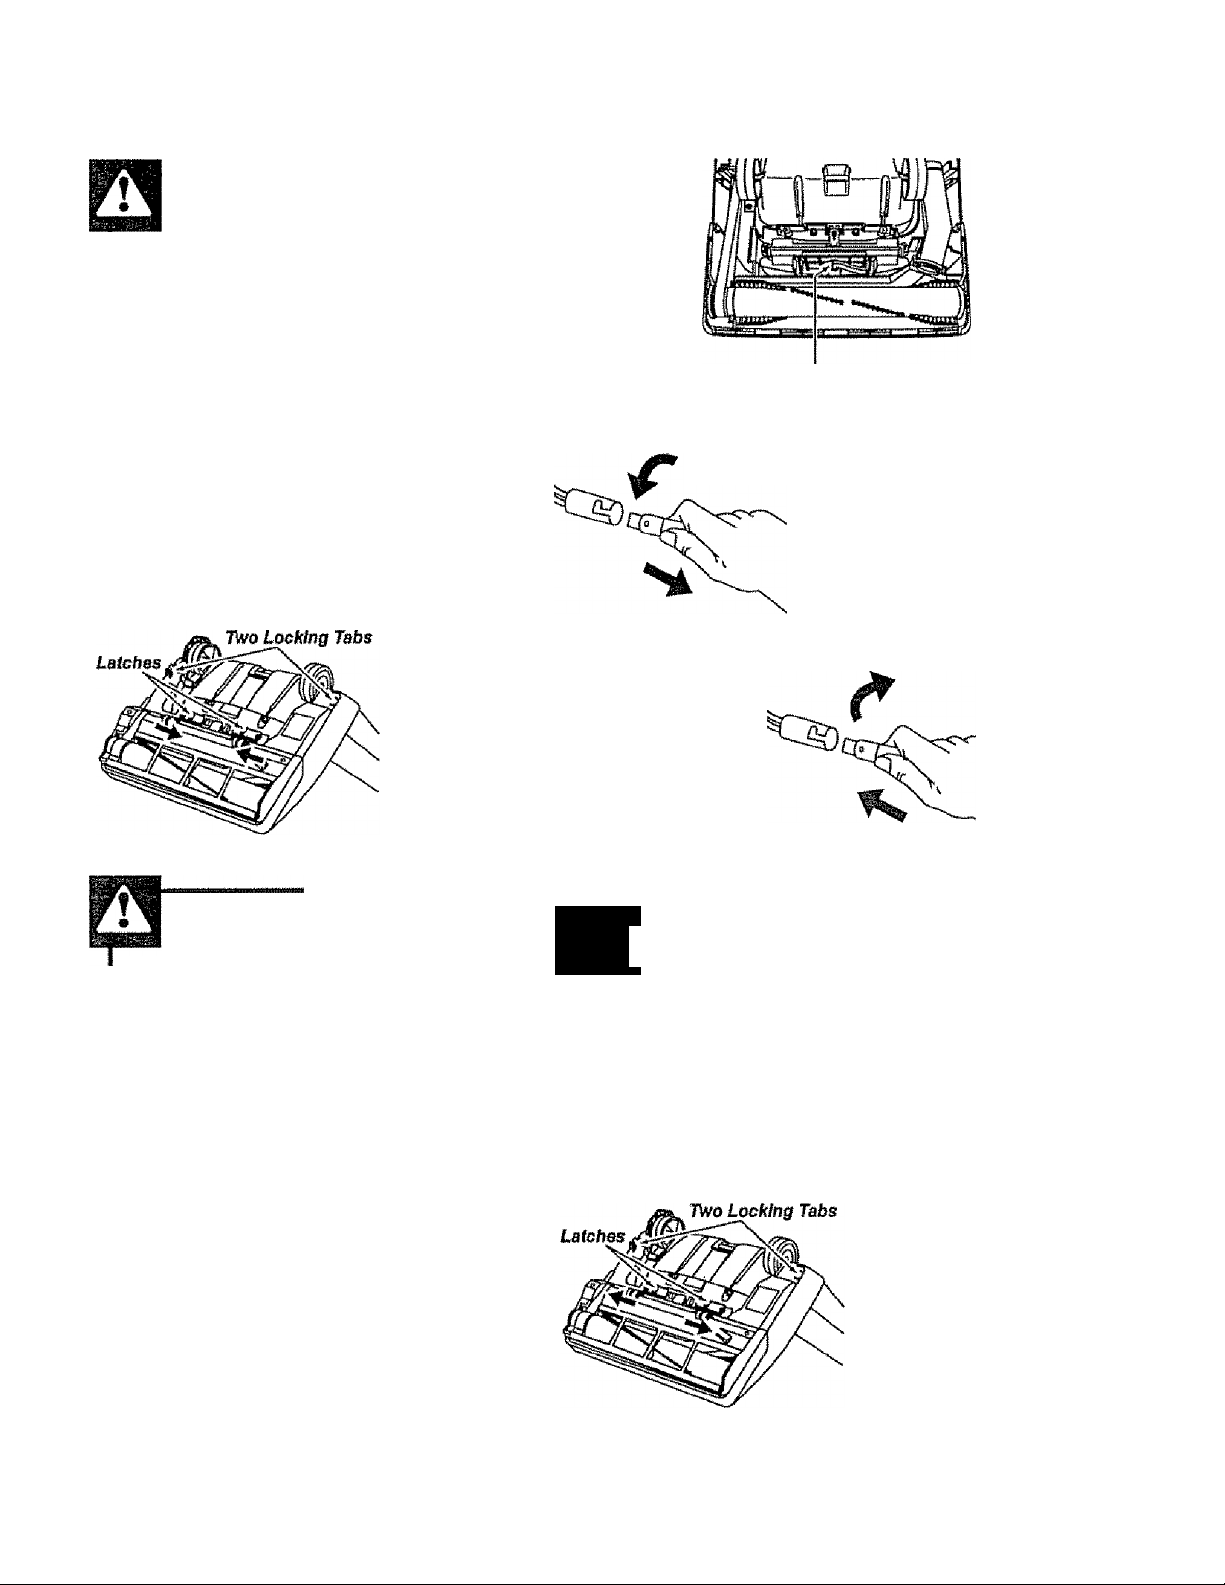
LIGHT BULB CHANGING
WARNING
Electrical Shock Or Personal Injury Hazard
Disconnect electrical supply before
servicing or cleaning the unit.
Failure to do so could result In
electrical shock or personal Injury
from cleaner suddenly starting.
Disconnect the power cord from the elec
trical outlet.
Press the handle release pedal to let the
upper portion of the cleaner lay back
against the floor
Remove
the base
outlined in
the BELT
CHANG
ING AND
BRUSH
CLEANING
section.
civ
Grasp the
bulb socket
assembly
and while
gently rock
ing it from
Side to side,
pull it up out
of the noz
zle housing.
To RbIbssb
To replace the light
bulb carefully insert
and turn clockwise
to securely fit into
slot
NOTE: See PARTS
AND FEATURES
for bulb #.
Bulb Socket Ass&mbfy^
Remove the light
bulb by pushing
the bulb in while
turning counter
clockwise to
release from the
slot.Then pull the
light buib straight
out.
CAUTION
Do not use a bulb rated over 15W.
During extended use, heat from
the bulb could overheat surround
ing plastic parts.
A
CAUTION
Do not plug in or turn on until the
vacuum Is completely reassem
bled.
Replace the base plate as outlined in the
BELT CHANGING AND BRUSH
CLEANING section.
20
Page 21

RDIIC14 QPD\/ir^[M/2
CJ imU.lCl il , ::Ì5 Cw V.i 1V3. ;
WARNING
Eiecirical Shock Or Personal Injury Hazard
I«/ISIkWwf II IlFiliSWM IwAi 5!>M|.lfp«ll^ MwiVrl w
servicing or cleaning the unit.
Failure to do so could result In
electrical shock or personal Injury
from cleaner suddenly starting.
TO CHECK BRUSH:
When brushes
are worn to the
leve! of the base
plate belt guard
or when the
back-up beater
bar is chipped or
Base Plate Belt Guard
TO REPLACE BRUSH:
Remove the base plate and agitator. See
BELT CHANGING AND BRUSH GLEAN
ING section.
gougedj replace
the brushes.
Push out worn
brush strips.
Slide the new
brush strips Into
the slots. Make
sure not to
reverse the
brush and back
up beater bar
position. See
AGITATOR
assembly
iliustration
beiow.
Replace the
washers and
end caps.
NOTE: New brush strips may be easier to
install if they are soaked in warm water
for a few minutes before sliding them Into
the slots. Do not use oil. Dry thoroughly
before reinstalling the agitator.
Reassemble the belt, agitator and base
plate. See instructions for replacing belt In
BELT CHANGING AND BRUSH GLEAN
ING section.
Remove the end caps and washers.
AGITATOR ASSEMBLY
Washer Brush
Back-Up Beater Bar Washer
21
Page 22

TROUBLESHOOTING
Review this chart to find do-it-yourself solutions for minor performance problems. Any ser
vice needed, other than those described in this owner's manual, should be performed by
an authorized service representative.
WARNING Electrical Shock Hazard
Disconnect electrical supply before servicing or cleaning the unit. Failure to do so could result In electrical shock or personal Injury.
^
---------------------«------------------------------
,
1 POSSIBLE CAUSE I
Cleaner won't run.
Poor Job of dirt
pfck-up.
Cieaner picka up
moveable rugs or
pushes too hard.
Light won't work. 1. Burned out light bulb.
1. Unplugged at wall outlet.
2. Tripped circuit brsakar^iown fuss
at household service panel.
3. On/off switch not turned on.
1. Full or dogged dust bag
2. Wrong pile height setting.
3. Worn brush,
4. Clogged nozads or dirt tuba.
5. Clogged hose,
6. Hole In hose.
7. Srokert/misplaced belt.
8. Hose not Inserted fultv
9. Motor protection system activated.
Its. Dirty filters.
1. Wrong pile height setting.
1 POSSIBLE SOLUTION 1
1. Plug In firmly, push on/off switch to
on,
2. Reset circuit breaker or replace fuse,
3. Push ontolf switch to on.
1. Change bag, (page 13),
2. Adjust setting, (page 8).
3. Replace brush, (page 21).
4. Clean nozzle area, (page 15).
5. Check for clogs, (page 19).
6. Replace hose.
7. Replaceffix belt, (page 17).
6, Insert hose fully, (page 9).
9. Chedi for clogs, (page 19).
10. Clean filters, (page 14),
1. Adjust setting, (page 7).
1. Change light bulb, (page 20).
Agitator does not
turn.
Performance Indicator,
some models, ts red.
Air flow restricted
with attachment use.
Sound changes.
Excessive noise as
vacuum Is shut off.
1. Broken belt.
2. Bare floor selector to bare
floor setting.
3. Belt installed tncotrectly.
1, Full or clogged dust bag.
2. Dirty filters.
3. Clogged airflow passage -
dirt tube, nozzle, hose.
4, Certain attachment tools.
1, Attachment use restricts
air flow.
2. Hew carpet fuzz dogged air path.
1. Belt rubbing on carpaM3are floor
selector shaft.
22
1. Replace ball, (page 16).
2. Swtch seledor to the carpet setting,
(pass 7).
3. Check BELT CHANGING AND
BRUSH GLEANING, (page 17).
1. Change bag, (page 13).
2. Clean flefs, (page 14).
3. Clear clog from airflow passage,
(page 19).
4. Should return to normal when
tool is removed.
1, Check ATTACHMENTS,
(page 0).
2, Check CLOG REMOVAL and clean
hose, (page 19).
1. Push selector all the way forward.
Page 23

Get it fixed, at your home or ours!
For repair of major brand appliances in your own home ...
no matter who made it, no matter who sold iti
1-800-4-MY-H01\/!E®
(1-800-469-4663)
www,sea rs.com
Anytime, day or night
(U.S.A. and Canada)
www.searsxa
For repair of carry-in products like vacuums, lawn equipment, and
electronics, cail for the nearest Sears Parts and Repair Center.
1-800-488-1222 Anytime, day or night (U.S.A. only)
vs?ww,seafs.com
For the replacement parts, accessories and owner’s manuals
that you need to do-it-yourself, cail Sears PartsDirecf “i
1-800-366-PART
(1-BOO-366-7278)
6 a,m. - 11 p.m.,, 7 days a week
(U.S.A. only)
www.sears.com/partsdireot
To purchase or inquire about a Sears Service Agreement
or Sears Maintenance Agreement:
1 »800-827-6655 (U.S.A, )
7 a.m, 5 p.m., GST, Mon. - Sat.
Para pedir servido de reparación a
domicilio, y para ordenar piezas:
1-888-SU-HOGAR®^
(1-886-784-6427)
1-800-361-6665 (Canada)
9 a.m„ - B p.m, EST, M - F. 4 p.m. Sai
Au Canada pour service en français:
•î t tS
(1-800-533-6937)
wvMw.sears.ca
x/T Cf*
HomeCentral®
© Sears, Roebuck and Co.
® Registered Trademark / Trademark / Service Mark of Sears, Roebuck and Co,
® Marca Registrada/™ Marca de Fábrica / Marca de Servicio de Sears, Roebuck and Co,
Marque de commerce / Marque déposée de Sears, Roebuck and Co
23
Page 24

Manual Del Propietario
Kentnore
Á QnirstHnrst
jfwííjJII ClUC^i ¿3r
Modelo 116.38412
CUIDADO:
Lb3 y siQUB todss Iss
instrucciones de operación
y seguridad antes del uso de
este producto.
Sears, Roebuck and Co., Hoffman Estates, ÍL 60179 U.S.A.
Pieza W C01ZAPY00U00-4370481
Impreso en EUA
Page 25

TABLA DE CONTENIDO
Antes de usar su aspiradora nueva ,. 2
Garantía de la aspiradora de
Kenmore ........................................... 2
instrucciones importantes de
seguridad
Piezas y características .., —
.........................................
......
........
instrucciones de ensambiamiento ... 5
instrucciones de operación ......... 6
Ajusfe y selección de nivel de pelo
de la alfombra ...................................
Selector de pisos con alfombra y
sin alfombra ..................................
Desprendimiento de! mango ........... 8
Bolon de encendido/a pagado .......... 8
Accesorios
f*^liísrírr^ Hia ría Irte "tri
Vi/IJwU^IW Ww UCiM IMs* ÍvO* « r » v- « l\J
................................
8-10
Sugerencias para aspirar ............ 11
Características de rendimiento
....
11-12
Cuidado de ia aspiradora ....... 12
Cuadro de uso de los accesorios ...... 12
Limpieza dai exterior y de los accesorios .12
3
Cambio de la bolsa
Cambio del filtro de seguridad
4
del motor14-15
Limpieza del filtro de escape 15
.......................
Cambio de la correa y limpieza del
7
cepillo
7
Cómo eliminar los residuos de basura
©n ios conductas
Cambio de la bombilla
Cuidado del cepillo
....................................
........... .,.
............
................., 21
Ensamble del agitador
Solución de problemas
tf 1 iV1IIjdwiwi 1 MIC* 1 ivici
o servicio
................
......
.............
_______
13
16-18
...
. , .
. í j,
.. .
ie
20
23
ANTES DE USAR SU ASPIRADORA NUEVA
Por favor lea esta guia que le ayudara a assemblar y operar su aspiradora nueva de Kenmore en una manera
más segura y effeciiva.
Para mas información acerca del cuidado y operación de esta aspirador, ilame a su tienda Sears mas cercana,
Cuando pregunte por información usted necisilará el número completo de serie y modelo de la aspiradora que
está tocado en la placa de [os números de modelo y serie.
21
22
Use ef espacio de abajo para registrar el número de modelo y serie para su nueva aspiradora de Kenmore.
Número de Modelo
Número de Serie
Fecha de Compra.
Maíengs este tibro y su recibo en u lugar seguro para referencias futuras.
_____________________________________
GARANTIA DE LA ASPIRADORA DE KENMORE
GARANTÍA LIMITADA DE UN AÑO DE LA ASPIRADORA KENMORE
Esta garantía es por un año desde ¡a fecha de compra, e incluye solamente e! uso de !a aspiradora en hogares
privados. Durante el año de garantía, cuando ¡a aspiradora es operada y mantenida de acuerdo al manual de
instrucciones del dueño, Sears reparará cualquier defecto en materiaíes o fabricación libre de cargo.
Esta garantía excluye ias bolsas de colección, correas, lamparillas, y filtros, las cuales son partes gastabSes que
se deterioran con el uso normal.
Para el servicio de garantía, retorne esta aspiradora al Centro de Servicio Sears más cercano en ios
Estados Unidos,
Esta garantía se aplica solamente mientras este producto está en uso en los Estados Unidos Esta garantía le
da a usted derechos legales específicos, y usted puede tener también otros derechos los cuales varían de
CíCSÍCirlA £S oettf
BZ>ÍCIlHÍ Ci tíQl-CilJU*
Sears, Roebuck and Co., D/817WA, Hoffman Estates, IL 60173
Page 26

A ADVERTENCIA
Su seguridad es muy importante para nosotros, para reducir et riesgo de incendio, choque
eiéctrico, lesión corporal o daños al utilizar su aspiradora, actúe de acuerdo con precauciones
básicas de seguridad, entre ellas;
Lea este manual antes de armar o litilfear su
aspiradora.
Use su aspiradora ùnicamente en !a forma
descrita en este manual- Use únicamente con
accesorios recomendados por Sears.
Para reducir el riesgo de choque eléctrico, rto use
su aspiradora si aire iibre ni sobre superficies
mojadas.
Desconecte la fuente de eieclrìcdad antes de
dar servicio o limpiar. De lo contrario podría
causar un choque eiéctrico o lesión corporal,
Siempre debe apagar su aspiradora antes de
desconectarla.
No desconecte la aspiradora tirando dei cordón
eléctrico Para desconectarla, hale el enchufe, rto
e! cordón.
No use la aspiradora si el cordón o el enchufe
está dañado. Si la aspiradora no está
fuíicionando adecuadamente o si se ha dejado
caer, está dañada, se ha dejado expuesta a la
intemperie o se ha dejado caer en agua, devuél
vala a un Centro/ Departamento de servicio de
Sears
No hale ni transporte la aspiradora por el cordón;
no use el cordón como mango; no cierre puertas
sobre el cordón; no hale el cordón sobre rebor
des agudos ni esquinas. No pase la aspiradora
sobre 8Í cordón Mantenga el cordón alejado de
superficies calientes.
No abandone la aspiradora cuando esté conec
tada Desconéctela cuando no la esté usando y
antes de darle servicio.
No permita que sea utilizada como juguete. Se
requiere tener mayor cuidado cuando sea
utilizada en la proximidad de niños o por niños
No toque ¡a aspiradora ni eí enchufe con las
manos mojadas.
No coloque objetos en las aberturas
No utilice la aspiradora si alguna abertura está
bloqueada; manténgala libre de polvo, pelusa,
cabellos y cualquiera cosa que podría disminuir
el flujo de aire
Mantenga e! cabello, ropa suelta, dedos y todas
las partes dei cuerpo alejados de las aberturas y
piezas mecánicas
No use la aspiradora sin tener instalada la bolsa
para polvo y/o los filtros
Cambie siempre la bolsa para polvo después de
aspirar limpiadores de alfombras o desodorantes,
talcos y polvos linos. Estos productos atascan la
bolsa, reducen el flujo de aire y pueden causar
que ésta se rompa . Si no cambia la bolsa podría
ocasionar daño permanente a la aspiradora.
No use la aspiradora para levantar objetos agu
dos, juguetes pequeños, alfileres, pape!, etc.
Podrían dañar la aspiradora o la bolsa para poivo-
No levante ninguna cosa que se esié quemando
o emitiendo humo, como cigarrillos, cerios o
um udlltslimis-
No use le aspiradora para aspirar iiquidos
inflamables o combustibles (gasolina, líquidos
para limpieza, perfumes, etc.) ni ia use en
lugares donde éstos podrían estar preserríes Los
vapores de estas sustancias pueden crear un
peligro de incendio o explosión.
Tenga cuidado especial al utilizarla aspiradora
en escalones. No la coloque sobre sillas, mesas,
etc. Manténgala en el piso
Usted es responsable de asegurar que su aspira
dora no sea utilizada por ninguna persona que no
pueda rnanejaria correctamente.
GUARDE ESTAS INSTRUCCIONES
E! armado y uso seguro de su aspiradora son su reaponsabiltdad Esta aspiradora ha sido diseñada
exclusivamente para uso doméstico. La aspiradora deberá almacenarse en un lugar seco y en el inte
rior Lea este Manual de! propietario detenidamente, pues contiene información importante sobre segu
ridad y USO-, Esta quia contiene información sobre seguridad debajo de símbolos de advertíencía
cuidado Por favor ponga atención especial a estas instrucciones dadas Advertencia: Este
información le alertará con el poügro de fuego, choques eléctricos, quemadas y lesiones, Cuidado;
Este información le alertara a peligros como lesiones y daños de propiedad.
Page 27

PIEZAS Y CARACTERÍSTICAS DE ASPIRADORA VERTICAL
Es importante concsr tes piezas y características de su aspiradora para asegurar su uso adecuado y seguro. Examíneias antes de usar su aspiradora.
Objeto Pieza N®
en EUA
Bolsa para polvo 20-50688
Bombia da farol
20^5240
Corroa 20-5275
Filtro de seguridad
del motor
Sujetador
de liberación
rapida del
cordón
Sujetador
inferior del
cardón
Mango para
transportar
Herramienta para
hendiduras
Tubo
telescópico
t^ubierta del
portino para
limpieza ^
Cepliio
para sacudir
20-86886
Pieza N“
en Canadá
20-50680
20-40600
20-40096
20-86886C
Palanca para ajustar
la altura
Protector
de muebles
Farol
Manguera giratoria
list para usar
Manga
Interruptor de
en cendido/apaga do
Montada en el mango
(Algunos modelos}
Interruptor de
encendido/apagado
Montado en el cuerpo
(Algunos modelos) —
Seguro de la
cubierta de
la bolsa
Indicador de
rendimiento
(Algunos modelos)
Cubierta
de la bolsa
Selector de pisos
con alfombra y
sin alfombra
(Algunos modelos)
Herramlenia
para tapices
Hedai de
liberación
del mango
Protector de motar
(Detrás de la manguera)
/■
Agitador
Números de
series del modelo
Page 28

INSTRUCCIONES DE ENSAMBLAIVlíENTO
Antes de armar la aspiradora, chequee ía LISTA
DE EMBALAJE en ia cubierta separada de ía Lista
de Parles para Reparación,. Use esta lista para veri
ficar que ha recibido todas las componentes de su
nueva aspiradora Kenmore,
A
«mJF Ir i Sm V « iilir«!
Peligro de choque eléctrico
No conecte la aspiradora hasta que
termine de armarla. De lo contrario
podría causar un choque eléctrico o
lesión corporal.
COLOCACION DEL MANGO
Retire el tornillo ubicado justo debajo del
mango para transportar en ia parte posterior
de la aspiradora.
Arííes de armar su aspiradora, asegúrese da
tener disponibles todas las piezas que se
muestraii.
Mango
Sujetadores
det cordón
Orificio para
el tornillo
Abertura para
si mango
Orificio para
el tornillo
del mango
Parte
posterior de
la aspiradora
Coloque el mango da manera que los sujeta
dores del cordón eléctrico estén hada la parte
radora y dentro daf mango.
Comience a apretar el tomillo con los dedos.
Es posible que tenga que ajustar ligeramente
el mango.
Page 29

Apriete el
íomíflo con un
deslorniliador.
A CUIDADO
No apriete demasiado e] torniilo.
Si to aprieta demasiado podría arruinar
ios orificios para el tornino.
No opere la aspiradora sin tener instala
do el tornillo.
COLOCACIÓN DEL CORDÓN
Asegúrese de que el sujetador superior del cor
dón de liberación rápida se encuentre en posi
ción vertical Quite al alambra con el que está
atado el cordón eléctrico.
Fije e! cordón en
posición,
forzándolo en la
ranura de bloqueo
ubicada en el
cuerpo dei
sujetador superior
del cordón, como
se muestra. Esto
ayuda a que el
cordón no se
enrede debajo del
agitador de la
aspiradora.
fiberación
rapide dei
cordón —
Cordón
eléctrico
Sujetador
inferior del
cardón -
Hendidura
de fijación
—jITS
Cordón
eléctrico
V
/
Enrolle el
cordón eléctri-
CMJ ClUtíva wl
de ios sujeta
dores superior
y inferior y
presione la
ranura del
enchufe sobre
a! cordón.
INSTRUCCIONES DE OPERACIÓN
PARA COMENZAR
1. Gira el
sujetador
del cordón
da lado a
lado y
hacía abajo
para liberar
e! cordón
eléctrico.
2. Desprenda el enchufe del cordón eléctrico y
quite el cordón del sujetador superior.
Compruebe que el cordón eléctrico sigue fijado
en la ranura de bloqueo del sujetador superior.
3. Verifique que la aspiradora tenga Instalada
una bolsa. Consulte la CAMBIO DE LA
BOLSA.
NOTAí Para reducir el riesgo de choque
alócírico, asta aspiradora cuenta con una
clavija polarizada, uno de los contactos es más
ancho que el otro. La clavija sólo puede
introducirse de una manera en el enchufe. Si la
clavija no cabe bien en ei enchufe, inviértala. Si
aún no cabe, llame a un electricista para que
instale un enchufe correcto. No altere la clavija
de ninguna manera.
4, Conecte el cordón eléctrico polarizado en un
enchufa de 120 voltios que se encuentre c^rca
del piso.
ADVERTENCIA
Peligro de lesión personal y daño al producto
• NO conecte la aspiradora si al Inte
rruptor está eti la posición ON. Podría
resultar en lesión personal o daño.
* NO use ios enchufes localizados so
bre ios muebles. Los objetos cercanos
podrían resultar dañados.
Page 30
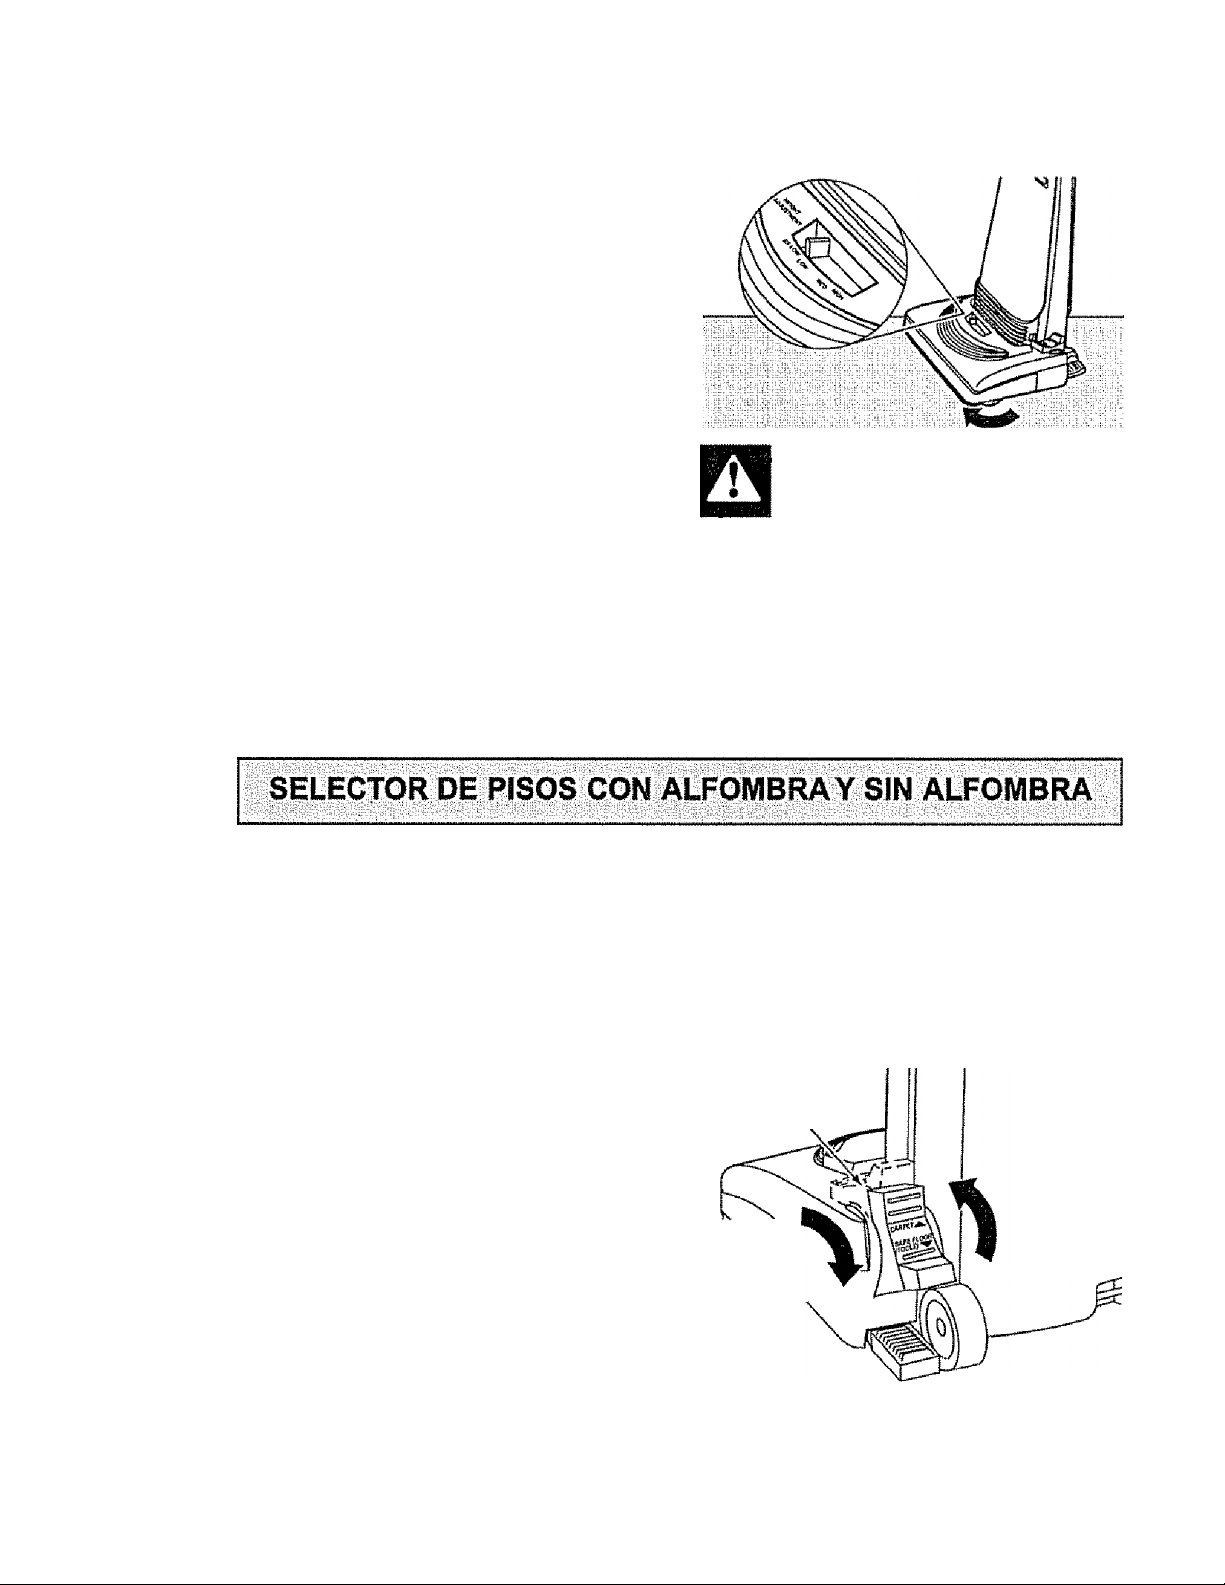
Para seleccionar un ajuste de nivel de pelo
de Ea alfombra:
Apagua la aspiradora. Seleccione un nivel de
ajuste inclinando la aspiradora hacía atrás hasí
f*1t l£l ISÍ^ t'i l'fClISSrlTfSf'lSSC OCTM.n lifl
i^u>3 idd I MwMctw MdiciiIitdi} uii |»/wviw
despegadas deE piso.
I^{30iiuc2 fe* UdidJIwd Md Md tllvm mOím
id ndldn/^d Hd diitcsid in¡\/dl Hd
de la alfombra a la posición deseada.
SUGERENCIAS DE AJUSTE DE NIVEL DE
PELO ALFOMBRA
Para que se le fadlííen algunas tareas de
limpieza, como por ejemplo tapetes aueltos y
alfombras de pelo large, puede que sea nece
sario elevar ajuste de nivei de pelo de la aífombra. Los ajustes sugeridos son (os suguientes.
HIGH: pelo áspero y lanudo, pelo largo, felpa,
alfombras o tapates irragularas.
MED: pelo mediano o poco largo.
LOW: pelo corto o meiano.
EX LOW; pelo muy corto.
ADVERTENCIA
Peligro de lesión personal
NO PONE las manos o los pies debajo
rfi!> Id f'ilsaiirtn f'-dinHia ría Id
Mw Id dd|«#iiciuív#ici VrUciiHifw vdiiiwiw Wd id
selección de pisos sin alfombra hasta
la selección de nivel de pelo de la
alfombra. El agitador gire rápidamente
cuando la aspiradora está encendida y
está en la selección de pisos con
alfombra.
ALGUNOS MODELOS
Para de seccionar el ajuste de piso descu«
bierto: Oprima el botón de selección hasta
dírsuna \f HdHíSÍA Hd id KArtitlild Hdctd amo
ciuciSs y ucssJdjvj Md Id LJMMuiiid lidvsici uud od
sienta asegurado.
Nota: Para la vida más larga de (a correa,
dAáHIAMd 1 IH ísií ¿aCAirSiHAfSÍ dAfdC Hd rYlA4/df‘ di
Vw
V*A
Id d5$ldlI dvivfi |l.x3vi 111vi VviI
selector, de otra manera, asegúrese de que
Ud. apriete por completo y tan rápido como
posibie el selector a !a posición deseada. Si
usted no io hace de esta manera, puede
causar que la correa frota el eje del selector y
En esta posición el asemblaje de cepillo no da
vuiitas. Esta posición debe estar usada para
puede calentar y causar que se queme la cor
rea que causeria un olor quemado.
limpiamiento de piso de madera y mosaico y
cuando se usan algunos atachamientos
herramientas).
S^Isctar tís pisos
con alfombra y
sin alfombra
Selección de pisos con alfombra: Oprime el
boton completamenta hasta el frente y por
diT^IKín Hdcfd !d аа<51А1гАг|| Hd nlcsACt aaa dlfAiYiKifd
di i ILJCi I ÍC44é9LC1 i id LJ I vi id |di wvJv vfv# 11 td
En esta posición e! asemblaje de cepilio da
vueltas. Cuando se limpia alfombras, el selec
tor tiene que estar en esta posición.
i
I >d i I iLri d
*■
Hasta la
posición de
pisos sin
alfombra
Hasta la
posición de
pisas can
alfombra
Page 31

MtíwfJltdliuA о1 IMcIIImU Uì^eiMiJU t7t pULicil Uw ilL/~
eraoión y tiranda del mango hacia abajo con la
mano.
MONTADO EN EL MANGO
ALGUNOS MODELOS
Para arrancar ía
aspiradora,
deslice ei
terruptor de
encendido/
apagado de la
posición OFF a la
posición ON, Para
detenerla, coloque
e! Interruptor en la
posición OFF.
Herramienta
para
hendiduras
Tubo
telescópico
Cepillo para
sacudir
Herramienta
рвгв b
tapices
IntenvptOF C/0
тстШво/
apagado
Manguera
expansible
Collar de
manguera
MONTADO EN EL CUERPO
ALGUNOS MODELOS
Para arrancar la aspiradora, deslice el interrup
tor de encendido/
apagado a la k '
posición ON, Elija
la posición
OFF cuando
no esté usando . ..
la aspiradora o ^mngo
i AAnCirlA
i eUlileauoiiAi !cx>
a
Para detener la aspiradora, deslice el interrup
tor de encendido/apagado a la posición OFF
Cuando regrese hasta la selección de pisos
con alfombra, cuida que el selector puede
moverse rápidamente hasta la selección a
causa de la tensión de la correa.
Saca la parta inferior de la manguera exansibie
de la aspiradora y tirando por atrás.
NOTA: La válvula de desviación puede estar
«dMimicl otí Uoaíl Ivo aLUyoUMw O pdlH
limpiar una alfombra nueva a causa de un flujo
reducido de aire por los accesorios mismos o
por la pelusa de la alfombra que llene la bolsa
rápidamente. Consulte ei cuadro
RECONOCIMIENTO DE PROBLEMAS.
..................... ... ...................
-----
^ 1
interruptor ds
encendido/
Bpsgado—
u lécü-lco,
^
Identifique cada uno de los accesorios mostra
dos a continuación.
CÓMO UTILIZAR LOS ACCESORIOS
Para selectionar la selección de pisos sin
alfombra, gira el selector aitrás y abajo hasta la
selección de pisos sin alfombra. Ver sección
de PISOS CON ALFOMBRA Y SIN
ALFOMBRA.
Peligro de choque eléctrico o lesión cor
poral
Desconecte (a unidad antes de limpiarla
o darle servicio. De lo contrario podría
producirse un choque eléctrico o causar
lesión corporal si la aspiradora arranca
de manera imprevista.
Page 32

La manguera
incorporada gira
Giratoria
para facilitar la
limpieza en cual»
quier dirección
Tubo
toloscópico
Saque el tubo
ъСЭ I \3 «Э W U Lr t w w
de su lugar
de alma
cenamiento.
Retire la herramienta para hendiduras de su
lugar de aimacenamiento dentro del tubo. Gira
el aro de bloqueo hasta !a posición UNLOCK.
Despliegue el tubo completamente. Gire el aro
de bloqueo del tubo hasta !a posición LOCK,
instale el tubo de extensión en el extremo
abierto de la manguera.
OesHiatíor de
Tubo
Inferior
control de
aspiración
Alinee las pestañas de! tubo de extensión con
las ranuras en forma de “J” de ia manguera.
Empuje ©I tubo dentro da la manguera y gire
hacia ia derecha para bloquearla.
Para obtener la máxima longitud con los acce
sorios, instale la herramienta para hendiduras
en el extremo del tubo. Para hacerJí?, iijlcodúz"
cala en el tubo y gírela un poco.
Manguera
úe
control de
aSphaolOfr
Tuno
telescópico
Herramienta
jOiEffa
/i eri I I ao
Cuando 1^el cepillo’
sorio peínelas, puedé
mente en el tubo o en
ramienía para hendiduras.
1 iIttIí piJ'
Cuando use ios accesorios, tenga cui
dado de no estirar demasiado la man
guera expansibla para tratar de alcan
zar más lejos. SI trata de estirar la man
guera más de lo debido, podría causar
que la aspiradora se venga abajo.
Tubo
superior
DADA riDCDAD Cl neei ITA
rAA.rvM WrCrv/Ai\ Cía.
DOR DE CONTROL DE
ASPI RACION
TUBO TELESCOPICO
Cuando use accesorios para limpiar cortinas,
tapetes pequeños de peio corto y otros artícu
los delicados, gire el selector de control de
aspiración a la posición abierta. Este selector
se encuentra en el tubo telescópico, cerca de la
manguera.
Esto reducirá la potencia de aspiración para
facilitar la limpieza.
NOTA • Coloque el selector de control de aspi
ración a la posición cerrada para la limpieza
normal.
Deslizador
de control
de aspiración
Page 33

ALMACENAJE DE LOS ACCESORIOS:
Retire el cepiílo para sacudir o el accesorio
para telas. Coiáquelos firmemente en su iugar
de almaceriamiento correspondiente.
Retire la herramienta para hendiduras del tubo
girándola. Póngala a un lado-
Retire el tubo de extensión de la manguera.
Gire el tubo hacia la izquierda y tire del
extremo de la manguera.
■Jubo
m Aro de
d®/ tubo ^
auperiOi
Desbloquee el tubo
girando el aro de
bloqueo hasta la
posición UNLOCK.
Deslice el tubo inferior dentro de! tubo superior.
Gire el aro de bloqueo del tubo a la posición
LOCK.
Introduzca la herramienta para hendiduras den
tro del tubo comprimido. Instale bien en su
posición de almacenamiento.
Asegúrase de que la unidad esté apagada.
Inserte nuevamente la manguera completa
mente dentro de la abertura ubicada en la
parte inferior de la aspiradora, de donde la
sacó Inicialmenta. Ejerza presión Arme para
asegurarse de que conecte bien.
A
CUIDADO
NO tire de la aspiradora por la man
guera en la habitación. Podrían ocurrir
daños a sus pertenencias.
MANGUERA DE EXTENSIÓN
ALGUNOS MODELOS
La manguera expansible adherida a la aspira
dora cuanta con dos ranuras en forma de “J” en
el extremo donde se Instalan los accesorios.
La manguera de extensión tiene dos botones
en el extremo que pueden oprimirse s inser
tarse en las ranuras para juntar las dos man
gueras.
Los accesorios y el tubo talescópioo pueden
instalarse en eí extremo opuesto de la man
guera de extensión para alcanzar más lejos.
Si su modelo no tiene una manguera
exlensible, usted puede comprar una, en
alguna tienda Sears, El número de parte es
20-52571. En Canadá pieza N“ 20-40975.
A
CUIDADO
ADVERTENCIA
Peligro de lesión personal
NO ponga las manos o píes debajo de la
unidad a! conectar la manguera. El cepillo
cilindrico empieza a girar rápidamente
lecciona una g raduación de aitura. |
CUADRO DE USO DE LOS ACCESORIOS
ACCESORIO
CEPiLLO
SACUDIR
HERRAMIENTA PARA ^
HENDIDURAS
CEPILLO PARA
TELAS
' Siempre limpie ios accesorios arries de usar sobre lelas.
Muebles*^
X
X
X
10
Cuando use la manguera en forma normal
o con la manguera de extensión instalada,
la aspiradora debe mantenerse sobre una
superficie firme al mismo ntvel o a un nivel
inferior que los pies del usuario. NO use las
mangueras cuando la aspiradora está a un
nivel más alto que los pies del usuario.
Area a limpiar
Cnfro
Itwl 1 tfl 9
coijines*
A
Cortinas* Escalones Paredes
X
X
X
X X
Page 34

SUGERENCIAS PARA ASPIRAR
Orillas de alfombras.
Guíe uno de los costados o !a parte anterior
de la boquilla a lo largo del borde de la pared.
Los cepillos largos ayudan a aspirar la tierra en
tftCS li^íC CJÍfrtíTíKrJiaC
cío UJ M Ct>i I IIhi/I cíw4
Í
IVCI«
Coloque el mango en la posición vertical. Use
la herramienta para hendiduras o el cepillo
nssrsi TAIfiSCS
ADVERTENCIA
Peligro de lesión personal
Actúe con precaución si coloca ia
aspiradora sobre escalones. Si se cae,
podría causar lesión personal o daño a
la propiedad.
Para obtener los
mejores resultados
de limpieza, man
tenga desbloquea
dos los conductos
de flujo do aire.
Examine de vez
en cuando cada
una de las zonas
que se indica
podrían causar bloqueo.
Desconecte ia aspiradora
del enchufe antes de examinarla.
CUIDADO
Cuando Use la manguera en forma nor
ma! o con la manguera de extensión Ins
talada, la aspiradora debe mantenerse
sobra una superflcie firme, tai como el
piso, y al mismo nivel o a un nivel Inferior
que ios pies del usuario. NO use las man
gueras cuando la aspiradora esté a un
nivel más alto que ios pies del usuario.
CARACTERlSITCAS DE RENDIMIENTO
A
ADVERTENCIA
Peligro de choque eléctrico o lesión cor
poral
Desconecte la unidad antes de limpiarla
o darle servicio. De lo contrario podría
producirse un choque eléctrico o causar
lesión corporal si la aspiradora arranca
de manera Imprevista.
pg PROTECTfON
DE MOTOR
Esta aspiradora tiene una válvuia de
desviación que sirve como protector de motor
que se abre automaticamente para proveer un
flujo de aíre ai motor cuando un zueco impida
que circule el aire al motor. Si se abre la válvula
hvna«Q naríA imriíiHír mía aa
recalente el motor y que no
haga daño a la aspiradora, sej
noiariá un cambio de
sonidomientras el aire por
la abertura d la válvula.
Para corregir el pro
blema: Consulte el cua
dro RECONOCI
MIENTO DE PROBLE
MAS.
n«’Díecía/
de motar
(A/trés de
la manguera)
11
Page 35

INDICADOR DE RENDIMIENTO
ALGUNOS MODELOS
Cuando la unidad está operando con flujo de aíre normal, las líneas
del indicador de rendimiento están en blanco, Las líneas de! Indica
dor de rendimiento cambian a rojo cuando se biocjuaan los con
duelos de flujo de aire. Si eso ocurre, examine la bolsa
desechable para polvo, el filtro de seguridad del motor y
otros lugares da bloqueo posible indicados en las CÓMO
ELIMINAR LOS RESIDUOS DE BASURA EN LOS
CONDUCTOS.
NOTA: Puede que las lineas se vean rojas a! usar los accesorios
debido a que eí flujo de aire se reduce al pasar por ellos.
Para corregir el problema: Consulte el cuadro
RECONOCIMIENTO DE PROBLEMAS.
CUIDADO DE LA ASPIRADORA
infil Glûmrsrû Tr^ríQC ISiG Ír4GTí'l nnOC /tO
iyCÍ olí?f ILLrviCl'O ItSlÍ? IÏlvt*+LpÍ 1ч?0 LJÇr
S
seguridad al limpiar y darle servicio a su
aspiradora.
ADVERTENCIA
Peligro de choque eléctrico o lesión cor
poral
Desconecte la unidad antes de limpiarla
o darle servicio. De lo contrarío podría
producirse un choque eléctrico o causar
lesión corporal si la aspiradora arranca
de manera imprevista.
renciimhmo
ALMACENAMIENTO DE LA ASPIRADORA
Recoja el cordón y enrrólleio en los sujetado
res superior e inferior, sin que queda muy
apretado.
Guarde la aspira
dora bajo techo en un
lugar seco, con el
mango en posición
verflcal.
LIMPIEZA DEL EXTERIOR Y DE LOS ACCESORIOS
M^bwvllUULc? Wt LOiUUlI íáJüvlMCO la vlaViJa UW
la pared. NO choree agua sobre la aspira
dora.
Limpie ef exterior con un trapo suave y limpio,
que ha sido exprimido después de remojar en
una solución de agua y detergente líquido
iVJípfí %?*• v| v*i\? íVI I Lie t LI Cn|,irLi^ Oí?Li*Lr
pués de limpiar.
Limpie la superficie exterior del receptáculo y
de los accesorios para reducir la electricidad
estática y ta acumulación de polvo.
Lave los accesorios en agua tibia jabonosa,
ADVERTENCIA
Peligro de choque eléctrico o lesión
corporal
Si enrolla el cordón muy apretado pue
de tensarlo mucho y causarle daños.
De dañarse, el cordón podría causar
descargas eléctricas y lesiones o
daños personales.
enjuague y deje secar al aire. No los lave en
lavadora de platos.
NO USE LOS ACCESORIOS SI ESTÁN MOJADOS.
CUIDADO
Los accesorios que se utilicen en áreas
sucias, debajo del refrigerador, no deben
usarse en otras superficies sin antes ser
lavados. Podrían dejar marcas.
12
Page 36

l!t]ir’Vi%ip\ Vfe|[ikJ 11 inüÿ g
eA>
ADVERTENCIA
Siempre desconecte el cordón électri*
t^n stníü9í Ha pariArAP nsüHa Ha !a
%*sf AIIVCpA MiCp t Kp^'dl Ai lA ^A1 i.A vi A
aspiradora.
Oprirna ai botón
de liberación ubi
cado en ía parte
superior de la
cubierta de la
bolsa.
Tire de la
cubierta de la
r\i*í|cst rí!3r*lS> Ai
ImTIvttM* i fviVi^tvJi >71
frente. Retírela
y déjela a un
lado.
Tubo de
basura/
Sujetador de
la bolsa
Cavidad para
la bolsa
Revise el tubo
de basura y el
nitro de seguri
dad del motor.
Si estuvieran
bloqueados,
consulte la
Filtra de
seguridad
del ftíofor
cuadra de RE
CONOCIMIEN
TO DE PROB
LEMAS,
PARA CAMBIAR LA BOLSA
Bofes para jooívo Poblé |g len
güeta de segur!- J
dad da la nueva /
bolsa para
polvo en direo-
ción contraria
que va en al tubo de basura.
NOTA: Consulte las PÍÉZAS Y
CARACTERISTICAS para determinar el N®. de
la bolsa para polvo.
Desdoble la bolsa para
polvo nueva.
Inserte la bolsa para polvo
completamente sobre el
tubo de basura sujetando
la bolsa por el colíar.
Coloque el collar de la
bolsa en posición.
Lengüeta de
ssg ¡rlaad
la abertura
Tome el collar de la
bolsa para polvo y
tire con cuidado
para reUrar la bolsa
para polvo.
Tire la bolsa usada
a la basura. No la
vuelva a usar.
/%! |ir\ A 1*%/%
A
\ii^ (tiiip i Wmf
NUNCA RËUTIL1CE UNA BOLSA PARA
POLVO. Los materiales muy finos, tales
como desodorantes para alfombras, talco
facial, polvo fino, yeso, hollín, pelusa de
alfombras nuevas, etc., pueden atascar la
boisa y causar que se rompa antes de que
esté llena. Cambie la bolsa más seguido
cuando aspire este tipo de materiales-
Asegúrese de que ia parta inferior de la bolsa
para polvo esté completamente dentro de la
cavidad para la bolsa antes de instalar la
cubierta de la bolsa.
Coloque la
iHícaHís Ha
vLIMi o I Icl LitJ
Cubierta —
de la bolsa
la bolsa de
manera que
la pestaña
entre en la
ranura de
posición del
cuerpo.
Ranura de
posición
del cuerpo
Pestaña de
posición de la
cubierta de la bolsa
Cierre la cu-
HtArtA Ha Í£t Ka!»
Uivf Id ud Id L/WI
Cubierta de la bolsa
sa, Al escuchar
un chasquido
característico
será indicación
de que la cu
bierta ha cerra
do bien.
13
Page 37

CAMBIO DEL FILTRO DE SEGURIDAD DEL MOTOR
Revisa con frecuencia ef fiftro de motor y cam
biar cuando esté sucio.
A
ADVERTENCIA
PeUgro de chogue eléctrico
No opere la aspiradora sin el filtro de
seguridad de! motor. Asegéurese de
que el filtro esté seco e instalado
adecuadamente para impedir que el
motor faiie y/o que se prodU2ca un
choque eléctrico.
Siempre desconecte ei cordón électríco antes de reparar alguna parte de la
aspiradora.
PARA QUITAR LA BOLSA:
Oprima el botón da
liberación ubicado
an ia parte superior
da la cubierta de la
bolsa.
Botón tío
Hbamclón
Cubierta —
da la bolsa
filtro de seguridad del
MOTOR
Este filtro se tiene que cambiar cuando esté
CI r'SimrtlSSrCSQ F^Ql*lli/lir*5lÍ'nDniS CQntlf^
OMwlw' v^l I iUJOl Cit? I ft:?M Iw vOljMII
las condiciones de uso. El filtro no se puede
lavar pues prdería su capacidad para atra
par altrapar polvo.
NOTA: Consulte las PIÈZAS Y
CARACTERISTICAS para determinar a! N“. de
la filtro de seguridad del motor.
SI el filtro localizado al fondo de la cavidad de
la HAÍca nara csiiHi^ firanHn
i el jJ'Ciiei csoici dcsviia# ociviueiJiw UidMivíW
Hü ¿I Harria aHalai^fa HaKal/^ Ha lata atafHaa
tjQ OI I iclvio tsMwid* Itw iJiyi icld oMí
NAielva a colocar el filtro deslizándoio da nuevo
en su lugar debajo de las estrías en la cavi
dad de la bolsa para polvo.
PARA CAMBIAR LA BOLSA:
Cubierta
de la bolsa
Tome ei collar
de la bolsa y
tire cuidadosa
mente para reti
rar la bolsa para
polvo.
Tire de la
cubierta de ia
bolsa hacia ei
frente. Retírela
y déjela aun
lado.
14
Doble la len-
Bolsa para polvo
Lengüeta de
seguridad
nidiata Ha qa*
gurldad de la
nueva bolsa
para polvo en
dirección coritraria a la
abertura que
va en el tubo
de basura.
CUIDADO
NUNCA REUTILICE UNA BOLSA PARA
POLVO, Los materiales muy finos,
tales como desodorantes para alfom
bras, talco facial, polvo fino, yeso, hol
lín, pelusa de alfombras nuevas, etc.,
pueden atascar la bolsa y causar que
Se rompa antes de que este llena.
Cambie la bolsa más seguido cuando
aspire este tipo de materiales.
V# e* i»tii o w
Page 38

Desdoble la bolsa para
polvo nueva*
Inserte la bolsa para
polvo completamente
sobre el tubo de basura
sujetando la bolsa por
e! collar.
Coloque el collar de la
Нл1<5Й ЙП
СЭ i 1 ВаГЧ/Оз wi u I I «■
Asegúrese de que la parte inferior de la bolsa
para polvo esté completamente dentro de la
f'CS4/jfiS5rt nñlfQ IS3 SSflTACS f^Q ISS
чигС# w ivIríSv» |nlOl€«f IСд "Cíf Ittlíw íl PcS
cubierta de la bolsa.
LIMPIEZA DEL FILTRO DE ESCAPE
ADVERTENCIA
Coloque la
cubierta de
la bolsa
da manera
que la pes
Cubierta —
de ia bolsa
Ranura ele
posición
del cuerpo
taña entre
en la ranu
ra de posi
ción del
Pestaña de
posición de ta
cubierta de la boisa
cuerpo.
Cierre la cubierta de
la bolsa.
Cubierta
de fa bolsa \
Ai escuchar un chas
quido característico
será indicación de
que la cubierta ha
cerrado bien.
Levante el filtro esponjoso para retirarloLávelo, enjágueío y séquelo.
No opere la aspiradora sin ei filtro de
escape»
Examine el filtro
frecuentemente.
Limpíelo cuando esté
sucio.
Oprima e! pedal de
liberación del mango
con el fin de que la
parte superior de la
aspiradora se incline
completamente hada
atrás hasta que
Pedal de
liberación
del mango
quede sobre el piso,
Tome ei panel de
yOWCSuO diiv7
рог los extremos
con ambas
manos, empuje
hacia adentro y
tire del panel
I^S3r'i£] 2$f$<3ÍSfill¡3
MQvIm CívivJIC«i
Hll5» £3|}*А
NO lo lave en
ei lavaplatos.
NO lo instale
húmedo.
Ranuras
Pernos
Ranuras
Reponga el fil
tro esponjoso
cuando esté
colocándolo
con cuidado
u3 iTlailSfa
que las ranu
ras queden
bien instaladas
OuLé/i \7 IwSü ^tlíl **
nos salientes.
15
Page 39

ADVERTENCIA
Feilgro de choque eléctrico o lesión
corporal
Desconecte la unidad antes de lim
piarla o darle servicio. De lo contrario
podría producirse un choque eiéctrico
o causar lesión corporal si la aspira
dora arranca de manera imprevista.
Frecuentemente revise el área deí cepillo y qui
te todo palo, cordón o pelusa que se haya acumufado. Si Ja acumulación es excesiva, siga las
instrucciones a continuación,
PARA QUITAR LA CORREA:
Desconecte el cordón eléctrico y ponga un
papel debajo de la aspiradora para proteger al
piso. Coloque la aspiradora en la posición
vertical.
Correa
gteaor
El agitador y la rarrea ahora están visibles.
Saca cuidadosamente algunos residuos que
puíden acumuíarse alrededor de la correa.
Ejs ds
transmisión
del motor
invierta !a
unidad de
manera que
el ensamble
del cepillo y
ia placa de
la base
miren hacia
arriba.
Localize los
dos
pestillos y
Pestili
Lsngüetas efe
SBgurídad
las dos
lengütas de
seguridad
que
aseguran la
base del
plato.
Para abrir el plato de la base, deslize el pestillo
de la izquierda a la derecha y el pestillo dere
cho a la izquierda. Oprime ias lengüetas par el
centro de la aspiradora.
Hala la base del plato furea de ia caja protec
tora de la boquilla. Los lados de la base del
plato necesita ser halados un poco hacia
afuera para dejar espacio par las ruedas.
Coloque las manos sobre el conjunto del cepi
llo. Si la correa aún está unida al rodillo el con
junto del cepillo se sentirá bastante tenso. Si la
correa no está rota, quítela del eje de transmi
sión del motor antes de sacar el conjunto del
cepillo.
Levante cuidadosamente el extremo derecho
del agitador y después levanta el extremo
izquierdo.
Retire con cuidado ei soporte del cepillo y la
arandela de cada extremo y póngalas a un
lado. Consulta ia perspectiva despiezada.
ADVERTENCIA
Peligro de lesión personal
Tenga cuidado al quitar el cepillo cílfn-
drlcOj la tensión de la correa es gran
de. SI no tiene precaución podría sufrir
una lesión personal si si cepillo se li
bera rápidamente y sale disparado.
16
Page 40

CUIDADO
Puedd que ai retirar ios soportes del
cepillo se desprenda una pequeña
arandela de metal de cada extremo.
NO pierda estas arandelas.
NOTA: Para mantener una alta eficiencia de
limpieza y evitar e! daño a la aspiradora, hay
que limpiar el ensamble del capülo cada vez
También hay que limpiar et ensamble del cepil
lo según el siguiente horario:
Limpie el
ensamble del
cepiiío
PARA CAMBIAR LA CORREA;
Asegurase que ei selector de pisos con y sin
alfombra este en la posición de piaos con
alfombra. Coloque la nueva correa alrededor
del eje de transmisión del motor.
Correa
. Eje del selector de pisos
con y sin alfombra
Eje de
trensmisláü
del motor
Frecuente -
cada semana
(usada dirariamenie)
Moderado -
cada mes
(usada 2 o 3 veces
por semana)
Ligero -
iCr i í
(usada 1 vez por semana)
núiirCk írTriif^t#^ fio i^siQilrQ o dir^iofifsfi fio i!3
i \t!í MI sJ llJtJlwJvr líi vi I el vi viTlnlli/lv?vlcíiw \Jvi ICl
zona de la correa y del rodillo del cepilio.
Perspectiva despiezada -
Ensamble del cepillo
0-,
^rende/s
Soporte dei
cepifío
Unidad dei agitador
Arandela T
Soporte
del
cepillo
Con cuidado quite
las tapas y quite
el hilo o los restos
ubicados en el
ensamble del
cepilio, en ios
soportes del cepil
lo, en ias arande
las o en ei eje del
agitator.
Correa
nueva
Ranura de
la correa
NOTA: Consulte las PIEZAS AND
CARACTERISTICAS para determinar el N®. de
correa.
C«ric:í!ífio lo tiiicitt/ct Hol
ÜZIlocalto Icx wUEfod llUtaVd OULlio tji t7ltocaiilUlt;i Mvl
cepillo.
(íyinee la extensión cuadrada de cada tapa con
las ranuras de la estructura de la boquiila.
Ensamble
del cepillo
Boquilla
Ranura de
la boquilla
Ranura de
la boquilla
Boquilla
NOTA: Debido a la tensión de la correa, debe
actuar con cuidado al insfalaria.
IMPORTANTE
í^artiHífó líííi £9rs3riHiStls3C: \J Issq QfTnnrfoQ
vJ^Cll Mi.Jfv¡í loo OI OI IMvSI-CÍO y lUOyvl loo Ow^vl 4“Oí^
Vea la perspectiva despiezada para seguir el
orden correcto de coiocación de las piezas.
17
Page 41

CORREA SOBRE LA RANURA GUIA
Correa Está Centrada
Sobre ta Ranura Guia
(Selector ele pisos con y sin alfombra
este en la posición da pisos can alfombra)
Ensemble Selector
del серШ—чг—CV-i da pisos
Ensemble
del cepllh
X \ y'~~-—^ i:' con alfam-
Eje del selector de Eje de
pisos con y sin transmisión
alfombra del motor
Correa No Está Centrada
Sobre la Ranura Guia
fCorrea aldrededor del eje del selector
de pisos con y sin alfombra}
*—., con a/fon?»
;Qi t braysln
X alfombra
Eje de
Ele del selector
da pisos con y
sin alfombra
transmisión
del motor
Correa No Está Centrada
Sobre la Ranura Guia
este
Ensemble
del cepilla
Correa
Selector
de pisos
Selector de
pisos con
alfombra y
sin alfombra
/
Para reinstalar la placa de la base, inserte las
cuatro pestañas derttro de las cuatro ranuras
ubicadas a lo largo del borde frontal de la
base. Coloque la aspiradora en la posición
vertical. Coloque la placa de la base en su
posición original.
Posición vertical
Ubicación de
las "TAeS"
V^uwlilViw L/CaJCíI IviM Id iU*CilC!tw| Id |«/CII i.d llIlvIlMi/i
cftcsTA Is r\s3c.o Ís3 r\ssf*ii3 inforinr
va a rozar contra las ruedas. Si ud, I© hala un
poco afuera le ayudara a resamblario.
Lengüetas de
Precione ia
base del plato
para abajo
hasta que las
lengüetas de
seguridad
estén en su
lugar.
Eje da Eje del selector de
transmisión pisos con y sin
del motor alfombra
Haga presión firmemente, asegurándose de
que hayan entrado bien ambos extremos-
Asegúrese de que la correa esté centrada
sobre la ranura gula- Gire el agitador con ios
dados para asegurarse de que gire libremente.
Deslizo ©I
pestillo de la
Pestíllos
izquierda a la
izquierda y ©i
pestillo dere
cho a la
derecha para
í*ii Id dctfdn
UUd C7*3tC2| I
seguros.
Coloque la aspiradora en la posición vertical
antes de conectarla en el enchufe.
18
Page 42

Proceda siempre con precaiiciones de seguri
dad al limpiar y dar servicio la aspiradora.
A
ámJÉk
Si considera que la aspiradora no aspira bien o
si la autopropuisión no funciona, asegúrese pri
mero de que la bolsa no esté llena y de que el
filtro no esté atascado, Consulte las instruccio
nes sobre CAMBIO DE LA BOLSA Y LIMPIEZA
DEL FILTRO DE SEGURIDAD DEL MOTOR,
Si las zonas del filtro y la bolsa no están atas
cadas, examine la zona de la manguera. Retire
el extremo inferior de la manguera expansible
de la aspiradora tomándola por el collar y
tirando de hacia arriba.
Examíne visualmente la zona del portillo para
MIl|<-1Vj 1C4 fC« id w Viltn/iisiqii wCí illCisí?
la manguera.
ADVERTENCIA
Peligro de choque eléctrico o lesión
corporal
Desconecte la unidad antes de lim
piarla o darle servicio. De lo contrario
podría producirse un choque eléctrico
o causar lesión corporal si la aspira
dora arranca de manera Imprevista.
Enchufe la
aspiradora
y encién
dala. Abra y
cierre la
cubierta dei
portillo para
limpieza.
Estire al
máximo ía
manguera y
luego per
mita que se
encoja
i lezoio ou
tamaño
normal de
almacena
miento.
Apague la
unidad y
desconéc
tela.
cii
Cierre la cubierta del portillo para limpieza,
asegurándose de que selle bien.
inserte nuevamente la manguera en la abertura
de la parte inferior de donde la retiró. Empuje
con firmeza para asegurarse de que quede
bien conectada.
Cublert0 de portillo
para limpieza
ADVERTENCIA
Peligro de lesión personal
NO coloque las manos ni los pies deba
jo de la unidad cuando inserte la man
guera. El agitador empieza a girar muy
rápido cuando la aspiradora esta
encendida y tiene establecido un ajusfe
de nivel de pelo de allombra.
Si las zonas del filtro y la bolsa y las zonas de
la manguera no están atascadas, examine la
zona de la boquiiia. Para examinar dicha zona,
consulte la sección sobre CAMBIO DE LA
CORREA Y LIMPIEZA DEL CEPILLO.
Coloque la aspiradora en la posición vertical
antes de conectarla en el enchufe.
Para obtener los mejores resultados de
III i ILJI11 ÍC 3i i táXJ I ly¿l CÍ L#lxj| Lv. r >tJ i wV ri l U ^.il llr IQ II x í«
Ud necesita revisar su
aspiradora '
Ar!í4«3Íí*iíialriiaíifo AAr
residuos de basura. Este
diagrama tiene estrellas que
indican las areas donde más
se acumulan los residuos.
Desconecte la aspiradora
antes de examinar.
lYítaintáünriíi aI r’AnHiiT'fA jHa
Retir# cualquier material bloqueante.
19
Page 43

CAMBIO DE LA BOMBILLA
ADVERTENCIA
Peligro de chotjue eléctrico o lesión cor»
porsi
Desconecte te unidad antes de limpiaría
o darle servicio. Ds lo contrarío podría
producirse un choque eléctrico o causar
lesión corporal si la aspiradora arranca
de manera imprevista.
Desconecte la aspiradora.
Oprima al peda! de liberación del mango para
que la parte superior de la aspirador se
incline hacia atrás hasta el piso.
Remueva
LBngOstas da
el plato de
las base
como está
descrita e
la sección
CAMBIO
1 A
^
LA
CORREAY
LIMPIEZA
DEL
CEPILLO.
Agarra el
O C AlrYt Ki £}
clo^l I lUlcai I iltsl I”
to da la bom»
billa y valla
moviéndolo
de lado a lado
cuidadosa
mente para
afuera ds la
caja de la
boquilla.
Par rempiacar la
bombilla, cuidadosa
mente inserte y de
vuelta hacia la
licitud
guiarla en la
abertura,
NOTA: Míre PIEZAS Y CARACTERISTICAS
para el numero de la bombilla.
Ensambla ds la bombilla
Para ratírar
Remueva ia bom
billa empujándola
y valla dandola
vuelta para la
izquierda para
sacarla de la aber
tura. Después
saque la bombilla
para afuera.
CUIDADO
No use una bombilla de más de 15
vatios. Cuando se use la aspiradora
por un largo periodo de tiempo, el
calor de la bombilla puede calentar las
partes de plástico cerca.
A
iABITipiBCo 13 03SB QSI pi3*0 COiTIO mBBCíIíO
©n la sección CAMBIO DE LA CORREA Y
LIMPIEZA DEL CEPILLO,
CUIDADO
No conecte o encende la aspiradora
antes de armarla completamente.
Lengüüias da
20
Page 44
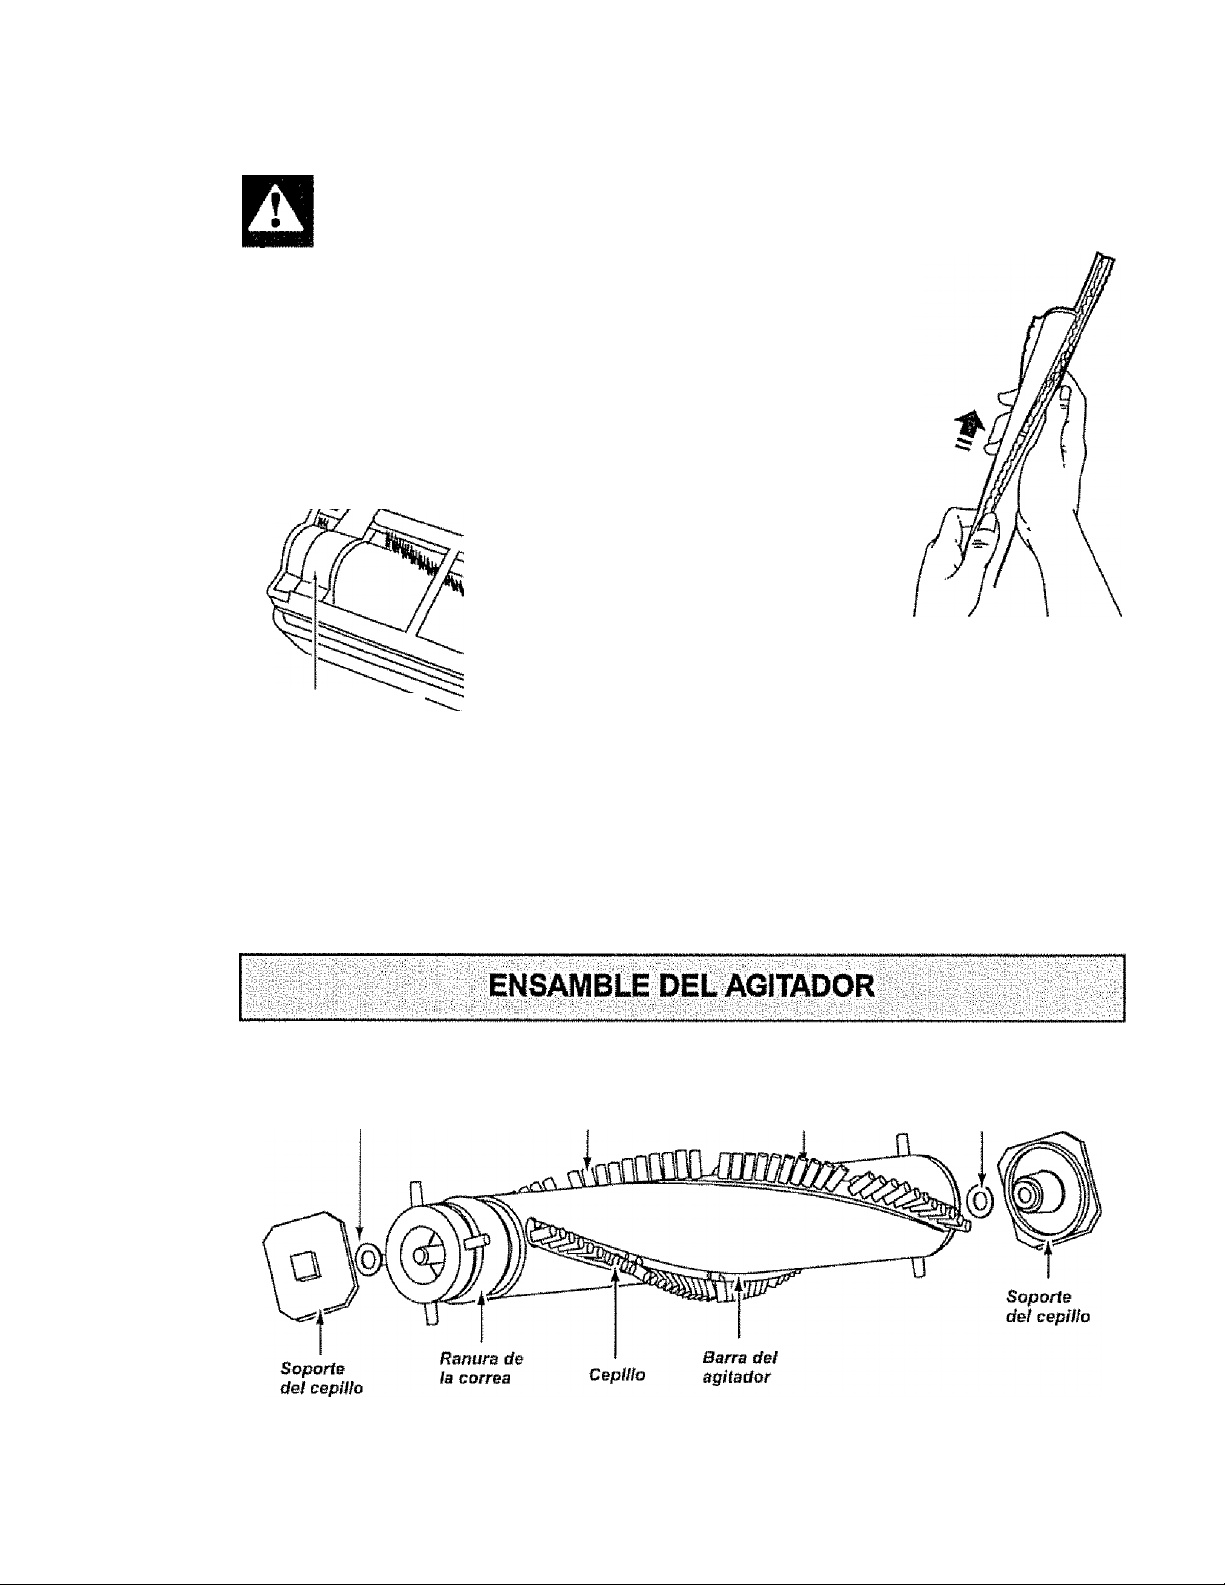
Retire los cepillos.
ADVERTENCIA
Peligro de choque eléctrico o lesión
corporal
Desconecte la unidad antes de lim
piarla o darle servido. De lo contrario
podría producirse un choque eléctrico
o causar lesión corporal si la aspira
dora arranca de manera imprevista.
DADA CYAKAIKIAD d a
Profector dB la correa'
de la placa de la base
PARA CAMBIAR EL CEPILLO:
Retire la placa de la base y el agitador. Con
sulte CAMBIO DE LA CORREA Y LIMPIEZA
DEL CEPILLO.
l!!!!iyVr\i\niiM IZílaw wláwi IL*wLééV/s
Cuando ios cepillos
se hayan desgas
tado hasta el nivel
del protector de la
correa de la placa
de ]a base o cuando
la barra del agitador
esté astillada o frag
mentada, cambie los
cepiilos-
Deslice los nuevos
cepillos dentro de
las ranuras. Ase
gúrese de no inver
tir la posición del
cepillo y de la barra
de respaldo del agi
tador. Consulte el
ENSAMBLE DEL
DEPILLO a conti
nuación.
\^i£iÍl/53 sa IndíialDr Idc
arandelas y los
soportes del cepillo,
NOTA: Quizás le
resulte más fácil
instalar los cepillos
nuevos y los cepi
llos de los extremos si primero los remoja en
agua tibia unos minutos antes de desiizarlos en
ias nanuras. No use aceite. Sáquelos bien antes
de instalarlos de agitador.
Reinstale la correa, el agitador y la placa de la
base. Consulte CAMBIO DE LA CORREA Y
LIMPIEZA DEL CEPILLO.
Retire los soportes de! cepillo y las arandelas.
Arandela Cepillo
Barra del agitador Arandela
21
Page 45

l*%lw V# «¡if I fVl I CwINi ..I'.^nir. : illir IZh .1^ iXllwr lilwElli
Consulte este cuadro para encontrar soluciones que usted mismo puede realizar cuando tenga pro
blemas menores de rendimiento. Cualquier servicio que necesite aparte de otros descritos en este
manual tienen que ser hechos por un represetaníe de servicio autorizado.
IIQIIIIIIIIIIIIIII^
La BBpfradora no
funciona.
No aspira
aaUafactoriantants.
lE 1^ 1^1 Cí# Peligro de choque eléctr
ico
Desconecte ia aspiradora antes de darle servicio o limpiarla. De lo contrario podría producirse un choque eléctrico o causar lesión corporal.
1
------------------------------------------------------------i---------------------------------------------------------------
1 CAUSA pOSJBLE |
1. Estédeaoonedada,
2. Cortacircuitos botado o fusible
quemado an et tablero de sarvlclo
da la residencia.
3. intemjplor de enoendldo/apagado
na está en la poalotón on,
1. Bolsa para polvo llena o atascada.
2. ^usts Incorrecto de nivel da peioda
la alfombra.
3. Cepillo desgaalado-,
4 Boquilla, o tubo da polvo, atascado,
5. Manguera atascado.
6. Manguera rola.
7. Correa roía.
8. La manguera ni} asíá bien irtsartada,
9. Actìvacfon de1 sistema de pratectldn
del motor
10. Filtros da seguridad.
.
SOLUCIÓN POSIBLE
1. Coneda bien, oprima selector da
Bncandldo/apagado a te postotún on.
2. Restablezca al cortadrcultoa o
cambie ai fusible.
3. Cotoqua el interruptor da encendido/
apagado en ia posición on.
1. Cambie la bolsa, (página 13}
2. Ajusta nivel, (página 8).
3. Cambie el oeplílo, {página 21).
4 Llmplsr área da la boquilla,
(página 18)
5. Daiarratoa at existan bloqueos,
(página 10).
6. Cambia la manguera.
7. Cambie la correa, (página 17),
8. insorte bien la manguera, (página 9).
9. Delermlna si existen bloqueos,
(página 18).
10. Umps el filtros, (página 14j.
1
La aspiradora levanta
tapates o es dlffcul
empujar.
La luz no ftinclona. 1. Bombilla fundida.
Et agitador no gira.
El indicador da rendi
miento, algunos
modelos, está rojo.
Restricción del flujo de
el uso de los accesorios.
Cambio de sonido.
Ruido excesivo cuendo se
apaga la aspiradora.
1. í^usla Incorrecto da nival de palo
de la alfombra.
1. Correa rota,
2. Selector de piso oon alfombra y
piso 8¡n alfombra en la sateocidn
ds piso sin alfombra,
3. Con-sa ínsíalada Incorreclamente
1. Bolsa para polvo llena 0 atascada.
2. FIHíos de seguridad.
3. Conducto de flujo de aíre atascado,
Tuíjo para liana, boquilla, manguera,
4 Ciarlos accasorlos.
1.
El uso de tos accesorios ílmiia a!
flujo da aire
2,
La patosa da una alfombra nueva
obslruye al paso de aire.
1. SelBotor da plso/alfombra no está
empujando compíeíamanla al franta.
1, Ajuste al ntval, (página 7).
1. Cambíe la bombttlB, (página 20).
1. Cambie ia eorraa, (págSnal 6).
2. Cambie al selector en !a selección
con alfombra, (página 7).
3. Revise CAMBIO DE LA CORREA Y
LIMPIEZA DEL CEPILLO, (pagina 17),
1. Cambíe la bolsa, (pàgina 13).
Z Limpie a! filtros, (página 14).
3, Retire el material bioqueanls del
conducto de aire, (página 19).
4, Retornará al funolonasntenlo normal
cuando remueva alguna berramianta.
1. Revise USO DE LOS
ACCESORIOS, (página 6).
2. Revisa CÓMO ELEMINAR LOS RES
IDUOS DE BASURA EN LOS CON
DUCTOS y limpíe la manguera, (página 10).
1, Oprime el boton comptaíamsnfa
basta el frente.
22
Page 46

Get it fixed, at your home or ours!
For repair of major brand appliances in your own home ...
no matter who made it, no matter who sold It!
1-800-4-MY-HOME®
(1-800-469-4663)
WWW.Sears.com
For repair of carry-in products like vacuums, lawn equipment, and
electronics, call for the nearest Sears Parts and Repair Center.
1 "800-488”1222 Anytime, day or night (U.S A. only)
www.searsxom
For the replacement parts, accessories and owner’s manuals
that you need to do-it-yourself, call Sears PartsDirecf“!
Anytime, day or night
(U S. A. and Canada)
www.sears.ca
1-800-366-PART 6 a m. -11 p m,, 7 days a week
(1-800-366-7278) (U.S.A.oniy)
www.sears.com/pai1sdirect
To purchase or inquire about a Sears Service Agreement
or Sears Maintenance Agreement:
|i
fB::::
ii
;ï;:.
1
1-800-827-6655 (US A )
7 a.m, - 5 p,m., CST, Mon.. - Sat.
Para pedir servicio de reparación a
domicilio, y para ordenar piezas;
1-888-SU-HOGAR®'^
(1-888-784-6427)
1-800-361 “6665 (Canada )
9 a,m. - 8 p.m, EST, M - F. 4 p,m- Sat
Au Canada pour service en irançais:
I WVfM ImI'IIim i Va* I ím*I I
(1-80Û-S33-6937)
www.sears.ca
HomeCentraF
© Sears, Roebuck and Co,
® Registered Trademark / 'f*'* Trademark / Service Mark ûf Sears, Roebuck and Co.
® Marca Registrada / ™ Marca de Fábrica ! Marca de Servicio de Sears, Roebuck and Co,
Marque de commerce Marque déposée de Sears, Roebuck and Co,
23
 Loading...