

Page 1
ENERGY STAR
H^3t
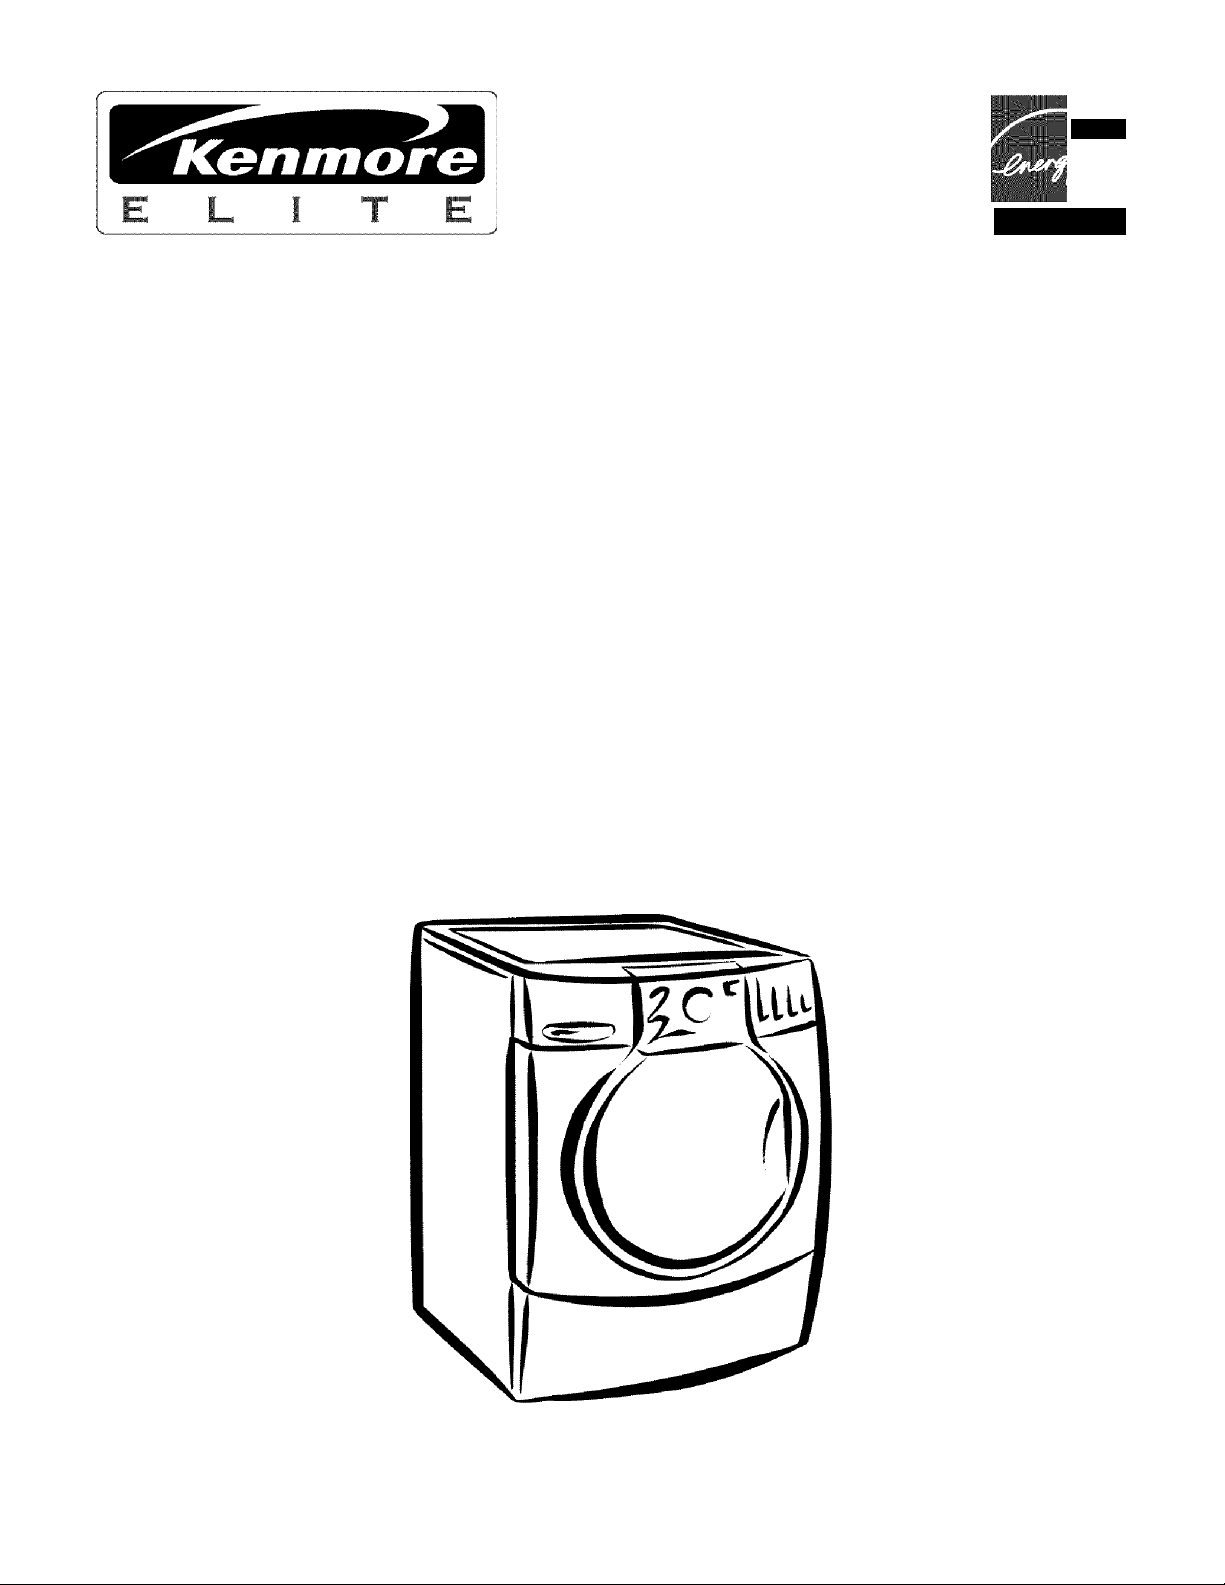
Front-Loading Automatic Washer
Lavadora automática de carga frontal
Laveuse automatique à chargement frontal
:^'/:y.y y;^:- iy y ■■. '. ^ ': Vy': y ^y y ' > y;^^y^ Vyy.;:yy.v -y^
Models/Modelos/Modèles 110.4596î§î, 4597î§î
= color number, número de color, numéro de couleur
461970222531
Sears Roebuck and Co., Hoffman Estates, IL 60179, U.S.A.
Sears Canada Inc., Toronto, Ontario, Canada MSB 2B8
wtA/w.sea rs.com
www.sears.ca
Page 2

.
j[^e Master Protection Agreement also helps extend the life of
■ «Ql — your new product. Here’s what’s included in fhe Agreement:
wV/l^ I I w ✓ Expert service by our 12,000 professional repair specialists
PROTECTION AGREEMENTS...................................................................2 ✓ Unlimited service and no charge for parts and labor on all
In the U.S.A............................................................................................. 2 covered repairs
In Canada................................................................................................2 ^ “No-lemon guarantee - replacement of your covered product
WARRANTY.................................................................................................3 if four or more product failures occur within twelve months
PEDESTAL OPTION WARRANTY
WASHER SAFETY
INSTALLATION REQUIREMENTS.............................................................5 extra charge
Tools and Parts........................................................................................5 ✓ Fast help by phone - phone support trom a Sears technician
Options.....................................................................................................5 on products requiring in-home repair, plus convenient repair
Location Requirements............................................................................6 scheduling
Drain System
Electrical Requirements...........................................................................8 power fluctuations
INSTALLATION INSTRUCTIONS...............................................................9 Rental reimbursement if repair of your covered product takes
Remove Transport System
......................................................................................
...
......................................................................................7 ^ Power surge protection against electrical damage due to
.............................................................
......................................................................
3 ✓ Product replacement if your covered product can’t be fixed
4 ✓ Annual Preventive Maintenance Check at your request - no
9 longer than promised
Route the Drain Hose.........................................................................10 purchase the Agreement, a simple phone call is all that
secure the Drain Hose........................................................................10 schedule a service appointment online.
Level the Washer................................................................................10 „ , . , . . ^ , ,
Complete Installation..........................................................................10 "as over 12,000 professional repair specialists, who have
FEATURES AND BENEFITS.................................................................11 the kind of professionalism you can count on to help prolong the
WASHER USE 12 У®'-’*' ®®'^ purchase tor years to come. Purchase your
Starting ^ ^ Master Protection Agreement today!
Using the Dispenser.............................................................................13 Some limitations and exclusions apply. For prices and
Pausing or Restarting 14 additionalinformation, call 1-800-827-6655.
Changing Cycles, Options and Modifiers...........................................14
Status Lights 14 Sears Installation Service
K| ................................................................................door openers, water heaters, and other major home items, in the
„ ................................................................................U.S.A. call1-800-4-MY-HOME®.
Options................................................................................................16
Modifiers.............................................................................................16
Laundry Guide....................................................................................17 . , .
LAUNDRYTIPS..........................................................................................17 ... .
I .|д Maintenance Agreements
WASHER CARE........................................................................................18 Sears HomeCentral® for service. With over 2,400 Service
Cleaning Your Washer.........................................................................18 Technicians and more than a million parts and accessories, we
Water Inlet Hoses.................................................................................18 have the tools, parts, knowledge and skills to back our pledge:
Vacation, Storage, and Moving Care..................................................18 We Service What We Sell.
TROUBLESHOOTING...............................................................................19 Your Kenmore® product is designed, manufactured and tested to
QPDVir.i: Ml iMRPDQ RAr.if г.пл/рр provide years of dependable operation. But like all products, it
___________________
............................................................................................. Your purchase has added value because you can depend on
...............................................
_______________
It takes for you to schedule service. You can call anytime day or
access to over 4.5 million quality parts and accessories. That s
.|ц For Sears professionai instailation of home appliances, garage
___________________________________________________________
require service from time to time. The Sears Maintenance
Agreement offers you an outstanding service program, affordably
PROTECTION AGREEMENTS
^___________________________________________________ The Sears Maintenance Agreement
. ,. . . ■ Is your way to buy tomorrow’s service at today’s price
■ Eliminates repair bills resulting from normal wear and tear
Master Protection Agteements
Congratulations on making a smart purchase. Your new
Kenmore® product is designed and manufactured for years of
dependable operation. But like all products, it may require
preventive maintenance or repair from time to time. That’s when
having a Master Protection Agreement can save you money and
aggravation.
Purchase a Master Protection Agreement now and protect
yourself from unexpected hassle and expense.
m Provides phone support from a Sears technician on products
requiring in-home repair
■ Even if you don’t need repairs, provides an annual Preventive
Maintenance Check, at your request, to ensure that your
product is in proper running condition.
Some limitations apply. For more information about Sears
Canada Maintenance Agreements, call 1-800-361-6665.
Page 3

KENMORE ELITE® WASHER
WARRANTY
Limited Lifetime Warranty on Stainiess Steei Drum
For the lifetime of the washer from the date of purchase, Sears
will replace the Stainless Steel wash drum due to defective
material or workmanship. After the first year, you will be charged
for labor.
Limited 10-Year Warranty on Piastic Tub*
For the second through tenth year from the date of purchase,
Sears will replace the plastic tub if it is defective in material or
workmanship. After the first year, you will be charged for labor.
Limited 5-Year Warranty on Gearcase Parts*
For the second through fifth year from the date of purchase,
Sears wiil replace any gearcase parts that are defective in
material or workmanship. After the first year, you will be charged
for labor.
Limited 2-Year Warranty on SENSOR SMART*'
Controi Board
For two years from the date of purchase, Sears will replace the
SENSOR SMART*" control board if it is defective in material or
workmanship. You will be charged for labor after the first year.
Fuii 1-Year Warranty on Mechanicai and Eiectricai Parts
For one year from the date of purchase, when this washer is
installed and operated according to the instructions that come
with it, Sears will repair or replace any of its mechanical or
electrical parts if they are defective in material or workmanship.
Service must be provided by a Sears Service Department in the
United States or Canada or an authorized agent.
Warranty Restriction
If this washer is operated for any purpose other than private
family use, all warranty coverage is restricted to 90 days from the
date of purchase.
Warranty Service
Warranty service is available by contacting the nearest Sears
Service Center in the United States or Canada. This warranty
applies only while the product is in use in the United States or
Canada.
This warranty gives you specific legal rights and you may also
have other rights which vary from state to state or province to
province.
For Sears warranty information or to contact a Sears Service
Center, please reference the service numbers located on the
back page of this manual.
Sears, Roebuck and Co.
D/817WA, Hoffman Estates, IL 60179
Sears Canada Inc.
Toronto, Ontario, Canada MSB 2B8
*ln Canada a different warranty may apply.
Product Record
In the space below, record your complete model number, serial
number, and purchase date. You can find this information on the
model and serial number label.
Have this information available to help you quickly obtain
assistance or service when you contact Sears concerning your
appliance.
Model number 110___________________________________________
Serial number________
Purchase date
________________ ________________
Save these instructions and your sales receipt for future
reference.
PEDESTAL OPTION
WARRANTY
Full One-Year Warranty on Mechanical Parts
For one year from the date of purchase, supplier will repair or replace
any of its mechanical parts if defective in materiai or workmanship.
This Pedestal must be installed with this washer according to the
instructions provided in the Pedestal Installation Instructions.
Warranty Restriction
If the pedestal Is subject to other than private family use and or if
the pedestal is used with any other product than those listed in
the installation instructions, the above warranty coverage is null
and void.
Product Record
In the space below, record your complete model number, serial
number, and purchase date. You can find this information on the
model and serial number label.
Have this information available to help you quickly obtain assistance
or service when you contact Sears concerning your pedestal.
Model number 110.
Serial number
Purchase date
Save these instructions and your saies receipt for future
reference.
__________________________________________
________ _______________ ________________
Page 4

WASHER SAFETY
Your safety and the safety of others are very important.
We have provided many important safety messages in this manual and on your appliance. Always read and obey all safety
messages.
This is the safety alert symbol.
This symbol alerts you to potential hazards that can kill or hurt you and others.
All safety messages will follow the safety alert symbol and either the word “DANGER” or “WARNING.”
These words mean:
You can be killed or seriously injured if you don't immediately
ADANGER
iâk A R NIN G
All safety messages will tell you what the potential hazard is, tell you how to reduce the chance of injury, and tell you what can
happen if the instructions are not followed.
IMPORTANT SAFETY INSTRUCTIONS
WARNING: To reduce the risk of fire, electric shock, or injury to persons when using the washer, follow basic precautions,
including the following:
follow instructions.
You can be killed or seriously injured if you don’t follow instructions.
Read all instructions before using the washer.
Do not wash articles that have been previously cleaned
in, washed in, soaked In, or spotted with gasoline, dry
cleaning solvents, other flammable, or explosive
substances as they give off vapors that could ignite or
explode.
Do not add gasoline, dry-cleaning solvents, or other
flammable, or explosive substances to the wash water.
These substances give off vapors that could ignite or
explode.
Under certain conditions, hydrogen gas may be
produced in a hot water system that has not been used
for 2 weeks or more. HYDROGEN GAS IS EXPLOSIVE.
If the hot water system has not been used for such a
period, before using the washing machine, turn on all hot
water faucets and let the wafer flow from each for sever
al minutes. This will release any accumulated hydrogen
gas. As the gas is flammable, do not smoke or use an
open flame during this time.
SAVE THESE INSTRUCTIONS
■ Do not allow children to play on or in the washer. Close
supervision of children is necessary when the washer is used
near children.
■ Before the washer is removed from service or discarded,
remove the door or lid.
■ Do not reach into the washer if the drum, tub or agitator is
moving.
■ Do not install or store the washer where it will be exposed to
the weather.
■ Do not tamper with controls.
■ Do not repair or replace any part of the washer or attempt any
servicing unless specifically recommended in this manual or in
published user-repair instructions that you understand and
have the skills to carry out.
■ See “Electrical Requirements” for grounding instructions.
Page 5
INSTALLATION REQUIREMENTS
Gather the required tools and parts before starting installation.
The parts supplied are in the washer drum.
Tools needed for connecting the water inlet hoses
■ Pliers (that open to 1®/i6" [39.5 mm])
■ Flashlight (optional)
Tools needed for installation
■ Open end wrench 17 mm and 13 mm
■ Level
■ Wood block
■ Ruler or measuring tape
Parts supplied
o
B e a d ed str a p Tran s p o r t bolt h o le plu g (4 )
Alternate Parts
Parts listed are available from your local Sears store or Sears
Service Center. For further information, please call
1-800-4-MY-HOME® (1-800-469-4663).
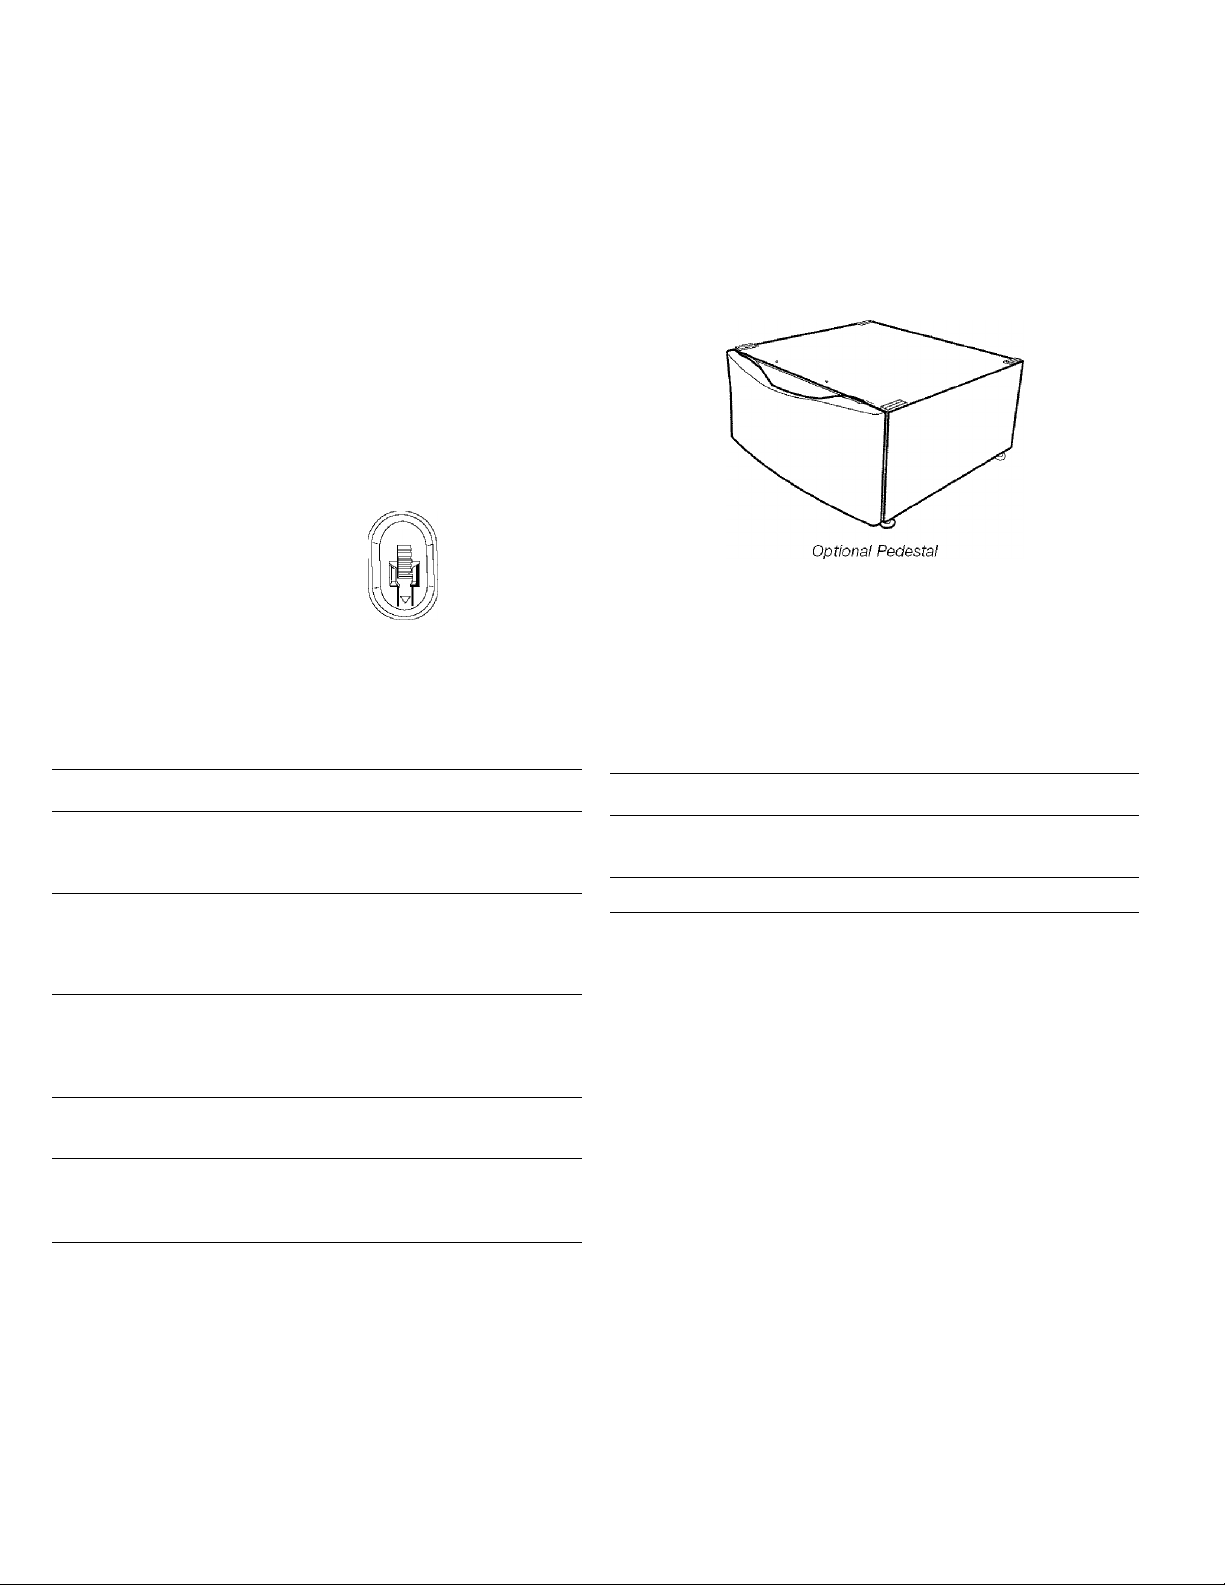
Pedestal
You have the option of purchasing a pedestal for this washer. This
will add to the total height of your washer.
This pedestal (with storage drawer) is available in three colors.
To order, call your local Sears store. For further Information,
please cal 11-800-4-MY-HOME® (1-800-469-4663).
Pedestal
Height
13" (33 cm) 51" (130 cm) White 42842
Approximate
height with
washer
Color Part
Number
If You Have You Will Need to Buy
Laundry tub or
standpipe taller
than 96" (2.4 m)
Overhead sewer Standard 20 gal. (76 L), 30" (76.2 cm)
Floor drain Siphon break. Part Number 285834;
Drain hose too
short
Water faucets
beyond reach of
fill hoses
Sump pump system (if not already
available)
tall drain tub or utility sink and sump
pump (available from local plumbing
suppliers)
additional drain hose Part
Number 8318155; and connector kit,
Part Number 285835
4 ft (1.2 m) drain hose extension kit, Part
Number 285863
2 longer water fill hoses:
6 ft (1.8 m) Part Number 76314,
10 ft (3.0 m) Part Number 350008
13" (33 cm) 51" (130 cm) Bisque 42844
13" (33 cm) 51" (130 cm) Graphite 42846
Stack Kit
Are you planning to stack your Kenmore washer and dryer? To do
so, find the stack kit (8541503) in the drum of the matching
Kenmore dryer. Follow instructions included with the kit.
Page 6
Selecting the proper location for your washer improves
performance and minimizes noise and possible washer “walk.”
Your washer can be installed under a custom counter, or in a
basement, laundry room, closet, or recessed area. See “Drain
System.”
Companion appliance location requirements should also be
considered. Proper installation is your responsibility.
You will need
■ A water heater set to deliver 120°F (49°C) water to the
washer.
■ A grounded electrical outlet located within 6 ft (1.8 m) of
where the power cord is attached to the back of the washer.
See “Electrical Requirements.”
■ Hot and cold water faucets located within 4 ft (1.2 m) of the
hot and cold water fill valves, and water pressure of
20-100 psi (137.9-689.6 kPa).
■ A level floor with a maximum slope of 1" (2.5 cm) under
entire washer. Installing the washer on soft floor surfaces,
such as carpets or surfaces with foam backing, is not
recommended.
■ A sturdy and solid floor to support the washer with a total
weight (water and load) of 400 lbs (180 kg).
Do not operate your washer in temperatures below 32°F (0°C).
Some water can remain in the washer and can cause damage in
low temperatures.
Installation clearances
■ The location must be large enough to allow the washer door
to be fully opened,
■ Additional spacing should be considered for ease of
installation and servicing.
■ Additional clearances might be required for wall, door, and
floor moldings.
■ Additional spacing of 1" (2.5 cm) on all sides of the washer is
recommended to reduce noise transfer.
■ Companion appliance spacing should also be considered.
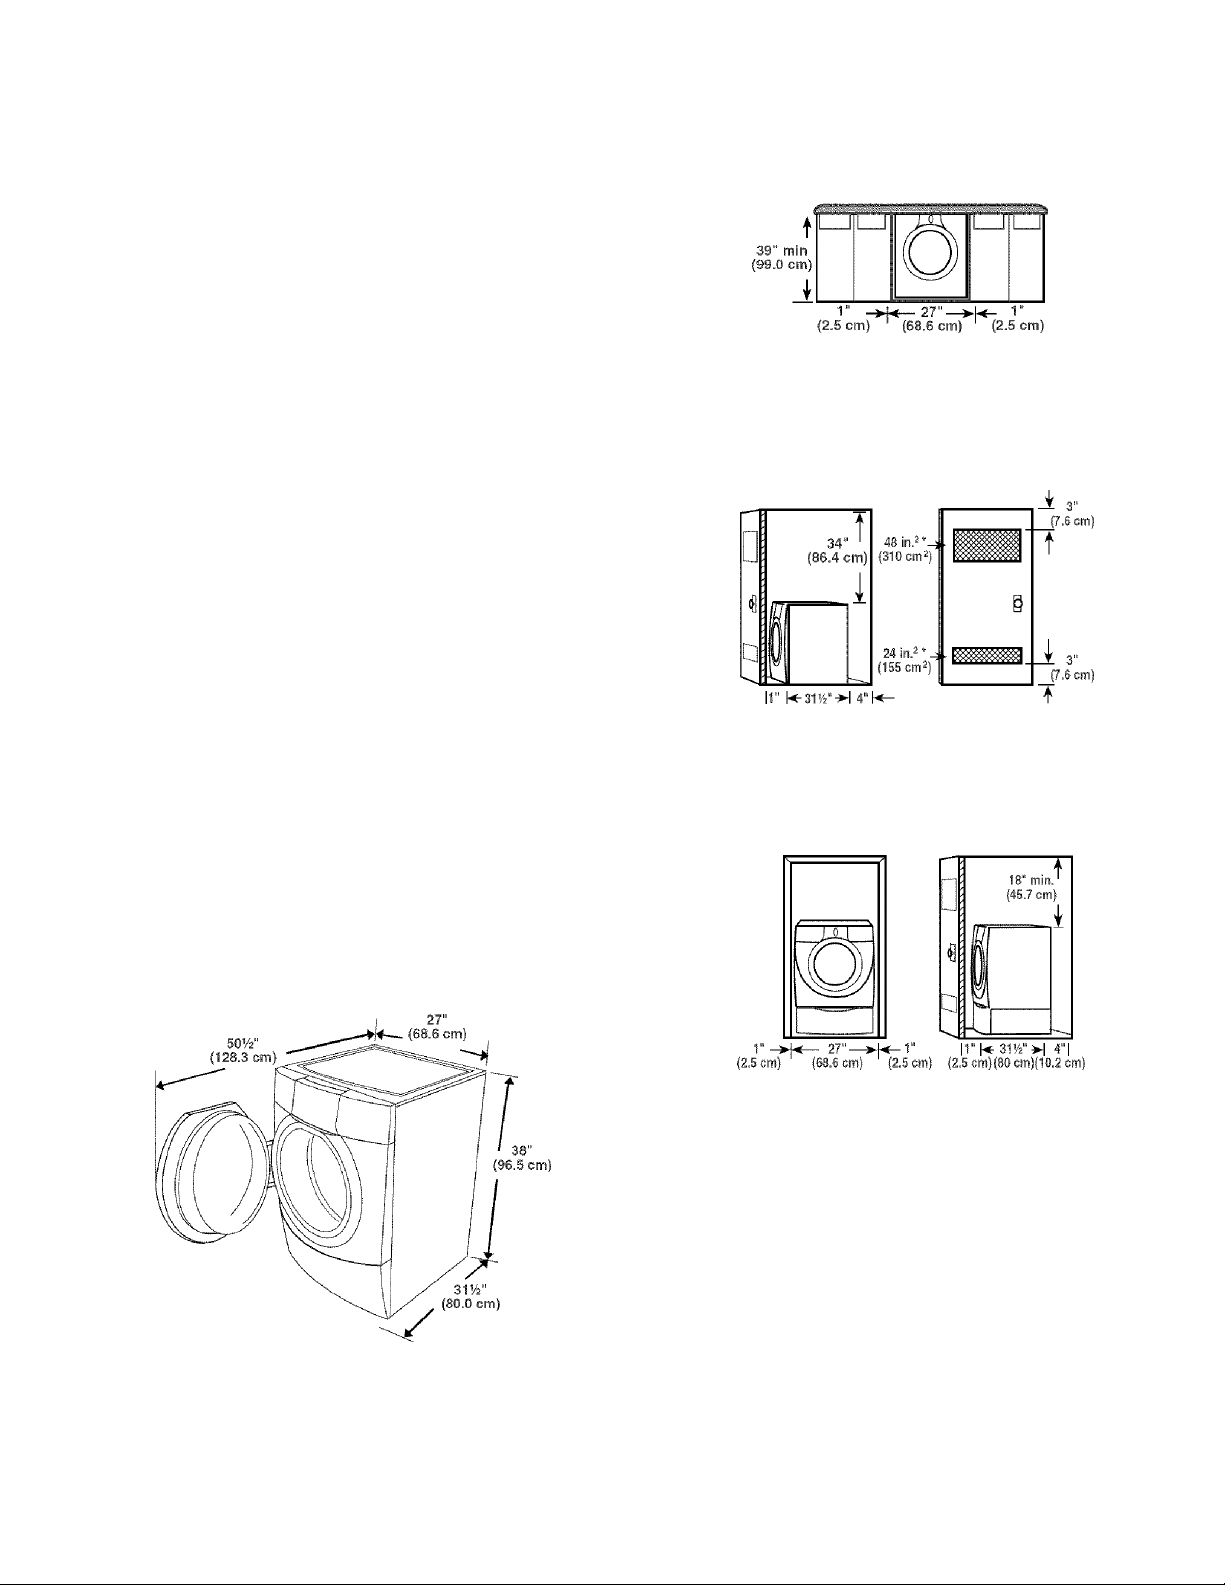
Recommended installation spacing for custom
undercounter installation
The dimensions shown are for the recommended spacing.
Custom undercounter installation - Washer only
Recommended installation spacing for recessed or
closet installation, with or without a pedestal
The dimensions shown are for the recommended spacing.
Recessed area or closet installation
(2.5 cm)(80 Cin)(10.2 cm)
A B
A . Sid e vie w - c lose t or c o n fin e d a re a
B . C loset d oo r w ith v en ts
Recessed or closet installation - Washer on pedestal
Washer Dimensions
A . R ece s s e d a re a
B . S id e view - c lose t or c o n fin e d a re a
Page 7

Recommended installation spacing for recessed or
closet installation, with stacked washer and dryer
The dimensions shown are for the recommended spacing.
48 in/
The washer can be installed using the standpipe drain system
(floor or wall), the laundry tub drain system, or the floor drain
system. Select the drain hose installation method you need. See
“Tools and Parts.”
Standpipe drain system - wall or floor (views A & B)
The standpipe drain requires a minimum diameter standpipe of
2" (5 cm). The minimum carry-away capacity can be no less than
17 gal. (64 L) per minute.
The top of the standpipe must be at least 30" (76.2 cm) high and
no higher than 96" (2.4 m) from the bottom ot the washer.
Laundry tub drain system (view Af
The laundry tub needs a minimum 20 gal. (76 L) capacity. The top
of the laundry tub must be at least 30" (76.2 cm) above the floor.
* M in . top an d b o t tom air op e n in g s fo r clo s e t d o or,
* E x t e rn a l exha u s t elb ow r e q u ir e s a d d itio n al s p a c e .
* W a ll, doo r and flo o r m old in g m a y re qu ire
ad d itio n al sp a c ing .
Recommended installation spacing for cabinet
installation
The dimensions shown are for the recommended spacing.
For cabinet installation, with a door, the minimum ventilation
openings in the top are required.
7" (17.8 cm) 7" (17.8 cm)
Floor drain system (view B)
The floor drain system requires a siphon break that may be
purchased separately. See “Tools and Parts.”
The siphon break must be a minimum of 28" (71 cm) from the
bottom of the washer. Additional hoses might be needed.
4" 31K" 1" 1" 27" 1"
(10.2 cm) (SO.Ocm) (25 cm) (25 cm) (6B.6cm) (25 cm)
Page 8

AWARNING
Electrical Shock Hazard
Plug into a grounded 3 prong outlet.
Do not remove ground prong.
Do not use an adapter.
Do not use an extension cord.
Failure to follow these instructions can result in death,
fire, or electrical shock.
A 120-volt, 60-Hz., AC-only, 15- or 20-amp, fused electrical
supply Is required. A time-delay fuse or circuit breaker is
recommended. It is recommended that a separate circuit
serving only this appilance be provided.
This washer is equipped with a power supply cord having a
3 prong grounding plug.
To minimize possible shock hazard, the cord must be
plugged into a mating, 3 prong, grounding-type outlet,
grounded in accordance with local codes and ordinances. If a
mating outlet is not available, it is the personal responsibility
and obligation of the customer to have the properly grounded
outlet installed by a qualified electrician.
If codes permit and a separate ground wire is used, it is
recommended that a qualified electrician determine that the
ground path is adequate.
Do not ground to a gas pipe.
Check with a qualified electrician if you are not sure the
washer is properly grounded.
Do not have a fuse in the neutral or ground circuit.
GROUNDING INSTRUCTIONS
For a grounded, cord-connected washer:
This washer must be grounded. In the event of a malfunction
or breakdown, grounding will reduce the risk of electrical
shock by providing a path of least resistance for electric
current. This washer is equipped with a cord having an
equipment-grounding conductor and a grounding plug. The
plug must be plugged into an appropriate outlet that is
properly installed and grounded in accordance with all local
codes and ordinances.
WARNING: Improper connection of the equipment
grounding conductor can result in a risk of electric shock.
Check with a qualified electrician or serviceman if you are in
doubt as to whether the appliance is properly grounded.
Do not modify the plug provided with the appliance -- if it will
not fit the outlet, have a proper outlet installed by a qualified
electrician.
For a permanently connected washer;
This washer must be connected to a grounded metal,
permanent wiring system, or an equipment grounding
conductor must be run with the circuit conductors and
connected to the equipment-grounding terminal or lead on
the appliance.
Page 9
INSTALLATION INSTRUCTIONS
A WARNING
Excessive Weight Hazard
Use two or more peopie to move and instail washer.
Failure to do so can result in back or other injury.
IMPORTANT: Position the washer so that the rear of the unit is
within approximately 3 ft {90 cm) of the final location.
There are 4 bolts in the rear panel of the washer that support the
suspension system during transportation. These bolts also retain
the power cord inside the washer until the bolts are removed.
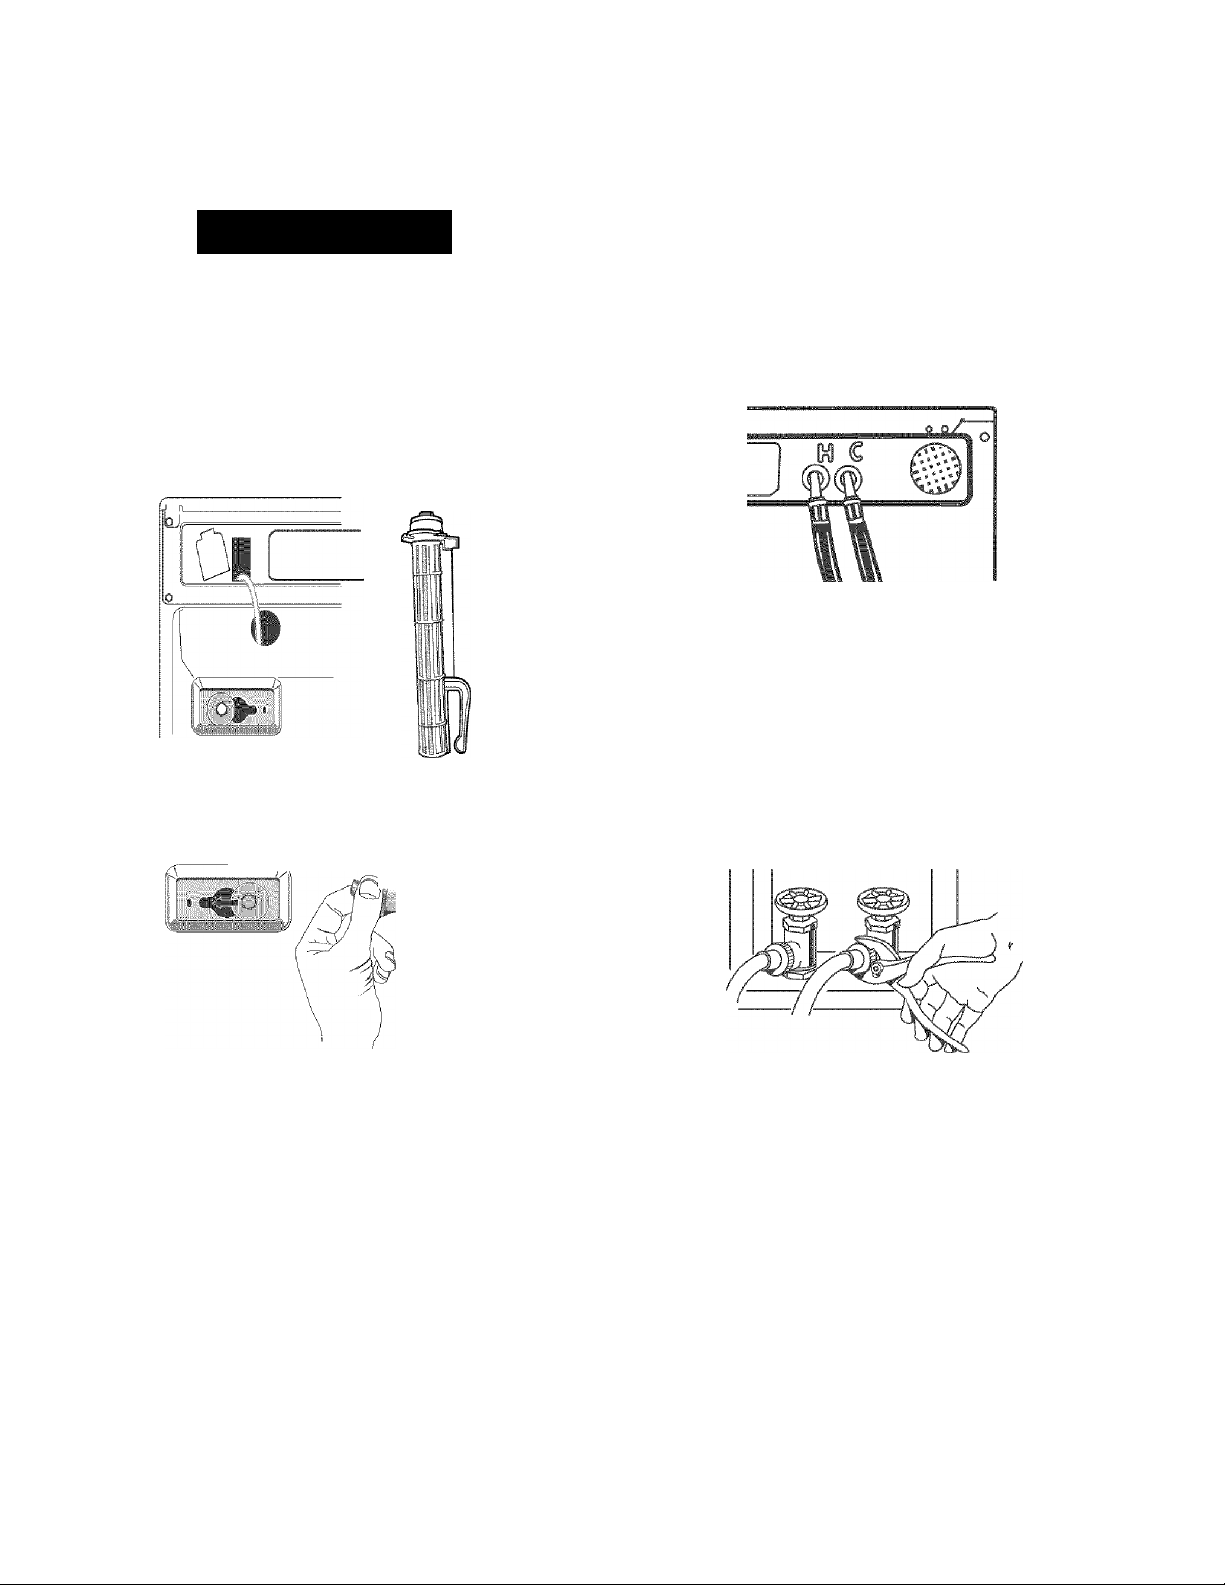
1. Using a 13 mm wrench, loosen each of the bolts.
2. Once the bolt is loose, move it to the center of the hole and
completely pull out the bolt, including the plastic spacer
covering the bolt.
--
------
1
J
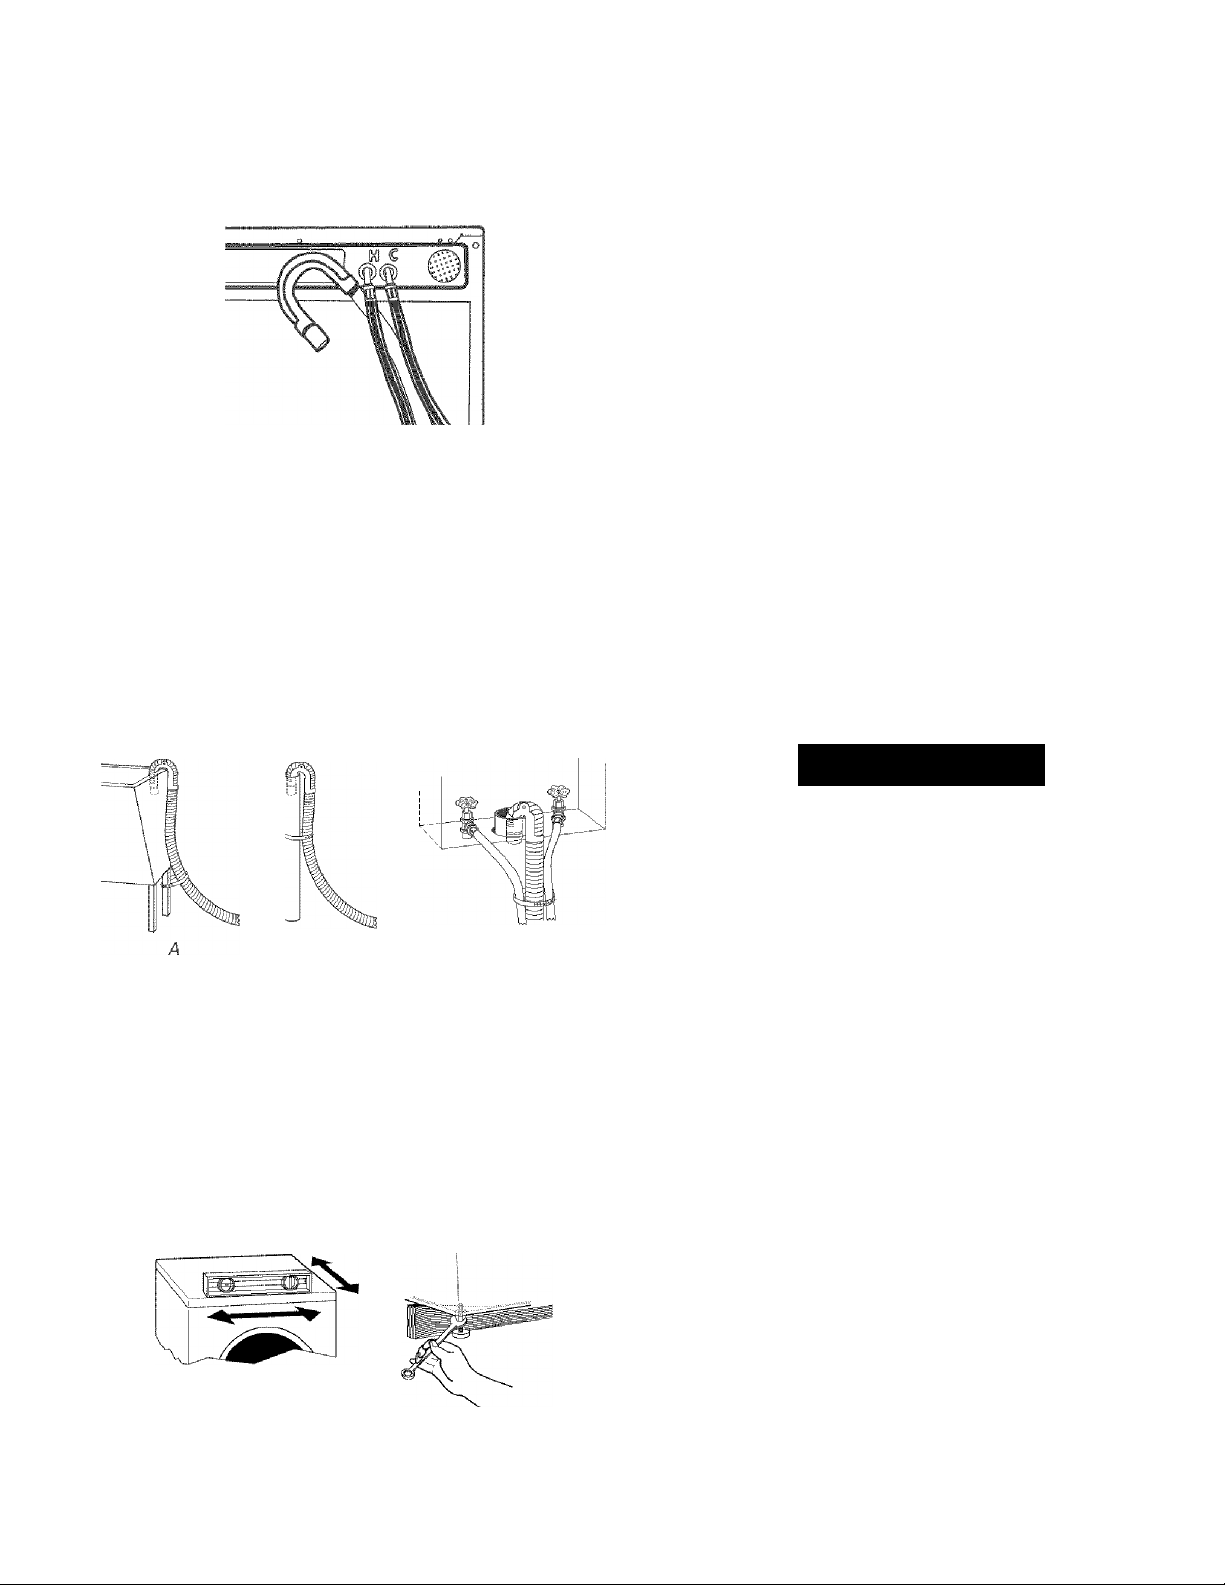
Connect the inlet hoses to the water faucets
Make sure the washer drum is empty.
1. Attach the hose with the red color indicator to the Hot (left)
inlet valve. Attaching the red coupling first makes it easier to
tighten connection with pliers. Screw on coupling by hand
until it is seated on the washer,
2. Attach the hose with the blue color indicator to the Cold
(right) water inlet valve. Screw on coupling by hand until it is
seated on the washer.
Using pliers, check the tightness of the hose couplings
already attached to the washer.
NOTE: Do not overtighten. Damage to the coupling can
result.
Attach the hose with the red color indicator to the hot water
faucet. Screw on coupling by hand until it is seated on the
washer.
5.
Attach the hose with the blue color indicator to the cold water
faucet. Screw on coupling by hand until it is seated on the
washer.
6.
Using pliers, tighten the couplings with an additional
two-thirds turn.
3. Once all 4 bolts are removed, discard the bolts and spacers.
Then pull the power cord through the opening of the rear
panel and close the hole with the attached cap.
4. Close the bolt holes with the 4 transport bolt hole plugs.
NOTE: If the washer is to be transported at a later date, call your
local service center. To prevent suspension and structural
damage, your machine must be properly set up for relocation by
a certified technician.
NOTE: Do not overtighten. Damage to the coupling can
result.
Turn on the water faucets and check for leaks.
NOTE: Replace inlet hoses after 5 years of use to reduce the
risk of hose failure. Record hose installation or replacement
dates on the hoses for fufure reference.
Periodically inspect and replace hoses if bulges, kinks, cuts,
wear, or leaks are found.
Page 10
Proper routing of the drain hose protects your floors from
damage due to water leakage. Carefully read and follow these
instructions.
The drain hose is connected to your washer.
To prevent drain water from going back into the washer:
■ Do not straighten the drain hose, and do not force excess
drain hose into standpipe. Hose should be secure, but loose
enough to provide a gap for air.
■ Do not lay excess hose on the bottom of the laundry tub.
Floor drain
You may need additional parts. See Floor Drain under “Tools and
Parts.”
1. Drape the power cord over the washer top.
2. Secure the drain hose to the laundry tub leg or standpipe with
the beaded strap provided. (See illustrations A and B.)
If the washer is against a wall, move the washer out slightly
before tipping back. If the washer is not level, first prop the
front with a wood block and adjust the feet as necessary;
then prop the back and adjust feet as necessary. Repeat this
step until washer is level.
2. Make sure that all for feet are stable and resting on the floor.
Then check that the appliance is perfectly level (use a level).
3. After the washer is level, use a 17 mm open-end wrench to
turn the nuts on the feet tightly against the washer cabinet,
IMPORTANT: All 4 feet must be tightened. If the nuts are not
tight against the washer cabinet, the washer may vibrate.
4. When pushing on the edges of the washing machine top
plate, the machine should not move front to back, side to
side, or diagonally.
5. Slide the washer to its final location.
6. Confirm the levelness of the washer.
1.
Check the electrical requirements. Be sure that you have the
correct electrical supply and the recommended grounding
method. See “Electrical Requirements.”
2.
Check to be sure all parts are now installed. If there is an
extra part, go back through the steps to see which step was
skipped.
3.
Check to be sure you have all of your tools.
4.
Dispose of or recycle all packaging materials.
5.
Check to be sure the water faucets are on.
6.
Check for leaks around faucets and inlet hoses.
B
If the washer faucets and the drain standpipe are recessed
(see illustration C), put the hooked end of the drain hose in
the standpipe. Tightly wrap the beaded strap around the
water inlet hoses and the drain hose.
Do not force excess drain hose into the standpipe.
Properly leveling your washer prevents excessive noise and
vibration.
1. Check the levelness of the washer by placing a level on the
top edge of the washer, first side to side, then front to back.
AWARNING
Electrical Shock Hazard
Plug into a grounded 3 prong outlet.
Do not remove ground prong.
Do not use an adapter.
Do not use an extension cord.
Failure to foliow these instructions can result in death,
fire, or electrical shock.
7. Plug into a grounded 3 prong outlet.
8. Read “Washer Use.”
9. To test and to clean your washer, measure Vi the normal
recommended amount of powdered or liquid High Efficiency
(HE) detergent. Pour the detergent into the detergent
dispenser. Select NORMAL7CASUAL, and then select START.
Allow the washer to complete one whole cycle.
10
Page 11

FEATURES AND BENEFITS
SENSOR SMART^'^ Electronic Controls
Flexible electronic controls are easy to use whether you are a
beginner or an expert.
Smart Dispensers
The smart dispensers make your washer truly automatic. This
washer provides a three-compartment dispenser which includes
separate compartments for detergent, fabric softener, and
bleach. The dispenser has large pour zones, Is self-cleaning, and
can be easily removed. Laundry products are diluted with fresh
water and added to the load at the proper time in the wash cycle.
Auto Water Level
Adjusting to the size of the load, this feature allows the washer to
use the minimal amount of water needed to clean and rinse the
clothes. With a low water level, you can obtain the same results
with smaller amounts of additives. Because only the required
amount of water is used, the washer saves energy, too.
CATALYST® Cleaning Action with Direct Injection
A concentrated detergent solution is sprayed onto the clothes at
the beginning of the cycle to ensure that the detergent comes
into contact with the clothes as quickly as possible, removing
stains from your clothes without pretreating.
Larger Load Size
Since there is no agitator, you can wash larger, bulkier items such
as an average size sleeping bag. You are also able to wash more
clothes at one time, which means fewer loads. You can wash a
pillow or a large stuffed teddy bear.
Suspension System
To reduce washer “walk” and “off-balance” conditions, your new
washer combines:
■ 2 Springs to Isolate vibration
■ 4 Shock absorbers at the washer base to minimize movement
Stainless Steel Drum
The Stainless Steel drum eliminates corrosion and enables higher
spin speeds for more water extraction, reducing drying time.
Adaptive Variable Speed Motor
The motor adapts to the load size and to the cycle selected to
give optimum cleaning, rinsing, and spinning conditions. The
motor can handle slow speeds needed for wool and delicate
items and is powerful enough to drive a large clothes load into a
1050 rpm spin.
High-Efficiency Wash System
Your new front-loading, high-efficiency washer saves time with
fewer, larger loads, conserves resources and lowers your water
and energy bills too.
Spin Speeds
This washer automatically selects the spin speed based on the
cycle selected. This factory setting can be changed, however.
This washer offers up to five different spin speed choices.
Automatic Temperature Control (АТС)
АТС electronically senses and maintains a uniform water
temperature. АТС regulates incoming hot and cold water. The
АТС is automatically turned On when a cycle is selected.
Add A Garment
When this option is available at the beginning of the cycle the
Add A Garment status light will glow for the first 8 minutes. This
washer allows an 8-minute period in which forgotten garments
may be added to a load.
Dynamic Balance
A precision balancing system that allows the washer to reach
spin speeds up to 1050 rpm. The washer spins faster so that
clothes coming out of the washer will dry faster. In addition, if the
Dynamic Balance system detects off balance loads during
spinning, it redistributes the clothes so that they are evenly
balanced.
11
Page 12
WASHER USE
^WARNING
JÉ
Fire Hazard
Never place items in the washer that are dampened
with gasoline or other flammabie fluids.
No washer can completely remove oil.
Do not dry anything that has ever had any type of oii on
it (including cooking oils).
Doing so can result in death, explosion, or fire.
WARNING: To reduce the risk of fire, electric shock, or injury to
persons, read the IMPORTANT SAFETY INSTRUCTIONS before
operating this appliance.
The following is a guide to using your washer. Please refer to
other sections of this manual for more detailed information.
Do not store laundry products on the top surface of this washer.
Vibration is normal during operation.
First Wash Cycle Without Laundry
Before washing clothes for the first time, choose the Normal/
Casual cycle and run it without clothes. Use Vz the normal
recommended amount of powdered or liquid High Efficiency (HE)
detergent. This initial cycle serves to ensure the interior is clean
before washing clothes.
according to color and type of fabric. Place a load of sorted
clothes in the washer. Do not overload washer. Overloading
can cause poor cleaning.
■ The washer can be fully loaded, but not tightly packed.
Washer door should close easily.
■ Mix large and small items. Avoid washing a single item.
Load evenly.
■ Wash small items, such as infant socks, in mesh garment
bags. It is a recommended that more than one garment
bag be used and that each garment bag be filled with
equal amounts of material.
■ When unloading garments, occasionally check under the
rubber rim at the front of the tub for small items.
2. Close the washer door by pushing it firmly until the lock
clicks. The washer door will remain locked during the wash
cycle.
NOTE: After any wash cycle is completed, the door must be
opened and then closed before a new cycle can begin. The
door can be opened only if PAUSE/CANCEL is selected while
the ADD A GARMENT light is glowing or if the cycle has been
canceled. See “To cancel a cycle.”
3. Open the dispenser drawer and add laundry products to the
detergent, bleach, or fabric softener compartments. Close
drawer slowly to avoid spills. See “Using the Dispenser.”
NOTE: For best performance, use High Efficiency detergents.
The package for this type of detergent will be marked “HE” or
“High Efficiency.” The HEY “wash action” along with less
water could create too much sudsing with a regular
detergent.
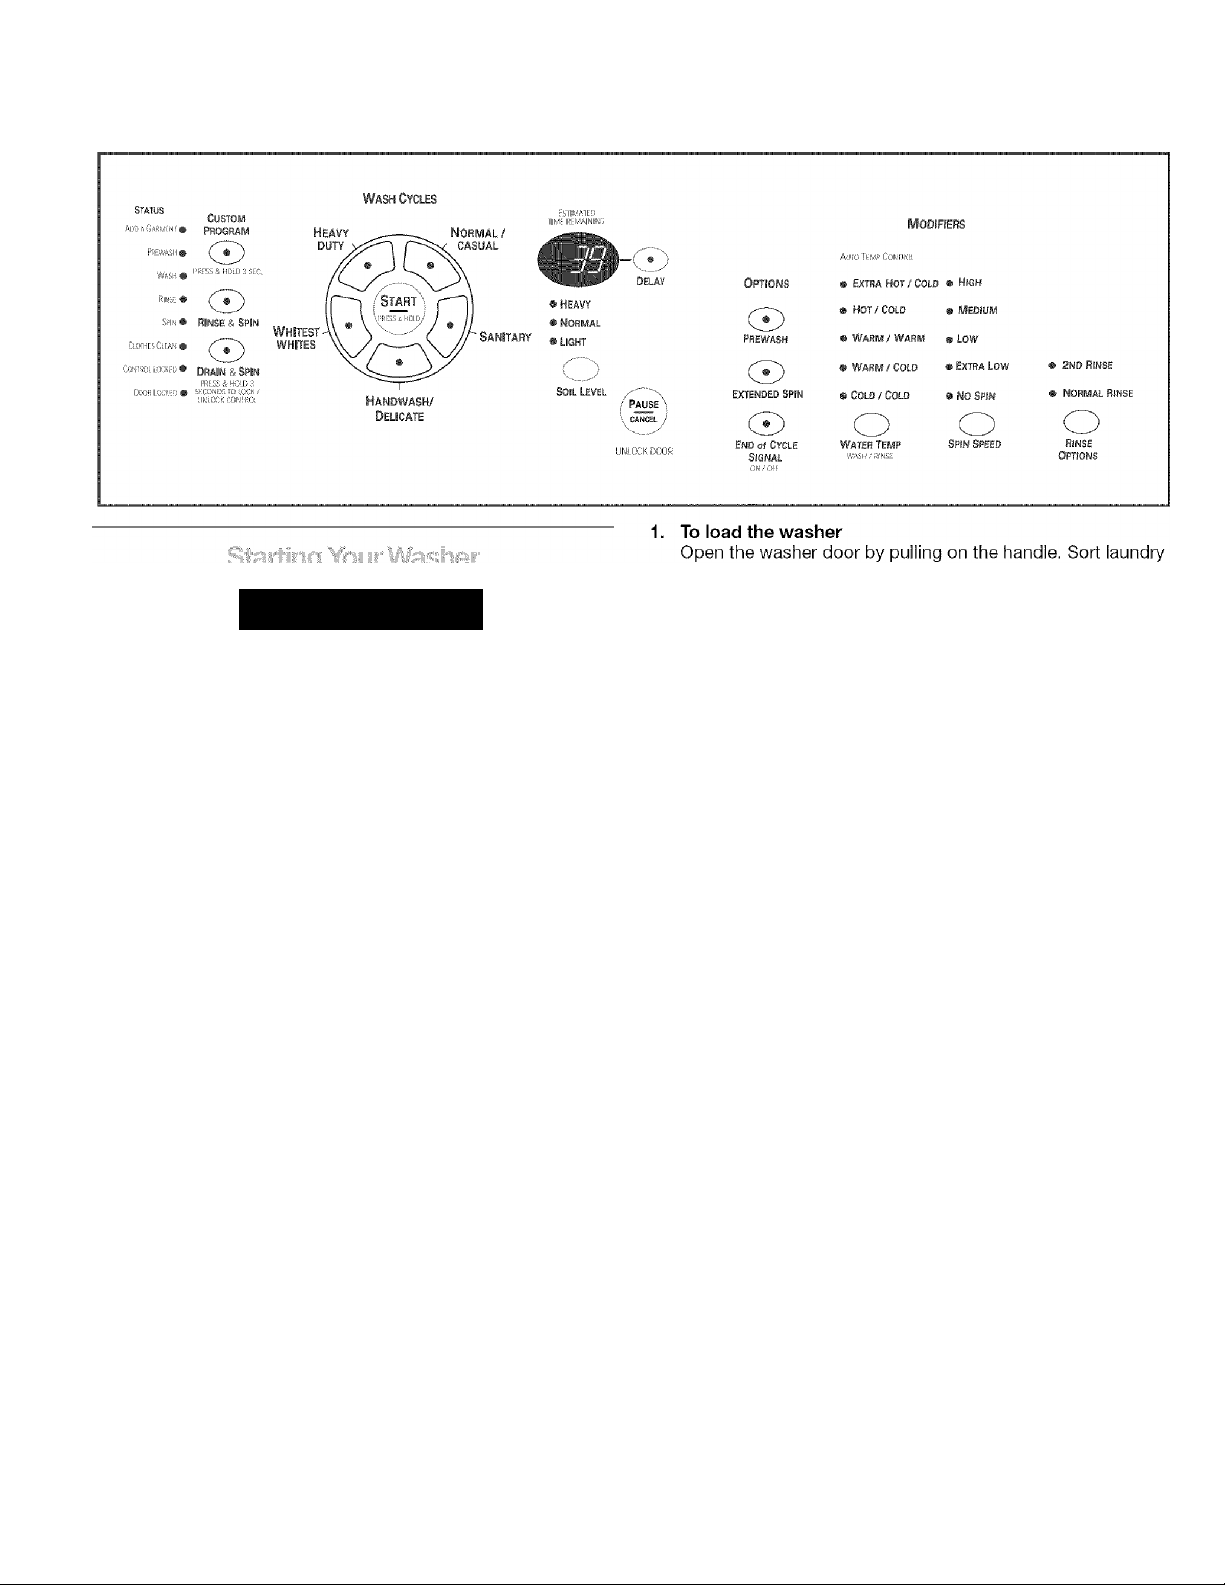
4. Turn on the washer by selecting one of the WASH CYCLES.
The indicator light for the selected cycle will glow. When
selecting a Wash Cycle, the preset options. Water Temp, Spin
Speed, and Soil Level for the selected cycle will glow. The
display shows the estimated time remaining. The preset
settings provide the recommended fabric care for the
selected cycle. See “Cycles.”
5. Select the desired OPTIONS. Not all Options are available
with all cycles. See “Options.”
6. Select the desired MODIFIERS. Not all Modifiers are available
with all Cycles and Options. See “Modifiers.”
7. If desired, select the END OF CYCLE SIGNAL. The signal is
helpful when you are washing items that should be removed
from the washer as soon as it stops. Select ON or OFF.
12
Page 13

8. To begin the wash cycle immediately
Select and hold START (for approximately 1 second).
■ If you do not select START within 5 minutes of choosing a
cycle, the washer automatically shuts off.
■ When the wash cycle is complete, the CLOTHES CLEAN
status light glows, the door unlocks, and the wash load
can be removed from the washer. The washer powers
down automatically 5 minutes after the cycle is complete
and the CLOTHES CLEAN light goes off. To power down
the washer manually after the wash cycle is complete,
select PAUSE/CANCEL once.
9. To begin the wash cycle later
Select DELAY until the desired delay time (in hours) shows in
the Estimated Time Remaining display. Select START. The
countdown to the wash cycle will show in the display window.
Your new washer has a dispenser drawer with three separate
compartments for your laundry products—one is for detergent,
one is for liquid chlorine bleach, and one is for liquid fabric
softener. Laundry products are diluted and dispensed
automatically at the proper time during the wash cycle, making it
unnecessary for you to return to the washer during the cycle to
add them.
It is normal for small amounts of water to remain in the
dispensers when the wash cycle is complete.
Do not put laundry additives directly into the wash tub. Always
use the proper dispensers when adding laundry products.
Main Wash detergent compartment
(Letter C in Dispenser Illustration)
Add liquid or powdered HE detergent to this oompartment for
your wash cycle. The detergent separator must always be in
place, either in the front or back position.
■ When delaying a cycle, use only powdered detergents in the
main wash compartment since liquid detergents may seep
out of the compartment during Delay, before the wash cycle
begins.
■ Do not fill beyond the “MAX” level.
■ Liquid or powdered color-safe bleach may be added to the
Main Wash compartment along with the same type of
detergent, liquid or powdered.
■ Liquid detergent: Put the SEPARATOR in the front position,
between the guides, as shown following. There will be no gap
between the bottom of the wash cycle detergent
compartment and the bottom of the separator.
LIQUi
SO
Choosing the Right Detergent
For best washing performance, use a High Efficiency (HE), or
low-sudsing, detergent.
To fiii dispenser compartments
1. Pull out the dispenser drawer.
2. Add the desired laundry product to the proper compartment.
3. Push in the dispenser drawer carefully and completely (to
avoid spillage).
S e p a rato r in fr o n t p o s itio n , b e t w e e n g u id e s
A . S e p a rator
B . G u id e
Powdered detergent: Put the SEPARATOR in the back
position, behind the guides, as shown following. There will be
a gap between the bottom of the wash cycle detergent
compartment and the bottom of the separator.
D
LiQU
A . D is p e nse r re le a s e le v e r
B . S e p a rato r
C . M ain W a sh detergen t com partm e nt
D . Liq u id c h lo r ine ble ach com p a r tm en t
E. Fabric softe ne r com pa rtm e nt
A . S e p a rator
B . G u id e
NOTE: The separator will be in the powder (back) position when
shipped from the factory.
13
Page 14

Liquid chiorine bieach compartment
(Letter D in Dispenser lilustration)
Add NO MORE THAN Vs cup (80 mL) liquid chiorine bleach to this
compartment. The bleach will be automatically diluted and
dispensed at the best time during the first rinse after the wash
cycle. This compartment cannot dilute powdered bleach.
■ Always measure liquid chlorine bleach. Use a measuring cup
with a pour spout; do not guess.
■ Do not fill beyond the “MAX” level.
NOTE: Overfilling could cause severe garment damage.
Fabric softener compartment
(Letter E in Dispenser Illustration)
Add Vi cup (60 mL) liquid fabric softener to this compartment.
Fabric softener will be automatically dispensed in the final rinse.
■ Do not fill beyond the “MAX” level.
1. To pause the washer at any time, select PAUSE/CANCEL.
2. To continue the cycle, select and hold START (for
approximately 1 second).
Not all Options and Modifiers are available with all Cycles.
Cycles, Options and Modifiers can be changed anytime before
START is selected.
Options and Modifiers can be changed anytime after START is
selected and before the start of the selected Option or Modifier.
To cancel a cycle and select a new cycle
1,
Select PAUSE/CANCEL twice.
2,
Select desired cycle.
3,
Select the desired OPTIONS or MODIFIERS.
4,
Select and hold START (for approximately 1 second) to restart
the washer at the beginning of the new cycie.
To cancel a cycle
1. Select PAUSE/CANCEL twice.
2. The washer powers down, the door unlocks, and clothes can
be removed.
NOTE: If the water level or the temperature is too high, the
washer will drain automatically before the door unlocks.
To change Options and Modifiers after the cycle has started
1. Select PAUSE/CANCEL.
2. Select the desired OPTIONS or MODIFIERS.
3. Select and hold START (for approximately 1 second) to
continue the cycle.
To drain the washer manually
1. Select PAUSE/CANCEL.
2. Select DRAIN & SPIN.
3. Select and hold START (for approximately 1 second) to begin
the drain.
4. When the spin is complete, the door unlocks. Items can be
removed from the washer.
These lights show which portion of the cycle the washer is
operating. They also indicate when you can add an additional
item to the wash cycle and when the controls are locked.
Smrys
AddaGarmen.1*
PREVAASH*
Wash*
Rinse #
SPIN •
Clothes Clean •
CONTROL LOCKED •
DOOR LOCKED #
Adding items
This washer aliows an 8-minute period in which forgotten
garments may be added to the load. You can add items to the
washer, If the ADD A GARMENT status light is glowing.
To add items
1. Select PAUSE/CANCEL. The washer door unlocks, and items
can be added.
2. To continue the cycle, close the door and select and hold
START (for approximately 1 second).
3. To unlock the door after the Add a Garment period, press
Pause/Cancel twice. This will cancel the Wash Cycle.
Ciothes Ciean
The Clothes Clean light stays on for 5 minutes after the cycle is
complete. The washer will then power down.
Locking controis
The Control Lock prevents unintended use of the washer. You
can also use the control lock feature to prevent unintended cycle
or option changes during a cycle. When CONTROL LOCKED is
lit, all buttons are disabled except for Pause/Cancel and Start.
You can lock the controls while the washer is operating.
To lock the controls
Select and hold DRAIN & SPIN for 3 seconds.
DRAIN &SPIN
PRESS a HOLD 3
StCONDS TO LOCK /
UNIOCK CONTROL
The CONTROL LOCKED status light glows.
To unlock the controls
Select and hold DRAIN & SPIN for 3 seconds until the CONTROL
LOCKED Status light turns off.
Door Lock
When the DOOR LOCKED status light glows, the door is locked.
14
Estimated Time Remaining
The cycle times vary automatically based on your water pressure,
water temperature, detergent, and clothes load. The cycle time
will be extended if oversudsing occurs or the load is unbalanced.
The SUDs routine removes extra suds and assures proper rinsing
of your garments. During the unbalance routine the time
displayed may pause until this activity is complete, then resume
with the remainder of the cycle.
Page 15
Wash Cycles
Choose Wash Cycles by selecting the button next to the desired
cycle. Each cycle is designed for different types of fabric and soil
levels.
Wash Cycles
Delicate
■ Each cycle has a preset Soil Level (cycle time), Water
Temperature, Spin Speed and may have preset Options. The
preset settings provide the recommended fabric care for the
selected cycle.
■ The preset settings can be changed anytime before START is
selected. Not all Options and Modifiers are available with all
Cycles. To change settings after the cycle has started, select
PAUSE/CANCEL, then select the desired settings. Select and
hold START (for approximately 1 second) to continue the
cycle.
Preset cycle settings
Each cycle has a preset Cycle Time, Water Temperature, and
Spin Speed. The preset settings provide the recommended fabric
care for the selected cycle. See chart.
Whitest Whites
This cycle is especially designed for cleaning loads of soiled
white fabrics with the addition of bleach. Hot washing
temperatures assure optimal bleach activity. An additional rinse
provides optimal rinse performance to avoid chlorine residues on
your laundry. This cycle combines fast-speed tumbling, longer
wash time, and high-speed spin to shorten drying time.
Heavy Duty
Use this cycle to wash loads of sturdy, colorfast fabrics and
heavily soiled garments. This cycle combines fast-speed
tumbling, longer wash time, and high-speed spin to shorten
drying times.
Normal/Casual
Use this cycle to wash loads of no-iron fabrics such as sport
shirts, blouses, casual business clothes, permanent press
blends, cottons and linens, and synthetic fabrics. This cycle
combines medium-speed tumbling, high-speed spin, and a load
cooling process to reduce wrinkling.
Sanitary
Use this cycle to clean heavily soiled colorfast fabrics. This cycle
combines a very hot water temperature and fast-speed tumbling
to help ensure the removal of heavy soils and stains. It Is
recommended that you set your hot water heater to 120°F (49°C)
to ensure proper performance during this cycle. The Sanitary
cycle also helps eliminate 99.999% of 3 common infectious
bacteria, even when no bleach is used. Extra high speed spin
helps shorten drying time.
Handwash/Delicate
Use this cycle to clean handwashable and special-care
garments. This cycle combines low-speed tumbling and extra
low speed spin for gentle fabric care.
Extra Cycles
Select the button for the desired cycle.
CUSTOM
Program
Cycle Soil Level
(hr:min)
Whitest Whites Heavy
(1:00)
Heavy Duty Heavy
(1:05)
Norma l/Casuai Normal
(0:45)
Sanitary Heavy
(2:00)
Handwash/
Delicate
Normal
(0:35)
Rinse & Spin Normal
(0:20)
Drain & Spin Normal
(0:12)
Water Temp Spin
Speed
Hot/Cold High
Hot/Cold High
Warm/Cold High
Extra Hot/
Cold
Cold/Cold Extra Low
Cold/Cold High
Cold/Cold High
High
O
PRESS & HOLD 3 SLC.
RINSE & Spin
®
Drain & Spin
You can change the selection anytime before START is selected.
Custom Program
Custom Program allows you to store a customized wash cycle for
future use.
To Customize a Wash Cycle:
1. Select a cycle.
2. Select the desired Options.
3. Select the desired Modifiers.
4. To record the cycle press and hold Custom Program
(approximately 3 seconds) until a beep sounds. The Custom
Program cycle is now stored for future use.
5. Press START.
To reuse this cycle at another time, select CUSTOM PROGRAM
and press START.
15
Page 16

Rinse & Spin
Use this cycle to get a rinse and spin only. This cycle combines
fast-speed tumbling and high-speed spin. If desired, you can
reduce the spin speed by selecting the speed you want from the
SPIN SPEED modifier.
Rinse & Spin is useful for
■ Loads that need rinsing only.
■ Adding fabric softener to a load using the fabric softener
dispenser.
Drain & Spin
Use this cycle to drain your washer or to drain and spin your
wash load. The spin speed Is preset to high. If desired, you can
reduce the spin speed by selecting the speed you want from the
SPIN SPEED modifier.
NOTE: Loads of synthetics, delicate fabrics, handwashables, and
woolens should be drained with no spin or low spin to avoid
fabric stress.
As with any new product, you will hear sounds that you are not
accustomed to. You may hear various sounds when the door is
locked and unlocked and during the washing, rinsing, and
spinning process. Between changes in wash actions, there will
be momentary pauses. You will hear water spraying and
splashing during the wash and rinse cycles. These new sounds
and pauses are part of normal washer operation. See
“Troubleshooting.”
Prewash
Use this option for loads of heavily soiled garments that need
pretreatment.
■ Add detergent to the Main Wash Compartment of the
Dispenser Drawer.
This option adds tumbling time prior to the selected main cycle.
The washer continues automatically from prewash into the main
wash cycle.
Extended Spin
Use this option to add an additional spin to any cycle to improve
drying times for some heavy fabrics or special-care items by
reducing excess water, which may save energy.
End of Cycle Signal
This signal is helpful when you are removing items from the
washer as soon as it stops. Select ON or OFF.
Preset cycle settings of Wash/Rinse Temp, Spin Speed, and Soil
Level can be changed. You can change a modifier after starting a
cycle anytime before the selected modifier begins. Not all
Modifiers are available with all options and cycles.
MODIFiEHS
Лито TlmfContro!
• EXTRA HOT / COLD • High
You can customize your wash by adding OPTIONS to your cycle
selections. You can add or change an option after starting a cycle
anytime before the selected option begins. Not all Options are
available with all cycles.
Options
Prewash
EXTENDED Spin
END of CYCLE
Signal
ON / OFF
See the “Laundry Guide” section for an overview of possible
options for each Wash Cycle selection.
You can select more than one option for a cycie. Some
options cannot be added to some cycles.
If an option is available with a selected cycle, the light for that
option will glow when selected.
If an option is unavailable with a selected cycle, there will be a
short tone, and the light for that option will not glow when
selected.
• HOT/COLD
• WARM / WARM
• WARM / COLD
• COLD / COLD
Water temp
WASi iR/NSt
• Medium
»LOW
• Extra low
• No Spin
V.
__
SPIN SPEED
• 2ND RINSE
• NORMAL RINSE
BIMSE
OPTIONS
To change the water temperature, select the WATER TEMP
button until the desired setting glows.
To change the spin speed, select the SPIN SPEED button
until the desired setting glows.
• HEAVY
• NORMAL
• LieHT
SOIL Level
■ To change cycle time, select SOIL LEVEL button.
2nd Rinse
A second rinse can be used to aid In the removal of detergent or
bleach residue from garments. This option provides an additional
rinse with the same water temperature as the first rinse. This is
the default rinse setting for the Whitest Whites cycle.
Normal Rinse
Consists of a two phase rinsing process that is effective for
everyday laundry.
16
Page 17

Wash/Rinse Temp
Select a water temperature based on the type of load you are
washing. Use the warmest wash water safe for fabrics. Follow
garment label instructions.
Warm rinses leave the loads drier than cold rinses. Warm rinses
increase wrinkling. In cold climates, a warm rinse makes the load
more comfortable to handle. Cold rinses save energy.
Temperature Guide
Wash Water Temperature Suggested Fabrics
EXTRA HOT Sturdy colorfast fabrics.
Heavy soils
HOT Whites and pastels
Heavy soils
WARM Bright colors
Moderate to light soils
COLD Colors that bleed or fade
Light soils
!n wash water temperatures colder than 70°F (21 °C), detergents
do not dissolve well. Soils may be difficult to remove.
Auto Temp Control
АТС (Auto Temp Control) electronically senses and maintains a
uniform water temperature. АТС regulates incoming hot and cold
water. The АТС is automatically turned On when a cycle is
selected. (See “Preset cycle settings” in “Cycles.”)
■ АТС ensures consistent cleaning.
■ АТС works for the wash temperature with Extra Flot/Cold,
Flot/Cold, Warm/Warm, Warm/Cold, and Cold/Cold settings.
■ АТС works for the wash temperature with Flot/Cold, Warm/
Warm, Warm/Cold, and Cold/Cold settings.
■ АТС works for the Warm rinse setting by regulating the water
temperature at approximately 104°F (40°C).
■ The Cold rinse temperatures depend on the cold water at
your faucet.
Refer to this chart for suggested load types and their corresponding cycles. Listed to the right are the options available within each of
these washer cycles.
CYCLE SUGGESTED LOAD TYPE PREWASH RINSE
Whitest Whites Soiled white fabrics ✓ ✓ ✓
Heavy Duty Heavily soiled underwear, towels, shirts, etc. ✓ ✓ ✓
Norma l/Casual Normally soiled blouses, shirts, overalls, etc., made of
polyester, nylon, cotton, linen, or cotton blends
Sanitary Heavily soiled underwear, towels, work clothes, diapers, etc. ✓ ✓ ✓
Handwash/Deticate Curtains and delicate clothing. Special-care items labeled
"handwashable."
✓ ✓ ✓
OPTIONS
✓
EXTENDED
SPIN
LAUNDRY TIPS
Preparing clothes for washing
Follow these recommendations to help you prolong the life of
your garments.
■ Close zippers, snaps, and hooks to avoid snagging other
items. Remove pins, buckies, and other hard objects to avoid
scratching the washer interior. Remove non-washable trim
and ornaments.
■ Empty pockets and turn them inside-out.
■ Turn down cuffs; brush away lint and dirt.
■ Turn synthetic knits inside-out to avoid pilling.
■ Tie strings and sashes so they will not tangle.
■ Mend tears, loose hems, and seams.
■ Treat spots and stains.
■ Stained or wet garments should be washed promptly for best
results.
■ Mix large and small items, avoid washing single items, load
evenly.
■ Wash small items such as infant socks in mesh garment
bags. It is a recommended that more than one garment bag
be used and that each garment bag be filled with equal
amounts of material.
Sorting
■ Separate heavily soiled items from lightly soiled ones, even if
they wouid normally be washed together. Separate lint-givers
(towels, chenille) from lint-takers (corduroy, synthetics,
permanent press). When possible, turn lint-givers inside-out.
■ Separate dark colors from light colors, colorfast items from
noncolorfast items.
■ Sort by fabric and construction (sturdy cottons, knits, delicate
items).
17
Page 18

Unloading
■ Remove clothes from washer after the cycle is completed.
Metal objects such as zippers, snaps, and buckles may rust if
left in the washer basket for a long time.
■ When unloading garments, occasionally check under the
rubber rim at the front of the tub for smali items.
Loading suggestions (maximum size loads).
Heavy Work Clothes
4 jeans
4 workpants
4 workshirts
Towels
10 bath towels
10 hand towels
Mixed Load
3 sheets (1 king, 2 twin)
4 pillowcases
3 shirts
3 blouses
2 sweatpants
2 sweatshirts
14 washcloths
9 T-shirts
9 shorts
10 handkerchiefs
WASHER CARE
Cleaning the exterior
Use a soft damp cloth or sponge to wipe up any spills.
Occasionally wipe the outside of your washer to keep it looking
new. Use mild soap and water. Do not use abrasive products.
Cleaning the interior
Use a soft damp cloth or sponge to occasionally wipe the inner
door to remove any detergent residue. Use mild soap and water.
Do not use abrasive products.
Cleaning the door seal
Use a soft damp cloth or sponge when necessary. Check the fold
of the seal periodically for any foreign objects.
Cleaning the dispenser drawer
The dispenser drawer is removable for easy cleaning.
1. Unlock the dispenser drawer by pressing the Release Lever.
See “Using the Dispenser.” Remove the drawer.
2. Remove the inserts (the siphon from the softener and bleach
compartments and the separator).
3. Wash the parts under running water.
4. Replace the inserts and return the dispenser to the drawer.
Install and store your washer where It will not freeze. Because
some water may stay In the hoses, freezing can damage your
washer. If storing or moving your washer during freezing weather,
winterize it.
Non-use or vacation care:
Operate your washer only when you are at home. If you will be on
vacation or not using your washer for an extended period of time,
you should:
■ Unplug washer or disconnect power.
■ Turn off the water supply to the washer. This helps avoid
accidental flooding (due to a water pressure surge) while you
are away.
■ Slightly open door to provide ventilation.
To winterize washer:
1. Put 1 qt (1 L) of R.V.-type antifreeze in the drum.
2. Run washer on a DRAIN & SPIN cycle.
3. Unplug washer or disconnect power.
4. Shut off both water faucets.
5. Disconnect water inlet hoses from faucets and drain.
To use washer again:
1. Flush water pipes.
2. Reconnect water inlet hoses to faucets.
3. Turn on both water faucets.
4. Plug in washer or reconnect power.
5. Run the washer through the NORMAL/CASUAL cycle with
V2 the normal recommended amount of FIE detergent to clean
out antifreeze.
To transport the washer:
1. If washer will be moved during freezing weather, put in 1 qt
(1 L) of R.V.-type antifreeze in the drum. Run washer on a
DRAIN & SPIN cycle.
2. Unplug the power cord.
3. Disconnect the drain hose from the drain system and attach
to rear panel clips.
4. Shut off both water faucets.
5. Disconnect the water Inlet hoses from faucets, then drain the
hoses and clip them to the rear panel of the washer.
6. IMPORTANT: Call Service. Do not reuse transport bolts. Unit
must be transported in the upright position. To prevent
suspension and structural damage, your machine must be
properly set up for relocation by a certified technician.
Reinstalling the washer
1. Follow the “Installation Instructions” to locate, level and
connect the washer.
2. Run the washer through the NORMAL/CASUAL cycle with
y2 the normal recommended amount of HE detergent to clean
the washer and remove the antifreeze, if used.
Replace inlet hoses after five years of use to reduce the risk of
hose failure. Periodically inspect and replace inlet hoses if
bulges, kinks, cuts, wear or leaks are found.
When replacing your inlet hoses, record the date of replacement.
18
Page 19

TROUBLESHOOTING
First try the solutions suggested here to possibly avoid the cost of a service call...
Washer displaying code message and tone sounds Washer stops
“FH” (Water Inlet Problem—no or insufficient water supply)
Select PAUSE/CANCEL twice to cancel the cycle. Unplug
washer or disconnect power.
Check the following:
Are water faucets completely turned on?
Are screens at inlet hose connection to washer clogged?
Are water inlet hoses kinked?
Are water inlet hoses frozen?
Plug in washer or reconnect power. Re-select cycle and press
START. If the problem remains, call for service.
“F02” (Drain Problem)
Select PAUSE/CANCEL twice to cancel the cycle. Unplug
washer or disconnect power.
Check the following:
Is the drain hose kinked?
Is the drain hose frozen?
Is the drain hose clogged?
Is the drain hose more than 96" (2.4 m) above the floor?
“SUD” (Suds Routine)
When excessive suds are detected, a suds routine
automatically starts. This routine removes extra suds and
assures proper rinsing of your garments. “SUD” is displayed
during rinsing and at the end of the cycle to inform you that
Suds Routine was activated. To avoid excessive sudsing, use
only HE detergents.
“F” Variables [F4 to F16] (Electrical Problem)
Select PAUSE/CANCEL twice to cancel the cycle. Select
DRAIN & SPIN if there is excessive water in the washer.
Re-select cycle and press START. If the problem remains, call
for service.
Washer won’t start
Check the following:
Is the power cord plugged into a grounded 3 prong outlet?
Is the washer door firmly shut?
Has a cycle been selected, but START has not been selected
and held for 1 second?
Was the door open after completion of last cycle?
Check the following:
Is the power cord plugged into a grounded 3 prong outlet?
Is there power at the plug?
Check electrical source or call electrician.
Has a fuse blown, or has a circuit breaker tripped?
If problem continues, call electrician.
Are you using an extension cord?
Do not use an extension cord.
Washer won’t drain or spin
Is the drain hose clogged, or the end of the drain hose more than 96" (2.4 m) above the floor?
Is your voltage low?
Check electrical source or call electrician. Do not use an
extension cord.
Is the “SUD” routine active?
Cycle will complete once extra suds are removed.
Is the load balanced?
A single or bulky item may cause imbalance. Add more items
or redistribute the load.
Washer makes noise or vibrates
Is the washer level?
The washer must be level. The four feet should be properly
installed, and the nuts should be tightened against the
washer cabinet.
As water is drained from the washer, you may hear air being
pulled through the pump. This happens during the end of
draining. It is normal.
Are you washing items with metal snaps, buckles or
zippers?
You may hear metal items touching the washer drum. This is
normal.
Is washer installed on a sturdy and solid floor?
Refer to the “Installation Instructions” for flooring
requirements. Noise and vibration may be reduced by placing
a piece of %" (19.1 mm) plywood underneath your washer.
The plywood may extend underneath both washer and dryer
to keep them at equal heights.
Water near washer
Washer won’t fill, wash or rinse
Check the following:
Is the power cord plugged into a grounded 3 prong outlet?
Is there power at the plug? Check electrical source or call
electrician.
Are the hot and cold water faucets turned on?
Is the water inlet hose kinked?
Are the water inlet valve screens clogged?
Check household plumbing for leaks.
19
Page 20

Dispensers clogged or leaking
Are the laundry products in the correct dispenser compartment?
Add the correct amounts of detergent, fabric softener or liquid
chlorine bleach to the correct compartments. Add powdered
or liquid color-safe bleach to the detergent compartment.
Be sure to match powdered color-safe bleach with powdered
detergent or match liquid color-safe bleach with liquid
detergent.
Is the detergent separator in the correct position?
Separator should be in the front position when using liquid
detergent and in the back position when using powdered
detergent.
Load too wet
Did you use the right cycle for the load being washed?
Select a cycle with a higher spin speed.
Did you wash a single item or bulky items or have you
overloaded the washer?
A single item, bulky items, or overloading may cause
imbalance. Add items or try to evenly distribute your wet
laundry in the drum, and start a DRAIN & SPIN cycle. If the
laundry is still wet, take half of the load out of the washer and
try again.
Residue or lint on load
Did you add detergent to the dispenser?
For best results, add detergent to the detergent
compartment. Do not add detergent to the washer drum.
Did you sort properly?
Sort lint givers (towels, chenille) from lint takers (corduroy,
synthetics). Also, sort by color.
Did you overload the washer?
Do not overload the washer. The washer can be fully loaded,
but not tightly packed. The wash load must be balanced. Lint
can be trapped in the load if overloaded.
Check the following:
Was paper or tissue left in pockets?
Did you use enough detergent?
Follow manufacturer’s directions. Use enough detergent to
hold the lint in the water.
Is your water colder than 70°F (21 °C)?
Wash water colder than 70°F (21 °C) may not completely
dissolve the detergent.
Are you using a low-speed wash cycle?
Powdered detergents may not dissolve well in a slow-speed
cycle. For best results, use liquid detergent for slow-speed
cycles such as Handwash/Delicate.
Did you properly sort the load?
Sort dark clothes from whites and lights.
Did you unload the washer promptly?
To avoid dye transfer, unload the washer as soon as it stops.
Did you use a fabric softener dispensing ball?
Dispensing balls will not operate correctly with this washer.
Add liquid fabric softener to the fabric softener compartment.
Did you use powdered detergent in a low-speed cycle?
Consider using liquid detergent.
Load is wrinkled
Did you unload the washer promptly?
Unload the washer as soon as it stops.
Did you use the right cycle for the load being washed?
Use the Handwash/Delicate cycle or another cycle with a
low-spin speed to reduce wrinkling.
Did you overload the washer?
The wash load must be balanced and not overloaded. Loads
should tumble freely during washing.
Gray whites, dingy colors
Did you properly sort the load?
Dye transfer can occur when mixing whites and colors in a
load. Sort dark clothes from whites and lights.
Was the wash temperature too low?
Use hot or warm washes if safe for the load. Make sure your
hot water system is adequate to provide a hot water wash.
Did you use enough detergent, or do you have hard
water?
Use more detergent for washing heavy soils in cold or hard
water.
Cycle too long
Is “SUD” shown in the display?
Excessive sudsing has been detected, and a suds routine has
been started to reduce excessive suds. This routine will add
time to the original cycle.
Did the load cause imbalance?
When too much imbalance occurs, an imbalance routine will
start to distribute the load. During the imbalance routine the
time displayed may pause until this activity is complete, then
resume with the remainder of the cycle.
Did you select the Handwash/Delicate wash cycle?
When using Handwash/Delicate wash cycle you should use
small loads. This ensures a gentle wash for your garments
without increasing cycle times.
Door locked at end of wash cycle
Stains on load
Did you add detergent to the dispenser?
For best results, add detergent to the detergent
compartment. Do not add detergent to the washer drum.
Did you use enough detergent?
Use enough detergent to remove soil and hold it in suspension.
For best performance, use a High Efficiency detergent.
Follow manufacturer’s recommendations for the type of load
you are washing.
Is there above average iron (rust) in water?
You may need to install an iron filter.
20
Did all of the water drain out of the washer during the spin?
Select DRAIN & SFIN to remove any water remaining In the
washer. The washer door will unlock at the end of the drain.
Page 21

INDICE
CONTRATOS DE PROTECCIÓN.........................................................21
EnlosEE.UU.......................................................................................21
En Canadá.........................................................................................21
GARANTÍA.............................................................................................22
GARANTÍA DE LA OPCIÓN DE PEDESTAL
SEGURIDAD DE LA LAVADORA.........................................................23
REQUISITOS DE INSTALACIÓN
Herramientas y piezas
Opciones............................................................................................ 24
Requisitos para la ubicación
Sistema de desagüe...........................................................................26
Requisitos eléctricos..........................................................................27
INSTRUCCIONES DE INSTALACIÓN..................................................28
Eliminación del sistema de transporte
Conexión de las mangueras de entrada
Tendido de la manguera de desagüe
Fijación de la manguera de desagüe.................................................29
Nivelación de la lavadora...................................................................29
Complete la instalación......................................................................29
CARACTERÍSTICAS Y BENEFICIOS
USO DE LA LAVADORA......................................................................31
Puesta en marcha de la lavadora......................................................31
Uso del depósito.................................................................................32
Pausa o reanudación de la marcha
Cambio de ciclos, opciones y modificadores
Luces de estado.................................................................................33
Ciclos..................................................................................................34
Sonidos normales...............................................................................35
Opciones............................................................................................ 35
Modificadores.....................................................................................36
Guia para el lavado............................................................................37
CONSEJOS DE LAVANDERÍA.............................................................37
Cómo cargar.......................................................................................37
CUIDADO DE LA LAVADORA
Limpieza de su lavadora
Mangueras de entrada del agua
Cuidado durante las vacaciones,
el almacenamiento y la mudanza.......................................................38
SOLUCIÓN DE PROBLEMAS
NÚMEROS DE SERVICIO
.......................................................................
.........................................................
..............................................................
.............................................................
....................................................................
........................................................
..............................................................
.......................................
.......................................
...............................................
............................................
................................................
..................................................
...................................................
.....................................
CONTRAPORTADA
22
24
24
25
28
28
29
30
33
33
38
38
38
39
CONTRATOS DE
PROTECCIÓN
Contratos Maestros de Protección
¡Felicitaciones por su inteligente adquisición! Su nuevo producto
Kenmore® ha sido diseñado y fabricado para brindarle años de
funcionamiento confiable. Pero al igual que todos los productos,
puede necesitar mantenimiento preventivo o reparación de vez
en cuando. Es alK donde el Contrato Maestro de Protección
puede ahorrarle dinero e inconvenientes.
AdquíQra un Contrato Maostro do Protección hoy y protéjase
contra molestias y gastos inesperados.
El Contrato Maestro de Protección también ayuda a prolongar la
vida de su nuevo producto. He aquí lo que se incluye en el
Contrato:
✓ Servicio experto por nuestros 12.000 especialistas en
reparación competentes
✓ Servicio iiimitado y gratuito para repuestos y mano de obra
en todas las reparaciones protegidas por el contrato
✓ Garantía “sin disgustos” - reemplazo de su producto
protegido si ocurren cuatro o más fallas del producto en el
transcurso de doce meses
✓ Reemplazo del producto si su producto protegido no puede
ser reparado
✓ Revisión Anual de Mantenimiento Preventivo a solicitud
suya - sin costo adicional
✓ Ayuda rápida por teléfono - asistencia por teléfono a cargo
de un técnico de Sears para productos que deban ser
reparados en su hogar, además de un horario de reparación
conveniente
✓ Protección de sobrevoltaje contra daños eléctricos debido a
fluctuaciones de electricidad
✓ Reembolso de la renta si la reparación de su producto
protegido tarda más de lo prometido
Una vez adquirido el Contrato, tan sólo tiene que llamar para fijar
la visita de servicio técnico. Usted puede llamar a cualquier hora,
de día o de noche, o fijar una visita técnica en internet.
Sears cuenta con un equipo de más de 12.000 especialistas en
reparación competentes, quienes tienen a disposición más de
4,5 millones de piezas y accesorios de calidad. Ése es el tipo de
profesionalismo con el que usted puede contar para ayudarle a
prolongar la vida de su nuevo artefacto por muchos años más.
¡Adquiera hoy su Contrato Maestro de Protección!
Se aplican algunas limitaciones y exclusiones. Para obtener
precios e información adicional, llame al 1-800-827-6655.
Servicio de Instalación de Sears
Para la instalación profesional de Sears de artefactos
electrodomésticos, abridores de puertas de garaje, calentadores
de agua y otros artículos importantes de la casa, en los EE.UU.
llame al 1-800-4-MY-HOME®.
Contratos de mantenimiento
Su compra adquiere un nuevo valor ya que usted puede confiar
en Sears HomeCentral® para obtener servicio de reparación. Con
más de 2.400 especialistas capacitados en reparaciones y
acceso a más de un millón de piezas y accesorios, contamos con
las herramientas, piezas, conocimiento y la destreza para
asegurarnos de respaldar nuestra promesa de que: Reparamos
lo que vendemos.
Su producto Kenmore® está diseñado, fabricado y sometido a
prueba para proporcionarle años de funcionamiento confiable.
No obstante, cualquier producto puede necesitar servicio técnico
de vez en cuando. El contrato de mantenimiento Sears le ofrece
un programa de servicio excepcional, a un precio accesible.
El contrato de mantenimiento Sears
■ Es la manera de comprar el servicio técnico del mañana a
precios de hoy
■ Elimina las facturas de reparación producidas por el uso
normal y el desgaste
■ Ofrece apoyo por teléfono a cargo d un técnico de Sears para
los productos que deban ser reparados en el hogar
21
Page 22

■ Aún si usted no necesita reparaciones, proporciona una
revisión anual de mantenimiento preventivo a solicitud suya,
para asegurarse de que su producto está en condiciones
apropiadas de funcionamiento.
Se aplican ciertas restricciones. Para obtener más
información referente a los Contratos de mantenimiento de
Sears Cañada, llame al 1-800-361-6665.
GARANTÍA DE
LA LAVADORA
KENMORE ELITP
Garantía limitada de por vida para el tambor de acero
inoxidable
Durante la vida útil de la lavadora a partir de la fecha de compra,
Sears reemplazará el tambor de lavado de acero inoxidable si
tuviese defectos de materiales o de mano de obra. El cliente se
hará cargo de los gastos de mano de obra después del primer
año.
Garantía limitada de 10 años para el tambor plástico*
Desde el segundo año y por un máximo de diez años a partir de
la fecha de compra, Sears reemplazará el tambor plástico si éste
tuviese algún defecto de material o de fabricación. Después del
primer año, usted será responsable de los gastos de mano de
obra.
Esta garantía le otorga derechos legales específicos y es posible
que usted tenga también otros derechos que pueden variar de un
estado al otro o de una provincia a otra.
Para información respecto a la garantía Sears, o para ponerse en
contacto con el Centro de servicio Sears, sírvase tomar como
referencia los números de servicio ubicados en la contraportada
de este manual.
Sears, Roebuck and Co.
D/817WA, Hoffman Estates, IL 60179
Toronto, Ontario, Canada M5B 2B8
*La garantía que se aplique en Canadá puede ser diferente.
Sears Canada Inc.
Registro del producto
Use el espacio a continuación para anotar el número completo
del modelo y de la serie así como la fecha de compra. Usted
podrá encontrar esta Información en la etiqueta con el número de
modelo y de serie.
Siempre que se ponga en contacto con Sears respecto a su
electrodoméstico, tenga esta información a mano para facilitar la
obtención de ayuda o servicio técnico.
Número de modelo 110.
Número de serie
Fecha de compra _
Guarde estas instrucciones y su comprobante de compra
para referencia futura.
______________________________________
___
_________ _______________
Garantía limitada de 5 años para las piezas de la caja de
engranajes*
Desde el segundo año y por un máximo de cinco años a partir de
la fecha de compra, Sears reemplazará cualquier pieza de la caja
de engranajes que tuviese algún defecto de material o de
fabricación. Después del primer año, usted será responsable de
los gastos de mano de olera.
Garantía limitada de 2 años para el panel de control
SENSOR SMARTT-^
Durante 2 años a partir de la fecha de compra, Sears
reemplazará el panel de control SENSOR SMART™ si tuviese
algún defecto de material o de fabricación. Después del primer
año, usted será responsable de los gastos de la mano de obra.
Garantía completa de un año para las piezas
mecánicas y componentes eléctricos
Durante un año a partir de la fecha de compra, si se instala y
pone en funcionamiento la lavadora en conformidad con las
instrucciones que vienen con la misma, Sears reparará o
reemplazará cualquier pieza mecánica o componente eléctrico
de esta lavadora que tuviese algún defecto de material o de
fabricación.
El servicio debe ser proporcionado por un departamento de
servicio Sears en los Estados Unidos o en Canadá, o por un
agente autorizado.
Restricción de la garantía
Si se somete a esta lavadora a un uso ajeno al familiar privado,
todas las coberturas de las garantías arriba citadas quedan
restringidas a 90 días a partir de la fecha de compra.
Servicio de Reparación de la Garantía
El servicio de reparación de la garantía está a su disposición al
contactarse con el Centro de servicio Sears de su localidad en
los Estados Unidos o en Canadá. Esta garantía corresponde sólo
mientras se use este producto en los Estados Unidos o en
Canadá.
GARANTÍA DE LA OPCIÓN
DE PEDESTAL
Garantía total de un año para las piezas mecánicas
Por un año a partir de la fecha de compra, el proveedor reparará
o reemplazará cualquiera de sus partes mecánicas si tuviesen
defectos en el material o en la fabricación. Este pedestal debe
instalarse con esta lavadora de acuerdo con las instrucciones
provistas en las Instrucciones para la instalación del pedestal.
Restricción de la garantía
SI se somete al pedestal a un uso ajeno al familiar privado, o si se
usa el pedestal con cualquier otro producto que no esté indicado
en las instrucciones de instalación, la cobertura de la garantía
arriba citada queda anulada y sin vigor.
Registro del producto
En el espacio siguiente, anote el número completo del modelo,
de la serie y la fecha de compra del producto. Podrá encontrar
esta información en la etiqueta con el número del modelo y de la
serie.
Siempre que llame a Sears respecto a su pedestal, tenga esta
información a mano para agilizar la obtención de asistencia o
servicio.
Número del modelo 110.
Número de la serie
Fecha de compra
Guarde estas instrucciones junto con su comprobante de
compra para consuita futura.
_____________________________________
__________________________________________
___________________________________________
22
Page 23

SEGURIDAD DE LA LAVADORA
Su seguridad y la seguridad de los demás es muy importante.
Hemos incluido muchos mensajes importantes de seguridad en este manual y en su electrodoméstico. Lea y obedezca siempre
todos ios mensajes de seguridad.
Este es el símbolo de advertencia de seguridad.
Este símbolo le llama la atención sobre peligros potenciales que pueden ocasionar la muerte o una lesión a
usted y a los demás.
Todos los mensajes de seguridad irán a continuación del símbolo de advertencia de seguridad y de la palabra
“PELIGRO” o “ADVERTENCIA”. Estas palabras significan:
Si no sigue las instrucciones de inmediato, usted puede
l
Todos los mensajes de seguridad le dirán el peligro potencial, le dirán cómo reducir las posibilidades de sufrir una lesión y lo que
puede suceder si no se siguen las instrucciones.
APELIGRO
AADVERTEN
I
J
INSTRUCCIONES IMPORTANTES DE SEGURIDAD
morir o sufrir una iesión grave.
Si no sigue ias instrucciones, usted puede morir o sufrir una iesión grave.
ADVERTENCIA: Para reducir el riesgo de incendio, choque eléctrico o lesiones a personas al usar su lavadora, siga las
precauciones básicas, incluyendo las siguientes:
Lea todas las instrucciones antes de usar la
lavadora.
No lave artículos que hayan sido previamente
limpiados, lavados, remojados o humedecidos con
gasolina, solventes para lavar en seco, u otras
sustancias inflamables o explosivas ya que éstas
emanan vapores que podrían encenderse o causar
una explosión.
No agregue gasolina, solventes para lavar en seco,
u otras sustancias inflamables o explosivas al agua
de lavado. Estas sustancias emanan vapores que
podrían encenderse o causar una explosión.
En ciertas condiciones, puede generarse gas
hidrógeno en un sistema de agua caliente que no se
haya usado por dos semanas o un período mayor.
EL GAS HIDRÓGENO ES EXPLOSIVO. SI no se ha
usado el agua caliente durante dicho período, antes
de usar la lavadora, abra todos los grifos de agua
caliente y deje que corra el agua por varios minutos.
Esto liberará todo el gas hidrógeno que se haya
acumulado. Debido a la inflamabilidad de dicho gas,
no fume ni use una llama abierta durante este lapso.
No permita que los niños jueguen encima o dentro de la
lavadora. Es necesario una supervisión cuidadosa de los
niños toda vez que se use la lavadora cerca de ellos.
Antes de poner la lavadora fuera de servicio o desecharla,
quíteie la puerta o la tapa.
No introduzca las manos en la lavadora si el tambor, la
tina, o el agitador están funcionando.
No instale ni almacene esta lavadora donde pudiese estar
sometida a la intemperie.
No trate de forzar los controles.
No repare ni cambie pieza alguna de la lavadora ni intente
realizar tarea alguna de servicio técnico, excepto cuando
asi se le indique específicamente en este manual o en
instrucciones de reparación para el usuario publicadas,
que usted entienda y para cuya ejecución cuente con la
habilidad necesaria.
Para obtener información respecto a los requisitos de
conexión a tierra, refiérase a los “Requisitos Eléctricos”.
GUARDE ESTAS INSTRUCCIONES
23
Page 24

REQUISITOS DE
INSTALACIÓN
Reúna las herramientas y piezas necesarias antes de comenzar
la instalación. Las piezas provistas con la lavadora están en el
tambor de la lavadora.
Herramientas necesarias para la conexión de las
mangueras de entrada del agua
■ Alicates (que se abran a 1®/i6" [39,5 mmj)
■ Linterna (opcional)
Herramientas necesarias para la instalación
■ Llave de boca de 17 mm y 13 mm
■ Nivel
■ Bloque de madera
■ Regla o cinta de medir
Piezas proporcionadas
Pedestal
Usted tiene la opción de comprar un pedestal para esta lavadora.
Esto se añadirá a la altura total de su lavadora.
Este pedestal (con cajón de almacenamiento) está disponible en
tres colores.
Para pedir las piezas, llame a la tienda Sears de su localidad.
Para más información, sírvase llamar al 1-800-4-MY-HOME®
(1-800-469-4663).
O
Fle je r e b ordea d o Ta p ó n para o rific ios de
Piezas alternativas
Las piezas aquí enumeradas se pueden adquirir en la tienda
Sears o en el Centro de Servicio Sears de su localidad. Para más
información, llame por favor al 1-800-4-MY-HOME®
(1-800-469-4663).
Si tiene
Un lavadero o
tubo vertical a una
altura mayor de
96" (2,4 m)
Una alcantarilla Un tanque de desagüe normal o un
suspendida lavabo de uso general de 20 gal. (76 L)
Un desagüe por el
piso
Necesitará adquirir
Sistema de bomba de sumidero (si ya
no está disponible)
de capacidad y 30" (76,2 cm) de altura y
una bomba de sumidero (en venta en
establecimientos de fontanería locales)
Desviación del sifón, Pieza
Nümero 285834; manguera de desagüe
adicional, Pieza No. 8318155; y juego
de conectores. Pieza Número 285835.
pe rn o s d e transpo rte ( 4 )
Altura del
pedestal
13" (33 cm) 51" (130 cm) Blanco 42842
13" (33 cm) 51" (130 cm) Bisque 42844
13" (33 cm) 51" (130 cm) Grafito 42846
Juego de apilamiento
¿Planea apilar su lavadora y secadora Kenmore? Para hacerlo,
busque el juego de apilamiento (8541503) en el tambor de la
secadora Kenmore que hace juego. Siga las instrucciones que se
incluyen con el juego.
Altura
aproximada
con la
lavadora
Color Número
de pieza
Una manguera de
desagüe muy
corta
Grifos del agua
fuera del alcance
de las mangueras
de llenado
24
Juego de extensión para manguera de
desagüe de 4 pies (1,2 m), Pieza
No. 285863.
2 mangueras de llenado de agua más
largas;
6 pies (1,8 m) Pieza Número 76314,
10 pies (3,0 m) Pieza Número 350008
Page 25

La selección de una ubicación apropiada para su lavadora realza
el rendimiento y reduce al mínimo el ruido y la posible “caminata”
de la lavadora.
La Instalación de su lavadora puede ser debajo de un mostrador
hecho a la medida, en un sótano, en un cuarto de lavandería, en
un clóset o en una zona empotrada. Vea “Sistema de Desagüe”.
Deberá tenerse en cuenta también los requisitos para la
ubicación de otro electrodoméstico acompañante. La instalación
correcta es responsabilidad suya.
Usted necesitará
■ Un calentador de agua fijado para suministrar a la lavadora el
aguaa120°F (49°C).
■ Un contacto eléctrico con conexión a tierra ubicado a una
distancia de no más de 6 pies (1,8 m) del lugar donde el
cable eléctrico está fijado a la parte posterior de la lavadora.
Vea “Requisitos eléctricos.”
■ Los grifos de agua saliente y de agua fría ubicados a una
distancia de no más de 4 pies (1,2 m) de las válvulas de
llenado del agua callente y fría y una presión de agua de
20-100 Ib/pg2 (137,9 - 689,6 kPa).
■ Un piso nivelado con un declive máximo de 1" (2,5 cm)
debajo de toda la lavadora. No se recomienda instalar la
lavadora sobre superficies blandas del piso, tales como
alfombras o superficies con reverso de espuma.
■ Un piso resistente y firme que soporte la lavadora con un
peso total (del agua y de la carga) de 400 libras (180 kg).
No ponga a funcionar su lavadora a temperaturas inferiores a
32°F (0°C). Puede quedar algo de agua en la lavadora y podría
ocasionar daños a bajas temperaturas.
Espacios libres para la instalación
■ La ubicación debe ser lo suficientemente grande para
permitir que la puerta abra completamente.
■ Se debe considerar espacio adicional para facilitar la
instalación y el servicio.
■ Es posibie que se requieran espacios libres adicionales para
moldes de pared, puerta y piso.
■ Se recomienda un espacio libre adicional de 1" (2,5 cm) en
todos los lados de la lavadora para reducir la transferencia de
ruidos.
■ También se debe considerar un espacio para un
electrodoméstico compañero.
Recomendaciones de espacios de instalación para
instalación debajo del mostrador hecho a la medida
Las dimensiones que se muestran son para los espacios
recomendados.
Instalación debajo del mostrador hecho a la medidaLavadora solamente
Recomendaciones de espacios de instalación para
instalación empotrada o en el armario, con o sin
pedestal
Las dimensiones que se muestran son para los espacios
recomendados.
Instalación en el área empotrada o en el armario
{2,5 cm){80 cm)(10,2 cm)
A B
A . Vis ta la t e r a l - a rm a rio o á r e a c o nfin a d a
B . Pue rta del a rm a rio c o n ven tíiación
Instalación empotrada o en el armario - Lavadora sobre pedestal
Dimensiones de la lavadora
A . Area em p o trad a
B . V is t a la tera l - arm a rio o área confin a da
25
Page 26

Recomendaciones de espacios de instalación para
instalación empotrada o en el armario, con lavadora y
secadora apiladas
Las dimensiones que se muestran son para los espacios
recomendados.
*
Recomendaciones de espacios de instalación para la
instalación en el gabinete
Las dimensiones que se muestran son para los espacios
recomendados.
Para la instalación en el gabinete con puerta, se requieren las
aberturas de ventilación mínimas en la parte superior.
7" (17,8 cm) 7" (17,8 cm)
(10,2 cm) (80,0 cm) (2,5 cm) (2,5 cm) (68,6 cm) (2,5 cm)
* Ab e r tu ras supe riore in ferio r d e aire m ínim as
pa ra la p u erta d e l arm ario .
* E I codo de escap e e x te rn o req u iere espacio
ad icio n al.
* L o s m o ldes de pared, p ue rta y p is o p u ede n
requ e r ir e s p a oio a dic io n a l.
Se puede instalar la lavadora utilizando el sistema de desagüe
por tubo vertical (en el piso o en la pared), el sistema de desagüe
por el lavadero, o el sistema de desagüe por el piso. Seleccione
el método de instalación de la manguera de desagüe que usted
necesite. Vea “Herramientas y piezas.”
Sistema de desagüe por tubo vertical - en la pared o en el
piso (ilustraciones A y B)
El desagüe por tubo vertical necesita un tubo vertical con un
diámetro mínimo de 2" (5 cm). La capacidad mínima de desagüe
no puede ser menor de 17 gal (64 L) por minuto.
La parte superior del tubo vertical debe estar a una altura mínima
de 30" (76,2 cm) y máxima de 96" (2,4 m) de la parte inferior de la
lavadora.
26
Page 27

Sistema de desagüe por el lavadero (ilustración A)
El lavadero necesita una capacidad mínima de 20 gal. (76 L). La
parte superior del lavadero debe estar a una altura mínima de 30"
(76,2 cm) dei piso.
Sistema de desagüe por el piso (ilustración B)
El sistema de desagüe por el piso necesita una desviación del
sifón que puede adquirirse por separado. Vea “Herramientas y
piezas”.
La desviación dei sifón debe estar a una distancia mínima de 28"
(71 cm) de la parte inferior de la lavadora. Quizás necesite
mangueras adicionales.
AADVERTENCIA
Peligro de Choque Eléctrico
Conecte a un contacto de pared de conexión a tierra de
3 terminales.
No quite ei terminai de conexión a tierra.
No use un adaptador.
No use un cable eléctrico de extensión.
No seguir estas instrucciones puede ocasionar
ia muerte, incendio o choque eléctrico.
Si los códigos lo permiten y se utiliza un cable a tierra
separado, se recomienda verificar con un electricista
competente si el circuito de conexión a tierra es el adecuado.
No derive la conexión a tierra hacia una tubería de gas.
Si no está seguro de que la conexión a tierra de la lavadora
sea la adecuada, verifiquela con un electricista competente.
No coloque un fusible en el circuito neutro o de conexión a
tierra.
INSTRUCCIONES PARA LA CONEXION
ATIERRA
Para una lavadora conectada a tierra con cable
eléctrico:
Esta lavadora debe conectarse a tierra. En caso de
funcionamiento defectuoso o avería, la conexión a tierra
reducirá el riesgo de choque eléctrico al proporcionar una
vía de menor resistencia para la corriente eléctrica. Esta
lavadora viene equipada con un cable eléctrico que tiene un
conductor de conexión a tierra del equipo y un enchufe con
conexión a tierra. El enchufe debe conectarse en un
contacto de pared apropiado que haya sido debidamente
instalado y conectado a tierra de conformidad con todos los
códigos y ordenanzas ¡ocales.
ADVERTENCIA: La conexión incorrecta del conductor
de conexión a tierra dei equipo puede ocasionar un riesgo
de choque eléctrico. Consulte con un electricista o técnico
en reparaciones calificado si tiene duda alguna en cuanto a
la conexión a tierra correcta del electrodoméstico.
No modifique el enchufe provisto con el electrodoméstico. Si
éste no encaja en el contacto de pared, pida a un
electricista calificado que le instale un contacto de pared
apropiado.
Para una lavadora con contacto eléctrico permanente:
Esta lavadora debe conectarse a un sistema de metal con
cableado permanente, o se debe tender un conductor de
conexión a tierra del equipo con los conductores del circuito
y conectarlos al terminal de conexión a tierra del equipo o
conductor de suministro en el electrodoméstico.
Se necesita un suministro eléctrico de 120 voltios,
60 hertzios, CA solamente, de 15 ó 20 amperios y protegido
con fusibles. Se aconseja el uso de un fusible retardador o
cortacircuitos. Asimismo se recomienda el empleo de un
circuito separado sólo para este electrodoméstico.
Esta lavadora viene equipada con un cable eléctrico dotado
de un enchufe con tres terminales y conexión a tierra.
Para reducir el peligro de posibles choques eléctricos, el
cable debe conectarse en un contacto que tenga
3 terminales y conexión a tierra de conformidad con los
códigos y ordenanzas locales. Si no dispone del contacto
apropiado, es obligación y responsabilidad del cliente
contratar a un electricista competente para que instale el
contacto debido con conexión a tierra.
27
Page 28

INSTRUCCIONES DE INSTALACION
AADVERTENCIA
Peligro de Peso Excesivo
Use dos o más personas para mover e instalar
la iavadora.
No seguir esta instrucción puede ocasionar una lesión
en ia espalda u otro tipo de lesiones.
IMPORTANTE: Coloque la lavadora de modo que la parte
posterior del aparato esté aproximadamente a 3 pies (90 cm) de
distancia de su ubicación final.
Hay 4 pernos en el panel posterior de la lavadora, los cuales
sostienen el sistema de suspensión durante el transporte. Estos
pernos también retienen el cable de suministro de energía dentro
de la lavadora hasta que se quiten los pernos.
Utilice una llave de tuercas de 13 mm para aflojar cada uno
de los pernos.
Una vez que el perno esté flojo, muévalo hacia el centro del
orificio y jálelo hacia fuera por completo, incluyendo el
espaciador de plástico que cubre el perno.
Conecte las mangueras de entrada a los grifos de agua
Asegúrese de que el tambor de la lavadora esté vacío.
1.
Conecte la manguera con el indicador rojo a la válvula de
entrada Caliente (izquierda). El conectar el acoplamiento rojo
primero facilita el ajuste de la conexión con los alicates.
Atornille el acoplamiento con la mano hasta que se asiente
en la arandela.
2.
Conecte la manguera con el indicador azul a la válvula de
entrada del agua Ería (derecha). Atornille el acoplamiento con
la mano hasta que se asiente en la arandela.
3. Usando los alicates, fíjese cuánto están apretados los
acoplamientos de la manguera que ya están sujetos a la
lavadora.
NOTA: No los apriete demasiado. Se pueden dañar los
acoplamientos.
4. Conecte la manguera que tiene el indicador de color rojo con
el grifo del agua caliente. Atornille el acoplamiento con la
mano hasta que quede asentado en la arandela.
5. Conecte la manguera que tiene el indicador de color azul al
grifo del agua fría. Atornille el acoplamiento con la mano
hasta que quede asentado en la arandela.
6. Usando los alicates, apriete los acoplamientos dos tercios de
vuelta adicional.
3. Una vez que haya quitado los 4 pernos, descarte los pernos y
los espaciadores. Después jale el cable eléctrico por la
abertura del panel trasero y cierre el orificio con la tapa
adjunta.
4. Cierre los orificios de los pernos con los 4 tapones para
orificios de pernos de transporte.
NOTA: Ll ame a su centro de servicio más cercano si la lavadora
se va a transportar unos días más tarde. Para prevenir daños
estructurales y de suspensión, su máquina debe estar
debidamente preparada para ser nuevamente ubicada por un
técnico certificado.
28
NOTA: No I os apriete demasiado. Se pueden dañar los
acoplamientos.
Abra los grifos del agua y revise si hay fugas de agua.
NOTA: Reemplace las mangueras de entrada después de
5 años de uso para reducir el riesgo de que fallen. Para
consulta en el futuro, anote en las mangueras la fecha de
instalación o la fecha de reposición de las mismas.
Inspeccione periódicamente y reemplace las mangueras si
aparecen bultos, torceduras, cortaduras, desgaste o fugas
de agua.
Page 29

El tendido apropiado de la manguera de desagüe protege sus
pisos contra daños ocasionados por filtraciones de agua. Lea y
siga estas instrucciones con cuidado.
La manguera de desagüe está conectada con su lavadora.
Para evitar que el agua de desagüe vuelva a su lavadora:
■ No enderece la manguera de desagüe, y no fuerce el exceso
de la manguera de desagüe dentro del tubo vertical. La
manguera debe quedar asegurada pero lo suficientemente
floja que permita un espacio para el aire.
■ No tienda ei exceso de la manguera en el fondo del lavadero.
Desagüe por el piso
Quizás necesite piezas adicionales. Vea desagüe por el piso en la
sección “Herramientas y piezas.”
1. Coloque el cable eléctrico encima de la lavadora.
2. Asegure la manguera de desagüe a la pata del lavadero o al
tubo vertical utilizando el fleje rebordeado que viene con la
lavadora. (Vea las ilustraciones A y B.)
Si la lavadora está contra la pared, mueva la lavadora
ligeramente hacia afuera antes de inclinarla hacia atrás. Si la
lavadora no está nivelada, primero apuntale la parte frontal
con un bloque de madera y regule las patas según sea
necesario, después apuntale la parte de atrás y regule las
patas según sea necesario. Repita este paso hasta que la
lavadora quede nivelada.
2. Asegúrese de que las cuatro patas estén estables y
descansando sobre el suelo. Después verifique que el
aparato esté perfectamente nivelado (use un nivel).
3. Una vez que la lavadora esté nivelada, use una llave de boca
de 17 mm para apretar las tuercas de las patas contra el
gabinete de la lavadora.
IMPORTANTE: Se deben ajustar las cuatro patas. Si no se
aprietan las tuercas contra el gabinete de la lavadora, la
lavadora podría vibrar.
4. Cuando empuje los bordes de la placa superior de la
lavadora, esta no se debe mover de adelante hacia atrás, de
lado a lado ni en forma diagonal.
5. Deslice la lavadora a su ubicación final.
6. Verifique el grado de nivelación de la lavadora.
1.
Revise los requisitos eléctricos. Asegúrese de contar con la
fuente de electricidad correcta y el método recomendado de
conexión a tierra. Vea “Requisitos eléctricos.”
Cerciórese de que todas las piezas estén instaladas. Si hay
alguna pieza extra, vuelva a revisar todos los pasos para ver
cuál se omitió.
3.
Cerciórese de tener todas las herramientas.
4.
Deshágase o recicle todos los materiales de embalaje.
Cerciórese de que los grifos del agua estén abiertos.
5.
6.
Revise si hay filtraciones de agua alrededor de los grifos y las
mangueras de entrada.
Si los grifos de suministro de la lavadora y el tubo vertical de
desagüe están empotrados (vea la ilustración C), ponga el
extremo en forma de gancho de la manguera de desagüe en
el tubo vertical. Enrolle el fleje rebordeado con firmeza
alrededor de las mangueras de entrada del agua y de la
manguera de desagüe.
No fuerce el exceso de la manguera de desagüe dentro del tubo
vertical.
La nivelación apropiada de su lavadora evita el ruido excesivo y
la vibración.
1. Revise si la lavadora está nivelada colocando un nivel en el
borde superior de la lavadora, primero de lado a lado, luego
de frente hacia atrás.
A ADVERTENCIA
Peligro de Choque Eléctrico
Conecte a un contacto de pared de conexión a tierra de
3 íerminaies.
No quite el terminal de conexión a tierra.
No use un adaptador.
No use un cable eléctrico de extensión.
No seguir estas instrucciones puede ocasionar
la muerte, incendio o choque eléctrico.
7. Conecte a un contacto de pared de conexión a tierra de
3 terminales.
8. Lea “Uso de la lavadora”.
9. Para probar y limpiar su lavadora, mida V2 de la cantidad
normal recomendada de detergente de alto rendimiento (HE)
en polvo o líquido. Vierta el detergente en el depósito del
detergente. Seleccione Normal/Informal (NORMAL7CASUAL)
y luego seleccione Puesta en marcha (START). Deje que la
lavadora funcione durante el ciclo completo.
29
Page 30

CARACTERISTICAS Y BENEFICIOS
Controles electrónicos SENSOR SMART’^'^
Los controles electrónicos flexibles son fáciles de usar tanto sea
usted principiante o experto.
Depósitos inteligentes
Los depósitos inteligentes realzan la calidad automática de su
lavadora. Esta lavadora proporoiona un depósito de tres
compartimientos, el cual incluye compartimientos separados
para el detergente, suavizante de telas, y blanqueador. El
depósito tiene zonas grandes para el vertido; es de limpieza
automática y se puede quitar con facilidad. Los productos de
lavandería se diluyen con el agua y se incorporan a la carga de
ropa en el momento oportuno del ciclo de lavado.
Nivel del agua automático
Al ajustarse al tamaño de la carga, esta característica permite a la
lavadora usar la cantidad mínima de agua que necesita para
lavar y enjuagar la ropa. Con un nivel de agua bajo, usted puede
obtener los mismos resultados con cantidades menores de
aditivos. Al usarse solamente la cantidad de agua requerida, la
lavadora también ahorra energía.
Acción de limpieza catalizadora CATALYST® con inyección
directa
Una solución concentrada de detergente rocía las prendas en el
comienzo del ciclo para asegurarse de que el detergente entre en
contacto con las mismas tan rápido como sea posible, quitando
las manchas de las prendas sin un tratamiento previo.
Cargas más voluminosas
Debido a que no tiene agitador, usted puede lavar artículos más
voluminosos y más grandes como bolsas de dormir de tamaño
mediano. También puede lavar más ropa a la vez, lo que significa
menor cantidad de lavados. Usted puede lavar una almohada o
un oso de peluche grande.
Sistema de suspensión
Para reducir los problemas de la “caminata” y el “desequilibrio”
de la lavadora, su nueva lavadora cuenta con:
■ 2 resortes para aislar la vibración
■ 4 amortiguadores en la base de la lavadora para minimizar el
movimiento.
Motor adaptable a velocidad variable
El motor se adapta al tamaño de la carga de ropa y al ciclo
seleccionado, para proporcionar las condiciones óptimas de
limpieza enjuague y escurrido. Ei motor puede soportar
velocidades lentas para lana y artículos delicados, y es lo
suficientemente poderoso como para exprimir la ropa en un giro
de 1050 r.p.m.
Sistema de lavado de alto rendimiento
Su nueva lavadora de carga frontal y alto rendimiento ahorra
tiempo con lavados más voluminosos y menor número de veces,
conserva los recursos y también reduce sus gastos de agua y
electricidad.
Velocidades de exprimido
Esta lavadora selecciona automáticamente la velocidad de
exprimido según el ciclo seleccionado. Sin embargo, se puede
modificar este ajuste de fábrica. Esta lavadora ofrece un máximo
de cinco opciones distintas de velocidad de exprimido.
Control automático de temperatura (CAT)
El CAT - (Control automático de temperatura) detecta y mantiene
electrónicamente una temperatura de agua uniforme. El CAT
regula el agua fría y callente que ingresa. El CAT se enciende
automáticamente al seleccionar un ciclo.
Agregado de prendas
Cuando esta opción esté disponible al comienzo del ciclo, la luz
de estado de agregar prendas (Add A Garment) se iluminará
durante los primeros 8 minutos. Esta iavadora permite que
durante un período de 8 minutos se puedan agregar prendas que
se hayan olvidado agregar a una carga.
Equilibrio dinámico
Un sistema preciso de equilibrio que permite a la lavadora
alcanzar velocidades de exprimido de hasta 1050 r.p.m. La
lavadora exprime rápidamente de manera que las prendas que
salen de la misma se sequen más rápido. Además, si el sistema
de equilibrio dinámico detecta que las cargas están
desequilibradas durante el exprimido, redistribuye las prendas
para que queden uniformemente equilibradas.
Tambor de acero inoxidable
El tambor de acero inoxidable elimina la corrosión y permite
velocidades más altas, logrando mayor extracción del agua, que
a su vez reduce el tiempo de secado.
30
Page 31

uso DE UV LAVADORA
jfìk ^VD^^ERTENCI^V
M
Peligro de Incendio
Nunca coloque en ia lavadora artículos que estén
humedecidos con gasolina o cualquier otro
líquido inflamable.
Ninguna lavadora puede eliminar completamente el
aceite.
No seque ningún artículo que haya tenido alguna vez
cualquier tipo de aceite (incluyendo aceites de cocina).
No seguir estas instrucciones puede ocasionar
la muerte, explosión o incendio.
ADVERTENCIA: A fin de reducir el riesgo de incendio, de
choque eléctrico o de daños personales, lea las
INSTRUCCIONES IMPORTANTES DE SEGURIDAD antes de
operar este aparato.
La siguiente es una gula para el empleo de su lavadora. Consulte
otras secciones de este manual para obtener información
detallada.
No almacene productos de lavandería encima de esta lavadora.
La vibración es normal durante el funcionamiento.
Primer ciclo de lavado sin ropa
Antes de lavar la ropa por primera vez, elija el ciclo Normal/
Informal (NORMAL/CASUÁL) y póngalo a funcionar sin ropa.
Utilice '/2 de la cantidad normal recomendada de detergente de
alto rendimiento (HE) en polvo o líquido. Este ciclo inicial sirve
para asegurar la limpieza del interior de la lavadora antes de lavar
la ropa.
Abra la puerta de la lavadora jalando la manija. Separe la
ropa por color y tipo de tela. Coloque la carga de ropa
seleccionada en la lavadora. No sobrecargue la lavadora. La
sobrecarga puede dar lugar a limpiezas insatisfactorias.
■ Se puede llenar por completo la lavadora pero sin apretar
la ropa. La puerta de la lavadora debe cerrarse con
facilidad.
■ Mezcle artículos grandes y pequeños. Evite lavar de a un
artículo. Coloque la carga uniformemente.
■ Lave pequeños artículos como calcetines de niños en
una bolsa de malla para prendas. Se recomienda usar
más de una bolsa para prendas y que cada una de ellas
se llene con la misma cantidad de material.
■ Al sacar las prendas de la lavadora, de vez en cuando
revise si no han quedado pequeños artículos debajo del
borde de goma que está al frente de la tina.
2. Cierre la puerta de la lavadora empujándola con firmeza
hasta que escuche el chasquido de la traba. La puerta de la
lavadora permanecerá con seguro durante el ciclo de lavado.
NOTA: Al cabo de cualquier ciclo de lavado, se debe abrir la
puerta y luego cerrarla para que pueda iniciar un nuevo ciclo.
La puerta puede abrirse únicamente si se ha seleccionado
Pausa/Anulado (PAUSE/CANCEL) mientras la luz de Agregue
una prenda (ADD A GARMENT) está encendida o si se ha
anulado el ciclo. Vea “Para anular un ciclo".
3. Abra la gaveta del depósito y agregue los productos de
lavandería en los compartimientos de detergente,
blanqueador, o suavizante de telas. Cierre la gaveta
lentamente para evitar derrames. Vea “Uso del depósito”.
NOTA: Para lograr un rendimiento óptimo, use detergentes
de alto rendimiento. El paquete para este tipo de detergentes
tendrá la marca “HE” o “Alto rendimiento” (High Efficiency).
La “acción de lavado” de HE® junto con una cantidad menor
de agua podría generar demasiada espuma con detergentes
comunes.
4. Encienda la lavadora seleccionando uno de los ciclos de
lavado (WASH CYCLES). La luz indicadora del ciclo
seleccionado se iluminará. Al seleccionar un ciclo de lavado,
las opciones, la temperatura del agua, la velocidad de
exprimido, y el nivel de suciedad prefijados para el ciclo
seleccionado se encenderán. La pantalla muestra el tiempo
aproximado restante. Los ajustes prefijados proporcionan el
cuidado recomendado de las telas en el ciclo seleccionado.
Vea “Ciclos.”
31
Page 32

5. Seleccione las opciones (OPTIONS) deseadas. No todas las
opciones están disponibles oon todos los ciclos. Vea
“Opciones”.
6. Seleccione los modificadores (MODIFIERS) deseados. No
todos los modificadores están disponibles con todos los
ciclos y opciones. Vea “Modificadores”.
7. Si lo desea, seleccione la señal de fin de ciclo (END OF
CYCLE SIGNAL). Esfa señal es útil cuando tiene que lavar
artículos que deben quitarse de la lavadora tan pronto como
ésta se detenga. Seleccione encendido (ON) o apagado
(OEF).
8. Para comenzar el ciclo de lavado de inmediato
Seleccione y sostenga START (durante un segundo
aproximadamente).
■ Si no selecciona Puesta en marcha (START) después de
5 minutos de haber elegido el ciclo, la lavadora se apaga
automáticamente.
■ Al término del ciclo de lavado, la luz de estado Ropa
limpia (CLOTHES CLEAN) se ilumina, la puerta se
destraba y se puede descargar la lavadora. La lavadora
se apaga automáticamente 5 minutos después del
término del ciclo y la luz de CLOTHES CLEAN se apaga.
Para apagar la lavadora manualmente al cabo de un
ciclo, seleccione Pausa/Anulado (PAUSE/CANCEL) una
vez.
9. Para el inicio diferido del ciclo de lavado
Seleccione Diferido (DELAY) hasta que el tiempo diferido
deseado (en horas) aparezca en la panfalla de fiempo
aproximado restante (Estimated Time Remaining). Seleccione
START. La cuenta regresiva del ciclo de lavado aparecerá en
la pantalla.
Su nueva lavadora tiene una gaveta de depósito con tres
compartimientos separados para sus productos de lavandería;
uno es para el detergente, otro es para el blanqueador liquido
con cloro y el otro es para el suavizante líquido de telas. Los
productos de lavandería se diluyen y se distribuyen
automáticamente en el momento oportuno durante el ciclo de
lavado, sin que usted tenga que regresar en el transcurso del
ciclo de lavado para agregarlos.
Es normal que quede un poco de agua en los depósitos al
término del ciclo de lavado.
No ponga aditivos de lavandería directamente en la tina de
lavado. Siempre use los depósitos apropiados al agregar
productos de lavandería.
Selección del detergente adecuado
Para lograr un rendimiento de lavado óptimo, utilice un
detergente de Alto Rendimiento (HE) o de poca espuma.
Para llenar los compartimientos del depósito
1. Jale la gaveta del depósito.
2. Agregue el produoto de lavandería deseado en el
compartimiento apropiado.
3. Empuje la gaveta del depósito suave y completamente hacia
adentro (para evitar derrames).
D e p ósit o
A . P a la nca de desen g a nch e d e l d ep ó s ito
B . S e parad o r
C . C o m partim iento del d e t e r g e n te p ara e i la va d o p r incip a l
D . C o m p artim iento d el b lan q u ead o r líqu ido con clo r o
E. C o m p a rtim ie nto del su a v iza n te de tela s
Compartimiento del detergente para el lavado principal
(Letra C en la ilustración del depósito)
Agregue detergente en polvo o líquido a este compartimiento
para su ciclo de lavado. El separador de detergentes debe estar
siempre en su lugar, ya sea en la posición del frente o de atrás.
■ Al diferir un ciclo, use sólo detergentes en polvo en el
compartimiento para el lavado principal, ya que los
detergentes líquidos se pueden filtrar fuera del
compartimiento durante el ciclo diferido antes de que
comience el ciclo.
■ No llene encima del nivel máximo (“MAX”).
■ Se puede agregar blanqueador líquido o en polvo que no
decolore en el compartimiento del lavado principal junto con
el mismo tipo de detergente, líquido o en polvo.
■ Detergente líquido: Coloque el SEPARADOR en la posición
frontal, entre las guías, oomo se ilustra a continuación. No
habrá espacio entre el fondo del compartimiento de
detergente del ciclo de lavado y el fondo del separador.
...
D
32
A . S e parad o r
B . G u ia
Page 33

Detergente en polvo: Ponga el SEPARADOR en la posición
posterior, detrás de las guías, como se ilustra a continuación.
Habrá un espacio entre el fondo del compartimiento de
detergente del ciclo de lavado y el fondo del separador.
LIQUI
S e p a rado r en la po s ició n p osterio r ,
de trás de la s gu ías
A . S e parad o r
B . G uía
NOTA: Cuando sea enviado de la fábrica, el separador estará en
la posición de “powder” (detergente en polvo-parte posterior).
Compartimiento del blanqueador líquido con cloro
(Letra D en la Ilustración del depósito)
Agregue NO MÁS DE 'A de taza (80 mL) del blanqueador liquido
con cloro en este compartimiento. El blanqueador se diluirá y
distribuirá automáticamente en el momento oportuno durante el
primer enjuague después del ciclo de lavado. Este
compartimiento no puede diluir blanqueador en polvo.
■ Siempre mida el blanqueador líquido con cloro. Use una taza
medidora con pico vertedor; no lo haga al cálculo.
■ No llene encima del nivel máximo “MAX”.
NOTA: El sobrellenado puede ocasionar serios daños a las
prendas.
Compartimiento dei suavizante de teias
(Letra E en la ilustración del depósito)
Agregue V4 de taza (60 mL) del suavizante líquido de telas en este
compartimiento. El suavizante de telas se distribuirá
automáticamente en el enjuague final.
■ No llene encima del nivel máximo (“MAX”).
se
Para anular un ciclo y seleccionar uno nuevo
1. Seleccione Pausa/Anulado (PAUSE/CANCEL) dos veces.
2. Seleccione el ciclo deseado.
3. Seleccione las opciones (OPTIONS) y modificadores
(MODIEIERS) deseados.
4. Seleccione y sostenga Puesta en marcha (START) (durante un
segundo aproximadamente) para reanudar la marcha de la
lavadora al inicio de un nuevo ciclo.
Para anular un ciclo
1. Seleccione Pausa/Anulado (PAUSE/CANCEL) dos veces.
2. La lavadora se apaga, la puerta se destraba y se puede
sacar la ropa.
NOTA: Si el nivel del agua o la temperatura están demasiado
altos, la lavadora se desaguará automáticamente antes de que la
puerta se destrabe.
Para cambiar opciones y modificadores después de que
haya comenzado el ciclo
1. Seleccione Pausa/Anulado (PAUSE/CANCEL).
2. Seleccione las opciones (OPTIONS) o modificadores
(MODIEIERS) deseados.
3. Seleccione y sostenga Puesta en marcha (START) (durante un
segundo aproximadamente) para continuar el ciclo.
Para desaguar la lavadora manualmente
1.
Seleccione Pausa/Anulado (PAUSE/CANCEL).
2.
Seleccione Desagüe/Exprimido (DRAIN/SPIN).
3.
Seleccione y sostenga Puesta en marcha (START) (durante un
segundo aproximadamente) para comenzar el desagüe.
4.
Al cabo del exprimido, la puerta se destraba. Se puede
descargar la lavadora.
Estas luces muestran en qué porción del ciclo está funcionando la
lavadora. También indican cuándo se puede agregar un artículo
en el ciclo de lavado y cuándo los controles están bloqueados.
STATUS
ADD A GARMENT •
PREVWSH»
Wash •
RINSE •
Spin •
Clothes Clean •
1. Para detener la lavadora en cualquier momento, seleccione
Pausa/Anulado (PAUSE/CANCEL).
2. Para reanudar el ciclo, seleccione y sostenga Puesta en
marcha (START) (durante un segundo aproximadamente).
No todas las opciones y modificadores están disponibles con
todos los ciolos. Los ciclos, opciones y modificadores se pueden
cambiar en cualquier momento antes de seleccionar Puesta en
marcha (START).
Las opciones y modificadores se pueden cambiar en cualquier
momento después de seleccionar Puesta en marcha (START) y
antes de que comience la opción o modificador seleccionado.
CONTROL LOCKED •
Door Locked •
Agregado de artículos
Esta lavadora permite que durante un periodo de 8 minutos se
puedan agregar prendas que se hayan olvidado de agregar a la
carga. Usted puede agregar artículos en la lavadora si la luz de
estado Agregue una prenda (ADD A GARMENT) está encendida.
Para agregar artículos
1. Seleccione PAUSE/CANCEL. La puerta de la lavadora se
destraba y se pueden añadir artículos.
2. Para continuar el ciclo, cierre la puerta y seleccione y
sostenga START (durante un segundo aproximadamente).
3. Para destrabar la puerta después del período de agregar
prendas, presione pausa/anulación dos veces. Esto anulará
el ciclo de lavado.
33
Page 34

Ropa limpia
La luz de Ropa limpia (Clothes Clean) permanecerá enoendlda
por 5 minutos después de haber completado el ciclo. Entonces
se apagará la lavadora.
Bloqueo de los controles
El bloqueo de los controles (Control Lock) evita el uso accidental
de la lavadora. También puede usar la función de bloqueo de los
controles para evitar cambios accidentales del ciclo o de
opciones durante un ciclo. Cuando Control bloqueado
(CONTROL LOCKED) está encendido, todos los botones quedan
desactivados, con la excepción de Pausa/Anulado (Pause/
Cancel) y Puesta en marcha (Start). Usted puede bloquear los
controles mientras la lavadora se encuentre en funcionamiento.
Para bloquear los controles
Seleccione y sostenga Desagüe/Exprimido (DRAIN/SPIN)
durante 3 segundos.
C,*l)
DRAIN & SPIN
PFitSS & F-IOI.D 3
SI:CONI3S TO LOCK /
UN1.0CK CONTROL
La luz de estado CONTROL LOCKED se enciende.
Para desbloquear los controles
Seleccione y sostenga DRAIN/SPIN durante 3 segundos hasta
que la luz de estado CONTROL LOCKED se apague.
Bloqueo de la puerta
Cuando la luz de estado se enciende, la puerta está bloqueada.
Tiempo estimado restante
Los tiempos del ciclo varían automáticamente según la presión y
la temperatura del agua, el detergente y la carga de ropa. El
tiempo del ciclo se prolongará si hay exceso de espuma o si la
carga está desequilibrada. La rutina de espuma quita la espuma
excedente y asegura el enjuague apropiado de sus prendas.
Durante la rutina de desequilibrio, el tiempo en la pantalla puede
hacer una pausa hasta que se complete esta actividad; luego
reanudará el resto del ciclo.
Ciclos de lavado
Elija ciclos de lavado seleccionando el botón adyacente al ciclo
deseado. Cada ciclo ha sido diseñado para los diversos tipos de
tela y niveles de suciedad.
■ Los ajustes prefijados pueden cambiarse en cualquier
momento antes de seleccionar Puesta en marcha (START).
No todas las opciones y modificadores estarán disponibles
con todos los ciclos. Para cambiar los ajustes después de
que haya comenzado el ciclo, seleccione Pausa/Anulado
(PAUSE/CANCEL), luego seleccione los ajustes deseados.
Seleccione y sostenga Puesta en marcha (START) (durante un
segundo aproximadamente) para continuar el ciclo.
Ajustes prefijados de ciclos
Cada ciclo tiene los siguientes ajustes prefijados: Tiempo del
ciclo (Cycle Time), Temperatura del agua (Water Temp) y
Velocidad de exprimido (Spin Speed). Los ajustes prefijados
proporcionan el cuidado recomendado de las telas en el ciclo
seleccionado. Vea el cuadro.
Ciclo
Blancos blanquísimos (Whitest Whites)
Lavado intenso (Heavy Duty)
Normal/Informal (Normal/Casual)
Sanitario
(Sanitary)
Lavado a mano/
Ropa delicada
(Handwash/
Delicate)
Enjuague y
Exprimido
(Rinse & Spin)
Desagüe y
Exprimido (Drain
& Spin)
Nivel de
suciedad
(hr;min)
Intenso
(1:00)
Intenso
(1:05)
Normal
(0:45)
Intenso
(2:00)
Normal
(0:35)
Normal
(0:20)
Normal
(0:12)
Temperatura
del agua
Caliente/Ería
(Hot/Cold)
Caliente/Ería
(Hot/Cold)
Tibia/Ería
(Warm/Cold)
Extra caliente/
Ería (Extra
Hot/Cold)
Eria/Eria
(Cold/Cold)
Eria/Eria
(Cold/Cold)
Eria/Eria
(Cold/Cold)
Velocidad
de
Exprimido
Alta
(High)
Alta
(High)
Alta
(High)
Alta
(High)
Extra baja
(Extra-Low)
Alta
(High)
Alta
(High)
Wash Cycles
Delicate
Cada ciclo tiene los siguientes ajustes prefijados; Nivel de
suciedad (Soil Level) (tiempo del ciclo). Temperatura del agua
(Water Temperature), Velocidad de exprimido (Spin Speed) y
puede tener opciones (Optiones) prefijadas. Los ajustes
prefijados proporcionan el cuidado recomendado de la tela
para el ciclo seleccionado.
34
Blancos blanquísimos (Whitest Whites)
Este ciclo ha sido diseñado especialmente para el lavado de
telas blancas sucias con la ayuda del blanqueador. Las
temperaturas calientes de lavado aseguran la óptima acción del
blanqueador. El enjuague adicional proporciona un rendimiento
óptimo de enjuague para evitar residuos de cloro en su ropa.
Este ciclo combina una agitación veloz, tiempo de lavado más
prolongado, y un exprimido a velocidad extra alta para acortar el
tiempo de secado.
Lavado intenso (Heavy Duty)
Use este ciclo para lavar telas resistentes que no destiñen y
prendas con suciedad normal. Este ciclo combina una agitación
veloz, tiempo de lavado más prolongado, y un exprimido a
velocidad alta para acortar los tiempos de secado.
Normal/Informal (Normal/Casual)
Use este ciclo para lavártelas inarrugables como camisas
deportivas, blusas, ropa de negocios informal, fibras mixtas de
planchado permanente, fibras de algodón y de lino y fibras
sintéticas. Este ciclo combina una agitación a velocidad media,
exprimido a alta velocidad y un proceso de enfriamiento de la
ropa para reducir la formación de arrugas.
Page 35

Sanitario (Sanitary)
Use este ciclo para lavar telas que no destiñen, con suciedad
profunda. Este ciclo combina una temperatura de agua muy
caliente y agitación de alta velocidad para ayudar a eliminar la
suciedad y manchas profundas. Es recomendable fijar el
calentador de agua en 120°F (49°C) para asegurar un
rendimiento adecuado durante este ciclo. El ciclo sanitario
también ayuda a eliminar 99.999% de 3 bacterias de infección
comunes, aún cuando no se emplee blanqueador. El exprimido a
velocidad extra alta ayuda a acortar el tiempo de secado.
Lavado a mano/Ropa delicada (Handwash/Delicate)
Use este ciclo para lavar prendas de lavado a mano y de cuidado
especial. Este ciclo combina una agitación a baja velocidad y
exprimido extra lento para el cuidado especial de la tela.
Ciclos adicionales
Seleccione el botón para el ciclo deseado.
CUSTOM
PROGRAM
PRESS & IPOLD S SRC.
RINSE & Spin
Como ocurre con cualquier producto nuevo, usted escuchará
sonidos a los cuales no está acostumbrado. Podrá oír varios
sonidos al trabar o destrabar la puerta, y durante el proceso de
lavado, enjuague y exprimido. Durante los intervalos entre las
etapas de lavado, habrá pausas momentáneas. Usted escuchará
el rociado y chapoteo del agua durante los ciclos de lavado y
enjuague. Estos nuevos sonidos y pausas son parte del
funcionamiento normal de la lavadora. Vea “Solución de
problemas.”
Usted puede personalizar su lavado al agregar Opciones
(OPTIONS) a sus selecciones de ciclo. Puede agregar o cambiar
una opción después del inicio del ciclo en cualquier momento
antes de que comience la opción seleccionada. No todas las
opciones estarán disponibles con todos los ciclos.
Options
Prewash
Extended Spin
DRAIN & SPIN
Usted puede cambiar la selección en cualquier momento antes
de seleccionar Puesta en marcha (START).
Programa personalizado (Custom Program)
El programa personalizado le permite guardar un ciclo de lavado
personalizado para un uso futuro.
Para personalizar un ciclo de lavado:
1. Seleccione un ciclo.
2. Seleccione las Opciones deseadas.
3. Seleccione los Modificadores deseados.
4. Para guardar el ciclo presione y sostenga Custom Program
(3 segundos aproximadamente) hasta que escuche un bip. El
programa personalizado ahora está guardado para uso futuro.
5. Presione puesta en marcha (START).
Para volver a usar este ciclo en otra ocasión, seleccione
CUSTOM PROGRAM y presione START.
Enjuague y Exprimido (Rinse & Spin)
Use este ciclo sólo para enjuagar y exprimir. Este ciclo combina
una agitación veloz y exprimido a velocidad alta. Si lo desea, puede
reducir la velocidad de exprimido seleccionando la velocidad que
desea del modificador SPIN SPEED (Velocidad de exprimido).
El ciclo de Enjuague y Exprimido (Rinse & Spin) es útil para
■ Cargas que necesitan únicamente enjuague.
■ Agregar suavizante de telas a una carga utilizando el
depósito del suavizante de telas.
Desagüe y Exprimido (Drain & Spin)
Use este ciclo para vaciar el agua de la lavadora o para desaguar
y exprimir la ropa. La velocidad de exprimido ha sido prefijada en
alta. Si lo desea, puede reducir la velocidad de exprimido
seleccionando la velocidad que desea del modificador Velocidad
de exprimido (SPIN SPEED).
NOTA: Las cargas de telas sintéticas, fibras delicadas, de lavado a
mano y de lana se deben escurrir sin exprimir o con un exprimido
a baja velocidad para evitar deformaciones de las telas.
O
END of Cycle
Signal
ON/OFP
■ Vea la sección “Guía para el lavado” para obtener un cuadro
global de las opciones posibles en cada selección de ciclo de
lavado.
■ Usted puede seleccionar más de una opción por ciclo.
Algunas opciones no se pueden añadir a ciertos ciclos.
■ Si una determinada opción está disponible en el ciclo
seleccionado, la luz de esa opción se iluminará al ser
seleccionada.
■ Si una determinada opción no está disponible en el ciclo
seleccionado, se escuchará una señal audible corta y la luz
para esa opción no se iluminará al ser seleccionada.
Prelavado (Prewash)
Use esta opción para cargas con suciedad profunda que
necesitan tratamiento previo.
■ Agregue el detergente en el compartimiento del detergente
de la gaveta de depósito.
Esta opción agrega tiempo de rotación antes del ciclo principal
seleccionado. La lavadora continúa automáticamente del ciclo
de prelavado al de lavado principal.
Exprimido prolongado (Extended Spin)
Use esta opción para agregar un exprimido adicional a cualquier
ciclo a fin de mejorar los tiempos de secado para algunas telas
pesadas o artículos de cuidado especial reduciendo el exceso de
agua, lo que puede ahorrar energía.
Señal de fin de ciclo
Esta señal es útil cuando tiene que quitar artículos de la lavadora
tan pronto como ésta se detenga. Seleccione encendido (ON) o
apagado (OFF).
35
Page 36

Guía de la temperatura
Los ajustes prefijados de los ciclos Temperatura de Lavado/
Enjuague (Wash/RinseTemp), Velocidad de exprimido {Spin
Speed) у Nivel de suciedad (Soil Level) pueden modificarse.
Usted puede cambiar el modificador después del inicio del ciclo
en cualquier momento antes de que comience el modificador
seleccionado. No todos los modificadores estarán disponibles
con todas las opciones y ciclos.
MODIFERS
Лито Tlmp Control
• ЕХТЯА НОТ/COLD • KIQH
• HOT/GOLD
• WARM / WARM
• WARM / COLD
• COLD / COLD
Water Теир
WASli/RINSf
• MEDIUM
• LOW
• Extra low
• No SPIN
V_R
SPIN SPEED
• 2MD RINSE
• NORMAL RINSE
---
V__.V
Rinse
Options
Para cambiar la temperatura del agua, seleccione el botón
Temperatura del agua (WATER TEMP) hasta que el ajuste.
• Heavy
• NORMAL
• LIGHT
SOIL LEVEL
■ Para cambiar el tiempo del ciclo, seleccione el botón Nivel de
suciedad (SOIE LEVEL).
2do. Enjuague (2nd Rinse)
Se puede utilizar un segundo enjuague para ayudar en la
eliminación de residuos del detergente o del blanqueador que
haya quedado en las prendas. Esta opción proporciona un
enjuague adicional con la misma temperatura del agua del primer
enjuague. Este es un ajuste de enjuague prefijado para el ciclo de
Blancos Blanquísimos.
Temperatura del agua de
Telas sugeridas
lavado
Extra caliente (EXTRA
HOT)
Telas resistentes que no
destiñen
Suciedad profunda
Callente (HOT) Ropa blanca y de color pastel
Suciedad profunda
Tibia (WARM) Colores vivos
Suciedad entre moderada y
ligera
Fría (COLD) Colores que destiñen o se
opacan
Suciedad ligera
En temperaturas de agua inferiores a 70°F (21°C), los detergentes
no se disuelven bien. Además puede resultar difícil quitar la
suciedad.
Control automático de la temperatura (Auto Temp Control)
El CAT - Control automático de la temperatura (Auto Temp
Control) detecta y mantiene electrónicamente una temperatura
de agua uniforme. El CAT regula el agua fría y caliente que
ingresa. El CAT se enciende automáticamente al seleccionar un
ciclo. Vea “Ajustes prefijados de ciclos” en “Ciclos”.
■ El CAT asegura una limpieza homogénea.
■ El CAT funciona en la temperatura de lavado con los ajustes
Extra caliente/Fría (Extra Hot/Coid), Caliente/Fría (Hot/Coid),
Tibia/Tibia {Warm/Warm),Tibia/Fr(a (Warm/Coid) y Fría/Fría
(Cold/Coid).
■ El CAT funciona en la temperatura de lavado con los ajustes
Caliente/Fría (Hot/CoId), Tibia/Tibia (Warm/Warm), Tibia/Fría
(Warm/CoId) y Fría/Fría (Cold/Coid).
■ El CAT funciona para el ajuste de enjuague tibio (Warm)
regulando la temperatura del agua aproximadamente en
104°F(40°C).
■ Las temperaturas de los enjuagues con agua fría dependen
de la temperatura del agua fría de su grifo.
Enjuague normal
Consiste en un proceso de enjuague de dos fases que es eficaz
para el lavado de todos los días.
Temperatura de Lavado/Enjuague
Seleccione una temperatura de agua basado en el tipo de carga
que esté lavando. Use el agua más caliente que la tela pueda
resistir. Siga las Instrucciones de la etiqueta de las prendas.
Los enjuagues con agua tibia dejan las cargas más secas que los
enjuagues fríos. Los enjuagues con agua tibia aumentan la
formación de arrugas. En climas trios, el enjuague tibio hace que
la ropa sea más cómoda para manejar. Los enjuagues con agua
fría ahorran energía.
36
Page 37

Consulte este cuadro para obtener sugerencias sobre tipos de cargas y sus ciclos correspondientes. A la derecha se detallan las
opciones disponibles para cada uno de estos ciclos de lavado.
CICLO TIPO DE CARGA SUGERIDA Prelavado
(PREWASH)
Blancos
blanquísimos
(Whitest Whites)
Lavado intenso
(Heavy Duty)
Norma l/Informal
(Normal/Casual)
Sanitario
(Sanitary)
Lavado a mano/Ropa
delicada (Handwash/
Delicate)
Telas blancas sucias ✓ ✓ ✓
Ropa interior, toallas, camisas de algodón, etc.
con suciedad profunda
Blusas, camisas, overoles, etc. de poliéster,
nàilon, algodón, lino o mezclas de algodón con
suciedad normal
Ropa interior, toallas, ropas de trabajo, pañales,
etc. con suciedad profunda
Cortinas y prendas delicadas. Artículos de
cuidado especial cuya etiqueta indica para
“lavado a mano”.
CONSEJOS DE LAVANDERIA
Preparación de la ropa para lavar
Siga estas recomendaciones para ayudarle a prolongar la vida de
sus prendas de vestir.
■ Cierre los zípers, broches de presión y corchetes para evitar
que enganchen otros artículos. Quite alfileres, hebillas y
demás objetos duros para evitar que rayen el interior de la
lavadora. Quite todo adorno y ornamento que no sea lavable.
■ Vacíe los bolsillos y vuélvalos al revés.
■ Doble los puños y limpie con un cepillo la pelusa y la
suciedad.
■ Vuelva al revés las prendas de tejido sintético para evitar que
se llenen de pelusas.
■ Ate los cordones y fajas de modo que no se enreden.
■ Remiende lo que esté roto así como las costuras y
dobladillos flojos.
■ Trate las manchas y suciedades.
■ Las prendas manchadas o mojadas deberán lavarse con
prontitud para obtener mejores resultados.
■ Mezcle artículos grandes y pequeños, evite lavar artículos
separados y cargue de modo uniforme.
■ Lave los artículos pequeños, tales como calcetines de niños,
en bolsas de malla para prendas. Se recomienda usar más
de una bolsa para prendas y que cada una de ellas se llene
con la misma cantidad de material.
■ Separe los colores oscuros de los colores claros, los artículos
no desteñidles de los que sí lo son.
■ Separe por tipo de tela y estructura (prendas fuertes de
algodón, tejidos de punto y prendas finas).
Cómo descargar
■ Saque la ropa de la lavadora luego de que se haya
completado el ciclo. Los objetos metálicos como cierres,
broches a presión y hebillas pueden herrumbrarse si se dejan
en la lavadora por un largo período de tiempo.
■ Al sacar las prendas de la lavadora, de vez en cuando revise
si no han quedado pequeños artículos debajo del borde de
goma que está al frente de la tina.
Sugerencias para cargar (tamaño máximo de cargas).
Ropa de trabajo pesada
4 pantalones de mezclilla
4 pantalones de trabajo
4 camisas de trabajo
Toallas
10 toallas de baño
10 toallas de mano
Opciones de
enjuague
(RINSE
OPTIONS)
✓
✓ ✓ ✓
✓ ✓ ✓
✓
✓
2 pantalones de deporte
2 camisetas de deporte
14 toallas faciales
Exprimido
prolongado
(EXTENDED SPIN)
✓
Selección de la ropa
■ Separe las prendas con suciedad rebelde de las que están
ligeramente sucias, aún cuando éstas normalmente se
lavarían juntas. Separe las prendas que sueltan pelusas
(toallas, felpilla) de las que atraen pelusas (pana, fibras
sintéticas y planchado permanente). Siempre que sea
posible, vuelva al revés las prendas que sueltan pelusa.
Carga mixta
3 sábanas (1 king, 2 de 1
plaza)
4 fundas
3 camisas
3 blusas
9 camisetas
9 pantalones cortos
10 pañuelos de mano
37
Page 38

CUIDADO DE LA LAVADORA
Limpieza dei exterior
Use un paño suave y húmedo o una esponja para limpiar
cualquier derrame. De vez en cuando limpie ei exterior de su
lavadora para que se vea como nueva. Use un jabón suave y
agua. No emplee productos abrasivos.
Limpieza dei interior
Use un paño suave y húmedo o una esponja para limpiar de vez
en cuando la puerta interior a fin de quitar todo residuo de
detergente. Use jabón suave y agua. No use productos
abrasivos.
Limpieza dei seiio de ia puerta
Use un paño suave y húmedo cuando sea necesario. Revise de
vez en cuando si hay algún objeto extraño en el pliegue del sello.
Limpieza de ia gaveta de depósito
La gaveta de depósito es desmontable para facilitar la limpieza.
1. Destrabe la gaveta de depósito presionando la palanca de
desenganche. Vea “Uso del depósito.” Quite la gaveta.
2. Quite los insertos (el sifón de los compartimientos del
suavizante y del blanqueador y el separador).
3. Lave las piezas en el agua del grifo.
4. Vuelva a colocar los insertos y coloque nuevamente el
depósito en la gaveta.
Reemplace las mangueras de entrada del agua después de cinco
años de uso para reducir el riesgo de fallas. Inspeccione
periódicamente y cambie las mangueras si se hallan
protuberancias, torceduras, cortes, desgaste o pérdidas de
agua.
Cuando reemplace las mangueras de entrada del agua, anote la
fecha de reposición.
Instale y guarde su lavadora donde no se congele. Debido a que
queda algo de agua en las mangueras, la congelación de ésta
puede dañar su lavadora. Si va a almacenar o mover su lavadora
durante una temporada de invierno riguroso, acondiciónela para
el invierno.
Cuidado durante las vacaciones y períodos sin uso;
Ponga a funcionar su lavadora únicamente cuando esté en casa.
Si va a salir de vacaciones o no va a usar la lavadora durante un
período prolongado, usted debe:
■ Desenchufar la lavadora o desconectar el suministro de
energía.
■ Interrumpir el suministro de agua de la lavadora. Esto ayuda a
evitar inundaciones accidentales (debido a aumentos en la
presión del agua) en ausencia suya.
■ Abrir ligeramente la puerta para proporcionar ventilación.
Para acondicionar la lavadora para el invierno:
1. Vierta 1 cuarto (1 L) de anticongelante tipo R.V en el tambor.
2. Ponga la lavadora a funcionar en el ciclo de Desagüe y
Exprimido (Drain & Spin).
3. Desenchufe la lavadora o desconecte el suministro de
energía.
4. Cierre ambos grifos del agua.
5. Desconecte las mangueras de entrada del agua de los grifos
y desagüe.
Para volver a usar la lavadora:
1. Deje correr agua por las tuberías.
2. Vuelva a conectar las mangueras de entrada del agua a los
grifos.
3. Abra ambos grifos del agua.
4. Enchufe la lavadora o reconecte el suministro de energía.
5. Ponga a funcionar la lavadora durante el ciclo Normal/
Informal (NORMAL/CASUAL) con Vi de la cantidad
recomendada de detergente HE para eliminar el
anticongelante.
Para transportar la lavadora:
1. Si va a mover la lavadora durante una temporada de invierno
riguroso, vierta 1 cuarto (1 L) de anticongelante tipo R.V. en el
tambor. Ponga la lavadora a funcionar en el ciclo Desagüe y
Exprimido (Drain & Spin).
2. Desenchufe el cable de suministro de energía.
3. Desconecte la manguera de desagüe del sistema de desagüe
y fíjela a los ganchos del panel posterior.
4. Cierre ambos grifos del agua.
5. Desconecte las mangueras de entrada del agua de los grifos,
luego elimine el agua de las mangueras y fíjelas al panel
posterior de la lavadora.
6. IMPORTANTE: Llame para solicitar servicio. No vuelva a
usar los pernos de transporte. La unidad debe ser
transportada en la posición vertical. Para prevenir daños
estructurales y de suspensión, su máquina debe estar
debidamente preparada para ser nuevamente ubicada por un
técnico certificado.
Para volver a instalar la lavadora:
1. Siga las “Instrucciones de instalación” para ubicar, nivelar y
conectar la lavadora.
2. Ponga la lavadora a funcionar en el ciclo NORMAL/CASUAL
con un Vi de la cantidad normal recomendada de detergente
HE para limpiar la lavadora y eliminar el anticongelante, de
haberlo usado.
38
Page 39

SOLUCION DE PROBLEMAS
Pruebe primero las soluciones aquí sugeridas y posiblemente se evite el costo de una visita de servicio técnico..
La pantalla de la lavadora muestra mensajes
codificados y emite señales audibles
“FH” (Problema de entrada del agua - no hay agua o el abastecimiento dei agua es insuficiente)
Seleccione Pausa/Anulado (PAUSE/CANCEL) dos veces para
anular el ciclo. Desenchufe la lavadora o desconecte el
suministro de energía.
Revise lo siguiente:
¿Están completamente abiertos los grifos del agua?
¿Están obstruidos los filtros en la conexión de la manguera
de entrada con la lavadora?
¿Están retorcidas las mangueras de entrada del agua?
¿Se han congelado las mangueras de entrada del agua?
Enchufe la lavadora o reconecte el suministro de energía.
Vuelva a seleccionar el ciclo y presione Puesta en marcha
(START). Si el problema persiste, llame al servicio técnico.
“F02” (Problema de desagüe)
Seleccione (PAUSE/CANCEL) dos veces para anular el ciclo.
Desenchufe la lavadora o desconecte el suministro de
energía.
Revise lo siguiente:
¿Está retorcida la manguera de desagüe?
¿Se ha congelado la manguera de desagüe?
¿Está obstruida la manguera de desagüe?
¿Está la manguera de desagüe a una altura mayor de 96"
(2,4 m) del piso?
“SUD” (Rutina de espuma)
Cuando se detecta el exceso de espuma, la rutina de
espuma comienza automáticamente. Esta rutina quita la
espuma excedente y asegura el enjuague apropiado de sus
prendas. “SUD” aparece en la pantalla durante el enjuague y
al final del ciclo para informarle que la Rutina de espuma ha
sido activada. Para evitar el exceso de espuma, utilice
solamente detergentes de alto rendimiento (HE).
Variables “F” [F4 a F16] (Problema eléctrico)
Seleccione Pausa/Anulado (PAUSE/CANCEL) dos veces para
anular el ciclo. Seleccione Escurrido y Exprimido (DRAIN &
SPIN) si hay exceso de agua en la lavadora.
Vuelva a seleccionar el ciclo y presione Puesta en marcha
(START). Si el problema persiste, llame al servicio técnico.
La lavadora no se llena, ni lava ni enjuaga
Revise lo siguiente:
¿Se ha enchufado el cable eléctrico en un contacto de tres
terminales con conexión a tierra?
¿Hay corriente en el enchufe? Revise la fuente de electricidad
o llame a un electricista.
¿Están abiertos los grifos del agua fría y del agua caliente?
¿Está retorcida la manguera de entrada del agua?
¿Están obstruidos los filtros de la válvula de entrada?
La lavadora se detiene
Revise lo siguiente:
¿Se ha enchufado el cable eléctrico en un contacto de tres
terminales con conexión a tierra?
¿Hay corriente en el enchufe?
Revise la fuente de electricidad o llame a un electricista.
¿Se ha quemado algún fusible o se ha disparado el
disyuntor?
Si el problema persiste, llame a un electricista.
¿Está usando un cable eléctrico de extensión?
No use un cable eléctrico de extensión.
La lavadora no escurre ni exprime
¿Se ha obstruido la manguera de desagüe, o el extremo
de la manguera de desagüe está a una altura mayor de
96" (2,4 m) del piso?
¿Está bajo el voltaje?
Revise la fuente de electricidad o llame a un electricista. No
use un cable eléctrico de extensión.
¿Se ha activado la rutina de espuma “SUD”?
El ciclo concluirá una vez que se haya eliminado el exceso de
espuma.
¿Está balanceada la carga?
Un solo artículo o uno que sea voluminoso puede oausar
desequilibrio. Agregue más artículos o redistribuya la carga.
La lavadora no funciona
Revise lo siguiente:
¿Se ha enchufado el cable eléctrico en un contacto de tres
terminales con conexión a tierra?
¿Se ha cerrado bien la puerta de la lavadora?
¿ Se ha seleccionado un ciclo, pero no se ha seleccionado
START sosteniéndolo durante un segundo?
¿Se ha abierto la puerta después de haberse terminado el
ciclo anterior?
39
Page 40

La lavadora hace ruidos o vibra Ropa demasiado mojada
¿Está nivelada la lavadora?
La lavadora debe estar nivelada. Las cuatro patas deben
instalarse correctamente, y las tuercas deben apretarse
contra el gabinete de la lavadora.
Mientras se escurre el agua de la lavadora, usted podrá oír el
aire que se succiona a través de la bomba. Esto ocurre
durante la fase final del escurrido. Es normal.
¿Está lavando artículos con broches metálicos a presión,
hebillas o zípers?
Usted podrá escuchar el ruido producido por los artículos al
tocar el tambor de la lavadora. Esto es normal.
¿Se ha instalado la lavadora sobre un piso resistente y firme?
Consulte la sección “Instrucciones de instalación" para
informarse respecto a los requisitos del piso. El ruido y la
vibración pueden reducirse colocando un pedazo de madera
laminada de %" (19,1 mm) debajo de su lavadora. La madera
laminada puede extenderse debajo de la lavadora y la
secadora para mantenerlas a la misma altura.
Agua cerca de la lavadora
Revise las tuberías del agua de la casa para ver si hay fugas.
Los depósitos están obstruidos o hay fugas
¿Se han colocado los productos de lavandería en el compartimiento apropiado del depósito?
Agregue las cantidades adecuadas de detergente, suavizante
de telas o blanqueador líquido con cloro en los
compartimientos apropiados. Agregue el blanqueador que no
decolora líquido o en polvo en el compartimiento del
detergente.
Asegúrese de combinar el blanqueador en polvo no
decolorante con el detergente en polvo o de combinar el
blanqueador líquido no decolorante con el detergente líquido.
¿Está el separador de detergente en la posición
correcta?
El separador deberá estar en la posición frontal cuando se
utilice detergente líquido y en la posición posterior cuando se
utilice detergente en polvo.
¿Ha empleado el ciclo apropiado para la ropa que está
lavando?
Seleccione un ciclo con una velocidad de exprimido más alta.
¿Ha lavado un solo artículo, artículos voluminosos o ha
sobrecargado la lavadora?
Un solo artículo, los artículos voluminosos o la sobrecarga
puede ocasionar el desequilibrio. Agregue prendas o trate de
distribuir uniformemente la ropa mojada en el tambor, y
ponga en marcha un ciclo de Escurrido y Exprimido (DRAIN &
SPIN). Si la ropa continúa mojada, saque la mitad de la carga
de la lavadora e inténtelo de nuevo.
Residuos o pelusas en la ropa
¿Ha agregado detergente en el depósito?
Para obtener óptimos resultados, agregue detergente en el
compartimiento del detergente. No agregue el detergente en
el tambor de la lavadora.
¿Ha separado adecuadamente la ropa?
Separe la ropa que suelta pelusa (toallas, felpilla) de la ropa
que atrae pelusa (pana, fibras sintéticas). Sepárelas también
por color.
¿Ha sobrecargado la lavadora?
No sobrecargue la lavadora. La lavadora puede llenarse por
completo, pero sin apretar la ropa. La carga debe estar
equilibrada. La pelusa puede quedar atrapada en la carga si
la lavadora está sobrecargada.
Revise lo siguiente:
¿Ha dejado papel o tisú en los bolsillos?
¿Ha utilizado suficiente detergente?
Siga las instrucciones del fabricante. Use suficiente
detergente para mantener la pelusa en el agua.
¿Está la temperatura del agua debajo de 70“F (21 “Cj?
Si la temperatura del agua es inferior a 70°F (21 °C), es
posible que el detergente no se disuelva por completo.
¿Está usando un ciclo de lavado de baja velocidad?
Los detergentes en polvo quizás no se disuelvan bien en los
ciclos de velocidad baja. Para obtener óptimos resultados,
utilice detergente líquido para los ciclos de velocidad baja
como Ropa delicada/Lavado a mano (Delicate/Handwash).
40
Manchas en la ropa
¿Ha agregado detergente en el depósito?
Para obtener óptimos resultados, agregue detergente en el
compartimiento del detergente. No agregue detergente en el
tambor de la lavadora.
¿Ha usado suficiente detergente?
Use suficiente detergente para quitar la suciedad y
mantenerla en suspensión. Para lograr un óptimo
rendimiento, use un detergente de alto rendimiento (HE). Siga
las recomendaciones del fabricante para el tipo de ropa que
está lavando.
Page 41

¿Hay exceso de óxido de hierro (herrumbre) en ei agua?
Quizás tenga que instalar un filtro de hierro.
¿Ha separado adecuadamente la ropa?
Separe las ropas de color oscuro de las de color blanco y
claro.
¿Ha descargado la lavadora con prontitud?
Para evitar la transferencia de tintes, descargue ia lavadora
tan pronto se detenga.
¿Ha usado una bola con suavizante de telas?
Las bolas que distribuyen suavizante de telas no funcionan
correctamente en esta lavadora. Agregue el suavizante
líquido de telas en el oompartimiento del suavizante de telas.
¿Ha usado detergente en polvo en un ciclo de baja velocidad?
Considere el empleo de un detergente liquido.
La ropa está arrugada
Ciclo demasiado prolongado
¿Aparece en la pantalla “SUD”?
Se ha detectado excesiva espuma y la rutina de espuma ha
sido activada para eliminar el exceso. Esta rutina añadirá
tiempo adicional al ciclo original.
¿Ha sido la carga lo que causa un desequilibrio?
Cuando hay demasiado desequilibrio, una rutina de
desequilibrio comenzará a redistribuir la carga. Durante la
rutina de desequilibrio, el tiempo en la pantalla puede hacer
una pausa hasta que se complete esta actividad; luego
reanudará el ciclo.
¿Ha seleccionado el ciclo de lavado a mano/ropa
delicada (Handwash/Delicate)?
Cuando use los ciclos de lavado a mano/ropa delicada, debe
poner cargas pequeñas. Esto le asegura un lavado delicado
para sus prendas sin aumentar los tiempos del ciclo.
¿Ha descargado la lavadora con prontitud?
Descargue la lavadora tan pronto se detenga.
¿Ha empleado el ciclo correcto para ia carga que está
lavando?
Utilice el ciclo Ropa delicada (Handwash/Delicate) u otro
ciclo con velocidad baja de exprimido para reducir la
formación de arrugas.
¿Ha sobrecargado la lavadora?
La carga deberá estar equilibrada y sin sobrecarga. Las
cargas deben moverse con libertad durante el lavado.
Blancos grisáceos, colores opacos
¿Ha separado adecuadamente la ropa?
Al mezclar ropa blanca y de color en una carga puede ocurrir
transferencia de tintes. Separe las ropas de color oscuro de
las de color blanco y claro.
¿Estaba la temperatura de lavado demasiado baja?
Lave con agua caliente o tibia que no dañe la ropa.
Cerciórese de que el sistema de agua caliente sea el
adecuado para proveer un lavado con agua caliente.
¿Ha usado suficiente detergente, o tiene un suministro de
agua dura?
Use más detergente para lavar ropa con suciedad profunda
en agua fría o dura.
La puerta está trabada al final del ciclo de lavado
¿Se ha escurrido toda el agua de la lavadora durante el período de exprimido?
Seleccione Escurrido y Exprimido (DRAIN & SPIN) para
eliminar toda el agua que haya quedado en la lavadora. La
puerta de la lavadora se destrabará al término dei escurrido.
41
Page 42

TABLE DES MATIERES
CONTRATS DE PROTECTION.............................................................42
Aux États-Unis....................................................................................42
Au Canada..........................................................................................43
GARANTIE DE.......................................................................................43
GARANTIE DE L’OPTION DE PIÉDESTAL
SÉCURITÉ DE LA LAVEUSE................................................................45
EXIGENCES D’INSTALLATION
Outillage et pièces..............................................................................46
Options...............................................................................................46
Exigences d'emplacement.................................................................47
Système de vidange...........................................................................48
Spécifications électriques...................................................................49
INSTRUCTIONS D’INSTALLATION
Enlèvement du système de transport
Raccordement des tuyaux d'alimentation
Acheminement du tuyau de vidange
Immobilisation du tuyau de vidange..................................................51
Réglage de l’aplomb de la laveuse
Achever l'installation..........................................................................51
CARACTÉRISTIQUES ET AVANTAGES.............................................52
UTILISATION DE LA LAVEUSE...........................................................53
Mise en marche de la laveuse
Utilisation du distributeur....................................................................54
Pause ou remise en marche..............................................................55
Changement de programmes, options et modificateurs
Témoins lumineux..............................................................................55
Programmes.......................................................................................56
Sons normaux....................................................................................57
Options...............................................................................................57
Modificateurs......................................................................................58
Guide de lessivage.............................................................................59
CONSEILS DE LESSIVAGE
Chargement........................................................................................59
ENTRETIEN DE LA LAVEUSE
Nettoyage de la laveuse
Tuyaux flexibles d’alimentation de la laveuse....................................60
Préparation avant les vacances,
un entreposage ou un déménagement
DÉPANNAGE........................................................................................61
NUMÉROS DE SERVICE.............................COUVERTURE ARRIÈRE
...........................................................
...........................................................
.................................................................
.............................................................
....................................................................
.........................................
.....................................................
................................................
..........................................
.................................................
...................................................
....................
..............................................
44
46
50
50
50
51
51
53
55
59
60
60
60
CONTRATS DE PROTECTION
Contrats principaux de protection
Nous vous félicitons d’avoir fait un achat judicieux. Votre
nouveau produit Kenmore® est conçu et fabriqué pour vous
procurer des années de fonctionnement fiable. Mais comme pour
tous les produits, il pourra à l’occasion nécessiter un entretien
préventif ou une réparation. Le cas échéant, un Contrat prinoipal
de protection peut vous épargner de l’argent et des soucis.
Souscrivez dès maintenant un Contrat principai de protection et
protégez-vous contre les dépenses et ennuis inattendus.
Le Contrat principal de protection contribue aussi à prolonger la
vie utile de votre nouveau produit. Voici ce qui est inclus dans le
contrat :
✓ Service expert par nos 12 000 réparateurs professionnels
✓ Service iiiimité et sans frais pour les pièces et la main-
d’œuvre pour toutes les réparations couvertes
✓ Garantie “Anti-citron” - remplacement de votre produit
couvert si quatre pannes ou plus se produisent en deçà de
douze mois
✓ Remplacement du produit si votre produit couvert ne peut
être réparé
✓ Vérification annuelle d’entretien préventif sur demande -
sans frais supplémentaires
✓ Aide rapide au téléphone - assistance téléphonique fournie
par un technicien de Sears pour les produits réparables à
domicile, plus un horaire de réparation commode
✓ Protection contre les sautes de puissance pour prévenir les
dommages attribuables aux fluctuations de courant
✓ Remboursement de location si la réparation prend plus de
temps que promis
Dès que vous souscrivez le Contrat, il suffit d'un simple appel
téléphonique pour obtenir un rendez-vous de service. Vous
pouvez appeler en tout temps jour et nuit ou prendre un rendez
vous de service en ligne.
Sears compte plus de 12 000 réparateurs professionnels qui ont
accès à plus de 4,5 millions de pièces et accessoires de qualité.
C’est le genre de professionnalisme sur lequel vous pouvez
compter pour aider à prolonger la vie de votre nouvel achat
pendant des années. Achetez votre Contrat principal de
protection aujourd’hui même!
Certaines limitations et exclusions s’appliquent. Pour des
prix et renseignements supplémentaires, composer le
1-800-827-6655.
42
Service d’installation Sears
Pour l’installation professionnelle par Sears d’appareils
ménagers, d’ouvre-portes de garage, de chauffe-eau et d’autres
articles importants de la maison, aux É.-U. composer le
1-800-4-MY-HOME®.
Page 43

Contrats d’entretien
Votre achat a plus de valeur parce que vous pouvez compter sur
Sears HomeCentral®pour le service. Avec plus de 2400
spécialistes formés et l’accès à plus d’un million de pièces et
accessoires, nous avons les outils et les pièces ainsi que les
connaissances et compétences pour remplir cette promesse que
nous vous faisons : Nous assurons le service de nos produits.
Votre produit Kenmore® est conçu, fabriqué et vérifié pour qu’il
puisse vous fournir de nombreuses années de service en toute
confiance. Cependant, tout produit peut nécessiter des
interventions de service de temps à autre. Le contrat d'entretien
Sears vous offre un programme de service remarquable à un prix
abordable.
Le contrat d’entretien Sears
■ Constitue une manière d’acheter un service pour demain au
prix d’aujourd’hui
■ Élimine les factures pour les réparations imputables à l’usure
normale
■ Fournit un support téléphonique assuré par un technicien de
chez Sears pour les produits nécessitant une réparation à
domicile
■ Même si vous n’avez pas besoin de réparations, comprend
une inspection annuelle d’entretien préventif (sur votre
demande) pour maintenir votre appareil en bon état de
fonctionnement
Certaines limitations s’appliquent. Pour plus de
renseignements concernant les contrats d’entretien de Sears
Canada, composer le 1-800-361-6665.
GARANTIE DE
LA LAVEUSE
KENMORE ELITE®
Garantie limitée à vie sur le tambour en acier inoxydable
Pour la durée de vie de la laveuse à partir de la date d’achat,
Sears remplacera le tambour de lavage en acier inoxydable par
suite de vice de matériau ou de fabrication. Les coûts de maind’oeuvre vous seront imputés après la première année.
Garantie limitée de 10 ans sur la cuve de plastique*
À partir de la deuxième jusqu’à la dixième année inclusivement à
compter de la date d’achat, Sears remplacera la cuve de
plastique s’il existe un vice de matériau ou de fabrication. Après
un an, les frais de main-d’oeuvre vous seront facturés.
Garantie limitée de 5 ans sur les composants de la boîte
d’engrenages*
À partir de la deuxième jusqu’à la cinquième année inclusivement
à compter de la date d’achat, Sears remplacera toute pièce de la
boîte d’engrenages qui s’avérera défectueuse à cause d’un vice
de matériau ou de fabrication. Après un an, les frais de maind’oeuvre vous seront facturés.
Garantie limitée de 2 ans sur le tableau de commande
SENSOR SMART™
Pour une période de deux ans à compter de la date d'achat,
Sears remplacera le tableau de commande SENSOR SMART'^'^
s'il comporte un vice de matériau ou de fabrication. Les frais de
main-d'oeuvre vous seront facturés après la première année.
Garantie complète de 1 an sur les composants
mécaniques et électriques
Pendant un an, à compter de la date d'achat, si la laveuse est
installée et utilisée conformément aux instructions qui
l’accompagnent, Sears réparera ou remplacera tout composant
mécanique ou électrique qui s’avérera défectueux à cause d’un
vice de matériau ou de fabrication.
Le service doit être fourni par un service d’entretien Sears aux
États-Unis ou au Canada ou par un agent autorisé.
Restriction des garanties
Si la laveuse est utilisée autrement que dans une utilisation
tamiliale, la garantie ci-dessus ne demeure en vigueur que
pendant 90 jours à compter de la date d'achat.
43
Page 44

Service sous garantie
Pour obtenir le service sous garantie, contacter le Centre de
service Sears le plus proche aux États-Unis ou au Canada. La
présente garantie n'est valide que pendant que cette laveuse est
utilisée aux États-Unis ou au Canada.
Cette garantie vous donne des droits juridiques spécifiques et
vous pourriez avoir d’autres droits qui pourraient varier d’un État
à un autre ou d’une province à une autre.
Pour obtenir des informations sur la garantie Sears ou pour
contacter un Centre de service Sears, veuillez consulter les
numéros de service indiqués au dos de la couverture de ce
manuel.
Sears, Roebuck and Co.,
Hoffman Estates, IL 60179
*Une garantie différente peut être offerte au Canada.
Enregistrement du produit
Dans l’espace ci-dessous, inscrire vos numéros de modèle et de
série complets et la date d'achat. Vous trouverez ces numéros
sur la plaque signalétique tel qu’indiqué.
Ayez ces renseignements à la portée de la main pour obtenir une
assistance ou un service rapide lorsque vous contactez Sears à
propos de votre appareil ménager.
Numéro de modèle 110.
Numéro de série
Date d’achat,
Conservez ces instructions et ie reçu de vente pour
référence uitérieure.
____ ______________
D/817WA,
Sears Canada Inc.,
Toronto, Ontario,
Canada MSB 2B8
______________________________________
______________
GARANTIE DE L’OPTION DE
PIÉDESTAL
Garantie de un an sur les pièces mécaniques
Pendant une année à partir de la date d'achat, le fournisseur
réparera ou remplacera toute pièce mécanique qui devient
défectueuse à cause d'un vice de matériau ou de main-d'oeuvre.
Ce piédestal doit être installé avec cette laveuse conformément
aux instructions fournies dans le guide d'installation du piédestal.
Restriction de la garantie
Si le piédestal est soumis à tout autre usage que pour l’usage
privé d’une famille et/ou si le piédestal est utilisé avec tout autre
produit que ceux qui sont indiqués dans les instructions
d’installation, la garantie ci-dessus est nulle et sans valeur.
Enregistrement du produit
Dans l’espace ci-dessous, Inscrivez le numéro de modèle, le
numéro de série et la date d’achat au complet. Vous pouvez
trouver ces renseignements sur l’étiquette des numéros de
modèle et de série.
Garder ces renseignements disponibles pour vous aider à obtenir
rapidement une assistance ou un service lorsque vous contactez
Sears au sujet de votre support.
Numéro de modèle 110.
Numéro de série_
Date d’achat
Conservez ces instructions et votre reçu de vente pour
référence future.
____
______________________________________
44
Page 45

SECURITE DE LA LAVEUSE
Votre sécurité et celle des autres est très importante.
Nous donnons de nombreux messages de sécurité importants dans ce manuel et sur votre appareil ménager. Assurez-vous de
toujours lire tous les messages de sécurité et de vous y conformer.
Voici le symbole d'alerte de sécurité.
Ce symbole d’alerte de sécurité vous signale ies dangers potentiels de décès et de blessures graves à vous
et à d’autres.
Tous les messages de sécurité suivront ie symbole d’alerte de sécurité et le mot “DANGER” ou
“AVERTISSEMENT’. Ces mots signifient :
Risque possible de décès ou de blessure grave si vous ne
l
AAVERTISSEMEN
Tous les messages de sécurité vous diront quel est le danger potentiel et vous disent comment réduire ie risque de blessure et
ce qui peut se produire en cas de non-respect des instructions.
ADANGER
I
J
IMPORTANTES INSTRUCTIONS DE SÉCURITÉ
AVERTISSEMENT ; Pour réduire les risques d’incendie, de choc électrique ou de blessures lors de l’utilisation de la
laveuse, suivre les précautions fondamentales dont les suivantes :
suivez pas immédiatement les instructions.
Risque possible de décès ou de blessure grave si vous
ne suivez pas les instructions.
Lire toutes les instructions avant d’utiliser la laveuse.
Ne pas laver des articles qui ont été nettoyés ou
lavés avec de l’essence ou imbibés d’essence,
solvants de nettoyage à sec, ou autres substances
inflammables ou explosives; ces substances
peuvent émettre des vapeurs susceptibles de
s’enflammer ou d’exploser.
Ne pas ajouter d’essence, solvant de nettoyage à
sec ou autre produit inflammable ou explosif dans
l’eau de lavage. Ces substances peuvent émettre
des vapeurs susceptibles de s’enflammer ou
d’exploser.
Dans certaines conditions, de l’hydrogène gazeux
peut se former dans un circuit d’eau chaude qui n’a
pas été utilisé pendant 2 semaines ou plus. LE GAZ
HYDROGÈNE EST EXPLOSIBLE. Si le circuit d’eau
chaude n’a pas été utilisé pendant une telle période,
avant d’utiliser la laveuse, ouvrir tous les robinets
d’eau chaude et laisser l’eau s’écouler pendant
plusieurs minutes par chaque robinet. Ceci
permettra l’évacuation de l’hydrogène gazeux
accumulé. Comme ce gaz est inflammable, ne pas
fumer ou utiliser une flamme nue au cours de cette
période.
CONSERVEZ
Ne pas laisser des enfants jouer sur ou à l’intérieur de la
laveuse. Bien surveiller les enfants lorsque la laveuse est
utilisée à proximité d’enfants.
Avant de mettre la laveuse au rebut ou hors de service,
enlever la porte ou le couvercle.
Ne pas tenter d’atteindre un article à l’intérieur de la cuve de
la laveuse lorsque le tambour, la cuve ou l’agitateur est en
mouvement.
Ne pas installer ou remiser cette laveuse à un endroit où elle
serait exposée aux intempéries.
Ne pas modifier les organes de commande.
Ne pas réparer ou remplacer un composant quelconque de
la laveuse, ni entreprendre une opération de service, si ce
n’est spécifiquement recommandé dans ce manuel ou dans
un manuel d’instructions de réparations destiné à l’utilisateur;
il est alors essentiel que la personne concernée comprenne
ces instructions et soit compétente pour les exécuter.
Voir “Spécifications électriques” pour les instructions de
liaison à la terre.
CES INSTRUCTIONS
45
Page 46

EXIGENCES D’INSTALLATION
Rassembler les outils et pièces nécessaires avant de commencer
l’installation. Les pièces fournies se trouvent dans le tambour de
la laveuse.
Outils nécessaires pour raccorder les tuyaux d’arrivée
d’eau
■ Pinces (ouverture jusqu’à Wie" [39,5 mm])
■ Lampe de poche (facultative)
Outils nécessaires pour l’installation
■ Clé piate de 17 mm et de 13 mm
■ Niveau
■ Bloc de bois
■ Règle ou ruban à mesurer
Pièces fournies :
O
C o u rro ie p e r lée B o u chon d u trou du
Autres pièces
Les pièces indiquées sont disponibles à votre magasin Sears
local ou du centre de service Sears. Pour obtenir plus de
renseignements, veuillez composer le
(1-800-469-4663).
Si vous avez Il faudra acheter
bo u lon d e tra nsp o r t (4 )
1-800-4-MY-HOME®
Piédestal
Vous avez la possibilité d'acheter un piédestal pour cette
laveuse. Cela ajoutera à la hauteur totale de votre laveuse.
Ce piédestal (avec tiroir de rangement) est disponible en trois
couleurs.
Pour commander, appeler le magasin Sears local. Pour plus
d’informations, veuillez composer le 1-800-4-MY-HOME®
(1-800-469-4663).
Hauteur du
piédestal
13" (33 cm) 51" (130 cm) Blanc 42842
13" (33 cm) 51" (130 cm) Bisque 42844
13" (33 cm) 51" (130 cm) Graphite 42846
Hauteur
approximative
avec laveuse
Couleur Numéro
de pièce
Évier de buanderie
ou tuyau de rejet à
l’égout plus haut
que 96" (2,4 m)
Égout surélevé Évier de vidange standard de 20 gai
Vidange au
plancher
Tuyau de vidange
trop court
Robinets d’eau
éloignés du tuyau
d’entrée d’eau
Système de pompe de puisard (si non
déjà disponible)
(76 L) et de 30" (76,2 cm) de hauteur ou
évier utilitaire et pompe de puisard
(disponibles de votre fournisseur local
d’articles de plomberie)
Brise-siphon, pièce n° 285834; tuyau de
vidange additionnel, pièce n° 8318155;
et trousse de connexion,
pièce n° 285835
Trousse de rallonge de tuyau
d’écoulement de 4 pi (1,20 m),
pièce n° 285863
2 tuyaux plus longs de remplissage
d’eau ;
6 pi (1,8 m) pièce m 76314,
10 pi (3,0 m) pièce n° 350008
Ensemble de superposition
Prévoyez-vous superposer votre laveuse et votre sécheuse
Kenmore? Pour ce faire, vous trouverez l’ensemble de
superposition (8541503) dans ie tambour de la sécheuse
Kenmore correspondante. Suivre les instructions incluses avec
cet ensemble.
46
Page 47

Le choix d’un emplacement approprié pour la laveuse en
améliore le rendement et réduit au minimum le bruit et le
“déplacement” possible de la laveuse.
La laveuse peut être installée sous un comptoir sur mesure, dans
un sous-sol, une salle de buanderie, un placard ou un
encastrement. Voir “Système de vidange”.
Les exigences d’un emplacement pour les appareils connexes
doivent être également considérées. Il vous incombe d’assurer
une installation appropriée.
Il vous faudra
■ Un chauffe-eau pour fournir de l’eau à 120°F (49“C) à la
laveuse.
■ Une prise électrique reliée à la terre située à moins de
6 pi (1,8 m) de la prise du cordon électrique se trouvant à
l’arrière de la laveuse. Voir “Spécifications électriques”.
■ Des robinets d’eau chaude et d’eau froide situés à moins de
4 pi (1,2 m) des robinets de remplissage d’eau chaude et
d'eau froide, et une pression d'eau de 20-100 Ib/po®
(137,9-689,6 kPa).
■ Un plancher à niveau ayant une pente maximale de
1 " (2,5 cm) sous toute la laveuse. L’installation de la laveuse
sur des surfaces molles telles que de la moquette ou un
revêtement de sol avec coussinet de mousse n'est pas
recommandée.
■ Un plancher robuste et solide pour supporter la laveuse dont
le poids total (eau et charge) est de 400 Ib (180 kg).
Ne pas faire fonctionner la laveuse à des températures au-
dessous de 32°F (0°C). Une quantité d’eau peut demeurer dans
la laveuse et causer des dommages à des températures basses.
Espacements d'installation
■ L'emplacement doit être assez grand pour permettre d'ouvrir
complètement la porte de la laveuse.
■ On doit prévoir un peu plus d'espace pour faciliter
l'installation et l’entretien.
■ Un espace supplémentaire peut être requis pour les moulures
de porte et de murs ainsi que pour les plinthes.
■ Un espace supplémentaire de 1 " (2,5 cm) de tous les côtés
de la laveuse est recommandé pour réduire le transfert du
bruit.
■ Il faut aussi tenir compte de l'espace requis pour des
appareils connexes.
Espacement recommandé pour une installation
personnalisée sous un comptoir
Les dimensions indiquées sont pour l'espacement recommandé.
Installation personnalisée sous un comptoir - laveuse
seulement
Espacement recommandé pour une installation dans un
encastrement ou dans un placard, avec ou sans support
Les dimensions indiquées sont pour l'espacement recommandé.
Installation dans un encastrement ou placard
48 po^
(310 cm 2;
24 po^ *
(155 cm^
11" K31%"^l 4"h<-
(2,5 cm)(80cm)(10,2 cm)
A . Vue la t é r a le - p lacard ou end ro it e x igu
B . Porte d e pla c a r d a v e c o r ifices d'e n tré e d 'a ir
Installation dans un encastrement ou placard - laveuse sur support
Dimensions de la laveuse
A B
A , E n c a s t re m e n t
B . V u e latérale - p lacard ou endroit ex igu
47
Page 48

Espaœment recommandé pour une installation dans un
encastrement ou dans un placard, avec une laveuse et
une sécheuse superposées
Les dimensions indiquées sont pour l'espacement recommandé.
La laveuse peut être installée en utilisant le système de rejet à
l’égout (au plancher ou mural), le système de vidange de l'èvier
ou le système de vidange au plancher. Sélectionner la méthode
d’installation du tuyau de vidange selon les besoins. Voir
“Outillage et pièces”.
Système de rejet à l’égout - mural ou au plancher
{Vues A et B)
Le système de rejet à l'égout nécessite un tuyau de diamètre
minimum de 2" (5 cm). La capacité minimale d'acheminement ne
doit pas être de moins de 17 gai (64 L) par minute.
Le sommet du tuyau de vidange doit être d’au moins
30" (76,2 cm) de haut et au maximum à 96" (2,4 m) de la base de
la laveuse.
"O rifices d’e n tré e d ’a ir m in . sup é rieurs e t
in fé rie u r s p o u r p o rte de pla c a rd.
"Esp a c e su p p ié m e ntair e n é c e s s a ir e p o u r cou d e
d’évacu a tion extern e.
* U n espace sup p lém e n ta ire p eut ê tre n é c e ssair e
po u r le s m o ulu res d e m ur, d e p o r te et les
plin th e s .
Espacement recommandé pour l'installation de la caisse
Les dimensions indiquées sont pour l'espacement recommandé.
Pour installation de la caisse avec porte, on doit prévoir des
ouvertures minimum d'entrée d'air au sommet de la caisse.
r (17,8 cm) 7" (i7_8 cm)
Système de vidange de l’évier de buanderie (Vue A)
L’évier de buanderie doit avoir une capacité minimale de 20 gai
(76 L). Le sommet de l’évier doit être à au moins 30" (76,2 cm)
au-dessus du plancher.
Système de vidange au plancher (Vue B)
Le système de vidange au plancher exige un brise-siphon qui
peut être acheté séparément. Voir “Outillage et pièces”.
Le brise-siphon doit être à un minimum de 28'' (71 cm) de la base
de la laveuse. D’autres tuyaux peuvent être requis.
, g"
r (22,9 cm)
48
(10,2 cm) (^,0cm) (2,5 cm) (2,6 cm) (68,6 cm) (2,5 cm)
Page 49

A AVERTISSEMENT
Si les codes le permettent et si un conducteur distinct de
mise à la terre est utilisé, il est recommandé qu’un électricien
qualifié détermine que la liaison à la terre est adéquate.
Ne pas effectuer de liaison à la terre sur une canalisation de
gaz.
En cas de doute concernant la qualité de la liaison à la terre
de la laveuse, vérifier auprès d’un électricien qualifié.
Ne pas utiliser un fusible dans le circuit neutre ou de liaison à
la terre.
Risque de choc électrique
Brancher sur une prise à 3 alvéoles reliée à la terre.
Ne pas enlever la broche de liaison à la terre.
Ne pas utiliser un adaptateur.
Ne pas utiliser un câble de rallonge.
Le non-respect de ces instructions peut causer
un décès, un incendie ou un choc électrique.
Une alimentation électrique de 120 volts, 60-Hz, CA
seulement, de 15 ou 20 ampères, protégée par un fusible est
requise. Un fusible temporisé ou disjoncteur est
recommandé. Il est recommandé d’utiliser un circuit distinct
pour alimenter seulement cet appareil.
Cette laveuse est dotée d’un cordon d'alimentation avec
fiche de branchement à 3 trois broches pour liaison à la terre.
Pour minimiser le risque de choc électrique, le cordon doit
être branché sur une prise de courant de configuration
correspondante (3 alvéoles) reliée à la terre, conformément
aux codes et règlements locaux. Si une prise de configuration
correspondante n’est pas disponible, c’est au client
qu’incombe la responsabilité et l’obligation personnelle de
faire installer par un électricien qualifié une prise
convenablement mise à la terre.
INSTRUCTIONS DE LIAISON À LA TERRE
Pour une laveuse reliée à la terre et connectée par
un cordon :
Cette laveuse doit être reliée à la terre. En cas d’anomalie
de fonctionnement ou de panne, la liaison à la terre réduira
le risque de choc électrique en offrant au courant électrique
un itinéraire d’évacuation de moindre résistance. Cette
laveuse est alimentée par un cordon électrique comportant
un conducteur relié à la terre et une fiche de branchement
munie d'une broche de liaison à la terre. La fiche doit être
branchée sur une prise de courant appropriée qui est bien
installée et reliée à la terre conformément à tous les codes
et règlements locaux.
AVERTISSEMENT : Le raccordement incorrect de cet
appareil au conducteur de liaison à la terre peut susciter un
risque de choc électrique. En cas de doute quant à la qualité
de la liaison à la terre de l’appareil, consulter un électricien
ou technicien d’entretien qualifié.
Ne pas modifier la fiche de branchement fournie avec
l’appareil ” si la fiche ne correspond pas à la configuration
de la prise de courant, demander à un électricien qualifié
d’installer une prise de courant convenable.
Pour une laveuse raccordée en permanence :
Cette laveuse doit être raccordée à un système de câblage
permanent en métal relié à la terre ou un conducteur relié à
la terre doit être en fonction avec les conducteurs de circuit
et raccordés à la borne de liaison à la terre ou la borne sur
l’appareil ménager.
49
Page 50

INSTRUCTIONS D’INSTALLATION
U
IMPORTANT : Positionner la laveuse de sorte que l’arrière de la
machine soit à environ 3 pi (90 cm) de l’emplacement final.
On trouve sur le panneau arrière de la laveuse 4 boulons qui
supportent le système de suspension durant le transport. Ces
boulons retiennent également le cordon d'alimentation à
l'intérieur de la laveuse jusqu'à ce qu'on les enlève.
1. Au moyen d’une clé de 13 mm, desserrer chacun des
A AVERTISSEMENT
Risque du poids excessif
Utiliser deux ou plus de personnes pour déplacer et
installer la laveuse.
Le non-respect de cette instruction peut causer une
blessure au dos ou d'autre blessure.
boulons.
2. Une fois le boulon desserré, le déplacer au centre du trou et
le retirer complètement, y compris la cale d’espacement en
plastique couvrant le boulon.
Connecter les tuyaux d'alimentation aux robinets d'eau
S'assurer que le tambour de la laveuse est vide.
1.
Raccorder le tuyau à indicateur rouge à la valve du tuyau
d'alimentation d’eau chaude (à gauche). Le fait d'attacher
d'abord le tuyau à raccord rouge permet de resserrer plus
facilement la connexion avec les pinces. Visser
complètement le raccord à la main pour qu'il comprime le
joint.
2.
Raccorder le tuyau à indicateur bleu à la valve du tuyau
d'alimentation d’eau froide (à droite). Visser complètement le
raccord à la main pour qu’il comprime le joint.
3.
À l'aide d'une pince, vérifier l'étanchéité des raccords de
tuyaux déjà reliés à la laveuse.
REMARQUE : Ne pas serrer excessivement. Le raccord
risque d’être endommagé.
4.
Raccorder le tuyau à indicateur rouge au robinet d’eau
chaude. Visser complètement le raccord à la main pour qu’il
comprime le joint.
5.
Raccorder le tuyau à indicateur bleu au robinet d’eau froide.
Visser complètement le raccord à la main pour qu’il
comprime le joint.
6.
Terminer le serrage des raccords en effectuant deux tiers de
tour avec une pince.
3. Lorsque les 4 boulons sont retirés, les jeter, ainsi que les
cales d'espacement. Ensuite, tirer le cordon d'alimentation
par l'ouverture du panneau arrière et boucher le trou avec le
cache fixé.
4. Obturer les trous avec les 4 bouchons des boulons de
transport.
REMARQUE : Si la I aveuse doit être transportée plus tard,
appeler le centre de service local. Afin d'éviter tout
endommagement de la suspension et de la structure, votre
machine doit d’abord être correctement installée pour être
ensuite déplacée par un technicien certifié.
50
REMARQUE : Ne pas serrer excessivement. Le raccord
risque d’être endommagé.
7.
Ouvrir les robinets d’eau et vérifier s’il y a des fuites.
REMARQUE : Remplacer les tuyaux d’arrivée d’eau après
5 ans d’utilisation pour réduire le risque de défaillance
intempestive. Prendre note de la date d’installation ou de
remplacement des tuyaux d’arrivée d’eau, pour référence
ultérieure.
Inspecter périodiquement les tuyaux; les remplacer en cas de
renflement, de déformations, de coupures, d’usure ou si une
fuite se manifeste.
Page 51

Le bon acheminement du tuyau de vidange protège vos
planchers contre les dommages imputables à une fuite d’eau.
Lire et suivre attentivement ces instructions.
Le tuyau de vidange est raccordé à ia laveuse.
Pour empêcher l’eau de vidange de refluer dans la laveuse :
■ Ne pas redresser le tuyau de vidange ni forcer l’excédent de
tuyau dans le tuyau de rejet à l’égout. Le tuyau doit être bien
immobilisé, tout en permettant le passage d’air.
■ Ne pas mettre l'excédent du tuyau de vidange au fond de
l'évier de buanderie.
Égout au plancher
li vous faudra peut-être des pièces supplémentaires. Voir
Vidange au plancher dans “Outillage et pièces”.
1. Faire passer le cordon d’alimentation par-dessus la laveuse.
2. Fixer le tuyau de vidange au pied de l’évier de buanderie ou
au tuyau rigide de rejet à l’égout avec la courroie perlée. (Voir
les illustrations A et B.)
Si la laveuse est contre un mur, la déplacer légèrement avant
de l’incliner vers l’arrière. Si la laveuse n’est pas d’aplomb,
soulever d’abord l'avant avec un bloc de bois et ajuster le
déploiement des pieds selon le besoin, puis soulever l’arrière
et ajuster le déploiement des pieds selon le besoin. Répéter
ceci jusqu’à l’aplomb parfait de la laveuse.
S'assurer que les quatre pieds de nivellement sont bien
stables et en contact avec le sol. Puis vérifier que l'appareil
est parfaitement d'aplomb (à l'aide d'un niveau).
Après avoir réglé l’aplomb de la laveuse, utiliser une clé plate
de 17 mm pour visser les écrous sur les pieds fermement
contre la caisse de la laveuse.
IMPORTANT : Les 4 pieds doivent être bien serrés. Si les
écrous ne sont pas bloqués contre la caisse de la laveuse, la
laveuse peut vibrer.
La machine ne doit bouger ni d'avant en arrière, ni
transversalement ou en diagonale, lorsque l'on pousse sur
les bords de la plaque supérieure.
Faire glisser la laveuse à son emplacement final.
Confirmer l’aplomb de la laveuse.
Consulter les spécifications électriques. Vérifier que la
tension électrique disponible est correcte et que la prise de
courant est convenablement reliée à la terre, ’^oir
“Spécifications électriques”.
Vérifier que toutes les pièces sont installées. S’il reste une
pièce, passer en revue les différentes étapes pour découvrir
laquelle aurait été oubliée.
S’assurer d’avoir tous les outils.
Jeter ou recycler tout le matériel d’emballage.
Vérifier que chaque robinet d’arrivée d’eau est ouvert.
Vérifier s’il y a des fuites autour des robinets et des tuyaux
d’arrivée d’eau.
Si les robinets d’eau et le tuyau rigide de rejet à l’égout sont
placés en retrait (voir l’illustration C), introduire l’extrémité en
col de cygne du tuyau de vidange dans le tuyau rigide de
rejet à l’égout. Attacher fermement les tuyaux d’arrivée d’eau
et le tuyau de vidange ensemble, avec la courroie perlée.
Ne pas forcer l’excédent du tuyau de vidange dans le tuyau rigide
de rejet à l’égout.
Un bon aplomb de la laveuse minimisera le bruit et les vibrations.
1. Vérifier l’aplomb en plaçant un niveau sur le bord supérieur
de la laveuse, transversalement, puis dans le sens avant
arrière.
A AVERTISSEMENT
Risque de choc éiectrique
Brancher sur une prise à 3 alvéoles reliée à la terre.
Ne pas enlever la broche de liaison à la terre.
Ne pas utiliser un adaptateur.
Ne pas utiliser un câble de rallonge.
Le non-respect de ces instructions peut causer
un décès, un incendie ou un choc électrique.
7. Brancher sur une prise à 3 alvéoles reliée à la terre.
8. Lire “Utilisation de la laveuse”.
9. Pour tester et nettoyer la laveuse, mesurer la moitié de la
quantité normale recommandée de détergent en poudre ou
liquide Haute efficacité (HE). Verser le détergent dans le
distributeur de détergent. Sélectionner NORMAL/CASUAL
(Normal/tout-aller), puis START (Mise en marche). Laisser la
machine exécuter un programme complet.
51
Page 52

CARACTERISTIQUES ET AVANTAGES
Commandes électroniques SENSOR SMART^'^
Les commandes électroniques flexibles sont faciles à utiliser que
vous soyez un novice ou un expert.
Distributeurs intelligents
Les distributeurs intelligents rendent votre laveuse vraiment
automatique. Cette laveuse fournit un distributeur à trois
compartiments qui comprend des compartiments séparés pour
le détergent, l’assouplissant de tissu, et l’eau de Javel. Le
distributeur comporte de grandes zones de versement, est
autonettoyant et peut être facilement retiré. Les produits de
lessive sont dilués à l’eau fraîche et ajoutés à la charge au
moment approprié durant le programme de lavage.
Niveau d’eau automatique
Cette caractéristique qui s’ajuste en fonction du volume de la
charge, permet à la laveuse d’utiliser la quantité d’eau minimale
nécessaire pour nettoyer et rincer les vêtements. Avec un niveau
d’eau bas, vous pouvez obtenir les mêmes résultats avec de plus
petites quantités d’additifs. Parce qu’elle n’utilise que la quantité
d’eau requise, la laveuse économise aussi de l’énergie.
Action de nettoyage CATALYST® à injection directe
Une solution concentrée de détergent est aspergée sur les
vêtements au début du programme de telle sorte que le
détergent entre en contact avec les vêtements le plus rapidement
possible et enlève les taches de vos vêtements sans
prétraitement.
Charges plus grosses
Comme il n’y a pas d’agitateur, vous pouvez laver des articles
plus gros et plus épais tel qu’un sac de couchage de grandeur
moyenne. Vous pouvez aussi laver plus de vêtements à la fois, ce
qui veut dire moins de charges. Vous pouvez laver un oreiller ou
un gros ourson rembourré.
Système de suspension
Pour réduire le “déplacement" de la laveuse et les conditions de
“déséquilibre”, votre nouvelle laveuse combine :
■ 2 ressorts pour isoler la vibration
■ 4 amortisseurs de choc à la base de la laveuse pour
minimiser le mouvement.
Tambour en acier inoxydable
Le tambour en acier inoxydable élimine la corrosion et permet
des vitesses d’essorage plus élevées pour une extraction plus
forte d'eau ce qui réduit le temps de séchage.
Moteur adaptatif à vitesse variable
Le moteur s’adapte au volume de la charge et au programme
choisi pour donner les meilleures conditions de nettoyage,
rinçage et essorage. Le moteur peut tourner aux vitesses lentes
nécessaires pour les lainages et articles délicats, mais il est assez
puissant pour essorer une charge volumineuse à 1050 tr/min.
Système de lavage à haute efficacité
Votre nouvelle laveuse à haute efficacité à chargement à l’avant
fait économiser du temps grâce à des charges moins
nombreuses et plus grosses, conserve les ressources et diminue
vos frais d’eau et d’énergie.
Vitesses d’essorage
Cette laveuse choisit automatiquement la vitesse d’essorage en
fonction du programme choisi. Toutefois, ce réglage en usine
peut être changé. Cette laveuse offre jusqu’à cinq choix de
vitesses différentes d’essorage.
Commande automatique de la température (CAT)
CAT détecte électroniquement et maintient une température
d’eau uniforme. La CAT régule l'entrée d'eau chaude et d'eau
froide. La CAT est automatiquement activée lorsqu’un
programme est sélectionné.
Ajouter un vêtement (Add A Garment)
Lorsque cette option est disponible au début du programme, le
témoin lumineux Add A Garment s'allume pendant les
8 premières minutes. Avec cette laveuse, on dispose d'une
période de 8 minutes pendant laquelle les vêtements oubliés
peuvent être ajoutés à la charge.
Équilibre dynamique
Un système d’équilibrage de précision qui permet à la laveuse
d'atteindre une vitesse d’essorage de 1050 tr/min. La laveuse
tourne plus rapidement de telle sorte que les vêtements essorés
sécheront plus rapidement. De plus, si le système d’équilibre
dynamique détecte une charge déséquilibrée durant l’essorage, il
redistribue les vêtements pour rétablir l’équilibre.
52
Page 53

UTILISATION DE LA LAVEUSE
A AVERTISSEMENT
M
Risque d’incendie
Ne jamais mettre des articles humectés d’essence ou
d’autres fluides infiammables dans la laveuse.
Aucune laveuse ne peut complètement enlever l’huile.
Ne pas faire sécher des articles qui ont été salis par
tout genre d’huile (y compris les huiles de cuisson).
Le non-respect de ces instructions peut causer un
décès, une explosion ou un incendie.
AVERTISSEMENT : Pour réduire le risque d'incendie, de choc
électrique ou de blessures corporelles, lire les INSTRUCTIONS
IMPORTANTES DE SÉCURITÉ avant de faire fonctionner cet
appareil.
Le texte suivant est un guide pour l’utilisation de votre laveuse.
Se référer aux sections spécifiques de ce manuel pour des
renseignements plus détaillés.
Ne pas remiser des produits de lessive sur le dessus de cette
laveuse. La vibration est normale au cours du fonctionnement.
Premier programme de lavage sans linge à laver
Avant de laver le linge pour la première fols, choisir le programme
Normal/Casual (Normal/tout-aller) et l'exécuter sans linge. Utiliser
la moitié de la quantité normale recommandée de détergent à
haute efficacité (HE) en poudre ou liquide. Le programme initial
sert à assurer que l'intérieur est propre avant de laver le linge.
linge d'après la couleur et le type de tissu. Placer une charge
de linge trié dans la laveuse. Ne pas surcharger la laveuse.
Une charge excessive peut causer un nettoyage médiocre.
■ La laveuse peut être bien remplie mais le linge ne doit pas
être tassé. La porte de la laveuse devrait se fermer
facilement.
■ Mélanger les gros articles avec les petits articles. Ne pas
laver un seul article à la fois. Charger la laveuse
uniformément.
■ Il est recommandé de laver de petits articles tels que les
chaussettes d’enfants dans un sac en filet pour le linge. Il
est recommandé d’utiliser plus d’un sac de linge et de
remplir chaque sac avec des quantités similaires.
■ Lorsqu’on enlève le linge, vérifier occasionneilement sous
le rebord en caoutchouc à l’avant de la cuve pour repérer
les petits articles.
2. Fermer la porte de la laveuse en la poussant fermement
jusqu’à ce que le verrou s’enclenche. La porte de la laveuse
demeurera verrouillée durant le programme de lavage.
REMARQUE : Lorsque tout programme de lavage est
achevé, la porte doit être ouverte et ensuite fermée avant
qu’un nouveau programme puisse commencer. La porte peut
être ouverte seulement si la touche PAUSE/CANCÉL (Pause/
annulation) est choisie lorsque le témoin lumineux ADD A
GARMENT (ajouter un vêtement) s’illumine ou si le
programme a été annulé. Voir “Pour annuler un programme.’’
3. Ouvrir le tiroir distributeur et ajouter les produits de lessive au
compartiment de détergent, d’eau de Javel ou
d’assouplissant de tissu. Fermer le tiroir lentement pour éviter
les renversements. Voir “Utilisation du distributeur”.
REMARQUE : Pour le meilleur rendement, utiliser des
détergents à haute efficacité. Le contenant pour ce type de
détergent sera marqué “HE” ou “Haute efficacité”. L’action de
lavage HE^t avec moins d’eau pourrait occasionner un excès
de mousse avec un détergent normal.
4. Mettre la laveuse en marche en choisissant l’un des
programmes de lavage. Le témoin lumineux pour le
programme choisi s’illuminera. Lors de la sélection d’un
programme de lavage, les options préréglées (la température
de l’eau, la vitesse d’essorage et le niveau de saieté)
s’ailumeront. L’affichage indique le temps restant estimé. Les
réglages préréglés fournissent le soin recommandé pour les
tissus pour le programme sélectionné. Voir “Programmes”.
53
Page 54

5. Choisir los OPTIONS désirées. Toutes les options ne sont pas
disponibles avec tous les programmes. Voir “Options”.
6. Choisir ies MODIFIERS (modificateurs) désirés. Tous les
modificateurs ne sont pas disponibles avec tous les
programmes et toutes les options. Voir “Modificateurs”.
7. Si désiré, choisir END OF CYCLE SIGNAL (Signal de fin de
programme). Le signal est utile lorsqu’on lave des articles qui
devraient être enlevés de la laveuse dès qu’elle s’arrête.
Sélectionner ON (marche) ou OFF (arrêt).
8. Pour commencer immédiatement le programme de
lavage
Sélectionner et appuyer sur START (environ 1 seconde).
■ Si vous ne sélectionnez pas START moins de 5 minutes
après avoir choisi un programme, la laveuse s’arrêtera
automatiquement.
■ Lorsque le programme de lavage est achevé, le témoin
lumineux indiquant CLOTHES CLEAN (Linge propre)
s’illumine, la porte se déclenche et la charge de lavage
peut être retirée de la laveuse. La laveuse est désactivée
automatiquement 5 minutes après la fin d'un programme
et CLOTHES CLEAN (linge propre) s’éteint. Pour
désactiver la laveuse manuellement après la fin du
programme de lavage, sélectionner PAUSE/CANCEL
(Pause/annulation) une fois.
9. Pour commencer le programme de lavage plus tard
Sélectionner DELAY (Différé) jusqu’à ce que le délai désiré (en
heures) apparaisse sur l'afficheur du temps restant estimé.
Appuyer sur START. Le compte à rebours avant le
programme de lavage sera indiqué sur l’afficheur.
Cette laveuse comporte un tiroir distributeur avec trois
compartiments séparés pour vos produits de lessive — un pour
le détergent, un pour l’eau de Javel et un autre pour
l’assouplissant de tissu liquide. Les produits de lessive sont
dilués et distribués automatiquement au moment approprié
durant le programme de lavage, ce qui évite à l’utilisateur de
retourner à la laveuse durant le programme pour ajouter ces
produits.
Il est normal que de petites quantités d’eau demeurent dans les
distributeurs lorsque le programme de lavage est achevé.
Ne pas placer d’additifs de lessive directement dans la cuve de
lavage. Toujours utiliser les distributeurs appropriés lors de
l’addition de produits de lessive.
Choix du détergent approprié
Pour le meilleur rendement de lavage, utiliser un détergent à
haute efficacité (HE) ou à faible mousse.
Pour remplir les compartiments du distributeur
1. Tirer le tiroir distributeur.
2. Ajouter le produit de lessive désiré dans le compartiment
approprié.
3. Pousser complètement et avec précaution le tiroir
distributeur (pour éviter les renversements).
D
D istrib u te u r
A . Lev ier d e d ég a g e m en t du dis t rib uteu r
B . S é p a rate ur
C . C o m partim e n t p o u r d étergent
D . Co m p a r tim e nt p our eau de Javel
E. C o m p a rtim en t pou r assou p lis s a n t d e t issu
Compartiment pour détergent du lavage principal
(Lettre C dans l'illustration des compartiments)
Ajouter le détergent liquide ou en poudre HE à ce compartiment
pour votre programme de lavage. Le séparateur de détergent doit
toujours être en place en avant ou en arrière.
■ Programme différé : Utiliser seulement des détergents en
poudre. Les détergents en poudre demeureront dans le
distributeur jusqu'à ce que le programme commence, mais
les détergents liquides peuvent couler hors du compartiment
durant le temps différé.
■ Ne pas remplir au-delà du niveau “MAX”.
■ De l’eau de Javel liquide ou en poudre sans danger pour les
couleurs, peut être ajoutée au compartiment pour détergent
du lavage principal avec le même type de détergent, liquide
ou en poudre.
■ Détergent liquide : Placer le SÉPARATEUR à la position avant,
entre les guides, tel qu’illustré ci-après. Il n’y aura pas d’écart
entre le fond du compartiment pour détergent du cycle de
lavage et la base du séparateur.
UQUi
SO
54
S é p a rate ur e n position ava n t , entre les guides
A . S é parateur
B . G u id e
Page 55

Détergent en poudre : Placer le SÉPARATEUR à la position
arrière, derrière les guides, tel qu’illustré ci-après. Il y aura un
écart entre le fond du compartiment pour détergent du cyole
de lavage et le fond du séparateur.
LIQUI
S é p a rate ur à la po s itio n arriè r e ,
de rriè r e les g uid es
A , S é parateur
B . G u id e
REMARQUE : Le séparateur est expédié de l'usine en position
poudre (arriére).
Compartiment pour eau de Javel
(Lettre D dans rillustration des distributeurs)
Ne PAS ajouter PLUS DE Vs tasse (80 mL) d’eau de Javel dans ce
compartiment. L’eau de Javel sera automatiquement diluée et
distribuée au moment approprié durant le premier rinçage après
le programme de lavage. Ce compartiment ne peut pas diluer un
agent de blanchiment en poudre.
■ Toujours mesurer l’eau de Javel. Utiliser une tasse à mesurer
avec un bec verseur et éviter l’à-peu-près.
■ Ne pas remplir au-delà du niveau “MAX”.
REMARQUE : Le remplissage excessif pourrait causer de
sérieux dommages aux vêtements.
Compartiment pour assouplissant de tissu
(Lettre E dans l’Illustration des distributeurs)
Ajouter V4 de tasse (60 mL) d'assouplissant de tissu liquide dans
ce compartiment. L’assouplissant sera automatiquement
distribué lors du rinçage final.
■ Ne pas remplir au-delà du niveau “MAX”.
SO
Pour annuler un programme et sélectionner un nouveau programme
1. Sélectionner PAUSE/CANCEL (Pause/annulation) deux fois.
2. Sélectionner le programme désiré.
3. Sélectionner les OPTIONS ou MODIEIERS (Modificateurs) désirés.
4. Sélectionner et appuyer sur START (environ 1 seconde) pour
remettre la laveuse en marche au commencement d’un
nouveau programme.
Pour annuler un programme
1. Sélectionner PAUSE/CANCEL (Pause/annulation) deux fois.
2. La laveuse est désactivée, la porte se déclenche et le linge
peut être enlevé.
REMARQUE : Si le niveau d’eau ou la température sont trop
élevés, la laveuse se vidangera automatiquement avant que la
porte se déclenche.
Pour changer les options ou modificateurs après le
commencement d’un programme
1. Sélectionner PAUSE/CANCEL (Pause/annulation).
2. Sélectionner les OPTIONS ou MODIFIERS (Modificateurs) désirés.
3. Sélectionner et appuyer sur START (environ 1 seconde) pour
continuer le programme.
Pour vidanger la laveuse manuellement
1.
Sélectionner PAUSE/CANCEL (Pause/annulation).
2.
Sélectionner DRAIN & SPIN (Vidange et essorage).
Sélectionner et appuyer sur START (environ 1 seconde) pour
3.
commencer la vidange.
4.
Lorsque l’essorage est achevé, la porte se déverrouille. Le
linge peut être enlevé de la laveuse.
Ces témoins lumineux montrent quelle portion du programme de
la laveuse est en cours. Ils indiquent aussi quand vous pouvez
ajouter un autre article au programme de lavage et quand les
commandes sont verrouillées.
STATUS
ADD A GARMENT •
PREVWSH»
Wash •
RINSE •
Spin •
Clothes Clean •
1. Pour faire une pause de la laveuse à tout moment,
sélectionner PAUSE/CANCEL (Pause/annulation).
2. Pour continuer le programme, sélectionner et appuyer sur
START (Mise en marche) (environ 1 seconde).
Les options et modificateurs ne sont pas tous disponibles avec
tous les programmes. Les programmes, options et modificateurs
peuvent être changés à tout moment avant que START (Mise en
marche) soit sélectionné.
Les options et les modificateurs peuvent être changés à tout
moment après que START (Mise en marche) a été sélectionné et
avant la mise en marche de l’option ou du modificateur
sélectionné.
CONTROL LOCKED •
Door Locked •
pouter un vêtement
Avec cette laveuse, on dispose d’une période de 8 minutes
pendant laquelle des vêtements oubliés peuvent être ajoutés à la
charge. On peut ajouter des articles à la laveuse après que le
programme a commencé si le témoin lumineux ADD A
GARMENT (Ajouter un vêtement) s’illumine.
Pour ajouter des articles
1. Sélectionner PAUSE/CANCEL (Pause/annulation). La porte de
la laveuse se déclenche et des articles peuvent être ajoutés.
2. Pour continuer le programme, fermer la porte et sélectionner
et appuyer sur START (environ 1 seconde).
3. Pour déverrouiller la porte après la période Add A Garment,
appuyer deux fois sur Pause/Cancel (Pause/annulation). Ceci
annulera le programme de lavage.
55
Page 56

Linge propre
Le témoin lumineux de linge propre reste allumé pendant 5 minutes
après la fin du programme. Puis la laveuse se désactivera.
Commandes de verrouillage
La commande de verrouillage empêche l’utilisation non
intentionnelle de la laveuse. Vous pouvez aussi utiliser la
caractéristique de commande de verrouillage pour empêcher un
programme non désiré ou des changements d’option au cours
d’un programme. Lorsque le témoin CONTROL LOCKED
(Commande verrouillée) est allumé, tous les boutons sont
désactivés, sauf Pause/Cancel (Pause/annulation) et Start (Mise
en marche). Vous pouvez verrouiller les commandes de la
laveuse pendant qu’elle est en fonctionnement.
Pour verrouiller les commandes
Sélectionner et appuyer sur DRAIN & SPIN (Vidange et essorage)
pendant 3 secondes.
C*
DRAIN & Spin
PRESS & HOLD 3
SECONDS TO LOCK /
UNLOCK CONTROl
Le témoin lumineux CONTROL LOCKED (Commande verrouillée)
s’allume.
Pour déverrouiller les commandes
Sélectionner et appuyer sur DRAIN & SPIN (Vidange et essorage)
pendant 3 secondes jusqu’à ce que le témoin lumineux
CONTROL LOCKED (Commande verrouillée) s’éteigne.
Door Lock (Verrouillage de la porte)
Lorsque le témoin est illuminé, la porte est verrouillée.
Temps restant estimé
Les durées des programmes varient selon la pression de l’eau, la
température de l’eau, le détergent et la charge de linge. La durée
du programme peut se prolonger en cas d’excès de mousse ou
de déséquilibre de la charge. L’action anti-mousse enlève le
surplus de mousse et garantit le rinçage adéquat de vos
vêtements. L’affichage du temps marquera une pause jusqu’à ce
que cette activité soit terminée, puis reprendra pour le reste du
programme.
■ Les réglages préréglés peuvent être changés en tout temps
avant que START (Mise en marche) ne soit sélectionné. Tous
les modificateurs ne sont pas disponibles avec tous les
programmes. Pour changer les réglages après que le
programme a été mis en marche, sélectionner PAUSE/
CANCEL (Pause/annulation), ensuite choisir les réglages
désirés. Sélectionner et appuyer sur START (environ
1 seconde) pour continuer le programme.
Préréglages des programmes
Chaque programme a un temps de programme, une température
de l’eau, et une vitesse d’essorage préréglés. Les réglages
préréglés fournissent les soins recommandés des tissus pour le
programme choisi. Voir tableau.
Programme Niveau
de
saleté
(hr:min)
Whitest Whites
(Blancs les plus
blancs)
Heavy Duty
(Service
intense)
Normal/Casual
(Normal/Tout-
aller)
Sanitary
(Sanitaire)
Handwash/
Delicate
(Lavage à la
main/Tissus
délicats)
Heavy
(Intense)
(1:00)
Heavy
(Intense)
(1:05)
Normal
(0:45)
Heavy
(Intense)
(2:00)
Normal
(0:35)
Température
de l’eau
Hot/Cold
(Chaude/
Lroide)
Hot/Cold
(Chaude/
Lroide)
Warm/Cold
(Tiède/Lroide)
Extra Hot/Cold
(Extra chaude/
Lroide)
Cold/Cold
(Lroide/Lroide)
Vitesse
d’essorage
High
(Élevée)
High
(Élevée)
High
(Élevée)
High
(Élevée)
Extra Low
(Très
basse)
Programmes de lavage
Choisir les programmes de lavage en sélectionnant le bouton à
côté du programme désiré. Chaque programme est conçu pour
des types différents de tissus et de niveaux de saleté.
Wash Cycles
Chaque programme comporte un niveau de saleté (durée du
programme), une température de l’eau, et une vitesse
d’essorage préréglés et peut également comporter des
options préréglées. Les réglages préréglés fournissent les
soins recommandés des tissus pour le programme choisi.
Rinse & Spin
(Rinçage et
essorage)
Drain & Spin
(Vidange et
essorage)
Whitest Whites (Biancs ies pius biancs)
Ce programme est spécialement conçu pour nettoyer des
charges de tissus blancs salis, avec l’addition d’eau de Javel. Les
températures de lavage à l’eau chaude assurent l’activité idéale
de l’eau de Javel. Un rinçage additionnel fournit un rendement
idéal de rinçage pour éviter les résidus de chlore sur votre linge.
Ce programme combine le culbutage à vitesse rapide, un temps
de lavage prolongé, et un essorage à vitesse élevée pour
raccourcir le temps de séchage.
Heavy Duty (Service intense)
Utiliser ce programme pour laver des charges de tissus épais,
de couleurs grand teint, et les vêtements très sales. Ce
programme combine un culbutage à vitesse rapide, un temps de
lavage prolongé, et un essorage à vitesse élevée pour raccourcir
les temps de séchage.
Normal
(0:20)
Normal
(0:12)
Cold/Cold
(Lroide/Lroide)
Cold/Cold
(Lroide/Lroide)
High
(Élevée)
High
(Élevée)
56
Page 57

Normal/Casual (Normal/Tout-aller)
Utiliser ce programme pour laver des charges de tissus
n’exigeant pas de repassage tels que chemises de sport,
chemisiers, vêtements tout-aller pour le bureau, mélanges de
textiles à pressage permanent, cotons et toiles, ainsi que tissus
synthétiques. Ce programme combine le culbutage à vitesse
moyenne, l’essorage à haute vitesse, et un procédé de
refroidissement de la charge pour réduire le froissement.
Sanitary (Sanitaire)
Utiliser ce programme pour nettoyer des tissus aux couleurs
grand teint très sales. Ce programme combine une température
de l'eau très chaude et un culbutage à vitesse élevée pour
garantir le retrait des taches intenses. Il est recommandé de
régler votre chauffe-eau sur 120°F (49°C) pour garantir le meilleur
rendement durant ce programme. Le programme sanitaire
aide également à éliminer 99,999% de 3 bactéries
infectieuses communes, même sans utilisation d'eau de
Javel. Une vitesse d'essorage élevée aide à diminuer le
temps de séchage.
Handwash/Delicate (Lavage à la main/Tissus délicats)
Utiliser ce programme pour nettoyer les vêtements lavables à la
main et demandant un soin spécial. Ce programme combine le
culbutage à basse vitesse et un essorage à basse vitesse pour le
soin des tissus délicats.
Extra Cycles (Programmes additionnels)
Les programmes additionnels peuvent être choisis en
sélectionnant le bouton du programme désiré.
CUSTOM
Program
Rinse & Spin (Rinçage et essorage) est utiie pour
■ Les charges qui ont seulement besoin d’être rincées.
■ L’addition d’assouplissant de tissu à une charge en utilisant
le distributeur d’assouplissant.
Drain & Spin (Vidange et essorage)
Utiliser ce programme pour vidanger votre laveuse ou pour
vidanger et essorer votre charge de linge. La vitesse d’essorage
est préréglée à élevée. Si désiré, il est possible de réduire la
vitesse d’essorage en choisissant la vitesse désirée du
modificateur SPIN SPEED (Vitesse d’essorage.)
REMARQUE : Les charges de tissus synthétiques, tissus
délicats, articles lavables à la main, et lainages, doivent être
vidangées sans essorage ou à essorage faible pour éviter d’étirer
les tissus.
Comme avec tout produit neuf, on entendra des sons qui ne sont
pas familiers. On peut entendre divers sons lorsque la porte est
verrouillée et déverrouillée, et durant le lavage, le rinçage et
l’essorage. Entre les changements des actions de lavage, il y
aura des pauses momentanées. On entendra l’aspersion et
l’éclaboussement de l’eau durant les programmes de lavage et
de rinçage. Ces nouveaux sons et pauses font partie du
fonctionnement normal de la laveuse. Voir “Dépannage”.
On peut personnaliser son lavage en ajoutant des OPTIONS à
ses sélections de programme. On peut ajouter ou changer
l’option après avoir commencé un programme n’importe quand
avant que l’option sélectionnée commence. Toutes les options ne
sont pas disponibles avec tous les programmes.
PRESS & i lOLD 3 SPC.
«
Rinse & spin
Drain & Spin
On peut changer la sélection n’importe quand avant la sélection
de START (Mise en marche).
Programme personnalisé
Custom Program (Programme personnalisé) vous permet
d'enregistrer un programme de lavage personnalisé pour une
prochaine utilisation.
Pour personnaliser un programme de lavage :
1. Sélectionner un programme.
2. Sélectionner les options désirées.
3. Sélectionner les modificateurs désirés.
4. Pour enregistrer le programme, sélectionner et appuyer sur
Custom Program (Programme personnalisé) pendant environ
3 secondes jusqu'à ce qu'un signal retentisse. Le programme
personnalisé est maintenant mémorisé pour usage ultérieur.
5. Appuyer sur START (Mise en marche).
Pour réutiliser ce programme, sélectionner CUSTOM PROGRAM
(Programme personnalisé) et appuyer sur START (Mise en marche).
Rinse & Spin (Rinçage et essorage)
Utiliser ce programme pour obtenir un rinçage et un essorage
seulement. Ce programme combine le culbutage à vitesse rapide
et un essorage à vitesse élevée. Si désiré, il est possible de
réduire la vitesse d’essorage en choisissant la vitesse désirée du
modificateur SPIN SPEED (Vitesse d’essorage).
Options
PREWASH
Extended Spin
end of Cycle
Signal
ON / OFF
Voir section “Guide de lavage du linge” pour un aperçu des
options possibles pour chaque sélection de programme de
lavage.
Vous pouvez choisir plus d’une option par programme.
Certaines options ne peuvent pas être ajoutées à certains
programmes.
Si une option est disponible avec un programme sélectionné,
le témoin lumineux pour cette option s'allumera lorsqu’il est
sélectionné.
Si une option n’est pas disponible avec un programme
sélectionné, il y aura un bref signal sonore et le témoin
lumineux pour cette option ne s'allumera pas lorsqu’il est
sélectionné.
57
Page 58

Prewash (Prélavage)
Utiliser cette option pour les charges très sales qui ont besoin de
prétraitement.
■ Ajouter le détergent au compartiment de lavage principal
dans le tiroir distributeur.
Cette option ajoute un temps de culbutage avant le programme
principal sélectionné. La laveuse enchaîne automatiquement du
programme de prélavage au programme de lavage principal.
Extended Spin (Essorage prolongé)
Utiliser cette option pour ajouter un essorage additionnel à tout
programme pour réduire le temps de séchage de certains tissus
épais ou articles nécessitant un soin spécial, ce qui permet
d’économiser l’énergie.
End of Cycle Signal (Signal de fin de programme)
Ce signal est utile lorsque vous retirez des articles de la laveuse
dès son arrêt. Sélectionner ON (Marche) ou OFF (Arrêt)
Les réglages préréglés de programmes de Wash/Rinse Temp
(Température de lavage/rinçage), Spin Speed (Vitesse
d’essorage) et Soil Level (Niveau de saleté) peuvent être
changés. Un modificateur peut être changé après la mise en
marche d’un programme à tout moment avant que le
modificateur choisi commence. Tous les modificateurs ne sont
pas disponibles avec toutes les options et tous les programes.
Modifiers
Auto Cont.roi.
• EXTRA HOT/COLD
• HOT/COLD
• WARM / WARM
• HIGH
• Medium
• Low
Normai Rinse (Rinçage normai)
Consiste en un rinçage en deux étapes pour le linge de tous les
jours.
Wash/Rinse Temp (Température de iavage/rinçage)
Sélectionner une température d’eau en fonction du type de
charge à laver. Utiliser l’eau la plus tiède favorable au tissu.
Suivre les instructions sur l’étiquette du vêtement.
Les rinçages tièdes laissent les charges plus sèches que les
rinçages froids. Les rinçages tièdes augmentent le froissement.
Dans les climats froids, un rinçage tiède rend la charge plus
confortable à manipuler. Les rinçages froids économisent
l’énergie.
Guide de température
Température de l’eau de
lavage
EXTRA HOT (Très chaude) Tissus robustes aux couleurs
HOT (Chaude) Blancs et pastels
WARM (Tiède) Couleurs vives
COLD (Froide) Couleurs qui déteignent ou
Dans /es températures d’eau de lavage plus froides que 70”F
(21 °C), les détergents ne se diluent pas bien. Les saletés peuvent
être difficiles à enlever.
Tissus suggérés
grand teint
Saletés intenses
Saletés intenses
Saletés de modérées à légères
s’atténuent
Saletés légères
• WARM / COLD
• COLD / COLO
• EXTRA LOW
• No Spin
• 2MD RINSE
• NORMAL RINSE
W N
WATER Temp
WASH ' RINSC
SPIN SPEED
Rinse
Options
■ Pour changer la température de l’eau, sélectionner le bouton
WATER TEMP (Température de l’eau) jusqu’à ce que le
réglage désiré s'allume.
■ Pour changer la vitesse d’essorage, sélectionner le bouton
SPIN SPEED (Vitesse d’essorage) jusqu’à ce que le réglage
désiré s'allume.
• Heavy
• NORMAL
• LIGHT
O
Soil Level
■ Pour changer le temps du programme, sélectionner le bouton
SOIL LEVEL (Niveau de saleté).
2nd Rinse (2e rinçage)
Un deuxième rinçage peut être utilisé pour enlever plus
facilement tout résidu de détergent ou d’agent de blanchiment
présent sur les vêtements. Cette option fournit un rinçage
supplémentaire à la môme température qu’au premier rinçage.
C’est le réglage de rinçage par défaut pour le programme Whitest
Whites (Blancs les plus blancs).
Auto Temp Control (Commande automatique de
température)
La CAT (Commande automatique de température) détecte
électroniquement et maintient une température d’eau uniforme.
La CAT ajuste l’eau chaude et l'eau froide à l'entrée de la laveuse.
La CAT est automatiquement activée lorsqu’un programme est
sélectionné. Voir “Réglage d'un programme préréglé" dans
“Programmes”.
■ La CAT assure un nettoyage consistant.
■ La CAT agit pour le réglage de température de lavage avec
Extra Flot/Cold (Très chaude/Eroide), Flot/Cold (Chaude/
Froide), WarmAA/arm (Tiède/Tiède), Warm/Cold (Tiède/Froide)
et Cold/Cold (Froide/Froide).
■ La CAT agit pour le réglage de température de lavage avec
Hot/Cold (Chaude/Eroide), Warm/Warm (Tiède/Tiède), Warm/
Cold (Tiède/Froide) et Cold/Cold (Froide/Froide).
■ La CAT agit pour le réglage de rinçage à Warm (Tiède) en
réglant la température de l’eau à environ 104°F (40”C).
■ Les températures de rinçage froides dépendent de l’eau
froide à votre robinet.
58
Page 59

Se référer à ce tableau pour des types de charges suggérés et leurs programmes correspondants. À droite se trouvent ies options
disponibles pour chacun de ces programmes.
PROGRAMME TYPE DE CHARGE SUGGÉRÉ PREWASH
(Prélavage)
Whitest Whites
(Blancs les plus blancs)
Heavy Duty
(Service intense)
Norma l/Casuat
(Normal/Tout-aller)
Sanitary (sanitaire) Articles très sales tels que sous-vêtements,
Hand Wash/Delicate
(Lavage à la main/
Articles délicats)
Tissus blancs sales ✓ ✓ ✓
Articles très sales en coton tels que sousvêtements, serviettes, chemises, etc.
Articles normalement sales en polyester, nylon,
coton, toile ou mélanges de coton, tels que
chemisiers, chemises, salopettes, etc.
serviettes, vêtements de travail, couches, etc.
Rideaux et vêtements délicats. Articles demandant
un soin spécial et marqués “Lavable à la main”.
CONSEILS DE LESSIVAGE
Préparation des vêtements pour le lavage
Suivre les recommandations suivantes pour prolonger la vie de
vos vêtements.
■ Fermer les fermetures à glissière, les boutons pression et les
crochets pour éviter d’accrocher d’autres articles. Enlever les
épingles, les boucles et autres objets durs pour éviter
d’égratigner l’intérieur de la laveuse. Ôter les garnitures et les
ornements non lavables.
■ Vider les poches et les retourner.
■ Retourner les revers et enlever la charpie et la poussière avec
une brosse.
■ Retourner les tricots synthétiques pour éviter le boulochage.
■ Attacher les cordons et les ceintures-écharpes pour
empêcher l’emmêlement.
■ Réparer les déchirures, les ourlets et coutures décousus.
■ Traiter les taches.
■ Les vêtements tachés ou mouillés devraient être lavés sans
délai pour obtenir les meilleurs résultats.
■ Mélanger les petits articles avec les gros, éviter de laver un
article seul et répartir la charge de façon égale dans la
laveuse.
■ Laver les petits articles, tels que les chaussettes d'enfants,
dans un sac en filet pour le linge. Il est recommandé d'utiliser
plus d'un sac de linge, et de remplir chaque sac avec des
quantités similaires.
Tri
Séparer les articles très sales des articles légèrement sales,
même si on les lave normalement ensemble. Séparer les
articles qui forment de la charpie (serviettes, chenille) des
articles qui attrapent la charpie (velours côtelé, synthétique,
pressage permanent). Dans la mesure du possible, retourner
les articles qui forment de la charpie.
■ Séparer les couleurs foncées des couleurs claires et les
articles grand teint des articles qui déteignent.
■ Trier en fonction des tissus et de la confection (cotons
solides, tricots, articles délicats).
Déchargement
■ Retirer les vêtements de la laveuse une fois que le
programme est terminé. Des objets en métal comme les
fermetures à glissière, les boutons-pression et les boucles
peuvent rouiller si on les laisse longtemps dans le panier de la
laveuse.
■ Lorsqu'on retire le linge, vérifier de temps en temps sous le
pourtour en caoutchouc à l'avant du tambour qu'il n'y ait pas
de petits articles coincés
Suggestions de chargement (capacité maximaie de
charge).
Vêtements de travail
4 jeans
4 pantalons
4 chemises
Serviettes
10 serviettes de bain
10 serviettes à main
Charges mixtes
3 draps (1 très grand, 2
simples)
4 taies d’oreiller
3 chemises
3 chemisiers
RINSE
OPTIONS
(options de
rinçage)
✓ ✓ ✓
✓ ✓ ✓
✓ ✓ ✓
✓
2 survêtements (bas)
2 survêtements (haut)
14 débarbouillettes
9 tee-shirts
9 shorts
10 mouchoirs
EXTENDED SPIN
(Essorage
prolongé)
59
Page 60

ENTRETIEN DE ÍA LAVEUSE
Nettoyage de l’extérieur
Utiliser une éponge ou un linge doux humide pour essuyer les
renversements. Essuyer occasionnellement les surfaces externes
de la laveuse pour maintenir son apparence d’appareii neuf.
Utiliser un savon doux et de l’eau. Ne pas utiliser de produits
abrasifs.
Nettoyage de l'intérieur
Utiliser une éponge ou un linge doux humide pour essuyer de
temps à autre l’intérieur de la porte pour enlever tout résidu de
détergent. Utiliser un savon doux et de l’eau. Ne pas utiliser de
produits abrasifs.
Nettoyage du joint de porte
Utiliser une éponge ou un linge doux humide au besoin. Vérifier le
pli du joint périodiquement pour tout objet étranger.
Nettoyage du tiroir distributeur
Le tiroir distributeur est amovible pour faciliter le nettoyage.
1. Dégager le tiroir distributeur en appuyant sur le levier de
dégagement. Voir “Utilisation du distributeur”. Retirer le tiroir.
2. Enlever les pièces incluses (le siphon des compartiments de
l’assouplissant et de l’eau de Javel et le séparateur).
3. Laver les pièces sous l’eau du robinet.
4. Remettre les pièces incluses et remettre le distributeur dans
le tiroir.
Remplacer les tuyaux d'alimentation après cinq ans d’utilisation
afin de réduire le risque de défaillance intempestive. Inspecter
périodiquement et remplacer les tuyaux d’alimentation
comportant des renflements, écrasements, coupures, signes
d’usure ou si une fuite se manifeste.
Lors du remplacement des tuyaux d’alimentation, inscrire la date
de remplacement.
Installer et remiser la laveuse à un emplacement où elle ne sera
pas exposée au gel. Comme il peut rester un résidu d’eau dans
les tuyaux, le gel pourrait endommager la laveuse. Si la laveuse
doit faire l’objet d’un déménagement ou de remisage au cours
d’une période où la température cause un gel, préparer l’appareil
pour l’hiver.
Période d’inutilisation ou de vacances :
Faire fonctionner la laveuse seulement lorsqu’on est présent. Si
vous devez partir en vacances ou si vous n’utilisez pas votre
laveuse pendant une période prolongée, vous devez :
■ Débrancher la laveuse ou déconnecter la source de courant
électrique.
■ Fermer les robinets d’arrivée d’eau. Ceci évitera le risque
d’inondation accidentelle (à l’occasion d’une surpression
d’eau) au cours de la période d’absence.
■ Ouvrir légèrement la porte pour fournir une ventilation.
Préparation de la laveuse pour l’hiver :
1. Verser 1 pte {1 L) d’antigel pour véhicule récréatif dans le
tambour.
2. Faire exécuter à la laveuse un programme DRAIN & SPIN
(Vldange/essorage).
3. Débrancher la laveuse ou déconnecter la source de courant
électrique.
4. Fermer les deux robinets d’arrivée d’eau.
5. Déconnecter et vider les tuyaux flexibles d’alimentation
d’eau.
Avant la réutilisation :
1. Rincer les tuyaux d’arrivée d’eau.
2. Reconnecter les tuyaux flexibles d’alimentation d’eau aux
robinets.
3. Ouvrir les deux robinets d’arrivée d’eau.
4. Brancher la laveuse ou reconnecter la source de courant
électrique.
5. Faire exécuter à la laveuse un programme complet NORMAL/
CASUAL (Normal/Tout-aller) avec la moitié de la quantité
normale recommandée de détergent HE pour éliminer
l’antigel.
Transport de la laveuse :
1. Si la laveuse est déménagée pendant une période de gel,
verser dans le tambour 1 pte (1 L) d’antigel pour véhicule
récréatif. Faire exécuter à la laveuse un programme DRAIN &
SPIN
2. Débrancher le cordon d'alimentation.
3. Déconnecter le tuyau de vidange du système de vidange et le
fixer aux pinces du panneau arrière.
4. Fermer les deux robinets d’arrivée d’eau.
5. Déconnecter les tuyaux d’arrivée d'eau des robinets, ensuite
vider les tuyaux et les fixer au panneau arrière de la laveuse.
6. IMPORTANT : Faire un appel de service. Ne pas réutiliser les
boulons de transport. L’appareil doit être transporté dans la
position verticale. Afin d'éviter l'endommagement de la
suspension et de la structure, la machine d'abord être
correctement installée par un technicien pour être ensuite
déplacée.
Réinstallation de la laveuse
1. Suivre les “Instructions d’installation” pour choisir
remplacement, mettre la laveuse d’aplomb et la connecter.
2. Faire exécuter à la laveuse un programme NORMAL/CASUAL
(Normal/Tout-aller) avec la moitié de la quantité normale
recommandée de détergent HE pour nettoyer la laveuse et
enlever l’antigel, le cas échéant.
60
Page 61

DEPANNAGE
Essayer d’abord les solutions suggérées ici pour éviter possiblement le coût d’une visite de service..
La laveuse affiche un message par code et un signal
sonore est émis
“FH” (problème d’entrée d’eau - approvisionnement en eau nul ou insuffisant)
Appuyer deux fois sur PAUSE/CANCEL pour annuler le
programme. Débrancher la laveuse ou déconnecter le
courant électrique.
Vérifier ce qui suit :
Les robinets sont-ils complètement ouverts?
Les tamis à la connexion des tuyaux d’entrée d’eau à la
laveuse sont-ils obstrués?
Les tuyaux d’entrée d’eau sont-ils déformés?
Les tuyaux d’entrée d’eau sont-ils gelés?
Brancher la laveuse ou reconnecter la source de courant
électrique. Sélectionner de nouveau le programme et
appuyer sur START. Si le problème persiste, faire un appel de
service.
“F02” (problème de vidange)
Appuyer deux fois sur PAUSE/CANCEL pour annuler le
programme. Débrancher la laveuse ou déconnecter le
courant électrique.
Vérifier ce qui suit :
Le tuyau de vidange est-il déformé?
Le tuyau de vidange est-il gelé?
Le tuyau de vidange est-il obstrué?
Le tuyau de vidange est-il à plus de 96" (2,4 m) au-dessus du
plancher?
“SUD” (mousse savonneuse)
Lorsqu'un excès de mousse est détecté, une action se met
automatiquement en marche pour le corriger. Cette action
enlève l’excès de mousse et assure le rinçage approprié de
votre linge. “SUD" est affiché durant le rinçage et à la fin du
programme pour vous informer que l’action corrective pour la
mousse a été activée. Pour éviter une mousse excessive,
utiliser uniquement des détergents HE.
“F” variables [F4 à F16] (problème électrique)
Appuyer deux fois sur PAUSE/CANCEL pour annuler le
programme. Appuyer sur DRAIN & SPIN s’il y a un excès
d'eau dans la laveuse.
Sélectionner de nouveau le programme et appuyer sur
START. Si le problème persiste, faire un appel de service.
Absence de remplissage, lavage ou rinçage
Vérifier ce qui suit :
Le cordon d'alimentation est-il branché sur une prise à
3 alvéoles reliée à la terre?
La prise de courant est-elle alimentée?
Vérifier la source d’électricité ou faire venir un électricien.
Les robinets d’eau froide et d’eau chaude sont-ils ouverts?
Le tuyau d’entrée d’eau est-il déformé?
Les tamis de la valve d’entrée d’eau sont-ils obstrués?
La laveuse s’arrête
Vérifier ce qui suit :
Le cordon d’alimentation est-il branché sur une prise à
3 alvéoles reliée à la terre?
La prise de courant est-elle branchée?
Vérifier la source d’alimentation électrique ou faire venir un
électricien.
Un fusible est-il grillé ou le disjoncteur est-il ouvert?
Si le problème persiste, faire venir un électricien.
Une rallonge est-elle utilisée?
Ne pas utiliser un cordon de rallonge.
Absence de vidange ou d’essorage de la laveuse
Le tuyau d’évacuation est-il obstrué, ou l’extrémité du
tuyau d’évacuation se trouve-t-eile à plus de 96" (2,4 m)
au-dessus du plancher?
La tension est-elle basse?
Vérifier la source d’électricité ou faire venir un électricien. Ne
pas utiliser un cordon de rallonge.
L’action de mousse savonneuse “SUD” est-elle active?
Le programme se complétera lorsque la mousse excessive
est enlevée.
La charge est-elle équilibrée?
Un seul article ou un article encombrant peut provoquer un
déséquilibre. Ajouter des articles ou redistribuer la charge.
La laveuse ne se met pas en marche
Vérifier ce qui suit :
Le cordon d’alimentation est-il branché sur une prise à
3 alvéoles reliée à la terre?
La porte de la laveuse est-elle bien fermée?
Un programme a-t-il été choisi mais START n’a-t-il pas été
sélectionné et enfoncé pendant une seconde?
La porte a-t-elle été ouverte après l’achèvement du dernier
programme?
61
Page 62

La laveuse fait du bruit ou vibre Charge trop mouillée
La laveuse est-elle d’aplomb?
La laveuse doit être d’aplomb. Les quatre pieds doivent être
bien installés et les écrous doivent être serrés contre la caisse
de la laveuse.
Lorsque l’eau est vidangée de la laveuse, vous pouvez
entendre le bruit de la succion de l’air par la pompe. Ceci se
produit à la fin de la vidange. Ceoi est normal.
Lavez-vous des articles avec agrafes en métal, boucles
ou fermetures à glissière?
Vous pouvez entendre le bruit d’articles métalliques touchant
le tambour de la laveuse. Ceci est normal.
La laveuse est-elle installée sur un plancher robuste et
solide?
Se référer aux “Instructions d’installation” pour les exigences
de plancher. Le bruit et la vibration peuvent être réduits en
plaçant une planche de contreplaqué de %" (19,1 mm) sous
votre laveuse. Le contreplaqué peut se prolonger en-dessous
de la laveuse et de la sécheuse pour les maintenir à des
hauteurs égales.
Eau près de la laveuse
Vérifier la plomberie du domicile pour des fuites.
Obstruction ou fuite des distributeurs
Les produits de lessive sont-ils dans le compartiment correct du distributeur?
Ajouter les quantités correctes de détergent, d’assouplissant
de tissu ou d’eau de Javel liquide aux compartiments
corrects. Ajouter l’agent de blanchiment en poudre ou liquide
sans danger pour les couleurs au compartiment de détergent.
S'assurer d'assortir l'agent de blanchiment en poudre sans
danger pour les couleurs avec un détergent en poudre ou
assortir un agent de blanchiment liquide sans danger pour les
couleurs avec un détergent liquide sans danger pour les
couleurs.
Le séparateur de détergent est-il à la position correcte?
Le séparateur devrait être à la position avant lors de
l’utilisation de détergent iiquide et à ia position arrière lors de
l’utilisation de détergent en poudre.
Avez-vous utilisé le bon programme pour la charge à
laver?
Choisir un programme avec une vitesse d’essorage plus
élevée.
Avez-vous lavé un article seul, des articles épais ou avezvous surchargé la laveuse?
Un article seul, des articles épais, ou une charge excessive
peuvent causer un déséquilibre. Ajouter des articles ou
essayer de distribuer également votre lessive mouillée dans
le tambour, et commencer le programme DRAIN & SPIN
(Vidange et Essorage). Si la lessive est encore mouillée, retirer
la moitié de la charge de la laveuse et essayer de nouveau.
Résidu ou charpie sur ie iinge
Avez-vous ajouté du détergent au distributeur?
Pour obtenir de meilleurs résultats, ajouter du détergent au
compartiment de détergent. Ne pas ajouter de détergent au
tambour de la laveuse.
Avez vous effectué le tri correctement?
Trier les articles qui forment la charpie (serviettes, chenille)
des articles qui attrapent la charpie (velours côtelé, tissus
synthétiques). Assortir aussi les couleurs.
Avez-vous surchargé la laveuse?
Ne pas surcharger la laveuse. La laveuse peut être remplie
complètement mais le linge ne doit pas être tassé. La charge
de lavage doit être équilibrée. Les particules de charpie
peuvent être emprisonnées dans la charge s’il y a surcharge.
Vérifier ce qui suit :
A-t-on laissé du papier ou un mouchoir de papier dans les
poches?
Avez-vous utilisé suffisamment de détergent?
Suivre les instructions du fabricant. Utiliser suffisamment de
détergent pour maintenir la charpie en suspension dans l’eau.
L’eau de lavage est-elle plus froide que 70°F (21 °C)?
L’eau de lavage plus froide que 70°F (21 °C) peut ne pas
dissoudre complètement le détergent.
Utilisez-vous un programme de lavage à basse vitesse?
Les détergents en poudre peuvent ne pas bien se dissoudre
dans un programme à basse vitesse. Pour les meilleurs
résultats, utiliser un détergent liquide pour les programmes à
basse vitesse tels que Handwash/Delioate (lavables à la
main/articles délicats).
62
Page 63

Présence de taches sur le linge Programme trop long
Avez-vous ajouté du détergent au distributeur?
Pour les meilleurs résultats, ajouter du détergent au
compartiment de détergent. Ne pas ajouter de détergent au
tambour de la laveuse.
Avez-vous utilisé suffisamment de détergent?
Utiliser suffisamment de détergent pour enlever la saleté et la
tenir en suspension. Pour le meilleur rendement, utiliser le
détergent à haute efficacité. Suivre les recommandations du
fabricant en fonction du type de charge que vous lavez.
La présence de fer (rouille) dans l'eau est-elle supérieure
à la moyenne?
Il vous faudra peut-être faire installer un filtre à fer.
Avez-vous bien trié la charge?
Séparer les articles de teinte foncée des articles blancs ou
clairs.
Avez-vous déchargé la laveuse promptement?
Pour éviter le transfert de teinture, décharger la laveuse dès
qu'elle s’arrête.
Avez-vous utilisé une boule distributrice d’assouplissant
de tissu?
Les boules distributrices ne fonctionnent pas correctement
avec cette laveuse. Ajouter un assouplissant pour tissu
liquide dans le compartiment d’assouplissant de tissu.
Avez-vous utilisé du détergent en poudre dans un
programme à basse vitesse?
Considérer l’utilisation d’un détergent liquide.
Le mot “SUD” apparaît-il sur l’affichage?
Un excès de mousse savonneuse a été détecté et une action
corrective pour la mousse a été mise en marche pour éliminer
l’excès de mousse. Cette action ajoutera du temps au
programme original.
La charge a-t-elle provoqué un déséquilibre?
Lorsqu’il y a un trop grand déséquilibre, une caractéristique
spéciale se mettra en marche pour redistribuer la charge.
Pendant la procédure de déséquilibre, l'affichage de la durée
peut faire une pause jusqu'à ce que l'activité soit terminée,
puis reprendre pour la durée du programme.
Avez-vous utilisé le programme de lavage Handwash/
Delicate (lavage à la main/articles délicats)?
Avec le programme de lavage Handwash/Delicate, il faut ne
laver que de petites charges. Ceci assure un lavage délicat
pour vos vêtements sans augmenter les durées de
programme.
Porte verrouillée à la tin du programme de lavage
Est-ce que toute l’eau s’est écoulée de la laveuse durant l’essorage?
Choisir DRAIN & SPIN (Vidange et essorage) pour enlever
toute l’eau qui reste dans la laveuse. La porte de la laveuse
se déverrouillera à la fin de la vidange.
Linge froissé
Avez-vous déchargé la laveuse promptement?
Décharger la laveuse dès qu’elle s’arrête.
Avez-vous utilisé le bon programme pour la charge à
laver?
Utiliser le programme Handwash/Delicate (Lavage à la main/
Tissus délicats) ou un autre programme avec une vitesse
d’essorage basse pour réduire le froissement.
Avez-vous surchargé la laveuse?
La charge doit être équilibrée et la laveuse ne doit pas être
surchargée. Les charges doivent pouvoir culbuter librement
durant le lavage.
Blanc grisâtre, couleurs défraîchies
Avez-vous bien trié la charge?
Le transfert de teinture peut se produire lors du mélange
d’articles blancs et de couleur dans une même charge.
Séparer le linge de teinte foncée des articles blancs ou clairs.
La température de lavage est-elle trop basse?
Utiliser les lavages à l’eau chaude ou tiède si sans danger
pour le tissu. S'assurer que votre système d'eau chaude
permet d'effectuer un lavage à l'eau chaude.
Avez-vous utilisé suffisamment de détergent, ou avezvous de l’eau dure?
Utiliser plus de détergent pour laver le linge très sale à l’eau
froide ou à l’eau dure.
63
Page 64

Get it fixed, at your home or ours!
Your Home
For repair-In your home-of all major brand appliances,
lawn and garden equipment, or heating and cooling systems,
no matter who made it, no matter who sold it!
For the replacement parts, accessories and
owner’s manuals that you need to do-it-yourself.
For Sears professional installation of home appliances
and items like garage door openers and water heaters.
1 -800-4-M Y-HOM E® (1 -800-469-4663)
Call anytime, day or night (U.S.A. and Canada)
www.sears.com
www.sears.ca
Our Home
For repair of carry-in items like vacuums, lawn equipment,
and electronics, call or go on-line for the location of your nearest
Sears Parts & Repair Center.
1 -800-488-1222
Call anytime, day or night (U.S.A. only)
www.sears.com
To purchase a protection agreement (U.S.A.)
or maintenance agreement (Canada) on a product serviced by Sears:
1-800-827-6655 (u.s.A.) 1-800-361-6665 (Canada)
Para pedir servicio de reparación
a domicilio, y para ordenar piezas:
1-888-SU-HOGARS“
(1-888-784-6427)
Au Canada pour service en français;
1 ™800"LE™F"0"YEFÎ^^
(1-800-533-6937)
www.sears.ca
461970222531
© 2004 Sears,
Roebuck and Co.
©Registered Trademark/™Trad6mark/®^Service Mark of Sears, Roebuck and Co., under licensee by Sears Canada.
©CATALYST is a registered trademark of Whirlpool U.S.A., used under licensee by Sears, Roebuck and Co. and Sears Canada.
©Marca reglstrada/''^'^ Marca de comercio/®^Marca de Servicio de Sears, Roebuck and Co,, usada bajo licencia de Sears Canada.
©CATALYST es una marca registrada de Whirlpool U.S.A., usada bajo licencia de Sears, Roebuck and Co., y Sears Canada.
@ Marque déposée/ TM Marque de commerce/SM Marque de service de Sears, Roebuck and Co.,
©CATALYST est une marque déposée de Whirlpool, U.S.A., en vertu d’un porteur
en vertu d’un porteur de licence par Sears Canada.
de licence par Sears, Roebuck and Co, et Sears Canada.
Printed in Germany
Impreso en Alemania
Imprimé en Allemagne
6/04
 Loading...