

Page 1

Use & Care Guide
Manual de Uso y Cuidado
Guide d’Utilisation et d’Entretien
English / Español / Français
Table of Contents...2 / Índice...20 / Table des matières...40
Models/Modelos/Modèles: 110.2813*410, 110.2913*410
Kenmore®
Designed to use only HE High Eciency
detergents.
Diseñada para utilizar solamente
detergentes de alto rendimiento (HE).
Conçue pour l’utilisation d’un détergent
haute efficacité seulement.
Top-Loading High Efficiency
Low-Water Washer
Lavadora de alto rendimiento y carga
superior, con nivel bajo de agua
Laveuse haute efficacité à faible
consommation d’eau avec chargement
par le dessus
* = color number, número de color, le numéro de la couleur
P/N W10682720A
Sears Brands Management Corporation
Hoffman Estates, IL 60179 U.S.A.
www.kenmore.com
www.sears.com
Sears Canada Inc.
Toronto, Ontario, Canada M5B 2C3
www.sears.ca
Page 2
TABLE OF CONTENTS
WASHER SAFETY �����������������������������������������������������������������������2
WHAT'S NEW UNDER THE LID? ���������������������������������������������3
CONTROL PANEL AND FEATURES ���������������������������������������� 4
Dispensers �����������������������������������������������������������������������������6
CYCLE GUIDE ���������������������������������������������������������������������������� 7
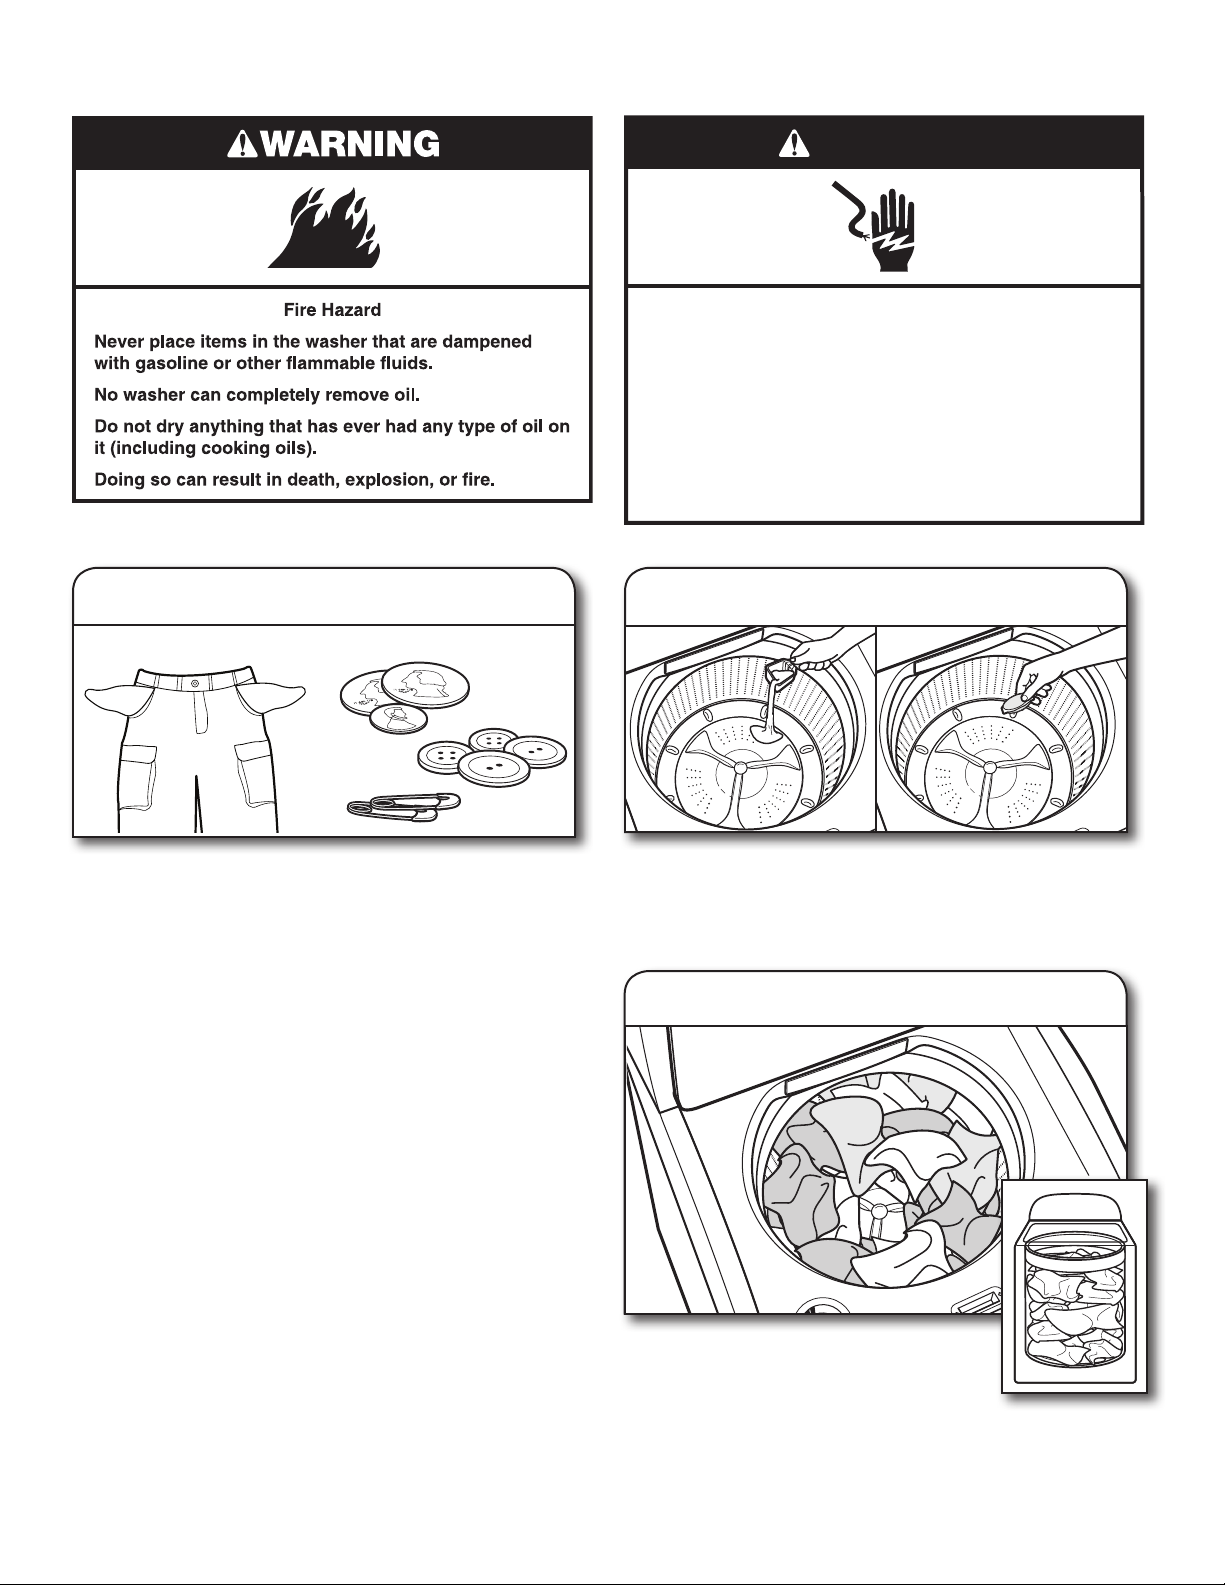
WASHER SAFETY
USING YOUR WASHER ������������������������������������������������������������9
WASHER MAINTENANCE ������������������������������������������������������ 12
TROUBLESHOOTING ��������������������������������������������������������������14
WARRANTY ������������������������������������������������������������������������������� 19
ASSISTANCE OR SERVICE �������������������������������������� Back Cover
2
Page 3
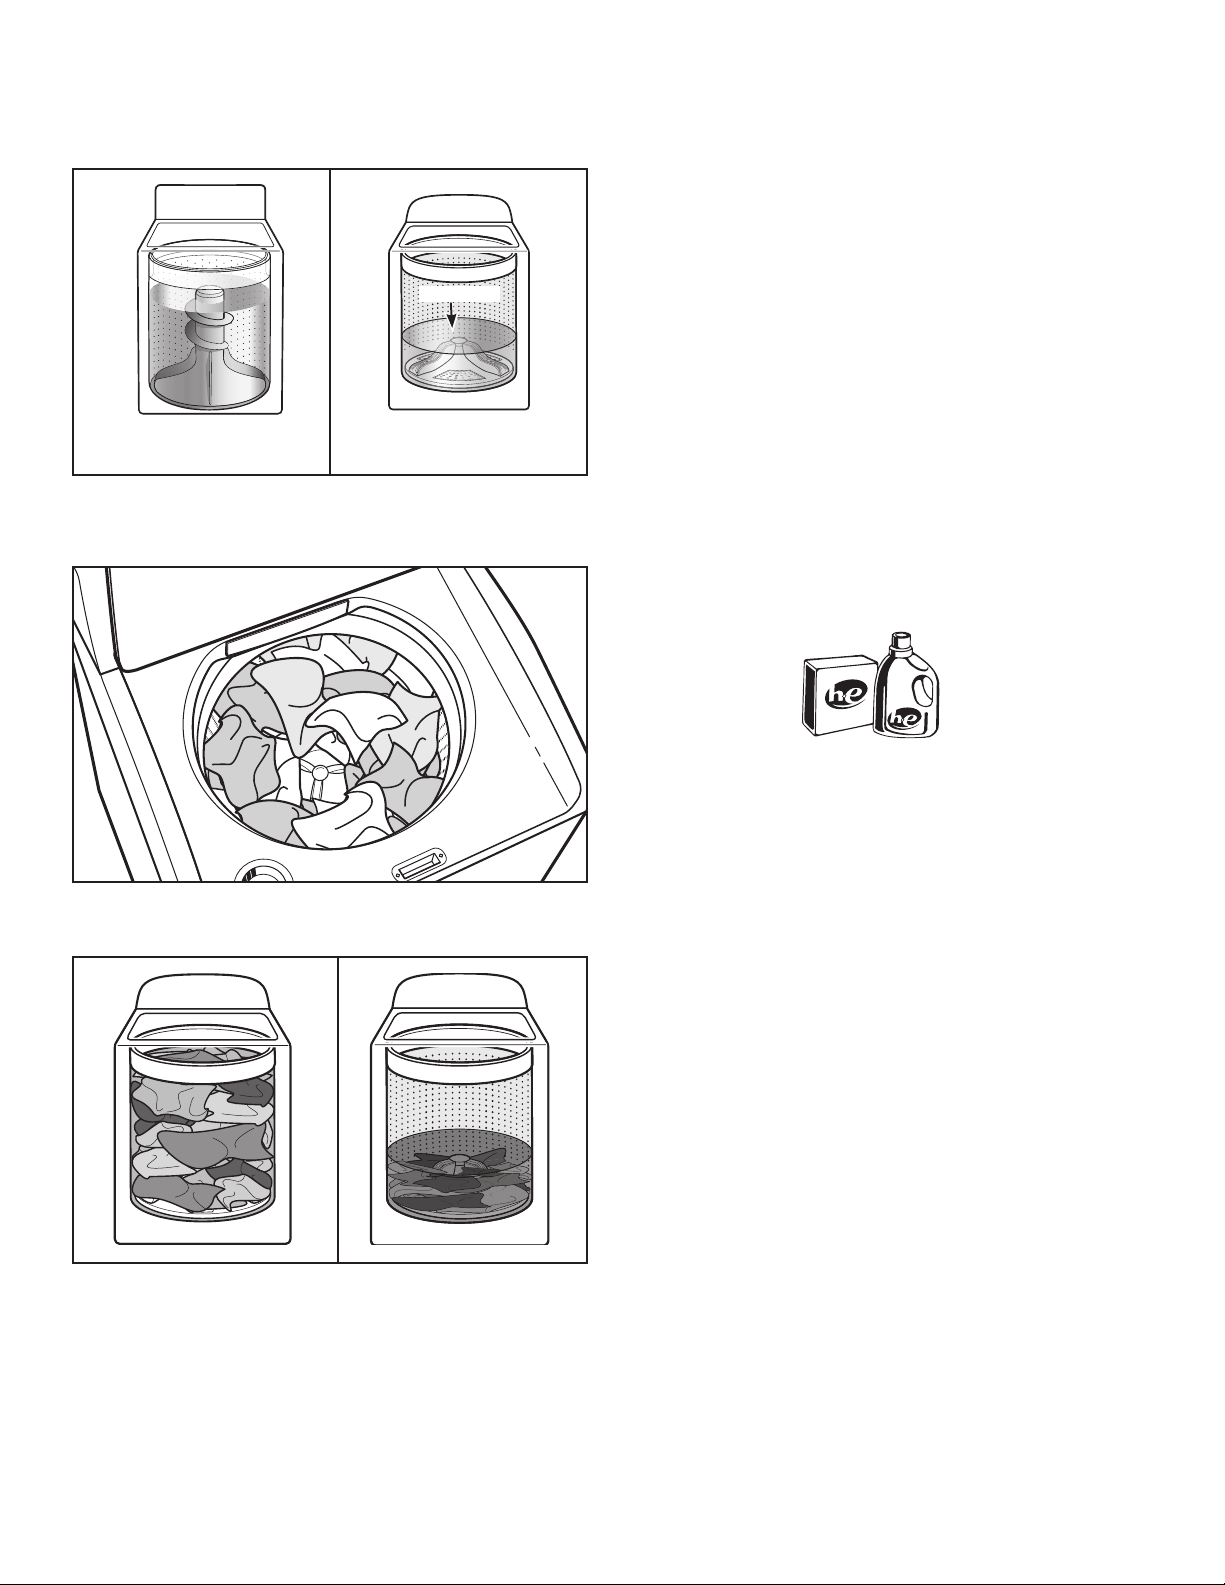
WHAT’S NEW UNDER THE LID?
Cleaning with Less Water
Washplate
Washplate
Traditional agitator-style
washer
The most striking dierence in your new washer is the low-water
washplate wash system� The washer automatically adjusts the
water level to the load size—no water level selector is needed�
Washer with low-water
washplate wash system
Automatic Load Size Sensing
Once you start the cycle, the lid will lock, and the washer will
begin the sensing process to determine the correct water level
for the load� This may take several minutes before water is
added. You will nd a step-by-step description in the “Cycle
Status Lights” section�
Initially the basket will start to spin prior to adding water, this is
part of the sensing process and is normal� This low-water wash
method uses less water and energy compared to a traditional
agitator-style washer�
Choosing the Right Detergent
Use only High Eciency detergents. The package will be
marked “HE” or “High Eciency.” Low-water washing creates
excessive sudsing with a regular non-HE detergent� Using regular
detergent will likely result in longer cycle times and reduced
rinsing performance� It may also result in component failures and
noticeable mold or mildew� HE detergents are made to produce
the right amount of suds for the best performance� Follow the
manufacturer’s instructions to determine the amount of detergent
to use and do not go over the Max line on the dispenser� See
“Using Laundry Product Dispensers” for more information�
For best performance, it is recommended to load items in loose
heaps evenly around the washplate�
As the washer dampens and moves the load, the level of the
items will settle in the basket� This is normal, and does not
indicate that more items should be added�
IMPORTANT: You will not see a washer basket full of water
as with your past agitator-style washer� It is normal for some
of the load to be above the water line�
Use only High Efciency (HE) detergent.
Improved Cleaning
Low-water cleaning means concentrated cleaning� Rather
than diluting detergent as done in an agitator-style washer,
this washer delivers the detergent directly to the soils� This low
water wash also allows the clothing to move in a more eective
way to remove soils�
Normal Sounds You Can Expect
At dierent stages of the wash cycle, you may hear sounds and
noises that are dierent from those of your previous washer. For
example, you may hear a clicking and hum at the beginning
of the cycle, as the lid lock goes through a self-test� There
will be dierent kinds of humming and whirring sounds as the
washplate moves the load and as basket is slowing down to
stop� And sometimes, you may hear nothing at all, as the washer
determines the correct water level for your load or allows time
for clothes to soak�
3
Page 4
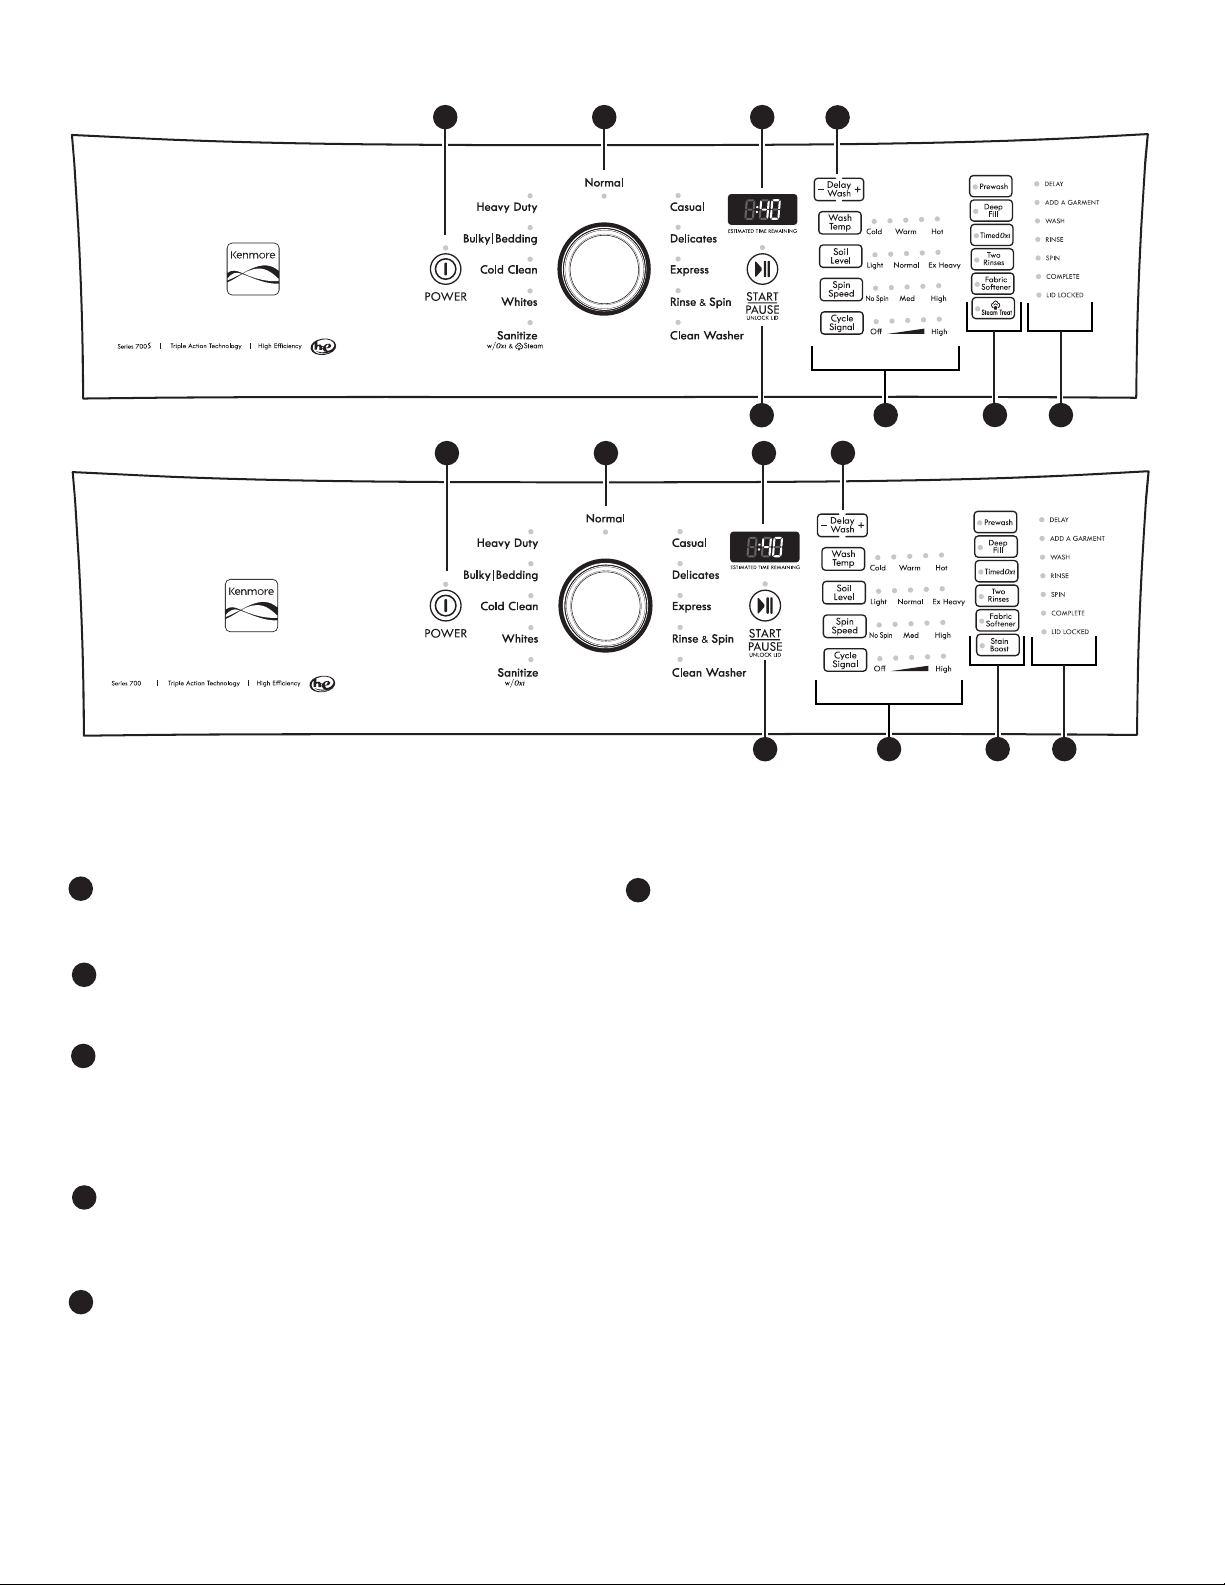
STEAM MODEL
CONTROL PANEL AND FEATURES
21 3
4
5
NON-STEAM MODEL
21 3
6
7 8
4
65 7 8
Not all features and cycles are available on all models�
NOTE: The control panel features a sensitive surface that responds to a light touch of your nger. To ensure your selections are registered,
touch the control panel with your nger tip, not your ngernail. When selecting a setting or option, simply touch its name until the
desired section is illuminated�
POWER BUTTON
1
Touch to turn the washer ON� Touch to stop/cancel a cycle at
any time�
WASH CYCLE KNOB
2
Turn the Wash Cycle knob to select a cycle for your laundry
load� See “Cycle Guide” for detailed descriptions of cycles�
TIME DISPLAY
3
The Estimated Time Remaining display shows the time
required for the cycle to complete� Factors such as load
size and water pressure may aect the time shown in the
display� Overloading, unbalanced loads, or excessive suds
may cause the washer to adjust the cycle time, as well�
DELAY WASH
4
Use “+” and “–” to delay the start of the wash cycle by up
to 12 hours. To turn o Delay Wash, use “+” and “–” to set
the delay time to “0,” or touch POWER�
START/PAUSE/UNLOCK LID BUTTON
5
Touch and hold START/PAUSE button for up to 3 seconds
or until the washer starts to begin the selected cycle; touch
again to pause a cycle�
NOTE: If the washer is spinning, it may take several minutes
to unlock the lid�
CYCLE MODIFIERS
6
When you select a cycle, its default settings will light up�
WASH TEMP
Wash Temp control senses and maintains uniform water
temperatures by regulating incoming hot and cold water�
Select a wash temperature based on the type of fabric
and soils being washed� For best results and following the
garment label instructions, use the warmest wash water
safe for your fabric�
• On some models and cycles, warm and hot water may
be cooler than what your previous washer�
• Even for cold wash settings, some warm water may
be added to the washer to maintain a minimum
temperature�
SOIL LEVEL
Select the most suitable setting for your load� For heavily
soiled items, select Ex Heavy Soil Level for more wash
time� For lightly soiled items, select Light Soil Level for
less wash time�
Lighter soil level setting will help reduce tangling and
wrinkling�
SPIN SPEED
This washer automatically selects the spin speed based
on the cycle selected� The preset speeds can be changed�
Not all spin speeds are available with all cycles�
• Faster spin speeds mean shorter dry times, but may
increase wrinkling in your load�
• Slower spin speeds mean less wrinkling, but will leave
your load more damp�
4
Page 5

CYCLE SIGNAL
Use this option to adjust volume of the signal that sounds
at end of cycle� The Cycle Signal is a helpful reminder to
remove items from washer as soon as the cycle has
completed�
To turn Button Sounds either On or Off:
While washer is on, touch and hold Cycle Signal for 3
seconds� Washer will make a single beep when the process
is complete�
NOTE:
• Cycle Signal button will still operate, even if you turned
the button sounds o.
• Whatever your preferences are, they remain in eect
through a power loss�
• The Default setting for button sounds is ON.
CYCLE OPTIONS
7
You may add or remove options for each cycle� Note that
not all options can be used with all cycles, and some are
preset to work with certain cycles�
PREWASH
Use this option to add an extra agitation and soak time
to the beginning of any cycle to break up tough stains�
DEEP FILL
Will add the most amount of water for large or bulky
loads� Items need to move freely� Tightly packing the
load can lead to poor cleaning performance, and may
increase wrinkling and tangling�
TimedOxi
This washer is designed to dispense laundry boosters
such as oxygenated stain treaters and color-safe
bleach at the right time in the cycle for best cleaning
performance� Do not use laundry boosters and chlorine
bleach in the same cycle�
TWO RINSES
This option can be used to automatically add a second
rinse to most cycles�
NOTE: If you want to Drain and Spin only, select the Rinse
& Spin cycle; then touch to turn o the Two Rinses option.
FABRIC SOFTENER
This option must be set to “On” if using fabric softener�
It ensures that fabric softener is added at the correct
time in the rinse for even distribution�
STAIN TREAT for Steam models or STAIN BOOST for
Non-Steam models
This option provides enhanced cleaning action for tough
stains� It will add additional agitation and soak time to
the cycle�
CYCLE STATUS LIGHTS INDICATOR
8
The Cycle Status Lights show the progress of a cycle� At each
stage of the process, you may notice sounds or pauses that
are dierent from traditional washers.
DELAY
When the Delay Wash is selected, this light will come on
to indicate your washer is set-up to run a delayed wash�
ADD A GARMENT
You may place additional clothing in the wash when the
Add a Garment indicator is lit without sacricing wash
performance� Touch START/PAUSE once� The Lid Lock light
will turn o. Open the washer lid, add garments, and
close the lid� Touch and hold START/PAUSE to restart�
WASH
You will hear the motor and washplate moving the load�
It is normal for some of the load to be above the water
line� Low-water cleaning means concentrated cleaning�
Rather than diluting detergent as done in an agitator-style
washer, this washer delivers the detergent directly to the
soils. The motor sounds may change at dierent stages
in the cycle� The wash time is determined by the selected
Soil Level�
RINSE
You will hear sounds similar to the wash cycle as the
washer rinses and moves the load� Fabric softener will
be added if the Fabric Softener option was selected�
SPIN
The washer spins the load at increasing speeds for proper
water removal, based on the selected cycle and spin
speed�
COMPLETE
Once the cycle is complete, this light will come on�
Remove the load promptly for best results�
LID LOCKED
To allow for proper load sensing and spinning, the lid
will lock and the Lid Locked light will turn on� This light
indicates that the lid is locked and cannot be opened�
If you need to open the lid, touch START/PAUSE/Unlock
Lid� The lid will unlock once the washer movement has
stopped� This may take several minutes if the load was
spinning at high speed� Touch and hold START/PAUSE/
Unlock Lid again for up to 3 seconds to resume the cycle�
5
Page 6
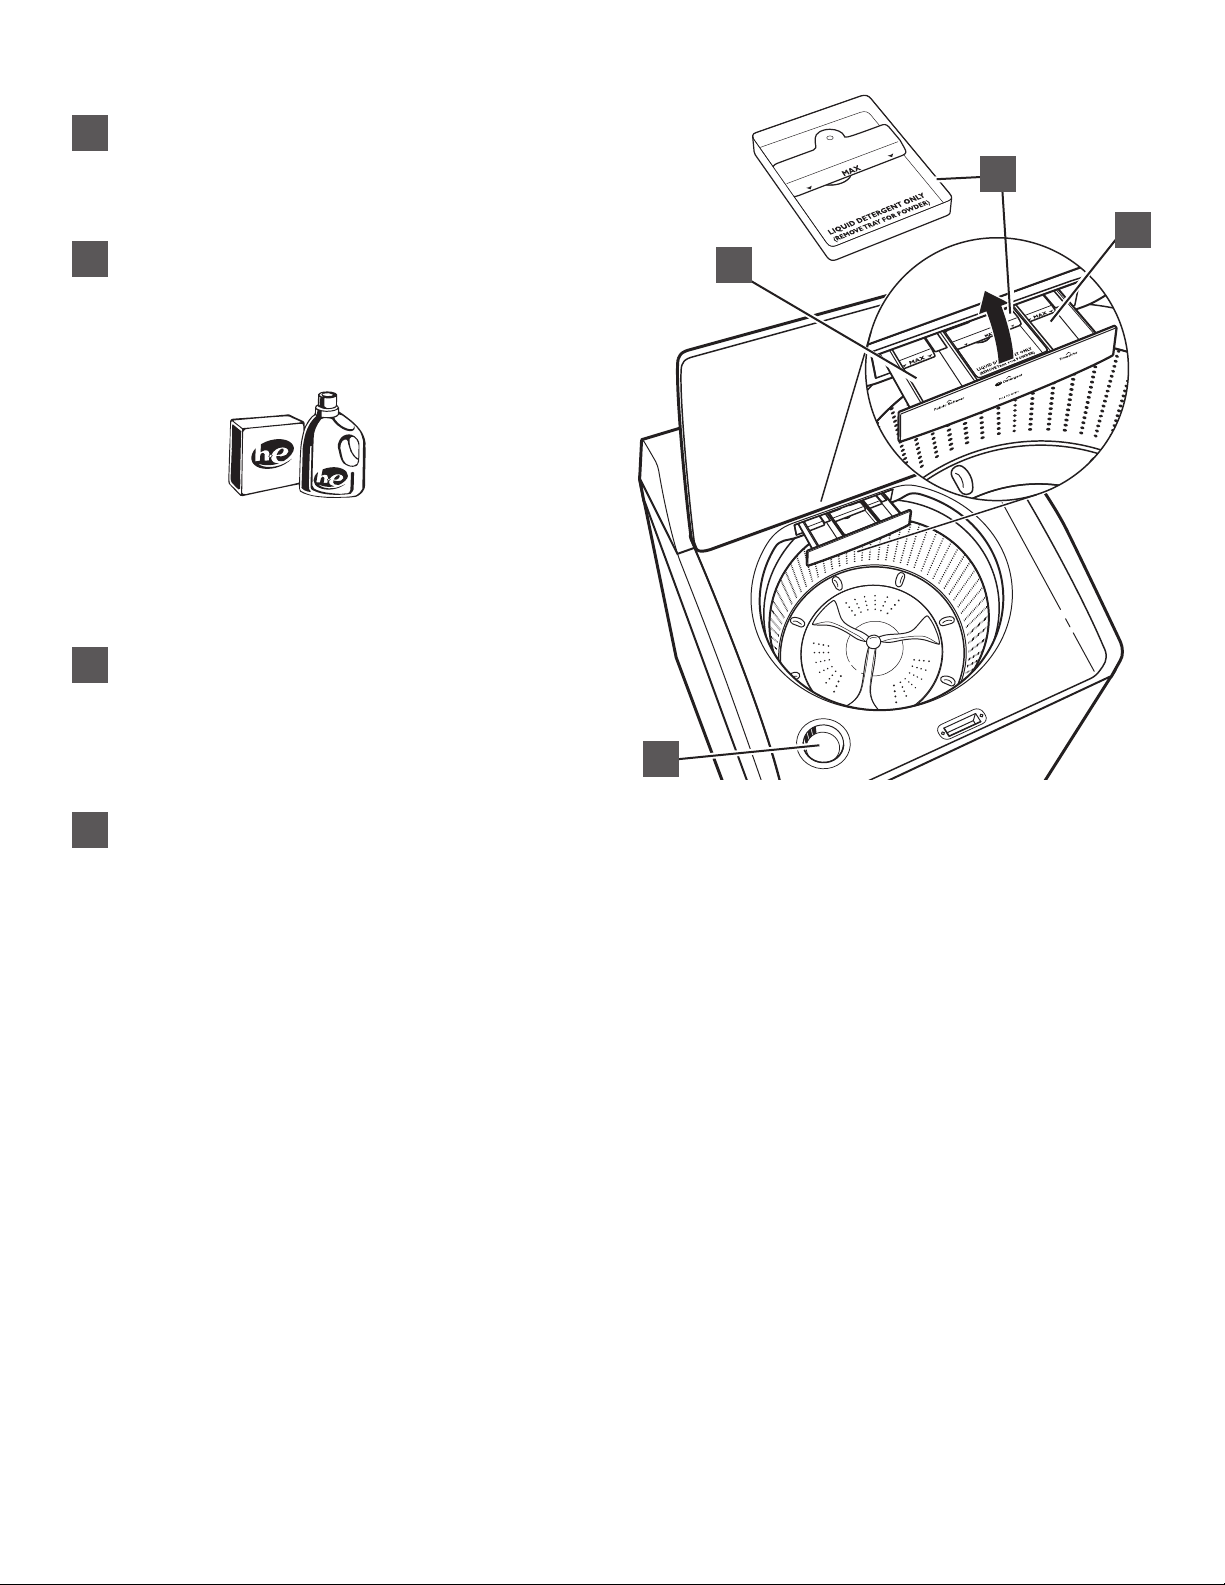
Dispensers
Liquid fabric softener dispenser
A
Pour measured liquid fabric softener into the liquid fabric
softener dispenser, if desired� It will dispense automatically
at the optimum time�
• Use only liquid fabric softener in this dispenser.
High Efficiency “HE” detergent dispenser
B
Add liquid or powdered HE detergent product to this
dispenser for your main wash cycle� Remove tray if using
powder detergent�
IMPORTANT: Make sure tray is in drawer when using liquid
detergent and removed when using powder detergent and
do not go over the Max line�
Use only High Efficiency (HE) detergent�
NOTE: Follow the manufacturer’s instructions to determine
the amount of detergent to use� Do not add single-dose
laundry packets, color-safe bleach, or fabric softener
crystals to dispensers� They will not dispense correctly�
Oxi dispenser
C
This dispenser holds up to 3/4 cup (180 mL) Oxi booster or
other laundry booster, such as powdered or liquid color-safe
bleach� Laundry boosters are automatically dispensed at
the proper time during the wash cycle� Be sure to select Oxi
from the options to ensure proper dispensing�
NOTE: Fill dispenser with only oxi� Do not mix with bleach�
B
C
A
D
Liquid chlorine bleach dispenser
D
This dispenser holds up to 3/4 cup (180 mL) liquid chlorine
bleach� The bleach will be automatically diluted and
dispensed at the optimum time during the wash cycle� This
dispenser cannot dilute powdered bleach�
NOTE: Fill dispenser with only liquid bleach�
6
Page 7

CYCLE GUIDE
Settings shown are default settings for that cycle. Once you select a cycle, the default modiers or the previous set modiers for
that cycle will be lit. For best fabric care, choose the cycle that best ts the load being washed. Not all cycles and options are
available on all models�
Items to Wash: Cycle: Wash*
Cottons, linens,
and mixed item
loads
No-iron fabrics,
cottons, perm
press, linens,
synthetics
Machine-wash
silks, hand-wash
fabrics and
wool
Lightly soiled
items
Heavily soiled,
colorfast
fabrics
Heavily soiled
white fabrics
Bright or darkly
colored cottons,
linens, casual
and mixed
loads
Normal Prewash
Casual Prewash
Delicates Prewash
Express Prewash
Sanitize
w/Oxi &
Steam or
Sanitize
w/Oxi
(depending
on model)
Whites Prewash
Cold Clean Prewash
Temp:
Soil
Level:
Spin
Speed :
Available
Options:
TimedOxi
Two Rinses
Fabric Softener
Stain Treat or
Stain Boost
TimedOxi
Two Rinses
Fabric Softener
Stain Treat or
Stain Boost
TimedOxi
Two Rinses
Fabric Softener
Stain Treat or
Stain Boost
TimedOxi
Two Rinses
Fabric Softener
Stain Treat or
Stain Boost
Prewash
TimedOxi
Two Rinses
Fabric Softener
Stain Treat or
Stain Boost
Deep Fill
TimedOxi
Two Rinses
Fabric Softener
Stain Treat or
Stain Boost
Deep Fill
TimedOxi
Two Rinses
Fabric Softener
Stain Treat or
Stain Boost
Cycle Details:
Use this cycle to clean normally
soiled cottons and mixed fabric
loads� Default settings can be
adjusted as needed�
Use this cycle for no-iron
fabrics such as sport shirts,
blouses, casual business clothes,
permanent press, and blends�
The cycle uses a warm wash,
a cool down, and medium
spin speeds for better wrinkle
performance�
Use this cycle for machinewashable delicate items� This
cycle uses intermittent wash
action with cool water and
slow spin to gently care for ne
washables and avoid shrinkage�
Place small items in mesh bags
before washing�
Use this cycle to wash a few
lightly soiled items that are
needed in a hurry� This short
cycle combines high-speed
wash action and high-speed
spin for best cleaning and
shortened dry time�
Use this cycle to eliminate
99�9% of bacteria when used
in conjunction with the Oxi
option� Preset cycle setting
must be used to achieve the
proper sanitization� Be sure to
add an Oxi product to the Oxi
dispenser�
This cycle adds liquid chlorine
bleach to the load at the
proper time for improved
whitening of soiled white
fabrics�
Cold water with an additional
wash action gently lifts stains
while caring for fabrics�
Settings may be adjusted as
desired, but must use only cold
water settings�
* Wash temperatures vary according to the chosen cycle setting� All rinses are cold�
7
Page 8

CYCLE GUIDE
Settings shown are default settings for that cycle. Once you select a cycle, the default modiers or the previous set modiers for
that cycle will be lit. For best fabric care, choose the cycle that best ts the load being washed. Not all cycles and options are
available on all models�
Items to Wash: Cycle: Wash*
Temp:
Large items
such as sheets,
sleeping
bags, small
comforters,
jackets, small
washable rugs
Sturdy fabrics,
colorfast items
Swimsuits, items
that need
rinsing only
No clothes in
washer
Bulky/
Bedding
Heavy
Duty
Rinse &
Spin
Clean
Washer
N/A
N/A
Soil
Level:
N/A
N/A
Spin Speed : Available
Options:
Prewash
Deep Fill
TimedOxi
Two Rinses
Fabric Softener
Stain Treat or
Stain Boost
Prewash
Deep Fill
TimedOxi
Two Rinses
Fabric Softener
Stain Treat or
Stain Boost
Two Rinses Combines a rinse and high
N/A N/A
Cycle Details:
Use this cycle to wash large
items such as jackets and small
comforters� The washer will
ll with enough water to wet
down the load before the wash
portion of the cycle begins, and
uses a higher water level than
other cycles�
Use this cycle for heavily soiled
or sturdy cotton items� This
cycle combines high-speed
wash action, longer wash time,
and extra high-speed spin to
shorten drying times� Adjust
temperature settings as needed�
speed spin for loads requiring
an additional rinse cycle or to
complete a load after power
interruption� Also use for loads
that require rinsing only� If you
want to Drain & Spin only,
select the Rinse & Spin cycle;
then touch to turn o the Two
Rinses option� Use Drain & Spin
to spin excess water out of a
load�
Use this cycle every 30 washes
to keep the inside of your washer
fresh and clean� This cycle
uses a higher water level� Use
with liquid chlorine bleach to
thoroughly clean the inside of
your washer� This cycle should
not be interrupted� See “Washer
Care�”
IMPORTANT: Do not place
garments or other items in the
washer during the Clean Washer
cycle� Use this cycle with an
empty wash tub�
* Wash temperatures vary according to the chosen cycle setting� All rinses are cold�
8
Page 9
USING YOUR WASHER
Plug into a grounded 3 prong outlet.
Do not remove ground prong.
Do not use an adapter.
Do not use an extension cord.
Failure to follow these instructions can result in death,
re, or electrical shock.
WARNING
Electrical Shock Hazard
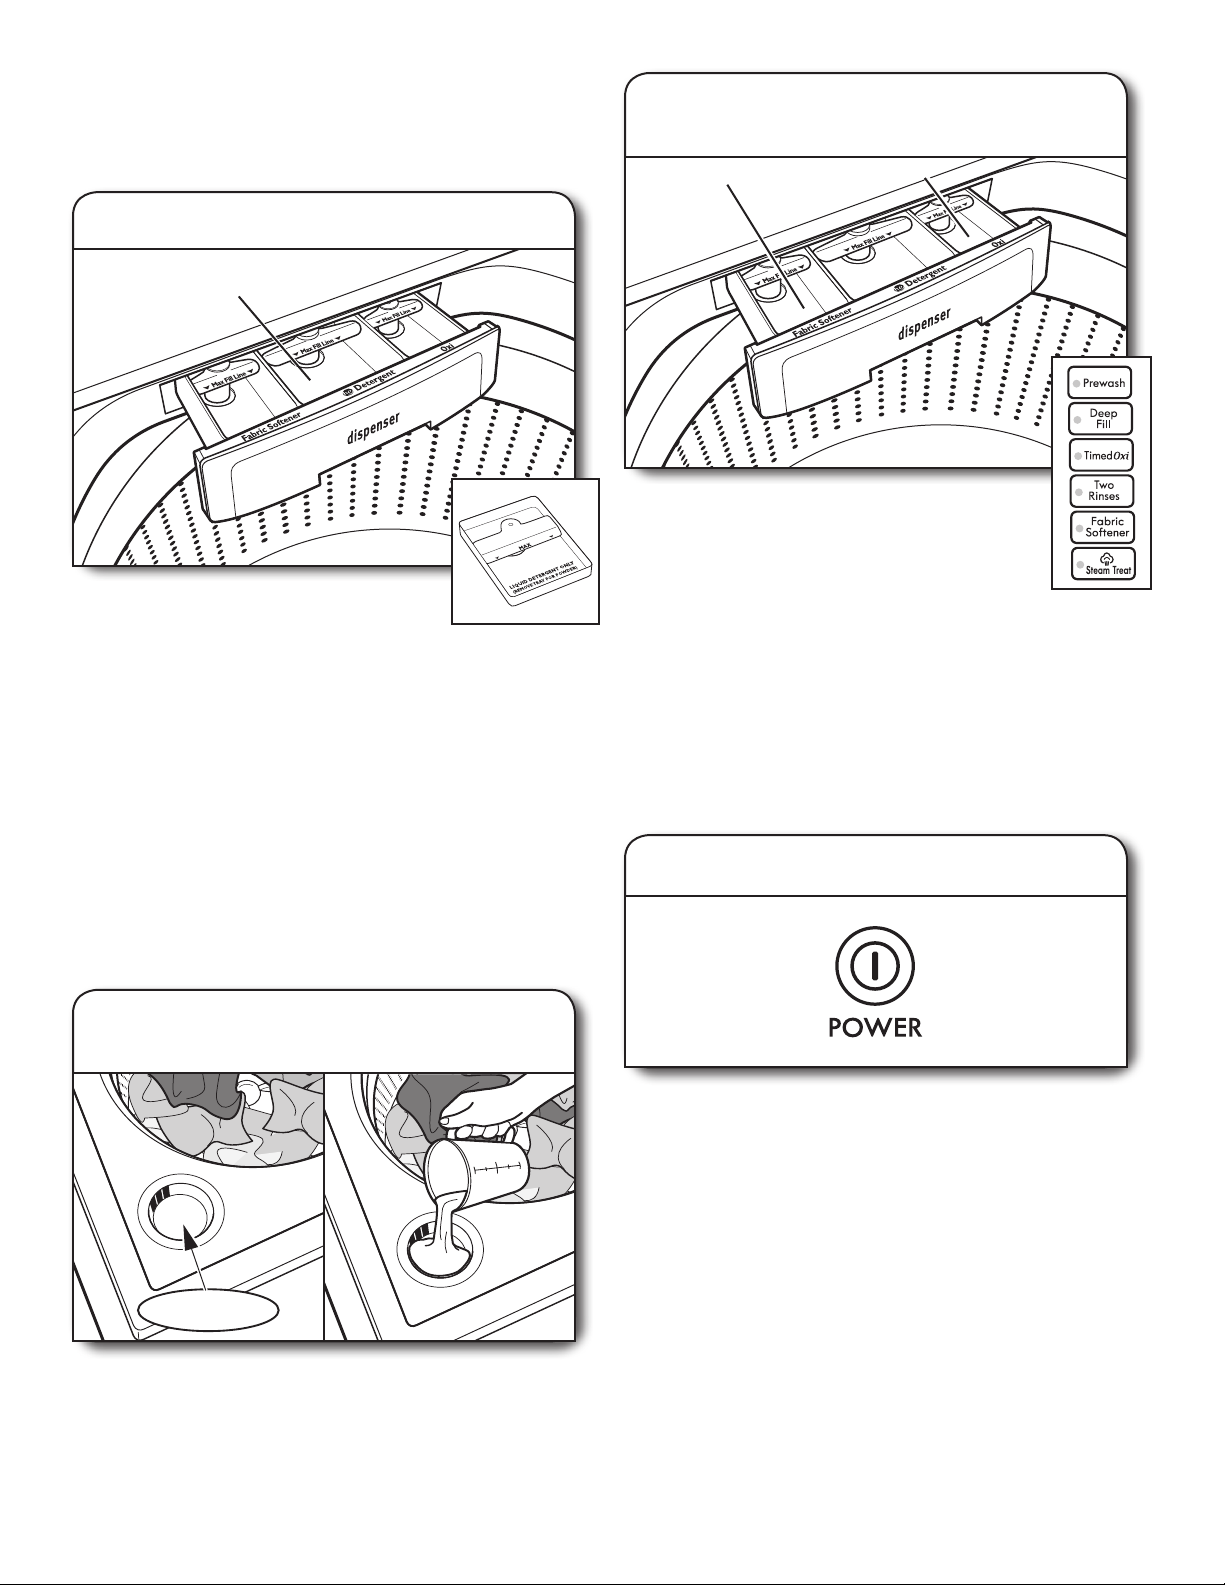
1. Sort and prepare your laundry
• Empty pockets. Loose change, buttons, or any small object
can pass under the washplate and become trapped, causing
unexpected sounds�
• Sort items by recommended cycle, water temperature,
and colorfastness�
• Separate heavily soiled items from lightly soiled.
• Separate delicate items from sturdy fabrics.
• Do not dry items if stains remain after washing; heat can
set stains into fabric�
• Treat stains promptly.
• Close zippers, fasten hooks, tie strings and sashes.
Remove non-washable trim and ornaments�
• Mend rips and tears to avoid further damage to items
during washing�
Helpful Tips:
• For best performance, use HE liquid detergent when washing
bulky items�
• When washing water-proof or water-resistant items, load
evenly� See “Cycle Guide” for tips and more information on
using the Bulky/Bedding cycle�
• Use mesh bags to help prevent tangling when washing
delicate or small items�
• Turn knits inside out to avoid pilling. Separate lint-takers from
lint-givers� Synthetics, knits, and corduroy fabrics will pick up
lint from towels, rugs, and chenille fabrics�
NOTE: Always read and follow fabric care labels instructions
to avoid damage to your items�
2. Add laundry products, if desired
Single-dose laundry packet, color-safe bleach, or fabric
softener crystals can be added to the basket prior to adding
laundry�
NOTE: Do not add clothes to washer basket prior to adding
laundry products� Always follow manufacturer’s instructions�
3. Load laundry into washer
For best performance, load items in
loose heaps evenly around the washplate�
Try mixing dierent sized items to reduce
tangling�
IMPORTANT: Items need to move freely
for best cleaning and to reduce wrinkling and tangling�
9
Page 10
Liquid
Chlorine Bleach
Using Laundry Product Dispensers
NOTE: Do not add single-dose laundry packets, color-safe
bleach, or fabric softener crystals to dispensers� They will not
dispense correctly�
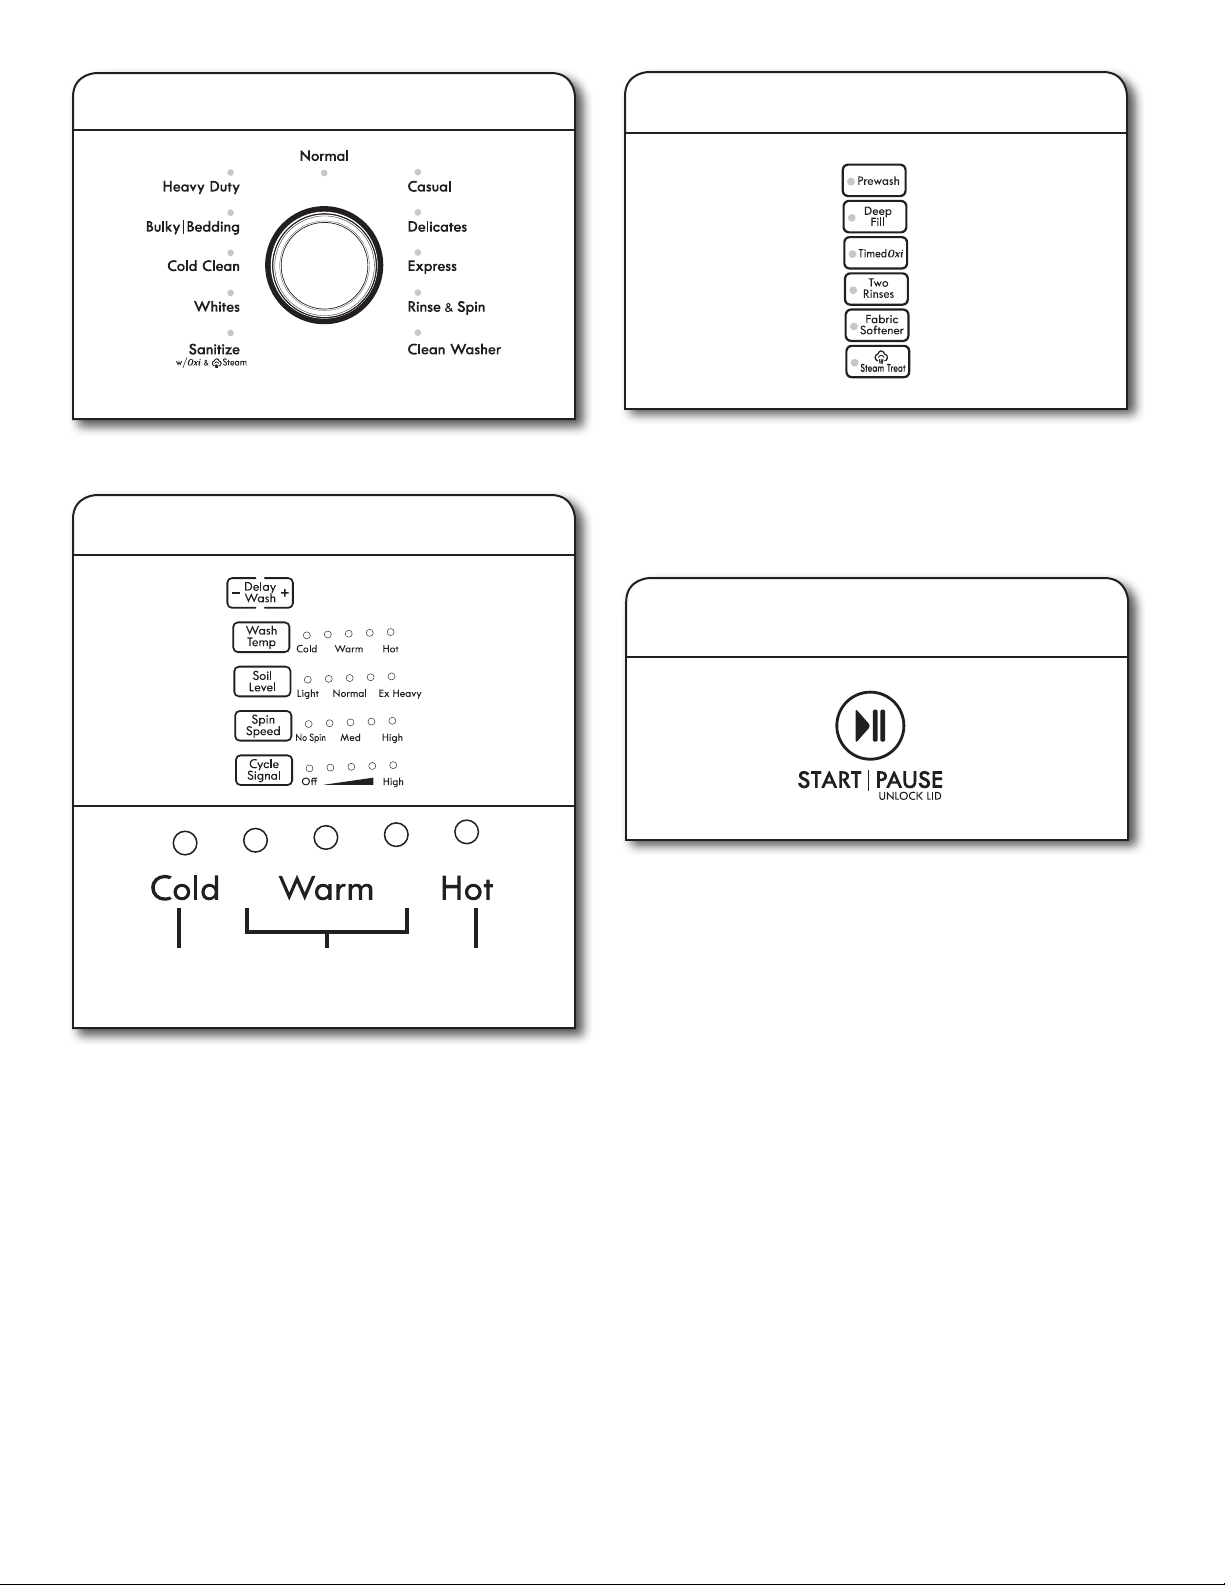
4. Add HE detergent
HE removable
detergent tray
Add a measured amount of HE liquid
detergent into detergent tray� This tray holds
3 oz� (89 mL)� If adding powder HE detergent remove inside
tray. Do not overll tray - adding too much detergent may
cause detergent to be dispensed into the washer too early�
NOTE: Make sure tray is in drawer when using liquid detergent
and removed when using powder detergent and do not go over
the Max line�
IMPORTANT: Use only High Eciency detergents. The package
will be marked “HE” or “High Eciency.” Low-water washing
creates excessive sudsing with a regular non-HE detergent�
Using regular detergent will likely result in longer cycle
times and reduced rinsing performance� It may also result
in component failures and noticeable mold or mildew� HE
detergents are made to produce the right amount of suds for
the best performance� Follow the manufacturer’s instructions to
determine the amount of detergent to use�
HELPFUL TIP: See “Washer Maintenance” for information
recommended method of cleaning washer dispenser trays�
6. Add liquid fabric softener or
Oxi to dispenser
Fabric softener tray
Pour a measured amount of liquid fabric softener
or Oxi-type boosters, into tray; always follow
manufacturer’s directions for correct amount of
fabric softener or Oxi based on your load size� Close
dispenser drawer, then select TimedOxi and/or
Fabric Softener option� Oxi is added during main
wash and Fabric Softener is
added during rinse�
IMPORTANT: TimedOxi and/or Fabric Softener option must
be selected to ensure proper distribution at correct time in
cycle. Do not overll or dilute. Overlling dispenser will cause
fabric softener to immediately dispense into washer�
If Two Rinses option is selected, fabric softener will be
dispensed into the last rinse�
It is normal for a small amount of water to remain in the
dispenser at the end of a cycle�
Oxi tray
7. Touch POWER to turn on washer
5. Add liquid chlorine bleach
to dispenser
Do not overll, dilute, or use more than 1 cup (236 mL).
Do not use color-safe bleach or Oxi products in the same
cycle with liquid chlorine bleach�
10
Make sure the dispenser drawer is closed completely, then
touch POWER to turn on the washer� Other methods of
turning the washer on include opening the lid or turning
the cycle selection knob�
Page 11
8. Select cycle
10. Select cycle options
Steam model shown
Turn cycle knob to choose your wash cycle�
9. Select cycle modiers, if desired
Light soils
Colors that bleed
or fade
Once you select a cycle, the default settings for that cycle will
be lit. Touch the cycle modiers buttons to change the Wash
Temp, Soil Level, and Spin Speed, if desired� Not all settings are
available with all cycles� Even for cold wash settings, some warm
water may be added to the washer to maintain a minimum
temperature�
NOTE: Always read and follow fabric care labels instructions to
avoid damage to your items� If not sure on which temperature to
use, refer to the diagram above or select a cooler temperature�
Moderate soils
Bright colors
Heavy Soils
Whites
Pastels
Steam model shown
Select any other cycle options you may wish to add, if not
previously set� Some cycles will automatically add certain
options such as Two Rinses. These may be turned o,
if desired�
NOTE: Not all options are available with all cycles�
11. Touch and hold START/PAUSE/Unlock Lid
to begin wash cycle
Touch and hold START/PAUSE/Unlock Lid button for up to
3 seconds to start the wash cycle. When the cycle has nished,
the COMPLETE indicator will light and the end of cycle signal
will sound (if set)� Promptly remove items when cycle is done
to avoid odor, reduce wrinkling, and rusting of metal hooks,
zippers, and snaps�
Unlocking the lid to add garments
If you need to open the lid to add 1 or 2 missed items:
Touch START/PAUSE/Unlock Lid to pause washer; the lid will
unlock once the washer movement has stopped� This may take
several minutes if the load was spinning at high speed� Then
close lid and touch and hold START/PAUSE/Unlock Lid again
for up to 3 seconds to restart the cycle�
IMPORTANT: If lid is left open for more than 10 minutes the
water will pump out and F8E6 error code will appear on the
display�
11
Page 12

WASHER MAINTENANCE
WATER INLET HOSES
Replace inlet hoses after 5 years of use to reduce the risk of
hose failure� Periodically inspect and replace inlet hoses if
bulges, kinks, cuts, wear, or leaks are found�
When replacing your inlet hoses, mark the date of
replacement on the label with a permanent marker�
NOTE: This washer does not include inlet hoses� See the
Installation Instructions for more information�
WASHER CARE
Recommendations to Help Keep Your Washer Clean
and Performing at its Best
1. Always use High Eciency (HE) detergents and follow the
HE detergent manufacturer’s instructions regarding the
amount of HE detergent to use� Never use more than the
recommended amount because that may increase the rate
at which detergent and soil residue accumulate inside your
washer, which in turn may result in undesirable odor�
2. Use warm and hot wash water settings sometimes (not
exclusively cold water washes), because they do a better
job of controlling the rate at which soils and detergent
accumulate�
3. Always leave the washer lid open between uses to help dry
out the washer and prevent the buildup of odor-causing
residue�
Cleaning Your Top Loading Washer
Read these instructions completely before beginning the
routine cleaning processes recommended below� This Washer
Maintenance Procedure should be performed, at a minimum,
once per month or every 30 wash cycles, whichever occurs
sooner, to control the rate at which soils and detergent may
otherwise accumulate in your washer�
Cleaning the Inside of the Washer
To keep your washer odor-free, follow the usage instructions
provided above, and use this recommended monthly cleaning
procedure:
Clean Washer Cycle
This washer has a special cycle that uses higher water volumes
in combination with liquid chlorine bleach to clean the inside
of the washer�
Begin procedure
1. Chlorine Bleach Procedure:
a. Open the washer lid and remove any clothing or items�
b. Add 1 cup (236 mL) of liquid chlorine bleach to the
bleach compartment�
NOTE: Use of more liquid chlorine bleach than is
recommended above could cause washer damage over
time�
c. Close the washer lid�
d. Do not add any detergent or other chemical to the
washer when following this procedure�
e. Select the CLEAN WASHER cycle�
WASHER CARE (cont.)
f. Touch and hold the START/PAUSE/Unlock button to
begin the cycle� The Clean Washer Cycle Operation is
described below�
NOTE: For best results, do not interrupt cycle� If cycle must
be interrupted, touch POWER/CANCEL� (For models with
no Power/Cancel button, touch and hold START/PAUSE/
Unlock for three seconds)� After the Clean Washer cycle
has stopped, run a
washer�
Description of Clean Washer Cycle Operation:
1. This cycle will ll to a water level higher than in normal
wash cycles to provide rinsing at a level above the water
line for normal wash cycle�
2. During this cycle, there will be some agitation and spinning
to increase the removal of soils�
After this cycle is complete, leave the lid open to allow for
better ventilation and drying of the washer interior�
Cleaning the Dispensers
After a period of using your washer, you may nd some
residue buildup in the washer’s dispensers� To remove residue
from the dispensers, wipe them with a damp cloth and towel
dry� Do not attempt to remove the dispensers or trim for
cleaning� The dispensers and trim are not removable� If your
model has a dispenser drawer, however, remove the drawer
and clean it before or after you run the Clean Washer cycle�
Use an all-purpose surface cleaner, if needed�
Cleaning the Outside of the Washer
Use a soft, damp cloth or sponge to wipe away any spills� Use
only mild soaps or cleaners when cleaning external washer
surfaces�
IMPORTANT: To avoid damaging the washer’s nish, do not
use abrasive products�
Rinse & Spin
cycle to rinse cleaner from
NON-USE AND VACATION CARE
Operate your washer only when you are home� If moving,
or not using your washer for a period of time, follow these
steps:
1. Unplug or disconnect power to washer�
2. Turn o water supply to washer, to avoid ooding due to
water pressure surge�
12
Page 13
CLEANING YOUR DISPENSER
You may nd laundry product residue leftover in your dispenser
drawer� To remove residue, follow this recommended cleaning
procedure:
1. Pull drawer out until you feel resistance�
2. Push 2 tabs downward, and then continue pulling out�
3. Wash in warm, soapy water, using a mild detergent�
4. Rinse with warm water�
5. Air dry, or dry with a towel, then place back into slot�
IMPORTANT: Dispenser drawer and tray are not dishwasher
safe�
WINTER STORAGE CARE
IMPORTANT: To avoid damage, install and store washer
where it will not freeze� Because some water may stay in
hoses, freezing can damage washer� If storing or moving
during freezing weather, winterize your washer�
To winterize washer:
1. Shut o both water faucets; disconnect and drain water
inlet hoses�
2. Put 1 qt� (1 L) of R�V�-type antifreeze in basket and run
washer on RINSE & SPIN cycle for about 30 seconds to
mix antifreeze and remaining water�
3. Unplug washer or disconnect power�
TRANSPORTING YOUR WASHER
1. Shut o both water faucets. Disconnect and drain water
inlet hoses�
2. If washer will be moved during freezing weather, follow
WINTER STORAGE CARE directions before moving�
3. Disconnect drain from drain system�
4. Unplug power cord�
5. Place inlet hoses inside washer basket�
6. Drape power cord and drain hose over the console and
secure with masking tape�
7. Place foam packing ring from original shipping materials
back inside washer� If you do not have packing ring, place
heavy blankets or towels into basket opening� Close lid
and place tape over lid and down front of washer� Keep
lid taped until washer is placed in new location� Transport
washer in upright position�
REINSTALLING/USING WASHER AGAIN
To reinstall washer after non-use, vacation, winter storage or
moving:
1. Refer to Installation Instructions to locate, level, and
connect washer�
2. Before using again, run washer through the following
recommended procedure:
To use washer again:
1. Flush water pipes and hoses� Reconnect water inlet hoses�
Turn on both water faucets�
WARNING
Electrical Shock Hazard
Plug into a grounded 3 prong outlet.
Do not remove ground prong.
Do not use an adapter.
Do not use an extension cord.
Failure to follow these instructions can result in death,
re, or electrical shock.
2. Plug in washer or reconnect power�
3. Run washer through Bulky/Bedding cycle to clean washer
and remove antifreeze, if used. Use only HE High Eciency
detergent� Use half the manufacturer’s recommended
amount for a medium-size load�
13
Page 14
TROUBLESHOOTING
First try the solutions suggested here or visit for assistance and to possibly avoid a service call�
If you experience Possible Causes Solution
Vibration or O-Balance
Vibration, rocking, or
“walking”
Vibration during spinning
or washer stopped with
all dial lights ashing
Noises
Clicking or metallic noises Objects caught in washer drain
Gurgling or humming Washer may be draining water� It is normal to hear the pump making a continuous humming
Humming Load sensing may be occurring� You may hear the hum of the sensing spins after you have started
Whirring Basket may be slowing down� You may hear the whirring sound of the basket decelerating� This
Water Leaks
Check the following for
proper installation:
Washer not performing as expected
Not enough water
in washer
Feet may not be in contact with the
oor and locked.
Washer may not be level� Check oor for exing or sagging. If ooring is uneven, a 3/4"
Load could be unbalanced� Load items in loose heaps evenly around the washplate� Adding
system�
Washer not level� Water may splash o basket if washer is not level.
Fill hoses not attached tightly� Tighten ll-hose connection.
Fill hose washers Make sure all four ll hose at washers are properly seated.
Drain hose connection Pull drain hose from washer cabinet and properly secure it to
Check household plumbing for leaks
or clogged sink or drain�
Washer not loaded as recommended� An unbalanced load can cause basket to be out of alignment
Load not completely covered in water� This is normal operation for an HE low-water washer� The load will
Front and rear feet must be in rm contact with oor, and washer
must be level to operate properly� Jam nuts must be tight against
the bottom of the cabinet�
(19 mm) piece of plywood under your washer will reduce sound�
See “Level the Washer” in the Installation Instructions�
wet items to washer or adding more water to basket could
unbalance washer�
Avoid washing single items� Balance a single item such as a rug
or jeans jacket with a few extra items. If the dial is ashing,
redistribute the load, close the lid, and touch and hold START/
PAUSE/Unlock Lid�
Use Bulky/Bedding cycle for oversized, non-absorbent items such
as comforters or poly-lled jackets. Other items may not be
appropriate for Bulky/Bedding cycle� See “Cycle Guide�”
Item or load not suitable for selected cycle� See “Cycle Guide”
and “Using Your Washer�”
Empty pockets before washing� Loose items such as coins could fall
between basket and tub or may block pump� It may be necessary
to call for service to remove items�
It is normal to hear metal items on clothing such as metal snaps,
buckles, or zippers touch against the stainless steel basket�
sound with periodic gurgling or surging as nal amounts of water
are removed during the spin/drain cycles�
the washer� This is normal�
is normal�
drainpipe or laundry tub�
Do not place tape over drain opening�
Water can back up out of a clogged sink or drainpipe� Check
all household plumbing for leaks (laundry tubs, drain pipe, water
pipes, and faucets�)
and cause water to splash o tub. See “Using Your Washer” for
loading instructions�
not be completely underwater� The washer senses load sizes and
adds correct amount of water for optimal cleaning� See “What’s
New under the Lid�”
IMPORTANT: Do not add more water to washer� Adding water lifts
the items o the washplate, resulting in less eective cleaning.
Run clean washer cycle to optimize the water level and wash
performance�
14
Page 15
TROUBLESHOOTING
First try the solutions suggested here or visit for assistance and to possibly avoid a service call�
If you experience Possible Causes Solution
Washer not performing as expected (cont.)
Washer won’t run or ll,
washer stops working
Check for proper water supply� Both hoses must be attached and have water owing to inlet
valve�
Both hot and cold water faucets must be turned on�
Check that inlet valve screens have not become clogged�
Check for any kinks in inlet hoses, which can restrict water ow.
WARNING
Electrical Shock Hazard
Plug into a grounded 3 prong outlet.
Do not remove ground prong.
Do not use an adapter.
Do not use an extension cord.
Failure to follow these instructions can result in death,
re, or electrical shock.
If you experience Possible Causes Solution
Washer not performing as expected (cont.)
Washer won’t run or ll,
washer stops working
(cont�)
Washer not draining/
spinning, loads are still
wet
Check proper electrical supply� Plug power cord into a grounded 3-prong outlet�
Do not use an extension cord�
Ensure there is power to outlet�
Reset a tripped circuit breaker� Replace any blown fuses�
NOTE: If problems continue, contact an electrician�
Normal washer operation� Lid must be closed for washer to run�
Washer will pause during certain phases of cycle� Do not interrupt
cycle�
Washer may be stopped to reduce suds�
Washer may be tightly packed� Remove several items, rearrange load evenly around the
Not using HE detergent or using too
much HE detergent�
Small items may have been caught
in pump or between basket and tub,
which can slow draining�
Using cycles with a lower spin speed� Cycles with lower spin speeds remove less water than cycles with
washplate� Close lid and touch and hold START/PAUSE/Unlock
Lid�
Add only 1 or 2 additional items after washer has started�
Do not add more water to the washer�
Only use HE detergent� Suds from regular detergents can slow
or stop the washer� Always measure detergent and following
detergent directions based on your load requirements�
To remove suds, cancel cycle� Select RINSE & SPIN� Select your
cycle� Touch and hold
detergent�
Empty pockets and use garment bags for small items�
high spin speeds� Use the recommended cycle/speed spin for your
item�
START/PAUSE/Unlock Lid
� Do not add more
15
Page 16
TROUBLESHOOTING
First try the solutions suggested here or visit for assistance and to possibly avoid a service call�
If you experience Possible Causes Solution
Washer not performing as expected (cont.)
Washer not draining/
spinning, loads are still
wet (cont�)
Dry spots on load after
cycle
Incorrect or wrong wash
or rinse temperatures
Load not rinsed Check for proper water supply� Make sure hot and cold inlet hoses are not reversed�
Washer may be tightly packed or
unbalanced�
Load o balanced. See “Vibration or O-Balance” in Troubleshooting section for
Check plumbing for correct
drain hose installation� Drain hose
extends into standpipe farther than
4.5" (114 mm).
Not using HE detergent or using too
much HE detergent�
High speed spins extract more
moisture than traditional top-load
washers�
Check for proper water supply� Make sure hot and cold inlet hoses are not reversed�
Energy-saving controlled wash
temperatures�
Tightly packed loads may not allow the washer to spin correctly,
leaving the load wetter than normal� Evenly arrange the wet load
for balanced spinning� Select DRAIN & SPIN to remove excess
water� See “Using Your Washer” for loading recommendations�
more information�
Check drain hose for proper installation� Use drain hose form
and securely attach to drainpipe or tub� Do not tape over drain
opening. Lower drain hose if the end is higher than 96" (2.4 m)
above the oor. Remove any clogs from drain hose.
Suds from regular detergent or using too much detergent can
slow or stop draining or spinning� Use only HE detergent� Always
measure and follow detergent directions for your load� To remove
extra suds, select RINSE & SPIN� Do not add detergent�
The high spin speeds combined with air ow during the nal spin
can cause items near the top of the load to develop dry spots
during the nal spin. This is normal.
Both hoses must be attached to both washer and faucet, and have
both hot and cold water owing to inlet valve.
Check that inlet valve screens are not clogged�
Remove any kinks in hoses�
ENERGY STAR® qualied washers use cooler wash and rinse water
temperatures than traditional top-load washers� This includes
cooler hot and warm washes�
Both hoses must be attached and have water owing to the inlet
valve�
Both hot and cold water faucets must be on�
Inlet valve screens on washer may be clogged�
Remove any kinks in the inlet hose�
Not using HE detergent or using too
much HE detergent�
Washer may be tightly packed� The washer is less ecient at rinsing when load is tightly packed.
Fabric softener option not selected� When using fabric softener, be sure the Fabric Softener option is
Sand, pet hair, lint, etc�
on load after washing
Load is tangling Washer not loaded as recommended� Load items in loose heaps evenly around the washplate�
Heavy sand, pet hair, lint, and
detergent or bleach residues may
require additional rinsing�
Wash action and/or spin speed too
fast for load�
The suds from regular detergent can cause the washer to operate
incorrectly�
Use only HE detergent� Be sure to measure correctly�
Always measure detergent and follow detergent directions based
on load size and soil level�
Load items in loose heaps evenly around the washplate�
Use cycle designed for the fabrics being washed�
Add only 1 or 2 additional items after washer has started�
selected�
Add Two Rinses to the selected cycle�
Reduce tangling by mixing types of load items� Use the
recommended cycle for the type of items being washed�
Select a cycle with a slower wash action and slower spin speed�
Note that items will be wetter than when using a higher speed spin�
16
Page 17
TROUBLESHOOTING
First try the solutions suggested here or visit for assistance and to possibly avoid a service call�
If you experience Possible Causes Solution
Washer not performing as expected (cont.)
Not cleaning or
removing stains
Odors Monthly maintenance not done as
Fabric Damage Sharp items were in pockets during
Wash load not completely
covered in water�
Added more water to washer� Do not add more water to washer. Adding water lifts the items o
Washer not loaded as recommended� Load items in loose heaps evenly around the washplate�
Adding detergent on top of load� Add detergent, oxi products and color-safe bleach to the bottom
Not using HE detergent or using too
much HE detergent�
Not using correct cycle for fabric
type�
Not using dispensers� Use dispensers to avoid chlorine bleach and fabric softener
Not washing like colors together� Wash like colors together and remove promptly after the cycle
recommended�
Not using HE detergent or using too
much HE detergent�
wash cycle�
Strings and straps could have tangled� Tie all strings and straps before starting wash load�
Items may have been damaged
before washing�
Fabric damage can occur if the load
is tightly packed�
Garment care instructions may not
have been followed�
Liquid chlorine bleach may have been
added incorrectly�
Washer senses load size and adds correct amount of water� This is
normal and necessary for clothes to move�
the washplate, resulting in less eective cleaning.
Add only 1 or 2 additional items after washer has started�
of the basket before adding the load items�
The suds from regular detergent can prevent washer from
operating correctly�
Use only HE detergent� Be sure to measure correctly�
Always measure detergent and follow detergent directions based
on load size and soil level�
Use a higher soil level cycle option and warmer wash temperature
to improve cleaning�
If using Express cycle (on some models), wash only a few items�
Use Whites, Heavy Duty, or Cold Clean cycle for tough cleaning�
See the “Cycle Guide” to match your load with the best cycle�
staining�
Load dispensers before starting a cycle�
Avoid overlling.
Do not add products directly onto load�
is complete to avoid dye transfer�
Run the Clean Washer cycle after every 30 washes� See “Washer
Care” in “Washer Maintenance�”
Unload washer as soon as cycle is complete�
Use only HE detergent� Be sure to measure correctly�
Always follow the detergent directions�
See “Washer Care” section�
Empty pockets, zip zippers, and snap or hook fasteners before
washing to avoid snags and tears�
Mend rips and broken threads in seams before washing�
Load items in loose heaps evenly around washplate�
Load items should move freely during wash to avoid damage�
Use cycle designed for the fabrics being washed�
Add only 1 or 2 additional items after washer has started�
Always read and follow garment manufacturer’s care label
instructions� See the “Cycle Guide” to match your load with the
best cycle�
Do not pour liquid chlorine bleach directly onto load� Wipe up
bleach spills�
Undiluted bleach will damage fabrics� Do not use more than
recommended by manufacturer�
Do not place load items on top of bleach dispenser when loading
and unloading washer�
17
Page 18
TROUBLESHOOTING
First try the solutions suggested here or visit for assistance and to possibly avoid a service call�
If you experience Possible Causes Solution
Washer not performing as expected (cont.)
Incorrect dispenser
operation
Single-dose laundry
packet not dissolving
Error Code Appears in Display
LF (too long to ll)
appears in display
“--” Cycle knob is not on cycle� This is not an error� The selector knob is not on a cycle� Rotate
F## code (F-type error
code) appears in display
Clogged dispensers or laundry
products dispensing too soon�
Liquid chlorine bleach not used in
dispenser or TimedOxi option not
selected�
Adding laundry packet incorrectly� Be sure laundry packet is added to washer basket before adding
Washer taking too long to ll. Drain
extends more than 4.5" (114 mm) into
standpipe�
System error code� Touch START/PAUSE/Unlock Lid once to clear the code� Then
Do not overll dispenser. Overlling causes immediate dispensing.
Always select Fabric Softener option to assure proper dispensing�
Load dispensers before starting a cycle�
It is normal for small amounts of water to be remain in dispenser
at the end of the cycle�
Homes with low water pressure may result in residual powder
in the dispenser� To avoid, select a warmer wash temperature if
possible, depending on your load�
Use only liquid chlorine bleach in the bleach dispenser�
You may only place Oxi products directly in the liquid chlorine
bleach dispenser� If using Oxi products, be sure to select
TimedOxi option� Do not use both liquid chlorine bleach and
Oxi product in the same load�
clothes� Follow the manufacturer’s instructions to avoid damage to
your items�
Check plumbing for correct drain hose installation� Use drain hose
form and attach securely to drainpipe or tub� Do not tape over
drain opening� See Installation Instructions�
your selector knob until a cycle lights up�
touch START/PAUSE/Unlock Lid again to restart washer� If code
appears again, call for service�
18
Page 19

PROTECTION AGREEMENTS
Master Protection Agreements
Congratulations on making a smart purchase. Your new Kenmore®
product is designed and manufactured for years of dependable
operation.
But like all products, it may require preventive maintenance or
repair from time to time. That’s when having a Master Protection
Agreement can save you money and aggravation.
The Master Protection Agreement also helps extend the life
of your new product. Here’s what the Agreement* includes:
Parts and labor needed to help keep products operating properly
under normal use, not just defects. Our coverage goes well
beyond the product warranty. No deductibles, no functional
failure excluded from coverage—real protection.
Expert service by a force of more than 10,000 authorized Sears
service technicians, which means someone you can trust will be
working on your product.
Unlimited service calls and nationwide service, as often as you
want us, whenever you want us.
– replacement of your covered product if four or more product
failures occur within twelve months.
Product replacement if your covered product can’t be xed.
Annual Preventive Maintenance Check at your request –
no extra charge.
Fast help by phone – we call it Rapid Resolution – phone support
from a Sears representative on all products. Think of us as a
“talking owner’s manual.”
Power surge protection against electrical damage due
to power uctuations.
Rental reimbursement if repair of your covered product takes
longer than promised.
25% discount o the regular price of any non-covered repair
service and related installed parts.
Once you purchase the Agreement, a simple phone call is all
that it takes for you to schedule service. You can call anytime
day or night, or schedule a service appointment online.
The Master Protection Agreement is a risk free purchase. If you
cancel for any reason during the product warranty period, we
will provide a full refund. Or, a prorated refund anytime after the
product warranty period expires. Purchase your Master Protection
Agreement today! Some limitations and exclusions apply.
For prices and additional information in the U.S.A., call
1-800-827-6655. *Coverage in Canada varies on some items.
For full details, call Sears Canada at 1-800-361-6665.
Sears Installation Service
For Sears professional installation of home appliances, garage
door openers, water heaters, and other major home items,
in the U.S.A. or Canada, call 1-800-4-MY-HOME®.
KENMORE APPLIANCE WARRANTY
KENMORE LIMITED WARRANTY
FOR ONE YEAR from the date of sale this appliance is warranted
against defects in material or workmanship when it is correctly
installed, operated, and maintained according to all supplied
instructions.
WITH PROOF OF SALE, a defective appliance will receive free
repair or replacement at option of seller.
For warranty coverage details to obtain free repair or
replacement, visit the web page: www.kenmore.com/warranty.
This warranty applies for only 90 DAYS from the sale date in the
United States, and is void in Canada, if this appliance is ever used
for other than private household purposes.
This warranty covers ONLY defects in material and
workmanship, and will NOT pay for:
1. Expendable items that can wear out from normal use, including
but not limited to lters, belts, bags, or screw-in base light
bulbs.
2. A service technician to clean or maintain this appliance, or to
instruct the user in correct appliance installation, operation, and
maintenance.
3. Service calls to correct appliance installation not performed
by Sears authorized service agents, or to repair problems with
house fuses, circuit breakers, house wiring, and plumbing or gas
supply systems resulting from such installation.
4. Damage to or failure of this appliance resulting from
installation not performed by Sears authorized service agents,
including installation that was not in accord with electrical, gas,
or plumbing codes.
5. Damage to or failure of this appliance, including discoloration
or surface rust, if it is not correctly operated and maintained
according to all supplied instructions.
6. Damage to or failure of this appliance, including discoloration
or surface rust, resulting from accident, alteration, abuse, misuse
or use for other than its intended purpose.
7. Damage to or failure of this appliance, including discoloration
or surface rust, caused by the use of detergents, cleaners,
chemicals, or utensils other than those recommended in all
instructions supplied with the product.
8. Damage to or failure of parts or systems resulting from
unauthorized modications made to this appliance.
9. Service to an appliance if the model and serial plate is missing,
altered, or cannot easily be determined to have the appropriate
certication logo.
DISCLAIMER OF IMPLIED WARRANTIES; LIMITATION
OF REMEDIES
Customer’s sole and exclusive remedy under this limited warranty
shall be product repair or replacement as provided herein. Implied
warranties, including warranties of merchantability or tness
for a particular purpose, are limited to one year or the shortest
period allowed by law. Seller shall not be liable for incidental
or consequential damages. Some states and provinces do not
allow the exclusion or limitation of incidental or consequential
damages, or limitation on the duration of implied warranties of
merchantability or tness, so these exclusions or limitations may
not apply to you.
This warranty applies only while this appliance is used in the
United States or Canada*.
This warranty gives you specic legal rights, and you may also
have other rights which vary from state to state.
* In-home repair service is not available in all Canadian
geographical areas, nor will this warranty cover user or servicer
travel and transportation expenses if this product is located
in a remote area (as dened by Sears Canada Inc.) where an
authorized servicer is not available.
Sears Brands Management Corporation
Homan Estates, IL 60179
Sears Canada Inc.
Toronto, Ontario, Canada M5B 2C3
10/2014
19
Page 20

INDICE
SEGURIDAD DE LA LAVADORA �������������������������������������������20
¿QUÉ HAY DE NUEVO DEBAJO DE LA TAPA? ������������������� 22
PANEL DE CONTROL Y CARACTERÍSTICAS ������������������������23
Depósitos ��������������������������������������������������������������������������� 25
GUÍA DE CICLOS �������������������������������������������������������������������� 26
SEGURIDAD DE LA LAVADORA
USO DE SU LAVADORA ��������������������������������������������������������� 28
MANTENIMIENTO DE LA LAVADORA ��������������������������������� 31
SOLUCIÓN DE PROBLEMAS ��������������������������������������������������33
GARANTÍA ������������������������������������������������������������������������������� 39
AYUDA O SERVICIO TÉCNICO �����������������������Contraportada
20
Page 21

21
Page 22

¿QUÉ HAY DE NUEVO DEBAJO DE LA TAPA?
Limpieza con menos agua
Washplate
Placa de lavado
Lavadora de estilo
tradicional con agitador
La mayor diferencia en su nueva lavadora es el sistema de
lavado con placa de lavado y bajo nivel de agua� La lavadora
regula automáticamente el nivel del agua de acuerdo al tamaño
de la carga; no se necesita un selector de nivel de agua�
Lavadora con sistema de
lavado de placa de lavado
y bajo nivel de agua
Detección automática del tamaño de la carga
Una vez que ponga en marcha el ciclo, la tapa se asegurará
y la lavadora comenzará el proceso de detección para
determinar el nivel de agua adecuado para la carga, esto puede
tomar varios minutos antes de que comience a llenarse de agua�
Encontrará una descripción paso a paso en la sección “Luces de
estado del ciclo”�
La canasta comenzará a girar antes de agregar agua� Esto
forma parte del proceso de detección y es normal� Este método
de lavado con bajo nivel de agua usa menos agua y energía, en
comparación con el estilo tradicional de lavadora con agitador�
Selección del detergente adecuado
Use solamente detergentes de alto rendimiento� El paquete
tendrá la indicación “HE” o “High Eciency” (Alto rendimiento).
El lavado con poca agua crea espuma en exceso con un
detergente regular que no sea HE� El uso de un detergente común
probablemente derive en tiempos de ciclo más prolongados
y menor rendimiento de enjuague� También puede ocasionar
fallas en los componentes y moho evidente� Los detergentes de
alto rendimiento (HE) están hechos para producir la cantidad
adecuada de espuma para el mejor rendimiento� Siga las
instrucciones del fabricante para determinar la cantidad de
detergente que debe utilizar y no se pase de la línea Max (Máx�)
del depósito� Consulte la sección “Cómo usar los depósitos para
productos de lavandería” para obtener más información�
Para obtener el mejor funcionamiento, se recomienda colocar
las prendas en montones ojos y de modo parejo alrededor
de la placa de lavado�
A medida que la lavadora moja y mueve la carga, las prendas
de acomodan en la canasta y el nivel de las mismas se asentará�
Esto es normal y no indica que se deban agregar más prendas�
IMPORTANTE: No verá una canasta llena de agua como en su
lavadora anterior de estilo tradicional con agitador� Es normal
que parte de la carga quede por encima del nivel de agua�
Use solamente un detergente de Alto rendimiento (HE)�
Limpieza mejorada
Una limpieza con bajo nivel de agua signica una limpieza
concentrada� En lugar de diluir el detergente como lo hace
una lavadora con agitador, esta lavadora coloca el detergente
directamente sobre la suciedad� Este sistema de bajo nivel
de agua también permite que las prendas se muevan de una
manera más ecaz para quitar las manchas.
Sonidos comunes que puede esperar
En diferentes etapas del ciclo de lavado, podrá escuchar
sonidos y ruidos que son diferentes a los de su lavadora anterior�
Por ejemplo, podrá escuchar un chasquido y un zumbido al
comienzo del ciclo, cuando el seguro de la tapa realiza una
autovericación. Se escucharán distintos tipos de zumbidos
y runruneos mientras la placa de lavado mueve la carga y
mientras la canasta desacelera para detenerse� Algunas veces
no escuchará nada, ya que la lavadora determina el nivel de
agua adecuado para su carga y en remojo por un tiempo�
22
Page 23

Modelo con vapor
PANEL DE CONTROL Y CARACTERÍSTICAS
21 3
4
Modelo sin vapor
21 3
5
6
4
7
8
65 7 8
No todas las características y ciclos están disponibles en todos los modelos�
NOTA: El panel de control tiene una supercie sensible, la cual responde al toque ligero de los dedos. Para cerciorarse de que se
hayan registrado sus selecciones, toque el panel de control con la punta del dedo, no con la uña� Al seleccionar un ajuste o una opción,
simplemente toque su nombre hasta que se ilumine la sección deseada�
BOTÓN DE POWER (Encendido)
1
Presione para ENCENDER la lavadora� Presione para
detener/cancelar un ciclo en cualquier momento�
PERILLA DE CICLOS DE LAVADO
2
Gire la perilla de ciclos de lavado para seleccionar un
ciclo para su carga� Consulte “Guía de ciclos” para ver
descripciones detalladas de los ciclos�
BOTÓN DE START/PAUSE/UNLOCK LID (Inicio/pausa/
5
desbloqueo de la tapa)
Mantenga presionado el botón START/PAUSE (Inicio/Pausa)
durante tres segundos o hasta que la lavadora ponga en
marcha el ciclo seleccionado� Presione nuevamente para
pausar un ciclo�
NOTA: Si la lavadora está centrifugando, puede tardar
varios minutos para desbloquear la tapa�
PANTALLA DE TIEMPO
3
La pantalla de Estimated Time Remaining (Tiempo estimado
restante) muestra el tiempo necesario para que se complete
el ciclo� Factores tales como el tamaño de la carga y la
presión del agua pueden afectar el tiempo que se muestra en
la pantalla� El apretujar la ropa, las cargas desequilibradas o
la espuma en exceso también pueden hacer que la lavadora
regule el tiempo del ciclo�
DELAY WASH (Lavado con retraso)
4
Presione “+” y “–” para demorar el inicio del ciclo de lavado
hasta por un máximo de 12 horas� Para apagar Delay Wash
(Lavado con retraso), presione “+” y “–” para jar en “0” el
tiempo de retraso o presione POWER (Encendido)�
MODIFICADORES DE LOS CICLOS
6
Cuando selecciona un ciclo, se encenderán sus ajustes por
defecto�
WASH TEMP (Temperatura de lavado)
El control de Wash Temp (Temperatura de lavado)
detecta y mantiene temperaturas de agua uniformes,
regulando el agua fría y caliente que entra�
Seleccione una temperatura de lavado según el tipo de
tela que esté lavando y el nivel de suciedad� Para obtener
los mejores resultados y siguiendo las instrucciones de
las etiquetas de las prendas, use el agua de lavado más
caliente que las telas puedan resistir�
• En algunos modelos y ciclos, el agua tibia y caliente
tendrá una temperatura menor a la que su lavadora
anterior proveía�
• Aun en ajustes de agua fría, un poco de agua tibia
puede agregarse a la lavadora para mantener una
temperatura mínima�
23
Page 24

SOIL LEVEL (Nivel de suciedad)
Seleccione el ajuste más adecuado para su carga� Para
los artículos con suciedad profunda, seleccione Ex Heavy
Soil Level (Nivel de suciedad super intenso) para agregar
tiempo de lavado� Para los artículos con suciedad ligera,
seleccione Light Soil Level (Nivel de suciedad ligero) para
disminuir el tiempo de lavado�
Un ajuste de nivel de suciedad más bajo ayuda a reducir
los enredos y la formación de arrugas�
SPIN SPEED (Velocidad de exprimido)
Esta lavadora selecciona automáticamente la velocidad
de exprimido según el ciclo seleccionado� Las velocidades
prejadas pueden cambiarse. No todas las velocidades de
exprimido están disponibles con todos los ciclos�
• Las velocidades de exprimido más rápidas proveen
tiempos de secado más cortos, pero pueden aumentar
la formación de arrugas en su carga�
• Las velocidades de exprimido más bajas disminuyen las
arrugas, pero dejarán su carga más húmeda�
CYCLE SIGNAL (Señal de ciclo)
Utilice esta opción para regular el volumen de la señal
que suena al nal de un ciclo. La Cycle Signal (Señal de
ciclo) es un recordatorio útil para quitar artículos de la
lavadora en cuanto se haya terminado el ciclo�
Para activar o desactivar los sonidos de los botones:
Mientras la lavadora está encendida, mantenga presionado
el botón Cycle Signal (Señal de ciclo) durante tres segundos�
La lavadora hará un solo pitido cuando se ha completado el
proceso�
NOTA:
• El botón Cycle Signal seguirá funcionando, incluso si se han
desactivado los sonidos de los botones�
• Independientemente de cuáles sean sus preferencias,
seguirán vigentes después de un corte de energía�
• Los sonidos de los botones están activados de forma
predeterminada�
OPCIONES DE LOS CICLOS
7
Puede agregar o quitar opciones para cada ciclo� Tenga en
cuenta que no todas las opciones pueden usarse con todos
los ciclos, y algunas están prejadas para funcionar con
ciertos ciclos�
PREWASH (Prelavado)
Utilice esta opción para agregar agitación y remojo
adicional al comienzo de cualquier ciclo, para ablandar
las manchas rebeldes�
DEEP FILL (Llenado profundo)
Agregará la mayor cantidad de agua para las cargas
grandes o voluminosas� Los artículos deben moverse
libremente� El cargar la ropa de modo apretado puede
resultar en un desempeño de limpieza insuciente e
incrementar la formación de arrugas y los enredos�
TimedOxi (Oxi programado)
Esta lavadora está diseñada para distribuir productos
para mejorar el lavado, como tratamientos oxigenados
para manchas y blanqueador no decolorante, en el
momento adecuado del ciclo, para un mejor rendimiento
de limpieza� No use los productos para realzar el lavado
y el blanqueador con cloro en el mismo ciclo�
TWO RINSES (Dos enjuagues)
Esta opción se puede usar para agregar automáticamente
un segundo enjuague a la mayoría de los ciclos�
NOTA: Si desea un desagüe y exprimido únicamente,
seleccione el ciclo Rinse & Spin (Enjuague y exprimido)
y luego presione para apagar la opción Two Rinses (Dos
enjuagues)�
FABRIC SOFTENER (Suavizante de telas)
Esta opción deberá jarse en “On” (Encendido) si va a
usar suavizante de telas� Asegura que el suavizante de
telas se agregue en el momento adecuado durante el
enjuague, para que se distribuya uniformemente�
STAIN TREAT (Tratamiento de manchas) para modelos
con vapor o STAIN BOOST (Realce para quitar las
manchas) para modelos sin vapor
Esta opción brinda una acción de limpieza mejorada para
las manchas rebeldes� Agregará agitación y tiempo de
remojo adicional al ciclo�
LUCES INDICADORAS DE ESTADO DEL CICLO
8
Las luces de estado muestran el progreso de un ciclo�
Es posible que note sonidos o pausas en cada etapa
del proceso, los cuales son diferentes de las lavadoras
tradicionales�
DELAY (Retraso)
Cuando se seleccione Delay Wash (Lavado con retraso),
se encenderá esta luz para indicar que su lavadora está
programada para poner en marcha un lavado con retraso�
ADD A GARMENT (Agregado de prendas)
Puede colocar prendas adicionales en la lavadora
cuando se encienda la luz indicadora de Add a Garment
(Agregado de prendas) sin sacricar el rendimiento del
lavado� Presione START/PAUSE (Inicio/Pausa) una vez� La
luz de Lid Lock (Bloqueo de la tapa) se apagará� Abra la
tapa de la lavadora, agregue prendas y cierre la tapa�
Mantenga presionado el botón START/PAUSE (Inicio/
Pausa) para volver a poner en marcha la lavadora�
WASH (Lavado)
Escuchará el motor y la placa de lavado moviendo la
carga� Es normal que parte de la carga quede por encima
del nivel de agua� Una limpieza con bajo nivel de agua
signica una limpieza concentrada. En lugar de diluir
el detergente como lo hace una lavadora con agitador,
esta lavadora aplica el detergente directamente sobre
la suciedad� Los sonidos del motor pueden cambiar en
las diferentes etapas del ciclo� El tiempo de lavado está
determinado por el Nivel de suciedad seleccionado�
RINSE (Enjuague)
Escuchará sonidos similares a los del ciclo de lavado a
medida que la lavadora enjuaga y mueve la carga� Se
agregará suavizante de telas si se ha seleccionado la
opción de Fabric Softener (Suavizante de telas)�
24
Page 25

SPIN (Exprimido)
La lavadora exprime la carga a velocidades cada vez
mayores para la remoción adecuada del agua, según el ciclo
seleccionado y la velocidad de exprimido�
COMPLETE (Terminado)
Una vez que se haya terminado el ciclo, se encenderá esta luz�
Saque la carga de inmediato para obtener mejores resultados�
Depósitos
Depósito de suavizante líquido de telas
A
Si lo desea, vierta la cantidad medida de suavizante de
telas líquido en el depósito de suavizante de telas líquido�
Será distribuido automáticamente en el momento óptimo�
• Use solamente suavizante de telas líquido en este depósito.
Depósito de detergente de alto rendimiento “HE”
B
Agregue detergente HE (de alto rendimiento) líquido o en
polvo en este depósito para su ciclo de lavado principal�
Quite la bandeja si utiliza detergente en polvo�
IMPORTANTE: Asegúrese de que la bandeja esté en
el cajón al utilizar el detergente líquido y que no esté
colocada al utilizar el detergente en polvo y no se pase
de la línea Max (Máx�)�
LID LOCKED (Tapa bloqueada)
Para permitir una detección y exprimido de la carga
adecuados, la tapa se bloqueará y se encenderá la luz de Lid
Locked (Bloqueo de la tapa)� Esta luz indica que la tapa está
asegurada y no se puede abrir�
Si necesita abrir la tapa, presione START/PAUSE/Unlock
lid (Inicio/Pausa/Desbloqueo de la tapa)� La tapa se
desbloqueará una vez que se haya detenido el movimiento
de la lavadora� Esto puede tomar varios minutos si la carga
estaba exprimiéndose a alta velocidad� Mantenga presionado
START/PAUSE/Unlock lid (Inicio/Pausa/Desbloqueo de la tapa)
nuevamente durante tres segundos para reanudar el ciclo�
B
C
A
Use solamente un detergente de Alto rendimiento (HE)�
NOTA: Siga las instrucciones del fabricante para determinar
la cantidad de detergente que debe usar� No agregue
paquetes de detergente de lavandería de una dosis única,
blanqueador no decolorante ni cristales de suavizante de
telas a los depósitos� No se distribuirán correctamente�
Depósito Oxi
C
Este depósito tiene capacidad para hasta 3/4 taza
(180 mL) de producto Oxi u otro producto para realzar
el lavado, como blanqueador no decolorante en polvo o
líquido� Los productos para realzar el lavado se distribuyen
automáticamente en el momento apropiado durante el ciclo
de lavado� Cerciórese de seleccionar Oxi de las opciones
para garantizar una distribución adecuada�
NOTA: Llene el depósito solamente con Oxi� No mezcle
los productos�
Depósito del blanqueador líquido con cloro
D
El depósito tiene una capacidad para hasta 3/4 taza
(180 ml) de blanqueador líquido con cloro� El blanqueador
se diluirá y distribuirá automáticamente en el momento
óptimo durante el ciclo de lavado� Este depósito no puede
diluir blanqueador en polvo�
NOTA: Llene el depósito solamente con blanqueador
líquido�
D
25
Page 26

GUÍA DE CICLOS
Los ajustes que se muestran son los ajustes por defecto para ese ciclo. Una vez que haya seleccionado un ciclo, los modicadores
por defecto o los modicadores anteriores para ese ciclo se iluminarán. Para lograr el mejor cuidado de las telas, elija el ciclo que
sea el más adecuado para la carga que va a lavar� No todos los ciclos y las opciones están disponibles en todos los modelos�
Artículos
a lavar:
Algodón,
lino y cargas
de prendas
mezcladas
Telas
inarrugables,
de algodón,
planchado
permanente,
lino y telas
sintéticas
Seda lavable
a máquina,
telas de
lavado a
mano y lana
Telas con
suciedad
ligera
Cargas
muy sucias,
telas que no
destiñen
Telas blancas
con suciedad
profunda
Cargas de
prendas de
algodón de
colores vivos
u oscuros,
lino, informal
y mixtas
Ciclo:
Normal Prewash
Casual
(Informal)
Delicates
(Ropa
delicada)
Express
(Expreso)
Sanitize w/
Oxi & Steam
(Higienizar con
Oxi y vapor)o
Sanitize w/Oxi
Higienizar con
Oxi) (según
el modelo)
Whites (Ropa
blanca)
Cold Clean
(Lavado con
agua fría)
Temperatura de
lavado*:
Velocidad de
exprimido:
Nivel de
suciedad:
disponibles:
TimedOxi
Two Rinses
Fabric Softener
Stain Treat or
Stain Boost
TimedOxi
Two Rinses
Fabric Softener
Stain Treat or
Stain Boost
TimedOxi
Two Rinses
Fabric Softener
Stain Treat or
Stain Boost
TimedOxi
Two Rinses
Fabric Softener
Stain Treat or
Stain Boost
TimedOxi
Two Rinses
Fabric Softener
Stain Treat or
Stain Boost
TimedOxi
Two Rinses
Fabric Softener
Stain Treat or
Stain Boost
TimedOxi
Two Rinses
Fabric Softener
Stain Treat or
Stain Boost
Opciones
Prewash
Prewash
Prewash
Prewash
Prewash
Deep Fill
Prewash
Deep Fill
Detalles de los ciclos:
Use este ciclo para limpiar
las prendas de algodón, lino
y cargas de telas mixtas con
suciedad normal� Pueden
regularse los ajustes por
defecto según se necesite�
Use este ciclo para lavar
cargas con telas inarrugables
como camisas deportivas,
blusas, ropa de ocina
informal, bras de planchado
permanente y mezclas� El
ciclo utiliza un lavado tibio, un
enfriamiento, y una velocidad
de exprimido media para una
mejor reducción de las arrugas�
Use este ciclo para las prendas
delicadas lavables a máquina�
Este ciclo usa una acción de
lavado intermitente con agua
fresca y un exprimido lento,
para el cuidado delicado de
artículos nos lavables y evitar
el encogimiento� Coloque los
artículos pequeños en bolsas de
malla antes de lavarlos�
Use este ciclo para lavar unos
pocos artículos con suciedad
ligera que se necesiten con
urgencia� Este ciclo corto
combina una acción de
lavado a alta velocidad y un
exprimido a alta velocidad
para la mejor limpieza y
tiempos de secado más cortos�
Utilice este ciclo para eliminar
el 99,9% de las bacterias
cuando se usa junto con la
opción Oxi� Se debe utilizar
el ajuste prejado para lograr
la higienización adecuada�
Asegúrese de agregar un
producto Oxi al depósito Oxi�
En este ciclo se agrega
el blanqueador líquido
con cloro a la carga en el
momento adecuado para el
blanqueamiento mejorado de
las telas blancas sucias�
El agua fría con una acción
de lavado adicional quita
con delicadeza las manchas
mientras cuida las telas� Pueden
regularse los ajustes como
desee, pero deberán usarse
solamente ajustes con agua fría�
* Temperaturas de lavado varían de acuerdo con el ajuste del ciclo seleccionado� Todos los enjuagues son con agua fría�
26
Page 27

GUÍA DE CICLOS
Los ajustes que se muestran son los ajustes por defecto para ese ciclo. Una vez que haya seleccionado un ciclo, los modicadores
por defecto o los modicadores anteriores para ese ciclo se iluminarán. Para lograr el mejor cuidado de las telas, elija el ciclo que
sea el más adecuado para la carga que va a lavar� No todos los ciclos y las opciones están disponibles en todos los modelos�
Artículos
a lavar:
Artículos
grandes como
sábanas,
bolsas para
dormir,
edredones
pequeños,
chaquetas
y alfombras
pequeñas
lavables
Telas
resistentes,
prendas que
no destiñen
Trajes de
baño, artículos
que sólo
necesiten
enjuagarse
Ninguna
prenda en la
lavadora
Ciclo:
Bulky/
edding
(Artículos
voluminosos/
Ropa de
cama)
Heavy
Duty
(Intensa)
Rinse & Spin
(
Enjuague &
exprimido)
Clean
Washer
(Limpiar la
lavadora)
Temperatura
de lavado*:
N/A
N/A
Velocidad de
exprimido:
N/A
N/A
Nivel de
suciedad:
Opciones
disponibles:
Deep Fill
TimedOxi
Two Rinses
Fabric Softener
Stain Treat or
Stain Boost
Deep Fill
TimedOxi
Two Rinses
Fabric Softener
Stain Treat or
Stain Boost
Two Rinses Combina un enjuague y un
N/A N/A
Prewash
Prewash
Detalles de los ciclos:
Utilice este ciclo para lavar
artículos grandes como pueden
ser chaquetas y edredones
pequeños� La lavadora se llenará
con suciente agua para mojar la
carga antes de que comience la
etapa de lavado del ciclo y usa
un nivel de agua más alto que
otros ciclos�
Use este ciclo para cargas de
algodón pesadas o con mucha
suciedad� Este ciclo combina
una acción de lavado a alta
velocidad, un tiempo de lavado
más prolongado y un exprimido a
velocidad extra alta para acortar
el tiempo de secado� Regule los
ajustes de temperatura según sea
necesario�
exprimido a alta velocidad
para las cargas que requieran
un ciclo de enjuague adicional
o para terminar de lavar una
carga después de un corte de
corriente� Úselo también para las
cargas que solamente necesitan
enjuagarse� Si desea un desagüe y
exprimido únicamente, seleccione
el ciclo Rinse & Spin (Enjuague y
exprimido) y luego presione para
apagar la opción Two Rinses (Dos
enjuagues)� Utilice Drain & Spin
(Desagüe y exprimido) para sacar
el exceso de agua de la carga�
Use este ciclo cada 30 lavados
para mantener el interior de su
lavadora fresco y limpio� Este ciclo
usa un nivel de agua más alto�
Úselo con blanqueador líquido
con cloro, para limpiar a fondo el
interior de su lavadora� Este ciclo no
debe interrumpirse� Vea “Cuidado
de la lavadora”�
IMPORTANTE: No coloque prendas
ni otros artículos en la lavadora
durante el ciclo de Clean Washer
(Limpiar la lavadora)� Use este ciclo
con la tina de lavado vacía�
* Temperaturas de lavado varían de acuerdo con el ajuste del ciclo seleccionado� Todos los enjuagues son con agua fría�
Opciones disponibles:
Prewash (Prelavado)
Deep Fill (Llenado profundo)
TimedOxi (Oxi programado)
Two Rinses (Dos enjuagues)
Fabric Softener (Suavizante de telas)
Stain Treat or Stain Boost (Tratamiento de
manchas o Realce para quitar las manchas)
27
Page 28

USO DE SU LAVADORA
Conecte a un contacto de pared de conexión a tierra
de 3 terminales.
No quite la terminal de conexión a tierra.
No use un adaptador.
No use un cable eléctrico de extensión.
No seguir estas instrucciones puede ocasionar
la muerte, incendio o choque eléctrico.
ADVERTENCIA
Peligro de Choque Eléctrico
1. Separe y prepare su ropa
• Vacíe los bolsillos. Las monedas, los botones o cualquier
objeto pequeño suelto puede pasar debajo de la placa
de lavado y atorarse, provocando sonidos no esperados�
• Separe los artículos según el ciclo recomendado, la
temperatura del agua y la resistencia a perder el color�
• Separe los artículos con mucha suciedad de los que tienen
poca suciedad�
• Separe los artículos delicados de las telas resistentes.
• No seque los artículos si aún hay manchas después
del lavado ya que el calor puede hacer las manchas
permanentes�
• Trate las manchas inmediatamente.
• Cierre los zípers, abroche los ganchos, ate los cordones y
las fajas, y quite los adornos y ornamentos que no sean
lavables�
• Remiende lo que esté roto y desgarrado para evitar más
daños a los artículos durante el lavado�
Consejos útiles:
• Para obtener los mejores resultados, utilice detergente HE
líquido al lavar artículos voluminosos�
• Cuando lave artículos a prueba o resistentes al agua,
colóquelos de modo parejo� Consulte “Guía de ciclos” para
obtener consejos y más información acerca del ciclo de
Deep Wash (Lavada en agua profunda)�
• Use bolsas de malla para prendas, para ayudar a prevenir
los enredos cuando lave artículos delicados o pequeños�
• Vuelva al revés las prendas de tejido para evitar que se
formen motitas� Separe las prendas que sueltan pelusa
de las que la atraen� A las prendas de telas sintéticas, los
tejidos, y la pana se les pegará la pelusa de las toallas, los
tapetes y la felpilla�
NOTA: Siempre lea y siga las instrucciones en las etiquetas
de cuidado de las telas para evitar daños a sus prendas�
28
2. Agregue los productos de lavandería
(si lo desea)
Si va a usar un paquete de detergente de lavandería de una
dosis única o cristales de suavizante de telas, agréguelos al
fondo de la canasta de lavado antes de agregar las prendas�
NOTA: Siga las instrucciones del fabricante para determinar
la cantidad de los productos de lavandería que debe usa
3. Cargue las prendas en la lavadora
Para obtener el mejor funcionamiento,
se recomienda colocar las prendas en
montones ojos y de modo parejo alrededor
de la placa de lavado� Pruebe mezclar
prendas de distintos tamaños para reducir los enredos�
IMPORTANTE: Las prendas deben moverse libremente para una
mejor limpieza y para reducir la formación de arrugas y enredos�
Page 29

Liquid
Chlorine Bleach
Cómo usar los depósitos para productos
de lavandería
NOTA: No agregue los paquetes de detergente de lavandería
de una dosis única o cristales de suavizante de telas a los
depósitos� No distribuirán correctamente�
4. Agregue detergente HE
Bandeja desmontable
de detergente HE
Agregue una cantidad medida de detergente
HE en la bandeja de detergente� Esta bandeja
tiene una capacidad de 3 onzas (89 mL)� Si va
a agregar detergente HE en polvo, quite la bandeja interior�
No llene en exceso la bandeja� El agregar demasiado
detergente puede hacer que se distribuya demasiado pronto
en la lavadora�
NOTA: Asegúrese de que la bandeja esté en el cajón al utilizar
el detergente líquido y que no esté colocada al utilizar el
detergente en polvo�
IMPORTANTE: Use solamente detergentes de alto rendimiento�
El paquete tendrá la marca “HE” o “High Eciency” (Alto
rendimiento)� El lavado con poca agua crea espuma en
exceso con un detergente regular que no sea HE� El uso de
un detergente común probablemente derive en tiempos de
ciclo más prolongados y menor rendimiento de enjuague�
También puede ocasionar fallas en los componentes y moho
evidente� Los detergentes de alto rendimiento HE están hechos
para producir la cantidad adecuada de espuma para el
mejor rendimiento� Siga las instrucciones del fabricante para
determinar la cantidad de detergente que debe usar�
CONSEJO ÚTIL: Vea “Mantenimiento de la lavadora” para
obtener información acerca del método recomendado de
limpieza de los depósitos de la lavadora�
6. Agregue suavizante de telas líquido
u Oxi al depósito
Bandeja para el
suavizante de telas
Vierta una cantidad medida de suavizante de telas
líquido o productos para realzar el lavado como
Oxi en la bandeja� Siempre siga las instrucciones
del fabricante para usar la cantidad correcta de
suavizante de telas o producto Oxi según el tamaño
de la carga� Cierre el cajón del depósito y seleccione
la opción TimedOxi (Oxi programado) y/o Fabric Softener
(Suavizante de telas)� El producto Oxi se agrega durante el
lavado principal y el suavizante de telas durante el enjuague�
IMPORTANTE: La opción TimedOxi (Oxi programado) y/o
Fabric Softener (Suavizante de telas)� se debe seleccionar
para asegurar la distribución apropiada en el momento
oportuno durante el ciclo� No sobrellene ni diluya� El
sobrellenar el depósito hará que el suavizante de telas se
distribuya inmediatamente en la lavadora�
Si se selecciona la opción Two Rinses (Dos enjuagues),
el suavizante de telas se distribuirá en el enjuague nal.
Es normal que quede un poco de agua en el depósito al nal
del ciclo�
Bandeja Oxi
7. Presione POWER (Encendido) para
encender la lavadora
5. Agregue blanqueador líquido con cloro
al depósito
Blanqueador
líquido con cloro�
No sobrellene, diluya ni utilice más de 1 taza (236 ml)� No
utilice blanqueador no decolorante ni productos Oxi en el
mismo ciclo con blanqueador líquido con cloro�
Cerciórese de que el cajón del depósito esté cerrado por
completo y luego presione POWER (Encendido) para
encender la lavadora� Otros métodos para encender la
lavadora son levantar la tapa y girar la perilla de selección
de ciclos�
29
Page 30

8. Seleccione un ciclo
10. Seleccione las opciones del ciclo
Se muestra el modelo con vapor
Gire la perilla de los ciclos para elegir su ciclo de lavado�
9. Seleccione los ajustes del ciclo,
si lo desea
Suciedad ligera
Colores que
destiñen o se
opacan
Una vez que haya seleccionado un ciclo, los ajustes por
defecto de ese ciclo se iluminarán� Presione los botones de
los modicadores del ciclo para cambiar la Wash Temp
(Temperatura de lavado), el Soil Level (Nivel de suciedad)
y la Spin Speed (Velocidad de exprimido), si lo desea� No
todos los ajustes están disponibles con todos los ciclos� Incluso
para los ajustes de lavado con agua fría, se puede agregar
un poco de agua tibia a la lavadora para mantener una
temperatura mínima�
NOTA: Siempre lea y siga las instrucciones de cuidado de
las telas para evitar daños a sus prendas� Si no está seguro de
qué temperatura utilizar, consulte el cuadro anterior o seleccione
una temperatura más baja�
Suciedad
moderada
Colores vivos
Suciedad
profunda
Ropa blanca
Colores pasteles
Se muestra el modelo con vapor
Seleccione cualquier otra opción de ciclo que desee agregar,
si no se ha jado previamente. En algunos ciclos se agregarán
opciones automáticamente, tales como Two Rinses (Dos
enjuagues)� Estas opciones pueden apagarse si lo desea�
NOTA: No todas las opciones están disponibles con todos
los ciclos�
11. Mantenga presionado START/PAUSE/
Unlock Lid (Inicio/Pausa/Desbloqueo
de la tapa) para comenzar el ciclo de
lavado
Mantenga presionado el botón START/PAUSE/Unlock Lid
(Inicio/Pausa/Desbloqueo) durante tres segundos para
comenzar el ciclo de lavado� Cuando haya terminado el ciclo,
se encenderá el indicador de COMPLETE (Terminado) y se
escuchará la señal de n de ciclo (si se ha jado). Saque las
prendas a tiempo cuando se haya terminado el ciclo para
evitar olores, reducir la formación de arrugas y evitar que se
herrumbren los ganchos, zípers y broches a presión de metal�
Cómo desbloquear la tapa para agregar prendas
Si usted necesita abrir la tapa para agregar 1 ó 2 prendas:
Presione START/PAUSE/Unlock Lid (Inicio/Pausa/Desbloqueo)
para pausar la lavadora; la tapa se desbloqueará una
vez que la lavadora haya dejado de moverse� Esto puede
tomar varios minutos si la carga estaba exprimiéndose a
alta velocidad� Luego cierre la tapa y mantenga presionado
nuevamente START/PAUSE/Unlock Lid (Inicio/Pausa/
Desbloqueo) durante tres segundos para volver a iniciar
el ciclo�
IMPORTANT: Si se deja la tapa abierta por más de
10 minutos, el agua será bombeada hacia fuera y
aparecerá el código de error F8E6 en la pantalla�
30
Page 31

MANTENIMIENTO DE LA LAVADORA
MANGUERAS DE ENTRADA DE AGUA
Reemplace las mangueras de entrada después de 5 años
de uso para reducir el riesgo de que fallen� Inspeccione
periódicamente y cambie las mangueras si se hallan
protuberancias, torceduras, cortes, desgaste o pérdidas
de agua�
Cuando reemplace sus mangueras de entrada de agua,
anote la fecha de reposición en la etiqueta con un marcador
permanente�
NOTA: Este lavadora no incluye mangueras de entrada�
Vea las Instrucciones de instalación para más información�
CUIDADO DE LA LAVADORA
Recomendaciones para ayudar a que su lavadora
limpie y rinda de la mejor manera
1. Use siempre detergentes HE (Alto rendimiento) y siga las
instrucciones del fabricante de detergente HE acerca
de la cantidad de detergente HE a usar� Nunca use más
de la cantidad recomendada, ya que puede acelerar la
acumulación de residuos de detergente y suciedad en
la lavadora, lo que puede causar un olor no deseado�
2. Use a veces lavados con agua tibia o caliente (no
solamente lavados con agua fría), ya que los mismos
pueden hacer un mejor trabajo al controlar el ritmo
en el cual se acumulan la suciedad y el detergente�
3. Deje siempre la tapa de la lavadora abierta entre un uso
y otro, para ayudar a que se termine de secar la lavadora
y evitar la acumulación de residuos causantes de olores�
Limpieza de la lavadora de carga superior
Lea estas instrucciones completamente antes de comenzar
el proceso de limpieza de rutina que se recomienda a
continuación� El procedimiento de mantenimiento de la
lavadora deberá efectuarse una vez al mes o cada 30 ciclos
de lavado como mínimo, lo primero que ocurra, para controlar
el ritmo en el cual puedan acumularse la suciedad
y el detergente en la lavadora�
Cómo limpiar el interior de la lavadora
Para mantener la lavadora libre de olores, siga las
instrucciones de uso detalladas arriba y utilice este
procedimiento mensual de limpieza que recomendamos
a continuación:
Ciclo de Clean Washer (Limpiar la lavadora)
Esta lavadora tiene un ciclo especial que utiliza mayores
volúmenes de agua junto con blanqueador líquido con cloro para
limpiar el interior de su lavadora�
CUIDADO DE LA LAVADORA (cont.)
Comience el procedimiento
1. Procedimiento de blanqueador con cloro:
a. Abra la tapa de la lavadora y saque la ropa o artículos
de la misma�
b. Agregue 1 taza (236 mL) de blanqueador líquido con
cloro al depósito del blanqueador�
NOTA: El usar más blanqueador líquido con cloro de
lo recomendado anteriormente puede ocasionar daños
en la lavadora con el paso del tiempo�
c. Cierre la tapa de la lavadora�
d. No agregue detergente ni ningún otro producto químico
a la lavadora cuando siga este procedimiento�
e. Seleccione el ciclo de CLEAN WASHER (Limpiar
la lavadora)�
f. Mantenga presionado el botón de START/PAUSE/
Unlock lid (Inicio/Pausa/Desbloqueo de la tapa)
para comenzar el ciclo� A continuación se describe
cómo funciona el ciclo de Clean Washer (Limpiar la
lavadora)�
NOTA: Para obtener los mejores resultados, no interrumpa
el ciclo� Si es necesario interrumpir el ciclo, presione
POWER/CANCEL (Encendido/Cancelar)� (Para los
modelos sin botón de Power/Cancel (Encendido/
Cancelar), presione y sostenga START/PAUSE/Unlock
[Inicio/Pausa/Desbloqueo] durante tres segundos)�
Después de que se detenga el ciclo de CLEAN WASHER
(Limpiar la lavadora), ponga en marcha un ciclo de Rinse
& Spin (Enjuague y exprimido) para enjuagar el limpiador
de la lavadora�
Descripción del funcionamiento del ciclo de CLEAN WASHER
(Limpiar la lavadora):
1. Este ciclo llenará la lavadora de agua hasta un nivel más alto
que los ciclos normales de lavado para enjuagar arriba de la
línea de agua de un ciclo normal�
2. Durante este ciclo, habrá períodos de agitación y exprimido
para eliminar mejor la suciedad�
Una vez que haya nalizado el ciclo, deje la tapa abierta para
que haya una mejor ventilación y secado del interior de la
lavadora�
Limpieza de los depósitos
Después de usar la lavadora durante cierto tiempo, es posible
que encuentre acumulación de residuos en los depósitos de la
misma� Para quitar los restos de los depósitos, límpielos con
un paño húmedo y seque con una toalla� No intente sacar los
depósitos ni el borde para la limpieza� Los depósitos y el borde
no se pueden sacar� Si su modelo tiene un cajón de depósito, sin
embargo, saque el cajón y límpielo antes o después de poner en
marcha el ciclo de CLEAN WASHER (Limpiar la lavadora)� Use
un limpiador multiuso para supercies, si es necesario.
Cómo limpiar el exterior de la lavadora
Use un paño suave y húmedo o una esponja para limpiar
cualquier derrame� Utilice sólo limpiadores o jabones suaves
para limpiar las supercies externas de la lavadora.
IMPORTANTE: Para evitar dañar el acabado de la lavadora, no
use productos abrasivos�
31
Page 32

CUIDADO DURANTE LA FALTA DE USO
Y LAS VACACIONES
Ponga a funcionar su lavadora únicamente cuando esté
en casa� Si va a mudarse o no va a usar la lavadora durante
cierto período, siga estos pasos:
1. Desenchufe la lavadora o desconecte el suministro
de energía a la misma�
2. Cierre el suministro de agua a la lavadora para evitar
inundaciones debidas a aumentos en la presión del agua�
LIMPIEZA DEL DEPÓSITO
Es posible que haya restos de productos de lavandería
en el cajón del depósito� Para quitar el residuo, siga este
procedimiento recomendado para la limpieza:
1. Jale el cajón hacia fuera hasta sentir resistencia�
2. Empuje las dos lengüetas hacia abajo y luego siga jalando
hacia fuera�
3. Lávela en agua tibia jabonosa usando un detergente suave�
4. Enjuáguelo con agua tibia�
5. Séquelo al aire o con una toalla, luego vuelva a colocarlo
dentro de la ranura�
TRANSPORTE DE LA LAVADORA
1. Cierre ambos grifos de agua� Desconecte y elimine el agua
de las mangueras de entrada de agua�
2. Si se va a trasladar la lavadora durante una temporada de
invierno riguroso, siga las instrucciones descritas en Cuidado
para el almacenamiento durante el invierno antes de la
mudanza�
3. Desconecte el desagüe del sistema de desagüe�
4. Desenchufe el cable eléctrico�
5. Ponga las mangueras de entrada y la manguera de
desagüe en el interior de la canasta de la lavadora�
6. Cuelgue el cable eléctrico y la manguera de desagüe sobre
la consola y asegúrelo con cinta adhesiva�
7. Coloque el anillo de empaque de espuma de los materiales
de envío originales nuevamente en el interior de la lavadora�
Si no cuenta con el anillo de empaque, coloque sábanas
gruesas o toallas en la abertura de la canasta� Cierre la
tapa y coloque cinta sobre la misma hacia el frente a la
lavadora� Mantenga la tapa pegada con cinta adhesiva
hasta que se coloque la lavadora en su nuevo lugar�
Traslade la lavadora en posición vertical�
CÓMO REINSTALAR O USAR
LA LAVADORA NUEVAMENTE
IMPORTANTE: El cajón y la bandeja del depósito no son
aptos para la lavavajillas�
CUIDADO PARA EL ALMACENAMIENTO
DURANTE EL INVIERNO
IMPORTANTE: Para evitar daños, instale y guarde la
lavadora en un lugar donde no se congele� Debido a que
queda un poco de agua en las mangueras, el congelamiento
de la misma podría dañar la lavadora� Si va a almacenar
o mover su lavadora durante una temporada de invierno
riguroso, acondiciónela para el invierno�
Para acondicionar la lavadora para el invierno:
1. Cierre ambos grifos de agua; desconecte y escurra el agua
de las mangueras de llenado�
2. Vierta un 1 cuarto (1 L) de anticongelante tipo R�V� en la
canasta y ponga a funcionar la lavadora en un ciclo de
Rinse & Spin (Enjuague & exprimido) durante unos 30
segundos para mezclar el anticongelante con el agua
restante�
3. Desenchufe la lavadora o desconecte el suministro de
energía�
Para reinstalar la lavadora después de la falta de uso,
vacaciones, almacenamiento durante el invierno o mudanza:
1. Consulte las Instrucciones de instalación para ubicar,
nivelar y conectar la lavadora�
2. Antes de usar la lavadora nuevamente, póngala a funcionar
siguiendo el procedimiento recomendado a continuación:
Para volver a usar la lavadora:
1. Deje correr el agua por los tubos y las mangueras� Vuelva a
conectar las mangueras de entrada de agua� Abra ambos
grifos de agua�
ADVERTENCIA
Peligro de Choque Eléctrico
Conecte a un contacto de pared de conexión a tierra
de 3 terminales.
No quite la terminal de conexión a tierra.
No use un adaptador.
No use un cable eléctrico de extensión.
No seguir estas instrucciones puede ocasionar
la muerte, incendio o choque eléctrico.
2. Enchufe la lavadora o reconecte el suministro de energía�
3. Ponga a funcionar la lavadora en el ciclo de Bulky/Bedding
(Artículos voluminosos/Ropa de cama) para limpiarla y para
quitar el anticongelante, de haberlo usado� Use solamente
un detergente de alto rendimiento (HE)� Use la mitad de la
cantidad recomendada por el fabricante para una carga
de tamaño mediano�
32
Page 33

SOLUCIÓN DE PROBLEMAS
para obtener asistencia y si es posible evitar una visita de servicio�
Pruebe primero las soluciones sugeridas aquí
Si experimenta Causas posibles Solución
Vibración o desequilibrio
Vibración, balanceo o
“caminata”
Vibración durante
el exprimido o si
la lavadora se ha
detenido con todas las
luces parpadeando
Ruidos
Chasquidos o ruidos
metálicos
Gorgoteo o zumbido La lavadora puede estar
Zumbido Es posible que esté en marcha una
Zumbidos La canasta puede estar disminuyendo
Fugas de agua
Verique que lo
siguiente esté
instalado
adecuadamente:
Es posible que las patas no estén
haciendo contacto con el piso
y no estén seguras�
Es posible que la lavadora no esté
nivelada�
La carga puede estar desequilibrada� Cargue los artículos secos de modo uniforme en montones ojos
Objetos atrapados en el sistema de
desagüe de la lavadora�
desaguándose�
detección de la carga�
su velocidad�
La lavadora no está nivelada� Es posible se salpique agua de la canasta si la lavadora no está
Las mangueras de llenado no están
bien sujetas�
Arandelas de la manguera de llenado� Asegúrese que están debidamente colocadas las cuatro
Conexión de la manguera de
desagüe�
Revise la plomería de la casa para
ver si hay fugas o si el fregadero o
el desagüe está obstruido�
No se ha cargado la lavadora según
lo recomendado�
Las patas frontales y posteriores deberán hacer contacto rme
con el piso y la lavadora deberá estar nivelada para funcionar
adecuadamente. Las tuercas adoras deberán estar rmes contra
la parte inferior de la carcasa�
Revise si el piso está irregular o hundido� Si el piso no está parejo,
el colocar una pieza de madera de 3/4" (19 mm) debajo de la
lavadora reducirá el sonido�
Vea “Nivelación de la lavadora” en las Instrucciones de instalación�
alrededor de la placa de lavado� El agregar artículos mojados o
agregar más agua a la canasta podría causar un desequilibrio en
la lavadora�
Evite el lavado de artículos individuales� Para lograr equilibrio,
cargue un artículo como una alfombra o chaqueta de mezclilla con
unos pocos artículos adicionales� Si están parpadeando las luces,
redistribuya la carga, cierre la tapa y mantenga presionado START/
PAUSE/Unlock Lid (Inicio/Pausa/Desbloqueo de la tapa)�
Use el ciclo de Bulky/Bedding (Artículos voluminosos/Ropa de cama)
para los artículos de tamaño extra grande no absorbentes, tales
como edredones o chaquetas rellenas de poliéster� Otros artículos
no son apropiados para el ciclo de Bulky/Bedding (Artículos
voluminosos/Ropa de cama)� Vea “Guía de ciclos”�
El artículo o la carga no es adecuado para el ciclo seleccionado�
Vea “Guía de ciclos” y “Uso de la lavadora”�
Vacíe los bolsillos antes del lavado� Los artículos sueltos, tales como
monedas, podrían caer entre la canasta y la tina o bloquear la
bomba� Tal vez sea necesario solicitar servicio técnico para quitar
los artículos�
Es normal escuchar el ruido de los artículos de metal en las
prendas, tales como broches a presión de metal, hebillas o cierres
cuando tocan la canasta de acero inoxidable�
Es normal escuchar que la bomba haga un sonido continuo
de zumbido, con gorgoteos periódicos o repentinos, cuando salen los
últimos restos de agua durante los ciclos de exprimido/desagüe�
Puede ser que escuche el zumbido de los giros de detección después
de haber puesto en marcha la lavadora� Esto es normal�
Puede escuchar el zumbido de la canasta disminuyendo su
velocidad� Esto es normal�
nivelada�
Apriete la conexión de la manguera de llenado�
arandelas planas de las mangueras de llenado�
Jale la manguera de desagüe de la carcasa de la lavadora y
asegúrela correctamente al tubo vertical o tina de lavadero�
No coloque cinta adhesiva sobre la abertura del desagüe�
Es posible que el agua se salga de un lavadero o tubo vertical
bloqueado� Revise toda la plomería de la casa y fíjese si hay fugas
de agua (tinas de lavadero, tubo de desagüe, tubos de agua y
grifos)�
El cargar desequilibrado puede hacer que la canasta quede
desalineada y que salpique agua fuera de la tina� Vea “Uso
de su lavadora” para las instrucciones de carga�
33
Page 34

SOLUCIÓN DE PROBLEMAS
para obtener asistencia y si es posible evitar una visita de servicio�
Pruebe primero las soluciones sugeridas aquí
Si experimenta Causas posibles Solución
La lavadora no funciona como se esperaba (cont.)
No hay suciente agua
en la lavadora
La lavadora no
funciona o no llena, la
lavadora
La carga no está completamente
cubierta en agua�
Verique si hay el suministro
adecuado de agua�
Este es el funcionamiento normal para una lavadora de HE (Alto
rendimiento) con nivel bajo de agua� La carga no estará sumergida por
completo� La lavadora detecta los tamaños de las cargas y agrega la
cantidad correcta de agua para la limpieza óptima� Vea “Qué hay de
nuevo debajo de la tapa”�
IMPORTANTE: No agregue más agua a la lavadora� El agua que se
agregue levantará y separará la carga de la placa de lavado, lo que
ocasionará una menor acción de limpieza�
Ponga en marcha el ciclo Clean Washer (Limpiar la lavadora) para
optimizar el nivel de agua y el rendimiento de la lavadora�
Deberán sujetarse ambas mangueras y tener ujo de agua a la válvula
de llenado�
Los grifos de agua fría y caliente deben estar abiertos�
Revise que los ltros de la válvula de entrada no se hayan obstruido.
Revise si hay torceduras en las mangueras de entrada, las cuales pueden
restringir el ujo de agua.
ADVERTENCIA
Peligro de Choque Eléctrico
Conecte a un contacto de pared de conexión a tierra
de 3 terminales.
No quite la terminal de conexión a tierra.
No use un adaptador.
No use un cable eléctrico de extensión.
No seguir estas instrucciones puede ocasionar
la muerte, incendio o choque eléctrico.
Si experimenta Causas posibles Solución
La lavadora no funciona como se esperaba (cont.)
La lavadora no
funciona o no llena,
la lavadora (cont�)
Verique que el suministro
eléctrico sea el adecuado�
Funcionamiento normal de la
lavadora�
Conecte el cable eléctrico a un contacto de pared de conexión a tierra
de 3 terminales�
No use un cable eléctrico de extensión�
Cerciórese de que haya suministro eléctrico en el contacto�
Reposicione el cortacircuitos si se ha disparado� Reemplace los fusibles
que se hayan quemado�
NOTA: Si los problemas continúan, contacte a un electricista�
La tapa deberá estar cerrada para que funcione la lavadora�
La lavadora hará una pausa durante ciertas fases del ciclo�
No interrumpa el ciclo�
34
Es posible que la lavadora se haya detenido para reducir la espuma�
Page 35

SOLUCIÓN DE PROBLEMAS
para obtener asistencia y si es posible evitar una visita de servicio�
Pruebe primero las soluciones sugeridas aquí
Si experimenta Causas posibles Solución
La lavadora no funciona como se esperaba (cont.)
La lavadora no
funciona o no llena,
la lavadora se
detiene (cont�)
La lavadora no
desagua/exprime,
las cargas todavía
están mojadas
Partes secas en
la carga después
del ciclo
Temperaturas
incorrectas o
equivocadas
de lavado
o enjuague
La carga no está
enjuagada
Puede ser que la lavadora se haya
cargado de manera apretada�
No se está usando detergente de HE
(Alto rendimiento) o se está usando
demasiado del mismo�
Es posible que los artículos pequeños
hayan quedado atrapados en la
bomba o entre la canasta y la tina,
lo que puede enlentecer el desagüe�
Está usando ciclos con una
velocidad más baja de exprimido�
La lavadora puede estar cargada de
manera apretada o desequilibrada�
La carga no está balanceada� Consulte “Vibración o desequilibrio” en la sección Solución de
Revise la plomería para ver si
está instalada correctamente la
manguera de desagüe� La manguera
de desagüe se extiende dentro del
tubo vertical más de 4,5" (114 mm).
No se está usando detergente de HE
(Alto rendimiento) o se está usando
demasiado del mismo�
Los exprimidos a alta velocidad
quitan mayor humedad que los de
las lavadoras tradicionales de carga
superior�
Verique si hay el suministro
adecuado de agua�
Temperaturas de lavado con
control de ahorro de energía�
Verique si hay el suministro
adecuado de agua�
Saque varios artículos y vuelva a arreglar la carga uniformemente
alrededor de la placa de lavado� Cierre la tapa y mantenga presionado
START/PAUSE/Unlock Lid (Inicio/Pausa/Desbloqueo de la tapa)�
Agregue solamente 1 ó 2 artículos adicionales después de que haya
comenzado el ciclo�
No agregue más agua a la lavadora�
Use solamente un detergente de HE (Alto rendimiento)� La espuma
que producen los detergentes comunes puede enlentecer la lavadora
o detenerla� Mida siempre el detergente y siga las instrucciones del
mismo según los requisitos de la carga�
Para quitar la espuma, anule el ciclo� Seleccione RINSE & SPIN
(Enjuague y exprimido)� Seleccione el ciclo que desee� Mantenga
presionado START/PAUSE/Unlock Lid (Inicio/Pausa/Desbloqueo de
la tapa)� No agregue más detergente�
Vacíe los bolsillos y use bolsas para prendas para los artículos
pequeños�
Los ciclos con velocidades de exprimido más bajas quitan menos agua
que los ciclos con velocidades de exprimido más altas� Use el ciclo/la
velocidad de exprimido recomendado para la prenda�
El cargar apretadamente posiblemente no permitirá que la lavadora
exprima correctamente, dejando la carga más mojada de lo normal�
Distribuya la carga mojada de modo uniforme para que pueda girar
en equilibrio� Seleccione DRAIN & SPIN (Desagüe y exprimido) para
eliminar el exceso de agua� Vea “Uso de la lavadora” para obtener
recomendaciones sobre cómo cargar�
problemas para obtener más información�
Revise la manguera de desagüe para ver si está instalada
correctamente� Use el molde de la manguera de desagüe y sujételo
bien al tubo vertical o a la tina� No ponga cinta adhesiva sobre la
abertura del desagüe� Baje la manguera de desagüe si el extremo
está a más de 96" (2,4 m) por encima del piso. Quite lo que esté
obstruyendo la manguera de desagüe�
La espuma producida por el detergente común o el usar demasiado
detergente puede enlentecer o detener el desagüe o el exprimido� Use
solamente un detergente de HE (Alto rendimiento)� Mida siempre el
detergente y siga las instrucciones del mismo para su carga� Para quitar
la espuma en exceso, seleccione RINSE & SPIN (Enjuague y exprimido)�
No agregue detergente�
Las altas velocidades de exprimido, combinadas con el ujo de aire
durante el exprimido nal, pueden hacer que partes de los artículos
que están cerca de la parte superior de la carga se sequen durante el
exprimido nal. Esto es normal.
Verique que no se han invertido las mangueras de entrada del agua
caliente y del agua fría�
Ambas mangueras deberán sujetarse a la lavadora y al grifo,
y deberán tener ujo de agua caliente y fría a la válvula de entrada.
Revise que los ltros de la válvula de entrada no estén obstruidos.
Enderece las torceduras que pueda haber en las mangueras�
Las lavadoras con clasicación ENERGY STAR® usan temperaturas de
agua y enjuague más frías que las lavadoras tradicionales de carga
superior� Esto incluye lavados con agua no tan tibia ni tan caliente�
Verique que no se han invertido las mangueras de entrada del agua
caliente y del agua fría�
Deberán sujetarse ambas mangueras y tener ujo de agua a la válvula
de llenado�
35
Page 36

SOLUCIÓN DE PROBLEMAS
para obtener asistencia y si es posible evitar una visita de servicio�
Pruebe primero las soluciones sugeridas aquí
Si experimenta Causas posibles Solución
La lavadora no funciona como se esperaba (cont.)
La carga no está
enjuagada (cont�)
Hay arena, pelo de
mascotas, pelusa, etc�
en la carga después
del lavado
La carga está
enredada
No limpia ni quita las
manchas
Verique si hay el suministro
adecuado de agua�
No se está usando detergente de
HE (Alto rendimiento) o se está
usando demasiado del mismo�
La lavadora puede estar cargada
de manera apretada�
No se ha seleccionado la opción
de suavizante de telas�
La arena, pelo de mascotas,
pelusa o los restos de detergente
o blanqueador excesivos pueden
requerir enjuague adicional�
No se ha cargado la lavadora
según lo recomendado�
Acción de lavado y/o velocidad
de exprimido demasiado rápida
para la carga�
La carga no está completamente
cubierta en agua�
Se ha agregado más agua
a la lavadora�
No se ha cargado la lavadora
según lo recomendado�
Se está agregando detergente
sobre la carga�
No se está usando detergente de
HE (Alto rendimiento) o se está
usando demasiado del mismo�
Deberán estar abiertos los grifos de agua fría y caliente�
Es posible que estén obstruidos los ltros de la válvula de entrada
en la lavadora�
Enderece las torceduras que pueda haber en la manguera de entrada�
Es posible que la espuma ocasionada por un detergente común impida
que la lavadora funcione correctamente�
Use solamente un detergente de HE (Alto rendimiento)� Cerciórese de
medirlo correctamente�
Mida siempre el detergente y siga las instrucciones del mismo según
el tamaño de la carga y el nivel de suciedad�
La lavadora es menos ecaz en el enjuague cuando la carga está
apretada�
Cargue las prendas de modo uniforme en montones ojos alrededor
de la placa de lavado�
Use el ciclo diseñado para las telas que se van a lavar�
Agregue solamente 1 ó 2 artículos adicionales después de que
la lavadora haya comenzado�
Cuando use el suavizante de telas, cerciórese de seleccionar la opción
de Fabric Softener (Suavizante de telas)�
Agregue un Two Rinses (Dos enjuagues) al ciclo seleccionado�
Cargue las prendas de modo uniforme en montones ojos alrededor de
la placa de lavado�
Reduzca los enredos mezclando diferentes tipos de artículos en la carga�
Use el ciclo recomendado para el tipo de prendas que se van a lavar�
Seleccione un ciclo con una acción de lavado y velocidad de exprimido
más lenta� Tenga en cuenta que los artículos estarán más mojados que
cuando usa un exprimido a una velocidad más alta�
La lavadora detecta el tamaño de la carga y agrega la cantidad
correcta de agua� Esto es normal y es necesario para que la ropa se
mueva�
No agregue más agua a la lavadora� El agua adicional que se agregue
levantará y separará la carga de la placa de lavado, lo que ocasionará
una menor acción de limpieza�
Cargue las prendas de modo uniforme en montones ojos alrededor
de la placa de lavado�
Agregue solamente 1 ó 2 artículos después de que la lavadora haya
comenzado�
Agregue el detergente, los productos Oxi y el blanqueador no
decolorante en el fondo de la canasta antes de colocar las prendas�
Es posible que la espuma ocasionada por un detergente común impida
que la lavadora funcione correctamente�
Use solamente un detergente de HE (Alto rendimiento)� Cerciórese
de medir correctamente�
Mida siempre el detergente y siga las instrucciones del fabricante según
el tamaño de la carga y el nivel de suciedad�
36
Page 37

SOLUCIÓN DE PROBLEMAS
para obtener asistencia y si es posible evitar una visita de servicio�
Pruebe primero las soluciones sugeridas aquí
Si experimenta Causas posibles Solución
La lavadora no funciona como se esperaba (cont.)
No limpia ni quita las
manchas (cont�)
Olores No se ha hecho el mantenimiento
Daños en las telas Había objetos losos en los
No está usando el ciclo correcto
para el tipo de tela�
No está usando los depósitos� Use los depósitos para evitar que el blanqueador con cloro y el
No está lavando los colores
similares juntos�
de limpiar la lavadora según lo
recomendado�
No se está usando detergente de
HE (Alto rendimiento) o se está
usando demasiado del mismo�
bolsillos duranteel ciclo de lavado�
Se han enredado los cordones
y las fajas�
Los artículos pueden haber estado
dañados antes del lavado�
Si la lavadora está apretada, las
telas pueden dañarse�
Tal vez no se hayan seguido las
instrucciones de las etiquetas de
las prendas�
El blanqueador líquido con
cloro puede haberse agregado
incorrectamente�
Use una opción de ciclo con nivel de suciedad más alto y temperatura
de lavado más caliente para mejorar la limpieza�
Si va a usar el ciclo de Express (Expreso), lave solamente unos pocos
artículos�
Para una limpieza poderosa, use el ciclo de Whites (Blanquísimos),
Heavy Duty (Intenso) o Cold Clean (Lavado con agua fría)�
Vea el “Guia de ciclos” para coincida con su carga a los mejores del ciclo�
suavizante de telas manchen la ropa�
Cargue los depósitos antes de comenzar un ciclo�
Evite llenar en exceso�
No agregue productos directamente sobre la carga�
Lave los colores similares juntos y quite la carga inmediatamente
después de que se termine el ciclo, para evitar la transferencia de tinte�
Ponga a funcionar el ciclo de Clean Washer (Limpiar la lavadora) cada
30 lavados� Vea “Cuidado de la lavadora” en “Mantenimiento de la
lavadora”�
Descargue la lavadora en cuanto termine el ciclo�
Use solamente un detergente de HE (Alto rendimiento)� Cerciórese
de medirlo correctamente�
Siga siempre las indicaciones del fabricante�
Vea la sección “Cuidado de la lavadora”�
Vacíe los bolsillos, cierre los zípers, los broches de presión y los
corchetes antes del lavado para evitar enganches y rasgaduras�
Ate todos los cordones y las fajas antes de comenzar a lavar la carga�
Remiende lo que esté roto y descosido antes del lavado�
Cargue las prendas de modo uniforme en montones ojos alrededor de
la placa de lavado�
Use el ciclo diseñado para las telas que se van a lavar�
Agregue solamente 1 ó 2 artículos adicionales después de que
la lavadora haya comenzado�
Lea y siga siempre las instrucciones de la etiqueta de cuidado
proporcionadas por el fabricante de la prenda� Consulte la “Guía
de ciclos” para ver cuál es el mejor ciclo para su carga�
No vierta el blanqueador líquido con cloro directamente en la carga�
Limpie los derrames del blanqueador�
El blanqueador no diluido dañará las telas� No use más de lo
recomendado por el fabricante�
No coloque los artículos sobre el depósito del blanqueador cuando
ponga o quite la ropa de la lavadora�
37
Page 38

SOLUCIÓN DE PROBLEMAS
para obtener asistencia y si es posible evitar una visita de servicio�
Pruebe primero las soluciones sugeridas aquí
Si experimenta Causas posibles Solución
La lavadora no funciona como se esperaba (cont.)
Funcionamiento
incorrecto del depósito
No se disuelve el
paquete de detergente
de lavandería de una
dosis única
Aparece un código de error en la pantalla
Aparece LF (llenado
demasiado prolongado)
en la pantalla
“--” La perilla de control no está en
Aparece código F##
(código de error tipo F)
en la pantalla
Los depósitos están obstruidos o
los productos de lavandería se
están distribuyendo demasiado
pronto�
El blanqueador líquido
con cloro no se ha usado
en el depósito o no se ha
seleccionado la opción
TimedOxi�
Se está agregando el paquete
de detergente de lavandería de
modo incorrecto�
La lavadora tarda demasiado
en llenarse� La manguera de
desagüe se extiende dentro
del tubo vertical más de 4,5"
(114 mm)�
un ciclo�
Código de error del sistema� Oprima START/PAUSE/Unlock Lid (Inicio/Pausa/Desbloqueo de la tapa)
No sobrellene el depósito� El llenado en exceso ocasiona que los
productos se distribuyan de inmediato�
Seleccione siempre la opción de Fabric Softener (Suavizante de telas)
para asegurarse la distribución adecuada�
Cargue los depósitos antes de comenzar un ciclo�
Es normal que quede un poco de agua en el depósito al nal del ciclo.
En las casas con baja presión de agua, es posible que queden residuos
de polvo en el depósito� Para evitar esto, seleccione si es posible
una temperatura de lavado más elevada, dependiendo de la carga�
Use solamente blanqueador líquido con cloro en el depósito
del blanqueador líquido con cloro�
Si va a usar un producto Oxi solamente en el depósito de blanqueador
líquido con cloro� Si va a usar un producto Oxi, asegúrese de seleccionar
la opción de TimedOxi� No utilice los productos de Oxi en el mismo
ciclo con blanqueador líquido con cloro�
Cerciórese de que el paquete de detergente de lavandería se agregue
a la canasta de la lavadora antes de agregar las prendas� No agregue
el paquete al depósito� Siga las instrucciones del fabricante para evitar
que se dañen las prendas�
Revise la plomería para ver si está instalada correctamente la manguera
de desagüe� Use el molde de la manguera de desagüe y sujételo bien al
tubo vertical o a la tina� No ponga cinta adhesiva sobre la abertura del
desagüe� Consulte las Instrucciones de instalación�
Esto no es un error� La perilla del selector no está en un ciclo� Gire la
perilla del selector hasta que se ilumine un ciclo�
una vez para despejar el código� Después presione START/PAUSE/
Unlock Lid (Inicio/Pausa/Desbloqueo de la tapa) nuevamente para
volver a iniciar la lavadora� Si el código aparece nuevamente, llame al
servicio técnico�
38
Page 39

CONTRATOS DE PROTECCIÓN
Contratos maestros de protección
¡Felicitaciones por su inteligente adquisición! Su nuevo producto
Kenmore® está diseñado y fabricado para proporcionarle años de
funcionamiento conable.
Pero al igual que todos los productos, puede necesitar
mantenimiento preventivo o reparación de vez en cuando. Es allí
donde el Contrato maestro de protección puede ahorrarle dinero
e inconvenientes.
El Contrato maestro de protección también ayuda a prolongar
la vida de su nuevo producto. He aquí lo que se incluye en el
Contrato*:
Piezas y mano de obra necesarias para ayudar a mantener los
productos funcionando correctamente bajo uso normal, no sólo
en caso de defectos. Nuestra cobertura va mucho más allá de
la garantía del producto. No existen deducibles ni fallas de
funcionamiento que estén excluidas de la cobertura – protección
verdadera.
Servicio experto a cargo de un personal de más de 10.000
técnicos de servicio autorizados por Sears, lo que signica que su
producto será reparado por alguien en quien usted puede conar.
Llamadas de servicio ilimitado y servicio en todo el país, con
la frecuencia que usted desee, cuando usted desee.
– reemplazo de su producto protegido si ocurren cuatro fallas
o más del producto en el transcurso de doce meses.
Reemplazo del producto si su producto protegido no puede ser
reparado.
Revisión anual de mantenimiento preventivo a solicitud suya –
sin costo adicional.
Ayuda rápida por teléfono – lo que nosotros llamamos Solución
rápida – apoyo por teléfono a cargo de un representante de
Sears para todos los productos. Piense en nosotros como si
fuéramos un “manual parlante para el propietario”.
Protección por sobrevoltaje contra daños eléctricos debido a
uctuaciones de electricidad.
Reembolso de la renta si la reparación de su producto protegido
tarda más de lo prometido.
Descuento del 25% sobre el precio común por el servicio de
reparación que no esté cubierto, así como también las piezas
relacionadas con el mismo que se hayan instalado.
Una vez adquirido el Contrato, tan sólo tiene que llamar para jar
la visita de servicio técnico. Usted puede llamar a cualquier hora,
de día o de noche, o jar una visita técnica en Internet.
El Contrato maestro de protección es una compra sin riesgo. Si por
algún motivo usted lo cancela durante el período de la garantía
del producto, le proveeremos un reembolso total. O un reembolso
proporcional en cualquier momento posterior a la expiración del
período de la garantía. ¡Adquiera hoy su Contrato maestro de
protección! Se aplican algunas limitaciones y exclusiones. Para
informarse sobre los precios y obtener información adicional, en
los EE.UU. llame al 1-800-827-6655. *La cobertura en Canadá
varía para algunos artículos. Para obtener los detalles completos,
llame a Sears Canada al 1-800-361-6665.
Servicio de instalación de Sears
Para la instalación profesional de Sears de aparatos
electrodomésticos, abridores de puertas de garaje, calentadores
de agua y otros artículos principales del hogar, en los EE.UU. o en
Canadá, llame a 1-800-4-MY-HOME®.
GARANTÍA DE LOS ELECTRODOMÉSTICOS DE KENMORE
GARANTÍA LIMITADA DE KENMORE
DURANTE UN AÑO a partir de la fecha de venta de este
electrodoméstico, el aparato posee garantía contra defectos en
los materiales o en la mano de obra cuando se instale, opere y
mantenga correctamente de acuerdo con todas las instrucciones
provistas.
CON EL COMPROBANTE DE VENTA, un electrodoméstico
defectuoso recibirá la reparación o sustitución gratuita, a discreción
del vendedor.
Para obtener detalles de la cobertura de la garantía sobre
reparaciones y repuestos sin cargo, visite la página web:
www.kenmore.com/warranty.
Esta garantía es válida solamente durante 90 DÍAS a partir de la
fecha de venta en los Estados Unidos, y no tiene validez en Canadá,
si este electrodoméstico se utiliza en algún momento
para nes que no sean domésticos.
Esta garantía cubre SOLAMENTE los defectos de material
y mano de obra, y NO pagará por:
1. Los artículos no reutilizables que puedan gastarse con el uso
normal, incluyendo, pero sin limitación, ltros, correas, bolsas
y bombillas de luz con rosca en la base.
2. Un técnico de servicio para limpiar o mantener este
electrodoméstico o para enseñarle al usuario la correcta
instalación, uso y mantenimiento de este.
3. Visitas del servicio técnico para corregir la instalación
del electrodoméstico la cual no fue realizada por agentes
autorizados del servicio técnico de Sears, o para reparar
problemas con fusibles domésticos, cortacircuitos, cableado de la
casa y plomería o sistemas de suministro de gas que resulten de
tal instalación.
4. Daños o fallas en el electrodoméstico que resulten de la
instalación la cual no fue realizada por agentes autorizados de
servicio técnico de Sears, lo que incluye instalaciones que no se
realizaron de acuerdo con los códigos eléctricos, de gas o de
plomería.
5. Daños o fallas en el electrodoméstico, lo que incluye decoloración
u óxido en la supercie, si no se hizo un uso y mantenimiento
correcto de acuerdo con todas las instrucciones provistas.
6. Daños o fallas en el electrodoméstico, lo que incluye
decoloración u óxido en la supercie como consecuencia de un
accidente, alteración, abuso, uso indebido o un uso diferente de
aquél para el cual fue diseñado.
7. Daños o fallas en el electrodoméstico lo que incluye decoloración
u óxido en la supercie causados por el uso de detergentes,
limpiadores, productos químicos o utensilios diferentes de
los recomendados en todas las instrucciones provistas con el
producto.
8. Daños o fallas en piezas o sistemas como resultado de
modicaciones no autorizadas que se hayan efectuado en este
electrodoméstico.
9. Servicio técnico a un electrodoméstico si la placa de modelo y
número de serie falta, está alterada o no puede determinarse con
facilidad el logotipo de certicación correspondiente.
EXCLUSIÓN DE GARANTÍAS IMPLÍCITAS; LIMITACIÓN
DE RECURSOS
El único y exclusivo recurso del cliente según los términos de esta
garantía limitada será el de reparar o sustituir el producto según
se estipula en la presente. Las garantías implícitas, incluyendo
las garantías de comerciabilidad o de capacidad para un
propósito particular, serán limitadas a un año o al período más
corto permitido por ley. El vendedor no se hará responsable por
daños incidentales o consecuentes. Algunos estados y provincias
no permiten la exclusión o limitación de daños incidentales o
consecuentes, la limitación acerca de cuánto debe durar una
garantía implícita de comerciabilidad o capacidad, de modo
que las limitaciones o exclusiones arriba mencionadas pueden
no aplicarse en su caso.
Esta garantía se aplica sólo mientras este electrodoméstico
se usa en los Estados Unidos o Canadá*.
Esta garantía le otorga derechos legales especícos, y es posible
que usted tenga también otros derechos, los cuales varían de un
estado a otro.
* El servicio de reparación a domicilio no está disponible para
todas las áreas de Canadá y esta garantía no cubrirá los gastos
de transporte o traslado del usuario o técnico de servicio si el
producto se encuentra ubicado en un lugar remoto (de acuerdo con
la denición de Sears Canada Inc.) donde no haya un técnico de
servicio autorizado.
Sears Brands Management Corporation
Homan Estates, IL 60179 U.S.A.
Sears Canada Inc.
Toronto, Ontario, Canada M5B 2C3
10/2014
39
Page 40

TABLE DES MATIÈRES
SÉCURITÉ DE LA LAVEUSE �����������������������������������������������������40
QUOI DE NEUF SOUS LE COUVERCLE? ���������������������������� 42
TABLEAU DE COMMANDE ET CARACTÉRISTIQUES �������� 43
Distributeurs ���������������������������������������������������������������������� 45
GUIDE DES PROGRAMMES �������������������������������������������������� 46
SÉCURITÉ DE LA LAVEUSE
UTILISATION DE LA LAVEUSE ����������������������������������������������� 48
ENTRETIEN DE LA LAVEUSE ��������������������������������������������������� 51
DÉPANNAGE �����������������������������������������������������������������������������53
GARANTIE �������������������������������������������������������������������������������� 59
ASSISTANCE OU SERVICE �������������������������Couverture arrière
40
Page 41

41
Page 42

QUOI DE NEUF SOUS LE COUVERCLE?
Nettoyer avec moins d’eau
Washplate
Plateau de lavage
Laveuse traditionnelle
de type agitateur
La nouveauté la plus agrante de cette nouvelle laveuse est son
système de lavage à faible consommation d’eau avec plateau
de lavage� La laveuse ajuste automatiquement le niveau d’eau
en fonction de la taille de la charge - nul besoin de sélecteur de
niveau d’eau�
Laveuse à faible consommation
d’eau avec plateau de lavage
Détection automatique de taille de charge
et la laveuse entame un processus de détection pour déterminer
le niveau d’eau approprié à la charge� Cela peut prendre
plusieurs minutes avant que l’eau ne soit ajoutée� Voir la
description pas-àpas dans la section “Témoins lumineux des
programmes”�
Le panier se met tout d’abord à tourner avant que l’eau
ne s’écoule, ceci est normal et fait partie du processus de
détection� Cette méthode de lavage avec faible consommation
d’eau utilise moins d’eau et d’énergie qu’une laveuse
traditionnelle de type agitateur�
Choix du détergent approprié
Utiliser uniquement des détergents Haute ecacité. L’emballage
ortera la mention “HE” ou “High Eciency” (haute ecacité).
Un lavage avec faible consommation d’eau produit un excès
de mousse avec un détergent non HE ordinaire� Il est probable
que l’utilisation d’un détergent ordinaire prolongera la durée des
programmes et réduira la performance de rinçage� Ceci peut
aussi entraîner des défaillances des composants et une moisissure
perceptible� Les détergents HE sont conçus pour produire la
quantité de mousse adéquate pour le meilleur rendement�
Suivre les instructions du fabricant pour déterminer la quantité
de détergent à utiliser, et ne pas remplir au-delà de la ligne
de remplissage maximum du distributeur� Voir “Utilisation des
distributeurs de produits de lessive” pour plus d’informations�
Pour un meilleur rendement, il est recommandé de déposer
les vêtements en vrac et de façon uniforme le long du
plateau de lavage�
À mesure que la laveuse imbibe et déplace la charge, les
vêtements se tassent dans le panier. Ceci est normal et ne signie
pas que l’on doive rajouter des vêtements�
IMPORTANT : Le panier de la laveuse ne sera pas rempli d’eau,
comme avec votre précédente laveuse de type agitateur� Il est
normal qu’une partie de la charge dépasse du niveau d’eau�
Utiliser uniquement un détergent Haute efcacité (HE).
Nettoyage amélioré
Le système de lavage à faible consommation d’eau signie un
lavage concentré� Plutôt que de diluer du détergent comme dans
une laveuse de type agitateur, cette laveuse libère le détergent
directement sur les endroits souillés� Ce système de lavage à
faible consommation d’eau déplace également les vêtements
d’une manière plus ecace pour éliminer la saleté.
Sons normaux prévisibles
Au cours des diérents stades du programme de lavage, vous
entendrez peut-être des bruits que votre laveuse précédente
ne produisait pas� Par exemple, vous entendrez peut-être
un cliquetis au début du programme lorsque le système de
verrouillage du couvercle eectue un test automatique. Diérents
bourdonnements et bruits de frottements rythmiques se produiront
à mesure que le plateau de lavage déplace la charge et que
le panier ralentit jusqu’à l’arrêt� Parfois, il est possible que la
laveuse soit complètement silencieuse, lorsqu’elle détermine le
niveau d’eau adéquat ou qu’elle laisse tremper les vêtements�
42
Page 43

Modèle à vapeur
TABLEAU DE COMMANDE ET CARACTÉRISTIQUES
21 3
4
Modèle à fonctionnement sans vapeur
5
21 3
6
7 8
4
65 7 8
Certains programmes et caractéristiques ne sont pas disponibles sur certains modèles�
REMARQUE : La surface du tableau de commande est très sensible et il sut d’un léger toucher pour l’activer. Pour s’assurer que vos
sélections ont été sauvegardées, toucher le tableau de commande du bout du doigt et non avec l’ongle� Pour sélectionner un réglage ou
une option, il sut de toucher le nom qui lui correspond jusqu’à ce que la section souhaitée s’allume.
BOUTON POWER (mise sous tension)
1
Appuyer sur ce bouton pour mettre la laveuse en marche et
pour l’éteindre� Appuyer sur ce bouton pour arrêter/annuler
un programme à tout moment�
BOUTON DE PROGRAMME DE LAVAGE
2
Tourner le bouton de programme pour sélectionner un
programme correspondant à la charge de linge� Voir le
“Guide de programmes” pour des descriptions détaillées�
AFFICHAGE DE LA DURÉE
3
L’achage de la durée de programme estimée indique le
temps nécessaire à l’achèvement du programme� Des facteurs
tels que la taille de la charge et la pression de l’eau peuvent
aecter la durée achée. La laveuse peut également ajuster
la durée du programme en cas de surcharge, de charge
déséquilibrée ou de production excessive de mousse�
4
DELAY WASH (lavage différé)
Appuyer sur “+” et “–” pour diérer la mise en marche d’un
programme de lavage jusqu’à 12 heures� Pour désactiver
l’option Delay Wash (lavage diéré), utiliser les touches
“+” et “–” pour programmer une heure de mise en marche
diérée jusqu’à “0” ou appuyer sur POWER (mise sous
tension)�
BOUTON START/PAUSE/UNLOCK LID (mise en
5
marche/pause/deverrouillage)
Appuyer sur ce bouton pendant 3 secondes ou jusqu’à ce que
la laveuse démarre le programme sélectionné, puis appuyer
de nouveau pour suspendre un programme�
REMARQUE : Si la laveuse tourne, le couvercle peut mettre
quelques minutes à se déverrouiller�
MODIFICATEURS DE PROGRAMMES
6
Lorsqu’on sélectionne un programme, ses réglages par défaut
s’allument�
WASH TEMP (témperature de lavage)
La fonction Wash Temp (température de lavage) détecte
et maintient une température uniforme de l’eau en
régulant le débit d’arrivée d’eau chaude et d’eau froide�
Sélectionner une température de lavage en fonction
du type de tissu et de saleté à laver� Pour des résultats
optimaux, suivre les instructions sur l’étiquette du vêtement
et utiliser la température d’eau de lavage la plus chaude
possible qui reste sans danger pour le tissu�
• Sur certains modèles et pour certains programmes, les
températures utilisées pour l’eau chaude et l’eau tiède
peuvent être inférieures aux températures utilisées par
votre précédente laveuse�
• Même avec un lavage à l’eau froide, il est possible que
de l’eau tiède soit ajoutée à la laveuse pour maintenir
une température minimale�
SOIL LEVEL (niveau de saleté)
Sélectionner le réglage le plus adapté à votre charge�
Pour les articles très sales, sélectionner le niveau de saleté
Ex Heavy (saleté très intense) pour prolonger la durée de
lavage� Pour les articles peu sales, sélectionner le niveau
de saleté Light Soil (saleté très légère) pour diminuer la
durée de lavage�
Le réglage de niveau de saleté légère aidera à réduire
l’emmêlement et le froissement�
43
Page 44

SPIN SPEED (vitesse d’essorage)
Cette laveuse sélectionne automatiquement la vitesse
d’essorage en fonction du programme sélectionné� Les
vitesses préréglées peuvent être modiées. Sur certains
programmes, certaines vitesses d’essorage ne sont pas
disponibles�
• Des vitesses d’essorage plus élevées signient des durées
de séchage plus courtes mais elles peuvent augmenter le
froissement de la charge�
• Des vitesses d’essorage plus lentes signient moins de
froissement mais laissent la charge plus humide�
CYCLE SIGNAL (signal de programme)
Utiliser cette option pour ajuster le volume du signal qui
retentit à la n d’un programme. Le signal de programme
peut être utile si l’on souhaite retirer les articles dès la n
du programme�
Pour activer ou désactiver le son des boutons :
Lorsque la laveuse est en marche, appuyer sur Cycle Signal
(signal de n de programme) pendant 3 secondes. La laveuse
émet un seul bip lorsque le processus est terminé�
REMARQUE :
• Le bouton de signal de n de programme fonctionne
toujours, même lorsque le son des boutons a été désactivé�
• Quelles que soient les préférences de l’utilisateur, cette
fonction reste active après une panne de courant�
• Par défaut, le son des boutons est réglé sur ON (marche).
OPTIONS DE PROGRAMMES
7
On peut aussi ajouter ou supprimer des options pour chaque
programme� Noter que certaines options ne peuvent pas être
utilisées avec certains programmes, et que certaines d’entre
elles sont préréglées pour ne fonctionner qu’avec certains
programmes�
PREWASH (prélavage)
Utiliser cette option pour ajouter une agitation
supplémentaire et un temps de trempage au début de
n’importe que programme pour briser les taches tenaces�
DEEP FILL (grand remplissage)
Ajoute la quantité d’eau maximale pour de grosses
charges volumineuses� Les articles doivent pouvoir se
déplacer librement� Des vêtements que l’on aurait tassés
dans la charge pourraient entraîner une mauvaise
performance de lavage et davantage de froissement et
d’emmêlement�
TimedOxi (Oxi minuté)
Cette laveuse a été conçue pour distribuer des activateurs
pour vêtements (tels des traitements anti-taches à
base d’eau oxygénée ou des agents de blanchiment
sans danger pour les couleurs) au moment adéquat du
programme pour un nettoyage hautement performant� Ne
pas utiliser d’activateurs pour vêtements et d’eau de Javel
dans le même programme�
TWO RINSES (deux rinçages)
On peut utiliser cette option pour ajouter
automatiquement un second rinçage à la plupart
des programmes�
REMARQUE : Si uniquement Drain & Spin (vidange
et essorage) est désiré, sélectionner le programme
Rinse & Spin (rinçage et essorage) puis appuyer pour
désélectionner l’option Two Rinses (deux rinçages)�
FABRIC SOFTENER (Assouplissant pour tissu)
Cette option doit être sélectionnée si l’on utilise de
l’assouplissant pour tissu durant un programme� Ceci
garantit que l’assouplissant pour tissu est ajouté au bon
moment lors du rinçage pour être correctement distribué�
STAIN TREAT (traitement anti-taches) pour les modèles
avec vapeur ou STAIN BOOST (activateur anti-taches)
pour les modèles à fonctionnement sans vapeur.
Cette option fournit une action de nettoyage améliorée
pour les taches tenaces� Ceci prolonge la durée
d’agitation et trempage du programme�
TÉMOINS LUMINEUX DES PROGRAMMES
8
Les témoins lumineux indiquent la progression du programme�
À chaque étape du processus, il est possible que l’on
remarque des pauses ou des sons diérents de ceux des
laveuses ordinaires�
DELAY (mise en marche différée)
Lorsque la fonction Delay Wash (lavage diéré) est
sélectionnée, le témoin lumineux s’allume pour indiquer
que la laveuse a été réglée pour un lavage diéré.
ADD A GARMENT (ajouter un vêtement)
Il est possible d’ajouter un vêtement supplémentaire lors
du lavage lorsque le témoin lumineux Add a Garment
(ajouter un vêtement) est allumé, sans pour autant
diminuer la performance de lavage� Appuyer une fois
sur START/PAUSE (mise en marche/pause)� Le témoin
lumineux Lid Lock (verrouillage du couvercle) s’éteint�
Ouvrir le couvercle de la laveuse, ajouter les vêtements et
fermer le couvercle� Appuyer sur START/PAUSE (mise en
marche/pause) pour redémarrer le programme�
WASH (lavage)
On entend le moteur et le plateau de lavage déplacer la
charge� Il est normal qu’une partie de la charge dépasse
du niveau d’eau� Un nettoyage avec faible niveau d’eau
signie un nettoyage concentré. Plutôt que de diluer du
détergent comme dans une laveuse de type agitateur,
cette laveuse libère le détergent directement sur les
endroits souillés� Les bruits émis par le moteur peuvent
changer lors des diérentes étapes du programme. La
durée de lavage est déterminée par le Soil Level (niveau
de saleté) sélectionné�
RINSE (rinçage)
On entend des sons similaires à ceux entendus lors du
programme de lavage à mesure que la laveuse rince et
déplace la charge� L’assouplissant pour tissu sera ajouté
si l’option Fabric Softener (assouplissant pour tissu) est
sélectionnée�
SPIN (essorage)
La laveuse essore la charge à des vitesses augmentant
graduellement pour une bonne extraction de l’eau, en
fonction du programme et de la vitesse d’essorage
sélectionnés�
COMPLETE (terminé)
Une fois le programme terminé, ce témoin s’allume�
Retirer la charge rapidement pour un résultat optimal�
LID LOCKED (couvercle verrouillé)
Pour permettre une bonne détection de la charge et un
bon essorage, le couvercle se verrouille et le témoin Lid
Locked (couvercle verrouillé) s’allume� Ce témoin lumineux
indique que le couvercle est verrouillé et qu’il ne peut être
ouvert�
Si l’on doit ouvrir le couvercle, appuyer sur START/PAUSE/
Unlock Lid (mise en marche/pause/déverrouillage)� Le
couvercle se déverrouille une fois que le mouvement de
la laveuse a cessé� Il se peut que cela prenne plusieurs
minutes si la laveuse essorait la charge à grande vitesse�
Appuyer de nouveau sur START/PAUSE/Unlock Lid (mise
en marche/pause/déverrouillage) pendant 3 secondes
pour reprendre le programme�
44
Page 45

Distributeurs
Distributeur d’assouplissant de tissu liquide
A
Si désiré, verser la mesure d’assouplissant pour tissu liquide
dans le distributeur d’assouplissant pour tissu liquide�
Celui-ci distribuera automatiquement le produit au moment
opportun�
• Utiliser uniquement de l’assouplissant de tissu liquide dans
ce distributeur�
Distributeur de détergent Haute efficacité “HE”
B
Verser le détergent HE liquide ou en poudre ou le produit
activateur Oxi dans ce distributeur pour le programme de
lavage principal�
IMPORTANT : S’assurer que le compartiment se trouve dans
le tiroir lorsque l’on utilise du détergent liquide, et qu’il a
été retiré lorsque l’on utilise du détergent en poudre� Ne pas
dépasser la ligne de remplissage MAX�
Utiliser uniquement un détergent Haute efficacité (HE)�
REMARQUE : Suivre les recommandations du fabricant
pour déterminer la quantité de détergent à utiliser� Ne pas
ajouter de sachet de lessive à dose unique, d’agent de
blanchiment sans danger pour les couleurs, ou des cristaux
d’assouplissant pour tissu dans les distributeurs� Ils ne seront
pas distribués correctement�
B
C
A
Distributeur Oxi
C
Ce distributeur peut contenir jusqu’à 3/4 de tasse (180 mL)
de produit activateur Oxi ou d’un autre produit activateur
de lessive, tel que de l’agent de blanchiment sans danger
pour les couleurs liquide ou en poudre� Les activateurs de
lessive sont automatiquement distribués au moment adéquat
lors du programme de lavage� Veiller à sélectionner Oxi
parmi les options pour assurer une distribution correcte�
REMARQUE : Remplir le distributeur uniquement avec du
produit activateur Oxi� Ne pas mélanger avec de l’agent
de blanchiment�
Distributeur d’eau de Javel
D
Ce distributeur peut contenir jusqu’à 3/4 de tasse
(180 mL) d’eau de Javel� L’agent de blanchiment sera
automatiquement dilué et distribué au moment opportun au
cours du programme de lavage� Ce distributeur ne peut pas
diluer de l’agent de blanchiment en poudre�
NOTE: Remplir le distributeur uniquement avec de l’eau
de Javel�
D
45
Page 46

GUIDE DE PROGRAMMES
Les réglages indiqués sont les réglages par défaut pour ce programme. Après avoir sélectionné un programme, les modicateurs par
défaut ou les modicateurs précédemment réglés correspondant à ce programme s’allument� Pour un meilleur soin des tissus, choisir le
programme qui convient le mieux à la charge à laver� Certains programmes et options ne sont pas disponibles sur certains modèles�
Articles
à laver :
Charges de
vêtements
en coton, lin
et charges
mixtes
Articles non
repassables,
articles en
coton, de
pressage
permanent,
linge de
maison, tissus
synthétiques
Articles en
soie lavables
en machine,
tissus lavables
à la main et
laine
Tissus peu
sales
Tissus grand
teint très sales
Tissus blancs
sales
Vêtements
en coton
de couleurs
vives ou
foncées, linge
de maison,
vêtements
tout-aller
et charges
mixtes
*Les températures de lavage varient en fonction du réglage du cycle choisi� Tous les rinçages se font à l’eau froide�
Programme :
Normal Prewash
Casual
(tout-aller)
Delicates
(délicats)
Express
(lavage rapide)
Sanitize w/
Oxi & Steam
(assainissement
avec Oxi et
vapeur) ou
Sanitize w/Oxi
(assainissement
avec Oxi)
(selon le
modèle)
Whites
(blancs)
Cold Clean
(lavage à l’eau
froide)
Température
de lavage* :
Niveau
de saleté :
Vitesse
d’essorage :
disponibles :
Timed Oxi
Two Rinses
Fabric Softener
Stain Treat or
Stain Boost
Timed Oxi
Two Rinses
Fabric Softener
Stain Treat or
Stain Boost
Timed Oxi
Two Rinses
Fabric Softener
Stain Treat or
Stain Boost
Timed Oxi
Two Rinses
Fabric Softener
Stain Treat or
Stain Boost
Timed Oxi
Two Rinses
Fabric Softener
Stain Treat or
Stain Boost
Timed Oxi
Two Rinses
Fabric Softener
Stain Treat or
Stain Boost
Timed Oxi
Two Rinses
Fabric Softener
Stain Treat or
Stain Boost
Options
Prewash
Prewash
Prewash
Prewash
Prewash
Deep Fill
Prewash
Deep Fill
Détails du programme :
Utiliser ce programme pour
nettoyer les articles en coton
et les charges de tissus mixtes
présentant un degré de saleté
normal� Les réglages par défaut
peuvent être ajustés au besoin�
Utiliser ce programme pour
laver des charges de vêtements
qui ne se repassent pas tels que
chemises de sport, chemisiers,
vêtements de travail tout-aller,
articles à pressage permanent
et mélanges de tissus� Ce
programme utilise un lavage
à l’eau tiède, une période de
refroidissement et des vitesses
d’essorage moyennes pour mieux
lutter contre le froissement�
Utiliser ce programme pour laver
les articles délicats lavables en
machine� Ce programme utilise
un culbutage intermittent dans
de l’eau froide et un essorage à
faible vitesse pour prendre soin
des articles délicats lavables et
éviter le rétrécissement� Placer
les petits articles dans des sacs
en let avant le lavage.
Utiliser ce programme pour laver
quelques articles légèrement
sales dont on a besoin
rapidement� Ce programme
court combine un lavage et un
essorage à haute vitesse pour un
nettoyage optimal et un temps
de séchage plus court�
Utiliser ce programme pour
éliminer 99,9 % des bactéries
lorsqu’il est utilisé en conjonction
avec l’option Oxi� On doit utiliser
le préréglage de programme
pour un assainissement correct�
Veiller à ajouter un produit Oxi
dans le distributeur Oxi�
Ce programme introduit l’agent
de blanchiment liquide à la
charge au moment approprié
pour un blanchiment amélioré
des tissus blancs sales�
Un lavage à l’eau froide avec
une action supplémentaire de
lavage qui élimine les taches
en douceur tout en prenant soin
des tissus� On peut ajuster les
réglages comme désiré, mais
on doit seulement utiliser les
réglages à l’eau froide�
46
Page 47

GUIDE DE PROGRAMMES
Les réglages indiqués sont les réglages par défaut pour ce programme. Après avoir sélectionné un programme, les modicateurs par
défaut ou les modicateurs précédemment réglés correspondant à ce programme s’allument� Pour un meilleur soin des tissus, choisir le
programme qui convient le mieux à la charge à laver� Certains programmes et options ne sont pas disponibles sur certains modèles�
Articles
à laver :
Articles de
grande taille
tels que
les draps,
les sacs de
couchage, les
petits duvets,
les vestes, les
petits tapis
lavables
Tissus
résistants,
articles
grand-teint
Maillots
de bain
et articles
nécessitant
uniquement
un rinçage
Pas de
vêtements
dans la
laveuse
* Les températures de lavage varient en fonction
du réglage du cycle choisi� Tous les rinçages se
font à l’eau froide�
Programme :
Bulky/
Bedding
(articles
volumineux/
de literie)
Heavy
Duty
(service
Intense)
Rinse & Spin
(rinçage et
essorage)
Clean Washer
(nettoyage de
la laveuse)
Température
de lavage* :
N/A
N/A
Niveau
de saleté :
N/A
N/A
Options disponibles :
Prewash (prélavage)
Deep Fill (grand remplissage)
TimedOxi (Oxi minuté)
Two Rinses (deux rinçages)
Fabric Softener (assouplissant pour tissu)
Stain Treat ou Stain Boost (traitement anti-taches ou activateur anti-taches)
Vitesse
d’essorage :
N/A N/A
Options
disponibles :
Prewash
Deep Fill
TimedOxi
Two Rinses
Fabric Softener
Stain Treat or
Stain Boost
Prewash
Deep Fill
TimedOxi
Two Rinses
Fabric Softener
Stain Treat or
Stain Boost
Two Rinses
Détails du programme :
Utiliser ce programme pour
laver de gros articles tels que
des vestes et de petites couettes�
La laveuse se remplit de
susamment d’eau pour mouiller
la charge avant que l’étape
de lavage du programme ne
commence� Elle utilise aussi un
niveau d’eau plus élevé que les
autres programmes�
Utiliser ce programme pour les
articles en coton très sales ou
en coton épais� Ce programme
combine un lavage à vitesse
rapide, une durée de lavage plus
longue et un essorage à vitesse
très élevée pour réduire la durée
de séchage� Ajuster les réglages
de température si nécessaire�
Combine un rinçage et un
essorage à haute vitesse
pour les charges nécessitant
un programme de rinçage
supplémentaire ou pour
achever un cycle de lavage
après une coupure de courant�
À utiliser également pour les
charges nécessitant uniquement
un rinçage� Si l’on souhaite
utiliser uniquement Drain &
Spin (vidange et essorage),
sélectionner le programme Drain
& Spin (vidange et essorage)�
Ensuite, appuyer pour désactiver
l’option Two Rinses (deux
rinçages)� Utiliser Drain & Spin
(vidange et essorage) pour
extraire par essorage l’excédent
d’eau présent dans la charge�
Utiliser ce programme à
l’issue de chaque série de 30
lavages pour que l’intérieur
de la laveuse reste frais et
propre� Ce programme utilise
un niveau d’eau plus élevé�
Avec ce programme, utiliser de
l’eau de Javel pour nettoyer
soigneusement l’intérieur de
votre laveuse� Ce programme ne
doit pas être interrompu� Voir
“Entretien de la laveuse”�
IMPORTANT : Ne pas placer
de vêtements ou autres articles
dans la laveuse pendant le
programme Clean Washer�
Utiliser ce programme avec une
cuve de lavage vide�
47
Page 48

UTILISATION DE LA LAVEUSE
AVERTISSEMENT
Risque d’incendie
Ne jamais mettre des articles humectés d’essence ou
d’autres uides inammables dans la laveuse.
Aucune laveuse ne peut complètement enlever l’huile.
Ne pas faire sécher des articles qui ont été salis par
tout genre d’huile (y compris les huiles de cuisson).
Le non-respect de ces instructions peut causer un
décès, une explosion ou un incendie.
1. Trier et préparer le linge
• Vider les poches. Des pièces de monnaie, des boutons ou
objets de petite taille sont susceptibles de glisser sous le
plateau de lavage et de s’y coincer, ce qui peut entraîne
des bruits inattendus�
• Trier les articles en fonction du programme et de la
température d’eau recommandés, ainsi que de la solidité
des teintures�
• Séparer les articles très sales des articles peu sales.
• Séparer les articles délicats des tissus résistants.
• Ne pas sécher les vêtements si les taches sont toujours
présentes après le lavage car la chaleur pourrait xer les
taches sur le tissu�
• Traiter les taches sans délai.
• Fermer les fermetures à glissière, attacher les crochets, cordons
et ceintures en tissu� Ôter les garnitures et les ornements non
lavables�
• Réparer les déchirures pour éviter que les articles ne
s’endommagent encore davantage lors du lavage�
AVERTISSEMENT
Risque de choc électrique
Brancher sur une prise à 3 alvéoles reliée à la terre.
Ne pas enlever la broche de liaison à la terre.
Ne pas utiliser un adaptateur.
Ne pas utiliser un câble de rallonge.
Le non-respect de ces instructions peut causer
un décès, un incendie ou un choc électrique.
Conseils utiles :
• Pour une meilleure performance, utiliser un détergent Haute
ecacité (HE) pour le lavage des articles volumineux.
• Lors du lavage d’articles imperméables ou résistants à
l’eau, charger la laveuse de façon uniforme� Voir “Guide de
programmes” pour des conseils et pour plus d’informations sur
l’utilisation du programme Deep Wash (lavage intense)�
• Utiliser des sacs en let pour aider à empêcher l’emmêlement
lors du lavage d’articles délicats ou de petits articles�
• Retourner les tricots pour éviter le boulochage. Séparer les
articles qui forment la charpie de ceux qui la retiennent�
Les articles synthétiques, tricots et articles en velours retiennent
la charpie provenant des serviettes, des tapis et des tissus
chenille�
REMARQUE : Toujours lire et suivre les instructions des étiquettes
de soin des tissus pour éviter d’endommager les vêtements�
2. Ajouter les produits de lessive, si désiré
Si l’on utilise un sachet de lessive à dose unique ou de
l'assouplissant pour tissu sous forme de cristaux, les ajouter au
fond du panier de la laveuse avant d’ajouter les vêtements�
REMARQUE : Suivre les instructions du fabricant pour déterminer
la quantité de produits de lessive à utiliser�
48
Page 49

3. Charger les vêtements dans la laveuse
Liquid
Chlorine Bleach
Pour un meilleur rendement, il est recommandé
de déposer les vêtements en vrac et de façon
uniforme le long du plateau de lavage�
de mélanger diérents types d’articles pour
réduire l’emmêlement�
IMPORTANT : Les vêtements doivent pouvoir se déplacer
librement pour un nettoyage optimal et pour réduire
le froissement et l’emmêlement�
Essayer
Ceci peut aussi entraîner des défaillances des composants et une
moisissure perceptible� Les détergents HE sont conçus pour produire
la quantité de mousse adéquate pour le meilleur rendement�
Suivre les instructions du fabricant pour déterminer la quantité de
détergent à utiliser�
CONSEIL UTILE : Voir “Entretien de la laveuse” pour plus
d’information sur la méthode recommandée pour le nettoyage
des distributeurs de la laveuse�
5. Ajouter ll’eau de Javel dans le
distributeur
Eau de javel
Utilisation des distributeurs de produits
de lessive
REMARQUE: Ne pas placer de sachets de lessive à dose unique
ou d’assouplissant pour tissu sous forme de cristaux dans les
distributeurs� Ces produits ne se dissoudront pas correctement�
4. Ajouter le détergent HE dans
le distributeur
Compartiment à
détergent amovible HE
Ajouter une mesure de détergent HE dans le
compartiment à détergent� La capacité de ce
compartiment est de 3 oz (89 mL)� Ne pas faire remplir
excessivement le compartiment – le fait d’ajouter trop de détergent
peut entraîner sa distribution prématurée dans la laveuse�
REMARQUE : S’assurer que le compartiment se trouve dans le tiroir
lorsque l’on utilise du détergent liquide, et qu’il a été retiré lorsque
l’on utilise du détergent en poudre� Ne pas dépasser la ligne de
remplissage MAX�
IMPORTANT : Utiliser uniquement des détergents Haute ecacité.
L’emballage portera la mention “HE” ou “High Eciency” (haute
ecacité). Un lavage avec faible consommation d’eau produit
un excès de mousse avec un détergent non HE ordinaire� Il est
probable que l’utilisation d’un détergent ordinaire prolongera la
durée des programmes et réduira la performance de rinçage�
Ne pas remplir excessivement le distributeur ne pas diluer ni
utiliser plus d’une tasse (236 mL)� Ne pas utiliser d’agent de
blanchiment sans danger pour les couleurs ni de produit Oxi
avec un programme utilisant de l’eau de Javel�
6. Ajouter de l’assouplissant pour tissu
liquide ou l’Oxi dans le distributeur
Compartiment d’assouplissant
pour tissu
Verser une mesure d’assouplissant pour tissu liquide
ou d’activateurs de type Oxi dans le distributeur –
toujours suivre les instructions du fabricant
concernant la dose d’assouplissant pour tissu ou
d’Oxi à utiliser en fonction de la taille de la charge�
Fermer le tiroir du distributeur, sélectionner ensuite l’option
TimedOxi (Oxi minuté) et/ou Fabric Softener (l’assouplissant)� Le
produit Oxi est ajouté lors du lavage principal et l’assouplissant
pour tissu est ajouté lors du rinçage�
IMPORTANT : L’option TimedOxi (Oxi minuté) et/ou Fabric
Softener (l’assouplissant) doit être sélectionnée pour que le produit
soit distribué correctement et au moment adéquat du programme�
Ne pas remplir le distributeur excessivement ni diluer le produit� Si
l’on remplit excessivement le distributeur, l’assouplissant pour tissu
sera distribué dans la laveuse immédiatement�
Si l’on sélectionne l’option Two Rinses (deux rinçages),
l’assouplissant pour tissu sera distribué au cours du dernier rinçage�
Il est normal qu’il reste une petite quantité d’eau dans le
distributeur une fois le programme terminé�
Compartiment
d’Oxi
49
Page 50

7. Appuyer sur POWER (mise sous tension
pour mettre en marche la laveuse
S’assurer que le tiroir distributeur est complètement fermé,
puis appuyer sur POWER (mise sous tension) pour mettre la
laveuse en marche� D’autres moyens de mettre en marche
la laveuse consistent à ouvrir le couvercle ou à tourner le
bouton de sélection de programme�
Remarque : Toujours lire et suivre les instructions des étiquettes
de soin des tissus pour éviter d’endommager les vêtements� En
cas d’incertitude quant à la température à utiliser, se reporter au
schéma ci-dessus ou sélectionner une température inférieure�
10. Sélectionner les options de programme
8. Sélectionner le programme
Illustration : Modèle à vapeur
Tourner le bouton de programme pour choisir un programme
de lavage�
9. Sélectionner les réglages de programme,
si désiré
Saleté légère
Couleurs qui déteignent
ou s’atténuent
Après avoir sélectionné un programme, les réglages par défaut
correspondant à ce programme s’allument� Appuyer sur les
boutons de réglage du programme pour modier Wash Temp
(température de lavage), Soil Level (niveau de saleté), et Spin
Speed (vitesse d’essorage) si désiré� Tous les réglages ne sont pas
disponibles avec tous les programmes� Même pour les réglages
de lavage à l’eau froide, de l’eau chaude peut être ajoutée à la
laveuse an de maintenir une température minimale.
Saleté modérée
à légère
Couleurs vives
Saleté intense
Blancs
Couleurs claires
Illustration : Modèle à vapeur
Sélectionner les autres options de programme que l’on
souhaite ajouter, si ce n’est pas déjà fait� Certains programmes
ajoutent automatiquement certaines options telles que Two
Rinses (deux rinçages)� Elles peuvent être désactivées si désiré�
REMARQUE : Toutes les options ne sont pas disponibles avec
tous les programmes�
11. Appuyer sur START/PAUSE/Unlock Lid
(mise en marche/pause/déverrouillage
du couvercle) pour démarrer le
programme de lavage
Appuyer sur le bouton START/PAUSE/Unlock Lid (mise en
marche/pause/déverrouillage) jusqu’à 3 secondes pour
démarrer le programme de lavage� Lorsque le programme
est terminé, le témoin lumineux Complete (terminé) s’allume
et le signal de n de programme retentit (si réglé). Retirer
rapidement les vêtements une fois le programme terminé
pour éviter la formation d’odeurs, réduire le froissement et
empêcher les crochets métalliques, fermetures à glissière et
boutons-pression de rouiller�
Déverrouiller le couvercle pour ajouter les vêtements
Si l’on doit ouvrir le couvercle pour ajouter 1 ou 2 vêtements :
Appuyer sur START/PAUSE/Unlock Lid (mise en marche/
pause/déverrouillage); le couvercle se déverrouille une fois
que le mouvement de la laveuse a cessé� Ceci peut prendre
plusieurs minutes si la laveuse essorait la charge à grande
vitesse� Fermer ensuite le couvercle et appuyer de nouveau
sur START/PAUSE/Unlock Lid (mise en marche/pause/
déverrouillage) jusqu’à 3 secondes pour redémarrer
le programme�
IMPORTANT: Si on laisse le couvercle ouvert pendant plus
de 10 minutes, l’eau est vidangée et le code d’erreur F8E6
apparaît sur l’achage.
50
Page 51

ENTRETIEN DE LA LAVEUSE
TUYAUX D’ARRIVÉE D’EAU
Remplacer les tuyaux d’arrivée d’eau après 5 ans d’utilisation
pour réduire le risque de défaillance intempestive� Inspecter
périodiquement les tuyaux; les remplacer en cas de
renement, de déformation, de coupure et d’usure ou si
une fuite se manifeste�
Lors du remplacement des tuyaux d’arrivée d’eau, noter la
date de remplacement au marqueur indélébile sur l’étiquette�
REMARQUE : Cette laveuse ne comprend pas de tuyaux
d’arrivée d’eau� Voir les Instructions d’installation pour plus
de renseignements�
ENTRETIEN DE LA LAVEUSE
Recommandations pour une laveuse propre et pour un
niveau de performance optimal
1.
Toujours utiliser des détergents haute ecacité (HE) et suivre
les recommandations du fabricant de détergent HE pour
déterminer la quantité de détergent HE à utiliser� Ne jamais
utiliser plus que la quantité recommandée de détergent, car
ceci peut augmenter le taux d’accumulation de résidus de
détergent et de souillures à l’intérieur de la laveuse, ce qui
pourrait entraîner la formation d’odeurs indésirables�
2. Exécuter périodiquement des lavages avec de l’eau tiède
ou chaude (et non pas exclusivement des lavages à l’eau
froide), car l’eau tiède ou chaude permet de contrôler plus
ecacement la vitesse à laquelle les saletés et les résidus de
détergent s’accumulent�
3. Veiller à toujours laisser le couvercle de la laveuse ouvert
entre deux utilisations pour qu’elle puisse sécher, et pour éviter
l’accumulation de résidus générateurs d’odeurs�
Nettoyage de la laveuse à chargement par le dessus
Lire complètement ces instructions avant d’entreprendre les
opérations de nettoyage de routine recommandées ci-dessous�
Le processus d’entretien de la laveuse doit être exécuté au moins
une fois par mois ou à intervalles de 30 lavages (selon la période
la plus courte des deux); ceci permettra de contrôler la vitesse à
laquelle les résidus de détergent et les souillures s’accumulent dans
la laveuse�
Nettoyage de l’intérieur de la laveuse
Pour que l’intérieur de la laveuse reste libre de toute odeur, suivre
les instructions d’utilisation indiquées ci-dessus et eectuer la
procédure de nettoyage mensuelle recommandée suivante :
Programme Clean Washer (nettoyage de la laveuse)
Ce laveuse comporte un programme spécial qui utilise des
volumes d’eau plus importants en conjonction avec de l’agent de
blanchiment liquide au chlore pour nettoyer l’intérieur du laveuse�
Début de la procédure
1.
Méthode avec agent de blanchiment au chlore :
a. Ouvrir le couvercle de la laveuse et retirer tout vêtement
ou article�
b. Verser 1 tasse (236 mL) d’agent de blanchiment liquide
au chlore dans le distributeur d’agent de blanchiment�
REMARQUE : L’emploi d’une quantité d’agent de
blanchiment liquide au chlore supérieure à ce qui est
recommandé ci-dessus pourrait endommager la laveuse
avec le temps�
c. Rabattre le couvercle de la laveuse�
d. Ne pas ajouter de détergent ou autre composé chimique
dans la laveuse lors de l’exécution de cette procédure�
e. Sélectionner le programme CLEAN WASHER (nettoyage de
la laveuse)�
ENTRETIEN DE LA LAVEUSE (suite)
f. Appuyer sur le bouton START/Pause/Unlock (mise
en marche/pause/déverrouillage) pour démarrer le
programme� Le processus du programme de nettoyage
de la laveuse est décrit ci-dessous�
REMARQUE : Pour de meilleurs résultats, ne pas interrompre
le programme� Si l’on doit annuler le programme, appuyer
sur POWER/CANCEL (mise sous tension/annulation)� (Pour
les modèles dépourvus du bouton Power/Cancel [mise sous
tension/annulation], appuyer sur START/Pause/Unlock [mise
en marche/pause/déverrouillage] pendant trois secondes)�
Une fois le programme de nettoyage de la laveuse terminé,
eectuer un programme RINSE & SPIN (rinçage et essorage)
pour rincer le nettoyant de la laveuse�
Description de l’utilisation du programme de nettoyage de
la laveuse :
1. Ce programme remplit la laveuse à un niveau supérieur à
celui des programmes de lavage ordinaires an que le niveau
de l’eau de rinçage soit supérieur à celui d’un programme de
lavage ordinaire�
2. Ce programme comporte une agitation et un essorage pour
améliorer l’élimination des souillures�
Une fois ce programme terminé, laisser le couvercle ouvert pour
permettre une meilleure ventilation et pour que l’intérieur de la
laveuse puisse sécher�
Nettoyage des distributeurs
Après avoir utilisé la laveuse pendant longtemps, on peut parfois
constater une accumulation de résidus dans les distributeurs de
la laveuse� Pour éliminer les résidus des distributeurs, les essuyer
avec un chion humide et les sécher avec une serviette. Ne pas
tenter de retirer les distributeurs ou la garniture pour le nettoyage�
Les distributeurs et la garniture ne peuvent pas être retirés�
Cependant, si votre modèle comporte un tiroir distributeur, retirer
le tiroir et le nettoyer avant ou après avoir eectué le programme
de nettoyage de la laveuse� Si nécessaire, utiliser un nettoyant
tout-usage�
Nettoyage de l’extérieur de la laveuse
Utiliser une éponge ou un chion doux et humide pour essuyer
les renversements éventuels� Utiliser uniquement des savons ou
nettoyants doux pour nettoyer la surface externe de la laveuse�
IMPORTANT : An d’éviter d’endommager le revêtement de
la laveuse, ne pas utiliser de produits abrasifs�
NON-UTILISATION ET ENTRETIEN
EN PÉRIODE DE VACANCES
Faire fonctionner la laveuse seulement lorsqu’on est présent�
En cas de déménagement ou si l’on n’utilise pas la laveuse
pendant un certain temps, suivre les étapes suivantes :
1. Débrancher la laveuse ou déconnecter la source
de courant électrique�
2. Fermer l’alimentation en eau à la laveuse pour éviter
toute inondation due à une surpression�
51
Page 52

NETTOYAGE DU TIROIR DISTRIBUTEUR
On trouvera peut-être des traces de produits de lessive dans
les distributeurs� Pour éliminer ces traces, suivre la procédure
de nettoyage recommandée suivante :
1. Tirer le tiroir jusqu’à ce que l’on sente une résistance�
2. Appuyer sur les 2 onglets, et continuer à tirer�
3. Laver dans une eau tiède et savonneuse avec un détergent
doux�
4. Rincer à l’eau tiède�
5. Sécher à l’air ou avec une serviette, puis le replacer dans
son logement�
IMPORTANT : Les tiroirs distributeurs ne sont pas lavables
au lave-vaisselle�
TRANSPORT DE LA LAVEUSE (suite)
7. Replacer l’emballage en polystyrène circulaire des
matériaux d’expédition d’origine à l’intérieur de la
laveuse� Si vous n’avez plus l’emballage circulaire, placer
des couvertures lourdes ou des serviettes dans l’ouverture
du panier� Fermer le couvercle et placer du ruban adhésif
sur le couvercle et jusqu’à la partie inférieure avant de la
laveuse� Laisser le couvercle fermé par l’adhésif jusqu’à
ce que la laveuse soit installée à son nouvel emplacement�
Déplacer le lavevaisselle en position verticale�
RÉINSTALLATION/RÉUTILISATION
DE LA LAVEUSE
Pour réinstaller la laveuse en cas de non-utilisation,
d’entreposage pour l’hiver, de déménagement ou en période
de vacances :
1. Consulter les instructions d’installation pour choisir
l’emplacement, régler l’aplomb de la laveuse et la raccorder�
2. Avant de réutiliser la laveuse, exécuter la procédure
recommandée suivante :
Remise en marche de la laveuse :
1. Vidanger les canalisations d’eau et les tuyaux� Reconnecter
les tuyaux d’arrivée d’eau� Ouvrir les deux robinets d’eau�
ENTRETIEN POUR ENTREPOSAGE HIVERNAL
IMPORTANT : Pour éviter tout dommage, installer et remiser
la laveuse à l’abri du gel� L’eau qui peut rester dans les tuyaux
risque d’abîmer la laveuse en temps de gel� Si la laveuse doit
faire l’objet d’un déménagement ou d’entreposage au cours
d’une période de gel, hivériser la laveuse�
Hivérisation de la laveuse :
1. Fermer les deux robinets d’eau; déconnecter et vidanger
les tuyaux d’arrivée d’eau�
2. Placer 1 pinte (1 L) d’antigel pour véhicule récréatif
dans le panier et faire fonctionner la laveuse sur
un programme RINSE & SPIN (rinçage et essorage)
pendant environ 30 secondes pour mélanger l’antigel
et l’eau restante�
3. Débrancher la laveuse ou déconnecter la source
de courant électrique�
TRANSPORT DE LA LAVEUSE
1. Fermer les deux robinets d’eau� Débrancher et vidanger
les tuyaux d’arrivée d’eau�
2. Si l’on déplace la laveuse pendant une période de gel,
suivre les instructions de la section Entretien pour
entreposage hivernal avant de la déplacer�
3. Déconnecter le tuyau de vidange du système de vidange�
4. Débrancher le cordon d’alimentation�
5. Placer les tuyaux d’arrivée d’eau dans le panier de la
laveuse�
6. Faire passer le cordon d’alimentation et le tuyau de
vidange par dessus la console et les xer avec du ruban
de masquage�
AVERTISSEMENT
Risque de choc électrique
Brancher sur une prise à 3 alvéoles reliée à la terre.
Ne pas enlever la broche de liaison à la terre.
Ne pas utiliser un adaptateur.
Ne pas utiliser un câble de rallonge.
Le non-respect de ces instructions peut causer
un décès, un incendie ou un choc électrique.
2. Brancher la laveuse ou reconnecter la source de courant
électrique�
3. Faire exécuter à la laveuse le programme Bulky/Bedding
(articles volumineux/literie) pour nettoyer la laveuse et
éliminer l’antigel, le cas échéant� Utiliser uniquement un
détergent HE Haute ecacité. Utiliser la moitié de la
quantité recommandée par le fabricant pour une charge
de taille moyenne�
52
Page 53

DÉPANNAGE
Essayer d’abord les solutions suggérées ici pour obtenir de l’aide
et pour éviter une intervention de réparation�
Si les phénomènes
suivants se produisent
Vibrations ou déséquilibre
Vibrations, balancement
ou eet de “marche”
de la laveuse
Vibrations durant
l’essorage ou bien la
laveuse s’arrête et le
code d’erreur uL clignote
Bruits
Cliquetis ou bruits
métalliques
Gargouillement
ou bourdonnement
Bourdonnement Le processus de détection de la
Frottements rythmiques Il se peut que le panier
Fuites d’eau
Vérier ce qui suit pour
que l’installation soit
correcte :
Causes possibles Solution
Les pieds ne sont peut-être
pas en contact avec le plancher
et verrouillés�
La laveuse n’est peut-être
pas d’aplomb�
La charge est peut-être
déséquilibré�
Des objets sont coincés
dans le système de vidange
de la laveuse�
La laveuse est peut-être
en train d’évacuer de l’eau�
charge est peut-être en cours�
ralentisse�
La laveuse n’est pas d’aplomb� Il est possible que de l’eau éclabousse en dehors du panier si la laveuse
Les tuyaux de remplissage
ne sont pas solidement xés.
Rondelles d’étanchéité
des tuyaux de remplissage�
Raccord du tuyau de vidange� Tirer le tuyau de vidange de la caisse de la laveuse et le xer
Inspecter le circuit de plomberie
du domicile pour vérier qu’il n’y
a pas de fuites ou que l’évier ou le
tuyau de vidange n’est pas obstrué�
La laveuse n’a pas été chargée
tel que recommandé�
Les pieds avant et arrière doivent être en contact ferme avec le plancher
et la laveuse doit être d’aplomb pour fonctionner correcte� Les contreécrous doivent être bien serrés contre le bas de la caisse�
Vérier que le plancher n’est pas incurvé ou qu’il ne s’aaisse pas.
Si le plancher est irrégulier, un morceau de contreplaqué de 3/4"
(19 mm) placé sous la laveuse permettra de réduire le bruit�
Voir “Réglage de l’aplomb de la laveuse” dans les Instructions d’installation�
Charger les vêtements sans les tasser et de façon uniforme le long
du plateau de lavage� Le fait d’ajouter des articles mouillés ou de
rajouter de l’eau dans le panier pourrait déséquilibrer la laveuse�
Éviter de laver un article seul� Compenser le poids d’un article seul tel
un tapis ou une veste en jean par quelques articles supplémentaires pour
équilibrer le tout� Si le cadran clignote, ré-agencer la charge, fermer
le couvercle et maintenir enfoncée la touche START/PAUSE/Unlock Lid
(mise en marche/pause/déverrouillage)�
Utiliser le programme Bulky/Bedding (articles volumineux/literie) pour
les articles sur dimensionnés et non absorbants tels que les couettes
ou les vestes avec rembourrage en polyester� Certains articles ne
conviennent pas au programme Bulky/Bedding (articles volumineux/
literie)� Voir “Guide de programmes”�
L’article ou la charge ne convient pas au programme sélectionné�
Voir “Guide de programmes” et “Utilisation de la laveuse”�
Vider les poches avant le nettoyage� Les articles mobiles tels des pièces
de monnaie sont susceptibles de tomber entre le panier et la cuve;
ils peuvent aussi obstruer la pompe� Un appel pour intervention de
dépannage s’avéra peut-être nécessaire pour retirer ces objets�
Il est normal d’entendre des articles métalliques faisant partie des
vêtements comme les bouton-pression métalliques, boucles ou
fermetures à glissière toucher le panier en acier inoxydable�
Il est normal d’entendre la pompe produire un bourdonnement continu
accompagné de gargouillements ou de bruits de pompage périodiques
lorsque les quantités d’eau restantes sont éliminées au cours des
programmes d’essorage/de vidange�
Il est possible que les essorages émettent un bruit de ronronnement après
la mise en marche de la laveuse�Ceci est normal�
Il se peut que le panier qui ralentit émette un bruit de frottements
rythmiques� Ceci est normal�
n’est pas d’aplomb�
Serrer le raccord du tuyau de remplissage�
S’assurer que les quatre rondelles d’étanchéité plates des tuyaux de
remplissage sont correctement installées�
correctement au tuyau de rejet à l’égout ou l’évier de buanderie�
Ne pas placer de ruban adhésif sur l’ouverture du système de vidange�
De l’eau pourrait refouler de l’évier ou du tuyau de rejet à l’égout
obstrué� Inspecter tout le circuit de plomberie du domicile (éviers de
buanderie, tuyau de vidange, conduites d’eau et robinets) pour vérier
qu’il n’y a aucune fuite�
Une charge déséquilibrée peut entraîner une déviation du panier; de
l’eau pourrait alors éclabousser en dehors de la cuve� Voir “Utilisation de
la laveuse” pour des instructions sur le chargement�
53
Page 54

Essayer d’abord les solutions suggérées ici pour obtenir de l’aide
Si les phénomènes
Causes possibles Solution
suivants se produisent
La laveuse ne fonctionne pas comme prévu
Quantité d’eau
insusante dans la
laveuse
La laveuse ne fonctionne
pas ou ne se remplit pas;
elle cesse de fonctionner
La charge n’est
pas complètement
submergée dans l’eau�
Vérier que
l’alimentation en
eau est correcte�
AVERTISSEMENT
DÉPANNAGE
et pour éviter une intervention de réparation�
Ceci correspond à un fonctionnement normal pour une laveuse HE à faible
consommation d’eau� La charge ne sera pas complètement submergée�
La laveuse détecte la taille de la charge et ajoute la bonne quantité d’eau pour
un nettoyage optimal� Voir “Quoi de neuf sous le couvercle”�
IMPORTANT : Ne pas ajouter d’eau dans la laveuse� De l’eau supplémentaire
éloignerait la charge du plateau de lavage en la soulevant, ce qui réduirait la
performance de nettoyage�
Lancer le programme de nettoyage de la laveuse an d’optimiser le niveau
d’eau et la performance de lavage�
Les deux tuyaux doivent être xés et l’eau doit pénétrer dans la valve d’arrivée.
Les deux robinets d’eau chaude et d’eau froide doivent être ouverts�
Vérier que les tamis des valves d’arrivée ne sont pas obstrués.
Vérier que les tuyaux d’arrivée d’eau ne sont pas déformés; ceci peut réduire
le débit�
Risque de choc électrique
Brancher sur une prise à 3 alvéoles reliée à la terre.
Ne pas enlever la broche de liaison à la terre.
Ne pas utiliser un adaptateur.
Ne pas utiliser un câble de rallonge.
Le non-respect de ces instructions peut causer
un décès, un incendie ou un choc électrique.
Si les phénomènes
Causes possibles Solution
suivants se produisent
La laveuse ne fonctionne pas comme prévu (suite)
La laveuse ne fonctionne
pas ou ne se remplit pas;
elle cesse de fonctionner
(suite)
Vérier que l’alimentation
électrique à la laveuse est
correcte�
Fonctionnement normal
de la laveuse�
La charge de la laveuse
est peut-être trop tassée�
Brancher le cordon d’alimentation dans une prise à 3 alvéoles reliée à la terre�
Ne pas utiliser de câble de rallonge�
Vérier que la prise est alimentée.
Remettre un disjoncteur qui serait ouvert en marche� Remplacer tout fusible
grillé�
REMARQUE : Si le problème persiste, appeler un électricien�
Le couvercle doit être fermé pour que la laveuse puisse fonctionner�
La laveuse fait des pauses durant certaines phases du programme� Ne pas
interrompre le programme�
On peut arrêter la laveuse pour réduire la production de mousse�
Retirer plusieurs articles, et ré-agencer la charge de façon uniforme le long du
plateau de lavage� Fermer le couvercle et appuyer sur START/PAUSE/Unlock
Lid (mise en marche/pause/déverrouillage)�
Si l’on souhaite ajouter des vêtements une fois que la laveuse a démarré, n’en
rajouter qu’un ou deux�
Ne pas ajouter d’eau dans la laveuse�
54
Page 55

Essayer d’abord les solutions suggérées ici pour obtenir de l’aide
Si les phénomènes
Causes possibles Solution
suivants se produisent
La laveuse ne fonctionne pas comme prévu (suite)
La laveuse ne fonctionne
pas ou ne se remplit pas;
elle cesse de fonctionner
(suite)
La laveuse ne se
vidange/n’essore pas;
les charges restent
mouillées
Détergent HE non utilisé ou
utilisation excessive de détergent
HE�
Des petits articles sont peut-être
coincés dans la pompe ou entre
le panier et la cuve, ce qui peut
ralentir la vidange�
Utilisation des programmes
comportant une vitesse
d’essorage inférieure�
La charge de la laveuse est
peut-être tassée ou déséquilibrée�
Charge déséquilibrée� Voir “Vibration ou déséquilibre” dans la section Dépannage pour plus
Inspecter le circuit de plomberie
pour vérier que le tuyau de
vidange est correctement installé�
Le tuyau de vidange se prolonge
dans le tuyau rigide de rejet à
l’égout au-delà de 4,5" (114 mm).
Détergent HE non utilisé ou
utilisation excessive de détergent
HE�
DÉPANNAGE
et pour éviter une intervention de réparation�
Utiliser uniquement un détergent HE� La mousse produite par des
détergents ordinaires peut ralentir ou arrêter la laveuse� Toujours
mesurer la quantité de détergent et suivre les instructions du détergent
en fonction des modalités de nettoyage de la charge�
Pour éliminer la mousse, annuler le programme� Sélectionner RINSE &
SPIN (rinçage et essorage)� Sélectionner un programme� Appuyer sur
START/PAUSE/Unlock Lid (mise en marche/pause/déverrouillage)�
Ne pas ajouter de détergent�
Vider les poches et utiliser des sacs en let pour les petits articles.
Les programmes avec vitesses d’essorage réduites éliminent moins d’eau
que les programmes qui comportent des vitesses d’essorage supérieures�
Utiliser la vitesse d’essorage appropriée/le programme recommandé
pour le vêtement�
Des charges trop tassées peuvent empêcher la laveuse d’essorer
correctement : les charges ressortent donc plus mouillées qu’elles ne
devraient l’être� Répartir uniformément la charge mouillée pour que
l’essorage soit équilibré� Sélectionner DRAIN & SPIN (vidange et essorage)
pour éliminer l’eau restée dans la laveuse� Voir “Utilisation de la laveuse”
pour des recommandations sur la façon de charger la laveuse�
d’informations�
Vérier que le tuyau de vidange est correctement installé. Utiliser
la bride de retenue pour tuyau de vidange et la xer solidement au
tuyau de rejet à l’égout ou à la cuve� Ne pas placer de ruban adhésif
sur l’ouverture du système de vidange� Abaisser le tuyau de vidange
si l’extrémité se trouve à plus de 96" (2,4 m) au-dessus du plancher.
Retirer toute obstruction du tuyau de vidange�
Un excès de mousse causé par l’utilisation d’un détergent ordinaire
ou d’un surplus de détergent peut ralentir ou arrêter la vidange ou
l’essorage� Utiliser uniquement un détergent HE� Toujours mesurer les
quantités et suivre les instructions gurant sur le détergent en fonction
de la charge� Pour éliminer tout excès de mousse, sélectionner RINSE &
SPIN (rinçage et essorage)� Ne pas ajouter de détergent�
Endroits secs sur
la charge après un
programme
Températures
de lavage ou de
rinçage incorrectes
Charge non rincée Vérier que l’alimentation en eau
Un essorage à vitesse élevée
extrait davantage d’humidité
que les laveuses traditionnelles
à chargement par le dessus�
Vérier que l’alimentation en eau
est correcte�
Températures de lavage
contrôlées pour économies
d’énergie�
est correcte
Un essorage à vitesse élevée associé à une circulation d’air durant
l’essorage nal peut entraîner l’apparition de portions sèches sur le
linge placé sur le haut de la charge au cours de l’essorage nal. Ceci
est normal�
Vérier que les tuyaux d’arrivée d’eau chaude et d’eau froide ne sont
pas inversés�
Les deux tuyaux doivent être xés et l’eau doit pénétrer dans la valve
d’arrivée�
Vérier que les tamis des valves d’arrivée ne sont pas obstrués.
Éliminer toute déformation des tuyaux�
Les laveuses certiées de ENERGY STAR® utilisent moins des
températures de lavage et de rinçage inférieures à celes d’une laveuse
traditionnelle à chargement par le dessus. Cela signie également des
températures de lavage à l’eau chaude et à l’eau tiède�
Vérier que les tuyaux d’arrivée d’eau chaude et d’eau froide ne sont
pas inversés�
Les deux tuyaux doivent être xés et l’eau doit pénétrer dans la valve d’arrivée.
Les robinets d’eau chaude et d’eau froide doivent être ouverts tous les deux�
Les tamis de la valve d’arrivée d’eau de la laveuse sont peut-être obstrués�
Éliminer toute déformation du tuyau d’arrivée�
55
Page 56

DÉPANNAGE
Essayer d’abord les solutions suggérées ici pour obtenir de l’aide
et pour éviter une intervention de réparation�
Si les phénomènes
suivants se produisent
La laveuse ne fonctionne pas comme prévu (suite)
Charge non rincée (suite) Détergent HE non utilisé ou utilisation
Sable, poils d’animaux,
charpie, etc� sur la charge
après le nettoyage
La charge est emmêlée La laveuse n’a pas été chargée
Ne nettoie ou
ne détache pas
excessive de détergent HE�
La charge de la laveuse est
peut-être trop tassée�
Option Fabric Softener (assouplissant
des tissu) non sélectionnée�
Des résidus lourds de sable, de
poils d’animaux, de charpie et de
détergent ou d’agent de blanchiment
peuvent nécessiter un rinçage
supplémentaire�
tel que recommandé�
Action de lavage et/ou vitesse
d’essorage trop rapide pour
la charge�
La charge de lavage n’est pas
complètement submergée dans l’eau�
Causes possibles Solution
La mousse produite par un détergent ordinaire peut empêcher
la laveuse de fonctionner correctement�
Utiliser uniquement un détergent HE� Veiller à mesurer
correctement�
Toujours mesurer la quantité de détergent et suivre les instructions
du détergent en fonction de la taille et du niveau de saleté de la
charge�
La laveuse eectuera un rinçage moins performant si la charge est
bien tassée�
Charger les vêtements sans les tasser et de façon uniforme le long
du plateau de lavage�
Utiliser le programme conçu pour les tissus à laver�
Si l’on souhaite ajouter des vêtements une fois que la laveuse a
démarré, n’en rajouter qu’un ou deux�
Si l’on utilise de l’assouplissant pour tissu, s’assurer que l’option
Fabric Softener (assouplissant des tissu) a été sélectionnée�
Ajouter un Two Rinses (deux rinçages) au programme sélectionné�
Charger les vêtements sans les tasser et de façon uniforme le long
du plateau de lavage�
Réduire l’emmêlement en mêlant plusieurs types d’articles dans la
charge� Utiliser le programme recommandé correspondant aux
types de vêtements à laver�
Sélectionner un programme comportant un lavage plus lent et une
vitesse d’essorage inférieure� Notons que les articles seront plus
mouillés que si l’on utilise une vitesse d’essorage supérieure�
La laveuse détecte la taille de la charge et ajoute la quantité d’eau
adéquate� Ceci est normal et nécessaire au mouvement
des vêtements�
56
Davantage d’eau a été ajoutée
à la laveuse�
La laveuse n’a pas été chargée tel
que recommandé�
Les couleurs similaires ne sont pas
lavées ensemble�
Détergent HE non utilisé ou utilisation
excessive de détergent HE�
Programme utilisé incorrect
par rapport au type de tissu�
Ne pas ajouter d’eau dans la laveuse� De l’eau supplémentaire
éloignerait le linge du plateau de lavage en le soulevant, ce qui
réduirait la performance de nettoyage�
Charger les vêtements sans les tasser et de façon uniforme le long
du plateau de lavage�
Si l’on souhaite ajouter des vêtements une fois que la laveuse a
démarré, n’en rajouter qu’un ou deux�
Laver ensemble les couleurs semblables et les retirer rapidement
une fois le programme terminé pour éviter tout transfert de teinture�
La mousse produite par un détergent ordinaire peut empêcher
la laveuse de fonctionner correctement�
Utiliser uniquement un détergent HE� Veiller à mesurer correctement�
Toujours mesurer la quantité de détergent et suivre les instructions
du détergent en fonction de la taille et du niveau de saleté de la
charge�
Utiliser une option de programme de niveau de saleté plus élevée
et une température de lavage plus chaude pour améliorer le
nettoyage�
Si l’on utilise le programme Express, ne laver que quelques articles�
Utiliser le programme Whites (blancs), Heavy Duty (service intense)
ou Cold Clean (lavage à l’eau froide) pour un nettoyage puissant�
Page 57

DÉPANNAGE
Essayer d’abord les solutions suggérées ici pour obtenir de l’aide
et pour éviter une intervention de réparation�
Si les phénomènes
suivants se produisent
La laveuse ne fonctionne pas comme prévu (suite)
Ne nettoie ou ne détache
pas (suite)
Odeurs L’entretien de la laveuse
Dommages aux tissus Des objets pointus se trouvaient
Fonctionnement incorrect
du distributeur
Causes possibles Solution
Programme utilisé incorrect
par rapport au type de tissu�
(suite)
Distributeurs non utilisés� Utiliser les distributeurs pour éviter que l’agent de blanchiment au chlore
Les couleurs similaires ne sont
pas lavées ensemble�
n’est pas eectué tel que
recommandé�
Détergent HE non utilisé ou
utilisation excessive de
détergent HE�
dans les poches au moment du
programme de lavage�
Les cordons et les ceintures
se sont peut-être emmêlés�
Les articles étaient peut-être Raccommoder les déchirures et repriser les ls cassés des coutures avant
Les tissus peuvent subrir des
dommages si l’on tasse le linge
dans la laveuse�
Les instructions de soin des
vêtements n’ont peut-être pas
été suivies�
Vous n’avez peut-être pas
ajouté correctement l’eau de
Javel�
Distributeurs obstrués ou
produits de lessive distribués
trop tôt�
Voir le “Guide de programmes” pour utiliser le programme qui
correspond le mieux à la charge�
ou l’assouplissant pour tissu ne tachent les vêtements�
Remplir les distributeurs avant de démarrer un programme�
Éviter de les remplir excessivement�
Ne pas verser de produits directement sur la charge�
Laver ensemble les couleurs semblables et les retirer rapidement une fois
le programme terminé pour éviter tout transfert de teinture�
Faire fonctionner le programme Clean Washer (nettoyage de la laveuse)
après chaque série de 30 lavages� Voir “Entretien de la laveuse” dans la
section “Entretien de la laveuse”�
Vider la laveuse dès que le programme est terminé�
Utiliser uniquement un détergent HE� Veiller à mesurer correctement�
Toujours suivre les instructions du détergent�
Voir la section “Entretien de la laveuse”�
Vider les poches, fermer les fermetures à glissière, les boutons pression
et les agrafes avant le lavage pour éviter d’accrocher et de déchirer le
linge�
Attacher tous les cordons et les ceintures avant de démarrer le nettoyage
de la charge�
le lavage�
Charger les vêtements sans les tasser et de façon uniforme le long du
plateau de lavage�
Les articles de charge devraient se bouger librement pendant le cycle de
lavage pour éviter des dommages�
Utiliser le programme conçu pour les tissus à laver�
Si l’on souhaite ajouter des vêtements une fois que la laveuse a démarré,
n’en rajouter qu’un ou deux�
Avez-vous lu et suivi les instructions d’entretien du fabricant indiquées
sur l’étiquette du vêtement� Voir le “Guide de programmes” pour utiliser
le programme qui correspond le mieux à la charge�
Ne pas verser d’eau de Javel directement sur la charge� Essuyer tous les
renversements d’agent de blanchiment�
Un agent de blanchiment non dilué endommagera les tissus� Ne pas
utiliser plus que la quantité recommandée par le fabricant�
Ne pas placer d’articles sur le dessus du distributeur d’agent de
blanchiment lorsqu’on charge et décharge la laveuse�
Ne pas remplir excessivement le distributeur� Un remplissage excessif
peut entraîner une distribution immédiate�
Toujours sélectionner l’option Fabric Softener (assouplissant pour tissu)
pour garantir une bonne distribution�
Remplir les distributeurs avant de démarrer un programme�
Il est normal qu’il reste de petites quantités d’eau dans le distributeur une
fois le programme terminé�
Pour les domiciles présentant une basse pression d’eau, il est possible
qu’il reste de la poudre dans le distributeur� Pour éviter cela, sélectionner
une température de lavage plus chaude (si possible, en fonction de la
charge�)
57
Page 58

Essayer d’abord les solutions suggérées ici pour obtenir de l’aide
et pour éviter une intervention de réparation�
Si les phénomènes
Causes possibles Solution
suivants se produisent
La laveuse ne fonctionne pas comme prévu (suite)
Fonctionnement incorrect
du distributeur (suite)
Le sachet de lessive à
dose unique ne se dissout
pas
Un code d’erreur apparaît sur l’acheur
LF (remplissage trop long)
apparaît sur l’acheur
“--” Le bouton de sélection de
Code F## (code d’erreur
de type F) apparaît sur
l’acheur
Eau de Javel pas utilisé dans
le distributeurou option TimedOxi
(Oxi minuté) pas sélectionnée�
Sachet de lessive mal utilisé� Veiller à placer le sachet de lessive dans le panier de la laveuse avant
La laveuse met trop de temps
à se remplir� Le tuyau de vidange
se prolonge dans le tuyau rigide
de rejet à l’égout au-delà de
4,5" (114 mm).
programme n’est pas réglé
sur un programme�
Code d’erreur du système� Appuyer une fois sur START/PAUSE/Unlock Lid (mise en marche/
DÉPANNAGE
Utiliser seulement de l’eau de Javel dans le distributeur d’eau de Javel�
Les produits Oxi doivent être placés directement dans le distributeur
d’eau de Javel et uniquement dans ce distributeur� Si vous utilisez un
produit Oxi, veillez à sélectionner l’option TimedOxi (Oxi minuté)� Ne
pas utiliser de l’eau de Javel et du produit Oxi dans la même charge�
d’ajouter les vêtements� Ne pas placer de sachet dans le distributeur�
Suivre les instructions du fabricant pour éviter d’endommager les
vêtements�
Inspecter le circuit de plomberie pour vérier que le tuyau de vidange
est correctement installé� Utiliser la bride de retenue pour tuyau de
vidange et la xer solidement au tuyau de rejet à l’égout ou à la cuve.
Ne pas placer de ruban adhésif sur l’ouverture du système de vidange�
Voir Instructions d’installation�
Ceci n’est pas une erreur� Le bouton de sélection n’est pas réglé
sur un programme� Tourner le bouton de sélection jusqu’à ce qu’un
programme s’illumine�
pause/déverrouillage) pour eacer le code. Puis appuyer de nouveau
sur START/PAUSE/Unlock Lid (mise en marche/pause/déverrouillage)
pour redémarrer la laveuse� Si le code réapparaît, faire un appel de
service�
58
Page 59

CONTRATS DE PROTECTION
Contrats principaux de protection
Nous vous félicitons d’avoir fait un achat judicieux. Votre nouvel
appareil Kenmore® est conçu et fabriqué pour vous procurer des
années de fonctionnement able.
Mais comme pour tous les produits, il pourra à l’occasion
nécessiter un entretien préventif ou une réparation. Le cas
échéant, un Contrat principal de protection peut vous épargner
de l’argent et des soucis.
Le Contrat principal de protection contribue aussi à prolonger
la vie utile de votre nouvel appareil ménager. Le Contrat* inclut :
Pièces et main d’œuvre nécessaires pour conserver les
appareils en état de fonctionnement correct pendant une
utilisation normale, pas uniquement pour remédier aux
défaillances. Notre couverture s’étend bien au-delà de la
garantie du produit. Aucune franchise, aucune anomalie de
fonctionnement ne sont exclues de ce contrat – protection réelle.
Un service d’expert proposé par plus de 10 000 techniciens
d’entretien Sears autorisés, ce qui signie que quelqu’un de
conance prendra soin de votre produit.
Appels de service illimités et service national, aussi souvent
que vous en avez besoin et quand vous en avez besoin.
– remplacement de votre produit couvert si au moins quatre pannes
se produisent en deçà de douze mois.
Remplacement du produit si votre produit couvert ne peut être
réparé.
Vérication annuelle d’entretien préventif sur demande – sans frais
supplémentaires.
Aide rapide par téléphone – nous appelons cela Résolution
rapide – support téléphonique d’un agent de Sears sur tous les
produits. Considérez-nous comme un “manuel d’utilisateur parlant”.
Protection contre les sautes de puissance pour prévenir les
dommages électriques attribuables aux uctuations de courant.
Remboursement de location si la réparation du produit couvert
prend plus de temps que promis.
25 % de réduction sur le prix courant de toute intervention de
réparation non-couverte et pièces de rechange.
Dès que vous achetez le Contrat, il sut d’un appel téléphonique
pour obtenir un rendez-vous pour une intervention de dépannage ou
d’entretien. Vous pouvez appeler à n’importe quelle heure du jour ou
de la nuit ou prendre un rendez-vous de dépannage en ligne.
Le Contrat principal de protection constitue un investissement
sans risque. Si vous annulez pour une quelconque raison pendant la
période de garantie du produit, nous vous rembourserons
intégralement. Ou nous vous verserons un remboursement au
prorata après l’expiration de la période de garantie. Achetez
votre Contrat principal de protection aujourd’hui même! Certaines
limitations et exclusions s’appliquent. Pour des prix et
renseignements supplémentaires aux États-Unis, composer le
1-800-827-6655. *Au Canada, la couverture varie en fonction
des articles. Pour des informations détaillées, appeler Sears
Canada au 1-800-361-6665.
Service d’installation Sears
Pour l’installation professionnelle garantie par Sears d’appareils
ménagers et d’articles tels que les ouvre-portes de garage, chaue-
eau, et autres gros appareils ménagers, aux É.-U. ou
au Canada, composer le 1-800-4-MY-HOME®.
GARANTIE DES APPAREILS MÉNAGERS KENMORE
GARANTIE LIMITÉE KENMORE
PENDANT UN AN à compter de la date d’achat, cet appareil
est garanti contre tout défaut de matériau ou de fabrication en
cas d’installation, d’utilisation et d’entretien conformément aux
instructions fournies.
SUR PREUVE DE VENTE, un appareil défectueux sera réparé ou
remplacé gratuitement à la discrétion du vendeur.
Pour connaître les détails sur la couverture de la garantie an
d’obtenir un dépannage gratuit ou un remplacement, visiter la
page Web suivante : www.kenmore.com/warranty
Si cet appareil ménager est utilisé à d’autres ns que pour un
usage privé et domestique, la présente garantie ne s'applique que
pendant 90 JOURS à partir de la date d'achat aux États-Unis, et
est nulle au Canada.
La présente garantie couvre UNIQUEMENT les vices de
matériaux et de fabrication et NE prendra PAS en charge :
1. Les pièces courantes pouvant s’user suite à une utilisation
normale, notamment les ltres, courroies, sacs et les ampoules
d’éclairage à culot à vis.
2. L’intervention d’un technicien de réparation pour nettoyer ou
entretenir cet appareil, ou pour montrer à l’utilisateur comment
installer, utiliser et entretenir correctement cet appareil.
3. Les interventions de dépannage pour rectier l’installation de
l’appareil non réalisée par des agents d’entretien autorisés
de Sears, ou pour intervenir sur des problèmes concernant
les fusibles du domicile, les disjoncteurs, et les systèmes de
plomberie ou d’alimentation de gaz résultant de l’installation.
4. L’endommagement ou l’état défectueux de cet appareil
imputable à l’installation non réalisée par des agents
d’entretien autorisés de Sears, y compris une installation non
conforme aux codes d’électricité, de gaz et de plomberie.
5. L’endommagement ou l’état défectueux de cet appareil,
notamment une décoloration ou l’apparition de rouille sur la
surface, dans le cas où l’utilisation ou l’entretien ne sont pas
conformes à toutes les instructions fournies.
6. L’endommagement ou l’état défectueux de cet appareil,
notamment une décoloration ou l’apparition de rouille sur la
surface, résultant d’un accident, d’un usage impropre ou abusif
ou d’une utilisation autre que celle à laquelle il est destiné.
7. L’endommagement ou l’état défectueux de cet appareil,
notamment une décoloration ou l’apparition de rouille sur
la surface, causé par l’utilisation de détergents, nettoyants,
produits chimiques ou ustensiles autres que ceux recommandés
dans toutes les instructions fournies avec le produit.
8. L’endommagement ou l’état défectueux de pièces ou systèmes
résultant d’une modication non autorisée faite à cet appareil.
9. L’intervention sur l’appareil si la plaque signalétique indiquant
le numéro de modèle et de série est manquante, a subi une
modication, ou s’il est dicile de déterminer si l’appareil porte
le logo de certication approprié.
CLAUSE D’EXONÉRATION DE RESPONSABILITÉ AU TITRE
DES GARANTIES IMPLICITES; LIMITATION DES RECOURS
Le seul et exclusif recours du client dans le cadre de la présente
garantie limitée consiste en la réparation ou le remplacement
prévus ci-dessus. Les garanties implicites, y compris les garanties
applicables de qualité marchande ou d’aptitude à un usage
particulier, sont limitées à un an ou à la plus courte période
autorisée par la loi. Le vendeur n’assume aucune responsabilité
pour les dommages fortuits ou indirects. Certains États ou certaines
provinces ne permettent pas l’exclusion ou la limitation des
dommages fortuits ou indirects, ou la limitation de la durée des
garanties implicites de qualité marchande ou d’aptitude à un
usage particulier, de sorte que cette exclusion ou limitation peut ne
pas être applicable dans votre cas.
Cette garantie s’applique seulement lorsque cet appareil ménager
est utilisé aux États-Unis ou le Canada*.
Cette garantie vous confère des droits juridiques spéciques et
vous pouvez également jouir d’autres droits qui peuvent varier
d’un État à l’autre.
* Le service de réparation à domicile n’est pas disponible dans
toutes les régions du Canada; cette garantie ne couvrira pas non
plus les frais de déplacement et de transport de l’utilisateur ou du
dépanneur si ce produit se trouve dans une région éloignée (tel
que déni par Sears Canada Inc.) où aucun dépanneur autorisé
n’est disponible.
Sears Brands Management Corporation
Homan Estates, IL 60179
Sears Canada, Inc.
Toronto, Ontario, Canada M5B 2C3
10/2014
59
Page 60

W10682720A
® Registered Trademark /™ Trademark of KCD IP, LLC in the United States, or Sears Brands, LLC in other countries
® Marca Registrada /™ Marca de Fábrica de KCD IP, LLC en Estados Unidos, o Sears Brands, LLC en otros países
MC
Marque de commerce / MD Marque déposée de Sears Brands, LLC
11/14
Printed in U�S�A�
Impreso en EE�UU�
Imprimé aux É-U
 Loading...